sea scout manual - ithaca sea scoutsithacaseascouts.org/resources/seascoutmanual2016.pdf ·...
TRANSCRIPT

SEA SCOUT MANUAL
12th Edition
33239ISBN 978-0-8395-3239-2©2016 Boy Scouts of America2016 Printing
SEA SCOUT MANUAL
SEA SCOUT MANUAL
12th Edition
33239ISBN 978-0-8395-3239-2©2016 Boy Scouts of America2016 Printing

A Word About Youth Protection
Child abuse is a serious problem in our society, and unfortunately, it can
occur anywhere, even in Scouting. Youth safety is of paramount importance to
Scouting. For that reason, the BSA continues to create barriers to abuse beyond
what have previously existed in Scouting.
The Boy Scouts of America places the greatest importance on providing the
most secure environment possible for our youth members. To maintain such
an environment, the BSA has developed numerous procedural and leadership
selection policies, and provides parents and leaders with numerous online and
print resources for the Cub Scout, Boy Scout, and Venturing programs.
The BSA requires Youth Protection training for all registered leaders.
New leaders are required to complete Youth Protection training. To take the
training online, go to www.MyScouting.org and establish an account using the
member number you receive when you register for BSA membership. If you
take the training online before you obtain a member number, be sure to return
to MyScouting and enter your number for training record credit. Your BSA local
council also provides training on a regular basis if you cannot take it online.
For more information, refer to the back of the BSA adult membership application,
No. 524-501.
Youth Protection training must be taken every two years—regardless of
position. If a volunteer does not meet the BSA’s Youth Protection training
requirement at the time of recharter, the volunteer will not be reregistered.
We encourage all adults, including all parents, to take the BSA’s Youth
Protection training.
To find out more about the Youth Protection policies of the Boy Scouts of
America and how to help Scouting keep your family safe, see the Parent’s
Guide in any of the Cub Scouting or Boy Scouting handbooks, or go to
http://www.scouting.org/Training/YouthProtection.aspx.
Revised October 2011
Dedication 3
DEDICATION
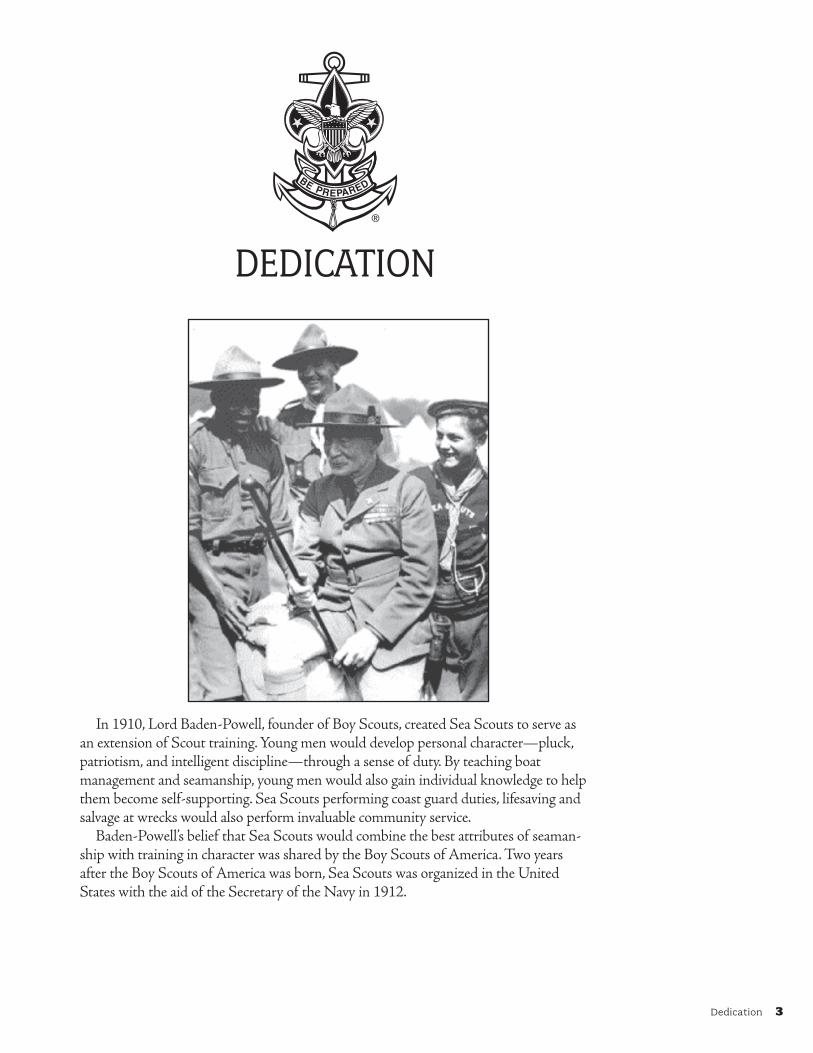
In 1910, Lord Baden-Powell, founder of Boy Scouts, created Sea Scouts to serve as an extension of Scout training. Young men would develop personal character—pluck, patriotism, and intelligent discipline—through a sense of duty. By teaching boat management and seamanship, young men would also gain individual knowledge to help them become self-supporting. Sea Scouts performing coast guard duties, lifesaving and salvage at wrecks would also perform invaluable community service.
Baden-Powell’s belief that Sea Scouts would combine the best attributes of seaman-ship with training in character was shared by the Boy Scouts of America. Two years after the Boy Scouts of America was born, Sea Scouts was organized in the United States with the aid of the Secretary of the Navy in 1912.


Welcome Aboard 5
WELCOME ABOARDWelcome aboard—to the fun and adventure of Sea Scouts, a program combining the
traditions of the past with the technology of the future. Whether you look to the sea for a career or lifelong hobby, Sea Scouts is for you.
The element of water makes Sea Scouts unique. Sea Scout units use a variety of boats, from outboard motorboats to large sailing yachts. Sea Scouts belong to a world that is distinct from anything on shore, and they have their own language and customs.
The water is not a place for the unwary, and the Scout motto, “Be Prepared,” is imperative. The challenge is taking a vessel from point A to point B while being ready for whatever may be encountered along the way. Crewing a vessel involves sharing the duties of helmsman, navigator, lookout, cook, sail handler, or engineer. Outings on a boat offer new destinations in the morning and the changing scenery of a new harbor by evening. Every event is an adventure.
Sea Scout programs are run by the youth members. Elected officers plan and conduct the program. Being part of the vessel’s crew teaches teamwork. As experience is gained, more opportunities arise to contribute to the leadership of the unit. At quarterdeck meetings, ship’s officers work together to plan and evaluate the ship’s program. Leadership skills learned in Sea Scouts last a lifetime.
Sea Scouts give service to others. Sea Scouts have been of service to hundreds of communities across the nation. Service can be expressed in individual good turns to others or in organized projects involving the crew or the whole ship. In rescues at sea, or facing emergencies on shore, Sea Scouts have saved lives and property. Sea Scout service puts citizenship into action.
Sea Scout advancement rewards individual pursuits of excellence. Each level of advancement marks growth as a seaman and a leader. The highest rank a Sea Scout can earn is the prestigious Quartermaster rank.
Seafaring has traditions that go back hundreds of years. Sea Scouts have adapted these traditions to the Sea Scout program and have created traditions of their own.
A youth must be 13 years of age and graduated from the eighth grade or be 14 to join Sea Scouts. You can stay in Sea Scouts until you are 21 years of age. Sea Scout ships can be located by contacting the Boy Scouts of America in your area. If there is not a ship nearby, encourage parents, school, church, or community organizations to organize one.


Contents 7
CONTENTSSection One—Ship Organization and Uniforms . . . . . . . . . . . . . . . . . . . . . .11 The Organization of a Ship . . . . . . . . . . . . . . . . . . . . . . . . . . . . . . . . . . . . 11 Officers’ Responsibilities . . . . . . . . . . . . . . . . . . . . . . . . . . . . . . . . . . . . . . 13 Adult Leader Responsibilities . . . . . . . . . . . . . . . . . . . . . . . . . . . . . . . . . . 15 Quarterdeck Training . . . . . . . . . . . . . . . . . . . . . . . . . . . . . . . . . . . . . . . . . 15 Ship Management . . . . . . . . . . . . . . . . . . . . . . . . . . . . . . . . . . . . . . . . . . . . 16 The Ship Code and Bylaws . . . . . . . . . . . . . . . . . . . . . . . . . . . . . . . . . . . . 16 The Right Vessel . . . . . . . . . . . . . . . . . . . . . . . . . . . . . . . . . . . . . . . . . . . . . 18 Uniforms . . . . . . . . . . . . . . . . . . . . . . . . . . . . . . . . . . . . . . . . . . . . . . . . . . . . 18 Proper Insignia Placement for Sea Scout Uniforms . . . . . . . . . . . . . .26
Section Two—Ship Operations . . . . . . . . . . . . . . . . . . . . . . . . . . . . . . . . . . . . . . 27 The Ship Meeting . . . . . . . . . . . . . . . . . . . . . . . . . . . . . . . . . . . . . . . . . . . .27 Two-Part Program . . . . . . . . . . . . . . . . . . . . . . . . . . . . . . . . . . . . . . . . . . .30 The Quarterdeck Meeting . . . . . . . . . . . . . . . . . . . . . . . . . . . . . . . . . . . . .32 A Balanced Program . . . . . . . . . . . . . . . . . . . . . . . . . . . . . . . . . . . . . . . . . .34 Cruise and Superactivity Plans . . . . . . . . . . . . . . . . . . . . . . . . . . . . . . . .35 Written Communications . . . . . . . . . . . . . . . . . . . . . . . . . . . . . . . . . . . . .38 Recruiting New Members . . . . . . . . . . . . . . . . . . . . . . . . . . . . . . . . . . . . .38 Fundraising . . . . . . . . . . . . . . . . . . . . . . . . . . . . . . . . . . . . . . . . . . . . . . . . . .39 Customs and Courtesies . . . . . . . . . . . . . . . . . . . . . . . . . . . . . . . . . . . . . .39
Section Three—Advancement and Recognition . . . . . . . . . . . . . . . . . . . . . 47 Advancement . . . . . . . . . . . . . . . . . . . . . . . . . . . . . . . . . . . . . . . . . . . . . . . .47 Sea Scout Advancement . . . . . . . . . . . . . . . . . . . . . . . . . . . . . . . . . . . . . .49 Other Recognition . . . . . . . . . . . . . . . . . . . . . . . . . . . . . . . . . . . . . . . . . . .64
Section Four—Safety and Seamanship . . . . . . . . . . . . . . . . . . . . . . . . . . . . . . 71 Safety . . . . . . . . . . . . . . . . . . . . . . . . . . . . . . . . . . . . . . . . . . . . . . . . . . . . . . 71 Accident Prevention: Elements of Safe Swim Defense and Safety Afloat . . . . . . . . . . . . . . . . . . . . . . . . . . . . 71 Safety Equipment . . . . . . . . . . . . . . . . . . . . . . . . . . . . . . . . . . . . . . .79 Emergencies Underway . . . . . . . . . . . . . . . . . . . . . . . . . . . . . . . . . .84 Sample Crisis-at-Sea Emergency Drills . . . . . . . . . . . . . . . . . . . .88 Communication . . . . . . . . . . . . . . . . . . . . . . . . . . . . . . . . . . . . . . . . .92 Communications Signaling . . . . . . . . . . . . . . . . . . . . . . . . . . . . . . .95 First Aid . . . . . . . . . . . . . . . . . . . . . . . . . . . . . . . . . . . . . . . . . . . . . . . .98 General Safety . . . . . . . . . . . . . . . . . . . . . . . . . . . . . . . . . . . . . . . . .102 Marlinspike Seamanship . . . . . . . . . . . . . . . . . . . . . . . . . . . . . . . . . . . . .105 Rope . . . . . . . . . . . . . . . . . . . . . . . . . . . . . . . . . . . . . . . . . . . . . . . . . .105 Helpful Knot Terminology . . . . . . . . . . . . . . . . . . . . . . . . . . . . . . 109 Knots . . . . . . . . . . . . . . . . . . . . . . . . . . . . . . . . . . . . . . . . . . . . . . . . . 110 Hitches . . . . . . . . . . . . . . . . . . . . . . . . . . . . . . . . . . . . . . . . . . . . . . . . 113 Bends . . . . . . . . . . . . . . . . . . . . . . . . . . . . . . . . . . . . . . . . . . . . . . . . . 115 Whipping . . . . . . . . . . . . . . . . . . . . . . . . . . . . . . . . . . . . . . . . . . . . . . 116

8 Contents
Splicing . . . . . . . . . . . . . . . . . . . . . . . . . . . . . . . . . . . . . . . . . . . . . . . . 117 Canvas Work and Sail Repair . . . . . . . . . . . . . . . . . . . . . . . . . . . .122 Blocks and Tackles . . . . . . . . . . . . . . . . . . . . . . . . . . . . . . . . . . . . . .124 Boat Handling . . . . . . . . . . . . . . . . . . . . . . . . . . . . . . . . . . . . . . . . . . . . . . 127 Parts of a Boat . . . . . . . . . . . . . . . . . . . . . . . . . . . . . . . . . . . . . . . . . 127 Types of Sailing Craft . . . . . . . . . . . . . . . . . . . . . . . . . . . . . . . . . . .130 Sailing a Small Boat . . . . . . . . . . . . . . . . . . . . . . . . . . . . . . . . . . . . .133 Smaller Powerboats . . . . . . . . . . . . . . . . . . . . . . . . . . . . . . . . . . . .139 Underway in a Powerboat . . . . . . . . . . . . . . . . . . . . . . . . . . . . . . .140 Wharfs, Piers, Docks, and Slips . . . . . . . . . . . . . . . . . . . . . . . . . . . 141 Heaving a Line . . . . . . . . . . . . . . . . . . . . . . . . . . . . . . . . . . . . . . . . .145 Waterskiing . . . . . . . . . . . . . . . . . . . . . . . . . . . . . . . . . . . . . . . . . . . .145 Trailering Your Boat . . . . . . . . . . . . . . . . . . . . . . . . . . . . . . . . . . . .146 Rowing . . . . . . . . . . . . . . . . . . . . . . . . . . . . . . . . . . . . . . . . . . . . . . . .147 Paddlecraft . . . . . . . . . . . . . . . . . . . . . . . . . . . . . . . . . . . . . . . . . . . . . . . . .149 Introduction . . . . . . . . . . . . . . . . . . . . . . . . . . . . . . . . . . . . . . . . . . .149 Canoes . . . . . . . . . . . . . . . . . . . . . . . . . . . . . . . . . . . . . . . . . . . . . . . .150 Kayaks . . . . . . . . . . . . . . . . . . . . . . . . . . . . . . . . . . . . . . . . . . . . . . . . 152 Stand Up Paddleboards (SUPs) . . . . . . . . . . . . . . . . . . . . . . . . . . .154 Rafts . . . . . . . . . . . . . . . . . . . . . . . . . . . . . . . . . . . . . . . . . . . . . . . . . . 155 Personal Safety Skills . . . . . . . . . . . . . . . . . . . . . . . . . . . . . . . . . . . 155 Aquatics Supervision . . . . . . . . . . . . . . . . . . . . . . . . . . . . . . . . . . . .156 Risk Management . . . . . . . . . . . . . . . . . . . . . . . . . . . . . . . . . . . . . . 157 Ground Tackle . . . . . . . . . . . . . . . . . . . . . . . . . . . . . . . . . . . . . . . . . . . . . .163 Anchor Parts . . . . . . . . . . . . . . . . . . . . . . . . . . . . . . . . . . . . . . . . . . .163 Types of Anchors . . . . . . . . . . . . . . . . . . . . . . . . . . . . . . . . . . . . . . .164 Anchor Selection . . . . . . . . . . . . . . . . . . . . . . . . . . . . . . . . . . . . . . .165 Stowage of Ground Tackle . . . . . . . . . . . . . . . . . . . . . . . . . . . . . . .166 Anchor Cable for Larger Vessels . . . . . . . . . . . . . . . . . . . . . . . . . .167 Anchoring . . . . . . . . . . . . . . . . . . . . . . . . . . . . . . . . . . . . . . . . . . . . . .167 Navigation Rules . . . . . . . . . . . . . . . . . . . . . . . . . . . . . . . . . . . . . . . . . . . . 173 Rules of the Road . . . . . . . . . . . . . . . . . . . . . . . . . . . . . . . . . . . . . . . 173 Steering and Sailing Rules . . . . . . . . . . . . . . . . . . . . . . . . . . . . . . . 174 Lights and Shapes . . . . . . . . . . . . . . . . . . . . . . . . . . . . . . . . . . . . . . 177 Aids to Navigation . . . . . . . . . . . . . . . . . . . . . . . . . . . . . . . . . . . . . . . . . . 181 Light List . . . . . . . . . . . . . . . . . . . . . . . . . . . . . . . . . . . . . . . . . . . . . . 181 Lighthouses . . . . . . . . . . . . . . . . . . . . . . . . . . . . . . . . . . . . . . . . . . . .182 Daybeacons . . . . . . . . . . . . . . . . . . . . . . . . . . . . . . . . . . . . . . . . . . . .182 Buoys . . . . . . . . . . . . . . . . . . . . . . . . . . . . . . . . . . . . . . . . . . . . . . . . .183 Port-Side Odd-Numbered Aids . . . . . . . . . . . . . . . . . . . . . . . . . . .183 Starboard-Side Even-Numbered Aids . . . . . . . . . . . . . . . . . . . . .183 Safe Water Marks . . . . . . . . . . . . . . . . . . . . . . . . . . . . . . . . . . . . . .184 Isolated Danger Marks . . . . . . . . . . . . . . . . . . . . . . . . . . . . . . . . . .184 Dayboards . . . . . . . . . . . . . . . . . . . . . . . . . . . . . . . . . . . . . . . . . . . . .184 Special Marks . . . . . . . . . . . . . . . . . . . . . . . . . . . . . . . . . . . . . . . . . .184 Characteristics of Lighted Buoys . . . . . . . . . . . . . . . . . . . . . . . . .185 Sound Buoys . . . . . . . . . . . . . . . . . . . . . . . . . . . . . . . . . . . . . . . . . . .185 Dependence on Buoys . . . . . . . . . . . . . . . . . . . . . . . . . . . . . . . . . . .185

Contents 9
The Rule of Lettering . . . . . . . . . . . . . . . . . . . . . . . . . . . . . . . . . . . .185 Intracoastal Waterway . . . . . . . . . . . . . . . . . . . . . . . . . . . . . . . . . .186 Western River (Mississippi River) System . . . . . . . . . . . . . . . . .186 Piloting and Navigation . . . . . . . . . . . . . . . . . . . . . . . . . . . . . . . . . . . . . .189 Charts . . . . . . . . . . . . . . . . . . . . . . . . . . . . . . . . . . . . . . . . . . . . . . . . .189 Compass . . . . . . . . . . . . . . . . . . . . . . . . . . . . . . . . . . . . . . . . . . . . . . .192 Variation . . . . . . . . . . . . . . . . . . . . . . . . . . . . . . . . . . . . . . . . . . . . . .193 Deviation . . . . . . . . . . . . . . . . . . . . . . . . . . . . . . . . . . . . . . . . . . . . . .193 Measuring Speed . . . . . . . . . . . . . . . . . . . . . . . . . . . . . . . . . . . . . . .194 Time . . . . . . . . . . . . . . . . . . . . . . . . . . . . . . . . . . . . . . . . . . . . . . . . . .196 Measuring Distance . . . . . . . . . . . . . . . . . . . . . . . . . . . . . . . . . . . . .197 Speed, Time, and Distance . . . . . . . . . . . . . . . . . . . . . . . . . . . . . . .198 Dead Reckoning . . . . . . . . . . . . . . . . . . . . . . . . . . . . . . . . . . . . . . . .198 Deck Log . . . . . . . . . . . . . . . . . . . . . . . . . . . . . . . . . . . . . . . . . . . . . . .198 Chart Plotting . . . . . . . . . . . . . . . . . . . . . . . . . . . . . . . . . . . . . . . . . 200 Fixes . . . . . . . . . . . . . . . . . . . . . . . . . . . . . . . . . . . . . . . . . . . . . . . . . 202 Weather . . . . . . . . . . . . . . . . . . . . . . . . . . . . . . . . . . . . . . . . . . . . . . . . . . 209 Before Leaving the Dock . . . . . . . . . . . . . . . . . . . . . . . . . . . . . . . 209 Weather Underway . . . . . . . . . . . . . . . . . . . . . . . . . . . . . . . . . . . . .214 Practical Deck Seamanship . . . . . . . . . . . . . . . . . . . . . . . . . . . . . . . . . .219 Watches . . . . . . . . . . . . . . . . . . . . . . . . . . . . . . . . . . . . . . . . . . . . . . .219 The Lookout . . . . . . . . . . . . . . . . . . . . . . . . . . . . . . . . . . . . . . . . . . 220 Helmsmanship . . . . . . . . . . . . . . . . . . . . . . . . . . . . . . . . . . . . . . . . .221 Cruise Log . . . . . . . . . . . . . . . . . . . . . . . . . . . . . . . . . . . . . . . . . . . . .222 Vessel Maintenance . . . . . . . . . . . . . . . . . . . . . . . . . . . . . . . . . . . . .222 Environment . . . . . . . . . . . . . . . . . . . . . . . . . . . . . . . . . . . . . . . . . . . . . . 229 Water Pollution . . . . . . . . . . . . . . . . . . . . . . . . . . . . . . . . . . . . . . . . 229 Aquatic Nuisance Species . . . . . . . . . . . . . . . . . . . . . . . . . . . . . . .231
Appendix . . . . . . . . . . . . . . . . . . . . . . . . . . . . . . . . . . . . . . . . . . . . . . . . . . . . . . . . . . 233 U .S . Aids to Navigation System . . . . . . . . . . . . . . . . . . . . . . . . . . . . . . .233 International Flags and Pennants . . . . . . . . . . . . . . . . . . . . . . . . . . . . 236 Lights Conforming to Rules 23–31 of Navigation Rules,
International and Inland . . . . . . . . . . . . . . . . . . . . . . . . . . . . . . . .237 Official Sea Scout Uniform Insignia and Uniforms . . . . . . . . . . . . . 238 Sea Scout Marksmanship Program . . . . . . . . . . . . . . . . . . . . . . . . . . 249 Resources . . . . . . . . . . . . . . . . . . . . . . . . . . . . . . . . . . . . . . . . . . . . . . . . . .253 Glossary . . . . . . . . . . . . . . . . . . . . . . . . . . . . . . . . . . . . . . . . . . . . . . . . . . 259 Credits . . . . . . . . . . . . . . . . . . . . . . . . . . . . . . . . . . . . . . . . . . . . . . . . . . . . 265 Index . . . . . . . . . . . . . . . . . . . . . . . . . . . . . . . . . . . . . . . . . . . . . . . . . . . . . 266


Ship Organization and Uniforms 11
SHIP ORGANIZATION AND UNIFORMS
You and other high school–age young adults have joined Sea Scouts to go places and do things, and when people get together for this, they must plan and organize.
Organization is the key to success in Sea Scouts. You organize in such a way that you can carry out a program of activities that will provide you and your friends with the fun and adventure you are seeking.
This chapter explains in detail the organization of a Sea Scout ship and describes how the various responsibilities are divided. At times you may want to run a “tight” ship with formality and ceremonies. At other times you will want to operate informally. In Sea Scouts, there is a time and place for both kinds of operation.
All the adult leaders—the Skipper, mates, and committee members—have one objective. They want to facilitate a program of activities that will accomplish the purposes of the Scout movement—character development, citizenship training, and personal fitness. At the same time, they know that the program must be youth-driven, reflecting the desire for fun and adventure promised to Sea Scouts.
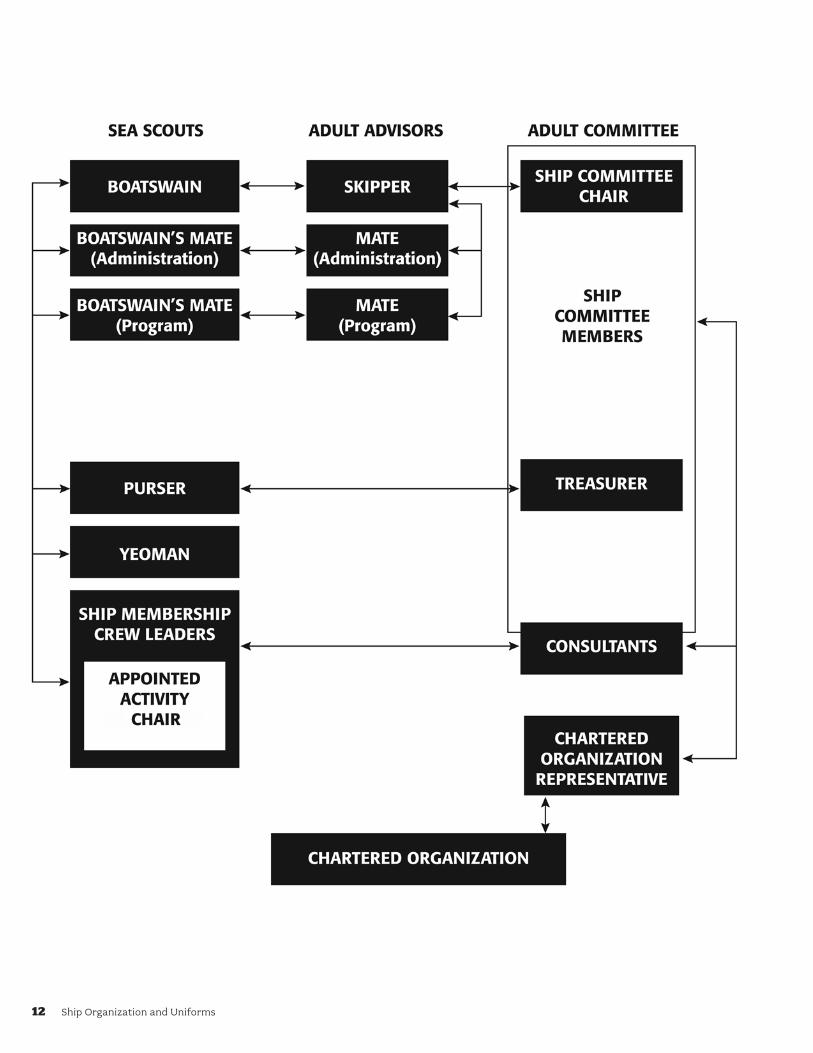
The Organization of a ShipThrough the National Council, a council issues charters to organizations that
organize Sea Scout ships, Venturing crews, Boy Scout troops, and Cub Scout packs. By accepting the charter, an organization agrees to provide a ship with a good Sea Scout program under the best available leadership.
The ship committee is appointed by the chartered organization. Although a ship may register with a minimum of three committee members, it should have at least five or six active adults. The committee is responsible for the selection of the Skipper, mates, and general program support of the ship.
Sea Scouts have a vast reservoir of experts at their disposal for program support. Those who provide specialized help are called consultants. They may come from inside the ship or from the community. Consultants have special skills or knowledge, equipment or facilities, or contacts that can help your ship.
Officers such as boatswain, yeoman, purser, etc., are elected by the youth. Program activities of a Sea Scout ship are carried out through activity committees,
and specialists may be appointed by adult leaders to carry out assignments such as photographer, engineer, or other specific skills.
12 Ship Organization and Uniforms

Ship Organization and Uniforms 13
Officers’ Responsibilities
All Officers• Support the boatswain and officers in their leadership functions.• Work closely with the Skipper and adult leaders.• Lead and inspire by example.• Stimulate participation and encourage teamwork.• Recruit new members for the ship. • Carry out other duties as assigned by the boatswain.
Boatswain• Plan and conduct regular quarterdeck meetings.• Give leadership to all ship meetings and activities.• Share responsibilities of leading the ship with the other officers.• Know the needs and interests of ship members.• Watch for individual ship members who may have problems,
questions, or concerns.• Direct the development of your ship’s operational plan.• Appoint ship members to serve as activity committee chairs.
Boatswain’s Mate for Administration• Take over for the ship’s boatswain when necessary.• Give leadership to recruiting new members into the ship by
— Coordinating plans for an annual open house to invite new members to join
— Encouraging all ship members to bring new prospects to ship meetings and activities
— Admitting new members into the ship. Be sure they are introduced and feel welcome.
• Follow up with ship members who seem to be losing interest in the ship.
• Recognize the achievements of ship members.• Conduct opening and closing ceremonies for your ship.
Boatswain’s Mate for Program• Collect activity and meeting ideas from ship members by
— Asking ship members what they would like their ship to do — Surveying ship members on their interests — Evaluating ship meetings and activities after they take place
• Maintain an activities file of programs, activities, projects, and trips.
• Help ship’s activity chairs plan and conduct successful activities.
Yeoman• Keep minutes of quarterdeck and ship meetings.• Remind officers of assigned tasks.• Keep membership records for the ship.• Supervise ship’s correspondence.• Keep all ship members informed about upcoming meetings,
activities, and projects.
Apprentice 3a. Describe your ship's
organization, including the youth and adult leadership positions.
Apprentice 3b. Demonstrate your ability
to identify insignia of youth and adult leadership
positions. Explain the chain of command in your ship.
14 Ship Organization and Uniforms
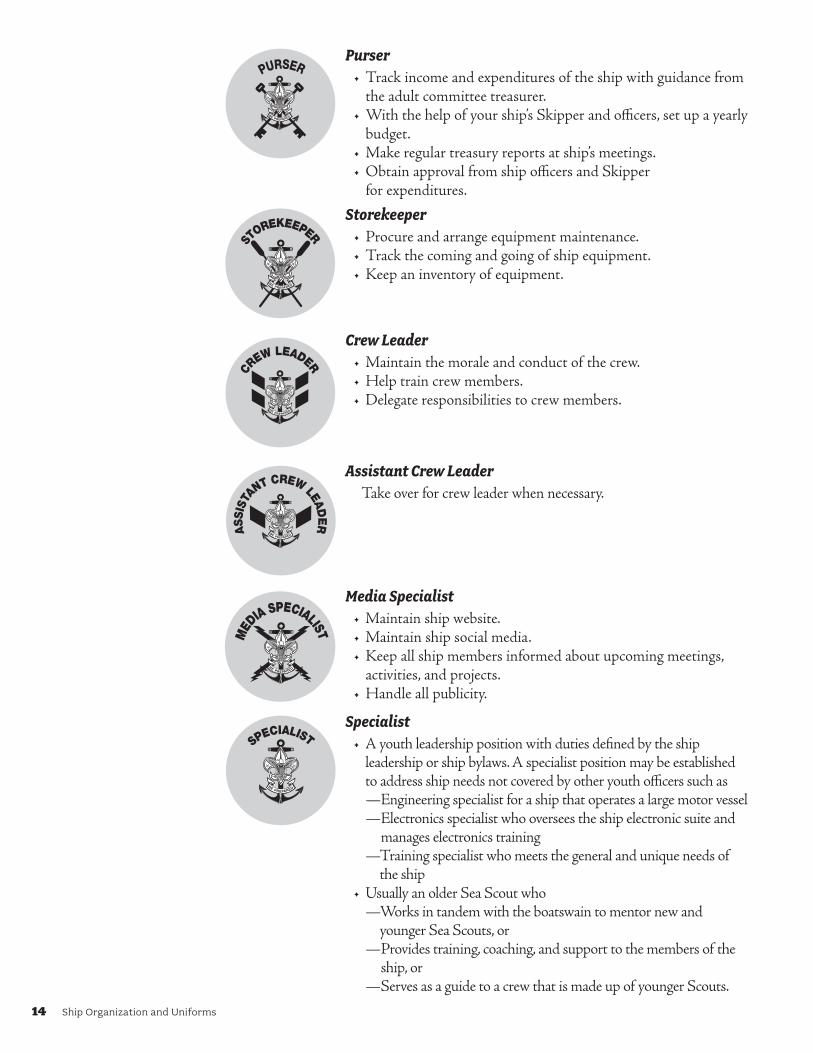
Purser• Track income and expenditures of the ship with guidance from
the adult committee treasurer.• With the help of your ship’s Skipper and officers, set up a yearly
budget.• Make regular treasury reports at ship’s meetings.• Obtain approval from ship officers and Skipper
for expenditures.
Storekeeper• Procure and arrange equipment maintenance.• Track the coming and going of ship equipment.• Keep an inventory of equipment.
CREW LEADER
Crew Leader• Maintain the morale and conduct of the crew.• Help train crew members.• Delegate responsibilities to crew members.
Assistant Crew LeaderTake over for crew leader when necessary.
Media Specialist• Maintain ship website.• Maintain ship social media.• Keep all ship members informed about upcoming meetings,
activities, and projects.• Handle all publicity.
Specialist• A youth leadership position with duties defined by the ship
leadership or ship bylaws. A specialist position may be established to address ship needs not covered by other youth officers such as
—Engineering specialist for a ship that operates a large motor vessel — Electronics specialist who oversees the ship electronic suite and
manages electronics training — Training specialist who meets the general and unique needs of
the ship• Usually an older Sea Scout who — Works in tandem with the boatswain to mentor new and
younger Sea Scouts, or — Provides training, coaching, and support to the members of the
ship, or —Serves as a guide to a crew that is made up of younger Scouts.

Ship Organization and Uniforms 15
Activity Chair (Appointed by the Boatswain)• Consult with the boatswain and Skipper regarding the
assigned activity.• Plan, promote, run and evaluate an event.• Recruit and chair a committee if necessary.
Adult Leader ResponsibilitiesA trained adult leader in Sea Scouts must complete two basic courses: 1) Venturing
Youth Protection Training for Adults and 2) Sea Scout Adult Leader Basic Training (SSALBT). This includes Skippers, mates, ship chairs, and ship committee members. Other courses are considered either supplemental or advanced training for Sea Scout adult leaders.
Ship Committee• Select and recruit the adult leaders and provides facilities for the
ship meeting place. • Supervise ship funds and property and helps obtain supplies
and equipment. • See that the ship operates in accordance with the policies and
standards of the chartered organization, the Boy Scouts of America, and the ship’s code and bylaws.
• Is responsible for completing the annual charter renewal.
Skipper• Serve as the key adult leader of a Sea Scout ship. • Give direction to the ship program while carrying out the
most important duty—advising and coaching the officers as they plan, organize, and conduct the meetings and activities of the ship.
• Be a liaison between the adult leaders, the chartered organization, and the youth.
MatesAssist the Skipper as directed, and assume the Skipper’s duties
if absent.
Quarterdeck TrainingThere are two key elements in quarterdeck training – Introduction to Leadership
Skills for Ships (ILSS) and a needs assessment to establish the quarterdeck’s goals.ILSS is organized into three modules containing team-building games and challenges
to enhance the leadership lessons in the syllabus. The course may be conducted over three days, one module at a time, or it may be part of an extended quarterdeck training. Many ships will plan a weekend retreat so newly elected officers can work some, play some, and develop the ship’s operational plan. This orientation and planning enables the Skipper to focus the officers on program possibilities, setting goals, and establishing a calendar.
16 Ship Organization and Uniforms
Typically, ship’s officers are mentored by their ship’s committee counterpart. The Skipper works with the boatswain, the secretary works with the yeoman and the boatswain’s mate of administration to update the ship’s database of contacts and determine processes for communication, and the treasurer works with the purser. The ship’s advancement chair can work with the boatswain’s mate of program to schedule quality training for the youth in the ship. The ship’s bylaws and code of conduct should also be reviewed to make sure they continue to reflect the needs of the ship.
The experience level of the quarterdeck will determine the nature of the training. If the ship has young, inexperienced leadership, the quarterdeck training will likely focus on the roles of each officer. More experienced youth leadership will be able to spend more time on the attributes of leadership and refining the processes that run the ship.
Ship ManagementThe ship’s officers are the elected Sea Scout youth leaders. They work with the
Skipper and mates to give leadership to your ship. Elected officers generally serve terms of six months or a year. They are trained by the Skipper to carry out their assignments.
Ship activities are selected by the officers based on the desires of the membership. For each activity, an activity committee chair is appointed. Activity chairs may be invited to quarterdeck meetings by the boatswain to present detailed plans of coming events and activities.
Monthly quarterdeck meetings are held by the officers of the ship. The Skipper and other adult officers attend this meeting. The boatswain determines an agenda with the Skipper’s approval, and conducts quarterdeck meetings.
The Ship Code and BylawsA ship’s code is a statement of ideals and conduct developed and approved by the
ship’s members. Each ship’s code is different and meets the needs of the ship. In addition to supplementing the Sea Promise, the ship’s code should express:
• A statement of purpose• Standards of conduct• Goals
The entire ship should develop the ship’s code since everyone is expected to subscribe to the results. The ship code should be reviewed annually and modified if necessary. New members should be required to sign the ship’s code when they join the ship.
Bylaws define the operations of the ship.

Ship Organization and Uniforms 17
Sample
Ship Code and Bylaws
1. OBJECTIVESThe objectives of Ship 2502 are:A. To learnB. To share responsibilitiesC. To have fun
2. MEMBERSHIPMembership shall be open to all young adults living in the surrounding area who are 14 years of age or 13 years of age and have completed the eighth grade and under 21 years of age. No prospective member shall be disqualified because of race, color, creed, or sex. All members must be registered as Sea Scouts and agree to and sign the ship code and bylaws.
3. OFFICERSA. The elected officers shall be boatswain,
two boatswain’s mates, yeoman, and purser.
B. The normal term of office shall be for one year starting on February 1. Elections shall be held in January.
C. No member shall serve more than two successive terms in the same office.
D. The boatswain shall appoint a nominat-ing committee that shall consist of three members. The committee shall present a complete slate of candidates who have agreed, if elected, to serve to the best of their abilities.
E. On the night of the elections, nominations may be presented from the floor by any member. If the nomination is seconded and the candidate agrees to serve, he or she must be included on the ballot.
F. All contested ballots shall be secret.G. Nominees must be willing and able to
serve in the position elected for the full term of the office.
4. SHIPBUSINESSShip business will be conducted under the principles outlined in Robert’s Rules of Order.
Voting on all issues will be by simple majority, with the exception of changes or amendments to the bylaws, which will require a two-thirds vote of the total active membership. A quorum shall consist of one more than the majority of members for votes on routine business.
5. GENERALMEETINGSGeneral meetings will be held at least once a month, during the third week. Special meet-ings may be called by the boatswain as needed.
6. OFFICERS’MEETINGSOfficers’ meetings will be held at least once a month, during the third week. Special meet-ings may be called by the boatswain as needed.
7. NEWSLETTERThe ship will publish a newsletter the first week of every other month. Included in this mailing, too, will be all other supplemental information of interest to the membership. The newsletter will serve as the historical record of the ship.
8. DUESDues will be $5 per month, payable at the first meeting of every month. College reserve members’ dues will be $2 per month. Two months of delinquent dues make the member ineligible to participate in activities.
9. MONEYEARNINGDues will be supplemented by money-earning activities involving the participation of all members. Members not participating will not be entitled to the benefits of the money derived from the activities. All money-earning projects must be approved by the skipper and meet the requirements listed on the BSA Unit Money-Earning Application, No. 34427.
10. ACTIVITIESIt shall be the intention of the ship’s leadership to provide outside activities.
18 Ship Organization and Uniforms
The Right VesselEach Sea Scout ship is different and must select the correct vessel for its program. If
the home waters are the Mississippi River, choosing a 54-foot sailboat is not appropriate. A powerboat would be better. If you are sailing on the Gulf of Mexico, something larger than a Sunfish will be necessary. The ship should also assess the sailing, boating, engine maintenance, and vessel maintenance skills available within the unit before choosing craft for the ship.
No matter which type boat the ship chooses, it must be seaworthy. While painting, cleaning, and routine maintenance are well within the capabilities of most ships, major structural repairs or engine rebuilds are not. A good rule of thumb is to never accept a boat that has been offered to you just because it is free. Select the type of boat you want for the ship and then find that boat.
UniformsSea Scout uniforms are worn in accordance with the official policy of the Boy Scouts
of America: “... uniforms help create a sense of belonging. They symbolize character development, citizenship training, and personal fitness. Wearing a uniform gives youth and adult members a sense of identification and commitment.” Uniforms provide program recognition and acknowledge personal equality, identification, achievement, and personal commitment.
Wearing a Sea Scout uniform is a privilege; with that privilege comes responsibility. Always keep in mind that your actions while in uniform reflect upon the reputation of all Sea Scouts; always do the right thing. Keep your uniform in good condition, clean and pressed, with badges and insignia properly placed.
The uniforms described in this manual are required for participants in national Scouting events.
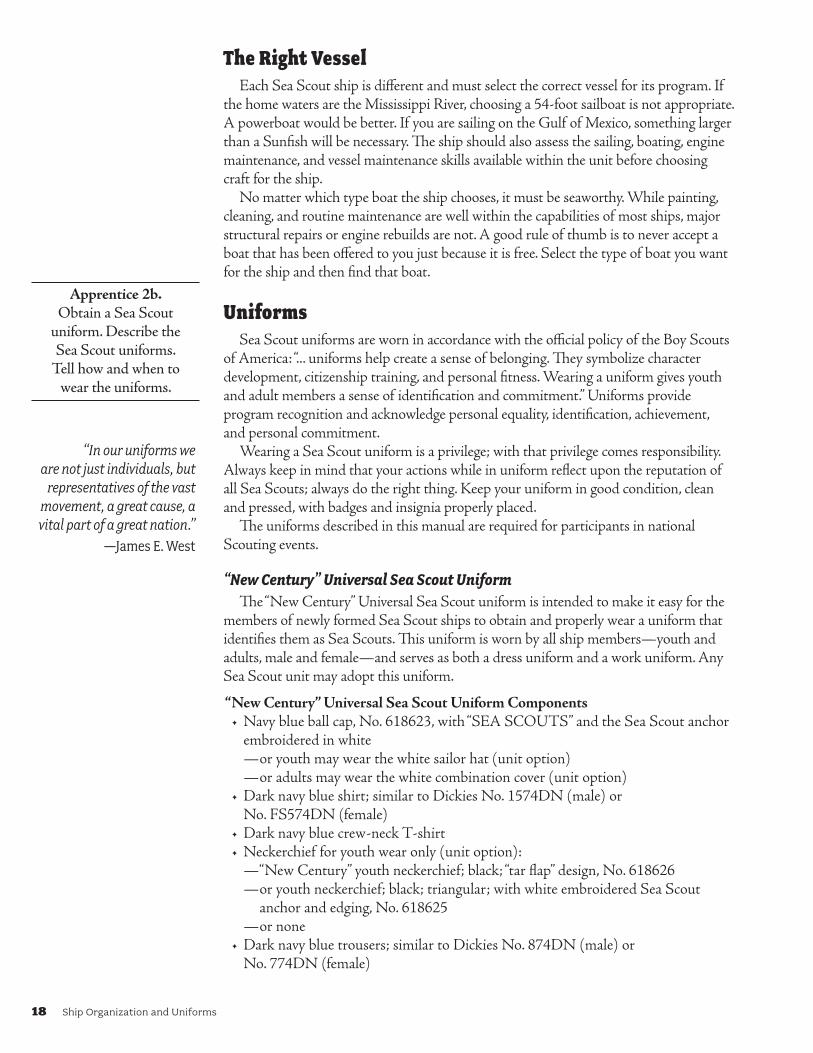
“New Century” Universal Sea Scout UniformThe “New Century” Universal Sea Scout uniform is intended to make it easy for the
members of newly formed Sea Scout ships to obtain and properly wear a uniform that identifies them as Sea Scouts. This uniform is worn by all ship members—youth and adults, male and female—and serves as both a dress uniform and a work uniform. Any Sea Scout unit may adopt this uniform.
“New Century” Universal Sea Scout Uniform Components• Navy blue ball cap, No. 618623, with “SEA SCOUTS” and the Sea Scout anchor
embroidered in white —or youth may wear the white sailor hat (unit option) —or adults may wear the white combination cover (unit option)• Dark navy blue shirt; similar to Dickies No. 1574DN (male) or
No. FS574DN (female)• Dark navy blue crew-neck T-shirt• Neckerchief for youth wear only (unit option): —“New Century” youth neckerchief; black; “tar flap” design, No. 618626 — or youth neckerchief; black; triangular; with white embroidered Sea Scout
anchor and edging, No. 618625 —or none• Dark navy blue trousers; similar to Dickies No. 874DN (male) or
No. 774DN (female)
Apprentice 2b. Obtain a Sea Scout
uniform. Describe the Sea Scout uniforms.
Tell how and when to wear the uniforms.
“Inouruniformswearenotjustindividuals,but
representativesofthevastmovement,agreatcause,avitalpartofagreatnation.”
—James E. West
Ship Organization and Uniforms 19
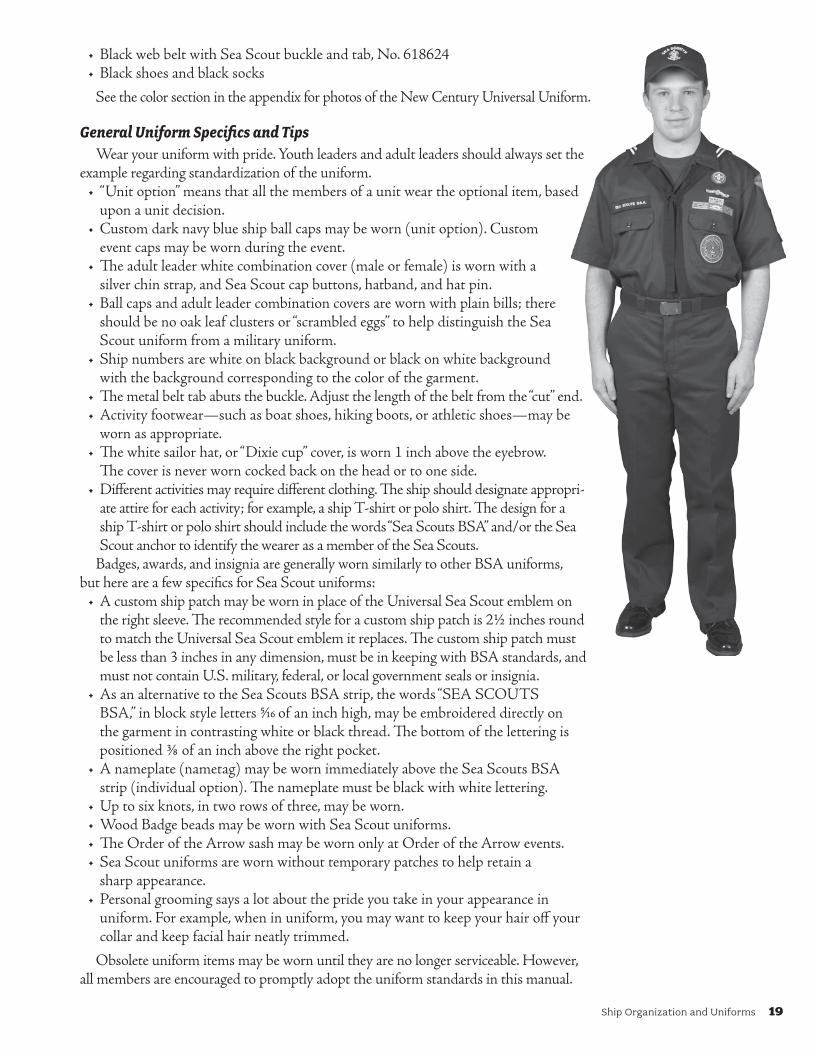
• Black web belt with Sea Scout buckle and tab, No. 618624• Black shoes and black socks
See the color section in the appendix for photos of the New Century Universal Uniform.
General Uniform Specifics and TipsWear your uniform with pride. Youth leaders and adult leaders should always set the
example regarding standardization of the uniform.• “Unit option” means that all the members of a unit wear the optional item, based
upon a unit decision.• Custom dark navy blue ship ball caps may be worn (unit option). Custom
event caps may be worn during the event.• The adult leader white combination cover (male or female) is worn with a
silver chin strap, and Sea Scout cap buttons, hatband, and hat pin.• Ball caps and adult leader combination covers are worn with plain bills; there
should be no oak leaf clusters or “scrambled eggs” to help distinguish the Sea Scout uniform from a military uniform.
• Ship numbers are white on black background or black on white background with the background corresponding to the color of the garment.
• The metal belt tab abuts the buckle. Adjust the length of the belt from the “cut” end.• Activity footwear—such as boat shoes, hiking boots, or athletic shoes—may be
worn as appropriate. • The white sailor hat, or “Dixie cup” cover, is worn 1 inch above the eyebrow.
The cover is never worn cocked back on the head or to one side.• Different activities may require different clothing. The ship should designate appropri-
ate attire for each activity; for example, a ship T-shirt or polo shirt. The design for a ship T-shirt or polo shirt should include the words “Sea Scouts BSA” and/or the Sea Scout anchor to identify the wearer as a member of the Sea Scouts.
Badges, awards, and insignia are generally worn similarly to other BSA uniforms, but here are a few specifics for Sea Scout uniforms:
• A custom ship patch may be worn in place of the Universal Sea Scout emblem on the right sleeve. The recommended style for a custom ship patch is 2½ inches round to match the Universal Sea Scout emblem it replaces. The custom ship patch must be less than 3 inches in any dimension, must be in keeping with BSA standards, and must not contain U.S. military, federal, or local government seals or insignia.
• As an alternative to the Sea Scouts BSA strip, the words “SEA SCOUTS BSA,” in block style letters 5⁄16 of an inch high, may be embroidered directly on the garment in contrasting white or black thread. The bottom of the lettering is positioned ⅜ of an inch above the right pocket.
• A nameplate (nametag) may be worn immediately above the Sea Scouts BSA strip (individual option). The nameplate must be black with white lettering.
• Up to six knots, in two rows of three, may be worn.• Wood Badge beads may be worn with Sea Scout uniforms.• The Order of the Arrow sash may be worn only at Order of the Arrow events.• Sea Scout uniforms are worn without temporary patches to help retain a
sharp appearance.• Personal grooming says a lot about the pride you take in your appearance in
uniform. For example, when in uniform, you may want to keep your hair off your collar and keep facial hair neatly trimmed.
Obsolete uniform items may be worn until they are no longer serviceable. However, all members are encouraged to promptly adopt the uniform standards in this manual.
20 Ship Organization and Uniforms
New Century Universal Uniform Specifics and Tips (In addition to the “Specifics and Tips” above)
• The optional neckerchief is worn under the shirt collar. The neckerchief may be tied with a reef (square) knot or an inverted wall knot that drapes better (unit option).
• The unit number is required.• Matching shorts, or cargo shorts, may be worn; similar to Dickies No. 40214RDN.• The youth “event dress” New Century Universal Uniform includes the tar-flap neck-
erchief and the white sailor hat. This uniform may be specified for special events.• The Order of the Arrow lodge flap patch may be worn on the New Century
Universal Uniform (only).• Shirts and trousers can be purchased at stores or websites that carry work clothing,
such as dickies.com, Sears, or Wal-Mart.
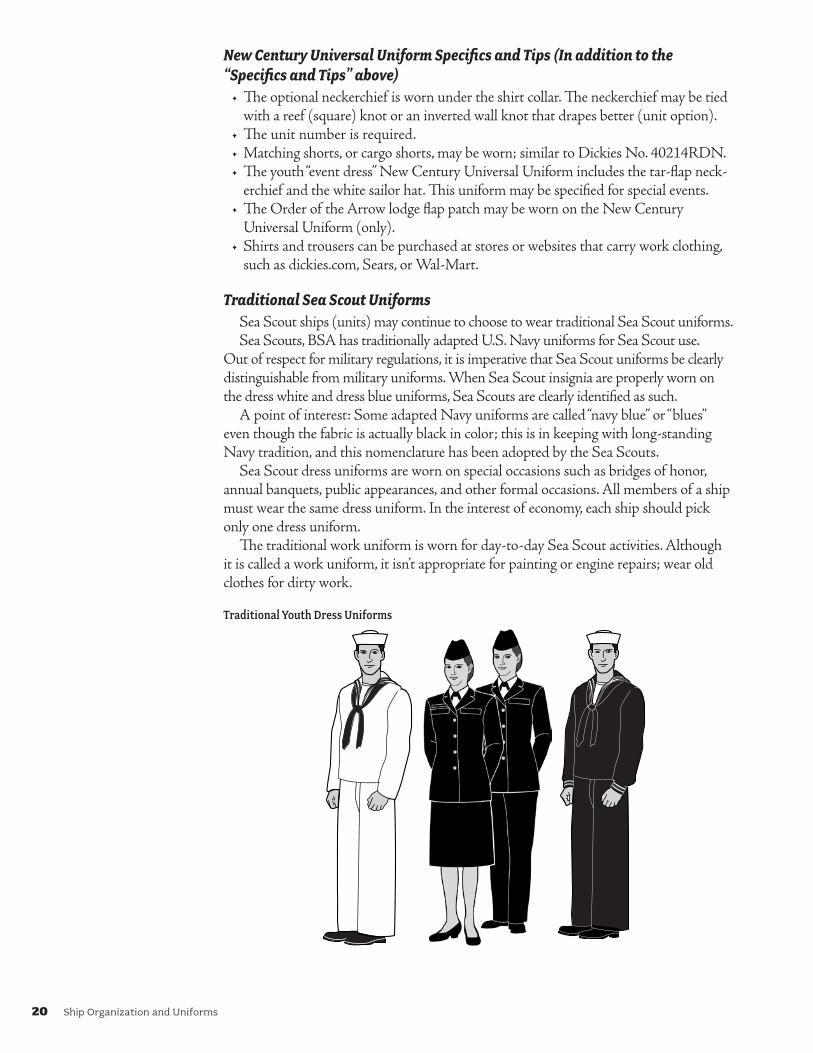
Traditional Sea Scout UniformsSea Scout ships (units) may continue to choose to wear traditional Sea Scout uniforms.Sea Scouts, BSA has traditionally adapted U.S. Navy uniforms for Sea Scout use.
Out of respect for military regulations, it is imperative that Sea Scout uniforms be clearly distinguishable from military uniforms. When Sea Scout insignia are properly worn on the dress white and dress blue uniforms, Sea Scouts are clearly identified as such.
A point of interest: Some adapted Navy uniforms are called “navy blue” or “blues” even though the fabric is actually black in color; this is in keeping with long-standing Navy tradition, and this nomenclature has been adopted by the Sea Scouts.
Sea Scout dress uniforms are worn on special occasions such as bridges of honor, annual banquets, public appearances, and other formal occasions. All members of a ship must wear the same dress uniform. In the interest of economy, each ship should pick only one dress uniform.
The traditional work uniform is worn for day-to-day Sea Scout activities. Although it is called a work uniform, it isn’t appropriate for painting or engine repairs; wear old clothes for dirty work.
Traditional Youth Dress Uniforms
Ship Organization and Uniforms 21
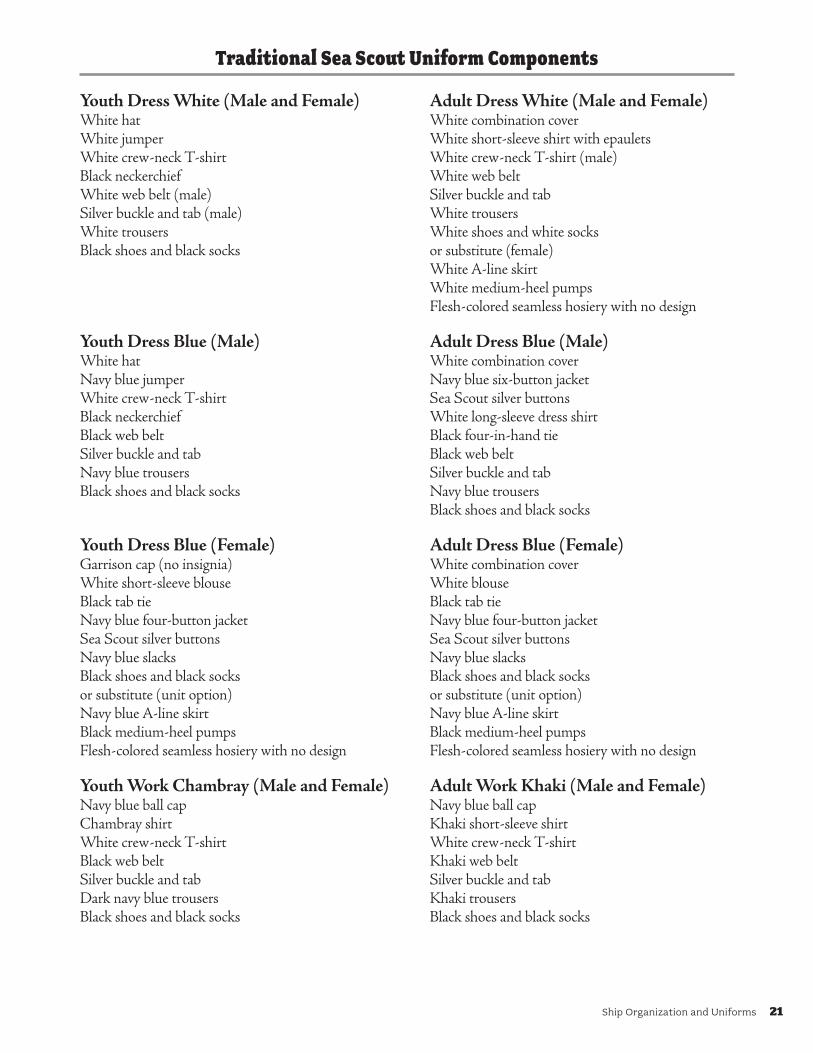
Traditional Sea Scout Uniform Components
Youth Dress White (Male and Female) Adult Dress White (Male and Female)White hat White combination coverWhite jumper White short-sleeve shirt with epauletsWhite crew-neck T-shirt White crew-neck T-shirt (male)Black neckerchief White web beltWhite web belt (male) Silver buckle and tabSilver buckle and tab (male) White trousersWhite trousers White shoes and white socksBlack shoes and black socks or substitute (female) White A-line skirt White medium-heel pumps Flesh-colored seamless hosiery with no design
Youth Dress Blue (Male) Adult Dress Blue (Male)White hat White combination coverNavy blue jumper Navy blue six-button jacketWhite crew-neck T-shirt Sea Scout silver buttonsBlack neckerchief White long-sleeve dress shirtBlack web belt Black four-in-hand tieSilver buckle and tab Black web beltNavy blue trousers Silver buckle and tabBlack shoes and black socks Navy blue trousers Black shoes and black socks
Youth Dress Blue (Female) Adult Dress Blue (Female)Garrison cap (no insignia) White combination coverWhite short-sleeve blouse White blouseBlack tab tie Black tab tieNavy blue four-button jacket Navy blue four-button jacketSea Scout silver buttons Sea Scout silver buttonsNavy blue slacks Navy blue slacksBlack shoes and black socks Black shoes and black socksor substitute (unit option) or substitute (unit option)Navy blue A-line skirt Navy blue A-line skirtBlack medium-heel pumps Black medium-heel pumpsFlesh-colored seamless hosiery with no design Flesh-colored seamless hosiery with no design
Youth Work Chambray (Male and Female) Adult Work Khaki (Male and Female)Navy blue ball cap Navy blue ball capChambray shirt Khaki short-sleeve shirtWhite crew-neck T-shirt White crew-neck T-shirtBlack web belt Khaki web beltSilver buckle and tab Silver buckle and tabDark navy blue trousers Khaki trousersBlack shoes and black socks Black shoes and black socks
22 Ship Organization and Uniforms
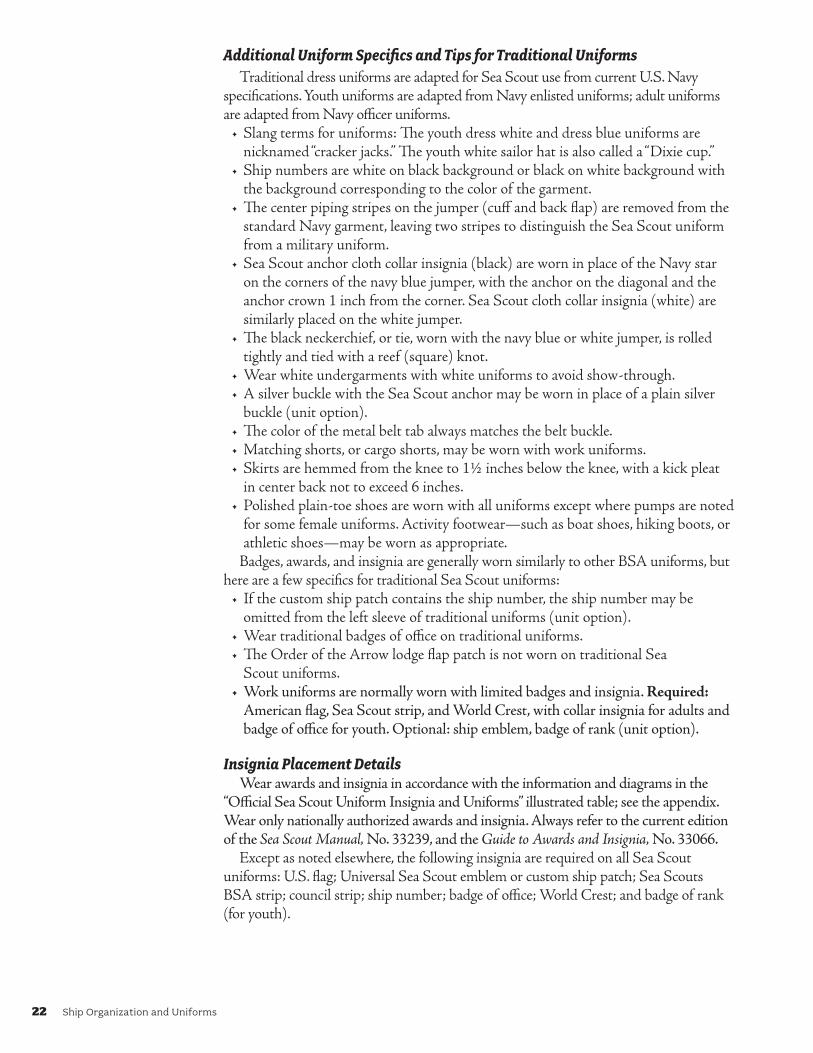
Additional Uniform Specifics and Tips for Traditional UniformsTraditional dress uniforms are adapted for Sea Scout use from current U.S. Navy
specifications. Youth uniforms are adapted from Navy enlisted uniforms; adult uniforms are adapted from Navy officer uniforms.
• Slang terms for uniforms: The youth dress white and dress blue uniforms are nicknamed “cracker jacks.” The youth white sailor hat is also called a “Dixie cup.”
• Ship numbers are white on black background or black on white background with the background corresponding to the color of the garment.
• The center piping stripes on the jumper (cuff and back flap) are removed from the standard Navy garment, leaving two stripes to distinguish the Sea Scout uniform from a military uniform.
• Sea Scout anchor cloth collar insignia (black) are worn in place of the Navy star on the corners of the navy blue jumper, with the anchor on the diagonal and the anchor crown 1 inch from the corner. Sea Scout cloth collar insignia (white) are similarly placed on the white jumper.
• The black neckerchief, or tie, worn with the navy blue or white jumper, is rolled tightly and tied with a reef (square) knot.
• Wear white undergarments with white uniforms to avoid show-through.• A silver buckle with the Sea Scout anchor may be worn in place of a plain silver
buckle (unit option).• The color of the metal belt tab always matches the belt buckle.• Matching shorts, or cargo shorts, may be worn with work uniforms.• Skirts are hemmed from the knee to 1½ inches below the knee, with a kick pleat
in center back not to exceed 6 inches.• Polished plain-toe shoes are worn with all uniforms except where pumps are noted
for some female uniforms. Activity footwear—such as boat shoes, hiking boots, or athletic shoes—may be worn as appropriate.
Badges, awards, and insignia are generally worn similarly to other BSA uniforms, but here are a few specifics for traditional Sea Scout uniforms:
• If the custom ship patch contains the ship number, the ship number may be omitted from the left sleeve of traditional uniforms (unit option).
• Wear traditional badges of office on traditional uniforms.• The Order of the Arrow lodge flap patch is not worn on traditional Sea
Scout uniforms.• Work uniforms are normally worn with limited badges and insignia. Required:
American flag, Sea Scout strip, and World Crest, with collar insignia for adults and badge of office for youth. Optional: ship emblem, badge of rank (unit option).
Insignia Placement DetailsWear awards and insignia in accordance with the information and diagrams in the
“Official Sea Scout Uniform Insignia and Uniforms” illustrated table; see the appendix. Wear only nationally authorized awards and insignia. Always refer to the current edition of the Sea Scout Manual, No. 33239, and the Guide to Awards and Insignia, No. 33066.
Except as noted elsewhere, the following insignia are required on all Sea Scout uniforms: U.S. flag; Universal Sea Scout emblem or custom ship patch; Sea Scouts BSA strip; council strip; ship number; badge of office; World Crest; and badge of rank (for youth).

Ship Organization and Uniforms 23
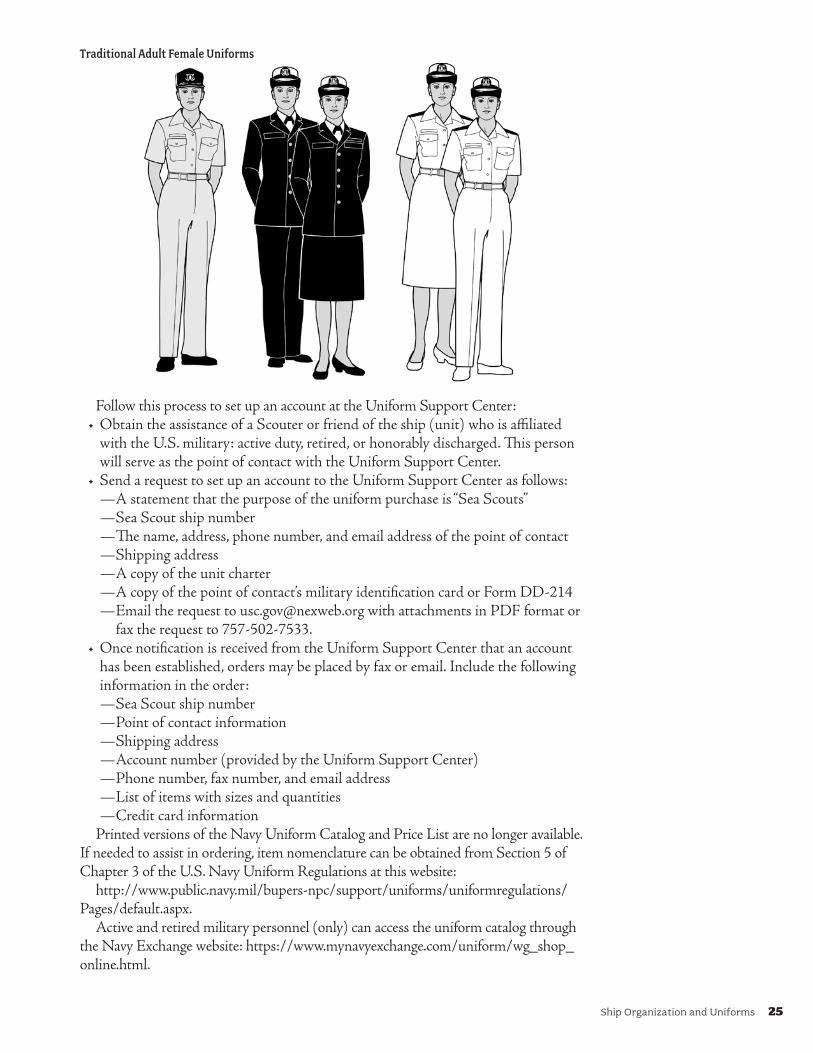
New Century Universal UniformRight sleeve—The U.S. flag is centered at the shoulder seam. The Universal
Sea Scout emblem or custom ship patch is centered 1 inch below the U.S. flag. The Journey to Excellence patch is centered 1 inch below the Universal Sea Scout emblem or custom ship patch. (The National Flagship Award, or the National Flagship Fleet Award, takes the place of the Journey to Excellence patch.)
Left sleeve—The council emblem is centered at the shoulder seam. The ship number is positioned immediately below the council emblem. The badge of office is centered immediately below the ship number. The Long Cruise badge is centered ½ inch below the badge of office. (On a very short sleeve, the badge spacing may be reduced to fit the badges.)
Right pocket—The Sea Scouts BSA strip is placed immediately above the pocket. The optional nameplate is worn immediately above the Sea Scouts BSA strip. Seabadge and Seabadge Underway pins are worn centered ⅜ of an inch above the Sea Scouts BSA strip or nameplate.
Left pocket—The World Crest, and Messengers of Peace ring if earned, is centered over the pocket halfway between the top of the pocket and the top of the shoulder. Up to six knots may be worn immediately over the pocket in two rows of three. The Sea Scout Experience Advanced Leadership (SEAL) insignia is worn ⅜ of an inch above the left pocket. If suspended medals or knots are worn, the SEAL insignia is worn ⅜ of an inch above the suspended medals or knots. Suspended medals are worn no more than five at a time, pinned in a single row immediately above the pocket. Medals are worn for bridges of honor and formal occasions. Youth wear the badge of rank centered on the left pocket. Youth wear bar awards (Small-Boat Handler and Qualified Seaman) centered ⅜ of an inch below the pocket.
Youth Traditional Dress UniformsUse the same insignia placement as for the New Century Universal Uniform above.
Adult Traditional Dress UniformsOn the adult dress blue uniform jacket, the badges of office are placed with the lowest
part of the embroidered insignia 2 inches from the hem of each sleeve.On the adult dress white uniform shirt, instead of a sleeve badge of office, wear a
black epaulet cover with embroidered badge of office. The crown of the anchor points toward the shoulder.
Otherwise, use the same insignia placement as above, except:Left sleeve—The Long Cruise badge is centered 4 inches below the shoulder seam.
Adult Traditional Khaki Work UniformCollar—A silver metal badge of office collar device is worn on each collar. The insignia
is centered 1 inch from the tip of the collar to the lowest portion of the insignia. The shank of the anchor bisects the angle of the tip of the collar. (Note: The metal collar device is worn on adult traditional khaki work uniforms only.)
GeneralThere is no right pocket on some traditional uniforms, so select the position using the
left pocket as a guide.The order in which medals and knots are worn is at the discretion of the wearer.
Members may choose to wear the knot they deem most important to the wearer’s right.Military ribbons or other awards not awarded by the BSA are not worn on any Sea
Scout uniforms except for the Finley Award, which is awarded by the United States Power Squadrons. The Community Organization Award knot may be worn.
24 Ship Organization and Uniforms
Uniform SourcesBadges and insignia are generally available from ScoutStuff.org, from your local
Scout shop, or from The Ship’s Stores.The adult dress white short-sleeve shirt with epaulets can be obtained from a
variety of commercial sources including LighthouseUniform.com, local uniform stores, The Ship’s Stores, and the United States Power Squadrons.
The “New Century” Universal Uniform, khaki, and work uniforms can be purchased at stores or websites specializing in work clothing, such as dickies.com, Sears, or Wal-Mart.
A familiar source of uniforms, insignia, and information is The Ship’s Stores. The Ship’s Stores is a nonprofit organization operated by Sea Scout volunteers. The catalog and current price list are on the website, or Skippers and council officers may request a free catalog and current price list by writing to:
The Ship’s Stores 2100 W. Highway 12 Lodi, CA 95242 Phone: 209-747-5308 Email: [email protected] Website: www.ships-store.orgNavy uniforms have customarily been obtained from Navy Exchanges, thrift shops,
or surplus stores. In the aftermath of 9/11, the Navy has tightened up on uniform sales for security reasons. Access to uniform purchases at a Navy Exchange usually requires a military identification card. Navy uniforms are also available from:
Uniform Support Center Government Accounts Team Bldg. 3126, 2nd Floor 1240 Gator Blvd., Suite 200 Virginia Beach, VA 23459 [email protected] Phone: 800-368-4088; option 3 Fax: 757-502-7533
Traditional Adult Male Uniforms
Ship Organization and Uniforms 25
Follow this process to set up an account at the Uniform Support Center:• Obtain the assistance of a Scouter or friend of the ship (unit) who is affiliated
with the U.S. military: active duty, retired, or honorably discharged. This person will serve as the point of contact with the Uniform Support Center.
• Send a request to set up an account to the Uniform Support Center as follows: —A statement that the purpose of the uniform purchase is “Sea Scouts” —Sea Scout ship number —The name, address, phone number, and email address of the point of contact —Shipping address —A copy of the unit charter —A copy of the point of contact’s military identification card or Form DD-214 —Email the request to [email protected] with attachments in PDF format or fax the request to 757-502-7533.
• Once notification is received from the Uniform Support Center that an account has been established, orders may be placed by fax or email. Include the following information in the order:
—Sea Scout ship number —Point of contact information —Shipping address —Account number (provided by the Uniform Support Center) —Phone number, fax number, and email address —List of items with sizes and quantities —Credit card information
Printed versions of the Navy Uniform Catalog and Price List are no longer available. If needed to assist in ordering, item nomenclature can be obtained from Section 5 of Chapter 3 of the U.S. Navy Uniform Regulations at this website:
http://www.public.navy.mil/bupers-npc/support/uniforms/uniformregulations/Pages/default.aspx.
Active and retired military personnel (only) can access the uniform catalog through the Navy Exchange website: https://www.mynavyexchange.com/uniform/wg_shop_online.html.
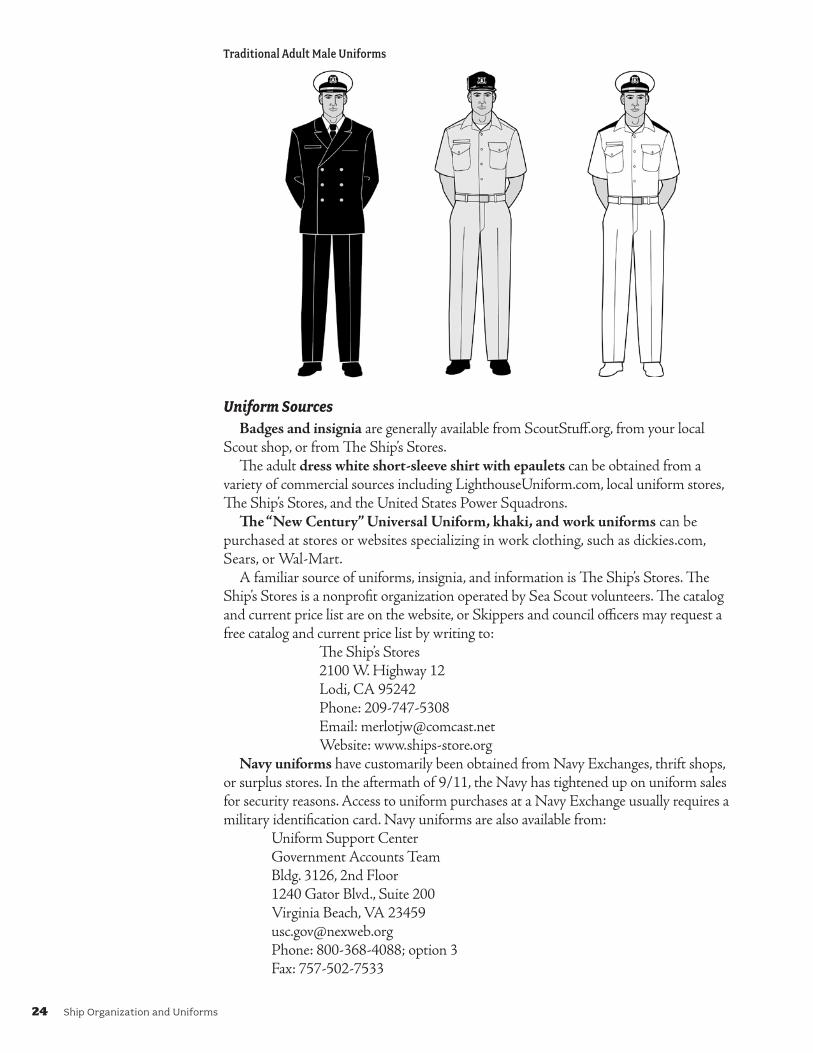
Traditional Adult Female Uniforms

26 Ship Organization and Uniforms
NATIONAL
F L AGS HI P20 02
NATIONAL
F L AGS HI P20 02
Proper Insignia Placement for Sea Scout Uniforms
RIGHT SLEEVELEFT SLEEVE
RIGHT POCKETLEFT POCKET
Council Emblem
Badge of Office
Long Cruise Badge
SEAL Pin
Badge of Rank
Bar Awards
Seabadge Pin Seabadge Underway Pin (adult uniform)
Sea Scouts BSA Strip
Name Plate
Universal Sea Scout Emblem or Ship Emblem
U.S. Flag
Shoulder Seam
Ship Number1"
Journey to Excellence or National Flagship or Flagship Fleet Patch
World Crest Emblem
1"
3/8"
3/8"
3/8"
½"
Ship Operations 27
SHIP OPERATIONSThe time and place for things to happen in Sea Scouts is at ship meetings. A Sea
Scout ship whose meetings are full of fun and meaningful activity is a ship that has few morale or membership problems. High school–age youth join to take part in the fun and exciting adventures of Sea Scouts, so, keep your regular meetings full of activities that are just as interesting as cruises and other seagoing events.
Meetings also involve administration. It is a time for reports and decisions by the members in the democratic spirit of America. It is the place where members can and should speak up so that most decisions will be in the best interests of the majority of the membership. Experience has shown that where the program is based on discussion and general agreement, the response is usually enthusiastic.
To be successful, meetings must be carefully planned and organized in advance. The agenda, activity ideas, and meeting techniques in this chapter are designed to give you the information you need to plan successful meetings.
The Ship MeetingShip meetings should be held at a regular time and
place. Some ships build a landship to add atmosphere and provide a proper setting for ceremonies.
Generally, successful ships follow these guidelines:• The ship holds regular weekly meetings at an
established time and place.• The ship’s officers hold a quarterdeck meeting
once a month to problem-solve and plan.• The ship schedules at least one monthly activity.• Ship meetings are held on the same night of the
week. Quarterdeck and ship committee meetings are held on a different night. This makes it easier for members to remember.
• Ship officers can plan additional meetings, activities, work parties, etc., during the month, as needed.

28 Ship Operations
FIRST SHIP MEETING OF THE MONTH
A. OPENING CEREMONIES boatswain Call ship to attention. Advance the colors. Recognize visitors.
B. THE BUSINESS SESSION Call to order boatswain Minutes of the last meeting yeoman Officers’ reports boatswain • Communications yeoman • Membership boatswain’s mate • Financial report purser • Equipment storekeeper • District and council activities boatswain New activity chair and committees boatswain Promotion of activities activity chair Questions for ship decision boatswain Skipper’s comments Skipper
C. THE ACTIVITY At the conclusion of the business session, the boatswain calls upon the Sea
Scout who is the chair of the activity scheduled for that particular meeting. He or she takes over and with the aid of his or her committee conducts the activity.
D. CLOSING CEREMONIES boatswain Retire the colors. Skipper’s minute Dismiss the ship.

Ship Operations 29
CHECKLIST OF ITEMS FOR SHIP MEETING AGENDA
OPENINGCEREMONY,boatswainThe standard opening ceremony for a Sea Scout ship should be carried out with the dignity and the respect due the tradi-tions of the sea. It can be carried out aboard a landship and follows this pattern:
Call ship to attention.Advance the colors. Recognize visitors.
ADMISSIONOFNEWMEMBERS,boatswain’smateNew members can be brought in and registered at any time, but in many ships the official admission ceremony for new members is generally carried out during the second ship meeting of each month. This should be an impressive, formal welcome of the new member to the ship and should be scheduled imme diately after each new member is registered.
MINUTESOFTHELASTSHIPMEETING,yeomanThe minutes of the last ship meeting—read, corrected, and approved—may be posted on the bulletin board in advance so they can be read by members before the meeting. If this is done, they can be approved by a vote when presented without being read by the yeoman.
OFFICERS’REPORTS,boatswainAt the first meeting of every month, the boatswain calls for verbal reports from the officers. These are brief reports which should, if necessary, be discussed by the membership. Questions calling for ship action concerning these reports should be delayed until the portion of the meeting con cerning “questions for ship decision.”
COLLECTIONOFACTIVITYSUGGESTIONS,SkipperRealizing that the activity desires of the ship are essential to successful programming, the Skipper discusses activities with the members. The yeoman makes a list of the most popular ideas, which will then be discussed at the next quarterdeck meeting.
PROMOTIONOFACTIVITIES,activitychairActivity chairs responsible for the activities are asked to promote participation in those activities. This is done through progress reports on superactivities as well as the regular activities.
QUESTIONSFORSHIPDECISION,boatswainQuestions may be presented by members for vote at any time. This permits members to have a direct vote in any ship decision. However, if members have elected good officers to represent them, the members should rely upon the officers to make decisions. Sufficient time should be allowed for questions that are referred from quarterdeck meetings or come up during a discussion of the officers’ reports.
ELECTIONOFSHIPOFFICERS,boatswainandSkipperThe election of officers should be followed by setting a time and place for the training of the new officers by the Skipper.
SKIPPER’SCOMMENTS,SkipperLate in each meeting, the Skipper should be asked for his or her comments. This does not mean the Skipper cannot make comments during the rest of the meeting, for he or she must be alert to answer direct questions or to make comments which are necessary to the smooth operation of the ship.
COMMUNICATIONS,yeomanPertinent parts of letters and bulletins received are discussed. The ship decides what action to take.
MEMBERSHIP,boatswain’smateDiscuss the names of new prospects and assign them to members in accordance with the ship recruiting plan.
FINANCES,purserA brief financial report is made by the purser. It should include last month’s income, disbursements, balance, and any unpaid dues or outstanding assessments. The ship budget should be approved by the ship members annually.
EQUIPMENT,storekeeperThe storekeeper gives a complete report on the inventory and general condition of all the ship equipment, securing help as needed from ship members.
ANNOUNCEMENTOFACTIVITYCOMMITTEES,boatswainThe boatswain announces the chair, committee members, and consultants (if any) for each scheduled activity for the next month.
At intervals the ship will be represented at national, regional, or local activities and conferences. These representatives should be asked to prepare and make reports to the ship membership at the first meeting following the conference.
SHIPMEETINGACTIVITY,activitychairAt this time, during each ship meeting, the boatswain turns the meeting over to the activity chair who, with the help of his or her committee, conducts the activity. At the close of the activity, the activity chair turns the meeting back to the boatswain.
CLOSINGCEREMONY,boatswainThe closing ceremony of a ship is generally an established ceremony that follows an inspirational and meaningful pat-tern. Listed below are some things you might consider.
• Changing the watch • Skipper’s minute • Piping the Skipper over the side • Dousing the colors • Dismissing the crews
At times, when an activity is not carried out aboard a landship, the boatswain, with the Skipper’s approval, may dispense with the closing ceremony and merely dismiss the ship.
30 Ship Operations
Two-Part ProgramShip meetings consist of two parts, a business session and an activity. Since the activity
is the focus and involves the major portion of the time, the business session should be handled as efficiently as possible.
Officers’ report only needs to be made once a month. Usually these reports are made during the first meeting of the month. Other meetings are reserved for program, advancement, and those business items that happen occasionally.
The Ship Business SessionThe business session of a ship meeting is generally brief but important. Because of its
nature, it is not necessarily the most interesting part of the meeting, but it need not be dull. The way to make this session effective, and fun, follows.
• Ship business must be conducted in concurrence with the ship bylaws.• The officers need to understand the overall organization and operation of a Sea
Scout ship. Well-trained officers will find it easy to carry out their responsibilities during the ship business session.
• The boatswain, who is in charge of the business session, should involve other officers and members in the preparation of reports and assignments related to the business session. The session will be more interesting if more people are involved and have responsibility for business matters.
• Make the group feel at ease.• Give everyone a chance to participate. Free discussion will encourage better ideas.
Direct, do not dominate, the conversation. Don’t forget to ask the opinions of shy members. At the same time, slow down the person who talks too much.
• Focus on the subject. Make the discussion lead to decisions and a plan of action. This means that once in a while you will have to stop a discussion that deviates from the main subject, and get the group back on track.
• Be fair. Respect the opinions of both the majority and the minority. To do this, you must determine the true wishes of both sides. This is done by giving both parties a fair hearing. Once each has had its say, bring the matter to a vote. When there is a divided opinion, use a secret ballot.
• Summarize occasionally. Review the points that have already been made.• The one thing that will help most is to follow the prepared agenda for the ship
meeting. If you are knowledgeable about the agenda, you should have effective, interesting business sessions.
Hints for Ship MembersBusiness sessions provide a real opportunity for ship members to influence the
conduct and program of their ship. To have an equal opportunity to express themselves, the ship members should observe these general rules of conduct:
• Take turns speaking during the general discussion. If you have trouble getting a word in, address the boatswain and ask for the floor. If everyone is talking and interrupting each other, your boatswain should call for order and decide who has the floor.
• Stay with the topic of discussion. Help the group reach a decision on one topic before discussing the next one. Ship members can help the boatswain by staying on the subject and clarifying the point of discussion for others. Remember, this will save your time as well as everyone else’s.
• Be informal. Efficiency in handling ship business should not require a great deal of parliamentary procedure. Parliamentary procedure was developed primarily for large groups of people with many conflicting opinions. Most ships will find informal discussion a faster and more effective way to operate.

Ship Operations 31
• Some business can be handled formally. If there is a large group present that is discussing a controversial issue, the motion and vote are the most effective method for reaching a decision.
The Activity Session
Inviting a Guest SpeakerChoose a speaker for his or her knowledge and ability to present accurate informa-
tion in an interesting and captivating manner. Extend an invitation that gives the speaker plenty of time to prepare. The speaker will need to know how much time will be available, the size and age range of the audience, the experience and knowledge level of the group, the meeting location, time for arrival, and contact information.
On behalf of the ship, the moderator should publicly thank the speaker at the end of the presentation. In addition, it is appropriate to thank the speaker with a letter from the yeoman expressing the appreciation of the ship.
Giving a DemonstrationShip meetings are the time for planning and learning. When planning a program that
will teach a skill, the following ideas should be considered:• Decide what training is needed and the skills the participants should master by the
end of the training.• Create a training outline and estimate the time the instruction will take. • Select teaching methods most suitable for you, your topic, and your students.• Design or select teaching aids and activities.• Require feedback to demonstrate that the information given has been understood.• Be flexible. Sometimes people really get it, but sometimes they need more time to
digest and process information.• Evaluate. Performance tests are preferable to written tests.
In summary, you must first decide what you want your students to do. Then you tell them what to do, show them what to do, let them practice doing it and finish by evaluat-ing their performance.
Coaching a SkillCoaching—the method of supervised learning by doing—is the perfect follow-up to
the demonstration of a skill.
Suggestions for Coaching• Be able to perform the skill well yourself. Review your own experience in learning
the skill and work out a series of steps for teaching it.• Keep the coaching on a personal basis by working with a small group, perhaps only
one to start with. Get additional coaches, if necessary, to keep the groups small.• Evaluate the abilities and personality traits of those you are coaching, as relating to
their power to learn a particular skill.• If someone has acquired little or none of the skill through reading, discussion, or
past experience, go slowly at first. Insist on accuracy or form first, then speed.• Don’t interfere with a person’s honest attempts. Don’t interrupt efforts unless he or
she bogs down or goes off on the wrong track.• Let the person make mistakes if he or she can learn from them, but definitely
point out any mistakes.• Never make corrections sarcastically or for the entertainment of onlookers.• Encourage by remarking on progress, pointing out the completion of each step
and the steps done well.• Urge the person to practice and perhaps to coach someone else, when he or she
has mastered the skill.
32 Ship Operations
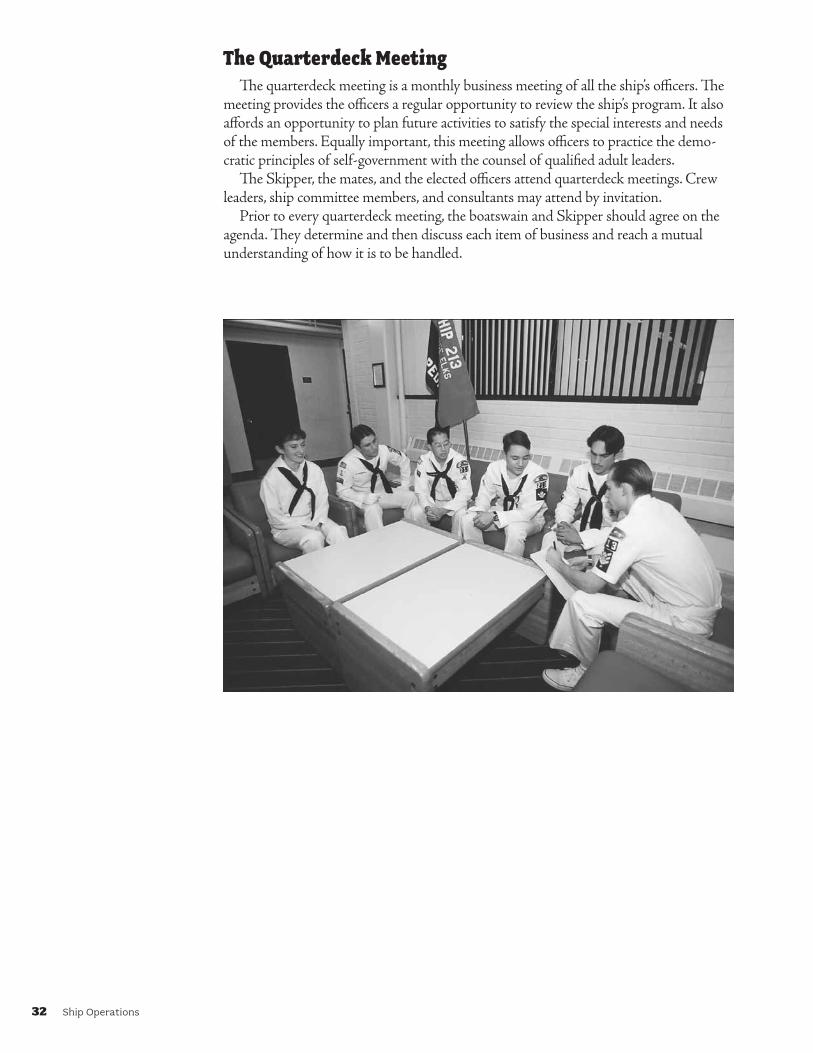
The Quarterdeck MeetingThe quarterdeck meeting is a monthly business meeting of all the ship’s officers. The
meeting provides the officers a regular opportunity to review the ship’s program. It also affords an opportunity to plan future activities to satisfy the special interests and needs of the members. Equally important, this meeting allows officers to practice the demo-cratic principles of self-government with the counsel of qualified adult leaders.
The Skipper, the mates, and the elected officers attend quarterdeck meetings. Crew leaders, ship committee members, and consultants may attend by invitation.
Prior to every quarterdeck meeting, the boatswain and Skipper should agree on the agenda. They determine and then discuss each item of business and reach a mutual understanding of how it is to be handled.

Ship Operations 33
SUGGESTED AGENDA FOR QUARTERDECK MEETINGS
(The boatswain presides. Other officers participate as indicated.)
1. CALLTOORDER,boatswain
2. MINUTESOFLASTQUARTERDECKMEETING,yeoman Minutes are read, corrected, and approved.
3. REPORTSOFOFFICERS—Calledforbyboatswain
Communications,yeoman• Reads or summarizes all correspondence
depending on its importance.• Takes notes and plans appropriate action.
Membership,boatswain’smate• Presents plans for future ceremonies.• Reports progress in recruiting, including a
discussion of prospective members.
Finances,purser• Reports last month’s income, disbursements,
and balance.• Reports members owing dues or fees.• Obtains authorization for payment of bills.
Boats and equipment,storekeeper• Reports last month’s new, lost, or damaged items.• Reports needed maintenance or repairs.• Secures approval for items to be purchased
or repaired.
District and council activities,boatswain• Reports district and council activities and leads a
discussion concerning ships’ participation in them.• Secures suggestions for future district or
council activities.
Past activities review,boatswain
Gives a brief review of the past month’s activities, complimenting those responsible for success and encouraging positive discussion of any weaknesses.
Ship committee meeting report,Skipper
Gives brief summary of meeting emphasizing the committee’s plans for its support of ship activities.
4. APPROVALOFSHIPMEETINGAGENDA,boatswain The boatswain presents for approval the agenda for
the business part of the two regular meetings to be held during the month.
5. CHECKONTHISMONTH’SACTIVITYPLANS,Skipper• Conducts a thorough check on all activity plans
for the month with definite action to tie up any loose ends.
• Takes action concerning any necessary changes in activities or committees.
6. PROGRAMPLANNINGSESSIONFORFUTUREACTIVITIES
The program planning procedure is followed at this time during each quarterdeck meeting. Under the supervision of the Skipper, the officers use this practical and democratic four-step method to make final decisions concerning the activities they feel will meet the needs and desires of the ship’s membership.
STEP 1: Collect activity ideas.STEP 2: Select the activities you want.STEP 3: Assign committees to conduct them.STEP 4: Double-check all plans and enthusiasti-
cally promote and enjoy the activities.
7. ADJOURNMENT,boatswain
34 Ship Operations
A Balanced ProgramYouth join Sea Scouts to take part in interesting and exciting activities. This puts the
creation and production of activities high on the list of things officers must consider. The Skipper must guide the unit into a well-balanced set of exciting and interesting activities. When selecting and promoting activities, officers should consider social, leadership, outdoor, fitness, service, and citizenship experiences.
Planning activities for your ship program should be a collaborative effort. Begin by collecting and brainstorming activity ideas. The best sources are ship members. Once completed, this list can be used by officers in planning programs for the ship.
Sources of ConsultantsListed here are some of the more common sources of consultants:
• Yacht club members• Boat club members and officers• Local Power Squadron or Coast Guard Auxiliary flotilla members• Boating supply and equipment store personnel• Owners and employees of marinas• Military personnel, especially active and reserve members of the Navy and
Coast Guard• Ship committee members• Parents and friends• Teachers in schools, colleges, and universities• People in industry, businesses, and professions• People in government and other public agencies• Members of local boating and water safety organizations• Local members of the American Canoe Association
Activity CommitteesTo produce a successful Sea Scout activity, two elements must be present. The first is
a good idea, and the second is a good committee to carry it out. A good activity idea can be a complete washout if the committee does not have the spirit and know-how to plan, organize, and promote it.
The Skipper consults with the officers on the selection of chairs for each activity committee. Overloading “workhorses” needs to be avoided in order to help all Sea Scouts develop leadership abilities.
The boatswain and chair select the committee. The size of the committee, chosen by the boatswain and the activity chair, should be tailored to the size of the activity. Activity chairs schedule meetings and make plans well in advance of the deadline date, and report on their progress at quarterdeck meetings. This ensures reliable information concerning the project, and recognizes the importance of each activity chair.
After each activity, publicly give credit to those who helped, then thank them pri-vately. Be sure the location of the activity is cleaner than it was before the activity. Return equipment to its proper place in good condition. Anything lost, damaged, or destroyed should be repaired or replaced, particularly if it was borrowed. Settle financial matters for the activity with the purser. This includes any bills paid or unpaid by the committee and any income collected or to be collected. It is important to make this financial report in writing and attach any receipts and invoices. Finish by reporting suggestions for improving similar future activities to the boatswain.
Ship Operations 35
Cruise and Superactivity PlansAlthough the ship has a simple month-by-month procedure for program planning, it is
sometimes necessary to do some long-range planning. Nearly every teenager, and certainly every Sea Scout, dreams of taking a cruise. It is, therefore, not merely a good idea, but a solemn responsibility that the ship’s officers plan at least one long cruise each year.
Once a long cruise has been set, officers need to schedule things that must be carried out to ensure the success of the cruise. The cost of food and lodging, essential equip-ment, and transportation have to be considered carefully for any superactivity. From such discussion will come a monthly plan of action.
Cruises are just one phase of the many superactivities available to Sea Scouts. There are unlimited opportunities, tours and visits, and special at-home features available to ships. Passport to High Adventure, No. 34245, describes how to plan, prepare for, and carry out a high-adventure experience. This guidebook includes a directory of councils with high-adventure programs and a list of councils with high-adventure bases.
A superactivity requires special planning and preparation. The ship’s officers must be sure the members really want the activity and that the decision is made far enough in advance to allow time for thorough preparations.
Plans are usually made months ahead. As the officers meet for each monthly planning session, some portion of the preparation for the superactivity is included in their planning. In this way, essential preparations are made for the coming high-adventure experience.
A cruise or other superactivity must be the choice of the majority of the ship members. Unless they approve strongly of the event, they will not give it their wholehearted support. Therefore, involve as many members as possible from the very beginning to ensure success.
Superactivities need the approval of the ship’s committee. Once you get their approval, you have a fine team of adults to help you succeed.
A superactivity calls for a special committee of adults and ship members. The main ingredient needed to make this committee flourish is enthusiasm. If each member of the committee is looking forward to the activity with high anticipation, you can be sure it will happen in a big way.
Check your equipment. Well in advance of any cruise or superactivity, all equipment, such as boats, camp gear, and trailers, should be carefully checked and put in good condition. All secondary equipment should be secured and readied for use.
A certain amount of training is necessary before almost every superactivity. Sometimes it involves the handling of a boat, other times a knowledge of the history and terrain of the area you are visiting. Long before a cruise or superactivity, decide what training must be conducted. This kind of preparation makes an activity safer, more exciting, and meaningful.
Finance in advance. Although most cruises or superactivities are somewhat costly, early planning permits Sea Scouts to earn and save their share of the expenses.
When plans for a cruise or superactivity involve extensive travel, investigate the pos-sible use of military facilities along the way. Travel stopovers at Air Force, Army, or Navy bases make meals and accommodations available at very reasonable rates.
Be safety-minded. For the protection of the Sea Scouts, every precaution should be taken to conduct cruises and superactivities safely. Safety must not be secondary. It must be a prime consideration from the very beginning of the superactivity planning experi-ence. A ship must go prepared with the right skills and equipment. Leaders, at all times, must avoid unnecessary risks even though their decisions may make them unpopular. Each Sea Scout must be mature enough to take care of himself or herself and to realize he or she is also responsible for the safety of the entire ship.

36 Ship Operations
Cruises and superactivities are usually rugged experiences. Everyone must be in good health before starting out. Use the Annual Health and Medical Record (No. 34605) to check each person in advance. Emphasize good health habits with those who are fit to go. Especially important to the health of the ship’s company is good sanitation as it relates to cooking, drinking water, sleeping arrangements, and toilet facilities. The ship should also check with the council to make sure they have the insurance necessary to cover the group during the activity. If not, consult a local insurance agent on the advis-ability of carrying health and accident insurance.
Discipline is necessary. As a ship travels, it is in the public eye. Its conduct is a reflec-tion of its chartered organization and the Boy Scouts of America. Safety is based on the assumption that each person will obey the leader as directed especially in an emergency.
All boating activities outside of council or district events, as well as trips of more than 500 miles or trips outside the council borders, require that a tour and activity plan be submitted to your local BSA council. At least 21 days in advance, complete a tour and activity plan online; use paper form No. 680-014 only if you do not have access to www.MyScouting.org.
Cruising—whether by sail, paddle, motor, or pulling boat on a river, lake, or ocean—is the reason that 99 out of 100 of your shipmates joined. This calls for training and interesting activities based on reliable information.
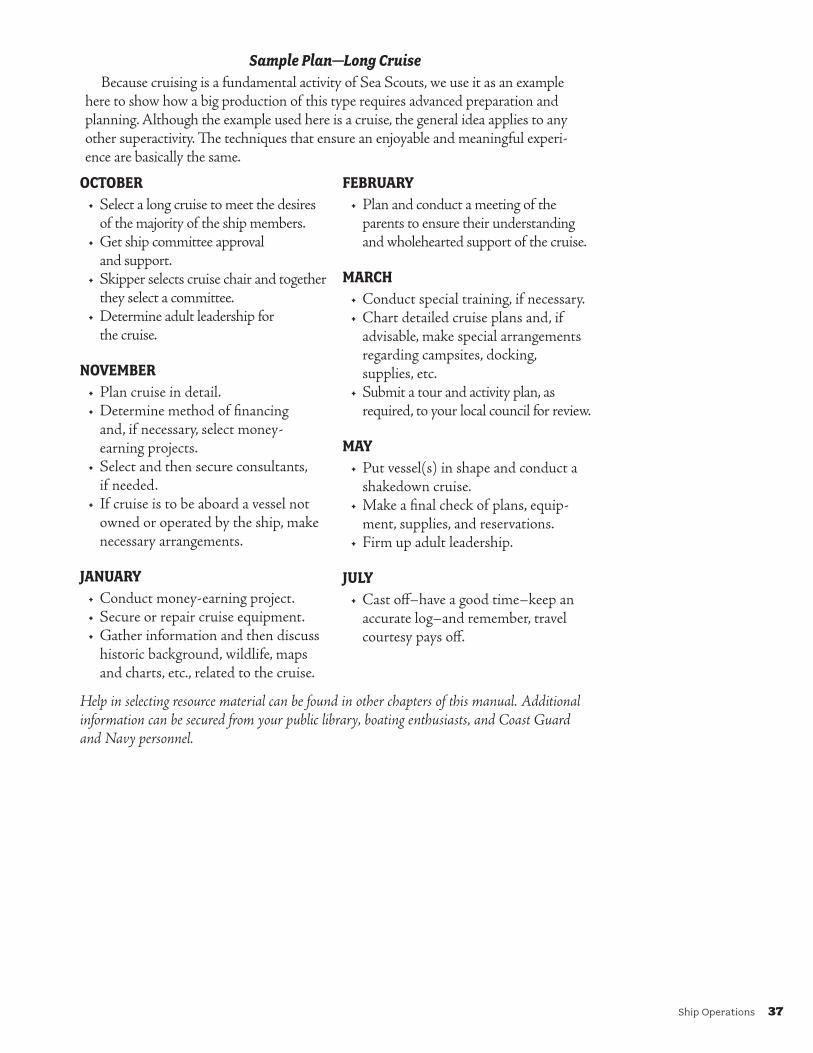
Ship Operations 37
Sample Plan—Long CruiseBecause cruising is a fundamental activity of Sea Scouts, we use it as an example
here to show how a big production of this type requires advanced preparation and planning. Although the example used here is a cruise, the general idea applies to any other superactivity. The techniques that ensure an enjoyable and meaningful experi-ence are basically the same.
OCTOBER• Select a long cruise to meet the desires
of the majority of the ship members.• Get ship committee approval
and support.• Skipper selects cruise chair and together
they select a committee.• Determine adult leadership for
the cruise.
NOVEMBER• Plan cruise in detail.• Determine method of financing
and, if necessary, select money-earning projects.
• Select and then secure consultants, if needed.
• If cruise is to be aboard a vessel not owned or operated by the ship, make necessary arrangements.
JANUARY• Conduct money-earning project.• Secure or repair cruise equipment.• Gather information and then discuss
historic background, wildlife, maps and charts, etc., related to the cruise.
FEBRUARY• Plan and conduct a meeting of the
parents to ensure their understanding and wholehearted support of the cruise.
MARCH• Conduct special training, if necessary.• Chart detailed cruise plans and, if
advisable, make special arrangements regarding campsites, docking, supplies, etc.
• Submit a tour and activity plan, as required, to your local council for review.
MAY• Put vessel(s) in shape and conduct a
shakedown cruise.• Make a final check of plans, equip-
ment, supplies, and reservations.• Firm up adult leadership.
JULY• Cast off–have a good time–keep an
accurate log–and remember, travel courtesy pays off.
Help in selecting resource material can be found in other chapters of this manual. Additional information can be secured from your public library, boating enthusiasts, and Coast Guard and Navy personnel.
38 Ship Operations
Written Communications
Ship LogbookKeeping the ship’s papers and records is the responsibility of the yeoman. Minutes
of ship and quarterdeck meetings, membership rosters, rosters of the ship’s officers and adult leaders, records of attendance, advancement, etc., will provide a historical record of the ship. The ship logbook is a place to keep photographs, clippings, and program souvenirs, and notes on outstanding achievements by the members of the ship. When new members join the ship, they can sign the logbook during the admission ceremony.
Letters of AppreciationMany people will help a ship over time. Donations of equipment will be made,
consultants will give time and expertise, hospitality will be extended, and adult leaders will patiently guide and teach. A thoughtful letter of appreciation is always appropriate. Make sure to express thanks for specific help, and mention the lasting effect the help will provide.
Publicizing Your ShipPublicity is simple. Plan something, do something, and tell everyone something
happened. Sea Scouts regularly participate in fun, exciting, and unique events. Once you plan an event, notify the local newspaper, the school newspaper, the local television station, and neighborhood papers of the details. If reporters and photographers are not sent, make sure you send a press release to the media describing the event. When submitting an article, include the following:
• Answer the five W’s: who, what, when, where, and why.• Explain how the event occurred.• Use sensory details, dialogue (if appropriate), and action verbs to show exactly
what was observed.• Present events in a clear, logical order.• Capture the mood of the event.• Put a contact name and phone number at the end of the article.• Edit and proofread.• Submit a picture showing the action of the event.
Recruiting New MembersThe continuous addition of new members is essential for growth and running a
successful program. Empowering youth to develop and run a good program is one of the best ways to recruit.
What works? If kids are having fun, word of mouth will bring in recruits. Youth sharing experiences with other youth, interacting with Scout troops, Cub Scout cruises, and volunteering at camporees are all ways to let others know about your ship. Be a presence in uniform wherever possible—award ceremonies, parades, festivals, outdoor shows, boat shows, and other civic events. Create a website with high-impact images and a calendar of events. Invite people to an open house and feed them with both food and ideas. The possibilities for letting others know about the dynamics of your program are endless. Just remember, the key is to make it fun.
Ship Operations 39
FundraisingMaintaining boats is a costly undertaking. Long cruises and high-adventure experiences
require money. Before taking on a fundraising campaign, check with your council regarding Friends of Scouting or any other limitations, and file the council fundraising approval form.
Possibilities are unlimited, but there are tried and true methods of bringing money into the ship’s treasury. Selling concessions, yard sales, silent auctions, car washes, spaghetti suppers, and pancake breakfasts are great fun and serve multiple purposes—publicity, recruitment, fundraising, and fun.
Customs and CourtesiesSea Scouts brings to its members a wealth of customs and courtesies based on the lore of
the sea. These traditions furnish the background for Sea Scout ceremonies and formalities. They add atmosphere and connect us to our heritage as sailors and as Sea Scouts.
The Scout SignThe Scout sign shows you are a Scout. Give it each time you recite the Scout Oath
and Law. When a Scout or Scouter raises the Scout sign, all Scouts should make the sign, too, and come to silent attention.
Make the Scout sign by covering the nail of the little finger of your right hand with your right thumb, then raising your right arm with your elbow at a right angle and holding the three middle fingers of your hand upward.
The Scout SaluteThe Scout salute shows respect. Use it to salute the flag of the United States of
America. You may also salute a Scout leader or another Scout. Give the Scout salute by forming the Scout sign with your right hand and then
bringing that hand upward until your forefinger touches the brim of your hat or the arch of your right eyebrow. The palm of your hand should not show.
The Scout HandshakeThe Scout handshake is made with the hand nearest the heart and is offered as a
token of friendship. Extend your left hand to another Scout and firmly grasp his left hand. Only use this handshake when both people are in uniform.
Sea Scout CourtesyThe respect of the young for the old and the junior for the senior is expressed in many
ways in Sea Scouts. For instance, when several officers of various ranks are coming aboard a large ship from a small boat, the senior always leads from the small boat, followed by the juniors; but when disembarking, the senior always gets into the small boat last.
At the table it is customary for the junior to remain standing until the senior is seated or orders are given to take seats. The junior never leaves the table after the meal until he or she has asked for and has received permission from the presiding officer at the table.
Sea Scouts do not barge aboard any vessel. Permission to come aboard is requested, and must be granted before boarding.
The most outstanding form of courtesy found in Sea Scouts is the use of the word “sir” or “ma’am.” A simple “yes” or “no” is not appropriate. You should respond with, “Yes, sir,” or “no, sir,” or “Aye, aye, sir,” or “ma’am.”
Sea Scouts are ladies and gentlemen, and courtesy is the outward expression of their character.
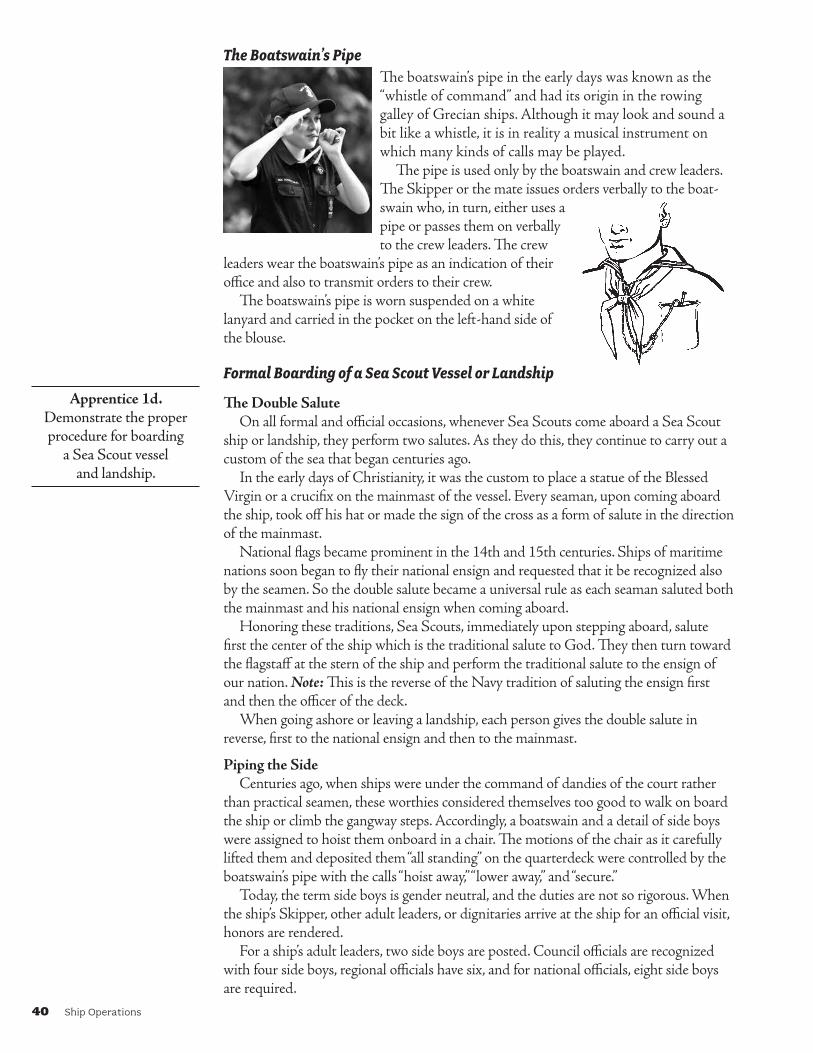
40 Ship Operations
The Boatswain’s PipeThe boatswain’s pipe in the early days was known as the “whistle of command” and had its origin in the rowing galley of Grecian ships. Although it may look and sound a bit like a whistle, it is in reality a musical instrument on which many kinds of calls may be played.
The pipe is used only by the boatswain and crew leaders. The Skipper or the mate issues orders verbally to the boat-swain who, in turn, either uses a pipe or passes them on verbally to the crew leaders. The crew
leaders wear the boatswain’s pipe as an indication of their office and also to transmit orders to their crew.
The boatswain’s pipe is worn suspended on a white lanyard and carried in the pocket on the left-hand side of the blouse.
Formal Boarding of a Sea Scout Vessel or Landship
The Double SaluteOn all formal and official occasions, whenever Sea Scouts come aboard a Sea Scout
ship or landship, they perform two salutes. As they do this, they continue to carry out a custom of the sea that began centuries ago.
In the early days of Christianity, it was the custom to place a statue of the Blessed Virgin or a crucifix on the mainmast of the vessel. Every seaman, upon coming aboard the ship, took off his hat or made the sign of the cross as a form of salute in the direction of the mainmast.
National flags became prominent in the 14th and 15th centuries. Ships of maritime nations soon began to fly their national ensign and requested that it be recognized also by the seamen. So the double salute became a universal rule as each seaman saluted both the mainmast and his national ensign when coming aboard.
Honoring these traditions, Sea Scouts, immediately upon stepping aboard, salute first the center of the ship which is the traditional salute to God. They then turn toward the flagstaff at the stern of the ship and perform the traditional salute to the ensign of our nation. Note: This is the reverse of the Navy tradition of saluting the ensign first and then the officer of the deck.
When going ashore or leaving a landship, each person gives the double salute in reverse, first to the national ensign and then to the mainmast.
Piping the SideCenturies ago, when ships were under the command of dandies of the court rather
than practical seamen, these worthies considered themselves too good to walk on board the ship or climb the gangway steps. Accordingly, a boatswain and a detail of side boys were assigned to hoist them onboard in a chair. The motions of the chair as it carefully lifted them and deposited them “all standing” on the quarterdeck were controlled by the boatswain’s pipe with the calls “hoist away,” “lower away,” and “secure.”
Today, the term side boys is gender neutral, and the duties are not so rigorous. When the ship’s Skipper, other adult leaders, or dignitaries arrive at the ship for an official visit, honors are rendered.
For a ship’s adult leaders, two side boys are posted. Council officials are recognized with four side boys, regional officials have six, and for national officials, eight side boys are required.
Apprentice 1d. Demonstrate the proper procedure for boarding
a Sea Scout vessel and landship.

Ship Operations 41
Side boys are mustered by the boatswain’s mate with the order, “Side boys post.” Starting at the gangway, side boys are stationed on either side of the route taken by the arriving officers across the quarterdeck. As the official steps on the deck, the boatswain’s mate announces the arrival by calling out the rank or relationship of the official. For instance, if the person boarding is the Skipper of the Sea Scout Ship Invincible, the boatswain’s mate announces, “Invincible arriving.” If the officer is the secretary of the Navy, the boatswain’s mate announces, “Navy arriving.”
The announcement is followed by ringing the ship’s bell. The number of rings cor-responds to the number of side boys posted, and the rings are sounded in groups of two. Following the ringing of the bell, the boatswain’s mate plays the call “Pipe the Side” on the boatswain’s pipe. The side boys salute at the first note of the pipe and hold the salute until the last note is sounded.
The person being piped aboard salutes midship, where the officer of the deck is posted, and the officer of the deck returns the salute. The person boarding salutes the ensign, and holds his salute until he reaches the end of the line of side boys.
If a Sea Scout party is boarding a U.S. Navy or U.S. Coast Guard vessel, the person in charge of the party should first walk up the gangway. At the top of the gangway, this person must turn and salute the ensign, which will be aft. This person then will turn and salute the officer of the deck and request permission for the party to come aboard. All persons in the party will salute the ensign and then the officer of the deck when they reach the top of the gangway. The reverse procedure applies
when departing the ship. When on a U.S. Naval vessel or U.S. Coast Guard vessel, Sea Scouts follow military customs.
Boarding a Sea Scout ShipPersons boarding a Sea Scout ship must request permission to come aboard. If the
persons are in a group, only the person in charge of the group must request permission for the entire group.
History of the Flag of the United States of America“Our flag carries American ideas, American history and American feelings. It is not
a painted rag. It is a whole history. It is the Constitution. It is the Government. It is the emblem of the sovereignty of the people. It is the Nation.”—Henry Ward Beecher, 1861
We have all heard the story of George Washington, Betsy Ross, and the first American flag; however, there is no evidence to corroborate this story. We do know that the Grand Union flag flew over George Washington’s headquarters outside Boston on January 1, 1776.
The Revolutionary War had started the year before, and the colonies needed a flag of their own. The Grand Union flag is often referred to as the first American flag; however, on June 14, 1777, several resolutions from the Marine Committee were passed by the Continental Congress. The resolution that established an official flag for the new nation was probably meant to define a naval ensign rather than a national flag, but the first flag act resolved, “That the flag of the United States be
Ordinary 1b. Give a brief history of the United States flag.
Ordinary 1c. Demonstrate how to fly, hoist, lower, fold, display, and salute the U.S. flag. Explain flag etiquette and protocols for both
land and sea.
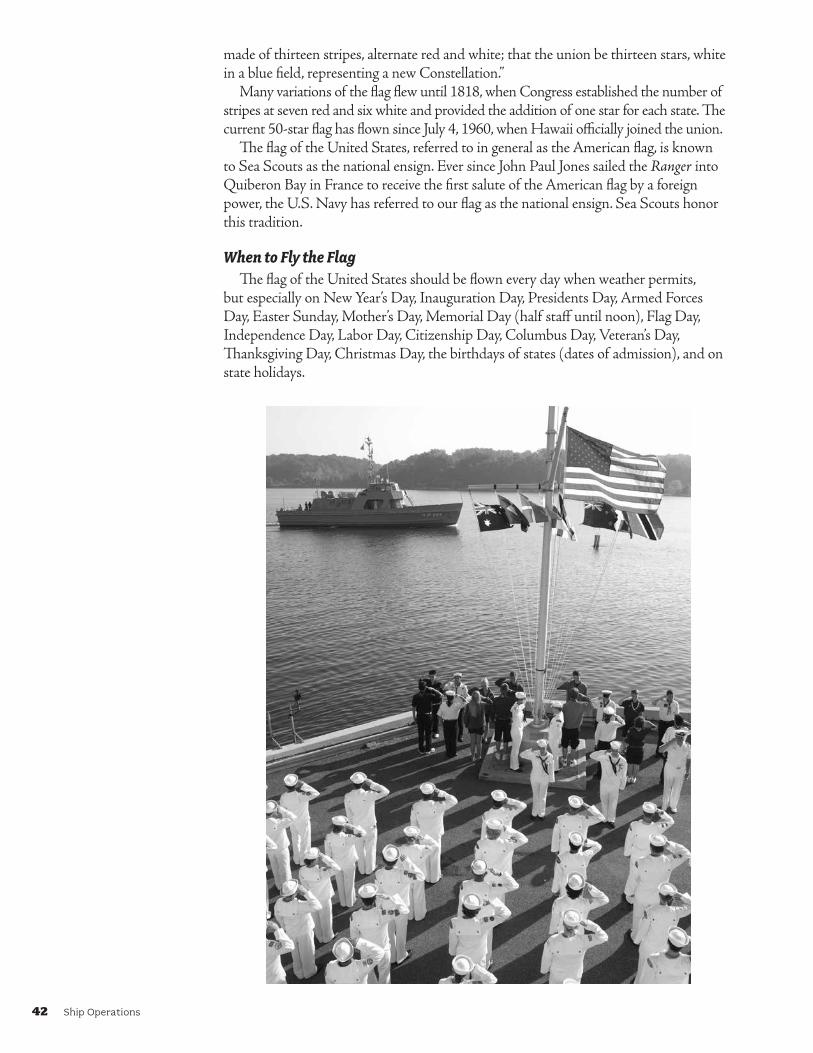
42 Ship Operations
made of thirteen stripes, alternate red and white; that the union be thirteen stars, white in a blue field, representing a new Constellation.”
Many variations of the flag flew until 1818, when Congress established the number of stripes at seven red and six white and provided the addition of one star for each state. The current 50-star flag has flown since July 4, 1960, when Hawaii officially joined the union.
The flag of the United States, referred to in general as the American flag, is known to Sea Scouts as the national ensign. Ever since John Paul Jones sailed the Ranger into Quiberon Bay in France to receive the first salute of the American flag by a foreign power, the U.S. Navy has referred to our flag as the national ensign. Sea Scouts honor this tradition.
When to Fly the FlagThe flag of the United States should be flown every day when weather permits,
but especially on New Year’s Day, Inauguration Day, Presidents Day, Armed Forces Day, Easter Sunday, Mother’s Day, Memorial Day (half staff until noon), Flag Day, Independence Day, Labor Day, Citizenship Day, Columbus Day, Veteran’s Day, Thanksgiving Day, Christmas Day, the birthdays of states (dates of admission), and on state holidays.

Ship Operations 43
Hoisting and Lowering the Flag
On LandTwo Sea Scouts are needed to hoist or lower the flag correctly. In raising, one holds
the flag to prevent it from touching the ground, while the other attaches the line and raises the flag, keeping it close to the staff by holding the line rather taut. When the flag has left the flag bearer’s arms, he steps back and comes to salute. In lowering, the flag bearer catches the flag and unfastens it.
Hoist the flag briskly in the morning. Lower it slowly in the evening but not later than sunset.
On BoardSea Scouts refer to the flag of the United States as the ensign or colors. On Sea
Scout ships the ensign is flown at the stern when the ship is alongside or at anchor. It is flown at the gaff, usually aft and above the bridge, while underway on a power vessel and three-quarters of the way up the backstay or leach on a sailboat. When the ship is preparing to get underway, the ensign is shifted from the stern to the underway position at the moment the last line comes across or at the moment the anchor is aweigh. Ship’s flags and officer’s flags are flown from the starboard spar, and signal flags are flown from the port spar. The ensign is never flown from the masthead.
The ensign is raised at exactly 0800 when the ship is alongside or at anchor. It is lowered (retired) at exactly sundown when the ship is at anchor or alongside. When underway, the ensign is never retired. (In foreign waters it may be a violation of law not to fly the ensign.)
When raising the ensign, a color guard is posted. Sea Scouts often wear shorts or T-shirts when underway, but when raising or retiring the colors, more respectful clothing is required. A work uniform and baseball cap as cover is appropriate. It is also important that the color guard is trained by the boatswain’s mate in advance so there is no fumbling or disrespect shown during this ceremony.
The boatswain’s mate should assemble the color guard and off-duty crew with the boatswain’s call “All Hands.” The boatswain’s mate should salute the OOD (officer of the deck) and say, “Request permission to strike eight bells on time, sir?” The OOD should reply, “Make it so.” The boatswain’s mate sounds the boatswain’s call “Attention.” At approximately 0759:56, the ship’s bell should be struck eight times so that the last bell strike sounds at exactly 0800 to the second. The boatswain’s mate may then give the verbal command, “Hand salute.” The boatswain’s mate sounds the boatswain’s call “Pipe the Side.” At the first note of the boatswain’s call, the colors are briskly raised. The call should sound until the colors reach the apex of the hoist and end with a sharp up note. At the last sharp note of this call, the ship’s company should smartly retire their salute. If the salute was initiated with a verbal command, it should be completed with the verbal command, “Ready, two.” All hands should stand at attention until the halyard is secured. When the halyard is secured, the boatswain’s mate sounds a short warble with a fade to convey the command, “Carry on.” The boatswain then gives the verbal command, “Detail dismissed. Carry on,” and the ship’s company will resume normal duties. Note: The verbal commands are redundant to the boatswain’s calls and could be omitted with a well-trained ship’s company. If so, the hand salute should be initiated with the first note of the boatswain’s call “Pipe the Side” and retired with the last note of that call.
During this ceremony, the ship’s company not on deck stands at attention. If ashore, a member of the ship’s company will come to attention and salute if in uniform. If not in uniform, it is proper to stand at attention and place the right hand over the heart. The ship’s flag and officer’s flag are raised slightly after the ensign starts its ascent. These flags are retired slightly after the ensign starts its descent. The rule is that the ensign is first up and last down.
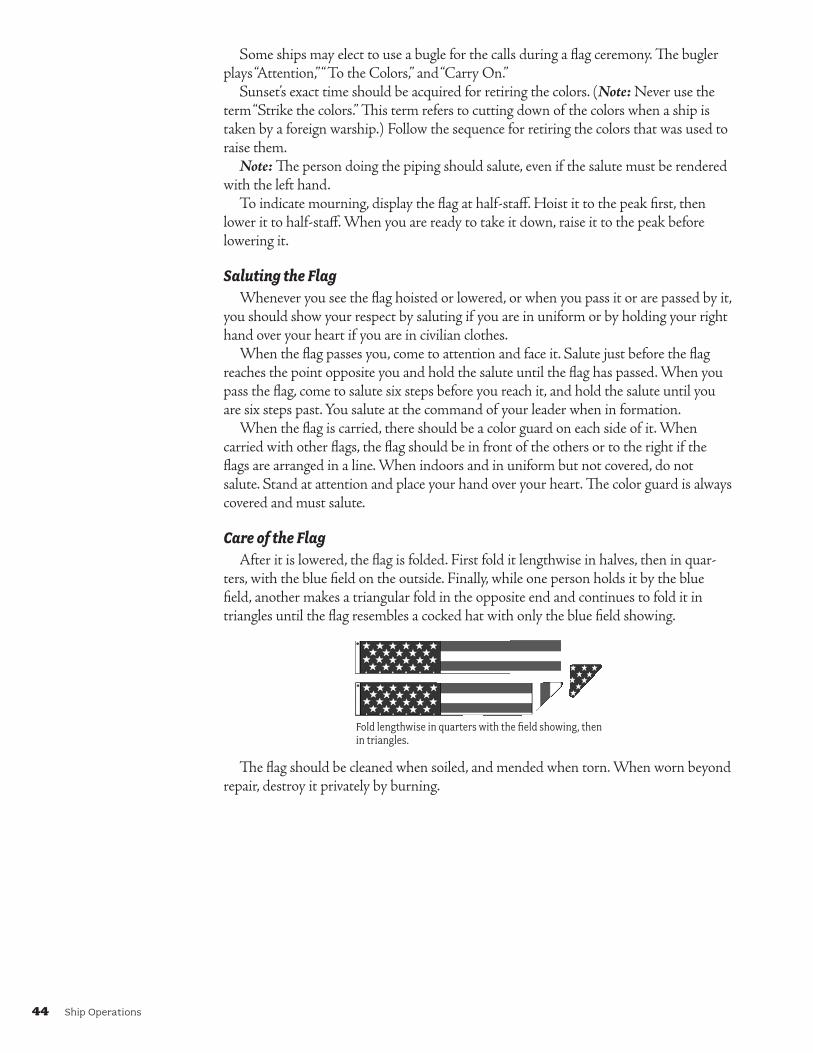
44 Ship Operations
Some ships may elect to use a bugle for the calls during a flag ceremony. The bugler plays “Attention,” “To the Colors,” and “Carry On.”
Sunset’s exact time should be acquired for retiring the colors. (Note: Never use the term “Strike the colors.” This term refers to cutting down of the colors when a ship is taken by a foreign warship.) Follow the sequence for retiring the colors that was used to raise them.
Note: The person doing the piping should salute, even if the salute must be rendered with the left hand.
To indicate mourning, display the flag at half-staff. Hoist it to the peak first, then lower it to half-staff. When you are ready to take it down, raise it to the peak before lowering it.
Saluting the FlagWhenever you see the flag hoisted or lowered, or when you pass it or are passed by it,
you should show your respect by saluting if you are in uniform or by holding your right hand over your heart if you are in civilian clothes.
When the flag passes you, come to attention and face it. Salute just before the flag reaches the point opposite you and hold the salute until the flag has passed. When you pass the flag, come to salute six steps before you reach it, and hold the salute until you are six steps past. You salute at the command of your leader when in formation.
When the flag is carried, there should be a color guard on each side of it. When carried with other flags, the flag should be in front of the others or to the right if the flags are arranged in a line. When indoors and in uniform but not covered, do not salute. Stand at attention and place your hand over your heart. The color guard is always covered and must salute.
Care of the FlagAfter it is lowered, the flag is folded. First fold it lengthwise in halves, then in quar-
ters, with the blue field on the outside. Finally, while one person holds it by the blue field, another makes a triangular fold in the opposite end and continues to fold it in triangles until the flag resembles a cocked hat with only the blue field showing.
Fold lengthwise in quarters with the field showing, then in triangles.
The flag should be cleaned when soiled, and mended when torn. When worn beyond repair, destroy it privately by burning.
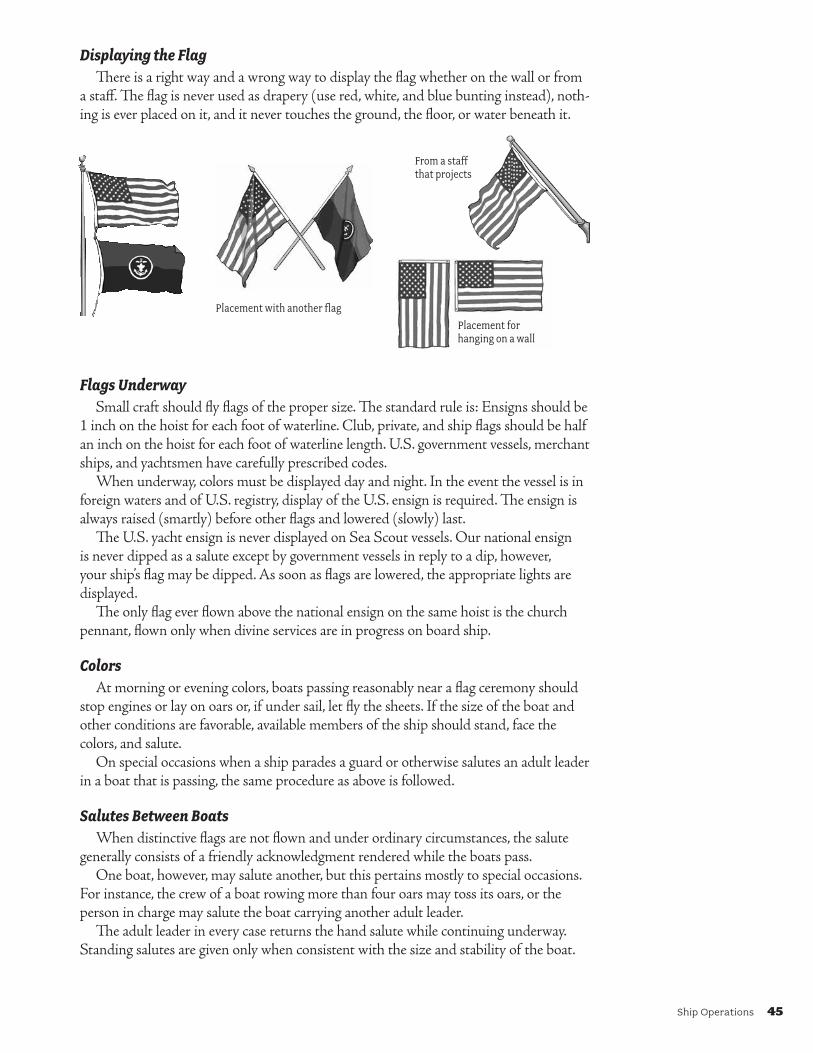
Ship Operations 45
Displaying the FlagThere is a right way and a wrong way to display the flag whether on the wall or from
a staff. The flag is never used as drapery (use red, white, and blue bunting instead), noth-ing is ever placed on it, and it never touches the ground, the floor, or water beneath it.
Placement with another flag
From a staff that projects
Placement for hanging on a wall
Flags UnderwaySmall craft should fly flags of the proper size. The standard rule is: Ensigns should be
1 inch on the hoist for each foot of waterline. Club, private, and ship flags should be half an inch on the hoist for each foot of waterline length. U.S. government vessels, merchant ships, and yachtsmen have carefully prescribed codes.
When underway, colors must be displayed day and night. In the event the vessel is in foreign waters and of U.S. registry, display of the U.S. ensign is required. The ensign is always raised (smartly) before other flags and lowered (slowly) last.
The U.S. yacht ensign is never displayed on Sea Scout vessels. Our national ensign is never dipped as a salute except by government vessels in reply to a dip, however, your ship’s flag may be dipped. As soon as flags are lowered, the appropriate lights are displayed.
The only flag ever flown above the national ensign on the same hoist is the church pennant, flown only when divine services are in progress on board ship.
ColorsAt morning or evening colors, boats passing reasonably near a flag ceremony should
stop engines or lay on oars or, if under sail, let fly the sheets. If the size of the boat and other conditions are favorable, available members of the ship should stand, face the colors, and salute.
On special occasions when a ship parades a guard or otherwise salutes an adult leader in a boat that is passing, the same procedure as above is followed.
Salutes Between BoatsWhen distinctive flags are not flown and under ordinary circumstances, the salute
generally consists of a friendly acknowledgment rendered while the boats pass.One boat, however, may salute another, but this pertains mostly to special occasions.
For instance, the crew of a boat rowing more than four oars may toss its oars, or the person in charge may salute the boat carrying another adult leader.
The adult leader in every case returns the hand salute while continuing underway. Standing salutes are given only when consistent with the size and stability of the boat.


Advancement and Recognition 47
ADVANCEMENT AND RECOGNITION
Advancement can be a source of personal pride and a measure of your success in Scouting. Advancement in rank is a measure of your nautical knowledge and your performance as a leader. This unit of measure is called rank. This system is also used by the United States military to award an individual with special privileges.
If you apply to a U.S. military academy, you will be given special consideration if you are a Sea Scout Quartermaster or Eagle Scout.
AdvancementThere are many opportunities for advancement in Sea Scouts. Included are the trails
to Eagle and Quartermaster. Each of these trails is a highlight experience, but each requires the Sea Scout to set his (or her, in the case of the Quartermaster Award) own goals and follow through to achievement.
The requirements for advancement were designed by Sea Scout youth to establish standards of performance for all Sea Scouts. It’s up to you to measure up.
Reviewing ProcedureSea Scouts must use the Quartermaster Leadership Service Project Workbook, No.
420-011, and get the required approvals before beginning their Quartermaster project. Give your Quartermaster Application, No. 420-015, to your Skipper. Your Skipper will hold a Skipper’s conference with you during which he or she will assess whether you are ready to advance in rank. If you and your Skipper agree that you are ready to advance, your application will be forwarded to your ship’s bridge of review. This group includes members from both the ship’s quarterdeck and the ship committee. If the bridge approves, the ship’s advancement chair notifies the local council service center and secures the necessary badge.
Eagle Scout or Quartermaster Award applications must also be approved by the ship committee and the district or council advancement committee. Following this, an Eagle or Quartermaster application is forwarded to the National Council.
If your application is not approved, the Skipper will return it to you and explain what is lacking. He or she will help you make corrections so you can resubmit your application later.

48 Advancement and Recognition
Bridge of HonorAs soon as possible after an application has been reviewed and approved, it should be
forwarded through the proper channels. The badge is secured and then presented at an impressive ceremony soon after it has been earned.
A bridge of honor is the ideal occasion for presenting awards. Traditionally, a bridge of honor is held in connection with a social affair. Although this is a good idea, it does not always have to be done this way.
It is important that each Sea Scout get his or her award as soon as possible. Sometimes there is an unavoidable delay between the date of approval and the bridge of honor. If this is the case, the award may be presented informally at a ship meeting and then presented again formally at your next bridge of honor.
The Eagle Scout AwardEagle Scout is primarily a recognition for young men in Boy Scout troops; however, if you have attained the First Class rank in a Boy Scout troop, a male Sea Scout may continue to work toward the Eagle Scout Award through age 17 by meeting the requirements described in the Boy Scout Handbook. Leadership requirements may be met in the ship as boatswain, boatswain’s mate, yeoman, purser, or storekeeper. Personal conferences, conducted by the Skipper and the board of review, for each progress award must be reviewed by the ship committee.
The Quartermaster AwardQuartermaster rank is the highest award in Sea Scouts and is as impor-tant as the Eagle Scout Award. It results from a young adult’s determination to reach a goal he or she has set and achieved in spite of difficulties along the way.
The award is rich in symbolism. The carrick bend represents an ability to hold fast to our ideals. The blue ribbon stands for loyalty to country. The compass suggests the importance of a carefully chosen direction in life. The wheel reminds us that we are the guides of our own future and that we must persevere with self-discipline. The Scout
badge—the emblem of a purposeful brotherhood—has challenged and strengthened the lives of more than 40 million people. It represents Sea Scouts as an important part of the Scouting tradition. The anchor reminds us that a truly worthy life must be anchored in duty to God.
This badge of color, beauty, and symbolism, but most of all, of challenge, awaits every Sea Scout who has the determination to achieve excellence.
After Achieving QuartermasterTo a Sea Scout who has earned the Quartermaster Award, it may appear that there
are no futher achievements to be attained. True, there is no higher rank, but this does not mean the quartermaster has no future challenges, no work to be done. Thomas J. Keane, former national Sea Scout director, stated that the quartermaster “is on the threshold of a great adventure. The ship on which he is about to embark is God’s greatest gift—life. Fortified by the Scouting experience, the quartermaster plots course, sets sails, stands by the wheel, and whether the winds be fair or foul, looks forward to a happy and successful voyage.”
“TheQuartermasterAward,whichstandsforexcellence,goestotheyoungadultwhoattainsthehighestrankinSeaScouts.Theawardisareminderthatasashipneedsarudder,acompass,andamovingforcetoreachitsdestination,soanindividualmustbephysicallystrong,mentallyawake,andmorallystraighttoachieveworthwhilegoalsinlife.”
—Commander Thomas J. Keane
Advancement and Recognition 49
Sea Scout AdvancementReference materials such as U.S. Coast Guard navigation rules, International Sailing
Federation Rules, OSHA requirements, International Code of Signals, and others change frequently. They should be available in your ship’s library. They are not reprinted in this manual.
Apprentice
1. Idealsa. Qualify as a member of your Sea Scout ship by taking part in the ship’s
admission ceremony.b. Repeat from memory and discuss with an adult leader, an Able Scout, or a
Quartermaster Scout the Scout Oath and Law and the Sea Promise, and agree to carry out the provisions of your ship’s code and bylaws.
c. Demonstrate acceptable courtesies used aboard a Sea Scout vessel.d. Demonstrate the proper procedure for boarding a Sea Scout vessel
and landship.
2. ActiveMembershipa. Provide evidence that you are fulfilling your financial obligations to your ship,
including helping with fundraisers. b. Obtain a Sea Scout uniform. Describe the Sea Scout uniforms. Tell how and
when to wear the uniforms.c. Meet your ship’s bylaws requirement for active participation in your ship’s
meetings and activities for three months.
3. Leadershipa. Describe your ship’s organization, including the youth and adult
leadership positions. b. Demonstrate your ability to identify insignia of youth and adult leadership
positions. Explain the chain of command in your ship.
4. Swimminga. Jump feetfirst into water over the head in depth. Level off and swim 75 yards
in a strong manner using one or more of the following strokes: sidestroke, breaststroke, trudgen, or crawl; then swim 25 yards using an easy resting backstroke. The 100 yards must be completed in one swim without stops and must include at least one sharp turn. After completing the swim, rest by floating. (Refer to the BSA’s Swimming merit badge instruction if you need to improve your swimming strokes.)
b. Discuss the BSA Safe Swim Defense plan and explain how it is used to protect Sea Scouts and other groups during swimming activities.
5. Safetya. Explain the uses, advantages, and disadvantages of the various types of Coast
Guard–approved life jackets. Demonstrate the proper use and care of life jackets used by your ship. Discuss your state's boating laws as they relate to life jacket wear.
b. Identify visual day and night marine distress signals, and know their location and the proper use for your ship’s vessel(s).
c. Use the Distress Communications Form to demonstrate the procedure to send the following VHF emergency messages: Mayday, Pan Pan, and Security.
50 Advancement and Recognition
d. Know the safety rules that apply to vessels and equipment used by your ship, and safety standards in the use of power tools, machinery, lifting heavy objects, and other safety devices used by your ship.
6. MarlinspikeSeamanshipUsing both large and small lines, tie and explain the use of the following knots: overhand, square, figure eight, bowline, two half hitches, clove hitch, sheet bend, and cleat hitch.
7. BoatHandlinga. Name the principal parts of a typical sailboat and a runabout.b. Describe the identifying characteristics of a sloop, ketch, yawl, cutter,
and schooner.c. Demonstrate the ability to use a heaving line.
8. Servicea. Log at least eight hours of work on ship equipment, projects, or activities other
than regular ship meetings, parties, dances, or fun events.b. Participate with your ship for at least eight hours in community service projects.Note: Arrange for this work through the ship’s officers.
Ordinary
1. Idealsa. Explain the symbolism of the Sea Scout emblem.b. Give a brief oral history of the U.S. flag.c. Demonstrate how to fly, hoist, lower, fold, display and salute the U.S. flag.
Explain flag etiquette and protocols for both land and sea.d. Discuss with an adult leader how you live the Scout Oath and Law in your
daily life.
2. ActiveMembershipa. Meet your ship's bylaws requirement for active participation in your ship's
meetings and activities for three months.b. Do one of the following. Recruit a new member for your ship and follow
through until the new member is registered and formally admitted with an admissions ceremony, or assist in planning and carrying out a ship recruiting activity, such as an open house or joint activity with a youth group or organi-zation (another Sea Scout ship will not count).
3. Leadershipa. Participate in the BSA's Introduction to Leadership Skills for Ships
(ILSS) course.b. Complete quarterdeck training, either as an officer or as a prospective officer.c. Serve as an activity chair for a major ship event. Responsibilities should
include planning, directing, and evaluating the event.
4. SwimmingPass all requirements for the BSA’s Swimming merit badge.
5. Safetya. Discuss BSA Safety Afloat with an adult leader or a Quartermaster candidate.b. Describe the safety equipment required by law for your ship’s primary vessel.c. Develop a ship’s station bill for your ship and review it with an adult leader.d. Plan and practice the following drills: man overboard, fire, and abandon ship.

Advancement and Recognition 51
e. Describe three types of equipment used in marine communications.f. Demonstrate your knowledge of correct maritime radio telephone communica-
tions procedures by making at least three calls to other vessels, marinas, bridges, or locks.
g. Galleyi) Before an activity, submit a menu that uses cooked and uncooked dishes,
a list of provisions, and estimated costs for a day’s meal (breakfast, lunch, and dinner). Once the provision list is approved, help obtain the items on the list.
ii) Explain the use of charcoal, pressurized alcohol, and propane. Include safety precautions for each.
iii) Prepare breakfast, lunch, and dinner while on the activity. Demonstrate your ability to properly use the galley equipment or personal cooking gear generally used by your ship.
iv) Demonstrate appropriate sanitation techniques for food preparation and meal cleanup.
6. MarlinspikeSeamanshipa. Name the various materials used to manufacture rope, the advantages and
disadvantages of each, and the characteristics of laid and braided rope. Discuss the meaning of lay, thread, strand, and hawser. Explain how rope is sized and measured.
b. Using both large and small lines, tie and explain the use of the following knots: stevedore’s knot, French (double) bowline, bowline on a bight, timber hitch, rolling hitch, marline hitch, midshipman’s (taut-line) hitch, and trucker's hitch.
c. Demonstrate your ability to secure a line to pilings, cleats, and rings, and to coil, flake, and flemish a line.
d. Demonstrate how to cut and heat-seal a synthetic line and whip the end of plain-laid line using waxed cord or similar material.
7. BoatHandlinga. Name the principal parts of the masts, booms, spars, standing and running
rigging, and sails of a gaff- or Marconi-rigged sloop, schooner, and ketch or yawl.b. Demonstrate your ability to handle a vessel with paddles or oars by doing one of
the following:
Safely board a rowboat and row in a straight line for 200 yards/meters, stop, make a pivot turn, return to the starting point, and backwater in a straight line for 50 yards/meters. Make a turn and return to the starting point.
or Safely board a canoe, kayak, or paddleboard and paddle a straight line for 200
yards/meters. Make a turn and return to the starting point. Demonstrate a draw stroke to move the boat sideways both right and left, and forward and reverse sweeps to spin the boat both clockwise and counterclockwise.
8. GroundTacklea. Name the parts of a stock anchor and a stockless anchor.b. Describe five types of anchors. Describe how each type holds the bottom, the
kind of bottom in which it holds best, and the advantages or disadvantages of each type.
c. Calculate the amount of anchor rode necessary for your ship’s primary vessel in the following depths: 10, 20, and 30 feet in normal and storm conditions.
d. Demonstrate the ability to set and weigh anchor.
52 Advancement and Recognition
9. NavigationRulesa. Explain the purpose of Navigation Rules, International and Inland.b. Know the general “Rule of Responsibility.”c. Define stand-on and give-way vessels for the following situations: meeting,
crossing, and overtaking for both power and sailing vessels.d. Explain “Responsibility Between Vessels” (vessel priority).e. Explain the navigation lights required for power-driven and sailing vessels
underway. Explain what is required for a vessel under oars. Describe the light-ing requirements for paddlecraft. Explain why carrying a sound-producing device, such as a whistle, is important when operating a paddlecraft.
f. Describe the sound signals for maneuvering, warning, and restricted visibility.
10. PilotingandNavigationa. Demonstrate your understanding of latitude and longitude. Using a chart,
demonstrate that you can locate your position from given coordinates and determine the coordinates of at least five aids to navigation.
b. Explain the degree system of compass direction. Explain variation and deviation and how they are used to convert between true headings and bearings to compass headings and bearings.
c. Describe three kinds of devices used aboard ship for measuring speed and/or distance traveled and, if possible, demonstrate their use.
d. Explain the 24-hour time system and demonstrate that you can convert between 12- and 24-hour time.
e. Understand Coordinated Universal Time (Greenwich Mean Time or Zulu Time) and zone time. Demonstrate your ability to convert from one to the other for your local area.
f. Make a dead reckoning table of compass and distances (minimum three legs) between two points, plot these on a chart, and determine the final position. Note: Ideally this requirement should be met while underway. If this is not possible, it may be simulated using charts.
g. Discuss how a GPS unit works. Explain possible uses and functions including different screen views. Use a GPS unit to set a waypoint and navigate to the waypoint you have set.
11. PracticalDeckSeamanshipa. Name the seven watches and explain bell time.b. Explain the duties of a lookout and demonstrate how to report objects in view
and wind directions with respect to the vessel.c. Name relative bearings expressed in degrees.d. While underway, serve as a lookout for two hours total. When boating in a
manually propelled craft, boating alone or as a bow paddler for a tandem craft will meet this requirement.
e. Demonstrate the use of wheel or helm commands found in the Sea Scout Manual.f. Describe the deck log kept aboard your ship’s principal craft. Contribute to
a cruise log for three days of cruising (one cruise or a combination of day cruises). Submit the logs to your Skipper.
12. Environmenta. Discuss with an adult leader the Federal Water Pollution Control Act as
related to oil discharges. Explain what a “Discharge of Oil Prohibited” placard is and if applicable find it aboard your ship’s vessels.
b. Explain what aquatic nuisance species are and how you can help stop their spread.

Advancement and Recognition 53
13. WeatherRead and understand a local weather bulletin. Know how to obtain current marine and weather reports from the National Weather Service in your area by telephone or radio, or online.
14. Cruisinga. Plan and participate in an overnight cruise.b. While on the cruise, perform the duties of a helmsman for at least 30 minutes.
If underway in a paddlecraft, paddling independently or as a stern paddler/steersman will meet this requirement.
15. BoatingSafetyCourseSuccessfully complete a boating safety course approved by the National Association of State Boating Law Administrators (NASBLA) offered by one of the following agencies: a state boating agency, the United States Power Squadrons, the United States Coast Guard Auxiliary, or other private or military education courses.
16. Servicea. Log at least eight hours of work on ship equipment, projects, or activities other
than ship meetings, parties, dances, or fun events.b. Participate with your ship for at least eight hours in community service projects.
17. ElectivesChoose any three electives from the options listed following the Quartermaster rank requirements.
Able
1. Idealsa. Organize and conduct two impressive opening and closing ceremonies for
your ship.b. Explain how our nation’s maritime history has contributed to our way of life.
Note: “Explain” means to convey information to one or more people using any of the following methods (or something similar approved by your Skipper): video, computer slide show (PowerPoint presentation), storyboard (project board display), diorama, model, annotated photo album, verbal report, or writ-ten report. For comparison purposes, a written report of 500 to 1,000 words would form an appropriate explanation.
2. ActiveMembershipa. Meet your ship’s bylaws requirement for active participation in your ship’s
meetings and activities for six months.b. Prepare and present a program on Sea Scouts for a Boy Scout troop,
Venturing crew, Venturing Officers’ Association meeting, school class, or other youth group. Your presentation should last a minimum of 15 minutes and describe the activities of your ship and Sea Scouts.
3. LeadershipEither serve and fulfill the responsibilities of a crew leader or an elected officer of your ship, or serve as an activity chair for two major ship events. Responsibilities should include planning, directing, and evaluating the event. (These events are in addition to the Ordinary requirement.)
4. SwimmingPass all requirements for the BSA’s Lifesaving merit badge.

54 Advancement and Recognition
5. Safetya. Develop and use a customized vessel safety checklist for a boat used by your ship. b. Demonstrate your understanding of fire prevention on vessels.c. Know the classes of fires and the substances that will extinguish each type of fire.d. In a safe place, under adult supervision, demonstrate your ability to successfully
extinguish a class A and a class B fire with an approved fire extinguisher. If required, see that the fire extinguisher used is properly recharged or replaced.
e. Conduct a fire safety inspection of the vessel normally used by your ship or of your ship’s meeting place. Note any fire hazards and report them to your ship’s adult leaders.
f. Complete the certification for standard first aid through the American Red Cross, the American Heart Association, or other approved organization’s standard first-aid course.
g. Complete the certification for CPR through the American Red Cross, the American Heart Association, or other approved organization’s course.
6. MarlinspikeSeamanshipa. Complete a back splice, eye splice, short splice, long splice, and a palm-and-
needle whipping. b. Sew a flat seam, round seam, and grommet eye in canvas or sail material.
Describe how each is used in construction of and the care of sails.c. Describe the parts of a block and explain how blocks are sized. Describe the
following types of tackle: luff, gun, double purchase, single whip, and runner. With the help of another shipmate, reeve a double purchase tackle.
or Establish a 2-point load-distributing anchor point and a 3:1 mechanical
advantage system (e.g., Z-drag) used to unpin paddlecraft. Use the system to haul a weight at least 5 feet across the ground. The system must include a progress capture system and a damper.
7. BoatHandlinga. Demonstrate your ability to properly operate a small boat equipped with
a motor. Included should be fueling, starting, leaving a dock, maneuvering, docking, and coming alongside.
b. Know the names and functions of lines used to secure a vessel to a wharf or pier. Understand and execute docking commands used in handling lines on your ship’s primary vessel.
8. GroundTacklea. Describe the various kinds of anchor rode and the advantages and disadvantages
of each type.b. Identify the parts of the anchor cable starting with the anchor and ending at
the vessel.c. Describe the methods of marking chain or rode and demonstrate that you
know the chain or rode markings on your ship’s vessel.d. While on a cruise assist in the construction of an anchor watch schedule and
stand one watch.e. Identify a capstan or windlass and explain its use in handling line, wire rope,
or chain.
9. NavigationRulesa. Demonstrate a working knowledge of Navigation Rules, International
and Inland.
Advancement and Recognition 55
b. Explain vessel lights and day shapes for the following: towing (astern, alongside, pushing ahead, and cannot deviate), fishing, trawling, restricted maneuverability, not under command, underwater operations, constrained by draft, dredging, aground, and sailing vessels under power.
c. Understand the system of aids to navigation employed in your area. Include buoys, lights, and daymarks, and their significance and corresponding chart symbols.
d. Read in detail a National Ocean Service (NOS) chart, preferably for the area normally cruised by your ship, identifying all marks on it.
10. PilotingandNavigationa. Supervise the proper keeping of a complete deck log for three days of cruising (one
cruise or a combination of day cruises). Submit the cruise logs to your Skipper. or
Keep a journal of paddling trips that includes names of participants, access points, waterway description, and notable events. Record at least three trips in the journal and submit to your Skipper.
b. Lay a course of at least three legs and execute it using dead reckoning.c. Demonstrate your ability to fix your position by the following methods: taking
bearings from two known objects, running fix, and estimated position.d. Establish distance from a known object using “double the angle on the bow”
and explain how to set a danger bearing.e. Enter three waypoints into an electronic navigation device (i.e., GPS, chart-
plotter) and navigate your vessel to each point. Demonstrate the use of the MOB function on your electronic navigation device.
f. Discuss how radar is used in situational awareness and the method of taking a radar fix.
g. Explain the use of tide tables, current tables, and light lists, and how to update a chart using the Notice to Mariners.
11. PracticalDeckSeamanshipa. Demonstrate your knowledge of personal safety equipment needed while
cleaning, maintaining, or repairing your vessel.b. Know the names, uses, sizes, and proper care of the common hand tools used
by your ship.c. Identify and explain the use of the following: thimble, shackle, turnbuckle,
pelican hook, and other ship’s hardware and fittings commonly used aboard your ship’s vessels.
d. Demonstrate proper surface and coating preparation, coating techniques, care of stored coatings, and cleaning of brushes and tools used to maintain surfaces on your ship’s vessel.
e. Explain techniques used for the maintenance, protection, and repair of hulls and decks on your ship’s vessel.
12. Environmenta. Demonstrate your knowledge of local environmental laws related to the
proper storage, disposal, and cleanup of maritime coating materials, fuels, and other environmentally sensitive materials.
b. Discuss with an adult leader the dumping of garbage in the marine environ-ment. Review the contents of the MARPOL placard and locate it aboard your ship’s vessels.
c. Explain the importance of protecting marine endangered species using a repre-sentative species as an example (mammal, bird, fish, or reptile). As a minimum,
56 Advancement and Recognition
include a description of the species; its habitat, history, and current population numbers; and current steps being employed to help its recovery. Note: Refer to the definition and expectation for “explain” in Able 1b.
13. WeatherDemonstrate your ability to read a barometer, thermometer, anemometer, and weather vane. Be familiar with the Beaufort Wind Force Scale.
14. Cruising Earn the Long Cruise badge.
15. ElectivesChoose any four level 2 or higher electives from the options listed following the Quartermaster rank requirements.
Quartermaster
1. Idealsa. Initiate a discussion on the ideals stated in the Sea Promise.b. Prepare a written analysis, offering recommendations for improvements
regarding one of the following ship’s programs: bylaws and code, training pro-grams, ceremonies, quarterdeck meetings, recruiting programs, or fundraising.
2. ActiveMembershipa. Meet your ship’s bylaws requirement for active participation in your ship’s
meetings and activities for six months.b. Present a talk or program at least 15 minutes long on Sea Scouts to a service
club, religious organization, PTA, or other adult organization.
3. Leadershipa. Quartermaster Project: While an Able Sea Scout, plan, develop, and
demonstrate leadership to others in a service project that is helpful to any religious institution, school, or your community. The project plan must be approved by your Skipper and ship committee and approved by the council or district advancement committee before you start. This service project should involve your ship and at least one other group. You must use the Quartermaster Leadership Service Project Workbook, No. 420-011, to document your work. Note: The Quartermaster project is separate and distinct from a youth's Eagle Scout service project.
b. Officer: Serve as a ship officer for at least six months.c. Quartermaster Cruise: Take command of a vessel with a crew of not less
than four Sea Scouts for at least 40 consecutive hours, including two nights. You must delegate and supervise all duties. During the cruise complete the following: File a float plan; inspect the vessel for required equipment; super-vise all menu preparation; prepare the boat to get underway with a proper checklist approved by the adult leaders; anchor, dock, and maintain course by commands to the helmsman; remain underway for an extended period during darkness; and discuss appropriate nighttime running procedures. While underway, perform the following drills: man overboard, damage control, abandon ship, fire, collision, and any other drills used by your ship. During this cruise no substantial errors may be committed.
or Plan and lead a paddlecraft cruise with at least four paddlecraft for at least two
days. You must delegate and supervise all duties. During the cruise complete the following: Inspect the vessels and members of the group for required equipment;

Advancement and Recognition 57
plan for provisions; supervise all menu preparation; prepare the boats to get underway with a proper checklist approved by the adult leaders; and file a float plan. If on open water, prepare a navigation chart including at least three legs and/or course corrections. If on inland rivers, identify river access points and coordinate transportation at both ends of the trip. With an adult leader, inspect all vessels and evaluate whether they are adequately secured for transportation. During this cruise no substantial errors may be committed.
or Successfully complete SEAL (Sea Scout Advanced Leadership) training.d. Organize and help conduct the BSA’s Introduction to Leadership Skills for
Ships (ILSS) for your ship, or serve as an NYLT staff advisor.
4. SwimmingComplete the requirements for lifeguard through the BSA, the American Red Cross, or other approved organization’s lifeguard course.
5. Safetya. Know the heavy-weather precautions taken aboard power, sailing, and paddle
vessels when dangerous weather approaches, and demonstrate these precau-tions aboard the vessel used by your ship.
b. Know the special precautions that should be taken when limited visibility is encountered.
c. Teach Apprentice 5a and Ordinary 5a, 5b, and 5c requirements to a crew.
6. MarlinspikeSeamanshipa. Teach the Apprentice, Ordinary, and Able marlinspike seamanship require-
ments to a crew.b. Make an eye splice in double-braided line.
7. BoatHandlinga. Take charge of the craft used by your ship and give all commands to the crew
for picking up a mooring buoy and properly mooring the vessel in several wind and current situations.
b. Demonstrate and teach the principles of springing into and out from a dock, from both bow and stern, using an engine depending on the type of vessel used by your ship.
c. Teach Ordinary and Able boat handling requirements to a crew.
8. GroundTacklea. Teach the Ordinary and Able anchoring requirements to a crew.b. Know the methods of bringing a vessel to anchor and a mooring with special
emphasis on wind and current.c. Take charge of a vessel used by your ship and give all commands to the crew
for setting and weighing anchor in several wind and current situations.
9. NavigationRulesTeach the Ordinary navigation rules requirements and Able 9b and 9c to a crew.
10. PilotingandNavigationa. Teach the Ordinary and Able piloting requirements to a crew.b. Know the methods of fixing a boat’s position in limited visibility. c. Create a route in an electronic navigation device that includes at least five
waypoints. Use the electronic navigation device to navigate your route.
11. Weathera. Teach the Ordinary and Able weather requirements to a crew.b. Demonstrate your knowledge of the weather signs for your local area, including

58 Advancement and Recognition
cloud types. Prepare a 48-hour forecast and compare your forecast with the actual weather that occurred.
12. Environmenta. Discuss the three types of marine sanitation devices and the laws governing
sewage discharge.b. Explain what gray water is and how it should be handled in your boating area.c. Write a 500-word report on an aquatic environment (freshwater, coastal, estuary,
or sanctuary). Include in the report the location, habitat, history, animals and plants that inhabit the area, its importance to man, current regulations, and what boaters can do to help preserve it for future generations.
13. ElectivesChoose any four level 3 or higher electives from the following options.
Sea Scout Advancement ElectivesOrdinary: Choose any three electives.Able: Choose any four additional electives, level 2 or higher.Quartermaster: Choose any four additional electives, level 3 only.
Leadership1. Attend National Youth Leadership Training (NYLT).2. Attend National Advanced Youth Leadership Experience (NAYLE).3. Attend Wood Badge (youth 18 and over).3. Attend Powder Horn (youth 14 and over).Duty to God1. Participate in two appropriate interfaith religious services during ship outings.2. Plan and conduct two appropriate interfaith religious services during
ship outings.3. Complete the requirements for the religious emblem of your faith. (Refer to
the Duty to God brochure, No. 512-879.)Sailing1. In a cat-rigged or similar small vessel, demonstrate your ability to sail single-
handedly a triangular course (leeward, windward, and reaching marks). Demonstrate beating, reaching, and running. A qualified sailing instructor should observe this requirement.
2. While leading a crew of not less than two other persons, demonstrate your ability to sail a sloop or another suitable vessel correctly and safely over a triangular course (leeward, windward, and reaching marks), demonstrating beating, reaching, running, and the proper commands.
3. Know the principles of handling a schooner, ketch, yawl, or other suitable sail-ing vessel. Under competent oversight, take charge of a crew and demonstrate your ability to handle a suitable sailing vessel in all points of sail.
Paddlecraft1. Join the American Canoe Association (ACA) or an ACA Paddle America Club.2. Complete the requirements for one of the following: Boardsailing BSA,
Kayaking BSA, or Stand Up Paddling BSA award, or the Kayaking, Whitewater, or Canoeing merit badge. (Note: This must be a different activity from the one chosen under level 2 electives–Specialty Proficiency.)
2. Take a course from an ACA certified instructor.2. Compete in a freestyle, downriver, flatwater, or slalom paddling race in a canoe,
kayak, or stand up paddleboard (SUP) using nationally accepted rules.

Advancement and Recognition 59
2. Successfully complete an ACA level 1 or higher assessment in canoe, kayak, or SUP.
2. Complete an ACA level 3 or higher swiftwater rescue course.2. Earn ACA instructor certification in canoe, kayak, or SUP at any level.3. Complete the SmartStart for Paddlers course. Conduct a watercraft safety
class for your ship using Paddle Smart America materials. Identify sources of safety brochures and other materials that could be used by your ship and distribute to troops in your area or your chartered organization.
Vessels1. Teach and lead a crew under oar using a boat pulling at least four oars single- or
double-banked. Perform the following maneuvers: get underway, maneuver ahead and back, turn the boat in its own length, dock, and secure.
3. Under competent oversight, assume the duties of navigator of your ship’s vessel. Plot its projected course between two ports at least two hours apart and cruise that course mooring to mooring handling all piloting duties. The cruise should be made in daylight hours with good visibility.
Racing1. Describe the procedures used in yacht racing and the signals used by the
race committee to start a race. Serve as a crew member in a race sailed under current International Sailing Federation rules.
2. i) Demonstrate your understanding of the shapes, flag hoists, gun, and horn signals used in yacht racing as well as a working knowledge of the racing rules of the International Sailing Federation (ISAF).
ii) Serve as helmsman, with one or more additional crew members, of a sloop-rigged or other suitable boat with a spinnaker in a race sailed under ISAF racing rules.
3. Take charge of a crew in a race using current ISAF racing rules.Engines1. Perform routine maintenance on your ship’s propulsion system, including
filter, spark plug, oil changes, proper fueling procedures, and other routine maintenance tasks. Refer to operations manuals or your ship’s adult leaders for correct procedures and guidance.
2. i) Understand the safe and proper procedures for the use of gasoline and diesel inboard engines, including fueling, pre-start checks, ventilation, starting, running, periodic checks while running, securing, postoperative checks, and keeping an engine log.
ii) Using the type of engine aboard the vessel you most frequently use, dem-onstrate your understanding of basic troubleshooting and the preventive maintenance schedule recommended by the manufacturer.
3. i) Explain the principal features of steam turbine, turboelectric, direct revers-ing diesel, diesel-electric, gas turbine, nuclear, gasoline, and diesel engines and the relative advantages of each type.
ii) Explain the operation of spark ignition and compression ignition for internal combustion engines used aboard small vessels.
iii) Demonstrate your familiarity with the engine aboard the vessel used by your ship, including its principles of operation, fuel, lubrication, cooling and electrical systems, and their component parts.
iv) Demonstrate your ability to locate and correct minor engine troubles according to the engine manufacturer’s troubleshooting guide.
60 Advancement and Recognition
Vessel Maintenance2. Demonstrate your proficiency and knowledge of fiberglass repair and gel
coating while working on your ship’s vessel or other similar vessel.2. Demonstrate your knowledge of small paddlecraft construction by building
your own or assisting in building a canoe or kayak from wood, fiberglass, or other suitable materials. Kits may be used.
3. Take charge of reconditioning or overhauling at least one of your ship’s vessels, or take charge of hauling out the principal vessel used by your ship. In either case, lay out a plan of the work to be done in advance, including an estimate of the materials, tools, cost, and time involved.
3. Take charge of building a paddlecraft. Lay out the plan of work to be done; identify suitable building plans; and estimate materials, tools, cost, and time involved. Launch the craft.
3. Electricity: i) Know and demonstrate the correct method of rescuing a person in
contact with a live wire. ii) Understand the construction of simple battery cells. Demonstrate the
proper care of storage batteries. iii) Explain the difference between direct current and alternating current and
the best uses for each. iv) Demonstrate that you know how to replace fuses, reset circuit breakers,
and properly splice shipboard electric cable. v) Submit a diagram of the electrical system aboard the vessel used by your ship. vi) Explain wire tables, the current-carrying capacity of circuits, and the
hazards and prevention of electrical overloading. vii) Explain electrolysis as applied to the deterioration of a boat’s underwater
fittings by galvanic action and its prevention.3. Rigging: Demonstrate your ability to splice and handle wire rope, attach wire
rope fittings, and complete a safety and tuning inspection of a vessel.Specialty Proficiency2. Complete the requirements for one of the following: Boardsailing BSA,
Kayaking BSA, or Stand Up Paddleboarding BSA award, or the Kayaking, Whitewater, or Canoeing merit badge. (Note: This must be a different activity from the one chosen under level 2 electives–Paddlecraft.)
3. Become a certified scuba diver or become proficient in boardsailing, surfing, kayaking, or whitewater rafting/canoeing.
3. Teach another Sea Scout the information needed to complete the Kayaking, Canoeing, or Whitewater merit badge, or the Kayaking BSA, Stand Up Paddleboarding BSA, or Boardsailing BSA award.
Ornamental Ropework1. Make a three-strand Turk’s head and a three-strand monkey’s fist. Using either
ornamental knot, make up a heaving line.2. Demonstrate your ability to fashion the following items of ornamental
ropework: four-strand Turk’s head, coach whipping, cockscombing, round braid, flat sennit braid, wall knot, and crown knot. Make a useful item such as a boatswain’s lanyard, rigging knife lanyard, bell rope, etc., or decorate a portion of your ship’s equipment such as a stanchion, rail, lifeline, tiller, etc.
Advancement and Recognition 61
Maritime Tradition1. Boatswain Call: Demonstrate your ability to use a boatswain’s pipe by making
the following calls—word to be passed, boat call, veer, all hands, pipe down, and piping the side.
1. Drill: Demonstrate your ability to execute commands in close-order drill.2. Maritime History: Describe the highlights of maritime history from the
earliest times to the present. Include the evolution of vessel construction and propulsion, important voyages of exploration and development, the origin of maritime traditions, and the achievements of notable maritime leaders in U.S. sea history.
2. Drill: Demonstrate your ability to give and execute commands in close- order drill.
3. Celestial Navigation: i) Explain how the sextant works. Show how to use it and demonstrate
measuring horizontal angles and altitudes. ii) Find latitude by the altitude of Polaris or by the sun’s altitude at local
apparent noon. Demonstrate how longitude is determined. iii) Demonstrate finding error in the boat’s compass by the sun’s azimuth.
3. Drill: Demonstrate your ability to handle the ship’s company in close-order drill. Do all required maneuvers.
3. Communication: Draw the International Code flags and pennants from memory and give the single-letter meanings of the flags (for example, Alfa = Have diver down, keep clear). Show how to use the book International Code of Signals.
United States Coast Guard Auxiliary1. Successfully complete either the Coast Guard Auxiliary Boating Skills and
Seamanship course or the Sailing Skills and Seamanship course. All core sessions, as well as at least three elective sessions, must be completed to fulfill this requirement.
2. Successfully complete the Coast Guard Auxiliary Weekend Navigator course.3. Join a local Coast Guard Auxiliary flotilla as a Basic Qualified member and
qualify for any Operational Auxiliary Program (AUXOP) or any Trident Marine Safety specialty rating.
United States Power Squadrons1. Be inducted as a member of your local USPS squadron.2. As a member of the United States Power Squadrons, complete the
Seamanship and Piloting courses.3. As a member of the United States Power Squadrons, complete the Advanced
Piloting course.
Reference materials such as U.S. Coast Guard navigation rules, International Sailing Federation rules, OSHA requirements, International Code of Signals, and some others change frequently. They should be available in your ship’s library. They are not reprinted in this manual.

62 Advancement and Recognition
Sea
Sco
ut __________________________________
of Sh
ip N
o. ________________________ is in
go
od
stan
din
g a
nd
is rec
om
me
nd
ed
for th
e ra
nk o
fA
BLE.
Sign
ed
_____________________________________C
rew
lea
de
r
Sign
ed
_____________________________________Skip
pe
r
Ap
pro
ved
by sh
ip’s p
etty o
ffice
rs at a
qu
arte
r-d
ec
k me
etin
g fo
r ce
rtifica
te a
nd
ba
dg
e.
Sign
ed
_____________________________________Bo
atsw
ain
Da
te _______________________________________
ABLE
SEA SC
OU
TSC
OREBO
ARD
Na
me
_____________________________________
Ship _______________________________________
Distric
t ____________________________________
Co
uncil
___________________________________
BO
Y SC
OU
TS OF A
MER
ICA
Sea
Sco
ut __________________________________
of Sh
ip N
o. ________________________ is in
go
od
stan
din
g a
nd
is rec
om
me
nd
ed
for th
e ra
nk o
fA
PP
REN
TICE.
Sign
ed
_____________________________________C
rew
lea
de
r
Sign
ed
_____________________________________Skip
pe
r
Ap
pro
ved
by sh
ip’s p
etty o
ffice
rs at a
qu
arte
r-d
ec
k me
etin
g fo
r ce
rtifica
te a
nd
ba
dg
e.
Sign
ed
_____________________________________Bo
atsw
ain
Da
te _______________________________________
APPREN
TICE
SEA SC
OU
TSC
OREBO
ARD
Na
me
_____________________________________
Ship _______________________________________
Distric
t ____________________________________
Co
uncil
___________________________________
BO
Y SC
OU
TS OF A
MER
ICA
Sea
Sco
ut __________________________________
of Sh
ip N
o. ________________________ is in
go
od
stan
din
g a
nd
is rec
om
me
nd
ed
for th
e ra
nk o
fQ
UA
RTER
MA
STER.
Sign
ed
_____________________________________C
rew
lea
de
r
Sign
ed
_____________________________________Skip
pe
r
Ap
pro
ved
by sh
ip’s p
etty o
ffice
rs at a
qu
arte
r-d
ec
k me
etin
g fo
r ce
rtifica
te a
nd
ba
dg
e.
Sign
ed
_____________________________________Bo
atsw
ain
Da
te _______________________________________
QU
AR
TERMA
STERSEA
SCO
UT
SCO
REBOA
RDN
am
e
_____________________________________
Ship _______________________________________
Distric
t ____________________________________
Co
uncil
___________________________________
BO
Y SC
OU
TS OF A
MER
ICA
Sea
Sco
ut __________________________________
of Sh
ip N
o. ________________________ is in
go
od
stan
din
g a
nd
is rec
om
me
nd
ed
for th
e ra
nk o
fO
RD
INA
RY.
Sign
ed
_____________________________________C
rew
lea
de
r
Sign
ed
_____________________________________Skip
pe
r
Ap
pro
ved
by sh
ip’s p
etty o
ffice
rs at a
qu
arte
r-d
ec
k me
etin
g fo
r ce
rtifica
te a
nd
ba
dg
e.
Sign
ed
_____________________________________Bo
atsw
ain
Da
te _______________________________________
ORD
INA
RYSEA
SCO
UT
SCO
REBOA
RDN
am
e
_____________________________________
Ship _______________________________________
Distric
t ____________________________________
Co
uncil
___________________________________
BO
Y SC
OU
TS OF A
MER
ICA
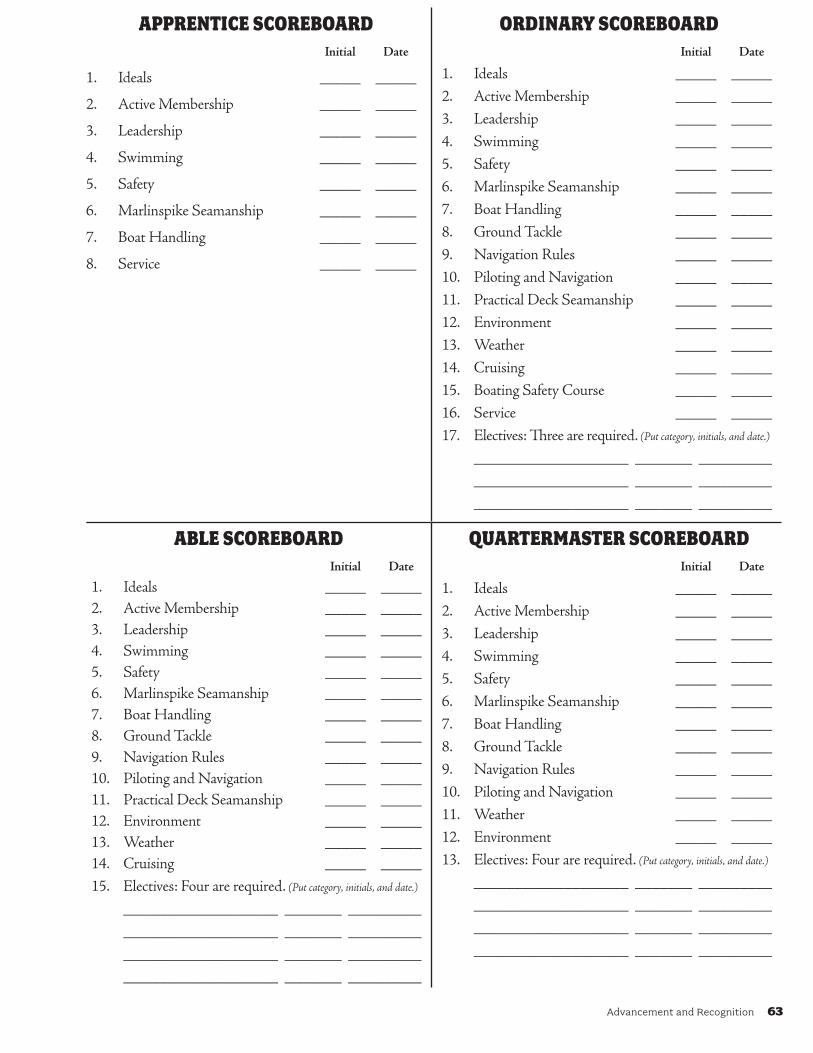
Advancement and Recognition 63
APPRENTICE SCOREBOARD Initial Date
1. Ideals _____ _____
2. Active Membership _____ _____
3. Leadership _____ _____
4. Swimming _____ _____
5. Safety _____ _____
6. Marlinspike Seamanship _____ _____
7. Boat Handling _____ _____
8. Service _____ _____
ORDINARY SCOREBOARD Initial Date
1. Ideals _____ _____2. Active Membership _____ _____3. Leadership _____ _____4. Swimming _____ _____5. Safety _____ _____6. Marlinspike Seamanship _____ _____7. Boat Handling _____ _____8. Ground Tackle _____ _____9. Navigation Rules _____ _____10. Piloting and Navigation _____ _____11. Practical Deck Seamanship _____ _____12. Environment _____ _____13. Weather _____ _____14. Cruising _____ _____15. Boating Safety Course _____ _____16. Service _____ _____17. Electives: Three are required. (Put category, initials, and date.)
___________________ _______ _________ ___________________ _______ _________ ___________________ _______ _________
ABLE SCOREBOARD Initial Date
1. Ideals _____ _____2. Active Membership _____ _____3. Leadership _____ _____4. Swimming _____ _____5. Safety _____ _____6. Marlinspike Seamanship _____ _____7. Boat Handling _____ _____8. Ground Tackle _____ _____9. Navigation Rules _____ _____10. Piloting and Navigation _____ _____11. Practical Deck Seamanship _____ _____12. Environment _____ _____13. Weather _____ _____14. Cruising _____ _____15. Electives: Four are required. (Put category, initials, and date.)
___________________ _______ _________ ___________________ _______ _________ ___________________ _______ _________ ___________________ _______ _________
QUARTERMASTER SCOREBOARD Initial Date
1. Ideals _____ _____2. Active Membership _____ _____3. Leadership _____ _____4. Swimming _____ _____5. Safety _____ _____6. Marlinspike Seamanship _____ _____7. Boat Handling _____ _____8. Ground Tackle _____ _____9. Navigation Rules _____ _____10. Piloting and Navigation _____ _____11. Weather _____ _____12. Environment _____ _____13. Electives: Four are required. (Put category, initials, and date.)
___________________ _______ _________ ___________________ _______ _________ ___________________ _______ _________ ___________________ _______ _________

64 Advancement and Recognition
Other Recognition
SEAL TrainingSea Scout Advanced Leadership training, as the name implies, is a training course
designed to develop leadership skills in young adults. Seamanship is the foundation on which this course is taught. Nautical skills are the means, not the end. This course uses an at-sea experience where Sea Scouts are taught and immediately apply leadership skills. Few other media offer the opportunity to young people to actually put group dynamic leadership skills into practice. There is no playacting. All situations and tasks are real, and bad decisions or team failure can produce real problems.
It is not possible to teach this course if students do not arrive with some nautical skills; therefore, before taking the course, students must have attained the rank of Ordinary and must possess a thorough knowledge of the contents of the Safety and Seamanship section of the Sea Scout Manual. Upon successful completion of this course, participants are authorized to wear the double dolphin SEAL insignia.
Several SEAL training courses are held each year in a variety of venues across the United States. Applications must be mailed to: National Director of Sea Scouts, Boy Scouts of America, 1325 West Walnut Hill Lane, P.O. Box 152079, Irving, TX 75015-2079 no later than March 1 each year to be considered for summer training.
Sea Scout Safe Boating and Advanced Seamanship TrainingThe Small-Boat Handler Course and Qualified Seaman Course are designed for
Sea Scout ships whose members are not interested in following the advancement plan leading to Quartermaster, or they can serve as a training outline for traditional ships. The entire membership of a ship can work as a group in the course led by the ship’s adult officers and/or qualified instructors.
Details supporting the course outlines are found in the technical sections of this manual along with references to other publications listed in the bibliography.
The Small-Boat Handler Course
Section One—Aids to Navigation and Rules of the Road
1. Introduction to aids to navigation2. Buoyage system3. Chart symbols and letter designations4. Primary shapes for buoys5. Obstruction, mid-channel, and special types of buoys6. Beacons and daybeacons7. Ranges, range markers8. Intracoastal waterways, lakes, and rivers9. Class project—Develop buoy recognition game using flash cards10. Reasons for rules of the road11. The danger zone12. Windward and leeward clearances13. Stand-on and give-way vessels14. Sailboat right of way
Advancement and Recognition 65
15. Sailboat rules16. Lights required on boats17. Emergency lights18. Sound signals19. Safety equipment20. Visual signaling devices
Section Two—Boating Safety1. Boating safety and first aid2. Checking the hull3. Motor size compared with the boat4. Fueling—dangers, precautions, and procedures5. Loading a small boat6. When not to go out7. Operating8. Distress signals9. Equipment10. Equipment—anchors, line, signaling, first-aid kit11. Project—Have class develop a checklist.12. Seamanship—Review sea terms (see glossary).13. Knots—Have class learn to tie overhand, square, sheet bend, bowline, clove
hitch, two half hitches, and belaying to a cleat.14. Class project—Prepare to cruise. Have class demonstrate on an actual boat
the checklist, and procedures covered in items 1–12.15. Types and uses of anchors16. Wind and current
Section Three—Boat HandlingDemonstrate your boat handling ability by doing one of the following:1. Small-Boat Sailing
Show that you, alone or with a buddy, can sail a boat properly. Do the following:a. Prepare a boat for sailing, including a safety inspection.b. Get underway from dockside, mooring, or beach.c. Properly set sails for a round-trip course approved by your leader that will
include running, beating, and reaching—the basic points of sail. While sailing, demonstrate good helmsmanship skills.
d. Change direction by tacking; change direction by jibing.e. Demonstrate getting out of irons.f. Upon returning to the dock, mooring, or beach, properly secure all equip-
ment, furl or stow sails, and prepare the craft for unattended docking or beaching overnight or longer.
2. MotorboatingDemonstrate proper procedures and skills by doing the following:
a. Board and show how to assist others in boarding.b. Complete a safety check.c. Get underway from dockside or from a beach.d. Run a course for at least a mile, showing procedures for overtaking and
passing slower craft, yielding right-of-way, passing oncoming traffic, making turns, reversing direction, and using navigation aids.
e. Land or dock; get out and show how to assist others.f. Moor the boat and secure all gear.
66 Advancement and Recognition
3. RowingDo the following:a. Alone or with a passenger, do the following:
1) Board and complete a safety check.2) Launch from dockside or from a beach.3) Row in a straight line for 100 yards. Stop, pivot, and return to the
starting point.4) Backwater in a straight line for 25 yards. Make a turn underway and
return to the starting point.5) Land and moor or rack your craft.
b. Come alongside a pier and help a passenger into the boat. Pull away from the pier, change positions with your passenger, and demonstrate sculling over the stern or side. Resume your rowing position, return alongside the pier, and help your passenger out of the boat.
4. Paddlecraft Check www.seascout.org for a paddlecraft alternative requirement.
Note: Most of the requirements for earning the Small-Boat Handler bar are met by each state’s National Association of State Boating Law Administrators boating safety course. State agencies provide group instruction, as well as online instruction and testing. NASBLA-approved boating safety courses are also taught by the U.S. Power Squadrons and the U.S. Coast Guard Auxiliary.
The Qualified Seaman Course
Section One—Aids to Navigation1. Aids to navigation2. The buoyage system3. Use of various buoys4. Storm warnings—publications and charts5. Other storm warnings6. Daymarks on vessels7. Dredges, moored vessels, and towing8. Daymarks, beacons, minor lights, and ranges9. Intracoastal waterway markings, buoys, and aids10. Lightships and lighthouses11. Radio beacons12. Government publications—tide tables, Notice to Mariners, etc.
Section Two—Rules of the Road1. Purpose of rules of the road2. Danger zone, right of way3. Sound signals4. Lights5. Orders to the helmsman
Section Three—Seamanship1. Lookout2. Bearings, reporting3. Taking soundings4. Marlinspike seamanship5. Types and use of anchors
Advancement and Recognition 67
Section Four—Safety1. Necessary equipment2. Hazards3. Hull inspection4. Firefighting5. Proper fueling6. Life jackets7. Charts8. Weather9. Man overboard drill—class project10. Grounding11. First aid
Section Five—Piloting1. The compass—description and use2. Compass boxing contest3. Operating by visual aids4. Working a course
Section Six—Charts1. Definition of charts2. Orientation and dividers3. Chart symbols4. Speed, distance, and time
Section Seven—Safe Boating1. Operation2. Principles of sailing3. Powerboat operation
Section Eight—Operating a Boat1. Demonstrate proper operation of a sailboat or a powerboat.
a. Safety checklistb. Emergency procedurec. Handling linesd. Correct anchoringe. Use a chart—lay out a coursef. Operate the boat in a proper manner and make a correct landing.
Long Cruise BadgeThe Long Cruise badge may be earned by both youth and adults registered in Sea Scouts. Once the individual has com-pleted the requirements that follow, the Skipper submits an advancement report to the Boy Scout local council service center where the badges can be secured. It is recommended that all Sea Scouts and adult leaders qualifying for the Long Cruise Badge maintain a log of their cruising experiences. This log will be useful for Scout advancement, U.S. Coast Guard licensing,
US Sailing certification, and chartering.A Sea Scout must be Ordinary rank before he or she can start recording cruising
time for the Long Cruise badge. The Sea Scout must cruise for two weeks on any vessel or boat provided by the local council or the ship, or their own vessel when authorized by

68 Advancement and Recognition
an adult leader in that Sea Scout ship. Each additional long cruise earned is marked by a red arc above the badge, until five such cruises have been completed. Then a single white arc replaces them above the badge.
In the event that it is not possible to make a two-week cruise, a series of weekend or overnight cruises on any boat or ship may be made, provided that the total number equals 14 days. (Note: An overnight cruise lasts two days; a weekend cruise starting on Friday and ending on Sunday will be counted as three days.)
There are no requirements regarding distance and number of miles. The Long Cruise badge is an achievement, not a badge of rank; therefore, an adult leader may qualify for the badge without qualifying for Ordinary rank.
Sea Scout Marksmanship AwardThe Sea Scout Marksmanship program begins with the NRA’s FIRST Steps program for the firearm a youth is learning to shoot. A Sea Scout begins with Basic Shooter requirements for rifle, shotgun, or pistol, and can advance through intermediate and advanced levels to the ultimate level of expert. The Sea Scout’s achievements correlate to the NRA’s Winchester/Marksmanship Qualification Program, and Sea Scouts will be eligible for those awards as well.
Aquatics Awards
BSA LifeguardThe BSA Lifeguard emblem is especially important in Sea Scouts. It improves your ability to help others in all types of aquatics activities. Completion of swimming skills, Safe Swim Defense, Safety Afloat, first aid, emergency action, lifesaving, rowing, and canoeing requirements are some of the qualifications for BSA Lifeguard. The Application for BSA Lifeguard, No. 430-033, can be downloaded from www.scouting.org/Awards_Central.
Boardsailing BSABoardsailing BSA was developed to introduce Boy Scout-, Sea Scout-, and Venturing-age youth to basic boardsailing skills, equipment, and safety precautions; to encourage the development of skills that promote fitness and safe aquatic recreation; and to lay a foundation of skill and knowledge for those who will participate later in more advanced and demanding activities on the water. A Boardsailing BSA Award
Application, No. 512-017, can be downloaded from www.scouting.org/Awards_Central. See also Start Windsurfing Right, a US Sailing publication.
Kayaking BSAKayaking BSA was developed to introduce Boy Scout-, Sea Scout- and Venturing-age youth to basic boardsailing skills, equipment, and safety precautions; to encourage the develop-ment of skills that promote fitness and safe aquatic recreation; and to lay a foundation of skill and knowledge for those who will participate later in more advanced and demanding activities on
Advancement and Recognition 69
the water. A Kayaking BSA application, No. 430-036, can be downloaded from www.scouting.org/Awards_Central.
BSA Stand Up PaddleboardingThe BSA Stand Up Paddleboarding award introduces Scouts to the basics of stand up paddleboarding (SUP) on calm water, including skills, equipment, self-rescue, and safety precautions. This award also encourages Scouts to develop paddling skills that promote fitness and safe aquatics recreation. A BSA Stand Up Paddleboarding application, No. 430-189, can be down-loaded from www.scouting.org/Awards_Central.
Snorkeling BSASnorkeling, BSA requirements were developed by the National Health and Safety Service to introduce Boy Scout- Sea Scout- and Venturing-age youth to the special skills, equipment, and safety precautions associated with snorkeling, to encourage the development of aquatic skills that promote fitness and recreation, and to lay a solid skill and knowledge foundation for those who will later participate in more advanced underwater activity. A Snorkeling BSA Award
application, No. 430-603, can be downloaded from www.scouting.org/Awards_Central.
Mile Swim BSAThe Mile Swim BSA emblem is earned by swimming a continuous mile under safe conditions in the presence of a special counselor approved by your council. A Mile Swim BSA Award application, No. 512-020, can be downloaded from www.scouting.org/Awards_Central.
Other Awards
Historic Trails AwardThere are numerous historic sites and trails across America. The Historic Trails Award was established to facilitate cooperation between historical societies and the BSA. This cooperation makes many exciting trips and treks possible for you. Information on the require-ments for this award is found in the BSA’s Tours and Expeditions. The Historic Trails Award application,
which must be filled out and submitted to the local council service center, is available online at www.scouting.org/Awards_Central.
50-Miler AwardThe 50-Miler Award is presented to each individual of a Sea Scout ship for satisfactory participation on a cruise or wilderness trek that meets the award requirements. Information including the rules, award requirements, and the application can be found at www.scouting.org/Awards_Central.

70 Advancement and Recognition
Religious EmblemsReligious emblems are provided by the authorities of various faiths to stimulate the spiritual growth of Sea Scouts in those faiths. The requirements and procedures for earning any one of the emblems are available at your local council service center.
Awards for Heroism
Awards for heroism are made to Sea Scouts by the National Court of Honor of the Boy Scouts of America. Your Skipper and the local council service center must submit an application on a regular form within six months of the deed of heroism.
The Honor Medal is for saving a life or attempting to save a life at considerable risk to self. In cases of exceptional skill or resourcefulness and extreme risk of life, it is awarded with crossed palms.
The Medal of Merit and the Certificate of Merit are for an outstanding act of service not necessarily involving the risk of life.
Hornaday AwardThe William T. Hornaday Award is for distinguished service to conservation, and is named for the conservationist and first director of the New York State Zoological Society, William T. Hornaday. Suggestions that will help you qualify for this award are found on the application, which is available at your local council service center or www.scouting.org.
Safety and Seamanship 71
SAFETYSea Scouts vow to guard against water accidents in the first phrase of the Sea
Promise. Skill, knowledge, and judgment are the principal ingredients of safety: skill in handling the vessel under all conditions, knowledge of equipment and its proper use, judgment that exercises caution in speed, bad weather, or rough seas. In spite of preparation, some dangers in and on the water cannot be avoided. Sea Scouts and their leaders must minimize danger with planning, neutralize danger with good decisions, and overcome danger with wise actions.
Accident Prevention: Elements of Safe Swim Defense and Safety Afloat
The primary emphasis of each plan is prevention. Qualified supervision and discipline guard against unsafe activities and ensure that each point is properly implemented. A personal health review addresses medical complications. Ability groups, swimming ability, and skill proficiency match activities, areas, and equipment to abilities. Safe swimming area; equipment, including life jackets; and planning concern safe physical arrangements.
Each plan covers preparation, including recognition and response, should an accident occur. The buddy system, lookouts, and response personnel provide eyes and ears alert for trouble and ensure that someone is available to provide safe and effective assistance. They are integral parts of emergency action plans.
Safe Swim DefenseBSA groups shall use Safe Swim Defense for all swimming activities. Adult leaders
supervising a swimming activity must have completed Safe Swim Defense training within the previous two years. Safe Swim Defense standards apply at backyard, hotel, apartment, and public pools; at established waterfront swim areas such as beaches at state parks and U.S. Army Corps of Engineers lakes; and at all temporary swimming areas such as a lake, river, or ocean.
Safe Swim Defense does not apply to boating or water activities such as waterskiing or swamped-boat drills that are covered by Safety Afloat guidelines. Safe Swim Defense applies to nonswimming activities whenever participants enter water over knee deep or when submersion is likely, for example, when fording a stream, seining for bait, or con-structing a bridge as a pioneering project.
Snorkeling in open water requires each participant to have demonstrated knowledge and skills equivalent to those for Snorkeling, BSA in addition to following Safe Swim Defense. Scuba activities must be conducted in accordance with the BSA scuba policy found in the Guide to Safe Scouting. Because of concerns with hyperventilation, competitive underwater swimming events are not permitted in Scouting.
Apprentice 4b. Discuss the BSA Safe Swim
Defense plan and explain how it is used to protect Sea
Scouts and other groups during swimming activities.

72 Safety and Seamanship
Safe Swim Defense training may be obtained from MyScouting.org, at council summer camps, and at other council and district training events. Confirmation of training is required on tour and activity plans for trips that involve swimming. Additional information on various swimming venues is provided in the Aquatics Supervision guide, No. 34346, available from local council service centers.
1. Qualified SupervisionAll swimming activity must be supervised by a mature and conscientious adult age 21 or older who understands and knowingly accepts responsibility for the well-being and safety of those in his or her care, and who is trained in and committed to compliance with the eight points of BSA Safe Swim Defense. It is strongly recommended that all units have at least one adult or older youth member currently trained in BSA Aquatics Supervision: Swimming and Water Rescue or BSA Lifeguard to assist in planning and conducting all swimming activities.
2. Personal Health ReviewA complete health history is required of all participants as evidence of fitness for swimming activities. Forms for minors must be signed by a parent or legal guardian. Participants should be asked to relate any recent incidents of illness or injury just prior to the activity. Supervision and protection should be adjusted to anticipate any potential risks associated with individual health conditions. For significant health conditions, the adult supervisor should require an exami-nation by a physician and consult with the parent, guardian, or caregiver for appropriate precautions.
3. Safe AreaAll swimming areas must be carefully inspected and prepared for safety prior to each activity. Water depth, quality, temperature, movement, and clarity are important considerations. Hazards must be eliminated or isolated by conspicu-ous markings and discussed with participants.• Controlled Access: There must be safe areas for all participating ability
groups to enter and leave the water. Swimming areas of appropriate depth must be defined for each ability group. The entire area must be within easy reach of designated rescue personnel. The area must be clear of boat traffic, surfing, or other nonswimming activities.
• Bottom Conditions and Depth: The bottom must be clear of trees and debris. Abrupt changes in depth are not allowed in the nonswimmer area. Isolated underwater hazards should be marked with floats. Rescue personnel must be able to easily reach the bottom. Maximum recommended water depth in clear water is 12 feet. Maximum water depth in turbid water is 8 feet.
• Visibility: Underwater swimming and diving are prohibited in turbid water. Turbid water exists when a swimmer treading water cannot see his feet. Swimming at night is allowed only in areas with water clarity and lighting sufficient for good visibility both above and below the surface.
• Diving and elevated entry: Diving is permitted only into clear, unob-structed water from heights no greater than 40 inches. Water depth must be at least 7 feet. Bottom depth contours below diving boards and elevated surfaces require greater water depths and must conform to state regulations. Persons should not jump into water from heights greater than they are tall, and should jump only into water chest deep or greater with minimal risk from contact with the bottom. No elevated entry is permitted where the person must clear any obstacle, including land.

Safety and Seamanship 73
• Water temperature: Comfortable water temperature for swimming is near 80 degrees. Activity in water at 70 degrees or less should be of limited duration and closely monitored for negative effects of chilling.
• Water quality: Bodies of stagnant, foul water; areas with significant algae or foam; or areas polluted by livestock or waterfowl should be avoided. Comply with any signs posted by local health authorities. Swimming is not allowed in swimming pools with green, murky, or cloudy water.
• Moving water: Participants should be able to easily regain and maintain their footing in currents or waves. Areas with large waves, swiftly flowing currents, or moderate currents that flow toward the open sea or into areas of danger should be avoided.
• Weather: Participants should be moved from the water to a position of safety whenever lightning or thunder threatens. Wait at least 30 minutes after the last lightning flash or thunder before leaving shelter. Take precau-tions to prevent sunburn, dehydration, and hypothermia.
• Life jacket use: Swimming in clear water over 12 feet deep, in turbid water over 8 feet deep, or in flowing water may be allowed if all participants wear properly fitted, Coast Guard–approved life jackets and the supervisor determines that swimming with life jackets is safe under the circumstances.
4. Response Personnel (Lifeguards)Every swimming activity must be closely and continuously monitored by a trained rescue team on the alert for and ready to respond during emergencies. Professionally trained lifeguards satisfy this need when provided by a regulated facility or tour operator. When lifeguards are not provided by others, the adult supervisor must assign at least two rescue personnel, with additional numbers to maintain a ratio of one rescuer to every 10 participants. The supervisor must provide instruction and rescue equipment and assign areas of responsibility as outlined in Aquatics Supervision, No. 34346. The qualified supervisor, the designated response personnel, and the lookout work together as a safety team. An emergency action plan should be formulated and shared with participants as appropriate.
5. LookoutThe lookout continuously monitors the conduct of the swim, identifies any departures from Safe Swim Defense guidelines, alerts response personnel as needed, and monitors the weather and environment. The lookout should have a clear view of the entire area but be close enough for easy verbal communication. The lookout must have a sound understanding of Safe Swim Defense but is not required to perform rescues. The adult supervisor may serve simultaneously as the lookout but must assign the task to someone else if engaged in activities that preclude focused observation.
6. Ability GroupsAll youth and adult participants are designated as swimmers, beginners, or nonswimmers based on swimming ability confirmed by standardized BSA swim classification tests. Each group is assigned a specific swimming area with depths consistent with those abilities. The classification tests should be renewed annually, preferably at the beginning of the season.• Swimmers must pass this test: Jump feetfirst into water over the head in
depth. Level off and swim 75 yards in a strong manner using one or more of the following strokes: sidestroke, breaststroke, trudgen, or crawl; then swim 25 yards using an easy resting backstroke. The 100 yards must be completed in one swim without stops and must include at least one sharp turn. After completing the swim, rest by floating.

74 Safety and Seamanship
• Beginners must pass this test: Jump feetfirst into water over the head in depth, level off, and swim 25 feet on the surface. Stop, turn sharply, resume swimming, and return to the starting place.
• Anyone who has not completed either the beginner or swimmer tests is classified as a nonswimmer.
• The nonswimmer area should be no more than waist to chest deep and should be enclosed by physical boundaries such as the shore, a pier, or lines. The enclosed beginner area should contain water of standing depth and may extend to depths just over the head. The swimmer area may be up to 12 feet in depth in clear water and should be defined by floats or other markers.
7. Buddy SystemEvery participant is paired with another. Buddies stay together, monitor each other, and alert the safety team if either needs assistance or is missing. Buddies check into and out of the area together.• Buddies are normally in the same ability group and remain in their assigned
area. If they are not of the same ability group, then they swim in the area assigned to the buddy with the lesser ability.
• A buddy check reminds participants of their obligation to monitor their bud-dies and indicates how closely the buddies are keeping track of each another. Roughly every 10 minutes, or as needed to keep the buddies together, the look-out, or other person designated by the supervisor, gives an audible signal, such as a single whistle blast, and a call for “Buddies.” Buddies are expected to raise each other’s hand before completion of a slow, audible count to 10. Buddies who take longer to find each other should be reminded of their responsibility for the other’s safety.
• Once everyone has a buddy, a count is made by area and compared with the total number known to be in the water. After the count is confirmed, a signal is given to resume swimming.
8. DisciplineRules are effective only when followed. All participants should know, understand, and respect the rules and procedures for safe swimming provided by Safe Swim Defense guidelines. Applicable rules should be discussed prior to the outing and reviewed for all participants at the water’s edge just before the swimming activity begins. People are more likely to follow directions when they know the reasons for rules and procedures. Consistent, impartially applied rules supported by skill and good judgment provide steppingstones to a safe, enjoyable outing.
Safety AfloatBSA groups shall use Safety Afloat for all boating activities. Adult leaders supervising
activities afloat must have completed Safety Afloat training within the previous two years. Safety Afloat standards apply to the use of canoes, kayaks, rowboats, rafts, floating tubes, sailboats, motorboats, including waterskiing, and other small craft, but do not apply to transportation on large commercial vessels such as ferries and cruise ships. Parasailing (being towed airborne behind a boat using a parachute), kitesurfing (using a wakeboard towed by a kite), and recreational use of personal watercraft (small sit-on-top motorboats propelled by water jets) are not authorized BSA activities.
Safety Afloat training may be obtained from MyScouting.org, at council summer camps, and at other council and district training events. Confirmation of training is required on tour and activity plans for trips that involve boating. Additional guidance on appropriate skill levels and training resources is provided in the Aquatics Supervision guide, available from local council service centers.
Ordinary 5a. Discuss BSA Safety Afloat
with an adult leader or a Quartermaster candidate.
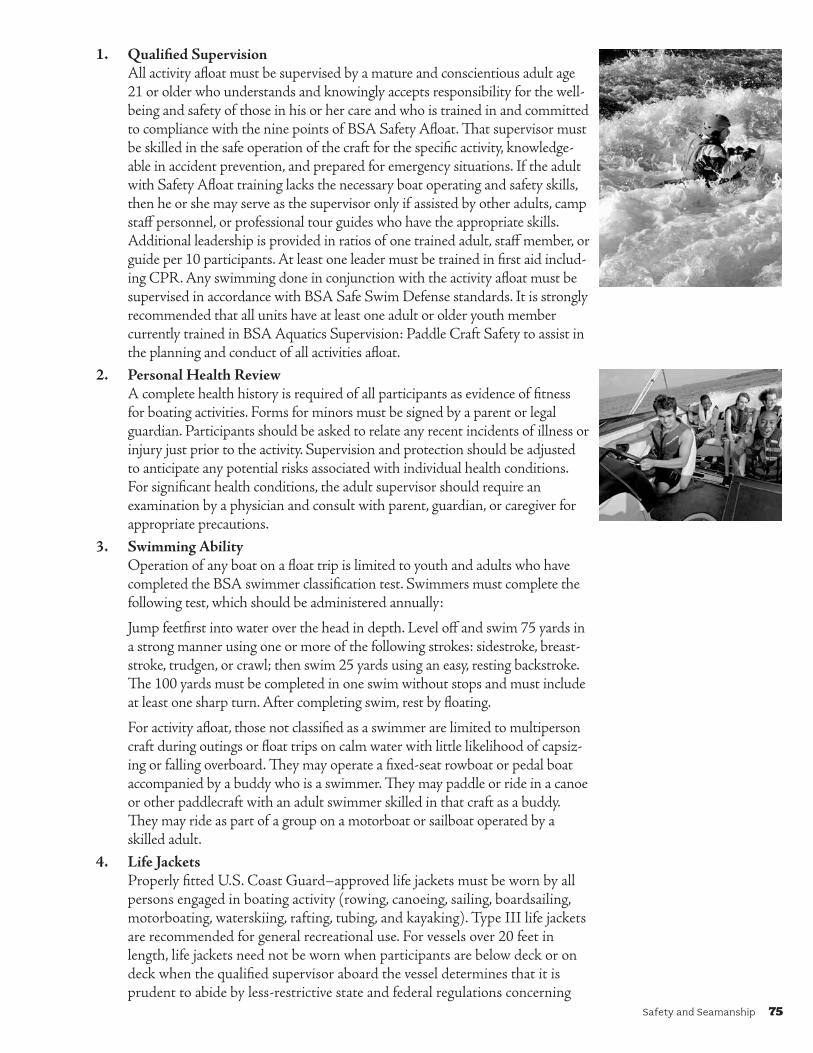
Safety and Seamanship 75
1. Qualified SupervisionAll activity afloat must be supervised by a mature and conscientious adult age 21 or older who understands and knowingly accepts responsibility for the well-being and safety of those in his or her care and who is trained in and committed to compliance with the nine points of BSA Safety Afloat. That supervisor must be skilled in the safe operation of the craft for the specific activity, knowledge-able in accident prevention, and prepared for emergency situations. If the adult with Safety Afloat training lacks the necessary boat operating and safety skills, then he or she may serve as the supervisor only if assisted by other adults, camp staff personnel, or professional tour guides who have the appropriate skills. Additional leadership is provided in ratios of one trained adult, staff member, or guide per 10 participants. At least one leader must be trained in first aid includ-ing CPR. Any swimming done in conjunction with the activity afloat must be supervised in accordance with BSA Safe Swim Defense standards. It is strongly recommended that all units have at least one adult or older youth member currently trained in BSA Aquatics Supervision: Paddle Craft Safety to assist in the planning and conduct of all activities afloat.
2. Personal Health ReviewA complete health history is required of all participants as evidence of fitness for boating activities. Forms for minors must be signed by a parent or legal guardian. Participants should be asked to relate any recent incidents of illness or injury just prior to the activity. Supervision and protection should be adjusted to anticipate any potential risks associated with individual health conditions. For significant health conditions, the adult supervisor should require an examination by a physician and consult with parent, guardian, or caregiver for appropriate precautions.
3. Swimming AbilityOperation of any boat on a float trip is limited to youth and adults who have completed the BSA swimmer classification test. Swimmers must complete the following test, which should be administered annually:
Jump feetfirst into water over the head in depth. Level off and swim 75 yards in a strong manner using one or more of the following strokes: sidestroke, breast-stroke, trudgen, or crawl; then swim 25 yards using an easy, resting backstroke. The 100 yards must be completed in one swim without stops and must include at least one sharp turn. After completing swim, rest by floating.
For activity afloat, those not classified as a swimmer are limited to multiperson craft during outings or float trips on calm water with little likelihood of capsiz-ing or falling overboard. They may operate a fixed-seat rowboat or pedal boat accompanied by a buddy who is a swimmer. They may paddle or ride in a canoe or other paddlecraft with an adult swimmer skilled in that craft as a buddy. They may ride as part of a group on a motorboat or sailboat operated by a skilled adult.
4. Life JacketsProperly fitted U.S. Coast Guard–approved life jackets must be worn by all persons engaged in boating activity (rowing, canoeing, sailing, boardsailing, motorboating, waterskiing, rafting, tubing, and kayaking). Type III life jackets are recommended for general recreational use. For vessels over 20 feet in length, life jackets need not be worn when participants are below deck or on deck when the qualified supervisor aboard the vessel determines that it is prudent to abide by less-restrictive state and federal regulations concerning

76 Safety and Seamanship
the use and storage of life jackets, for example, when a cruising vessel with safety rails is at anchor. All participants not classified as swimmers must wear a life jacket when on deck underway.
Life jackets need not be worn when an activity falls under Safe Swim Defense guidelines, for example when an inflated raft is used in a pool or when snorkeling from an anchored craft.
Life vests and flotation devices are designed to save your life, and the U.S. Coast Guard requires that all recreational boats must carry one wearable life jacket for every person aboard. The Guide to Safe Scouting requires that, “Properly fitted U.S. Coast Guard–approved life jackets must be worn by all persons engaged in boating activity (rowing, canoeing, sailing, boardsailing, motorboating, waterskiing, rafting, tubing, and kayaking). Type III life jackets are recommended for general recreational use.” Sea Scouts and adult leaders must know which type is appropri-ate for every circumstance, make sure it is in good and serviceable condition, and properly fits the intended user. Life jackets, regardless of type, must be readily accessible and every passenger must be able to put them on in a reasonable amount of time in an emergency.
Type I offshore life jackets are designed to provide protection and flotation for extended periods in the sea. They must be carried on all vessels going offshore. Type I’s have flotation collars around the neck and head, are adjust-able to fit various sizes, and can have several kinds of survival gear attached. Type II life jackets are the near shore “buoyant vests” that are sold in most boating shops. They are useful on lakes and bays. They have less flotation than off-shore type Is. Coast Guard–approved Type I and II lifesaving jackets are required to float a person in an upright, slightly backward position to keep his or her face out of the water if unconscious.Type III life vests are flotation aids. Some are “trimmed down” back and chest, and some are inflatable. The vest type covers your chest, but has no neck support. Some inflatables inflate automatically when a person goes into the water, but others must be manually inflated. While inflatables are much more comfortable to wear, they must be worn to count toward the number of life jackets on board. Inflatables are expensive to buy and must be serviced at about half the original cost if they are used. Throwable Type IV floatable devices must be carried on boats over 16 feet in length. There are many kinds ranging from the classic life ring or ring buoy to cockpit cushions designed to do double duty as a life preserver. A Type IV should be kept at hand when on the water just in case someone goes overboard.Type V life jackets are special-use jackets designed for specific water activities. They can be used instead of other types of life jackets only if they are used according to the approved condition listed on the label. This type of life jacket includes deck suits, work vests, board-sailing vests, and inflatable vests. Remember, only U.S. Coast Guard–approved equipment (Types I, II, or III) is acceptable in Scouting aquatics.
5. Buddy SystemAll participants in an activity afloat are paired as buddies who are always aware of each other’s situation and prepared to sound an alarm and lend assistance immediately when needed. When several craft are used on a float trip, each boat on the water should have a “buddy boat.” All buddy pairs must be accounted for
Apprentice 5a. Explain the uses, advantages,
and disadvantages of the various types of Coast
Guard–approved life jackets. Demonstrate the proper
use and care of life jackets used by your ship.
Type I
Type II
Type III

Safety and Seamanship 77
at regular intervals during the activity and checked off the water by the qualified supervisor at the conclusion of the activity. Buddies either ride in the same boat or stay near one another in single-person craft.
6. Skill ProficiencyEveryone in an activity afloat must have sufficient knowledge and skill to participate safely. Passengers should know how their movement affects boat stability and have a basic understanding of self-rescue. Boat operators must meet government requirements, be able to maintain control of their craft, know how changes in the environment influence that control, and undertake activities only within personal and group capabilities. • Content of training exercises should be appropriate for the age, size, and experi-
ence of the participants and should cover basic skills on calm water of limited extent before proceeding to advanced skills involving current, waves, high winds, or extended distance. At a minimum, instructors for canoes and kayaks should be able to demonstrate the handling and rescue skills required for BSA Aquatics Supervision: Paddle Craft Safety. All instructors must have at least one assistant who can recognize and respond appropriately if the instructor’s safety is compromised.
• Anyone engaged in recreational boating using human-powered craft on flatwater ponds or controlled lake areas free of other activities should be instructed in basic safety procedures prior to launch, and allowed to proceed after they have demonstrated the ability to control the boat adequately to return to shore at will.
• For recreational sailing, at least one person aboard should be able to dem-onstrate basic sailing proficiency (tacking, reaching, and running) sufficient to return the boat to the launch point. Extended cruising on a large sailboat requires either a professional captain or an adult leader with sufficient experi-ence to qualify as a bareboat skipper.
• Motorboats may be operated by youth, subject to state requirements, only when accompanied in the boat by an experienced leader or camp staff member who meets state requirements for motorboat operation. Extended cruising on a large powerboat requires either a professional captain or an adult leader with similar qualifications.
• Before a unit using human-powered craft controlled by youth embarks on a float trip or excursion that covers an extended distance or lasts longer than four hours, each participant should receive a minimum of three hours’ training and supervised practice or demonstrate proficiency in maneuvering the craft effectively over a 100-yard course and recovering from a capsize.
• Unit trips on whitewater above Class II must be done with either a profes-sional guide in each craft or after all participants have received American Canoe Association or equivalent training for the class of water and type of craft involved.
7. PlanningProper planning is necessary to ensure a safe, enjoyable exercise afloat. All plans should include a scheduled itinerary, notification of appropriate parties, com-munication arrangements, contingencies in case of foul weather or equipment failure, and emergency response options. • Preparation: Any boating activity requires access to the proper equipment
and transportation of gear and participants to the site. Determine what state and local regulations are applicable. Get permission to use or cross private property. Determine whether personal resources will be used or whether

78 Safety and Seamanship
outfitters will supply equipment, food, and shuttle services. Lists of group and personal equipment and supplies must be compiled and checked. Even short trips require selecting a route, checking water levels, and determining alternative pull-out locations. Changes in water level, especially on moving water, may pose significant, variable safety concerns. Obtain current charts and information about the waterway and consult those who have traveled the route recently.
• Float plan: Complete the preparation by writing a detailed itinerary, or float plan, noting put-in and pull-out locations and waypoints, along with the approximate time the group should arrive at each. Travel time should be estimated generously.
• Notification: File the float plan with parents, the local council office if travel-ing on running water, and local authorities if appropriate. Assign a member of the unit committee to alert authorities if prearranged check-ins are overdue. Make sure everyone is promptly notified when the trip is concluded.
• Weather: Check the weather forecast just before setting out, and keep an alert weather eye. Anticipate changes and bring all craft ashore when rough weather threatens. Wait at least 30 minutes before resuming activities after the last incidence of thunder or lightning.
• Contingencies: Planning must identify possible emergencies and other circumstances that could force a change of plans. Develop alternative plans for each situation. Identify local emergency resources such as EMS systems, sheriff departments, or ranger stations. Check your primary communication system and identify backups, such as the nearest residence to a campsite. Cell phones and radios may lose coverage, run out of power, or suffer water damage.
8. EquipmentAll craft must be suitable for the activity, be seaworthy, and float if capsized. All craft and equipment must meet regulatory standards, be properly sized, and be in good repair. Spares, repair materials, and emergency gear must be carried as appropriate. Life jackets and paddles must be sized to the participants. Properly designed and fitted helmets must be worn when running rapids rated above Class II. Emergency equipment such as throw bags, signal devices, flashlights, heat sources, first-aid kits, radios, and maps must be ready for use. Spare equipment, repair materials, extra food and water, and dry clothes should be appropriate for the activity. All gear should be stowed to prevent loss and water damage. For float trips with multiple craft, the number of craft should be sufficient to carry the party if a boat is disabled, and critical supplies should be divided among the craft.
9. DisciplineRules are effective only when followed. All participants should know, understand, and respect the rules and procedures for safe boating activities provided by Safety Afloat guidelines. Applicable rules should be discussed prior to the outing and reviewed for all participants near the boarding area just before the activity afloat begins. People are more likely to follow directions when they know the reasons for rules and procedures. Consistent, impartially applied rules supported by skill and good judgment provide steppingstones to a safe, enjoyable outing.

Safety and Seamanship 79
Safety EquipmentThe law requires that boaters carry specific safety equipment, and bigger boats
require more equipment. Federal requirements for all boats, including those powered by oars, paddle, and sail only are:
• One readily accessible Type I, II, or III, or V wearable floatation device for each person on board. (The BSA does not allow Type V.)
For power boats under 16 feet and sailboats 14 feet to 16 feet:• Certificate of number (state registration) must be on board when vessel is in use.• Current state registration numbers not less than 3 inches in height fixed on each
side of the forward half of the vessel with the state validation sticker affixed within 6 inches of the registration number
• One B-1 fire extinguisher (if there is an enclosed engine compartment)• A means of making an “efficient” sound signal (e.g., handheld air horn, athletic
whistle). The human voice is not acceptable.• All gasoline-powered inboard/outboard or inboards must be equipped with an
approved backfire flame control device.• Boats built after August 1, 1980, with gasoline engines in closed compartments
must have a powered ventilation system. If built after August 1, 1978, the boat with a closed fuel tank compartment has to display a “certificate of compliance.” If the boat was built before either date, it must have natural or power ventilation in the fuel tank compartment.
• Navigational lights are to be displayed from sunset to sunrise and in or near areas of limited visibility
• If a toilet is installed, it must be a Coast Guard approved device. Overboard discharge outlets must be capable of being sealed.
Boats over 16 feet must add:• A Type IV throwable flotation device• (1) One orange distress flag and one electric distress light, or (2) three handheld or
floating orange smoke signals and one electric distress light, or (3) three combina-tion red flares (handheld, meteor, or parachute type)
Boats over 26 feet add:• One B-2 or two B-1 fire extinguishers. A fixed system equals one B-1.• A sound-signaling appliance capable of producing an efficient sound signal,
audible for one-half mile with a four- to six-second duration• Oil pollution placard at least 5 by 8 inches placed in the machinery space or at the
bilge station• Garbage placard at least 4 by 9 inches made of durable material displayed in a
conspicuous place reminding all on board of discharge restrictions
Boats 39.4 feet or greater add:• Copy of the Navigation Rules (inland only)• A bell with a clapper (bell size not less than 7.9 inches in diameter at the mouth)
Along with federal requirements, the BSA requires additional safety equipment. Cruising boats must carry a first-aid kit, appropriate charts and a marine VHF radio. Sea Scout vessels must also have an annual Vessel Safety Check.
While not required, there are other items that need to be on board when Sea Scouts are on the water. An anchor and a spare, a boat hook, charts, compass, spare parts, hard-ware, tools, extra line, dewatering device (pump or bailer), fuel, and alternate propulsion (paddles) are absolutes. For the safety and comfort of your crew and passengers, always carry plenty of water, extra food, extra clothing, extra hats, and plenty of sunscreen.
Ordinary 5b. Describe the safety equipment required by law for your ship’s
primary vessel.

80 Safety and Seamanship
Many vessels carry an Emergency Position-Indicating Radio Beacon to signal mari-time distress. This tracking transmitter interfaces with the international satellite system for search and rescue (often shortened to “SAR”). When activated, an EPIRB sends out a distress signal that can be uniquely identified. It gives the identification and location of the registered user. By using the initial position given via the satellite system, search and rescue aircraft, and ground search parties can quickly target the distress signals from the beacons and render aid to the boater in need.
Paddle craft are required to have a life jacket aboard for each individual and a sound-producing device such as a whistle. In periods of reduced visibility—nighttime or foggy conditions—a flashlight or other form of all-round white light is also required.
In addition to required equipment, useful optional equipment includes: a distress signal flag (preferred for most use over flares), a heaving line, flotation bags, a bilge pump, paddle float and footstrap, paddle leash, first-aid kit, and repair materials such as duct tape. Develop your own checklist based on your local conditions and needs.
SUPs are officially “vessels” and are included in the life jacket requirement. SUPs should also be equipped with an appropriate ankle leash and operators should wear suitable footwear.
Vessel Safety CheckTo develop a safety checklist for any boat, the easiest place to start is with the list used by
the U.S. Coast Guard Auxiliary or the United States Power Squadrons for vessel safety checks.An annual Vessel Safety Check is required by the BSA for all Sea Scout vessels. The
VSC is a free bow-to-stern inspection of a boat by a qualified member of the U.S. Coast Guard Auxiliary or the United States Power Squadrons. This is one of the best ways to learn about potential problems that might violate state or federal laws or create a danger when out on the water.
VSCs are customized for the variety of watercraft recreational boaters use. The list includes all the safety equipment required by law. The list also includes recommended items such as marine VHF radio, dewatering device and backup, anchor and dock lines, etc. The VSC examiner will check to see that the decks are free of hazards, the bilge is clean, and the visible hull is generally sound. The electrical system will be examined to be sure it is in good working order with wiring in good condition and batteries secured with terminals covered. Fuel systems will be checked for corrosion and proper ventilation. Discussion with the examiner will also include topics such as responsibility for accident reporting, offshore operations, survival and first-aid tips, fueling, and safe boating classes.
The VSC examiner usually takes about 20 minutes and concludes the visit by giving you a copy of the VSC form and a VSC decal if the vessel successfully meets all the requirements.
Sea Scouts across the nation use an assortment of vessels to ply a variety of waters. Begin with the downloadable list used by the U.S. Coast Guard Auxiliary and United States Power Squadrons (http://nws.cgaux.org, www.usps.org) to develop a vessel safety checklist for your ship. Add safety items that are unique to your vessel, your state law, and your waters. Each time the ship prepares to get underway, every item on the ship’s customized VSC should be examined.
Visual Marine Distress SignalsFederal law and the Navigation Rules require mariners to carry specific equipment
and signaling devices to attract attention if there is an emergency. Note: Distress signals should never be used in jest. Their use can trigger a series of events that can cost others time, effort, and even physical risk. By law, distress signals may only be displayed when a life is in danger.
Able 5a. Develop and use a
customized vessel safety checklist for a boat used
by your ship.
Apprentice 5b. Identify visual day and night marine distress
signals, and know their location and the proper use
for your ship’s vessel(s).
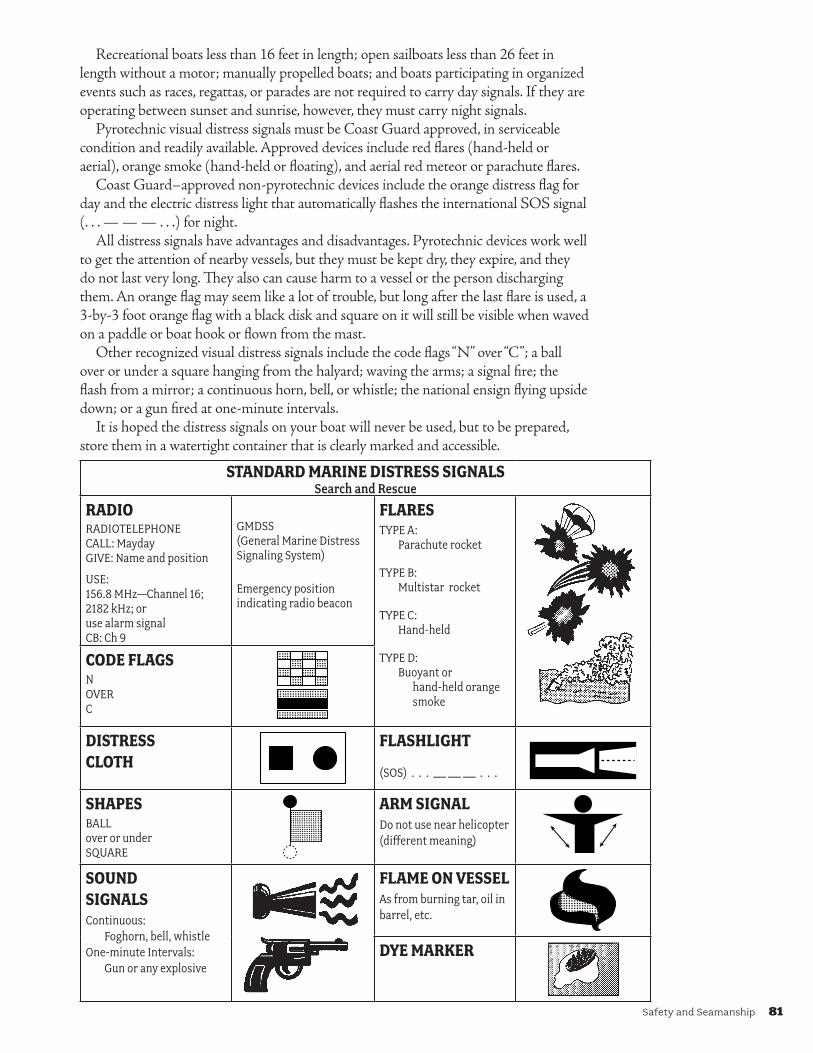
Safety and Seamanship 81
Recreational boats less than 16 feet in length; open sailboats less than 26 feet in length without a motor; manually propelled boats; and boats participating in organized events such as races, regattas, or parades are not required to carry day signals. If they are operating between sunset and sunrise, however, they must carry night signals.
Pyrotechnic visual distress signals must be Coast Guard approved, in serviceable condition and readily available. Approved devices include red flares (hand-held or aerial), orange smoke (hand-held or floating), and aerial red meteor or parachute flares.
Coast Guard–approved non-pyrotechnic devices include the orange distress flag for day and the electric distress light that automatically flashes the international SOS signal (. . . — — — . . .) for night.
All distress signals have advantages and disadvantages. Pyrotechnic devices work well to get the attention of nearby vessels, but they must be kept dry, they expire, and they do not last very long. They also can cause harm to a vessel or the person discharging them. An orange flag may seem like a lot of trouble, but long after the last flare is used, a 3-by-3 foot orange flag with a black disk and square on it will still be visible when waved on a paddle or boat hook or flown from the mast.
Other recognized visual distress signals include the code flags “N” over “C”; a ball over or under a square hanging from the halyard; waving the arms; a signal fire; the flash from a mirror; a continuous horn, bell, or whistle; the national ensign flying upside down; or a gun fired at one-minute intervals.
It is hoped the distress signals on your boat will never be used, but to be prepared, store them in a watertight container that is clearly marked and accessible.
STANDARDMARINEDISTRESSSIGNALSSearch and Rescue
RADIORADIOTELEPHONE CALL: Mayday GIVE: Name and position
USE: 156.8 MHz—Channel 16; 2182 kHz; or use alarm signal CB: Ch 9
GMDSS (General Marine Distress Signaling System)
Emergency position indicating radio beacon
FLARESTYPE A: Parachute rocket
TYPE B: Multistar rocket
TYPE C: Hand-held
TYPE D: Buoyant or hand-held orange
smoke
CODEFLAGSN OVER C
DISTRESSCLOTH
FLASHLIGHT
(SOS) . . . __ __ __ . . .
SHAPESBALL over or under SQUARE
ARMSIGNALDo not use near helicopter (different meaning)
SOUNDSIGNALSContinuous: Foghorn, bell, whistle One-minute Intervals: Gun or any explosive
FLAMEONVESSELAs from burning tar, oil in barrel, etc.
DYEMARKER
82 Safety and Seamanship
Fire PreventionOne of the first lessons we learn in school is what to do if there is a fire. We are
trained to evacuate a building quickly and safely, and we get out of the way so trained firefighters can deal with the fire.
When we are out on the water in a boat, the professionals are not nearby. An onboard fire is such an extreme hazard that every step to prevent it should be taken, and every technique to extinguish it should be thoroughly understood. Remember, most fires are preventable.
GalleyAccording to insurance statistics, the galley is where most boat fires start. If your gal-
ley stove is fueled by alcohol, follow the directions for proper use in lighting the stove or burners. Alcohol flames are difficult to see, so it is possible for a fire to be deadly before it is detected.
Propane stoves have thermocouples and igniters designed to prevent flare-ups. If a burner begins to ignite with a pop and a flare, the stove needs to be serviced immediately.
As in any kitchen, a grease fire is always a risk. There should never be anything near the stove that is readily flammable—towels, curtains, loose clothing—and the cook should be able to reach a fire extinguisher from either side of the stove. If a fire of any kind starts, turn off the burner to stop the flow of fuel, and then extinguish the fire. Remember, the best prevention for a galley fire is vigilance on the part of the cook.
Electrical SystemThe second most common fire on a boat is electrical, and it is a more difficult fire to
immediately detect. Wire should be the correct size to carry the load, should be properly insulated, and have tight connections. Regularly inspect the wire connectors on board. If you see any signs of corrosion, replace them.
All circuits must have fuses or circuit breakers, and switches should be sparkproof. Batteries need to be secured in battery boxes to prevent shifting, and make sure paper products, cloth, plastics, fuel, or other flammable materials are not lying against wiring or connectors.
EnginesFortunately, inboard gasoline engines have not been installed in production sailboats
since 1980. Unfortunately, many of our Sea Scout boats are donations that were built when gasoline engines were the standard. By law, carburetors must have a backfire control device installed. This flame arrester prevents an open flame from entering the vessel’s engine compartment and igniting any accumulated gasoline vapors.
Diesel engines rarely start a fire, but a worn fuel line can cause trouble. Make sure fuel lines are not at risk of rubbing against anything. Regardless of the fuel your engine uses, the engine area should be kept clean and well ventilated with leakproof fuel tanks and tight fuel lines and fittings at fuel injection points.
Before cranking the engine, open the hatches and sniff the bilge for fumes. Leave the hatches open, run ventilation blowers for a full five minutes, and then start the engine.
FuelingBefore:
• Extinguish all flames.• Engine and all electronics must be off.• Since fuel vapors are heavier than air and will sink to the lowest part of the boat,
close hatches, ports, and doors.• Send passengers to shore.• Put portable tanks on the dock to fill.
Able 5b. Demonstrate your
understanding of fire prevention on vessels.

Safety and Seamanship 83
During:• Have absorbent material on hand in case of spills.• Make sure you are putting the fuel in the proper fill entry.• Maintain contact between the nozzle and the fill pipe to prevent any sparking.• Go slowly and listen for a change in pitch as the tank nears capacity to avoid spills.
After:• Clean up any spills and dispose of cleaning materials properly.• Open ports, hatches, and doors to ventilate.• Sniff the engine compartment and bilges for fumes.• Operate the blower for five minutes before starting the engine.
LockersGasoline should not be stored in an interior locker. A safe propane locker is isolated
from the interior of the boat and drains overboard but not near any opening that would allow the gas to enter the interior of the hull. Before using the propane, check the lines for fracture or wear.
In general, lockers should be kept clean and orderly. Never stow oily rags in them, and if possible, avoid the stowage of paint, varnish, solvents, grease, and oil. A well-ventilated metal-lined locker is safest if flammables must be carried.
Classes of FireIf fire does break out, it must be quickly and properly suppressed. There is a universal
system to describe different types of fires that incorporates the use of letters to help users select an extinguisher suitable for the type of material involved in the fire. Fire extinguishers are classified by a letter and number symbol. The letter indicates the type fire the unit is designed to extinguish. (Type B, for example, is designed to extinguish flammable liquids.) The number indicates the size of the extinguisher. The higher the number, the larger the extinguisher.
• Class A fires involve ordinary combustibles such as wood, fabric, paper, rubber, and other common materials that burn easily.
• Class B fires involve flammable liquids such as gasoline, oil, grease, tar, oil-based paint, lacquer, and flammable gas.
• Class C fires are electrical fires involving wiring, fuse boxes, circuit breakers, machinery, and appliances.
• You are not likely to encounter a class D fire while on a boat. This type fire involves combustible metals such as magnesium, aluminum, lithium, and other metals or metal dust.
Extinguishing a FireFire needs fuel, oxygen, and heat to burn. Fire extinguishers remove one of these
elements by applying an agent that either cools the burning fuel, or removes or displaces the surrounding oxygen.
• Water (A). On a boat, water is all around you, and it is the best medium for putting out a class A fire. Water drowns a fire by cooling it below combustion temperature; however, it is limited to fighting class A fires. Never use water to fight a class B or C fire. Flammable liquids float on water, and water will cause the fire to spread. Water conducts electricity, so water added to a class C fire creates a new deadly hazard for the person fighting the fire.
• Dry chemical extinguishers (B, C). Dry chemical extinguishers are filled with either foam or powder, usually sodium bicarbonate (baking soda) or potassium bicarbonate, and are pressurized with nitrogen. Baking soda is effective because it decomposes at 158 degrees Fahrenheit and releases carbon dioxide, which
Able 5c. Know the classes of fires
and the substances that will extinguish each type of fire.
84 Safety and Seamanship
smothers the oxygen that is feeding the fire. Dry chemical extinguishers interrupt the chemical reaction of the fire by coating the fuel with a thin layer of powder or foam that separates the fuel from the surrounding oxygen. Caution: When used indoors, these extinguishers produce a thick cloud of dust that can obscure vision and cause choking.
• Carbon dioxide (CO2) extinguishers (B, C). CO2 extinguishers contain carbon dioxide, a non-flammable gas, and are highly pressurized. The pressure is so great that it is not uncommon for bits of dry ice to shoot out of the extinguisher. CO2 is heavier than oxygen so these extinguishers work by displacing or taking oxygen away from the surrounding area. CO2 is also very cold, so it cools the fuel, as well.
• Halotron (A, B, C). Halotron is a vaporizing liquid that is ozone friendly and leaves no residue.
• Foam (A, B). Foam floats on flammable liquids to tame a fire and prevent reflashes.
Using a Hand-Held Fire ExtinguisherA portable fire extinguisher is not designed to fight a large or spreading fire. Even
fighting a small fire, they are only useful if they are large enough for the fire at hand, are in working order, and are fully charged. The person using the fire extinguisher must know how it operates. There is no time to stop and read directions once a fire has begun.
If you can remember the acronym P-A-S-S, then you can remember how to use a fire extinguisher.
P—Pull the pin at the top of the extinguisher. This will release the handle. A—Aim at the base of the fire, not at the flames in the middle. In order to
put out the fire, you must neutralize the fuel at the edge of the fire. S—Squeeze the handle to release the extinguishing agent. To stop the
discharge, let go of the handle. S—Sweep from side to side at the base of the fire until it is out. Operate the
extinguisher from a safe distance, and move toward the fire once it begins to diminish. When the fire is out, watch for remaining smoldering hot spots or possible reflash of flammable liquids.
Emergencies UnderwaySafety aboard has been a concern since man first went to sea. Safety drills are
required by law on commercial vessels, and they are required of us, too. Drills should be held frequently in anticipation of any emergency so if a situation develops, it can be dealt with skillfully and quickly without confusion. On vessels large or small, everyone should know where he or she should be and what action is expected in an emergency. Station duties must be clear.
A station bill is a set of assigned duties for each crew member in the event of an emergency. The vessel’s officer of the deck is the person in charge of vessel opera-tions while underway. In all emergencies, the OOD takes charge of the emergency response. The helmsman always steers the vessel; the lookout warns of other dangers, reports, and tracks a man overboard; the navigator notes position and generally is the person who makes the proper emergency call. Each station on the vessel should have a list of duties posted where it can be easily read and executed. A station bill should be prepared and posted for your ship’s vessels for man overboard, fire, abandon ship, and other emergency situations.
Able 5d. In a safe place, under adult supervision, demonstrate your ability to extinguish
a class A and a class B fire with an approved
fire extinguisher. If required, see that the fire extinguisher used is properly recharged
or replaced.
Ordinary 5c. Develop a ship’s station
bill for your ship and review it with an adult leader.
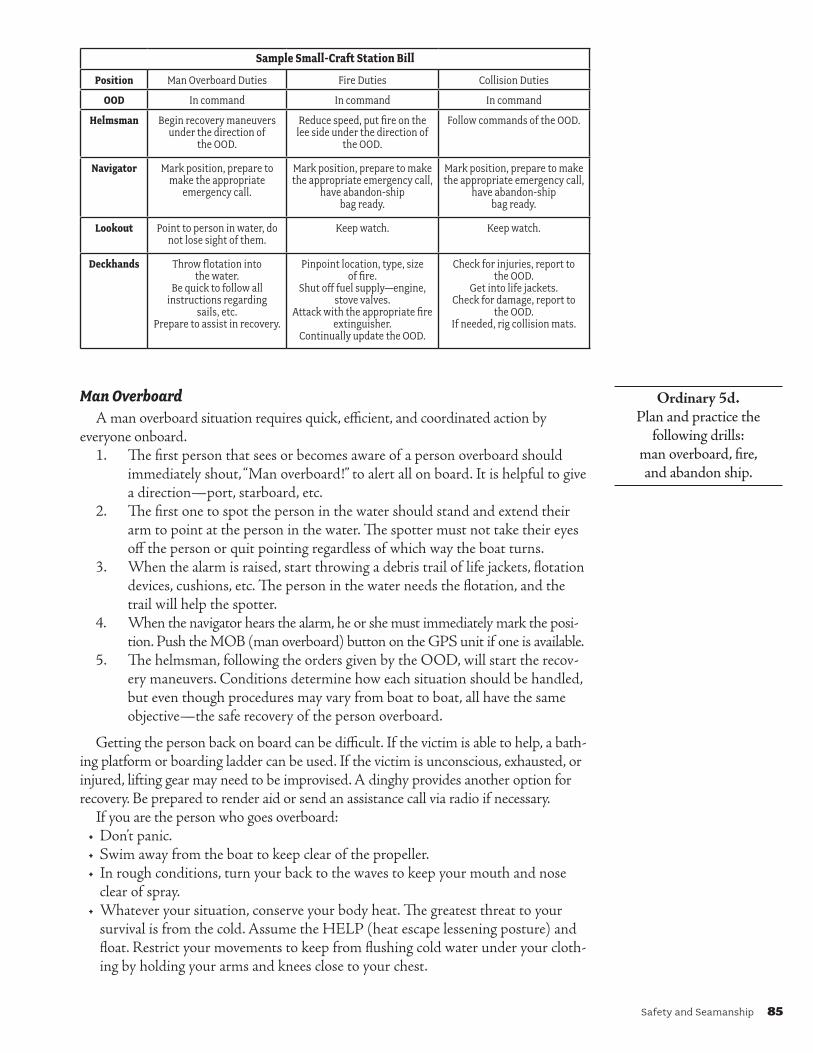
Safety and Seamanship 85
Man OverboardA man overboard situation requires quick, efficient, and coordinated action by
everyone onboard.1. The first person that sees or becomes aware of a person overboard should
immediately shout, “Man overboard!” to alert all on board. It is helpful to give a direction—port, starboard, etc.
2. The first one to spot the person in the water should stand and extend their arm to point at the person in the water. The spotter must not take their eyes off the person or quit pointing regardless of which way the boat turns.
3. When the alarm is raised, start throwing a debris trail of life jackets, flotation devices, cushions, etc. The person in the water needs the flotation, and the trail will help the spotter.
4. When the navigator hears the alarm, he or she must immediately mark the posi-tion. Push the MOB (man overboard) button on the GPS unit if one is available.
5. The helmsman, following the orders given by the OOD, will start the recov-ery maneuvers. Conditions determine how each situation should be handled, but even though procedures may vary from boat to boat, all have the same objective—the safe recovery of the person overboard.
Getting the person back on board can be difficult. If the victim is able to help, a bath-ing platform or boarding ladder can be used. If the victim is unconscious, exhausted, or injured, lifting gear may need to be improvised. A dinghy provides another option for recovery. Be prepared to render aid or send an assistance call via radio if necessary.
If you are the person who goes overboard:• Don’t panic.• Swim away from the boat to keep clear of the propeller.• In rough conditions, turn your back to the waves to keep your mouth and nose
clear of spray.• Whatever your situation, conserve your body heat. The greatest threat to your
survival is from the cold. Assume the HELP (heat escape lessening posture) and float. Restrict your movements to keep from flushing cold water under your cloth-ing by holding your arms and knees close to your chest.
Ordinary 5d. Plan and practice the
following drills: man overboard, fire, and abandon ship.
SampleSmall-CraftStationBill
Position Man Overboard Duties Fire Duties Collision Duties
OOD In command In command In command
Helmsman Begin recovery maneuvers under the direction of
the OOD.
Reduce speed, put fire on the lee side under the direction of
the OOD.
Follow commands of the OOD.
Navigator Mark position, prepare to make the appropriate
emergency call.
Mark position, prepare to make the appropriate emergency call,
have abandon-ship bag ready.
Mark position, prepare to make the appropriate emergency call,
have abandon-ship bag ready.
Lookout Point to person in water, do not lose sight of them.
Keep watch. Keep watch.
Deckhands Throw flotation into the water.
Be quick to follow all instructions regarding
sails, etc. Prepare to assist in recovery.
Pinpoint location, type, size of fire.
Shut off fuel supply—engine, stove valves.
Attack with the appropriate fire extinguisher.
Continually update the OOD.
Check for injuries, report to the OOD.
Get into life jackets. Check for damage, report to
the OOD. If needed, rig collision mats.

86 Safety and Seamanship
FireA shipboard fire requires prompt, careful action to save the vessel and prevent an
abandon ship situation. Some things will occur almost simultaneously.1. Sound the alarm and pass the word.2. Pinpoint the location, the type, and size of the fire.3. The fire’s fuel source should be cut off—ignition keys shut off the engine fuel
pump, stoves have shutoff valves, etc.4. The helmsman needs to reduce speed or stop and turn the vessel to put the
fire on the lee side to minimize the wind effect.5. The navigator needs to mark the position and prepare to make the appropri-
ate emergency call.6. While these things are occurring, the fire should be attacked with extin-
guishing equipment. The OOD needs constant updates—“under control,” “holding,” “spreading,” “out of control,” or “explosion danger!”
7. If necessary, the crew needs to be prepared to abandon ship.
Discuss the specifics of fire emergency procedures for your ship’s vessels with your adult leaders.
CollisionSea Scouts promise to guard against water accidents, but sometimes things do not go
as planned. If a collision occurs, you must check for injuries to the crew and the vessel.1. The alarm must be sounded, and the word passed.2. Check for injuries and damage and report to the OOD.3. The navigator needs to mark the position and be prepared to make the
appropriate emergency calls.4. Get all hands on deck and in life jackets.5. Rig a collision mat if needed, or use canvas or materials at hand to stop inflow
of water.6. If you collided with another vessel and you are not in danger of sinking, stand
by to render assistance to the other vessel.7. If your vessel is in danger of sinking, prepare to abandon her.
Heavy Weather“The wise sailor avoids the storm he cannot weather, and weathers the storm he
cannot avoid.”Before leaving the dock, you should know the limits of your vessel, your crew, and
yourself, and what the predictions are for your day on the water. Sometimes, in spite of the forecast, unexpected bad weather develops, and precautions must be taken. If it can be done, seek a sheltered harbor, put out the proper ground tackle and ride the storm out.
If you are caught in an exposed position, to prepare for heavy weather:1. Make sure the crew knows the location and use of all safety gear.2. Make sure the VHF radio is on and working, and everyone onboard knows
how to make an emergency call.3. Get everyone in their foul weather gear and life jackets.4. Assign tasks to the crew based on ability and experience.5. The navigator should record the ship’s position in the log and check the chart
for nearby hazards.6. Clear any unnecessary items from the cockpit and deck, and secure all gear
and equipment below decks.7. Rig jacklines from bow to stern on port and starboard. Everyone on deck
needs to be in a harness and attached to a jackline.
Quartermaster 5a. Know the heavy-weather precautions taken aboard
both power and sailing vessels when dangerous weather approaches, and
demonstrate these precau-tions aboard the vessel
used by your ship.

Safety and Seamanship 87
8. Reduce your speed to steerage way and turn toward the wind if you are in a powerboat. If you are in a sailboat, reduce the sail to the minimum needed to maintain steerage and keep the ship’s head into the waves. Approach waves at about 45 degrees.
Fog1. Know where you are. Take fixes regularly to determine if you are still on a
safe course.2. Avoid collisions. Take every action to be seen and to see other vessels and hazards.3. The speed of a vessel should be reduced to the point where it maintains full
maneuverability and can stay on course.4. Audible signals should be sounded to announce the vessel’s presence. Vary
the rhythm of your signals occasionally in case your signals are in sync with a nearby vessel.
5. Post multiple lookouts. A lookout is required by the Navigation Rules, but two lookouts on the bow must watch for aids to navigation, other vessels, or hazards. They must listen for sound signals. A lookout aft needs to watch for overtaking vessels. Keeping silence onboard is recommended so all can listen. Fog has the unnerving capacity to distort sound in terms of both volume and direction.
6. Use radar and radar reflectors. Even if your boat doesn’t have radar, hoist a passive radar reflector as high as possible to increase your chances of being seen.
7. If worse comes to worst, and depth of water and other conditions allow, then anchor or lay to. Sound the proper fog signals, keep lookouts posted, and watch and listen for other vessels and hazards.
Running AgroundThere are three kinds of boaters. Some have run aground, the rest will run aground,
and some will lie. Sea Scouts use a variety of vessels on every kind of water, so there is no hard and fast set of rules for grounding. Each grounding is situational with a wide range of possible variables—bottom type, whether under sail or power, current, tide, and where you are and what the chart says.
The first moments after grounding are critical. Do not panic, and assess the situation. • Check for injury to passengers and damage to the vessel.• If there is damage to the vessel, you may need to stay where you are and call the
Coast Guard.
If there is no damage to the vessel, a first instinct is to throw the engine into reverse and use the throttle to try to back out. This is a dangerous choice before fully assessing the situation. Prop wash can cause all manner of muck and mire to be sucked into the raw water intake with the potential to clog strainers and shred impellers. Safer alterna-tives are not limited to, but do include:
• Set an anchor to keep from being pushed harder aground.• Drop the sails to keep from being pushed harder aground, or backwind the sails to
try to push you off.• If you have a centerboard, raise it.• Assess the water depth in front, behind, and to the sides of the boat.• Check wind, current conditions, and a chart to see where deeper water is located.• Check the tide table. The next high tide may free the boat.• Kedge. Set an anchor behind you; use a winch to pull the boat toward the anchor
and freedom.• Reduce your draft. Empty water tanks and put heavy gear in a dinghy.
Quartermaster 5b. Know the special
precautions that should be taken when limited
visibility is encountered.
88 Safety and Seamanship
• Decrease the boat’s draft by heeling her. Move the crew as far to leeward as possible.• Put on shoes and a life jacket if the water is shallow. Make sure you can get back
on the boat, then get off and give her a good push.• If you try to back off and are successful, monitor your temperature gauges carefully
until you are sure you have not fouled the engine intake.• A good Samaritan may offer a tow. Be very careful. Serious injuries can result if
fittings or lines fail.• Call for a professional tow.
Abandon ShipAbandon ship is the final escape for a ship’s crew.1. When the alarm is raised, the word is passed, and everyone gets on deck in a
life jacket.2. The navigator makes a final Mayday call including the ship’s location and intentions.3. Lifeboats or rafts need to be launched, temporarily tethered to the vessel, and
loaded with survival equipment, passengers, and crew.4. If there is no lifeboat, the crew needs to get off the vessel with available
survival equipment. They need to link up so they do not lose contact.5. Remember, stay with your craft unless it is sinking or there is an uncontrol-
lable fire or danger of an explosion.
Abandon Ship BagIn the middle of an emergency, you may only have moments to assess the situation and
abandon the boat. Mere moments do not give you the time to think about or assemble what you will need. Abandon ship or “ditch bags” should be prepared in advance with the appropriate tools and materials necessary to survive and signal for rescue.
At a minimum, the waterproof bag should contain a portable VHF radio, compass, flares, waterproof charts, signal mirror, knife, fishing equipment, first-aid kit, sunscreen, and a waterproof flashlight. The bag should be stored in an easily accessible location.
Sample Crisis-at-Sea Emergency DrillsThe following exercises are suggested for practice by all adult leaders, officers, and
ship members. Emergency drills are extremely important, and new mem bers should be trained as soon after joining as possible. Frequent unannounced practice should be standard protocol. Remember, safety at sea is a high priority in Sea Scouts. The term “officer of the deck” as it relates to these drills refers to the person in charge of the vessel’s operations while underway. The OOD may be the Skipper, the boatswain, or another qualified individual.
Man Overboard DrillTie together two milk bottles that have been half-filled with water. In open water,
toss the milk bottles into the water and announce, “This is a drill. Man overboard.”
Sailing Vessels1. Officer of the deck’s duties:
A. The OOD immediately gives the command, “Right (or left) full rudder.” The vessel is turned so the bow turns toward the side where the victim entered the water (e.g., if the victim fell off the starboard side, the command would be for right full rudder).
B. The OOD orders the vessel’s engine started immediately. He then gives the command, “Man your rescue stations.” If the vessel has a public address
Safety and Seamanship 89
system, the alert, “This is a drill. Man overboard; man your rescue stations!” should be repeated on the PA system.
C. When the vessel is exactly 60 degrees from its original course, the OOD gives the command, “Left (or right) full rudder,” and turns the vessel left (or right) until the vessel reaches the exact reciprocal of the original course. The OOD then orders, “Steady up on course _____.” Example: If the vessel is heading north (000 degrees), the OOD would turn the vessel right to 060 degrees, then left to 180 degrees.
D. The jib sheet is not immediately released. At the point where the vessel is about to beam reach on the reciprocal course, the OOD orders, “Release the mainsheet,” and allows the mainsail to luff.
E. Once on a reciprocal course, as the vessel approaches the victim, the OOD orders the rudder right or left full again, as though he were trying to turn the vessel back through the wind. Approach the victim to windward. This pro-cedure causes the vessel to “heave to” or stop. The turn is called a Williamson turn and, if properly executed, will return the vessel to the spot where the victim entered the water.
2. Lookout’s duties:A. The lookout will immediately locate the victim in the water and will not take
his eyes off the victim. The lookout will point a finger at the location of the victim in the water and give verbal location of the victim relative to the vessel’s position.
B. As the vessel approaches the victim, the lookout will give continuous updates as to the victim’s location. Some vessels have electronic ship communications systems that make this operation easier.
3. Navigator’s duties:A. The navigator will immediately determine exactly where the victim fell into
the water by whatever means are available. If the vessel has GPS, write the exact latitude and longitude of the position on the log. Some GPS units have a man overboard feature that allows the device to retain the exact position of the victim by simply pushing a button. Read the instructions carefully on the unit.
B. If the crew cannot immediately spot the victim, the navigator determines the current position and continuously plots a course to the presumed location of the victim. The navigator is usually near the VHF radio and should call the U.S. Coast Guard if the victim is not immediately found.
4. Helmsman’s duties:A. The helmsman must follow the exact instructions of the OOD. He must be
familiar with what is about to happen. The helmsman must also fully under-stand the Williamson turn and how to heave to.
5. General crew’s duties:A. Throw some floating object overboard immediately to mark the site and
to give the victim something to grasp for added buoyancy. Some vessels are equipped with a man overboard pole that can be released by a crew member. At night, point a light on the victim and hold it there to help guide the helmsman.
B. Crew members will put on their life jackets as soon as practical. The lookout should always be wearing his life jacket if he is standing on the bow. It may be necessary to put a swimmer in the water, but do not put a member of the crew into the water immediately unless the victim is a small child or an elderly
90 Safety and Seamanship
or disabled adult. One member of the crew should be preparing a line to be attached to the swimmer if necessary. A first-aid kit should be brought on deck as well as blankets, if conditions dictate.
C. The procedure for getting the victim back on board varies with the vessel. If the victim cannot help himself, it may be necessary to rig a sling suspended from a block connected to the sail or cargo boom. Generally, lowering a ladder will work. Smaller ves sels are more stable if the victim boards over the stern. Experiment with this procedure in a safe area with the vessel at anchor.
D. If the vessel begins an extended search for the victim, the international signal flag “Oscar” should be hoisted on the port side of the vessel.
Power VesselsThe procedure for power vessels is the same as under sail except for sail-
handling procedures.
Fire Drill
1. OOD’s duties:A. The OOD gives the order “All stop” if the vessel is under power.B. The OOD sends a crew member forward to note the exact origin of the fire.
If there is breathing equipment on board, the crew member should wear it. While moving forward to locate the fire, the crew member should carry a fire extinguisher. If the vessel has a public address system, the alert “This is a drill. Fire in the forward paint locker; all hands man your firefighting stations!” should be broadcast.
C. The OOD orders another crew member to collect all other fire extinguishers and carry them to the fire’s location.
D. The OOD will prepare the crew to abandon ship.2. Navigator’s duties:
A. The navigator will immediately fix the exact location of the vessel.B. The navigator will simulate a call to the Coast Guard giving the vessel’s
position and description, the number of people on board, and the nature of the emergency.
3. Crew’s duties:A. Crew members will put on their life jackets.B. No unnecessary talking.C. Bring the first-aid kit topside.D. Prepare to abandon ship.
4. Advanced training:A. Be sure all crew members know general firefighting techniques. In a safe area
ashore, light a fire in a container using charcoal lighter fluid and have crew members extinguish the fire using extinguishers.
B. Be sure all crew members know the types and classes of fire extinguishers, and understand the ABCs of fire chemistry (i.e., fuel + oxygen + heat).
C. Be sure all crew members understand the damage that smoke and heat cause when inhaled.
D. Plan a trip to a fire station or a Coast Guard station, and arrange for a lecture on firefighting. The Coast Guard and Navy have simulators to practice firefighting.

Safety and Seamanship 91
Damage Control DrillYour ship must establish a damage control procedure for each vessel it uses. This
procedure will vary widely from vessel to vessel. Here are some basics for damage control drills:
• Require that each ship member know the location and proper operation of all through-hull fittings. To practice, blindfold ship members one by one and require them to find and secure certain through-hull fittings.
• Know the location and operation of all bilge pumps. Have the crew man the pumps and make them operational. Practice bilge pump replacement in case a pump fails.
• Simulate a hole in the hull at a particular point and ask crew members what they would do. Ensure that you have damage control materials on board (plywood, underwater mastic, etc.). Large vessels should have damage control lockers.
• As you begin damage control, have a crew member simulate a call to the Coast Guard, giving them the same information as in a fire drill.
• Prepare to abandon ship. • Don’t take chances with your crew. If the situation is grave or life-threat ening, aban-
don ship. Remember that you are better off floating on the vessel than in a life raft or life jacket. Knowledge and practice will ensure a suc cessful outcome in emergencies.
Abandon Ship DrillIn a safe area while riding at anchor, the OOD gives the command, “This is a drill.
Prepare to abandon ship!”1. Preparation:
A. An abandon ship bag should be prepared ahead. B. All crew members must be briefed on the abandon ship proce dure and know
their duties and stations.C. Everyone must know how to operate a VHF marine radio.
2. OOD’s duties:A. Order the ship to abandon ship stations.B. Have the abandon ship bag placed in a life raft or assign a ship member to be
responsible for it.C. Direct the navigator to determine the vessel’s position and simulate a radio
call to the Coast Guard, giving the vessel’s position and description and detailed information about the emergency.
D. Confirm that all hands are wearing life jackets. Then launch the life raft.E. Direct a crew member to place food and water in the life raft. If there is a
portable water maker, be sure it works and is placed in the life raft.F. Confirm that all crew members are off the vessel. The OOD and the Skipper
are the last to leave.3. Crew’s duties:
A. All crew members will put on their life jackets and other gear needed for weather or sea conditions.
B. Each crew member will man his or her assigned abandon ship station.
92 Safety and Seamanship
Communication
Radiotelephone Aboard ShipThree types of radiotelephone equipment are common for marine use. The first is
single sideband and covers long-range communication requirements from 150 to 10,000 miles. This equipment usually is found on oceangoing ships, is relatively expensive, and not normally used aboard Sea Scout vessels. SSB use requires both a station and operator’s license.
A more practical type of radiotelephone for Sea Scout use is very high frequency-frequency modulated (VHF-FM). The VHF radiotelephone has a line-of-sight range and is practical to 20 miles—farther with a tall antenna. Neither a station license nor operator’s permit is required for VHF-FM radios while in U.S. inland waters.
The third type of radiotelephone is citizens’ band. Its range is short, discipline is almost nonexistent in its use, and it is not monitored on a regular basis by the U.S. Coast Guard or other agencies. While units are inexpensive, they are not recommended for Sea Scout use.
Radiotelephone ProceduresThe VHF is the tool most boaters use to communicate with other boaters, the Coast
Guard, barges, drawbridge tenders, etc. There are also marine weather channels, and at least one covers your area.
Careful discipline is to be maintained when using SSB or VHF marine equip-ment. “Handles,” “10 codes,” CB jargon, and idle chitchat have no place in marine radiotelephone communication. The Federal Communications Commission monitors transmissions and will issue citations for repeated violations of the rules. A marine radiotelephone is not a plaything. It can—and has—saved many lives.
ProwordsMarine radiotelephone conversations are terse, efficient, and to the point. A number
of procedure words, or “prowords,” have become common usage:Over. It is your turn to talk.Out. I have finished talking and no reply is expected.Roger. I understand.Wilco. I will comply.Say again. Please repeat your last transmission.I spell. I am spelling in phonetic words.There are other prowords, but these are the most common.
The AlphabetLetters of the alphabet often sound alike. B, C, D, E, G, P, T, V, and Z can easily be
confused. There is no doubt, however, when one hears Bravo, Charlie, Delta, Echo, Golf, Papa, Tango, Victor, and Zulu. So all letters of the alphabet are transmitted by voice using the following words:A—AlfaB—BravoC—CharlieD—DeltaE—EchoF—FoxtrotG—GolfH—HotelI—India
J—JulietK—KiloL—LimaM—MikeN—NovemberO—OscarP—PapaQ—QuebecR—Romeo
S—SierraT—TangoU—UniformV—VictorW—WhiskeyX—X-RayY—YankeeZ—Zulu
Ordinary 5e. Describe three types of equipment used in
marine communications.

Safety and Seamanship 93
A radiotelephone call sign WLB 4321 is stated on the air as Whiskey Lima Bravo 4321. To spell the name of the vessel Scout, the radiotelephone operator would say, “I spell: Sierra, Charlie, Oscar, Uniform, Tango.”
Using the RadiotelephoneSpecific frequencies have been set aside for calling and emergency traffic on SSB and
VHF radiotelephones. These are 2182 kHz on SSB and channel 16 on VHF. Each vessel is required by law to monitor the emergency and calling channel unless actively speaking on another channel designated for the type of transmission being sent. VHF has many channels, but just a few are for pleasure boaters:
06 Safety messages, ship to ship09 Primary hail (call), and monitor (listen)13 Hail commercial vessels and drawbridge tenders on low power16 Emergency (Mayday) hail; hail Coast Guard22 Coast Guard working channel24, 25, 26, 27, 28 Hail marine operator; phone calls68, 69, 71, 72, 78 Pleasure boat working channels
There is a prescribed format used to initiate a call on a marine radiotelephone. All calls are made on channel 16 when VHF is used, 2182 kHz for SSB. Once contact is established, both stations shift to a working frequency to transact their business. Here’s an example of the procedure:
Check to be sure that the calling and desired working channels are free of traffic.Place the call, being sure to identify who you are calling and who is making the call:
“Scout, Scout, Scout. This is Invincible, Kilo Mike 5502. Over.”If not immediately answered, the call may be repeated. If there is no answer within 30 seconds, two minutes must elapse before calling again.
The vessel being called answers:“Invincible, this is Scout, Kilo Delta 1996. Over.”
The two stations agree on the working channel: “Scout, Invincible; shift and answer six eight.”“Six eight; wilco.”Both stations now shift to channel 68.
The called station speaks next:“Invincible. Scout, Kilo Delta 1996. Over.”This identifies the stations now on channel 68.
The vessel that originated the call now identifies itself and the conversation proceeds:“Scout. Invincible, Kilo Mike 5502.” (The message now follows.)
Each vessel’s radio operator takes turn speaking. Each message ends with “over” to let the other party know that a reply is desired.
When the business has been concluded, both stations sign off and shift back to channel 16:
“Scout, Kilo Delta 1996, out.”“Invincible, Kilo Mike 5502, out.”
The most misused prowords are “over” and “out.” “Over” means, “It’s your turn to talk.” “Out” means, “I’ve finished this transmission.” If you say “Over and out,” you’re saying, “It’s your turn to talk, but I’m not listening.”
Marine radiotelephone messages should be brief, clear, and concise. Each transmis-sion may last no more than five minutes. Each station spends as little time as possible on channel 16, clearing it for emergency and other use.
Ordinary 5f. Demonstrate your
knowledge of correct maritime radio telephone
communications procedures by making at least three
calls to other vessels, marinas, bridges, or locks.
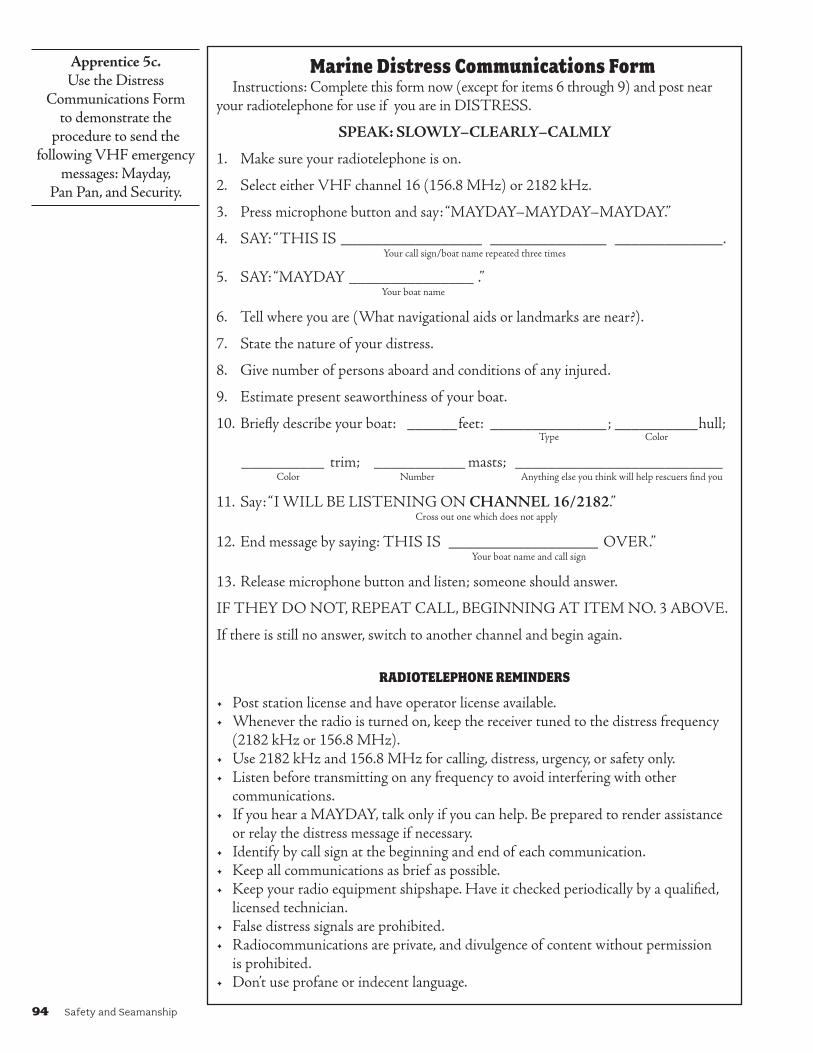
94 Safety and Seamanship
Apprentice 5c. Use the Distress
Communications Form to demonstrate the
procedure to send the following VHF emergency
messages: Mayday, Pan Pan, and Security.
Marine Distress Communications FormInstructions: Complete this form now (except for items 6 through 9) and post near
your radiotelephone for use if you are in DISTRESS.
SPEAK: SLOWLY–CLEARLY–CALMLY
1. Make sure your radiotelephone is on.
2. Select either VHF channel 16 (156.8 MHz) or 2182 kHz.
3. Press microphone button and say: “MAYDAY–MAYDAY–MAYDAY.”
4. SAY: “THIS IS _________________ ______________ _____________.Your call sign/boat name repeated three times
5. SAY: “MAYDAY _______________ .” Your boat name
6. Tell where you are (What navigational aids or landmarks are near?).
7. State the nature of your distress.
8. Give number of persons aboard and conditions of any injured.
9. Estimate present seaworthiness of your boat.
10. Briefly describe your boat: ______feet: ______________; __________hull; Type Color
__________ trim; ___________ masts; _________________________ Color Number Anything else you think will help rescuers find you
11. Say: “I WILL BE LISTENING ON CHANNEL 16/2182.” Cross out one which does not apply
12. End message by saying: THIS IS __________________ OVER.” Your boat name and call sign
13. Release microphone button and listen; someone should answer.
IF THEY DO NOT, REPEAT CALL, BEGINNING AT ITEM NO. 3 ABOVE.
If there is still no answer, switch to another channel and begin again.
RADIOTELEPHONE REMINDERS
• Post station license and have operator license available.• Whenever the radio is turned on, keep the receiver tuned to the distress frequency
(2182 kHz or 156.8 MHz).• Use 2182 kHz and 156.8 MHz for calling, distress, urgency, or safety only.• Listen before transmitting on any frequency to avoid interfering with other
communications.• If you hear a MAYDAY, talk only if you can help. Be prepared to render assistance
or relay the distress message if necessary.• Identify by call sign at the beginning and end of each communication.• Keep all communications as brief as possible.• Keep your radio equipment shipshape. Have it checked periodically by a qualified,
licensed technician.• False distress signals are prohibited.• Radiocommunications are private, and divulgence of content without permission
is prohibited.• Don’t use profane or indecent language.
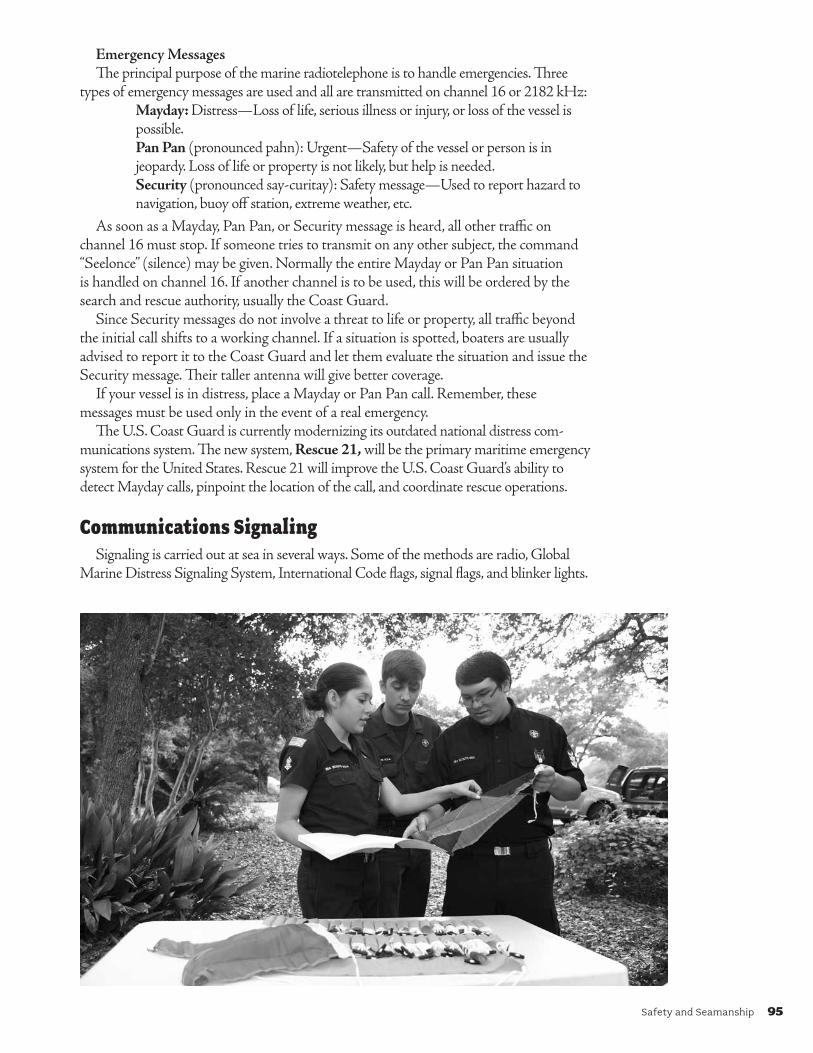
Safety and Seamanship 95
Emergency MessagesThe principal purpose of the marine radiotelephone is to handle emergencies. Three
types of emergency messages are used and all are transmitted on channel 16 or 2182 kHz:Mayday: Distress—Loss of life, serious illness or injury, or loss of the vessel is possible.Pan Pan (pronounced pahn): Urgent—Safety of the vessel or person is in jeopardy. Loss of life or property is not likely, but help is needed.Security (pronounced say-curitay): Safety message—Used to report hazard to navigation, buoy off station, extreme weather, etc.
As soon as a Mayday, Pan Pan, or Security message is heard, all other traffic on channel 16 must stop. If someone tries to transmit on any other subject, the command “Seelonce” (silence) may be given. Normally the entire Mayday or Pan Pan situation is handled on channel 16. If another channel is to be used, this will be ordered by the search and rescue authority, usually the Coast Guard.
Since Security messages do not involve a threat to life or property, all traffic beyond the initial call shifts to a working channel. If a situation is spotted, boaters are usually advised to report it to the Coast Guard and let them evaluate the situation and issue the Security message. Their taller antenna will give better coverage.
If your vessel is in distress, place a Mayday or Pan Pan call. Remember, these messages must be used only in the event of a real emergency.
The U.S. Coast Guard is currently modernizing its outdated national distress com-munications system. The new system, Rescue 21, will be the primary maritime emergency system for the United States. Rescue 21 will improve the U.S. Coast Guard’s ability to detect Mayday calls, pinpoint the location of the call, and coordinate rescue operations.
Communications SignalingSignaling is carried out at sea in several ways. Some of the methods are radio, Global
Marine Distress Signaling System, International Code flags, signal flags, and blinker lights.
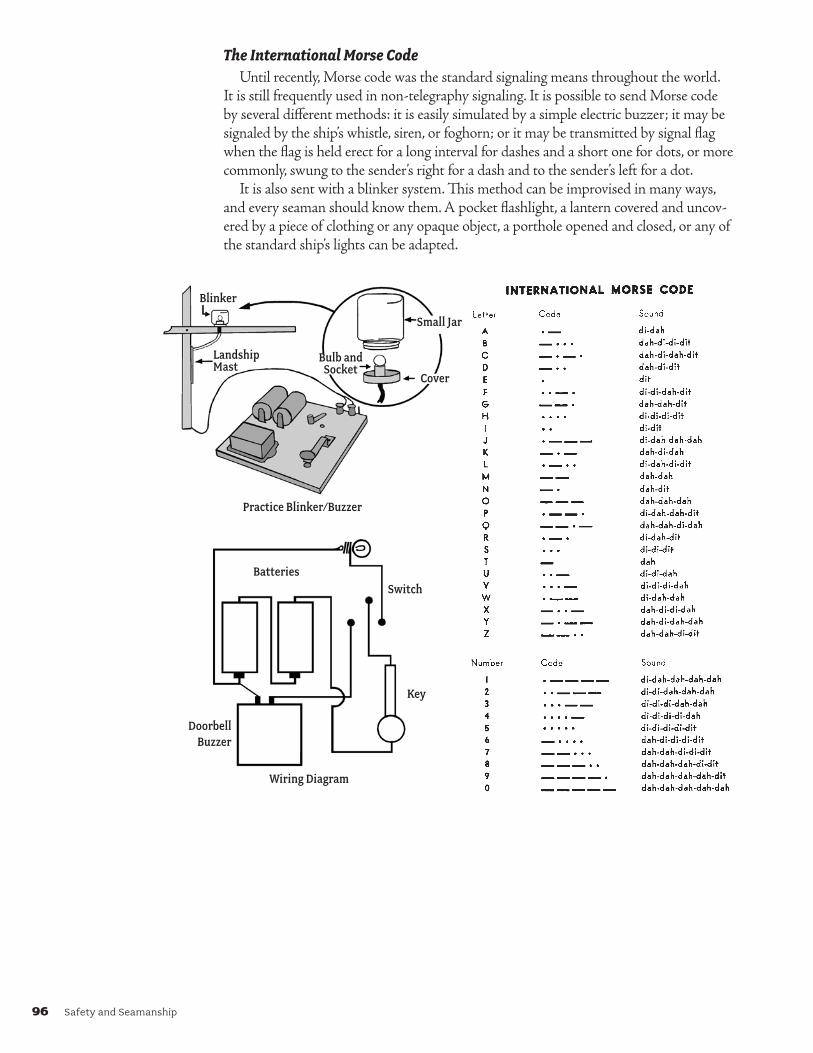
96 Safety and Seamanship
The International Morse CodeUntil recently, Morse code was the standard signaling means throughout the world.
It is still frequently used in non-telegraphy signaling. It is possible to send Morse code by several different methods: it is easily simulated by a simple electric buzzer; it may be signaled by the ship’s whistle, siren, or foghorn; or it may be transmitted by signal flag when the flag is held erect for a long interval for dashes and a short one for dots, or more commonly, swung to the sender’s right for a dash and to the sender’s left for a dot.
It is also sent with a blinker system. This method can be improvised in many ways, and every seaman should know them. A pocket flashlight, a lantern covered and uncov-ered by a piece of clothing or any opaque object, a porthole opened and closed, or any of the standard ship’s lights can be adapted.
Practice Blinker/Buzzer
Wiring Diagram
Blinker
Landship Mast
Bulb and Socket
Small Jar
Cover
BatteriesSwitch
Doorbell Buzzer
Key

Safety and Seamanship 97
SemaphoreThis method of signaling is an old favorite of the Navy and has much to recommend
it. It is the fastest way of sending messages by flags. It can be used only in the daytime and at short distances. Form the letters by placing two flags at certain angles to each other. Hold each so the staff is a continuation of your forearm. Keep your arms stiff.
A B C D E F G H
I J K L M N O P
Q R S T U V W
X Y Z ATTENTION INTERVAL NUMERAL
Semaphore Signaling
Whenever you cross a flag in front of you to make a letter, twist your body slightly in the same direction.
To send a semaphore message, get the receiver’s attention with the attention signal, made by waving both flags repeatedly overhead in a scissorlike motion. When the receiver sends the letter K, you can go ahead.
Send the letters of each word by going directly from the position of one letter, without stopping, into the position of the next, pausing in each. If you have to think of the next letter, hold the letter you are making until the next one comes to mind.
To indicate the end of a word, give the front signal by bringing the flags down in front of you, with the staffs crossing each other.
Whenever double letters appear in a word, use the front signal to separate them. Make the first letter, then front, and immediately, without pause, bring the flags again in the position of the letter.
The receiver acknowledges each word by sending C. If he or she suddenly sends IMI, it means he or she did not catch your last word. Repeat it and continue from there. If you have made an error yourself, send eight E’s and start again from the beginning of that word. Finish the message with AR and wait for the receiver to make the letter R. This means the receiver has your message.

98 Safety and Seamanship
International Code FlagsAny extensive use of International Code flags will call for the use of International
Code of Signals, published by the U.S. Naval Oceanographic Office. A few of the principal signals and the general method of making and answering signals are given here.
The flags are shown in color on the “International Flags and Pennants” page in the appendix.
How to Make a SignalIf you want to make a signal, hoist your ensign with the code flag under it. If more
than one vessel or signal station is in sight and your signal is intended for a particular vessel or signal station, indicate which vessel or signal station you are addressing by making the distinguishing signal (i.e., the signal letters) of the vessel or station with which you want to communicate. If you don’t know the distinguishing signal, observe that ships will answer with their distinguishing signal hoists or answering pennant.
When you have been answered by the vessel you are addressing, proceed with your sig-nal, first hauling down your code flag. It may be required for making or answering signals.
Signals should always be hoisted where they can be best seen, not necessarily at the masthead. Each hoist should be kept flying until the other ship hoists her answering pennant close up. When finished signaling, haul down your ensign.
How to Answer a SignalOn seeing a signal made by another ship, hoist your answering pennant at the dip.
(A flag is at the dip when it is hoisted about three-quarters up its halyard.)Always hoist the answering pennant where it can be seen best.When the hoist has been recognized and is understood, hoist your answering
pennant close up, and keep it there until the other ship hauls her hoist down. Then haul your answering pennant down to the dip and wait for the next hoist.
If the other ship’s flags cannot be made out or the signal is not understood, keep your answering pennant at the dip, and make a signal to that effect. When she has repeated or clarified her signal, hoist your answering pennant close up.
The code flags come in various sizes. The square flags, 3 by 3 feet, are handy for Sea Scouts.
The best method of practice is to rig up two widely separated masts or halyard hauls. Then have your instructor give a set of signals to one group, noting the time, speed, and accuracy in which they are transmitted. Then have the second group send some signals.
Signal flags should be properly bent, either with a sheet or signal halyard bend, or with snap hooks. The best way to stow and use flags for quick work is to have a signal rack and a signal bag made of canvas. Flags should never be stowed wet and should be kept in repair.
First AidA working knowledge of first aid is absolutely essential to the safe operation of a Sea
Scout ship. Normally, medical assistance is not immediately available—particularly on a small boat.
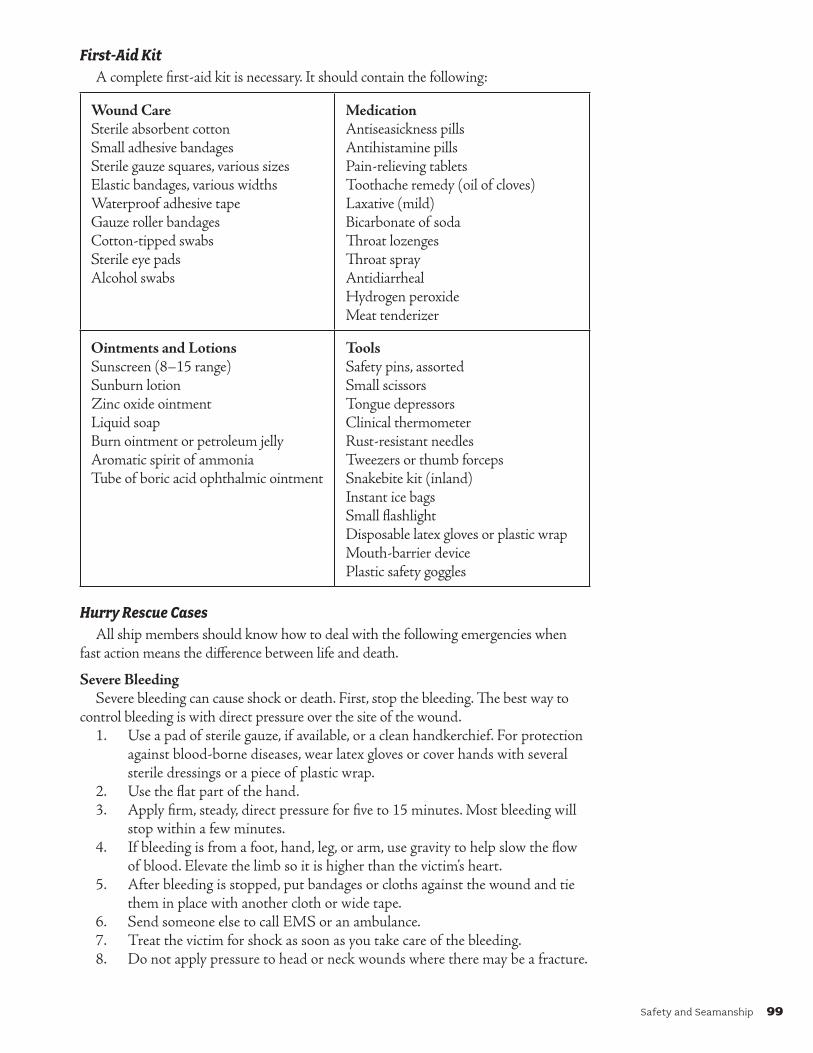
Safety and Seamanship 99
First-Aid KitA complete first-aid kit is necessary. It should contain the following:
Wound CareSterile absorbent cottonSmall adhesive bandagesSterile gauze squares, various sizesElastic bandages, various widthsWaterproof adhesive tapeGauze roller bandagesCotton-tipped swabsSterile eye padsAlcohol swabs
MedicationAntiseasickness pillsAntihistamine pillsPain-relieving tablets Toothache remedy (oil of cloves)Laxative (mild)Bicarbonate of sodaThroat lozengesThroat sprayAntidiarrhealHydrogen peroxideMeat tenderizer
Ointments and LotionsSunscreen (8–15 range)Sunburn lotionZinc oxide ointmentLiquid soapBurn ointment or petroleum jellyAromatic spirit of ammoniaTube of boric acid ophthalmic ointment
ToolsSafety pins, assortedSmall scissorsTongue depressorsClinical thermometerRust-resistant needlesTweezers or thumb forcepsSnakebite kit (inland)Instant ice bagsSmall flashlightDisposable latex gloves or plastic wrapMouth-barrier devicePlastic safety goggles
Hurry Rescue CasesAll ship members should know how to deal with the following emergencies when
fast action means the difference between life and death.
Severe BleedingSevere bleeding can cause shock or death. First, stop the bleeding. The best way to
control bleeding is with direct pressure over the site of the wound.1. Use a pad of sterile gauze, if available, or a clean handkerchief. For protection
against blood-borne diseases, wear latex gloves or cover hands with several sterile dressings or a piece of plastic wrap.
2. Use the flat part of the hand.3. Apply firm, steady, direct pressure for five to 15 minutes. Most bleeding will
stop within a few minutes.4. If bleeding is from a foot, hand, leg, or arm, use gravity to help slow the flow
of blood. Elevate the limb so it is higher than the victim’s heart.5. After bleeding is stopped, put bandages or cloths against the wound and tie
them in place with another cloth or wide tape.6. Send someone else to call EMS or an ambulance.7. Treat the victim for shock as soon as you take care of the bleeding.8. Do not apply pressure to head or neck wounds where there may be a fracture.

100 Safety and Seamanship
Rescue BreathingA drowning person is pulled out of the water . . . a man is dragged out of a burning
building . . . an auto mechanic is dragged from under a car with its motor running . . . a child is pulled away from an electric wire. In each of these cases, breathing may have stopped. Yet, the victim’s life may be saved.
If you come upon an emergency, check to see if the victim is breathing. Look at the chest, and listen with an ear to the mouth. If not breathing, begin rescue breathing.
In rescue breathing you breathe your own breath into the victim’s lungs. The air in your breath has enough oxygen in it to save a life. For an adult you breathe through the victim’s mouth. For a child you breathe into both nose and mouth.
First Aid. Place the victim face up. Tilt his head far back, chin pointing up. Lift with the fingers of one hand under the chin. Press down with the other hand on the forehead. Pinch the nostrils shut with thumb and forefinger of this hand.
Then take a deep breath and give rescue breathing:1. Open your mouth wide and seal it over the victim’s mouth. (For protection
from airborne infectious diseases, use a mouth-barrier device.) Blow into the mouth to fill up the lungs. Look to see that the chest rises.
2. Remove your mouth. Take a deep breath. Look to see that the victim’s chest falls as the air escapes.
Repeat steps 1 and 2 every five seconds for an adult or every three seconds for a child (1 to 8 years of age).
When the victim’s breathing starts, time your efforts to fit his efforts to breathe for himself. Then care for shock.
If no air is getting into the victim’s lungs, move speedily to open the airways:1. Place one of your hands on your other hand and press the victim’s abdomen
with upward thrusts.2. Probe the victim’s mouth with two fingers for obstructions. Then quickly resume
rescue breathing. Don’t give up. Continue until a physician tells you to stop.
Stopped Breathing—No PulseIf the victim has stopped breathing and there is no pulse, his heart has stopped.
Cardiopulmonary resuscitation is the approved method to start the heart again.CPR requires a trained person. Proper training by local Red Cross chapters or
American Heart Association affiliates is essential because CPR can cause damage, even when done correctly.
Abdominal ThrustsIf someone is choking but conscious and cannot breathe or speak, something has
blocked the airway. Encourage the victim to cough, and if that does not dislodge what-ever is blocking the airway, then administer some firm back slaps with the heel of your hand on the victim’s upper back. If the airway remains blocked, you will need to perform abdominal thrusts.
1. If the victim is sitting, ask them to stand.2. Put your arms around the victim at the waist.3. Make a fist with one hand and place your thumb toward the victim just above
the navel.4. Grab your fist with your other hand and give four to five upward squeeze-
thrusts to the victim’s abdomen. Make the squeeze tight enough to dislodge the foreign body. (Your thrusts are forcing the diaphragm to move air out of the victim’s lungs to create an artificial cough.)
5. Repeat the maneuver until the object is dislodged.Caution: If the person is coughing, wheezing, and breathing in some way, do not use
abdominal thrusts.

Safety and Seamanship 101
HypothermiaA deadly hazard to persons on or about outdoor waters is hypothermia.
Hypothermia occurs when the body loses heat faster than it can produce heat because of exposure to cold temperatures. When this occurs, the heart, the nervous system, and the body’s normal functions slow and cease.
PreventionWear appropriate clothing when it is cold. Cotton is a poor choice because it retains
water if it gets wet. Synthetic and wool fibers are better insulation and dry more quickly. Carry an extra change of clothing when boating. You may need it if the weather gets rough, or you may want to put on another layer if the cold becomes more extreme. The U.S. Coast Guard promotes using life jackets as a method of protection against hypo-thermia through the 50/50/50 rule: If someone is in 50 degrees Fahrenheit water for 50 minutes, he or she has a 50 percent better chance of survival.
SymptomsWatch for “umbles”—stumbles, mumbles, fumbles, and grumbles. There are three
stages of hypothermia, and treating it in the earlier stages is far easier and safer than waiting until the situation is dire.
• Stage 1: Mild to strong shivering, goose bumps, breathing is quick and shallow, victim is unable to perform complex tasks with hands.
• Stage 2: Violent shivering; apparent lack of muscle coordination; movement is slow and labored; mild confusion; victim is pale with blue lips, ears, fingers, and toes.
• Stage 3: Shivering stops, difficulty speaking and thinking, stumbling, inability to use hands, pulse and respiration rates decrease, major organs fail, clinical death occurs.
TreatmentConserve the heat the victim has and replace the heat they have lost.
• Mild to moderate hypothermia: — Remove all wet clothes and shelter the victim from wind and weather. — Give warm fluids if the victim is able to drink. Do not give caffeine or alcohol. — Cover the person’s body with blankets and put them in a sleeping bag.
• Severe hypothermia: — Crawl into the sleeping bag with the victim. — Do not administer fluids. — Monitor breathing and pulse. — If breathing stops, perform rescue breathing and CPR until medical help arrives.
Note: With hypothermia, a person cannot be considered dead until he or she has been adequately warmed.
Heat ExhaustionNormally, our bodies cool by sweating, but there are factors that can interrupt or
impede this process. Children under 5, the aged, people on certain medications, folks who are not used to extreme heat and humidity, and those who are not properly hydrated are the most at risk. When we sweat, our body loses a combination of fluids and salts. If these are not replaced with an adequate intake of fluids, then heat exhaustion occurs.
Prevention• If working or playing in extreme heat, drink plenty of fluids before, during and
after the activity.• Drink more than usual.
102 Safety and Seamanship
• Avoid caffeine and sugar.• Wear loose and lightweight clothing.
SymptomsHeat exhaustion’s symptoms are similar to the symptoms of shock:
• Heavy sweating• Feeling faint or nauseous• Pale, clammy skin• Extreme thirst• Headache• Extreme fatigue• Cramps• Dark-colored urine
Treatment• Get out of the sun and into the shade. Air-conditioning is even better.• Drink cool fluids.• Cool the body by spraying or sponging with water. Fan the skin.• Loosen clothing.• Rest, lie down, and elevate legs and feet.
If the victim’s fever is greater than 102 degrees, they faint, are confused, or have a seizure, make a Mayday or 911 call.
General SafetyVessel and equipment safety rules that apply to a ship vary across the nation; how-
ever, there are some general rules that have broad application. Basically, each individual needs to exercise care and common sense around boats.
Vessel Safety1. Before you even get on the boat, don’t forget to file a float plan; and before you
leave the dock, make sure you have all the safety equipment required by law on board.
2. Make sure you have enough fuel, oil, water, food, and sunscreen.3. Stow everything properly. Make sure there are no tripping hazards on deck
and down below.4. Wear your life jacket!5. Keep hands, feet, loose clothing, long hair, and jewelry away from winches.
Braid the hair or tuck it under a hat, and leave the jewelry at home.6. Operate the boat at safe speeds.7. Stay away from beaches and people. Propellers can cause serious injuries.8. Have a designated lookout.9. Be courteous to others on and around the water. Know and practice the rules
of the road (Navigation Rules).10. Know where you are and where you are going. Pay attention to posted signs
and markers, and keep an eye on the weather.11. Pack out what you pack in, and leave the water better than you found it.
Tool Safety1. Wear safety glasses with most hand and power tools.2. Wear the appropriate protective equipment for the tool being used—gloves,
helmets, shoes, aprons, etc.3. Inspect all tools before using. Check for wear, cracks, breaks, etc.
Apprentice 5d. Know the safety rules that
apply to vessels and equipment used by your
ship, and safety standards in the use of power tools, machinery, lifting heavy objects, and other safety
devices used by your ship.

Safety and Seamanship 103
4. Make sure all power tool shields are in place and safety interconnects are working.5. The work area should be well lit, clean, dry, and free of obstructions.6. Avoid loose clothing and secure long hair.7. Use the right tool for the job.8. Do not use power tools unless you have been properly trained, and only use
them with adult permission and supervision.9. Disconnect power when changing blades or bits and during cleaning
or maintenance.10. If lifting is necessary, plan before you lift. Know where you are taking the
object and clear a path. Get help with bulky loads, and use the appropriate equipment for loads too heavy to carry safely.
11. If you are tired, stop. If you are distracted, stop. Fatigue and inattention cause accidents and injuries.
GalleyStoves aboard ship are a potential source of fire and explosion. They must be kept in
good repair. Always shut off the fuel source at the tank when the stove is not in use, and have a fire extinguisher within arm’s length of the cook in the galley.
PropaneVarious types of stoves are used aboard ships. Each type has unique characteristics.
Propane stoves use compressed gas that is heavier than air. While propane is relatively inexpensive, a leak could let the heavy gas sink into the bilge or engine area and cause an explosion. The stove must have both an electrical and manual shutoff. The stove should be thermocoupled, meaning that if a flame is blown out, the gas automatically turns off.
Pressurized AlcoholPressurized alcohol fuel stoves have a complex lighting sequence. The bowl under the
burner must be filled with fuel and the stove valve turned off. The bowl is then ignited and more fuel added a little at a time until the fuel vaporizes when it reaches the hot burner. No liquid fuel should be visible in the bowl when the burner valve is opened. If an alcohol fire begins, remember, it can be put out with water.
Compressed Natural GasCompressed natural gas is lighter than air and for that reason is safer. This fuel
unfortunately is difficult to find and does not last as long as propane. A compressed natural gas stove works like a home gas stove.
CharcoalYour ship may carry a charcoal grill for shore use. Charcoal produces carbon
monoxide, a colorless and odorless gas, which can accumulate to toxic levels in a closed environment. Charcoal should never be used inside, even if ventilation is provided. Charcoal continues to produce carbon monoxide until it is completely extinguished.
It is recommended that you wait 48 hours before disposing of ashes; however, if you need to dispose of ashes before they are completely cooled, soak them completely in water, wrap in heavy duty foil and dispose of them in a non-combustible container.
When using charcoal that is not “ready to light,” arrange the briquettes in a pyramid and douse with lighter fluid. While waiting for the fluid to soak into the briquettes, stow the fluid a safe distance from the grill. Caution: Never add lighter fluid to coals that are already hot or warm. When using instant light briquettes, do not add lighter fluid.
Ordinary 5g.ii. Explain the use of charcoal,
pressurized alcohol, and propane. Include the safety
precautions for each.

104 Safety and Seamanship
Food SafetyThousands of bacteria are naturally present in our environment—some beneficial,
some deadly. Bacteria in foods can cause nausea, vomiting, diarrhea, fever, and worse, but foodborne illness can be prevented. Proper storage, processing, and cooking of food reduces and destroys bacteria.
1. Wash your hands and clean all surfaces often. Clean and sanitize everything used in food preparation prior to its use.
2. When purchasing and storing food, separate raw meats, poultry, and seafood from other foods. The same goes for food preparation. Do not process vegetables on the same cutting board you used for meat unless it has been thoroughly washed.
3. Bacteria multiply rapidly from 40°F–140°F, so make sure foods are stored quickly and at the correct temperatures.
4. Cook foods, especially meats, to the proper temperatures.5. Wash all fruits and vegetables that are to be eaten raw.6. Pure drinking water is essential. It should be available in clean, tightly covered
containers. You must also be sure that it is dispensed in a sanitary manner—each person drinking from his or her own cup if paper cups are not available.
Overloading or Improper Loading and Boating AccidentsUnited States Coast Guard statistics show the most common cause of boating
accidents is overloading and improper loading of small boats. Most fatal accidents caused by a loading error involved boats under 26 feet in length, and half of these vessels had 10 horsepower or less.
The number of seats is not indicative of the number of passengers a boat can carry safely. A safe load capacity depends on the boat’s construction and characteristics. Weather and sea conditions must also be considered.
There are several things to keep in mind before leaving the dock. First, when loading a boat, distribute the load evenly. Keep the load low. Don’t let anyone stand up in a small boat. A boat under 26 feet can be very unstable with just one person moving around. If moving is necessary, stop or slow the boat. Keep low and toward the centerline of the boat. Above all, don’t overload your boat. An overloaded boat will easily swamp or capsize because it cannot react to waves and other actions properly.
Manufacturers install a plate on their boats showing the recommended weight capacity (a capacity plate may not be installed on older boats). This usually indicates the number of persons the boat can carry as well as the number of pounds for persons, motor, fuel, and gear. The recommendations on the capacity plate are for fair weather, however, and do not relieve the operator of the responsibility for exercising his or her judgment. If weather and water conditions are adverse, the load should be reduced accordingly.
Low Head DamsLow head dams are defined as those dams whose overflow, or spillway, discharges
water of a foot or more depth measured at the lip of the outfall in normal weather. The downstream portions of such dams should be treated with the greatest respect. A swimmer or boater caught in the boil, backwash, or eddy currents on such downstream side is in dire peril. Not only are they unable to swim out of such boils, falling water has such force they may be pitchpoled under water, like a shirt in a clothes dryer, until they drown. Rescue is almost impossible.
If you plan to cruise rivers and canals in unfamiliar territory, your wisest investment is a topographical chart. Know where your portages are, and go ashore at least 100 yards upstream from any low head dam.
Ordinary 5e.iv. Demonstrate appropriate
sanitation techniques for food preparation and
meal cleanup.
Safety and Seamanship 105
MARLINSPIKE SEAMANSHIPMarlinspike seamanship is the care, handling, knotting, splicing, and use of fiber and
wire rope. A marlinspike is a pointed metal tool (or its wooden equivalent, the fid) used in marling or in separating rope strands for splicing.
In the days when sailing vessels ruled the seas, every sailor had to be an expert in this field. They developed marlinspike seamanship into a leisure-time art that produced hundreds of knots, hitches, bends, and splices. Today, however, only about a dozen are of any regular use to the sailor of small boats.
RopeRope is perhaps one of the oldest and most useful tools of man. In small boats, it is
used for mooring, anchoring, towing, and general utility. Sailboats, in particular, have many uses for rope, including standing rigging (wire), halyards (wire and/or rope), sheets, etc. All rope aboard a vessel is referred to as line unless it has a specific name such as a halyard, sheet, etc.
Generally speaking, rope is made from three types of material—vegetable fibers, synthetic materials, and wire. In the early days, rope was made from whatever material was available, such as vines or strips of animal hides, but these crude materials were gradually replaced by stronger fibers like flax, cotton, and ramie. These products were replaced by jute, sisal, and Manila hemp. The last two are still widely used for certain applications.
During World War II, the scarcity of sisal and Manila hemp prompted scientists to develop a substitute. As a result, many synthetic rope-making materials were produced. Some of these new products proved superior to the vegetable fibers used for so many years.
Dacron and nylon have proved particularly effective, and polyethylene and polypro-pylene have many uses in rope manufacture. Sometimes two synthetic materials are used together such as a polyethylene cover over a Dacron center. Although braided synthetic lines are proving to be increasingly popular, laid rope of either a natural or synthetic fiber is still most widely used. It is made in diameters from 3⁄16 to 4 inches. The manufacture of laid rope involves four principal steps:
1. Clean fibers, lubricated to withstand internal friction, are laid parallel and drawn into continuous “slivers.” (This first step is not necessary with synthetic fibers.)
2. The slivers are spun into yarns of uniform size, twisted in one direction. Synthetic fibers are spun directly into yarns.
3. The yarns are twisted in opposite directions to form strands.
Ordinary 6a. Name the various materials used to
manufacture rope, the advantages and
disadvantages of each, and the characteristics of
laid and braided rope. Discuss the meaning of lay, thread, strand, and
hawser. Explain how rope is sized and measured.
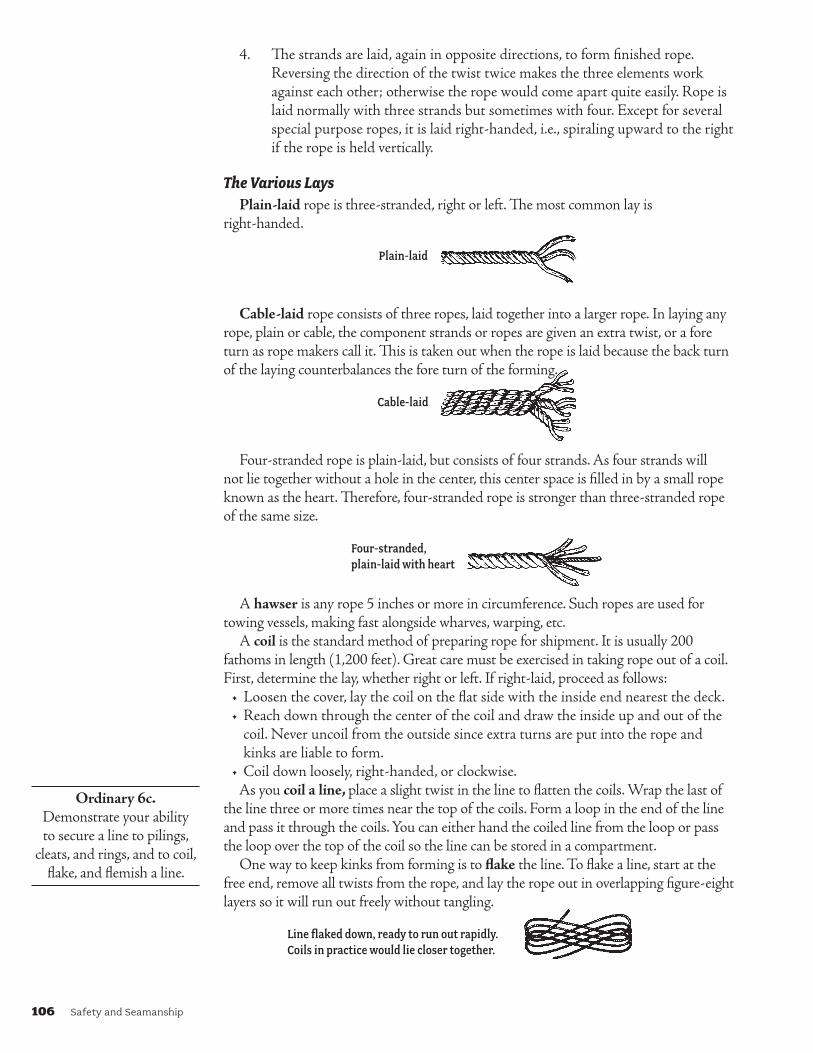
106 Safety and Seamanship
4. The strands are laid, again in opposite directions, to form finished rope. Reversing the direction of the twist twice makes the three elements work against each other; otherwise the rope would come apart quite easily. Rope is laid normally with three strands but sometimes with four. Except for several special purpose ropes, it is laid right-handed, i.e., spiraling upward to the right if the rope is held vertically.
The Various LaysPlain-laid rope is three-stranded, right or left. The most common lay is
right-handed.
Plain-laid
Cable-laid rope consists of three ropes, laid together into a larger rope. In laying any rope, plain or cable, the component strands or ropes are given an extra twist, or a fore turn as rope makers call it. This is taken out when the rope is laid because the back turn of the laying counterbalances the fore turn of the forming.
Cable-laid
Four-stranded rope is plain-laid, but consists of four strands. As four strands will not lie together without a hole in the center, this center space is filled in by a small rope known as the heart. Therefore, four-stranded rope is stronger than three-stranded rope of the same size.
Four-stranded, plain-laid with heart
A hawser is any rope 5 inches or more in circumference. Such ropes are used for towing vessels, making fast alongside wharves, warping, etc.
A coil is the standard method of preparing rope for shipment. It is usually 200 fathoms in length (1,200 feet). Great care must be exercised in taking rope out of a coil. First, determine the lay, whether right or left. If right-laid, proceed as follows:
• Loosen the cover, lay the coil on the flat side with the inside end nearest the deck. • Reach down through the center of the coil and draw the inside up and out of the
coil. Never uncoil from the outside since extra turns are put into the rope and kinks are liable to form.
• Coil down loosely, right-handed, or clockwise.As you coil a line, place a slight twist in the line to flatten the coils. Wrap the last of
the line three or more times near the top of the coils. Form a loop in the end of the line and pass it through the coils. You can either hand the coiled line from the loop or pass the loop over the top of the coil so the line can be stored in a compartment.
One way to keep kinks from forming is to flake the line. To flake a line, start at the free end, remove all twists from the rope, and lay the rope out in overlapping figure-eight layers so it will run out freely without tangling.
Line flaked down, ready to run out rapidly. Coils in practice would lie closer together.
Ordinary 6c. Demonstrate your ability to secure a line to pilings,
cleats, and rings, and to coil, flake, and flemish a line.

Safety and Seamanship 107
Suppose a rope becomes full of turns and kinks are forming. You may get the order, “Thoroughfoot that rope!” To thoroughfoot, first determine if the twists are to the left or the right. If the turns are left-handed, the rope should be coiled down left-handed and then dip the end through the coil. If the turns are right-handed, the rope is coiled down right-handed before dipping the end through the coil.
A flemish coil is made by taking the end of a line and spiraling it into a flat coil on the deck. It is a way to tidy up loose ends and reduce tripping hazards.
Sizing RopeRope sizes are sometimes measured by circumference, but the diameter is more com-
monly used. The strength of rope is measured by the load that it will support without breaking. Different kinds of ropes vary considerably in their strength characteristics.
In any strenuous boating use, the minimum safe tensile strength under normal conditions is five times the weight of the object attached to the rope. Thus, a water-skier weighing 175 pounds needs a towing line of about 875-pound tensile strength. This 5-to-1 safety factor allows for sudden strains and for normal deterioration.
The size of rope is proportional to its strength, other things being equal. However, the best rope for a given purpose is not always the size indicated by the tensile strength specification.
Another important factor is the use of the rope. This is particularly important in rope used to run through blocks. If the diameter is too small, the rope will tend to slip and roll in the sheave, wearing out quickly. A rope that is too large for a particular block will chafe against the sides of the block and also wear out before it should.
The stretching quality or elasticity is an important consideration in choosing rope. Two elements are involved in determining this—permanent elongation and working elasticity.
Permanent elongation refers to the permanent increase in length the first time a load is put on a rope. Under normal conditions, Manila stretches approximately 1.5 percent; Dacron, 0.5 percent; and nylon, 4 percent.
Working elasticity measures the amount that rope can be stretched and recover while in use. This quality varies considerably in types of rope materials as well as the load applied and how long the rope might be free of strain between uses. Under a normal (20 percent) load and relaxation period, working elasticity varies from 7 percent in Manila to 9 percent in Dacron to 22 percent in nylon.
These stretching qualities make nylon well suited to mooring and anchor lines, where it can act as a shock absorber. On the other hand, nylon is much too elastic for use on sailboat halyards or sheets. Dacron or Manila rope is best for this.
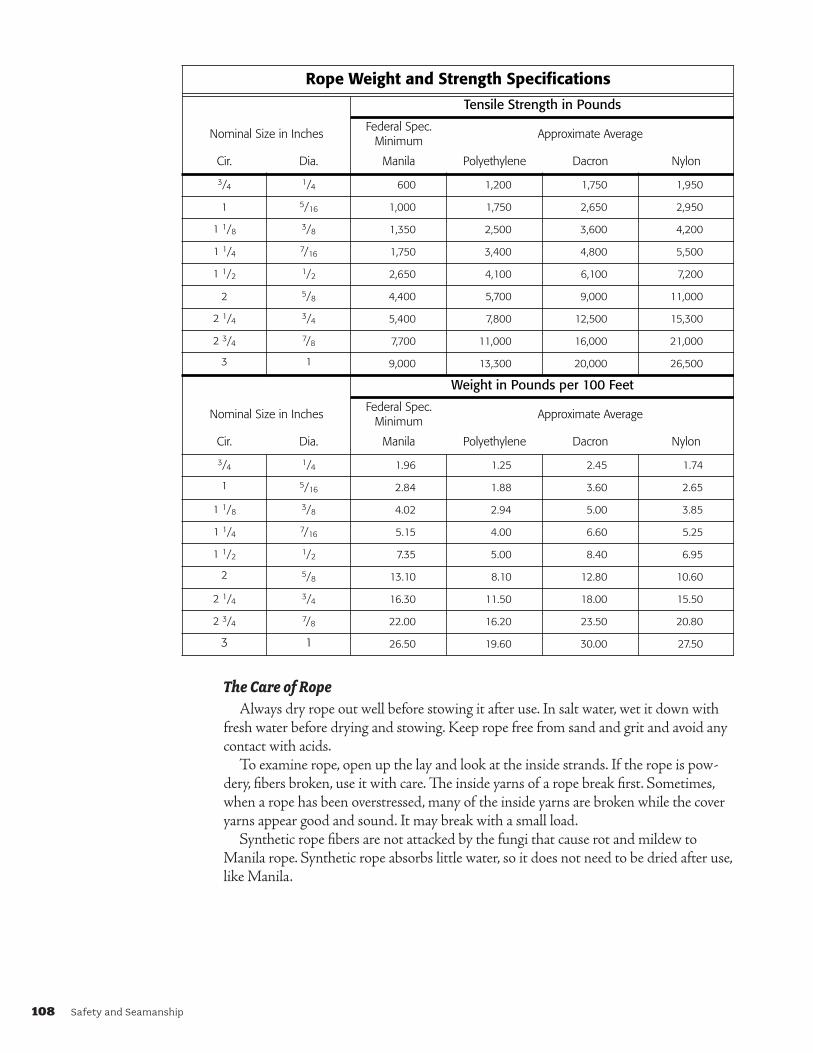
108 Safety and Seamanship
SEAMANSHIP AND BOATING SAFETY
127
SEA SCOUT MANUAL
The size of rope is proportional to its strength, other things being equal.However, the best rope for a given purpose is not always the size indicated bythe tensile strength specification.
Another important factor is the use of the rope. This is particularly importantin rope used to run through blocks. If the diameter is too small, the rope willtend to slip and roll in the sheave, wearing out quickly. A rope that is too largefor a particular block will chafe against the sides of the block and also wear outbefore it should.
The stretching quality or elasticity is an important consideration in choosingrope. Two elements are involved in determining this—permanent elongationand working elasticity.
Permanent elongation refers to the permanent increase in length the firsttime a load is put on a rope. Under normal conditions, Manila stretches approx-
imately 1.5 percent; Dacron, 0.5 percent; and nylon, 4 percent.
Working elasticity measures the amount that rope can be stretched andrecover while in use. This quality varies considerably in types of rope materials
Rope Weight and Strength Specifications
Tensile Strength in Pounds
Nominal Size in InchesFederal Spec.
MinimumApproximate Average
Cir. Dia. Manila Polyethylene Dacron Nylon
3
/
41
/
4
600 1,200 1,750 1,950
1
5
/
16
1,000 1,750 2,650 2,950
1
1
/
83
/
8
1,350 2,500 3,600 4,200
1
1
/
47
/
16
1,750 3,400 4,800 5,500
1
1
/
21
/
2
2,650 4,100 6,100 7,200
2
5
/
8
4,400 5,700 9,000 11,000
2
1
/
43
/
4
5,400 7,800 12,500 15,300
2
3
/
47
/
8
7,700 11,000 16,000 21,000
3 1 9,000 13,300 20,000 26,500
Weight in Pounds per 100 Feet
Nominal Size in InchesFederal Spec.
MinimumApproximate Average
Cir. Dia. Manila Polyethylene Dacron Nylon
3
/
41
/
4
1.96 1.25 2.45 1.74
1
5
/
16
2.84 1.88 3.60 2.65
1
1
/
83
/
8
4.02 2.94 5.00 3.85
1
1
/
47
/
16
5.15 4.00 6.60 5.25
1
1
/
21
/
2
7.35 5.00 8.40 6.95
2
5
/
8
13.10 8.10 12.80 10.60
2
1
/
43
/
4
16.30 11.50 18.00 15.50
2
3
/
47
/
8
22.00 16.20 23.50 20.80
3 1
26.50 19.60 30.00 27.50
33239.06.CHAP4.kg Page 127 Thursday, December 12, 2002 2:56 PM
The Care of RopeAlways dry rope out well before stowing it after use. In salt water, wet it down with
fresh water before drying and stowing. Keep rope free from sand and grit and avoid any contact with acids.
To examine rope, open up the lay and look at the inside strands. If the rope is pow-dery, fibers broken, use it with care. The inside yarns of a rope break first. Sometimes, when a rope has been overstressed, many of the inside yarns are broken while the cover yarns appear good and sound. It may break with a small load.
Synthetic rope fibers are not attacked by the fungi that cause rot and mildew to Manila rope. Synthetic rope absorbs little water, so it does not need to be dried after use, like Manila.

Safety and Seamanship 109
Helpful Knot TerminologyOld-time seamen made quite a distinction between a knot, a hitch, and a bend. A
knot is used to close or stopper something (reef knot, overhand knot, etc.) A hitch is used to attach a line to an object (clove hitch, rolling hitch, etc.) A bend is used to con-nect two pieces of rope (sheet bend, carrick bend, etc.) Over the years these definitions have become blurred and the general term “knot” is commonly used today.
The end of a rope is what you work with in tying a knot. (If passing through a block, it is called the fall.)
The standing part is the long unused or belayed end of a rope.The bight is the loop or half loop formed by turning the rope back on itself.
Standing Part
End
Bight
An overhand loop is made by crossing the end over the standing part.
Overhand Loop
An underhand loop is made by crossing the end under the standing part.
Underhand Loop
A turn is one loop around an object such as a pile. A round turn is two loops around an object.
Turn
Round Turn
There are three additional points to remember in knot tying:1. Every knot requires passing rope either over or under itself or both. If this is
not done carefully, the wrong knot, or no knot at all, will result.2. A knot must be tightened slowly and evenly with all elements of the knot in
proper relationship. If this is not done, an embarrassing snarl may result.3. In joining two lengths of rope, you can reduce the rope’s strength up to
50 percent by using a knot. A well-made splice, however, retains about 90 percent of the rope’s strength. Therefore, a carefully made splice is preferable to a knot, when strength is important.

110 Safety and Seamanship
Knots
Overhand Knot The overhand knot is the smallest and simplest of knots and the start of bigger ones. It can be an effective stopper, but will jam when pulled too tight. To make an overhand knot, make an overhand loop and pass the end under and up through the loop.
Reef or Square Knot This knot is used to tie the reef points when reefing a sail. The knot is often tied as a
slipped hitch to permit a rapid release. Never use this knot to join two lines. It would be unreliable. Unless this knot is tied carefully, you will come up with a worthless granny knot.
3
2 4
1
Figure Eight KnotThis knot is easily untied and gentle to fiber. It is the best knot for keeping a rope end
from running through a fairlead or block. To make this knot, make an underhand loop; then bring the end around and over the standing part, under and up through the loop.
Apprentice 6. Using both large and small
lines, tie and explain the use of the following knots:
overhand, square, figure eight, bowline, two half
hitches, clove hitch, sheet bend, and cleat hitch.
Ordinary 6b. Using both large and small
lines, tie and explain the use of the following knots:
stevedore’s knot, French (double) bowline, bowline on a bight, timber hitch,
rolling hitch, midshipman’s (taut-line) hitch, and
marline hitch.
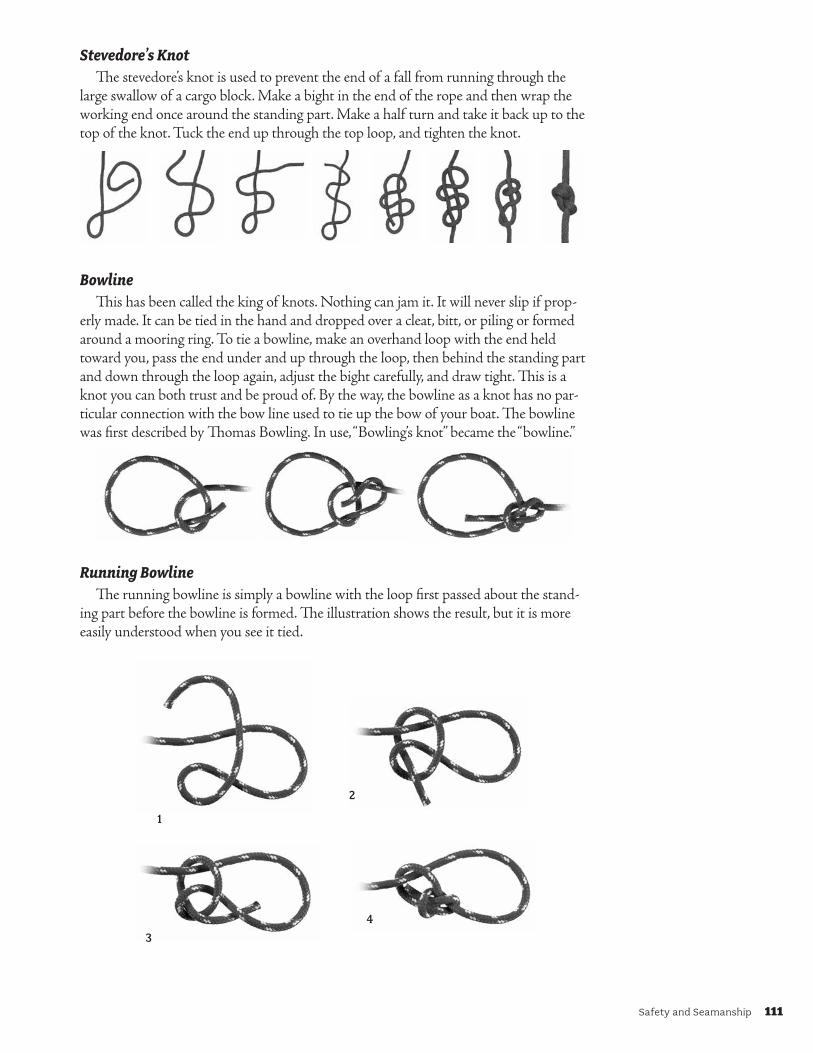
Safety and Seamanship 111
Stevedore’s KnotThe stevedore’s knot is used to prevent the end of a fall from running through the
large swallow of a cargo block. Make a bight in the end of the rope and then wrap the working end once around the standing part. Make a half turn and take it back up to the top of the knot. Tuck the end up through the top loop, and tighten the knot.
BowlineThis has been called the king of knots. Nothing can jam it. It will never slip if prop-
erly made. It can be tied in the hand and dropped over a cleat, bitt, or piling or formed around a mooring ring. To tie a bowline, make an overhand loop with the end held toward you, pass the end under and up through the loop, then behind the standing part and down through the loop again, adjust the bight carefully, and draw tight. This is a knot you can both trust and be proud of. By the way, the bowline as a knot has no par-ticular connection with the bow line used to tie up the bow of your boat. The bowline was first described by Thomas Bowling. In use, “Bowling’s knot” became the “bowline.”
Running BowlineThe running bowline is simply a bowline with the loop first passed about the stand-
ing part before the bowline is formed. The illustration shows the result, but it is more easily understood when you see it tied.
1
3
4
2
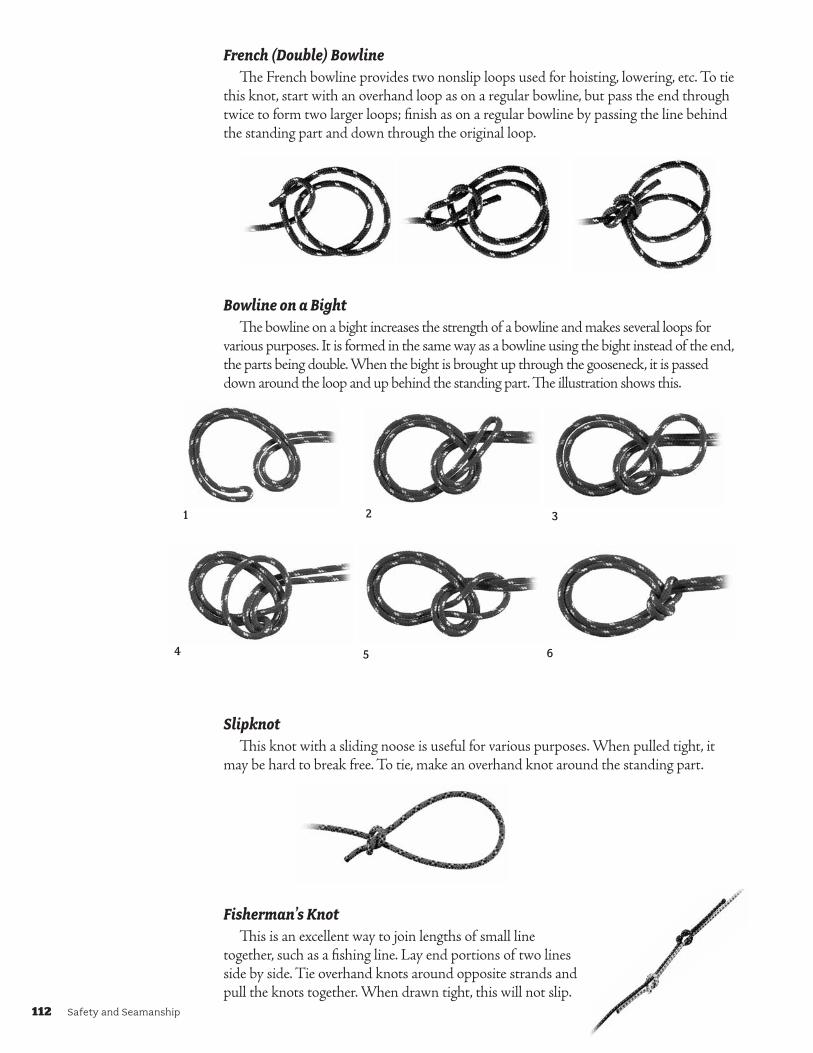
112 Safety and Seamanship
French (Double) Bowline The French bowline provides two nonslip loops used for hoisting, lowering, etc. To tie
this knot, start with an overhand loop as on a regular bowline, but pass the end through twice to form two larger loops; finish as on a regular bowline by passing the line behind the standing part and down through the original loop.
Bowline on a Bight The bowline on a bight increases the strength of a bowline and makes several loops for
various purposes. It is formed in the same way as a bowline using the bight instead of the end, the parts being double. When the bight is brought up through the gooseneck, it is passed down around the loop and up behind the standing part. The illustration shows this.
1 2 3
4 5 6
SlipknotThis knot with a sliding noose is useful for various purposes. When pulled tight, it
may be hard to break free. To tie, make an overhand knot around the standing part.
Fisherman’s Knot This is an excellent way to join lengths of small line
together, such as a fishing line. Lay end portions of two lines side by side. Tie overhand knots around opposite strands and pull the knots together. When drawn tight, this will not slip.
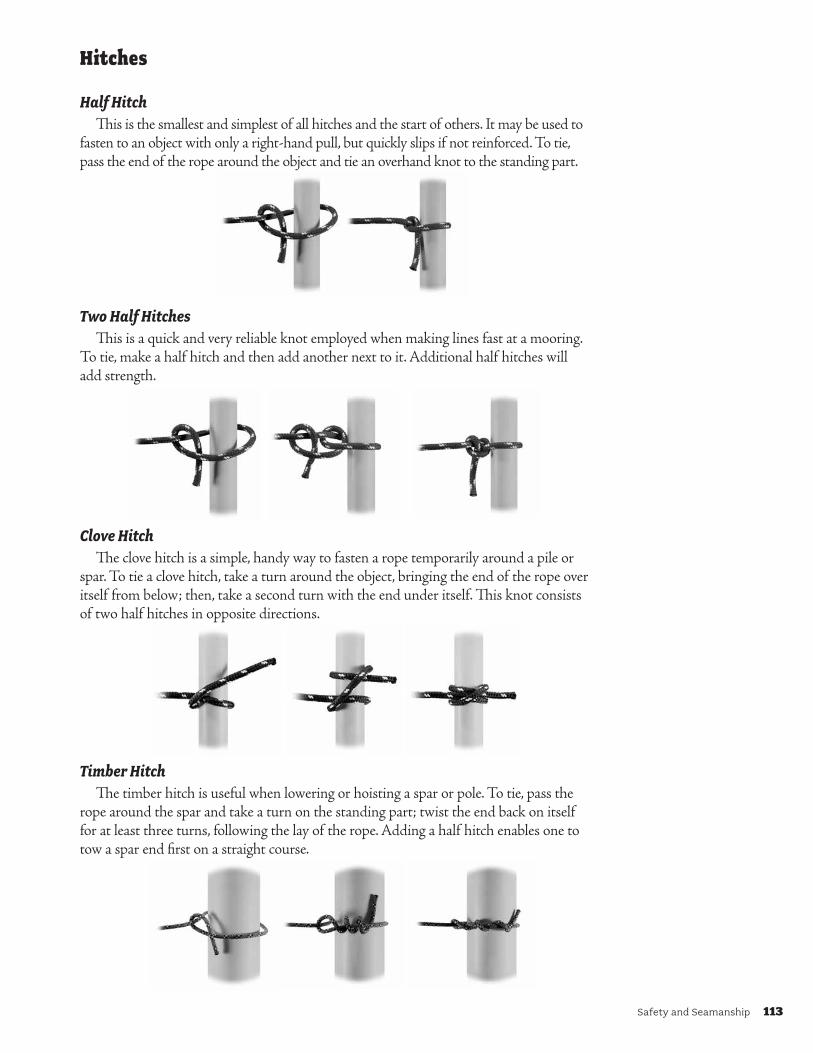
Safety and Seamanship 113
Hitches
Half HitchThis is the smallest and simplest of all hitches and the start of others. It may be used to
fasten to an object with only a right-hand pull, but quickly slips if not reinforced. To tie, pass the end of the rope around the object and tie an overhand knot to the standing part.
Two Half HitchesThis is a quick and very reliable knot employed when making lines fast at a mooring.
To tie, make a half hitch and then add another next to it. Additional half hitches will add strength.
Clove HitchThe clove hitch is a simple, handy way to fasten a rope temporarily around a pile or
spar. To tie a clove hitch, take a turn around the object, bringing the end of the rope over itself from below; then, take a second turn with the end under itself. This knot consists of two half hitches in opposite directions.
Timber HitchThe timber hitch is useful when lowering or hoisting a spar or pole. To tie, pass the
rope around the spar and take a turn on the standing part; twist the end back on itself for at least three turns, following the lay of the rope. Adding a half hitch enables one to tow a spar end first on a straight course.
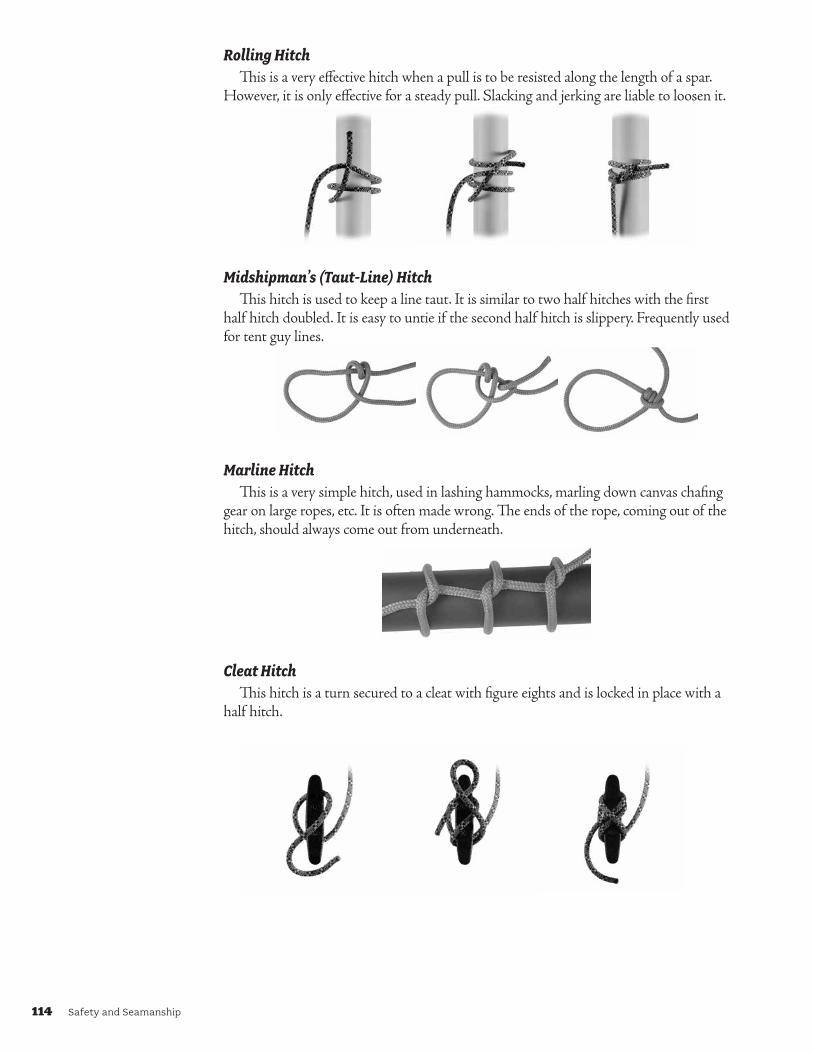
114 Safety and Seamanship
Rolling Hitch This is a very effective hitch when a pull is to be resisted along the length of a spar.
However, it is only effective for a steady pull. Slacking and jerking are liable to loosen it.
Midshipman’s (Taut-Line) Hitch This hitch is used to keep a line taut. It is similar to two half hitches with the first
half hitch doubled. It is easy to untie if the second half hitch is slippery. Frequently used for tent guy lines.
Marline HitchThis is a very simple hitch, used in lashing hammocks, marling down canvas chafing
gear on large ropes, etc. It is often made wrong. The ends of the rope, coming out of the hitch, should always come out from underneath.
Cleat HitchThis hitch is a turn secured to a cleat with figure eights and is locked in place with a
half hitch.
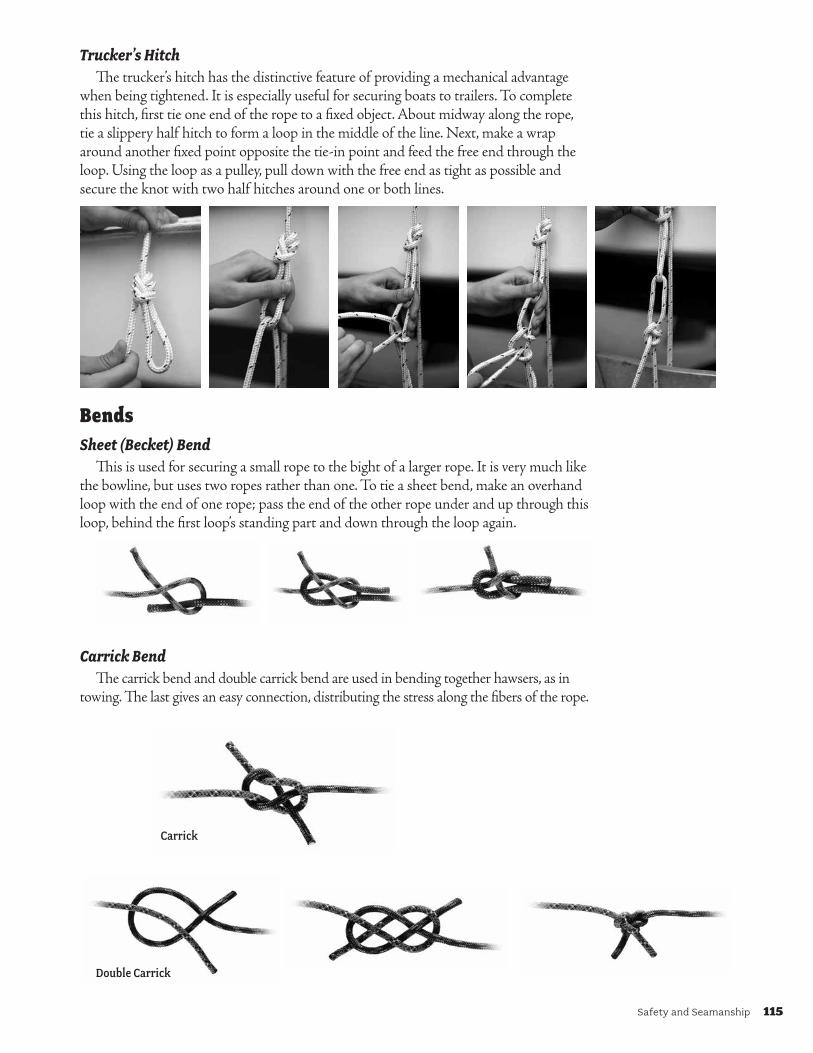
Safety and Seamanship 115
Trucker’s HitchThe trucker’s hitch has the distinctive feature of providing a mechanical advantage
when being tightened. It is especially useful for securing boats to trailers. To complete this hitch, first tie one end of the rope to a fixed object. About midway along the rope, tie a slippery half hitch to form a loop in the middle of the line. Next, make a wrap around another fixed point opposite the tie-in point and feed the free end through the loop. Using the loop as a pulley, pull down with the free end as tight as possible and secure the knot with two half hitches around one or both lines.
BendsSheet (Becket) Bend
This is used for securing a small rope to the bight of a larger rope. It is very much like the bowline, but uses two ropes rather than one. To tie a sheet bend, make an overhand loop with the end of one rope; pass the end of the other rope under and up through this loop, behind the first loop’s standing part and down through the loop again.
Carrick BendThe carrick bend and double carrick bend are used in bending together hawsers, as in
towing. The last gives an easy connection, distributing the stress along the fibers of the rope.
Carrick
Double Carrick
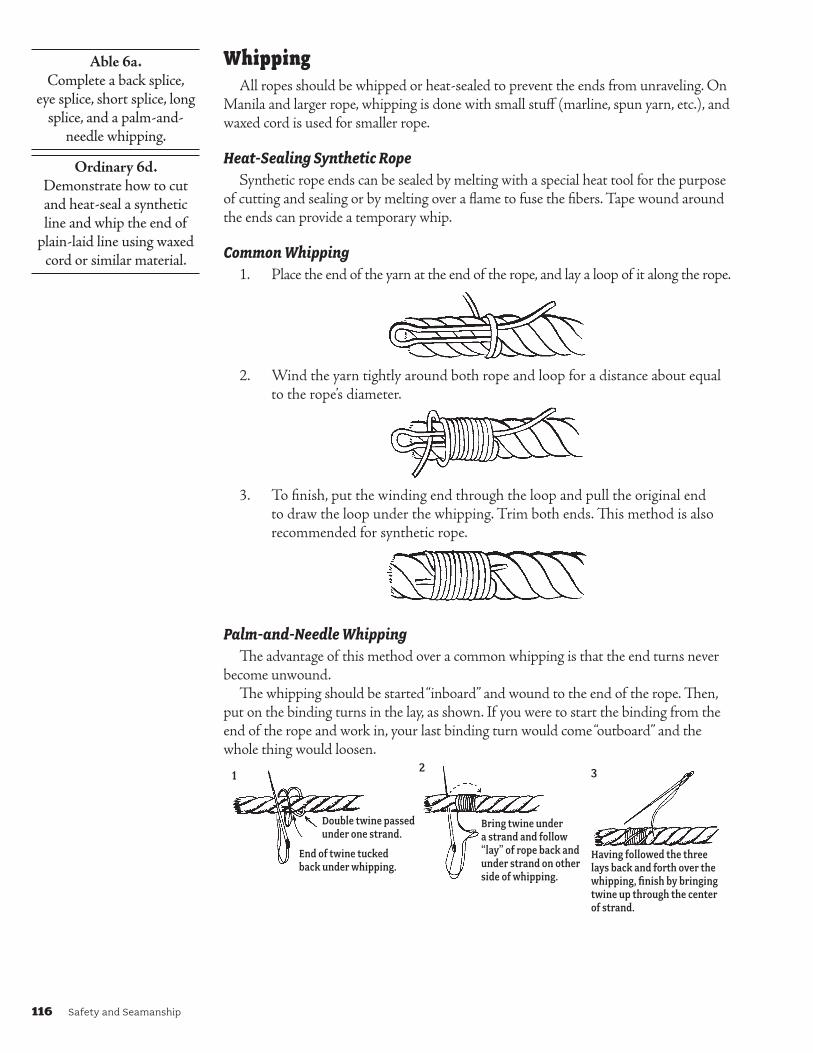
116 Safety and Seamanship
WhippingAll ropes should be whipped or heat-sealed to prevent the ends from unraveling. On
Manila and larger rope, whipping is done with small stuff (marline, spun yarn, etc.), and waxed cord is used for smaller rope.
Heat-Sealing Synthetic RopeSynthetic rope ends can be sealed by melting with a special heat tool for the purpose
of cutting and sealing or by melting over a flame to fuse the fibers. Tape wound around the ends can provide a temporary whip.
Common Whipping1. Place the end of the yarn at the end of the rope, and lay a loop of it along the rope.
2. Wind the yarn tightly around both rope and loop for a distance about equal to the rope’s diameter.
3. To finish, put the winding end through the loop and pull the original end to draw the loop under the whipping. Trim both ends. This method is also recommended for synthetic rope.
Palm-and-Needle WhippingThe advantage of this method over a common whipping is that the end turns never
become unwound.The whipping should be started “inboard” and wound to the end of the rope. Then,
put on the binding turns in the lay, as shown. If you were to start the binding from the end of the rope and work in, your last binding turn would come “outboard” and the whole thing would loosen.
Double twine passed under one strand.
2 3
End of twine tucked back under whipping.
Bring twine under a strand and follow “lay” of rope back and under strand on other side of whipping.
Having followed the three lays back and forth over the whipping, finish by bringing twine up through the center of strand.
1
Able 6a. Complete a back splice,
eye splice, short splice, long splice, and a palm-and-
needle whipping.
Ordinary 6d. Demonstrate how to cut and heat-seal a synthetic line and whip the end of
plain-laid line using waxed cord or similar material.

Safety and Seamanship 117
SplicingSplicing is the sailor’s art of joining any two parts of rope together permanently. The
most important step in splicing is the start. Marry the strands correctly, and the remain-ing steps follow easily.
To prepare a rope for splicing, unlay the end adequately and whip each strand with a temporary whipping of small stuff or tape. Extra care is needed with nylon as the strands do not retain their set and will quickly frizz.
Splicing requires several tools. The first is a knife. The second is a fid. A rigging knife is also handy, since it combines a blade and a small marlinspike in one tool.
FidA fid is a tool used in ropework for tasks such as unlaying rope for splicing and unty-
ing knots. A fid is a cone tapered to a rounded or flattened point that is usually 6 to 10 inches long. The size of the rope being worked determines the size of the fid required. A marlinspike (for which the marlin fish was named) is a similar tool but is made from metal while a fid is typically made from wood or bone.
TucksA tuck occurs when you pass an unlaid strand under a fixed strand. Four tucks will
hold any splice in normal fiber rope, providing they are full strands, i.e., not tapered off. Tapering off is made after the fourth tuck and is done by reducing each of the strands by one-third; tucking, reducing by another third; and finally, tucking and trimming off close. Six tucks are advised for more slippery synthetic rope.
Eye SpliceThe eye splice is the strongest type of rope loop and may be formed around a thimble.
Unlay the rope for a distance of about 12 times the rope’s diameter. If you are a beginner in the art of splicing, it is a good idea to put on a temporary whipping at the point where the strands begin to unlay or at the crotch. This whipping should be cut off after the splice is formed.
Use a fid or marlinspike to lift one strand of the standing part. Tuck one of the unlaid strands under it and draw it taut (see fig. 1). The other two strands are to lie on each side of this middle strand. Have the eye toward you and the strands and standing part of the rope away from you.
Then take the left strand, tuck it from right to left under the next strand of the rope, and haul firmly taut (see fig. 2). Then the last strand is to be tucked to the right. Give it an extra turn and tuck from right to left (see fig. 3).
Make certain the three strands are properly taut (all equally so) and each under its proper strand of rope. Also, make certain that the eye thus formed is the required size, and the eye itself is not distorted in any way.

118 Safety and Seamanship
EyeSplice
Figure 1 Figure 2 Figure 3
No. 1No. 1
No. 2No. 3
Repeat the tucks in the same order until the end strands are too short to work. You can “fair” the splice to some extent by rolling it under your shoe or pounding it gently with a wooden or rubber mallet.
Short SpliceThe short splice joins two ropes or two ends of the same rope. It is the strongest of
splices, but because it increases the diameter, it cannot run through a correctly sized block. Its bulk can be reduced by tapering the strands toward the end of the splice, but this tends to weaken it somewhat.
Both ends should be unlaid for about a distance equal to 12 times the rope’s diameter. Temporarily, whip the crotch at A and the ends of the strands of each rope. Bring the two ends together as shown, alternating the strands, and pull them taut.
Temporarily, tie down the unlaid strands of the right-hand rope at B (in cut). Remove the lashing from that rope. Using a fid, raise one strand of it as shown so that strand 1 from the left-hand rope can be tucked under it.
Pass strand 1 over the intervening strand and under the raised one. Tuck it against the lay of the rope and pull it taut.
Raise the next strand and tuck left-hand strand 2 under it. Do the same with strand 3. This completes one full tuck. Continue tucking the strands in sequence until you have at least four tucks.
Remove the temporary tie B and the lashing A from the other rope. Tuck the strands one after the other as with the first rope.
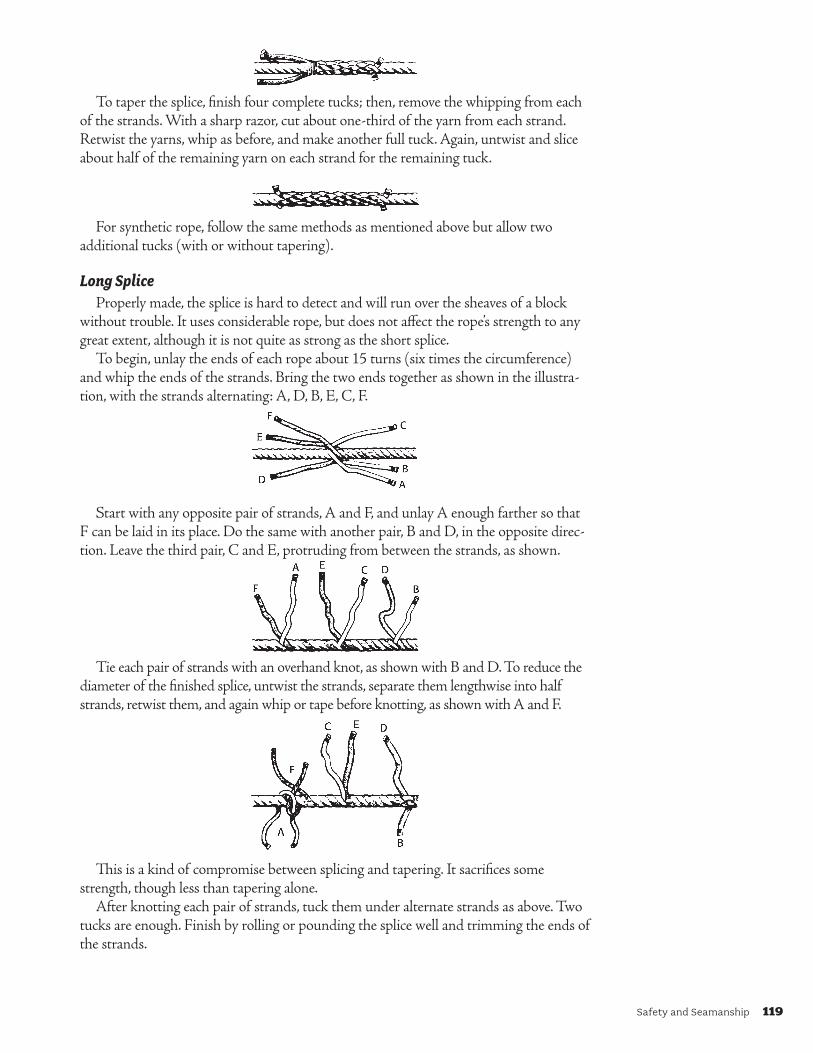
Safety and Seamanship 119
To taper the splice, finish four complete tucks; then, remove the whipping from each of the strands. With a sharp razor, cut about one-third of the yarn from each strand. Retwist the yarns, whip as before, and make another full tuck. Again, untwist and slice about half of the remaining yarn on each strand for the remaining tuck.
For synthetic rope, follow the same methods as mentioned above but allow two additional tucks (with or without tapering).
Long SpliceProperly made, the splice is hard to detect and will run over the sheaves of a block
without trouble. It uses considerable rope, but does not affect the rope’s strength to any great extent, although it is not quite as strong as the short splice.
To begin, unlay the ends of each rope about 15 turns (six times the circumference) and whip the ends of the strands. Bring the two ends together as shown in the illustra-tion, with the strands alternating: A, D, B, E, C, F.
Start with any opposite pair of strands, A and F, and unlay A enough farther so that F can be laid in its place. Do the same with another pair, B and D, in the opposite direc-tion. Leave the third pair, C and E, protruding from between the strands, as shown.
Tie each pair of strands with an overhand knot, as shown with B and D. To reduce the diameter of the finished splice, untwist the strands, separate them lengthwise into half strands, retwist them, and again whip or tape before knotting, as shown with A and F.
This is a kind of compromise between splicing and tapering. It sacrifices some strength, though less than tapering alone.
After knotting each pair of strands, tuck them under alternate strands as above. Two tucks are enough. Finish by rolling or pounding the splice well and trimming the ends of the strands.
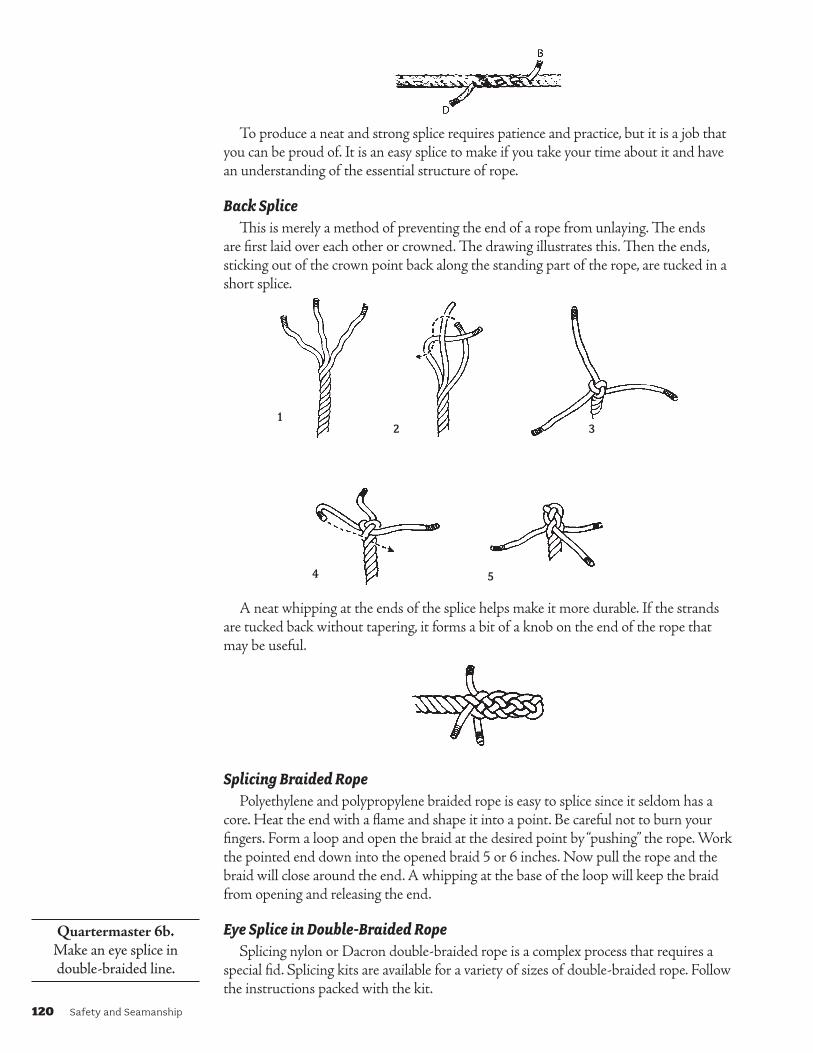
120 Safety and Seamanship
To produce a neat and strong splice requires patience and practice, but it is a job that you can be proud of. It is an easy splice to make if you take your time about it and have an understanding of the essential structure of rope.
Back SpliceThis is merely a method of preventing the end of a rope from unlaying. The ends
are first laid over each other or crowned. The drawing illustrates this. Then the ends, sticking out of the crown point back along the standing part of the rope, are tucked in a short splice.
12 3
4 5
A neat whipping at the ends of the splice helps make it more durable. If the strands are tucked back without tapering, it forms a bit of a knob on the end of the rope that may be useful.
Splicing Braided RopePolyethylene and polypropylene braided rope is easy to splice since it seldom has a
core. Heat the end with a flame and shape it into a point. Be careful not to burn your fingers. Form a loop and open the braid at the desired point by “pushing” the rope. Work the pointed end down into the opened braid 5 or 6 inches. Now pull the rope and the braid will close around the end. A whipping at the base of the loop will keep the braid from opening and releasing the end.
Eye Splice in Double-Braided RopeSplicing nylon or Dacron double-braided rope is a complex process that requires a
special fid. Splicing kits are available for a variety of sizes of double-braided rope. Follow the instructions packed with the kit.
Quartermaster 6b. Make an eye splice in double-braided line.

Safety and Seamanship 121
Wire RopeRope that is formed from wire strands rather than fiber yarn is wire rope. As with fiber, the wires are twisted into strands and the strands are then twisted the opposite way around a center strand to make the finished wire rope.
There are many variations that give wire rope great versatility. Wires are made from a number of metals, including galvanized iron, cast steel, plow steel, stainless steel, and sometimes copper, bronze, or phosphor bronze.
The coppers are generally not as strong as iron wire of the same diameter. For yacht and small boat use, long-lasting wire is made of stainless steel and other alloys that make it non-rusting and much stronger than ordinary steel wire. Wire rope is almost universally preferred for standing rigging and halyards on sailboats (sometimes spliced to fiber rope). It also is often used on both sailboats
and powerboats for tiller and steering cables, handrails, mooring pennants, and similar applications.
Wire rope is often coated with plastic materials, usually nylon or vinyl, which make it tough, flexible, smooth running, and easier to handle. This coated rope is used for steering lines or handrails.
Wire rope is made in diameters from 1⁄16 to 11⁄2 inches or larger and is designated always by the diameter of the rope, not the circumference as sometimes with fiber rope. Wire sizes above 1 inch are called cable. It is also classified by the number of strands.
Wire rope cannot be knotted like fiber rope but, if made of flexible material, will run through blocks, sheaves, or fairleads. In handling wire rope, use leather palm gloves to protect your hands against frayed ends or splinters.
The ends of wire rope should be whipped with seizing or serving wire, just as fiber rope should be whipped with small stuff. Wire rope can also be spliced end to end using a long splice, or to form an eye, either plain or around a thimble. In most cases a rigger’s screw is used to hold the eye. Then the strands are opened up with a steel marlinspike for tucking.
Today, most eyes in wire are “swaged” by fitting a metal sleeve, or ferrule, around the standing part and the end of the wire just below the eye and squeezing with a hand or power press. Wire rope requires special tools and equipment and is not easy to handle by the inexperienced.
SeizingsThese are really small lashings that bind or fasten together two lines or a line to a
spar. They are often of a permanent character and should be carefully made. The seizing is made with small stuff, such as marline or other tarred material, if it is to be exposed to the elements.
Round Seizing Throat Seizing
Racking Seizing Rattling Down

122 Safety and Seamanship
Canvas Work and Sail RepairThe sewing of canvas is an art acquired by practice. Although any major repairs
should be left to a professional sailmaker, every sailor should be familiar with stitches useful for construction and repair of sails. The flat stitch is usually used at the seams of a sail, where the round stitch is used for repairing tears or for constructing line covers. Grommets are made to pass line through, and they must be carefully crafted so the cloth does not rip under stress.
Canvas-sewing equipment consists of the following:Sail needles. Long spur needles, triangular in shape, rounded at the eye end for general
sewing. The No. 15, which is 21⁄2 inches long, is the needle most generally used.Twine. Use cotton twine of 4 to 8 ply for general canvas work, the heavier ply for
heavier canvas. Cotton twine comes in a half-pound ball. Heavier roping is done with 9- to 12-ply twine. Synthetic line equal to what is being sewn can also be used; nylon to nylon, rayon to rayon, etc., will control shrinkage. This is also for added strength. Twine should be threaded through the eye of the needle, doubled, and well waxed for extended life.
Palm. A heavy leather half-glove worn over the hand. The palm has a lead casting sewn in, and this is used to push the needle through the canvas or rope. Palms are either right- or left-handed.
Pricker. A long, sharp, steel-pointed tool used to puncture a needle hole through several thicknesses of canvas.
Creasing stick. A tool, having a slot at one end, used to crease the seams in preparing the sewing of seams.
Beeswax. A small cake of pure beeswax is used for waxing twine.
Canvas Seams
Round SeamsThe round or overhand stitch is used for light sails and in repairing minor tears, 1 to 4
inches long. If repairing a sail, gather the two sides of the rip, starting about an inch above it. Secure the thread by passing it under the first few stitches; then sew over it and continue round and round ending about an inch below the tear. Finish off the thread by passing it back under the stitches. Do not use knots to secure the thread. They will rip out.
Round seams are also used to make line covers, especially for places where wear is likely to occur. A covering will be more stable if the stitch is passed through the line.
Round Seam
Note: The only difference between the two types shown is the direction of the needle thrust.
Flat SeamsFlat seams are really two seams. They are commonly used to join two pieces of can-
vas. To sew a flat seam, lay the two pieces of canvas on a flat surface, only overlapping the edges that you want to fasten together. You can mark the overlap with a pencil. Arrange the two cloths with the raw edge toward you and the folded edge behind it. Sew away from you. When finished, open and rub the seam flat using a creasing stick.
Able 6b. Sew a flat seam, round seam, and grommet eye
in canvas or sail material. Describe how each is
used in the construction of and care of sails.

Safety and Seamanship 123
Fold back the second cloth and sew the edge to the doubled part of the second cloth. Rub the seam smooth. If done right, it will lie flat.
Flat Seam
Sail Repair
Herringbone StitchThis stitch is used for more serious repairs. Before placing the two sides of the rip
together, fold under a narrow margin on each and “iron” it like a pair of pants by gently scraping the edge of the sailcloth with a creasing tool or a knife. Then make alternate long and short stitches to avoid an even line, starting about 1⁄4 inch from the end of the tear, and finish 1⁄4 inch below it. Tuck the end of the twine under the final few stitches as in the round stitch, and cut.
PatchCut a patch, if possible, from the same weight and type of material as the damaged
sail. Allow about 1½ inches of margin on either side of the tear and turn the patch under ½ inch all the way round. “Iron” folds with a creasing tool or knife to keep them manageable, especially heavier weight cloths. Try to get the weave of the patching cloth to run identically with the sail being repaired. Measuring the approximate area and marking the patch material with pencil before cutting is recommended.
TapeSpinnaker and white rigging tape can be pressed into service swiftly and efficiently
to help you finish—even win—a race, or perhaps withstand the wind in some cruising crisis until you reach port.
In making the repair, separate the sticky part from its guard which comes as part of the tape roll; then as you unroll the ready tape, press with your fingers on both sides of the rip or seam. It should hold until you can get to it with needle and thread or bring it ashore to the sailmaker.
GrommetsThese are sail fittings that must be carefully made. Making a seagoing grommet eye
takes practice. It is done as follows:Cut a hole, somewhat smaller than that of the finished eye. This hole must be cut out
of the canvas and not punched by a spike. Then, lay a brass or galvanized iron ring over the edge of the hole or, if you have no ring and wish to make a good eyelet, form a strong grommet of marline, and lay this over the hole. Then take some stout roping twine, 9 or 10 ply, wax it well, and having hitched the end around the side of the grommet away from the point of stress, work around the grommet and through the canvas, about 1⁄8 inch away from the grommet, making your stitches even and pulling them taut.

124 Safety and Seamanship
Then follow around again, stitching a bit further away, and riding your turns between those stitched first. Follow this by one or two more rings of stitching, all evenly disposed and pulled taut. Finish off by hitching the end securely under the grommet ring with a few cross-stitches.
Such a grommet eye, properly made, will not pull out or tear the canvas under any reasonable stress.
Spliced Rope Grommet Metal Grommet Ring
Toothed Metal Grommet
Blocks and Tackles
BlocksScore
Swallow
Shell
Pin
Sheave
ScoreBreech Block
Shell
A block is a mechanical device made up of one or more scored wheels called sheaves (pulleys) over which a rope or ropes are worked. The sheaves are mounted in a shell that is fitted with a hookeye, shackle, or other means of attaching it to an object. Blocks are used to change the direction of an applied force and gain a mechanical advantage. Blocks are single, double, treble, etc., accord-ing to the number of sheaves. They are also spoken of as single, twofold, threefold, etc.
Snatch blocks are fitted with an opening by which the bight of a line may be snatched into the block without going to the trouble of reeving (passing the rope through the block and over the sheave) through the end. These particular blocks are very useful on board ship for snatching boat falls (the part of the tackle made of rope, wire or fiber), to give them a proper lead along the deck.
The block to which the standing part (the part of a fall to which the power is applied) of a fall is made fast has a becket worked into its heel. A becket is an eye designed to take the hook of a block.
Blocks are sized differently depending on the type of rope. The circumference of natural or synthetic line is multiplied two times to determine sheave diameter, and three times to determine the block shell size. For example, half-inch diameter line is 11⁄2-inch circumference and requires a sheave 3 inches in diameter. Because wire rope should not have a sharp bend, the sheave size should be at least 20 times the diameter of the rope.
In choosing a block, use the block manufacturer’s rating of the load the block will carry safely. Of secondary importance is the rated strength of the rope being used, as this is normally greater than that of the block.
Single Block Double Block Runner Block
Snatch Block
Able 6c. Describe the parts of a block and explain how
blocks are sized. Describe the following types of
tackle: luff, gun, double purchase, single whip, and runner. With the help of another shipmate, reeve a double purchase tackle.

Safety and Seamanship 125
TackleWhen a block or blocks and rope are combined to multiply power, it is called a tackle.
The following terms are used in connection with tackle:• Hauling part—the end of the fall to which power is applied• Round in—to bring the two blocks together• Overhaul—to separate the two blocks
Tackle is a rope and block system. The rope transmits a linear motion force to a load through one or more blocks for the purpose of pulling a load.
In a system using a single rope and blocks, when friction is not considered, the mechanical advantage gained can be calculated by counting the number of rope lengths or exerting force on the load. Since the tension in each rope length is equal to the force exerted on the free end or hauling part of the rope, the mechanical advantage is simply equal to the number of ropes pulling on the load. Therefore, mechanical advantage is increased by looping more rope around more pulleys.
On a vessel, a tackle consists of a certain fixed block on some solid fixture, like a mast, and a movable block on the object to be moved. The power loss, due to friction, in a tackle is variable, about one-fourth is normal. With well-designed blocks, wide swallows, and large sheaves, the power loss will be less than when a heavy rope is rove through small blocks.
Types of Tackle
Single WhipThe single whip is simply a rope rove through a single block. If the
block is stationary, no power is gained. If the block is attached to the object to be moved, the power gained is two.
RunnerThe runner is simply the whip with the block at the movable
object. These combinations of a single block and rope, whip, or run-ner are found in many parts of the rigging of ships. In modern vessels, the cargo whip is a good example of its use.
Gun TackleIn days of old, the gun tackle was attached to the gun carriages
of smoothbore cannon and helped to train the guns. The tackle is made of two single blocks with the standing and hauling parts of the fall leading from the same block. The diagram shows the method of reeving the fall. The power gained is two or three, according to the block attached to the movable object.
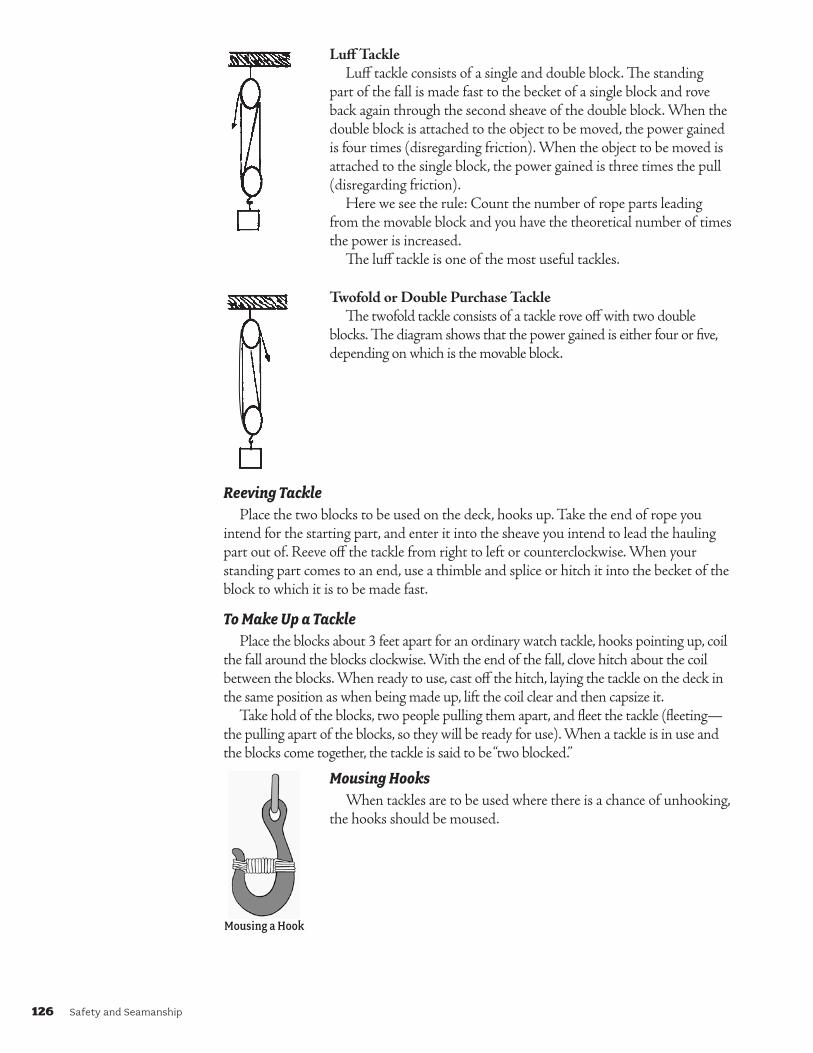
126 Safety and Seamanship
Luff TackleLuff tackle consists of a single and double block. The standing
part of the fall is made fast to the becket of a single block and rove back again through the second sheave of the double block. When the double block is attached to the object to be moved, the power gained is four times (disregarding friction). When the object to be moved is attached to the single block, the power gained is three times the pull (disregarding friction).
Here we see the rule: Count the number of rope parts leading from the movable block and you have the theoretical number of times the power is increased.
The luff tackle is one of the most useful tackles.
Twofold or Double Purchase TackleThe twofold tackle consists of a tackle rove off with two double
blocks. The diagram shows that the power gained is either four or five, depending on which is the movable block.
Reeving TacklePlace the two blocks to be used on the deck, hooks up. Take the end of rope you
intend for the starting part, and enter it into the sheave you intend to lead the hauling part out of. Reeve off the tackle from right to left or counterclockwise. When your standing part comes to an end, use a thimble and splice or hitch it into the becket of the block to which it is to be made fast.
To Make Up a TacklePlace the blocks about 3 feet apart for an ordinary watch tackle, hooks pointing up, coil
the fall around the blocks clockwise. With the end of the fall, clove hitch about the coil between the blocks. When ready to use, cast off the hitch, laying the tackle on the deck in the same position as when being made up, lift the coil clear and then capsize it.
Take hold of the blocks, two people pulling them apart, and fleet the tackle (fleeting—the pulling apart of the blocks, so they will be ready for use). When a tackle is in use and the blocks come together, the tackle is said to be “two blocked.”
Mousing a Hook
Mousing HooksWhen tackles are to be used where there is a chance of unhooking,
the hooks should be moused.
Safety and Seamanship 127
BOAT HANDLING
Parts of a BoatJust like other disciplines and sports, boating has its own vocabulary. If you do not
know the language, you cannot participate fully; and you may actually be a risk to yourself and others.
Some words such as aboard and ahead have crossed over into general language, but other common boating terms have not made it into the landlubber’s vocabulary. For example, chafing gear is not lip gloss. It is a protective cover or tubing that protects your line, and line is not something you use to get the attention of someone who interests you. Line is actually the rope used for various purposes aboard a boat.
Some parts of a boat are universal. All boats have the following: Bow. The front of the boat Stern. The back of the boat Port. The left side of the boat if you are looking toward the bow Starboard. The right side of the boat if you are looking toward the bow Hull. The boat’s main body or outer shell Freeboard. The distance between the waterline and the main deck or gunwale Draft. The depth of a hull from the waterline to the lowest part of the keel Keel. The backbone of the boat, the basic support extending from bow to stern
Apprentice 7a. Name the principal
parts of a typical sailboat and a runabout.

128 Safety and Seamanship
The following diagrams will help you learn the parts of a typical sailboat and a runabout.
Types of Sails
Ordinary 7a. Name the principal parts
of the masts, booms, spars, standing and running
rigging, and sails on a gaff- or Marconi-rigged sloop,
schooner, and ketch or yawl.
Parts of the Boat and Sails
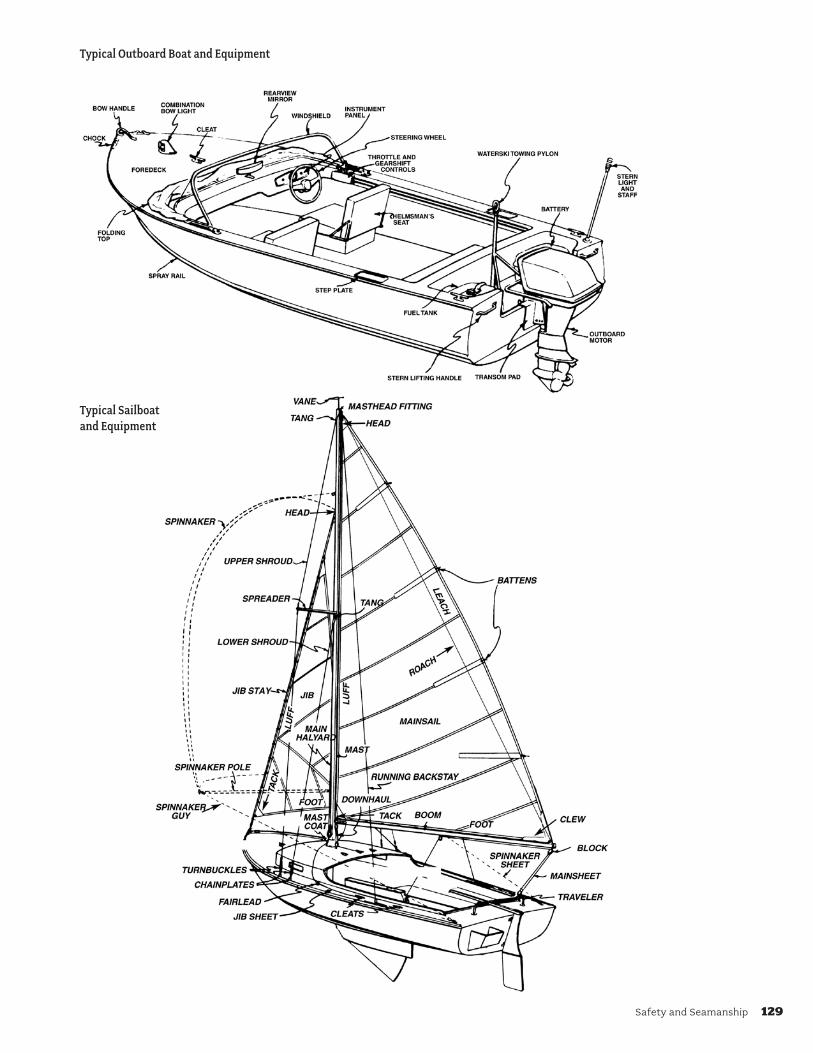
Safety and Seamanship 129
Typical Outboard Boat and Equipment
Typical Sailboat and Equipment

130 Safety and Seamanship
Types of Sailing Craft
Types of Rigs
There is a vast range of makes and types of sailing craft, however, rigs fall into a few basic types.
A Sunfish, with its pole mast straight up in the bow, carries a single sail and is easily handled by a single sailor.
The sloop is a single-masted vessel with the mast far enough aft to enable it to carry one or more headsails—forestaysail, jib, or spinnaker.
Apprentice 7b. Describe the identifying characteristics of a sloop,
ketch, yawl, cutter, and schooner.
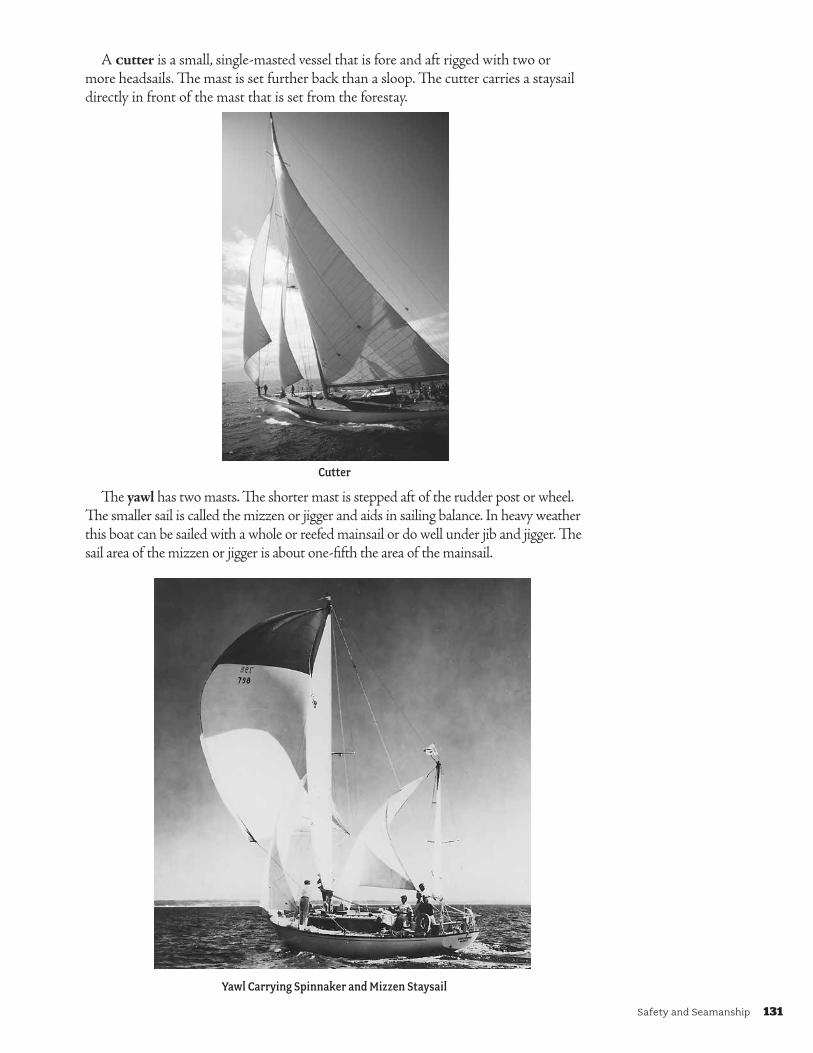
Safety and Seamanship 131
A Cutter is a small, single-masted vessel that is fore and aft rigged with two or more headsails. The mast is set further back than a sloop. The cutter carries a staysail directly in front of the mast that is set from the forestay.
Cutter
The yawl has two masts. The shorter mast is stepped aft of the rudder post or wheel. The smaller sail is called the mizzen or jigger and aids in sailing balance. In heavy weather this boat can be sailed with a whole or reefed mainsail or do well under jib and jigger. The sail area of the mizzen or jigger is about one-fifth the area of the mainsail.
Yawl Carrying Spinnaker and Mizzen Staysail
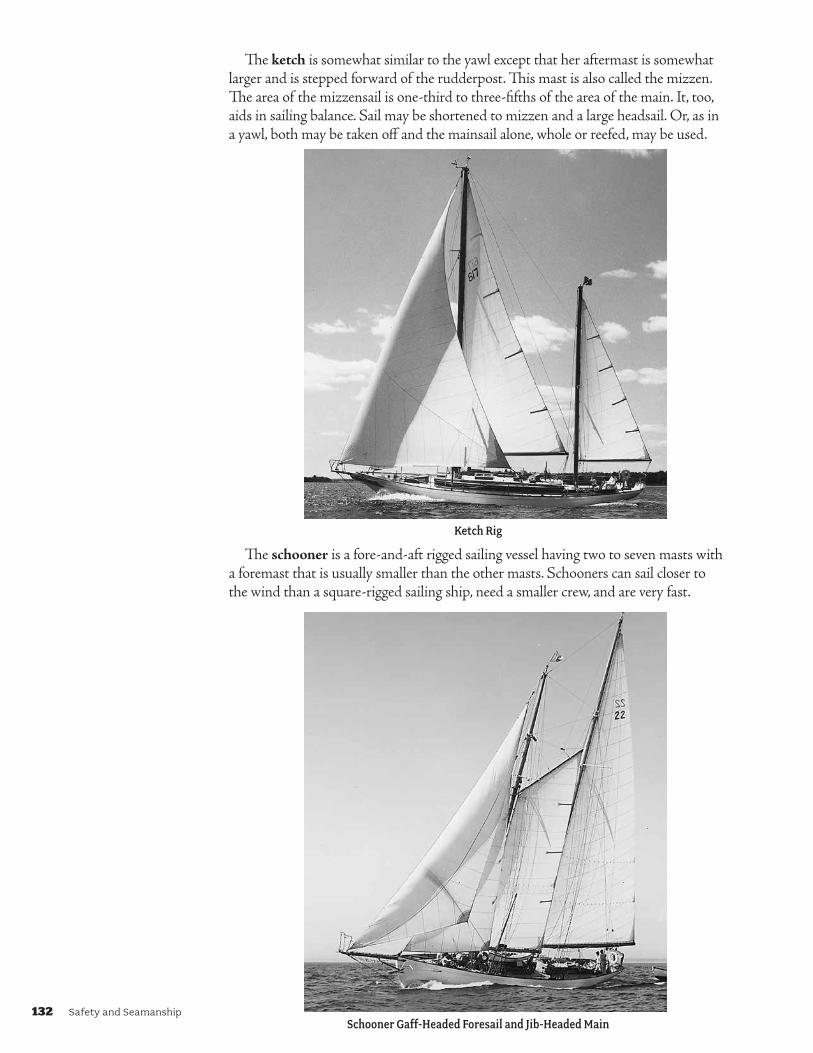
132 Safety and Seamanship
The ketch is somewhat similar to the yawl except that her aftermast is somewhat larger and is stepped forward of the rudderpost. This mast is also called the mizzen. The area of the mizzensail is one-third to three-fifths of the area of the main. It, too, aids in sailing balance. Sail may be shortened to mizzen and a large headsail. Or, as in a yawl, both may be taken off and the mainsail alone, whole or reefed, may be used.
Ketch Rig
The schooner is a fore-and-aft rigged sailing vessel having two to seven masts with a foremast that is usually smaller than the other masts. Schooners can sail closer to the wind than a square-rigged sailing ship, need a smaller crew, and are very fast.
Schooner Gaff-Headed Foresail and Jib-Headed Main
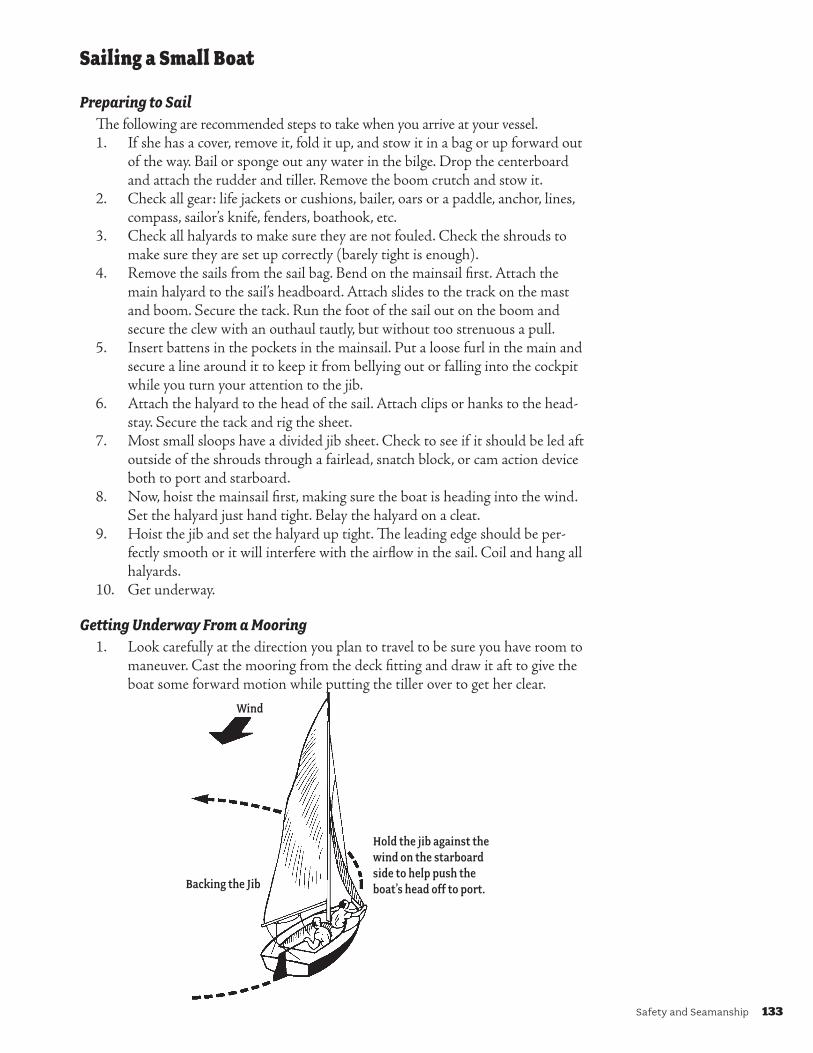
Safety and Seamanship 133
Sailing a Small Boat
Preparing to SailThe following are recommended steps to take when you arrive at your vessel.1. If she has a cover, remove it, fold it up, and stow it in a bag or up forward out
of the way. Bail or sponge out any water in the bilge. Drop the centerboard and attach the rudder and tiller. Remove the boom crutch and stow it.
2. Check all gear: life jackets or cushions, bailer, oars or a paddle, anchor, lines, compass, sailor’s knife, fenders, boathook, etc.
3. Check all halyards to make sure they are not fouled. Check the shrouds to make sure they are set up correctly (barely tight is enough).
4. Remove the sails from the sail bag. Bend on the mainsail first. Attach the main halyard to the sail’s headboard. Attach slides to the track on the mast and boom. Secure the tack. Run the foot of the sail out on the boom and secure the clew with an outhaul tautly, but without too strenuous a pull.
5. Insert battens in the pockets in the mainsail. Put a loose furl in the main and secure a line around it to keep it from bellying out or falling into the cockpit while you turn your attention to the jib.
6. Attach the halyard to the head of the sail. Attach clips or hanks to the head-stay. Secure the tack and rig the sheet.
7. Most small sloops have a divided jib sheet. Check to see if it should be led aft outside of the shrouds through a fairlead, snatch block, or cam action device both to port and starboard.
8. Now, hoist the mainsail first, making sure the boat is heading into the wind. Set the halyard just hand tight. Belay the halyard on a cleat.
9. Hoist the jib and set the halyard up tight. The leading edge should be per-fectly smooth or it will interfere with the airflow in the sail. Coil and hang all halyards.
10. Get underway.
Getting Underway From a Mooring1. Look carefully at the direction you plan to travel to be sure you have room to
maneuver. Cast the mooring from the deck fitting and draw it aft to give the boat some forward motion while putting the tiller over to get her clear.
Backing the Jib
Hold the jib against the wind on the starboard side to help push the boat’s head off to port.
Wind
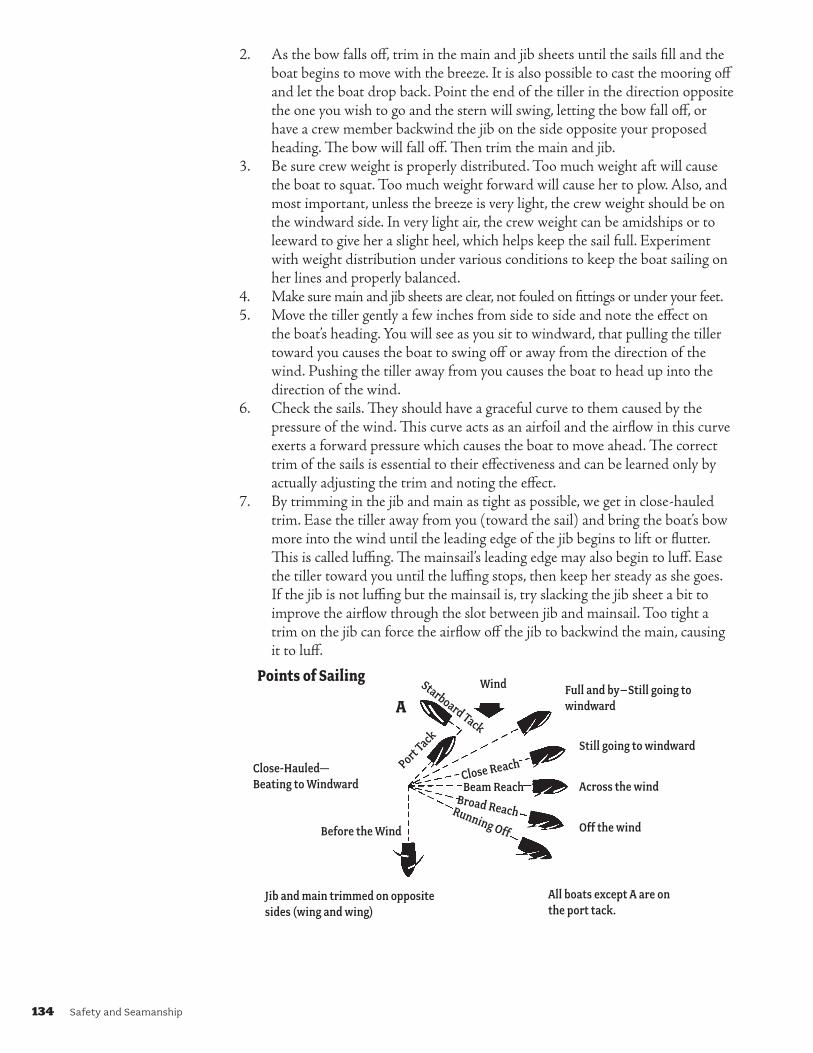
134 Safety and Seamanship
2. As the bow falls off, trim in the main and jib sheets until the sails fill and the boat begins to move with the breeze. It is also possible to cast the mooring off and let the boat drop back. Point the end of the tiller in the direction opposite the one you wish to go and the stern will swing, letting the bow fall off, or have a crew member backwind the jib on the side opposite your proposed heading. The bow will fall off. Then trim the main and jib.
3. Be sure crew weight is properly distributed. Too much weight aft will cause the boat to squat. Too much weight forward will cause her to plow. Also, and most important, unless the breeze is very light, the crew weight should be on the windward side. In very light air, the crew weight can be amidships or to leeward to give her a slight heel, which helps keep the sail full. Experiment with weight distribution under various conditions to keep the boat sailing on her lines and properly balanced.
4. Make sure main and jib sheets are clear, not fouled on fittings or under your feet.5. Move the tiller gently a few inches from side to side and note the effect on
the boat’s heading. You will see as you sit to windward, that pulling the tiller toward you causes the boat to swing off or away from the direction of the wind. Pushing the tiller away from you causes the boat to head up into the direction of the wind.
6. Check the sails. They should have a graceful curve to them caused by the pressure of the wind. This curve acts as an airfoil and the airflow in this curve exerts a forward pressure which causes the boat to move ahead. The correct trim of the sails is essential to their effectiveness and can be learned only by actually adjusting the trim and noting the effect.
7. By trimming in the jib and main as tight as possible, we get in close-hauled trim. Ease the tiller away from you (toward the sail) and bring the boat’s bow more into the wind until the leading edge of the jib begins to lift or flutter. This is called luffing. The mainsail’s leading edge may also begin to luff. Ease the tiller toward you until the luffing stops, then keep her steady as she goes. If the jib is not luffing but the mainsail is, try slacking the jib sheet a bit to improve the airflow through the slot between jib and mainsail. Too tight a trim on the jib can force the airflow off the jib to backwind the main, causing it to luff.
Close-Hauled— Beating to Windward
Before the Wind
Jib and main trimmed on opposite sides (wing and wing)
All boats except A are on the port tack.
Off the wind
Across the wind
Still going to windward
Full and by–Still going to windward
WindStarboard Tack
Port Tack
Close Reach
Beam ReachBroad ReachRunning Off
A
PointsofSailing

Safety and Seamanship 135
TackingSince it is impossible for a sailboat to sail directly into the wind, progress is made
to windward in a series of tacks or zigzags, each tack being at about a 45-degree angle to the wind. To change tacks, it is necessary to periodically come about. To do this, the helmsman alerts the crew with the command READY ABOUT.
The crew checks the jib sheets to be sure they are clear. At the command HARD ALEE the helmsman eases the tiller away from him or her. He or she swings it to a point where it is at about 45 degrees to the boat’s centerline.
Never slam the tiller hard over as it will cause the rudder to act as a brake or drag, slowing the boat down and possibly putting her in irons as she fails to turn past the eye of the wind.
Now a crewman eases the jib sheet, and as the boat comes up into the wind, shifts his or her weight amidships. He or she ducks as the boom swings over the boat and then as the boat passes the eye of the wind trims in the other jib sheet as the boat sails away on the new tack.
Moving his or her weight to windward as needed, the helmsman also shifts sides as the boat comes about, keeping the mainsheet in his or her hand since on the new tack the mainsheet trim should be about as it was on the previous tack.
Wind Arrow
Close-hauled on starboard tack. Adjust sheets to best trim, crew weight to windward.
Filling away, trim jib and main, begin to ease helm back to centerline.
In the eye of the wind, jib and main slatting, helm still over, crew weight in center.
Hard alee, ease jib sheet, helm over about 45°.
Ready about, prepare to tack.Clos
e-ha
uled
on
port
tack
ComingAbout
JibingThis maneuver involves
changing tacks while sailing off or before the wind. It looks easy, but it can cause real trouble if not carefully controlled. It is the chief reason that boats capsize. It should be practiced in light air until cause and effect are clearly understood.
Wind Arrow Ease helm up. Bow begins to swing off.
Port Tack
Trim main in snug to centerline.
Wind catches sails on opposite side. Boom swings over. Ease sheet gradually.
Bear off a bit to ease sheets out and fill sails.
Bear up on new course. Trim sheets
Starboard tack
Jibing
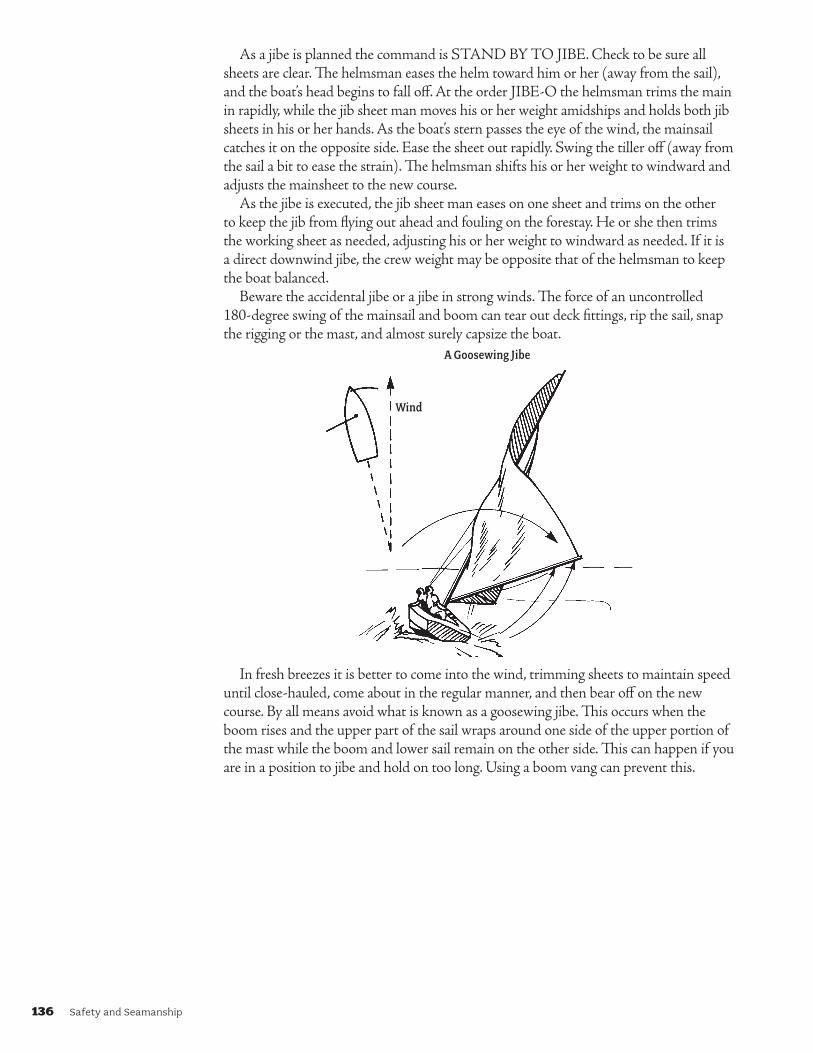
136 Safety and Seamanship
As a jibe is planned the command is STAND BY TO JIBE. Check to be sure all sheets are clear. The helmsman eases the helm toward him or her (away from the sail), and the boat’s head begins to fall off. At the order JIBE-O the helmsman trims the main in rapidly, while the jib sheet man moves his or her weight amidships and holds both jib sheets in his or her hands. As the boat’s stern passes the eye of the wind, the mainsail catches it on the opposite side. Ease the sheet out rapidly. Swing the tiller off (away from the sail a bit to ease the strain). The helmsman shifts his or her weight to windward and adjusts the mainsheet to the new course.
As the jibe is executed, the jib sheet man eases on one sheet and trims on the other to keep the jib from flying out ahead and fouling on the forestay. He or she then trims the working sheet as needed, adjusting his or her weight to windward as needed. If it is a direct downwind jibe, the crew weight may be opposite that of the helmsman to keep the boat balanced.
Beware the accidental jibe or a jibe in strong winds. The force of an uncontrolled 180-degree swing of the mainsail and boom can tear out deck fittings, rip the sail, snap the rigging or the mast, and almost surely capsize the boat.
A Goosewing Jibe
Wind
In fresh breezes it is better to come into the wind, trimming sheets to maintain speed until close-hauled, come about in the regular manner, and then bear off on the new course. By all means avoid what is known as a goosewing jibe. This occurs when the boom rises and the upper part of the sail wraps around one side of the upper portion of the mast while the boom and lower sail remain on the other side. This can happen if you are in a position to jibe and hold on too long. Using a boom vang can prevent this.

Safety and Seamanship 137
RunningSailing on a close haul or broad reach poses no particular problems other than proper
trim of the sails and crew weight distribution. The boom should be at, or nearly at, a right angle to the direction of the wind.
When running free (the most difficult aspect of sailing), many factors must be considered. Carelessness on the helm or a sudden wind shift could cause an accidental jibe. Keep a sharp eye on sea and wind conditions and take corrective action to meet any changes.
Wing and Wing
The Whisker Pole
Wind
A Few PointersSailboats are designed to sail on their lines. Don’t permit them to heel too far over.
In an open cockpit boat, putting her rail under may look exciting, but the margin of safety is very slim and the boat’s actual speed is reduced. Keep the rail up by having crew weight as far to windward as possible and well distributed fore and aft.
In fresh to strong breezes, tuck a reef in the mainsail or ease the mainsheet to let the sail luff and spill some of the wind.
In rough water, ease the bow off a bit to meet wave crests. Heading up into them could stop forward progress and make the boat subject to a knockdown. Keep the jib trimmed in flat. It will help maintain forward motion and at the same time backwind the mainsail. The jib sheet can be cleated with a couple of round turns but never the mainsheet. Keep it in your hand. Ease it off in heavy gusts; then trim it in enough to keep moving well.
Sooner or later, most small-boat sailors capsize or get knocked down. If it happens to you, don’t panic. Stay with the boat.
First check to be sure all persons are accounted for. Round up and secure all loose gear. Loosen the sails by releasing the halyards. Draw them down into the boat and lash them.
Your boat can probably be righted by standing on the centerboard and pulling on the coaming. Bail the water out until it’s safe to get aboard and finish the job. Otherwise, stay with the boat until help comes.
The sailor on the far side is getting the mainsail off the mast while his companion stands on the centerboard preparing to swing the boat upright.
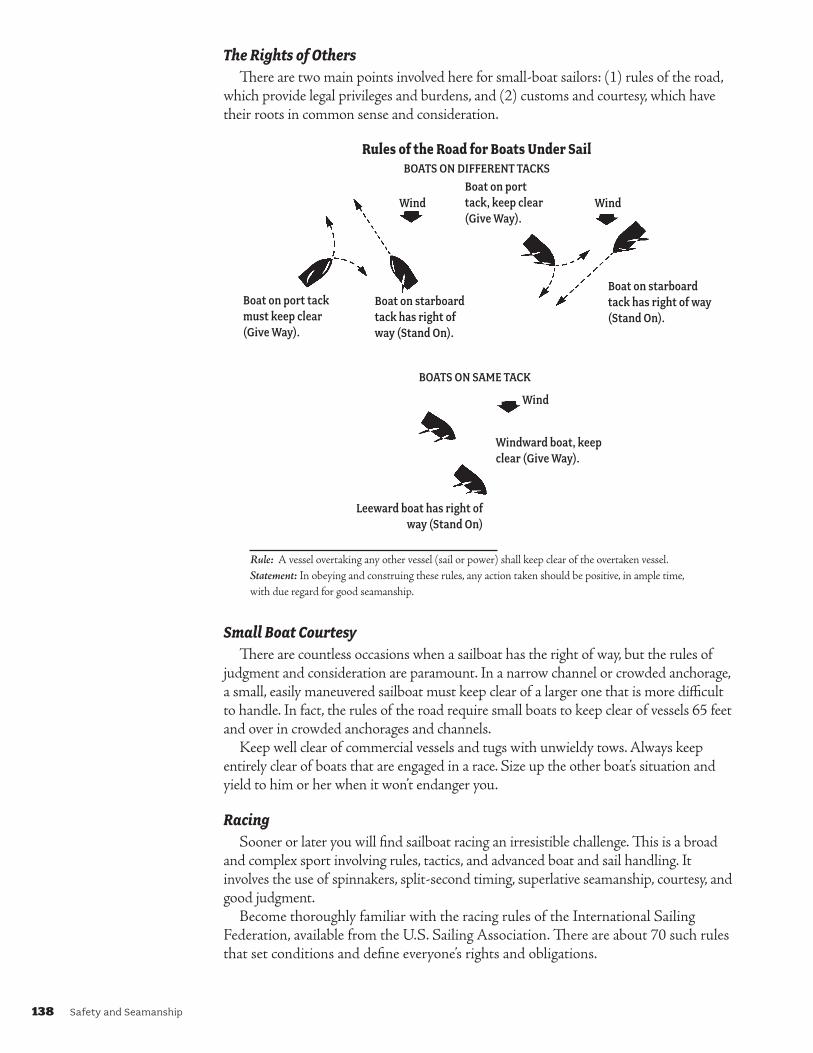
138 Safety and Seamanship
The Rights of OthersThere are two main points involved here for small-boat sailors: (1) rules of the road,
which provide legal privileges and burdens, and (2) customs and courtesy, which have their roots in common sense and consideration.
RulesoftheRoadforBoatsUnderSailBOATS ON DIFFERENT TACKS
Boat on port tack, keep clear (Give Way).
Wind
Boat on starboard tack has right of way (Stand On).
Boat on port tack must keep clear (Give Way).
Boat on starboard tack has right of way (Stand On).
Wind
BOATS ON SAME TACK
Wind
Windward boat, keep clear (Give Way).
Leeward boat has right of way (Stand On)
Rule: A vessel overtaking any other vessel (sail or power) shall keep clear of the overtaken vessel.Statement: In obeying and construing these rules, any action taken should be positive, in ample time, with due regard for good seamanship.
Small Boat CourtesyThere are countless occasions when a sailboat has the right of way, but the rules of
judgment and consideration are paramount. In a narrow channel or crowded anchorage, a small, easily maneuvered sailboat must keep clear of a larger one that is more difficult to handle. In fact, the rules of the road require small boats to keep clear of vessels 65 feet and over in crowded anchorages and channels.
Keep well clear of commercial vessels and tugs with unwieldy tows. Always keep entirely clear of boats that are engaged in a race. Size up the other boat’s situation and yield to him or her when it won’t endanger you.
RacingSooner or later you will find sailboat racing an irresistible challenge. This is a broad
and complex sport involving rules, tactics, and advanced boat and sail handling. It involves the use of spinnakers, split-second timing, superlative seamanship, courtesy, and good judgment.
Become thoroughly familiar with the racing rules of the International Sailing Federation, available from the U.S. Sailing Association. There are about 70 such rules that set conditions and define everyone’s rights and obligations.

Safety and Seamanship 139
The most famous sailboat race is the America’s Cup. In this con-test, another nation challenges the current holder of the America’s Cup. The United States success-fully defended the cup since the schooner America won the first race in 1851, losing for the first time to Australia in 1983.
Buddy Melges (left) and Bill Koch (right), winners of the 1992 America’s Cup and Sea Scout volunteers, along with members of the winning crew.
Smaller PowerboatsThere are many sizes and shapes of powerboats, ranging from the canoe, which is
man-powered, to the supertanker. Each type of powerboat is designed and built for a special purpose or to meet special conditions.
There is an important relationship between where and how the boat is used, the type of power, and the material of which the boat is constructed. Boats can be made of wood, aluminum, plastic, cement, and fiberglass. Power choices include inboard engines, outboard, and inboard-outboard motors—either jet or propeller type.
Some of the smaller powerboats Sea Scouts may use include the following:Punts and skiffs are designed for smooth, sheltered water. The dory is designed to
meet conditions on the open sea.
Skiff
Punt
Dory
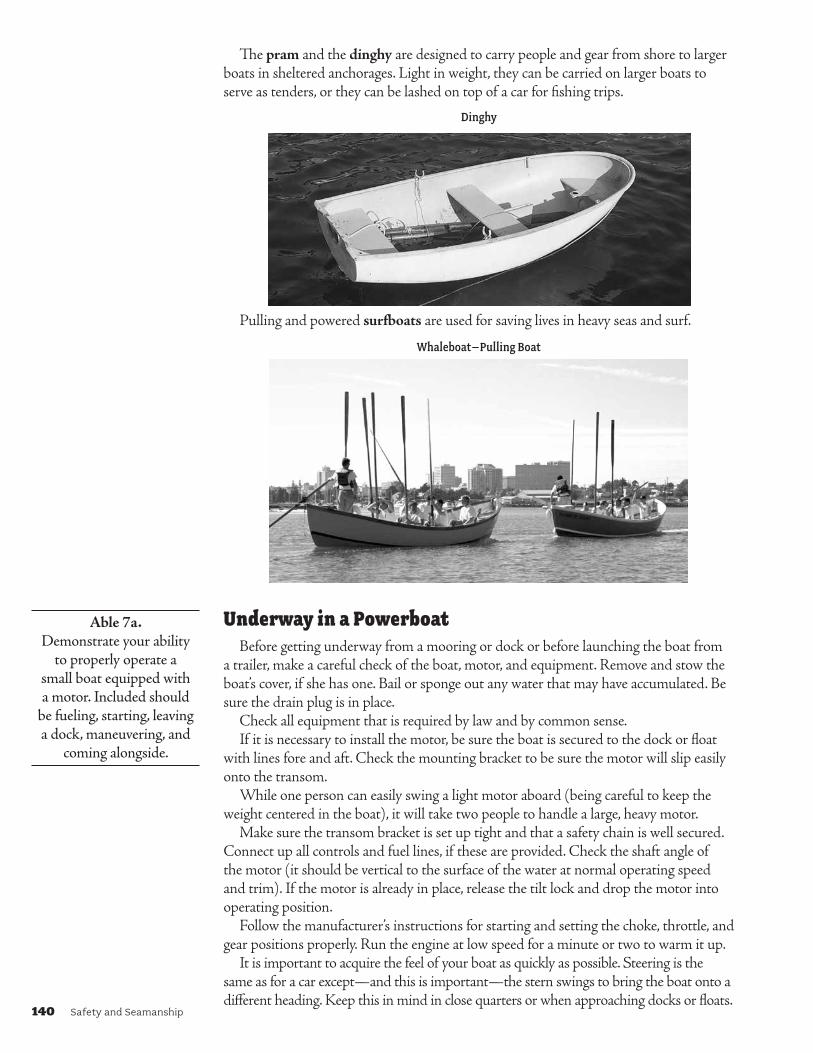
140 Safety and Seamanship
The pram and the dinghy are designed to carry people and gear from shore to larger boats in sheltered anchorages. Light in weight, they can be carried on larger boats to serve as tenders, or they can be lashed on top of a car for fishing trips.
Dinghy
Pulling and powered surfboats are used for saving lives in heavy seas and surf.
Whaleboat–Pulling Boat
Underway in a PowerboatBefore getting underway from a mooring or dock or before launching the boat from
a trailer, make a careful check of the boat, motor, and equipment. Remove and stow the boat’s cover, if she has one. Bail or sponge out any water that may have accumulated. Be sure the drain plug is in place.
Check all equipment that is required by law and by common sense. If it is necessary to install the motor, be sure the boat is secured to the dock or float
with lines fore and aft. Check the mounting bracket to be sure the motor will slip easily onto the transom.
While one person can easily swing a light motor aboard (being careful to keep the weight centered in the boat), it will take two people to handle a large, heavy motor.
Make sure the transom bracket is set up tight and that a safety chain is well secured. Connect up all controls and fuel lines, if these are provided. Check the shaft angle of the motor (it should be vertical to the surface of the water at normal operating speed and trim). If the motor is already in place, release the tilt lock and drop the motor into operating position.
Follow the manufacturer’s instructions for starting and setting the choke, throttle, and gear positions properly. Run the engine at low speed for a minute or two to warm it up.
It is important to acquire the feel of your boat as quickly as possible. Steering is the same as for a car except—and this is important—the stern swings to bring the boat onto a different heading. Keep this in mind in close quarters or when approaching docks or floats.
Able 7a. Demonstrate your ability
to properly operate a small boat equipped with a motor. Included should
be fueling, starting, leaving a dock, maneuvering, and
coming alongside.

Safety and Seamanship 141
Warning: Don’t cut the forward speed too rapidly or your wake may catch up with you and pour over the stern.
See how the boat handles in reverse. Practice maneuvering alongside an anchored boat cushion to judge stopping distances, steering, stern swing, etc. Practice allowing for the effects of the wind and current.
Wharfs, Piers, Docks, and SlipsA wharf is a structure parallel to the shore (and usually attached to it) to which boats
and ships are tied. A pier is a structure perpendicular to the shore. Vessels can be tied along either side. A dock is the space alongside a wharf or pier that the boat occupies. You cannot tie a boat to a dock since the dock is the space the boat occupies. A slip is the docking space between two piers. A marina usually contains many slips in a row. In common usage the slip can include both the docking space, piers, and other structures.
Docking Orders to the CrewOn larger vessels there are specific orders used in connection with the handling of
lines at a dock.When docking, the order STAND BY TO DOCK puts the crew at readiness, each
standing by his or her station with his or her line coiled, ready to heave. If no one is available at the dock to receive lines, other crew members stand ready to step ashore to receive the lines.
At the command HEAVE THE BOW LINE (or whatever line is to be used), the deckhand assigned to this line heaves it to the dock.
TAKE IN SLACK means that deckhands are to pull in the slack and take a turn on the cleat or bitt.
TAKE A STRAIN means that deckhands are to pull on the line named, taking a turn on the cleat or bitt but allowing it to slip.
EASE OFF means that the line is to be allowed to slip off more freely.HOLD means to check the line temporarily.SECURE LINES means to make fast permanently, adjusting to proper length.On leaving a dock, the order STAND BY THE LINES tells the people on the
wharf or pier to be ready to cast off the lines and the people on the deck to be ready to take them in. This is followed by the order CAST OFF THE LINES at which time the dock men clear the lines from the bollards and toss them to the deck men, keeping them clear of the water if possible.
On a small boat, the procedures explained above are greatly simplified. Docking may involve one person stepping ashore for the bow and stern lines with simple instructions from the Skipper.
Warning: Never allow docking lines, or any other lines, to go over the side where they can be sucked down into the propeller and wrapped around the shaft.
Mooring to a PierWhen making fast to a wharf or pier, sufficient and proper lines must be run out,
fenders placed, and provisions made to protect the ship in case of change of tide or wind, or against the wash of passing vessels.
For a short stay, bow and stern lines are adequate, and someone should remain on board to fend off if necessary. The sketch shows the proper way to moor for a long stay. Note the diagonal lines. These are to gradually check slight movements of the vessel away from the wharf so that sudden strain will not snap the lines. They also prevent any motion ahead or astern.
Able 7b. Know the names and func-tions of lines used to secure a vessel to a wharf or pier. Understand and execute docking commands used in handling lines on your
ship’s primary vessel.
Quartermaster 7a. Take charge of the craft
used by your ship and give all commands to the crew for picking up a mooring
buoy and properly mooring the vessel in several wind
and current situations.
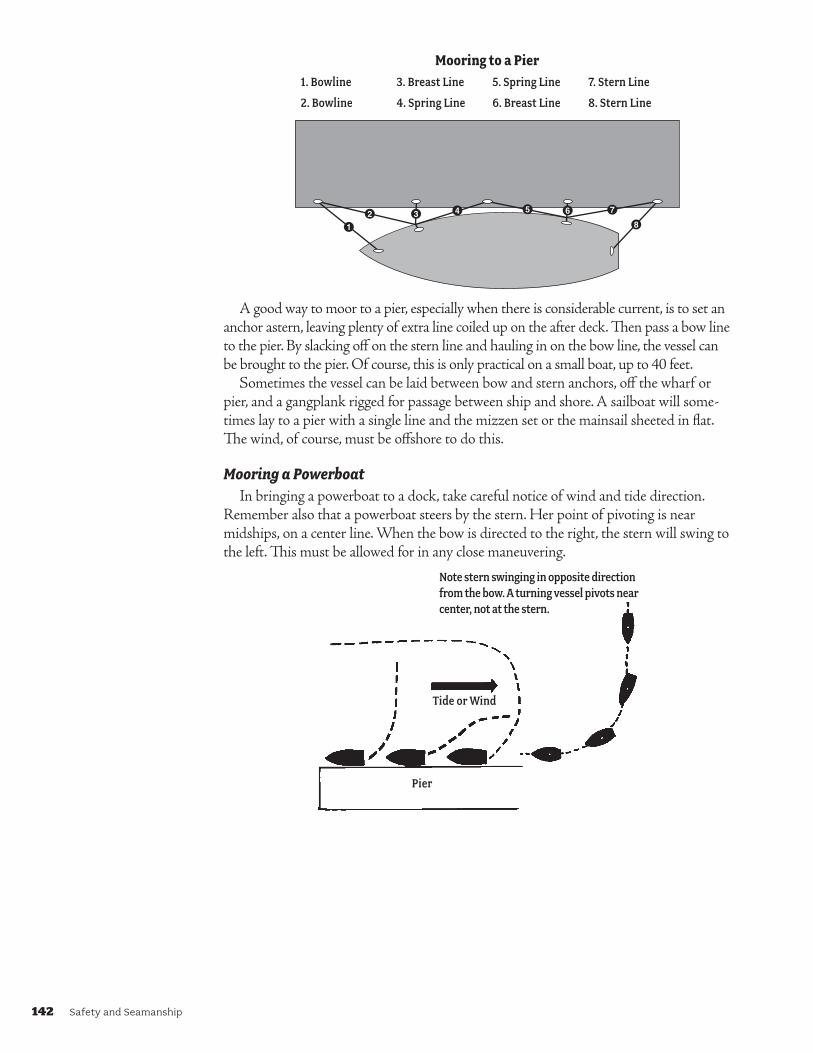
142 Safety and Seamanship
8765432
1
MooringtoaPier1. Bowline 3. Breast Line 5. Spring Line 7. Stern Line
2. Bowline 4. Spring Line 6. Breast Line 8. Stern Line
A good way to moor to a pier, especially when there is considerable current, is to set an anchor astern, leaving plenty of extra line coiled up on the after deck. Then pass a bow line to the pier. By slacking off on the stern line and hauling in on the bow line, the vessel can be brought to the pier. Of course, this is only practical on a small boat, up to 40 feet.
Sometimes the vessel can be laid between bow and stern anchors, off the wharf or pier, and a gangplank rigged for passage between ship and shore. A sailboat will some-times lay to a pier with a single line and the mizzen set or the mainsail sheeted in flat. The wind, of course, must be offshore to do this.
Mooring a PowerboatIn bringing a powerboat to a dock, take careful notice of wind and tide direction.
Remember also that a powerboat steers by the stern. Her point of pivoting is near midships, on a center line. When the bow is directed to the right, the stern will swing to the left. This must be allowed for in any close maneuvering.
Note stern swinging in opposite direction from the bow. A turning vessel pivots near center, not at the stern.
Tide or Wind
Pier
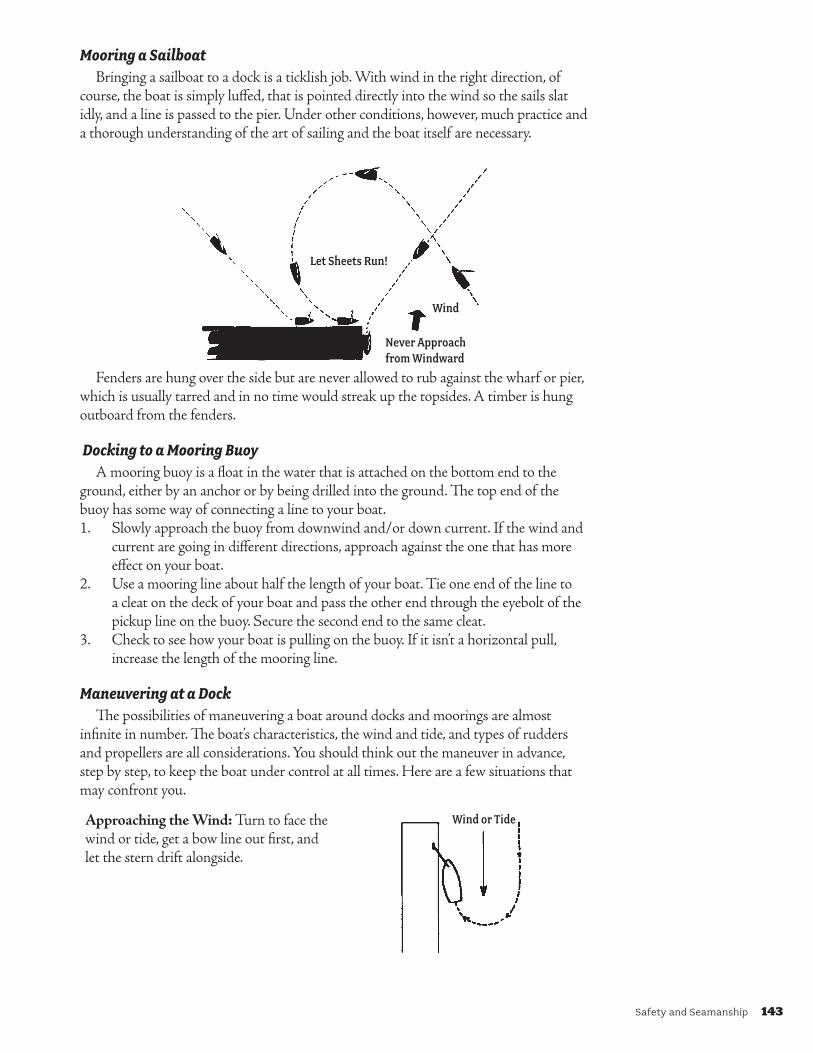
Safety and Seamanship 143
Mooring a SailboatBringing a sailboat to a dock is a ticklish job. With wind in the right direction, of
course, the boat is simply luffed, that is pointed directly into the wind so the sails slat idly, and a line is passed to the pier. Under other conditions, however, much practice and a thorough understanding of the art of sailing and the boat itself are necessary.
Never Approach from Windward
Wind
Let Sheets Run!
Fenders are hung over the side but are never allowed to rub against the wharf or pier, which is usually tarred and in no time would streak up the topsides. A timber is hung outboard from the fenders.
Docking to a Mooring BuoyA mooring buoy is a float in the water that is attached on the bottom end to the
ground, either by an anchor or by being drilled into the ground. The top end of the buoy has some way of connecting a line to your boat.1. Slowly approach the buoy from downwind and/or down current. If the wind and
current are going in different directions, approach against the one that has more effect on your boat.
2. Use a mooring line about half the length of your boat. Tie one end of the line to a cleat on the deck of your boat and pass the other end through the eyebolt of the pickup line on the buoy. Secure the second end to the same cleat.
3. Check to see how your boat is pulling on the buoy. If it isn’t a horizontal pull, increase the length of the mooring line.
Maneuvering at a DockThe possibilities of maneuvering a boat around docks and moorings are almost
infinite in number. The boat’s characteristics, the wind and tide, and types of rudders and propellers are all considerations. You should think out the maneuver in advance, step by step, to keep the boat under control at all times. Here are a few situations that may confront you.
Approaching the Wind: Turn to face the wind or tide, get a bow line out first, and let the stern drift alongside.
Wind or Tide
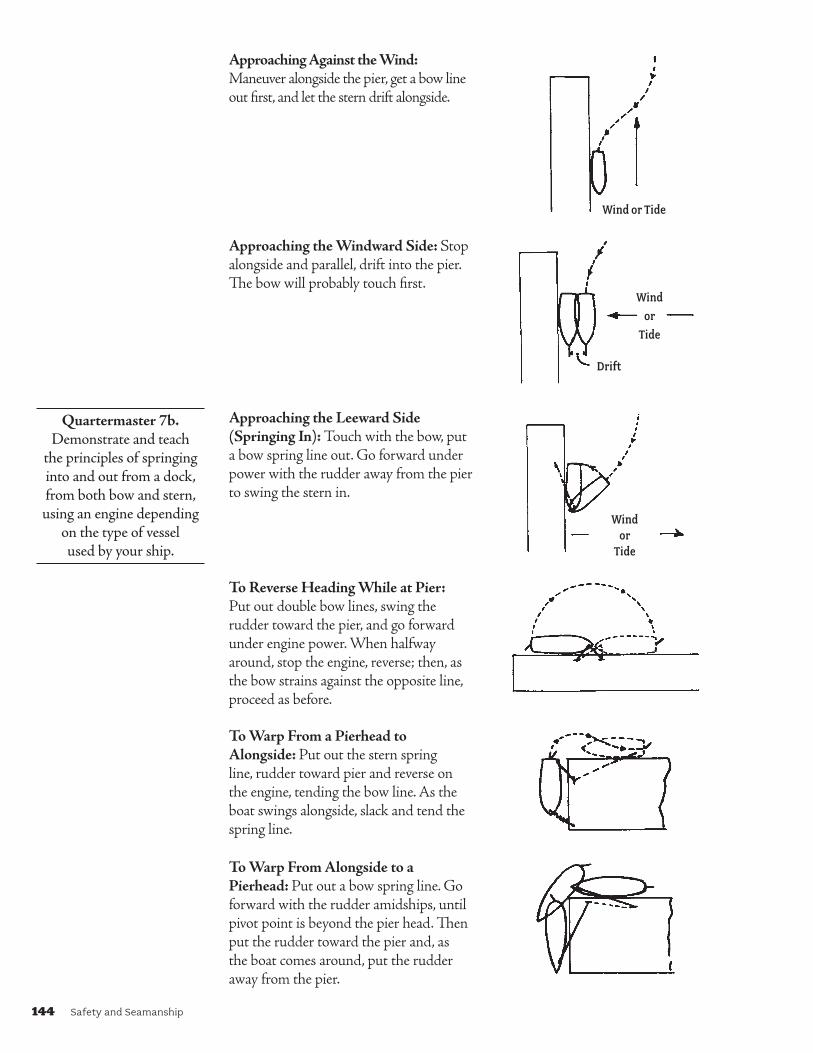
144 Safety and Seamanship
Approaching Against the Wind: Maneuver alongside the pier, get a bow line out first, and let the stern drift alongside.
Wind or Tide
Approaching the Windward Side: Stop alongside and parallel, drift into the pier. The bow will probably touch first.
Wind
or
Tide
Drift
Approaching the Leeward Side (Springing In): Touch with the bow, put a bow spring line out. Go forward under power with the rudder away from the pier to swing the stern in.
Windor
Tide
To Reverse Heading While at Pier: Put out double bow lines, swing the rudder toward the pier, and go forward under engine power. When halfway around, stop the engine, reverse; then, as the bow strains against the opposite line, proceed as before.
To Warp From a Pierhead to Alongside: Put out the stern spring line, rudder toward pier and reverse on the engine, tending the bow line. As the boat swings alongside, slack and tend the spring line.
To Warp From Alongside to a Pierhead: Put out a bow spring line. Go forward with the rudder amidships, until pivot point is beyond the pier head. Then put the rudder toward the pier and, as the boat comes around, put the rudder away from the pier.
Quartermaster 7b. Demonstrate and teach
the principles of springing into and out from a dock, from both bow and stern, using an engine depending
on the type of vessel used by your ship.

Safety and Seamanship 145
Right and Wrong Manner to Leave a Pier: Go forward with the rudder amid-ships and, as speed is picked up, move away from the pier slightly, increasing the angle as the boat slowly clears the pier. To set the rudder sharply away from the pier, as the boat leaves, will swing the stern into the wharf with force that may damage the boat.
Wrong Right
Clearing a Pier When Between Two Boats (Springing Out From the Bow): Put out a bow spring line and, with the rudder toward the wharf or pier, go forward on the engine. When clear, cast off and reverse; then go forward.
Clearing a Pier When Between Two Boats (Springing Out From the Stern): Leave a spring line attached to the stern cleat and turned around a cleat or a post on the dock. Bring the bitter end back into the boat. Because the stern will be swinging close to the dock, it is important to make sure there isn’t a piling or other obstruction that can damage the boat. Release all other dock lines and slowly back up the boat. As the spring line tensions, the stern will pivot and the bow will swing out. When the bow is clear, retrieve the spring line and go forward.
Heaving a LineA few preparations and practice will give you the ability to handle a line properly.
There are four things to remember.1. The line must be considerably longer than the distance it is to be thrown or it
will probably fall short of the target.2. The line must be coiled carefully and evenly with the draw of the loops toward
the free end; the loops should be smaller than those made for other purposes.3. Hold the shipboard end of the line in one hand and the coil to be thrown in
the other.4. The coil must be thrown properly—in an underhand motion with a strong,
swinging motion. Release it when the arm is well above the shoulders and at not too great a distance. Always aim at the head and shoulders of the person receiving it. Otherwise, the throw is apt to be low. If necessary, a weight can be used to help carry the line a greater distance, but in small-boat handling this is seldom necessary.
WaterskiingBoatmen are infuriated when water-skiers violate the rules of common sense.
• Never water-ski in an anchorage or channel, or near a swimming beach or anchored boats.
• Pick an open area where you will not interfere with anyone.• There must always be two people in the towing boat—one to operate the boat, the
other to observe the skier and tend the towline. Some states require a rearview mirror.• Skiers should wear a life jacket even if they are very strong swimmers. A wipeout
at high speed can stun and disorient the most experienced skier.• Learn the standard signals for waterskiing and observe them. Have fun, but use
good judgment.
Apprentice 7c. Demonstrate the ability to
use a heaving line.
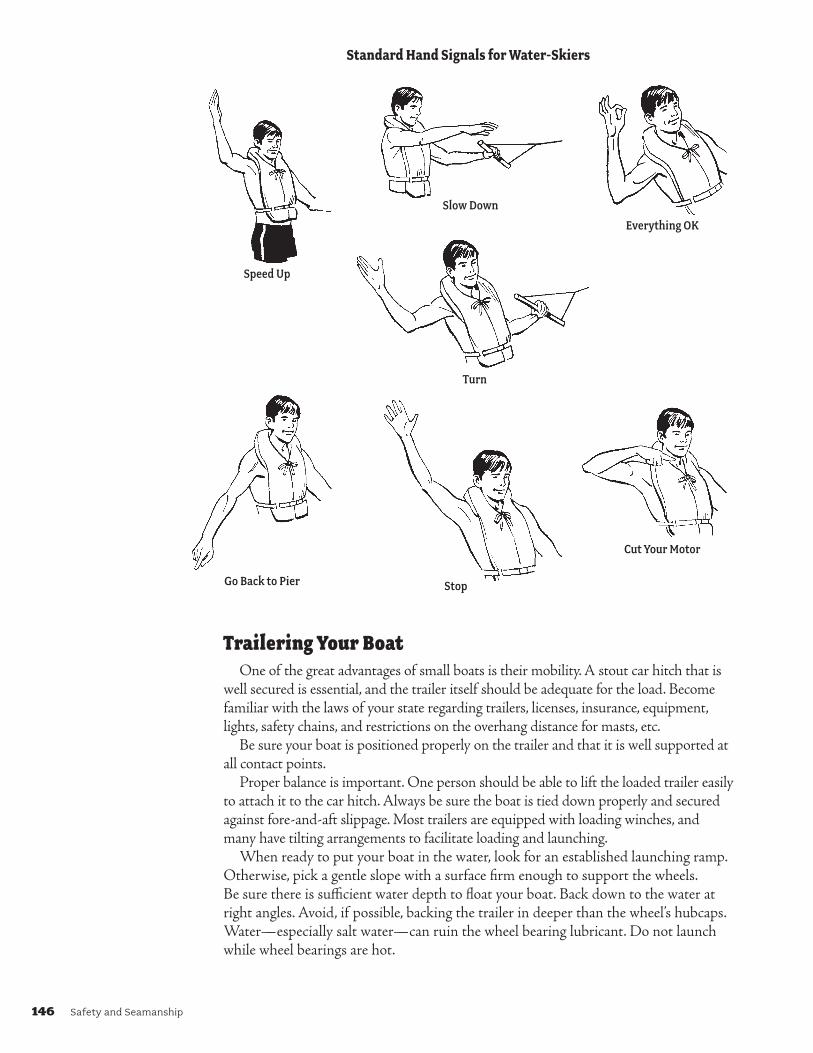
146 Safety and Seamanship
StandardHandSignalsforWater-Skiers
Speed Up
Slow Down
Everything OK
Turn
Go Back to Pier Stop
Cut Your Motor
Trailering Your BoatOne of the great advantages of small boats is their mobility. A stout car hitch that is
well secured is essential, and the trailer itself should be adequate for the load. Become familiar with the laws of your state regarding trailers, licenses, insurance, equipment, lights, safety chains, and restrictions on the overhang distance for masts, etc.
Be sure your boat is positioned properly on the trailer and that it is well supported at all contact points.
Proper balance is important. One person should be able to lift the loaded trailer easily to attach it to the car hitch. Always be sure the boat is tied down properly and secured against fore-and-aft slippage. Most trailers are equipped with loading winches, and many have tilting arrangements to facilitate loading and launching.
When ready to put your boat in the water, look for an established launching ramp. Otherwise, pick a gentle slope with a surface firm enough to support the wheels. Be sure there is sufficient water depth to float your boat. Back down to the water at right angles. Avoid, if possible, backing the trailer in deeper than the wheel’s hubcaps. Water—especially salt water—can ruin the wheel bearing lubricant. Do not launch while wheel bearings are hot.

Safety and Seamanship 147
Before launching, release all tiedowns, lock the motor in tilt position, release the bow winch, and rig a line to draw the boat back in when it floats free of the trailer. Disconnect the trailer lights to avoid burning out a bulb when you use the brakes.
When all is ready, push the boat off the trailer or tilt the trailer so the boat rolls off. Remove the car and trailer to a parking spot and draw the boat up to the beach until you are ready to get underway.
Travel TipsBefore starting a trailer trip, check the security of the boat on the trailer. If you load
gear into the boat, distribute the load evenly to maintain balance. Do not exceed the load capacity of the trailer. Be sure all state requirements are observed.
Check the wheel bearing lubricant, tire air pressure, lights, and the hitch and safety chains (allow enough chain slack to make sharp turns.) Be sure the boat’s motor is secure on the transom.
If you have a sailboat, place the mast so there is a minimum overhang, and attach a red cloth to the end of the mast. Check all points of boat and gear contact, and pad, if necessary, to avoid chafing. Be sure the trailer tilt and winch locks are in place.
It is recommended that fuel tanks be empty when traveling. Fill them at your destination.
RowingRowing is a skill acquired by practice. However, a few hints may be of help. Before
starting to row, be certain the oars are the right length. Good oarsmen generally prefer to have the ends of the oar handles touch each other or overlap slightly, since this gives more power to the stroke.
The complete stroke is made up of four distinct movements:1. Catch: placing the blades in the water ready to pull.2. Pull: sweeping the blades aft to give headway.3. Feather: raising the blades and turning them flat.4. Recover: swinging the oars to the position of catch.
To give the stroke full power, keep the upper edge of the blades at the surface of the water, your hands as level as possible. They should move fore and aft in a smooth motion.
As the stroke is finished, give your wrists a smart flip so the blades come out of the water at about a 45-degree angle. Keep your elbows close to the body and your back straight, chin up and in, and your feet against the stretcher or otherwise well braced. Your weight should be centered slightly abaft.
The pin-type rowlock will not permit proper rowing technique. This kind of oarlock is used principally on lakes for trolling where the oars are often trailed. A ring rowlock is better, and a preventer inboard of the oar is used so the oar will not move overboard.
In rowing, learn to set a course making due allowance for tide or wind. Once your course has been determined, steer by the wake or by taking a range over some point off the quarter. It is tiresome to be turning continually after every few strokes to look forward.
Ordinary 7b. Demonstrate your ability
to handle a vessel with paddles or oars by doing
one of the following:
Safely board a rowboat and row in a straight line for 200
yards/meters, stop, make a pivot turn, return to the
starting point, and backwater in a straight line for 50 yards/
meters. Make a turn and return to the starting point. or
Safely board a canoe, kayak, or paddleboard and paddle
a straight line for 200 yards/meters. Make a turn and
return to the starting point. Demonstrate a draw stroke to move the boat sideways both right and left, and for-ward and reverse sweeps to
spin the boat both clockwise and counterclockwise.
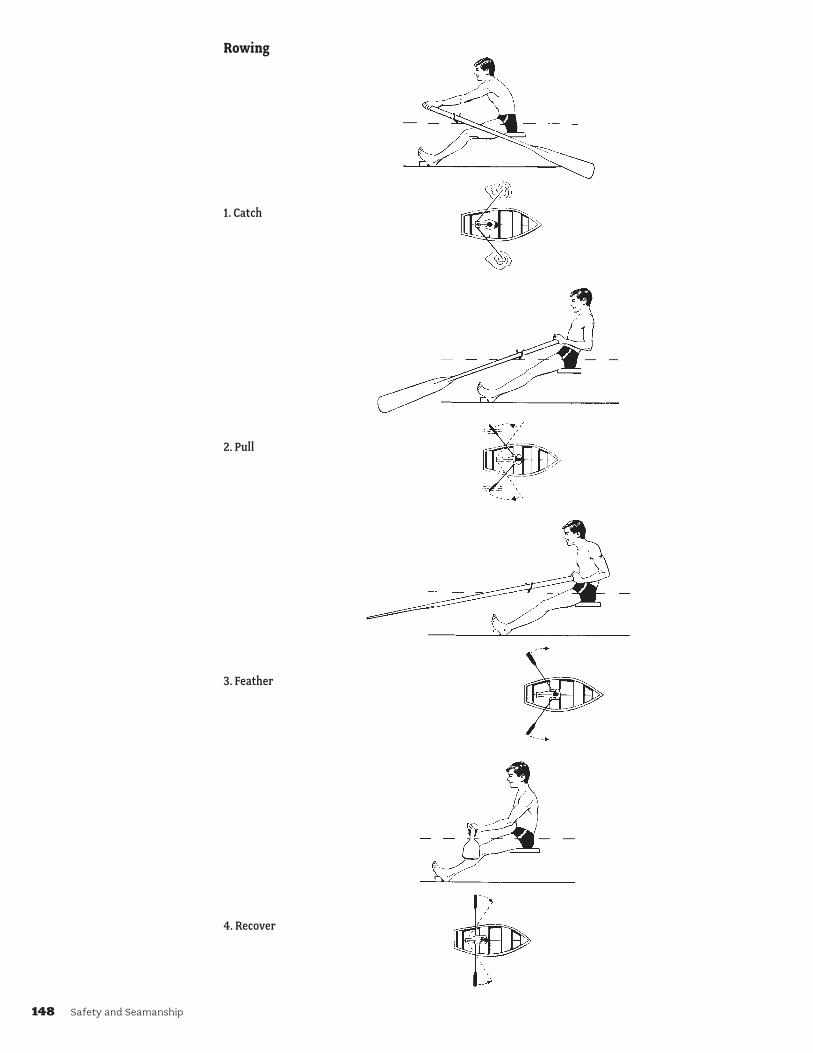
148 Safety and Seamanship
1. Catch
2. Pull
3. Feather
4. Recover
Rowing

Safety and Seamanship 149
PADDLECRAFT
IntroductionPaddlecraft are among both the oldest and the newest ways to go out on the water.
Native cultures developed canoes and kayaks centuries ago, but constructed with mod-ern materials such as fiberglass and plastic, these paddlecraft have increasingly become an affordable, popular way to recreate. More than 50 million Americans participate in some form of paddling activity each year, and every year the number of participants grows. Stand up paddleboards are the newest form of paddlecraft. Sea kayaks and whitewater kayaks have become more specialized for specific waters, and rafting has become an activity of choice on many rivers.
Unfortunately, as interest and participation have gone up, the number of accidents, including drowning, has also gone up. As a prudent mariner, you need to be aware of and manage risks.
To begin, ships need to study and adhere to the principles of Safety Afloat and Safe Swim Defense. It is imperative that every participant be classified as a “swimmer” to participate in training for paddlecraft activities or to paddle at a Sea Scouting function. Properly fitted U.S. Coast Guard–approved life jackets must be worn by all persons engaged in paddlecraft activities.
All persons participating in activity afloat must be trained and practiced in craft-handling skills, safety, and emergency procedures. The Canoeing merit badge and the Kayaking BSA and BSA Stand Up Paddleboarding awards prepare Sea Scouts and unit leaders for kayaking on flat water of a limited extent. Kayak or canoe trips require additional training in emergency equipment and communication. Ocean and river trips require additional kayaking skills for dealing with waves and moving water and the ability to read the environment. Units should not undertake excursions on Class II whitewater before mastering the necessary skills on Class I rivers.
Before Sea Scouts go afloat, they develop a float plan detailing their route, time schedule, and contingency plans. The float plan considers all possible water and weather conditions and all applicable rules or regulations, and is shared with all who have an interest.
Equipment must be suited to the craft, to the water conditions, and to the individual. Equipment must be in good repair and meet all applicable standards. Appropriate rescue equipment must be available. Whitewater kayaking requires the use of safety helmets. During treks, safety gear such as navigation aids, weather radios, individual signal devices, throw bags, first-aid kits, spare paddles, and spare clothing should be carried in the kayaks or in support craft.

150 Safety and Seamanship
Canoes For several centuries, the canoe was a primary method of travel for explorers and
settlers. Today, it remains an important part of the wilderness experience and an enjoyable leisure activity that teaches communication, teamwork, and physical fitness.
Canoe Shape and PerformanceA canoe’s dimensions affect how the canoe will perform on water. For example, a
longer waterline enhances speed and improves tracking and the ability to go straight. A keel further improves a canoe’s tracking ability.
A longer canoe glides farther with each stroke and can carry a heavier load than a shorter boat. Thus, a 17-foot canoe on flat water would hold more cargo and go straighter and faster than a 13-foot canoe. The shorter a canoe’s waterline, the easier it is to turn. The waterline can vary depending on the length of the hull, the shape of the canoe’s ends, and the curve of the bow and stern sections out of the water. The contour of the ends of a canoe as seen from the side is called the stem. The curve of the hull from bow to stern is the rocker, like the bottom of a rocking chair. The more curve in the rocker, the shorter the waterline. A canoe with a lot of rocker can turn and spin easily and is suited for whitewater paddling, which involves quick navigation. The width of a canoe, or its beam, mainly affects stability. Wider canoes can carry bigger loads and are less likely to tip over. The width of the bow also is a factor in a canoe’s performance. A narrow, pointed bow cuts through the water like a knife. A wider, blunt bow more easily navigates waves and deflects rocks. A bow that is longer and narrower than the stern—asymmetrical, or irregular in shape—will slice through the water better than a symmetrical one, increasing the speed of the canoe.
PaddlesOn even the shortest canoe journey, you will lift your paddle thousands of times,
making a lightweight paddle worth plenty. Canoe paddles are made of wood, fiberglass, metal, plastic, or combinations of these. Shorter blades are best for shallow rivers, while blades that are long and narrow can be quieter and more manageable. A blade width of 7 to 8 inches is good for beginners. The top of the paddle, where one hand is placed, is called the grip. The grip of your paddle should fit your hand smoothly and comfortably. The other hand should be comfortably placed along the shaft of the paddle but above the gunwale of the canoe. The blade is the wide part of the paddle that is placed into the water. The end of the blade, called the tip, is fragile. The throat is where the shaft and blade join.
EquipmentWhether you are setting out for an hour of paddling or a week of wilderness
exploration, your canoe must be outfitted with essentials to propel it and to protect its passengers. Life jackets for each person are the most important piece of gear you have on the water, perhaps even more vital than the canoe itself. Life jackets work only if they fit well and are worn. Watertight or waterproof containers keep food, sleeping bags, and other items dry. Dry bags are extremely durable. They are made from a heavy plastic and generally have a roll-up watertight closure and shoulder straps and hip belts for portaging. A backpack may be made from water-resistant fabric but does not have the watertight seal of a dry bag. Other good waterproof containers include 5-gallon reseal-able buckets and waterproof map cases. Simple plastic bags such as resealable freezer

Safety and Seamanship 151
bags and heavy-duty garbage bags work well, too. When using garbage bags, double-bag all items and close the bags with a thick rubber band. Then place the garbage bags in a duffel bag, stuff sack, or other container to protect the bag from being punctured or torn. Waterproof containers such as dry bags, plastic buckets, and plastic bags are essential for keeping canoeists’ gear and food dry.
Portage YokeWhen you pick up a canoe and carry it over land from one lake or stream to another,
you are portaging. The trail you follow is the portage. Canoe yokes come in handy when carrying the canoe on your shoulders.
Paddling a CanoeGood position and body mechanics lead to effective paddling. Whether you canoe
with a partner or alone, either kneel in the canoe or sit solidly on a seat for stability and more efficient paddling. Think of yourself as part of the canoe, locked in place. Most canoes have bow and stern seats. Whether paddling tandem or solo, sitting is comfortable for long cruises on open water. However, sitting also raises the joint center of gravity of the canoe and paddler, making the combination less stable. Paddling from the seat is acceptable on quiet waters, but on rough water or a windy day it is best to kneel. Kneeling lowers your center of gravity and makes the canoe more stable, especially in windy conditions. It is important to learn a few kneeling positions so that you can change positions and give your muscles and joints some rest. You can use them whether paddling solo or in tandem. Always use a kneeling pad to protect your knees. The most common kneeling position is the cruising position. Kneel with your knees apart and with your weight against a thwart or the edge of a seat. To improve stability and control, wedge the knee on the paddling side against the bilge.
StrokesWhen paddling, maintain a smooth rhythm with your paddle, keeping your strokes
steady and crisp and in sync with your paddling partner. Use your arms to guide your paddle, but power the strokes with the larger muscle groups of your abdomen, shoulders, and back. Practice the forward stroke, backstroke, draw stroke, pushaway, forward sweep, reverse sweep, and J-stroke using the following key principles:
• Maintain good posture. Sitting straight will allow you to balance the boat more easily and to use your muscles more efficiently. Try not to hunch forward or over-reach with your arms.
• Center your body over the boat. When your head is over your abdomen, your center of gravity will help keep the boat balanced. Even when sitting or kneeling close to the side of the boat, you can still maintain good balance by following this principle.
• Paddle in the box. Imagine a box about as wide as your shoulders, as high as the top of your head, and as low as the top of the gunwales. It extends forward from your back to as far as your arms will reach while keeping good posture. Keeping your hands and arms in this box while you paddle will help prevent muscle strain and help you use the larger muscle groups of your abdomen, shoulders, and back to power your strokes.
• Rotate from the waist. If you rotate your upper body to perform each stroke, the large, strong muscles of the torso will power the stroke and prevent fatigue. As you paddle, imagine your torso twisting around your backbone.
• Following the paddle blade with your eyes will help you learn to rotate your torso through each stroke.

152 Safety and Seamanship
KayaksOriginally, kayaks were made of seal skins stretched over a wood and bone frame.
The Inuit used them for hunting and fishing. Early recreational kayaks were made of cloth over wooden frames. Some models of folding kayaks still use fabric on a frame, but most modern kayaks are made of rigid plastics such as polyethylene, fiberglass, or Kevlar. Kayak designs vary according to usage and construction. A flatwater racer differs from a whitewater racer. Recreational kayaks are multipurpose craft suitable for a variety of water conditions. Touring kayaks are larger and have storage capacity for camping gear. They are also known as sea kayaks, due to their use around ocean shorelines. They can be long—up to 20 feet—to aid in tracking, and often have a rudder or skeg. Special play boats or squirt boats are used in heavy whitewater. They are short—down to 6 feet—for easy turning. Some play boat designs are adapted for surfing. Sit-on-tops do away with the traditional cockpit and deck in favor of a recessed well that is self-bailing. The paddler also sits on the floor of portable inflatable kayaks.
INUIT
FOLDING
TOURING OR SEA
Basic Paddling ManeuversYou should become proficient in each of the following techniques:
• Strokes—forward, forward sweep, reverse sweep, draw, rudder, and backstroke• Getting in and out; entering and launching a kayak from dock or shore; landing or
docking; and exiting a kayak from dock or shore• Aiding a capsized paddler• Assisted rescues• Self-rescues
EquipmentAll equipment must be suited to the craft—whether sit-on-top, decked, or inflat-
able—ready for the water conditions, and fitted to the individual. Equipment must be in good repair and meet all applicable standards. Appropriate rescue equipment must be available. Whitewater kayaking requires the use of safety helmets. During treks, safety gear such as navigation aids, weather radios, individual signal devices, throw bags, first-aid kits, spare paddles, and spare clothing should be carried in the kayaks or in support craft. A whistle and life jacket are both required by the Coast Guard.

Safety and Seamanship 153
PaddlesThe blades of kayak paddles are made in various designs, such as flat or spoon
shaped. Many blades are set at an angle to one another, from 45 to 90 degrees. The offset angle allows the blade out of the water to be automatically feathered. Feathering reduces wind and splash resistance. A paddle with offset blades is controlled by firmly gripping the shaft with one hand, the right being the most common. The paddle should rotate freely in the loose grip of the opposite hand. Grasp the paddle with your hands just over shoulder-width apart. The knuckles of your control hand should be aligned with the edge of the blade nearest that hand. Some shafts are oval in cross-section to make hand placement easier and more comfortable. The grip of the control hand never changes. Practice rotating the blade 90 degrees by bending your wrist to raise your knuckles while also allowing your elbow to bend. Allow the paddle shaft to rotate freely in your other hand. This will turn the blade near your slip hand into the correct position for an efficient stroke. Correct paddle length depends on both your size and that of the boat. Your instructor will be able to suggest an appropriate size. You will then need to test the paddle in your kayak to be sure you can perform the strokes correctly.

154 Safety and Seamanship
Stand Up Paddleboards (SUPs)Stand up paddleboarding originated as an offshoot of surfing. It is still used in the surf
and has expanded into whitewater. Sea Scout training for SUP should be conducted in calm, flat water free from wind, waves, current, and outside boat traffic, and be within swimming distance of shore. There should be no submerged trees or structures that could injure an individual falling off a board. Completion of the training should prepare Sea Scouts and leaders to enjoy SUP activities in similar environments. That, in turn, can lead to opportunities such as flatwater racing. However, the farther you venture from shore, the more you need to know about handling wind, waves, and currents. Flatwater touring is another possibility. Gear can be carried on the deck in waterproof bags. Consult other resources for what to carry, where to go, and how to deal with changing environ-ments. Operating a SUP in the surf zone or on whitewater requires skills beyond those covered in the BSA Stand Up Paddleboarding award. Such skills are best acquired from qualified instruction. Check local paddling clubs and the American Canoe Association (www.americancanoe.org) for opportunities to learn more advanced skills.
Stand up paddleboards come in a range of materials, styles, widths, and lengths. Some boards are highly specialized either for a specific activity or for a certain water venue. Other all-around boards can be used for different activities across a range of water venues. Generally, the wider a board is the more stable it will be on the water.
PaddlesThere are many different materials and styles of paddles. Key components to under-
stand when choosing a good paddle are length and weight. Heavy paddles will tire a person quickly, but lighter paddles can be more expensive. There are also numerous techniques for sizing a paddle, so consider going with the manufacturer’s recommendation. However, the key point when sizing a paddle is that when the blade is fully immersed in the water, the grip should not be higher than your shoulder. In addition, different SUP activities might be better executed with a different length of paddle. For example, some ocean SUP surfers prefer a shorter paddle length than when they are paddling on flat water.

Safety and Seamanship 155
EquipmentIn addition to a board, paddle, and properly sized life jacket, each participant in a
SUP activity on calm water should have a whistle and an appropriate leash. All equip-ment should be safety checked and repaired as needed prior to use. Dress should be appropriate for air and water temperatures. Shoes, sunscreen, a hat, sunglasses, and a water bottle are also recommended.
Leashes are a crucial piece of equipment in numerous situations. In flat water, a leash will keep your board from blowing away in the wind and may keep it from striking another paddler if you fall. Leashes are straight, coiled, or a hybrid of both. A coiled leash is appropriate for flat water because a straight leash may drag in the water and snag paddle blades or other objects. One end of the leash is attached with a Velcro cuff to your ankle or calf. The other end is attached to a fitting on the tail of the board.
Straight or hybrid leashes are typically used in surf. In flowing rivers, with or without whitewater, leash use is not as straightforward because there is a possibility the leash could lead to entanglement. For river use, the leash should be attached to your life jacket with a quick-release mechanism, never to your ankle or calf. Seek specialized training before attempting SUP in moving water, rivers, or whitewater, and follow the advice of your instructor. When in doubt, do not wear a leash in moving water or whitewater.
For more information, go to the BSA Stand Up Paddleboarding award material available at www.scouting.org/filestore/Outdoor%20Program/pdf/BSA_SUP_Award.pdf.
Rafts Rafting, especially whitewater rafting, is a challenging recreational activity using an
inflatable craft to navigate a river, usually on white or rough water. Modern rafting as a leisure sport has become popular since the mid-1970s, evolving from individuals paddling small 10-foot rafts with double-bladed paddles to multiperson rafts propelled by single-bladed paddles and steered by a tour guide at the stern. The modern raft is an inflatable boat, consisting of very durable, multilayered rubberized (hypalon) or vinyl fabrics (PVC) with multiple air chambers. They range in size from 20 feet long by 8 feet wide to single-person packable rafts that may be as small as 5 feet long and weigh as little as 4 pounds.
In the “Whitewater” chapter of Aquatics Supervision there are two pages on how to select a commercial rafting service. The Aquatics Supervision manual does not currently cover rafting techniques for youth rafting without a guide on board. More and more outfit-ters are offering four- to six-man rafts and duckies (single or tandem inflatable kayaks) for rent in lieu of rigid canoes and kayaks. The whitewater program at the Paul R. Christen National High Adventure Base, located at the Summit Bechtel Family National Scout Reserve, is a good place for Sea Scouts to experience this paddling opportunity. For more information about high-adventure programs at the Summit Bechtel Reserve, visit http://summitbsa.org/programs/national-high-adventure-base/summit-experience/.
Personal Safety Skills Participants are required to have personal safety skills, including how to select and
fit life jackets, how to float in moving water, how to deal with cold water, and how to perform capsize drills. Everyone wears a life jacket while paddling. There are exceptions in BSA policy, but they do not apply to paddlecraft such as canoes, kayaks, and rafts, or even dragon boats or war canoes more than 20 feet long.

156 Safety and Seamanship
SwimmingConditions that limit swimming ability will also limit boating activities because of
the swimmer requirement, but limit is not the same as prohibit. The requirements for the BSA swimmer test are to jump feetfirst into water over your head in depth, level off, and swim 75 yards in a strong manner using one or more of the following strokes: sidestroke, breaststroke, trudgen, crawl. Then swim 25 yards using an easy, restful backstroke. The 100 yards must be swum continuously and include at least one sharp turn. After completing the swim, rest by floating. Those not classified as a swimmer are limited to multiperson craft during outings or float trips on calm water with little likeli-hood of capsizing or falling overboard. They may ride in a canoe or other paddlecraft with an adult swimmer skilled in that craft as a buddy.
CommunicationsModern mobile phones are ubiquitous. They offer what seems to be a handy solu-
tion to general communications. Many incorporate a GPS receiver that can transmit a latitude and longitude, but they also have limitations. Battery life, cell tower distance and location, and waterproofing are all issues that can make a cellphone less desirable than a marine radio. A good, floating, waterproof VHS radio with a built-in GPS receiver and digital selective calling is a good investment for a Sea Scout group going offshore.
FlotationYour paddlecraft may have built-in flotation and bulkheads to limit taking on water.
To prevent more water from coming in, add inflatable flotation bags at bow and stern to displace that water and reduce the amount you may have to bail out. In an incident, you will stay with your vessel, and improving its flotation can make it a long, hard, lifesaving device.
VisibilityWhen other vessels, particularly powered vessels, are bearing down on paddlecraft, they
are likely to see you at a distance of only about a quarter of a mile. Depending on their speed, they may have less than a minute to respond to avoid you. Help them see you by being aware that your paddle glint and motion will be the first things they see. Next, they will see your clothing, so wear colors that contrast with your background and are bright.
Fitness As with all physical activities, paddling requires fitness—endurance to paddle for
long periods, strength to lift the paddlecraft or portage it, and agility and balance to react to wind and wave. Develop your own fitness plan that focuses on core strength, upper-body strength, and endurance.
Aquatics Supervision
Swimming and Water Rescue and Aquatics SupervisionPaddle Craft Safety covers skills needed to meet Safe Swim Defense and Safety
Afloat policies applied at the unit level. These training courses are provided locally by qualified instructors who are authorized by the local council. They are also available online. Sea Scout youth (ages 16 and older per the requirements) are encouraged to attend the Aquatics Supervision training sessions held by the National Council. Offering the training programs to older youth meets the objective of preparing the unit to safely conduct its own aquatics activities and is therefore appropriate. Sea Scouts are encouraged to earn the Lifesaving merit badge prior to taking Swimming and Water

Safety and Seamanship 157
Rescue, and to complete the requirements for the Canoeing or Kayaking merit badge and/or Kayaking BSA prior to taking Paddle Craft Safety. All youth with an active interest in paddlecraft, lifeguarding, or positions as summer camp aquatics staff are encouraged to attend a BSA Lifeguard program.
Risk ManagementAn injury that doesn’t happen needs no treatment. An emergency that doesn’t occur
requires no response. An illness that doesn’t develop demands no remedy. The best way to stay safe on the water is to avoid getting into trouble in the first place. That requires planning, training, leadership, good judgment, and accepting responsibility—in short, risk management.
We manage risk in almost every aspect of our lives. There is risk involved in stepping out of our homes in the morning, but we go anyway. There are risks in crossing a street, catching a bus, and taking part in sports, but we find ways to minimize these risks and maximize our safety and well-being.
Risk management is so much a part of paddlecraft adventures that often we hardly notice we are doing it. When we fill bottles with water from streams and lakes, we deal with the risk of parasites by treating the water with a filter or chemicals, or by boiling it. When we share the water with sea mammals or fish, we protect them and ourselves by staying out of their reach, eliminating human odors from ourselves, and keeping alert. When foul weather blows in and we become uncomfortably exposed, we consider all the available information and then make decisions that keep risks at acceptable levels.
Perceived risk can energize paddlecraft activities by bringing to them an immediacy that is sharper than what we normally experience. The actual risk on a well-managed paddling trek, for example, is relatively low, but participants experiencing the events of the trip might perceive that the risk is much higher than it actually is. That heightened awareness can take them beyond their usual comfort levels and encourage them to accept challenges that will stretch their abilities and build their confidence.
The only way to eliminate risk completely on the water is to give up the pleasures, chal-lenges, and satisfaction of taking part in an adventure. Rather than attempting to do away with it, group members and leaders can manage risk by identifying its sources, understand-ing its boundaries, and tailoring their behavior to minimize exposure to danger.
Shared Management of RisksMany outdoors-oriented organizations have guidelines to address certain hazards
they believe to be of particular concern to their members. This chapter, for example, will discuss hypothermia, lightning, and several other potential risks of great interest to Sea Scouts. A truly effective approach to risk management, though, is found not just in the details but also in the willingness of everyone in a group to take an active role in maximizing his or her own safety and the safety of others.
Here are three keys to effective risk management:• Everyone in the group commits to having a safe experience. • Everyone understands and follows group guidelines established to minimize risk. • Everyone has a say in recognizing and dealing with risks that arise during a trek.
A leader who empowers group members with resources, training, and responsibilities for conducting successful paddling trips often will find that they also can be trusted to do their part to manage risk. When each person has a part to play in the success of a trek, everyone has a stake in risk management. Group members are far better prepared to deal with illnesses or injuries if they are versed in response plans and if they know where they are, what resources are at their disposal, and what skills they can draw upon. On the other hand, leaders who expect group members simply to obey rules and

158 Safety and Seamanship
instructions—to be followers rather than thinkers and problem solvers—might discover that their groups aren’t able to deal effectively with the changing nature of risk.
A critical aspect of risk management is letting others know when you are having difficulties or are aware of a concern that might affect you or the group. Many people have a tendency to keep things to themselves. They don’t want to slow down the group, or they are worried about what others will think of them. Stopping for a few moments to deal with a hot spot helps avoid bringing the group to a long halt later in the day when blisters break out. Voicing concern about changing weather or questionable route decisions can bring important matters to the attention of the rest of your group.
Ways individuals can help manage personal risks include:• Stay in good shape so you are ready for the physical demands of a paddling
adventure.• Know where you are going and what to expect. • Adjust clothing layers to match changing conditions. • Drink plenty of water. • Protect yourself from exposure to the sun. • Take care of your gear.
Outdoor-Oriented First AidTake care of yourself, and you will be far less likely to have trouble on the water. You
also will be much better able to help others deal with difficult situations. When we get away from it all, among the things we are getting away from is quick
access to emergency support and care. If someone has an accident in an American city, calling 911 will bring an emergency team to the scene within minutes.
The farther group members are from medical facilities, the more important is their ability to deal with emergencies on their own. Responding to incidents during paddling adventures can involve not only immediate treatment but also evacuating ill or injured persons to shore, or stabilizing them and maintaining their safety for hours until medical assistance arrives.
Those who intend to paddle offshore should prepare themselves with first-aid training, ideally including training in caring for injured and ill persons in remote settings. Among the training courses available in various parts of the country are Red Cross Wilderness First Aid Basic, Wilderness First Responder, Wilderness Emergency Medical Technician, and Mountaineering Oriented First Aid.
Preparing a Group to Manage RiskThe Coast Guard and rescue team professionals and trained volunteers responding
to calls can be exposed to considerable risk. Never hesitate to summon help when you need it, but minimize the need for assistance by preparing well and doing your best to proceed in ways that maximize your safety and that of others.
Risks associated with the outdoors can involve rain, wind, heat, cold, water, wildlife, and falling overboard. Human elements affecting risk include lack of physical preparation, improper training, poor judgment, and unreasonable expectations by group members, leaders, parents, and others. Many of these concerns can be addressed by leaders helping group members decide upon activities that are appropriate to their skills, experience levels, and interests. Preparing a group to manage risk also involves a certain amount of pre-trip planning and paperwork and development of an emergency response plan.
PaperworkThe policies of a given organization will determine the paperwork that must be
completed before a trek begins—releases for medical treatment, for example, proof of health insurance, tour and activity plans, and any forms required by land management
Safety and Seamanship 159
agencies. Leaders also should be fully informed in writing if a group member requires medications or has any medical issues or allergies. Always prepare a written itinerary of where you plan to be on each day and night of a trek. Leave copies with several responsible people who will take appropriate action if you haven’t returned according to schedule.
Emergency Response PlanDeveloping a written emergency response plan requires group members to figure
out the steps to be taken during emergencies and to write down contact information for agency personnel, law enforcement authorities, and medical response networks. The plan should outline strategies for contacting help, if help is needed. Along with your group’s roster, itinerary, intended route, and expected time of return, give copies of the emergency response plan to support people at home before you get underway.
Mobile Telephones and Risk ManagementGPS receivers allow travelers to pinpoint locations, but they are no substitute
for mastering the use of maps and compasses. Likewise, mobile telephones can be a convenient means for groups to contact emergency response personnel, but phones are useless if they malfunction, the batteries are exhausted, or distance and terrain prevent clear reception of signals. Mobile phones can be made waterproof, but few float, and you can be out of the range of a cell tower when you are offshore.
Frivolous use of mobile phones can seriously diminish solitude, independence, and challenge in the outdoors. If you carry a mobile phone, stow it in a waterproof container and bring it out only for emergency calls. Most of all, never assume that having a mobile phone grants you any protection for attempting activities beyond your levels of skill and experience, especially if you are far from emergency support.
Managing Risk AfloatThe degree of risk in a situation depends on a host of factors that can change from
one moment to the next. Managing risk often is a matter of considering the “what if ” of a situation: What if I fall in? What if I lose my paddle? What if I hurt my shoulder paddling? What if I get too tired to paddle back? Other considerations that might be factors are the time of day; your group’s level of fatigue, hunger, or anxiety; and the amount of experience you’ve had with similar situations.
Put lots of faith in your gut feeling about a situation. If it doesn’t seem right but you’re not sure why, your instincts might be telling you something you need to know but do not yet fully understood. Take plenty of time to consider your options.
Anyone in a group should feel empowered to call a halt to group activities whenever he or she perceives a risk that should be addressed. In turn, group leaders and other members must respect those concerns and give them full consideration.
While the tone of a group is best when it is upbeat and members strive to see the positive in every situation, it’s good to be a pessimist about hazards, erring on the side of too much caution rather than not enough. The risk management portion of your brain should be focused on what could go wrong so that you can act in ways that increase the likelihood of things going right.
Incident ResponseRisk management is not built on a list of rules but rather on good judgment and
a willingness to accept responsibility for one’s own safety and that of others. Incident response is what happens when an injury or illness has occurred during a trek and a group must decide how to handle it.
Accounts of injuries and illnesses in the outdoors often try to pinpoint a specific cause. Hypothermia, for example, often is blamed on chilly weather, cotton clothing,
160 Safety and Seamanship
and precipitation. Of course, the steps that led to poorly dressed travelers shivering in the rain can be traced back to decisions that might easily have prevented that dangerous situation from occurring at all. With qualified leadership, personal responsibility, and effective planning, those travelers would have had warm clothing and rain gear. They would have been well-hydrated and have had energy food in their packs. They would have kept an eye on the weather and made timely decisions about where to go, when to go ashore, and whether to turn around and go home.
The following pages discuss ways to prepare for and manage certain risks, and also the basics of how groups can respond to incidents brought about by these concerns. Watercraft adventures present specific risk management issues that will be addressed in the chapters discussing those activities.
DehydrationDehydration can play a significant role in a number of maladies including heat
exhaustion, heatstroke, hypothermia, and frostbite. Water is essential for nearly every bodily function, including brain activity and
temperature control. We lose moisture through breathing, sweating, digestion, and urination. A person who loses more water than he or she takes in risks becoming dehydrated. The first sign of dehydration usually is dark urine. Other signs can include weariness, headache and body aches, and confusion.
Help keep your body in balance by drinking enough throughout the day. The impor-tance of drinking plenty of fluids cannot be overemphasized. Don’t wait until you feel thirsty—that’s an indication that you are already becoming a bit dehydrated. Replenish your water supplies at every opportunity and drink often in warm weather and cold alike.
Incident Response for DehydrationA person showing any indications of dehydration should rest in the shade and sip water until the symptoms subside.
Heat ExhaustionPlease refer to “Hurry Rescue Cases” in the Safety and Seamanship section of this manual.
HeatstrokeHeatstroke occurs when a person’s core temperature rises to a life-threatening
level (above 105 degrees). Causal factors include dehydration and overexertion in hot environments. Symptoms can include hot, red skin that can be either dry or sweaty; confusion; and a rapid pulse.
Incident Response for HeatstrokeA heatstroke victim must be cooled immediately. He or she is in danger of dying. To quickly lower the body temperature and begin restoring hydration, move the victim ashore to a cool, shady spot and cool him or her any way you can. Keep the victim lying down and comfortable, with head and shoulders slightly raised. Remove outer clothing and sponge the victim with cold water. Cover the victim with wet towels, wet clothing, or whatever else is handy, and fan him or her. Place the victim in a stream, in a tub filled with cool (not ice-cold) water, or in front of an air conditioner running full blast in a house or car. Use combinations of all available treatments.
Get emergency medical help as soon as possible. The victim’s temperature might go up again, or he or she might vomit or require rescue breathing.
HypothermiaPlease refer to “Hurry Rescue Cases” in the Safety and Seamanship section of
this manual.
Safety and Seamanship 161
SunburnAlthough skin appears to recover from sunburn, damage to its cellular structure
accumulates. That can lead to premature wrinkling and is a primary cause of skin cancer. Use sunscreen to protect exposed skin, giving special attention to your face, ears, nose, and neck. To be effective, sunscreen should have a sun protection factor (SPF) of at least 15. Apply it liberally before sunlight exposure, and reapply if you are sweating and after immersion in water. Hats with large brims, long-sleeved shirts, and long pants will provide further protection.
Sunlight reflected by water can intensify the damaging effects of solar radiation. Zinc oxide offers total blockage of the sun’s rays, and might be what you need for your face and ears during watercraft adventures. Wear sunglasses with UV protection to prevent eyestrain, and shield your lips against chapping and sun injury by applying a lip balm with an SPF of 15 or higher.
Incident Response for SunburnPrevent further injury by getting out of the sun, either by seeking shade or by putting on a hat and clothing that affords protection. Treat painful sunburn with damp cloths. Remedies containing aloe vera also might provide relief.
LightningOpen water can be a hazardous place during lightning storms. Plan to be off the
water before afternoon when thunderstorms are more prevalent. If you are caught in a dangerous area, quickly move to shore, ideally away from the direction of the approach-ing storm. Bodies of water might conduct electricity.
If a lightning storm catches your group in the open, spread out so that people are at least 30 feet from one another. Further minimize your risk by staying low with a life jacket or pad between you and your boat. Stay aboard and keep hands and paddles out of the water.
Incident Response for Lightning StrikesThose struck by lightning might suffer varying degrees of burns. Of more immedi-ate concern is the likelihood that their hearts have stopped beating and they are no longer breathing. Treat by checking their circulation and respiration; if necessary, perform CPR. Once they are stabilized, attend to burns or other injuries, treat for shock, and closely monitor their vital signs until they are under a physician’s care.
Falling OverboardAlthough every precaution should be made, people sometimes go overboard. It may not be possible to grab an outside safety line or reach the throw bag.
Incident Response for Falling Overboard in a Swift RiverWhen you surface, assume a position with your feet aimed downstream, and then use them to absorb impact against objects. Should you manage to get to an island or into the branches of a tree, stay calm and wait for assistance.For more on surviving a fall into moving water, see the “Kayaking and Rafting” chapter in the Fieldbook.
Anaphylactic ShockIn rare cases, stings or bites of insects can cause anaphylactic shock, a condition that
restricts breathing passages and requires immediate treatment by a physician or a person trained in emergency first aid. People who are allergic to peanuts, shellfish, and certain other foods can have similar reactions if they ingest those items.
Travelers who know they are susceptible to anaphylactic reactions (and anyone dealing with asthma) should consult with their physicians to prepare themselves for the outdoors with strategies and treatment kits, and should share that information
162 Safety and Seamanship
with the leaders of their groups. For example, the emergency kits carried by people who know they might suffer from anaphylactic shock often include an EpiPen for injecting a measured dose of epinephrine.
AsthmaThe symptoms of an asthma attack can be similar to those of a person suffering
anaphylactic shock—a constriction of the throat and increasing difficulty in breathing. Conditions afloat that might trigger an asthma attack include physical exertion, changes in humidity, and weather. Many people coping with asthma use inhalers and other forms of medication to treat asthma episodes. Before a cruise begins, they should fully inform group leaders of their health histories, treatment regimens, medications, and the locations of those medications.
AnimalsSeeing animals such as whales, seals, and dolphins in their natural habitat is always
a pleasure, but it’s wise to remember that they are the permanent residents of the water while we humans are the visitors. Whales, seals, and dolphins are large and interest-ing, but we need to treat them with respect, give them enough space so they won’t feel threatened by our presence, and properly manage our proximity. If we do so, they seldom will present a risk to our safety.
Incident Response for InjuriesWhen helping victims of bites or stings, do whatever you must to avoid being bitten or stung yourself. A rescuer who becomes injured could greatly complicate any emergency situation.
Shark AttackThough rare, shark attacks on humans create dramatic headlines in the media. Many
more people die each year from the effects of bee stings than from shark bites. Reduce even that remote likelihood of a shark attack by avoiding areas where sharks are known to congregate. Don’t enter the water alone. Blood, fish bait, and human waste in the water might attract sharks, as can bright objects such as jewelry. If sharks are sighted, return to shore quickly but with a minimum of splashing.
Jellyfish StingsYour trips along shorelines and on the open sea can bring you within close proximity
of a variety of animals that are best observed from a distance. The Portuguese man-of-war and jellyfish have stinging cells on their tentacles. When touched, the toxins in those cells may attach to the skin and cause a sharp, burning pain.
Do not wash affected skin with fresh water, as that can cause the release of more toxins. Instead, soak the injury for 30 minutes in alcohol or vinegar, and then use tweezers to remove the remaining tentacles. Quickly get the victim under medical care. People who are allergic to jellyfish stings might go into deep shock.
Keeping Risk in PerspectivePerhaps the greatest risk to be managed during cruises is also one of its real attrac-
tions—the simple matter of distance. The farther you travel from clinics, physicians, and rescue squads, the more you must rely upon yourself and your companions to maintain your safety. Of course, the best response to risk is to stay out of trouble in the first place. That requires planning, leadership, and an awareness of your surroundings so that you can make good decisions every step of the way. Add the first-aid training you need to respond effectively to an illness or injury that might arise, and you can make the man-agement of risk second nature on every paddling adventure.

Safety and Seamanship 163
GROUND TACKLEGround tackle is a general term for the anchors, cables, warps, springs, etc., used for
securing a vessel at anchor.
Anchor PartsConsider the parts of the old-fashioned anchor or its very close relative, the yachts-
man’s stock anchor in general use today. The shank, which is the main stem of the anchor, is its most important part. The arms, branching off from the bottom of the shank, form the holding element. They are slightly curved and branch upward at an angle. The arms join the shank at the crown. At the upper side, on either side of the shank, is the throat. When a buoy rope is hitched about an anchor, it is attached here.
The arms are tipped by the flukes or palms and these in turn by the bill or pee. The metal shod boards on the bow of ships are called billboards, where the bill of the anchor touches the side when hoisted inboard.
The outside of the palm, where the fluke tapers down and acts as a support, is called the blade.
The stock is the part that turns the anchor into an attitude that enables the flukes to dig into the bottom. Just above the stock, the upper end of the shank carries a large eye where the anchor shackle is attached. This is where the anchor cable is joined to the anchor.
Danforth Anchor
Shank Stock
Crown
Fluke
Ordinary 8a. Name the parts of a stock anchor and a stockless anchor.
BLADE

164 Safety and Seamanship
Types of Anchors
Yachtsman’s or Old-FashionedThe yachtsman’s anchor is very similar to the anchor used for centuries that had a
wooden stock. In suitable weight, it has excellent holding power. The stock, running across the shank, is designed to make the anchor lie on the bottom so that when a horizontal pull comes from the boat, the fluke digs into the bottom.
The yachtsman’s anchor in general use today is constructed so the stock slides through the shank and folds down alongside it for convenience in stowage. The one disadvantage of the yachtsman’s anchor is that it can easily be fouled by the protruding fluke as the boat swings or “walks” while anchored.
Navy AnchorThe stockless or navy anchor, sometimes called patent, has no stock and, therefore,
is free of the danger of fouling the cable. Its effectiveness depends on its weight and the bottom conditions that enable the flukes and heavy crown to dig in.
The crown is pivoted on the end of the shank and this allows the flukes to turn down into the bottom. This type of anchor is used on large ships that can handle and stow it efficiently. The navy anchor is not effective for small craft.
Lightweight AnchorsThe most widely used anchors for small craft today are the lightweight type.
Developed by R. S. Danforth in 1939, this design produces strong holding power because of thin large flukes that heavy strains bury deeply. Instead of a stock through the head of the anchor, the Danforth has a round rod through the crown that prevents the anchor from rolling. This type of anchor has the unique feature of being equally adapt-able to large or small craft.
Another comparable model is the Northill. This anchor is light and relatively efficient. The Northill has a stock at the crown instead of at the ring end, adding to the anchor’s holding power when the flukes are buried. The arms are at right angles to the shank, and the broad flukes are set at a carefully engineered angle to ensure a quick bite into the bottom.
Another efficient anchor is the CQR, or plow, of English design. As it does not have a stock, it rarely fouls. It has the ability to dig in again promptly even after a 180-degree change of direction of a boat at anchor caused by changes in the wind or tide. This type of anchor is not stowed as easily as some of the other lightweight anchors.
Mushroom AnchorThe mushroom anchor is standard for permanent moorings. In heavy weights, it has
excellent holding power. It has a cast-iron bowl at the end of the shank.
Homemade AnchorYou can fashion a simple anchor by placing a large bolt in a No. 10 can and then
filling the can with concrete. This is suitable only for a very small boat in calm waters.
GrapnelsThe grapnel is frequently used by small craft for temporary use. It has three or more
flukes uplifted around the shank. It is a handy piece of equipment for retrieving gear lost overboard by dragging along the bottom.
Ordinary 8b. Describe five types of
anchors. Describe how each type holds the bottom, the kind of bottom in which
it holds best, and the advantages or disadvantages
of each type.
Navy Anchor
Danforth
Plow or CQR
Mushroom Anchor
Homemade Anchor
Grapnel
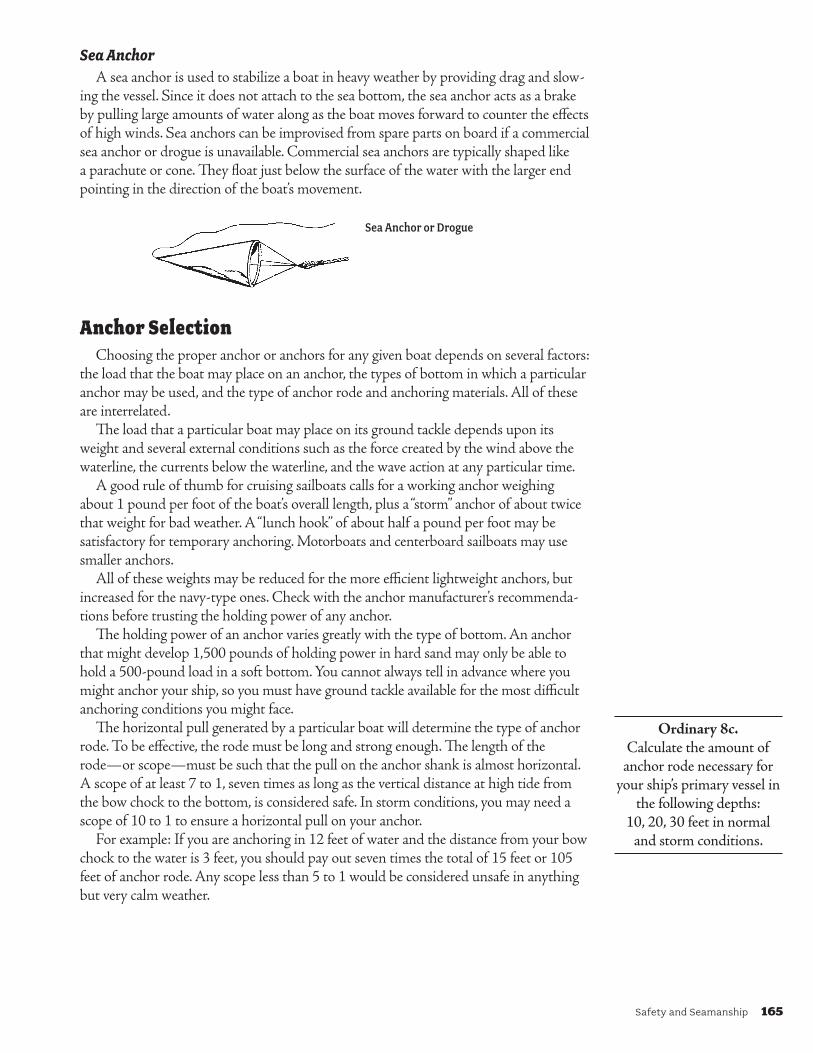
Safety and Seamanship 165
Sea AnchorA sea anchor is used to stabilize a boat in heavy weather by providing drag and slow-
ing the vessel. Since it does not attach to the sea bottom, the sea anchor acts as a brake by pulling large amounts of water along as the boat moves forward to counter the effects of high winds. Sea anchors can be improvised from spare parts on board if a commercial sea anchor or drogue is unavailable. Commercial sea anchors are typically shaped like a parachute or cone. They float just below the surface of the water with the larger end pointing in the direction of the boat’s movement.
Sea Anchor or Drogue
Anchor SelectionChoosing the proper anchor or anchors for any given boat depends on several factors:
the load that the boat may place on an anchor, the types of bottom in which a particular anchor may be used, and the type of anchor rode and anchoring materials. All of these are interrelated.
The load that a particular boat may place on its ground tackle depends upon its weight and several external conditions such as the force created by the wind above the waterline, the currents below the waterline, and the wave action at any particular time.
A good rule of thumb for cruising sailboats calls for a working anchor weighing about 1 pound per foot of the boat’s overall length, plus a “storm” anchor of about twice that weight for bad weather. A “lunch hook” of about half a pound per foot may be satisfactory for temporary anchoring. Motorboats and centerboard sailboats may use smaller anchors.
All of these weights may be reduced for the more efficient lightweight anchors, but increased for the navy-type ones. Check with the anchor manufacturer’s recommenda-tions before trusting the holding power of any anchor.
The holding power of an anchor varies greatly with the type of bottom. An anchor that might develop 1,500 pounds of holding power in hard sand may only be able to hold a 500-pound load in a soft bottom. You cannot always tell in advance where you might anchor your ship, so you must have ground tackle available for the most difficult anchoring conditions you might face.
The horizontal pull generated by a particular boat will determine the type of anchor rode. To be effective, the rode must be long and strong enough. The length of the rode—or scope—must be such that the pull on the anchor shank is almost horizontal. A scope of at least 7 to 1, seven times as long as the vertical distance at high tide from the bow chock to the bottom, is considered safe. In storm conditions, you may need a scope of 10 to 1 to ensure a horizontal pull on your anchor.
For example: If you are anchoring in 12 feet of water and the distance from your bow chock to the water is 3 feet, you should pay out seven times the total of 15 feet or 105 feet of anchor rode. Any scope less than 5 to 1 would be considered unsafe in anything but very calm weather.
Ordinary 8c. Calculate the amount of
anchor rode necessary for your ship’s primary vessel in
the following depths: 10, 20, 30 feet in normal
and storm conditions.

166 Safety and Seamanship
Small-craft anchor rodes are usually made of rope. Until the newly developed synthetic ropes came onto the market, Manila had been the traditional rope for anchor rodes. Manila is weaker than the synthetic materials and does not have the elasticity of synthetic fibers, particularly nylon, which is strong, light, easy to handle, and elastic. Nylon is particularly effective in minimizing shock loads caused by winds and tides. The synthetic materials dry quicker and are more durable than Manila.
A short chain between the end of the rope line and the anchor is effective. It tends to lie on the bottom and further lessens the shock by adding weight to help maintain the important horizontal pull.
All components of the anchoring materials should be joined with good-quality galvanized shackles, and the line should have an eye with a thimble where it meets the chain to reduce abrasion as much as possible.
In constructing a proper anchor rode, limit the working load to one-fifth of the rated breaking strength of the rope and one-half of the proof test of the chain used. Thus, a boat developing a load of some 2,000 pounds should have a rode in which the rope is rated at 10,000 pounds.
Plow Anchor Rig
Stowage of Ground TackleThough some small boats carry only a single anchor, this is by no means adequate. Even
if you discount the possibility of fouling an anchor so that it cannot be retrieved, there are many occasions when it is desirable to lay two anchors. Also, having just one anchor heavy enough for heavy-weather conditions would be a nuisance in ordinary conditions.
Many boats carry three anchors. Two are kept on deck, ready for use. A light one is used for brief stops while someone is aboard. A medium-weight anchor is used for ordinary service, including overnight anchorage in a harbor. The third anchor might be considered a spare that has been chosen for extreme holding conditions. It is usually carried below.
To prevent deck anchors from coming adrift when the boat rolls and pitches, carry them in chocks and be sure they are securely lashed.
Except for very small craft that carry their line coiled forward on the deck or in an open cockpit, the usual practice in boat manufacture is to provide rope and chain lockers in the forepeak. Chain dries quickly as it comes from the water and can be fed down through a deck pipe as it comes off the winch or is hauled by hand.
If Manila rope is used, it should be thoroughly dried before it is stowed in the chain locker. Some boats have gratings on the deck as an aid in drying rope. The chain lockers
Able 8a. Describe the various
kinds of anchor rode and the advantages and
disadvantages of each type.
Able 8b. Identify the parts of the
anchor cable starting with the anchor and ending
at the vessel.
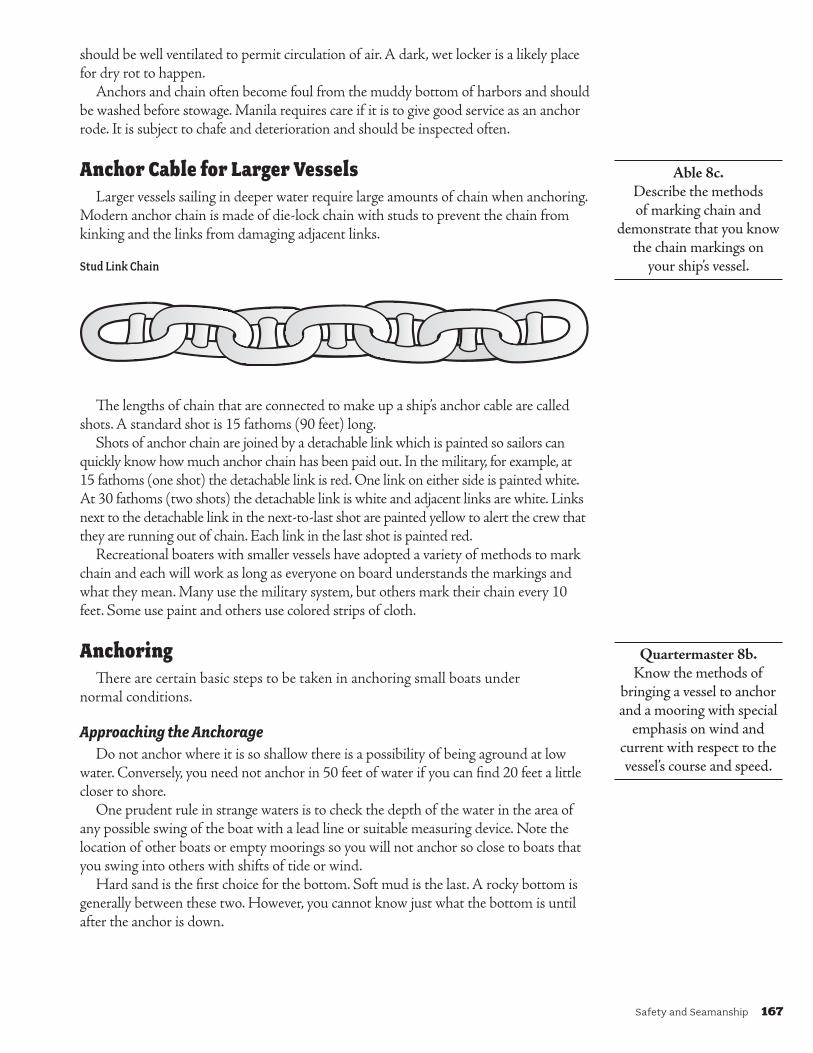
Safety and Seamanship 167
should be well ventilated to permit circulation of air. A dark, wet locker is a likely place for dry rot to happen.
Anchors and chain often become foul from the muddy bottom of harbors and should be washed before stowage. Manila requires care if it is to give good service as an anchor rode. It is subject to chafe and deterioration and should be inspected often.
Anchor Cable for Larger VesselsLarger vessels sailing in deeper water require large amounts of chain when anchoring.
Modern anchor chain is made of die-lock chain with studs to prevent the chain from kinking and the links from damaging adjacent links.
Stud Link Chain
The lengths of chain that are connected to make up a ship’s anchor cable are called shots. A standard shot is 15 fathoms (90 feet) long.
Shots of anchor chain are joined by a detachable link which is painted so sailors can quickly know how much anchor chain has been paid out. In the military, for example, at 15 fathoms (one shot) the detachable link is red. One link on either side is painted white. At 30 fathoms (two shots) the detachable link is white and adjacent links are white. Links next to the detachable link in the next-to-last shot are painted yellow to alert the crew that they are running out of chain. Each link in the last shot is painted red.
Recreational boaters with smaller vessels have adopted a variety of methods to mark chain and each will work as long as everyone on board understands the markings and what they mean. Many use the military system, but others mark their chain every 10 feet. Some use paint and others use colored strips of cloth.
AnchoringThere are certain basic steps to be taken in anchoring small boats under
normal conditions.
Approaching the AnchorageDo not anchor where it is so shallow there is a possibility of being aground at low
water. Conversely, you need not anchor in 50 feet of water if you can find 20 feet a little closer to shore.
One prudent rule in strange waters is to check the depth of the water in the area of any possible swing of the boat with a lead line or suitable measuring device. Note the location of other boats or empty moorings so you will not anchor so close to boats that you swing into others with shifts of tide or wind.
Hard sand is the first choice for the bottom. Soft mud is the last. A rocky bottom is generally between these two. However, you cannot know just what the bottom is until after the anchor is down.
Able 8c. Describe the methods of marking chain and
demonstrate that you know the chain markings on
your ship’s vessel.
Quartermaster 8b. Know the methods of
bringing a vessel to anchor and a mooring with special
emphasis on wind and current with respect to the vessel’s course and speed.

168 Safety and Seamanship
Dropping AnchorUnder either power or sail, come up to your chosen anchorage into the wind or tidal
current (whichever is stronger). Under power, bring the boat to a dead stop and then reverse very slowly. At this point a crew member already stationed forward lowers the anchor gently, always maintaining control of the rode. Never throw an anchor.
Reverse the boat slowly as the rode is paid out to keep the anchor from getting fouled. Keep reversing until it takes hold and ample scope has been paid out. If the anchor drags at this point, it is usually because it has been fouled or is resting on poor holding ground at the bottom.
If it does drag, then you must raise the anchor and try it again. Once the anchor takes hold, check to be certain you are clear of the shore and other boats before shutting off the engine. Under sail, of course, you cannot reverse your boat to help you take hold. However, you can use the tide or wind as a natural reversing power.
At the moment you come to a standstill, drop the anchor quickly, but smoothly, and pay out ample scope. Then belay the rode to the bitt or a cleat and wait until you are certain the anchor is not dragging.
At Anchor
Orders to the CrewBefore anchoring or weighing anchor, the crew must know what is expected of them.
Duties and deck positions need to be explained and assigned. There is usually some distance between those handling the anchor and the helmsman; so if radios are not available, basic hand signals need to be established so the helmsman and anchor handler can communicate.
Basic helm commands are: LET GO THE ANCHOR or DROP THE ANCHOR, RETREIVE THE ANCHOR, FEED OUT MORE SCOPE, and SNUB or CLEAT OFF THE ANCHOR RODE.
Anchor handlers need to communicate: ANCHOR IS READY, ANCHOR IS AWEIGH (up) or DOWN, ANCHOR IS IN SIGHT, ANCHOR IS CLEAR, ANCHOR IS SECURED FOR SEA. The anchor handler sometimes needs to com-municate the need to move forward, into neutral or reverse.
If you are in a crowded anchorage, are experiencing poor weather conditions, or are concerned that you may drag anchor, an anchor watch should be established. While on duty, the anchor watch should:
• Conduct frequent visual checks of landmarks and surrounding boats. Check their position relative to yours to see if your anchor or a nearby boat is dragging.
• Monitor GPS, VHF, and other electronics, and have an air horn ready.• Keep your eye on depth, wind speed and direction, and the anchor rode.• If another boat drags toward you, prepare to fend.
Ordinary 8d. Demonstrate the ability to
set and weigh anchor.
Quartermaster 8c. Take charge of a vessel used
by your ship and give all commands to the crew
for setting and weighing anchor in several wind and
current situations.
Able 8d. While on a cruise, assist in the construction of an
anchor watch schedule and stand one watch.
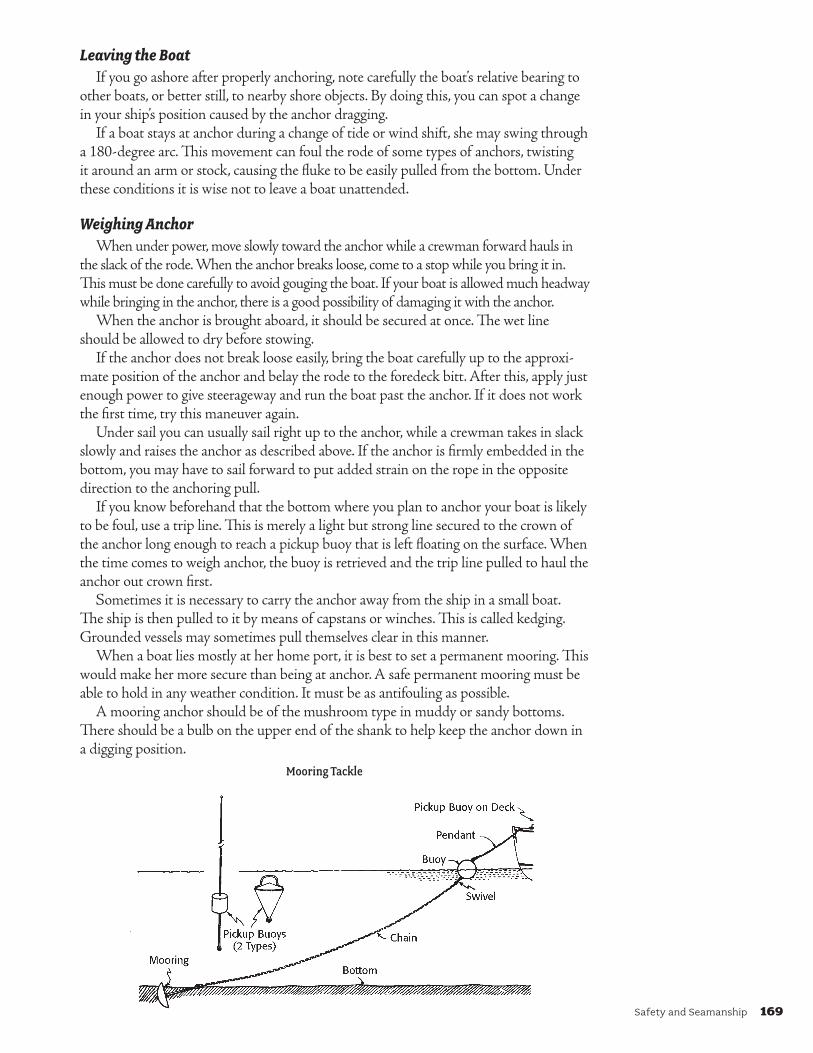
Safety and Seamanship 169
Leaving the BoatIf you go ashore after properly anchoring, note carefully the boat’s relative bearing to
other boats, or better still, to nearby shore objects. By doing this, you can spot a change in your ship’s position caused by the anchor dragging.
If a boat stays at anchor during a change of tide or wind shift, she may swing through a 180-degree arc. This movement can foul the rode of some types of anchors, twisting it around an arm or stock, causing the fluke to be easily pulled from the bottom. Under these conditions it is wise not to leave a boat unattended.
Weighing AnchorWhen under power, move slowly toward the anchor while a crewman forward hauls in
the slack of the rode. When the anchor breaks loose, come to a stop while you bring it in. This must be done carefully to avoid gouging the boat. If your boat is allowed much headway while bringing in the anchor, there is a good possibility of damaging it with the anchor.
When the anchor is brought aboard, it should be secured at once. The wet line should be allowed to dry before stowing.
If the anchor does not break loose easily, bring the boat carefully up to the approxi-mate position of the anchor and belay the rode to the foredeck bitt. After this, apply just enough power to give steerageway and run the boat past the anchor. If it does not work the first time, try this maneuver again.
Under sail you can usually sail right up to the anchor, while a crewman takes in slack slowly and raises the anchor as described above. If the anchor is firmly embedded in the bottom, you may have to sail forward to put added strain on the rope in the opposite direction to the anchoring pull.
If you know beforehand that the bottom where you plan to anchor your boat is likely to be foul, use a trip line. This is merely a light but strong line secured to the crown of the anchor long enough to reach a pickup buoy that is left floating on the surface. When the time comes to weigh anchor, the buoy is retrieved and the trip line pulled to haul the anchor out crown first.
Sometimes it is necessary to carry the anchor away from the ship in a small boat. The ship is then pulled to it by means of capstans or winches. This is called kedging. Grounded vessels may sometimes pull themselves clear in this manner.
When a boat lies mostly at her home port, it is best to set a permanent mooring. This would make her more secure than being at anchor. A safe permanent mooring must be able to hold in any weather condition. It must be as antifouling as possible.
A mooring anchor should be of the mushroom type in muddy or sandy bottoms. There should be a bulb on the upper end of the shank to help keep the anchor down in a digging position.
Mooring Tackle

170 Safety and Seamanship
A common rule of thumb for mushroom anchor weights is about 10 pounds for every foot of the boat’s overall length. This may be lessened somewhat for small, lightweight racing sailboats, but should be increased for larger cruising craft, both power and sail.
In hard or rocky bottoms, other types of moorings with sufficient weight would be adequate. Discarded railroad wheels, concrete blocks, old engine blocks, etc., might make adequate permanent mooring anchors, but in really bad storms, the mushroom anchor is the most effective anchor.
The chain used in permanent moorings is standard link steel chain that is usually galvanized to resist corrosion. The diameter should be large enough for a holding power consistent with the strain that will be placed on it.
Some two-thirds of the total length of chain to be used should be of heavy chain (¾ to 1 inch in diameter). The balance should be lighter. The chain and all fittings should be checked annually for any possible looseness or worn links.
The mooring buoy that the light chain connects to is often a steel sphere, although often wooden spars or Styrofoam buoys are used. If a metal buoy is used, it should have some form of a bumper to cushion any possible striking against the boat’s hull.
The pendant or line by which a boat is connected to the mooring buoy should be about the same strength as the chain and often is made of Manila or nylon. Nylon is good for several seasons; Manila should be replaced each year. As the pendant will run through the bow chock at angles depending upon the swinging of the boat, the edges of the chock should be smooth to minimize any abrasions. The pendant itself should be protected by tape, cloth, canvas, or a hose tied around it to protect it from chafing where it rubs along the chock.
The pickup buoy can be made of many things. Whatever the material, it should have a ring or handle on top to aid in picking it up.
CapstanThe capstan is a rotating device, operated by power or by hand, employed on board
ship for the application of extreme power to ropes and wires in the hauling in of heavy objects such as an anchor. The main element of a capstan is its upright drum or barrel, which distinguishes it from a windlass.
Head
Pigeon Holes
BarrelWhelps
Pawls
Pawl Ring
Base
Able 8e. Identify a capstan or
windlass and explain its use in handling line, wire
rope, or chain.
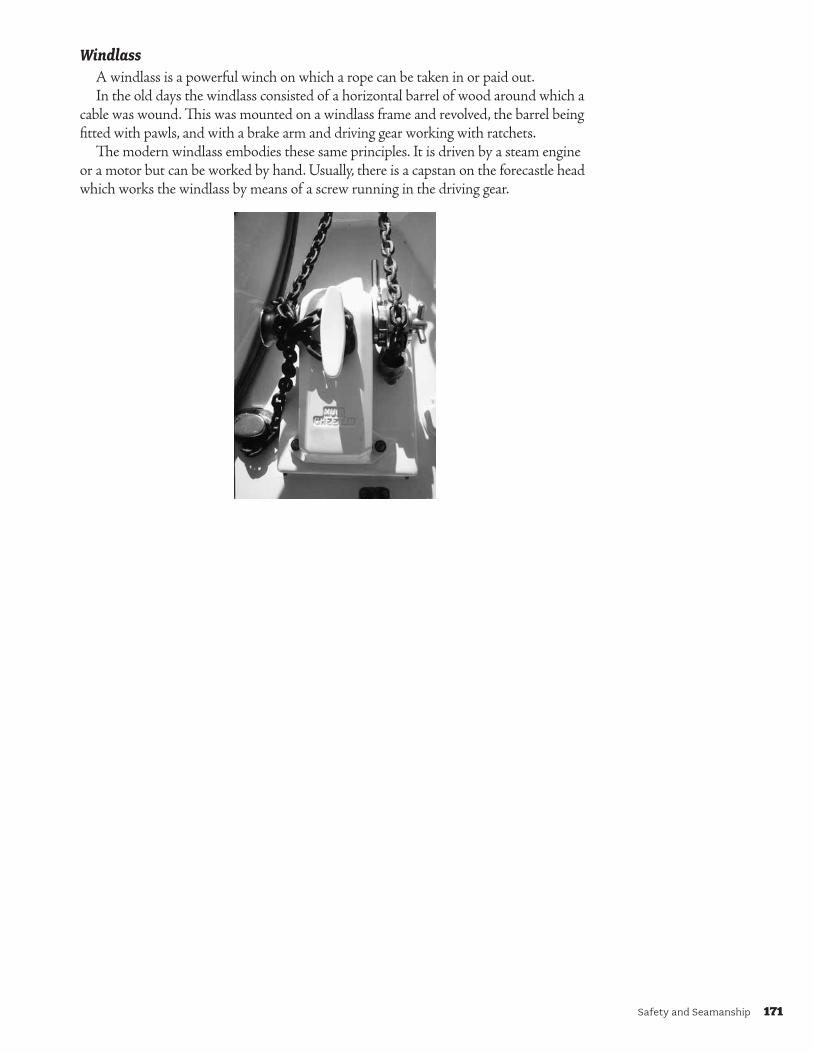
Safety and Seamanship 171
WindlassA windlass is a powerful winch on which a rope can be taken in or paid out.In the old days the windlass consisted of a horizontal barrel of wood around which a
cable was wound. This was mounted on a windlass frame and revolved, the barrel being fitted with pawls, and with a brake arm and driving gear working with ratchets.
The modern windlass embodies these same principles. It is driven by a steam engine or a motor but can be worked by hand. Usually, there is a capstan on the forecastle head which works the windlass by means of a screw running in the driving gear.

Safety and Seamanship 173
NAVIGATION RULESWhen driving a car, we must know traffic laws and rules of the road. When piloting
a ship we must know maritime laws and rules of the nautical road. Navigation Rules, International and Inland is a system of laws to help you stay clear of other vessels.
There are two sets of rules, international and inland. With a few exceptions, interna-tional and inland rules are identical. International rules are in effect on the ocean beyond a line of demarcation usually at the harbor entrance. Inland rules apply to harbors, rivers, and inland lakes. A few additional rules are in effect for the Great Lakes and western rivers, and mariners cruising these waters should note them.
The “rules of the road” are found in the book Navigation Rules, International and Inland (COMDTPUB P16672.2 [series]) published by the U.S. Coast Guard. This publication may be purchased from the Superintendent of Documents, U.S. Government Printing Offices in most major metropolitan centers. The entire Navigation Rules, International and Inland can be accessed and downloaded from the U.S. Coast Guard’s Navigation Center website by going to www.navcen.uscg.gov and clicking on “Navigation Rules.”
For updates regarding your local waters, go to the U.S. Coast Guard’s Navigation Center website to check for recent changes. A “Notice to Mariners” is posted here and it advises mariners of important matters to navigational safety such as changes in channels or aids to navigation.
Every vessel is governed by the rules applying to the waters she is on. It is very important that the skipper and crew be familiar with all pertinent boating laws.
Courtesy and common sense dictate that small boats stay clear of larger vessels. However, if there is any risk of collision whatever, the rules clearly apply to large and small vessels alike. Only strict observance of all rules by all vessels can ensure the mini-mum danger. Every Sea Scout ship should have a copy of Navigation Rules on board.
Rules of the Road
Rule 2—Responsibility“Nothing in these rules shall exonerate any vessel, or the owner, master, or crew
thereof, from the consequences of any neglect to comply with these Rules or of the neglect of any precaution which may be required by the ordinary practice of seamen, or by the special circumstances of the case.”
“In construing and obeying these Rules, due regard shall be had to all dangers of navigation and collision and to any special circumstances, including the limitations of the vessels involved, which may make a departure from these rules necessary to avoid immediate danger.”
Ordinary 9a. Explain the purpose of Navigation Rules,
International and Inland.
Able 9a. Demonstrate a working knowledge of Navigation
Rules, International and Inland.
Ordinary 9b. Know the general
“Rule of Responsibility.”

174 Safety and Seamanship
A rule may be departed from—that is, it may be disobeyed—only when circum-stances of the case make it necessary to avoid immediate danger. For example, when obeying the rule would run your vessel aground or into collision with a third vessel, or when the vessel that is supposed to keep out of the way cannot do her duty and collision is imminent, the responsibility rule allows you to take whatever action is necessary. Such a situation might be caused by a disabled steering gear or sudden loss of power.
Rule 3—General DefinitionsWhen the rules refer to a power-driven vessel, they mean any vessel propelled by
machinery, including steam, electricity, gasoline, and diesel, whether the vessel is also under sail or not. A sailing vessel is any vessel proceeding under sail only, though she may be equipped with power. A vessel is underway when she is not at anchor, or made fast to the shore, or aground. It is not necessary to be moving through the water to be “underway.”
A “vessel engaged in fishing” means that nets, lines, trawls, or other fishing apparatus is in use and restricting the vessel’s maneuverability. Seaplanes are aircraft designed to maneuver on water. A vessel “not under command” is a vessel that is unable to maneuver by the rules because of some exceptional circumstance, and a “vessel restricted in her ability to maneuver” is a vessel whose work restricts her ability to move as required by the rules. A dredge is an example of a vessel restricted in her ability to maneuver. A “vessel constrained by her draft” is a power-driven vessel that cannot deviate from the course she is following because of her draft in relation to available depth and width of the navigable water.
Dangerous situations requiring quick decisions are often as numerous for the person at the helm of a boat as for the person behind the wheel of an auto, but are usually far more complex. Therefore, the person at the helm must know the rules well to be able to analyze a situation quickly and apply the applicable rule correctly. Not every situation can be discussed here, but the following describes the rudiments.
Steering and Sailing Rules
Rule 5—Lookout“Every vessel shall at all times maintain a proper lookout by sight and hearing as well
as by all available means appropriate in the prevailing circumstances and conditions so as to make a full appraisal of the situation and of the risk of collision.”
Rule 6—Safe SpeedEvery vessel shall at all times proceed at a safe speed so she can take proper and effec-
tive action to avoid collision and be stopped within a distance appropriate to prevailing circumstances and conditions. In determining a safe speed, some of the factors that should be taken into account are:
a) The state of visibilityb) The amount of other vessel traffic in the areac) The maneuverability of your vesseld) At night, the presence of background lightinge) The state of the wind, sea, current, and proximity of navigational hazardsf ) The draft of your vessel in relation to the available depth of water

Safety and Seamanship 175
Rule 7—Risk of CollisionEvery vessel shall use all available means appropriate to the prevailing circumstances
and conditions to determine if risk of collision exists, including the use of radar equip-ment if installed and operational. If there is any doubt, such risk shall be deemed to exist. Assumptions shall not be made on the basis of scanty information, especially scanty radar information.
In determining if risk of collision exists, the following considerations shall be among those taken into account:
a) Such risk shall be deemed to exist if the compass bearing of an approaching vessel does not appreciably change; and
b) Such risk may sometimes exist even when an appreciable bearing change is evident, particularly when approaching a very large vessel, a tow, or when approaching a vessel at close range.
Situations for Proper ManeuveringThere are three basic situations that can lead to collision afloat—and an inevitable
lawsuit ashore: the meeting situation, the crossing situation, and the overtaking situation.All of these situations are shown in the diagram.None of the situations actually exist until two or more vessels are in sight or sound of
each other. Consider how quickly a situation might arise with another vessel suddenly appearing out of a fog bank or around a river bend.
Normally, all of the situations can be observed in the making by simply taking a series of bearings on the other vessel or, at night, her lights. If the bearings do not change substantially from sight to sight, the two vessels are on a collision course. The give-way vessel—the one not having the right of way—is therefore required to change course or speed or both.
Common sense is one of the best rules. It is better to avoid a situation that might lead to a collision than to try to remember the exact rule to get you out of trouble.
If you are the skipper of the vessel in the center of the diagram, you must keep out of the way of any vessel approaching you in the arc from dead ahead of you to 22.5 degrees abaft your starboard beam. All the other vessels in the diagram—except the meeting vessel—must keep clear of you. Both you and the meeting vessel must alter course as necessary to pass clear of each other.
CRO
SSIN
G V
ESSE
LS G
IVE W
AY
CROSSING VESSELS STAND
ON
OVERTAKING VESSELS GIVE WAY
ABEAM ABEAM
MEETING VESSEL
112.5º247.5º

176 Safety and Seamanship
Rule 12—Conduct of Vessels in Sight of One Another, Sailing VesselsThese rules apply to sailing vessels except vessels racing among themselves. These
rules do apply to racing vessels encountering others not in the race. Study them carefully.a) When two sailing vessels are approaching one another so as to involve risk of
collision, one of them shall keep out of the way of the other as follows:• When each has the wind on a different side, the vessel that has the wind on
the port side shall keep out of the way of the other.• When both have the wind on the same side, the vessel that is to windward
shall keep out of the way of the vessel which is to leeward; and• If a vessel with the wind on the port side sees a vessel to windward and
cannot determine with certainty whether the other vessel has the wind on the port or on the starboard side, she shall keep out of the way of the other.
b) For the purpose of this rule, the windward side is the side opposite to that on which the mainsail is carried.
Rule 13—OvertakingThe overtaking vessel is required to keep out of the way of the vessel being overtaken.
Power-driven vessels should keep to the starboard side of narrow channels.A vessel is considered to be overtaking another when coming up from a direction
more than 22.5 degrees abaft her beam; and if a vessel is in any doubt as to whether she is overtaking another, she should assume this is the case and behave accordingly.
Overtaking
Overtaking Vessel Stays Clear
Rule 14—Head-On SituationNeither vessel may turn to port. If they are already so far left of one another that
they may pass safely without changing course, then they may do so. But if any change of course is necessary to avoid risk of collision, the change must be to starboard.
Meeting
Each Holds Course Sounds 1 Blast
Each Holds Course Sounds 2 Blasts
Each Turns Right Sounds 1 Blast
Ordinary 9c. Define stand-on and
give-way vessels for the following situations:
meeting, crossing, and overtaking for both power
and sailing vessels.
Safety and Seamanship 177
Rule 15—Crossing SituationThe vessel that has the other on her starboard is required to keep out of the way by
altering course to starboard, slowing, stopping, or reversing. She may not turn to port. The appropriate action will cause each vessel to pass the other port side to port side. Hence the one short blast.
Rule 18—Responsibility Between VesselsExcept where (Navigation) Rules 9, 10, and 13 otherwise require:a) A power-driven vessel underway shall keep out of the way of:
• A vessel not under command• A vessel restricted in her ability to maneuver• A vessel engaged in fishing• A sailing vessel
b) A sailing vessel underway shall keep out of the way of:• A vessel not under command• A vessel restricted in her ability to maneuver• A vessel engaged in fishing
c) A vessel engaged in fishing when underway shall, so far as possible, keep out of the way of:• A vessel not under command• A vessel restricted in her ability to maneuver
d) A seaplane on the water shall, in general, keep clear of all vessels and avoid impeding their navigation. In circumstances, however, where risk of collision exists, she shall comply with the rules of this part.
Lights and ShapesBy day, a vessel’s course or a change in her course is fairly obvious to the lookout. By
night or in limited visibility, however, little can be determined about the direction of another vessel unless that vessel is lighted as required by the rules. Navigation lights have required color, arc, range, and location.
Navigation lights provide information about the vessel’s size, activity, and direction of travel. If you know the characteristics of navigation lights, you can take the appropriate course of action when approaching other vessels.
For example, if you see a solid green light moving on the water, you are seeing the starboard side of a sailboat. A red light means its port side. If you see them both, the sailboat is dead ahead. A white light higher than red means you are looking at the port side of a powerboat, and white higher than green is starboard. If you see all three, the boat is dead ahead. Sailboats and powerboats are both required to show white astern, so if you are approaching a white light that is moving on the water, you are overtaking a vessel.
An anchored vessel must display an all-round light that is visible for 2 miles in any direction. No other navigation lights should be on while a vessel is at anchor. Vessels under 7 meters do not need to display an anchor light, but it is a good idea to do so.
Vessels are required to show the proper navigation lights in all weather conditions from sunset to sunrise, in limited visibility, and other times considered necessary. No other visible lights that could be mistaken for navigation lights or lights that impair visibility or interfere with keeping a proper lookout can be displayed.
Ordinary 9d. Explain “Responsibility
Between Vessels” (vessel priority).
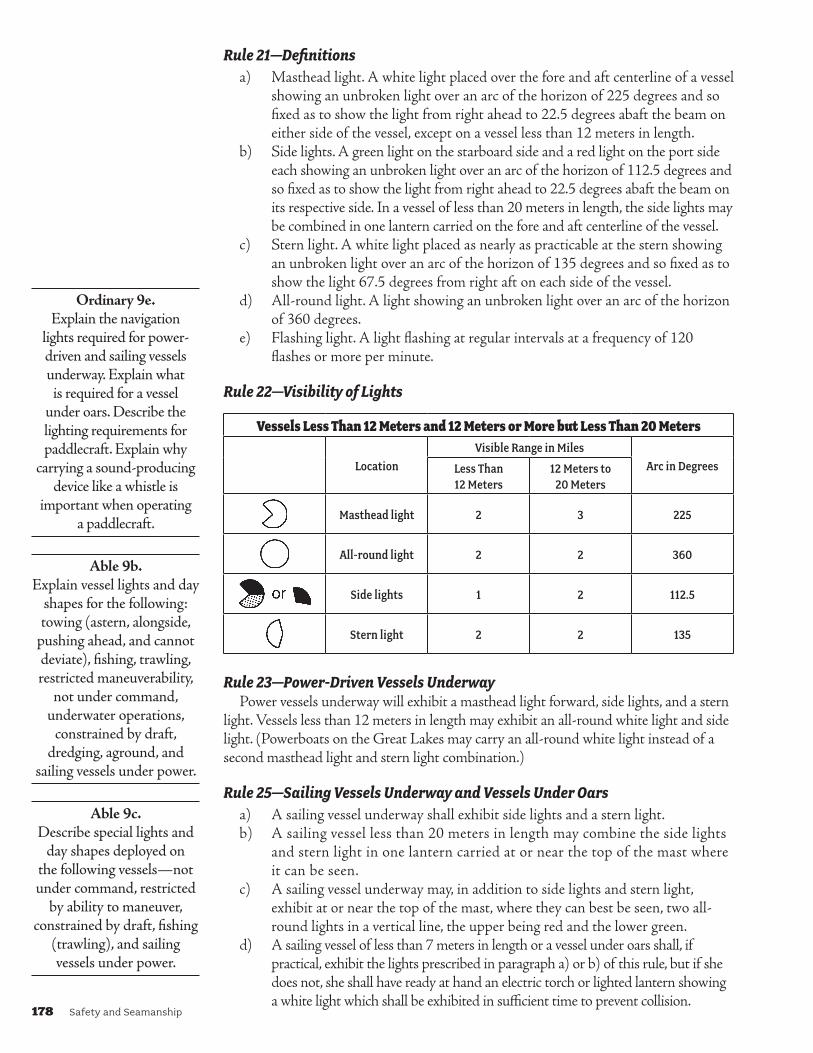
178 Safety and Seamanship
Rule 21—Definitionsa) Masthead light. A white light placed over the fore and aft centerline of a vessel
showing an unbroken light over an arc of the horizon of 225 degrees and so fixed as to show the light from right ahead to 22.5 degrees abaft the beam on either side of the vessel, except on a vessel less than 12 meters in length.
b) Side lights. A green light on the starboard side and a red light on the port side each showing an unbroken light over an arc of the horizon of 112.5 degrees and so fixed as to show the light from right ahead to 22.5 degrees abaft the beam on its respective side. In a vessel of less than 20 meters in length, the side lights may be combined in one lantern carried on the fore and aft centerline of the vessel.
c) Stern light. A white light placed as nearly as practicable at the stern showing an unbroken light over an arc of the horizon of 135 degrees and so fixed as to show the light 67.5 degrees from right aft on each side of the vessel.
d) All-round light. A light showing an unbroken light over an arc of the horizon of 360 degrees.
e) Flashing light. A light flashing at regular intervals at a frequency of 120 flashes or more per minute.
Rule 22—Visibility of Lights
Vessels Less Than 12 Meters and 12 Meters or More but Less Than 20 Meters
LocationVisible Range in Miles
Arc in DegreesLess Than 12 Meters
12 Meters to 20 Meters
Masthead light 2 3 225
All-round light 2 2 360
Side lights 1 2 112.5
Stern light 2 2 135
Rule 23—Power-Driven Vessels UnderwayPower vessels underway will exhibit a masthead light forward, side lights, and a stern
light. Vessels less than 12 meters in length may exhibit an all-round white light and side light. (Powerboats on the Great Lakes may carry an all-round white light instead of a second masthead light and stern light combination.)
Rule 25—Sailing Vessels Underway and Vessels Under Oarsa) A sailing vessel underway shall exhibit side lights and a stern light.b) A sailing vessel less than 20 meters in length may combine the side lights
and stern light in one lantern carried at or near the top of the mast where it can be seen.
c) A sailing vessel underway may, in addition to side lights and stern light, exhibit at or near the top of the mast, where they can best be seen, two all-round lights in a vertical line, the upper being red and the lower green.
d) A sailing vessel of less than 7 meters in length or a vessel under oars shall, if practical, exhibit the lights prescribed in paragraph a) or b) of this rule, but if she does not, she shall have ready at hand an electric torch or lighted lantern showing a white light which shall be exhibited in sufficient time to prevent collision.
Ordinary 9e. Explain the navigation
lights required for power-driven and sailing vessels underway. Explain what is required for a vessel
under oars. Describe the lighting requirements for paddlecraft. Explain why
carrying a sound-producing device like a whistle is
important when operating a paddlecraft.
Able 9b. Explain vessel lights and day
shapes for the following: towing (astern, alongside,
pushing ahead, and cannot deviate), fishing, trawling, restricted maneuverability,
not under command, underwater operations,
constrained by draft, dredging, aground, and
sailing vessels under power.
Able 9c. Describe special lights and
day shapes deployed on the following vessels—not under command, restricted
by ability to maneuver, constrained by draft, fishing
(trawling), and sailing vessels under power.
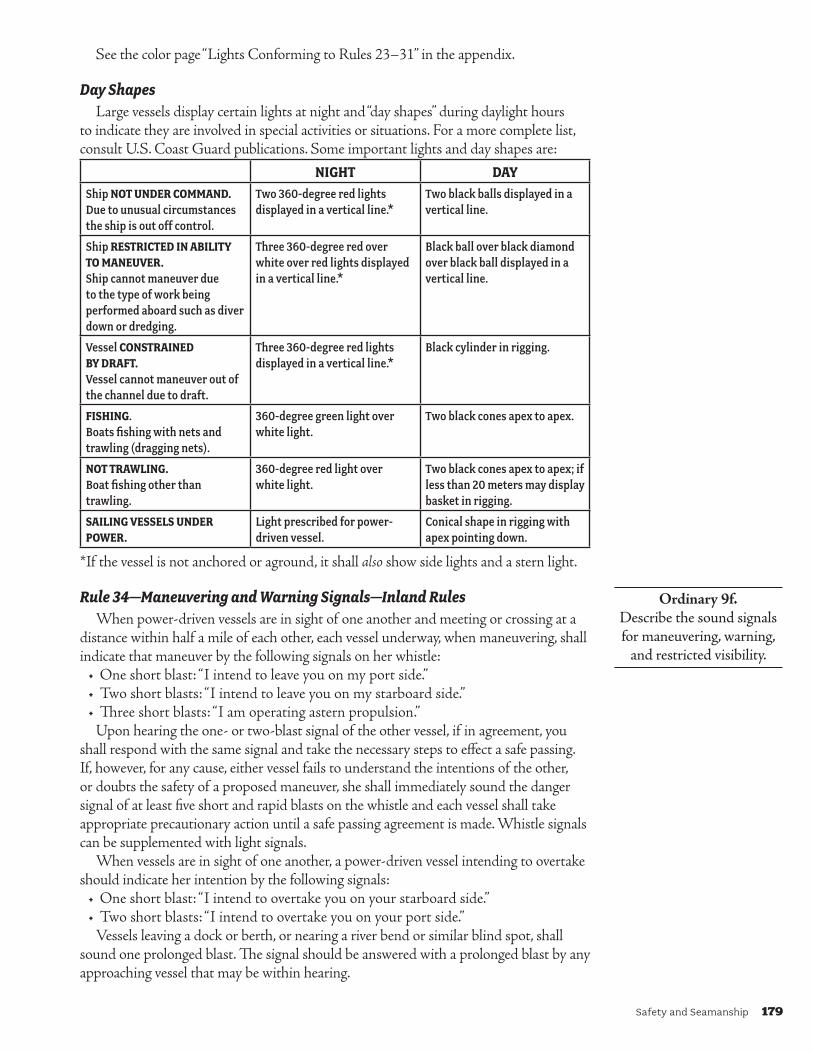
Safety and Seamanship 179
See the color page “Lights Conforming to Rules 23–31” in the appendix.
Day ShapesLarge vessels display certain lights at night and “day shapes” during daylight hours
to indicate they are involved in special activities or situations. For a more complete list, consult U.S. Coast Guard publications. Some important lights and day shapes are:
NIGHT DAYShip NOTUNDERCOMMAND.Due to unusual circumstances the ship is out off control.
Two 360-degree red lights displayed in a vertical line.*
Two black balls displayed in a vertical line.
Ship RESTRICTEDINABILITYTOMANEUVER.Ship cannot maneuver due to the type of work being performed aboard such as diver down or dredging.
Three 360-degree red over white over red lights displayed in a vertical line.*
Black ball over black diamond over black ball displayed in a vertical line.
Vessel CONSTRAINEDBYDRAFT.Vessel cannot maneuver out of the channel due to draft.
Three 360-degree red lights displayed in a vertical line.*
Black cylinder in rigging.
FISHING. Boats fishing with nets and trawling (dragging nets).
360-degree green light over white light.
Two black cones apex to apex.
NOTTRAWLING.Boat fishing other than trawling.
360-degree red light over white light.
Two black cones apex to apex; if less than 20 meters may display basket in rigging.
SAILINGVESSELSUNDERPOWER.
Light prescribed for power-driven vessel.
Conical shape in rigging with apex pointing down.
*If the vessel is not anchored or aground, it shall also show side lights and a stern light.
Rule 34—Maneuvering and Warning Signals—Inland RulesWhen power-driven vessels are in sight of one another and meeting or crossing at a
distance within half a mile of each other, each vessel underway, when maneuvering, shall indicate that maneuver by the following signals on her whistle:
• One short blast: “I intend to leave you on my port side.”• Two short blasts: “I intend to leave you on my starboard side.”• Three short blasts: “I am operating astern propulsion.”
Upon hearing the one- or two-blast signal of the other vessel, if in agreement, you shall respond with the same signal and take the necessary steps to effect a safe passing. If, however, for any cause, either vessel fails to understand the intentions of the other, or doubts the safety of a proposed maneuver, she shall immediately sound the danger signal of at least five short and rapid blasts on the whistle and each vessel shall take appropriate precautionary action until a safe passing agreement is made. Whistle signals can be supplemented with light signals.
When vessels are in sight of one another, a power-driven vessel intending to overtake should indicate her intention by the following signals:
• One short blast: “I intend to overtake you on your starboard side.”• Two short blasts: “I intend to overtake you on your port side.”
Vessels leaving a dock or berth, or nearing a river bend or similar blind spot, shall sound one prolonged blast. The signal should be answered with a prolonged blast by any approaching vessel that may be within hearing.
Ordinary 9f. Describe the sound signals for maneuvering, warning,
and restricted visibility.
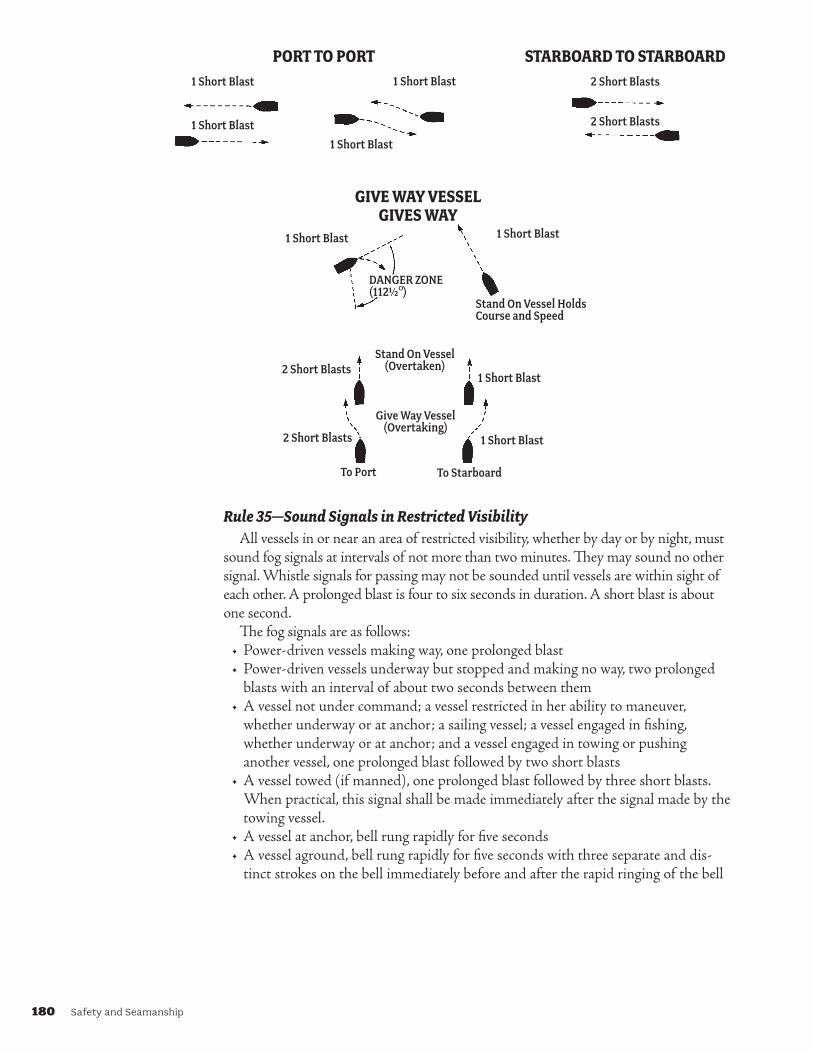
180 Safety and Seamanship
1 Short Blast1 Short Blast
1 Short Blast
1 Short Blast
2 Short Blasts
2 Short Blasts
DANGER ZONE(112½º)
Stand On Vessel HoldsCourse and Speed
GIVEWAYVESSELGIVESWAY
Stand On Vessel (Overtaken)
Give Way Vessel (Overtaking)
To Port To Starboard
1 Short Blast
1 Short Blast
1 Short Blast
1 Short Blast
PORTTOPORT2 Short Blasts
2 Short Blasts
STARBOARDTOSTARBOARD
Rule 35—Sound Signals in Restricted VisibilityAll vessels in or near an area of restricted visibility, whether by day or by night, must
sound fog signals at intervals of not more than two minutes. They may sound no other signal. Whistle signals for passing may not be sounded until vessels are within sight of each other. A prolonged blast is four to six seconds in duration. A short blast is about one second.
The fog signals are as follows:• Power-driven vessels making way, one prolonged blast• Power-driven vessels underway but stopped and making no way, two prolonged
blasts with an interval of about two seconds between them• A vessel not under command; a vessel restricted in her ability to maneuver,
whether underway or at anchor; a sailing vessel; a vessel engaged in fishing, whether underway or at anchor; and a vessel engaged in towing or pushing another vessel, one prolonged blast followed by two short blasts
• A vessel towed (if manned), one prolonged blast followed by three short blasts. When practical, this signal shall be made immediately after the signal made by the towing vessel.
• A vessel at anchor, bell rung rapidly for five seconds• A vessel aground, bell rung rapidly for five seconds with three separate and dis-
tinct strokes on the bell immediately before and after the rapid ringing of the bell
Safety and Seamanship 181
AIDS TO NAVIGATIONAlong the length of the coasts and navigable waters of the United States and its pos-
sessions, there are many aids to navigation, which are all those man-made objects used by mariners to determine position or a safe course. These aids range from steel, concrete, or wood structures such as lighthouses, buoys, and beacons, to electronic navigation aids such as radio beacons and GPS. Aids to navigation include all the visible, audible, and electronic symbols that are established by government and private authorities for piloting purposes.
The U.S. Coast Guard has responsibility for designing, establishing, and maintaining more than 40,000 navigational aids in the waters of the United States. The Coast Guard also monitors thousands of state and privately maintained aids to navigation. Today our nation has the biggest and best aids-to-navigation system in the world. In comparison, Great Britain, a seafaring nation, maintains fewer than 550 aids to navigation.
This system, evolved through the years, has many variations. They are as follows:• U.S. Navigation System• Western River System• Uniform State Waterway Marking System• Private Aids to Navigation
Aids to navigation encompass a wide range of floating and fixed objects. They fall into two basic categories:
1. Beacons—structures permanently fixed to the land or seabed. Most beacons have lateral or non-lateral aids attached to them. Lighted beacons are called “lights,” unlighted beacons are “daybeacons.”
2. Buoys—floating objects anchored to the bottom. They have distinctive shapes and colors that communicate their purpose and how the mariner should navigate around them.
Note: Buoys and beacons may have lights or sound-making devices attached. Both buoys and beacons may be referred to as “marks.”
Light ListA complete list of aids to navigation is found in the five-volume Light List published
yearly by the U.S. Coast Guard. Volume I covers the Atlantic Coast to Little River, South Carolina; Volume II, the balance of the Atlantic and Gulf coasts; Volume III, the Pacific coasts and islands; Volume IV, the Great Lakes; and Volume V, the Mississippi River system. The Light List and all charts should be corrected regularly from “Notice to Mariners” as changes in aids to navigation are made.
Able 9d. Understand the system of
aids to navigation employed in your area. Include buoys,
lights, and daymarks and their significance and
corresponding chart symbols.
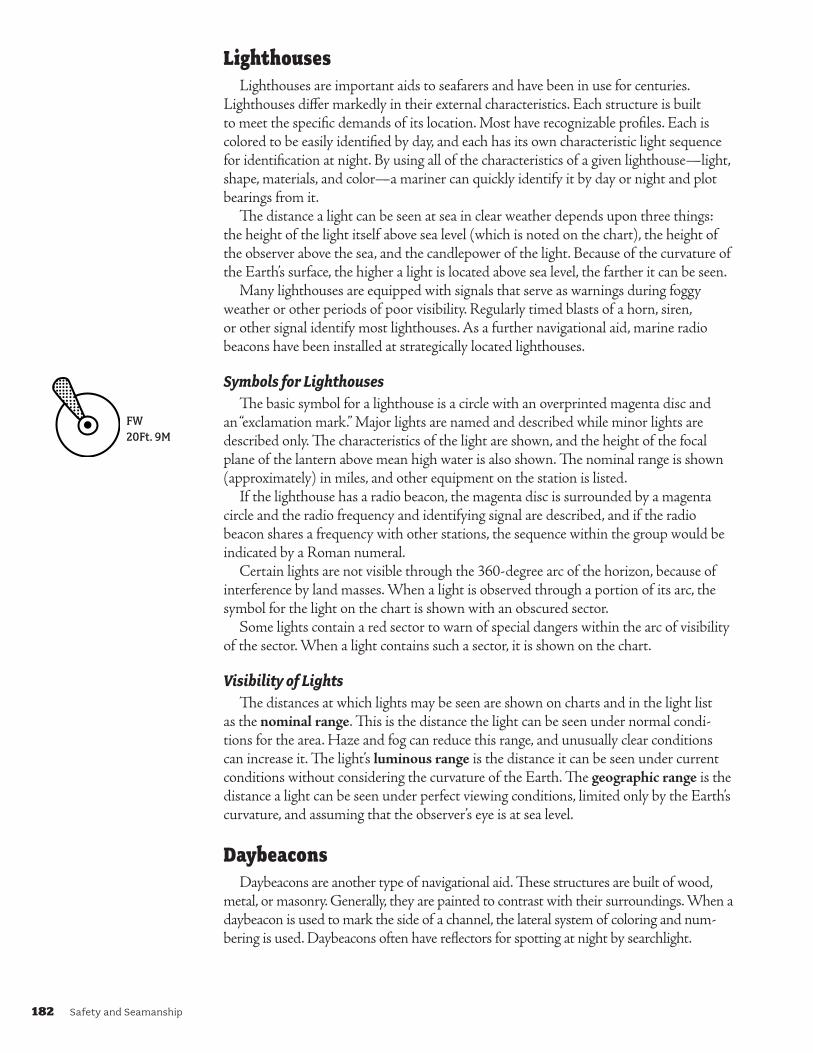
182 Safety and Seamanship
LighthousesLighthouses are important aids to seafarers and have been in use for centuries.
Lighthouses differ markedly in their external characteristics. Each structure is built to meet the specific demands of its location. Most have recognizable profiles. Each is colored to be easily identified by day, and each has its own characteristic light sequence for identification at night. By using all of the characteristics of a given lighthouse—light, shape, materials, and color—a mariner can quickly identify it by day or night and plot bearings from it.
The distance a light can be seen at sea in clear weather depends upon three things: the height of the light itself above sea level (which is noted on the chart), the height of the observer above the sea, and the candlepower of the light. Because of the curvature of the Earth’s surface, the higher a light is located above sea level, the farther it can be seen.
Many lighthouses are equipped with signals that serve as warnings during foggy weather or other periods of poor visibility. Regularly timed blasts of a horn, siren, or other signal identify most lighthouses. As a further navigational aid, marine radio beacons have been installed at strategically located lighthouses.
Symbols for LighthousesThe basic symbol for a lighthouse is a circle with an overprinted magenta disc and
an “exclamation mark.” Major lights are named and described while minor lights are described only. The characteristics of the light are shown, and the height of the focal plane of the lantern above mean high water is also shown. The nominal range is shown (approximately) in miles, and other equipment on the station is listed.
If the lighthouse has a radio beacon, the magenta disc is surrounded by a magenta circle and the radio frequency and identifying signal are described, and if the radio beacon shares a frequency with other stations, the sequence within the group would be indicated by a Roman numeral.
Certain lights are not visible through the 360-degree arc of the horizon, because of interference by land masses. When a light is observed through a portion of its arc, the symbol for the light on the chart is shown with an obscured sector.
Some lights contain a red sector to warn of special dangers within the arc of visibility of the sector. When a light contains such a sector, it is shown on the chart.
Visibility of LightsThe distances at which lights may be seen are shown on charts and in the light list
as the nominal range. This is the distance the light can be seen under normal condi-tions for the area. Haze and fog can reduce this range, and unusually clear conditions can increase it. The light’s luminous range is the distance it can be seen under current conditions without considering the curvature of the Earth. The geographic range is the distance a light can be seen under perfect viewing conditions, limited only by the Earth’s curvature, and assuming that the observer’s eye is at sea level.
DaybeaconsDaybeacons are another type of navigational aid. These structures are built of wood,
metal, or masonry. Generally, they are painted to contrast with their surroundings. When a daybeacon is used to mark the side of a channel, the lateral system of coloring and num-bering is used. Daybeacons often have reflectors for spotting at night by searchlight.
FW20Ft. 9M
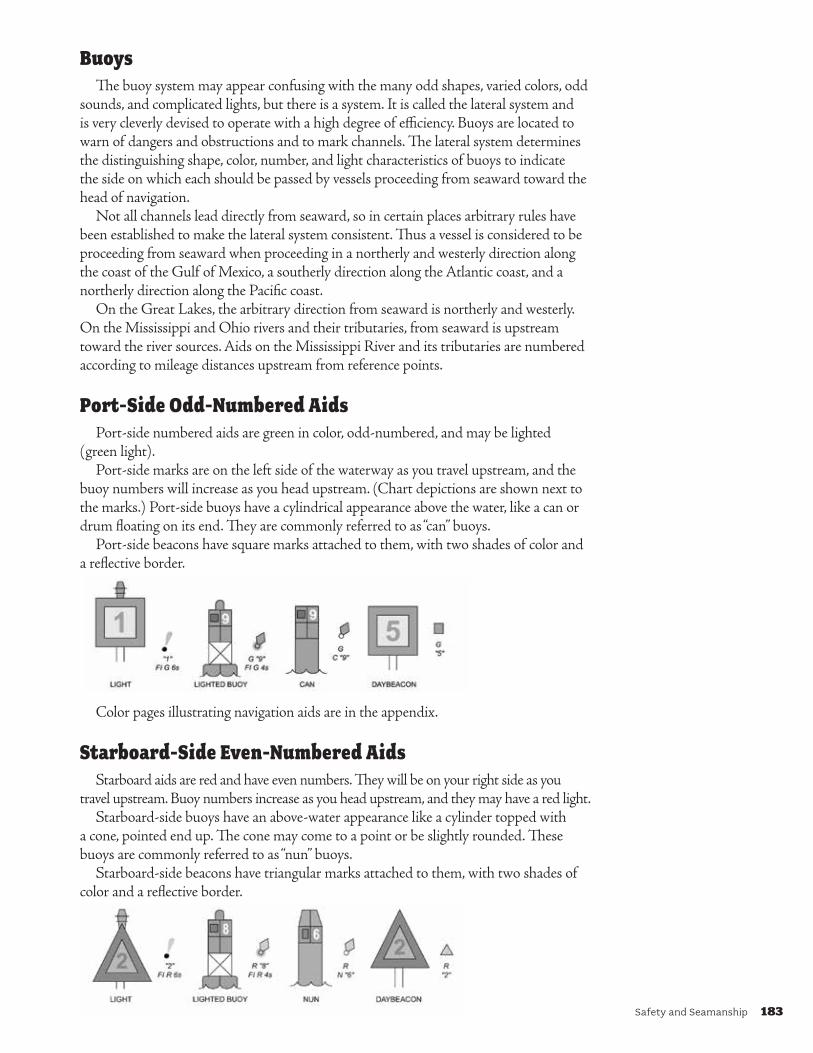
Safety and Seamanship 183
BuoysThe buoy system may appear confusing with the many odd shapes, varied colors, odd
sounds, and complicated lights, but there is a system. It is called the lateral system and is very cleverly devised to operate with a high degree of efficiency. Buoys are located to warn of dangers and obstructions and to mark channels. The lateral system determines the distinguishing shape, color, number, and light characteristics of buoys to indicate the side on which each should be passed by vessels proceeding from seaward toward the head of navigation.
Not all channels lead directly from seaward, so in certain places arbitrary rules have been established to make the lateral system consistent. Thus a vessel is considered to be proceeding from seaward when proceeding in a northerly and westerly direction along the coast of the Gulf of Mexico, a southerly direction along the Atlantic coast, and a northerly direction along the Pacific coast.
On the Great Lakes, the arbitrary direction from seaward is northerly and westerly. On the Mississippi and Ohio rivers and their tributaries, from seaward is upstream toward the river sources. Aids on the Mississippi River and its tributaries are numbered according to mileage distances upstream from reference points.
Port-Side Odd-Numbered AidsPort-side numbered aids are green in color, odd-numbered, and may be lighted
(green light).Port-side marks are on the left side of the waterway as you travel upstream, and the
buoy numbers will increase as you head upstream. (Chart depictions are shown next to the marks.) Port-side buoys have a cylindrical appearance above the water, like a can or drum floating on its end. They are commonly referred to as “can” buoys.
Port-side beacons have square marks attached to them, with two shades of color and a reflective border.
Color pages illustrating navigation aids are in the appendix.
Starboard-Side Even-Numbered AidsStarboard aids are red and have even numbers. They will be on your right side as you
travel upstream. Buoy numbers increase as you head upstream, and they may have a red light.Starboard-side buoys have an above-water appearance like a cylinder topped with
a cone, pointed end up. The cone may come to a point or be slightly rounded. These buoys are commonly referred to as “nun” buoys.
Starboard-side beacons have triangular marks attached to them, with two shades of color and a reflective border.
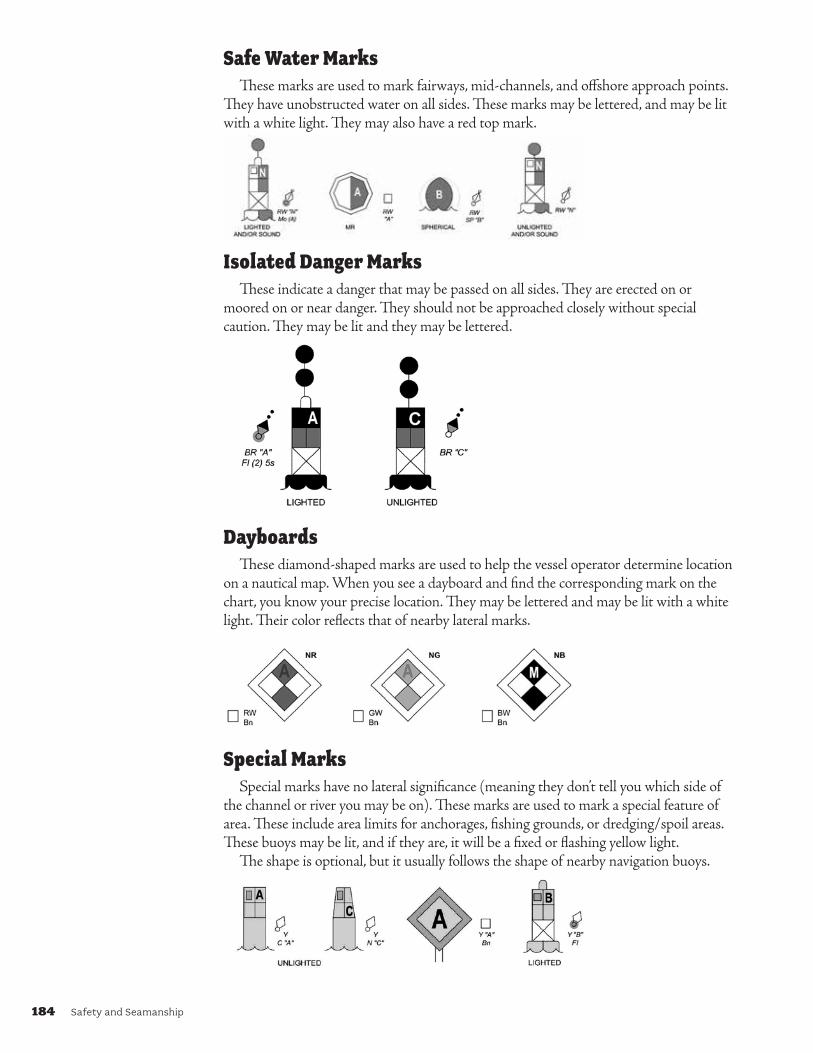
184 Safety and Seamanship
Safe Water MarksThese marks are used to mark fairways, mid-channels, and offshore approach points.
They have unobstructed water on all sides. These marks may be lettered, and may be lit with a white light. They may also have a red top mark.
Isolated Danger MarksThese indicate a danger that may be passed on all sides. They are erected on or
moored on or near danger. They should not be approached closely without special caution. They may be lit and they may be lettered.
DayboardsThese diamond-shaped marks are used to help the vessel operator determine location
on a nautical map. When you see a dayboard and find the corresponding mark on the chart, you know your precise location. They may be lettered and may be lit with a white light. Their color reflects that of nearby lateral marks.
Special MarksSpecial marks have no lateral significance (meaning they don’t tell you which side of
the channel or river you may be on). These marks are used to mark a special feature of area. These include area limits for anchorages, fishing grounds, or dredging/spoil areas. These buoys may be lit, and if they are, it will be a fixed or flashing yellow light.
The shape is optional, but it usually follows the shape of nearby navigation buoys.
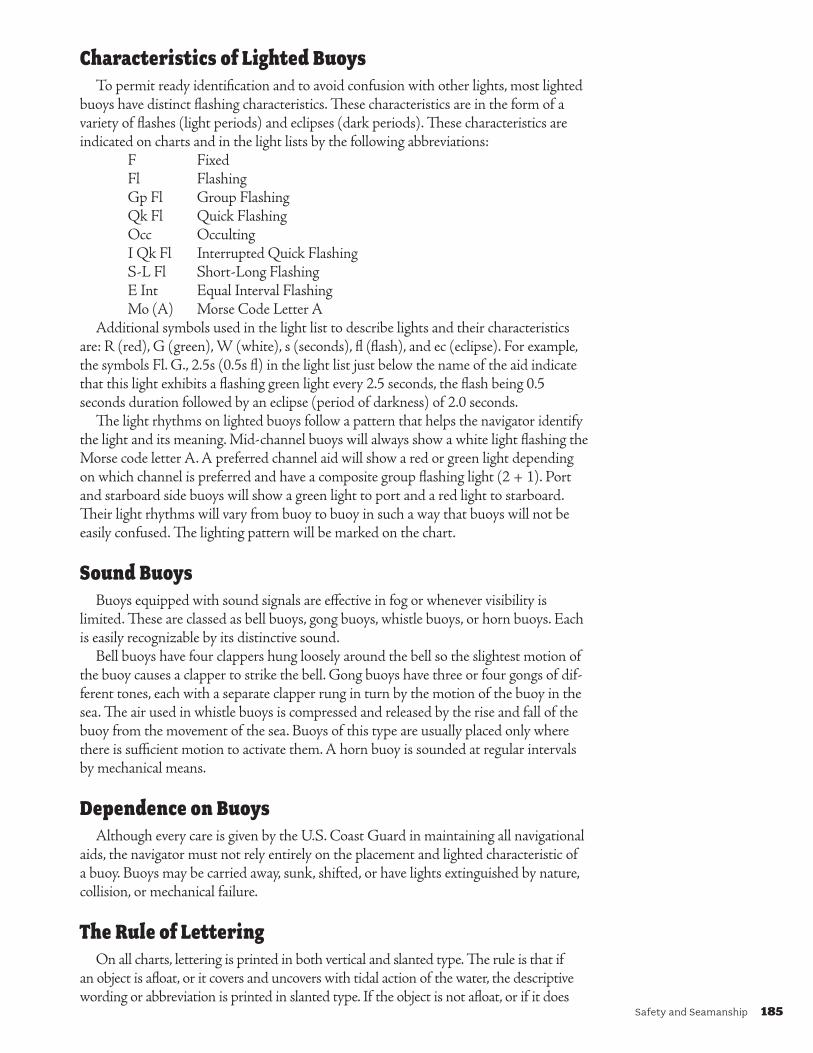
Safety and Seamanship 185
Characteristics of Lighted BuoysTo permit ready identification and to avoid confusion with other lights, most lighted
buoys have distinct flashing characteristics. These characteristics are in the form of a variety of flashes (light periods) and eclipses (dark periods). These characteristics are indicated on charts and in the light lists by the following abbreviations:
F Fixed Fl Flashing Gp Fl Group Flashing Qk Fl Quick Flashing Occ Occulting I Qk Fl Interrupted Quick Flashing S-L Fl Short-Long Flashing E Int Equal Interval Flashing Mo (A) Morse Code Letter AAdditional symbols used in the light list to describe lights and their characteristics
are: R (red), G (green), W (white), s (seconds), fl (flash), and ec (eclipse). For example, the symbols Fl. G., 2.5s (0.5s fl) in the light list just below the name of the aid indicate that this light exhibits a flashing green light every 2.5 seconds, the flash being 0.5 seconds duration followed by an eclipse (period of darkness) of 2.0 seconds.
The light rhythms on lighted buoys follow a pattern that helps the navigator identify the light and its meaning. Mid-channel buoys will always show a white light flashing the Morse code letter A. A preferred channel aid will show a red or green light depending on which channel is preferred and have a composite group flashing light (2 + 1). Port and starboard side buoys will show a green light to port and a red light to starboard. Their light rhythms will vary from buoy to buoy in such a way that buoys will not be easily confused. The lighting pattern will be marked on the chart.
Sound BuoysBuoys equipped with sound signals are effective in fog or whenever visibility is
limited. These are classed as bell buoys, gong buoys, whistle buoys, or horn buoys. Each is easily recognizable by its distinctive sound.
Bell buoys have four clappers hung loosely around the bell so the slightest motion of the buoy causes a clapper to strike the bell. Gong buoys have three or four gongs of dif-ferent tones, each with a separate clapper rung in turn by the motion of the buoy in the sea. The air used in whistle buoys is compressed and released by the rise and fall of the buoy from the movement of the sea. Buoys of this type are usually placed only where there is sufficient motion to activate them. A horn buoy is sounded at regular intervals by mechanical means.
Dependence on BuoysAlthough every care is given by the U.S. Coast Guard in maintaining all navigational
aids, the navigator must not rely entirely on the placement and lighted characteristic of a buoy. Buoys may be carried away, sunk, shifted, or have lights extinguished by nature, collision, or mechanical failure.
The Rule of LetteringOn all charts, lettering is printed in both vertical and slanted type. The rule is that if
an object is afloat, or it covers and uncovers with tidal action of the water, the descriptive wording or abbreviation is printed in slanted type. If the object is not afloat, or if it does
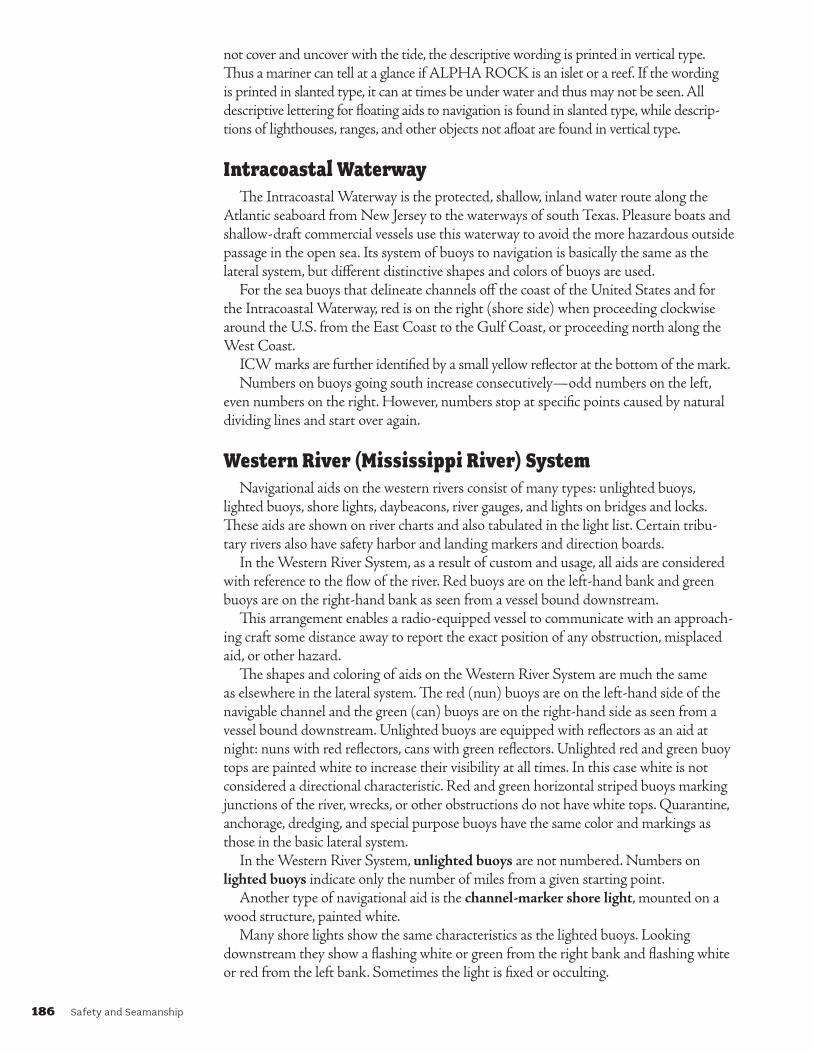
186 Safety and Seamanship
not cover and uncover with the tide, the descriptive wording is printed in vertical type. Thus a mariner can tell at a glance if ALPHA ROCK is an islet or a reef. If the wording is printed in slanted type, it can at times be under water and thus may not be seen. All descriptive lettering for floating aids to navigation is found in slanted type, while descrip-tions of lighthouses, ranges, and other objects not afloat are found in vertical type.
Intracoastal WaterwayThe Intracoastal Waterway is the protected, shallow, inland water route along the
Atlantic seaboard from New Jersey to the waterways of south Texas. Pleasure boats and shallow-draft commercial vessels use this waterway to avoid the more hazardous outside passage in the open sea. Its system of buoys to navigation is basically the same as the lateral system, but different distinctive shapes and colors of buoys are used.
For the sea buoys that delineate channels off the coast of the United States and for the Intracoastal Waterway, red is on the right (shore side) when proceeding clockwise around the U.S. from the East Coast to the Gulf Coast, or proceeding north along the West Coast.
ICW marks are further identified by a small yellow reflector at the bottom of the mark.Numbers on buoys going south increase consecutively—odd numbers on the left,
even numbers on the right. However, numbers stop at specific points caused by natural dividing lines and start over again.
Western River (Mississippi River) SystemNavigational aids on the western rivers consist of many types: unlighted buoys,
lighted buoys, shore lights, daybeacons, river gauges, and lights on bridges and locks. These aids are shown on river charts and also tabulated in the light list. Certain tribu-tary rivers also have safety harbor and landing markers and direction boards.
In the Western River System, as a result of custom and usage, all aids are considered with reference to the flow of the river. Red buoys are on the left-hand bank and green buoys are on the right-hand bank as seen from a vessel bound downstream.
This arrangement enables a radio-equipped vessel to communicate with an approach-ing craft some distance away to report the exact position of any obstruction, misplaced aid, or other hazard.
The shapes and coloring of aids on the Western River System are much the same as elsewhere in the lateral system. The red (nun) buoys are on the left-hand side of the navigable channel and the green (can) buoys are on the right-hand side as seen from a vessel bound downstream. Unlighted buoys are equipped with reflectors as an aid at night: nuns with red reflectors, cans with green reflectors. Unlighted red and green buoy tops are painted white to increase their visibility at all times. In this case white is not considered a directional characteristic. Red and green horizontal striped buoys marking junctions of the river, wrecks, or other obstructions do not have white tops. Quarantine, anchorage, dredging, and special purpose buoys have the same color and markings as those in the basic lateral system.
In the Western River System, unlighted buoys are not numbered. Numbers on lighted buoys indicate only the number of miles from a given starting point.
Another type of navigational aid is the channel-marker shore light, mounted on a wood structure, painted white.
Many shore lights show the same characteristics as the lighted buoys. Looking downstream they show a flashing white or green from the right bank and flashing white or red from the left bank. Sometimes the light is fixed or occulting.
Safety and Seamanship 187
The channel is buoyed where it is narrow or makes a sharp bend. Where it is straight for a considerable distance, channel shore lights are used as a guide. Each light is visible from the one preceding it.
Found in separated pairs, one higher than the other, range lights are usually small, skeleton-type structures. They are visible from one direction only. When they are in line, you know you are on a safe course.
By steering a course that keeps these lights in line, you will remain in the channel. But you must consult your charts to know where to leave the range course. Proceeding too far might ground your vessel.
The range lights may be white, red, or green and may be fixed or flashing.All light structures and daybeacons in the Western River System are equipped with
reflectors. As seen from a vessel bound downstream, they are red and white on the left bank, green and white on the right bank. All reflectors are white unless shown as red or green in the light list.
River gauges are signboards at intervals along the riverbanks in the Western River System. Each bears a single number to enable the experienced pilot to estimate the depth of the water at a particular point. These river gauges appear on all river charts. The numbers are changed to conform to the seasonal level of the river.
There are two printed aids to navigation that every river pilot should have available for instant use: the light list and the river chart. They are prepared and sold by the Corps of Engineers. The charts show the sailing line or channel, around and between islands in the river, as well as the mileage from a given point to the head of navigation.
Lights on locks and bridges guide the pilot through the many locks on the Western River System and locate the channel beneath bridges.


Safety and Seamanship 189
PILOTING AND NAVIGATIONPiloting and navigation are the art and science of guiding your vessel on its intended
path. Though piloting and navigation are closely related, the seaman considers piloting the art of finding his way along a shore or in and out of harbors and rivers. Navigation, then, is piloting offshore but without the many aids to navigation close to land. The pilot can actually see the shore and lighthouses, ranges and buoys. He can read the depth under him and listen to various radio aids, foghorns, and bells. The navigator must proceed without these aids. He or she must rely on the story told by the celestial bodies, the speed of his ship, and his or her knowledge of the currents, tides, and the vast ocean that he or she sails.
To get from place to place on land, we use a map. We depend on visual cues to guide us and keep us safe. There are no street names, lane markers, or road signs on water, and a sailor must choose his own path. This is done with a chart that provides details such as landmarks, water depth, navigational aids, channels and shorelines.
To pilot or navigate properly, you need the proper tools—compass, watch, chart, pencil, dividers, parallel rules or plotter, and a calculator.
ChartsA chart is a detailed scale print
or representation (in indelible ink on waterproof paper) of navigable waters. All charts are projected to overcome the curvature of the Earth’s surface. The round globe is projected onto a flat chart without loss of accuracy by what is called Mercator projection. The value of this is that a straight course appears as a straight line on a chart.
Pole
Parallel of Latitude
Meridian of Longitude
Equator
A chart is a small section “peeled” from the cylinder or projection.
Chart
AMercatorProjection
Ordinary 10a. Demonstrate your
understanding of latitude and longitude. Using a
Mercator chart, demonstrate that you can locate your
position from given coordinates and determine the coordinates of at least
five aids to navigation.
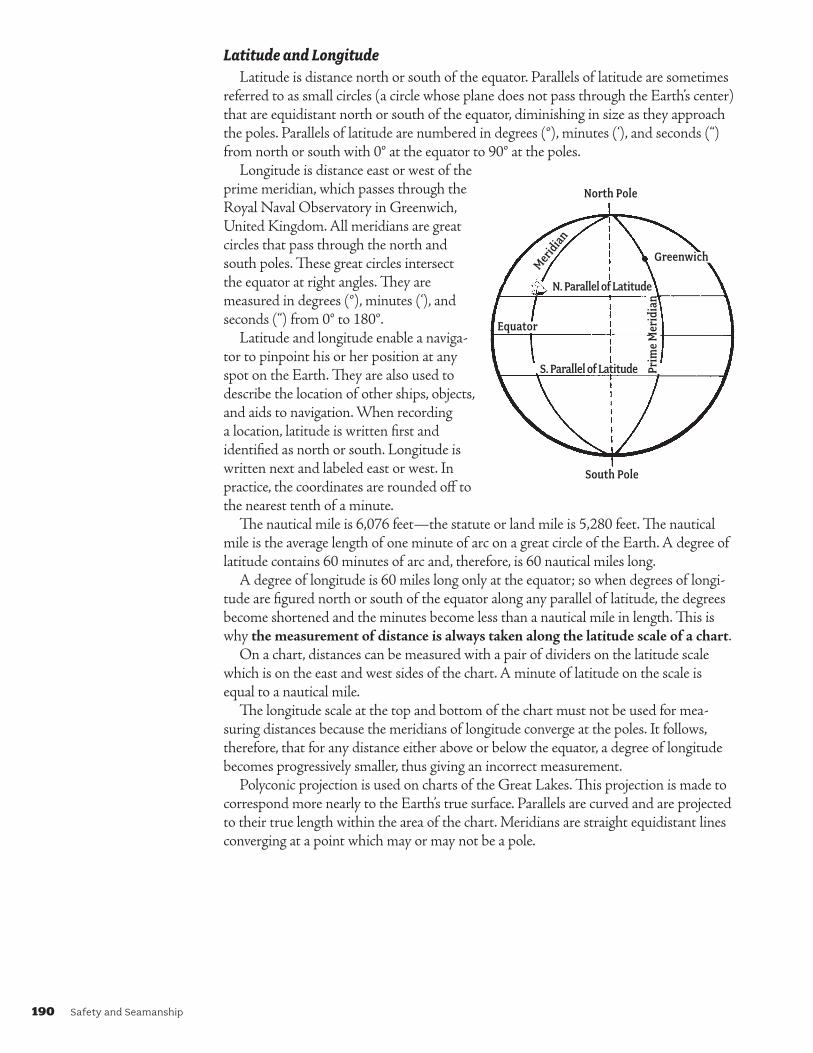
190 Safety and Seamanship
Latitude and LongitudeLatitude is distance north or south of the equator. Parallels of latitude are sometimes
referred to as small circles (a circle whose plane does not pass through the Earth’s center) that are equidistant north or south of the equator, diminishing in size as they approach the poles. Parallels of latitude are numbered in degrees (°), minutes (‘), and seconds (“) from north or south with 0° at the equator to 90° at the poles.
Longitude is distance east or west of the prime meridian, which passes through the Royal Naval Observatory in Greenwich, United Kingdom. All meridians are great circles that pass through the north and south poles. These great circles intersect the equator at right angles. They are measured in degrees (°), minutes (‘), and seconds (“) from 0° to 180°.
Latitude and longitude enable a naviga-tor to pinpoint his or her position at any spot on the Earth. They are also used to describe the location of other ships, objects, and aids to navigation. When recording a location, latitude is written first and identified as north or south. Longitude is written next and labeled east or west. In practice, the coordinates are rounded off to the nearest tenth of a minute.
The nautical mile is 6,076 feet—the statute or land mile is 5,280 feet. The nautical mile is the average length of one minute of arc on a great circle of the Earth. A degree of latitude contains 60 minutes of arc and, therefore, is 60 nautical miles long.
A degree of longitude is 60 miles long only at the equator; so when degrees of longi-tude are figured north or south of the equator along any parallel of latitude, the degrees become shortened and the minutes become less than a nautical mile in length. This is why the measurement of distance is always taken along the latitude scale of a chart.
On a chart, distances can be measured with a pair of dividers on the latitude scale which is on the east and west sides of the chart. A minute of latitude on the scale is equal to a nautical mile.
The longitude scale at the top and bottom of the chart must not be used for mea-suring distances because the meridians of longitude converge at the poles. It follows, therefore, that for any distance either above or below the equator, a degree of longitude becomes progressively smaller, thus giving an incorrect measurement.
Polyconic projection is used on charts of the Great Lakes. This projection is made to correspond more nearly to the Earth’s true surface. Parallels are curved and are projected to their true length within the area of the chart. Meridians are straight equidistant lines converging at a point which may or may not be a pole.
North Pole
Greenwich
N. Parallel of Latitude
S. Parallel of Latitude
Equator
South Pole
Prim
e M
erid
ian
Meridian
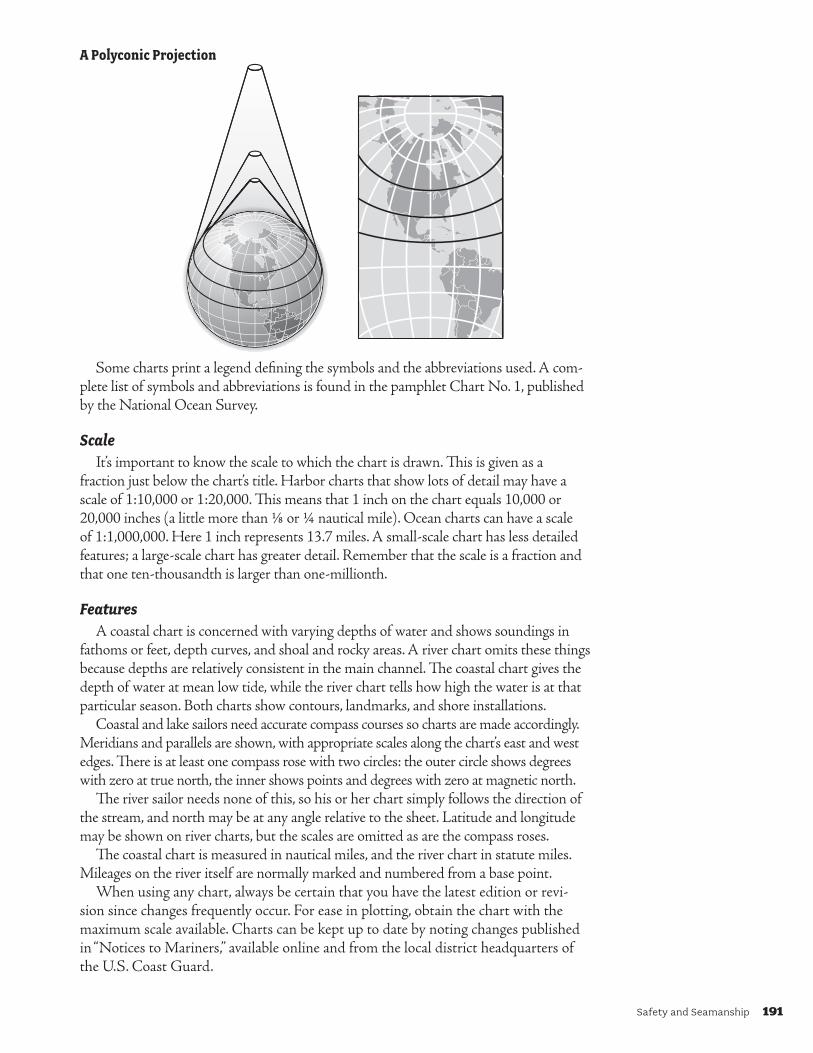
Safety and Seamanship 191
Latitude and LongitudeLatitude is distance north or south of the equator. Parallels of latitude are sometimes
referred to as small circles (a circle whose plane does not pass through the Earth’s center) that are equidistant north or south of the equator, diminishing in size as they approach the poles. Parallels of latitude are numbered in degrees (°), minutes (‘), and seconds (“) from north or south with 0° at the equator to 90° at the poles.
Longitude is distance east or west of the prime meridian, which passes through the Royal Naval Observatory in Greenwich, United Kingdom. All meridians are great circles that pass through the north and south poles. These great circles intersect the equator at right angles. They are measured in degrees (°), minutes (‘), and seconds (“) from 0° to 180°.
Latitude and longitude enable a naviga-tor to pinpoint his or her position at any spot on the Earth. They are also used to describe the location of other ships, objects, and aids to navigation. When recording a location, latitude is written first and identified as north or south. Longitude is written next and labeled east or west. In practice, the coordinates are rounded off to the nearest tenth of a minute.
The nautical mile is 6,076 feet—the statute or land mile is 5,280 feet. The nautical mile is the average length of one minute of arc on a great circle of the Earth. A degree of latitude contains 60 minutes of arc and, therefore, is 60 nautical miles long.
A degree of longitude is 60 miles long only at the equator; so when degrees of longi-tude are figured north or south of the equator along any parallel of latitude, the degrees become shortened and the minutes become less than a nautical mile in length. This is why the measurement of distance is always taken along the latitude scale of a chart.
On a chart, distances can be measured with a pair of dividers on the latitude scale which is on the east and west sides of the chart. A minute of latitude on the scale is equal to a nautical mile.
The longitude scale at the top and bottom of the chart must not be used for mea-suring distances because the meridians of longitude converge at the poles. It follows, therefore, that for any distance either above or below the equator, a degree of longitude becomes progressively smaller, thus giving an incorrect measurement.
Polyconic projection is used on charts of the Great Lakes. This projection is made to correspond more nearly to the Earth’s true surface. Parallels are curved and are projected to their true length within the area of the chart. Meridians are straight equidistant lines converging at a point which may or may not be a pole.
APolyconicProjection
Some charts print a legend defining the symbols and the abbreviations used. A com-plete list of symbols and abbreviations is found in the pamphlet Chart No. 1, published by the National Ocean Survey.
ScaleIt’s important to know the scale to which the chart is drawn. This is given as a
fraction just below the chart’s title. Harbor charts that show lots of detail may have a scale of 1:10,000 or 1:20,000. This means that 1 inch on the chart equals 10,000 or 20,000 inches (a little more than ⅛ or ¼ nautical mile). Ocean charts can have a scale of 1:1,000,000. Here 1 inch represents 13.7 miles. A small-scale chart has less detailed features; a large-scale chart has greater detail. Remember that the scale is a fraction and that one ten-thousandth is larger than one-millionth.
FeaturesA coastal chart is concerned with varying depths of water and shows soundings in
fathoms or feet, depth curves, and shoal and rocky areas. A river chart omits these things because depths are relatively consistent in the main channel. The coastal chart gives the depth of water at mean low tide, while the river chart tells how high the water is at that particular season. Both charts show contours, landmarks, and shore installations.
Coastal and lake sailors need accurate compass courses so charts are made accordingly. Meridians and parallels are shown, with appropriate scales along the chart’s east and west edges. There is at least one compass rose with two circles: the outer circle shows degrees with zero at true north, the inner shows points and degrees with zero at magnetic north.
The river sailor needs none of this, so his or her chart simply follows the direction of the stream, and north may be at any angle relative to the sheet. Latitude and longitude may be shown on river charts, but the scales are omitted as are the compass roses.
The coastal chart is measured in nautical miles, and the river chart in statute miles. Mileages on the river itself are normally marked and numbered from a base point.
When using any chart, always be certain that you have the latest edition or revi-sion since changes frequently occur. For ease in plotting, obtain the chart with the maximum scale available. Charts can be kept up to date by noting changes published in “Notices to Mariners,” available online and from the local district headquarters of the U.S. Coast Guard.

192 Safety and Seamanship
Navigation charts for North America are produced largely by three U.S. government departments and one Canadian agency. U.S. National Ocean Survey charts cover all coastal waters in the United States, including tidal rivers. The U.S. Army Corps of Engineers is responsible for important inland waters that include the Mississippi system and the Gulf Intracoastal Waterway. Its U.S. Lake Survey covers the Great Lakes and connecting waters. The U.S. Naval Oceanographic Office produces offshore charts and republishes foreign charts of navigable waters around the world. The Canadian Hydrographic Service charts the dominion’s important navigable waters.
CompassThe most important navigational device on a boat is the compass. A reliable compass
tells you what direction you are going, and this is necessary information when plotting dead reckoning positions.
A simple compass consists of a magnetized needle or pointer mounted on a card. The needle swings on a pivot so it always points in a northerly direction. This position is called “magnetic north.”
A compass will not be accurate if it is not installed properly. The lubber line must be aligned with the keel of the boat, and the compass needs to be away from interfering metallic objects and unshielded or untwisted electrical wiring.
The compass card can be marked in several ways. An outer card will show degrees. There are 360 degrees in a complete revolution of the compass needle. North is 000°; east 090°; south 180°; and west 270°. (Note: Any compass bearing less than 100° is expressed in three digits with a leading zero, e.g., 084° is expressed as zero-eight-four.) An inner card showing the “points of the compass” has historic value but is no longer used having been abandoned in favor of the more accurate 360-degree compass.
CompassCard
Ordinary 10b. Explain the degree system
of compass direction. Explain variation and
deviation and how they are used to convert between true headings and bearings
to compass headings and bearings.

Safety and Seamanship 193
VariationThe magnetic compass always points to magnetic north, the center of magnetic
energy which draws and holds the needle. It does not point to true or geographic north. Geographic north, or the North Pole, is the northern end of the axis upon which Earth rotates. All charts and maps are oriented to geographic or true north. Variation is the degree of difference between true and magnetic north.
Magnetic north is not a fixed spot. Its general location is north of Canada, but its exact location is subject to some annual change. The motion is predictable and by simple computations, the correct local variation and annual change are noted upon each compass rose on all charts. The mariner converts his magnetic compass reading to true reading to conform to his charts.
Because waves of magnetic energy flow in irregular paths between the northern and southern magnetic poles, variation is easterly or westerly, or as the mariner faces the North Pole, the compass needle is too far to the right or to the left. Charts indicate the direction of variation.
Variation is expressed in degrees and minutes, east or west of true north.Why do you need to understand variation? Your charts reflect true north, but your
compass reads magnetic north. In some places, the degrees difference can determine whether you get where you want to be or whether you are lost at sea.
If you live on the east coast of the United States, the variation is to the west. If you are on the west coast, variation is to the east. The compass rose on your chart is your reference for both true and magnetic direction; and since variation is location depen-dent, on smaller scale charts with multiple compass roses, the variation may be different. Always use the compass rose closest to where you are plotting on the chart.
To convert from true to magnetic, you simply add west variation or subtract east variation to true to get the equivalent magnetic heading.
DeviationDeviation is the error caused by ferrous metals on the boat and in the boat’s equip-
ment such as generators, radios, alternators, and batteries. All of these pull the compass needle. This pull, or deviation, is reduced by placing magnetized iron bars called flinders bars near the compass to pull it back to a nearly correct heading. Compass correction, also known as compensating, should be done by expert compass adjusters.
There are almost always small residual compass errors, and in some cases large ones. Deviation can be determined by running your ship over known courses to bear on known range marks. Make note of your compass headings. The difference between your compass heading and the magnetic heading is your deviation for that compass heading. Use your calculations to prepare a chart for use when piloting.
Note: When taking bearings with a hand-held compass, do not apply deviation. Deviation is only good for the compass in that location. As you move around the boat, the deviation will change. It is best, too, not to take compass bearings while standing near the engine or the anchor. The middle of the vessel, farthest from large iron pieces, will give the best results.
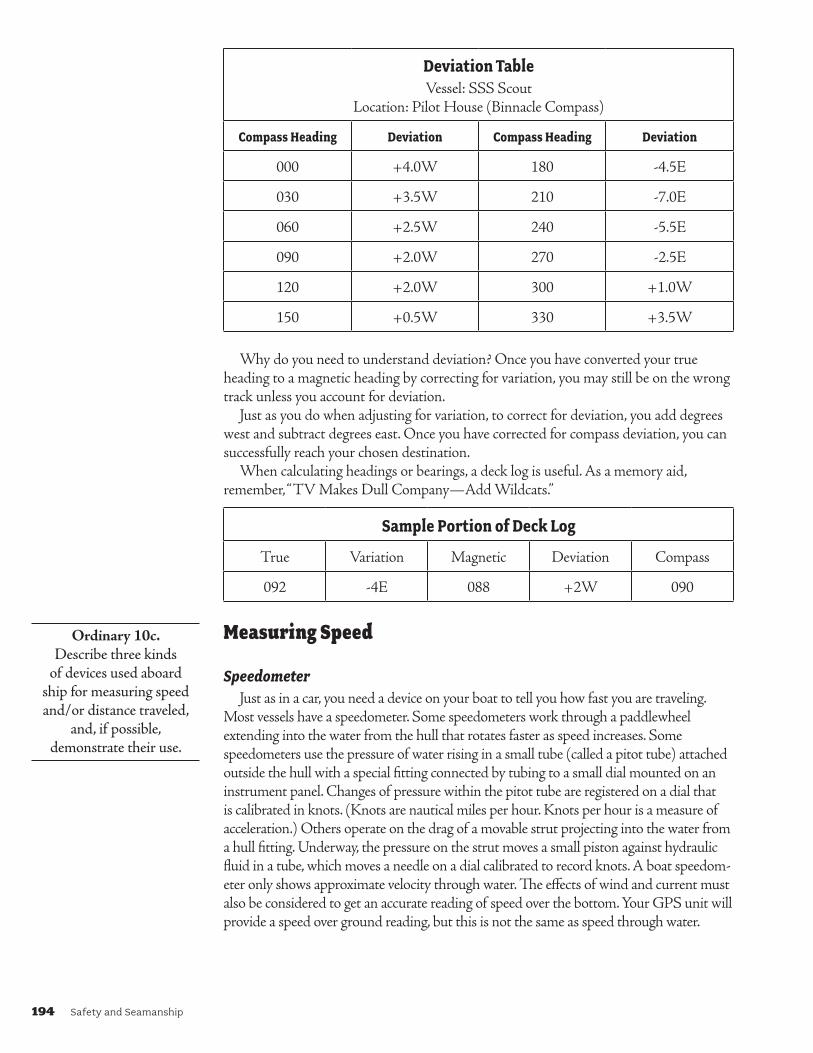
194 Safety and Seamanship
DeviationTableVessel: SSS Scout
Location: Pilot House (Binnacle Compass)
CompassHeading Deviation CompassHeading Deviation
000 +4.0W 180 -4.5E
030 +3.5W 210 -7.0E
060 +2.5W 240 -5.5E
090 +2.0W 270 -2.5E
120 +2.0W 300 +1.0W
150 +0.5W 330 +3.5W
Why do you need to understand deviation? Once you have converted your true heading to a magnetic heading by correcting for variation, you may still be on the wrong track unless you account for deviation.
Just as you do when adjusting for variation, to correct for deviation, you add degrees west and subtract degrees east. Once you have corrected for compass deviation, you can successfully reach your chosen destination.
When calculating headings or bearings, a deck log is useful. As a memory aid, remember, “TV Makes Dull Company—Add Wildcats.”
SamplePortionofDeckLog
True Variation Magnetic Deviation Compass
092 -4E 088 +2W 090
Measuring Speed
SpeedometerJust as in a car, you need a device on your boat to tell you how fast you are traveling.
Most vessels have a speedometer. Some speedometers work through a paddlewheel extending into the water from the hull that rotates faster as speed increases. Some speedometers use the pressure of water rising in a small tube (called a pitot tube) attached outside the hull with a special fitting connected by tubing to a small dial mounted on an instrument panel. Changes of pressure within the pitot tube are registered on a dial that is calibrated in knots. (Knots are nautical miles per hour. Knots per hour is a measure of acceleration.) Others operate on the drag of a movable strut projecting into the water from a hull fitting. Underway, the pressure on the strut moves a small piston against hydraulic fluid in a tube, which moves a needle on a dial calibrated to record knots. A boat speedom-eter only shows approximate velocity through water. The effects of wind and current must also be considered to get an accurate reading of speed over the bottom. Your GPS unit will provide a speed over ground reading, but this is not the same as speed through water.
Ordinary 10c. Describe three kinds
of devices used aboard ship for measuring speed and/or distance traveled,
and, if possible, demonstrate their use.
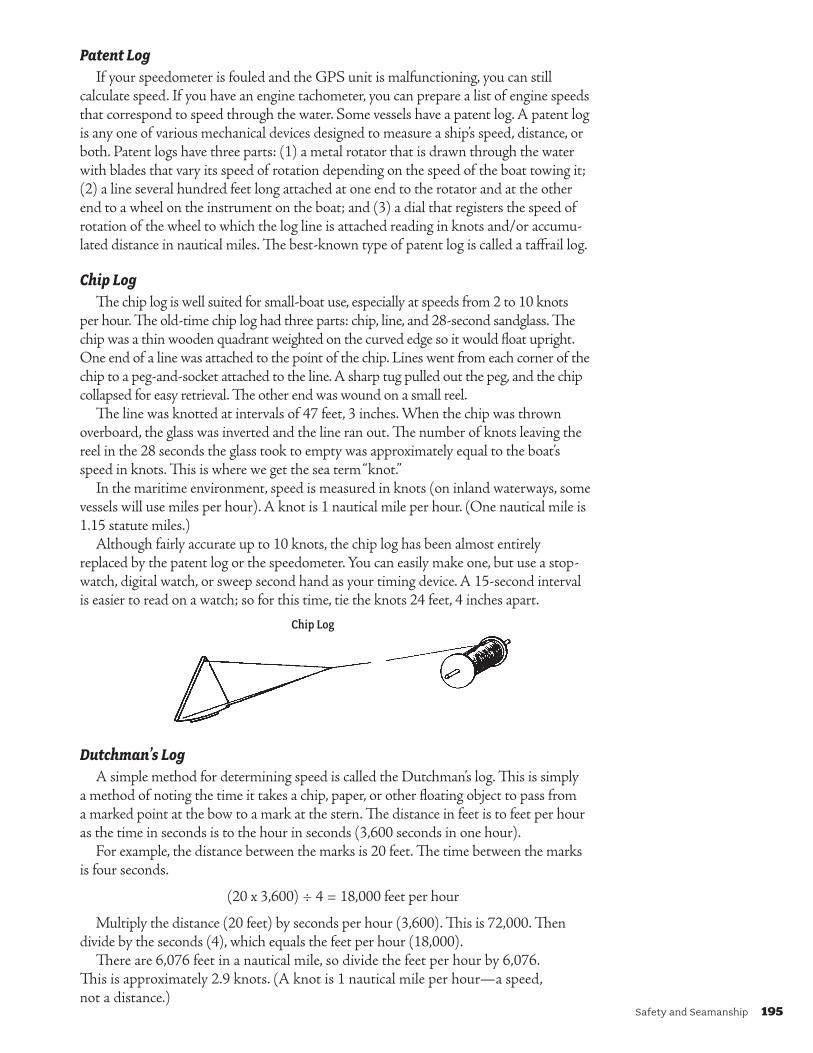
Safety and Seamanship 195
Patent LogIf your speedometer is fouled and the GPS unit is malfunctioning, you can still
calculate speed. If you have an engine tachometer, you can prepare a list of engine speeds that correspond to speed through the water. Some vessels have a patent log. A patent log is any one of various mechanical devices designed to measure a ship’s speed, distance, or both. Patent logs have three parts: (1) a metal rotator that is drawn through the water with blades that vary its speed of rotation depending on the speed of the boat towing it; (2) a line several hundred feet long attached at one end to the rotator and at the other end to a wheel on the instrument on the boat; and (3) a dial that registers the speed of rotation of the wheel to which the log line is attached reading in knots and/or accumu-lated distance in nautical miles. The best-known type of patent log is called a taffrail log.
Chip LogThe chip log is well suited for small-boat use, especially at speeds from 2 to 10 knots
per hour. The old-time chip log had three parts: chip, line, and 28-second sandglass. The chip was a thin wooden quadrant weighted on the curved edge so it would float upright. One end of a line was attached to the point of the chip. Lines went from each corner of the chip to a peg-and-socket attached to the line. A sharp tug pulled out the peg, and the chip collapsed for easy retrieval. The other end was wound on a small reel.
The line was knotted at intervals of 47 feet, 3 inches. When the chip was thrown overboard, the glass was inverted and the line ran out. The number of knots leaving the reel in the 28 seconds the glass took to empty was approximately equal to the boat’s speed in knots. This is where we get the sea term “knot.”
In the maritime environment, speed is measured in knots (on inland waterways, some vessels will use miles per hour). A knot is 1 nautical mile per hour. (One nautical mile is 1.15 statute miles.)
Although fairly accurate up to 10 knots, the chip log has been almost entirely replaced by the patent log or the speedometer. You can easily make one, but use a stop-watch, digital watch, or sweep second hand as your timing device. A 15-second interval is easier to read on a watch; so for this time, tie the knots 24 feet, 4 inches apart.
Chip Log
Dutchman’s LogA simple method for determining speed is called the Dutchman’s log. This is simply
a method of noting the time it takes a chip, paper, or other floating object to pass from a marked point at the bow to a mark at the stern. The distance in feet is to feet per hour as the time in seconds is to the hour in seconds (3,600 seconds in one hour).
For example, the distance between the marks is 20 feet. The time between the marks is four seconds.
(20 x 3,600) ÷ 4 = 18,000 feet per hour
Multiply the distance (20 feet) by seconds per hour (3,600). This is 72,000. Then divide by the seconds (4), which equals the feet per hour (18,000).
There are 6,076 feet in a nautical mile, so divide the feet per hour by 6,076. This is approximately 2.9 knots. (A knot is 1 nautical mile per hour—a speed, not a distance.)
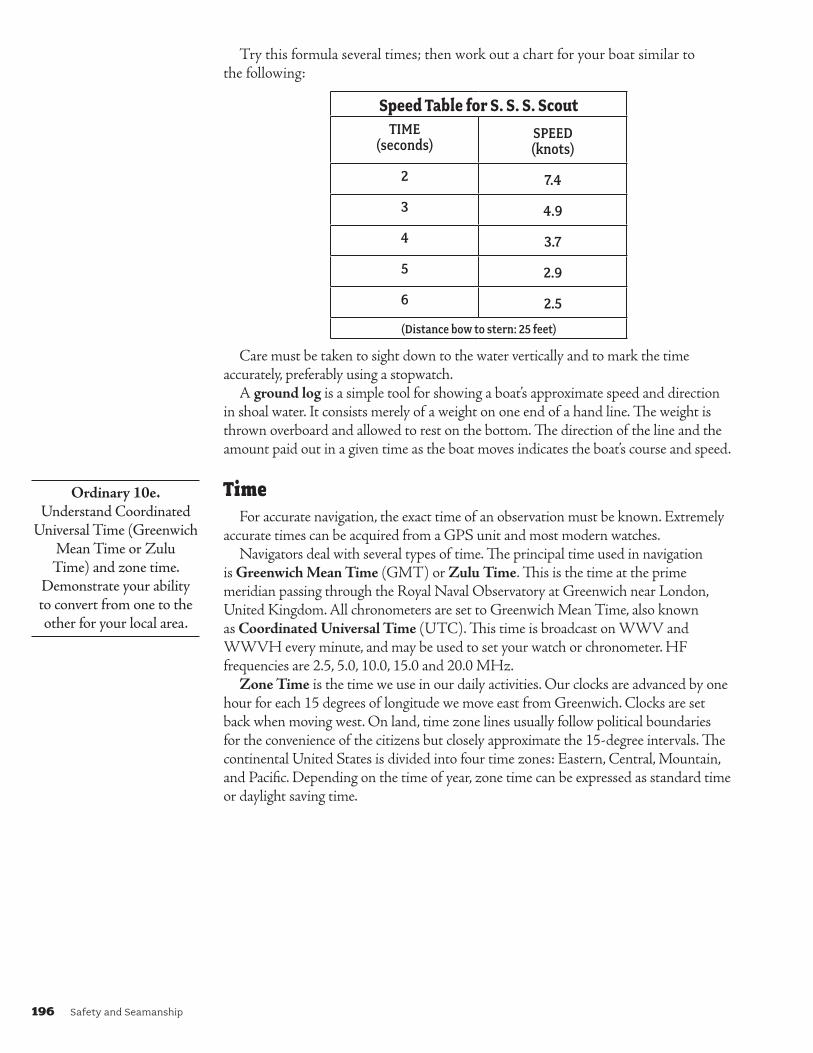
196 Safety and Seamanship
Try this formula several times; then work out a chart for your boat similar to the following:
SpeedTableforS.S.S.ScoutTIME
(seconds)SPEED (knots)
2 7.4
3 4.9
4 3.7
5 2.9
6 2.5
(Distance bow to stern: 25 feet)
Care must be taken to sight down to the water vertically and to mark the time accurately, preferably using a stopwatch.
A ground log is a simple tool for showing a boat’s approximate speed and direction in shoal water. It consists merely of a weight on one end of a hand line. The weight is thrown overboard and allowed to rest on the bottom. The direction of the line and the amount paid out in a given time as the boat moves indicates the boat’s course and speed.
TimeFor accurate navigation, the exact time of an observation must be known. Extremely
accurate times can be acquired from a GPS unit and most modern watches.Navigators deal with several types of time. The principal time used in navigation
is Greenwich Mean Time (GMT) or Zulu Time. This is the time at the prime meridian passing through the Royal Naval Observatory at Greenwich near London, United Kingdom. All chronometers are set to Greenwich Mean Time, also known as Coordinated Universal Time (UTC). This time is broadcast on WWV and WWVH every minute, and may be used to set your watch or chronometer. HF frequencies are 2.5, 5.0, 10.0, 15.0 and 20.0 MHz.
Zone Time is the time we use in our daily activities. Our clocks are advanced by one hour for each 15 degrees of longitude we move east from Greenwich. Clocks are set back when moving west. On land, time zone lines usually follow political boundaries for the convenience of the citizens but closely approximate the 15-degree intervals. The continental United States is divided into four time zones: Eastern, Central, Mountain, and Pacific. Depending on the time of year, zone time can be expressed as standard time or daylight saving time.
Ordinary 10e. Understand Coordinated
Universal Time (Greenwich Mean Time or Zulu
Time) and zone time. Demonstrate your ability to convert from one to the other for your local area.

Safety and Seamanship 197
GMT/UTCConversionZone GMT/UTC Standard Daylight
Atlantic 1800 1400 -4 1500 -3
Eastern 1800 1300 -5 1400 -4
Central 1800 1200 -6 1300 -5
Mountain 1800 1100 -7 1200 -6
Pacific 1800 1000 -8 1100 -7
Alaska 1800 0900 -9 1000 -8
Hawaii 1800 0800 -10 0900 -9
Navigators concerned with the correct time can obtain a radio time signal, called a time tick or a time hack, at least daily. Zone time accurate to 0.2 seconds can be obtained by logging on to www.time.gov. Click on the time zone where you live, and set your watch to agree with the displayed time. You can also dial 303-499-7111. This is a toll call to the National Institute of Science and Technology in Boulder, Colorado. The time will be reported as Coordinated Universal Time.
For piloting, navigation, and military purposes, time is expressed in four figures from 0001 through 2400 (midnight). This 24-hour clock avoids confusion between morning and afternoon. Thus, 0100 (pronounced “O-one-hundred”) is 1 a.m., and 1300 (thirteen-hundred) is 1 p.m.
When piloting, times need to be added and subtracted. Remember, there are only 60 minutes in an hour. Do not be fooled and subtract a time such as 1125 from 1218 and think that 93 minutes have elapsed. Only 53 minutes of time have actually passed.
Measuring DistanceIn the marine environment, we measure distance in nautical miles to make plotting
on our charts easier. The distance a vessel travels is a function of the speed and time it travels. A car traveling 60 miles per hour goes a mile a minute. A boat traveling 6 knots goes 1 nautical mile in 10 minutes.
If you know your boat’s speed and the time she has been underway, you can calculate the distance run. The Speed/Time/Distance formula, referred to as 60 D Street, is easy to use.
60 x Distance (nautical miles) = Speed (knots) x Time (minutes)
Suppose you have been sailing for an hour and 10 minutes at 6.2 knots. How far have you gone?
• Convert the time to minutes: 1 hour (60 minutes) + 10 = 70 minutes• 60 D = Speed (6.2) x Time (70)• 60 D = 434.2• D = 434.2 ÷ 60 = 7.24 nautical miles
Ordinary 10d. Explain the 24-hour time
system and demonstrate that you can convert between 12- and 24-hour time.

198 Safety and Seamanship
Speed, Time, and DistanceComputing speed, time, and distance is an important part of dead reckoning. The 60
D Street calculation can be used to find speed, time, or distance as long as two of the factors are known.
What if your GPS unit shows you are traveling at 5.7 SOG (speed over ground)? How long will it take you to sail 24 miles back to your marina?
• 60 D = Speed x Time• 60 x 24 = Speed x Time• 1,440 = Speed x Time• 1,440 = 5.7 x Time• 1,440 ÷ 5.7 = Time• 266 minutes = Time• Convert the time to hours and minutes. 266 minutes = 240 (4 hours) + 26 minutes
Suppose your handheld GPS unit goes overboard after you have traveled 12.5 nautical miles in two hours and 17 minutes and your skipper wants an estimated speed for your vessel?
• Convert the time to minutes: 2 hours (120 minutes) + 17 = 137 minutes• 60 D = Speed x Time (137)• 60 x 12.5 = Speed x 137• 750 = Speed x 137• 750 ÷137 = Speed• 5.47 knots = Speed
Most charts have a logarithmic speed scale located on the upper or lower margin. This is an aid in avoiding arithmetic as you can tick off time, speed, or distance with your dividers; however, a pocket calculator is quite easy to use.
Dead ReckoningEarly navigators abbreviated deduced reckoning as ded. reckoning. Today, dead
reckoning (DR) is the term used for locating a position by calculation. If speed, time, and heading are known, it is possible to calculate or “dead reckon” a position.
A dead reckoning plot is the record of your boat’s progress based on heading steered and speed made through the water (or over ground if using GPS). It does not show your true position at any point—only your “reckoned” position. Your true position is found by fixes from charted features, radio navigation aids, GPS, or celestial observa-tions. Your dead reckoning plot must always start from a known point, a fix. It tracks your progress until the next fix, where you start a new dead reckoning plot.
An important part of dead reckoning is calculating an estimated time of arrival at your waypoints. These ETAs help prevent gross errors in navigation.
Deck LogA deck log is a record of the calculations made when planning a course. The departure
point and legs of your journey should be logged as part of your pre-sail plan. Because the departure time is unknown, the estimated time en route (ETE) is shown instead of an ETA. This information should be recorded on the first lines of the deck log.
Ordinary 10f. Make a dead reckoning table
of compass and distances (minimum three legs)
between two points, plot these on a chart, and deter-
mine the final position. Note: Ideally this require-ment should be met while
underway. If this is not possible, it may be simulated
using charts.
Able 10a. Describe the deck log
aboard your ship’s principal craft. Keep a complete log
for three cruises.
LogarithmicSpeedScale
1 2 3 4 5 6 7 8 9 10 15 20 25 30 40 50 60
To find SPEED, place one point of dividers on distance run (in any unit) and the other on minutes run. Without changing divider spread, place right point on 60 and left
point will then indicate speed in units per hour. Example: with 4.0 nautical miles run in 15 minutes, the speed is 16.0 knots.

Safety and Seamanship 199
Tim
ePo
sitio
nLa
titud
eLo
ngitu
deTr
ueVa
r. M
ag.
Dev.
Com
p.Sp
eed
Dist
ance
ETA
Rem
arks
DEC
KL
OG
VESS
EL_
____
____
____
____
____
____
____
N
AVIG
ATO
R__
____
____
____
____
____
____
____
____
____
FRO
M_
____
____
____
_T
O
____
____
____
____

200 Safety and Seamanship
Once underway, the time of actual departure is logged. Calculations made during pre-sail planning can be used to give a compass heading and compute an ETA to the first waypoint. Actual speeds and headings are logged. Fixes determine your actual position, and the deck log tracks your progress until the next fix where you start a new dead reckoning plot.
Chart PlottingSome tools are needed for chart plotting. The minimum will be an up-to-date chart,
sharp pencil, pair of dividers, good eraser, and parallel rules, or one of the many plotters available. Your boat should have a good compass with a deviation table. A pelorus or a hand-bearing compass is helpful but not required.
To determine the distance of a line or course on the chart, spread the dividers to the length of the line. Then place the points of the dividers on the distance scale to read the distance in nautical miles, or set the dividers for a given number of miles and walk off the distance. On Mercator projection scale charts, the distance can be read from the latitude scale: 1 minute of latitude equals 1 nautical mile.
To describe a position on the chart, note either the latitude and longitude or its dis-tance and direction from some specific point. Latitude and longitude can be determined by using the dividers to measure the distance of the position to the nearest printed parallel and meridian. This distance is then measured with the dividers on the latitude and longitude scales on the chart borders.
Measuring the longitude of a point on a chart. The longitude is 78º32.7' West.
Measuring the latitude of a point on a chart. The latitude of Point X is 32º12.5' North.
Able 10b. Lay a course of at least
three legs and execute it using dead reckoning.

Safety and Seamanship 201
Charts usually have a compass rose in several different places. This rose has an outer ring that is oriented to true north. A second compass rose inside the outer ring is oriented to magnetic north. The date, exact variation, and change in variation are in the center of this rose.
Parallel rules are used on the compass rose to measure a course or bearing or to draw a course line or line of position. To measure a course, place the dividers on the line, well spread. Put the edge of the parallel rules against the dividers without moving them. Put your fingers firmly on the line side of the rules, and “walk” the other side up to the nearest compass rose. Put the edge of the rules exactly on the cross (+) in the center of the rose. Read the course on the same side as your direction of travel. For example, if you are headed generally southeast, your answer should be between 090° and 180°.
To lay out an accurate plot you must understand variation and deviation to correct a compass course or bearing to a true course or bearing, and how to uncorrect from true to compass. The time-speed-distance formula will be used regularly. You will also need to know how the lines are drawn and labeled. Here are some general rules.
• Always start a DR plot from a known position—a fix.• All lines on the chart are labeled as soon as they are drawn.• Numbers are rounded off to the nearest value. If the number is exactly midway
between two values, it is rounded to the even value. Thus, 1.44 is rounded to 1.4, 1.46 to 1.5, and 1.45 to 1.4, while 1.55 is rounded to 1.6.
• Time is always expressed in military time: 1:30 a.m. is written 0130, 4:18 p.m. is written 1618. The time of a fix is written parallel to the bottom of the chart, time of a DR position is written at an angle to the bottom of the chart, and if lines of position are labeled, the time is above the line. Time is rounded off to the nearest minute.
• Courses and bearings are always plotted as true directions using three digits. The course is written above the course line: a course of 45° is written C 045; 282° is written C 282. If bearings are labeled on lines of position, they are written below the line: a bearing of 185° is written B 185. The degree symbol is not used, as three-digit numbers are always degrees.
• Speed is expressed in knots on oceans and harbors, statute miles per hour on inland waters. The speed used must agree with the chart’s usage. Speed is written below the course line and rounded off to the nearest 10th. A speed of 6.27 knots is written S 6.3.
• Distance is rounded off to the nearest 1⁄10 mile. If distance is plotted on a course line, it is written below the line following the speed.
• Dead reckoning positions are indicated by a dot on the course line with a semi-circle. DR positions are plotted whenever there is a change in course or speed, as well as every hour, on the hour. The time of all DR positions is noted.
• A fix is marked with a dot surrounded by a circle. The time of the fix is noted and this starts a new DR plot.
• An electronic fix position is marked with a dot surrounded by a triangle.• An estimated position is marked with a dot surrounded by a square. The time is
not noted, as it will be the same as its accompanying DR position. A new DR plot is never started from an estimated position.
• Latitude and longitude are never marked on the chart. When they are logged, however, they are rounded off to the nearest 10th of a minute, or six seconds. Latitude is written first, then longitude. Latitude 42 18’ 14” North is written 42° 18.2’ N. The latitude scale is used to determine distance; the longitude scale is never used for this purpose.
• In addition to plotting the DR course on the chart, the skilled navigator keeps an accurate set of notes on a deck log.
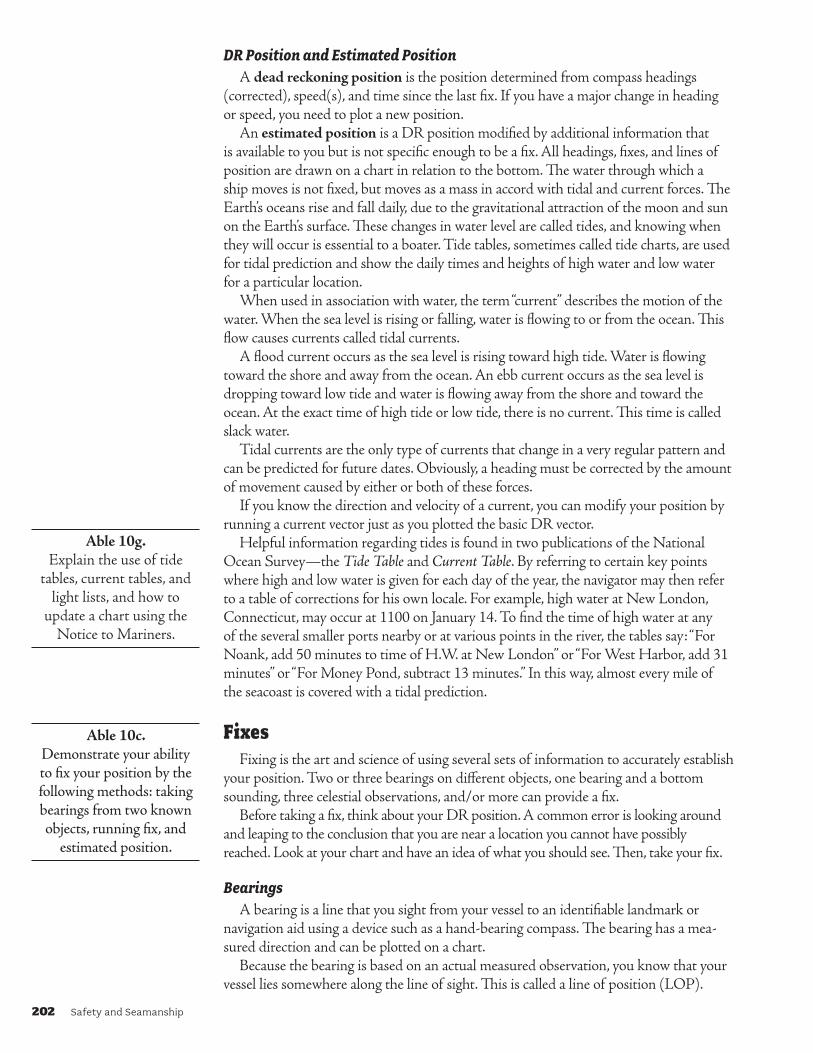
202 Safety and Seamanship
DR Position and Estimated PositionA dead reckoning position is the position determined from compass headings
(corrected), speed(s), and time since the last fix. If you have a major change in heading or speed, you need to plot a new position.
An estimated position is a DR position modified by additional information that is available to you but is not specific enough to be a fix. All headings, fixes, and lines of position are drawn on a chart in relation to the bottom. The water through which a ship moves is not fixed, but moves as a mass in accord with tidal and current forces. The Earth’s oceans rise and fall daily, due to the gravitational attraction of the moon and sun on the Earth’s surface. These changes in water level are called tides, and knowing when they will occur is essential to a boater. Tide tables, sometimes called tide charts, are used for tidal prediction and show the daily times and heights of high water and low water for a particular location.
When used in association with water, the term “current” describes the motion of the water. When the sea level is rising or falling, water is flowing to or from the ocean. This flow causes currents called tidal currents.
A flood current occurs as the sea level is rising toward high tide. Water is flowing toward the shore and away from the ocean. An ebb current occurs as the sea level is dropping toward low tide and water is flowing away from the shore and toward the ocean. At the exact time of high tide or low tide, there is no current. This time is called slack water.
Tidal currents are the only type of currents that change in a very regular pattern and can be predicted for future dates. Obviously, a heading must be corrected by the amount of movement caused by either or both of these forces.
If you know the direction and velocity of a current, you can modify your position by running a current vector just as you plotted the basic DR vector.
Helpful information regarding tides is found in two publications of the National Ocean Survey—the Tide Table and Current Table. By referring to certain key points where high and low water is given for each day of the year, the navigator may then refer to a table of corrections for his own locale. For example, high water at New London, Connecticut, may occur at 1100 on January 14. To find the time of high water at any of the several smaller ports nearby or at various points in the river, the tables say: “For Noank, add 50 minutes to time of H.W. at New London” or “For West Harbor, add 31 minutes” or “For Money Pond, subtract 13 minutes.” In this way, almost every mile of the seacoast is covered with a tidal prediction.
FixesFixing is the art and science of using several sets of information to accurately establish
your position. Two or three bearings on different objects, one bearing and a bottom sounding, three celestial observations, and/or more can provide a fix.
Before taking a fix, think about your DR position. A common error is looking around and leaping to the conclusion that you are near a location you cannot have possibly reached. Look at your chart and have an idea of what you should see. Then, take your fix.
BearingsA bearing is a line that you sight from your vessel to an identifiable landmark or
navigation aid using a device such as a hand-bearing compass. The bearing has a mea-sured direction and can be plotted on a chart.
Because the bearing is based on an actual measured observation, you know that your vessel lies somewhere along the line of sight. This is called a line of position (LOP).
Able 10g. Explain the use of tide
tables, current tables, and light lists, and how to
update a chart using the Notice to Mariners.
Able 10c. Demonstrate your ability to fix your position by the following methods: taking bearings from two known objects, running fix, and
estimated position.
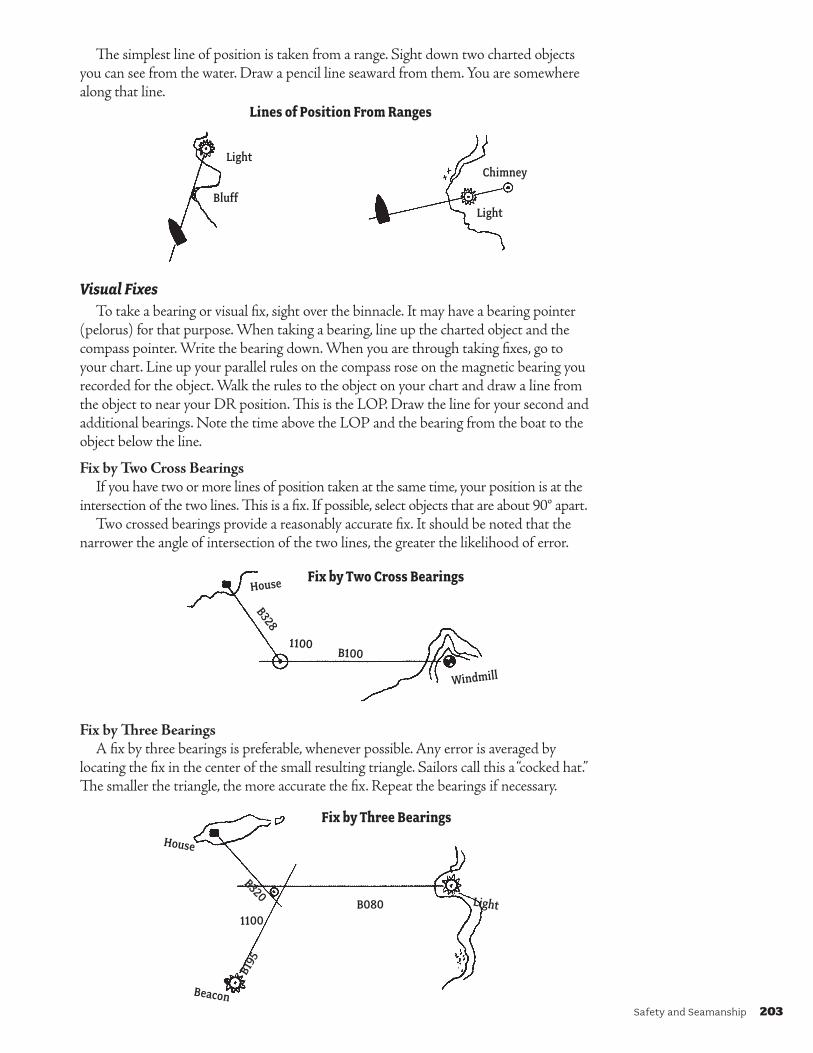
Safety and Seamanship 203
The simplest line of position is taken from a range. Sight down two charted objects you can see from the water. Draw a pencil line seaward from them. You are somewhere along that line.
Light
Bluff
Chimney
Light
LinesofPositionFromRanges
Visual FixesTo take a bearing or visual fix, sight over the binnacle. It may have a bearing pointer
(pelorus) for that purpose. When taking a bearing, line up the charted object and the compass pointer. Write the bearing down. When you are through taking fixes, go to your chart. Line up your parallel rules on the compass rose on the magnetic bearing you recorded for the object. Walk the rules to the object on your chart and draw a line from the object to near your DR position. This is the LOP. Draw the line for your second and additional bearings. Note the time above the LOP and the bearing from the boat to the object below the line.
Fix by Two Cross BearingsIf you have two or more lines of position taken at the same time, your position is at the
intersection of the two lines. This is a fix. If possible, select objects that are about 90° apart.Two crossed bearings provide a reasonably accurate fix. It should be noted that the
narrower the angle of intersection of the two lines, the greater the likelihood of error.
House
B328
1100B100
Windmill
FixbyTwoCrossBearings
Fix by Three BearingsA fix by three bearings is preferable, whenever possible. Any error is averaged by
locating the fix in the center of the small resulting triangle. Sailors call this a “cocked hat.” The smaller the triangle, the more accurate the fix. Repeat the bearings if necessary.
FixbyThreeBearings
B080
B195
1100
B320
House
Beacon
Light
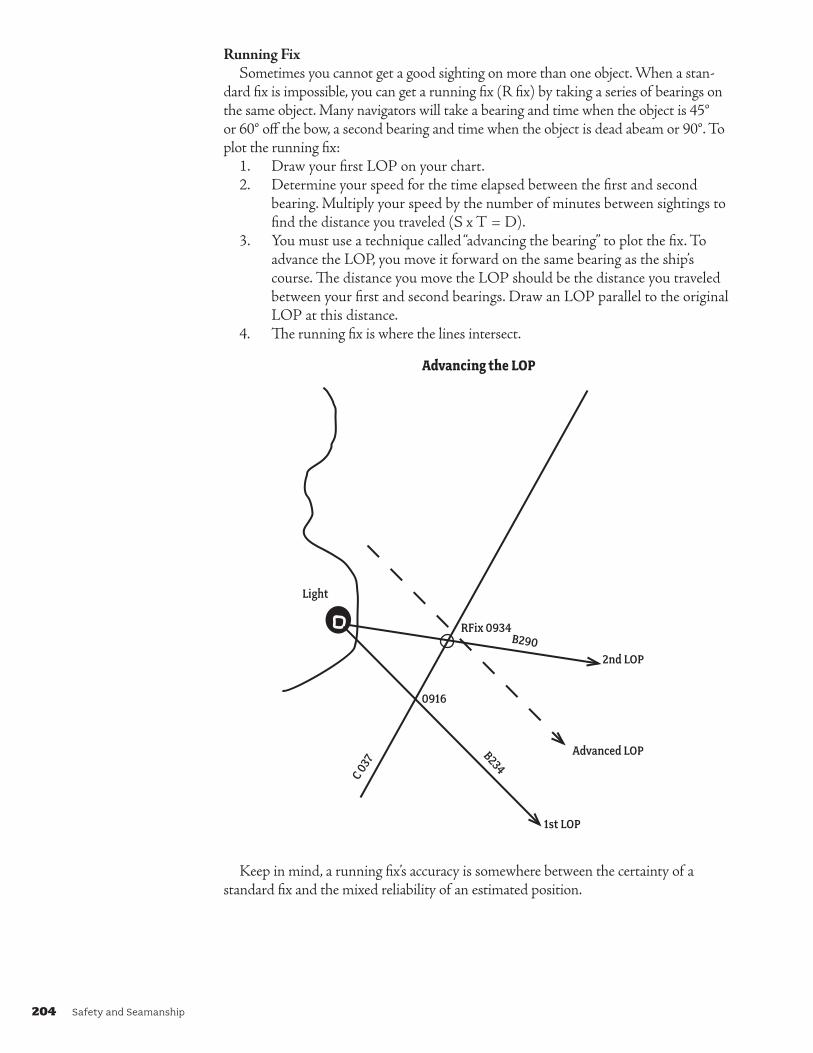
204 Safety and Seamanship
Running FixSometimes you cannot get a good sighting on more than one object. When a stan-
dard fix is impossible, you can get a running fix (R fix) by taking a series of bearings on the same object. Many navigators will take a bearing and time when the object is 45° or 60° off the bow, a second bearing and time when the object is dead abeam or 90°. To plot the running fix:
1. Draw your first LOP on your chart. 2. Determine your speed for the time elapsed between the first and second
bearing. Multiply your speed by the number of minutes between sightings to find the distance you traveled (S x T = D).
3. You must use a technique called “advancing the bearing” to plot the fix. To advance the LOP, you move it forward on the same bearing as the ship’s course. The distance you move the LOP should be the distance you traveled between your first and second bearings. Draw an LOP parallel to the original LOP at this distance.
4. The running fix is where the lines intersect.
AdvancingtheLOP
0916
RFix 0934
Light
C 037
B290
B234
Advanced LOP
1st LOP
2nd LOP
Keep in mind, a running fix’s accuracy is somewhere between the certainty of a standard fix and the mixed reliability of an estimated position.
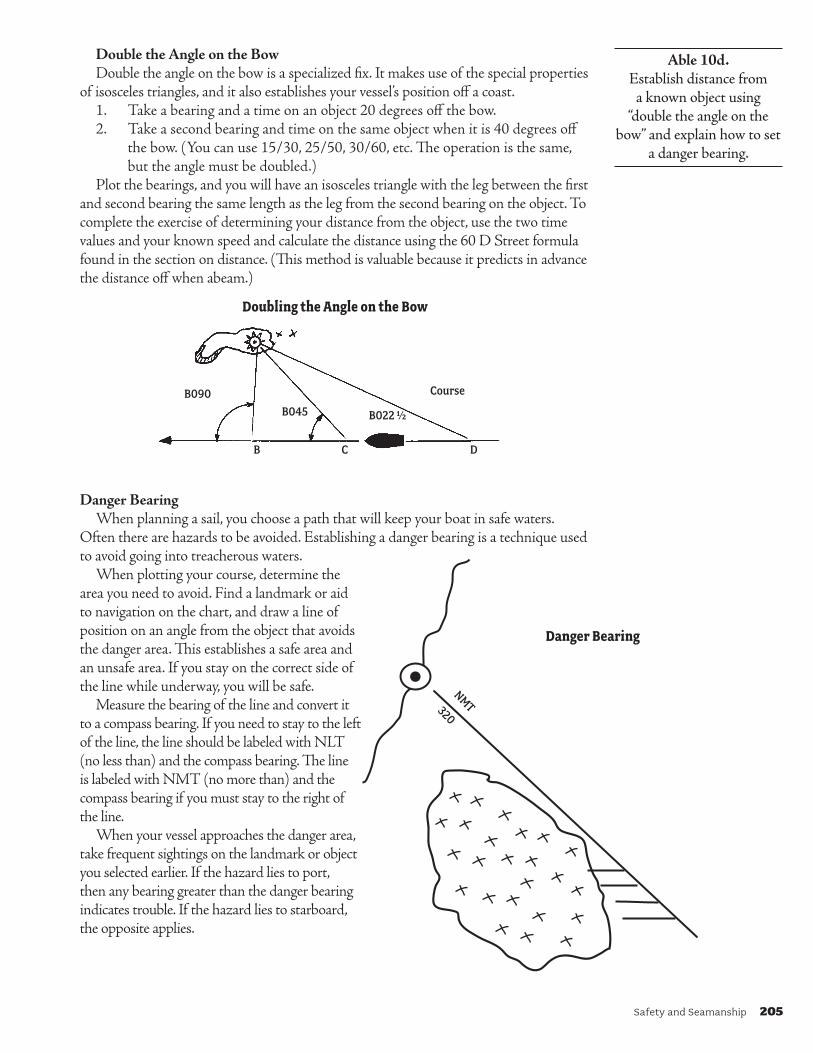
Safety and Seamanship 205
Double the Angle on the BowDouble the angle on the bow is a specialized fix. It makes use of the special properties
of isosceles triangles, and it also establishes your vessel’s position off a coast.1. Take a bearing and a time on an object 20 degrees off the bow.2. Take a second bearing and time on the same object when it is 40 degrees off
the bow. (You can use 15/30, 25/50, 30/60, etc. The operation is the same, but the angle must be doubled.)
Plot the bearings, and you will have an isosceles triangle with the leg between the first and second bearing the same length as the leg from the second bearing on the object. To complete the exercise of determining your distance from the object, use the two time values and your known speed and calculate the distance using the 60 D Street formula found in the section on distance. (This method is valuable because it predicts in advance the distance off when abeam.)
DoublingtheAngleontheBow
B090B045 B022 ½
Course
B C D
Danger BearingWhen planning a sail, you choose a path that will keep your boat in safe waters.
Often there are hazards to be avoided. Establishing a danger bearing is a technique used to avoid going into treacherous waters.
When plotting your course, determine the area you need to avoid. Find a landmark or aid to navigation on the chart, and draw a line of position on an angle from the object that avoids the danger area. This establishes a safe area and an unsafe area. If you stay on the correct side of the line while underway, you will be safe.
Measure the bearing of the line and convert it to a compass bearing. If you need to stay to the left of the line, the line should be labeled with NLT (no less than) and the compass bearing. The line is labeled with NMT (no more than) and the compass bearing if you must stay to the right of the line.
When your vessel approaches the danger area, take frequent sightings on the landmark or object you selected earlier. If the hazard lies to port, then any bearing greater than the danger bearing indicates trouble. If the hazard lies to starboard, the opposite applies.
Able 10d. Establish distance from
a known object using “double the angle on the
bow” and explain how to set a danger bearing.
DangerBearing
NMT320
206 Safety and Seamanship
Electronic Fixes
Global Positioning SystemTwenty-four or more GPS satellites orbit the Earth, and they broadcast very precise
time signals. GPS devices receive the satellite signals, compare them, and give you a set of coordinates. This is especially valuable to the sailor, because GPS looks at your absolute position on the globe. Sometimes, when relying on dead reckoning alone, the effects of current and wind are not readily apparent.
The primary purpose of GPS is determining position, which it gives in latitude and longitude, but GPS can also tell which course to steer if waypoints are established, and it can provide an ETA to your destination. The GPS device provides your speed over ground (SOG). It is important to understand that SOG is not necessarily speed through the water. SOG is a result of speed through the water, current, and leeway.
A GPS device cannot warn of hazards or determine water depth. Knowledge of the local environment must come from charts, personal observations, and other instruments on the boat.
Today, the simplest and most common fix taken is a GPS fix. Because GPS is not a chart, you need to plot your position as reported by the GPS device on a chart at regular intervals. To take a GPS fix, make sure the GPS device is currently locked on. Then read the present position coordinates. They should be changing constantly if you are in motion. Make note of the time. Then read and write down the latitude to 1⁄10 of a minute. Next, read and write down the longitude to 1⁄10 of a minute. You may also want to note track and groundspeed as additional useful information. Plot the coordinates and time immediately, check your course for hazards, and compute an ETA to the next point.
WaypointsAlthough the primary purpose of a GPS device is to tell location, an equally
important function is helping you get where you are going. This involves waypoints.Waypoints are the places you want to go. When planning a cruise, you establish
positions and record latitude and longitude in your deck log. These coordinates can be entered into a GPS device and stored in a bank of waypoints.
Working with waypoints provides several opportunities to make mistakes. Be sure to:• Double-check the latitude and longitude of the waypoints on your chart.• Enter the latitude and longitude correctly into the GPS device. Most errors in
GPS input occur because of transposed numbers in the coordinates.• Do not set exact coordinates for large objects such as range markers or beacons as way-
points. Set waypoints that provide ample clearance for safe passage around them. If you are traveling in limited visibility, you do not want to navigate directly into something.
• When underway, select the correct waypoint from the list stored in your GPS device.
When you select and activate a waypoint for navigation, GPS will compute the course bearing and distance from your current location to the waypoint; however, you must remember it does not know what lies beneath the water. You must use your chart to make sure your course is clear of obstacles that will endanger your vessel.
One waypoint you must be able to generate blindfolded is the MOB (man over-board) waypoint. Once the MOB waypoint is created, it automatically becomes the active waypoint directing you back to the place where it was activated.
Never take the precision of the GPS as a given. Satellite signals can be weakened or interrupted by the geometry of the satellites, atmospheric conditions, obstacles block-ing the signal, sunspots or solar flares, and electrical interference. Good seamanship demands that your navigation is verified by all available means, including taking bearings of landmarks/beacons/lights, radar, depth sounding, and calculating the effects of set and drift due to the tide.
Ordinary 10g. Discuss how a GPS unit
works. Explain possible uses and functions including
different screen views. Use a GPS unit to set a waypoint
and navigate to the waypoint you have set.
Able 10e. Enter three waypoints into
an electronic navigation device (i.e., GPS, chart-
plotter) and navigate your vessel to each point. Demonstrate the use of
the MOB function on your electronic navigation device.

Safety and Seamanship 207
RadarRadar, or radio detecting and ranging, is an electronic device that bounces radio
energy off objects and measures the time required for the impulse to return to the point of transmission. The returning impulses are translated into a maplike picture of the object on a radar scope. The image may be interpreted to provide bearings and distances of the objects.
Metal is highly reflective. Dirt is less reflective. Water does not reflect radar much at all. If you are in a bay, the water surrounding the ship will show as black. A trained radar operator, by changing the gain and other controls, can identify ships, buoys, bridges, water towers, industrial plants, and shorelines.
Maritime radars use a plan position indicator format, which means the radar display looks somewhat like a chart. Around the edge is a compass rose to allow you to take bearings. On simple radars, the bow of the boat is always at the top, and you read relative bearings. More complex systems feed the magnetic heading and variation to the radar so it shows true north at the top. The heading of the boat is shown as a bright strobe from the center to edge. Range marks allow you to measure distances from as little as a half mile up to 20 miles.
Radar’s primary use is collision avoidance, but it is very useful for fixing, as well. Fixing can be done three ways. The simplest is to take a range and bearing on a known object, note the time, and plot it on your chart. Another fix would be to take bearings on two or more known objects, and plot them just as you would visual fix bearings. Finally, you can take two or more ranges from known objects, arc off the distances with a drawing compass, and your position is where the arcs intersect.
Radio Direction FinderThis device is a radio receiver with a loop antenna that can be rotated so the direction
of the transmitting station can be determined. Locations of transmitting stations are charted and marked as “radio beacons.” These stations transmit designated signals at stated intervals so they can be identified.
Two or more radio beacons can produce lines of position that intersect to give the ship’s position, or the ship can home in on a single beacon. Bearings so established may be subject to error due to local or atmospheric distortion. This means constant recheck-ing. The normal range is between 20 and 200 miles.
Automatic ID System (AIS)AIS is a maritime navigation safety communications system that provides vessel
identity, type, position, course, speed, navigational status, and other safety-related information automatically to appropriately equipped shore stations, other ships, and aircraft. With this information, it is possible to call any ship over VHF radiotelephone by name, rather than an imprecise call such as, “Ship off my starboard bow.”
AIS’s primary function is as a navigation tool for collision avoidance, but it is helping to improve our nation’s security by increasing the U.S. Coast Guard’s awareness of vessels in the maritime domain, especially vessels approaching United States ports.
Inertial Navigation SystemThis highly sophisticated multi-device equipment involves a complex computer
that takes into account all the factors found in dead reckoning such as speed, distance, courses, changes, current, wind, etc. A vessel’s position can be constantly known.
Able 10f. Discuss how radar is used in situational awareness
and the method of taking a radar fix.

208 Safety and Seamanship
Fixing by SoundingCharts contain information about objects that are invisible from a boat but that can
be verified, measured, or identified. The depth of the water beneath a boat is one more piece of information that can be used to find a position.
Charts show depth. Soundings are often recorded in feet, but on some NOS charts, they are in meters. In very deep water, depths are shown in fathoms of 6 feet. The scale will be clearly marked on the chart.
A sounding will not usually indicate a precise position, but it can help you determine generally where you are and are not.
Electronic Depth SounderAn electronic depth sounder determines the depth of water under a boat’s hull by
measuring the time required for a transmitted sonic impulse to reach the bottom and return by echo to the boat. This instrument is called by many names—sonic depth finder, echo sounder, depth finder, depth indicator, depth meter, depth sounder, or fathometer.
A depth sounder consists of two elements, an indicator and a transducer. The transducer is a combined transmitter and receiver installed in the hull. It is small and compact. A cable inside the hull runs from the transducer to the indicator. Electronic pulses are sent and received by the transducer. A unit in the indicator times their travel and converts the result into depth (distance from the transducer to the bottom).
The LeadAlthough the lead line is considered old fashioned, it comes in handy as a backup to
an electronic depth sounder. It can also be useful in checking the depths all about a boat that has gone aground.
The lead line is nothing more than a long length of small-diameter rope with a lead weight at one end. The line is marked at regular intervals to show depth. Sometimes, a dollop of wax is affixed to the end of the lead so a sample of the bottom’s consistency can be obtained.
To use a lead line, the boat must be going slow ahead. A person on the bow heaves the lead forward and lets the line run out. When the bow passes the line, the slack is pulled out until the line is vertical, and the tag closest to the water is read. Caution: Retrieve the line quickly if the engine is running so you won’t foul the propeller.
Fixing in Limited VisibilityThe curse of the coastal boater and the bane of oceangoing vessels is the seafarer’s
ancient enemy—fog. Thick weather (fog, heavy rain, snow, haze) blots out landmarks, conceals aids to navigation, and hides ships at sea in a sometimes impenetrable blanket where visibility is reduced to 100 feet or less.
In foggy conditions, which prevail when visibility is seven-tenths of a mile or less, you must know where you are. Fixing in limited visibility is best done by electronic means. The GPS is not normally affected by visibility. Radar sets will see thunderstorms, but should also be able to see the normal radar returns. A radio direction finder is also useful.
Quartermaster 10b. Know the methods of
fixing a boat’s position in limited visibility.
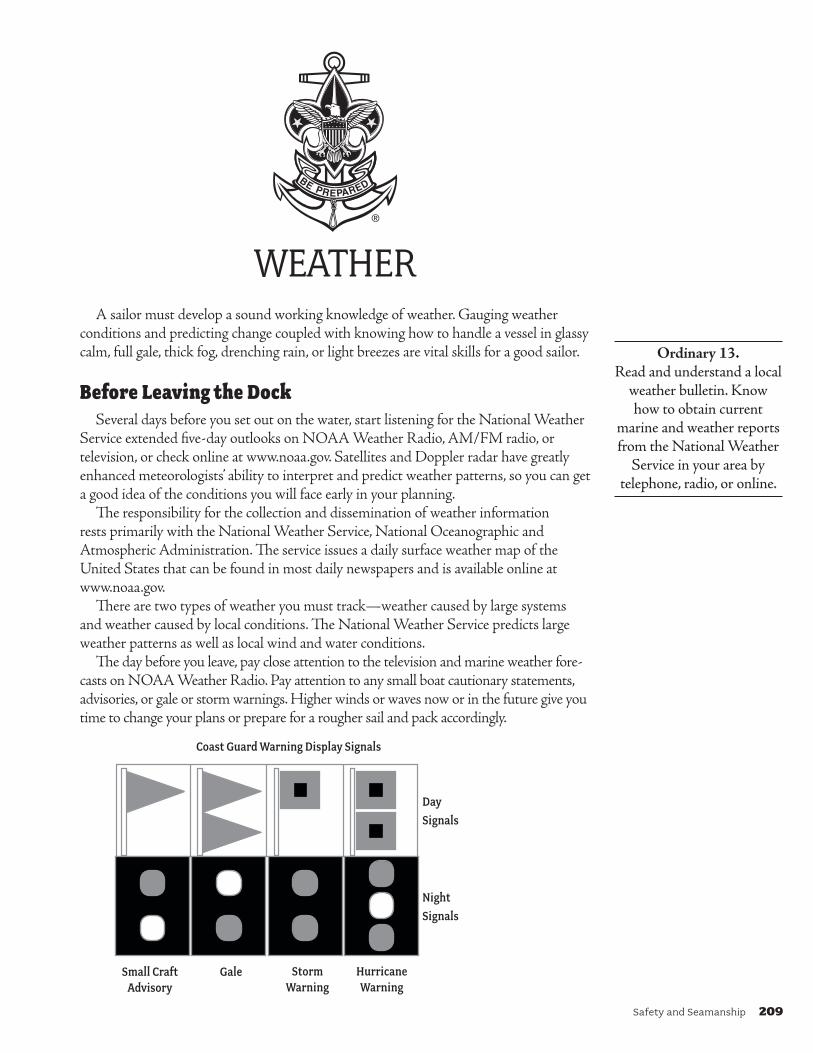
Safety and Seamanship 209
WEATHERA sailor must develop a sound working knowledge of weather. Gauging weather
conditions and predicting change coupled with knowing how to handle a vessel in glassy calm, full gale, thick fog, drenching rain, or light breezes are vital skills for a good sailor.
Before Leaving the DockSeveral days before you set out on the water, start listening for the National Weather
Service extended five-day outlooks on NOAA Weather Radio, AM/FM radio, or television, or check online at www.noaa.gov. Satellites and Doppler radar have greatly enhanced meteorologists’ ability to interpret and predict weather patterns, so you can get a good idea of the conditions you will face early in your planning.
The responsibility for the collection and dissemination of weather information rests primarily with the National Weather Service, National Oceanographic and Atmospheric Administration. The service issues a daily surface weather map of the United States that can be found in most daily newspapers and is available online at www.noaa.gov.
There are two types of weather you must track—weather caused by large systems and weather caused by local conditions. The National Weather Service predicts large weather patterns as well as local wind and water conditions.
The day before you leave, pay close attention to the television and marine weather fore-casts on NOAA Weather Radio. Pay attention to any small boat cautionary statements, advisories, or gale or storm warnings. Higher winds or waves now or in the future give you time to change your plans or prepare for a rougher sail and pack accordingly.
Ordinary 13. Read and understand a local
weather bulletin. Know how to obtain current
marine and weather reports from the National Weather
Service in your area by telephone, radio, or online.
Coast Guard Warning Display Signals
Small Craft Advisory
Gale Storm Warning
Hurricane Warning
Day
Signals
Night
Signals
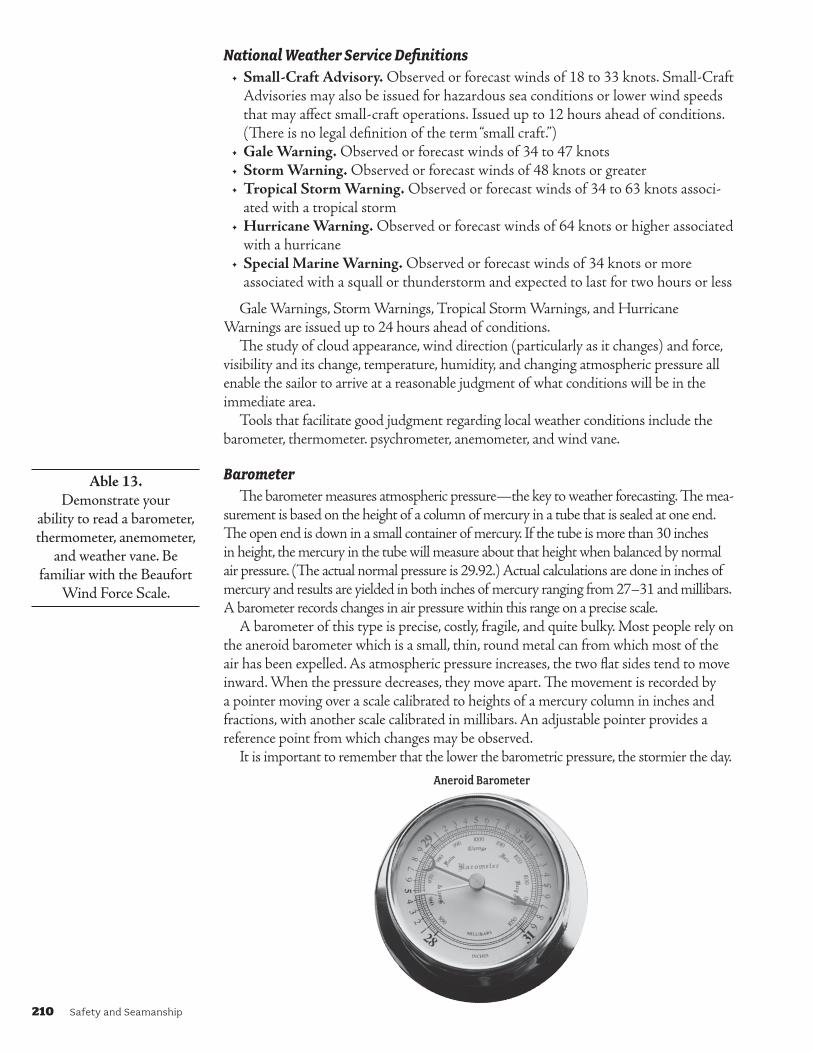
210 Safety and Seamanship
National Weather Service Definitions• Small-Craft Advisory. Observed or forecast winds of 18 to 33 knots. Small-Craft
Advisories may also be issued for hazardous sea conditions or lower wind speeds that may affect small-craft operations. Issued up to 12 hours ahead of conditions. (There is no legal definition of the term “small craft.”)
• Gale Warning. Observed or forecast winds of 34 to 47 knots• Storm Warning. Observed or forecast winds of 48 knots or greater• Tropical Storm Warning. Observed or forecast winds of 34 to 63 knots associ-
ated with a tropical storm• Hurricane Warning. Observed or forecast winds of 64 knots or higher associated
with a hurricane• Special Marine Warning. Observed or forecast winds of 34 knots or more
associated with a squall or thunderstorm and expected to last for two hours or less
Gale Warnings, Storm Warnings, Tropical Storm Warnings, and Hurricane Warnings are issued up to 24 hours ahead of conditions.
The study of cloud appearance, wind direction (particularly as it changes) and force, visibility and its change, temperature, humidity, and changing atmospheric pressure all enable the sailor to arrive at a reasonable judgment of what conditions will be in the immediate area.
Tools that facilitate good judgment regarding local weather conditions include the barometer, thermometer. psychrometer, anemometer, and wind vane.
BarometerThe barometer measures atmospheric pressure—the key to weather forecasting. The mea-
surement is based on the height of a column of mercury in a tube that is sealed at one end. The open end is down in a small container of mercury. If the tube is more than 30 inches in height, the mercury in the tube will measure about that height when balanced by normal air pressure. (The actual normal pressure is 29.92.) Actual calculations are done in inches of mercury and results are yielded in both inches of mercury ranging from 27–31 and millibars. A barometer records changes in air pressure within this range on a precise scale.
A barometer of this type is precise, costly, fragile, and quite bulky. Most people rely on the aneroid barometer which is a small, thin, round metal can from which most of the air has been expelled. As atmospheric pressure increases, the two flat sides tend to move inward. When the pressure decreases, they move apart. The movement is recorded by a pointer moving over a scale calibrated to heights of a mercury column in inches and fractions, with another scale calibrated in millibars. An adjustable pointer provides a reference point from which changes may be observed.
It is important to remember that the lower the barometric pressure, the stormier the day.
Able 13. Demonstrate your
ability to read a barometer, thermometer, anemometer,
and weather vane. Be familiar with the Beaufort
Wind Force Scale.
Aneroid Barometer

Safety and Seamanship 211
ThermometerThe thermometer is a well-known device for measuring the temperature. The
Fahrenheit scale is commonly used with the freezing point of water at 32°F and the boiling point of water at 212°F at sea level. The total scale is subdivided into 180 parts or degrees. On the Celsius scale, the freezing point of water is 0°C and the boiling point is 100°C.
PsychrometerThe psychrometer measures relative humidity with a combination of wet and dry
thermometers. These are either permanently mounted or can be portable like the sling psychrometer, which is more commonly used. Relative humidity is computed from the ambient temperature as shown by the dry-bulb thermometer and the difference in temperatures as shown by the wet-bulb and dry-bulb thermometers.
Psychrometer
Sling Psychrometer
AnemometerThe anemometer is a device for measuring wind force in statute miles per hour or
in knots. It may have rotating cups with a geared wheel that measures wind speed on a dial, or it may be the tube type that measures velocity on a vertical scale according to the height a small ball rises in the tube.
Anemometer
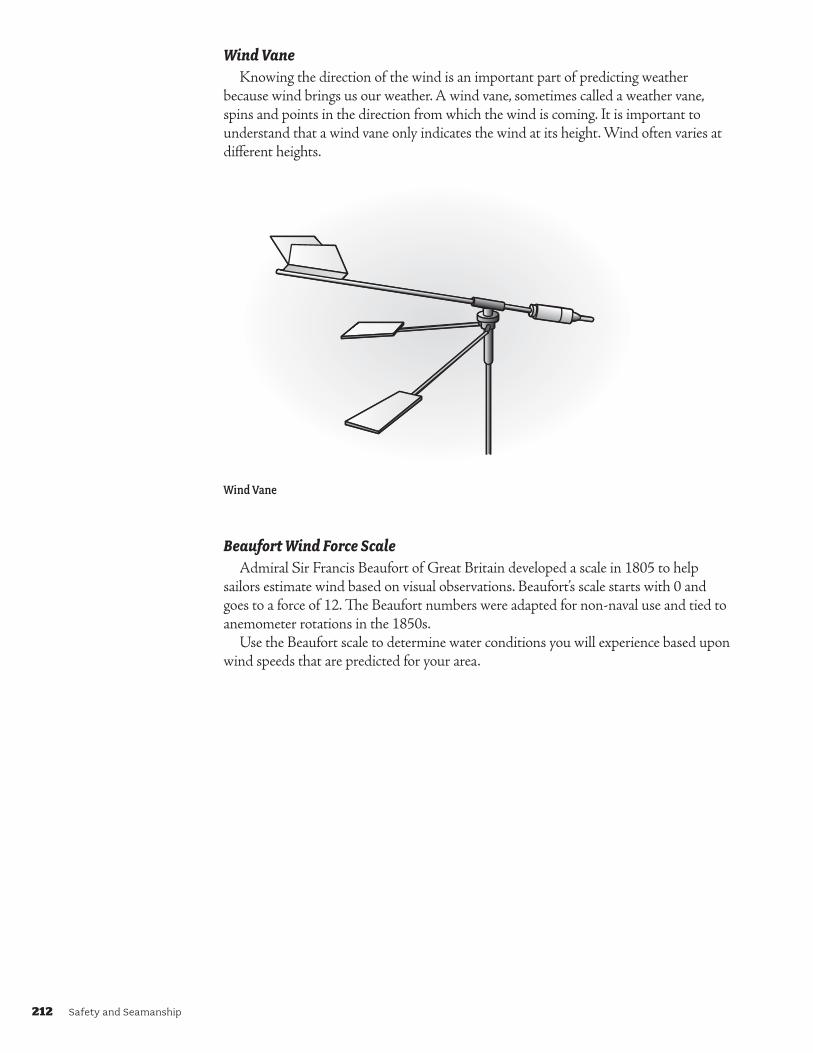
212 Safety and Seamanship
Wind VaneKnowing the direction of the wind is an important part of predicting weather
because wind brings us our weather. A wind vane, sometimes called a weather vane, spins and points in the direction from which the wind is coming. It is important to understand that a wind vane only indicates the wind at its height. Wind often varies at different heights.
Wind Vane
Beaufort Wind Force ScaleAdmiral Sir Francis Beaufort of Great Britain developed a scale in 1805 to help
sailors estimate wind based on visual observations. Beaufort’s scale starts with 0 and goes to a force of 12. The Beaufort numbers were adapted for non-naval use and tied to anemometer rotations in the 1850s.
Use the Beaufort scale to determine water conditions you will experience based upon wind speeds that are predicted for your area.
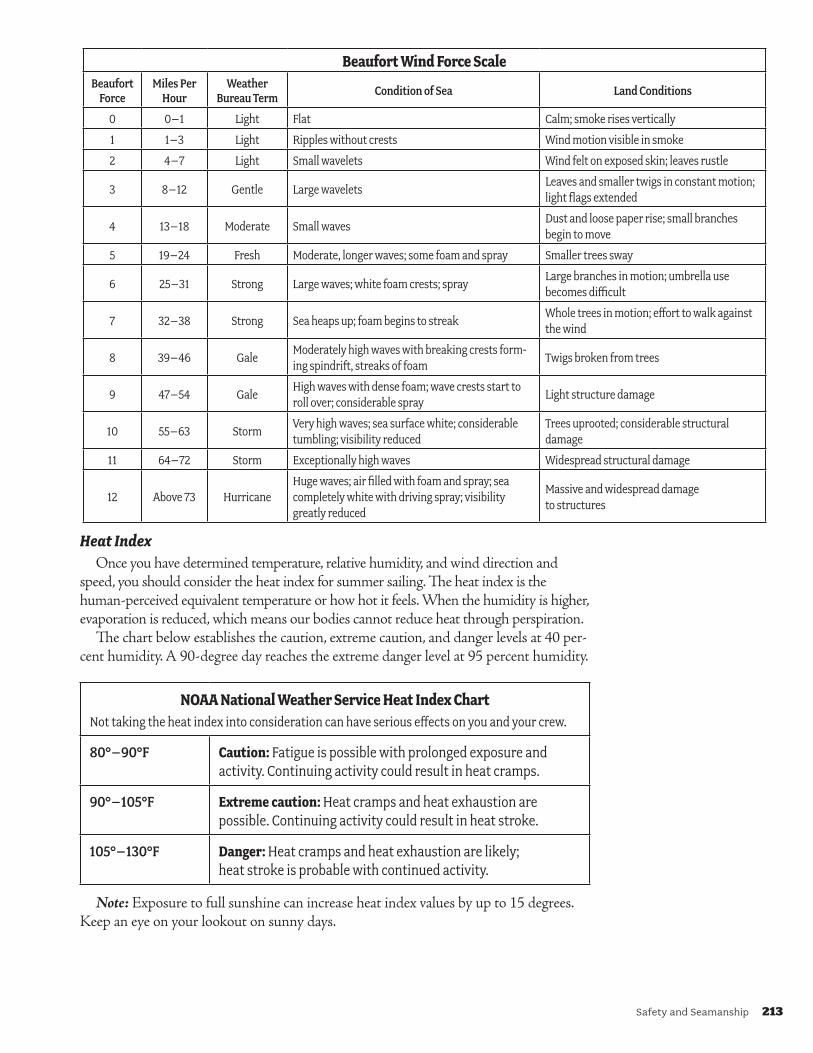
Safety and Seamanship 213
BeaufortWindForceScaleBeaufort
ForceMiles Per
HourWeather
Bureau Term Condition of Sea Land Conditions
0 0–1 Light Flat Calm; smoke rises vertically
1 1–3 Light Ripples without crests Wind motion visible in smoke
2 4–7 Light Small wavelets Wind felt on exposed skin; leaves rustle
3 8–12 Gentle Large waveletsLeaves and smaller twigs in constant motion; light flags extended
4 13–18 Moderate Small wavesDust and loose paper rise; small branches begin to move
5 19–24 Fresh Moderate, longer waves; some foam and spray Smaller trees sway
6 25–31 Strong Large waves; white foam crests; sprayLarge branches in motion; umbrella use becomes difficult
7 32–38 Strong Sea heaps up; foam begins to streakWhole trees in motion; effort to walk against the wind
8 39–46 GaleModerately high waves with breaking crests form-ing spindrift, streaks of foam
Twigs broken from trees
9 47–54 GaleHigh waves with dense foam; wave crests start to roll over; considerable spray
Light structure damage
10 55–63 StormVery high waves; sea surface white; considerable tumbling; visibility reduced
Trees uprooted; considerable structural damage
11 64–72 Storm Exceptionally high waves Widespread structural damage
12 Above 73 HurricaneHuge waves; air filled with foam and spray; sea completely white with driving spray; visibility greatly reduced
Massive and widespread damage to structures
Heat IndexOnce you have determined temperature, relative humidity, and wind direction and
speed, you should consider the heat index for summer sailing. The heat index is the human-perceived equivalent temperature or how hot it feels. When the humidity is higher, evaporation is reduced, which means our bodies cannot reduce heat through perspiration.
The chart below establishes the caution, extreme caution, and danger levels at 40 per-cent humidity. A 90-degree day reaches the extreme danger level at 95 percent humidity.
NOAANationalWeatherServiceHeatIndexChartNot taking the heat index into consideration can have serious effects on you and your crew.
80°–90°F Caution: Fatigue is possible with prolonged exposure and activity. Continuing activity could result in heat cramps.
90°–105°F Extremecaution:Heat cramps and heat exhaustion are possible. Continuing activity could result in heat stroke.
105°–130°F Danger:Heat cramps and heat exhaustion are likely; heat stroke is probable with continued activity.
Note: Exposure to full sunshine can increase heat index values by up to 15 degrees. Keep an eye on your lookout on sunny days.
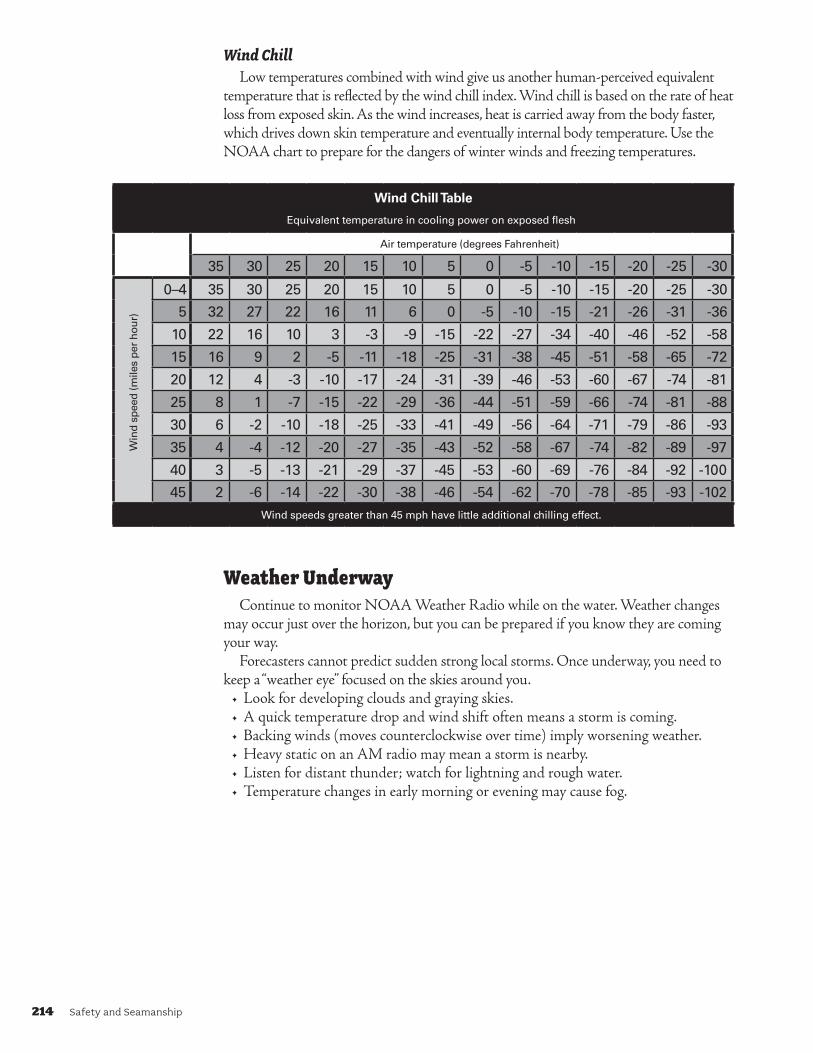
214 Safety and Seamanship
Wind ChillLow temperatures combined with wind give us another human-perceived equivalent
temperature that is reflected by the wind chill index. Wind chill is based on the rate of heat loss from exposed skin. As the wind increases, heat is carried away from the body faster, which drives down skin temperature and eventually internal body temperature. Use the NOAA chart to prepare for the dangers of winter winds and freezing temperatures.
Wind Chill Table
Equivalent temperature in cooling power on exposed flesh
Air temperature (degrees Fahrenheit)
35 30 25 20 15 10 5 0 -5 -10 -15 -20 -25 -30
Win
d sp
eed
(mile
s pe
r ho
ur)
0–4 35 30 25 20 15 10 5 0 -5 -10 -15 -20 -25 -30
5 32 27 22 16 11 6 0 -5 -10 -15 -21 -26 -31 -36
10 22 16 10 3 -3 -9 -15 -22 -27 -34 -40 -46 -52 -58
15 16 9 2 -5 -11 -18 -25 -31 -38 -45 -51 -58 -65 -72
20 12 4 -3 -10 -17 -24 -31 -39 -46 -53 -60 -67 -74 -81
25 8 1 -7 -15 -22 -29 -36 -44 -51 -59 -66 -74 -81 -88
30 6 -2 -10 -18 -25 -33 -41 -49 -56 -64 -71 -79 -86 -93
35 4 -4 -12 -20 -27 -35 -43 -52 -58 -67 -74 -82 -89 -97
40 3 -5 -13 -21 -29 -37 -45 -53 -60 -69 -76 -84 -92 -100
45 2 -6 -14 -22 -30 -38 -46 -54 -62 -70 -78 -85 -93 -102Wind speeds greater than 45 mph have little additional chilling effect.
Weather UnderwayContinue to monitor NOAA Weather Radio while on the water. Weather changes
may occur just over the horizon, but you can be prepared if you know they are coming your way.
Forecasters cannot predict sudden strong local storms. Once underway, you need to keep a “weather eye” focused on the skies around you.
• Look for developing clouds and graying skies.• A quick temperature drop and wind shift often means a storm is coming.• Backing winds (moves counterclockwise over time) imply worsening weather.• Heavy static on an AM radio may mean a storm is nearby.• Listen for distant thunder; watch for lightning and rough water.• Temperature changes in early morning or evening may cause fog.

Safety and Seamanship 215
CloudsCloud watching can be a pleasant pastime, and knowledge of cloud shape and height
can clue you in to important changes in the weather. There are many names and types of clouds, but a sailor only needs to concentrate on two basic shapes—cumulus and stratus.
Cumulus means heap, pile, an accumulation. These clouds are puffy, and they look like masses of cotton balls
Stratus means to spread out, flatten, or cover with a layer.You never have to worry about cumulus or stratus clouds unless they are also nimbus.
Nimbus means rainy cloud.Names of the specific types of clouds are created by combining the type of cloud with
the height of the cloud.
CloudGroup CloudHeight CloudType
Cirrus = High clouds 18,000+ Feet Cirrus Cirrostratus Cirrocumulus
Alto= Middle-level clouds 6,500 feet to 18,000 feet Altostratus Altocumulus
Stratus= Low clouds Up to 6,500 feet Stratus Stratocumulus Nimbostratus
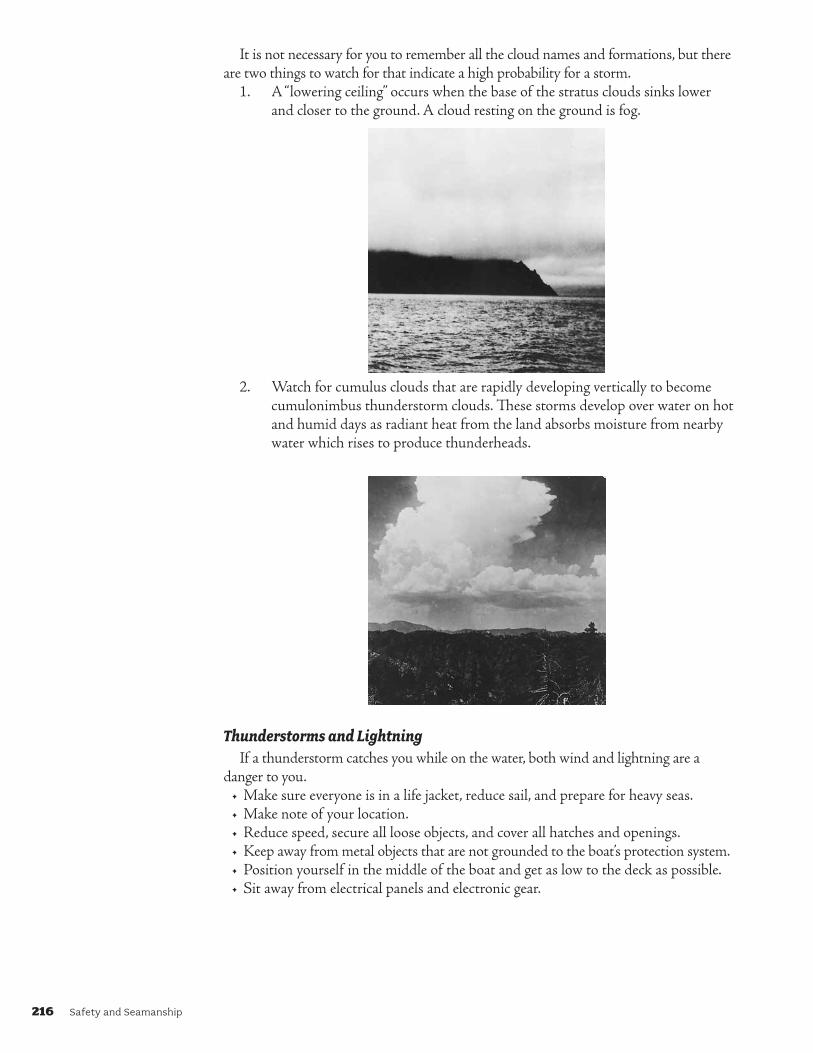
216 Safety and Seamanship
It is not necessary for you to remember all the cloud names and formations, but there are two things to watch for that indicate a high probability for a storm.
1. A “lowering ceiling” occurs when the base of the stratus clouds sinks lower and closer to the ground. A cloud resting on the ground is fog.
2. Watch for cumulus clouds that are rapidly developing vertically to become cumulonimbus thunderstorm clouds. These storms develop over water on hot and humid days as radiant heat from the land absorbs moisture from nearby water which rises to produce thunderheads.
Thunderstorms and LightningIf a thunderstorm catches you while on the water, both wind and lightning are a
danger to you.• Make sure everyone is in a life jacket, reduce sail, and prepare for heavy seas.• Make note of your location.• Reduce speed, secure all loose objects, and cover all hatches and openings.• Keep away from metal objects that are not grounded to the boat’s protection system.• Position yourself in the middle of the boat and get as low to the deck as possible.• Sit away from electrical panels and electronic gear.

Safety and Seamanship 217
WaterspoutsThere are two types of waterspouts—fair-weather waterspouts and tornadic water-
spouts. Tornadic waterspouts form during severe thunderstorms and along the edges of frontal systems. They have the same characteristics and dangers as tornadoes over land. Fair-weather waterspouts are generally less dangerous, and they are not associated with super-cell thunderstorms. They are more akin to the dust devils that form over land.
Waterspouts are unpredictable, but signs that signal their formation are dark spots on the water, sudden shifts or increases in wind, and funnels coming from clouds overhead. Fair-weather waterspouts generally occur in coastal waters and develop in association with dark, flat-bottomed, developing cumulus clouds.
As fascinating as they are, you need to steer clear. The best way to avoid a waterspout is to move away at a 90-degree angle to its apparent line of movement.


Safety and Seamanship 219
PRACTICAL DECK SEAMANSHIPDeck seamanship concerns the general work that goes on about the ship’s deck.
Drills, damage control, handling lines, marlinspike, and handling ground tackle are deck seamanship skills. There are many other deck seamanship skills that make us safer and more competent sailors.
WatchesWatches are work shifts. In days gone by, the standard was “four on” and “four off ”
referring to duty hours. Today, the general rule on larger vessels is four-on and eight-off. This system keeps a third of the crew on duty at all times. Dog watches occur to stagger the shifts and allow the crew an opportunity to eat an evening meal.
WatchesFirst Watch 2000–2400
Middle Watch 2400–0400
Morning Watch 0400–0800
Forenoon Watch 0800–1200
Afternoon Watch 1200–1600
First Dog Watch 1600–1800
Second Dog Watch 1800–2000*In the second dog watch, to indicate that a new watch has taken over, the sequence of bells is varied as follows: 1 bell, 6:30 p.m.; 2 bells, 7 p.m.; 3 bells 7:30 p.m.; 8 bells, 8 p.m. The ship’s clock, of course, repeats the sequence of 1 to 8 bells every four hours (day and night) without variation.
BellsClocks, as we know them, were not invented
until the 14th century. Hourglasses were used to keep time onboard. Sand passed from the top half of the hourglass to the bottom approximately every half hour.
One strike on the bell indicates the first half hour of the watch has passed. The bell is struck an additional time for each half hour. Thus, eight bells signal the end of a four-hour watch. This process is repeated for every watch.
When the bell is struck more than once, it is sounded in twos. At 1430, for example, you will hear ring-ring, ring-ring, ring.
Ordinary 11a. Name the seven watches
and explain bell time.
BellsandHowStruck1 bell (.)
2 bells (..)
3 bells (.. .)
4 bells (.. ..)
5 bells (.. .. .)
6 bells (.. .. ..)
7 bells (.. .. .. .)
8 bells (.. .. .. ..)Each dot represents one strike of the bell.
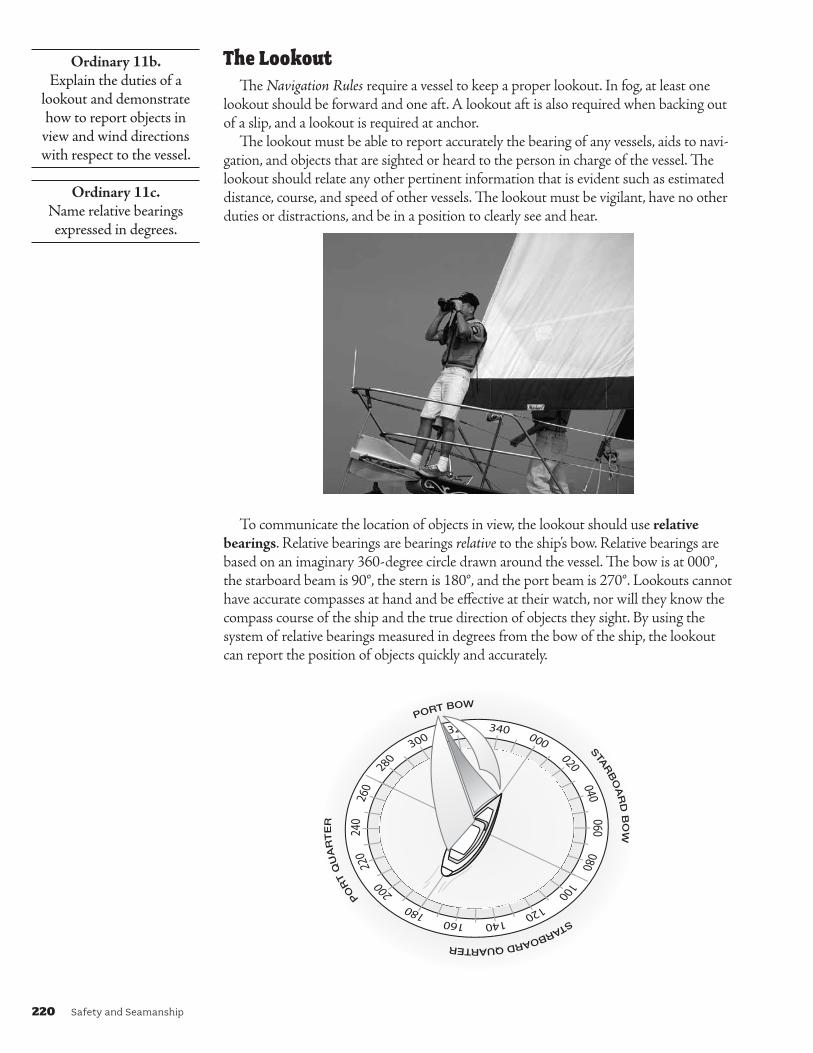
220 Safety and Seamanship
The LookoutThe Navigation Rules require a vessel to keep a proper lookout. In fog, at least one
lookout should be forward and one aft. A lookout aft is also required when backing out of a slip, and a lookout is required at anchor.
The lookout must be able to report accurately the bearing of any vessels, aids to navi-gation, and objects that are sighted or heard to the person in charge of the vessel. The lookout should relate any other pertinent information that is evident such as estimated distance, course, and speed of other vessels. The lookout must be vigilant, have no other duties or distractions, and be in a position to clearly see and hear.
To communicate the location of objects in view, the lookout should use relative bearings. Relative bearings are bearings relative to the ship’s bow. Relative bearings are based on an imaginary 360-degree circle drawn around the vessel. The bow is at 000°, the starboard beam is 90°, the stern is 180°, and the port beam is 270°. Lookouts cannot have accurate compasses at hand and be effective at their watch, nor will they know the compass course of the ship and the true direction of objects they sight. By using the system of relative bearings measured in degrees from the bow of the ship, the lookout can report the position of objects quickly and accurately.
Ordinary 11b. Explain the duties of a
lookout and demonstrate how to report objects in view and wind directions with respect to the vessel.
Ordinary 11c. Name relative bearings expressed in degrees.
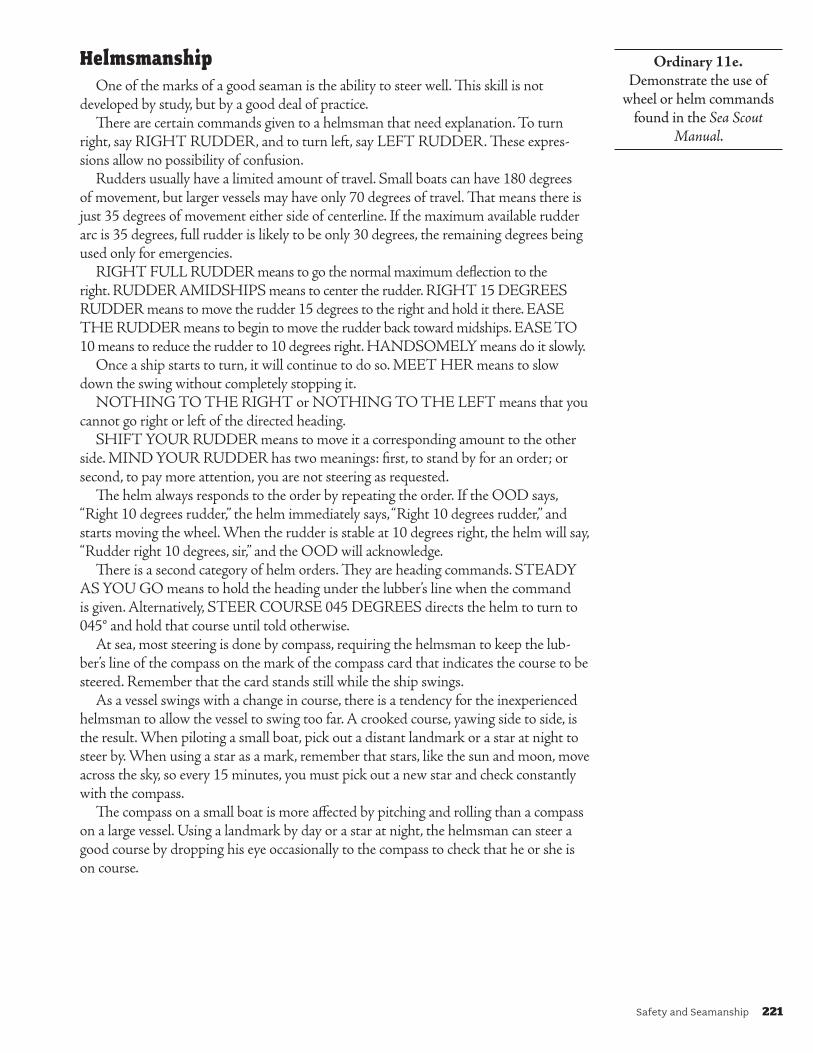
Safety and Seamanship 221
HelmsmanshipOne of the marks of a good seaman is the ability to steer well. This skill is not
developed by study, but by a good deal of practice. There are certain commands given to a helmsman that need explanation. To turn
right, say RIGHT RUDDER, and to turn left, say LEFT RUDDER. These expres-sions allow no possibility of confusion.
Rudders usually have a limited amount of travel. Small boats can have 180 degrees of movement, but larger vessels may have only 70 degrees of travel. That means there is just 35 degrees of movement either side of centerline. If the maximum available rudder arc is 35 degrees, full rudder is likely to be only 30 degrees, the remaining degrees being used only for emergencies.
RIGHT FULL RUDDER means to go the normal maximum deflection to the right. RUDDER AMIDSHIPS means to center the rudder. RIGHT 15 DEGREES RUDDER means to move the rudder 15 degrees to the right and hold it there. EASE THE RUDDER means to begin to move the rudder back toward midships. EASE TO 10 means to reduce the rudder to 10 degrees right. HANDSOMELY means do it slowly.
Once a ship starts to turn, it will continue to do so. MEET HER means to slow down the swing without completely stopping it.
NOTHING TO THE RIGHT or NOTHING TO THE LEFT means that you cannot go right or left of the directed heading.
SHIFT YOUR RUDDER means to move it a corresponding amount to the other side. MIND YOUR RUDDER has two meanings: first, to stand by for an order; or second, to pay more attention, you are not steering as requested.
The helm always responds to the order by repeating the order. If the OOD says, “Right 10 degrees rudder,” the helm immediately says, “Right 10 degrees rudder,” and starts moving the wheel. When the rudder is stable at 10 degrees right, the helm will say, “Rudder right 10 degrees, sir,” and the OOD will acknowledge.
There is a second category of helm orders. They are heading commands. STEADY AS YOU GO means to hold the heading under the lubber’s line when the command is given. Alternatively, STEER COURSE 045 DEGREES directs the helm to turn to 045° and hold that course until told otherwise.
At sea, most steering is done by compass, requiring the helmsman to keep the lub-ber’s line of the compass on the mark of the compass card that indicates the course to be steered. Remember that the card stands still while the ship swings.
As a vessel swings with a change in course, there is a tendency for the inexperienced helmsman to allow the vessel to swing too far. A crooked course, yawing side to side, is the result. When piloting a small boat, pick out a distant landmark or a star at night to steer by. When using a star as a mark, remember that stars, like the sun and moon, move across the sky, so every 15 minutes, you must pick out a new star and check constantly with the compass.
The compass on a small boat is more affected by pitching and rolling than a compass on a large vessel. Using a landmark by day or a star at night, the helmsman can steer a good course by dropping his eye occasionally to the compass to check that he or she is on course.
Ordinary 11e. Demonstrate the use of
wheel or helm commands found in the Sea Scout
Manual.

222 Safety and Seamanship
Cruise LogEvery time you go out on the water with your ship, you have an opportunity to
record information that is useful, and you can document the highlights of the cruise.Many ships have developed their own cruise log format, and you will find that most
logs begin by recording the date, prevailing weather conditions, wind direction and speed, persons aboard, departure location and time, and arrival location and time.
Observations such as the difficulty in lining up landmarks when entering a new harbor or the time it takes to get from one point to another against an incoming tide are instructional and helpful when planning a future cruise. Capturing events such as a hat or the Skipper’s sandwich going overboard are especially fun for later reflection.
Vessel MaintenanceIn general, boats are fragile. Whether a canoe or an ocean liner, they have been designed
to travel under skillful direction in an element that could be overwhelming. The best design and the sturdiest construction won’t amount to much if the craft has been allowed to deteriorate through neglect or ignorance.
The real seaman is always alert for signs of trouble—a strained hull, evidence of dry rot, corrosion, worn gear, frayed lines, sluggish performance of hull or engine, worn stitching on the seams of a sail. Flaking finish or crazed varnish can mean impending trouble. The knowledgeable boatman keeps his vessel shipshape. It is a good practice to keep a mainte-nance log every sail, and enter all discrepancies in it, both those you fix at the time and those that must wait for a while to be fixed.
First and foremost, the safety of the ship and her passengers can be seriously jeopardized by neglecting the hull, fittings, sail, rigging, power plant, or gear. The continuing value of the boat depends almost entirely on its care and upkeep. The true seafarer takes pride in the sparkling appearance of his or her ship.
There are boats today that are 30 to 50 years old that retain their full seaworthiness and original appearance because they have been kept up. There are boats only a few years old that are worthless hulks because of simple neglect. Sun, rain, salt water, acids, and fumes are consid-ered the great enemies of finish, appearance, and integrity; however, the real enemy is neglect.
WORKSCHEDULEOutfitting Checklist
ITEM TO BE DONE BY DATE TO BE DONE MATERIAL COST
Remove cover—Store Skipper—mate Apr. 1 ————— —————
Inspect boat Crew Leaders ——
Develop checklist Committeeman ——————— —————
Scrub and clean
Inside Outside
Crew #1 Crew #2
Apr. 8
Clean and check seams, fittings, etc., for leaks—recaulk
Crew #1 on deck Crew #2 on hull
Apr. 8 Compound $3.50
————— ————— ————— —————Remove and replace plank—portside
Crew #3 mate Apr. 15 Plank $16.00
Install sisterframe starboard amidships
Skipper, consultant
Apr. 15 Frame Fastenings
$14.25 $16.18
Cut away and install new section of coaming
Crew #4 committeeman Apr. 15 Parts and Labor $28.95
Ordinary 11f. Describe the deck log kept aboard your ship’s principal craft. Contribute to a cruise log for three days of cruising
(one cruise or a combina-tion of day cruises). Submit
the logs to your Skipper.
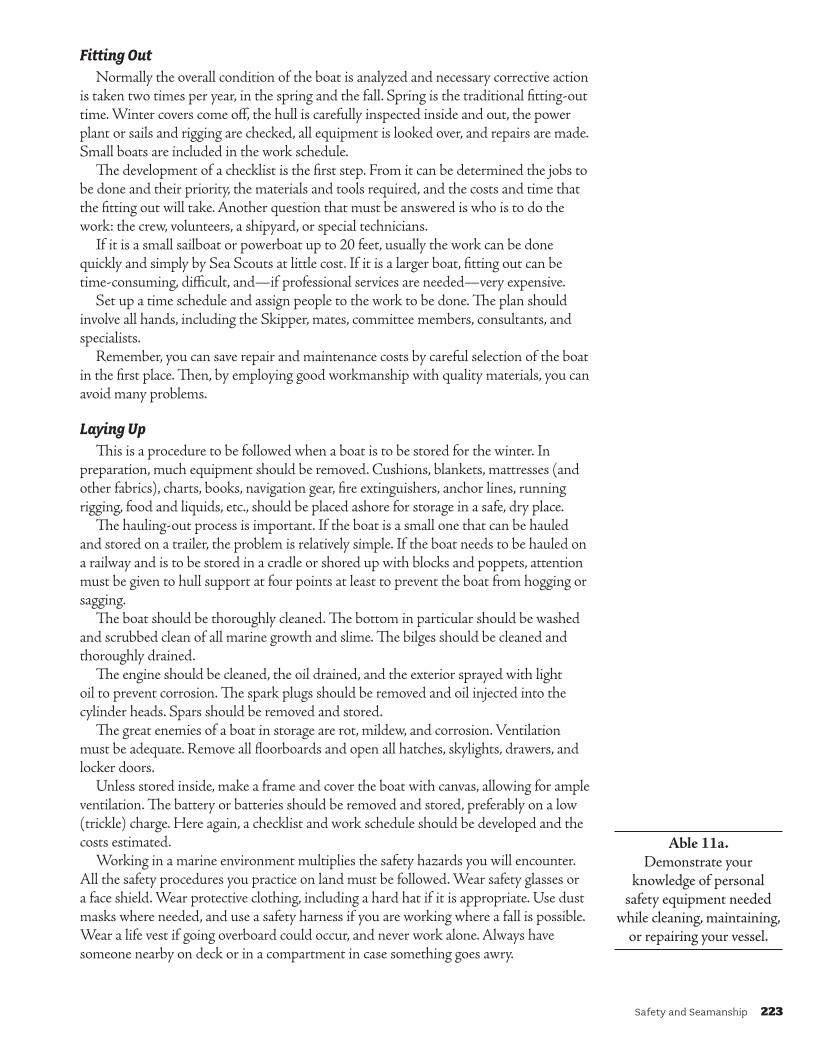
Safety and Seamanship 223
Fitting OutNormally the overall condition of the boat is analyzed and necessary corrective action
is taken two times per year, in the spring and the fall. Spring is the traditional fitting-out time. Winter covers come off, the hull is carefully inspected inside and out, the power plant or sails and rigging are checked, all equipment is looked over, and repairs are made. Small boats are included in the work schedule.
The development of a checklist is the first step. From it can be determined the jobs to be done and their priority, the materials and tools required, and the costs and time that the fitting out will take. Another question that must be answered is who is to do the work: the crew, volunteers, a shipyard, or special technicians.
If it is a small sailboat or powerboat up to 20 feet, usually the work can be done quickly and simply by Sea Scouts at little cost. If it is a larger boat, fitting out can be time-consuming, difficult, and—if professional services are needed—very expensive.
Set up a time schedule and assign people to the work to be done. The plan should involve all hands, including the Skipper, mates, committee members, consultants, and specialists.
Remember, you can save repair and maintenance costs by careful selection of the boat in the first place. Then, by employing good workmanship with quality materials, you can avoid many problems.
Laying UpThis is a procedure to be followed when a boat is to be stored for the winter. In
preparation, much equipment should be removed. Cushions, blankets, mattresses (and other fabrics), charts, books, navigation gear, fire extinguishers, anchor lines, running rigging, food and liquids, etc., should be placed ashore for storage in a safe, dry place.
The hauling-out process is important. If the boat is a small one that can be hauled and stored on a trailer, the problem is relatively simple. If the boat needs to be hauled on a railway and is to be stored in a cradle or shored up with blocks and poppets, attention must be given to hull support at four points at least to prevent the boat from hogging or sagging.
The boat should be thoroughly cleaned. The bottom in particular should be washed and scrubbed clean of all marine growth and slime. The bilges should be cleaned and thoroughly drained.
The engine should be cleaned, the oil drained, and the exterior sprayed with light oil to prevent corrosion. The spark plugs should be removed and oil injected into the cylinder heads. Spars should be removed and stored.
The great enemies of a boat in storage are rot, mildew, and corrosion. Ventilation must be adequate. Remove all floorboards and open all hatches, skylights, drawers, and locker doors.
Unless stored inside, make a frame and cover the boat with canvas, allowing for ample ventilation. The battery or batteries should be removed and stored, preferably on a low (trickle) charge. Here again, a checklist and work schedule should be developed and the costs estimated.
Working in a marine environment multiplies the safety hazards you will encounter. All the safety procedures you practice on land must be followed. Wear safety glasses or a face shield. Wear protective clothing, including a hard hat if it is appropriate. Use dust masks where needed, and use a safety harness if you are working where a fall is possible. Wear a life vest if going overboard could occur, and never work alone. Always have someone nearby on deck or in a compartment in case something goes awry.
Able 11a. Demonstrate your
knowledge of personal safety equipment needed
while cleaning, maintaining, or repairing your vessel.

224 Safety and Seamanship
ToolsEvery ship needs certain hand tools because all vessels need tuning, adjustment, and
repair regularly. Each ship is unique in its needs, but there are a number of useful hand tools that are commonly needed by all vessels.
Pliers give you a grip on almost anything, but often damage that item as well. Don’t use pliers if you have a wrench that fits the job.
Wrenches come in many varieties: open end, box end, specialty. Each is sized for a specific nut, metric or English. Have the right set.
Screwdrivers also come in a wide variety of heads, mostly flat-head or Phillips, but there are others. Use the right size.
Hammers (ball-peen and claw), hacksaws, knives, and other small hand tools are often needed.
For woodworking, you’ll need saws, chisels, planes, nail sets, rivet blocks, scrapers, clamps, files, drills, bit brace and bits, putty knife, spirit level, and rule.
On-deck tools should include wire cutters (of a size to cut any diameter wire aboard), routing iron, fid, needles, palm, wax, twine, wire brush, electrician’s tape, Mystik tape, sail repair tape, hand ax, tin snips, sandpaper, putty, caulking compound, sealer, etc. A good extension light should be included.
All hand tools need reasonable care. Store them in a dry area so they won’t rust. Don’t abuse them by using them for something they are not designed to do. A screwdriver is not a pry bar. If tools become worn, replace them before they become dangerous.
HardwareEverything on a boat will regularly be put to the test, and it is imperative for your
safety and the safety of others that you use the right tool for the job. When selecting hardware for your boat, you need to know the purpose and your needs. You need to consider things like safe working load, working load limit, breaking strength, and correct size of connecting pieces.
Common Boat Hardware
Pelican HookThe pelican hook is a hinged hook shaped like
a pelican’s beak that is held closed by a ring that is easily released. It has various uses aboard a boat, and is commonly seen securing lifelines. The upper hook is sized by length. The lower part of the pelican hook is sized by the wire or thread that is attached to the hook.
Able 11b. Know the names, uses,
sizes, and proper care of the common hand tools
used by your ship.
Able 11c. Identify and explain the
use of the following: thimble, shackle, turnbuckle,
pelican hook, and other ship’s hardware and fittings
commonly used aboard your ship’s vessels. Describe
how each is sized.
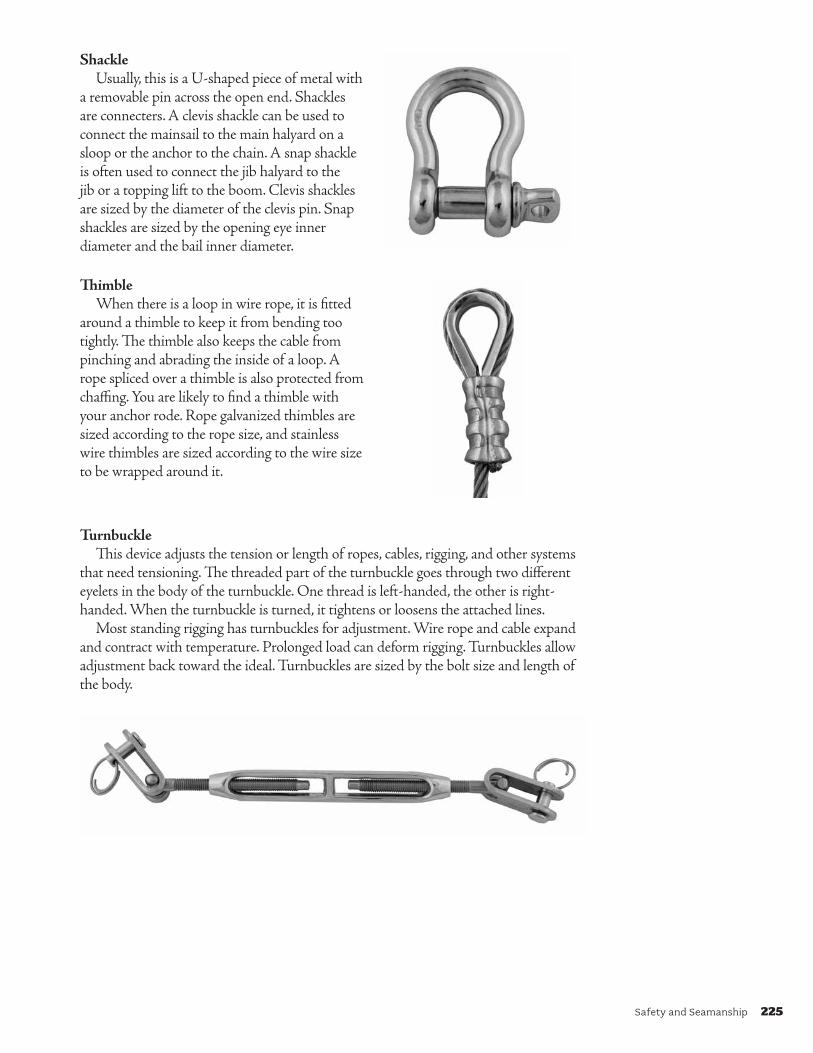
Safety and Seamanship 225
ShackleUsually, this is a U-shaped piece of metal with
a removable pin across the open end. Shackles are connecters. A clevis shackle can be used to connect the mainsail to the main halyard on a sloop or the anchor to the chain. A snap shackle is often used to connect the jib halyard to the jib or a topping lift to the boom. Clevis shackles are sized by the diameter of the clevis pin. Snap shackles are sized by the opening eye inner diameter and the bail inner diameter.
ThimbleWhen there is a loop in wire rope, it is fitted
around a thimble to keep it from bending too tightly. The thimble also keeps the cable from pinching and abrading the inside of a loop. A rope spliced over a thimble is also protected from chaffing. You are likely to find a thimble with your anchor rode. Rope galvanized thimbles are sized according to the rope size, and stainless wire thimbles are sized according to the wire size to be wrapped around it.
TurnbuckleThis device adjusts the tension or length of ropes, cables, rigging, and other systems
that need tensioning. The threaded part of the turnbuckle goes through two different eyelets in the body of the turnbuckle. One thread is left-handed, the other is right-handed. When the turnbuckle is turned, it tightens or loosens the attached lines.
Most standing rigging has turnbuckles for adjustment. Wire rope and cable expand and contract with temperature. Prolonged load can deform rigging. Turnbuckles allow adjustment back toward the ideal. Turnbuckles are sized by the bolt size and length of the body.
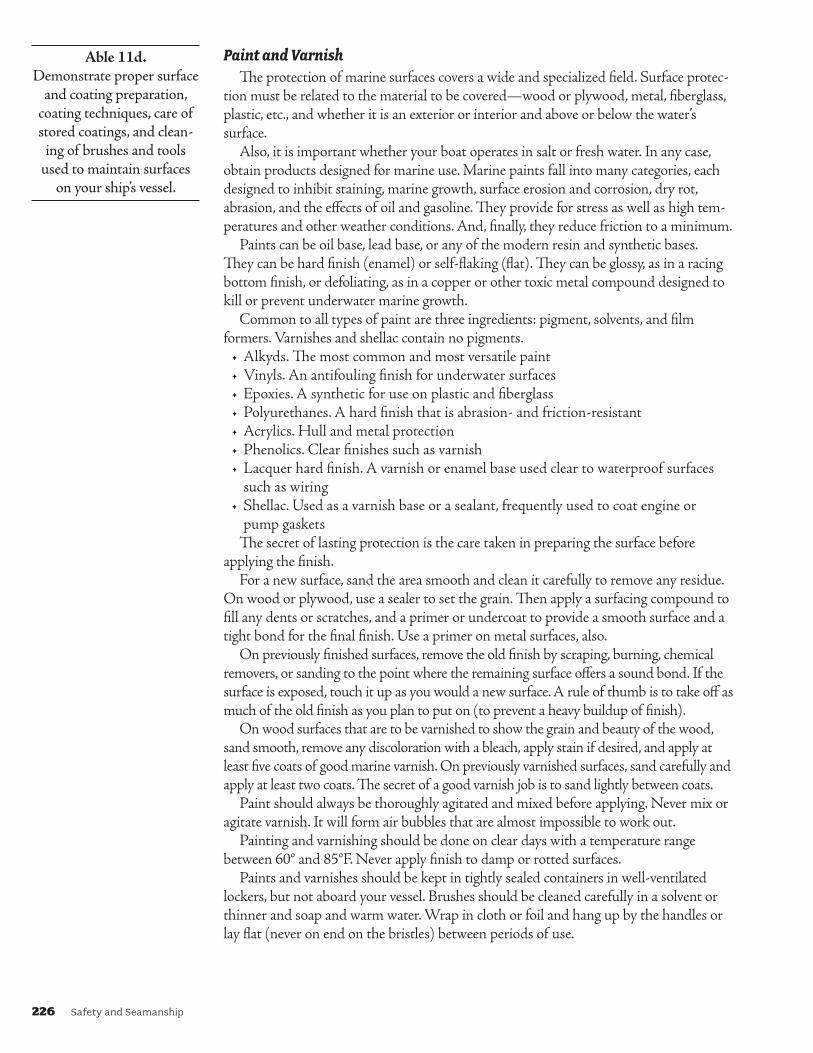
226 Safety and Seamanship
Paint and VarnishThe protection of marine surfaces covers a wide and specialized field. Surface protec-
tion must be related to the material to be covered—wood or plywood, metal, fiberglass, plastic, etc., and whether it is an exterior or interior and above or below the water’s surface.
Also, it is important whether your boat operates in salt or fresh water. In any case, obtain products designed for marine use. Marine paints fall into many categories, each designed to inhibit staining, marine growth, surface erosion and corrosion, dry rot, abrasion, and the effects of oil and gasoline. They provide for stress as well as high tem-peratures and other weather conditions. And, finally, they reduce friction to a minimum.
Paints can be oil base, lead base, or any of the modern resin and synthetic bases. They can be hard finish (enamel) or self-flaking (flat). They can be glossy, as in a racing bottom finish, or defoliating, as in a copper or other toxic metal compound designed to kill or prevent underwater marine growth.
Common to all types of paint are three ingredients: pigment, solvents, and film formers. Varnishes and shellac contain no pigments.
• Alkyds. The most common and most versatile paint• Vinyls. An antifouling finish for underwater surfaces• Epoxies. A synthetic for use on plastic and fiberglass• Polyurethanes. A hard finish that is abrasion- and friction-resistant• Acrylics. Hull and metal protection• Phenolics. Clear finishes such as varnish• Lacquer hard finish. A varnish or enamel base used clear to waterproof surfaces
such as wiring• Shellac. Used as a varnish base or a sealant, frequently used to coat engine or
pump gasketsThe secret of lasting protection is the care taken in preparing the surface before
applying the finish.For a new surface, sand the area smooth and clean it carefully to remove any residue.
On wood or plywood, use a sealer to set the grain. Then apply a surfacing compound to fill any dents or scratches, and a primer or undercoat to provide a smooth surface and a tight bond for the final finish. Use a primer on metal surfaces, also.
On previously finished surfaces, remove the old finish by scraping, burning, chemical removers, or sanding to the point where the remaining surface offers a sound bond. If the surface is exposed, touch it up as you would a new surface. A rule of thumb is to take off as much of the old finish as you plan to put on (to prevent a heavy buildup of finish).
On wood surfaces that are to be varnished to show the grain and beauty of the wood, sand smooth, remove any discoloration with a bleach, apply stain if desired, and apply at least five coats of good marine varnish. On previously varnished surfaces, sand carefully and apply at least two coats. The secret of a good varnish job is to sand lightly between coats.
Paint should always be thoroughly agitated and mixed before applying. Never mix or agitate varnish. It will form air bubbles that are almost impossible to work out.
Painting and varnishing should be done on clear days with a temperature range between 60° and 85°F. Never apply finish to damp or rotted surfaces.
Paints and varnishes should be kept in tightly sealed containers in well-ventilated lockers, but not aboard your vessel. Brushes should be cleaned carefully in a solvent or thinner and soap and warm water. Wrap in cloth or foil and hang up by the handles or lay flat (never on end on the bristles) between periods of use.
Able 11d. Demonstrate proper surface
and coating preparation, coating techniques, care of stored coatings, and clean-
ing of brushes and tools used to maintain surfaces
on your ship’s vessel.

Safety and Seamanship 227
Fiberglass RepairsAs most of the contemporary boats used by Sea Scouts are constructed of fiberglass,
the repair of damage to such boats should be known to all. Fiberglass is available in cloth, mats, ribbon, and powdered form. Exercise caution when working around this material as it floats in the air and is a hazard to your nose, eyes, and skin. Irritation is marked. Wear nose masks, goggles, and long-sleeve shirts.
Fiberglass is molded into a hull in a permanent mold which has been lined first with a parting compound and a layer of gel-coat. A layer of activated resin is applied followed by a layer of fiberglass cloth. Then another layer of resin and fiberglass until the desired thickness is obtained. Upon curing, by time, the hull is removed from the mold for further processing.
To repair a hole in the hull of such a vessel, secure a patching kit from any hardware store and follow directions for activating the resin and note that mixing must be done in a glass or metal container using a disposable wooden stick. The activator will eat right through most paper cups. Depending on the ratio of activator to resin in your mix, you have about three minutes to use it before it becomes stiff.
Prepare edges of the hole to be repaired by sanding a clean surface at least 2 inches all around. Next apply a coat of activated resin and let it dry until tacky. Then cut (with scissors) a patch of cloth equal to the cleaned area. Soak this patch in a fresh batch of activated resin using a stick or putty knife. Do not use your hands if at all possible. Apply the patch to the opening and smooth down with a broad putty knife—from the middle outward. Smooth out wrinkles and bubbles and feather the edges. Allow to cure before application of successive layers, if needed. Complete with one or more coats of activated resin and allow to cure thoroughly.
Use 240-grit wet-or-dry sandpaper to smooth and feather edges. Finish with 400-grit paper. Use plenty of water in each case. Let dry and paint, if required. Hands and tools may be cleaned with acetone, but use it sparingly.
On occasion it may be possible to repair the gel-coat if the hole is not too large. Gel-coat repair kits are available in most marine supply stores together with instructions.
It is impractical to gel-coat an entire boat unless you have had years of experi-ence using a two-line spray gun and materials at elevated temperatures.
Small Craft ConstructionConstruction of small craft, particularly of paddlecraft, can be a great ship project.
Whether building a paddle or rowing craft, small boats can be affordably built using readily available materials or kits. Composite materials including fiberglass and epoxies are generally used to add strength and watertightness to wooden hull forms.
Traditional builders used a method called “plank on frame” to build boats. In this method, a skeletal frame for the boat is erected using a strong, rot-resistant wood such as white oak. Planks made of a lighter wood such as cedar are then fastened to the frame using “trunnels,” rivets, or clenched nails. The planking can be installed abutting or overlapping and the spaces between the planks filled with caulking. When planking is laid side by side, it is called “carvel” planking; overlapping planking is called “lapstrake.”
Able 11e. Explain techniques used for the maintenance, protection,
and repair of hulls and decks on your ship’s vessel.
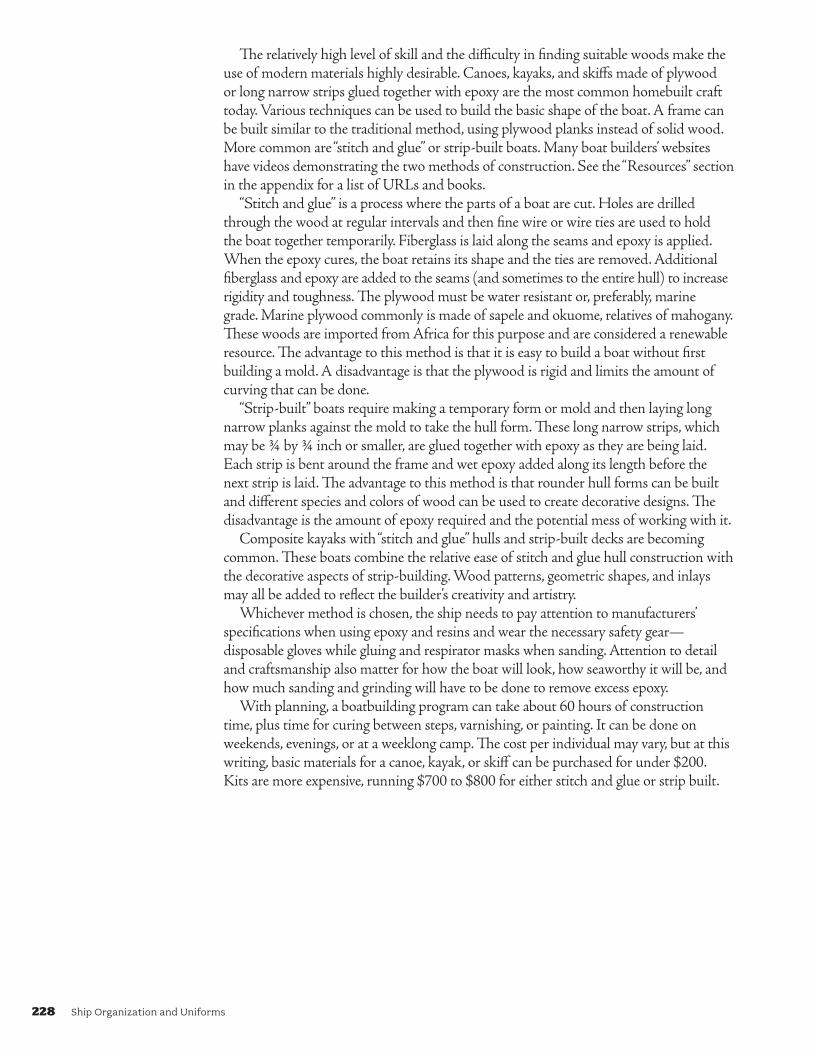
228 Ship Organization and Uniforms
The relatively high level of skill and the difficulty in finding suitable woods make the use of modern materials highly desirable. Canoes, kayaks, and skiffs made of plywood or long narrow strips glued together with epoxy are the most common homebuilt craft today. Various techniques can be used to build the basic shape of the boat. A frame can be built similar to the traditional method, using plywood planks instead of solid wood. More common are “stitch and glue” or strip-built boats. Many boat builders’ websites have videos demonstrating the two methods of construction. See the “Resources” section in the appendix for a list of URLs and books.
“Stitch and glue” is a process where the parts of a boat are cut. Holes are drilled through the wood at regular intervals and then fine wire or wire ties are used to hold the boat together temporarily. Fiberglass is laid along the seams and epoxy is applied. When the epoxy cures, the boat retains its shape and the ties are removed. Additional fiberglass and epoxy are added to the seams (and sometimes to the entire hull) to increase rigidity and toughness. The plywood must be water resistant or, preferably, marine grade. Marine plywood commonly is made of sapele and okuome, relatives of mahogany. These woods are imported from Africa for this purpose and are considered a renewable resource. The advantage to this method is that it is easy to build a boat without first building a mold. A disadvantage is that the plywood is rigid and limits the amount of curving that can be done.
“Strip-built” boats require making a temporary form or mold and then laying long narrow planks against the mold to take the hull form. These long narrow strips, which may be ¾ by ¾ inch or smaller, are glued together with epoxy as they are being laid. Each strip is bent around the frame and wet epoxy added along its length before the next strip is laid. The advantage to this method is that rounder hull forms can be built and different species and colors of wood can be used to create decorative designs. The disadvantage is the amount of epoxy required and the potential mess of working with it.
Composite kayaks with “stitch and glue” hulls and strip-built decks are becoming common. These boats combine the relative ease of stitch and glue hull construction with the decorative aspects of strip-building. Wood patterns, geometric shapes, and inlays may all be added to reflect the builder’s creativity and artistry.
Whichever method is chosen, the ship needs to pay attention to manufacturers’ specifications when using epoxy and resins and wear the necessary safety gear— disposable gloves while gluing and respirator masks when sanding. Attention to detail and craftsmanship also matter for how the boat will look, how seaworthy it will be, and how much sanding and grinding will have to be done to remove excess epoxy.
With planning, a boatbuilding program can take about 60 hours of construction time, plus time for curing between steps, varnishing, or painting. It can be done on weekends, evenings, or at a weeklong camp. The cost per individual may vary, but at this writing, basic materials for a canoe, kayak, or skiff can be purchased for under $200. Kits are more expensive, running $700 to $800 for either stitch and glue or strip built.

Safety and Seamanship 229
ENVIRONMENT
Water PollutionIn 1948, Congress enacted the Federal Water Pollution Control Act to “enhance
the quality and value of our water resources and to establish a national policy for the preservation, control and abatement of water pollution.” Multiple amendments have further defined the act over time.
OilThe Federal Water Pollution Act prohibits dumping harmful quantities of oil into
United States navigable waters or adjoining shorelines. All oil must be disposed of at an approved facility.
If a vessel or facility discharges oil, they must notify the U.S. Coast Guard immedi-ately. Failure to do so is punishable by a criminal penalty of fines or up to five years in jail or both for the person in charge of the source. The owner or operator who discharges the oil is also liable for all removal costs and all claims of loss or injury to other parties.
The Environmental Protection Agency has defined harmful quantities of oil as those that violate applicable water quality standards, or cause a film or sheen on the surface of the water, or cause a sludge or emulsion to be deposited beneath the surface of the water or on adjoining shorelines.
The law also specifies that using soap as a dispersant on an oil spill is illegal and violators can face severe state and federal fines.
Keeping an oil absorbent sponge in your bilge to soak up oil, and having oil absor-bent pads or rags on hand in case of a spill are good preventative measures. Be careful when changing engine oil, and wipe up any spills so the oil is not pumped overboard in bilge water.
On federally controlled waters, vessels 26 feet or longer must display a 5-by-8-inch “Discharge of Oil Prohibited” placard near the machinery space or at the bilge pump switch.
Ordinary 12a. Discuss with an adult leader the Federal Water Pollution Control Act as related to oil discharges. Explain what a “Discharge of Oil” placard is and, if applicable, find it aboard your ship’s vessels.
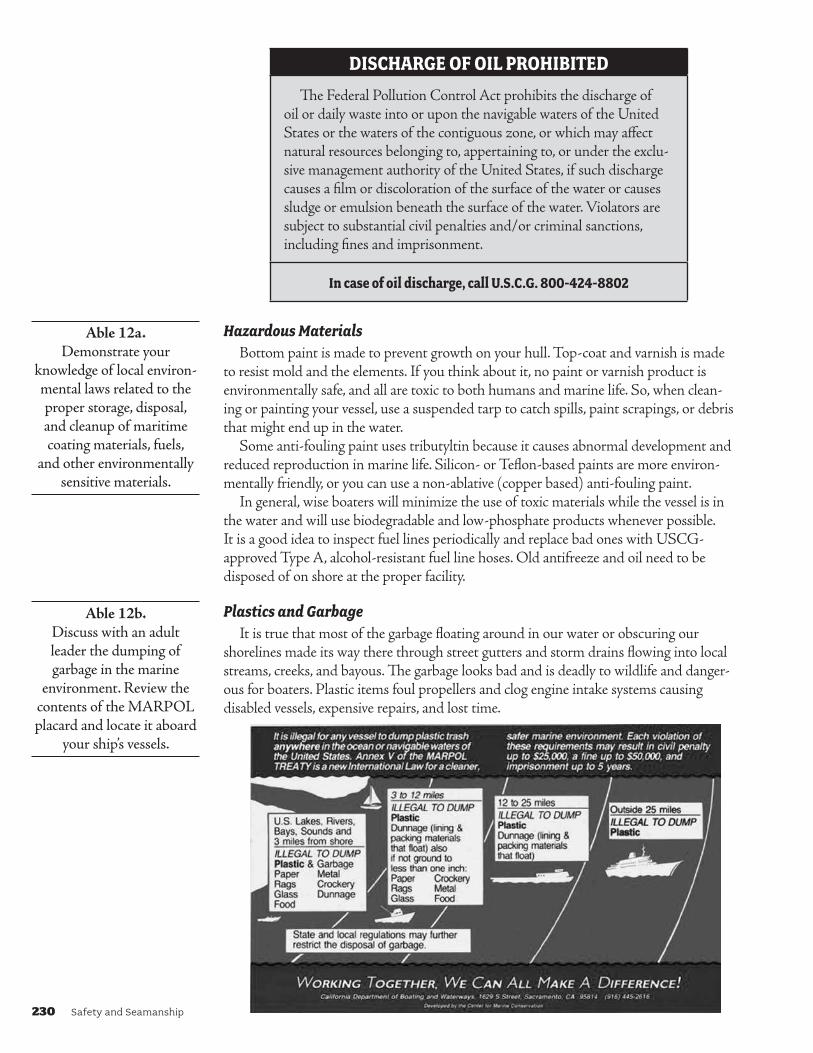
230 Safety and Seamanship
DISCHARGEOFOILPROHIBITED
The Federal Pollution Control Act prohibits the discharge of oil or daily waste into or upon the navigable waters of the United States or the waters of the contiguous zone, or which may affect natural resources belonging to, appertaining to, or under the exclu-sive management authority of the United States, if such discharge causes a film or discoloration of the surface of the water or causes sludge or emulsion beneath the surface of the water. Violators are subject to substantial civil penalties and/or criminal sanctions, including fines and imprisonment.
Incaseofoildischarge,callU.S.C.G.800-424-8802
Hazardous MaterialsBottom paint is made to prevent growth on your hull. Top-coat and varnish is made
to resist mold and the elements. If you think about it, no paint or varnish product is environmentally safe, and all are toxic to both humans and marine life. So, when clean-ing or painting your vessel, use a suspended tarp to catch spills, paint scrapings, or debris that might end up in the water.
Some anti-fouling paint uses tributyltin because it causes abnormal development and reduced reproduction in marine life. Silicon- or Teflon-based paints are more environ-mentally friendly, or you can use a non-ablative (copper based) anti-fouling paint.
In general, wise boaters will minimize the use of toxic materials while the vessel is in the water and will use biodegradable and low-phosphate products whenever possible. It is a good idea to inspect fuel lines periodically and replace bad ones with USCG-approved Type A, alcohol-resistant fuel line hoses. Old antifreeze and oil need to be disposed of on shore at the proper facility.
Plastics and GarbageIt is true that most of the garbage floating around in our water or obscuring our
shorelines made its way there through street gutters and storm drains flowing into local streams, creeks, and bayous. The garbage looks bad and is deadly to wildlife and danger-ous for boaters. Plastic items foul propellers and clog engine intake systems causing disabled vessels, expensive repairs, and lost time.
Able 12a. Demonstrate your
knowledge of local environ-mental laws related to the proper storage, disposal, and cleanup of maritime coating materials, fuels,
and other environmentally sensitive materials.
Able 12b. Discuss with an adult leader the dumping of garbage in the marine
environment. Review the contents of the MARPOL placard and locate it aboard
your ship’s vessels.

Safety and Seamanship 231
The International Treaty to Prevent Pollution from Ships (MARPOL) was created to address plastic pollution. Besides prohibiting the dumping of plastics, the law also restricts dumping of other vessel-generated garbage at sea, including paper, glass, metal, and food wastes.
The MARPOL treaty requires that vessel of 26 feet or longer must prominently display a placard for all crew and passengers to read.
Vessels 40 feet and over that are equipped with berthing and a galley must have a written waste management plan that includes instructions for discharging sewage and haz-ardous substances; discharging garbage and other food waste; disposing of plastics, bottles, and cans; and advising the captain in case of oily discharges or diesel spills. The same law requires marinas to have adequate trash receiving capability for their normal customers.
Violations of any of the regulations are liable for a civil penalty of up to $25,000 for each violation and criminal penalties of up to $50,000 and/or imprisonment for up to five years.
SewageAs boaters, it is our legal responsibility to help protect the aquatic environment. One
of the largest environmental problems is caused by sewage discharged from vessels, especially in shallow bays and inlets.
Sewage must be treated properly before disposal. If your boat has an installed toilet, it must have an operable marine sanitation device on board and be designed to prevent discharge into the water.
All installed MSDs must be U.S. Coast Guard certified. Types I and II treat waste with special chemicals to kill bacteria. These devices must have the “Y” valve secured so it cannot be opened when the vessel is on waters (fresh water, within 3 miles of the coast, etc.) where sewage cannot be dumped overboard.
Type III MSDs provide no sewage treatment and are either portable toilets or holding tanks. Collected waste is taken ashore and disposed of at a pump-out station or onshore toilet.
Gray WaterWhen you wash your hands or dishes, take a shower, or even brush your teeth on
a boat, you produce gray water. Gray water is problematic to our aquatic environment because of the soaps and detergents that are used. Even those labeled as biodegradable contain substances that are harmful to some marine life.
To reduce the gray water onboard, use shore-side showers, dishwashing stations, and laundry facilities whenever possible. Check product labels and use low-nitrogen and low-phosphorous detergents onboard, and when using cleaning products, use more “elbow grease” than cleaning product.
Aquatic Nuisance SpeciesAquatic nuisance species are waterborne, non-native organisms that threaten the
diversity or abundance of native species and the ecological stability of affected waters, or threaten a commercial, agricultural, aquacultural, or recreational activity. These nuisance species typically do not have predators and quickly outcompete native species for space and food.
ANS hiding in ballast water in oceangoing vessels, and the importation of tropical fish that are intentionally or accidentally released, cause potential ecosystem disaster.
Once here, the aquatic nuisance species use us to get around. They hide in our cloth-ing, boats, and the equipment we use in the water. When boats are moved from one waterway to another, the organisms get a free ride on trailers.
Quartermaster 12a. Discuss the three types of marine sanitation devices
(MSD) and the laws governing sewage discharge.
Quartermaster 12b. Explain what gray water is and how it
should be handled in your boating area.
Ordinary 12b. Explain what aquatic
nuisance species are and how you can help stop
their spread.

232 Safety and Seamanship
ANS have caused reductions in game fish populations, have clogged some lakes and rivers with excessive vegetation, and some have caused damage to boats. But you can help limit their spread. First, you need to learn to identify the ANS in your area. When you see them, you need to report them to your state’s natural resources agency.
Live wells, bilge water, transom wells, and the motor need to be drained at the ramp or access, and any visible organisms need to be removed from your boat, trailer, vehicle, and other equipment before leaving any body of water. Get rid of unwanted bait on land or in the trash. Never release live bait into the water.
Clean all equipment, clothing, and footwear, and do your best to eliminate ANS hitchhikers.
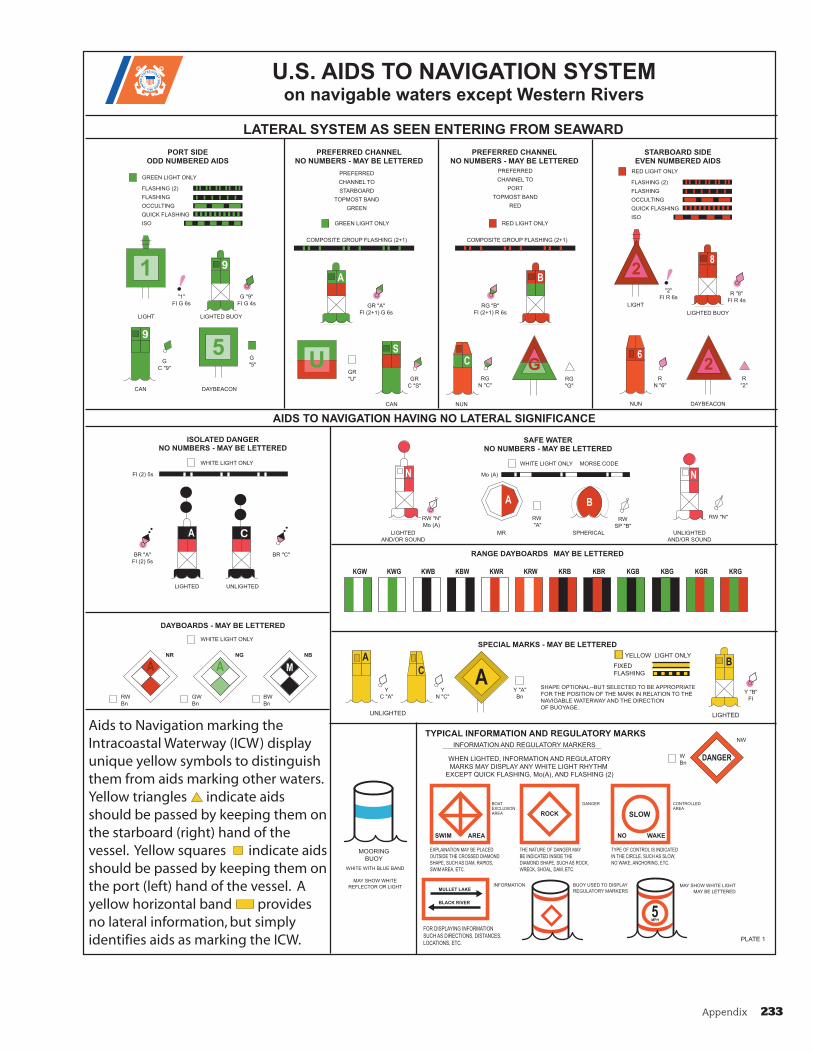
Appendix 233
KGW KWG KWB KBW KWR KRW KRB KBR KGB KBG KGR KRG
BR "A" FI (2) 5s
FI (2) 5s
BR "C"
RW "N" Mo (A)
RW "A"
G "5"
DAYBEACON
LIGHTED UNLIGHTED
CAN
CAN
LIGHTED
AND/OR SOUND
MR SPHERICAL UNLIGHTED
AND/OR SOUND
NUN NUN DAYBEACON
LIGHTED BUOY LIGHTED BUOY
LIGHT
LIGHT
GR "U"
GREEN LIGHT ONLY
FLASHING (2)
FLASHING
OCCULTING
QUICK FLASHING
ISO
WHITE LIGHT ONLY
WHITE LIGHT ONLY
NW
W
Bn
GW
Bn
NBNGNR
BW
Bn
RW
Bn
GREEN LIGHT ONLY RED LIGHT ONLY
RW SP "B"
RW "N"
Y C "A"
Y N "C"
Y "A" Bn
Y "B" FI
FIXED
FLASHING
LIGHTED
SHAPE OPTIONAL--BUT SELECTED TO BE APPROPRIATE
FOR THE POSITION OF THE MARK IN RELATION TO THE
NAVIGABLE WATERWAY AND THE DIRECTION
OF BUOYAGE. UNLIGHTED
PLATE 1
YELLOW ONLY
GR "A" FI (2+1) G 6s
G "9" FI G 4s
"1" FI G 6s
GR C "S"
RG "B" FI (2+1) R 6s
R "8" FI R 4s
RG N "C"
R N "6"
R "2"
G C "9"
"2" FI R 6s
PORT SIDE ODD NUMBERED AIDS
ISOLATED DANGER NO NUMBERS - MAY BE LETTERED
DAYBOARDS - MAY BE LETTERED
PREFERRED CHANNEL NO NUMBERS - MAY BE LETTERED
PREFERRED CHANNEL NO NUMBERS - MAY BE LETTERED
STARBOARD SIDE EVEN NUMBERED AIDS
LATERAL SYSTEM AS SEEN ENTERING FROM SEAWARD
AIDS TO NAVIGATION HAVING NO LATERAL SIGNIFICANCE
U.S. AIDS TO NAVIGATION SYSTEM on navigable waters except Western Rivers
WHITE LIGHT ONLY MORSE CODE
Mo (A)
SAFE WATER NO NUMBERS - MAY BE LETTERED
RANGE DAYBOARDSÑMAY BE LETTERED
SPECIAL MARKS - MAY BE LETTERED
RED LIGHT ONLY
FLASHING (2)
FLASHING
OCCULTING
QUICK FLASHING
ISO
PREFERRED
CHANNEL TO
STARBOARD
TOPMOST BAND
GREEN
COMPOSITE GROUP FLASHING (2+1) COMPOSITE GROUP FLASHING (2+1)
PREFERRED
CHANNEL TO
PORT
TOPMOST BAND
RED
RG "G"
9
9
C
WHITE WITH BLUE BAND
MAY SHOW WHITE
REFLECTOR OR LIGHT
MOORING
BUOY
UNITEDSTA
TESCOA
STGUAR
D
1790
Aids to Navigation marking the Intracoastal Waterway (ICW) display unique yellow symbols to distinguish them from aids marking other waters. Yellow triangles e aids should be passed by keeping them on the starboard (right) hand of the vessel. Yellow squares e aids should be passed by keeping them on the port (left) hand of the vessel. A yellow horizontal band ovides no lateral information, but simply identifies aids as marking the ICW.
INFORMATION AND REGULATORY MARKERS
WHEN LIGHTED, INFORMATION AND REGULATORY
MARKS MAY DISPLAY ANY WHITE LIGHT RHYTHM
EXCEPT QUICK FLASHING, Mo(A), AND FLASHING (2)
TYPICAL INFORMATION AND REGULATORY MARKS
EXPLAINATION MAY BE PLACED
OUTSIDE THE CROSSED DIAMOND
SHAPE, SUCH AS DAM, RAPIDS,
SWIM AREA, ETC.
THE NATURE OF DANGER MAY
BE INDICATED INSIDE THE
DIAMOND SHAPE, SUCH AS ROCK,
WRECK, SHOAL, DAM, ETC.
CONTROLLED AREA
DANGERBOAT EXCLUSION AREA
TYPE OF CONTROL IS INDICATED
IN THE CIRCLE, SUCH AS SLOW,
NO WAKE, ANCHORING, ETC.
SWIM AREA NO WAKE
ROCK SLOW
BUOY USED TO DISPLAY
REGULATORY MARKERS
INFORMATION MAY SHOW WHITE LIGHT
MAY BE LETTERED
FOR DISPLAYING INFORMATION
SUCH AS DIRECTIONS, DISTANCES,
LOCATIONS, ETC.
MULLET LAKE
BLACK RIVER
LIGHT
indicat
indicat
pr

234 Appendix
378 APPENDICES SEA SCOUT MANUAL
U.S. AIDS TO NAVIGATION SYSTEMon the Intracoastal Waterway
AS SEEN ENTERING FROM NORTH AND EAST—PROCEEDING TO SOUTH AND WEST
5
5
CA
6
5
56
6
D
6
B
8
76
1G
A
C B
LW
A B
2
PORT SIDE ODD NUMBERED AIDS
GREEN LIGHT ONLYFIXEDFLASHING (2)FLASHINGOCCULTINGQUICK FLASHINGISO
GREEN LIGHT ONLY
STARBOARD SIDE EVEN NUMBERED AIDS
RED LIGHT ONLYFIXEDFLASHING (2)FLASHINGOCCULTINGQUICK FLASHINGISO
G “9”Fl G 4sec
LIGHTED bUOY
CAN
G C “7”
DAYmARK
SG-1
G “1”
LIGHTED bUOY
R “8” Fl R 4sec
R N “6”
NUN
DAYmARK
TR
R “2”
RANGE DAYMARKS—MAY BE LETTERED KGW-1 KWG-1 KWb-1 KbW-1 KWR-1 KRW-1 KRb-1 KbR-1 KGb-1 KbG-1 KGR-1 KRG-1
DAYMARKS HAVING NO LATERAL SIGNIFICANCE mAY bE LETTERED ■WHITE LIGHT ONLY
RW bn
GW bn
bW bn
NR NG Nb
SAFE WATER NO NUMBERS—MAY BE LETTERED
■ WHITE LIGHT ONLY mORSE CODEmo (A)
N
PREFERRED CHANNEL NO NUMBERS—MAY BE LETTERED
COmPOSITE GROUP FLASHING (2+1)
RW SP “G”
RW “N” Mo (A)
mR
RW “A”
RED LIGHT ONLY
LIGHTED
GR “C” Fl (2+1) G
GR C “L”
RG N “W”
RG “B” Fl (2+1) R
PREFERRED CHANNEL TO STARbOARD
TOPmOST bAND GREEN
PREFERRED CHANNEL TO
PORT TOPmOST bAND
RED
CAN NUN
JG JR
GR “A”
RG “b”
SPHERICAL LIGHTED AND/OR SOUND
DUAL PURPOSE MARKING USED WHERE THE ICW AND OTHER WATERWAYS COINCIDE
When following the ICW from New Jersey through Texas, a should be kept to your starboard hand and a should be kept to your port hand, regardless of the color of the aid on which they appear. Information and Regulatory Marks and Special Marks may be found on Intracoastal Waterway. Refer to plate 1.
SG-SY
SG-TY
JG-TYJR-TY
TR-TY
DUAL PURPOSE
DAYMARKSDUAL
PURPOSE BUOYS
DUAL PURPOSE
DAYMARKSDUAL
PURPOSE BUOYS
JG-SYJR-SY
TR-SY
C “5”
C “5”R N “6”
R N “6”
RG “A”
R “6”
R “6”
G “5”
G “5”
RG “D”
RG “C”
RG “B”
Plate 2
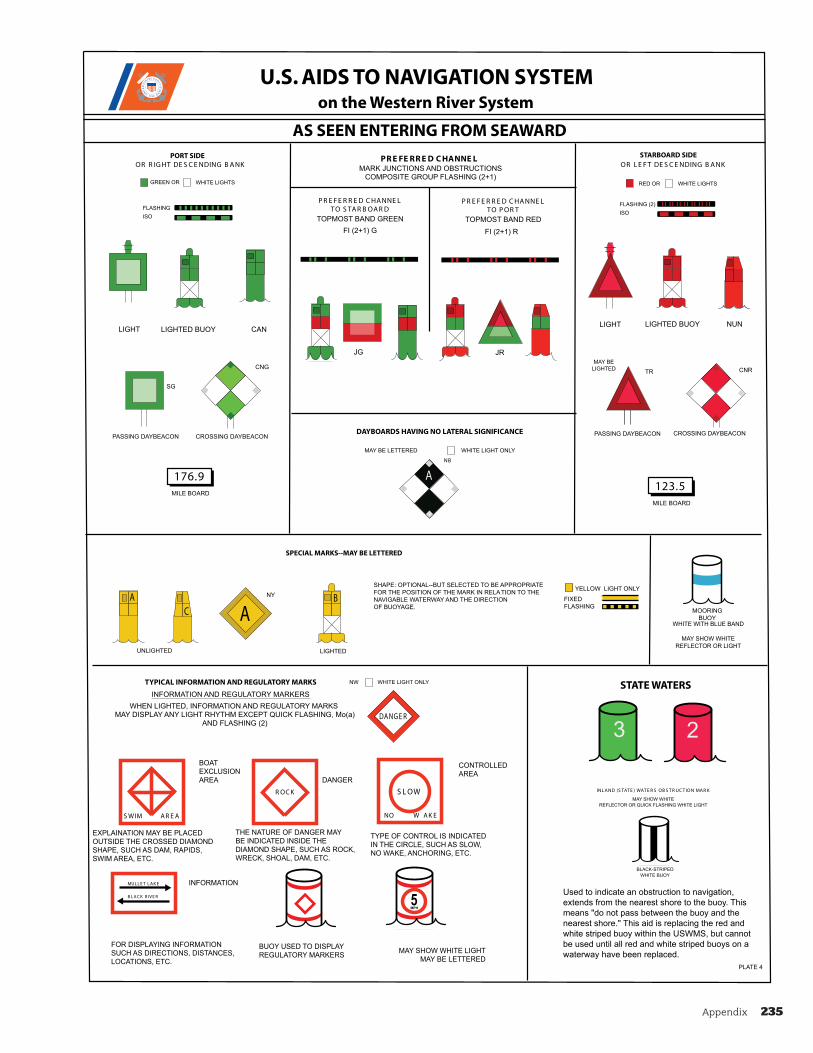
Appendix 235
PASSING DAYBEACON CROSSING DAYBEACON
CANLIGHTED BUOY
WHITE LIGHT ONLYMAY BE LETTERED
EXPLAINATION MAY BE PLACED OUTSIDE THE CROSSED DIAMOND SHAPE, SUCH AS DAM, RAPIDS, SWIM AREA, ETC.
THE NATURE OF DANGER MAYBE INDICATED INSIDE THEDIAMOND SHAPE, SUCH AS ROCK, WRECK, SHOAL, DAM, ETC.
BUOY USED TO DISPLAYREGULATORY MARKERS
INFORMATION
CONTROLLEDAREA
DANGER
BOATEXCLUSIONAREA
MAY SHOW WHITE LIGHT MAY BE LETTERED
TYPE OF CONTROL IS INDICATEDIN THE CIRCLE, SUCH AS SLOW,NO WAKE, ANCHORING, ETC.
S WIM
FOR DISPLAYING INFORMATIONSUCH AS DIRECTIONS, DISTANCES,LOCATIONS, ETC.
MUL L E T L A K E
B L A C K R IV E R
A R E A NO W A K E
R OC K S L OW
DA NG E R
WHITE LIGHT ONLY
NB
CNG CNR
SHAPE: OPTIONAL--BUT SELECTED TO BE APPROPRIATEFOR THE POSITION OF THE MARK IN RELATION TO THE NAVIGABLE WATERWAY AND THE DIRECTION OF BUOYAGE.
A
A
UNLIGHTED
LIGHT
B
LIGHTED
PASSING DAYBEACON
LIGHTED BUOY
MAY BE LIGHTED
NUNLIGHT
TR
FIXEDFLASHING
YELLOW ONLY
INFORMATION AND REGULATORY MARKERS WHEN LIGHTED, INFORMATION AND REGULATORY MARKS
MAY DISPLAY ANY LIGHT RHYTHM EXCEPT QUICK FLASHING, Mo(a) AND FLASHING (2)
NW
C
NY
PLATE 4
GREEN OR
FLASHINGISO
WHITE LIGHTS
OR R IG HT DE S C E NDING B A NK
RED OR
FLASHING (2) ISO
WHITE LIGHTS
OR L E F T DE S C E NDING B A NKMARK JUNCTIONS AND OBSTRUCTIONS COMPOSITE GROUP FLASHING (2+1)
PR E FE RR E D C HANNE L
WHITE WITH BLUE BAND
MAY SHOW WHITE REFLECTOR OR LIGHT
MOORINGBUOY
P R E F E R R E D C HA NNE LTO S TA R B OA R D
TOPMOST BAND GREEN FI (2+1) G
JG JR
P R E F E R R E D C HA NNE LTO P OR T
TOPMOST BAND RED
FI (2+1) R
CROSSING DAYBEACON
MILE BOARD
SG
BLACK-STRIPEDWHITE BUOY
123.5MILE BOARD
176.9
Used to indicate an obstruction to navigation, extends from the nearest shore to the buoy. Thismeans "do not pass between the buoy and the nearest shore." This aid is replacing the red and white striped buoy within the USWMS, but cannot be used until all red and white striped buoys on a waterway have been replaced.
MAY SHOW WHITE REFLECTOR OR QUICK FLASHING WHITE LIGHT
INL A ND (S TAT E ) WAT E R S OB S T R UC T ION MA R K
UNIT
ED
STAT E S CO AS
TG
UA
RD
1 7 9 0
A
23
LIGHT
PORT SIDE
on the Western River System
U.S. AIDS TO NAVIGATION SYSTEM
AS SEEN ENTERING FROM SEAWARDSTARBOARD SIDE
STATE WATERS
SPECIAL MARKS--MAY BE LETTERED
DAYBOARDS HAVING NO LATERAL SIGNIFICANCE
TYPICAL INFORMATION AND REGULATORY MARKS

236 Appendix
Romeo
*
Tango
Keep clear, engaged in pair trawling
India
Altering course to port
Golf
Require a pilot. Fishing: Hauling nets
Echo
Altering course to starboard
Delta
Keep clear, maneuvering with difficulty
Novem- ber
No
Mike
My vessel is stopped, making no way
Uniform
You are running into danger
Kilo
Wish to communicate
Bravo
Dangerous goods
Alfa
Have diver down, keep clear
INTERNATIONAL FLAGS AND PENNANTSWITH MORSE SYMBOLS
3 RD EDITIONDECEMBER 1977
Note: See Pub. 102, Page 22, for complete meanings
6DMA STOCK NO.
WOXZC6
*ONLY used as a Procedure Signal meaning, “Received” or “I have received your last signal”—NOT to be used as a Single Letter Signal.
Published by the Defense Mapping AgencyHydrographic/Topographic Center
WASHINGTON, D.C. 20315
NUMERAL PENNANTS
•-
-•••
-•-•
-••
•
••-•
--•
••••
••
•---
-•-
•-••
--
-•
---
•--•
--•-
•-•
•••
-
••-
•••-
•--
-••-
-•--
--••
•----
••---
•••--
••••-
•••••
-••••
--•••
---••
----•
-----
Charlie
Yes
Foxtrot
Disabled, communicate with me
Hotel
Pilot on board
Juliett
On fire, have dangerous cargo, keep clear
Lima
Stop instantly
Oscar
Man overboardIn harbor—All persons
report on board
PapaAt sea-Fishing:
Nets on obstruction
Quebec
Request free pratique
Sierra
Engines going astern
Victor
Require assistance
Xray
Stop your intentions, watch for signals
Yankee
Dragging my anchor
Zulu
Require a tug. Fishing: Shooting nets
SUBSTITUTES 1st
Substitute
2nd Substitute
3rd Substitute
CODE(Answering Pennant
or Decimal Point)
1
2
3
4
5
6
7
8
0
ALPHABET FLAGS
Whis- key
Require medical assistance
9
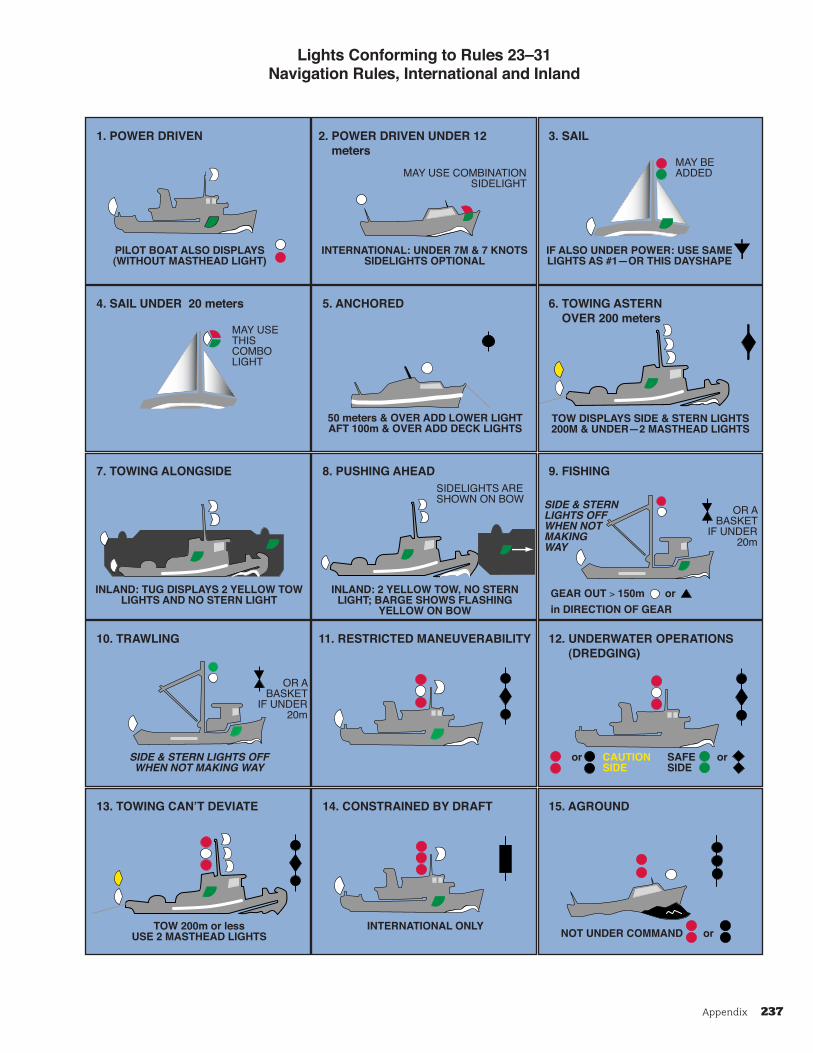
Appendix 237
1. POWER DRIVEN 2. POWER DRIVEN UNDER 12 meters
3. SAIL
4. SAIL UNDER 20 meters 5. ANCHORED 6. TOWING ASTERN OVER 200 meters
7. TOWING ALONGSIDE 8. PUSHING AHEAD 9. FISHING
10. TRAWLING 11. RESTRICTED MANEUVERABILITY 12. UNDERWATER OPERATIONS (DREDGING)
13. TOWING CAN’T DEVIATE 14. CONSTRAINED BY DRAFT 15. AGROUND
PILOT BOAT ALSO DISPLAYS (WITHOUT MASTHEAD LIGHT)
INTERNATIONAL: UNDER 7M & 7 KNOTS SIDELIGHTS OPTIONAL
IF ALSO UNDER POWER: USE SAME LIGHTS AS #1—OR THIS DAYSHAPE
50 meters & OVER ADD LOWER LIGHT AFT 100m & OVER ADD DECK LIGHTS
TOW DISPLAYS SIDE & STERN LIGHTS 200M & UNDER—2 MASTHEAD LIGHTS
INLAND: TUG DISPLAYS 2 YELLOW TOW LIGHTS AND NO STERN LIGHT
INLAND: 2 YELLOW TOW, NO STERN LIGHT; BARGE SHOWS FLASHING
YELLOW ON BOWGEAR OUT > 150m orin DIRECTION OF GEAR
SIDE & STERN LIGHTS OFF WHEN NOT MAKING WAY
or CAUTION SAFE or SIDE SIDE
TOW 200m or less USE 2 MASTHEAD LIGHTS
INTERNATIONAL ONLY NOT UNDER COMMAND or
SIDE & STERN LIGHTS OFF WHEN NOT MAKING WAY
MAY USE COMBINATION SIDELIGHT
MAY BE ADDED
MAY USE THIS COMBO LIGHT
SIDELIGHTS ARE SHOWN ON BOW
OR A BASKET
IF UNDER 20m
OR A BASKET
IF UNDER 20m
Lights Conforming to Rules 23–31Navigation Rules, International and Inland
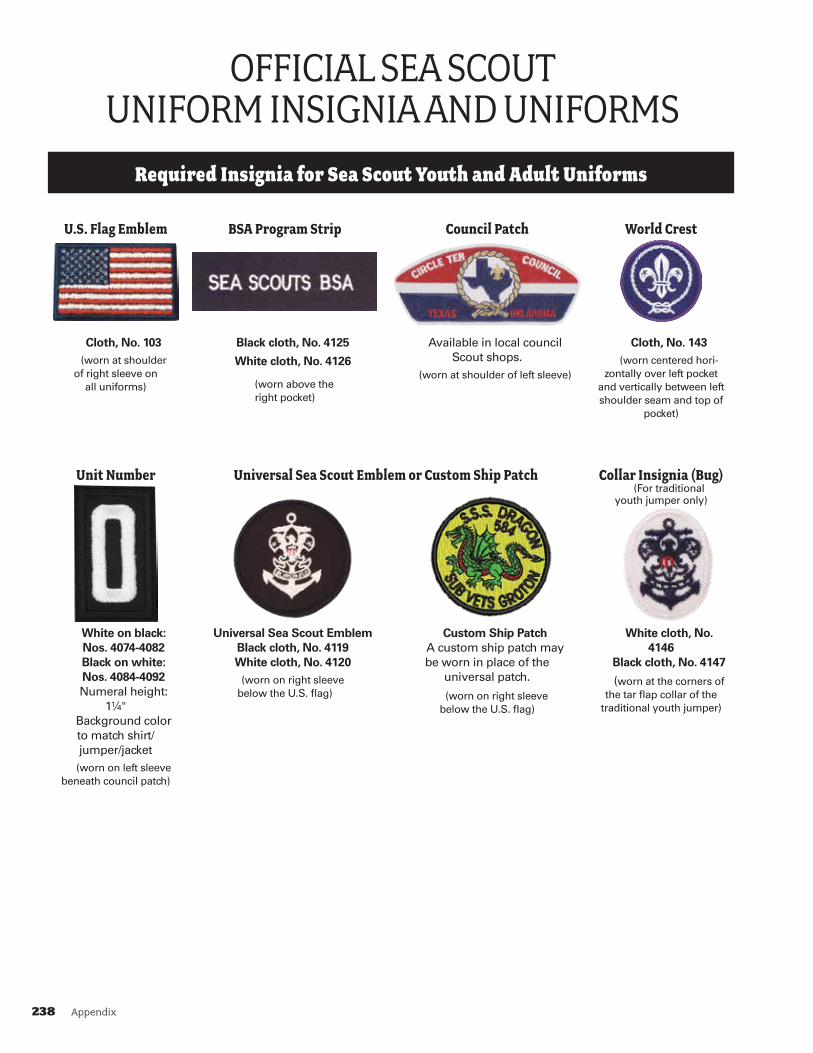
238 Appendix
OFFICIAL SEA SCOUT UNIFORM INSIGNIA AND UNIFORMS
Required Insignia for Sea Scout Youth and Adult Uniforms
U.S.FlagEmblem BSAProgramStrip CouncilPatch WorldCrest
Cloth, No. 103(worn at shoulder
of right sleeve on all uniforms)
Black cloth, No. 4125
White cloth, No. 4126
(worn above the right pocket)
Available in local council Scout shops.
(worn at shoulder of left sleeve)
Cloth, No. 143(worn centered hori-
zontally over left pocket and vertically between left shoulder seam and top of
pocket)
UnitNumber UniversalSeaScoutEmblemorCustomShipPatch CollarInsignia(Bug)(For traditional
youth jumper only)
White on black:Nos. 4074-4082Black on white:Nos. 4084-4092Numeral height:
1¼"Background color to match shirt/ jumper/jacket (worn on left sleeve
beneath council patch)
Universal Sea Scout EmblemBlack cloth, No. 4119White cloth, No. 4120
(worn on right sleeve below the U.S. flag)
Custom Ship PatchA custom ship patch may be worn in place of the
universal patch.
(worn on right sleeve below the U.S. flag)
White cloth, No. 4146
Black cloth, No. 4147
(worn at the corners of the tar flap collar of the
traditional youth jumper)
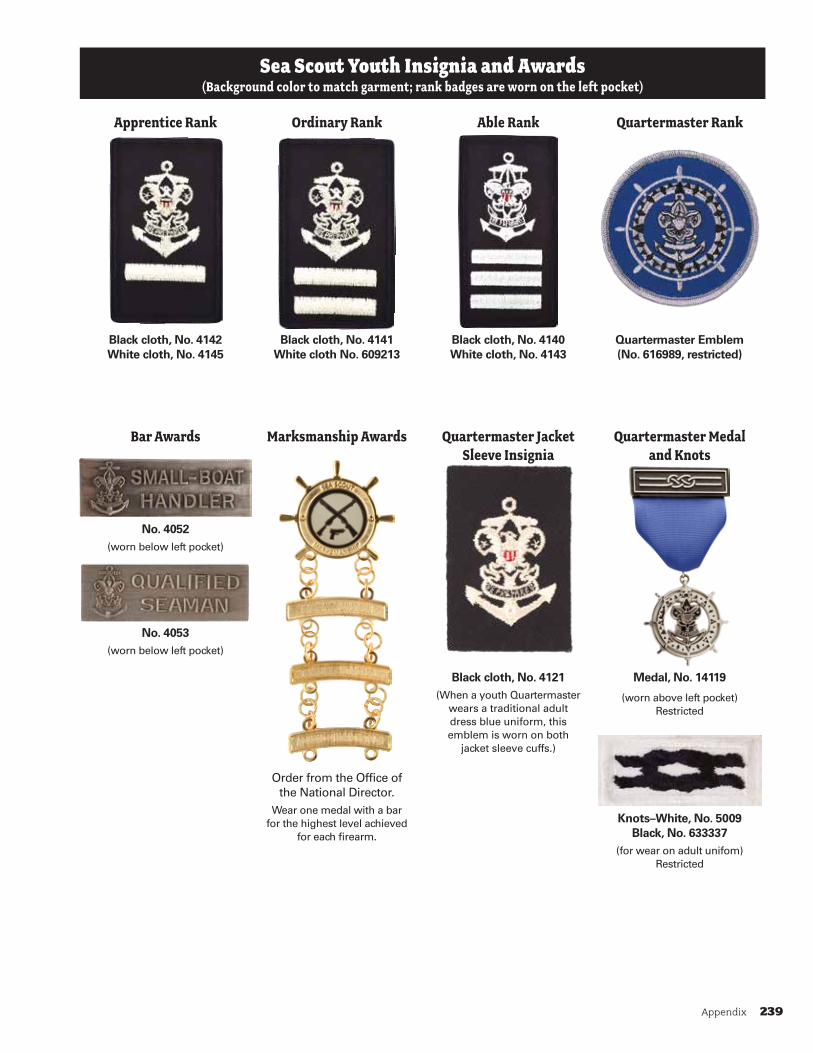
Appendix 239
Sea Scout Youth Insignia and Awards(Background color to match garment; rank badges are worn on the left pocket)
ApprenticeRank OrdinaryRank AbleRank QuartermasterRank
Black cloth, No. 4142White cloth, No. 4145
Black cloth, No. 4141 White cloth No. 609213
Black cloth, No. 4140White cloth, No. 4143
Quartermaster Emblem (No. 616989, restricted)
BarAwards
No. 4052(worn below left pocket)
No. 4053(worn below left pocket)
MarksmanshipAwards
Order from the Office of the National Director.
Wear one medal with a bar for the highest level achieved
for each firearm.
QuartermasterJacketSleeveInsignia
QuartermasterMedalandKnots
Black cloth, No. 4121(When a youth Quartermaster
wears a traditional adult dress blue uniform, this emblem is worn on both
jacket sleeve cuffs.)
Medal, No. 14119
(worn above left pocket) Restricted
Knots–White, No. 5009Black, No. 633337
(for wear on adult unifom) Restricted

240 Appendix
Sea Scout Youth Badges of Office(For the New Century Universal Uniform; worn on the left sleeve below the council patch and unit number)
Boatswain Boatswain’sMate Purser
No. 621904 No. 621903 No. 621912
CrewLeader AssistantCrewLeader Yeoman
No. 621908 No. 621902 No. 621901
Storekeeper MediaSpecialist Specialist
No. 621917 No. 621910 No. 621916
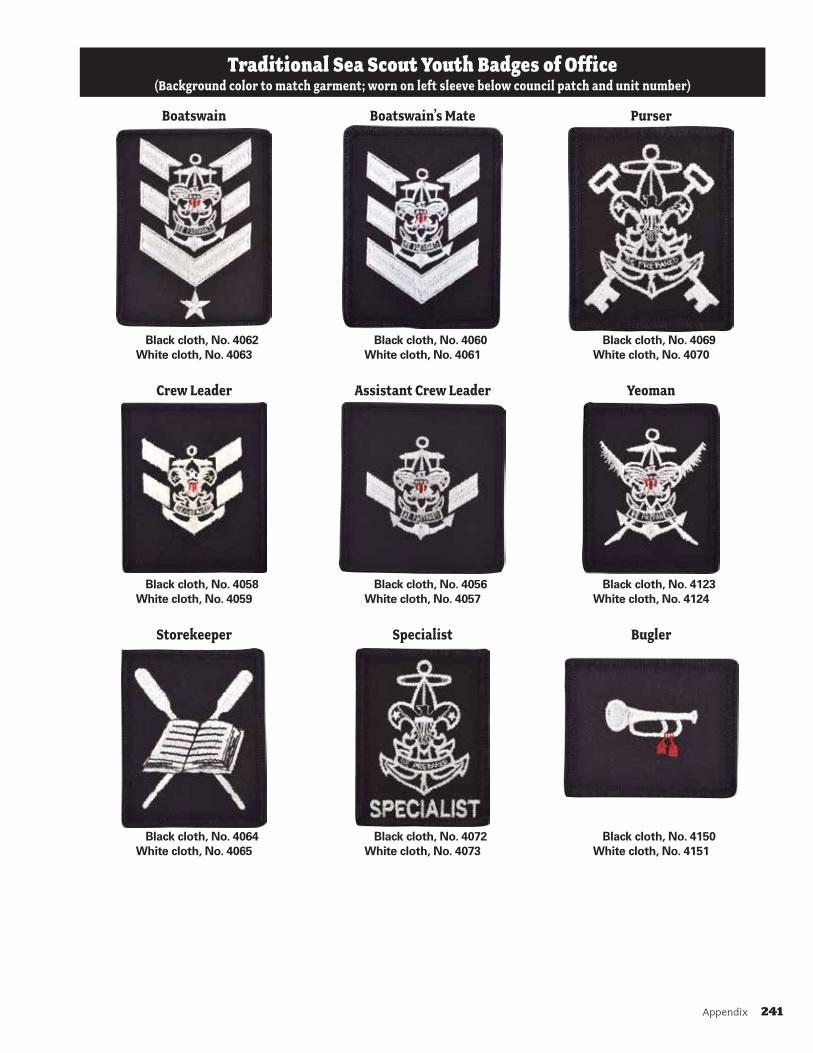
Appendix 241
Traditional Sea Scout Youth Badges of Office(Background color to match garment; worn on left sleeve below council patch and unit number)
Boatswain Boatswain’sMate Purser
Black cloth, No. 4062 White cloth, No. 4063
Black cloth, No. 4060 White cloth, No. 4061
Black cloth, No. 4069 White cloth, No. 4070
CrewLeader AssistantCrewLeader Yeoman
Black cloth, No. 4058 White cloth, No. 4059
Black cloth, No. 4056 White cloth, No. 4057
Black cloth, No. 4123 White cloth, No. 4124
Storekeeper Specialist Bugler
Black cloth, No. 4064 White cloth, No. 4065
Black cloth, No. 4072 White cloth, No. 4073
Black cloth, No. 4150 White cloth, No. 4151
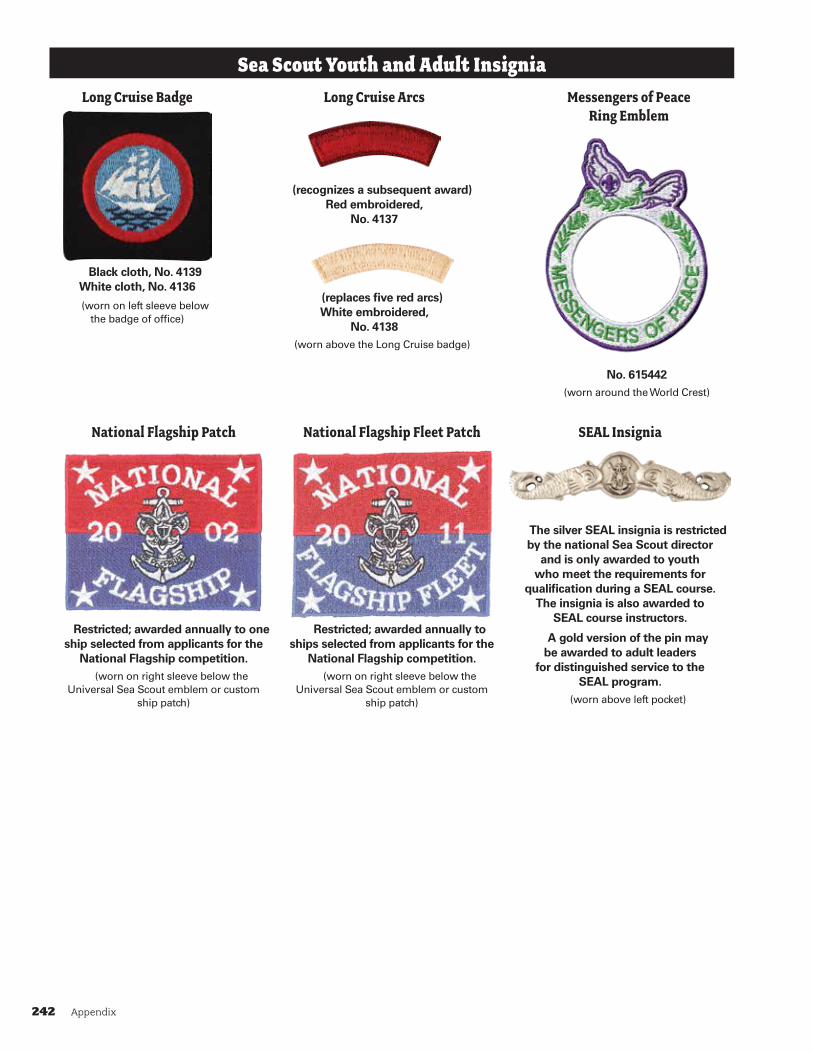
242 Appendix
Sea Scout Youth and Adult InsigniaLongCruiseBadge LongCruiseArcs
(recognizes a subsequent award) Red embroidered,
No. 4137
(replaces five red arcs) White embroidered,
No. 4138(worn above the Long Cruise badge)
MessengersofPeaceRingEmblem
No. 615442(worn around the World Crest)
Black cloth, No. 4139 White cloth, No. 4136
(worn on left sleeve below the badge of office)
NationalFlagshipPatch NationalFlagshipFleetPatch SEALInsignia
The silver SEAL insignia is restricted by the national Sea Scout director
and is only awarded to youth who meet the requirements for
qualification during a SEAL course. The insignia is also awarded to
SEAL course instructors.
A gold version of the pin may be awarded to adult leaders
for distinguished service to the SEAL program.
(worn above left pocket)
Restricted; awarded annually to one ship selected from applicants for the
National Flagship competition.(worn on right sleeve below the
Universal Sea Scout emblem or custom ship patch)
Restricted; awarded annually to ships selected from applicants for the
National Flagship competition.(worn on right sleeve below the
Universal Sea Scout emblem or custom ship patch)
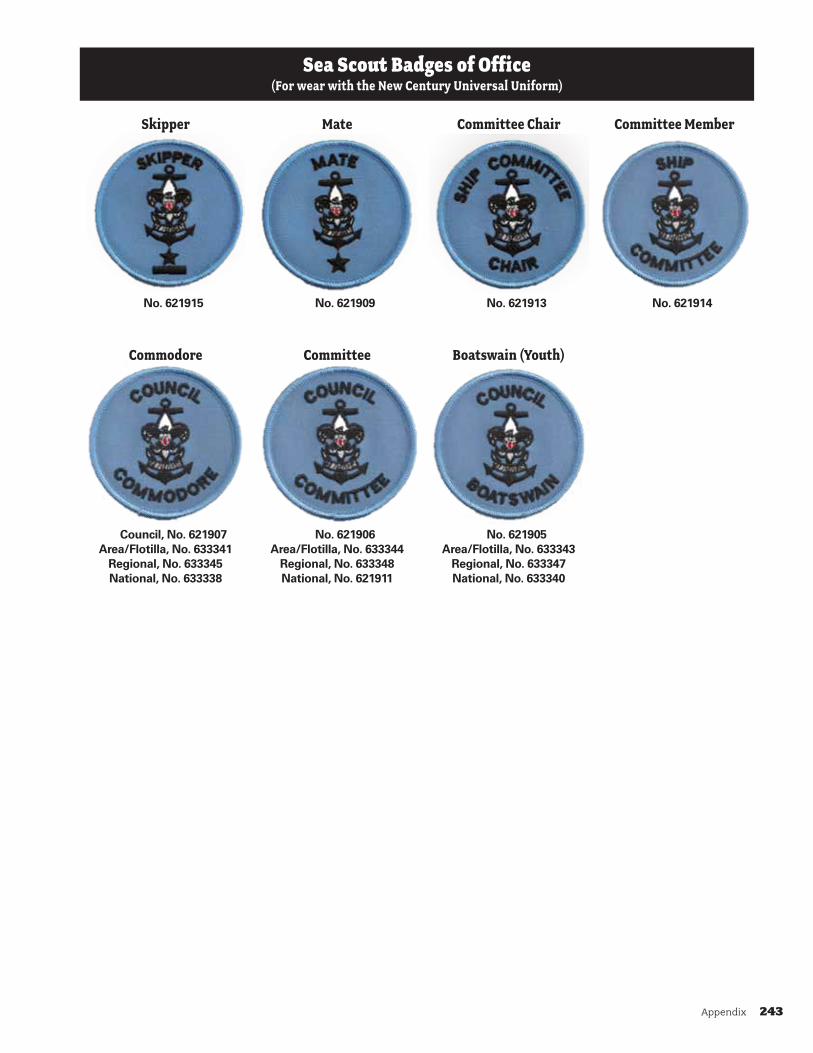
Appendix 243
Sea Scout Badges of Office(For wear with the New Century Universal Uniform)
Skipper Mate CommitteeChair CommitteeMember
No. 621915 No. 621909 No. 621913 No. 621914
Commodore Committee Boatswain(Youth)
Council, No. 621907 Area/Flotilla, No. 633341
Regional, No. 633345 National, No. 633338
No. 621906 Area/Flotilla, No. 633344
Regional, No. 633348 National, No. 621911
No. 621905 Area/Flotilla, No. 633343
Regional, No. 633347 National, No. 633340

244 Appendix
Traditional Sea Scout Adult Insignia(For wear with traditional uniforms)
Skipper(for dress blues)
MateandCommitteeMembers
(for dress blues)
Black cloth
Ship, No. 4098 Council, No. 4128
Region/Area, No. 4130 National, No. 4132
(worn on both jacket sleeve cuffs)
Skipper(epaulet covers for dress whites)
No. 618627
MateandCommitteeMembers
(epaulet covers for dress whites)
Black cloth, No. 4095(worn on both
jacket sleeve cuffs)
Unit, No. 618628 Council, No. 618629
Region/Area, No. 618630 National, No. 618631
CollarInsignia CoatButton
No. 4155
Skipper, No. 619113 Mate and Ship Committee, No. 619112
Council, No. 619114 Region/Area, No. 619115
National, restricted(worn on the collar of the khaki uniform only;
1 inch from the tip of the collar on the diagonal)
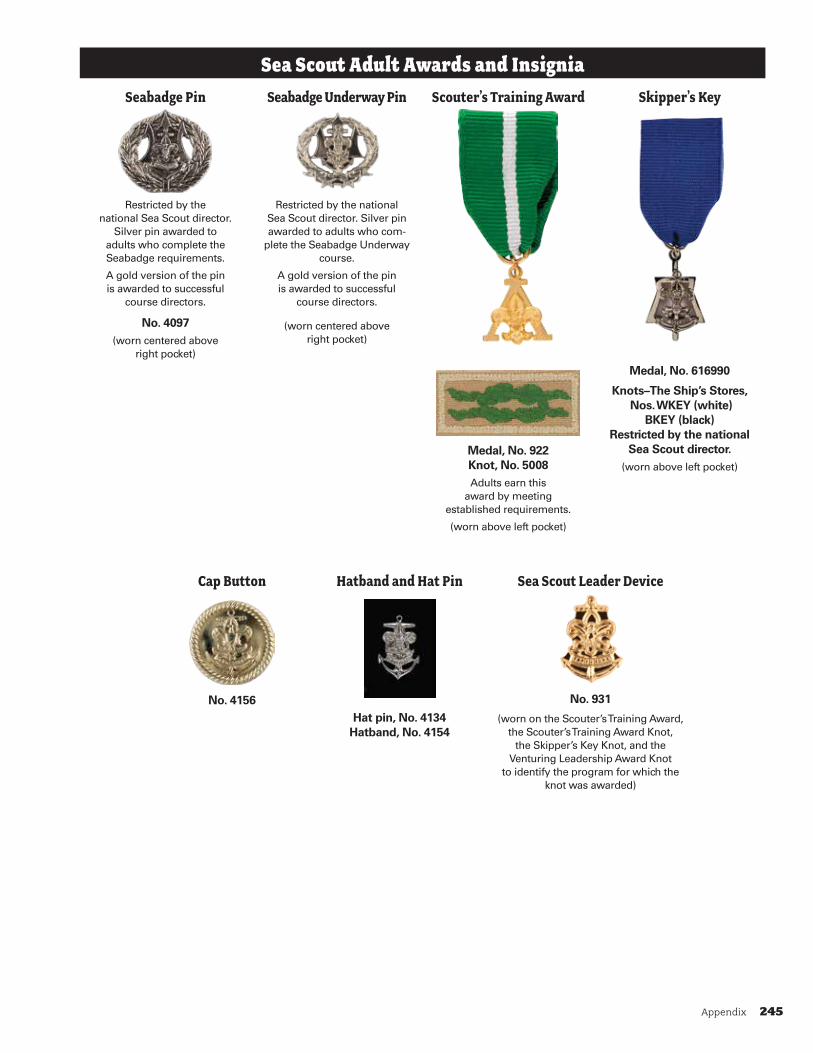
Appendix 245
Sea Scout Adult Awards and Insignia SeabadgePin SeabadgeUnderwayPin Scouter’sTrainingAward
Medal, No. 922 Knot, No. 5008Adults earn this
award by meeting established requirements.
(worn above left pocket)
Skipper’sKey
Medal, No. 616990
Knots–The Ship’s Stores, Nos. WKEY (white)
BKEY (black) Restricted by the national
Sea Scout director. (worn above left pocket)
Restricted by the national Sea Scout director.
Silver pin awarded to adults who complete the Seabadge requirements.
A gold version of the pin is awarded to successful
course directors.
No. 4097(worn centered above
right pocket)
Restricted by the national Sea Scout director. Silver pin awarded to adults who com-
plete the Seabadge Underway course.
A gold version of the pin is awarded to successful
course directors.
(worn centered above right pocket)
CapButton HatbandandHatPin
Hat pin, No. 4134 Hatband, No. 4154
SeaScoutLeaderDevice
No. 931
(worn on the Scouter’s Training Award, the Scouter’s Training Award Knot,
the Skipper’s Key Knot, and the Venturing Leadership Award Knot
to identify the program for which the knot was awarded)
No. 4156

246 Appendix
Discontinued and Unauthorized Insignia(Collectibles but not authorized for wear on an official Sea Scout uniform)
No. 17549; replaced by Journey to Excellence emblems
First class anchor (bug) on cover;
discontinued in 2000
Committee chair “diamond” insignia;
discontinued after WWII
Committee member “oval” insignia;
discontinued after WWII
SeabadgeParticipantKnotNo. 5527, discontinued in 2011; this accomplishment is now
recognized by the Seabadge pin
SeabadgeStaffKnotNever authorized for wear
SeabadgeCourseDirectorKnotNever authorized for wear
ImportantNotes:• Locally developed recognitions are not authorized elements of the official Sea Scout uniform.• Some vendors produce unofficial insignia to meet local demand. However, these insignia are not authorized
elements of the official Sea Scout uniform.• Although not included in the Sea Scout Manual, various award knots on black or white cloth are accepted as
being in common use in the Sea Scouting program, and may be worn.
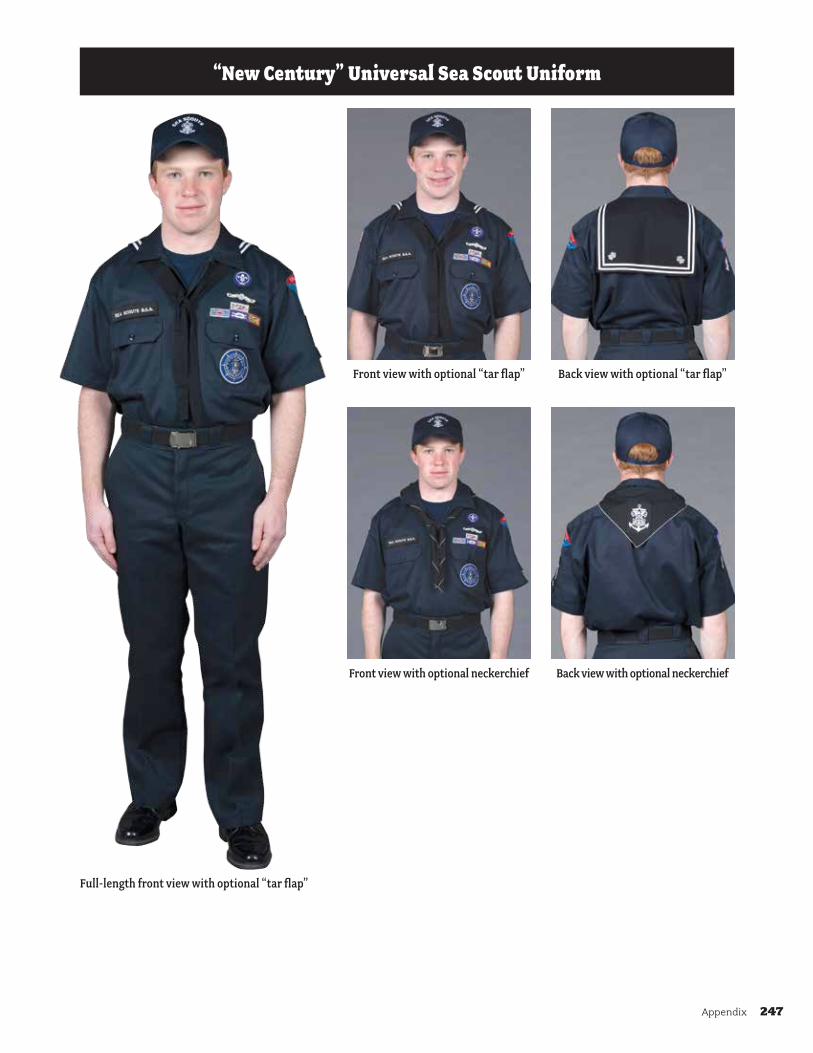
Appendix 247
“New Century” Universal Sea Scout Uniform
Full-length front view with optional “tar flap”
Front view with optional “tar flap” Back view with optional “tar flap”
Front view with optional neckerchief Back view with optional neckerchief

Appendix 249
SEA SCOUT MARKSMANSHIP PROGRAM
To earn the Sea Scout Marksmanship awards, Sea Scouts must begin with the Basic Shooter requirements after choosing the discipline or disciplines (rifle, shotgun, or pistol). A Scout may choose to learn how to shoot more than one firearm. A Sea Scout Shooting Sports Medal is earned after a Sea Scout completes the Basic Shooter level, no matter what discipline he or she shoots. From the main medal, small metal bars attach that show the Scout’s discipline and level of accomplishment. Sea Scouts only wear the bar for the highest level they have achieved. If a Scout shoots all three disciplines, he or she will have the maximum number of bars suspended from the medal.
Basic ShooterComplete one of the following discipline requirements. (Note that the requirements
can be completed in more than one discipline if a Sea Scout wants to learn to shoot more than one type of firearm.)
Rifle—Complete the following requirements:• Complete the NRA FIRST Steps program for rifle shooting.• Using a .22-caliber rimfire rifle, and shooting from the benchrest position at
50 feet, fire five groups (three shots per group) that can be covered by a quarter. Using these targets, explain how to adjust the sights to zero a rifle.
Shotgun—Complete the following requirements:• Complete the NRA FIRST Steps program for shotgun shooting.• Using a 20- or 12-gauge shotgun, hit 11 or more out of 25 targets in one
25-target group.
Pistol—Complete the following requirements:• Complete the NRA FIRST Steps program for pistol shooting covering both
revolvers and semi-automatic pistols.• Using a .22-caliber revolver or semi-automatic, shooting from the benchrest posi-
tion with two hands at 15 feet, and using 9-inch paper plates or paper disks, shoot 10 plates with five shots on each plate. All shots must be inside a half-inch margin from the edge of the plate. The 10 plates do not have to be fired in succession or on the same day. (Note that by achieving this score, the Sea Scout has also earned the Pro-Marksman level in the Winchester/NRA Marksmanship Qualification program for Pistol Qualification and would be eligible for their award.)
250 Appendix
Intermediate ShooterComplete the following requirements for the discipline or disciplines you are shoot-
ing from the previous level.
Rifle—Complete the following requirements:• Complete the NRA Basic Course for rifle shooting.• Using a .22-caliber rimfire rifle and an A-17 or A-32 target, and shooting from the
prone or benchrest position at 50 feet, fire two rounds of 20 shots in each round, scoring a minimum of 100 out of a possible 200 points in each round. (Note that by achieving this score, the Sea Scout has also earned the Pro-Marksman level in the Winchester/NRA Marksmanship Qualification program for Rimfire Rifle Prone/Benchrest shooting and would be eligible for their award.)
Shotgun—Complete the following requirements:• Complete the NRA Basic Course for shotgun shooting.• Using a 20- or 12-gauge shotgun on a trap or skeet course, hit 11 or more out
of 25 targets two times. (Note that by achieving this score, the Sea Scout has also earned the Pro-Marksman level in the Winchester/NRA Marksmanship Qualification program for Shotgun Qualification.)
Pistol—Complete the following requirements:• Complete the NRA Basic Course for pistol shooting.• Using a .22-caliber revolver or semi-automatic, shooting from the standing posi-
tion with two hands at 15 feet, and using 9-inch paper plates or paper disks, shoot 10 plates with 10 shots on each plate. All shots must be inside a 1½-inch margin from the edge of the plate. The 10 plates do not have to be fired in succession or on the same day. (Note that by achieving this score, the Sea Scout has also earned the Marksman level in the Winchester/NRA Marksmanship Qualification program for Pistol Qualification and would be eligible for their award.)
Advanced ShooterComplete the following requirements for the discipline or disciplines you are shoot-
ing from the previous level.
Rifle—Complete the following requirement:• Using a .22-caliber rimfire rifle and an A-17 or A-32 target, and shooting from
the standing position at 50 feet, fire four rounds of 10 shots in each round, scor-ing a minimum of 40 out of a possible 100 points in each round. (Note that by achieving this score, the Sea Scout has also earned the Pro-Marksman level in the Winchester/NRA Marksmanship Qualification program for Rimfire Rifle Standing Course shooting and would be eligible for their award.)
Shotgun—Complete the following requirement:• Using a 20- or 12-gauge shotgun on a trap or skeet course, hit 13 or more out of
25 targets four times. (Note that by achieving this score, the Sea Scout has also earned the Marksman level in the Winchester/NRA Marksmanship Qualification program for Shotgun Qualification.)
Pistol—Complete the following requirements:• Using a .22-caliber revolver or semi-automatic, shoot from the standing position, using
two hands with strong side and weak side stages. (Note: Strong side means the strong hand, usually the writing hand, grips the gun first and functions the trigger while the weak hand provides additional support. Weak side means the weak hand grips first and functions the trigger while the strong hand provides additional support.)
Appendix 251
(Note that this is conducted in two stages. Both stages must be completed in the same session to qualify as one completed course of fire.)
• Using an AP-2 target at 15 feet: — Stage 1 Strong Side—Fire at five targets with 10 shots each in six minutes. — Stage 2 Weak Side—Fire at five targets with 10 shots each in six minutes (total of 10 shots per target with a possible score per target of 100).
Scoring requirements: Shoot 10 targets, five with a score of 46 or better and five with a score of 56 or better. (Note that by achieving this score, the Sea Scout has also earned the Marksmanship First Class level in the Winchester/NRA Marksmanship Qualification program for Pistol Shooting.)
Expert ShooterComplete the NRA Rifle Instructor Training Course, the NRA Shotgun Instructor
Training Course, or the NRA Pistol Instructor Training Course (Sea Scout’s choice). Upon successful completion, the Sea Scout will be either an NRA Apprentice or an Assistant Instructor.
After completing the NRA Instructor Training Course, volunteer to assist at two separate rifle, shotgun, or pistol shooting activities held by your council’s shooting sports committee. These can be open shoots held at a camp range, or a district- or council-sponsored shooting event for Boy Scouts, Venturers, or Sea Scouts.
Rifle—Complete the following requirement:• Using a .22-caliber rimfire rifle and an A-17 or A-32 target, and shooting from
the standing position at 50 feet, fire six rounds of 10 shots in each round, scor-ing a minimum of 50 out of a possible 100 points in each round. (Note that by achieving this score, the Sea Scout has also earned the Marksman level in the Winchester/NRA Marksmanship Qualification program for Rimfire Rifle Standing Course shooting and would be eligible for their award.)
Shotgun—Complete the following requirement:• Using a 20- or 12-gauge shotgun on a trap or skeet course, hit 15 or more out of
25 targets six times. (Note that by achieving this score, the Sea Scout has also earned the Marksman First Class level in the Winchester/NRA Marksmanship Qualification program for Shotgun Qualification.)
Pistol— Complete the following requirements:• Using a .22-caliber revolver or semi-automatic, shoot from the standing, ready
position, using two hands with strong side and weak side stages. (Note: Strong side means the strong hand, usually the writing hand, grips the gun first and functions the trigger while the weak hand provides additional support. Weak side means the weak hand grips first and functions the trigger while the strong hand provides additional support.)
(Note that this is conducted in two stages. Both stages must be completed in the same session to qualify as one completed course of fire.)
• Using an AP-2 target at 15 feet: — Stage 1 Strong Side—Five shots in 20 seconds — Stage 2 Weak Side—Five shots in 20 seconds (total of 10 shots per target with a possible score per target of 100).
Scoring requirements: Shoot 10 targets, five with a score of 60 or better and five with a score of 65 or better. The 10 targets do not have to be fired in succession or on the same day. (Note that by achieving this score, the Sea Scout has also earned the Sharpshooter level in the Winchester/NRA Marksmanship Qualification program for Pistol Shooting.)

Appendix 253
RESOURCES
Piloting and NavigationBauer, Bruce A. Sextant Handbook. Maine: International Marine, 1992. Blewitt, Mary. Celestial Navigation for Yachtsmen. Maine: International Marine, 1995. Bok, Bart J., and Francis W. Wright. Basic Marine Navigation. Massachusetts:
Harvard University Press, 1944.Bowditch, Nathaniel. American Practical Navigator. Bethesda: National Imagery and
Mapping Agency, 2002.Burch, David. Emergency Navigation. Maine: International Marine, 1986. Eyges, Leonard. The Practical Pilot. Maine: International Marine, 1989. Hart, Marion R., and William McEwen. How to Navigate Today. New York:
Cornell Maritime Press, 1943.Lane, Carl D., and John Montgomery. Navigation the Easy Way. New York:
W.W. Norton, 1949.Maloney, Elbert S. Chapman’s Navigation and Piloting, 65th Edition. Annapolis:
Naval Institute Press, 2006.Mixter, George W. Primer of Navigation, 7th Edition. New York:
W.W. Norton & Company, 1995.Neeley, Henry M. Primer for Star Gazers. New York:
Random House Value Publishing, 1989.Rabl, S.S. The Star Atlas. New York: Cornell Maritime Press, 1946.Shufeldt, H.H., and G.D. Dunlap. Piloting and Dead Reckoning.
Annapolis: Naval Institute Press, 1991.Sterling, Frank W. Small Boat Navigation. New York: McMillan, 1917.
Boat Design and Building Chapell, Howard I. American Small Sailing Craft. New York:
W.W. Norton & Company, 1951.Schock, Edson I. How to Build Small Boats. New York: Imp. Barnes, 1952.Warren, Graham, and David Gidmark. Canoe Paddles: A Complete Guide to Making
Your Own. Buffalo: Firefly Books, 2001.
254 Appendix
Boat Maintenance and EnginesChapman, Charles F. Boat Maintenance Afloat and Ashore, Vols. I, II, and III.
New York: Motor Boating, Ideal Series, 1952.Fontaine, W.H. Boat Owners’ Handbook. New York: Dodd, Mead & Company, 1941.Jones, C. Morgan. Small Boat Engine Manual. New York: Cornell Maritime Press, 1948.Miller, Conrad. Small Boat Engines. New York: The Rudder Publishing, 1939.Robberson, Elbert. Small Boat Mechanic’s Handbook. Princeton: Van Nostrand, 1956.
Canoes, Rowboats, and Outboards Handel, Carle W. Canoe Camping. New York: Ronald Press Company, 1953.Mason, Bill. Path of the Paddle. Toronto: Kay Porter Books, 1996.Pearsall, Bill. Young Sportsman’s Guide to Motorboating. Nashville:
Thomas Nelson & Sons, 1962.
Knots and RopeworkAshley, Clifford W. The Ashley Book of Knots. New York: Random House, Inc., 1993.Day, Cyrus. The Art of Knotting and Splicing. Annapolis: Naval Institute Press, 1980.Graumont, Raoul, and John J. Hensel. Encyclopedia of Knots and Fancy Rope Work.
Cambridge: Cornell Maritime Press, 1972.Graumont, Raoul, and Elmer Wenstrom. Fisherman’s Knots—and Nets. Centreville:
Cornell Maritime Press, Inc. 1948.Henderson, Richard. Understanding Rigs and Rigging. Camden:
International Marine, 1985.Merry, Barbara. The Splicing Handbook. Camden: International Marine, 1987. Smith, Hervey G. The Arts of the Sailor: Knotting, Splicing and Ropework. New York:
Dover Publications, 1990.Toss, Brion. The Rigger’s Apprentice. Camden: International Marine, 1992. Toss, Brion. The Rigger’s Locker. Camden: International Marine, 1992.
Safety, First Aid, Swimming, and Lifesaving How to Survive on Land and Sea, U.S. Naval Institute, Annapolis, Maryland.
General SeamanshipBottomley, Tom. Boatman’s Handbook. New York: Hearst Marine Books, 1988.Brindze, Ruth. The Experts’ Book of Boating. New York: Prentice-Hall, 1959.Brotherton, Miner K. The 12-Volt Bible. Newport: Seven Seas Press, 1985.Burgess, Robert F. Handbook of Trailer Sailing. Camden: International Marine, 1992. Cutler, Thomas J. Blue Jacket’s Manual. Annapolis: Naval Institute Press, 1999.de Kerchove, René. International Maritime Dictionary. Princeton:
Van Nostrand Company, 1961.Krietemeyer, Capt. George E. The Coast Guardsman’s Manual. Annapolis:
Naval Institute Press, 2000.Lane, Carl D. New Boatman’s Manual. New York: W.W. Norton, 1951.Maloney, Elbert S. Chapman: Piloting, Seamanship and Small Boat Handling.
New York: Hearst Marine Books, 1996.Marino, Emiliano. The Sailmaker’s Apprentice. Camden: International Marine, 1994. Noel, Capt. John V. Jr. Knight’s Modern Seamanship. New York:
D. Van Nostrand Reinhold Company, 1961.

Appendix 255
Riesenberg, Felix. Standard Seamanship for the Merchant Service, 2nd Edition. New York: D. Van Nostrand Company, 1936.
Rogers, John G. Origins of Sea Terms. Mystic: Mystic Seaport Museum, 1984. Rousmaniere, John. The Annapolis Book of Seamanship. New York:
Simon & Schuster, 1999.Thomas, Elwell B. This Business of Boating. Cambridge: Cornell Maritime Press, 1949.Van Dorn, William G. Oceanography & Seamanship. Centreville:
Cornell Maritime Press, 1993. Walliser, Blair. Basic Seamanship and Safe Boat Handling. New York:
Bantam Doubleday Dell, 1978.Weeks, Morris Jr. The Complete Boating Encyclopedia. New York: Golden Press, 1964.West, Gordon. Boatowner’s Guide to Marine Electronics. Camden:
International Marine, 1993.
Galley Techniques and Outdoor Cooking and Camping Bates, Joseph D. Jr. The Outdoor Cook’s Bible. New York: Doubleday Books, 1964.Craighead, Frank C. Jr., and John J. Craighead. How to Survive on Land and Sea.
Annapolis: U.S. Naval Institute, 1984.Jones, Russell K., and C. McKim Norton. The New Cruising Cookbook. Easy to Cook
Meals on a Two Burner Stove. New York: W.W. Norton & Company, 1960.Kephart, Horace. Camp Cookery-Outdoor Cooking Secrets From 1910. Carlisle:
Applewood Books, 2001.Oetting, Rae, and Mabel Otis Robison. Camping and Outdoor Cooking. Minneapolis:
T. S. Denison and Company, 1958.Rutstrum, Calvin, and Leslie Kouba. New Way of the Wilderness. New York:
Macmillan, 1958.The Boy Scout Handbook. Irving: Boy Scouts of America, 2016.
Cruising, Tours, and ExpeditionsBenjamin, John J. Cruising Boats Within Your Budget. New York: Harper, 1957.Duncan, Roger, and Fessenden Blanchard. A Cruising Guide to the New England Coast.
New York: Dodd, Mead and Company, 1959.Jenkins, Elmer. Guide to America. Washington, D.C.: Public Affairs Press, 1953. Wells, George S., and Iris Wells. Handbook of Auto Camping and Motorists Guide to
Public Campgrounds. New York: Harper & Row, 1964.Wells, George S., and Iris Wells. Handbook of Wilderness Travel. New York:
Harper & Row, 1968.
Sailing and RacingAymar, Gordon C. Start ’Em Sailing. New York: Ronald Press Company, 1941.Aymar, Gordon C. The Second Book on Sailing: How to Choose, Race and Cruise Your
Own Boat. New York: Ronald Press Company, 1960.Basic Keelboat. US Sailing Association, 2009.Bavier, Robert N. Jr. Sailing to Win. New York: Dodd, Mead & Company, 1983.Bavier, Robert N. Jr. The New Yacht Racing Rules, Revised Edition. New York:
W.W. Norton & Company, 1969.Blanchard, Fessenden S. The Sailboat Classes of North America. Garden City:
Doubleday, 1968.Calahan, Harold A. Learning to Race. Mineola: Dover Publications, 2000.

256 Appendix
Calahan, Harold A. Learning to Sail. New York: Macmillan, 1972.Coutts, James. Start Windsurfing Right. St. Louis: C. V. Mosby, 1991.George, M.B. Basic Sailing. Croydon: Motor Racing Publications, LTD, 1980.Morris, Everett B. The Able Seaman: A Basic Book of Boating Under Sail or Power.
New York: Cornerstone Library, 1965.Ratsey, Earnest A., and W.H. de Fountaine. Yacht Sails, Their Care and Handling.
New York: W.W. Norton & Company, 1957.Smith, Hervey Garrett. The Small-Boat Sailor’s Bible. New York:
Doubleday & Company, Inc., 1964.Smith, Rufus G. Sailing Made Easy. New York: Dodd, Mead & Company, 1966.Start Sailing Right. US Sailing Association, 1997. The Racing Rules of Sailing 2009–2012. US Sailing Association.
Ship Meeting HelpsAuer, J. Jeffrey. Essentials of Parliamentary Procedure. New York: Prentice Hall, 1974.Auer, J. Jeffrey, and Henry Lee Ewbank. Handbook for Discussion Leaders. New York:
Harper & Brothers, 1947.Bailard, Virginia, and Harry McKown. So You Were Elected. New York:
McGraw-Hill, 1960.Trecker, Harleigh B., and Audrey R. Trecker. Committee Common Sense. Markham:
Whiteside, 1954.
PaddlecraftMason, Bill. Path of the Paddle. Toronto: Kay Porter Books, 1996.
CanoeingDillon, Pamela. Canoeing. Champaign: Human Kinetics, 2009.Foster, Nigel. Open Canoe Technique. Guilford: Falcon Guide, 2004.Gordon, Herbert I. The Complete Book of Canoeing. New Haven: Globe
Pequot Press, 1997.Introduction to Paddling. American Canoe Association. Birmingham: Menasha
Ridge Press, 1996.Jacobsen, Cliff. Basic Essentials: Solo Canoeing. New Haven: Globe Pequot Press, 1999.Jennings, John. The Canoe: A Living Tradition. Buffalo: Firefly Books, 2002.Mason, Bill. Path of the Paddle. Buffalo: Firefly Books, 1999.McGuffin, Gary, and Joanie McGuffin. Paddle Your Own Canoe. Ontario: Boston
Mills Press, 2005.Poling, Jim Sr. The Canoe: An Illustrated History. Woodstock: Countrymen Press, 2001.Ray, Slim. The Canoe Handbook. Harrisburg: Stackpole Books, 1992.Rock, Harry. The Basic Essentials of Canoe Poling. Terre Haute: ICS Books, 1992.Rounds, Jon. Basic Canoeing: All the Skills You Need to Get Started. Mechanicsburg:
Stackpole Books, 2003.Rugge, John, and James West Davidson. The Complete Wilderness Paddler. New York:
Vintage, 1982.

Appendix 257
KayakingAlderson, Doug. Sea Kayaker’s Savvy Paddler. Camden: Ragged Mountain Press, 2001.Burch, David. Fundamentals of Kayak Navigation. Old Saybrook: Globe
Pequot Press, 1993.Burnham, Bill, and Mary Burnham. Kayaking for Everyone. New Haven: Globe Pequot
Press, 2010.Diaz, Ralph. Complete Folding Kayaker. Camden: Ragged Mountain Press, 1994.Dillon, Pam, and Jeremy Oyen. Kayaking. American Canoe Association, Champaign:
Human Kinetics, 2009.Dowd, John. Sea Kayaking: A Manual for Long Distance Touring. Vancouver: Douglas
& McIntyre Ltd., 1988.Essentials of Kayak Touring. American Canoe Association. Birmingham: Menasha
Ridge Press, 2005.Gronseth, George, and Matt Broze. Sea Kayaker’s Deep Trouble and Their Lessons.
Camden: Ragged Mountain Press, 1997.Gullion, Laurie. Canoeing and Kayaking Instruction Manual. Birmingham: Menasha
Ridge Press,1987.Hutchinson, Derek C. Eskimo Rolling. Camden: Ragged Mountain Press, 1992.Hutchinson, Derek C. Expedition Kayaking on Sea and Open Water. Old Saybrook:
Globe Pequot Press, 1995.Johnson, Shelley. The Complete Sea Kayaker’s Handbook. Camden: Ragged Mountain
Press, 2002.Killen, Ray. Simple Kayak Navigation. Camden: Ragged Mountain Press, 2006.Robison, John. Sea Kayaking Illustrated: A Visual Guide to Better Paddling. Camden:
Ragged Mountain Press, 2003.Seidman, David. The Essential Sea Kayaker: A Complete Course for the Open Water
Paddler. Camden: Ragged Mountain Press, 1992.Snyder, Rocky. Fit to Paddle: The Paddler’s Guide to Strength and Conditioning.
Camden: Ragged Mountain Press, 2003.Whiting, Ken. Recreational Kayaking: The Ultimate Guide. Bingham Farms:
The Heliconia Press, 2008.Wyatt, Mike. The Basic Essentials of Sea Kayaking. Old Saybrook: Globe
Pequot Press, 1990.
Stand Up Paddleboard Burgoyne, Nate. The Stand Up Paddle Book. Haleiwa: Lava Rock Media, 2010.Casey, Rob. Stand Up Paddling: Flatwater to Surf and Rivers. Seattle: Mountaineers
Books, 2011.Marcus, Ben. The Art of Stand Up Paddling: A Complete Guide to SUP on Lakes, Rivers,
and Oceans. Santa Monica: Falcon Guides, 2011.
Boatbuilding YouTube has a large collection of videos demonstrating small boat construction
and methods.WoodenBoat magazine has led to a resurgence of interest in traditional wooden
boatbuilding since the early 1970s. It is a good place for information about all aspects and for all skill levels of boatbuilding. The website is http://www.woodenboat.com. Formal boatbuilding instruction is available at the Wooden Boat School: http://thewoodenboatschool.com/boatbuilding/index.php. Its companion, the

258 Appendix
Wooden Boat Store, has materials and plans: http://www.woodenboatstore.com/category/canoes_-_kayaks.
Kits, materials, and plans are available from such commercial suppliers as:Sam Devlin, 10-foot skiff: http://store.devlinboat.com/Bella10.aspx Chesapeake Light Craft: www.clcboats.com Pygmy Boats: www.pygmyboats.com/about-pygmy-boats.htmlIf you do a Web search on the phrase “small boat building,” you will also find a number
of blogs about the building process, and the pros and cons of various building methods and brands. As with many blogs, you will find debates about the “best” boat to build.
A not-for-profit program with useful information is the Alexandria Seaport Foundation: http://alexandriaseaport.org/.
Classic boatbuilding series are Building the Six-Hour Canoe by Richard Butz, John Montague, and William Bartoo (Tiller Publishing, 1994) and Building the Weekend Skiff by Richard Butz and John Montague (Tiller Publishing, 1997).
Paddlecraft Organizations and WebsitesAmerican Canoe Association ACA | Canoe - Kayak - SUP - Raft - Rescue503 Sophia St., Suite 100Fredericksburg, VA 22401Telephone: 540-907-4460 Website: www.americancanoe.org
American Whitewater 1424 Fenwick Lane Silver Spring, MD 20910Telephone: 866-262-8429Website: www.americanwhitewater.org
Paddling.netWebsite: www.paddling.net
USA Canoe/Kayak 230 S. Tryon St., Suite 220Charlotte, NC 28202Telephone: 704-348-4330Website: www.usack.org
United States Canoe Association 53 Ross RoadPreston, CT 06365Website: www.uscanoe.com

Appendix 259
GLOSSARYThe jargon of the sea began with seafaring men centuries ago. Many terms were
added during the golden age of sail, and a few came about later with the advent of steam power and the internal combustion engine.
A few meanings were lost or changed as the basic source of energy was trans ferred from sail to mechanical power. But the flavor of this language was so strong that it has survived and probably will persist for ages.
abaft. Toward the stern; at the rear of a ship.
abeam. The direction at right angles to the keel of the boat.
aboard. On or in the boat.
abreast. Lying or moving side by side.
adrift. Not made fast; lying around loose; at the mercy of wind and wave.
aft. In, near, or toward the stern or rear end of the boat.
after. Toward the stern.
aground. On the bottom; stranded (usually a miserable situation).
ahead. In a forward direction.
amidships. Midway between the bow and the stern, or the front and back of the boat.
anchorage. A sheltered area where boats can anchor in reasonable safety and not interfere with marine traffic.
apparent wind. The wind felt aboard a boat. It is the combination of the true wind and the wind caused by the motion of the boat.
astern. Behind a boat, or in a backward direction.
auxiliary. A boat equipped to be propelled by sail or power, or both used together.
aweigh. Said of an anchor when it is clear of the bottom.
backstay. A wire brace led aft to support a mast against the pressure of the wind.
bark. Three-masted sailing vessel square-rigged on fore and main, with the mizzen fore-and-aft rigged.
barkentine. Three-masted sailing vessel square-rigged on fore, with the main and mizzen fore-and-aft rigged.
barometer. An instrument for measuring atmospheric pressure.
beam. The greatest width of a vessel.
beam sea. A sea running at right angles to the boat’s course.
bearing. The direction of an object from a boat (expressed in compass degrees).
beat. A zigzag course against the wind.
belay. A command to stop; a line is belayed when it is made fast.
belaying pin. A wooden or metal pin fitted into a rail; it is used for the securing of sheets and halyards.
bell. Used aboard a boat as a warning signal, or as a means of announcing time.
below. In the cabin or under the deck.
bend. To connect two lengths of rope; a knot used for this purpose.
bight. Any part of a rope except the ends; usually refers to a curl or loop in a rope.
260 Appendix
bilge. The lowest point of the inner hull of a ship; also, the internal part of a boat below waterline.
binnacle. Protective casing for the compass.
bitt. A stout vertical post used for taking the heavy strain of lines used in mooring or anchoring. Bitts may be bolted to the deck, or through the deck and stepped at the keel. Bitts are sometimes fitted with round metal pins (called “norman pins”) near the bitt’s head to aid in belaying a line.
bitter end. The last part of a rope, or the last link in an anchor chain.
block. A mechanical device used for transmit-ting power or changing the direction of motion by means of a rope or chain passing around movable pulleys.
boom. A spar at the foot of a fore-and-aft sail to which the sail is secured.
boom crutch. A notched upright board, or metal structure, into which the boom fits when the sails are furled or off the spars.
bow. The forward or front end of a vessel.
bow chocks. Metal fittings on the deck at the bow through which anchor and dock lines are fed.
bowsprit. A spar to which the headsails are attached, extending forward beyond the bow.
brightwork. Woodwork on a vessel which is varnished or finished to show its grain. Also refers to polished metal parts.
broach to. Said of a vessel under sail when running with the wind on the quarter when the ship’s head comes up suddenly toward the wind in conse quence of a sea striking the stern or through bad steering.
bulkhead. A wall or partition between compartments—often watertight for safety.
bunk. Sleeping berth; also, something reported that is not done or not true.
buoy. A floating marker anchored to the bottom.
cable. A rope or chain secured to the anchor.
cast off. To let go of a line.
caulk. To make seams watertight by filling them with cotton, oakum, or caulking compound.
centerboard. A movable plate of wood or metal pivoted at its forward end that can be raised or lowered through the keel of a sailboat to prevent sliding to leeward.
chafing gear. A wrapping of canvas or rope around spars, rigging, or lines to prevent chafing.
chart. Marine version of a road map show-ing aids to navigation, shoals, water depth, dangers, etc.
chine. The curved or angular part of the hull where the bottom and sides meet.
clear. Free, not entangled.
cleat. A horned fitting of wood or metal to which lines are made fast.
clew. The aft lower corner of a sail.
close-hauled. Sailing as close to the wind as possible.
coaming. A protective rail higher than the deck to keep water out of the cockpit.
cockpit. Open part or well of the boat where passengers sit and the helms man steers.
coil. To arrange a line in easily manageable loops so it can be stowed.
colors. The ceremony of raising or lowering the national ensign and other recognized flags.
come about. To change the course of a ship when sailing by the wind so it will sail at the same angle with the wind on the other side.
course. The direction steered by the helmsman.
cringle. A ring sewn into the sail so a line can be passed through it, like a grommet in the edge of a tent.
cross bearing. Two or more bearings of known objectives noted and plot ted on a chart to determine the ship’s position.
current. The movement of water in a horizontal direction.
dead reckoning. A method of navigation by which the position of a ship is calculated from its last well-determined position and its subsequent direc tion and rate of progress through the water.
deviation. The change in the compass read-ing caused by the magnetic influence of the iron, steel, or electronics aboard a boat and its equipment.
displacement. The number of tons of water displaced by a vessel afloat.
ditty bag. A small bag for carrying or stowing all personal articles.

Appendix 261
downwind. To leeward.
draft. Depth of a hull from the waterline to the lowest part of the keel.
ease. To slacken or loosen.
ensign. The flag of the United States of America or other nation. Also the flag of the U.S. Power Squadrons, U.S. Coast Guard Auxiliary, a yacht ensign flown by documented yachts.
fast. A rope or chain by which a vessel is moored to a wharf, pier, quay, etc.
fathom. A unit of water-depth equivalent to 6 feet.
fenders. Portable bumpers hung over the sides to protect the hull from contact with a pier, wharf, or other boat.
fid. A tapered wooden tool used to separate the strands of a rope before splicing.
fitting. General name for ship’s hardware.
fix. A term denoting the determination of a ship’s position by observation of celestial or terrestrial objects, or by a combination of both.
flake. A method of loosely stowing line that is too thick or too long to coil. Flaking down a line involves laying it onto a deck in figure eights. Each figure eight is a “fake.” A line with multiple fakes has been “flaked down.”
flemish down. Line that has been secured on a deck in a tight, flat coil resembling a mat.
flotsam. Floating trees, plants, driftwood, wreckage, etc. (any “stuff” floating).
fluke. The flattened end of an anchor arm.
fore and aft. In line with the keel; from stem to stern; lengthwise.
forestay. A stay leading from a mast forward.
forward. Toward the bow.
foul. Not clear; jammed; tangled.
freeboard. The distance between the waterline and the main deck or gunwale.
galley. Kitchen aboard a boat.
gear. Name applied to blocks, tackle, ropes, and other equipment used in operating a boat.
give-way vessel. The vessel which, according to the rules of the road for two approaching vessels, must keep out of the way of the other.
ground tackle. The anchor and anchoring gear.
gunwale. “Gunnel”; upper edge of a boat’s side.
halyard. A line used for hoisting sails.
handsomely. Gradually or carefully, as when slacking or easing a rope on which there is a strain.
hatch. An opening through the deck to a cabin or area below.
haul. To tighten or pull in (like hauling the anchor, for instance). A change of wind in a counterclockwise direction.
hawse pipe. Opening in the bow of a vessel from which the anchor line is passed.
hawser. Fiber rope 5 to 24 inches in circumfer-ence used for towing or working the ship.
head. The toilet aboard a boat; the bow area of the boat.
heading. The direction in which a ship actually points or heads at any particular moment.
heave. To throw; the rise and fall of a vessel at sea.
heave in. To pull (as on an anchor line).
heave to. To put a sailing vessel in the position of lying to, by putting the helm down and causing the sails to counteract each other.
heaving line. A light line, or messenger, attached to a heavier line and thrown to a pier or other vessel.
heel. A boat heels when it inclines to one side or the other. There is a transverse tilt when the hull is off the vertical.
helm. The steering device; tiller, wheel.
helmsman. The person who steers.
hitch. To tie a rope to an object; a knot used for this purpose.
hook. Sailor’s name for an anchor.
hull. The main body or shell of a boat, exclusive of superstructure.
jetsam. Things that sink in the water— they don’t float like flotsam.
jib. A triangular sail set ahead of the foremast on a sailboat.
jibe. Bringing a sailboat from one tack to the other by swinging her stern across the wind, in order to bring the sails to the other side. To shift suddenly and with force from one side to another when running before the wind.
jib sheet. The line by which the angle of the jib is controlled.
jury rig. A makeshift rig.
262 Appendix
keel. The backbone of the boat; the basic support extending from stem to stern.
knot. A measure of speed; the velocity in nautical miles (6,076 feet) per hour.
lee. Pertaining to the part or side away from the wind, or which is sheltered from the wind.
leeward. “Loo-ard;” toward the lee side; away from the wind.
leeway. A drift to leeward, or in the direction toward which the wind is blowing.
lines. Ropes used for various purposes aboard a boat.
locker. A chest, box, cabinet, or closet used as a storage compartment.
log. A record of a vessel’s activities; also, an instrument for measuring distance traveled.
logbook. A record of all the activities of a ship.
luff. The forward or entering edge of a sail.
luffing. The quivering of the sail when sailing almost directly into the wind.
mainsail. The boat’s main or principal sail. It is the sail set on the mainmast.
mainsheet. The line by which the trim (angle) of the mainsail is controlled.
make fast. To secure the belaying turns of a rope around a cleat or belaying pin by adding a single hitch.
marlinspike. A pointed steel tool used by seamen to separate the strands of rope when splicing; also, it can be used as a lever when putting on seizings, marline, etc.
midships. A term describing the position of an object midway between the stem and stern, or midway between the sides of the hull.
mizzenmast. The aft and shorter of two masts on yawls and ketches; the aftermost of three masts on a three-masted schooner, ship, or bark.
nautical mile. Known as a sea mile; it is 6,076.11549 feet long; usually rounded off to 6,076 feet.
navigation. Usually refers to celestial naviga-tion, the determination of a ship’s position by observation of celestial bodies (sun, moon, planets, and stars). Electronic navigation involves the use of electronic devices such as radio direction finders, radar, and satellite navigation aids.
outboard. Toward the sides of a vessel or outside of it.
outhaul. A device or line used to haul out the clew (aft corner) of a sail along a boom.
painter. A line at the bow of a small boat or canoe for securing it.
pay out. To slack away (let out) a line made fast on board.
peak. The angle formed by the head and leech of a gaff sail. The greater the angle, the less peak the sail is said to have.
pelorus. A movable compass card swung in gimbals and with a sighting apparatus through which the observer may sight on an object.
piloting. A near-shore navigation method by which the movements of a ship are directed by reference to landmarks, other navigational aids, and soundings.
point. The ability to sail close into the wind.
port. The left side of a vessel looking toward the bow.
quarter. That part of a craft lying within 45 degrees from the stern; starboard or port quarter, depending whether aft right or left corner is referred to.
quarterdeck. The stern deck area of the vessel; on Navy ships, the deck area at the head of the gangway.
rail. The boat’s side above the deck line.
reef. To reduce sail area.
reeve. To thread a rope through a block.
rigging. A general term for all ropes, chains, and gear used for supporting and operating masts, yards, booms, stays, and sails.
right of way. The legal right and obligation to hold one’s course and speed.
rode. The length of cable measured from the hawse hole to the anchor.
rope. A general term for cordage over 1 inch in circumference.
rudder. A device that is used for steering and maneuvering a vessel.
rules of the road. The rules and regulations accepted by international agreement and enforced by law in maritime countries, which govern the movements of ships when approaching each other.
running. Sailing with the wind astern.

Appendix 263
running rigging. All rope or wire lines used to control sails.
sail. A piece of fabric of some kind spread to the wind to cause, or assist in causing, a vessel to move through the water.
scope. The ratio between the anchor rode and the depth of the water. A ves sel anchored in 10 feet of water with 70 feet of anchor cable out is riding at a scope of 7 to 1.
seam. The joint between adjacent planks.
secure. To make fast a line, or to leave a boat safely moored or tied up with everything aboard shipshape; also, to tie down a movable part.
seize. To bind, lash, or make fast one rope to another, a rope to a spar, etc.
shackle. A wrought-iron or steel fitting with a pin across the throat, used as a connection between lengths of chain.
sheave. A grooved wheel in a block, mast, or yard over which a rope passes.
sheet. A rope or chain fastened to one or both of the lower corners of a sail or beam and used to extend it or to change its direction.
shipshape. In correct fashion aboard a ship; everything orderly, secure, and in its place.
shrouds. Wire stays leading from the upper part of the mast to the deck on either side to provide lateral support.
sister hook. Two hooks opposed to each other and pivoted together on their shanks. Sister hooks are intended to allow materials (such as lines or cargo) to pass between the two hooks and then hold the materials fast under tension.
snub. To check a rope or line from running out by making a turn about a cleat, piling, or post.
spars. All booms, masts, gaffs, etc., to which a sail may be set.
spreaders. Short spars extending from each side of the mast to spread the shrouds and give them greater mechanical advantage to keep the mast straight.
stand-on vessel. The vessel which, according to the rules of the road for two approaching vessels, has the right of way and is obligated to maintain course and speed.
starboard. The right side of a vessel, looking forward.
stay. Rigging; a wire or line that supports a mast.
stern. The aft part or back end of a vessel.
swab. A seagoing name for a mop (one swabs down, not mops up).
tack. To change the course of a ship by turning her through the wind so she will sail at the same angle but with the wind on the other side.
tiller. The handle attached to the rudder by which the boat is steered if it is not equipped with a wheel.
topsides. The sides of the hull above the waterline.
transom. The framework of the stern; the boards forming the flat stern area of any boat not having a pointed stern.
trim. The way in which a boat floats; the set of a boat’s sails.
true wind. The direction of the wind as observed from a stationary object.
underway. A vessel is underway when it is neither anchored, moored, nor aground. It need not be in motion to be underway.
variation. Difference in direction between true north as determined by the Earth’s axis of rotation and the magnetic north determined by the Earth’s magnetism.
veer. To slack off and allow to run out (for instance, veering more anchor line). A change of wind in a clockwise direction.
wake. The track a vessel leaves astern.
watch. The part of a ship’s company employed in working it at one time.
way. The progress or motion through the water of a vessel. A vessel gathers way when its rate of sailing increases. Don’t confuse “making way” (in motion) with “underway” (neither anchored, moored, nor aground).
weather side. The windward side; the side toward the wind.
windward. “win’ard;” the direction from which the wind is blowing.
yaw. A vessel yaws when it swings widely from one side of the course to the other—usually when running before heavy, quartering seas.


Appendix 265
CREDITSThe Sea Scouts, Boy Scouts of America, gratefully acknowledges the contributions of
the following people for their help in preparing the Sea Scout Manual, 12th edition.
Project DirectorCassie Johnson, National Sea Scout Support Committee
EditorialKeith ChristopherT.W. CookGeorge CrowlDon GoffDon HenryJimmie L. HomburgBruce JohnsonCassie JohnsonDavid NoserRobin PopePeter SchmidtAdam TunksCharles Wurster, VADM, USCG (retired)

266 Index
abandon ship drill, 91 procedure, 88abdominal thrusts, 100Able rank requirements, 53–56activity chair, 15, 16activity committees, 34adult leader responsibilities, 15advancement, 47, 49–63 review, 47 scoreboards, 62–63AIS (Automatic ID System), 207all-round light, 178America’s Cup, 139anaphylactic shock, 161–162anchor cable, 167anchoring, 167–168 commands, 168anchors, parts of, 163 selecting, 164–166 stowing, 166–167anchor types, 164–165 CQR anchor, 164 Danforth anchor, 163, 164 drogue, 164 grapnel, 164 homemade anchor, 164 mushroom anchor, 164 navy anchor, 164 Northill anchor, 164 old-fashioned anchor, 164 plow anchor, 164 sea anchor, 165 stockless anchor, 164 yachtsman’s anchor, 164anemometer, 211ANS, see aquatic nuisance speciesApprentice rank requirements, 49–50aquatic nuisance species, 231–232aquatics awards, 68–69Aquatics Supervision training, 156–157assistant crew leader, 14asthma, 162Automatic ID System (AIS), 207awards, 68–70, 239, 245
back splice, 120barometer, 210beacons, 181bearings, 202–203 relative, 220Beaufort Wind Force Scale, 212–213becket bend, 115
bells, 219bends, 109, 115 becket bend, 115 carrick bend, 115 double carrick bend, 115 sheet bend, 115bight, 109bleeding, 99block, 124boarding a vessel, 40–41Boardsailing BSA award, 68boat, see vesselboatswain, 12boatswain’s mate for administration, 13boatswain’s mate for program, 13boatswain’s pipe, 40bow, 127bowline, 111bowline on a bight, 112braided rope, splicing, 120bridge of honor, 48BSA Lifeguard award, 68BSA Mission Statement, inside back coverBSA Stand Up Paddleboarding award, 69BSA swimmer test, 156BSA Vision Statement, inside back coverbuoys, 181, 183 dependence on, 185 lighted, 183, 185, 186 sound, 185 unlighted, 186bylaws, 16 sample, 17
cable-laid rope, 106canoes, 150–151 paddling, 151cans, 183canvas seams, 122–123canvas-sewing equipment, 122capstan, 170carrick bend, 115chain, marking, 167channel-marker shore light, 186charcoal, 103chart plotting, 200–202charts, 189–192chip log, 195cleat hitch, 114clouds, 215–216clove hitch, 113coaching tips, 31Coast Guard warning signals, 209coil, 106
Index

Index 267
coiling a line, 106collision, determining risk of, 175 emergency procedure, 86coming about, 135commands, anchoring,168 docking, 141 helm, 221 jibing, 136 tacking, 135common whipping, 116communication, 38, 92–95compass, 192compressed natural gas, 103consultants, 11, 34Coordinated Universal Time (UTC), 196courtesy, 39, 139CQR anchor, 164crew leader, 14crossing situation, 177cruise log, 222current, 202customs and courtesies, 39–45 boarding a vessel, 40–41 boatswain’s pipe, 40 courtesy, 39 double salute, 40 flag history, 41–42 flag protocol, 42–45 handshake, 39 piping the side, 40–41 salute, 39 sign, 39cutter, 131
damage control drill, 91Danforth anchor, 163, 164danger bearing, 205danger marks, 184daybeacons, 182dayboards, 184day shapes, 179dead reckoning, 198dead reckoning position, 202deck log, 194, 198–200dehydration, 160demonstration tips, 31depth sounder, 208deviation, 193–194 table, 194dinghy, 140distance, calculating, 197distress signals, 80–81dock, 141
docking, 143–145 commands, 141dory, 139double bowline, 112double-braided rope, splicing, 120double carrick bend, 115double purchase tackle, 126double salute, 40double the angle on the bow, 205draft, 127dress uniform, 20–22drills, 88–91drogue, 164Dutchman’s log, 195–196
Eagle Scout Award, 48ebb current, 202electronic depth sounder, 208electronic fixes, 206–207emergencies, handling, 84–88emergency drills abandon ship, 91 damage control, 91 fire, 90 man overboard, 88–90emergency messages, 95emergency procedures abandon ship, 88 collision, 86 fire, 86 fog, 87 heavy weather, 86–87 man overboard, 85 running aground, 87–88emergency response plan, 159end, 109environment, 229–232EPIRB (Emergency Position-Indicating Radio Beacon), 80estimated position, 202ETA (estimated time of arrival), 198ETE (estimated time en route), 198eye splice, 117–118eye splice in double-braided rope, 120
fall, 109falling overboard, 162fiberglass craft, repairing, 227fid, 11750-Miler Award, 69figure eight knot, 110fire, classes of, 83 drill, 90 emergency procedure, 86

268 Index
extinguishing, 83–84 preventing, 82–83fire extinguishers, 83–84first aid, 98–102 outdoor-oriented, 158first-aid kit, 99fisherman’s knot, 112fitting out, 223fixes, 202–208fix by three bearings, 203fix by two cross bearings, 203fixing, 202 by sounding, 208 electronically, 206–207 in limited visibility, 208 visually, 203–205flag history, 41–42flag protocol, 42–45flaking a line, 106flashing light, 178flat seams, 122–123flemish coil, 107float plan, 149flood current, 202flotation devices, 76fog emergency procedure, 87food safety, 104freeboard, 127French bowline, 112fundraising, 39
Gale Warning, 210galley safety, 103garbage, disposing of, 230–231geographic north, 193geographic range, 182Global Positioning System, see GPSGMT (Greenwich Mean Time), 196goosewing jibe, 136GPS (Global Positioning System), 156, 206, 208grapnel, 164gray water, 231Greenwich Mean Time (GMT), 196grommets, 123–124ground log, 196ground tackle, 163 stowing, 166–167guest speakers, 31gun tackle, 125
half hitch, 113handshake, 39hardware, 224–225hawser, 106hazardous materials, 230
head-on situation, 176heat exhaustion, 101–102heat index, 213heat-sealing synthetic rope, 116heatstroke, 160heaving a line, 145heavy weather emergency procedure, 86–87helm commands, 221heroism awards, 70herringbone stitch, 123Historic Trails Award, 69hitches, 109 cleat hitch, 114 clove hitch, 113 half hitch, 113 marline hitch, 114 midshipman’s hitch, 114 rolling hitch, 114 taut-line hitch, 114 timber hitch, 113 trucker’s hitch, 115 two half hitches, 113homemade anchor, 164 hooks, mousing, 126Hornaday Award, 70hull, 127Hurricane Warning, 210hurry rescue cases, 99–100hypothermia, 101
ICW, see Intracoastal WaterwayILSS (Introduction to Leadership Skills for Ships), 15incident response, 159–162inertial navigation system, 207insignia, 238–246 placement of, 19, 22–23, 26International Code flags, 98, 236Intracoastal Waterway, 186 navigation aids, 234Introduction to Leadership Skills for Ships, 15
jellyfish stings, 162jibing, 135–136 commands, 136
Kayaking BSA award, 68–69kayaks, 152–153 paddling, 152keel, 127ketch, 132knot tying, 109knots, 109 bowline, 111 bowline on a bight, 112

Index 269
double bowline, 112 figure eight knot, 110 fisherman’s knot, 112 French bowline, 112 overhand knot, 110 reef knot, 110 running bowline, 111 slipknot, 112 square knot, 110 stevedore’s knot, 111knots (nautical miles), 195
latitude, 190laying up, 223lead line, 208lettering, 185–186life jackets, 75–76lighted buoys, 183, 185, 186lighthouses, 182light list, 181, 187lightning, 161, 216lights, 178 conforming to Rules 23–31, 237 on bridges, 187 on locks, 187 visibility of, 178, 182lights and shapes rules, 177–179lightweight anchors, 164limited visibility, fixing in, 208line, coiling, 106 flaking, 106 heaving, 145line of position, 202–203loading, improper, 104logbook, 38long cruise, planning, 35–37Long Cruise badge, 67–68longitude, 190long splice, 119–120lookout, 174, 220low head dams, 104luff tackle, 126luminous range, 182
magnetic north, 193maintenance, 222–228maneuvering, proper, 175maneuvering signals, 179–180man overboard drill, 88–90 procedure, 85 waypoint, 206Marine Distress Communications Form, 94marine sanitation device, 231marline hitch, 114
marlinspike, 105marlinspike seamanship, 105MARPOL treaty, 231masthead light, 178mates, 15Mayday, 95media specialist, 14meetings, 27–29 activity session, 31 guest speakers, 31 hints, 30–31 quarterdeck, 32–33 ship business session, 30 two-part program, 30–31Mercator projection, 189meridians, 190midshipman’s hitch, 114Mile Swim BSA award, 69Mississippi River, see Western River Systemmobile phones, 156, 159MOB waypoint, 206mooring a powerboat, 142 a sailboat, 143 to pier, 141–142mooring buoy, docking to, 143Morse Code, 96mushroom anchor, 164
National Weather Service, 209nautical mile, 190, 197navigation, 189 aids, 181–187, 233–235navigation rules, 173–180 Rule 2, Responsibility, 173–174 Rule 3, General Definitions, 174 Rule 5, Lookout, 174 Rule 6, Safe Speed, 174 Rule 7, Risk of Collision, 175 Rule 12, Conduct of Vessels in Sight of One Another, Sailing Vessels, 176 Rule 13, Overtaking, 176 Rule 14, Head-On Situation, 176 Rule 15, Crossing Situation, 177 Rule 18, Responsibility Between Vessels, 177 Rule 21, Definitions, 178 Rule 22, Visibility of Lights, 178 Rule 23, Power-Driven Vessels Underway, 178 Rule 25, Sailing Vessels Underway and Vessels Under Oars, 178 Rule 34, Maneuvering and Warning Signals, 179–180 Rule 35, Sound Signals in Restricted Visibility, 180

270 Index
Navigation Rules, International and Inland, 173navy anchor, 164New Century universal Sea Scout uniform, 18–19, 20, 247nominal range, 182Northill anchor, 164nuns, 183
officer responsibilities, 13–14oil, 229–230old-fashioned anchor, 164Ordinary rank requirements, 50–53overhand knot, 110overhand loop, 109overloading vessel, 104overtaking, 176
paddleboards, see stand up paddleboardspaddlecraft, 149 lights for, 178 personal safety skills, 155–156paddles, for canoeing, 150 for kayaking, 153 for stand up paddleboarding, 154paddling canoe, 151 kayak, 152paint, 226palm-and-needle whipping, 116Pan Pan, 95parallels, 190patch, 123patent log, 195pelican hook, 224personal safety skills, 155–156pier, 141 mooring to, 141–142piloting, 189piping the side, 40–41pitot tube, 194plain-laid rope, 106plastics, 230–231plow anchor, 164points of sailing, 134polyconic projection, 190–191port, 127portage yoke, 151port-side navigation aids, 183powerboat, 139–140; see also vessel getting underway, 140–141 lights for, 178 mooring, 142pram, 140pressurized alcohol, 103
prime meridian, 190propane, 103psychrometer, 211publicity, 38punt, 139purser, 14
Qualified Seaman requirements, 66–67quarterdeck meetings, 16, 32–33quarterdeck training, 15–16Quartermaster Award, 48Quartermaster rank requirements, 56–61
racing, 138radar, 207radio direction finder, 207radiotelephone procedures, 92–93 alphabet, 92–93 prowords, 92rafts, 155range lights, 187rank requirements Able, 53–56 Apprentice, 49–50 Ordinary, 50–53 Quartermaster, 56–61recognition, 64–70recruiting, 38reef knot, 110reflectors, 187relative bearings, 220religious emblems, 70rescue breathing, 100responsibility, between vessels, 177 general, 173–174restricted visibility, sound signals in, 180risk management, 157–159risks, keeping in perspective, 162 managing, 159 preparing to manage, 158–159river chart, 187river gauges, 187rolling hitch, 114rope, 105–106 care of, 108 elasticity of, 107 heat-sealing, 116 lay of, 106 sizing, 107 splicing, 117–120 tensile strength, 108 weight and strength specifications, 108 whipping, 116round seams, 122

Index 271
round turn, 109rowing, 147–148rules, see navigation rulesrunner tackle, 125running, 137running aground emergency procedure, 87–88running bowline, 111running fix, 204
safe speed, 174Safe Swim Defense, 71–74safety, general, 102–104Safety Afloat, 74–78safety equipment, 79–80safety skills, paddlecraft, 155–156safe water marks, 184sailboat, see sailing vesselsailing, 133–139 rules, 174–177sailing vessel, see also vessel conduct of, 176 getting underway, 133–134 lights for, 178 mooring, 143 preparing to sail, 133 racing, 138 rules of the road, 138 types of, 130–132sails, parts of, 128, 129 repairing, 123–124 types of, 128salute, 39scale, 191schooner, 132scoreboards, 62–63Scout handshake, 39Scout Law, inside front coverScout Oath, inside front coverScout salute, 39Scout sign, 39sea anchor, 165SEAL training, 64seams, canvas, 122–123Sea Promise, inside front coverSea Scout emblem, inside back coverSea Scout Marksmanship Award, 68 requirements, 249–251Security, 95Seelonce, 95seizings, 121semaphore signaling, 97sewage, disposing of, 231shackle, 225shark attack, 162
sheet bend, 115ship committee, 5, 11 management, 16 organization, 11–12ship code, 16 sample, 17short splice, 118–119shots, 167side lights, 178signaling, 95–98signals, Coast Guard warning, 209 maneuvering, 179–180 warning, 179–180 water-skier, 146single whip tackle, 12560 D Street, 197, 198skiff, 139Skipper, 15slip, 141slipknot, 112sloop, 130Small-Boat Handler requirements, 64–66Small-Craft Advisory, 210small craft construction, 227–228 plank on frame, 227 stitch and glue, 228 strip-built, 228Snorkeling BSA award, 69sound buoys, 185sounding, fixing by, 208sound signals in restricted visibility, 180Special Marine Warning, 210specialist, 14speed, measuring, 194–196speedometer, 194splicing, 117 back splice, 120 braided rope, 120 eye splice, 117–118 eye splice in double-braided rope, 120 long splice, 119–120 short splice, 118–119square knot, 110standing part, 109stand up paddleboards, 154–155starboard, 127starboard-side navigation aids, 183station bill, 84–85statute mile, 195steering rules, 174–177stern, 127stern light, 178stevedore’s knot, 111stockless anchor, 164

272 Index
stopped breathing, 100storekeeper, 14Storm Warning, 210sunburn, 161Sunfish, 130superactivity, planning, 35–37surfboat, 140synthetic rope, heat-sealing, 116
tacking, 135 commands, 135tackle, 125making, 126reeving, 126types of, 125–126tackle types double purchase tackle, 126 gun tackle, 125 luff tackle, 126 runner tackle, 125 single whip tackle, 125 twofold tackle, 126taffrail log, 195tape, 123taut-line hitch, 114thermometer, 211thimble, 225thoroughfoot, 107thunderstorms, 216tidal currents, 202tide tables, 202timber hitch, 113time, 196–197 conversion, 197tools, 224 safety, 102–103traditional uniform, 20–22trailering a boat, 146–147Tropical Storm Warning, 210trucker’s hitch, 115true north, 193tuck, 117turn, 109turnbuckle, 225twofold tackle, 126two half hitches, 113two-part program meetings, 30–31
underhand loop, 109uniforms, 18–25 dress, 20–22 insignia placement on, 19, 22–23, 26 New Century universal, 18–19, 20, 247 sources of, 24–25 traditional, 20–22, 24, 25 work, 20–22
universal Sea Scout uniform, 18–19, 20, 247unlighted buoys, 186UTC (Coordinated Universal Time), 196
variation, 193varnish, 226vessel, see also powerboat boarding, 40–41 hardware, 224–225 maintaining, 222–228 parts of, 127–128, 129 safety, 102 sailing, see sailing vessel selecting, 18 trailering, 146–147Vessel Safety Check, 80visibility of lights, 178, 182visual fixes, 203–205visual marine distress signals, 80–81
warning signals, 179–180, 209warping, 144waste, disposing of, 230–231watches, 219water pollution, 229–231waterskiing, 145–146waterspouts, 217waypoints, 206weather, monitoring, 209–214 underway, 214–217weighing anchor, 168–169Western River System, 186–187 navigation aids, 235wharf, 141whipping, 116 common, 116 heat-sealing synthetic rope, 116 palm-and-needle, 116wind chill, 214windlass, 171wind vane, 212wing and wing, 134, 137wire rope, 121work uniform, 20–22
yachtsman’s anchor, 164yawl, 131yeoman, 13youth officer responsibilities, 13–14
zone time, 196Zulu Time, 196

SEA SCOUT MANUAL
12th Edition
33239ISBN 978-0-8395-3239-2©2016 Boy Scouts of America2016 Printing
SKU 620543
33239 2016 Printing