search engine tracker for miva merchant - cbstech.com must first confirm that you have at least...
TRANSCRIPT
CustContactfor Miva Merchant™
Customer Service Capabilities
Product Manual

COPERNICUS BUSINESS SYSTEMS 2
Table of Contents
Module Description .................................................................................................................... 3 Key Benefits............................................................................................................................ 3 Example Usage ....................................................................................................................... 5
Theory of Operation.................................................................................................................... 6 General Theory ....................................................................................................................... 6 Module Theory........................................................................................................................ 6
Module Installation and Upgrading ............................................................................................ 7 Domain Installation of Module............................................................................................... 7 Store Installation of Module ................................................................................................... 9 Module Upgrading................................................................................................................ 11
Module Usage ........................................................................................................................... 13 Module Configuration........................................................................................................... 13 CBS – CustContact Tab (Store Utility Configuration) ......................................................... 14 CustContact Categories Tab (Store Utilities Configuration) ................................................ 16 CustContact Types Tab (Store Utilities Configuration) ....................................................... 18 Contact Page and Contact History Page Link on Storefront................................................. 20 CustContact Queue (Utilities Menu) .................................................................................... 25 CustContact History Menu (Utilities)................................................................................... 31 CBS-CustContact Tab (Edit Customer)................................................................................ 34 CBS-CustContact Tab (Order).............................................................................................. 37 Shopper Screen Shots and Correspondence Process ............................................................ 40
Legal Information ..................................................................................................................... 43 Copyright Information .......................................................................................................... 43 Corporate End User License Agreement .............................................................................. 45
COPERNICUS BUSINESS SYSTEMS 3
•
Module Description The CustContact module is a mini-help desk system specifically designed to work with your Miva Merchant storefront. Your customers log onto a special “Contact Us” page that they can use to send you messages that are categorized, tracked and can be responded to – all through the Merchant admin! Customers have their own “Contact Us” page where they can view the history of their communication with you, view any updates since they last logged on and of course, send another message to you!
Key Benefits • Create a “Contact Us” page that serves as the communications hub for your customers.
o Set up header/footer o Develop text displayed on page o Configure look and feel
• Receive an email alert when new communication is added o Configure who receives the email alerts o The email can optionally include the body of the message
Send an email to your customer when a new communication is added o Use text and tokens in the header and footer of this email o The email includes a link back to the Contact Us page for the customer to view the new
communication o The email can optionally include the body of the message using tokens
• Track the communication between you and your customer based on: o Order number o Customer name o Customer Account
• Control the communications center internally o Set permissions so that only certain employees can view tickets o Reply to tickets from many sections of the admin including customer account and order o Prioritize tickets o Close tickets
The CustContact module is a mini-help desk system specifically designed to work with your Miva Merchant storefront. Your customers log onto a special “Contact Us” page that they can use to send you messages that are categorized, tracked and can be responded to – all through the Merchant admin! Customers have their own “Contact Us” page where they can view the history of their communication with you, view any updates since they last logged on and of course, send another message to you!
COPERNICUS BUSINESS SYSTEMS 4
The module allows you to configure the “Contact Us” page that the customer uses to send an inquiry or request to your business. You can configure the messages that they see when they click on the page, the header and footer of the page and in general, the look and feel of this page. When a customer adds a comment or request to their “Contact Us” page, the Merchant admin can send an email to the employee in charge of managing this particular type of communication to alert them that there is new communication that needs to be handled. When the customer visits your “Contact Us” page, he is initiating a conversation that will be recorded for him and tracked by the Merchant admin. This communication can be tracked by order number, customer name, account ID or all three. In order to reply to the customer who has asked for assistance, you log into the Merchant admin, and respond to his message. An email is sent to the customer informing him of an update to his “Contact Us” page and contains a link to that page. The customer then returns to the “Contact Us” page to view the updated correspondence. You can choose to have the message that you have created included in the email to the customer if you do not want to require the customer to return to your storefront to view the message from you. In order to contact the store again, the customer will need to return to his Contact Us page to send another message back to the storefront. From the Contact Us page, the customer has access to all of the history of this communication and can add additional correspondence to you. Within the Merchant admin, you can view and update the person assigned to handle each message ticket, you can prioritize the tickets, see all of the information associated with a ticket, and you can close the tickets when they are completed. You can create permissions Groups so that as the administrator of the storefront, you can limit what other employees can access when they are answering tickets. Additionally, you can initiate a contact through the admin – so, if a customer calls in with a request for assistance and you still want to track it as you do for your internet-based customers, you can add a new contact through the Merchant Admin.
The Customer Suite of modules, CustCredit, CustReturns, CustRMA and CustContact can each be used separately but are best when used together as a comprehensive customer service solution.
COPERNICUS BUSINESS SYSTEMS 5
Example Usage A storefront that sells cakes and jelly beans online has seen a surge in customer communication and cannot keep up with all of the requests. Unknowingly, the storefront owner missed a few questions that came in over the holidays through his website. There were three new customers who had contacted him asking questions about his jelly bean selection. Since he never answered the questions that these new customers were asking, he lost them as customers. Now they buy jelly beans from their local grocery store and ship them through Mail Boxes etc. The worst part of this story is that he didn’t even know that he lost these new customers. The Solution. Then, the storefront owner learned about the CustContact module from Copernicus. He learned about a whole new way to keep track of customer communications. His customers and potential new customers can log onto his “Contact Us” page and he knows every question and response. He’s never been more confident of his ability to keep track of his customer communications!

COPERNICUS BUSINESS SYSTEMS 6
Theory of Operation General Theory In the early years of e-commerce, the technical hurdles of creating a functioning storefront had to be the focus of any online retailer since the store, simply put, had to work. A few years later….. with the technical hurdles taken care of by Miva Corporation and many third-party module programmers, Miva Merchant storefront owners can focus on other areas to help improve the customer experience. As storefront owners search for ways to improve sales, the old-fashioned need for customer service is clear. Even though in e-commerce the store owner and shopper may never actually meet, the need for the customer to be attended to does not change. Customer Service is an area where an online retailer can quickly differentiate their business from other e-commerce options on the Internet. If the “Customer is King,” he will quickly know it and will become loyal to your site. Gaining customer loyalty is simplified by utilizing technology that reaches out to your customers to let them know that you care. The Copernicus Customer Service Suite was designed with this in mind. By utilizing these tools, you can provide your customers with the type of service that other large online retail outlets offer such as making the returns process easy and improving methods of communication.
Module Theory The CustContact module is a mini-help desk system that allows a storefront to receive and respond to messages from their customers. All correspondence takes place within the Miva Merchant system and is tied to the customer’s account and the specific order about which the customer initiated the message. The customer can access a Contact Us page on the storefront and can submit messages, view the messages he has put into the system, view the responses from a store representative and enter additional follow-up messages all through the Contact Us page. Within the Miva Merchant admin, the storeowner can view messages from the customer and respond to those messages. Additionally, the storeowner can assign messages of a pre-determined type to specific members of the store’s team. Then, when the team member logs into the Miva Merchant admin, he can view (and respond to) a queue of just those messages assigned to him. Additionally, team members can view and respond to the messages both by customer account and by order number. This mini-help desk system keeps all customer correspondence within the Miva Merchant store and allows for easy tracking for both the storeowner and the customer.
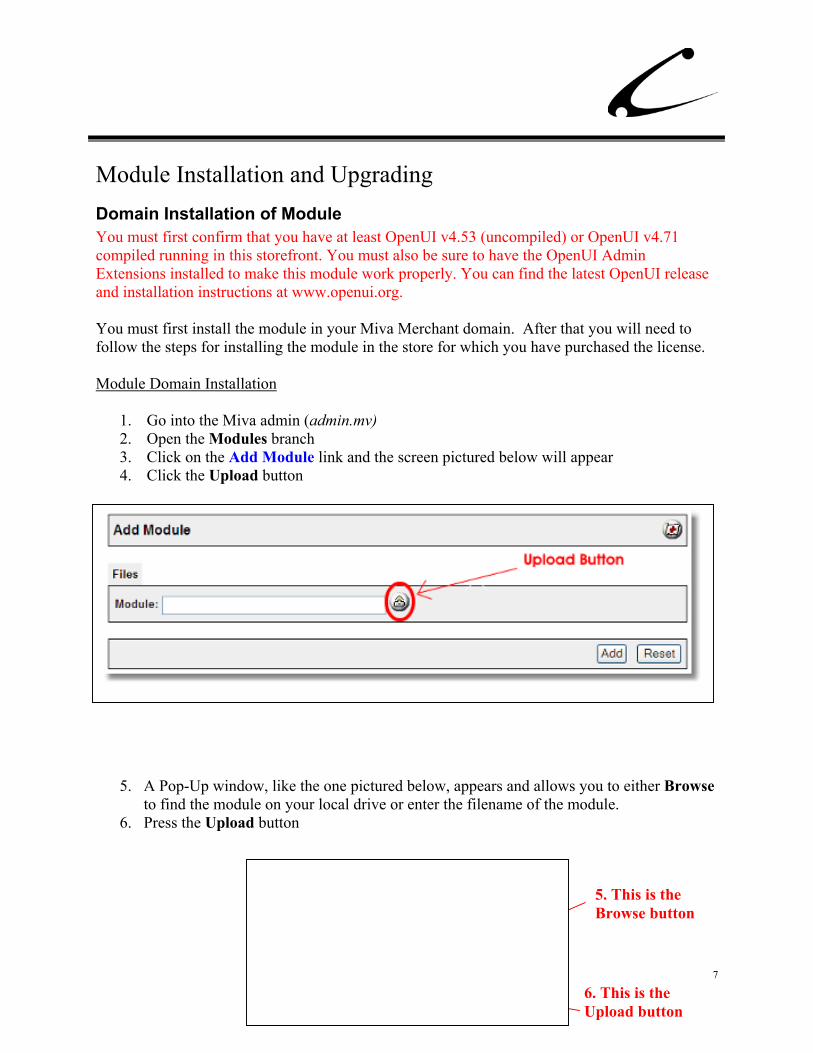
Module Installation and Upgrading Domain Installation of Module You must first confirm that you have at least OpenUI v4.53 (uncompiled) or OpenUI v4.71 compiled running in this storefront. You must also be sure to have the OpenUI Admin Extensions installed to make this module work properly. You can find the latest OpenUI release and installation instructions at www.openui.org. You must first install the module in your Miva Merchant domain. After that you will need to follow the steps for installing the module in the store for which you have purchased the license. Module Domain Installation
1. Go into the Miva admin (admin.mv) 2. Open the Modules branch 3. Click on the Add Module link and the screen pictured below will appear 4. Click the Upload button
5. A Pop-Up window, like the one pictured below, appears and allows you to either Browse to find the module on your local drive or enter the filename of the module.
6. Press the Upload button
7 COPERNICUS BUSINESS SYSTEMS
5. This is the Browse button
6. This is the Upload button

7. Once you press the Upload button, the Upload File PopUp box disappears and the Add
Module box is again visible. Press the Add button
8.
COPERNICUS BUSINESS SYSTEMS 8
Now the module has been installed in the domain. Next you need to install the module in the store
7. This is the Add button
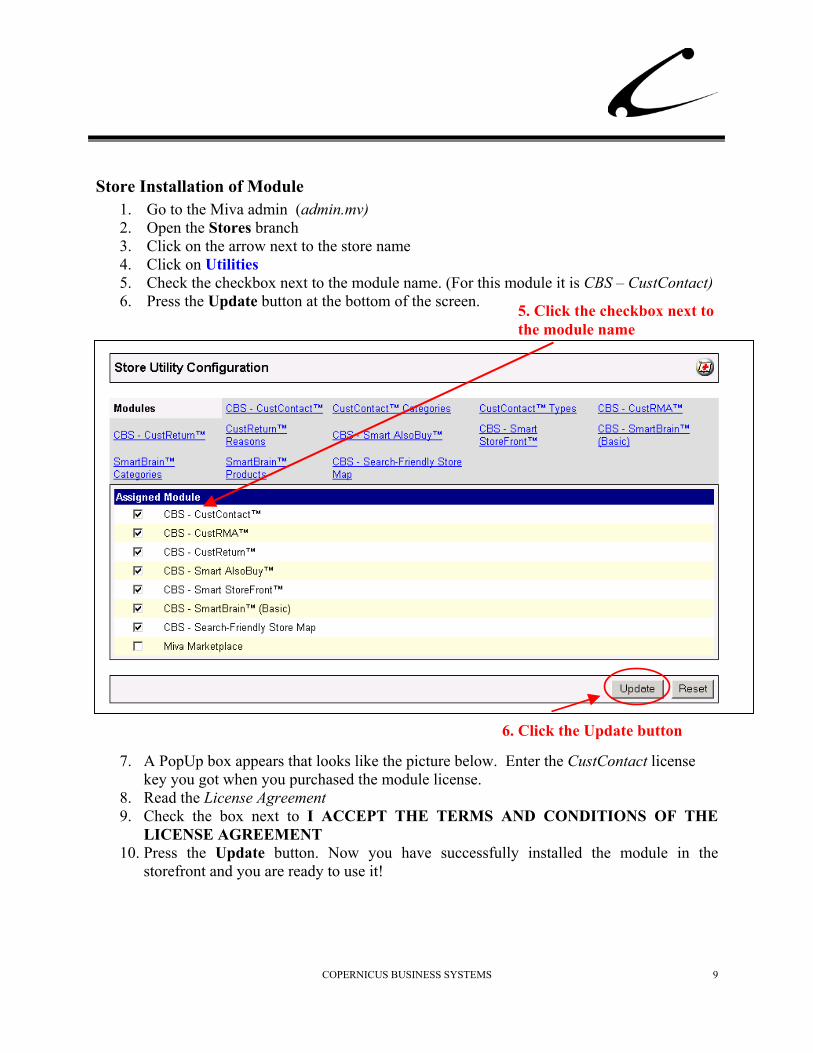
Store Installation of Module 1. Go to the Miva admin (admin.mv) 2. Open the Stores branch 3. Click on the arrow next to the store name 4. Click on Utilities 5. Check the checkbox next to the module name. (For this module it is CBS – CustContact) 6. Press the Update button at the bottom of the screen. 5. Click the checkbox next to
the module name
COPERNICUS BUSINESS SYSTEMS 9
6. Click the Update button 7. A PopUp box appears that looks like the picture below. Enter the CustContact license
key you got when you purchased the module license. 8. Read the License Agreement 9. Check the box next to I ACCEPT THE TERMS AND CONDITIONS OF THE
LICENSE AGREEMENT 10. Press the Update button. Now you have successfully installed the module in the
storefront and you are ready to use it!
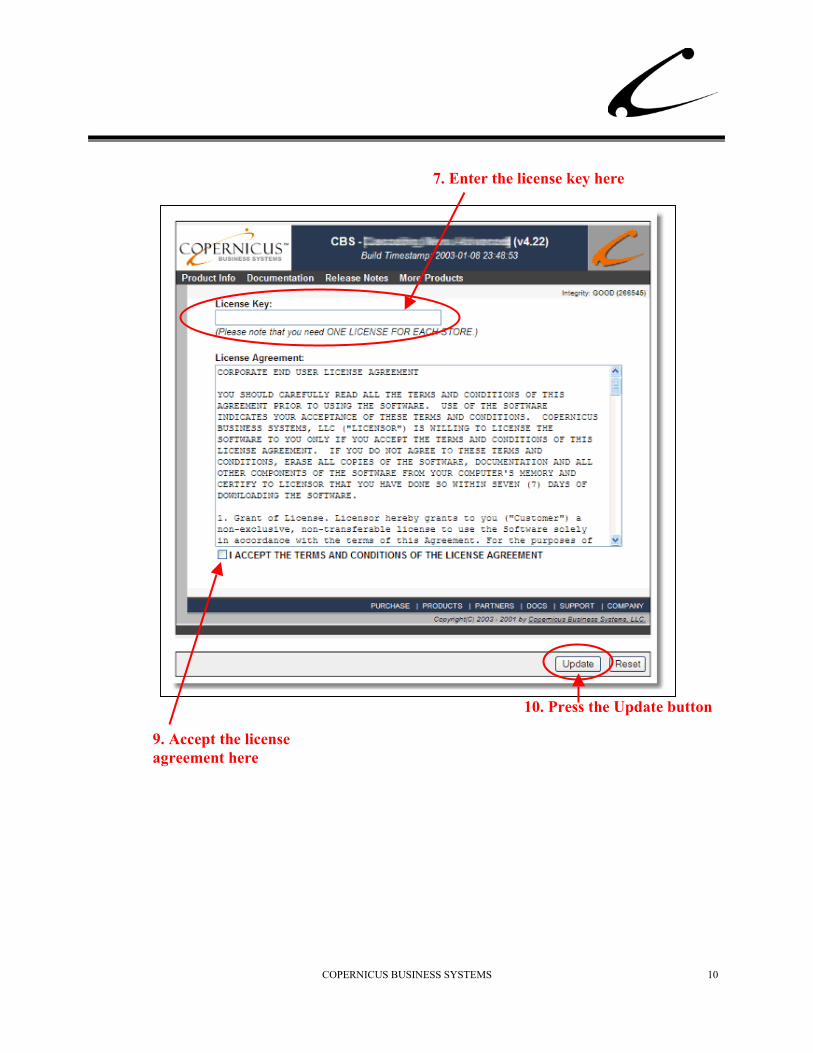
7. Enter the license key here
9.ag
COPERNICUS BUSINESS SYSTEMS 10
10. Press the Update button
Accept the license reement here
COPERNICUS BUSINESS SYSTEMS 11
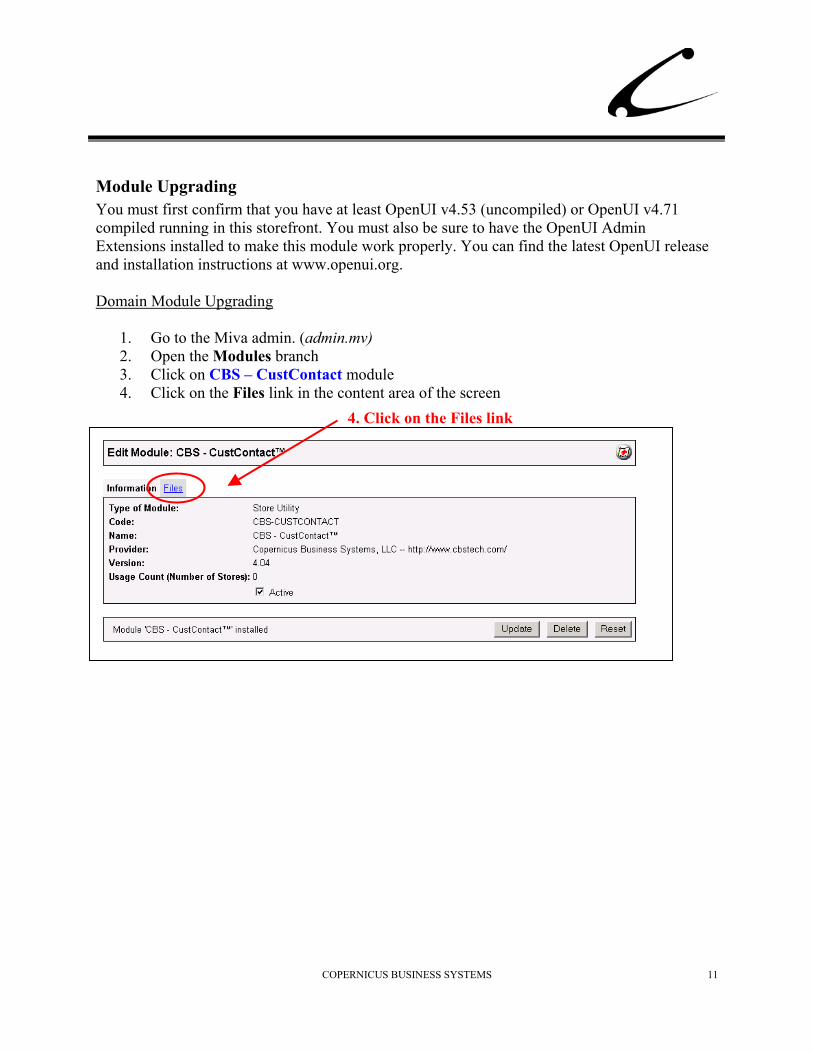
Module Upgrading You must first confirm that you have at least OpenUI v4.53 (uncompiled) or OpenUI v4.71 compiled running in this storefront. You must also be sure to have the OpenUI Admin Extensions installed to make this module work properly. You can find the latest OpenUI release and installation instructions at www.openui.org. Domain Module Upgrading
1. Go to the Miva admin. (admin.mv) 2. Open the Modules branch 3. Click on CBS – CustContact module 4. Click on the Files link in the content area of the screen
4. Click on the Files link

5. Click the Upload graphic button
6. The Upload file PopUp box will appear. Check the Overwrite box so that the updated module will overwrite the old version.
7. Enter the filename of the module on your local drive or use Browse to find the file. 8. Press the Upload button this will take you back to the “Files” screen. 9. Press the Update button and you are finished!
6. Check the Overwrite checkbox 8. Press the Upload button
7. Click the Browse button to find the file.
9. Press the Update button
5. Click on the Upload button
COPERNICUS BUSINESS SYSTEMS 12
COPERNICUS BUSINESS SYSTEMS 13
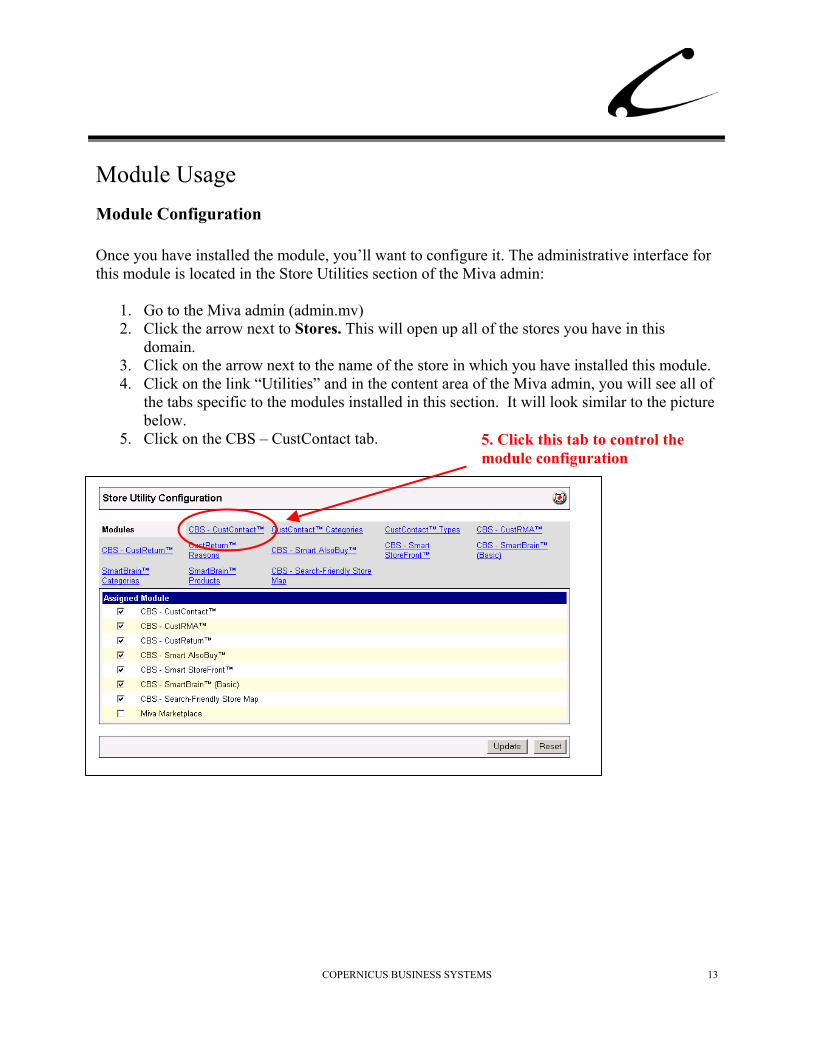
Module Usage Module Configuration Once you have installed the module, you’ll want to configure it. The administrative interface for this module is located in the Store Utilities section of the Miva admin:
1. Go to the Miva admin (admin.mv) 2. Click the arrow next to Stores. This will open up all of the stores you have in this
domain. 3. Click on the arrow next to the name of the store in which you have installed this module. 4. Click on the link “Utilities” and in the content area of the Miva admin, you will see all of
the tabs specific to the modules installed in this section. It will look similar to the picture below.
5. Click on the CBS – CustContact tab.
5. Click this tab to control the module configuration
COPERNICUS BUSINESS SYSTEMS 14
•
•
•
•
•
•
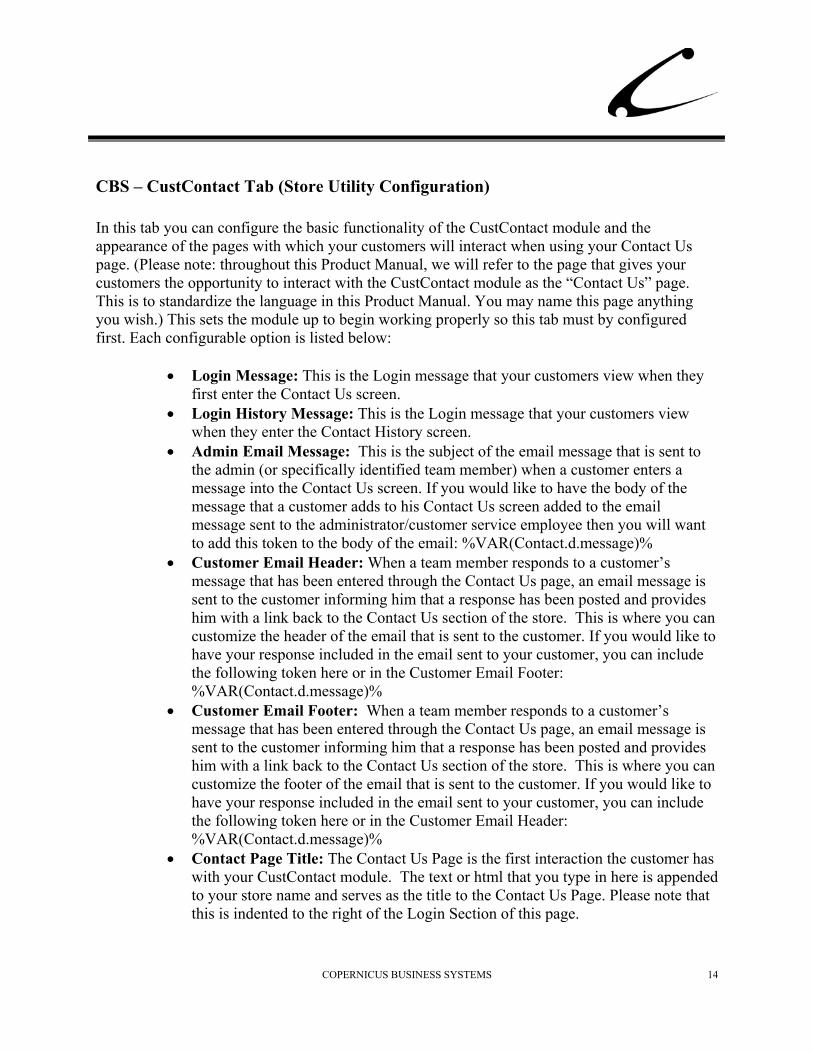
CBS – CustContact Tab (Store Utility Configuration) In this tab you can configure the basic functionality of the CustContact module and the appearance of the pages with which your customers will interact when using your Contact Us page. (Please note: throughout this Product Manual, we will refer to the page that gives your customers the opportunity to interact with the CustContact module as the “Contact Us” page. This is to standardize the language in this Product Manual. You may name this page anything you wish.) This sets the module up to begin working properly so this tab must by configured first. Each configurable option is listed below:
Login Message: This is the Login message that your customers view when they first enter the Contact Us screen. Login History Message: This is the Login message that your customers view when they enter the Contact History screen. Admin Email Message: This is the subject of the email message that is sent to the admin (or specifically identified team member) when a customer enters a message into the Contact Us screen. If you would like to have the body of the message that a customer adds to his Contact Us screen added to the email message sent to the administrator/customer service employee then you will want to add this token to the body of the email: %VAR(Contact.d.message)% Customer Email Header: When a team member responds to a customer’s message that has been entered through the Contact Us page, an email message is sent to the customer informing him that a response has been posted and provides him with a link back to the Contact Us section of the store. This is where you can customize the header of the email that is sent to the customer. If you would like to have your response included in the email sent to your customer, you can include the following token here or in the Customer Email Footer: %VAR(Contact.d.message)% Customer Email Footer: When a team member responds to a customer’s message that has been entered through the Contact Us page, an email message is sent to the customer informing him that a response has been posted and provides him with a link back to the Contact Us section of the store. This is where you can customize the footer of the email that is sent to the customer. If you would like to have your response included in the email sent to your customer, you can include the following token here or in the Customer Email Header: %VAR(Contact.d.message)% Contact Page Title: The Contact Us Page is the first interaction the customer has with your CustContact module. The text or html that you type in here is appended to your store name and serves as the title to the Contact Us Page. Please note that this is indented to the right of the Login Section of this page.
15
•
•
•
•
•
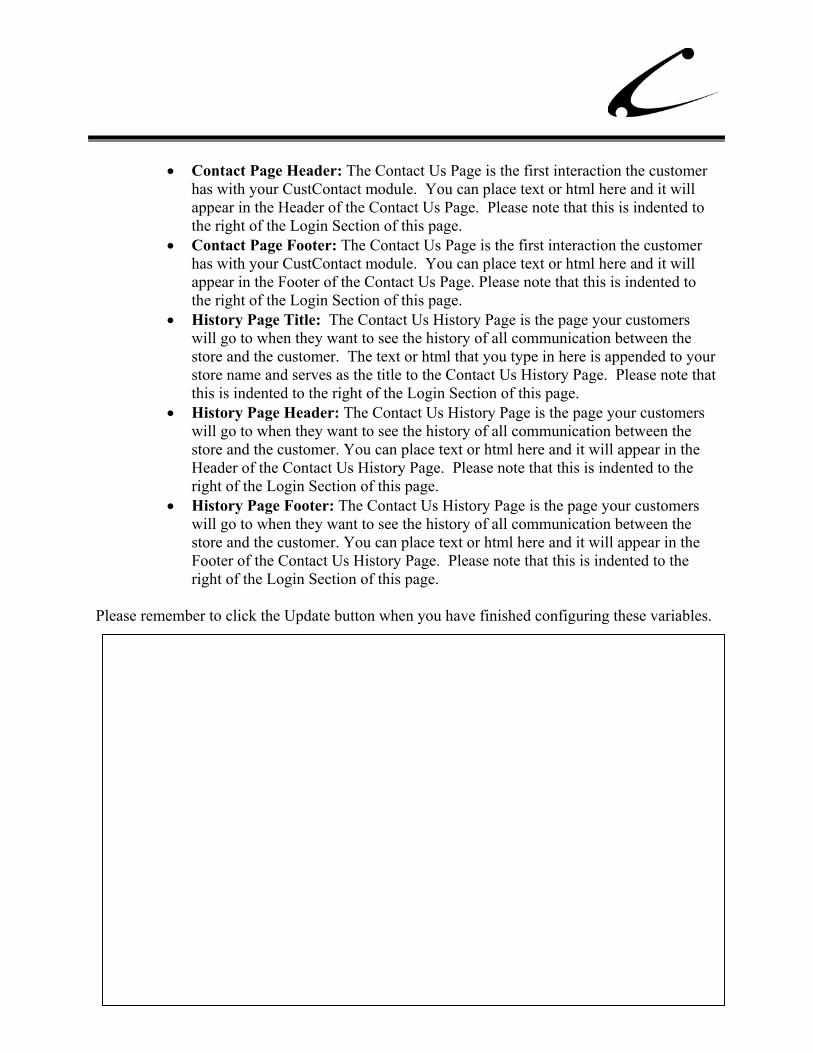
Contact Page Header: The Contact Us Page is the first interaction the customer has with your CustContact module. You can place text or html here and it will appear in the Header of the Contact Us Page. Please note that this is indented to the right of the Login Section of this page. Contact Page Footer: The Contact Us Page is the first interaction the customer has with your CustContact module. You can place text or html here and it will appear in the Footer of the Contact Us Page. Please note that this is indented to the right of the Login Section of this page. History Page Title: The Contact Us History Page is the page your customers will go to when they want to see the history of all communication between the store and the customer. The text or html that you type in here is appended to your store name and serves as the title to the Contact Us History Page. Please note that this is indented to the right of the Login Section of this page. History Page Header: The Contact Us History Page is the page your customers will go to when they want to see the history of all communication between the store and the customer. You can place text or html here and it will appear in the Header of the Contact Us History Page. Please note that this is indented to the right of the Login Section of this page. History Page Footer: The Contact Us History Page is the page your customers will go to when they want to see the history of all communication between the store and the customer. You can place text or html here and it will appear in the Footer of the Contact Us History Page. Please note that this is indented to the right of the Login Section of this page.
Please remember to click the Update button when you have finished configuring these variables.
COPERNICUS BUSINESS SYSTEMS
COPERNICUS BUSINESS SYSTEMS 16
•
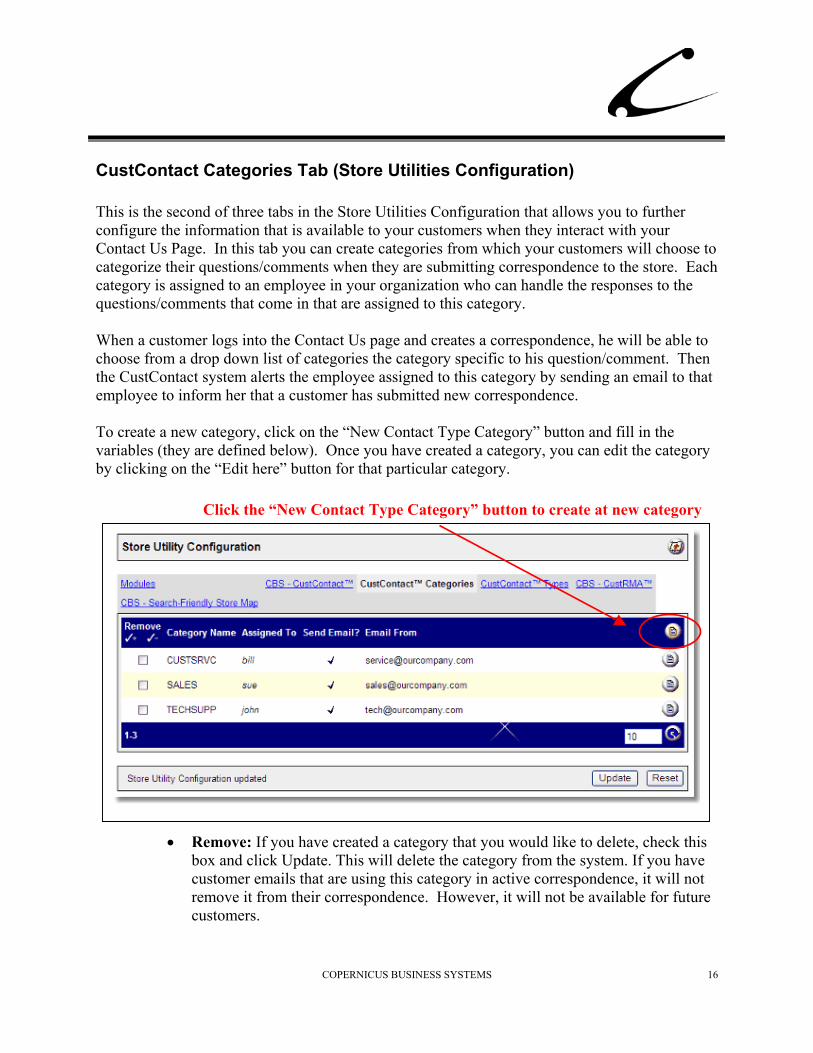
CustContact Categories Tab (Store Utilities Configuration) This is the second of three tabs in the Store Utilities Configuration that allows you to further configure the information that is available to your customers when they interact with your Contact Us Page. In this tab you can create categories from which your customers will choose to categorize their questions/comments when they are submitting correspondence to the store. Each category is assigned to an employee in your organization who can handle the responses to the questions/comments that come in that are assigned to this category. When a customer logs into the Contact Us page and creates a correspondence, he will be able to choose from a drop down list of categories the category specific to his question/comment. Then the CustContact system alerts the employee assigned to this category by sending an email to that employee to inform her that a customer has submitted new correspondence. To create a new category, click on the “New Contact Type Category” button and fill in the variables (they are defined below). Once you have created a category, you can edit the category by clicking on the “Edit here” button for that particular category.
Click the “New Contact Type Category” button to create at new category
Remove: If you have created a category that you would like to delete, check this box and click Update. This will delete the category from the system. If you have customer emails that are using this category in active correspondence, it will not remove it from their correspondence. However, it will not be available for future customers.
COPERNICUS BUSINESS SYSTEMS 17
•
•
•
•
Category Name: This is where you input the name of the category you are creating. This will be displayed in parenthesis to your customers in the Type drop down list on the “Contact Us” page. Assigned To: Choose from the drop down list the Miva Merchant admin “Users” associated with the person who is responsible for correspondence for this category. Your customers cannot see this information. Please review the Permission Setting section of this product manual for more information. Send Email?: If this box is checked, when a customer initiates a correspondence through the Contact Us page and selects this particular Category-Type from the Type drop down list, an email will be sent to the email address in the “Email From” variable discussed below. This email is designed to alert the employee in charge of this Category to the addition of correspondence in his assigned Category. When this box is not checked, no email is sent to alert the employee who is in charge of this Category. Email From: When you or someone on your team responds to a customer correspondence that is associated with this category, this is the “From” email address that the customer will view when he receives an email from the CustContact system.
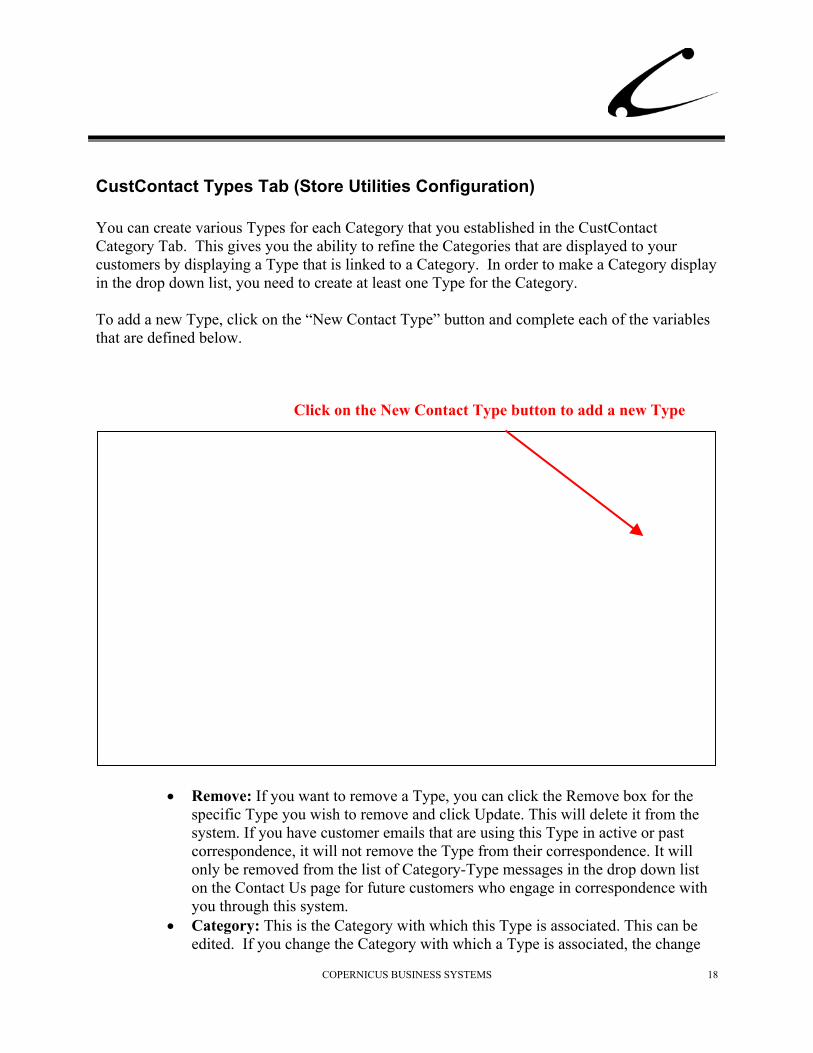
CustContact Types Tab (Store Utilities Configuration) You can create various Types for each Category that you established in the CustContact Category Tab. This gives you the ability to refine the Categories that are displayed to your customers by displaying a Type that is linked to a Category. In order to make a Category display in the drop down list, you need to create at least one Type for the Category. To add a new Type, click on the “New Contact Type” button and complete each of the variables that are defined below.
Click on the New Contact Type button to add a new Type
COPERNICUS BUSINESS SYSTEMS 18
•
• Remove: If you want to remove a Type, you can click the Remove box for the specific Type you wish to remove and click Update. This will delete it from the system. If you have customer emails that are using this Type in active or past correspondence, it will not remove the Type from their correspondence. It will only be removed from the list of Category-Type messages in the drop down list on the Contact Us page for future customers who engage in correspondence with you through this system. Category: This is the Category with which this Type is associated. This can be edited. If you change the Category with which a Type is associated, the change
COPERNICUS BUSINESS SYSTEMS 19
•
•
will not affect current and past correspondence. It will only change for future customer correspondence. Priority: You can set the priority for customer correspondence that is linked to this Category-Type. The higher the number the higher the priority. Subject: This is the message or title that identifies the contact Type. The customer will see this message appended to its associated Category Name.
COPERNICUS BUSINESS SYSTEMS 20
•
Contact Page and Contact History Page Link on Storefront To make the Contact Us screens appear on your Miva Merchant site, you need to add a link reference to the Contact Us Page and Contact Us History Page so that your customers can view the pages that this module generates. You can do this by including a Button in the OpenUI NavBar or by placing an html link to these pages anywhere in the store. Each page will be discussed separately.
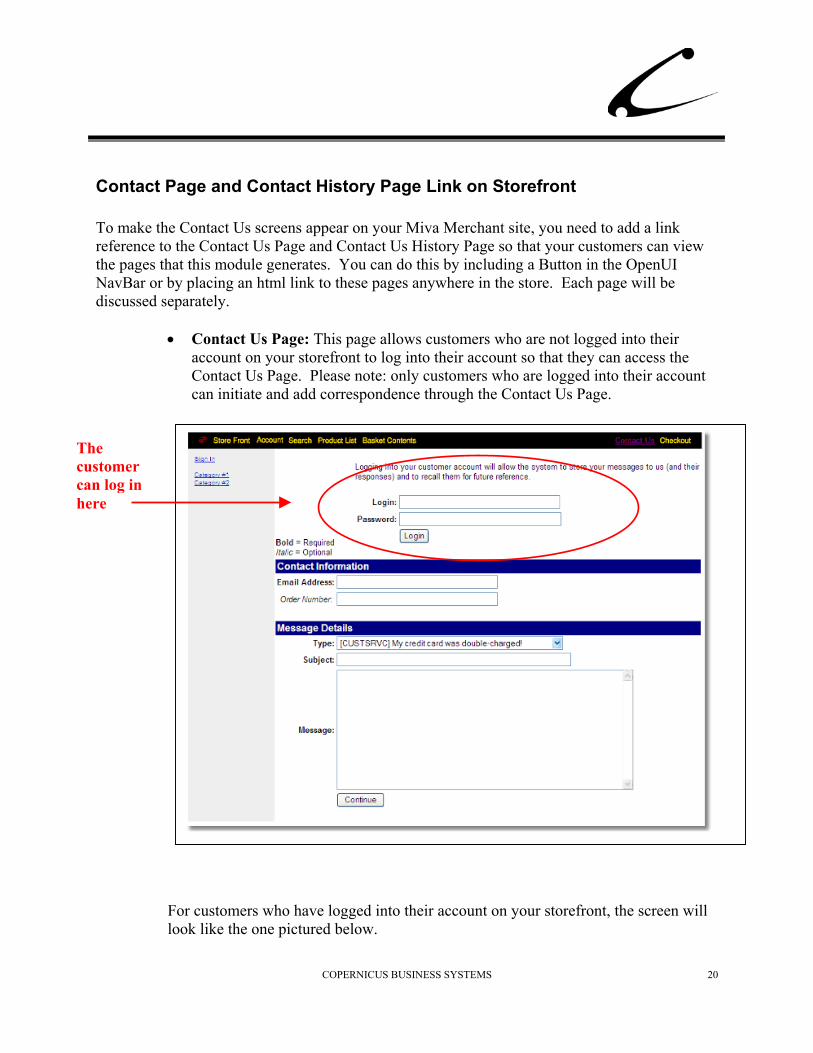
Contact Us Page: This page allows customers who are not logged into their account on your storefront to log into their account so that they can access the Contact Us Page. Please note: only customers who are logged into their account can initiate and add correspondence through the Contact Us Page.
The customer can log in here
For customers who have logged into their account on your storefront, the screen will look like the one pictured below.
COPERNICUS BUSINESS SYSTEMS 21
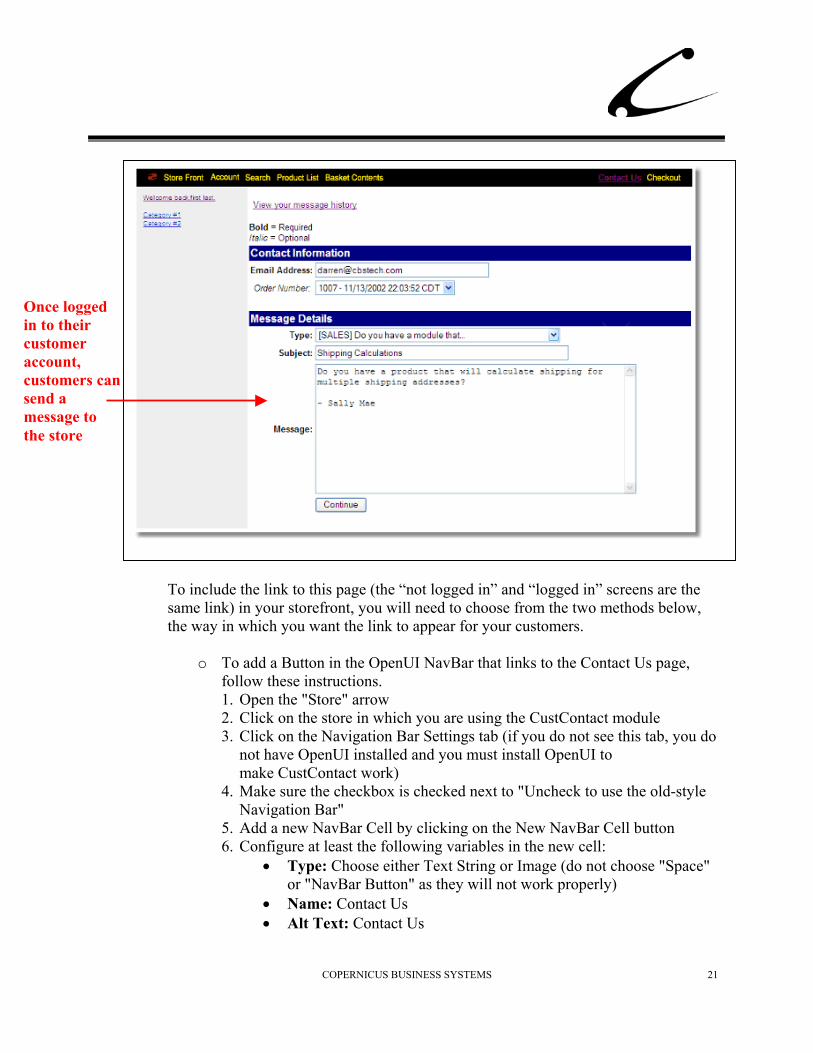
Once logged in to their customer account, customers can send a message to the store
To include the link to this page (the “not logged in” and “logged in” screens are the same link) in your storefront, you will need to choose from the two methods below, the way in which you want the link to appear for your customers.
o To add a Button in the OpenUI NavBar that links to the Contact Us page, follow these instructions. 1. Open the "Store" arrow 2. Click on the store in which you are using the CustContact module 3. Click on the Navigation Bar Settings tab (if you do not see this tab, you do
not have OpenUI installed and you must install OpenUI to make CustContact work)
4. Make sure the checkbox is checked next to "Uncheck to use the old-style Navigation Bar"
5. Add a new NavBar Cell by clicking on the New NavBar Cell button 6. Configure at least the following variables in the new cell:
• Type: Choose either Text String or Image (do not choose "Space" or "NavBar Button" as they will not work properly)
• Name: Contact Us • Alt Text: Contact Us
•
• Link: Type this link into the box: <A HREF="%VAR(g.sessionurl)%Store_Code=???&Screen=CBS_CONTACT"> Replace the question marks with your store code. Note: do not copy and past this link into the Miva Merchant admin screen. You will need to re-type this link into the link box in the Navigation Bar Settings tab. Microsoft Word interprets quotation marks differently than html therefore; this link will not work if you copy and paste from this document.
7. Click Update to save your changes
o To add an html link, you will first need to determine where you want the link to be displayed. You can place this link in any header or footer and if you are using OpenUI and the OpenUI SuperMod, you can find any hook point that is not being used and use the hook point for this link. The content of the link must be <A HREF=“http://www.???.com/merchant2/merchant.mv?Store_Code=???&Screen=CBS_CONTACT”>Contact Us</a> where the first set of question marks are replaced by your domain name and the second set of question marks are replaced by your Store Code. Also, you can place any text you want to display for this link. We have simply chosen “Contact Us.” Note: do not copy and past this link into the Miva Merchant admin screen. You will need to re-type this link into the appropriate box in the Miva Merchant admin. Microsoft Word interprets quotation marks differently than html therefore; this link will not work if you copy and paste from this document. Also, depending on where your host installed Miva Merchant, the path that you use for this link may be slightly different and you may need to capitalize the “M” in merchant2.
Contact Us History Page: For customers who are not logged into their account and wish to see their correspondence history with the store, they will need to login to their account. They will see a page like this one below so that they can log in.
The customer must log in to their account to view or add correspondence
COPERNICUS BUSINESS SYSTEMS 22
COPERNICUS BUSINESS SYSTEMS 23
For customers who are logged into their account, they can view a history of their correspondence with the store. To include the link to this page in your storefront, you will need to choose from the two methods below, the way in which you want the link to appear for your customers.
o To add a Button in the OpenUI NavBar that links to the Contact Us History
page, follow these instructions. 1. Open the "Store" arrow 2. Click on the store in which you are using the CustContact module 3. Click on the Navigation Bar Settings tab (if you do not see this tab, you do
not have OpenUI installed and you must install OpenUI to make CustContact work)
4. Make sure the checkbox is checked next to "Uncheck to use the old-style Navigation Bar"
5. Add a new NavBar Cell by clicking on the New NavBar Cell button 6. Configure at least the following variables in the new cell:
• Type: Choose either Text String or Image (do not choose "Space" or "NavBar Button" as they will not work properly)
• Name: Contact Us History • Alt Text: Contact Us History • Link: Type this link into the box:
<A HREF="%VAR(g.sessionurl)%Store_Code=???&Screen=CBS_CONTACTHIST"> Replace the question marks with your store code. Note: do not copy and past this link into the Miva Merchant admin screen. You will need to re-type this link into the link box in the Navigation Bar Settings tab. Microsoft Word interprets quotation marks differently than html therefore; this link will not work if you copy and paste from this document.
7. Click Update to save your changes
COPERNICUS BUSINESS SYSTEMS 24
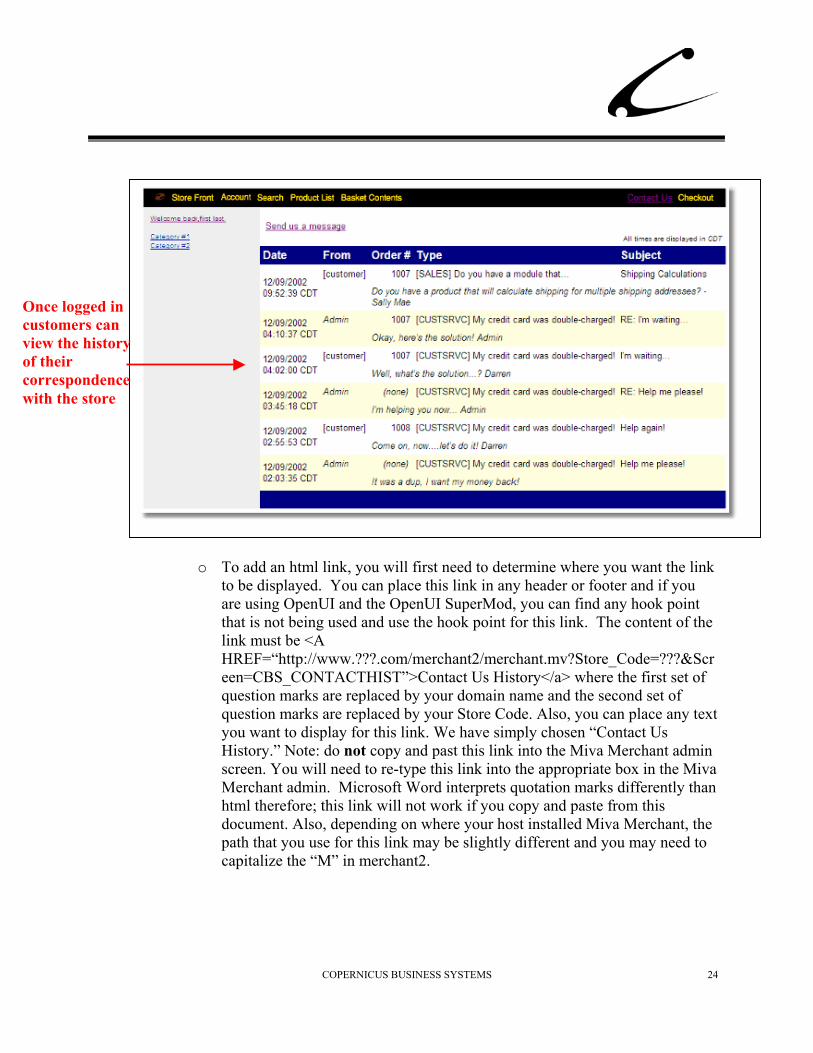
Once logged in customers can view the history of their correspondence with the store
o To add an html link, you will first need to determine where you want the link to be displayed. You can place this link in any header or footer and if you are using OpenUI and the OpenUI SuperMod, you can find any hook point that is not being used and use the hook point for this link. The content of the link must be <A HREF=“http://www.???.com/merchant2/merchant.mv?Store_Code=???&Screen=CBS_CONTACTHIST”>Contact Us History</a> where the first set of question marks are replaced by your domain name and the second set of question marks are replaced by your Store Code. Also, you can place any text you want to display for this link. We have simply chosen “Contact Us History.” Note: do not copy and past this link into the Miva Merchant admin screen. You will need to re-type this link into the appropriate box in the Miva Merchant admin. Microsoft Word interprets quotation marks differently than html therefore; this link will not work if you copy and paste from this document. Also, depending on where your host installed Miva Merchant, the path that you use for this link may be slightly different and you may need to capitalize the “M” in merchant2.

COPERNICUS BUSINESS SYSTEMS 25
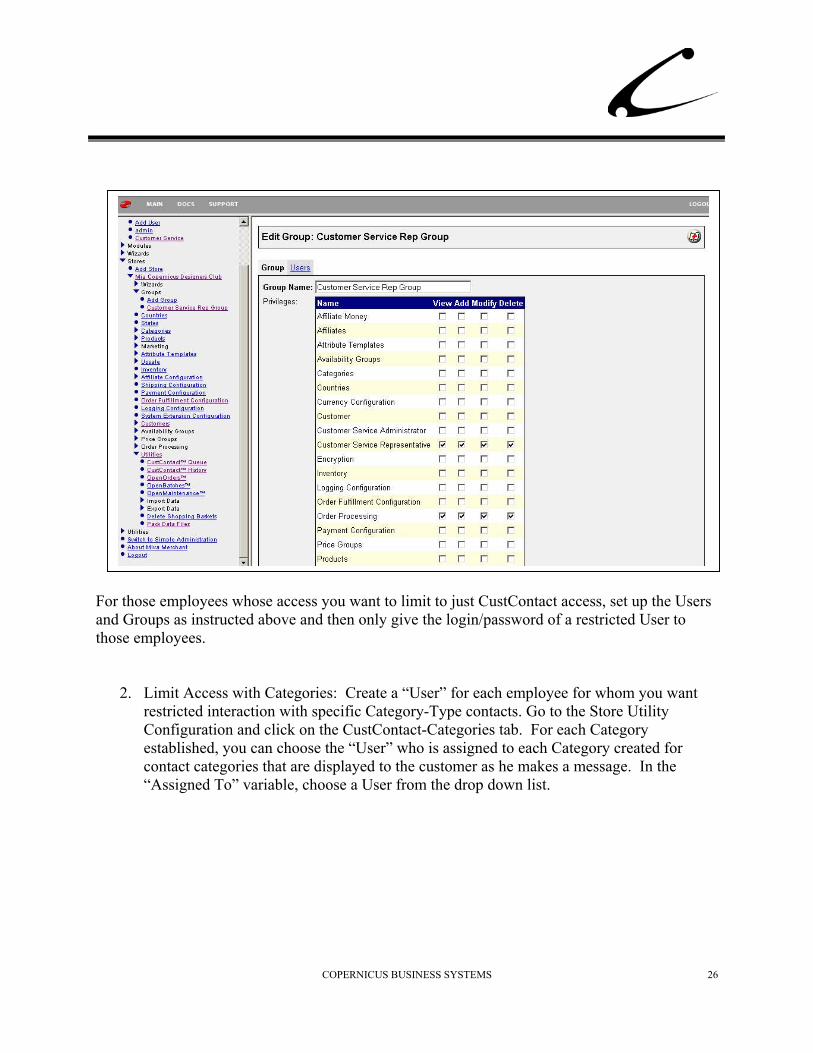
Permission Settings The storefront administrator has two separate ways to limit the CustContact information displayed to non-admin users of the Merchant Admin. Any user with Administrator status can view and edit everything in the store.
1. Limit Access with Groups: The storefront administrator can create a “User” that is given a separate login and password to the Merchant Admin. To create a new “User” go to User/Add User. After creating the “User” go to Store/Groups and add a new Group. It is here that you will establish which Users are a part of this Group and what limitations into the Merchant Admin that Group will have.
a. Limit Access: In order to limit a Group to only be able to use the CustContact functions go to the Group/Edit Groups/Group link and check the boxes for the following names. Check only the boxes of the level of permissions you want to permit. (View, Add, Modify, Delete)
i. Customer Service Representative ii. Order Processing
iii. Store Utility Configuration b. Limit Users: In order to limit the users that are permitted in this Group, go to the
Group/Edit Groups/Users link and check the box next to the Users that you want added. This is a list of users that you created in the “Users” section of the Merchant admin.
Foantho
COPERNICUS BUSINESS SYSTEMS 26
r those employees whose access you want to limit to just CustContact access, set up the Users d Groups as instructed above and then only give the login/password of a restricted User to se employees.
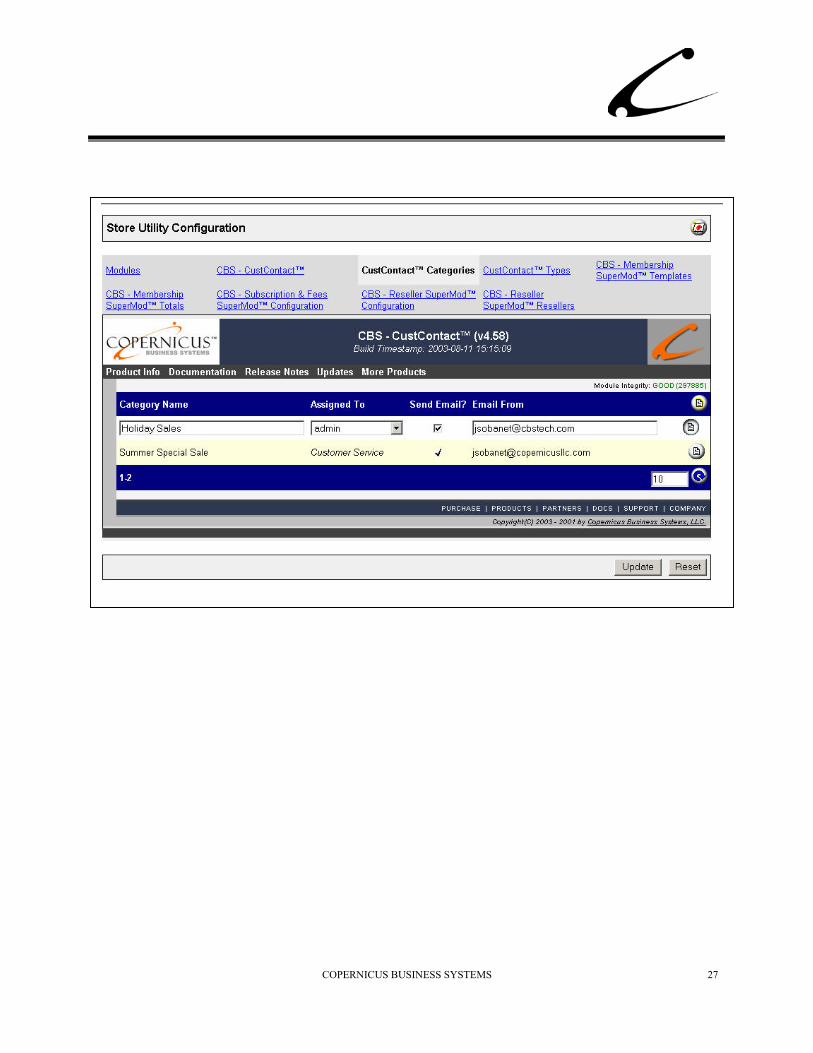
2. Limit Access with Categories: Create a “User” for each employee for whom you want
restricted interaction with specific Category-Type contacts. Go to the Store Utility Configuration and click on the CustContact-Categories tab. For each Category established, you can choose the “User” who is assigned to each Category created for contact categories that are displayed to the customer as he makes a message. In the “Assigned To” variable, choose a User from the drop down list.
COPERNICUS BUSINESS SYSTEMS 27
COPERNICUS BUSINESS SYSTEMS 28
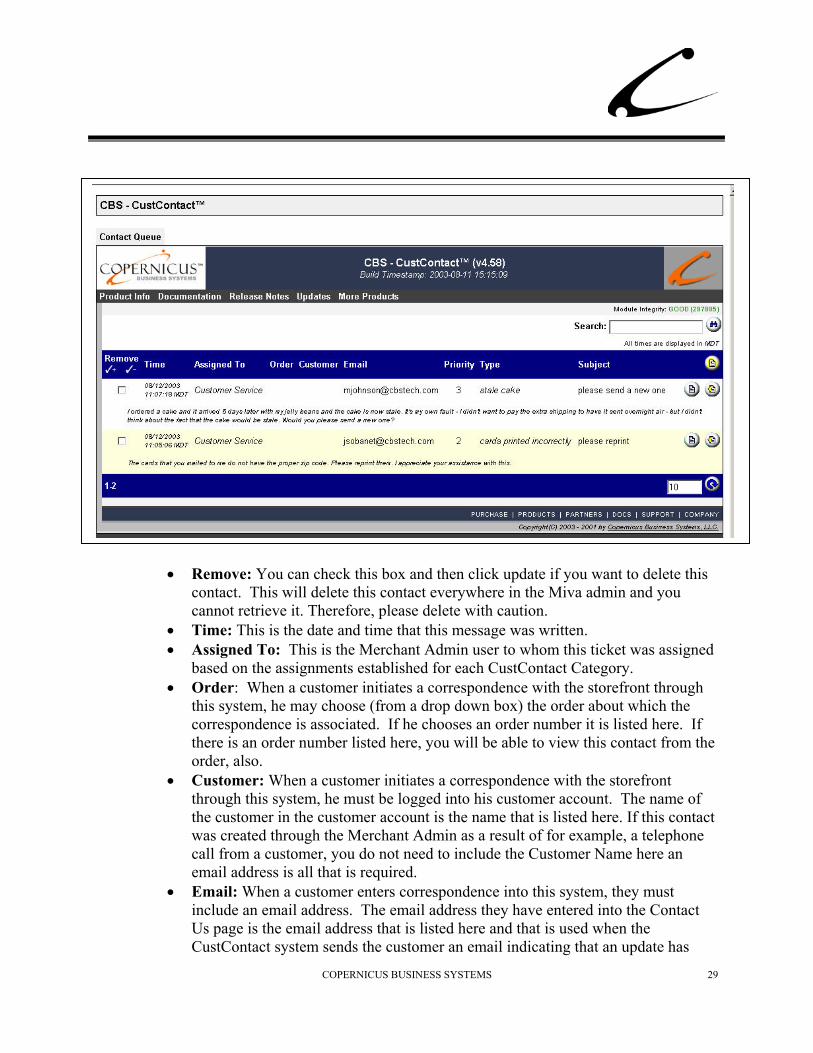
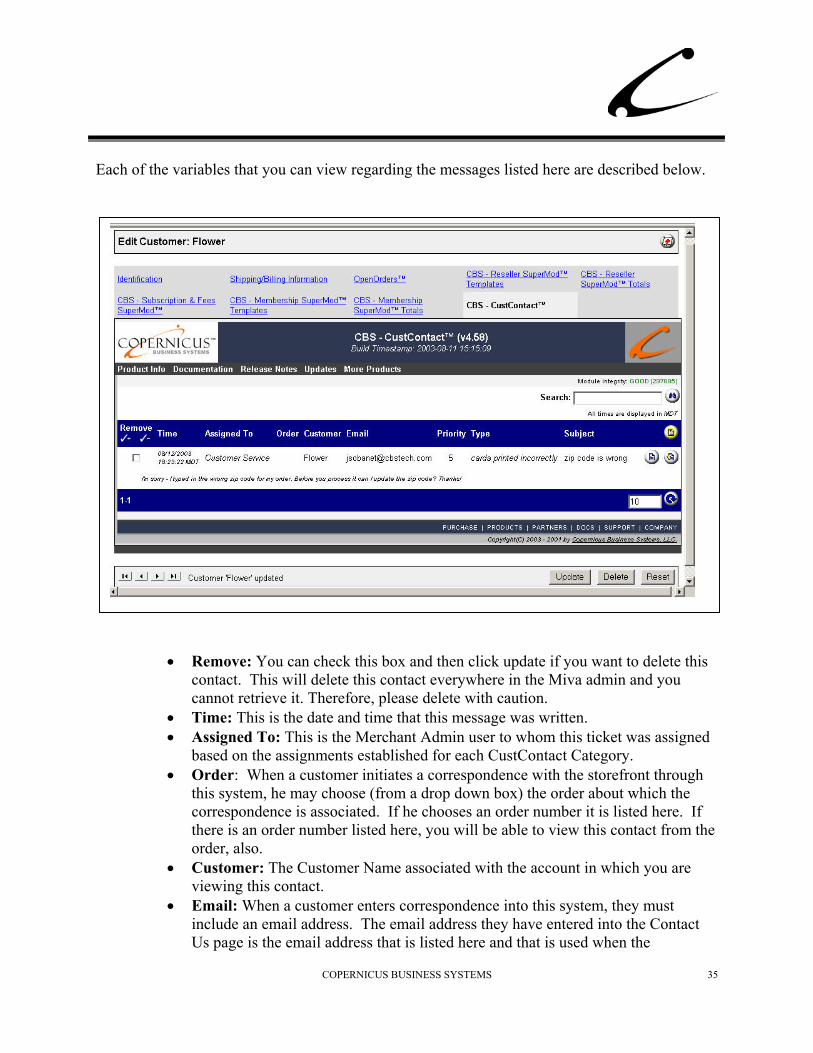
CustContact Queue (Utilities Menu) To find this section, open the arrow next to the Store Utilities menu and you will find the CustContact Queue link. It is in this section that you can view, edit and respond to all customer correspondence that is a) assigned to the Miva Merchant “User” used to log into the admin and b) assigned to this “User” in the CustContact-Categories tab. In other words…. this is your personal queue of messages to answer! The messages listed here are only the customer messages (not your responses) to which you have not yet responded and they are listed first by priority and second by date/time. You can make different views of this list by using the search function at the top of the page. You can search on Order Number, Email Address, Subject and Message. If you would like to view messages by Customer Name/Account, please go to the Customer Account in the Merchant Admin and click on the CBS-CustContact tab. It will display all contacts related to that Customer Account/Name within the User/Category Assigned To restrictions. Once you respond to a new message, the original customer message is removed from your queue and the customer receives an email telling him that a response to his message has been logged. In the email message, there is a link to the storefront that the customer can follow to view the response that was written by a member of the store team. If desired, you can also include this response in the email to the customer. (To configure this please see the instructions regarding configuring the CustContact tab.) The CustContact History section of the Merchant Admin maintains the original message and your reply so that you can refer to it as needed. You have the option to “remove” any contact or reply. Please note that if you remove a contact or reply it is completely removed from the database and cannot be retrieved. Each of the variables that you can view regarding the messages listed here are described below.
COPERNICUS BUSINESS SYSTEMS 29
•
• •
•
•
•
Remove: You can check this box and then click update if you want to delete this contact. This will delete this contact everywhere in the Miva admin and you cannot retrieve it. Therefore, please delete with caution. Time: This is the date and time that this message was written. Assigned To: This is the Merchant Admin user to whom this ticket was assigned based on the assignments established for each CustContact Category. Order: When a customer initiates a correspondence with the storefront through this system, he may choose (from a drop down box) the order about which the correspondence is associated. If he chooses an order number it is listed here. If there is an order number listed here, you will be able to view this contact from the order, also. Customer: When a customer initiates a correspondence with the storefront through this system, he must be logged into his customer account. The name of the customer in the customer account is the name that is listed here. If this contact was created through the Merchant Admin as a result of for example, a telephone call from a customer, you do not need to include the Customer Name here an email address is all that is required. Email: When a customer enters correspondence into this system, they must include an email address. The email address they have entered into the Contact Us page is the email address that is listed here and that is used when the CustContact system sends the customer an email indicating that an update has
COPERNICUS BUSINESS SYSTEMS 30
•
•
•
•
been made to their message by the store. If you add a contact through the Merchant Admin, you must include an email address here. Priority: Each Category-Type combinations can be assigned a priority when they are created in the CustContact Category and CustContact Type tabs (Store Utilities Configuration). This is the priority number that was assigned to the Category-Type that was chosen from the Type drop down list by the customer. The storefront owner can edit this priority. The messages in this queue are sorted by priority number and then time. Type: When the customer creates a message he must choose a Type from the Type dropdown list. This is the Type that the customer chose. Subject: When the customer creates a message he can type in a subject line to his message. This is the subject line typed in by the customer. Message: The message is listed below this information. The message is truncated to 500 characters to fit in this screen.
COPERNICUS BUSINESS SYSTEMS 31
CustContact History Menu (Utilities) To find this section, open the arrow next to the Store Utilities menu and you will find the CustContact History link. It is in this section that you will find all customer correspondence that has been replied to (and the replies) that is a) assigned to the Miva Merchant “User” used to log into the admin and b) assigned to this “User” in the CustContact-Categories tab. In other words…. this is this history of your messages and answers! You can initiate a response from any customer contact listed here and that response will trigger an email to be sent to the customer. Please note: You cannot initiate a customer contact from a Reply – only from an original customer contact. You can edit some variables (such as who the contact is assigned to, the customer’s email address etc.) within the replies but you cannot edit the message of a reply that has already been sent to a customer. The messages are listed first by priority and second by date/time. You can make different views of this list by using the search function at the top of the page. You can search on Order Number, Email Address, Subject and Message. If you would like to view messages by Customer Name/Account, please go to the Customer Account in the Merchant Admin and click on the CBS-CustContact tab. It will display all contacts related to that Customer Account/Name within the User/Category Assigned To restrictions. Once you respond to a message, the customer receives an email telling him that a response to his message has been logged. In the email message, there is a link to the storefront that the customer can follow to view the response that was written by a member of the store team. If desired, you can also include this response in the email to the customer. (To configure this please see the instructions regarding configuring the CustContact tab.) Please note that if you remove a contact or reply it is completely removed from the database and cannot be retrieved. Each of the variables that you can view regarding the messages listed here are described below.

COPERNICUS BUSINESS SYSTEMS 32
•
• •
•
•
Remove: You can check this box and then click update if you want to delete this contact. This will delete this contact everywhere in the Miva admin and you cannot retrieve it. Therefore, please delete with caution. Time: This is the date and time that this message was written. Assigned To: This is the Merchant Admin user to whom this ticket was assigned based on the assignments established for each CustContact Category. Order: When a customer initiates a correspondence with the storefront through this system, he may choose (from a drop down box) the order about which the correspondence is associated. If he chooses an order number it is listed here. If there is an order number listed here, you will be able to view this contact from the order, also. Customer: When a customer initiates a correspondence with the storefront through this system, he must be logged into his customer account. The name of the customer in the customer account is the name that is listed here. If this contact was created through the Merchant Admin as a result of for example, a telephone

COPERNICUS BUSINESS SYSTEMS 33
•
•
•
•
•
call from a customer, you do not need to include the Customer Name here an email address is all that is required. Email: When a customer enters correspondence into this system, they must include an email address. The email address they have entered into the Contact Us page is the email address that is listed here and that is used when the CustContact system sends the customer an email indicating that an update has been made to their message by the store. If you add a contact through the Merchant Admin, you must include an email address here. Priority: Each Category-Type combinations can be assigned a priority when they are created in the CustContact Category and CustContact Type tabs (Store Utilities Configuration). This is the priority number that was assigned to the Category-Type that was chosen from the Type drop down list by the customer. The storefront owner can edit this priority. The messages in this queue are sorted by priority number and then time. Type: When the customer creates a message he must choose a Type from the Type dropdown list. This is the Type that the customer chose. Subject: When the customer creates a message he can type in a subject line to his message. This is the subject line typed in by the customer. Message: The message is listed below this information. The message is truncated to 500 characters to fit in this screen.
COPERNICUS BUSINESS SYSTEMS 34
CBS-CustContact Tab (Edit Customer) You can view correspondence specific to a customer account that has come in through the CustContact system. This view will be limited by any User permission restrictions as discussed above. In your Miva Merchant store, go to the ‘Customer” link and find the customer whose correspondence you want to review. Click on the “Edit” button for that customer and you will see a tab titled CBS-CustContact. Click on that tab and you will be able to view, edit and respond to the correspondence that is associated with that customer. This correspondence is assigned to this customer because the customer used the Login and Password associated with this customer account when he entered in the messages listed. The messages are arranged first by priority and second by date/time. You can use the Search function in the top right corner of this screen to search for a particular message. You can search by order number, email address, subject or message. You can respond to any message in this list that has a “Respond To” button. (If there isn’t a “Respond To” button it is because this message has already been responded to.) Once you respond to a new message, the customer receives an email telling him that a response to his message has been logged. In the email message, there is a link to the storefront that the customer can follow to view the response that was written by a member of the store team. If desired, you can also include this response in the email to the customer. (To configure this please see the instructions regarding configuring the CustContact tab.) Please note: when a response is made through the CBS-CustContact Tab in the Customer account, the message is removed from the “Queue” section but remains as history in the customer’s account and in the History section of the admin. Tip: If you receive telephone contacts in addition to website contacts that you would like to track, you can track them through CustContact. When you receive a telephone contact, go to the customer record or order number about which the contact has been made. Click on the CBS-CustContact tab and then click on the New Contact button. You can fill in the information relayed by telephone and when you click update, this sends an email to the email address associated with this customer account. Now, this telephone customer can CustContact user and you can track your correspondence easily.
COPERNICUS BUSINESS SYSTEMS 35
•
• •
•
•
•
Each of the variables that you can view regarding the messages listed here are described below.
Remove: You can check this box and then click update if you want to delete this contact. This will delete this contact everywhere in the Miva admin and you cannot retrieve it. Therefore, please delete with caution. Time: This is the date and time that this message was written. Assigned To: This is the Merchant Admin user to whom this ticket was assigned based on the assignments established for each CustContact Category. Order: When a customer initiates a correspondence with the storefront through this system, he may choose (from a drop down box) the order about which the correspondence is associated. If he chooses an order number it is listed here. If there is an order number listed here, you will be able to view this contact from the order, also. Customer: The Customer Name associated with the account in which you are viewing this contact. Email: When a customer enters correspondence into this system, they must include an email address. The email address they have entered into the Contact Us page is the email address that is listed here and that is used when the
COPERNICUS BUSINESS SYSTEMS 36
•
•
•
•
CustContact system sends the customer an email indicating that an update has been made to their message by the store. If you add a contact through the Merchant Admin, you must include an email address here. Priority: Each Category-Type combinations can be assigned a priority when they are created in the CustContact Category and CustContact Type tabs (Store Utilities Configuration). This is the priority number that was assigned to the Category-Type that was chosen from the Type drop down list by the customer. The storefront owner can edit this priority. The messages in this queue are sorted by priority number and then time. Type: When the customer creates a message he must choose a Type from the Type dropdown list. This is the Type that the customer chose. Subject: When the customer creates a message he can type in a subject line to his message. This is the subject line typed in by the customer. Message: The message is listed below this information. The message is truncated to 500 characters to fit in this screen.
COPERNICUS BUSINESS SYSTEMS 37
CBS-CustContact Tab (Order) You can view correspondence specific to a particular order number that has come in through the CustContact system. This view will be limited by any User permission restrictions as discussed above. In your Miva Merchant store, go to the Store “Utilities” link and click on the Open Orders link. Use the Order List functionality to find the order whose correspondence you wish to view. Click on the “Edit” button for that order and you will see a tab titled CBS-CustContact. Click on that tab and you will be able to view, edit and respond to the correspondence that is associated with that order. This correspondence is assigned to this order because the customer clicked on this order number from the drop down list in the Contact Us Page. If the customer did not associate his contact with an order number you will not be able to locate the contact in this section. The messages are arranged first by priority and second by date/time. You can use the Search function in the top right corner of this screen to search for a particular message. You can search by order number, email address, subject or message. You can respond to any message in this list that has a “Respond To” button. (If there isn’t a “Respond To” button it is because this message has already been responded to.) Once you respond to a new message, the customer receives an email telling him that a response to his message has been logged. In the email message, there is a link to the storefront that the customer can follow to view the response that was written by a member of the store team. If desired, you can also include this response in the email to the customer. (To configure this please see the instructions regarding configuring the CustContact tab.) Please note: when a response is made through the CBS-CustContact Tab in the Open Orders section, the message is removed from the Queue in which the message was originally listed but remains as history for this order. If you need to review messages linked to closed orders, you will find these in the CustContact History tab. Tip: If you receive telephone contacts in addition to website contacts that you would like to track, you can track them through CustContact. When you receive a telephone contact, go to the customer record or order number about which the contact has been made. Click on the CBS-CustContact tab and then click on the New Contact button. You can fill in the information relayed by telephone and when you click update, this sends an email to the email address associated with this customer account. Now, this telephone customer can CustContact user and you can track your correspondence easily.

COPERNICUS BUSINESS SYSTEMS 38
•
• •
•
•
Each of the variables that you can view regarding the messages listed here are described below.
Remove: You can check this box and then click update if you want to delete this contact. This will delete this contact everywhere in the Miva admin and you cannot retrieve it. Therefore, please delete with caution. Time: This is the date and time that this message was written. Assigned To: This is the Merchant Admin user to whom this ticket was assigned based on the assignments established for each CustContact Category. Order: The Order Number associated with the order in which you are viewing this contact. Customer: When a customer initiates a correspondence with the storefront through this system, he must be logged into his customer account. The name of the customer in the customer account is the name that is listed here. If this contact was created through the Merchant Admin as a result of for example, a telephone call from a customer, you do not need to include the Customer Name here an email address is all that is required.
COPERNICUS BUSINESS SYSTEMS 39
•
•
•
•
•
Email: When a customer enters correspondence into this system, they must include an email address. The email address they have entered into the Contact Us page is the email address that is listed here and that is used when the CustContact system sends the customer an email indicating that an update has been made to their message by the store. If you add a contact through the Merchant Admin, you must include an email address here. Priority: Each Category-Type combinations can be assigned a priority when they are created in the CustContact Category and CustContact Type tabs (Store Utilities Configuration). This is the priority number that was assigned to the Category-Type that was chosen from the Type drop down list by the customer. The storefront owner can edit this priority. The messages in this queue are sorted by priority number and then time. Type: When the customer creates a message he must choose a Type from the Type dropdown list. This is the Type that the customer chose. Subject: When the customer creates a message he can type in a subject line to his message. This is the subject line typed in by the customer. Message: The message is listed below this information. The message is truncated to 500 characters to fit in this screen.
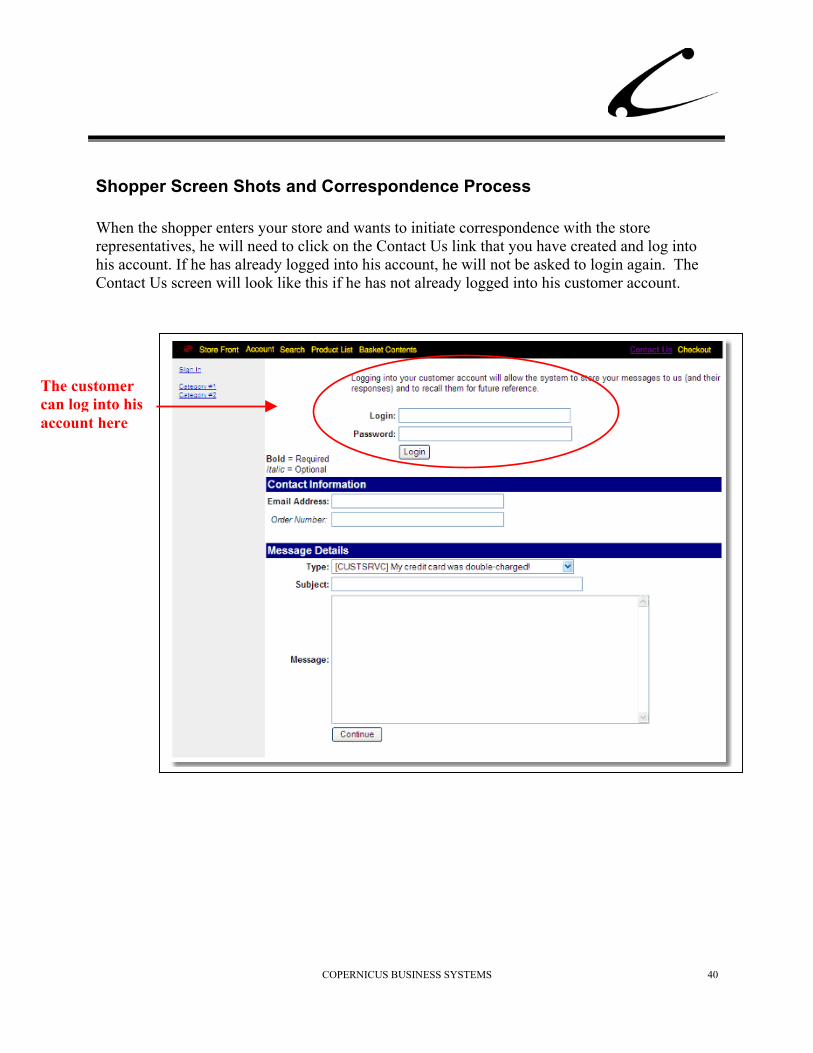
Shopper Screen Shots and Correspondence Process When the shopper enters your store and wants to initiate correspondence with the store representatives, he will need to click on the Contact Us link that you have created and log into his account. If he has already logged into his account, he will not be asked to login again. The Contact Us screen will look like this if he has not already logged into his customer account.
The customer can log into his account here
COPERNICUS BUSINESS SYSTEMS 40
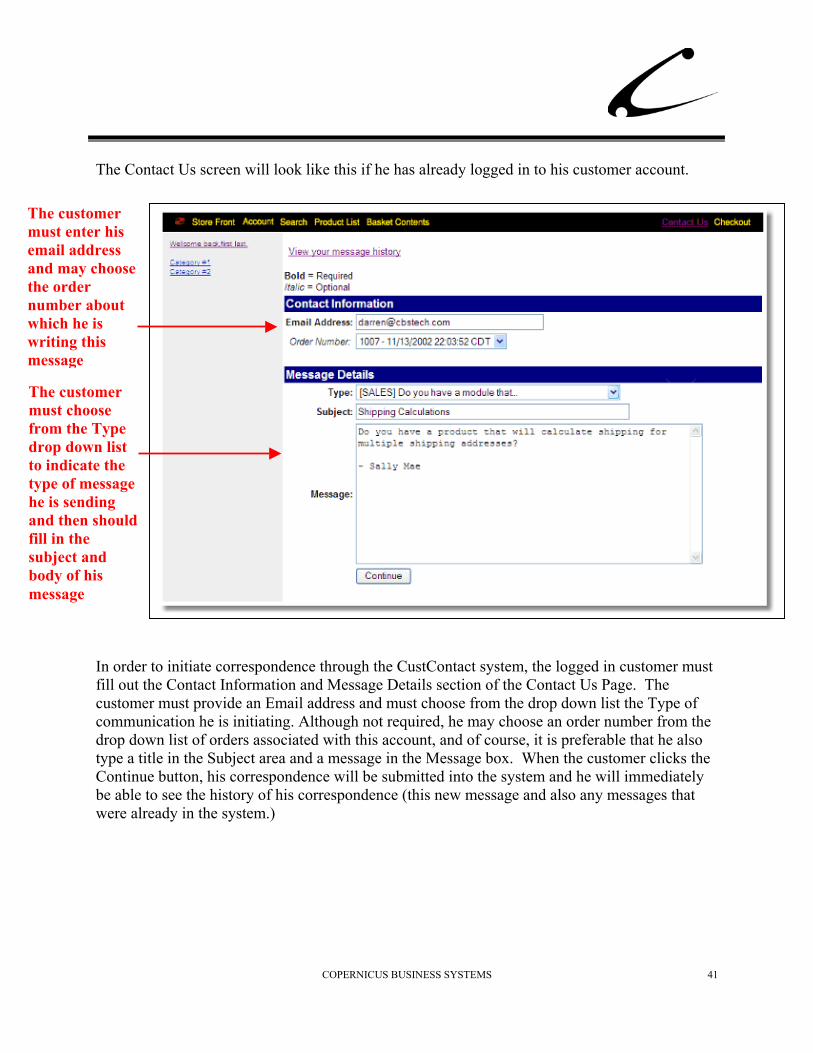
The Contact Us screen will look like this if he has already logged in to his customer account.
The customer must choose from the Type drop down list to indicate the type of message he is sending and then should fill in the subject and body of his message
In order tfill out thcustomercommundrop dowtype a titContinuebe able towere alre
The customer must enter his email address and may choose the order number about which he is writing this message
COPERNICUS BUSINESS SYSTEMS 41
o initiate correspondence through the CustContact system, the logged in customer must e Contact Information and Message Details section of the Contact Us Page. The must provide an Email address and must choose from the drop down list the Type of ication he is initiating. Although not required, he may choose an order number from the n list of orders associated with this account, and of course, it is preferable that he also
le in the Subject area and a message in the Message box. When the customer clicks the button, his correspondence will be submitted into the system and he will immediately see the history of his correspondence (this new message and also any messages that ady in the system.)

The customer can view the history of his correspondence with the store by clicking the View History link or a Contact Us History button created by the storefront owner that specifically links into the customer’s Contact Us History. Here he can view his past messages and the responses to those messages.
The customer can view the messages he has written and also those that the store representatives have written back to him
If the cusHistory liof messag
tomer is not logged into his customer account and attempts to view the Contact Us nk, the screen will look like this and the customer will need to login to view his history es.
COPERNICUS BUSINESS SYSTEMS 42
COPERNICUS BUSINESS SYSTEMS 43
Legal Information Copyright Information This document and the software described by this document are protected by copyright law. (Copyright © 2002 - 2003 Copernicus Business Systems, LLC. All Rights Reserved.) This document and the software described herein are the property of Copernicus Business Systems, LLC. Use of this document and the software is restricted to the specific terms and conditions in the License Agreement associated with the software. Duplication or distribution of this document or portions of this document for uses not covered by the License Agreement is not allowed without a written agreement signed by an officer of Copernicus Business Systems, LLC. Information contained within this document is subject to change without notice. THE SOFTWARE DESCRIBED IN THIS DOCUMENT WAS DESIGNED TO SUPPLEMENT SOFTWARE AND/OR OTHER PRODUCTS PRODUCED AND/OR PROVIDED BY MIVA CORPORATION. COPERNICUS DOES NOT ENDORSE AND IS NOT AFFILIATED WITH MIVA CORPORATION, AND DOES NOT CONTROL MIVA PRODUCTS. COPERNICUS IS NOT RESPONSIBLE OR LIABLE FOR ANY UPGRADES, UPDATES, ENHANCEMENTS OR FUTURE RELEASES OF MIVA CORPORATION SOFTWARE OR PRODUCTS THAT MAY BE INCOMPATIBLE WITH THE SOFTWARE OR RENDER THE SOFTWARE INEFFECTIVE. COPERNICUS DOES NOT WARRANT THAT THE SOFTWARE WILL WORK EFFECTIVELY WITH ANY UPGRADES, UPDATES, ENHANCEMENTS OR FUTURE RELEASES OF MIVA CORPORATION SOFTWARE OR OTHER PRODUCTS. TO THE MAXIMUM EXTENT PERMITTED BY APPLICABLE LAW, IN NO EVENT SHALL COPERNICUS BE LIABLE TO CUSTOMER FOR ANY INCIDENTAL, SPECIAL, PUNITIVE, EXEMPLARY OR CONSEQUENTIAL DAMAGES OF EITHER CUSTOMER OR A THIRD PARTY AGAINST CUSTOMER (INCLUDING, BUT NOT LIMITED TO, LOSS OF DATA OR INFORMATION, LOST PROFITS, BUSINESS INTERRUPTION OR OTHER PECUNIARY LOSS) ARISING OUT OF OR IN CONNECTION WITH THIS SOFTWARE OR USE OF OR INABILITY TO USE THE SOFTWARE EVEN IF COPERNICUS HAS BEEN ADVISED OF THE POSSIBILITY OF SUCH DAMAGES. IN NO EVENT SHALL COPERNICUS BE LIABLE FOR DAMAGES FOR ANY CAUSE WHATSOEVER (WHETHER BASED IN CONTRACT, TORT OR OTHERWISE) IN EXCESS OF THE AMOUNT PAID TO COPERNICUS BY CUSTOMER FOR USE OF THE SOFTWARE. SOME STATES DO NOT ALLOW THE LIMITATION OR EXCLUSION OF LIABILITY FOR INCIDENTAL OR CONSEQUENTIAL DAMAGES, SO THE ABOVE LIMITATION OR EXCLUSION MAY NOT APPLY TO YOU. Miva is a registered trademark of Miva Corporation. Miva Script, Miva Merchant, Miva Empresa, and the Miva Engine are trademarks of Miva Corporation. All other trademarks are the property of their respective owners.

COPERNICUS BUSINESS SYSTEMS 44
Copyright © 2003 Copernicus Business Systems, LLC The Copernicus Revolution, RMXB Technology, OPENDB, RMXB AutoMigration Technology and related images are trademarks of Copernicus Business Systems, LLC.
COPERNICUS BUSINESS SYSTEMS 45
Corporate End User License Agreement YOU SHOULD CAREFULLY READ ALL THE TERMS AND CONDITIONS OF THIS AGREEMENT PRIOR TO USING THE SOFTWARE. USE OF THE SOFTWARE INDICATES YOUR ACCEPTANCE OF THESE TERMS AND CONDITIONS. COPERNICUS BUSINESS SYSTEMS, LLC (“LICENSOR”) IS WILLING TO LICENSE THE SOFTWARE TO YOU ONLY IF YOU ACCEPT THE TERMS AND CONDITIONS OF THIS LICENSE AGREEMENT. IF YOU DO NOT AGREE TO THESE TERMS AND CONDITIONS, ERASE ALL COPIES OF THE SOFTWARE, DOCUMENTATION AND ALL OTHER COMPONENTS OF THE SOFTWARE FROM YOUR COMPUTER’S MEMORY AND CERTIFY TO LICENSOR THAT YOU HAVE DONE SO WITHIN SEVEN (7) DAYS OF DOWNLOADING THE SOFTWARE.
1. Grant of License. Licensor hereby grants to you (“Customer”) a non-exclusive, non-transferable license to use the Software solely in accordance with the terms of this Agreement. For the purposes of this Agreement, “Software” means the software programs and documentation accompanying this Agreement and any online documentation. This Agreement permits Customer to use one copy of the Software on one MIVA Merchant Domain (“Domain”) and on one Store within that Domain. Customer may make one copy of the Software for archival and backup purposes. Customer must reproduce and include any copyright and trademark notices, legends and logos on each copy of the Software or diskettes made by Customer. The Software is protected by copyright laws and international copyright treaties and other laws regarding trade secrets and other intellectual property rights. Title and full ownership rights to the Software and any and all copies of the Software remain with Licensor.
2. Use of Software. Licensor will provide Customer with a license key to activate the Software. The Software may be used only for, by, and on behalf of Customer. Customer may not transfer any of its rights hereunder.
IN NO EVENT MAY CUSTOMER TRANSFER THE SOFTWARE TO ANY PERSON, ENTITY OR OTHER END USER IN VIOLATION OF APPLICABLE U.S. EXPORT LAW, INCLUDING, BUT NOT LIMITED TO, ANY TRANSFER FOR USE OUTSIDE THE COUNTRY IN WHICH IT WAS ORIGINALLY LICENSED.
3. Term and Termination. This Agreement may be terminated by mutual consent, or by election of either Customer or Licensor in case of the other’s unremedied material breach. In case of any termination of this Agreement, Customer will immediately return to Licensor all the Software components that Customer has obtained from Licensor and any copies in Customer’s possession, and will certify in writing that all such components and all copies of the Software have been returned or destroyed, and all copies erased from the memory of Customer’s computers.
4. Disclaimer of Warranties.
4.1 Licensor does not warrant that the functions contained in the Software will meet Customer’s requirements or that the operation of the Software will be error free. The Software is licensed on an “AS IS” basis. The entire risk as to the quality and performance of the Software is solely with Customer.

COPERNICUS BUSINESS SYSTEMS 46
4.2 NO OTHER WARRANTIES, EXPRESS OR IMPLIED ARE MADE WITH RESPECT TO THE SOFTWARE, INCLUDING, WITHOUT LIMITATION, WARRANTIES OF MERCHANTABILITY OR FITNESS FOR A PARTICULAR PURPOSE. SOME STATES DO NOT ALLOW THE EXCLUSION OF IMPLIED WARRANTIES, SO THIS EXCLUSION MAY NOT APPLY TO YOU.
4.3 YOU UNDERSTAND THAT THE SOFTWARE WAS DESIGNED TO SUPPLEMENT SOFTWARE AND/OR OTHER PRODUCTS PRODUCED AND/OR PROVIDED BY MIVA CORPORATION. LICENSOR DOES NOT ENDORSE AND IS NOT AFFILIATED WITH MIVA CORPORATION, AND DOES NOT CONTROL MIVA PRODUCTS. LICENSOR IS NOT RESPONSIBLE OR LIABLE FOR ANY UPGRADES, UPDATES, ENHANCEMENTS OR FUTURE RELEASES OF MIVA CORPORATION SOFTWARE OR PRODUCTS THAT MAY BE INCOMPATIBLE WITH THE SOFTWARE OR RENDER THE SOFTWARE INEFFECTIVE. LICENSOR DOES NOT WARRANT THAT THE SOFTWARE WILL WORK EFFECTIVELY WITH ANY UPGRADES, UPDATES, ENHANCEMENTS OR FUTURE RELEASES OF MIVA CORPORATION SOFTWARE OR OTHER PRODUCTS.
5. Limitation of Liability. TO THE MAXIMUM EXTENT PERMITTED BY APPLICABLE LAW, IN NO EVENT SHALL LICENSOR BE LIABLE TO CUSTOMER FOR ANY INCIDENTAL, SPECIAL, PUNITIVE, EXEMPLARY OR CONSEQUENTIAL DAMAGES OF EITHER CUSTOMER OR A THIRD PARTY AGAINST CUSTOMER (INCLUDING, BUT NOT LIMITED TO, LOSS OF DATA OR INFORMATION, LOST PROFITS, BUSINESS INTERRUPTION OR OTHER PECUNIARY LOSS) ARISING OUT OF OR IN CONNECTION WITH THIS AGREEMENT OR USE OF OR INABILITY TO USE THE SOFTWARE EVEN IF LICENSOR HAS BEEN ADVISED OF THE POSSIBILITY OF SUCH DAMAGES. IN NO EVENT SHALL LICENSOR BE LIABLE FOR DAMAGES FOR ANY CAUSE WHATSOEVER (WHETHER BASED IN CONTRACT, TORT OR OTHERWISE) IN EXCESS OF THE AMOUNT PAID TO LICENSOR BY CUSTOMER FOR USE OF THE SOFTWARE. SOME STATES DO NOT ALLOW THE LIMITATION OR EXCLUSION OF LIABILITY FOR INCIDENTAL OR CONSEQUENTIAL DAMAGES, SO THE ABOVE LIMITATION OR EXCLUSION MAY NOT APPLY TO YOU.
6. Other Restrictions and Limitations. Customer agrees that (1) it will not copy the Software except as permitted in Section 1; (2) it will not reproduce, deactivate, or bypass any security device supplied with the Software; (3) it will preserve and respect Licensor’s copyright and the notice of copyright included in the Software; (4) the Software contains information which is confidential and proprietary to Licensor, and Customer will not disclose or transfer or otherwise provide to any third party all or any part of the Software without the express written consent of Licensor; (5) it will not disassemble, reverse compile or reverse engineer the Software or any portion thereof or otherwise attempt to discover the source code or structural framework of the Software; (6) it will not rent or lease the Software; and (7) it will not modify the Software.
7. Breach. Customer will be deemed to be in breach of this Agreement if Customer violates any covenants or obligations imposed on it under this Agreement.
8. License by U.S. Government. The Software is provided with RESTRICTED RIGHTS. Use, duplication, or disclosure by the U.S. Government is subject to restrictions set forth in 48 CFR 52.227-14
COPERNICUS BUSINESS SYSTEMS 47
(g)(3)(ii) as applicable. Contractor/Manufacturer is Copernicus Business Systems, LLC, 167 Maribeau Square, Atlanta, GA 30327.
9. General Terms and Conditions. The terms and conditions of any purchase order or other ordering document issued by Customer in connection with this Agreement which are in addition to or inconsistent with the terms and conditions of this Agreement shall not be binding on Licensor and shall not be deemed to modify this Agreement. This Agreement constitutes and expresses the entire agreement and understanding between the parties in reference to all matters referred to herein and any and all previous agreements, discussions, promises, representations, and understandings between the parties relative thereto are merged herein and superceded hereby. The remedies provided in Section 3 shall be cumulative and additional to any other remedies in law or equity which Licensor may have. This Agreement shall be governed by the laws of the State of Georgia and shall inure to the benefit of Licensor, its successors, and assigns. The sole jurisdiction and venue for any litigation arising out of this Agreement shall be an appropriate federal court in the Northern District of Georgia or a state court located in the Northern District of Georgia. Customer hereby consents to personal jurisdiction in such courts. Sections 4, 5, 6, 8 and 9 shall survive any termination of this Agreement. All rights not specifically granted herein are reserved by Licensor.