security removable media manager · troubleshooting with the sccm client logs ... in your domain...
TRANSCRIPT

Security Removable Media Manager
Version 9.9.0.0
(January 2018)
Protect your valuable data

secRMM SCCM Installation Guide
Page 2
© 2011 Squadra Technologies, LLC. ALL RIGHTS RESERVED.
This guide contains proprietary information protected by copyright. The software described in this guide is furnished
under a software license or nondisclosure agreement. This software may be used or copied only in accordance with
the terms of the applicable agreement. No part of this guide may be reproduced or transmitted in any form or by
any means, electronic or mechanical, including photocopying and recording for any purpose other than the
purchaser's personal use without the written permission of Squadra Technologies, LLC.
If you have any questions regarding your potential use of this material, contact:
Squadra Technologies, LLC
7575 West Washington Ave
Suite 127-252
Las Vegas, NV 89128 USA
www.squadratechnologies.com
email: [email protected]
Refer to our Web site for regional and international office information.
TRADEMARKS
Squadra Technologies, secRMM are trademarks and registered trademarks of Squadra Technologies, LLC. Other
trademarks and registered trademarks used in this guide are property of their respective owners.
Disclaimer
The information in this document is provided in connection with Squadra Technologies products. No license, express
or implied, by estoppel or otherwise, to any intellectual property right is granted by this document or in connection
with the sale of Squadra Technologies products. EXCEPT AS SET FORTH IN Squadra Technologies's TERMS AND
CONDITIONS AS SPECIFIED IN THE LICENSE AGREEMENT FOR THIS PRODUCT, Squadra Technologies ASSUMES
NO LIABILITY WHATSOEVER AND DISCLAIMS ANY EXPRESS, IMPLIED OR STATUTORY WARRANTY RELATING TO
ITS PRODUCTS INCLUDING, BUT NOT LIMITED TO, THE IMPLIED WARRANTY OF MERCHANTABILITY, FITNESS FOR
A PARTICULAR PURPOSE, OR NON-INFRINGEMENT. IN NO EVENT SHALL Squadra Technologies BE LIABLE FOR ANY
DIRECT, INDIRECT, CONSEQUENTIAL, PUNITIVE, SPECIAL OR INCIDENTAL DAMAGES (INCLUDING, WITHOUT
LIMITATION, DAMAGES FOR LOSS OF PROFITS, BUSINESS INTERRUPTION OR LOSS OF INFORMATION) ARISING
OUT OF THE USE OR INABILITY TO USE THIS DOCUMENT, EVEN IF Squadra Technologies HAS BEEN ADVISED OF
THE POSSIBILITY OF SUCH DAMAGES. Squadra Technologies makes no representations or warranties with respect
to the accuracy or completeness of the contents of this document and reserves the right to make changes to
specifications and product descriptions at any time without notice. Squadra Technologies does not make any
commitment to update the information contained in this document.
Squadra Technologies Excel AddIn Administrator Guide Created - August 2011

secRMM SCCM Installation Guide
Page 3
Contents
INTRODUCTION ..................................................................................................................................................... 4
INSTALLATION OF SECRMM USING SCCM .............................................................................................................. 4
PREPARE THE SCCM SERVER ............................................................................................................................................ 4
DOWNLOAD THE SECRMM SOFTWARE ............................................................................................................................... 5
DOWNLOAD THE MICROSOFT PREREQUISITE SOFTWARE ......................................................................................................... 7
Checking for the Microsoft Prerequisite software ................................................................................................. 8
CREATE SCCM GLOBAL CONDITIONS ................................................................................................................................. 8
CREATE SCCM APPLICATIONS ......................................................................................................................................... 12
secRMM installation ............................................................................................................................................ 12 secRMM MSI files .............................................................................................................................................................. 14
secRMM License file ............................................................................................................................................. 40 Scripts to copy the license file ........................................................................................................................................... 40
DISTRIBUTE THE SECRMM APPLICATION CONTENT TO SCCM DISTRIBUTION POINTS ................................................................. 69
DEPLOY THE SCCM SECRMM APPLICATIONS ..................................................................................................................... 74
TROUBLESHOOTING WITH THE SCCM CLIENT LOGS ............................................................................................. 87
SECRMM LICENSE ........................................................................................................................................................ 88
CONTACTING SQUADRA TECHNOLOGIES SUPPORT ............................................................................................. 89
ABOUT SQUADRA TECHNOLOGIES, LLC. ............................................................................................................... 89

secRMM SCCM Installation Guide
Page 4
Introduction Security Removable Media Manager (secRMM) can be installed (deployed) in your domain using Microsoft System Center Configuration Manager (SCCM). The easiest way to do this is by using the SCCM Applications deployment feature. The sections below will show you how to use the SCCM Applications deployment feature for secRMM. There is a YouTube video on this subject at: https://www.youtube.com/watch?v=xHkOA2o4NGs NOTE: This document is 95% screenshots so don’t get discouraged with the number of pages! Hopefully you will find that a picture is really worth 1000 words.
Installation of secRMM using SCCM
Prepare the SCCM server To deploy the secRMM product, the secRMM license file and the secRMM “Microsoft prerequisite software” (which may already be installed on your systems), we will create a network share on a server in your domain that all the computers in your domain can access. We suggest you name the directory secRMM. Under the secRMM directory, you will create 3 subdirectories:
1. secRMMInstallvx.x.x.x where x.x.x.x is the secRMM version number you are installing 2. secRMMLicense 3. secRMMPrerequisite
As you can see from the screenshot above, we used the SCCM site server (named sccmr2) and created the secRMM directory under the directory named _SCCMAppDeployments. We will share the directory C:\_SCCMAppDeployments\secRMM so SCCM and the SCCM client computers can access it. In the screen shot below, you can see we create the share on the SCCMR2 server and the share for

secRMM SCCM Installation Guide
Page 5
C:\_SCCMAppDeployments\secRMM is named secRMM so other computers can access this share at \\SCCMR2\secRMM.
Note the share permission below. We allow the “Domain Computers” read access to this share. This will allow SCCM access to the directory1
Download the secRMM software
1 The security in your environment might be set up differently. If this is the case and you are unsure of how to allow SCCM to access this directory, please contact Squadra Technologies support for assistance in setting this up.

secRMM SCCM Installation Guide
Page 6
Now that the directory structure has been created, we will download the files to go into the directories. Go to http://www.squadratechnologies.com. Follow the screen shot below to get to the secRMM download page.
If you have 64-bit and 32-bit computers in your environment, make sure to download both of the installation files. Each zip file that you download will contain the Windows installation file (the file will have a file extension of MSI). secRMMInstallx64.zip will contain secRMMInstallx64.msi and

secRMM SCCM Installation Guide
Page 7
secRMMInstallx86.zip will contain secRMMInstallx86.msi.
At the bottom of the secRMM download page, it will always show you the secRMM version you are downloading. You should write the version number down so that when we perform the SCCM Application steps below we will have the secRMM version number.
Extract the zip files and put the msi files into the share we created above.
Download the Microsoft Prerequisite software secRMM relies on the Microsoft Visual C++ Redistributable dlls. Currently, secRMM is using the “Microsoft Visual C++ 2015 Redistributable Update 3”. If you are keeping current with Microsoft updates, this should already be installed on your systems. If your systems do not already have “Microsoft Visual C++ 2015 Redistributable Update 3” installed (see below on how to check if you have it already installed), please refer to the “secRMM Prerequisites Installation Guide” available from the Squadra Technologies web site (the same page where you received this installation guide).

secRMM SCCM Installation Guide
Page 8
Checking for the Microsoft Prerequisite software To see if the “Microsoft Visual C++ 2015 Redistributable Update 3” dlls are already on your systems, you can check in the Windows\system32 directory for a dll named vcruntime140.dll.
If the “Microsoft Visual C++ 2015 Redistributable Update 3” dlls are not on your systems and you install secRMM, secRMM will generate an error (“Provider load failure”) and will not be able to function properly.
Create SCCM Global Conditions Since secRMM provides a 64-bit (x64) and 32-bit (x86) installation program, we will create two SCCM “Global Conditions” so that SCCM will install the 64-bit secRMM onto x64 Windows computers and the 32-bit secRMM onto x86 Windows computers2. If you already have SCCM “Global Conditions” for this, you can reuse what you have already created. Note that if you have XP computers in your environment, you will need to use Win32_Processor instead of Win32_OperatingSystem and AddressWidth instead of OSArchitecture. The AddressWidth property will either be ”64” or ”32”.
2 It may seem illogical to use the terms 32-bit and x86 to mean the same thing. The x86 was the name of the Intel processor which at the time was a 32-bit processor. When you see 32-bit or x86, it means the same thing.

secRMM SCCM Installation Guide
Page 9
Below is the screen shot for the 64-bit Global Condition. You can cut and paste the values below: Name: OS Architecture x64 Class: Win32_OperatingSystem
Property: OSArchitecture
WQL query WHERE clause: OSArchitecture = '64-bit'

secRMM SCCM Installation Guide
Page 10
Below is the screen shot for the 32-bit Global Condition. You can cut and paste the values below: Name: OS Architecture x86 Class: Win32_OperatingSystem
Property: OSArchitecture WQL query WHERE clause: OSArchitecture = '32-bit'

secRMM SCCM Installation Guide
Page 11

secRMM SCCM Installation Guide
Page 12
Create SCCM Applications
secRMM installation Now we will create the SCCM Application for the secRMM installation. You may want to create a folder for secRMM under the SCCM->”Software Library”->Overview->”Application Management”->Applications tree node as shown below.
Press the “Create Application” button on the SCCM Console ribbon bar when you have the Software Library->Application Management->Applications clicked. The “Create Application Wizard” will display. Select the “Manually specify the application installation” and click the Next button.

secRMM SCCM Installation Guide
Page 13
On the “General Information” page, specify the application name. You should include the secRMM version number so that if/when you upgrade secRMM, you can have unique names for the secRMM SCCM application package. There are other optional fields (such as Publisher and Software version) you can fill in based on your SCCM processes.
On the “Application Catalog” page, there are optional fields you can fill in based on your SCCM processes.

secRMM SCCM Installation Guide
Page 14
secRMM MSI files On the “Deployment Types” page, we will add the secRMM msi files (one for x64 and one for x86). To do this, click the “Add” button.

secRMM SCCM Installation Guide
Page 15

secRMM SCCM Installation Guide
Page 16
Click the “Browse” button and select the secRMMx64.msi file using the network share name \\sccmr2\secRMM\secRMMInstallvx.x.x.x\secRMMInstallx64.msi. Be sure you do not use the local file name C:\_SCCMAppDeployments\secRMM\ on this step.
Click the “Next” button.
secRMM SCCM Installation Guide
Page 17
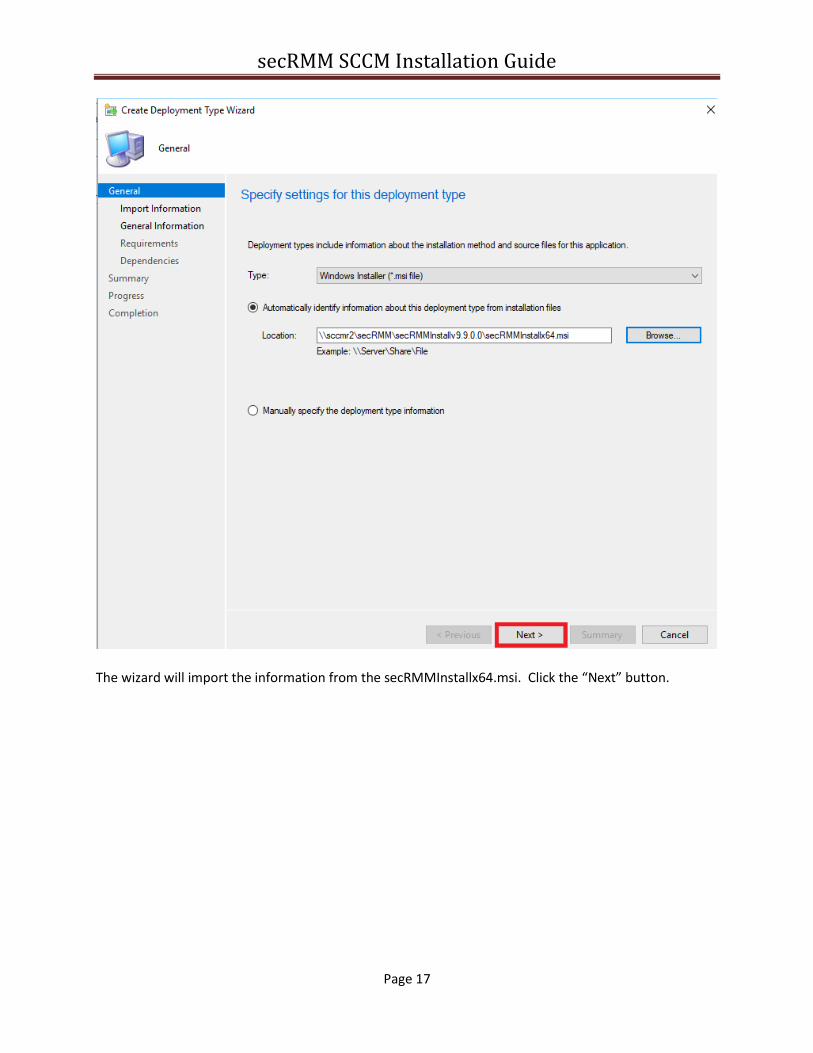
The wizard will import the information from the secRMMInstallx64.msi. Click the “Next” button.

secRMM SCCM Installation Guide
Page 18
Change the Name by adding x64 after the word secRMM. Click the “Next” button.

secRMM SCCM Installation Guide
Page 19
On the “Requirements” page, we will associate the SCCM “Global Condition” named “OS Architecture x64” that we created earlier. This step ensures that SCCM installs the secRMM x64 program only on computers running 64-bit Windows.

secRMM SCCM Installation Guide
Page 20

secRMM SCCM Installation Guide
Page 21
The value is 64-bit

secRMM SCCM Installation Guide
Page 22
There are no required dependencies, so click the “Next” button.

secRMM SCCM Installation Guide
Page 23
Click the “Next” button on the “Summary” page.

secRMM SCCM Installation Guide
Page 24
Click the “Close” button on the “Completion” page.

secRMM SCCM Installation Guide
Page 25
We are now back on the “Deployment Types” page. We will click the “Add” button again to add the 32-bit msi file (secRMMInstallx86.msi). If you do not have any 32-bit computers in your environment, you can skip this section.

secRMM SCCM Installation Guide
Page 26

secRMM SCCM Installation Guide
Page 27

secRMM SCCM Installation Guide
Page 28
Change the Name by adding x86 after the word secRMM. Click the “Next” button.

secRMM SCCM Installation Guide
Page 29

secRMM SCCM Installation Guide
Page 30

secRMM SCCM Installation Guide
Page 31
The value is 32-bit

secRMM SCCM Installation Guide
Page 32

secRMM SCCM Installation Guide
Page 33

secRMM SCCM Installation Guide
Page 34

secRMM SCCM Installation Guide
Page 35

secRMM SCCM Installation Guide
Page 36

secRMM SCCM Installation Guide
Page 37

secRMM SCCM Installation Guide
Page 38

secRMM SCCM Installation Guide
Page 39

secRMM SCCM Installation Guide
Page 40
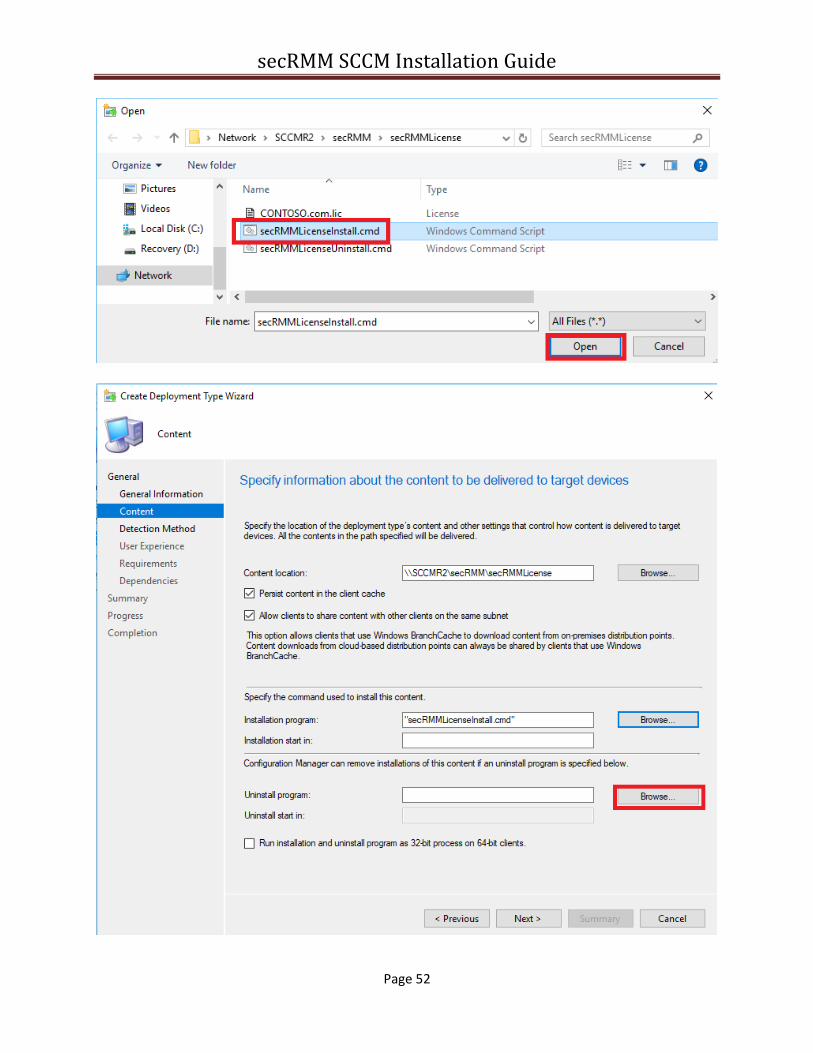
secRMM License file The secRMM license file needs to be copied to each computer running secRMM in your environment. You receive the secRMM license file from Squadra Technologies. If you are deploying secRMM with SCCM for a test and do not yet have a secRMM license file, you can skip this step. secRMM will run (fully functional) for 30 days. Once you do get a secRMM license file, you can come back to this section. Under the network share we created earlier (in the section titled "Prepare the SCCM server" above), we created a subdirectory named \\sccmr2\secRMM\secRMMLicense (C:\_SCCMAppDeployments\secRMM\secRMMLicense). Put the secRMM license file you received from Squadra Technologies into this directory. Your secRMM license file will have a name similar to your domain name. In this document (for example purposes), we will use the name CONTOSO.com.lic for the secRMM license file. Be sure though that you change CONTOSO.com.lic to be the actual file name you received from Squadra Technologies (we will point out each place you need to make a change below).
Scripts to copy the license file The secRMM SCCM license file is deployed using a script (cmd file). The install and uninstall scripts are in the secRMMDeployment.zip (in the Licensing\SCCM directory) which you can download from the Squadra Technologies web site. Since they are so short, if you prefer, you can just copy and paste them from below. If you use the files from the secRMMDeployment.zip file, make sure you still edit them and change the MyDomain.lic to the name of your secRMM license file as shown below. In the screenshots below, we will use CONTOSO.com.lic as our secRMM license file. If you choose to just copy and paste the scripts, using notepad (or another editor such as Visual Studio), create a file named secRMMLicenseInstall.cmd in the same directory where you put your secRMM license file: \\sccmr2\secRMM\secRMMLicense (C:\_SCCMAppDeployments\secRMM\secRMMLicense). *** Intentionally blank so script below is on a single page ***

secRMM SCCM Installation Guide
Page 41
Be sure to change MyDomain.lic in the script below to be the name of your secRMM license file. Cut and paste the following text into the file named secRMMLicenseInstall.cmd: set license=MyDomain.lic
@ECHO OFF
setlocal enabledelayedexpansion
setlocal enableextensions
for /f "tokens=* delims= " %%a in ("%license%") do set license=%%a
for /l %%a in (1,1,260) do if "!license:~-1!"==" " set license=!license:~0,-1!
set log="%~dp0Install.log"
set KEY_NAME=HKLM\SOFTWARE\Microsoft\MMC\SnapIns\FX:{4bbd4ebc-d808-4efc-b0a6-83c62e4ac931}
set VALUE_NAME=ApplicationBase
FOR /F "usebackq skip=2 tokens=1-4" %%A IN (`REG QUERY %KEY_NAME% /v %VALUE_NAME% 2^>nul`) DO (
set secRMMDir=%%C %%D
)
if defined secRMMDir (
@echo secRMM is installed at %secRMMDir% > %log%
@echo Using %license% as the secRMM license file >> %log%
if exist "%~dp0%license%" (
@echo copy "%~dp0%license%" "%secRMMDir%%license%" /y >> %log%
copy "%~dp0%license%" "%secRMMDir%%license%" /y
if not exist "%secRMMDir%%license%" (
@echo license file "%secRMMDir%%license%" does not exist, copy failed. >> %log%
exit 8
) else (
call :log
)
) else (
@echo license file "%~dp0%license%" does not exist. >> %log%
exit 9
)
) else (
@echo "%KEY_NAME:"=%\%VALUE_NAME%" not found, meaning secRMM is not installed. > %log%
exit 10
)
goto :EOF
:log
SET MESSAGE=secRMM license file deployed by SCCM.
SET SECRMMLOGID=3
SET MESSAGEID=300
SET EVENTLEVEL=4
WMIC /Namespace:\\root\cimv2\secrmm path secRMMWMIProvider call WriteToNTEventLog ^
"%MESSAGE%", %SECRMMLOGID%, %MESSAGEID%, %EVENTLEVEL%
exit /b
*** Intentionally blank so script below is on a single page ***

secRMM SCCM Installation Guide
Page 42
Using notepad (or another editor such as Visual Studio), create a file named secRMMLicenseUninstall.cmd in the same directory where you put your secRMM license file: \\sccmr2\secRMM\secRMMLicense (C:\_SCCMAppDeployments\secRMM\secRMMLicense). Be sure to change MyDomain.lic in the script below to be the name of your secRMM license file. Cut and paste the following text into the file named secRMMLicenseUninstall.cmd:
set license=MyDomain.lic
@ECHO OFF
setlocal enabledelayedexpansion
setlocal enableextensions
for /f "tokens=* delims= " %%a in ("%license%") do set license=%%a
for /l %%a in (1,1,260) do if "!license:~-1!"==" " set license=!license:~0,-1!
set log="%~dp0Uninstall.log"
set KEY_NAME=HKLM\SOFTWARE\Microsoft\MMC\SnapIns\FX:{4bbd4ebc-d808-4efc-b0a6-83c62e4ac931}
set VALUE_NAME=ApplicationBase
FOR /F "usebackq skip=2 tokens=1-4" %%A IN (`REG QUERY %KEY_NAME% /v %VALUE_NAME% 2^>nul`) DO (
set secRMMDir=%%C %%D
)
if defined secRMMDir (
@echo secRMM is installed at %secRMMDir% > %log%
@echo Using %license% as the secRMM license file >> %log%
if exist "%secRMMDir%%license%" (
@echo del "%secRMMDir%%license%" /f /q >> %log%
del "%secRMMDir%%license%" /f /q
if exist "%secRMMDir%%license%" (
@echo license file "%secRMMDir%%license%" exists, delete failed. >> %log%
exit 8
)
) else (
@echo license file "%secRMMDir%%license%" does not exist. >> %log%
)
) else (
@echo "%KEY_NAME:"=%\%VALUE_NAME%" not found, meaning secRMM is not installed. > %log%
)

secRMM SCCM Installation Guide
Page 43
The screenshot below is what the secRMMLicense directory should look like (except you will have your secRMM license file instead of CONTOSO.com.lic).
Now, we will create another SCCM Application to deploy the secRMM License file to the computers in your environment. Press the “Create Application” button on the SCCM Console ribbon bar when you have the Software Library->Application Management->Applications->secRMM clicked. The “Create Application Wizard” will display. Select the “Manually specify the application installation” and click the Next button.

secRMM SCCM Installation Guide
Page 44
On the “General Information” page, specify the application name (we used “secRMM License file”). There are other optional fields you can fill in based on your SCCM processes.

secRMM SCCM Installation Guide
Page 45

secRMM SCCM Installation Guide
Page 46

secRMM SCCM Installation Guide
Page 47

secRMM SCCM Installation Guide
Page 48

secRMM SCCM Installation Guide
Page 49

secRMM SCCM Installation Guide
Page 50

secRMM SCCM Installation Guide
Page 51
secRMM SCCM Installation Guide
Page 52

secRMM SCCM Installation Guide
Page 53

secRMM SCCM Installation Guide
Page 54

secRMM SCCM Installation Guide
Page 55

secRMM SCCM Installation Guide
Page 56
On the “Browse File System”, we want to specify the directory where secRMM is installed. The default installation directory is C:\Program Files\secRMM. The file name we will use is the secRMM license file name. For this document, we use CONTOSO.lic but you will use the file name you received from Squadra Technologies. If you don’t have secRMM installed on the computer where you are running the SCCM console, then you can just manually type in the information (i.e. the “Path” and “file or folder name” on the Window/dialog named “Detection Rule” (see the screen shot below).

secRMM SCCM Installation Guide
Page 57
Make sure the checkbox is not checked.

secRMM SCCM Installation Guide
Page 58

secRMM SCCM Installation Guide
Page 59

secRMM SCCM Installation Guide
Page 60

secRMM SCCM Installation Guide
Page 61

secRMM SCCM Installation Guide
Page 62

secRMM SCCM Installation Guide
Page 63

secRMM SCCM Installation Guide
Page 64

secRMM SCCM Installation Guide
Page 65

secRMM SCCM Installation Guide
Page 66

secRMM SCCM Installation Guide
Page 67

secRMM SCCM Installation Guide
Page 68

secRMM SCCM Installation Guide
Page 69
Distribute the secRMM application content to SCCM Distribution Points Distribute the application content to your SCCM Distribution Points. The data in the screenshots below will be much different than your environment but the screenshots will give you a general idea of how to distribute the secRMM SCCM applications.

secRMM SCCM Installation Guide
Page 70

secRMM SCCM Installation Guide
Page 71

secRMM SCCM Installation Guide
Page 72

secRMM SCCM Installation Guide
Page 73

secRMM SCCM Installation Guide
Page 74
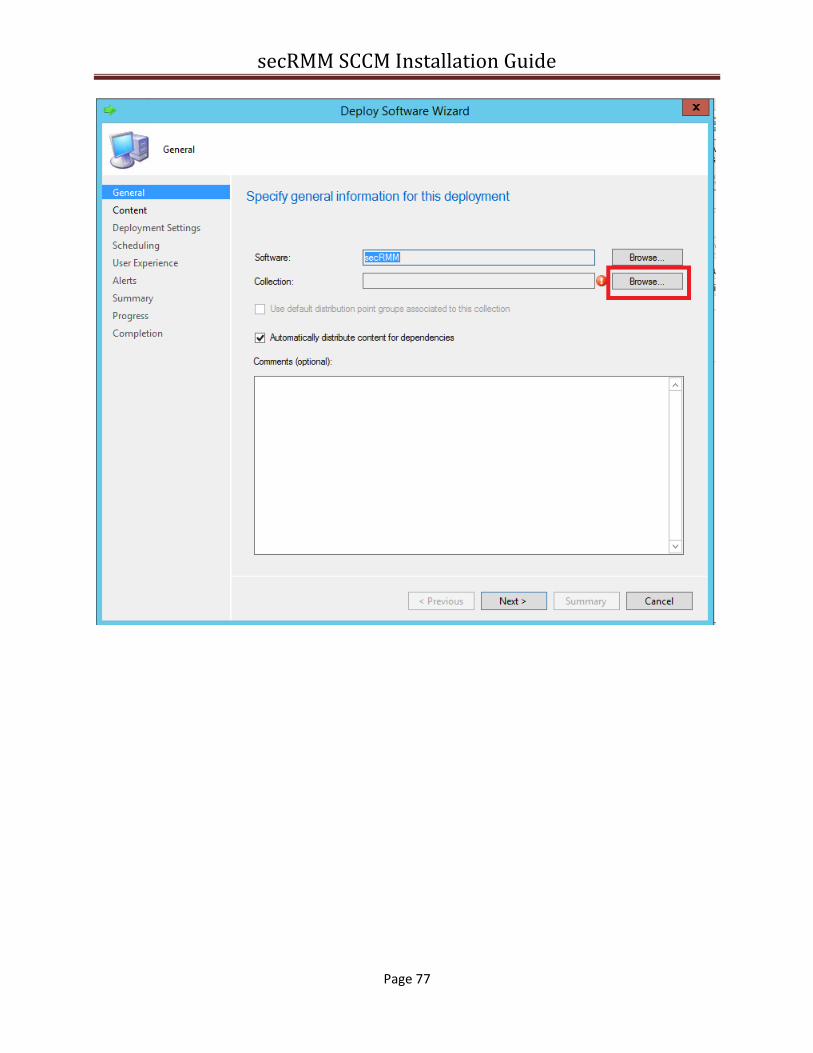
Deploy the SCCM secRMM applications We can now deploy the two secRMM applications (the secRMM installation and the secRMM License file). The deployment for each secRMM application will be the same except on the “secRMM license file” deployment, you will tell SCCM that the “secRMM license file” deployment is dependent on the “secRMM installation” deployment. This is necessary because the installation directory for secRMM will not exist for the license file copy to occur until the secRMM software is installed on the computer. The data in the Deployment dialogs will be different in your environment since the Device collections will be different. If you are unsure of the steps to take here, please contact Squadra Technologies technical support for assistance.

secRMM SCCM Installation Guide
Page 75

secRMM SCCM Installation Guide
Page 76
secRMM SCCM Installation Guide
Page 77

secRMM SCCM Installation Guide
Page 78

secRMM SCCM Installation Guide
Page 79

secRMM SCCM Installation Guide
Page 80

secRMM SCCM Installation Guide
Page 81

secRMM SCCM Installation Guide
Page 82

secRMM SCCM Installation Guide
Page 83

secRMM SCCM Installation Guide
Page 84

secRMM SCCM Installation Guide
Page 85

secRMM SCCM Installation Guide
Page 86

secRMM SCCM Installation Guide
Page 87
At this point, we can go to one of the targeted systems to watch the deployment.
Troubleshooting with the SCCM client logs This section helps you troubleshoot your SCCM environment when the software does not get deployed.

secRMM SCCM Installation Guide
Page 88
secRMM License On the SCCM client, you can see the SCCM logs at C:\Windows\CCM\Logs. For the script based deployments, you can search for the script name (secRMMLicenseInstall.cmd) in the logs named: AppEnforce.log DataTransferService.log A simple way to see if the string is even occurring in any of the logs, you can type the following: C:\Windows\CCM\Logs> findstr /m "secRMMLicenseInstall.cmd" *.log AppEnforce.log DataTransferService.log In addition, look the directory named C:\Windows\ccmcache. Remember, for the secRMM License File Copy operation, we told SCCM to persist the scripts in the SCCM clients cache. The SCCM clients cache is the directory C:\Windows\ccmcache. Therefore, type: dir secRMMLicenseInstall.cmd /s in directory C:\Windows\ccmcache. This will tell you what subdirectory the script executed in. There will be a log file in that directory named Install.log and it will give you the execution results. Below is an example.

secRMM SCCM Installation Guide
Page 89
Contacting Squadra Technologies Support Squadra Technologies Support is available to customers who have purchased a commercial version of secRMM and have a valid maintenance contract or who are in a trial mode of the product. When you contact Support please include the following information:
1. The version of secRMM you have installed.
2. The Windows versions you have installed: XP, 2003 Server, 2008 Server R2, Vista, Windows 7,
etc.
3. The version of SCCM you have installed.
4. Whether the Windows Operating System is 32bit or 64bit.
5. The specific issue you are contacting support for.
About Squadra Technologies, LLC. Squadra Technologies delivers innovative products that help organizations get more data protection within the computer infrastructure. Through a deep expertise in IT operations and a continued focus on what works best, Squadra Technologies is helping customers worldwide. Contacting Squadra Technologies, LLC.
Phone 562.221.3079 (United States and Canada) Email [email protected] Mail Squadra Technologies, LLC. World Headquarters 7575 West Washington Ave. Suite 127-252 Las Vegas, NV 89128 USA Web site http://www.squadratechnologies.com/