sei clientconnect · pdf file3 login process you will access seiclientconnect using...
TRANSCRIPT

SEI CLIENTCONNECT USER GUIDE JULY 2015
SEI ClientConnect

1
Contents
Purpose ................................................................................................................................................. 2
Login Process ........................................................................................................................................ 2
Mobile Access ........................................................................................................................................ 2
CConnect Core Functionality ................................................................................................................. 2
Log In Process ....................................................................................................................................... 3
My Accounts .......................................................................................................................................... 4
Navigation .............................................................................................................................................. 5
My Favorites .......................................................................................................................................... 6
Viewing Groups ...................................................................................................................................... 7
Individual Accounts ................................................................................................................................ 8
Account Summary .................................................................................................................................. 9
Holdings Detail ................................................................................................................................ 10-11
Taxlot Detail ......................................................................................................................................... 12
Transaction Detail ................................................................................................................................ 13
My Documents ..................................................................................................................................... 14
Download to Quicken ........................................................................................................................... 15

2
Purpose
This document covers the core functionality of SEIClientConnect as well as various screenshots and suggestions or
best practice suggestions.
You will be using SEIClientConnect to quickly access your real-time account information as needed.
Mobile Access
We created SEIClientConnect specifically for you. SEIClientConnect is a browser-based solution designed to
deliver a pleasant and consistent experience across all of your devices, be it a desktop/laptop, a tablet or
a smartphone. You are not required to download or maintain an app from an app store but rather
always have the latest version of the website at your disposal.
SEI ClientConnect Core Functionality
SEIClientConnect has a core set of functionality that includes the following pages:
My Accounts
Account Profile
Account Summary o Pending Activity o Realized Gain/Loss
Holdings Detail
Transaction History
Taxlot Detail
My Documents
Download to Quicken

3
Login Process
You will access SEIClientConnect using SEI’s login page and our Multi-factor authentication (MFA) process.
Please be aware that the look and feel of the login and MFA screens are updated. The functionality will
remain exactly the same. This same look and feel will also carry over to tablets and smartphones.
Step 1: Enter your ID.
Step 2: Enter your password.
Step 3: If this is your first time logging on to the URL with a new device, answer two security questions
and register your device.
Step 4: Re-enter your password to be logged in.
Step 1 Step 2
Step 3 Step 4

4
If you have to select Forget Password or Reset Password because you get locked out, you will follow the
same process. The main difference is that after answering your two security questions correctly, you will
be emailed a one-time password that you must enter back into the URL. Next, you will create and
confirm a new password and then you will be logged in.
Home Page — My Accounts
With your new SEIClientConnect site, one of the first things you will notice is the new layout and
navigation. Your default home screen is referred to as your My Accounts page and your view will default
to all of your registered accounts. The drop-down menu in the top right corner of the page will indicate
your account or group of accounts. All information on the My Accounts page will reflect all of your
accounts and can be changed to other groups or individual accounts. The page consists of three
sections:
Total Accounts by Market Value — This section lists the top five accounts in decending market
value order. If you need to view more than five accounts, click on Show All. The All Accounts
value at the top left will always be the total market value of all your registered accounts.
Asset Allocation — Represents the breakdown of your investments by asset class.
Recent Transactions — Lists your last five transactions. For additional transactions, click on
Transaction History.
5
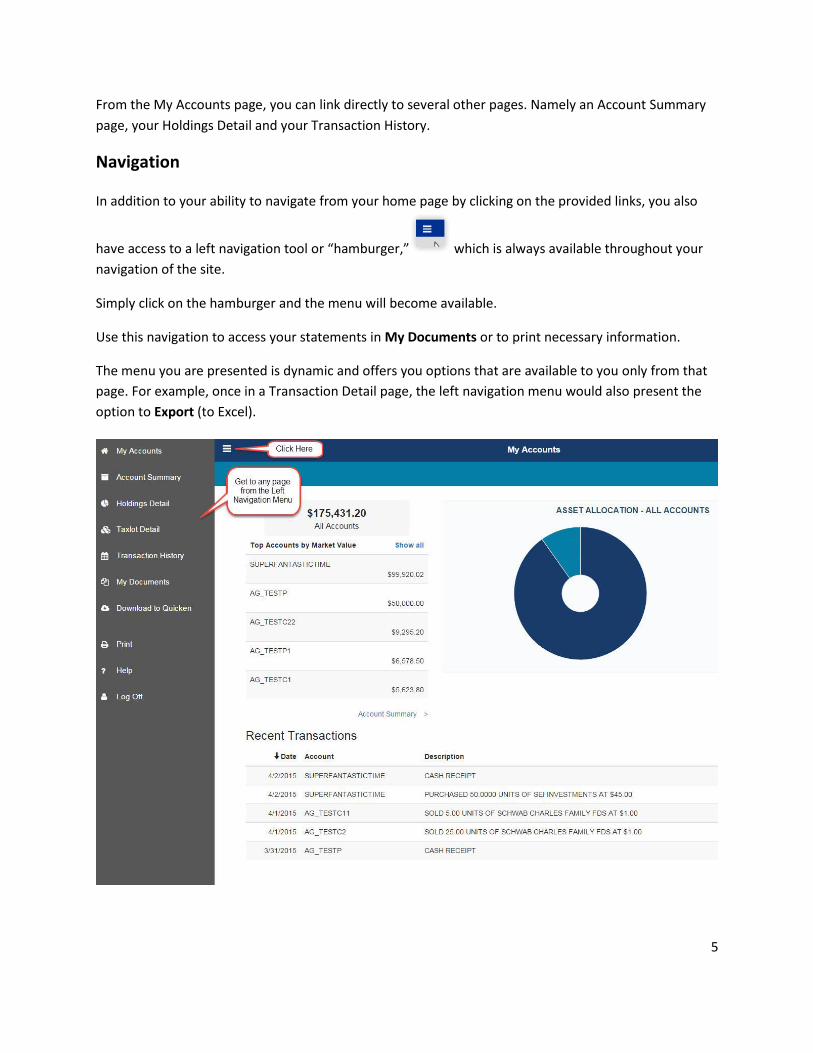
From the My Accounts page, you can link directly to several other pages. Namely an Account Summary
page, your Holdings Detail and your Transaction History.
Navigation
In addition to your ability to navigate from your home page by clicking on the provided links, you also
have access to a left navigation tool or “hamburger,” which is always available throughout your
navigation of the site.
Simply click on the hamburger and the menu will become available.
Use this navigation to access your statements in My Documents or to print necessary information.
The menu you are presented is dynamic and offers you options that are available to you only from that
page. For example, once in a Transaction Detail page, the left navigation menu would also present the
option to Export (to Excel).

6
Creating a My Favorites Group
Groups are a convenient aspect of any user experience. With ClientConnect, we have designed a
maintenance-free grouping experience as well as the ability to create one My Favorite group. As shown
below, from the My Accounts page, you can click on Show All to both see your full list of accounts and
their market value as well as choose accounts for a favorite group.
Select any account(s) from your list by clicking on the star to the left of the account number. Once
saved, you will now have a My Favorites group available in your drop-down menu to view an aggregated
list such as a Summary or Holdings, whether they areIRAs, taxable accounts, a child’s accounts, etc.
The My Favorite grouping functionality can be updated dynamically and within seconds to compare and
contrast information from say IRA and taxable accounts or view dependents’ aggregated information.

7
Viewing Automated Groups
With a simple-to-use interface, you can update your My Favorites any time, including within a single
login experience so you can see multiple views of your same accounts.
In addition to the All Accounts group that SEI sets up and maintains and the My Favorites functionality
— which allows you to create and edit a group yourself as often as you’d like — other specific groups are
auto-created for you.
If you used our Managed Account and/or our Goals-Based Accounts you most likely have sub-accounts
(for example, 98765 as a main account and 98765A, 98765B or 98765AE, 98765EE as sub-accounts). If
so, SEI now automatically aggregates those sub-accounts in one group under the main account.
As an example, if you have a Managed Account (98765) that has two sub-accounts (98765AE and
98765EE) if you select the main account, you will see an aggregated view of the entire Managed
Account.
In the example below, you can see that while one account (the main account) was selected, three
accounts (the main account plus the two sub-accounts) show up in the Account Value section at the top
left section of the page and are represented in the Asset Allocation and Recent Transaction section.
Furthermore, any additional sub-accounts that are opened will be added to your registration
automatically.

8
Viewing Individual Accounts
In addition to viewing aggregated data for a Managed or Goals-Based Account (as shown above), select
an individual sub-account within the group to view data specific to that sub-account.
As with every screen, the information reflected in all three areas of your My Accounts home page reflect
the account (or group) chosen.

9
Account Summary Page
This page displays the Asset Allocation chart with allocations by security type as well as dollar amount.
Any pending activity can be viewed, and exported, under the Pending Activity link and Show Detail, if
available. Pending activity is any monetary activity (a trade, a transfer, etc.) that has not started and is
not yet completed. If there are no pending activities within SMAC, the word None will appear instead of
Show Detail.
You can also view the realized gain/loss summary for the current year and the previous year. A drill
down to the taxlot level detail is provided by clicking on the Current Year while the Previous Year is a
snapshot.
The last item on this page is the Estimated Annual Income.

10
Holdings Detail
You can link to your Holdings Detail from either your My Accounts page or the hamburger at the top left.
The information you see depends on the context from which you enter the screen. In the example
below, the user is in All Accounts. As a result, the user is seeing all holdings. If they wish to see only
single accounts, they can and should select that account.
When entering the Holdings Detail from the context of a group, the default is to aggregate the positions
and show all asset classes as seen below.
To see a breakdown of how an asset or assets are distributed across accounts, change the default
setting for Show Accounts/Sub-Accounts from No to Yes, as shown on the next page.
To isolate a specific asset class, either click on that asset class in the Asset Allocation matrix and you will
be auto-scrolled down to that section or you can change your filter from All Holdings to the Asset
Class(es) you wish to see, as shown on the next page.

11
Holdings Detail (Continued)
All holdings are listed out by security type along with other important information. You also have the ability to drill down to additional detail (shown below) by clicking anywhere within the line of a particular security.

12
Taxlot Detail
From your Holdings page, you can drill down into your taxlot detail and view specific assets and taxlots.
When viewing taxlot detail, you can review the gain/loss associated with your account purchases.
The information available in the taxlot page is exportable to edit in Excel.
The Jump To feature allows you to find a particular asset quickly without searching or scrolling. You can
also cancel that security and start a new search. To close the Jump To search, just click on the red X.

13
Transaction Detail
This page provides transaction history that you can filter by date range or transaction type. The default
view is the last 30 days for all transactions. Like the Holdings Detail page, this page allows you to
customize your view by selecting specific time frames as well as specific transaction types (see
screenshots below). This page was designed to allow users to view transactions in the context of a single
account.
You can also filter by a specific type of transaction you want to see (or both).

14
My Documents Page — Statements
View your Activity and Perfomance Statements online by going to theleft navigation menu, and then
click on Statements to pull up the statements available viewing or download.
There is also an icon titled Go Paperless, allowing you to easily opt in to electronic delivery of
statements. Simply click on the green leaf, select E-Statements and enter your email (see image at the
bottom of this page) and accept the conditions associated with electronic delivery.

15
Download to Quicken
Like our previous site, you can download your account information into Quicken by selecting the
accounts and date range you want to see.