september 2017 release class keeway tsao - watercolor ... · pdf fileseptember 2017 release...
TRANSCRIPT
For more great products and inspiration please visit mftstamps.com
September 2017 Release ClassKeeway Tsao - Watercolor Wildflowers
Stamps:Rustic Wildflowers
Die-namics:A2 Rectangle STAX Set 2Blessed & Blessings
Card Stock:Black LicoriceRazzle BerryRanger Watercolor Paper
Ink:Black Licorice HybridDistress Inks
Supplies:Mini MISTIMono Aqua Liquid GluePrecision Tip Glue Applicator BottleMini Misters – 3 Pack
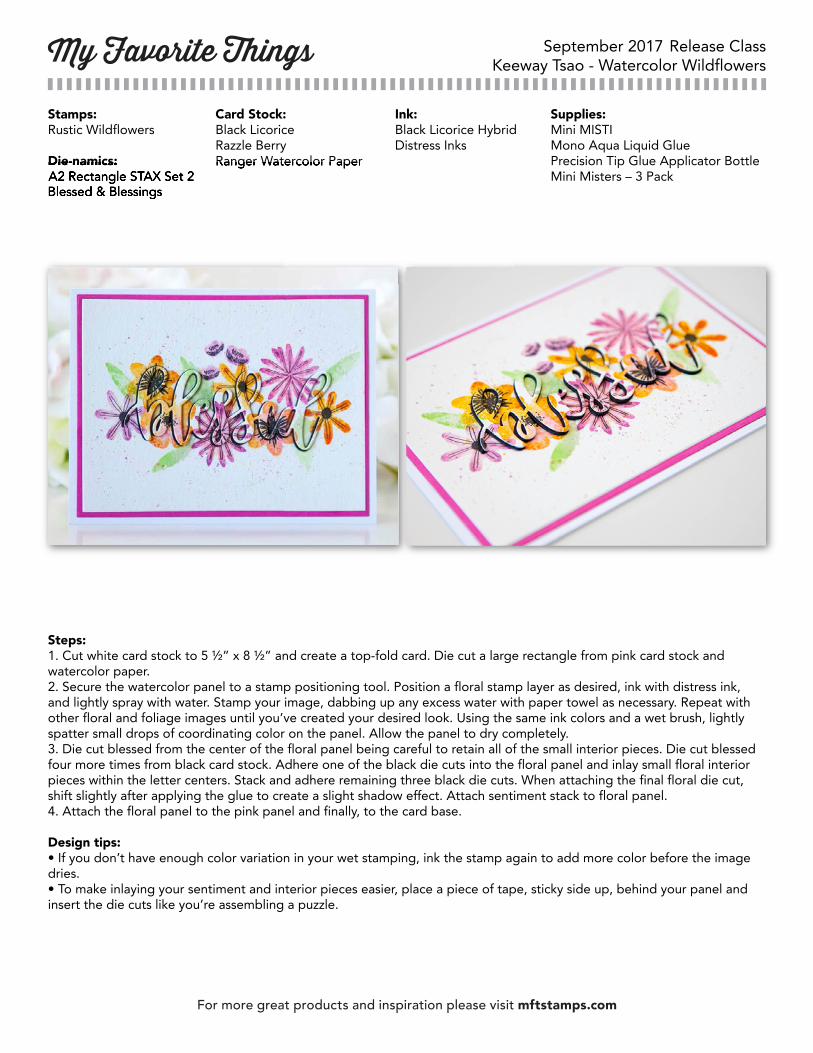
Steps:1. Cut white card stock to 5 ½” x 8 ½” and create a top-fold card. Die cut a large rectangle from pink card stock and watercolor paper.2. Secure the watercolor panel to a stamp positioning tool. Position a floral stamp layer as desired, ink with distress ink, and lightly spray with water. Stamp your image, dabbing up any excess water with paper towel as necessary. Repeat with other floral and foliage images until you’ve created your desired look. Using the same ink colors and a wet brush, lightly spatter small drops of coordinating color on the panel. Allow the panel to dry completely.3. Die cut blessed from the center of the floral panel being careful to retain all of the small interior pieces. Die cut blessed four more times from black card stock. Adhere one of the black die cuts into the floral panel and inlay small floral interior pieces within the letter centers. Stack and adhere remaining three black die cuts. When attaching the final floral die cut, shift slightly after applying the glue to create a slight shadow effect. Attach sentiment stack to floral panel.4. Attach the floral panel to the pink panel and finally, to the card base.
Design tips:• If you don’t have enough color variation in your wet stamping, ink the stamp again to add more color before the image dries.• To make inlaying your sentiment and interior pieces easier, place a piece of tape, sticky side up, behind your panel and insert the die cuts like you’re assembling a puzzle.
Die-namics:A2 Rectangle STAX Set 2Blessed & Blessings
Ranger Watercolor Paper
For more great products and inspiration please visit mftstamps.com
September 2017 Release ClassKarolyn Loncon - Pop-Up Greetings
Stamps:Magical Unicorns
Die-namics:Essential Fishtail Sentiment StripsPop-Up AlphabetStitched Cloud EdgesStitched Rainbow
Stencil:Mini Cloud Edges
Ink:Black Licorice HybridVersamark
Card Stock:Blu RaspberryBoysenberryLimelightOrange ZestRazzle BerrySmooth WhiteSunshine
Supplies:3 mm Sparkling Clear Sequins3D Foam Squares – White, RegularClear Detail Embossing PowderMini Ink Blending ToolMini MISTIMulti Medium MattePost-It Full Adhesive Roll – WhiteScor-BuddySmall Teflon Bone Folder
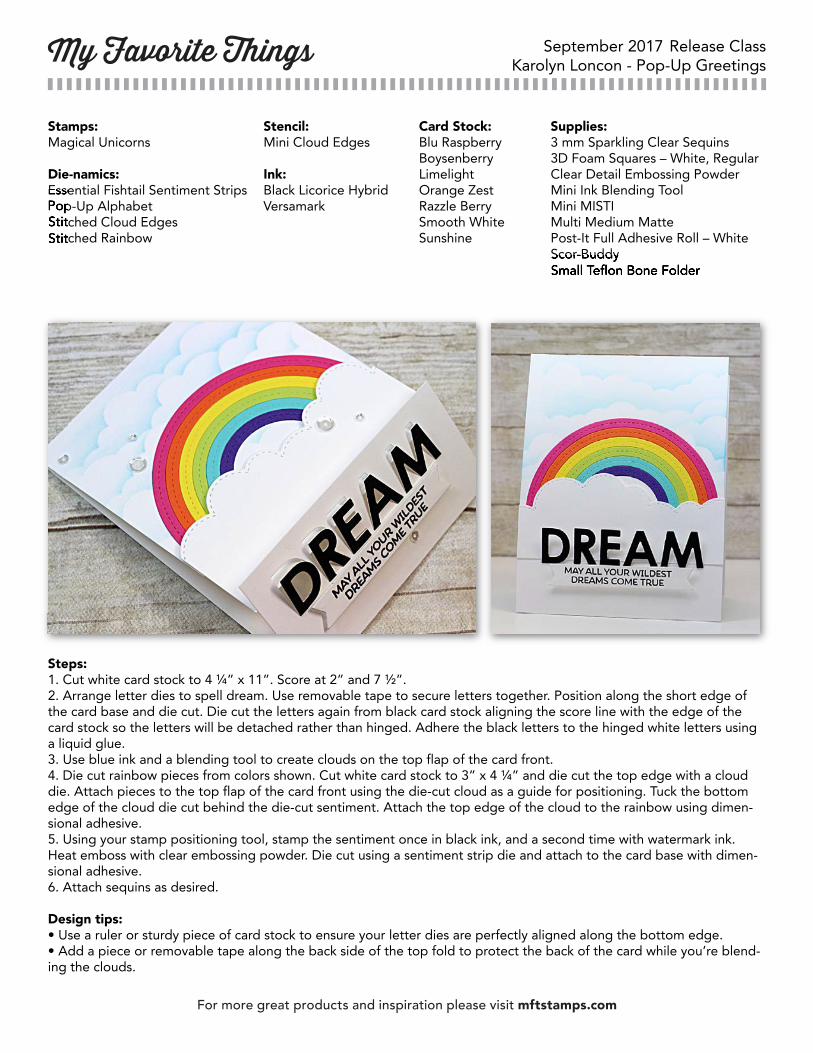
Steps:1. Cut white card stock to 4 ¼” x 11”. Score at 2” and 7 ½”.2. Arrange letter dies to spell dream. Use removable tape to secure letters together. Position along the short edge of the card base and die cut. Die cut the letters again from black card stock aligning the score line with the edge of the card stock so the letters will be detached rather than hinged. Adhere the black letters to the hinged white letters using a liquid glue.3. Use blue ink and a blending tool to create clouds on the top flap of the card front.4. Die cut rainbow pieces from colors shown. Cut white card stock to 3” x 4 ¼” and die cut the top edge with a cloud die. Attach pieces to the top flap of the card front using the die-cut cloud as a guide for positioning. Tuck the bottom edge of the cloud die cut behind the die-cut sentiment. Attach the top edge of the cloud to the rainbow using dimen-sional adhesive.5. Using your stamp positioning tool, stamp the sentiment once in black ink, and a second time with watermark ink. Heat emboss with clear embossing powder. Die cut using a sentiment strip die and attach to the card base with dimen-sional adhesive.6. Attach sequins as desired.
Design tips:• Use a ruler or sturdy piece of card stock to ensure your letter dies are perfectly aligned along the bottom edge. • Add a piece or removable tape along the back side of the top fold to protect the back of the card while you’re blend-ing the clouds.
Scor-BuddySmall Teflon Bone Folder
Essential Fishtail Sentiment StripsPop-Up AlphabetStitched Cloud EdgesStitched Rainbow
For more great products and inspiration please visit mftstamps.com
September 2017 Release ClassErica Hernandez - Bundles of Blossoms Smiles
Die-namics:Blueprints 27Double the Smiles
Card Stock:Smooth White
Supplies:3D Foam Creative Sheets
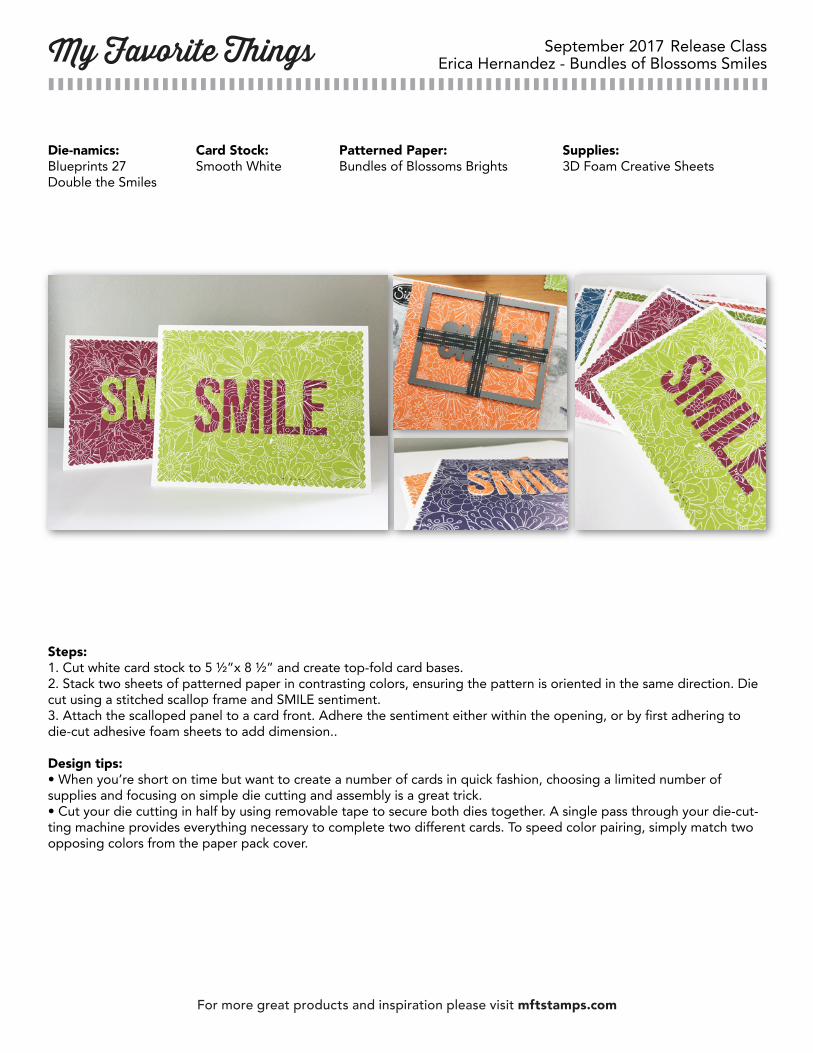
Steps:1. Cut white card stock to 5 ½”x 8 ½” and create top-fold card bases. 2. Stack two sheets of patterned paper in contrasting colors, ensuring the pattern is oriented in the same direction. Die cut using a stitched scallop frame and SMILE sentiment.3. Attach the scalloped panel to a card front. Adhere the sentiment either within the opening, or by first adhering to die-cut adhesive foam sheets to add dimension..
Design tips:• When you’re short on time but want to create a number of cards in quick fashion, choosing a limited number of supplies and focusing on simple die cutting and assembly is a great trick.• Cut your die cutting in half by using removable tape to secure both dies together. A single pass through your die-cut-ting machine provides everything necessary to complete two different cards. To speed color pairing, simply match two opposing colors from the paper pack cover.
Patterned Paper:Bundles of Blossoms Brights
For more great products and inspiration please visit mftstamps.com
September 2017 Release ClassStephanie Klauck - The Four Seaons
Stamps:Good FortuneModern Trees
Die-namics:Blueprints 29Stitched Square STAX
Card Stock:Grout GrayHot FudgeSmooth White
Ink: Black Licorice Premium DyeHot Fudge Premium DyeJellybean Green Premium DyeOrange Zest Premium DyeSour Apple Premium DyeDistress Inks
Supplies:Mini Ink Blending ToolMISTISilver Stickles Glitter GlueSparkling Clear MixUni-Ball White Gel Pen
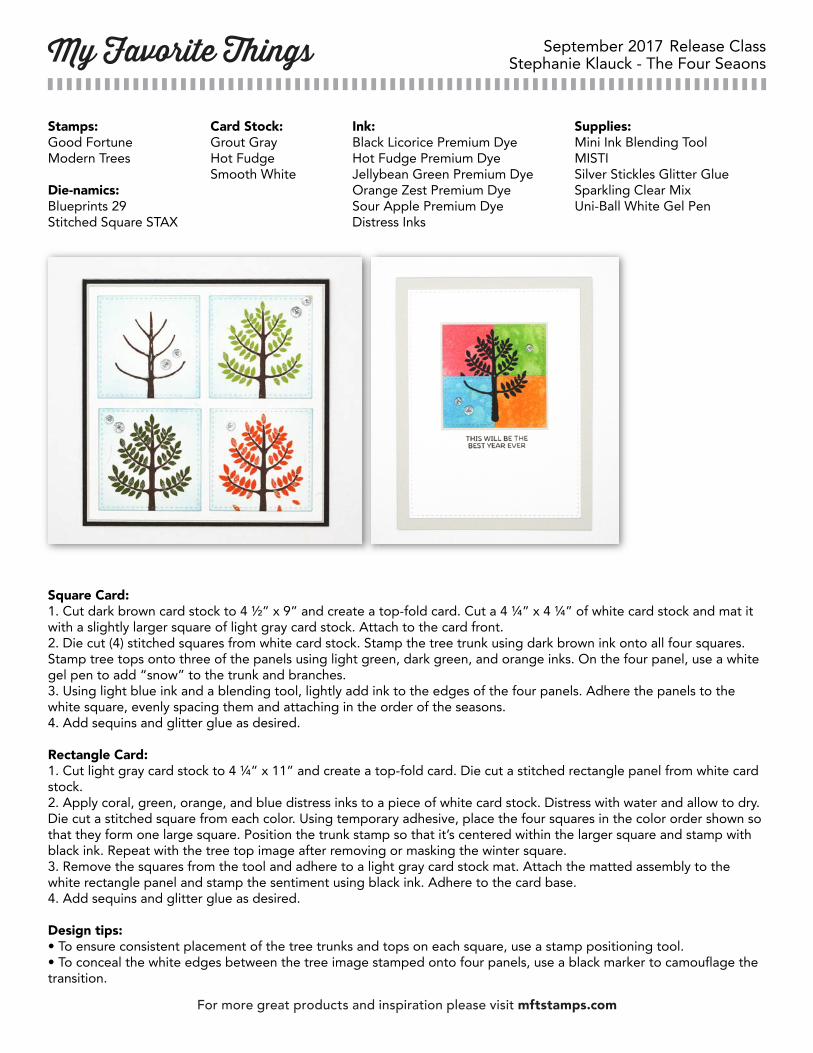
Square Card:1. Cut dark brown card stock to 4 ½” x 9” and create a top-fold card. Cut a 4 ¼” x 4 ¼” of white card stock and mat it with a slightly larger square of light gray card stock. Attach to the card front.2. Die cut (4) stitched squares from white card stock. Stamp the tree trunk using dark brown ink onto all four squares. Stamp tree tops onto three of the panels using light green, dark green, and orange inks. On the four panel, use a white gel pen to add “snow” to the trunk and branches.3. Using light blue ink and a blending tool, lightly add ink to the edges of the four panels. Adhere the panels to the white square, evenly spacing them and attaching in the order of the seasons.4. Add sequins and glitter glue as desired.
Rectangle Card:1. Cut light gray card stock to 4 ¼” x 11” and create a top-fold card. Die cut a stitched rectangle panel from white card stock.2. Apply coral, green, orange, and blue distress inks to a piece of white card stock. Distress with water and allow to dry. Die cut a stitched square from each color. Using temporary adhesive, place the four squares in the color order shown so that they form one large square. Position the trunk stamp so that it’s centered within the larger square and stamp with black ink. Repeat with the tree top image after removing or masking the winter square.3. Remove the squares from the tool and adhere to a light gray card stock mat. Attach the matted assembly to the white rectangle panel and stamp the sentiment using black ink. Adhere to the card base.4. Add sequins and glitter glue as desired.
Design tips:• To ensure consistent placement of the tree trunks and tops on each square, use a stamp positioning tool. • To conceal the white edges between the tree image stamped onto four panels, use a black marker to camouflage the transition.
For more great products and inspiration please visit mftstamps.com
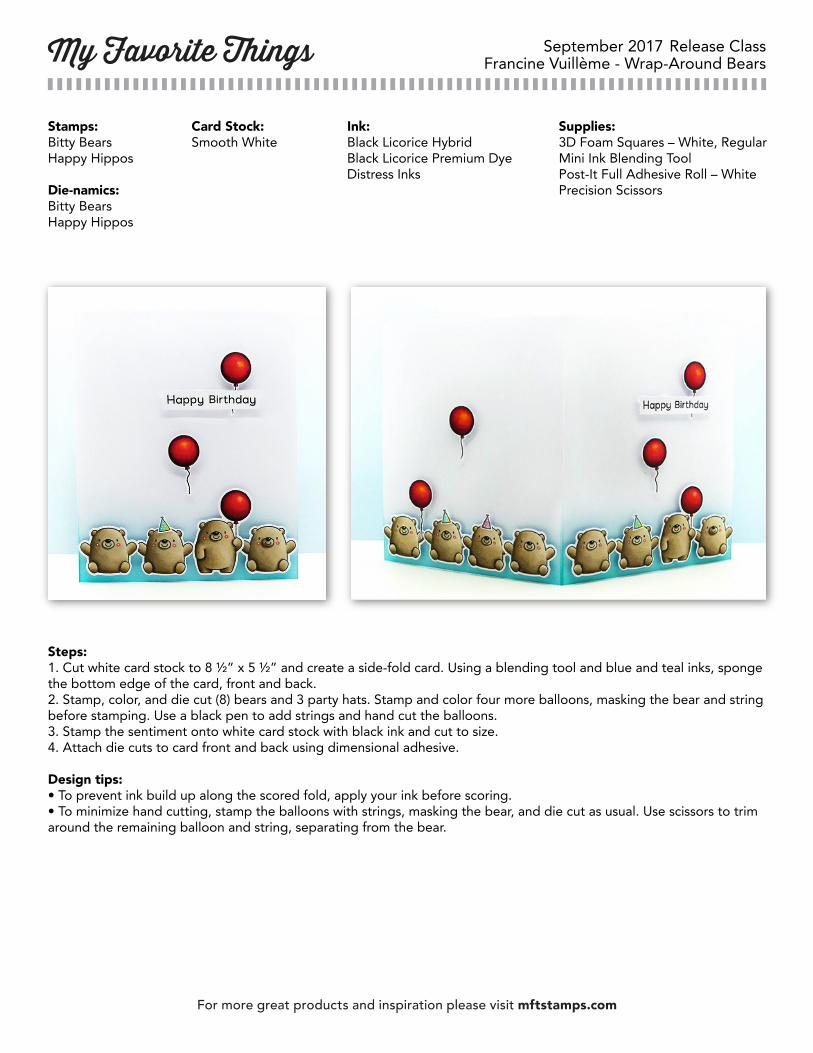
September 2017 Release ClassFrancine Vuillème - Wrap-Around Bears
Stamps:Bitty BearsHappy Hippos
Die-namics:Bitty BearsHappy Hippos
Card Stock:Smooth White
Ink:Black Licorice HybridBlack Licorice Premium DyeDistress Inks
Supplies:3D Foam Squares – White, RegularMini Ink Blending ToolPost-It Full Adhesive Roll – WhitePrecision Scissors
Steps:1. Cut white card stock to 8 ½” x 5 ½” and create a side-fold card. Using a blending tool and blue and teal inks, sponge the bottom edge of the card, front and back.2. Stamp, color, and die cut (8) bears and 3 party hats. Stamp and color four more balloons, masking the bear and string before stamping. Use a black pen to add strings and hand cut the balloons.3. Stamp the sentiment onto white card stock with black ink and cut to size.4. Attach die cuts to card front and back using dimensional adhesive.
Design tips:• To prevent ink build up along the scored fold, apply your ink before scoring. • To minimize hand cutting, stamp the balloons with strings, masking the bear, and die cut as usual. Use scissors to trim around the remaining balloon and string, separating from the bear.