serena changeman zmf 7.1 - micro focus · 2017-03-31 · ofm getting started guide 5 welcome to...
TRANSCRIPT

SERENA
ChangeMan ZMF 7.1.3OFM Getting Started Guide
Serena Proprietary and Confidential Information

Copyright © 2001-2013 Serena Software, Inc. All rights reserved.This document, as well as the software described in it, is furnished under license and may be used or copied only in accordance with the terms of such license. Except as permitted by such license, no part of this publication may be reproduced, photocopied, stored in a retrieval system, or transmitted, in any form or by any means, electronic, mechanical, recording, or otherwise, without the prior written permission of Serena. Any reproduction of such software product user documentation, regardless of whether the documentation is reproduced in whole or in part, must be accompanied by this copyright statement in its entirety, without modification.This document contains proprietary and confidential information, and no reproduction or dissemination of any information contained herein is allowed without the express permission of Serena Software.The content of this document is furnished for informational use only, is subject to change without notice, and should not be construed as a commitment by Serena. Serena assumes no responsibility or liability for any errors or inaccuracies that may appear in this document.
TrademarksSerena, TeamTrack, StarTool, PVCS, Comparex, Dimensions, Prototype Composer, Mariner and ChangeMan are registered trademarks of Serena Software, Inc. The Serena logo, Version Manager and Mover are trademarks of Serena Software, Inc. All other products or company names are used for identification purposes only, and may be trademarks of their respective owners.
U.S. Government RightsAny Software product acquired by Licensee under this Agreement for or on behalf of the U.S. Government, its agencies and instrumentalities is "commercial software" as defined by the FAR. Use, duplication, and disclosure by the U.S. Government is subject to the restrictions set forth in the license under which the Software was acquired. The manufacturer is Serena Software, Inc., 1900 Seaport Boulevard, Redwood City, CA 94063.
Publication date: 5 June 2013

Table of Contents
Welcome to Serena® ChangeMan® ZMF . . . . . . . . . . . . . . 5Guide to ChangeMan ZMF Documentation. . . . . . . . . . . . . . . . . . . . . . . 5
ChangeMan ZMF Documentation Suite . . . . . . . . . . . . . . . . . . . . . . 5Using the Manuals . . . . . . . . . . . . . . . . . . . . . . . . . . . . . . . . . . . . 7Searching the ChangeMan ZMF Documentation Suite. . . . . . . . . . . . 7ChangeMan ZMF Release Notes. . . . . . . . . . . . . . . . . . . . . . . . . . . 8
Online Help . . . . . . . . . . . . . . . . . . . . . . . . . . . . . . . . . . . . . . . . . . . . 8Online Tutorial . . . . . . . . . . . . . . . . . . . . . . . . . . . . . . . . . . . . . . 8Online Help Screens . . . . . . . . . . . . . . . . . . . . . . . . . . . . . . . . . . 8Online Error Messages . . . . . . . . . . . . . . . . . . . . . . . . . . . . . . . . . 8
Typographical Conventions . . . . . . . . . . . . . . . . . . . . . . . . . . . . . . . . . 9
Chapter 1 Introduction . . . . . . . . . . . . . . . . . . . . . . . . . . . . . . . 11Uses for Online Forms . . . . . . . . . . . . . . . . . . . . . . . . . . . . . . . . . . . . 12Online Forms Life Cycle . . . . . . . . . . . . . . . . . . . . . . . . . . . . . . . . . . . 12Roles in Online Forms. . . . . . . . . . . . . . . . . . . . . . . . . . . . . . . . . . . . . 12Benefits . . . . . . . . . . . . . . . . . . . . . . . . . . . . . . . . . . . . . . . . . . . . . . 13
Chapter 2 Preparing to Use the OFM . . . . . . . . . . . . . . . . . . . . . . 15Introduction . . . . . . . . . . . . . . . . . . . . . . . . . . . . . . . . . . . . . . . . . . . 16Hardware and Software Requirements . . . . . . . . . . . . . . . . . . . . . . . . . 16Installing the OFM . . . . . . . . . . . . . . . . . . . . . . . . . . . . . . . . . . . . . . . 16
Apply OFM Option License . . . . . . . . . . . . . . . . . . . . . . . . . . . . . . 16Define OFM Option Administrator Security Entity. . . . . . . . . . . . . . . 17Copy OFM Global Definition Records . . . . . . . . . . . . . . . . . . . . . . . 17Copy Forms Panels . . . . . . . . . . . . . . . . . . . . . . . . . . . . . . . . . . . 18Specify the OFM Panel Library. . . . . . . . . . . . . . . . . . . . . . . . . . . . 18Verify OFM Form Availability . . . . . . . . . . . . . . . . . . . . . . . . . . . . . 19
Restrictions . . . . . . . . . . . . . . . . . . . . . . . . . . . . . . . . . . . . . . . . . . . . 19
Chapter 3 Creating and Maintaining Online Forms. . . . . . . . . . . . . . 21Accessing the Online Forms Options Menu . . . . . . . . . . . . . . . . . . . . . . 22Maintaining Online Forms . . . . . . . . . . . . . . . . . . . . . . . . . . . . . . . . . . 22Creating Forms . . . . . . . . . . . . . . . . . . . . . . . . . . . . . . . . . . . . . . . . . 24Updating Forms . . . . . . . . . . . . . . . . . . . . . . . . . . . . . . . . . . . . . . . . . 25Deleting Forms . . . . . . . . . . . . . . . . . . . . . . . . . . . . . . . . . . . . . . . . . 25Defining Form Panels . . . . . . . . . . . . . . . . . . . . . . . . . . . . . . . . . . . . . 26
Panel Format Restrictions. . . . . . . . . . . . . . . . . . . . . . . . . . . . . . . 27Defining Form Variables . . . . . . . . . . . . . . . . . . . . . . . . . . . . . . . . . . . 28Defining Form Notifications . . . . . . . . . . . . . . . . . . . . . . . . . . . . . . . . . 29Defining OFM Option Form Security Entity . . . . . . . . . . . . . . . . . . . . . . 30
OFM Getting Started Guide 3

Table of Contents
Example - Creating a New Form by Copying an Existing Form . . . . . . . . . 31
Chapter 4 Using Online Forms . . . . . . . . . . . . . . . . . . . . . . . . . . 37Accessing Online Forms Selection . . . . . . . . . . . . . . . . . . . . . . . . . . . . 38
Editing Forms . . . . . . . . . . . . . . . . . . . . . . . . . . . . . . . . . . . . . . . 40Form Locking . . . . . . . . . . . . . . . . . . . . . . . . . . . . . . . . . . . . . . . 40Browsing Forms . . . . . . . . . . . . . . . . . . . . . . . . . . . . . . . . . . . . . 41Submitting Forms for Approval . . . . . . . . . . . . . . . . . . . . . . . . . . . 41Deactivating Forms . . . . . . . . . . . . . . . . . . . . . . . . . . . . . . . . . . . 41Approving Forms. . . . . . . . . . . . . . . . . . . . . . . . . . . . . . . . . . . . . 42Rejecting Forms . . . . . . . . . . . . . . . . . . . . . . . . . . . . . . . . . . . . . 42Commenting Forms . . . . . . . . . . . . . . . . . . . . . . . . . . . . . . . . . . . 42Using the Form Comments Panel. . . . . . . . . . . . . . . . . . . . . . . . . . 43Form Locking . . . . . . . . . . . . . . . . . . . . . . . . . . . . . . . . . . . . . . . 43Printing Forms . . . . . . . . . . . . . . . . . . . . . . . . . . . . . . . . . . . . . . 43
Online Forms Freeze/Unfreeze. . . . . . . . . . . . . . . . . . . . . . . . . . . . . . . 44
Appendix A Predefined Variables. . . . . . . . . . . . . . . . . . . . . . . . . . 45
Appendix B Messages and Codes . . . . . . . . . . . . . . . . . . . . . . . . . . 47
Appendix C Record Descriptions . . . . . . . . . . . . . . . . . . . . . . . . . . 51Form Definition Records . . . . . . . . . . . . . . . . . . . . . . . . . . . . . . . . . . . 51Form Data Records . . . . . . . . . . . . . . . . . . . . . . . . . . . . . . . . . . . . . . 52Form Variable Definitions . . . . . . . . . . . . . . . . . . . . . . . . . . . . . . . . . . 53Form Data Values . . . . . . . . . . . . . . . . . . . . . . . . . . . . . . . . . . . . . . . 54
Example 1 . . . . . . . . . . . . . . . . . . . . . . . . . . . . . . . . . . . . . . . . . 54Example 2 . . . . . . . . . . . . . . . . . . . . . . . . . . . . . . . . . . . . . . . . . 55
Index. . . . . . . . . . . . . . . . . . . . . . . . . . . . . . . . . . . . 57
4 Serena® ChangeMan® ZMF 7.1.2

Welcome to Serena® ChangeMan® ZMFThe Online Forms Manager (OFM) is a selectable option of Serena® ChangeMan® ZMF that provides customer-defined online forms to manage non-component tasks that are required to implement a change to your production environment.
Before You Begin See the ReadMe file for the latest updates and corrections for this manual.
Objective This manual provides information for installing and using the ChangeMan ZMF OFM.
After reading this publication, you should be able to
Understand the OFM features.
Create and maintain forms.
Use forms in change packages.
Audience This manual is intended for ChangeMan ZMF system administrators responsible for installing, administering, and managing the change management system and for end users responsible for using forms in change packages.
Navigating thisbook
This guide describes the ISPF user interface to the ChangeMan ZMF OFM Option.
Change Bars Change bars in the left margin identify substantive changes in this publication since ChangeMan ZMF release 7.1.
Guide to ChangeMan ZMF DocumentationThe following sections provide basic information about ChangeMan ZMF documentation.
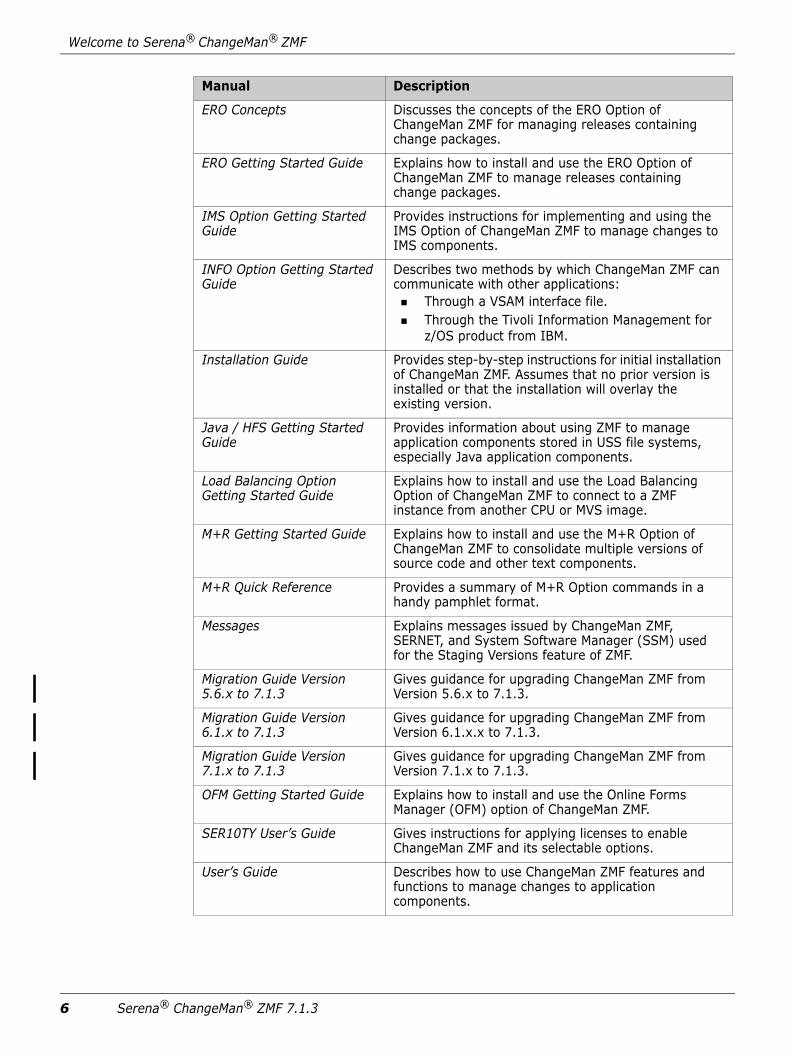
ChangeMan ZMF Documentation SuiteThe ChangeMan ZMF documentation set includes the following manuals in PDF format.
Manual Description
Administrator’s Guide Describes ChangeMan ZMF features and functions with instructions for choosing options and configuring global and application administration parameters.
ChangeMan ZMF Quick Reference
Provides a summary of the commands you use to perform the major functions in the ChangeMan ZMF package life cycle.
Customization Guide Provides information about ChangeMan ZMF skeletons, exits, and utility programs that will help you to customize the base product to fit your needs.
DB2 Option Getting Started Guide
Describes how to install and use the DB2 Option of ChangeMan ZMF to manage changes to DB2 components.
OFM Getting Started Guide 5
Welcome to Serena® ChangeMan® ZMF
ERO Concepts Discusses the concepts of the ERO Option of ChangeMan ZMF for managing releases containing change packages.
ERO Getting Started Guide Explains how to install and use the ERO Option of ChangeMan ZMF to manage releases containing change packages.
IMS Option Getting Started Guide
Provides instructions for implementing and using the IMS Option of ChangeMan ZMF to manage changes to IMS components.
INFO Option Getting Started Guide
Describes two methods by which ChangeMan ZMF can communicate with other applications: Through a VSAM interface file. Through the Tivoli Information Management for
z/OS product from IBM.
Installation Guide Provides step-by-step instructions for initial installation of ChangeMan ZMF. Assumes that no prior version is installed or that the installation will overlay the existing version.
Java / HFS Getting Started Guide
Provides information about using ZMF to manage application components stored in USS file systems, especially Java application components.
Load Balancing Option Getting Started Guide
Explains how to install and use the Load Balancing Option of ChangeMan ZMF to connect to a ZMF instance from another CPU or MVS image.
M+R Getting Started Guide Explains how to install and use the M+R Option of ChangeMan ZMF to consolidate multiple versions of source code and other text components.
M+R Quick Reference Provides a summary of M+R Option commands in a handy pamphlet format.
Messages Explains messages issued by ChangeMan ZMF, SERNET, and System Software Manager (SSM) used for the Staging Versions feature of ZMF.
Migration Guide Version 5.6.x to 7.1.3
Gives guidance for upgrading ChangeMan ZMF from Version 5.6.x to 7.1.3.
Migration Guide Version 6.1.x to 7.1.3
Gives guidance for upgrading ChangeMan ZMF from Version 6.1.x.x to 7.1.3.
Migration Guide Version 7.1.x to 7.1.3
Gives guidance for upgrading ChangeMan ZMF from Version 7.1.x to 7.1.3.
OFM Getting Started Guide Explains how to install and use the Online Forms Manager (OFM) option of ChangeMan ZMF.
SER10TY User’s Guide Gives instructions for applying licenses to enable ChangeMan ZMF and its selectable options.
User’s Guide Describes how to use ChangeMan ZMF features and functions to manage changes to application components.
Manual Description
6 Serena® ChangeMan® ZMF 7.1.3

Guide to ChangeMan ZMF Documentation
Using the ManualsUse Adobe® Reader® to view ChangeMan ZMF PDF files. Download the Reader for free at get.adobe.com/reader/.
This section highlights some of the main Reader features. For more detailed information, see the Adobe Reader online help system.
The PDF manuals include the following features:
Bookmarks. All of the manuals contain predefined bookmarks that make it easy for you to quickly jump to a specific topic. By default, the bookmarks appear to the left of each online manual.
Links. Cross-reference links within a manual enable you to jump to other sections within the manual with a single mouse click. These links appear in blue.
Comments. All PDF documentation files that Serena delivers with ChangeMan ZMF have enabled commenting with Adobe Reader. Adobe Reader version 7 and higher has commenting features that enable you to post comments to and modify the contents of PDF documents. You access these features through the Comments item on the menu bar of the Adobe Reader.
Printing. While viewing a manual, you can print the current page, a range of pages, or the entire manual.
Advanced search. Starting with version 6, Adobe Reader includes an advanced search feature that enables you to search across multiple PDF files in a specified directory.
Searching the ChangeMan ZMF Documentation SuiteThere is no cross-book index for the ChangeMan ZMF documentation suite. You can use the Advanced Search facility in Adobe Acrobat Reader to search the entire ZMF book set for information that you want. The following steps require Adobe Reader 6 or higher.
1 Download the ZMF All Documents Bundle ZIP file and the ChangeMan ZMF Readme to your workstation from the My Downloads tab on the Serena Support website.
2 Unzip the PDF files in the ZMF All Documents Bundle into an empty folder. Add the ChangeMan ZMF Readme to the folder.
3 In Adobe Reader, select Edit | Advanced Search (or press Shift+Ctrl+F).
4 Select the All PDF Documents in option and use Browse for Location in the drop down menu to select the folder containing the ZMF documentation suite.
5 In the text box, enter the word or phrase that you want to find.
XML Services User’s Guide Documents the most commonly used features of the XML Services application programming interface to ChangeMan ZMF.
ZMF Web Services User’s Guide
Documents the Web Services application programming interface to ChangeMan ZMF.
Manual Description
OFM Getting Started Guide 7

Welcome to Serena® ChangeMan® ZMF
6 Optionally, select one or more of the additional search options, such as Whole words only and Case-Sensitive.
7 Click Search.
8 In the Results, expand a listed document to see all occurrences of the search argument in that PDF.
9 Click on any listed occurrence to open the PDF document to the found word or phrase.
ChangeMan ZMF Release NotesHigh-level descriptions of the enhancements that are delivered in the ChangeMan ZMF 7.1 major version release and in all subsequent ZMF 7.1.x maintenance releases are included in the "Features and Fixes" section of the latest ChangeMan ZMF 7.1.x Readme.
Online HelpOnline help is the primary source of information about ChangeMan ZMF. Online help is available as a tutorial, through Help screens, and in ISPF error messages.
Online TutorialChangeMan ZMF includes an online tutorial that provides information about features and operations, from high-level descriptions of concepts to detailed descriptions of screen fields.
To view the tutorial table of contents, select option T from the Primary Option Menu, or jump to it from anywhere in ChangeMan ZMF by typing =T and pressing ENTER.
Press PF1 from anywhere in the Tutorial for a complete list of Tutorial navigation commands and PF keys.
Online Help ScreensIf you have questions about how a ChangeMan ZMF screen works, you can view a help panel by pressing PF1 from anywhere on the screen.
Online Error MessagesIf you make an invalid entry on a ChangeMan ZMF screen, or if you make an invalid request for a function, a short error message is displayed in the upper right corner of the screen. Press PF1 to display a longer error message that provides details about the error condition.
Remember that the long message does not display automatically. Request the long message by pressing PF1.
8 Serena® ChangeMan® ZMF 7.1.3
Typographical Conventions
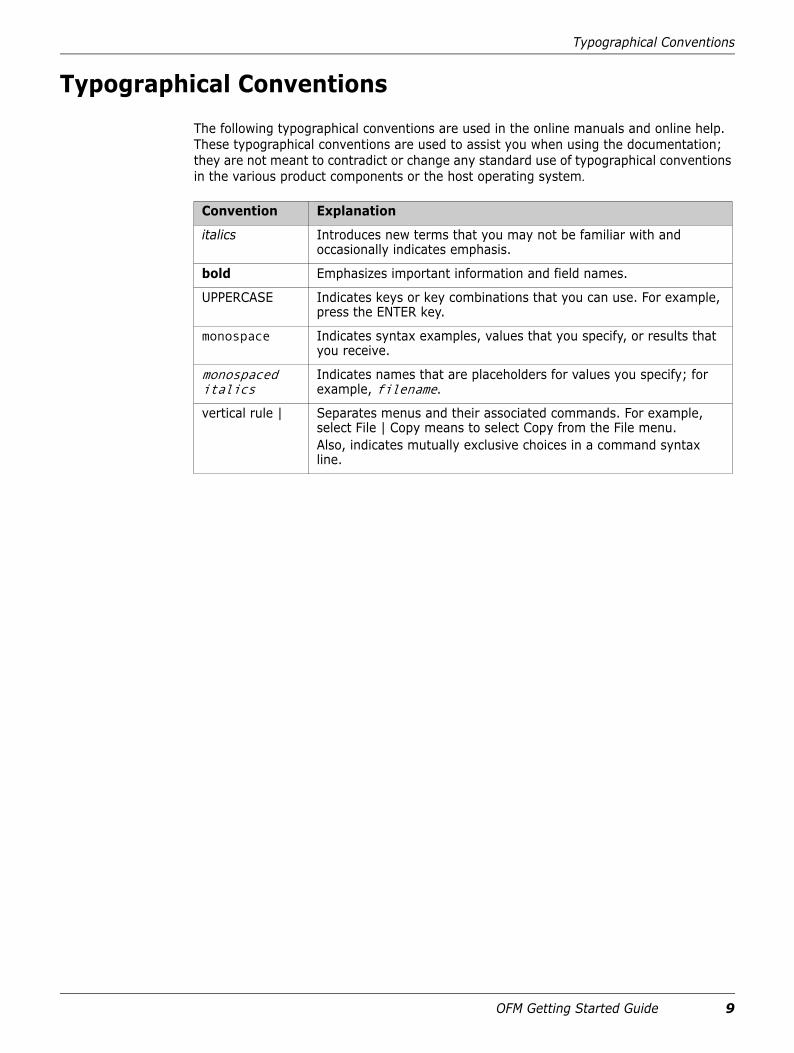
Typographical ConventionsThe following typographical conventions are used in the online manuals and online help. These typographical conventions are used to assist you when using the documentation; they are not meant to contradict or change any standard use of typographical conventions in the various product components or the host operating system.
Convention Explanation
italics Introduces new terms that you may not be familiar with and occasionally indicates emphasis.
bold Emphasizes important information and field names.
UPPERCASE Indicates keys or key combinations that you can use. For example, press the ENTER key.
monospace Indicates syntax examples, values that you specify, or results that you receive.
monospaced italics
Indicates names that are placeholders for values you specify; for example, filename.
vertical rule | Separates menus and their associated commands. For example, select File | Copy means to select Copy from the File menu.Also, indicates mutually exclusive choices in a command syntax line.
OFM Getting Started Guide 9

Welcome to Serena® ChangeMan® ZMF
10 Serena® ChangeMan® ZMF 7.1.3
Chapter 1Introduction
The Online Forms Manager (OFM) is a selectable option of Serena® ChangeMan® ZMF that provides customer-defined online forms to manage non-component tasks that are required to implement a change to your production environment.
Uses for Online Forms 12Online Forms Life Cycle 12Roles in Online Forms 12Benefits 13
OFM Getting Started Guide 11

Chapter 1 Introduction
Uses for Online FormsTasks that you might manage with online forms in a change package might include:
Reservation of DASD storage space
Changes to ACS routines in DFHSMS
GDG builds
Changes to security authorization for data sets or privileged functions
Changes to the production schedule
Changes to standard operating procedures
Changes to report distribution
Changes to application end user procedure
Online forms in the OFM Option are often used to notify other departments in your data center about tasks that they must perform to prepare for a software change.
Online Forms Life CycleOnline forms in the OFM Option have a life cycle that fits within the ChangeMan package life cycle between create package and freeze package. Each form has a pre-defined lead time that determines how long before package freeze the form must be approved. This separate life cycle reflects the need to have certain tasks performed, or at least acknowledged and added to work schedules, before your production environment is altered by package installation.
Roles in Online FormsThis table shows the roles played by different groups in configuring and using forms in the OFM Option.
Role or Group OFM Option Activities
ChangeMan Administrator
With the assistance of Technical Support, defines ISPF panels for online forms, variables for fields on the forms, the lead time for form approvals before package freeze, and the automatic notifications for forms approvers. May also create skeletons that create batch jobs that are executed when a form is approved.
Security Administrator
Defines a security entity and permits the ChangeMan Administrator to authorize them to create and maintain forms in the OFM Option. Defines an approval entity for each form and permits TSO IDs or groups to give them authority to approve the form.
12 Serena® ChangeMan® ZMF 7.1.3

Benefits
Benefits Allows fast, interactive creation and testing of forms.
Forms are available for use immediately after creation.
No assembly, compilation or linkage editing required.
Allows full use of the ISPF Dialog Manager panel definition language.
Form authorizations maintained in your security system.
ChangeMan ZMF User
Selects forms from those defined by the Administrator and adds them to a change package. Edits the form online to enter data in form fields. Submits the form when it is finished.
Form Approver Approves the form when the requested task is completed or added to a work schedule to be coordinated with the installation of the change package.
Role or Group OFM Option Activities
OFM Getting Started Guide 13

Chapter 1 Introduction
14 Serena® ChangeMan® ZMF 7.1.3

Chapter 2Preparing to Use the OFM
Online forms in the OFM Option are defined as ISPF Dialog Manager panels which are stored in your ChangeMan ZMF custom panels library. Variable definitions for online form fields and form approver notification information are stored in the ChangeMan ZMF package master file in global records. Your ChangeMan ZMF Administrator uses ISPF panels in the OFM Option to create and manage online form panels, variables, and notifications.
Introduction 16Hardware and Software Requirements 16Installing the OFM 16Restrictions 19
OFM Getting Started Guide 15

Chapter 2 Preparing to Use the OFM
IntroductionForms are opened in a change package by a developer or someone else with update authority in the application. They enter required data in fields on the form, then submit the form. Whoever was specified by the administrator in the form notification receives an MVS send message or an e-mail telling them the form is ready for their review and action. Data for forms opened in a change package are stored in the ChangeMan ZMF package master file in package records.
When the recipient of the form has taken the appropriate action, they approve the form to end the life cycle of the form. All forms in a change package must be approved before the package is frozen.
Forms in a frozen package can be selectively unfrozen and refrozen. Other actions that can be taken for a form are deactivate, reject, and comment.
Hardware and Software RequirementsRequirements for installing and using the ChangeMan ZMF OFM Option are the same as the base ChangeMan ZMF product. See the ChangeMan ZMF Installation Guide for a detailed description of hardware and software requirements.
Installing the OFMComponents for all ChangeMan ZMF selectable options are included with ChangeMan ZMF components delivered in the ZMF installer. When you run the installer, then download the XMIT files to the mainframe and expand them into PDS libraries, components necessary to run selectable options like the OFM Option are in the CMNZMF and SERCOMC libraries that you create.
Apply OFM Option LicenseIf you license the OFM Option at the same time that you license ChangeMan ZMF, the license for the option is applied when you apply the license for the base product. You do not have to take further action to enable the OFM Option.
If you license the OFM Option after you apply licenses for ChangeMan ZMF and other selectable options, use the SER10TY™ License Manager to add a license for the option. See the SER10TY User Guide for instructions on how to apply a license. The load modules, JCL, and other components that you need to run SER10TY are included in the SERCOMC libraries in the ZMF installer.
After you apply a license, shut down the SERNET started task where ChangeMan ZMF runs and restart the task.
To verify that the license for the OFM is properly applied, look for this option on the Primary Option Menu.
O OFMlist - Online Forms package list
16 Serena® ChangeMan® ZMF 7.1.3

Installing the OFM
If you select Option O on the Primary Option Menu and press Enter, short message NO GLOBAL OFM displays. If you press PF1, this long message displays:
CMN4700A - No Global Online Forms are defined in the Package Master
Define OFM Option Administrator Security EntityDefine security entities to authorize your ChangeMan ZMF Administrator to create and maintain OFM Option forms. Have your security administrator perform these tasks in your security system.
1 In your security system under the resource class for ChangeMan ZMF, create the following profile with no access (UACC NONE):
CMNxFORM
where x is the subsystem ID of the ChangeMan instance that will use the OFM Option. If you use a null subsystem ID, the profile name is CMNFORM.
2 Permit the TSO ID of the ChangeMan Administrator UPDATE access to the new profile with UPDATE access.
Copy OFM Global Definition RecordsCopy global definition records into the package master file from the CMNZMF SAMPLES library unloaded from the ZMF installer.
1 Shutdown the SERNET instance running ChangeMan ZMF.
2 Create a batch job with the following IDCAMS step.
//IDCAMS EXEC PGM=IDCAMS //SYSPRINT DD SYSOUT=* //SYSUT1 DD DSN=somnode.SERENA.CMNZMF.VvRrMn.SAMPLES(FORMS),// DISP=SHR //SYSUT2 DD DSN=somnode.CHGMAN.CMNPMAST, // DISP=SHR //SYSIN DD * REPRO IFILE(SYSUT1) OFILE(SYSUT2) REPLACE
a Change SYSUT1 to point to the SAMPLES library unloaded from the ZMF installer.
b Change SYSUT2 to point to the package master VSAM file for your ChangeMan ZMF instance.
3 Submit the job, and see a return code RC=00.
4 Start the SERNET instance that runs ChangeMan ZMF.
OFM Getting Started Guide 17

Chapter 2 Preparing to Use the OFM
5 Verify that the Global OFM records are properly copied to the package master file. Select Option O on the Primary Option menu and press Enter. The Online Forms Package Parameters (CMNOLST0) panel displays.
Copy Forms PanelsSample form panels for the OFM are delivered in the CMNZMF PANELS library unloaded from the ZMF installer.
Copy members CMNZnnnn, where nnnn is a four-digit number, from the delivered CMNZMF PANELS library to your CUSTOM PANELS library.
Specify the OFM Panel LibrarySpecify the library where your OFM Option panels reside.
1 Select A (Admin) from the Primary Option menu. Press Enter.
2 Select G (Global) from the Administration Options menu. Press Enter.
3 Select O (Options) from the Global Administration Options menu. Press Enter.
4 Select Option 4 (OFM) from the Global Selectable Options menu. Press Enter. The Online Forms Options menu (CMNGOOFM) displays.
CMNOLST0 -------------- ONLINE FORMS PACKAGE PARAMETERS ----------------------- COMMAND ===> SPECIFY SELECTION CRITERIA: FORM ID ===> (Full name or pattern; blank for list) FORM STATUS ===> (ACTIVE,SUBMITTED,APPROVED,REJECTED) PACKAGE ID ===> (Full name or pattern; blank for list) PACKAGE STATUS ===> (DEV, FRZ, APR, REJ, DIS, INS, BAS, BAK, TCC or DEL) CREATOR'S TSO-ID ===> WORK REQUEST ID ===> DEPARTMENT ===> PACKAGE LEVEL ===> (1-Simple, 4-Participating) PACKAGE TYPE ===> (Planned or Unplanned) PACKAGE TIME SPAN ===> (Permanent or Temporary) FROM INSTALL DATE ===> (YYYYMMDD) TO INSTALL DATE ===> (YYYYMMDD) FROM CREATION DATE ===> (YYYYMMDD) TO CREATION DATE ===> (YYYYMMDD) Press ENTER to process; Enter END command to exit.
CMNGOOFM -------------------- ONLINE FORMS OPTIONS ---------------------------- OPTION ===> 1 Maintain - Create or update Online Forms 2 Library - Specify panel library dataset name Press ENTER to process; Enter END command to exit.
18 Serena® ChangeMan® ZMF 7.1.3
Restrictions
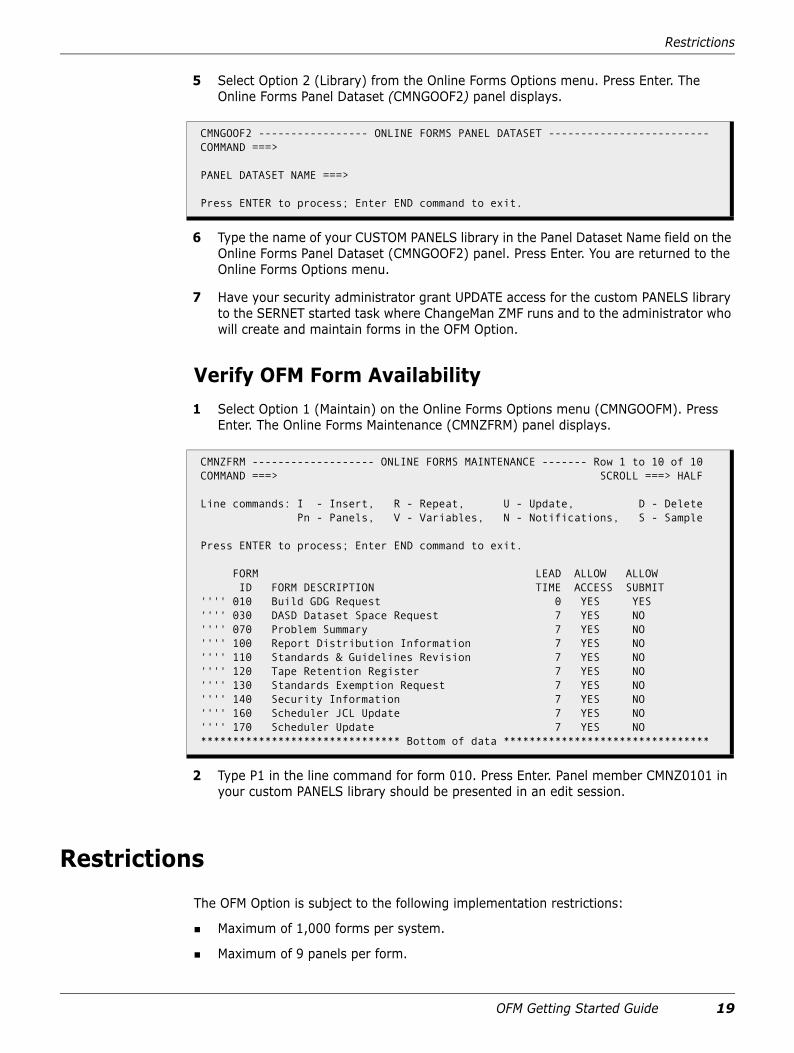
5 Select Option 2 (Library) from the Online Forms Options menu. Press Enter. The Online Forms Panel Dataset (CMNGOOF2) panel displays.
6 Type the name of your CUSTOM PANELS library in the Panel Dataset Name field on the Online Forms Panel Dataset (CMNGOOF2) panel. Press Enter. You are returned to the Online Forms Options menu.
7 Have your security administrator grant UPDATE access for the custom PANELS library to the SERNET started task where ChangeMan ZMF runs and to the administrator who will create and maintain forms in the OFM Option.
Verify OFM Form Availability1 Select Option 1 (Maintain) on the Online Forms Options menu (CMNGOOFM). Press
Enter. The Online Forms Maintenance (CMNZFRM) panel displays.
2 Type P1 in the line command for form 010. Press Enter. Panel member CMNZ0101 in your custom PANELS library should be presented in an edit session.
RestrictionsThe OFM Option is subject to the following implementation restrictions:
Maximum of 1,000 forms per system.
Maximum of 9 panels per form.
CMNGOOF2 ----------------- ONLINE FORMS PANEL DATASET ------------------------- COMMAND ===> PANEL DATASET NAME ===> Press ENTER to process; Enter END command to exit.
CMNZFRM ------------------- ONLINE FORMS MAINTENANCE ------- Row 1 to 10 of 10 COMMAND ===> SCROLL ===> HALF Line commands: I - Insert, R - Repeat, U - Update, D - Delete Pn - Panels, V - Variables, N - Notifications, S - Sample Press ENTER to process; Enter END command to exit. FORM LEAD ALLOW ALLOW ID FORM DESCRIPTION TIME ACCESS SUBMIT '''' 010 Build GDG Request 0 YES YES '''' 030 DASD Dataset Space Request 7 YES NO '''' 070 Problem Summary 7 YES NO '''' 100 Report Distribution Information 7 YES NO '''' 110 Standards & Guidelines Revision 7 YES NO '''' 120 Tape Retention Register 7 YES NO '''' 130 Standards Exemption Request 7 YES NO '''' 140 Security Information 7 YES NO '''' 160 Scheduler JCL Update 7 YES NO '''' 170 Scheduler Update 7 YES NO ******************************* Bottom of data ********************************
OFM Getting Started Guide 19

Chapter 2 Preparing to Use the OFM
Maximum of 200 variables per form.
Maximum of 3,072 bytes total variable lengths per form.
Maximum of 10 notification entries per form.
20 Serena® ChangeMan® ZMF 7.1.3

Chapter 3Creating and Maintaining Online Forms
Accessing the Online Forms Options Menu 22Maintaining Online Forms 22Creating Forms 24Updating Forms 25Deleting Forms 25Defining Form Panels 26Defining Form Variables 28Defining Form Notifications 29Defining OFM Option Form Security Entity 30Example - Creating a New Form by Copying an Existing Form 31
OFM Getting Started Guide 21

Chapter 3 Creating and Maintaining Online Forms
Accessing the Online Forms Options MenuTo access the Online Forms Options menu:
1 Select Option A (Admin) from the Primary Option menu. Press Enter.
2 Select Option G (Global) from the Administration Options menu. Press Enter.
3 Select Option O (Options) from the Global Administration Options menu. Press Enter.
4 Select Option 4 (OFM) from the Global Selectable Options menu. Press Enter. The Online Forms Options menu (CMNGOOFM) appears:
Maintaining Online FormsWhen you select Option 1 (Maintain) from the Online Forms Options Menu and press Enter, the Online Forms Maintenance panel (CMNZFRM) appears.
The Online Forms Maintenance panel displays a table of all existing form definition rows and provides access to all the functions that are necessary for creation, modification, or deletion.
CMNGOOFM -------------------- ONLINE FORMS OPTIONS -----------------------------OPTION ===>
1 Maintain - Create or update Online Forms 2 Library - Specify panel library dataset name
Press ENTER to process; Enter END command to exit.
CMNZFRM ------------------- ONLINE FORMS MAINTENANCE ------- ROW 1 TO 10 OF 10 COMMAND ===> SCROLL ===> CSR Line commands: I - Insert, R - Repeat, U - Update, D - Delete Pn - Panels, V - Variables, N - Notifications, S - Sample Press ENTER to process; Enter END command to exit. FORM LEAD ALLOW ALLOW ID FORM DESCRIPTION TIME ACCESS SUBMIT '''' 010 Build GDG Request 0 YES YES '''' 030 DASD Dataset Space Request 7 YES NO '''' 070 Problem Summary 7 YES NO '''' 100 Report Distribution Information 7 YES NO '''' 110 Standards & Guidelines Revision 7 YES NO '''' 120 Tape Retention Register 7 YES NO '''' 130 Standards Exemption Request 7 YES NO '''' 140 Security Information 7 YES NO '''' 160 Scheduler JCL Update 7 YES NO '''' 170 Scheduler Update 7 YES NO ******************************* BOTTOM OF DATA ********************************
NOTE Notifications specified at this panel are used to notify users of a pending form approval.
22 Serena® ChangeMan® ZMF 7.1.3

Maintaining Online Forms
The following table describes the fields on the Online Forms Maintenance panel (CMNZFRM).
Field Explanation
Line Commands I - InsertDisplays the Online Forms Creation panel for creating a new form definition.R - RepeatDisplays the Online Forms Creation panel for cloning an existing form definition.D - DeleteDisplays the Online Forms Deletion panel for deleting an existing form together with all associated panels, variables, and notifications.U - UpdateDisplays the Online Forms Update panel for updating an existing form definition.P - PanelsInvokes Panel Editor, allowing you to select a panel.Pn - PanelsInvokes the Panel Editor, allowing you to select a specific panel member name for editing.V -VariablesDisplays the Define Form Variables panel, allowing you to define the form variables.N - NotificationsDisplays the Define Form Notifications panel, allowing you to define the form notifications for pending forms approval.S - SampleDisplays the form panels in the end-user mode.
Form ID Type a three-digit numeric number to be associated with the form used both for identification of forms by users and internally for the creation of panel member names, form entity names for security purposes, and as part of the key of all package master file records relating to the form.
Form Description Type a free-format description or name for the form.
Lead Time Type the number of days the approver requires to process the form to enable ChangeMan ZMF to display the days remaining before the form must be submitted for approval in relation to the change package install date.
OFM Getting Started Guide 23
Chapter 3 Creating and Maintaining Online Forms
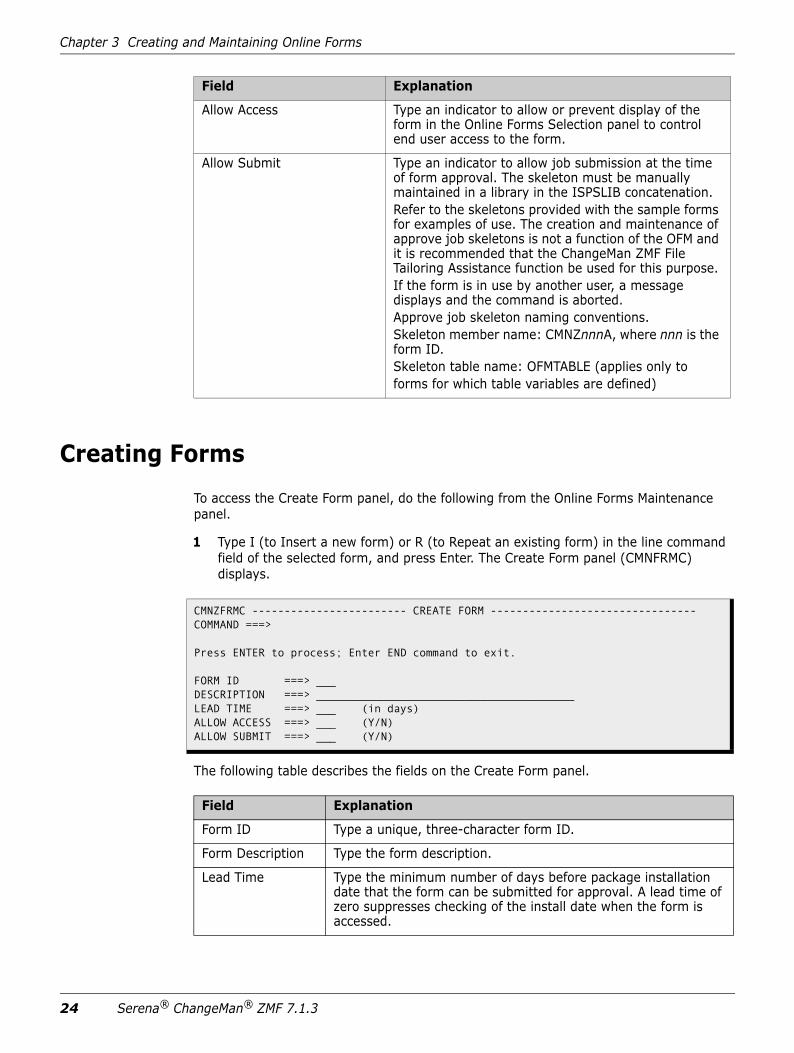
Creating FormsTo access the Create Form panel, do the following from the Online Forms Maintenance panel.
1 Type I (to Insert a new form) or R (to Repeat an existing form) in the line command field of the selected form, and press Enter. The Create Form panel (CMNFRMC) displays.
The following table describes the fields on the Create Form panel.
Allow Access Type an indicator to allow or prevent display of the form in the Online Forms Selection panel to control end user access to the form.
Allow Submit Type an indicator to allow job submission at the time of form approval. The skeleton must be manually maintained in a library in the ISPSLIB concatenation.Refer to the skeletons provided with the sample forms for examples of use. The creation and maintenance of approve job skeletons is not a function of the OFM and it is recommended that the ChangeMan ZMF File Tailoring Assistance function be used for this purpose.If the form is in use by another user, a message displays and the command is aborted.Approve job skeleton naming conventions.Skeleton member name: CMNZnnnA, where nnn is the form ID.Skeleton table name: OFMTABLE (applies only toforms for which table variables are defined)
Field Explanation
CMNZFRMC ------------------------ CREATE FORM --------------------------------COMMAND ===>
Press ENTER to process; Enter END command to exit.
FORM ID ===> ___DESCRIPTION ===> ________________________________________LEAD TIME ===> ___ (in days)ALLOW ACCESS ===> ___ (Y/N)ALLOW SUBMIT ===> ___ (Y/N)
Field Explanation
Form ID Type a unique, three-character form ID.
Form Description Type the form description.
Lead Time Type the minimum number of days before package installation date that the form can be submitted for approval. A lead time of zero suppresses checking of the install date when the form is accessed.
24 Serena® ChangeMan® ZMF 7.1.3

Updating Forms
2 Press Enter.
Updating FormsTo access the Update Form panel, follow these steps on the Online Forms Maintenance panel.
1 Type U in the line command field of the selected form and press Enter. The Update Form panel (CMNFRMU) appears.
The following table describes the fields of the Update Form panel.
Deleting FormsTo access the Delete Form panel (CMNFRMD), follow the steps from the Online Forms Maintenance panel.
Allow Access Type YES to allow access to the form from the Online Forms Selection panel; otherwise, type NO.
Allow Submit Type YES to allow submission of the associated skeleton at the time of form approval; otherwise, type NO.
Field Explanation
CMNZFRMU ------------------------ UPDATE FORM --------------------------------COMMAND ===>
Press ENTER to process; Enter END command to exit.
FORM ID:FORM DESCRIPTION ===> ________________________________________LEAD TIME ===> ___ (in days)ALLOW ACCESS ===> ___ (Y/N)ALLOW SUBMIT ===> ___ (Y/N)
Field Explanation
Form Description Type the form description.
Lead Time Type the minimum number of days before package installation date that the form can be submitted for approval. A lead time of zero suppresses checking of the install date when the form is accessed.
Allow Access Type YES to allow access to the form from the Online Forms Selection panel; otherwise, type NO.
Allow Submit Type YES to allow submission of the associated skeleton at the time of form approval; otherwise, type NO.
OFM Getting Started Guide 25

Chapter 3 Creating and Maintaining Online Forms
1 Type D and press Enter. The Delete Form panel (CMNZFRMD) appears.
2 Inspect the form to make certain that you want to delete it, and press Enter.
Your form definitions are removed permanently from the package master file on completion of the delete function.
Defining Form PanelsFrom the Online Forms Maintenance panel (CMNZFRM), take the following steps:
1 Type Pn (where n is the panel suffix) or P in the line command field of the selected form, and press Enter. The editor member selection panel displays, if any panels currently exist.
CMNZFRMD ------------------------ DELETE FORM ---------------------------------COMMAND ===>
Press ENTER to process; Enter END command to exit.
FORM ID:DESCRIPTION:LEAD TIME: daysALLOW ACCESS:ALLOW SUBMIT:
26 Serena® ChangeMan® ZMF 7.1.3

Defining Form Panels
2 Type S in the line command field of the selected member and press Enter. The Panel Editor similar to the following appears:
Panel Format RestrictionsThe OFM imposes the following panel format restrictions:
The name of the command variable must be ZCMD.
The name of the scroll variable must be AMT.
Primary commands Cancel and Refresh must be validated and returned in the system variable ZCMD.
ISREDDE - PROD99.CMNZMF.CUSTPANL(CMNZ0101) - 01.00 ------------ COLUMNS 001 072 COMMAND ===> SCROLL ===> CSR ****** ***************************** TOP OF DATA ****************************** 000001 )ATTR 000002 # TYPE(OUTPUT) 000003 @ TYPE(&XATTR) CAPS(ON) PAD('''') JUST(LEFT) INTENS(HIGH) 000004 { TYPE(&XATTR) CAPS(ON) PAD('_') JUST(LEFT) INTENS(LOW) 000005 )BODY EXPAND(!!) 000006 %!-! &XMODE BUILD GDG REQUEST !-! 000007 %COMMAND ===>_ZCMD ! ! %SCROLL ===>_AMT + 000008 + 000009 + PACKAGE ID:#XPKGNAME + STATUS:#Z + INSTALL DATE:#Z 000010 + 000011 +Press%ENTER+to process; Enter%END+command to exit. 000012 + 000013 % INDEX ENTRIES DELETE EMP 000014 )MODEL 000015 @XCMD+{INDEX +{Z + {Z + {Z 000016 )INIT 000017 .ZVARS = '(XPKGSTAT,XPKGDATE,ENTRIES,DELETE,EMPTY)' 000018 IF (&XATTR = OUTPUT) 000019 .CURSOR = ZCMD 000020 &XCMD = &Z 000021 )REINIT 000022 IF (.MSG ¬= &Z) 000023 REFRESH(ZCMD,AMT,XCMD,INDEX,ENTRIES,DELETE,EMPTY) 000024 .AUTOSEL = YES 000025 )PROC 000026 &TCMD = TRUNC(&ZCMD,1) 000027 IF (&TCMD ¬= '+') 000028 &ZCMD = TRANS(TRUNC(&ZCMD,1) C,CANCEL R,REFRESH *,*) 000029 VER (&ZCMD,LIST,CANCEL,REFRESH,MSG=CMNZ001) 000030 IF (&ZCMD ¬= CANCEL,REFRESH) 000031 IF (&ZTDSELS ¬= 0000) 000032 &DELETE = TRANS(TRUNC(&DELETE,1) Y,YES N,NO *,*) 000033 &EMPTY = TRANS(TRUNC(&EMPTY,1) Y,YES N,NO *,*) 000034 &XCMD = TRUNC(&XCMD,1) 000035 &XCMDCNT = .TRAIL 000036 VER (&XCMD,LIST,I,R,D,MSG=CMNZ002) 000037 VER (&XCMDCNT,NUM,MSG=CMNZ003) 000038 IF (&XCMD ¬= D) 000039 VER (&INDEX,NB,DSNAME) 000040 VER (&ENTRIES,NB,NUM) 000041 VER (&DELETE,NB,LIST,YES,NO) 000042 VER (&EMPTY,NB,LIST,YES,NO) 000043 )END ****** **************************** BOTTOM OF DATA ****************************
OFM Getting Started Guide 27

Chapter 3 Creating and Maintaining Online Forms
If the form contains table variable definitions, the name of the line command variable appearing in the model section must be XCMD and must be truncated to one character by the TRUNC command. The associated variable containing the line command iteration factor must be XCMDCNT and must be set to .TRAIL resulting from the TRUNC command.
Defining Form VariablesCreate a form variable definition row for each symbolic variable referenced in the form panels for which user data is to be stored. The definition of one or more table variables results in the creation and display of an ISPF Dialog Manager table when the form is accessed from the Online Forms Selection panel. A table variable value is stored for each row created and saved by the user. Table variables can also be defined as key variables in order to prevent the form user from saving rows of data having duplicate values for those variables.
The variable definitions are used define the variables to Dialog Manager and map the variables to user data in package master records. Changes to variable definitions after a form has been put into use produce incorrect mapping of existing user data unless consideration is given to the position, length and type of the variables in the definition requiring change. As with conventional record definitions, it is possible to reserve space for future use with “filler” variables.
To access the Define Form Variables panel (CMNZVRB), take the following steps:
1 Type V in the line command field of the selected form and press Enter. The Define Form Variables panel (CMNVRB) appears.
CMNZVRB -------------------- DEFINE FORM VARIABLES --------- ROW 1 TO 13 OF 15 COMMAND ===> SCROLL ===> CSR FORM ID: 010 DESCRIPTION: Build GDG Request Press ENTER to process; Enter END command to save changes and exit; Enter CANCEL command to cancel changes and exit. VARIABLE VARIABLE VARIABLE TABLE KEY NAME FORMAT LENGTH VARIABLE VARIABLE '''' INDEX___ CHAR____ 44__ YES NO_ '''' ENTRIES_ CHAR____ 3___ YES NO_ '''' DELETE__ CHAR____ 3___ YES NO_ '''' EMPTY___ CHAR____ 3___ YES NO_ '''' ________ ________ ____ ___ ___ '''' ________ ________ ____ ___ ___ '''' ________ ________ ____ ___ ___ '''' ________ ________ ____ ___ ___ '''' ________ ________ ____ ___ ___ '''' ________ ________ ____ ___ ___ '''' ________ ________ ____ ___ ___ '''' ________ ________ ____ ___ ___ '''' ________ ________ ____ ___ ___
28 Serena® ChangeMan® ZMF 7.1.3

Defining Form Notifications
The following table describes the fields of the Define Form Variables panel.
Defining Form NotificationsThe Define Form Notifications panel (CMNNTF) allows you to access the notification function to send messages by the started task to notify approvers when a form is submitted that requires their approval.
To access the Define Form Notifications panel, take the following steps:
Field Explanation
Line Commands I - Insert Inserts a new form variable row.R - Repeat Repeats an existing form variable row.D - Delete Deletes the form variable row.
Variable Name Type a unique one- to eight-character symbolic variable name following Dialog Manager conventions. Names beginning with X, Y, or Z are reserved for internal use and as such may not be defined. Both ISPF and Online Forms pre-defined variables (see Appendix C, “,” on page 51) may also appear in panel definitions as required.
Variable Format Type CHAR (Character string - data is left-justified and padded on the right with blanks) or FIXED (Fixed binary integer - variables with a length of 4 are signed allowing entry of a leading minus sign).
Variable Length Type the variable length in the range 1-3072 for format CHAR or 1-4 for format FIXED.
Table Variable Type Y if the variable is to be displayed in table format in a scrollable part of the associated panel; otherwise, type N.
Key Variable Type Y if the variable is to be checked for a unique value within the table; otherwise, type N.
OFM Getting Started Guide 29

Chapter 3 Creating and Maintaining Online Forms
1 Type N in the line command field of the selected form and press Enter. The Define Form Notifications panel (CMNZNTF) appears.
Notifications specified at this panel notify users of a pending form approval.
The following table provides a description of the Define Form Notification panel (CMNZNTF).
2 Complete a row for each notification you want to define for the form, then issue the End command.
Defining OFM Option Form Security EntityYour security administrator must define a security entity for each OFM Option form to grant authorization to approve the form. For each form you create:
1 In your security system under the resource class for ChangeMan ZMF, create the following profile with no access (UACC NONE):
CMNsZfff
CMNZNTF ------------------ DEFINE FORM NOTIFICATIONS ------ ROW 1 TO 10 OF 10 COMMAND ===> SCROLL ===> CSR FORM ID: 010 DESCRIPTION: Build GDG Request Press ENTER to process; Enter END command to save changes and exit; Enter CANCEL command to cancel changes and exit. VEHICLE USERIDS TO NOTIFY (separate with commas) '''' MVSSEND_ CMNUSER8,CMNUSER9__________________________ '''' ________ ___________________________________________ '''' ________ ___________________________________________ '''' ________ ___________________________________________ '''' ________ ___________________________________________ '''' ________ ___________________________________________ '''' ________ ___________________________________________ '''' ________ ___________________________________________ '''' ________ ___________________________________________ '''' ________ ___________________________________________ ******************************* BOTTOM OF DATA ********************************
Field Explanation
Line Commands I - Insert Inserts a new form variable row.R - Repeat Repeats an existing form variable row.D - Delete Deletes the form variable row.
A maximum of 10 rows are allowed.
Vehicle Type a Notification Vehicle that is enabled in Global Administration Parameters.
User IDs Type one or more TSO userids or e-mail addresses separated by commas.
30 Serena® ChangeMan® ZMF 7.1.3
Example - Creating a New Form by Copying an Existing Form
where s is the subsystem ID of the ChangeMan instance that will use the OFM Option and fff is the 3-character form number. If you use a null subsystem ID, the profile name is CMNZfff.
2 Permit the TSO ID of the form approver (or a group) UPDATE access to the new profile.
3 Under the resource class for ChangeMan ZMF, permit the TSO ID of the form approver (or a group) READ access to the security entity for the ChangeMan application where the form will be used in change packages.
Example - Creating a New Form by Copying an Existing Form
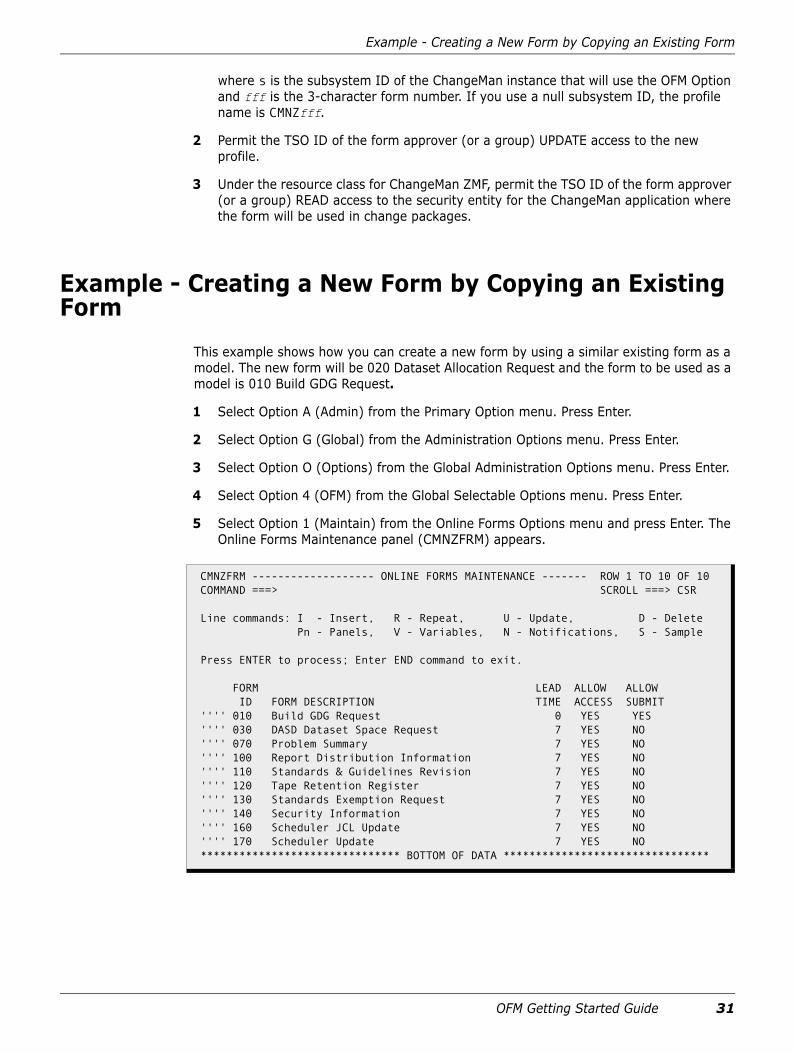
This example shows how you can create a new form by using a similar existing form as a model. The new form will be 020 Dataset Allocation Request and the form to be used as a model is 010 Build GDG Request.
1 Select Option A (Admin) from the Primary Option menu. Press Enter.
2 Select Option G (Global) from the Administration Options menu. Press Enter.
3 Select Option O (Options) from the Global Administration Options menu. Press Enter.
4 Select Option 4 (OFM) from the Global Selectable Options menu. Press Enter.
5 Select Option 1 (Maintain) from the Online Forms Options menu and press Enter. The Online Forms Maintenance panel (CMNZFRM) appears.
CMNZFRM ------------------- ONLINE FORMS MAINTENANCE ------- ROW 1 TO 10 OF 10 COMMAND ===> SCROLL ===> CSR Line commands: I - Insert, R - Repeat, U - Update, D - Delete Pn - Panels, V - Variables, N - Notifications, S - Sample Press ENTER to process; Enter END command to exit. FORM LEAD ALLOW ALLOW ID FORM DESCRIPTION TIME ACCESS SUBMIT '''' 010 Build GDG Request 0 YES YES '''' 030 DASD Dataset Space Request 7 YES NO '''' 070 Problem Summary 7 YES NO '''' 100 Report Distribution Information 7 YES NO '''' 110 Standards & Guidelines Revision 7 YES NO '''' 120 Tape Retention Register 7 YES NO '''' 130 Standards Exemption Request 7 YES NO '''' 140 Security Information 7 YES NO '''' 160 Scheduler JCL Update 7 YES NO '''' 170 Scheduler Update 7 YES NO ******************************* BOTTOM OF DATA ********************************
OFM Getting Started Guide 31

Chapter 3 Creating and Maintaining Online Forms
6 Type R (Repeat) in the line command area of the form to be repeated and press Enter. The Create Form panel (CMNFRMC) appears.
7 Modify Form ID to the new forms ID.
8 Modify Form Description to the new description.
9 Press Enter.
The Online Forms Maintenance panel (CMNZFRM) displays with a message indicating that the new form has been created.
10 Type P1 (Panel number 1) in the line command field of the new form.
CMNZFRMC ------------------------ CREATE FORM ----------------------------------- COMMAND ===> Press ENTER to process; Enter END command to exit. FORM ID ===> 010 DESCRIPTION ===> Build GDG Request_______________________ LEAD TIME ===> 0__ (in days) ALLOW ACCESS ===> YES (Y/N) ALLOW SUBMIT ===> YES (Y/N)
CMNZFRM ------------------- ONLINE FORMS MAINTENANCE --------------FORM CREATED COMMAND ===> SCROLL ===> CSR Line commands: I - Insert, R - Repeat, U - Update, D - Delete Pn - Panels, V - Variables, N - Notifications, S - Sample Press ENTER to process; Enter END command to exit. FORM LEAD ALLOW ALLOW ID FORM DESCRIPTION TIME ACCESS SUBMIT '''' 010 Build GDG Request 0 YES YES '''' 020 Dataset Allocation Request 0 YES YES '''' 030 DASD Dataset Space Request 7 YES NO '''' 070 Problem Summary 7 YES NO '''' 100 Report Distribution Information 7 YES NO '''' 110 Standards & Guidelines Revision 7 YES NO '''' 120 Tape Retention Register 7 YES NO '''' 130 Standards Exemption Request 7 YES NO '''' 140 Security Information 7 YES NO '''' 160 Scheduler JCL Update 7 YES NO '''' 170 Scheduler Update 7 YES NO ******************************* BOTTOM OF DATA ********************************
32 Serena® ChangeMan® ZMF 7.1.3
Example - Creating a New Form by Copying an Existing Form
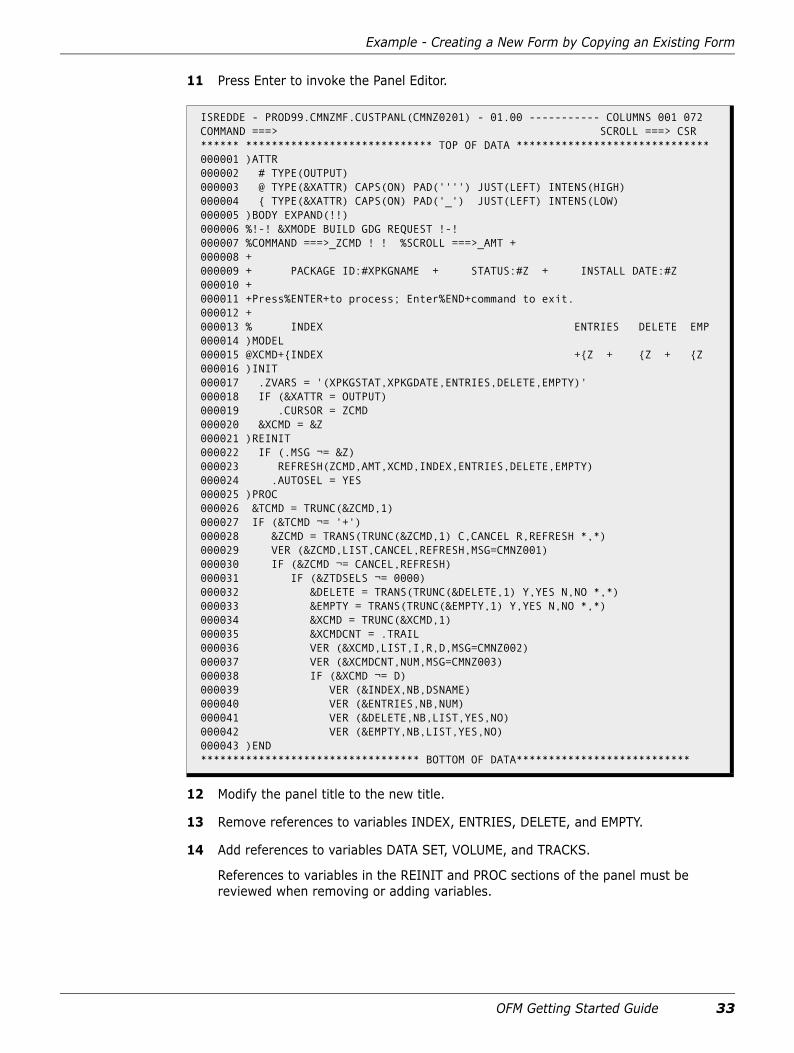
11 Press Enter to invoke the Panel Editor.
12 Modify the panel title to the new title.
13 Remove references to variables INDEX, ENTRIES, DELETE, and EMPTY.
14 Add references to variables DATA SET, VOLUME, and TRACKS.
References to variables in the REINIT and PROC sections of the panel must be reviewed when removing or adding variables.
ISREDDE - PROD99.CMNZMF.CUSTPANL(CMNZ0201) - 01.00 ----------- COLUMNS 001 072 COMMAND ===> SCROLL ===> CSR ****** ***************************** TOP OF DATA ****************************** 000001 )ATTR 000002 # TYPE(OUTPUT) 000003 @ TYPE(&XATTR) CAPS(ON) PAD('''') JUST(LEFT) INTENS(HIGH) 000004 { TYPE(&XATTR) CAPS(ON) PAD('_') JUST(LEFT) INTENS(LOW) 000005 )BODY EXPAND(!!) 000006 %!-! &XMODE BUILD GDG REQUEST !-! 000007 %COMMAND ===>_ZCMD ! ! %SCROLL ===>_AMT + 000008 + 000009 + PACKAGE ID:#XPKGNAME + STATUS:#Z + INSTALL DATE:#Z 000010 + 000011 +Press%ENTER+to process; Enter%END+command to exit. 000012 + 000013 % INDEX ENTRIES DELETE EMP 000014 )MODEL 000015 @XCMD+{INDEX +{Z + {Z + {Z 000016 )INIT 000017 .ZVARS = '(XPKGSTAT,XPKGDATE,ENTRIES,DELETE,EMPTY)' 000018 IF (&XATTR = OUTPUT) 000019 .CURSOR = ZCMD 000020 &XCMD = &Z 000021 )REINIT 000022 IF (.MSG ¬= &Z) 000023 REFRESH(ZCMD,AMT,XCMD,INDEX,ENTRIES,DELETE,EMPTY) 000024 .AUTOSEL = YES 000025 )PROC 000026 &TCMD = TRUNC(&ZCMD,1) 000027 IF (&TCMD ¬= '+') 000028 &ZCMD = TRANS(TRUNC(&ZCMD,1) C,CANCEL R,REFRESH *,*) 000029 VER (&ZCMD,LIST,CANCEL,REFRESH,MSG=CMNZ001) 000030 IF (&ZCMD ¬= CANCEL,REFRESH) 000031 IF (&ZTDSELS ¬= 0000) 000032 &DELETE = TRANS(TRUNC(&DELETE,1) Y,YES N,NO *,*) 000033 &EMPTY = TRANS(TRUNC(&EMPTY,1) Y,YES N,NO *,*) 000034 &XCMD = TRUNC(&XCMD,1) 000035 &XCMDCNT = .TRAIL 000036 VER (&XCMD,LIST,I,R,D,MSG=CMNZ002) 000037 VER (&XCMDCNT,NUM,MSG=CMNZ003) 000038 IF (&XCMD ¬= D) 000039 VER (&INDEX,NB,DSNAME) 000040 VER (&ENTRIES,NB,NUM) 000041 VER (&DELETE,NB,LIST,YES,NO) 000042 VER (&EMPTY,NB,LIST,YES,NO) 000043 )END ********************************** BOTTOM OF DATA***************************
OFM Getting Started Guide 33

Chapter 3 Creating and Maintaining Online Forms
ISREDDE - PROD99.CMNZMF.CUSTPANL(CMNZ0201) - 01.00 ----------- COLUMNS 001 072 COMMAND ===> SCROLL ===> CSR ****** ***************************** TOP OF DATA ****************************** 000001 )ATTR 000002 # TYPE(OUTPUT) 000003 @ TYPE(&XATTR) CAPS(ON) PAD('''') JUST(LEFT) INTENS(HIGH) 000004 { TYPE(&XATTR) CAPS(ON) PAD('_') JUST(LEFT) INTENS(LOW) 000005 )BODY EXPAND(!!) 000006 %!-! &XMODE DATASET ALLOCATION REQUEST !-! 000007 %COMMAND ===>_ZCMD ! ! %SCROLL ===>_AMT + 000008 + 000009 + PACKAGE ID:#XPKGNAME + STATUS:#Z + INSTALL DATE:#Z 000010 + 000011 +Press%ENTER+to process; Enter%END+command to exit. 000012 + 000013 % DATASET VOLUME TRACKS 000014 )MODEL 000015 @XCMD+{DATASET +{Z + {Z + 000016 )INIT 000017 .ZVARS = '(XPKGSTAT,XPKGDATE,VOLUME,TRACKS)' 000018 IF (&XATTR = OUTPUT) 000019 .CURSOR = ZCMD 000020 &XCMD = &Z 000021 )REINIT 000022 IF (.MSG ¬= &Z) 000023 REFRESH(ZCMD,AMT,XCMD,DATASET,VOLUME,TRACKS) 000024 .AUTOSEL = YES 000025 )PROC 000026 &TCMD = TRUNC(&ZCMD,1) 000027 IF (&TCMD ¬= '+') 000028 &ZCMD = TRANS(TRUNC(&ZCMD,1) C,CANCEL R,REFRESH *,*) 000029 VER (&ZCMD,LIST,CANCEL,REFRESH,MSG=CMNZ001) 000030 IF (&ZCMD ¬= CANCEL,REFRESH) 000031 IF (&ZTDSELS ¬= 0000) 000032 &XCMD = TRUNC(&XCMD,1) 000033 &XCMDCNT = .TRAIL 000034 VER (&XCMD,LIST,I,R,D,MSG=CMNZ002) 000035 VER (&XCMDCNT,NUM,MSG=CMNZ003) 000036 IF (&XCMD ¬= D) 000037 VER (&DATASET,NB,DSNAME) 000038 VER (&VOLUME,NB) 000039 VER (&TRACKS,NB,NUM) 000040 )END ****** **************************** BOTTOM OF DATA ****************************
34 Serena® ChangeMan® ZMF 7.1.3

Example - Creating a New Form by Copying an Existing Form
15 Enter the End command to save changes and exit. The Online Forms Maintenance panel (CMNZFRM) appears.
16 Type V in the line command field of the new form.
17 Press Enter. The Define Form Variables panel (CMNZVRB) appears.
CMNZFRM ------------------- ONLINE FORMS MAINTENANCE ------ ROW 1 TO 11 OF 11 COMMAND ===> SCROLL ===> CSR Line commands: I - Insert, R - Repeat, U - Update, D - Delete Pn - Panels, V - Variables, N - Notifications, S - Sample Press ENTER to process; Enter END command to exit. FORM LEAD ALLOW ALLOW ID FORM DESCRIPTION TIME ACCESS SUBMIT '''' 010 Build GDG Request 0 YES YES '''' 020 Dataset Allocation Request 0 YES YES '''' 030 DASD Dataset Space Request 7 YES NO '''' 070 Problem Summary 7 YES NO '''' 100 Report Distribution Information 7 YES NO '''' 110 Standards & Guidelines Revision 7 YES NO '''' 120 Tape Retention Register 7 YES NO '''' 130 Standards Exemption Request 7 YES NO '''' 140 Security Information 7 YES NO '''' 160 Scheduler JCL Update 7 YES NO '''' 170 Scheduler Update 7 YES NO ******************************* BOTTOM OF DATA ********************************
CMNZVRB -------------------- DEFINE FORM VARIABLES -------- ROW 1 TO 13 OF 15 COMMAND ===> SCROLL ===> CSR FORM ID: 020 DESCRIPTION: Dataset Allocation Request Press ENTER to process; Enter END command to save changes and exit; Enter CANCEL command to cancel changes and exit. VARIABLE VARIABLE VARIABLE TABLE KEY NAME FORMAT LENGTH VARIABLE VARIABLE '''' INDEX___ CHAR____ 44__ YES NO_ '''' ENTRIES_ CHAR____ 3___ YES NO_ '''' DELETE__ CHAR____ 3___ YES NO_ '''' EMPTY___ CHAR____ 3___ YES NO_ '''' ________ ________ ____ ___ ___ '''' ________ ________ ____ ___ ___ '''' ________ ________ ____ ___ ___ '''' ________ ________ ____ ___ ___ '''' ________ ________ ____ ___ ___ '''' ________ ________ ____ ___ ___ '''' ________ ________ ____ ___ ___ '''' ________ ________ ____ ___ ___ '''' ________ ________ ____ ___ ___
OFM Getting Started Guide 35

Chapter 3 Creating and Maintaining Online Forms
18 Modify the variable entries to suit the variables now defined in the form panel.
19 Enter the End command to save changes and exit. This displays the Online Forms Maintenance panel. The new form is ready for use.
CMNZVRB -------------------- DEFINE FORM VARIABLES -------- ROW 1 TO 13 OF 14 COMMAND ===> SCROLL ===> CSR FORM ID: 020 DESCRIPTION: Dataset Allocation Request Press ENTER to process; Enter END command to save changes and exit; Enter CANCEL command to cancel changes and exit. VARIABLE VARIABLE VARIABLE TABLE KEY NAME FORMAT LENGTH VARIABLE VARIABLE '''' DATASET_ CHAR____ 44__ YES NO_ '''' VOLUME__ CHAR____ 6___ YES NO_ '''' TRACKS__ CHAR____ 4___ YES NO_ '''' ________ ________ ____ ___ ___ '''' ________ ________ ____ ___ ___ '''' ________ ________ ____ ___ ___ '''' ________ ________ ____ ___ ___ '''' ________ ________ ____ ___ ___ '''' ________ ________ ____ ___ ___ '''' ________ ________ ____ ___ ___ '''' ________ ________ ____ ___ ___ '''' ________ ________ ____ ___ ___ '''' ________ ________ ____ ___ ___
36 Serena® ChangeMan® ZMF 7.1.3

Chapter 4Using Online Forms
Online forms selection is an end user function from within a selected change package. This function allows you to select available forms for:
Entry and modification of the form data.
Approval and subsequent approval or rejection.
Access to form comments and a form print utility.
You can also use an extension of the ChangeMan ZMF Package Freeze/Unfreeze function to selectively Freeze or Unfreeze individual forms within a change package.
Accessing Online Forms Selection 38Online Forms Freeze/Unfreeze 44
OFM Getting Started Guide 37

Chapter 4 Using Online Forms
Accessing Online Forms SelectionThe Online Forms Selection panel displays a table of all available forms within the change package and provides line commands for Edit, Browse, Submit, Deactivate, Approve, Reject, Comment, and Print functions.
To access the Online Forms Selection panel:
1 Select Option 1 (Build) from the Primary Option menu. Press Enter.
2 Select Option 3 (Custom) from the Build Options menu. Press Enter.
3 Complete the package ID on the Create/Update Online Forms panel. Press Enter.
- or -
4 Select Option 5 (List) from the Primary Option menu. Press Enter.
5 Complete the parameters on the Package List Parameters panel. Press Enter.
6 Type OF next to a package ID on the Change Package List panel. Press Enter.
- or -
7 Select Option Q (Query) from the Primary Option Menu. Press Enter.
8 Select Option P (Package) from the Query Options Menu. Press Enter.
9 Complete the parameters on the Query Package Parameters panel. Press Enter.
10 Type S next to a package ID on the Query Package List panel. Press Enter.
11 Type S next to Custom Forms on the Package Information Categories panel. Press Enter.
- or -
12 Select Option O (OFMlist) from the Primary Option Menu. Press Enter.
13 Complete the parameters on the Online Forms Package Parameters panel. Press Enter.
38 Serena® ChangeMan® ZMF 7.1.3

Accessing Online Forms Selection
14 Type S next to a package ID on the Online Forms Package List panel and press Enter. The Update Online Form Selection panel (CMNZMGR) appears.
Use the following line commands to access forms or change the form status as required.
CMNZMGR ---------------- UPDATE: ONLINE FORMS SELECTION --- ROW 1 TO 10 OF 10 COMMAND ===> SCROLL ===> CSR PACKAGE ID: TEST000001 STATUS: DEV INSTALL DATE: 940601 Line commands: E - Edit, B - Browse, S - Submit, D - Deactivate, A - Approve, R - Reject, C - Comment, P - Print Press ENTER to process; Enter END command to exit. FORM LEAD DAYS LAST ID FORM DESCRIPTION TIME LEFT STATUS USERID '''' 010 Build GDG Request 0 44 ACTIVE CMNUSER1 '''' 030 DASD Dataset Space Request 7 37 '''' 070 Problem Summary 7 37 '''' 100 Report Distribution Information 7 37 '''' 110 Standards & Guidelines Revision 7 37 '''' 120 Tape Retention Register 7 37 REJECTED CMNUSER2 '''' 130 Standards Exemption Request 7 37 '''' 140 Security Information 7 37 '''' 160 Scheduler JCL Update 7 37 '''' 170 Scheduler Update 7 37 ******************************* BOTTOM OF DATA ********************************
NOTE The available line commands depend on the package status, form status, remaining days, and user access rights.
Field Explanation
Line Commands E - EditDisplays the form in edit mode and sets the form status to ACTIVE when exiting with the End command.B - BrowseDisplays the form in browse mode.S - SubmitSets the form status to SUBMITTED and notifies all defined form approvers, specified with Global OFM panel (CMNZNTF) of a pending forms approval.D - DeactivateClears the form status but retains any form data and form comments.A - ApproveSets the form status to APPROVED and optionally submits the approve job skeleton, as well as notifying the package creator of the forms approval through MVSSEND.R - RejectSets the form status to REJECTED and displays the Form Comments panel, as well as notifying the package creator of the forms rejection through MVSSEND.
OFM Getting Started Guide 39

Chapter 4 Using Online Forms
Editing FormsTo access an Online Form in edit mode, do the following from the Online Forms Selection panel:
1 Type E (Edit) in the line command field of the selected form. (Sample form 010 - Build GDG Request was selected for this example.)
2 Press Enter. The Edit Build GDG Request panel (CMNZ0101) appears and locks the form to prevent update by another user. If the form is in use by another user a message displays and the command is aborted.
3 Use an Online Form in edit mode.
An Online Form consists of single or multiple panels containing table and non-table variables. Forms using multiple panels allow navigation using Enter to display the next panel (if all validation for the panel is passed) and the End command to return to the previous panel. If a form contains table variables, then the first panel contains scrollable rows with a line command input area for each row. This line command area allows I, R, and D commands and, if the form contains multiple panels, the S command to display the next panel. Exiting from the form with the End command always saves the form data in the package master file. The form status is set to ACTIVE and the last user ID field is updated. If no data exists (all form variables contain null values) then the form status and last user ID fields are cleared. To avoid updating the last user ID field when no changes have been made to the form data, use the Cancel command.
Form LockingThis function incorporates a locking facility that locks the form on entry and unlocks the form on exit preventing update by more than one user at a time. Attempts to use an update function on a form currently locked by another user results in an error message and the command is aborted. A form can remain locked when the user is unable to exit normally due to a system failure or session time-out. The OFM allows access to the form if
CMNZ0101 ------------- EDIT: BUILD GDG REQUEST -------------ROW 1 TO 13 OF 13 COMMAND ===> SCROLL ===> PAGE PACKAGE ID: TEST000001 STATUS: DEV INSTALL DATE: 19971230 Press ENTER to process; Enter END command to exit. INDEX ENTRIES DELETE EMPTY ‘’’’ TEST.DATASET.NAME01_________________________ 10_ YES NO_ ‘’’’ TEST.DATASET.NAME02_________________________ 10_ YES NO_ ‘’’’ TEST.DATASET.NAME03_________________________ 10_ YES NO_ ‘’’’ TEST.DATASET.NAME04_________________________ 10_ YES NO_ ‘’’’ ____________________________________________ ___ ___ ___ ‘’’’ ____________________________________________ ___ ___ ___ ‘’’’ ____________________________________________ ___ ___ ___ ‘’’’ ____________________________________________ ___ ___ ___ ‘’’’ ____________________________________________ ___ ___ ___ ‘’’’ ____________________________________________ ___ ___ ___ ‘’’’ ____________________________________________ ___ ___ ___ ‘’’’ ____________________________________________ ___ ___ ___ ‘’’’ ____________________________________________ ___ ___ ___***************************** BOTTOM OF DATA **********************************
40 Serena® ChangeMan® ZMF 7.1.3

Accessing Online Forms Selection
the current user ID is the same as that under which the form was previously locked or if the current user ID has local or global administrator rights.
Browsing FormsTo access an Online Form in browse mode, do the following from the Online Forms Selection panel:
1 Type B (Browse) in the line command field of the selected form.
2 Press Enter. The Browse Build GDG Request panel (CMNZ0101) appears.
Use the Online Form in browse mode.
An Online Form consists of single or multiple panels containing table and non-table variables. Forms that use multiple panels allow navigation using Enter to display the next panel (if all validation for the panel is passed) and the End command to return to the previous panel. If a form contains table variables, then the first panel contains scrollable rows with a line command input area for each row. This line command area allows the S command to display the next panel if the form contains multiple panels.
Submitting Forms for ApprovalTo use the Submit function, do the following from the Online Forms Selection panel.
1 Type S (Submit) in the line command field of the selected form.
2 Press Enter.
This changes the form status to SUBMITTED and updates the last user ID field. A message is sent to all user IDs in the notification definition that the form is waiting for their approval. If the form is in use by another user, a message displays and the command is aborted.
Deactivating FormsTo use the Deactivate function, do the following from the Online Forms Selection panel:
1 Type D (Deactivate) in the line command field of the selected form.
2 Press Enter.
CMNZ0101 ----------- BROWSE: BUILD GDG REQUEST -------------- ROW 1 TO 4 OF 4 COMMAND ===> SCROLL ===> PAGE PACKAGE ID: TEST000001 STATUS: DEV INSTALL DATE: 19971230 Press ENTER to process; Enter END command to exit. INDEX ENTRIES DELETE EMPTY ‘’’’ TEST.DATASET.NAME01_________________________ 10_ YES NO_ ‘’’’ TEST.DATASET.NAME02_________________________ 10_ YES NO_ ‘’’’ TEST.DATASET.NAME03_________________________ 10_ YES NO_ ‘’’’ TEST.DATASET.NAME04_________________________ 10_ YES NO_***************************** BOTTOM OF DATA **********************************
OFM Getting Started Guide 41

Chapter 4 Using Online Forms
This clears the form status and last user ID fields. All form data and form comments are retained. The form may be edited subsequently and the status reset to ACTIVE. If the form is in use by another user, a message displays and the command is aborted.
Approving FormsTo use the Approve function, do the following from the Online Forms Selection panel.
1 Type A (Approve) in the line command field of the selected form.
2 Press Enter.
This sets the form status to APPROVED and, if the form allows submit at approval, invokes processing of the approve job skeleton which submits the output job stream for execution. Upon successful completion, a jobname(jobnumber) submitted message is received from the ChangeMan ZMF started task. Any errors detected during skeleton processing are indicated by standard ISPF Dialog Manager messages (press PF1 for the long message text).
Rejecting FormsTo use the Reject function, do the following from the Online Forms Selection panel.
1 Type R (Reject) in the line command field of the selected form.
2 Press Enter.
This changes the form status to REJECTED and updates the last user ID field. If the form is in use by another user, a message displays and the command is aborted.
Commenting FormsTo access the Form Comments panel, do the following from the Online Forms Selection panel.
1 Type C (Comments) or R (Reject) in the line command field of the selected form.
42 Serena® ChangeMan® ZMF 7.1.3

Accessing Online Forms Selection
2 Press Enter. The Form Comments panel (CMNZCMT) appears and locks the form to prevent updates by another user. If the form is in use by another user, a message displays and the command is aborted.
Using the Form Comments PanelType comments into unused comments lines as required. Non-blank comment lines are protected from input in order to maintain a log of comments. Intervening blank lines are removed when the data is saved. Terminate comments with the id of the author and the date and time.
Form LockingThis function incorporates a locking facility that locks the form on entry and unlocks the form on exit preventing update by more than one user at a time. Attempts to use an update function on a form currently locked by another user results in an error message and the command is aborted. A form can remain locked when the user is unable to exit normally due to a system failure or session time-out. The OFM allows access to the form if the current user ID is the same as that under which the form was previously locked or if the current user ID has local or global administrator rights.
Printing FormsTo print Online Forms, do the following from the Online Forms Selection panel:
1 Type P (Print) in the line command field of the selected form.
2 Press Enter.
This invokes the print job skeleton that submits the output job stream for execution. Upon successful completion a jobname(jobnumber) submitted message is received from the ChangeMan ZMF started task. Any errors detected during skeleton processing are indicated by standard ISPF Dialog Manager messages (press PF1 for the long message text).
CMNZCMT --------------------- FORM COMMENTS ------------------------------- COMMAND ===> PACKAGE ID: TEST000001 STATUS: DEV INSTALL DATE: 19971230 FORM ID: 120 DESCRIPTION: Tape Retention Register Press ENTER to process; Enter END command to exit. COMMENTS: ===> Rejected due to non-standard dataset name - MWS 9/18/1997 ===> ===> ===> ===> ===> ===> ===> ===> ===>
OFM Getting Started Guide 43

Chapter 4 Using Online Forms
Online Forms Freeze/UnfreezeThe Online Forms Selection panel displays a table of all available forms within the change package and provides access to all the functions necessary for selectively freezing and unfreezing individual forms.
To access the Online Forms Freeze/Unfreeze panel:
1 Select Option 2 (Freeze) from the Primary Option menu. Press Enter.
2 Select Option 3 from the Freeze Options menu. Press Enter.
3 Type S in the line command field next to Custom Forms in the Selective Freeze/Unfreeze panel. Press Enter.
This displays the Online Forms Freeze/Unfreeze panel (CMNZUNF).
Use the following line commands to freeze or unfreeze the forms as required. If the form is in use by another user, a message displays and the command is aborted.
CMNZUNF ----------------- ONLINE FORMS FREEZE/UNFREEZE -----------------------COMMAND ===> SCROLL ===> PAGE PACKAGE ID: TEST000002 STATUS: DEV INSTALL DATE: 19971230 Line commands: F-Freeze, U-Unfreeze Press ENTER to process; Enter END command to exit. FORM LEAD DAYS LAST ID FORM DESCRIPTION TIME LEFT STATUS USERID f’’’ 120 Tape Recovery Form 10 6 ACTIVE USER85
Field Explanation
Line Commands F - FreezeFreezes the form.U - UnfreezeUnfreezes the form.
44 Serena® ChangeMan® ZMF 7.1.3

Appendix APredefined Variables
The following symbolic variables are defined by the OFM for the user defined panels.
Refer to the sample form panels for examples of use.
Name Format Length Description
XATTR char 6 Access attribute (INPUT/OUTPUT)
XCMD char 4 Line command
XCMDCNT fixed 4 Line command suffix
XFRMID char 3 Form identifier
XFRMDESC char 40 Form description
XMODE char 7 Access mode (EDIT:/BROWSE:)
XPKGDATE char 6 Package install date
XPKGNAME char 10 Package name
XPKGSTAT char 3 Package status
OFM Getting Started Guide 45

Appendix A Predefined Variables
46 Serena® ChangeMan® ZMF 7.1.3

Appendix BMessages and Codes
8201A Primary command not valid for this panel.
Explanation: The command entered in the primary command area is not a valid choice for this panel.
8202A Primary command not valid for this panel.
Explanation: The command entered in the line command area is not a valid choice for this panel.
8203A Line command suffix must be numeric.
Explanation: The command entered in the line command area contains a nonnumeric suffix iteration factor.
8204I Changes saved in the Package Master.
Explanation: An END command was processed; your changes were saved in the package master file.
8205I Changes canceled at user request.
Explanation: A CANCEL command was processed and your changes were discarded.
8206A Line command not allowed for this form.
Explanation: The command entered in the line command area is not valid for the selected form based upon the package status, form status, and days left.
8207A Access denied - see administrator.
Explanation: You do not have sufficient access rights for the requested function. Solution: See your administrator.
8208A Package {package_ID} not found in the Package Master.
Explanation: The requested package cannot be found in the package master file.
8209A Package {package_ID} is memo deleted.
Explanation: The requested package was found in the package master file but has been marked for deletion and is not available for use.
8210A Duplicate rows not allowed for this form.
Explanation: The form contains one or more variables defined to ensure that duplicate data is not saved.
8211A Variable names beginning with X, Y, or Z are reserved.
Explanation: An attempt was made to save variable definitions containing a variable name having a first character of X, Y, or Z. Variable names beginning with these characters are reserved for internal use.
OFM Getting Started Guide 47

Appendix B Messages and Codes
8212A Form data record not found - retry command.
Explanation: The form data record could not be found in the package master file. An administrator may have deleted the record while you were using it, or the package master file may be damaged.
8213A Form data record not found - see administrator.
Explanation: The form definition record could not be found in the package master file. An administrator may have deleted the record while you were using it, or the package master file may be damaged.
8214A Form data must not exceed 32,767 bytes.
Explanation: An attempt was made to save form data that has a length exceeding 32,767 bytes.Solution: Delete sufficient rows from the form to reduce the length to <=32,767 bytes and retry the operation.
8215A Form ID must be numeric.
Explanation: The form ID field contains nonnumeric characters.
8216A Form description must not be blank.
Explanation: The form description field must not be blank.
8217A Lead time must be numeric.
Explanation: The lead time field must contain all numeric characters.
8218A Variable name contains an invalid character.
Explanation: The variable name field contains one or more invalid characters. Alphanumeric characters A-Z, 0-9, #, $, or @ can be used in the name, but the first character cannot be numeric.
8219A Variable format must be CHAR or FIXED.
Explanation: OFM currently supports only the ISPF Dialog Manager variable formats of CHAR and FIXED.
8220A Variable length must be in range 1-3072 (CHAR) or 1- 4 (FIXED).
Explanation: The variable length field must be within the range 1-3072 for a CHAR variable format or 1-4 for a FIXED variable format.
8221A Table variable must be YES or NO.
Explanation: The table variable field must contain a value of YES or NO.
8222A Key variable must be YES or NO.
Explanation: The key variable field contains a value other than YES or NO.
8223A Number of variables must not exceed 200.
Explanation: An attempt was made to save more than 200 form variable definitions.
8224A Total of variable lengths must not exceed 3,072.
Explanation: An attempt was made to save form variable definitions with a total length that exceeds 3,072 bytes.
48 Serena® ChangeMan® ZMF 7.1.3

Appendix B Messages and Codes
8225A Notification vehicle must be MVSSEND.
Explanation: OFM currently supports only the MVSSEND notification vehicle.
8226A Notification vehicle undefined.
Explanation: The requested notification vehicle has not been defined to ChangeMan ZMF in the Global Parameters.
8227A Notification user IDs must not be blank.
Explanation: The notification user IDs field was blank.
8228A Notifications must not exceed 10 rows.
Explanation: OFM currently supports a maximum of 10 rows of notification definitions.
8229A Approve/reject authorization denied - see administrator.
Explanation: You do not have sufficient security access rights for the approve and reject line commands.
8230A Form {form_ID} already exists in the Package Master.
Explanation: An attempt was made to create a new form using a form ID that already exists in the package master file.
8231A Form {form_ID} created in the Package Master.
Explanation: The requested form has been successfully created in the package master file.
8232A Form {form_ID} deleted from the Package Master.
Explanation: The requested form was successfully deleted from the package master file.
8233A Form {form_ID} updated in the Package Master.
Explanation: The requested form was successfully updated in the package master file.
8234A No panels defined for form {form_ID} - see administrator.
Explanation: Either no panels were created for the specified form number or the panels are not available in the ISPF Dialog Manager ISPPLIB library concatenation.
8235A Key variable must be table variable.
Explanation: The key variable of YES is only valid for a variable that is also defined with a table variable of YES.
8236A Form currently in use by user ID {User_ID}.
Explanation: The requested form was locked by another user and is not available for use at this time. If the form remains locked due to a system failure or session time-out, only the last user or an administrator can unlock the form.
8237A Allow access must be YES or NO.
Explanation: The allow access field does not contain a value of YES or NO.
8238A Allow submit must be YES or NO.
Explanation: The allow submit field does not contain a value of YES or NO.
OFM Getting Started Guide 49

Appendix B Messages and Codes
8239A Form status changed by another user - use REFRESH command.
Explanation: The form status was changed by another user since the current panel was entered or refreshed.
8240A Skeleton {skeleton_name] not found in ISPSLIB.
Explanation: The specified skeleton member name could not be found in the ISPF Dialog Manager ISPSLIB library concatenation.
50 Serena® ChangeMan® ZMF 7.1.3

Appendix CRecord Descriptions
The OFM maintains two types of records in the package master file: form definition records and form data records. The following sections describe the record formats and their use.
Form Definition RecordsThe following are attributes of Form Definition records:
They contain the form descriptions.
They exist at the global level.
They are maintained by ChangeMan ZMF administrators.
They are maintained using the Online Forms Maintenance function.
The following table provides a description of the form definition records.
Offset Length Usage Description Contents
0 4 Character Application X’4B4B4B4B’ = Global
4 4 Binary Package Number Zero = Global
8 1 Character Record Type X’80’ = Online Forms
9 2 Binary Record Sequence Form Id
11 1 Character Record Sub-sequence X’00’
12 2 Binary Record Data Length (Record Length-12)
14 40 Character Form Description
54 4 Binary Form Lead Time
58 1 Character Allow Form Access ‘Y’ - Yes‘N’ - No
59 1 Character Allow Job Submit ‘Y’ - Yes‘N’ - No
60 78 Character Unused
138 520 10 Approvers (i=1 to 10)
138+(52*(i-1)) 8 Character Approver Vehicle (i)
146+(52*(i-1)) 44 Character Approver User IDs (i)
658 3200 200 Variables (j=1 to 200)
658+(16*(j-1)) 8 Character Variable Name (j)
666+(16*(j-1)) 2 Binary Variable Length (j)
OFM Getting Started Guide 51

Appendix C Record Descriptions
Form Data RecordsThe following are attributes of Form Data records:
They contain the form user data.
They exist at the package level.
They are maintained by ChangeMan ZMF users.
They are maintained using the Online Forms Selection function.
The following table provides a description of the form data records.
668+(16*(j-1)) 1 Character Variable Format (j) ‘C’ - Char‘F’ - Fixed
669+(16*(j-1)) 1 Character Table Variable (j) ‘Y’ - Yes‘N’ - No
670+(16*(j-1)) 1 Character Key Variable (j) ‘Y’ - Yes‘N’ - No
671+(16*(j-1)) 3 Character Unused
Offset Length Usage Description Contents
Offset Length Usage Description Contents
0 4 Character Package Mnemonic
4 4 Binary Package Number
8 1 Character Record Type X’80’ = Online Forms
9 2 Binary Record Sequence Form ID
11 1 Character Record Sub-sequence X’00’ thru X’09’
12 2 Binary Data Length (length of the form data)
14 8 Character Form Entity
22 720 Character Form Comments
742 1 Character Form Status X’00’ = NullX’02’ = InactiveX’04’ = UnfrozenX’08’ = SubmittedX’10’ = FrozenX’20’ = RejectedX’40’ = ApprovedX’80’ = Selected
743 4 Character Form Encryption
747 8 Character Form User ID
755 8 Character Lock User ID
763 64 Character Unused
827 3269 Character Form Data
52 Serena® ChangeMan® ZMF 7.1.3

Form Variable Definitions
Form Variable DefinitionsForm variables are defined using the Online Forms Variable Definition panel. These definitions map the location of form variable values in the form data records. The following Define Form Variable panel (CMNZVRB) shows the variable definitions for 010 - Build GDG Request.
The form variable definitions are stored in the form definition record as follows:
CMNZVRB -------------------- DEFINE FORM VARIABLES --------- ROW 1 TO 4 OF 15 COMMAND ===> SCROLL ===> CSR FORM ID: 010 DESCRIPTION: Build GDG Request Press ENTER to process; Enter END command to save changes and exit; Enter CANCEL command to cancel changes and exit. VARIABLE VARIABLE VARIABLE TABLE KEY NAME FORMAT LENGTH VARIABLE VARIABLE '''' INDEX___ CHAR____ 44__ YES NO_ '''' ENTRIES_ CHAR____ 3___ YES NO_ '''' DELETE__ CHAR____ 3___ YES NO_ '''' EMPTY___ CHAR____ 3___ YES NO_
Offset Length Contents
658 8 INDEX
666 2 44
668 1 C
669 1 Y
670 1 Y
671 3
674 8 ENTRIES
682 2 3
684 1 C
685 1 Y
686 1 N
687 3
690 8 DELETE
698 2 3
700 1 C
701 1 Y
702 1 N
703 3
706 8 EMPTY
714 2 3
OFM Getting Started Guide 53
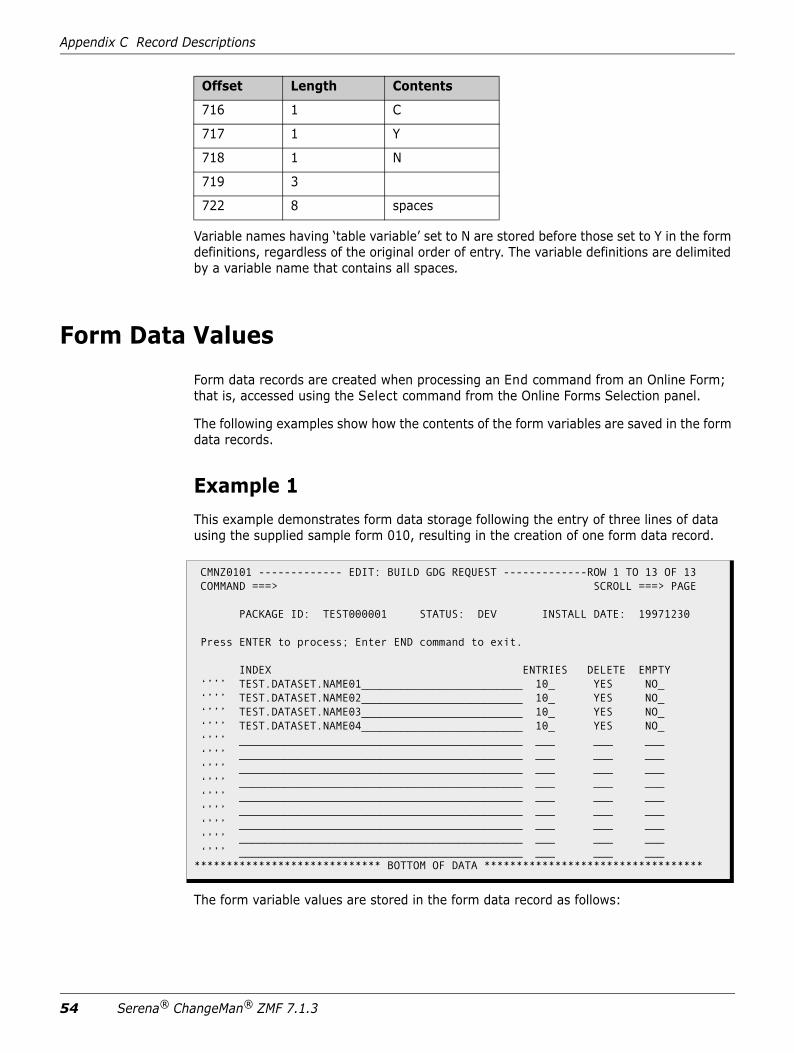
Appendix C Record Descriptions
Variable names having ‘table variable’ set to N are stored before those set to Y in the form definitions, regardless of the original order of entry. The variable definitions are delimited by a variable name that contains all spaces.
Form Data ValuesForm data records are created when processing an End command from an Online Form; that is, accessed using the Select command from the Online Forms Selection panel.
The following examples show how the contents of the form variables are saved in the form data records.
Example 1This example demonstrates form data storage following the entry of three lines of data using the supplied sample form 010, resulting in the creation of one form data record.
The form variable values are stored in the form data record as follows:
716 1 C
717 1 Y
718 1 N
719 3
722 8 spaces
Offset Length Contents
CMNZ0101 ------------- EDIT: BUILD GDG REQUEST -------------ROW 1 TO 13 OF 13 COMMAND ===> SCROLL ===> PAGE PACKAGE ID: TEST000001 STATUS: DEV INSTALL DATE: 19971230 Press ENTER to process; Enter END command to exit. INDEX ENTRIES DELETE EMPTY ‘’’’ TEST.DATASET.NAME01_________________________ 10_ YES NO_ ‘’’’ TEST.DATASET.NAME02_________________________ 10_ YES NO_ ‘’’’ TEST.DATASET.NAME03_________________________ 10_ YES NO_ ‘’’’ TEST.DATASET.NAME04_________________________ 10_ YES NO_ ‘’’’ ____________________________________________ ___ ___ ___ ‘’’’ ____________________________________________ ___ ___ ___ ‘’’’ ____________________________________________ ___ ___ ___ ‘’’’ ____________________________________________ ___ ___ ___ ‘’’’ ____________________________________________ ___ ___ ___ ‘’’’ ____________________________________________ ___ ___ ___ ‘’’’ ____________________________________________ ___ ___ ___ ‘’’’ ____________________________________________ ___ ___ ___ ‘’’’ ____________________________________________ ___ ___ ___***************************** BOTTOM OF DATA **********************************
54 Serena® ChangeMan® ZMF 7.1.3

Form Data Values
Example 2This example demonstrates form data storage following the entry of 63 lines of data using the supplied sample form 010 resulting in the creation of 2 form data records.
The form variables are stored in two form data records as shown in the following tables:
Offset Length Contents
827 44 TEST.DATASET.NAME01
871 3 10
874 3 YES
877 3 NO
880 44 TEST.DATASET.NAME02
924 3 10
927 3 YES
930 3 NO
933 44 TEST.DATASET.NAME03
977 3 10
980 3 YES
983 3 NO
CMNZ0101 ------------- EDIT: BUILD GDG REQUEST -------------ROW 1 TO 63 OF 63 COMMAND ===> SCROLL ===> PAGE PACKAGE ID: TEST000001 STATUS: DEV INSTALL DATE: 19971230 Press ENTER to process; Enter END command to exit. INDEX ENTRIES DELETE EMPTY ‘’’’ TEST.DATASET.NAME01_________________________ 10_ YES NO_ ‘’’’ TEST.DATASET.NAME62_________________________ 10_ YES NO_ ‘’’’ TEST.DATASET.NAME63_________________________ 10_ YES NO_
OFM Getting Started Guide 55

Appendix C Record Descriptions
Form Data Record 1
Form Data Record 2
When form data is continued to subsequent records the contents of a variable can be split between two records, as in the previous example. Form data is considered as one string of data up to 32,767 bytes, saved in units of 3,269 bytes in each record.
Offset Length Contents
827 44 TEST.DATASET.NAME01
871 3 10
874 3 YES
877 3 NO
4060 36 TEST.DATSET.NAME63
Offset Length Contents
827 8
835 3 10
838 3 YES
841 3 NO
844 44 TEST.DATASET.NAME63
888 3 10
891 3 YES
894 3 NO
56 Serena® ChangeMan® ZMF 7.1.3

Index
Aaccessing
online forms selection 38Adobe Acrobat 7allow access 25allow submit 25approving
forms 42
Bbenefits
Online Forms Manager 13browsing forms 41
CCMNZCMT 43CMNZFRMU options 25CMNZVRB options 29creating
a new form by copying an existing form 31forms 24, 42online forms 21
Ddeactivating forms 41defining
form notifications 29form variables 28
deletingforms 25
Eediting forms 40
Fform data records
attributes 52form definition records
attributes 51
form notificationsdefining 29
form variablesdefining 28
formsapproving 42browsing 41commenting on 42creating 24, 42deactivating 41deleting 25editing 40freezing 44locking 40, 43printing 43rejecting 42submitting for approval 41unfreezing 44updating 25
freezing forms 44
Kkey variable 29
Llead time 24, 25license
SER10TY 16line commands 29, 30, 39locking forms 40, 43
Mmaintaining
online forms 19, 21, 22messages 47
Nnotification vehicle 30notifying users 29
OFM Getting Started Guide 57

Index
Oonline forms
creating 21definition 40maintaining 21using 37
Online Forms Managerbenefits of 13
online forms managerhow it works 15
online help 8options
create or update 18
Ppanel format restrictions 27parameters 18preparing to use OFM 15printing forms 43
Rrecord descriptions 51rejecting forms 42requirements
panel format 27
SSER10TY
license 16submitting forms 41
Ttable variable 29
Uunfreezing forms 44updating
forms 25user IDs 30using
online forms 37Online Forms Maintenance 22
using OFM 15
Vvariable format 29variable length 29variable name 29variables
form definitions 53
58 Serena® ChangeMan® ZMF 7.1.3