service manual, 20-300 kw fr ii (tp-5353)photos.imageevent.com/qdf_files/technicalgoodies... ·...
TRANSCRIPT

Industrial Generator Sets
Models:
20-300 kW
TP-5353 8/94c
Service

TP-5353 8/94 Table of Contents
Table of Contents
SUBJECT PAGE SUBJECT PAGE
Safety Precautions and Instructions I. . . . . . .
Introduction i. . . . . . . . . . . . . . . . . . . . . . . . . . . . .
Service Assistance i. . . . . . . . . . . . . . . . . . . . . . .
Section 1. Specifications 1-1. . . . . . . . . . . . . . . . .
Introduction 1-1. . . . . . . . . . . . . . . . . . . . . . . . . . . . . . .
Fast-Response� II Concepts 1-1. . . . . . . . . . . . . . .
Short Circuit Performance 1-1. . . . . . . . . . . . . . . . . .
Specifications 1-3. . . . . . . . . . . . . . . . . . . . . . . . . . . . .
Generator 1-3. . . . . . . . . . . . . . . . . . . . . . . . . . . . . . .
Engine 1-5. . . . . . . . . . . . . . . . . . . . . . . . . . . . . . . . . .
Accessories 1-6. . . . . . . . . . . . . . . . . . . . . . . . . . . . . .
Section 2. Operation 2-1. . . . . . . . . . . . . . . . . . . . .
Prestart Checklist 2-1. . . . . . . . . . . . . . . . . . . . . . . . .
Exercising the Generator Set 2-1. . . . . . . . . . . . . . .
16-Light Controller (Level 1) Operation 2-2. . . . . . .
Features 2-3. . . . . . . . . . . . . . . . . . . . . . . . . . . . . . . .
Starting 2-6. . . . . . . . . . . . . . . . . . . . . . . . . . . . . . . . .
Stopping 2-6. . . . . . . . . . . . . . . . . . . . . . . . . . . . . . . .
Resetting Emergency Stop Switches 2-7. . . . . . . .
Fault Shutdowns 2-8. . . . . . . . . . . . . . . . . . . . . . . . .
Controller Resetting Procedure (FollowingFault Shutdown) 2-9. . . . . . . . . . . . . . . . . . . . . . . .
6-Light Controller (Level 2) Operation 2-10. . . . . . . .
Features 2-11. . . . . . . . . . . . . . . . . . . . . . . . . . . . . . . .
Starting 2-13. . . . . . . . . . . . . . . . . . . . . . . . . . . . . . . . .
Stopping 2-14. . . . . . . . . . . . . . . . . . . . . . . . . . . . . . . .
Resetting Emergency Stop Switches 2-14. . . . . . . .
Fault Shutdowns 2-15. . . . . . . . . . . . . . . . . . . . . . . . .
Controller Resetting Procedure (FollowingFault Shutdown) 2-15. . . . . . . . . . . . . . . . . . . . . . . .
Paralleling Engine Gauge Box ControllerOperation (Switchgear) 2-16. . . . . . . . . . . . . . . . . . .
Features 2-17. . . . . . . . . . . . . . . . . . . . . . . . . . . . . . . .
Manual Controller Operation 2-18. . . . . . . . . . . . . . . .
Features 2-19. . . . . . . . . . . . . . . . . . . . . . . . . . . . . . . .
Starting 2-19. . . . . . . . . . . . . . . . . . . . . . . . . . . . . . . . .
Stopping 2-20. . . . . . . . . . . . . . . . . . . . . . . . . . . . . . . .
Fault Shutdowns 2-20. . . . . . . . . . . . . . . . . . . . . . . . .
Section 3. Scheduled Maintenance 3-1. . . . . . . .
Oil Requirements (30, 80, and100 kW FordPowered) 3-2. . . . . . . . . . . . . . . . . . . . . . . . . . . . . . .
Oil Change Procedure (30, 80, and100 kW FordPowered) 3-2. . . . . . . . . . . . . . . . . . . . . . . . . . . . . . .
Turbocharger Service Schedule (30, 80, and100 kW Ford Powered) 3-3. . . . . . . . . . . . . . . . . . .
Storage Procedure 3-3. . . . . . . . . . . . . . . . . . . . . . . .
Section 4. General Troubleshooting 4-1. . . . . . .
General Troubleshooting Chart 4-1. . . . . . . . . . . . . .
Section 5. Controller Troubleshooting 5-1. . . . .
Microprocessor Controller—Description 5-1. . . . . .
Circuit Board Terminal Identification (TB1) 5-3. . .
Fault Shutdowns—MicroprocessorController 5-9. . . . . . . . . . . . . . . . . . . . . . . . . . . . . .
Paralleling Engine Gauge Box Controller(Switchgear) 5-11. . . . . . . . . . . . . . . . . . . . . . . . . . . .
Speed Switch Adjustments 5-11. . . . . . . . . . . . . . . . .
Manual Controller 5-12. . . . . . . . . . . . . . . . . . . . . . . . .
Starting 5-12. . . . . . . . . . . . . . . . . . . . . . . . . . . . . . . . .
Running 5-12. . . . . . . . . . . . . . . . . . . . . . . . . . . . . . . . .
Stopping 5-12. . . . . . . . . . . . . . . . . . . . . . . . . . . . . . . .
Engine Safety Shutdown Switches 5-13. . . . . . . . . .
Section 6. Generator/ControllerTroubleshooting 6-1. . . . . . . . . . . . . . . . . . . . . . . .
Microprocessor Controller 6-1. . . . . . . . . . . . . . . . . .
Relay Descriptions 6-1. . . . . . . . . . . . . . . . . . . . . . . .
Troubleshooting Microprocessor Controller 6-2. . .
Fuses 6-3. . . . . . . . . . . . . . . . . . . . . . . . . . . . . . . . .
Engine Will Not Crank 6-4. . . . . . . . . . . . . . . . . . .
Engine Cranks, But Will Not Start 6-5. . . . . . . . .
Controller Instrumentation 6-6. . . . . . . . . . . . . . .
Lamp Circuit Board 6-7. . . . . . . . . . . . . . . . . . . . .
Overcrank Lamp 6-8. . . . . . . . . . . . . . . . . . . . . . .
FASTCHECK� Features and Operation 6-9. . . . .
Features 6-9. . . . . . . . . . . . . . . . . . . . . . . . . . . . . .
Operation 6-10. . . . . . . . . . . . . . . . . . . . . . . . . . . . .
Manual Controller 6-14. . . . . . . . . . . . . . . . . . . . . . . . .
Troubleshooting Manual Controller 6-15. . . . . . . . . .
Section 7. Component Testing andAdjustment 7-1. . . . . . . . . . . . . . . . . . . . . . . . . . . . .
Generator Troubleshooting 7-1. . . . . . . . . . . . . . . . .
Troubleshooting Generator—No OutputVoltage 7-2. . . . . . . . . . . . . . . . . . . . . . . . . . . . . . . .
Troubleshooting Generator—High OutputVoltage 7-3. . . . . . . . . . . . . . . . . . . . . . . . . . . . . . . .
Generator Testing 7-4. . . . . . . . . . . . . . . . . . . . . . . . .
No Output On Any Phase 7-4. . . . . . . . . . . . . . . . . .
Overvoltage 7-6. . . . . . . . . . . . . . . . . . . . . . . . . . . . . .
Fluctuating Voltage 7-6. . . . . . . . . . . . . . . . . . . . . . .
LED Circuit Board Test 7-7. . . . . . . . . . . . . . . . . . . . .
SCR Assembly and Photo Transistor Board 7-9. . .
Automatic Voltage Regulator (AVR) Operationand Adjustment 7-12. . . . . . . . . . . . . . . . . . . . . . . . . .
To Test AVR 7-13. . . . . . . . . . . . . . . . . . . . . . . . . . . . .

TP-5353 8/94Table of Contents
SUBJECT PAGE SUBJECT PAGE
Stator 7-14. . . . . . . . . . . . . . . . . . . . . . . . . . . . . . . . . . . .
Generator Field 7-15. . . . . . . . . . . . . . . . . . . . . . . . . . .
Exciter Armature 7-16. . . . . . . . . . . . . . . . . . . . . . . . . .
End Bracket Removal and Replacement 7-17. . . . . .
Speed Sensor Test 7-18. . . . . . . . . . . . . . . . . . . . . . . .
Air Damper Switch Adjustment 7-19. . . . . . . . . . . . . .
Overspeed/Time Delay Circuit Board 7-20. . . . . . . . .
Overvoltage Circuit Board 7-21. . . . . . . . . . . . . . . . . .
Governor Adjustment 7-22. . . . . . . . . . . . . . . . . . . . . .
Mechanical Governor—Hoof20-100 kW Ford-Powered Models 7-22. . . . . . . . .
Mechanical Governor—Stanadyne20-100 kW John Deere-Powered and20-100 kW Detroit Diesel-PoweredModels 7-23. . . . . . . . . . . . . . . . . . . . . . . . . . . . . . . .
Mechanical Governor—Nippondenso125-180 kW John Deere-PoweredModels 7-24. . . . . . . . . . . . . . . . . . . . . . . . . . . . . . . .
Mechanical Governor—Bosch P125-180 kW Detroit Diesel-PoweredModels 7-25. . . . . . . . . . . . . . . . . . . . . . . . . . . . . . . .
Electronic Governor—Barber-ColmanDyna 250020-100 kW Ford-Powered Models 7-26. . . . . . . . .
Electronic Governor—Barber-ColmanDyna 8000125-300 kW Detroit Diesel-Powered Models(Early 20-100 kW John Deere-Powered andEarly 20-100 kW Detroit Diesel-PoweredModels) 7-27. . . . . . . . . . . . . . . . . . . . . . . . . . . . . . . .
Electronic Governor—Barber-ColmanDyna 2500125-180 kW John Deere-Powered Models 7-29. .
Electronic Governor—Barber-ColmanDyna 70025 using Stanadyne D SeriesInjection Pump20-100 kW John Deere-Powered and20-100 kW Detroit Diesel-Powered Models 7-31.
Section 8. Generator Disassembly/Reassembly 8-1. . . . . . . . . . . . . . . . . . . . . . . . . . . .
Disassembly 8-4. . . . . . . . . . . . . . . . . . . . . . . . . . . . . .
Reassembly 8-7. . . . . . . . . . . . . . . . . . . . . . . . . . . . . .
Section 9. Generator Reconnection 9-1. . . . . . .
Voltage Reconnection Procedure 9-1. . . . . . . . . . . .
Generator Frequency Change and Adjustment 9-4
Frequency Change 9-4. . . . . . . . . . . . . . . . . . . . . . .
Frequency Adjustment 9-4. . . . . . . . . . . . . . . . . . . .
Appendix A. Glossary of Abbreviations A-1. . .
Appendix B. Common HardwareApplication Guidelines B-1. . . . . . . . . . . . . . . . . .
Appendix C. Common HardwareIdentification C-1. . . . . . . . . . . . . . . . . . . . . . . . . . .
Appendix D. General TorqueSpecifications D-1. . . . . . . . . . . . . . . . . . . . . . . . . .

TP-5353 8/94 Safety Precautions and Instructions I
Safety Precautions and InstructionsA generator set, like any other electromechanical
device, can pose potential dangers to life and limb if
improperly maintained or imprudently operated. The
best way to prevent accidents is to be aware of the
potential dangers and to always use good common
sense. In the interest of safety, some general
precautions relating to the operation of a generator set
follow. Below are some general precautions relating to
the operation of a generator set. SAVE THESE
INSTRUCTIONS.
DANGER
Danger indicates the presence of a hazard that will
cause severe personal injury, death, or substantial
property damage if the danger is ignored.
WARNING
Warning indicates the presence of a hazard that can
cause severe personal injury, death, or substantial
property damage if the warning is ignored.
CAUTION
Caution indicates the presence of a hazard that will or
can cause minor personal injury or property damage if
the caution is ignored.
NOTE
Note communicates installation, operation, or
maintenance information that is important but not
hazard related.
Safety decals are affixed to the generator set in
prominent places to advise the operator or service
technician of potential hazards. The decals are
reproduced here to improve operator recognition. For a
further explanation of decal information, refer to the
safety precautions throughout this manual. Before
operating or servicing the generator set, be sure you
understand the messages of these decals. Replace
decals if missing or damaged.
Accidental Starting
Accidental starting.
Can cause severe injury or death.
Disconnect battery cables before working on
generator set (negative lead first and reconnect it
last).
WARNING
Accidental starting can cause severe injury or
death. Turn generator set master switch to OFF
position, disconnect power to battery charger, and
remove battery cables (remove negative lead first and
reconnect it last) to disable generator set beforeworking
on any equipment connected to generator set. The
generator set can be started by automatic transfer
switch or remote start/stop switch unless these
precautions are followed.
Battery
Sulfuric acid in batteries.
Can cause severe injury or death.
Use protective goggles and clothes. Battery acid can
cause permanent damage to eyes, burn skin, and eat
holes in clothing.
WARNING

II Safety Precautions and Instructions TP-5353 8/94
WARNING
Explosion.
Can cause severe injury or death. Relays in
battery charger cause arcs or sparks.
Locate in a well-ventilated area. Keep explosive
fumes away.
Sulfuric acid in batteries can cause severe injury or
death. Sulfuric acid in battery can cause permanent
damage to eyes, burn skin, and eat holes in clothing.
Always wear splash-proof safety goggles when working
around the battery. If battery electrolyte is splashed in
the eyes or on skin, immediately flush the affected area
for 15minutes with large quantities of clean water. Seek
immediatemedical aid in the case of eye contact. Never
add acid to a battery once the battery has been placed in
service. This may result in hazardous spattering of
electrolyte.
Explosion can cause severe injury or death. Battery
gases can cause an explosion. Do not smoke or permit
flame or spark to occur near a battery at any time,
particularly when it is being charged. Avoid contacting
terminals with tools, etc., to prevent burns and sparks
that could cause an explosion. Remove wristwatch,
rings, and any other jewelry before handling battery.
Never connect negative (--) battery cable to positive (+)
connection terminal of starter solenoid. Do not test
battery condition by shorting terminals together. Sparks
could ignite battery gases or fuel vapors. Ventilate any
compartment containing batteries to prevent
accumulation of explosive gases. To avoid sparks, do
not disturb battery charger connections while battery is
being changed. Always turn battery charger off before
disconnecting battery connections. Remove negative
lead first and reconnect it last when disconnecting
battery.
Engine Backfire/Flash Fire
WARNING
Fire.
Can cause severe injury or death.
Do not smoke or permit flame or spark to occur
near fuel or fuel system.
Asuddenbackfire can cause severe injury or death.
Do not operate with air cleaner removed.
A flash fire can cause severe injury or death. Do
not smoke or permit flame or spark to occur near
carburetor, fuel line, fuel filter, fuel pump, or other
potential sources of spilled fuel or fuel vapors. Use a
suitable container to catch all fuel when removing fuel
line or carburetor.
Exhaust System
WARNING
Carbon monoxide.
Can cause severe nausea, fainting, or death.
The exhaust system must be leakproof and
routinely inspected.
Carbon monoxide can cause severe nausea,
fainting, or death. Never operate the generator set
inside a building unless the exhaust gas is piped safely
outside. Never operate in any area where exhaust gas
could accumulate and seep back inside an occupied
building. Avoid breathing exhaust fumes when working
on or near the generator set. Carbon monoxide is
particularly dangerous because it is an odorless,
colorless, tasteless, nonirritating gas. Be aware that it
can cause death if inhaled for even a short time.

TP-5353 8/94 Safety Precautions and Instructions III
Carbon monoxide can cause severe nausea,
fainting, or death. Carbon monoxide is a poisonous
gas which is present in exhaust gases. Carbon
monoxide poisoning symptoms include but are not
limited to the following:
� Light-headedness, dizziness
� Physical fatigue, weakness in joints and muscles
� Sleepiness, mental fatigue, inability to concentrate
or speak clearly, blurred vision
� Stomachache, vomiting, nausea
If any of these symptoms is experienced and carbon
monoxide poisoning is possible, affected persons
should seek fresh air immediately. They should remain
active. They should not be permitted to sit, lie down, or
fall asleep. Alert others to the situation. If the condition
of affected persons does not improve within minutes of
breathing fresh air, they should seek medical attention.
Carbon monoxide can cause severe nausea,
fainting, or death. Do not use copper tubing in diesel
exhaust systems. Diesel fumes can rapidly destroy
copper tubing in diesel exhaust systems. Exhaust sulfur
causes rapid deterioration of copper tubing resulting in
exhaust leakage.
Fuel System
Explosive fuel vapors.
Can cause severe injury or death.
Use extreme care when handling, storing,
and using fuels.
WARNING
Explosive fuel vapors can cause severe injury or
death. All fuels are highly explosive in a vapor state.
Use extreme care when handling and storing fuels.
Store fuel in a well-ventilated area away from
spark-producing equipment and out of the reach of
children. Never add fuel to the tank while the engine is
running since spilled fuel may ignite on contact with hot
parts or from ignition spark. Do not smoke or permit
flame or spark to occur near potential sources of spilled
fuel or fuel vapors. Keep fuel lines and connections tight
and in good condition. Do not replace flexible fuel lines
with rigid lines. Flexible sections are used to avoid
breakage due to vibration. If any fuel leakage, fuel
accumulation, or electrical sparks are noted, DO NOT
OPERATE GENERATOR SET. Repair systems before
resuming generator set operation

IV Safety Precautions and Instructions TP-5353 8/94
Explosive fuel vapors can cause severe injury or
death. Take additional precautions when using the
following fuels:
Gasoline—Store gasoline only in approved red
containers clearly marked GASOLINE.
Propane (LP)—Adequate ventilation is mandatory.
Propane is heavier than air; install gas detectors low in
room. Inspect detectors often.
Natural Gas—Adequate ventilation is mandatory.
Natural gas rises; install gas detectors high in room.
Inspect detectors often.
Explosive fuel vapors can cause severe injury or
death. Fuel leakage can cause an explosion. Check LP
vapor gas or natural gas fuel system for leakage using a
soap-water solution with fuel system test pressurized to
6-8 ounces per square inch (10-14 inches water
column). Do not use test solutions that contain
ammonia or chlorine, since the soap will not bubble for
an accurate leakage test.
Explosive fuel vapors can cause severe injury or
death. Storing gasoline and other volatile fuels in day or
subbase fuel tanks can cause an explosion. Store only
diesel fuel in these tanks.
Explosive fuel vapors can cause severe injury or
death. Spilled fuel can cause an explosion. Use a
container to catch fuel when draining fuel system. Wipe
up all spilled fuel after draining system.
Explosive fuel vapors can cause severe injury or
death. Fuel leakage can cause an explosion. Check LP
liquid withdrawal gas fuel system for leakage using a
soap-water solution with fuel system test pressurized
not less than 90 psi (621 kPa). Do not use test solutions
that contain ammonia or chlorine, since the soap will not
bubble for an accurate leakage test.

TP-5353 8/94 Safety Precautions and Instructions V
Hazardous Noise
Hazardous noise.
Can cause loss of hearing.
Never operate generator set without a muffler or
with a faulty exhaust system.
CAUTION
Hazardous Voltage/
Electrical Shock
WARNING
Hazardous voltage. Moving rotor.
Can cause severe injury or death.
Do not operate generator set without all guards and
electrical enclosures in place.
WARNING
Hazardous voltage.
Backfeed to utility system can cause property
damage, severe injury, or death.
When generator set is used for standby power, use
an automatic transfer switch to prevent inadvertent
interconnection of standby and normal sources of
supply.
Hazardous voltage can cause severe injury or
death. Whenever electricity is present, there is the
hazard of electrocution. Openmain circuit breaker on all
power sources before servicing equipment. Electrically
ground the generator set and electrical circuits when in
use. Never come into contact with electrical leads or
appliances when standing in water or on wet ground, as
the chance of electrocution is increased under such
conditions.
Hazardous voltage can cause severe injury or
death. Disconnect generator set from load by opening
line circuit breaker or by disconnecting generator set
output leads from transfer switch and heavily taping
ends of leads. If high voltage is transferred to load
during test, personal injury and equipment damagemay
result. Do not use the safeguard circuit breaker in place
of the line circuit breaker.
Hazardous voltage can cause severe injury or
death. Follow instructions of test equipment
manufacturer when performing high-voltage test on
rotor or stator. An improper test procedure can damage
equipment or lead to future generator set failures.
Hazardous voltage can cause severe injury or
death. Do not expose the photo transistor board to any
external light source, as exposure to light causes high
voltage. Keep foreign sources of light away from photo
transistor board during testing. Place black electrical
tape over LED of circuit board (mounted on generator
set end bracket) before starting generator set with end
cover removed.
Hazardous voltage can cause severe injury or
death. Be sure that foil side of photo transistor board,
end of shaft, and threaded holes are clean and free of
metal particles and chips. Metal debrismay short-circuit
photo transistor board and cause hazardous voltage in
generator set. AC voltmeter must show correct output
before generator set may be reconnected to load.

VI Safety Precautions and Instructions TP-5353 8/94
Hazardous voltage can cause severe injury or
death. Make sure leads C and E leading to SCR
assembly (one-piece) are connected to the
corresponding terminals. Reverse connection of these
leads or grounding of the C (red) lead will turn the SCR
assembly full-on resulting in hazardous output voltage.
Hazardous voltage can cause severe injury or
death. Electrical shock may occur if battery charger is
not electrically grounded. Connect battery charger
enclosure to ground of a permanent wiring system. As
an alternative, run an equipment grounding conductor
with circuit conductors and connect to equipment
grounding terminal or lead on battery charger. Perform
battery charger installation as prescribed in equipment
manual. Install battery charger in compliance with all
local codes and ordinances.
Hazardous voltage can cause severe injury or
death. Reconnect battery correctly to avoid electrical
shock and damage to battery charger and battery(ies).
Have a qualified electrician perform installation.
Hazardous voltage can cause severe injury or
death. Service day tank Electrical Control Module
(ECM) as prescribed in equipment manual. Disconnect
power to day tank before servicing. The power is
disconnected when the day tank ECM OFF pushbutton
is engaged. However, 120 volts AC is still present within
the ECM when the POWER ON light is on. Be sure that
generator set and day tank are electrically grounded.
Do not operate when standing in water or on wet ground
as the chance of electrocution is increased under such
conditions.
Hazardous voltage can cause severe injury or
death. Short circuits can cause bodily injury and/or
equipment damage. Do not contact electrical
connections with tools or jewelry while adjustments are
made. Remove wristwatch, rings, and jewelry that can
cause short circuits.
Hazardous voltage can cause severe injury or
death. Engine block heater can cause electrical shock.
Remove engine block heater plug from electrical outlet
before working on block heater electrical connections.
Hazardous backfeed voltage can cause severe
injury or death. Install a transfer switch in standby
power installations to prevent connection of standby
and other sources of power. Electrical backfeed into a
utility electrical system can cause serious injury or death
to utility personnel working on transmission lines.
Heavy Equipment
WARNING
Unbalanced weight.
Improper lift can cause severe injury or death
or equipment damage.
Do not use lifting eyes.
Use lifting bars through holes in skid to lift
generator set.

TP-5353 8/94 Safety Precautions and Instructions VII
Hot Parts
WARNING
Hot coolant and steam.
Can cause severe injury or death.
Before removing pressure cap, stop generator set
and allow it to cool. Then loosen pressure cap to
relieve pressure.
WARNING
Hot engine and exhaust system.
Can cause severe injury or death.
Do not work on generator set until it is allowed to
cool.
Hot parts can cause severe injury or death. Avoid
touching generator set field or exciter armature.
Generator set field and exciter armaturewill become hot
if shorted.
Hot coolant can cause severe injury or death. Allow
engine to cool and release pressure from cooling
system before opening pressure cap. To release
pressure, cover the pressure cap with a thick cloth; then
slowly turn it counterclockwise to the first stop. Remove
cap after pressure has been completely released and
the engine has cooled. Check coolant level at tank if
generator set is equipped with a coolant recovery tank.
Hot parts can cause severe injury or death. Do not
touch hot engine parts. An engine gets hot while running
and exhaust system components get extremely hot.

VIII Safety Precautions and Instructions TP-5353 8/94
Moving Parts
WARNING
Hazardous voltage. Moving rotor.
Can cause severe injury or death.
Do not operate generator set without all guards and
electrical enclosures in place.
WARNING
Rotating parts.
Can cause severe injury or death.
Do not operate generator set without all guards,
screens, and covers in place.
Exposed moving parts can cause severe injury or
death. Keep hands, feet, hair, and clothing away from
belts and pulleys when unit is running. Replace guards,
covers, and screens before operating generator set.
Notes
NOTICE
This generator set has been rewired from its
nameplate voltage to:
246242
NOTE
Affix notice to generator set after reconnecting to a
voltage different than the nameplate. Order voltage
reconnection decal 246242 from authorized service
distributors/dealers.
NOTE
Charge only lead-acid or nickel-cadmium batteries with
battery charger.
NOTE
Wipe up all spilled diesel fuel after bleeding system.
Wash hands after any contact with fuel oil.
NOTE
Pay special attention to the coolant level. After the
coolant has been drained, some time is required before
complete refill of the engine water jacket takes place.
NOTE
Engine Damage! Failure to bleed air from cooling
system may cause overheating and subsequent
damage to engine.
NOTE
Do not turn on block heater before filling cooling system.
Run engine until warm and refill radiator to purge air
from the system before energizing block heater. Block
heater failure occurs if heater element is not immersed
in water.
NOTE
Hardware Damage! Engine and generator set may
use both American Standard and metric hardware. Use
the correct size tools to prevent rounding of bolt heads
and nuts.
NOTE
When replacing hardware, do not substitute with
inferior grade hardware. Screws and nuts are
available in different hardness ratings. American
Standard hardware uses a series of markings and
metric hardware uses a numeric system to indicate
hardness. Check markings on bolt head and nuts for
identification.

TP-5353 8/94 Introduction i
IntroductionThis manual covers the concept, operation,
troubleshooting, and repair of 20-300 kW
Fast-Response� II generator sets. Wiring diagram
manuals are available separately.
All information in this publication represents data
available at time of printing. Kohler Co. reserves the
right to change this literature and the products
represented without incurring obligation.
Read through this manual and carefully follow all
procedures and safety precautions to ensure proper
equipment operation and to avoid bodily injury. Read
and follow the Safety Precautions and Instructions
section at the beginning of this manual. Keep this
manual with equipment for future reference.
Equipment service requirements are minimal but are
very important to safe and efficient operation; therefore,
inspect parts often and perform required service at the
prescribed intervals. An authorized service
distributor/dealer should perform required service to
keep equipment in top condition.
Service AssistanceFor sales and service in the U.S.A. and Canada check
the yellow pages of the telephone directory under the
headingGENERATORS—ELECTRIC for an authorized
service distributor/dealer or call 1-800-544-2444.
For sales and service outside the U.S.A. and Canada,
contact your local distributor.
For further information or questions, contact the
company directly at:
KOHLER CO., Kohler, Wisconsin 53044 U.S.A.
Phone: 920-565-3381
Fax: 920-459-1646 (U.S.A. Sales)
920-459-1614 (International)
Kohler Power Systems
Asia Pacific Headquarters
7 Jurong Pier Road
Singapore 619159
Phone: (65)264-6422, Fax (65)264-6455
To ensure supply of correct parts or information, make
note of the following identification numbers in the
spaces provided:
GENERATOR SET
MODEL, SPEC, and SERIAL numbers are found on
the nameplate attached to the generator set.
Model No.
Specification No.
Serial No.
Accessory Nos.
GENERATOR SET ACCESSORIES
An alternate nameplate inside the junction box identifiesfactory-installed generator set accessories.
ENGINE
The engine serial number is found on the enginenameplate.
Engine Serial No.
PART NUMBER AND SERIAL NUMBER
Part and serial numbers are provided on thenameplate attached to the transfer switch.
Part No.
Serial No.


TP-5353 8/94 Specifications 1-1
Section 1. Specifications
IntroductionThe spec sheets for each generator set provide specific
generator and engine information. Refer to the
respective spec sheet for data not supplied in this
manual. Consult the generator set operation manual,
installation manual, engine operation manual, and
engine service manual for additional specifications.
Fast-Response� II ConceptsThe generator excitation system uses a permanent
magnet exciter with a silicon controlled rectifier (SCR)
Assembly which controls the amount of DC current fed
to the generator field. This typeof systemuses avoltage
regulator which signals the SCR assembly through an
optical coupling. The voltage regulator monitors engine
speed and generator output voltage to turn a stationary
light emitting diode (LED) on or off, according to engine
speed and output voltage. The LED is mounted on the
end bracket opposite a photo transistor board which
rotates on the shaft. The photo transistor picks up the
signal from the LED and tells the SCR assembly to turn
on or off, depending upon the need, as dictated by the
voltage regulator. See Figure 1-1.
The voltage recovery period of this type of generator is
several times faster than the conventionally wound field
brushless generator because it does not have to content
with the inductance of the exciter field. It also has better
recovery characteristics than the static excited-machine
because it is not dependent upon the generator set
output voltage for excitation power. Possibly the
greatest advantage of this type machine is its inherent
ability to support short-circuit current and allow system
coordination for tripping downstream branch circuit
breakers.
The generator set systems deliver exciter current to the
main field within 0.05 seconds of a change in load
demand.
Short Circuit PerformanceWhen a short circuit occurs in the load circuit(s) being
served, output voltage drops and amperage
momentarily rises to 600-1000% of the generator set’s
rated current until the short is removed. The SCR
assembly sends full exciter power to the main field. The
generator then sustains up to 300% of its rated current.
Sustained high current will cause correspondingly rated
load circuit fuses/breakers to trip. The safeguard
breaker kit serves to collapse the generator set’s main
field in the event of a sustained heavy overload or short
circuit.

TP-5353 8/941-2 Specifications
1
2
3
4
6
7
8
9
10
11
12
13
5
TP-5353-1
1. Field2. Main Generator3. SCR Assembly4. Exciter Generator5. Exciter Field Magnets6. Exciter Armature7. Optical Coupling
8. Starting Battery9. Safegaurd Breaker (Optional)
10. AC Voltage Regulator11. LED Board12. Photo Transistor Board13. Stator
Figure 1-1. Alternator Schematic
TP-5353 8/94 Specifications 1-3
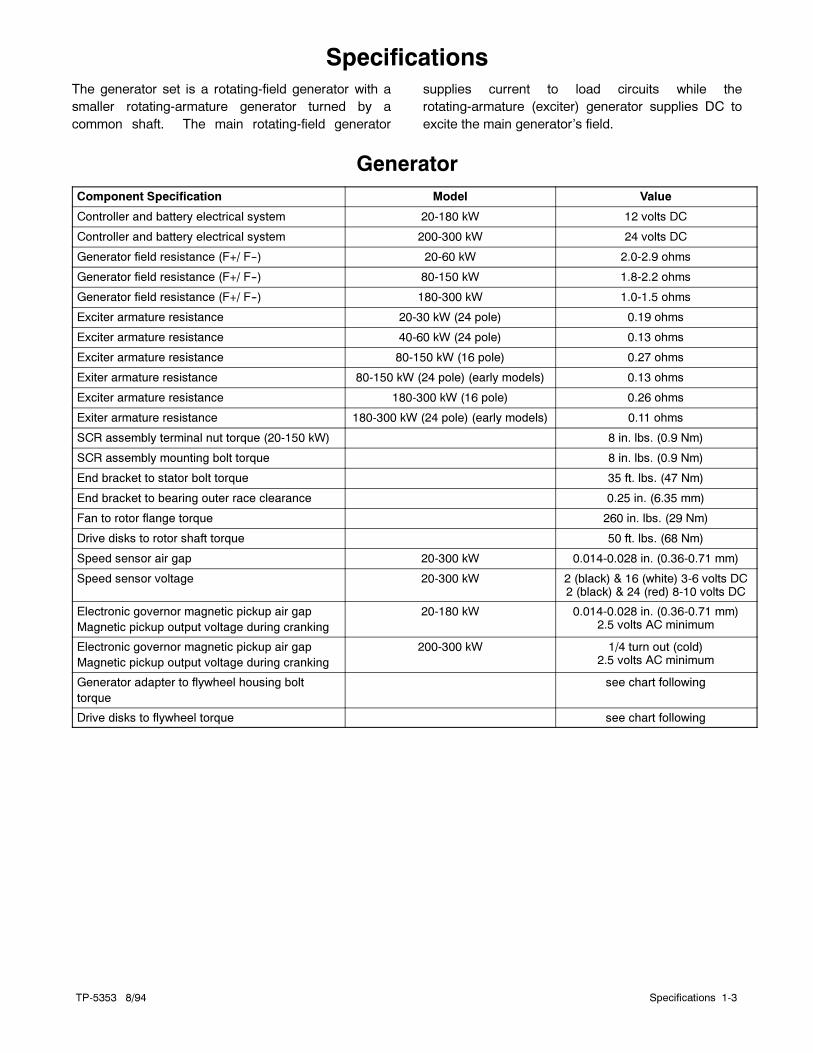
SpecificationsThe generator set is a rotating-field generator with a
smaller rotating-armature generator turned by a
common shaft. The main rotating-field generator
supplies current to load circuits while the
rotating-armature (exciter) generator supplies DC to
excite the main generator’s field.
Generator
Component Specification Model Value
Controller and battery electrical system 20-180 kW 12 volts DC
Controller and battery electrical system 200-300 kW 24 volts DC
Generator field resistance (F+/ F--) 20-60 kW 2.0-2.9 ohms
Generator field resistance (F+/ F--) 80-150 kW 1.8-2.2 ohms
Generator field resistance (F+/ F--) 180-300 kW 1.0-1.5 ohms
Exciter armature resistance 20-30 kW (24 pole) 0.19 ohms
Exciter armature resistance 40-60 kW (24 pole) 0.13 ohms
Exciter armature resistance 80-150 kW (16 pole) 0.27 ohms
Exiter armature resistance 80-150 kW (24 pole) (early models) 0.13 ohms
Exciter armature resistance 180-300 kW (16 pole) 0.26 ohms
Exiter armature resistance 180-300 kW (24 pole) (early models) 0.11 ohms
SCR assembly terminal nut torque (20-150 kW) 8 in. lbs. (0.9 Nm)
SCR assembly mounting bolt torque 8 in. lbs. (0.9 Nm)
End bracket to stator bolt torque 35 ft. lbs. (47 Nm)
End bracket to bearing outer race clearance 0.25 in. (6.35 mm)
Fan to rotor flange torque 260 in. lbs. (29 Nm)
Drive disks to rotor shaft torque 50 ft. lbs. (68 Nm)
Speed sensor air gap 20-300 kW 0.014-0.028 in. (0.36-0.71 mm)
Speed sensor voltage 20-300 kW 2 (black) & 16 (white) 3-6 volts DC2 (black) & 24 (red) 8-10 volts DC
Electronic governor magnetic pickup air gap
Magnetic pickup output voltage during cranking
20-180 kW 0.014-0.028 in. (0.36-0.71 mm)2.5 volts AC minimum
Electronic governor magnetic pickup air gap
Magnetic pickup output voltage during cranking
200-300 kW 1/4 turn out (cold)2.5 volts AC minimum
Generator adapter to flywheel housing bolt
torque
see chart following
Drive disks to flywheel torque see chart following

TP-5353 8/941-4 Specifications
Generator Adapter to Flywheel Housing Bolt Torque
Models Hardware TypeTorque—ft.lbs. (Nm)
20/30 kW Ford Powered * 3/8-16 grade 5 28 (38)
33-45 kW Ford Powered * 3/8-16 grade 8 35 (47)
50-100 kW Ford Powered * 7/16-14 grade 5 44 (60)
20-60 kW John Deere Powered 3/8-16 grade 8 35 (47)
80-150 kW John Deere Powered 3/8-16 grade 8 39 (53)
150 kW (Oversize Generator)John Deere Powered 7/16-14 grade 5 44 (60)
180 kW John Deere Powered 7/16-14 grade 5 44 (60)
20-60 kW Detroit Diesel Powered 3/8-16 grade 8 35 (47)
80/100 kW Detroit Diesel Powered M10-1.5 class 8.8/9.8 27 (37)
125-180 kW Detroit Diesel Powered 3/8-16 grade 8 39 (53)
200-300 kW Detroit Diesel Powered 7/16-14 grade 5 44 (60)
* Generator adapter mounts to engine (flywheel housing) mounting boss
Drive Discs to Flywheel Torque
Models Hardware TypeTorque—ft.lbs. (Nm)
HardwareSequence
20/30 kW Ford Powered 3/8-16 grade 8 stud 39 (53) 1
33-45 kW Ford Powered 3/8-16 grade 8 bolt 39 (53) 2
50-100 kW Ford Powered 3/8-16 grade 8 stud 39 (53) 3
20-60 kW John Deere Powered 3/8-16 grade 8 stud 39 (53) 1
80-100 kW John Deere Powered 3/8-16 grade 5 stud 39 (53) 1
150 kW (Oversize Generator)John Deere Powered(above serial no. 285000) 1/2-13 grade 8 stud 96 (130) 1
150 kW (Oversize Generator)John Deere Powered(below serial no. 285000) 1/2-13 grade 5 stud 64 (87) 1
180 kW John Deere Powered 1/2-13 grade 8 bolt 96 (130) 2
20-60 kW Detroit Diesel Powered 3/8-24 grade 8 stud 39 (53) 1
80/100 kW Detroit Diesel Powered 3/8-24 grade 8 stud 39 (53) 1
125-180 kW Detroit Diesel Powered 3/8-16 grade 5 stud 39 (53) 1
200-300 kW Detroit Diesel Powered 1/2-13 grade 8 bolt 96 (130) 2
200-300 kW Detroit Diesel Powered 1/2-13 grade 8 stud 96 (130) 1
Hardware Sequence
1) Stud/spacer (after drive disc)/hardened washer/nut
2) Hardened washer/bolt
3) Stud/spacer (before drive disc)/hardened washer/nut
Engine
Turbocharger Specifications
(30, 80, and 100 kW Ford Powered) Specification
Turbocharger Axial End Play 0.0043 in. (0.11 mm)
Turbocharger Radial Play 0.0075 in. (0.19 mm)

TP-5353 8/94 Specifications 1-5
Engine Prealarm and Shutdown Switches Specification
Anticipatory High Engine Temperature Switch
20/30 kW (before serial no. 329000) Ford
Powered
198�-212�F (92� -100�C)
20-45 kW (after serial no. 329000) Ford
Powered
211�-225�F (99� -107�C)
50-100 kW Ford Powered 211�-225�F (99�-107�C)
20-180 kW John Deere Powered 198�-212� F (92-100� C)
20-180 kW Detroit Diesel Powered 198�-212�F (92�-100�C)
200-300 kW Detroit Diesel Powered 198�-212�F (92�-100�C)
Anticipatory Low Oil Pressure Switch
20-70 kW Ford Powered 18-22 psi (124-152 kPa)
80/100 kW Ford Powered 36-40 psi (248-276 kPa)
20-180 kW John Deere Powered 18-22 psi (124-152 kPa)
20-60 kW Detroit Diesel Powered 18-22 psi (124-152 kPa)
80/100 kW Detroit Diesel Powered 18-22 psi (124-152 kPa)
125-180 kW Detroit Diesel Powered 18-22 psi (124-152 kPa)
200-300 kW Detroit Diesel Powered 23-27 psi (159-186 kPa)
Low Water Temperature Switch
20-100 kW Ford Powered 55�-65�F (13�-18�C)
20-180 kW John Deere Powered 55�-65� F (13-18� C)
20-180 kW Detroit Diesel Powered 55�-65�F (13�-18�C)
200-300 kW Detroit Diesel Powered 55�-65�F (13�-18�C)
High Engine Temperature Shutdown Switch
20 kW (before serial no. 329000) Ford
Powered
211�-225�F (99�-107�C)
20-100 kW Ford Powered 218�-238�F (103�-111�C)
20-180 kW John Deere Powered 211�-225�F (99�-107�C)
20-60 kW Detroit Diesel Powered 211�-225�F (99�-107�C)
80/100 kW Detroit Diesel Powered 218�-232�F (103�-111�C)
125-180 kW Detroit Diesel Powered 211�-225�F (99�-107�C)
200-300 kW Detroit Diesel Powered 211�-225�F (99�-107�C)
Low Oil Pressure Shutdown Switch
20-70 kW Ford Powered 11.5-18.5 psi (79-128 kPa)
80/100 kW Ford Powered 32-36 psi (211-248 kPa)
20-180 kW John Deere Powered 11.5-18.5 psi (79-128 kPa)
20-60 kW Detroit Diesel Powered 11.5-18.5 psi (79-128 kPa)
80/100 kW Detroit Diesel Powered 5.5-10.5 psi (38-72 kPa)
125-180 kW Detroit Diesel Powered 11.5-18.5 psi (79-128 kPa)
200-300 kW Detroit Diesel Powered 11.5-18.5 psi (79-128 kPa)

TP-5353 8/941-6 Specifications
Controller Gauge Senders Specification
Oil Pressure Sender (in ohms)
0 psi (0 kPa) 227-257
25 psi (172 kPa) 138-162
50 psi (345 kPa) 92-114
75 psi (517 kPa) 50-80
100 psi (690 kPa) 21-50
Water Temperature Sender (in ohms �10%)
100� F (38� C) 450
160� F (71� C) 130
220� F (104� C) 47

TP-5353 8/94 Specifications 1-7
AccessoriesSeveral accessories are available to finalize the
installation, add convenience to operation and service,
and to comply with state and local codes. Accessories
vary with each generator set model and controller.
Accessories are offered factory installed and/or
shipped loose. Some accessories are available only
with microprocessors controllers. Obtain all the most
current information by contacting your local authorized
service distributor/dealer. Several accessories
available at the time of print of this publication are as
follows.
Remote Annunciator Kit (with microprocessor controller only)A remote annunciator allows convenient monitoring of
the set’s condition from a location remote from the
generator. See Figure 1-2 and Figure 1-3. Remote
annunciator includes alarm horn, alarm silence switch,
lamp test, and the same lamp indicators (except air
damper and auxiliary prealarm) as the microprocessor
controller, plus the following:
Line Power. Lamp lights when using commercial utility
power.
Generator Power. Lamp lights when using generator
power.
Remote Annunciator
14-Relay Dry Contact Box
A-293983
A-258782
P
FBA--1
42B
10 AMP
NO C CNO CNO CNO CNO CNO CNO CNO CNO CNO CNO CNO CNO CNOK1 K2 K3 K4 K5 K6 K7 K8 K9 K10 K11 K12 K13 K14
INPUT CONTACT RATINGS: 10A@120VAC RES. LOAD
.01A@28VDC MIN.
10A@28VDC MAX.
PCB ASSY A--320639
LOT NO.
42A 2 K1 K2 K3 K4 K5 K6 K7 K8 K9 K10 K11 K13 K14K12
P
N
Figure 1-2. Remote Annunciator with 14-Relay Dry Contact Kit

TP-5353 8/941-8 Specifications
Surface Mount Flush Mount
Dry Contact Kit
A-258782
A-256452
A-256472
Figure 1-3. Remote Annunciator with 10-Relay Dry Contact Kit

TP-5353 8/94 Specifications 1-9
Audio/Visual (A/V) Alarm(with microprocessor
controller only)
An A/V alarm warns the operator of fault shutdowns and
prealarm conditions (except battery charger fault and low
battery voltage) from a location remote from the
generator. A/V alarms include alarm horn, alarm silence
switch, and common fault lamp. See Figure 1-4.
NOTE
Use the audio/visual alarm with a dry contact kit.
Front View Side View
A-292887
Figure 1-4. Audio/Visual Alarm
Ten-Relay Dry Contact Kit(with microprocessor
controller only)
The ten-relay dry contact kit allows monitoring of the
standby system and/or the ability to activate
accessories such as derangement panels. The kit
includes ten sets of relay contacts for connection of
customer-provided devices to desired generator
functions. Warning devices (lamp and/or audible
alarms) and other accessories are typically connected
to controller outputs listed. A total of three dry contact
kits may be connected to a specific output on the
controller. An internal view of the contact kit is shown in
Figure 1-5. Typical contact kit output connections
include:
Overspeed
Overcrank
High Engine Temperature
Low Oil Pressure
Low Water Temperature
Auxiliary Fault
Air Damper (if equipped)
Anticipatory High Engine Temperature
Anticipatory Low Oil Pressure
Emergency Stop
A-273936
Figure 1-5. Ten-Relay Dry Contact Kit
TP-5353 8/941-10 Specifications
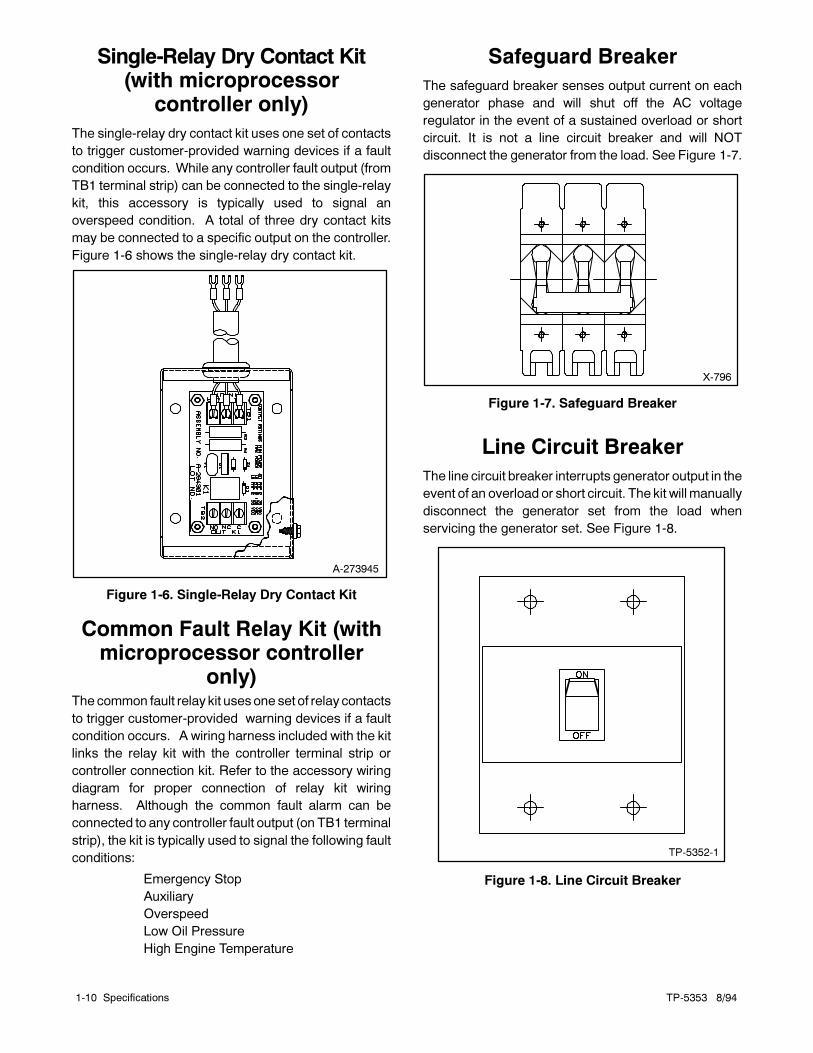
Single-Relay Dry Contact Kit(with microprocessor
controller only)
The single-relay dry contact kit uses one set of contacts
to trigger customer-provided warning devices if a fault
condition occurs. While any controller fault output (from
TB1 terminal strip) can be connected to the single-relay
kit, this accessory is typically used to signal an
overspeed condition. A total of three dry contact kits
may be connected to a specific output on the controller.
Figure 1-6 shows the single-relay dry contact kit.
A-273945
Figure 1-6. Single-Relay Dry Contact Kit
Common Fault Relay Kit (withmicroprocessor controller
only)The common fault relay kit usesone set of relay contacts
to trigger customer-provided warning devices if a fault
condition occurs. A wiring harness included with the kit
links the relay kit with the controller terminal strip or
controller connection kit. Refer to the accessory wiring
diagram for proper connection of relay kit wiring
harness. Although the common fault alarm can be
connected to any controller fault output (on TB1 terminal
strip), the kit is typically used to signal the following fault
conditions:
Emergency Stop
Auxiliary
Overspeed
Low Oil Pressure
High Engine Temperature
Safeguard Breaker
The safeguard breaker senses output current on each
generator phase and will shut off the AC voltage
regulator in the event of a sustained overload or short
circuit. It is not a line circuit breaker and will NOT
disconnect the generator from the load. See Figure 1-7.
X-796
Figure 1-7. Safeguard Breaker
Line Circuit Breaker
The line circuit breaker interrupts generator output in the
event of an overload or short circuit. The kit will manually
disconnect the generator set from the load when
servicing the generator set. See Figure 1-8.
TP-5352-1
Figure 1-8. Line Circuit Breaker

TP-5353 8/94 Specifications 1-11
Overvoltage Kit(with microprocessor
controller only)
The microprocessor controller will cause immediate
engine shutdown when it is triggered by a DC signal from
an overvoltage shutdown option. The generator set will
automatically shut down if output voltage is 15% above
nominal voltage longer than two seconds. The
overvoltage option connects to wire 30 in the controller.
See Figure 1-9.
G-291739
Figure 1-9. Overvoltage Circuit Board
Run Relay Kit
The run relay kit is energized only when the generator
set is running. The three sets of contacts in the kit are
typically used to control air intake and/or radiator
louvers. However, alarms and other signalling devices
can also be connected to the contacts. SeeFigure 1-10.
273705
Figure 1-10. Run Relay Kit
Remote Emergency Stop Kit(with microprocessor
controller only)
The emergency stop kit allows immediate shutdown of
the generator set from a station remote from the
generator set. See Figure 1-11. If the emergency stop
switch is activated, the emergency stop lamp lights and
the unit shuts down. Before attempting to restart the
generator set, reset the emergency stop switch (by
replacing glass piece) and reset the generator set by
placing themaster switch in theOFF/RESETposition. A
single replacement glass piece is located inside the
switch. Additional glass pieces are available as a
service part. Reset the engine air damper switch on
200-1600 kWmodels using Detroit Diesel engines. See
Section 2, Resetting Emergency Stop Switches.
A-222654TP-5352-1
Figure 1-11. Emergency Stop Kit

TP-5353 8/941-12 Specifications
Controller Connection Kit(with microprocessor
controller only)
The controller connection kit allows easy connection of
controller accessories without accessing the controller
terminal strip. The kit uses a 65-in. (165-cm) wiring
harness to link the controller TB1 terminal strip with a
remote terminal strip. With the exception of terminals
TB1-1, 1A, and 56 the remote terminal strip is identical to
that of the controller. Connect all accessories (except
the emergency stop kit) to the connection kit terminal
strip.
FASTCHECK� Diagnostic Tester(with microprocessor
controller only)
The FASTCHECK� diagnostic tester simulates engine
operation to identify faults in the controller and engine
circuitry. Use the FASTCHECK� when troubleshooting
start-up problems or to test and troubleshoot the
controller when removed from the generator. Tests are
performed without starting the generator set. Functions
performed by the FASTCHECK� are listed below; refer
to Figure 1-12 to identify LEDs and switches.
LEDs on the FASTCHECK� indicate the energizing of
the following circuits:
Engine Ignition (gas/gasoline) or
Fuel Solenoid (diesel)
Engine Crank
AC Voltage Regulator
Engine Antidieseling
Battery Connection (correct polarity)
Engine Malfunction Alarm and/or Alarm
Shutdown
Switches on the FASTCHECK� simulate:
Engine Cranking
Engine Running
Engine Overspeed
Low Fuel
Low Engine Coolant Temperature
Anticipatory Low Engine Oil Pressure
Anticipatory High Engine Coolant
Temperature
Low Engine Oil Pressure
High Engine Coolant Temperature
B-291930
Figure 1-12. FASTCHECK� Diagnostic Tester
Accessory Connection(with microprocessor
controller only)
The microprocessor controller circuit board is equipped
with a terminal strip (TB1) for easy connection of
generator set accessories. Do not direct-connect
accessories to the controller terminal strip. Connect all
accessories to either a single-relay dry contact kit or
ten-relay dry contact kit. Connect the dry contact kit(s)
to the controller terminal strip. Connect alarms, battery
chargers, remote switches, and other accessories to the
dry contact kit relay(s) using 18- or 20-gauge stranded
wire.
Lower the controller circuit board panel until it is lying flat
when connecting the dry contact kits to the controller
TB1 terminal strip. Route dry contact relay leads
through the controller grommet and guide loops to the
circuit board terminal strip. Place the controller circuit
board panel flat to ensure adequate slack in the dry
contact relay leads. For specific information on
accessory connections refer to Figure 1-13, the
accessory wiring diagram, and the instruction sheet
accompanying each kit.

TP-5353 8/94 Specifications 1-13
CIRCUIT BOARD TERMINAL IDENTIFICATION (TB1)1 - Ground—Emergency Stop Relay (K4)—Connect emergency stop across terminals TB1-1 and 1A
1A - Emergency Stop Relay (K4) Coil; Negative—Connect emergency stop across terminals TB1-1 and 1A56 - Not Used
- Not Used42A - Battery Voltage (Fuse #1 Protected)—Accessory Power Supply; Customer may also provide separate accessory power source
2 - Ground Terminal9 - Crank Mode Selection (open—cyclic crank; ground—continuous crank). Connect TB1-2 to TB1-9 for continuous cranking;
Leave TB1-9 open for cyclic cranking—see Starting.48 - Emergency Stop Signal *3 - Remote Start Ground—Connect remote start switch to TB1-3 and TB1-44 - Remote Start—Connect remote start switch to TB1-3 and TB1-4
26 - Auxiliary Signal *12 - Overcrank Signal *39 - Overspeed Signal *38 - Low Oil Pressure Signal *36 - High Engine Temperature Signal *60 - System Ready Signal *80 - Not In Auto Signal *40 - Anticipatory High Engine Temperature Signal *41 - Anticipatory Low Oil Pressure Signal *32 - Common Fault/Prealarm Line—A/V alarm or common fault relay activated by HET, LOP, LWT, OC, OS, and AUX Faults63 - Low Fuel—Connect fuel level sensor to TB1-63 to activate fault lamp (if used)61 - Battery Charger Fault—Connect battery charger to TB1-61 to activate fault lamp (if used)62 - Low Battery Volts—Connect battery charger to TB1-62 to activate fault lamp (if used)35 - Low Water Temperature Signal
Emergency
Stop†
B+
B-
48
3
26
12
39
38
36
32
32 Common Fault Indicator
Activated by:
HET Fault
LOP Fault
LWT Fault
OC Fault
OS Fault
AUX Fault
Connect A/V Alarm or
CommonFault RelayKit
35
Remove Jumper if
Emergency Stop is Used
60
80
40
41
63
61
62
NOTE: Not all terminals are used for all generator sets (see appropriate wiring diagrams for specific generator set model)
† Normally closed contacts
* Use a remote annunciator and/or A/V alarm kit as an indicator with a dry contact kit connected to controller terminal strip TB1
TB1 Terminal Strip
(See NOTE * below)
1 42A 2 9 481A 56 3 4 26 12 39 38 36 60 80 40 41 32 63 61 62 35
P1P2
4
TP-5352-1
Figure 1-13. Controller TB1 Terminal Strip Connection


TP-5353 8/94 Operation 2-1
Section 2. Operation
Prestart ChecklistCheck the following items before each startup of
manually controlled generator sets and at regular
intervals on sets equipped with automatic transfer
switches. See your engine operation/maintenance
manual for specific service procedures.
Oil Level. Keep the oil level at or near the full mark on
dipstick but not over. Keep the oil level in the governor (if
applicable) is at or near the full level.
Fuel Level. Make sure there is adequate fuel supply;
keep tanks full to allow operation for extended periods.
Battery. Check battery connections and level of battery
electrolyte.
Air Cleaner. Keep air cleaner element clean and
correctly installed to prevent unfiltered air from entering
engine.
Drive Belts. Check belt condition and tension of
radiator fan, water pump, and battery charging
alternator belt(s).
Operating Area. Check for obstructions that could
block the flow of cooling air. Keep the area clean. Do not
leave rags, tools, or debris on or near the generator set.
Coolant Level. Maintain coolant level at just below the
overflow tube on the radiator filler neck when the engine
is cold. Open air bleed petcocks if equipped when filling
radiator. Close air bleed petcockwhen coolant begins to
flow from petcock. Keep level in tank between 1/3 full
(cold) and 2/3 full (hot) if the unit is equipped with a
coolant recovery tank. A coolant solution of 50%
ethylene glycol and 50% clean, softened water is
recommended to inhibit rust/corrosion.
A coolant solution of 50% ethylene glycol will provide
freezing protection to --34�F (--37�C) and overheating
protection to 265�F (129�C). A coolant solution with
less than 50% ethylene glycol may not provide
adequate freezing and overheating protection. A
coolant solution with more than 50%ethylene glycol can
cause damage to engine and components. Do not use
alcohol or methanol antifreeze or mix them with the
specified coolant. Consult the engine manufacturer’s
operation manual for specific engine coolant
specifications.
Do not add coolant to an engine that has overheated
until engine has cooled. Adding coolant to an extremely
hot engine can cause a cracked block or cylinder head.
NOTE
Do not turn on block heater before filling cooling system.
Before energizing block heater, run engine until warm
and refill radiator to purge air from the system. Block
heater failure will result if heater element is not
immersed in water.
Exhaust System. Keep the exhaust outlet clear;
silencer and piping must be tight and in good condition.
Lamp Test. Press the lamp test button (if equipped) to
verify all controller lamps are operational.
Exercising the Generator SetIf the generator set is not equipped with an automatic
transfer switch or the transfer switch does not have the
automatic exercise option, run the generator set under
load once a week for one hour with an operator present.
Make all prestart checks before starting the exercise
procedure. Start the generator set according to the
procedure given for the generator controller. See the
appropriate controller section for specific starting
instructions.
2-2 Operation TP-5353 8/94
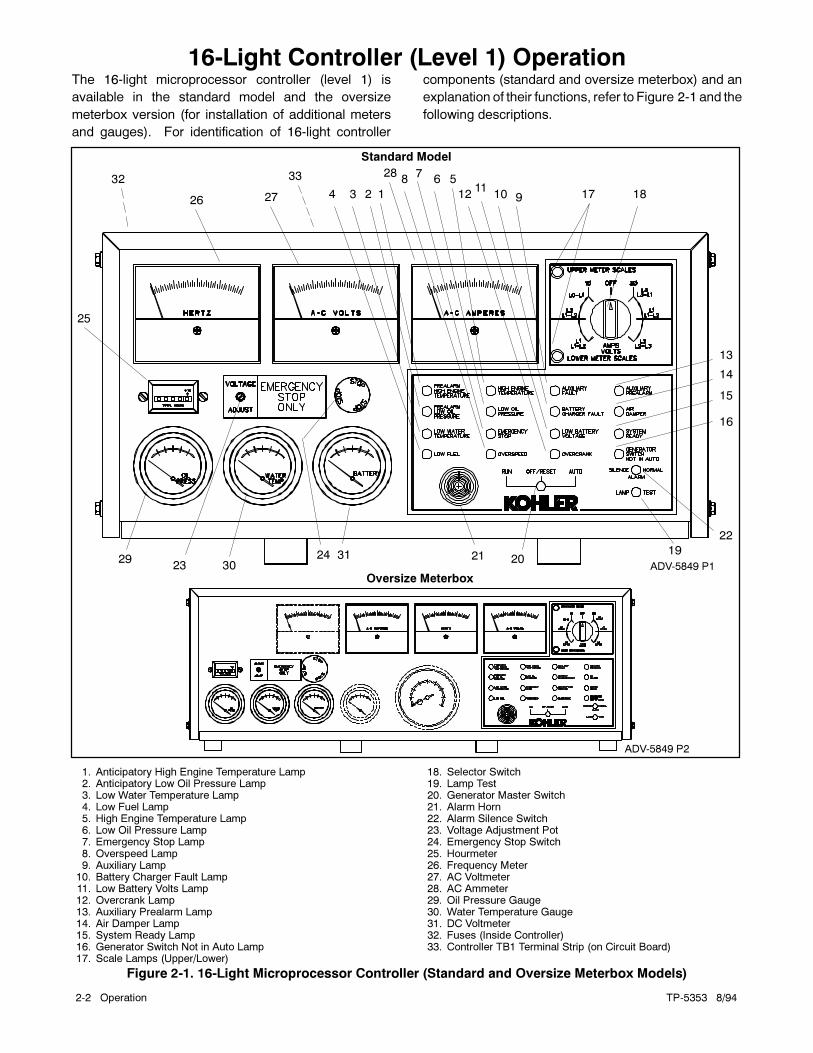
16-Light Controller (Level 1) OperationThe 16-light microprocessor controller (level 1) is
available in the standard model and the oversize
meterbox version (for installation of additional meters
and gauges). For identification of 16-light controller
components (standard and oversize meterbox) and an
explanation of their functions, refer to Figure 2-1 and the
following descriptions.
Standard Model
Oversize Meterbox
1234
5678
91011
12
13
14
15
16
17 18
192021
22
2324
25
26 27
28
2930
31
32 33
ADV-5849 P2
ADV-5849 P1
1. Anticipatory High Engine Temperature Lamp2. Anticipatory Low Oil Pressure Lamp3. Low Water Temperature Lamp4. Low Fuel Lamp5. High Engine Temperature Lamp6. Low Oil Pressure Lamp7. Emergency Stop Lamp8. Overspeed Lamp9. Auxiliary Lamp
10. Battery Charger Fault Lamp11. Low Battery Volts Lamp12. Overcrank Lamp13. Auxiliary Prealarm Lamp14. Air Damper Lamp15. System Ready Lamp16. Generator Switch Not in Auto Lamp17. Scale Lamps (Upper/Lower)
18. Selector Switch19. Lamp Test20. Generator Master Switch21. Alarm Horn22. Alarm Silence Switch23. Voltage Adjustment Pot24. Emergency Stop Switch25. Hourmeter26. Frequency Meter27. AC Voltmeter28. AC Ammeter29. Oil Pressure Gauge30. Water Temperature Gauge31. DC Voltmeter32. Fuses (Inside Controller)33. Controller TB1 Terminal Strip (on Circuit Board)
Figure 2-1. 16-Light Microprocessor Controller (Standard and Oversize Meterbox Models)

TP-5353 8/94 Operation 2-3
NOTE
Some installations use the 16-light microprocessor
controller with switchgear applications. These are
nonstandard controllers with remote start and no time
delay for engine cooldown circuitry. Consult switchgear
literature for configuration and function.
Features
The numbered paragraphs following refer to Figure 2-1.
1. Anticipatory High Engine Temperature (if
equipped). Lamp lights if engine coolant
temperature approaches shutdown range.
2. Anticipatory Low Oil Pressure (if equipped).
Lamp lights if engine oil pressure approaches
shutdown range.
3. Low Water Temperature (if equipped). Lamp
lights if water temperature approaches critical
range.
4. Low Fuel (if equipped). Lamp lights if fuel level in
tank approaches empty.
5. High Engine Temperature. Lamp lights if engine
has shut down due to high engine coolant
temperature. Shutdown occurs 5 seconds after
engine reaches temperature shutdown range.
6. Low Oil Pressure. Lamp lights if set shuts down
due to insufficient oil pressure. Shutdown occurs 5
seconds after engine reaches pressure shutdown
range.
7. Emergency Stop (if equipped). Lamp lights and
engine stops if emergency stop is made (local or
remote).
8. Overspeed. Lamp lights if set shuts down due to
overspeed condition (governed frequency
exceeding 70 Hz).
9. Auxiliary. Lamp flashes/lights under the following
conditions:
Flashing Lamp Conditions
� Auxiliary lamp will flash immediately if the
controller senses no AC output while the unit is
running (except during first 10 seconds after
start-up). When AC output is sensed, the
flashing will stop and the lamp will be off. No
manual reset is required.
� The auxiliary lamp will flash if the battery power
was reconnected or was low and then came
back up again while the generator master
switch was in the RUN or AUTO position. A
temporarily low battery condition where the
battery is weak or undersized for the application
may cause this condition.
Continuous On Lamp Conditions
� The auxiliary lamp lights if the optional
emergency stop switch is reset while the
generator master switch is in the AUTO or RUN
position. To clear this condition, place master
switch in the OFF/RESET position.
� The auxiliary lamp lights and engine shuts
down 5 seconds after high oil temperature
(P1-13), low coolant level (P1-14), or aux. delay
shutdown (P1-15) faults (if so equipped) occur.
These conditions are inhibited during first 30
seconds after crank disconnect.
� The auxiliary lamp lights and engine shuts
down immediately if overvoltage condition
arises (if equipped with overvoltage shutdown
kit).
� The auxiliary lamp lights and engine shuts
down if activated by customer-supplied sensing
devices connected to auxiliary immediate-
shutdown ports (P1-17 and P1-18).
10. Battery Charger Fault (if battery charger
equipped and connected). Lamp lights if battery
charger malfunctions.

2-4 Operation TP-5353 8/94
11. Low Battery Volts (if Battery Charger equipped
and connected). Lamp lights if battery voltage
drops below preset level.
12. Overcrank. Lamp lights and cranking stops if
engine does not start after 45 seconds of
continuous cranking or 75 seconds of cyclic
cranking. See Auto Starting.
� Cranking stops and overcrank lamp lights after
15 seconds if starter or engine will not turn
(locked rotor).
� Overcrank lamp flashes if speed sensor signal
is absent longer than one second.
NOTE
The controller is equippedwith an automatic restart
function. The generator set will attempt to restart if
the engine speed drops below 13 Hz. Decreased
engine speed causes an overcrank condition.
13. Auxiliary Prealarm. Lamp is activated by
customer-provided sensing devices.
14. Air Damper. Lamp lights after emergency stop or
overspeed fault or overvoltage fault. Lamp
indicates that engine air damper is closed; lamp
remains lit until air damper is manually reset. See
Resetting Emergency Stop Switches later in this
section. (Used on 200-1600 kW models with
Detroit Diesel engines only).
15. System Ready. Lamp lights when generator
master switch is in AUTO position and the system
senses no faults.
16. Generator Switch Not in Auto. Lamp lights when
generator master switch is in RUN or OFF/RESET
position.
17. Scale Lamps (Upper/Lower). Lamps indicate
which AC voltmeter and/or ammeter scales to
read.
18. Selector Switch. Switch selects generator output
circuits to measure. When switched to a position
with three circuit lead labels, amperage is
measured on the upper lead and voltage is
measured between the lower two leads. AC
ammeter and voltmeter will not register with switch
in the OFF position.
19. Lamp Test. Switch tests the controller indicator
lamps.
20. Generator Master Switch. Switch functions as
controller reset and generator operation switch.
Refer to Starting, Stopping, and Controller
Resetting Procedure following.
21. Alarm Horn. Horn sounds if any fault or
anticipatory condition exists (except emergency
stop, battery charger fault, or low battery volts).
Place generator master switch in the AUTO
position before silencing alarm horn. See
Controller Resetting Procedure following.
22. Alarm Silence. Switch disconnects alarm during
servicing (place generator master switch in the
AUTO position before silencing alarm horn).
Restore alarm horn switches at all locations
(controller, remote annunciator, or audio/visual
alarm) to normal position after fault shutdown is
corrected to avoid reactivating alarm horn. See
Controller Resetting Procedure following.
23. Voltage Adjustment. Fine adjustment for
generator output voltage.

TP-5353 8/94 Operation 2-5
24. Emergency Stop (If equipped). Switch is used to
instantly shut down the generator set in emergency
situations. Reset switch after shutdown by rotating
switch clockwise. Use the emergency stop switch
for emergency shutdowns only. Use the generator
master switch to stop the set under normal
circumstances.
25. Hourmeter. Hourmeter records generator set total
operating hours for reference in scheduling
maintenance.
26. Frequency Meter. Meter measures frequency
(Hz) of generator output voltage.
27. AC Voltmeter. Meter measures voltage across
output leads indicated by selector switch.
28. AC Ammeter. Meter measures amperage from
output leads indicated by selector switch.
29. Oil Pressure Gauge. Gauge measures engine oil
pressure.
30. Water Temperature Gauge. Gauge measures
engine coolant temperature.
31. DCVoltmeter. Meter measures voltage of starting
battery(ies).
32. Fuses. Fuses are located on controller circuit
board. See Figure 2-2.
� 3-Amp Remote Annunciator (F1). Fuse
protects dry contact kit (if equipped).
� 3-Amp Controller (F2). Fuse protects
controller circuit board, speed sensor, and lamp
circuit board.
� 15-Amp Engine and Accessories (F3). Fuse
protects engine/starting circuitry and
accessories.
33. Controller TB1 Terminal Strip (on Circuit
Board). Terminal strip allows connection of
generator accessories such as emergency stop
switch, remote start/stop switch, audio/visual
alarms, etc. Crank mode selection (cyclic or
continuous) is also made on the TB1 terminal strip.
Location of the TB1 terminal strip on the controller
circuit board is shown in Figure 2-2. Refer to
appropriate wiring diagrams for additional
information on connecting accessories to the TB1
terminal strip.
P1P2
1
2
G-292806
1. TB1 Terminal Strip2. Fuses
Figure 2-2. TB1 Terminal Strip on Controller
Circuit Board

2-6 Operation TP-5353 8/94
Starting
Local Starting
Move the generatormaster switch to theRUNposition to
start the generator set at the controller.
NOTE
The alarm horn will sound and the Not In Auto lamp will
light whenever the generator master switch is not in the
AUTO position.
NOTE
The 16-light controller is equipped with a transient
start/stop function to avoid accidental cranking of the
rotating engine. If the generator master switch is
momentarily placed in the OFF/RESET position then
quickly returned to RUN, the generator set will slow to
249 RPM and recrank before returning to rated speed.
Auto Starting
Move the generator master switch to the AUTO position
to allow start-up by automatic transfer switch or remote
start/stop switch (connected to controller terminals 3
and 4).
NOTE
The 16-light microprocessor controller provides up to 45
seconds of continuous cranking or 75 seconds of cyclic
cranking (crank 15 seconds, rest 15 seconds, crank 15
seconds, etc.) before overcrank shutdown. Cranking
mode (cyclic or continuous) selection is made on the
controller circuit board terminal strip. For cyclic
cranking, leave circuit board terminal TB1-9 open.
Continuous cranking is achieved by running a jumper
between circuit board terminal TB1-2 (ground) and
terminal TB1-9.
Stopping
Normal Stopping
1. Disconnect load from generator set and allow it to
run without load for 5 minutes.
NOTE
Run the generator at no load for 5 minutes prior to
stopping to ensure adequate cooling of the set.
2. Move generator master switch to the OFF/RESET
position. Engine will stop.
NOTE
If engine stop is signaled by a remote switch or
automatic transfer switch, the generator set will
continue running during a 5-minute cooldown
cycle.
Emergency Stopping
Turn generator master switch to the OFF/RESET
position or activate controller emergency stop switch (if
equipped) or optional remote emergency stop for
immediate shutdown. If either emergency stop switch is
activated, the controller emergency stop lamp will light
and the unit will shut down.
NOTE
Use the emergency stop switch(es) for emergency
shutdowns only. Use the generator master switch to
stop the generator set under normal circumstances.

TP-5353 8/94 Operation 2-7
Resetting Emergency StopSwitches
Use the following procedure to restart the generator set
after shutdown by emergency stop switch (local or
remote). Refer to Controller Resetting Procedure later
in this section to restart the generator set following a
fault shutdown.
1. Investigate cause of emergency stop and correct
problem(s).
2. If remote emergency stop switch was activated,
reset switch by replacing glass piece. If
controller-mounted emergency stop switch was
activated (if equipped), reset controller emergency
stop switch by rotating switch clockwise until switch
springs back to original position.
NOTE
The controller auxiliary lamp will light if the
generator master switch is in the RUN or AUTO
position during the resetting procedure.
3. If controller air damper light is on, reset air damper
on engine by rotating air damper lever as shown in
Figure 2-3 and the air damper light will go out.
(Used on 200-1600 kW models with Detroit Diesel
engines only).
4. Toggle generator master switch to OFF/RESET
and then to RUN or AUTO to resume operation.
The generator set will not crank until the resetting
procedure is completed.
TP-5633-2
Figure 2-3. Air Damper Lever (Detroit Diesel
Powered)

2-8 Operation TP-5353 8/94
Fault Shutdowns
The generator set will shut down automatically under
the following fault conditions:
Overspeed. Unit shuts down immediately if governed
frequency exceeds 70 Hz (2100 RPM) on 50 and 60 Hz
models.
Overcrank. Shutdown occurs after 45 seconds of
continuous cranking. Shutdown occurs after 75
seconds of cyclic cranking (crank 15 seconds, rest 15
seconds, crank 15 seconds, etc., for a total of 75
seconds). Shutdown occurs after 15 seconds if engine
or starter will not turn (locked rotor).
Low Oil Pressure. Shutdown occurs 5 seconds after
fault. Low oil pressure shutdown will not function during
the first 30 seconds after start-up.
NOTE
Low oil pressure shutdownwill not protect against lowoil
level. Check for oil level at engine.
High Engine Temperature. Shutdown occurs 5
seconds after fault. High engine temperature shutdown
will not function during first 30 seconds after start-up.
NOTE
High temperature shutdown will not function if proper
coolant level is not maintained.
Low Coolant Level. Shutdown occurs 5 seconds after
fault. Low coolant level shutdownwill not function during
the first 30 seconds after start-up.
NOTE
Low oil pressure, high engine temperature, and low
coolant level shutdowns will not function during the first
30 seconds after start-up.
Overvoltage (if equipped). Unit will shut down after
approximately two seconds of voltage 15%ormore over
nominal voltage. Low water temperature/auxiliary lamp
will light.
NOTE
Sensitive equipment may suffer damage in less than
one second of an overvoltage condition. Install separate
overvoltage protection to on-line equipment requiring
faster shutdowns.

TP-5353 8/94 Operation 2-9
Controller Resetting Procedure(Following Fault Shutdown)
Use the following procedure to restart the generator set
after a fault shutdown. Refer to Resetting Emergency
Stop Switches earlier in this section to reset the
generator set after an emergency stop.
1. Move controller alarm horn switch to the SILENCE
position. If equipped, A/V annunciator alarm horn
and lamp are activated. Move A/V annunciator
alarm switch to SILENCE to stop alarm horn. A/V
annunciator lamp stays lit.
2. Disconnect generator set from load with line circuit
breaker or automatic transfer switch.
3. Correct cause of fault shutdown. See Safety
Precautions section of this manual before
proceeding.
4. Start generator set bymoving the generatormaster
switch to OFF/RESET and then to the RUN
position. If equipped, A/V annunciator alarm horn
sounds and lamp goes out.
5. Verify that the cause of the shutdown has been
corrected by test operating generator set.
6. Reconnect generator to load via line circuit breaker
or automatic transfer switch.
7. Move generator master switch to AUTO position for
start-up by remote transfer switch or remote
start/stop switch. If equipped, move A/V
annunciator alarm switch to NORMAL.
8. Move controller alarm horn switch to the NORMAL
position.
Place generator master switch in the AUTO
position before silencing alarm horn.

2-10 Operation TP-5353 8/94
6-Light Controller (Level 2) OperationThe 6-light microprocessor controller (level 2) is
available in the standard model and the oversize
meterbox version (for installation of additional meters
and gauges). For identification of controller components
(standard and oversizemeterbox) and an explanation of
their functions, refer to Figure 2-4 and the following
descriptions.
Standard Controller
Oversize Meterbox
ADV--5849 P1
ADV--5849 P2
1 2 3 4567
8
910
11
1213
14
1516
17
18
19 20 21
22 23
1. Low Water Temperature/Aux. Lamp2. Overspeed Lamp3. High Engine Temperature Lamp4. Air Damper Lamp5. Overcrank Lamp6. Low Oil Pressure Lamp7. Selector Switch8. Lamp Test9. Generator Master Switch
10. Alarm Horn11. Alarm Silence Switch12. Voltage Adjustment Pot
13. Emergency Stop Switch14. Hourmeter15. Frequency Meter16. AC Voltmeter17. Scale Lamps (upper/lower)18. AC Ammeter19. Oil Pressure Gauge20. Water Temperature Gauge21. DC Voltmeter22. Fuses (Inside Controller)23. Controller TB1 Terminal Strip (on Circuit Board)
Figure 2-4. 6-Light Microprocessor Controller (Standard and Oversize Meterbox Models)

TP-5353 8/94 Operation 2-11
Features
The numbered paragraphs following refer to Figure 2-4.
1. Low Water Temperature (LWT)/Auxiliary.
Flashing or continuously on lamp indicates a fault
has occurred.
Flashing Lamp Conditions
� The LWT/auxiliary lamp will flash immediately if
the controller senses no AC output while the
unit is running (except during first 10 seconds
after start-up). When AC output is sensed, the
flashing will stop and the lamp will be off. No
manual reset is required.
� The LWT/auxiliary lamp will flash if the battery
power was reconnected or was low and then
came back up again while the generator master
switch was in the RUN or AUTO position. A
temporarily low battery condition where the
battery is weak or undersized for the application
may cause this condition. Place the master
switch in the OFF/RESET position to clear this
condition.
Continuous On Lamp Conditions
� The LWT/auxiliary lamp lights and unit shuts
down immediately if the optional emergency
stop switch is activated (if equipped with
optional emergency stop switch).
� The LWT/auxiliary lamp lights if the optional
emergency stop switch is reset while the
generator master switch is in the AUTO or RUN
position. Place the generator master switch in
the OFF/RESET position to clear this condition.
� The LWT/auxiliary lamp lights and engine shuts
down 5 seconds after high oil temperature
(P1-13), low coolant level (P1-14), or aux. delay
shutdown (P1-15) faults (if so equipped) occur.
These conditions are inhibited during first 30
seconds after crank disconnect.
� The LWT/auxiliary lamp lights and engine shuts
down immediately if overvoltage condition
arises (if equipped with overvoltage shutdown
kit).
� The LWT/auxiliary lamp lights and engine shuts
down if activated by customer-supplied sensing
devices connected to auxiliary immediate
shutdown ports (P1-17 and P1-18).
� The LWT/auxiliary lamp lights if engine low
water temperature (P1-24) condition occurs (if
sensor equipped).
2. Overspeed. Lamp lights if set shuts down due to
overspeed condition (governed frequency
exceeding 70 Hz).
3. High Engine Temperature. Lamp lights if engine
has shut down due to high engine coolant
temperature. Shutdown occurs 5 seconds after
engine reaches temperature of shutdown range.
4. Air Damper. Lamp lights after emergency stop or
overspeed fault or overvoltage fault. Lamp
indicates that engine air damper is closed; lamp
remains lit until air damper is manually reset. See
Resetting Emergency Stop Switches later in this
section. (Used on 200-1600 kW models with
Detroit Diesel engines only).
5. Overcrank. Lamp lights and cranking stops if
engine does not start after 45 seconds of
continuous cranking or 75 seconds of cyclic
cranking. See Auto Starting.
� Cranking stops and overcrank lamp lights after
15 seconds if starter or engine will not turn
(locked rotor).
� Overcrank lamp flashes if speed sensor signal
is absent longer than one second.
NOTE
The 6-light controller is equipped with an automatic
restart function. The generator set will attempt to
restart if the engine speed drops below 13 Hz.
Decreased engine speed causes an overcrank
condition.

2-12 Operation TP-5353 8/94
6. Low Oil Pressure. Lamp lights if set shuts down
due to insufficient oil pressure. Shutdown occurs 5
seconds after engine reaches pressure shutdown
range.
7. Selector Switch. Selects generator output circuits
measure. When switched to a position with three
circuit lead labels, amperage is measured on the
upper lead and voltage is measured between the
lower two leads. AC ammeter and voltmeter will
not register with switch in the OFF position.
8. Lamp Test. Switch tests the controller indicator
lamps.
9. Generator Master Switch. Switch functions as
controller reset and generator operation switch.
Refer to Starting, Stopping, and Controller
Resetting Procedure following.
10. Alarm Horn. Sounds if any fault or anticipatory
condition exists (except emergency stop, battery
charger fault, or low battery volts). Place generator
master switch in the AUTO position before
silencing alarm horn. See Controller Resetting
Procedure following.
11. Alarm Silence. Switch disconnects alarm during
servicing (place generator master switch in the
AUTO position before silencing alarm horn).
Restore alarm horn switches at all locations
(controller, remote annunciator, or audio/visual
alarm) to normal position after fault shutdown is
corrected to avoid reactivating alarm horn. See
Controller Resetting Procedure following.
12. Voltage Adjustment. Fine adjustment for
generator output voltage.
13. Emergency Stop (If equipped). Switch is used to
instantly shut down the generator set in emergency
situations. Reset switch after shutdown by rotating
switch clockwise. Use the emergency stop switch
for emergency shutdowns only. Use the generator
master switch to stop the set under normal
circumstances.
14. Hourmeter. Hourmeter records generator set total
operating hours for reference in scheduling
maintenance.
15. Frequency Meter. Meter measures frequency
(Hz) of generator output voltage.
16. AC Voltmeter. Meter measures voltage across
output leads indicated by selector switch.
17. Scale Lamps (Upper/Lower). Lamps indicate
which AC voltmeter and/or ammeter scales to
read.
18. AC Ammeter. Meter measures amperage from
output leads indicated by selector switch.
19. Oil Pressure. Gauge measures engine oil
pressure.
20. Water Temperature. Gauge measures engine
coolant temperature.
21. DCVoltmeter. Meter measures voltage of starting
battery(ies).
22. Fuses. Fuses are located on controller circuit
board. See Figure 2-5.
� 3-Amp Remote Annunciator (F1). Fuse
protects dry contact kit (if equipped).
� 3-Amp Controller (F2). Fuse protects
controller circuit board, speed sensor, and lamp
circuit board.
� 15-Amp Engine and Accessories (F3). Fuse
protects engine/starting circuitry and
accessories.

TP-5353 8/94 Operation 2-13
23. Controller TB1 Terminal Strip (on Circuit
Board). Terminal strip allows connection of
generator accessories such as emergency stop
switch, remote start/stop switch, audio/visual
alarms, etc. Crank mode selection (cyclic or
continuous) is also made on the TB1 terminal strip.
Location of the TB1 terminal strip on the controller
circuit board is shown in Figure 2-5. Refer to
appropriate wiring diagrams for additional
information on connecting accessories to the TB1
terminal strip.
P1P2
G-292806
1
2
1. TB1 Terminal Strip2. Fuses
Figure 2-5. TB1 Terminal Strip on Controller
Circuit Board
Starting
Local Starting
Move the generatormaster switch to theRUNposition to
start the generator set at the controller.
NOTE
The 6-light controller is equipped with a transient
start/stop function to avoid accidental cranking of the
rotating engine. If the generator master switch is
momentarily placed in the OFF/RESET position then
quickly returned to RUN, the generator set will slow to
249 RPM and recrank before returning to rated speed.
Auto Starting
Move the generator master switch to the AUTO position
to allow start-up by automatic transfer switch or remote
start-stop switch (connected to controller terminals 3
and 4).
NOTE
The 6-light microprocessor controller provides up to 45
seconds of continuous cranking or 75 seconds of cyclic
cranking (crank 15 seconds, rest 15 seconds, crank 15
seconds, etc.) before overcrank shutdown. Cranking
mode (cyclic or continuous) selection is made on the
controller circuit board terminal strip. For cyclic
cranking, leave circuit board terminal TB1-9 open.
Continuous cranking is achieved by running a jumper
between circuit board terminal TB1-2 (ground) and
terminal TB1-9.

2-14 Operation TP-5353 8/94
Stopping
Normal Stopping
1. Disconnect load from generator set and allow it to
run without load for 5 minutes.
NOTE
Run the generator at no load for 5 minutes prior to
stopping to ensure adequate cooling of the set.
2. Move generator master switch to the OFF/RESET
position. Engine will stop.
NOTE
If engine stop is signaled by a remote switch or
automatic transfer switch, the generator set will
continue running during a 5-minute cooldown cycle.
Emergency Stopping
Turn generator master switch to the OFF/RESET
position or activate controller emergency stop switch (if
equipped) or optional remote emergency stop for
immediate shutdown. If either emergency stop switch is
activated, the controller low water temperature/auxiliary
lamp will light and the unit will shut down. On 200-1600
kW models with Detroit Diesel engines, both the air
damper and low water temperature/auxiliary lamps will
light if the emergency stop switch is activated.
NOTE
Use the emergency stop switch(es) for emergency
shutdowns only. Use the generator master switch to
stop the generator set under normal circumstances.
Resetting Emergency StopSwitches
Use the following procedure to restart the generator set
after shutdown by emergency stop switch (local or
remote). Refer to Controller Resetting Procedure later
in this section to restart the generator set following a
fault shutdown.
1. Investigate cause of emergency stop and correct
problem(s).
2. If remote emergency stop switch was activated,
reset switch by replacing glass piece. If
controller-mounted emergency stop switch was
activated (if equipped), reset controller emergency
stop switch by rotating switch clockwise until switch
springs back to original position.
NOTE
The controller auxiliary lamp will light if the
generator master switch is in the RUN or AUTO
position during the resetting procedure.
3. If controller air damper light is on, reset air damper
on engine by rotating air damper lever as shown in
Figure 2-6 and the air damper light will go out.
(Used on 200-1600 kW models with Detroit Diesel
engines only).
4. Toggle generator master switch to OFF/RESET
and then to RUN or AUTO to resume operation.
The generator set will not crank until the resetting
procedure is completed.
TP-5633-2
Figure 2-6. Air Damper Lever (Detroit Diesel
Powered)

TP-5353 8/94 Operation 2-15
Fault Shutdowns
The generator set will shut down automatically under
the following fault conditions:
Overspeed. Unit shuts down immediately if governed
frequency exceeds 70 Hz (2100 RPM) on 50 and 60 Hz
models.
Overcrank. Shutdown occurs after 45 seconds of
continuous cranking. Shutdown occurs after 75
seconds of cyclic cranking (crank 15 seconds, reset 15
seconds, crank 15 seconds, etc., for a total of 75
seconds). Shutdown occurs after 15 seconds if engine
or starter will not turn (locked rotor).
Low Oil Pressure. Shutdown occurs 5 seconds after
fault. Low oil pressure shutdown will not function during
the first 30 seconds after start-up.
NOTE
Low oil pressure shutdownwill not protect against lowoil
level. Check for oil level at engine.
High Engine Temperature. Shutdown occurs 5
seconds after fault. High engine temperature shutdown
will not function during first 30 seconds after start-up.
NOTE
High temperature shutdown will not function if coolant
level is not maintained.
Low Coolant Level. Shutdown occurs 5 seconds after
fault. Low coolant level shutdownwill not function during
the first 30 seconds after start-up.
NOTE
Low oil pressure, high engine temperature, and low
coolant level shutdowns will not function during the first
30 seconds after start-up.
Overvoltage (if equipped). Unit will shut down after
approximately two seconds of voltage 15%ormore over
nominal voltage. Low water temperature/auxiliary lamp
will light.
NOTE
Sensitive equipment may suffer damage in less than
one second of an overvoltage condition. Install
separate overvoltage protection to on-line equipment
requiring faster shutdowns.
Controller Resetting Procedure(Following Fault Shutdown)
Use the following procedure to restart the generator set
after a fault shutdown. Refer to Resetting Emergency
Stop Switches earlier in this section to reset the
generator after an emergency stop.
1. Move controller alarm horn switch to the SILENCE
position. If equipped, A/V annunciator alarm horn
and lamp are activated. Move A/V annunciator
alarm switch to SILENCE to stop alarm horn. A/V
annunciator lamp stays lit.
2. Disconnect generator set from load with line circuit
breaker or automatic transfer switch.
3. Correct cause of fault shutdown. See Safety
Precautions section of this manual before
proceeding.
4. Start generator set bymoving the generatormaster
switch to OFF/RESET and then to the RUN
position. If equipped, A/V annunciator alarm horn
sounds and lamp goes out.
5. Verify that the cause of the shutdown has been
corrected by test operating generator set.
6. Reconnect generator to load via line circuit breaker
or automatic transfer switch.
7. Move generator master switch to AUTO position for
start-up by remote transfer switch or remote
start/stop switch. If equipped, move A/V
annunciator alarm switch to NORMAL.
8. Move controller alarm horn switch to the NORMAL
position.
Place generator master switch in the AUTO
position before silencing alarm horn.

2-16 Operation TP-5353 8/94
Paralleling Engine Gauge Box Controller Operation(Switchgear)
TP-5633-2
1
2 3
5
4
6,7,8
1. Hourmeter2. Oil Pressure Gauge3. Water Temperature Gauge4. DC Voltmeter
5. Emergency Stop Switch (if equipped)6. Gauge Box Terminal Strips (inside controller)7. Connection Plug (inside controller)8. Electronic Speed Switch (inside controller)
Figure 2-7. Paralleling Engine Gauge Box Controller Operation (Switchgear)
The paralleling engine gauge box is designed for
interconnecting the generator set with switchgear-
mounted control logic. An engine gauge box is required
for each generator set in the paralleling system. Other
than the emergency stop switch (if equipped), no
operating controls are included in the engine gauge
box—generator set operating controls are included in the
switchgear. A connection plug is used to connect the
generator set governor, crank relays, safety switches (high
water temperature, low oil pressure, low coolant level),
and gauge senders to gauge box terminal strips. The
appropriate terminals on the terminal strips are then
hard-wired to the switchgear controls. Also included in the
gauge box is an electronic speed switch with overspeed
and crank outputs. For identification of paralleling meter
box components and an explanation of their functions,
refer to Figure 2-7 and the following descriptions.

TP-5353 8/94 Operation 2-17
Features
The numbered paragraphs following refer to Figure 2-7.
1. Hourmeter. Hourmeter records generator set total
operating hours for reference in scheduling
maintenance.
2. Oil Pressure Gauge. Gauge measures engine oil
pressure.
3. Water Temperature Gauge. Gauge measures
engine coolant temperature.
4. DCVoltmeter. Meter measures voltage of starting
battery(ies).
5. Emergency Stop (If equipped). Switch is used to
instantly shut down the generator set in emergency
situations. Reset switch after shutdown by rotating
switch clockwise. Use the emergency stop switch
for emergency shutdowns only. Use the
switchgear-mounted operating controls to stop the
set under normal circumstances. Local emergency
stop switch is standard on 200-1600 kW models
with Detroit Diesel Engine.
6. Gauge Box Terminal Strips. Use terminal strips
to connect switchgear control wiring to generator
set governor control, crank relays, safety switches,
gauge senders, etc.
7. Connection Plug. Use plug to connect wiring
harness from generator set governor control, crank
relays, safety switches, gauge sender, etc., to
gauge box terminal strips.
8. Electronic Speed Switch. Switch signals engine
control logic in switchgear to disconnect starter
motor after start-up or shuts down the system if an
overspeed fault occurs. Speed switch settings are
adjustable for crank and overspeed.

2-18 Operation TP-5353 8/94
Manual Controller OperationThe manual controller is designed for prime power
applications using manual (nonautomatic) operation.
For identification of manual controller components and
an explanation of their functions, refer to Figure 2-8 and
the following descriptions.
12
3 4 5
6 7 8
9
1011 12
13
ADV-5849-A P3
1. Fault Lamp2. Hourmeter3. Frequency Meter4. AC Voltmeter5. AC Ammeter6. Oil Pressure Gauge7. Water Temperature Gauge
8. DC Voltmeter9. Selector Switch
10. Start/Stop Switch11. Voltage Adjustment Pot12. 10-Amp Fuse13. Scale Lamps (upper/lower)
Figure 2-8. Manual Controller

TP-5353 8/94 Operation 2-19
Features
The numbered paragraphs following refer to Figure 2-8.
1. Fault Lamp. Lamp lights during engine shutdown
if engine has shut down due to high engine
temperature, low oil pressure, low water level, or
overspeed faults. See Fault Shutdowns following
for additional shutdown information.
NOTE
The fault lamp will not stay lit after the unit shuts
down on a fault condition.
2. Hourmeter. Hourmeter records generator set total
operating hours for reference in scheduling
maintenance.
3. Frequency Meter. Meter measures frequency
(Hz) of generator output voltage.
4. AC Voltmeter. Meter measures voltage across
output leads indicated by selector switch.
5. AC Ammeter. Meter measures amperage from
output leads indicated by selector switch.
6. Oil Pressure Gauge. Gauge measures engine oil
pressure.
7. Water Temperature Gauge. Gauge measures
engine coolant temperature.
8. DCVoltmeter. Meter measures voltage of starting
battery(ies).
9. Selector Switch. Switch selects generator output
circuits to be measured. When switched to a
position with three circuit lead labels, amperage is
measured on the upper lead and voltage is
measured between the lower two leads. AC
ammeter and voltmeter will not register with switch
in the OFF position.
10. Start/Stop Switch. Use switch to start and stop
generator set. Refer to Starting and Stopping
following.
11. Voltage Adjustment. Fine adjust for generator
output voltage.
12. 10-Amp Fuse. Fuse protects controller circuitry
from short circuits and overloads.
13. Scale Lamps (upper/lower). Lamps indicate AC
voltmeter and/or ammeter scales to be read.
Starting
Hold controller or remote start/stop switch in START
position until the engine starts. If the engine fails to start
after cranking for 5-10 seconds, release the switch.
Wait for the engine to come to a complete stop before
attempting restart.
NOTE
Do not crank engine continuously for more than 10
seconds at a time. Allow a 60-second cooldown period
between cranking attempts if the engine does not start.
If the engine does not start after three attempts, contact
an authorized service distributor/dealer for repair.

2-20 Operation TP-5353 8/94
Stopping
1. Disconnect load from generator set and allow it to
run without load for 5 minutes.
NOTE
Run the generator at no load for 5 minutes prior to
stopping to ensure adequate cooling of the set.
2. Press controller or remote start/stop switch to the
STOP position. The generator set shuts down.
Fault Shutdowns
The generator set will shut down automatically under
the following fault conditions and cannot be restarted
until the fault condition has been corrected. The
shutdown switches will automatically reset when the
problem is corrected or the generator set cools (if
overheating was the problem).
NOTE
The fault lampwill not stay lit after the unit shuts downon
a fault condition.
Overspeed. Unit shuts down immediately if governed
frequency exceeds 70 Hz (2100 RPM) on 50 and 60 Hz
models.
LowOil Pressure. Shutdown occurs after fault. Low oil
pressure shutdown will not function during the first 5
seconds after start-up.
NOTE
Low oil pressure shutdownwill not protect against lowoil
level. Check for oil level at engine.
High Engine Temperature. Shutdown occurs after
fault. High engine temperature will not function during
first 5 seconds after start-up.
NOTE
High temperature shutdown will not function if proper
coolant level is not maintained.
Low Coolant Level. Shutdown occurs after coolant
level sensor detects no coolant. Low coolant level
shutdown will not function during first 5 seconds after
start-up.
NOTE
Low oil pressure, high engine temperature, and low
coolant level shutdowns will not function during the first
5 seconds after start-up.

Scheduled Maintenance 3-1TP-5353 8/94
Section 3. Scheduled MaintenanceUnder normal operating conditions, generator alternator
service will not be required on a regular basis. Themain
areas of attention are listed in the prestart checklist. If
operating under extremely dusty and dirty conditions,
use DRY compressed air to blow dust out of the
generator. Do this with the generator running and direct
the stream of air through openings in the generator end
bracket.
The end bracket bearing should be replaced every
10,000 hours of operation in standby and prime power
applications. Service more frequently if bearing
inspection indicates excessive rotor end play or bearing
damage from corrosion or heat build-up. Replace the
tolerance ring (if equipped) if the end bracket is
removed. The end bracket bearing is sealed and
requires no additional lubrication. Have all generator
service performed by an authorized service
distributor/dealer.
Perform generator engine service at the intervals
specified by the engine manufacturer in the engine
service literature. Contact your authorized service
distributor/dealer to obtain service literature for specific
models.
Accidental starting.
Can cause severe injury or death.
Disconnect battery cables before working on
generator set (negative lead first and reconnect it
last).
WARNING
Accidental starting can cause severe injury or
death. Turn generator set master switch to OFF
position, disconnect power to battery charger, and
remove battery cables (remove negative lead first and
reconnect it last) to disable generator set beforeworking
on any equipment connected to generator set. The
generator set can be started by automatic transfer
switch or remote start/stop switch unless these
precautions are followed.
WARNING
Hot engine and exhaust system.
Can cause severe injury or death.
Do not work on generator set until it is allowed to
cool.
Hot parts can cause severe injury or death. Do not
touch hot engine parts. An engine gets hot while running
and exhaust system components get extremely hot.
WARNING
Hazardous voltage. Moving rotor.
Can cause severe injury or death.
Do not operate generator set without all guards and
electrical enclosures in place.
Exposed moving parts can cause severe injury or
death. Keep hands, feet, hair, and clothing away from
belts and pulleys when unit is running. Replace guards,
covers, and screens before operating generator set.

3-2 Scheduled Maintenance TP-5353 8/94
Oil Requirements (30, 80, and 100 kW Ford Powered)
To assure long life andminimal engine wear, FordMotor
Company and the generator manufacturer have
amended the engine viscosity recommendations for
different temperature ranges. Do not use oil
recommendations given in the engine operationmanual
for 30, 80, and 100 kW Ford-Powered models. These
models are turbocharged and must use oil
recommendations that follow. Oil used in these
generator sets must be American Petroleum Institute
(API) class SG/CD. API class SF/CD or SF/CC are
acceptable substitutes. See Figure 3-1.
For Ambient TemperaturesConsistently Above: Use Viscosity:
32� F (0� C) 20W-50 or 40W
--10� F (--23� C) 10W-40 or 10W50
Figure 3-1. Oil Recommendation for 30, 80, 100 kW
Ford-Powered Models
Oil Change Procedure (30, 80, and 100 kW Ford Powered)
The 30 (with LSG-423 engine), 80, and 100 kW
Ford-poweredmodels are equippedwith turbochargers.
See the following service schedule turbocharger
maintenance.
After changing the engine lube oil, use the following
procedure prior to restarting the generator set to prevent
premature turbocharger bearing wear.
1. Place generator master switch to OFF/RESET
position (microprocessor controller) or STOP
position (manual controller).
2. Remove ignition coil to distributor wire at
distributor. Connect jumper wire to ignition coil
lead and engine block.
NOTE
ELECTRONIC IGNITION DAMAGE! Damage to
the electronic ignition systemmayoccur if the coil is
not grounded during turbocharger priming
procedure.
3. Remove turbocharger oil drain line at engine
connection. Place suitable container under oil
drain hose.
4. Place generator master switch to RUN position
(microprocessor controller) or START position
(manual controller) to crank engine until fresh oil
flows from turbocharger oil drain line.
NOTE
STARTER DAMAGE! Do not crank engine
continuously for more than 10 seconds at a time.
Allow a 60-second cooldown period between
cranking intervals to prevent starter motor and/or
starter solenoid failure due to overheating.
5. Place generator master switch to OFF/RESET
position (microprocessor controller) or STOP
position (manual controller).
6. Reconnect turbocharger oil drain line at engine
connection.
7. Remove jumper wire and reconnect ignition coil
wire to distributor.
8. Test run the generator set for a few minutes and
check for oil leaks at turbocharger drain line
connection. STOP generator set.
9. Check oil level and add oil as necessary to bring oil
up to proper level. Refer to Engine Operation
Manual for oil specifications.
10. Wipe up any spilled oil and dispose of rags in a
fireproof container. Properly dispose of oil
container.
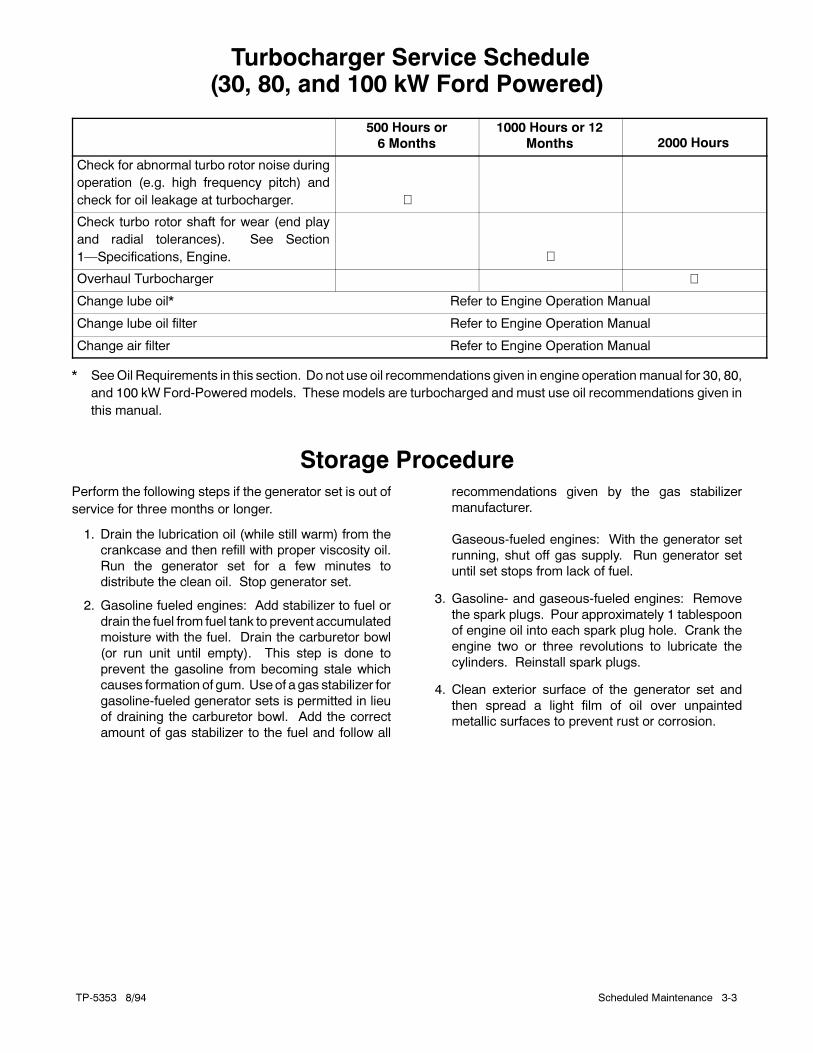
Scheduled Maintenance 3-3TP-5353 8/94
Turbocharger Service Schedule(30, 80, and 100 kW Ford Powered)
500 Hours or
6 Months
1000 Hours or 12
Months 2000 Hours
Check for abnormal turbo rotor noise during
operation (e.g. high frequency pitch) and
check for oil leakage at turbocharger. �
Check turbo rotor shaft for wear (end play
and radial tolerances). See Section
1—Specifications, Engine. �
Overhaul Turbocharger �
Change lube oil* Refer to Engine Operation Manual
Change lube oil filter Refer to Engine Operation Manual
Change air filter Refer to Engine Operation Manual
* SeeOil Requirements in this section. Do not use oil recommendations given in engine operationmanual for 30, 80,
and 100 kW Ford-Powered models. These models are turbocharged and must use oil recommendations given in
this manual.
Storage ProcedurePerform the following steps if the generator set is out of
service for three months or longer.
1. Drain the lubrication oil (while still warm) from the
crankcase and then refill with proper viscosity oil.
Run the generator set for a few minutes to
distribute the clean oil. Stop generator set.
2. Gasoline fueled engines: Add stabilizer to fuel or
drain the fuel from fuel tank to prevent accumulated
moisture with the fuel. Drain the carburetor bowl
(or run unit until empty). This step is done to
prevent the gasoline from becoming stale which
causes formation of gum. Useof a gas stabilizer for
gasoline-fueled generator sets is permitted in lieu
of draining the carburetor bowl. Add the correct
amount of gas stabilizer to the fuel and follow all
recommendations given by the gas stabilizer
manufacturer.
Gaseous-fueled engines: With the generator set
running, shut off gas supply. Run generator set
until set stops from lack of fuel.
3. Gasoline- and gaseous-fueled engines: Remove
the spark plugs. Pour approximately 1 tablespoon
of engine oil into each spark plug hole. Crank the
engine two or three revolutions to lubricate the
cylinders. Reinstall spark plugs.
4. Clean exterior surface of the generator set and
then spread a light film of oil over unpainted
metallic surfaces to prevent rust or corrosion.


TP-5353 8/94 General Troubleshooting 4-1
Section 4. General TroubleshootingUse the following tables as a quick reference in
troubleshooting individual problems. Generator set
faults are listed by specific groups and include likely
causes and remedies. The source of more detailed
information needed to correct a problem is indicated.
These sources include various sections of this manual,
the generator operation manual, engine operation
manual, and engine service manual. Corrective action
and testing in many cases requires knowledge of
electrical and electronic circuits. It is recommended that
service be done only by authorized service distributors/
dealers. Improper repair by unqualified personnel can
lead to additional failures.
General Troubleshooting Chart (Sheet 1 of 2)
Problem Possible Cause Corrective Action Reference
Unit will not crank Weak or dead battery Recharge or replace; check
charger operation
Engine Operation Manual
Reversed or poor battery
connections
Check connections Wiring Diagrams
Fuse blown in controller Replace fuse Section 5—Controller
Troubleshooting
Wiring Diagrams
Emergency stop switch
activated (local or remote)*
See Resetting Emergency Stop
Switches.
Section 2—Operation
Fault shutdown Correct fault and reset
controller*
Section 2—Operation
Generator master switch in
OFF position (attempting
start-up from remote switch;
microprocessor controllers
only)
Move generator master switch
to AUTO position
Section 2—Operation
Unit cranks but will Improper fuel Replace fuel Engine Operation Manual
not start No fuel Add fuel; check fuel control
circuit
Engine Service Manual
Air in fuel system (diesel
models)
Bleed air from system Engine Operation Manual
Defective ignition system
(gas/gasoline models)
Check ignition system Engine Service Manual
Air cleaner clogged Clean or replace filter element Engine Operation Manual
No AC output Line circuit breaker or
safeguard breaker in the OFF
position (if equipped)
Return to the ON position
Generator problem such as
defective voltage regulator or
other internal fault
Test and/or replace Section 6—Generator/Controller
Troubleshooting
Section 7—Component Testing and
Adjustment
* Not applicable to generator sets equipped with manual controller.

TP-5353 8/944-2 General Troubleshooting
General Troubleshooting Chart (Sheet 2 of 2)
Problem Possible Cause Corrective Action Reference
Low output or
i d i
Unit overloaded Reduce load
excessive drop in
voltageEngine speed too low Check governor Section 7—Component Testing and
Adjustment
Faulty voltage rheostat or
voltage regulator
Test and/or replace Section 6—Generator/Controller
Troubleshooting
Section 7—Component Testing and
Adjustment
Unit stops
suddenly
Low oil pressure shutdown Check oil level (if low, check for
leaks)
Engine Operation Manual
High temperature shutdown Check for cooling air restrictions
or poor belt tension
Engine Operation Manual
Low coolant level shutdown (if
equipped)
Check coolant level (if low,
check for leaks); see Safety
Precautions and Instructions
Section
Engine Operation Manual
Out of fuel Add fuel
Overcrank shutdown * Reset—if overcrank fault
reoccurs check controller circuit
Section 5—Controller
Troubleshooting
Fuse blown in controller Replace fuse—if fuse blows
again check controller circuit
Section 5—Controller
Troubleshooting
Wiring Diagrams
Engine malfunction Troubleshoot engine Engine Service Manual
Overspeed shutdown Reset—if unit overspeeds again
check controller circuit and/or
governor
Section 5—Controller
Troubleshooting
Section 7—Component Testing and
Adjustment
High oil temperature shutdown Check oil level and type. If
shutdown reoccurs,
troubleshoot engine lubrication
system
Engine Service Manual
Overvoltage shutdown (if
equipped)*
Check controller circuit and/or
voltage regulator
Section 5—Controller
Troubleshooting
Section 6—Generator/Controller
Troubleshooting
Section 7—Component Testing and
Adjustment
Generator master switch in
OFF/RESET position*
Move switch to proper position
(RUN or AUTO)
Section 2—Operation
Emergency stop switch
activated (local or remote)*
Check reason for emergency
shutdown; reset switch
Section 2—Operation
* Not applicable to generator sets equipped with manual controller.

TP-5353 8/94 Controller Troubleshooting 5-1
Section 5. Controller Troubleshooting
Microprocessor Controller—DescriptionFor external features, see Section 2—Operation
Microprocessor Controller, Figure 5-1 through Figure
5-5 show locations of controller components and
connections. Figure 5-6 and Figure 5-7 are the logic
schematics showing input/output circuits for reference
in troubleshooting. This information deals directly with
the 16-light microprocessor. Information applies to the
6-light microprocessor where applicable.
1
10 8
62 5
11 7
3
12
4
9
TP-5353-5
1. Panel Lamps2. Lamp Circuit Board3. Selector Switch4. Controller DC Ground Terminal5. AC Fuse Terminal Block (TB3)6. CT/Meter Scale Terminal Block (TB2)
7. Accessory Wire Guide Loops8. Lamp Selection Jumper9. Controller Fuses
10. Control Panel Harness Connector (P2)11. Controller Main Circuit Board12. P3/P4 Harness
Figure 5-1. Microprocessor Controller

TP-5353 8/945-2 Controller Troubleshooting
12
9
14
4 657
83
12131011
G-292806
1. Fuse: 3 Amp (F2) Controller2. Fuse: 15 Amp (F3) Engine and Accessories3. LED4 (K4 Relay)4. K4 Relay: Emergency Stop5. K2 Relay: Control Relay (Crank)6. K3 Relay: Control Relay (Run)7. LED2 (K2 Relay)8. LED3 (K3 Relay)
9. Controller TB1 Terminal Strip10. P3 Connector (Control Panel Harness) to P4 (LED Indicator
Panel Assembly)11. Microprocessor Chip12. P1 Connector (DC Harness)13. P2 Connector (AC Harness)14. Fuse: 3 Amp (F1) Remote Annunciator
Figure 5-2. Microprocessor Controller Circuit Board Components

TP-5353 8/94 Controller Troubleshooting 5-3
Circuit Board Terminal Identification (TB1)Terminal/Wire Description1. 1 Ground -- Emergency Stop Relay (K4)2. 1A Emergency Stop Relay (K4) Coil3. 56 Air Damper Indicator4. Open5. 42A Battery Voltage (Fuse #1 Protected)6. 2 Ground7. 9 Crank Mode (open -- cyclic crank;
ground -- continuous crank)8. 48 Emergency Stop Indicator9. 3 Remote Start Ground
10. 4 Remote Start (Active Low*)11. 26 Auxiliary Indicator12. 12 Overcrank Indicator13. 39 Overspeed Indicator14. 38 Low Oil Pressure Indicator15. 36 High Engine Temperature Indicator16. 60 System Ready Indicator17. 80 Not In Auto Indicator18. 40 Prealarm High Engine Temperature Indicator19. 41 Prealarm Low Oil Pressure Indicator20. 32 Common Fault/Prealarm21. 63 Low Fuel (Active Low*)22. 61 Battery Charger Fault (Active Low*)23. 62 Low Battery Volts (Active Low*)24. 35 Low Water Temperature
P1 Connector Pins
Terminal Description1. Output to K1 Relay (Crank Relay), Wire 712. Ground for Speed Sensor, Wire 23. Output to Safeguard Breaker Terminal and Water Level Switch,
Wire 70 (and K5 Relay if equipped with Electronic Governor)4. Not Used5. Ground (--), Wire N6. Speed Sensor Shield Ground, Wire S27. Output to Fuel Solenoid (FS), Wire 708. Battery Positive to Speed Sensor, Wire 249. Input from Speed Sensor, Wire 16
10. Not Used11. Not Used12. Input from Battery Positive (14P)13. Input from Auxiliary Delay Shutdown14. Input from Water Level Switch, Wire 3115. Input from Auxiliary Delay Shutdown16. Input from Pre-High Engine Temperature Switch, Wire 40A17. Input fromAuxiliary Immediate (Overvoltage)Shutdown,Wire3018. Input from Air Damper, Wire 56 (200-1600 kW models with
Detroit Diesel engines only)19. Output to K6 relay, Wire 57 (200-1600 kW models with Detroit
Diesel engines only)20. Not Used21. Input from High Engine Temperature Switch, Wire 3422. Input from Low Oil Pressure Switch, Wire 1323. Input from Pre Low Oil Pressure Switch, Wire 41A24. Input from Low Water Temperature Switch, Wire 35A
P2 Connector Pins
Terminal Description1. Output to Oil Pressure Sender, Wire 702. Input from Overvoltage Board, Wire 303. Input for AC Crank Disconnect and Instrumentation, Wire V7F4. Air Damper Output (200-1600 kW models with Detroit Diesel
engines only), wire 565. Input for AC Crank Disconnect and instrumentation, Wire V06. Engine Ground, Wire 2
P3 Connector Pins
Terminal Description1. Output to Emergency Stop Lamp, Wire 482. Output to Auxiliary Indicator, Wire 263. Output to Overcrank Indicator, Wire 124. Output to Overspeed Indicator, Wire 395. Output to Low Oil Pressure Indicator, Wire 386. Output to High Engine Temperature Indicator, Wire 367. Output to System Ready Indicator, Wire 608. Voltage (+) to Front Panel, Wire 249. Output to Not In Auto Indicator, Wire 80
10. Output to Pre High Engine Temperature Indicator, Wire 4011. Output to Pre Low Oil Pressure Indicator, Wire 4112. Output to Low Water Temperature Indicator, Wire 3513. Output to Low Battery Volts Indicator, Wire 6214. Output to Battery Charger Fault Indicator, Wire 6115. Output to Low Fuel Indicator, Wire 6316. Output to Common Alarm, Wire 3217. Input from Generator Master Switch, RUN position, Wire 4718. Input from Generator Master Switch, OFF/RESET position,
Wire 4319. Input from Generator Master Switch, AUTO position, Wire 4620. Ground (--), Front Panel, Wire 2
P4 Connector Pins
Terminal Description1. Input to Emergency Stop Lamp, Wire 482. Input to Auxiliary Indicator, Wire 263. Input to Overcrank Indicator, Wire 12**4. Output to Overspeed Indicator, Wire 39**5. Input to Low Oil Pressure Indicator, Wire 38**6. Input to High Engine Temperature Indicator, Wire 36**7. Input to System Ready Indicator, Wire 608. Voltage (+) to Front Panel, Wire 249. Input to Not In Auto Indicator, Wire 80
10. Input to Pre-High Engine Temperature Indicator, Wire 40**11. Input to Pre-Low Oil Pressure Indicator, Wire 41**12. Input to Low Water Temperature Indicator, Wire 35**13. Input to Low Battery Volts Indicator, Wire 6214. Input to Battery Charger Fault Indicator, Wire 6115. Input to Low Fuel Indicator, Wire 63**16. Input to Common Alarm, Wire 32**17. Output from Generator Master Switch, RUN position,
Wire 4718. Output from Generator Master Switch, OFF/RESET position,
Wire 4319. Output from Generator Master Switch, AUTO position, Wire 4620. Ground (--), Front Panel
* Active low circuits may be checked for proper operation by placing ground on terminals so designated.
** Common alarm triggered by High Engine Temperature, High Engine Temperature Prealarm, Low Oil Pressure, Low Oil Pressure Prealarm,Low Water Temperature, Overcrank, Overspeed, Low Fuel, and Auxiliary Faults.

TP-5353 8/945-4 Controller Troubleshooting
G-292806-S
Low Water Temperature (35A)
P1--24 Input
TB1-35
P3-12
EmergencyStop
B+
B--
E.STOP
Remote Sw.
AUX
OC
OS
LOP
HWT
Common Fault /Prealarm
LWT
System Ready
NIA
AWT
AOP
Low Fuel
Battery Charger Fault
Low Battery
Air Damper(--)
Low Battery Volts (62)
TB1-62 Input
Output
Battery Charging Fault (61)
P3-14 Output
Common Fault Indicator Activated By:HWTAWTLOPAOPLWTOCOSLFAUX
Connect AV Alarm orCommon Fault Relay Kit
K4TB1--48
P3--1
Logic
Emergency Stop
Low Fuel (63)
TB1-63
P3-15
Common Alarm (32)
TB1-32 Output
P3-16 Input
PHET (40A)
TB1--40 Output
P1-16 Input
P3-10 Output
Switch
P1-18
P2-4
TB1-56
Engine Air Damper
TB1
TB2
P1--2
P1--5
P1--6
P2--6
P3--20
Battery
K5 Governor Control
P1-12
F3
K2
K3
P1-4
P1-1
P1-3
P1-7
F212V Reg.
Q2
Logic
K4 K2
K3
Logic
LogicK4
Logic
K4 TB1--1A
P1--8
P3--8
F1
TB1--42A
--+
K657
K6
EAD
P2-1 TB1-61
Figure 5-3. Microprocessor Controller Connections (TB1 Terminal Strip)

TP-5353 8/94 Controller Troubleshooting 5-5
G-292806-S
OvervoltageShutdown
120 VAC forCrank Disconnect
30
V7
2
VO
70
3
4
5
Panel Lamps
BV HR
WTOP
B+
Engine AirDamper Indicator
2
T56 561
6
P2
AOP Anticipatory (Low) Oil PressureAUX. AuxiliaryAUX PRE Auxiliary PrealarmAWT Anticipatory (High) Water Tempera-
tureBCF Battery Charger FaultEAD Engine Air Damper
E. STOP Emergency StopFS Fuel SolenoidHWT High Water TemperatureLBV Low Battery Volts
LF Low FuelLOP Low Oil PressureLWT Low Water TemperatureNIA Not In Auto
OC OvercrankOS OverspeedSG Safeguard Circuit BreakerSYS RDY System ReadyWLS Water Level SwitchInput
Output
1
4
21
24
31WLS
K5
K1 71
BATTERY
20
+
--
FS
34
13
HETLOP
-- +14P
24
16
70
MagneticPickup
30
56
Engine AirDamper Switch
Auxiliary Immediate(Overvoltage)Shutdown Switch
VoltageReg.
B+
Ign. B+
SafeguardCircuitBreaker
70
Aux. Delay Shutdown
AlternatorFlash
K657
P
B+
41A
PLOP
31
40A
35A
LWT
PHET
P1
Figure 5-4. Microprocessor Controller Connections (P1 and P2)

TP-5353 8/945-6 Controller Troubleshooting
BCAWT
G-292806-S
1 2 3 4 5 6 7 8 9 10 11 12 13 14 15 16 17 18 19 20
TB1--26
TB1--12
TB1--39
TB1--38
TB1--36
12VREG.
TB1--35
OC
OS
LOP
HET
Alarm Horn
Lamp Test
HornOn Silence
Grd.
Run
Auto
Off/Reset
GeneratorControlSwitch
Switch Logic
AUTO
OFF/RESET
RUN
TB1--48
P2-4
T56
EAD
ES
AUX
TB1--60
SYSRDY
TB1--80
TB1--40
TB1--16
TB1--41
AOP
LWT
LBV LFNIA
TB1--62
TB1--61
TB1--63
TB1--32
AOP Anticipatory (Low) Oil PressureAUX. AuxiliaryAUX PRE Auxiliary PrealarmAWT Anticipatory (High)Water Temperature
BCF Battery Charger FaultEAD Engine Air DamperE. STOP Emergency Stop
FS Fuel SolenoidHWT High Water TemperatureLBV Low Battery VoltsLF Low Fuel
LOP Low Oil PressureLWT Low Water TemperatureNIA Not In AutoOC Overcrank
OS OverspeedSG Safeguard Circuit BreakerSYS RDY System Ready
WLS Water Level Switch
Input
Output
T27
AUXPRE
Controller Circuit Board
P3
Controller 16-Light LED Indicators
56
EAD Switch
P1-18
Figure 5-5. Microprocessor Controller to 16-Light LED Indicator Connections (P3)

TP-5353 8/94 Controller Troubleshooting 5-7
ADV-5618-D
Figure 5-6. Logic Schematic, 1-Phase/3-Phase Models
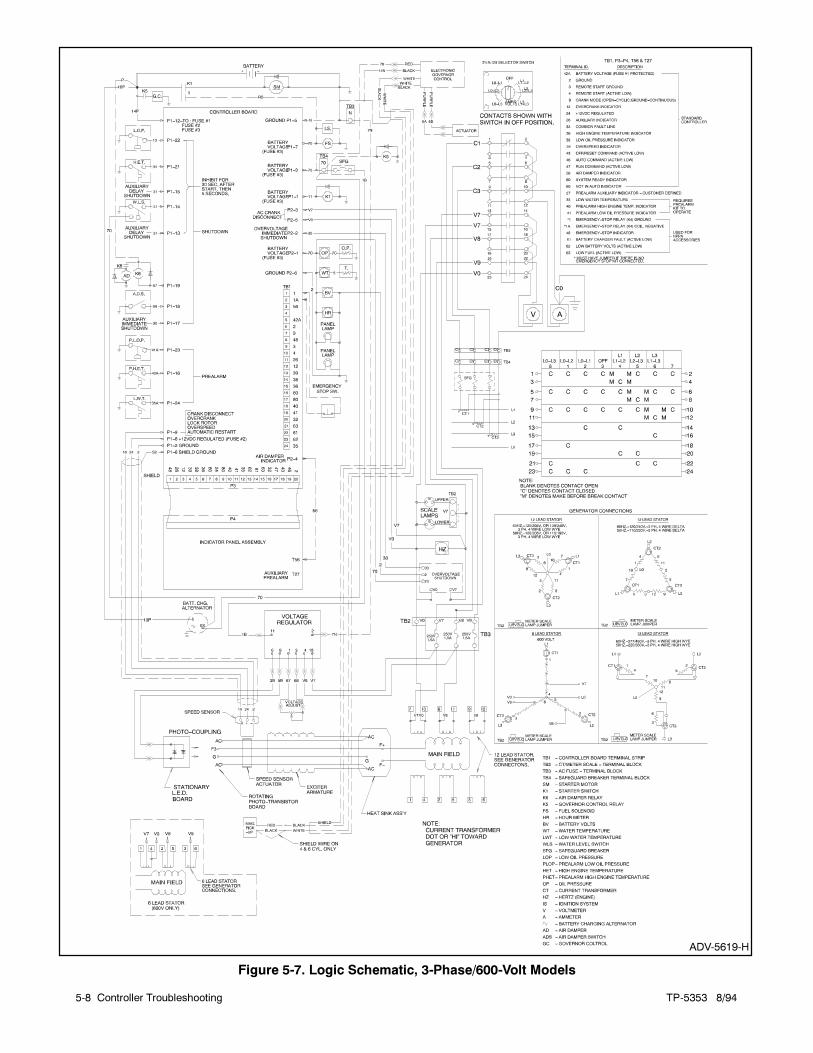
TP-5353 8/945-8 Controller Troubleshooting
ADV-5619-H
Figure 5-7. Logic Schematic, 3-Phase/600-Volt Models

TP-5353 8/94 Controller Troubleshooting 5-9
Fault Shutdowns—Microprocessor ControllerIf the generator set will not start or stops running due to a
fault shutdown (fault lamp lit), refer to the following chart
to identify fault conditions. Consult the Engine Service
Manual for detailed information on correcting engine
related faults. To reset the set after a fault shutdown, see
Section 2—Operation.
Fault Shutdown Troubleshooting Chart
Indicator Fault Condition/Causes
High Engine Temperature Lamp Lights Engine coolant temperature is above shutdown range. See Section1—Specifications for specific model
Cooling system malfunction
Low Oil Pressure Lamp Lights Engine oil pressure is below shutdown range.See Section 1—Specifications for specific model
Overspeed Lamp Lights Governed frequency is in excess of 70 Hz (all models)
Overcrank Lamp Lights Continuous cranking is more than 45 secondsOvercrank Lamp Lights
Cyclic cranking is more than 75 seconds
Locked rotor
Overcrank Lamp Flashes Speed sensor signal is absent longer than one second
Auxiliary Lamp Flashes No AC output is presentAuxiliary Lamp Flashes
Battery power was reconnected or was low and then came back upagain while generator master switch was in the RUN or AUTOposition
Auxiliary Lamp Lights Optional emergency stop switch is reset while the generator masterswitch is in the RUN or AUTO position
High oil temperature (P1-13), low coolant level (P1-14), or auxiliarydelay shutdown (P1-15) faults occur (if sensor equipped)
Overvoltage (if equipped) has occurred—voltage 15% greater thannominal voltage (for period longer than two seconds)
Activated by customer-supplied sensing device connected toauxiliary immediate shutdown ports (P1-17 and P1-18)
Optional emergency stop switch is activated (6-light microprocessorcontroller only)
Engine low water temperature (P1-24) condition occurs (if sensorequipped). 6-light microprocessor controller only
Emergency Stop (if equipped) Emergency stop switch is activated (local or remote)
Emergency stop switch(es) are disconnected from controllerterminals TB1-1 or 1A
Multiple LampsLight (where illuminationmayonlyappeardim)
Main circuit board F1 (3 amp) fuse blown. F1 fuse supplies batteryvoltage to a remote annunciator and/or dry contact kit.

5-10 Controller Troubleshooting TP-5353 8/94
Paralleling Engine Gauge Box Controller (Switchgear)No logic circuitry is supplied with the paralleling engine
gauge box controller. The switchgear provides the logic
to start and stop the generator set. Use the service
literature supplied with the switchgear for
troubleshooting. See the appropriate wiring diagram for
available paralleling engine gauge box controller wiring
diagrams.
The paralleling engine gauge box controller contains a
speed switch which controls crank and overspeed
adjustments. See Figure 5-8.
TP-5353-7
CRANK OVERSPEED
OVERSPEED
TEST RESET OVERSPEED
CRANK
1 2 3
456
E1
E2
1 2 3 5 6 7 8 9 10 11 12 13 144
TACHCAL
1. Overspeed Test Switch2. Overspeed Reset Switch3. Overspeed Adjustment Pot4. Crank Adjustment Pot5. Red Overspeed LED6. Green Crank LED
Figure 5-8. Speed Switch Adjustments
Speed Switch Adjustments
The speed switch is powered by the generator set
battery and the input speed signal is supplied by a
magnetic pickup sensormonitoring the engine camshaft
gear. As the speed of the rotating gear increases, the
frequency of the AC signal from the magnetic pickup
increases until each set point is surpassed. An LED
lights after the speed surpasses the set point and
triggers an internal relay. The set point for the speed
settings are independent and are adjusted precisely
with a 25-turn potentiometer. The crank adjustment
feature latches when the set point has been exceeded.
The overspeed adjustment feature latches and remains
on until power is removed or the overspeed reset button
is pushed. The test button lowers the overspeed setting
by 30% which initiates a shutdown. Periodic testing
during routine engine maintenance is recommended to
ensure positive protection.
Crank Adjustment
Crank adjustment is made by cranking the engine and
simultaneously turning crank adjustment pot slowly
counterclockwise until the desired crank termination
speed is reached. When the cranking termination set
point is reached, the green crank LED illuminates.
The unit is factory set for manual reset. To reinitiate
engine cranking, remove battery power and then
reapply. Automatic reset when the engine speed falls
below the cranking termination set point is done by
removing the 82k-ohm resistor located between
terminals E1 and E2 on the circuit board near the
overspeed pot.
Overspeed Adjustment
Overspeed adjustment is made with the unit running.
Increase the engine speed to 10% below the desired
overspeed set point. For example: on a 60 Hz unit, the
desired overspeed set point might be 70 Hz and 10%
below this point is 63 Hz. See Section 7—Governors for
specific engine speed adjustment information.
Turn the overspeed adjustment counterclockwise until
the overspeed internal relay energizes and the red
overspeed LED illuminates. Reset the overspeed relay
by pressing the overspeed reset button. After the
engine comes to a complete stop remove battery power
from the speed switch. Reconnect power to the speed
switch and readjust the engine speed to the normal
operating speed using the governor adjustment
procedure. The overspeed set point is tested by
pressing the overspeed test button.
Troubleshooting
Apply DC power and an input speed signal to the speed
switch. Connect a voltmeter to terminal 5 (+) and engine
ground (--). As the speed input frequency is increased
an increase in voltage is noted if functioning correctly. If
the voltage is proportional to frequency, check thewiring
at the terminal strip. If the voltage is not proportional to
frequency, check the output of the magnetic speed
sensor. If the speed sensor is operating and the terminal
strip is wired correctly the speed switch is defective.

TP-5353 8/94 Controller Troubleshooting 5-11
Manual ControllerThe following text covers the manual controller
sequence of operation during generator start, run, stop,
and fault shutdown modes. Use this as a starting point
for controller fault identification. The LEDs on the
controller circuit board are intended to assist in the
troubleshooting process. An illuminated LED indicates
the respective relay is receiving power; the LED does
not indicate whether that relay is energized. See
Figure 5-9.
Starting
� Close the start/stop switch between N and 47.
� K2 relay is energized (LED2 lights). A set of
normally open K2 contacts provide power for
the oil pressure and water temperature gauges,
water level sensor, panel lamps, hourmeter,
voltmeter, fuel solenoid (for diesel), ignition
system (for gas or gasoline), K3 relay, and
overspeed/time delay circuit board.
� K3 relay normally open contacts close to
energize K20 (starter solenoid).
� K20 relay normally open contacts close to
engage starter motor and provide initial battery
voltage to ignition system (gas/gasoline).
Running
� Stator leads V0 and V7 connected to terminals
33 and 44 provide speed sensing for overspeed
shutdown.
� Once the generator is running and B1/B2
obtains the correct output voltage, K1 relay is
energized (LED1 lights). After a 5-10 second
time delay, K5 relay is energized (LED5 lights).
Note: Voltage to the K1 and K5 relays is
supplied by stator leads V0 and V7. It is
reduced from 120 vac to 12 vac by a stepdown
transformer. Then it is rectified and regulated to
12 volts DC by the BR1 rectifier and VR1
voltage regulator.
� One set of normally open K1 contacts close to
maintain voltage to K2 (LED2 remains lit).
Normally open K2 contacts remain closed to
maintain voltage to engine controls.
� Another set of K4 contacts close permitting the
fault lamp to function.
� A set of normally open K5 contacts close to
permit low water level, engine low oil pressure,
and high engine temperature shutdown
switches to function. Note: All safety shutdown
switches (except overspeed) are subject to a 5
second time delay during starting. TDR
normally open contacts close after a 5 second
delay. Overspeed shutdown is immediate and
closing of K5 contacts is not required.
� A set of normally closed K1 contacts in series
with the start switch open to de-energize K3
(LED3 goes out). K3 normally open contacts
open to de-energize the starter motor and initial
battery voltage to the ignition system
(gas/gasoline). When K1 normally open
contacts open it provides protection against
accidental reenergizing the starter motor.
� When the unit is running, the start switch
contacts between N and 47 are opened by
releasing the start/stop rocker switch.
Stopping
� Close the stop switch between N and 43.
� K4 relay is energized (LED4 lights).
� Normally closed K4 contacts open and
de-energize the ignition system (gas/gasoline)
or fuel solenoid (diesel).
� Normally open K4 contacts close to maintain a
ground connection to the K4 relay until the unit
comes to a complete stop.
� Fault lamp is energized until the generator
speed and voltage decrease enough to
de-energize the K1 relay. K1 normally open
contacts open and the fault lamp turns off.

5-12 Controller Troubleshooting TP-5353 8/94
Engine Safety ShutdownSwitches
Engine Overspeed (Overspeed/Time Delay Circuit Board)
� The overspeed relay (SDR) receives its power
when K2 normally open contact closes during
starting and running.
� The overspeed relay receives its sensing
source (frequency) from stator leads V0 and V7
at terminals 33 and 44.
� An overspeed (overfrequency of 70 Hz or
greater) at terminals 33 and 44 will cause the
SDR normally open contact to close and
energize K4 relay (LED4 lights).
� Normally closed K4 contacts open to
de-energize the ignition system (gas/gasoline)
or fuel solenoid (diesel).
� Normally open K4 contacts close to maintain a
ground connection to the K4 relay until the unit
comes to a complete stop.
� Fault lamp is energized until the generator
speed and voltage decreases enough to
de-energize K1 relay. K1 normally open
contacts open and the fault lamp turns off.
Low Oil Pressure, High EngineTemperature, or Low Water Level
Shutdown
� Safety shutdown switch contacts close and
energize the K4 relay (LED4 lights). Note:
During cranking Time Delay Relay (TDR) relay
will cause a five second time delay before
shutdown occurs. This is allows the engine to
reach normal operating engine oil pressure.
� Normally closed K4 contacts open to
de-energize the ignition system (gas/gasoline)
or fuel solenoid (diesel).
� Normally open K4 contacts close to maintain a
ground connection to the K4 relay until the unit
comes to a complete stop.
� Fault lamp is energized until the generator
speed and voltage decreases enough to
de-energize K1 relay. K1 normally open
contacts open and the fault lamp turns off.

TP-5353 8/94 Controller Troubleshooting 5-13
S-ADV-5664-C
Figure 5-9. Manual Controller


TP-5353 8/94 Generator/Controller Troubleshooting 6-1
Section 6. Generator/Controller
Troubleshooting
Microprocessor Controller
Relay Descriptions
A description of the controller and generator relays is
given below. Use this information in troubleshooting the
generator set and in conjunction with the
Troubleshooting Microprocessor Controller flow charts
on the following pages. Use the troubleshooting section
following and the appropriate wiring diagram for
additional information.
K1 Relay (Starter Solenoid)� Energizes starter; K1 relay is located on engine.
See Figure 6-1.
C
S
I
TP-5353-6
Figure 6-1. Starter Solenoid
K2 Relay (Crank Relay on MainCircuit Board)
� Energizes K1 Relay. LED2 lights when
energized during crank mode. K2 relay is
located on controller circuit board. See
Figure 6-2.
K3 Relay (Run Relay on MainCircuit Board)
� Energizes ignition, fuel solenoid, fuel pump,
choke, and instrumentation.
� Energizes generator voltage regulator, LED3
lights when energized during crank and run
modes. K3 relay is located on controller circuit
board.
K4 Relay (Emergency Stop Relayon Main Circuit Board)
� The K4 relay is energized continuously except
during emergency stop conditions. LED4 is lit at
all times except during emergency stop. K4
relay is located on controller circuit board. If
emergency stop kit is connected (local or
remote), remove jumper from circuit board
TB1-1 and 1A. If no emergency stop kit is
connected, a jumper must connect terminals
TB1-1 and 1A. See Figure 6-2.
K5 Relay (Governor Control Relay)� Energizes engine governor control circuit.
Relay is located in generator junction box.
K6 Relay (Air Damper Relay)� Energizes air damper solenoid for emergency
stop on 200-1600 kW models with Detroit
Diesel engines only. K6 relay is located in
generator junction box.
G-292806
1 2 3 4
56
1. K4 Relay2. LED43. K2 Relay4. LED25. LED36. K3 Relay
Figure 6-2. Main Circuit Board Relays

6-2 Generator/Controller Troubleshooting TP-5353 8/94
Troubleshooting Microprocessor Controller
Use the following charts as a quick reference in
troubleshooting individual problems. Consult the first
chart for aid in locating the cause of blown fuses. In the
successive charts, generator faults are listed by specific
groups and correlated with possible causes and
corrective action. Before beginning any troubleshooting
procedure, read all safety precautions at the beginning
of this manual and those included in the text. Do not
neglect these precautions.
WARNING
Hazardous voltage. Moving rotor.
Can cause severe injury or death.
Do not operate generator set without all guards and
electrical enclosures in place.
Hazardous voltage can cause severe injury or
death. Whenever electricity is present, there is the
hazard of electrocution. Openmain circuit breaker on all
power sources before servicing equipment. Electrically
ground the generator set and electrical circuits when in
use. Never come into contact with electrical leads or
appliances when standing in water or on wet ground, as
the chance of electrocution is increased under such
conditions.
Accidental starting.
Can cause severe injury or death.
Disconnect battery cables before working on
generator set (negative lead first and reconnect it
last).
WARNING
Accidental starting can cause severe injury or
death. Turn generator set master switch to OFF
position, disconnect power to battery charger, and
remove battery cables (remove negative lead first and
reconnect it last) to disable generator set beforeworking
on any equipment connected to generator set. The
generator set can be started by automatic transfer
switch or remote start/stop switch unless these
precautions are followed.
NOTE
If starting unit by remote switch, verify proper operation
of remote switch before troubleshooting controller. Test
remote switch operation by placing generator master
switch in the AUTO position and running a jumper
between terminals 3 and 4 on controller circuit board. If
the generator does not start, proceed with the controller
troubleshooting procedure outlined in the following
pages.

TP-5353 8/94 Generator/Controller Troubleshooting 6-3
To quickly check the condition of the components
mentioned to in the following flowcharts, use an
ohmmeter to read resistance between the designated
terminal and ground. See Figure 6-3. With ohmmeter
on the R x 1 scale, a reading of less than one ohm
(continuity) indicates that component may be defective.
Isolate the defective component and repair or replace.
Checking P1 and P2 Connections
ComponentConnect betweenground and terminal:
Engine Gauges Connector P2, pin 1
Overvoltage Circuit Board Connector P2, pin 2
Crank (K1 Relay) Circuit Connector P1, pin 1
(Diesel) Fuel Solenoid CIrcuit Connector P1, pin 7
3-187
�
1
2
1. Ground Connection2. P2 Connection
Figure 6-3. Checking P1 and P2 Connections
Fuses
The chart following lists the possible causes of blown
controller fuses F1, F2, and F3. If a fuse is blown,
replace it and resume operation. If the fuse blows again,
use the chart to identify the faulty component(s).
Blown F1 fuse (remote annunciator: 3 amp)
Blown F2 fuse (controller: 3 amp)
Battery connections reversed Shorted DC supply to indicator panel Shorted controller circuit board
Blown F3 fuse (engine and accessories: 15 amp)
Defective engine electrical components Defective overvoltage board Defective panel lamps, engine gauges
Defective dry contact kit Remaining accessories connected to TB1-42ADefective audio/visual alarm

6-4 Generator/Controller Troubleshooting TP-5353 8/94
Engine Will Not Crank
Check for DC voltage at Fuse
F2 (3 amp). See Figure 6-4.
Voltage at fuse indicates fuse
is good. Is voltage present?
Check engine start circuit (P1
harness, starter, solenoid,
battery connections, etc.). Is
start circuit okay?
Engine will not crank with generator
master switch in RUN position.
Is battery fully charged? Yes
No
Charge battery and attempt restart.
If engine will not crank, continue
troubleshooting sequence.
Press lamp test button.
Do lamps light?
No
Check P3/P4 harness and connections.
Are connections okay?
No
Replace P3/P4 harness. Replace defective indicator
panel circuit board.
Yes
Is controller LED4 lit? Yes
Is emergency stop switch (controller
or remote) activated? See emergency
stopping in Section 2—Operation.
Do controller LED2 and LED3 light with
generator master switch in RUN position?Yes
Was there a fault shutdown?
Replace circuit
board.
Correct fault.
Repair defective
component.
Replace
circuit board.
Reset emergency stop switch
(controller or remote). Reset air
damper on 200-1600 kW Detroit
Diesel models only. Is LED4 lit?
Check fuse. Is
fuse okay?
Replace fuse. If fuse blows
again, refer to Fuses
earlier in this section.
Check P1 connector/harness.
Check if battery connections
are loose or reversed.
Replace circuit board.
No Yes
No
No Yes
No
YesNo
Yes
No
No
Yes
Yes
Yes
Place test jumper between TB1-1
and TB1-1A. Is LED4 lit? Remove
test jumper before proceeding.
No
No
Yes
Repair/replace defective
emergency stop switch
(controller or remote.)

TP-5353 8/94 Generator/Controller Troubleshooting 6-5
Engine Cranks, But Will Not Start
Engine cranks but will not start.
Is fuel low? Yes
No
Is LED3 lit? No
Add fuel.
Yes
Yes
Replace circuit board.
Check circuit board
P2 harness and
connector pins. Is
harness defective?
No
Yes
Repair or
replace
harness.
Replace circuit board.
Are controller panel lights lit?
No
Repair or replace
harness and/or
components.
No
Yes
Check P1 harness and
connector pins. Is
harness defective?Yes
Repair or replace
harness.
No
Replace circuit board.
Check bulbs. Are
bulbs burned out?Yes
Replace
bulbs
No
Does engine starting circuit
checkout okay? Check for
battery voltage at ignition
coil (on gas/gasoline units)
or fuel solenoid/injector
pump/electronic governor
(on diesel units).
3-187
V
1
1. Fuse Terminal
Figure 6-4. Checking Condition of Fuse F2

6-6 Generator/Controller Troubleshooting TP-5353 8/94
Controller Instrumentation
Controller instrumentation not functioning properly.
Loose input or component lead
connection at AC fuse terminal
block (TB3) or at component?Yes
No
Blown 1.5-amp fuse at
AC fuse terminal block
(TB3)? See Figure 6-5.Replace the fuse.
Instrumentation is defective.
Replace or repair component.
Secure the connection.
No
Yes
TP-5353-61
1. AC Fuse Terminal Block
Figure 6-5. AC Fuse Terminal Block

TP-5353 8/94 Generator/Controller Troubleshooting 6-7
Lamp Circuit Board
Press lamp test button.
Do lamps light?
Lamp circuit board not functioning or not functioning
properly (fault lamps and alarm horn only).
Improper input signal. Main
circuit board is defective.
Is lamp circuit board receiving
power? Check for input voltage
at P4-8 and P4-20 soldered
connections on lamp circuit
board. See Figure 6-6.
Panel circuit board
defective. Replace it.
Is P3/P4 ribbon connector undamaged
and properly connected? (On 200-1600
kW models with Detroit Diesel engines:
For these lamps to function requires
connection of air damper and auxiliary
prealarm leads between circuit boards).
Replace ribbon
connector.
Replace main
circuit board.
Yes
No
Yes
No
Yes
No
3-187
1
2
1. P4-8 (+) Connection2. P4-20 (--) Connection
Figure 6-6. Checking Input to Lamp Circuit Board

6-8 Generator/Controller Troubleshooting TP-5353 8/94
Overcrank Lamp
Open speed sensor circuit? Check continuity of wire 2
(black), wire 16 (white), and wire 24 (red) between P1
connector and speed sensor. Check for 8-10 volts DC
across speed sensor (+) positive terminal and (--)
negative terminals. Check wire 16 for 3-6 volts DC, and
wire 24 for 8-10 volts DC. Does test check out okay?
Excessive speed sensor air gap?
Engine starts and runs, but overcrank lamp flashes.
NOTE: The overcrank lamp will flash if speed sensor
signal is absent longer than one second.
Adjust speed sensor air gap to
0.014-0.028 in. (0.36-0.71 mm). See
Figure 6-7.
Defective speed sensor.
See Speed Sensor Test in
this section.
Repair circuit.
No
Yes
Yes
No
0 + ---
0.014-0.028 in.
(0.36-0.71 mm)
1
2
3
6
5
4
3-100R12758-3 TP-5353-6
1. Speed Sensor2. Wire 16: White/Clear3. Wire 24: Red
4. Wire 2: Black5. Air Gap: 0.014-0.028 in. (0.36-0.71 mm)6. Actuator Cup
Figure 6-7. Speed Sensor Air Gap

TP-5353 8/94 Generator/Controller Troubleshooting 6-9
FASTCHECK� Features and Operation
The FASTCHECK� is an engine simulator for testing
and troubleshooting the microprocessor controller.
FeaturesFeatures are shown in the following paragraphs, see
Figure 6-8 for illustration. Engine conditions are
simulated by the following engine switch position:
� OFF—locked engine (starter energized but not
turning)
� CRANK—engine cranking, but not started
� RUN—engine running
Indicator Lamps
IGN—(ignition) lamp:
� shows battery voltage supplied to ignition
(gas/gasoline) or fuel solenoid (diesel), fuel valves,
water valve (city-water cooled sets)
� lights during cranking and running
CRK—(crank) lamp:
� shows battery voltage switched to starter (engine
not necessarily turning)
� lights only during on-crank cycles
REG—(regulator) lamp:
� shows battery voltage supplied to generator set’s
AC voltage regulator
� lights only during cranking and running
BATT—(battery) lamp:
� shows lights when test battery(ies) or DC power
supply is live and properly connected
NOTE
L.O.P., H.W.T., and OVERSPEED simulate
malfunctions causing engine to shut down. L.O.P and
H.W.T. circuits will start timing after engine has been
running for 30 seconds. Engine shutdown should occur
5 seconds after pushing fault switch.
1
2
3
4
B-291930
1. Toggle Switches2. Indicator Lamps3. Overspeed Button4. Engine Switch
Figure 6-8. FASTCHECK� Simulator
Switches
L.O.P.—low oil pressure
H.W.T.—high water (engine) temperature
OVERSPEED—simulates a 70 Hz overspeed condition
L.F.—low fuel (not used for testing)
L.W.T.—low engine water temperature
A.O.P.—anticipatory (low) oil pressure
A.W.T.—anticipatory (high) water temperature

6-10 Generator/Controller Troubleshooting TP-5353 8/94
Operation
Use the FASTCHECK� to test the microprocessor
controller on the generator set when troubleshooting
start-up problems, or to test and troubleshoot the
controller when removed from the generator set.
To operate the FASTCHECK� the following equipment
is required:
� FASTCHECK� simulator (B-291930) and harness
(255915).
� Variable low-voltage DC power supply; 0-30 volt, 3
amp minimum current, 0.5% maximum output
voltage ripple at 30 volts DC. A 12- or 24-volt
battery (depending on system voltage) can also be
used to operate the FASTCHECK�.
NOTE
The 200-300 kW diesel-powered models use a
24-volt battery system.
To Connect/Operate the FASTCHECK�
Tester
1. Unplug DC engine harness from DC harness
connector (P1). See Figure 6-9.
2. Connect FASTCHECK� harness to DC harness
connector (P1) and top of FASTCHECK�.
3. Move generator master switch to OFF/RESET
position.
4. Move FASTCHECK� engine switch to OFF.
5. Clip red (+) and black (--) harness leads to
battery(ies) or DC power supply of proper voltage
for generator set (12 or 24 volt). Adjust output
voltage to 1-2 volts above battery voltage when
using a DC power supply. See BATT rating on
generator nameplate. Use generator set
battery(ies) if accessible and fully charged.
NOTE
Circuit board damage will occur if correct polarity is
not observed when connecting FASTCHECK�.
NOTE
Due to the absence of AC output, the auxiliary lamp
will flash during controller testing on 16-light
microprocessor controllers. On 6-light controllers
the low water temperature/auxiliary lamp will flash.
The NOT IN AUTO lamp is illuminated whenever
the generator master switch is not in the AUTO
position on 16-light microprocessor controllers.
6. Move generator master switch to RUN position.
Move FASTCHECK� engine switch to CRANK.
FASTCHECK� IGN., CRK., and REG. lamps
should light. The generator controller will cause
the engine to crank until the FASTCHECK� switch
is moved to RUN (or OVERCRANK shutdown
appears on generator controller).
7. Move the FASTCHECK� engine switch to RUN.
CRK. lamp should go out and REG. and IGN.
lamps should stay on.
8. Simulate engine malfunctions by pressing
FASTCHECK� fault switches. Corresponding fault
lamp on controller should light during each
simulated engine malfunction.
NOTE
Leave FASTCHECK� engine switch in RUN
position for at least 30 seconds before pushing
toggle switches. Toggle generatormaster switch to
OFF/RESET and FASTCHECK� engine switch to
OFF, then back to RUN after simulated fault
shutdowns.
9. Procedures to test overcrank circuitry, speed
sensor circuitry, and generator condition indicators
are described later in this section.
12
3
4
R11118-23-187
1. FASTCHECK�2. Wiring Harness3. DC Harness Connector4. DC Power Supply
Figure 6-9. FASTCHECK� Connections
TP-5353 8/94 Generator/Controller Troubleshooting 6-11
Overcrank
To test the controller’s ability to:
� Detect a locked engine.
� Stop a start-up attempt if the starter locks or will not
engage.
1. Move FASTCHECK� engine switch to OFF.
2. Move generator master switch to OFF position and
then move switch to RUN position.
3. IGN., CRK., and REG. lamps on FASTCHECK�
should light for approximately 5 seconds and then
go out. 5 seconds later the IGN., CRK.,and REG.
lamps should relight for 5 seconds before going out
again (15 seconds total elapsed time). Controller
OVERCRANK lamp lights. Check for operating
voltage between TB1-42A (+) and TB1-12 (--).
4. This test verifies the proper operation of the engine
overcrank circuit. If the OVERCRANK shutdown
fails to function, check the speed sensor and
related circuitry. See Controller Speed Sensor
Circuitry following and Speed Sensor Test in
Section 7—Component Testing and Adjustment.
Controller Speed Sensor Circuitry
To check the controller’s ability to respond to signals
from the speed sensor, perform the following test:
1. Move generator master switch to OFF/RESET
position.
2. Move FASTCHECK� engine switch to OFF
position.
3. Move generator master switch to RUN position.
Observe IGN., CRK., and REG. lamps light.
4. Within 5 seconds, move FASTCHECK� engine
switch to RUN.
5. If CRK. lamp goes out on FASTCHECK�, the
controller speed sensor circuitry is functioning
correctly.
Generator Condition Indicator Terminal(TB1 Terminal Strip)
Remote accessories (A/V alarm, remote annunciator,
dry contact kits, etc.) may be connected to the controller
TB1 terminal strip to signal the condition of the
generator set. (Some generator sets may not be
equipped with the optional sending devices necessary
to operate all generator condition indicators.) If remote
accessories will not operate, test for output voltage at
the TB1 terminal strip. To test the operation of each
indicator, move the generator master switch and
FASTCHECK� toggle in the position prescribed. Test
point voltage is slightly less than the voltage being
supplied to the controller (12 or 24 volts). If correct
voltage is not detected at the test point, remote
accessories (A/V alarm, remote annunciator, dry
contact kits, etc.) will not function. Test point
connections are shown in Figure 6-10 and the chart
titled Generator Condition Indicator Terminals.
NOTE
When checking controller test point voltage, place
negative (--) lead of voltmeter on terminal designated in
the chart (and) and voltmeter positive (+) lead on
TB1-42A.
NOTE
Due to the absence of AC output, the auxiliary lamp will
flash during controller testing on 16-light
microprocessor controllers. On 6-light controllers the
low water temperature/auxiliary lamp will flash. The
NOT IN AUTO lamp is illuminated whenever the
generator master switch is not in the AUTO position on
16-light microprocessor controllers.
NOTE
LeaveFASTCHECK� engine switch in theRUNposition
for at least 30 seconds before pushing toggle switches.
Toggle generator master switch to OFF/RESET
position. Move the FASTCHECK� engine switch toOFF
position. Move generator master switch to RUN
position. Observe IGN., CRK., and REG. lamps light.
Within 5 seconds, move the FASTCHECK� engine
switch to RUN.

6-12 Generator/Controller Troubleshooting TP-5353 8/94
G-292806
1 2
1. TB1-42A 2. TB1—(See chart titled Generator Condition Indicator Terminals)
Figure 6-10. Indicator Lamp Test Connections
Generator Condition Indicator Terminals
Indicator Switch Position/Remarks Check For Voltage Between:
System Ready Master switch in AUTO position; engine
switch in OFF position.
TB1-42A (+) and TB1-60 (--)
High (Engine) Water Temperature
(H.W.T.)
Master switch in RUN position; engine
switch in RUN position; hold toggle
switch to H.W.T for at least 5 seconds
TB1-42A (+) and TB1-36 (--)
Low Oil Pressure (L.O.P.) Master switch in RUN position; engine
switch in RUN position; hold toggle
switch to L.O.P. for at least 5 seconds
TB1-42A (+) and TB1-38 (--)
Auxiliary Fault (16-light controller) or
Low Water Temperature/Auxiliary
(6-light controller)
Master switch in RUN position; engine
switch in RUN position; wait 10
seconds. Flashing AUX lamp indicates
proper operation of all Auxiliary
functions
TB1-42A (+) and TB1-26 (--)
Emergency Stop (local/remote) (if
equipped)
Master switch in RUN position; engine
switch in RUN position; remove switch
lead connected to controller terminals
TB1-1 or 1A.
Not Applicable

TP-5353 8/94 Generator/Controller Troubleshooting 6-13
Generator Condition Indicator Terminals (Continued)
Indicator Switch Position/Remarks Check For Voltage Between:
Generator Switch Not in Auto Master switch in RUN or OFF/RESET;
engine switch in any position
TB1-42A (+) and TB1-80 (--)
Anticipatory (High Engine) Water
Temperature (A.W.T.)
Master switch in RUN position; engine
switch in RUN; hold toggle switch to
A.W.T.
TB1-42A (+) and TB1-40 (--)
Anticipatory (Low Engine) Oil Pressure
(A.O.P.)
Master switch in RUN position; engine
switch in RUN; hold toggle switch to
A.O.P.
TB1-42A (+) and TB1-41 (--)
Low Water Temperature (L.W.T.) Master switch in RUN position; engine
switch in RUN; hold toggle switch to
L.W.T.
TB1-42A (+) and TB1-35 (--)
Low Fuel Generator master switch in
OFF/RESET; engine switch in RUN
position
Ground controller terminal TB1-63 to
test. If Low Fuel lamp lights, circuit is
functioning correctly
Not Applicable
Battery Charger Fault (if battery charger
equipped and connected)
Generator master switch in
OFF/RESET; engine switch in RUN
position
Ground controller terminal TB1-61 to
test. If Battery Charger lamp lights,
circuit is functioning correctly
Not Applicable
Low Battery Volts (if battery charger
equipped and connected)
Generator master switch in
OFF/RESET; engine switch in RUN
position
Ground controller terminal TB1-62 to
test. If Low Battery Volts lamp lights,
circuit is functioning correctly
Not Applicable
Overspeed See Controller Speed Sensor Circuitry
earlier in this section
Not Applicable
Overcrank See Overcrank earlier in this section Not Applicable
Auxiliary Prealarm (Common Fault) Master switch in RUN position; engine
switch in RUN position; hold toggle
switch to L.W.T., H.W.T., or L.O.P.
TB1-42 (+) and TB1-32 (--)

6-14 Generator/Controller Troubleshooting TP-5353 8/94
Manual ControllerUse the following charts as a reference in
troubleshooting individual problems. Before beginning
any troubleshooting procedure, read all safety
precautions at the beginning of this manual and those
included in the text. Do not neglect these precautions.
WARNING
Hazardous voltage. Moving rotor.
Can cause severe injury or death.
Do not operate generator set without all guards and
electrical enclosures in place.
Hazardous voltage can cause severe injury or
death. Whenever electricity is present, there is the
hazard of electrocution. Openmain circuit breaker on all
power sources before servicing equipment. Electrically
ground the generator set and electrical circuits when in
use. Never come into contact with electrical leads or
appliances when standing in water or on wet ground, as
the chance of electrocution is increased under such
conditions.
Accidental starting can cause severe injury or
death. Turn generator set master switch to OFF
position, disconnect power to battery charger, and
remove battery cables (remove negative lead first and
reconnect it last) to disable generator set beforeworking
on any equipment connected to generator set. The
generator set can be started by automatic transfer
switch or remote start/stop switch unless these
precautions are followed.

TP-5353 8/94 Generator/Controller Troubleshooting 6-15
Troubleshooting Manual Controller
Press start
switch
Does engine
crank?
Is K2 relay
LED2 lit?No Yes
No
Replace
fuse.
� Check condition/
connections of
start/stop switch
(N, 43, and 47).
See Section 7 fol-
lowing.
� Check battery
condition and
connections.
Yes
Is 10-amp
fuse okay?
Is K3 relay
LED3 lit?
Is K2 relay functioning
properly? See Section 7
following.
Replace
circuit
board.
K3 relay or K1
relay faulty—
replace circuit
board.
Verify that K3 relay is
energized by checking for
DC voltage at K20 relay
coil when START switch is
actuated. Is voltage
present at relay?
K3 relay faulty—
replace circuit
board
Is DC voltage available
at K20 relay contacts
(starter motor side) when
START switch is
actuated?
No
Replace K20
relay (starter
motor solenoid)
� Check starter solenoid
on starter motor (if so
equipped).
� Check starter motor.
� Check battery(ies). Load
test battery(ies).
Yes Go to
A
No
Yes
No
No
Yes
Yes
No
Yes

6-16 Generator/Controller Troubleshooting TP-5353 8/94
Troubleshooting Manual Controller (Continued)
Does engine
start?Yes
Is DC voltage present at the following
components (if so equipped)?
� Ignition module (gas/gasoline)
� Fuel pump (gasoline)
� Fuel valve (gas)
� Fuel solenoid (diesel 20-180 kW)
� Governor controller (diesel 200-300 kW)
Is K4 relay
LED lit?
Did an engine safety
shutdown for
overspeed occur?
Replace main
circuit board
(defective K4
relay).
� Check for overspeed
(overfrequency).
� Check/test electronic gov-
ernor and/or voltage regu-
lator.
Engine fault check the following components
(if so equipped):
� Fuel supply
� Ignition module (gas/gasoline)
� Fuel pump (gasoline)
� Fuel valve ( gas)
� Fuel solenoid (diesel 20-180 kW)
� Governor controller (diesel 200-300 kW)
A Go to
B
No
Yes
No
Yes
No
Yes
No
Check harness
connections from
control board to
component.

TP-5353 8/94 Generator/Controller Troubleshooting 6-17
Troubleshooting Manual Controller (Continued)
Does engine continue
to run after start switch
is released?
Can engine be
stopped by
using stop
switch?
GENERATOR
SET CHECKS
OUT OKAY.
Did K4
relay LED
light?
Replace
defective
start/stop
switch.
Replace circuit
board (defective
K4 relay).
BGo to
CNo
Yes
Yes
No
Yes
NoNo
Yes
Does engine stop when
engine fault shutdown lead
is grounded to engine
block.?
Yes
No
Did K4
relay LED
light?
Yes
No
No
Repair/replace
wiring harness.Yes
Replace circuit
board (defective
K4 relay).
Replace circuit
board (defective
K4 relay).
Does wiring
harness
checkout okay?
Does start/stop
switch function
correctly and wiring
checkout okay?

6-18 Generator/Controller Troubleshooting TP-5353 8/94
Troubleshooting Manual Controller (Continued)
Do the following engine components function
correctly (if so equipped)?
� Ignition module (gas/gasoline)
� Fuel pump (gasoline)
� Fuel valve (gas)
� Fuel solenoid (diesel 20-180 kW)
� Governor controller (diesel 200-300 kW)
Does K1
relay LED
light?
Did K4 relay
LED light?
Does start/stop
switch function
correctly?
Replace circuit
board (K4 relay
defective).
Replace circuit
board (K4 relay
defective).
Check/replace
defective engine
components.
Replace
defective
start/stop
switch.
C No
Yes
No
YesYes
Yes
No
Is there AC output when
start button is held and
unit is running?
Is AC output at correct
voltage? (Stator leads 7
and 10 at approximately
120 volts AC.)
Is voltage adjusting
rheostat set correctly?
Readjust voltage
adjusting rheostat.
K1 relay faulty—
replace circuit board.
Go to generator
troubleshooting
flowchart in Section 7.
No
Yes
No
No
Yes
Yes
No
Does low oil pressure
(LOP) safety shutdown
switch checkout okay?
Replace
defective
switch.
No
Yes
Does engine have correct
oil pressure? Use a
mechanical gauge to verify
pressure.
Check oil level.
Repair/replace
oil pump.
No
Yes
Do temperature safety
shutdown switch and water
level switch checkout
okay?
NoReplace
defective
switch(es).
Yes

TP-5353 8/94 Generator Troubleshooting 7-1
Section 7. Component Testing and Adjustment
Generator TroubleshootingUse the following flowchart to troubleshoot the
generator set when no voltage or high voltage is
detected. The remaining parts of this section give
additional and more detailed information about the
individual checks/tests mentioned in the flowchart. Use
the flowchart to initially isolate the possible problem.
See the flowcharts following.
Accidental starting.
Can cause severe injury or death.
Disconnect battery cables before working on
generator set (negative lead first and reconnect it
last).
WARNING
Accidental starting can cause severe injury or
death. Turn generator set master switch to OFF
position, disconnect power to battery charger, and
remove battery cables (remove negative lead first and
reconnect it last) to disable generator set beforeworking
on any equipment connected to generator set. The
generator set can be started by automatic transfer
switch or remote start/stop switch unless these
precautions are followed.
WARNING
Hazardous voltage. Moving rotor.
Can cause severe injury or death.
Do not operate generator set without all guards and
electrical enclosures in place.
Hazardous voltage can cause severe injury or
death. Disconnect generator set from load by opening
line circuit breaker or by disconnecting generator set
output leads from transfer switch and heavily taping
ends of leads. If high voltage is transferred to load
during test, personal injury and equipment damagemay
result. Do not use the safeguard circuit breaker in place
of the line circuit breaker.

TP-5353 8/947-2 Generator Troubleshooting
Troubleshooting Generator—No Output Voltage
No output voltage
is detected.
Is safeguard circuit breaker
in ON position?
Do flashlight test on
photo transistor board.
See LED Circuit Board
Test.
Place safeguard circuit
breaker to ON position.
If no voltage is detected,
remove G and F+ (red)
leads from SCR assembly.
Repeat flashlight test on
photo transistor board.
If high voltage is detected,
check for battery voltage at
voltage regulator. Is battery
voltage present?
Check DC voltage at
LED circuit board.
If high voltage is
detected, replace
photo transistor
board.
If no voltage is de-
tected, test rotor. Do
exciter armature and
main field windings
check out okay?
If no DC voltage is
present, unplug
connector at LED
circuit board and
check voltage.
If DC voltage of
6-12 volts is pres-
ent, replace LED
circuit board.
(LED is open.)
Replace rotor. Replace SCR
assembly.
If DC voltage of 6-12
volts is present, re-
place LED circuit
board. (LED or flyback
diode is shorted and/
or grounded .)
If no DC voltage is
present, check wiring
between voltage regu-
lator and LED circuit
board. Does wiring
check out okay?
Repair/replace
wiring.
Replace voltage
regulator.
YesNo
No
Yes
Yes
YesNo
Check wiring to
voltage regulator.No

TP-5353 8/94 Generator Troubleshooting 7-3
Troubleshooting Generator—High Output Voltage
High output voltage
is detected.
Turn safeguard circuit breaker
to OFF position. Does output
voltage remain high?
Remove G and F+ (red)
leads from SCR assem-
bly. Does output voltage
remain high?
Turn safeguard circuit
breaker to OFF position. Is
sensing voltage (190-277
volts) at leads V7 and V8
available?Check for open wir-
ing between stator
and safeguard circuit
breaker.
Replace
SCR assembly.
If no voltage is de-
tected, replace pho-
to transistor board.
Test stator
windings.
Replace
voltage
regulator.
If sensing voltage is
low, check voltage
on all phases. Is
voltage balanced
on all windings?
If sensing voltage
is high, replace
voltage regulator.
YesNo
Yes
No
No
Yes
Yes
No

TP-5353 8/947-4 Generator Troubleshooting
Generator TestingThis section covers generator testing for the following
generator conditions:
� No output on any phase
� Overvoltage
� Fluctuating voltage
Accidental starting can cause severe injury or
death. Turn generator set master switch to OFF
position, disconnect power to battery charger, and
remove battery cables (remove negative lead first and
reconnect it last) to disable generator set beforeworking
on any equipment connected to generator set. The
generator set can be started by automatic transfer
switch or remote start/stop switch unless these
precautions are followed.
WARNING
Hazardous voltage. Moving rotor.
Can cause severe injury or death.
Do not operate generator set without all guards and
electrical enclosures in place.
Hazardous voltage can cause severe injury or
death. Disconnect generator set from load by opening
line circuit breaker or by disconnecting generator set
output leads from transfer switch and heavily taping
ends of leads. If high voltage is transferred to load
during test, personal injury and equipment damagemay
result. Do not use the safeguard circuit breaker in place
of the line circuit breaker.
Follow all safety precautions in front of this manual and
the additional precautions within the text. Figure 7-1
lists the various generator output conditions and
component tests. Refer to Figure 7-2, AC Voltage
Control for assistance in troubleshooting.
No Output On Any Phase
1. Check the safeguard breaker (if equipped). If
safeguard breaker is open, close breaker and, with
set running, check AC voltmeter for proper output
voltage.
2. If proper output does not show, then:
a. Check wire 1B from safeguard breaker and wire
7N (ground) to voltage regulator.
b. Check for voltage to safeguard breaker (if
equipped).
3. If all items in step 2 are okay, proceed to the LED
circuit board flashlight test and Automatic Voltage
Regulator (AVR) test as described later in this
section.
4. If tests indicate LED and AVR are functioning
correctly, visually inspect photo transistor board for
damage (open foil pattern or heat discoloration).
5. If the photo transistor board test appears good,
proceed to the exciter armature test as described
later in this section.
6. If the exciter armature test indicates the armature is
functioning correctly, proceed to the generator field
test as described later in this section.
7. If the generator field test indicates the field is
functioning correctly, replace the SCR assembly or
the photo transistor board as described later in this
section.

TP-5353 8/94 Generator Troubleshooting 7-5
Components and Circuits to Test Under Certain Generator Output Conditions
GeneratorOutput
Condition
LEDBoard
PhotoTransistorBoard
AutomaticVoltageRegulator(AVR)
SCRAssembly
SafeguardBreaker
ExciterArmature
GeneratorField
GeneratorStator
VoltageAdjustment
Pot
NoOutput
� � � � � � � � �*
OverVoltage
�** � �
FluctuatingVoltage
� � � � � � �
* No output voltage if voltage adjustment pot circuit is open or shorted to ground.
** Overvoltage will occur if an outside light source is present when the LED board is removed.
Figure 7-1. Troubleshooting Guide
67 7N 68
3B
5B
1B V7
9
V8
5B 3B
VOLTAGE ADJUSTMENT RHEOSTAT
AC VOLTAGE REGULATORCIRCUIT BOARD
STAB.
T2T1 T3
50 Hz
60 Hz
C
A
LED BOARD
PHOTOTRANSISTORBOARD
MAGNETS
MAGNETS
EXCITER ARMATURE
SCR ASSEMBLY
GENERATORFIELD
12 LEAD STATOR
BATTERY
--- +
STARTER
PS
P
HC
15AMP
CONTROLRELAY CONTACTS
SELECTORSWITCH
T3 T1
P4
T2AC AMPS
SAFEGUARDBREAKER
7N
1B
7012
11
10
9
8
7
6
5
4
3
2
1
D2
AC
F3
G
AC
AC
F+
F---
AC
G
V/HZ
SOLENOID
50 Hz
V/Hz60 Hz
TP-5353-7
Figure 7-2. AC Voltage Control (Typical)

TP-5353 8/947-6 Generator Troubleshooting
Overvoltage
NOTE
If overvoltage occurs, disconnect harness plug at AVR
(voltage regulator). If overvoltage continues, the
problem lies in the photo transistor circuit and/or SCR
assembly; proceed through the following checks. If
output voltage disappears, the problem is in the AVR
(voltage regulator), including connections and/or wiring.
1. Examine photo transistor board for visible signs of
damage (open foil pattern or heat discoloration).
Replace photo transistor board if visibly damaged.
If overvoltage continues after replacement of photo
transistor board, proceed to Step 2.
2. Remove green (center) lead from G terminal and
red lead from F+ terminal of SCR assembly. (Tape
each terminal end of leads to prevent contact with
adjacent metal components.)
3. With safeguard breaker open, start generator set.
The lack of AC output indicates the SCR assembly
is functioning properly. If overvoltage continues,
replace the SCR assembly.
NOTE
When replacing SCR assembly, do not exceed
torque value of 8 in. lbs. (0.9 Nm) when tightening
SCR mounting bolts.
4. If overvoltage is read with the safeguard breaker
closed, check for an open circuit in leadsV7 andV8
to the AVR (voltage regulator ). If these circuits are
open or shorted, repair or replace. Check the
voltage rheostat circuit (leads 67 and 68). Repair or
replace as necessary.
5. If all the circuits described in step 4 are okay, check
the voltage regulator (AVR) as described later in
this section.
Fluctuating Voltage
1. Check the generator output leads for proper
connections. Refer to Wiring Diagrams.
2. Check for loose connections to the AVR (voltage
regulator), LED board, photo transistor board, or
SCR assembly.
3. Check the stator for shorted or openwindings; refer
to stator testing later in this section.
4. Verify AVR adjustment. See AVR (Voltage
Regulator) Operation and Adjustment later in this
section.
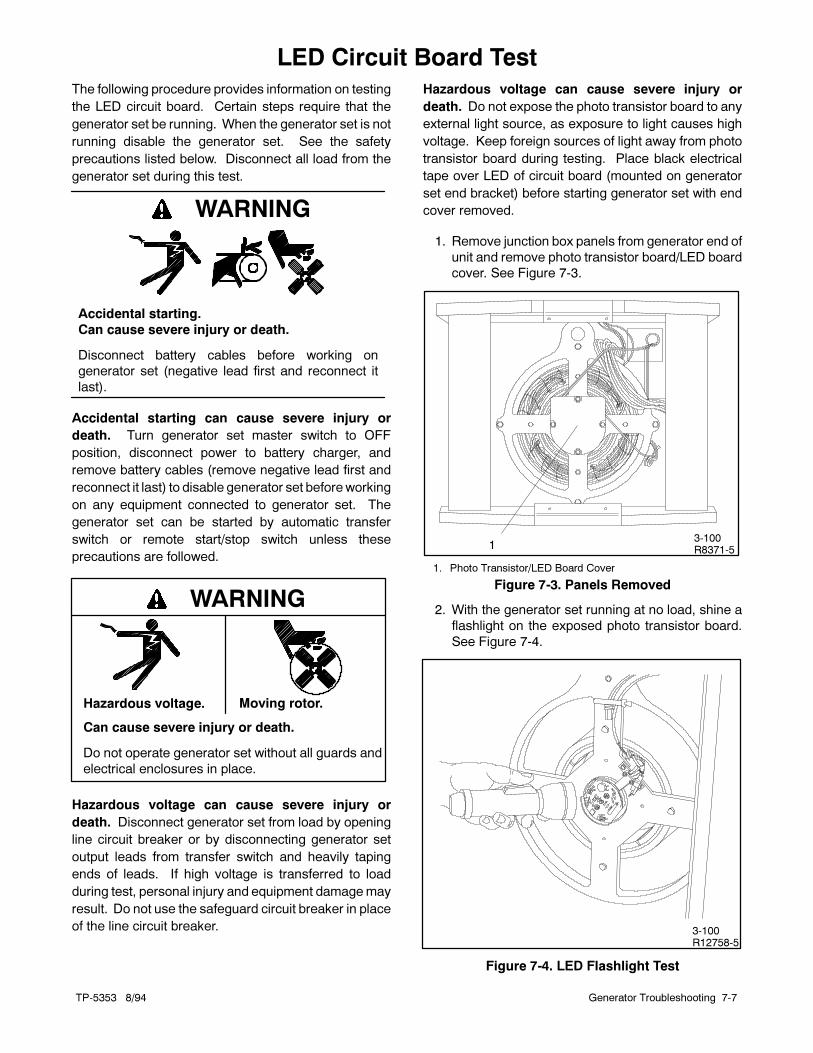
TP-5353 8/94 Generator Troubleshooting 7-7
LED Circuit Board TestThe following procedure provides information on testing
the LED circuit board. Certain steps require that the
generator set be running. When the generator set is not
running disable the generator set. See the safety
precautions listed below. Disconnect all load from the
generator set during this test.
Accidental starting.
Can cause severe injury or death.
Disconnect battery cables before working on
generator set (negative lead first and reconnect it
last).
WARNING
Accidental starting can cause severe injury or
death. Turn generator set master switch to OFF
position, disconnect power to battery charger, and
remove battery cables (remove negative lead first and
reconnect it last) to disable generator set beforeworking
on any equipment connected to generator set. The
generator set can be started by automatic transfer
switch or remote start/stop switch unless these
precautions are followed.
WARNING
Hazardous voltage. Moving rotor.
Can cause severe injury or death.
Do not operate generator set without all guards and
electrical enclosures in place.
Hazardous voltage can cause severe injury or
death. Disconnect generator set from load by opening
line circuit breaker or by disconnecting generator set
output leads from transfer switch and heavily taping
ends of leads. If high voltage is transferred to load
during test, personal injury and equipment damagemay
result. Do not use the safeguard circuit breaker in place
of the line circuit breaker.
Hazardous voltage can cause severe injury or
death. Do not expose the photo transistor board to any
external light source, as exposure to light causes high
voltage. Keep foreign sources of light away from photo
transistor board during testing. Place black electrical
tape over LED of circuit board (mounted on generator
set end bracket) before starting generator set with end
cover removed.
1. Remove junction box panels from generator end of
unit and remove photo transistor board/LED board
cover. See Figure 7-3.
3-100R8371-51
1. Photo Transistor/LED Board Cover
Figure 7-3. Panels Removed
2. With the generator set running at no load, shine a
flashlight on the exposed photo transistor board.
See Figure 7-4.
3-100R12758-5
Figure 7-4. LED Flashlight Test

TP-5353 8/947-8 Generator Troubleshooting
3. Observe the AC output voltmeter. High AC output
voltage indicates the SCR assembly and photo
transistor board are functioning properly. The fault
is likely in the wiring, AVR, or LED circuit board as
output voltage should drop to low level when
flashlight is removed. If no output is observed,
check the SCR assembly and photo transistor
board.
4. With the generator set running, approximately 1-2
volts DC should be observed at 3B (+) and 5B (--) at
the LED board. See Figure 7-5. Shine flashlight on
photo transistor. DC voltage reading should drop,
showing the AVR is functioning properly. If voltages
are not observed, refer to the AVR test. Stop
generator set. 3-094R8936-10
Figure 7-5. Checking LED Board

TP-5353 8/94 Generator Troubleshooting 7-9
SCR Assembly and Photo Transistor BoardThe SCR assembly is located behind the exciter
armature and controls current flow to the generator field.
The command and sensing circuitry is located on the
shaft-mounted photo transistor board. See Figure 7-6.
The generator set will only function if both components
are functional. The following test will determine which
component is faulty. Since it is necessary to remove the
end bracket from the set to correctly test these
components, do not begin this procedure unless there is
reasonable certainty that these components are
defective. See Generator Troubleshooting earlier in this
section. Examine the photo transistor board for visible
signs of damage (open foil patterns and heat
discoloration) before removing entire SCR assembly for
testing. Refer to End Bracket Removal and
Replacement later in this section and Section
8—Disassembly/Reassembly for end bracket removal.
3-100R12758-8
B-292902
B-258545-A
A-233999-B
1
2
3
1. Photo Transistor Board2. SCR Assembly (20-150 kW)
3. SCR Assembly (180-300 kW)
Figure 7-6. Component Locations
To test the SCR assembly and photo transistor board,
the following components are needed:
� One 120-volt/110-watt light bulb with socket
� Switch—DPST (double-pole/single-throw, 120 volt
10 amp minimum)
� Fuse, 1 amp (in holder)
� 120 volt AC plug with cord
� One “good” SCR assembly and photo transistor
board
This test simulates the normal operation of the
components when the generator is running. In the test, a
“known good” component (example: photo transistor
board) is matched with a component of unknown quality
(example: SCR assembly). If the components do not
function normally during the test, it is reasonable to
assume that the component of unknown quality is
defective. Test either component in this manner.

TP-5353 8/947-10 Generator Troubleshooting
Hazardous voltage can cause severe injury or
death. Carefully follow instructions in the equipment
manual when testing or servicing generator set in the
presence of voltage.
Hazardous voltage can cause severe injury or
death. Whenever electricity is present, there is the
hazard of electrocution. Openmain circuit breaker on all
power sources before servicing equipment. Electrically
ground the generator set and electrical circuits when in
use. Never come into contact with electrical leads or
appliances when standing in water or on wet ground, as
the chance of electrocution is increased under such
conditions.
1. Connect components as illustrated in Figure 7-7. If
testing the photo transistor board, the SCR
assembly must be “good.” If testing the SCR
assembly, the photo transistor board must be
“good.”
NOTE
When testing the SCR assembly used on 20-150
kW models, connections must make good contact
with the SCR foil pattern. Secure all SCR
connections with terminal nuts to ensure good
contact with foil pattern during testing. The SCR
threaded terminals are insulated from the SCR foil
pattern and are not in contact except when
“bridged” by terminal nut, electrical lead, terminal,
etc. Do not exceed 8 in. lbs. (0.9 Nm) when
tightening SCR terminal nuts.
2. With cord switch in the OFF position, plug in
electrical cord.
3. Turn cord switch to the ON position.
4. Apply light source directly to photo transistor
board. Shield the photo transistor board from all
sources of light during this test. If both components
are “good,” the test fixture light bulb will light when
the external light source is applied to the photo
transistor board. Remove the light source; the
fixture light bulb should go out. If the test fixture light
bulb does not light or is lit prior to receiving external
light source, the component being tested is
defective (in this example the SCR). Replace the
SCR assembly.
NOTE
When replacing SCR assembly, do not exceed a
torque value of 8 in. lbs. (0.9 Nm) when tightening
SCR mounting bolts.

TP-5353 8/94 Generator Troubleshooting 7-11
F
+
AC
AC
G
F---
3 5 643
546
77
10
11
12
10
11
12
1 2
9
9
8 8
1. SCR Assembly (20-150 kW)2. SCR Assembly (180-300 kW)3. White Wire4. Red Wire5. Green Wire6. Black Wire
7. Photo Transistor Board8. Light Source (Flashlight)9. 120 Volt/100 Watt Lamp
10. Fuse (1 Amp)11. Switch (DPST) S112. 120 Volts AC
Figure 7-7. SCR Assembly and Photo Transistor Board

TP-5353 8/947-12 Generator Troubleshooting
Automatic Voltage Regulator (AVR)Operation and Adjustment
The AVR monitors output voltage magnitude and
frequency to supply current to the stationary LEDboard.
The AVR circuit board includes volts/Hz and stability
adjustment pots. The volts/Hz adjustment is factory set
and normally requires no further adjustment. If
replacement of the controller circuit board or operation
of the generator under extreme loads results in voltage
instability, adjust the pots according to the procedure
following. See Figure 7-8.
C-255670-B
1
2
3
1. 60 Hz Voltage Adjustment2. 50 Hz Voltage Adjustment3. Stability Adjustment
Figure 7-8. AVR Adjustment
Stability Pot. Fine tunes voltage regulator to reduce
light flicker.
Volt/Hz. Pot. This adjustment determines engine
speed (Hz) at which generator output voltage will begin
to drop.
1. Turn generator master switch to OFF/RESET.
2. Set stability pot to far counterclockwise position.
3. Connect a 100-watt light bulb across terminals V0
and V7 on controller terminal strip or across
terminals on controller frequency meter.
4. Start generator set. With generator running at no
load, observe light bulb flicker. Excessive light bulb
flicker indicates poor stability.
5. Adjust stability pot until minimum flicker is
obtained.
6. Use controller voltage adjustment pot (or remote
voltage adjustment pot) to make adjustments to
generator while running under normal load (if
required).
7. Adjust engine speed to desired cut-in frequency
(factory setting is 57.5-58.0 Hz for 60 Hz models or
47.5-48.0 Hz for 50 Hz models) as measured on
frequency meter. See Section 7—Governor for
more information on engine adjustment.
8. Rotate Volts/Hz adjustment pot clockwise until
voltage level begins to drop (as measured on
voltmeter). When set to these specifications, the
generator will attempt to maintain normal output
until engine speed drops below the frequency set in
the previous step (as load is applied).
9. Adjust engine speed to obtain a full load engine
speed of 1800 rpm (60 Hz) or 1500 rpm (50 Hz).
10. Use controller voltage adjustment pot (or remote
voltage adjustment pot) to make final adjustments
to generator while running under normal load.
11. Readjust stability pot (if necessary).
To determine whether the AVR is functioning properly,
reduce engine speed (Hz) and watch for a
corresponding drop in AC voltage. At 60 Hz operation,
the voltage will remain constant until engine speed
drops below 58 Hz (approximately). If AC frequency
drops below 58 Hz, AC voltage will decline. At 50 Hz
operation, AC voltage remains constant until engine
speed is reduced to 48 Hz (approximately). If the AVR is
not functioning properly, refer to the following test to
determine cause of malfunction.

TP-5353 8/94 Generator Troubleshooting 7-13
To Test AVR
With the safeguard breaker closed (if equipped):
1. Disconnect the wiring harness connector from the
voltage regulator and check for continuity between
the voltage sensing leads V7 and V8 (pins 4 and
10). See Figure 7-9. If this circuit is open , repair or
replace. An open circuit will normally result in a
high voltage or overvoltage condition. Check the
15-amp fuse (if equipped).
2. If there is continuity between V7 and V8, check for
continuity in the voltage adjustment circuit (leads
67 and 68). With the harness disconnected check
the resistance between pins 1 and 3. This
resistance should change as the voltage adjust
rheostat is turned. Repair or replace defective
components as necessary. A defective voltage
adjust rheostat usually results in a nonadjustable
voltage.
3. Check for battery voltage at the voltage regulator
harness plug (pins 2 and 11) with the generator set
running. If there is not a voltage reading, check the
safeguard circuit breaker. If battery voltage is not
present, there should be a very low voltage at the
main output leads.
4. While the generator set is running, check for
approximately 1-2 volts DC output at terminals 3B
(+) and 5B (--) on the LED board or separate 3B/5B
connector and check for 8 volts (approximately) at
the connector. If voltage is not measured at
connector, check for open or short circuit in wiring
back to voltage regulator. If a fault exists in voltage
regulator wiring, repair or replace as necessary. If
voltage regulator wiring tests good, replace the
voltage regulator. Low voltage at the LED circuit
board may cause a low output voltage fault.
TP-5353-6
3-101R8371-3
1
2
1. AVR Board in Junction Box2. Controller Terminal Strip
Figure 7-9. AVR and Connections

TP-5353 8/947-14 Generator Troubleshooting
StatorNOTE
Generator sets use a skewed (slanted) rotor with a
straight stator. When replacing either rotor or stator, be
sure replacement is the same as the original.
1. Check the generator output leads for proper
connections. Refer to Wiring Diagrams.
2. Check the stator windings for:
� Shorted windings: Inspect for burnt or hot
windings. Replace stator if these conditions
exist. See Figure 7-10.
NOTE
Disconnect V7, V8, V9, V0 at AC from controller
terminal blocks before doing this test
� Open windings: With ohmmeter, check each
pair of leads for low resistance readings
(continuity). High resistance across A or low
resistance (continuity) across B and ground
indicates a faulty stator; replace stator. See
Figure 7-11.
3-100R12758-8
1 2
1. Windings2. Leads
Figure 7-10. Stator
A
B
C
1 4 2 5 3 6 7 10 8 11 9 12
A. CONTINUITY/RESISTANCE
B. NO CONTINUITY
C. NO CONTINUITYTP-5353-7
Figure 7-11. Stator Winding Test

TP-5353 8/94 Generator Troubleshooting 7-15
Generator Field1. Disconnect battery (negative lead first). Remove
end bracket. See End Bracket Removal and
Replacement later in this section and Section
8—Disassembly/Reassembly. Disconnect F+ and
F-- from SCR assembly.
2. With an ohmmeter, check for continuity across F+
and F-- leads (see Figure 7-12). Resistance
readings are shown in Section 1—Specifications,
Generator.
����
3-100R12758-8TP-5353-7
1
1. Ohmmeter connections across F+ and F-- leads
Figure 7-12. Field Continuity Check
3. Check for a grounded generator field. No
continuity should exist between field leads and
rotor assembly.
4. Using amegohmmeter, apply 500 volts DC to F+ or
F-- lead and rotor shaft. See Figure 7-13. Follow
the instructions of themegohmmetermanufacturer
when performing this test. A reading of
approximately 500K ohms (1/2 megohm) and
higher indicates the field winding is good. A
reading of less than 500K ohms (approximately)
indicates deterioration of winding insulation and
possible current flow to ground. Repair or
replacement of the rotor assembly is necessary.
Repair F+ and F-- if test should show leads shorted
to ground. Solder and insulate splices. Use new
sleeving when tying leads to shaft or heat sink.
Replace generator rotor assembly if test shows a
shorted or grounded winding.
Hazardous voltage can cause severe injury or
death. Carefully follow instructions in the equipment
manual when testing or servicing generator set in the
presence of voltage.
Hot parts can cause severe injury or death. Avoid
touching generator set field or exciter armature.
Generator set field and exciter armaturewill become hot
if shorted.
Hazardous voltage can cause severe injury or
death. Follow instructions of test equipment
manufacturer when performing high-voltage test on
rotor or stator. An improper test procedure can damage
equipment or lead to future generator set failures.
M
3-100R12758-8TP-5353-7
1
1. Megohmmeter connections across F+ and F-- leads androtor shaft
Figure 7-13. High Voltage Test

TP-5353 8/947-16 Generator Troubleshooting
Exciter ArmatureHot parts can cause severe injury or death. Avoid
touching generator set field or exciter armature.
Generator set field and exciter armaturewill become hot
if shorted.
Hazardous voltage can cause severe injury or
death. Follow instructions of test equipment
manufacturer when performing high-voltage test on
rotor or stator. An improper test procedure can damage
equipment or lead to future generator set failures.
1. Disconnect battery (negative lead first). See End
Bracket Removal and Replacement and Section
8—Disassembly/Reassembly for end bracket
removal. Remove end bracket. Disconnect AC
leads from SCR assembly.
2. With an ohmmeter, check for continuity across AC
leads. See Figure 7-14.
3. Repair AC leads if damaged or open. Solder and
insulate splices. Use new sleeving when tying
leads to shaft or heat sink.
����
3-100R12758-8TP-5353-7
1
1. Ohmmeter connections across AC leads
Figure 7-14. Exciter Armature Continuity Check
4. Visually check exciter armature for shorted
winding(s); with an ohmmeter check for low
resistance readings. See Section 1—
Specifications, Generator for resistance readings.
See Figure 7-14. Low resistance readings indicate
a faulty exciter armature requiring replacement of
rotor assembly.
5. Using a megohmmeter, apply 500 volts DC to rotor
shaft and either AC lead. See Figure 7-15. Follow
the instructions of themegohmmetermanufacturer
when performing this test. A reading of
approximately 500K ohms (1/2 megohm) and
higher indicates the field winding is good. A reading
of less than 500K ohms (approximately) indicates
deterioration of winding insulation and possible
current flow to ground. Repair or replacement of
the rotor is necessary.
6. Repair AC leads if test indicates leads shorted to
ground. Solder and insulate splices. Use new
sleeving when tying leads to shaft or heat sink.
7. Replace rotor assembly if test shows armature is
shorted to ground.
M
3-100R12758-8TP-5353-7
1
1. MegohmmeterconnectionsacrosseitherAC leadand rotorshaft
Figure 7-15. High Voltage Test

TP-5353 8/94 Generator Troubleshooting 7-17
End Bracket Removal and ReplacementThis procedure is a condensed version of the one found
in Section 8—Disassembly/Reassembly.
NOTE
On some models, it is necessary to loosen the
generator junction box to remove the end bracket.
Remove the six junction box mounting screws and
pull the junction box away from the engine to
remove end bracket.
1. Remove LED board and cover. Disconnect leads
from speed sensor.
2. Remove screws holding actuator cup and photo
transistor board.
3. Reach in and remove leads—photo transistor
board leads from SCR assembly. This will allow
slack when removing the end bracket.
4. Remove four bolts holding end bracket to stator.
5. Use a puller tool to remove end bracket. See
Figure 7-16.
NOTE
To avoid loosening exciter field magnets, do not
attempt to remove end bracket by pounding with a
hammer.
6. Pull the end bracket and exciter field assembly
over the exciter armature. Be extremely careful to
avoid damaging exciter field magnets or photo
transistor board.
7. Reverse order of disassembly to reinstall end
bracket/exciter field assembly.
3-096R8936-2
Figure 7-16. Removing End Bracket

TP-5353 8/947-18 Generator Troubleshooting
Speed Sensor TestFollow the procedure outlined below to determine if the
speed sensor (overspeed fault) is emitting a signal.
1. With generator master switch in OFF/RESET
position, connect a DC voltmeter between positive
(+) lead (wire 24) at speed sensor and ground (wire
2). Voltmeter should read approximately 8-10 volts
DC.
2. With generator set running, connect DC voltmeter
negative probe to “0” terminal (wire 16—white) on
speed sensor. Place voltmeter positive probe on
positive (+) terminal (wire 24—red). Voltmeter
should indicate approximately 12 volts DC.
NOTE
During the test the controller leads must remain
connected to the speed sensor terminals. Slide
leads from speed sensor terminals only enough to
expose connection for test leads. Do not
disconnect leads.
If speed sensor is emitting a signal, check continuity of
speed sensor leads (wires 2, 16, and 24) between
controller P1 connector and lead terminals at speed
sensor.
If the speed sensor is not emitting a signal, test the
speed sensor through the following procedure:
1. Connect speed sensor, voltmeter, and DC voltage
source as shown in Figure 7-17.
2. Touch sensing surface with a flat piece of iron or
steel—at least 1/4 cubic inch (4.1 cm) in size.
3. Voltmeter test reading should equal source
voltage.
4. Remove iron or steel from sensing surface and
observe no test voltmeter reading.
o + ---
+
---
+1
2
3
TP-5353-7
1. DC Voltmeter2. 12-Volt Battery or DC Power Supply3. Sensing Surface
Figure 7-17. Speed Sensor Test

TP-5353 8/94 Generator Troubleshooting 7-19
Air Damper Switch AdjustmentThe air damper switch is found on 200-1600 kWmodels
using Detroit Diesel engines with microprocessor
controllers and paralleling engine gauge box
(switchgear) controllers. This switch uses the normally
closed contacts to signal the microprocessor controller.
Models with paralleling engine gauge box (switchgear)
controllers have both normally open and normally
closed contacts available to signal the switchgear logic.
When the emergency stop button is energized the air
damper is activated. The generator set resetting
procedure includes resetting the air damper lever. An
LED on the microprocessor controllers indicates a
tripped air damper. Resetting the air damper lever will
turn off the microprocessor controller LED.
If the air damper lever is reset and the switch needs
adjustment, use the following procedure and see
Figure 7-18. The generator set must not be running
during this adjustment.
5. Reset the air damper switch if not already done.
Disconnect the air damper switchwiring harness at
the 2-pin connector near the switch. Connect an
ohmmeter to the harness of the switch.
6. If the switch is correctly adjusted no continuity will
be measured.
If continuity is measured, loosen the two attaching
switch screws and move the switch toward the air
damper lever until no continuity is measured.
When the switch is correctly positioned tighten the
switch screws.
7. Reconnect the switch wiring harness.
8. Reconnect the generator set battery. The air
damper LED on microprocessor controllers must
not be on. If the LED is on, readjust the switch as
described in step 2.
9. Start the generator set and run for a few minutes.
Stop the generator set using the emergency stop
switch. The air damper LED on microprocessor
controllers will turn on if correctly adjusted.
10. Disconnect the switch wiring harness and
reconnect an ohmmeter. Continuity is measured
when correctly adjusted.
11. No continuity is measured when the air damper is
reset. Reconnect the switch wiring harness.
TP-5633-2
272790-B
4
5
6
4. Air Damper Lever5. Air Damper Switch6. Wiring Harness Connector
Figure 7-18. Air Damper Lever (Detroit Diesel
Powered)

TP-5353 8/947-20 Generator Troubleshooting
Overspeed/Time Delay Circuit BoardThe overspeed circuitry protects the generator set and
equipment connected to it from overfrequency. The
feature is standard on manual controllers.
Overfrequency will occur if the governor was
misadjusted or defective. Shutdown will occur
immediately should frequency reach 68-70 Hz or
greater. This setting applies to 50 and 60 Hz. models.
The time delay circuitry provides approximately a 5
second delay before generator set is subject to fault
shutdown from low oil pressure (LOW), high engine
temperature (HWT), or low water level (LWL).
NOTE
Overspeed is not subject to the 5-second shutdown
delay.
This 5-second delay is necessary during starting to
allow engine to build-up oil pressure. This time delay is
present only at cranking. After the generator set comes
up to correct AC voltage, the time delay circuitry times
out. After approximately 5 seconds, engine fault
shutdowns are operative.
Test both relays and circuit board for function. See
Figure 7-19 and use the following procedure. Tests are
made with circuit board in place and connected to
generator set. Do not connect load to generator set.
TP-5414-7
N
70
N
30
33
44
13A
13
TDR
SDR
Ground(--12 Volts DC)
P1--1(+12 Volts DC)
Not Used
P1--13 (K4 Relay)
Stator Lead V0
Stator Lead V7
P1--15 (K4 Relay)
Engine ShutdownSwitches
TDR
SDR
Figure 7-19. Overspeed/Time Delay Circuit Board
Overspeed Circuitry and Relay
The following conditions indicate that the overspeed
circuitry and relay are functional.
1. Check for 12 volts DC across terminals 70 (+) and
N (--). This is the battery supply voltage. If voltage
is not present K2 relay on main circuit board is
defective.
2. Check for 110-190 volts across terminals 33 and
44. These are sensing leads for frequency. If
voltage is not present, test stator.
3. Connect a frequency meter to terminals 33 and 44.
No continuity is measured using an ohmmeter
between terminals 30 and N when frequency is
below 68-70 Hz.
4. Momentarily increase frequency at engine
governor to a value of 70 Hz or greater. When
frequency reaches 68-70 Hz or greater, continuity
is measured using an ohmmeter between
terminals 30 and N.
5. If the circuit board fails steps 3 and/or 4 it is
defective.
Time Delay Circuit Board
The following conditions indicate that the time delay
circuitry and relay are functional.
1. Check for 110--190 volts across terminals 33 and
44 after generator set comes up to speed. These
are sensing leads for frequency. If voltage is not
present, test stator.
2. Initially no continuity is measured using an
ohmmeter between terminals 13 and 13A.
3. After approximately 5 seconds continuity is
measured using an ohmmeter between terminals
13 and 13A.
4. If the circuit board fails steps 2 and/or 3 it is
defective.

TP-5353 8/94 Generator Troubleshooting 7-21
Overvoltage Circuit BoardThe overvoltage circuit board provides overvoltage
protection when output voltage is 15% above nominal
voltage for more than one second. This option is
available only on microprocessor controllers.
Initial setup is necessary dependent upon specific
generator application. Clip and remove resistor R2 from
the overvoltage shutdown board if installing on
generator set with 24-volt cranking. Determine voltage
of generator set output. If voltage is 139/240 volts, 3
phase, 4 wire, 60 Hz lowwye or 277/480 volt, 3 phase, 4
wire, 60Hz highwye, leave jumperwire J1 installed. For
all voltages except 139/240 volt or 277/480 volt, remove
jumper wire J1 from the overvoltage shutdown board.
If the function of the circuit board is questionable,
perform the following test. See Figure 7-20.
WARNING
Hazardous voltage. Moving rotor.
Can cause severe injury or death.
Do not operate generator set without all guards and
electrical enclosures in place.
Hazardous voltage can cause severe injury or
death. Disconnect generator set from load by opening
line circuit breaker or by disconnecting generator set
output leads from transfer switch and heavily taping
ends of leads. If high voltage is transferred to load
during test, personal injury and equipment damagemay
result. Do not use the safeguard circuit breaker in place
of the line circuit breaker.
1. Disconnect generator from load (if not already
done). Place generator master switch to RUN
position to start generator set.
2. Loosen locknut (if equipped) and turn voltage
adjustment rheostat on controller slowly clockwise
until generator set shuts down and auxiliary
shutdown lamp lights. If generator set shuts down,
go to step 3.
NOTE
If generator set does not shut down, stop generator
set using generator master switch. Recheck
connections of overvoltage kit. Retest shutdown
function. If shutdown still does not occur, stop
generator set using generator master switch. Use
the following voltage check procedure to determine
fault.
a. With generator set stopped, disconnect lead 30
at overvoltage shutdown board. Connect DC
voltmeter (10 volt scale or higher) positive (+)
test lead to terminal 30 on overvoltage
shutdown board and negative (--) test lead to
controller ground lug.
b. Start generator set. Turn voltage adjustment
rheostat to an overvoltage condition and
observe voltmeter reading. A reading of less
than 5 volts indicates the overvoltage board is
defective. A reading of 5 volts or higher
indicates the controller board is defective.
c. Stop generator set. Disconnect DC voltmeter.
Replace defective component. Reconnect lead
30 to overvoltage shutdown board. Repeat
testing procedure.
3. Turn voltage adjustment rheostat on controller
slightly counterclockwise. Place generator switch
to OFF/RESET position.
4. Place generator master switch to RUN position to
start generator set. Turn voltage adjustment
rheostat as necessary for AC voltmeter to read
correct voltage for phase indicated by selector
switch.
5. Disconnect battery, negative lead first. Reconnect
generator to load.
6. Reconnect battery, negative lead last.
G-291739
Figure 7-20. Overvoltage Circuit Board

TP-5353 8/947-22 Generator Troubleshooting
Governor Adjustment
Mechanical Governor—Hoof20-100 kW Ford-Powered Models
With the constant speed type governor, the throttle
linkage is fixed at a definite length to establish a specific
load speed of 1800 rpm (60 Hz) or 1500 rpm (50 Hz)
models). Do not make any adjustment to the throttle
linkage as any variation in speed causes frequency
changes in output of the generator—for this reason only
slight readjustment of speed is possible. If governor
setting is too sensitive, hunting or speed surging will
occur with changing load. If a considerable drop in
speed is experienced when normal load is applied,
adjust the governor for greater sensitivity. If one of the
governor settings is readjusted, the other settings
should be readjusted since each has an effect on the
other. The governor components and adjustments are
shown in Figure 7-21. With the generator set running at
full or rated load, make speed and sensitivity
adjustments.
Speed
Check speed with hand tachometer or frequency meter.
Loosen locking nut on speed adjusting screw. Turn
screw in clockwise direction to increase speed (and
frequency) or in counter-clockwise direction to decrease
speed. Lock nut at new setting. Follow this adjustment
with sensitivity (droop) adjustment.
Sensitivity
Test under normal load conditions. If readjustment is
needed, proceed as follows. To make governor control
more sensitive, loosen the nut at bottom of adjusting
eyebolt and tighten the top nut thereby drawing the head
of the eyebolt closer to the governor arm pivot point. To
make governor control less sensitive, loosen the top nut
and tighten the bottom nut to move the head of the
eyebolt away from the pivot point. After sensitivity is
correct, tighten the nut that was previously loosened to
lock the eyebolt at the the new setting. Recheck speed
after sensitivity adjustment since changing this will also
affect speed. Stop generator set.
NOTE
A speed droop of 3 Hz or 90 rpm between no load and
full load is normal.
TP-5353-7
12
3
4
567
8
1. Governor Belt2. Governor Arm3. Throttle Linkage4. Pivot Point5. Eyebolt Head6. Sensitivity Adjustment7. Speed Adjustment8. Governor Mounting
Figure 7-21. Governor Components and
Adjustments

TP-5353 8/94 Generator Troubleshooting 7-23
Mechanical Governor—Stanadyne20-100 kW John Deere-Powered and
20-100 kW Detroit Diesel-Powered Models
NOTE
Before checking and adjusting engine speed, make
sure engine has reached its normal operating
temperature.
All speeds indicated apply to an engine hot under load.
The maximum permissible speed variation is 50 rpm for
fast idle speed.
1. Disconnect speed control from fuel injection pump
lever and start engine.
2. Verify that injector pump lever is held in fast idle
position against fast idle adjusting screw. See
Figure 7-22. Using a tachometer, check engine
speed. Adjust engine speed to obtain a full load
engine speed of 1800 rpm (60 Hz) or 1500 rpm (50
Hz). To increase engine speed, rotate fast idle
adjusting screw counterclockwise; rotate fast idle
adjusting screw clockwise to decrease engine
speed. Reconnect speed control to fuel injection
pump lever. Stop generator set.
TP-5353-71 2
1. Injection Pump Lever2. Fast Idle Adjusting Screw
Figure 7-22. Governor Adjustments—Typical

TP-5353 8/947-24 Generator Troubleshooting
Mechanical Governor—Nippondenso125-180 kW John Deere-Powered ModelsNOTE
Before checking and adjusting engine speed, make
sure engine has reached its normal operating
temperature.
All speeds indicated apply to an engine hot under load.
The maximum permissible speed variation is 50 rpm for
fast idle speed.
1. Verify that injector pump lever is held in fast idle
position against fast idle adjusting screw. See
Figure 7-23.
2. Check fast idle engine speed. Engine speed
should be 1800 rpm (60 Hz) or 1500 rpm (50 Hz) at
full load.
3. If fast idle speed is incorrect (but not more than 50
rpm above or below the minimum/maximum
specified settings), loosen fast idle adjusting screw
lock nut.
4. If engine speed is too low, back out fast idle
adjusting screw until speed is correct. If the engine
speed is too high, turn fast idle adjusting screw in
until correct speed is obtained. Tighten lock nut
securely. Stop generator set.
NOTE
If the fast idle is 50 rpm above or below the
minimum/maximum settings, have an authorized
service dealer remove and adjust the pump on a
test stand.
TP-5353-71
2
1. Injection Pump Lever2. Fast Idle Adjusting Screw
Figure 7-23. Governor Adjustments

TP-5353 8/94 Generator Troubleshooting 7-25
Mechanical Governor—Bosch P125-180 kW Detroit Diesel-Powered Models
NOTE
Before checking and adjusting engine speed, make
sure engine has reached its normal operating
temperature.
All speeds indicated apply to an engine hot under load.
The maximum permissible speed variation is 50 rpm for
fast idle speed.
1. Verify that injector pump lever is held in fast idle
position. See Figure 7-24.
2. Check fast idle engine speed. Engine speed
should be 1800 rpm (60 Hz) or 1500 rpm (50 Hz) at
full load.
3. If fast idle speed is incorrect (but not more than 50
rpm above or below the minimum/maximum
specified settings), loosen fast idle adjusting lock
nut.
4. If engine speed is too low, back out fast idle
adjusting screw until speed is correct. If the engine
speed is too high, turn fast idle adjusting screw in
until correct speed is obtained. Tighten lock nut
securely. Stop generator set.
NOTE
If the fast idle is 50 rpm above or below the
minimum/maximum settings, have an authorized
service dealer remove and adjust the pump on a
test stand.
T-324000-G
1 2 3
1. Fast Idle Adjusting Screw2. Fast Idle Adjusting Lock Nut3. Fuel Injection Pump Lever
Figure 7-24. Governor Adjustments

TP-5353 8/947-26 Generator Troubleshooting
Electronic Governor—Barber-Colman Dyna 250020-100 kW Ford-Powered Models
Some generator sets are equipped with Barber-Colman
electronic governors. This is an electronic device
requiring no mechanical drive or hydraulic connection.
The system consists of a magnetic pickup, an electronic
control unit, and an actuator. The magnetic pickup
monitors engine speed and transmits this information to
the electronic control unit. See Figure 7-25. The
electronic control unit interprets the signal from the
magnetic pickup to control current input to the throttle
actuator. The throttle actuator adjusts the throttle
position on the engine. See Figure 7-26. Adjust the
actuator shaft linkage for smooth, nonbinding operation
and to hold the carburetor throttle lever in the closed
position when the power is off. The magnetic pickup air
gap is 0.014-0.028 in. (0.36-0.71 mm).
Preliminary Adjustments
1. Place generator master switch to OFF position.
Generator set must not be running.
2. Set the gain adjustment three divisions from zero.
Final Adjustments
1. Place generator master switch to RUN to start
generator set.
2. Adjust the control unit speed pot until the engine is
operating at the desired rpm (50 or 60 Hz on the
frequency meter).
3. If governing is unstable, turn gain pot slightly
counterclockwise.
NOTE
Gain pot has internal stops a 0 and 100%.
4. With the engine running at no load, finalize gain
adjustment. Turn the gain adjustment clockwise
until the output shaft and linkage is stable. Upset
the linkage by hand. If the linkage oscillates 3-5
times then stops, the setting is correct. Stop the
generator set.
RED
BLACKPURPLE
PURPLEACT
MPUWHITE
BLK/WHT GAIN
SPEED
TP-5353-7
+
--
+ --
1
2
34
1. Control Unit2. Magnetic Pickup3. Actuator4. 12-Volt Battery
Figure 7-25. Governor Control Unit
TP-5353-71 2
1. Actuator2. Linkage
Figure 7-26. Throttle Actuator (Typical)

TP-5353 8/94 Generator Troubleshooting 7-27
Electronic Governor—Barber-Colman Dyna 8000125-300 kW Detroit Diesel-Powered Models(Early 20-100 kW John Deere-Powered and
Early 20-100 kW Detroit Diesel-Powered Models)
Some sets are equipped with Barber-Colman Dyna
8000 electronic governors. Since this is an electronic
device, no mechanical drive or hydraulic connection is
required. The system consists of a magnetic pickup, an
electronic control unit, and an actuator. The magnetic
pickup monitors engine speed and transmits this
information to the electronic control unit (see
Figure 7-27). The electronic control unit interprets the
signal from the magnetic pickup to control current input
to the throttle actuator. The throttle actuator adjusts the
throttle position on the engine. See Figure 7-28. Adjust
the actuator shaft linkage to hold the fuel injection pump
lever in the stop position when the power is off. The
magnetic pickup air gap is 0.014-0.028 in. (0.36-0.71
mm).
CW
CCW
5K
N
87A
87
86 85
30
BLACK
WHITE
DROOP
GAIN
SPEED
--+
TP1
INC
S1 -- 0FF -- DIESEL
S1 -- ON -- GAS
S2 -- OFF -- 8000 ACT
S2 -- ON -- 8400 ACT
S1 S2
ON
OFF
TP2
2
ACT
1 3 4 5 6
REMOTE
SPEED POT
8V 4VILS
87 9 10 MPU 11
P NN
70
TP-5353-7
1
23
4
5
6
7
1. Control Unit: Terminal #1—Positive, Terminal #2—Negative2. Magnetic Pickup3. Optional Remote Speed Pot4. Actuator5. Relay6. White Lead7. Black Lead
Figure 7-27. Governor Control Unit
The Barber-Colman control unit is equipped with
switches S1 and S2. Prior to making governor
adjustments, verify that S1 and S2 are in the correct
positions for your application. Switch S1 selects the
controller response range based upon engine type. Set
S1 to the OFF position for diesel models and to the ON
position for gas/gasoline models. Place switch S2 to
match the control unit of the governor actuator. In all
cases, place switch S2 in the OFF position. These
generators use the Dyna 8000 actuator.
TP-5353-7
1
2
1. Actuator2. Linkage
Figure 7-28. Throttle Actuator (Typical)

TP-5353 8/947-28 Generator Troubleshooting
Preliminary Adjustments
1. Place generator master switch to OFF. Generator
set must not be running.
2. Set the control unit “I” adjustment one division from
zero and the gain adjustment at the third division
from zero.
3. For isochronous operation, set the droop
adjustment potentiometer counterclockwise to the
minimum position. For droop operation, set droop
potentiometer to desired droop. Droop adjustment
may be necessary with parallel generator
operation.
4. Position actuator lever to hold fuel pump lever in
STOP position when power is off. Adjust the
actuator linkage for smooth, nonbinding operation.
Final Adjustments
1. Place generator master switch to RUN or TEST
position to start generator set.
2. Adjust the control unit speed potentiometer until
the engine is operating at the desired rpm (50 or 60
Hz on the frequency meter).
3. If governing is unstable, turn “I” and gain
potentiometers slightly counterclockwise.
NOTE
Except for the speed potentiometer, control unit
pots have internal stops at 0 and 100%.
4. Slowly turn the gain adjustment potentiometer
clockwise until the actuator level oscillates. (The
actuator lever will waver faster than when the I
potentiometer was adjusted.) Slowly turn gain
adjustment potentiometer counterclockwise until
the actuator lever is stable.
5. Jog the actuator lever by hand. If the actuator lever
oscillates three to five times and then stabilizes, the
gain setting is correct. If the actuator lever does not
perform as described, proceed to Step 6.
6. Turn the gain potentiometer one division
counterclockwise. Turn “I” potentiometer fully
clockwise and watch the actuator lever. If the
actuator lever does not become unstable, jog it by
hand.
7. When the actuator lever wavers, slowly turn the “I”
potentiometer counterclockwise until the lever is
stable.
8. Jog the actuator lever by hand. It should waver
from three to five times before stabilizing. The
governor is now calibrated. Stop the generator set.

TP-5353 8/94 Generator Troubleshooting 7-29
Electronic Governor—Barber-Colman Dyna 2500125-180 kW John Deere-Powered Models
Some sets are equipped with Barber-Colman Dyna
2500 electronic governors. Since this is an electronic
device, no mechanical drive or hydraulic connection is
required. The system consists of a magnetic pickup, an
electronic control unit, and an actuator. The magnetic
pickup monitors engine speed and transmits this
information to the electronic control unit (see
Figure 7-29). The electronic control unit interprets the
signal from the magnetic pickup to control current input
to the throttle actuator. The throttle actuator adjusts the
throttle position on the engine. See Figure 7-30. Adjust
the actuator shaft linkage to hold the fuel injection pump
lever in the stop position when the power is off. The
magnetic pickup air gap is 0.014-0.028 in. (0.36-0.71
mm).
REMOTE
SPEED POT
S1--OFF--DIESEL
S1-ON--GAS
S2-OFF--2000 ACT
S2--ON--2500 ACT
70
P N N
ON
OFF
S1 S2
DROOPD
GAIN
INC
SPEED
+ --
TP1
TP2
8V 4V ILS
MPU1 2 3 4 5 6 7 8 9
1011
87 85
30
87A86
CWCCW
5K
WHITE
I
BLACK
AX-273000-L
1
2
3
45
6
7
8
1. Control Unit: Terminal #1—Positive, Terminal #2—Negative2. Magnetic Pickup3. Optional Remote Speed Pot4. Actuator5. Connect to Ground Stud in Controller6. Connect to Cranking Solenoid Battery (+)7. Relay8. Connect to 70 of Safeguard Breaker Terminal Block
Figure 7-29. Governor Control Unit
The Barber-Colman control unit is equipped with
switches S1 and S2. Prior to making governor
adjustments, verify that S1 and S2 are in the correct
positions for your application. Switch S1 selects the
controller response range based upon engine type.
Place switch S1 to the OFF position for diesel models
and to the ON position for gas/gasoline models. Place
switch S2 to match the control unit of the governor
actuator. In all cases, place switch S2 in the ON
position. These generators use theDyna 2500 actuator.
TP-5353-71
2
1. Actuator2. Linkage
Figure 7-30. Throttle Actuator (Typical)

TP-5353 8/947-30 Generator Troubleshooting
Preliminary Adjustments
1. Place generator master switch to OFF. Generator
set must not be running.
2. Set the control unit “I” adjustment one division from
zero, the D adjustment four divisions from zero,
and the gain adjustment at the third division from
zero.
3. For isochronous operation, set the droop
adjustment potentiometer counterclockwise to the
minimum position. For droop operation, set droop
potentiometer to desired droop. Droop adjustment
may be necessary with parallel generator
operation.
NOTE
If the full stroke of the actuator shaft is used and the
linkage is adjusted to use only the active fuel range,
the maximum obtainable droop would be
approximately 12% at full load.
4. Position actuator lever to hold fuel pump lever in
STOP position when power is off. Adjust the
actuator linkage for smooth, non-binding
operation.
Final Adjustments
1. Place generator master switch to RUN or TEST
position to start generator set.
2. Adjust the control unit speed potentiometer until
the engine is operating at the desired rpm (50 or 60
Hz on the frequency meter).
3. If governing is unstable, turn “I” and gain
potentiometers slightly counterclockwise.
NOTE
Except for the speed potentiometer, control unit
pots have internal stops at 0 and 100%.
4. With the engine running at no load, finalize the “I”,
“D”, and gain adjustments.
5. Slowly turn the gain adjustment potentiometer
clockwise until the output shaft and linkage
oscillates. Slowly turn gain adjustment
potentiometer counterclockwise until the actuator
lever is stable.
6. Jog the actuator lever by hand. If the actuator lever
oscillates three to five times and then stabilizes, the
gain setting is correct.
7. Turn the gain potentiometer one division
counterclockwise. Turn the “D” adjustment fully
clockwise while observing the actuator shaft. If the
lever does not become unstable, jog it by hand.
When the lever oscillates, turn the “D” adjustment
counterclockwise slowly until the actuator shaft is
stable. Jog the lever again, it should oscillate 3-5
times and then become stable. If the system
response to load changes is satisfactory at this
point, omit Step 8.
8. Turn I potentiometer fully clockwise and watch the
actuator shaft. If the actuator lever does not
become unstable, jog it by hand. When the
actuator lever slowly oscillates, slowly turn the “I”
potentiometer counterclockwise until the lever is
stable.
9. Jog the actuator lever by hand. It should oscillate
3-5 times before stabilizing. The governor is now
calibrated. Stop the generator set.

TP-5353 8/94 Generator Troubleshooting 7-31
Electronic Governor—Barber-Colman Dyna 70025 usingStanadyne D Series Injection Pump20-100 kW John Deere-Powered and
20-100 kW Detroit Diesel-Powered Models
Some sets are equipped with Barber-Colman Dyna
70025 electronic governor used in conjunction with a
Stanadyne D Series injection pump. This particular
set-up uses different governor controllers for a
nonparalleling generator set or a paralleling generator
set. The system consists of a magnetic pickup, an
electronic control unit, and an actuator. The magnetic
pickup monitors engine speed and transmits this
information to the electronic control unit.
FT-273000-B
LEAD COLORS
A BLACK/WHITEB WHITEC PURPLED PURPLEE REDF BLACK
G BLACKH WHITE
A B C D E F
G H
P N
70
SPEED
GAIN
1
2
3
45
6
7
8
1. TwistMagnetic Pickup LeadsBeforeConnecting to Controller. 1turn per inch (25 mm)
2. Power Cable3. Relay4. Connect to Ground Stud in Controller5. Connect to Cranking Solenoid Battery (+)6. Connect to 70 of Safeguard Breaker Terminal Block7. Actuator8. Magnetic Pickup
Figure 7-31. Governor Control Unit
(Nonparalleling Generator Set)
See Figure 7-31 for nonparalleling generator sets or
Figure 7-32 for paralleling generator sets. The
electronic control unit interprets the signal from the
magnetic pickup to control current input to the throttle
actuator. The integrated throttle actuator adjusts the
throttle position internally in the fuel injection pump. See
Figure 7-33. The magnetic pickup air gap is
0.014-0.028 in. (0.36-0.71 mm).
FT-273000-B
LEAD COLORS
A BLACKB WHITE
70
A B
P N
1
2
34
5
6
78
9
10
11
12
1. Droop Pot2. Gain Pot3. Idle Spd (Speed) Pot4. Run Spd (Speed) Pot5. Power Cable6. Relay7. Connect to Ground Stud in Controller8. Connect to Cranking Solenoid Battery (+)9. Connect to 70 of Safeguard Breaker Terminal Block
10. Actuator11. Magnetic Pickup12. TwistMagnetic Pickup LeadsBeforeConnecting to Controller. 1
turn per inch (25 mm)
Figure 7-32. Governor Control Unit
(Paralleling Generator Set)

TP-5353 8/947-32 Generator Troubleshooting
TP-5353-71
23 4 5
1. Low Idle Adjustment Screw2. High Idle Adjustment Screw3. Injector Pump/Actuator4. Shutoff Shaft Assembly5. Droop Adjusting Screw
Figure 7-33. Governor Adjustments—Typical
Actuator Calibration
The following procedure is used to setup themechanical
governor for operation with the electronic integrated
actuator. Perform calibration of both the mechanical
and electronic governor in order for the system to
operate correctly. Lack of maximum power or poor
steady state speed control results from incorrect
calibration. See Figure 7-33.
NOTE
The actuator calibration procedure was performed at
the factory and no additional adjustment is necessary.
The actuator calibration procedure is done only if
removal of fuel injection pump has occurred or the
adjustment is questionable. Do not perform this
procedure unless it is deemed necessary.
1. Position the shutoff shaft assembly in the fuel on
position by moving it in the clockwise position. The
shutoff shaft assembly is the lever located on the
backside of the fuel injection pump. Secure using
existing mechanical linkage.
2. Place the throttle shaft assembly in the high idle
position. Back out the low idle adjustment screw a
maximum of three turns. Excessive backing out of
the low idle screw results in the disengagement of
the pump’s internal components.
NOTE
Follow this procedure carefully in order to not
overspeed the engine and cause damage to the
generator or other load.
3. Adjust the droop by turning the droop adjusting
screw in a counterclockwise (CCW) direction until it
stops. Droop adjustment used only on paralleling
generator sets.
Turn the droop adjusting screw clockwise (CW) two
full turns. The mechanical governor is now set in a
position that will permit starting the engine to
calibrate the electronic integrated actuator
governor. Do not operate the engine without the
electronic governor connected and the system
calibrated correctly as described in the following
procedure. Once this droop adjustment is made,
do not readjust.
Governor Calibration forNonparalleling Generator Sets
Preliminary Adjustments
1. Place generator master switch to OFF position.
Generator set must not be running.
2. Set the gain adjustment three divisions from zero.
Final Adjustments
1. Place generator master switch to RUN to start
generator set.
2. Adjust the control unit speed pot until the engine is
operating at the desired rpm (50 or 60 Hz on the
frequency meter).
3. If governing is unstable, turn gain pot slightly
counterclockwise.
NOTE
Gain pot has internal stops a 0 and 100%.
4. With the engine running at no load, finalize gain
adjustment. Turn the gain adjustment clockwise
until the output shaft and linkage is stable. Upset
the linkage by hand. If the linkage oscillates 3-5
times then stops, the setting is correct. Stop the
generator set.

TP-5353 8/94 Generator Troubleshooting 7-33
Governor Calibration for ParallelingGenerator Sets
Calibration Procedure
1. Place generator master switch to OFF. Generator
set must not be running.
2. Set the gain pot at 30% and the droop pot
completely counterclockwise (CCW).
3. Adjust the idle speed by turning the 20-turn pot
clockwise (CW) to increase speed and
counterclockwise (CCW) to decrease speed.
4. Adjust the run speed by turning the 20-turn pot
clockwise (CW) to increase speed and
counterclockwise (CCW) to decrease speed.
5. Place generator master switch to RUN or TEST
position to start generator set.
6. Slowly turn the gain pot clockwise (CW) until the
engine becomes unstable. After the engine
becomes unstable, slowly turn the gain pot
counterclockwise (CCW) until stable. Interrupt the
governor by momentarily removing power from the
governor. The engine should recover in 3-5
diminishing oscillation. Stop the generator set.
Droop Adjustment
1. Place generator master switch to RUN or TEST
position to start generator set.
2. Use the run speed pot to set the engine rpm to the
desired no load speed (frequency) on the
frequency meter.
3. Apply full load to the generator set.
4. While watching the frequency meter, slowly turn
the droop pot clockwise (CW) until the desired
droop percentage is obtained.
5. Remove full load from generator set.
6. Using the run speed pot readjust the engine rpm to
the desired no load speed (frequency) on the
frequency meter. Stop the generator set.


TP-5353 8/94 Generator Disassembly/Reassembly 8-1
Section 8. Generator
Disassembly/ReassemblyBefore beginning generator disassembly procedure,
carefully read all safety precautions at the beginning of
this manual. Please observe these precautions and
those included in text during the disassembly/
reassembly procedure.
The following procedures covermanymodels and some
steps may not apply to a particular engine. Use
Figure 8-1 and Figure 8-2 to help understand
component descriptions and general configuration of
the generator.
Use the disassembly procedure as a step-by-step
means to help take apart the generator. The
disassembly procedure provides important information
to minimize disassembly time and indicates where
special configurations exist which may require taking
notes. The reassembly procedure includes important
alignment steps and provides critical torque specs.
Accidental starting.
Can cause severe injury or death.
Disconnect battery cables before working on
generator set (negative lead first and reconnect it
last).
WARNING
Accidental starting can cause severe injury or
death. Turn generator set master switch to OFF
position, disconnect power to battery charger, and
remove battery cables (remove negative lead first and
reconnect it last) to disable generator set beforeworking
on any equipment connected to generator set. The
generator set can be started by automatic transfer
switch or remote start/stop switch unless these
precautions are followed.
WARNING
Hot engine and exhaust system.
Can cause severe injury or death.
Do not work on generator set until it is allowed to
cool.
Hot parts can cause severe injury or death. Do not
touch hot engine parts. An engine gets hot while running
and exhaust system components get extremely hot.
Explosive fuel vapors.
Can cause severe injury or death.
Use extreme care when handling, storing,
and using fuels.
WARNING

8-2 Generator Disassembly/Reassembly TP-5353 8/94
Explosive fuel vapors can cause severe injury or
death. All fuels are highly explosive in a vapor state.
Use extreme care when handling and storing fuels.
Store fuel in a well-ventilated area away from
spark-producing equipment and out of the reach of
children. Never add fuel to the tank while the engine is
running since spilled fuel may ignite on contact with hot
parts or from ignition spark. Do not smoke or permit
flame or spark to occur near potential sources of spilled
fuel or fuel vapors. Keep fuel lines and connections tight
and in good condition. Do not replace flexible fuel lines
with rigid lines. Flexible sections are used to avoid
breakage due to vibration. If any fuel leakage, fuel
accumulation, or electrical sparks are noted, DO NOT
OPERATE GENERATOR SET. Repair systems before
resuming generator set operation
Explosive fuel vapors can cause severe injury or
death. Take additional precautions when using the
following fuels:
Gasoline—Store gasoline only in approved red
containers clearly marked GASOLINE.
Propane (LP)—Adequate ventilation is mandatory.
Propane is heavier than air; install gas detectors low in
room. Inspect detectors often.
Perform the following steps prior to disassembling the
generator set.
1. Disconnect (negative lead first) and remove
starting batteries from work area to prevent fire
hazard. Disconnect AC-powered accessories,
such as battery charger, block heater, and fuel
transfer pump.
2. Shut off fuel supply. Drain fuel system as
necessary by emptying fuel into proper containers.
Remove any fuel containers from work area to
prevent fire hazard. Ventilate work area to clear
fumes.
3. Disconnect fuel, cooling, and exhaust systems as
necessary to tilt generator set. Disconnect output
leads or load circuit cables at generator set.
4. Any cranes, hoists, or other lifting devices used in
the disassembly or reassembly procedure must be
rated for the weight of the generator set. Check
generator set nameplate or spec sheet for weight.
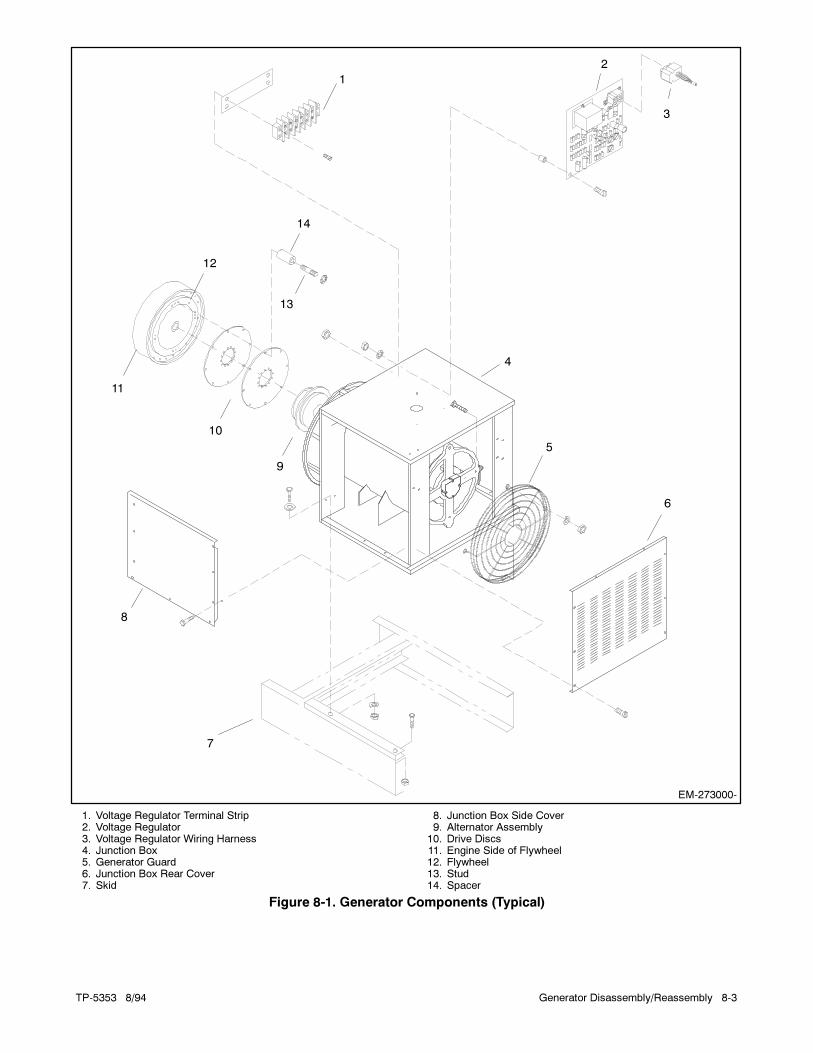
TP-5353 8/94 Generator Disassembly/Reassembly 8-3
EM-273000-
1
2
3
4
5
6
7
8
9
10
11
12
13
14
1. Voltage Regulator Terminal Strip2. Voltage Regulator3. Voltage Regulator Wiring Harness4. Junction Box5. Generator Guard6. Junction Box Rear Cover7. Skid
8. Junction Box Side Cover9. Alternator Assembly
10. Drive Discs11. Engine Side of Flywheel12. Flywheel13. Stud14. Spacer
Figure 8-1. Generator Components (Typical)

8-4 Generator Disassembly/Reassembly TP-5353 8/94
F---
AC
G
F+
AC
B-257657-Y
1
2
3
45
6
7
8
9
10
11
12
13
14
15
1. LED Circuit Board Cover2. LED Circuit Board3. Photo Transistor Board4. Insulating Washer5. Insulator6. Magnetic Actuator7. End Bracket8. Exciter Field Assembly
9. Rotor Assembly10. SCR Assembly11. Generator Fan12. Drive Discs13. Stator Assembly14. Generator Adapter15. Generator Fan Guard
Figure 8-2. Generator Components (Typical)

TP-5353 8/94 Generator Disassembly/Reassembly 8-5
Disassembly1. Disconnect all controller-to-engine and engine-to-
generator harnesses and wiring. Disconnect alarm
horn circuit board connector (if equipped), LED
board and housing, and speed sensor. Remove
junction box and controller as a unit.
2. Remove bolts from generator vibromounts.
3. Suspend the generator at both ends with hooks in
lifting eyes. Use a hoist to raise generator end off
vibromounts. See Figure 8-3.
3-083R8371-17
1
23
1. Hook2. Generator Adapter3. Wood Block(s)
Figure 8-3. Hoisting Generator
4. Support the engine by placing wood blocks under
flywheel housing. Lower generator end until
generator flywheel housing rests on blocks. See
Figure 8-3.
5. Remove fan guard. Remove bolts holding adapter
to flywheel housing.
NOTE
Later 20-100 kW Ford-powered models use a
generator adapter that serves as the flywheel
housing. The stator attaches to the generator
adapter/flywheel housing. Do not remove
generator adapter/flywheel housing from stator
assembly unless replacing the stator assembly.
6. Remove nuts and spacers holding drive discs to
flywheel.
NOTE
The 200-300 kW Detroit Diesel-powered models
use screws and hardened washers to mount drive
discs to flywheel. The 33-45 kW (6 cylinder)
Ford-powered models use screws and spacers to
mount drive discs to flywheel.
7. Work drive discs over studs (if equipped) to
separate generator from engine. See Figure 8-4.
3-084R8371-14
1
1. Drive Discs
Figure 8-4. Separating Generator and Engine
8. Set the generator assembly on the floor in a
horizontal position. Remove support slings or
chains.
9. To remove the rotor assembly, hook hoist to
adapter and place generator assembly on floor in a
vertical position. See Figure 8-5. Before lowering
assembly, place boards along the edge of end
bracket to prevent damage to photo transistor
board.

8-6 Generator Disassembly/Reassembly TP-5353 8/94
3-093R8348-22
1
2
1. Drive Disc Removal2. End Bracket Support
Figure 8-5. Generator Support, Drive Disc and Fan
Removal
10. Remove drive discs and fan from generator
assembly. See Figure 8-5.
NOTE
Some 50-100 kW Ford-powered models use a
special drive disc (flywheel) mounted to the rotor
shaft. The special drive disc (flywheel) had a lip on
the outer circumference and was not a flat surface
drive disc. Later models use a flat surface drive
disc.
11. Fasten lifting eye and hoist hook to rotor flange.
Hoist rotor carefully to avoid damaging exciter
armature or exciter field magnets. See Figure 8-6.
12. While rotor is suspended, remove photo transistor
board and actuator cup. Remove F3, G, and AC
leads from SCR assembly. Cut off photo transistor
board terminals to remove circuit board. If photo
transistor board is reused, leave leads as long as
possible.
13. Slowly lower rotor to horizontal position. Set the
rotor on a wooden surface. Take care not to
damage windings, laminations, or bearing. See
Figure 8-7.
3-090R8348-19
1
1. Hoist Hook Locations
Figure 8-6. Rotor Removal
3-088R8348-15
1
1. Rotor Assembly
Figure 8-7. Lowering Rotor

TP-5353 8/94 Generator Disassembly/Reassembly 8-7
14. Place the generator assembly on the generator
adapter end in order to remove the generator
adapter and end bracket from the stator. Fasten
chains to generator adapter and lower to a
horizontal position. Fasten hook to end bracket eye
and hoist to a vertical position. See Figure 8-8.
NOTE
Some 50-100 kW Ford-powered models use a
special drive disc (flywheel) mounted to the rotor
shaft. The special drive disc (flywheel) had a lip on
the outer circumference and was not a flat surface
drive disc. Later models use a flat surface drive
disc.
3-084R8348-8
1
2
3
4
1. Hoist Hook2. Hoist Hook3. End Bracket4. Adapter
Figure 8-8. Removing Generator Adapter
15. Remove generator adapter mounting bolts. Fasten
hoist hooks to end bracket and raise assembly
slightly. Bump generator adapter loose by using a
rubber mallet.
NOTE
Some 50-100 kW Ford-powered models use a
special drive disc (flywheel) mounted to the rotor
shaft. The special drive disc (flywheel) had a lip on
the outer circumference and was not a flat surface
drive disc. Later models use a flat surface drive
disc.
16. Lower stator assembly. Remove end bracket
mounting bolts. Separate end bracket from stator
by bumping loose with a rubber mallet.
17. Remove exciter magnets from end bracket. See
Figure 8-9.
NOTE
Some early models are equipped with a tolerance
ring inside the end bracket bore.
3-080R8348-1
1
1. Exciter Magnets
Figure 8-9. End Bracket View

8-8 Generator Disassembly/Reassembly TP-5353 8/94
Reassembly1. Attach exciter field to end bracket with four
mounting screws. See Figure 8-9.
NOTE
Some early models are equipped with a tolerance
ring inside the end bracket bore. Install a new
tolerance ring when reinstalling end bracket.
2. Place stator in a vertical position with end bracket
side up.
NOTE
End bracket side of stator has four mounting
bosses.
3. Place end bracket on stator and use bolts to align
holes. Use a rubber mallet to mount end bracket
flush with stator. See Figure 8-10.
3-082R8348-3
Figure 8-10. Mounting End Bracket on Stator
NOTE
Position end bracket housing eye opposite the
stator mounting bracket during reassembly.
NOTE
Early models use a skewed (slanted) stator with a
straight rotor. When replacing either rotor or stator,
be sure replacement is the same as the original.
Use dissimilar rotor and stator styles (skewed rotor
with straight stator or straight rotor with skewed
stator) when reassembling the generator set.
4. Install bolts and washers to attach end bracket to
stator. Torque bolts to 35 ft. lbs. (47 Nm)maximum.
5. Attach hoist hooks to end bracket and suspend
stator. Place the generator adaptor on the floor and
lower stator to within 1/2-1/4 in. (12.7-6.4 mm) of
the adapter lip. See Figure 8-11.
3-083R8348-7
Figure 8-11. Aligning Adapter and Stator
6. Align adapter with stator and start bolts with
washers. Lower stator onto adapter and finish
tightening bolts.
NOTE
Position adapter hoisting eye so that it is opposite
of the stator mounting bracket and directly below
end bracket hoisting eye.

TP-5353 8/94 Generator Disassembly/Reassembly 8-9
7. Place the generator assembly on the end bracket
end when installing the rotor. Fasten hoisting hook
to end bracket eye and lower generator assembly
to a horizontal position.
8. Attach hoisting hooks to the adapter as shown in
Figure 8-12. Suspend generator assembly. Before
lowering the generator, place boards along the
edge of the end bracket. Maintain a 1 in. (25 mm)
clearance underneath the center of the end bracket
to prevent damage to the photo transistor board
and actuator cup when the rotor in installed.
3-087R8348-14
Figure 8-12. Supporting Generator Assembly
9. Fasten the lifting eye and hoist hook to rotor flange.
See Figure 8-13. Hoist the rotor to a vertical
position taking care not to damage windings,
laminations, or bearing.
3-088R8348-15
1
1. Hoist Hook
Figure 8-13. Hoisting Rotor
10. While the rotor is suspended install the photo
transistor board, insulator board, and actuator cup.
Place photo transistor board lead through actuator
cup as shown in Figure 8-14. Push lead through
hole in rotor shaft and then through exciter
laminations ending near SCR assembly.
NOTE
Early model generators use insulator washers to
insulate the photo transistor board from the
actuator cup. If the unit is disassembled, substitute
the insulator washers with the insulated board
(available as service part no. 257850).
WARNING
Hazardous voltage. Moving rotor.
Can cause severe injury or death.
Do not operate generator set without all guards and
electrical enclosures in place.

8-10 Generator Disassembly/Reassembly TP-5353 8/94
Hazardous voltage can cause severe injury or
death. Be sure that foil side of photo transistor board,
end of shaft, and threaded holes are clean and free of
metal particles and chips. Metal debrismay short-circuit
photo transistor board and cause hazardous voltage in
generator set. AC voltmeter must show correct output
before generator set may be reconnected to load.
3-089R12758-29
1
2
1. Magnetic Actuator2. Photo Transistor Board
Figure 8-14. Installing Photo Transistor Board
11. Attach photo transistor board and magnetic
actuator to end of rotor shaft with two mounting
screws. See Figure 8-15. Cut off excess leadwire,
leaving enough wire to reach SCR assembly. Strip
2-3 in. (50-75 mm) of gray insulator jacket from
lead. Cut off all exposed uninsulated wire. Strip
about 1/4 in. (0.6mm) of insulation on red and black
leads and crimp on #8 electrical terminals (part no.
X-283-7). Before connecting to SCR studs, secure
leads with tie wraps. Reconnect photo board white
lead to SCR AC stud, red lead to F+ stud, green
lead to G stud, and black lead to remaining AC
stud. Secure leads with stop nuts. Torque
connections to 8 in. lbs. (0.9 Nm) maximum.
3-089R12758-29
Figure 8-15. Mounting Photo Transistor Board and
Magnetic Actuator

TP-5353 8/94 Generator Disassembly/Reassembly 8-11
12. Suspend the rotor over the generator assembly.
Lower the rotor field into stator. Be extremely
careful while lowering the rotor to avoid damaging
the exciter armature, field magnets, stator
windings, or rotor laminations. See Figure 8-16.
Carefully align rotor bearing into end bracket.
Check for an outer race measurement of 1/4 in.
(0.6 mm) from bracket to bearing. Make sure the
photo transistor board and actuator cup have
clearance below the end bracket.
3-090R8348-19
Figure 8-16. Installing Rotor
13. Place fan over rotor flange and torque bolts to 260
in. lbs. (29 Nm).
14. Attach drive disc(s) to end of rotor shaft. Torque
drive disc(s) mounting bolts to 50 ft. lbs. (68 Nm).
NOTE
Some 50-100 kW Ford-powered models use a
special drive disc (flywheel) mounted to the rotor
shaft. The special drive disc (flywheel) had a lip on
the outer circumference and was not a flat surface
drive disc. Later models use a flat surface drive
disc.
15. Attach hoist to adapter eye and place generator
assembly in a horizontal position. Take care not to
damage rotor or stator. Place hoisting eyes of
generator to the top.
16. Thread studs (if so equipped) into flywheel as
shown in Figure 8-17. Install studs completely into
flywheel. Apply Loctite� No. 271 red to stud
threads and install into flywheel. Apply Loctite�
No. 242 blue to stud threads on nut side.
NOTE
Some 50-100 kw Ford poweredmodels use a short
spacer between flywheel and drive disc.
3-098R8371-9
1
1. Flywheel Studs
Figure 8-17. Flywheel Studs
17. Place hoist hooks into end bracket and adapter
eye. Raise generator assembly and align studs
with drive discs by turning the flywheel. Move
generator as necessary to work drive discs over
studs. When drive discs are about 1 in. (25 mm)
over studs, install spacers if so equipped. See
Figure 8-18.
NOTE
Some models mount drive discs to flywheel using
bolts. Some applications use hardened washers.
Loctite� is a registered trademark of Loctite Corporation.

8-12 Generator Disassembly/Reassembly TP-5353 8/94
3-097R8371-14
1 2 3
1. Drive Discs2. Studs3. Spacers
Figure 8-18. Installing Spacers
18. Move generator as necessary to align generator
adapter and flywheel housing. Fasten and final
tighten adapter to flywheel housing using bolts and
hardened lock washers. See Figure 8-19. Torque
bolts to value given in Section 1—Specifications,
Generator.
3-083R8371-17
Figure 8-19. Aligning Adapter and Flywheel
Housing
19. Install nuts on studs. Do not final tighten at this
time.
NOTE
Some models mount drive discs to flywheel using
bolts. Some applications use hardened washers.
20. Hoist generator and engine slightly to remove
wood block(s) from under flywheel housing. Align
generator assembly and skid. Lower generator and
tighten vibromount mounting bolts.
21. Remove chains or slings used for suspending
generator. Final tighten drive discs to flywheel.
Torque hardware to values given in Section
1—Specifications, Generator.
22. Install fan guard.

TP-5353 8/94 Generator Disassembly/Reassembly 8-13
23. Install and set speed sensor air gap at 0.014-0.028
in. (0.36-0.71 mm). See Figure 8-20. Replace
LED board/housing assembly to end bracket.
24. Reinstall junction box and controller. Reconnect all
controller-to-engine and engine-to-generator
harnesses and wiring. Refer to wiring diagrams as
required.
25. Reconnect fuel, cooling, and exhaust systems that
were disconnected during disassembly.
Reconnect output leads or load circuit cables at
generator. Open fuel supply valve.
26. Reconnect starting batteries, negative lead last.
Connect any AC-powered accessories such as
battery charger, block heater, fuel transfer pump,
etc.
0 + ---
0.014-0.028 in.
(0.36-0.71 mm)
TP-5353-8
1
2
34
5
6
1. Speed Sensor2. Wire 16: White/Clear3. Wire 24: Red4. Wire 2: Black5. Air Gap: 0.014-0.028 in. (0.36-0.71 mm)6. Actuator Cup
Figure 8-20. Speed Sensor Air Gap


TP-5353 8/94 Generator Reconnection 9-1
Section 9. Generator Reconnection
Voltage Reconnection ProcedureThis reconnection procedure details voltage
reconnections only. If frequency changes are required,
the governor and voltage regulator will need
adjustment. See Generator Frequency Change and
Adjustment for information regarding frequency
adjustment.
To illustrate the proper reconnection of 12-lead
generator sets, the following information is provided. In
all cases, follow the National Electrical Code (NEC)
guidelines.
Reconnect the stator leads of the generator set if a
different output phase or voltage is desired. Refer to the
following procedure and the connection schematics
following. Follow all safety precautions at the front of
this manual and in the text during this procedure.
NOTE
Affix notice to generator set after reconnecting to a
voltage different than the nameplate. Order voltage
reconnection decal 246242 from authorized service
distributors/dealers.
Accidental starting.
Can cause severe injury or death.
Disconnect battery cables before working on
generator set (negative lead first and reconnect it
last).
WARNING
Accidental starting can cause severe injury or
death. Turn generator set master switch to OFF
position, disconnect power to battery charger, and
remove battery cables (remove negative lead first and
reconnect it last) to disable generator set beforeworking
on any equipment connected to generator set. The
generator set can be started by automatic transfer
switch or remote start/stop switch unless these
precautions are followed.
WARNING
Hazardous voltage. Moving rotor.
Can cause severe injury or death.
Do not operate generator set without all guards and
electrical enclosures in place.
Hazardous voltage can cause severe injury or
death. Whenever electricity is present, there is the
hazard of electrocution. Openmain circuit breaker on all
power sources before servicing equipment. Electrically
ground the generator set and electrical circuits when in
use. Never come into contact with electrical leads or
appliances when standing in water or on wet ground, as
the chance of electrocution is increased under such
conditions.
Hazardous voltage can cause severe injury or
death. Short circuits can cause bodily injury and/or
equipment damage. Do not contact electrical
connections with tools or jewelry while adjustments are
made. Remove wristwatch, rings, and jewelry that can
cause short circuits.
1. Move generator set master switch to OFF/RESET
position.
2. Disconnect engine starting battery, negative (--)
lead first. Disconnect power to battery charger (if
equipped).
3. Select desired voltage connection from Figure 9-1.
Route leads through current transformers and
connect according to the diagram for desired
phase and voltage.
NOTE
Position current transformers CT1, CT2, and CT3
with dot or HI side toward generator set.
NOTE
Current transformers (CTs) are only used on
generator sets equipped with controllers with
meters and/or safeguard circuit breakers.

9-2 Generator Reconnection TP-5353 8/94
NOTE
All 12-lead generator sets arereconnectable. The 6-lead, 600-voltgenerator set is not reconnectable. Somespecial wound stators are made for aspecific voltage configuration and are alsonot reconnectable.
TP-5750-5
Figure 9-1. Generator Reconnections

TP-5353 8/94 Generator Reconnection 9-3
4. If controller is equipped with meters, remove
controller cover and reposition meter scale lamp
jumper (see Figure 9-2), if necessary, to match
proper position for desired voltage (shown in
Figure 9-1). Replace cover.
5. If the generator set is equipped with the
overvoltage kit, verify correct use of the J1 jumper
on the overvoltage circuit board . Install the J1
jumper if the generator set is connected for
139/240 (low wye) or 277/480 volts (high wye)
3-phase, 4-wire, 60 Hz. Remove the J1 jumper for
all other voltages. Replace controller cover.
6. Turn the phase selector switch to the L1-L2
position (1-phase or 3-phase depending on
generator connection) if the controller is equipped
with meters. Connect a voltmeter across leads L1
and L2 if the controller is not equipped with meters.
NOTE
High voltage may damage equipment. Be sure that
line circuit breakers, transfer switch(es), and any
other accessories using line voltage are sized for
the voltage selected.
7. Reconnect starting battery, negative lead last.
Move generator master switch to the RUN position
to start the generator set. Check voltmeter for
proper voltage. Adjust voltage if necessary with the
voltage adjustment potentiometer on the generator
controller front panel or switchgear. See
Figure 9-3. STOP generator set when adjustment
is complete.
TP-5353-6
1
1. Lamp Jumper
Figure 9-2. Meter Scale Lamp Jumper
ADV-5849 P11
1. Voltage Adjustment
Figure 9-3. Voltage Adjustment

9-4 Generator Reconnection TP-5353 8/94
Generator Frequency Change and Adjustment
Frequency Change
Set the voltage regulator circuit board for either 50 or 60
Hz application. See Figure 9-4. Connect a jumper
between terminals T1 and T2 for 60 Hz operation.
Connect a jumper between terminals T1 and T3 to
convert voltage regulator circuit board to 50 Hz
application.
This procedure changes the voltage regulator circuit
board for the desired frequency. See Frequency
Adjustment for changing generator set frequency and
speed.
C-255670-B
1
2
3
1. T1 Terminal2. T2 Terminal3. T3 Terminal
Figure 9-4. Jumper Location for 50 or
60 Hz Operation
Frequency Adjustment
Check the frequency meter for a no-load reading of 63
Hz for 60 Hz operation and 53 Hz for 50 Hz operation to
determine correct frequency operation. Check for 50
and 60 Hz operation at no load if the generator set is
equipped with an isochronous governor. Connect a
frequency meter across V0 and V7 on the control board
terminal strip (generator set must not be running while
making connections) if the controller is not equipped
with a frequency meter. Refer to Figure 9-5.
To adjust governor speed, refer to Section
7—Component Testing and Adjustment, Governors.
TP-5353-6
1
1. Frequency Meter Connection Points
Figure 9-5. Frequency Meter Connections

Appendices A-1TP-5353 8/94
Appendix A. Glossary of AbbreviationsAbbreviations are used throughout this manual.
Normally they will appear in the text in complete form
with the abbreviation following in parentheses the first
time they are used. After that they will appear in the
abbreviated form. The commonly used abbreviations
are shown below. Some items may not apply to this
application.
Abbreviation Description Abbreviation Description
ABDC after bottom dead center
AC alternating current
AISI American Iron and Steel Institute
AHWT anticipatory high water temp.
ALOP anticipatory low oil pressure
AM amplitude modulation
amp ampere
amps amperes
ANSI American National Standard Institute
API American Petroleum Institute
approx. approximate, approximately
A/R as required, as requested
A/S as supplied, as stated, as suggested
ASA American Standards Association
(former name of ANSI)
ASME American Society of
Mechanical Engineers
assy. assembly
ASTM American Society for Testing Materials
ATDC after dead top center
aux. auxiliary
A/V audio--visual
AWG American Wire Gage
AWM appliance wiring material
BBDC before bottom dead center
BDC before dead center
BHP brake horsepower
bmep brake mean effective power
BTDC before top dead center
Btu British thermal unit
�C Celsius degree
cc cubic centimeter
CCA cold cranking amps
CEC Canadian Electrical Code
cfh cubic feet per hour
cfm cubic feet per minute
CID cubic inch displacement
cm centimeter, centimeters
cmm cubic meters per minute
co. company
cont’d. continued
CPVC chloropoly vinyl chloride
CRT cathode ray tube
CSA Canadian Standards Association
CT current transformer
cu. in. cubic inch (es)
CWC city-water cooled
cyl. cylinder
dB decibel
dBA decibels (A weighted)
DC direct current
DCR direct current resistance
deg. degree
dept. department
dia. diameter
DIN Deutsches Institut fur Normung e. V.
(also Deutsche Industrie
Normenausschuss)
e.g. example given
EIA Electronic Industries Association
EMI electromagnetic interference
EPA Environmental Protection Agency
etc. etcetera, (and so forth)
ext. external
�F Fahrenheit degree
fl. oz. fluid ounce(s)
FM frequency modulation
ft. foot, feet
ft. lbs. foot pound(s)
fs full scale
ga. gauge (meters wire size)
gal./gals. gallon, gallons
gph gallons per hour
gpm gallons per minute
gr. grade
grd. ground
HCHT high cylinder head temperature
HET high exhaust temperature
Hg. mercury (element)
H2O water
HP horsepower
hr, hrs hour, hours
HWT high water temperature
Hz hertz (cycles per second)
ID inside diameter
IEEE Institute of Electrical and
Electronic Engineers
in. inch, inches
inc. incorporated
in. lbs. inch pounds
int. internal
int.-ext. internal--external

A-2 Appendices TP-5353 8/94
Abbreviation Description Abbreviation Description
ISO International Standards Organization
J joule, joules
JIS Japanese Industry Standard
kg kilogram, kilograms
kg/cm2 kilograms per square centimeter
kgm kilogram meter(s)
kJ kilojoules (btu cal)
km kilometer, kilometers
kPa kiloPascal, kiloPascals
kph kilometers per hour
kV kilovolt
kVA kilovolt amperes
kW kilowatt, kilowatts
kWH kilowatt hour
L liter, liters
LxWxH length x width x height
LED(s) light emitting diode(s)
lb., lbs. pound, pounds
L/hr. liter per hour, liters per hour
L/min. liter(s) per minute
LOP low oil pressure
LP liquified petroleum
LWT low water temperature
m meter, meters
m3 cubic meter, cubic meters
max. maximum
MCM one thousand circular mils.
meggar megohmmeter
MHz megahertz
mi. mile, miles
mil one one--thousandth of an inch
min. minimum
misc. miscellaneous
mJ milli joule(s)
MJ mega joule(s)
mm millimeter
m3/min cubic meters per minute
MPa megaPascal
mpg miles per gallon
mph miles per hour
MS military standard
mW milliwatt(s)
MW megawatt(s)
N/A not available
NBS National Bureau of Standards
N.C. normally closed
NEC National Electrical Code
NEMA National Electrical Manufacturers
Association
NFPA National Fire Protection Association
Nm Newton meter(s)
N.O. normally open
no., nos. number, numbers
NPT National Standard taper pipe thread
per general use
N/R not required
OC overcrank
OD outside diameter
OEM original equipment manufacturer
OS overspeed
O/S oversize
OSHA Occupational Safety and Health Act
OV overvoltage
oz. ounce, ounces
PF power factor
PMG permanent magnet generator
pot potentiometer
ppm parts per million
psi pounds per square inch
pt., pts. pint, pints
PVC polyvinyl chloride
qt., qts. quart, quarts
qty. quantity
ref. reference
RFI radio frequency interference
r.h.m. round--head machine (screw)
rms root means square
RPM revolutions per minute
RTV room temperature vulcanization
SAE Society of Automotive Engineers
SCR silicon controlled rectifier
sec. second, seconds
spec, specs specification
sq. square
sq. cm. square centimeters
sq. in. square inch(es)
tach tachometer
TDC top dead center
tech. pub. technical publications
temp. temperature
TIF telephone influence factor
TP, TPs technical publications
turbo turbocharger
UHF ultrahigh frequency
UNC Unified coarse thread (was NC)
UNF Unified fine thread (was NF)
UL Underwriter’s Laboratories, Inc.
U/S undersize
U.S.A. United States of America
V volt, volts
vac volts alternating current
vdc volts direct current
VHF very high frequency
W watt, watts
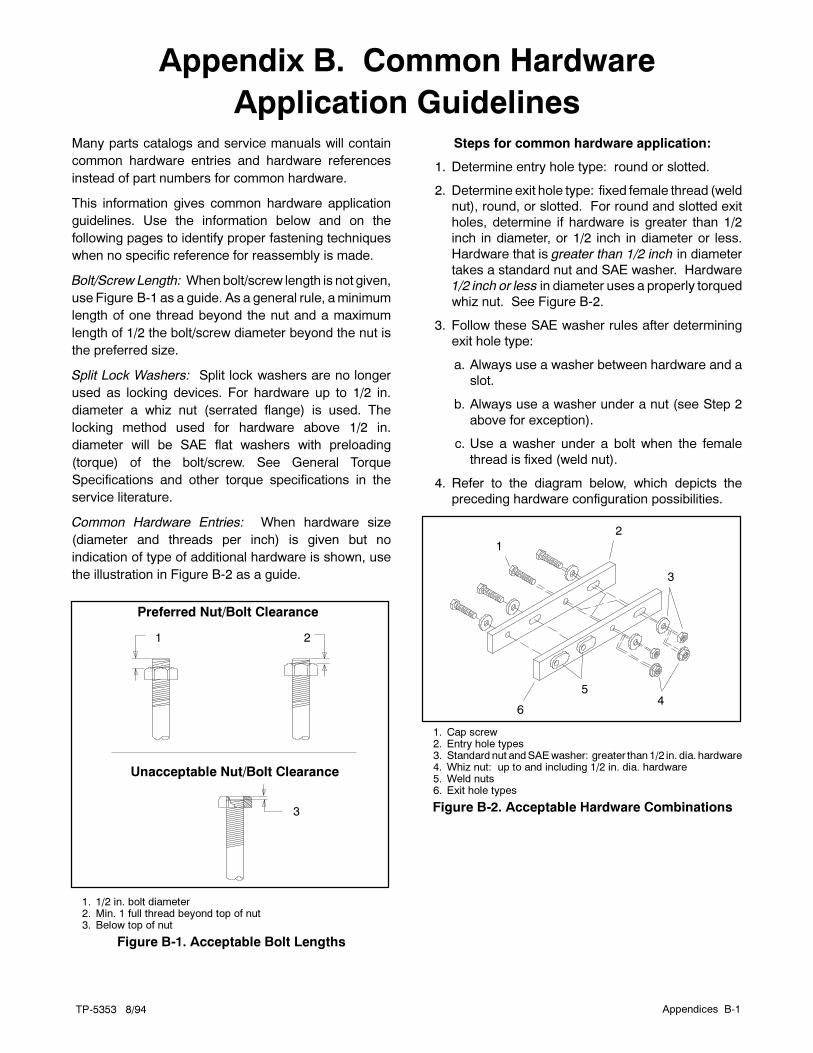
Appendices B-1TP-5353 8/94
Appendix B. Common Hardware
Application GuidelinesMany parts catalogs and service manuals will contain
common hardware entries and hardware references
instead of part numbers for common hardware.
This information gives common hardware application
guidelines. Use the information below and on the
following pages to identify proper fastening techniques
when no specific reference for reassembly is made.
Bolt/Screw Length: Whenbolt/screw length is not given,
use Figure B-1 as a guide. As a general rule, aminimum
length of one thread beyond the nut and a maximum
length of 1/2 the bolt/screw diameter beyond the nut is
the preferred size.
Split Lock Washers: Split lock washers are no longer
used as locking devices. For hardware up to 1/2 in.
diameter a whiz nut (serrated flange) is used. The
locking method used for hardware above 1/2 in.
diameter will be SAE flat washers with preloading
(torque) of the bolt/screw. See General Torque
Specifications and other torque specifications in the
service literature.
Common Hardware Entries: When hardware size
(diameter and threads per inch) is given but no
indication of type of additional hardware is shown, use
the illustration in Figure B-2 as a guide.
Preferred Nut/Bolt Clearance
Unacceptable Nut/Bolt Clearance
1 2
3
1. 1/2 in. bolt diameter2. Min. 1 full thread beyond top of nut3. Below top of nut
Figure B-1. Acceptable Bolt Lengths
Steps for common hardware application:
1. Determine entry hole type: round or slotted.
2. Determine exit hole type: fixed female thread (weld
nut), round, or slotted. For round and slotted exit
holes, determine if hardware is greater than 1/2
inch in diameter, or 1/2 inch in diameter or less.
Hardware that is greater than 1/2 inch in diameter
takes a standard nut and SAE washer. Hardware
1/2 inch or less in diameter uses a properly torqued
whiz nut. See Figure B-2.
3. Follow these SAE washer rules after determining
exit hole type:
a. Always use a washer between hardware and a
slot.
b. Always use a washer under a nut (see Step 2
above for exception).
c. Use a washer under a bolt when the female
thread is fixed (weld nut).
4. Refer to the diagram below, which depicts the
preceding hardware configuration possibilities.
1
2
3
45
6
1. Cap screw2. Entry hole types3. Standard nut andSAEwasher: greater than 1/2 in. dia. hardware4. Whiz nut: up to and including 1/2 in. dia. hardware5. Weld nuts6. Exit hole types
Figure B-2. Acceptable Hardware Combinations


Appendices C-1TP-5353 8/94
Appendix C. Common Hardware
IdentificationCommon hardware has many different head, drive, and
grade (hardness) styles. Some of the more common
types are shown in Figure C-1 and Figure C-2. This is a
guide for identification purposes. Not all generator
hardware used is shown.
Hex. Head or
Machine Head
Hex. Head or
Machine Head
with Washer
Hex. Head or
Machine Head
Flat Head Round
Head
Pan
Head
Socket
Head Cap
or Allen�
Head Cap
Socket Head or
Allen� Head
Shoulder Bolt
Stud
Screws/Bolts/Studs
Sheet Metal
Screw
HEAD STYLES
GRADE (HARDNESS)
Grade 2 Grade 5 Grade 8 Grade 8/9
DRIVE STYLES
Hex. Hex. and
Slotted
Phillips� Slotted Hex. Socket
American Standard Metric
12.910.98.85.8
1/4-20 x 1Major Thread Diameter In Fractional
Inches Or Screw Number Size
Length In Inches
Threads Per Inch
SAMPLE DIMENSIONS
American Standard
MetricM8-1.25 x 20
Major Thread Diameter In Millimeters Length In Millimeters
Distance Between Threads In Millimeters
Allen� is a trademark of Holo-Krome Co.
Phillips� is a registered trademark of the Phillips Screw Company.
Figure C-1. Screws/Bolts/Studs

C-2 Appendices TP-5353 8/94
8.8
Hex. Head Lock Nut or
Nylock Nut
Square Nut Cap Nut or
Acorn Nut
Wing Nut
Plain
Washer
Split Lock
Washer or
Spring Washer
Internal
Tooth Lock
Washer
Internal-External
Tooth Lock Washer
NutsSTYLES
GRADE (HARDNESS)
Grade 2 Grade 5
American Standard Metric
12.910.95.8
SAMPLE DIMENSIONS
1/4-20Major Thread Diameter In Fractional
Inches Or Screw Number Size
Threads Per Inch
American Standard
MetricM8-1.25
Major Thread Diameter In Millimeters Distance Between Threads In Millimeters
WashersSTYLES
GRADE (HARDNESS)There is no marking to identify hardness. Usually hardened washers have a
black oxide or black phosphate finish rather than a zinc (silver-colored) finish.
SAMPLE DIMENSIONS
9/32 x 5/8 x 1/16
Plain Washers
Internal Dimension Thickness
External Dimension
Lock Washers
Internal Dimension
5/8
Spring Washer
or Wave Washer
External
Tooth Lock
Washer
Figure C-2. Nuts/Washers

Appendices D-1TP-5353 8/94
Appendix D. General Torque SpecificationsUse the following specifications for American Standardfasteners when no torque values are given elsewhere inthis manual for a specified bolt. The values are basedon new plated threads. Increase values by 20% if
non-plated threads are used. Screws threaded intoaluminummust have two diameters of threads engagedand may require 30% or more reduction in the torque.
American Standard
Assembled in Cast Iron or Steel
Assembled in
Aluminum
Size Measurement Grade 2 Grade 5 Grade 8 Grade 2 or 5
8-32 in. lbs. (Nm) 16 (2) 20 (2.3) -- 16 (1.8)
10-24 in. lbs. (Nm) 26 (3) 32 (3.6) -- 26 (2.9)
10-32 in. lbs. (Nm) 26 (3) 32 (3.6) -- 26 (2.9)
1/4-20 in. lbs. (Nm) 60 (7) 96 (10.8) 132 (14.9) 60 (6.8)
1/4-28 in. lbs. (Nm) 72 (8) 108 (12.2) 144 (16.3) 72 (8.1)
5/16-18 in. lbs. (Nm) 120 (14) 192 (21.7) 264 (29.8) 120 (13.6)
5/16-24 in. lbs. (Nm) 132 (15) 204 (23.1) 288 (32.5) 132 (14.9)
3/8-16 ft. lbs. (Nm) 18 (24) 28 (38) 39 (53) 18 (24)
3/8-24 ft. lbs. (Nm) 20 (27) 31 (42) 44 (60) 20 (27)
7/16-14 ft. lbs. (Nm) 29 (39) 44 (60) 63 (85)
7/16-20 ft. lbs. (Nm) 32 (43) 50 (68) 70 (95)
1/2-13 ft. lbs. (Nm) 44 (60) 68 (92) 96 (130)
1/2-20 ft. lbs. (Nm) 49 (66) 76 (103) 108 (146)
9/16-12 ft. lbs. (Nm) 60 (81) 98 (133) 138 (187)
9/16-18 ft. lbs. (Nm) 67 (91) 108 (148) 154 (209)
5/8-11 ft. lbs. (Nm) 83 (113) 135 (183) 191 (259)
5/8-18 ft. lbs. (Nm) 94 (128) 153 (208) 216 (293)
3/4-10 ft. lbs. (Nm) 147 (199) 240 (325) 338 (458)
3/4-16 ft. lbs. (Nm) 164 (222) 268 (363) 378 (513)
1-8 ft. lbs. (Nm) 191 (259) 532 (721) 818 (1109)
1-12 ft. lbs. (Nm) 209 (283) 582 (789) 895 (1214)
MetricAssembled in Cast Iron or Steel Assembled in
Size (mm) Measurement 5.8 8.8 10.9Assembled in
Aluminum
6 x 1.00 ft. lbs. (Nm) 5 (7) 6 (9) 9 (12) 5 (7)
8 x 1.25 ft. lbs. (Nm) 14 (19) 14 (20) 20 (37) 14 (19)
8 x 1.00 ft. lbs. (Nm) 16 (21) 17 (24) 23 (31) 16 (21)
10 x 1.50 ft. lbs. (Nm) 25 (35) 27 (37) 38 (51) 25 (35)
10 x 1.25 ft. lbs. (Nm) 29 (39) 34 (46) 45 (61) 29 (39)
12 x 1.75 ft. lbs. (Nm) 42 (57) 45 (61) 65 (89)
12 x 1.50 ft. lbs. (Nm) 48 (65) 55 (75) 78 (106)
14 x 2.00 ft. lbs. (Nm) 64 (86) 69 (94) 101 (137)
14 x 1.50 ft. lbs. (Nm) 74 (100) 81 (110) 116 (157)
16 x 2.00 ft. lbs. (Nm) 98 (133) 104 (141) 150 (204)
16 x 1.50 ft. lbs. (Nm) 104 (141) 116 (157) 168 (228)
18 x 2.50 ft. lbs. (Nm) 133 (181) 145 (196) 208 (283)
18 x 1.50 ft. lbs. (Nm) 145 (196) 156 (212) 226 (306)


� 1993, 1994, 2000 by Kohler Co. All rights reserved.
TP-5353 8/94c
KOHLER CO. Kohler, Wisconsin 53044Phone 920-565-3381, Web site www.kohlergenerators.comFax 920-459-1646 (U.S.A. Sales), Fax 920-459-1614 (International)For the nearest sales and service outlet in U.S.A. and CanadaPhone 1-800-544-2444
Kohler Power SystemsAsia Pacific Headquarters7 Jurong Pier RoadSingapore 619159Phone (65)264-6422, Fax (65)264-6455