service manual - bike rally - bmi gaming
TRANSCRIPT

To Purchase This Item, Visit BMI Gaming | www.bmigaming.com | (800) 746-2255 | +1.561.391.7200

3
TABLE OF CONTENTS FACTORY CONTACT INFORMATION 2
TABLE OF CONTENTS 3
INTRODUCTION 4
INSPECTION 4
SPECIFICATIONS 5
SAFETY PRECAUTIONS 5
HOW TO PLAY 7
HOW TO CHOOSE A PRIZE 8
QUICK SET UP GUIDE 9
DETAILED OPERATIONS / MAIN MENU 10
STASTICS / AUDIT SYSTEM MENU 11
HISTORY MENU 12
DIAGNOSTICS MENU 12
SET UP MENU 13
SET UP / PAYOUT MENU 14
FACTORY SETTINGS MENU 15
PRIZE COST & MILEAGE GUIDELINE 16
TROUBLE SHOOTING GUIDE 17-22
POWER SUPPLY DIAGNOSTICS 23
HOW TO: REMOVE THE WHEEL 24-25
HOW TO: ADJUST WHEEL SENSOR 26
HOW TO: SET BRAKE TENSION 27
HOW TO: CLEAN GAME 27
COMPONENT AND CABLE MAPPING 28
WIRING DIAGRAMS 29
MAINTENANCE LOG 30
TECHNICAL SUPPORT 31
WARRANTY 32
BIKE RALLY PARTS LIST 33-34
FIELD PERFORMANCE WORKSHEET 35
To Purchase This Item, Visit BMI Gaming | www.bmigaming.com | (800) 746-2255 | +1.561.391.7200
4
WELCOME TO: Bike Rally™
Congratulations on your Bike Rally™ purchase! We hope you find Bike Rally™ offers value to your clientele, as well as your organization. Beyond the simplistic proven game play, Bike Rally™ was designed to house the most extensive audit system ever released by the Bay Tek Games factory. When used to its fullest capabilities, your operations will possess finite details to help track your player’s tendencies, prize preferences, and pertinent game performance details. We’ve made all this available to you at the push of a button in efforts to help your operations reach the expected return goals for this great game. We hope you take a few moments to read through this manual, and encourage you to contact the factory with any further questions you may have . Thank you in advance for your Bike Rally™ purchase and we wish you great success!
Your Friends at Bay Tek Games
GAME INSPECTION
Inspect the game for any damaged, loose, or missing parts. If damage is found, please contact your freight carrier first. Then, contact Bay Tek Games
Service Department at 920.822.3951 or e-mail them at [email protected] for further assistance.
To Purchase This Item, Visit BMI Gaming | www.bmigaming.com | (800) 746-2255 | +1.561.391.7200

5
SAFETY PRECAUTIONS
DANGER
DO NOT perform repairs or maintenance on this game with the power ON.
Unplug the unit from the wall outlet or shut off the power at the power
strip located inside the game cabinet.
WARNING
Use of flammable substances can cause severe burns or serious injury. Al-
ways use NON-FLAMMABLE solvents for cleaning.
DO NOT use gasoline, kerosene, or thinners.
CAUTION
Lifting heavy objects can cause back, neck, or other injuries. Be sure ade-
quate lifting and moving devices are available when unloading, unpacking,
and moving this game.
ATTENTION
Be sure the electrical power matches the game requirements. See the serial
number decal located on the back of the game cabinet. Always plug game
into a grounded circuit. If the supply cord is damaged, it must be replaced
by a special cord or assembly available from the manufacturer or its service
SPECIFICATIONS WEIGHT
WEIGHT 525 LBS.
SHIP WEIGHT 565 LBS.
DIMENSIONS
WIDTH 35 IN.
DEPTH 32 IN.
HEIGHT 78.5 IN.
POWER REQUIREMENTS
INPUT VOLTAGE RANGE 100 to 120 VAC or 220 to 240 VAC
INPUT FREQUENCY RANGE 50 HZ to 60 HZ
MAX START UP CURRENT
1.5 AMPS @ 115 VAC
0.75 AMPS @ 230 VAC
OPERATING CURRENT
0.7 AMPS @ 115 VAC
.35 AMPS @ 230 VAC
OPERATING TEMPERATURE
80 - 100 Degrees Fahrenheit
26.7 - 37.8 Degrees Celcius
To Purchase This Item, Visit BMI Gaming | www.bmigaming.com | (800) 746-2255 | +1.561.391.7200

6
HOW TO PLAY: Bike Rally™
Jump In! This Bike Rally™ takes play-ers through three American cities with rich motorcycle histories: Laconia, Milwaukee, & Sturgis. Prizes are offered at each of the three levels for players that spin enough miles! Step up and spin the wheel by simply pulling the handle up and giv-ing it a big push down. When the wheel stops, players are awarded mileage shown on the wheel.
Taking up to three spins each level, players must spin 250 miles to reach Chicago, where they se-lect a small prize or Continue on to Denver, where they need to spin at least 475 miles to win a medium prize or Continue on to Hollywood, just 500 miles away to win the large prize! Note: Miles start at zero at each level.
Players must spin the wheel fast enough to count as a "GOOD SPIN." For added excitement, three “MYSTERY MILE” targets have been added to the wheel, surprising players with mileage ranging from 100 - 300 miles each time!
Actual factory default shown
To Purchase This Item, Visit BMI Gaming | www.bmigaming.com | (800) 746-2255 | +1.561.391.7200

7
HOW TO CHOOSE A PRIZE: Bike Rally™
Players love Road Trip™ for its simplicity PLUS excitement builds with better prizes offerings at each of the three levels.
When a player reaches level 1, they must choose [Continue] to play on to the next level or [Select] a small prize and end their game. *Capsule or Small Spindles 1-4*
When a player reaches level 2, they must choose [Continue] to play on to the third & final level or [Select] a medium prize and end their game. *Medium Spindles 1 & 2*
Congratulations! When a player has made it to level 3, Hollywood, they have completed their
road trip and Won The Large Prize!!! *Large prize spindle 1 & 2*
Important! The player does not win any prize if they choose [Continue] & fail to get enough miles to reach the next prize level.
Important! The player does not win any prize if they choose [Continue] & fail to get enough miles to reach the next prize level.
SMALL PRIZE
MEDIUM PRIZE
LARGE PRIZE
Use [Select Prize] button to toggle back & forth between prize spindles. Then press [Continue] button to take your prize.
To Purchase This Item, Visit BMI Gaming | www.bmigaming.com | (800) 746-2255 | +1.561.391.7200

8
Congratulations! You’re Ready To Go!
A: GET STARTED
1. Complete warranty card (inside cashbox)
2. Plug in and boot up game.
B: YOUR GAME IS PRE-SET WITH THE FOLLOWING
QUICK SET UP GUIDE
*Actual factory default Game Set Up screen
IMPORTANT! Should you decide to deviate
from the factory settings shown above, additional
information MUST be entered into the game to
achieve your desired performance!! Refer to Prize Cost & Mileage Guideline in your manual.
With the factory defaults pre-set, all
you need to do is load $0.25 small,
$10.00 medium, and $150 large
prizes, and you are location ready for
a target payout of 25%!
Because Bike Rally™ is a skill-based game, Bay
Tek highly recommends operating your game a
minimum of 4-6 weeks at the factory setting be-
fore making alterations to the extensively field
tested settings!!
C: LOAD PRIZES
1. Refer to PRIZE DETAILS sheet inside game and / or manual.
D: CLEAR CUMULATIVE STATISTICS
If this game was in operations at a prior location, the factory recommends clearing the
Cumulative Statistics by pressing the [SELECT PRIZE] button for 30 seconds.
To Purchase This Item, Visit BMI Gaming | www.bmigaming.com | (800) 746-2255 | +1.561.391.7200

9
DETAILED OPERATIONS
Detailed report displaying complete game performance. Total games played, quantity of prizes dispensed, payout details, and much more.
Quick way to reset or clear existing credits on the machine.
Itemized log [displaying date and time] of each action item performed on the game.
Used to trouble shoot prize spindle motors, sensors, wheel position, and brake status.
This information MUST be entered at time of game set up for expected performance.
General game functions including: volume, counters, model, and lighting preferences.
GAME STATISTICS:
RESET CREDITS:
GAME HISTORY:
DIAGNOSTICS:
GAME SET UP:
FACTORY SETTINGS:
Access The Following Sub Menus From The Main Menu [Above]
MAIN MENU
1. Access Main Menu by pressing [MENU BUTTON] inside cabinet by counters (shown below) and holding button down for 3 seconds.
2. Press [SELECT PRIZE] button on control panel & scroll to Main Menu. Press [CONTINUE] to enter MAIN MENU.
To Purchase This Item, Visit BMI Gaming | www.bmigaming.com | (800) 746-2255 | +1.561.391.7200

10
Current Statistics is a detailed report showing total game performance since “stats” were last cleared. Hold down [select prize] button for 3 seconds to clear statistics.
CURRENT STATISTICS
CUMULATIVE STATISTICS
STATISTICS / AUDIT TERMS TO KNOW
GAME STATISTICS MENU
Cumulative Statistics is a high level summary of game performance since time of install. Tip: This data does NOT clear when Current Statistics are cleared.
Games Played: Total number of plays. Coin Pulses: Advances 1 digit per coin in. DBA Pulses: Advances 4 digits per dollar in. Current Payout: Payout % since Statistics were last cleared. Game Loses: Quantity of players that did not select a prize. Small Prizes Won: Prizes won at level one. Medium Prizes Won: Prizes won at level two. Large prizes Won: Prizes won at level three. Prize Dispense Retries: If a prize has not fallen through the prize sen-sors in allotted time, the game commands the spindle to RETRY” or “turn again” until a prize has been sensed. If a prize has not dropped, the player is give an opportunity to select a prize from a different spindle at the same prize level.
Prize Dispense Failures: When a player chooses an empty spindle twice, it will count as a prize failure. The game may also be empty, or a player has chose not to collect a prize. Spindle 1 thru 8 prize dispenses: Provides quantity of prizes dispensed from each spindle. A great way to determine what prizes are working well for your clientele. Total Continues: Tracks how many players have chosen to forfeit a prize to continue playing to next level. Small Continues: Quantity of players that reached level one and chose to forfeit their small prize to continue to the medium level. Medium Continues: Quantity of player that reached level two and chose to forfeit the medium prize to continue to the large level.
To Purchase This Item, Visit BMI Gaming | www.bmigaming.com | (800) 746-2255 | +1.561.391.7200

11
“Press Continue Button To Exit, Press Select Button To Go Up”. Game History provides a running log of each action performed on the game. History will provide details such as: Game was powered on, large prize was won, player chose a prize from spindle 1, plum tilt bob was activated, warning was set, error occurred, etc. TIP: This log can be used to verify a player's winning claim. Time & Date must be correct for log to provide accurate data.
FORCE MOTOR ON
1. All spindles OFF 2. Test each spindle independently 3. Press [Continue] to advance to next
spindle.
PRIZE SENSOR TEST
Game software = A.A Aux software = B.B
Wheel Position
x y z
There are [24] targets on the
wheel. [x] represents the arrow is pointing to target [x]
Mileage value the arrow is pointing to.
[0] Indi-cates sen-sor is posi-tioned
within the target area.
[1] Sensor is positioned on the line between
targets
1. OFF: Game is in play mode 2. RUNNING: Activates motor for spindle 1
and/or capsule dispenser until game senses a prize has fallen through the prize sensor. Repeats until you turn motor off.
GAME HISTORY MENU
GAME DIAGNOSTICS MENU
DIAGNOSTICS INFORMATION BRAKE STATUS
A simple algorithm is used to determine the wheel coast time. The diagnostic screen will report one of the four commands showing brake status:
UNKNOWN OK LOOSEN TIGHTEN
Wheel has not been spun .
No adjustments necessary
Brake needs to be
loosened.
Brake needs to be tightened.
After making adjustments, spin wheel again for new report. Repeat until status reads: BRAKE OK..
To Purchase This Item, Visit BMI Gaming | www.bmigaming.com | (800) 746-2255 | +1.561.391.7200

12
1. CREDITS PER GAME
0
1
1 Card Swipe
2
3
4
4+ 6 plays for $5
5
6
7
8
8+ 3 plays for $5
9
10
12
20
DEFAULT
4. PRIZE COSTS SETTINGS
SMALL MEDIUM LARGE
$0.15 $5.00 $15.00
$0.20 $8.00 $25.00
$0.25 $10.00 $50.00
$0.50 $15.00 $75.00
$1.00 $20.00 $100.00
$2.00 $25.00 $150.00
$50.00 $200.00
$250.00
$300.00
$350.00
$400.00
IMPORTANT! Enter your ACTUAL prize cost! Inflating this number will cause your payout statistics to be in-correct! The game uses actual data to
calculate mystery miles!
GAME SET UP MENU
5. SET TIME AND DATE *Entering time and date ensures the history log is accu-
1. Set Month 2. Set Day 3. Set Year 4. Set Hour 5. Set Minute Exit Menu
Follow Step 1 thru 5: Make a selection for each item below from the
Game Set Up Menu *at time of set up only
2. PRICE PER PLAY $0.25
$0.50
$0.75
$1.00 DEFAULT
$1.25
$1.50
$1.75
$2.00
$2.25
$2.50
$2.75
$3.00
$3.25
$3.50
$3.75
$4.00
$4.25
$4.50
$4.75
$5.00
$5.25
$5.50
$5.75
$6.00
Actual factory default shown above
NOTICE! Should you decide to deviate from the factory settings shown above, additional infor-
mation MUST be entered into the game to achieve your desired performance.
3. DESIRED PAYOUT %
Please See Step 3 [Payout Selection] on following page and
make your desired payout % selection.
Actual factory default costs are highlighted in yellow
To Purchase This Item, Visit BMI Gaming | www.bmigaming.com | (800) 746-2255 | +1.561.391.7200

13
Mystery Miles: Your game has three mystery mile targets on the wheel. The amount of mystery miles a player is awarded is determined by the following three factors: overall revenue taken in, prize dollars out (using ACTUAL prize cost) and your desired payout %.
GAME SET UP MENU cont’d
DESIRED PAYOUT % RANGE OPTIONS
20 25 30 35 40 45 50
Important! Road Trip™ is a game of skill and therefore prize payout may vary de-
pending on the skill level of the player! Progress should be evaluated over a period
of time before making weighted game adjustments!
STEP 3: (continued from p. 15) Make Desired Payout Selection
Higher mystery miles are dispersed to the player when your payout is lower than de-sired, while Lower mystery miles are dispersed to the player when your payout is higher than desired. Important! Mystery Mile targets ALWAYS output mileage rang-ing from 100 to 300 miles, and cannot be manipulated in any way to determine a play-ers outcome.
PAYOUT % and MYSTERY MILES
Two key factors work in tandem to control prize payout:
Mystery Miles & Miles Needed To Each Prize Level
The factory default is pre-set with a desired payout of 25%. Follow these three steps below to adjust your de-sired payout % upward or downward: Step 1: Enter Set Up Menu Step 2: Select Desired Payout Step 3: Adjust payout percent up or down accordingly.
Actual factory default shown above
ACTUAL GAME SET UP MENU BELOW
To Purchase This Item, Visit BMI Gaming | www.bmigaming.com | (800) 746-2255 | +1.561.391.7200

14
FACTORY SETTINGS MENU
STEP 1: MAKE VOLUME SELECTIONS GAME VOLUME: Projects sound when game is coined up.
ATTRACT VOLUME: Projects sound when game is idle to get player's attention. Tip: If location is low traffic during the day and wants the volume lower, make adjustments to the attract volume, but leave the game volume alone.
ATTRACT LIGHTING ON: LED lights blink for attention. (factory default) ATTRACT LIGHTING OFF: LED lights softly transition between colors. Recommended for bar or club locations.
STEP 3: MAKE MECHANICAL COUNTERS SELECTION
COUNT GAMES: Advances mechanical counter one digit per game. (factory default)
COUNT CREDITS: Advances mechanical counter one digit per coin/credit
MILEAGE DESCRIPTION: Players must accumulate enough miles in three spins or less to get to each prize level. When mileage is increased between cities, the game becomes more difficult, while less miles (distance) between cities makes the game easier. The mileage instruction decal is located below the wheel inside the cabinet.
IMPORTANT! If you make a change to your Mileage Pattern Selection - You MUST also change the mileage decal located below the wheel inside the game cabi-
STEP 4: MAKE MILEAGE PATTERN SELECTION FOR EACH PRIZE LEVEL
BEGIN BY FOLLOWING STEPS 1 THRU 6
Make a selection for each item below from the Factory Settings Menu.
STEP 2: MAKE LIGHTING SELECTIONS
See prize table reference guide on next page!
STEP 5: MAKE WINNER EVERY TIME SELECTION
ENABLED: When Winner Every Time is Enabled, players have ability to claim a small prize even when they have not accumulated the specified amount of miles to the small prize level (Chicago)
DISABLED: When Winner Every Time is disabled, players MUST accumulate the specified amount of miles (or more) to be eligible to claim a small prize. (factory default)
STEP 6: MAKE SPINDLE OR CAPSULE SELECTION SPINDLES: Spindle games are equipped with (4) small prize spindles (2) medium prize spindles and (2) large prize spindles. (factory default)
ACTUAL FACTORY SET UP MENU
Actual factory default shown above
Actual factory default mileage pattern
CAPSULES; Capsule games are equipped with (1) capsule hopper (2) medium prize spindles and (2) large prize spindles.
To Purchase This Item, Visit BMI Gaming | www.bmigaming.com | (800) 746-2255 | +1.561.391.7200

15
1. Identify the ACTUAL cost of your SMALL, MEDIUM, & LARGE prizes. 2. Next - Enter Factory Settings Menu and scroll down to Mileage Patterns. 3. Next - Locate software patterns that match your prize cost for each prize level.
Example A: If your small prizes cost $0.50, you should select Mileage Pattern 2 because $0.50 is shown under the Mileage Pattern 2 column. Example B: If your medium prizes cost $20, you should select Mileage Pattern 4 because $20 is shown under the Mileage Pattern 4 column. Factory default mileage patterns are highlighted in yellow.
4. Lastly - Locate replacement mile decals inside the cashbox. Make sure the appropriate mileage stickers are placed on each prize level to instruct the player how many miles they need to spin to win each level.
PRIZE COST & MILEAGE GUIDELINE FOLLOW 4 STEPS: DETERMINE PRIZE COSTS & MAKE MILEAGE SELECTIONS
MILEAGE REFERENCE GUIDE
MEDIUM PRIZE (MILWAUKEE)
PATTERN 1 2 3 4 5
COST
$5.00 $5.00 $8.00 $10.00 $25.00
$15.00 $30.00
$20.00 $50.00
MILES 350 MILES
400 MILES
450 MILES
475 MILES
500 MILES
LARGE PRIZE (STURGIS)
PATTERN 1 2 3 4 5 6
COST
$15.00 $75.00 $200.00 $250.00 $350.00 $400.00
$25.00 $100.00 $300.00 $500.00
$50.00 $150.00 $550.00
MILES 450 MILES
500 MILES
525 MILES
550 MILES
575 MILES
600 MILES
$600.00
SMALL PRIZE (LACONIA)
PATTERN 3 4 5
COST
$0.15 $0.50 $2.00
$0.20 $0.75
$0.25 $1.00
MILES 250 MILES
300 MILES
350 MILES
1
$0.15
$0.20
$0.25
175 MILES
2
$0.15
$0.20
$0.25
200 MILES
To Purchase This Item, Visit BMI Gaming | www.bmigaming.com | (800) 746-2255 | +1.561.391.7200

16
Troubleshooting Chart Problem Probable Cause Remedy
No power to the game. No lights on at all.
Unplugged. Circuit breaker tripped. Power strip faulty. Faulty cable/power supply.
Check wall outlet. Reset power strip breaker switch or building
circuit breaker. Change plug position, replace if needed. See Power Supply diagnostic below.
AC Light and Bill Acceptor on. But everything else off. (Power Supply not ON)
Unplugged. Rocker Switch.
Ensure plug is seated in Power Supply Make sure rocker is set ON.
Check for Green Light on motherboard. If Green light is OFF – Replace Power Supply. (AAPS1005)
If Green light is ON : Touch 2 red pins on motherboard together to start fan. Game will boot up and play normally. If fan does not turn – Replace motherboard. If fan is turning and monitor is blank, go to Monitor Troubleshooting.
Dollar Bill Acceptor not functioning.
Ensure bill acceptor has cor-
rect voltage. Dirt or debris in acceptor
slot. Ensure acceptor dipswitch is
set to “always enable” Pinched, broken, or discon-
nected wiring. Bill acceptor problem.
Acceptor should cycle stacker at game
power up. If not, check cable connec-tions. Caution Bill Acceptor may be 110 Volts AC or 12 Volts Dc
Clean with bill reader cleaning card. (A5CC9000)
There are dips on side of acceptor. Set to
“always enable” (not harness enable) Check wiring from bill acceptor to I/O board. Repair or replace wiring harness.
Refer to troubleshooting section of dollar bill acceptor manual included with this game or the diagnostics label of the back of the unit.
Troubleshooting Strategy Use common sense and a systematic method of troubleshooting to determine the exact problem, probable cause and remedy. Use the process of elimination to find the faulty component. Always check for the simple and obvious causes first such as unplugged, loose or broken wires and bad sensors, bent, pinched, stuck or jammed components.
TROUBLE SHOOTING GUIDE
To Purchase This Item, Visit BMI Gaming | www.bmigaming.com | (800) 746-2255 | +1.561.391.7200

17
No Audio
Volume too low. Loose wire. Faulty I/O Board Faulty motherboard
Increase the volume by pressing Menu button, scroll to volume slider Bar and adjust. Check audio cable connections from main board to I/O board to speakers.
c. Replace I/O Board. (AACB4400) d. Replace Motherboard. (AAMB6)
Monitor not work-ing. Power down, wait 10 seconds and power up again.
Monitor says “NO SIGNAL” for 5 seconds after power-up. Then dark.
Small 12 Volt power connector unplugged on motherboard. Monitor VGA cable unplugged. Large power connector unplugged on motherboard Faulty or loose RAM Faulty power supply - Check for 12 Volts and green LED on motherboard.
Check for fan spinning on power supply. Faulty motherboard - Replace faulty board. (AAMB6)
Monitor has nothing at all on power up.
Power cable unplugged from
monitor. Faulty monitor.
Ensure power is plugged into back of
monitor, down to power strip. Replace monitor. (A5CBDI030)
Error on screen at power up. Re-Boot game to see if prob-lem still exists.
Display stops at "No bootable de-
vice -- insert boot disk and press any key"
Display shows “Kernel panic –
unable to mount root”
Flash drive unplugged from board or
faulty. Re-seat and apply power to game Replace main program. (A5FHD001) Faulty or loose RAM
AACE8811
A5CEAU01
AACE44
TROUBLE SHOOTING GUIDE
To Purchase This Item, Visit BMI Gaming | www.bmigaming.com | (800) 746-2255 | +1.561.391.7200

18
Monitor problems. Blurry Monitor Too bright, or dim. Position off.
Adjustment buttons are on bottom edge of monitor. Lift plexi from bottom of monitor. b. Press “Auto” c. Use menu buttons to access monitor adjustments.
Game plays but some of the functions do not work.
None of inputs work. No coin up,
no test buttons, display may say door open.
Display is OK, but does not show
some screens. No volume Game freezes, locks up.
I/O Serial cable unplugged from I/O
board to motherboard Flash drive loose, or faulty. Faulty RAM, or motherboard.
Game does not coin up.
One of coin switches jammed, or
held down. Short in coin door harness. I/O Serial cable unplugged from I/
O board to motherboard I/O board faulty.
If one coin switch is “closed” the other
one will not work either. Unplug white molex from door, and
jump between white and black wires to simulate coin-up.
Ensure serial cable is tight and con-nected.
Replace I/O board. (AACB4400)
Tilt Alarm always going off.
Tilt Plumb Bob touching bottom
ring. Bottom ring bent or crooked. Wire short. I/O board faulty.
Loosen Plumb Bob and adjust until
metal is not contacting ring. Adjust ring until straight and true. Check wiring from tilt to I/O board. Repair or replace wiring harness. Replace I/O board. (AACB4400)
Tilt Alarm never activates. Alarm should sound when game is shaken. Note: Game play is NOT affected.
Tilt Plumb Bob mechanical prob-
lem. Alarm does not activate until
game is really rocked. Pinched, broken, or disconnected
wiring. I/O board faulty.
Adjust Plum Bob so that alarm activates
when it touches bottom ring. Adjust Plum Bob higher on support. Check wiring from tilt to I/O board. Repair or replace wiring harness. Replace I/O board. (AACB4400)
TROUBLE SHOOTING GUIDE
To Purchase This Item, Visit BMI Gaming | www.bmigaming.com | (800) 746-2255 | +1.561.391.7200
19
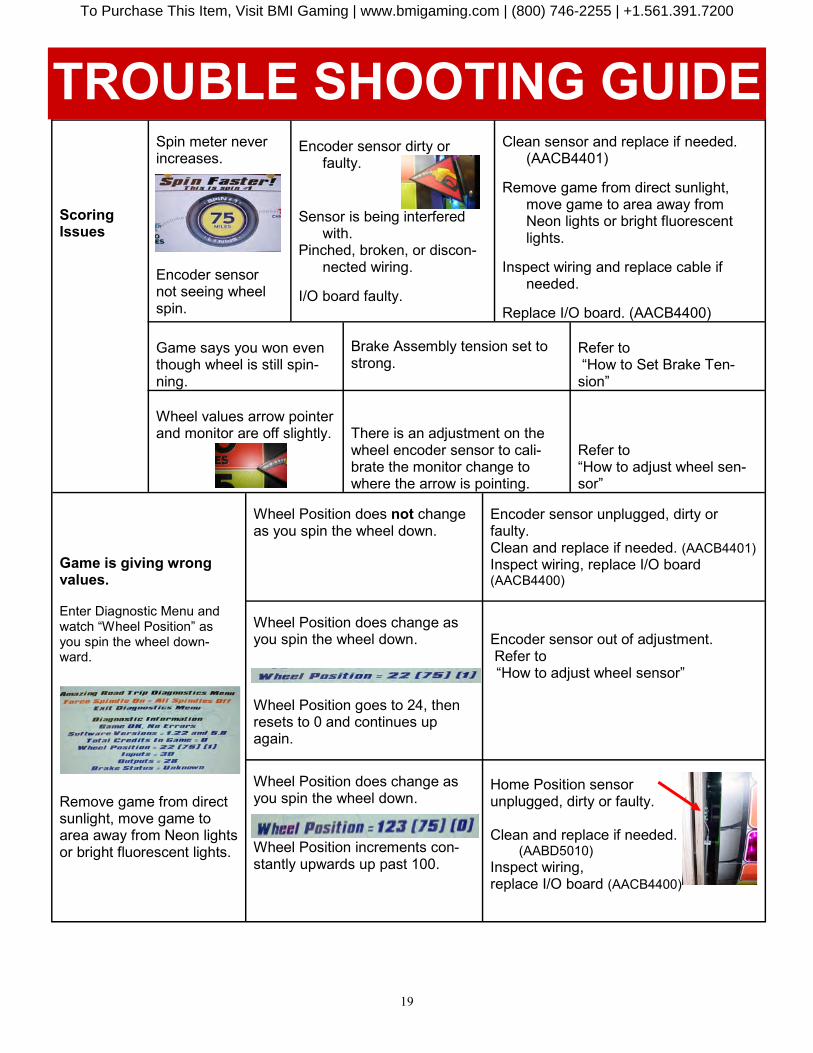
Scoring Issues
Spin meter never increases.
Encoder sensor not seeing wheel spin.
Encoder sensor dirty or
faulty. Sensor is being interfered
with. Pinched, broken, or discon-
nected wiring. I/O board faulty.
Clean sensor and replace if needed.
(AACB4401) Remove game from direct sunlight,
move game to area away from Neon lights or bright fluorescent lights.
Inspect wiring and replace cable if
needed. Replace I/O board. (AACB4400)
Game says you won even though wheel is still spin-ning.
Brake Assembly tension set to strong.
Refer to “How to Set Brake Ten-sion”
Wheel values arrow pointer and monitor are off slightly.
There is an adjustment on the wheel encoder sensor to cali-brate the monitor change to where the arrow is pointing.
Refer to “How to adjust wheel sen-sor”
Game is giving wrong values. Enter Diagnostic Menu and watch “Wheel Position” as you spin the wheel down-ward.
Remove game from direct sunlight, move game to area away from Neon lights or bright fluorescent lights.
Wheel Position does not change as you spin the wheel down.
Encoder sensor unplugged, dirty or faulty. Clean and replace if needed. (AACB4401) Inspect wiring, replace I/O board (AACB4400)
Wheel Position does change as you spin the wheel down.
Wheel Position goes to 24, then resets to 0 and continues up again.
Encoder sensor out of adjustment. Refer to “How to adjust wheel sensor”
Wheel Position does change as you spin the wheel down.
Wheel Position increments con-stantly upwards up past 100.
Home Position sensor unplugged, dirty or faulty. Clean and replace if needed. (AABD5010) Inspect wiring, replace I/O board (AACB4400)
TROUBLE SHOOTING GUIDE
To Purchase This Item, Visit BMI Gaming | www.bmigaming.com | (800) 746-2255 | +1.561.391.7200

20
Wheel not spinning when player moves handle. Check for 12 Volts DC at coin up on connector.
No 12 Volts on connector at coin up.
Inspect cable from Solenoid to I/O board. (J28) Main cable part # AACB4400 Replace I/O board. (AACB4400)
12 Volts present at connector, but solenoid still doesn’t engage.
If 12 Volts present at connector, but sole-noid still doesn’t engage. Wheel will have to be removed to further inspect or replace. Refer to “How to Remove Wheel”
Solenoid always stays on. Players can spin wheel without inserting money. Players will win a lot!
Jammed Solenoid or Springs
Pinched Cable. Check for 12 Volts DC on cable
to solenoid when game is in normal
Inspect solenoid. Ensure it operates
smoothly. Press in on silver bar. It is spring loaded and will spring back after release. Inspect cable for smashed wire. May also
have to replace I/O Board. If 12 Volts present, Replace I/O board.
(AACB4400) If no 12 Volts and solenoid is still engaged – Wheel will have to be removed to further inspect or replace. Refer to “How to Remove Wheel”
Meters do not work.
Prize meter should click as prize
drops through chute sensors. Game meter should click as
game starts. I/O board faulty.
Watch as prize drops. Replace counters (AACO1000) Watch as next game starts. Replace counters (AACO1000) Replace I/O board. (AACB4400)
Sensor Blocked Left Error
Prize chute blocked. Prize chute sensors dirty. Pinched, broken, or disconnected
wiring. Prize chute sensors faulty.
Make certain nothing is in jammed in prize
chute. Check prize dimensions. Blow air through holes in wood prize chute. Prize chute can be removed to clean sensors. Check wiring from sensor to sensor. (AACE4406) Check wiring from sensor to I/O Board. (AACE4405) Replace both prize chute sensors. (AACB4402)
TROUBLE SHOOTING GUIDE
To Purchase This Item, Visit BMI Gaming | www.bmigaming.com | (800) 746-2255 | +1.561.391.7200

21
Game does not drop prize. “It didn’t give me a prize”
Player chooses to continue. Player “mistaken”
If the player continues to try to win higher
prize – you give up the lower prize. Enter game history menu to prove a dis-
puted win. It has a time stamp with what the game has done.
Enter Statistics Menu and look at Prize Dis-penser Failures and Prizes Dispensed Refer to instruction manual for detailed ex-planation.
Symptom: Game is about to dispense a prize, but spindle doesn’t turn and game moves on thinking it dropped a prize.
Prize chute sensors dirty. Clean or replace faulty sensors. (AACB4402)
TROUBLE SHOOTING GUIDE
To Purchase This Item, Visit BMI Gaming | www.bmigaming.com | (800) 746-2255 | +1.561.391.7200

22
Power Supply Diagnostics: Check power cable to game.
Check connections on power socket on bottom rear of game (A)
Check connection to power supply (B).
Ensure Power Supply switch is set to 115V (C)
(Some power supplies may not have this) Ensure Power switch is on (D).
Ensure fan is turning.
Verify power to motherboard: Check for 12 Volts DC between black and yellow wires.
.
Note: The location of this con-nector may vary depending on which version motherboard is in game.
1.) Ensure fan is turning.
2.) Green LED should be ON
SERIAL PORT
TO MOTHER-
BOARD
SPEAKER LINE
MONITOR CA-
Mother Board – Part # AAMB6
POWER SUPPLY DIAGNOSTICS
A
B
D
C
To Purchase This Item, Visit BMI Gaming | www.bmigaming.com | (800) 746-2255 | +1.561.391.7200

23
HOW TO: Remove Wheel
STEP 1: 1. Unplug connector to solenoid. 2. Press Menu button in front of game. 3. Measure voltage across red and black wires.
It should be 12 Volts DC 4. If meter reads 0 Volts DC with the solenoid
unplugged, the problem is the I/O AUX board or wires. 5. If meter reads 12 Volts DC - then plug in so-
lenoid connector, 6. Check wires to solenoid, look for a cut wire. If the wires pass this test, then continue to re move wheel and replace solenoid.
Step 2: 1. Remove 4 bolts securing wood
frame to game cabinet. 2. Remove 2 bolts on pointer in
front of wheel. Allow pointer to dangle next to wheel.
Caution: If arrow is still mounted to game as the wheel is removed, the sensor may be damaged.
Step 4: Remove pin at bottom of arm
Step 5: Slowly remove from cabinet and lay on bench. Lay on side so arm is toward top of unit.
Step 3: 1. Unplug connector near bottom of wheel.
Solenoid replacement requires the wheel to be removed from game. It is important to troubleshoot the game first to determine if the problem actually is a faulty
To Purchase This Item, Visit BMI Gaming | www.bmigaming.com | (800) 746-2255 | +1.561.391.7200

24
Step 6 Remove set screw and re-move wheel to access wheel home position sensor.
Step 7 There is a calibration tab on the side of the wheel. The posts are 1 3/8 inches tall
Step 9 To re-assemble wheel: Reverse steps, making sure: wheel bear-ing is on straight and tight. Arm is positioned in gap.
Step 8 The sensor that reads home position of wheel is mounted to bottom wood piece. [AABD5010]
Step 10 When re-installing top wood, Position brake assy. To fol-low curve on wheel. Ensure wood slides.
Step 11 Secure top wood and ensure the following fit properly.
The 4 screws attach to
wheel bearing.
Slide wood un-
der plexi for
attraction
lighting
Re-install wheel assy. Into cabinet. NOTE: Make sure solenoid assy. Is swung toward rear of machine when installing pin on bottom of arm.
HOW TO: Remove Wheel
To Purchase This Item, Visit BMI Gaming | www.bmigaming.com | (800) 746-2255 | +1.561.391.7200
25
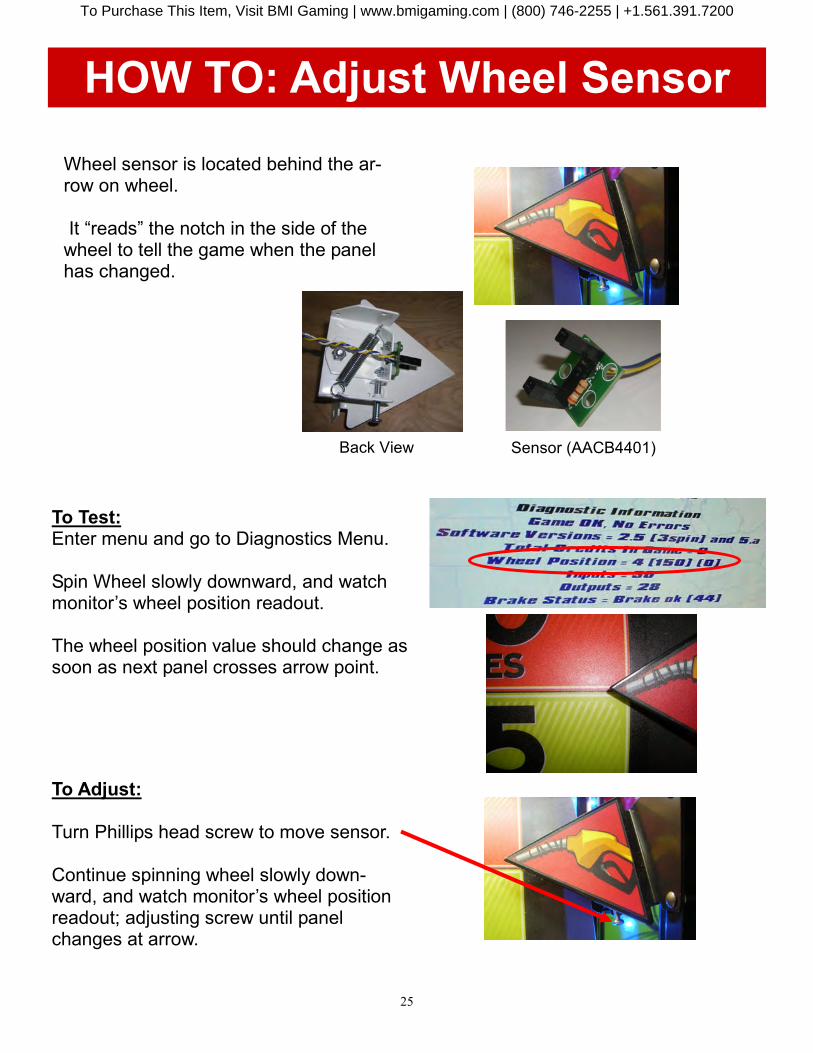
Back View Sensor (AACB4401)
To Test: Enter menu and go to Diagnostics Menu. Spin Wheel slowly downward, and watch monitor’s wheel position readout. The wheel position value should change as soon as next panel crosses arrow point.
To Adjust: Turn Phillips head screw to move sensor. Continue spinning wheel slowly down-ward, and watch monitor’s wheel position readout; adjusting screw until panel changes at arrow.
Wheel sensor is located behind the ar-row on wheel. It “reads” the notch in the side of the wheel to tell the game when the panel has changed.
HOW TO: Adjust Wheel Sensor
To Purchase This Item, Visit BMI Gaming | www.bmigaming.com | (800) 746-2255 | +1.561.391.7200

26
HOW TO: Set Brake Tension To Test: Enter menu and go to Diagnostics Menu. Use plunger handle to give the wheel a good spin, Let the wheel coast to a stop like a normal game play. If brake is set correctly, screen will show: Brake Status = Brake OK If Brake Status shows Loosen Brake or Tighten Brake, adjust brake assem-bly.
To Adjust: To loosen brake: Loosen top nut and move 1/4 inch up. The threaded rod will drop as top nut moves up. Spin bottom nut up tight to bracket. Tighten both nuts. To tighten brake: Loosen bottom nut and move 1/4 inch down. Lift up the threaded rod and spin nut down tight to bracket. Tighten both nuts. Re-test to verify: Brake Status = Brake OK
HOW TO: Clean Game Use a mild soap solution and a clean lint free cloth to wipe down game.
Do NOT use any cleaning solvents on the game’s graphics!
To Purchase This Item, Visit BMI Gaming | www.bmigaming.com | (800) 746-2255 | +1.561.391.7200

27
COMPONENT & CABLE MAPPING AUX I/O
BAORD
[AACB4400]
To Purchase This Item, Visit BMI Gaming | www.bmigaming.com | (800) 746-2255 | +1.561.391.7200

28
Select Button
Wiring Diagram
Green Red W/ Green Stripe
Blue W/ White Stripe
White W/ Black Stripe
Continue Button
Wiring Diagram
Green W/ Black Stripe
Orange W/ Black Stripe
Red W/ Black Stripe
Blue W/ Red Stripe
SPEAKER LINE OUT
MONITOR CABLE
SERIAL PORT TO
MOTHERBOARD
USB DRIVE
SOFTWARE
WIRING DIAGRAMS
PUPUSH BUTTON WIRING
MOTHER BOARD WIRING [AAMB6]
To Purchase This Item, Visit BMI Gaming | www.bmigaming.com | (800) 746-2255 | +1.561.391.7200

29
If you need to make repairs or order replacement parts it is a good idea to keep a log. Below is a chart you can use to track repairs and maintenance.
DATE MAINTENANCE PERFORMED PARTS ORDERED INITIALS
MAINTENANCE LOG
To Purchase This Item, Visit BMI Gaming | www.bmigaming.com | (800) 746-2255 | +1.561.391.7200

30
Electronics / Circuit Boards - Repair Options Repair & Return – If you have Circuit Board issues with your Bay Tek game, you can send the board to us and we’ll repair it right away. Most items sent to us are repaired and returned to you within two days. This option is your best value as we offer this fast turn-around service at the most reasonable price. Advance Replacement – If you have Circuit Board issues with your Bay Tek game, but you don’t have time to send in your board in for repair, give us a call and ask for an Advance Replacement. We’ll send you a replacement board that same day (pending availability). When you get your new board, just repackage the defective board in the same box and send it back to us. We make it easy by including a UPS Return Shipping label for you to put on the box (not available for international shipments). This is your best option when you need to get you game up and running as quickly as possible! Spare Parts – Take matters into your own hands and purchase new spare Circuit Boards for your Bay Tek games. Many of our games share the same main-board electronics. This means you can buy one set of spare electronics to support many of your Bay Tek games. Spare boards allow you to get your game up and running the quickest and provide you a valuable troubleshooting option. Call our technicians to get recommendations for what you should keep on hand for spare parts! Technical Support: “You” are the best tool for troubleshooting! Your abilities to understand the game and your skills to repair the game are invaluable to us! If you need help, you know you can call us. It’s not easy to diagnose a game remotely by phone, but our technicians do a great job. They’ll need your help to perform some troubleshooting steps and convey to them exactly what’s happening with your game. Returns, Credits, & Fees: NOTICE! ALL ITEMS being sent to Bay Tek Games for repair or return, etc. require prior Return Authorization! Bay Tek Games will provide a Product Return Form with an authorizing Ticket Num-ber for each item to be returned. Please be certain to include this document with all shipments! Late Fees and Non-Return Fees - Advance Replacement and Warranty Replacement items require the defective items to be returned by Bay Tek games promptly to avoid Late Fees. We would expect items to be returned with 10 working days. Late fees are invoiced monthly. Late fees are non-refundable under any circumstance! Any item not returned within 90 days will be invoiced in full as a replacement part! Bench Fees - Bench fees will apply for each electronic item returned to Bay Tek Games (this in-cludes unused Advance Replacement items). This charge covers our cost to inspect, evaluate and retest each item. Please note that returned items that do not pas sour tests will be charged accord-ingly as replacement items or advance replacements. Restocking Fees - Unused items returned for credit will be credited minus a restocking fee. Items must be returned with in 30 days of purchase in order to qualify for any credit amount. No shipping charges will be credited.
TECHNICAL SUPPORT Excellent customer service is very important to Bay Tek Games! We know that keeping your games in great operating condition is important to your business. When you need us, we are here to help. You can call us fro free technical assistance, and you can count on us to have parts on-hand to sup-port your game. When you do need us, it’s important that you know what to expect. We offer op-tions that fit your needs.
To Purchase This Item, Visit BMI Gaming | www.bmigaming.com | (800) 746-2255 | +1.561.391.7200

31
Bay Tek Games warrants to the original purchaser that all game components will be free of defects in workmanship and materials for a period of 6 months from the date of purchase. Hint:Register your new game for an extra 3 months on your warranty (Find registration card in the cashbox) Bay Tek Games will, without charge, repair or replace at it's option defective compo-nent parts upon notification to the parts/service department. Warranty replacement part(s) will be shipped immediately, via ground service, along with a Product Return Form for the return of defective part(s). Defective part(s) must be shipped back to Bay Tek Games unless otherwise in-structed. Items not returned to Bay Tek Games will be invoiced as replacement parts. This warranty does not apply in the event of any misuse or abuse to the product, or as a result of any unauthorized repairs or alterations. The warranty does not apply if any serial number decal is altered, defaced, or removed from it's original position.
Should you need your game serviced, determine the serial number from the decal placed on the front of this manual, or locate it on the back of the game. Then con-tact our Service Department at: 920.822.3951 or e-mail: [email protected]
WARRANTY
NON-WARRANTY Should you need your game serviced, determine the serial number on the front page of this manual, or by locating the decal on the back of the game cabinet, and contact our Service Department at: 920.822.3951 or [email protected]
Options and estimated charges will be provided to you for your approval. Please remember that any items being sent to Bay Tek Games must include prior re-turn authorization from our Parts & Service Department. This approval will include a Product Return Form which is required to be included with any incoming shipments. Repaired part(s) will be shipped back using the same method in which they were re-ceived. Repairs are warranted for 30 days from the date of return shipment.
In order to maintain the safety & other compliance certifications of the game, ONLY approved parts may be used. For approved parts,
refer to the parts list in this manual.
ATTENTION
To Purchase This Item, Visit BMI Gaming | www.bmigaming.com | (800) 746-2255 | +1.561.391.7200

32
Bike Rally™ PARTS LIST PART
NUMBER DESCRIPTION
A5CB2050 Cash Box
A5SP1050 Speaker
A5CO4400 Handle Grips
A5FI9010 Inline Filter
A5FR4400 License Plate Frame
A5HA1001 T Handle (No Lock)
A5LK1001 Lock for T Handle
A5BURU075 Rubber Handle Stop
A5DSPZ010 Long Prize Dispense Spindle
A5PL9097 Blanking Plate (Replaces Bill Acceptor)
A5SLSX001 Shaft Collar
A5SP5021 Compression Spring for Solenoid
A5TI1001 Plumb Bob Tilt
A5PBAC001 Red "Select Prize" Button
A5PBAC002 Green "Continue" Button
W5HG1065 Single Bend Hinge
AACE4400 Main Cable
AACE4401 Prize Chute Bottom Wheel Lights
AACE4402 Wheel Cables
AACE4403 Wheel Chase light Cable (2 Per) .
AACE4404 Top Board Chase light Cable
AACE4405 Prize Chute Cable
AACE4406 Prize Chute Jumper Cable
AACE4408 Solenoid & Cable Assembly
AACE4409 DBA Cable
AACE1614 Interface Cable
AACE1710 Door Ground Cable
AACE8802 Outlet Strip Cable
AACE8822 Fluorescent Light Power Cable
AACBL4A-DOOR Door Cable
AAJP9090 Bill Acceptor Cable
AAPB2700 Push Button Assembly
AALIHL110 Light Holder
AACH4400-P50 Pack of 50 Gift Card Holders
A5ME4400-BLK Metal Front Frame (Black)
A5ME4400-WHT Metal Front Frame (White)
A5ME4401-BLK Metal Top Front Door (Black)
PART NUMBER
DESCRIPTION
A5ME4402-BLK Metal Lock Arm (Black)
A5ME4403-BLK Metal Lock Link (Black)
A5ME4404-BLK Metal Side Guard (Black)
A5ME4405-BLK Metal Pivot Lock (Black)
A5ME4406-BLK Metal Bottom Front Door (Black)
A5ME4407-BLK Metal Prize Door (Black)
A5ME4408-BLK Metal Security Door (Black)
A5ME4409-BLK Metal Prize Door Connector (Black)
A5ME4410-BLK Metal Side Prize Return (Black)
A5ME4414-BLK Metal Handle Guide (Black)
A5ME4415 Metal T-Handle
A5ME4416-BLK Metal Rocker Arm (Black)
A5ME4417-BLK Metal Pivot Link (Black)
A5ME4418-BLK Metal Wheel Link (Black)
A5ME4420-BLK Metal Pivot Link Bracket (Black)
A5ME4421-BLK Metal Sensor Bracket (Black)
A5ME4422-BLK Metal Mounting Bracket (Black)
A5ME4424-BLK Metal Wheel Bearing (Black)
A5ME4429-BLK Metal Wheel Spin Bracket (Black)
A5ME4430-BLK Metal Slip Clutch Bracket (Black)
A5ME4431-BLK Metal Handle Bumper Bracket (Black)
A5OU1000 Outlet Strip
A5LI0001 120Volt Fluorescent Light
A5TU4400 Clear Tubing for Light
AAPS1005 Power Supply
AASO4010 Solenoid Assembly
CIRCUIT BOARDS / MONITORS
A5CBDI025 16" LCD Monitor
AACB4400 Door Interface Board
AACB4401 Encoder Sensor With Cable
AACB4402 Prize Detector Sensor
AACB4403 Reflector Sensor
AAMB6 Main Board
SEE NEXT PAGE FOR REPLACEMENT DECALS...
To Purchase This Item, Visit BMI Gaming | www.bmigaming.com | (800) 746-2255 | +1.561.391.7200
33
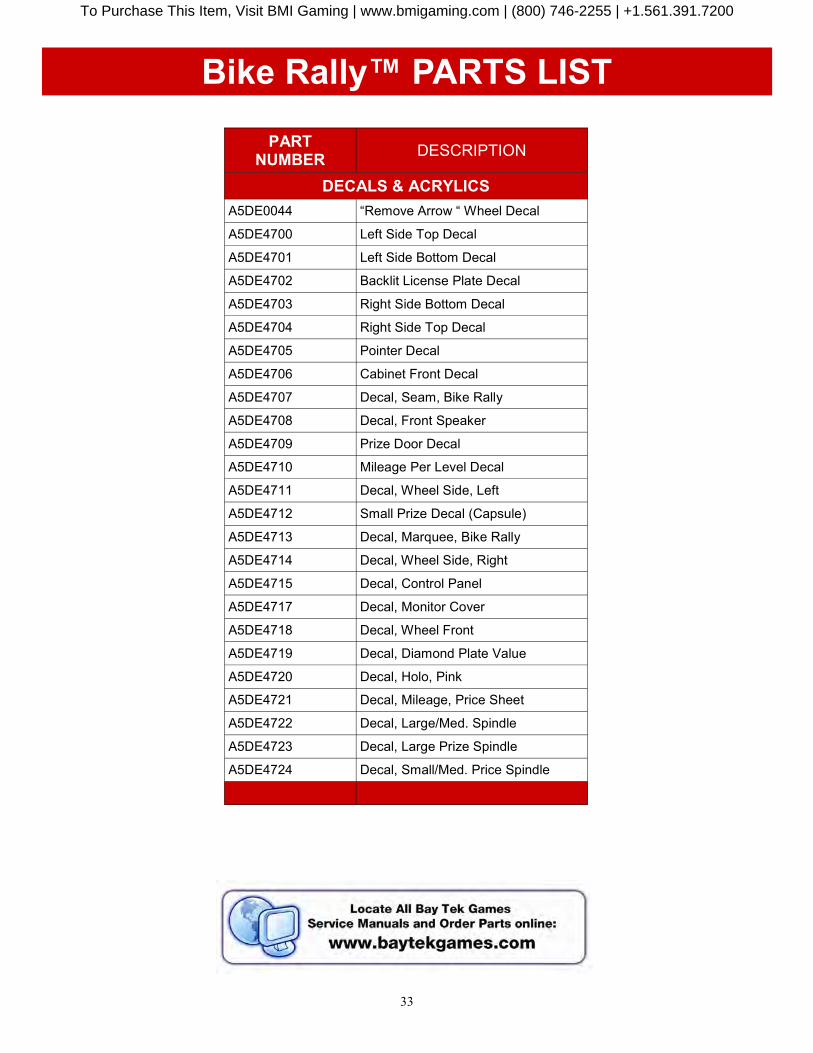
Bike Rally™ PARTS LIST
PART NUMBER
DESCRIPTION
DECALS & ACRYLICS
A5DE0044 “Remove Arrow “ Wheel Decal
A5DE4700 Left Side Top Decal
A5DE4701 Left Side Bottom Decal
A5DE4702 Backlit License Plate Decal
A5DE4703 Right Side Bottom Decal
A5DE4704 Right Side Top Decal
A5DE4705 Pointer Decal
A5DE4706 Cabinet Front Decal
A5DE4707 Decal, Seam, Bike Rally
A5DE4708 Decal, Front Speaker
A5DE4709 Prize Door Decal
A5DE4710 Mileage Per Level Decal
A5DE4711 Decal, Wheel Side, Left
A5DE4712 Small Prize Decal (Capsule)
A5DE4713 Decal, Marquee, Bike Rally
A5DE4714 Decal, Wheel Side, Right
A5DE4715 Decal, Control Panel
A5DE4717 Decal, Monitor Cover
A5DE4718 Decal, Wheel Front
A5DE4719 Decal, Diamond Plate Value
A5DE4720 Decal, Holo, Pink
A5DE4721 Decal, Mileage, Price Sheet
A5DE4722 Decal, Large/Med. Spindle
A5DE4723 Decal, Large Prize Spindle
A5DE4724 Decal, Small/Med. Price Spindle
To Purchase This Item, Visit BMI Gaming | www.bmigaming.com | (800) 746-2255 | +1.561.391.7200

34
FIE
LD
WO
RK
SH
EET
N
AM
E
SO
FTW
AR
E R
EA
DIN
GS
ME
CH
AN
ICA
L M
ETE
R R
EA
DIN
GS
TOTAL GAMES PLAYED
PREVIOUS GAME METER
PREVIOUS PRIZE METER
CURRENT PAYOUT %
GAME METER
PRIZE METER
TOTAL GAMES LOST
GROSS REVENUE
PRIZES OUT
TOTAL CONTINUES
NET REVENUE
PAYOUT %
PRIZE DISP. RETRIES
Q
UA
NTIT
Y O
F P
RIZ
ES
DIS
PE
NS
ED
LIS
T P
RIZ
ES A
DD
ED
Q
UA
N-
TIT
Y
PRIZE DISP. FAILURES
SPINDLE 1
AVERAGE TIME PER GAME
SPINDLE 2
MADE IT TO LEVEL 1 (CHICAGO)
SPINDLE 3
DID NOT MAKE IT TO LEVEL 1 (CHICAGO)
SPINDLE 4
SMALL PRIZE W
ON (TOOK SMALL PRIZE)
SPINDLE 5
SMALL CONTINUE (GAVE UP SMALL))
SPINDLE 6
MADE IT TO LEVEL 2 (DENVER)
SPINDLE 7
DID NOT MAKE IT TO LEVEL 2 (DENVER)
SPINDLE 8
MEDIUM PRIZE WON (TOOK MEDIUM PRIZE)
G
AM
E P
LA
Y - M
ILE
AG
E
MEDIUM CONTINE (GAVE UP MEDIUM)
CHICAGO
CLEARED STATISTICS (CHECK
BOX)
MADE IT TO LEVEL 3
DENVER
COLLECTED CASH (CHECK BOX)
DID NOT MAKE IT TO LEVEL 3 (HOLLYWOOD)
HOLLYWOOD
LARGE PRIZE WON (TOOK LARGE PRIZE)
LARGE PRIZE CONTINUE
CU
MU
LA
TIV
E T
OTA
L
SU
MM
AR
Y: O
F S
OFTW
AR
E A
DD
ITIO
NS
/ CH
AN
GE
S / U
PD
ATE
S / E
TC
.
CUMULATIVE GAMES
USE THIS WORKSHEET TO TRACK DETAILED GAME PERFORMANCE & FAX TO BAY TEK
GAMES AT 920.822.8936 OR EMAIL TO [email protected]. W
E WILL GLADLY
HELP EVALUATE YOUR PERFORMANCE & MAKE RECOMMENDATIONS WE HAVE
LEARNED IN TESTING.
CUMULATIVE LOSES
TOTAL SMALL PRIZES WON
TOTAL MEDIUM PRIZES WON
TOTAL LARGE PRIZES WON
To Purchase This Item, Visit BMI Gaming | www.bmigaming.com | (800) 746-2255 | +1.561.391.7200

35
To Purchase This Item, Visit BMI Gaming | www.bmigaming.com | (800) 746-2255 | +1.561.391.7200

36
To Purchase This Item, Visit BMI Gaming | www.bmigaming.com | (800) 746-2255 | +1.561.391.7200