session one - photo book · session one: welcome to photobook shop. ... select the format of book...
TRANSCRIPT

www.thephotobookshop.com.au
P a g e | 1
SESSION ONE:
Welcome to Photobook Shop.
Photobook Shop allows you to share your Photobooks, and your memories, with your friends and
family on Facebook and other social networking sites.
Memories from birthdays, holidays, and special occasions can be shared with Photobook Shop –
comment on photos, rate projects, and order duplicates for your personal collection
Share your tips and tricks with other Photobook members – Photobook Shop is a hub for
photographers to meet, whether beginner or professional. Review designs, offer photography
advice, and software tips
Photobook Shop offers a platform for professionals to share their products. Upload your
Photobooks, showcase your company, and allow potential clients to engage with your brand and
view your products.
LESSON ONE
In this section you will learn how to:
Sign up to www.thephotobookshop.com.au
Download Photobook Shop software
Select and customise your personal Photobook Shop layout
Individually name your Photobook Shop project

www.thephotobookshop.com.au
P a g e | 2
Lesson 1.1: Downloading
System Requirements:
Minimum Mac Specifications:
768MB RAM
2GB free hard disc space
Windows XP (Service Pack 2 or 3) or Windows Vista
Minimum PC Specifications:
1GB RAM
2GB free hard disc space
Mac OS 10.3.9
You will also need basic computer components, such as a monitor, mouse and keyboard.
Installing Software:
The software required to create Photo books and join Photobook Shop can be accessed at
http://www.thephotobookshop.com.au/
Go to our website www.thephotobookshop.com.au, click on the Download button and after
entering your name and email, we will ask you to select the version you would like to
download (Mac or PC). Once you have downloaded the software, follow the prompts on‐
screen and you’ll be ready to start using the software.

www.thephotobookshop.com.au
P a g e | 3
Once downloaded, the program will appear in the start‐up menu.
www.thephotobookshop.com.au
P a g e | 4
Lesson 1.2: Getting Started
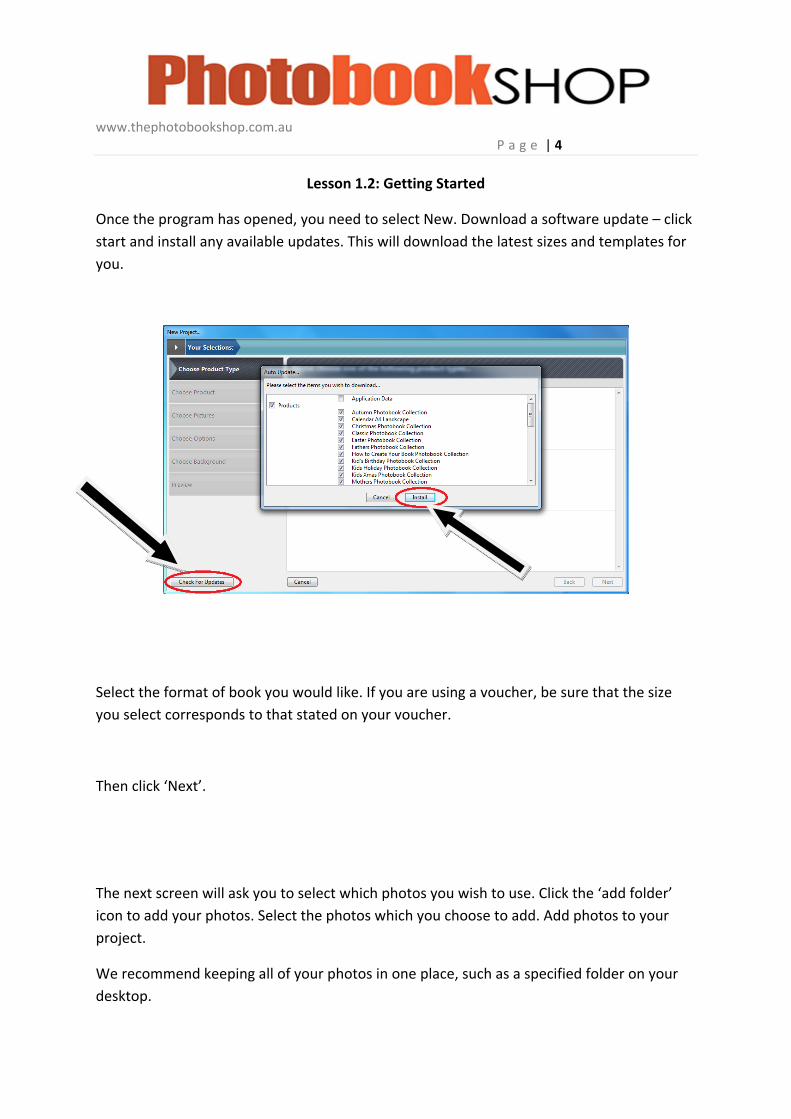
Once the program has opened, you need to select New. Download a software update – click
start and install any available updates. This will download the latest sizes and templates for
you.
Select the format of book you would like. If you are using a voucher, be sure that the size
you select corresponds to that stated on your voucher.
Then click ‘Next’.
The next screen will ask you to select which photos you wish to use. Click the ‘add folder’
icon to add your photos. Select the photos which you choose to add. Add photos to your
project.
We recommend keeping all of your photos in one place, such as a specified folder on your
desktop.

www.thephotobookshop.com.au
P a g e | 5
You may click to add an entire folder of images
You may click to add individual images.
‐ Removes a image from your selection
‐ Rotates images clockwise or anti‐clockwise
Once you have added your images click “Next”. The more images you select the more pages
the wizard will add to your book.
Note: You may wish to skip the Wizard at this step by clicking on the Skip Wizard button
bottom left of the window.
Select how you want the wizard to decide how many pages you would like.
www.thephotobookshop.com.au
P a g e | 6
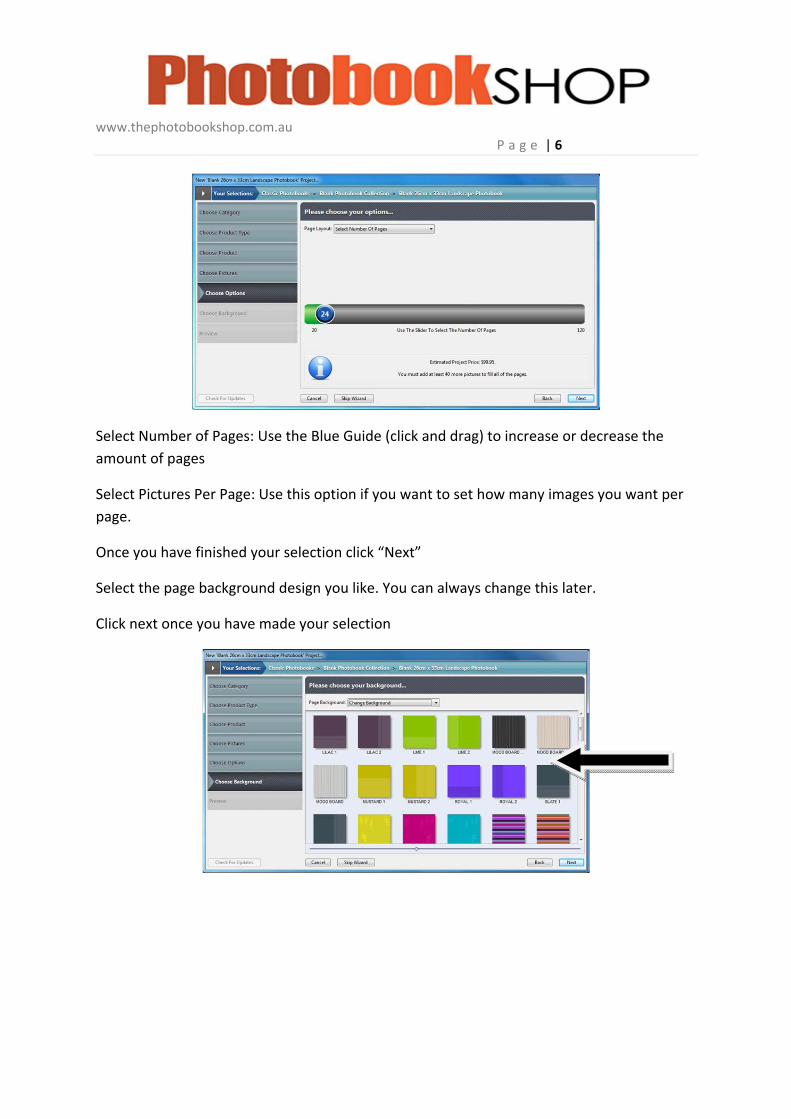
Select Number of Pages: Use the Blue Guide (click and drag) to increase or decrease the
amount of pages
Select Pictures Per Page: Use this option if you want to set how many images you want per
page.
Once you have finished your selection click “Next”
Select the page background design you like. You can always change this later.
Click next once you have made your selection
www.thephotobookshop.com.au
P a g e | 7
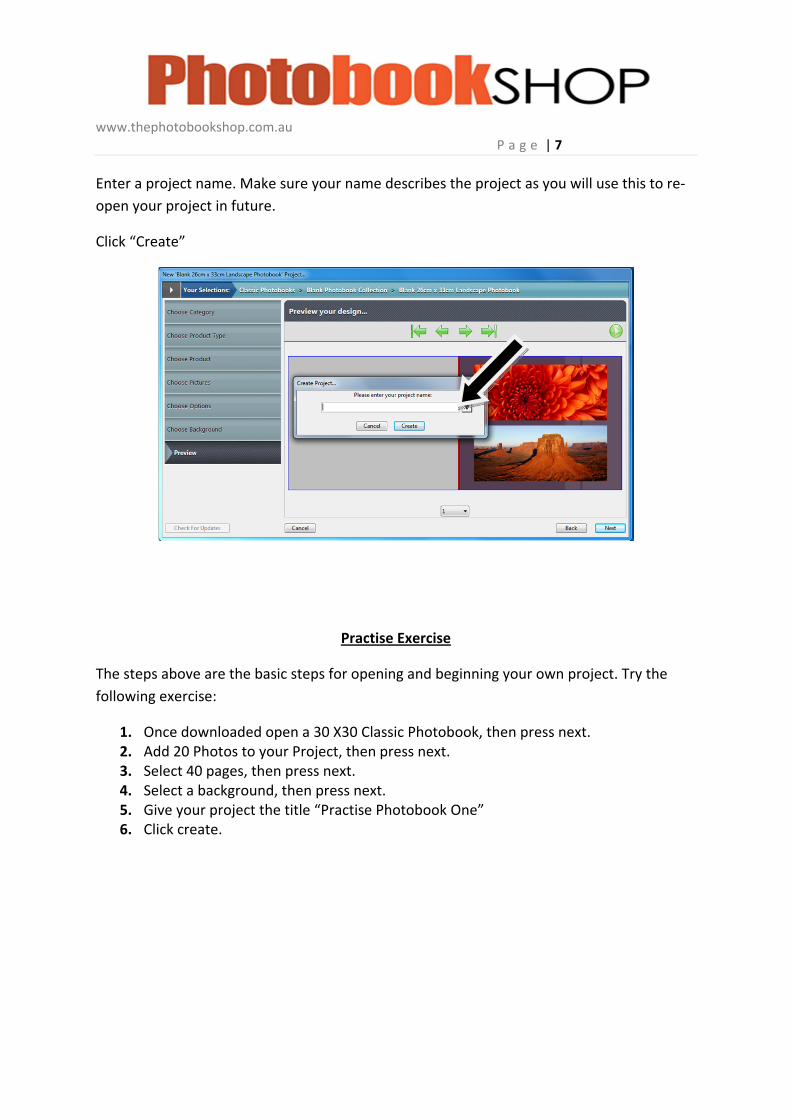
Enter a project name. Make sure your name describes the project as you will use this to re‐
open your project in future.
Click “Create”
Practise Exercise
The steps above are the basic steps for opening and beginning your own project. Try the
following exercise:
1. Once downloaded open a 30 X30 Classic Photobook, then press next. 2. Add 20 Photos to your Project, then press next. 3. Select 40 pages, then press next. 4. Select a background, then press next. 5. Give your project the title “Practise Photobook One” 6. Click create.
www.thephotobookshop.com.au
P a g e | 8
Lesson 2: Getting to know your features
In this section you will learn:
Learn the different functions of the toolbar.
You will learn about Page Styles
You will learn how to crop and image
You will learn how to resize an image
You will learn how to add, rearrange, delete and duplicate pages
You will learn how to add an image to the page.
Lesson 2.1 Getting to know your toolbar
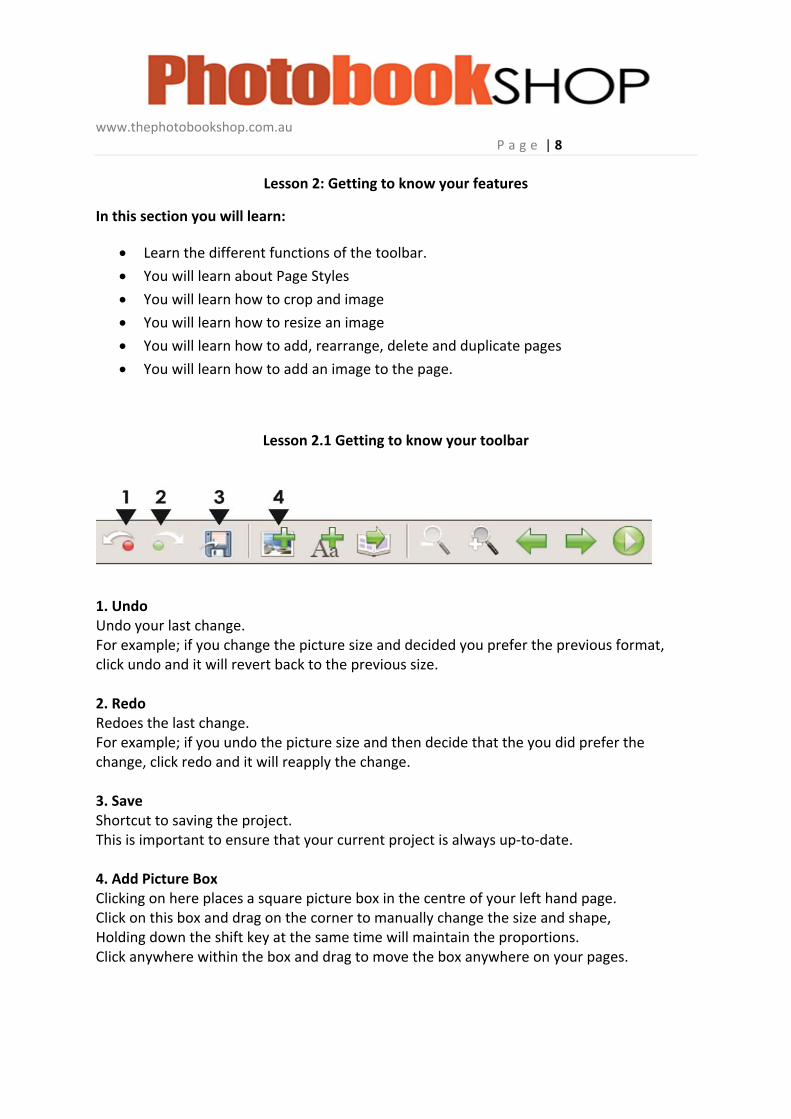
1. Undo Undo your last change. For example; if you change the picture size and decided you prefer the previous format, click undo and it will revert back to the previous size. 2. Redo Redoes the last change. For example; if you undo the picture size and then decide that the you did prefer the change, click redo and it will reapply the change. 3. Save Shortcut to saving the project. This is important to ensure that your current project is always up‐to‐date. 4. Add Picture Box Clicking on here places a square picture box in the centre of your left hand page. Click on this box and drag on the corner to manually change the size and shape, Holding down the shift key at the same time will maintain the proportions. Click anywhere within the box and drag to move the box anywhere on your pages.

www.thephotobookshop.com.au
P a g e | 9
To populate your image box select the image you wish to use from the Pictures panel on the left, click and drag the image in to the picture box. If you then double click anywhere in the image box you will be taken to the Crop Picture panel where you can resize the image within the box and choose which area of the image you desire.
5. Add Text Box Clicking on here places a square text box in the centre of your left hand page. As with the picture box click on this box and drag on the corner to manually change the size and shape. If you hold down the shift key whilst doing this it will scale the image proportionally. Click anywhere within the box and drag to move the box anywhere on your pages. To edit your text, double click anywhere in the text box you will be taken to the Text Editor Menu where you can add text and change its properties. A red border around the text box is a warning that there is too much text contained within. To fix, either expand the size of the box by dragging on the corner or double click on the text box to bring up the Text Editor Menu Panel again and adjust the settings. Any font installed on your computer can be used for your text. 6. Autoflow The Autoflow function is a great time saver if you already have all of your photographs the right way up in the Picture Panel. Autoflow automatically uses all of the images in the Picture Panel and flows them into the document using the page styles provided at random. You can still go through the document manually and make any additional layout changes and adjustments. This can be used to save time in individually placing your own photos.

www.thephotobookshop.com.au
P a g e | 10
7.Zoom Out Allows you to zoom out on the page. This can help to see the page at a distance. 8. Zoom In Allows you to zoom in on an area of your page. This can be used if trying to identify small parts of a page. Also useful in ensuring photos line up. 9. Previous Page Navigates you to the previous page. 10. Next Page Navigates you to the next page. 11. Preview Enables you to view your entire book full screen. This will show your project as it will appear printed.

www.thephotobookshop.com.au
P a g e | 11
Lesson 2.2 Pane Functions
Left Pane: This shows you all the images you have selected for your project. To add more
images click on the plus button. To add an image to the page click, drag and drop in the
position you would like the image to appear.
Top Pane: This shows you all your pages.
Bottom Pane: You have 5 tabs here.
The Bottom Pane comprises of: Page styles, Background, Masks, Frames and Scrapbook. We
will discuss the others in Lesson Three.
LEFT
PANE
TOP PANE

www.thephotobookshop.com.au
P a g e | 12
Page Styles:
Styles are pre‐designed page layouts that use existing items found in the other tabs. To
apply a style to a page simply click, drag and drop onto the page.
You can use this toolbar to select which page style you would prefer. Once selected, you can
still alter size and positioning.

www.thephotobookshop.com.au
P a g e | 13
Resizing Images:
There are two ways that you can resize an image
1. Click on one of the corners of the image. Drag the image out.
This will allow you to resize to any size and it may crop the image
2. Click on one of the corners of the image. Drag the image out. (Hold down shift
while doing this)
This will keep the image constraints so the image won’t be cropped.
When resizing the background, the green grids are there to help you with your sizing.
This will help ensure pictures are of equal size (if you want)
www.thephotobookshop.com.au
P a g e | 14
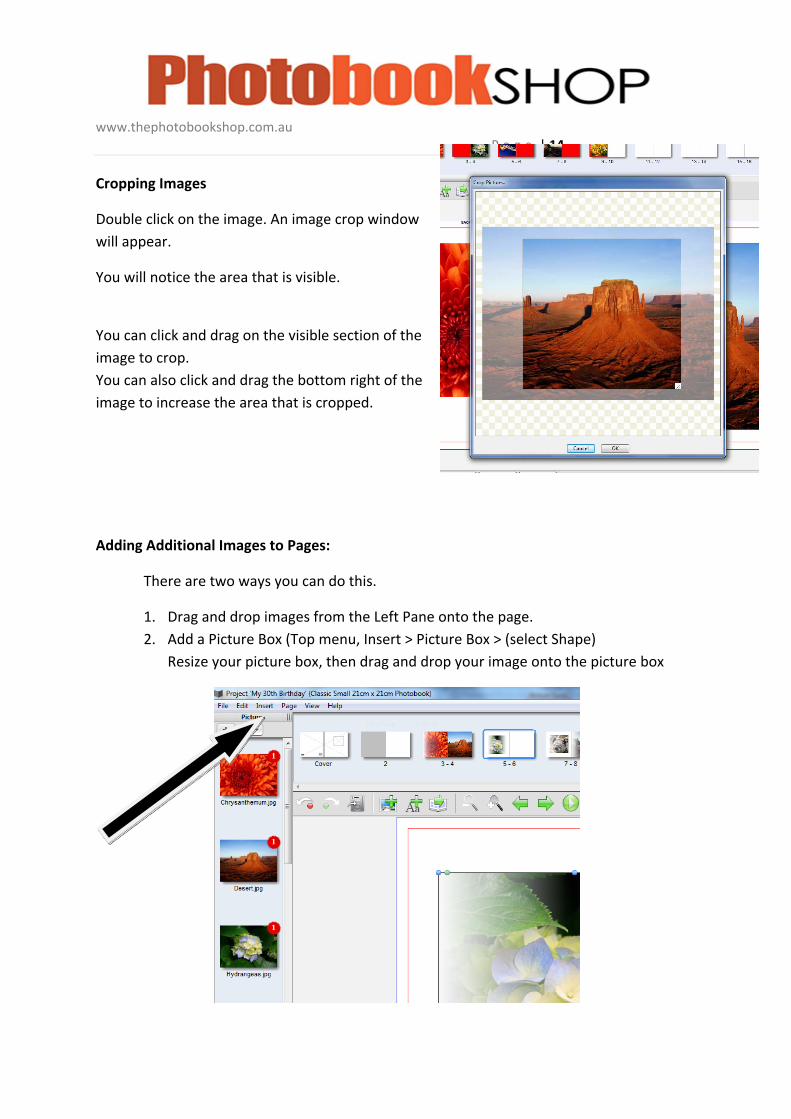
Cropping Images
Double click on the image. An image crop window
will appear.
You will notice the area that is visible.
You can click and drag on the visible section of the
image to crop.
You can also click and drag the bottom right of the
image to increase the area that is cropped.
Adding Additional Images to Pages:
There are two ways you can do this.
1. Drag and drop images from the Left Pane onto the page.
2. Add a Picture Box (Top menu, Insert > Picture Box > (select Shape)
Resize your picture box, then drag and drop your image onto the picture box

www.thephotobookshop.com.au
P a g e | 15
Add/duplicate/rearrange pages
From the top menu select Page then Insert, From here you can also duplicate, delete
and rearrange pages.
SESSION ONE REVIEW
Allow students 30mins to use their own photos and begin their own book (which will later
be printed)
‐ Select photos for your Project
‐ Choose a layout for your book
‐ Choose where you would like your photos to be
‐ Choose picture sizes and cropping

www.thephotobookshop.com.au
P a g e | 16
SESSION TWO
Lesson 3: Individualising your Project
In this section you will learn how to:
Use the bottom panel.
Use Masks on your images.
Create different backgrounds.
Use frames with your pictures.
Use the scrapbook function to add to your photopage
You will learn the functions of the right pane

www.thephotobookshop.com.au
P a g e | 17
3.1 Further Use of the bottom Panel Masks: Masks sit on top of images to create an effect over them. To apply a mask on an
image simply click, drag and drop onto the image.
Example: The picture below shows how different masks can change the appearance of a
picture.
You can use this toolbar to select which mask you would like to use on your photos.
www.thephotobookshop.com.au
P a g e | 18
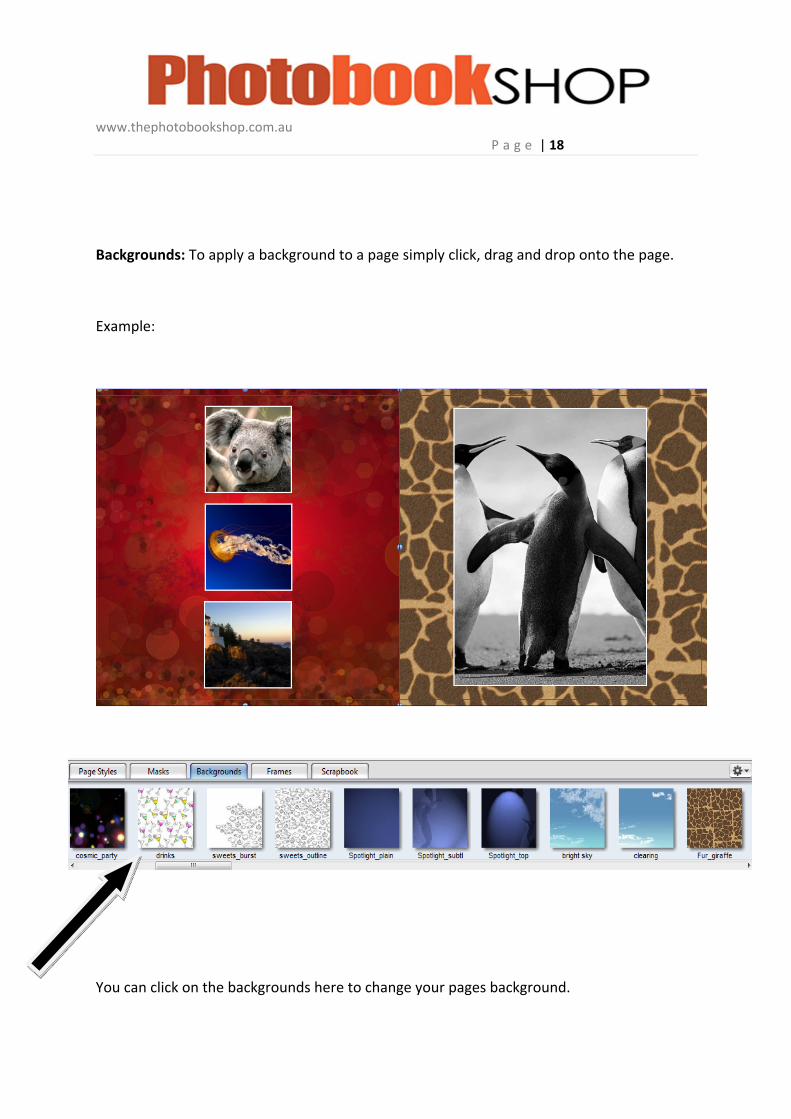
Backgrounds: To apply a background to a page simply click, drag and drop onto the page.
Example:
You can click on the backgrounds here to change your pages background.
www.thephotobookshop.com.au
P a g e | 19
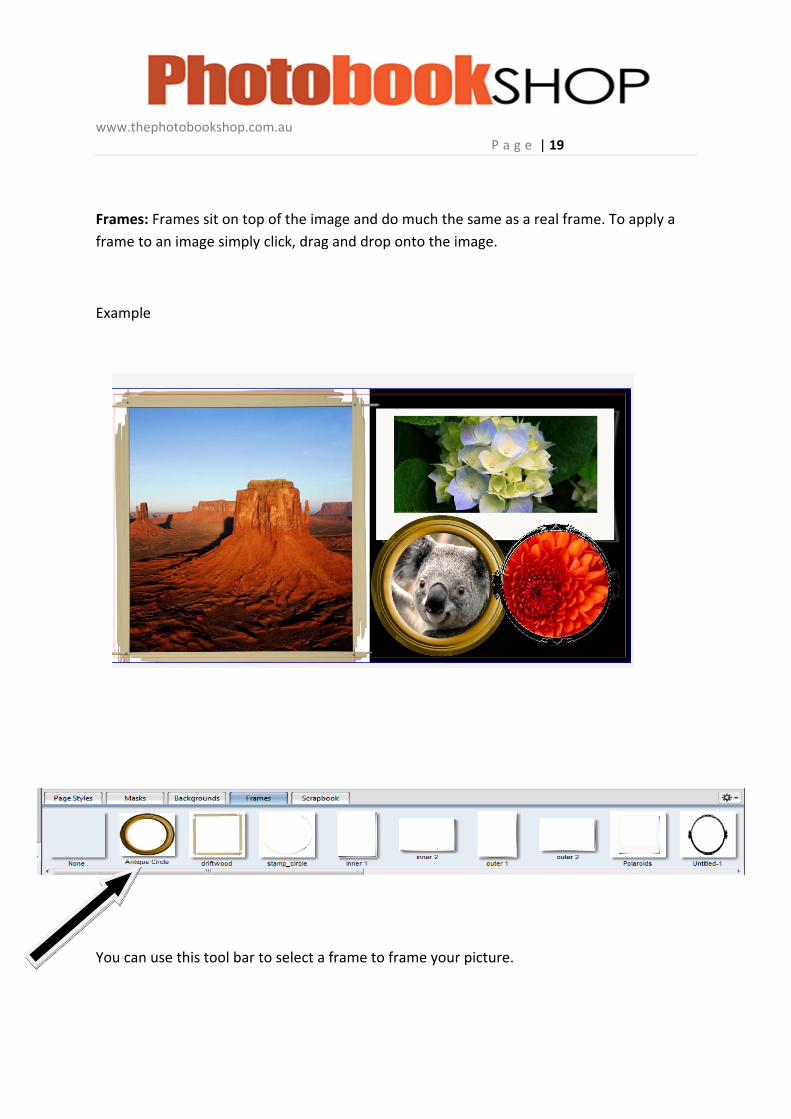
Frames: Frames sit on top of the image and do much the same as a real frame. To apply a
frame to an image simply click, drag and drop onto the image.
Example
You can use this tool bar to select a frame to frame your picture.
www.thephotobookshop.com.au
P a g e | 20
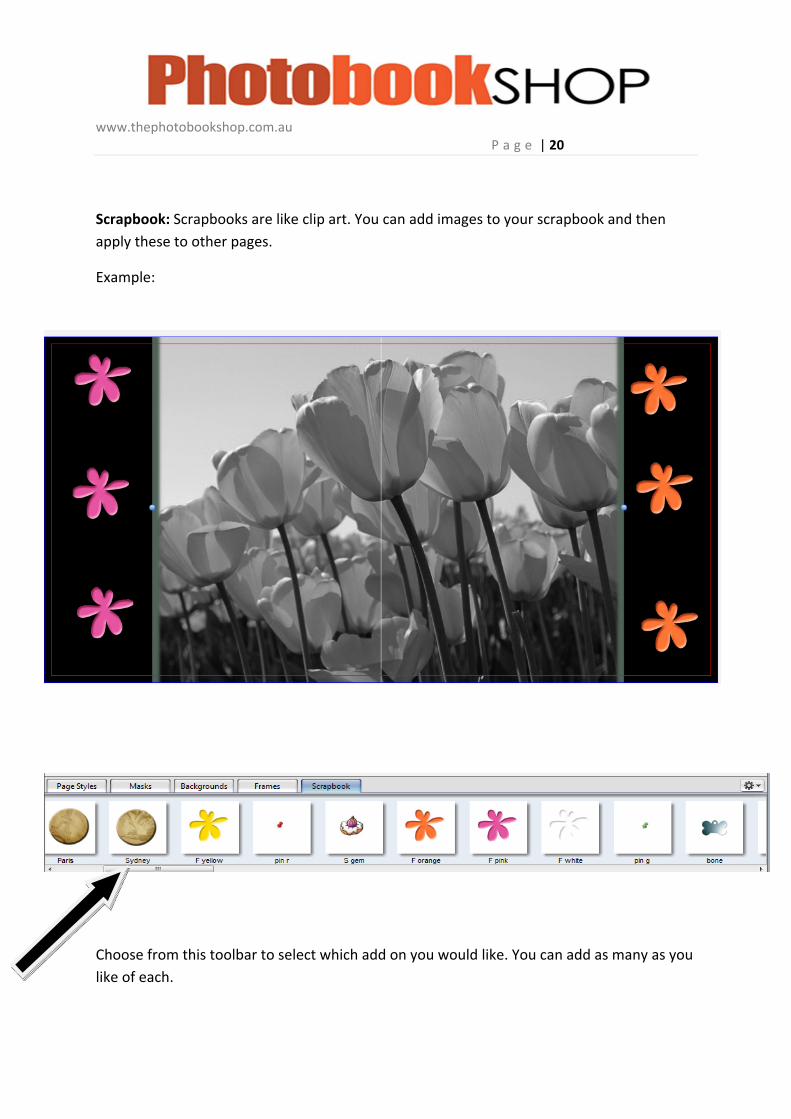
Scrapbook: Scrapbooks are like clip art. You can add images to your scrapbook and then
apply these to other pages.
Example:
Choose from this toolbar to select which add on you would like. You can add as many as you
like of each.

www.thephotobookshop.com.au
P a g e | 21
You can add your own by clicking on the button and add, then navigating to your desired
scrapbook item on your computer.
Practise Exercise:
1. Insert a page style different to the current page style.
2. Add two different masks to two different photos.
3. Apply a different background to three different pages.
4. Apply a frame to each of your photos.

www.thephotobookshop.com.au
P a g e | 22
Right Pane: The right pane has your properties and settings
Tab 1:
Here you can control the image properties.
Examples are as follows
Change the shape of the image box
Add Corners
Change Opacity
Add Boards
Add Shadows
Not only can you change the number of sides of an object but you can
also change the angle, the corners can be curved as dramatically as you
choose, borders can be added in any colour with any opacity at a
variety of thicknesses and text boxes can be made any colour from the
dropdown menus shown.
Whether your item is a Text Box or a Picture Box, a Drop Shadow can
easily be added, giving life to your book and lifting your images from
the page. In this panel, you have full control of how you would like the
shadow to appear by adjusting the Offset, Angle, Blur, Colour, the
Expanse and the Opacity.
www.thephotobookshop.com.au
P a g e | 23
Tab 2:
More image options appear under here
Change the angle of images
Change Colour Mode from Colour to Black and White to Sepia.
Add Vignette (A device used to print photographs and illustrations with
borders that fade gradually into the background.)
All of the functions apply to the actual box that the image is in and not to the image itself.
So, if you replace the image in the box the new image, it will be affected in the same way as
the previous image, for example, changing its Angle, Flipping it, changing its Colour more to
Sepia or Black and White or applying a Vignette.
Tab 3:
This has settings for text boxes
Tab 4:
Rule and Position Settings for the item you have selected on your page
In the Position section you set the exact X and Y coordinates of your item. In Size you can set the size. Click the Constrain Proportions check box to keep proportions the same. Offset refers to how the image is placed within the image box. When an image is cropped, panned or zoomed these settings are set automatically to the centre of the image. The Offset tool here allows you to set this manually. You can also affect this by holding down the Alt key, clicking and moving the image or in the Crop Picture window that is produced by double‐clicking on the image. Scaling the % of the image controls the magnification of the image within the box. As with Offsetting you can set this manually, in the Crop Picture window that is produced by double‐clicking on the image or by holding down the Control and Alt keys whilst dragging the image within its box. You have complete control over the rotation of images on the page by dragging the dial control or manually inputting figures in to the field on the right of the Angle setting section.

www.thephotobookshop.com.au
P a g e | 24
Tab 5:
Page Background Colours‐ here you can select the left and right page colours separately.
Practise Exercise:
1. Change one picture to sepia and one picture to black and white
2. Change the opacity of two images
3. Add a text box and write a comment about the chosen photo
You are now ready to customise your Photo book in any way you like.

www.thephotobookshop.com.au
P a g e | 25
Lesson Four: Finishing and Ordering
In this lesson you will learn how to:
Check and proof your photo book
Upload your Photobook for printing.
Now that you have finished your project there are two last things you need to know:
4.1 Proofing
When you are satisfied that you have completed your book you may choose to check your
project through.
First you are required to save the project then in the File menu select Check Project, this will
bring up a pop‐up window where it may give any warnings of missing images, over flowing
text, or pictures that are low quality. You can then preview the document by pressing the
preview button.
Once you are totally satisfied with the product you can then proceed to the checkout to
complete your order.

www.thephotobookshop.com.au
P a g e | 26
4.2 Ordering
To order, either select File ‐ Order from the main menu, or select the green checkout button
on the top right hand corner.
If you did not already check for any issues with the file, Photobook Shop will automatically
proceed to this step for you.
A results window will inform you of any problems. If a yellow warning triangle is displayed,
this is simply a warning and you may proceed with the order if you choose to. However, if a
red symbol is shown you will be required to fix the problem in order to complete your order.
Once satisfied, you can click OK to proceed.
Photobook Shop uses an encryption system to create the high resolution files of your
project. The files you have either uploaded or saved to a disc are encrypted and are
exclusive to Photobook Shop and your license of the software. They can only be decrypted
by Photobook Shop.
A disclaimer box will then appear where you need to read the agreement and click OK to
proceed. If you have any issues please don’t hesitate to contact us.

www.thephotobookshop.com.au
P a g e | 27
Click Start to begin the order, this will automatically open up a new web‐browser window
displaying the login for the Photobook Shop online ordering system.
Since you are a new customer you will have to click the New Customer link on the page, if
you are an existing customer who has previously signed up you, will be able to re‐use the
same login and password.
You will then be required to add your personal information including your billing address.
www.thephotobookshop.com.au
P a g e | 28
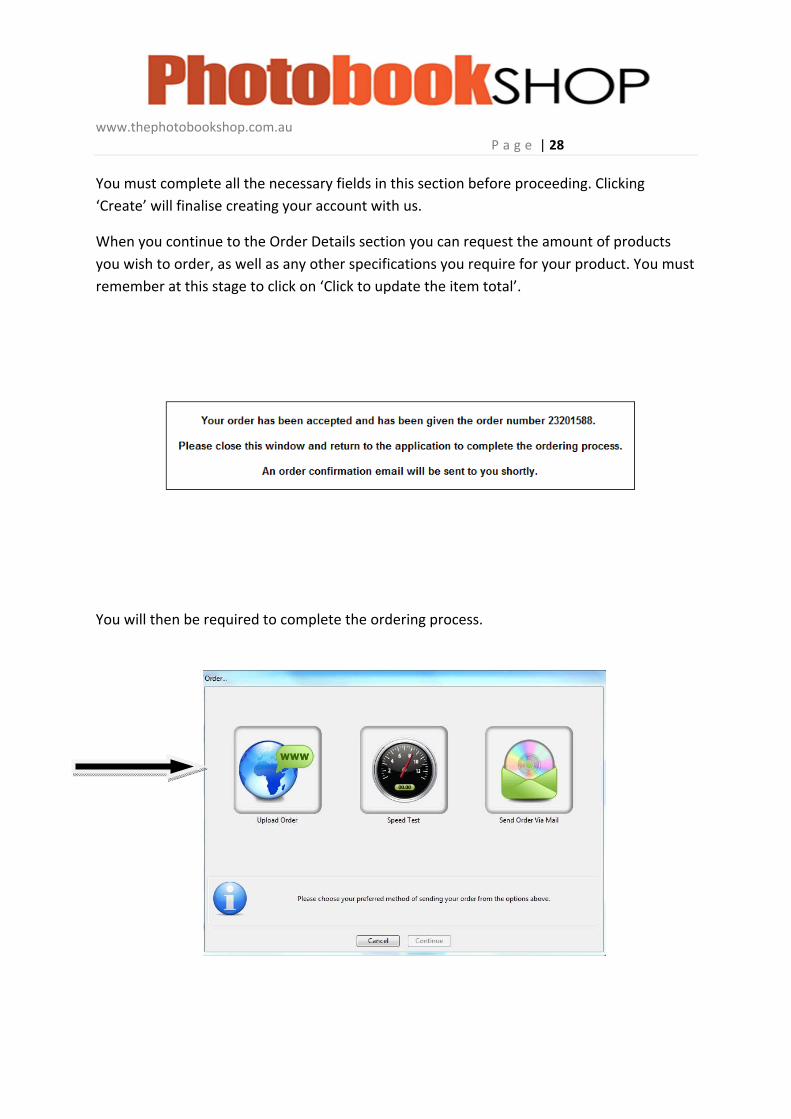
You must complete all the necessary fields in this section before proceeding. Clicking
‘Create’ will finalise creating your account with us.
When you continue to the Order Details section you can request the amount of products
you wish to order, as well as any other specifications you require for your product. You must
remember at this stage to click on ‘Click to update the item total’.
You will then be required to complete the ordering process.

www.thephotobookshop.com.au
P a g e | 29
The Upload process will then begin. This may take some time, once complete Photobook
Shop will have received your order.
All that’s left now is for you to receive your beautiful creations.

www.thephotobookshop.com.au
P a g e | 30
TROUBLESHOOTING
Vouchers
Occasionally there are issues with your voucher. Here are the main ways to remedy this.
Check that the book you have made corresponds to what is on your voucher.
Ensure you are entering the voucher code as stated on your voucher.
Check the expiry date.
Email us on [email protected] with a full screenshot of the error
page, and your voucher as an attachment. This will allow us to diagnose the
problem, and fix it for you as soon as possible.
Issues connecting to server
1. Do you have antivirus? What type? If your running Norton 360 you will need to disable
this to download and install our software.
2. Do you have a firewall? What type? If your firewall is blocking FTP port 21 then you will
have troubles accessing our updates and our uploading server.
3. Are you on a corporate network? If so your work may be blocking FTP port 21 then you
will have troubles accessing our updates and our uploading server.
4. What type of internet connection do you have?
You may have to use another internet connection or computer. If so it’s easy to move your
project.
You need to:
1. Install our software
2. Copy the ‘ThePhotobookShop.com.au Projects' folder from My Documents to the new
computer.
3. Copy your images to the new computer
When you open the project again it may prompt you to find the missing images. It may be a
good idea to save these under the My Pictures folder.

www.thephotobookshop.com.au
P a g e | 31
Save your project and send it to us.
It’s possible that you may not want to upload your project to our website, and would rather
post it. This occasionally happens when there is an issue with your internet connection.
To save your project to disc after you have already ordered.
Open our software
Open your project
Click File > Order
Select Save Finished Pages
Select My Documents as the save location.
Now that you have saved your project you may burn it to CD and post it to
Attn: Uploads
239 Separation Street, Northcote, Victoria 3070

www.thephotobookshop.com.au
P a g e | 32
This Photobook Shop User Guide has been specially written for you to help you
throughout the creation of your photo book.
If you have any feedback for us or require any additional information please contact
us at:
Photobook Shop, 239 Separation Street, Northcote Victoria 3070