setting up digi one iap for modbus bridging up digi one iap for modbus bridging 90000638 b page | 7...
TRANSCRIPT

Setting up Digi One IAP for Modbus bridging, including linking a serial PLC
and serial HMI February 2018
90000638
90000638 B www.digi.com Page | 2 of 13
Contents 1 Introduction ......................................................................................................................... 3
1.1 Example application ..................................................................................................... 3
1.2 Theory of operations .................................................................................................... 3
2 Hardware setup................................................................................................................... 4
2.1 Enable pass-through port ............................................................................................. 4
2.2 Connect your devices .................................................................................................. 4
2.3 Configure the firmware in the Digi One IAP .................................................................. 4
3 Web setup ........................................................................................................................... 4
3.1 Select the group—consider resetting IA config ............................................................. 5
3.2 Limit the group to Modbus Family ................................................................................ 6
3.3 Define first master / Message Source—the HMI ........................................................... 6
3.4 Define second master / Message Source—remote PLC and OPC ............................... 7
3.5 Assign master priority ................................................................................................... 8
3.6 Create the first destination—the PLC(s) ....................................................................... 8
3.7 Create more destinations—remote Digi One IAP or PLC w/Enet .................................10
3.8 The finished destinations table ....................................................................................10
3.9 Reboot the Digi One IAP .............................................................................................11
4 Hyperterminal setup ...........................................................................................................11
4.1 Copy this script and paste into Notepad ......................................................................11
4.2 Copy/paste from Notepad to Hyperterminal ................................................................11
5 Troubleshooting tips ...........................................................................................................12
5.1 Baud rates ..................................................................................................................12
5.2 Modicon 984 PLC with DB-9 .......................................................................................12
5.3 Why Exception Response 0x0A? ................................................................................12

Setting up Digi One IAP for Modbus bridging
90000638 B www.digi.com Page | 3 of 13
1 Introduction Abstract
This application note explains how to set up the Digi One IAP’s pass-through port to connect a Modbus serial master to a Modbus serial slave. It describes how to set up Network masters, Serial masters, Network slaves, and Serial slaves. You should be able to combine these into a variety of configurations.
Note This document assumes the HMI and PLC are pre-programmed, and the Digi One IAP’s Ethernet interface is configured. If you require additional assistance in configuring the Digi One IAP, see the documentation available on the Digi One IAP support page.
1.1 Example application In this example, you will need an existing system with a serial master and single-port slave, such as a local HMI and low-end PLC. The Digi One IAP allows you to retrofit this system so the serial master can share this slave with the world.
This diagram shows the HMI connected to the screw terminal port and the PLC to the DB-9 port. This can be reversed, depending on your needs. The order does not matter but you need to adjust the steps shown as appropriate.
This example shows a local HMI or operator panel on port 1 and a single-port PLC on port 2. When pass-through is enabled:
• Port 1 is the screw terminal and can be EIA-232, 422, or 485.
• Port 2 is the DB-9 and is EIA-232 only.
1.2 Theory of operations The Digi One IAP supports this application because it is Modbus protocol-aware. It understands Modbus/RTU, Modbus/ASCII, and Modbus/TCP requests and responses. It also understands how slave addresses or unit IDs are handled.
Given this understanding of the Modbus protocol, the Digi One IAP acts like a network print server. It can juggle and interleave requests from many masters to many slaves. Requests from

Setting up Digi One IAP for Modbus bridging
90000638 B www.digi.com Page | 4 of 13
the HMI are understood to be destined for the PLC (or can even be for remote PLC). The same is true of requests from remote OPC, programming software, or network-enabled PLC.
2 Hardware setup
2.1 Enable pass-through port • Power off the Digi One IAP.
• Set the pass-through DIP-switch to ON. This lone DIP-switch is on the side of the unit opposite the MAC address and serial number labels. It is not in the four-switch block used for EIA-232/485 selection.
• Power on the Digi One IAP. The pass-through DIP-switch is only read during boot up, so changing it while the unit is powered has no effect.
2.2 Connect your devices The HMI and PLC can be connected to either physical serial interface. This document assumes that the HMI is on the screw terminal block and the PLC is connected via the DB-9 connector. If you connect in the opposite order, you just need to modify the steps below as necessary.
2.3 Configure the firmware in the Digi One IAP There are two options for configuring the Digi One IAP. You can use your web browser to access the Industrial Automation Wizard, or you can use HyperTerminal (or any telnet/comms app) to access the Digi One IAP by TCP port 23.
The login is root. The default password is dbps.
3 Web setup To summarize setup with Industrial Automation Wizard:
• Define a group and which protocol(s) it may contain. This allows the wizard to narrow down options more quickly. In this example, you’ll select Modbus Family to limit options to Modbus protocols.
• Define where messages will be coming from; in this example, it is Modbus/TCP by network and Modbus/RTU by serial port #1.
• Define destinations for these messages; in this example, the PLC.
• Click Industrial Automation under Applications, to launch the Industrial Automation Wizard.

Setting up Digi One IAP for Modbus bridging
90000638 B www.digi.com Page | 5 of 13
3.1 Select the group—consider resetting IA config The first page of the wizard allows you to select which group to use and to assign a name. On a Digi One IAP you’ll likely have only one group.
If you don’t know what non-IA settings may be there, you should do a full reset. You’ll see the Factory Default Settings under Administration on the Digi One IAP home page. This reset is important because some of the non-IA settings affect IA protocol behavior.
Since the table1 group always exists, you can choose to modify that group or define your own new name, such as main_grp.
Setting up Digi One IAP for Modbus bridging
90000638 B www.digi.com Page | 6 of 13
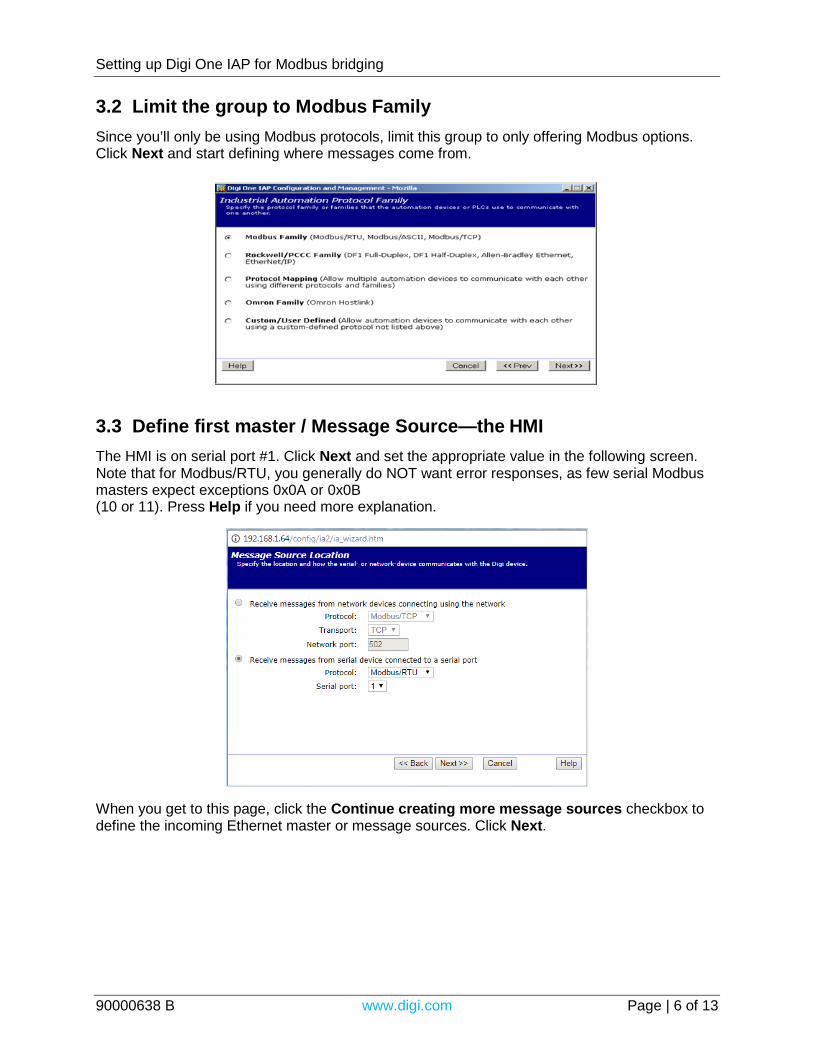
3.2 Limit the group to Modbus Family Since you’ll only be using Modbus protocols, limit this group to only offering Modbus options. Click Next and start defining where messages come from.
3.3 Define first master / Message Source—the HMI The HMI is on serial port #1. Click Next and set the appropriate value in the following screen. Note that for Modbus/RTU, you generally do NOT want error responses, as few serial Modbus masters expect exceptions 0x0A or 0x0B (10 or 11). Press Help if you need more explanation.
When you get to this page, click the Continue creating more message sources checkbox to define the incoming Ethernet master or message sources. Click Next.

Setting up Digi One IAP for Modbus bridging
90000638 B www.digi.com Page | 7 of 13
3.4 Define second master / Message Source—remote PLC and OPC Click the Receive messages from network devices connecting using the network radio button and set the protocol to Modbus/TCP. The Network Port should set itself to 502. Click Next and set the appropriate value in the following screen. Press Help if you need more explanation.
When you get to this page, click the Continue creating more messages checkbox (uncheck) to stop adding masters or message sources. Click Next.

Setting up Digi One IAP for Modbus bridging
90000638 B www.digi.com Page | 8 of 13
3.5 Assign master priority This option allows a serial master to compete with many network masters. For example, you have 9 network masters and 1 serial master connected. The normal priority design will give each master fair, round-robin access to the shared slave. If all the network masters are active and polling, the serial master obtains just 2% of the serial bandwidth, which at 9600 baud means 1 message every 10 seconds. By setting priority on the serial master, you give it roughly 50% of the serial bandwidth and force all network masters to compete for the remaining 50%.
For Modbus bridging, you normally want to assign a higher priority to the serial master. This is because most 3rd party ActiveX or OPC will open multiple sockets to the Digi One IAP; one for each RS-485 multi-drop slave. If you have 10 RS-485 slaves, remote Modbus/TCP clients will often open 10 sockets and by default be able to issue 10 polls for every 1 the serial master gets answered.
3.6 Create the first destination—the PLC(s) All masters, not just serial masters, can forward messages based on a protocol address. For Modbus/RTU, this is the slave address. In Modbus/TCP this is the Unit ID or Bridge Index.
You can send all messages addressed from 0 to 32 to the PLC(s), which supports a multi-drop of 32 slaves. If you only have one PLC, you can limit this address range to 0 to 1, since 0 will be
Setting up Digi One IAP for Modbus bridging
90000638 B www.digi.com Page | 9 of 13
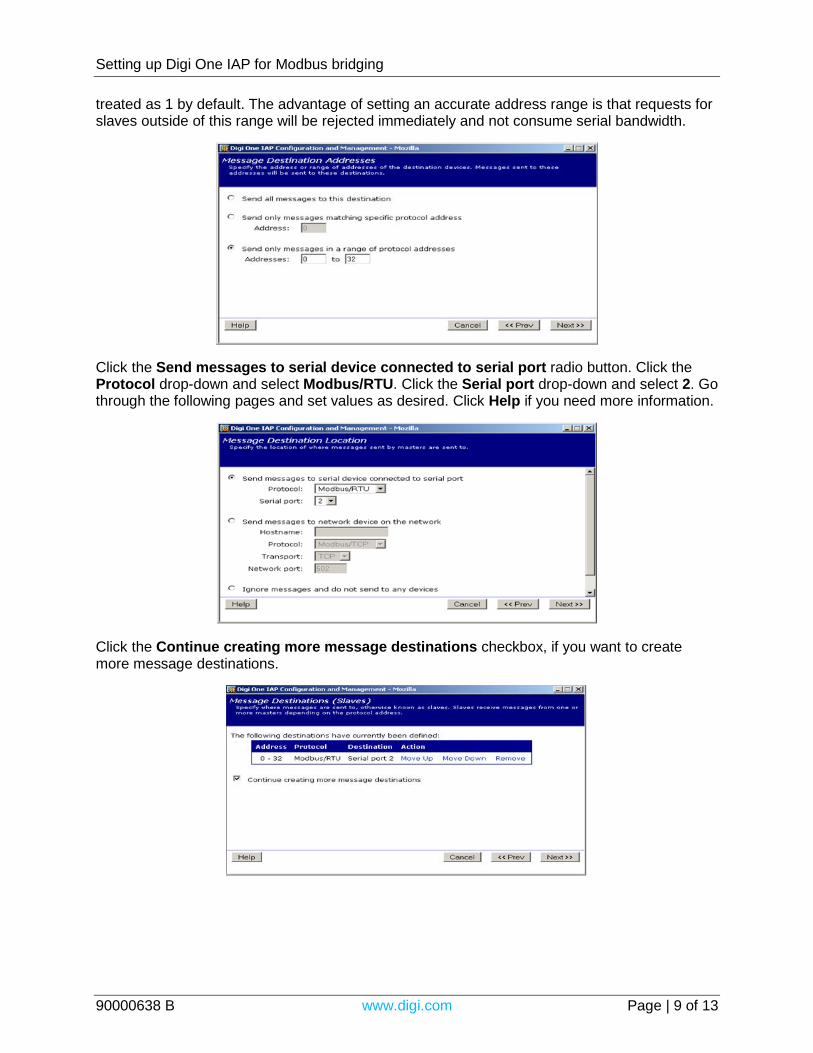
treated as 1 by default. The advantage of setting an accurate address range is that requests for slaves outside of this range will be rejected immediately and not consume serial bandwidth.
Click the Send messages to serial device connected to serial port radio button. Click the Protocol drop-down and select Modbus/RTU. Click the Serial port drop-down and select 2. Go through the following pages and set values as desired. Click Help if you need more information.
Click the Continue creating more message destinations checkbox, if you want to create more message destinations.
Setting up Digi One IAP for Modbus bridging
90000638 B www.digi.com Page | 10 of 13
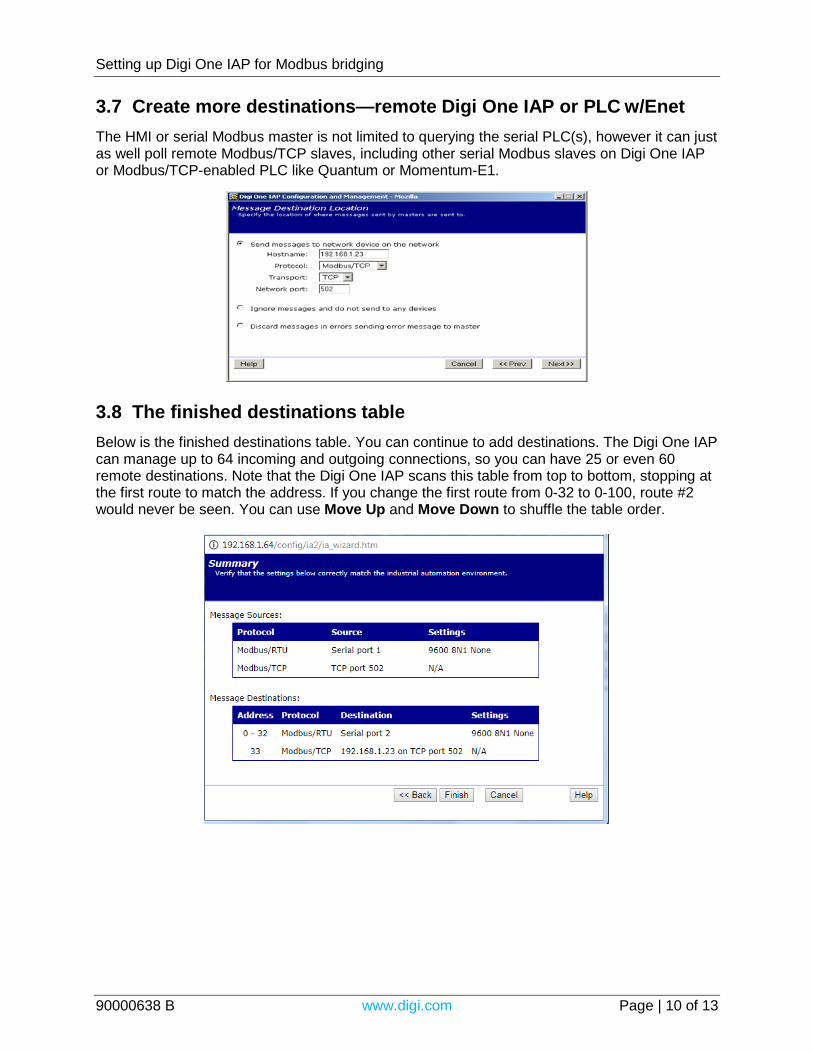
3.7 Create more destinations—remote Digi One IAP or PLC w/Enet The HMI or serial Modbus master is not limited to querying the serial PLC(s), however it can just as well poll remote Modbus/TCP slaves, including other serial Modbus slaves on Digi One IAP or Modbus/TCP-enabled PLC like Quantum or Momentum-E1.
3.8 The finished destinations table Below is the finished destinations table. You can continue to add destinations. The Digi One IAP can manage up to 64 incoming and outgoing connections, so you can have 25 or even 60 remote destinations. Note that the Digi One IAP scans this table from top to bottom, stopping at the first route to match the address. If you change the first route from 0-32 to 0-100, route #2 would never be seen. You can use Move Up and Move Down to shuffle the table order.

Setting up Digi One IAP for Modbus bridging
90000638 B www.digi.com Page | 11 of 13
3.9 Reboot the Digi One IAP You can make minor changes to the Digi One IAP configuration. When changing the number or type of masters (message sources) or the number or type of slave (message destinations) you should reboot. This is because these changes affect the number and type of tasks running in the Digi One IAP RTOS and occasionally these changes fail to take effect correctly without a reboot.
4 Hyperterminal setup Below is the script for using HyperTerminal or telnet to configure the Digi One IAP in firmware E.
4.1 Copy this script and paste into Notepad Adobe Acrobat allows you to select and copy the text below and paste it into a text editor such as Notepad.exe. Edit it as you require; you can also save it as documentation. Note that this script clears all industrial protocol settings when it starts, but it will not affect the IP address or other non-IA settings. # clear all IA config revert ia=factory # setup port 1 (screw term) as Modbus master (baud = 19200,8,N,1) set port ra=1 dev=ia set line ra=1 baud=19200 csize=8 parity=N stopb=1 set ia serial=1 protocol=mbrtu type=master table=1 # setup port 2 (db9) as Modbus slaves (baud = 9600,8,E,1) set port ra=2 dev=ia set line ra=2 baud=9600 csize=8 parity=E stopb=1 set ia serial=2 protocol=mbrtu type=slave table=1 # setup network for Modbus/TCP incoming set ia master=1 active=on protocol=mbtcp transport=tcp ipport=502 table=1 # setup destination table set ia table=1 name=main_grp # port #2 is our slaves address 0-32 set ia table=1 addroute=1 active=on protocol=mbrtu set ia table=1 route=1 protaddr=0-32 type=serial port=2 # add 10 remote slaves at 1 IP – perhaps another Digi One IAP set ia table=1 addroute=2 active=on protocol=mbtcp set ia table=1 route=2 protaddr=50-59 type=ip ipport=502 set ia table=1 route=2 connect=active ipaddress=192.168.1.23 # reboot the DOIAP boot action=reset
4.2 Copy/paste from Notepad to Hyperterminal Use HyperTerminal or telnet to log into your Digi One IAP. You’ll need to enter the IP address of your Digi One IAP and use the telnet port of 23.
In HyperTerminal use the Edit | Paste to Host menu option. You should not see any errors. You can use show ia all to verify the settings.

Setting up Digi One IAP for Modbus bridging
90000638 B www.digi.com Page | 12 of 13
5 Troubleshooting tips
5.1 Baud rates Modicon equipment normally defaults to 9600 baud with even parity. Most third-party products default to no parity.
5.2 Modicon 984 PLC with DB-9 Modicon equipment with DB9 is DTE (even though female) and will short pin #1 to frame ground. This means the standard 9-to-9 pin null modem cable supplied with a Digi One IAP will not work. This cable will short the DSR and DCD inputs to the PLC to ground, and the PLC will not talk if DSR is not asserted.
5.3 Why Exception Response 0x0A? Technically, this exception response means Gateway Path Unavailable. Within the Digi One IA it means the attempt to route the message to a destination either failed or was rejected. Below are some reasons.
5.3.1 You have no configured destination for this “unit id” By default, the Digi One IAP scans the destination table looking for a destination and returns this error if none is found. So if you defined a single destination such that slave address/unit id #1 (and only 1) goes to the serial port, polls to all other addresses return this exception. If you defined a single destination such that all slave address/unit ids 0 to 255 goes to the serial port, polls to all other addresses will be sent out and a timeout will occur. For a timeout you will either get no response or exception code 0x0B.
5.3.2 Your IA Serial slaves are not active If you configured a serial slave but either forgot to set the port type to IA, or it was set and you did something in the Web UI that unset the type from IA, then you will receive exception code 0x0A back. When the Digi One IAP attempts to use the slave address (or unit id) to find a destination, it does not consider any destinations that are disabled or inactive.
5.3.3 The configured destination for this “unit id” is inactive When the Digi One IAP attempts to use the slave address (unit id) to find a destination, it does not consider any destinations that are disabled or inactive.
5.3.4 During protocol mapping, an error in Modbus format was detected Normally the Digi One IAP does NOT validate Modbus messages passing through. It does not care if you attempt to read 10,000 registers within a single request. Since the max byte count in the response is 250, the slave will return an exception which the Digi One IAP happily returns. However, during protocol mapping, attempting to parse an invalid Modbus request returns various exceptions, including 0x0A.

Setting up Digi One IAP for Modbus bridging
90000638 B www.digi.com Page | 13 of 13
5.3.5 Setting the timeouts Setting a valid combination of timeouts requires the correct relationship between the four key timeouts you need to manage. The best defaults to start will be:
• Your master application’s slave timeout: 3 seconds
• The Digi One IAP’s message timeout: default of 2.5 seconds
• The Digi One IAP’s slave timeout: default of 1 second
• The Digi One IAP’s character timeout: 50 milliseconds
These defaults safely allow two remote masters to share most slaves. For more information related to timeouts, see Understanding Timeout Settings in Digi One IAP.