sg247955_exploiting ibm aix workload partitions
TRANSCRIPT

ibm.com/redbooks
Front cover
Exploiting IBM AIX Workload Partitions
Dino QuinteroShane Brandon
Bernhard BuehlerThierry Fauck
Guilherme Galoppini FelixChris Gibson
Bob MaherMehboob Mithaiwala
Kurosh Khan-Afshar MohaMathis Mueller
Bjorn RodenMarian Tomescu
Helps reduce total cost of ownership
Helps mitigate risks
Contains implementation sample scenarios


International Technical Support Organization
Exploiting IBM AIX Workload Partitions
August 2011
SG24-7955-00

© Copyright International Business Machines Corporation 2011. All rights reserved.Note to U.S. Government Users Restricted Rights -- Use, duplication or disclosure restricted by GSA ADP ScheduleContract with IBM Corp.
First Edition (August 2011)
This edition applies to IBM AIX 6.1 Technology Level (TL) 06 Service Pack (SP) 06, IBM AIX 6.1 TL4, AIX 7.1 TL00 SP02, IBM AIX 7.1 TL1, IBM Systems Director 6.2.1, IBM WebSphere Application Server V7.0, IBM DB2 V9.7, IBM HTTP Server, IBM Virtual I/O Server (VIOS) 2.2.0.11 Fix Pack (FP) 24 SP01, Hardware Management Console (HMC) V7R7.2.0 SP01, and IBM Workload Partition Manager 2.3.
Note: Before using this information and the product it supports, read the information in “Notices” on page ix.

Contents
Notices . . . . . . . . . . . . . . . . . . . . . . . . . . . . . . . . . . . . . . . . . . . . . . . . . . . . . . . . . . . . . . . . . ixTrademarks . . . . . . . . . . . . . . . . . . . . . . . . . . . . . . . . . . . . . . . . . . . . . . . . . . . . . . . . . . . . . . .x
Preface . . . . . . . . . . . . . . . . . . . . . . . . . . . . . . . . . . . . . . . . . . . . . . . . . . . . . . . . . . . . . . . . . xiThe team who wrote this book . . . . . . . . . . . . . . . . . . . . . . . . . . . . . . . . . . . . . . . . . . . . . . . . xiNow you can become a published author, too! . . . . . . . . . . . . . . . . . . . . . . . . . . . . . . . . . . xivComments welcome. . . . . . . . . . . . . . . . . . . . . . . . . . . . . . . . . . . . . . . . . . . . . . . . . . . . . . . xivStay connected to IBM Redbooks . . . . . . . . . . . . . . . . . . . . . . . . . . . . . . . . . . . . . . . . . . . . xiv
Part 1. What is new with AIX workload partitioning . . . . . . . . . . . . . . . . . . . . . . . . . . . . . . . . . . . . . . . . . 1
Chapter 1. Introduction to AIX workload partitions . . . . . . . . . . . . . . . . . . . . . . . . . . . . . 31.1 Workload management and partitioning in AIX systems. . . . . . . . . . . . . . . . . . . . . . . . . 4
1.1.1 AIX Workload Manager . . . . . . . . . . . . . . . . . . . . . . . . . . . . . . . . . . . . . . . . . . . . . . 41.1.2 Logical partitions . . . . . . . . . . . . . . . . . . . . . . . . . . . . . . . . . . . . . . . . . . . . . . . . . . . 51.1.3 PowerVM (formerly Advanced POWER Virtualization) . . . . . . . . . . . . . . . . . . . . . . 61.1.4 AIX 6.1 and AIX 7.1 WPARs. . . . . . . . . . . . . . . . . . . . . . . . . . . . . . . . . . . . . . . . . . 61.1.5 Global environment . . . . . . . . . . . . . . . . . . . . . . . . . . . . . . . . . . . . . . . . . . . . . . . . . 81.1.6 System WPAR . . . . . . . . . . . . . . . . . . . . . . . . . . . . . . . . . . . . . . . . . . . . . . . . . . . . 81.1.7 Application WPAR. . . . . . . . . . . . . . . . . . . . . . . . . . . . . . . . . . . . . . . . . . . . . . . . . . 8
1.2 AIX 7 and POWER7 features . . . . . . . . . . . . . . . . . . . . . . . . . . . . . . . . . . . . . . . . . . . . . 91.3 WPAR isolation and security . . . . . . . . . . . . . . . . . . . . . . . . . . . . . . . . . . . . . . . . . . . . . 10
1.3.1 Processes . . . . . . . . . . . . . . . . . . . . . . . . . . . . . . . . . . . . . . . . . . . . . . . . . . . . . . . 101.3.2 Users. . . . . . . . . . . . . . . . . . . . . . . . . . . . . . . . . . . . . . . . . . . . . . . . . . . . . . . . . . . 101.3.3 Resources. . . . . . . . . . . . . . . . . . . . . . . . . . . . . . . . . . . . . . . . . . . . . . . . . . . . . . . 10
1.4 Live Application Mobility . . . . . . . . . . . . . . . . . . . . . . . . . . . . . . . . . . . . . . . . . . . . . . . . 121.5 When to use WPARs . . . . . . . . . . . . . . . . . . . . . . . . . . . . . . . . . . . . . . . . . . . . . . . . . . 13
1.5.1 Simplifying operating system and application management . . . . . . . . . . . . . . . . . 131.5.2 Protection of existing hardware investment . . . . . . . . . . . . . . . . . . . . . . . . . . . . . 141.5.3 Optimization of resource usage . . . . . . . . . . . . . . . . . . . . . . . . . . . . . . . . . . . . . . 141.5.4 Running old AIX in new AIX . . . . . . . . . . . . . . . . . . . . . . . . . . . . . . . . . . . . . . . . . 151.5.5 Highly granular control of resource allocation . . . . . . . . . . . . . . . . . . . . . . . . . . . . 151.5.6 Control of security and privilege command. . . . . . . . . . . . . . . . . . . . . . . . . . . . . . 151.5.7 Virtualization capacity licensing . . . . . . . . . . . . . . . . . . . . . . . . . . . . . . . . . . . . . . 161.5.8 Easily clone application environments . . . . . . . . . . . . . . . . . . . . . . . . . . . . . . . . . 171.5.9 Business continuity: Disaster or failure recovery solution . . . . . . . . . . . . . . . . . . . 171.5.10 Using WPAR technology for high performance computing (HPC) . . . . . . . . . . . 181.5.11 Supporting “Green” computing strategies . . . . . . . . . . . . . . . . . . . . . . . . . . . . . . 181.5.12 Improvement of service-level agreements (SLAs) . . . . . . . . . . . . . . . . . . . . . . . 18
Chapter 2. Overview of the latest enhancements . . . . . . . . . . . . . . . . . . . . . . . . . . . . . 192.1 WPARs and logical partitions (LPAR) comparison . . . . . . . . . . . . . . . . . . . . . . . . . . . . 202.2 WPAR features added to AIX technology level releases . . . . . . . . . . . . . . . . . . . . . . . 202.3 WPAR enhancements since AIX 6.1 TL2 . . . . . . . . . . . . . . . . . . . . . . . . . . . . . . . . . . . 21
2.3.1 Storage devices and storage adapter support . . . . . . . . . . . . . . . . . . . . . . . . . . . 212.3.2 Versioned Workload Partitions . . . . . . . . . . . . . . . . . . . . . . . . . . . . . . . . . . . . . . . 222.3.3 Root volume group (rootvg) WPARs. . . . . . . . . . . . . . . . . . . . . . . . . . . . . . . . . . . 232.3.4 Live WPAR mobility with IBM Systems Director . . . . . . . . . . . . . . . . . . . . . . . . . . 232.3.5 Trusted Kernel Extensions in WPARs. . . . . . . . . . . . . . . . . . . . . . . . . . . . . . . . . . 24
© Copyright IBM Corp. 2011. All rights reserved. iii

2.4 IBM PowerHA support. . . . . . . . . . . . . . . . . . . . . . . . . . . . . . . . . . . . . . . . . . . . . . . . . . 242.5 IBM PowerVM Workload Partition Manager for AIX . . . . . . . . . . . . . . . . . . . . . . . . . . . 25
2.5.1 What is new in WPAR Manager V2.2.1 . . . . . . . . . . . . . . . . . . . . . . . . . . . . . . . . 25
Part 2. Installation and configuration . . . . . . . . . . . . . . . . . . . . . . . . . . . . . . . . . . . . . . . . . . . . . . . . . . . . 27
Chapter 3. Installing IBM Systems Director . . . . . . . . . . . . . . . . . . . . . . . . . . . . . . . . . . 293.1 Implementation environment . . . . . . . . . . . . . . . . . . . . . . . . . . . . . . . . . . . . . . . . . . . . . 303.2 Preparing for the IBM Systems Director server installation. . . . . . . . . . . . . . . . . . . . . . 30
3.2.1 Hardware requirements. . . . . . . . . . . . . . . . . . . . . . . . . . . . . . . . . . . . . . . . . . . . . 303.2.2 Software requirements . . . . . . . . . . . . . . . . . . . . . . . . . . . . . . . . . . . . . . . . . . . . . 323.2.3 IBM Systems Director pre-installation utility . . . . . . . . . . . . . . . . . . . . . . . . . . . . . 33
3.3 IBM Systems Director server installation. . . . . . . . . . . . . . . . . . . . . . . . . . . . . . . . . . . . 343.4 Importing the Common Agent package into the IBM Systems Director server . . . . . . . 383.5 Installing the IBM PowerVM Workload Partition Manager for AIX. . . . . . . . . . . . . . . . . 393.6 IBM Systems Director resources. . . . . . . . . . . . . . . . . . . . . . . . . . . . . . . . . . . . . . . . . . 41
3.6.1 IBM Systems Director home page . . . . . . . . . . . . . . . . . . . . . . . . . . . . . . . . . . . . 413.6.2 IBM Systems Director downloads . . . . . . . . . . . . . . . . . . . . . . . . . . . . . . . . . . . . . 413.6.3 IBM Systems Director documentation and other resources . . . . . . . . . . . . . . . . . 423.6.4 IBM Systems Director user forum . . . . . . . . . . . . . . . . . . . . . . . . . . . . . . . . . . . . . 42
Chapter 4. Configuring and using the IBM PowerVM Workload Partition Manager . . 434.1 Why WPAR Manager . . . . . . . . . . . . . . . . . . . . . . . . . . . . . . . . . . . . . . . . . . . . . . . . . . 444.2 WPAR Manager agent . . . . . . . . . . . . . . . . . . . . . . . . . . . . . . . . . . . . . . . . . . . . . . . . . 444.3 WPAR Manager license enablement . . . . . . . . . . . . . . . . . . . . . . . . . . . . . . . . . . . . . . 454.4 Configuring WPAR Manager. . . . . . . . . . . . . . . . . . . . . . . . . . . . . . . . . . . . . . . . . . . . . 45
4.4.1 WPAR Manager setup advisor . . . . . . . . . . . . . . . . . . . . . . . . . . . . . . . . . . . . . . . 464.4.2 Defining a managed system . . . . . . . . . . . . . . . . . . . . . . . . . . . . . . . . . . . . . . . . . 554.4.3 Updating WPAR-related attributes of the managed system . . . . . . . . . . . . . . . . . 55
4.5 Managing WPARs using WPAR Manager . . . . . . . . . . . . . . . . . . . . . . . . . . . . . . . . . . 554.5.1 Working with WPARs that are created from the command line . . . . . . . . . . . . . . 564.5.2 Versioned Workload Partitions . . . . . . . . . . . . . . . . . . . . . . . . . . . . . . . . . . . . . . . 564.5.3 Considerations for support of Live Application Mobility. . . . . . . . . . . . . . . . . . . . . 574.5.4 Creating WPARs. . . . . . . . . . . . . . . . . . . . . . . . . . . . . . . . . . . . . . . . . . . . . . . . . . 594.5.5 Creating Versioned Workload Partitions . . . . . . . . . . . . . . . . . . . . . . . . . . . . . . . . 694.5.6 Backing up WPARs. . . . . . . . . . . . . . . . . . . . . . . . . . . . . . . . . . . . . . . . . . . . . . . . 724.5.7 Restoring WPARs . . . . . . . . . . . . . . . . . . . . . . . . . . . . . . . . . . . . . . . . . . . . . . . . . 744.5.8 Starting a system WPAR. . . . . . . . . . . . . . . . . . . . . . . . . . . . . . . . . . . . . . . . . . . . 764.5.9 Stopping a WPAR . . . . . . . . . . . . . . . . . . . . . . . . . . . . . . . . . . . . . . . . . . . . . . . . . 784.5.10 Synchronizing a system WPAR . . . . . . . . . . . . . . . . . . . . . . . . . . . . . . . . . . . . . 814.5.11 Cloning a WPAR . . . . . . . . . . . . . . . . . . . . . . . . . . . . . . . . . . . . . . . . . . . . . . . . . 834.5.12 Removing and deleting a WPAR. . . . . . . . . . . . . . . . . . . . . . . . . . . . . . . . . . . . . 844.5.13 Deploying a WPAR definition . . . . . . . . . . . . . . . . . . . . . . . . . . . . . . . . . . . . . . . 854.5.14 Viewing or modifying WPAR properties . . . . . . . . . . . . . . . . . . . . . . . . . . . . . . . 85
4.6 WPAR Manager command-line interface . . . . . . . . . . . . . . . . . . . . . . . . . . . . . . . . . . . 87
Chapter 5. Workload partition rootvg support . . . . . . . . . . . . . . . . . . . . . . . . . . . . . . . . 915.1 System rootvg WPARs . . . . . . . . . . . . . . . . . . . . . . . . . . . . . . . . . . . . . . . . . . . . . . . . . 925.2 WPAR system rootvg creation . . . . . . . . . . . . . . . . . . . . . . . . . . . . . . . . . . . . . . . . . . . 93
5.2.1 Recreating a system rootvg WPAR erased by the rmwpar command . . . . . . . . . 96
Chapter 6. Storage adapters and devices . . . . . . . . . . . . . . . . . . . . . . . . . . . . . . . . . . . 1016.1 Storage devices and adapters . . . . . . . . . . . . . . . . . . . . . . . . . . . . . . . . . . . . . . . . . . 102
6.1.1 Storage management in inactive WPARs. . . . . . . . . . . . . . . . . . . . . . . . . . . . . . 102
iv Exploiting IBM AIX Workload Partitions

6.1.2 Storage management in an active WPAR. . . . . . . . . . . . . . . . . . . . . . . . . . . . . . 1026.2 Storage devices . . . . . . . . . . . . . . . . . . . . . . . . . . . . . . . . . . . . . . . . . . . . . . . . . . . . . 102
6.2.1 Disk allocation to WPARs . . . . . . . . . . . . . . . . . . . . . . . . . . . . . . . . . . . . . . . . . . 1036.2.2 Disk deallocation from WPAR. . . . . . . . . . . . . . . . . . . . . . . . . . . . . . . . . . . . . . . 1036.2.3 Listing disks allocated to a WPAR . . . . . . . . . . . . . . . . . . . . . . . . . . . . . . . . . . . 1046.2.4 Other storage devices. . . . . . . . . . . . . . . . . . . . . . . . . . . . . . . . . . . . . . . . . . . . . 104
6.3 Storage adapters. . . . . . . . . . . . . . . . . . . . . . . . . . . . . . . . . . . . . . . . . . . . . . . . . . . . . 1056.3.1 Storage adapter allocation to a WPAR . . . . . . . . . . . . . . . . . . . . . . . . . . . . . . . . 1056.3.2 Storage adapter deallocation from a WPAR . . . . . . . . . . . . . . . . . . . . . . . . . . . . 1056.3.3 Listing storage adapters allocated to a WPAR . . . . . . . . . . . . . . . . . . . . . . . . . . 106
Part 3. Resource system management in a workload partition environment . . . . . . . . . . . . . . . . . . . 107
Chapter 7. Resource control and management . . . . . . . . . . . . . . . . . . . . . . . . . . . . . . 1097.1 Resource control introduction . . . . . . . . . . . . . . . . . . . . . . . . . . . . . . . . . . . . . . . . . . . 1107.2 Resource control and WPARs . . . . . . . . . . . . . . . . . . . . . . . . . . . . . . . . . . . . . . . . . . 1107.3 Resource control attributes . . . . . . . . . . . . . . . . . . . . . . . . . . . . . . . . . . . . . . . . . . . . . 112
7.3.1 Resource sets . . . . . . . . . . . . . . . . . . . . . . . . . . . . . . . . . . . . . . . . . . . . . . . . . . . 1127.4 Resource default values . . . . . . . . . . . . . . . . . . . . . . . . . . . . . . . . . . . . . . . . . . . . . . . 1137.5 Share-based and percentage-based resource allocation . . . . . . . . . . . . . . . . . . . . . . 1147.6 CPU and memory resources. . . . . . . . . . . . . . . . . . . . . . . . . . . . . . . . . . . . . . . . . . . . 1157.7 Processes and threads . . . . . . . . . . . . . . . . . . . . . . . . . . . . . . . . . . . . . . . . . . . . . . . . 1187.8 Pseudo terminals (PTYs) . . . . . . . . . . . . . . . . . . . . . . . . . . . . . . . . . . . . . . . . . . . . . . 1197.9 Large pages . . . . . . . . . . . . . . . . . . . . . . . . . . . . . . . . . . . . . . . . . . . . . . . . . . . . . . . . 1207.10 Pinned memory . . . . . . . . . . . . . . . . . . . . . . . . . . . . . . . . . . . . . . . . . . . . . . . . . . . . . 1217.11 File systems . . . . . . . . . . . . . . . . . . . . . . . . . . . . . . . . . . . . . . . . . . . . . . . . . . . . . . . 1227.12 WPAR isolation . . . . . . . . . . . . . . . . . . . . . . . . . . . . . . . . . . . . . . . . . . . . . . . . . . . . . 123
7.12.1 Access to storage devices and adapters . . . . . . . . . . . . . . . . . . . . . . . . . . . . . 1247.12.2 File system access . . . . . . . . . . . . . . . . . . . . . . . . . . . . . . . . . . . . . . . . . . . . . . 1247.12.3 Network access. . . . . . . . . . . . . . . . . . . . . . . . . . . . . . . . . . . . . . . . . . . . . . . . . 1247.12.4 System settings. . . . . . . . . . . . . . . . . . . . . . . . . . . . . . . . . . . . . . . . . . . . . . . . . 1257.12.5 Command-line interface . . . . . . . . . . . . . . . . . . . . . . . . . . . . . . . . . . . . . . . . . . 1257.12.6 Security and user management . . . . . . . . . . . . . . . . . . . . . . . . . . . . . . . . . . . . 1257.12.7 Process resources and intercommunication . . . . . . . . . . . . . . . . . . . . . . . . . . . 1257.12.8 Kernel manipulation . . . . . . . . . . . . . . . . . . . . . . . . . . . . . . . . . . . . . . . . . . . . . 1267.12.9 Commands . . . . . . . . . . . . . . . . . . . . . . . . . . . . . . . . . . . . . . . . . . . . . . . . . . . . 1267.12.10 Shared Kernel . . . . . . . . . . . . . . . . . . . . . . . . . . . . . . . . . . . . . . . . . . . . . . . . . 127
7.13 Security . . . . . . . . . . . . . . . . . . . . . . . . . . . . . . . . . . . . . . . . . . . . . . . . . . . . . . . . . . . 1277.13.1 Enhanced and existing role-based access control (RBAC) . . . . . . . . . . . . . . . 1287.13.2 Using RBAC to secure WPAR operations. . . . . . . . . . . . . . . . . . . . . . . . . . . . . 129
7.14 User management. . . . . . . . . . . . . . . . . . . . . . . . . . . . . . . . . . . . . . . . . . . . . . . . . . . 1337.14.1 Security credentials in WPAR environments. . . . . . . . . . . . . . . . . . . . . . . . . . . 135
7.15 Encrypted file systems . . . . . . . . . . . . . . . . . . . . . . . . . . . . . . . . . . . . . . . . . . . . . . . 1367.15.1 Privacy of WPAR data . . . . . . . . . . . . . . . . . . . . . . . . . . . . . . . . . . . . . . . . . . . 1367.15.2 WPAR user access to the global environment data . . . . . . . . . . . . . . . . . . . . . 139
7.16 Network . . . . . . . . . . . . . . . . . . . . . . . . . . . . . . . . . . . . . . . . . . . . . . . . . . . . . . . . . . . 1417.16.1 WPAR network configuration . . . . . . . . . . . . . . . . . . . . . . . . . . . . . . . . . . . . . . 142
7.17 WPAR performance monitoring . . . . . . . . . . . . . . . . . . . . . . . . . . . . . . . . . . . . . . . . 1437.17.1 WPAR Manager and performance . . . . . . . . . . . . . . . . . . . . . . . . . . . . . . . . . . 144
Chapter 8. Workload partition mobility and WPAR Manager . . . . . . . . . . . . . . . . . . . 1458.1 Potential hardware for Live Application Mobility . . . . . . . . . . . . . . . . . . . . . . . . . . . . . 1468.2 Current available hardware . . . . . . . . . . . . . . . . . . . . . . . . . . . . . . . . . . . . . . . . . . . . . 1468.3 Types of WPARs to be created on each LPAR. . . . . . . . . . . . . . . . . . . . . . . . . . . . . . 147
Contents v

8.4 Mobile WPAR concepts . . . . . . . . . . . . . . . . . . . . . . . . . . . . . . . . . . . . . . . . . . . . . . . 1488.4.1 Checkpointable flag . . . . . . . . . . . . . . . . . . . . . . . . . . . . . . . . . . . . . . . . . . . . . . 1488.4.2 File systems of a mobile WPAR . . . . . . . . . . . . . . . . . . . . . . . . . . . . . . . . . . . . . 1488.4.3 Networking . . . . . . . . . . . . . . . . . . . . . . . . . . . . . . . . . . . . . . . . . . . . . . . . . . . . . 149
8.5 Tips for creating a mobile application WPAR . . . . . . . . . . . . . . . . . . . . . . . . . . . . . . . 1498.6 Creating a system WPAR . . . . . . . . . . . . . . . . . . . . . . . . . . . . . . . . . . . . . . . . . . . . . . 151
8.6.1 AIX mkwpar command full syntax. . . . . . . . . . . . . . . . . . . . . . . . . . . . . . . . . . . . 1518.6.2 WPM CLI smcli mkwpar command syntax . . . . . . . . . . . . . . . . . . . . . . . . . . . . . 1538.6.3 SMIT wpar fastpath. . . . . . . . . . . . . . . . . . . . . . . . . . . . . . . . . . . . . . . . . . . . . . . 1548.6.4 SMIT wpar fastpath for advanced system WPAR creation . . . . . . . . . . . . . . . . . 155
8.7 Creating a local JFS2 system WPAR . . . . . . . . . . . . . . . . . . . . . . . . . . . . . . . . . . . . . 1588.7.1 Mobility aspect of a JFS2 system WPAR . . . . . . . . . . . . . . . . . . . . . . . . . . . . . . 1598.7.2 Using SMIT . . . . . . . . . . . . . . . . . . . . . . . . . . . . . . . . . . . . . . . . . . . . . . . . . . . . . 1598.7.3 Other commands to verify the WPAR information . . . . . . . . . . . . . . . . . . . . . . . 160
8.8 Creating an NFS system WPAR . . . . . . . . . . . . . . . . . . . . . . . . . . . . . . . . . . . . . . . . . 1618.8.1 Creating an NFS system WPAR using the vfs=nfs flag for all file systems. . . . . 1628.8.2 Creating an NFS system WPAR using the vfs=directory flag for all file systems except
the root . . . . . . . . . . . . . . . . . . . . . . . . . . . . . . . . . . . . . . . . . . . . . . . . . . . . . . . . 1638.9 Creating a rootvg system WPAR . . . . . . . . . . . . . . . . . . . . . . . . . . . . . . . . . . . . . . . . 165
8.9.1 Mobility of the rootvg system WPAR. . . . . . . . . . . . . . . . . . . . . . . . . . . . . . . . . . 1678.9.2 Mobility of a SAN rootvg WPAR . . . . . . . . . . . . . . . . . . . . . . . . . . . . . . . . . . . . . 169
8.10 Creating a Versioned WPAR. . . . . . . . . . . . . . . . . . . . . . . . . . . . . . . . . . . . . . . . . . . 1698.11 WPAR mobility using WPAR Manager . . . . . . . . . . . . . . . . . . . . . . . . . . . . . . . . . . . 1718.12 System compatibility for WPAR mobility . . . . . . . . . . . . . . . . . . . . . . . . . . . . . . . . . . 172
8.12.1 Compatibility testing for WPAR mobility . . . . . . . . . . . . . . . . . . . . . . . . . . . . . . 1728.12.2 Compatibility states . . . . . . . . . . . . . . . . . . . . . . . . . . . . . . . . . . . . . . . . . . . . . . 174
8.13 WPAR relocation. . . . . . . . . . . . . . . . . . . . . . . . . . . . . . . . . . . . . . . . . . . . . . . . . . . . 1748.13.1 Relocation domains . . . . . . . . . . . . . . . . . . . . . . . . . . . . . . . . . . . . . . . . . . . . . 1748.13.2 Relocation policy . . . . . . . . . . . . . . . . . . . . . . . . . . . . . . . . . . . . . . . . . . . . . . . . 1758.13.3 Manual relocation . . . . . . . . . . . . . . . . . . . . . . . . . . . . . . . . . . . . . . . . . . . . . . . 1788.13.4 Policy-based relocation. . . . . . . . . . . . . . . . . . . . . . . . . . . . . . . . . . . . . . . . . . . 1848.13.5 WPAR relocation using WPAR Manager CLI . . . . . . . . . . . . . . . . . . . . . . . . . . 185
8.14 WPAR and GPFS . . . . . . . . . . . . . . . . . . . . . . . . . . . . . . . . . . . . . . . . . . . . . . . . . . . 1868.14.1 Creating the GPFS test WPAR . . . . . . . . . . . . . . . . . . . . . . . . . . . . . . . . . . . . . 1888.14.2 Creating a simple GPFS cluster . . . . . . . . . . . . . . . . . . . . . . . . . . . . . . . . . . . . 190
Chapter 9. Workload partition migration scenarios . . . . . . . . . . . . . . . . . . . . . . . . . . . 1939.1 WPAR migration . . . . . . . . . . . . . . . . . . . . . . . . . . . . . . . . . . . . . . . . . . . . . . . . . . . . . 194
9.1.1 Migrating a detached WPAR with WebSphere Application Server . . . . . . . . . . . 1949.1.2 Migrating a shared WPAR. . . . . . . . . . . . . . . . . . . . . . . . . . . . . . . . . . . . . . . . . . 1979.1.3 Migrating the rootvg WPAR. . . . . . . . . . . . . . . . . . . . . . . . . . . . . . . . . . . . . . . . . 198
9.2 Migrating a WPAR to a separate IBM Power System . . . . . . . . . . . . . . . . . . . . . . . . . 2009.2.1 Migrating a rootvg WPAR to a separate system with the same AIX level using
external shared accessed storage . . . . . . . . . . . . . . . . . . . . . . . . . . . . . . . . . . . 2019.2.2 Migrating a rootvg WPAR from an AIX 6.1 system to an AIX 7.1 system. . . . . . 2089.2.3 Migrating a system WPAR to a new system with the same AIX level using a savewpar
image . . . . . . . . . . . . . . . . . . . . . . . . . . . . . . . . . . . . . . . . . . . . . . . . . . . . . . . . . 2179.2.4 Migrating a system WPAR from AIX 6.1 to AIX 7.1 in another system using the
savewpar image . . . . . . . . . . . . . . . . . . . . . . . . . . . . . . . . . . . . . . . . . . . . . . . . . 219
Chapter 10. Software maintenance . . . . . . . . . . . . . . . . . . . . . . . . . . . . . . . . . . . . . . . . 22510.1 AIX updates and WPARs . . . . . . . . . . . . . . . . . . . . . . . . . . . . . . . . . . . . . . . . . . . . . 226
10.1.1 Installing AIX updates in a shared WPAR. . . . . . . . . . . . . . . . . . . . . . . . . . . . . 226
vi Exploiting IBM AIX Workload Partitions

10.1.2 Installing AIX updates in a detached WPAR. . . . . . . . . . . . . . . . . . . . . . . . . . . 23210.1.3 Additional considerations . . . . . . . . . . . . . . . . . . . . . . . . . . . . . . . . . . . . . . . . . 24710.1.4 AIX updates and Versioned Workload Partitions . . . . . . . . . . . . . . . . . . . . . . . 250
10.2 Managing interim fixes in a WPAR . . . . . . . . . . . . . . . . . . . . . . . . . . . . . . . . . . . . . . 25210.2.1 Applying iFixes to a shared WPAR . . . . . . . . . . . . . . . . . . . . . . . . . . . . . . . . . . 25210.2.2 Removing an iFix from a shared WPAR . . . . . . . . . . . . . . . . . . . . . . . . . . . . . . 25310.2.3 Applying an iFix to a detached WPAR . . . . . . . . . . . . . . . . . . . . . . . . . . . . . . . 25510.2.4 Removing an iFix from a detached WPAR . . . . . . . . . . . . . . . . . . . . . . . . . . . . 256
Chapter 11. Backing up and restoring workload partitions . . . . . . . . . . . . . . . . . . . . 25911.1 Backing up and restoring WPARs. . . . . . . . . . . . . . . . . . . . . . . . . . . . . . . . . . . . . . . 260
11.1.1 Restoring a lower level detached WPAR . . . . . . . . . . . . . . . . . . . . . . . . . . . . . 26611.2 Using mksysb . . . . . . . . . . . . . . . . . . . . . . . . . . . . . . . . . . . . . . . . . . . . . . . . . . . . . . 27011.3 Backing up the WPAR using Tivoli Storage Manager . . . . . . . . . . . . . . . . . . . . . . . . 271
Chapter 12. Managing your system workload partition with Network Installation Manager . . . . . . . . . . . . . . . . . . . . . . . . . . . . . . . . . . . . . . . . . . . . . . . . . . . . . 283
12.1 Network Installation Manager (NIM) . . . . . . . . . . . . . . . . . . . . . . . . . . . . . . . . . . . . . 28412.2 Adding a System WPAR to NIM . . . . . . . . . . . . . . . . . . . . . . . . . . . . . . . . . . . . . . . . 28412.3 Creating a system WPAR with NIM . . . . . . . . . . . . . . . . . . . . . . . . . . . . . . . . . . . . . 28612.4 Starting your system WPAR with NIM. . . . . . . . . . . . . . . . . . . . . . . . . . . . . . . . . . . . 28812.5 Stopping your system WPAR with NIM. . . . . . . . . . . . . . . . . . . . . . . . . . . . . . . . . . . 28812.6 Removing a system WPAR with NIM . . . . . . . . . . . . . . . . . . . . . . . . . . . . . . . . . . . . 28812.7 Managing a system WPAR with NIM . . . . . . . . . . . . . . . . . . . . . . . . . . . . . . . . . . . . 289
12.7.1 Changing the characteristics of your WPAR by using the chwpar command . . 28912.7.2 Synchronizing the WPAR software . . . . . . . . . . . . . . . . . . . . . . . . . . . . . . . . . . 290
12.8 Backing up the system WPAR . . . . . . . . . . . . . . . . . . . . . . . . . . . . . . . . . . . . . . . . . 29012.9 Restoring the System WPAR . . . . . . . . . . . . . . . . . . . . . . . . . . . . . . . . . . . . . . . . . . 29212.10 Using specification files for system WPAR . . . . . . . . . . . . . . . . . . . . . . . . . . . . . . . 292
12.10.1 Specification file for system WPARs. . . . . . . . . . . . . . . . . . . . . . . . . . . . . . . . 29212.10.2 Specification file for application WPARs . . . . . . . . . . . . . . . . . . . . . . . . . . . . . 295
12.11 Application WPARs and NIM . . . . . . . . . . . . . . . . . . . . . . . . . . . . . . . . . . . . . . . . . 29512.12 WPAR cloning . . . . . . . . . . . . . . . . . . . . . . . . . . . . . . . . . . . . . . . . . . . . . . . . . . . . . 295
12.12.1 WPAR cloning on the same LPAR . . . . . . . . . . . . . . . . . . . . . . . . . . . . . . . . . 303
Part 4. Scenarios. . . . . . . . . . . . . . . . . . . . . . . . . . . . . . . . . . . . . . . . . . . . . . . . . . . . . . . . . . . . . . . . . . . . 315
Chapter 13. Highly available workload partitions with PowerHA 7.1 and 6.1 . . . . . . 31713.1 Planning for high availability . . . . . . . . . . . . . . . . . . . . . . . . . . . . . . . . . . . . . . . . . . . 31813.2 PowerHA 6.1 and rootvg WPARs . . . . . . . . . . . . . . . . . . . . . . . . . . . . . . . . . . . . . . . 318
Chapter 14. Versioned workload partitions . . . . . . . . . . . . . . . . . . . . . . . . . . . . . . . . . 32114.1 Overview . . . . . . . . . . . . . . . . . . . . . . . . . . . . . . . . . . . . . . . . . . . . . . . . . . . . . . . . . . 32214.2 System requirements . . . . . . . . . . . . . . . . . . . . . . . . . . . . . . . . . . . . . . . . . . . . . . . . 32214.3 Installing the Oracle Database on the WPAR environment . . . . . . . . . . . . . . . . . . . 326
14.3.1 Certified AIX systems for Oracle Database 11gR2. . . . . . . . . . . . . . . . . . . . . . 32614.3.2 Oracle WPAR installation requirements on AIX . . . . . . . . . . . . . . . . . . . . . . . . 32714.3.3 Oracle installation guidelines . . . . . . . . . . . . . . . . . . . . . . . . . . . . . . . . . . . . . . 32814.3.4 Installing an Oracle Database on a non-shared system WPAR . . . . . . . . . . . . 32914.3.5 Listener configuration . . . . . . . . . . . . . . . . . . . . . . . . . . . . . . . . . . . . . . . . . . . . 33214.3.6 Oracle Database . . . . . . . . . . . . . . . . . . . . . . . . . . . . . . . . . . . . . . . . . . . . . . . . 33414.3.7 Installing Oracle on a shared system WPAR . . . . . . . . . . . . . . . . . . . . . . . . . . 33714.3.8 Live Application Mobility for the Oracle Database. . . . . . . . . . . . . . . . . . . . . . . 33814.3.9 Tivoli Storage Manager data protection for Oracle . . . . . . . . . . . . . . . . . . . . . . 338
Contents vii

Part 5. Appendixes . . . . . . . . . . . . . . . . . . . . . . . . . . . . . . . . . . . . . . . . . . . . . . . . . . . . . . . . . . . . . . . . . . 339
Appendix A. Debugging, messages, and problem analysis . . . . . . . . . . . . . . . . . . . . 341Problems with syncwpar . . . . . . . . . . . . . . . . . . . . . . . . . . . . . . . . . . . . . . . . . . . . . . . . . . 342bos.rte.security.post_u error with mkwpar . . . . . . . . . . . . . . . . . . . . . . . . . . . . . . . . . . . . . 342Insufficient file system space during the WPAR creation . . . . . . . . . . . . . . . . . . . . . . . . . . 343WPAR staying in the T state due to remaining mount points . . . . . . . . . . . . . . . . . . . . . . . 346What to do if your WPAR ends up in the broken state. . . . . . . . . . . . . . . . . . . . . . . . . . . . 348
A WPAR can also end up in the broken state when you attempt to start it. . . . . . . . . . 349What to do if you cannot fix the problem . . . . . . . . . . . . . . . . . . . . . . . . . . . . . . . . . . . . . . 350
Appendix B. Considerations for applications in workload partitions . . . . . . . . . . . . 353Installing WebSphere Application Server . . . . . . . . . . . . . . . . . . . . . . . . . . . . . . . . . . . . . . 354WebSphere Application Server installation guidelines. . . . . . . . . . . . . . . . . . . . . . . . . . . . 354
Installing WebSphere Application Server to the WPAR from the global environment . 354Installing WebSphere Application Server from within the WPAR . . . . . . . . . . . . . . . . . 354
Installing the IBM DB2 Database Server . . . . . . . . . . . . . . . . . . . . . . . . . . . . . . . . . . . . . . 356Installing the IBM HTTP Server in a WPAR . . . . . . . . . . . . . . . . . . . . . . . . . . . . . . . . . . . . 356Installing the Oracle Database server in a WPAR . . . . . . . . . . . . . . . . . . . . . . . . . . . . . . . 360
Related publications . . . . . . . . . . . . . . . . . . . . . . . . . . . . . . . . . . . . . . . . . . . . . . . . . . . . 361IBM Redbooks publications . . . . . . . . . . . . . . . . . . . . . . . . . . . . . . . . . . . . . . . . . . . . . . . . 361Other publications . . . . . . . . . . . . . . . . . . . . . . . . . . . . . . . . . . . . . . . . . . . . . . . . . . . . . . . 361Online resources . . . . . . . . . . . . . . . . . . . . . . . . . . . . . . . . . . . . . . . . . . . . . . . . . . . . . . . . 362Help from IBM . . . . . . . . . . . . . . . . . . . . . . . . . . . . . . . . . . . . . . . . . . . . . . . . . . . . . . . . . . 362
Index . . . . . . . . . . . . . . . . . . . . . . . . . . . . . . . . . . . . . . . . . . . . . . . . . . . . . . . . . . . . . . . . . 363
viii Exploiting IBM AIX Workload Partitions

Notices
This information was developed for products and services offered in the U.S.A.
IBM may not offer the products, services, or features discussed in this document in other countries. Consult your local IBM representative for information on the products and services currently available in your area. Any reference to an IBM product, program, or service is not intended to state or imply that only that IBM product, program, or service may be used. Any functionally equivalent product, program, or service that does not infringe any IBM intellectual property right may be used instead. However, it is the user's responsibility to evaluate and verify the operation of any non-IBM product, program, or service.
IBM may have patents or pending patent applications covering subject matter described in this document. The furnishing of this document does not give you any license to these patents. You can send license inquiries, in writing, to: IBM Director of Licensing, IBM Corporation, North Castle Drive, Armonk, NY 10504-1785 U.S.A.
The following paragraph does not apply to the United Kingdom or any other country where such provisions are inconsistent with local law: INTERNATIONAL BUSINESS MACHINES CORPORATION PROVIDES THIS PUBLICATION "AS IS" WITHOUT WARRANTY OF ANY KIND, EITHER EXPRESS OR IMPLIED, INCLUDING, BUT NOT LIMITED TO, THE IMPLIED WARRANTIES OF NON-INFRINGEMENT, MERCHANTABILITY OR FITNESS FOR A PARTICULAR PURPOSE. Some states do not allow disclaimer of express or implied warranties in certain transactions, therefore, this statement may not apply to you.
This information could include technical inaccuracies or typographical errors. Changes are periodically made to the information herein; these changes will be incorporated in new editions of the publication. IBM may make improvements and/or changes in the product(s) and/or the program(s) described in this publication at any time without notice.
Any references in this information to non-IBM websites are provided for convenience only and do not in any manner serve as an endorsement of those websites. The materials at those websites are not part of the materials for this IBM product and use of those websites is at your own risk.
IBM may use or distribute any of the information you supply in any way it believes appropriate without incurring any obligation to you.
Information concerning non-IBM products was obtained from the suppliers of those products, their published announcements or other publicly available sources. IBM has not tested those products and cannot confirm the accuracy of performance, compatibility or any other claims related to non-IBM products. Questions on the capabilities of non-IBM products should be addressed to the suppliers of those products.
This information contains examples of data and reports used in daily business operations. To illustrate them as completely as possible, the examples include the names of individuals, companies, brands, and products. All of these names are fictitious and any similarity to the names and addresses used by an actual business enterprise is entirely coincidental.
COPYRIGHT LICENSE:
This information contains sample application programs in source language, which illustrate programming techniques on various operating platforms. You may copy, modify, and distribute these sample programs in any form without payment to IBM, for the purposes of developing, using, marketing or distributing application programs conforming to the application programming interface for the operating platform for which the sample programs are written. These examples have not been thoroughly tested under all conditions. IBM, therefore, cannot guarantee or imply reliability, serviceability, or function of these programs.
© Copyright IBM Corp. 2011. All rights reserved. ix
Trademarks
IBM, the IBM logo, and ibm.com are trademarks or registered trademarks of International Business Machines Corporation in the United States, other countries, or both. These and other IBM trademarked terms are marked on their first occurrence in this information with the appropriate symbol (® or ™), indicating US registered or common law trademarks owned by IBM at the time this information was published. Such trademarks may also be registered or common law trademarks in other countries. A current list of IBM trademarks is available on the Web at http://www.ibm.com/legal/copytrade.shtml
The following terms are trademarks of the International Business Machines Corporation in the United States, other countries, or both:
AIX 5L™AIX®DB2®developerWorks®eServer™GPFS™HACMP™IBM®iSeries®LoadLeveler®Passport Advantage®
Power Systems™POWER3™POWER4™POWER5™POWER5+™POWER6®POWER7™PowerHA™PowerVM™POWER®pSeries®
Redbooks®Redbooks (logo) ®Service Director™System p®System Storage®Tivoli®WebSphere®Workload Partitions Manager™XIV®
The following terms are trademarks of other companies:
Microsoft, Windows, and the Windows logo are trademarks of Microsoft Corporation in the United States, other countries, or both.
Java, and all Java-based trademarks and logos are trademarks or registered trademarks of Oracle and/or its affiliates.
UNIX is a registered trademark of The Open Group in the United States and other countries.
Intel, Intel logo, Intel Inside, Intel Inside logo, Intel Centrino, Intel Centrino logo, Celeron, Intel Xeon, Intel SpeedStep, Itanium, and Pentium are trademarks or registered trademarks of Intel Corporation or its subsidiaries in the United States and other countries.
Linux is a trademark of Linus Torvalds in the United States, other countries, or both.
Other company, product, or service names may be trademarks or service marks of others.
x Exploiting IBM AIX Workload Partitions

Preface
This IBM® Redbooks® publication provides an update of the latest AIX Workload Partition (WPAR) capabilities. It provides a how-to guide and well-defined and documented deployment model for system administrators and architects using WPARs in AIX® Version 7.1 within an IBM POWER® System virtualized environment. This book helps clients create a planned foundation for their future deployments.
This book is targeted toward technical professionals, such as business intelligence (BI) consultants, technical support staff, IT architects, and IT specialists, who are responsible for providing solutions and support for IBM POWER Systems and IBM AIX Version 7.1.
The team who wrote this book
This book was produced by a team of specialists from around the world working at the International Technical Support Organization, Poughkeepsie Center.
Dino Quintero is a Project Leader and IT generalist with the ITSO in Poughkeepsie, NY. His areas of knowledge include enterprise continuous availability planning and implementation, enterprise systems management, virtualization, and clustering solutions. He is currently an Open Group Master Certified IT Specialist. Dino holds a Master of Computing Information Systems degree and a Bachelor of Science degree in Computer Science from Marist College.
Shane Brandon is a Senior IT Specialist in Brisbane, Australia. He has 13 years of experience in the Power Systems™ and AIX fields and has worked for IBM for six years. Shane is an IBM Certified Advanced Technical Expert, a Certified Systems Administrator Tivoli® Storage Manager, and Certified Systems Administrator RHEL. His areas of expertise include PowerHA™, virtualization, and IBM Systems Director. He has written and presented on AIX, Workload Partitions, IBM Systems Director, and High Availability (HA).
Bernhard Buehler is an IT Specialist in Germany. He currently works for IBM STG Lab Services in La Gaude, France. He has worked at IBM for 30 years and has 21 years of experience in AIX and the availability field. His areas of expertise include AIX, PowerHA, HA architecture, script programming, and AIX security. He is a co-author of several IBM Redbooks publications. He is also a co-author of several courses in the IBM AIX curriculum.
Thierry Fauck is a Certified IT Specialist working in Toulouse, France. He has 25 years of experience in Technical Support with major high-performance computing (HPC) providers. As System Administrator of the French development lab, his areas of expertise include AIX, VIOS, storage area networks (SAN), and PowerVM™. He currently leads a functional verification test (FVT) development team for WPAR and WPAR mobility features. He authored a white paper on WPARs and actively contributed to the WPAR IBM Redbooks publication. He also co-authored two AIX differences Guide publications.
Guilherme Galoppini Felix is a Power System, Virtualization, and AIX Specialist working for IBM Brazil. He has more than 10 years of experience with UNIX and virtualization. He currently holds a Bachelor degree in Information Systems. He is a Certified Advanced Technical Expert (CATE), Red Hat Certified Engineer (RHCE), and a Master Certified IT Specialist. He has written articles that have been published in IBM developerWorks®, and he has written a previous IBM Redbooks publication.
© Copyright IBM Corp. 2011. All rights reserved. xi

Chris Gibson is an AIX and PowerVM specialist. He works for Southern Cross Computer Systems, an IBM Business Partner that is located in Melbourne, Australia. He has 12 years of experience with AIX and is an IBM Certified Advanced Technical Expert - AIX. He is an active member of the AIX community and has written numerous technical articles about AIX and PowerVM for IBM developerWorks. He also writes his own AIX blog on the IBM developerWorks website. Chris is also available online on Twitter (@cgibbo). This book is his third Redbooks publication, having previously co-authored the NIM from A to Z in AIX 5L™ and IBM AIX Version 7.1 Differences Guide books.
Bob Maher is an IT Specialist with Power VM, AIX, and Linux working in Poughkeepsie, NY. He has 15 years of experience in AIX, Linux, and Virtualization. He holds a Bachelors degree in Computer Science. He is a Certified IT Specialist and an IBM AIX Certified Specialist. His areas of expertise include performance, middleware, and Power Systems. He is a member of many UNIX/AIX users’ groups and has written numerous technical articles about AIX and PowerVM and has contributed to Redpapers and white papers on server consolidation. Bob is the architect for the Power on Wheels solution that provides clients with a hands-on demo of virtualization technologies.
Mehboob Mithaiwala is a Certified Consulting IT Specialist with the IBM Power Systems Advanced Technical Skills organization. He has 20 years of varied IT experience with IBM, including application development, BI, server consolidation, IBM i, Windows integration with iSeries®, systems management, and Power Systems benchmarking. Mehboob’s current focus product areas are IBM Compliance Expert Express Edition, IBM Systems Director for Power Systems, AIX Workload Partitions, and IBM PowerVM Workload Partition Manager™ for AIX.
Kurosh Khan-Afshar Moha joined IBM Spain in 1999 as an IT Specialist in AIX, High Availability Cluster Multiprocessing (HACMP™), and related software. At the same time, he started to work as an Associated Professor at the university in the Computer Science department. In 2006, he took part in the recently created AIX Virtual Front End, an EMEA second support layer, where later he became the Team Leader. Recently, he has joined AIX worldwide level 2 support.
Mathis Mueller is an AIX specialist with extensive experience in Network Installation Management (NIM) administration and virtualization (logical partitions (LPAR) and WPAR). He works for Deutsche Telekom AG in Stuttgart, Germany, and has more than five years experience with UNIX. He is an active member of the AIX community. This book is his first co-authored Redbooks publication.
Bjorn Roden works for IBM Systems Lab Services as part of the IBM PowerCare Team, and has co-authored six other IBM Redbooks publications. Bjorn has spoken at several international IT industry technical events and conferences. He holds MSc, BSc, and DiplSSc in Informatics from Lund University in Sweden, and BCSc and DiplCSc in Computer Science from Malmo University in Sweden. He is also an IBM Certified Infrastructure Systems Architect (ISA), a Certified TOGAF Architect, a Certified PRINCE2 Project Manager, and has multiple certifications, since 1994, as an IBM Advanced Technical Expert, IBM Specialist, and IBM Technical Leader. He has worked with designing, planning, implementing, programming, and assessing HA, resilient and secure, and high performance systems and solutions for Power/AIX since AIX V3.1 in 1990.
Marian Tomescu has 13 years experience as an IT Specialist and currently works for IBM Global Technologies Services in Romania. Marian has seven years of experience in Power Systems. He is a certified specialist for IBM System p® Administration, HACMP for AIX, Tivoli Storage Management Implementation, Oracle Certified Associated, IBM eServer™ Certified Specialist, and Cisco Information Security Specialist. His areas of expertise include Tivoli Storage Manager, PowerHA, PowerVM, IBM System Storage®, AIX, General Parallel File
xii Exploiting IBM AIX Workload Partitions

System (GPFS™), VMware, Linux, and Windows. Marian has a Bachelor degree in Electronics Images, Shapes and Artificial Intelligence, from Polytechnic University - Bucharest, Electronics and Telecommunications, Romania.
Figure 1 From left to right: Shane Brandon, Mathis Mueller, Kurosh Khan-Afshar Moha, Marian Tomescu, Dino Quintero (project leader), Mehboob Mithaiwala, Bob Maher, Bernhard Buehler, Guilherme Galoppini Felix, Thierry Fauck, and Chris Gibson
Thanks to the following people for their contributions to this project:
Ella Buchlovic, Richard Conway, David Bennin, Donald BrennanInternational Technical Support Organization, Poughkeepsie Center
David Sheffield, Khalid Filali-Adib, Mark McConaughy, Rene R Martinez, Sungjin Yook, Paul Finley, Eric Haase, Nick Ham, Scott Lightsey, Janel Brandon, Nathaniel Tomsic, Eric Haase, Paul Finley, Ann Wigginton, Rohit Krishna PrasadIBM Austin
Mike Coffey, Gordon McPheetersIBM Poughkeepsie
Shawn BodilyIBM Dallas
Alex Abderrazag, Nigel GriffithsIBM UK
Linda Flanders IBM Beaverton
Mario Bono, Peter Cook, Peter Grassi, Hemantha GunasingheIBM Australia
Qin ZhaoIBM China
Kavitha RamalingamIBM India
Preface xiii

Thanks to the authors of the previous editions of this book:
� Authors of the first edition, Introduction to Workload Partition Management in IBM AIX Version 6.1, SG24-7431, published in November 2007, were Bruno Blanchard, Pedro Coelho, Mary Hazuka, Jerry Petru, Theeraphong Thitayanun, Chris Almond
� Authors of the second edition, Workload Partition Management in IBM AIX Version 6.1, SG24-7656, published in December 2008, were Shane Brandon, Anirban Chatterjee, Henning Gammelmark, Vijayasekhar Mekala, Liviu Rosca, Arindom Sanyal
Now you can become a published author, too!
Here’s an opportunity to spotlight your skills, grow your career, and become a published author—all at the same time! Join an ITSO residency project and help write a book in your area of expertise, while honing your experience using leading-edge technologies. Your efforts will help to increase product acceptance and customer satisfaction, as you expand your network of technical contacts and relationships. Residencies run from two to six weeks in length, and you can participate either in person or as a remote resident working from your home base.
Find out more about the residency program, browse the residency index, and apply online at:
ibm.com/redbooks/residencies.html
Comments welcome
Your comments are important to us!
We want our books to be as helpful as possible. Send us your comments about this book or other IBM Redbooks publications in one of the following ways:
� Use the online Contact us review Redbooks form found at:
ibm.com/redbooks
� Send your comments in an email to:
� Mail your comments to:
IBM Corporation, International Technical Support OrganizationDept. HYTD Mail Station P0992455 South RoadPoughkeepsie, NY 12601-5400
Stay connected to IBM Redbooks
� Find us on Facebook:
http://www.facebook.com/IBMRedbooks
� Follow us on Twitter:
http://twitter.com/ibmredbooks
� Look for us on LinkedIn:
xiv Exploiting IBM AIX Workload Partitions

http://www.linkedin.com/groups?home=&gid=2130806
� Explore new Redbooks publications, residencies, and workshops with the IBM Redbooks weekly newsletter:
https://www.redbooks.ibm.com/Redbooks.nsf/subscribe?OpenForm
� Stay current on recent Redbooks publications with RSS Feeds:
http://www.redbooks.ibm.com/rss.html
Preface xv

xvi Exploiting IBM AIX Workload Partitions
Part 1 What is new with AIX workload partitioning
In the first part of this publication, we provide a short introduction to AIX workload partitions (WPARs), including an overview of the latest enhancements with IBM AIX 7.1.
Part 1
© Copyright IBM Corp. 2011. All rights reserved. 1

2 Exploiting IBM AIX Workload Partitions

Chapter 1. Introduction to AIX workload partitions
AIX workload partitions (WPARs) provide a software-based virtualization solution for creating and managing multiple individual AIX operating system environments within a single AIX-based logical partition.
This chapter describes the IBM technology that has influenced this software solution, the terminology that is used to describe this virtual environment, and the situation in which you want to use WPARs.
We discuss the following topics:
� Workload management and partitioning in AIX systems� AIX 7 and POWER7 features� WPAR isolation and security� Live Application Mobility� When to use WPARs
1
© Copyright IBM Corp. 2011. All rights reserved. 3

1.1 Workload management and partitioning in AIX systems
Today’s competitive corporate environment requires nimble IT departments with the ability to respond quickly to changes in capacity and usage. The use of innovative methods is necessary to maximize server utilization, control management costs, and reduce deployment time for new applications. The escalating costs of power and raised floor capacity also drive the need to utilize technology in new ways to maximize a company’s IT investment.
For this reason, IBM has developed numerous tools to operate within its UNIX server and operating system products, giving IT administrators new levels of control and flexibility in how they deploy and manage application workloads.
1.1.1 AIX Workload Manager
Workload Manager (WLM) was introduced as part of AIX with Version 4.3. It allows multiple workloads to run under one AIX instance. The system administrator builds rules based upon a user, process, or workload. Based upon these rules, shares of CPU and memory or a percentage can be optimally assigned to the workload with peak demand (see Figure 1-1).
Figure 1-1 WLM used to manage multiple workloads on a single AIX instance
4 Exploiting IBM AIX Workload Partitions

1.1.2 Logical partitions
With AIX 5.1 and POWER4™ technology, IBM introduced logical partitions (LPARs) as a way to provide greater flexibility and better utilization of resources in large systems. With LPARs, systems run AIX alongside other operating systems in separate partitions, starting at a minimum of one CPU, 1 GB of memory, and one Ethernet adapter.
AIX 5.2 added more systems flexibility by being able to move the CPU, I/O adapters, and memory dynamically without rebooting the LPARs. This capability allowed IT environments to become even more flexible in efficiently supporting workload hosting requirements (see Figure 1-2).
Figure 1-2 System partitioned into four LPARs, each running a workload
LPARs: Throughout this book, we use the term LPAR to refer to all types of LPARs, such as a micropartition or dedicated partition of a POWER-based server, or a full physical server that is not partitioned (also known as a full-system partition in POWER4 terminology).
Chapter 1. Introduction to AIX workload partitions 5

1.1.3 PowerVM (formerly Advanced POWER Virtualization)
The trend toward providing more system resource partitioning flexibility continued with the introduction of AIX 5.3 and the POWER5™ processor. IBM System p Advanced POWER Virtualization (APV) offered advanced technology to facilitate server consolidation, reduce costs, provide redundancy, and adapt capacity to quickly meet demand. APV can reduce the need for static adapters, rapidly respond to changing capacity demands, and generally allow companies to utilize their purchasing dollars more effectively.
With the launch of the POWER6® platform, IBM rebranded APV as PowerVM, and added key features, such as the ability to migrate a running LPAR between systems (Live Partition Mobility). See Figure 1-3.
Figure 1-3 Four LPARs dynamically sharing a pool of resources using Virtual I/O Server (VIOS)
1.1.4 AIX 6.1 and AIX 7.1 WPARs
In AIX 6.1 and AIX 7.1, workload partitions (WPARs) add an additional operating system software-based layer for the virtualization of operating environments. Each WPAR can host applications and isolate them from applications executing within other WPARs. This capability can be used on any server platform capable of running AIX6, including POWER4, POWER5, POWER5+™, POWER6, and POWER7™. Figure 1-4 on page 7 shows three application- or service-specific WPARs being hosted within a single LPAR.
6 Exploiting IBM AIX Workload Partitions

Figure 1-4 WPARs reduce the number of managed LPARs and still provide workload isolation
WPARs can be created within an AIX 6.1 or an AIX 7.1 LPAR. Each WPAR provides an isolated environment for the application that it hosts. From the application or service point of view, the WPAR provides a replica of a standard AIX operating system environment. Furthermore, the WPAR runtime environment can be dedicated to only hosting that application (the workload), and it can be tuned to optimize performance based on the specific workload characteristics of that application. Logically, WPARs can be considered as an operating system-level boundary around a specific set of AIX processes. Inside the WPAR, the applications have the following benefits:
� Private execution environments� Isolation from other processes outside the WPAR� Dedicated network addresses and file systems� Interprocess communication that is restricted to processes executing only in the same
workload partition
The following sections introduce new concepts:
� Global environment
This term refers to the LPARs with the AIX operating system that hosts WPARs. This environment is the classical AIX environment. Typically, only the AIX system’s root superuser has access to it, because it needs to be set up to host WPARs exclusively, not native applications.
Chapter 1. Introduction to AIX workload partitions 7

� System WPAR
This term refers to a more flexible WPAR-based instance of AIX. By default, it contains a mix of dedicated and shared file systems, and system service daemons.
� Application WPAR
This term refers to a WPAR that is set up to host only a single application or process. It provides an AIX runtime environment that is suitable for execution of one or more processes that can be started from a single command.
1.1.5 Global environment
WPARs are created within standard AIX 6.1 and AIX 7.1 instances. The global environment is the part of an AIX V6 instance that does not belong to any WPAR. The global environment is therefore similar to the operating system environment of earlier versions of AIX. This global environment can be hosted within a dedicated LPAR or a micropartition.
The global environment usually owns all physical or virtual resources of the LPAR: network adapters, disk adapters, disks, processors, and memory. It allocates CPU and memory resources to the WPARs, and it provides them access to the network and storage devices.
The global environment has visibility into the WPARs, and most performance monitoring and tuning activities are performed from this environment. A system administrator can log into the global environment directly or via IBM Systems Director to create, activate, and manage WPARs. WPARs cannot be created within other WPARs. It is possible from the global environment to see (and control) the processes that are executing within the WPARs, and to see the file systems that are used by the WPARs.
1.1.6 System WPAR
A system WPAR is similar to a typical AIX environment. Each system WPAR has dedicated writable file systems, although it can share the global environment /usr and /opt file systems in read-only mode. When a system WPAR is started, an init process is created for it, which in turn spawns other processes and daemons. For example, a system WPAR contains an inetd daemon to allow complete networking capacity, making it possible to remotely log in to a system WPAR. It also runs a cron daemon, so that the execution of processes can be scheduled.
1.1.7 Application WPAR
If an application or group of applications can be started with one command in the AIX command-line interface, it is a candidate to be hosted by an application WPAR. Using application WPARs is a quick way to use the isolation, resource control, and checkpoint features of WPARs for hosting virtually any application or process.
Note the following points:
� An application WPAR shares the file system of the global environment. It does not own any dedicated storage.
� An application WPAR can run daemons, but it will not run any of the system service daemons, such as inetd, cron, or srcmstr.
Important: For this reason, make sure that no user accounts other than the system superuser have access to the global environment.
8 Exploiting IBM AIX Workload Partitions

It is not possible to remotely log in to an application partition or remotely execute an action into an application WPAR.
1.2 AIX 7 and POWER7 features
With AIX 7 and the new Power7 hardware, several new features were integrated in AIX WPAR:
� rootvg WPAR� Storage area network (SAN) mobility� Fibre Channel (FC) adapters support� Versioned Workload Partition (only on IBM Power7 systems)
With rootvg support and FC adapters support, it is possible to add and remove storage and FC adapters from an existing WPAR. With SAN mobility and IBM Systems Director, you have an alternative for WPAR mobility with Network File System (NFS). Refer to Figure 1-5.
Figure 1-5 New features with AIX 6.1 TL2
A second enhancement is the capability to run an AIX 5.2 machine inside a WPAR on your AIX 7.1 global environment. This enhancement permits you to virtualize an AIX 5.2 system.
You can obtain more details about the new WPARs features in Chapter 2, “Overview of the latest enhancements” on page 19.
SAN mobility and rootvg WPAR: The rootvg WPAR and SAN mobility were introduced in AIX 6.1 Technology Level (TL) 4.
SharedPool
CPU
CPU
CPU
CPU
CPU
CPU
CPU
CPU
Virtual I/O Server
vEvS
MEM
MEM
MEM
MEM
MEM
vEvS
MEM
MEM
WPAR
WPAR
WPAR
vS
vE
Database
Accounting
WebLinuxLPAR
AIX 6.1
LPAR
vS
vE
vS
vE
MEMEthernetSAN
HYPERVISOR
Chapter 1. Introduction to AIX workload partitions 9

1.3 WPAR isolation and security
Even though WPARs all run under the same operating system image, much care has been taken to ensure that applications running within WPARs are isolated from one another. In fact, the features, which are provided with WPARs, support levels of isolation that approach the levels of applications that are run in separate LPARs.
We summarize these isolation features, as they relate to processes, users, and resources, in the following sections.
1.3.1 Processes
Great effort has been taken to ensure that processes running in separate WPARs cannot affect one another. To start with, a process running inside a WPAR can only see other processes in the WPAR; processes running in other WPARs or the global environment are invisible to it. Signals and other interprocess communications are only possible between processes within the same WPAR.
In addition, such processes can only access resources that are explicitly available inside the WPAR (file systems mounted by the WPAR, network interfaces bound to the WPAR, and so on). All resources bound to a WPAR are tagged with the WPAR’s ID so that no other WPAR can access them.
1.3.2 Users
Application WPARs inherit their user profiles from the global environment, so that they will have the same set of users, with the same privileges, as the global environment.
System WPARs each maintain a totally independent set of users, complete with potentially unique or overlapping logins and security attributes. They do not inherit any users from the global environment. This separation is done to make sure that each system WPAR behaves as if it is a unique AIX instance.
1.3.3 Resources
In general, resources created or owned by the global environment can only be used by the global environment unless they are explicitly shared with a WPAR. Resources created or owned by a WPAR are visible only to that WPAR and the global environment.
To facilitate the isolation of file systems between system WPARs, a separate directory tree under the /wpars directory is created for each WPAR (for example, /wpars/wpar1 or /wpars/wpar2). Inside this directory, each WPAR maintains its own home, tmp, and var directories. A system WPAR will also mount normally the global environment’s /opt and /usr file systems as read only, as seen in Figure 1-6 on page 11.
10 Exploiting IBM AIX Workload Partitions

Figure 1-6 System WPAR’s file systems related to the global environment
It is possible to have a system WPAR with its own /usr and /opt, too. Application WPARs do not create their own file systems, so they are usually allowed access to the file systems of the global environment, as seen in Figure 1-7.
Figure 1-7 Application WPAR file system relationship with the global environment
Each system WPAR can potentially be assigned its own network address, and applications running inside can only bind to the network address that is assigned to their WPAR. Communications between WPARs running under the same AIX instance are generally routed via the loopback interface by default. However, the administrator can optionally force traffic
System WPAR skippy
/opt /proc /usr / /tmp /var /home
/opt /proc /usr / /tmp /var /home /wpars/skippy
MPIODisk
VSCSIVSCSI
Global Environment sydney
Application WPAR
/opt /proc /usr / /tmp /var /home
/opt /proc /usr / /tmp /var /home
MPIODisk
VSCSIVSCSI
Global Environment sydney
Chapter 1. Introduction to AIX workload partitions 11

between selected WPARs to flow outside the system for network isolation reasons (for example, to monitor traffic levels for individual WPARs or to force all traffic through a firewall).
1.4 Live Application Mobility
Both types of WPARs, the system WPAR and the application WPAR, are capable of being configured to support mobility or relocation.
The capability to move one WPAR from one LPAR to another, possibly from one physical system to another, can be executed on active partitions. In this case, the application undergoes active relocation (it is hot-migrated) without stopping the application (Figure 1-8 on page 13). The only visible effect for a user of the application is a slightly longer response time while the application is migrating. WPAR mobility uses checkpoint and restart features to move WPARs. The checkpoint saves the current status of the application and then restarts it on a new system or OS instance at the previously saved state.
The premise allows for planned migrations of workloads from one system to another so that the application is uninterrupted, for example, during hardware maintenance or a firmware installation on the server. The workload does not need to be aware of the migration. But ensure that proper planning and testing are always done before moving anything into a production environment.
Distinction: In 2007, IBM System p6 and AIX 6 have two features that seem similar, but differ: WPAR mobility and Live Partition Mobility:
� WPAR mobility, which is discussed in this book, is a feature of AIX 6 and IBM Systems Director. It is available on POWER4, POWER5, and POWER6 systems.
� Live Partition Mobility relies on the POWER6 hardware and hypervisor technology (Advance Power Virtualization). It is available on POWER6 systems only. This feature is also available to AIX 5.3 LPARs.
Important: Partition mobility is not a replacement for a high availability (HA) solution.
12 Exploiting IBM AIX Workload Partitions

Figure 1-8 WPAR migration
Figure 1-8 depicts the use of WPAR relocation for workload balancing where two applications are moved between two servers to balance the load of these servers. This figure also introduces the concept of Workload Partition Manager, which is described in Chapter 4, “Configuring and using the IBM PowerVM Workload Partition Manager” on page 43.
1.5 When to use WPARs
WPARs offer new possibilities for managing AIX environments. They complement other virtualization solutions that are available for IBM Power Systems platforms. The following scenarios show the benefit of using WPARs.
1.5.1 Simplifying operating system and application management
WPAR technology can help system administrators simplify the way that they maintain operating systems and application software stacks.
For a long time, the traditional approach to application deployment has been to dedicate one server to one application. With the advent of virtualization and partitioning technologies, it has been possible to host multiple applications within partitions of a physical server. But this solution still implies that the system administrator needs to maintain one operating system instance for each application.
WPAR technology allows the system administrator to share an AIX instance between multiple applications, while still running each application within its own environment, providing operating system-level isolation between applications. In this case, the more applications that are consolidated within one AIX instance, the less the system administrator has to perform
Compatibility: WPAR mobility is a software solution that depends on AIX 6 or higher for execution. When used for the migration of a WPAR from one LPAR to another or between physical systems, hardware and software compatibility is required.
AIX #1
WorkloadPartitionApp Srv
WorkloadPartitionE-mail
WorkloadPartition
Dev
WorkloadPartition
Web
AIX #2
WorkloadPartition
QA
WorkloadPartition
Data Mining
WorkloadPartitionBilling
Workload PartitionsManager
Policy
Chapter 1. Introduction to AIX workload partitions 13

operating system fix applications, backups, migration, and other operating system maintenance tasks. Additionally, memory utilization is optimized because only one running operating system image needs to be resident in memory. However, note that this type of consolidation requires that all applications can run under the same version and maintenance level of the operating system.
In addition to sharing the operating system, the system administrator can take advantage of the WPAR technology to share application code. In a traditional AIX environment, if several Apache Web servers are needed, they each need to be deployed in a dedicated server or LPAR.
In a WPAR environment, it is possible to install Apache in one LPAR and then execute multiple instances of the Apache server within this LPAR, by starting multiple WPARs. Each WPAR runs its own Apache server with its own data in dedicated disk space, but it shares the Apache code with all other WPARs. This type of configuration optimizes memory utilization by eliminating the duplication of code. It also reduces the administrative maintenance of the Apache code, which only needs to be updated once for all server instances.
1.5.2 Protection of existing hardware investment
Although clients using POWER4 IBM pSeries® servers cannot take advantage of physical or hypervisor-based virtualization technology, the WPAR technology relies only on IBM AIX 6.1 and 7.1 with no dependency on the underlying hardware. It can be used on POWER4, POWER5, POWER6, and POWER7-based servers. Clients having many applications, each running a dedicated POWER-based server or dedicated partition and requiring only a fraction of the available processing power, can, thanks to the WPAR technology, consolidate these applications within one LPAR. Each application can be executed within one WPAR, providing a dedicated environment that is isolated from the other applications’ environments, while all WPARs share the physical resource of one LPAR.
1.5.3 Optimization of resource usage
The IBM Power Systems family offers many ways to optimize resource utilization through virtualization technologies, such as LPARs, dynamic LPARs, micropartitions, and other features, such as VIOS and virtual Ethernet and Virtual Small Computer System Interface (SCSI). The WPAR technology complements the existing solution offerings because of its unique characteristics.
The WPAR technology gives you additional flexibility in system capacity planning as part of a strategy for maximizing system utilization and provisioning efficiency. Due to the static allocation of partitions in physical servers, in a typical IT environment, each server is sized with spare capacity to allow for the resource consumption increase of all applications executing within this server. Thanks to the mobility feature of WPARs, the server sizing and planning can be based on the overall resources of a group of servers, rather than being performed server per server. It is possible to allocate applications to one server up to 100% of its resources. When an application grows and requires resources that can no longer be provided by the server, the application can be moved to another server with spare capacity.
The same mobility feature, combined with the policy-based relocation functions of the WPAR Manager, allows you to size a set of servers to handle the peak load, based on the overall resource capacity of the set of servers, and not for each server. In a classical environment, each server must be able to support the peak load of all partitions hosted within that server. Thanks to the WPAR mobility, it is possible to take advantage of free resources in one physical server to offload another physical server hosting applications that require more resources than are locally available.
14 Exploiting IBM AIX Workload Partitions

AIX 6.1 and 7.1 provide highly granulated control of CPU and memory resource allocation to WPARs (down to 0.01% increments). This technology is therefore suitable for server consolidation of extremely small workloads. This technology can be particularly interesting for the replacement of old servers, for which even 10% of one POWER5, POWER6, or POWER7 processor (the smallest micropartition) exceeds the application needs.
The theoretical upper limit on the number of WPARs that can be executed within one LPAR is 8,192. In actual practice, your application environment will probably require far less than 8,192 WPARs running within a single LPAR. And in practice, we expect that you will encounter other AIX system limitations preventing you from actually approaching this theoretical limit.
1.5.4 Running old AIX in new AIX
With a Versioned WPAR, it is now possible to run an AIX 5.2 TL10 Service Pack (SP) 08 application environment inside a WPAR. Your global environment will be AIX 7.1, and your WPAR will be AIX 5.2. So, it is possible to virtualize and consolidate your old hardware and AIX. You can obtain more details in Chapter 14, “Versioned workload partitions” on page 321.
1.5.5 Highly granular control of resource allocation
When multiple applications execute within the same AIX instance, the system administrator might want to control the amount of CPU and memory resources used by each application. One way to perform this control is to set up the Workload Manager (WLM) functions, which are part of the standard AIX features.
The WPAR technology provides a new way to perform this resource control. The WPAR resource control reuses the WLM technology, but it encapsulates it in a way that WLM is invisible to the system administrator. There is no need for the system administrator to know about WLM. The resource control is available through options of the WPAR command line and System Management Interface Tool (SMIT) interfaces.
The WPAR resource control feature allows the system administrator to arbitrate between applications competing for system resources. This feature guarantees that each application receives a share of the CPU and memory resource available from the global environment. These resources are separate from the requirements of the other applications executing in WPARs within the same operating system instance.
1.5.6 Control of security and privilege command
In large AIX environments, where a partition hosts many applications, it is not unusual to have multiple people acting as system administrators. However, all of them might not need root or superuser privileges in all domains of system administration. These people can be specialized for activities, such as user administration, network control, storage control, or software maintenance.
The WPAR technology supports this specialization of roles and can help restrict the privileges given to one person to just the scope that person needs to control. System WPARs have their
Factors that influence the number of WPARs: In practice, the number of WPARs, which can be created and made active in an LPAR, depends upon the capacity of the system, the configuration of the WPARs, and the characteristics of the applications being run in those WPARs.
Chapter 1. Introduction to AIX workload partitions 15

own user set, independent from the user set that is defined at the global environment level. An individual, who uses root within a system WPAR, only has superuser privileges for the resources that are visible within this WPAR. This user cannot control global environment resources, such as network adapter or physical devices, and cannot act on resources belonging to other WPARs. Many applications need the application administrator to use the root user to control the application, even if this person does not need to manage the operating system. The WPAR technology allows you to delegate the superuser privileges to one individual and limit them to an application environment without jeopardizing the global environment.
The separation of user sets (or security domains) between separate system WPARs also enables the system administrators to isolate groups of users logging on in AIX environments according to their application access control requirements. Users defined in one system WPAR are unaware of the applications executing in the global environment or in other WPARs. They cannot see the list of users or processes outside their WPAR.
IBM AIX Version 6.1 provides improvement over the previous AIX 5L Version 5.3 for role-based control of user privileges. This feature is known as Role-Based Access Control (RBAC). An exhaustive description of these new features is available in AIX V6 Advanced Security Features Introduction and Configuration, SG24-7430, and in 7.13.1, “Enhanced and existing role-based access control (RBAC)” on page 128.
WPAR integrates the use of RBAC features for controlling privileges. A default RBAC setting is provided with each WPAR, but the system administrator can also further customize the RBAC configuration that is used in a WPAR context.
1.5.7 Virtualization capacity licensing
Virtualization or sub-capacity licensing allows organizations to license a Processor Value Unit or PVU-based software application for less than the complete processor core capacity of the server, when the application is deployed in an eligible virtualization environment. With full capacity licensing, clients are required to obtain PVU license entitlements for all activated processor cores in the server, regardless of how the software was deployed.
The IBM Passport Advantage Virtualization Capacity Licensing offering provides the following benefits:
� It enables clients to use server virtualization to more effectively consolidate their infrastructure and reduce their overall total cost of ownership (TCO).
� It allows for flexible software licensing using advanced virtualization capabilities, such as shared processor pools, micropartitioning, virtual machines, and dynamic reallocation of resources.
� It provides growing clients the flexibility to choose how to add workload environments without having to compromise between hardware design, procurement, and software licensing.
� It offers the flexibility to use the IBM PVU pricing metric that, unlike per-socket pricing or fractional core pricing, strikes the balance between simplicity and granularity in aligning computing capacity with client value.
Licensing: To be eligible for Virtualization capacity (sub-capacity) licensing, clients must agree to the terms of the International Passport Advantage® Agreement (IPAA) attachment for virtualization capacity licensing terms and conditions:
http://www-01.ibm.com/software/lotus/passportadvantage/
16 Exploiting IBM AIX Workload Partitions

� It enables clients to license software for only the processor core capacity that is available to the partition that hosts the IBM software.
� It also provides a tool, the IBM License Metric Tool, which allows the client to track and manage the processor core capacity that is available to IBM PVU-based applications. You can obtain details of the IBM License Metric Tool at this website:
http://www.ibm.com/software/tivoli/products/license-metric-tool/
There are conditions and guidelines around the use of virtualization capacity license counting rules and counting scenarios, which are intended to assist clients in determining the correct number of processor cores required to be licensed. You can obtain the virtualization counting rules for an IBM Power Systems virtualization environment at this website:
http://tinyurl.com/VCL-for-WPARs
1.5.8 Easily clone application environments
With WPARs, it is simple to quickly provision application environments for development, test, or production use.
Prior to AIX6, when an administrator is asked to provision a new server, the administrator normally needs to create a new LPAR, install AIX into it via a boot image, install any fix packs or environment customizations, and finally install any needed applications before the server can be made available. WPAR technology allows the administrator to quickly provision a WPAR for immediate use within minutes. The newly provisioned WPAR inherits the latest fix packs, customizations, and applications installed in the global environment by the administrator.
WPAR configuration information can be stored in ASCII text files. These specification files can be generated by the operating system from pre-existing WPARs and can be edited, created, or modified manually. In an environment where a system administrator has to manage several application environments, the WPAR technology can help the system administrator quickly clone and define new application environments. These specification files can be used as input to WPAR creation commands, allowing the system administrator to automate, through scripts and programs, the start-up and handling of multiple WPARs. These techniques also facilitate rapid recovery from situations where system users have destabilized their environments beyond the practical point of repair. If the WPAR has a recent checkpoint available, you typically can reload the checkpoint and resume work with little impact. Otherwise, an identical working environment can quickly be created based on the specification files of the original WPAR.
1.5.9 Business continuity: Disaster or failure recovery solution
The WPAR technology can be integrated as one element of a solution to provide a business continuity plan.
The checkpointing feature of WPAR allows you to capture a snapshot of an executing application without having to instrument the code. The application checkpoint image is then saved to a file that can be used later to resume the execution of an application. Combined with a backup of the application data, the WPAR checkpoint feature can provide an alternate disaster or failure recovery solution for applications that do not use other solutions, such as IBM PowerHA or server clusters.
Chapter 1. Introduction to AIX workload partitions 17

1.5.10 Using WPAR technology for high performance computing (HPC)
An application WPAR is a useful instrument for running small job applications in an HPC environment. With an application WPAR, it is possible to distribute an application in an HPC environment with software, such as LoadLeveler®. LoadLeveler integrates with AIX Workload Manager (WLM) to provide both resource specification on job start and resource utilization controls to prevent resource overuse by an errant application. With Live Application Mobility, you can migrate a running application from one server to another without interrupting it. So, it is possible to scale your HPC environment without any interruption.
1.5.11 Supporting “Green” computing strategies
Using WPAR relocation features for Live Application Mobility means that you have the flexibility to consolidate workloads during periods of low usage onto smaller numbers of operating server platforms. In this strategy, you still provide continuous application availability, but you do so using a smaller number of powered-up servers. As you approach normal high usage periods, you can then power up additional peak demand server resources and relocate cyclical workloads back to those machines during those peak demand periods. For example, if your data center peak workload periods are 12 hours per day, five days per week, peak load systems only need to be powered up approximately 35% of the time.
1.5.12 Improvement of service-level agreements (SLAs)
Hardware components of an IT infrastructure might need to undergo maintenance operations, requiring the component to be powered off. If an application is not part of a cluster of servers providing continuous availability, either for technical, organizational, or cost reasons, WPARs can help to reduce the application downtime. Using the Live Application Mobility feature and with the policy-based relocation, the applications that are executing on a physical server can be temporarily moved to another server without an application blackout period during the period of time required to perform the server physical maintenance operations.
The WPAR technology can also help in an environment where an application needs to be started often, on demand, and quickly. This function might apply, for example, in test environments where resources are too scarce to keep multiple applications executing concurrently when not in use. Using WPARs, many applications can be defined on a server, but not activated. Activation of the WPARs executing each of these applications can be performed only when needed for a test.
18 Exploiting IBM AIX Workload Partitions

Chapter 2. Overview of the latest enhancements
This chapter provides an overview of the latest features in AIX workload partitions (WPARs) and in WPAR Manager. This chapter also covers fundamental WPAR requirements.
This chapter contains the following topics:
� WPARs and logical partitions (LPAR) comparison� WPAR features added to AIX technology level releases� WPAR enhancements since AIX 6.1 TL2� IBM PowerHA support� IBM PowerVM Workload Partition Manager for AIX
2
© Copyright IBM Corp. 2011. All rights reserved. 19

2.1 WPARs and logical partitions (LPAR) comparison
WPARs are not a replacement for LPARs. These technologies are both key components of the IBM virtualization strategy. The technologies are complementary and can be used together to extend their individual value propositions. Both LPAR and WPAR technology, individually or combined, offer a broad range of virtualization capabilities.
WPARs and LPARs have separate characteristics and functionalities. Table 2-1 shows the differences between WPARs and LPARs.
Table 2-1 WPARs and LPARs differences
2.2 WPAR features added to AIX technology level releases
Multiple WPAR features have been added to AIX technology level (TL) releases. Table 2-2 on page 21 shows which of the features is provided in each TL. For a detailed list of features, refer to the TL release.
Workload partitions (WPARs)a
a. WPARs are not supported on thin servers (diskless and dataless systems that are not capable of booting and running without the assistance of servers on a network).
Logical partitions (LPARs)
Do not own the operating system kernel - shared or minimized operating system image
Owner of the operating system kernel - Completed, individual operating system image
Finer-grained resource management, per workload
Resource management per LPAR and Capacity on Demand (CoD)
Minimum memory: 64 MB Minimum memory: 512 MB
Lower administrative costs:� Single operating system to manage� Easy to create, remove, and configure� Integrated management tools
Operating System fault isolation and problem determination
Security isolation at software level provided by the operating system (AIX 6.1 or AIX 7.1)
Security isolation at hardware level provided by the Hypervisor
Cannot be a PowerHA or General Parallel File System (GPFS) cluster node
Can be part of PowerHA and/or GPFS cluster
Cannot be a Network File System (NFS) server Can be an NFS server
No kernel tuning availableb
b. WPARs kernel tuning must be performed in the AIX global environment. If multiple WPARs are hosted in the same global environment, all of them will be affected by changes made to tuning parameters. NFS tuning can be performed on a WPAR basis using the nfso command.
Kernel tuning available
Reference: For more information that is related to WPARs functionality and support, check the latest version of the WPAR manual for AIX 7.1, IBM Workload Partitions for AIX, at this website:
http://public.boulder.ibm.com/infocenter/aix/v7r1/index.jsp?topic=/com.ibm.aix.wpar/wpar-kickoff.html
20 Exploiting IBM AIX Workload Partitions

Table 2-2 AIX versions and WPAR features provided
2.3 WPAR enhancements since AIX 6.1 TL2
In this section, we describe the latest enhacements for WPARs.
2.3.1 Storage devices and storage adapter support
The support of devices in the WPAR is limited to fiber-attached storage devices (disks and tapes), Fibre Channel (FC) adapters (physical and virtual), and virtual Small Computer System Interface (vSCSI) disks.
Exporting an adapter to a WPAR also exports any child storage devices that are attached to it.
AIX version Feature
AIX 6.1 Base Level (GA) � Initial support, including mobility using synchronous checkpoint/restart
� First WPAR Manager release
AIX 6.1 TL1 NFS support for WPARsa
a. Support for NFS inside of a WPAR is only as a client.
AIX 6.1 TL2 � Asynchronous mobility� Per-WPAR routing� Name-mapped network interfaces� Network Installation Management
(NIM) support for WPARs
AIX 6.1 TL3 Storage disk device supportb
b. Allocating storage devices to WPARs that were created prior to AIX 6.1 TL3 is not supported.
AIX 6.1 TL4 � rootvg WPAR� Storage area network (SAN) mobility� WPAR Manager integration with IBM
Systems Director� VxFS support
AIX 6.1 TL5 WPAR Error Logging Framework Remote Supervisor Adapter (RAS)
AIX 6.1 TL6 � Virtual Small Computer System Interface (vSCSI) disk support
� WPAR migration to AIX 7.1c
c. Refer to Chapter 8, “Workload partition mobility and WPAR Manager” on page 145 for more information and requirements.
AIX 7.1 Base Level (GA) � Everything that is supported in AIX 6.1, plus:
� Fiber Channel (FC) adapter support� Versioned Workload Partitions running
AIX 5.2� Trusted Kernel Extension support
Important: Fiber Channel (FC) adapters can only be exported to WPARs running under AIX 7.1.
Chapter 2. Overview of the latest enhancements 21

The disk devices that are supported in a WPAR include any FC disk device that is supported by AIX 7.1, and uses the scsidisk device driver with the AIX MPIO (default PCM) multipath software, including the following disk devices:
� IBM System Storage DS3400� IBM System Storage DS4200� IBM System Storage DS4300 (FAStT600)� IBM System Storage DS4500 (FAStT900)� IBM System Storage DS4700� IBM System Storage DS4800� IBM System Storage DS5100� IBM System Storage DS5300� IBM XIV® Storage System
The tape drivers that are supported in a WPAR are any FC tape drivers that are supported by AIX 7.1 and use the sctape or atape device driver.
2.3.2 Versioned Workload Partitions
A new WPAR type has been introduced in AIX 7.1, the Versioned Workload Partition (VWPAR).
AIX 5.2 Workload Partitions for AIX 7 is a Licensed Program Product (LPP) that provides the ability to run an AIX 5.2 instance, as a WPAR, inside of the AIX 7.1 global environment on IBM POWER7 servers.
Conventional AIX 5.2 systems are not scalable, and usually have hardware and software limitations, which include these limitations:
� Running in old hardware (RS64, POWER3™, and POWER4)
� No shared processor or virtual processor
� Only support for dedicated adapters - no virtual device support
� No Virtual I/O Server (VIO) or Integrated Virtual Ethernet (IVE) support
� No Simultaneous Multi-Threading (SMT)
� No DVD or virtual optical devices
Converting an AIX 5.2 instance to a Versioned Workload Partition provides these benefits:
� Reduced electricity and cooling costs
� Freeing up rack and floor space by removing the old servers
� Reducing costs related to hardware maintenance for the AIX 5.2 servers
� Boosting performance with POWER7 processors, and reducing processor count to reduce software licenses
� Access to POWER7 and PowerVM features:
– Virtual I/O Server and its features (virtual disks, virtual networks)
– Four-way Simultaneous Multi-Threading (SMT4)
– Advanced Memory Extension (AME)
VWPAR: Versioned Workload Partition is only supported on IBM POWER7 servers.
22 Exploiting IBM AIX Workload Partitions

� WPARs only see file systems, enabling the use of new hardware through the AIX global environment:
– Serial-attached SCSI (SAS)/solid-state drive (SSD) disks
– 10 GB Ethernet adapters
– 8 GB Fibre Channel adapters
Consider the following information to plan for a Versioned Workload Partition environment:
� The AIX 5.2 supported level for the Versioned Workload Partition is the final service pack (SP) of the final Technology Level (TL) (TL10 SP8 or 5200-10-08).
� Applications that require direct communication adapters, or adapters that are no longer supported in AIX 7.1, are not good candidates to become a Versioned WPAR. These adapters include but are not limited to:
– Multiport async adapters
– X.25 adapters
– Token ring adapters
– Graphics adapters (as in a workstation environment)
� AIX 5.2 running as a Versioned Workload Partition cannot be upgraded to a newer version
� Adapters cannot be exported to Versioned Workload Partitions
For detailed information about how to implement Versioned Workload Partitions, refer to Chapter 14, “Versioned workload partitions” on page 321.
2.3.3 Root volume group (rootvg) WPARs
A system WPAR that is configured with its own root volume group (rootvg) on one or more dedicated storage devices is called a rootvg WPAR. It was first introduced in AIX 6.1 TL4.
A configuration with a WPAR-owned root volume group helps to isolate the file systems and volume groups of the WPAR from the AIX global environment. In a rootvg WPAR, the WPAR owns all rootvg file systems (/, /tmp, /var, and /etc).
For more information related to rootvg WPARs, refer to Chapter 5, “Workload partition rootvg support” on page 91.
2.3.4 Live WPAR mobility with IBM Systems Director
Using IBM Systems Director together with the IBM PowerVM Workload Partition Manager for AIX enables WPAR mobility. WPAR mobility is the process of relocating a WPAR between two hosts or virtual servers running AIX Version 6.1 or later.
Two types of relocation are possible: live and static WPAR mobility.
Important: Hardware support is limited to the hardware that is provided by the global environment.
Important: AIX 5.2 images are not provided with the installable LPP; thus, a valid AIX 5.2 mksysb must be available.
Chapter 2. Overview of the latest enhancements 23

Live WPAR mobilityLive WPAR mobility is the process of relocating a WPAR while preserving the state of the application stack. During Live Application Mobility, WPARs are relocated from the source server to the target server with minimum application downtime and without losing active transactions.
Static WPAR mobilityStatic WPAR mobility is defined as a shutdown of the WPAR on the source node and the clean start of the WPAR on the target node while preserving the file system state. For system WPARs, static relocation uses the backup and restore capabilities.
WPAR mobility requires environment prerequisites, considerations, and configurations. For further information, refer to Chapter 8, “Workload partition mobility and WPAR Manager” on page 145.
2.3.5 Trusted Kernel Extensions in WPARs
Loading the Trusted Kernel Extensions into a WPAR provides the ability to applications that need it, to run inside a WPAR. Trusted Kernel Extensions are only supported in AIX 7.1, and they can be loaded into either a regular or Versioned WPAR.
Considerations when using Trusted Kernel Extensions in WPARs:
� WPARs with explicit Trusted Kernel Extensions cannot be relocated via live or static relocation.
� The WPAR Manager does not actually perform any loading of kernel extensions. It only provides the administrative support to specify which kernel extensions a WPAR can load.
It is also possible to load a private copy of a kernel extension to be used only by a WPAR. Thus, the WPAR can load and use a separate version of a kernel extension than what is loaded globally in the LPAR.
For more information about how to use this feature, refer to the IBM AIX Version 7.1 Differences Guide, SG24-7910, at this website:
http://www.redbooks.ibm.com/abstracts/sg247910.html?Open
2.4 IBM PowerHA support
WPAR is supported with the IBM PowerHA since Version 5.4.1. PowerHA provides capabilities to monitor and take care of the WPAR as a resource group (RG). PowerHA versions 6.1 and 7.1 also support Versioned Workload Partitions as resource groups (RGs).
The WPAR offering is supported with IBM PowerHA (formerly HACMP) 6.1 and 7.1. However, particularly in the planning phase, special care must be taken because the combination of WPARs and PowerHA in an environment has the potential to introduce new single points of failure (SPOFs) into the environment with the NFS server, the WPAR Manager, and the networks between these products and WPAR.
For more information related to PowerHA and WPARs, refer to Chapter 13, “Highly available workload partitions with PowerHA 7.1 and 6.1” on page 317.
24 Exploiting IBM AIX Workload Partitions

2.5 IBM PowerVM Workload Partition Manager for AIX
The IBM PowerVM Workload Partition Manager for AIX (WPAR Manager) is a plug-in for IBM Systems Director. It provides a centralized point of control for managing workload partitions (WPARs) across a collection of managed systems running AIX.
The WPAR Manager plug-in also provides complete life-cycle management support for WPARs (discover, create, modify, delete, and remove). A complete task history is available on every action performed on a WPAR, including standard output and error. Graphic reports that display resource usage and performance are provided for both managed systems and WPARs.
The WPAR Manager can manage heterogeneous environments of managed systems at various AIX technology levels. However, to use the full management capabilities, the WPAR Manager agent needs to be updated to the latest version.
The following features are supported on all AIX technology levels:
� Cross-system management of WPARs, including life-cycle management
� Global load balancing with application mobility
� Web-based administration of major WPAR operations and advanced management tasks
� Monitoring and reporting of WPAR performance metrics
� WPAR Manager command line
Since Version 2.1, the WPAR Manager requires IBM Systems Director 6.2. In addition, to fully integrate with the IBM Systems Director, the WPAR Manager provides new functionality that was not previously provided.
2.5.1 What is new in WPAR Manager V2.2.1
WPAR Manager v2.2.1 has significant changes, including the following new functionalities:
� Enablement to manage WPARs on AIX 6.1 TL6 (6100-06) and AIX 7.1
� Support for AIX 5.2 Workload Partitions for AIX 7.1
� Support for Controlled Kernel Extensions Enablement for WPARs on AIX 7.1
� Support for virtual SCSI (vSCSI) devices in a WPAR
� WPAR Manager command-line interface (CLI)
� Support for persistent WPAR definitions
PowerHA: PowerHA does not manage or monitor the WPAR. It only manages and monitors the applications that run in the WPAR.
Required: The WPAR Manager plug-in is mandatory for Live Application (WPAR) mobility operations.
Chapter 2. Overview of the latest enhancements 25

26 Exploiting IBM AIX Workload Partitions

Part 2 Installation and configuration
This part of the book contains details about the installation and configuration of IBM Systems Director and, in particular, information about how to configure the IBM PowerVM Workload Partition Manager.
Also, this part of the publication describes WPAR support on rootvg. It also covers storage adapters and device support for WPARs.
Part 2
© Copyright IBM Corp. 2011. All rights reserved. 27

28 Exploiting IBM AIX Workload Partitions

Chapter 3. Installing IBM Systems Director
This chapter provides the installation procedures to implement IBM Systems Director on AIX on a Power Systems server. You can then build onto this environment by installing the IBM PowerVM Workload Partition Manager for AIX (WPAR Manager) plug-in to provide a centralized, single point of administrative control for managing system and application AIX workload partitions (WPARs).
We describe the following topics in this chapter to help you deploy the IBM Systems Director server:
� Implementation environment� Preparing for the IBM Systems Director server installation� IBM Systems Director server installation� Importing the Common Agent package into the IBM Systems Director server � Installing the IBM PowerVM Workload Partition Manager for AIX� IBM Systems Director resources
3
Installation: For detailed instructions about planning and installation, refer to the IBM Systems Director for AIX Planning, Installation, and Configuration Guide, Version 6.2.1, GI11-8709-06.
© Copyright IBM Corp. 2011. All rights reserved. 29
3.1 Implementation environment
We set up a virtual server (logical partition (LPAR)) on an IBM POWER6 9117-MMA (570-170) Power Systems server for the IBM Systems Director server deployment. We have installed AIX 6.1 Technology Level (TL) 6, Service Pack (SP) 1 (6100-06-01-1043).
3.2 Preparing for the IBM Systems Director server installation
Before installing the IBM Systems Director server on AIX, check that the system meets the applicable hardware and software requirements. Next, we cover the hardware and software requirements for the IBM Systems Director server deployment on AIX environments.
3.2.1 Hardware requirements
IBM Systems Director server has certain hardware requirements. These requirements can vary depending on the size of your IBM Systems Director systems-management environment.
If you are interested in information about how to plan, implement, configure, and use an IBM Systems Director server to manage a large configuration with optimal performance, refer to the IBM Systems Director for AIX Planning, Installation, and Configuration Guide, Version 6.2.1, GI11-8709-06.
This section provides the recommended hardware requirements for running IBM Systems Director server on AIX. This information covers the supported IBM Power Systems, including IBM Power Blade servers.
Because the hardware requirements can vary depending on the size of the IBM Systems Director systems-managed environment, We provide three types of configurations with specific characteristics as a guideline:
� Small configuration:
– Fewer than 500 Common Agent-managed systems
– Uses Apache Derby as the database software
� Medium configuration:
– Between 500 and 1,000 Common Agent-managed systems
– Uses IBM DB2® as the database software
� Large configuration:
– Between 1,000 and 5,000 Common Agent-managed systems
– Uses IBM DB2 as the database software
When reviewing the installation recommendations, consider the following information:
� Installation and start-up times improve with faster disk access times. Small Computer System Interface (SCSI) adapters and 10K RPM drives provide the best performance.
� Disk sizes are arbitrary and indicative of disk requirements.
Common Agent: The Common Agent component is always installed with the IBM Systems Director server. Therefore, remember the Common Agent requirements whenever reviewing the IBM Systems Director server requirements.
30 Exploiting IBM AIX Workload Partitions

� The overall system performance depends on the nature of your requirements and system workload.
� The IBM DB2 database software sizing typically is comparable for Oracle and Microsoft SQL Server. The sizing presumes that DB2 is running on the same server as the IBM Systems Director server.
The following suggestions are based on a 64-bit Java virtual machine (JVM) running on a 64-bit version of AIX.
Table 3-1 includes the recommended hardware requirements for running IBM Systems Director server on AIX, based on the size of the environment to be managed.
Table 3-1 IBM Systems Director server recommended hardware requirements for AIX
The paging space needs to equal or exceed the physical memory size, with a minimum of 3 GB. Ensure that you always have a minimum of 6 GB of combined memory and paging space. Ensuring that this space exists is particularly critical if the physical memory is close to the 3 GB minimum requirement.
The installation/update script provided with the IBM Systems Director server 6.2.1 verifies if the free space on the file system is sufficient. If a file system has less free space than needed, the script tries to increase the file system size using deallocated disk space. If the script has increased the /tmp file system in size for temporary space requirements and it is a Journal File System 2 (JFS2) file system, the script tries to decrease the file system after the installation or update has been completed.
ConfigurationRecommended hardware requirements
Processor Memory Disk storage
Small 2 processors: POWER5, POWER6, or POWER7
For partitioned systems:Entitlement = 1Uncapped Virtual Processors = 4Weight = Default
3 GB 4 GB
Medium 2 processors: POWER5, POWER6, or POWER7
For partitioned systems:Entitlement = 1Uncapped Virtual Processors = 4Weight = Default
4 GB 8 GB
Large 2 processors: POWER5, POWER6, or POWER7
For partitioned systems:Entitlement = 1Uncapped Virtual Processors = 4Weight = Default
12 GB 16 GB
Chapter 3. Installing IBM Systems Director 31

Table 3-2 provides information about the disk storage requirements for installing the IBM Systems Director server. These requirements include the Common Agent and the Platform Agent. Both the Common Agent and the Platform Agent are installed with the IBM Systems Director server.
Table 3-2 Disk space requirements for installing the IBM Systems Director server
3.2.2 Software requirements
IBM Systems Director has specific requirements for operating systems and software. IBM Systems Director provides support for operating systems, database applications, virtualization software, web browsers, and screen readers.
The following list details the software requirements for installing IBM Systems Director server 6.2.1 on AIX:
� Operating system level must be AIX 5.3 TL09 or higher� OpenSSL and OpenSSH package:
– The openssl.base 0.9.8.4 (or higher) needs to be installed.– The openssh.base.server 4.5.0.5301 (or higher) needs to be installed.
File system Disk space required
/ 50 MB
/usr 200 MB
/var 512 MB
/tmp 200 MB
Note: This space is only required during the installation and is freed after the installation is complete.
/opt 4 GB
Disk space: The disk space requirements do not include the requirements for updating the IBM Systems Director server to later versions, or for downloading and staging updates (such as updates for AIX, Hardware Management Console (HMC), or system firmware updates) with Update Manager.
DVD install: This section covers the fresh install of the IBM Systems Director server 6.2.1 using the DVD media. Therefore, all the requirements apply to this installation option only. When updating an existing installation or installing from the web download installation package, the requirements can change.
32 Exploiting IBM AIX Workload Partitions

Note the following list of required filesets that are installed as part of the IBM Systems Director server installation:
� expect.base 5.42.1.0� tcl.base 8.4.7.0� tk.base 8.4.7.0
3.2.3 IBM Systems Director pre-installation utility
The IBM Systems Director pre-installation utility scans the local system to identify potential problems that might prevent the IBM Systems Director from installing successfully. The utility does not scan for device driver or firmware requirements.
The IBM Systems Director pre-installation utility is available on the IBM Systems Director installation media in the /checkds directory. Or, you can download the latest version of the utility from the IBM Systems Director download site:
http://www.ibm.com/systems/management/director/downloads
The IBM Systems Director pre-installation utility performs these checks:
� Runtime authentication� OS compatibility� Host architecture� Processors� Disk space available� Memory available� Software required� Port availability� Promotion validity� Migration information� Performance information� User name check� Remote Supervisor Adapter (RSA) check� Paging size check� File limit check (AIX only)� SELinux check (Linux only)� Intelligent Platform Management Interface (IPMI) check (Linux only)� Locale check (Linux only)� Short name (8.3 names) check (Windows only)
Openssl and openssh: There is a dependency between the openssl and openssh versions. If openssl is not installed, it is installed as part of the server or agent installation. However, if this install creates an inconsistency with the openssh version on the system, openssl is not installed and the installation fails.
If you want to run the Agent Installation Wizard from the server to install IBM Systems Director Common Agent for AIX, openssh is required. However, the server installation does not enforce the openssh installation.
In the ITSO lab, we have the following versions of openssl and openssh installed:
� openssl.base 0.9.8.1300 COMMITTED Open Secure Socket Layer� openssh.base.server 5.4.0.6100 COMMITTED Open Secure Shell Server
Chapter 3. Installing IBM Systems Director 33

The IBM Systems Director pre-installation utility generates reports and displays the results in the command window or the default browser. Refer to the readme.txt file in the /checkds directory on the installation media for more information about runtime options, the reports that are generated, and the return codes.
Example 3-1 shows the results from running the checkds.sh IBM Systems Director pre-installation utility.
Example 3-1 Results from the checkds.sh IBM Systems Director pre-installation utility
root@wparmgr /kits/checkds #root@wparmgr /kits/checkds #root@wparmgr /kits/checkds # ./checkds.shJava: /kits/checkds/jvm/aix/bin/javaStarting IBM Systems Director Pre-Installation Utility...Finished analysing systemCreating reports...Install Readiness Text report being written to /tmp/checkds/reports/checkDS_Text_04142011_173333.txtInstall Readiness Error Text report being written to /tmp/checkds/reports/checkDS_Error.txtInstall Readiness Detailed HTML report being written to /tmp/checkds/reports/checkDS_Detailed_04142011_173333.htmlInstall Readiness Summary HTML report being written to /tmp/checkds/reports/checkDS_Summary_04142011_173334.htmlUnable to launch the default browser, please view the text or summary HTML report manually.
Your system is currently showing warnings for 2 of 12 checks.
WARN Check 11: Paging Size Check2.00GB available on system3.00GB required
WARN Check 12 File Size Limit CheckFile size limit of [2097151] is not large enough.File size limit must be at least 4194302.
Overall Report Return Code: 44root@wparmgr /kits/checkds #
3.3 IBM Systems Director server installation
After preparing your system, you can install the IBM Systems Director server on AIX by downloading the AIX installation file or using the IBM Systems Director for AIX, V6.2.1 DVD. We used the IBM Systems Director for AIX, V6.2.1 DVD media to perform the installation in the ITSO lab.
Download: To obtain an image of the IBM Systems Director for AIX, V6.2.1 DVD, download the SysDir6_2_1_DVD_AIX.iso file from the IBM Systems Director download website:
http://www.ibm.com/systems/management/director/downloads
34 Exploiting IBM AIX Workload Partitions

Important considerationsConsider the following information during the IBM Systems Director installation:
� The IBM Systems Director installation media for 6.2 is refreshed to include the updates for 6.2.1. When running the installation from the refreshed installation media, the 6.2.1 updates are automatically included as part of the installation. The updates for 6.2.1 are found in the \update directory on the installation media.
� The installation of the IBM Systems Director installs the IBM Systems Director server, the Common Agent, and the Platform Agent all together. Therefore, it is not necessary to separately install the Common Agent or the Platform Agent on the management server after installing the IBM Systems Director server.
� Common Agent and Platform Agent are now shipped as part of the AIX operating system.
� Installing the IBM Systems Director server 6.2.1 on an AIX system on which the agent is already installed will update the agent to the 6.2.1 level, if it is not already at this level.
� By default, the Common Agent is started when your system is rebooted.
� The IBM Systems Director server is not supported to run in a system WPAR on an AIX system.
Installing the IBM Systems Director server 6.2.1 using the dirinstall.server script is the only supported method. The Network Installation Manager (NIM) is not supported for installing the IBM Systems Director server.
To install the IBM Systems Director server, log in as the root user.
Perform these steps:
1. To start the installation from the IBM Systems Director for AIX, V6.2.1 DVD, complete the following steps:
a. Insert the DVD into the DVD-ROM drive.
b. If the DVD does not auto-mount, type the following command and press Enter:
mount -v cdrfs -o ro /dev /mnt
Where dev is the specific device file for the block device and mnt is the mount point of the drive.
c. To change to the directory in which the installation script is located, type the following command and press Enter:
cd /dvd_mnt/server/
Where dvd_mnt is the mount point of the DVD media.
2. Optional: To customize the installation, for example to select a non-default database, copy the response file (dirserv.rsp) to a local directory and modify the installation settings in your local copy:
a. Type the following command and press Enter:
cp dirserv.rsp /directory/
English language only: The IBM Systems Director server and the Common Agent installation packages for AIX are provided in English only.
Tip: You can find the installation logs for this process in /var/log/dirinst.log and /opt/ibm/director/log/installFeatures_date.log.
Chapter 3. Installing IBM Systems Director 35

Where directory is a local directory.
b. Open an ASCII text editor and modify the installation settings in the copy of the dirserv.rsp file. This file is fully commented.
You can specify the following items in the server response file:
• Specify the log file options• Specify the Web console port numbers• Specify the Tivoli Provisioning Manager host name and IP address• Specify the migration options• Enable or disable the nonstop service, which keeps the server continuously running• Specify a separate database• Specify a separate location from where to install updates
Notes:
• In the response file, "1" indicates that an item is to be installed and "0" indicates that an item is not to be installed.
• If you want to use the default for any value in the response file, comment out that value with a pound symbol (#) symbol at the beginning of the line instead of leaving the value blank.
• If you need to enter any Windows-based locations, ensure that you include the back slash after the drive_letter:, for example, use C:\foldername instead of C:foldername.
c. Save the modified response file with a new name.
3. Tip: To install the IBM Systems Director server, from within the directory in which the installation script is located (Example 3-2), type one of the following commands and press Enter:
– To accept the default settings, type:
./dirinstall.server
– To use the response file, type:
./dirinstall.server -r /directory/response.rsp
Where directory is the local directory to which you copied the response file, and response.rsp is the name of the response file.
Example 3-2 Start the installation of IBM Systems Director server using the dirinstall.server script
root@wparmgr /cdrom/server # ./dirinst.serverFilesystem size changed to 3407872+===========================================================================+Notice: image DirectorServer6.2.0.0a is being used in this installationinstead of DirectorServer+===========================================================================+################################################################################Start of product installation on Wed Mar 23 16:49:35 EDT 2011
Hint: After the installation, keep the response file for future use and reference.
Process length: The installation and update process can take up to one hour, depending on the hardware configuration.
36 Exploiting IBM AIX Workload Partitions

################################################################################AgentPort variable was not specified.AgentNonStopPort1 variable was not specified.AgentNonStopPort2 variable was not specified.PortNumber variable was not specified. Using 8421.SecurePortNumber variable was not specified. Using 8422.EnableNonStop variable was not specified. Using 0.MIGRATE_DATA variable was not specified. Using 1. This variable is only for migration.RETAIN_SAVED_DATA variable was not specified. Using 1. This variable is only for migration.SAVED_DATA_PATH variable was not specified. Using /var/tmp/director_save_620. This variable is only for migration.UPDATES_PATH variable value is: /cdrom/server/../update. This variable is only for merge.
+===========================================================================+Notice: image DirectorServer6.2.0.0a is being used in this installationinstead of DirectorServer+===========================================================================+Filesystem size changed to 4718592Attempting to install sysmgt.cimserver.pegasus+-----------------------------------------------------------------------------+ Pre-installation Verification...+-----------------------------------------------------------------------------+Verifying selections...doneVerifying requisites...doneResults...
SUCCESSES--------- Filesets listed in this section passed pre-installation verification and will be installed.
Selected Filesets ----------------- sysmgt.cimserver.pegasus.rte 2.9.1.0 # Pegasus CIM Server Runtime E...
..... (content omitted ....)
+-----------------------------------------------------------------------------+
Installation Summary--------------------Name Level Part Event Result-------------------------------------------------------------------------------DirectorServer 6.2.0.0 USR APPLY SUCCESSDirectorServer 6.2.0.0 ROOT APPLY SUCCESSCopying agent packages.This installation log file can be found in /var/log/dirinst.log.Installation of IBM Systems Director Server completed successfully.
Chapter 3. Installing IBM Systems Director 37

4. Complete the following steps to start the IBM Systems Director server:
a. To configure the agent manager that the server uses to manage Common Agent resources, type the following command and press Enter:
install_root/bin/configAgtMgr.sh
Where install_root is where IBM Systems Director server was installed. The default install path is /opt/ibm/director.
After you have provided all the requested information, the configuration of the embedded agent manager (if chosen) and the registration of the IBM Systems Director server as the resource manager with the embedded or existing agent manager begin. The agent manager configuration script runs and displays a series of status messages.
b. If it is not already started, start the IBM Systems Director processes on the management server by running the smstart command:
install_root/bin/smstart
c. To view the IBM Systems Director server status, type the following command and press Enter:
install_root/bin/smstatus -r
When this command returns a value of Active, the server is started.
5. Complete the following steps to unmount the drive and remove the DVD:
a. Type cd / and press Enter.
b. Type the following command and press Enter:
umount /mnt
Where mnt is the mount point of the drive.
c. Remove the DVD from the drive.
If you have not already merged and installed the updates as part of the installation, you can use update manager to update to the latest version of IBM Systems Director.
3.4 Importing the Common Agent package into the IBM Systems Director server
Most of the advanced management features that are provided by the IBM Systems Director require the Common Agent component to be installed on the managed systems. This component is also a requirement for WPAR Manager to manage AIX WPARs on the managed AIX systems. This integration is supported by the WPAR Manager subagent, which must be installed on the AIX server on top of the Common Agent to extend the functionality.
The Common Agent component can be installed manually or deployed on the managed systems using the Release Management features. To deploy the Common Agent component using Release Management, the Common Agent package must be imported to the IBM Systems Director server.
To import the Common Agent package for AIX to the IBM Systems Director server, complete the following steps:
Tip: You can use Ctrl+C to exit from smstatus -r if necessary. Ctrl+C causes the smstatus command to end.
38 Exploiting IBM AIX Workload Partitions

1. If the DVD media is not already mounted, insert the DVD into the DVD-ROM drive. Complete these tasks:
a. If the DVD does not auto-mount, type the following command and press Enter:
mount -v cdrfs -o ro /dev /mnt
Where dev is the specific device file for the block device and mnt is the mount point of the drive.
b. In the IBM Systems Director Web interface, go to Release Management Agents and click Import Agent.
c. Enter the directory path that contains the agent package that you want to import and click OK. After a successful import, the 6.2.1 packages will appear in the IBM Systems Director Web interface and will be ready for distribution.
2. Complete the following steps to unmount the drive and remove the DVD:
a. Type cd / and press Enter.
b. Type the following command and press Enter:
umount /mnt
Where mnt is the mount point of the drive.
c. Remove the DVD from the drive.
3.5 Installing the IBM PowerVM Workload Partition Manager for AIX
The IBM PowerVM Workload Partition Manager for AIX (WPAR Manager) is a separate installable plug-in that you can download from the IBM Systems Director plug-ins download website:
http://www-03.ibm.com/systems/software/director/downloads/plugins.html
You can install the WPAR Manager to manage the complete life cycle of AIX workload partitions (WPARs) across a collection of managed systems running AIX 6 and AIX 7. WPAR Manager also provides advanced capabilities, such as Live Application Mobility and a policy-based relocation engine, to automate the relocation of WPARs based on system utilization.
The WPAR Manager plug-in is supported on an IBM Systems Director server running on AIX, Windows, or Linux. The WPAR Manager agent can be installed on AIX 6.1 with TL03, or later.
Note that there are memory and disk requirements for the components of the WPAR Manager.
Table 3-3 on page 40 shows the typical memory requirements for WPAR Manager when it is idle. These requirements do not include any additional memory requirements for other software that is running on your system.
Locations: The SysDir6_2_1_Common_Agent_platform.jar files are provided in the /agent subdirectory of the DVD media. The IBM Systems Director Common Agent for AIX is located in the /agent/common/aix/6.2.1 subdirectory of the DVD media.
Chapter 3. Installing IBM Systems Director 39

Table 3-3 WPAR Manager memory and disk space requirements
You must install the WPAR Manager on the same system on which the IBM Systems Director server is installed.
PrerequisitesEnsure that you have the authority to complete the installation:
� For Windows, administrator authority is required.� For AIX or Linux, root authority is required.
Complete the following steps to install WPAR Manager as an IBM Systems Director advanced manager:
1. Log in to the system with the required authority level.
2. If you are installing from media, insert the media containing WPAR Manager into the media drive. If installing from a download, copy the installer to the target system.
3. Copy the platform-specific product archive into a local directory.
4. To unzip and extract the contents of the installation package, type the following command:
gzip -cd <package_name> | tar -xvf -
Where <package_name> is the file name of the WPAR Manager package. This action creates a platform-specific subdirectory.
5. Use cd to change to the platform subdirectory.
6. Optional: To customize the installation, for example to select silent installation, open an ASCII text editor and modify the installation settings in the installer.properties file. This response file is used to specify install options when performing a silent install of WPAR Manager and is fully commented.
Modify the installer properties:
– INSTALLER_UI=silent– LICENSE_ACCEPTED=true– RESTART_DIRECTOR=true
7. Start the installation by running the following command to install WPAR Manager from the directory that contains the installer (Example 3-3):
– For AIX or Linux: ./WparMgrSetup.bin– For Windows: WparMgrSetup.exe
Example 3-3 Installing WPAR Manager plug-in to IBM Systems Director
root@wparmgr /kits/wpm2.2.1/AIX #root@wparmgr /kits/wpm2.2.1/AIX #
Application Memory requirement Disk space requirement
WPAR Manager 125 MB � / , 5 MB� /var, minimum 180 MB� /opt, 15 MB
WPAR Agent 45 MB when idle /var, 1 MB
Media: If you are using AIX or Linux, you can mount the media drive using the following command (where /mnt is the mount point for your media drive):
/usr/sbin/mount -v cdrfs -p -r /dev/cd0 /mnt
40 Exploiting IBM AIX Workload Partitions

root@wparmgr /kits/wpm2.2.1/AIX # ls -latotal 198056dr-xr-xr-x 3 root system 256 Sep 2 2010 .drwxr-xr-x 3 root system 256 Apr 18 11:52 ..-r-x------ 1 root system 101394451 Sep 2 2010 WparMgrSetup.bin-rw-r--r-- 1 root system 2145 Sep 2 2010 installer.propertiesdr-xr-xr-x 2 root system 4096 Sep 2 2010 licenseroot@wparmgr /kits/wpm2.2.1/AIX #root@wparmgr /kits/wpm2.2.1/AIX # ./WparMgrSetup.binUnpacking the JRE...Extracting the installation resources from the installer archive...Configuring the installer for this system’s environment...
Launching installer...
Preparing SILENT Mode Installation...
==============================================================================IBM PowerVM Workload Partitions Manager for AIX (created with InstallAnywhere)------------------------------------------------------------------------------
==============================================================================Installing...-------------
[==================|==================|==================|==================][------------------|------------------|------------------|------------------]
Installation Complete.root@wparmgr /kits/wpm2.2.1/AIX #
3.6 IBM Systems Director resources
The following sections contain links for additional information about IBM Systems Director.
3.6.1 IBM Systems Director home page
Refer to the IBM Systems Director website for links to various resources available for IBM Systems Director:
http://www-03.ibm.com/systems/software/director/
3.6.2 IBM Systems Director downloads
Refer to the following website for links to IBM Systems Director downloads:
http://www-03.ibm.com/systems/software/director/downloads/index.html
Chapter 3. Installing IBM Systems Director 41

3.6.3 IBM Systems Director documentation and other resources
Refer to the following website for links to product documentation, IBM Redbooks publications, white papers, and learning modules related to IBM Systems Director and IBM Systems Director plug-ins:
http://www-03.ibm.com/systems/software/director/resources.html
3.6.4 IBM Systems Director user forum
Review and participate on the IBM Systems Director forum through the following URL:
http://www.ibm.com/developerworks/forums/forum.jspa?forumID=759
42 Exploiting IBM AIX Workload Partitions

Chapter 4. Configuring and using the IBM PowerVM Workload Partition Manager
In this chapter, we introduce the IBM PowerVM Workload Partition Manager for AIX (WPAR Manager), provide steps to properly configure the environment, and describe how to use WPAR Manager to manage AIX workload partitions (WPARs) across a collection of managed systems running AIX 6.1 or AIX 7.1.
In this chapter, we describe the following topics:
� Why WPAR Manager� WPAR Manager agent� WPAR Manager license enablement� Configuring WPAR Manager� Managing WPARs using WPAR Manager� Viewing or modifying WPAR properties
4
© Copyright IBM Corp. 2011. All rights reserved. 43

4.1 Why WPAR Manager
IBM PowerVM Workload Partition Manager for AIX (WPAR Manager) is a licensed program product that is designed to provide additional flexibility and efficiency by managing AIX workload partitions (WPARs) across multiple systems, running AIX 6.1 or later versions of the AIX operating system, and providing enablement for Live Application Mobility.
WPAR Manager is designed to reduce management costs by reducing the administrative workload associated with managing WPARs by allowing an administrator to create WPARs from scratch, clone, remove WPAR definitions, start and stop WPARs, or relocate WPARs from one system to another from an easy to use management interface.
WPAR Manager includes the checkpoint/restart enablement needed to relocate a WPAR from one system to another using Live Application Mobility. Live Application Mobility is designed to relocate a WPAR without restarting the application or causing significant impact to the application users.
Live Application Mobility, which is enabled by the WPAR Manager, is designed to improve application availability and server utilization while reducing administrative workload. WPARs can be relocated manually from the WPAR Manager console or automatically based on a policy that uses processor load, memory utilization, and other system metrics.
One of the primary benefits of Live Application Mobility is moving applications away from a system that needs to be shut down for planned maintenance. Live Application Mobility can also be used to improve application performance and system utilization by moving workloads from overloaded systems to less used systems. Live Application Mobility can also provide energy savings by moving workloads from a server and shutting the server down during off-peak times.
WPAR Manager is a prerequisite and a plug-in to the IBM Systems Director and extends the capabilities of IBM Systems Director to the management of WPARs along with other, IBM Systems Director-managed resources. The IBM Systems Director browser-based graphical user interface (GUI) allows for consistent and easy platform management across all IBM systems from almost any platform.
WPAR Manager is also available as part of the AIX Enterprise Edition. AIX Enterprise Edition provides an easy way to get AIX, IBM Systems Director Enterprise Edition, WPAR Manager, and Tivoli Application Dependency Discovery Manager, Tivoli Monitoring, and Tivoli Usage and Accounting Virtualization Edition at an attractive price.
The capabilities of the WPAR Manager can help clients get the most out of the WPAR capability of the AIX operating system.
4.2 WPAR Manager agent
WPAR Manager is based on a client/server architecture in which agents on the managed systems are directed by a WPAR Manager server. The WPAR Manager agent is a subagent to the IBM Systems Director Common Agent and enhances the IBM Systems Director agent to provide an interface for creating and managing WPARs. The IBM Systems Director Common Agent for AIX along with the WPAR Manager Agent CommonAgentSubagent must be installed in the global environment of each AIX operating system image that is to be managed.
44 Exploiting IBM AIX Workload Partitions

The WPAR Manager agent is a management component that provides a secure interface for the WPAR Manager to perform operations on a managed system. It enables support for performing remote operations on WPARs (for example, create, start, stop, remove, clone, and relocate) and collecting performance metrics on a managed system for automated relocation and reporting system status.
The WPAR Manager can manage a heterogeneous environment of managed systems at separate AIX 6.1 or AIX 7.1 technology levels. However, to make use of full management capabilities, the WPAR Manager agent must be updated to the latest version. For the full set of features and capabilities, all agents installed on managed systems in the management pool must be installed at, or migrated to, the latest WPAR Manager agent versions and corresponding AIX technology levels.
The Metacluster Checkpoint and Restart (MCR) kernel extension fileset is part of the WPAR Manager agent image and provides for the checkpoint, restart, and live relocation capabilities. Because MCR is an AIX kernel extension, it is closely tied to the AIX technology level deployed on a managed system. Installing the latest version of WPAR Manager agent on the managed system with the corresponding updated AIX technology level and MCR level allows for the management of all newly supported WPAR properties and operations delivered in the latest WPAR Manager version.
4.3 WPAR Manager license enablement
WPAR Manager is delivered by default with a temporary 60 day evaluation license that enables you to explore the WPAR Manager benefits and capabilities at no charge.
The IBM Systems Director welcome page displays the status of the WPAR Manager license and how many days remain before the temporary license expires.
If you have an evaluation license, you can contact your IBM marketing representative to purchase a permanent license activation for WPAR Manager. When you purchase the permanent license, you will receive a WPAR Manager license installer that must be run after the product is installed. This installer promotes the temporary license to a permanent license.
The following locations show where the license installers are on the media:
� In AIX: <media root>/manager/AIX/WparMgrKey.bin� In Linux: <media root>/manager/Linux/WparMgrKey.bin� In Windows: <media root>/manager/Windows/WparMgrKey.exe
4.4 Configuring WPAR Manager
WPAR Manager provides a setup advisor that is designed to assist you with post-install configuration and setup for the creation and management of WPARs on supported AIX-managed systems. The setup advisor walks you through the following steps:
� Discover WPAR-capable AIX systems:
– Guide the user through the steps of discovering systems
– Authenticate and get access to AIX systems remotely through IBM Systems Director
– Install WPAR Manager agents on managed AIX systems
– Run inventory collection tasks to inventory all software and extended WPAR inventory information
Chapter 4. Configuring and using the IBM PowerVM Workload Partition Manager 45

� Discover existing WPARs on newly managed systems
� View or change WPAR Manager configuration settings
� Create WPARs
4.4.1 WPAR Manager setup advisor
After installing the WPAR Manager plug-in to IBM Systems Director, an entry for WPAR Manager is created on the Welcome page, as shown in Figure 4-1.
Figure 4-1 WPAR Manager entry on IBM Systems Director welcome page
As indicated in the WPAR Manager entry on the IBM Systems Director welcome page, additional configuration is required, because no WPAR-capable systems have been identified as of yet.
Perform these steps:
1. Click the setup advisor link to launch the Setup Advisor wizard. The setup advisor wizard’s Welcome page is displayed. On the welcome page, click Next to proceed (Figure 4-2).
Figure 4-2 Setup Advisor wizard Welcome page
2. To identify WPAR-capable systems, we need to run the System Discovery task in IBM Systems Director. You need a list of the IP addresses or host names of all the AIX systems
46 Exploiting IBM AIX Workload Partitions

on which you want to work with WPARs. To go to the System Discovery page, click Discover, as shown in Figure 4-3.
Figure 4-3 Setup Advisor wizard: Discover WPAR-capable systems
3. On the System Discovery page, you can discover a system by specifying a single IP address or host name, specify a range of IP addresses, or use a discovery profile. After filling in the required information, click Discover Now to initiate the discovery immediately or Schedule to schedule the discovery task for a later time (Figure 4-4).
Figure 4-4 System Discovery
Chapter 4. Configuring and using the IBM PowerVM Workload Partition Manager 47

4. After completing the discovery task, return back to the WPAR Manager Setup Advisor and click Next on the Discovery page. The next step is to get access to the newly discovered systems. Click Request access on the Get Access to Managed Systems page, as shown in Figure 4-5.
Figure 4-5 Setup Advisor wizard: Get Access to Managed Systems
5. From the No Access Systems page, all the newly discovered systems with No access state are listed. You can click the No access link or select the managed system and select Security Request Access from the Actions drop-down menu (Figure 4-6 on page 49).
Common Agent: In order for AIX systems to be discovered by IBM Systems Director, IBM Systems Director Common Agent for AIX or OpenSSH 4.7.0.530 (or later) has to be installed and the SSH service has to be running on the AIX system.
Starting with AIX Version 6.1 TL03, Common Agent Version 6.1.0.3 and Platform Agent 5.20.3 are installed when you perform an overwrite or a preservation operating system installation with the default options, which include the SystemMgmtClient bundle.
Starting with AIX Version 6.1 TL04, Common Agent and Platform Agent are installed when upgrading from a previous version of AIX if a previous version of the agent is already installed. Both Common Agent and Platform Agent are also installed when you perform an overwrite or a preservation operating system installation with the default options, which include the SystemMgmtClient bundle.
IBM Systems Director 6.2.1 provides fresh installation images for Common Agent on AIX that you can use for a fresh installation or to update an existing 6.1.x or 6.2.0 agent.
48 Exploiting IBM AIX Workload Partitions

Figure 4-6 No Access Systems
6. On the Request Access page, provide the user credentials for the IBM Systems Director to authenticate to one or more target systems and click Request Access to grant all authorized Systems Director users access to the target systems (Figure 4-7).
Figure 4-7 Request access to target system
7. After gaining access to the target AIX systems, return back to the WPAR Manager Setup Advisor and click Next on the Get Access to Managed Systems page. The next step is to install the WPAR Manager subagents on the managed systems. Click Install agent to launch the Agent Installation wizard (Figure 4-8 on page 50).
Chapter 4. Configuring and using the IBM PowerVM Workload Partition Manager 49

Figure 4-8 Setup Advisor wizard: Installing the WPAR Manager subagent
8. Click Next on the Agent Installation wizard’s Welcome page (Figure 4-9).
Figure 4-9 Agent Installation wizard
9. On the Select the agent code to be installed dialog, click the Common Agent Subagent Packages group to list the group members. Select the CommonAgentSubagent WPAR Manager Agent 2.2.1.x (select the latest available version) and click Add and then click OK (Figure 4-10 on page 51).
50 Exploiting IBM AIX Workload Partitions

Figure 4-10 Select WPAR Manager Agent package to be installed
10.Click Next to proceed to select the managed systems.
11.Select one or more target AIX systems on which you want to install the WPAR Manager Agent, and click Add. Click Next to proceed (Figure 4-11).
Figure 4-11 Select AIX systems on which to install WPAR Manager Agent
12.Verify the details on the Agent Installation summary page and click Finish to launch the install agent task (Figure 4-12 on page 52).
Chapter 4. Configuring and using the IBM PowerVM Workload Partition Manager 51

Figure 4-12 Agent Installation summary
13.As with all tasks within Systems Director, you have the option to Run Now or Schedule the task to be run at a later time. Click OK to complete the installation.
14.After the WPAR Manager agent installation task completes, return back to the WPAR Manager Setup Advisor and click Next on the Install Agents page to proceed to the Collect Inventory page. Click Collect inventory to launch the View and Collect Inventory page (Figure 4-13).
Figure 4-13 Setup Advisor wizard: Collect Inventory
Collecting inventory is a two-step process.
Free space: Before installing the WPAR Manager agent on a managed system, ensure that it has at least 200 MB of free space in the /var file system. If it does not, execute the following command as root:
chfs -a size=+200MB /var
To install the WPAR Manager agent from the server, OpenSSH must be installed on the IBM Systems Director agent.
52 Exploiting IBM AIX Workload Partitions

15.From the View and Collect Inventory page, make sure that the Target systems field contains all the systems onto which you installed the WPAR Manager subagent. Select the All Software Inventory option from the View by list box and click Collect Inventory.
16.Next, collect the extended WPAR inventory on the same systems by selecting the Extended WPAR Inventory option from the View by list box and click Collect Inventory (Figure 4-14).
Figure 4-14 View and Collect Inventory: All software inventory and extended WPAR inventory
After the extended WPAR inventory job completes, the systems will be recognized as WPAR-capable. This step also discovers any existing WPARs on the WPAR-capable systems and collects additional properties used by WPAR Manager.
17.Return back to the WPAR Manager Setup Advisor and click Next to proceed to the Configure WPAR Manager Settings page. Click Configuration to configure the WPAR Manager application settings (Figure 4-15).
Figure 4-15 Setup Advisor wizard: Configure the WPAR Manager settings
18.On the WPAR Manager Settings dialog, you can specify shared directory, enable debug information (if needed), and specify whether to preserve WPAR definitions after the WPAR is deleted (Figure 4-16 on page 54).
Chapter 4. Configuring and using the IBM PowerVM Workload Partition Manager 53

Figure 4-16 WPAR Manager Settings
When a WPAR is relocated, a set of files is generated, including logs and the state file used to save the full context of the applications running within the WPAR. Specify the shared directory where these files are going to be generated during the relocation work flows. For system WPARs, this directory refers to a location relative to the root directory (/) of the WPAR. For application WPARs, the directory refers to a location relative to the root directory of the managed system that is hosting the WPAR.
If you are experiencing problems when relocating WPARs, you can enable debug information for relocation logs to enable verbose log messages for relocation operations.
You have the option to preserve WPAR definitions after the WPARs have been deleted. Checking this option will preserve WPAR definitions after a system WPAR has been deleted or an application WPAR has been stopped. WPAR definitions also get created and persisted during the create WPARs tasks if any error occurs during the create operation. If WPAR definitions are preserved, they can be deployed at a later time on a WPAR-capable system. If this option is not selected, no records are persisted on the IBM Systems Director environment after a WPAR has been deleted from the managed system.
19.After making the appropriate selections, click Apply and then click OK to apply the WPAR Manager configuration setting changes.
20.This essentially completes the post-installation setup and configuration tasks for the WPAR Manager. Click Next to proceed to create a WPAR using the Create WPAR wizard, or click Finish to complete the Setup Advisor wizard.
Shared directory accessibility: Because files generated during relocation must be accessible from both the departure system and the arrival system, it is important to make sure that what you specify as the shared directory is accessible from any system where application WPARs are to be relocated. You can accomplish this requirement by mounting the shared directory over a Network File System (NFS) file system in each managed system. In the case of system WPARs, this action is not necessary because the shared directory refers to a location within the WPAR’s file system, which is already accessible from both the departure and the destination systems.
Important: Only select this option for debugging purposes, because it affects performance.
54 Exploiting IBM AIX Workload Partitions

4.4.2 Defining a managed system
Configuring an AIX system to work with the WPAR Manager requires discovering the system within IBM Systems Director, installing the WPAR Manager subagent, and collecting software and extended WPAR inventory on the system. After these steps are completed, the managed system is recognized as WPAR-capable and additional capabilities, such as creating a WPAR and restoring a WPAR, are available.
4.4.3 Updating WPAR-related attributes of the managed system
After a system has been discovered and inventory has been collected, the WPAR Manager stores hardware and software configuration parameters that are specific to the managed system. These properties are used to calculate compatibility between systems for WPAR mobility, provide default values for WPAR attributes, and present the list of possible resources to use in the WPARs.
If a system undergoes configuration changes, the properties assigned to the managed system must be updated. The WPAR Manager subagent constantly monitors the properties on which the application depends, and if changes are detected, an event is generated to update the information. To manually update the managed system configuration, perform an inventory collection using the Extended WPAR Inventory profile.
4.5 Managing WPARs using WPAR Manager
The WPAR Manager allows you to perform simple management tasks, such as creating, starting, stopping, synchronizing, backing up, and restoring WPARs. In this section, we discuss the various tasks that can be performed to effectively manage WPARs on one or more WPAR-capable systems.
Tips: To effectively manage WPARs, add the Workload Partitions and Hosts page and the WPAR Manager Summary page to your My Startup Pages within IBM Systems Director.
Complete the following steps to add these pages to your My Startup Pages:
1. In the IBM Systems Director web interface navigation area, expand Inventory Views and then click Workload Partitions and Hosts.
2. Select Add to My Startup Pages from the Select Action drop-down menu in the upper-right corner.
3. Click OK to confirm.
4. From the IBM Systems Director Welcome Page, select the Manage panel.
5. Select WPAR Manager to open the WPAR Manager Summary page.
6. Select Add to My Startup Pages from the Select Action drop-down menu in the upper-right corner.
7. Click OK to confirm.
Chapter 4. Configuring and using the IBM PowerVM Workload Partition Manager 55

4.5.1 Working with WPARs that are created from the command line
With the WPAR Manager subagent installed on the managed system, WPARs created from the command line are discovered by the WPAR Manager and their configurations are stored in the IBM Systems Director database. After the WPARs are discovered, you can perform operations on these WPARs as if you had created them through the WPAR Manager.
4.5.2 Versioned Workload Partitions
Versioned Workload Partitions are always private or detached system WPARs that provide a separate version of the AIX runtime environment than the global environment. Versioned Workload Partitions own the writable /opt and /usr file systems.
Base AIX Version 7.1 Versioned Workload Partition support is provided by separately purchased licensed programs, which must be installed on each global AIX 7.1 managed system where this support is required. The licensed program that provides an AIX Version 5.2 WPAR runtime environment is available. For more information about the IBM AIX 5.2 Workload Partitions for AIX 7, V1.1, see the IBM Announcement ZP10-0247:
http://www-01.ibm.com/common/ssi/cgi-bin/ssialias?subtype=ca&infotype=an&appname=iSource&supplier=877&letternum=ENUSZP10-0247
WPAR Manager 2.2.1 provides support for simple life-cycle management of Versioned Workload Partitions and supporting tasks, such as backup, restore, clone, and relocation. By definition, the runtime environment of a Versioned Workload Partition differs from the runtime environment of the global environment. So, synchronization of runtime environments is not supported between Versioned Workload Partitions and the global environment.
Prerequisites for IBM AIX 5.2 Workload PartitionsThe following considerations and prerequisites exist for AIX 5.2 Workload Partitions:
� Versioned Workload Partitions are only supported on POWER7 hardware.
� Versioned Workload Partitions can be installed only on an AIX 7.1 operating system.
� Any backup image that is used to create an AIX 5.2 WPAR must be from a system running the AIX 5.2 technology level (TL) 10, service pack (SP) 8 version.
� IBM AIX 5.2 Workload Partitions for AIX 7, V1.1 licensed program product (5765-H38) is required.
Tips: With all tasks within IBM Systems Director, there is no one correct way to perform a particular operation. From the IBM Systems Director web interface, there are several ways to perform any particular task or operation.
For most of the WPAR management tasks that we describe in this section, we use the Workload Partitions and Hosts page and the WPAR Manager Summary page.
Important: Live relocation of application WPARs created from the command line will fail if the WPAR is relocated from the WPAR Manager user interface.
56 Exploiting IBM AIX Workload Partitions

4.5.3 Considerations for support of Live Application Mobility
Live relocation is the capability to relocate a WPAR to another system without losing the state of the application stack running within the WPAR.
In order for the WPAR to support live relocation, you must configure your WPAR in the following manner:
� To support live relocation, a WPAR must have the checkpoint option enabled. This setting can be specified when the WPAR is created through the “Enable checkpoint” option on the General tab (). A WPAR with the checkpoint option enabled allows the application to save the internal state of applications running within the WPAR to be restored on another similarly configured system.
� The WPAR owns the devices where the rootvg is created (WPAR-owned rootvg), or the WPAR must be NFS-based.
WPAR-owned rootvgThe root file systems for the WPAR reside in the storage area network (SAN) devices or virtual Small Computer System Interface (SCSI) devices. To relocate the WPAR, both the host system and the destination system have access to the storage disk that is assigned to the WPAR.
Storage devices can be configured in the Devices panel of the Create WPAR wizard. At least one of the disks must have a device control setting as rootvg, as shown in Figure 4-17 on page 58.
Important: After installing the separately purchased AIX Versioned Workload Partitions licensed program, it is necessary to rerun the IBM Systems Director software inventory task on any managed systems recently updated with the new software support for Versioned Workload Partitions. This action identifies the newly updated managed systems as Versioned WPAR-capable systems to the WPAR Manager.
Chapter 4. Configuring and using the IBM PowerVM Workload Partition Manager 57

Figure 4-17 Setting device control setting to rootvg
NFS-based WPARThe root file systems for an NFS-based WPAR reside on an NFS server and must be configured to be accessed from the WPAR. To relocate the NFS-based WPAR, WPAR’s file systems must be accessible from the WPAR, as well as both the host system and the destination system.
For NFS-based WPARs, you must mount /, /tmp, /var, and /home remotely as read-write NFS file systems.
NFS-based WPAR must have a valid network configuration. NFS-based WPARs without network connectivity cannot be relocated. If the name of your WPAR resolves to a valid network host name, the WPAR connects to the network automatically. If the name of your WPAR does not resolve to a valid network host name, you must provide connection information.
WPAR Manager: WPAR Manager does not verify whether the name of a WPAR resolves to a valid network host name.
Requirement: Live relocation of AIX 5.2 Versioned Workload Partitions requires the installation of additional software within the AIX 5.2 Versioned Workload Partition before live mobility can be attempted. You must apply APAR IZ72315 within each Versioned Workload Partition environment that is to be configured for live mobility. The software for APAR IZ72315 is available under the aix52_updates directory on the IBM AIX 5.2 Workload Partitions for AIX 7 (5765-H38) program product media.
58 Exploiting IBM AIX Workload Partitions

4.5.4 Creating WPARs
To create a WPAR using the Create Workload Partition wizard, complete the following steps:
1. From the Workload Partitions and Hosts page, right-click the system on which you want to deploy the WPAR. Select Workload Partitions Management Create workload partition to start the wizard (Figure 4-18).
Figure 4-18 Create workload partition
Alternatively, you can select the system on which to deploy the WPAR, click Actions, and select Workload Partitions Management Create workload partition.
Follow the instructions on each page to complete the wizard.
2. From the Welcome page, click Next (Figure 4-19).
Figure 4-19 Create Workload Partition wizard: Welcome page
Chapter 4. Configuring and using the IBM PowerVM Workload Partition Manager 59

3. On the General page, you specify WPAR type (System or Application), WPAR name, host name, and whether the WPAR is relocatable (Enable checkpoint) or not (Figure 4-20). Click Next to proceed.
Figure 4-20 Create Workload Partition wizard: General page
4. On the Devices page, you can specify storage devices from the global environment that you might want to allocate to the WPAR (Figure 4-21). Click Add to export a storage device or Next to proceed.
Figure 4-21 Create Workload Partition wizard: Devices page
5. If you click Add to export a storage device to the WPAR, select a valid target and then add it to the selected list. Click OK to return back to the wizard (Figure 4-22 on page 61).
60 Exploiting IBM AIX Workload Partitions

Figure 4-22 Adding a storage device to export to the WPAR
6. Specify the device control for the storage device. At least one of the disks must have a device control setting as rootvg for a WPAR-owned rootvg (Figure 4-23).
Figure 4-23 Create Workload Partition wizard: Specifying the device control setting
7. For system WPARs, on the Filesystems page, you can select the Use private /usr and /opt option to create a private or detached system WPAR.
Chapter 4. Configuring and using the IBM PowerVM Workload Partition Manager 61

The WPAR’s file systems can be local (on the global environment), NFS-based, or the WPAR’s file systems are on the WPAR-owned rootvg.
On the Filesystems page, click Configure required filesystems to configure the file systems for Local filesystems (Figure 4-24), or for NFS based filesystems (Figure 4-25 on page 63) WPAR.
Figure 4-24 Create Workload Partition wizard: Filesystems (local)
62 Exploiting IBM AIX Workload Partitions

Figure 4-25 Create Workload Partition wizard: Filesystems (NFS-based)
For a rootvg WPAR, the file systems cannot be specified manually. (Figure 4-26).
Figure 4-26 Create Workload Partition wizard: Filesystems (rootvg)
8. Click Next to proceed.
9. On the Options page, you can specify the base directory and other options for the WPAR (Figure 4-27 on page 64).
Chapter 4. Configuring and using the IBM PowerVM Workload Partition Manager 63

Figure 4-27 Create Workload Partition wizard: Options
10.Click Next to proceed to specify network options.
11.On the Network page, click Add to specify network settings for the WPAR (Figure 4-28).
Figure 4-28 Create Workload Partition wizard: Network settings
12.Click Next to continue. On the Routing page, if you need to, you can specify WPAR-specific routes (Figure 4-29 on page 65).
Important: Although the WPAR Manager does not restrict the use of multiple WPARs with the same network configuration, use caution. If the new WPAR is deployed into a managed system that is already using that network configuration for another WPAR, the create task fails. Alternatively, if the WPAR is deployed into a system separate from that hosting the WPAR with the same network configuration, no error is raised and two WPARs will be sharing the same network address.
64 Exploiting IBM AIX Workload Partitions

Figure 4-29 Create Workload Partition wizard: Routing
13.Click Next to proceed to specify the security options for the WPAR (Figure 4-30).
Figure 4-30 Create Workload Partition wizard: Security options
14.Click Next. On the Resource controls page, there are four tabs to specify resource controls for CPU (Figure 4-31 on page 66), Memory (Figure 4-32 on page 66), IPC (Figure 4-33 on page 67), and Other (Figure 4-34 on page 67).
Chapter 4. Configuring and using the IBM PowerVM Workload Partition Manager 65

Figure 4-31 Create Workload Partition wizard: Resource controls (CPU)
Figure 4-32 Create Workload Partition wizard: Resource controls (Memory)
66 Exploiting IBM AIX Workload Partitions

Figure 4-33 Create Workload Partition wizard: Resource controls (IPC)
Figure 4-34 Create Workload Partition wizard: Resource controls (Other)
15.Click Next to advance to the Advanced settings page where you can specify relocation-related settings for the WPAR. On the Relocation tab (Figure 4-35 on page 68), you can specify settings for Live relocation. On the Compatibility tab (Figure 4-36 on page 68), you can specify additional optional compatibility tests that need to be checked for WPAR relocation.
Chapter 4. Configuring and using the IBM PowerVM Workload Partition Manager 67

Figure 4-35 Create Workload Partition wizard: Advanced settings (Relocation)
Figure 4-36 Create Workload Partition wizard: Advanced settings (Compatibility)
16.Click Next to move on to the Summary page (Figure 4-37 on page 69).
68 Exploiting IBM AIX Workload Partitions

Figure 4-37 Create Workload Partition wizard: Summary
17.On the Summary page, review all the details and click Finish to create the WPAR with the specified settings.
4.5.5 Creating Versioned Workload Partitions
Refer to “Prerequisites for IBM AIX 5.2 Workload Partitions” on page 56 for hardware and software requirements for Versioned Workload Partitions.
In order to create an AIX 5.2 WPAR, you need to have the mksysb backup image of the AIX 5.2 TL10 SP8 system. To create the mksysb image and make it available, complete the following steps:
1. Create a mksysb image of an AIX 5.2 system that provides the content for your Versioned WPAR:
mksysb -i /mksysb_images/AIX52_image
Where /mksysb_images is a local or NFS-mounted directory to store the mksysb image and where AIX52_image is the AIX 5.2 system’s mksysb image.
2. Copy or NFS-mount this backup image to the system where the WPAR is to be created.
To create a new Versioned WPAR, using the mksysb image from the AIX 5.2 system, perform the following steps using the Create Versioned Workload Partition wizard:
1. From the IBM Systems Director navigation panel, select Navigate Resources. This action opens the Navigate Resources table in IBM Systems Director.
2. Select Workload Partitions Groups in the table.
3. Select Versioned WPAR-capable Systems (x) in the table.
The x indicates the number of managed systems that WPAR Manager has identified as meeting the prerequisites for hosting Versioned Workload Partitions. If there are no (0)
Chapter 4. Configuring and using the IBM PowerVM Workload Partition Manager 69

managed systems that have been identified as versioned WPAR-capable systems and you have previously installed the separately purchased AIX Versioned Workload Partitions licensed product, then you must rerun the IBM Systems Director software inventory task on the appropriate managed systems. This task can appropriately inventory the newly installed licensed product and identify the managed system or systems as versioned WPAR-capable managed systems.
The managed systems that are capable of hosting Versioned Workload Partitions are listed.
4. Select the check box next to the name of the required system and then click Actions in the table toolbar to view the Actions menu.
5. From the Actions menu, click Workload Partitions Management Create versioned workload partition.
This action launches the Create Versioned Workload Partitions wizard.
6. Follow the instructions to complete the wizard and create the Versioned Workload Partition on the selected managed system. Note that this wizard is similar to the Create Workload Partitions wizard with a few additional steps required for creating a versioned WPAR. Follow the steps as listed in “Creating WPARs” on page 59 starting at step 2 on page 59 with the following additional steps.
7. After specifying the WPAR name and host name on the General page, click Next. On the Version Information page, you need to specify the location and select the mksysb image file to use to create the Versioned Workload Partition (Figure 4-38).
Figure 4-38 Create Versioned Workload Partitions wizard: Version Information
8. Filesystem options for the Versioned Workload Partition differ slightly from the regular system WPAR. A Versioned Workload Partition is always a private or detached system WPAR.
Available options are to use or ignore the file systems defined in the mksysb image for the WPAR.
You can select whether to use or ignore the file systems defined in the mksysb image for this WPAR. If you select Use filesystem definitions from the mksysb image, you can also add file systems to the table. If you add a file system to the table that has the same
70 Exploiting IBM AIX Workload Partitions

name as a file system in the image, the file system definition from the table will be used. If you select Ignore filesystem definitions from the mksysb image, click Configure required filesystems to define all file systems to be used for this WPAR (Figure 4-39).
Figure 4-39 Create Versioned Workload Partitions wizard: Filesystems
9. There is one additional optional step when creating Versioned Workload Partitions. From the Advanced settings page, there is a Versioned tab (Figure 4-40 on page 72) where you can specify the factor by which to increase the size of any compressed file systems of type JFS that are present in the mksysb used to create a versioned WPAR. These file systems will be replaced by Journal File System 2 (JFS2)-type file systems. The available expansion range is 1 - 8.
Chapter 4. Configuring and using the IBM PowerVM Workload Partition Manager 71

Figure 4-40 Create Versioned Workload Partitions wizard: Advanced settings (Versioned)
4.5.6 Backing up WPARs
Incorporate backing up your WPARs as part of your normal backup process.
The backup task in WPAR Manager backs up the selected WPAR to a backup image file. This function is equivalent to using the mkwpardata command followed by the savewpar command. The resulting backup image can be used to recreate the WPAR using the restwpar command or the WPAR Manager user interface.
The following restrictions apply to this operation:
� Only system WPARs can be backed up.
� You can only back up to an AIX backup file. In order to back up to a CD-ROM, DVD, or tape, you must log on to the managed system and use the mkwpardata command and the savewpar command with the desired options.
Follow these steps to back up a WPAR to an image file on a managed system:
1. From the Workload Partitions and Hosts page, right-click the WPAR that you want to back up, and select Back up (Figure 4-41 on page 73).
Alternatively, you can select the WPAR that you want to back up, click Actions, and select Back up.
72 Exploiting IBM AIX Workload Partitions

Figure 4-41 Backing up a WPAR
2. From the Back up workload partition page, specify the backup directory location and any other backup options (Figure 4-42).
Figure 4-42 Backing up a WPAR: Backup directory location and other options
Chapter 4. Configuring and using the IBM PowerVM Workload Partition Manager 73

3. Click OK to complete the backup.
The backup operation from WPAR Manager creates the backup image file, as well as the image.data and WPAR specification file containing information about the WPAR for use by the savewpar and restwpar commands. The information includes the list of logical volumes, file systems and their sizes, the list of volume groups, and the WPAR name.
The listing of files that are created is shown in Example 4-1.
Example 4-1 Files created when backing up a WPAR
root@750_1_LPAR_7 / # ls -l /var/adm/WPAR/750_1_LPAR_7/wpmmi02total 157808-rw-r--r-- 1 root system 80793600 Apr 20 08:35 wpmmi02_20110420_083404.bffroot@750_1_LPAR_7 / #root@750_1_LPAR_7 / # ls -l /tmp/wpardata/wpmmi02total 392-rw-r--r-- 1 root system 154822 Apr 20 08:35 backup.data-rw-r--r-- 1 root system 5548 Apr 20 08:35 filesystems-rw-r--r-- 1 root system 24 Apr 20 08:35 fslv00.map-rw-r--r-- 1 root system 12 Apr 20 08:35 fslv01.map-rw-r--r-- 1 root system 24 Apr 20 08:35 fslv04.map-rw-r--r-- 1 root system 24 Apr 20 08:35 fslv05.map-rw-r--r-- 1 root system 4798 Apr 20 08:35 image.data-rw-r--r-- 1 root system 13 Apr 20 08:35 image.infodrwxr-xr-x 2 root system 256 Apr 20 08:35 vgdata-rw-r--r-- 1 root system 244 Apr 20 08:35 vgdata.files-rw-r--r-- 1 root system 2851 Apr 20 08:35 wpar.spec
4.5.7 Restoring WPARs
You can restore a WPAR from a backed-up image file that was created using either WPAR Manager or the savewpar command.
A WPAR backup image contains an image.data file and a WPAR specification file that are used to establish the characteristics of the WPAR to be restored.
To restore a WPAR from a backup image, complete the following steps:
1. From the Workload Partitions and Hosts page, right-click the system onto which you want to restore the WPAR, select Workload Partitions Management Restore workload partition to open the Restore WPAR page (Figure 4-43 on page 75).
74 Exploiting IBM AIX Workload Partitions

Figure 4-43 Restore WPAR
Alternatively, you can select the system onto which to restore the WPAR, click Actions, and select Workload Partitions Management Restore Workload Partition.
2. From the Restore Workload Partition page, specify the full host name of the managed system on which the backup image was created, and the path to the backup image (Figure 4-44). You can specify other options by selecting the Synchronization tab (Figure 4-45 on page 76) or the Other options tab (Figure 4-46 on page 76).
Figure 4-44 Restore Workload Partition: Managed system and path to the backup image file
Chapter 4. Configuring and using the IBM PowerVM Workload Partition Manager 75

Figure 4-45 Restore Workload Partition: Synchronization
Figure 4-46 Restore Workload Partition: Other options
3. Click OK to complete the task.
4.5.8 Starting a system WPAR
When a system WPAR is created, unless you specified to start the WPAR after creation, the WPAR goes to the defined state and cannot be used until it is started. At this state, only the infrastructure for the WPAR is in place.
Before the WPAR is started, the file systems are not mounted, the network configuration is not active, and processes are not running. Only system WPARs that are in the defined state can be started. You can only perform this action for system WPARs, because application WPARs are started as soon as they are created on a managed system and never go through the defined state.
To start a system WPAR, perform the following steps:
1. From the WPAR Manager summary page, under Manage Resources, click x System WPARs (where x indicates the number of system WPARs that WPAR Manager has identified on all WPAR-capable systems) to list all of the system WPARs currently identified by WPAR Manager (Figure 4-47 on page 77).
76 Exploiting IBM AIX Workload Partitions

Figure 4-47 Click x System WPARs from the WPAR Manager summary page
2. Select one or more WPARs in the defined state that you want to start.
3. Click Actions, and select Start (Figure 4-48 on page 78).
Chapter 4. Configuring and using the IBM PowerVM Workload Partition Manager 77

Figure 4-48 Start WPAR
4. A dialog box confirming your request is displayed. Click OK to continue (Figure 4-49).
Figure 4-49 Start WPAR confirmation
4.5.9 Stopping a WPAR
Both system WPARs and application WPARs can be stopped while they are active. For both system WPARs and application WPARs, the stop operation deactivates the running WPAR. System WPARs remain on the system but the state of the WPAR changes to defined. When an application WPAR is stopped, the WPAR is removed from the system and depending on whether preserving the WPARs is desired, a WPAR definition can be preserved. This definition is represented by the undeployed state.
Monitor the progress: As with submitting any other task within IBM Systems Director, you can monitor the progress of the task by selecting Display Properties in the message box at the top of the window, after the task request has been submitted.
78 Exploiting IBM AIX Workload Partitions

To stop a WPAR, perform the following steps:
1. From the WPAR Manager summary page, under Manage Resources, click x Workload partitions (WPARs) (where x indicates the number of WPARs that WPAR Manager has identified on all WPAR-capable systems) to list all of the WPARs currently identified by WPAR Manager (Figure 4-50).
Figure 4-50 Click x Workload partitions (WPARs) from the WPAR Manager summary
2. In the table, select one or more WPARs that you want to stop.
3. Click Actions, and select Stop (Figure 4-51 on page 80).
Chapter 4. Configuring and using the IBM PowerVM Workload Partition Manager 79

Figure 4-51 Stop WPAR
4. Select the type of stop that you want to perform and click OK (Figure 4-52).
Figure 4-52 Stop WPAR options
The stop option selected dictates how the WPAR is stopped:
– Normal: Select this option to slowly stop the WPAR.
80 Exploiting IBM AIX Workload Partitions

– Hard: Select this option to have the WPAR stop in 60 seconds.
– Force: Select this option to stop running processes more aggressively and force an unmount of file systems. If any processes remain, the WPAR is placed in the broken state, and it cannot be restarted.
4.5.10 Synchronizing a system WPAR
The installed software in a system WPAR can be synchronized with the software in the global AIX system. You must synchronize your WPAR if updates have been applied to the managed system, or if the WPAR has been relocated.
To synchronize a system WPAR, perform the following steps:
1. From the Workload Partitions and Hosts page, right-click the system WPAR that you want to synchronize, and select Synchronize (Figure 4-53).
Figure 4-53 Synchronize system WPAR
2. The type of synchronization available is based upon the following characteristics:
– If the WPAR is a shared WPAR (shares the /usr and /opt file system with the global AIX system), the Synchronize Workload Partition page allows you to choose options for synchronizing install filesets, RPM filesets, or all of the installed software (Figure 4-54).
Application WPARs: If the selected targets are application WPARs, the Preserve WPAR definition option is rendered. The value is preset with the corresponding application configuration setting. You can override the application configuration setting by toggling this value.
Chapter 4. Configuring and using the IBM PowerVM Workload Partition Manager 81

Figure 4-54 Synchronize shared system WPAR
– If the WPAR is a Detached WPAR that has its own private /usr and /opt file system, the Synchronize Workload Partition page allows you to specify the installation directory or device (Figure 4-55).
Figure 4-55 Synchronize detached or private system WPAR
3. From the Synchronize Workload Partition page, specify the synchronization options for the WPAR, and click OK.
More information: Synchronization is also available when you are restoring a WPAR from a backup image (4.5.7, “Restoring WPARs” on page 74).
The synchronize task is unavailable for application WPARs or Versioned Workload Partitions.
82 Exploiting IBM AIX Workload Partitions

4.5.11 Cloning a WPAR
The WPAR Manager provides the capability to quickly clone an existing system WPAR to create a new copy of that WPAR.
Using this functionality, a system administrator can create a system WPAR and then use it as a deployment standard to create new copies.
When you clone a WPAR, the data from the existing external devices is not copied. However, if one or more external devices contains rootvg information, that information is copied to a newly specified external device.
To clone a WPAR, complete the following steps:
1. From the Workload Partitions and Hosts page, right-click the system WPAR that you want to clone, and select Clone (Figure 4-56).
Figure 4-56 Clone WPAR
2. Provide the name and host name for the clone WPAR (Figure 4-57 on page 84).
Important: If the WPAR contains a rootvg device, you can only clone the WPAR if the WPAR is in an active state.
Chapter 4. Configuring and using the IBM PowerVM Workload Partition Manager 83

Figure 4-57 Clone WPAR name and host name
3. Specify the clone options for the WPAR, and click OK (Figure 4-58).
Figure 4-58 Clone WPAR options
4.5.12 Removing and deleting a WPAR
After an existing WPAR has been discovered by or a new WPAR created using WPAR Manager, the WPAR reference is created within the IBM Systems Director database as a managed endpoint. You can remove only the WPAR reference from the IBM Systems Director database, retaining the WPAR and its artifacts intact on the managed system. You can also delete a WPAR reference from the Director database and the WPAR from the managed system on which it is running.
84 Exploiting IBM AIX Workload Partitions

WPAR Manager provides an application configuration setting to preserve WPAR definitions after a WPAR is removed or deleted. Within WPAR Manager, these WPAR definitions are represented by the undeployed WPAR state. This behavior can toggle from the WPAR Application Configuration window or the Preserve workload partition definitions on the delete panel.
Perform the remove or delete tasks depending on whether the WPAR definition must be preserved. Consider the following scenarios:
� WPAR definitions are not preserved
The remove task removes the WPAR managed-endpoint definition from within the IBM Systems Director environment. The delete task deletes the definition from the IBM Systems Director and also deletes the WPAR and its artifacts from the managed system.
� WPAR definitions are preserved
The remove task on a WPAR that is deployed on a managed system disassociates the WPAR from the managed system and preserves the WPAR managed-endpoint definition in the IBM Systems Director environment as an undeployed WPAR. The delete task deletes the WPAR and its artifacts from the managed system and preserves the WPAR managed-endpoint definition in the IBM Systems Director environment as an undeployed WPAR. The remove task on an undeployed WPAR removes the WPAR managed-endpoint definition from within the IBM Systems Director environment.
4.5.13 Deploying a WPAR definition
WPAR Manager provides an application configuration setting to preserve WPAR definitions after a WPAR is removed or deleted. You can deploy a WPAR definition from a previously deleted WPAR on a managed system.
To deploy a WPAR definition, perform the following steps:
1. Click Navigate Resources from the IBM Systems Director.
2. Click Workload Partitions Groups from the table.
3. Click Workload Partition Definitions to list all the WPAR definitions from previously deleted or removed WPARs.
4. Select the WPAR definition that you want to deploy.
5. Click Actions Deploy.
The corresponding Create WPAR wizard is launched.
6. Select the target system where the WPAR definition is deployed and follow the steps of the wizard. The values from the WPAR definition are shown in the wizard.
The deploy action can also be initiated from any other view where the WPAR definitions are displayed, for example, Workload Partitions and Hosts.
4.5.14 Viewing or modifying WPAR properties
After a WPAR has been deployed on a managed system, you can modify the properties of the WPAR using the chwpar command on the managed system. WPAR Manager also facilitates viewing or modifying the WPAR properties.
When a WPAR configuration change is performed through the command line, the WPAR Manager discovers the changes after a short delay, and the IBM Systems Director database is updated to reflect the new configuration.
Chapter 4. Configuring and using the IBM PowerVM Workload Partition Manager 85

When a WPAR is deployed on a managed system, only selected properties of the WPAR’s configuration can be modified, depending on the state of the WPAR. Alternatively, if a WPAR is not deployed, the WPAR Manager allows you to modify all of the properties of the WPAR.
To view or modify WPAR properties, complete the following steps:
1. From the Workload Partitions and Hosts page, right-click the WPAR that you want to view or modify, and select Edit (Figure 4-59).
Figure 4-59 Editing a WPAR configuration
2. From the Modify Workload Partition dialog, you can modify selected properties of the WPAR’s configuration, depending on the current state of the WPAR. After making the desired changes, click OK (Figure 4-60 on page 87).
86 Exploiting IBM AIX Workload Partitions

Figure 4-60 Modify Workload Partition
4.6 WPAR Manager command-line interface
You can access the WPAR Manager functionality from the IBM Systems Director browser-based console. WPAR Manager Version 2.2.1 delivers centralized WPAR management capabilities from the IBM Systems Director command-line interface (CLI), as well. All WPAR Manager CLI commands are grouped in the wparmgr command bundle.
To obtain a list of all the CLI commands that are available for WPAR Manager, run the following command (the output is shown in Example 4-2):
smcli wparmgr/help
Example 4-2 List of available WPAR Manager smcli commands
root@wparmgr / # smcli wparmgr/help
The following WPAR Manager commands are supported:
- help - Display this help information- lswpar - List all WPARs, or properties of specific WPARs- mkwpar - Create a WPAR- rmwpar - Delete a WPAR- startwpar - Start a WPAR- stopwpar - Stop a WPAR- savewpar - Save a WPAR- restwpar - Restore a WPAR- movewpar - Relocate a WPAR- lswparcapablesys - List WPAR-capable systems, its WPARs, and device information- lswparcompat - View compatibility results for a WPAR
Type "smcli <command_name> -h" to see the usage statement of the command.Type "smcli <command_name> --help" for a full description of the command and its usage
root@wparmgr / #
Chapter 4. Configuring and using the IBM PowerVM Workload Partition Manager 87

To obtain a short description of a particular command (for example, startwpar), which includes usage and a brief description of the flags, run the following command (Example 4-3):
smcli wparmgr/startwpar -h
Example 4-3 Help for the startwpar WPAR Manager CLI command (short description)
root@wparmgr / # smcli wparmgr/startwpar -h
Usage: smcli startwpar [-h | -? | --help] [-L | --lang language]
smcli startwpar [-L | --lang language] [-m | --managed_sys managedSystemList] [-q | --quiet] [-v | --verbose] { {-n | --names wparList} | {-N | --groups groupList} | {-f | --file filename} }
-f | --file filename Targets the WPARs specified in a file or standard input pipe -h | -? Lists short help --help Lists full help (equivalent to a man page) -L | --lang language Specifies the locale under which the command is run -m | --managed_sys managedSystemList Limits the targets to those WPARs configured on the specified managed system -n | --names wparList Targets the WPAR manageable endpoints specified in list of manageable-endpoint names or IDs -N | --groups groupList Targets the WPARs in the groups specified as group names or IDs -q | --quiet Minimizes output, suppressing informational messages -v | --verbose Writes verbose messages to standard output
root@wparmgr / #
To obtain a long description of a particular command (for example, startwpar), which includes usage, a full description of the flags, and execution examples, run the following command (Example 4-4):
smcli wparmgr/startwpar --help
Example 4-4 Help for the startwpar WPAR Manager CLI command (long description)
root@wparmgr / # smcli wparmgr/startwpar --help
Description: The startwpar command issues the start operation on the WPAR(s) specified
Usage: smcli startwpar [-h | -? | --help] [-L | --lang language]
88 Exploiting IBM AIX Workload Partitions

smcli startwpar [-L | --lang language] [-m | --managed_sys managedSystemList] [-q | --quiet] [-v | --verbose] { {-n | --names wparList} | {-N | --groups groupList} | {-f | --file filename} }
-f | --file filename Targets the WPARs specified in a file or standard input pipe -h | -? Lists short help --help Lists full help (equivalent to a man page) -L | --lang language Specifies the locale under which the command is run -m | --managed_sys managedSystemList Limits the targets to those WPARs configured on the specified managed system -n | --names wparList Targets the WPAR manageable endpoints specified in list of manageable-endpoint names or IDs -N | --groups groupList Targets the WPARs in the groups specified as group names or IDs -q | --quiet Minimizes output, suppressing informational messages -v | --verbose Writes verbose messages to standard output
Examples:
smcli startwpar -n MyWPAR Starts all WPARs called "MyWPAR" being managed by the server smcli startwpar -n MyWPAR -m HostFoo Start the WPAR called "MyWPAR" running on the system called "HostFoo"
root@wparmgr / #
Commands: Most commands are executed by a user in the administrator role.
Chapter 4. Configuring and using the IBM PowerVM Workload Partition Manager 89

90 Exploiting IBM AIX Workload Partitions

Chapter 5. Workload partition rootvg support
This chapter provides additional details about System rootvg workload partitions (WPARs).
This chapter contains the following topics:
� System rootvg WPARs� WPAR system rootvg creation
5
© Copyright IBM Corp. 2011. All rights reserved. 91

5.1 System rootvg WPARs
By default, the file systems for a system WPAR are created from the root volume group of the global environment.
A rootvg WPAR owns its own root volume group that is created on one or more disks that have been allocated to the WPAR. As with system WPARs, rootvg WPARs have their own users and groups, network configuration, login, and administrative domain.
A system WPAR, which is configured with its own root volume group, is referred to as a rootvg WPAR. The rootvg volume group is created on one or more endpoint devices exported (allocated) to the WPAR from global environment.
Rootvg system WPARs are limited to fiber-attached storage devices, Fibre Channel (FC) adapters, and virtual Small Computer System Interface (SCSI) disks.
A system WPAR, which is not a rootvg WPAR, does not have its own root volume group, but has file systems created in logical volumes and created from the root volume group of the global environment.
Rootvg system WPARs can be either a detached system rootvg (non-shared /usr) or a shared system rootvg. But, even a detached system rootvg WPAR has shared points with the global environment, such as the /etc/objrepos/wboot and /proc file systems.
In general terms, for the virtualized environments, we need to know if there is any incompatibility between the environment and the software that is required to be deployed, if all application software features are supported or not on that particular environment, and what our expectations from that application are.
The WPAR environment, especially the detached system rootvg WPAR, offers almost the same functionality as an independent AIX operating system.
For a system rootvg WPAR, if you use both FC adapters and endpoint devices, these devices must be exported (or allocated) to the WPAR when it is created. You can allocate other adapters or endpoint devices later on to the WPAR.
After the WPAR has been created, you can use the chwpar command to allocate or deallocate additional disks or adapters to WPARs.
However, it is not possible to change an existing non-rootvg WPAR volume group into a rootvg WPAR.
Allocating adapters: If you want to allocate new FC adapters to a WPAR, you must deallocate all existing adapters and disks and reallocate all the new adapters and all endpoint devices, with the WPAR in the defined state. Assigning only endpoint devices to WPAR can be done without stopping the WPAR.
Requirement: To enable the checkpointable (-c) feature, you need to install additional software (mcr.rte). This software is included in the WPAR plug-in for IBM Systems Director, which needs to be installed first, before you can use the checkpointable feature.
92 Exploiting IBM AIX Workload Partitions

5.2 WPAR system rootvg creation
System rootvg shared or non-shared WPARs are easily created with the mkwpar command or with SMIT (smitty mkwpar).
A detached (private copy of /usr and /opt file systems) system rootvg WPAR is created with the mkwpar command with the “-l” flag, or with a specification file (refer to Table 5-2 on page 94).
Table 5-1 The mkwpar command with the -l flag and the specification file attributes
We create a shared rootvg WPAR named wparm91 with the rootvg based on disk hdisk0 (virtual SCSI disk), and another disk hdisk4 (MPIO DS4K Array disk) with network details, as shown in Example 5-1.
Example 5-1 Creating shared system rootvg WPAR from the command line
mkwpar -n wparm91 -D devname=hdisk4 rootvg=yes -D devname=hdisk0 -N interface=en0 address=172.16.20.90 netmask=255.255.252 .0 -I rtdest=0 rtgateway=172.16.20.1
Creating workload partition's rootvg. Please wait...mkwpar: Creating file systems... / /admin /home /opt /proc /tmp/usr /var……Lines were removed…..Finished populating scratch file systems.Workload partition wparm91 created successfully.mkwpar: 0960-390 To start the workload partition, execute the following as root: startwpar [-v]wparm91
Flag/attribute Description/value
-l This flag creates private and writable versions of the /usr and /opt file systems.
rootvgwpar The value is “yes” for a rootvg WPAR or “no” for non-rootvg WPAR.
privateusr The value is “yes” for a WPAR dedicated /usr file system or “no” for a shared /usr file system with the global environment.
Disk space: When you create a detached system rootvg WPAR, you must consider the size of the file systems from the global environment for the hdisk rootvg sizing.
If the allocated disk for the rootvg is smaller than the current size of the file systems from the global environment, the following mkwpar error message appears:
mkwpar: 0960-351 Failed to create the <corresponding file system>
Chapter 5. Workload partition rootvg support 93

The mkwpar command accepts many input parameters when a new WPAR is created. You can set parameters, such as logical volume management policy, mount directories, resource control settings, and user customization script, and allocate disks and adapters. If you do not provide all needed parameters to the mkwpar command, you can modify the created WPAR configuration with the chwpar command.
Table 5-2 shows the important flags for the mkwpar command.
Table 5-2 Important mkwpar flags
Flag Description
-a Automatically resolve erroneous/conflicting settings.
-B Device or path name of savewpar or mksysb backup image.
-c Flag as checkpointable.
-e Get specification data from an existing WPAR.
-f Path to input specification file.
-l Create private, writable versions of /usr and /opt.
-L Logical volume management policy (image_data, shrink, ignore_lvs, and ignore_maps).
-n WPAR name.
-N Network settings (interface, address, netmask, broadcast, address6, and prefixlen).
-o Path to output specification file.
-O Overwrite an existing volume group on the specified disks for a rootvg WPAR.
-p Preserve file system data from the named mount group.
-r Copy global network name resolution configuration into the WPAR.
-R Resource control settings (active, rset, CPU, memory, procVirtMem, totalVirtMem, shares_CPU, shares_memory, totalProcesses, totalThreads, totalPTYs, totalLargePages, pct_msgIDs, pct_semIDs, pct_shmIDs, and pct_pinMem).
-S Configures the security settings of a WPAR (secfile and privs[+|-]).
-X Configures the exported kernel extensions (kext, exportfile, local, and major).
-w Only write specification file (do not create).
-C Create a Versioned WPAR.
-D Needed to export devices (to create a rootvg WPAR).
94 Exploiting IBM AIX Workload Partitions

The System rootvg detached WPAR can also be recreated with a WPAR specification file.
In Example 5-2, a detached rootvg WPAR is created using a specification file with the mkwpar command. To create a shared rootvg WPAR with the same specification, just change the attribute "privateusr", under the "general" stanza clause, from "yes" to "no".
Example 5-2 The mkwpar -f wpar11specPrivateUSR command
root@750_1_LPAR_9:/home: mkwpar -f wpar11specPrivateUSRCreating workload partition's rootvg. Please wait...mkwpar: Creating file systems... / /admin /home /opt /proc /tmp /usr /varMounting all workload partition file systems.mkwpar: Copying base files......LINES REMOVED...
root@750_1_LPAR_9:/home: cat wpar11specPrivateUSR
general:name = "wpar11"checkpointable = "no"hostname = "wpar11"directory = "/wpars/wpar11"privateusr = "yes"devices = "/etc/wpars/devexports"ostype = "0"auto = "no"rootvgwpar = "yes"preserve = "no"routing = "yes"
...LINES REMOVED...
device:devid = "3E213600A0B8000114632000026614D882CF30F1815 FAStT03IBMfcp"devtype = "2"rootvg = "yes"
extension:kext = "ALL"
...LINES REMOVED...
network:broadcast = "172.16.23.255"interface = "en0"address = "172.16.20.115"netmask = "255.255.252.0"
Chapter 5. Workload partition rootvg support 95

5.2.1 Recreating a system rootvg WPAR erased by the rmwpar command
We assume for this case that a system rootvg WPAR has been erased by the rmwpar command; however, erasing a system rootvg WPAR with the rmwpar command does not destroy the WPAR disks. Only the WPAR profile is erased from the system. When a rootvg WPAR is removed, no data is removed from the rootvg disks.
When you remove a WPAR, the disks remain in the defined state, until the configuration manager is run (cfgmgr or mkdev command), as shown in Example 5-3.
Example 5-3 Removing a WPAR and disk state
root@750_1_LPAR_9:/: rmwpar -s wpar11Stopping workload partition 'wpar11'.Stopping workload partition subsystem 'cor_wpar11'....LINES REMOVED...hdisk0 Definedfscsi0 Definedfscsi1 Defined...LINES REMOVED...
root@750_1_LPAR_9:/: lspvhdisk1 00f660760718f727 rootvg active
root@750_1_LPAR_9:/: cfgmgr
root@750_1_LPAR_9:/: lspvhdisk0 00f6607622d6e255 Nonehdisk1 00f660760718f727 rootvg active
To continue, allocated the disks of the WPAR before deleting the WPAR, as shown in Example 5-4.
Example 5-4 Disks allocated to WPAR wparm91
root@750_2_LPAR_4:/> lswpar -Da devname wparm91|grep hdiskhdisk4hdisk0root@750_2_LPAR_4:/> lscfg -l hdisk*|egrep 'hdisk4|hdisk0' hdisk4 U8233.E8B.106078P-V6-C145-T1-L8100000000000000 Virtual SCSI Disk Drive hdisk0 U8233.E8B.106078P-V6-C103-T1-W201200A0B811A662-LF000000000000 MPIO Other DS4K Array Disk
We remove WPAR wparm91, but we have the specification file for wparm91 from a mksysb, or from our earlier backups, or from the documentation of our previous configuration.
If you do not have the specification file, you can recreate it from the beginning using another specification file, or you can use the mkwpar command with its flags, as shown in Example 5-5.
Example 5-5 Removing a WPAR
root@750_2_LPAR_4:/etc/wpars> rmwpar wparm91rmwpar: Removing file system /wpars/wparm91/usr.rmwpar: Removing file system /wpars/wparm91/opt.rmwpar: Removing file system /wpars/wparm91/etc/objrepos/wboot.rmlv: Logical volume fslv01 is removed.
Non-rootvg WPAR: For a non-rootvg WPAR, the rmwpar command removes the WPAR file systems from the global environment.
96 Exploiting IBM AIX Workload Partitions

rmwpar: Removing file system /wpars/wparm91.rmlv: Logical volume fslv00 is removed.
We verify the WPAR definition in our logical partition (LPAR), as shown in Example 5-6.
Example 5-6 Verifying the WPAR
root@750_2_LPAR_4:/etc/wpars> lswpar wparm91lswpar: 0960-419 Could not find a workload partition called wparm91.
The disks are still in the defined status. We can use the cfgmgr command to make them available, as shown in Example 5-7, or we can use the command mkdev –l <hdisk_number>.
Example 5-7 Make hdisks available
root@750_2_LPAR_4:/etc/wpars> lspv |egrep 'hdisk0|hdisk4'root@750_2_LPAR_4:/etc/wpars> mkdev -l hdisk4hdisk4 Availableroot@750_2_LPAR_4:/etc/wpars> mkdev -l hdisk0hdisk0 Available
If we do not have the specification file, we can create a WPAR with the hdisk4 belonging to rootvg and hdisk0 for other volume group with the mkwpar command.
Because we do not want mkwpar to create the WPAR from nothing, but rather recreate the WPAR and preserve the file system structure, we must add the -p flag (preserve) to the mkwpar command. If the -p flag is not use, the WPAR is reinstalled.
In Example 5-8, hdisk4 is the disk with the rootvg structure and content, not hdisk0, as is specified in the example.
Example 5-8 Recreating the WPAR preserving the existing rootvg
mkwpar -n wparm91 –p -D devname=hdisk0 rootvg=yes -D devname=hdisk4 -N interface=en0 \address=172.16.20.90 netmask=255.255.252.0 -I rtdest=0 rtgateway=172.16.20.1
If we specify the wrong hdisk, hdisk0 as the rootvg disk instead of hdisk4, as shown in Example 5-9, when the WPAR is started, we encounter an error message, as shown in Example 5-9.
Example 5-9 Creating system rootvg WPAR with the wrong hdisk
root@750_2_LPAR_4:/etc/wpars> startwpar wparm91Starting workload partition 'wparm91'.Mounting all workload partition file systems.Loading workload partition.172.16.20.1 net default: gateway 172.16.20.1Exporting workload partition devices.hdisk0 Defined
Using the -p flag: If a shared rootvg WPAR has a writable directory under the /usr or /opt file systems, the rmwpar command will only preserve the file system data associated with that directory if you use the -p flag.
Chapter 5. Workload partition rootvg support 97

hdisk4 DefinedExporting workload partition kernel extensions.Stopping workload partition subsystem 'cor_wparm91'.0513-004 The Subsystem or Group, cor_wparm91, is currently inoperative.projctl qpolicy: No such file or directory/usr/lib/wpars/wparinstcmd: 0960-231 ATTENTION: '/usr/bin/projctl qpolicy -nomsg' failed with return code 1.Shutting down all workload partition processes.hdisk0 Definedhdisk1 Definedfscsi0 Definedfscsi1 Definedvscsi1 Definedfscsi0 Definedfscsi1 Definedvscsi1 Definedwio0 Definedstartwpar: 0960-232 ATTENTION: 'wpar_sweep()' returned an unexpected result.Unmounting all workload partition file systems.startwpar: 0960-228 ATTENTION: cleanup may not have completed successfully
Because we used the -p flag, we can resolve this problem quickly by removing the WPAR definition and recreating it with the corrected options, as shown in Example 5-10.
Example 5-10 Recreating the WPAR with the correct rootvg disk
mkwpar -n wparm91 -D devname=hdisk4 rootvg=yes -D devname=hdisk0 -N interface=en0 address=172.16.20.91 netmask=255.255.252.0 -I rtdest=0 rtgateway=172.16.20.1 –p
Now, the WPAR is in the defined state, and we can start the WPAR with the proper configuration, as shown in Example 5-11.
Example 5-11 Starting the WPAR
root@750_2_LPAR_4:/etc/wpars> startwpar wparm91Starting workload partition 'wparm91'.Mounting all workload partition file systems.Loading workload partition.172.16.20.1 net default: gateway 172.16.20.1Exporting workload partition devices.Exporting workload partition kernel extensions.Starting workload partition subsystem 'cor_wparm91'.0513-059 The cor_wparm91 Subsystem has been started. Subsystem PID is 10223776.Verifying workload partition startup.
Within the recreated WPAR, volume groups other than rootvg are not imported automatically and must be imported manually (importvg and varyonvg).
Assuming that we do not know the names of the other volume groups within the WPAR, we can identify the names with the ls command, as shown in example Example 5-12 on page 99, and run importvg/varyonvg, specifying the disk and volume group name.
98 Exploiting IBM AIX Workload Partitions

Example 5-12 Identifying corresponding volume groups inside of the WPAR
# ls -la /dev/*vg|grep –v rootvg crw-rw---- 1 root system 531, 0 Apr 22 17:17 /dev/datavg
In Example 5-13, we have imported the datavg volume group in the WPAR from the global environment hdisk0.
Example 5-13 Volume groups after import
# lsvg -o|lsvg -ildatavg:LV NAME TYPE LPs PPs PVs LV STATE MOUNT POINTfslv04 jfs2 32 32 1 open/syncd /u01rootvg:LV NAME TYPE LPs PPs PVs LV STATE MOUNT POINTfslv00 jfs2 2 2 1 open/syncd /fslv01 jfs2 1 1 1 open/syncd /adminfslv02 jfs2 1 1 1 open/syncd /homefslv03 jfs2 2 2 1 open/syncd /tmpfslv07 jfs2 2 2 1 open/syncd /var
If you saved a specification file from the WPAR, recreating the WPAR is simpler than using the previous steps, as shown in this command:
mkwpar –f <spec file > -p
You can use a similar method when you want to move a system rootvg WPAR to another LPAR, removing the WPAR from one LPAR and recreating it on another LPAR that has access to the same disks.
Chapter 5. Workload partition rootvg support 99

100 Exploiting IBM AIX Workload Partitions

Chapter 6. Storage adapters and devices
This chapter shows how to manage storage adapters and devices in a workload partition (WPAR) environment.
This chapter illustrates how to add, change, and remove disks, tapes, and Fibre Channel (FC) storage adapters with the following topics:
� Storage devices and adapters� Storage devices� Storage adapters
6
© Copyright IBM Corp. 2011. All rights reserved. 101

6.1 Storage devices and adapters
The support of devices in the WPAR is limited to fiber-attached storage devices, FC adaptors, and virtual Small Computer System Interface (vSCSI) disks.
The devices can be allocated to an inactive WPAR or to an active WPAR.
6.1.1 Storage management in inactive WPARs
With an inactive WPAR, a storage device can be allocated and deallocated to any number of WPARs.
The first WPAR that starts takes ownership of the device. The device will be unconfigured in the global environment and reconfigured in the WPAR. No configuration changes on the device in the global environment are allowed when the device is in use by the WPAR.
There are no restrictions on removing a device from an inactive WPAR.
6.1.2 Storage management in an active WPAR
A device can be allocated to an active WPAR in one of two ways:
� If a device is not in use by another WPAR, the chwpar command allocates the device to the WPAR and makes the device available for use in the WPAR.
� If a device is in use by another WPAR, it is added to the WPAR file configuration. This device is not made accessible to the WPAR, because it is already in use by another WPAR.
When an active WPAR has control of a device, the device is kept in the defined state in the global environment and no configuration changes can be made to it.
6.2 Storage devices
Storage devices that can be exported to a WPAR are any disks that are supported by AIX and that are managed by the native AIX MPIO subsystem.
Exporting a disk device in WPAR allows the management of the WPAR’s file systems to be done through the WPAR.
After the disk has been assigned and configured in a WPAR, all Logical Volume Manager (LVM) commands are available for use. The volume groups (VG) can be created and managed from inside the WPAR, as well as the logical volumes (LVs), physical volumes (PVs), and file systems.
Important: Storage devices and adapters can only be exported to System WPARs.
Storage devices: Subsystem Device Driver Path Control Module (SDDPCM) software and drivers, and any other vendor-provided PCM software and drivers, are not supported in a WPAR.
102 Exploiting IBM AIX Workload Partitions

6.2.1 Disk allocation to WPARs
A disk can be allocated to either an active or inactive WPAR. The chwpar syntax is the same for both scenarios. Example 6-1 shows how to add a disk to a running WPAR.
Example 6-1 Exporting a disk device to a running WPAR
Global# chwpar -D devname=hdisk2 wpar1Global# clogin wpar1WPAR1# cfgmgrWPAR1# lspvhdisk0 none NoneWPAR1#
If the WPAR that is shown in Example 6-1 is inactive, only the chwpar command has been executed, because during the WPAR boot process, the cfgmgr command is run automatically.
If the WPAR is inactive, run the cfgmgr command inside the WPAR to configure the additional disk and to make it available.
Alternatively, a disk can be allocated to a WPAR during its creation time. You must specify the -D option of the mkwpar command. See Example 6-2.
Example 6-2 Exporting a disk during the WPAR creation
Global# mkwpar -D devname=hdisk2 wpar1
After the disk has been exported to a WPAR, its status in the global environment remains in the defined state until it is removed from the WPAR and cfgmgr is executed in the global environment, or until the WPAR is shut down and cfgmgr is run in the global environment. See Example 6-3.
Example 6-3 Disk device status in global environment after allocation to WPAR
Global# chwpar -D devname=hdisk2 wpar1Global# clogin wpar1 cfgmgrGlobal# lsdev -Cc diskhdisk0 Available 00-T1-01 MPIO Other DS4K Array Diskhdisk1 Available 00-T1-01 MPIO Other DS4K Array Diskhdisk2 Defined 00-T1-01 MPIO Other DS4K Array Diskhdisk3 Available 00-T1-01 MPIO Other DS4K Array Diskhdisk4 Available 00-T1-01 MPIO Other DS4K Array Diskhdisk5 Available 00-T1-01 MPIO Other DS4K Array Diskhdisk6 Available 00-T1-01 MPIO Other DS4K Array Disk
6.2.2 Disk deallocation from WPAR
As with disk allocation, the deallocation process can be executed to either an active or an inactive WPAR. In both cases, the command is the same. See Example 6-4 on page 104.
Using smitty: If using smitty to create the WPAR, the advanced option must be used to export devices to a WPAR.
Chapter 6. Storage adapters and devices 103
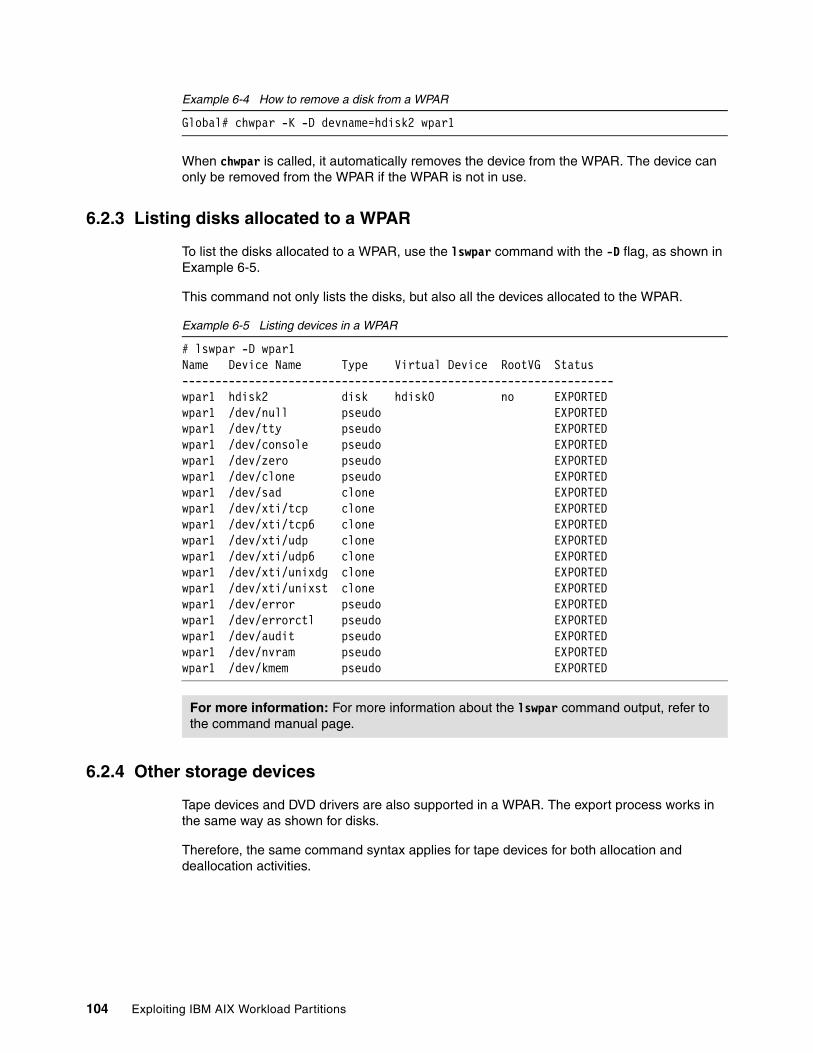
Example 6-4 How to remove a disk from a WPAR
Global# chwpar -K -D devname=hdisk2 wpar1
When chwpar is called, it automatically removes the device from the WPAR. The device can only be removed from the WPAR if the WPAR is not in use.
6.2.3 Listing disks allocated to a WPAR
To list the disks allocated to a WPAR, use the lswpar command with the -D flag, as shown in Example 6-5.
This command not only lists the disks, but also all the devices allocated to the WPAR.
Example 6-5 Listing devices in a WPAR
# lswpar -D wpar1Name Device Name Type Virtual Device RootVG Status-----------------------------------------------------------------wpar1 hdisk2 disk hdisk0 no EXPORTEDwpar1 /dev/null pseudo EXPORTEDwpar1 /dev/tty pseudo EXPORTEDwpar1 /dev/console pseudo EXPORTEDwpar1 /dev/zero pseudo EXPORTEDwpar1 /dev/clone pseudo EXPORTEDwpar1 /dev/sad clone EXPORTEDwpar1 /dev/xti/tcp clone EXPORTEDwpar1 /dev/xti/tcp6 clone EXPORTEDwpar1 /dev/xti/udp clone EXPORTEDwpar1 /dev/xti/udp6 clone EXPORTEDwpar1 /dev/xti/unixdg clone EXPORTEDwpar1 /dev/xti/unixst clone EXPORTEDwpar1 /dev/error pseudo EXPORTEDwpar1 /dev/errorctl pseudo EXPORTEDwpar1 /dev/audit pseudo EXPORTEDwpar1 /dev/nvram pseudo EXPORTEDwpar1 /dev/kmem pseudo EXPORTED
6.2.4 Other storage devices
Tape devices and DVD drivers are also supported in a WPAR. The export process works in the same way as shown for disks.
Therefore, the same command syntax applies for tape devices for both allocation and deallocation activities.
For more information: For more information about the lswpar command output, refer to the command manual page.
104 Exploiting IBM AIX Workload Partitions

6.3 Storage adapters
FC adapters can be exported to WPARs. The adapters can either be physical or virtual. The deployment of FC adapters in a WPAR allows the management of logical unit numbers (LUNs) without the intervention of the global environment.
When an FC adapter is exported to a WPAR, it automatically owns and manage the storage devices (disks and tapes) that are attached to it.
Consider the following information when exporting storage adapters to WPARs:
� If a child device of an adapter is busy, the adapter cannot be exported to the WPAR.� No WPAR mobility of any kind is possible with exported storage adapters.� Storage adapters are not supported in Versioned Workload Partitions.
6.3.1 Storage adapter allocation to a WPAR
Storage adapters can be allocated to active or to inactive WPARs. Example 6-6 shows how to export a storage adapter to a WPAR.
Example 6-6 Allocation of a storage adapter to an active WPAR
Global# chwpar -D devname=fcs2 wpar1fcs2 Availablefscsi2 Availablesfwcomm2 Definedfscsi2 Definedline = 0Global# clogin wpar1 WPAR1# cfgmgrWPAR1# lsdev -Cc adapterfcs2 Available 99-T1 Virtual Fibre Channel Client Adapter
6.3.2 Storage adapter deallocation from a WPAR
A storage adapter can only be deallocated from a running WPAR if all of its children devices are not in use.
For instance, if a child device of a given storage adapter is being used for a VG, the parent FC adapter of that disk cannot be deallocated from the WPAR until the VG is deactivated and exported.
Example 6-7 shows how to remove a storage adapter from a running WPAR. The command chwpar must be executed together with the -K and -D flags. For further details, check the chwpar command manual page.
Example 6-7 Removal of a storage adapter from an active WPAR
Global# chwpar -K -D devname=fcs2 wpar1Global# clogin wpar1 lsdev -Cc adapter
Chapter 6. Storage adapters and devices 105

6.3.3 Listing storage adapters allocated to a WPAR
To list the storage adapters and its children devices that are assigned to a WPAR, the lswpar command must be invoked with the -D option, as shown in Example 6-8.
Example 6-8 Listing storage adapters in a WPAR
Global# lswpar -D wpar1Name Device Name Type Virtual Device RootVG Status------------------------------------------------------------------wpar1 fcs2 adapter EXPORTEDwpar1 /dev/null pseudo EXPORTEDwpar1 /dev/tty pseudo EXPORTEDwpar1 /dev/console pseudo EXPORTEDwpar1 /dev/zero pseudo EXPORTEDwpar1 /dev/clone pseudo EXPORTEDwpar1 /dev/sad clone EXPORTEDwpar1 /dev/xti/tcp clone EXPORTEDwpar1 /dev/xti/tcp6 clone EXPORTEDwpar1 /dev/xti/udp clone EXPORTEDwpar1 /dev/xti/udp6 clone EXPORTEDwpar1 /dev/xti/unixdg clone EXPORTEDwpar1 /dev/xti/unixst clone EXPORTEDwpar1 /dev/error pseudo EXPORTEDwpar1 /dev/errorctl pseudo EXPORTEDwpar1 /dev/audit pseudo EXPORTEDwpar1 /dev/nvram pseudo EXPORTEDwpar1 /dev/kmem pseudo EXPORTED
106 Exploiting IBM AIX Workload Partitions

Part 3 Resource system management in a workload partition environment
In this section, we illustrate with examples how to perform system management in a workload partition (WPAR) environment. The following chapters explain resource control and management, WPAR mobility and WPAR Manager, WPAR migration scenarios, software maintenance, backup and restore, and managing your system WPAR with Network Installation Management (NIM).
Part 3
© Copyright IBM Corp. 2011. All rights reserved. 107

108 Exploiting IBM AIX Workload Partitions

Chapter 7. Resource control and management
This chapter provides an insight into the resource components of workload partitions (WPARs), how resource control works, and the various methods of controlling resource management for your WPARs.
In this chapter, we introduce the principles behind resource management for WPARs, provide examples of how to set and manage resource controls, and discuss the benefits of diligently controlling your WPAR resources.
This chapter also describes and demonstrates WPAR security features, such as role-based access control (RBAC) and enhanced RBAC, isolation, user management, and network configuration.
This chapter contains the following topics:
� Resource control introduction� Resource control and WPARs� Resource control attributes� Resource default values� Share-based and percentage-based resource allocation� CPU and memory resources� Processes and threads� Pseudo terminals (PTYs)� Large pages� Pinned memory� File systems� WPAR isolation� Security� User management� Encrypted file systems� Network� WPAR performance monitoring
7
© Copyright IBM Corp. 2011. All rights reserved. 109

7.1 Resource control introduction
In this topic, we discuss resource control and present methods and examples that show systems administrators how to allocate and manage resources for a WPAR.
The effective management of resource control helps prevent potential performance issues in environments where multiple WPARs contend for or, in certain cases, attempt to overconsume resources from the shared pool within the global environment.
Resource controls for WPARs in AIX are based on an enhanced evolution of the Workload Manager (WLM) technology first introduced into AIX in Version 4.3.3. As the WLM functionality is incorporated within the WPAR-related commands, a systems administrator does not need a thorough understanding of the workings of WLM in order to implement or change resource controls for one or more WPARs.
The global environment hosting the WPARs is capable of supporting up to 8,192 resource-controlled WPARs, although the number of WPARs not actively using resource control is only limited or constrained by the resources assigned to the system hosting the WPARs.
7.2 Resource control and WPARs
Resource control in relation to WPAR management can be separated into the following categories:
� The amount of CPU and physical memory resources allocated to a WPAR
� The amount of virtual memory that can be consumed by a WPAR
� The number of processes and threads that are allowed to run in a WPAR
� The amount of virtual memory that a single process running in a WPAR can use (AIX 6.1 Technology Level 4 (TL4) and later)
� The maximum number of pseudo terminals (PTYs) permitted for a WPAR
� The total number of large pages allowed for the WPAR
� The maximum number of message queue IDs of the system that are allowed in the WPAR
� The percentage of the maximum number of semaphore IDs of the system allowed in the WPAR
� The percentage of the maximum pinned memory of the system that can be allocated to the WPAR
� The percentage of the maximum number of shared memory IDs of the system allowed in the WPAR
� The amount of pinned memory used by a WPAR
� Which resource set (rset) to use
110 Exploiting IBM AIX Workload Partitions

If, during the creation of the WPAR, an administrator does not define or allocate resource limits, the WPAR uses a set of default values. When the WPAR is inactive, it is in the defined state. Only the attributes defined in the configuration file are displayed by the lswpar command, with the exception of the Per-Process Virtual Memory Limit value. This value is displayed, regardless of whether it is defined in the WPAR’s configuration file, as shown in Example 7-1.
Example 7-1 Resource listing for an inactive WPAR
root@p7wphost2 / # lswpar -R janel=================================================================janel - Defined=================================================================Active: yesResource Set:CPU Shares:CPU Limits:Memory Shares:Memory Limits:Per-Process Virtual Memory Limit: unlimitedTotal Virtual Memory Limit: unlimitedTotal Processes:Total Threads:Total PTYs:Total Large Pages:Max Message Queue IDs:Max Semaphore IDs:Max Shared Memory IDs:Max Pinned Memory:
However, when the WPAR is running and active, any attributes that are not defined in the configuration file are assigned a set of default values. Example 7-2 shows the output of the lswpar command when the janel system WPAR is active. Note that previously undefined values now display the additional default attributes.
Example 7-2 Resource listing for an active WPAR
root@p7wphost2:/# lswpar -R janel=================================================================janel - Active=================================================================Active: yesResource Set:CPU Shares: unlimitedCPU Limits: 0%-100%,100%Memory Shares: unlimitedMemory Limits: 0%-100%,100%
Using the -R flag: Resource allocation, control, and management are performed within the global environment by a privileged user. Commands related to resource control are not available within a WPAR.
You specify resource control attributes when creating a WPAR by making use of the -R flag of the mkwpar or wparexec command. Alternatively, these attributes can be changed dynamically using the -R flag of the chwpar command.
Chapter 7. Resource control and management 111

Per-Process Virtual Memory Limit: unlimitedTotal Virtual Memory Limit: unlimitedTotal Processes: unlimitedTotal Threads: unlimitedTotal PTYs: unlimitedTotal Large Pages: unlimitedMax Message Queue IDs: 100%Max Semaphore IDs: 100%Max Shared Memory IDs: 100%Max Pinned Memory: 100%
7.3 Resource control attributes
Table 7-1 displays the attributes and values that can be used with the -R flag of the mkwpar, wparexec, chwpar, or lswpar command.
Table 7-1 Attributes and values for use with the -R flag
7.3.1 Resource sets
A resource set is used to define a subset of processors and memory regions in the system. If a resource set is specified for a WPAR, it can use only the processors and memory regions specified within the resource set.
Attribute=Value Description
active={yes|no} Using active=yes activates resource control for a WPAR. Using active=no does not remove the attributes specified for the WPAR, and it does not activate the resource controls for the WPAR. The limits will remain in the configuration file.
rset=<rset> Instructs the WPAR to use only the specified resource set.
shares_CPU=# Specifies the number of processor shares available for the WPAR. The shares value can be a value within a range of 1 - 65,535.
CPU=<minimum>%-<SoftMax>%,<HardMax>%
Specifies the minimum CPU percentage, the soft maximum CPU percentage, and the hard maximum CPU percentage for the WPAR.
shares_memory=# Specifies the number of memory shares available for the WPAR. Shares value can be a value within a range of 1 - 65,535.
memory=<minimum>%-<SoftMax>%,<HardMax>%
Specifies the minimum memory percentage, the memory soft maximum percentage, and the memory hard maximum percentage for the WPAR.
TotalProcesses=# Specifies the maximum number of processes allowed in the WPAR.
totalThreads=# Specifies the maximum number of threads allowed in the WPAR. The maximum number of threads must be greater than or equal to the maximum number of processes.
procVirtMem=# Specifies the maximum amount of virtual memory that a single process in the WPAR can use.
112 Exploiting IBM AIX Workload Partitions

Example 7-3 demonstrates the syntax used to create a resource set called wpar_rset/procs0to4 containing five processors.
Example 7-3 Shows the syntax used to create a resource set
root@p7wphost2:/# mkrset -c 0-4 wpar_rset/procs0to4
7.4 Resource default values
As a result of the WPAR resource control being built on Workload Manager technology, the default values for the resource control attributes, as displayed in Table 7-2, are inherited from the WLM.
To obtain the best performance outcome from the global environment and the subsequent WPARs running within the global environment, the default values might need altering. For example, if a CPU-intensive application and an I/O-intensive application are running in active WPARs in the same global environment, it might be necessary to define a minimum CPU percentage for the WPAR hosting the I/O-intensive application to ensure that it can obtain a sufficient amount of processor power even when the CPU-intensive application reaches its peak.
Table 7-2 Resource control default values
Virtualization Capacity Licensing: The use of a resource set is normally associated with compute-intensive applications to achieve processor affinity. They can also be used for license control in a situation where you are licensed for only a subset of the total CPUs or amount of memory within the system. This function is known as Virtualization Capacity Licensing, which we explained in 1.5.7, “Virtualization capacity licensing” on page 16.
Attribute Default value Recommendations
Active Yes Use the default value for all WPARs. If a WPAR uses the no value, it is difficult for WLM to have effective control over all resources.
rset None Use the default value unless your workload includes computing-intensive applications.
shares_CPU Unlimited Specify for all WPARs a value that reflects the importance and weight that a WPAR needs to have among all other WPARs.
CPU 0%-100%,100% � Specify an adequate value for the minimum percentage so that the WPAR is guaranteed to receive enough CPU resource even when CPU contention conditions occur.
� Use the default values for soft or hard maximum percentage.
shares_memory Unlimited Specify for all WPARs a value that reflects the importance and weight that a WPAR needs to have among all other WPARs.
Chapter 7. Resource control and management 113

Unless performance or capacity planning constraints dictate, normally only the CPU, memory, and perhaps virtual memory resource controls are specified during the creation of the WPAR, with additional tuning to these and the remaining parameters defined and constrained at a later point in time. As any changes to resource control take place dynamically, there is no outage or downtime suffered by applications that are actively running within the WPAR.
7.5 Share-based and percentage-based resource allocation
Processor and memory resources can be allocated in one of two ways:
� Share-based resource allocation
With this method, each WPAR is allocated a portion of the specified resource according to the ratio of its own share to the sum of shares of all currently active WPARs.
In this instance, the amount of a resource received for use by a WPAR can vary significantly depending not only on its own shares, but also on its state and the shares of all other WPARs.
� Percentage-based resource allocation
With this method, for a given resource and WPAR, the desired percentages of the total amount of the resource available to all WPARs is specified in these three parameters:
– Minimum percentage: This parameter refers to the minimum amount of a particular resource that a WPAR is guaranteed to have available at all times.
If the WPAR uses a lesser amount, WLM raises the priority of WPAR processes and distributes the unused amount of that resource to the global environment. The value specified must be within a range of 0 - 100%.
– Soft maximum percentage: This parameter refers to the maximum amount of a resource that a WPAR can have when multiple WPARs contend for that type of resource. If resource contention does not occur, the WPAR can and will exceed this limit. The value specified must be within a range of 0 - 100%.
– Hard maximum percentage: This parameter refers to the maximum amount of a resource that a WPAR can ever utilize. Even if there is a sufficient amount of that type of resource available and resource contention does not occur, the WPAR cannot exceed this limit. The value specified must be within a range of 0 - 100%.
Memory 0%-100%,100% � Specify an adequate value for the minimum percentage so that the WPAR is guaranteed to get enough memory resource even when memory contention conditions occur.
� Use the default value for soft or hard maximum percentage.
totalProcesses Unlimited Unless application specifications dictate, use the default values.
totalThreads Unlimited Unless application specifications dictate, use the default values.
procVirtMem Unlimited Use the default value unless you want to restrict the amount of virtual memory that any of your processes might use.
Attribute Default value Recommendations
114 Exploiting IBM AIX Workload Partitions

7.6 CPU and memory resources
In this topic, we explain and give examples of implementing and altering CPU resource control features for a WPAR.
Share-based approach to resource controlThe share-based approach to resource control involves allocating available CPU or memory resources to the WPARs based on their weight or importance using the shares_CPU or shares_Memory options to the mkwpar and chwpar commands. The total amount of processing power within the global environment is conceptually divided into shares.
In Example 7-4, we list the resource controls from the default values when the janel WPAR was created. We then assign 15 CPU shares to the WPAR and list again to confirm the change was made.
Example 7-4 Assigning share-based CPU resources
root@p7wphost1 / # lswpar -R janel=================================================================janel - Active=================================================================Active: yesResource Set:CPU Shares: unlimitedCPU Limits: 0%-100%,100%Memory Shares: unlimitedMemory Limits: 0%-100%,100%Per-Process Virtual Memory Limit: unlimitedTotal Virtual Memory Limit: unlimitedTotal Processes: unlimitedTotal Threads: unlimitedTotal PTYs: unlimitedTotal Large Pages: unlimitedMax Message Queue IDs: 100%Max Semaphore IDs: 100%Max Shared Memory IDs: 100%Max Pinned Memory: 100%
root@p7wphost1 / # chwpar -R shares_CPU=15 janelroot@p7wphost1 / # lswpar -R janel=================================================================janel - Active
Important: There are three rules for applying percentage-based parameters to a WPAR:
� The sum of the minimum percentage for all running WPARs must not exceed 100%.
� For each WPAR, the minimum percentage must not exceed the soft maximum percentage.
� For each WPAR, the soft maximum percentage must not exceed the hard maximum percentage.
Chapter 7. Resource control and management 115

=================================================================Active: yesResource Set:CPU Shares: 15CPU Limits: 0%-100%,100%Memory Shares: unlimitedMemory Limits: 0%-100%,100%Per-Process Virtual Memory Limit: unlimitedTotal Virtual Memory Limit: unlimitedTotal Processes: unlimitedTotal Threads: unlimitedTotal PTYs: unlimitedTotal Large Pages: unlimitedMax Message Queue IDs: 100%Max Semaphore IDs: 100%Max Shared Memory IDs: 100%Max Pinned Memory: 100%
Each WPAR receives a portion of the total processing power or amount of memory that equals the ratio of the WPAR’s own share to the sum of shares of all currently active WPARs. This approach implies that the amount of a CPU or the memory resources that can be allocated to a WPAR can vary significantly and depends solely on the running status and shares of all other WPARs.
For example, if there are three active WPARs (A, B, and C) with shares for a particular resource of 15, 10, and 5, which makes our total number of shares equal to 30, the allocation targets are divided this way:
� WPAR A: 15/30 or 50%
� WPAR B: 10/30 or 33%
� WPAR C: 5/30 or 17%
Allocation targets adjust with the number of active WPARs. If partition A is inactive, the allocation targets adjust this way:
� WPAR B: 10/15 or 66%
� WPAR C: 5/15 or 33%
Share-based allocation is specified by using the shares_CPU option with the mkwpar command or the chwpar command.
Percentage-based resource controlThere are a couple of instances where it is wise to evaluate the use of percentage-based resource control for your WPARs:
� If you need to ensure at any given time that a minimum amount of a given resource is available for a WPAR
� If there is a requirement to limit the maximum amount of a given resource that a WPAR can consume
116 Exploiting IBM AIX Workload Partitions

The percentage-based method of allocating CPU or memory to the WPAR is determined by the following user-specified values.
The minimum percentage value reflects the amount of a resource capacity that is allocated to a WPAR. If the WPAR consumes a lesser amount, depending on the WLM setup, one of the following conditions occur:
� The amount of the resource is reserved for the WPAR’s exclusive usage and is not redistributed to the global environment.
� The WLM raises the priority of WPAR processes and redistributes the unused amount to the global environment. However, if at any time the WPAR needs the unused resource capacity, it can reclaim it, and because it has the highest priority, the WPAR receives it.
The soft maximum percentage reflects the maximum amount of CPU or memory resources that a WPAR receives when there is contention for the resource. If the system has enough capacity and contention does not occur, the WPAR can and will exceed this limit.
The hard maximum percentage is the absolute amount of resources that a WPAR can ever consume. There are no conditions or exceptions where this amount can be exceeded by the WPAR.
In Example 7-5, we illustrate how to change the percentage-based resource controls for the jake WPAR.
Example 7-5 Percentage-based resource controls
root@p7wphost1 / # chwpar -R CPU=8%-35%,45% jakeroot@p7wphost1 / # lswpar -R jake=================================================================jake - Active=================================================================Active: yesResource Set:CPU Shares: 10CPU Limits: 8%-35%,45%Memory Shares: 10Memory Limits: 0%-100%,100%Per-Process Virtual Memory Limit: unlimitedTotal Virtual Memory Limit: unlimitedTotal Processes: unlimitedTotal Threads: unlimitedTotal PTYs: unlimitedTotal Large Pages: unlimitedMax Message Queue IDs: 100%Max Semaphore IDs: 100%Max Shared Memory IDs: 100%Max Pinned Memory: 100%
root@p7wphost1 / # chwpar -R memory=10%-25%,40% jakeroot@p7wphost1 / # lswpar -R jake=================================================================jake - Active=================================================================Active: yesResource Set:CPU Shares: 10CPU Limits: 8%-35%,45%
Chapter 7. Resource control and management 117

Memory Shares: 10Memory Limits: 10%-25%,40%Per-Process Virtual Memory Limit: unlimitedTotal Virtual Memory Limit: unlimitedTotal Processes: unlimitedTotal Threads: unlimitedTotal PTYs: unlimitedTotal Large Pages: unlimitedMax Message Queue IDs: 100%Max Semaphore IDs: 100%Max Shared Memory IDs: 100%Max Pinned Memory: 100%
7.7 Processes and threads
Limits can also be specified for the maximum number of processes and threads permitted to be active at any given time within the WPAR.
If the maximum number of processes is not explicitly set for a WPAR, the value of the maxuproc attribute of the sys0 object within the global environment is applied for non-root users with the value for the WPAR’s root user being unlimited.
In Example 7-6, we define a threshold for both the total processes for our WPAR and the total threads. As shown in the example, the command fails if we try to define a value for total threads that is less than that defined for the total processes.
Example 7-6 Defining thread and process thresholds
root@p7wphost1 / # chwpar -R totalProcesses=237 janelroot@p7wphost1 / # lswpar -R janel=================================================================janel - Active=================================================================Active: yesResource Set:CPU Shares: 15CPU Limits: 20%-50%,65%Memory Shares: 30Memory Limits: 25%-40%,55%Per-Process Virtual Memory Limit: unlimitedTotal Virtual Memory Limit: unlimitedTotal Processes: 237Total Threads: unlimitedTotal PTYs: unlimitedTotal Large Pages: unlimitedMax Message Queue IDs: 100%Max Semaphore IDs: 100%Max Shared Memory IDs: 100%Max Pinned Memory: 100%
Important: A systems administrator can specify both share-based and percentage-based resource controls. In the event of conflict between the two types of resource controls, the percentage-based controls take precedence.
118 Exploiting IBM AIX Workload Partitions

root@p7wphost1 / # chwpar -R totalThreads=89 janel**********************************************************************ERRORchwpar: 0960-527 resources.totalThreads = 89 is invalid: Must be greater than or equal to totalProcesses (237).
**********************************************************************
root@p7wphost1 / # chwpar -R totalThreads=289 janelroot@p7wphost1 / # lswpar -R janel=================================================================janel - Active=================================================================Active: yesResource Set:CPU Shares: 15CPU Limits: 20%-50%,65%Memory Shares: 30Memory Limits: 25%-40%,55%Per-Process Virtual Memory Limit: unlimitedTotal Virtual Memory Limit: unlimitedTotal Processes: 237Total Threads: 289Total PTYs: unlimitedTotal Large Pages: unlimitedMax Message Queue IDs: 100%Max Semaphore IDs: 100%Max Shared Memory IDs: 100%Max Pinned Memory: 100%
7.8 Pseudo terminals (PTYs)
This setting specifies the total number of pseudo terminals allowed in the WPAR. A pseudo terminal includes a pair of control and slave character devices to provide a text terminal interface rather than having a reliance on hardware.
The slave device provides processes with essentially the same interface as that provided by the tty device driver. However, instead of providing support for a hardware device, the slave device is manipulated by another process through the control device half of the pseudo terminal. That is, anything written on the control device is given to the slave device as input and anything written on the slave device is presented as input on the control device.
Limiting the number of PTYs allows us to control the number of terminal emulation programs or applications, such as remote access applications, such as Secure Shell (SSH), Telnet, and the Expect tool.
In Example 7-7 on page 120, the System WPAR has a total of only three PTYs assigned. We then increase the number of total PTYs allowed in the WPAR to 15.
Note: When no attributes are specified for the chwpar command, the -K and -R flags restore the resource control profile of the WPAR to the default settings.
Chapter 7. Resource control and management 119

Example 7-7 Increasing the total PTYs in a WPAR
root@p7wphost1 / # lswpar -R janel=================================================================janel - Active=================================================================Active: yesResource Set:CPU Shares: 15CPU Limits: 0%-100%,100%Memory Shares: 15Memory Limits: 0%-100%,100%Per-Process Virtual Memory Limit: unlimitedTotal Virtual Memory Limit: unlimitedTotal Processes: 95Total Threads: 100Total PTYs: 3Total Large Pages: 20Max Message Queue IDs: 50%Max Semaphore IDs: 40%Max Shared Memory IDs: 40%Max Pinned Memory: 30%root@p7wphost1 / # chwpar -R totalPTYs=15 janelroot@p7wphost1 / # lswpar -R janel=================================================================janel - Active=================================================================Active: yesResource Set:CPU Shares: 15CPU Limits: 0%-100%,100%Memory Shares: 15Memory Limits: 0%-100%,100%Per-Process Virtual Memory Limit: unlimitedTotal Virtual Memory Limit: unlimitedTotal Processes: 95Total Threads: 100Total PTYs: 15Total Large Pages: 20Max Message Queue IDs: 50%Max Semaphore IDs: 40%Max Shared Memory IDs: 40%Max Pinned Memory: 30%
7.9 Large pages
Large pages are used predominantly to improve system performance for High-Performance Computing (HPC) applications or any memory-intensive applications that consume large quantities of virtual memory.
The improved efficiencies in system performance stem from the reduction of translation lookaside buffer (TLB) misses due to the TLB mapping to a larger virtual memory range.
120 Exploiting IBM AIX Workload Partitions

Large pages also improve the prefetching of memory by eliminating the need to restart the prefetch operations on 4 KB boundaries. AIX supports large page usage by both 32-bit and 64-bit applications.
The large page architecture requires all the virtual pages in a 256 MB segment to be the same size. AIX supports this architecture by using a mixed-mode process model so that certain segments in a process are backed with 4 KB pages, while other segments are backed with 16 MB pages. Applications can request that their heap segments or memory segments be backed with large pages.
AIX maintains separate 4 KB and 16 MB physical memory pools. You can dictate the amount of physical memory in the 16 MB memory pool using the vmo command. Beginning with AIX 5.3, the large page pool is dynamic, which means that the amount of physical memory you specify will take effect immediately. This change occurs dynamically without the requirement of a system reboot. The remaining physical memory backs the 4 KB virtual pages.
7.10 Pinned memory
AIX enables memory pages to be maintained in real memory all the time. This mechanism is called pinning memory. We can specify a limit as a percentage of the pinned memory available from the global environment to the WPARs either on creation or by using the chwpar command.
Pinning a memory region prohibits the pager from stealing pages from the pages backing the pinned memory region. The memory regions, which are defined in either the system or user space, can potentially be pinned. After a memory region is pinned, accessing that region does not result in a page fault until the region is subsequently unpinned. While a portion of the kernel remains pinned, many regions are pageable and are only pinned while being accessed.
The advantage of having portions of memory pinned is that, when accessing a page that is pinned, you can retrieve the page without going through the page replacement algorithm.
The vmo maxpin% tunable can be used to adjust the amount of memory that can be pinned in the global environment. The maxpin% tunable specifies the maximum percentage of real memory that can be pinned.
User applications can pin memory through several mechanisms. Applications can use a number of subroutines to pin application memory.
An application can explicitly pin shared memory regions by specifying the SHM_LOCK option to the shmctl() subroutine. An application can also pin a shared memory region by specifying the SHM_PIN flag to the shmget() subroutine.
Paging activity: An adverse side effect of having too many pinned memory pages is that this situation can increase paging activity for unpinned pages, which will result in a degradation of performance across the system.
Important: Because the kernel must be able to pin a certain amount of kernel data, decreasing the value of the maxpin% tunable can potentially lead to functional problems and is not advised.
Chapter 7. Resource control and management 121

7.11 File systems
System WPARs have their own file systems that are similar to stand-alone AIX partitions.
A system WPAR is similar to a typical AIX environment. Each System WPAR, by default, shares the /usr and /opt from the global environment, mounting them in read-only mode. However, sometimes having these file systems in read-only mode might not be suitable for certain workloads or applications.
To overcome this limitation, a System WPAR can be created with a private /usr and /opt. This option provides better isolation and security for an application running inside a WPAR that needs a writable /usr or /opt.
When the system WPAR has isolated file system spaces, each file system is owned and managed by the global environment. For a WPAR-owned root volume group, dedicated storage devices must be allocated to the WPAR and each file system is owned and managed by the WPAR.
The following Journal File System 2 (JFS2) file systems are created with in-line logs and populated similarly to a stand-alone AIX system with the following sizes:
� / (64 MB)� /tmp (96 MB)� /var (128 MB)� /home (32 MB)
The following JFS2 file systems are shared from the global environment using namefs mounts with the followed permissions:
� /usr (read-only permissions)� /opt (read-only permissions)� /proc (read-write permissions)
File system considerationsAt creation time, a WPAR can have several types of file systems:
� NameFS� JFS� JFS2� NFS� VxFS
By default, the system creates /, /home, /tmp, and /var as jfs2 and /usr, /op as namefs read-only, and /proc as namefs and read-write.
A namefs file system is a function that provides file-over-file and directory-over-directory mounts (also called soft mounts). It allows you to mount a subtree of a file system in a separate place in the same server, allowing a file to be accessed through two separate path names.
If the applications require more file systems, they need to be manually created from the global environment, or locally in the WPAR if a device has been exported to it. Network File System (NFS) mount points can also be mounted from inside a WPAR.
File system size: The initial sizes of these file systems can change, depending on the system requirements and storage characteristics.
122 Exploiting IBM AIX Workload Partitions

File systems in a rootvg WPARWhen a system WPAR is created with its own root volume group (rootvg WPAR), the root file systems are created in a separate volume group that is owned and managed by the WPAR.
When a rootvg WPAR is created, it will create five more file systems similar to a stand-alone AIX system:
� /� /admin� /home� /tmp� /var
If a non-shared system WPAR is created that owns the root volume group, the /usr file system and /opt file system are created and populated within the WPAR-owned root volume group.
Versioned Workload Partitions always have non-shared /usr and /opt file systems.
The WPAR administrator can change the file system characteristics of any file system that resides within the WPAR-owned root volume group.
Application mobility and file systemsIf application mobility is desired, it can only be accomplished by either using a storage area network (SAN)-based WPAR, or using NFS file systems. The use of an NFS file system is an option where a SAN infrastructure is not available, and mobility is needed.
Using NFS file systems, a WPAR can have all its file systems using imported NFS shares from another machine, including /usr and /opt if a private System WPAR is chosen. However, an NFS server can add a potential single point of failure (SPOF) in the environment if it is not supported by a high availability solution, such as IBM PowerHA.
7.12 WPAR isolation
Each WPAR represents an individual environment that relies on and uses services provided by the global environment.
WPARs are able to communicate with other WPARs residing in the same global environment or any other external system. At the same time, each WPAR is separated by the global environment and other WPARs. Each application running in a WPAR is provided with a private execution environment by the AIX kernel.
The global environment represents a framework that controls all user-level and system-level objects that are usual for any regular AIX operating system image, such as devices, file systems, or processes. The core of the WPAR technology is the shared kernel that the global environment and the active WPAR instances use.
WPARs and the global environment have been designed so that administrative tasks and commands that can be run from the global environment have the ability to affect WPAR
Logical volume names: The logical volume names used within a rootvg WPAR are the same as those typically used on an AIX system. For example, /dev/hd4 is the logical volume name for the root / file system, and /dev/hd11admin is the logical volume name for the /admin file system.
Chapter 7. Resource control and management 123

operation. However, the potential of a WPAR to interfere with a separate partition or the global environment is strictly limited.
7.12.1 Access to storage devices and adapters
The following information provides access information to storage devices and adapters:
� Physical-disk devices and Logical Volume Manager (LVM)-associated objects, such as physical volumes, volume groups, or logical volumes, are available and isolated within a WPAR.
� Physical devices, such as network devices, are not available in a WPAR (with the exception of storage devices that are covered in Chapter 6, “Storage adapters and devices” on page 101).
� WPARs have access only to a set of pseudo devices, such as /dev/ptyp0.
� Devices that provide a more global view of the system, such as /dev/mem or /dev/kmem, have been removed.
� Access to system-generic devices that are safe, /dev/null or /dev/zero, is allowed.
� The WPARs are not capable of creating new devices by themselves, for instance, by using the mknod command.
7.12.2 File system access
For file system access, remember these points:
� File systems in a system WPAR can only be accessed from that WPAR or from the global environment.
� Certain utilities that use file system metadata and require access to certain /dev devices do not work when invoked from the WPAR. In consequence, certain file system operations, such as extension or defragmentation, are not allowed from the WPAR, unless the file system is being managed by the WPAR through exported devices.
� Regular global users cannot access WPAR file systems unless explicitly given specific privileges.
� WPAR administrators cannot mount or unmount WPAR file systems that are mounted or umounted from the global environment.
7.12.3 Network access
For network access, remember these points:
� Modification of network settings, such as the IP address, is not allowed from the WPAR.
� If configured, WPARs can have a separated routing table.
� Processes from a WPAR can bind, send, or receive packets only from the IP addresses and ports that are configured in the WPAR.
� Outgoing IP datagrams must use, as the source IP, the IP address that is assigned to the WPAR.
� Application processes are not allowed to bypass the network stack.
124 Exploiting IBM AIX Workload Partitions

7.12.4 System settings
For system settings, remember these points:
� Access to system-wide settings is restricted.
� Access to system-wide objects is restricted.
� Access to certain system-wide configuration files, such as those contained in /etc, has been restricted.
� Kernel, I/O, and Virtual Machine Manager (VMM) tuning are not allowed from inside a WPAR.
7.12.5 Command-line interface
For the command-line interface, remember these points:
� The ability to use certain administrative commands that might affect the global environment has been removed. For instance, it is not allowed to modify the date or time from a WPAR or to bind a process to a specific processor.
� System-wide parameters cannot be changed from a WPAR using the command-line interface.
7.12.6 Security and user management
For security and user management, remember these points:
� User, group, and security repositories of all WPARs represent distinct entities. They also differ from the global repository.
� Applications running in a WPAR derive their credentials from the local WPAR repositories. The scope of credentials is confined to the WPAR limits.
� The scope of WPAR root privileges is contained within the WPAR boundaries and cannot interfere with the global environment.
7.12.7 Process resources and intercommunication
For processing resources and intercommunication, remember these points:
� Processes that run in the global environment and have appropriate privileges can view and signal processes within a WPAR.
� Processes belonging to a WPAR cannot be reassigned to a separate WPAR.
� Processes within a WPAR can only create, view, and access the resources owned by the WPAR. These resources include non-shared file systems, devices, network interfaces, or ports.
� Processes within a WPAR can only access files located in the file systems mounted in the same WPAR.
� Processes within a WPAR can only see processes running in the same WPAR.
� Processes within a WPAR can send signals only to processes in the same WPAR.
� Processes within a WPAR can share System V interprocess communication (IPC) mechanisms (shared memory areas, message queues, and semaphores) or Portable Operating System Interface (POSIX) IPCs only with other processes executing in the same WPAR.
Chapter 7. Resource control and management 125

� Resources used by applications running in a WPAR are tagged with the ID of that WPAR.
7.12.8 Kernel manipulation
The ability to load or unload system-level device drivers and kernel extensions from inside the WPAR has been removed. Kernel extensions can be loaded and unloaded from a WPAR by using the chwpar command with the -X flag from the global environment.
7.12.9 Commands
Most of the standard AIX commands are available in a WPAR. Certain commands have been modified or enhanced with new parameters to accommodate their use with WPARs. The output of the commands is significant to the context in which the command was run.
For instance, the behavior of the df command depends on whether it is run from the WPAR or the global environment. When run in the global environment, it displays information on all file systems and the paths returned are absolute. When run from a WPAR, it displays information on WPAR-mounted file systems only and the paths displayed are relative to the WPAR root or base directory, as we see in Example 7-8.
Example 7-8 Command behavior within a WPAR
root@p7wphost1 / # df -mFilesystem MB blocks Free %Used Iused %Iused Mounted on/dev/hd4 2048.00 1863.47 10% 9964 3% //dev/hd2 3072.00 1309.97 58% 41375 13% /usr/dev/hd9var 2048.00 1729.73 16% 8104 3% /var/dev/hd3 2048.00 2045.50 1% 41 1% /tmp/dev/hd1 32.00 31.63 2% 11 1% /home/dev/hd11admin 128.00 127.63 1% 5 1% /admin/proc - - - - - /proc/dev/hd10opt 2048.00 1859.00 10% 7089 2% /opt/dev/livedump 256.00 255.64 1% 4 1% /var/adm/ras/livedump/dev/fslv14 96.00 66.81 31% 2017 12% /wpars/janel/dev/fslv15 32.00 31.16 3% 5 1% /wpars/janel/home/opt 2048.00 1859.00 10% 7089 2% /wpars/janel/opt/proc - - - - - /wpars/janel/proc/dev/fslv16 96.00 94.42 2% 9 1% /wpars/janel/tmp/usr 3072.00 1309.97 58% 41375 13% /wpars/janel/usr/dev/fslv17 128.00 107.57 16% 353 2% /wpars/janel/var
root@p7wphost1 / # ssh janelLast unsuccessful login: Thu 21 Apr 13:09:48 2011 on ssh from p7wphost1Last login: Thu 21 Apr 13:10:00 2011 on /dev/Global from p7wphost1******************************************************************************** ** ** Welcome to AIX Version 7.1! ** ** ** Please see the README file in /usr/lpp/bos for information pertinent to ** this release of the AIX Operating System. ** ** ********************************************************************************
126 Exploiting IBM AIX Workload Partitions

root@janel / # df -mFilesystem MB blocks Free %Used Iused %Iused Mounted onGlobal 96.00 66.79 31% 2022 12% /Global 32.00 31.16 3% 5 1% /homeGlobal 2048.00 1859.00 10% 7089 2% /optGlobal - - - - - /procGlobal 96.00 94.42 2% 9 1% /tmpGlobal 3072.00 1309.97 58% 41375 13% /usrGlobal 128.00 107.51 17% 355 2% /var
7.12.10 Shared Kernel
Having a shared kernel implies that both global environment and all WPAR instances use services provided by a unique AIX kernel. The kernel is able to handle and manage resources belonging to various WPARs and still maintain complete separation. For instance, file handles or memory areas allocated to a WPAR cannot be accessed from another WPAR.
There have been changes implemented for new AIX kernel services. Using these services, the kernel can determine the status of a partition or can identify the WPAR that owns the process that initiates a particular system call.
7.13 Security
Traditionally, the approach taken to extend or grant privileged access in AIX has relied on a single system user account, which is named the root user.
The root user provides for the superuser-style access required by systems administrators for them to perform their day-to-day duties. The root user has the authority to perform all the privileged system administration tasks within an AIX operating system and the WPARs that it hosts.
Dependence on a single superuser and account for all aspects of system administration raises issues in regard to the separation of administrative duties and is fundamentally flawed from a security perspective. The root user allows an administrator to have a single point of control when managing the AIX operating system, but this access then allows an individual to have complete freedom within the operating system and to its resources. While this unrestricted access might be of benefit in everyday administration, it also has the potential to pose a risk to the overall security and integrity of the operating system.
These days, it is rare that any business has a single administrator for a number of reasons, including redundancy from the point of human resources alone. It is likely that the privileges of the root user account are shared among a number of systems administrators. The practice of sharing administrative accounts is likely not only to breach security guidelines but also to have repercussions around auditing and accounting, because actions and changes in this instance cannot be attributed to an individual.
Anyone with access to the root user account can perform tasks and operations on the system that include the ability to erase any audit log entries designed to keep track of activity on the systems, making the identification of an individual responsible for those actions impossible.
Important: Commands that might impact or alter settings of the global environment cannot be executed from a WPAR.
Chapter 7. Resource control and management 127

Role-based access control provides the option to define roles that allow users to perform privileged commands based upon the user’s requirements while maintaining the integrity of the operating system.
7.13.1 Enhanced and existing role-based access control (RBAC)
In this section, we highlight the differences between the two operating modes of RBAC that are available in AIX: legacy mode and enhanced mode.
With the release of AIX V6.1, we saw the introduction of an enhanced version of role-based access control (RBAC), which added to the existing version of RBAC that has been a component of the AIX operating system since Version 4.2.1.
To distinguish between these two versions, the following naming conventions are used:
� Enhanced RBAC is the enhanced version of RBAC that was introduced in AIX V6.1.
� Legacy RBAC is the original version of RBAC introduced in AIX V4.2.1.
OverviewThe following section provides an overview of the variants of RBAC.
Legacy RBACLegacy RBAC was introduced in AIX V4.2.1. The AIX security infrastructure began to provide the administrator with the ability to allow a user account other than the root user to perform certain privileged system administration tasks as defined or delegated.
Legacy RBAC often required that the command being controlled by an authorization have setuid to the root user in order for an authorized user to have the proper privileges to accomplish the operation in question.
Enhanced RBACA more powerful iteration of RBAC was provided with AIX 6.1. Applications that require administrative privileges for certain operations have new integration options with enhanced RBAC.
These integration options focus on the use of granular privileges and authorizations as well as the ability to configure any command on the system as a privileged command. Features of the enhanced RBAC mode are installed and enabled by default on all installations of AIX beginning with AIX 6.1.
The enhanced RBAC mode provides a configurable set of roles, authorizations, privileged commands, devices, and files through the following RBAC databases. With enhanced RBAC, the databases can reside either in the local file system or can be managed remotely through Lightweight Directory Access Protocol (LDAP):
� Authorization database� Role database� Privileged command database� Privileged device database� Privileged file database
Important: At the time of publication, the new Domain RBAC feature in AIX 7.1 is not supported within a WPAR.
128 Exploiting IBM AIX Workload Partitions

Enhanced RBAC mode introduces a new naming convention for authorizations that allow a hierarchy of authorizations to be created. AIX provides a granular set of system-defined authorizations, and an administrator is free to create additional user-defined authorizations as necessary.
The behavior of roles has been enhanced to provide a separation of duty and functionality. Enhanced RBAC introduces the concept of role sessions. A role session is a process with one or more associated roles. A user can create a role session for any roles that the user has been assigned, therefore activating a single role or several selected roles at a time. By default, a new system process does not have any associated roles. Roles have further been enhanced to support the requirement that the user must authenticate before activating the role to protect against an attacker taking over a user session, because the attacker then needs to authenticate to activate the user’s roles.
The introduction of the privileged command database implements the least privilege principle. The granularity of system privileges has been increased, and explicit privileges can be granted to a command and the execution of the command can be governed by an authorization. This approach provides the functionality to enforce authorization checks for command execution without requiring a code change to the command. Use of the privileged command database removes the requirement of secure user ID (SUID) and secure group ID (SGID) applications, because the capability of only assigning required privileges is possible.
The privileged device database allows access to devices to be governed by privileges, while the privileged file database allows unprivileged users access to restricted files based on authorizations. These databases increase the granularity of system administrative tasks that can be assigned to users who otherwise have insufficient privileges.
The information in the RBAC databases is gathered and verified and then sent to an area of the kernel designated as the Kernel Security Tables (KSTs).
7.13.2 Using RBAC to secure WPAR operations
This section illustrates how RBAC features can be used to implement strict control over the usual operational procedures in a WPAR environment that uses RBAC features.
Securing an operational procedure involves the following actions:
� Determining the set of privileges required to use the procedure
� Creating a mechanism that allows granting and revoking the credentials required for users to use the procedure
� Ensuring that users that have not been explicitly granted the set of required privileges cannot execute the procedure
The scenario presented here demonstrates how to secure a daily routine operation, such as starting and stopping a WPAR. Similar actions can be performed with respect to all WPAR-related activities.
Starting a WPAR requires access to a single system command, startwpar. Stopping a WPAR requires access to a single system command, stopwpar.
Important: The security policy and decisions that are used by the system are based on the data in the Kernel Security Tables. Entries that are modified in the user-level RBAC databases are not implemented or used for security decisions until the KSTs have been successfully updated with the setkst command, as seen in Example 7-16 on page 134.
Chapter 7. Resource control and management 129

In RBAC-specific terms, you must perform the following tasks:
� Determine the set of authorizations required to invoke both startwpar and stopwpar commands.
� Define a role that includes those privileges.
� Ensure that the role is unique.
RBAC-specific concepts are implemented in the following manner:
1. Determine the full path of the commands to include in the role, as shown in Example 7-9.
Example 7-9 Determining the path for WPAR Commands
root@p7wphost1 / # find / -name "*startwpar*"/opt/mcr/bin/restartwpar/usr/sbin/startwpar/usr/share/man/info/EN_US/a_doc_lib/cmds/aixcmds5/startwpar.htmroot@p7wphost1 / # find / -name "*stopwpar*"/usr/sbin/stopwpar/usr/share/man/info/EN_US/a_doc_lib/cmds/aixcmds5/stopwpar.htm
2. Determine the required system authorizations for these commands, as shown in Example 7-10. Three authorizations are required to run the startwpar and stopwpar commands.
Example 7-10 Determining authorizations for the startwpar/stopwpar commands
root@p7wphost1 / # lssecattr -c /usr/sbin/startwpar/usr/sbin/startwpar euid=0 egid=0 accessauths=aix.wpar.owner,aix.wpar.system.start innateprivs=PV_AZ_ROOT,PV_DAC_,PV_PROC_PRIV inheritprivs=PV_AZ_ADMIN,PV_AZ_CHECK,PV_DAC_,PV_AZ_ROOT,PV_KER_,PV_DEV_QUERY,PV_FS_MKNOD secflags=FSF_EPS
root@p7wphost1 / # lssecattr -c /usr/sbin/stopwpar/usr/sbin/stopwpar accessauths=aix.wpar.owner,aix.wpar.system.stop innateprivs=PV_AZ_ROOT,PV_DAC_O,PV_DAC_R,PV_DAC_X,PV_PROC_PRIV,PV_TCB inheritprivs=PV_AU_ADMIN,PV_AZ_CHECK,PV_AZ_ROOT,PV_DAC_O,PV_DAC_R,PV_DAC_W,PV_DAC_X,PV_DEV_CONFIG,PV_DEV_LOAD,PV_DEV_QUERY,PV_FS_CHOWN,PV_FS_MOUNT,PV_KER_ACCT,PV_KER_DR,PV_KER_EXTCONF,PV_KER_RAC,PV_KER_VARS,PV_KER_WLM,PV_KER_WPAR,PV_NET_CNTL,PV_NET_PORT,PV_PROC_PRIV,PV_PROC_RAC,PV_PROC_SIG,PV_SU_UID,PV_TCB,PV_FS_MKNOD secflags=FSF_EPS
3. Determine the roles that include the authorizations identified, as shown in Example 7-11. All authorizations are included in the SysConfig role.
Example 7-11 Determining the roles that include required authorizations
root@p7wphost1 / # lsauth -a roles aix.wpar.owneraix.wpar.owner roles=SysConfigroot@p7wphost1 / # lsauth -a roles aix.wpar.system.startaix.wpar.system.start roles=SysConfigroot@p7wphost1 / # lsauth -a roles aix.wpar.system.stopaix.wpar.system.stop roles=SysConfig
4. Create the wpar-operator user-defined role that includes the authorizations previously determined, as shown in Example 7-12.
130 Exploiting IBM AIX Workload Partitions

Example 7-12 Creating the user-defined role
root@p7wphost1 / # mkrole authorizations='aix.wpar.owner,aix.wpar.owner.start,aix.wpar.owner.stop' dfltmsg='WPAR-Operator' wpar-operator
root@p7wphost1 / # lsrole wpar-operatorwpar-operator authorizations=aix.wpar.owner,aix.wpar.owner.start,aix.wpar.owner.stop rolelist= groups= visibility=1 screens=* dfltmsg=WPAR-Operator msgcat= auth_mode=INVOKER id=12
5. As demonstrated in Example 7-13, create the operator user, assign it the wpar-operator role, and then update the Kernel Security Tables. After completing these tasks, the user operator can activate the role wpar-operator and will be assigned the expected authorizations.
Example 7-13 Creating the user and assigning the role
# mkuser operator
# lsuser -a roles operatoroperator roles=
# chuser roles=wpar-operator operator
# lsuser -a roles operatoroperator roles=wpar-operator
# setkstSuccessfully updated the Kernel Authorization Table.Successfully updated the Kernel Role Table.Successfully updated the Kernel Command Table.Successfully updated the Kernel Device Table.Successfully updated the Kernel Object Domain Table.Successfully updated the Kernel Domains Table.
$ swrole wpar-operatoroperator's Password:$ rolelist -eawpar-operator aix.wpar.owner
6. Example 7-14 illustrates that at this point, there are two roles that contain the three authorizations. Now, remove them from the SysConfig role.
Example 7-14 Removing the authorizations from the SysConfig role
# lsauth -a roles aix.wpar.owneraix.wpar.owner roles=SysConfig,wpar-operator
# lsauth -a roles aix.wpar.owneraix.wpar.owner roles=SysConfig,wpar-operator
# lsauth -a roles aix.wpar.system.startaix.wpar.system.start roles=SysConfig,wpar-operator
# lsauth -a roles aix.wpar.system.stop
Chapter 7. Resource control and management 131

aix.wpar.system.stop roles=SysConfig,wpar-operator
# lsrole -a authorizations SysConfigSysConfigauthorizations=aix.system.boot.create,aix.system.config.bindintcpu,aix.system.config.console,aix.system.config.date,aix.system.config.diag,aix.system.config.dlpar,aix.system.config.inittab,aix.system.config.io,aix.system.config.kext,aix.system.config.mode,aix.system.config.perf,aix.system.config.rset,aix.system.config.uname,aix.system.config.write,aix.system.stat,aix.wpar
# chroleauthorizations=aix.system.boot.create,aix.system.config.bindintcpu,aix.system.config.console,aix.system.config.date,aix.system.config.diag,aix.system.config.dlpar,aix.system.config.inittab,aix.system.config.io,aix.system.config.kext,aix.system.config.mode,aix.system.config.perf,aix.system.config.rset,aix.system.config.uname,aix.system.config.write,aix.system.stat SysConfig
# lsrole -a authorizations SysConfigSysConfigauthorizations=aix.system.boot.create,aix.system.config.bindintcpu,aix.system.config.console,aix.system.config.date,aix.system.config.diag,aix.system.config.dlpar,aix.system.config.inittab,aix.system.config.io,aix.system.config.kext,aix.system.config.mode,aix.system.config.perf,aix.system.config.rset,aix.system.config.uname,aix.system.config.write,aix.system.stat
7. The final step shows that the wpar-operator role is the only role that includes aix.wpar.owner, aix.wpar.system.start, and aix.wpar.system.stop authorizations. Only users that switched to this role can perform the WPAR-specific operations that required those authorizations.
The user ana successfully switches to the SysConfig role. However, this role no longer contains the authorizations required to start a WPAR. Therefore, ana is denied the permission to execute the startwpar command.
After the authorizations are added back into the SysConfig role, you can see in Example 7-15 that the user ana now has the required authorizations to start the jake WPAR as well as to perform other WPAR operations.
Example 7-15 Altering authorizations for roles
# lsauth -a roles aix.wpar.owneraix.wpar.owner roles=wpar-operator
# lsauth -a roles aix.wpar.system.startaix.wpar.system.start roles=wpar-operator
# lsauth -a roles aix.wpar.system.stopaix.wpar.system.stop roles=wpar-operator
$ swrole SysConfigana's Password:
$ rolelist -eaSysConfig aix.system.boot.create aix.system.config.bindintcpu aix.system.config.console aix.system.config.date
132 Exploiting IBM AIX Workload Partitions

aix.system.config.diag aix.system.config.dlpar aix.system.config.inittab aix.system.config.io aix.system.config.kext aix.system.config.mode aix.system.config.perf aix.system.config.rset aix.system.config.uname aix.system.config.write aix.system.stat aix.wpar$ lswparName State Type Hostname Directory RootVG WPAR--------------------------------------------------------jake D S jake /wpars/tommy nojanel A S janel /wpars/janel nolucy D S lucy /wpars/lucy no
$ startwpar -v jakeStarting workload partition jake.Mounting all workload partition file systems.Mounting /wpars/jakeMounting /wpars/jake/homeMounting /wpars/jake/optMounting /wpars/jake/procMounting /wpars/jake/tmpMounting /wpars/jake/usrMounting /wpars/jake/varLoading workload partition.Exporting workload partition devices.Exporting workload partition kernel extensions.Starting workload partition subsystem cor_jake.0513-059 The cor_jake Subsystem has been started. Subsystem PID is 8192086.Verifying workload partition startup.Return Status = SUCCESS.
7.14 User management
User management in relation to WPARs varies based on the type of WPAR in question. An application WPAR being created and running using the file systems of the global environment includes the user management and security files of the global environment.
By contrast, the system WPAR is designed to function as though it is an independent AIX environment. The system WPAR inherits the traditional AIX management tasks, control features, and security attributes with respect to both users and groups, so all user and group management activities are similar to those performed on a stand-alone AIX system.
However, the users and groups of a WPAR are completely isolated and independent from those that exist in the global environment or in another WPAR. Therefore for our WPAR users and groups, you can think of the WPAR as a completely independent system, isolated from both the global environment users and groups as well as that of the other WPARs hosted by the same global environment.
Chapter 7. Resource control and management 133

Even in the case when a user from the system WPAR environment has an ID and security attributes that are identical to those of a user from the global environment, they are still completely separate entities, as highlighted in Example 7-16. Note that separate home directories are defined in the global environment and in the janel WPAR for the user called ana, as shown in Example 7-16.
Example 7-16 User isolation of WPARs
root@p7wphost1 / # lsuser -f -a id pgrp groups admgroups home anaana: id=212 pgrp=finance groups=staff,system,finance,accounts admgroups=finanace home=/home/ana
root@p7wphost1 / # clogin janel******************************************************************************** ** ** Welcome to AIX Version 7.1! ** ** ** Please see the README file in /usr/lpp/bos for information pertinent to ** this release of the AIX Operating System. ** ** ********************************************************************************Last login: Sat 16 Apr 12:05:52 2011 on /dev/Global from p7wphost1
root@janel / # lsuser -f -a id pgrp groups admgroups home anaana: id=212 pgrp=finance groups=staff,system,finance,accounts admgroups=finance home=/home/ana/inwpar
Each WPAR has its own security-related files and settings. Therefore, the /etc/passwd file from the global environment is an entirely separate entity from the /etc/passwd file within the WPAR, as seen in Example 7-17.
Example 7-17 Separation of security files
root@p7wphost1 / # find / -name passwd -print/etc/passwd/etc/security/passwd/wpars/janel/etc/passwd/wpars/janel/etc/security/passwd/wpars/janel/usr/bin/passwd/wpars/jake/etc/passwd/wpars/jake/etc/security/passwd/wpars/jake/usr/bin/passwd
Each WPAR’s unique set of users and groups can be administered either locally using the local security repository, or remotely through a centralized network-based repository, such as
134 Exploiting IBM AIX Workload Partitions

Network Information Service (NIS), NIS+, or LDAP with the Request for Comments (RFC) 2307 schema.
7.14.1 Security credentials in WPAR environments
Applications running within a WPAR derive their security credentials from the rights of the local WPAR users and groups. Applications running in an Encrypted File System (EFS)-enabled environment obtain their security privileges using both an AIX traditional discretionary access control mechanism and security credentials contained in user and group keystores.
This section demonstrates how EFS-related features interact in WPAR environments, and how they can be used to strengthen the security. A prior understanding of concepts regarding EFS is required. Before endeavouring to use EFS within a WPAR, EFS must first be enabled in the global environment with the efsenable command. This enablement only needs to be performed once.
User security credentials within a WPAR Just as with a stand-alone AIX system, in the instance where WPARs or the global environment are EFS-enabled, there is no connection between the key contained in user and group keystores.
In Example 7-18, we enable EFS and illustrate the user named ana, which has identical ID and security attributes in the global environment and in two separate system WPARs. Each private key fingerprint differs, which means that the private keys themselves also differ.
Example 7-18 EFS and security differences in a WPAR
root@p7wphost1 / # efsenable -aEnter password to protect your initial keystore:Enter the same password again:root@p7wphost1 / # lsuser -af efs_initialks_mode efs_keystore_algo efs_keystore_access efs_adminks_access efs_adminks_access efs_allowksmodechangebyuser efs_file_algo anaana: efs_initialks_mode=admin efs_keystore_algo=RSA_1024 efs_keystore_access=file efs_adminks_access=file efs_allowksmodechangebyuser=true efs_file_algo=AES_128_CBC$ efskeymgr -vKeystore content:Keystore owner ............ : uid 222Keystore mode ............. : admin:managed by EFS administratorPassword changed last on .. : 06/19/08 at14:35:55Private key:Algorithm : RSA_1024Fingerprint : af0dfb52:f7fc349f:97b5d29a:d22be9dd:408ba8a0Validity : This key is valid.
$ hostnamejanel
Chapter 7. Resource control and management 135

$ cat /etc/passwd|grep anaana:!:222:1::/home/ana:/usr/bin/ksh$ lsuser -a -f efs_initialks_mode efs_keystore_algo efs_keystore_accessefs_adminks_access efs_allowksmodechangebyuser efs_file_algo anaana:efs_initialks_mode=adminefs_keystore_algo=RSA_1024efs_keystore_access=fileefs_adminks_access=fileefs_allowksmodechangebyuser=yesefs_file_algo=AES_128_CBC
$ efskeymgr -vKeystore content:Keystore owner ............ : uid 222
7.15 Encrypted file systems
When using Encrypted File Systems (EFS), each file is encrypted using the Advanced Encryption Standard (AES) algorithm. EFS is designed so that each file is assigned a unique AES key named the secret key. The secret AES key is used to encrypt file data blocks when data is written on the disk, and to decrypt file data blocks when they are read from the disk. Thus, only someone who has the secret key can have access to data.
In EFS-enabled environments, each user is assigned a pair or RSA keys: a private and a public key.
When a user creates a file, a new AES file-specific secret key is generated. Data is encrypted with the secret key and written on the disk. The secret key is encrypted with the public key of the file owner and stored in the file extended attributes. This entity represents the file cryptographic metadata.
When the file owner tries to open the file, the owner first opens the file cryptographic metadata. Because the owner’s private key matches the owner’s public key that protects the secret key, the owner is able to get access to the secret key and then decrypt the file data.
When the legitimate file owner decides to grant another user access to the file data, the owner opens the file cryptographic metadata, encrypts the secret key with the new user public key, and adds it to the file cryptographic metadata.
7.15.1 Privacy of WPAR data
You can easily imagine various situations in which the WPAR administrator decides that the WPAR local data must not be accessed from the global environment. The WPAR is still dependent on the global environment from an operational perspective. However, the WPAR data must remain confidential in the sense that the information contained in the WPAR data files cannot be disclosed to an unauthorized user.
The practical scenario is based on the following assumptions:
� Encryption has been enabled within the global environment.
� File system encryption is enabled at the WPAR level.
136 Exploiting IBM AIX Workload Partitions

� An EFS-enabled file system named fs has been created in the global environment and mounted in WPAR wpr03.
� The userwp user has been defined in the wpr03 WPAR and the corresponding user keystore has been created using default settings.
� A plain text file named file_userwp that is owned by userwp has been created.
� Traditional Discretionary Access Control (DAC) permissions have been set to provide proper access to files and directories.
By default, the root user of the global environment has full read/write access to any file. However, the global root can be prevented from reading file information while still being able to have access to data contained in the file data blocks.
Example 7-19 demonstrates how a standard WPAR user can ensure the privacy of the user’s data:
� User taylor has no security credentials loaded in the current shell.
� A file named file_taylor is owned by taylor. The file is in clear format.
� The user taylor has all DAC privileges and can access its own file. The file is in clear format.
� Global root has all required DAC privileges and can access file_taylor.
� Taylor decides to use encryption and loads the private key into the current shell.
� Taylor then encrypts file_taylor. As shown by displaying the metadata of file_taylor, only Taylor’s private key can decrypt file_taylor.
� Global root cannot access file_taylor anymore.
� Global root wants to look at file_taylor and has all system tools available. Global root decides to use the powerful fsdb.
� Global root determines that inode 5 corresponds to file_userwp.
� Global root determines that file_userwp uses block 22.
� Global root displays block 22 and finds out that file_taylor has been encrypted, so global root cannot read the data in the file.
Example 7-19 Privacy of WPAR-level EFS
taylor@janel /home/taylor # efskeymgr -VThere is no key loaded in the current process.taylor@janel /tfs # ls -altotal 16drwxr-xr-x 3 taylor staff 256 21 Apr 23:36 .drwxr-xr-x 19 root system 4096 21 Apr 23:36 ..-rw-r--r-- 1 taylor staff 54 21 Apr 23:36 file_taylor
taylor@janel /tfs # cat file_taylor1111111111111111122222222222222222#################root@p7wphost1 / # cat /wpars/janel/tfs/file_taylor1111111111111111122222222222222222#################
taylor@janel /tfs # efskeymgr -o ksh
Chapter 7. Resource control and management 137

taylor's EFS password:
$ efsmgr -e /tfs/file_taylor
$ efsmgr -l /tfs/file_taylorEFS File information: Algorithm: AES_128_CBCList of keys that can open the file: Key #1: Algorithm : RSA_1024 Who : uid 223 Key fingerprint : 84752e63:b1e9c3ec:042ee707:0c4bec79:1d7aafe4
root@p7wphost1 / # cat /wpars/janel/tfs/file_taylorcat: 0652-050 Cannot open /wpars/janel/tfs/file_taylor.
root@p7wphost1 / # ls -liU /wpars/janel/tfs/file_taylor 5 -rw-r--r--e 1 223 staff 54 21 Apr 23:47 /wpars/janel/tfs/file_taylor
root@p7wphost1 / # istat 5 /dev/fslv18Inode 5 on device 10/31 FileProtection: rw-r--r--Owner: 223(<UNKNOWN>) Group: 1(staff)Link count: 1 Length 54 bytes
Last updated: Thu 21 Apr 23:47:52 2011Last modified: Thu 21 Apr 23:47:52 2011Last accessed: Thu 21 Apr 23:47:52 2011
Block pointers (hexadecimal):22
root@p7wphost1 / # fsdb /dev/fslv18Filesystem /dev/fslv18 is mounted. Modification is not permitted.
File System: /dev/fslv18
File System Size: 64096 (512 byte blocks)Aggregate Block Size: 4096Allocation Group Size: 8192 (aggregate blocks)
> display 0x22Block: 34 Real Address 0x2200000000000: D728D414 46DA4163 B102B932 48B15B86 |.(..F.Ac...2H.[.|00000010: E8E77336 BDADB77E BAF5B726 CD498DB0 |..s6...~...&.I..|00000020: 7714B9AF E24E12ED C00E17FD CAB623B7 |w....N........#.|00000030: 43079EDB B6F3A982 F513E7EC 3C76E16D |C...........<v.m|00000040: 4F27926D DFACF5CD 3761B6A1 21FFB960 |O'.m....7a..!..`|00000050: 13E56A1A 50F34A3F B96AB832 F866ACDD |..j.P.J?.j.2.f..|00000060: 8A7CEF93 11CE6559 DA8C2E88 71DB122D |.|....eY....q..-|00000070: F2073B75 C4217133 AB975266 62FB6AC4 |..;u.!q3..Rfb.j.|00000080: 513B3306 D9A56519 B8EEC486 D68E42FD |Q;3...e.......B.|00000090: BEBA9345 CBCFA870 337D8B56 BDCCB1DB |...E...p3}.V....|000000a0: 29B311A7 A03ECE14 F5754203 B0C51003 |)....>...uB.....|
138 Exploiting IBM AIX Workload Partitions

000000b0: A60C885F E78EACF6 CA6AC3CE 8C242572 |..._.....j...$%r|000000c0: 169A530C D299BB68 8E685EE5 7022CCC7 |..S....h.h^.p"..|000000d0: DC054C2E 9E16547D 9D6AB534 E65E1C10 |..L...T}.j.4.^..|000000e0: 64833FF1 A1B2DC0B 78D5FFC2 30942FB1 |d.?.....x...0./.|000000f0: 3A6D8A61 369E9021 36641354 4E141010 |:m.a6..!6d.TN...|-hit enter for more-
This technique can be used to protect the privacy of user data within the WPAR from any user in the global environment, including the root user. The information is also protected against the local root user, because the WPAR root user cannot get access to privileges and tools that are available for the global root user.
This technique also provides the ability to have an isolated WPAR that can contain data at a separate security classification than the global environment’s security classification.
7.15.2 WPAR user access to the global environment data
There might be situations in which certain users of certain WPARs need to be granted access to the global environment data.
To set up this capability, the WPAR user and the global user must reach agreement. They also need the involvement of the global root user. However, if the global user decides to revoke the access to global data, the global user can revoke that access at any time without the consent of the root user of the global environment.
Our practical scenario makes the following assumptions:
� File system encryption is enabled at the global environment level.
� File system encryption is enabled at the WPAR level.
� An EFS-enabled file system named fs has been created in the global environment and mounted in WPAR wpr04.
� The global user has been defined in the global environment and the corresponding user keystore has been created using the default settings. The global user grants a WPAR user access to its data.
� The glagent user has been defined in the global environment and the corresponding user keystore has been created using the default settings. The glagent user is simply a regular user that, in this scenario, acts as a proxy for granting and denying access to global data. From the global perspective, the glagent user is the relay that conveys data access permissions to the WPAR environment.
� The locagent user in the WPAR environment has been defined and the corresponding user keystore has been created using the default settings. The locagent is also simply a regular user that, in this scenario, acts as a proxy for receiving data access permissions on behalf of local users.
� An encrypted file has been created named global_file that is owned by the global environment.
� Assume that traditional DAC permissions have been set to provide proper access to files and directories.
Example 7-20 illustrates how global user global has granted and then revoked a WPAR user named locagent access to a file:
� The global user decides to grant glagent access to global_file. The global user discovers that glagent has the ID 205.
Chapter 7. Resource control and management 139

� The global user grants glagent access to global_file and verifies that global_file metadata has been updated accordingly. The global_file metadata shows that the private key of user 205 can access the file.
� The global root user replaces the locagent keystore with the glagent keystore. This operation requires global root privileges. The WPAR root cannot perform this action.
� The glagent keystore password is communicated to the locagent user. This step is a human activity and requires mutual agreement between the two users.
� The locagent user logs in the local environment using its own login password. Because its login password differs from the replaced keystore password, the locagent user has no security credentials loaded in the login shell.
� The locagent user opens the replaced keystore, enters the password for the glagent user, and loads the glagent security credentials.
� The locagent user is able to access global_file.
� The global user decides to revoke the glagent user access to global_file.
� The global user verifies that the global_file metadata has been updated accordingly. The global_file metadata shows that the private key of user 205 has been removed.
� The locagent user is no longer able to access global_file.
Example 7-20 Granting WPAR users access to global data
global@lpar13#lsuser glagentglagent id=205 pgrp=staff groups=staff home=/home/glagentshell=/usr/bin/ksh
global@lpar13#efsmgr -a global_file -u glagent
global@lpar13#efsmgr -l global_fileEFS File information:Algorithm: AES_128_CBCList of keys that can open the file:Key #1:Algorithm : RSA_1024Who : uid 204Key fingerprint : 3f77390a:ac67372e:d3868009:dc4b4cfb:3529dd68Key #2:Algorithm : RSA_1024Who : uid 205Key fingerprint : ab943a46:34d53a98:35aae495:c42063b5:4954b9fb
root@lpar13#cp /var/efs/users/glagent/keystore/wpars/wpr04/var/efs/users/locagent/keystore
locagent@wpr04#efskeymgr -VThere is no key loaded in the current process.
locagent@wpr04#efskeymgr -o kshlocagent's EFS password:locagent@wpr04#efskeymgr -VList of keys loaded in the current process:Key #0:Kind ..................... User keyId (uid / gid) ......... 205Type ..................... Private key
140 Exploiting IBM AIX Workload Partitions

Algorithm ................ RSA_1024Validity ................. Key is validFingerprint ..............ab943a46:34d53a98:35aae495:c42063b5:4954b9fb
locagent@wpr04#cat /fs/global_file1111111122222222
global@lpar13#efsmgr -r global_file -u glagent
global@lpar13#efsmgr -l global_fileEFS File information:Algorithm: AES_128_CBCList of keys that can open the file:Key #1:Algorithm : RSA_1024Who : uid 204Key fingerprint : 3f77390a:ac67372e:d3868009:dc4b4cfb:3529dd68
locagent@wpr04#cat /fs/global_filecat: 0652-050 Cannot open /fs/global_file.
This technique can be used when access to global data needs to be granted to local users and the global environment still retains control over the data and the access to it.
7.16 Network
All network configuration for a WPAR is executed from the global environment using the chwpar command.
If an IP address is not specified at the WPAR creation time, but the WPAR’s name resolves to an IP address in the same network that the global environment is configured, the mkwpar command automatically configures the network for the WPAR.
If the WPAR’s name does not resolve to an IP address, network configuration can be specified using the -N flag for the mkwpar command or the chwpar command.
All network changes can be performed on active or inactive WPARs. The changes take effect immediately.
In highly-secured environments, there might be situations where it is desirable to isolate WPAR network traffic due to specific network security requirements. For instance, traffic originating from a WPAR might be required to follow a certain secured route and pass through a firewall to enter a trusted network.
Each WPAR can use the routing table available in the global environment. However, the WPAR administrator can decide to enable a WPAR local routing table and add and delete routes as desired, thereby deciding the routing path to be followed by the traffic originating from the WPAR.
Chapter 7. Resource control and management 141

7.16.1 WPAR network configuration
The following sections describe the WPAR network configuration.
IP address managementA network IP address can be configured in a WPAR while the WPAR is active or inactive.
To configure the network during the WPAR build, use the option -N of the mkwpar command, as shown in Example 7-21.
Example 7-21 Configuring the network in a WPAR during the build
Global# mkwpar -n wpar1 -N address=172.16.20.100 netmask 255.255.252.0
Changing an IP address is a two-step process. The old IP address needs to be removed and then the new IP address can be added. Otherwise, the WPAR has two IP addresses. Example 7-22 shows how to change an IP address.
Example 7-22 Changing a WPAR’s IP address
Global# chwpar -K -N address=172.16.20.100 wpar1Global# chwpar -N address=172.16.20.102 netmask=255.255.252.0 wpar1
To list the network configuration of a WPAR, use the lswpar command with the -N flag, as shown in Example 7-23.
Example 7-23 Listing the IP address configuration for a WPAR
Global# lswpar -N wpar1Name Interface Address(6) Mask/Prefix Broadcast-------------------------------------------------------------wpar1 en0 172.16.20.102 255.255.252.0 172.16.23.255
Unless otherwise specified, the mkwpar and the chwpar commands use the first network interface from the global environment that has access to the network being configured in the WPAR. A specific WPAR network interface is passed as a parameter to the commands. Example 7-24 shows how to create a WPAR using a specific network interface and then how to change it to another network interface using the chwpar command.
Example 7-24 Creating and changing a WPAR network interface
Global# mkwpar -n wpar1 -N interface=en1 address=172.16.20.102 \> netmask 255.255.252.0Global# chwpar -N interface=en0 address=172.16.20.102 wpar1
Any type of network interfaces can be used with WPARs, including, but not limited to, physical interfaces, virtual interfaces, Etherchannels, and virtual local area networks (VLAN) interfaces.
WPAR-specific routing tableBy default, the WPAR uses the global environment’s routing table and a network interface that has direct access to the same network that is being configured in the WPAR.
However, it is possible to create a routing table that is specific for the WPAR. The option that enables it is the -I flag from the mkwpar command or from the chwpar command. Example 7-25 shows how to enable WPAR-specific routes during the routing table’s creation.
142 Exploiting IBM AIX Workload Partitions

Example 7-25 Configuring WPAR-specific routes
Global# mkwpar -n wpar \-N address=172.16.20.100 netmask=255.255.252.0 \-I rtdest=default rtgateway=172.16.20.1
Every management task to the WPAR’s routing table must be executed from the global environment. Example 7-26 shows how to list the WPAR’s routing table.
Example 7-26 Listing WPAR’s routing table using lswpar
# lswpar -I wparName Destination Gateway Type Interface------------------------------------------------wpar default 172.16.20.1
The AIX netstat command has also been changed to support WPARs, and it can list all routes from all WPARs in the system. See Example 7-27.
Example 7-27 Listing all WPAR routes using netstat
# netstat -nr -@Routing tablesWPAR Destination Gateway Flags Refs Use If
Route tree for Protocol Family 2 (Internet):Global default 172.16.20.1 UG 1 16424 en0wpar default 172.16.20.1 UG 1 28 en0Global 127/8 127.0.0.1 U 18 294552 lo0Global 172.16.20.0 172.16.20.62 UHSb 0 0 en0Global 172.16.20/22 172.16.20.62 U 5 322367 en0wpar 172.16.20/22 172.16.20.100 U 1 4 en0wpar1 172.16.20/22 172.16.20.101 U 0 4 en0Global 172.16.20.62 127.0.0.1 UGHS 1 2955 lo0wpar 172.16.20.100 127.0.0.1 UGHS 0 0 lo0wpar1 172.16.20.101 127.0.0.1 UGHS 0 0 lo0Global 172.16.23.255 172.16.20.62 UHSb 2 2334 en0wpar 172.16.23.255 172.16.20.100 UHSb 0 0 en0wpar1 172.16.23.255 172.16.20.101 UHSb 0 0 en0
Route tree for Protocol Family 24 (Internet v6):Global ::1%1 ::1%1 UH 2 26492 lo0
7.17 WPAR performance monitoring
WPAR performance monitoring can be performed either from the WPAR or the global environment. There are several advantages to continuously monitoring system performance. Proactive system performance monitoring brings the following advantages:
� Sometimes detects underlying problems before they have an adverse effect� Detects problems that affect a user’s productivity� Collects data when a problem occurs for the first time� Allows you to establish a baseline for comparison
Chapter 7. Resource control and management 143

Successful monitoring involves the following actions:
� Periodically obtaining performance-related information from the operating system
� Storing the information for future use in problem diagnosis
� Displaying the information for the benefit of the system administrator
� Detecting situations that require additional data collection or responding to directions from the system administrator to collect data or both
� Collecting and storing the necessary detail data
� Tracking changes made to the system and applications
Most of the standard AIX performance monitoring tools have WPAR support to gather data either from the global environment or from the WPAR.
7.17.1 WPAR Manager and performance
The WPAR agent that communicates with WPAR Manager can periodically send back data that can allow the administrator to track the performance of servers on a variety of levels. This performance data includes data from individual WPARs and the managed systems.
The performance data sent to the WPAR Manager is also used to drive automated relocations. The WPAR Manager retains the performance data in a database and can display historical visualizations of the data.
It is also possible to set up thresholds, alerts, and events in the IBM Systems Director for performance items, such as the processor and memory.
For more information: You can obtain more information that is related to performance management at the IBM AIX 7.1 Information Center:
http://publib.boulder.ibm.com/infocenter/aix/v7r1/index.jsp
144 Exploiting IBM AIX Workload Partitions

Chapter 8. Workload partition mobility and WPAR Manager
This chapter describes workload partition (WPAR) mobility concepts in the multiple, available environments. WPAR mobility is also referred to Live Application Mobility. The IBM Redbooks publications, Introduction to Workload Partition Management in AIX Version 6.1, SG24-7431, and AIX Workload Partition Management in AIX Version 6, SG24-7656, introduced Live Application Mobility.
This chapter includes a description of application WPAR mobility and the multiple system WPAR configurations that are mobile (Network File System (NFS), rootvg, and Versioned WPAR). We also describe practices to make mobility successful. After you read this chapter, you will be able to set up your environment for the following purposes:
� Create a mobile Application WPAR
� Create a mobile NFS System WPAR
� Create a rootvg System WPAR with storage area network (SAN) disks
� Create a rootvg System WPAR with virtual Small Computer System Interface (vSCSI) disks
� General Parallel File System (GPFS) and WPAR
We also discuss which type of WPAR to use on a particular system.
8
Live Application Mobility: Live Application Mobility is enabled through the use of the WPAR Manager (WPM) agent of the IBM Systems Director (optional AIX product). Refer to 1.4, “Live Application Mobility” on page 12.
© Copyright IBM Corp. 2011. All rights reserved. 145

8.1 Potential hardware for Live Application Mobility
We describe the hardware environment that will be used in the examples throughout the chapter. In Figure 8-1, we use logical partition (LPAR) as a generic name for either a stand-alone system or LPARs. Each LPAR type is associated with the name LPARx.
The LPAR system boot disk is not shown in Figure 8-1 even though it can allow the creation of a Journal File System 2 (JFS2) System WPAR.
8.2 Current available hardware
Figure 8-1 shows four systems using six LPARs with file system access.
Figure 8-1 Current available hardware
The following descriptions explain the hardware that is shown in Figure 8-1:
� All systems can access the /shared1 NFS file system served by NFS1.
� All systems run the WPAR Manager agent, which is driven through the IBM Systems Director Console that is located on system WPM1. We describe the physical location of the system in “IBM Systems Director server installation” on page 34.
� LPAR1 is a stand-alone system that connects to a SCSI disk called SCSI1.
� LPAR2 and LPAR3 connect to the SCSI disk called SCSI2. Each partition sees the disk as a vSCSI disk.
� LPAR4 is a stand-alone system attached to the SAN bay through a Fibre Channel (FC) adapter. Disks are viewed as MPIO array disks.
SAN bay
scsi1 scsi2
LVD SCSI disks
network
FC links
NFS serverNFS1
Shared partition visible from all LPARs
LPAR1 LPAR2 LPAR3 LPAR4 LPAR6LPAR5
shared1
sanhd1
sanhd2
MPIO disks
vSCSI vSCSIvSCSIvSCSI
LVD SCSI disks MPIO disks
NFSWPAR
System compatible for NFS WPAR mobility
JFS2WPAR
JFS2WPAR
Local JFS2 WPAR created – not mobile
System compatible for NFS WPAR mobility
NFSWPAR
IBM Director ServerWPAR Manager plug-in
WPM
146 Exploiting IBM AIX Workload Partitions

� LPAR5 and LPAR6 connect to the SAN by the Virtual I/O Server (VIOS). They potentially see each disk served as a vSCSI disk.
8.3 Types of WPARs to be created on each LPAR
Depending on the disks and file systems being accessed, it is possible to create various types of WPARs on each of these systems. The command lsdev | grep hdisk | grep -v hdisk0 is then performed on each host for reference. We describe examples of the commands that are used to create various kinds of WPARs:
� All systems with access to the NFS can create application WPARs and system WPARs using the mount point, as shown in Example 8-1.
Example 8-1 df | grep share on each LPARx system
nfs1:/shared1 104857600 24254432 80603168 24% /shared1
� On LPAR1, you can create a system WPAR using the local SCSI disk. The available disks can be seen using the lsdev and lspv commands, as shown in Example 8-2.
Example 8-2 (lsdev; lspv) | grep hdisk | grep -v hdisk0
hdisk1 Available 16 Bit LVD SCSI Disk Drivehdisk1 00034a7acd7c40dc None
� On LPAR2 and LPAR3, you get a vSCSI disk, so you can create a rootvg system WPAR using that disk, as displayed in Example 8-4. On LPAR4, you can create a System WPAR using the MPIO disk that is managed by the SAN. For example, the output from the LPAR4 system shows the available disks in Example 8-3.
Example 8-3 (lsdev; lspv) | grep hdisk | grep -v hdisk0 from LPAR4
hdisk1 Available 06-08-01-8,0 16 Bit LVD SCSI Disk Drivehdisk2 Available 02-08-02 MPIO Other DS4K Array Diskhdisk3 Available 02-08-02 MPIO Other DS4K Array Diskhdisk4 Available 02-08-02 MPIO Other DS4K Array Diskhdisk5 Defined 02-08-02 MPIO Other DS4K Array Diskhdisk1 none None hdisk2 00034a5a76f3e36e None hdisk3 00034a5a117a1aef None hdisk4 00034a5a8f76e97e None
� On LPAR5 and LPAR6, you get vSCSI disks so you can create rootvg System WPARs using these disks. The disks configured on the systems are shown in Example 8-4.
Example 8-4 lsdev; lspv) | grep hdisk | grep -v hdisk0 from LPAR5
hdisk1 Available Virtual SCSI Disk Drivehdisk2 Defined Virtual SCSI Disk Drivehdisk1 00034a7acd7c40dc None
State: The hdisk1 is in the available state and usable for a WPAR. The status of hdisk2 prevents its use at the moment, meaning that it might already be in use by a WPAR on another system.
Chapter 8. Workload partition mobility and WPAR Manager 147

8.4 Mobile WPAR concepts
Live Application Mobility currently requires that systems are hardware compatible and at equivalent software levels. Live Application Mobility also requires that the two systems involved get a view of the same file systems. We describe each case in the following sections.
8.4.1 Checkpointable flag
A mobile WPAR needs to get the checkpointable flag. This flag can be checked through the lswpar command, as shown Example 8-5. This flag applies to both application and system WPARs.
Example 8-5 lswpar checkpointable flag
# lswpar -G | grep CheckpointableCheckpointable: yes
You can specify the flag at the creation of the WPAR using the -c specification flag:
� For application WPARs, use:
wparexec -c [...]
� For system WPARs, use:
mkwpar -c [...]
This flag is also available with the chwpar command. But, it requires that you stop the WPAR, so it is only available for a system WPAR. Otherwise, you get an error message, as shown in Example 8-6.
Example 8-6 Error modifying an application WPAR checkpointable flag
# lswpar applicationName State Type Hostname Directory RootVG WPAR--------------------------------------------------------------application A A application / no # chwpar -c applicationchwpar: 0960-545 Cannot change the checkpointability (-c) of a running workload partition.
Refer to 8.5, “Tips for creating a mobile application WPAR” on page 149 for more examples of working with the checkpointable flag with the local system WPAR.
8.4.2 File systems of a mobile WPAR
When creating a system WPAR, the file systems that are created by default are shown in Example 8-7 on page 149. The file systems /, /home, /tmp, and /var are local to the WPAR. The /opt and /usr file systems can be shared with the global environment (in our case) or can be private to the WPAR.
For a system WPAR to be mobile, its private file systems must be on a type of storage that is accessible to both the departure and arrival systems that are involved in the mobility. We illustrate in the following sections the types of disk support for a mobile system WPAR.
148 Exploiting IBM AIX Workload Partitions

Example 8-7 Default layout of a simple system WPAR
# lswpar -M syswparName Mount Point Device Vfs Nodename Options---------------------------------------------------------------------syswpar /wpars/syswpar /dev/fslv02 jfs2 syswpar /wpars/syswpar/home /dev/fslv03 jfs2 syswpar /wpars/syswpar/opt /opt namefs ro syswpar /wpars/syswpar/proc /proc namefs rw syswpar /wpars/syswpar/tmp /dev/fslv04 jfs2 syswpar /wpars/syswpar/usr /usr namefs ro syswpar /wpars/syswpar/var /dev/fslv05 jfs2
8.4.3 Networking
In order to be mobile, a system WPAR requires an address. Creating a system WPAR without a specific address can result in unsupported behavior.
The simplest networking specification for mkwpar or the smcli mkwpar commands is to give an address to the default Ethernet interface. Example 8-8 gives the parameter to add the address 172.16.20.180 to the mkwpar command.
Example 8-8 The mkwpar specification of the network address
mkwpar -n syswpar1 ... -N address=172.16.20.180# lswpar -N syswpar1Name Interface Address(6) Mask/Prefix Broadcast -------------------------------------------------------------syswpar1x en0 172.16.20.180 255.255.255.0 172.16.20.255
8.5 Tips for creating a mobile application WPAR
To create a simple application WPAR, execute the wparexec command with the minimum arguments, as shown in Example 8-9.
Example 8-9 Error creating a simple application WPAR
wparexec -c -n sleep -- /bin/sleep 1000**********************************************************************ERRORwparexec 0960-081 Checkpointable workload partitions require additional software.**********************************************************************
The error message specifies that the required Licensed Product Program (LPP) for mobility is not available on the system. Check for the availability of the mcr.rte fileset.
The error can also relate to missing packages for enabling mobility. The WPAR Manager plug-in for the IBM Systems Director must be installed to prevent the message that is listed in Example 8-10 on page 150. Refer to Chapter 4, “Configuring and using the IBM PowerVM Workload Partition Manager” on page 43.
Chapter 8. Workload partition mobility and WPAR Manager 149

Example 8-10 wparexec -c error if mcr component not enabled
Mounting all workload partition file systems.Loading workload partition.1020-294 Checkpointable workload partitions require additional software. [18.393.0292]startwpar: 0960-244 Error loading workload partition.
Currently, to use mobility with an application WPAR, you need to use the WPAR Manager (WPM) graphical user interface (GUI) or the WPM command-line interface (CLI), which is available with WPM 2.2.1. Refer to 4.6, “WPAR Manager command-line interface” on page 87.
The WPM CLI in Version 2.2.1 provides the capability to create a WPAR from the command line, but it integrates it into the IBM Systems Director environment.
For an application WPAR, the smcli mkwpar command syntax is displayed in Example 8-11. The syntax is close to the AIX wparexec command, but because it is integrated with the IBM Systems Director database, it has its own parameters:
� Parameters use short names like -a as long names --resolve_errors
� -E is specific to WPM
� -H | --hostname hostName is equivalent to the AIX -h flag
� -T is specific to WPM
� -t is specific to WPM to specify that it is an application WPAR
� -m is specific to WPM to specify on which system the WPAR needs to be created
� -x is required when, used with AIX wparexec, it is the last parameter of the command
Example 8-11 Help for the WPM CLI mkwpar command for application WPAR creation
For application WPARs: smcli mkwpar [-a | --resolve_errors] [-c | --checkpointable] [-E | --description "description"] [-F | --force] [-H | --hostname hostName] [-i | --wpar_routing] [-I | --route attr=value,...] [-L | --lang language] [-M | --mount attr=value,...] [-N | --network attr=value,...] [-q | --quiet] [-R | --resource attr=value,...] [-T | --test_compat testName,...] [-u | --script pathToScript] [-v | --verbose] [-W | --wpar_settings settings] { {-t | --type app} {-n | --wpar_name wparName} {-m | --system_name systemName} {-x | --execute_cmd "command arguments"}
For comparison with the command in Example 8-11, the AIX wparexec syntax is shown in Example 8-12.
Example 8-12 AIX wparexec command syntax
# wparexecwparexec: 0960-383 You must specify exactly one application to run.Usage: wparexec [-a] [-c [-1]] [-F] [-h hostName] [-i] [-I attr=value ...] ... [-M attr=value ...] ... [-n wparName] [-N attr=value ...] ...
Using wparexec: If you create an application WPAR using the AIX command wparexec, the WPAR is not visible through the WPAR Manager tag and is not available for mobility.
150 Exploiting IBM AIX Workload Partitions

[-R attr=value ...] [-u userScript] [-v]{ [-e existing_wpar | -f inFile] [-o outFile [-w]] [--] [VAR=val ...] Command [args]| {-f inFile | -e existing_wpar} [-o outFile [-w]] [[--] [VAR=val ...] Command [args]]| -w -o outFile [-f inFile | -e existing_wpar] [[--] [VAR=val ...] Command [args]] }
Flags: -1 = Create configuration file only. -a = Automatically resolve erroneous/conflicting settings. -c = Flag as checkpointable. -e = Get specification data from existing workload partition. -f = Path to input specification file. -F = Force - ignore certain errors. -h = Hostname. -i = WPAR-specific routing. -I = User-specified route settings (rtdest, rtgateway, rtinterface, rtnetmask, rtprefixlen, rttype). -M = File system dependencies (dev, directory, vfs, mode, host, mountopts). -n = Workload partition name. -N = Network settings (interface, address, netmask, broadcast, address6, prefixlen). -o = Path to output specification file. -R = Resource control settings (active, rset, CPU, memory, procVirtMem, totalVirtMem, shares_CPU, shares_memory, totalProcesses, totalThreads, totalPTYs, totalLargePages, pct_msgIDs, pct_semIDs, pct_shmIDs, pct_pinMem). -u = User script to execute on start & stop. -v = Verbose mode. -w = Do not create, only write specification file.
8.6 Creating a system WPAR
There are multiple ways to create a system WPAR:
� Use the AIX mkwpar command� Use the SMIT command and fastpath wpar� Use the WPM CLI smcli mkwpar command� Use the WPM GUI
To manage the mobility of the WPAR, the WPAR must be included in the IBM Systems Director WPM environment. By default, the WPAR is included if the WPAR is created through the WPM GUI. The new WPM CLI that is available with Version 2.2.1 allows the creation of a WPAR through a command line (see 8.6.2, “WPM CLI smcli mkwpar command syntax” on page 153).
The AIX mkwpar command (or smit interface) can also be used, because the Director WPM agent can perform a system discovery to take into account any available system WPAR that has been previously defined.
8.6.1 AIX mkwpar command full syntax
The AIX mkwpar command syntax is available in the man page (see man mkwpar). The short help is shown in Example 8-13 on page 152.
Chapter 8. Workload partition mobility and WPAR Manager 151

Example 8-13 AIX mkwpar command syntax
Usage: mkwpar [-a] [-A] [-b devexportsFile] [-B wparBackupDevice] [-c] [-C] [-d directory] [-D attr=value ...[-O]] ... [-E directory] [-F] [-g vg ] [-h hostName] [-i] [-I attr=value ...] ... [-k /path/to/script] [-l] [-L attr=value ...] [-M attr=value ...] ... [-N attr=value ...] ... [-P] [-r][-R attr=value ...] [-S attr[+|-]=value ...] [-s] [-u /path/to/script] [-U [UUID]][-v] [-X attribute=value ...] ...{ -n wparName [-p [name]] [-e existing_wpar | -f inFile] [-o outFile [-w]]
| -p name [-n wparName] [-e existing_wpar | -f inFile] [-o outFile [-w]]| -f inFile [-n wparName] [-p [name]] [-o outFile [-w]]
| -w -o outFile [-n wparName] [-p [name]] [-f inFile | -e existing_wpar] }
Flags: -a = Automatically resolve erroneous/conflicting settings. -A = Start automatically on system boot. -b = Path to permitted device exports file. -B = Device or Pathname of savewpar backup image. -c = Flag as checkpointable. -C = Create a versioned workload partition. -d = Base directory. -D = Override default device exports (devname, devtype, export). -e = Get specification data from existing workload partition. -E = Directory containing software for compatibility runtime environment. -f = Path to input specification file. -F = Force - ignore certain errors. -g = Default volume group for local file systems. -h = Hostname. -i = WPAR-specific routing. -I = User-specified route settings (rtdest, rtgateway, rtinterface, rtnetmask, rtprefixlen, rttype). -k = Post-installation customization script. -l = Create private, writeable versions of /usr and /opt. -L = Logical volume management policy (image_data, shrink, ignore_lvs, ignore_maps). -M = Mount settings (dev, directory, vfs, size, crfsopts, mode, vg, logname, host, mountopts). -n = Workload partition name. -N = Network settings (interface, address, netmask, broadcast, address6, prefixlen). -o = Path to output specification file. -O = Overwrite an existing volume group on the specified disks for a rootvg workload partition. -p = Preserve file system data from the named mount group. -P = Set workload partition root password interactively. -r = Copy global network name resolution configuration into the workload partition. -R = Resource control settings (active, rset, CPU, memory, procVirtMem, totalVirtMem, shares_CPU, shares_memory, totalProcesses, totalThreads, totalPTYs, totalLargePages, pct_msgIDs, pct_semIDs, pct_shmIDs, pct_pinMem). -S = Configures the security settings of a workload partition (secfile, privs[+|-]). -s = Start after creation. -u = User script to execute on start & stop.
152 Exploiting IBM AIX Workload Partitions

-U = Specifies Workload Partition UUID. If not given, UUID will be automatically generated for the corresponding Workload Partition. -v = Verbose mode. -w = Only write specification file (do not create). -X = Configures the exported kernel extensions (kext, exportfile, local, major).
The syntax that is shown in Example 8-13 on page 152 includes all flags for all system WPAR types, such as NFS, rootvg, and Versioned.
8.6.2 WPM CLI smcli mkwpar command syntax
Example 8-14 explains the syntax of the command, and the syntax matches part of the key parameters of the AIX mkwpar command that is described in Example 8-13 on page 152.
Example 8-14 WPM CLI smcli command syntax for a simple system WPAR
For system WPARs: smcli mkwpar [-A | --start_automatically] [-c | --checkpointable] [-d | --directory directory]] [-D | --device attr=value,... [-O | --overwrite_vg]] [-E | --description "description"] [-F | --force] [-g | --volume_group vg] [-H | --hostname hostName] [-i | --wpar_ routing] [-I | --route attr=value,...] [-l | --private_usr_opt] [-L | --lang language] [-M | --mount attr=value,...] [-N | --network attr=value] [-p | --preserve_fs] [-P | --password password] [-q | --quiet] [-r | --inherit_resolution] [-R | --resource attr=value,...] [-s | --start_now] [-S | --security attr=value,...] [-T | --test_compat testName,...] [-u | --script pathToScript] [-v | --verbose] [-W | --wpar_settings settings] [-X | --extensions extensions,...] { {-t | --type sys} {-n | --wpar_name wparName} {-m | --system_name systemName} }
The syntax for a Versioned system WPAR differs slightly, as shown in Example 8-15.
Example 8-15 WPM CLI smcli mkwpar command to create a Versioned WPAR
For Versioned WPARs: smcli mkwpar [-A | --start_automatically] [-c | --checkpointable] [-d | --directory directory]] [-D | --device attr=value,... [-O | --overwrite_vg]] [-e | --xfactor xfactor] [-E | --description "description"] [-F | --force] [-g | --volume_group vg] [-H | --hostname hostName] [-i | --wpar_ routing] [-I | --route attr=value,...] [-l | --private_usr_opt] [-L | --lang language] [-M | --mount attr=value,...] [-N | --network attr=value] [-p | --preserve_fs] [-P | --password password] [-q | --quiet] [-r | --inherit_resolution] [-R | --resource attr=value,...] [-s | --start_now] [-S | --security attr=value,...]
Chapter 8. Workload partition mobility and WPAR Manager 153

[-T | --test_compat testName,...] [-u | --script pathToScript] [-v | --verbose] [-V | --filesets_path path] [-W | --wpar_settings settings] [-X | --extensions extensions,...] { {-t | --type ver} {-n | --wpar_name wparName} {-m | --system_name systemName} {-B | --backup_image_path backup_image_path} }
The command primarily contains additional flags:
� [-e | --xfactor xfactor]
� {-B | --backup_image_path backup_image_path}
The -B flag allows you to load a mksysb in the WPAR.
The JFS2 file size increment that is specified by xfactor is only needed when you create a Versioned Workload Partition using a 5.2 mksysb image containing files from a compressed JFS file system. Then, it is used to control the expansion of the size of the corresponding JFS2 file system that is created in the WPAR.
8.6.3 SMIT wpar fastpath
You can use the SMIT menu to create a system WPAR. The main fastpath is named wpar. The fastpath for system WPAR creation is named simplewpar_sys. An overview of the menu is available in Example 8-16.
Example 8-16 smitty simplewpar_sys fastpath menu
Create a System Workload Partition
Type or select values in entry fields.Press Enter AFTER making all desired changes.
[TOP] [Entry Fields]* Workload Partition Name [ > HOSTNAME [] Base Directory [] Default Volume group name [] + Copy Global Name Resolution Settings no + Network INTERFACE + Internet ADDRESS (dotted decimal) [] Network MASK [] -OR- IPv6 ADDRESS (colon delimited) [] Prefix Length [] WPAR-Specific Routing? no + Create the Workload Partition? yes +[MORE...4]
F1=Help F2=Refresh F3=Cancel F4=ListF5=Reset F6=Command F7=Edit F8=ImageF9=Shell F10=Exit Enter=Do
154 Exploiting IBM AIX Workload Partitions

8.6.4 SMIT wpar fastpath for advanced system WPAR creation
To create a mobile system WPAR on NFS or rootvg, you need to specify additional parameters. Another SMIT fastpath menu is available. It is called advancewpar_sys and it allows server specification, as shown in Example 8-17. The advanced menu integrating all possible options of the mkwpar command presents 124 lines of options.
Example 8-17 smit fast path advancewpar_sys for system wpar creation
Create a System Workload Partition (Advanced)
Type or select values in entry fields.Press Enter AFTER making all desired changes.
[TOP] [Entry Fields]* Workload Partition Name [] HOSTNAME [] Base Directory [] Default Volume group name [rootvg] + Copy Global Name Resolution Settings no + User Script [] Network INTERFACE + Internet ADDRESS (dotted decimal) [] Network MASK [] -OR- IPv6 ADDRESS (colon delimited) [] Prefix Length [] WPAR-Specific Routing? no +Create the Workload Partition? yes + Specification Output File [] / Checkpointable? no + START Workload Partition? no + Start at system boot? no + Automatically RESOLVE conflicts? no +
Resource Control Active yes + Resource Set [] CPU Shares [] # CPU Minimum (%) [] CPU Maximum (%) []
CPU Absolute Maximum (%) [] Memory Shares [] # Memory Minimum (%) [] Memory Maximum (%) [] Memory Absolute Maximum (%) [] Per-Process Virtual Memory Limit [] Total Virtual Memory Limit [] Processes Maximum [] # Thread Maximum [] # Total PTYs [] Total Large Pages [] Max Message Queue IDs (%) [] Max Semaphore IDs (%) []Max Shared Memory IDs (%) [] Max Pinned Memory (%) []
Chapter 8. Workload partition mobility and WPAR Manager 155

Security Control List Privileges or Specify File? List Privileges + Privileges [] + -OR- Security File [] / Additional Privileges [] + Excluded Privileges [] +
Device Control Storage Devices [] +
Workload Partition MOUNT POINT [/] TYPE localfs + Mount OPTIONS [] + localfs TYPE [jfs2] + Volume group name [] + SIZE of file system in Megabytes [96] # Create OPTIONS [] namefs Global Directory [] nfs Remote Directory []Remote NODE []
Workload Partition MOUNT POINT [/home] TYPE localfs + Mount OPTIONS [] + localfs TYPE [jfs2] + Volume group name [] + SIZE of file system in Megabytes [32] # Create OPTIONS [] namefs Global Directory [] nfsRemote Directory [] Remote NODE []
Workload Partition MOUNT POINT [/var] TYPE localfs + Mount OPTIONS [] + localfs TYPE [jfs2] + Volume group name [] + SIZE of file system in Megabytes [128] # Create OPTIONS [] namefs Global Directory []nfs Remote Directory [] Remote NODE []
Workload Partition MOUNT POINT [/tmp]
156 Exploiting IBM AIX Workload Partitions

TYPE localfs + Mount OPTIONS [] + localfs TYPE [jfs2] + Volume group name [] + SIZE of file system in Megabytes [96] # Create OPTIONS [] namefsGlobal Directory [] nfs Remote Directory [] Remote NODE []
Workload Partition MOUNT POINT [/usr] TYPE namefs + Mount OPTIONS [ro] + localfs TYPE [] + Volume group name [] + SIZE of file system in Megabytes [] # Create OPTIONS []
namefs Global Directory [/usr] nfs Remote Directory [] Remote NODE []
Workload Partition MOUNT POINT [/opt] TYPE namefs + Mount OPTIONS [ro] + localfs TYPE [] + Volume group name [] + SIZE of file system in Megabytes [] #Create OPTIONS [] namefs Global Directory [/opt] nfs Remote Directory [] Remote NODE []
[BOTTOM]
F1=Help F2=Refresh F3=Cancel F4=ListF5=Reset F6=Command F7=Edit F8=ImageF9=Shell F10=Exit Enter=Do
SMIT: We do not describe the SMIT use in detail, because the parameters are self-explanatory.
Chapter 8. Workload partition mobility and WPAR Manager 157

8.7 Creating a local JFS2 system WPAR
You create a simple system WPAR on a rootvg disk through the mkwpar -n syswpar command, as shown in Example 8-18.
Example 8-18 Creation of a system WPAR on the local rootvg disk
# mkwpar -n syswparmkwpar: Creating file systems... / /home /opt /proc /tmp /usr /varMounting all workload partition file systems....Workload partition syswpar created successfully.mkwpar: 0960-390 To start the workload partition, execute the following as root: startwpar [-v] syswpar# lswpar -M syswparName Mount Point Device Vfs Nodename Options---------------------------------------------------------------------syswpar /wpars/syswpar /dev/fslv02 jfs2 syswpar /wpars/syswpar/home /dev/fslv03 jfs2 syswpar /wpars/syswpar/opt /opt namefs ro syswpar /wpars/syswpar/proc /proc namefs rw syswpar /wpars/syswpar/tmp /dev/fslv04 jfs2 syswpar /wpars/syswpar/usr /usr namefs ro syswpar /wpars/syswpar/var /dev/fslv05 jfs2 > lswpar -G syswpar=================================================================syswpar - Defined=================================================================Type: SRootVG WPAR: noOwner: rootHostname: syswparWPAR-Specific Routing: noVirtual IP WPAR:Directory: /wpars/syswparStart/Stop Script:Auto Start: noPrivate /usr: noCheckpointable: noApplication:
OStype: 0UUID: ff8cade2-5e98-11e0-8628-e2dc60002003
Verify the location of the volume on the rootvg volume by using the lslv command, as shown in Example 8-19 on page 159.
158 Exploiting IBM AIX Workload Partitions

Example 8-19 Localization of the logical volume allocated to the local system WPAR
lslv fslv02 LOGICAL VOLUME: fslv02 VOLUME GROUP: rootvgLV IDENTIFIER: 00034a7a0000d3000000012f0bb0b56e.14 PERMISSION: read/writeVG STATE: active/complete LV STATE: closed/syncdTYPE: jfs2 WRITE VERIFY: offMAX LPs: 512 PP SIZE: 32 megabyte(s)COPIES: 1 SCHED POLICY: parallelLPs: 3 PPs: 3STALE PPs: 0 BB POLICY: relocatableINTER-POLICY: minimum RELOCATABLE: yesINTRA-POLICY: middle UPPER BOUND: 32MOUNT POINT: /wpars/syswpar LABEL: /wpars/syswparMIRROR WRITE CONSISTENCY: on/ACTIVE EACH LP COPY ON A SEPARATE PV ?: yes Serialize IO ?: NO INFINITE RETRY: no
8.7.1 Mobility aspect of a JFS2 system WPAR
It is not possible to change the type of WPAR to a mobile WPAR, because file systems are not accessible from other systems. Example 8-20 shows the output of the command.
Example 8-20 Error trying to change the checkpoint flag of a local system WPAR
#chwpar -c syswpar**********************************************************************ERRORchwpar: 0960-100 All writable file systems must be remote for checkpointable workload partitions. Found local file system /.
ERRORchwpar: 0960-100 All writable file systems must be remote for checkpointable workload partitions. Found local file system /home.
ERRORchwpar: 0960-100 All writable file systems must be remote for checkpointable workload partitions. Found local file system /tmp.
ERRORchwpar: 0960-100 All writable file systems must be remote for checkpointable workload partitions. Found local file system /var.**********************************************************************
8.7.2 Using SMIT
The parameters that are specified in the smitty simplewpar_sys fastpath (see Example 8-21 on page 160) create a simple system WPAR that matches the previous specification with name and address.
Chapter 8. Workload partition mobility and WPAR Manager 159

Example 8-21 Simple system WPAR creation using the smit panel
Create a System Workload Partition
Type or select values in entry fields.Press Enter AFTER making all desired changes.
[TOP] [Entry Fields]* Workload Partition Name [syswpar] HOSTNAME [syswpar] Base Directory [] Default Volume group name [] + Copy Global Name Resolution Settings no + Network INTERFACE + Internet ADDRESS (dotted decimal) [172.16.20.180] Network MASK [] -OR- IPv6 ADDRESS (colon delimited) [] Prefix Length [] WPAR-Specific Routing? yes + Create the Workload Partition? yes +[MORE...4]
F1=Help F2=Refresh F3=Cancel F4=ListF5=Reset F6=Command F7=Edit F8=ImageF9=Shell F10=Exit Enter=Do
8.7.3 Other commands to verify the WPAR information
From the command that is executed in Example 8-25 on page 162, it is possible to get information about the created WPAR.
For file systems, a listing of the devices on the Global rootvg volume (see the output of the command in Example 8-22) shows that there are entries for the WPAR /, /home, /tmp, and /var file systems.
Example 8-22 Listing of the rootvg volume after the creation of a local system WPAR
# lsvg -l rootvgrootvg:LV NAME TYPE LPs PPs PVs LV STATE MOUNT POINThd5 boot 1 1 1 closed/syncd N/Ahd6 paging 8 8 1 open/syncd N/Ahd8 jfs2log 1 1 1 open/syncd N/Ahd4 jfs2 5 5 1 open/syncd /hd2 jfs2 36 36 1 open/syncd /usrhd9var jfs2 10 10 1 open/syncd /varhd3 jfs2 6 6 1 open/syncd /tmphd1 jfs2 1 1 1 open/syncd /homehd10opt jfs2 7 7 1 open/syncd /opthd11admin jfs2 2 2 1 open/syncd /adminlg_dumplv sysdump 16 16 1 open/syncd N/Alivedump jfs2 4 4 1 open/syncd /var/adm/ras/livedumpfslv04 jfs2 2 2 1 open/syncd /wpars/syswpar
160 Exploiting IBM AIX Workload Partitions
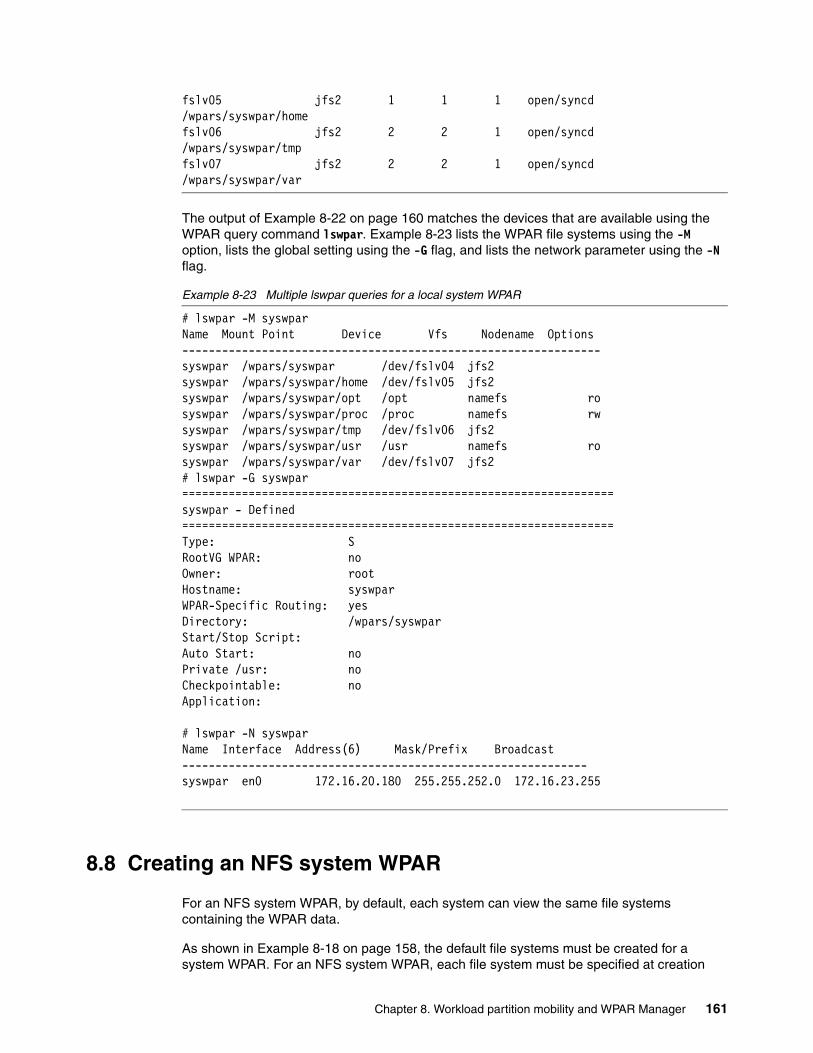
fslv05 jfs2 1 1 1 open/syncd /wpars/syswpar/homefslv06 jfs2 2 2 1 open/syncd /wpars/syswpar/tmpfslv07 jfs2 2 2 1 open/syncd /wpars/syswpar/var
The output of Example 8-22 on page 160 matches the devices that are available using the WPAR query command lswpar. Example 8-23 lists the WPAR file systems using the -M option, lists the global setting using the -G flag, and lists the network parameter using the -N flag.
Example 8-23 Multiple lswpar queries for a local system WPAR
# lswpar -M syswparName Mount Point Device Vfs Nodename Options---------------------------------------------------------------syswpar /wpars/syswpar /dev/fslv04 jfs2 syswpar /wpars/syswpar/home /dev/fslv05 jfs2 syswpar /wpars/syswpar/opt /opt namefs ro syswpar /wpars/syswpar/proc /proc namefs rw syswpar /wpars/syswpar/tmp /dev/fslv06 jfs2 syswpar /wpars/syswpar/usr /usr namefs ro syswpar /wpars/syswpar/var /dev/fslv07 jfs2 # lswpar -G syswpar=================================================================syswpar - Defined=================================================================Type: SRootVG WPAR: noOwner: rootHostname: syswparWPAR-Specific Routing: yesDirectory: /wpars/syswparStart/Stop Script:Auto Start: noPrivate /usr: noCheckpointable: noApplication:
# lswpar -N syswparName Interface Address(6) Mask/Prefix Broadcast -------------------------------------------------------------syswpar en0 172.16.20.180 255.255.252.0 172.16.23.255
8.8 Creating an NFS system WPAR
For an NFS system WPAR, by default, each system can view the same file systems containing the WPAR data.
As shown in Example 8-18 on page 158, the default file systems must be created for a system WPAR. For an NFS system WPAR, each file system must be specified at creation
Chapter 8. Workload partition mobility and WPAR Manager 161
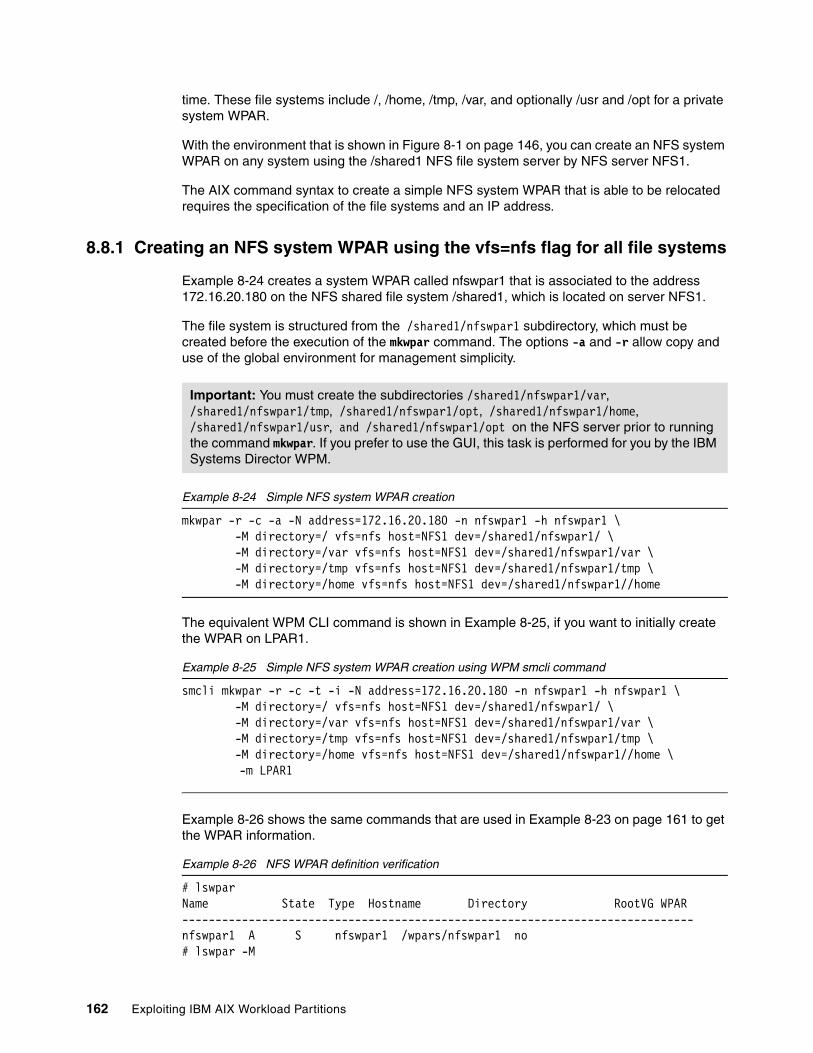
time. These file systems include /, /home, /tmp, /var, and optionally /usr and /opt for a private system WPAR.
With the environment that is shown in Figure 8-1 on page 146, you can create an NFS system WPAR on any system using the /shared1 NFS file system server by NFS server NFS1.
The AIX command syntax to create a simple NFS system WPAR that is able to be relocated requires the specification of the file systems and an IP address.
8.8.1 Creating an NFS system WPAR using the vfs=nfs flag for all file systems
Example 8-24 creates a system WPAR called nfswpar1 that is associated to the address 172.16.20.180 on the NFS shared file system /shared1, which is located on server NFS1.
The file system is structured from the /shared1/nfswpar1 subdirectory, which must be created before the execution of the mkwpar command. The options -a and -r allow copy and use of the global environment for management simplicity.
Example 8-24 Simple NFS system WPAR creation
mkwpar -r -c -a -N address=172.16.20.180 -n nfswpar1 -h nfswpar1 \ -M directory=/ vfs=nfs host=NFS1 dev=/shared1/nfswpar1/ \ -M directory=/var vfs=nfs host=NFS1 dev=/shared1/nfswpar1/var \ -M directory=/tmp vfs=nfs host=NFS1 dev=/shared1/nfswpar1/tmp \ -M directory=/home vfs=nfs host=NFS1 dev=/shared1/nfswpar1//home
The equivalent WPM CLI command is shown in Example 8-25, if you want to initially create the WPAR on LPAR1.
Example 8-25 Simple NFS system WPAR creation using WPM smcli command
smcli mkwpar -r -c -t -i -N address=172.16.20.180 -n nfswpar1 -h nfswpar1 \ -M directory=/ vfs=nfs host=NFS1 dev=/shared1/nfswpar1/ \ -M directory=/var vfs=nfs host=NFS1 dev=/shared1/nfswpar1/var \ -M directory=/tmp vfs=nfs host=NFS1 dev=/shared1/nfswpar1/tmp \ -M directory=/home vfs=nfs host=NFS1 dev=/shared1/nfswpar1//home \
-m LPAR1
Example 8-26 shows the same commands that are used in Example 8-23 on page 161 to get the WPAR information.
Example 8-26 NFS WPAR definition verification
# lswparName State Type Hostname Directory RootVG WPAR-----------------------------------------------------------------------------nfswpar1 A S nfswpar1 /wpars/nfswpar1 no # lswpar -M
Important: You must create the subdirectories /shared1/nfswpar1/var, /shared1/nfswpar1/tmp, /shared1/nfswpar1/opt, /shared1/nfswpar1/home, /shared1/nfswpar1/usr, and /shared1/nfswpar1/opt on the NFS server prior to running the command mkwpar. If you prefer to use the GUI, this task is performed for you by the IBM Systems Director WPM.
162 Exploiting IBM AIX Workload Partitions
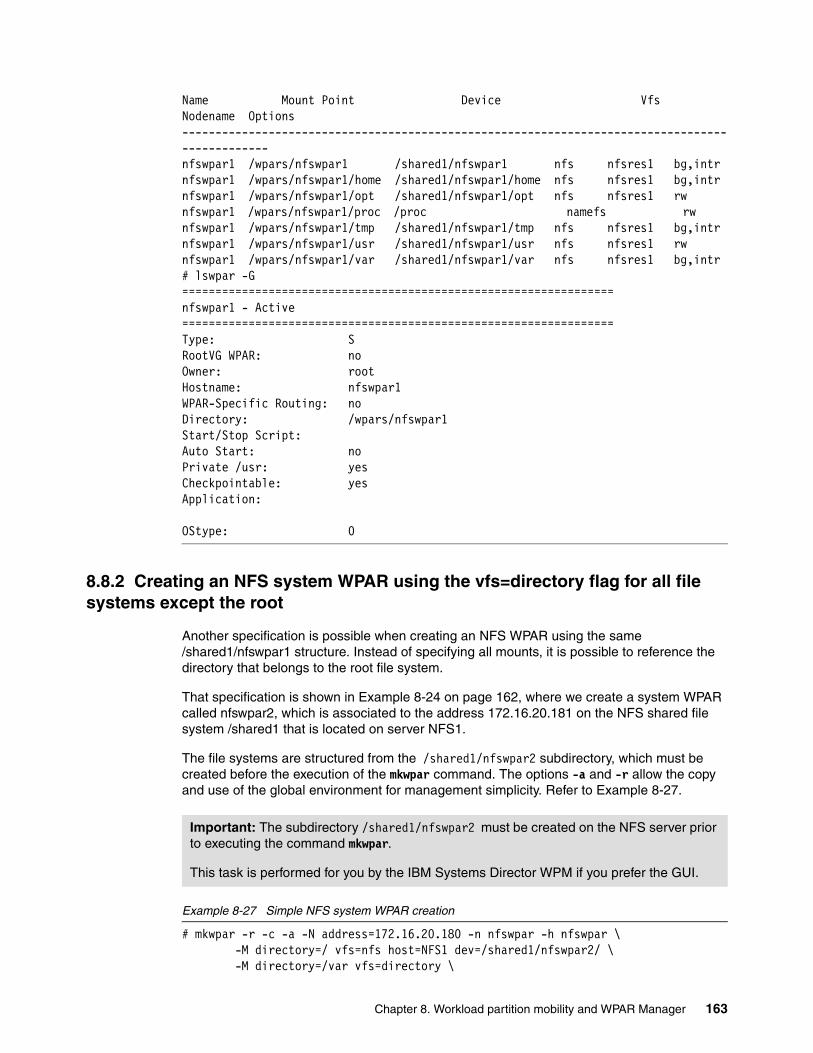
Name Mount Point Device Vfs Nodename Options-----------------------------------------------------------------------------------------------nfswpar1 /wpars/nfswpar1 /shared1/nfswpar1 nfs nfsres1 bg,intrnfswpar1 /wpars/nfswpar1/home /shared1/nfswpar1/home nfs nfsres1 bg,intrnfswpar1 /wpars/nfswpar1/opt /shared1/nfswpar1/opt nfs nfsres1 rw nfswpar1 /wpars/nfswpar1/proc /proc namefs rw nfswpar1 /wpars/nfswpar1/tmp /shared1/nfswpar1/tmp nfs nfsres1 bg,intrnfswpar1 /wpars/nfswpar1/usr /shared1/nfswpar1/usr nfs nfsres1 rw nfswpar1 /wpars/nfswpar1/var /shared1/nfswpar1/var nfs nfsres1 bg,intr# lswpar -G=================================================================nfswpar1 - Active=================================================================Type: SRootVG WPAR: noOwner: rootHostname: nfswpar1WPAR-Specific Routing: noDirectory: /wpars/nfswpar1Start/Stop Script:Auto Start: noPrivate /usr: yesCheckpointable: yesApplication:
OStype: 0
8.8.2 Creating an NFS system WPAR using the vfs=directory flag for all file systems except the root
Another specification is possible when creating an NFS WPAR using the same /shared1/nfswpar1 structure. Instead of specifying all mounts, it is possible to reference the directory that belongs to the root file system.
That specification is shown in Example 8-24 on page 162, where we create a system WPAR called nfswpar2, which is associated to the address 172.16.20.181 on the NFS shared file system /shared1 that is located on server NFS1.
The file systems are structured from the /shared1/nfswpar2 subdirectory, which must be created before the execution of the mkwpar command. The options -a and -r allow the copy and use of the global environment for management simplicity. Refer to Example 8-27.
Example 8-27 Simple NFS system WPAR creation
# mkwpar -r -c -a -N address=172.16.20.180 -n nfswpar -h nfswpar \ -M directory=/ vfs=nfs host=NFS1 dev=/shared1/nfswpar2/ \ -M directory=/var vfs=directory \
Important: The subdirectory /shared1/nfswpar2 must be created on the NFS server prior to executing the command mkwpar.
This task is performed for you by the IBM Systems Director WPM if you prefer the GUI.
Chapter 8. Workload partition mobility and WPAR Manager 163

-M directory=/tmp vfs=directory \ -M directory=/home vfs=directory
Example 8-28 shows the equivalent WPM CLI command if you want to initially create the WPAR on LPAR1.
Example 8-28 Simple NFS system WPAR creation using WPM smcli command
smcli mkwpar -r -c -t -i -N address=172.16.20.180 -n nfswpar -h nfswpar \ -M directory=/ vfs=nfs host=NFS1 dev=/shared1/nfswpar2/ \ -M directory=/var vfs=directory \ -M directory=/tmp vfs=directory \ -M directory=/home vfs=directory\
-m LPAR1
Example 8-29 provides the same commands that are used in Example 8-23 on page 161 to get the WPAR information.
Example 8-29 NFS WPAR definition verification
# lswpar -G nfswpar2=================================================================nfswpar2 - Defined=================================================================Type: SRootVG WPAR: noOwner: rootHostname: nfswpar2WPAR-Specific Routing: noDirectory: /wpars/nfswpar2Start/Stop Script:Auto Start: noPrivate /usr: yesCheckpointable: yesApplication:
# lswpar -M nfswpar2Name Mount Point Device Vfs Nodename Options------------------------------------------------------------------------------nfswpar2 /wpars/nfswpar2 /shared1/nfswpar2 nfs NFS1 rwnfswpar2 /wpars/nfswpar2/opt /opt namefs ro nfswpar2 /wpars/nfswpar2/proc /proc namefs rw nfswpar2 /wpars/nfswpar2/usr /usr namefs ro # lswpar -N nfswpar2Name Interface Address(6) Mask/Prefix Broadcast ---------------------------------------------------------------nfswpar2 en0 172.16.20.99 255.255.252.0 172.16.23.255
Important: The root specification requires the vfs=nfs specification.
164 Exploiting IBM AIX Workload Partitions

8.9 Creating a rootvg system WPAR
A rootvg system WPAR is a WPAR whose file systems are contained on a volume that is separate from the global environment rootvg disk. In Figure 8-1 on page 146, the disks named sandisk1 and sandisk2 are candidates for this purpose. From the global environment named LPAR2, the disk hdisk2 is potentially usable (see Example 8-3 on page 147).
The rootvg WPAR creation creates in the specified volume a full file system structure with /, /admin, /home, /tmp, and /var by default. Example 8-30 shows a query of that volume.
Because this structure is an external disk, not necessarily known by the global environment, it is necessary to create two other file systems in the current volume of the global environment. These file systems are seen as / and /etc/objrepos/wboot in the global rootvg content that is listed in Example 8-31. They allow you to bootstrap the file systems containing the real data. These files are then listed in the /etc/file systems of the global environment when the WPAR is defined. See Example 8-32 on page 166.
Example 8-30 WPAR rootvg volume content
rootvgwpar1> lsvg -l rootvgrootvg:LV NAME TYPE LPs PPs PVs LV STATE MOUNT POINThd4 jfs2 3 3 1 open/syncd /hd11admin jfs2 1 1 1 open/syncd /adminhd1 jfs2 1 1 1 open/syncd /homehd3 jfs2 3 3 1 open/syncd /tmphd9var jfs2 4 4 1 open/syncd /var
Example 8-31 Global rootvg volume content with a rootvg WPAR defined
# lsvg -l rootvgrootvg:LV NAME TYPE LPs PPs PVs LV STATE MOUNT POINThd5 boot 1 1 1 closed/syncd N/Ahd6 paging 16 16 1 open/syncd N/Ahd8 jfs2log 1 1 1 open/syncd N/Ahd4 jfs2 16 16 1 open/syncd /hd2 jfs2 204 204 1 open/syncd /usrhd9var jfs2 32 32 1 open/syncd /varhd3 jfs2 10 10 1 open/syncd /tmphd1 jfs2 1 1 1 open/syncd /oldhomehd10opt jfs2 26 26 1 open/syncd /opthd11admin jfs2 4 4 1 open/syncd /adminlivedump jfs2 8 8 1 open/syncd /var/adm/ras/livedumpfslv00 jfs2 3 3 1 open/syncd /wpars/rootvgwpar1
Important: A disk must be in the available state to be usable for a mkwpar creation.
Global environment /etc/filesystems: The global environment /etc/filesystems file can also contain entries for the WPAR /usr and /opt if it is a shared rootvg WPAR. These file systems are of the type vfs=namefs and point to the global environment /usr and /opt file systems.
Chapter 8. Workload partition mobility and WPAR Manager 165

fslv01 jfs2 1 1 1 open/syncd /wpars/rootvgwpar1/etc/objrepos/wboot
Example 8-32 Global /etc/filesystems entries for the rootvg WPAR file systems
/wpars/rootvgwpar1: dev = /dev/fslv00 vfs = jfs2 log = INLINE mount = false type = rootvgwpar1 account = false
/wpars/r/etc/objrepos/wboot: dev = /dev/fslv01 vfs = jfs2 log = INLINE mount = false type = rootvgwpar1
account = false
The command to create the rootvg system WPAR is again called mkwpar. It requires the -D parameter with the rootvg=yes option and the devname= parameters. The devname= specifies the disk to be used for the WPAR data. The simple creation of the rootvg WPAR called rootvgwpar1 on disk hdisk2 is shown in Example 8-33.
Example 8-33 rootvg system mkwpar creation on disk hdisk2
# mkwpar -D rootvg=yes devname=hdisk2 -n rootvgwpar1 mkwpar: Creating file systems...//home/opt/proc/tmp/usr/varMounting all workload partition file systems.mkwpar: Copying base files...x ./usrx ./libx ./adminx ./admin/tmpx ./auditx ./devx ./etcx ./etc/check_config.filesx ./etc/consdef...Workload partition rootvgwpar1 created successfully.mkwpar: 0960-390 To start the workload partition, execute the following as root:startwpar [-v] rootvgwpar1
#lswpar -M rootvgwpar1Name Mount Point Device Vfs Nodename Options
166 Exploiting IBM AIX Workload Partitions

-------------------------------------------------------------------------------------------rootvgwpar1 /wpars/rootvgwpar1 /dev/fslv00 jfs2 rootvgwpar1 /wpars/rootvgwpar1/etc/objrepos/wboot /dev/fslv01 jfs2 rootvgwpar1 /wpars/rootvgwpar1/opt /opt namefs ro rootvgwpar1 /wpars/rootvgwpar1/usr /usr namefs
8.9.1 Mobility of the rootvg system WPAR
The previous rootvg system WPAR, as it has been created, is not checkpointable. To make it checkpointable, it must be flagged. Use the chwpar command, as shown in Example 8-34.
Example 8-34 Flagging the rootvg system as ready for mobility
# chwpar -c rootvgwpar1# lswpar -G rootvgwpar1=================================================================rootvgwpar1 - Defined=================================================================Type: SRootVG WPAR: yesOwner: rootHostname: rootvgwpar1WPAR-Specific Routing: noVirtual IP WPAR:Directory: /wpars/rootvgwpar1Start/Stop Script:
If the disk is already in use: If the disk was already used (for example, a volume name has been assigned to it), such as
# lspv | grep hdisk3hdisk3 00034a5a117a1aef vg00 active
A message is issued to prevent the execution of the command:
# mkwpar -n rootvgwpar1 -D rootvg=yes devname=hdisk3Creating workload partition's rootvg. Please wait...mkwpar: 0960-621 Failed to create a workload partition's rootvg. Please use -O flag to overwrite hdisk3.
And an overwrite force specification is required. Use the -O option of the mkwpar command:
#mkwpar -n rootvgwpar1 -D rootvg=yes devname=hdisk3 -OCreating workload partition's rootvg. Please wait...mkwpar: Creating file systems... / /admin /home /opt /proc /tmp /usr /varMounting all workload partition file systems.
Chapter 8. Workload partition mobility and WPAR Manager 167

Auto Start: noPrivate /usr: noCheckpointable: yesApplication:
OStype: 0UUID: e5f8e3cc-6691-11e0-bda6-0011257e4dbb
Because the WPAR is mobile, we must ensure that the disk where the WPAR data resides is visible from both systems on which mobility can be performed.
The disk being used on LPAR2 is hdisk3. We check that the disk is visible and usable on LPAR3, and then, we can perform the following actions, as demonstrated in Example 8-35:
� Get the hdisk3 disk Universally Unique Identifier (uuid). The uuid is available in the configuration file /etc/wpars/rootvgwpar1.
� Verify that the uuid is available on LPAR3. Verify that the disk being used in lswpar -D matches the disk that is available in the Object Data Manager (ODM) CuAt.
� Verify that the associated disk is in the available state on LPAR3 using the same odmget command on LPAR3.
Example 8-35 Checking the availability of the disk on LPAR3
#lswpar -D | grep disk rootvgwpar1 hdisk3 disk yes ALLOCATED# grep devid /etc/wpars/rootvgwpar1.cf devid = "3E213600A0B80002948DC000071004C22D3740F1814 FAStT03IBMfcp"# odmget -q value='"3E213600A0B80002948DC000071004C22D3740F1814 FAStT03IBMfcp"' CuAt
CuAt: name = "hdisk3" attribute = "unique_id" value = "3E213600A0B80002948DC000071004C22D3740F1814 FAStT03IBMfcp" type = "R" generic = "D" rep = "nl" nls_index = 79
# rsh LPAR3 "odmget -q value='\"3E213600A0B80002948DC000071004C22D3740F1814 FAStT03IBMfcp\"' CuAt"CuAt: name = "hdisk3" attribute = "unique_id" value = "3E213600A0B80002948DC000071004C22D3740F1814 FAStT03IBMfcp" type = "R" generic = "D" rep = "nl" nls_index = 79
Because the rootvg disk is visible on both Global LPAR 2 and LPAR3, the mobility of that rootvg system WPAR can be performed between them. See 8.3, “Types of WPARs to be created on each LPAR” on page 147 for more details.
168 Exploiting IBM AIX Workload Partitions

8.9.2 Mobility of a SAN rootvg WPAR
The rootvg WPAR that is created on SAN disks, which are either of type MPIO or vSCSI, are mobile under the same conditions. Therefore, LPAR2 and LPAR3 can be moved to LPAR4 and LPAR5.
8.10 Creating a Versioned WPAR
An AIX 5.2 Versioned Workload Partition (VWPAR) is a system WPAR running binaries and libraries at the AIX 5.2 level on a global environment at AIX Version 7.1 or higher. The mkwpar command gets a specific parameter for Versioned Workload Partition called -C. This parameter is required to create the specific file systems environment that we describe next.
You can load the AIX 5.2 environment at the creation of the WPAR using the -B mksysb image parameter, which allows you to import the data from a mksysb image.
It is possible to create an NFS Versioned Workload Partition or a rootvg Versioned Workload Partition.
Example 8-36 displays a rootvg system WPAR loading an AIX 5.2 environment. The command adds the -C and -B parameters.
Example 8-36 Creating a rootvg AIX 5.2 Versioned WPAR
mkwpar -N address=172.16.20.132 -D rootvg=yes devname=hdisk3 -n versioned -B /var/tmp/AIX52DB2.mksysb -C....wio.common 7.1.0.0 ROOT APPLY SUCCESS Finished populating scratch file systems.Workload partition versioned created successfully.mkwpar: 0960-390 To start the workload partition, execute the following as root: startwpar [-v] versioned
# lswpar -MName Mount Point Device Vfs Nodename Options---------------------------------------------------------------------------------------
Network address: As mentioned in 8.4.3, “Networking” on page 149, a network address is required for the WPAR to be mobile. If the WPAR did not have a network address, you can specify the -N address = argument in the command that is run in Example 8-34 on page 167.
chwpar -c -N address=172.16.20.132 rootvgwpar1
Requirements: An AIX 5.2 Versioned Workload Partition requires additional packages that need to be installed prior to attempting to create a Versioned WPAR:
# lslpp -l | grep vwpar vwpar.52.rte 1.1.0.0 COMMITTED AIX 5.2 Versioned WPAR Runtime
vwpar.images.base 1.1.0.0 COMMITTED Versioned WPAR Base Support vwpar.sysmgt 1.1.0.0 COMMITTED Versioned WPAR Management
Chapter 8. Workload partition mobility and WPAR Manager 169

versioned /wpars/versioned /dev/fslv00 jfs2 versioned /wpars/versioned/etc/objrepos/wboot /dev/fslv01 jfs2 versioned /wpars/versioned/opt /opt namefs ro versioned /wpars/versioned/usr /usr namefs ro
The new message “Finished populating scratch file systems” is specific to the Versioned WPAR. The previously created WPAR provides information about its mobility that is highlighted in Example 8-37.
Example 8-37 Startwpar of a Versioned WPAR
# startwpar versionedStarting workload partition 'versioned'.Mounting all workload partition file systems.Loading workload partition.Exporting workload partition devices.hdisk0 DefinedExporting workload partition kernel extensions.Starting workload partition subsystem 'cor_versioned'.0513-059 The cor_versioned Subsystem has been started. Subsystem PID is 8650912.startwpar: 0960-239 The workload partition 'versioned' is not configured to be checkpointable.Verifying workload partition startup.
To understand the file system structure as described next, a mount command issued from the global environment gives the output of Example 8-38.
� File systems / and /etc/objrepos/wboot.
� File systems /opt, /proc, /usr, and /sbin are of type namefs and point to the global AIX 7.1 operating system.
� File systems that are visible inside the WPAR (see Example 8-39 on page 171). In our specific case, a user file system called download has been created, because it was part of the mksysb image.
Example 8-38 Versioned Workload Partition file systems mounted from the global environment
# mount | grep versioned | sort /dev/fslv00 /wpars/versioned jfs2 Apr 14 11:40 rw,log=INLINE /dev/fslv01 /wpars/versioned/etc/objrepos/wboot jfs2 Apr 14 11:41 rw,log=INLINE /opt /wpars/versioned/nre/opt namefs Apr 14 11:41 ro /proc /wpars/versioned/proc namefs Apr 14 11:41 rw /sbin /wpars/versioned/nre/sbin namefs Apr 14 11:41 ro /usr /wpars/versioned/nre/usr namefs Apr 14 11:41 ro /wpars/versioned/dev/fslv07 /wpars/versioned/download jfs2 Apr 14 11:41 rw,log=INLINE /wpars/versioned/dev/hd1 /wpars/versioned/home jfs2 Apr 14 11:41 rw,log=INLINE /wpars/versioned/dev/hd10opt /wpars/versioned/opt jfs2 Apr 14 11:41 rw,log=INLINE /wpars/versioned/dev/hd11admin /wpars/versioned/admin jfs2 Apr 14 11:41 rw,log=INLINE /wpars/versioned/dev/hd2 /wpars/versioned/usr jfs2 Apr 14 11:41 rw,log=INLINE /wpars/versioned/dev/hd3 /wpars/versioned/tmp jfs2 Apr 14 11:41 rw,log=INLINE
170 Exploiting IBM AIX Workload Partitions

/wpars/versioned/dev/hd4 /wpars/versioned/ jfs2 Apr 14 11:41 rw,log=INLINE /wpars/versioned/dev/hd9var /wpars/versioned/var jfs2 Apr 14 11:41 rw,log=INLINE
Example 8-39 Versioned Workload Partition file systems that are visible inside the WPAR
# clogin versioned lsfs Name Nodename Mount Pt VFS Size Options Auto Accounting/dev/hd4 -- / jfs2 131072 -- no no /dev/hd11admin -- /admin jfs2 65536 -- yes no /dev/hd1 -- /home jfs2 131072 -- no no /dev/hd10opt -- /opt jfs2 262144 -- no no /dev/hd3 -- /tmp jfs2 131072 -- no no /dev/hd2 -- /usr jfs2 3407872 -- no no /dev/hd9var -- /var jfs2 131072 -- no no /dev/fslv07 -- /download jfs2 5373952 -- no no
We describe mobility in 8.9.1, “Mobility of the rootvg system WPAR” on page 167.
8.11 WPAR mobility using WPAR Manager
The WPAR Manager is required. It enables WPAR relocation across systems and provides workflows for WPAR static and live mobility. The WPAR Manager supports the static relocation and live relocation of WPARs.
During static relocation, the WPAR is shut down on the departure node and a clean start of the WPAR is performed on the arrival node while preserving the file system state. Static relocation of system WPARs uses the backup and restore capabilities.
Live Application Mobility is the process of relocating a WPAR while preserving the state of the application stack on the arrival node. During Live Application Mobility, WPARs are relocated from the departure node to the arrival node with minimal application downtime and without losing active transactions.
Detached WPAR: A Versioned Workload Partition is created as a detached (non-shared) WPAR, because the /usr, /opt, and /var have to run AIX 5.2 binaries and libraries.
Important: Live mobility of application WPARs that were created from the command line will fail if the WPAR is relocated from the WPAR Manager user interface.
Requirements: Live relocation of AIX 5.2 Versioned Workload Partitions requires the installation of additional software updates within the AIX 5.2 Versioned Workload Partition before live mobility can be attempted.
The additional updates that are required are available under the aix52_updates directory on the IBM AIX 5.2 Workload Partitions for AIX 7 (5765-H38) program product media.
Chapter 8. Workload partition mobility and WPAR Manager 171

8.12 System compatibility for WPAR mobility
There are restrictions on the setup of the environment to support application mobility. Various levels of restriction apply for live and static relocations. System compatibility is the degree of similarity between two servers when relocating a WPAR from one server to another.
The following considerations apply to the environment for both types of application mobility:
� Managed systems to be used as departure and arrival nodes for mobility must be in the same subnet.
� Departure and arrival servers must be running on compatible hardware (same processor family) and have compatible software installed.
� For IPv6 networks, if you are planning to use NFS-mounted remote directories, NFSv4 is required.
8.12.1 Compatibility testing for WPAR mobility
In order to perform relocation, WPAR Manager conducts a series of critical tests to determine the compatibility between the departure and the arrival nodes. Live relocation requires more extensive compatibility checks than static relocation. It is entirely possible that two systems that are incompatible for live relocations are compatible for static mobility.
The critical tests for static relocation are a subset of the tests that are performed for live relocation. The critical compatibility tests check the following compatibility criteria for both types, static and live mobility:
� Devices exported to the WPAR must be available and not exported to any other WPAR on the arrival system.
� Devices allocated to the WPAR must be available on the arrival system.
In addition to the device test cases, Figure 8-2 lists the additional critical compatibility tests that are checked for static relocation.
Figure 8-2 Critical compatibility tests for static relocation
For Live Application Mobility, in addition to the device test cases, WPAR Manager lists the critical compatibility test checks that are performed to determine if the departure and the arrival systems are compatible, as shown in Figure 8-3 on page 173.
172 Exploiting IBM AIX Workload Partitions
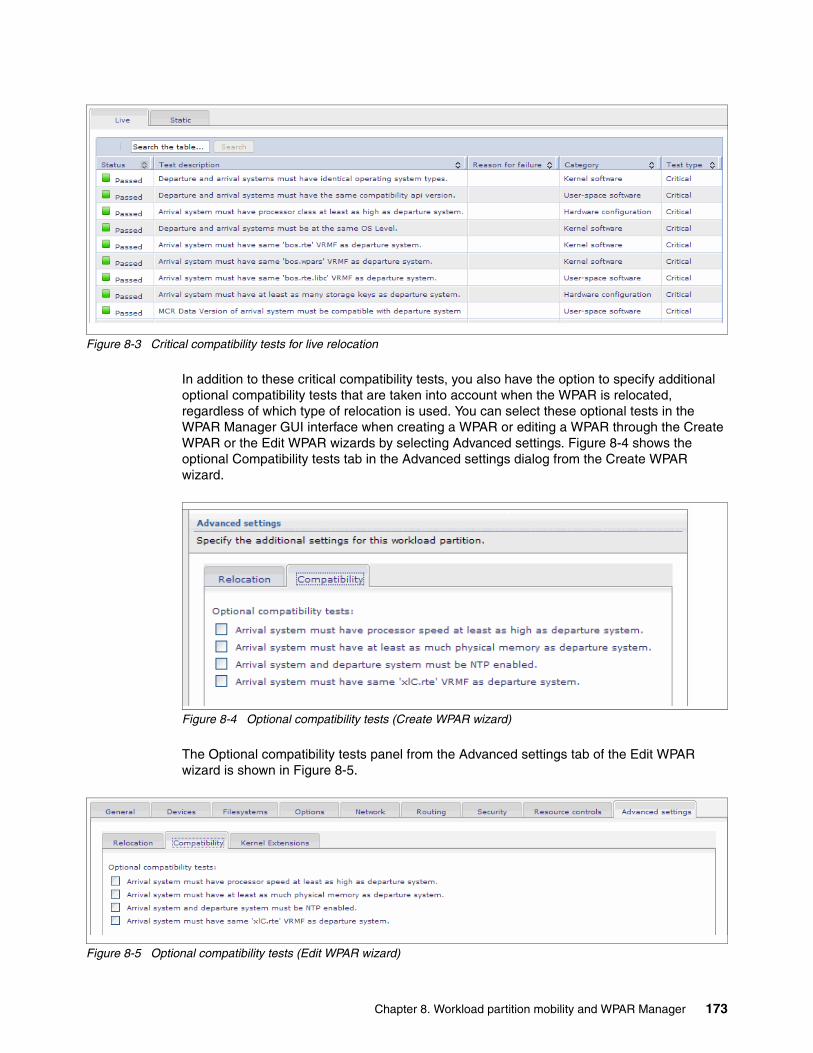
Figure 8-3 Critical compatibility tests for live relocation
In addition to these critical compatibility tests, you also have the option to specify additional optional compatibility tests that are taken into account when the WPAR is relocated, regardless of which type of relocation is used. You can select these optional tests in the WPAR Manager GUI interface when creating a WPAR or editing a WPAR through the Create WPAR or the Edit WPAR wizards by selecting Advanced settings. Figure 8-4 shows the optional Compatibility tests tab in the Advanced settings dialog from the Create WPAR wizard.
Figure 8-4 Optional compatibility tests (Create WPAR wizard)
The Optional compatibility tests panel from the Advanced settings tab of the Edit WPAR wizard is shown in Figure 8-5.
Figure 8-5 Optional compatibility tests (Edit WPAR wizard)
Chapter 8. Workload partition mobility and WPAR Manager 173

8.12.2 Compatibility states
Based on the results of the compatibility test, the compatibility states might be any of the following states:
� Compatible
For a given relocation type, all critical and user-selected tests comparing the system properties of the departure system to the system properties of the arrival system pass. A WPAR can be relocated from the departure system to the arrival system and can also be relocated from the arrival system back to the departure system.
� Compatible with warnings
For a given relocation type, at least one of the critical or user-selected tests was skipped, because the required system property was not collected on either the departure system or the arrival system. No failures are recorded on any of the remaining critical and user-selected tests. Because not all test cases were executed, there is a risk that the WPAR cannot be relocated from the departure system to the arrival system or from the arrival system back to the departure system.
� Not compatible
For a given relocation type, compatibility testing shows that a WPAR cannot be safely relocated from the departure system to the arrival system and back.
Because several of the test case rules are based on inequalities, the processor class on the arrival system must be at least as high as departure system. A failure might happen in one direction only. However, because it is not possible to safely relocate the WPAR in both directions, the compatibility state between the managed systems is marked as Not compatible.
Notice that when the compatibility state between two managed systems is reported as Not compatible, a failure probably occurs if you try to move the WPAR to the incompatible system. It is possible, in certain cases, that the relocation might succeed.
� Unknown
This state indicates that the compatibility analysis was not performed, because the departure server changed its state to unknown or the arrival server appears to be offline.
� Canceled
Compatibility testing was unable to be completed as a result of an error or a server profile mismatch condition.
8.13 WPAR relocation
The WPAR Manager supports static and live relocation methods for manual relocation. The WPAR Manager also supports policy-based automatic relocation. For policy-based relocation, you have to create a relocation domain and associate the domain with a relocation policy.
8.13.1 Relocation domains
A relocation domain is a group of managed WPAR-capable AIX systems that is defined as a Group in the IBM Systems Director. The relocation domain represents the set of WPAR-capable managed systems used to restrict the possible destination systems of a WPAR during automatic relocation.
174 Exploiting IBM AIX Workload Partitions

WPAR relocation domains are a special IBM Systems Director group where the group type is WPAR Relocation Domain. Only WPAR-capable systems can be members of this type of group. This group is associated with a relocation policy, so that when a policy violation occurs due to heavy workload on a managed system, only the members of the group are evaluated as potential destinations for WPAR relocation.
A managed WPAR-capable system can be a member of only one WPAR relocation domain at any given time. If a system is already a member of a WPAR relocation domain, it cannot be added to another WPAR relocation domain until it is removed from its current WPAR relocation domain.
Automatic relocation for a WPAR is restricted to only members of the WPAR relocation domain. When a WPAR is deployed on a system that belongs to a WPAR relocation domain, the WPAR Manager only looks for other systems in the same domain if relocation is necessary.
To create a WPAR relocation domain, follow the same procedure as to create an IBM Systems Director group and select WPAR relocation domain as the Group type.
You can relocate a WPAR to a separate relocation domain using manual relocation. Because the relocation domain is associated with the WPAR-capable managed system where the WPAR is deployed, relocating the WPAR manually to a managed system that belongs to another relocation domain will result in a change of the relocation domain for the WPAR.
To create a relocation domain, perform the following steps:
1. From the IBM Systems Director web interface navigation area, click Navigate Resources.
2. Click Create Group on the navigation area toolbar.
3. Enter the name and description of the Relocation Domain and click Next.
4. Select WPAR relocation domain as the Group type, enter the group location, and click Next.
5. Select the members of the relocation domain and click Next. Only WPAR-capable systems can be selected.
6. Click Finish.
8.13.2 Relocation policy
WPAR relocation policies are a set of metrics and rules that determine when a WPAR is automatically relocated. A relocation policy sets maximum utilization thresholds for either processor or memory on managed systems. It might be associated with a relocation domain that specifies which systems can be considered as potential destination systems for automatic relocation.
The policy metrics that are currently supported by WPAR Manager are processor utilization and memory utilization in a global AIX system.
Tip: If Create Group is not shown, you can click Action and select the Create Group menu item.
Tip: To add or remove members from the relocation domain, go to a view where the relocation domain is shown and select Edit.
Chapter 8. Workload partition mobility and WPAR Manager 175

A policy violation is an event that occurs when either average processor or memory utilization on an AIX system exceeds a specified threshold over a specified period of time. Threshold values and the averaging period are specified in a relocation policy that is in effect for the system.
In a relocation policy, the averaging period is the interval of time over which processor or memory utilization is averaged to determine whether the workload on a managed system exceeds the policy threshold. Utilization is averaged over the period to avoid the relocation of WPARs in response to brief spikes in the workload.
In response to a policy violation, the WPAR Manager initiates a policy analysis of workloads in multiple AIX systems to determine whether a WPAR can be moved from a busy system to a less busy system for improved performance.
To create a relocation policy, perform the following steps:
1. From the WPAR Manager main page, select View relocation policies from the Common views area (Figure 8-6).
Figure 8-6 View relocation policies (WPAR Manager summary window)
2. On the Relocation Policy window, click Create policy (Figure 8-7).
Figure 8-7 Create relocation policy
3. On the General tab, enter the policy name and specify the averaging period and policy metrics for the policy. The WPAR Manager supports the monitoring of two system metrics, processor and memory use and their thresholds, as shown in Figure 8-8 on page 177.
176 Exploiting IBM AIX Workload Partitions

Figure 8-8 Setting relocation policy metrics and thresholds
4. From the Relocation domains tab, click Add to specify the relocation domain to which you want to associate this policy. You can create a relocation domain if necessary by clicking Create relocation domain (Figure 8-9).
Figure 8-9 Associating relocation domain with relocation policy (1 of 2)
5. Select the relocation domain from the available list. Click Add to move it over to the selected list and click OK (Figure 8-10 on page 178).
Chapter 8. Workload partition mobility and WPAR Manager 177

Figure 8-10 Associating relocation domain with relocation policy (2 of 2)
6. After the policy has been associated with a relocation domain, click OK to complete the wizard for policy creation (Figure 8-11).
Figure 8-11 Relocation policy created
8.13.3 Manual relocation
Using WPAR Manager, you can initiate a manual relocation of a WPAR using static or live relocation methods. Before attempting a manual relocation of a WPAR to a manually selected server, you must ensure that your environment meets the requirements to support relocation.
After you decide which WPAR to relocate, you can use the WPAR Manager to help you select the best possible system to which to move the WPAR, based on system compatibility. While selecting a fully compatible system is the preferred option, you can override the compatibility recommendation at your own risk and select any system regardless of compatibility.
To start the relocation, first select the WPAR that you want to relocate, and then choose Relocate from the Actions menu or from the right-click options, as illustrated in Figure 8-12 on page 179.
178 Exploiting IBM AIX Workload Partitions

Figure 8-12 Initiate manual WPAR relocation
The Relocate Workload Partition dialog then prompts you to choose a destination system. The dialog lists the results summary of the critical compatibility tests for each of the WPAR-capable systems, as shown in Figure 8-13.
Figure 8-13 Critical compatibility test results
After clicking Next, you are prompted to select the type of relocation to perform, as displayed in Figure 8-14 on page 180. In our example, we selected Live.
Chapter 8. Workload partition mobility and WPAR Manager 179

Figure 8-14 Select relocation method
After selecting the relocation method and clicking Next, the WPAR relocation job is submitted and the relocation process starts. The WPAR’s state changes to Transitional, as shown in Figure 8-15.
Figure 8-15 WPAR relocation job started
You can view the details about the WPAR relocation job by clicking Display Properties. On the General tab, the current status and progress indicator for the job are displayed, as shown in Figure 8-16 on page 181.
180 Exploiting IBM AIX Workload Partitions

Figure 8-16 WPAR relocation job properties
Job logs for the relocation job are viewable from the Logs tab, as shown in Figure 8-17.
Figure 8-17 WPAR relocation job log
Individual job steps and their progress are shown on the Job Steps tab, as shown in Figure 8-18 on page 182.
Chapter 8. Workload partition mobility and WPAR Manager 181

Figure 8-18 WPAR relocation job steps
On the departure or source server, while the WPAR relocation task is running, you can see the WPAR’s state changing from transitional to moving to defined to being removed and not there by viewing the results of running the lswpar command, as shown in Example 8-40.
Example 8-40 lswpar command results during WPAR relocation (source or departure server)
root@750_2_LPAR_7 / #root@750_2_LPAR_7 / # lswparName State Type Hostname Directory RootVG WPAR------------------------------------------------------------wp01 A S wp01 /wpars/wp01 nowpsan61 T S wpsan61 /wpars/wpsan61 yesroot@750_2_LPAR_7 / #root@750_2_LPAR_7 / # lswparName State Type Hostname Directory RootVG WPAR------------------------------------------------------------wp01 A S wp01 /wpars/wp01 nowpsan61 M S wpsan61 /wpars/wpsan61 yesroot@750_2_LPAR_7 / #root@750_2_LPAR_7 / # lswparName State Type Hostname Directory RootVG WPAR------------------------------------------------------------wp01 A S wp01 /wpars/wp01 nowpsan61 D S wpsan61 /wpars/wpsan61 yesroot@750_2_LPAR_7 / #root@750_2_LPAR_7 / # lswparName State Type Hostname Directory RootVG WPAR------------------------------------------------------------wp01 A S wp01 /wpars/wp01 noroot@750_2_LPAR_7 / #
Similarly, on the destination or the arrival node during the relocation task, you can see the WPAR appear and then change state from transitional to active as the relocation task
182 Exploiting IBM AIX Workload Partitions

completes by viewing the results of the lswpar command, as shown in Example 8-41 on page 183.
Example 8-41 lswpar command results during WPAR relocation (destination or arrival server)
root@750_1_LPAR_7 / #root@750_1_LPAR_7 / # lswparName State Type Hostname Directory RootVG WPAR------------------------------------------------------------wpnfs61 A S wpnfs61 /wpars/wpnfs61 nowpsan02 A S wpsan02 /wpars/wpsan02 yesroot@750_1_LPAR_7 / #root@750_1_LPAR_7 / # lswparName State Type Hostname Directory RootVG WPAR------------------------------------------------------------wpnfs61 A S wpnfs61 /wpars/wpnfs61 nowpsan02 A S wpsan02 /wpars/wpsan02 yeswpsan61 T S wpsan61 /wpars/wpsan61 yesroot@750_1_LPAR_7 / #root@750_1_LPAR_7 / # lswparName State Type Hostname Directory RootVG WPAR------------------------------------------------------------wpnfs61 A S wpnfs61 /wpars/wpnfs61 nowpsan02 A S wpsan02 /wpars/wpsan02 yeswpsan61 A S wpsan61 /wpars/wpsan61 yes
The complete list of job steps, their status, and progress indicators for the current WPAR relocation job are shown in Figure 8-19 and Figure 8-20 on page 184.
Figure 8-19 WPAR live relocation job steps (1 of 2)
Chapter 8. Workload partition mobility and WPAR Manager 183

Figure 8-20 WPAR live relocation job steps (2 of 2)
Upon completion of the relocation task, the WPAR has been relocated to the selected destination server, and the state is Active, as shown in Figure 8-21.
Figure 8-21 WPAR relocation complete
8.13.4 Policy-based relocation
Policy-based relocation is only available for WPARs that meet the following requirements:
� The WPARs are checkpointable.� The WPARs are marked as policy-enabled.� The WPARs’ hosting systems belong to relocation domains.� The WPARs do not have target shares set.
184 Exploiting IBM AIX Workload Partitions

When a system’s performance state falls outside of the policy-specified thresholds, the WPAR Manager tries to find the WPAR that, if relocated, has the biggest impact and removes the policy violation threshold of that system. The candidate system to relocate the WPAR belongs to the same relocation domain of the system in trouble. Multiple policy violation relocations might be required to achieve the goal of removing the threshold violation.
When a policy violation is reported, the WPAR-capable system’s problem status in the IBM Systems Director is set to Warning to notify the user that a policy violation has occurred. The system is also listed in the Director Health Summary scoreboard.
8.13.5 WPAR relocation using WPAR Manager CLI
Beside using the WPAR Manager web interface, you can use the WPAR Manager CLI to relocate WPARs, using the static relocation or live relocation methods.
The WPAR Manager CLI that is available with Version 2.2.1 of the IBM Systems Director plug-in provides the capability to relocate a WPAR from the command line or to be scripted and integrated with the IBM Systems Director environment.
The smcli movewpar command syntax to relocate a WPAR is displayed in Example 8-42.
Example 8-42 Help for the WPAR Manager CLI movewpar command to relocate a WPAR
smcli movewpar [-L | --lang language] [ {-d | --departure_sys departureSystem} {-D | --directory directory} {-q | --quiet} {-U | --ignore_map} {-v | --verbose} ] { {-a | --arrival_sys arrivalSystem} {-n | --wpar_name wparName} {-t | --type type} }
-a | --arrival_sys arrivalSystem [Required] Name of the arrival managed system -d | --departure_sys departureSystem Name of the departure managed system -D | --directory directory Shared directory for static relocation of system WPARs -h | -? Lists short help --help Lists full help (equivalent to a man page) -L | --lang language Specifies the locale under which the command is run -n | --wpar_name wparName [Required] Name of WPAR to relocate -q | --quiet Minimizes output, suppressing informational messages -t | --type type [Required] Type of relocation ("s" for static; "l" for live) -U | --ignore_map Ignore existing map files when creating the WPAR on the arrival system -v | --verbose Verbose mode
Chapter 8. Workload partition mobility and WPAR Manager 185

8.14 WPAR and GPFS
This section describes several tests that we performed with the IBM General Parallel File System (GPFS) and a System WPAR.
We performed a test with AIX 7100-00-02-1041, GPFS 3.4.0.2, for a shared or detached rootvg-WPAR and with the ALL kernel extension option, so your results might vary.
Note the following considerations:
� If installing and configuring GPFS onto the global environment, before doing so in a WPAR, later configuring GPFS in a WPAR in the same global environment can fail and give you an error message stating “The node appears to already belong to a GPFS cluster”.
� Only one active GPFS cluster can be active in either the global environment or WPAR at the same time. You see the “The GPFS subsystem is already active” message. The active GPFS cluster is logged in the /var/mmfs/gen/mmfslog GPFS logfile, and you get the message “/usr/lpp/mmfs/bin/aix64/mmfs64 is already loaded”.
� Installing GPFS filesets into the WPAR first and then installing GPFS filesets onto the global environment require post-synchronization from the global environment to the WPAR, or it can cause a kernel panic on the global environment (errpt LABEL: KERNEL_PANIC).
� After configuring GPFS onto the global environment, removing a previously configured GPFS cluster from a WPAR can fail and require manual configuration file editing.
� Stopping a GPFS cluster within the WPAR and then restarting it in the global environment works, as shown in Example 8-43.
Example 8-43 Stopping the GPFS cluster within a WPAR and starting it in the global environment
root@750_1_LPAR_9:/: clogin wpar11 /usr/lpp/mmfs/bin/mmshutdownSun Apr 24 18:17:40 EDT 2011: mmshutdown: Starting force unmount of GPFS file systemsSun Apr 24 18:17:46 EDT 2011: mmshutdown: Shutting down GPFS daemonsShutting down!'shutdown' command about to kill process 9175260Sun Apr 24 18:17:51 EDT 2011: mmshutdown: Finished
root@750_1_LPAR_9:/: mmstartupSun Apr 24 18:17:57 EDT 2011: mmstartup: Starting GPFS ...
root@750_1_LPAR_9:/: mmgetstate -aL
Node number Node name Quorum Nodes up Total nodes GPFS state Remarks------------------------------------------------------------------------------------ 2 750_2_LPAR_9 1 1 3 active quorum node 3 750_1_LPAR_9 1 1 3 active 4 wpar11 0 0 3 down
� A detached rootvg WPAR can have an active GPFS cluster and be part of a GPFS cluster with other GPFS cluster nodes. In Example 8-44 on page 187, wpar11 is part of the LPAR 750_1_LPAR_9, whereas LPAR 750_2_LPAR_9 is a separate LPAR.
Considerations: The GPFS file system type and GPFS file system cluster capability are not supported for integrated use with WPARs. We do not advise that you use GPFS for WPAR file systems. It is not recommended to install and configure GPFS within WPARs.
186 Exploiting IBM AIX Workload Partitions

Example 8-44 GPFS cluster status with two global environment LPARs and one WPAR
root@wpar11:/var/mmfs/gen: mmgetstate -aL
Node number Node name Quorum Nodes up Total nodes GPFS state Remarks------------------------------------------------------------------------------------ 1 wpar11 1 1 1 active quorum node
root@wpar11:/: exit
root@750_1_LPAR_9:/: mmgetstate -aL
Node number Node name Quorum Nodes up Total nodes GPFS state Remarks------------------------------------------------------------------------------------ 2 750_2_LPAR_9 1 1 3 active quorum node 3 750_1_LPAR_9 0 0 3 down 4 wpar11 1 1 3 active
root@750_2_LPAR_9:/: mmgetstate -aL
Node number Node name Quorum Nodes up Total nodes GPFS state Remarks------------------------------------------------------------------------------------ 2 750_2_LPAR_9 1 1 3 active quorum node 3 750_1_LPAR_9 0 0 3 down 4 wpar11 1 1 3 active
� Using GPFS in the global environment and mounting a GPFS file system into the WPAR works. However, it does not get unmounted with stopwpar, and it causes the WPAR to end up in an inconsistent state that requires manual intervention to resolve (under the default WPAR directory hierarchy “/wpars/<WPARname>/<WPAR mount point>”). See Example 8-45 and Example 8-46.
Example 8-45 GPFS file system in the global environment
root@750_1_LPAR_9:/: mount node mounted mounted over vfs date options-------- --------------- --------------- ------ ------------ ---------------.../dev/gpfslv00 /wpars/wpar11/wpar1fs mmfs Apr 24 18:51 rw,mtime,atime,dev=gpfslv00
Example 8-46 GPFS file system in WPAR
root@wpar11:/: mount node mounted mounted over vfs date options-------- --------------- --------------- ------ ------------ ---------------... Global /wpar1fs mmfs Apr 24 18:51 rw,mtime,atime,dev=gpfslv00
� Using GPFS in the global environment and mounting a GPFS file system into the WPAR with NFS works. However, it does not get unmounted with stopwpar and it causes the WPAR to end up in an inconsistent state that requires manual intervention to resolve. Refer to Example 8-47 and Example 8-48 on page 188.
Example 8-47 GPFS file system in the global environment NFS exported to the WPAR
root@750_1_LPAR_9:/: mount node mounted mounted over vfs date options-------- --------------- --------------- ------ ------------ ---------------...
Chapter 8. Workload partition mobility and WPAR Manager 187

/dev/gpfslvGlobal /gpfs mmfs Apr 24 18:18 rw,mtime,atime,dev=gpfslvGlobal750_1_LPAR_9 /gpfs /wpars/wpar11/mnt nfs3 Apr 24 18:31
Example 8-48 GPFS file system mounted with NFS into the WPAR
root@wpar11:/: mount node mounted mounted over vfs date options-------- --------------- --------------- ------ ------------ ---------------...750_1_LPAR_9 /gpfs /mnt nfs3 Apr 24 18:31
� Configuring a WPAR GPFS cluster with a remote cluster connection had permission issues when attempting to mount a remote GPFS file system, either to or from the WPAR GPFS cluster node. The system displayed a “Host is down” message.
� Inconsistent status when including a WPAR as a GPFS cluster node in an active GPFS cluster running on a separate Global LPAR. Refer to Example 8-49.
Example 8-49 WPAR status after configuring the global environment with a shared rootvg WPAR
root@wpar11:/: mmgetstate -aL
Node number Node name Quorum Nodes up Total nodes GPFS state Remarks------------------------------------------------------------------------------------ 2 750_2_LPAR_9 1 1 3 active quorum node 3 750_1_LPAR_9 0 0 3 down 4 wpar11 0 0 3 unknown
8.14.1 Creating the GPFS test WPAR
The detached rootvg WPAR was created using a specification file with the mkwpar command, as shown in Example 8-50.
Example 8-50 mkwpar -f wpar11specPrivateUSR
root@750_1_LPAR_9:/home: mkwpar -f wpar11specPrivateUSRCreating workload partition's rootvg. Please wait...mkwpar: Creating file systems... / /admin /home /opt /proc /tmp /usr /varMounting all workload partition file systems.mkwpar: Copying base files......
root@750_1_LPAR_9:/home: cat wpar11specPrivateUSR
general:name = "wpar11"checkpointable = "no"hostname = "wpar11"
188 Exploiting IBM AIX Workload Partitions

directory = "/wpars/wpar11"privateusr = "yes"devices = "/etc/wpars/devexports"ostype = "0"auto = "no"rootvgwpar = "yes"preserve = "no"routing = "yes"
...
device:devid = "3E213600A0B8000114632000026614D882CF30F1815 FAStT03IBMfcp"devtype = "2"rootvg = "yes"
extension:kext = "ALL"
...
network:broadcast = "172.16.23.255"interface = "en0"address = "172.16.20.115"netmask = "255.255.252.0"
To view the kernel extensions and devices, as shown in Example 8-51, Example 8-52, and Example 8-53 on page 190, you can use the following commands:
� Global: lswpar -X <WPAR name>
Example 8-51 lswpar -X for WPAR kernel extensions
root@750_1_LPAR_9:/: lswpar -X wpar11Name Extension Name Local Major Status-----------------------------------------------wpar11 ALL yes no EXPORTEDwpar11 aixapdiskpcmke no 0 EXPORTEDwpar11 scsidisk no 0 EXPORTED
� Global: lswpar -D <WPAR name>
Example 8-52 lswpar -D for WPAR devices
root@750_1_LPAR_9:/home: lswpar -D wpar11Name Device Name Type Virtual Device RootVG Status------------------------------------------------------------------wpar11 /dev/null pseudo EXPORTEDwpar11 /dev/tty pseudo EXPORTEDwpar11 /dev/console pseudo EXPORTED...wpar11 /dev/kmem pseudo EXPORTEDwpar11 hdisk0 disk hdisk0 yes EXPORTED
Chapter 8. Workload partition mobility and WPAR Manager 189

� WPAR: lsdev -C
Example 8-53 lsdev -C
root@wpar11:/: lsdev -Cfscsi0 Available 08-T1-01 WPAR I/O Virtual Parent Devicefscsi1 Available 08-T1-01 WPAR I/O Virtual Parent Devicehd1 Available Logical volume...hd9var Available Logical volumehdisk0 Available 08-T1-01 MPIO Other DS4K Array Diskinet0 Defined Internet Network Extensionpty0 Available Asynchronous Pseudo-Terminalrootvg Available Volume groupsys0 Available System Objectwio0 Available WPAR I/O Subsystem
8.14.2 Creating a simple GPFS cluster
You can use the following steps to create a simple GPFS cluster:
1. Install the GPFS filesets and program temporary fixes (PTFs):
– gpfs.msg.en_US
– gpfs.docs.data
– gpfs.base
2. Create a one-node GPFS cluster using one of these commands:
– mmcrcluster -A -p wpar11 -N wpar11:manager-quorum
– mmcrcluster -A -p $(hostname -s) -N $(hostname -s):manager-quorum
3. Accept the GPFS license:
mmchlicense server --accept -N managernodes
4. Enable the latest GPFS release features:
mmchconfig release=LATEST
5. Start the GPFS cluster:
mmstartup -N $(hostname -s)
6. Prepare the disks for use by a GPFS file system:
– Create a disk descriptor text file, in this case, a file named PVfile with one disk:
hdisk3:::dataAndMetadata:::
– Create the GPFS NSD using the disk descriptor text file PVfile:
mmcrnsd -F PVfile
– The PVfile is now to be modified by the mmcrnsd command, in this case:
• # hdisk3:::dataAndMetadata:::
• gpfs1nsd:::dataAndMetadata:-1::
7. Create a GPFS file system using the modified disk descriptor file:
mmcrfs /gpfs gpfslv -F PVfile -A yes
190 Exploiting IBM AIX Workload Partitions

8. Mount the GPFS file system:
mmmount gpfslv -a
Example 8-54 illustrates a one-node WPAR GPFS cluster status.
Example 8-54 mmlscluster in WPAR
root@wpar11:/: mmlscluster
GPFS cluster information======================== GPFS cluster name: wpar11 GPFS cluster id: 12398432259608316135 GPFS UID domain: wpar11 Remote shell command: /usr/bin/rsh Remote file copy command: /usr/bin/rcp
GPFS cluster configuration servers:----------------------------------- Primary server: wpar11 Secondary server: (none)
Node Daemon node name IP address Admin node name Designation ----------------------------------------------------------------------------------------------- 1 wpar11 172.16.20.115 wpar11 quorum-manager
In Example 8-55, a logical volume within the detached rootvg WPAR is used to create a GPFS file system.
Example 8-55 Using a logical volume to create a GPFS file system
root@wpar11:/home: mmcrfs /gpfs gpfslv -F PVfile -A yes
The following disks of gpfslv will be formatted on node wpar11: gpfs1nsd: size 1114112 KBFormatting file system ...Disks up to size 24 GB can be added to storage pool 'system'.Creating Inode FileCreating Allocation MapsClearing Inode Allocation MapClearing Block Allocation MapFormatting Allocation Map for storage pool 'system'Completed creation of file system /dev/gpfslv.
root@wpar11:/home: mmlsdisk gpfslv -Ldisk driver sector failure holds holds storagename type size group metadata data status availability disk id pool remarks------------ -------- ------ ------- -------- ----- ------------- ------------ ------- ------------ ---------gpfs1nsd nsd 512 -1 yes yes ready up 1 system descNumber of quorum disks: 1Read quorum value: 1Write quorum value: 1
root@wpar11:/home: mmdf gpfslv
Chapter 8. Workload partition mobility and WPAR Manager 191

disk disk size failure holds holds free KB free KBname in KB group metadata data in full blocks in fragments--------------- ------------- -------- -------- ----- -------------------- -------------------Disks in storage pool: system (Maximum disk size allowed is 24 GB)gpfs1nsd 1114112 -1 yes yes 960768 ( 86%) 328 ( 0%) ------------- -------------------- -------------------(pool total) 1114112 960768 ( 86%) 328 ( 0%)
============= ==================== ===================(total) 1114112 960768 ( 86%) 328 ( 0%)
Inode Information-----------------Number of used inodes: 4038Number of free inodes: 29754Number of allocated inodes: 33792Maximum number of inodes: 33792
root@wpar11:/home: mmmount gpfslv -aSat Apr 23 13:57:50 EDT 2011: mmmount: Mounting file systems ...
root@wpar11:/home: mmlsmount all -L
File system gpfslv is mounted on 1 nodes: 172.16.20.115 wpar11
root@wpar11:/home: mmlsdisk gpfslv -Ldisk driver sector failure holds holds storagename type size group metadata data status availability disk id pool remarks------------ -------- ------ ------- -------- ----- ------------- ------------ ------- ------------ ---------gpfs1nsd nsd 512 -1 yes yes ready up 1 system descNumber of quorum disks: 1Read quorum value: 1Write quorum value: 1
root@wpar11:/home: mmlsnsd -X
Disk name NSD volume ID Device Devtype Node name Remarks--------------------------------------------------------------------------------------------------- gpfs1nsd AC1014734DB3127D /dev/lv00 lv wpar11 lv=lv00,vg=rootvg
root@wpar11:/home: df /gpfsFilesystem 512-blocks Free %Used Iused %Iused Mounted on/dev/gpfslv 2227712 1921536 14% 4038 12% /gpfs
192 Exploiting IBM AIX Workload Partitions

Chapter 9. Workload partition migration scenarios
This chapter provides scenarios for migrating a workload partition (WPAR) from AIX 6.1 to AIX 7.1. We considered that in many cases the migration also occurs with an application installed in the WPAR.
In this chapter, we have performed the steps required to migrate WPARs from AIX 6.1 to AIX 7.1. We provide several examples of WPARs of various types and show how we migrated them to the new operating system (OS) level.
There are cases where we had an application installed in the WPAR when we migrated. After migration, we started the application to confirm that it still functioned properly.
This chapter presents the following topics:
� WPAR migration� Migrating a WPAR to a separate IBM Power System
9
© Copyright IBM Corp. 2011. All rights reserved. 193

9.1 WPAR migration
When a global version of AIX running in a logical partition (LPAR) is migrated to a new level of AIX, the WPARs that run within that global environment need to be migrated to the same level that has been applied to the global environment. The WPAR shares the same kernel as the global environment. System software must be kept at the same level as the global environment in order to avoid unexpected results. There might be unexpected behavior if system calls, functions, or libraries are called from a WPAR that has not been migrated.
Prior to the migration to AIX 7.1, the global environment level of AIX was 6.1. There was a detached (private) WPAR, which was created with AIX 6.1. In order for the WPARs to function correctly after the migration to AIX 7.1, it must also be migrated. To migrate the detached WPAR, use the migwpar command.
A global environment of AIX is migrated with a normal AIX migration from one release of AIX to another. Refer to the AIX Installation and Migration Guide, SC23-6722, for information about migrating AIX:
http://publib.boulder.ibm.com/infocenter/aix/v7r1/topic/com.ibm.aix.install/doc/insgdrf/insgdrf_pdf.pdf
The WPAR migration is separate from a global environment migration. WPARs are not migrated automatically during an AIX migration. After the global environment has been successfully migrated from AIX 6.1 to AIX 7.1, any associated WPARs must also be migrated to AIX 7.1.
Currently, only system WPARs are supported for migration. Both shared and detached (private) system WPARs are supported. Shared system WPARs do not have their own private /usr and /opt file systems. They share these file systems from the global environment.
A detached system WPAR (or non-shared system WPAR) has private /usr and /opt file systems, which are copied from the global environment. In order to migrate a WPAR of this type, the administrator must specify the install media as the software source for the migration.
9.1.1 Migrating a detached WPAR with WebSphere Application Server
The private WPAR in our scenario was created as a private WPAR to accommodate the requirements for running WebSphere® Application server in the WPAR. WebSphere Application Server requires a detached WPAR. Detached WPARs have their own /usr and /opt file systems. For more information about detached WPARs, see the AIX 6.1 Information Center section about IBM Workload Partitions for AIX:
http://publib.boulder.ibm.com/infocenter/aix/v6r1/index.jsp?topic=/com.ibm.aix.wpar/wpar-kickoff.htm
Prior to migrating the global environment, there are steps that you need to take to be sure of a successful migration. These steps ensure that the WPAR is in sync with the global environment. We started with an AIX 6.1.6.1 LPAR with a detached WPAR at the same level.
First, back up your WPAR using the savewpar command against your WPAR to preserve a copy before migrating. We performed a savewpar backup on our WPAR to a Network File System (NFS)-mounted file system, as shown in Example 9-1.
Example 9-1 savewpar command output
# savewpar -f /mnt/mksysb/wpar61.save wpar61
194 Exploiting IBM AIX Workload Partitions

Creating information file (/image.data) for wptest3a.
Creating list of files to back up..Backing up 77759 files........................
As another step prior to migrating the WPAR, we ran the syncwpar and syncroot commands to make sure that the WPAR was in sync with the global environment, as shown in Example 9-2 and Example 9-3.
Example 9-2 Output of syncwpar command
# syncwpar -D wpar61*******************************************************************************Synchronizing workload partition 'wpar61' (1 of 1).*******************************************************************************Mounting all workload partition file systems.Loading workload partition.Shutting down all workload partition processes.Unloading workload partition.Unmounting all workload partition file systems.Workload partition 'wpar61' synchronized successfully.
Return Status = SUCCESS.
Example 9-3 Output of the syncroot command
*******************************************************************************Synchronizing workload partition 'wpar61' (1 of 1).*******************************************************************************Executing '/usr/sbin/syncroot' in workload partition 'wpar61'.syncroot: Processing root part installation status.syncroot: Installp root packages are currently synchronized.syncroot: RPM root packages are currently synchronized.syncroot: Root part is currently synchronized.syncroot: Returns Status = SUCCESSWorkload partition 'wpar61' synchronized successfully.
Return Status = SUCCESS.
There are additional scripts that are helpful when you migrate. These scripts are included to aid in the Global migration and are not required for WPAR migration.
There is a pre-migration script available on the AIX 7.1 media in the following location: /usr/lpp/bos/pre_migration. You can also get the pre-migration script in the AIX 7.1 Network Installation Management (NIM) SPOT. There is also a post-migration script available in the /usr/lpp/bos/post_migration directory after the migration is complete.
The syncwpar and syncroot commands: It is not necessary to run both syncwpar and syncroot. Syncwpar does everything (and more) that syncroot does, so it is redundant to run both commands. We included both commands here to be complete.
Chapter 9. Workload partition migration scenarios 195

Refer to the AIX 7.1 Information Center for more details relating to these scripts:
http://publib.boulder.ibm.com/infocenter/aix/v7r1/topic/com.ibm.aix.install/doc/insgdrf/migration_scripts.htm
After the global environment has been migrated to AIX 7.1, the next step is to migrate the WPAR. There are flags to pass to the migwpar command. When migrating a shared WPAR, use the following command:
# migwpar wpar61
You can migrate all shared WPARs with the following command:
# migwpar -A
When migrating a detached WPAR use the -d parameter. The -d parameter requires the software source as an option. To migrate a detached WPAR, use the following command:
# migwpar -d /sw_images wpar61
WPAR migration information is logged to the /var/adm/ras/migwpar.log file in the global environment. For more information about migrating WPARS, see AIX Version 7.1 Differences Guide, SG24-7910.
The 6.1 WPAR in our scenario is a detached WPAR, so we need the -d option.
We performed the following actions to migrate our WPAR:
1. Prior to migrating the global environment, we ran the syncwpar command on the global environment to sync the WPAR.
2. We stopped the WebSphere Application Server while running in the LPAR. Do not stop the WPAR if running a detached WPAR. Stopping the WPAR unmounts the file systems and they will not be visible to the global OS during the migration.
3. We migrated the global environment to AIX 7.1.
After the migration completed, we checked to make sure that the global environment was migrated successfully, and that the WPAR was still defined, as shown in Example 9-4.
Example 9-4 Commands to check the OS level after the upgrade
# oslevel -s7100-00-02-1041# lswparName State Type Hostname Directory RootVG WPAR----------------------------------------------------------wpar61 D S wpar61 /wpars/wpar61 no
4. After migrating the global environment, we migrated the WPAR to AIX 7.1 with the migwpar command, as shown in Example 9-5.
Example 9-5 Migrating the WPAR to AIX 7.1
# migwpar -d /mnt/aix702.full wpar61Detached WPAR list:wpar61WPAR wpar61 mount point:
Important: You will not be able to start your WPAR, because a Versioned Workload Partition at AIX 6.1 is not currently supported in AIX 7.1.
196 Exploiting IBM AIX Workload Partitions

/wpars/wpar61Mounting all workload partition file systems.Loading workload partition.Saving system configuration files.
5. We started the WPAR and verified that the WPAR was migrated correctly, as shown in Example 9-6.
6. We started WebSphere Application Server and verified that it migrated properly.
Example 9-6 Commands to start the application server after the migration of the WPAR
#clogin wpar61******************************************************************************** ** ** Welcome to AIX Version 7.1! ** ** ** Please see the README file in /usr/lpp/bos for information pertinent to ** this release of the AIX Operating System. ** ** ********************************************************************************# oslevel -s7100-00-02-1041
# cd /usr/IBM/WebSphere/AppServer/profiles/AppSrv01/bin# ps -ef | grep java root 16056332 13041786 0 09:08:55 pts/1 0:00 grep java# ./startServer.sh server1ADMU0116I: Tool information is being logged in file /wpars/wpar61/usr/IBM/WebSphere/AppServer/profiles/AppSrv01/logs/server1/startServer.logADMU0128I: Starting tool with the AppSrv01 profileADMU3100I: Reading configuration for server: server1
9.1.2 Migrating a shared WPAR
The shared WPAR in our scenario was created to house the IBM HTTP server. We installed the IBM HTTP server after the WPAR had already been defined. We did it this way to test the ability to install into the global environment and to run syncwpar to get the code into the installed WPAR. This WPAR is a shared WPAR so installing an application into the /usr and /opt directories of the global environment became part of the WPAR. Then, we ran syncwpar to get any associated root parts installed into the WPAR.
The previous steps also apply to the shared WPAR. Prior to migration, we made sure that our WPAR was in sync with the global environment. We started with an AIX 6.1.6.1 LPAR with a WPAR at the same level. We used the NIM Alternate Disk Install method to copy the existing rootvg to another disk and performed the migration to this disk. We like this method, because it provides the ability to go back to our original installation if there are any problems with the migration.
Chapter 9. Workload partition migration scenarios 197

We followed these steps:
1. Prior to migrating the global environment, we ran the syncwpar and syncroot commands on the global environment to sync the WPAR.
Do not stop the WPAR if running a detached WPAR. Stopping the WPAR unmounts the file systems and they will not be visible to the global OS during the migration.
2. We migrated the global environment to AIX 7.1.
After the migration completed, we checked to make sure that the global environment was migrated successfully, and that the WPAR was still defined, as shown in Example 9-7.
Example 9-7 Checking the WPAR listing after the global migration
# oslevel -s7100-00-02-1041# lswparName State Type Hostname Directory RootVG WPAR--------------------------------------------------------------wptesta1 D S wptesta1 /wpars/wptesta1 no
3. After migrating the global environment, we migrated the WPAR to AIX 7.1 with the migwpar command.
4. We started the WPAR and verified that the WPAR migrated correctly, as shown in Example 9-8.
5. We logged in to the WPAR and verified the version.
Example 9-8 Output of the WPAR environment after migration
# clogin wptesta1******************************************************************************** ** ** Welcome to AIX Version 7.1! ** ** ** Please see the README file in /usr/lpp/bos for information pertinent to ** this release of the AIX Operating System. ** ** ********************************************************************************Last login: Mon Apr 11 13:59:48 2011 on /dev/Global from 750_1_LPAR_2
# oslevel -s7100-00-02-1041
9.1.3 Migrating the rootvg WPAR
In earlier versions of AIX 7 prior to 7.1.0.1, migration of a rootvg WPAR was not allowed. With the newer releases, you can now migrate shared rootvg WPARs from your 6.1 environments to AIX 7.1 or higher.
Important: Migration of a detached rootvg WPAR is not supported as of this writing.
198 Exploiting IBM AIX Workload Partitions

The rootvg WPAR in our scenario was created to demonstrate the ability to migrate the rootvg WPAR from AIX 6.1 to AIX 7.1. We built the rootvg WPAR on the storage area network (SAN) disk using the command that is shown in Example 8-30 on page 165.
After we defined the rootvg WPAR, we then migrated the global OS version from AIX 6.1.6.1 to AIX 7.1.0.2. Example 9-9 shows our rootvg WPAR prior to migration.
Example 9-9 Output of the rootvg WPAR prior to migration
# clogin wptestb2******************************************************************************** ** ** Welcome to AIX Version 6.1! ** ** ** Please see the README file in /usr/lpp/bos for information pertinent to ** this release of the AIX Operating System. ** ** ********************************************************************************Last login: Mon Apr 11 13:56:46 2011 on /dev/Global from 750_1_LPAR_2
# oslevel6.1.0.0# oslevel -s6100-06-01-1043# lslpp -l bos.rte Fileset Level State Description ----------------------------------------------------------------------------Path: /usr/lib/objrepos bos.rte 6.1.6.0 COMMITTED Base Operating System Runtime
Path: /etc/objrepos bos.rte 6.1.6.0 COMMITTED Base Operating System Runtime
Prior to migrating the global environment, we ran the syncwpar and syncroot commands on the global environment to sync the WPAR. We stopped any application that was running in the WPAR. And, we migrated the global environment to AIX 7.1.
After the migration completed, we checked to make sure that the global environment was migrated successfully, and that the WPAR was still defined.
After migrating the global environment, we migrated the WPAR to AIX 7.1 with the migwpar command, as shown in Example 9-10.
Example 9-10 Migrating the WPAR to AIX 7.1
# migwpar wptestb2
Then, we started the WPAR and verified that the WPAR migrated correctly.
Important: You will not be able to start your WPAR, because a Versioned Workload Partition at AIX 6.1 is not supported in AIX 7.1 at the time of this writing.
Chapter 9. Workload partition migration scenarios 199

Then, we started our application and verified that it migrated properly.
When the global migration was complete, we verified that the global migration was successful, and that the WPARs were still listed with the lswpar command. We migrated the WPAR with the migwpar command on the rootvg WPAR. After the successful completion of the migration, we verified that the rootvg WPAR was successfully migrated, as shown in Example 9-11.
Example 9-11 Checking the levels of the migrated rootvg WPAR
# clogin wptestb2******************************************************************************** ** ** Welcome to AIX Version 7.1! ** ** ** Please see the README file in /usr/lpp/bos for information pertinent to ** this release of the AIX Operating System. ** ** ********************************************************************************Last login: Mon Apr 11 13:59:48 2011 on /dev/Global from 750_1_LPAR_2
# oslevel -s7100-00-02-1041
# lslpp -l bos.rte Fileset Level State Description ----------------------------------------------------------------------------Path: /usr/lib/objrepos bos.rte 7.1.0.2 COMMITTED Base Operating System Runtime
Path: /etc/objrepos bos.rte 7.1.0.0 COMMITTED Base Operating System Runtime#
9.2 Migrating a WPAR to a separate IBM Power System
We describe migrating a WPAR from a source machine with AIX 6.1 Technology Level 6 (TL06) - Service Pack 2 (SP02) to a new target machine either with the same AIX level or with AIX 7.1 TL00-SP02. Although the easiest way to perform this task is to use the Workload Partition Manager (WPM) relocation facility, in certain cases, using this facility is not possible, for example, if there are two isolated sites or a WPM is not available.
We tested two scenarios for migrating a WPAR from one system to another without using a WPM.
200 Exploiting IBM AIX Workload Partitions

9.2.1 Migrating a rootvg WPAR to a separate system with the same AIX level using external shared accessed storage
Here, we tested the following scenario where WPM is not available and both source and target systems have access to the same storage device where the rootvg WPAR disk is accessible. In this case, the shared disk is a virtual SCSI (vSCSI) disk backed up by a logical volume (LV) on the Virtual I/O Server (VIOS), as shown in Figure 9-1.
Figure 9-1 Source System WPAR using a virtual disk
Creating the source environmentTo create a shareable vdisk, we need to create a vhost and a vscsi virtual SCSI adapter on the VIOS and the client LPAR. For example, if using the Hardware Management Console (HMC), select the VIOS LPAR and navigate to Configuration Manage Profiles select the profile Actions Edit Virtual Adapters Actions Create a Virtual Adapter SCSI Adapter.
In Figure 9-2 on page 202, we see the virtual SCSI adapter definition window on the HMC.
vhost2 vhost3
VTD
wpar_hdisk
rootvg
wparlv
fsc0
VIOS
Target System
vscsi0
Source System
vscsi0
Disk Storage
WPAR
rootvg
hdisk2
SAN
Chapter 9. Workload partition migration scenarios 201

Figure 9-2 Creating a vhost adapter
Make sure to choose the correct Client partition and select an unused slot ID number (Client adapter ID) on the client LPAR. This step creates a virtual SCSI server adapter on the VIOS LPAR.
Next, select the client LPAR and repeat the same navigation operation. Use the slot numbers according to the previous pairing, as shown in Figure 9-3. This step creates a virtual SCSI client adapter on the client LPAR.
Figure 9-3 Creating a vSCSI adapter
202 Exploiting IBM AIX Workload Partitions

In order to avoid booting to discover the newly added virtual SCSI adapters, we can add them again by selecting Dynamic Logical Partitioning Virtual Adapter in both the VIOS and the client LPAR.
In the next section, we proceed to create a virtual disk (vdisk) and map it to the client LPAR.
Creating a rootvg WPAR on a vdiskWe start by discovering the newly added virtual SCSI server adapter and then creating and mapping a logical volume to this adapter, as shown in Example 9-12.
Example 9-12 Creating a WPAR on a vdisk
$ uname -aAIX p7501vio1 1 6 00F660764C00$ cfgdev$ lsdev -type adapter -virtual |grep vhost...vhost2 Available Virtual SCSI Server Adapter$ mklv -lv wparlv rootvg 140wparlv$ mkvdev -dev wpar_hdisk -vadapter vhost2 -vdev wparlvwpar_hdisk Available$ lsmap -vadapter vhost2SVSA Physloc Client Partition ID--------------- -------------------------------------------- ------------------vhost2 U8233.E8B.106076P-V1-C6 0x00000006
VTD wpar_hdiskStatus AvailableLUN 0x8100000000000000Backing device wparlvPhyslocMirrored N/A
On the Client LPAR, we will see the wpar_hdisk as hdisk2 and will use it to create the WPAR:
# cfgmgr# lspvhdisk0hdisk1hdisk2# mkwpar -c -l -D rootvg=yes devname=hdisk2 -n mig_wpar_1 -N address=172.16.20.117 netmask=255.255.252.0mkwpar: Creating file systems... / /home /opt /proc /tmp /usr /varMounting all workload partition file systems.mkwpar: Copying base files...x ./usrx ./lib
Chapter 9. Workload partition migration scenarios 203

x ./adminx ./admin/tmpx ./auditx ./devx ./etcx ./etc/check_config.filesx ./etc/consdef...Workload partition mig_wpar_1 created successfully.mkwpar: 0960-390 To start the workload partition, execute the following as root: startwpar [-v] mig_wpar_1
# startwpar mig_wpar_1Starting workload partition 'mig_wpar_1'.Mounting all workload partition file systems.Loading workload partition.Exporting workload partition devices.hdisk2 DefinedStarting workload partition subsystem 'cor_mig_wpar_1'.0513-059 The cor_mig_wpar_1 Subsystem has been started. Subsystem PID is 11599938.
To recreate a practical scenario, we next installed IBM WebSphere Application Server V7 on the WPAR and ran the Sample Application (Figure 9-4 on page 205). For this task, we extended the /usr file system at least 500 MB to provide enough disk space for the installation. Another option is to create a separate file system for the WebSphere Application Server installation using the WPAR rootvg disk. For details about installing the WebSphere Application Server on a WPAR, see the following technical documents:
� http://www-01.ibm.com/support/docview.wss?uid=swg21420491
� http://www-01.ibm.com/support/docview.wss?uid=swg21377268
� http://www-01.ibm.com/support/docview.wss?uid=swg21291889
� http://www-01.ibm.com/support/docview.wss?uid=swg21294421
Important: Before starting a checkpointable WPAR, notice the -c flag that we added to the mkwpar command. You need to make sure that the mcr.rte fileset is installed in the global environment. This fileset is not installed by default in AIX, although the WPM Agent Deploy from IBM Systems Director will install this fileset (refer to the 4.2, “WPAR Manager agent” on page 44). However, you can always manually install this fileset directly by using smit installp.
We also used the -l flag to create a private or detached WPAR; however, this migration procedure, to the same AIX-level target machine, is also valid for a shared rootvg WPAR.
204 Exploiting IBM AIX Workload Partitions

Figure 9-4 Sample WebSphere application running on the WPAR
Deleting the WPAR from the source systemA rootvg WPAR is contained on an hdisk. In this case, we used hdisk2; however, you can add other file systems to the WPAR. These file systems can be either an NFS-mounted file system or a locally added file system either created in the WPAR’s rootvg or mounted from the global environment. Removing a WPAR does not make any change to the hdisk2.
For NFS-mounted file systems, make sure that the target system has access to those file systems and create the same mount point. We perform this step later, immediately after creating the WPAR in the target system.
To recreate the WPAR in the target system, we must create a specfile out of the WPAR, as shown in Example 9-13. Note how we check the correlation between the device ID in the specfile and AIX Object Data Manager (ODM) device information.
Example 9-13 Deleting a WPAR
# mkwpar -w -e mig_wpar_1 -o mig_wpar_1.specfile# grep devid mig_wpar_1.specfile# grep -p devid mig_wpar_1.specfile
Important: Removing the WPAR removes all file systems in the Mount Group of the WPAR in the global environment. Thus, before removing the WPAR, check the file systems of the WPAR Mount Group using the lsfs -u WPAR_name command in the global environment. To preserve any file system, change the Mount Group (smit chfs) to any value other than WPAR_name or to a blank before removing the WPAR.
Chapter 9. Workload partition migration scenarios 205

device: devid = "372200f6607600004c000000012ecab8f278.205VDASD03AIXvscsi" devtype = "2" rootvg = "yes"# odmget CuAt|grep -p 372200f6607600004c000000012ecab8f278.205VDASD03AIXvscsiCuAt: name = "hdisk2" attribute = "unique_id" value = "372200f6607600004c000000012ecab8f278.205VDASD03AIXvscsi" type = "R" generic = "" rep = "n" nls_index = 0
Next, we remove the WPAR and then rediscover and delete hdisk2 (Example 9-14).
Example 9-14 Removing the WPAR and deleting hdisk2
# rmwpar mig_wpar_1# cfgmgr# rmdev -dl hdisk2
Creating a WPAR on the target systemWe assume that the target system and the VIOS have their own vhost-vscsi adapter pairs; therefore, we first remove the vdisk mapping to the source system, and we map it to the target system instead, as shown in Figure 9-5 on page 207.
206 Exploiting IBM AIX Workload Partitions

Figure 9-5 Target System WPAR using virtual disk
We proceed, as shown in Example 9-15.
Example 9-15 Creating WPAR on target system
$ rmvdev -vtd wpar_hdiskwpar_hdisk deleted$ mkvdev -dev wpar_hdisk -vadapter vhost3 -vdev wparlvwpar_hdisk Available
Important: On the target system, we issued the cfgmgr command to discover the newly added vdisk and transfer the specfile from the source system. Before creating the WPAR off of the specfile, we checked the devid against ODM as we did before.
If the target system is on another network, you might want to modify the network stanza on the specfile manually before executing the mkwpar command:
network:broadcast = "172.16.23.255"interface = "en0"address = "172.16.20.117"netmask = "255.255.252.0"
Optionally, you can provide the network information by using the -N flag to overwrite the network definition in the specfile.
Target System
hdisk2
WPAR
rootvg
vscsi0
Source System
vscsi0
vhost2 vhost3
VTD
wpar_hdisk
rootvg
wparlv
fsc0
Disk Storage
VIOS
Chapter 9. Workload partition migration scenarios 207

# mkwpar -pf mig_wpar_1.specfile -N address=172.16.22.143 netmask=255.255.252.0# lswparName State Type Hostname Directory RootVG WPAR--------------------------------------------------------------------mig_wpar_1 D S mig_wpar_1 /wpars/mig_wpar_1 yes
# startwpar mig_wpar_1Starting workload partition 'mig_wpar_1'.Mounting all workload partition file systems.Loading workload partition.Exporting workload partition devices.hdisk2 DefinedStarting workload partition subsystem 'cor_mig_wpar_1'.0513-059 The cor_mig_wpar_1 Subsystem has been started. Subsystem PID is 15401058.Verifying workload partition startup.
We checked that the WebSphere Sample Application is online.
9.2.2 Migrating a rootvg WPAR from an AIX 6.1 system to an AIX 7.1 system
Migrating a rootvg WPAR from AIX 6.1 to AIX 7.1, no matter if they are on the same system or on a separate target system, is not supported for detached rootvg WPARs at the time of this writing. In this section, we test a shared rootvg WPAR.
Typically, the WPAR Manager relocation facility does not work from an AIX 6.1 to an AIX 7.1 system due to libraries and system call differences. In fact, in this test, we created a WPAR in an AIX 7.1 system that was based on the source WPAR in the AIX 6.1 system.
In this test, both source and target systems have access to the same storage device where the rootvg WPAR disk is accessible. In this case, the shared disk is a vSCSI disk backed up by an LV on the VIOS, as shown in Figure 9-6 on page 209.
Important: If the WPAR has any additional file system or NFS mount access resources (from the source system), make sure that these resources are available now in the target system before starting the WPAR.
208 Exploiting IBM AIX Workload Partitions

Figure 9-6 Target System WPAR using virtual disk
Creating the source environmentThe creation of the source environment is similar to the previous example. Refer to 9.2.1, “Migrating a rootvg WPAR to a separate system with the same AIX level using external shared accessed storage” on page 201.
Creating a rootvg WPAR on a vdisk in the source systemIn this test, we created and mapped a vdisk on the VIOS. We then mapped it to the source system and created a WPAR using the vdisk on the source system, as shown in Example 9-16.
Example 9-16 Creating a WPAR on a vdisk in the source system
$ cfgdev$ lsdev -type adapter -virtual |grep vhost...vhost2 Available Virtual SCSI Server Adapter$ mklv -lv wparlv rootvg 140wparlv$ mkvdev -dev wpar_hdisk -vadapter vhost2 -vdev wparlvwpar_hdisk Available$ lsmap -vadapter vhost2SVSA Physloc Client Partition ID--------------- -------------------------------------------- ------------------vhost2 U8233.E8B.106076P-V1-C6 0x00000006
vhost2 vhost3
VTD
wpar_hdisk
rootvg
wparlv
fsc0
VIOS
Target System
vscsi0
Source System
vscsi0
Disk Storage
WPAR
rootvg
hdisk2
SAN
Chapter 9. Workload partition migration scenarios 209

VTD wpar_hdiskStatus AvailableLUN 0x8200000000000000Backing device wparlvPhyslocMirrored N/A
On the Client LPAR, we can now discover wpar_hdisk as hdisk3:
# cfgmgr# lspvhdisk0hdisk1hdisk2hdisk3
And now we are prepared to create the shared rootvg WPAR:
# mkwpar -D rootvg=yes devname=hdisk3 -n mig_wpar_6 -N address=172.16.20.131 netmask=255.255.252.0Creating workload partition's rootvg. Please wait...mkwpar: Creating file systems... / /admin /home /opt /proc /tmp /usr /varMounting all workload partition file systems.x ./usrx ./libx ./admin...ifor_ls.base.cli 6.1.0.0 ROOT APPLY SUCCESS lum.base.cli 5.1.2.0 ROOT APPLY SUCCESS Finished populating scratch file systems.Workload partition mig_wpar_6 created successfully.mkwpar: 0960-390 To start the workload partition, execute the following as root: startwpar [-v] mig_wpar_6# startwpar mig_wpar_6Starting workload partition 'mig_wpar_6'.Mounting all workload partition file systems.Loading workload partition.Exporting workload partition devices.hdisk3 DefinedStarting workload partition subsystem 'cor_mig_wpar_6'.0513-059 The cor_mig_wpar_6 Subsystem has been started. Subsystem PID is 7798986.Verifying workload partition startup.
# clogin mig_wpar_6******************************************************************************** ** ** Welcome to AIX Version 6.1! *
210 Exploiting IBM AIX Workload Partitions

* ** ** Please see the README file in /usr/lpp/bos for information pertinent to ** this release of the AIX Operating System. ** ** ********************************************************************************#
To recreate a practical scenario, we next installed WebSphere Application Server V7 on the WPAR and ran the Sample Application (Figure 9-7). For this task, we created an additional file system using the rootvg disk of the WPAR to allocate the WebSphere installation files.
Figure 9-7 Sample WebSphere application running on the WPAR
Deleting WPAR from the source systemA rootvg WPAR is contained on an hdisk. In this case, we used hdisk3; however, you can add other file systems to the WPAR. These file systems can be either an NFS-mounted file system or a locally added file system. Removing a WPAR does not make any change to hdisk3.
Important: Removing the WPAR removes all file systems in the Mount Group of the WPAR. Thus, before removing the WPAR, check the file systems on the WPAR Mount Group using the lsfs -u WPAR_name command. To preserve any file system, change the Mount Group (smit chfs) to any value other than WPAR_name or to a blank before removing the WPAR.
Chapter 9. Workload partition migration scenarios 211

For NFS-mounted file systems, make sure that the target system has access to those file systems and create the same mount point. This step is done in later sections after creating the WPAR in the target system.
To recreate the WPAR in the target system, we need to create a specfile out of the WPAR, as shown in Example 9-17. Note how we check the correlation between the device ID in the specfile and the AIX ODM device information.
Example 9-17 Deleting a rootvg WPAR from the source system
# mkwpar -w -e mig_wpar_6 -o mig_wpar_6.specfile# grep devid mig_wpar_6.specfile# grep -p devid mig_wpar_6.specfiledevice: devid = "372200f6607600004c000000012ecab8f278.305VDASD03AIXvscsi" devtype = "2" rootvg = "yes"# odmget CuAt|grep -p 372200f6607600004c000000012ecab8f278.305VDASD03AIXvscsiCuAt: name = "hdisk3" attribute = "unique_id" value = "372200f6607600004c000000012ecab8f278.305VDASD03AIXvscsi" type = "R" generic = "" rep = "n" nls_index = 0
Next, we remove the WPAR and then rediscover and delete hdisk3.
# rmwpar mig_wpar_6# cfgmgr# rmdev -dl hdisk3
Creating a WPAR on the target systemWe assume that the target system and the VIOS have their own vhost-vscsi adapter pairs; therefore, we first removed the vdisk mapping to the source system and we mapped it to the target system instead, as shown in Figure 9-8 on page 213.
212 Exploiting IBM AIX Workload Partitions

Figure 9-8 Target system WPAR using virtual disks
We proceed as follows. Refer to Example 9-18.
Example 9-18 Creating a WPAR on the target system
$ rmvdev -vtd wpar_hdiskwpar_hdisk deleted$ mkvdev -dev wpar_hdisk -vadapter vhost3 -vdev wparlvwpar_hdisk Available
Important: On the target system, issue the cfgmgr command to discover the newly added vdisk and transfer the specfile from the source system. Before creating the WPAR off of the specfile, check the device ID against the ODM as we did before.
Target System
hdisk2
WPAR
rootvg
vscsi0
Source System
vscsi0
vhost2 vhost3
VTD
wpar_hdisk
rootvg
wparlv
fsc0
Disk Storage
VIOS
Chapter 9. Workload partition migration scenarios 213

# mkwpar -pf mig_wpar_6.specfile -N address=172.16.22.143 netmask=255.255.252.0Creating scratch file system...Populating scratch file systems for rootvg workload partition...Mounting all workload partition file systems.x ./usrx ./libx ./adminx ./admin/tmpx ./auditx ./devx ./etcx ./etc/check_config.filesx ./etc/consdefx ./etc/cronlog.confx ./etc/csh.cshrcx ./etc/csh.loginx ./etc/dlpi.confx ./etc/dumpdatesx ./etc/environment...syncroot: Processing root part installation status.syncroot: Synchronizing installp software.+-----------------------------------------------------------------------------+ Pre-installation Verification...+-----------------------------------------------------------------------------+Verifying selections...doneVerifying requisites...doneResults...SUCCESSES--------- Filesets listed in this section passed pre-installation verification and will be installed. Selected Filesets ----------------- Java5.sdk 5.0.0.325 # Java SDK 32-bit Java5.sdk 5.0.0.345 # Java SDK 32-bit Java5_64.sdk 5.0.0.325 # Java SDK 64-bit Java5_64.sdk 5.0.0.345 # Java SDK 64-bit Java6.sdk 6.0.0.215 # Java SDK 32-bit Tivoli_Management_Agent.client.rte 3.7.1.0 # Management Framework Endpoin... X11.apps.rte 7.1.0.0 # AIXwindows Runtime Configura...
Important: If the target system is on another network, you might want to modify the network stanza on the specfile manually before executing the mkwpar command:
network:broadcast = "172.16.23.255"interface = "en0"address = "172.16.20.117"netmask = "255.255.252.0"
Optionally, you can provide the network information by using the -N flag to overwrite the network definition in the specfile.
214 Exploiting IBM AIX Workload Partitions

X11.apps.xdm 7.1.0.0 # AIXwindows xdm Application...Finished populating scratch file systems.Workload partition mig_wpar_6 created successfully.mkwpar: 0960-390 To start the workload partition, execute the following as root: startwpar [-v] mig_wpar_6
# lswparName State Type Hostname Directory RootVG WPAR--------------------------------------------------------------------mig_wpar_6 D S mig_wpar_6 /wpars/mig_wpar_6 yes
In order to make rootvg WPAR devices available, we need to start the WPAR before the migration, as shown in Example 9-19.
Example 9-19 Starting the WPAR before the migration
:# startwpar mig_wpar_6Starting workload partition 'mig_wpar_6'.Mounting all workload partition file systems.Loading workload partition.Exporting workload partition devices.hdisk3 DefinedExporting workload partition kernel extensions.Starting workload partition subsystem 'cor_mig_wpar_6'.0513-059 The cor_mig_wpar_6 Subsystem has been started. Subsystem PID is 6750356.Verifying workload partition startup.
The WPAR started even though we have AIX 7.1 /usr parts in AIX 6.1 root parts. This attempt might fail in certain cases, depending on which filesets are installed and the AIX level to which you are migrating. Next, we show what happens if we log in to the WPAR, as shown in Example 9-20.
Example 9-20 Login to the WPAR
# clogin mig_wpar_6******************************************************************************** ** ** Welcome to AIX Version 6.1! ** ** ** Please see the README file in /usr/lpp/bos for information pertinent to ** this release of the AIX Operating System. ** ** ********************************************************************************
Namefs file systems: This time, the shared /usr and /opt of the WPAR are created as namefs file systems of the hosting AIX 7.1.
Additional resources: If this WPAR has any additional file system or NFS mount access resources (from the source system), remember that these resources are available now in the target system before starting the WPAR.
Chapter 9. Workload partition migration scenarios 215

Last login: Thu Apr 14 05:08:34 2011 on /dev/Global from 750_1_LPAR_5# oslevel -s 7100-00-02-1041
This example seems contradictory, because the /etc/motd message that was seen in the login comes from the root parts and the oslevel command is on the usr part that reflects the global environment. Now, we need to synchronize the WPAR, as shown in Example 9-21.
Example 9-21 Synchronizing the WPAR
# syncwpar mig_wpar_6*******************************************************************************Synchronizing workload partition 'mig_wpar_6' (1 of 1).*******************************************************************************COMMAND START, ARGS: mig_wpar_6Shared /usr WPAR list:mig_wpar_6WPAR mig_wpar_6 mount point:/wpars/mig_wpar_6WPAR mig_wpar_6 active/usr/bin/lslpp: Error while processing fileset csm.client./usr/bin/lslpp: No match was found for the SWVPD data search....MIGWPAR: Merging configuration files for mig_wpar_60518-307 odmdelete: 1 objects deleted.MIGWPAR: Running syncroot for mig_wpar_6syncroot: Processing root part installation status.syncroot: Synchronizing installp software.syncroot: Processing root part installation status.syncroot: Synchronizing installp software.syncroot: Processing root part installation status.syncroot: Installp root packages are currently synchronized.syncroot: RPM root packages are currently synchronized.syncroot: Root part is currently synchronized.syncroot: Returns Status = SUCCESSCleaning up ...Workload partition 'mig_wpar_6' synchronized successfully.Return Status = SUCCESS.
# clogin mig_wpar_6******************************************************************************** ** ** Welcome to AIX Version 7.1! ** ** ** Please see the README file in /usr/lpp/bos for information pertinent to ** this release of the AIX Operating System. ** ** ********************************************************************************Last login: Thu Apr 14 05:20:37 2011 on /dev/Global from 750_1_LPAR_5# oslevel -s7100-00-02-1041# lppchk -v
216 Exploiting IBM AIX Workload Partitions

Now, we have a consistent WPAR. We did not explicitly use the migwpar command in this case, although it was used internally by the syncwpar command.
We also checked that the WebSphere Sample Application is online.
9.2.3 Migrating a system WPAR to a new system with the same AIX level using a savewpar image
Although we discuss the backup and restore in Chapter 11, “Backing up and restoring workload partitions” on page 259, here we demonstrate a scenario where a savewpar image is used to restore onto a separate system. In this case, we use NFS to mount a common directory on both the source and target systems in order to store and then access the savewpar image.
Creating the source WPARThis time, we created a private system WPAR by including the -l flag. This migration procedure to a target system with the same AIX level also applies to a shared system WPAR. We proceeded, as shown in Example 9-22.
Example 9-22 Creating the source WPAR for migration using a savewpar image
# mkwpar -l -r -n mig_wpar_2 -N address=172.16.20.118 netmask=255.255.252.0...Workload partition mig_wpar_2 created successfully.mkwpar: 0960-390 To start the workload partition, execute the following as root: startwpar [-v] mig_wpar_2
At this point, we installed a WebSphere Application Server on mig_wpar_2 to reproduce a real scenario running a sample application. We had to extend the /usr file system to allocate the necessary space for this installation. From the global environment, we extended the /wpars/mig_wpar_2/usr file system. We also created the mount point /wpars/mig_wpar_2/SW and mounted the /dev/swlv on this mount point from the global environment, to make available the WebSphere installation software to the WPAR. For installing WebSphere Application Server on a WPAR, see the following technical documents:
� http://www-01.ibm.com/support/docview.wss?uid=swg21420491
� http://www-01.ibm.com/support/docview.wss?uid=swg21377268
� http://www-01.ibm.com/support/docview.wss?uid=swg21291889
� http://www-01.ibm.com/support/docview.wss?uid=swg21294421
Deleting a WPAR from the source systemBefore deleting the WPAR, check that there is no file system on the WPAR_name Mount Group other than those file systems that were created by the mkwpar command, because they will all be deleted. If you need to preserve any file system, use the smit chfs to change the Mount Group to any other value or to blank.
You can create a savewpar command, as shown in Example 9-23 on page 218.
Chapter 9. Workload partition migration scenarios 217

Example 9-23 Deleting the WPAR from the source system
# mount nimres1:/nimrepo/savewpars /savew# savewpar -if /savew/mig_2_savewpar mig_wpar_2Creating information file (/image.data) for mig_wpar_2.Creating list of files to back up Backing up 92766 files......................92766 of 92766 files backed up (100%)0512-038 savewpar: Backup Completed Successfully.
Alternatively, if you have a NIM server, you can accomplish the same task from the NIM master. Make sure that the NIM master and the WPAR host names are resolvable to an IP address in both the NIM master and the WPAR. On the NIM master, define the WPAR this way:
# nim -o define -t wpar -a mgmt_profile1="750_1_LPAR_4 mig_wpar_2" -a if1="nim172 mig_wpar_2 0" mig_wpar_2
In this definition, 750_1_LPAR_4 is the source system or global environment containing the WPAR wpar_mig_2.
On wpar_mig_2, initiate as the NIM client:
# clogin wpar_mig_2# niminit # nim -o define -t savewpar -a server=master -a location=/nimrepo/savewpars/mig_2.image -a source=mig_wpar_2 -a mk_image=yes sw_mig_2
Next, we remove the WPAR from the source system:
# rmwpar mig_wpar_2
Creating a WPAR on the target systemTo restore the savewpar image on the target system, follow Example 9-24.
Example 9-24 Creating a WPAR from a savewpar image
# mount nimres1:/nimrepo/savewpars /savew# restwpar -Cf /savew/mig_2_savewparNew volume on /savew/mig_2_savewpar: Cluster 51200 bytes (100 blocks). Volume number 1 Date of backup: Thu Apr 7 13:15:30 2011 Files backed up by name User rootx 2917 ./.savewpar_dir/wpar.spec...mkwpar: Creating file systems... /
Important: Because a savewpar image can be larger than 2 GB, use the following command. That way, you do not reach the filesize limit, which causes the savewpar to fail.
# ulimit unlimited
Use this command before launching the savewpar command.
218 Exploiting IBM AIX Workload Partitions

Creating logical volume 'fslv04' specified in image.dataCreating file system '/' specified in image.data...x 136 ./.savewpar_dir/data.files10092688x 136 ./.savewpar_dir/vgdata.files...Workload partition mig_wpar_2 created successfully
Here, we used the -C flag to ignore any incompatibility with the source system. Now, we start the newly added WPAR:
# lswparName State Type Hostname Directory RootVG WPAR--------------------------------------------------------------------mig_wpar_2 D S mig_wpar_2 /wpars/mig_wpar_2 no# startwpar mig_wpar_2Starting workload partition 'mig_wpar_2'.Mounting all workload partition file systems.Loading workload partition....0513-059 The cor_mig_wpar_2 Subsystem has been started. Subsystem PID is 7929956.Verifying workload partition startup.
We successfully tested accessing the Sample Application on WebSphere Application Server on the WPAR.
9.2.4 Migrating a system WPAR from AIX 6.1 to AIX 7.1 in another system using the savewpar image
This scenario is similar to the WPAR Manager relocation facility, which does not work from an AIX 6.1 to an AIX 7.1 system due to libraries and system call differences.
It is possible to restore a savewpar that was collected in an AIX 6.1 system to an AIX 7.1 system; thus, you can use this procedure as a migration procedure. In this test, both the source and target systems have access to the same NFS repository where the savewpar image is stored from an AIX 6.1 system and where later the savewpar image is accessed and restored in an AIX 7.1 system. Refer to Chapter 11, “Backing up and restoring workload partitions” on page 259.
Creating the source WPARThis time, we created a private system WPAR by including the -l flag. This migration procedure to a target system with another AIX level also applies to a shared system WPAR. We proceeded, as shown in Example 9-25.
Example 9-25 Creating the source WPAR for migration using a savewpar image
# mkwpar -l -r -n mig_wpar_4 -N address=172.16.20.119 netmask=255.255.252.0...Workload partition mig_wpar_4 created successfully.mkwpar: 0960-390 To start the workload partition, execute the following as root: startwpar [-v] mig_wpar_4
Chapter 9. Workload partition migration scenarios 219

At this point, we installed a WebSphere Application Server on mig_wpar_2 to reproduce a scenario running a sample application. We had to extend the /usr file system to allocate the necessary space for this installation. We extended the /usr file system from the global environment by extending the /wpars/mig_wpar_2/usr file system. We also created the mount point /wpars/mig_wpar_2/SW and mounted the /dev/swlv on this mount point from the global environment, to make the WebSphere installation software available to the WPAR. For installing WebSphere Application Server on a WPAR, see the following technical documents:
� http://www-01.ibm.com/support/docview.wss?uid=swg21420491
� http://www-01.ibm.com/support/docview.wss?uid=swg21377268
� http://www-01.ibm.com/support/docview.wss?uid=swg21291889
� http://www-01.ibm.com/support/docview.wss?uid=swg21294421
Deleting the WPAR from the source systemBefore deleting the WPAR, make sure that there is no file system on the WPAR_name Mount Group other than those file systems that were created by the mkwpar command, because they will all be deleted. If you need to preserve any file system, use smit chfs to change the Mount Group to any other value or to blank. You can issue a savewpar command, as shown in Example 9-26.
Example 9-26 Executing the savewpar command
# mount nimres1:/nimrepo/savewpars /savew# savewpar -if /savew/mig_4_savewpar mig_wpar_4Creating information file (/image.data) for mig_wpar_4.Creating list of files to back up Backing up 92766 files......................92766 of 92766 files backed up (100%)0512-038 savewpar: Backup Completed Successfully.
Alternatively, if you have a NIM server, you can accomplish the same task from the NIM master. Make sure that the NIM master and the WPAR alias are resolvable to an IP address in both the NIM master and the WPAR. On the NIM master, define the WPAR:
# nim -o define -t wpar -a mgmt_profile1="750_1_LPAR_4 mig_wpar_4" -a if1="nim172 mig_wpar_4 0" mig_wpar_4
In this definition, 750_1_LPAR_4 is the source system containing the WPAR wpar_mig_4. On wpar_mig_4, initiate as the NIM client:
# clogin wpar_mig_4# niminit # nim -o define -t savewpar -a server=master -a location=/nimrepo/savewpars/mig_4.image -a source=mig_wpar_4 -a mk_image=yes sw_mig_4
Next, we remove the WPAR from the source system.
# rmwpar mig_wpar_4
Important: Because a savewpar image can be larger than 2 GB, use the following command. That way, you do not reach the filesize limit, which causes the savewpar to fail.
# ulimit unlimited
Use this command before launching the savewpar command.
220 Exploiting IBM AIX Workload Partitions

Creating a WPAR on the target systemTo restore an AIX 6.1 savewpar image to an AIX 7.1 system, you need to apply the authorized program analysis report (APAR) IZ99829.
To restore the savewpar image on the target system, follow Example 9-27.
Example 9-27 Creating the WPAR on the target AIX 7.1 system using a savewpar image
# mount nimres1:/nimrepo/savewpars /savew# restwpar -Cf /savew/mig_4_savewparNew volume on /savew/mig_4_savewpar: Cluster 51200 bytes (100 blocks). Volume number 1 Date of backup: Thu Apr 7 13:15:30 2011 Files backed up by name User rootx 2917 ./.savewpar_dir/wpar.specx 6617 ./.savewpar_dir/image.datax 162038 ./.savewpar_dir/backup.data total size: 171572 files restored: 3restwpar: 0960-507 Level 6.1.6.1 of bos.rte.libc in saved image does not match level 7.1.0.2 on the running system.mkwpar: Creating file systems... /Creating logical volume 'fslv04' specified in image.dataCreating file system '/' specified in image.data /homeCreating logical volume 'fslv05' specified in image.dataCreating file system '/home' specified in image.data /optCreating logical volume 'fslv06' specified in image.dataCreating file system '/opt' specified in image.data /proc /tmpCreating logical volume 'fslv07' specified in image.dataCreating file system '/tmp' specified in image.data /usr...x 1 ./wpars/mig_wpar_4x 0 ./proc total size: 3826218841 files restored: 92766syncroot: Processing root part installation status.syncroot: Installp root packages are currently synchronized.syncroot: RPM root packages are currently synchronized.syncroot: Root part is currently synchronized.syncroot: Returns Status = SUCCESSWorkload partition mig_wpar_4 created successfully.mkwpar: 0960-390 To start the workload partition, execute the following as root: startwpar [-v] mig_wpar_4
We used the -C flag on the restwpar command to ignore any incompatibility with the source system. Now, we start the newly added WPAR:
# lswparName State Type Hostname Directory RootVG WPAR
Chapter 9. Workload partition migration scenarios 221

--------------------------------------------------------------------mig_wpar_4 D S mig_wpar_4 /wpars/mig_wpar_4 no
Starting the WPAR fails as expected, because we still need to migrate the WPAR:
# startwpar mig_wpar_4Starting workload partition 'mig_wpar_4'.Mounting all workload partition file systems.startwpar: 0960-667 The operating system level within the workload partition is not supported.Unmounting all workload partition file systems.# mount nimres1:/nimrepo/lpp_source/aix7102.full /mnt# migwpar -d /mnt mig_wpar_4Detached WPAR list:mig_wpar_4WPAR mig_wpar_4 mount point:/wpars/mig_wpar_4Mounting all workload partition file systems.Loading workload partition.Saving system configuration files.Checking for initial required migration space.Setting up for base operating system restore./home...bos.net.nfs.client 7.1.0.2 USR COMMIT SUCCESS bos.net.nfs.client 7.1.0.2 ROOT COMMIT SUCCESS bos.wpars 7.1.0.2 USR COMMIT SUCCESS bos.wpars 7.1.0.2 ROOT COMMIT SUCCESS perfagent.tools 7.1.0.2 USR COMMIT SUCCESS perfagent.tools 7.1.0.2 ROOT COMMIT SUCCESS bos.cluster.solid 7.1.0.1 USR COMMIT SUCCESS bos.ecc_client.rte 7.1.0.2 USR COMMIT SUCCESS bos.suma 7.1.0.1 USR COMMIT SUCCESS ...install_all_updates: Initializing system parameters.install_all_updates: Log file is /var/adm/ras/install_all_updates.loginstall_all_updates: Checking for updated install utilities on media.install_all_updates: Processing media.install_all_updates: Generating list of updatable installp filesets.#---------------------------------------------------------------------# No filesets on the media could be used to update the currently# installed software.## Either the software is already at the same level as on the media, or# the media contains only filesets which are not currently installed.#---------------------------------------------------------------------install_all_updates: Generating list of updatable rpm packages.install_all_updates: No updatable rpm packages found.install_all_updates: Checking for recommended maintenance level 7100-00.install_all_updates: Executing /usr/bin/oslevel -rf, Result = 7100-00install_all_updates: Verification completed.install_all_updates: Log file is /var/adm/ras/install_all_updates.loginstall_all_updates: Result = SUCCESSKnown Recommended Maintenance Levels------------------------------------Error: Recommended Maintenance level 7100-00 is invalid or unknown.
222 Exploiting IBM AIX Workload Partitions

Restoring device ODM database.Shutting down all workload partition processes.wio0 DefinedUnloading workload partition.Unmounting all workload partition file systems.Cleaning up ...# lswparName State Type Hostname Directory RootVG WPAR--------------------------------------------------------------------mig_wpar_4 D S mig_wpar_4 /wpars/mig_wpar_4 no # startwpar mig_wpar_4Starting workload partition 'mig_wpar_4'.Mounting all workload partition file systems.Loading workload partition.Exporting workload partition devices.Exporting workload partition kernel extensions.Starting workload partition subsystem 'cor_mig_wpar_4'.0513-059 The cor_mig_wpar_4 Subsystem has been started. Subsystem PID is 15794284.Verifying workload partition startup.# clogin mig_wpar_4******************************************************************************** ** ** Welcome to AIX Version 7.1! ** ** ** Please see the README file in /usr/lpp/bos for information pertinent to ** this release of the AIX Operating System. ** ** ********************************************************************************Last login: Thu Apr 7 11:51:43 2011 on /dev/Global from 750_1_LPAR_4# syncrootsyncroot: Processing root part installation status.syncroot: Installp root packages are currently synchronized.syncroot: RPM root packages are currently synchronized.syncroot: Root part is currently synchronized.syncroot: Returns Status = SUCCESS# /usr/IBM/WebSphere/AppServer/bin/startServer.sh server1ADMU0116I: Tool information is being logged in file/usr/IBM/WebSphere/AppServer/profiles/AppSrv01/logs/server1/startServer.logADMU0128I: Starting tool with the AppSrv01 profileADMU3100I: Reading configuration for server: server1ADMU3200I: Server launched. Waiting for initialization status.ADMU3000I: Server server1 open for e-business; process id is 13762654# lppchk -v#
We tested accessing the Sample Application successfully on the WebSphere Application Server on the WPAR.
Chapter 9. Workload partition migration scenarios 223

224 Exploiting IBM AIX Workload Partitions

Chapter 10. Software maintenance
This chapter discusses the following topics:
� AIX updates and WPARs� Managing interim fixes in a WPAR
10
© Copyright IBM Corp. 2011. All rights reserved. 225

10.1 AIX updates and WPARs
Workload partitions (WPARs) share the same kernel as the global environment. For this reason, they must not run separate levels of AIX. This guideline is important to remember when installing AIX updates, such as new technology levels (TLs) or service packs (SPs). These updates must be installed in the global environment before they can be made available to a WPAR.
After the updates have been installed in the global environment, it is necessary to synchronize the system WPARs so that all new fileset updates are also installed in the WPAR’s root file system.
In this section, we demonstrate how to install updates in both the global environment and WPAR environment. We show both shared and non-shared (detached) WPAR examples.
10.1.1 Installing AIX updates in a shared WPAR
In the following scenario, we install a new AIX 6.1 service pack in the global environment. Then, we update the shared WPAR.
Our global environment runs on AIX 6.1 TL6 SP3. We update it to AIX 6.1 TL6 SP4. We confirm this update by running the oslevel command from the global environment and the lslpp command in both environments (as shown in Example 10-1).
Example 10-1 Verifying the AIX level in the global environment
# uname -W0# oslevel -s6100-06-03-1048# uname -W0
# lslpp -La bos.mp64 Fileset Level State Type Description (Uninstaller) ---------------------------------------------------------------------------- bos.mp64 6.1.4.0 C F Base Operating System 64-bit Multiprocessor Runtime
6.1.4.2 C F Base Operating System 64-bit Multiprocessor Runtime
6.1.4.3 C F Base Operating System 64-bit Multiprocessor Runtime
6.1.6.3 C F Base Operating System 64-bit Multiprocessor Runtime...
Clarification: Versioned Workload Partitions are an exception. A Versioned Workload Partition has an AIX 5.2 runtime environment and runs on a global environment with a newer version of AIX. The AIX commands and libraries inside a Versioned Workload Partition support AIX 5.2 syntax and semantics, even though the AIX kernel on the system is running a newer level of AIX.
226 Exploiting IBM AIX Workload Partitions

From within our shared WPAR, we also confirm that it is at the same level as the global environment, as shown in Example 10-2.
Example 10-2 Verifying the AIX level in the shared WPAR
# clogin wpar1# uname -W1# oslevel -s6100-06-03-1048
# lslpp -La bos.mp64 Fileset Level State Type Description (Uninstaller) ---------------------------------------------------------------------------- bos.mp64 6.1.4.0 C F Base Operating System 64-bit Multiprocessor Runtime
6.1.4.2 C F Base Operating System 64-bit Multiprocessor Runtime
6.1.4.3 C F Base Operating System 64-bit Multiprocessor Runtime
6.1.6.3 C F Base Operating System 64-bit Multiprocessor Runtime...
We plan to install Service Pack 4 for AIX 6.1 TL6 (6100-06-04-1112). The fixes for SP4 have been placed in a staging directory in the global environment, as shown in Example 10-3.
Example 10-3 Staging area for AIX fixes
# cd /mnt/aix61tl6sp4/# ls -tlr | tail -20-rw-r--r-- 1 root system 328704 Apr 01 09:57 U840066.bff-rw-r--r-- 1 root system 1888256 Apr 01 09:58 U840067.bff-rw-r--r-- 1 root system 1057792 Apr 01 09:58 U840068.bff-rw-r--r-- 1 root system 1037312 Apr 01 09:58 U840069.bff-rw-r--r-- 1 root system 110592 Apr 01 09:58 U840070.bff-rw-r--r-- 1 root system 440320 Apr 01 09:59 U840071.bff-rw-r--r-- 1 root system 694272 Apr 01 09:59 U840075.bff-rw-r--r-- 1 root system 1306624 Apr 01 10:00 U840077.bff-rw-r--r-- 1 root system 644096 Apr 01 10:00 U840078.bff-rw-r--r-- 1 root system 114688 Apr 01 10:00 U840079.bff-rw-r--r-- 1 root system 270336 Apr 01 10:00 U840080.bff-rw-r--r-- 1 root system 368640 Apr 01 10:00 U841535.bff-rw-r--r-- 1 root system 19456 Apr 01 10:00 U841672.bff-rw-r--r-- 1 root system 196608 Apr 01 10:00 U841673.bff-rw-r--r-- 1 root system 327680 Apr 01 10:00 U841674.bff-rw-r--r-- 1 root system 243712 Apr 01 10:00 U841675.bff-rw-r--r-- 1 root system 685056 Apr 01 10:00 U841676.bff-rw-r--r-- 1 root system 286720 Apr 01 10:00 U841677.bff-rw-r--r-- 1 root system 512 Apr 01 10:00 U842241.bff-rw-r--r-- 1 root system 3646065 Apr 07 20:22 .toc
We must first update the global environment to SP4. We use the conventional smitty update_all method. Example 10-4 on page 228 shows the associated SMIT panels. After performing a preview operation, the bos.rte.install fileset is installed successfully. Then, the
Chapter 10. Software maintenance 227

smitty update_all operation is performed on the remaining filesets in the global environment.
Immediately after the update has been installed, we verify that the installed service pack level has changed using the oslevel command. The system is then rebooted.
Example 10-4 Using smitty to update the global environment
# smitty install_all
Install and Update from ALL Available Software
Type or select values in entry fields.Press Enter AFTER making all desired changes.
[Entry Fields]* INPUT device / directory for software .* SOFTWARE to install [bos.rte.install] + PREVIEW only? (install operation will NOT occur) no + COMMIT software updates? yes + SAVE replaced files? no + AUTOMATICALLY install requisite software? yes + EXTEND file systems if space needed? yes + OVERWRITE same or newer versions? no + VERIFY install and check file sizes? no + DETAILED output? yes + Process multiple volumes? yes + ACCEPT new license agreements? yes + Preview new LICENSE agreements? no +
WPAR Management Perform Operation in Global Environment yes + Perform Operation on Detached WPARs no + Detached WPAR Names [_all_wpars] + Remount Installation Device in WPARs yes + Alternate WPAR Installation Device []
....etc...
Installation Summary--------------------
Name Level Part Event Result-------------------------------------------------------------------------------bos.rte.install 6.1.6.4 USR APPLY SUCCESSbos.rte.install 6.1.6.4 ROOT APPLY SUCCESSbos.rte.install 6.1.6.4 USR COMMIT SUCCESSbos.rte.install 6.1.6.4 ROOT COMMIT SUCCESS
# smit update_all
Update Installed Software to Latest Level (Update All)
Type or select values in entry fields.
Press Enter AFTER making all desired changes.
[Entry Fields]* INPUT device / directory for software .
228 Exploiting IBM AIX Workload Partitions

* SOFTWARE to update _update_allPREVIEW only? (update operation will NOT occur) yes +COMMIT software updates? yes +SAVE replaced files? no +
AUTOMATICALLY install requisite software? yes +EXTEND file systems if space needed? yes +VERIFY install and check file sizes? no +DETAILED output? yes +Process multiple volumes? yes +ACCEPT new license agreements? yes +Preview new LICENSE agreements? no +
WPAR ManagementPerform Operation in Global Environment yes +Perform Operation on Detached WPARs no +Detached WPAR Names [_all_wpars] +Remount Installation Device in WPARs yes +Alternate WPAR Installation Device []
...etc....
******************************************************************************End of installp PREVIEW. No apply operation has actually occurred.******************************************************************************....etc...
Update Installed Software to Latest Level (Update All)
Type or select values in entry fields.
Press Enter AFTER making all desired changes.
[Entry Fields]
* INPUT device / directory for software .
* SOFTWARE to update _update_all
PREVIEW only? (update operation will NOT occur) no +COMMIT software updates? yes +SAVE replaced files? no +AUTOMATICALLY install requisite software? yes +EXTEND file systems if space needed? yes +VERIFY install and check file sizes? no +DETAILED output? yes +Process multiple volumes? yes +ACCEPT new license agreements? yes +Preview new LICENSE agreements? no +
WPAR ManagementPerform Operation in Global Environment yes +Perform Operation on Detached WPARs no +Detached WPAR Names [_all_wpars] +Remount Installation Device in WPARs yes +Alternate WPAR Installation Device []
....etc....
Chapter 10. Software maintenance 229

bos.sysmgt.serv_aid 6.1.6.3 ROOT COMMIT SUCCESSbos.sysmgt.trace 6.1.6.2 USR COMMIT SUCCESSbos.sysmgt.trace 6.1.6.2 ROOT COMMIT SUCCESS
installp: * * * A T T E N T I O N ! ! ! Software changes processed during this session require this system and any of its diskless/dataless clients to be rebooted in order for the changes to be made effective.
# uname -W0
# oslevel -s6100-06-04-1112
# shutdown -FrSHUTDOWN PROGRAM
Thu Apr 7 20:42:25 CDT 2011
0513-044 The sshd Subsystem was requested to stop.Stopping workload partition wpar2.Stopping workload partition wpar1.Stopping workload partition subsystem cor_wpar2.Stopping workload partition subsystem cor_wpar1.0513-044 The cor_wpar1 Subsystem was requested to stop.stopwpar: 0960-261 Waiting up to 600 seconds for workload partition to halt.0513-044 The cor_wpar2 Subsystem was requested to stop.stopwpar: 0960-261 Waiting up to 600 seconds for workload partition to halt.Shutting down all workload partition processes.Shutting down all workload partition processes.Unmounting all workload partition file systems.Unmounting all workload partition file systems.
Wait for 'Rebooting...' before stopping.
Upon a successful reboot of the global environment, we must now synchronize the shared WPAR. The WPAR is started. We connect to the WPAR and confirm that it needs to be synchronized, because the fileset level for the root part is down level (as shown in Example 10-5).
Example 10-5 Comparing fileset levels in the WPAR and the global environment
# uname -W0# uptime08:48PM up 3 mins, 1 user, load average: 1.23, 0.37, 0.13
# oslevel -s6100-06-04-1112
# lslpp -l bos.rte.install Fileset Level State Description ----------------------------------------------------------------------------Path: /usr/lib/objrepos bos.rte.install 6.1.6.4 COMMITTED LPP Install Commands
Path: /etc/objrepos bos.rte.install 6.1.6.4 COMMITTED LPP Install Commands
230 Exploiting IBM AIX Workload Partitions

# lswparName State Type Hostname Directory RootVG WPAR--------------------------------------------------------wpar1 D S wpar1 /wpars/wpar1 nowpar2 D S wpar2 /wpars/wpar2 no
# startwpar -v wpar1Starting workload partition wpar1.Mounting all workload partition file systems.Mounting /wpars/wpar1Mounting /wpars/wpar1/homeMounting /wpars/wpar1/optMounting /wpars/wpar1/procMounting /wpars/wpar1/tmpMounting /wpars/wpar1/usrMounting /wpars/wpar1/varLoading workload partition.Exporting workload partition devices.Starting workload partition subsystem cor_wpar1.0513-059 The cor_wpar1 Subsystem has been started. Subsystem PID is 5963842.Verifying workload partition startup.Return Status = SUCCESS.
# clogin wpar1# lslpp -l bos.rte.install Fileset Level State Description ----------------------------------------------------------------------------Path: /usr/lib/objrepos bos.rte.install 6.1.6.4 COMMITTED LPP Install Commands
Path: /etc/objrepos bos.rte.install 6.1.6.3 COMMITTED LPP Install Commands#
The WPAR is synchronized with the syncwpar command, as shown in Example 10-6.
Example 10-6 Synchronizing the WPAR with the service pack updates
# uname -W0
# syncwpar -v wpar1 ...etc....bos.aixpert.cmds 6.1.6.1 ROOT COMMIT SUCCESSbos.rte.shell 6.1.6.4 ROOT COMMIT SUCCESSbos.sysmgt.serv_aid 6.1.6.3 ROOT COMMIT SUCCESSbos.sysmgt.trace 6.1.6.2 ROOT COMMIT SUCCESSsyncroot: Processing root part installation status.syncroot: Installp root packages are currently synchronized.syncroot: RPM root packages are currently synchronized.syncroot: Root part is currently synchronized.syncroot: Returns Status = SUCCESSWorkload partition wpar1 synchronized successfully.
Return Status = SUCCESS.
The WPAR is now synchronized with the global environment. We can confirm this synchronization by viewing the output from the lslpp command. The level of the root part of
Chapter 10. Software maintenance 231

the fileset is now the same in both the global environment and the shared WPAR environment, as shown in Example 10-7.
Example 10-7 Check that the WPAR and the Global fileset levels are identical
# uname -W0
# lslpp -l bos.rte.install Fileset Level State Description ----------------------------------------------------------------------------Path: /usr/lib/objrepos bos.rte.install 6.1.6.4 COMMITTED LPP Install Commands
Path: /etc/objrepos bos.rte.install 6.1.6.4 COMMITTED LPP Install Commands
# clogin wpar1# lslpp -l bos.rte.install Fileset Level State Description ----------------------------------------------------------------------------Path: /usr/lib/objrepos bos.rte.install 6.1.6.4 COMMITTED LPP Install Commands
Path: /etc/objrepos bos.rte.install 6.1.6.4 COMMITTED LPP Install Commands#
10.1.2 Installing AIX updates in a detached WPAR
In the following scenario, we install a new AIX 6.1 service pack in an environment that has a single detached WPAR. The global environment is updated first. We then update a detached WPAR, which is named wpar_detached (as shown in Example 10-8).
Our global environment is running AIX 6.1 TL6 SP3. We confirm this level by running the oslevel command from the global environment and the lslpp command in both environments. We update the system to AIX 6.1 TL6 SP4.
Example 10-8 Listing the detached WPAR’s details
# lswparName State Type Hostname Directory RootVG WPAR-----------------------------------------------------------------------------wpar_detached A S wpar_detached /wpars/wpar_detached no
The smit fastpath, smitty update_all, is used to preview the updates to be installed. You notice that the Perform Operation in Global Environment and Perform Operation on Detached WPARs options are both set to yes. We also selected the name of the detached WPAR from the list of WPARs available on the system. Refer to Example 10-9.
Example 10-9 smitty update_all
# uname -W0
# smit update_all
Update Installed Software to Latest Level (Update All)
232 Exploiting IBM AIX Workload Partitions

Type or select values in entry fields.Press Enter AFTER making all desired changes.
[Entry Fields]* INPUT device / directory for software .
* SOFTWARE to update _update_all
PREVIEW only? (update operation will NOT occur) yes + COMMIT software updates? yes + SAVE replaced files? no + AUTOMATICALLY install requisite software? yes + EXTEND file systems if space needed? yes + VERIFY install and check file sizes? no + DETAILED output? yes + Process multiple volumes? yes + ACCEPT new license agreements? yes + Preview new LICENSE agreements? no +
WPAR Management Perform Operation in Global Environment yes + Perform Operation on Detached WPARs yes + Detached WPAR Names [wpar_detached] + Remount Installation Device in WPARs yes + Alternate WPAR Installation Device []
...etc..
FILESET STATISTICS------------------ 105 Selected to be installed, of which: 1 Passed pre-installation verification 104 Deferred (see * below) ---- 1 Total to be installed ...etc...
******************************************************************************End of installp PREVIEW. No apply operation has actually occurred.******************************************************************************
inuwpar: Operation Summary:Environment Return Code-------------------------------------------------------- Global 0 wpar_detached 0
With a successful return code (of 0) for the preview operation, on both the global environment and wpar_detached, we can now install the bos.rte.install fileset. We install this fileset by using the smit fastpath, smitty install_all. The fileset is first installed into the global environment and then the detached WPAR. Refer to Example 10-10 for a screen capture of the SMIT panels that were used.
Example 10-10 Installing bos.rte.install in the global environment and the detached WPAR
# smitty install_all
Install and Update from ALL Available Software
Chapter 10. Software maintenance 233

Type or select values in entry fields.
Press Enter AFTER making all desired changes.
[Entry Fields]
* INPUT device / directory for software .* SOFTWARE to install [bos.rte.install] + PREVIEW only? (install operation will NOT occur) no + COMMIT software updates? yes + SAVE replaced files? no + AUTOMATICALLY install requisite software? yes + EXTEND file systems if space needed? yes + OVERWRITE same or newer versions? no +
VERIFY install and check file sizes? no + DETAILED output? yes + Process multiple volumes? yes + ACCEPT new license agreements? yes + Preview new LICENSE agreements? no +
WPAR Management Perform Operation in Global Environment yes + Perform Operation on Detached WPARs yes + Detached WPAR Names [wpardetached] + Remount Installation Device in WPARs yes + Alternate WPAR Installation Device [] .....etc......
Command: running stdout: yes stderr: no
Before command completion, additional instructions may appear below.
inuwpar: The operation will be attempted in these environments: Global wpar_detached
inuwpar: ==== Performing operation on Global ====
COMMAND STATUS
Command: OK stdout: yes stderr: no
Before command completion, additional instructions may appear below.
inuwpar: The operation will be attempted in these environments: Global wpar_detached
inuwpar: ==== Performing operation on Global ====geninstall -I "a -cgNqXY -V2 -J" -Z -d . -f File 2>&1
File: bos.rte.install ...etc...
installp: APPLYING software for:
234 Exploiting IBM AIX Workload Partitions

bos.rte.install 6.1.6.4
. . . . . << Copyright notice for bos >> . . . . . . .Licensed Materials - Property of IBM
5765G6200 Copyright International Business Machines Corp. 1985, 2011. Copyright AT&T 1984, 1985, 1986, 1987, 1988, 1989. Copyright Regents of the University of California 1980, 1982, 1983, 1985, 1986, 1987, 1988, 1989. Copyright BULL 1993, 2011. Copyright Digi International Inc. 1988-1993.
Pre-installation Failure/Warning Summary----------------------------------------Name Level Pre-installation Failure/Warning-------------------------------------------------------------------------------bos.rte.install 6.1.6.1 Already superseded by 6.1.6.3
Installation Summary--------------------Name Level Part Event Result-------------------------------------------------------------------------------bos.rte.install 6.1.6.4 USR APPLY SUCCESSbos.rte.install 6.1.6.4 ROOT APPLY SUCCESSbos.rte.install 6.1.6.4 USR COMMIT SUCCESSbos.rte.install 6.1.6.4 ROOT COMMIT SUCCESS
inuwpar: ==== Performing operation on wpar_detached ====installp_cmd: Using alternate installation device /tmp/aaa0SaxUa/aix61tl6sp4.installp_cmd: Using alternate input file /tmp/inuwp0paxUb.geninstall -I "a -cgNqXY -V2 -J" -Z -d /tmp/aaa0SaxUa/aix61tl6sp4 -f File 2>&1
File: bos.rte.install
Installation Summary--------------------Name Level Part Event Result-------------------------------------------------------------------------------bos.rte.install 6.1.6.4 USR APPLY SUCCESSbos.rte.install 6.1.6.4 ROOT APPLY SUCCESSbos.rte.install 6.1.6.4 USR COMMIT SUCCESSbos.rte.install 6.1.6.4 ROOT COMMIT SUCCESS
inuwpar: Operation Summary:Environment Return Code-------------------------------------------------------- Global 0 wpar_detached 0
To confirm that the bos.rte.install fileset has been updated in both environments, we use the lslpp command to check the fileset level, as shown in Example 10-11.
Example 10-11 Confirm that bos.rte.install is the same level in global environment and wpar_detached
# uname -W0# lslpp -La bos.rte.install Fileset Level State Type Description (Uninstaller)
Chapter 10. Software maintenance 235

---------------------------------------------------------------------------- bos.rte.install 6.1.0.0 C F LPP Install Commands 6.1.0.1 C F LPP Install Commands 6.1.0.2 C F LPP Install Commands 6.1.1.1 C F LPP Install Commands 6.1.2.2 C F LPP Install Commands 6.1.3.1 C F LPP Install Commands 6.1.4.0 C F LPP Install Commands 6.1.4.3 C F LPP Install Commands 6.1.4.4 C F LPP Install Commands 6.1.6.3 C F LPP Install Commands 6.1.6.4 C F LPP Install Commands...
# clogin wpar_detached lslpp -La bos.rte.install Fileset Level State Type Description (Uninstaller) ---------------------------------------------------------------------------- bos.rte.install 6.1.0.0 C F LPP Install Commands 6.1.0.1 C F LPP Install Commands 6.1.0.2 C F LPP Install Commands 6.1.1.1 C F LPP Install Commands 6.1.2.2 C F LPP Install Commands 6.1.3.1 C F LPP Install Commands 6.1.4.0 C F LPP Install Commands 6.1.4.3 C F LPP Install Commands 6.1.4.4 C F LPP Install Commands 6.1.6.3 C F LPP Install Commands 6.1.6.4 C F LPP Install Commands ...
The next step is to update the remaining filesets in both environments. The smitty update_all smit fastpath is used in Example 10-12 to accomplish this task. Both the global environment and the detached WPAR are updated in sequence.
Example 10-12 Updating filesets in the global environment and the detached WPAR
# smitty update_all
Update Installed Software to Latest Level (Update All)
Type or select values in entry fields.
Press Enter AFTER making all desired changes.
[Entry Fields]* INPUT device / directory for software .* SOFTWARE to update _update_all PREVIEW only? (update operation will NOT occur) no + COMMIT software updates? yes + SAVE replaced files? no + AUTOMATICALLY install requisite software? yes + EXTEND file systems if space needed? yes + VERIFY install and check file sizes? no + DETAILED output? yes + Process multiple volumes? yes + ACCEPT new license agreements? yes + Preview new LICENSE agreements? no +
WPAR Management Perform Operation in Global Environment yes +
236 Exploiting IBM AIX Workload Partitions

Perform Operation on Detached WPARs yes + Detached WPAR Names [wpar_detached] + Remount Installation Device in WPARs yes + Alternate WPAR Installation Device []
...etc...
inuwpar: The operation will be attempted in these environments: Global wpar_detachedinuwpar: ==== Performing operation on Global ====geninstall -I "a -cgNpqwXY -V2 -J" -Z -p -d . -f File 2>&1
File: X11.Dt.lib 6.1.6.1 X11.motif.mwm 6.1.6.1 bos.64bit 6.1.6.4 bos.acct 6.1.6.1 bos.adt.base 6.1.6.2...etc...bos.rte.libc 6.1.6.4 ROOT COMMIT SUCCESSbos.net.tcp.client 6.1.6.4 USR COMMIT SUCCESSbos.net.tcp.client 6.1.6.4 ROOT COMMIT SUCCESSbos.rte.control 6.1.6.4 USR COMMIT SUCCESSbos.rte.control 6.1.6.4 ROOT COMMIT SUCCESSbos.rte.filesystem 6.1.6.2 USR COMMIT SUCCESSbos.rte.filesystem 6.1.6.2 ROOT COMMIT SUCCESSbos.rte.lvm 6.1.6.2 USR COMMIT SUCCESSbos.rte.lvm 6.1.6.2 ROOT COMMIT SUCCESSbos.rte.serv_aid 6.1.6.4 USR COMMIT SUCCESSbos.rte.serv_aid 6.1.6.4 ROOT COMMIT SUCCESSbos.wpars 6.1.6.3 USR COMMIT SUCCESSbos.wpars 6.1.6.3 ROOT COMMIT SUCCESSbos.rte.security 6.1.6.4 USR COMMIT SUCCESSbos.rte.security 6.1.6.4 ROOT COMMIT SUCCESSbos.aixpert.cmds 6.1.6.1 USR COMMIT SUCCESSbos.aixpert.cmds 6.1.6.1 ROOT COMMIT SUCCESSbos.rte.shell 6.1.6.4 USR COMMIT SUCCESSbos.rte.shell 6.1.6.4 ROOT COMMIT SUCCESSbos.sysmgt.serv_aid 6.1.6.3 USR COMMIT SUCCESSbos.sysmgt.serv_aid 6.1.6.3 ROOT COMMIT SUCCESSbos.sysmgt.trace 6.1.6.2 USR COMMIT SUCCESSbos.sysmgt.trace 6.1.6.2 ROOT COMMIT SUCCESS
installp: * * * A T T E N T I O N ! ! ! Software changes processed during this session require this system and any of its diskless/dataless clients to be rebooted in order for the changes to be made effective.
inuwpar: Operation Summary:Environment Return Code-------------------------------------------------------- Global 0 wpar_detached 0
A return code of zero for both environments confirms that the updates have been installed successfully. We verify that both the global environment and the detached WPAR are now at the same AIX service pack level, as shown in Example 10-13 on page 238.
Chapter 10. Software maintenance 237

Example 10-13 Verify that the global environment and the WPAR are at same AIX SP level
# uname -W0# oslevel -s6100-06-04-1112
# clogin wpar_detached oslevel -s6100-06-04-1112# exit
In Example 10-14, the global environment and the WPAR are both restarted after the updates have been installed.
Example 10-14 Restarting the global environment and the WPAR environment
# stopwpar -Fv wpar_detachedStopping workload partition wpar_detached.Stopping workload partition subsystem cor_wpar_detached.0513-044 The cor_wpar_detached Subsystem was requested to stop.Shutting down all workload partition processes.WPAR='wpar_detached' CID=1ID=1 KEY=0x4107001c UID=0 GID=9 RT=-1ID=15 KEY=0x43054242 UID=0 GID=0 RT=-1ID=1048592 KEY=0x01054326 UID=0 GID=0 RT=-1ID=17 KEY=0x620544df UID=0 GID=0 RT=-1Unmounting all workload partition file systems.Umounting /wpars/wpar_detached/var.Umounting /wpars/wpar_detached/usr.Umounting /wpars/wpar_detached/tmp.Umounting /wpars/wpar_detached/proc.Umounting /wpars/wpar_detached/opt.Umounting /wpars/wpar_detached/home.Umounting /wpars/wpar_detached.
Return Status = SUCCESS.
# uname -W0# shutdown -FrSHUTDOWN PROGRAMFri Apr 8 01:48:46 CDT 20110513-044 The sshd Subsystem was requested to stop.
Wait for 'Rebooting...' before stopping.
# uptime 01:55AM up 5 mins, 1 user, load average: 0.76, 0.43, 0.18
# lswparName State Type Hostname Directory RootVG WPAR-----------------------------------------------------------------------------wpar_detached D S wpar_detached /wpars/wpar_detached no
# startwpar -v wpar_detachedStarting workload partition wpar_detached.Mounting all workload partition file systems.Mounting /wpars/wpar_detachedMounting /wpars/wpar_detached/homeMounting /wpars/wpar_detached/optMounting /wpars/wpar_detached/proc
238 Exploiting IBM AIX Workload Partitions

Mounting /wpars/wpar_detached/tmpMounting /wpars/wpar_detached/usrMounting /wpars/wpar_detached/varLoading workload partition.Exporting workload partition devices.Starting workload partition subsystem cor_wpar_detached.0513-059 The cor_wpar_detached Subsystem has been started. Subsystem PID is 3014788.Verifying workload partition startup.
Return Status = SUCCESS.
In the previous steps, the software updates were installed through the SMIT interface. From the output shown, it is clear that another utility assists with the installation of the filesets. This utility is called the inuwpar command.
The inuwpar command performs software installation or maintenance tasks in detached WPARs. A detached WPAR is a system WPAR with a writable /usr file system and a writable /opt file system that is not shared with the global environment.
Table 10-1 describes the available options that can be passed to the inuwpar command.
Table 10-1 inuwpar command-line flags
Example 10-15 shows an example of using the inuwpar command to install software in a detached WPAR. Prior to the installation, we confirm that the fileset is not installed already. Here, the bos.games fileset is installed into the global environment and the detached WPAR.
Example 10-15 Using the inuwpar command to install software
#uname -W0# lslpp -l bos.gameslslpp: 0504-132 Fileset bos.games not installed.
Flag Description
-A Applies the installation command to all detached system WPARs.
-d directory Specifies the directory in the WPAR where the installation directory is accessible. By default, the directory is mounted from the installation command into a temporary directory within the WPAR file system. If the options of the installation command contain the -d directory option, the directory is used as the installation directory for the command.
-D Specifies that the directory that is used in the installation command is accessible within the WPAR file systems.
-f wparnamesfile Specifies a file containing a list of detached WPARs to which the installation command is applied.
-G Runs the installation command within the global environment and the detached system WPAR.
-w wparname Specifies one or more detached WPARs to which the installation command is applied.
Chapter 10. Software maintenance 239

# clogin wpar_detached lslpp -l bos.gameslslpp: 0504-132 Fileset bos.games not installed.
# uname -W0# inuwpar -G -A installp -qaXd /tmp/cg bos.gamesinuwpar: The operation will be attempted in these environments: Global wpar_detachedinuwpar: ==== Performing operation on Global ====+-----------------------------------------------------------------------------+ Pre-installation Verification...+-----------------------------------------------------------------------------+Verifying selections...doneVerifying requisites...doneResults...
SUCCESSES--------- Filesets listed in this section passed pre-installation verification and will be installed.
Selected Filesets ----------------- bos.games 6.1.6.0 # Games
<< End of Success Section >>...etc...Installation Summary--------------------Name Level Part Event Result-------------------------------------------------------------------------------bos.games 6.1.6.0 USR APPLY SUCCESSbos.games 6.1.6.0 ROOT APPLY SUCCESSinuwpar: ==== Performing operation on wpar_detached ====installp: Using alternate installation device /tmp/aaaFXaaMa....etc...Selected Filesets ----------------- bos.games 6.1.6.0 # Games
...etc...
Installation Summary--------------------Name Level Part Event Result-------------------------------------------------------------------------------bos.games 6.1.6.0 USR APPLY SUCCESSbos.games 6.1.6.0 ROOT APPLY SUCCESSinuwpar: Operation Summary:Environment Return Code-------------------------------------------------------- Global 0 wpar_detached 0
Using the lslpp command (in Example 10-16 on page 241), we can verify that the bos.games fileset has been successfully installed into both environments.
240 Exploiting IBM AIX Workload Partitions

Example 10-16 Using lslpp to verify that bos.games was installed by inuwpar
# uname -W0# lslpp -l bos.games Fileset Level State Description ----------------------------------------------------------------------------Path: /usr/lib/objrepos bos.games 6.1.6.0 COMMITTED Games
Path: /etc/objrepos bos.games 6.1.6.0 COMMITTED Games
# clogin wpar_detached lslpp -l bos.games Fileset Level State Description ----------------------------------------------------------------------------Path: /usr/lib/objrepos bos.games 6.1.6.0 COMMITTED Games
Path: /etc/objrepos bos.games 6.1.6.0 COMMITTED Games
To remove software from a detached WPAR, you can run the inuwpar command in the global environment to deinstall filesets. In Example 10-17, we deinstall the bos.games fileset from the detached WPAR named wpar_detached.
Example 10-17 Removing a fileset from a detached WPAR
# uname -W0# inuwpar -w wpar_detached installp -u bos.gamesinuwpar: The operation will be attempted in these environments: wpar_detachedinuwpar: ==== Performing operation on wpar_detached ====+-----------------------------------------------------------------------------+ Pre-deinstall Verification...+-----------------------------------------------------------------------------+Verifying selections...doneVerifying requisites...doneResults...
SUCCESSES--------- Filesets listed in this section passed pre-deinstall verification and will be removed.
Selected Filesets ----------------- bos.games 6.1.6.0 # Games
<< End of Success Section >>
FILESET STATISTICS------------------ 1 Selected to be deinstalled, of which: 1 Passed pre-deinstall verification ---- 1 Total to be deinstalled
+-----------------------------------------------------------------------------+
Chapter 10. Software maintenance 241

Deinstalling Software...+-----------------------------------------------------------------------------+
installp: DEINSTALLING software for: bos.games 6.1.6.0
Finished processing all filesets. (Total time: 2 secs).
+-----------------------------------------------------------------------------+ Summaries:+-----------------------------------------------------------------------------+
Installation Summary--------------------Name Level Part Event Result-------------------------------------------------------------------------------bos.games 6.1.6.0 ROOT DEINSTALL SUCCESSbos.games 6.1.6.0 USR DEINSTALL SUCCESSinuwpar: Operation Summary:Environment Return Code-------------------------------------------------------- wpar_detached 0
In the previous examples, we updated the global environment and detached WPAR using the smit update_all fastpath. However, if there were many detached WPARs to update, this method might not be the most expeditious. Therefore, consider updating the detached WPARs using the syncwpar command.
To update a detached WPAR, we can issue the syncwpar command with the -d and -D options. Table 10-2 describes each flag.
Table 10-2 syncwpar flags for detached WPARs
In the following scenario, we update a detached WPAR (wpar3_detached) using the syncwpar command. In Example 10-18 on page 243, the syncwpar command is run with the additional flags of -v, -p, and -X. The -v flag provides verbose output, the -p flag performs a preview of the installation, and the -X flag extends file systems.
Flag Description
-d Synchronizes the software in a detached WPAR, using the specific software installation directories. The -d flag is valid only when used along with -D.
When the -d flag is specified, the images in the directory are used to apply the base installation or updates to the detached WPARs.
When the -d flag is not specified, the synchronization rejects or commits the levels of software in the detached WPARs.
-D Synchronizes software in the detached system WPARs that have a writable /usr directory. The default is to synchronize software in only shared system WPARs that have a read-only /usr directory.
242 Exploiting IBM AIX Workload Partitions

Example 10-18 Previewing a syncwpar operation on a detached WPAR
# syncwpar -v -p -X -D -d /mnt/aix61tl6sp4 wpar3_detached
*******************************************************************************Synchronizing workload partition wpar3_detached (1 of 1).*******************************************************************************
Executing syncd_install_sync in workload partition wpar3_detached.
Previewing install operations to synchronize wpar3_detached:: Further operations may be necessary to complete synchronization:
Fileset levels to be applied: X11.Dt.lib 6.1.6.1 X11.motif.mwm 6.1.6.1 bos.64bit 6.1.6.4 bos.acct 6.1.6.1 bos.adt.base 6.1.6.2 bos.adt.debug 6.1.6.2 bos.adt.include 6.1.6.4 bos.adt.prof 6.1.6.4 bos.adt.syscalls 6.1.6.2 bos.aixpert.cmds 6.1.6.1...etc...
With the preview operation complete, the syncwpar command is again issued to perform the actual update. The bos.rte.install fileset is installed first, as shown in Example 10-19.
Example 10-19 Installing the bos.rte.install fileset in a detached WPAR
# syncwpar -v -X -D -d /mnt/aix61tl6sp4 wpar3_detached*******************************************************************************Synchronizing workload partition wpar3_detached (1 of 1).*******************************************************************************
Executing syncd_install_sync in workload partition wpar3_detached.
Previewing install operations to synchronize wpar3_detached:: Further operations may be necessary to complete synchronization:
inuwpar: The operation will be attempted in these environments: wpar3_detachedinuwpar: ==== Performing operation on wpar3_detached ====installp: Using alternate installation device /tmp/aaapZadUa/aix61tl6sp4.
...etc...
Mandatory Fileset Updates ------------------------- (being installed automatically due to their importance) bos.rte.install 6.1.6.4 # LPP Install Commands
installp: APPLYING software for: bos.rte.install 6.1.6.4
. . . . . << Copyright notice for bos >> . . . . . . . Licensed Materials - Property of IBM
...etc...
Chapter 10. Software maintenance 243

installp: The installp command has been updated. Reinvoking installp to process the remaining items.installp: Using alternate installation device /tmp/aaapZadUa/aix61tl6sp4....etc...+-----------------------------------------------------------------------------+ Committing Software...+-----------------------------------------------------------------------------+
installp: COMMITTING software for: bos.rte.install 6.1.6.4
Finished processing all filesets. (Total time: 0 secs).
+-----------------------------------------------------------------------------+ Summaries:+-----------------------------------------------------------------------------+
Installation Summary--------------------Name Level Part Event Result-------------------------------------------------------------------------------bos.rte.install 6.1.6.4 USR COMMIT SUCCESSbos.rte.install 6.1.6.4 ROOT COMMIT SUCCESSinuwpar: Operation Summary:Environment Return Code-------------------------------------------------------- wpar3_detached 0Workload partition wpar3_detached synchronized successfully.
Return Status = SUCCESS.
The bos.rte.install fileset is updated first. We confirmed that this fileset is updated to SP4 by logging into the WPAR and checking the fileset level with the lslpp command, as shown in Example 10-20.
Example 10-20 Check that bos.rte.install was updated by syncwpar
#clogin wpar3_detached# oslevel -s6100-06-03-1048
# lslpp -l bos.rte.install Fileset Level State Description ----------------------------------------------------------------------------Path: /usr/lib/objrepos bos.rte.install 6.1.6.4 COMMITTED LPP Install Commands
Path: /etc/objrepos bos.rte.install 6.1.6.4 COMMITTED LPP Install Commands#
Then, the syncwpar command needs to run again to update the remaining filesets, as shown in Example 10-21.
Example 10-21 Installing updates in the detached WPAR with syncwpar
# syncwpar -v -D -X -d /mnt/aix61tl6sp4 wpar3_detached...etc...
FILESET STATISTICS
244 Exploiting IBM AIX Workload Partitions

------------------ 104 Selected to be installed, of which: 104 Passed pre-installation verification ---- 104 Total to be installed...etc..devices.chrp.base.rte 6.1.6.3 ROOT APPLY SUCCESSdevices.pciex.14107a0314107 6.1.6.1 USR APPLY SUCCESSdevices.sas.rte 6.1.6.1 USR APPLY SUCCESSdevices.vdevice.hvterm1.rte 6.1.6.2 USR APPLY SUCCESSdevices.common.IBM.ib.rte 6.1.6.3 USR APPLY SUCCESSbos.net.tcp.client 6.1.6.4 ROOT APPLY SUCCESSbos.rte.tty 6.1.6.2 USR APPLY SUCCESSbos.rte.tty 6.1.6.2 ROOT APPLY SUCCESS...etc...devices.pci.4f11c800.rte 6.1.6.2 ROOT APPLY SUCCESS
installp: * * * A T T E N T I O N ! ! ! Software changes processed during this session require this system and any of its diskless/dataless clients to be rebooted in order for the changes to be made effective.inuwpar: Operation Summary:Environment Return Code-------------------------------------------------------- wpar3_detached 0
Workload partition wpar3_detached synchronized successfully.
Return Status = SUCCESS.
All the updates for SP4 have now been applied successfully to the detached WPAR. The WPAR is restarted, as shown in Example 10-22. Again, we connect to the WPAR with the clogin command and check the AIX SP level using the oslevel and lslpp commands.
Example 10-22 Verifying that the updates were installed in the detached WPAR
# stopwpar -Fv wpar3_detachedStopping workload partition wpar3_detached.Stopping workload partition subsystem cor_wpar3_detached.0513-044 The cor_wpar3_detached Subsystem was requested to stop.Shutting down all workload partition processes.WPAR='wpar3_detached' CID=2ID=2 KEY=0x4107001c UID=0 GID=9 RT=-1ID=1048591 KEY=0x4304e242 UID=0 GID=0 RT=-1ID=1048593 KEY=0x0104e326 UID=0 GID=0 RT=-1ID=18 KEY=0x6204e4df UID=0 GID=0 RT=-1ID=20 KEY=0x0104e302 UID=0 GID=0 RT=-1Unmounting all workload partition file systems.Umounting /wpars/wpar3_detached/var.Umounting /wpars/wpar3_detached/usr.Umounting /wpars/wpar3_detached/tmp.Umounting /wpars/wpar3_detached/proc.Umounting /wpars/wpar3_detached/opt.Umounting /wpars/wpar3_detached/home.Umounting /wpars/wpar3_detached.Return Status = SUCCESS.
# startwpar -v wpar3_detachedStarting workload partition wpar3_detached.Mounting all workload partition file systems.
Chapter 10. Software maintenance 245

Mounting /wpars/wpar3_detachedMounting /wpars/wpar3_detached/homeMounting /wpars/wpar3_detached/optMounting /wpars/wpar3_detached/procMounting /wpars/wpar3_detached/tmpMounting /wpars/wpar3_detached/usrMounting /wpars/wpar3_detached/varLoading workload partition.Exporting workload partition devices.Starting workload partition subsystem cor_wpar3_detached.0513-059 The cor_wpar3_detached Subsystem has been started. Subsystem PID is 4653306.Verifying workload partition startup.Return Status = SUCCESS.
# clogin wpar3_detached# oslevel -s6100-06-04-1112# lslpp -l bos.rte.libc Fileset Level State Description ----------------------------------------------------------------------------Path: /usr/lib/objrepos bos.rte.libc 6.1.6.4 COMMITTED libc Library
Path: /etc/objrepos bos.rte.libc 6.1.6.4 COMMITTED libc Library#
All of the updates have now been installed successfully in the detached WPAR.
246 Exploiting IBM AIX Workload Partitions

10.1.3 Additional considerations
On certain systems, the syncwpar operation can fail if there are filesets in the global environment that cannot be synchronized with a shared system WPAR. There can be many reasons why a fileset cannot be synchronized in a WPAR. In specific cases, the fileset might not be necessary or desired in the WPAR, because it is only required in the global environment.
In this case, it might be necessary to use the swvpdmgr utility to prevent the filesets from being included in the synchronization of the shared WPAR. Table 10-3 on page 248 lists the flags that are available with the swvpdmgr command.
Important: You might encounter the following error during the update process:
file_type failed: A file or directory in the path name does not exist.0503-008 installp: There is not enough free disk space in filesystem /usr (378912 more 512-byte blocks are required). An attempt to extend this filesystem was unsuccessful. Make more space available then retry this operation.
inuwpar: Operation Summary:Environment Return Code-------------------------------------------------------- wpar3_detached 255
syncwpar: 0960-580 Synchronization operation halted due to a cycle detected while processing syncwpar.syncwpar: 0960-264 Error synchronizing workload partition wpar3_detached.
Return Status = FAILURE.
This message indicates insufficient file system space in the /usr file system of the detached WPAR. The syncwpar command calls the syncroot command, which eventually calls the installp command. If the WPAR is not a rootvg WPAR, the WPAR’s file systems are still owned by the global environment. As a result, the installp command fails to expand the file systems inside the WPAR. This situation can occur even if the -X flag is supplied to the syncwpar command.
To work around this issue, it might be necessary to extend the detached WPAR’s /usr file system manually. You can use the chfs command from the global environment to increase the size of the file system as required:
# chfs -a size=+256M /wpars/wpar3_detached/usr
With the file system extended, rerun the syncwpar command to update the filesets as desired.
Chapter 10. Software maintenance 247

Table 10-3 swvpdmgr command-line options
In Example 10-23, the swvpdmgr command has been issued without command-line options. The usage information indicates that we must supply at least one flag and the name of the fileset.
Example 10-23 The swvpdmgr command usage information
# swvpdmgrUsage: swvpdmgr { [-p|-s] [-g|-w] } Fileset ...
Flags: -g = Mark fileset managed by the Global system. -w = Mark fileset manageable by workload partitions. -p = Mark fileset private (visible only in Global system). -s = Mark fileset as shared with workload partitions.
For example, if we want to mark the bos.games fileset as manageable by a shared WPAR, we run the command that is shown in Example 10-24.
Example 10-24 Marking the bos.games fileset with swvpdmgr
# swvpdmgr -w bos.games
In Example 10-25, we attempt to synchronize a shared WPAR after installing new software in the global environment. This software was to be used in the global environment only. Upon issuing the syncwpar command, synchronization errors were reported for specific filesets, as shown in Example 10-25.
Example 10-25 syncwpar errors for a fileset in the global environment
# syncwpar wpar1*******************************************************************************Synchronizing workload partition wpar1 (1 of 1).*******************************************************************************Executing /usr/sbin/syncroot in workload partition wpar1.syncroot: Processing root part installation status.syncroot: Synchronizing installp software.+-----------------------------------------------------------------------------+ Pre-installation Verification...+-----------------------------------------------------------------------------+Verifying selections...doneVerifying requisites...doneResults...
SUCCESSES--------- Filesets listed in this section passed pre-installation verification and will be installed.
Flags Description
-g Mark fileset managed by the global environment.
-w Mark fileset manageable by WPARs.
-p Mark fileset private (visible only in the global environment).
-s Mark fileset as shared with WPARs.
248 Exploiting IBM AIX Workload Partitions

Selected Filesets ----------------- ibmdebugger 7.1.0.0 # IBM Debugger for AIX
...etc...
installp: APPLYING software for: ibmdebugger 7.1.0.0
0503-000 vpdadd: Unable to add an entry to the Software Vital Product Data database.instal: Failed while executing the ./ibmdebugger.post_i script.
0503-464 installp: The installation has FAILED for the "root" part of the following filesets: ibmdebugger 7.1.0.0
installp: Cleaning up software for: ibmdebugger 7.1.0.0
rm: 0653-609 Cannot remove /usr/idebug/engine/bin/derdrdr1.The file system has read permission only.rm: 0653-609 Cannot remove /usr/idebug/engine/bin/derdshl2.The file system has read permission only....etc..Finished processing all filesets. (Total time: 0 secs).
+-----------------------------------------------------------------------------+ Summaries:+-----------------------------------------------------------------------------+
Installation Summary--------------------Name Level Part Event Result-------------------------------------------------------------------------------ibmdebugger 7.1.0.0 ROOT APPLY FAILEDibmdebugger 7.1.0.0 ROOT CLEANUP SUCCESSsyncroot: Error synchronizing installp software.syncroot: Returns Status = FAILURE/usr/lib/wpars/wparinstcmd: 0960-231 ATTENTION: '/usr/sbin/syncroot' failed with return code 1.syncwpar: 0960-264 Error synchronizing workload partition wpar1.
Return Status = FAILURE.
These filesets relate to IBM Debugger for AIX, which is an interactive source-level debugger for use by application programmers. This software was preventing the WPAR from synchronizing successfully. In order to allow the WPAR to synchronize without failure, we used the swvpdmgr command to mark all of these filesets as private and only visible by the global environment, as shown in Example 10-26.
Example 10-26 Using the swvpdmgr command to mark filesets as private
/usr/sbin/swvpdmgr -p ibmdebugger/usr/sbin/swvpdmgr -p ibmdebugger.engine/usr/sbin/swvpdmgr -p ibmdebugger.engine.msg.de_DE/usr/sbin/swvpdmgr -p ibmdebugger.engine.msg.en_US/usr/sbin/swvpdmgr -p ibmdebugger.engine.msg.es_ES
Chapter 10. Software maintenance 249

/usr/sbin/swvpdmgr -p ibmdebugger.engine.msg.fr_FR/usr/sbin/swvpdmgr -p ibmdebugger.engine.msg.it_IT/usr/sbin/swvpdmgr -p ibmdebugger.engine.msg.ja_JP/usr/sbin/swvpdmgr -p ibmdebugger.engine.msg.ko_KR/usr/sbin/swvpdmgr -p ibmdebugger.engine.msg.pt_BR/usr/sbin/swvpdmgr -p ibmdebugger.engine.msg.zh_CN/usr/sbin/swvpdmgr -p ibmdebugger.engine.msg.zh_TW/usr/sbin/swvpdmgr -p ibmdebugger.jre/usr/sbin/swvpdmgr -p ibmdebugger.ui
The syncwpar command now completes successfully, as shown in Example 10-27.
Example 10-27 Successful synchronization of the WPAR after swvpdmgr was run
# syncwpar wpar1*******************************************************************************Synchronizing workload partition wpar1 (1 of 1).*******************************************************************************Executing /usr/sbin/syncroot in workload partition wpar1.syncroot: Processing root part installation status.syncroot: Installp root packages are currently synchronized.syncroot: RPM root packages are currently synchronized.syncroot: Root part is currently synchronized.syncroot: Returns Status = SUCCESSWorkload partition wpar1 synchronized successfully.
Return Status = SUCCESS.
10.1.4 AIX updates and Versioned Workload Partitions
In the following scenario, we update a Versioned Workload Partition running AIX 5.2.
We install TL10 SP8 for AIX 5.2 in our Versioned Workload Partition named 52wpar. This WPAR currently runs AIX 5.2 TL9 and the global environment runs AIX 7.1, as shown in Example 10-28.
Example 10-28 AIX level prior to installing updates in a Versioned WPAR
# uname -W0# oslevel -s7100-00-02-1041# clogin 52wpar52wpar[/] > oslevel -s5200-09-00
First, all of the fixes for AIX 5.2 TL10 SP8 are copied from a local directory in the global environment to the /tmp file system in the Versioned WPAR, as shown in Example 10-29.
Example 10-29 Copying AIX 5.2 updates to the WPAR /tmp file system
# uname -W
Important: At the time of this writing, only AIX 5.2 TL10 SP8 is supported in a Versioned WPAR. The following example shows a WPAR running AIX 5.2 TL9. This level of AIX 5.2 is not supported in a Versioned WPAR. This level is shown here for demonstration purposes only.
250 Exploiting IBM AIX Workload Partitions

0# cd /fixes/52tl10# cp -pRh 52tl10 /wpars/52wpar/tmp# cd /wpars/52wpar/tmp/52tl10/# ls -ltr | tail-rw-r--r-- 1 root system 4477952 May 02 01:44 992.bff-rw-r--r-- 1 root system 5120 May 02 01:44 995.bff-rw-r--r-- 1 root system 4096 May 02 01:44 994.bff-rw-r--r-- 1 root system 1790976 May 02 01:44 993.bff-rw-r--r-- 1 root system 240640 May 02 01:44 997.bff-rw-r--r-- 1 root system 1327104 May 02 01:44 996.bff-rw-r--r-- 1 root system 7168 May 02 01:44 999.bff-rw-r--r-- 1 root system 71680 May 02 01:44 998.bff-rw-r--r-- 1 root system 1928434 May 02 01:45 .toc
Next, we connect to the Versioned Workload Partition to install the updates. From within the WPAR, we perform a smitty update_all operation specifying the location of the fixes in the /tmp directory. As shown in Example 10-30, it is similar to performing the same update operation in the global environment.
Example 10-30 Installing updates in a Versioned Workload Partition with smitty update_all
# clogin 52wpar52wpar[/] > uname -W652wpar[/] > cd /tmp/52tl10/52wpar[/tmp/52tl10] > smitty update_allUpdate Installed Software to Latest Level (Update All)
Type or select values in entry fields.Press Enter AFTER making all desired changes.
[Entry Fields]* INPUT device / directory for software .* SOFTWARE to update _update_all PREVIEW only? (update operation will NOT occur) no + COMMIT software updates? yes + SAVE replaced files? no + AUTOMATICALLY install requisite software? yes + EXTEND file systems if space needed? yes + VERIFY install and check file sizes? no + DETAILED output? no + Process multiple volumes? yes + ACCEPT new license agreements? no + Preview new LICENSE agreements? no
After the updates have finished installing, we can use the oslevel and instfix commands to verify that the Versioned WPAR’s AIX 5.2 TL and SP levels have been updated as expected, as shown in Example 10-31.
Example 10-31 Verifying Versioned Workload Partition AIX level after installing updates
52wpar[/] > oslevel -s5200-10-08-093052wpar[/] > instfix -i | grep AIX
Important: Install APAR IV01560 in the global environment before attempting to install AIX updates in a Versioned WPAR. This APAR provides a fix for the /usr/sys/inst.images/vwpar.52 file. This file is contained in the vwpar.images.52 fileset.
Chapter 10. Software maintenance 251

All filesets for 5.2.0.0_AIX_ML were found. All filesets for 5200-01_AIX_ML were found. All filesets for 5200-02_AIX_ML were found. All filesets for 5200-03_AIX_ML were found. All filesets for 5200-04_AIX_ML were found. All filesets for 5200-05_AIX_ML were found. All filesets for 5200-06_AIX_ML were found. All filesets for 5200-07_AIX_ML were found. All filesets for 5200-08_AIX_ML were found. All filesets for 5200-09_AIX_ML were found. All filesets for 5200-10_AIX_ML were found.52wpar[/] >
10.2 Managing interim fixes in a WPAR
Interim fixes or iFixes are provided by IBM Support for those problems with a level of urgency that cannot wait until the next AIX Service Pack or Technology Level release. An iFix is prepared based on a particular system and environment where the problem is detected and is roughly tested. iFixes will be added to the next release after going through exhaustive tests, but they are an interim solution for urgent problems. iFixes are provided in a compressed packed file with the extension .epkg.Z and are managed by AIX by using the emgr command.
The syncwpar, inuwpar, and syncroot commands are not able to apply or remove an iFix from a WPAR. We discuss managing iFixes for shared and detached WPARs.
10.2.1 Applying iFixes to a shared WPAR
A shared WPAR has no write access to /usr; therefore, any software application that needs to modify /usr has to be run from the global environment. In Example 10-32, we see how the iFix is applied to a shared WPAR.
Example 10-32 Applying an iFix to a shared WPAR
# uname -W0# emgr -lThere is no efix data on this system.# emgr -e restmig71.110412.epkg.Z+-----------------------------------------------------------------------------+Efix Manager Initialization+-----------------------------------------------------------------------------+Initializing log /var/adm/ras/emgr.log ...Efix package file is: /home/restmig71.110412.epkg.ZMD5 generating command is /usr/bin/csumMD5 checksum is 3243835a6aa6f645ed8460c6bab373f8Accessing efix metadata ...Processing efix label "restmig71" ......Setting efix state to: STABLE
+-----------------------------------------------------------------------------+Operation Summary+-----------------------------------------------------------------------------+Log file is /var/adm/ras/emgr.log
252 Exploiting IBM AIX Workload Partitions

EPKG NUMBER LABEL OPERATION RESULT=========== ============== ================= ==============1 restmig71 INSTALL SUCCESS
Return Status = SUCCESS# clogin shared_wpar******************************************************************************** ** ** Welcome to AIX Version 7.1! ** ** ** Please see the README file in /usr/lpp/bos for information pertinent to ** this release of the AIX Operating System. ** ** ********************************************************************************Last login: Wed Apr 20 09:07:49 2011 on /dev/Global from 750_1_LPAR_5
# emgr -l
ID STATE LABEL INSTALL TIME UPDATED BY ABSTRACT=== ===== ========== ================= ============================== 1 S restmig71 04/20/11 09:14:05 Fix for restore 6.1 wpar on 7.1...
We see that all shared WPARs have the iFix applied after it has been applied to the global environment. All iFixes that are applied to the global environment are also applied to all its shared WPARs.
10.2.2 Removing an iFix from a shared WPAR
Removing an iFix needs to modify /usr. Because a shared WPAR has no write access to /usr, you need to remove iFixes in the same way that they are applied, that is, from the global environment. Trying to remove the iFix within the WPAR fails. In Example 10-33, we see how to remove an iFix from a shared WPAR.
Important: Certain iFixes might contain a root part modification. Applying the iFix in the global environment updates only the /usr part for the WPAR. At this time, the syncwpar and syncroot commands do not update a possible iFix root part modification. While a solution is being developed, check the iFix content and if it contains any root part modification, update that root part in the WPAR manually:
# uncompress iFix.epkg.Z# tar -x iFix.epkg# grep TARGET_FILE ecfile TARGET_FILE=/usr/lib/corrals/populate TARGET_FILE=/usr/sbin/mkcorral
In this example, the iFix contains only two /usr modifications. If you need assistance updating the root part in the WPAR, contact IBM Support.
Chapter 10. Software maintenance 253

Example 10-33 Removing an iFix from a shared WPAR
# uname -W1# emgr -l
ID STATE LABEL INSTALL TIME UPDATED BY ABSTRACT=== ===== ========== ================= ===============================1 S restmig71 04/20/11 09:14:05 Fix for restore 6.1 wpar on 7.1...# emgr -r -L restmig71mkdir: cannot create /usr/emgrdata./usr/emgrdata: Read-only file systememgr: 0645-104 Error initializing efix database.emgr: 0645-007 ATTENTION: cleanup() returned an unexpected result.# exit# uname -W0# emgr -r -L restmig71+-----------------------------------------------------------------------------+Efix Manager Initialization+-----------------------------------------------------------------------------+Initializing log /var/adm/ras/emgr.log ...Accessing efix metadata ...Processing efix label "restmig71" ......Operation Summary+-----------------------------------------------------------------------------+Log file is /var/adm/ras/emgr.log
EFIX NUMBER LABEL OPERATION RESULT=========== ============== ================= ==============1 restmig71 REMOVE SUCCESS
Return Status = SUCCESS# emgr -lThere is no efix data on this system.# clogin shared_wpar# uname -W1# emgr -lThere is no efix data on this system.
Removing an iFix from the global environment is the same as removing it from all shared WPARs.
254 Exploiting IBM AIX Workload Partitions

10.2.3 Applying an iFix to a detached WPAR
A detached WPAR has its own copy of /usr. When an iFix is applied to the global environment, it is not applied to the detached WPAR. The syncwpar, inuwpar, and syncroot commands are not able to manage iFixes. Therefore, the iFix needs to be applied within the WPAR. We can create scenarios where an iFix is only applied to the global environment or only applied to a detached WPAR. An additional benefit of detached WPARs is to isolate and test an iFix, before applying it widely to the global environment, other systems, or WPARs.
This testing capability is particularly important in the case of Versioned Workload Partitions, because we might encounter situations where we need to apply an iFix that applies only to the AIX version of WPAR. For example, the Fix IZ72315 was developed for AIX 5.2 to allow a checkpointable Versioned AIX 5.2 WPAR to be relocated by WPM. This Fix is applied in the WPAR for its AIX 5.2 filesets.
In Example 10-34, we see how to apply an iFix to a detached WPAR.
Example 10-34 Applying an iFix to a detached WPAR
# uname -W0# emgr -lThere is no efix data on this system.# clogin detached_wpar******************************************************************************** ** ** Welcome to AIX Version 7.1! ** ** ** Please see the README file in /usr/lpp/bos for information pertinent to ** this release of the AIX Operating System. ** ** ********************************************************************************Last login: Wed Apr 20 08:06:16 2011 on /dev/Global from 750_1_LPAR_5
# emgr -lThere is no efix data on this system.# cd /SW
Important: Certain iFixes might contain a root part modification. Applying the iFix in the global environment updates only the /usr part for the WPAR. At this time, the syncwpar and syncroot commands do not update a possible iFix root part modification. While a solution is being developed, check the iFix content and if it contains any root part modification, update that root part in the WPAR manually:
# uncompress iFix.epkg.Z# tar -x iFix.epkg# grep TARGET_FILE ecfile TARGET_FILE=/usr/lib/corrals/populate TARGET_FILE=/usr/sbin/mkcorral
In this example, the iFix contains only two /usr modifications. If you need assistance updating the root part in the WPAR, contact IBM Support.
Chapter 10. Software maintenance 255

# emgr -e restmig71.110412.epkg.Z+-----------------------------------------------------------------------------+Efix Manager Initialization+-----------------------------------------------------------------------------+Initializing log /var/adm/ras/emgr.log ...Efix package file is: /SW/restmig71.110412.epkg.ZMD5 generating command is /usr/bin/csumMD5 checksum is 3243835a6aa6f645ed8460c6bab373f8Accessing efix metadata ...Processing efix label "restmig71" ...Verifying efix control file ......Efix State+-----------------------------------------------------------------------------+Setting efix state to: STABLE
+-----------------------------------------------------------------------------+Operation Summary+-----------------------------------------------------------------------------+Log file is /var/adm/ras/emgr.log
EPKG NUMBER LABEL OPERATION RESULT=========== ============== ================= ==============1 restmig71 INSTALL SUCCESS
Return Status = SUCCESS# exit# uname -W0# emgr -lThere is no efix data on this system.
We see that the iFix is applied only to the detached WPAR and is not found in the global environment.
10.2.4 Removing an iFix from a detached WPAR
Detached WPARs have their own /usr where iFixes are installed. The syncwpar, inuwpar, and syncroot commands are not able to manage iFixes; therefore, you must remove an iFix from within the WPAR by using the emgr command. In Example 10-35, we see how to remove an iFix from a detached WPAR.
Example 10-35 Removing an iFix from a detached WPAR
# uname -W0# clogin detached_wpar******************************************************************************** ** ** Welcome to AIX Version 7.1! ** ** ** Please see the README file in /usr/lpp/bos for information pertinent to ** this release of the AIX Operating System. *
256 Exploiting IBM AIX Workload Partitions

* ** ********************************************************************************Last login: Wed Apr 20 08:50:29 2011 on /dev/Global from 750_1_LPAR_5
# emgr -l
ID STATE LABEL INSTALL TIME UPDATED BY ABSTRACT=== ===== ========== ================= ===============================1 S restmig71 04/20/11 08:51:23 Fix for restore 6.1 wpar on 7.1...# emgr -r -L restmig71+-----------------------------------------------------------------------------+Efix Manager Initialization+-----------------------------------------------------------------------------+Initializing log /var/adm/ras/emgr.log ...Accessing efix metadata ...Processing efix label "restmig71" ......+-----------------------------------------------------------------------------+Operation Summary+-----------------------------------------------------------------------------+Log file is /var/adm/ras/emgr.log
EFIX NUMBER LABEL OPERATION RESULT=========== ============== ================= ==============1 restmig71 REMOVE SUCCESS
Return Status = SUCCESS# emgr -lThere is no efix data on this system.
Chapter 10. Software maintenance 257

258 Exploiting IBM AIX Workload Partitions

Chapter 11. Backing up and restoring workload partitions
This chapter discusses backing up and restoring workload partitions (WPARs). We describe these topics:
� Backing up and restoring WPARs� Using mksysb � Backing up the WPAR using Tivoli Storage Manager
11
© Copyright IBM Corp. 2011. All rights reserved. 259

11.1 Backing up and restoring WPARs
The dedicated command for backing up a WPAR is the savewpar command. The savewpar is similar to the mksysb command, but for WPARs. Unlike the mksysb command, the savewpar images are not bootable.
The savewpar command finds and backs up all files belonging to a specified WPAR when the WPAR does not contain any volume group other than rootvg.
For WPARs that contain endpoint devices that are configured as back ends for volume groups, you use the savevg command for backup.
The types of backups that savewpar and savevg create can be stored by the Network Installation Management (NIM) server or saved in a tape, DVD, CD, or file that is stored in a safe place. Refer to Example 11-1.
Example 11-1 List of flags for savewpar command
Usage: savewpar [-X] [-V] [-i] [-m] [-e] [-b blocks] [-f device] [-p] [-v] [-N] [-a] [-A] [-Z] wparName
-X Expand /tmp if needed.-V Verify backup readability (tape only).-i Create the image.data file.-m Create the image.data file and physical partition maps.-e Exclude the files/directories listed in /etc/exclude.<WPARname>.-v List files as they are backed up.-p Do not pack files as they are backed up.-b blocks Number of 512-byte blocks to write in a single output operation.-f device Name of device to receive the backup information. Default is /dev/rmt0-B Do not backup files from writeable namefs mounts in the mount group.-N Backup files from writeable NFS mounts in the mount group.-a Do not backup extended attributes or NFS4 ACLs-A Back up DMAPI filesystem files.-Z Do not back up encrypted files.wparName Name of Workload Partition to backup.
The savewpar command runs from the command-line interface (CLI) or the SMIT interface. The fastpath is savewpar, as shown in Example 11-2.
Example 11-2 savewpar command from the CLI
root@750_1_LPAR_3:/usr/tivoli/tsm/server/bin> savewpar -i -f /work/itsowpar.sw itsowparCreating information file (/image.data) for itsowpar.Creating list of files to back upBacking up 2694 files2694 of 2694 files backed up (100%)0512-038 savewpar: Backup Completed Successfully.
The image.data file is created in the directory /tmp/wpardata/<name_of_wpar>. It includes the list of logical volumes, file systems and their sizes, list of volume groups, WPAR name, general information about a WPAR, and storage information about a WPAR. You use this file when you have to restore a WPAR on separate disks.
Another configuration file for a WPAR is the specification file. For additional details, refer to 12.10, “Using specification files for system WPAR” on page 292.
260 Exploiting IBM AIX Workload Partitions

If you restore a WPAR from the savewpar backup file in the same location and with the same configuration, the savewpar backup file is enough.
The image.data file, specification file, and the savewpar backup file are necessary files when you want to recreate, reconfigure, clone, or deploy a WPAR from a backup, but mostly when you want to make a change from the original WPAR configuration.
The restwpar command is used to restore a WPAR from the backup file, as shown in Example 11-3.
Example 11-3 restwpar command
Usage: restwpar [-a] [-A] [-b Blocks] [-B devexportsFile ] [-C] [-d directory] [-f Device] [-F] [-h hostName] [-i imagedataFileName] [-k] [-K postInstallationScript] [-M mkwparFlags] [-n WPARName] [-r] [-s] [-S {a|A|f|F|n}] [-U] [-v] [-w wparSpecificationFile]-a Automatically resolve erroneous/conflicting settings.-A Start automatically on system boot.-b Number of 512-byte blocks to read in a single input operation.-B Path to permitted device exports file.-C Continue installation if compatibility check fails.-d Base directory.-f Name of device to restore the information from. Default is /dev/rmt0.-F Force creation of workload partition if it already exists.-h Hostname.-i Path to alternate image.data file.-k Create logical volumes with minimum sizes from the backup.-K Post-installation customization script.-M Additional flags to pass to the mkwpar command.-n Workload partition name.-r Copy global network name resolution configuration.-s Start after creation.-S {a|A|f|F|n} Specifies type of synchronization to use to make software levels in workload partition compatible with the global environment: a Install additional software if required, but do not remove (default). A Install additional software if required, but do not remove. Do not fail installation if synchronization fails. f Full synchronization - install or remove software as required. F Full synchronization - install or remove software as required. Do not fail installation if synchronization fails. n Do not perform any software synchronization.-U Do not use any existing MAP files.-v Verbose mode.-w Path to alternate mkwpar input specification file.
Our goal is to restore the shared rootvg WPAR using the backup file. We remove the WPAR, the image.data file is extracted from the savewpar backup file, and we use the specification file.
When you use the restwpar command for detached rootvg WPARs, the image.data file and the specification file are necessary, especially on a new configuration or when you want to migrate or clone a WPAR.
We back up the WPAR named wparm91 in the directory /maid, saving the image.data file, as shown in Example 11-4 on page 262.
Chapter 11. Backing up and restoring workload partitions 261

Example 11-4 Savewpar for detached rootvg WPAR
root@750_2_LPAR_4:/> lswpar wparm91Name State Type Hostname Directory RootVG WPAR------------------------------------------------------------wparm91 A S wparm91 /wpars/wparm91 yes
root@750_2_LPAR_4:/> savewpar -i -f /maid/wparm91_sawe wparm91Bringing up WPAR's rootvg disks for backup. Please wait...Creating list of files to back up
Backing up 2901 files
2901 of 2901 files backed up (100%)0512-038 savewpar: Backup Completed Successfully.Reverting back to the previous state of WPAR...
We create a specification file for the WPAR wparm91. In our case, the WPAR was not removed, and we are able to extract a specification file from the WPAR. If you do not have a specification file, you can create a specification file from the template or pass all of the required parameters to the mkwpar command, as shown in Example 11-5.
Example 11-5 Creating the spec file for wparm91
mkwpar -e wparm91 -w -o /maid/wparm91_spec
First, we remove the WPAR, as shown in Example 11-6.
Example 11-6 Remove the WPAR
root@750_2_LPAR_4:/> rmwpar -F wparm91stopwpar: 0960-254 Workload partition 'wparm91' is not currently active.umount: Could not find anything to unmountumount: There are no 'type=wparm91' stanzasrmwpar: Removing file system /wpars/wparm91/usr.rmwpar: Removing file system /wpars/wparm91/opt.rmwpar: Removing file system /wpars/wparm91/etc/objrepos/wboot.rmlv: Logical volume fslv02 is removed.rmwpar: Removing file system /wpars/wparm91.rmlv: Logical volume fslv01 is removed.
Then, we restore the WPAR using the backup, image.data, and the specification files, as shown in Example 11-7.
Example 11-7 Restore shared rootvg WPAR
root@750_2_LPAR_4:/maid> restwpar -f /maid/wparm91_sawe -w /maid/wparm91_specNew volume on /maid/wparm91_sawe: Cluster 51200 bytes (100 blocks). Volume number 1 Date of backup: Wed Apr 20 13:46:21 2011 Files backed up by name User rootx 2534 ./.savewpar_dir/wpar.specx 5614 ./.savewpar_dir/image.datax 148119 ./.savewpar_dir/backup.data total size: 156267
262 Exploiting IBM AIX Workload Partitions

In the next steps, we delete everything that belongs to WPAR wparm91, including the physical volume ID (PVID) that was used for rootvg. Refer to Example 11-8.
Example 11-8 Finding which disks are used in WPAR wparm91
root@750_2_LPAR_4:/> lswpar -Da devname wparm91 |grep hdiskhdisk0hdisk7
We verify the storage area network (SAN) configuration for the WPAR-assigned disks. Because the corresponding hdisks are in the defined state while the WPAR is active, we run the cfgmgr or mkdev -l command for those hdisks, as shown in Example 11-9.
Example 11-9 Storage configuration for detached WPAR
root@750_2_LPAR_4:/> mpio_get_config -Av|egrep 'hdisk7|hdisk0' hdisk0 20 A (preferred) LUN36 hdisk7 11 B (preferred) LUN22........root@750_2_LPAR_4:/>mkdev -l hdisk0root@750_2_LPAR_4:/>mkdev -l hdisk7root@750_2_LPAR_4:/> lspv |egrep 'hdisk7|hdisk0'hdisk7 00f660786b4af6b4 Nonehdisk0 00f660786bbf48f6 None
We erase the associated directory /tmp/wpardata/wparm91 along with all the files in it and remove wparm91. Therefore, none of the old data can affect how the WPAR will be created next time. We have only the savewpar file and the disks with the PVID and the same attributes for the hdisk device ID.
In next steps, we assume that we use separate disks from the storage to restore a backup file.
We erase everything that belongs to the WPAR, and we use new hdisks that are already assigned to our logical partition (LPAR) system. Our goal is to recreate the WPAR from the backup file, on the same LPAR with separate disks.
First, through the logical unit number (LUN) masking authorization process, we deallocate the configured hdisks of the WPAR storage system. Thus, these hdisks are not seen in the global environment (LPAR).
When you try to restore a savewpar backup file, but the hdisk that is specified in the image.data file and the specification file is missing in your global environment, you get the following message, as shown in Example 11-10.
Example 11-10 restwpar command on separate storage
root@750_2_LPAR_4:/maid> restwpar -f /maid/wparm91_sawe -n wparm91New volume on /maid/wparm91_sawe: Cluster 51200 bytes (100 blocks). Volume number 1 Date of backup: Wed Apr 20 13:46:21 2011 Files backed up by name User rootx 2534 ./.savewpar_dir/wpar.specx 5614 ./.savewpar_dir/image.datax 148119 ./.savewpar_dir/backup.data total size: 156267 files restored: 3
Chapter 11. Backing up and restoring workload partitions 263

**********************************************************************Warningmkwpar: 0960-588 The name for device with ID, 3E213600A0B8000291B08000007BD06AAF1B20F1815 FAStT03IBMfcp, is missing.
**********************************************************************Creating workload partition's rootvg. Please wait...mkwpar: Creating file systems... /ATTENTION: Logical volume 'hd4' is not unique. Renaming to 'wlv0'.Creating logical volume 'wlv0' specified in image.data0516-306 lquerypv: Unable to find physical volume hdisk0 in the Device Configuration Database.0516-822 mklv: Unable to create logical volume.bosinst_mkobject: failed command: /usr/sbin/mklv -o n -L / -u 32 -r y -b y -d p -v n -s y -w a -a m -e m -c 1 -x 512 -t jfs2 -y wlv0 vg00 2 hdisk0wparidata: Error processing image.dataumount: Could not find anything to unmountumount: There are no 'type=wparm91' stanzasrestwpar: 0960-514 /usr/sbin/mkwpar exited with return code 1.
We can use the restwpar command to restore a backup file on specific endpoint devices if we have the image.data file and specification file. The image.data file can be extracted from the backup file using the restore command, as shown in Example 11-11.
Example 11-11 extract image.data from backup file
root@750_2_LPAR_4:/maid> restore -Tvqf wparm91_sawe|grep image.dataNew volume on wparm91_sawe: Cluster 51200 bytes (100 blocks). Volume number 1 Date of backup: Wed Apr 20 13:46:21 2011 Files backed up by name User root 5614 ./.savewpar_dir/image.data 5740 ./.savewpar_dir.9175236/image.data files archived: 2901
We modify the image.data file with the corresponding hdisks. You can use the specification file that was already created for the WPAR, or you can use the specification template file to create the new file with the corresponding hdisk device ID attributes.
The restwpar command is used with -i and -w flags, as shown in Table 11-1.
Table 11-1 The restwpar flags
Flag Description
-i The file is used as the image.data file instead of the file that is contained within the backup image that is being restored.
-w The file is used as the WPAR specification file rather than the version in the WPAR backup image created by the mkwpar command.
264 Exploiting IBM AIX Workload Partitions

We explain using the specification file in detail and the image.data file for restoring WPARs using NIM in Chapter 12, “Managing your system workload partition with Network Installation Manager” on page 283.
If you want to create or restore a WPAR from the savewpar backup file with another disk configuration or without modifying the image.data file or the specification file, use the mkwpar command instead of the restwpar command.
For the mkwpar command, you have to use the -B flag and the savewpar backup file as input, as shown in Example 11-12.
Example 11-12 Creating the WPAR using the savewpar backup file as input for mkwpar
root@750_2_LPAR_4:/etc/wpars> mkwpar -n wparm91 -B /maid/wparm91_sawe -O -D devname=hdisk0 rootvg=yes -D devname=hdisk7Creating workload partition's rootvg. Please wait...mkwpar: Creating file systems... / /admin /home /opt /proc /tmp /usr /varMounting all workload partition file systems.luster 51200 bytes (100 blocks). Volume number 1 Date of backup: Sat Apr 2 21:06:17 2011 Files backed up by name User rootx 13 ./.savewpar_dir/image.infox 136 ./.savewpar_dir/vgdata.filesx 5473 ./.savewpar_dir/filesystems.............................wio.common 7.1.0.0 ROOT APPLY SUCCESSFinished populating scratch file systems.Workload partition wparm99 created successfully.mkwpar: 0960-390 To start the workload partition, execute the following as root: startwpar [-v] wparm91
Using the -B flag: The mkwpar -B flag specifies a device containing a WPAR backup image. This image is used to populate the WPAR file systems. The wparBackupDevice parameter is a WPAR image that is created with the savewpar, mkcd, or mkdvd command:
-B wparbackupdevice
The -B flag is used by the restwpar command as part of the process of creating a WPAR from a backup image.
Chapter 11. Backing up and restoring workload partitions 265

11.1.1 Restoring a lower level detached WPAR
In the following scenario, we use the savewpar and restwpar commands to back up and restore a detached system WPAR. At the time the backup is taken, both the global environment and the WPAR are running at the same AIX technology level and service pack level. We then install a later service pack in the global environment, and we attempt to restore the lower level WPAR image back to the same global environment.
First, the savewpar command is run to back up the detached WPAR (wpar2_detached), as shown in Example 11-13.
Example 11-13 Backing up a detached WPAR with savewpar
# savewpar -ivf /export/wpar2_detached.savewpar wpar2_detached
Creating information file for workload partition wpar2_detached.
Creating list of files to back up.
....a 2080740 ./sbin/helpers/jfs2/logredoa 2256290 ./sbin/helpers/jfs2/logredo64a 31544 ./sbin/helpers/jfs2/lsfsa 118298 ./sbin/helpers/jfs2/mkfsa 92680 ./sbin/helpers/jfs2/mounta 66970 ./sbin/helpers/jfs2/nchecka 86622 ./sbin/helpers/jfs2/quotachecka 117180 ./sbin/helpers/jfs2/rdumpa 117144 ./sbin/helpers/jfs2/restbyinodea 188634 ./sbin/helpers/jfs2/rollbacka 118804 ./sbin/helpers/jfs2/rrestorea 86922 ./sbin/helpers/jfs2/snapshota 33500 ./sbin/helpers/jfs2/statfs64a 24 ./sbin/helpers/jfs2/umounta 43928 ./sbin/helpers/nfsmnthelpa 4552 ./sbin/helpers/pmemfsmnthelpa 13856 ./sbin/helpers/stnfsmnthelpa 6868 ./sbin/helpers/udfmnthelpa 164328 ./sbin/helpers/v3fshelpera 33601 ./sbin/rc.boota 0 ./tftpboota 0 ./tmpa 5 ./ua 21 ./unixa 0 ./usra 0 ./vara 0 ./wparsa 1 ./wpars/wpar2_detacheda 0 ./procThe total size is 4671369417 bytes.Backup finished on Sun Apr 10 05:39:09 CDT 2011; there are 6600800 blocks on 1 volumes.
0512-038 savewpar: Backup Completed Successfully.
# ls -ltr /export/total 6600808drwxr-xr-x 2 root system 256 Apr 10 05:33 lost+found-rw-r--r-- 1 root system 3379609600 Apr 10 05:39 wpar2_detached.savewpar
266 Exploiting IBM AIX Workload Partitions

A backup image of the WPAR is now available in the /export file system in the global environment.
Since taking the image of the WPAR, the global environment has been updated to a later AIX service pack level. Service Pack 4 for AIX 6.1 TL6 was installed in the global environment.
Now, we recover the saved image of the WPAR. The image was saved with a lower level of AIX service pack, AIX 6.1 TL6 SP3.
If you want to recover this lower level image into the later level global environment, you need to use the restwpar command with the -C flag. If we attempt to recover the WPAR without this flag, you receive the error message that is shown in Example 11-14.
Example 11-14 restwpar compatibility check error message
# restwpar -f /export/wpar2_detached.savewpar -n wpar3_detachedNew volume on /export/wpar2_detached.savewpar:Cluster size is 51200 bytes (100 blocks).The volume number is 1.The backup date is: Sun Apr 10 05:35:50 CDT 2011Files are backed up by name.The user is root.x 2818 ./.savewpar_dir/wpar.specx 6617 ./.savewpar_dir/image.x 519779 ./.savewpar_dir/backup.dataThe total size is 529214 bytes.The number of restored files is 3.restwpar: 0960-507 Level 6.1.6.3 of bos.rte.libc in saved image does not match level 6.1.6.4 on the running system.restwpar: 0960-508 Compatibility check between saved and running system failed. Use the -C option to ignore system compatibility levels.
The -C flag allows us to restore the lower level image and ignore the system compatibility checks that were performed by the restwpar command. Table 11-2 shows a full description of the -C flag.
Table 11-2 restwpar -C flag description
The WPAR is now recovered from the backup image and restored to a new WPAR with a separate name (wpar3_detached).
Prior tor restoring the WPAR, we first create a WPAR specification file using the -e, -w, and -o flags to the mkwpar command. This process produces a text file containing the current configuration of wpar2_detached, as shown in Example 11-15. All occurrences of wpar2 are changed to wpar3 using the vi editor.
A new specification file, wpar3_spec, is now ready to be used to create a new WPAR.
Example 11-15 Create a specification file based on an existing WPAR
# mkwpar -e wpar2_detached -w -o /tmp/cg/wpar2_spec# cd /tmp/cg# cp -p wpar2_spec wpar3_spec
Flag Description
-C Forces the creation of the named WPAR, even when a compatibility check fails between the system from the backup image and the system where the backup is being restored.
Chapter 11. Backing up and restoring workload partitions 267

# vi wpar3_specgeneral: name = "wpar3_detached" hostname = "wpar3_detached" checkpointable = "no" directory = "/wpars/wpar3_detached" privateusr = "yes" devices = "/etc/wpars/devexports" auto = "no" rootvgwpar = "no" preserve = "no" routing = "no"
device: devname = "/dev/xti/unixdg" devtype = "3"...etc...:%s/wpar2/wpar3/g
Table 11-3 shows a description of each of the flags used in Example 11-15 on page 267.
Table 11-3 mkwpar flags for the creation of the specification file
We can now issue the restwpar command to recover the WPAR using the lower level image and the custom specification file. Before starting the restore process, we run the lswpar command to confirm the state of the existing WPAR. The WPAR, wpar2_detached, is active, as shown in Example 11-16.
Example 11-16 Restoring the WPAR to a new WPAR
# lswparName State Type Hostname Directory RootVG WPAR-------------------------------------------------------------------------------wpar2_detached A S wpar2_detached /wpars/wpar2_detached no
The restwpar command is run to start the restore, as shown in Example 11-17 on page 269.
The -C flag is used to ignore compatibility checks, the -v flag lists the files that were restored, the -f flag specifies the name of the device from which the image is being restored, and the -w flag indicates the specification file to use during the WPAR creation.
Flag Description
-e existingwparname Specifies a directory, which contains additional filesets to install when a compatibility WPAR is created. If you do not specify a directory name, /usr/sys/inst.images is used.
-w Writes the specification file only. When used with the -o flag, the -w flag causes the mkwpar command to quit after writing the new specification file, without actually creating the WPAR.
-o outfile Indicates an output path and filename to which to write specification data. This specification file can then be used to create a WPAR at a later time using the -f flag.
268 Exploiting IBM AIX Workload Partitions

Because we are restoring the image into the same global environment on which wpar2_detached resides, the mkwpar command renames the new logical volumes from their original names to new names to avoid conflicts.
Example 11-17 restwpar restoring lower level backup image with spec file
# restwpar -w /tmp/cg/wpar3_spec -Cvf /export/wpar2_detached.savewpar -n wpar3_detachedNew volume on /export/wpar2_detached.savewpar:Cluster size is 51200 bytes (100 blocks).The volume number is 1.The backup date is: Sun Apr 10 05:35:50 CDT 2011Files are backed up by name.The user is root.x 2818 ./.savewpar_dir/wpar.specx 6617 ./.savewpar_dir/image.datax 519779 ./.savewpar_dir/backup.dataThe total size is 529214 bytes.The number of restored files is 3.restwpar: 0960-507 Level 6.1.6.3 of bos.rte.libc in saved image does not match level 6.1.6.4 on the running system.
mkwpar: Creating file systems... /ATTENTION: Logical volume 'fslv00' is not unique. Renaming to 'wlv0'.Creating logical volume 'wlv0' specified in image.dataCreating file system '/' specified in image.data /homeATTENTION: Logical volume 'fslv01' is not unique. Renaming to 'wlv1'.Creating logical volume 'wlv1' specified in image.dataCreating file system '/home' specified in image.data /optATTENTION: Logical volume 'fslv02' is not unique. Renaming to 'wlv2'.Creating logical volume 'wlv2' specified in image.dataCreating file system '/opt' specified in image.data /proc /tmpATTENTION: Logical volume 'fslv03' is not unique. Renaming to 'wlv3'.Creating logical volume 'wlv3' specified in image.dataCreating file system '/tmp' specified in image.data /usrATTENTION: Logical volume 'fslv04' is not unique. Renaming to 'wlv4'....etc...x 33601 ./sbin/rc.bootx 0 ./tftpbootx 0 ./tmpx 5 ./ux 21 ./unixx 0 ./usrx 0 ./varx 0 ./wparsx 1 ./wpars/wpar2_detachedx 0 ./procThe total size is 4671369417 bytes.The number of restored files is 121462.syncroot: Processing root part installation status.syncroot: Installp root packages are currently synchronized.syncroot: RPM root packages are currently synchronized.syncroot: Root part is currently synchronized.syncroot: Returns Status = SUCCESSWorkload partition wpar3_detached created successfully.
Chapter 11. Backing up and restoring workload partitions 269

mkwpar: 0960-390 To start the workload partition, execute the following as root: startwpar [-v] wpar3_detached
The WPAR image has been restored to the new WPAR named wpar3_detached. We confirm this WPAR image by running the lswpar command to list the WPARs on the system. Our new WPAR is currently deactivated (as shown in Example 11-18).
Example 11-18 Listing the WPARs in the system
# lswparName State Type Hostname Directory RootVG WPAR--------------------------------------------------------------------------------wpar2_detached A S wpar2_detached /wpars/wpar2_detached nowpar3_detached D S wpar3_detached /wpars/wpar3_detached no
# startwpar -v wpar3_detachedStarting workload partition wpar3_detached.Mounting all workload partition file systems.Mounting /wpars/wpar3_detachedMounting /wpars/wpar3_detached/homeMounting /wpars/wpar3_detached/optMounting /wpars/wpar3_detached/procMounting /wpars/wpar3_detached/tmpMounting /wpars/wpar3_detached/usrMounting /wpars/wpar3_detached/varLoading workload partition.Exporting workload partition devices.Starting workload partition subsystem cor_wpar3_detached.0513-059 The cor_wpar3_detached Subsystem has been started. Subsystem PID is 2490702.Verifying workload partition startup.Return Status = SUCCESS.
At this stage, our new detached WPAR is still running the lower level of the AIX service pack compared to the global environment, as shown in Example 11-19.
The next step is to update both detached WPARs to same level as the global environment. Refer to the 10.1, “AIX updates and WPARs” on page 226 for details about how to perform this activity.
Example 11-19 Differing os levels in the global environment and the detached WPAR
# uname -W ; oslevel06100-06-04-1112
# clogin wpar3_detached# oslevel -s6100-06-03-1048
11.2 Using mksysb
You can use the mksysb command to back up a system, including any WPARs whose file systems are all defined from the global environment’s root volume group.
With the -N flag, the mksysb command backs up the file systems that belong to a WPAR in the defined state.
270 Exploiting IBM AIX Workload Partitions

Table 11-4 mksysb -N flag
In AIX 7.1, directly attached devices are used inside of WPARs. Using other volume groups than rootvg for a shared or non-shared system rootvg WPAR implies backing up and restoring these volume groups.
The mksysb command cannot be used to back up a rootvg WPAR or a Network File System (NFS)-based WPAR. For these cases, use savewpar and savevg, as described in earlier sections.
Back up other volume groups that were created and managed inside WPAR by using the savevg command or other backup methods.
Instead of the mksysb command, which is performed at the Global level, the WPAR uses the savewpar command.
11.3 Backing up the WPAR using Tivoli Storage Manager
Another option to back up and restore WPAR files and folders is to use dedicated software for the backup.
Beginning with AIX V7.1, the Tivoli Storage Manager server, Tivoli Storage Manager backup archive client, and the Tivoli Storage Manager storage agents can run in detached (non-shared /usr) WPARs with full tape and library access.
If you want to back up a shared WPAR, because each WPAR has its own security domain and only the user root from global environment has full access to all WPAR data, you use Tivoli Storage Manager clients from the global environment. Backing up and restoring shared WPARs is similar to backing up and restoring data for a common node client. Refer to the following document at this website:
http://publib.boulder.ibm.com/infocenter/tsminfo/v6/index.jsp?topic=/com.ibm.itsm.client.doc/c_bac_aixwpar.html
Tivoli Storage Manager servers and storage agents can run in detached (non-shared /usr) WPARs.
The support information and considerations regarding the Tivoli Storage Manager products running inside of a WPAR are listed at following website:
https://www-304.ibm.com/support/docview.wss?uid=swg21239546#IBM%20Workload%20Partitions%20for%20AIX%20(
The Tivoli Storage Manager backup archive client runs inside the WPAR, as shown in Example 11-20 on page 272.
Flag Description
- N Includes the file systems that belong to a WPAR in the defined state in the system backup.Important: To be included in the backup, all file systems that belong to a WPAR in the defined state need to be in the rootvg volume group.
Chapter 11. Backing up and restoring workload partitions 271

Example 11-20 Tivoli Storage Manager backup archive client running inside the WPAR
root@wparm125:/> uname -W1root@wparm125:/> dsmcIBM Tivoli Storage ManagerCommand Line Backup-Archive Client Interface Client Version 6, Release 2, Level 2.0 Client date/time: 04/27/11 14:19:45(c) Copyright by IBM Corporation and other(s) 1990, 2010. All Rights Reserved.
Node Name: WPARM125Session established with server WPAR1_LPAR3: AIX Server Version 6, Release 2, Level 2.2 Server date/time: 04/27/11 14:19:42 Last access: 04/27/11 13:55:06
tsm> q mgmtDomain Name : ITSODOMActivated Policy Set Name : STANDARDActivation date/time : 04/26/11 14:01:45Default Mgmt Class Name : STANDARDGrace Period Backup Retn. : 30 day(s)Grace Period Archive Retn.: 365 day(s)
MgmtClass Name : STANDARDDescription : Installed default management class.
We perform a standard Tivoli Storage Manager backup and restore process using the Tivoli Storage Manager backup archive client, as shown in Example 11-21.
Example 11-21 Using Tivoli Storage Manager backup archive client inside the WPAR
root@wparm91:/usr/tivoli/tsm/client/ba/bin> dsmc sel -subdir=yes /u01/app/oraInventory/Command Line Backup-Archive Client Interface Client Version 6, Release 2, Level 2.0(c) Copyright by IBM Corporation and other(s) 1990, 2010. All Rights Reserved.Node Name: WPARM90Session established with server WPAR1_LPAR3: AIX Server Version 6, Release 2, Level 2.2Server date/time: 04/19/11 16:29:44 Last access: 04/19/11 16:29:34
Directory--> 4,096 /u01/app/oraInventory [Sent]Directory--> 256 /u01/app/oraInventory/ContentsXML [Sent]Directory--> 256 /u01/app/oraInventory/logs [Sent]Directory--> 256 /u01/app/oraInventory/oui [Sent]Normal File--> 38 /u01/app/oraInventory/install.platform [Sent]Normal File--> 56 /u01/app/oraInventory/oraInst.loc [Sent]Normal File--> 293 /u01/app/oraInventory/oraInstaller.properties [Sent]Normal File--> 1,623 /u01/app/oraInventory/orainstRoot.sh [Sent]Normal File--> 307 /u01/app/oraInventory/ContentsXML/comps.xml [Sent]Normal File--> 415 /u01/app/oraInventory/ContentsXML/inventory.xml [Sent]Normal File--> 270 /u01/app/oraInventory/ContentsXML/libs.xml [Sent]Normal File--> 3,709,296 /u01/app/oraInventory/logs/installActions2011-04-07_10-58-57AM.log [Sent]Normal File--> 3,159 /u01/app/oraInventory/logs/oraInstall2011-04-07_10-58-57AM.err [Sent]
272 Exploiting IBM AIX Workload Partitions

Normal File--> 117 /u01/app/oraInventory/logs/oraInstall2011-04-07_10-58-57AM.out [Sent]Normal File--> 326 /u01/app/oraInventory/oui/srcs.lst [Sent]Selective Backup processing of '/u01/app/oraInventory/*' finished without failure.
Total number of objects inspected: 15Total number of objects backed up: 15Total number of objects updated: 0Total number of objects rebound: 0Total number of objects deleted: 0Total number of objects expired: 0Total number of objects failed: 0Total number of bytes transferred: 3.54 MBData transfer time: 0.04 secNetwork data transfer rate: 85,801.47 KB/secAggregate data transfer rate: 3,431.64 KB/secObjects compressed by: 0%Elapsed processing time: 00:00:01root@wparm90:/usr/tivoli/tsm/client/ba/bin> rm -f /u01/app/oraInventory/logs/oraInstall2011-04-07_10-58-57AM.errroot@wparm90:/usr/tivoli/tsm/client/ba/bin> dsmc restore /u01/app/oraInventory/logs/oraInstall2011-04-07_10-58-57AM.errIBM Tivoli Storage ManagerIBM Tivoli Storage ManagerCommand Line Backup-Archive Client Interface Client Version 6, Release 2, Level 2.0 Client date/time: 04/19/11 16:30:49(c) Copyright by IBM Corporation and other(s) 1990, 2010. All Rights Reserved.
Node Name: WPARM90Session established with server WPAR1_LPAR3: AIX Server Version 6, Release 2, Level 2.2Server date/time: 04/19/11 16:30:18 Last access: 04/19/11 16:29:44
Restore function invoked.
Restoring 3,159 /u01/app/oraInventory/logs/oraInstall2011-04-07_10-58-57AM.err [Done]Restore processing finished.Total number of objects restored: 1Total number of objects failed: 0Total number of bytes transferred: 3.11 KBData transfer time: 0.00 secNetwork data transfer rate: 76,005.14 KB/secAggregate data transfer rate: 0.99 KB/secElapsed processing time: 00:00:03root@wparm90:/usr/tivoli/tsm/client/ba/bin> uname -W
The storage agents’ installation is supported inside of the WPAR for Tivoli Storage Manager versions 6.1 and 6.2. You must have the following prerequisites to install Tivoli Storage Manager server and Tivoli Storage Manager storage agents on the WPAR environment:
� At a minimum, AIX V7.1 SP 1 (7100-00-01-1037) is required.
� The WPAR must be a detached-system WPAR.
� The Fibre Channel (FC) adapter can be either a dedicated adapter or a virtual N Port ID Virtualization (NPIV) adapter.
Chapter 11. Backing up and restoring workload partitions 273

� The FC adapter must be assigned to the WPAR. Do not assign individual tape or library devices to the WPAR.
� When installing either the Atape driver or Tivoli Storage Manager device driver, you must install the same driver in both the global environment and the WPAR, even if you are not using any devices in the global environment. A failure to install the same driver makes the devices appear as defined devices in the WPAR instead of as available devices.
The installation prerequisites for Tivoli Storage Manager server and Tivoli Storage Manager storage agents in the WPAR environment are listed in the following IBM document, reference number 1461901:
http://www-01.ibm.com/support/docview.wss?uid=swg21461901
Using device driversThis section provides details about how to deploy device drivers.
With the Atape driver, follow these steps:
1. Install the Atape driver in the global environment.
2. Install the same Atape driver in the WPAR.
3. Reboot the global environment.
With the Tivoli Storage Manager device driver, follow these steps:
1. Install the following Tivoli Storage Manager components in the WPAR:
– The server or storage agent
– The Tivoli Storage Manager device driver
– Optional: The messages
2. Install only the Tivoli Storage Manager device driver into the global environment.
3. Reboot the global environment.
You have to download and run the cfgwpardd script to make Tivoli Storage Manager devices available. See the following link:
http://www-01.ibm.com/support/docview.wss?uid=swg21461901&aid=1
We configure the Tivoli Storage Manager instance inside the WPAR (Figure 11-1 on page 275).
274 Exploiting IBM AIX Workload Partitions

Figure 11-1 TSM server installation inside of the WPAR
We use the configuration wizard, as shown in Figure 11-2.
Figure 11-2 Configuring the Tivoli Storage Manager instance inside of the WPAR
Example 11-22 on page 276 shows the Tivoli Storage Manager software packages installed in the WPAR.
Chapter 11. Backing up and restoring workload partitions 275

Example 11-22 Tivoli Storage Manager packages installed inside of the detached WPAR
Fileset Level State Description ----------------------------------------------------------------------------Path: /usr/lib/objrepos tivoli.tivguid 1.3.3.1 COMMITTED IBM Tivoli GUID on AIX tivoli.tsm.StorageAgent 6.2.2.2 COMMITTED TSM Storage Agent tivoli.tsm.client.api.32bit 6.2.2.0 COMMITTED TSM Client - Application Programming Interface tivoli.tsm.client.api.64bit 6.2.2.0 COMMITTED TSM Client - 64bit Application Programming Interface tivoli.tsm.client.ba.64bit.base 6.2.2.0 COMMITTED TSM Client 64 - Backup/Archive Base Files tivoli.tsm.client.ba.64bit.common 6.2.2.0 COMMITTED TSM Client 64 - Backup/Archive Common Files tivoli.tsm.client.ba.64bit.image 6.2.2.0 COMMITTED TSM Client 64 - IMAGE Backup Client tivoli.tsm.client.ba.64bit.web 6.2.2.0 COMMITTED TSM Client 64 - Backup/Archive Java GUI & WEB Client tivoli.tsm.devices.acsls 6.2.2.2 COMMITTED TSM ACSLS Support tivoli.tsm.devices.msg.en_US 6.2.2.2 COMMITTED TSM Device Driver Messages, locale en_US tivoli.tsm.devices.rte 6.2.2.2 COMMITTED TSM Device Driver tivoli.tsm.server 6.2.2.2 COMMITTED TSM Server tivoli.tsm.server.msg.en_US 6.2.2.2 COMMITTED TSM Server Messages, locale en_US
Path: /etc/objrepos tivoli.tivguid 1.3.3.1 COMMITTED IBM Tivoli GUID on AIX tivoli.tsm.devices.acsls 6.2.2.2 COMMITTED TSM ACSLS Support tivoli.tsm.devices.rte 6.2.2.2 COMMITTED TSM Device Driver tivoli.tsm.server 6.2.2.2 COMMITTED TSM Server
In the next step, we configure a Tivoli Storage Manager device class based on library TS3210, allocating an FC adapter from the Virtual I/O Server (VIOS).
Because our WPAR is checkpointable, we remove this capability (the WPAR is in the defined state). Example 11-23 shows multiple outputs with an FC adapter inside of the WPAR.
Example 11-23 Assigning a tape drive
chwpar -K -c wparm90root@750_2_LPAR_4:/> lswpar wparm90Name State Type Hostname Directory RootVG WPAR------------------------------------------------------------wparm90 D S wparm90 /wpars/wparm90 yes
We remove assigned rootvg hdisk:
Important: It is not possible to use Live Application Mobility with a WPAR that has an allocated FC adapter.
276 Exploiting IBM AIX Workload Partitions

root@750_2_LPAR_4:/> lswpar -Da devname wparm90 |grep hdisk6hdisk6
root@750_2_LPAR_4:/> chwpar -K -D devname=hdisk6 wparm90root@750_2_LPAR_4:/> chwpar -D devname=hdisk6 rootvg=yes -D devname=fcs2 wparm90
chwpar -D devname=fcs2 wparm90chwpar: 0960-688 Cannot add adapter(s) to a WPAR that has only endpoint device(s ).
root@750_2_LPAR_4:/> lswpar -G wparm90=================================================================wparm90 - Defined=================================================================Type: SRootVG WPAR: yesOwner: rootHostname: wparm90WPAR-Specific Routing: noDirectory: /wpars/wparm90Start/Stop Script:Auto Start: noPrivate /usr: yesCheckpointable: noApplication:
OStype: 0
Before adding a dedicated FC adapter for a tape library, you have to install the Atape driver inside of the WPAR first, as shown in Example 11-24.
Example 11-24 Install Atape driver without allocating the tape library to the WPAR
Installation Summary--------------------Name Level Part Event Result-------------------------------------------------------------------------------Atape.driver 12.2.4.0 USR APPLY SUCCESS
We stop the WPAR in order to allocate the FC adapter. With the chwpar command, we allocate the corresponding hdisk for rootvg and the FC adapter for the tape drive in the same command. If you have many devices, allocate all the devices in the same chwpar command.
We stop the WPAR before adding the corresponding FC adapter, as shown in Example 11-25.
Example 11-25 Adding an FC adapter to a WPAR
root@750_2_LPAR_4:/>chwpar -K -D devname=hdisk6 rootvg=yes wparm90root@750_2_LPAR_4:/>chwpar -D devname=hdisk6 rootvg=yes -D devname=fcs2 wparm90root@750_2_LPAR_4:/> startwpar wparm90Starting workload partition 'wparm90'.Mounting all workload partition file systems.Loading workload partition.Exporting workload partition devices.sfwcomm2 Definedrmt0 Definedfscsi2 Definedline = 0
Chapter 11. Backing up and restoring workload partitions 277

hdisk6 DefinedExporting workload partition kernel extensions.Starting workload partition subsystem 'cor_wparm90'.0513-059 The cor_wparm90 Subsystem has been started. Subsystem PID is 8716422.Verifying workload partition startup.
We start the WPAR, and we verify the tape drive and the tape medium changer configuration inside of the WPAR, as shown in Example 11-26.
Example 11-26 The rmt and smc devices inside of the WPAR
root@wparm90:/> lsdev -Cc tapermt0 Available 46-T1-01 IBM 3580 Ultrium Tape Drive (FCP)smc0 Available 46-T1-01 IBM 3573 Tape Medium Changer (FCP)
root@wparm90:/> lsattr -El rmt0alt_pathing no Enable Alternate Pathing Support Trueautoload no Use Autoloading Feature at End-of-Tape Trueblock_size 0 Block Size (0=Variable Length) Truecompress yes Use Hardware Compression on Tape Truedebug_trace no Debug Trace Logging Enabled Truedev_status N/A Falsedevtype ULT3580- Device Type Falsehh_refresh no Half height refresh Drive Falselocation Location Truelogging no Activate volume information logging Truelun_id 0x0 Logical Unit Number Truemax_log_size 500 Maximum size of log file (in # of entries) Truenew_name New Logical Name Truenode_name 0x2007000e1110e588 World Wide Node Name Falseprimary_device rmt0 Primary Logical Device Falsereserve_key Persistent Reservation Key Truereserve_type reserve_6 Reservation Type Trueretain_reserve no Retain Reservation Truerew_immediate no Use Immediate Bit in Rewind Commands Truescsi_id 0x106e0 SCSI Target ID Truespace_mode SCSI Backward Space/Forward Space Record Mode Truesys_encryption no Use System Encryption FCP Proxy Manager Truetrace_logging yes Trace Logging Enabled Truetrailer_labels no Trailer Label Processing Truewrt_encryption custom System Encryption for Write Commands at BOP Trueww_name 0x2008000e1110e588 World Wide Port Name Falseroot@wparm90:/> lsattr -El smc0alt_pathing no Enable Alternate Pathing Support Truedebug_trace no Debug Trace Logging Enabled Truedev_status N/A Falsedevtype 3573-TL Device Type Falselocation Location Truelun_id 0x1000000000000 Logical Unit Number Truenew_name New Logical Name Truenode_name 0x2007000e1110e588 World Wide Node Name Falseprimary_device smc0 Primary Logical Device Falsereserve_support yes Use Reserve/Release on Open and Close Trueretain_reserve no Retain Reservation Truescsi_id 0x106e0 SCSI Target ID Truetrace_logging yes Trace Logging Enabled Truetsm_barcode_len 6 Default TSM Barcode Length for Ultrium 1/2 Media Trueww_name 0x2008000e1110e588 World Wide Port Name False
278 Exploiting IBM AIX Workload Partitions

We configure a library and a device class associated with rmt0 in the Tivoli Storage Manager server (Example 11-27). The IBM Redbooks publication Tivoli Storage Manager Implementation Guide, SG245416, provides detailed steps:
http://www.redbooks.ibm.com/redbooks/pdfs/sg245416.pdf
Example 11-27 Defining the Tivoli Storage Manager library and drive inside of the WPAR
tsm: WPAR1_LPAR3>q libr f=d
Library Name: 3573LIB Library Type: SCSI ACS Id: Private Category: Scratch Category: WORM Scratch Category: External Manager: Shared: Yes LanFree: ObeyMountRetention: Primary Library Manager: WWN: 2007000E1110E588 Serial Number: 00L4U78C9235_LL0 AutoLabel: Yes Reset Drives: Yes Relabel Scratch:Last Update by (administrator): TSMINST1 Last Update Date/Time: 04/26/11 13:45:05
tsm: WPAR1_LPAR3>q drive f=d
Library Name: 3573LIB Drive Name: DRV00 Device Type: LTO On-Line: Yes Read Formats: ULTRIUM4C,ULTRIUM4,ULTRIUM3C,ULTRIUM3,ULTRIUM2C,ULTRIUM2 Write Formats: ULTRIUM4C,ULTRIUM4,ULTRIUM3C,ULTRIUM3 Element: 257 Drive State: UNKNOWN Volume Name: Allocated to: WWN: 2007000E1110E588 Serial Number: 1310025521 Last Update by (administrator): TSMINST1 Last Update Date/Time: 04/26/11 13:49:07Cleaning Frequency (Gigabytes/ASNEEDED/NONE): NONE
tsm: WPAR1_LPAR3>q path * *Session established with server WPAR1_LPAR3: AIX Server Version 6, Release 2, Level 2.2 Server date/time: 04/27/11 11:46:19 Last access: 04/27/11 11:13:26
Source Name Source Type Destination Destination On-Line Name Type----------- ----------- ----------- ----------- -------WPAR1_LPAR3 SERVER 3573LIB LIBRARY YesWPAR1_LPAR3 SERVER DRV00 DRIVE YesWPARM125_S- SERVER DRV00 DRIVE Yes TA
Chapter 11. Backing up and restoring workload partitions 279

The tape drive driver installation on WPAR assumes the following considerations:
� The WPAR is started without FC adapters.
� The required drivers for the tape drives are installed first in the global environment and then inside of the WPAR.
� The WPAR is stopped, and the FC adapters are assigned accordingly. Refer to Example 11-25 on page 277.
We already have installed the Tivoli Storage Manager storage agent and the backup archive client inside of the detached rootvg WPAR named wparm125. We test backing up several files using the Tivoli Storage Manager local area network (LAN)-free data movement, as shown in Example 11-28.
Example 11-28 A backup using the Tivoli Storage Manager storage agent inside of the WPAR
#dsmc sel -subdir=yes /etc/ /usr/*IBM Tivoli Storage ManagerCommand Line Backup-Archive Client Interface Client Version 6, Release 2, Level 2.0 Client date/time: 04/27/11 13:55:08(c) Copyright by IBM Corporation and other(s) 1990, 2010. All Rights Reserved.
Node Name: WPARM125Session established with server WPAR1_LPAR3: AIX Server Version 6, Release 2, Level 2.2 Server date/time: 04/27/11 13:55:05 Last access: 04/27/11 12:17:56
Selective Backup function invoked.ANS1898I ***** Processed 2,000 files *****Directory--> 8,192 /etc [Sent]Normal File--> 2 /etc/.init.state [Sent]Normal File--> 0 /etc/.trcfmt.lock [Sent]Normal File--> 3,133 /etc/3270.keys [Sent]Symbolic Link--> 17 /etc/aliases [Sent]Normal File--> 15,390 /etc/atm.defs [Sent]Normal File--> 8 /etc/atmsvcd.pid [Sent]Normal File--> 24,312 /etc/binld.cnf [Sent].............Lines were removed.....................................Normal File--> 1,746 /usr/websm/config/factory_defaults/AppMonitoring.db [Sent]Selective Backup processing of '/usr/*' finished without failure.
Total number of objects inspected: 44,566Total number of objects backed up: 44,565Total number of objects updated: 0Total number of objects rebound: 0Total number of objects deleted: 0Total number of objects expired: 0Total number of objects failed: 0Total number of bytes inspected: 1.92 GBTotal number of bytes transferred: 1.92 GBLanFree data bytes: 1.91 GBData transfer time: 4.93 secNetwork data transfer rate: 409,689.73 KB/secAggregate data transfer rate: 8,301.70 KB/secObjects compressed by: 0%
280 Exploiting IBM AIX Workload Partitions

Total data reduction ratio: 0.00%Elapsed processing time: 00:04:03
On the Tivoli Storage Manager server, you can check if the data movement was LAN-free by using the command that is shown in Example 11-29.
Example 11-29 Verifying LAN-free data movement
tsm: WPAR1_LPAR3>q actlog search=wparm125_sta msgno=8337Session established with server WPAR1_LPAR3: AIX Server Version 6, Release 2, Level 2.2 Server date/time: 04/27/11 14:03:46 Last access: 04/27/11 11:46:19
Date/Time Message-------------------- ----------------------------------------------------------04/27/11 13:57:06 ANR8337I (Session: 75, Origin: WPARM125_STA) LTO volume 569AAAL4 mounted in drive DRV00 (/dev/rmt0). (SESSION: 75)
Chapter 11. Backing up and restoring workload partitions 281

282 Exploiting IBM AIX Workload Partitions

Chapter 12. Managing your system workload partition with Network Installation Manager
In this chapter, we illustrate how to manage your system workload partition (WPAR) with Network Installation Manager (NIM). This chapter describes creating, saving, and restoring system WPARs. This chapter shows you how to perform the following tasks:
� Adding a System WPAR to NIM� Creating a system WPAR with NIM� Starting your system WPAR with NIM� Stopping your system WPAR with NIM� Removing a system WPAR with NIM� Managing a system WPAR with NIM� Backing up the system WPAR� Restoring the System WPAR� Using specification files for system WPAR� Application WPARs and NIM� WPAR cloning
12
© Copyright IBM Corp. 2011. All rights reserved. 283

12.1 Network Installation Manager (NIM)
NIM is a client/server application that provides an environment to install and manage AIX filesets (base operating system, technology levels (TLs), individual fixes, WPARs, backup images, and so on) on machines over the network.
12.2 Adding a System WPAR to NIM
The first step is to add a WPAR to the NIM. You add a WPAR to the NIM in the same way as adding a stand-alone server or a logical partition (LPAR). The smitty fastpath is smitty nim_mkmac, or smitty Software Installation and Maintenance Network Installation Management Perform NIM Administration Tasks Manage Machines Define a Machine.
See Example 12-1 for the detailed information that you need to successfully add the WPAR to NIM.
Example 12-1 Adding a WPAR named lpar_6_wpar_1 on the host system 750_1_LPAR_6
* NIM Machine Name [lpar_6_wpar_1]* Machine Type [wpar] * Hardware Platform Type [chrp] Kernel to use for Network Boot [64] Communication Protocol used by client [] + Primary Network Install Interface* Cable Type bnc Network Speed Setting [] Network Duplex Setting [] * NIM Network nim172* Host Name lpar_6_wpar_1 Network Adapter Hardware Address [0] Network Adapter Logical Device Name [] IPL ROM Emulation Device [] CPU Id [] Machine Group []
Managing System Information WPAR Options Managing System [750_1_LPAR_6] -OR- LPAR Options Identity [] Management Source []
Comments []
NIM: In this chapter, we assume that a NIM server is already running and configured in the environment. For more information about how to configure a NIM server, see NIM from A to Z in AIX 5L, SG245524:
http://www.redbooks.ibm.com/abstracts/sg245524.html?Open
284 Exploiting IBM AIX Workload Partitions

We can check our machine with the lsnim command. The syntax is lsnim -l WPAR_name. See Example 12-2.
Example 12-2 lsnim command to show the status of our machine
root@nimres1 / # lsnim -l lpar_6_wpar_1lpar_6_wpar_1: class = machines type = wpar connect = shell platform = chrp if1 = nim172 lpar_6_wpar_1 0 mgmt_profile1 = 750_1_LPAR_6 lpar_6_wpar_1 Cstate = managed system defined but not yet created prev_state = ready for a NIM operation Mstate = not running
Managing system: The Managing System field is the name of the LPAR (global environment) where the WPAR resides. You must add this field manually.
Chapter 12. Managing your system workload partition with Network Installation Manager 285

12.3 Creating a system WPAR with NIM
Now, we are ready to install the WPAR with NIM using smitty NIM Perform NIM Software Installation and Maintenance Tasks Manage Workload Partition Machines Create a Managed Workload Partition.
Then, smitty displays a list of target systems, which is the LPAR where the WPAR will be created. See Example 12-3.
Example 12-3 Choosing the target system
Create a Managed Workload Partition Start a Managed Workload Partition Stop a Managed Workload Partition Show Characteristics of a Workload Partition
Important: Prior to adding the WPAR as a NIM client, you must first define the Managed System as a NIM client in the NIM master. If the Managed System is not defined (or the wrong Machine Type is selected, such as stand-alone rather than WPAR), the following error message might be displayed:
0042-001 nim: processing error encountered on "master":
You can confirm if the Managed System has already been defined on the NIM master by running the lsnim command. After the WPAR is defined as a NIM client, the manages attribute of the Managed System displays the name of the WPAR located on that system. Running the lsnim command against the WPAR NIM client shows that the mgmt_profile1 attribute contains the name of the Managed System where the WPAR resides:
# lsnim -l 750_1_LPAR_6750_1_LPAR_6: class = machines type = standalone connect = nimsh platform = chrp netboot_kernel = 64 if1 = nim172 750_1_LPAR_6 0 cable_type1 = N/A Cstate = ready for a NIM operation prev_state = ready for a NIM operation Mstate = currently running manages = wpar1
# lsnim -l lpar_6_wpar_1lpar_6_wpar_1: class = machines type = wpar connect = nimsh platform = chrp if1 = nim172 lpar_6_wpar_1 0 mgmt_profile1 = 750_1_LPAR_6 lpar_6_wpar_1 Cstate = managed system defined but not yet created prev_state = ready for a NIM operation Mstate = currently running
286 Exploiting IBM AIX Workload Partitions

Synchronize Workload Partition Software Remove a Managed Workload Partition +--------------------------------------------------------------------------+ | Select a TARGET for the operation | | | | Move cursor to desired item and press Enter. | | ||| | lpar_6_wpar_1 |
Then, enter the parameters for the target system, as shown in Example 12-4.
Example 12-4 Entering the information for the target system
* Target Name [lpar_6_wpar_1] Remain NIM client after install? [yes] + Specification Resource [] + WPAR Options WPAR Name lpar_6_wpar_1 Resource for Backup Image [] + Alternate DEVEXPORTS for installation [] + Alternate SECATTRS for installation [] +
It is also possible to use the NIM command-line interface (CLI) to add a WPAR, as shown in Example 12-5.
Example 12-5 750_1_LPAR_6 is your host and lpar_6_wpar_1 is your WPAR
# nim -o define -t wpar -a mgmt_profile1="750_1_LPAR_6 lpar_6_wpar_1" -a if1="find_net lpar_6_wpar_1 0" lpar_6_wpar_1# nim -o create lpar_6_wpar_1
The Installation now starts, as shown in Example 12-6.
Example 12-6 Output during a system WPAR installation
mkwpar: Creating file systems... / /home /opt /proc /tmp /usr /varMounting all workload partition file systems.x ./usrx ./libx ./admin
Our object status in the NIM database has changed. We verify the status with the lsnim command again, as shown in Example 12-7 on page 288.
Important: It is not possible to create a System root volume group (rootvg) WPAR with NIM.
Chapter 12. Managing your system workload partition with Network Installation Manager 287

Example 12-7 Checking the status of the machine
root@nimres1 / # lsnim -l lpar_6_wpar_1lpar_6_wpar_1: class = machines type = wpar connect = shell platform = chrp if1 = nim172 lpar_6_wpar_1 0 mgmt_profile1 = 750_1_LPAR_6 lpar_6_wpar_1 Cstate = ready for a NIM operation prev_state = creating workload partition Mstate = not running Cstate_result = success
Example 12-7 shows that the Cstate is now “ready for a NIM operation”.
12.4 Starting your system WPAR with NIM
To start your system WPAR using smitty, issue smitty NIM Perform NIM Software Installation and Maintenance Tasks Manage Workload Partition Machines Start a Managed Workload Partition.
Or, start your system WPAR by using the command line, as shown in Example 12-8.
Example 12-8 The command for starting your WPAR with NIM
# nim -o activate lpar_6_wpar_1
12.5 Stopping your system WPAR with NIM
To stop your system WPAR using smitty, issue smitty NIM Perform NIM Software Installation and Maintenance Tasks Manage Workload Partition Machines Stop a Managed Workload Partition.
Or, stop your system WPAR by using the command line, as shown in Example 12-9.
Example 12-9 The command for stopping your WPAR with NIM
# nim -o deactivate lpar_6_wpar_1
12.6 Removing a system WPAR with NIM
Removing a WPAR is similar to creating a WPAR. Choose Removing a WPAR in the SMIT menu. Be aware that you need to stop the WPAR first. On the command line, issue the command to remove (destroy) a WPAR with NIM, as shown in Example 12-10 on page 289.
Tip: The system WPAR that was created with NIM does not automatically start up after its creation. Start it after the installation.
288 Exploiting IBM AIX Workload Partitions

Example 12-10 Destroying the WPAR using NIM
# nim -o destroy lpar_6_wpar1
After the successful removal of your WPAR, you need to remove the NIM object, too, as shown in Example 12-11.
Example 12-11 Removing an object from NIM
# nim -o remove lpar_6_wpar_1
12.7 Managing a system WPAR with NIM
With a NIM server, you have options to manage your WPARs:
� Changing the characteristics of your WPAR by using the chwpar command� Synchronizing the WPAR software
12.7.1 Changing the characteristics of your WPAR by using the chwpar command
You can change the following configuration items and attributes in a WPAR by using NIM:
� WPAR-specific routing� Base directory� User script� Checkpointable� Start at system boot
WPAR-specific routingYou can activate or disable the WPAR-specific routing. To add WPAR-specific routes, you need to add them from the global environment. There is no option in NIM to add WPAR-specific routes.
Base directoryIt is possible to change the base directory of your WPAR. You must shut down the WPAR for this operation. Remember to use the chmod command to change the access rights for the new directory with access 700, as shown in Example 12-12, or you get an error.
Example 12-12 Changing the access rights for our new WPAR directory
# chmod -R 700 /new_wpar_directory
Example 12-13 shows the command from the NIM command-line interface.
Example 12-13 From the NIM CLI
# nim -o chwpar -a cmd_flags="-d /new_wpar_directory" lpar_6_wpar1
User scriptIt is possible to add an user script that executes during the start-up of the WPAR. The script is executed in the host system. You can add a script that writes an email if this WPAR is started, as shown in Example 12-14 on page 290.
Chapter 12. Managing your system workload partition with Network Installation Manager 289

Example 12-14 Adding a script for a WPAR with NIM
# nim -o chwpar -a cmd_flags="-u /directory/scriptname" lpar_6_wpar1
CheckpointableYou can enable or disable the checkpointable capability for a WPAR. The WPAR must be shutdown for this operation. Refer to Example 12-15.
Example 12-15 Enabling checkpointable with NIM
# nim -o chwpar -a cmd_flags="-c" lpar_6_wpar_1
Start at system bootYou can enable or disable the start of this WPAR at system boot. You can enable or disable the start of this WPAR at system boot online, as shown in Example 12-16.
Example 12-16 Enabling the automatic start of the WPAR during system boot
# nim -o chwpar -a cmd_flags="-A" lpar_6_wpar_1
12.7.2 Synchronizing the WPAR software
You can synchronize the software between the global environment and the WPAR, as shown in Example 12-17.
Example 12-17 Synchronizing the software with NIM
# nim -o syncwpar lpar_6_wpar_1
12.8 Backing up the system WPAR
Similar to a mksysb in an LPAR, it is possible to back up your WPAR online using NIM. To create a backup of your WPAR, you need to create a resource for it. Enter smitty nim Perform NIM Administration Tasks Manage Resources Define a Resource Savewpar, as shown in Example 12-18.
Example 12-18 Backing up the WPAR and saving it to /nimrepo/backups on the NIM
* Resource Name [lpar_6_wpar_1_savewpar]* Resource Type savewpar* Server of Resource [master] * Location of Resource [/nimrepo/backups/lpar_6_wpar_1_savewpar] NFS Client Security Method [] NFS Version Access [] Comments []
Source for Replication [] -OR- System Backup Image Creation Options: CREATE system backup image? yes WPAR to backup [lpar_6_wpar_1] PREVIEW only? no
290 Exploiting IBM AIX Workload Partitions

IGNORE space requirements? no EXPAND /tmp if needed? no Create MAP files? no Backup extended attributes? yes Number of BLOCKS to write in a single output [] (leave blank to use system default) Use local EXCLUDE file? no (specify no to include all files in backup) -OR- EXCLUDE_FILES resource [] (leave blank to include all files in backup) Backup encrypted files? yes Backup DMAPI filesystem files? yes Disable software packing of backup? no
Example 12-19 NIM CLI
nim -o define -t savewpar -a server=master -a source=lpar_6_wpar_1 -a location=/your_directory/lpar_6_wpar_1_savewpar -a mk_image=yes lpar_6_wpar_1_savewpar
If the WPAR’s file systems are created inside the global environment’s root volume group (rootvg), they are automatically included in the global environment’s mksysb if the WPARs are active, unless otherwise specified. If the WPAR is deactivated (in the defined state), the file systems can be manually included in the global environment’s mksysb by using the -N option of the mksysb command.
You must select the “Create map files” option if you recreate a WPAR on a host system that hosted a WPAR with the same name before.
When you delete a WPAR, the image.data file is not be deleted. It contains all file systems and more information concerning the WPAR. So it is possible that you can create a new WPAR with an old name and separate file systems, but the old file systems are still listed in the image.data file. This situation gives you errors during the backup and restore process, as shown in Example 12-20. To avoid this error, select the “Create MAP files” option.
Example 12-20 Errors while restoring a WPAR
Standard error:------------------------------lsfs: No record matching '/wpars/lpar_6_wpar_2/admin' was found in /etc/filesystems.lsfs: No record matching '/wpars/lpar_6_wpar_2/download' was found in /etc/filesystems.find: bad status-- ./downloadfind: bad status-- ./download
Important: It is extremely important to set “Create system backup image” to yes, as shown in Example 12-18.
Example 12-19 shows the same command via the NIM CLI.
Important: The option to manually include file systems in the global environment’s mksysb is not available in NIM.
Chapter 12. Managing your system workload partition with Network Installation Manager 291

12.9 Restoring the System WPAR
The procedure to restore a WPAR is almost the same as creating a new WPAR. During the creation, you specify the backup file.
Enter smitty nim Perform NIM Installation Manage Workload Partitions Machines Create a Managed Workload Partition, as shown in Example 12-21.
Example 12-21 The target name is your WPAR, and the resource for the backup image is your backup
* Target Name [lpar_6_wpar_1] Remain NIM client after install? [yes] Specification Resource [] WPAR Options WPAR Name lpar_6_wpar_1 Resource for Backup Image [lpar_6_wpar_1_savewpar] Alternate DEVEXPORTS for installation [] Alternate SECATTRS for installation []
Example 12-22 shows the command-line executable.
Example 12-22 Restoring a WPAR using the NIM CLI
# nim -o create -a savewpar=lpar_6_wpar_1_savewpar lpar_6_wpar
12.10 Using specification files for system WPAR
A specification file (“spec file”) is a file in stanza format with all the attributes that are needed to build the WPAR.
You can pass the specification file as an input file to the following commands:
� mkwpar command by using the -f flag
� restwpar command by using the -w flag
� wparexec command by using the -f flag
12.10.1 Specification file for system WPARs
The specification file can be defined as a resource in the NIM server, and it can be used as well at the WPAR creation or WPAR restoration from the NIM server.
Example 12-23 on page 293 shows defining a WPAR specification resource file in the NIM server.
The wpar_exec resource definition steps are enter smitty nim_mkres Define resource wpar_exec, after the specification file has already been copied into the desired location from the source LPAR to the NIM master, as shown in Example 12-23 on page 293.
Important: If you use a rootvg WPAR and relocate it to another LPAR, it is not possible to back it up with NIM. For such situations, you can use the IBM Systems Director.
292 Exploiting IBM AIX Workload Partitions

Example 12-23 Defining the wpar_exec resource
Define a Resource
Type or select values in entry fields.Press Enter AFTER making all desired changes.
[Entry Fields]* Resource Name [wparm90]* Resource Type wpar_spec* Server of Resource [master] +* Location of Resource [/nimrepo/backups/spec/wparm90.sf] / NFS Client Security Method [] + NFS Version Access [] + Comments []
Source for Replication [] +
The specification file is created automatically at WPAR creation time and saved in the /etc/wpars/<name_of_wpar.cf> directory.
The specification file template is located in /usr/samples/wpars/sample.spec and belongs to the bos.wpars package. The specification file can be created from this template and customized as necessary. Refer to Example 12-24.
We describe the corresponding attributes for the WPAR specification files in 12.10, “Using specification files for system WPAR” on page 292.
Example 12-24 Specification file created by mkwpar for a system non-shared rootvg WPAR
general: name = "wparm91" hostname = "wparm91" checkpointable = "yes" directory = "/wpars/wparm91" privateusr = "yes" ostype = "0" auto = "no"
Specification files: The specification files for application WPARs that are created by using the CLI (mkwpar -e <name_of_WPAR> -o <spec_file>) or smit clonewpar_sys are kept in the directory /etc/wpars until the application WPAR is stopped.
The spec file is automatically deleted when the application WPAR is stopped.
Specification files of application WPARs that are created by the WPAR Manager through the IBM Systems Director are managed and located in the IBM Systems Director.
If you are not using WPAR Manager, the specification file is used at starting the WPAR application by the wparexec -f <location of specification file> command.
Chapter 12. Managing your system workload partition with Network Installation Manager 293

rootvgwpar = "yes" routing = "yes"
network: broadcast = "172.16.23.255" interface = "en0" netmask = "255.255.252.0" address = "172.16.20.91"
route: rttype = "net" rtgateway = "172.16.20.1" rtinterface = "en0" rtdest = "default"
resources: shares_CPU = "-1" active = "yes"
security: privs = "PV_SU_,PV_AU_READ,PV_DEV_LOAD,PV_MAC_R_PROC,PV_AU_WRITE,PV_DAC_GID,PV_DOM_,PV_LAB_SL_FILE,PV_LAB_SLDG_STR,PV_NET_,PV_MAC_R_STR,PV_MAC_W_DN,PV_SEC_TRACE,PV_DAC_UID,PV_MAC_R_CL,PV_AZ_READ,PV_DEV_CONFIG,PV_MAC_W_PROC,PV_LAB_SLUG_STR,PV_MAC_,PV_LAB_,PV_MAC_W_UP,PV_DOM_CHK,PV_MAC_OVRRD,PV_DOM_CSET,PV_DAC_O,PV_KER_,PV_DAC_R,PV_AZ_ADMIN,PV_DAC_W,PV_DAC_X,PV_LAB_SLDG,PV_WPAR_CKPT,PV_AU_PROC,PV_MAC_R,PV_WPAR_DEV_LOAD,PV_LAB_CLTL,PV_MAC_W,PV_AU_ADD,PV_PROBEVUE_,PV_PROC_,PV_DAC_,PV_MAC_CL,PV_LAB_CL,PV_TP,PV_LAB_SLUG,PV_TP_SET,PV_MIC_CL,PV_DAC_RID,PV_DOM_SELF,PV_LAB_LEF,PV_LAB_TL,PV_DEV_QUERY,PV_LAB_SL_SELF,PV_DOM_PROC,PV_MIC,PV_AZ_ROOT,PV_LAB_SL_PROC,PV_AU_,PV_FS_,PV_TCB,PV_MAC_W_CL,PV_AZ_CHECK,PV_AU_ADMIN"
.......device: devname = "/dev/errorctl" devtype = "1"device: devname = "/dev/audit" devtype = "1"device: devname = "/dev/nvram" devtype = "1"device: devname = "/dev/kmem" devtype = "1"device: devid = "3E213600A0B8000291B08000007BD06AAF1B20F1815 FAStT03IBMfcp" devtype = "2" rootvg = "yes"
294 Exploiting IBM AIX Workload Partitions

12.10.2 Specification file for application WPARs
Application WPARs provide an environment for the isolation of applications and their resource to enable checkpoint, restart, and relocation at the application level.
The application WPAR profile is erased from the default location after the application WPAR is stopped.
If the specification file does not exist, we have to recreate the application WPAR; otherwise, we run wparexec -f <spec_file> to start and reuse an application WPAR.
After the application WPAR has been created, we extract the specification file, or we merely copy it from /etc/wpars/<wparname>.cf.
12.11 Application WPARs and NIM
Application WPARs are not intended to be managed from NIM.
Managing application WPARs from NIM is not possible. The only commands that can be called directly or indirectly in NIM are mkwpar, restwpar, chwpar, savewpar, and syncwpar.
12.12 WPAR cloning
The cloning process requires the definition of the resources of the WPAR in the NIM server:
� WPAR image.data file � WPAR specification file � An existing savewpar file
The cloning process includes a preliminary savewpar command execution, image.data file extraction, and a modified specification file. All of these files need to be defined as resources in the NIM server. The cloning is available only from the command line.
We create a backup savewpar file from the desired WPAR that needs to be cloned using the NIM GUI or the savewpar command. Refer to Example 12-25.
Example 12-25 Creating a WPAR machine on NIM
Define a Machine
Type or select values in entry fields.Press Enter AFTER making all desired changes.
[Entry Fields]* NIM Machine Name [wparm91]* Machine Type [wpar] +* Hardware Platform Type [chrp] +
For more information: Resource definitions in the NIM server are explained in detail in the IBM Redbooks publication, NIM from A to Z in AIX 5L, SG24-7296:
http://www.redbooks.ibm.com/redbooks/pdfs/sg247296.pdf
Chapter 12. Managing your system workload partition with Network Installation Manager 295

Kernel to use for Network Boot [64] + Communication Protocol used by client [] + Primary Network Install Interface* Cable Type bnc + Network Speed Setting [] + Network Duplex Setting [] +* NIM Network nim172* Host Name wparm91 Network Adapter Hardware Address [0] Network Adapter Logical Device Name [] IPL ROM Emulation Device [] +/ CPU Id [] Machine Group [] +
Managing System Information WPAR Options Managing System [750_2_LPAR_4] -OR- LPAR Options Identity [] Management Source [] Comments []
In the next step, we define a new savewpar NIM resource. We use the smit nim_mkres fastpath, and we choose the savewpar resource, as shown in Example 12-26.
Example 12-26 Defining the savewpar resource in NIM
Define a Resource
Type or select values in entry fields.Press Enter AFTER making all desired changes.
[Entry Fields]* Resource Name [wparm91_savewpar_1]* Resource Type savewpar* Server of Resource [master] +* Location of Resource [/nimrepo/sawe/wparm91_savewpar_1] / NFS Client Security Method [] + NFS Version Access [] + Comments []
Source for Replication [] + -OR- System Backup Image Creation Options: CREATE system backup image? yes +
296 Exploiting IBM AIX Workload Partitions

WPAR to backup [wparm91] + PREVIEW only? no + IGNORE space requirements? no + EXPAND /tmp if needed? yes + Create MAP files? yes + Backup extended attributes? yes + Number of BLOCKS to write in a single output [] # (leave blank to use system default) Use local EXCLUDE file? no + (specify no to include all files in backup) -OR- EXCLUDE_FILES resource [] + (leave blank to include all files in backup) Backup encrypted files? yes + Backup DMAPI filesystem files? yes + Disable software packing of backup? no +
A complete backup of the WPAR is done. Now, we have a full backup of our WPAR that is saved in NIM, as shown in Example 12-27.
Example 12-27 Savewpar command output
Command: OK stdout: yes stderr: no
Before command completion, additional instructions may appear below.
Creating list of files to back up
Backing up 91814 files..............................60200 of 91814 files backed up (65%)........
91814 of 91814 files backed up (100%)0512-038 savewpar: Backup Completed Successfully.
We proceed to define the image.data file for the WPAR. We execute mkwpardata <name_wpar>. This command places the image.data file in
Important: If the WPAR has file systems in the Network File System (NFS), you use the savewpar command from the command line with -N flag.
The command savewpar with the -N flag backs up files from writable NFS-mounted file systems in the mount group for the WPAR.
Chapter 12. Managing your system workload partition with Network Installation Manager 297

/tmp/wpardata/<WparName>/image.data. We transfer the image.data file to the NIM server and the corresponding image_data resource is created, as shown in Example 12-28.
Example 12-28 Creating wpar.image.data
Define a Resource
Type or select values in entry fields.Press Enter AFTER making all desired changes.
[Entry Fields]* Resource Name [wparm91_image_data]* Resource Type image_data* Server of Resource [master] +* Location of Resource [/nimrepo/sawe/wparm91_image_data] / NFS Client Security Method [] + NFS Version Access [] + Comments []
Source for Replication [] +
We proceed to create a spec file on the NIM server. We then transfer the WPAR spec file to the NIM server, as shown in Example 12-29.
Example 12-29 Creating the specification file as a resource in the NIM server
Define a Resource
Type or select values in entry fields.Press Enter AFTER making all desired changes.
[Entry Fields]* Resource Name [wparm91_spec]* Resource Type wpar_spec* Server of Resource [master] +* Location of Resource [/nimrepo/sawe/wparm91.cf] / NFS Client Security Method [] + NFS Version Access [] + Comments []
Source for Replication []
The WPAR cloning is possible for the system shared/non-shared non-rootvg/rootvg WPAR.
Cloning for system non-rootvg is done in the same manner as a regular restore from a backup. See 12.9, “Restoring the System WPAR” on page 292.
A new WPAR is created in the NIM server. Now, we have the savewpar backup image as support for restoration.
298 Exploiting IBM AIX Workload Partitions

Cloning a WPAR for system rootvg requires changing certain parameters that relate to specification and image.data files:
� The device ID contained in the spec file must be replaced with the new device ID taken from the new WPAR location attribute that is located in specification file.
� The PVID must be changed in the image.data file with the value of the corresponding disk, or it must be cleared.
� The image.data file contains attributes regarding the type of file systems needed to be created for a WPAR.
� If the destination disk has a smaller capacity than the previous hdisk, the attributes, such as MAX_LP for each logical volume (LV) must be changed accordingly.
Note that you can change parameters by duplicating the image.data file and the spec file from old files to new files.
The device that holds the rootvg for the new WPAR has the following details, as shown in Example 12-30.
Example 12-30 Listing the device attributes of hdisk5
root@750_2_LPAR_4:/tmp/wpardata/wparm91> lsattr -El hdisk5PCM PCM/friend/otherapdisk Path Control Module FalsePR_key_value none Persistent Reserve Key Value Truealgorithm fail_over Algorithm Trueautorecovery no Path/Ownership Autorecovery Trueclr_q no Device CLEARS its Queue on error Truecntl_delay_time 0 Controller Delay Time Truecntl_hcheck_int 0 Controller Health Check Interval Truedist_err_pcnt 0 Distributed Error Percentage Truedist_tw_width 50 ........Location Label Truelun_id 0xb000000000000 Logical Unit Number ID Falselun_reset_spt yes LUN Reset Supported Truemax_retry_delay 60 Maximum Quiesce Time Truemax_transfer 0x40000 Maximum TRANSFER Size Truenode_name 0x200200a0b811a662 FC Node Name Falsepvid 00f660785c6746dc0000000000000000 Physical volume identifier Falseq_err yes Use QERR bit True
Important: When the image.data file is used as a template for other WPARs, consider the type of each file system that is specified in the image.data template, hdisk used, and target ID.
Chapter 12. Managing your system workload partition with Network Installation Manager 299

q_type simple Queuing TYPE Truequeue_depth 10 Queue DEPTH Truereassign_to 120 REASSIGN time out value Truereserve_policy single_path Reserve Policy Truerw_timeout 30 READ/WRITE time out value Truescsi_id 0x10000 SCSI ID Falsestart_timeout 60 START unit time out value Trueunique_id 3E213600A0B8000291B08000007BD06AAF1B21F1815
FAStT03IBMfcp Unique device identifier Falseww_name 0x201200a0b811a662 FC World Wide Name False
We change the corresponding hdisk’s unique ID in the specification file that was created in the NIM server, as shown in Example 12-31.
Example 12-31 Changing the specification file
root@nimres1 /nimrepo/sawe # more /nimrepo/sawe/wparm91.cfdevice: devname = "/dev/xti/udp" devtype = "3".............devname = "/dev/nvram" devtype = "1"
device: devname = "/dev/kmem" devtype = "1"
device: devid = "3E213600A0B8000291B08000007BD06AAF1B20F1815 FAStT03IBMfcp" devtype = "2" rootvg = "yes"
We restore the WPAR wparm91 on hdisk5.
The nim cloning command is shown in Example 12-32.
Example 12-32 NIM cloning command
nim -o create -a wpar_spec=wparm91_spec -a image_data=wparm91_image_data -a savewpar=wparm91_savewpar_1 wparm91x 2165 ./.savewpar_dir/wpar.spec
Name change: Because the NIM server uses the name of the WPAR to link the WPAR name with the LPAR management profile, change the management profile for the WPAR that will be cloned to the corresponding name of the LPAR where it will be migrated.
300 Exploiting IBM AIX Workload Partitions

8366 ./.savewpar_dir/image.datax 147928 ./.savewpar_dir/backup.datax 8366 ./.savewpar_dir/image.datax 147928 ./.savewpar_dir/backup.data total size: 158459x 12 ./.savewpar_dir/hd1.mapx 72 ./.savewpar_dir/hd10opt.mapx 12 ./.savewpar_dir/hd11admin.mapx 2676 ./.savewpar_dir/hd2.mapx 408 ./.savewpar_dir/hd3.mapx 24 ./.savewpar_dir/hd4.mapx 24 ./.savewpar_dir/hd9var.mapx 12 ./.savewpar_dir/loglv00.maptotal size: 3240Creating workload partition's rootvg. Please wait...mkwpar: Creating file systems... /Creating logical volume 'fslv02' specified in image.dataCreating file system '/' specified in image.data /admin /home /opt /proc /tmp /usr /var /etc/objrepos/wbootATTENTION: Logical volume 'fslv03' is not unique. Renaming to 'wlv0'.Creating logical volume 'wlv0' specified in image.dataCreating file system '/etc/objrepos/wboot' specified in image.data..............0513-071 The rpc.lockd Subsystem has been added.0513-071 The rpc.mountd Subsystem has been added.0513-071 The automountd Subsystem has been added.0513-071 The nfsrgyd Subsystem has been added.0513-071 The gssd Subsystem has been added.Finished populating scratch file systems.Workload partition wparm91 created successfully.mkwpar: 0960-390 To start the workload partition, execute the following as root: startwpar [-v] wparm91
On the target system, the WPAR is in a transitional state until the restoration is done, as shown in Example 12-33 and Example 12-34.
Example 12-33 WPAR status
root@750_2_LPAR_4:/tmp/wpardata/wparm91> lswparName State Type Hostname Directory RootVG WPAR--------------------------------------------------------------------------------woraR_vg_shared_1 D S ora1 /wpars/woraR_vg_shared_1 yeswparm90 A S wparm90 /wpars/wparm90 yeswparm91 T S wparm91 /wpars/wparm91 yes
Example 12-34 Restoration from NIM GUI
Create a Managed Workload Partition
Type or select values in entry fields.Press Enter AFTER making all desired changes.
Chapter 12. Managing your system workload partition with Network Installation Manager 301

[Entry Fields]* Target Name [wparm91] Remain NIM client after install? [yes] + Specification Resource [wparm91_spec] + WPAR Options WPAR Name wparm91 Resource for Backup Image [wparm91_savewpar_1] + Alternate DEVEXPORTS for installation [] + Alternate SECATTRS for installation [] +
The restoration output is shown in Example 12-35.
Example 12-35 The restoration output using only the spec file from the NIM GUI interface
Before command completion, additional instructions may appear below.
x 2165 ./.savewpar_dir/wpar.spec8366 ./.savewpar_dir/image.datax 147928 ./.savewpar_dir/backup.datax 8366 ./.savewpar_dir/image.datax 147928 ./.savewpar_dir/backup.data total size: 158459x 12 ./.savewpar_dir/hd1.mapx 72 ./.savewpar_dir/hd10opt.mapx 12 ./.savewpar_dir/hd11admin.mapx 2676 ./.savewpar_dir/hd2.mapx 408 ./.savewpar_dir/hd3.mapx 24 ./.savewpar_dir/hd4.mapx 24 ./.savewpar_dir/hd9var.mapx 12 ./.savewpar_dir/loglv00.map
If you use another hdisk for the WPAR restoration, and the image.data file is not updated, you encounter errors, as shown in Example 12-36.
Example 12-36 image.data is not updated
root@nimres1 / # nim -o create -a wpar_spec=wparm91_spec -a image_data=wparm91_image_data -a savewpar=wparm91_savewpar_1 wparm91x 2165 ./.savewpar_dir/wpar.specx 8366 ./.savewpar_dir/image.datax 147928 ./.savewpar_dir/backup.data
total size: 158459x 12 ./.savewpar_dir/hd1.mapx 72 ./.savewpar_dir/hd10opt.mapx 12 ./.savewpar_dir/hd11admin.mapx 2676 ./.savewpar_dir/hd2.mapx 408 ./.savewpar_dir/hd3.mapx 24 ./.savewpar_dir/hd4.mapx 24 ./.savewpar_dir/hd9var.map
302 Exploiting IBM AIX Workload Partitions

x 12 ./.savewpar_dir/loglv00.map total size: 3240Creating workload partition's rootvg. Please wait...mkwpar: Creating file systems... /Creating logical volume 'fslv02' specified in image.data0042-001 nim: processing error encountered on "master": 0042-001 m_create: processing error encountered on "wparm91": 0042-175 c_create: An unexpected result was returned by the "/usr/sbin/restwpar" command:New volume on /tmp/_nim_dir_9568502/savewpar: Cluster 51200 bytes (100 blocks). Volume number 1 Date of backup: Fri Apr 15 18:22:02 2011 Files backed up by name User root files restored: 3New volume on /tmp/_nim_dir_9568502/savewpar: Cluster 51200 bytes (100 blocks). Volume number 1 Date of backup: Fri Apr 15 18:22:02 2011 Files backed up by name User root files restored: 80516-082 lqueryvg: Unable to access a special device file. Execute redefinevg and synclvodm to build correct environment.bosinst_chklvattrs: error running lqueryvg0516-306 getlvodm: Unable to find physical volume hdisk5 in the Device Configuration Database.0516-822 mklv: Unable to create logical volume.bosinst_mkobject: failed command: /usr/sbin/mklv -o n -L / -u 32 -r y -b y -d p -v n -s y -w a -a m -e m -c 1 -x 512 -t jfs2 -y fslv02 vg00 5 hdisk5wparidata: Error processing image.dataumount: Could not find anything to unmountumount: There are no 'type=wparm91' stanzasrestwpar: 0960-514 /usr/sbin/mkwpar exited with return code 1.
The hdisk to which the WPAR will be restored must have the same capacity as the initial hdisk, or the required modifications must be reflected in the image.data file (SIZE_MB, MAX_LPS for LVs, and so on).
12.12.1 WPAR cloning on the same LPAR
We clone in the same LPAR a WPAR on a separate virtual Small Computer System Interface (vSCSI) hdisk. We change corresponding attributes in the image.data file and in the specification file on the NIM server.
First, we collect the needed attributes from the destination LPAR. We clone the WPAR named wparm91 into wparm92 on hdisk4. Refer to Example 12-37 and Example 12-38 on page 304.
Example 12-37 Many outputs for the characteristics of the wparm91 WPAR
root@750_2_LPAR_4:/> lswpar wparm91Name State Type Hostname Directory RootVG WPAR------------------------------------------------------------
Chapter 12. Managing your system workload partition with Network Installation Manager 303

wparm91 A S wparm91 /wpars/wparm91 yesroot@750_2_LPAR_4:/> lswpar -Da devname wparm91|grep hdiskhdisk7root@750_2_LPAR_4:/> lswpar -N wparm91Name Interface Address(6) Mask/Prefix Broadcast----------------------------------------------------------------wparm91 en0 172.16.20.199 255.255.252.0 172.16.23.255root@750_2_LPAR_4:/> lscfg -l hdisk7 hdisk7 U8233.E8B.106078P-V6-C103-T1-W201200A0B811A662-LB000000000000 MPIO Other DS4K Array Disk
We restore wparm91 on hdisk4 with a new name, wparm92, and with a new IP address.
Example 12-38 Gathering hdisk attributes
root@750_2_LPAR_4:/> lscfg -l hdisk4 hdisk4 U8233.E8B.106078P-V6-C145-T1-L8100000000000000 Virtual SCSI Disk Drive
The image.data file on the NIM server is reconfigured with hdisk4 and the specification file is reconfigured with the new attributes only for the device ID, as shown in Example 12-39.
The device ID value that is used in the specification file is taken from the Object Data Manager (ODM) database.
Example 12-39 Device ID for the vscsi disk
root@750_2_LPAR_4:/etc/wpars> odmget -qname=hdisk4 CuAt |grep value|grep scsi value = "382300f6607800004c000000012ec5d83a26.1605VDASD03AIXvscsi"
root@750_2_LPAR_4:/etc/wpars> odmget -qname=hdisk4 CuAt
CuAt: name = "hdisk4" attribute = "unique_id" value = "382300f6607800004c000000012ec5d83a26.1605VDASD03AIXvscsi" type = "R" generic = "" rep = "n" nls_index = 0...
We prepare the corresponding image.data and spec files for restoring wparm91 to wparm92, and we register the new machine as the WPAR type in NIM (Example 12-40). For more details, see 12.3, “Creating a system WPAR with NIM” on page 286.
Example 12-40 Defining the WPAR on the NIM server
Define a Machine
Type or select values in entry fields.Press Enter AFTER making all desired changes.
[Entry Fields]* NIM Machine Name [wparm92]* Machine Type [wpar] +
304 Exploiting IBM AIX Workload Partitions

* Hardware Platform Type [chrp] + Kernel to use for Network Boot [64] + Communication Protocol used by client [] + Primary Network Install Interface* Cable Type bnc + Network Speed Setting [] + Network Duplex Setting [] +* NIM Network nim172* Host Name wparm92 Network Adapter Hardware Address [0] Network Adapter Logical Device Name [] IPL ROM Emulation Device [] +/ CPU Id [] Machine Group [] +
Managing System Information WPAR Options Managing System [750_2_LPAR_4] -OR- LPAR Options Identity [] Management Source [] +
Comments
The corresponding hdisk that is used for cloning must have the PVID attribute cleared. Example 12-41 shows the command that is used to clear the PVID for hdisk1.
Example 12-41 Clearing hdisk PVID
chdev -l hdisk1 -a pv=clear
Table 12-1 on page 306 shows the WPAR specification file and its attributes.
Chapter 12. Managing your system workload partition with Network Installation Manager 305

Table 12-1 WPAR specification file corresponding attributes
Attribute name Explanation
name Required for system WPARs. (If not found in the specification file, the name must be specified to the mkwpar via the -n flag.) If no name is supplied for an application WPAR, a name will be generated. A WPAR name must conform to the following naming restrictions:� Cannot be more than 25 bytes� Cannot contain blanks or any of the following symbols: = : / ! ; ` ' " < > ~ & ( ) * + [ ] , . ^ $ ? { } | \� Cannot start with '-' or '0'Each WPAR name must be unique. The uname for the system is set to this value.
directory If not specified, the default will be /wpars/<wparname> for system WPARs and / (no file system isolation) for application WPARs. The path must be absolute (directory name must begin with '/') and must be unique. The specified directory must not be a registered file system in the global /etc/filesystems. If the directory already exists, it must be empty when the 'preserve' option is in effect. The parent of the directory must be owned by the root and have 0700 permissions.
hostname Specifies a host name for this WPAR. If not specified, the WPAR name will be used.
routing Indicates whether this WPAR’s network traffic will share the global environment’s routing tables ("no", the default) or use a routing table specific to the WPAR ("yes"). If WPAR-specific routing is thus enabled, entries will automatically be created in the WPAR’s routing table for loopback, broadcast, and subnet routes for each configured address (see the 'network' stanza). Any other desired routes must be added explicitly (see the 'route' stanza). If WPAR-specific routing is not enabled, loopback, broadcast, and subnet routes will be created in the global routing table as appropriate, and other desired routes must be managed as usual through the route command. The 'routing' attribute corresponds to the '-i' flag to mkwpar/wparexec.
application Specifies the tracked process for an application WPAR. The tracked process is required, either via this attribute or on the command line. The contents of this field will be shell-expanded before execution.
auto Specifies whether to start the WPAR automatically on system boot. Valid values are "yes" and "no". Default value is "no". Not valid for application WPARs.
306 Exploiting IBM AIX Workload Partitions

preserve (System WPARs only.) Specifies whether the workloadpartition will use existing file systems, or create and populate new file systems. The existing file systems were usually preserved by means of removing a previous WPAR via the rmwpar -p command. The valid values are "yes" and "no". If set to "yes", the preserved file systems can be specified in one of two ways: (1) specify a mount group registered in /etc/filesystems to the 'preservename' attribute, or (2) specify each file system mount using the mount stanzas (or the -M flag).The 'preservename' attribute cannot be given a mount group that isconfigured for use with an existing WPAR. The mount stanzas (or -M) cannot be used to mount file systems that are registered in /etc/filesystems. If this attribute is set to "no", the WPAR file systems will be created and populated as usual. The default value is "no". Not valid for application WPARs. Corresponds to the -p flag to mkwpar.
preservename (System WPARs only.) Specifies a mount group registered in /etc/filesystems. When used, instead of creating and populating new file systems, mkwpar will attach to the existing file systems in the mount group, preserving their data. This attribute can be used only when the 'preserve' attribute is set to "yes". Corresponds to the -p flag to mkwpar, when -p is given the name of the mount group in /etc/filesystems. If the preserved file systems are not registered in /etc/filesystems, remove the 'preservename' attribute, set the 'preserve' attribute to "yes", and specify each of the mounts in the mount stanzas (or use the -M flag).
script Specifies a user-defined script to be invoked each time that the WPAR is stopped or started. Corresponds to the mkwpar -u flag.
devices Absolute path to a stanza file representing all the devices that are permitted in the WPAR. If not specified, the default is "/etc/wpars/devexports". Not valid for application WPARs.
vg Volume group to use by default when creating Journal File System (JFS) or JFS2 file systems. Can be overridden by specifying the "vg" attribute in individual "mount" stanzas. If not specified, "rootvg" is assumed.
copy_nameres (System WPARs only.) Duplicates the global’s network name resolution configuration for the WPAR. The following files are copied into the WPAR, if they exist: /etc/resolv.conf /etc/hosts /etc/netsvc.conf /etc/irs.conf /etc/networksAlso copies the NSORDER environment variable. Corresponds to the -r flag to mkwpar. The default value is "no".
postscript (System WPARs only.) Specifies a user-defined script to be invoked after the files for the WPAR have been created but before the file systems are unmounted. The script runs from the global environment and passes as arguments the name and base directory of the WPAR. Corresponds to the mkwpar -k flag. If the script does not exist or does not exit with a return code of 0, a warning message is issued, but the operation does not fail.
Attribute name Explanation
Chapter 12. Managing your system workload partition with Network Installation Manager 307

network network: interface = en0 or interface = foo address = 192.168.1.1 broadcast = 192.168.1.255 netmask = 255.255.255.0network: interface = en1 address6 = fe80:abcd::260:8c2e:a4 prefixlen = 64Zero or more 'network' stanzas can be used. Each stanza represents a single IP address for the WPAR. Loopback addresses need not be specified. Network information can also be specified to mkwpar via the -N flag. If no network information is provided, mkwpar will attempt to resolve the WPAR’s host name (see "The 'hostname' attribute" in "The 'general' stanza"). If the host name can be resolved, and its address is valid for any 'up' Ethernet interface, this address will automatically be configured. Otherwise, the WPAR will be created with no network.The attributes 'address', 'broadcast', and 'netmask' define an IPv4 network stanza, whereas the attributes 'address6' and 'prefixlen' define an IPv6 network stanza. The only attribute that can be used in either network stanza type is 'interface'.
interface Indicates the network interface on which this address needs to be configured. If not specified, mkwpar will attempt to detect non-loopback 'up' interfaces matching the address and any other attributes specified. If no such interface exists, you must specify this value. This attribute is valid for both IPv4 and IPv6 network stanzas.For IPv4 network stanzas, you can also specify a mapped interface name registered in /etc/wpars/devmap. Name-mapped interfaces will be brought 'up' as needed during startwpar or chwpar. For details, refer to the comments in /etc/wpars/devmap.
address Represents a dotted-decimal IPv4 address. This attribute is not valid for IPv6 network stanzas.
netmask IPv4 subnet mask. If not specified, mkwpar will use the value associated with the interface on the global environment. If no guess is possible (for example, the interface is not configured in the global environment), mkwpar will generate an error. This attribute is not valid for IPv6 network stanzas.
broadcast Optional: If not specified, this setting will be generated based on the address and netmask. This attribute is not valid for IPv6 network stanzas.
address6 Represents an IPv6 address. An IPv6 address is a 128-bit addressrepresented as eight 16-bit integers that are separated by colons. Each integer is represented by four hex digits. Leading zeros can be skipped, and consecutive null 16-bit integers can be replaced by two colons (one time per address).This attribute is not valid for IPv4 network stanzas.Examples of valid 'address6' values are: fe80:abcd:0000:0000:0000:0260:8c2e:00a4 fe80:abcd:0:0:0:260:8c2e:a4 fe80:abcd::260:8c2e:a4
Attribute name Explanation
308 Exploiting IBM AIX Workload Partitions

prefixlen Represents the number of high-order bits used by routing protocols. The prefix is usually ded following the IPv6 address and a forward slash (/). For example, the notation ff12::/16 describes a 16-bit prefix whose value is 1111111100010010. This attribute is not valid for IPv4 network stanzas.
route route: rtdest = 192.168.0.0 rtnetmask = 255.255.0.0 rttype = net rtgateway = 192.168.0.1 rtinterface = en2For WPARs with an active network (see the 'network' stanza) and with WPAR-specific routing enabled (see the 'routing' attribute in the 'general' stanza), each 'route' stanza causes an explicit entry to be added to the WPAR’s routing table. Zero or more 'route' stanzas can be specified. Each 'route' stanza corresponds to an instance of the '-I' flag to mkwpar/wparexec.
rtdest (Required) Identifies the host or network to which you are directing the route. The value can be specified either by the symbolic name or numeric address. The keyword "default" can be used to specify a default route. See the Destination parameter in route(1).
rtnetmask Specifies the network mask to the destination address. This attribute is mutually exclusive with the 'rtprefixlen' attribute, and must not be used if a prefix length is incorporated into the 'rtdest' attribute (for example, '192.168.0.0/16'). See the -netmask argument in route(1).
rtprefixlen A positive integer. Specifies the length of a destination prefix (thenumber of bits in the netmask). This attribute is mutually exclusive with the 'rtnetmask' attribute, and must not be used if a prefix length is incorporated into the 'rtdest' attribute (for example, '192.168.0.0/16'). See the -prefixlen argument in route(1).
rttype Can be set to either of 'host' or 'net'. Forces the rtdest attribute to be interpreted as the specified type. If not specified, the destination type will be inferred from the other attributes. See the -net and -host arguments in route(1).
rtgateway (Required) Identifies the gateway to which packets are addressed. The value can be specified either by the symbolic name or numeric address. See the Gateway parameter in route(1).
rtinterface Specifies the interface (for example, en0) to associate with this route so that packets will be sent using this interface when this route is chosen. See the -if parameter in route(1).
Attribute name Explanation
Chapter 12. Managing your system workload partition with Network Installation Manager 309

mount mount: vfs = jfs2 directory = /var vg = rootvg size = 128M logname = INLINEFor system WPARs, each mount stanza gives mkwpar information both about creating the WPAR’s file systems, and configuring them on each WPAR start-up. No mount stanzas are required in a spec file. By default, a system WPAR’s /usr and /opt will be mounted read-only from their global equivalents, and new logical volumes will be created in rootvg for /, /var, /tmp, and /home. This default behavior can be overridden for any of these file systems by entering a mount stanza with its name specified in the directory attribute. Additional file system mounts can also be specified via separate mount stanzas. The mkwpar command will create each file system with vfs = jfs or jfs2 according to the 'vg', 'size', 'logname', 'mode', and 'crfsopts' attributes unless the file system already exists. If the file system exists, mkwpar will ensure that it is at least as large as specified by the 'size' attribute, and that its base directory has the permissions specified by the 'mode' attribute. (mkwpar will not attempt to move file systems to other volume groups as specified by vg.) After they are created, the file systems will be mounted on each start of the WPAR using the options that are specified by the 'mountopts' attribute.
In contrast, mount stanzas for application WPARs are for specifying file system dependencies only. No file systems are created by wparexec. The localfs type cannot be specified, and the attributes 'vg', 'size', 'logname', 'mode', and 'crfopts' are not valid. However, a local file system dependency can be defined by specifying only the directory attribute within a mount stanza. The directory referenced must already exist in /etc/filesystems. Only nfs, namefs, and directory are permitted for the 'vfs' attribute. The nfs and namefs types can be given a 'mountopts' attribute. By default, processes within an application WPAR will have the same level of access to all global file systems and mounts as the user who started wparexec. No mount stanzas are required. If a file system that is listed in the spec file is not mounted at the time of initialization, wparexec will make an attempt to mount it. If an error occurs during the process of creating the WPAR, any file systems mounted by wparexec are unmounted. However, after creation succeeds, the application WPAR leaves mounts in place, regardless of the exit condition of the application.
dev The absolute path to the device or directory to be mounted from the global environment. For vfs = jfs[2], this field must not be specified unless the logical volume device on which to create the file system already exists. If not specified, mkwpar will create the file system. For vfs = nfs, this attribute must contain the exported directory. For vfs = namefs, this attribute must contain the path to the global directory to be overmounted. For vfs = directory, this attribute must not be specified.
directory The directory (mount point) relative to the WPAR where the device must be mounted. Do not include the WPAR's base directory.
Attribute name Explanation
310 Exploiting IBM AIX Workload Partitions

vfs The file system type. Valid values are "jfs", "jfs2", "nfs","namefs", and "directory". The special value "directory" will onlycreate the directory in the WPAR; no file system creation or other mounting will occur. This file system type can be used to override the default behavior for the base file systems, such as /tmp, /var, and so on. The values "jfs" and "jfs2" are not valid for application WPARs.
size The size of the file system being created. The sizespec must be of a format acceptable to crfs -a size=<sizespec>. This attribute is only be specified for vfs = jfs[2]. This attribute is not valid for application WPARs.
mode The octal permission mode to assign to the base directory of thisfile system. The default is "0755" for all file systems, except /tmp ("1777"). This attribute is not valid for application WPARs.
vg The volume group in which to create new file systems if they do not already exist. If not specified, "rootvg" will be assumed. This attribute is not valid for application WPARs.
logname The name of the log device to use (for example, "wpar2_log", not"/dev/wpar2_log"). For vfs = jfs2, the INLINE log will be used if this field is not specified. For vfs = jfs, a default log device will be used or created if the logname attribute is not specified. The named log device must already be created and initialized before it can be used with a file system. This attribute is not valid for application WPARs.
crfsopts Optional: Other options to pass to crfs when creating thefile system. Options are passed straight through to crfs, so thevalue must be in the form as expected by crfs. Note: "-asize=<sizespec>" and "-a logname=<logLV>" must not be specified via the crfsopts field. Use the 'size' and 'logname' attributes, respectively. This attribute is not valid for application WPARs.
host The name of the host exporting the device to be NFS-mounted. Must be specified for NFS mounts. Must not be specified otherwise.
mountopts Mount options (corresponds to the "options" field in/etc/filesystems). Optional. If not specified, no mount flags willbe used by default.
lvmgmt lvmgmt: image_data = /tmp/wpardata/mywpar/image.data shrink = no ignore_maps = noAn 'lvmgmt' stanza can be included to specify the particularhandling of logical volume characteristics for a system workloadpartition. If no lvmgmt stanza is provided, any logical volumescreated for the WPAR are created using defaults basedupon the mount stanzas involving local file systems.
image_data Absolute path to the image.data specifications file for logical volume and file system attributes. See the /usr/lpp/bosinst/image.template file for more details about image.data.
Attribute name Explanation
Chapter 12. Managing your system workload partition with Network Installation Manager 311

shrink Specifies that the LV_MIN_LPS attribute from the lv_data stanzas from the file specified by the 'image_data' attribute must be used rather than the logical partitions (LPs) attribute to determine the number of logical partitions for the logical volume. This attribute is used to potentially reduce the amount of disk space required for a WPAR file system. This attribute has no effect if the image_data attribute is not specified.
ignore_maps Specifies that the MAPFILES attribute from the lv_data stanzas from the file specified by the 'image_data' attribute must not be used to provide a disk mapping for the logical volumes associated with a WPAR. This attribute has no effect if the image_data attribute is not specified.
device device: globaldev = /dev/tty* export = yesZero or more 'device' stanzas can be included to override device export defaults. (Defaults are based on those found in the Device Exports File specified in the 'devices' attribute of the 'general' stanza, or /etc/wpars/devexports by default.) This stanza is not valid for application WPARs.
globaldev The full path and name of the global device to be exported into theWPAR. This value can contain shell-style wildcard characters (for example, "/dev/*random" will match "/dev/random" and "/dev/urandom").
export Used to override the default behavior. "yes" causes a device to be exported when the default is not to export it (that is, the devexports file entry's 'auto' attribute is set to "no"); or causes an otherwise automatically exported device (auto = "yes" in devexports) not to be exported into this WPAR.
resources resources: active = yes rset = wpar/wpar1 shares_CPU = 100 CPU = 0%-100%,100% shares_memory = 100 memory = 0%-100%,100% procVirtMem = 1024MB totalVirtMem = 2048MB totalProcesses = 1024 totalThreads = 2048 totalPTYs = 8 totalLargePages = 16 pct_msgIDs = 20% pct_semIDs = 30% pct_shmIDs = 50% pct_pinMem = 20%Contains resource control configuration information. Only one'resources' stanza can be specified. If omitted, no resourcecontrols will be configured for this WPAR. Currently, resource controls are handled by Workload Manager (WLM), and other than 'active', these attributes correspond directly to those found in the WLM 'classes', 'shares', and 'limits' files.
Attribute name Explanation
312 Exploiting IBM AIX Workload Partitions
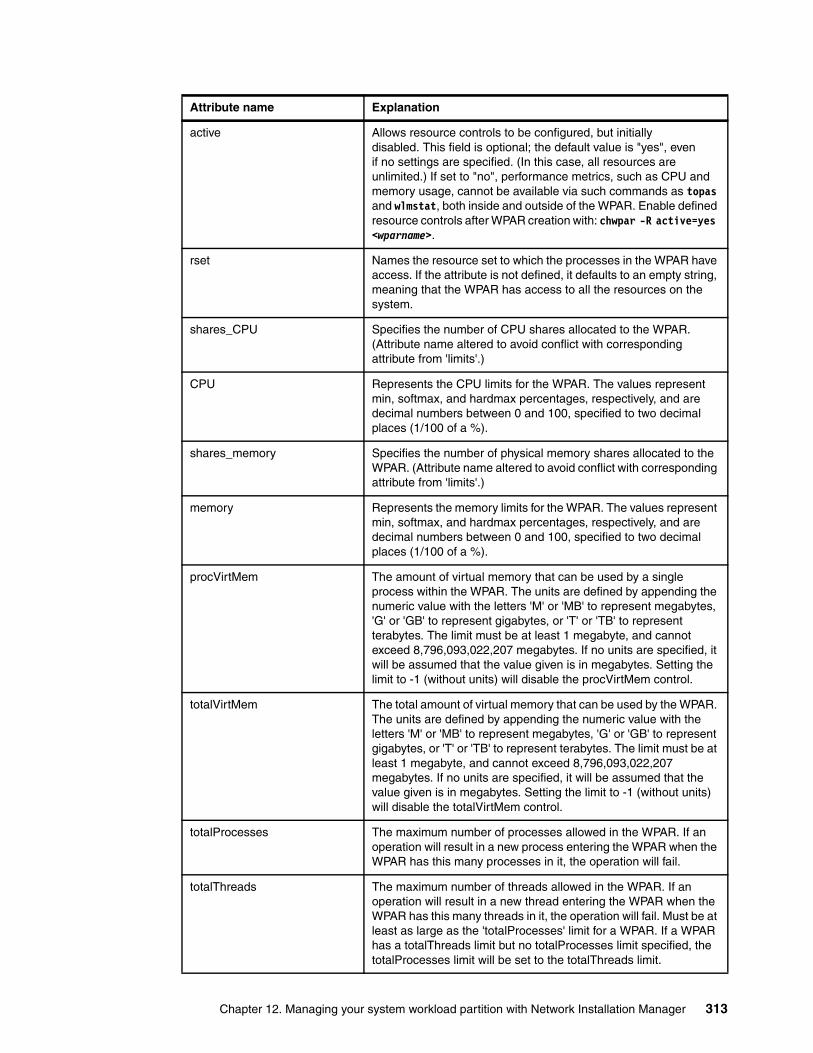
active Allows resource controls to be configured, but initiallydisabled. This field is optional; the default value is "yes", evenif no settings are specified. (In this case, all resources areunlimited.) If set to "no", performance metrics, such as CPU andmemory usage, cannot be available via such commands as topas and wlmstat, both inside and outside of the WPAR. Enable defined resource controls after WPAR creation with: chwpar -R active=yes <wparname>.
rset Names the resource set to which the processes in the WPAR have access. If the attribute is not defined, it defaults to an empty string, meaning that the WPAR has access to all the resources on the system.
shares_CPU Specifies the number of CPU shares allocated to the WPAR. (Attribute name altered to avoid conflict with corresponding attribute from 'limits'.)
CPU Represents the CPU limits for the WPAR. The values represent min, softmax, and hardmax percentages, respectively, and are decimal numbers between 0 and 100, specified to two decimal places (1/100 of a %).
shares_memory Specifies the number of physical memory shares allocated to theWPAR. (Attribute name altered to avoid conflict with corresponding attribute from 'limits'.)
memory Represents the memory limits for the WPAR. The values represent min, softmax, and hardmax percentages, respectively, and are decimal numbers between 0 and 100, specified to two decimal places (1/100 of a %).
procVirtMem The amount of virtual memory that can be used by a singleprocess within the WPAR. The units are defined by appending the numeric value with the letters 'M' or 'MB' to represent megabytes, 'G' or 'GB' to represent gigabytes, or 'T' or 'TB' to represent terabytes. The limit must be at least 1 megabyte, and cannot exceed 8,796,093,022,207 megabytes. If no units are specified, it will be assumed that the value given is in megabytes. Setting the limit to -1 (without units) will disable the procVirtMem control.
totalVirtMem The total amount of virtual memory that can be used by the WPAR. The units are defined by appending the numeric value with the letters 'M' or 'MB' to represent megabytes, 'G' or 'GB' to represent gigabytes, or 'T' or 'TB' to represent terabytes. The limit must be at least 1 megabyte, and cannot exceed 8,796,093,022,207 megabytes. If no units are specified, it will be assumed that the value given is in megabytes. Setting the limit to -1 (without units) will disable the totalVirtMem control.
totalProcesses The maximum number of processes allowed in the WPAR. If an operation will result in a new process entering the WPAR when the WPAR has this many processes in it, the operation will fail.
totalThreads The maximum number of threads allowed in the WPAR. If an operation will result in a new thread entering the WPAR when the WPAR has this many threads in it, the operation will fail. Must be at least as large as the 'totalProcesses' limit for a WPAR. If a WPAR has a totalThreads limit but no totalProcesses limit specified, the totalProcesses limit will be set to the totalThreads limit.
Attribute name Explanation
Chapter 12. Managing your system workload partition with Network Installation Manager 313

totalPTYs The total number of pseudo terminals allowed in this WPAR.
totalLargePages The number of large pages that can be allowed for this WPAR.
pct_msgIDs The percentage of the system's maximum number of message queue IDs that are allowed in this WPAR.
pct_semIDs The percentage of the system's maximum number of semaphore IDs that are allowed in this WPAR.
pct_shmIDs The percentage of the system's maximum number of shared memory IDs that are allowed in this WPAR.
pct_pinMem The percentage of the system's maximum pinned memory that can be allocated to this WPAR.
options options: enable_rawsock = no enable_hostname = yesSpecifies other miscellaneous options for the WPAR. One 'options' stanza can be specified, or the stanza can be omitted entirely. Not valid for application WPARs.
enable_rawsock Enable raw sockets in the WPAR. Valid values are "yes" and "no". The default value is "no".
enable_hostname Enable setting the host name in the WPAR. Valid values are "yes" and "no". The default value is "yes".
Attribute name Explanation
314 Exploiting IBM AIX Workload Partitions

Part 4 Scenarios
This section provides sample scenarios with workload partitions (WPARs) in an IBM Power High Availability (PowerHA) environment. Also in this part, we illustrate Versioned Workload Partitions.
Part 4
© Copyright IBM Corp. 2011. All rights reserved. 315

316 Exploiting IBM AIX Workload Partitions

Chapter 13. Highly available workload partitions with PowerHA 7.1 and 6.1
This chapter describes how to implement highly available workload partitions (WPARs) with Power Systems High Availability (PowerHA) 7.1 and 6.1.
In this chapter, we describe the following topics:
� Planning for high availability� PowerHA 6.1 and rootvg WPARs
13
© Copyright IBM Corp. 2011. All rights reserved. 317

13.1 Planning for high availability
The WPAR offering is supported with IBM PowerHA System Mirror since Version 5.4.1. However, particularly in the planning phase, care must be taken because the combination of WPARs and PowerHA in an environment has the potential to introduce new single points of failure (SPOFs) into the environment.
In PowerHA, you can have a mixture of normal resource groups and resource groups running in a WPAR. Figure 13-1 shows an example. In this example, we have two resource groups. one resource group is running in the “Global AIX” (also named Global WPAR) environment. The second resource group is running inside a WPAR. Both resource groups have two application servers defined and an application monitor for each application server.
Figure 13-1 PowerHA and WPAR fundamentals
13.2 PowerHA 6.1 and rootvg WPARs
Managing root volume group (rootvg) WPARs has several restrictions and is not supported with PowerHA.
Important: PowerHA does not manage or monitor the WPAR. It only manages and monitors the applications that run within the WPAR.
“RG1” is WPAR-disabled but “RG2” is WPAR-enabled
PowerHA and RSCT run only in the Global Environment
RSCT PowerHA
AIX WPAR Layer
AIX OS(version 6.1 or later)
AIX WPAR “RG2”
RG2
C
D
C
D
...
...
PowerHAApplication
Server
PowerHAApplication
Monitor
RG1
C
D
C
D
rem
ote s
hell
Global Environment
318 Exploiting IBM AIX Workload Partitions

Even with a shared or detached /usr rootvg WPAR, the global environment on all logical partitions (LPARs) must be at a consistent level.
PowerHA can manage a WPAR with customized start, stop, and monitor scripts as if the WPAR is an application.
A start script performs the startwpar command and the stop script performs the stopwpar command for the specific WPAR, but they also require you to handle error management within the script to handle possible error conditions.
The rootvg WPAR must be created on all PowerHA nodes with shared disk, and PowerHA manages the rootvg WPAR as an application server within a simple resource group.
With a two-node PowerHA cluster and one rootvg WPAR, we performed the following procedure using AIX 7.1 and PowerHA 6.1:
1. Create a detached /usr rootvg WPAR on the first PowerHA node, either with mkwpar flags or the specification file. Refer to Chapter 5, “Workload partition rootvg support” on page 91 for additional details.
2. Start and stop the WPAR.
3. On the second PowerHA node, recreate the WPAR with the same mkwpar flags or specification file, and the -p flag (preserve).
4. Start and stop the WPAR.
5. Swap the WPAR between the PowerHA nodes.
A simple swap script running on one of the PowerHA nodes (750_1_LPAR_9) can be seen in Example 13-1. The WPAR is named wpar13, where the cfgmgr command is only run to simplify changing the disk state from defined to available.
Example 13-1 Simple WPAR swap script
REMOTE=750_2_LPAR_9while :;do
for i in 1 2;do if [[ "$i" -eq 1 ]];then
hostname;cfgmgr;startwpar wpar13;clogin wpar13 sleep 120;stopwpar wpar13;cfgmgr;
elsersh $REMOTE "hostname;cfgmgr;startwpar wpar13;clogin wpar13 sleep
120;stopwpar wpar13;cfgmgr";fi
donedone
6. Create the PowerHA cluster, with a resource group and application server with scripts to start, stop, and monitor the WPAR.
Important: PowerHA does not have supported integration to manage rootvg WPARs, although it has supported integration for system WPARs.
Important: PowerHA is only used to start, stop, and monitor the WPAR as an application server, and it does not manage the WPAR’s IP addresses and disks. The WPAR’s IP addresses and disks are managed by the LPAR global environment WPAR Manager (WPM).
Chapter 13. Highly available workload partitions with PowerHA 7.1 and 6.1 319

Example 13-2 shows commands for adding the resource group, application server, and adding the application server to resource group.
The PowerHA cluster name is itsopower. The PowerHA node names are N750_1_LPAR_9 and N750_2_LPAR_9.
The resource group is named itsopowerrg, and the application server is named itsopoweras with a start script named /home/rg/start.itsopower and a stop script named /home/rg/stop.itsopower.
Example 13-2 PowerHA resource group and application server
/usr/es/sbin/cluster/utilities/clmodclstr -n 'itsopower' -p 'N750_1_LPAR_9 N750_2_LPAR_9'
/usr/es/sbin/cluster/utilities/claddgrp -g 'itsopowerrg' -n 'N750_1_LPAR_9 N750_2_LPAR_9' -S 'OHN' -O 'FNPN' -B 'NFB'
/usr/es/sbin/cluster/utilities/claddserv -s'itsopowerrg' -b'/home/rg/start.itsopower' -e'/home/rg/stop.itsopower'
/usr/es/sbin/cluster/utilities/claddres -g 'itsopowerrg' SERVICE_LABEL='' APPLICATIONS='itsopoweras' VOLUME_GROUP='' FORCED_VARYON='true' VG_AUTO_IMPORT='true' FSCHECK_TOOL='fsck' RECOVERY_METHOD='sequential' FS_BEFORE_IPADDR='true'
7. Start, stop, and move the WPAR between the PowerHA nodes, using the clRGmove command (/usr/es/sbin/cluster/utilities/clRGmove).
320 Exploiting IBM AIX Workload Partitions

Chapter 14. Versioned workload partitions
This chapter provides the following topics:
� Overview� System requirements� Installing the Oracle Database on the WPAR environment
14
© Copyright IBM Corp. 2011. All rights reserved. 321

14.1 Overview
Applications running in an AIX 5.2 workload partition (WPAR) use AIX 5.2 commands and libraries. If your applications have not been certified on newer versions of AIX, the AIX 5.2 commands and libraries provide a way to run them in an AIX 5.2 environment on top of AIX 7.1. Such a setup allows running these applications on currently available hardware that might not support the use of AIX 5.2 as a logical partition (LPAR).
A Versioned Workload Partition is always a system WPAR, and it is not shared. Versioned Workload Partitions own writable /opt and /usr file systems, which are needed because certain AIX 5.2 commands overlay the AIX 7.1 version. Examples are uname, vmstat, topas_nmon, and others.
A Versioned Workload Partition provides a separate version runtime environment than the global environment. They do have limitations as compared to native system WPARs. A versioned WPAR has an AIX 5.2 runtime environment and runs on a global environment with a newer level of AIX.
The AIX commands and libraries inside the WPAR support AIX 5.2 syntax and semantics, even though the AIX kernel on the system is running a newer level. Applications running in the WPAR do not need to be aware that the global environment is another version. However, there are limitations related to running in any WPAR that might affect certain applications.
Make sure to properly test your application in a Versioned Workload Partition environment before you shut down and dispose of your old hardware.
14.2 System requirements
The following criteria is required to transform a running AIX 5.2 system into a WPAR:
� AIX 5.2 must be running at technology level (TL) 10 and service pack (SP) 8.� Versioned Workload Partitions are only supported on POWER 7 hardware.� A Versioned Workload Partition only runs on AIX 7.1.� The AIX 5.2 Workload Partitions for AIX 7 product image is required.
As a first step to prepare our AIX 5.2 system that will become a WPAR, the Versioned Workload Partition product images must be installed.
The Versioned Workload Partition product images are in the Versioned Workload Partition product media. The files are located under /installp/ppc. Refer to Example 14-1.
Example 14-1 Install the summary of the required filesets on our LPAR
[TOP]geninstall -I "a -cNQqwXY -J" -F -Z -d . -f File 2>&1
Important: Versioned Workload Partitions cannot be synchronized with the global environment using the syncwpar command, because they are not the same AIX version. Also, a Versioned Workload Partition cannot be upgraded to newer AIX versions.
Backups: It is always a good practice to back up before making changes to a running server.
322 Exploiting IBM AIX Workload Partitions

File: I:vwpar.52.rte 1.1.0.0 I:vwpar.images.52 1.1.0.0 I:vwpar.images.base 1.1.0.0 I:vwpar.sysmgt 1.1.0.0
We now create a mksysb from the AIX 5.2 system and copy it to the target AIX 7.1 host system, as shown in Example 14-2.
The mksysb can either be created by using a Network Installation Management (NIM) server, or locally by using the mksysb command.
Example 14-2 Copying the mksysb image to the AIX 7.1 host system
# scp AIX52DB2.mksysb [email protected]:/tmp
With the mksysb, we can start to create a versioned WPAR. In our example, the WPAR to be created is going to be a root volume group (rootvg) WPAR with a dedicated disk device.
The WPAR’s name is lpar_6_wpar_2, and hdisk4 is the hdisk where we are going to restore the AIX 5.2 mksysb.
In Example 14-3, the option -c is used. This option enables a WPAR to be checkpointable, which is mandatory if the Versioned Workload Partition needs to be mobility-aware.
Example 14-3 Creating a versioned WPAR
# mkwpar -c -C -B AIX52DB2.mksysb -n lpar_6_wpar_2 -D devname=hdisk4 rootvg=yes
mkwpar: Extracting file system information from backup...Creating workload partition's rootvg. Please wait...mkwpar: Creating file systems... /Converting JFS to JFS2Creating file system '/' specified in image.data /admin /homeConverting JFS to JFS2Creating file system '/home' specified in image.data
...bos.wpars 7.1.0.0 ROOT APPLY SUCCESSbos.wpars 7.1.0.1 ROOT APPLY SUCCESSbos.net.ncs 7.1.0.0 ROOT APPLY SUCCESSwio.common 7.1.0.0 ROOT APPLY SUCCESSFinished populating scratch file systems.Workload partition lpar_6_wpar_2 created successfully.mkwpar: 0960-390 To start the workload partition, execute the following as root: startwpar [-v] lpar_6_wpar_2
We can create the Versioned Workload Partition with the IBM Systems Director, too. You can get more details about it in Chapter 4, “Configuring and using the IBM PowerVM Workload Partition Manager” on page 43. Remember to enable checkpointing (the -c flag) during the creation of your versioned WPAR. There is no negative effect if you do not enable partition mobility. You can activate checkpointable at a later time. Note that to activate the partition mobility later, the WPAR must be stopped. Refer to Example 14-4 on page 324.
Chapter 14. Versioned workload partitions 323

Example 14-4 Enable checkpoints in an WPAR
# chwpar -c lpar_6_wpar_2
After the mkwpar command has completed, the WPAR needs to be started manually if the -s option was omitted while creating it.
Before starting your versioned WPAR, list the details to show that it has been created as a versioned WPAR. The difference is shown in the OStype attribute. See Example 14-5.
Example 14-5 List a versioned WPAR’s attributes
# lswpar -L lpar_6_wpar_2=================================================================lpar_6_wpar_2 - Inactive=================================================================GENERALType: SRootVG WPAR: noOwner: rootHostname: lpar_6_wpar_2WPAR-Specific Routing: noDirectory: /wpars/lpar_6_wpar_2Start/Stop Script:Auto: noPrivate /usr: yesCheckpointable: yesApplication:OStype: 1
Now, the WPAR can be started. During the execution of the startwpar command, we get a notification if we enabled checkpointing (-c). Refer to Example 14-6.
Example 14-6 Starting the Versioned Workload Partition lpar_6_wpar_2
Starting workload partition subsystem 'cor_lpar_6_wpar_2'.0513-059 The cor_lpar_6_wpar_2 Subsystem has been started. Subsystem PID is 14417924. There was no data for IZ72315 in the fix database.startwpar: 0960-698 WPAR cannot be moved or checkpointed until the following fixes have been applied inside the WPAR and it has been restarted: IZ72315.Verifying workload partition startup.
The Versioned Workload Partition is working now, but for successful partition mobility, we need to install several fixes inside the versioned WPAR.
These fixes ship in the same media as the IBM AIX 5.2 Workload Partitions for AIX 7.1. You find the files on the DVD under the aix52_updates directory and the name of the files are U834870.bff, U834871.bff, U834872.bff, U834873.bff, U834874.bff, U834875.bff, U834876.bff, and U834877.bff.
Checkpoints: Checkpoints work only with file systems that can be accessed from both the departure and the arrival LPAR, which is a storage area network (SAN)-based rootvg or a Network File System (NFS)-based WPAR.
324 Exploiting IBM AIX Workload Partitions

If you are running AIX 7.1.0.3 or later (7.1 SP3), you need the updates for Authorized Problem Analysis Reports (APARs) IZ272315 and APAR IZ90201. These updates add two additional updates that must be installed: U834878.bff and U834879.bff. Refer to Example 14-7.
Example 14-7 An output of smitty install
[TOP]geninstall -I "a -cgNQqwXY -J" -Z -d . -f File 2>&1
File: S:bos.rte.cron 5.2.0.7001 S:bos.rte.printers 5.2.0.7001 S:bos.rte.misc_cmds 5.2.0.7001 S:bos.rte.streams 5.2.0.7001 S:bos.rte.libc 5.2.0.7001 S:bos.rte.libpthreads 5.2.0.7001 S:bos.net.nfs.client 5.2.0.7001 S:bos.net.tcp.client 5.2.0.7001
We can now start to set up the resource management. A more detailed explanation about resource management is available in Chapter 7, “Resource control and management” on page 109.
In this resource management example, we want to limit the CPU and the memory, so that it is not possible for the WPAR to allocate all available resources. Our LPAR has currently 4 GB memory and 4 CPUs. For our WPAR, we want only 2 GB and 30% of the CPU allocation. It is possible to add or remove resources online, and there is no need to restart the WPAR. See Example 14-8.
Example 14-8 We change the CPU resource of our WPAR
root@750_1_LPAR_6 / # chwpar -R CPU=10%-20%,30% lpar_6_wpar_1root@750_1_LPAR_6 / # lswpar -R lpar_6_wpar_1=================================================================lpar_6_wpar_1 - Active=================================================================Active: yesResource Set:CPU Shares: unlimitedCPU Limits: 10%-20%,30%Memory Shares: unlimitedMemory Limits: 0%-100%,100%Per-Process Virtual Memory Limit: unlimitedTotal Virtual Memory Limit: unlimitedTotal Processes: unlimitedTotal Threads: unlimitedTotal PTYs: unlimitedTotal Large Pages: unlimitedMax Message Queue IDs: 100%Max Semaphore IDs: 100%Max Shared Memory IDs: 100%Max Pinned Memory: 100%
In the next step, we perform the same exercise for the available memory. We want to give our WPAR 50% of the available memory as a minimum value. If there is more memory available, the WPAR can allocate it, as shown in Example 14-9 on page 326.
Chapter 14. Versioned workload partitions 325

Example 14-9 Managing the available memory to the WPAR
root@750_1_LPAR_6 / # chwpar -R memory=50%-100%,100% lpar_6_wpar_1root@750_1_LPAR_6 / # lswpar -R lpar_6_wpar_1=================================================================lpar_6_wpar_1 - Active=================================================================Active: yesResource Set:CPU Shares: unlimitedCPU Limits: 10%-20%,100%Memory Shares: unlimitedMemory Limits: 50%-100%,100%Per-Process Virtual Memory Limit: unlimitedTotal Virtual Memory Limit: unlimitedTotal Processes: unlimitedTotal Threads: unlimitedTotal PTYs: unlimitedTotal Large Pages: unlimitedMax Message Queue IDs: 100%Max Semaphore IDs: 100%Max Shared Memory IDs: 100%Max Pinned Memory: 100%
In our case, the host name has changed, so we need to adjust our DB2 database. We log in as user db2inst1, and we edit the /home/db2inst1/sqllib/db2nodes.cfg. Now, we can start our DB2 database again, as shown in Example 14-10.
Example 14-10 Successful start of our migrated DB2 database
$ db2startlscfg: device proc* not found.04/12/2011 14:32:51 0 0 SQL1063N DB2START processing was successful.SQL1063N DB2START processing was successfull
The lscfg device error can be ignored. The /proc directory is exported from the global environment.
We have now successfully migrated an AIX 5.2 server to a Versioned Workload Partition that is eligible for Live Application Mobility.
14.3 Installing the Oracle Database on the WPAR environment
This subsection covers an installation of an Oracle Database server single instance in a system WPAR running on an AIX operating system.
14.3.1 Certified AIX systems for Oracle Database 11gR2
AIX 5.3, AIX 6.1, and AIX 7.1 are certified operating systems for Oracle Database Version 11.2.0.1 running as single instance, and also with Real Application Cluster (RAC). See Table 14-1 on page 327.
Oracle Database single instance (SI) is certified on AIX 7.1; however, it is not certified on a WPAR on AIX 7.1. Oracle Database SI is only certified on a WPAR on AIX 6.1.
326 Exploiting IBM AIX Workload Partitions

You can obtain additional information about the compatibility matrix at these websites:
� My Oracle Support (for Oracle Certification):
https://support.oracle.com/CSP/ui/flash.htmlatrix
� Certification information about supported virtualization and partitioning technologies for Oracle Database and RAC product releases:
http://www.oracle.com/technetwork/database/virtualizationmatrix-172995.html
Table 14-1 Oracle Database versions supported with AIX versions
14.3.2 Oracle WPAR installation requirements on AIX
The following sections describe the Oracle WPAR installation requirements on AIX.
Supported WPARsOracle Database Server single instance mode installation is supported on the following types of WPARs:
� System rootvg WPARs� Shared and non-shared system WPARs
Supported devicesOnly the IBM AIX Journal File System 2 (JFS2) and supported network-attached storage (NAS) devices can be used with WPARs. Oracle’s Automatic Storage Management (ASM) is not supported at this time.
Required filesets and APARs The AIX required filesets for the Oracle Database are installed first in the global environment:
� bos.adt.base� bos.adt.lib� bos.adt.libm� bos.perf.libperfstat� bos.perf.perfstat � bos.perf.proctools� xlC.aix61.rte� xlC.rte
Depending on your AIX operating system level, you must install the required APARs and meet the requirements mentioned in the Oracle Database 11g release 2 Installation Guide:
http://download.oracle.com/docs/cd/E11882_01/install.112/e17162/pre_install.htm
Operating system Oracle Database version Comments
AIX 5.3 9i,10gR2, 11gR1, and 11gR2 Verify the required AIX TL.
AIX 6.1 10gR2, 11gR1, and 11gR2 Verify the required AIX TL.
AIX 7.1 11gR2 TL0, SP1, and SP2
Important: Application WPARs are not supported. Refer to Chapter 2, “Overview of the latest enhancements” on page 19 for more details about WPAR’s supported features. In this subsection, the term WPAR references a system WPAR.
Chapter 14. Versioned workload partitions 327

You can obtain the latest updates and fixes for your operating system and system hardware at this website:
http://www-933.ibm.com/support/fixcentral/
After all software prerequisites are installed, the synchronization between the WPAR software level and the global software level is required. The WPAR must have all the required software packages installed.
Environmental variablesThe environmental variable AIXPERFSTAT_SCOPE with value M must be set inside of the WPAR environment before (refer to Example 14-11) starting the listener and database for all local connections.
Example 14-11 Environmental variables
On Korn Shell $ export AIXPERFSTAT_SCOPE=M
On C Shell% setenv AIXPERFSTAT_SCOPE M
14.3.3 Oracle installation guidelines
Review the following documents for an Oracle Database 11g installation on AIX:
� IBM Reference FLASH10688:
https://www-304.ibm.com/jct03001c/support/techdocs/atsmastr.nsf/WebIndex/FLASH10688
� Oracle Database Installation Guide 11g Release 2 for AIX on POWER Systems (64-bit), E10854-05:
http://download.oracle.com/docs/cd/E11882_01/install.112/e10854/toc.htm
� Oracle Database Release s 11g Release 2 (11.2) for AIX on POWER Systems (64-bit), E10853-03:
http://download.oracle.com/docs/cd/E11882_01/rels.112/e10853/toc.htm
� My Oracle Support 282036.1, “Minimum Software Versions and Patches Required to Support Oracle Products on IBM pSeries” for the latest, up-to-date issues regarding Oracle Database 11g Release 2 and AIX
� Oracle Database Editions and Options:
http://www.oracle.com/database/product_editions.html
� My Oracle Support 889220.1, IBM AIX Workload Partition (WPAR) Installation Document
Tuning parameters and other variables for the Oracle Database server are described in detail in the Oracle documentation.
Important: In AIX 7.1, the default value for the AIXPERFSTAT_SCOPE variable is “P”, which signifies a process-wide contention scope (M:N). “S” signifies a system-wide contention scope (1:1).
328 Exploiting IBM AIX Workload Partitions

14.3.4 Installing an Oracle Database on a non-shared system WPAR
A non-shared system (detached) WPAR has a private copy of all files from the /usr file system and /opt file system from the global environment.
Depending on the type of storage devices used, a non-shared system WPAR can be based on global storage devices or configured with one or more dedicated devices for its own rootvg or other volume groups.
The Oracle Database software is installed inside of the WPAR. We create a system non-shared rootvg WPAR with one endpoint device, as shown in Example 14-12.
Example 14-12 Endpoint device attached and WPAR details
root@750_1_LPAR_3:/> lswparName State Type Hostname Directory RootVG WPAR------------------------------------------------------------wparm90 A S wparm90 /wpars/wparm90 yes
root@750_1_LPAR_3:/> lswpar -Da devname wparm90|grep hdiskhdisk4root@750_1_LPAR_3:/> lswpar -L wparm90=================================================================wparm90 - Active=================================================================GENERALType: SRootVG WPAR: yesOwner: rootHostname: wparm90WPAR-Specific Routing: yesDirectory: /wpars/wparm90Start/Stop Script:Auto Start: noPrivate /usr: yesCheckpointable: yesApplication:...FILE SYSTEMSMount Point Device Vfs Nodename Options-----------------------------------------------------------------/wpars/wparm90 /dev/fslv01 jfs2/wpars/wparm90/etc/ob... /dev/fslv02 jfs2/wpars/wparm90/opt /opt namefs ro/wpars/wparm90/usr /usr namefs ro
We create a group and a user for the Oracle Database installation inside of the WPAR, as shown in Example 14-13.
Example 14-13 User and group needed for Oracle installation
root@wparm90:/> mkgroup -A id=500 oinstallroot@wparm90:/> mkuser -a id=500 pgrp=oinstall oracleroot@wparm91:/> passwd oracleChanging password for "oracle"oracle's New password:
Chapter 14. Versioned workload partitions 329

Re-enter oracle's new password:root@wparm90:/> pwdadm -c oracle
We set the required ulimit values for the oracle user in the /etc/security/limits.conf file with corresponding values to conform to the Oracle documentation.
The application directory is set on /u01 with the required permission for the oracle user and group. In our case, the JFS2 file system with mount point /u01 is created on the system detached WPAR rootvg.
At the global level, the kernel extensions for the Oracle installation are loaded first, as shown in Example 14-14.
Example 14-14 On the global environment, rootpre.sh is required to run first
root@750_1_LPAR_3:/software/database> ./rootpre.sh./rootpre.sh output will be logged in /tmp/rootpre.out_11-04-11.22:42:37Saving the original files in /etc/ora_save_11-04-11.22:42:37....Copying new kernel extension to /etc....Loading the kernel extension from /etc
Oracle Kernel Extension Loader for AIX Copyright (c) 1998,1999 Oracle Corporation
Successfully loaded /etc/pw-syscall.64bit_kernel with kmid: 0x50a97000 Successfully configured /etc/pw-syscall.64bit_kernel with kmid: 0x50a97000The kernel extension was successfuly loaded.Checking if group services should be configured....Nothing to configure.
We verify the software requirements in the global environment and inside the WPAR, as shown in Example 14-15.
Example 14-15 Verify the software requirements
oot@750_1_LPAR_3:/> lslpp -l bos.adt.base bos.adt.lib bos.adt.libm bos.perf.libperfstat \bos.perf.perfstat bos.perf.proctools xlC.aix61.rte X11.motif.lib xlC.aix61.rte xlC.rte
Fileset Level State Description ----------------------------------------------------------------------------Path: /usr/lib/objrepos X11.motif.lib 6.1.4.0 COMMITTED AIXwindows Motif Libraries bos.adt.base 6.1.4.1 COMMITTED Base Application Development Toolkit bos.adt.lib 6.1.2.0 COMMITTED Base Application Development Libraries bos.adt.libm 6.1.4.0 COMMITTED Base Application Development Math Library bos.perf.libperfstat 6.1.4.2 COMMITTED Performance Statistics Library Interface
Tip: rootpre.sh makes available the Oracle Kernel Extension for all WPARs, and it is not required to be run again for other installations.
330 Exploiting IBM AIX Workload Partitions

bos.perf.perfstat 6.1.4.1 COMMITTED Performance Statistics Interface bos.perf.proctools 6.1.4.1 COMMITTED Proc Filesystem Tools xlC.aix61.rte 10.1.0.2 COMMITTED XL C/C++ Runtime for AIX 6.1 xlC.rte 10.1.0.2 COMMITTED XL C/C++ Runtime
Path: /etc/objrepos bos.adt.base 6.1.4.1 COMMITTED Base Application Development Toolkit bos.perf.libperfstat 6.1.4.2 COMMITTED Performance Statistics Library Interface bos.perf.perfstat 6.1.4.0 COMMITTED Performance Statistics Interface
If you encounter an error message, as shown in Figure 14-1, this error is not related to the WPAR environment.
Figure 14-1 Error message
Synchronization: The synchronization of the software levels between the global environment and system non-shared WPAR is done with the syncwpar command:
syncwpar -D [-d device ] [-p] [-v] [-X] { -A | -f wparNamesFile | wparName }
The device or directory specified with the -d flag must contain the update images that have been applied to the global environment and that are needed to be applied to WPAR. The flag -d is used with the -D flag.
When the -d flag is not specified, the synchronization rejects or commits the levels of software in the detached WPARs.
Chapter 14. Versioned workload partitions 331

The error is caused by a program or library that is linked with the -blazy flag and that does not behave correctly. This error is specified by IBM iFix IZ86476 with the work-around: do not use the –blazy option.
The work-around that is provided by Oracle is located in the Oracle metalink 1298284.1 at this website:
https://metalink.oracle.com
To continue the installation process, we have two options:
1. Continue the installation. At the end of installation, we follow the steps that are described on the Oracle metalink 1298284.1.
2. Modify $ORACLE_HOME/sysman/lib/env_emagent.mk file without the -blazy option for the LIB_JVM_LINK definition.
We remove from the $ORACLE_HOME/sysman/lib/env_emagent.mk file the –blazy option from the LIB_JVM_LINK definition, as shown in Example 14-16.
We click twice on the retry installation button (one click for the acknowledgement and cleaning up the actual running script, and the second click to continue the installation with the actual configuration).
Example 14-16 Line change in $ORACLE_HOME/sysman/lib/env_emagent.mk
LIB_JVM_LINK = -L$(JRE_LIB_DIR)/classic -L$(JRE_LIB_DIR) -blazy -ljava –ljvm.The line becomes: LIB_JVM_LINK = -L$(JRE_LIB_DIR)/classic -L$(JRE_LIB_DIR) -ljava –ljvm
When the installation has completed successfully, the root.sh and orainstRoot.sh are required to run as the root inside of the WPAR.
14.3.5 Listener configuration
Special considerations are required for the environment variable AIXPERFSTAT_SCOPE when remote connections are used.
The parameter ENVS is used to specify the AIXPERFSTAT_SCOPE environment variable inside of the listener.ora configuration file.
You can add the (ENVS = 'AIXPERFSTAT_SCOPE=M') on the listener.ora configuration file, as shown in Example 14-17. Example 14-18 on page 333 shows the listener.ora starting.
Example 14-17 Example of listener.ora configuration file
# Generated by Oracle configuration tools.LISTENER = (DESCRIPTION_LIST = (DESCRIPTION = (ADDRESS = (PROTOCOL = TCP)(HOST = wparm91)(PORT = 1521)) (ADDRESS = (PROTOCOL = IPC)(KEY = EXTPROC1521)) ) )SID_LIST_LISTENER= (SID_LIST= (SID_DESC= (GLOBAL_DBNAME=itsodb.ibm.com)
332 Exploiting IBM AIX Workload Partitions

(ORACLE_HOME=/usr/u01/app/oracle/product/11.2.0/dbhome_1) (SID_NAME=itsodb) (ENVS = 'AIXPERFSTAT_SCOPE=M')) (SID_DESC= (SID_NAME=plsextproc) (ORACLE_HOME=/usr//u01/app/oracle/product/11.2.0/dbhome_1) (PROGRAM=extproc)))ADR_BASE_LISTENER = /usr/u01/app/oracle
Example 14-18 Listener starting
oracle@wparm90:/u01/app/oracle/product/11.2.0/dbhome_1/bin> ./lsnrctl start
LSNRCTL for IBM/AIX RISC System/6000: Version 11.2.0.1.0 - Production on 11-APR-2011 13:01:23
Copyright (c) 1991, 2009, Oracle. All rights reserved.
Starting /u01/app/oracle/product/11.2.0/dbhome_1/bin/tnslsnr: please wait...
TNSLSNR for IBM/AIX RISC System/6000: Version 11.2.0.1.0 - ProductionSystem parameter file is /u01/app/oracle/product/11.2.0/dbhome_1/network/admin/listener.oraLog messages written to /u01/app/oracle/diag/tnslsnr/wparm90/listener/alert/log.xmlListening on: (DESCRIPTION=(ADDRESS=(PROTOCOL=tcp)(HOST=wparm90)(PORT=1521)))Listening on: (DESCRIPTION=(ADDRESS=(PROTOCOL=ipc)(KEY=EXTPROC1521)))
Connecting to (DESCRIPTION=(ADDRESS=(PROTOCOL=TCP)(HOST=wparm90)(PORT=1521)))STATUS of the LISTENER------------------------Alias LISTENERVersion TNSLSNR for IBM/AIX RISC System/6000: Version 11.2.0.1.0 - ProductionStart Date 11-APR-2011 13:01:23Uptime 0 days 0 hr. 0 min. 0 secTrace Level offSecurity ON: Local OS AuthenticationSNMP OFFListener Parameter File /u01/app/oracle/product/11.2.0/dbhome_1/network/admin/listener.oraListener Log File /u01/app/oracle/diag/tnslsnr/wparm90/listener/alert/log.xmlListening Endpoints Summary... (DESCRIPTION=(ADDRESS=(PROTOCOL=tcp)(HOST=wparm90)(PORT=1521))) (DESCRIPTION=(ADDRESS=(PROTOCOL=ipc)(KEY=EXTPROC1521)))Services Summary...Service "itsodb" has 1 instance(s). Instance "itsodb", status UNKNOWN, has 1 handler(s) for this service...Service "plsextproc" has 1 instance(s). Instance "plsextproc", status UNKNOWN, has 1 handler(s) for this service...The command completed successfully
TNSNAMES.ORA configuration file The tnsnames.ora configuration file contains the net service names mapped to connect descriptors for the local naming method. The net service names mapped to listener protocol addresses do not require special configuration for the WPAR environment. Refer to Example 14-19 on page 334.
Chapter 14. Versioned workload partitions 333

Example 14-19 Example of tnsnames.ora
ITSO = (DESCRIPTION = (ADDRESS_LIST = (ADDRESS = (PROTOCOL = TCP)(HOST = 172.16.20.90)(PORT = 1521)) ) (CONNECT_DATA = (SERVER = DEDICATED) (SERVICE_NAME = ITSODB.IBM.COM) ) )
14.3.6 Oracle Database
The Oracle Database is created inside of the WPAR.
In the next steps, we test the remote connectivity to the Oracle Database using an Oracle Database client running on the Windows platform, as shown in Example 14-20.
Example 14-20 Starting the database
oracle@wparm90:/u01/app/oracle/product/11.2.0/dbhome_1/bin> export AIXPERFSTAT_SCOPE=Moracle@wparm90:/u01/app/oracle/product/11.2.0/dbhome_1/bin> sqlplus / as sysdba
SQL*Plus: Release 11.2.0.1.0 Production on Mon Apr 11 13:04:20 2011
Copyright (c) 1982, 2009, Oracle. All rights reserved.
Connected to an idle instance.
SQL> startupORACLE instance started.
Total System Global Area 1720328192 bytesFixed Size 2207488 bytesVariable Size 1056964864 bytesDatabase Buffers 654311424 bytesRedo Buffers 6844416 bytesDatabase mounted.Database opened.
SQL> create user m identified by m;
User created.
SQL> grant resource,connect to m;
Grant succeeded.SQL> select to_char(sysdate,'HH24:MI:SS') as time,to_char(sysdate,'YYYY MM DD') as YYYYMMDD from dual;TIME YYYYMMDD-------- ----------13:21:00 2011 04 11
Important: The environment variable AIXPERFSTAT_SCOPE=M must be set before starting the database.
334 Exploiting IBM AIX Workload Partitions

We get connectivity to the database by using the Oracle client, as shown in Example 14-21.
Example 14-21 Connect remotely to the database
C:\Documents and Settings\Administrator>sqlplus /nolog
SQL*Plus: Release 10.2.0.1.0 - Production on Mon Apr 11 13:10:33 2011
Copyright (c) 1982, 2005, Oracle. All rights reserved.SQL> connect m/[email protected]> select to_char(sysdate,'HH24:MI:SS') as time,to_char(sysdate,'YYYY MM DD') as YYYYMMDD from dual;TIME YYYYMMDD-------- ----------13:21:21 2011 04 11
Client tnsnames.oraThe network configuration file tnsnames.ora does not require special configuration for the WPAR environment. See Example 14-22.
Example 14-22 Client tnsname.ora
ITSO =(DESCRIPTION = (ADDRESS_LIST = (ADDRESS = (PROTOCOL = TCP)(HOST = 172.16.20.90)(PORT = 1521)) ) (CONNECT_DATA = (SERVER = DEDICATED) (SERVICE_NAME = ITSODB.IBM.COM) ) )
Enterprise manager consoleThe enterprise manager database control console is started inside of the WPAR environment, as shown in Example 14-23.
Example 14-23 Starting the enterprise manager console
oracle@wparm90:/u01/app/oracle/product/11.2.0/dbhome_1/bin> ./emctl start dbconsoleOracle Enterprise Manager 11g Database Control Release 11.2.0.1.0Copyright (c) 1996, 2009 Oracle Corporation. All rights reserved.https://wparm90:1158/em/console/aboutApplicationStarting Oracle Enterprise Manager 11g Database Control ............ started.
We verify the running status of the enterprise management console, as shown in Example 14-24. The logs are generated in the directory /u01/app/oracle/product/11.2.0/dbhome_1/wparm90_itsodb/sysman/log.
Example 14-24 Enterprise manager agent starting
oracle@wparm90:/u01/app/oracle/product/11.2.0/dbhome_1/wparm90_itsodb/sysman/log> tail -f -n 5 /u01/app/oracle/product/11.2.0/dbhome_1/wparm2011-04-08 10:16:43,930 Thread-1 EMAgent normal shutdown (00703)2011-04-11 13:23:46,502 Thread-1 Starting Agent 10.2.0.4.2 from /u01/app/oracle/product/11.2.0/dbhome_1 (00701)
Chapter 14. Versioned workload partitions 335

2011-04-11 13:23:47,672 Thread-1 [Oracle Exadata Storage Server] InstanceProperty (MgmtIPAddr2) is marked OPTIONAL but is being used (00506)2011-04-11 13:23:48,116 Thread-1 [Load Balancer Switch] InstanceProperty (snmpTimeout) is marked OPTIONAL but is being used (00506)2011-04-11 13:23:57,456 Thread-1 EMAgent started successfully (00702)
We start the enterprise manager console in the WPAR environment, as shown in Example 14-25.
Example 14-25 Starting the enterprise management console
oracle@wparm90:/u01/app/oracle/product/11.2.0/dbhome_1/bin> ./emctl start dbconsoleOracle Enterprise Manager 11g Database Control Release 11.2.0.1.0Copyright (c) 1996, 2009 Oracle Corporation. All rights reserved.https://wparm90:1158/em/console/aboutApplicationStarting Oracle Enterprise Manager 11g Database Control ............ started.------------------------------------------------------------------Logs are generated in directory /u01/app/oracle/product/11.2.0/dbhome_1/wparm90_itsodb/sysman/log
We access the enterprise management console using a web browser at http://<hostname>:1158/em/console, as shown in Figure 14-2.
Figure 14-2 Enterprise manager availability
Using a data generator, we load the data into the database by using a type IV1 Java Database Connectivity (JDBC) driver (Thin). The database activity is monitored by the enterprise manager database control, as shown in Figure 14-3 on page 337.
336 Exploiting IBM AIX Workload Partitions

Figure 14-3 Database activity in WPAR environment
14.3.7 Installing Oracle on a shared system WPAR
The shared system WPAR has the advantage of sharing installed software that is located in the /usr or /opt file system in the global environment.
You can install the desired software inside a shared system WPAR, but the software will be deployed in a separate location instead of the /usr or /opt file system, because /usr and /opt are shared as read-only from the global environment using namefs mounts.
Creating writable directories under the /usr or /opt file system will permit the software installation under the read-only directories, bypassing this situation. You have to create a new file system for WPAR in the global environment, which will be linked under the /usr or /opt file system. All operations must be performed in the global environment.
The required folders for the Oracle Database installation are /usr/local and /opt/ORCLfmap which are private folders for the shared WPAR. These folders should have read-write permissions, and
the installation is performed as with the system-detached WPAR.
The required folders for the Oracle Database installation are /usr/local and /opt/ORCLfmap, which are private folders for the shared WPAR. These folders need to have read-write permissions, and the installation is performed as with the system-detached WPAR.
Read-only: The /usr and /opt file systems are read-only in a shared system WPAR.
For more information: To create a writable directory under a shared directory reference, see this website:
http://publib.boulder.ibm.com/infocenter/aix/v6r1/index.jsp?topic=/com.ibm.aix.wpar/config-fs.htm
Chapter 14. Versioned workload partitions 337

Depending on the storage that is used, you allocate storage from the global environment to the shared WPAR, or you can use a system shared rootvg WPAR with dedicated storage devices.
For an Oracle single database, with all these considerations, you can perform the installation inside of the shared system WPAR as in the system non-shared rootvg WPAR.
If you want to use the /usr file system and /opt file system from the global environment in read-write mode, it is possible to mount them inside of the WPAR over NFS with separate mount points (of course, after the file systems are already NFS-exported in the global environment).
In a system shared WPAR, rootvg or not, you can create the Oracle Database using the Oracle software installation mounted over NFS from the global environment, although this method is not recommended.
14.3.8 Live Application Mobility for the Oracle Database
The Live Application Mobility feature of WPAR is not certified with Oracle. You can relocate WPARs running the Oracle Database using static application mobility.
14.3.9 Tivoli Storage Manager data protection for Oracle
Besides the Tivoli Storage Manager backup archive client, you can use (inside of a WPAR) the Tivoli Storage Manager client for Databases (Database Protection for Oracle).
Tivoli Storage Manager Data Protection for Oracle is supported with detached or shared system WPARs. The Tivoli Storage Manager logs and configuration files have to be defined to non-default locations.
Important: Mounting over NFS of the full /usr file system and the /opt file system in read-write mode on other systems is not recommended.
Important: When NFS-mounted directories from the global environment are used for Oracle Database creation, depending on the configuration, only the command-line interface is available for database creation and configuration.
Oracle highly recommends creating the database by using the database configuration assistant (DBCA).
338 Exploiting IBM AIX Workload Partitions

Part 5 Appendixes
In this part of the publication, the appendixes provide general information about problem analysis and debugging and information about considerations while handling application workload partitions (WPARs).
Part 5
© Copyright IBM Corp. 2011. All rights reserved. 339

340 Exploiting IBM AIX Workload Partitions

Appendix A. Debugging, messages, and problem analysis
This appendix provides debugging, messaging, and problem analysis situations that occurred during the writing of this IBM Redbooks publication.
This appendix contains the following topics:
� Problems with syncwpar� bos.rte.security.post_u error with mkwpar� Insufficient file system space during the WPAR creation� WPAR staying in the T state due to remaining mount points� What to do if your WPAR ends up in the broken state� What to do if you cannot fix the problem� A WPAR can also end up in the broken state when you attempt to start it
A
© Copyright IBM Corp. 2011. All rights reserved. 341

Problems with syncwpar
In our environment, the syncwpar command failed when we updated the IBM Systems Director agent from Version 6.2.0 to Version 6.2.1, as shown in Example A-1.
Example A-1 syncwpar error
syncroot: Processing root part installation status. syncroot: ATTENTION, Root part is currently synchronized, but there are other SWVPD inconsistencies. Please execute "/usr/bin/lppchk -v" for more information. syncroot: Returns Status = FAILURE Workload partition lpar_6_wpar_2 created successfully. mkwpar: 0960-390 To start the workload partition, execute the following as root: startwpar [-v] lpar_6_wpar_2
The start-up for the workload partition (WPAR) was successful, and it was possible to log in without any error. But if we ran the lppchk command inside the WPAR, we got the following error, as shown in Example A-2.
Example A-2 Output of lppchk -v run inside the WPAR
# lppchk -v lppchk: The following filesets need to be installed or corrected to bring the system to a consistent state:
sysmgt.cimserver.pegasus.rte 2.9.1.0 (not installed; requisite fileset)
To solve this problem, you need to mark the Director.msg filesets as private. They are not supposed to run installed inside a WPAR. You run this command in the global environment, and it affects all WPARs running in it. Example A-3 shows a command that solves this problem.
Example A-3 Marking all Director.msg filesets private
lslpp -Lc | grep Director.install.msg | cut -f2 -d\: | xargs swvpdmgr -p
bos.rte.security.post_u error with mkwpar
When issuing the mkwpar command to create a shared system WPAR (as shown in Example A-4), several error messages are displayed with regard to the bos.rte.security fileset.
Example A-4 Creating a shared system WPAR with the mkwpar command
# mkwpar -n wpar1
Note: IBM intends to fix this situation in the next version of the IBM Systems Director agent.
342 Exploiting IBM AIX Workload Partitions

The error messages relate to the bos.rte.security.post_u script. Example A-5 shows an example of the possible messages.
Example A-5 mkwpar bos.rte.security error messages
installp: APPLYING software for: bos.rte.security 6.1.6.4
The file system has read permission only.bos.rte.security.post_u[227]: bos.rte.security.unpost_u: 0403-005 Cannot create the specified file.chmod: bos.rte.security.unpost_u: The file system has read permission only.The file system has read permission only.bos.rte.security.post_u[232]: bos.rte.security.unpost_u: 0403-005 Cannot create the specified file.The file system has read permission only.bos.rte.security.post_u[441]: bos.rte.security.unpost_u: 0403-005 Cannot create the specified file.The file system has read permission only.bos.rte.security.post_u[793]: bos.rte.security.unpost_u: 0403-005 Cannot create the specified file.The file system has read permission only.bos.rte.security.post_u[9]: tmpfile: 0403-005 Cannot create the specified file.The file system has read permission only.bos.rte.security.post_u[12]: tmpfile: 0403-005 Cannot create the specified file.The file system has read permission only.bos.rte.security.post_u[13]: tmpfile: 0403-005 Cannot create the specified file.The file system has read permission only.bos.rte.security.post_u[15]: bos.rte.security.unpost_u: 0403-005 Cannot create the specified file.rm: tmpfile: A file or directory in the path name does not exist.The file system has read permission only.
These errors occur, because the update script from the root part of the bos.rte.security fileset attempts to write to the user (/usr) file system. The /usr file system is mounted read-only in a shared system WPAR and therefore is not writable.
This is a limitation in the current packaging of this fileset, but it does not negatively affect the creation of the WPAR. These errors can be safely ignored.
Insufficient file system space during the WPAR creation
During the creation of a shared system WPAR, the process might fail with an error stating that the WPAR’s root file system is full. An error (similar to the error that is shown in Example A-6) is reported in the global environment AIX error report.
Example A-6 WPAR root file system full during mkwpar process
LABEL: J2_FS_FULLIDENTIFIER: F7FA22C9
Date/Time: Tue Mar 29 21:10:06 EETDT 2011Sequence Number: 216
Appendix A. Debugging, messages, and problem analysis 343
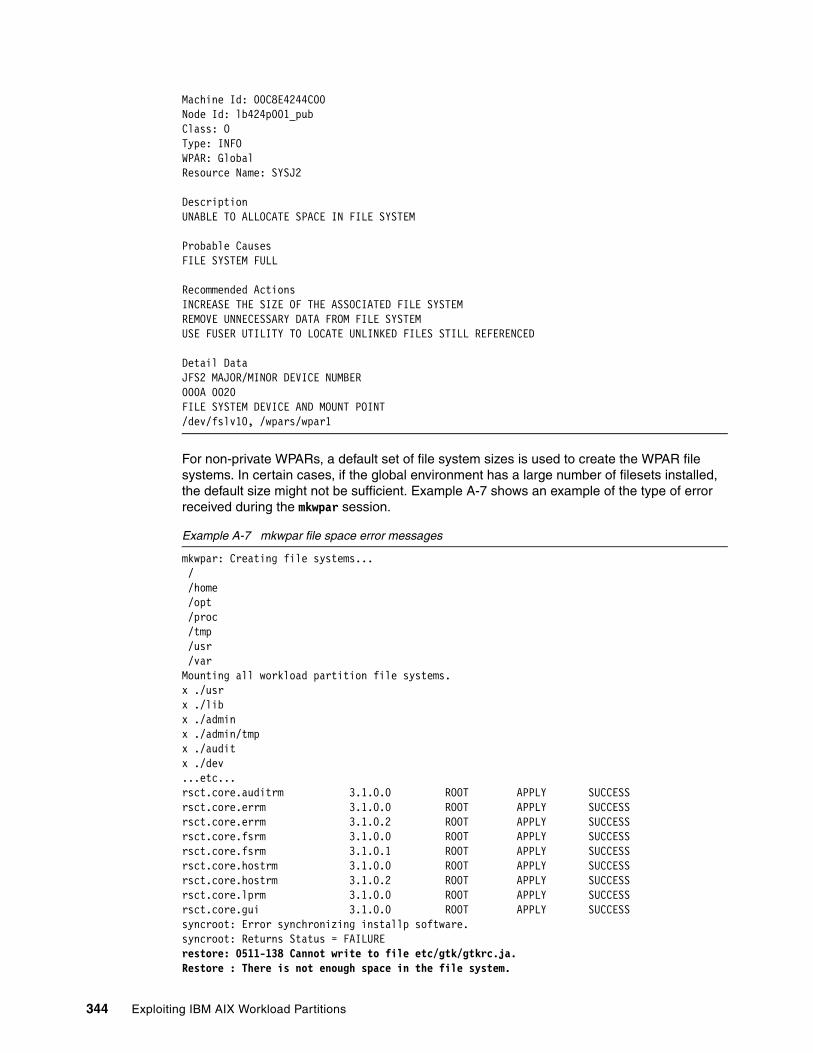
Machine Id: 00C8E4244C00Node Id: lb424p001_pubClass: OType: INFOWPAR: GlobalResource Name: SYSJ2
DescriptionUNABLE TO ALLOCATE SPACE IN FILE SYSTEM
Probable CausesFILE SYSTEM FULL
Recommended ActionsINCREASE THE SIZE OF THE ASSOCIATED FILE SYSTEMREMOVE UNNECESSARY DATA FROM FILE SYSTEMUSE FUSER UTILITY TO LOCATE UNLINKED FILES STILL REFERENCED
Detail DataJFS2 MAJOR/MINOR DEVICE NUMBER000A 0020FILE SYSTEM DEVICE AND MOUNT POINT/dev/fslv10, /wpars/wpar1
For non-private WPARs, a default set of file system sizes is used to create the WPAR file systems. In certain cases, if the global environment has a large number of filesets installed, the default size might not be sufficient. Example A-7 shows an example of the type of error received during the mkwpar session.
Example A-7 mkwpar file space error messages
mkwpar: Creating file systems... / /home /opt /proc /tmp /usr /varMounting all workload partition file systems.x ./usrx ./libx ./adminx ./admin/tmpx ./auditx ./dev...etc...rsct.core.auditrm 3.1.0.0 ROOT APPLY SUCCESSrsct.core.errm 3.1.0.0 ROOT APPLY SUCCESSrsct.core.errm 3.1.0.2 ROOT APPLY SUCCESSrsct.core.fsrm 3.1.0.0 ROOT APPLY SUCCESSrsct.core.fsrm 3.1.0.1 ROOT APPLY SUCCESSrsct.core.hostrm 3.1.0.0 ROOT APPLY SUCCESSrsct.core.hostrm 3.1.0.2 ROOT APPLY SUCCESSrsct.core.lprm 3.1.0.0 ROOT APPLY SUCCESSrsct.core.gui 3.1.0.0 ROOT APPLY SUCCESSsyncroot: Error synchronizing installp software.syncroot: Returns Status = FAILURErestore: 0511-138 Cannot write to file etc/gtk/gtkrc.ja.Restore : There is not enough space in the file system.
344 Exploiting IBM AIX Workload Partitions

populate: 0960-415 Warning: Unable to synchronize rpm-installed files into workload partition.Workload partition wpar1 created successfully.mkwpar: 0960-390 To start the workload partition, execute the following as root: startwpar [-v] wpar1
It might still be possible to start the WPAR after its creation, but upon investigation, you will see that the root file system for the WPAR is already full (as shown in Example A-8).
Example A-8 Root file system full in the WPAR
# startwpar -v wpar1Starting workload partition wpar1.Mounting all workload partition file systems.Mounting /wpars/wpar1Mounting /wpars/wpar1/homeMounting /wpars/wpar1/optMounting /wpars/wpar1/procMounting /wpars/wpar1/tmpMounting /wpars/wpar1/usrMounting /wpars/wpar1/varLoading workload partition.Exporting workload partition devices.Starting workload partition subsystem cor_wpar1.0513-059 The cor_wpar1 Subsystem has been started. Subsystem PID is 5046334.Verifying workload partition startup.Return Status = SUCCESS.
# clogin wpar1# df -gFilesystem GB blocks Free %Used Iused %Iused Mounted onGlobal 0.12 0.00 100% 5356 89% /Global 0.12 0.12 2% 5 1% /homeGlobal 0.62 0.10 85% 8922 28% /optGlobal - - - - - /procGlobal 0.12 0.12 3% 9 1% /tmpGlobal 4.00 0.18 96% 103953 63% /usrGlobal 0.12 0.05 59% 2752 19% /var#
In this situation, you might also discover the error that is shown in Example A-9, while attempting to connect to the WPAR with the clogin command.
Example A-9 clogin command error when the WPAR root file system is full
# clogin wpar1/dev/Global: 3004-004 You must "exec" login from the lowest login shell.
If this issue is encountered, run the mkwpar command with the -M flag to specify the size of the root file system. The command that is shown in Example A-10 specifies the desired size of the WPAR’s root file system at the time of creation.
Example A-10 Using the -M flag with mkwpar to specify the size of /
mkwpar -n wpar1 -M directory=/ size=512M
The -M flag can be used to override the default size of any file system for a WPAR.
Appendix A. Debugging, messages, and problem analysis 345

WPAR staying in the T state due to remaining mount points
When trying to stop a WPAR, it might stay in the T state if we forgot to unmount a Global file system, as we show in Example A-11.
The failure is clearly shown in the stopwpar command output message. After this situation happens, we are not able to use a forced stop or restart the WPAR until we remove the remaining mount and issue a forced stop on the WPAR.
Example A-11 WPAR staying in T state issue
# startwpar mig_wpar_3Starting workload partition 'mig_wpar_3'.Mounting all workload partition file systems.Loading workload partition.Exporting workload partition devices.hdisk2 DefinedStarting workload partition subsystem 'cor_mig_wpar_3'.0513-059 The cor_mig_wpar_3 Subsystem has been started. Subsystem PID is 9109580.Verifying workload partition startup.# lswparName State Type Hostname Directory RootVG WPAR--------------------------------------------------------------------mig_wpar_3 A S mig_wpar_3 /wpars/mig_wpar_3 yes # mount /dev/swlv /wpars/mig_wpar_3/SW# clogin mig_wpar_3******************************************************************************** ** ** Welcome to AIX Version 6.1! ** ** ** Please see the README file in /usr/lpp/bos for information pertinent to ** this release of the AIX Operating System. ** ** ********************************************************************************Last login: Mon Apr 11 10:56:20 2011 on /dev/Global from 750_1_LPAR_4# ls /SWC1G2MML C1G2NML lost+found# mount-------- --------------- --------------- ------ ------------ ---------------
Global / jfs2 Apr 18 05:12 rw,log=INLINE /dev/hd4 / jfs2 Apr 18 05:12 rw,log=INLINE /dev/hd2 /usr jfs2 Apr 18 05:12 rw,log=INLINE /dev/hd10opt /opt jfs2 Apr 18 05:12 rw,log=INLINE /dev/hd11admin /admin jfs2 Apr 18 05:12 rw,log=INLINE /dev/hd1 /home jfs2 Apr 18 05:12 rw,log=INLINE /dev/hd3 /tmp jfs2 Apr 18 05:12 rw,log=INLINE /dev/hd9var /var jfs2 Apr 18 05:12 rw,log=INLINE Global /etc/objrepos/wboot jfs2 Apr 18 05:12 rw,log=INLINE Global /proc namefs Apr 18 05:12 rw Global /SW jfs2 Apr 18 05:13 rw,log=/dev/hd8 # exit# stopwpar -N mig_wpar_3
346 Exploiting IBM AIX Workload Partitions

Stopping workload partition subsystem 'cor_mig_wpar_3'.0513-044 The cor_mig_wpar_3 Subsystem was requested to stop.stopwpar: 0960-242 Waiting for workload partition to halt.Shutting down all workload partition processes.stopwpar: 0960-630 Failed to unmount /SW.stopwpar: 0960-232 ATTENTION: 'wpar_sweep()' returned an unexpected result.# lswparName State Type Hostname Directory RootVG WPAR--------------------------------------------------------------------mig_wpar_3 T S mig_wpar_3 /wpars/mig_wpar_3 yes # startwpar mig_wpar_3startwpar: 0960-231 ATTENTION: '/usr/lib/wpars/wparlockctl' failed with return code 14.startwpar: 0960-247 Error processing workload partition locks.# stopwpar -F mig_wpar_3Stopping workload partition 'mig_wpar_3'.Stopping workload partition subsystem 'cor_mig_wpar_3'.0513-004 The Subsystem or Group, cor_mig_wpar_3, is currently inoperative.Shutting down all workload partition processes.stopwpar: 0960-630 Failed to unmount /SW.stopwpar: 0960-232 ATTENTION: 'wpar_sweep()' returned an unexpected result.Stopping workload partition subsystem 'cor_mig_wpar_3'.0513-004 The Subsystem or Group, cor_mig_wpar_3, is currently inoperative.Shutting down all workload partition processes.stopwpar: 0960-630 Failed to unmount /SW.stopwpar: 0960-232 ATTENTION: 'wpar_sweep()' returned an unexpected result.Method error (/etc/methods/ucfgdevice): 0514-062 Cannot perform the requested function because the specified device is busy.Method error (/usr/lib/methods/ucfgdevice): 0514-029 Cannot perform the requested function because a child device of the specified device is not in a correct state.Method error (/etc/methods/ucfgdevice): 0514-062 Cannot perform the requested function because the specified device is busy./usr/lib/wpars/wparinstcmd: 0960-231 ATTENTION: '/usr/lib/wpars/wpardevstop' failed with return code 1.stopwpar: 0960-228 ATTENTION: cleanup may not have completed successfully.# umount /wpars/mig_wpar_3/SW# stopwpar mig_wpar_3stopwpar: 0960-231 ATTENTION: '/usr/lib/wpars/wparlockctl' failed with return code 14.stopwpar: 0960-247 Error processing workload partition locks.# stopwpar -F mig_wpar_3Stopping workload partition 'mig_wpar_3'.Stopping workload partition subsystem 'cor_mig_wpar_3'.0513-004 The Subsystem or Group, cor_mig_wpar_3, is currently inoperative.Shutting down all workload partition processes.hdisk0 Definedvscsi0 Definedvscsi0 Definedwio0 DefinedUnmounting all workload partition file systems.# lswpar Name State Type Hostname Directory RootVG WPAR
Appendix A. Debugging, messages, and problem analysis 347

--------------------------------------------------------------------mig_wpar_3 D S mig_wpar_3 /wpars/mig_wpar_3 yes
What to do if your WPAR ends up in the broken state
There are various WPAR states that might be reported by the lswpar command:
� D - Defined. The WPAR has been defined, but it is not active. When you stop an active WPAR, it typically goes back to this state.
� T - Transitional. There is an administrative operation acting on the WPAR, typically, an indication that it is starting or stopping.
� A - Active. The WPAR is actively running.
� B - Broken. An administrative action on the WPAR has failed, leaving it in an unusable state. In most cases, this situation can be remedied with simple actions. The rest of this section provides recommendations to repair broken WPARs.
The most frequent case is a WPAR that ends up in a broken state as a result of a WPAR shutdown (stopwpar) operation due to errors unmounting WPAR file systems. You might see the following messages:
� "umount: error unmounting /dev/fslvXY: Device busy"
� "/usr/lib/wpars/wparinstcmd: 0960-231 ATTENTION: '/usr/bin/acctctl -nomsg' failed with return code 1."
� "/usr/lib/wpars/wparinstcmd: 0960-231 ATTENTION: '/usr/bin/projctl qpolicy -nomsg' failed with return code 255."
� "stopwpar: 0960-630 Failed to unmount /export/mywparfs."
These messages might occur for one of the following reasons:
� Unkillable processes are holding open files within the WPAR file systems, preventing the unmount of the file systems.
Use the fuser command to check if there are any of these running processes:
fuser -cx <dir>
The <dir> variable represents a file system within the WPAR. Use the mount command to see what file systems are still mounted in the WPAR and use fuser to check for each of them.
If fuser identifies any processes with access to the file systems, stop or kill them, and then try stopping the WPAR again with the force option (stopwpar -F <wparname>).
� The current directory of a process from the global environment is somewhere within the WPAR file systems, which also prevents the file systems from being unmounted.
The fuser command can be used to identify these processes.
To fix this situation, change the process’ current directory to a location outside of the WPAR, and try stopping the WPAR again with the force option (stopwpar -F <wparname>).
Fix: The T state will be changed to the correct, more appropriate B state for this issue in a future release.
348 Exploiting IBM AIX Workload Partitions

� Errors due to a network outage with a Network File System (NFS)-based WPAR.
If this case is suspected, verify that the NFS server is accessible and that all required file systems have been properly exported from it. After the NFS server is available again, run stopwpar -F <wparname> again.
A WPAR can also end up in the broken state when you attempt to start it
If this is the first time that this WPAR has been started, it is possible that an error occurred during the creation of the WPAR, for example, if one of the logical volumes of the WPAR has filled up. To check this situation, use the df command from the global environment to see if any file systems are 100% full. If so, recreate the WPAR, specifying a larger size for that particular file system, for example, mkwpar -n test -M directory=/var size=500M.
If this WPAR has been successfully started before, try stopping and restarting the WPAR again:
stopwpar -F mywparstartwpar mywpar
If the WPAR is in the broken state again, try rebooting the global environment (logical partition (LPAR) or stand-alone system).
If the WPAR still does not start successfully after a reboot, it is possible that the data on the disk is corrupted. In this case, the possible recovery actions depend on the type of WPAR.
For a rootvg WPARTry the following command to check the Logical Volume Manager (LVM) entries that relate to the WPAR’s rootvg disks:
mkdev -l <pv_name>; readvgda <pv_name>
If the logical volume entries appear to be alright, the problem might not be with the WPAR’s root volume group. Follow these steps to recreate the WPAR infrastructure, but preserve the root volume group content:
1. Run mkwpar -e <wparname> -w -o <spec file> (that is, run mkwpar -e test -w -o /test.spec).
2. Run rmwpar -F <wparname> (this command will not remove the rootvg disk contents).
3. Run mkwpar -f <spec file> -p (Remember the -p flag; otherwise, your rootvg content will not be preserved).
4. Run startwpar <wparname>.
For a non-rootvg WPARTry the following command to check the LVM entries that relate to the WPAR’s non-rootvg disks. Run mount | grep <wparname> to discover if the wpar’s file systems are mounted.
If they are not mounted, perform these steps:
1. Run mount -t <wparname> to mount them. The path from the global environment is /wpars/<WPAR name>.
2. Back up any important contents from the file systems.
3. Save a spec file to use later for recreating the WPAR:
mkwpar -e <WPAR_name> -w -o <spec_file>
Appendix A. Debugging, messages, and problem analysis 349

4. Remove the WPAR:
rmwpar -F <WPAR_name>
5. Recreate the WPAR:
mkwpar -f <spec_file>
6. Start the new WPAR:
startwpar <WPAR name>
7. Restore the content that you backed up in step 2.
And, of course, if these steps do not work, open a problem management record (PMR).
What to do if you cannot fix the problem
Call IBM support and open a PMR. You need to have a valid support contract for the product for which you open a PMR. AIX, Workload Partition Manager (WPM), and IBM Systems Director are three separate products. Before calling IBM Support, collect the following information:
� Environment:
Detailed information of the hardware and software that is relevant to the problem, including releases, technology level, fix pack, firmware, and third-party hardware and software
� Description:
The problem description with steps about how to reproduce, if possible. Symptoms, direct or relevant error messages, unexpected behaviors, and so on
� Action or analysis:
Actions that you have already taken so far to try to improve or fix the situation. Or analysis that you already made to find possible root causes, for example, any administrative system commands, system reboot, hardware check, third-party support involvement, and so on. This subject can be discussed with IBM Support.
� Next:
What is your next plan, or when will you be ready to try a new Action plan provided by the IBM Support team? This subject can be discussed with IBM Support.
� Test case:
Relevant system error messages that you have seen, for example, log files, AIX snapshot (snap -@gc collects WPAR-related information, including the event.log), and /var/adm/ras/wpar* contains logs and traces on specific WPARS.
In addition, try to narrow down the problem as much as possible, for example, if you see the problem on IBM Systems Director, try to reproduce it using commands to discard or confirm IBM Systems Director as the problem source. Use the same approach if you are using WPM; try to confirm or discard WPM as the problem source whenever possible.
Other relevant or useful information:
� If a similar system is not having the problem:
Describe differences and suggest possible problem sources.
� Change history:
Recent changes in your environment, software level, firmware, network, and so on can be a possible source of the problem.
350 Exploiting IBM AIX Workload Partitions

� When did you seen the problem for the first time?
Provide the exact time and date.
� When in the product life or usage cycle do you see the problem?
At the start-up, at the time of issuing any operation, or other
� Where do you see the problem?
Provide information about the place at which the issues have occurred. Is there any other system in any other place that does not have the issue?
� What is the trend of the problem?
Does it happen always? Does the problem have an increasing frequency?
In general, provide any other information that you suspect can help with problem determination.
Open one PMR for each issue that you have. At the time of opening the PMR, provide the priority of this issue for you in a 1 - 4 scale. Level 1 is the maximum priority. Discuss with IBM Support to set an appropriate severity level in a 1 - 4 scale. Level 1 is the maximum severity, meaning that the main company production application is down or in serious trouble. In the case of severity 1 PMRs, you can benefit from the IBM off-shift 7x24 worldwide support structure to assure your application’s re-establishment as soon as possible.
Appendix A. Debugging, messages, and problem analysis 351

352 Exploiting IBM AIX Workload Partitions

Appendix B. Considerations for applications in workload partitions
This appendix provides information to consider when installing an application within a workload partition (WPAR). In certain cases, you must use a specific WPAR type to host the application.
In this appendix, we provide information that is helpful when installing your application into a WPAR. For example, at the time of this writing, the WebSphere Application Server requires that you install it into a detached system WPAR. To install into the detached WPAR, there are several work-arounds to consider.
This appendix discusses the following topics:
� Installing WebSphere Application Server� Installing the Oracle Database server in a WPAR� WebSphere Application Server installation guidelines� Installing the IBM DB2 Database Server� Installing the IBM HTTP Server in a WPAR
B
© Copyright IBM Corp. 2011. All rights reserved. 353

Installing WebSphere Application Server
The WebSphere Application Server has an extensive configuration directory tree. Additionally, when installing the WebSphere Application Server, the server name is based on the host name of the node on which the profile is created. When installing WebSphere Application Server in a global environment, there can be conflicts in the server name of the profile. At the time of this writing, we recommend that you install WebSphere Application Server in a detached WPAR with its own /usr and /opt file systems.
Here, we present guidelines for installing WebSphere Application Server in a detached WPAR.
WebSphere Application Server installation guidelines
You can install WebSphere Application Server in the WPAR or from the global environment to the WPAR directory. We present the considerations in each case.
Installing WebSphere Application Server to the WPAR from the global environment
When installing WebSphere Application Server in the WPAR instance, you might get an error message that there is not enough disk space to perform the installation. Even if you have enough space for the installation, the installer reports the error. To get around this error, you can follow the technical advice at this website:
http://www-01.ibm.com/support/docview.wss?rs=180&context=SSEQTP&q1=AIX71Cert&uid=swg21420491&loc=en_US&cs=utf-8&lang=en
When installing WebSphere Application Server to the WPAR directory structure from the global environment, and creating the default profile, you have to consider that the name of the profile is based on the host name of the global environment.
One work-around here is to change the host name of the global environment temporarily for the installation of the WPAR, and then change it back when completed.
Another option is to launch the first steps after installing the WebSphere Application Server code and select the Advanced option in the GUI to set the name of the WPAR instance.
Installing WebSphere Application Server from within the WPAR
It is possible to install WebSphere Application Server from within the WPAR. There are considerations that help you accomplish this task. Exporting the Global_AS_Path helps to suppress the file system messages. In this case, perform the export within the WPAR. See this link:
http://www-01.ibm.com/support/docview.wss?rs=180&context=SSEQTP&q1=AIX71Cert&uid=swg21420491&loc=en_US&cs=utf-8&lang=en
Important: When installing WebSphere Application Server to the global environment, you must change the installation directory from the default /usr/WebSphere/Appserver to the Global WPAR directory /wpars/wparname/usr/WebSphere/AppServer.
354 Exploiting IBM AIX Workload Partitions

There are other guidelines to consider when installing to a detached WPAR with its own /usr and /opt file systems. The following technical document provides information for this scenario:
http://www-01.ibm.com/support/docview.wss?rs=180&context=SSEQTP&q1=AIX71Cert&uid=swg21377268&loc=en_US&cs=utf-8&lang=en
Also, installing in the WPAR might not start the first steps script to help you create the default profile. If this situation occurs, you can exit the installation script after the installation is completed. You will know that the first steps did not complete, because you do not receive the GUI that allows you to verify the installation. Additionally, if you go to the /usr/WebSphere/AppServer directory and there is no profiles directory, the default profile has not been completed.
You can execute the profile manager to create a default profile after the installation. Make sure that the proper host name is defined on the WPAR to ensure that your WebSphere application Server is named to run in the WPAR. Additionally, you can use the GUI to create the profile and make the appropriate changes to the host name with the advanced option.
Running WebSphere Application Server in an application WPARIf you have WebSphere Application Server installed in the global environment, it is possible to use an application WPAR to start and stop the application server profile. The following technical document describes this procedure:
http://www-01.ibm.com/support/docview.wss?rs=180&context=SSEQTP&q1=AIX71Cert&uid=swg21294421&loc=en_US&cs=utf-8&lang=en
As the root user, create an application WPAR using the following command from the global environment:
wparexec -n application_WPAR_name -- /usr/IBM/WebSphere/AppServer/profiles/profile_name/bin/startServer.sh server1
Because the created application WPAR is on the same machine as the global environment hosting system, ensure that the application WPAR uses an address whose subnet is the same subnet that is used by the global environment. If the address of the global environment is 129.160.0.x, for example, the address of the application WPAR must be 129.160.0.y. It is assumed that the subnet mask is 255.255.255.0.
The applications that are installed in your application server profile are then serviced under the network host name that is used for the application_WPAR_name parameter.
When you use the wparexec command to create an application WPAR, the application server profile that is bound with this application WPAR starts automatically during the creation of the application WPAR.
As the root user, you can also remove the application WPAR using the following command from the global environment: stopwpar <application_WPAR_name>.
When you use the stopwpar command to remove the application WPAR, the application server profile stops automatically during the removal of the application WPAR.
Important: When you create an application WPAR, ensure that the WPAR name resolves on your network before you issue the wparexec command. By default, the application WPAR host name is the same as the application WPAR name.
Consideration: Using WebSphere Application Server Version 6.0.x with a WPAR is not supported.
Appendix B. Considerations for applications in workload partitions 355

Installing the IBM DB2 Database Server
Installing the DB2 server on a WPAR is similar to installing it into a global environment. DB2 installation in the WPAR environment is only supported on a system WPAR. The DB2 Database product can be installed in a detached (private) WPAR, or it can be installed in a shared WPAR.
Each WPAR instance of DB2 manages its own copies of the DB2 instance and the DB2 administrative server.
We installed DB2 in a shared WPAR and had to increase the file systems. After we increased the file systems, we were able to install DB2.
Installing the IBM HTTP Server in a WPAR
The IBM HTTP Server lends itself to a WPAR extremely well. You can install the IBM HTTP Server in the Global WPAR and run syncwpar to install it into a shared WPAR. We think that this method is really the best method to work with the IBM HTTP Server. If you have multiple instances of the IBM HTTP Server running in multiple logical partitions (LPARs) and want to upgrade the server in each instance, simply update the Global version, then run syncwpar on each WPAR, and they are all upgraded to the level of the global environment.
Installing the IBM HTTP Server into the WPARWe wanted to test installing the IBM HTTP Server into a shared WPAR. There is no copy in the global environment so we install it directly to the WPAR.
To install to the WPAR, we first need to inspect the storage to ensure that there is sufficient space into which to install. We used a simple df command in the global environment, as shown in Example B-1.
Example B-1 Validating that there is enough space in the global environment
# df -gFilesystem GB blocks Free %Used Iused %Iused Mounted on/dev/hd4 0.38 0.18 52% 10483 18% //dev/hd2 2.31 0.41 83% 52658 31% /usr/dev/hd9var 0.44 0.11 76% 11071 29% /var/dev/hd3 2.00 1.99 1% 115 1% /tmp/dev/hd1 0.06 0.06 4% 86 1% /home/dev/hd11admin 0.12 0.12 1% 5 1% /admin/proc - - - - - /proc
Sufficient space: Make sure that there is enough space in the /usr, /home, and /opt file systems to hold the DB2 program and database. If you need to expand the file systems, expand them from the global environment. Increase the following file systems:
� /wpars/wparname/usr� /wpars/wparname/home� /wpars/wparname/opt
Tip: When installing DB2 in AIX 6.1 or 7.1, you might get an error, or the installation might stop. If this situation happens, there is a work-around to export JAVA_COMPILER=NONE.
356 Exploiting IBM AIX Workload Partitions

/dev/hd10opt 0.44 0.18 59% 8171 16% /opt/dev/livedump 0.25 0.25 1% 4 1% /var/adm/ras/livedumpnfsres1:/export/wpars 30.00 7.93 74% 199397 3% /mnt/dev/fslv28 0.19 0.06 69% 2543 15% /wpars/wptest3a/dev/fslv29 0.56 0.10 82% 309 2% /wpars/wptest3a/home/dev/fslv30 1.69 0.21 88% 13870 22% /wpars/wptest3a/opt/proc - - - - - /wpars/wptest3a/proc/dev/fslv31 0.62 0.60 4% 133 1% /wpars/wptest3a/tmp/dev/fslv32 2.56 0.64 76% 52880 24% /wpars/wptest3a/usr/dev/fslv33 0.12 0.05 59% 2785 18% /wpars/wptest3a/varnfsres1:/export/wpars 30.00 7.93 74% 199397 3% /wpars/wptest3a/mnt
We are concerned with the output of /wpars/wptest3s/usr and /wpars/wptest3s/usr specifically. These two file systems are small, so we increased the size, as shown in Example B-2.
Example B-2 Increasing the size of two file systems
# chfs -a size=+400M /wpars/wptest3a/tmpFilesystem size changed to 2228224Inlinelog size changed to 8 MB.# chfs -a size=+400M /wpars/wptest3a/usrFilesystem size changed to 6291456Inlinelog size changed to 12 MB.
Checking the df -g output again shows that we now have plenty of room to install, as shown in Example B-3.
Example B-3 Validating there is enough space before the installation
# df -gFilesystem GB blocks Free %Used Iused %Iused Mounted on/dev/hd4 0.38 0.18 52% 10483 18% //dev/hd2 2.31 0.41 83% 52658 31% /usr/dev/hd9var 0.44 0.11 76% 11071 29% /var/dev/hd3 2.00 1.99 1% 115 1% /tmp/dev/hd1 0.06 0.06 4% 86 1% /home/dev/hd11admin 0.12 0.12 1% 5 1% /admin/proc - - - - - /proc/dev/hd10opt 0.44 0.18 59% 8171 16% /opt/dev/livedump 0.25 0.25 1% 4 1% /var/adm/ras/livedumpnfsres1:/export/wpars 30.00 7.93 74% 199397 3% /mnt/dev/fslv28 0.19 0.06 69% 2543 15% /wpars/wptest3a/dev/fslv29 0.56 0.10 82% 309 2% /wpars/wptest3a/home/dev/fslv30 1.69 0.21 88% 13870 22% /wpars/wptest3a/opt/proc - - - - - /wpars/wptest3a/proc/dev/fslv31 1.06 1.04 3% 133 1% /wpars/wptest3a/tmp/dev/fslv32 3.00 1.08 65% 52880 17% /wpars/wptest3a/usr/dev/fslv33 0.12 0.05 59% 2785 18% /wpars/wptest3a/varnfsres1:/export/wpars 30.00 7.93 74% 199397 3% /wpars/wptest3a/mnt
Next, we log in to the WPAR directly using clogin or from a putty session. The IBM HTTP Server uses the same install shield program as the IBM WebSphere Application Server so
Appendix B. Considerations for applications in workload partitions 357

before we can start the install we need to export the GLOBAL_AS_PATH=TRUE as explained in the technical document that was referenced in the WebSphere Application Server section. See Example B-4.
Example B-4 Exporting the GLOBAL_AS_PATH=TRUE
# clogin wptest3a******************************************************************************** ** ** Welcome to AIX Version 7.1! ** ** ** Please see the README file in /usr/lpp/bos for information pertinent to ** this release of the AIX Operating System. ** ** ********************************************************************************Last login: Fri Apr 15 17:27:05 2011 on /dev/pts/0 from 172.16.254.22
# export GLOBAL_AS_PATH=TRUE
Next, we started the Launchpad to install the server, as shown in Figure B-1.
Figure B-1 Launchpad for the installation of the IBM HTTP Server
Click Launch The installation wizard for IBM HTTP Server to start the HTTP Server installation. You are presented with the initial installation window, as shown in Figure B-2 on page 359.
358 Exploiting IBM AIX Workload Partitions

Figure B-2 IBM HTTP Server initial installation window
Step through the next windows until you reach the directory into which to install the server. As long as you have exported the Global AS setting, you can set the installation directory to the directory that you want on the local WPAR. See Figure B-3.
Figure B-3 Choose the directory into which to install the WPAR
Finish stepping through the installation windows until the installation completes. When the installation is complete and you receive the success window, you have completed the installation.
You can now start the IBM HTTP Server.
Appendix B. Considerations for applications in workload partitions 359

Installing the Oracle Database server in a WPAR
Similar to the DB2 Server installation, the Oracle Database server must be installed in a system WPAR. It is preferable to install it in a private WPAR so that Oracle can have access to the /usr directory tree. Refer to the procedure that is located in this document:
http://www-03.ibm.com/support/techdocs/atsmastr.nsf/5cb5ed706d254a8186256c71006d2e0a/880bfb5a086913f7862576040070cbcc/$FILE/WPAR%20AIX%20for%20Oracle%2003%2007%2011.pdf
For more detailed information about the installation of Oracle in a WPAR, see 14.3, “Installing the Oracle Database on the WPAR environment” on page 326.
Tip: Remember after you have completed the installation of the IBM HTTP Server, you need to start it by logging in to a session rather than the clogin window. Starting from the clogin window works well in many cases. However, if you have a mobile WPAR and you want the process to keep running during a move, you must start from a Telnet, Secure Shell (SSH), or Remote Shell (RSH) session as opposed to a console login.
360 Exploiting IBM AIX Workload Partitions

Related publications
The publications listed in this section are considered particularly suitable for a more detailed discussion of the topics covered in this book.
IBM Redbooks publications
The following IBM Redbooks publications provide additional information about the topic in this document. Note that certain publications referenced in this list might be available in softcopy only.
� Introduction to Workload Partition Management in IBM AIX Version 6.1, SG24-7431
� Workload Partition Management in IBM AIX Version 6.1, SG24-7656
� IBM AIX Version 7.1 Differences Guide, SG24-7910
� PowerVM Virtualization on IBM System p: Managing and Monitoring, SG24-7590
� AIX V6 Advanced Security Features Introduction and Configuration, SG24-7430
� IBM PowerHA SystemMirror 7.1 for AIX, SG24-7845
� NIM A-Z in AIX 5L, SG24-7296
� PowerVM Virtualization on IBM System p: Introduction and Configuration Fourth Edition, SG24-7940
You can search for, view, download or order these documents and other IBM Redbooks, IBM Redpapers, Web Docs, draft and additional materials, at the following website:
ibm.com/redbooks
Other publications
These publications are also relevant as further information sources:
� Alex Abderrazag, HACMP Best Practices
http://www.powerha.lpar.co.uk/
� Thierry Fauck, AIX 6 Workload Partitions and Live Application Mobility, September 2007
http://www.ibm.com/developerworks/aix/library/au-wpar/
� IBM PowerVM Workload Partitions Manager for AIX, SC23-5241-04
http://publib.boulder.ibm.com/infocenter/director/v6r2x/topic/com.ibm.director.wparmgt.helps.doc/wparlpp_pdf.pdf
� AIX 5.2 Workload Partitions for AIX 7, SC23-6747-00
http://publib.boulder.ibm.com/infocenter/aix/v7r1/topic/com.ibm.aix.cre/cre_pdf.pdf
� IBM Systems Director for AIX Planning, Installation, and Configuration Guide, GI11-8709-06
http://publib.boulder.ibm.com/infocenter/director/v6r2x/topic/com.ibm.director.main.helps.doc/fqp0_bk_install_gde_aix.pdf
© Copyright IBM Corp. 2011. All rights reserved. 361

Online resources
These websites are also relevant as further information sources:
� AIX 7.1 Information Center
http://publib.boulder.ibm.com/infocenter/aix/v7r1/index.jsp
� Workload Partitions for AIX Information Center
http://public.boulder.ibm.com/infocenter/aix/v7r1/index.jsp?topic=/com.ibm.aix.wpar/wpar-kickoff.html
� WPAR Migration scripts
http://publib.boulder.ibm.com/infocenter/aix/v7r1/topic/com.ibm.aix.install/doc/insgdrf/migration_scripts.htm
� IBM Systems Director Downloads
http://www.ibm.com/systems/management/director/downloads
� IBM Systems Director Plug-ins
http://www-03.ibm.com/systems/software/director/downloads/plugins.html
� IBM Systems Director Resources
http://www-03.ibm.com/systems/software/director/resources.html
� IBM Systems Director User Forum
http://www.ibm.com/developerworks/forums/forum.jspa?forumID=759
� Tivoli Storage Manager and WPARs
http://publib.boulder.ibm.com/infocenter/tsminfo/v6/index.jsp?topic=/com.ibm.itsm.client.doc/c_bac_aixwpar.html
� Passport Advantage for Virtualization Licensing
http://www-01.ibm.com/software/lotus/passportadvantage/
� IBM Tivoli Licensing Metric Tool (LMT)
http://www-01.ibm.com/software/tivoli/products/license-metric-tool/
� Virtualization Capacity Licensing for POWER Systems and WPAR environments
http://tinyurl.com/VCL-for-WPARs
� My Oracle support
https://support.oracle.com/CSP/ui/flash.htmlatrix
� Oracle Virtualization technologies support matrix
http://www.oracle.com/technetwork/database/virtualizationmatrix-172995.html
Help from IBM
IBM Support and downloads
ibm.com/support
IBM Global Services
ibm.com/services
362 Exploiting IBM AIX Workload Partitions

Index
Symbols/ 23, 32, 40, 58/admin 123/etc 23/etc/filesystems 165/etc/objrepos/wboot 92/etc/passwd 134/home 58, 123/op 81/opt 8, 32, 40, 56, 93, 122, 165, 239/proc 92, 122/tmp 23, 31–32, 58, 123/usr 8, 32, 56, 81, 92–93, 122, 165, 239, 343/var 23, 32, 40, 58, 123
AActive partitions 12Active state 348Advanced Memory Extension (AME) 22Advanced POWER Virtualization (APV) 6Agent Installation Wizard 33AIX 6.1 Base Level (GA) 21AIX 6.1 TL1 21AIX 6.1 TL2 21AIX 6.1 TL3 21AIX 6.1 TL4 21AIX 6.1 TL5 21AIX 6.1 TL6 21AIX 7.1 Base Level (GA) 21AIX Enterprise Edition 44AIX fileset
bos.adt.base 327bos.adt.lib 327bos.adt.libm 327bos.perf.libperfstat 327bos.perf.perfstat 327bos.perf.proctools 327xlC.aix61.rte 327xlC.rte 327
AIX Global Environment 23AIX MPIO 22AIX Service Pack 252AIX Workload Manager 4AIX Workload Partitions (WPARs) 3, 39AIXPERFSTAT_SCOPE 328AIXPERFSTAT_SCOPE=M 334Application WPAR 8Asynchronous mobility 21Authorization database 128Available state 165
BBroken state 348
© Copyright IBM Corp. 2011. All rights reserved.
Business continuity plan 17
CCapacity changes 4Capacity on Demand (CoD) 20Checkpoint 8, 12Check-point/restart 44Command
./WparMgrSetup.bin 40cd /dvd_mnt/server/ 35cfgmgr 96–97, 103, 207, 263, 319chfs -a size=+200MB /var 52chmod 289chwpar 85, 92, 94, 102–105, 111–112, 115–116, 119, 121, 126, 141–142, 148, 167, 277, 295, 308chwpar -c -N address=172.16.20.132 rootvgwpar1 169chwpar -R active=yes 313clogin 245, 345clRGmove 320cp dirserv.rsp /directory/ 35df 126, 349df -g 357efsenable 135emgr 252, 256fuser 348gzip -cd | tar -xvf - 40importvg 98install_root/bin/configAgtMgr.sh 38installp 247instfix 251inuwpar 239, 252, 255lppchk 342lsdev | grep hdisk | grep -v hdisk0 147lsdev -C 190lsfs -u WPAR_name 205, 211lslpp 226, 231–232, 235, 245lslpp -l | grep vwpar 169lslv 158lsnim 285–286lspv 147lswpar 104, 106, 111–112, 148, 161, 182–183, 268, 348lswpar -D 189lswpar -X 189migwpar 194, 196, 198–199, 217migwpar -A 196migwpar -d /sw_images wpar61 196migwpar wpar61 196mkcd 265mkdev 96mkdev -l 263, 349mkdev –l 97mkdvd 265
363

mknod 124mksysb 323mksysb -i /mksysb_images/AIX52_image 69mkwpar 93–94, 103, 111–112, 115–116, 141–142, 149, 151, 163, 169, 188, 204, 214, 217, 262, 265, 292, 295, 319, 342, 344mkwpar -c 148mkwpar -e -o 293mkwpar -e -w -o 349mkwpar -e -w -o 349mkwpar -e test -w -o /test.spec 349mkwpar -f 350mkwpar -f -p 349mkwpar –f -p 99mkwpar -k 307mkwpar -n syswpar 158mkwpar -n test -M directory=/var size=500M 349mkwpardata 72, 297mmchconfig release=LATEST 190mmchlicense server --accept -N managernodes 190mmcrcluster -A -p $(hostname -s) -N $(hostname -s)
manager-quorum 190mmcrcluster -A -p wpar11 -N wpar11
manager-quorum 190mmcrfs /gpfs gpfslv -F PVfile -A yes 190mmcrnsd -F PVfile 190mmmount gpfslv -a 191mmstartup -N $(hostname -s) 190mount 170mount | grep 349mount -t 349mount -v cdrfs -o ro /dev /mnt 35, 39netstat 143nfso 20nim 300nim -o define -t wpar -a mgmt_profile1="750_1_LPAR_4 mig_wpar_2" -a if1="nim172 mig_wpar_2 0" mig_wpar_2 218odmget 168oslevel 216, 226, 232, 245, 251restore 264restwpar 72, 74, 261, 264–268, 292, 295rmwpar 96–97rmwpar -F 349–350rmwpar -p 307savevg 260, 271savewpar 72, 74, 194, 217, 260, 265–266, 271, 295setkst 129smcli mkwpar 149smcli movewpar command 185smcli wparmgr/help 87smcli wparmgr/startwpar -h 88smcli wparmgr/startwpar --help 88smitty mkwpar 93smitty update_all 227, 251smstart 38smstatus -r 38startwpar 88, 129, 132, 308, 319, 324, 349–350startwpar mywpar 349stopwpar 129, 187, 319, 346, 355
stopwpar -F 348stopwpar -F mywpar 349swvpdmgr 247–248syncroot 195, 198–199, 252, 255syncwpar 195–196, 198–199, 217, 231, 242, 248, 252, 255, 295, 322, 331, 342, 356topas_nmon 322ulimit unlimited 218, 220umount /mnt 38–39uname 322varyonvg 98vmo 121vmstat 322wlmstat 313wparexec 111–112, 149, 292, 355wparexec -c 148wparexec -f 293, 295wparmgr 87
Common Agent 32Compatible 174Compatible with warnings 174Control and flexibility 4CPU-intensive application 113Cross-system management 25
DDaemon
cron 8inetd 8srcmstr 8
Defined state 98, 111, 291, 348deinstall filesets 241Detached system WPAR 194Detached WPAR 242Device driver
atape 22scsidisk 22sctape 22
Directory/checkds 33–34/etc/wpars 293/installp/ppc 322/opt/ibm/director 38/tmp/wpardata/ 260install_root 38
DriverAtape 277
DVD media 32Dynamic trace 226, 266
EEncrypted File Systems (EFS) 136Endpoint devices 260Enhanced RBAC 128
Role sessions 129Escalating costs 4
364 Exploiting IBM AIX Workload Partitions

FFiber attached storage 102Fiber Channel (FC) 21Fiber channel (FC) 9Fiber Channel (FC) adapters 21Fiber channel adaptors 102File
/etc/hosts 307/etc/irs.conf 307/etc/netsvc.conf 307/etc/networks 307/etc/passwd 134/etc/resolv.conf 307/etc/security/limits.conf 330dirserv.rsp 36image.data 260tnsnames.ora 333
Filesetbos.games 239–240bos.rte.install 227, 235bos.rte.security 342Director.msg 342mcr.rte 204
Filesystem/wpars/wparname/home 356/wpars/wparname/opt 356/wpars/wparname/usr 356
Firmware installation 12Full capacity licensing 16
GGlobal Environment 7–8, 44, 60, 96, 110, 162, 194, 216, 285, 319, 356Global load balancing 25GPFS file sets 190
HHard maximum percentage 117Hardware maintenance 12Hardware Management Console (HMC) 32
II/O-intensive application 113IBM Debugger for AIX 249IBM General Parallel File System (GPFS) 186IBM PowerVM Workload Partitions Manager for AIX (WPAR Manager) 25, 39IBM System Director agent 342IBM Systems Director 8, 30
Large configuration 30Medium configuration 30Small configuration 30
IBM Systems Director Common Agent 44IBM Systems Director downloads 41IBM Systems Director Enterprise Edition 44IBM Systems Director forum 42IBM Systems Director Pre-Installation Utility 33IBM Systems Director pre-installation utility 33
Improve application availability 44Integrated Virtual Ethernet (IVE) 22Interim Fixes 252International Passport Advantage® Agreement (IPAA) 16Interprocess communication 7Inventory collection 45Isolation 8Isolation features 10ivoli Application Dependency Discovery Manager 44
JJava Virtual Machine (JVM) 31JFS 122JFS2 122JFS2 file system 31
KKernel Security Tables (KST) 129
LLarge pages 120Legacy RBAC 128Licensed Product Program (LPP) 149Licensed Program Product (LPP) 22Life cycle management 25Live Application Mobility 44, 145, 276Live Partition Mobility 6Live partition mobility 12Log
/opt/ibm/director/log/installFeatures_date.log 35/var/adm/ras/migwpar.log 196/var/log/dirinst.log 35
Logical partitions 5Logical Partitions (LPARs) 5Logical Volumes (LVs) 102LPAR
introduction 5
MManual relocation 178Memory 114Metacluster Checkpoint and Restart (MCR) 45Minimum CPU percentage 113Minimum percentage value 117Monitoring 25
NNameFS 122NFS 122NFS mounted filesystems 205NIM support for WPARs 21Non-shared system WPAR 194Not compatible 174
Index 365

Ppartition 5partitioning 4Percentage based resource allocation 114
Hard maximum percentage 114Minimum percentage 114Soft maximum percentage 114
Per-Process Virtual Memory Limit 111Physical Volumes (PVs) 102Pinning memory 121Platform Agent 32Policy violation 176Policy-based relocation 184Privileged command database 128Privileged device database 128Privileged file database 128Privileged user 111processes 10procVirtMem 114Pseudo terminals (PTYs) 110
Rreadvgda 349Real Application Cluster (RAC) 326Redbooks website 361
Contact us xivReduce costs 6Reduce deployment time 4Reducing administrative workload 44redundancy 6Removing an iFix 253Reporting 25Resource control 8, 110Resource set 112Resources 10resources 8Role Based Access Control 128Role Based Access Control (RBAC) 128Role database 128Role-Based Access Control (RBAC) 16Root volume group 92rootvg WPAR 9, 319rset 113
SSAN mobility 9savewpar backup file 261Script
/usr/lpp/bos/post_migration 195/usr/lpp/bos/pre_migration 195bos.rte.security.post_u 343cfgwpardd 274
SDDPCM 102Secret key 136Server consolidation 6Service Packs (SPs) 226Setup Advisor wizard 46Share based resource allocation 114Shared system WPARs 194
shares_CPU 113, 115shares_Memory 115shares_memory 113SHM_LOCK option 121Simultaneous Multi-Threading (SMT) 22Small Computer System Interface (SCSI) 92Small Computer System Interface (vSCSI) 21Soft maximum percentage 117Specification file 260start/stop/monitor scripts 319Storage Area Network (SAN) 57Sub-capacity licensing 16Synchronous checkpoint/restart 21System Discovery page 47System rootvg-WPAR 287System trace 226, 266System WPAR 8
TTechnology Level 252Technology Levels (TLs) 226Tivoli Monitoring 44Tivoli Usage and Accounting Virtualization Edition 44Total Cost of Ownership (TCO) 16totalProcesses 114totalThreads 114Trace
Dynamic trace 226, 266System trace 226, 266
Transitional state 348Translation lookaside buffer (TLB) 120Trusted Kernel Extensions 24
UUsers 10
VVersioned WPAR 9, 22, 250, 322Virtual I/O Server (VIO) 22Virtual SCSI (vSCSI) 21Virtual SCSI (vSCSI) disks 102Virtual SCSI Adapters 203Virtual SCSI Client Adapter 202visibility 8vmo maxpin% tunable 121Volume Groups (VG) 102VxFS 122
WWeb download installation package 32WLM 4
manage multiple workloads 4Workload Manager 4Workload Manager (WLM) 15, 110Workload Partition 110Workload Partition (WPAR) 226Workload Partitions (WPARs) 44WPAR
366 Exploiting IBM AIX Workload Partitions

migration 13reduce the number of managed LPARs 7system WPAR 8
WPAR Agent 40WPAR cloning 298WPAR inventory 45WPAR Manager 40, 44WPAR Manager agent 44WPAR Manager GUI 173WPAR Manager license 45WPAR Manager plug-in 46WPAR migration 194WPAR mobility 9, 12WPAR relocation policies 175WPAR restoration 302WPAR specification files 305wparBackupDevice parameter 265WPAR-specific routing 289
Index 367

368 Exploiting IBM AIX Workload Partitions

(0.5” spine)0.475”<
->0.873”
250 <->
459 pages
Exploiting IBM AIX W
orkload Partitions
Exploiting IBM AIX W
orkload Partitions
Exploiting IBM AIX W
orkload Partitions
Exploiting IBM AIX W
orkload Partitions

Exploiting IBM AIX W
orkload Partitions
Exploiting IBM AIX W
orkload Partitions


®
SG24-7955-00 ISBN 0738435872
INTERNATIONAL TECHNICALSUPPORTORGANIZATION
BUILDING TECHNICAL INFORMATION BASED ON PRACTICAL EXPERIENCE
IBM Redbooks are developed by the IBM International Technical Support Organization. Experts from IBM, Customers and Partners from around the world create timely technical information based on realistic scenarios. Specific recommendations are provided to help you implement IT solutions more effectively in your environment.
For more information:ibm.com/redbooks
®
Exploiting IBM AIX Workload Partitions
Helps reduce total cost of ownership
Helps mitigate risks
Contains implementation sample scenarios
This IBM Redbooks publication provides an update of the latest AIX Workload Partition (WPAR) capabilities. It provides a how-to guide and well-defined and documented deployment model for system administrators and architects using WPARs in AIX Version 7.1 within an IBM POWER System virtualized environment. This book helps clients create a planned foundation for their future deployments.
This book is targeted toward technical professionals, such as business intelligence (BI) consultants, technical support staff, IT architects, and IT specialists, who are responsible for providing solutions and support for IBM POWER Systems and IBM AIX Version 7.1.
Back cover