shale stone installation
TRANSCRIPT
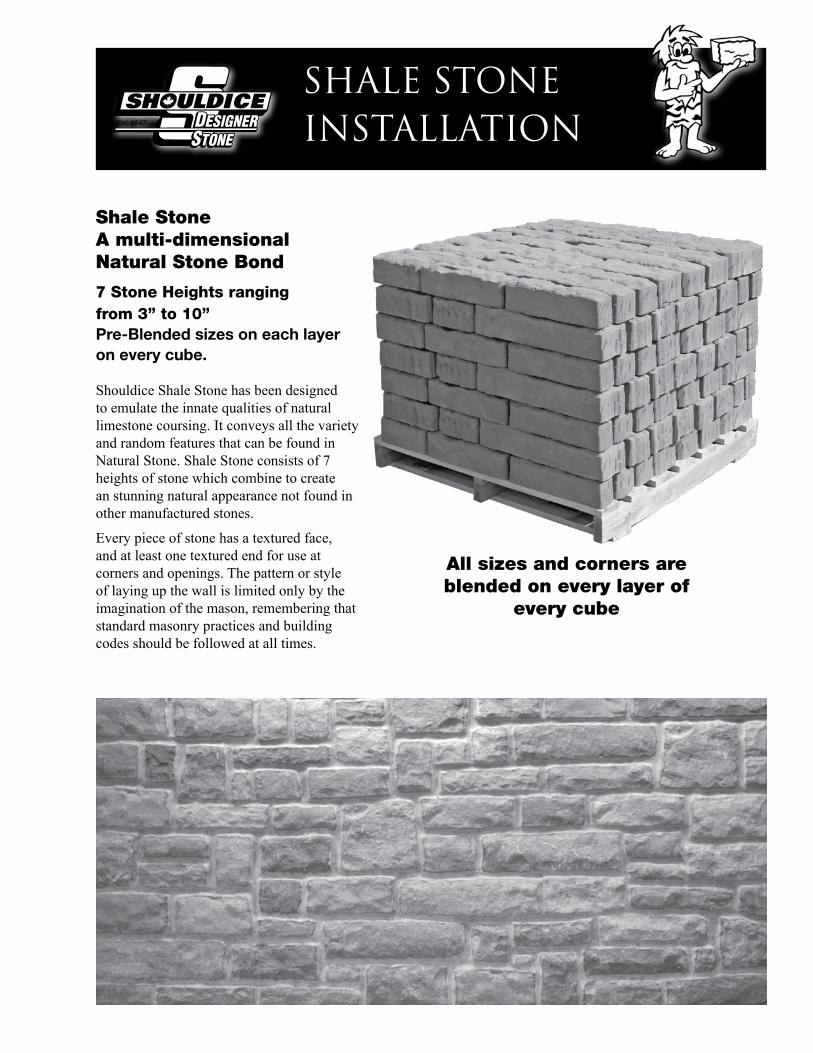
Shale Stone A multi-dimensional Natural Stone Bond 7 Stone Heights ranging from 3” to 10”Pre-Blended sizes on each layeron every cube.
Charington DetailsSHALE StoneInstallation
Shouldice Shale Stone has been designed to emulate the innate qualities of natural limestone coursing. It conveys all the variety and random features that can be found in Natural Stone. Shale Stone consists of 7 heights of stone which combine to create an stunning natural appearance not found in other manufactured stones.
Every piece of stone has a textured face, and at least one textured end for use at corners and openings. The pattern or style of laying up the wall is limited only by the imagination of the mason, remembering that standard masonry practices and building codes should be followed at all times.
All sizes and corners are blended on every layer of
every cube
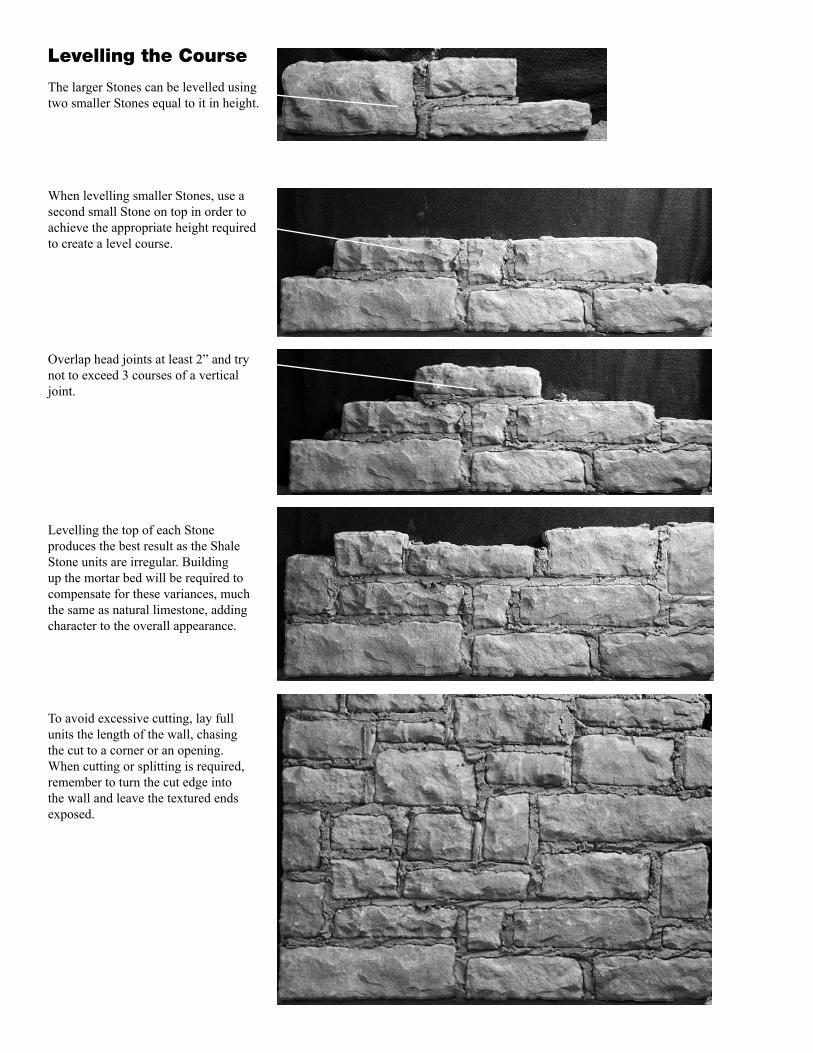
Levelling the Course
The larger Stones can be levelled using two smaller Stones equal to it in height.
When levelling smaller Stones, use a second small Stone on top in order to achieve the appropriate height required to create a level course.
Overlap head joints at least 2” and try not to exceed 3 courses of a vertical joint.
Levelling the top of each Stone produces the best result as the Shale Stone units are irregular. Building up the mortar bed will be required to compensate for these variances, much the same as natural limestone, adding character to the overall appearance.
To avoid excessive cutting, lay full units the length of the wall, chasing the cut to a corner or an opening. When cutting or splitting is required, remember to turn the cut edge into the wall and leave the textured ends exposed.
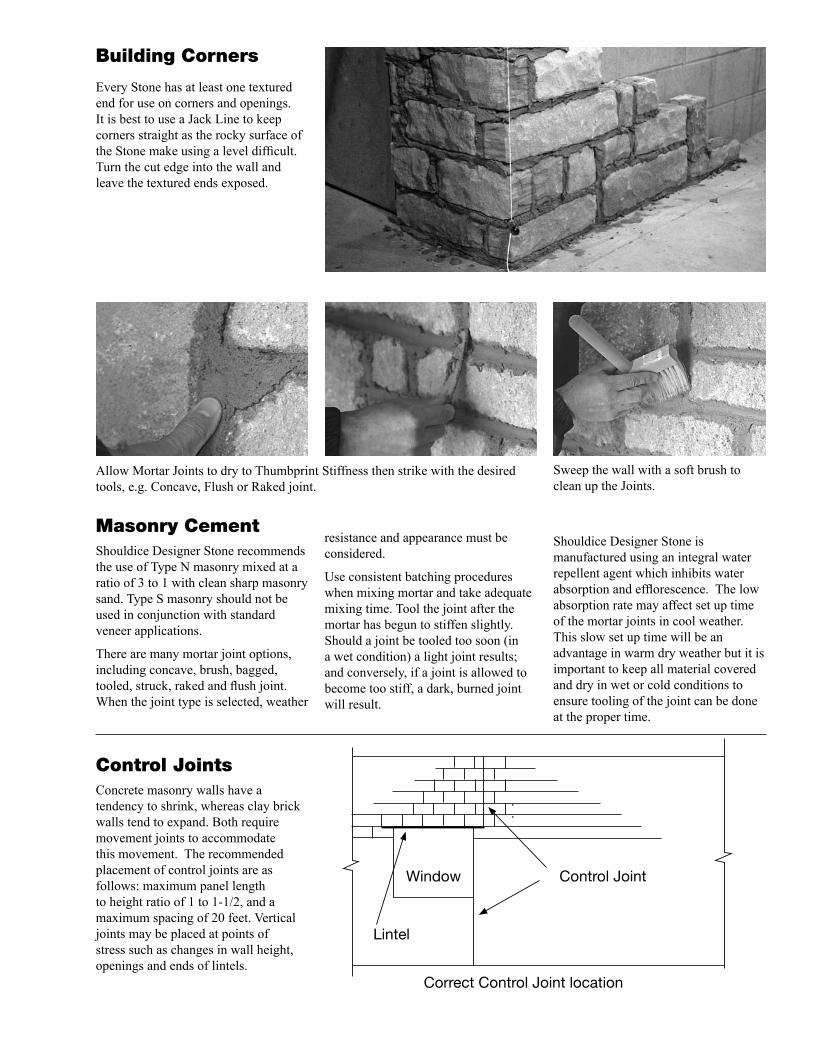
Allow Mortar Joints to dry to Thumbprint Stiffness then strike with the desired tools, e.g. Concave, Flush or Raked joint.
Sweep the wall with a soft brush to clean up the Joints.
Masonry CementShouldice Designer Stone recommends the use of Type N masonry mixed at a ratio of 3 to 1 with clean sharp masonry sand. Type S masonry should not be used in conjunction with standard veneer applications.
There are many mortar joint options, including concave, brush, bagged, tooled, struck, raked and flush joint. When the joint type is selected, weather
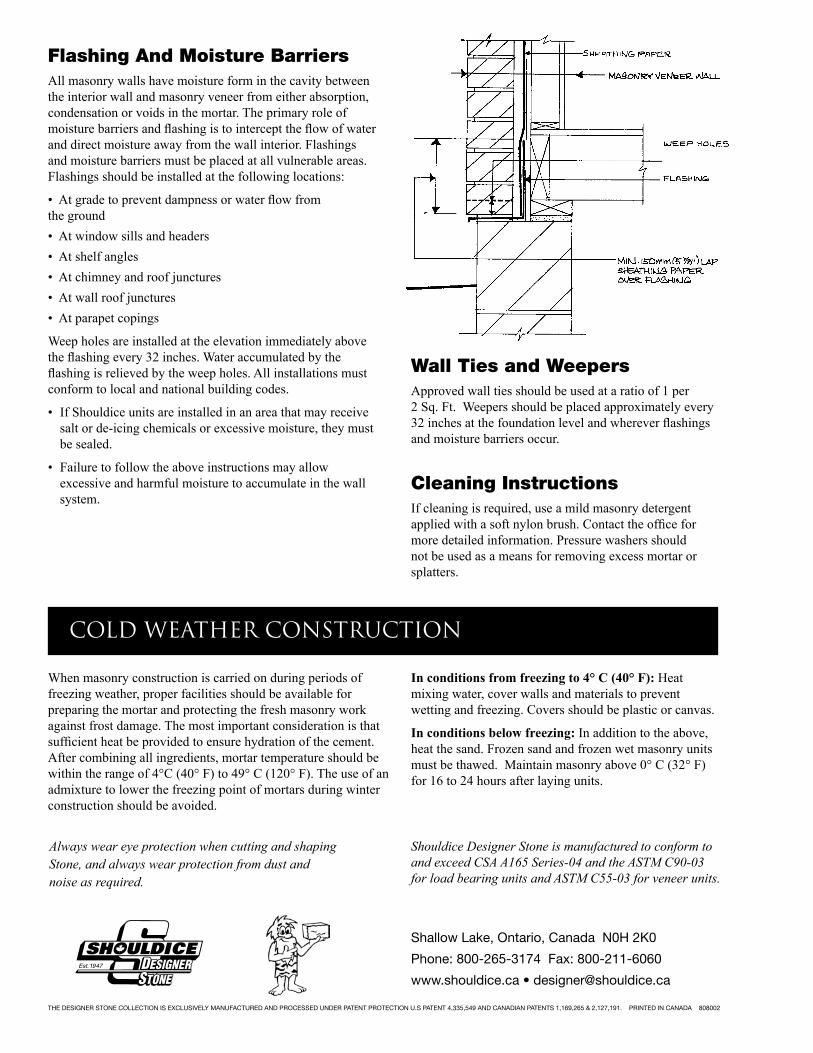
Control Joint
Correct Control Joint location
Window
Lintel
Control JointsConcrete masonry walls have a tendency to shrink, whereas clay brick walls tend to expand. Both require movement joints to accommodate this movement. The recommended placement of control joints are as follows: maximum panel length to height ratio of 1 to 1-1/2, and a maximum spacing of 20 feet. Vertical joints may be placed at points of stress such as changes in wall height, openings and ends of lintels.
resistance and appearance must be considered.
Use consistent batching procedures when mixing mortar and take adequate mixing time. Tool the joint after the mortar has begun to stiffen slightly. Should a joint be tooled too soon (in a wet condition) a light joint results; and conversely, if a joint is allowed to become too stiff, a dark, burned joint will result.
Shouldice Designer Stone is manufactured using an integral water repellent agent which inhibits water absorption and efflorescence. The low absorption rate may affect set up time of the mortar joints in cool weather. This slow set up time will be an advantage in warm dry weather but it is important to keep all material covered and dry in wet or cold conditions to ensure tooling of the joint can be done at the proper time.
Building Corners
Every Stone has at least one textured end for use on corners and openings. It is best to use a Jack Line to keep corners straight as the rocky surface of the Stone make using a level difficult. Turn the cut edge into the wall and leave the textured ends exposed.
THE DESIGNER STONE COLLECTION IS EXCLUSIVELY MANUFACTURED AND PROCESSED UNDER PATENT PROTECTION U.S PATENT 4,335,549 AND CANADIAN PATENTS 1,169,265 & 2,127,191. PRINTED IN CANADA 808002
Shallow Lake, Ontario, Canada N0H 2K0
Phone: 800-265-3174 Fax: 800-211-6060
www.shouldice.ca • [email protected]
When masonry construction is carried on during periods of freezing weather, proper facilities should be available for preparing the mortar and protecting the fresh masonry work against frost damage. The most important consideration is that sufficient heat be provided to ensure hydration of the cement. After combining all ingredients, mortar temperature should be within the range of 4°C (40° F) to 49° C (120° F). The use of an admixture to lower the freezing point of mortars during winter construction should be avoided.
In conditions from freezing to 4° C (40° F): Heat mixing water, cover walls and materials to prevent wetting and freezing. Covers should be plastic or canvas.
In conditions below freezing: In addition to the above, heat the sand. Frozen sand and frozen wet masonry units must be thawed. Maintain masonry above 0° C (32° F) for 16 to 24 hours after laying units.
Cold Weather Construction
Flashing And Moisture BarriersAll masonry walls have moisture form in the cavity between the interior wall and masonry veneer from either absorption, condensation or voids in the mortar. The primary role of moisture barriers and flashing is to intercept the flow of water and direct moisture away from the wall interior. Flashings and moisture barriers must be placed at all vulnerable areas. Flashings should be installed at the following locations:
• At grade to prevent dampness or water flow from the ground
• At window sills and headers
• At shelf angles
• At chimney and roof junctures
• At wall roof junctures
• At parapet copings
Weep holes are installed at the elevation immediately above the flashing every 32 inches. Water accumulated by the flashing is relieved by the weep holes. All installations must conform to local and national building codes.
• If Shouldice units are installed in an area that may receive salt or de-icing chemicals or excessive moisture, they must be sealed.
• Failure to follow the above instructions may allow excessive and harmful moisture to accumulate in the wall system.
Wall Ties and WeepersApproved wall ties should be used at a ratio of 1 per 2 Sq. Ft. Weepers should be placed approximately every 32 inches at the foundation level and wherever flashings and moisture barriers occur.
Cleaning InstructionsIf cleaning is required, use a mild masonry detergent applied with a soft nylon brush. Contact the office for more detailed information. Pressure washers should not be used as a means for removing excess mortar or splatters.
Shouldice Designer Stone is manufactured to conform to and exceed CSA A165 Series-04 and the ASTM C90-03 for load bearing units and ASTM C55-03 for veneer units.
Always wear eye protection when cutting and shaping Stone, and always wear protection from dust and noise as required.