side window glass noise during operation -...
TRANSCRIPT

T-SB-0077-12 May 21, 2012
Side Window Glass Noise During Operation
ServiceCategory Vehicle Exterior
Section Window/Glass Market USA
Applicability
YEAR(S) MODEL(S) ADDITIONAL INFORMATION
2012 Camry, Camry HV
Introduction
Some 2012 Camry and Camry HV vehicles, may exhibit a squeak or howl noise from one or moreof the side window glass when adjusting the glass position. Refer to the sound link below for anexample of the noise. Use the following procedure to address this condition.Example of Noise
Production Change Information
This bulletin applies to vehicles produced BEFORE the Production Change Effective VINs shownbelow.
MODEL PLANT DRIVETRAIN PRODUCTION CHANGE EFFECTIVE VIN
TMMK Line 1 4T1BK1FK#CU010455
TMMK Line 2V6
4T1BK1FK#CU515129
TMMK Line 1 4T1BF1FK#CU087492
TMMK Line 2 4T1BF1FK#CU566943
Camry
SIA
4 cyl
4T4BF1FK#CR210226
Camry HV TMMK Line 2 HV 4T1BD1FK#CU022633
Parts Information
PREVIOUS PART NUMBER CURRENT PART NUMBER PART NAME QTY
68171-06090 68171-06092 Weatherstrip, FR door glass, Inner RH 1
68172-06090 68172-06092 Weatherstrip, FR door glass, Inner LH 1
68173-06080 68173-06082 Weatherstrip, RR door glass, Inner RH 1
68174-06080 68174-06082 Weatherstrip, RR door glass, Inner LH 1
© 2012 Toyota Motor Sales, USA Page 1 of 22

T-SB-0077-12 May 21, 2012 Page 2 of 22
Side Window Glass Noise During Operation
Warranty Information
OP CODE DESCRIPTION TIME OFP T1 T2
BD1214 R&R Front Door Glass InnerWeatherstrip, One Side 0.4
COMBO A Other Side 0.4
68171-06090
68172-06090
BD1215 R&R Rear Door Glass InnerWeatherstrip, One Side 0.4
COMBO A Other Side 0.4
68173-06080
68174-06080
91 41
APPLICABLE WARRANTY• This repair is covered under the Toyota Comprehensive Warranty. This warranty is in effect for
36 months or 36,000 miles, whichever occurs first, from the vehicle’s in-service date.
• Warranty application is limited to occurrence of the specified condition described in thisbulletin.
Required Tools & Equipment
SPECIAL SERVICE TOOLS (SST) PART NUMBER QTY
Plastic Pry Tool Set* 00002-06000-01 1
* Essential SST.
NOTEAdditional SSTs may be ordered by calling 1-800-933-8335.
Repair Procedure
Confirm Condition
Confirm source of noise is from inner belt molding by temporarily pulling inner belt molding beltmolding seal away from the door glass while raising and lowering the door glass.
NOTEIf noise does not go away when inner belt molding seal is adjusted, STOP. This TSB does NOTapply. Continue with normal diagnostic procedures for unidentified noise.
If the noise is coming from the front door(s), see page 3.
If the noise is coming from the rear door(s), see page 13.
© 2012 Toyota Motor Sales, USA
T-SB-0077-12 May 21, 2012 Page 3 of 22
Side Window Glass Noise During Operation
Repair Procedure (Continued)
Front Door Disassembly
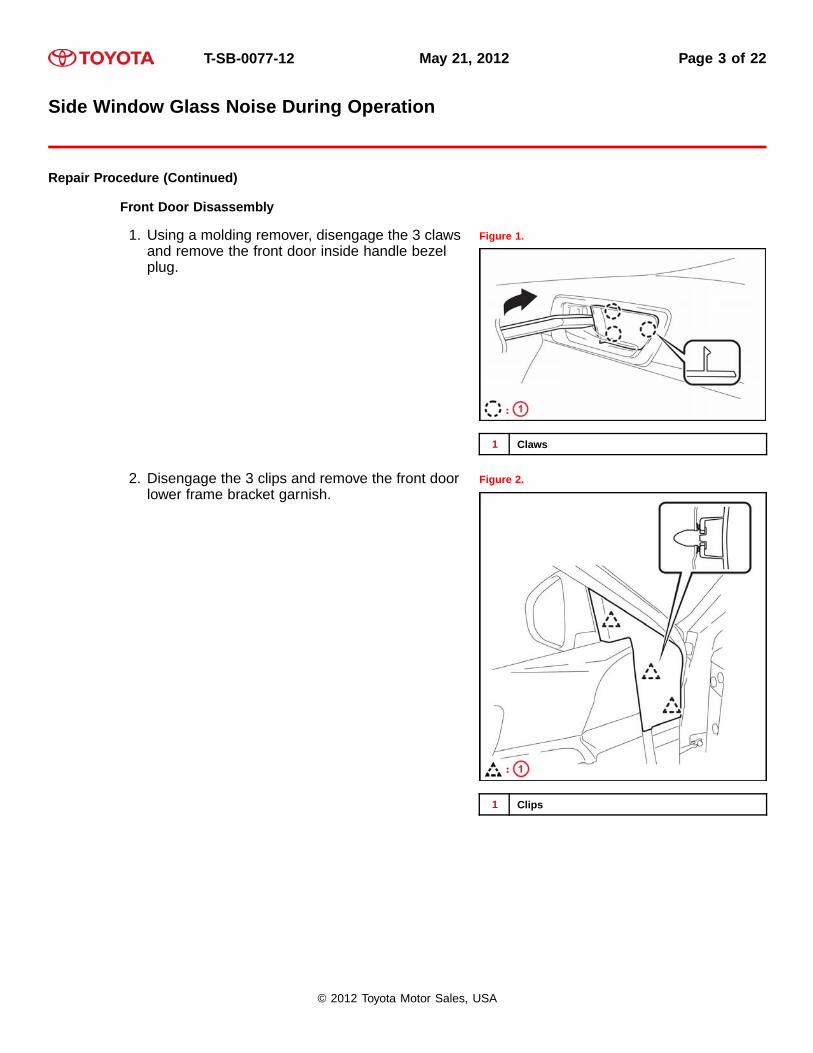
1. Using a molding remover, disengage the 3 clawsand remove the front door inside handle bezelplug.
Figure 1..
1 Claws
2. Disengage the 3 clips and remove the front doorlower frame bracket garnish.
Figure 2..
1 Clips
© 2012 Toyota Motor Sales, USA

T-SB-0077-12 May 21, 2012 Page 4 of 22
Side Window Glass Noise During Operation
Repair Procedure (Continued)Repair Procedure
Front Door Disassembly (Continued)
3. For LH front door.
Remove power window regulator master switchassembly with front door armrest base panel.
A. Using a molding remover, disengage the 2clips, 5 claws and 4 guides.
B. Disconnect each connector and removethe power window regulator master switchassembly with front door armrest base panel.
Figure 3..
1 Clips
2 Claws
3 Guides
© 2012 Toyota Motor Sales, USA

T-SB-0077-12 May 21, 2012 Page 5 of 22
Side Window Glass Noise During Operation
Repair Procedure (Continued)Repair Procedure
Front Door Disassembly (Continued)
4. For RH front door.
Remove power window regulator switch assemblywith front door armrest base panel.
A. Using a molding remover, disengage the 2clips, 5 claws and 4 guides.
B. Disconnect each connector and remove thepower window regulator switch assembly withfront door armrest base panel.
Figure 4..
1 Clips
2 Claws
3 Guides
© 2012 Toyota Motor Sales, USA

T-SB-0077-12 May 21, 2012 Page 6 of 22
Side Window Glass Noise During Operation
Repair Procedure (Continued)Repair Procedure
Front Door Disassembly (Continued)
5. Using a molding remover, disengage the 3 clips, 7claws and 2 guides and remove the front armrestassembly.
Figure 5..
1 Clips
2 Claws
3 Guides
© 2012 Toyota Motor Sales, USA

T-SB-0077-12 May 21, 2012 Page 7 of 22
Side Window Glass Noise During Operation
Repair Procedure (Continued)Repair Procedure
Front Door Disassembly (Continued)
6. Remove courtesy light assembly.
A. Using a pry tool, disengage the claw.
B. Disconnect the connector and remove thecourtesy light assembly.
Figure 6..
A LH Side
B RH Side
1 Claws
© 2012 Toyota Motor Sales, USA

T-SB-0077-12 May 21, 2012 Page 8 of 22
Side Window Glass Noise During Operation
Repair Procedure (Continued)Repair Procedure
Front Door Disassembly (Continued)
7. Remove front door trim board sub-assembly.
A. Put protective tape around the front doorpanel.
B. Remove the 3 screws.
Figure 7..
1 Protective Tape
C. Using a clip remover, disengage the 10 clips. Figure 8..
1 Clips
© 2012 Toyota Motor Sales, USA
T-SB-0077-12 May 21, 2012 Page 9 of 22
Side Window Glass Noise During Operation
Repair Procedure (Continued)Repair Procedure
Front Door Disassembly (Continued)
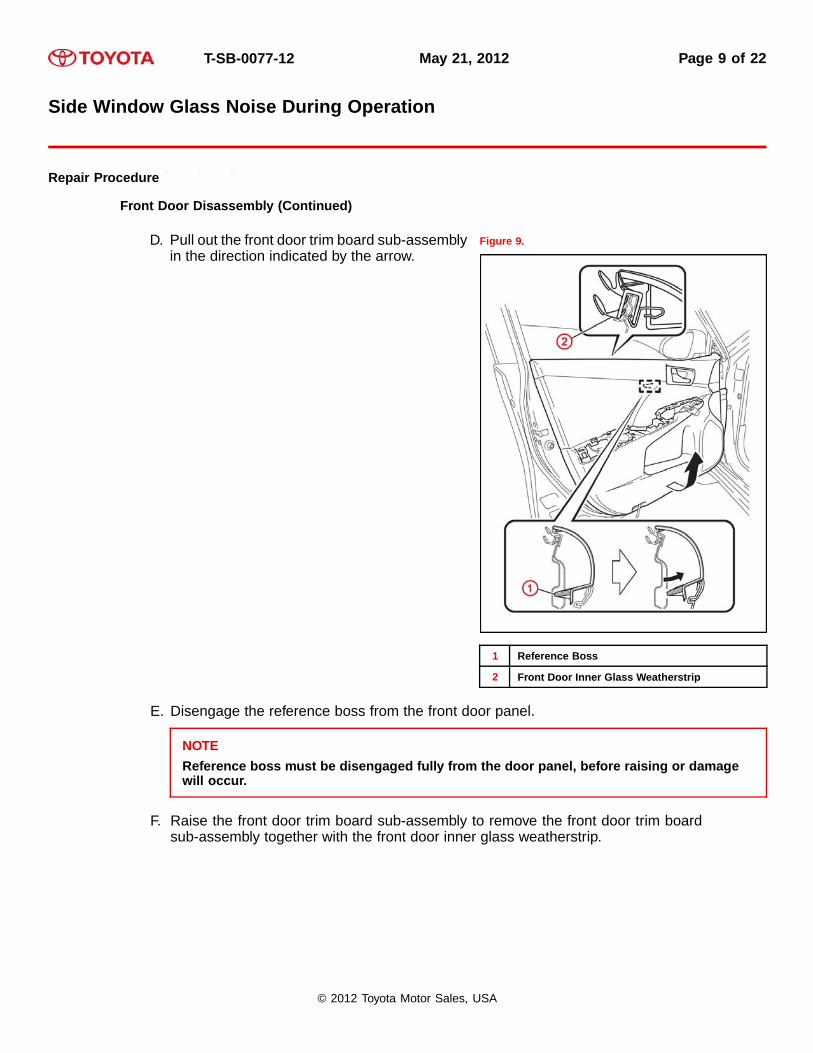
D. Pull out the front door trim board sub-assemblyin the direction indicated by the arrow.
Figure 9..
1 Reference Boss
2 Front Door Inner Glass Weatherstrip
E. Disengage the reference boss from the front door panel.
NOTEReference boss must be disengaged fully from the door panel, before raising or damagewill occur.
F. Raise the front door trim board sub-assembly to remove the front door trim boardsub-assembly together with the front door inner glass weatherstrip.
© 2012 Toyota Motor Sales, USA

T-SB-0077-12 May 21, 2012 Page 10 of 22
Side Window Glass Noise During Operation
Repair Procedure (Continued)Repair Procedure
Front Door Disassembly (Continued)
G. Disconnect the front door lock remote controlcable assembly and front door inside lockingcable assembly.
Figure 10..
8. Using a screwdriver or pry tool, disengage the4 claws and remove the front door inner glassweatherstrip from the front door trim boardsub-assembly.
Figure 11..
1 Screwdriver or pry tool
© 2012 Toyota Motor Sales, USA

T-SB-0077-12 May 21, 2012 Page 11 of 22
Side Window Glass Noise During Operation
Repair Procedure (Continued)
Front Door Reassembly
1. Install the NEW front door inner glassweatherstrip.
Figure 12..
2. Install front door trim board sub-assembly.
A. Connect the front door lock remote controlcable assembly and front door inside lockingcable assembly.
Figure 13..
1 Front Door Inside Locking Cable Assembly
2 Front Door Lock Remote Control CableAssembly
© 2012 Toyota Motor Sales, USA

T-SB-0077-12 May 21, 2012 Page 12 of 22
Side Window Glass Noise During Operation
Repair Procedure (Continued)Repair Procedure
Front Door Reassembly (Continued)
B. Engage the front door trim board sub-assemblywith the 4 claws and reference boss as shownin Figure 14.
Figure 14..
1 Claws
3. Remainder of reassembly is reverse of disassembly.
4. Confirm condition is improved.
© 2012 Toyota Motor Sales, USA

T-SB-0077-12 May 21, 2012 Page 13 of 22
Side Window Glass Noise During Operation
Repair Procedure (Continued)
Rear Door Disassembly
1. Using a molding remover, disengage the 3 clawsand remove the rear door inside handle bezelplug.
Figure 15..
1 Clips
2. Remove rear power window regulator switchassembly with rear door armrest base panel.
A. Using a molding remover, disengage the 2clips, 5 claws and 4 guides.
B. Disconnect the connector and remove the rearpower window regulator switch assembly withrear door armrest base panel.
Figure 16..
1 Clips
2 Claws
3 Guides
© 2012 Toyota Motor Sales, USA

T-SB-0077-12 May 21, 2012 Page 14 of 22
Side Window Glass Noise During Operation
Repair Procedure (Continued)Repair Procedure
Rear Door Disassembly (Continued)
3. Using a molding remover, disengage the 3 clips, 7claws and 2 guides and remove the rear armrestassembly.
Figure 17..
1 Clips
2 Claws
3 Guides
© 2012 Toyota Motor Sales, USA
T-SB-0077-12 May 21, 2012 Page 15 of 22
Side Window Glass Noise During Operation
Repair Procedure (Continued)Repair Procedure
Rear Door Disassembly (Continued)
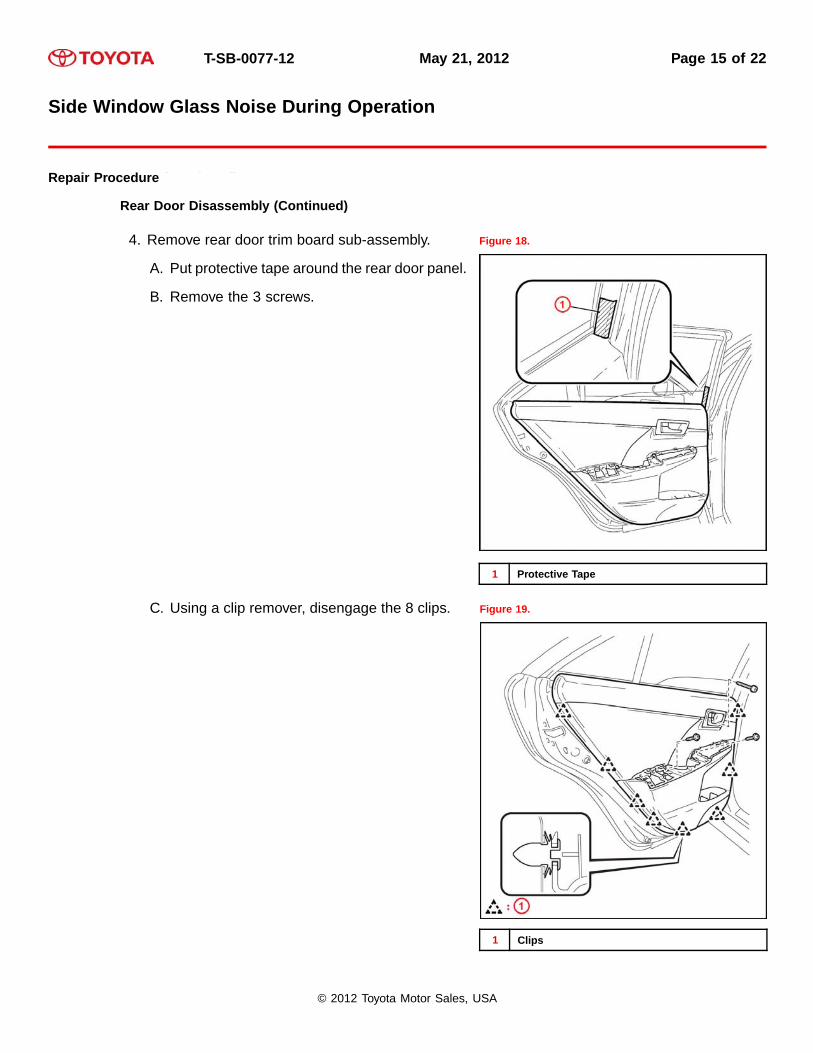
4. Remove rear door trim board sub-assembly.
A. Put protective tape around the rear door panel.
B. Remove the 3 screws.
Figure 18..
1 Protective Tape
C. Using a clip remover, disengage the 8 clips. Figure 19..
1 Clips
© 2012 Toyota Motor Sales, USA
T-SB-0077-12 May 21, 2012 Page 16 of 22
Side Window Glass Noise During Operation
Repair Procedure (Continued)Repair Procedure
Rear Door Disassembly (Continued)
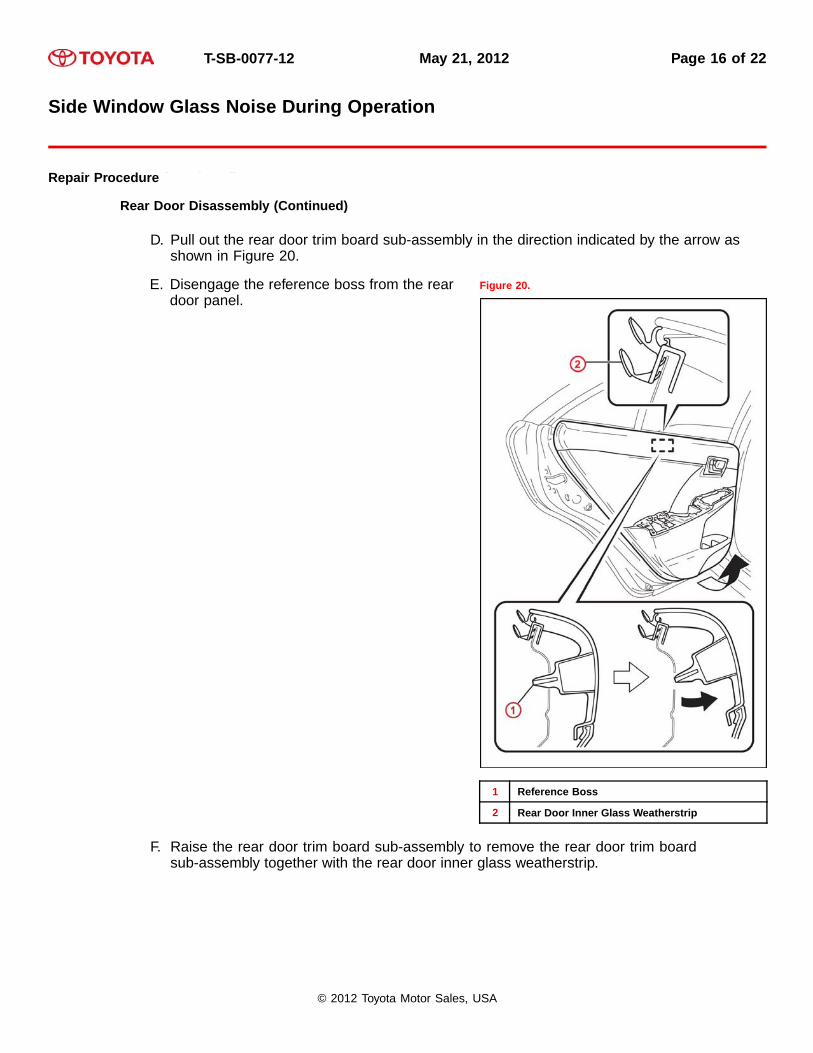
D. Pull out the rear door trim board sub-assembly in the direction indicated by the arrow asshown in Figure 20.
E. Disengage the reference boss from the reardoor panel.
Figure 20..
1 Reference Boss
2 Rear Door Inner Glass Weatherstrip
F. Raise the rear door trim board sub-assembly to remove the rear door trim boardsub-assembly together with the rear door inner glass weatherstrip.
© 2012 Toyota Motor Sales, USA
T-SB-0077-12 May 21, 2012 Page 17 of 22
Side Window Glass Noise During Operation
Repair Procedure (Continued)Repair Procedure
Rear Door Disassembly (Continued)
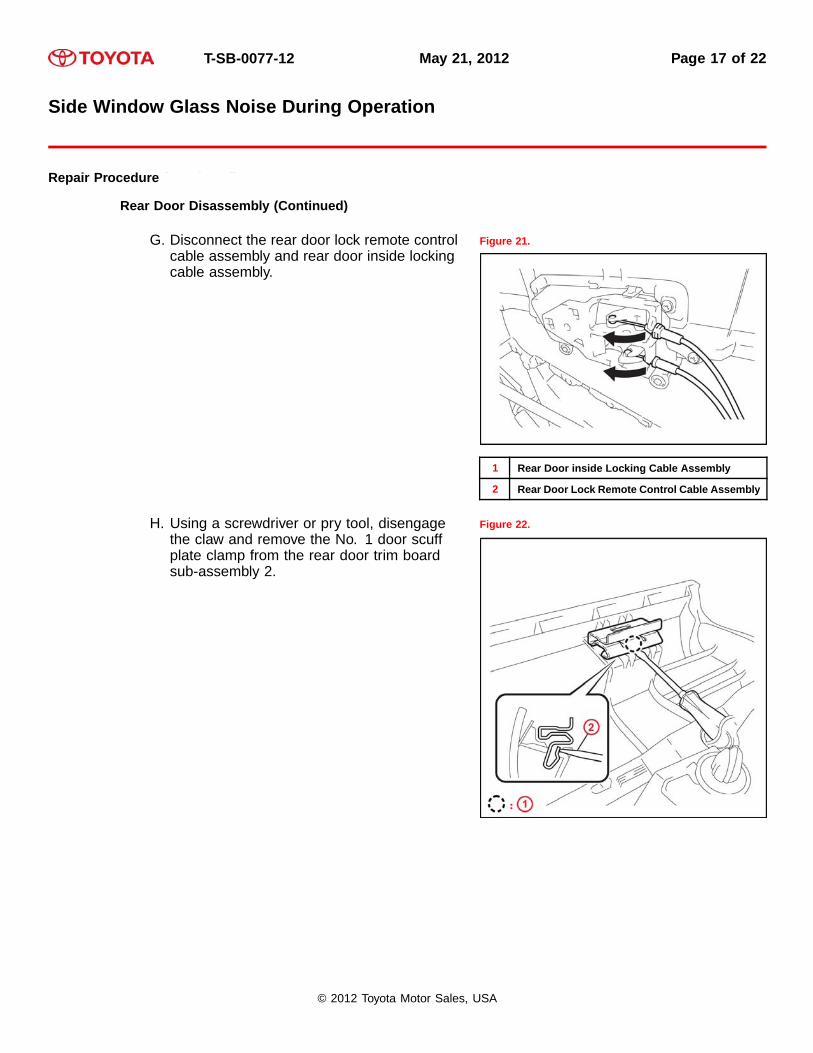
G. Disconnect the rear door lock remote controlcable assembly and rear door inside lockingcable assembly.
Figure 21..
1 Rear Door inside Locking Cable Assembly
2 Rear Door Lock Remote Control Cable Assembly
H. Using a screwdriver or pry tool, disengagethe claw and remove the No. 1 door scuffplate clamp from the rear door trim boardsub-assembly 2.
Figure 22..
© 2012 Toyota Motor Sales, USA

T-SB-0077-12 May 21, 2012 Page 18 of 22
Side Window Glass Noise During Operation
Repair Procedure (Continued)Repair Procedure
Rear Door Disassembly (Continued)
5. Using a screwdriver or pry tool, disengage the3 claws and remove the rear door inner glassweatherstrip from the rear door trim boardsub-assembly.
Figure 23..
1 Claws
2 Screwdriver or pry tool
© 2012 Toyota Motor Sales, USA

T-SB-0077-12 May 21, 2012 Page 19 of 22
Side Window Glass Noise During Operation
Repair Procedure (Continued)
Rear Door Reassembly
1. Install NEW rear door inner glass weatherstrip. Figure 24..
2. Install rear door trim board sub-assembly.
A. Install the No. 1 door scuff plate clamp.
Figure 25..
© 2012 Toyota Motor Sales, USA

T-SB-0077-12 May 21, 2012 Page 20 of 22
Side Window Glass Noise During Operation
Repair Procedure (Continued)Repair Procedure
Rear Door Reassembly (Continued)
B. Connect the rear door lock remote controlcable assembly and rear door inside lockingcable assembly.
Figure 26..
1 Rear Door inside Locking Cable Assembly
2 Rear Door Lock Remote Control Cable Assembly
© 2012 Toyota Motor Sales, USA

T-SB-0077-12 May 21, 2012 Page 21 of 22
Side Window Glass Noise During Operation
Repair Procedure (Continued)Repair Procedure
Rear Door Reassembly (Continued)
C. Engage the rear door trim board sub-assemblywith the 4 claws and reference boss.
Figure 27..
1 Claws
2 Reference Boss
© 2012 Toyota Motor Sales, USA

T-SB-0077-12 May 21, 2012 Page 22 of 22
Side Window Glass Noise During Operation
Repair Procedure (Continued)Repair Procedure
Rear Door Reassembly (Continued)
D. Engage the 8 clips and install the rear doortrim board sub-assembly.
Figure 28..
1 Clips
E. Install the 3 screws.
F. If protective tape has been applied, remove it.
3. Remainder of reassembly is reverse of disassembly.
4. Confirm condition if improved.
© 2012 Toyota Motor Sales, USA