siebel clinical trial managment system guide
TRANSCRIPT

[1]Siebel CRMSiebel Clinical Trial Management System Guide
Siebel Innovation Pack 2017, Rev. A
E52416-01
November 2017
Siebel Clinical Trial Management System Guide, Siebel Innovation Pack 2017, Rev. A
E52416-01
Copyright © 2005, 2017 Oracle and/or its affiliates. All rights reserved.
This software and related documentation are provided under a license agreement containing restrictions onuse and disclosure and are protected by intellectual property laws. Except as expressly permitted in yourlicense agreement or allowed by law, you may not use, copy, reproduce, translate, broadcast, modify, license,transmit, distribute, exhibit, perform, publish, or display any part, in any form, or by any means. Reverseengineering, disassembly, or decompilation of this software, unless required by law for interoperability, isprohibited.
The information contained herein is subject to change without notice and is not warranted to be error-free. Ifyou find any errors, please report them to us in writing.
If this is software or related documentation that is delivered to the U.S. Government or anyone licensing iton behalf of the U.S. Government, then the following notice is applicable:
U.S. GOVERNMENT END USERS: Oracle programs, including any operating system, integrated software,any programs installed on the hardware, and/or documentation, delivered to U.S. Government end usersare "commercial computer software" pursuant to the applicable Federal Acquisition Regulation andagency-specific supplemental regulations. As such, use, duplication, disclosure, modification, andadaptation of the programs, including any operating system, integrated software, any programs installed onthe hardware, and/or documentation, shall be subject to license terms and license restrictions applicable tothe programs. No other rights are granted to the U.S. Government.
This software or hardware is developed for general use in a variety of information managementapplications. It is not developed or intended for use in any inherently dangerous applications, includingapplications that may create a risk of personal injury. If you use this software or hardware in dangerousapplications, then you shall be responsible to take all appropriate fail-safe, backup, redundancy, and othermeasures to ensure its safe use. Oracle Corporation and its affiliates disclaim any liability for any damagescaused by use of this software or hardware in dangerous applications.
Oracle and Java are registered trademarks of Oracle and/or its affiliates. Other names may be trademarks oftheir respective owners.
Intel and Intel Xeon are trademarks or registered trademarks of Intel Corporation. All SPARC trademarksare used under license and are trademarks or registered trademarks of SPARC International, Inc. AMD,Opteron, the AMD logo, and the AMD Opteron logo are trademarks or registered trademarks of AdvancedMicro Devices. UNIX is a registered trademark of The Open Group.
This software or hardware and documentation may provide access to or information about content,products, and services from third parties. Oracle Corporation and its affiliates are not responsible for andexpressly disclaim all warranties of any kind with respect to third-party content, products, and servicesunless otherwise set forth in an applicable agreement between you and Oracle. Oracle Corporation and itsaffiliates will not be responsible for any loss, costs, or damages incurred due to your access to or use ofthird-party content, products, or services, except as set forth in an applicable agreement between you andOracle.

iii
Contents
Preface ............................................................................................................................................................... xiii
Audience..................................................................................................................................................... xiiiDocumentation Accessibility ................................................................................................................... xiiiRelated Documents ................................................................................................................................... xiiiConventions ............................................................................................................................................... xiii
1 What’s New in This Release
What’s New in Siebel Clinical Trial Management System Guide, Siebel Innovation Pack 2017,Rev. A.......................................................................................................................................................... 1-1What’s New in Siebel Clinical Trial Management System Guide, Siebel Innovation Pack 2017....1-1What’s New in Siebel Clinical Trial Management System Guide, Siebel Innovation Pack 2016....1-2
2 Overview of Siebel Clinical Trial Management System
About Siebel Clinical Trial Management System ............................................................................. 2-1Features of Siebel Clinical Trial Management System..................................................................... 2-1Product Modules and Options for Siebel Clinical Trial System .................................................... 2-3
3 Setting Up Siebel Clinical
About Setting Up Siebel Clinical ......................................................................................................... 3-1Configuring Properties for Siebel Clinical in Siebel Tools ............................................................ 3-2Enabling or Disabling Siebel Open UI for Siebel Clinical ............................................................ 3-2Enabling Siebel Server Component Groups for Siebel Clinical ................................................... 3-2Activating Workflow Policies for Siebel Clinical ............................................................................. 3-3Configuring Web Services for Siebel Clinical ................................................................................... 3-4Administrative Setup Tasks for Siebel Clinical ............................................................................... 3-5About the My Team’s Filter .................................................................................................................. 3-6Using Siebel Assignment Manager in Siebel Clinical .................................................................... 3-7
Predefined Assignment Objects ...................................................................................................... 3-7Contact Assignments in Siebel Clinical ......................................................................................... 3-8Contact Denormalization Mode in Siebel Life Sciences .............................................................. 3-8
Setting Up Mobile Web Clients for Position Rollup ........................................................................ 3-9Exporting Workflow Processes to the Local Client....................................................................... 3-9

iv
4 Setting Up Clinical Trials
About Setting Up Clinical Trials........................................................................................................... 4-1Scenario for Clinical Trials..................................................................................................................... 4-2Process of Managing Clinical Trials .................................................................................................... 4-3
Administrator Procedures ................................................................................................................ 4-3End-User Procedures ........................................................................................................................ 4-3
Creating Clinical Programs ................................................................................................................... 4-4Setting Up Clinical Protocols ................................................................................................................. 4-4Tracking and Revising Team Assignment History .......................................................................... 4-6
Automatically Assigning Team Members to a Protocol Using the Position Rolldown Button .....4-7
Creating and Revising Versions for Clinical Protocols .................................................................... 4-8Associating Clinical Protocols with Accounts ................................................................................... 4-8Setting Up Clinical Regions .................................................................................................................. 4-9
Automatically Assigning Team Members Using the Position Rollup and Rolldown Buttons .....4-10
Associating Clinical Regions with Accounts .................................................................................. 4-11Creating Accounts and Contacts for Clinical Trials ....................................................................... 4-11
Creating Accounts .......................................................................................................................... 4-11Creating Contact Records ............................................................................................................. 4-12
Creating Sites for Clinical Trials ....................................................................................................... 4-13Automatically Assigning Team Members to a Site Using the Position Rollup Button ....... 4-15Creating Satellite Sites for Clinical Trials .................................................................................... 4-16
Associating Sites with Accounts ....................................................................................................... 4-19Risk Assessments for Clinical Trials................................................................................................. 4-20
Creating Risk Assessment Templates .......................................................................................... 4-20Performing Risk Assessments for Clinical Trials ....................................................................... 4-22
5 Administering Clinical Subjects and Clinical Visits
About Subject Visit Templates ............................................................................................................. 5-2Process of Defining Subject Visit Templates .................................................................................... 5-2
Creating Subject Visit Templates ..................................................................................................... 5-2Defining Versions for Subject Visit Templates ............................................................................. 5-2Defining Subject Visits ...................................................................................................................... 5-3Defining Planned Subject Visits ...................................................................................................... 5-5Defining Activities for Subject Visits .............................................................................................. 5-5
Approving Subject Visit Templates .................................................................................................... 5-6About Automatic Tracking of Subject Status .................................................................................... 5-6
Status Tracking Fields that Trigger Create and Delete Operations on Records in Subject StatusMVG 5-6Status Tracking Fields that Trigger Update Operations on Fields of Subject Status MVG .... 5-7
Creating Records for Clinical Subjects ............................................................................................... 5-7Scheduling Clinical Subjects ................................................................................................................ 5-9Rescheduling Clinical Subjects ......................................................................................................... 5-10Administering Subject Visits in Batch Mode ................................................................................. 5-11Screening Clinical Subjects ................................................................................................................ 5-11

v
Rescreening Clinical Subjects ............................................................................................................ 5-12Enrolling Clinical Subjects ................................................................................................................. 5-13Randomizing Clinical Subjects ......................................................................................................... 5-13Overriding Initial Subject Status ...................................................................................................... 5-14Transferring Clinical Subjects ............................................................................................................ 5-14Viewing Subject Transfer Information for Clinical Subjects and Sites .................................... 5-15Viewing Subject Visits Information for Sites ................................................................................. 5-16Creating Unscheduled Subject Visits ............................................................................................... 5-16
Creating a Subject Visit From the Subjects Screen .................................................................... 5-16Creating a Subject Visit From the Calendars for Sites .............................................................. 5-16
Terminating Clinical Trials Early for Clinical Subjects ............................................................... 5-17Applying Protocol Amendments to Sites and Clinical Subjects ................................................ 5-18
Applying Revised Subject Visit Templates to Sites ................................................................... 5-18Applying Revised Subject Visit Templates to Clinical Subjects .............................................. 5-18Rules for Applying Protocol Amendments ................................................................................ 5-20Rules for Deleting Subject Visits When Deemed Non-Applicable by Early Termination .. 5-21
About Rolling Up Information for Subject Enrollment ............................................................... 5-21Characteristics of Trials Where Subject Level Data is Available for Each Site ...................... 5-21Characteristics of Trials Where Subject Level Data is Not Available for Each Site .............. 5-22Characteristics of Trials Where Site Level Data is Not Available for a Region .................... 5-22
Viewing Status Accruals for Clinical Subjects of Sites ................................................................ 5-23Viewing Status Accruals for Clinical Subjects of Clinical Regions ........................................... 5-24Viewing Status Accruals for Clinical Subjects of Clinical Protocols ......................................... 5-25Monitoring Rates for Subject Enrollment ....................................................................................... 5-25Monitoring Status Accruals for Clinical Subjects by Visit Type ............................................... 5-26Using Audit Trail for Changes to Subject Status ........................................................................... 5-26Generating Oracle BI Publisher Reports for Site Enrollment Status ......................................... 5-27
6 Managing Sites and Contacts for Clinical Trials
About Managing Sites and Contacts for Clinical Trials................................................................... 6-2Scenario for Managing Sites and Contacts for Clinical Trials ........................................................ 6-2Process of Managing Sites and Contacts for Clinical Trials ............................................................ 6-3
Administrator Procedures ................................................................................................................ 6-3End-User Procedures ......................................................................................................................... 6-4Managing Satellite Sites and Contacts for Clinical Trials ............................................................ 6-5
Creating Clinical Protocol Site Templates .......................................................................................... 6-6Creating Contact and Account Assessment Templates .................................................................... 6-6Maintaining Contacts and Accounts .................................................................................................... 6-6Associating Contracts with Sites ........................................................................................................... 6-7Associating Accounts with Contracts ................................................................................................... 6-7Associating Accounts with Sites ........................................................................................................... 6-8
Associating Accounts for Clinical Protocols with Sites ................................................................ 6-8Associating Accounts for Clinical Regions with Sites .................................................................. 6-9
Associating Activities with Sites........................................................................................................... 6-9Associating Activities for Clinical Protocols with Sites................................................................ 6-9Associating Activities for Clinical Regions with Sites ............................................................... 6-10
vi
Associating Documents with Sites .................................................................................................... 6-10Associating Documents for Clinical Protocols with Sites ......................................................... 6-10Associating Documents for Clinical Regions with Sites............................................................ 6-11
Creating and Managing Site Visits.................................................................................................... 6-11Monitoring Site Visits Using the Calendar.................................................................................. 6-12
Managing Contacts for Sites ............................................................................................................... 6-12Associating Sites with Contacts .................................................................................................... 6-13Archiving Contact Records for Sites ............................................................................................ 6-13Viewing the History of Contacts at Sites ..................................................................................... 6-14
Adding Address Types for Sites ........................................................................................................ 6-14Assigning Employees to Site Teams.................................................................................................. 6-15Creating Activity Plans for Sites ........................................................................................................ 6-15Applying Activity Templates to Sites ............................................................................................... 6-16
Applying Activity Templates to Sites in a Region ..................................................................... 6-16Applying Activity Templates to Sites in a Protocol ................................................................... 6-17
Tracking and Adding Documents at Sites ....................................................................................... 6-17Tracking Documentation Milestones ........................................................................................... 6-17Adding Documents to Sites ........................................................................................................... 6-18
Creating Activities for Document Tracking..................................................................................... 6-19Reviewing, Updating, and Adding Existing Documents for Tracking................................... 6-19
Managing Tracking Activities for Case Report Forms .................................................................. 6-20Viewing Tracking Activities for Case Report Forms ................................................................. 6-20Updating Existing Case Report Forms for Tracking.................................................................. 6-20
Tracking Case Report Forms ............................................................................................................... 6-21Creating Correspondence Activities for Sites.................................................................................. 6-21
Creating Correspondence Activities for Sites ............................................................................. 6-22Creating New Role Correspondence for Sites ............................................................................ 6-22Creating Partner Correspondence Activities .............................................................................. 6-22
Adding Notes to Sites........................................................................................................................... 6-23Viewing the Status History for Sites ................................................................................................. 6-23Assessing Contacts and Accounts ...................................................................................................... 6-24Generating Oracle BI Publisher Reports for Document Tracking .............................................. 6-25
Generating Reports for Site Document Tracking ....................................................................... 6-25Generating Reports for Protocol Level Document Tracking .................................................... 6-26Generating Reports for Region Level Document Tracking....................................................... 6-26Generating Reports for Protocol Document Tracking Across Sites......................................... 6-27Generating Reports for Regional Document Tracking Across Sites........................................ 6-27
Generating Reports for Actual Visits ................................................................................................ 6-28Generating Reports for Planned and Actual Dates of Subject Visits ......................................... 6-28
7 Managing Partial Source Data Verification
About Partial Source Data Verification ............................................................................................... 7-1Setting Up Partial Source Data Verification for Clinical Protocols ............................................... 7-2Setting Up Partial Source Data Verification for Clinical Regions ................................................. 7-2Setting Up Partial Source Data Verification for Subject Visit Templates .................................... 7-3Setting Up Partial Source Data Verification for Sites ....................................................................... 7-4Setting Up Partial Source Data Verification for Clinical Subjects ................................................. 7-5

vii
Viewing Case Report Forms for Partial Source Data Verification ................................................. 7-7Tracking Case Report Forms for Partial Source Data Verification During Site Visits .............. 7-7Recalculating Clinical Subjects Requiring Source Data Verification ........................................... 7-8About Partial Source Data Verification for Protocol Amendments ............................................... 7-9
8 Setting Up and Making Clinical Payments
About Setting Up and Making Clinical Payments for Subject Activities .................................... 8-1Scenario for Clinical Payments.............................................................................................................. 8-2Setting Up Standard Payment Amounts in Subject Visit Templates ............................................ 8-3Setting Payment Exceptions for Sites ................................................................................................... 8-3Splitting Payment Activities Between Multiple Payees................................................................... 8-4Copying Details for Payment Splits ..................................................................................................... 8-5Reversing Splits for Payment Activities .............................................................................................. 8-5Marking Subject Activities as Complete ............................................................................................. 8-6Creating Payment Activities for Sites .................................................................................................. 8-6Generating Payment Records for Sites ................................................................................................ 8-7Generating Payment Records for Sites Associated with Clinical Protocols and Regions ......... 8-7
Generating Payment Records for Sites Associated with Clinical Protocols .............................. 8-7Generating Payment Records for Sites Associated with Clinical Regions ................................ 8-8
Generating Payment Records for Unplanned Payment Activities ................................................. 8-9Adjusting Payment Amounts and Generating Payment Records for Sites ............................... 8-10Generating Final Payments for Sites ................................................................................................. 8-11Reverting Payment Records ................................................................................................................ 8-12Generating Oracle BI Publisher Reports for Clinical Payments ................................................. 8-13
9 Administering and Using Clinical Trip Reports
About Administering and Using Clinical Trip Reports ................................................................... 9-2Scenario for Managing Clinical Trip Reports .................................................................................... 9-2
Preparing Trip Report Templates .................................................................................................... 9-2Preparing Trip Reports...................................................................................................................... 9-2
Creating Questions for Clinical Trip Reports Using Siebel SmartScript ..................................... 9-3Creating Clinical Trip Report Templates ............................................................................................ 9-3Applying Clinical Trip Report Templates .......................................................................................... 9-4Completing Clinical Trip Reports ........................................................................................................ 9-5Completing Questionnaires for Clinical Trip Reports ..................................................................... 9-6Deleting Unanswered Questions from Questionnaires of Clinical Trip Reports ....................... 9-7Tracking Case Report Forms .................................................................................................................. 9-7Automated Validation and Notification Messages for Clinical Trip Reports ............................. 9-8Tracking Completion Status for Clinical Trip Reports ................................................................. 9-10Tracking Status Accruals for Clinical Subjects of Sites ................................................................ 9-11Viewing Universal Inbox Notifications for Action Items of Clinical Trip Reports ................ 9-12Reviewing Clinical Trip Reports ....................................................................................................... 9-13Approving Clinical Trip Reports ....................................................................................................... 9-13Making Clinical Trip Reports Obsolete ........................................................................................... 9-14Creating New Versions of Clinical Trip Reports ............................................................................ 9-15Viewing Version Information for Clinical Trip Reports .............................................................. 9-15

viii
Viewing Geographical Location Details for Clinical Trip Reports............................................. 9-16Using Audit Trail for Reviews and Approvals of Clinical Trip Reports ................................... 9-16Using Audit Trail for Changes to Clinical Trip Reports ............................................................... 9-17Generating Oracle BI Publisher Reports for Site Visits ................................................................ 9-18
10 Managing Clinical Projects
About Managing Clinical Projects..................................................................................................... 10-1Scenario for Managing Clinical Projects .......................................................................................... 10-1
Setting Up and Staffing the Project............................................................................................... 10-2Managing Tasks, Activities, and Risks ........................................................................................ 10-2
Process of Managing Clinical Projects .............................................................................................. 10-2Administrator Tasks ....................................................................................................................... 10-2End-User Procedures ...................................................................................................................... 10-3
Creating Activity Templates for Clinical Projects .......................................................................... 10-3Setting Up Employee Profiles for Clinical Projects........................................................................ 10-3Setting Up Position Types and Rate Lists for Billing .................................................................... 10-4
Creating Position Types as Products............................................................................................ 10-4Creating Rate Lists .......................................................................................................................... 10-4
Creating Clinical Projects .................................................................................................................... 10-4Associating People and Accounts with Clinical Projects .............................................................. 10-5
Adding Employees to Projects ...................................................................................................... 10-6Adding Contacts to Projects .......................................................................................................... 10-6Adding Partner Accounts to Projects ........................................................................................... 10-6
Creating Activities and Tasks for Clinical Projects ........................................................................ 10-7Creating Activities for Projects...................................................................................................... 10-7Creating Tasks and Associated Activities ................................................................................... 10-7
Monitoring Costs for Clinical Projects.............................................................................................. 10-8Managing Risk for Clinical Projects.................................................................................................. 10-8About Views in the Projects Screen................................................................................................... 10-9
11 Managing Clinical Training
About Managing Clinical Training ................................................................................................... 11-1Setting Up Training Topics for Clinical Training .......................................................................... 11-2Creating Training Plans ....................................................................................................................... 11-3Adding Criteria to Training Plans ..................................................................................................... 11-4Creating Versions of Training Plans ................................................................................................. 11-5About Publishing Training Plans ...................................................................................................... 11-6Publishing Training Plans................................................................................................................... 11-7Adding Training Plans to Clinical Sites ........................................................................................... 11-8Changing Training Topics for Clinical Sites ................................................................................... 11-8Designating Completed Training for Training Topics.................................................................. 11-9Designating Completed Training for Contacts ............................................................................. 11-10Viewing Training Information for Clinical Protocols ................................................................. 11-11Viewing Training Information for Clinical Regions ................................................................... 11-12

ix
12 Setting Up and Configuring Clinical Data Capture and Query ManagementSystem Integration
Overview of Clinical Data Capture and Query Management System Integration .................. 12-1Process of Setting Up Clinical Data Capture and Query Management System Integration .. 12-2
Activating Workflows for Clinical Data Capture and Query Management System Integration ..12-2Configuring Web Services for Clinical Data Capture and Query Management SystemIntegration 12-2
Configuring Protocol Integration Fields for Oracle Health Sciences InForm Integration .... 12-3Integrating Data for Subject Visits with Data for Activities ....................................................... 12-3About Exporting Data for Sites ......................................................................................................... 12-4About Integrating Data for Activity Completion .......................................................................... 12-5
13 Setting Up and Configuring Clinical Data Management System Integration
Overview of Clinical Data Management System Integration ...................................................... 13-1About Customizing Web Services for Clinical Data Management System Integration ......... 13-2Process of Setting Up Clinical Data Management System Integration ...................................... 13-2
Activating Workflows for Clinical Data Management System Integration ........................... 13-2Configuring Web Services for Clinical Data Management System Integration..................... 13-2
Integrating Data for Subject Visits with Data for Activities ........................................................ 13-3About Integrating Data for Clinical Subjects .................................................................................. 13-4About Integrating Data for Activity Completion ........................................................................... 13-4
14 Setting Up and Using the Siebel Mobile Disconnected Application for SiebelClinical
About Siebel Mobile Disconnected Applications .......................................................................... 14-1About the Siebel Mobile Disconnected Application for Siebel Clinical................................... 14-1Configuring a Siebel Mobile Disconnected Application for Siebel Clinical ........................... 14-2Using the Siebel Mobile Disconnected Application for Siebel Clinical ................................... 14-3
Getting Started with Siebel Mobile Disconnected Applications .............................................. 14-4Switching to Offline Mode and Synchronizing Data................................................................. 14-4
Managing My Site Visits for Siebel Clinical ................................................................................... 14-5Displaying My Site Visits Information......................................................................................... 14-5Modifying My Site Visits Information ......................................................................................... 14-6Modifying Checklist Activity Information.................................................................................. 14-6Modifying Current Follow Up Information................................................................................ 14-7Modifying All Follow Up Information ........................................................................................ 14-7Modifying CRF Tracking Information ......................................................................................... 14-8
Managing My Sites for Siebel Clinical ............................................................................................. 14-8Displaying My Sites Information.................................................................................................. 14-8Viewing Site Contacts Information .............................................................................................. 14-9Viewing Site Visits Information .................................................................................................... 14-9

x
A Developer’s Reference for Siebel Clinical
About Using the Siebel REST API with Siebel Clinical ................................................................. A-1Overview of User Properties for Siebel Clinical............................................................................... A-2User Properties for Business Components in Siebel Clinical ........................................................ A-2User Properties for Business Services in Siebel Clinical .............................................................. A-13Applet Properties in Siebel Clinical .................................................................................................. A-17Field Properties in Siebel Clinical ..................................................................................................... A-22System Preferences in Siebel Clinical............................................................................................... A-22Workflows in Siebel Clinical.............................................................................................................. A-24Web Services in Siebel Clinical.......................................................................................................... A-26
Index

xi
List of Tables
1–1 What’s New in Siebel Clinical Trial Management System Guide, Siebel Innovation Pack2017 1-1
1–2 What’s New in Siebel Clinical Trial Management System Guide, Siebel Innovation Pack2016 1-2
3–1 Tasks for Siebel Clinical Administration ................................................................................ 3-53–2 The Default Setting for the Manager List Mode User Property.......................................... 3-63–3 Assignment Object Changes in Siebel Life Sciences ............................................................. 3-75–1 Status Tracking Fields that Trigger Create and Delete Operations on Records in Subject
Status MVG 5-65–2 Status Tracking Fields that Trigger Update Operations on Fields of Subject Status MVG.....
5-79–1 Exceptions for SmartScript Question Settings ....................................................................... 9-39–2 Values in Trip Report Status Field, Validation, and Messages ........................................... 9-910–1 Views in the Projects Screen .................................................................................................. 10-9A–1 User Properties for Business Components in Siebel Clinical ............................................. A-2A–2 User Properties for Business Services in Siebel Clinical.................................................... A-13A–3 Applet Properties in Siebel Clinical ..................................................................................... A-17A–4 Field Properties in Siebel Clinical......................................................................................... A-22A–5 System Preferences in Siebel Clinical................................................................................... A-23A–6 Workflows in Siebel Clinical ................................................................................................. A-24A–7 Web Services in Siebel Clinical ............................................................................................. A-26

xii
List of Figures
4–1 Hierarchical Relationships in Siebel Clinical .......................................................................... 4-2

xiii
Preface
This guide covers information about Siebel Clinical Trial Management System.
AudienceThis document is intended for application administrators and users.
Documentation AccessibilityFor information about Oracle's commitment to accessibility, visit the OracleAccessibility Program website athttp://www.oracle.com/pls/topic/lookup?ctx=acc&id=docacc.
Access to Oracle SupportOracle customers that have purchased support have access to electronic supportthrough My Oracle Support. For information, visithttp://www.oracle.com/pls/topic/lookup?ctx=acc&id=info or visithttp://www.oracle.com/pls/topic/lookup?ctx=acc&id=trs if you are hearingimpaired.
Related DocumentsFor more information, see the following documents on Oracle Technology Network:
■ Siebel Applications Administration Guide
■ Siebel Life Sciences Guide
■ Integration Platform Technologies: Siebel Enterprise Application Integration
■ Siebel Business Process Framework: Workflow Guide
■ Siebel Project and Resource Management Administration Guide
■ Siebel CRM Web Services Reference
ConventionsThe following text conventions are used in this document:
Convention Meaning
italic Italic type indicates book titles, emphasis, or placeholder variables forwhich you supply particular values.

xiv
monospace Monospace type indicates commands, computer code, text that youenter, directory paths, or file paths.
Convention Meaning
1
What’s New in This Release 1-1
1What’s New in This Release
This guide describes new product features.
Note: Siebel Innovation Pack 2017 is a continuation of the Siebel8.1/8.2 release.
What’s New in Siebel Clinical Trial Management System Guide, SiebelInnovation Pack 2017, Rev. A
This guide has been updated to correct or remove obsolete product and componentterms.
What’s New in Siebel Clinical Trial Management System Guide, SiebelInnovation Pack 2017
Table 1–1 lists the changes in this revision of the documentation to support this releaseof Siebel Innovation Pack 2017.
Table 1–1 What’s New in Siebel Clinical Trial Management System Guide, SiebelInnovation Pack 2017
Topic Description
"Creating Risk Assessment Templates" onpage 4-20
New topic. It describes how to create riskassessment templates.
"Performing Risk Assessments for ClinicalTrials" on page 4-22
Modified topic. It describes how to preform riskassessments for clinical trials.
Setting Up and Configuring ClinicalOperations Integration
Removed topic. ClearTrial integration for clinicaltrip reports is no longer supported.
Chapter 14, "Setting Up and Using theSiebel Mobile Disconnected Application forSiebel Clinical"
New chapter. It describes how to configure andstart using the Siebel Mobile disconnectedapplication for Siebel Clinical.

What’s New in Siebel Clinical Trial Management System Guide, Siebel Innovation Pack 2016
1-2 Siebel Clinical Trial Management System Guide
What’s New in Siebel Clinical Trial Management System Guide, SiebelInnovation Pack 2016
Table 1–2 lists the changes in this revision of the documentation to support this releaseof Siebel Innovation Pack 2016.
Table 1–2 What’s New in Siebel Clinical Trial Management System Guide, SiebelInnovation Pack 2016
Topic Description
"Creating Satellite Sites for ClinicalTrials" on page 4-16
New topic. It includes information about how to createsatellite sites for clinical trials.
"Transferring Clinical Subjects" onpage 5-14
New topic. It includes information about how to transfersubjects from one study site to another.
"Viewing Subject TransferInformation for Clinical Subjectsand Sites" on page 5-15
New topic. It includes information about how to viewthe subject transfer information for subjects and sites.
"Viewing Subject Visits Informationfor Sites" on page 5-16
New topic. It includes information about how to viewthe subject visits information for sites.
"Managing Satellite Sites andContacts for Clinical Trials" onpage 6-5
New topic. It includes information about how to managesatellite sites and contacts for clinical trials.
"Tracking Completion Status forClinical Trip Reports" on page 9-10
"Viewing Universal InboxNotifications for Action Items ofClinical Trip Reports" on page 9-12
Updated topics. The Notifications feature is enabled bydefault for all Siebel Business Applications so allnotification messages for clinical trip reports are sentdirectly to the screens of users.
"Making Clinical Trip ReportsObsolete" on page 9-14
New topic. It includes information about how to retire anactive trip report so that a new version of the trip reportcan be created.
"Creating New Versions of ClinicalTrip Reports" on page 9-15
New topic. It includes information about how to reopenapproved or obsolete trip reports to modify and createnew versions of them.
"Viewing Version Information forClinical Trip Reports" on page 9-15
New topic. It includes information about how to viewthe version information for trip reports. The Versionsview is a new view for trip reports.
Chapter 12, "Setting Up andConfiguring Clinical Data Captureand Query Management SystemIntegration"
Modified chapter. Integration between Siebel Clinicaland Oracle Health Sciences InForm is supported only.Integration between Siebel Clinical and Oracle Clinicalno longer supported.
Chapter 13, "Setting Up andConfiguring Clinical DataManagement System Integration"
Modified chapter. Integration between Siebel Clinicaland Oracle Health Sciences InForm is supported only.Integration between Siebel Clinical and Oracle Clinicalintegration is no longer supported.
"About Using the Siebel REST APIwith Siebel Clinical" on page A-1
New topic. You can use the Siebel CRM RepresentationalState Transfer (REST) application programming interface(API) to create, synchronize, and delete Siebel Clinicalusers.

2
Overview of Siebel Clinical Trial Management System 2-1
2Overview of Siebel Clinical Trial ManagementSystem
This chapter provides an overview of Oracle’s Siebel Clinical Trial ManagementSystem. It includes the following topics:
■ About Siebel Clinical Trial Management System
■ Features of Siebel Clinical Trial Management System
■ Product Modules and Options for Siebel Clinical Trial System
About Siebel Clinical Trial Management SystemSiebel Clinical Trial Managements System allows biotechnology companies,pharmaceutical companies, and CROs (clinical research organizations) to bettermanage the clinical trial process, maintain quality of clinical trials, and manageinvestigator relationships. It provides a comprehensive set of tools for CRAs (clinicalresearch associates), clinical investigators, and site coordinators, and includes apersonalized Internet portal to conduct study activities more efficiently.
The following products are supported:
■ Siebel Clinical Trial Management System
■ Siebel Clinical Trial Management System Cloud Service
Features of Siebel Clinical Trial Management SystemSiebel Clinical supports the following functionality:
■ Support for full clinical trial hierarchies of Subject-Site-Region-Protocol-Program
■ Support for global trials running in multiple countries, multiple languages, andmultiple currencies
■ Support for randomized trials
■ Support for multi-arm, epoch, and adaptive trials
■ Site management tools for CRAs (clinical research associates), including a sitecalendar, trip reports, document tracking, and payment generation
■ Personalized Internet portal to help site coordinators, clinical investigators, andCRAs better manage clinical trials over the Web
■ Project and resource management

Features of Siebel Clinical Trial Management System
2-2 Siebel Clinical Trial Management System Guide
■ A flexible audit trail engine
■ Investigator and site profiling
■ Activity and calendar management for CRAs and clinical sites
■ Clinical trial status and management reports for study manager and CRAs
■ Integrated payment tracking for sites and investigators
■ Support for multiple accounts associated with a clinical protocol
■ Support for multiple contracts associated with a clinical site
■ Subject visit templates for study staff to better plan subject visits and promoteprotocol adherence
■ Automatic tracking of subject status on completion of relevant visits, eliminatingmanual errors.
■ Clinical trip report templates for CRAs to facilitate compliance with good clinicalpractice (GCP)
■ Automated notification emails sent to the owner, reviewer, and approver of thetrip reports
■ Audit trail for reviews and approvals of trip reports
■ Approver verification of clinical trip reports
■ Support for the Siebel Open UI framework
■ Siebel Clinical Trial Management System Cloud Service for Software as a Service(SaaS) deployments
■ Clinical operations integration for budget planning and tracking
■ Source data verification to ensure that data collected during clinical trials iscomplete, accurate, and verifiable
■ Support for planning and tracking of clinical training
Siebel Clinical is designed to allow CROs (clinical research organizations),pharmaceutical and biotech companies, and other clinical trial sponsors to:
■ Deploy a Web-based clinical trial management system to internal and externalusers.
■ Make better decisions throughout the clinical trials process, leading to moreefficient use of resources and faster time to market.
■ Increase productivity of CRAs and their managers by automating repetitive tasksand allowing real-time information sharing.
■ Create sustainable competitive advantage by allowing customers to providebreakthrough service to sites and investigators.
■ Provide a solution integrated with Siebel Pharma Sales and Siebel Pharma Serviceto allow customers to deploy one customer management solution across the entireenterprise.
Siebel Clinical supports the 21 CFR Part 11 industry standard.

Product Modules and Options for Siebel Clinical Trial System
Overview of Siebel Clinical Trial Management System 2-3
Product Modules and Options for Siebel Clinical Trial SystemYou can purchase many Siebel Business Applications modules and use them withSiebel Clinical Trial Management System and Siebel Life Sciences. In addition, you canpurchase the optional modules that are specific to Siebel Life Sciences to provideenhanced functionality for various business processes. For information about theoptional modules to use with Siebel Life Sciences and Siebel Clinical TrialManagement System, contact your Oracle sales representative.
This guide documents Siebel Life Sciences with the optional modules installed. Inaddition, the Sample database includes data for optional modules. If your installationdoes not include some of these modules, then your software interface differs from thatdescribed in some sections of this guide.
The exact configuration of Siebel Life Sciences screens and views depends on yourcompany’s configuration of Siebel Life Sciences. For more information about SiebelLife Sciences, see Siebel Life Sciences Guide.
For introductory information about using the Siebel Life Sciences interface, see SiebelFundamentals.
Note: The Siebel Bookshelf is available on Oracle Technology Network(http://www.oracle.com/technetwork/documentation/siebel-087898.html) and Oracle Software Delivery Cloud. It might also beinstalled locally on your intranet or on a network location.

Product Modules and Options for Siebel Clinical Trial System
2-4 Siebel Clinical Trial Management System Guide

3
Setting Up Siebel Clinical 3-1
3Setting Up Siebel Clinical
This chapter covers setting up Siebel Clinical. It includes the following topics:
■ About Setting Up Siebel Clinical
■ Configuring Properties for Siebel Clinical in Siebel Tools
■ Enabling or Disabling Siebel Open UI for Siebel Clinical
■ Enabling Siebel Server Component Groups for Siebel Clinical
■ Activating Workflow Policies for Siebel Clinical
■ Configuring Web Services for Siebel Clinical
■ Administrative Setup Tasks for Siebel Clinical
■ About the My Team’s Filter
■ Using Siebel Assignment Manager in Siebel Clinical
■ Setting Up Mobile Web Clients for Position Rollup
About Setting Up Siebel ClinicalThis chapter lists the administrative tasks that are specific to Siebel Clinical. Use thischapter in combination with the main guide for performing administrative tasks, SiebelApplications Administration Guide.
Siebel Applications Administration Guide covers the setup tasks that are common to allSiebel Business Applications, such as using license keys, defining employees, anddefining your company’s structure. It also provides the information that you need toimplement, configure, and monitor the Sales, Service, and Marketing products and toperform Data Administration and Document Administration tasks.
Some tasks listed in this chapter might replace tasks in Siebel ApplicationsAdministration Guide. Other tasks might be additional tasks. Make sure you reviewTable 3–1, " Tasks for Siebel Clinical Administration" before following the proceduresin Siebel Applications Administration Guide.
This guide assumes that you already installed Siebel Clinical or completed an upgradefrom another Siebel Business Application. If you have not, then refer to theInstallation/Upgrade section of the Siebel Bookshelf, and click the links to the guidesthat are relevant to your company’s implementation.
The Siebel database server installation script creates a Siebel administrator accountthat you can to perform the tasks described in this guide. For information about thisprocess, see the Siebel Installation Guide for the operating system you are using andSiebel System Administration Guide.

Caution: Do not perform system administration functions on yourlocal database, as these functions can cause data conflicts, an overlylarge local database, or a large number of additional transactions toroute.
Configuring Properties for Siebel Clinical in Siebel Tools
3-2 Siebel Clinical Trial Management System Guide
Configuring Properties for Siebel Clinical in Siebel ToolsUser properties are object definitions that are added to an applet, business component,control, field, or list column to enable and configure specialized behavior. Userproperties drive some Siebel Clinical features. You can customize these featuresthrough their respective user properties. With user properties, you can controlbehavior in the user interface, change default settings or leave them as they are, andenable or disable features. For information about enabling and configuring the SiebelTools object definitions required for Siebel Clinical, see Appendix A, "Developer’sReference for Siebel Clinical."
Enabling or Disabling Siebel Open UI for Siebel ClinicalTo enable or disable Siebel Open UI for Siebel Clinical, you must configure theEnableOpenUI parameter for the eClinicalObjMgr_enu Object Manager. Siebel OpenUI is disabled by default. For information about configuring the Object Manager toenable Siebel Open UI, see the Siebel Installation Guide for the operating system you areusing.
Enabling Siebel Server Component Groups for Siebel ClinicalThis system administration task describes how to activate the component groups thatare required for Siebel Clinical.
To enable Siebel Server component groups for Siebel Clinical
1. Navigate to the Administration - Server Configuration screen, then theComponent Groups view.
2. Complete the following steps to set the component groups:
a. Query for the Workflow Management Component Group.
b. On the Component Groups applet, click Enable.
c. Query for the EAI Component Group.
d. On the Component Groups applet, click Enable.
3. Navigate to the Administration – Server Management screen, then the Servers andComponent Groups view.
4. Verify that the State value for the Workflow Management and EAI ComponentGroups is set to Online.
5. Navigate to Administration – Server Configuration screen, then the Enterprisesand Synchronize view.
6. Click Synchronize.
7. Restart the Siebel Server.

Activating Workflow Policies for Siebel Clinical
Setting Up Siebel Clinical 3-3
Activating Workflow Policies for Siebel ClinicalThis system administration task describes how to activate the workflows andworkflow policies required for Siebel Clinical. Table A–6," Workflows in Siebel Clinical" shows a list of workflows for Siebel Clinical.
To activate the workflow policies for Siebel Clinical
1. Navigate to the Administration - Business Process screen, then the WorkflowDeployment view, and perform the following steps:
a. Query for all the workflows using the following criteria, and activate theworkflows:
– *Clinical*
– SWI - Protocol*
b. Verify that each activated workflow is added to the Active Workflow Processeslist view at the end of the screen.
2. Navigate to the Administration - Runtime Events screen, click Menu (thecogwheel icon), and select Reload Runtime Events.
3. Navigate to the Administration - Business Process screen, then the WorkflowPolicies view, and perform the following steps:
a. Query workflow policies for LS Clinical*
b. Set the activation date to one day before today’s date for all policies.
c. Check that expiration date is NULL for all policies.
4. Navigate to the Administration - Server Management screen, then the Jobs view,and perform the following steps to generate triggers for the workflow policiesreturned from your query:
a. Define a job for Generate Triggers component with the following parameters:
– EXEC: True
– Mode: ALL
– Privileged User: <%SADMIN%>
– Privileged User Password: <%PASSWORD%>
b. Start the job and query until the status is Success.
5. From the srvrmgr command utility, perform the following steps:
a. Create a component definition for the LS Clinical Rollup policy group asfollows:
– Component definition: LSCLIN
– Component type: WorkMon
– Component group: Workflow
– Run mode: Background
– Full name: LS Clinical
– Description: Monitors LS Clinical Workflow Manager events
– Parameter DfltTasks=1, GroupName=LS Clinical Rollup, SleepTime=30

Note: When working with component definition commands, launchand run the srvrmgr program for the enterprise; that is, do not startsrvrmgr with the back slashes (/s) (or -s for UNIX).
Configuring Web Services for Siebel Clinical
3-4 Siebel Clinical Trial Management System Guide
The component alias must be unique across the enterprise, and must not bemore than 30 characters in length. Also be careful not to use keywords in thecomponent description, such as for or component, unless the words areenclosed in quotes.
The component definition command starts a task to perform actions on LSClinical Rollup group policy as a result of updates on the corresponding tablesthat the database triggers monitor.
The SleepTime parameter represents the time in seconds for processingrequests. The default value is 20 seconds. Setting the SleepTime parameter to alow value or zero can have serious negative performance consequences.
b. Enter the following command to enable the LS Clinical Rollup component:
enable component definition LSCLIN
6. Navigate to the Administration - Server Configuration screen, then theSynchronize view, and perform the following steps:
a. Click Synchronize.
b. Verify that the Workflow Monitor Agent is running.
If it is not activated, then start the Workflow Monitor Agent task again.
7. Navigate to the Administration - Server Management screen, then the Tasks view,and perform the following steps to set the action interval for the WorkflowMonitor Agent task:
a. Navigate to the Parameters view.
b. In the Tasks list, query for the Workflow Monitor Agent in the Componentfield.
c. In the Task Parameters list, query for Action Interval in the Parameter fieldand set the value to 10.
Configuring Web Services for Siebel ClinicalThis task describes how to configure Web services for Siebel Clinical. For moreinformation about configuring Web services, see Integration Platform Technologies: SiebelEnterprise Application Integration.
Note: It is recommended that you use HTTPS authentication. Forinformation about configuring Secure Sockets Layer (SSL) for HTTPSauthentication, see Siebel Security Guide.
To configure Web services for Siebel Clinical
1. Navigate to the Administration - Web Services screen, then the Inbound WebServices view.
2. Query for the ClinicalSubject Inbound Web service.

Administrative Setup Tasks for Siebel Clinical
Setting Up Siebel Clinical 3-5
3. On the Service Ports applet, update the Address variable to point to your Webserver, and configure the Language variable.
4. Query for the SWILSClinicalQueryProtocolSite_SiteVisits Web service.
5. On the Service Ports applet, update the Address variable to point to your Webserver, and configure the Language variable.
6. Query for the SWILSClinicalCreateSiteVisitGeoLocation Web service.
7. On the Service Ports applet, update the Address variable to point to your Webserver, and configure the Language variable.
8. Click Clear Cache on the Inbound Web Services applet.
Administrative Setup Tasks for Siebel ClinicalTable 3–1 lists the administrative setup procedures that are specific to Siebel Clinicaland procedures that might differ from the procedures of the other Siebel BusinessApplications. The table also refers to documentation containing information abouteach task.
When setting up Siebel Clinical, use Table 3–1 in combination with the main resource,Siebel Applications Administration Guide.
Table 3–1 Tasks for Siebel Clinical Administration
AdministrativeTask Description For More Information
Managingaccounts contactsin Siebel LifeSciences
■ Activating workflows foraccounts contacts
■ Enabling server components foraccounts contacts
■ Generating column maps foraccounts contacts list
■ Creating product data to appearin accounts contacts list
Siebel Life Sciences Guide
Creating aclinical program
■ Creating protocols
■ Revising protocols
■ (Optional) Setting up regions
■ Defining a subject visit template
Chapter 4, "Setting Up ClinicalTrials"
Chapter 5, "Administering ClinicalSubjects and Clinical Visits"
Chapter 6, "Managing Sites andContacts for Clinical Trials"
Managing sites ■ Creating protocol site templates
■ Creating assessment templatesfor contacts and accounts
■ Maintaining contact andaccount information
■ Setting up contracts for sites
Chapter 6, "Managing Sites andContacts for Clinical Trials"
Setting upclinical payments
■ Setting up standard paymentamounts in subject visittemplates
■ Adjusting payment amountsand generating payments forsites
Chapter 8, "Setting Up and MakingClinical Payments"

About the My Team’s Filter
3-6 Siebel Clinical Trial Management System Guide
About the My Team’s FilterThe visibility filter appears on many screens. It provides a list of filters, such as MyContacts, My Team’s Contacts, and All Contacts. These filters determine the recordsthat appear in the view.
The behavior of the My Team’s filter varies from screen to screen. In some screens, thisfilter displays those records where the primary member of the team reports to the user.In other screens, this filter displays records where any of the team members report tothe user.
The Manager List Mode user property in the business component determines thisbehavior. If the Manager List Mode user property is active and set to Team, then theMy Team’s filter displays all records where the user’s subordinate is on the team but isnot necessarily the primary member.
Table 3–2 lists the default setting of the Manager List Mode user property for someSiebel Clinical screens and business components.
Table 3–2 The Default Setting for the Manager List Mode User Property
Screen Business Component Manager List Mode
Accounts Accounts Inactive
Contacts Contact Inactive
Protocols Clinical Protocol Active
Site Management Clinical Protocol Site Active
Creating tripreport templates
■ Creating trip report templates
■ Approving trip report templates
Chapter 9, "Administering andUsing Clinical Trip Reports"
Creating activitytemplates forprojects
■ Creating activity templates forprojects
Chapter 10, "Managing ClinicalProjects"
Importing data ■ Importing data with SiebelEnterprise Integration Manager
■ Importing, extracting, androuting syndicated data
■ Charting denormalizedsyndicated data
Siebel Life Sciences Guide
ConfiguringSiebel Clinical
■ Configuring user properties forbusiness components
■ Configuring user properties forbusiness services
■ Configuring applet properties
■ Configuring field properties
■ Configuring workflows
■ Customizing Web services
Appendix A, "Developer’s Referencefor Siebel Clinical,"
Table 3–1 (Cont.) Tasks for Siebel Clinical Administration
AdministrativeTask Description For More Information

Using Siebel Assignment Manager in Siebel Clinical
Setting Up Siebel Clinical 3-7
Using Siebel Assignment Manager in Siebel ClinicalSiebel Assignment Manager allows the Siebel administrator to automatically assigntasks to specific people. For this assignment, however, the Siebel administrator mustfirst define assignment rules for each task. For more information about using andimplementing Siebel Assignment Manager, see Siebel Assignment ManagerAdministration Guide. For additional information about creating territories and runningterritory realignments, see Siebel Territory Management Guide.
This topic provides Siebel Assignment Manager information that is specific to SiebelClinical.
Predefined Assignment ObjectsSome of the predefined assignment objects and underlying criteria described in SiebelAssignment Manager Administration Guide are modified in Siebel Life Sciences tosupport pharmaceutical business processes. Table 3–3 describes the assignment objectsthat are changed in Siebel Life Sciences.
Note: Assignment Item Type Industry Name is not supported. Thisassignment rule is defined for Siebel Business Applications andcurrently conflicts with Siebel Life Sciences assignment rules. SiebelLife Sciences uses the assignment item type SIC (Standard IndustrialClassification) Code.
Table 3–3 Assignment Object Changes in Siebel Life Sciences
Assignment Object Modifications
Account The assignment criteria SIC Code is renamed Account Class of Trade.
Its assignment criteria include:
■ Account City State Country
■ Account Brick
The source table for Account Brick is changed to S_CON_ADDR, andthe source column for Account Brick is changed to BRICK_ID.
Contact This assignment object is created specifically for Siebel Life Sciencesand is not described in Siebel Assignment Manager Administration Guide.
Its assignment criteria include:
■ Contact
■ Contact Medical Specialty Code
■ Contact Wildcard
■ Contact City
■ Contact State
■ Contact Country
■ Contact Zip Code
■ Contact City State Country
■ Contact Brick
■ Medical Specialty
■ Organization
■ Position

Using Siebel Assignment Manager in Siebel Clinical
3-8 Siebel Clinical Trial Management System Guide
Contact Assignments in Siebel ClinicalIn most Siebel Business Applications, contact assignment is based on the primaryaddress. This process is different for Siebel Life Sciences. A contact in Siebel LifeSciences can have multiple addresses, and each representative on the contact’s salesteam can indicate a different primary address for the same contact. For this reason, donot base the contact assignment on the primary address.
For example, Representative A might indicate a hospital address as the primaryaddress, while Representative B might indicate a private-office address as the primaryaddress. In the All Contacts and My Team’s Contacts views, the primary address thatappears is the address that the primary team member assigns. For more information,see "Predefined Assignment Objects" on page 3-7.
Contact Denormalization Mode in Siebel Life SciencesContact Denormalization mode in Siebel Life Sciences differs from the description ofthe mode in Siebel Assignment Manager Administration Guide in the following ways:
■ This mode denormalizes positions from the account team table to the contact teamtable for all contacts directly affiliated with an account. Users can specify a directaffiliation between a contact and an account by selecting:
– The Direct field in the Account Affiliations view of the Contacts screen.
– The Direct field in the Contact Affiliations view of the Accounts screen.
For more information, see Siebel Life Sciences Guide.
■ This mode does not denormalize positions from the opportunity team table to thecontact team table.
■ You must run this mode after separately running batch mode jobs for contacts andaccounts. Run the batch mode jobs in the following order:
a. Contacts
b. Accounts
c. Contact Denormalization
Contact Denormalization in Siebel Life Sciences has the following additionalimportant rules, requirements, and exceptions:
■ Running Contact Denormalization mode in Dynamic mode. To activate theContact Denormalization Policy, set the expiration date to a future date or leave itblank. Then generate the database triggers by running Generate Triggers.
■ Running Contact Denormalization mode in Batch mode. Remember to specifythe following parameters:
Object Name=Contact Denormalization
Assignment Mode=Denorm
■ Contact Denormalization mode does not evaluate rules. Therefore, you do nothave to create a rule-based object for Contact Denormalization to run AssignmentManager in this mode. Also, because it does not evaluate rules, ContactDenormalization mode does not set the primary team position.
■ Contact Denormalization assigns contacts to employees who are on the accountteam to which the contacts are directly affiliated. To reduce the number ofcontact-to-position relationship (S_POSTN_CON) rows routed to the manager'slocal database, the value of the ASGN_DNRM_FLG field is set to "N". With this

Setting Up Mobile Web Clients for Position Rollup
Setting Up Siebel Clinical 3-9
default setting, the contacts that the Contact Denormalization process assigns toteam members are not visible to managers on their local databases. However, ifyou want managers to see all contacts that are assigned to their team members,regardless the assignment method, then set the ASGN_DNRM_ "Y."
Setting Up Mobile Web Clients for Position RollupIn Siebel Clinical, a CRA (clinical research associate) can create sites and assignemployees to positions at the site level. When the CRA clicks the Position Rollupbutton, these positions become visible at the region and protocol levels. Typically, theCRA works in a disconnected mode, on a laptop computer.
The administrator must set up each mobile Web client to allow position rollups. Thesetup requires the following steps in Siebel Clinical:
■ The administrator exports workflow processes and data maps from the serverdatabase to XML files.
■ The administrator connects to a local client, imports the XML files to the clientdatabase and activates the workflow processes on the local client.
Note: Users of the local client must have Workflow ProcessDefinition, EAI DATA Map View, and EAI Data Map Editor in theiruser responsibilities to accept imported workflow processes and datamaps.
Exporting Workflow Processes to the Local ClientComplete the procedure in this topic to export the workflow processes to the localclient.
To export the workflow processes to the local client
1. Export the Clinical Assign Position From Region and Clinical Assign PositionFrom Site workflows to XML files.
2. Import the two XML files to the local client, and activate the workflows.
For information about exporting and importing workflow processes, see SiebelBusiness Process Framework: Workflow Guide.
Exporting DTE Data Maps From the Server Database to an XML FileComplete the procedure in this topic to export DTE data maps from the serverdatabase to an XML file.
To export DTE data maps from the server database to an XML file
1. In Siebel Clinical, connect to the server database.
2. Navigate to the Administration - Integration screen, then the Data Maps view.
3. In the Integration Object Map list, query for Clinical*.
The query returns the following records: Clinical Region Position to ProtocolPosition Map, Clinical Site Position to Account Position Map, Clinical Site Positionto Protocol Position Map, and Clinical Site Position to Region Position Map.
4. Click Menu (the cogwheel icon), and select Export Data Map.
5. In the dialog box, check Export All Rows in Current Query and click Export.

Setting Up Mobile Web Clients for Position Rollup
3-10 Siebel Clinical Trial Management System Guide
6. In the dialog box, select Save to Disk, select a location, and save the data maps asPositionRollupDataMap.xml.
Importing DTE Data Maps to a Local Client From an XML FileComplete the procedure in this topic to import DTE data maps to a local client from anXML file.
To import DTE data maps to a local client from an XML file
1. In Siebel Clinical, connect to the local client.
2. Navigate to the Administration - Integration screen, then the Data Maps view.
3. In the Integration Object Map list, click Menu (the cogwheel icon), and selectImport Data Map.
4. In the dialog box, select Browse and find PositionRollupDataMap.xml.
For information about creating this file, see "Exporting DTE Data Maps From theServer Database to an XML File" on page 3-9.
5. In the Integration Object Map list, query for Clinical*Position*.
4
Setting Up Clinical Trials 4-1
4Setting Up Clinical Trials
This chapter describes how to set up a clinical program, protocol, region, and site inSiebel Clinical. It includes the following topics:
■ About Setting Up Clinical Trials
■ Scenario for Clinical Trials
■ Process of Managing Clinical Trials
■ Creating Clinical Programs
■ Setting Up Clinical Protocols
■ Tracking and Revising Team Assignment History
■ Creating and Revising Versions for Clinical Protocols
■ Associating Clinical Protocols with Accounts
■ Setting Up Clinical Regions
■ Associating Clinical Regions with Accounts
■ Creating Accounts and Contacts for Clinical Trials
■ Creating Sites for Clinical Trials
■ Associating Sites with Accounts
■ Risk Assessments for Clinical Trials
About Setting Up Clinical TrialsThis chapter describes the main steps to carry out a clinical trial using Siebel Clinical.Following the procedures in this chapter you can:
■ Create a clinical program and clinical protocols.
■ Set up document tracking at the protocol, region, and site levels, and for accountsand contacts.
■ Set up and revise subject visit templates for a protocol.
■ Enter data on accounts, sites, and contacts.
■ Screen and enroll subjects.
■ View charts showing subject status and subject enrollment rates.
■ Review payments to the protocol.

Scenario for Clinical Trials
4-2 Siebel Clinical Trial Management System Guide
Figure 4–1 illustrates the important hierarchical relationship of programs, protocols,regions, and sites. In this example, the Bristol General Hospital in the USA region isparticipating in the AMXN 98447 protocol, which is part of the Anemia program.
Figure 4–1 Hierarchical Relationships in Siebel Clinical
Scenario for Clinical TrialsThis topic gives one example of how clinical trials might be used. You might useclinical trials differently, depending on your business model.
The clinical director and the study manager, working for a CRO (clinical researchorganization), or pharmaceutical, biotech, or medical device company, haveadministrator responsibilities in Siebel Clinical to:
■ Set up a new program for the treatment study.
■ Create one or more protocols designed to assess the safety and efficacy of certaincompounds in the treatment of the disease.
■ Set up the geographic regions where you carry out the protocols.
■ Compile a list of documents that are critical to the study and implement trackingat the protocol, region, and site levels, and for accounts and contacts.
■ Create a subject visit template to facilitate consistent application of the protocolacross sites and subjects. End users can use this template to set up subject visitschedules and activities according to the guidelines laid out in the protocol.
After the program, protocol, and subject visit templates are set up, the CRAs(clinical research associates) who are the end users of the Siebel Clinical productdo the following:
– Enter data about the:
* Sites where you carry out the protocols.
* Members to assign to the teams at the site, region, and protocol levels.
* Accounts or institutions, such as hospitals and clinics where the studiesare conducted.
* Contacts or site personnel, such as investigators, site coordinators, andnurse practitioners who carry out the protocols.
* Recruited subjects for the clinical trial.
– Screen and enroll subjects and, if necessary, rescreen the subjects.

Process of Managing Clinical Trials
Setting Up Clinical Trials 4-3
■ Use the subject visit template to set up detailed schedules for the subject visits tothe sites.
■ Track required documents at the protocol, region, or site level, or for accounts orcontacts.
Note: Site personnel can use Siebel Site Portal to enter subject dataand set up screening and enrollment schedules for subject visits. Formore information about Siebel Site Portal, see Siebel Life SciencesPortals Guide.
After subjects are enrolled in the trial, the clinical director, study manager, or CRAscan use the charting features of Siebel Clinical to review the progress of the trial. Twoinformative metrics are the subject status and subject enrollment rate. These metricsare plotted for an individual site, for a region, and for a protocol.
Process of Managing Clinical TrialsThis topic details sample tasks that administrators and end users often perform whenmanaging clinical trials. Your company might follow a different process according toits business requirements.
Perform the tasks in this topic in the order presented. For example, a protocol mustexist before you can create its subject visit template.
Administrator ProceduresThe following list shows the tasks administrators typically perform to manage aclinical trial:
1. "Creating Clinical Programs" on page 4-4
2. "Setting Up Clinical Protocols" on page 4-4
3. "Tracking and Revising Team Assignment History" on page 4-6
4. "Creating and Revising Versions for Clinical Protocols" on page 4-8
5. "Associating Clinical Protocols with Accounts" on page 4-8
6. (Optional) "Setting Up Clinical Regions" on page 4-9
7. "Associating Clinical Regions with Accounts" on page 4-11
End-User ProceduresThe following list shows the tasks CRAs (clinical research associates) typically performat the site level to manage a clinical trial:
1. (Optional) "Creating Accounts and Contacts for Clinical Trials" on page 4-11
2. "Creating Sites for Clinical Trials" on page 4-13
3. (Optional) "Creating Satellite Sites for Clinical Trials" on page 4-16
4. "Associating Sites with Accounts" on page 4-19
5. "Risk Assessments for Clinical Trials" on page 4-20

Creating Clinical Programs
4-4 Siebel Clinical Trial Management System Guide
Creating Clinical ProgramsThe clinical program is the highest-level initiative in Siebel Clinical. You associateprotocols, regions, sites, and subjects with a program.
You can associate multiple regulatory applications with a program. You create theseapplication records. Before you can create an application record, you must define theproduct that is associated with the application. For more information about definingproducts, see Siebel Life Sciences Guide.
This task is a step in "Process of Managing Clinical Trials" on page 4-3.
To create a clinical program
1. Navigate to the Administration - Clinical screen, then the Program List view.
2. In the Program list, create a new record and complete the necessary fields.
Some fields are described in the following table.
Field Comments
Program Type the name of the clinical program.
Mechanism Select the partners associated with the clinical program.
Application Select a record containing details of the application for the clinicalprogram. If necessary, create an application record. This record containsvalues for the following fields:
Number. The number assigned to the application when it is submitted tothe regulatory agency, for example the (A)NDA or IND number.
Type. The type of application, such as CTN, IND, or CTX.
Sub-Type. The application filer, for example, a company or an investigator.
Filed. Whether the application is filed with the specified regulatory agency.
Product. The applicable product for the application. You must completethis field before you can create a protocol for the program.
Indication. The clinical indication for the application.
3. (Optional) Drill down on the Program field of the new record and associate fileswith the clinical program.
Setting Up Clinical ProtocolsYou can associate multiple protocols with a program. When you create a protocolrecord, you can also add extra information about the protocol, such as financialinformation, central laboratory information, and so on.
This task is a step in "Process of Managing Clinical Trials" on page 4-3.
To set up a clinical protocol
1. Navigate to the Administration - Clinical screen, then the Protocol List view.
2. In the Protocol list, create a new record and complete the necessary fields.
Some fields are described in the following table.
Field Comments
Protocol # Type an identifying number for the protocol.

Setting Up Clinical Protocols
Setting Up Clinical Trials 4-5
Title Type a descriptive title for the protocol.
Status Select the status of the protocol, such as Planned, In Progress, orCompleted.
Program Select the name of the program for the clinical trial.
Product Select the product for the clinical trial. You can select only theproducts that are associated with the clinical program, through theApplication field in the Program List view, in the Clinical Product andIndication dialog box. For more information about creating a clinicalprogram, see "Creating Clinical Programs" on page 4-4.
Phase Select the phase of clinical trial, such as Phase I, II, or III.
Objective Type the objective for the clinical trial.
Sponsor Select the clinical trial sponsor.
Design Select the type of study.
Regions Required Select this field to indicate the sites for this protocol must belong to aregion. For information about regions, see "Setting Up ClinicalRegions" on page 4-9.
When you select this field, you cannot create sites directly underprotocols. You must create regions first, and then create sites that areassociated with regions.
Type Select the purpose of the protocol.
Team Select the team members who need access to the protocol, such as thestudy manager and others who monitor the clinical trial. For moreinformation, see Step 3.
Approval Date Select the date that the regulatory authority approves the protocol.
Currency Code Select the currency that is used to display the payments, costs, andbudgets for the protocol. The default value is USD (United Statesdollars).
Note: You must specify the currency code for the protocol.
Planned Start Date Select the planned start date for the study.
Exchange Date Select the date that determines the exchange rate of the currency. Bydefault, the exchange date for the protocol is the date that you createthe protocol.
Planned End Date Select the planned end date for the study.
Withholding Amount Type the amount to withhold from each of the payments to theinvestigators until the trial is complete. You can overwrite this valueat the region and site levels.
Actual Start Date Select the date that the study begins.
# Planned Sites Type the number of planned sites for the protocol.
# Planned Subjects Type the number of planned subjects for the protocol.
Withholding % Type the percentage to withhold from each of the payments to theinvestigators until the trial is complete. You can overwrite this valueat the region and site levels.
Actual End Date Select the date that the study concludes.
Field Comments

Tracking and Revising Team Assignment History
4-6 Siebel Clinical Trial Management System Guide
3. To add team members to the protocol, click the select button in the Team field toopen the Team dialog box, and complete the following steps:
a. Move the record for an available team member to the list of selected teammembers.
b. Click Position Rolldown.
Multi-selected team members are added to the protocol as well as to allregions and sites belonging to the protocol.
c. Click OK.
Each time a member is added to the team of a protocol, a tracking record iscreated in the Team History view with a proper start date for this trackingrecord. For more information, see "Automatically Assigning Team Members toa Protocol Using the Position Rolldown Button" on page 4-7.
If you remove a member from the team of a protocol, then the end date of thisrecord is automatically populated. For more information, see "AboutRemoving Team Members From the Team of a Protocol" on page 4-7.
4. Drill down on the protocol number field, and navigate to the More Info view toadd more information.
Some fields are described in the following table.
Field Comments
Central Lab Select the name of the laboratory associated with the study. You createthis name in the Accounts screen.
CRO Select the name of the clinical research organization that sponsors thetrial. You create this name in the Accounts screen.
5. Navigate to the Team History view to view the details of the team member that isautomatically added to the protocol in Step 3.
From the Team History view you can administer and track team members whowork on the protocol. This view also provides details about the role as well as thestart and end dates. To administer and track the history of team members whowork on a protocol and to determine their role, see "Tracking and Revising TeamAssignment History" on page 4-6.
Tracking and Revising Team Assignment HistoryA typical clinical trial can span many months to years and often requires changes ofstudy members. Rules and regulations require clinical organizations to keep records ofstudy team assignments and to promote tight access controls so that only people whoare assigned roles and responsibilities for a trial have the proper access to trial data.
When a person is no longer part of the clinical trial team, all access rights to the trialdata cease. When necessary, the study manager can also manually create a trackingrecord independent of the team assignment. Similar functionality applies to regionteam and site team assignment. The Team History view allows you to administer andtrack team members who work on the protocol, region, or site. This view also providesdetails about the role as well as the start and end dates.
This task is a step in "Process of Managing Clinical Trials" on page 4-3.

Tracking and Revising Team Assignment History
Setting Up Clinical Trials 4-7
To revise team assignment history
1. Navigate to the Administration - Clinical screen, then the Protocol List view.
2. In the Protocol list, drill down on the protocol number field of the protocol forwhich you want to create a new team assignment history.
3. Navigate to the Team History view.
4. In the History list, create a new record and complete the necessary fields.
Some fields are described in the following table.
Field Comments
Role Select the value that best describes the member’s role.
Start Date Select the start date and time for the team member. If you add amember from the team of a protocol (either manually or by usingthe Position Rollup mechanism), then the start date is populatedwith the system date, and the end date is blank.
End Date Select the end date and time for the team member. If you remove amember from the team of a protocol (either manually or throughreverse of Position Rollup mechanism), then the end date ispopulated with the system date. The system date overrides the datethat exists in the End Date field if the record is not read-only.
Lock Record Select this field to make the record read-only and to make the EndDate field a required field.
Automatically Assigning Team Members to a Protocol Using the Position RolldownButton
When you add a team member to a protocol, click the Position Rolldown button to addthe member to all regions and all sites under the protocol. You can add a member tothe team only once.
When you click the Position Rolldown button to add a member to the team of aprotocol, a record is created, where applicable, in each of the Team History views forall regions and all sites belonging to the protocol. The Position Rolldown mechanismautomates the addition of team members to the Team History view for sites and theTeam History view for regions as if they are manually added.
About Removing Team Members From the Team of a ProtocolWhen you remove a team member from the protocol, the team member is removedfrom either the protocol, or from all protocols, regions and sites belonging to theprotocol.
When you remove a member from the team of a protocol (either manually or throughPosition Rollup or Position Rolldown), the End Date field of the team member’srecord, if present, is updated with the system date. However, if the record is read-only,then the initial value in the End Date field is not updated. The Position Rolldownmechanism automates the update of the End Date field of the assignment records as ifthey are manually removed from the team of the sites and regions.
Note: A prompt appears asking whether to remove the memberfrom only the protocol or from all protocols, regions, and sitesbelonging to the protocol.

Creating and Revising Versions for Clinical Protocols
4-8 Siebel Clinical Trial Management System Guide
Creating and Revising Versions for Clinical ProtocolsYou can track and manage protocol versions using Siebel Clinical. The study managercan create a tracking record for the original protocol and for each subsequent version.
This task is a step in "Process of Managing Clinical Trials" on page 4-3.
To create a version for a clinical protocol
1. Navigate to the Administration - Clinical screen, then the Protocol List view.
2. In the Protocol list, drill down on the protocol number field of the protocol forwhich you want to create a new protocol version.
3. Navigate to the Protocol Versions view.
4. In the Protocol Versions list, create a new record and complete the necessary fields.
Some fields are described in the following table.
Field Comments
Original Version Select this field if this version is the first version of the protocol. Ifthis field is checked, then the Amendment Version field is read-only.
Amendment Version Select the version number of the protocol version, for example,Version 1, Version 2, and so on.
Date Select the date and time that you approve the new version.
Associating Clinical Protocols with AccountsAn account is the institution from which you manage clinical trials. Typically, it is thefacility where the investigators conduct the trials. You can track as accounts IRBs(institutional review boards), central laboratories, CROs (clinical researchorganizations), and other subcontractors. You can associate a clinical protocol withmultiple accounts.
This task is a step in "Process of Managing Clinical Trials" on page 4-3.
To associate a clinical protocol with an account
1. Navigate to the Administration - Clinical screen, then the Protocol List view.
2. In the Protocol list, drill down on the protocol number field of the protocol thatyou want to associate with an account.
3. Navigate to the Accounts view.
4. In the Accounts list, create a new record and complete the necessary fields.
Some fields are described in the following table.
Field Comments
Account Select the name of the account.
Type Select the type of account, such as IRB, CRO, or vendor. Systemadministrators can configure the values that appear in the Type pick list.
Central IRB Select this field to indicate that all sites use a central institutional reviewboard.
Regional CRO Select this field to indicate that a clinical research organization providesservices to all sites in the clinical region.

Setting Up Clinical Regions
Setting Up Clinical Trials 4-9
Setting Up Clinical RegionsClinical trials often occur in multiple countries. The region level in Siebel Clinicalallows you to track and view study data by country and region.
Regions are optional for protocols. However, if you choose to use regions by selectingthe Regions Required field in the protocol record, then each site associated with theprotocol must belong to a region. One of the advantages of using regions is thatregions provide another way of grouping sites and subjects. For example, you canchart subject enrollment by region in addition to by protocol and by site.
Note: You cannot create regions for a protocol unless the RegionsRequired field is selected for the protocol. For more information, seethe description of the Regions Required field in "Setting Up ClinicalProtocols" on page 4-4.
This task is a step in "Process of Managing Clinical Trials" on page 4-3.
To set up clinical regions
1. Navigate to the Administration - Clinical screen, then the Region List view.
2. In the Region list, create a new record and complete the necessary fields.
Create a region record for each country or geographical area where sites are or willbe participating in the protocol.
Some fields are described in the following table.
Field Comments
Protocol # Select the protocol for the region. Only protocols that require regionsare listed in the Pick Protocol dialog box.
Region Select the geographic region to which the site belongs.
Protocol Region Displays the name of the region. This field is automatically populatedwith the protocol number and the region name.
# Planned Sites Type the number of planned sites for the region.
# Planned Subjects Type the number of planned subjects for the region.
Team Select the team members associated with the protocol to which theregion belongs. For more information, see Step 3.
No Site Info Select this field to indicate that no site information is available under aregion. Only summary information about site enrollment is availablefor such a region.
Currency Code Select the currency that is used to display the payments, costs, andbudgets in the region. The default value is USD (United States dollars).
Note: You must specify the currency code for each region if multiplecurrencies are used for the trial.
Withholding Amount Type the amount to withhold from each of the payments to theinvestigators until the trial is complete. The default value is theWithholding Amount field for the protocol. However, you canoverwrite the Withholding Amount field for the protocol in this field atthe region level.
Withholding % Type the percentage to withhold from each of the payments to theinvestigators until the trial is complete. The default value is theWithholding % field for the protocol. However, you can overwrite theWithholding % field for the protocol in this field at the region level.

Setting Up Clinical Regions
4-10 Siebel Clinical Trial Management System Guide
3. To add team members to the region, click the select button in the Team field toopen the Team dialog box, and complete the following steps:
a. Move the record for an available team member to the list of selected teammembers.
b. Click Position Rolldown.
Multi-selected team members are added to all the site teams of this region.
Note: The Position Rolldown button for region applies only to thesites after a region.
c. Click Position Rollup.
Multi-selected team members are added to the protocol to which the regionbelongs. To administer and track the history of team members who work on aprotocol in a region and to determine their role, see "Tracking and RevisingTeam Assignment History" on page 4-6.
d. Click OK.
4. (Optional) Drill down on the Region field, and navigate to the More Info view toadd more information.
Automatically Assigning Team Members Using the Position Rollup and RolldownButtons
When you click the Position Rolldown and Position Rollup button, a record is created,where applicable, in each of the Team History views for the protocol and all sitesbelonging to the region. The Position Rolldown mechanism automates the addition ofteam members to the Team History view for sites and the Team History view forprotocols as if they are manually added. To remove a team member from the protocol,see "About Removing Team Members From the Team of a Protocol" on page 4-7.
Creating Assignment Team History for RegionsThe Team History view allows you to administer and track team members who workin the region. It also provides details about the roles as well as the start and end dates.
To create assignment team history for a region
1. Navigate to the Administration - Clinical screen, then the Region List view.
2. In the Region list, drill down on the Region field of the region for which you wantto create a new team assignment history.
3. Navigate to the Team History view.
4. In the History list, create a new record and complete the necessary fields.
Exchange Date Select the date that determines the exchange rate of the currency. Bydefault, the exchange date for the region is the date that you create theregion.
You can change this date in response to changes in currency rates.However, changes to the exchange date at the region level take effectonly when the exchange date also changes at the system level. For moreinformation, see Siebel Applications Administration Guide.
Field Comments

Creating Accounts and Contacts for Clinical Trials
Setting Up Clinical Trials 4-11
Associating Clinical Regions with AccountsAn account is the institution from which you manage clinical trials. Typically, it is thefacility where investigators conduct the trails. You can track as accounts IRBs(institutional review boards), central laboratories, CROs (clinical researchorganizations), and other subcontractors. You can associate a clinical region withmultiple accounts.
This task is a step in "Process of Managing Clinical Trials" on page 4-3.
To associate a clinical region with an account
1. Navigate to the Administration - Clinical screen, then the Region List view.
2. In the Region list, drill down on the Region field of the region that you want toassociate with an account.
3. Navigate to the Accounts view.
4. In the Accounts list, create a new record and complete the necessary fields.
Some fields are described in the following table.
Field Comments
Account Select the name of the account.
Type Select the type of account, such as IRB, CRO, or vendor. System administratorscan configure the values that appear in the Type picklist.
Central IRB Select this field to indicate that all sites use a central institutional review board.
Regional CRO Select this field to indicate that a clinical research organization providesservices to all sites in the clinical region.
Creating Accounts and Contacts for Clinical TrialsAn account is the institution from which you manage clinical trials. Typically, it is thefacility where the investigators conduct the trials. You can track as accounts IRBs(institutional review boards), central laboratories, CROs (clinical researchorganizations), and other subcontractors. You can associate multiple sites with anaccount, and an account can carry out multiple protocols.
A contact is a person working at a clinical site. Contacts include investigators, typicallymedical professionals who are also researchers, and site coordinators, who might bethe practicing nurses administering the treatment plan according to the clinicalprotocol.
The Siebel administrator generally bulk loads data on accounts and contacts, but endusers can create and modify these records as needed. For information about importingdata into your Siebel Life Sciences database, see Siebel Life Sciences Guide.
This task is a step in "Process of Managing Clinical Trials" on page 4-3.
Creating AccountsComplete the procedure in this topic to create an account.
To create an account
1. Navigate to the Accounts screen, then the Accounts List view.
2. In the Accounts list, create a new record and complete the necessary fields.
To access more fields, click the show more button in the account form.

Creating Accounts and Contacts for Clinical Trials
4-12 Siebel Clinical Trial Management System Guide
Some fields are described in the following table.
Field Comments
Site Type a description of the location or function of the account, such asheadquarters, corporate, or San Francisco.
Account Type Select the type of account, such as Hospital, Clinic, IRB, and so on.
Account Team Select the members assigned to the account team. The team member whocreates the account record is the primary team member.
Address Select the addresses for the account by picking from existing addresses orby entering new addresses. Avoid duplicating addresses by checking if anaddress exists before entering a new one.
3. Drill down on the Name field of the account, and navigate to the More Info viewto add more information.
Some fields are described in the following table.
Field Comments
Synonyms Select the synonyms for the account. This field allows you to refer toaccounts in the way that you prefer. For example, an account named A/BProducts, Inc., might have the following synonyms: AB, A/B, and ABProducts.
When you search for an account or enter an account in another part of yourSiebel Business Application, you can use a synonym instead of the actualname.
Territories Select the territories that are associated with the account.
4. Navigate to views, such as the Activities view, the Addresses view, and so on toadd more information to the account record.
For more information about creating and maintaining account affiliations, seeSiebel Life Sciences Guide.
Creating Contact RecordsComplete the procedure in this topic to create a contact record.
To create a contact record
1. Navigate to the Contacts screen, then the Contacts List view.
2. In the Contacts list, create a new record and complete the necessary fields.
Some fields are described in the following table.
Field Comments
My Address Select the addresses for the contact. A contact can have more than oneaddress. You must specify one address as the primary address. Each CRA(clinical research associate) assigned to the contact can specify a differentaddress as the primary address. For example, one CRA might specify aprivate office as the primary address, while another CRA might specify ahospital department as the primary address.
Team Select the CRAs assigned to the contact. The team member who creates thecontact record is the primary team member.

Creating Sites for Clinical Trials
Setting Up Clinical Trials 4-13
3. Navigate to other views to add or associate additional information with thecontact record.
For example, use the Relationships view to associate site coordinators and othersite personnel with the contact. For more information about creating andmaintaining contact records, see Siebel Life Sciences Guide.
Creating Sites for Clinical TrialsThe site is an account that a principal investigator manages for a particular protocol. InSiebel Clinical, a separate site record must exist for each unique combination of aprotocol, account, and principal investigator. Before starting to create sites for clinicaltrials, review "Process of Managing Sites and Contacts for Clinical Trials" on page 6-3for more information.
This task is a step in "Process of Managing Clinical Trials" on page 4-3.
To create a site for clinical trial
1. Navigate to the Site Management screen, then the Protocol Site List view.
2. In the Protocol Site list, create a new record and complete the necessary fields.
Some fields are described in the following table.
Field Comments
Satellite Site Read-Only field. A star in this field indicates that this is a satellite site.
Site # Type the number to assign to the site. This field is not required when theStatus field for the site is Planned or Not Initiated. This field becomesrequired after a site is initiated.
Protocol # Select the protocol from the list of existing protocols in the Pick Protocoldialog box.
Region Select the region name if regions are required for the protocol.
Parent Site Read-Only field. Populated only for satellite sites, this field indicates thename of the parent site to which the satellite site belongs.
Status Select the status of the site, for example, Planned, Initiated, Enrolling, andClosed. A preconfigured state model allows for a structured state transition.
PI Last Name Select the last name of the principal investigator for the site. To change theprinciple investigator for the site, you select a different contact in this field.For more information about adding other contacts to the site, see"Associating Sites with Contacts" on page 6-13.
When you click the select button in this field, the Pick Contacts dialog boxappears. After you select an account for the site, click the Affiliated Contactsbutton in this dialog box to view only those contacts who are affiliated withthe account for the site.
Account Select the primary account (the institution where the protocol is managed)for the site. To change the primary account for the site, you select a differentaccount in this field. For more information about adding other accounts tothe site, see "Associating Sites with Accounts" on page 4-19.
Team Select the team members for the site. The Primary field is populated for thesite record creator, and only the team manager can change this field throughthe My Team’s Sites view. Resource management is a manager’sresponsibility. For more information, see Step 3.
No Subject Info Select this field to indicate that no subject information is available for a site.Only summary information about subject enrollment is available for such asite.

Creating Sites for Clinical Trials
4-14 Siebel Clinical Trial Management System Guide
3. To add team members to the site, click the select button in the Team field to openthe Team dialog box, and complete the following steps:
a. Move the record for an available team member to the list of selected teammembers.
b. Click Position Rollup.
If the Regions Required field is selected for the protocol record, thenmulti-selected team members are added to the region and protocol to whichthe site belongs.
c. Click OK.
4. Click the select button in the Versions field and complete the following steps:
a. Select the version of the subject visit template to use at the site.
Only the template versions related to your protocol are available for selection.
b. Enter a date in IRB Approval Date field for the selected version.
You cannot activate the template version without the IRB (institutional reviewboard) approval date.
c. Select the Active field to make the selected version the active version at thesite.
Only one version can be active at a time. The active template is used whenactivities are generated for a subject. For more information about protocolversions, see "Tracking and Revising Team Assignment History" on page 4-6.
d. Click OK
5. (Optional) Drill down on the site number field, and navigate to the More Info viewto add more information.
Last CompletedVisit Date
Select this field to use the date of the last completed visit for reschedulingsubject visits.
Deselect this field to prompt the user to enter a new start date forrescheduled visits. All uncompleted subject visits are rescheduled using thenew date.
Versions Select the version of the subject visit template for the site. For moreinformation, see Step 4.
Currency Code Select the currency that is used to display the payments, costs, and budgetsfor the site.
WithholdingAmount
Type the amount of the total payment to withhold from the investigatorsuntil the trial is complete. You can set the default value at the region orprotocol level, but you can overwrite the value at the site level.
Withholding % Type the percentage of the total payment to withhold from the investigatorsuntil the trial is complete. You can set the default value at the region orprotocol level, but you can overwrite the value at the site level.
Exchange Date Select the date that determines the exchange rate of the currency. By default,the exchange date for the site is the date that you create the site.
You can change this date in response to changes in currency rates. However,changes to the exchange date at the site level take effect only when theexchange date also changes at the system level. For more information, seeSiebel Applications Administration Guide.
Field Comments

Creating Sites for Clinical Trials
Setting Up Clinical Trials 4-15
Some fields are described in the following table.
Field Comments
Address Select one of the principal investigator’s addresses as the site address.
# Screen Failure Displays the number of subjects that fail the screening.
Last Subject Off Study Displays the date that the last subject completes the study. (This field isautomatically rolled-up from the subject data.)
First Subject Enrolled Displays the date that you enroll the first subject in the study. (Thisfield is automatically rolled-up from the subject data.)
# Early Terminated Displays the number of subjects who terminate the study before it iscomplete.
Contract Amount Displays the sum of all contract amounts for the site. For moreinformation, see "Associating Contracts with Sites" on page 6-7.
Paid To Date Displays the amount of money that you paid to date to theinvestigators.
Earned To Date The amount of money that investigators earned to date.
Activate forSynchronization
Select this field to activate the site for synchronization. This field isrequired for integration with Oracle Health Sciences InForm. Whenthis field is checked, a new integration object for the protocol site issent to Oracle Health Sciences InForm. The integration object createsthe site in Oracle Health Sciences InForm, or updates the site, if italready exists.
This field is read-only until the following conditions are met:
■ The Synchronize Active Study Sites field of the protocol is set totrue.
■ The Primary Site Address field is populated.
Primary Site Address Select the primary address for the site. This field sets the primarylocation of the site for the study in Siebel Clinical. The Addressesdialog box displays all addresses for the site.
This field is required for integration with Oracle Health SciencesInForm, and populates the site address when the site is created inOracle Health Sciences InForm.
Automatically Assigning Team Members to a Site Using the Position Rollup ButtonWhen you add a member to a team for a site (either manually or through the PositionRollup mechanism), a record is created in the Team History view, with the Start Datefield set to the system date by default, and with a blank End Date field. To remove ateam member from the protocol, see "About Removing Team Members From the Teamof a Protocol" on page 4-7.
Creating Assignment Team History for SitesThe Team History view allows you to administer and track team members who workon the site. It also provides details about the roles as well as the start and end dates.
To create assignment team history for a site
1. Navigate to the Site Management screen, then the Protocol Site List view.
2. In the Protocol Site list, drill down on the site number field of the site for whichyou want to create a new team assignment history.
3. Navigate to the Team History view.
4. In the Team History list, create a new record and complete the necessary fields.

Creating Sites for Clinical Trials
4-16 Siebel Clinical Trial Management System Guide
About Removing Team Members From the Team of a SiteWhen you remove a member from the team of a site (either manually or throughPosition Rollup), the End Date field of the team member’s record, if present, isupdated with the system date. However, if the record is read-only, then the initialvalue in the End Date field is not updated. The Position Rollup mechanism automatesthe update of the End Date field of the assignment record as if it is manually removedfrom the team.
Note: A prompt appears asking whether to remove the memberfrom only the site or from all sites, regions, and protocols belonging tothe site including these particular sites and all other sites within thisprotocol that include this user as a team member.
Creating Satellite Sites for Clinical TrialsThe satellite site is a study site that is linked to an existing parent site where the parentsite and the satellite site share the same principal investigator. Subjects are seen by thesame principal investigator and visit both the parent site and the satellite siteaccording to their own business requirements. Before starting to create satellite sitesfor clinical trials, review "Managing Satellite Sites and Contacts for Clinical Trials" onpage 6-5 for more information.
This task is a step in "Process of Managing Clinical Trials" on page 4-3.
To create a satellite site for clinical trial
1. Navigate to the Site Management screen, then the Protocol Site List view.
2. In the Protocol Site Visits list, select My Sites in the visibility filter.
All site visits that you own appear.
3. In the Protocol Site list, drill down on the Site Number field of the site underwhich you want to create the satellite site.
4. Navigate to the Satellites Sites view.
This view contains the following information:
■ Subject Info. Shows the subject enrollment data accrued for a parent site fromall the satellite sites under it.
■ Financials. Shows the financial data accrued for a parent site from all thesatellite sites under it.
■ Satellite Sites. Lists all the satellite sites for the parent site and provides theability to create a new satellite site for the parent site.
5. In the Satellites Sites list, create a new record and complete the necessary fields.
Some data is inherited from the parent site and cannot be changed. Some fieldsare described in the following table.
Field Comments
Satellite Site Number Type the number to assign to the satellite site.
Account Select the primary account (the institution where the protocol ismanaged) for the site. To change the primary account for the site,you select a different account in this field. For more informationabout adding other accounts to the site, see "Associating Sites withAccounts" on page 4-19.

Creating Sites for Clinical Trials
Setting Up Clinical Trials 4-17
6. Drill down on the Satellite Site Number field to complete more fields as required.
Some data is inherited from the parent site and cannot be changed. Some fields aredescribed in the following table.
PI Last Name Read-only field. The last name of the principal investigator, inheritedfrom the parent site, for the satellite site. This is a read-only field.
PI First Name Read-only field. The first name of the principal investigator,inherited from the parent site, for the satellite site. This is a read-onlyfield.
Status The status of the satellite site, which is Planned by default. Otherstatuses are Initiated, Enrolling, and Closed.
Site Initiated The date the satellite site was created. This field is blank by default.
Site Terminated The date the satellite site was terminated. This field is blank bydefault.
Team Read-only field. The team for the satellite site, inherited from theparent site. For more information, see "Creating Sites for ClinicalTrials" on page 4-13 (Step 3.).
Field Comments
Protocol # Read-only field. The protocol, inherited from the parent site, for thesatellite site.
Region Read-only field.The region, inherited from the parent site, forsatellite site.
Parent Site Read-only field. The parent site for the satellite site.
Versions Read-only field.The version of the subject visit template, which isinherited from the parent site. Only one version can be active at atime. The active template is used when activities are generated for asubject. For more information about protocol versions, see "Trackingand Revising Team Assignment History" on page 4-6
Exchange Date Select the date that determines the exchange rate of the currency. Bydefault, the exchange date for the site is the date that you create thesite.
You can change this date in response to changes in currency rates.However, changes to the exchange date at the site level take effectonly when the exchange date also changes at the system level. Formore information, see Siebel Applications Administration Guide.
Withholding Amount Type the amount of the total payment to withhold from theinvestigators until the trial is complete. You can set the default valueat the region or protocol level, but you can overwrite the value at thesite level.
Withholding % Type the percentage of the total payment to withhold from theinvestigators until the trial is complete. You can set the default valueat the region or protocol level, but you can overwrite the value at thesite level.
Currency Code Read-only field. The currency, inherited from the parent site, that isused to display the payments, costs, and budgets for the satellite site.
Field Comments

Creating Sites for Clinical Trials
4-18 Siebel Clinical Trial Management System Guide
7. (Optional) Navigate to the More Info view to add more information.
Some fields are described in the following table.
Field Comments
Address Select one of the principal investigator’s addresses as the siteaddress.
# Screen Failure Displays the number of subjects that fail the screening.
Last Subject Off Study Displays the date that the last subject completes the study. (This fieldis automatically rolled-up from the subject data.)
First Subject Enrolled Displays the date that you enroll the first subject in the study. (Thisfield is automatically rolled-up from the subject data.)
# Early Terminated Displays the number of subjects who terminate the study before it iscomplete.
Contract Amount Displays the sum of all contract amounts for the site. For moreinformation, see "Associating Contracts with Sites" on page 6-7.
Paid To Date Displays the amount of money that you paid to date to theinvestigators.
Earned To Date The amount of money that investigators earned to date.
Activate forSynchronization
Select this field to activate the site for synchronization. This field isrequired for integration with Oracle Health Sciences InForm. Whenthis field is checked, a new integration object for the protocol site issent to Oracle Health Sciences InForm. The integration object createsthe site in Oracle Health Sciences InForm, or updates the site, if italready exists.
This field is read-only until the following conditions are met:
■ The Synchronize Active Study Sites field of the protocol is set totrue.
■ The Primary Site Address field is populated.
Primary Site Address Select the primary address for the site. This field sets the primarylocation of the site for the study in Siebel Clinical. The Addressesdialog box displays all addresses for the site.
This field is required for integration with Oracle Health SciencesInForm, and populates the site address when the site is created inOracle Health Sciences InForm.
Satellite Site Count Displays the number of satellite sites associated with this site.
8. Assign subject visits to the satellite site as follows:
a. Navigate to the Subjects view.
b. Create a new Subject record and complete the necessary fields.
c. Drill down on the Screening # field.
d. Create a new Visit Plan record and complete the necessary fields.
Last Completed VisitDate
Select this field to use the date of the last completed visit forrescheduling subject visits.
Deselect this field to prompt the user to enter a new start date forrescheduled visits. All uncompleted subject visits are rescheduledusing the new date.
Field Comments

Associating Sites with Accounts
Setting Up Clinical Trials 4-19
Some fields are described in the following table. For more information aboutsubjects visits, see "Defining Subject Visits" on page 5-3.
Field Comments
Site Select the site for the subject visit. The Sites pick list includes the parent siteand all satellite sites under the parent site.
Assigned To Select the user ID of the person assigned to the subject visit.
Sequence Type the sequence number of the visit.
Type Read-only field. The type of visit, which is Unscheduled Visit by default.
Name The name of the visit.
e. Add Activities to the subject visit as required and complete the necessaryfields. For more information about activities, see "Defining Activities forSubject Visits" on page 5-5 and "Associating Activities with Sites" on page 6-9.
9. Transfer (uncompleted) subject visits to or from the satellite site as required:
a. Navigate to the Subjects view.
b. Drill down on the Screening # field.
The Visits view of the Subjects screen appears showing the Visit Plans.
c. In the Site field, select the site to which you want to transfer the (uncompleted)subject visits to.
The Sites pick list includes the parent site and all the satellite sites under theparent site. You can transfer subject visits from one satellite site to anothersatellite site or to the parent site as required. For more information abouttransferring subjects, see "Transferring Clinical Subjects" on page 5-14.
d. Navigate to the Transfer History view and review all subject transfers againstthe subject.
The Transfer History view includes the following information for each subjecttransfer: Source Site Name, Destination Site Name, Transfer Date, TransferredBy, Status at Transfer, Description.
10. Navigate to the Site Management screen, then the Subject Transfer History viewand review all subject transfers against the site.
■ The Subject In applet lists all subject visits transferred to the site.
■ The Subject Out applet lists all subject visits transferred from the site.
Associating Sites with AccountsAn account is the institution from which you mange clinical trials. Typically, it is thefacility where the investigators conduct the trials. You can track as accounts IRBs(institutional review boards), central laboratories, CROs (clinical researchorganizations), and other subcontractors. In the Accounts view of a site, you canassociate the site with multiple accounts.
A record for the account that you select in the Account field of the site record isautomatically created in the Accounts view of the site. This record is automaticallypopulated with a value of Site Primary in the Type field. You cannot delete this recordor change its field values unless you select a new primary account in the Account fieldof the site record.

Risk Assessments for Clinical Trials
4-20 Siebel Clinical Trial Management System Guide
You can associate accounts for clinical protocols and for clinical regions with sites. Formore information, see "Associating Accounts with Sites" on page 6-8.
This task is a step in "Process of Managing Clinical Trials" on page 4-3.
To associate a site with an account
1. Navigate to the Site Management screen, then the Protocol Site List view.
2. In the Protocol Site list, drill down on the site number field of the site that youwant to associate with an account.
3. Navigate to the Accounts view.
4. In the Accounts list, create a new record and complete the necessary fields.
Some fields are described in the following table.
Field Comments
Type Select the type of account. The Site Primary value for this field isautomatically populated for the primary account of the site. In theAccounts view, you cannot change this value, or assign this value toanother account. To change the primary account for the site, you changethe value in the Account field of the form for the site record.
End Date Select the date that the account is inactive to inactivate the account. Youcan select a past date, but not a future date. You might want to inactivateaccounts instead of deleting them so that you can view the accounts thatare no longer associated with the site.
If you select a new primary account in the Account field of the form for thesite record, then this field is automatically populated with the current datefor the prior primary account, but you can change this date to a date in thepast.
Risk Assessments for Clinical TrialsYou can create risk assessment templates and perform risk assessments for clinicaltrials at the following levels:
■ Clinical (for generic assessment of a program, protocol, region, or protocol site)
■ Clinical Program
■ Clinical Protocol
■ Clinical Region
■ Clinical Protocol Site
For more information, see "Creating Risk Assessment Templates" on page 4-20 and"Performing Risk Assessments for Clinical Trials" on page 4-22.
Creating Risk Assessment TemplatesA Risk Assessment and Categorization Tool (RACT) template for the Clinical level ofrisk assessment is available in the preconfigured Siebel Clinical application.Administrators select a level (or type) of risk assessment in the Type field when theycreate an assessment template. They can create additional assessment templates withassociated attributes using the RACT Templates view of the Administration - Clinicalscreen.

Risk Assessments for Clinical Trials
Setting Up Clinical Trials 4-21
To create a risk assessment template
1. Navigate to the Administration - Clinical screen, then the RACT Templates view.
2. In the RACT Templates list, create a new record and complete the necessary fields.
Some fields are described in the following table.
Field Comments
Assessment Type in the name of the template.
Type Select a value that specifies the type of risk assessment template, which canbe one of the following:
■ Clinical
■ Clinical Program
■ Clinical Protocol
■ Clinical Protocol Site
■ Clinical Region
Active Select this check box to indicate that the risk assessment template is active,otherwise clear the check box.
Description Type in a description of the risk assessment template.
3. In the Assessment Questions list, create a new record for each question you wantto assess and complete the necessary fields.
Some fields are described in the following table.
Field Comments
Order Enter the order number for the assessment question.
Category (Mandatory field) Select a category for the assessment question, which canbe one of the following:
■ Safety
■ Study Phase
■ Complexity
■ Subject Population
■ Technology
■ Data Collection, CRF source
■ Endpoints
■ Organization Experience
■ Investigational Product/Study Medication
■ IP Logistics/Supply Chain
■ Blinding
■ Operational Complexity
■ Geography
Questions Type in the assessment question.
Weight Type in the weight for the assessment question. The default value is 1.
Considerations Type in any additional information relevant to the assessment question thatshould also be considered. Any information that you enter in this fieldautomatically appears on screen (for example, as a tool tip) when the userplaces the mouse over the respective question during an assessment.

Risk Assessments for Clinical Trials
4-22 Siebel Clinical Trial Management System Guide
4. In the Question Values list, create records to further describe the assessmentquestions you created in Step 3, and complete the necessary fields.
Some fields are described in the following table.
Field Comments
Order Enter the order number that corresponds to the assessment question.
Type Select from the following values to describe the assessment question:
■ Impact
■ Probability
■ Detectability
Value Select the value that applies to the option that you select in the Type field.
For Impact and Probability, the values available are:
■ High (3)
■ Medium (2)
■ Low (1)
For Detectability, the values available are:
■ Difficult to detect 3)
■ Medium to detect (2)
■ Easy to detect (1)
Score Enter the score for the value that you select.
Performing Risk Assessments for Clinical TrialsTo perform a risk assessment for a clinical trial, you select an appropriate riskassessment template for a program, protocol, region, or site in that clinical trial. Thistemplate facilitates uniformity in the assessment process.
After you save the selected risk assessment template, a list of attributes that you mustevaluate appears in the Assessment Attributes list. Attributes are frequently questionsthat you answer to evaluate the risk of adverse outcomes or the integrity of data forthe program, protocol, region, or site. To evaluate an attribute, you enter anappropriate value for the attribute. In the Assessment Attributes list, you cannot addattributes to or delete attributes from the risk assessment template.
To perform a risk assessment for a clinical trail
1. Complete one of the following steps:
■ To perform a risk assessment of a clinical program, navigate to the ClinicalPrograms screen, then the Program List view and drill down on the Programfield of the clinical program that you want to assess.
■ To perform a risk assessment of a clinical protocol, navigate to the Protocolsscreen, then the Protocol List view, and drill down on the Protocol # field ofthe protocol that you want to assess.
■ To perform a risk assessment of a clinical region, navigate to the Regionsscreen, then the Region List view, and drill down on the Region field of theregion that you want to assess.
■ To perform a risk assessment of a site, navigate to the Site Management screen,then the Protocol Site List view and drill down on the Site # field of the sitethat you want to assess.

Risk Assessments for Clinical Trials
Setting Up Clinical Trials 4-23
2. Navigate to the RACT Assessment view.
3. In the Assessment Templates list, create a new record and complete the necessaryfields.
Some fields are described in the following table.
Field Comments
Name When you save the record, displays the name of the template that youselect followed by an automatically generated number that uniquelyidentifies the assessment, but you can change this name.
Template Name Select a template that includes the appropriate attributes to assess theprogram, protocol, region, or site.
Description Displays the description of the template that you select.
Updated Displays the date and time that you last updated the record.
Score Displays the sum of the Weight field multiplied by the Score field for theassessment attributes that are associated with the template. This field ispopulated after you assign values to assessment attributes.
Percent Displays as a percentage the result of the Score field for the templatedivided by the Maximum Score field for the template. This field ispopulated after you assign values to assessment attributes.
Maximum Score Displays the highest score possible for the template that you select. Foreach assessment attribute in the template, the Weight field is multiplied bythe highest value possible in the Score field. The sum of these results is themaximum score for the template.
4. In the Assessment Questions list, enter a value for each question to assess theprogram, protocol, region, or site in the clinical trial.
Some fields are described in the following table.
Field Comments
Order (Read-only) Displays the order number for the question when you save theassessment template record. Administrators set up the order number for eachquestion when they set up the template.
Category (Read-only) Displays the category for the question, such as Safety, Technology,Operational Complexity, and so on.
Questions (Read-only) Displays the assessment question when you save the assessmenttemplate record. Administrators set up questions when they set up thetemplate.
Impact Select an impact value for the question, which can be one of the following:
■ High (3)
■ Medium (2)
■ Low (1)
This value determines the impact of the individual risk on the trial.
Probability Select a probability value for the question, which can be one of the following:
■ High (3)
■ Medium (2)
■ Low (1)
This value determines the probability of occurrence of the individual risk.

Risk Assessments for Clinical Trials
4-24 Siebel Clinical Trial Management System Guide
Detectability Select a detectability value for the question, which can be one of the following:
■ Difficult to detect 3)
■ Medium to detect (2)
■ Easy to detect (1)
The higher the detectability of individual risk, the lower the overall risk to thetrial
Weight (Read-only) Displays the weight for the attribute when you save theassessment template record. Administrators set up the weight for eachattribute when they set up the template.
This field is essentially ranks the importance of the category. If all categorieshave a default value of 1.0, then all categories are of equal importance.
Risk Score (Read-only) Displays the risk assessment score for the individual question.Individual risk scores are calculated automatically from the values in thefollowing fields: Impact, Probability, Detectability, Weight. The default formulafor calculating individual risk score is product of Impact, Probability,Detectability and Weight.
Risk Level Select a value that specifies the type of risk assessment template, which can beone of the following:
■ Program
■ Protocol
■ Program/Protocol
Rationale If required, type in any explanatory information to capture the rationale forcategory risk level assessment.
FunctionalImpact
Select a functional impact value for the attribute, which can be one of thefollowing:
■ Medical Monitoring Plan
■ Safety Plan
■ Data Plan
■ Statistical Analysis Plan
■ Monitoring Plan
■ Training Plan
■ Quality Plan
■ Risk Management Log
■ Communication Plan
This field highlights the specific functional plans that might be impacted bythis assessment.
Mitigation If required, type in the mitigation actions or plans for categories with thehighest category risk score.
Field Comments

5
Administering Clinical Subjects and Clinical Visits 5-1
5Administering Clinical Subjects and ClinicalVisits
This chapter covers administering clinical subjects and clinical visits. It includes thefollowing topics:
■ About Subject Visit Templates
■ Process of Defining Subject Visit Templates
■ Approving Subject Visit Templates
■ About Automatic Tracking of Subject Status
■ Creating Records for Clinical Subjects
■ Scheduling Clinical Subjects
■ Rescheduling Clinical Subjects
■ Administering Subject Visits in Batch Mode
■ Screening Clinical Subjects
■ Rescreening Clinical Subjects
■ Enrolling Clinical Subjects
■ Randomizing Clinical Subjects
■ Overriding Initial Subject Status
■ Transferring Clinical Subjects
■ Viewing Subject Transfer Information for Clinical Subjects and Sites
■ Viewing Subject Visits Information for Sites
■ Creating Unscheduled Subject Visits
■ Terminating Clinical Trials Early for Clinical Subjects
■ Applying Protocol Amendments to Sites and Clinical Subjects
■ About Rolling Up Information for Subject Enrollment
■ Viewing Status Accruals for Clinical Subjects of Sites
■ Viewing Status Accruals for Clinical Subjects of Clinical Regions
■ Viewing Status Accruals for Clinical Subjects of Clinical Protocols
■ Monitoring Rates for Subject Enrollment

About Subject Visit Templates
5-2 Siebel Clinical Trial Management System Guide
■ Monitoring Status Accruals for Clinical Subjects by Visit Type
■ Using Audit Trail for Changes to Subject Status
■ Generating Oracle BI Publisher Reports for Site Enrollment Status
About Subject Visit TemplatesSubject visit templates allow you to set up a clinical visit schedule using the clinicalprotocol. The template is then used to generate screening, rescreening, and enrollmentschedules for each subject, according to the subject’s screening, rescreening, andenrollment dates.
If you amend the protocol, then you must create new versions of the subject visittemplate to reflect the modifications to the protocol.
Process of Defining Subject Visit TemplatesTo define a subject visit template for scheduling subject visits, perform the followingtasks:
■ "Creating Subject Visit Templates" on page 5-2
■ "Defining Versions for Subject Visit Templates" on page 5-2
■ "Defining Subject Visits" on page 5-3
■ "Defining Planned Subject Visits" on page 5-5
■ "Defining Activities for Subject Visits" on page 5-5
Creating Subject Visit TemplatesThis topic describes how to create a subject visit template.
This task is a step in "Process of Defining Subject Visit Templates" on page 5-2.
To create a subject visit template
1. Navigate to the Administration - Clinical screen, then the Visit Templates view.
2. In the Subject Visit Templates list, create a new record and complete the necessaryfields.
Some fields are described in the following table.
Field Comments
Name Type the name of the subject visit template.
Protocol # Select the protocol for the subject visit template. Select from the list ofexisting protocols in the Pick Protocol dialog box.
Title Displays the title for the protocol that you select.
Comments Type comments about the subject visit template.
Defining Versions for Subject Visit TemplatesThis topic describes how to define a version for a subject visit template.
This task is a step in "Process of Defining Subject Visit Templates" on page 5-2.

Process of Defining Subject Visit Templates
Administering Clinical Subjects and Clinical Visits 5-3
To define a version for a subject visit template
1. Navigate to the Administration - Clinical screen, then the Visit Templates view.
2. In the Template Versions list, create a new template version record or select aversion that you created by using the Versions view.
Some fields are described in the following table.
Field Comments
Version Select the version of the subject visit template.
Comments Type comments about the version. This field has a maximum characterlength of 250 characters. This field is not copied when you copy thesubject visit template.
Start Date Select the date that you create the version of the subject visit template.
End Date Select the date that you must complete the version of the subject visittemplate.
Status Select the status of the version of the subject visit template. The followingvalues are available:
■ In Progress
■ Approved
■ Obsolete
When you create a new version of the subject visit template, the Statusfield is populated with a value of In Progress.
Change Summary Type a summary of changes to the version of the subject visit template.
Defining Subject VisitsThis topic describes how to define subject visits in a subject visit template.
This task is a step in "Process of Defining Subject Visit Templates" on page 5-2.
To define subject visits
1. Navigate to the Administration - Clinical screen, then the Visit Templates view.
2. For the new template version record, create a visit record in the Visits list for eachvisit that a subject will make to the site.
Some fields are described in the following table.
Field Comments
Sequence Type the sequence number of the visit. Typically, the first visit has asequence number of 1.
Visit Type Select the type of clinical visit. The following preconfigured values areavailable:
■ Screening
■ Rescreening
■ Enrollment
■ End of Study
You can add, modify, or delete values for the Visit Type field.
Name Type the name of the visit, for example, screening or baseline.

Process of Defining Subject Visit Templates
5-4 Siebel Clinical Trial Management System Guide
Planned Select this field to define a subject visit as a planned visit. This field isselected by default.
Status TrackingVisit
Select this field to enable automatic tracking of the status in the SubjectStatus MVG (multi value group) for each visit type. You can set only onevisit as the status tracking visit for each visit type. For example, ifTreatmentPhase1, TreatmentPhase2, and TreatmentPhase3 clinical visitsexist for a Treatment visit type, then you can set only TreatmentPhase3 asthe status tracking visit. When you select the Status Tracking Visit fieldfor a visit, the following status records are automatically created in theSubject Status MVG when each predefined visit type is processed:
■ A Visit Type value of Screening creates a Screened status record in theSubject Status MVG.
■ A Visit Type value of Re-Screening creates a Re-screened statusrecord in the Subject Status MVG.
■ A Visit Type value of Enrollment creates an Enrolled status record inthe Subject Status MVG.
■ A Visit Type value of End of Study creates a Completed status recordin the Subject Status MVG.
You can manually override the automatic value in the Subject StatusMVG.
Any create, update, or delete operations on the tracked status fieldstrigger automatic create, update, and delete operations in the SubjectStatus MVG.
Automatic status tracking is not enabled for custom values in the VisitType list.
You can edit the Status Tracking Visit field only in the subject visittemplate. This field is read-only when copied to the subject’s visit plan.
If you do not enable automatic status tracking for a clinical visit, then youcan manually create, update, and delete status records in the SubjectStatus MVG. The following conditions apply:
■ You can create only one status record for each visit type. Multiplestatus records for the same visit type are not permitted. If Visit Typeis not null, then it must be unique.
■ When Visit Type is null, the status value must be unique. Multiplestatus records with the same Status value, and a null Visit Type, arenot permitted. The value pair of Visit Type and Status must beunique.
Lead Type the lead time from the start date. You define the start date in theSchedule Date field when scheduling the subject.
Lead Units Select the units for the lead time.
Min Type the time before the lead time that the visit can occur.
For example, if Min is 1 and Min/Max Units is days, then the visit canoccur one day before the scheduled date.
Do not leave this field empty.
Max Type the time after the lead time that the visit can occur.
For example, if Max is 2 and Min/Max Units is days, then the visit canoccur up to two days after the scheduled visit.
Do not leave this field empty.
Min/Max Units Select the units for the Min and Max values.
Do not leave this field empty.
# CRF Pages Type the number of CRF (case report form) pages.
Field Comments
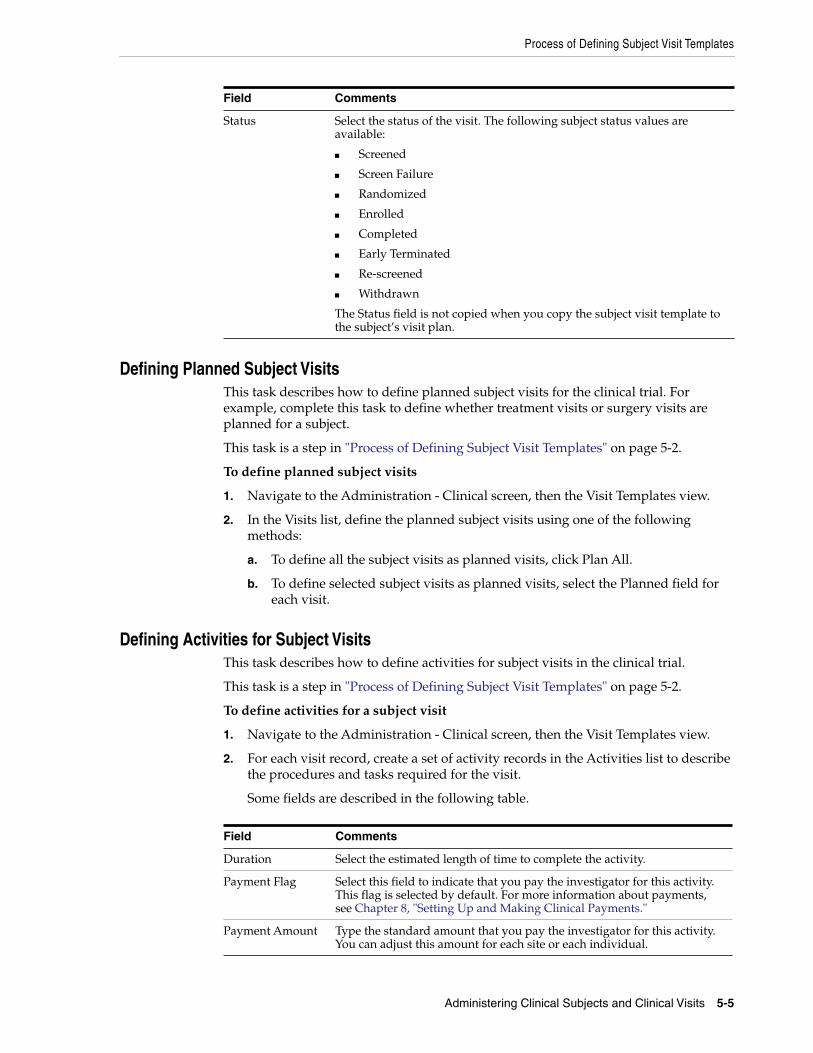
Process of Defining Subject Visit Templates
Administering Clinical Subjects and Clinical Visits 5-5
Defining Planned Subject VisitsThis task describes how to define planned subject visits for the clinical trial. Forexample, complete this task to define whether treatment visits or surgery visits areplanned for a subject.
This task is a step in "Process of Defining Subject Visit Templates" on page 5-2.
To define planned subject visits
1. Navigate to the Administration - Clinical screen, then the Visit Templates view.
2. In the Visits list, define the planned subject visits using one of the followingmethods:
a. To define all the subject visits as planned visits, click Plan All.
b. To define selected subject visits as planned visits, select the Planned field foreach visit.
Defining Activities for Subject VisitsThis task describes how to define activities for subject visits in the clinical trial.
This task is a step in "Process of Defining Subject Visit Templates" on page 5-2.
To define activities for a subject visit
1. Navigate to the Administration - Clinical screen, then the Visit Templates view.
2. For each visit record, create a set of activity records in the Activities list to describethe procedures and tasks required for the visit.
Some fields are described in the following table.
Field Comments
Duration Select the estimated length of time to complete the activity.
Payment Flag Select this field to indicate that you pay the investigator for this activity.This flag is selected by default. For more information about payments,see Chapter 8, "Setting Up and Making Clinical Payments."
Payment Amount Type the standard amount that you pay the investigator for this activity.You can adjust this amount for each site or each individual.
Status Select the status of the visit. The following subject status values areavailable:
■ Screened
■ Screen Failure
■ Randomized
■ Enrolled
■ Completed
■ Early Terminated
■ Re-screened
■ Withdrawn
The Status field is not copied when you copy the subject visit template tothe subject’s visit plan.
Field Comments

Approving Subject Visit Templates
5-6 Siebel Clinical Trial Management System Guide
Approving Subject Visit TemplatesSetting the status of a subject visit template to approved sets the subject visit templateas read-only. You can modify only the Approved Date field of an approved subjectvisit template.
To approve a clinical subject visit template
1. Navigate to the Administration - Clinical screen, then the Visit Templates view.
2. In the Template Versions list, select the version of the template to approve.
3. Enter the date in the Approval Date field.
4. Select Approved in the Status field.
About Automatic Tracking of Subject StatusThis topic describes the fields that the mechanism for automatically tracking subjectstatus uses, and the automatic operations that they trigger in the Subject Status MVG(multi value group). The Subject Status MVG contains a history of the subject’s status.It contains the following fields.
■ Date. The date that users change or update the status.
■ Status. The status of the subject, for example, Screened, Enrolled, or Re-screened.
■ Primary. A flag that sets the current status. This field appears in the Status field ofthe Subjects view.
■ Comments. Comments about the subject status.
■ Visit Type. The type of clinical subject visit, such as Screening or Enrollment. Thisfield is null for status records, such as Randomized and Withdrawn.
Status Tracking Fields that Trigger Create and Delete Operations on Records in SubjectStatus MVG
Table 5–1 lists the status tracking fields that trigger create and delete operations on therecords in the Subject Status MVG. The records in the Subject Status MVG areautomatically updated as follows:
■ Populating a status tracking field listed in Table 5–1 automatically creates thecorresponding status record in the Subject Status MVG, including Status, Date,and Visit Type fields, where applicable
■ Deleting a status tracking field listed in Table 5–1 automatically deletes the entirecorresponding status record in the Subject Status MVG, including the Status, Date,and Visit Type fields, where applicable.
Table 5–1 Status Tracking Fields that Trigger Create and Delete Operations on Recordsin Subject Status MVG
Status Tracking Field Record in Subject Status MVG Automatically Created or Deleted
Random ID Randomized
Screen Failure Reason Screen Failure
Withdrawn Reason Withdrawn
Early TerminationReason
Early Terminated

Creating Records for Clinical Subjects
Administering Clinical Subjects and Clinical Visits 5-7
Status Tracking Fields that Trigger Update Operations on Fields of Subject Status MVGTable 5–2 lists the status tracking fields that trigger update operations on the Date andStatus fields of the Subject Status MVG. The fields of the Subject Status MVG areautomatically updated as follows:
■ Populating or updating a status tracking field listed in Table 5–2 automaticallytriggers an update to the corresponding Date or Status field value in the SubjectStatus MVG.
■ Deleting a status tracking field listed in Table 5–2 automatically triggers a deleteoperation on the corresponding Date or Status field value in the Subject StatusMVG.
Table 5–2 Status Tracking Fields that Trigger Update Operations on Fields of SubjectStatus MVG
Status Tracking Field Field of Subject Status MVG Automatically Updated
Randomized Date Date field in the record of the Subject Status MVG with a Status fieldof Randomized
Screen Failure Date Date field in the record of the Subject Status MVG with a Status fieldof Screen Failure
Withdrawn Date Date field in the record of the Subject Status MVG with a Status fieldof Withdrawn
Early Terminated Date Date field in the record of the Subject Status MVG with a Status fieldof Early Terminated
Completed Date Date field in the record of Subject Status MVG
Override Status Status field in the Subject Status MVG is updated to Missed, or thestatus value in the Visit Plans list for that visit.
Creating Records for Clinical SubjectsCRAs (clinical research associates) can enter information about clinical subjects. Whenthey create the subject record, the subject visit template that is active for the site is usedto set up a schedule of visits and activities for the subject.
To create a record for a clinical subject
1. Navigate to the Site Management screen, then the Protocol Site List view.
2. In the Protocol Site list, drill down on the site number field of the site to which youwant to add a subject.
3. Navigate to the Subjects view.
4. In the Subjects list, create a new record and complete the necessary fields.
Missed Missed
Completed Status that the status value in the Visit Plans list for that visit defines
Override Status Missed, or the status that the status value in the Visit Plans list forthat visit defines
Table 5–1 (Cont.) Status Tracking Fields that Trigger Create and Delete Operations onRecords in Subject Status MVG
Status Tracking Field Record in Subject Status MVG Automatically Created or Deleted

Creating Records for Clinical Subjects
5-8 Siebel Clinical Trial Management System Guide
Some fields are described in the following table.
Field Comments
Last Completed VisitDate
Select this field to use the last completed clinical visit date forrescheduling clinical visits.
Subject ID Type a unique identifier for the subject.
Encounter Date Select the date that the subject first registers for the trial.
Screening # Displays the screening number for the subject. This field is automaticallygenerated from the Subject ID field and the Encounter Date field. Thescreening number is automatically generated after you enter the SubjectID field and the Encounter Date field, and save the record.
Enrollment ID Type the principal ID number for the subject.
Status Select a record containing a history of the subject’s status. This recordcontains values for the following fields:
■ Primary. A flag that sets the current status. This status appears inthe Status field of the Subjects view.
■ Visit Type. The type of clinical subject visit, such as Screening orEnrollment.
■ Status. The status of the subject, for example, Screened, Enrolled, orRe-screened.
■ Date. The date that users change or update the status.
■ Comments. Comments about the subject’s status.
You can override automatic status updates.
Randomization ID Type an ID number for the subject, which you can use in randomizedstudies where both an enrollment ID and a randomization ID are required.
Informed ConsentDates
Select the date that the subject signs the informed consent form forparticipation in the clinical trial. You must obtain informed consentprior to initiation of any clinical screening procedures.
Screen Failure Reason Select the reason the subject fails screening.
Withdrawn Reason Select the reason the subject withdraws from the clinical trial.

Scheduling Clinical Subjects
Administering Clinical Subjects and Clinical Visits 5-9
Scheduling Clinical SubjectsScheduling a subject applies the activated subject visit template. You enter a singlestart date for all subject visit types in the Schedule Date field.
To schedule a clinical subject
1. Navigate to the Site Management screen, then the Protocol Site List view.
2. In the Protocol Site list, drill down on the site number field of the site for whichyou want to schedule a subject.
3. Navigate to the Subjects view.
4. In the Subjects list, drill down on the screening number field of the subject toschedule.
The Visits view of the Subjects screen appears.
Some fields are described in the following table.
Field Comments
Early Terminated Date Displays the date that the subject’s participation in the trial terminates.
Randomized Date Displays the date that you randomize the subject into an arm of the trial.
Withdrawn Date Displays the date that the subject withdraws from the clinical trial.
Screen Failure Date Displays the date that the subject fails screening.
5. Click Schedule.
The Schedule applet is launched.
6. Select a date in the Schedule Date field, and click OK.
Early TerminationReason
Select the reason the subject’s participation in the trial terminates early.The following values are available:
■ Adverse Event
■ Completed
■ Death
■ Lack of Efficacy
■ Lost to Follow-Up
■ Non-Compliance with Study Drug
■ Other
■ Physician Decision
■ Pregnancy
■ Progressive Disease
■ Protocol Violation
■ Recovery
■ Screen Failure
■ Study Terminated by Sponsor
■ Technical Problems
■ Withdrawal by Subject
■ Not Done
Field Comments

Rescheduling Clinical Subjects
5-10 Siebel Clinical Trial Management System Guide
The subject visits record updates as follows:
■ All the visits in the active subject visit template are copied to the Visit Planslist.
■ The Visit Type, Name, Start Date, Planned, Status Tracking Visit, and Statusfields are copied from the subject visit template.
■ The planned dates and due dates are calculated using the lead time in thesubject visit template and the start date in the Schedule Date field. Theplanned dates and due dates are calculated as follows:
planned or due date equals schedule date plus lead time.
Note: You can also schedule subjects through workflows. Set theEnroll Screen Rescreen Through WorkFlow user property to true toexecute the schedule subject tasks in workflows instead of executingthese tasks through applets and business component methods.
If the Enroll Screen Rescreen Through WorkFlow user property is setto true, then workflows in other user properties are executedaccording to context. You can change workflow names to executecustom workflows. You can also modify other workflows andbusiness service methods according to your needs. For moreinformation about the Enroll Screen Rescreen Through WorkFlow userproperty, see "User Properties for Business Components in SiebelClinical" on page A-2.
Rescheduling Clinical SubjectsYou can reschedule clinical subject visits using a fixed date, or using the delay betweenthe Planned Date and Completed Date for the last completed visit. Select the LastCompleted Visit Date field to base the rescheduling of subject visits on the date of thelast completed visit, and deselect this field to base the rescheduling of subject visits ona fixed date. You can define the rescheduling mechanism at the site level. The selectedrescheduling option at the subject level overrides the selected option at the site level.
To reschedule a clinical subject
1. Navigate to the Site Management screen, then the Protocol Site List view.
2. In the Protocol Site list, drill down on the site number field of the site for whichyou want to reschedule a subject.
3. Navigate to the Subjects view.
4. Drill down on the screening number field of the subject to reschedule.
The Visits view of the Subjects screen appears.
5. Complete one of the following steps:
■ Deselect the Last Completed Visit Date field to reschedule subject visits usinga fixed date.
■ Select the Last Completed Visit Date field to reschedule subject visits using thedate of the last completed visit.
6. Click Reschedule.
7. To reschedule subject visits using a fixed date, enter a date in the Rescheduleapplet.

Screening Clinical Subjects
Administering Clinical Subjects and Clinical Visits 5-11
The subject visit dates are rescheduled as described in the following table.
Reschedule Option Reschedule Mechanism
Fixed Date The remaining subject visit dates are rescheduled using the datein the Reschedule applet.
Last Completed Visit Date The remaining subject visit dates are rescheduled using the delaybetween Planed Date and Completed Date for the last completedvisit. The rescheduled dates for the planned dates and due satesare calculated as follows:
Planned or Due Date equals Planned Date or Due Date plusDelay
Administering Subject Visits in Batch ModeThe Visit Types view displays the subject visit plan by visit type. Each distinct visittype for the subject appears in the Visit Types applet, with a read-only field indicatingwhether or not each visit type is planned for the subject. Associated visits for each visittype appear for batch administration, and associated activities for each visit alsoappear. The Visit Types view provides for the following administration tasks:
■ Viewing clinical visit types for each subject, the associated visits, and theassociated activities.
■ Planning and unplanning clinical visits in batch mode, by visit type.
■ Deleting clinical visits in batch mode, by visit type.
To administer subject visits in batch mode
1. Navigate to the Site Management screen, then the Protocol Site List view.
2. In the Protocol Site list, drill down on the site number field of the site for whichyou want to administer visits.
3. Navigate to the Subjects view.
4. In the Subjects list, drill down on the screening number field of the subject forwhich you want to administer visits.
The Visits view of the Subjects screen appears.
5. Navigate to the Visit Types view.
The visit types, associated visit plans, and associated activities appear.
6. Complete one of the following steps:
■ To plan all visits associated with a visit type, select the visit type, and clickPlan.
■ To unplan all visits associated with a visit type, select the visit type, and clickUnplan.
■ To delete a visit type and all associated visit plans, select the visit type, andclick Delete Visits.
Screening Clinical SubjectsYou can schedule screening visits when the subject signs the informed consent form.The Subject Status MVG (multi value group) is automatically updated for thescreening visit that is the status tracking visit in the subject visit template.

Rescreening Clinical Subjects
5-12 Siebel Clinical Trial Management System Guide
To screen a clinical subject
1. Navigate to the Site Management screen, then the Protocol Site List view.
2. In the Protocol Site list, drill down on the site number field of the site for whichyou want to screen a subject.
3. Navigate to the Subjects view.
4. In the Subjects list, enter the informed consent date for the subject to screen asfollows:
a. Click the select button in the Informed Consent Dates field to open theInformed Consent Dates dialog box.
b. Select the appropriate version.
c. Enter an informed consent date for the subject, and click OK.
5. In the Subjects list, drill down on the screening number field of the subject.
The Visits view of the Subjects screen appears.
6. (Optional) Edit subject visit dates or activities.
For example, you might want to edit some subject visit dates so that visits are notscheduled on weekends. If the rescheduled date is outside the range that thesubject visit template specifies, then a warning message appears, but the visit is stillrescheduled according to the new date.
7. Select the Completed field for the screening visit in the Visit Plans list.
8. Enter the completion date in the Completed Date field.
If the subject clinical visit is a status tracking milestone visit, then the subjectrecord automatically updates as follows:
■ A record with a value of Screening in the Visit Type field is added to theSubject Status MVG.
■ The Status field is updated to Screened.
■ The Date field of the Subject Status MVG is populated with the date in theCompleted Date field of the Visit Plans list.
Rescreening Clinical SubjectsYou can rescreen a subject who initially fails screening. You must define theRe-screening visit type in the visit plan for the subject. The Subject Status MVG (multivalue group) is automatically updated for the re-screening visit that is the statustracking visit in the subject visit template.
To rescreen a clinical subject
1. Navigate to the Subjects screen.
2. Drill down on the screening number field of the subject who failed screening.
3. Navigate to the Visits view.
4. (Optional) Edit subject visit dates or activities.
5. Select the Completed field for the Re-screening visit in the Visit Plans list.
6. Enter the completion date in the Completed Date field.

Randomizing Clinical Subjects
Administering Clinical Subjects and Clinical Visits 5-13
If the subject clinical visit is a status tracking milestone visit, then the Subjectrecord automatically updates as follows:
■ A record with a value of Re-screening in the Visit Type field is added to theSubject Status MVG.
■ The Status field is updated to Re-screened.
■ The Data field of the Subject Status MVG is populated with the date in theCompleted Date field of the Visit Plans list.
Enrolling Clinical SubjectsYou enroll in the study a subject who successfully passes screening or rescreening. TheSubject Status MVG (multi value group) is automatically updated for the enrollmentvisit that is the status tracking visit in the subject visit template.
To enroll a clinical subject
1. Navigate to the Subjects screen.
2. Drill down on the screening number field for the subject to enroll.
3. Navigate to the Visits view.
4. (Optional) Edit subject visit dates or activities.
5. Enter the enrollment ID in the Subjects applet.
6. In the Visit Plans list, complete the following steps:
a. Select the Completed field for the enrollment visit.
b. Enter the completion date in the Completed Date field.
If the subject clinical visit is a status tracking milestone visit, then the Subjectrecord automatically updates as follows:
– A record with a value of Enrollment in the Visit Type field is added to theSubject Status MVG.
– The Status field is updated to Enrolled.
– The Date field of the Subject Status MVG is populated with the date in theCompleted Date field of the Visit Plans list.
Randomizing Clinical SubjectsThis topic describes how to randomize a subject for a randomized clinical trial.
To randomize a clinical subject
1. Navigate to the Site Management screen, then the Protocol Site List view.
2. In the Protocol Site list, drill down on the site number field of the site for whichyou want to randomize a subject.
3. Navigate to the Subjects view.
4. In the Subjects list, drill down on the screening number field of the subject torandomize.
The Visits view of the Subjects screen appears.
5. Complete the required fields.
Some fields are described in the following table.

Field Comments
Random ID Type the ID number assigned to the subject for the randomized trial.
Randomized Date Select the date that you randomize the subject into an arm of the trial.
Overriding Initial Subject Status
5-14 Siebel Clinical Trial Management System Guide
6. Save the record.
The Subject record automatically updates as follows:
■ A Randomized status record is added to the Subject Status MVG (multi valuegroup), and the value in the Randomized Date field is copied to the Date fieldof the Subject Status MVG.
■ The Status field is updated to Randomized.
Overriding Initial Subject StatusYou can override the initial subject status for a status tracking clinical visit by selectinga new status in the Override Status field. For example, for a status tracking clinicalvisit with a Missed value, you can subsequently set the Override Status field toCompleted.
When you select the Completed value from the Override Status field, the previousMissed value is updated to the status value for that visit in the Visit Plans list. Forexample, the status value for the Screening visit type is updated to Screened.
When you select the Missed value in the Override Status field, the previous statusrecord for that visit is updated to Missed.
To override initial subject status
1. Navigate to the Subjects screen.
2. Drill down on the screening number field for the subject.
3. Navigate to the Visits view.
4. Select one of the following values from the Override Status field:
■ Completed
■ Missed
5. For a completed visit, enter the completion date in the Completed Date field.
Transferring Clinical SubjectsThe subject transfer feature allows you to manage the transfer of subjects from onestudy site to another, with options to retain the subject’s visit data and also thedestination study sites’s visit template. During subject transfers, the paymentexceptions from the destination site are applied and the payment data is recalculated.A history of all subject transfers is tracked at the subject and the site level. To ensuremore robust data audit trails, you can no longer delete subjects and sites.
To transfer clinical subjects
1. Navigate to the Subjects screen, then the Subject List view.
2. In the Subject list, select the subject that you want to transfer.
3. Click Transfer.
The Transfer applet is launched.

Viewing Subject Transfer Information for Clinical Subjects and Sites
Administering Clinical Subjects and Clinical Visits 5-15
4. In the Transfer applet, complete the fields as shown in the following table.
Field Description
Site Select the destination site to which you want to transfer the subject.Only sites within the same protocol are included in the Sitesdrop-down list.
Informed Consent Date Select an informed consent date if prompted.
Scheduled Date The start date for the destination site’s clinical subject visits.
Reason Select a reason for the subject transfer from the Reason drop-down list.
Comments Type in any comments about the subject transfer as required.
Transfer Date The date of the subject transfer.
5. If the destination sites’s Subject Visit Template version differs from the originatingsite, then you are prompted with a message similar to the following:
Would you like to delete uncompleted visits from the old version and completed visits fromthe new version?
Click OK to confirm the deletion of non applicable visits.
After confirmation, the subject transfer process completes, new visits and paymentexceptions are applied as defined by the destination site, and the transfer historyfor the subject and the site is updated accordingly. For more information, see"Viewing Subject Transfer Information for Clinical Subjects and Sites" on page 5-15.
Viewing Subject Transfer Information for Clinical Subjects and SitesThe Transfer History and Subject Transfer History views show all the subject transferinformation for subjects and sites respectively.
To view subject transfer information for clinical subjects and sites
1. View the subject transfer information for a subject as follows:
a. Navigate to the Site Management screen, then the Protocol Site List view.
b. Drill down on the Site # field of the site that you want.
c. Navigate to the Subjects view.
d. Drill down on the Screening # field of the subject for which you want to viewsubject transfer information.
The Visits view of the Subjects screen appears showing the Visit Plans.
e. Navigate to the Transfer History view.
The Transfer History view appears showing all subject transfers against thesubject. The view includes the following information for each subject transfer:Source Site Name, Destination Site Name, Transfer Date, Transferred By, Statusat Transfer, Description.
2. View the subject transfer information for a site as follows:
a. Navigate to the Site Management screen, then the Protocol Site List view.
b. Drill down on the Site # field of the site for which you want to view subjecttransfer information.
c. Navigate to the Subject Transfer History view.

Viewing Subject Visits Information for Sites
5-16 Siebel Clinical Trial Management System Guide
The Subject Transfer History view appears showing all subject transfersagainst the site as follows:
– The Subject In applet lists all subject visits transferred to the site.
– The Subject Out applet lists all subject visits transferred from the site.
Viewing Subject Visits Information for SitesThe Subjects Visits view shows information about all the completed subject visits for asite, including any completed subject visits where the subject has been transferred toanother site.
To view subject visits information for sites
1. Navigate to the Site Management screen, then the Protocol Site List view.
2. Drill down on the Site # field of the site for which you want to view subject visits.
3. Navigate to the Subjects Visits view.
The Subjects Visits view appears showing all completed subject visits (includingsubject visits where the subject has been transferred to another site) andcorresponding activity information for the selected site.
Creating Unscheduled Subject VisitsOn occasion, you might have to create an unscheduled subject visit.
Creating a Subject Visit From the Subjects ScreenComplete the procedure in this topic to create a subject visit from the Subjects screen.
To create a subject visit from the Subjects screen
1. Navigate to the Subjects screen, then the Subject List view.
2. In the Subject list, drill down on the screening number field of the subject forwhom you want to add an unscheduled visit.
3. Navigate to the Visits view.
4. In the Visit Plans list, create a new record and complete the necessary fields.
The type of the visit is automatically populated with Unscheduled Visit.
Creating a Subject Visit From the Calendars for SitesComplete the procedure in this topic to create a subject visit from the calendar for asite.
To create a subject visit from the calendar for a site
1. Navigate to the Site Management screen, then the Protocol Site List view.
2. In the Protocol Site list, drill down on the site number field of the site for whichyou want to add subject visits.
3. Navigate to the Calendar view.
4. Create a new record and complete the necessary fields.
Some fields are described in the following table.

Field Comments
Done Select the date that the visit occurred.
Done Flag Select this field to indicate that the visit occurred.
Calendar Planned Select the date and time that the subject visit is due. This field value isautomatically populated in the Due field.
Lock Assignment Select this field as necessary. If the activity is locked, then AssignmentManager cannot access it. If it is unlocked, then Assignment Manager canreassign it.
Assigned To Select the user ID of the person assigned to the subject visit.
Terminating Clinical Trials Early for Clinical Subjects
Administering Clinical Subjects and Clinical Visits 5-17
Terminating Clinical Trials Early for Clinical SubjectsOn occasion, you might have to terminate a subject’s participation in a trial beforecompletion of the trial. For example, the subject might no longer want to take part inthe trial, or the subject might fail a screening.
To terminate a clinical trial early for a clinical subject
1. Navigate to the Subjects screen, then the Subject List view.
2. In the Subject list, drill down on the screening number field of the subject of thetrial you want to terminate.
3. Enter the reason for terminating the subject’s trial using one of the followingmethods:
■ To indicate that the subject failed the screening, enter the reason in the ScreenFailure Reason field.
■ To indicate that the subject withdrew from the trial, enter the reason in theWithdrawn Reason field.
■ To indicate that the subject’s trial terminated early, select the reason in theEarly Termination Reason field.
4. Enter the date for terminating the subject’s trial using one of the followingmethods:
■ To indicate that the subject failed the screening, enter the date in the ScreenFailure Date field.
■ To indicate that the subject withdrew from the trial, enter the date in theWithdrawn Date field.
■ To indicate that the subject’s trial terminated early, enter the date in the EarlyTerminated Date field.
5. Save the record.
Subject Termination Event Automatic Field Updates
Screen Failure The Subject record automatically updates as follows:
■ A record with a Status field value of Screen Failure isadded to the Subject Status MVG (multi value group), andthe value in the Screen Failure Date field is copied to theDate field of the Subject Status MVG.
■ The Status field is updated to Screen Failure.

Applying Protocol Amendments to Sites and Clinical Subjects
5-18 Siebel Clinical Trial Management System Guide
When a Screen Failure or Early Terminated event occurs, all remaining visits for thesubject are deleted. For more information, see the LS Subject Terminate Study StatusValue 1 user property in "User Properties for Business Components in Siebel Clinical"on page A-2.
Applying Protocol Amendments to Sites and Clinical SubjectsWhen you revised a protocol mid-study, apply the protocol amendments and update:
■ The subject visit template version associated with the site.
■ The visit schedules of any subjects who are still in the study.
Applying Revised Subject Visit Templates to SitesThis topic describes how to apply a new version of the subject visit template to a sitewhen you revise a protocol mid-study. When you activate the new version of thesubject visit template at the site, the Schedule button is enabled in the Subjects screen.
To apply a revised subject visit template to a site
1. Navigate to the Site Management screen, then the Protocol Site List view.
2. In the Protocol Site list, select the site to which you want to apply a new version ofthe subject visit template.
3. In the Versions field, click the select button and complete the following steps:
a. Select the new version of the subject visit template.
b. Enter a date in IRB Approval Date field for the new version.
c. Select the Active field for the new version.
d. Click OK.
Applying Revised Subject Visit Templates to Clinical SubjectsThis topic describes how to apply a new version of the subject visit template to asubject when you revise a protocol mid-study. When you activate the new version ofthe subject visit template at the site, the Schedule button is enabled in the Subjectsscreen.
To apply a revised subject visit template to a clinical subject
Early Terminated The Subject record automatically updates as follows:
■ A record with a Status field value of Early Terminated isadded to the Subject Status MVG, and the value in theEarly Terminated Date field is copied to the Date field ofthe Subject Status MVG.
■ The Status field is updated to Early Terminated.
Withdrawn The Subject record automatically updates as follows:
■ A record with a Status field value of Withdrawn is addedto the Subject Status MVG, and the value in theWithdrawn Date field is copied to the Date field of theSubject Status MVG.
■ The Status field is updated to Withdrawn.
Subject Termination Event Automatic Field Updates

Applying Protocol Amendments to Sites and Clinical Subjects
Administering Clinical Subjects and Clinical Visits 5-19
1. Navigate to the Site Management screen, then the Protocol Site List view.
2. In the Protocol Site list, drill down on the site number field of the site for whichyou want to update subject visits.
3. Navigate to the Subjects view.
4. Complete one of the following steps:
■ To update the subject visit templates for all subjects at the site, click ApplyVersion to All.
For all subjects at this site, except for those subjects with a Status field value ofEarly Terminated or Completed, the value in the Informed Consent Dates fieldis cleared, and the record for the new, active version of the template is selectedin the dialog box for the Informed Consent Dates field.
■ To update the subject visit templates for some subjects at the site, select thesubject records, and click Apply Version to Selected.
For the selected subjects, except for those subjects with a Status field value ofEarly Terminated or Completed, the value in the Informed Consent Dates fieldis cleared, and the record for the new, active version of the template is selectedin the dialog box for the Informed Consent Dates field.
5. In the Subjects list, drill down on the screening number field of the enrolledsubject whose schedule you want to update for the revised subject visit template.
The Visits view of the Subjects screen appears.
6. In the Subjects form, complete the following steps to enter the informed consentdate for the new version:
a. Click the select button in the Informed Consent field to open the InformedConsent Dates dialog box.
b. Enter an informed consent date for the new version, and click OK.
7. Click Schedule, and complete the following steps:
a. Enter the Schedule Date.
A message appears asking if you want to delete uncompleted visits from theold version of the subject visit template and completed visits from the newversion of the subject visit template. Non-applicable visits are those visitsgenerated from the old template version that are scheduled to occur after thenew Informed Consent Date and those visits generated by the new templateversion that have due dates prior to the new Informed Consent Date.
b. Complete one of the following steps:
– Click OK.
The non-applicable visits are deleted.
– Click Cancel.
The new visits for the new protocol version are appended to the existingVisit Plans list. No visits are deleted. Typically, if you click Cancel, thenyou can return at a later stage to the Visits list and delete future-sched-uled visits from the original version of the subject visit template andpast-scheduled visits from the new version of the subject visit template.
The Subject Visits record updates as follows:

Applying Protocol Amendments to Sites and Clinical Subjects
5-20 Siebel Clinical Trial Management System Guide
– All the visits in the new active subject visit template are copied to the VisitPlans list.
– The Visit Type, Name, Start Date, Planned, Status Tracking Visit, andStatus fields are copied from the subject visit template.
– The planned dates and due dates are calculated using the lead time in thesubject visit template and the start date in the Schedule Date field. Theplanned dates and due dates are calculated as follows:
planned or due date equals schedule date plus lead time.
For more information, see "Rules for Applying Protocol Amendments" onpage 5-20.
Rules for Applying Protocol AmendmentsIf you choose Cancel in response to the delete uncompleted visits from the old versionand completed visits from the new version dialog, then a new set of visits is createdand added to the visits already created from prior versions.
If you choose OK, then a new set of visits is created, the two sets of visits arecompared, and the non-applicable visits are deleted when the following conditions aresatisfied:
1. The subject Informed Consent date is used for the new version as a cut-off date fortransitioning from the old version to the new version.
2. Equivalent Visits are those visits that have the same Visit Name.
3. For an old visit (created from the old template version) with a Completed date:
a. If the Completed date is earlier than the Informed Consent date, then the oldcompleted visit remains intact, and the corresponding visit from the morerecent amended version is deleted. In other words, visits under the old versionthat are completed before an amendment takes effect are preserved, and theequivalent visits from the new version are deleted.
b. If the Completed date is later than or equal to the Informed Consent date, thenthe following rules apply:
– If the Due date of the corresponding new visit is earlier than the InformedConsent date, then the old completed visit remains intact. In other words,visits that are scheduled under the old version to complete before anamendment occurs but are actually completed later are also preserved.The equivalent visits from the new version are deleted.
– If the Due date of the corresponding new visit is later than or equal to theInformed Consent date, then the visits from the old version are deleted,but the completed dates are copied to the equivalent visits from the newversion. In addition, all child activities of the completed visits are set toCompleted and have the same completed date of the parent visit. This ruleapplies in situations where the subject already switched to the newversion before Siebel Clinical is setup in time to handle such a scenario. Insuch a case, the visit records generated under the old version are markedComplete instead of the visits from the new version.
4. For an old clinical visit without a Completed date:
a. If the Due date is later than or equal to the Informed Consent date, then thevisit generated from the old version of the subject visit template is deleted. Inother words, future visits generated from the old version that are not yet

About Rolling Up Information for Subject Enrollment
Administering Clinical Subjects and Clinical Visits 5-21
completed are deleted, and their equivalent visits from the new version arepreserved.
b. If the Due date is earlier than the Informed Consent date, then the visit fromthe old version remains intact. In other words, visits under the old version thatare not completed (these visits are presumably the visits that a Subject missedin the past) are preserved, and the equivalent visit from the new version isdeleted.
5. For a new visit generated under the new template version:
a. If the Due date is earlier than the Informed Consent date, then the new visit isdeleted.
b. If the Due date is later than or equal to the Informed Consent date, then thenew visit remains intact, although it might still be deleted using theaforementioned rules.
Rules for Deleting Subject Visits When Deemed Non-Applicable by Early TerminationIn addition to automatically deleting non-applicable visits for protocol amendments,visits that are scheduled and deemed non-applicable by early termination are deleted.Visits that are not scheduled through a template are not deleted. The following rulesapply to deleting the appropriate visits:
1. Delete non-applicable, scheduled visits after a subject terminates the study.
When the Status field of a subject is changed to Early Terminated and the EarlyTerminated date is populated, all future visits are deleted. Future visits are visitswith a Due date and an Early Terminated date.
2. Delete non-applicable, scheduled visits after a subject fails screening.
When the Status field of a subject is changed to Screen Failure and the ScreenFailure date is populated, all future visits are deleted. Future visits are visits with aDue date and a Screen Failure date.
About Rolling Up Information for Subject EnrollmentSiebel Clinical supports clinical organizations in better managing subject enrollmentfor their trials in real-time. To implement this tracking, subject information is rolled upfrom the site level to the region level and then to the protocol level or directly from thesite level to the protocol level. However, frequently this data is not available to theclinical organization, which presents significant business challenges.
For example, if organizations out source trials to CROs (clinical researchorganizations), then the clinical organizations cannot always receive subject levelinformation. The enhanced subject rollup functionality provides accurate subjectenrollment data at the region and protocol level, when subject level information is notavailable for each site or region.
Characteristics of Trials Where Subject Level Data is Available for Each SiteTrials, for which subject level information is available for each site, display thefollowing rollup characteristics:
■ Subject enrollment information is automatically rolled up from the subject level tothe site level, from the subject level to the region level, and from the subject levelto the protocol level.
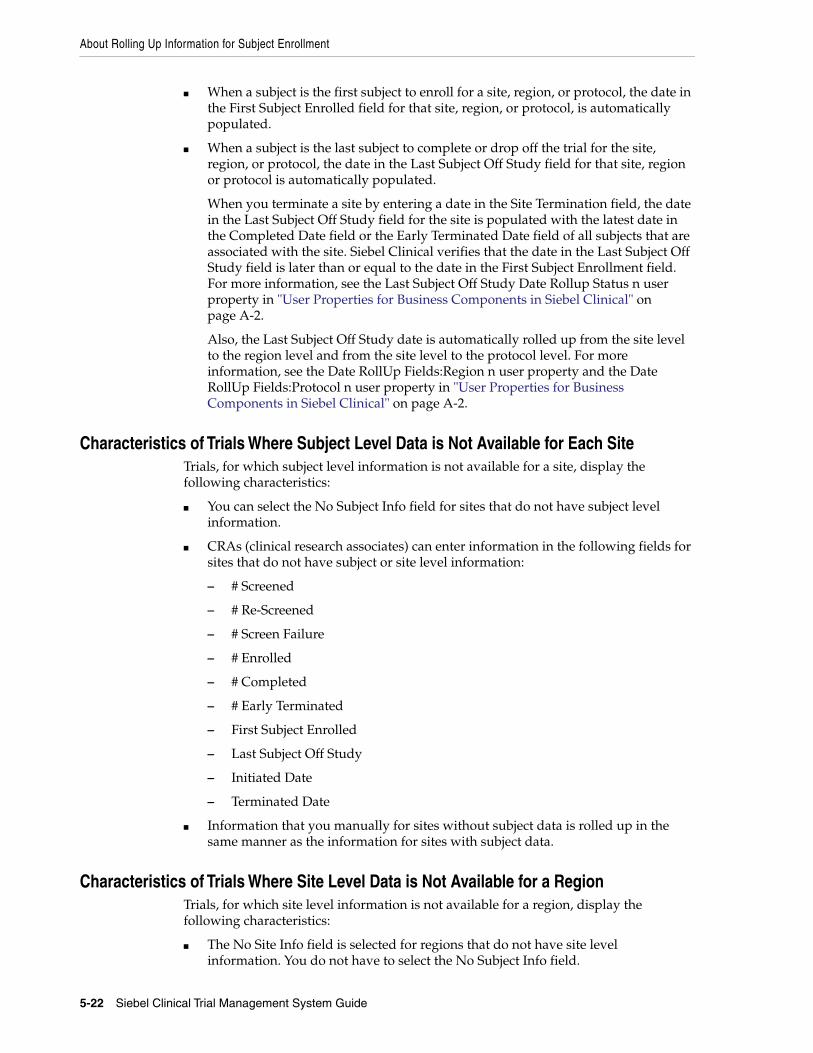
About Rolling Up Information for Subject Enrollment
5-22 Siebel Clinical Trial Management System Guide
■ When a subject is the first subject to enroll for a site, region, or protocol, the date inthe First Subject Enrolled field for that site, region, or protocol, is automaticallypopulated.
■ When a subject is the last subject to complete or drop off the trial for the site,region, or protocol, the date in the Last Subject Off Study field for that site, regionor protocol is automatically populated.
When you terminate a site by entering a date in the Site Termination field, the datein the Last Subject Off Study field for the site is populated with the latest date inthe Completed Date field or the Early Terminated Date field of all subjects that areassociated with the site. Siebel Clinical verifies that the date in the Last Subject OffStudy field is later than or equal to the date in the First Subject Enrollment field.For more information, see the Last Subject Off Study Date Rollup Status n userproperty in "User Properties for Business Components in Siebel Clinical" onpage A-2.
Also, the Last Subject Off Study date is automatically rolled up from the site levelto the region level and from the site level to the protocol level. For moreinformation, see the Date RollUp Fields:Region n user property and the DateRollUp Fields:Protocol n user property in "User Properties for BusinessComponents in Siebel Clinical" on page A-2.
Characteristics of Trials Where Subject Level Data is Not Available for Each SiteTrials, for which subject level information is not available for a site, display thefollowing characteristics:
■ You can select the No Subject Info field for sites that do not have subject levelinformation.
■ CRAs (clinical research associates) can enter information in the following fields forsites that do not have subject or site level information:
– # Screened
– # Re-Screened
– # Screen Failure
– # Enrolled
– # Completed
– # Early Terminated
– First Subject Enrolled
– Last Subject Off Study
– Initiated Date
– Terminated Date
■ Information that you manually for sites without subject data is rolled up in thesame manner as the information for sites with subject data.
Characteristics of Trials Where Site Level Data is Not Available for a RegionTrials, for which site level information is not available for a region, display thefollowing characteristics:
■ The No Site Info field is selected for regions that do not have site levelinformation. You do not have to select the No Subject Info field.

Viewing Status Accruals for Clinical Subjects of Sites
Administering Clinical Subjects and Clinical Visits 5-23
■ CRAs (clinical research associates) can enter information in the following fields forregions that do not have site level information:
– # Screened
– # Re-Screened
– # Screen Failure
– # Enrolled
– # Completed
– # Early Terminated
– First Subject Enrolled
– Last Subject Off Study
– Initiated Date
– Terminated Date
– First Site Initiated Date
– Last Site Terminated Date
■ Information that you manually for regions without site data is rolled up in thesame manner as the information for regions with subject data.
Viewing Status Accruals for Clinical Subjects of SitesClinical subject data is automatically rolled up to the clinical site record. The StatusField RollUp user properties determine the criteria for the automatic rollup of subjectstatus accruals to the clinical site record. For more information about these userproperties, see "User Properties for Business Components in Siebel Clinical" onpage A-2.
You must select the Status Tracking Visit field (in the Visits list in the Visit Templatesview of the Administration - Clinical screen) to automatically create subject statusaccruals for pairs of a visit type value and a subject status value. For more informationabout the Status Tracking Visit field, see "Defining Subject Visits" on page 5-3.
The task in this topic describes how to view subject status accruals for each visit typeand subject status of a clinical site.
To view status accruals for clinical subjects of a site
1. Navigate to the Site Management screen, then the Protocol Site List view.
2. In the Protocol Site list, drill down on the site number field of the site for whichyou want to view subject accruals.
3. Navigate to the Subject Status Accruals view.
Some fields are described in the following table.
Field Comments
Visit Type Displays a type of clinical subject visit that is associated with thesite, such as Screening, Re-screening, or Enrollment.
Status Displays a subject status that is associated with the site, such asScreened, Re-screened, or Enrolled.

Viewing Status Accruals for Clinical Subjects of Clinical Regions
5-24 Siebel Clinical Trial Management System Guide
Viewing Status Accruals for Clinical Subjects of Clinical RegionsClinical subject data is automatically rolled up to the clinical region record. The StatusRollUp Fields: Region user properties determine the criteria for the automatic rollup ofsubject status accruals to the clinical region record. For more information about theseuser properties, see "User Properties for Business Components in Siebel Clinical" onpage A-2.
You must select the Status Tracking Visit field (in the Visits list in the Visit Templatesview of the Administration - Clinical screen) to automatically create subject statusaccruals for pairs of a visit type value and a subject status value. For more informationabout the Status Tracking Visit field, see "Defining Subject Visits" on page 5-3.
The task in this topic describes how to view subject status accruals for each visit typeand subject status of a clinical region.
To view status accruals for clinical subjects of a clinical region
1. Navigate to the Regions screen, then the Region List view.
2. In the Region list, drill down on the Region field of the region for which you wantto view subject accruals.
3. Navigate to the Subject Status Accruals view.
Some fields are described in the following table.
Field Comments
Visit Type Displays a type of clinical subject visit that is associated with theregion, such as Screening, Re-screening, or Enrollment.
Status Displays a subject status that is associated with the region, such asScreened, Re-screened, or Enrolled.
Total Accrual Number Displays the number of region subjects for which the value in theVisit Type field and the value in the Status field currently apply tothe subjects and for which these same values applied to the subjectsin the past.
Current Accrual Number Displays the number of region subjects for which the value in theVisit Type field and the value in the Status field currently apply tothe subjects.
The value in the Visit Type field and the value in the Status fieldcurrently apply to records in the Subject Status MVG (multi valuegroup) for which the Primary field is selected. You see the SubjectStatus MVG when you click the select button in the Status field ofthe subject record.
Total Accrual Number Displays the number of site subjects for which the value in theVisit Type field and the value in the Status field currently apply tothe subjects and for which these same values applied to thesubjects in the past.
Current Accrual Number Displays the number of site subjects for which the value in theVisit Type field and the value in the Status field currently apply tothe subjects.
The value in the Visit Type field and the value in the Status fieldcurrently apply to records in the Subject Status MVG (multi valuegroup) for which the Primary field is selected. You see the SubjectStatus MVG when you click the select button in the Status field ofthe subject record.
Field Comments

Monitoring Rates for Subject Enrollment
Administering Clinical Subjects and Clinical Visits 5-25
Viewing Status Accruals for Clinical Subjects of Clinical ProtocolsClinical subject data is automatically rolled up to the clinical protocol record. TheStatus RollUp Fields: Protocol user properties determine the criteria for the automaticrollup of subject status accruals to the clinical protocol record. For more informationabout these user properties, see "User Properties for Business Components in SiebelClinical" on page A-2.
You must select the Status Tracking Visit field (in the Visits list in the Visit Templatesview of the Administration - Clinical screen) to automatically create subject statusaccruals for pairs of a visit type value and a subject status value. For more informationabout the Status Tracking Visit field, see "Defining Subject Visits" on page 5-3.
The task in this topic describes how to view subject status accruals for each visit typeand subject status of a clinical protocol.
To view status accruals for clinical subjects of a clinical protocol
1. Navigate to the Protocols screen, then the Protocol List view.
2. In the Protocol list, drill down on the protocol number field of the protocol forwhich you want to view subject accruals.
3. Navigate to the Subject Status Accruals view.
Some fields are described in the following table.
Field Comments
Visit Type Displays a type of clinical subject visit that is associated with theprotocol, such as Screening, Re-screening, or Enrollment.
Status Displays a subject status that is associated with the protocol, such asScreened, Re-screened, or Enrolled.
Total Accrual Number Displays the number of protocol subjects for which the value in theVisit Type field and the value in the Status field currently apply tothe subjects and for which these same values applied to the subjectsin the past.
Current Accrual Number Displays the number of protocol subjects for which the value in theVisit Type field and the value in the Status field currently apply tothe subjects.
The value in the Visit Type field and the value in the Status fieldcurrently apply to records in the Subject Status MVG (multi valuegroup) for which the Primary field is selected. You see the SubjectStatus MVG when you click the select button in the Status field ofthe subject record.
Monitoring Rates for Subject EnrollmentThe Subject Status feature in the Charts view provides a graphical representation ofsubject enrollment rates. You can display the charts by protocol, region, or site, and ina variety of pie chart and bar chart formats.
To monitor rates for subject enrollment
1. Navigate to the Protocols, Regions, or Site Management screen.
2. In the list, select the record for which you want to create the charts.
3. Navigate to the Charts view.

Monitoring Status Accruals for Clinical Subjects by Visit Type
5-26 Siebel Clinical Trial Management System Guide
4. Select values from the drop-down lists as follows:
a. From the first drop-down list, select Subject Status.
b. From the second drop-down list, select Subject Enrollment Rates.
c. From the third drop-down list, select the time frame.
d. From the fourth drop-down list, select the display type, such as bar chart orpie chart.
5. Click Go.
Monitoring Status Accruals for Clinical Subjects by Visit TypeThe Subject Status Analysis feature in the Charts view provides a graphicalrepresentation of subject status accruals by visit type. You can display the charts byprotocol, region, or site, and in a variety of pie chart and bar chart formats.
To monitor status accruals for clinical subjects by visit type
1. Navigate to the Protocols, Regions, or Site Management screen.
2. In the list, select the record for which you want to create the charts.
3. Navigate to the Charts view.
4. Select values from the drop-down lists as follows:
a. From the first drop-down list, select Subject Status Analysis.
b. From the second drop-down list, select Subject Accruals.
c. From the third drop-down list, select the time frame.
d. From the fourth drop-down list, select the display type, such as bar chart orpie chart.
5. Click Go.
Using Audit Trail for Changes to Subject StatusThe Status Audit Trail view provides a detailed history of the changes to Subject Statusrecords, including the dates and times of the changes and details of the users whomake the changes.
To use the audit trail for changes to subject status
1. Navigate to the Subjects screen, then the Subject List view.
2. In the Subject list, drill down on the screening number field of the subject.
3. Navigate to the Status Audit Trail view.
Some fields are described in the following table.
Field Comments
Employee Login Displays the username of the user who changed the record.
Business Component Displays the business component for the record where the databasechange occurred.
Field Displays the name of the field where the change occurred.
Operation Displays the type of operation that was performed, for example, NewRecord, or Modify.

Generating Oracle BI Publisher Reports for Site Enrollment Status
Administering Clinical Subjects and Clinical Visits 5-27
Generating Oracle BI Publisher Reports for Site Enrollment StatusYou can integrate Siebel Clinical with Oracle Business Intelligence Publisher (BIPublisher) to generate reports. You can generate, view, and schedule preconfiguredOracle BI Publisher reports in Siebel Clinical. The preconfigured Site Enrollment Statusreport applies clinical trials. For more information about using Siebel Reports, andintegrating with Oracle BI Publisher, see Siebel Reports Guide.
To generate an Oracle BI Publisher report for the site enrollment status
1. Navigate to the Protocols screen, then the Protocol List view.
2. In the Protocol list, drill down on the protocol number field of the protocol forwhich you want to generate an Oracle BI Publisher report.
3. Navigate to the Sites view.
4. On the application toolbar, click Reports.
5. In the Run Report pane, complete the appropriate fields.
Some fields are described in the following table.
Field Comments
Report Name Select the Site Enrollment Status report.
Output Type Select the output type for the report.
6. Click Submit.
The report runs.
7. Click My Reports to navigate to the Reports view of the BI Publisher Reportsscreen.
A record for the report appears in the Reports view. For information aboutviewing and printing the report, see Siebel Fundamentals for Siebel Open UI.
Old Value Displays the value in the field before the database change occurred.
New Value Displays the value in the field after the database change occurred.
Date Displays the timestamp of the change.
Record ID Displays the unique identifier of the record that was changed.
Base Table Displays the name of the primary database table where the databasechange occurred.
Column Displays the name of the column in which the change occurred.
Group ID Displays the unique identifier of the group to which the user whochanged the record belongs.
Node Displays the name of the database table node where the changeoccurred.
Table Displays the name of table to which the selected field belongs in theSiebel database.
Row ID Displays the unique identifier of the row in which the changeoccurred.
Employee ID Displays the unique identifier of the user who changed the record.
Field Comments

Generating Oracle BI Publisher Reports for Site Enrollment Status
5-28 Siebel Clinical Trial Management System Guide

6
Managing Sites and Contacts for Clinical Trials 6-1
6Managing Sites and Contacts for Clinical Trials
This chapter describes how to manage sites and contacts for clinical trials. It includesthe following topics:
■ About Managing Sites and Contacts for Clinical Trials
■ Scenario for Managing Sites and Contacts for Clinical Trials
■ Process of Managing Sites and Contacts for Clinical Trials
■ Managing Satellite Sites and Contacts for Clinical Trials
■ Creating Clinical Protocol Site Templates
■ Creating Contact and Account Assessment Templates
■ Maintaining Contacts and Accounts
■ Associating Contracts with Sites
■ Associating Accounts with Contracts
■ Associating Accounts with Sites
■ Associating Activities with Sites
■ Associating Documents with Sites
■ Creating and Managing Site Visits
■ Managing Contacts for Sites
■ Adding Address Types for Sites
■ Assigning Employees to Site Teams
■ Creating Activity Plans for Sites
■ Applying Activity Templates to Sites
■ Tracking and Adding Documents at Sites
■ Creating Activities for Document Tracking
■ Managing Tracking Activities for Case Report Forms
■ Tracking Case Report Forms
■ Creating Correspondence Activities for Sites
■ Adding Notes to Sites
■ Viewing the Status History for Sites
■ Assessing Contacts and Accounts

About Managing Sites and Contacts for Clinical Trials
6-2 Siebel Clinical Trial Management System Guide
■ Generating Oracle BI Publisher Reports for Document Tracking
■ Generating Reports for Actual Visits
■ Generating Reports for Planned and Actual Dates of Subject Visits
About Managing Sites and Contacts for Clinical TrialsThis chapter describes the tasks that the administrator and end users perform toupdate and maintain information about:
■ Sites for clinical trials
■ Contacts (investigators and other site personnel)
■ Accounts (hospitals and clinics where you carry out the trials)
■ Employees on the site team
■ Regulatory documentation relevant to recording the trials
■ Contracts associated with individual sites
Siebel Adverse Events and Complaints Management feature set allows you to recordthe relationships among these six entities.
This chapter also describes setting up and using:
■ Activity plans for sites
■ Account and contact assessments
Scenario for Managing Sites and Contacts for Clinical TrialsThis topic gives one example of how to manage sites and contacts for clinical trials.You might manage sites and contacts for clinical trials differently, depending on yourbusiness model.
To prepare for the clinical trial, the administrator sets up templates to generate activityplans for site initiation and to track documents. The administrator also createstemplates that the CRA (clinical research associate) uses near the end of the trial toassess contacts and accounts associated with the trial. The administrator might have toupdate contact and account information before the CRA can begin work on the site.Another important task that the administrator might have to complete is to associatecontracts with a site. Often, the administrator might have to associate multiplecontracts with individual sites.
When the CRAs begin work on a new clinical trial, they must set up a number of sitevisits that dictate whether the site can carry out the trial. Then they add newinformation and update existing information about accounts, contacts, and sites, andabout the affiliations and associations among them. Maintaining accurate data iscritical to successful clinical trials.
When creating a new contact record, the CRAs request that the administrator enter thecontact’s primary specialty. The CRAs cannot enter data in this field. Then the CRAsmust appoint a team of employees to assign to that site so that the study manager cankeep track of the members of each site team.
The CRAs plan how to carry out the protocol at the site by creating an activity plan forthe site. This plan determines how to conduct the trial. The CRAs use the clinicalprotocol site template that the administrator creates. They also track any number ofextra documents that are associated with a site. These documents can includeregulatory or clinical trial documentation.

Process of Managing Sites and Contacts for Clinical Trials
Managing Sites and Contacts for Clinical Trials 6-3
From time to time, the CRAs enter account or contact records incorrectly, or theydiscover that some account or contact records are obsolete. The CRA then puts in arequest to the administrator to delete those accounts and contacts. The CRAs do nothave the permissions to delete these records.
Before the clinical trial ends, the administrator or the study manager creates a contactassessment template that each CRA can use to evaluate the performance of theinvestigators at the conclusion of the trial.
Caution: In some countries, it is not permitted to evaluate theperformance of site personnel. Obtain legal advice before using thecontact assessment feature in Siebel Clinical.
Process of Managing Sites and Contacts for Clinical TrialsThis topic details sample tasks that administrators and end users often perform whenmanaging site (including satellite site) and contact information. Your company mightfollow a different process according to its business requirements.
Perform the administrative tasks described in this topic before performing the relatedend-user tasks. For example, a clinical protocol site template must exist before you cancreate the corresponding activity plan for the site.
For information about creating a site for a clinical trail, see "Creating Sites for ClinicalTrials" on page 4-13. For information about creating a satellite site for a clinical trial,see "Creating Satellite Sites for Clinical Trials" on page 4-16.
Administrator ProceduresThe following list shows the tasks administrators typically perform to manage site andcontact information:
■ "Creating Clinical Protocol Site Templates" on page 6-6. An administrator createstemplates that detail the activities that users must perform at all sites that carryout the same protocol.
■ "Creating Contact and Account Assessment Templates" on page 6-6. Anadministrator or the study manager creates assessment templates that defineweighted attributes for assessing a contact or account.
■ "Maintaining Contacts and Accounts" on page 6-6. An administrator maintainsrecords of contact license numbers, and deletes erroneous or obsolete account andcontact data.
■ "Associating Contracts with Sites" on page 6-7. An administrator or a studymanager enters details about the contracts for a site and the payment details foreach contract.
■ "Associating Accounts with Contracts" on page 6-7. An administrator or a studymanager enters details about the accounts for a site.
■ "Associating Accounts with Sites" on page 6-8. An administrator applies theaccounts for protocols and regions to site records.
■ "Associating Activities with Sites" on page 6-9. An administrator applies theactivities for protocols and regions to site records.
■ "Associating Documents with Sites" on page 6-10. An administrator applies thedocuments for protocols and regions to site records.

Process of Managing Sites and Contacts for Clinical Trials
6-4 Siebel Clinical Trial Management System Guide
End-User ProceduresThe following list shows the tasks end users typically perform to manage site andcontact information:
■ "Creating and Managing Site Visits" on page 6-11. CRAs (clinical researchassociates) create site visits to evaluate, initiate, monitor, and close out sites.
■ "Managing Contacts for Sites" on page 6-12. Users can associate sites with contacts,archive contact records for sites, and view the history of contacts at sites.
■ "Adding Address Types for Sites" on page 6-14. Users can add a specific type ofaddresses for each site.
■ "Assigning Employees to Site Teams" on page 6-15. Managers or CRAs addemployees to the team associated with the site.
■ "Creating Activity Plans for Sites" on page 6-15. CRAs use the clinical protocol sitetemplate that an administrator creates to plan a list of activities for each site.
■ "Applying Activity Templates to Sites" on page 6-16. Users can simultaneouslyapply one or multiple activity templates to one or multiple sites for a study.
■ "Tracking and Adding Documents at Sites" on page 6-17. CRAs and regional studymanagers post clinical trial and regulatory documentation for review at the site,region, and protocol levels.
■ "Creating Activities for Document Tracking" on page 6-19. CRAs attach and trackdocuments at the protocol, region, and site levels, or for accounts or contacts.
■ "Managing Tracking Activities for Case Report Forms" on page 6-20. Users cancreate tracking activities for CRFs (case report forms).
■ "Tracking Case Report Forms" on page 6-21. Users can create and track CRFs aspart of a protocol, site, and region.
■ "Creating Correspondence Activities for Sites" on page 6-21. Users can track allcorrespondence (phone, fax, email, and letters that the postal service delivers)between a site and a study team member as correspondence activities for the site.
■ "Adding Notes to Sites" on page 6-23. Users can add notes to a site.
■ "Viewing the Status History for Sites" on page 6-23. Users can view the changes tothe Status field for a site.
■ "Assessing Contacts and Accounts" on page 6-24. CRAs evaluate contacts andaccounts by using the attributes in an assessment template.
■ "Generating Oracle BI Publisher Reports for Document Tracking" on page 6-25.Users can generate, view, and schedule preconfigured Oracle BI Publisher reportsin Siebel Clinical.
■ "Generating Reports for Actual Visits" on page 6-28. Users can generate a reportfor completed clinical subject visits.
■ "Generating Reports for Planned and Actual Dates of Subject Visits" on page 6-28.Users can generate a report for completed clinical subject visit dates.

Process of Managing Sites and Contacts for Clinical Trials
Managing Sites and Contacts for Clinical Trials 6-5
Managing Satellite Sites and Contacts for Clinical TrialsYou manage satellite sites and contacts for clinical trials in the same way that youmanage normal sites and contacts for clinical trials. For more information, see thefollowing topics:
■ "Process of Managing Sites and Contacts for Clinical Trials" on page 6-3.
■ For information about creating a site for a clinical trail, see "Creating Sites forClinical Trials" on page 4-13.
■ For information about creating a satellite site for a clinical trail, see "CreatingSatellite Sites for Clinical Trials" on page 4-16.
Satellite sites function in a similar way to normal sites. From a business perspective, itis important to track all the satellite sites for a parent site and ensure that the protocolguidelines are being followed at the satellite as defined for the parent site. Otherimportant issues to note before starting to create and manage satellite sites for clinicaltrials include the following:
■ A site can have multiple satellite sites, but each satellite site can have only oneparent site.
■ If a subject visit happens at a site, then all corresponding activities also happen atthe same site.
■ All roll up and roll down of information in the standard hierarchy for the parentsite (Protocol - Region - Site) applies for the satellite site. This includes the roll upand roll down of the following information: position, payment, subject status, andcontract amount.6-5
■ Bulk actions carried out at the protocol and region level for the parent site (such asactivity, account, document tracking, and payment generation) apply for thesatellite site.
■ The following data is consolidated from the parent site to the satellite site: subjectenrolment, accrual payment, contract amount, and payment amount.
■ The satellite site and parent site can be of different types. For example, even if theparent site is a Hospital and the satellite site is a Private Clinic, the same principalinvestigator conducts the study for both sites.
■ The satellite site inherits the parent site’s subject visit template version, principalinvestigator, team, and currency information by default. Any change in the subjectvisit template version, principal investigator, team, or currency information isrolled down from the parent site to the satellite.
■ The subject enrollment of data from the satellite site is rolled up to the parent site.
■ The payments and contract data from the satellite site is rolled up to the parentsite.
■ The following use cases are supported for satellite sites:
■ A subject is allocated to a satellite site and carries out all visits at the satellitesite as part of the study.
■ A subject is allocated to a parent site and carries out some visits at the satellitesite as part of the study.

Creating Clinical Protocol Site Templates
6-6 Siebel Clinical Trial Management System Guide
Creating Clinical Protocol Site TemplatesActivities can be associated directly with sites. For example, all sites carrying out thesame protocol perform similar activities for site initiation, and submit similardocuments to the regulatory agencies. When many activities are common to multiplesites, the clinical protocol site template helps CRAs (clinical research associates) createactivities for the sites.
To create a clinical protocol site template, create an activity template with a Type fieldof Clinical Protocol Site. Make sure that Protocol Title field is complete and correct. Forinformation about how to create activity templates, see Siebel ApplicationsAdministration Guide.
If an activity template with a Type field of Clinical Protocol Site is not associated witha protocol title, then users can apply the template to all sites in the Activity Plans viewof the Site Management screen. If an activity template with a Type field of ClinicalProtocol Site is associated with a protocol title, then users can apply the activitytemplate only to the sites associated with the protocol.
Note: Unlike trip report templates, clinical protocol site templatesare protocol-specific. To use a clinical protocol site template for morethan one protocol, either duplicate the record, and then edit theProtocol Title field, or delete the protocol title to make the templateavailable to all sites.
This task is a step in "Process of Managing Sites and Contacts for Clinical Trials" onpage 6-3.
Creating Contact and Account Assessment TemplatesThe purpose of the assessment is to determine a single total score or a percentage thatyou can use to rank a contact or account. For information about creating an assessmenttemplate, see Siebel Applications Administration Guide.
For contact assessment templates, set the template type to Contact. For accountassessment templates, set the template type to Account.
This task is a step in "Process of Managing Sites and Contacts for Clinical Trials" onpage 6-3.
Maintaining Contacts and AccountsThe end users are responsible for much of the day-to-day maintenance of their contactand account data. For information about managing contacts and accounts, see SiebelLife Sciences Guide.
However, the administrator is responsible for the following tasks:
■ Entering data into the primary specialty field for contacts.
■ Deleting contact and account records that are in error or are obsolete.
This task is a step in "Process of Managing Sites and Contacts for Clinical Trials" onpage 6-3.

Associating Accounts with Contracts
Managing Sites and Contacts for Clinical Trials 6-7
Associating Contracts with SitesYou can associate the contracts defining the total site payments with each site. Somesites might need only one contract that governs the entire payment for the site.However, you might have to associate multiple contracts with a site. Each contract canhave multiple payees. You can associate multiple contracts and multiple payees with asite.
This task is a step in "Process of Managing Sites and Contacts for Clinical Trials" onpage 6-3.
To associate a contract with a site
1. Navigate to the Site Management screen, then the Protocol Site List view.
2. In the Protocol Site list, drill down on the site number field of the site with whichyou want to associate a contract.
3. Navigate to the Contracts view.
4. In the Contracts list, create a new record and complete the necessary fields.
Some fields are described in the following table.
Field Comments
Contract # Displays the number assigned to this contract. This field is automaticallypopulated.
Type Select the type of contract to associate with the site.
ContractAmount
Type the amount of money that the contract is worth. If you enter multiplecontracts, then the total value of all contract amounts equals the totalcontract amount for the site. This total appears in the Contract Amount fieldon the site form.
Payee Last Name Select the name of the person who receives payments for the contract. Youcan enter multiple payees for the contract by using the multi-value picklist.
Address Select the address associated with the payee.
Associating Accounts with ContractsThis topic describes how to associate accounts with a contract for clinical site. You canassociate multiple accounts with a contract by adding them to the selected list in theAccounts MVG (multi value group). Set one account as the primary account. The firstaccount that you add to the Accounts MVG is set as the primary account by default.You can change the primary account by selecting the Primary field in the AccountsMVG.
This task is a step in "Process of Managing Sites and Contacts for Clinical Trials" onpage 6-3.
To associate an account with a contract
1. Navigate to the Site Management screen, then the Protocol Site List view.
2. In the Protocol Site list, drill down on the site number field of the site.
3. Navigate to the Contracts view.
4. Click the select button in the Account field to open the Accounts dialog box, andcomplete the following steps:
a. Move the record for an available account to the list of selected accounts.

Associating Accounts with Sites
6-8 Siebel Clinical Trial Management System Guide
The first account that you associate with the contract is the primary account bydefault.
b. Configure the primary account for the contract by selecting the Primary field.
c. Click OK.
Associating Accounts with SitesYou can associate the accounts for a clinical protocol and for a clinical region withsites.
After you complete this task, the account records appear in the Accounts view in theProtocol Site List view of the Site Management screen. The account records originate inthe Accounts view in the Protocol List view of the Protocols screen or in the Accountsview in the Region List view of the Regions screen. In these Accounts views, you canchange the field values in the account records.
The Account field and the Type field uniquely identify an account record for a site.You can associate an account for a clinical protocol or for a clinical region with a siteonly if the values in these two fields do not already exist for an account recordassociated with the site. Consequently, note the following:
■ If you change the value in either of these fields for an account record, and thenreassociate that account record with the site, then a new account record is createdfor the site.
■ If you change other field values for an account record, and then reassociate thataccount record with the site, then a new account record is not created for the site,and the field values for the existing account record for the site do not change.
This task is a step in "Process of Managing Sites and Contacts for Clinical Trials" onpage 6-3.
Associating Accounts for Clinical Protocols with SitesThe Accounts view of the Protocols screen is automatically populated with the accountrecords that administrators set up in the Accounts view in the Protocol List view of theAdministration - Clinical screen. Also, you can manually add other account records tothe Accounts view of the Protocols screen.You can associate the account records in thisview with specific sites.
To associate the accounts for a clinical protocol with sites
1. Navigate to the Protocols screen, then the Protocol List view.
2. In the Protocol list, drill down on the protocol number field of the protocol forwhich you want to associate accounts with sites.
3. Navigate to the Accounts view.
4. Select the accounts that you want to associate with sites.
5. Click Apply To Sites.
6. In the dialog box of site records applicable to the protocol, select the appropriatesites, and click OK.

Associating Activities with Sites
Managing Sites and Contacts for Clinical Trials 6-9
Associating Accounts for Clinical Regions with SitesThe Accounts view of the Regions screen is automatically populated with the accountrecords that administrators set up in the Accounts view in the Region List view of theAdministration - Clinical screen. Also, you can manually add other account records tothe Accounts view of the Regions screen.You can associate the account records in thisview with specific sites.
To associate the accounts for a clinical region with sites
1. Navigate to the Regions screen, then the Region List view.
2. In the Region list, drill down on the Region field of the region for which you wantto associate accounts with sites.
3. Navigate to the Accounts view.
4. Select the accounts that you want to associate with sites.
5. Click Apply To Sites.
6. In the dialog box of site records applicable to the region, select the appropriatesites, and click OK.
Associating Activities with SitesYou can associate activities for a clinical protocol and for a clinical region with sites.
After you complete this task, the activity records appear in the Activities view in theProtocol Site List view of the Site Management screen. The activity records originate inthe Activities view in the Protocol List view of the Protocols screen or in the Activitiesview in the Region List view of the Regions screen. In these Activities views, you canchange the field values in the activity records.
This task is a step in "Process of Managing Sites and Contacts for Clinical Trials" onpage 6-3.
Associating Activities for Clinical Protocols with SitesYou can associate activity records for a clinical protocol with specific sites.
Each time you click the Apply To Sites button in the procedure in this topic, newactivity records for the selected sites appear in the Activities view in the Protocol SiteList view of the Site Management screen. These new activity records contain anychanged field values in the originating activity records in the Activities view in theProtocol List view of the Protocols screen.
Also, these new activity records have no values in the First Name field and Last Namefield, and not the values in these same fields in the originating activity records,because you must manually add the contacts who are associated with a site in theactivity records for the site.
To associate the activities for a clinical protocol with sites
1. Navigate to the Protocols screen, then the Protocol List view.
2. In the Protocol list, drill down on the protocol number field of the protocol forwhich you want to associate activities with sites.
3. Navigate to the Activities view.
4. Select the activities that you want to associate with sites.
5. Click Apply To Sites.

Associating Documents with Sites
6-10 Siebel Clinical Trial Management System Guide
6. In the dialog box of site records applicable to the protocol, select the appropriatesites, and click OK.
Associating Activities for Clinical Regions with SitesYou can associate activity records for a clinical region with specific sites.
Each time you click the Apply To Sites button in the procedure in this topic, newactivity records for the selected sites appear in the Activities view in the Protocol SiteList view of the Site Management screen. These new activity records contain anychanged field values in the originating activity records in the Activities view in theRegion List view of the Regions screen.
Also, these new activity records have no values in the First Name field and Last Namefield, and not the values in these same fields in the originating activity records,because you must manually add the contacts who are associated with a site in theactivity records for the site.
To associate the activities for a clinical region with sites
1. Navigate to the Regions screen, then the Region List view.
2. In the Region list, drill down on the Region field of the region for which you wantto associate activities with sites.
3. Navigate to the Activities view.
4. Select the activities that you want to associate with sites.
5. Click Apply To Sites.
6. In the dialog box of site records applicable to the region, select the appropriatesites, and click OK.
Associating Documents with SitesYou can associate documents for a clinical protocol and for a clinical region with sites.
After you complete this task, the document records appear in the Document Trackingview in the Protocol Site List view of the Site Management screen. The documentrecords originate in the Document Tracking view in the Protocol List view of theProtocols screen or in the Document Tracking view in the Region List view of theRegions screen. In these Document Tracking views, you can change the field values inthe document records.
This task is a step in "Process of Managing Sites and Contacts for Clinical Trials" onpage 6-3.
Associating Documents for Clinical Protocols with SitesYou can associate document records for a clinical protocol with specific sites.
Each time you click the Apply To Sites button in the procedure in this topic, newdocument records for the selected sites appear in the Document Tracking view in theProtocol Site List view of the Site Management screen. These new document recordscontain any changed field values in the originating document records in the DocumentTracking view in the Protocol List view of the Protocols screen.
To associate the documents for a clinical protocol with sites
1. Navigate to the Protocols screen, then the Protocol List view.

Creating and Managing Site Visits
Managing Sites and Contacts for Clinical Trials 6-11
2. In the Protocol list, drill down on the protocol number field of the protocol forwhich you want to associate documents with sites.
3. Navigate to the Document Tracking view.
4. Select the documents that you want to associate with sites.
5. Click Apply To Sites.
6. In the dialog box of site records applicable to the protocol, select the appropriatesites, and click OK.
Associating Documents for Clinical Regions with SitesYou can associate document records for a clinical region with specific sites.
Each time you click the Apply To Sites button in the procedure in this topic, newdocument records for the selected sites appear in the Document Tracking view in theProtocol Site List view of the Site Management screen. These new document recordscontain any changed field values in the originating document records in the DocumentTracking view in the Region List view of the Regions screen.
To associate the documents for a clinical region with sites
1. Navigate to the Regions screen, then the Region List view.
2. In the Region list, drill down on the Region field of the region for which you wantto associate documents with sites.
3. Navigate to the Document Tracking view.
4. Select the documents that you want to associate with sites.
5. Click Apply To Sites.
6. In the dialog box of site records applicable to the region, select the appropriatesites, and click OK.
Creating and Managing Site VisitsCRAs (clinical research associates) typically carry out the following types of visits to asite:
■ Site evaluation. A site visit to evaluate a site’s qualification for a study
■ Site initiation. A site visit to initiate a site
■ Site monitoring. A site visit to monitor study progress and to monitor and retrieveCRFs (case report forms)
■ Site close-out. A site visit to close out or terminate a site at the conclusion of astudy
■ Unscheduled. (Optional) An unexpected site visit that a CRA can carry out
CRAs create these visits for each site for which they are responsible. When a CRAcreates a site visit, it appears in the CRA’s calendar, the site investigator’s calendar,and the study manager’s calendar. Consequently, the study manager can keep track ofall site visits for all CRAs. The calendar entry is a useful reminder for investigators ofscheduled site visits.
You create site visits using the Protocol Site List view of the Site Management screen.From this view, CRAs can view all their site visits and all follow-up activities that arisefrom the visits. You can also view all site visits and follow-up activities associated with

Managing Contacts for Sites
6-12 Siebel Clinical Trial Management System Guide
these visits. Study managers can also filter site visits to see the visits that are assignedto their teams, and view follow-up activities to assess the most pressing issues.
This task is a step in "Process of Managing Sites and Contacts for Clinical Trials" onpage 6-3.
To create a site visit
1. Navigate to the Site Management screen, then the Protocol Site List view.
2. In the Protocol Site list, drill down on the site number field for the site with whichyou want to create a visit.
3. Navigate to the Site Visits view.
4. Create a new record and complete the necessary fields.
Some fields are described in the following table.
Field Comments
Visit Name Type a descriptive name for the visit.
Visit Start Select the date and time that the visit is due to occur. When youdrill down on this field, you see the trip report for the visit.
Visit Status Select the status of the site visit.
Trip Report Completed Select the date that the trip report for this visit is complete.
Trip Report Status Select the status of the trip report. The following values areavailable:
■ Not Started
■ In Progress
■ Completed
■ Submitted
■ Approved
■ Rejected
A preconfigured state model allows for a structured statetransition. For more information about trip reports, see Chapter 9,"Administering and Using Clinical Trip Reports."
Assigned To Select the user ID of the person assigned to the site visit.
Monitoring Site Visits Using the CalendarYou can monitor all CRA (clinical research associate) visits to a site from the Calendarview. Use the calendar to view visits on a daily, weekly, or monthly basis.
Managing Contacts for SitesA contact is a person working at a clinical site. Contacts include investigators, typicallymedical professionals who are also researchers, and site coordinators, who might bethe practicing nurses administering the treatment plan according to the clinicalprotocol.
This task is a step in "Process of Managing Sites and Contacts for Clinical Trials" onpage 6-3.

Managing Contacts for Sites
Managing Sites and Contacts for Clinical Trials 6-13
Associating Sites with ContactsA record for the contact that you select in the PI Last Name field of the site record isautomatically created in the Contacts view of the site. This record is automaticallypopulated with a value of Principle Investigator in the Role field. You can associate thesite with additional contacts.
To associate a site with a contact
1. Navigate to the Site Management screen, then the Protocol Site List view.
2. In the Protocol Site list, drill down on the site number field of the site that youwant to associate with a contact.
3. Navigate to the Contacts view.
4. In the Current list, create a new record and complete the necessary fields.
Some fields are described in the following table.
Field Comments
Role Select the role of the contact. The Principle Investigator value for thisfield is automatically populated for the principle investigator of the site.In the Contacts view, you cannot change this value, or assign this valueto another contact. To change the principle investigator for the site, youchange the value in the PI Last Name field of the form for the site record.
Last Name Select the last name of the contact. When you click the select button inthis field, the Pick Contacts dialog box appears. Click the AffiliatedContacts button in this dialog box to view only those contacts who areaffiliated with the account for the site. After you populate this field, youcannot change its value.
Start Date Select the date that the contact record is effective. You can select a pastdate, but not a future date.
Archiving Contact Records for SitesInstead of deleting inactive contact records, you archive these records so that you canview the history of contact records for the site. You cannot delete contact records forsites. When you archive an inactive contact record, you move the record from theCurrent view for site contacts to the History view for site contacts.
To archive the contact records for a site
1. Navigate to the Site Management screen, then the Protocol Site List view.
2. In the Protocol Site list, drill down on the site number field of the site for whichyou want to archive contact records.
3. Navigate to the Contacts view.
4. Select one or more contact records to archive.
5. Click Archive, and complete the following steps:
a. In the Archive dialog box that appears, select the date that the contact record isinactive.
You can select a past date, but not a future date.
b. Click OK.
The contact record is moved from the Current view for site contacts to theHistory view for site contacts, and the date that you select appears in the EndDate field of the History view.

Adding Address Types for Sites
6-14 Siebel Clinical Trial Management System Guide
Viewing the History of Contacts at SitesIf you change the value in the Role field for a site contact to assign a new role to thecontact, then the contact record with the prior Role field value is automatically movedto the History view for the site contact. However, if you change the value in anotherfield for a site contact, then the contact record with the prior field value is notautomatically moved to this History view.
When you archive an inactive contact record, the record from the Current view for sitecontacts is automatically moved to the History view for site contacts.
To view the history of contacts at a site
1. Navigate to the Site Management screen, then the Protocol Site List view.
2. In the Protocol Site list, drill down on the site number field of the site for whichyou want to view the history of contacts.
3. Navigate to the Contacts view.
The Current list of contacts for the site appears.
4. Navigate to the History view to see the history of contacts.
Some fields are described in the following table.
Field Comments
Start Date Displays the date that the contact record is effective.
End Date Displays the date that the contact record is archived.
Adding Address Types for SitesUsers can add a specific type of addresses for each site.
This task is a step in "Process of Managing Sites and Contacts for Clinical Trials" onpage 6-3.
To add an address type for a site
1. Navigate to the Site Management screen, then the Protocol Site List view.
2. In the Protocol Site list, drill down on the site number field of the site for whichyou want to add an address type.
3. Navigate to the Addresses view.
4. In the Addresses list, create a new record and complete the necessary fields.
Some fields are described in the following table.
Field Comments
Description Type a description for the address.
Address Type Select an address type from the list of values to associate with thesite.
Address Line 1 Select the appropriate site location from the MVG (multi valuegroup).
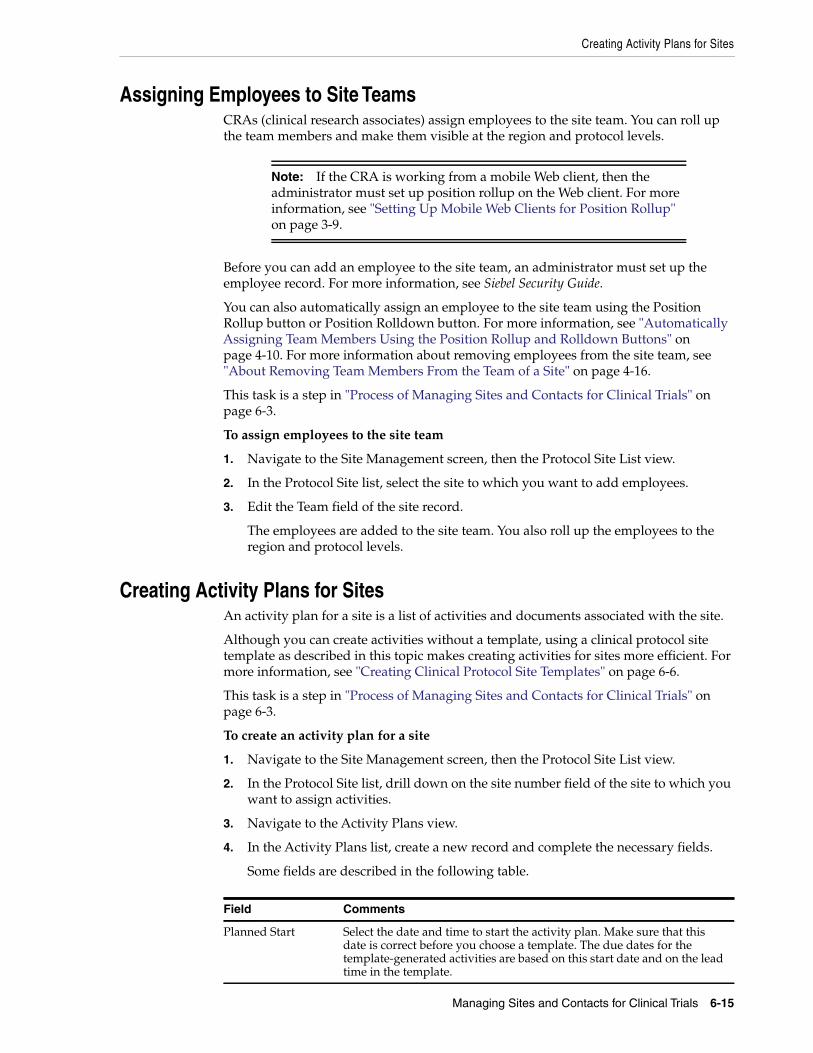
Creating Activity Plans for Sites
Managing Sites and Contacts for Clinical Trials 6-15
Assigning Employees to Site TeamsCRAs (clinical research associates) assign employees to the site team. You can roll upthe team members and make them visible at the region and protocol levels.
Note: If the CRA is working from a mobile Web client, then theadministrator must set up position rollup on the Web client. For moreinformation, see "Setting Up Mobile Web Clients for Position Rollup"on page 3-9.
Before you can add an employee to the site team, an administrator must set up theemployee record. For more information, see Siebel Security Guide.
You can also automatically assign an employee to the site team using the PositionRollup button or Position Rolldown button. For more information, see "AutomaticallyAssigning Team Members Using the Position Rollup and Rolldown Buttons" onpage 4-10. For more information about removing employees from the site team, see"About Removing Team Members From the Team of a Site" on page 4-16.
This task is a step in "Process of Managing Sites and Contacts for Clinical Trials" onpage 6-3.
To assign employees to the site team
1. Navigate to the Site Management screen, then the Protocol Site List view.
2. In the Protocol Site list, select the site to which you want to add employees.
3. Edit the Team field of the site record.
The employees are added to the site team. You also roll up the employees to theregion and protocol levels.
Creating Activity Plans for SitesAn activity plan for a site is a list of activities and documents associated with the site.
Although you can create activities without a template, using a clinical protocol sitetemplate as described in this topic makes creating activities for sites more efficient. Formore information, see "Creating Clinical Protocol Site Templates" on page 6-6.
This task is a step in "Process of Managing Sites and Contacts for Clinical Trials" onpage 6-3.
To create an activity plan for a site
1. Navigate to the Site Management screen, then the Protocol Site List view.
2. In the Protocol Site list, drill down on the site number field of the site to which youwant to assign activities.
3. Navigate to the Activity Plans view.
4. In the Activity Plans list, create a new record and complete the necessary fields.
Some fields are described in the following table.
Field Comments
Planned Start Select the date and time to start the activity plan. Make sure that thisdate is correct before you choose a template. The due dates for thetemplate-generated activities are based on this start date and on the leadtime in the template.

Applying Activity Templates to Sites
6-16 Siebel Clinical Trial Management System Guide
5. Edit the activities in the Activities list or create more activities.
Note: To view additional fields in this list, click Menu (the cogwheelicon) and select Columns Displayed.
Some fields are described in the following table.
Field Comments
Expected Date Select the expected date for the activity. For document tracking, thisfield denotes date that the site is expected to return the signeddocument.
Sent Date Select the sent date for the activity. For document tracking, this fielddenotes the date that you send the document to the site.
Received Date Select the received date for the activity. For document tracking, thisfield denotes the date that the site returns the signed document.
Expiration Date Select the expiration date for the activity. When you enter a date in thisfield, the Status field is automatically set to Done.
Status Select the status of the activity. When you set this field to Done, theCompleted Date field is automatically set to the current date.
Suppress Calendar Select this field to indicate that the activity does not appear on theuser’s calendar.
Applying Activity Templates to SitesYou can simultaneously apply one or multiple activity templates to one or multiplesites for a study. Activity records with a type of Document and Site-Initiation appear inthe Document Tracking view of the Site Management screen. Activity records with atype of Correspondence appear in the Activities view of the Site Management screen.
The applied templates also appear in the Activity Plans view of the Site Managementscreen for each of the selected sites.
This task is a step in "Process of Managing Sites and Contacts for Clinical Trials" onpage 6-3.
Applying Activity Templates to Sites in a RegionComplete the procedure in this topic to simultaneously apply one or multiple activitytemplates to multiple sites in a region.
Template Select the template for the activity plan. Only templates with a type ofClinical Protocol Site and with a protocol that matches the protocol atthe site are available for selection.
Only activities with type of Document or Site-Initiation appear in thedocument tracking views.
Lock Assignment Select this field as necessary. If the activity is locked, then AssignmentManager cannot access it. If it is unlocked, then Assignment Managercan reassign it.
Field Comments

Tracking and Adding Documents at Sites
Managing Sites and Contacts for Clinical Trials 6-17
To simultaneously apply one or multiple activity templates to multiple sites in a re-gion
1. Navigate to the Regions screen, then the Region List view.
2. In the Region list, drill down on the Region field of the region to which you wantto apply an activity template.
3. In the Sites view, select the sites to which you want to apply an activity template.
4. Click Apply Template.
5. From the Templates dialog, select one or multiple activity templates that you wantto apply to the selected site, and click OK.
Applying Activity Templates to Sites in a ProtocolComplete the procedure in this topic to simultaneously apply one or multiple activitytemplates to multiple sites in a protocol.
To simultaneously apply one or multiple activity templates to multiple sites in a pro-tocol
1. Navigate to the Protocols screen, then the Protocol List view.
2. In the Protocol list, drill down on the protocol number field of the protocol towhich you want to apply an activity template.
3. Navigate to the Sites view.
4. In the Sites list, select the sites to which you want to apply an activity template.
5. Click Apply Template.
6. From the Templates dialog, select one or multiple activity templates that you wantto apply to the selected site, and click OK.
Tracking and Adding Documents at SitesDuring a clinical trial, CRAs (clinical research associates) collect and track numerousdocuments, including critical regulatory documents. CRAs can take advantage of theactivity plans to generate a list of documents for tracking. In the document trackingviews, they can also create their own lists of activities to track important dates.
Note: Regional study managers can use similar procedures to addand track documents at the region level in the Regions screen.
This task is a step in "Process of Managing Sites and Contacts for Clinical Trials" onpage 6-3.
Tracking Documentation MilestonesComplete the procedure in this topic to track documentation milestones.
To track documentation milestones
1. Navigate to the Site Management screen, then the Protocol Site List view.
2. In the Protocol Site list, drill down on the site number field of the site for whichyou want to track documentation.

Tracking and Adding Documents at Sites
6-18 Siebel Clinical Trial Management System Guide
3. Navigate to the Document Tracking view.
A list of documents associated with the clinical trial appears.
4. Query for the appropriate document and complete the necessary fields.
Some fields are described in the following table.
Field Comments
Activity Displays a value of Document by default.
Name Type the name of the document. This field is a hypertext link to theAttachments view.
Sent Date Select the date that you send the document to the site.
Expected Date Select the date that the site is expected to return the signeddocument.
Received Date Select the date that the site returns the signed document.
Expiration Date Select the date that the document expires.
Assigned To Select the user ID of person assigned responsibility for thedocument.
Lock Assignment Select this field as necessary. If the activity is locked, thenAssignment Manager cannot access it. If it is unlocked, thenAssignment Manager can reassign it.
Adding Documents to SitesComplete the procedure in this topic to add a document to a site.
To add a document to a site
1. Navigate to the Site Management screen, then the Protocol Site List view.
2. In the Protocol Site list, drill down on the site number field of the site for whichyou want to track documentation.
3. Navigate to the Document Tracking view.
A list of documents associated with the clinical trial appears.
4. Create a new record and complete the necessary fields.
5. Step off the record you just added and drill down on the Name field.
The Attachments view appears.
6. Create a new record and complete the necessary fields.
Some fields are described in the following table.
Field Comments
Type Displays the type of attachment.
Auto Update. Select this field if you want to automatically update the file duringsynchronization. Synchronization applies only to local files. If a file isnot local, then it is not updated during synchronization.

Creating Activities for Document Tracking
Managing Sites and Contacts for Clinical Trials 6-19
Creating Activities for Document TrackingUsers collect numerous documents during clinical trials, either as electronic files or aspaper. You must track and periodically update these documents. You can associatedocuments with sites, regions, protocols, contacts, or accounts.
This task is a step in "Process of Managing Sites and Contacts for Clinical Trials" onpage 6-3.
To create an activity for document tracking
1. Navigate to the Document Tracking screen.
2. In the Document Tracking list, create a new record and complete the necessaryfields.
Note: You can associate an activity for document tracking with onlyone of the available tracking levels or entities.
Some fields are described in the following table.
Field Comments
Name Type the document name.
In the Document Tracking list, you can click the link in this field tonavigate to the associated Attachments view.
Site #, Region, Protocol,Contact, or Account.
Select a value in one of these five fields to assign the activity fordocument tracking to one of these five levels.
In the Document Tracking list, you can click the link the selected fieldto navigate to the Activities view.
Reviewing, Updating, and Adding Existing Documents for TrackingComplete the procedure in this topic to review, update, and add existing documentsfor tracking.
Alternatively, you can create and review activities for document tracking in theDocument Tracking view for a site. Similarly, you can create activities for documenttracking at the protocol and region levels in the Document Tracking view for theprotocol and region.
To review, update, and add existing documents for tracking
1. Navigate to the Document Tracking screen.
2. In the Document Tracking list, query for the document you want to update.
3. Drill down on the Name field of the document.
The associated Attachment view appears.
4. In the Attachment list, query for the document and drill down on the Name fieldof the document.
5. Open, update, and save the document.
6. Use the thread bar to return to the document record on the Document Trackinglist.
7. Copy the original document record and revise the associated site number, Region,Protocol, Contact, or Account field.

Managing Tracking Activities for Case Report Forms
6-20 Siebel Clinical Trial Management System Guide
Managing Tracking Activities for Case Report FormsUsers collect numerous CRFs (case report forms) during clinical trials, either aselectronic files or as paper. You must track and periodically update these forms. Youcan associate CRFs with sites, regions, or protocols.
In addition to subject visit records, CRF tracking records are created when you apply asubject visit template.
This task is a step in "Process of Managing Sites and Contacts for Clinical Trials" onpage 6-3.
Viewing Tracking Activities for Case Report FormsComplete the procedure in this topic to view tracking activities for CRFs (case reportforms).
To view tracking activities for a case report form
■ Navigate to the Document Tracking screen, then the CRF Tracking view.
The CRF Tracking list displays all of the tracking records.
Note: You can associate a tracking activity for a CRF with only one ofthe available tracking levels or entities.
Some fields are described in the following table.
Field Comments
Name Displays the name of the subject visit for which you collectCRFs.
Protocol #, Region, or site # Displays the protocol, region, or site assigned to CRF tracking.
Updating Existing Case Report Forms for TrackingComplete the procedure in this topic to update existing CRFs (case report forms) fortracking.
Alternatively, you can update activities for CRF tracking from the CRF Tracking viewof a site. Similarly, at the protocol and region levels, you can update activities for CRFtracking from the CRF Tracking view.
To update existing case report forms for tracking
1. Navigate to the Document Tracking screen, then the CRF Tracking view.
2. In the CRF Tracking list, query for the record you want to update.
3. Update and save the record.
You can revise the associated site number, Region, and protocol number field.

Creating Correspondence Activities for Sites
Managing Sites and Contacts for Clinical Trials 6-21
Tracking Case Report FormsUsers can track CRFs (case report forms) as part of a protocol, site, and region. Theycapture relevant information for each CRF record within a protocol, site and region.This information includes whether the CRFs are source verified, retrieved from a site,received in-house, or received by a data management process.
When you apply a subject visit template, in addition to creating subject visit recordsand the child activity records that exist in the current product, a duplicate set of visitrecords with a Type of Case Report Form are created (with the number of pages thatthe template specifies). These visit records with the number of CRF pages appear inthe CRF Tracking view in the Protocol Site List view of the Site Management screen.
This task is a step in "Process of Managing Sites and Contacts for Clinical Trials" onpage 6-3.
To track case report forms
1. Navigate to the Site Management screen, then the Protocol Site List view.
2. In the Protocol Site list, drill down on the site number field of the site for whichyou want to track CRFs.
3. Navigate to the CRF Tracking view
4. In the CRF Tracking list, complete the necessary fields.
Some fields are described in the following table.
Field Comments
Activity Select the activity associated with the site.
Activity Type Displays the activity type for the CRF. Only activity records withthis activity type appear in this view.
# CRF Pages Type the number of pages in the CRF.
Retrieved Select this field if the CRF is retrieved.
Retrieved Date Select the date and time that the CRF is retrieved.
Received in House Select the date and time that the CRA (clinical research associate)receives the CRF in house.
Received by DataManagement
Select the date and time that a data management process receivesthe CRF.
Source Verified Select this field if the CRF is a verified source document.
Source Verified Date Select the date and time that the CRF is source verified.
Comments Type relevant comments about the CRF.
Creating Correspondence Activities for SitesYou can track all correspondence (phone, fax, email, and letters that the postal servicedelivers) between a site and a study team member as correspondence activities for thesite. You can create such activities for multiple sites. This feature provides an easy wayto capture all forms of communication between a site and an employee, or betweenbusiness partners, such as a CRO (clinical research organization) or central laboratory.
For each created correspondence activity, you create an activity record in the Activitiesview of the Contacts screen for each of the contacts.
This task is a step in "Process of Managing Sites and Contacts for Clinical Trials" onpage 6-3.

Creating Correspondence Activities for Sites
6-22 Siebel Clinical Trial Management System Guide
Creating Correspondence Activities for SitesComplete the procedure in this topic to create a correspondence activity for a site.
To create a correspondence activity for a site
1. Navigate to the Site Management screen, then the Protocol Site List view.
2. In the Protocol Site list, drill down on the site number field of the site for whichyou want to create a correspondence activity.
3. Navigate to the Activities view.
4. In the Activities list, create a new record and complete the necessary fields.
Some fields are described in the following table.
Field Comments
Activity Displays a value of Correspondence by default.
Activity Type Select an activity type. The following values are available:
■ Case Report Form
■ Fax
■ Phone
Description Type a brief description for the correspondence activity.
Screen # Displays the number of screens for the correspondence.
Comments Type relevant comments about the correspondence activity.
Last Name Select the last name of the creator of the correspondence activity.This field is a required.
Creating New Role Correspondence for SitesComplete the procedure in this topic to create a new role correspondence for a site.
To create a new role correspondence for a site
1. Navigate to the Protocols screen, then the Protocol List view.
2. In the Protocol list, drill down on the protocol number field of the protocol forwhich you want to create a new role.
3. Navigate to the Sites view
4. In the Sites list, select one or multiple sites to which you want to apply a new rolefor the correspondence.
5. Click New Correspondence.
6. From the Roles of Contacts dialog box, select the role or multi-select the roles thatbest describe the individual’s role, and click OK.
Creating Partner Correspondence ActivitiesYou can track all correspondence (phone, fax, email, and letters that the postal servicedelivers) between business partners, such as a CRO (clinical research organization) orcentral laboratory.

Viewing the Status History for Sites
Managing Sites and Contacts for Clinical Trials 6-23
To create partner correspondence activities
1. Navigate to the Site Management screen, then the Protocol Site List view.
2. In the Protocol Site list, drill down on the site number field of the site for whichyou want to create a partner correspondence activity.
3. Navigate to the Activities view.
4. In the Activities list, create a new record and complete the necessary fields.
Adding Notes to SitesWhen you work with site records, you often find that you want to make notes. In theNotes view, you can enter public notes or private notes. Use the link bar in the Notesview to switch between public and private notes. Anyone who can access the recordcan see a public note. Only the person who creates the note can see a private note.
This task is a step in "Process of Managing Sites and Contacts for Clinical Trials" onpage 6-3.
To add a note to a site
1. Navigate to the Site Management screen, then the Protocol Site List view.
2. In the Protocol Site list, drill down on the site number field of the site for whichyou want to add a note.
3. Navigate to the Notes view, then the Private Notes view or Public Notes view.
4. Create a new record and complete the necessary fields.
Some fields are described in the following table.
Field Comments
Created By Name Displays your user ID.
Created Date Displays the system date.
Note Type Select the type of note. Examples include Exclusion, Pre-existingCondition, Permanent, System, Temporary, Business Description,Regional Plans, and Contracts Process.
Note Type the note text.
5. Click Check Spelling to make sure your note has no spelling errors.
Viewing the Status History for SitesFor each site, you can view information about how the Status field changed in the past.
To view the status history for a site
1. Navigate to the Site Management screen, then the Protocol Site List view.
2. In the Protocol Site list, drill down on the site number field of the site for whichyou want to view the status history.
3. Navigate to the Status History view.
Some fields are described in the following table.

Field Comments
Old Status Displays the prior value in the Status field for the site record.
New Status Displays the new value in the Status field for the site record.
Date Displays the date and time that the prior value changed to the newvalue.
Employee Login Displays the ID of the user who changed the Status field for the siterecord.
Assessing Contacts and Accounts
6-24 Siebel Clinical Trial Management System Guide
Assessing Contacts and AccountsAssessments allow end users to calculate a single numerical value that expresses thefitness of a contact or account, according to a set of attributes in the assessmenttemplate. For example, you can assess an investigator to determine competence tocarry out a large scale clinical trial in phase III, or you can assess a hospital todetermine suitability to carry out a similar trial. The results of this assessment helpCRAs (clinical research associates) find suitable investigators and hospitals forsubsequent trials. For more information, see "Creating Contact and AccountAssessment Templates" on page 6-6.
Note: The score values in the Assessment Attributes list and the(total) score value in the Assessments list are automatically updated.
This task is a step in "Process of Managing Sites and Contacts for Clinical Trials" onpage 6-3.
To assess a contact or account
1. Complete one of the following steps, depending on whether you want to assess acontact or account:
■ Navigate to the Contacts screen, then the Contacts List view, and in theContacts list, drill down on the Last Name field of the contact that you want toassess.
■ Navigate to the Accounts screen, then the Accounts List view, and in theAccounts list, drill down on the Name field of the account that you want toassess.
2. Navigate to the Assessments view.
3. In the Assessments list, create a new record.
4. In the Template Name field, select the assessment template.
For more information, see "Creating Contact and Account Assessment Templates"on page 6-6.
The other fields in the record are populated when the record is saved.
5. In the Assessment Attributes list, for each attribute:
a. Select a value in the Value field of the attribute.
b. Add or edit comments in the Comment field of the attribute.

Generating Oracle BI Publisher Reports for Document Tracking
Managing Sites and Contacts for Clinical Trials 6-25
Generating Oracle BI Publisher Reports for Document TrackingYou can integrate Siebel Clinical with Oracle Business Intelligence Publisher (BIPublisher) for generating reports. You can generate, view, and schedule preconfiguredOracle BI Publisher reports in Siebel Clinical. For more information about using SiebelReports and integrating with Oracle BI Publisher, see Siebel Reports Guide.
The following preconfigured reports apply to clinical document tracking:
■ Site Document Tracking
■ Protocol Level Document Tracking
■ Region Level Document Tracking
■ Protocol Document Tracking Across Sites
■ Regional Document Tracking Across Sites
This task is a step in "Process of Managing Sites and Contacts for Clinical Trials" onpage 6-3.
Generating Reports for Site Document TrackingThis topic describes how to generate the preconfigured Site Document Tracking reportfor Oracle BI Publisher.
To generate a report for site document tracking
1. Navigate to the Site Management screen, then the Protocol Site List view.
2. In the Protocol Site list, drill down on the site number field of the site for whichyou want to generate an Oracle BI Publisher report.
3. Navigate to the Document Tracking view.
4. On the application toolbar, click Reports.
5. In the Run Report pane, complete the appropriate fields.
Some fields are described in the following table.
Field Comments
Report Name Select the Site Document Tracking report.
Output Type Select the output type for the report.
6. Click Submit.
The report runs.
7. Click My Reports to navigate to the Reports view of the BI Publisher Reportsscreen.
A record for the report appears in the Reports view. For information aboutviewing and printing the report, see Siebel Fundamentals for Siebel Open UI

Generating Oracle BI Publisher Reports for Document Tracking
6-26 Siebel Clinical Trial Management System Guide
Generating Reports for Protocol Level Document TrackingThis topic describes how to generate the preconfigured Protocol Level DocumentTracking report for Oracle BI Publisher.
To generate a report for protocol level document tracking
1. Navigate to the Protocols screen, then the Protocol List view.
2. In the Protocol list, drill down on the protocol number field of the protocol forwhich you want to generate an Oracle BI Publisher report.
3. Navigate to the Document Tracking view.
4. On the application toolbar, click Reports.
5. In the Run Report pane, complete the appropriate fields.
Some fields are described in the following table.
Field Comments
Report Name Select the Protocol Level Document Tracking report.
Output Type Select the output type for the report.
6. Click Submit.
The report runs.
7. Click My Reports to navigate to the Reports view of the BI Publisher Reportsscreen.
A record for the report appears in the Reports view. For information aboutviewing and printing the report, see Siebel Fundamentals for Siebel Open UI.
Generating Reports for Region Level Document TrackingThis topic describes how to generate the preconfigured Region Level DocumentTracking report for Oracle BI Publisher.
To generate a report for region level document tracking
1. Navigate to the Regions screen, then the Region List view.
2. In the Region list, drill down on the Region field of the region for which you wantto generate an Oracle BI Publisher report.
3. Navigate to the Document Tracking view.
4. On the application toolbar, click Reports.
5. In the Run Report pane, complete the appropriate fields.
Some fields are described in the following table.
Field Comments
Report Name Select the Region Level Document Tracking report.
Output Type Select the output type for the report.
6. Click Submit.
The report runs.

Generating Oracle BI Publisher Reports for Document Tracking
Managing Sites and Contacts for Clinical Trials 6-27
7. Click My Reports to navigate to the Reports view of the BI Publisher Reportsscreen.
A record for the report appears in the Reports view. For information aboutviewing and printing the report, see Siebel Fundamentals for Siebel Open UI.
Generating Reports for Protocol Document Tracking Across SitesThis topic describes how to generate the preconfigured Protocol Document TrackingAcross Sites report for Oracle BI Publisher.
To generate a report for protocol document tracking across sites
1. Navigate to the Site Management screen.
2. On the application toolbar, click Reports.
3. In the Run Report pane, complete the appropriate fields.
Some fields are described in the following table.
Field Comments
Report Name Select the Protocol Document Tracking Across Sites report.
Output Type Select the output type for the report.
4. Click Submit.
The report runs.
5. Click My Reports to navigate to the Reports view of the BI Publisher Reportsscreen.
A record for the report appears in the Reports view. For information aboutviewing and printing the report, see Siebel Fundamentals for Siebel Open UI.
Generating Reports for Regional Document Tracking Across SitesThis topic describes how to generate the preconfigured Regional Document TrackingAcross Sites report for Oracle BI Publisher.
To generate a report for regional document tracking across sites
1. Navigate to the Site Management screen.
2. On the application toolbar, click Reports.
3. In the Run Report pane, complete the appropriate fields.
Some fields are described in the following table.
Field Comments
Report Name Select the Regional Document Tracking Across Sites report.
Output Type Select the output type for the report.
4. Click Submit.
The report runs.
5. Click My Reports to navigate to the Reports view of the BI Publisher Reportsscreen.

Generating Reports for Actual Visits
6-28 Siebel Clinical Trial Management System Guide
A record for the report appears in the Reports view. For information aboutviewing and printing the report, see Siebel Fundamentals for Siebel Open UI.
Generating Reports for Actual VisitsThis topic describes how to generate the preconfigured Actual Visits report for OracleBI Publisher. This report lists the completed subject visits for a site.
This task is a step in "Process of Managing Sites and Contacts for Clinical Trials" onpage 6-3.
To generate a report for actual visits
1. Navigate to the Site Management screen, then the Protocol Site List view.
2. In the Protocol Site list, drill down on the site number field of the site for whichyou want to generate an Oracle BI Publisher report.
3. On the application toolbar, click Reports.
4. In the Run Report pane, complete the appropriate fields.
Some fields are described in the following table.
Field Comments
Report Name Select the Actual Visits report.
Output Type Select the output type for the report.
5. Click Submit.
The report runs.
6. Click My Reports to navigate to the Reports view of the BI Publisher Reportsscreen.
A record for the report appears in the Reports view. For information aboutviewing and printing the report, see Siebel Fundamentals for Siebel Open UI.
Generating Reports for Planned and Actual Dates of Subject VisitsThis topic describes how to generate the preconfigured Planned vs Actual PatientDates report for Oracle BI Publisher. This report lists the planned and completedsubject visit dates for a site.
This task is a step in "Process of Managing Sites and Contacts for Clinical Trials" onpage 6-3.
To generate a report for planned and actual dates of subject visits
1. Navigate to the Site Management screen, then the Protocol Site List view.
2. In the Protocol Site list, drill down on the site number field of the site for whichyou want to generate an Oracle BI Publisher report.
3. On the application toolbar, click Reports.
4. In the Run Report pane, complete the appropriate fields.
Some fields are described in the following table.

Field Comments
Report Name Select the Planned vs Actual Patient Dates report.
Output Type Select the output type for the report.
Generating Reports for Planned and Actual Dates of Subject Visits
Managing Sites and Contacts for Clinical Trials 6-29
5. Click Submit.
The report runs.
6. Click My Reports to navigate to the Reports view of the BI Publisher Reportsscreen.
A record for the report appears in the Reports view. For information aboutviewing and printing the report, see Siebel Fundamentals for Siebel Open UI.

Generating Reports for Planned and Actual Dates of Subject Visits
6-30 Siebel Clinical Trial Management System Guide

7
Managing Partial Source Data Verification 7-1
7Managing Partial Source Data Verification
This chapter covers how to manage partial source data verification. It includes thefollowing topics:
■ About Partial Source Data Verification
■ Setting Up Partial Source Data Verification for Clinical Protocols
■ Setting Up Partial Source Data Verification for Clinical Regions
■ Setting Up Partial Source Data Verification for Subject Visit Templates
■ Setting Up Partial Source Data Verification for Sites
■ Setting Up Partial Source Data Verification for Clinical Subjects
■ Viewing Case Report Forms for Partial Source Data Verification
■ Tracking Case Report Forms for Partial Source Data Verification During Site Visits
■ Recalculating Clinical Subjects Requiring Source Data Verification
■ About Partial Source Data Verification for Protocol Amendments
About Partial Source Data VerificationTo ensure that all of the data collected during the clinical trial is complete, accurate,and verifiable, companies use SDV (source data verification). This key processinvolves many on-site visits and verification of all the data in the CRF (case reportform).
The number of clinical trials is growing, and these trials are becoming more complex.Also, regulatory agencies are more closely monitoring the drug approval process.Consequently, the cost of these trials is drastically rising, and companies and CROs(clinical research organizations) face challenges in keeping budget and time issues fortrials under control. Consequently, more companies and CROs are adopting risk basedmonitoring for their clinical trials. Risk based monitoring moves from the traditionalmethods involving 100% or complete SDV to PSDV (partial source data verification). Itintroduces strategic on-site monitoring that is based on risks and assessments aboutimportant aspects of clinical trials.
For PSDV, you plan the SDV process by using statistical and historical informationabout the clinical sites and the involved personnel and about events that occur atvarious points in the clinical trial. This planning involves decisions at various levels ofthe clinical trial. Some information included in partial source verification follows:
■ Percentage of CRFs to verify
■ Specific CRFs to verify

Setting Up Partial Source Data Verification for Clinical Protocols
7-2 Siebel Clinical Trial Management System Guide
■ Specific pages of the CRFs to verify
■ Adverse events at specific points in the clinical trial
Setting Up Partial Source Data Verification for Clinical ProtocolsThis topic describes how to set up PSDV (partial source data verification) for clinicalprotocols. You set up this verification by entering PSDV values in some fields whenyou create a record for a clinical protocol. These values are automatically populated inthe same fields for all of the regions and sites that you associate with the clinicalprotocol. However, you can change these automatically populated values.
If you update the PSDV values in the fields of a clinical protocol, then the updatedvalues are not automatically populated in the same fields of the regions and sites thatare already associated with the clinical protocol. If you associate new regions and siteswith the clinical protocol, then the updated values are automatically populated in thesame fields of the new regions and sites.
If you update the value (from Complete to Partial) in the SDV Policy field for a sitethat is associated with the clinical protocol, then the PSDV values in the fields of theclinical protocol are automatically populated in the same fields of the site.
To set up partial source data verification for a clinical protocol
1. Navigate to the Administration - Clinical screen, then the Protocol List view.
2. In the Protocol list, create a new record and complete the necessary fields.
For more information, see "Setting Up Clinical Protocols" on page 4-4.
Alternatively, you can select an existing protocol record to update it.
3. In the Protocol list, drill down on the protocol number field of the protocol record.
4. Navigate to the More Info view.
5. Scroll down to the Partial Source Data Verification section and complete the PSDVfields.
The PSDV fields are described in the following table.
Field Comments
Number of Initial Subjects Type the number of initial subjects with CRFs (case reportforms) to completely verify.
Subject Auto-Select Rate For the total number of subjects less the number of initialsubjects, type the percentage with CRFs that are part of SDV(source data verification).
Setting Up Partial Source Data Verification for Clinical RegionsThis topic describes how to set up PSDV (partial source data verification) for clinicalregions. You set up this verification by entering PSDV values in some fields when youcreate a record for a clinical region. These values are automatically populated in thesame fields for all of the sites that you associate with the clinical region. However, youcan change these automatically populated values.
If you update the PSDV values in the fields of a clinical region, then the updatedvalues are not automatically populated in the same fields of the sites that are alreadyassociated with the clinical region. If you associate new sites with the clinical region,

Setting Up Partial Source Data Verification for Subject Visit Templates
Managing Partial Source Data Verification 7-3
then the updated values are automatically populated in the same fields of the newsites.
If you update the value (from Complete to Partial) in the SDV Policy field for a sitethat is associated with the clinical region, then the PSDV values in the fields of theclinical region are automatically populated in the same fields of the site.
To set up partial source data verification for a clinical region
1. Navigate to the Administration - Clinical screen, then the Region List view.
2. In the Region list, create a new record and complete the necessary fields.
For more information, see "Setting Up Clinical Regions" on page 4-9.
Alternatively, you can select an existing region record to update it.
3. In the Region list, drill down on the Region field of the region record.
4. Navigate to the More Info view.
5. Scroll down to the Partial Source Data Verification section and complete the PSDVfields.
The PSDV fields are described in the following table.
Field Comments
Number of Initial Subjects Type the number of initial subjects with CRFs (case reportforms) to completely verify.
Subject Auto-Select Rate For the total number of subjects less the number of initialsubjects, type the percentage with CRFs that are part of SDV(source data verification).
Setting Up Partial Source Data Verification for Subject Visit TemplatesThis topic describes how to set up PSDV (partial source data verification) for subjectvisit templates. You set up this verification by entering PSDV values in some fieldswhen you create a record for a subject visit template. These values are automaticallypopulated in the same fields for all of the CRF (case report form) tracking records thatare associated with the subject visit template.
To set up partial source data verification for a subject visit template
1. Navigate to the Administration - Clinical screen, then the Visit Templates view.
2. In the Subject Visit Templates list, create a new record and complete the necessaryfields.
For more information, see "Creating Subject Visit Templates" on page 5-2.
Alternatively, you can select an existing subject visit template record.
3. Scroll down to the Template Versions list, create a new record and complete thenecessary fields.
For more information, see "Defining Versions for Subject Visit Templates" onpage 5-2.
Alternatively, you can select an existing version record.
4. Scroll down to the Visits list, create a new record and complete the necessaryfields.
Alternatively, you can select an existing visit record to update it.

Setting Up Partial Source Data Verification for Sites
7-4 Siebel Clinical Trial Management System Guide
The PSDV fields are described in the following table.
Field Comments
SDV Required Select this field if SDV (source data verification) is necessaryfor the subject visit associated with the template.
Page Numbers to Verify Type the page numbers of the CRF that are included in PSDV.If SDV is necessary for all the CRF pages, then enter All Pages.This field provides information to CRAs (clinical researchassociates) when they review CRFs, and does not affectprocessing in Siebel Clinical Trial Management System.
Setting Up Partial Source Data Verification for SitesThis topic describes how to set up PSDV (partial source data verification) for sites. Youset up this verification by entering PSDV values in some fields when you create orupdate a record for a site.
To set up partial source data verification for a site
1. Navigate to the Site Management screen, then the Protocol Site List view.
2. In the Protocol Site list, create a new record and complete the necessary fields.
For more information, see "Creating Sites for Clinical Trials" on page 4-13.
Alternatively, you can select an existing site record to update it.
3. In the Protocol Site list, drill down on the site number field of the site record.
4. Navigate to the More Info view.
5. Scroll down to the Integration section and the Partial Source Data Verificationsection and complete the PSDV fields.
The PSDV fields are described in the following table.
Field Comments
Use CDMS Auto-Select Rule If you use an integrated CDMS (clinical data managementsystem), such as Oracle Health Sciences InForm, then selectthis field to indicate that the PSDV fields in the site record arenot used in PSDV. In this scenario, the SDV Required field forthe appropriate subject records is populated from the CDMS.Clear this field to indicate that the PSDV fields in the siterecord are used in PSDV.
When you save the record after you select this field, the SDVPolicy field is automatically populated with a value ofExternal.
This field is disabled until you complete the following tasks inthe designated order:
1. Integrate Oracle Health Sciences InForm studies withSiebel clinical. For more information, see "Overview ofClinical Data Management System Integration" onpage 13-1.
2. Select a value in the Primary Site Address field in theIntegration section. You set up selectable addresses in theAddresses view of the Site Management screen.
3. Select the Activate for Synchronization field in theIntegration section.

Setting Up Partial Source Data Verification for Clinical Subjects
Managing Partial Source Data Verification 7-5
Setting Up Partial Source Data Verification for Clinical SubjectsThis topic describes how to set up PSDV (partial source data verification) for clinicalsubjects. You set up this verification by entering PSDV values in some fields when youcreate or update a record for a clinical subject.
To set up partial source data verification for a clinical subject
1. Navigate to the Site Management screen, then the Protocol Site List view.
2. In the Protocol Site list, create a new record and complete the necessary fields.
For more information, see "Creating Sites for Clinical Trials" on page 4-13.
Alternatively, you can select an existing site record.
3. In the Protocol Site list, drill down on the site number field of the site record.
4. Navigate to the Subjects view.
5. In the Subjects list, create a new record and complete the necessary fields.
For more information, see "Creating Records for Clinical Subjects" on page 5-7
Alternatively, you can select an existing subject record to update it.
The PSDV fields are described in the following table.
SDV Policy Select the policy for SDV (source data verification). Validvalues include Complete, Partial, and External. The defaultvalue is Complete.
When the value is Complete, all of the subjects associated withthe site record are part of complete SDV, and the SDV Requiredfield in those subject records is set to Yes.
Number of Initial Subjects Type the number of initial subjects with CRFs (case reportforms) to completely verify. You can change this field only ifthe SDV Policy field has a value of Partial.
If the protocol or region record that is associated with this sitealready has a value in this same field, then that value isautomatically populated in this field. However, you canchange this automatically populated value.
Subject Auto-Select Rate For the total number of subjects less the number of initialsubjects, type the percentage with CRFs that are part of SDV.You can change this field only if the SDV Policy field has avalue of Partial.
If the protocol or region record that is associated with this sitealready has a value in this same field, then that value isautomatically populated in this field. However, you canchange this automatically populated value.
Total Subjects Requiring SDV Displays the number of subjects who are included in SDV. Thisfield is read-only. The calculation of this field value follows:
(Number of Initial Subjects) plus [(Total Subjects in the SitePool) less (Number of Initial Subjects) times SubjectAuto-Select Rate]
For more information about this field, see "RecalculatingClinical Subjects Requiring Source Data Verification" onpage 7-8.
Total Subjects in Site Pool Displays the number of subjects in the site pool. This field isread-only.
Field Comments

Field Comments
SDV Required Displays an indication of whether SDV (source dataverification) is necessary for the CRFs (case report forms) ofthe subject. The value in this field can change in the followingways:
■ Manual. You can manually change the field value. Tochange the field value, drill down on the screeningnumber field of the subject record to navigate to thesubject form.
■ Site. The field value can be automatically populated usingthe PSDV field values of the site record that is associatedwith the subject record.
If the value in the SDV Policy field for the associated siterecord is Complete, then the SDV Required field for thesubject record is Yes.
If the value in the SDV Policy field for the associated siterecord is Partial, then the SDV Required field for thesubject record can be Yes or No. The value depends on theother PSDV field values.
■ Status. This field can be automatically populated when astatus rule set exists for the Status field of the subjectrecord. If such a rule set exists, then this field isautomatically populated with a value of Yes or No.
To set up this status rule set in Siebel Tools, enter values inthe SDV Subject Status user properties of the ClinicalSubject business component.
For example, enter the following value in the SDV SubjectStatus 1 user property: "Early Terminated","AdverseEffect","Y". Then enter the following value in the SDVSubject Status 2 user property: "Screen Failure","", "Y". Inthis example, if a subject terminates a study early becauseof an adverse effect, or if a subject fails screening, then theSDV Required field is automatically populated with avalue of Yes.
Set the CL Highest Preference SDV Rule system preference todetermine the priority order in which to implement these 3methods (Manual, Site, and Status) to change the SDVRequired field of a subject record. For more information, see"System Preferences in Siebel Clinical" on page A-22.
SDV Last Updated Source Displays the reason for the value in the SDV Required field.This field is read-only. It can have the following values:
Site. The value in the SDV Required field is the result of thePSDV fields of the site record that is associated with the subjectrecord. The subject records with this value are included in thesite pool.
Subject Status. The value in the SDV Required field is theresult of a status rule set for the Status field of the subjectrecord. The subject records with this value are included in thestatus pool.
Manual. The user selected the value in the SDV Required fieldfor the subject record. The subject records with this value areincluded in the subject pool.
External. The value in the SDV Required field is the result ofincoming data from an integrated CDMS (clinical datamanagement system).
Setting Up Partial Source Data Verification for Clinical Subjects
7-6 Siebel Clinical Trial Management System Guide

Tracking Case Report Forms for Partial Source Data Verification During Site Visits
Managing Partial Source Data Verification 7-7
Viewing Case Report Forms for Partial Source Data VerificationThis topic describes how to view the CRFs (case report forms) applicable to PSDV(partial source data verification). During a site visit, CRAs (clinical research associates)do not review all CRFs and all pages on those CRFs. The field values for PSDV in thesubject visit template that is associated with the site visit determine the informationthat appears in the PSDV fields of CRFs. The CRA restricts the review to theinformation in these PSDV fields.
To view the case report forms for partial source data verification
1. Complete one of the following steps:
a. Navigate to the Site Management screen, then the Protocol Site List view, anddrill down on the site number field of the site record in the Protocol Site list.
b. Navigate to the Protocols screen, then the Protocol List view, and drill downon the protocol number field of the protocol record in the Protocol list.
c. Navigate to the Regions screen, then the Region List view, and drill down onthe Region field of the region record in the Region list.
d. Navigate to the Document Tracking screen.
2. Navigate to the CRF Tracking view.
The PSDV fields are described in the following table.
Field Comments
SDV Required Displays an indication of whether SDV (source data verification) isnecessary for the site visit.
This field is read-only, and automatically populated from the valueof the same field in the subject visit template that is associated withthis CRF tracking record.
Page Numbers to Verify Displays the page numbers of the CRF that are included in PSDV.
This field is read-only, and automatically populated from the valueof the same field in the subject visit template that is associated withthis CRF tracking record.
Tracking Case Report Forms for Partial Source Data Verification DuringSite Visits
This topic describes how to track the CRFs (case report forms) for PSDV (partial sourcedata verification) during a site visit. During a site visit, CRAs (clinical researchassociates) do not review all CRFs and all pages on those CRFs. The field values forPSDV in the subject visit template that is associated with the site visit determine theinformation that appears in the PSDV fields of CRFs. The CRA restricts the review tothe information in these PSDV fields.
To track the case report forms for partial source data verification during a site visit
1. Navigate to the Site Visits screen, then the Clinical Site Visits List view.
2. In the Clinical Site Visits list, drill down on the Visit Start field of the site visit forwhich you want to track case report forms for partial source data verification.
3. Navigate to the Case Report Forms Tracking view.

Recalculating Clinical Subjects Requiring Source Data Verification
7-8 Siebel Clinical Trial Management System Guide
4. To add case report forms for scheduled subject visits, complete the following steps:
a. Click Add Scheduled.
b. Select the subject visits in the dialog box that appears.
c. Click OK.
The case report forms for selected subject visits appear in the Case ReportForms Tracking view. For a description of the PSDV fields that appear in thisview, see "Viewing Case Report Forms for Partial Source Data Verification" onpage 7-7.
5. To add case report forms for unscheduled subject visits, complete the followingsteps:
a. Click Add Unscheduled.
b. Select the subject visits in the dialog box that appears.
c. Click OK.
The case report forms for selected subject visits appear in the Case ReportForms Tracking view. For a description of the PSDV fields that appear in thisview, see "Viewing Case Report Forms for Partial Source Data Verification" onpage 7-7.
6. Complete the necessary fields in the case report forms.
Some fields are described in the following table.
Field Comments
Source Verified Select this field when you verify the CRF against the source document.
Retrieved Select this field when you retrieve the CRFs from the site.
Page Numbers Verified Type the CRF page numbers that you verify.
Charts Reviewed Date Select the date and time that you review the clinical charts.
Forms Signed Date Select the date and time that you sign the CRFs.
Recalculating Clinical Subjects Requiring Source Data VerificationIf you change the value in the Number of Initial Subjects field or the SubjectAuto-Select Rate field of a site record, then you must recalculate the value in the TotalSubjects Requiring SDV field of that site record.
If you change the number of subjects in the site pool by changing the value in the SDVRequired field of the site’s subject records, then you must recalculate the value in theTotal Subjects Requiring SDV field of the site record. If you change the number ofsubjects in other pools, such as the subject pool and the status pool, then you do nothave to recalculate the value in Total Subjects Requiring SDV field because these otherpools are not included in the calculation of this field. For more information aboutpools, see "Setting Up Partial Source Data Verification for Clinical Subjects" onpage 7-5.
To recalculate the subjects requiring source data verification
1. Navigate to the Site Management screen, then the Protocol Site List view.
2. In the Protocol Site list, drill down on the site number field of a site record.
3. Navigate to the More Info view.

About Partial Source Data Verification for Protocol Amendments
Managing Partial Source Data Verification 7-9
4. Click Reapply Auto-Select Rate.
If the value in the Number of Initial Subjects field or the Subject Auto-Select Ratefield changed, then the value in the Total Subjects Requiring SDV field isrecalculated, and this recalculation considers the subjects in the site pool.
About Partial Source Data Verification for Protocol AmendmentsWhen you change a subject visit template, you create a new version of that template.This new version results in a protocol amendment. When you apply the protocolamendment to the subjects, the following processing occurs:
1. The subject visits that are no longer valid are deleted.
2. CRF (case report form) records associated with the subject visits are deleted.
3. New subject visits are created.
4. New CRFs are created with values for PSDV (partial source data verification)fields from the latest version of the subject visit template.
For CRFs that already have values for PSDV fields, new CRFs are also created. Thevalues for fields that are not available in the subject visit template are copied fromthe prior CRFs to the new CRFs, and the values for PSDV fields are copied fromlatest version of the subject visit template to the new CRFs.
5. Activities are created according to the protocol amendment.

About Partial Source Data Verification for Protocol Amendments
7-10 Siebel Clinical Trial Management System Guide

8
Setting Up and Making Clinical Payments 8-1
8Setting Up and Making Clinical Payments
This chapter describes how to set up and make clinical payments. It includes thefollowing topics:
■ About Setting Up and Making Clinical Payments for Subject Activities
■ Scenario for Clinical Payments
■ Setting Up Standard Payment Amounts in Subject Visit Templates
■ Setting Payment Exceptions for Sites
■ Splitting Payment Activities Between Multiple Payees
■ Copying Details for Payment Splits
■ Reversing Splits for Payment Activities
■ Marking Subject Activities as Complete
■ Creating Payment Activities for Sites
■ Generating Payment Records for Sites
■ Generating Payment Records for Sites Associated with Clinical Protocols andRegions
■ Generating Payment Records for Unplanned Payment Activities
■ Adjusting Payment Amounts and Generating Payment Records for Sites
■ Generating Final Payments for Sites
■ Reverting Payment Records
■ Generating Oracle BI Publisher Reports for Clinical Payments
About Setting Up and Making Clinical Payments for Subject ActivitiesYou set and adjust payments to investigators and sites at the following levels:
■ The financial administrator sets standard payment amounts through the subjectvisit template.
■ You set exceptions to standard payment amounts according to agreements thatindividual sites negotiate.
■ You can further adjust payments on a one-time only basis before you generate thepayments.
Not all subject activities have payment amounts associated with them. For example,obtaining informed consent might be a subject activity for which you do not pay thesite, but you pay a site for performing a blood test. Subject activities for which you pay

Scenario for Clinical Payments
8-2 Siebel Clinical Trial Management System Guide
the site are payment subject activities. (In the Siebel Clinical interface, the Payment Flagfield indicates these activities.)
In addition to subject activities, you can pay sites for other activities that end userscreate at the site level, such as IRB (institutional review board) fees and equipmentcosts. End user can designate those activities as payable to the site with the PaymentFlag field. For information about managing budgets at the protocol level, seeChapter 10, "Managing Clinical Projects."
You can use multiple currencies for a protocol. For more information about setting upcurrency conversions, see Siebel Applications Administration Guide.
You can set currencies and exchange rate dates at the following levels:
■ Protocol level. You associate a single currency code and exchange date with aprotocol record. All payments you make to sites for the protocol are converted toand rolled up in the protocol currency.
■ Region level. If regions apply to the protocol, then set a currency code andexchange date for each region. All site payments you make in that region areconverted to and rolled up in the region currency.
■ Site level. Set a currency code and exchange date for each site. When you use asubject visit template to create subject visits and activities, all payment activitiesare converted to the currency for the site on the exchange date for the site.
Scenario for Clinical PaymentsThis topic gives one example of how clinical payments might be used. You might usepayments differently, depending on your business model.
Using the input from the clinical contract or grant negotiations group, the financialadministrator sets up the standard payment amounts for procedures and tasks that thesite performs. A major pain-point for clinical organizations is managing investigatorpayments. Often organizations pay investigators for activities that they do notcomplete, or for activities that they complete, but not to the satisfaction of the sponsor.By specifying a withholding amount and a withholding percentage, you can withholdpayments from an investigator to make sure that all activities are complete.Investigators are motivated to complete all activities so that they receive full payment.
The CRAs (clinical research associates) set up the payment exceptions for sites wheredifferent payments are negotiated for subject activities. (In some organizations, thestudy manager performs this task instead of the CRA.)
As the sites carry out the procedures, the financial administrator verifies successfulcompletion of the procedures, and generates payments for these activities. Hegenerates a payment (minus the withholding amount or percentage) when an activityis complete. If all activities for a site are complete, then he pays the investigator the fullamount for all activities, including the withholding amount or percentage.
Occasionally, the sponsor or CRO (clinical research organization) must make anadditional payment to a site, and the payment is not directly associated with subjectactivities. These payments are unplanned payments. A reimbursement for anunscheduled visit is an example of an unplanned payment.
Note: As the clinical trial progresses, the sites complete the subjectactivities for which they are paid. Typically, personnel at the sites entercomplete dates for subject activities using Siebel Site Portal. For moreinformation about Siebel Site Portal, see Siebel Life Sciences Portals Guide.

Setting Payment Exceptions for Sites
Setting Up and Making Clinical Payments 8-3
Setting Up Standard Payment Amounts in Subject Visit TemplatesYou can set up payment amounts when you create the subject visit template. For moreinformation, see "About Subject Visit Templates" on page 5-2.
Also, you can add payment amounts later by following the procedure in this topic.You can enter payments at the site level in any currency. All payment amounts at thesite level are converted to the currency for the site and rolled up into the currency forthe region. If a region is not applicable, then payment amounts at the site level arerolled up into the currency for the protocol.
Note: This task requires administrator privileges.
To set up standard payment amounts in the subject visit template
1. Navigate to the Administration - Clinical screen, then the Visit Templates view.
2. Select the subject visit template and template version for which you want to addpayment amounts.
3. For each visit and each activity for which to pay the sites:
a. Select the Payment Flag field.
If you do not select this field, then the activity does not appear in the PaymentActivities view, and you cannot generate a payment.
b. In the Payment Amount field, use the currency calculator to enter the amountand currency code.
Setting Payment Exceptions for SitesThe currency at the site might differ from the currency for the standard amount. Also,the paid amount to individual sites for a particular procedure can differ from thestandard amount in the subject visit template. For more information, see "Setting UpStandard Payment Amounts in Subject Visit Templates" on page 8-3.
The procedure in this topic explains how to use payment exceptions to change thestandard amount for a payment subject activity for an individual site. After you set thepayment exception for an activity associated with the given site, visit, and templateversion, each time the activity is generated for a subject, the activity shows thesite-specific amount.
Note: When a new subject visit template becomes active, setpayment exceptions for the new template.
To set payment exceptions for a site
1. Navigate to the Site Management screen, then the Protocol Site List view.
2. In the Protocol Site list, drill down on the site number field of the site for whichyou want to set up payment exceptions.
3. Navigate to the Payment Exceptions view.
4. In the Payment Exceptions list, create a new record.
The Payment Exceptions dialog box filters payment subject activities to show onlythose activities for the current protocol version. However, you can query from the

Splitting Payment Activities Between Multiple Payees
8-4 Siebel Clinical Trial Management System Guide
set of all payment subject activities with the Payment Flag field selected across allversions and protocols. Consequently, you can set payment exceptions foractivities in protocol version 2 and in protocol version 1, for example, if you expectthe site to transition to the newer version in the near future.
5. In the Payment Exceptions dialog box, select all activities for which you want toset payment exceptions, and click OK.
6. In the Exception Amount fields, enter the new amounts to pay to this site for eachactivity.
Note: The exception amount to pay at the site level might be in adifferent currency than the currency in the subject visit template or forthe site. When you create subject activities at a site, the currency isconverted to the currency for the site.
Splitting Payment Activities Between Multiple PayeesYou can split payment activity between multiple contracts and payees. Each contractand payee combination for each payment activity split must be unique for thepayment.
You define payment activity splits at the payment exceptions level in the Split Detailsapplet. You can also define payment activity splits in the Split Details view forpayments that do not have any payment exceptions. Scheduling a subject for thecorresponding site applies the subject visit template, and creates a payment activity foreach split payment in the Split Details applet.
To split a payment activity between multiple payees
1. Navigate to the Site Management screen, then the Protocol Site List view.
2. In the Protocol Site list, drill down on the site number field of the site for whichyou want to set up split payments.
3. Navigate to the Payment Exceptions view.
4. In the Payment Exceptions list, select the record for which you want to create splitpayments.
5. Navigate to the Split Details list.
6. Create a new record for each payment split and complete the necessary fields.
Some fields are described in the following table.
Field Comments
Contract Select the payee contract from the list of contracts. The contract and payeecombination for each payment split must be unique for the payment.
Account Displays the primary account for the selected contract.
Payee Last Name Select the payee last name from the list. The list displays all contacts forthe primary account of the selected contract.
Payee First Name Displays the payee first name.
Split Percentage Type the split percentage for each payment split. The total split percentagefor all of the payment splits must be one hundred percent.
The split percentage is automatically calculated if you manually enter theamount in the Split Amount field.

Reversing Splits for Payment Activities
Setting Up and Making Clinical Payments 8-5
7. After you create all payment splits, verify that the Split Status (icon) in thePayment Exceptions view is activated (or green in color), which indicates that thetotal splits for the payment amount to one hundred percent.
Copying Details for Payment SplitsYou can copy the details of a split payment activity to multiple payment activities. Youcopy payment activity splits at the payment exceptions level.
To copy details for a payment split
1. Navigate to the Site Management screen, then the Protocol Site List view.
2. In the Protocol Site list, drill down on the site number field of the site for whichyou want to copy split payment details.
3. Navigate to the Payment Exceptions view.
4. In the Payment Exceptions list, select the record that you want to copy.
5. Click Apply Split to Other.
The Payment Activities Select Applet appears.
6. Select the payment activities to which you want to apply the split details, and clickOK.
The split details are created in the Split Details applet for all of the selectedpayment activities.
7. Navigate to the Split Details applet, and make any required amendments.
Reversing Splits for Payment ActivitiesThis topic describes how to reverse a payment activity split. The split details for eachpayment are deleted from the Split Details applet.
To reverse a split for a payment activity
1. Navigate to the Site Management screen, then the Protocol Site List view.
2. In the Protocol Site list, drill down on the site number field of the site for whichyou want to reverse payment activity splits.
3. Navigate to the Payment Exceptions view.
4. In the Payment Exceptions list, select the records that you want to reverse.
5. Click Unsplit.
6. Click OK to delete the split details for the selected payment activities.
The split details for each selected payment activity are deleted from the SplitDetails applet.
Split Amount Displays the split amount by using the split percentage of the totalpayment amount. You can also manually enter the amount.
Field Comments

Marking Subject Activities as Complete
8-6 Siebel Clinical Trial Management System Guide
Marking Subject Activities as CompleteUsually the site personnel use Siebel Site Portal to enter the date that subjects completeactivities. However, a CRA (clinical research associate) can also perform this task usingSiebel Clinical.
To mark subject activities as complete
1. Navigate to the Subjects screen, then the Subjects List view.
2. In the Subject list, drill down on the screening number field of the subject withcomplete activities.
3. Navigate to the Visits view.
4. In the Visit Plans list, select the visit that is complete, and click CompleteActivities.
The selected visit and all of its activities are marked as complete as follows:
■ The Completed field is selected.
■ The Completed Date field of all activities for the selected visit are populatedwith the same value in the Completed Date field of the parent visit.
■ The Status field is set to Done.
5. If necessary, edit the fields for the visit in the Activities list.
Creating Payment Activities for SitesThis task describes how to create a payment activity record for a clinical site. Thisrecord includes the contract, account, and payee details.
To create a payment activity for a site
1. Navigate to the Site Management screen, then the Protocol Site List view.
2. In the Protocol Site list, drill down on the site number field of the site for whichyou want to create a payment activity.
3. Navigate to the Payment Activities view.
4. In the Payment Activities list, create a new record and complete the necessaryfields.
Some fields are described in the following table.
Field Comments
Payment Select this field to define the activity as a payment activity.
Standard Amount Type the payment amount prior to any adjustment.
Deviation Amount Type a value in this field to adjust the value in the Actual Amount field.
Actual Amount Displays the actual amount to pay to the site. The actual amount iscalculated as follows:
Standard Amount plus Deviation Amount equals Actual Amount
Contract Select the payee contract from the list of contracts.
Account Displays the primary account for the selected contract.
Payee Last Name Select the payee last name from the list. The list displays all primaryaccounts for the selected contract.

Generating Payment Records for Sites Associated with Clinical Protocols and Regions
Setting Up and Making Clinical Payments 8-7
Generating Payment Records for SitesThis topic describes how to generate payment records from payment activities.Payments are generated for each unique contract, account and payee combination forcomplete payment activities.
To generate a payment record for a site
1. Navigate to the Site Management screen, then the Protocol Site List view.
2. In the Protocol Site list, drill down on the site number field of the site for whichyou want to generate a payment.
3. Navigate to the Payment Activities view.
4. In the Payment Activities list, select the Completed field for each payment activityto use for generating the payment record.
5. Click Generate Payment.
The complete payments are removed from the Payment Activities list. Paymentrecords for each unique contract, account and payee combination are generated inthe Payments list.
Generating Payment Records for Sites Associated with Clinical Protocolsand Regions
You can generate payment records for the sites that are associated with a clinicalprotocol and with a clinical region.
After you complete the payment generation task, the payment records can appear inthe Payments view in the Protocol List view of the Protocols screen and in thePayments view in the Region List view of the Regions screen. Also, the paymentrecords appear in the Payments view in the Protocol Site List view of the SiteManagement screen. Payment records appear in these Payments views only if, beforeyou start the payment generation task, complete, unpaid payment activities exist inthe Payment Activities view in the Protocol Site List view of the Site Managementscreen.
In the Payments view in the Protocol Site List view of the Site Management screen, youcan change the field values in the generated payment records. Your changes areautomatically reflected in the Payments view in the Protocol List view of the Protocolsscreen and in the Payments view in the Region List view of the Regions screen. Youcannot manually change field values in the payment records in the Payments view inthe Protocol List view of the Protocols screen and in the Payments view in the RegionList view of the Regions screen.
Generating Payment Records for Sites Associated with Clinical ProtocolsThe Payments view of the Protocols screen is automatically populated with theexisting payment records for the sites that are associated with the protocol. Thesepayment records apply to the complete payment activities for those sites. In this view,you can generate payment records for complete, unpaid payment activities for thesites in the protocol.
Payee First Name Displays the payee first name.
Field Comments

Generating Payment Records for Sites Associated with Clinical Protocols and Regions
8-8 Siebel Clinical Trial Management System Guide
To generate payment records for sites associated with a clinical protocol
1. Navigate to the Protocols screen, then the Protocol List view.
2. In the Protocol list, drill down on the protocol number field of the protocol forwhich you want to generate payment records for sites.
3. Navigate to the Payments view.
If payment records exist in this view, then the selected payment record is irrelevantto this procedure.
4. Click Generate Payment.
A dialog box of site records applicable to the protocol appears. Your systemadministrator can set the Popup Visibility Type property to configure the recordsthat appear in this dialog box. For more information about this property, see"Applet Properties in Siebel Clinical" on page A-17.
5. In the dialog box of site records applicable to the protocol, select the appropriatesites, and click OK.
The complete payments are removed from the Payment Activities view in theProtocol Site List view of the Site Management screen. Payment records for eachunique contract, account and payee combination are generated in the Paymentsview in the Protocol Site List view of the Site Management screen.
You must again access the Payments view in the Protocol List view of theProtocols screen to view the generated payments. For the region that is associatedwith the selected sites, the generated payments also appear in the Payments viewin the Region List view of the Regions screen.
6. (Optional) To access a notification containing details about the paymentgeneration, click Notification on the menu toobar.
Your system administrator can set the WF properties to configure notifications forbulk payments. For more information about these properties, see "AppletProperties in Siebel Clinical" on page A-17. For more information about usingnotifications, see Siebel Fundamentals for Siebel Open UI.
Generating Payment Records for Sites Associated with Clinical RegionsThe Payments view of the Regions screen is automatically populated with the existingpayment records for the sites that are associated with the region. These paymentrecords apply to the complete payment activities for those sites. In this view, you cangenerate payment records for complete, unpaid payment activities for the sites in theregion.
To generate payment records for sites associated with a clinical region
1. Navigate to the Regions screen, then the Region List view.
2. In the Region list, drill down on the Region field of the region for which you wantto generate payment records for sites.
3. Navigate to the Payments view.
If payment records exist in this view, then the selected payment record is irrelevantto this procedure.
4. Click Generate Payment.
A dialog box of site records applicable to the region appears. Your systemadministrator can set the Popup Visibility Type property to configure the records

Generating Payment Records for Unplanned Payment Activities
Setting Up and Making Clinical Payments 8-9
that appear in this dialog box. For more information about this property, see"Applet Properties in Siebel Clinical" on page A-17.
5. In the dialog box of site records applicable to the region, select the appropriatesites, and click OK.
The complete payments are removed from the Payment Activities view in theProtocol Site List view of the Site Management screen. Payment records for eachunique contract, account and payee combination are generated in the Paymentsview in the Protocol Site List view of the Site Management screen.
You must again access the Payments view in the Region List view of the Regionsscreen to view the generated payments. For the protocol that is associated with theselected sites, the generated payments also appear in the Payments view in theProtocol List view of the Protocols screen.
6. (Optional) To access a notification containing details about the paymentgeneration, click Notification on the menu toobar.
Your system administrator can set the WF properties to configure notifications forbulk payments. For more information about these properties, see "AppletProperties in Siebel Clinical" on page A-17. For more information about usingnotifications, see Siebel Fundamentals for Siebel Open UI.
Generating Payment Records for Unplanned Payment ActivitiesYou can create unplanned payments that are not associated with subject activities forclinical sites.
To generate a payment record for an unplanned payment activity
1. Navigate to the Site Management screen, then the Protocol Site List view.
2. In the Protocol Site list, drill down on the site number field of the site for whichyou want to generate a payment.
3. Navigate to the Payment Activities view.
4. In the Payment Activities list, create a new record and complete the necessaryfields.
Some fields are described in the following table.
Field Comments
Completed Select this field. When you click the Generate Payment button, theprocess uses only payment activity records that are complete to generatepayment records.
Payment Select this field to define the activity as a payment activity.
Standard Amount Type the payment amount prior to any adjustment. The actual amount iscalculated as follows:
Standard Amount plus Deviation Amount equals Actual Amount
5. Click Generate Payment.
The complete payments are removed from the Payment Activities list, and thepayment record is created in the Payments list.
6. To complete the payment, follow Step 6 to Step 8 in "Adjusting Payment Amountsand Generating Payment Records for Sites" on page 8-10.

Adjusting Payment Amounts and Generating Payment Records for Sites
8-10 Siebel Clinical Trial Management System Guide
Adjusting Payment Amounts and Generating Payment Records for SitesAlthough payments are generally set for each site, occasionally the financialadministrator might want to make additional adjustments to the paid amount for agiven payment activity. For more information, see "Setting Payment Exceptions forSites" on page 8-3.
When the financial administrator finalizes the amounts, payments are generated for allcomplete payment subject activities in the currency for the site. Each payment record isgiven a unique identity number. You can later enter other information, such as checknumber, check date, and check amount, either manually or by importing the data froma back-office finance application.
Note: This task requires administrator privileges.
To adjust the payment amounts and generate payment records for a site
1. Navigate to the Site Management screen, then the Protocol Site List view.
2. In the Protocol Site list, drill down on the site number field of the site for whichyou want to generate payments.
3. Navigate to the Payment Activities view.
This view lists all scheduled payment subject activities for subjects associated withthe site.
4. (Optional) Adjust the Actual Amount to pay to the site by entering a value in theDeviation Amount field.
Standard Amount plus Deviation Amount equals Actual Amount
5. Select the Completed field, and click Generate Payment.
The complete payments are removed from the Payment Activities list.
6. Navigate to the Payments view.
The payment generated in Step 5 appears in the Payments list.
7. Complete the fields in the payment record.
Some fields are described in the following table.
Field Comments
Payment # Displays a unique number for the payment.
Type Select the type of payment. For payment subject activities that aregenerated from the Generate Payment button, this field is populatedwith a value of Interim Payments.
For payment subject activities that are generated from a back officeapplication, this field is populated with a value of Initial Payments.
Status Select the status of the payment record, for example, To be Processed,In Progress, Processed, and so on. A preconfigured state model allowsfor a structured state transition.
Earned Amount Type the sum of the actual payment amounts for the completepayment activities.
The sum of all values in the Earned Amount column equals the Earnedto Date value of the site.

Generating Final Payments for Sites
Setting Up and Making Clinical Payments 8-11
You can also automatically load the information from a back-office financeapplication.
8. (Optional) Drill down on the payment number field to view the payment activitiesassociated with the payment.
Generating Final Payments for SitesYou can make final payments to sites when all payment activities are complete.
Note: All prior final payments to sites must be complete and up todate before you can generate new final payments.
To generate final payments for a site
1. Navigate to the Site Management screen, then the Protocol Site List view.
2. In the Protocol Site list, drill down on the site number field of the site for whichyou want to generate a payment.
3. Navigate to the Payments view.
4. Make sure that all Check Amount fields for past payments are up to date.
5. In the Payments list, create a new record and complete the necessary fields.
Some fields are described in the following table.
Requested Amount Displays the requested amount of payment for the complete paymentactivities at this site. This field is calculated as follows:
Requested Amount equals Earned Amount times [(100 lessWithholding Percentage divided by 100) less Withholding Amount]
Check Amount Type the amount of money for the check. This amount is usually, butdoes not have to be, the same as the earned amount.
The sum of all values in the Check Amount fields for a site equals thePaid to Date value of the site.
Check Date Select the issue date for the check.
Check Number Type the number of the check.
VAT Amount Type the value added tax for the site payment. The total VAT amountfor all payments is rolled up to the region, protocol, and programlevels, and appears in the VAT to Date field.
Contract # Select the payee contract from the list of contracts.
Account Displays the primary account for the contract that you select.
Field Comments
Type Select a value of Final Payment. When you set this field, the RequestedAmount field for the final payment is automatically calculated asequal to the amount in the Earned to Date field for the site minus theamount in the Paid to Date field for the site.
Status Displays a value of To Be Processed.
Field Comments

Reverting Payment Records
8-12 Siebel Clinical Trial Management System Guide
When you step-off and save the record, the Requested Amount field isautomatically updated by subtracting the amount in the Paid to Date field for thesite (that is, the amount in the Check Amount field) from the amount in the Earnedto Date field for the site.
Reverting Payment RecordsYou can revert a payment record to modify the payment details. The Revert button isenabled when you select a single payment record with one of the following statuses:
■ In Progress
■ To Be Processed
The Revert button is disabled for other statuses, and if you select multiple records.
Your system administrator can modify the payment status values for which the Revertbutton is enabled by configuring the LS Clinical Enable Revert On Status user propertyin Siebel Tools. For more information about this user property, see "User Properties forBusiness Components in Siebel Clinical" on page A-2.
A reverted payment activity record is removed from the Payments view and returnedto the Payment Activities view.
To revert a payment record
1. Navigate to the Site Management screen, then the Protocol Site List view.
2. In the Protocol Site list, drill down on the site number field of the site for whichyou want to revert a payment.
3. Navigate to the Payments view.
4. Select the payment to revert.
5. Click Revert.
The payment records and split payment activities are updated as follows:
■ The reverted payment activity record is removed from the Payments view andreturned to the Payment Activities view for further processing.
■ If the payment record consists of multiple payment activities, and if you revertonly some of the payment activities, then the Earned Amount and RequestedAmount fields are recalculated for the Payment record.
Check Amount Type the amount of money for the check. This field is usually, but doesnot have to be, the same as the earned amount.
Check Date Select the issue date for the check.
Check Number Type the number of the check.
VAT Amount Type the value added tax for the site payment. The total VAT amountfor all payments is rolled up to the region, protocol, and programlevels, and appears in the VAT to Date field.
Contract # Select the payee contract from the list of contracts.
Account Displays the primary account for the contract that you select.
Field Comments

Generating Oracle BI Publisher Reports for Clinical Payments
Setting Up and Making Clinical Payments 8-13
Generating Oracle BI Publisher Reports for Clinical PaymentsYou can integrate Siebel Clinical with Oracle Business Intelligence Publisher (BIPublisher) to generate reports. You can generate, view, and schedule preconfiguredOracle BI Publisher reports in Siebel Clinical. The preconfigured Protocol Paymentsreport applies to clinical payments. For more information about using Siebel Reportsand integrating with Oracle BI Publisher, see Siebel Reports Guide.
To generate an Oracle BI Publisher report for Siebel clinical payments
1. Navigate to the Protocols screen, then the Protocol List view.
2. In the Protocol list, drill down on the protocol number field of the protocol forwhich you want to generate an Oracle BI Publisher report.
3. Navigate to the Payments view.
4. On the application toolbar, click Reports.
5. In the Run Report pane, complete the appropriate fields.
Some fields are described in the following table.
Field Comments
Report Name Select the Protocol Payments report.
Output Type Select the output type for the report.
6. Click Submit.
The report runs.
7. Click My Reports to navigate to the Reports view of the BI Publisher Reportsscreen.
A record for the report appears in the Reports view. For information aboutviewing and printing the report, see Siebel Fundamentals for Siebel Open UI.

Generating Oracle BI Publisher Reports for Clinical Payments
8-14 Siebel Clinical Trial Management System Guide

9
Administering and Using Clinical Trip Reports 9-1
9Administering and Using Clinical Trip Reports
This chapter describes how to set up and use clinical trip reports in Siebel Clinical. Itincludes the following topics:
■ About Administering and Using Clinical Trip Reports
■ Scenario for Managing Clinical Trip Reports
■ Creating Questions for Clinical Trip Reports Using Siebel SmartScript
■ Creating Clinical Trip Report Templates
■ Applying Clinical Trip Report Templates
■ Completing Clinical Trip Reports
■ Completing Questionnaires for Clinical Trip Reports
■ Deleting Unanswered Questions from Questionnaires of Clinical Trip Reports
■ Tracking Case Report Forms
■ Automated Validation and Notification Messages for Clinical Trip Reports
■ Tracking Completion Status for Clinical Trip Reports
■ Tracking Status Accruals for Clinical Subjects of Sites
■ Viewing Universal Inbox Notifications for Action Items of Clinical Trip Reports
■ Reviewing Clinical Trip Reports
■ Approving Clinical Trip Reports
■ Making Clinical Trip Reports Obsolete
■ Creating New Versions of Clinical Trip Reports
■ Viewing Version Information for Clinical Trip Reports
■ Viewing Geographical Location Details for Clinical Trip Reports
■ Using Audit Trail for Reviews and Approvals of Clinical Trip Reports
■ Using Audit Trail for Changes to Clinical Trip Reports
■ Generating Oracle BI Publisher Reports for Site Visits

About Administering and Using Clinical Trip Reports
9-2 Siebel Clinical Trial Management System Guide
About Administering and Using Clinical Trip ReportsThe study managers or clinical administrators can set up templates for trip reports.The CRAs (clinical research associates) then use these templates when they create tripreports to record their visits to sites.
Advantages of using the trip reports in Siebel Clinical are:
■ Trip reports are consistent across the organization and are based on GCP (goodclinical practice) and SOPs (standard operating procedures).
■ CRAs save time planning trips and writing trip reports.
■ Managers save time reviewing trip reports.
■ End users can generate a formatted, tamper-proof report for print or PDF from thetrip report record.
■ A central repository exists for all trip reports.
Scenario for Managing Clinical Trip ReportsThis topic gives one example of how to manage clinical trip reports. You mightmanage clinical trip reports differently, depending on your business model.
This topic includes the following information:
■ "Preparing Trip Report Templates" on page 9-2
■ "Preparing Trip Reports" on page 9-2
Preparing Trip Report TemplatesA clinical administrator prepares a set of trip report templates for the CRAs (clinicalresearch associates) to use when preparing for and writing up their visits to clinicalsites. For more information about site visits, see "Creating and Managing Site Visits"on page 6-11.
The clinical administrator prepares the following templates for each type of site visitthe CRAs typically must perform:
■ Site evaluation
■ Site initiation
■ Site monitoring
■ Site close-out
Preparing Trip ReportsThe CRA (clinical research associate) is the end user of the Siebel Clinical product.Before visiting a site, the CRA uses the trip report to prepare for the visit. Thefollow-up items list reminds the CRA of the open activities from previous visits thatthe CRA can close.
After preparing a draft trip report, the CRA makes a hard copy of the report and takesthis copy on the site visit. He can use the report as a reference to help keep track of theactivities he completes while at the site.
After returning from a site visit, the CRA completes the trip report and generates afinal report. He then submits this report to the study manager for approval. Themanager reviews the report and approves it if it is satisfactory. If the manager

Creating Clinical Trip Report Templates
Administering and Using Clinical Trip Reports 9-3
approves the trip report, then it is then locked to prevent the CRA from making anyfurther changes. If the trip report is not satisfactory, then the manager can reject thereport and return it to the CRA for further attention.
Creating Questions for Clinical Trip Reports Using Siebel SmartScriptYou can use Siebel SmartScript to create questionnaires for clinical trip reports. Forinformation about how to create questions using Siebel SmartScript, see SiebelSmartScript Administration Guide.
Some SmartScript question settings listed in Siebel SmartScript Administration Guide arenot applicable for clinical trip reports.Table 9–1 lists the question settings that are notapplicable to clinical trip reports.
Table 9–1 Exceptions for SmartScript Question Settings
Question Setting Questionnaire Exception for Clinical Trip Reports
Answer Type The Currency data type is not supported.
Auto Sub Parm This setting is not applicable.
Search Spec This setting is not applicable.
Save Business Object This setting is not applicable because the answers toquestionnaires for clinical trip reports are automatically saved aspart of the clinical trip reports.
Save Bus Comp This setting is not applicable because the answers toquestionnaires for clinical trip reports are automatically saved aspart of the clinical trip reports.
Save Field This setting is not applicable because the answers toquestionnaires for clinical trip reports are automatically saved aspart of the clinical trip reports.
Save User Parameters This setting is not applicable.
Save Currency Field This setting is not applicable because the answers toquestionnaires for clinical trip reports are automatically saved aspart of the clinical trip reports.
Pick Applet This setting is not supported.
Mvg Applet This setting is not supported.
Detail Applet This setting is not supported.
Save Answer Table This setting is not applicable because the answers toquestionnaires for clinical trip reports are automatically saved aspart of the clinical trip reports.
Currency This setting is not applicable.
You can assign a SmartScript questionnaire to a clinical trip report template after it isreleased using Siebel SmartScript. For information about how to release a script usingSiebel SmartScript, see Siebel SmartScript Administration Guide.
Creating Clinical Trip Report TemplatesTypically, the clinical administrator prepares a number of generic trip report templates,perhaps one designed for each of the different stages in the study. This topic describeshow to create a clinical trip report. You can define additional activities, such as

Applying Clinical Trip Report Templates
9-4 Siebel Clinical Trial Management System Guide
follow-up tasks to complete after the visit to the clinical site, in the Trip ReportTemplate Details view.
To create a clinical trip report template
1. Navigate to the Administration - Clinical screen, then the Trip Report Templatesview.
2. Create a new record and complete the necessary fields.
Some fields are described in the following table.
Field Comments
Name Type the name of the clinical trip report template.
Visit Type Select the type of site visit, for example, Site Evaluation, Site Initiation, orSite Monitoring.
Protocol # Select the protocol for the clinical site.
Region Select the region for the clinical site.
SmartScript Select a SmartScript questionnaire for the trip report template. Thequestionnaire is copied to the Questions view of the trip report when youapply the trip report template to the trip report.
The questionnaire uses branching logic to dynamically determine the flowof questions by using answers to prior questions. The Siebel Clinical TrialManagement System administrator determines the question hierarchy byusing Siebel SmartScript. For more information about Siebel SmartScript,see Siebel SmartScript Administration Guide.
3. Drill down on the Name field of the trip report template to display the Trip ReportTemplate Details view.
4. Create new records for any trip report activities to define.
Some fields are described in the following table.
Field Comments
Activity Select the type of trip report activity. The following values are available:
■ Checklist
■ Follow-Up
■ Issues
Priority Select the priority of the trip report activity.
Applying Clinical Trip Report TemplatesThe Template field of the Site Visits view displays all of the trip report templates thatare applicable to protocol, region, and visit type details for that site visit. When youapply a trip report template to a trip report, all of the details in the template are copiedto the trip report.
Checklist and follow-up activities in the Trip Report Template Details view of the tripreport template are copied to the trip report, and overwrite any existing checklist andfollow-up activities in the trip report.
SmartScript questionnaires in the SmartScript field of the trip report template areapplied to the trip report, and appear in the Questions view. For performance reasons,the SmartScript questionnaire does not appear in the Questions view until after the

Completing Clinical Trip Reports
Administering and Using Clinical Trip Reports 9-5
user launches the SmartScript questionnaire. For more information about SmartScriptquestionnaires, see "Completing Questionnaires for Clinical Trip Reports" on page 9-6.
To apply a clinical trip report template
1. Navigate to the Site Visits screen, then the Clinical Site Visits List view.
2. In the Clinical Site Visits list, drill down on the Visit Start field of the site visit towhich you want to apply a trip report template.
The Trip Report form for the selected site visit appears.
3. Click the select button in the Template field.
A list of templates that correspond to the protocol, region, and visit type details forthe site appears.
4. Select the name of the trip report template that you want to apply, and click OK.
When you save the Template field, the activities in the template appear in theChecklist Activities list and Follow-Up Items list.
Completing Clinical Trip ReportsAfter the site visit, you record the trip report details, such as:
■ The planned activities that you complete
■ Additional activities that you complete
■ Site personnel that you meet
■ Any follow-up items that arise from the trip
■ Comments on any of the previous items
Anyone can update and edit the records in the Trip Report Detail view at any time. Forthis reason, the end user can create a static report at the completion of the site visit,using the Siebel Report Viewer. This read-only document is ideal for archiving: as aprinted document, as a file, or as an attachment to the site record in the Siebel LifeSciences database.
To complete a clinical trip report
1. Navigate to the Site Visits screen, then the Clinical Site Visits List view.
2. In the Clinical Site Visits list, drill down on the Visit Start field of the site visit forwhich you want to complete a trip report.
The Trip Report form for the selected site visit appears.
3. Complete or edit fields in the Trip Report form.
Some fields are described in the following table.
Field Comments
Completed Select the date and time that you complete the site visit. This field ispopulated with the system date and time when you update the VisitStatus field to Done. The filter in the All Follow-Up Items list usesthis date to determine the closed follow-up items to show.
Visit Status Select the status of the site visit, for example, Planned or Completed.
Reviewer Comments Displays the reviewer comments if a reviewer submits a trip reportwith status Rejected.

Completing Questionnaires for Clinical Trip Reports
9-6 Siebel Clinical Trial Management System Guide
4. Navigate to the Checklist Activities view, complete the Status and Commentsfields for planned activities, and add any unplanned activities that you completed.
5. Navigate to the Follow-Up Items view, and complete the following steps:
a. Add any follow-up activities resulting from the site visit.
b. In the Current Trip Follow-Up Items list, click Menu (the cogwheel icon), andchoose Select All to display all open follow-up items and those items closedbetween the current and previous trip.
c. Update the records for those follow-up items that you addressed during thesite visit.
Some fields are described in the following table.
Field Comments
Status Displays a value of Done when you select a completed date for theitem.
Completed Date Select the resolution date and time of the follow-up issue. You mustpopulate this field because the filter in the All Follow-Up Items listuses this date to determine the closed follow-up items to show.
6. Set the Trip Report Status field to Submitted.
The report is submitted to the reviewer for review.
Completing Questionnaires for Clinical Trip ReportsThis topic describes how to complete a questionnaire for a clinical trip report. Youlaunch the questionnaire in the SmartScript player from the Questions view of the tripreport. Questions and responses are saved in the Questions list.
To complete a questionnaire for a clinical trip report
1. Navigate to the Site Visits screen, then the Clinical Site Visits List view.
Approver Comments Displays the approver comments if an approver submits a trip reportwith status Rejected.
Visit Type Select the nature of the visit, for example, Pre-Study, Site Initiation,or Site Monitoring.
Attendees Select the contacts (site personnel) that you meet during the visit.
Reviewer Select the user who reviews the trip report. An automated emailnotification is sent to the reviewer when you update the status of thetrip report to Submitted.
Approver Select the user who approves the trip report. An automated emailnotification is sent to the approver when the reviewer updates thestatus of the trip report to Submitted for Approval.
Assigned To Select the users assigned to the trip report. The team member whocreates the trip report is the primary owner.
Trip Report Completed Select the date that the trip report is complete and ready forsubmission. This field is populated with the system date when youupdate the Visit Status field of the trip report to Completed.
Field Comments

Tracking Case Report Forms
Administering and Using Clinical Trip Reports 9-7
2. In the Clinical Site Visits list, drill down on the Visit Start field of the site visit forthe required trip report.
The Trip Report form for the selected site visit appears.
3. Navigate to the Questions view.
4. Click Answer to launch the questionnaire for the trip report in the SmartScriptplayer.
5. Complete the questionnaire, and click Finish or Finish Later.
The responses are saved with the questions in the Questions list. You can filterquestions as follows:
■ To display only answered questions, select Show Answered.
■ To display all questions in the questionnaire for the trip report, select ShowAll.
Deleting Unanswered Questions from Questionnaires of Clinical TripReports
This topic describes how to delete unanswered questions from a questionnaire for aclinical trip report, using the LS Clinical Questions Batch Clean-up repositoryworkflow process.
Note: This task requires administrator privileges.
To delete unanswered questions from a questionnaire of a clinical trip report
1. Navigate to the Administration - Server Management screen, then the Jobs view.
2. Create a new record and complete the necessary fields.
3. Set the Component/Job field to Workflow Process Manager.
4. In the Job Parameters list, create a new record and complete the necessary fields.
5. Set the Name field to Workflow Process Name and the Value field to LS ClinicalQuestions Batch Clean-up.
6. Select the record in the Jobs list, and click Submit Job.
7. Refresh the screen and verify that the State field updates to Success.
All unanswered questions in the questionnaire for the clinical trip report are nowdeleted.
Tracking Case Report FormsThis topic describes how to create a CRF (case report form) tracking activity. Youcapture relevant information, such as review date and page numbers verified, for eachCRF record.
To track case report forms
1. Navigate to the Site Visits screen, then the Clinical Site Visits List view.
2. In the Clinical Site Visits list, drill down on the Visit Start field of the site visit forwhich you want to track case report forms.

Automated Validation and Notification Messages for Clinical Trip Reports
9-8 Siebel Clinical Trial Management System Guide
3. Navigate to the Case Report Forms Tracking view.
4. To add case report forms for scheduled subject visits, complete the following steps:
a. Click Add Scheduled.
b. Select the subject visits in the dialog box that appears.
c. Click OK.
The case report forms for selected subject visits appear in the Case ReportForms Tracking view.
5. To add case report forms for unscheduled subject visits, complete the followingsteps:
a. Click Add Unscheduled.
b. Select the subject visits in the dialog box that appears.
c. Click OK.
The case report forms for selected subject visits appear in the Case ReportForms Tracking view.
6. Complete the necessary fields in the case report forms.
Some fields are described in the following table.
Field Comments
Source Verified Select this field when you verify the CRF against the source document.
Retrieved Select this field when you retrieve the CRFs from the site.
Page Numbers Verified Type the CRF page numbers that you verify.
Charts Reviewed Date Select the date and time that you review the clinical charts.
Forms Signed Date Select the date and time that you sign the CRFs.
Automated Validation and Notification Messages for Clinical Trip ReportsThe state model for the trip report provides the order of transition for values in theTrip Report Status field to indicate the progress of the trip report. Table 9–2 describesthe values for the Trip Report Status field, the update type (such as automatic or user),the trip report validation, and the automated notification emails sent to the assignee’sUniversal Inbox for each status, where applicable.
Note: The Notifications feature is enabled by default for all SiebelBusiness Applications so all notification messages for clinical tripreports are sent directly to the screens of users. Messages appear innotification panes that users access by clicking Notification on theapplication banner. For more information about using, administeringand reviewing notifications, see Siebel Fundamentals Guide.

Automated Validation and Notification Messages for Clinical Trip Reports
Administering and Using Clinical Trip Reports 9-9
Table 9–2 Values in Trip Report Status Field, Validation, and Messages
Value in TripReport StatusField Description Update Type Validation
Automated EmailNotification
Not Started The end user created thetrip report, butprocessing is not yetstarted. This status is theinitial default value forall trip reports.
System Not applicable. Not applicable.
In Progress The end user started towork on the trip report,and it is not yetcomplete.
■ System if the tripreport is createdusing a template.
■ User if the tripreport is notcreated using atemplate.
Not applicable. Not applicable.
Completed The end user completedthe trip report, and it isready for the end user tosubmit for review.
User The trip report isvalidated to ensurethat the CompletedDate is populated.
The CompletedDate is aprerequisite forselectingCompleted.
Not applicable.
Submitted The end user submittedthe trip report to thereviewer for review.
User The trip report isvalidated to ensurethat a reviewer isassigned.
The followingautomated email issent to the reviewer:
Review Trip Report[Trip Report Name].
If you change thereviewer when theTrip Report Statusfield is Submitted,then this notificationemail is sent to thenew reviewer.
Reviewed withComments
The reviewer or approveradded review commentsrequiring a modificationto the trip report.
User Not applicable. The followingautomated email issent to the trip reportowner:
Rectify Trip Report[Trip Report Name].
Rejected The reviewer or approverrejected the trip report.
User The trip report isvalidated to ensurethat one of thefollowing fields iscompleted:
■ ReviewerComments
■ ApproverComments
The followingautomated message issent to the trip reportowner:
Rectify Trip Report[Trip Report Name].

Tracking Completion Status for Clinical Trip Reports
9-10 Siebel Clinical Trial Management System Guide
Tracking Completion Status for Clinical Trip ReportsThis task describes how to track the real-time progress for a trip report in theSummary view. You track the status for the following fields in the clinical trip report:
■ Checklists Completed
■ Questions Answered
■ Current Follow-Ups Completed
■ All Follow-Ups Completed
■ CRF Tracking Completed
■ Total Attendees
To track the completion status for a clinical trip report
1. Navigate to the Site Visits screen, then the Clinical Site Visits List view.
2. In the Clinical Site Visits list, drill down on the Visit Start field of the site visit forwhich you want to track the status of the trip report.
The Trip Report form for the selected site visit appears.
3. Navigate to the Summary view.
The summary status appears in the Summary applet.
Some fields are described in the following table.
Revised The end user modifiedthe rejected trip report,and it is not yetresubmitted for review.
User Not applicable. Not applicable.
Submitted forApproval
The reviewer submittedthe trip report for formalreview, withoutcomments or withcomments that do notrequire a change to thetrip report.
User The trip report isvalidated to ensurethat an approver isassigned.
The followingautomated email issent to the approver:
Approve Trip Report[Trip Report Name].
If the you change theapprover when theTrip Report Statusfield is Submitted forApproval, then thisnotification email issent to the newapprover.
Approved The approver approvedthe trip report, and it isnow read-only. When theapprover clicks theApproved button, theTrip Report Status field isupdated to Approved.
System Not applicable. Not applicable.
Table 9–2 (Cont.) Values in Trip Report Status Field, Validation, and Messages
Value in TripReport StatusField Description Update Type Validation
Automated EmailNotification
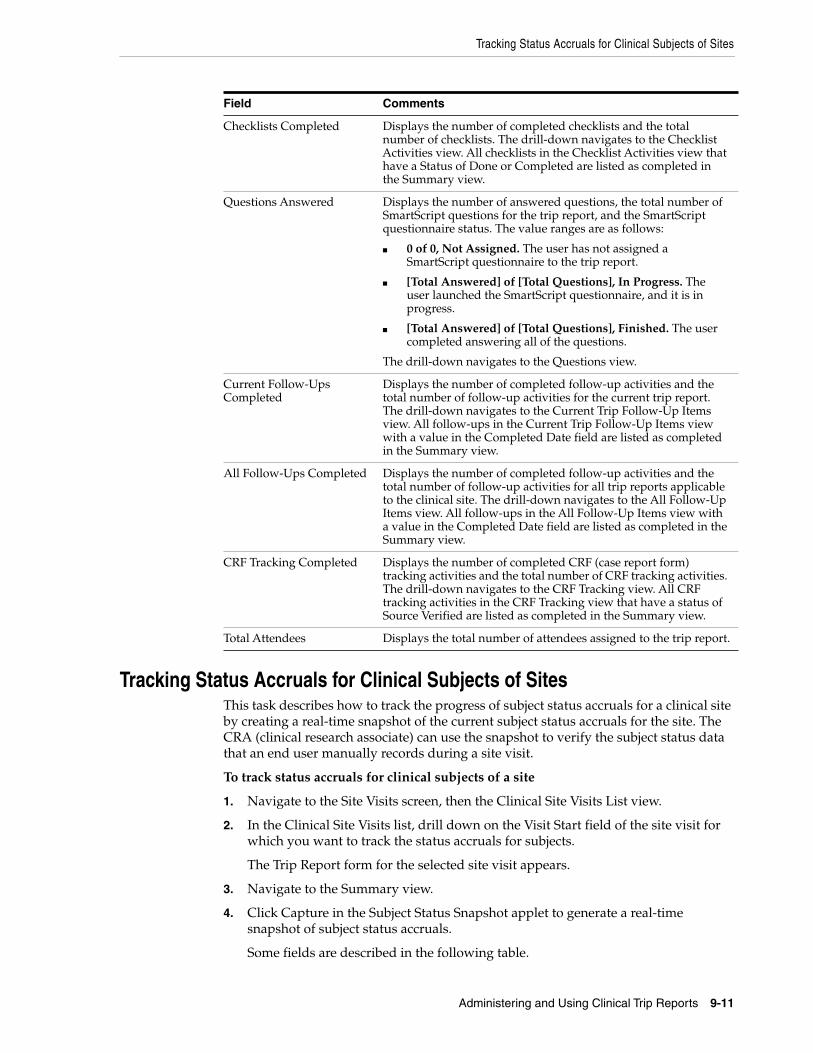
Field Comments
Checklists Completed Displays the number of completed checklists and the totalnumber of checklists. The drill-down navigates to the ChecklistActivities view. All checklists in the Checklist Activities view thathave a Status of Done or Completed are listed as completed inthe Summary view.
Questions Answered Displays the number of answered questions, the total number ofSmartScript questions for the trip report, and the SmartScriptquestionnaire status. The value ranges are as follows:
■ 0 of 0, Not Assigned. The user has not assigned aSmartScript questionnaire to the trip report.
■ [Total Answered] of [Total Questions], In Progress. Theuser launched the SmartScript questionnaire, and it is inprogress.
■ [Total Answered] of [Total Questions], Finished. The usercompleted answering all of the questions.
The drill-down navigates to the Questions view.
Current Follow-UpsCompleted
Displays the number of completed follow-up activities and thetotal number of follow-up activities for the current trip report.The drill-down navigates to the Current Trip Follow-Up Itemsview. All follow-ups in the Current Trip Follow-Up Items viewwith a value in the Completed Date field are listed as completedin the Summary view.
All Follow-Ups Completed Displays the number of completed follow-up activities and thetotal number of follow-up activities for all trip reports applicableto the clinical site. The drill-down navigates to the All Follow-UpItems view. All follow-ups in the All Follow-Up Items view witha value in the Completed Date field are listed as completed in theSummary view.
CRF Tracking Completed Displays the number of completed CRF (case report form)tracking activities and the total number of CRF tracking activities.The drill-down navigates to the CRF Tracking view. All CRFtracking activities in the CRF Tracking view that have a status ofSource Verified are listed as completed in the Summary view.
Total Attendees Displays the total number of attendees assigned to the trip report.
Tracking Status Accruals for Clinical Subjects of Sites
Administering and Using Clinical Trip Reports 9-11
Tracking Status Accruals for Clinical Subjects of SitesThis task describes how to track the progress of subject status accruals for a clinical siteby creating a real-time snapshot of the current subject status accruals for the site. TheCRA (clinical research associate) can use the snapshot to verify the subject status datathat an end user manually records during a site visit.
To track status accruals for clinical subjects of a site
1. Navigate to the Site Visits screen, then the Clinical Site Visits List view.
2. In the Clinical Site Visits list, drill down on the Visit Start field of the site visit forwhich you want to track the status accruals for subjects.
The Trip Report form for the selected site visit appears.
3. Navigate to the Summary view.
4. Click Capture in the Subject Status Snapshot applet to generate a real-timesnapshot of subject status accruals.
Some fields are described in the following table.

Field Comments
Visit Type Displays the type of clinical visit. The following clinical visittypes are preconfigured:
■ Screening
■ Rescreening
■ Enrollment
■ End of Study
Subject Status Displays the subject status. The following subject visit statuses arepreconfigured:
■ Screened
■ Screen Failure
■ Randomized
■ Enrolled
■ Completed
■ Early Terminated
■ Re-screened
■ Withdrawn
Total Accrual Number Displays the number of current and past subject status accrualsthat are automatically created for the site visit.
Total Actual Number Type the number of current and past subject status accruals thatyou manually recorded during the site visit.
Current Accrual Number Displays the number of current subject status accruals that areautomatically created for the site visit.
Current Actual Number Type the number of current subject status accruals the youmanually recorded during the site visit.
Comments Type a description of any discrepancy between accrual numbersand actual numbers.
Reviewer Comments Type reviewer comments about the trip report. Only the assignedreviewer can modify this field.
Time Stamp Displays the date and time that the snapshot is generated.
Viewing Universal Inbox Notifications for Action Items of Clinical Trip Reports
9-12 Siebel Clinical Trial Management System Guide
Viewing Universal Inbox Notifications for Action Items of Clinical TripReports
The Inbox provides a centralized list of items requiring your attention, such as clinicaltrip reports requiring review, revision, and approval. The following procedure showsyou how to access and view Universal Inbox notifications for action items of clinicaltrip reports. Alternatively, you can click Notification on the application banner toaccess and view all notification messages, including those for clinical trip reports.
Note: The Notifications feature is enabled by default for all SiebelBusiness Applications so all notification messages for clinical tripreports are sent directly to the screens of users. Messages appear innotification panes that users access by clicking Notification on theapplication banner. For more information about using, administeringand reviewing notifications, see Siebel Fundamentals Guide.

Approving Clinical Trip Reports
Administering and Using Clinical Trip Reports 9-13
To view Universal Inbox notifications for action items of a clinical trip report
1. From the application-level menu, choose Navigate, then Site Map.
2. Click Inbox.
The views available for the inbox appear.
3. Click Inbox Items List.
The list of notifications for your trip reports appears. The action required for eachtrip report appears in the Name field.
4. Drill down on the Name field to view each trip report requiring action.
Reviewing Clinical Trip ReportsThe user designated in the Reviewer field of the Trip Report form can review tripreports with a status of Submitted. An automated notification email is sent to thereviewer when an end user updates the trip report status to Submitted.
Access control applies to the Reviewer Comments field. Only the user designated inthe Reviewer field of the Trip Report form can edit the Reviewer Comments field.
To review a clinical trip report
1. Navigate to the Site Visits screen, then the Clinical Site Visits List view.
2. In the Clinical Site Visits list, select My Team’s Site Visits in the visibility filter.
All site visits for your team appear.
3. Query the list for site visits with a Visit Status field value of Submitted orSubmitted for Approval.
4. For the required report, drill down on the Visit Start field.
The Trip Report form appears.
5. Review the report.
6. Set the Trip Report Status field to one of the following values:
■ Reviewed with Comments. Use this value if minor changes to the trip reportare required. Enter the required corrections in the Reviewer Comments field.
■ Rejected. Use this value if major changes to the trip report are required. Enterthe required corrections in the Reviewer Comments field.
■ Submitted for Approval. Use this value if the trip report does not requireadditional changes, and is ready for approver review.
■ Obsolete. Use this value to retire the current or active version of a trip report.This makes it possible to reopen and create a new version of the trip report.
The date and time of the review of the clinical trip report are recorded in theReviewed Date field.
Approving Clinical Trip ReportsThe assigned approver can approve trip reports with a status of Submitted forApproval. Only the user designated in the Approver field of the trip report hasapproval permission. An automated notification email is sent to the approver when anend user updates the trip report status to Submitted for Approval. If the approver sets

Making Clinical Trip Reports Obsolete
9-14 Siebel Clinical Trial Management System Guide
the Trip Report Status field to Rejected, then the CRA (clinical research associate) hasthe opportunity to revise the report and then resubmit it for approval.
Note: The User Authentication applet for approver verification of atrip report is not enabled by default. To enable this functionality, yoursystem administrator must set the Enable Verification option to Y inthe Named Method 2 user property in Siebel Tools. For moreinformation about this user property, see "User Properties for BusinessComponents in Siebel Clinical" on page A-2.
Access control applies to the Approver Comments field. Only the user designated inthe Approver field of the Trip Report form can edit the Approver Comments field.
To approve a clinical trip report
1. Navigate to the Site Visits screen, then the Clinical Site Visits List view.
2. In the Clinical Site Visits list, select My Team’s Site Visits in the visibility filter.
All site visits for your team appear.
3. Query the list for site visits with a Visit Status field value of Submitted orSubmitted for Approval.
4. For the required report, drill down on the Visit Start field.
The Trip Report form appears.
5. Review the report.
6. (Optional) Add approval comments in the Approver Comments field.
7. Click Approve.
The User Authentication view appears.
8. Enter user credentials, and click Verify.
The Trip Report Status field is updated to Approved, the approval date and timeare recorded in the Approved Date field, and the site visit record and trip reportbecome read-only.
Making Clinical Trip Reports ObsoleteActive trip reports can be made obsolete at any time.
To make a clinical trip report obsolete
1. Navigate to the Site Visits screen, then the Clinical Site Visits List view.
2. In the Clinical Site Visits list, select My Team’s Site Visits in the visibility filter.
All site visits for your team appear.
3. In the Clinical Site Visits list, drill down on the Visit Start field of the site visit thatyou want to make obsolete.
The Trip Report form appears.
4. Set the value in the Trip Report Status field to Obsolete.
The current version of the trip report is retired and the Version button on the tripreport is activated. This makes it possible to reopen and create a new version ofthe trip report.

Viewing Version Information for Clinical Trip Reports
Administering and Using Clinical Trip Reports 9-15
Creating New Versions of Clinical Trip ReportsAfter a trip report is approved or made obsolete, it is locked (becomes read-only) andthe Version button on the trip report is activated. This allows you to reopen and createa new version of the trip report. You can modify and route the new version of the tripthrough the approvals process again.
You cannot create new versions of trip reports that are active. A message similar to thefollowing appears if you try to create a new version from an active trip report:
Another version of this trip report exists. Use the other trip report version, or change the statusof that version to Obsolete and create a new version.
To create a new version of a clinical trip report
1. Navigate to the Site Visits screen, then the Clinical Site Visits List view.
2. In the Clinical Site Visits list, select My Team’s Site Visits in the visibility filter.
All site visits for your team appear.
3. Query the list for site visits with a Visit Status field value of Approved or Obsolete.
4. For the required report, drill down on the Visit Start field.
The Trip Report form appears.
5. Review the report.
6. (Optional) Add reviewer comments in the Reviewer Comments field.
7. Click Version.
A new version of the trip report is created where all data from the original tripreport is copied over to the newly created trip report. Note the following:
■ The value in the Version field for the new trip report changes by incrementingby one.
■ The value in the Trip Report Status field for the new trip report changes to InProgress.
■ The value in the Trip Report Status field for the original trip report (forapproved trip reports only) changes from Approved to Obsolete.
8. Modify and approve the trip report as required.
For mor e information, see "Completing Clinical Trip Reports" on page 9-5 and"Approving Clinical Trip Reports" on page 9-13.
Viewing Version Information for Clinical Trip ReportsThe Versions view shows all the prior trip report versions for a selected trip report.
To view version information for clinical trip reports
1. Navigate to the Site Visits screen, then the Clinical Site Visits List view.
2. In the Clinical Site Visits list, drill down on the Visit Start field of the site visit forwhich you want to view trip report versions.
The Trip Report form appears.
3. Navigate to the Versions view.
Some fields are described in the following table.

Field Comments
Version The version number of the trip report.
Visit Start The visit start date and time.
Trip Report Status The status of the trip report, which can be Approved or Obsolete.
Viewing Geographical Location Details for Clinical Trip Reports
9-16 Siebel Clinical Trial Management System Guide
Viewing Geographical Location Details for Clinical Trip ReportsA third-party application records dates, times, and geographical location details forsites in the trip report for each site monitor visit to each clinical site.
Multiple site monitors can create multiple site visit records in the trip report for thesame site visit. Each site monitor can create multiple site visit records in the trip reportfor different times on the same site visit.
To view geographical location details for a clinical trip report
1. Navigate to the Site Visits screen, then the Clinical Site Visits List view.
2. In the Clinical Site Visits list, drill down on the Visit Start field of the site visit forwhich you want to view geographical location details.
The Trip Report form for the selected site visit appears.
3. Navigate to the Geo Location Details view.
Some fields are described in the following table.
Field Comments
User Id Displays the user ID of the site monitor who logs the geographical location detailsin the third-party clinical application.
Latitude Displays the latitude coordinate of the site. Latitude coordinates are representedin decimal degree format. The range of acceptable values is 0 to plus or minus 90.Northern hemisphere latitudes are represented by a positive number. The numberis preceded by a minus sign to represent southern hemisphere latitudes.
Longitude Displays the longitude coordinate of the site. Longitude coordinates are representedin decimal degree format. The range of acceptable values is 0 to plus or minus 180.Eastern hemisphere latitudes are represented by a positive number. The number ispreceded by a minus sign to represent western hemisphere longitudes.
Date Displays the date and time the site monitor logs the geographical location detailsin the third-party clinical application.
Comments Type any comments relating to the site visit. The site monitor populates this field.
Using Audit Trail for Reviews and Approvals of Clinical Trip ReportsThe Approvals view provides a summary audit trail of the changes to the trip reportstatus, including the dates and times of review and approval operations, and thedetails applicable to the users who complete those operations.
To use audit trail for reviews and approvals of a clinical trip report
1. Navigate to the Site Visits screen, then the Clinical Site Visits List view.
2. In the Clinical Site Visits list, drill down on the Visit Start field of the site visit forthe required trip report.
The Trip Report form for the selected site visit appears.

Using Audit Trail for Changes to Clinical Trip Reports
Administering and Using Clinical Trip Reports 9-17
3. Navigate to the Approvals view.
The Approvals applet appears.
Some fields are described in the following table.
Field Comments
Login Displays the login credentials of the user who modified the field.
Status Displays the value in the Trip Report Status field after the change occurred.
Old Status Displays the value in the Trip Report Status field before the change occurred.
Updated Displays the date and time that the field was modified.
Using Audit Trail for Changes to Clinical Trip ReportsThe Audit Trail view provides a detailed history of the changes to trip report records.The audit trail records for the trip report show operations for the following fields:
■ Comments
■ Reviewer
■ Reviewer Comments
■ Approver
■ Approver Comments
■ Trip Report Status
To use audit trail for changes to a clinical trip report
1. Navigate to the Site Visits screen, then the Clinical Site Visits List view.
2. In the Clinical Site Visits list, drill down on the Visit Start field of the site visit forthe required trip report.
The Trip Report form for the selected site visit appears.
3. Navigate to the Audit Trail view.
Some fields are described in the following table.
Field Comments
Employee Login Displays the username of the user who changed the record.
Business Component Displays the business component for the record where the databasechange occurred.
Field Displays the name of the field where the change occurred.
Operation Displays the type of operation that was performed, for example,New Record, or Modify.
Old Value Displays the value in the field before the database change occurred.
New Value Displays the value in the field after the database change occurred.
Date Displays the timestamp of the change.
Record ID Displays the unique identifier of the record that was changed.
Base Table Displays the name of the primary database table where thedatabase change occurred.
Generating Oracle BI Publisher Reports for Site Visits
9-18 Siebel Clinical Trial Management System Guide
Generating Oracle BI Publisher Reports for Site VisitsYou can integrate Siebel Clinical with Oracle Business Intelligence Publisher (BIPublisher) to generate reports. You can generate, view, and schedule preconfiguredOracle BI Publisher reports in Siebel Clinical. For more information about using SiebelReports and integrating with Oracle BI Publisher, see Siebel Reports Guide.
The following preconfigured reports apply to site visits:
■ Clinical Trip Report With CRF
■ Clinical Trip Report Without CRF
To generate an Oracle BI Publisher report for a site visit
1. Navigate to the Site Visits screen, then the Clinical Site Visits List view.
2. In the Clinical Site Visits list, drill down on the Visit Start field of the site visit forwhich you want to generate an Oracle BI Publisher report.
3. On the application toolbar, click Reports.
4. In the Run Report pane, complete the appropriate fields.
Some fields are described in the following table.
Field Comments
Report Name Select the Clinical Trip Report With CRF report or the Clinical TripReport Without CRF report.
Output Type Select the output type for the report.
5. Click Submit.
The report runs.
6. Click My Reports to navigate to the Reports view of the BI Publisher Reportsscreen.
A record for the report appears in the Reports view. For information aboutviewing and printing the report, see Siebel Fundamentals Guide.
Column Displays the name of the column in which the change occurred.
Group ID Displays the unique identifier of the group to which the user whochanged the record belongs.
Table Displays the name of table to which the selected field belongs inthe Siebel database.
Row ID Displays the unique identifier of the row in which the changeoccurred.
Field Comments

10
Managing Clinical Projects 10-1
10 Managing Clinical Projects
This chapter describes how to manage clinical projects. It includes the following topics:
■ About Managing Clinical Projects
■ Scenario for Managing Clinical Projects
■ Process of Managing Clinical Projects
■ Creating Activity Templates for Clinical Projects
■ Setting Up Employee Profiles for Clinical Projects
■ Setting Up Position Types and Rate Lists for Billing
■ Creating Clinical Projects
■ Associating People and Accounts with Clinical Projects
■ Creating Activities and Tasks for Clinical Projects
■ Monitoring Costs for Clinical Projects
■ Managing Risk for Clinical Projects
■ About Views in the Projects Screen
About Managing Clinical ProjectsThis chapter supplements other information about project management. Forinformation about project management, see Siebel Project and Resource ManagementAdministration Guide.
Projects in Siebel Clinical help project managers manage projects for clinical trials, andare associated with individual protocols. From the Projects screen, you can enter, view,and update timelines, milestones, costs, and resources.
Scenario for Managing Clinical ProjectsThis topic gives one example of how to manage clinical projects. You might manageclinical projects differently, depending on your business model.
This topic includes the following information:
■ "Setting Up and Staffing the Project" on page 10-2
■ "Managing Tasks, Activities, and Risks" on page 10-2

Process of Managing Clinical Projects
10-2 Siebel Clinical Trial Management System Guide
Setting Up and Staffing the ProjectA product manager works for a large CRO (clinical research organization) that has acontract to carry out a clinical trial for a pharmaceutical company. He is responsible forsetting up and running the project for a clinical trial.
First, the product manager enters some basic information about the project into SiebelClinical, and determines the employees that can access the project data by enteringthem in the project access list.
To optimize the resource assignment, the product manager enters the resourcerequirements in the team workbook, and then uses Siebel Assignment Manager to helpwith the staffing. He specifies the roles, skills, competencies, and availability requiredfor the team, and lets Resource Manager find the best candidate for the roles.
For this large project, the CRO might need some subcontractors to complete certainaspects of the project. Because the subcontractors are paid at an hourly rate, theproduct manager associates the appropriate billing rate list with the project. He alsomust add employees of the subcontracting company to the subcontractor resource list.
The product manager can add other external contacts and accounts to the project. Forexample, he can add information about the central laboratory and the primary contactat this laboratory.
Managing Tasks, Activities, and RisksYou can set milestones as tasks or activities. The product manager can createmilestones within projects in Siebel Clinical. Each Siebel activity has a budget, and endusers update the actual costs of these activities as the project progresses. Periodically,the product manager reviews these project costs, making sure that the project stayswithin budget. Payments you make to sites for subject activities are rolled up to theproject costs.
You document project risks as they arise, and you document the resolution activities toaddress the risks.
Process of Managing Clinical ProjectsThis topic details sample tasks that administrators and end users often perform whenmanaging clinical projects. Your company might follow a different process accordingto its business requirements.
Perform the administrative tasks described in this topic before performing the relatedend-user tasks.
Administrator TasksThe tasks that an administrator must complete to support projects depends on theproject features that the organization uses. You might not have to perform all the taskslisted in this topic. These tasks must occur before the project manager creates theproject.
The following list shows the tasks administrators typically perform to manage clinicalprojects:
■ "Creating Activity Templates for Clinical Projects" on page 10-3. Many projectmanagers use these templates to carry out similar clinical trials.

Setting Up Employee Profiles for Clinical Projects
Managing Clinical Projects 10-3
■ "Setting Up Employee Profiles for Clinical Projects" on page 10-3. Maintain theemployee profiles of skills and competencies that Siebel Assignment Manageruses.
■ "Setting Up Position Types and Rate Lists for Billing" on page 10-4. The positiontypes and rate lists are required to allow subcontractors (and employees) to bill theproject for their time.
End-User ProceduresThe following list shows the tasks end users typically perform to manage clinicalprojects:
■ "Creating Clinical Projects" on page 10-4. You associate protocols with projects.
■ "Associating People and Accounts with Clinical Projects" on page 10-5. Giveemployees access to the project; add contacts and accounts to the project teamworkbook.
■ "Creating Activities and Tasks for Clinical Projects" on page 10-7. Standaloneactivities are not associated with tasks.
■ "Monitoring Costs for Clinical Projects" on page 10-8. View costs for clinicalprojects.
■ "Managing Risk for Clinical Projects" on page 10-8. Document project risks andresolution activities.
Creating Activity Templates for Clinical ProjectsYou can create activities in the Projects screen. If the study managers primarily enteractivities in the Projects screen, then creating activity templates for projects isadvantageous.
To create an activity template for projects, you create an activity template with aProject type. The Protocol Type field is optional because you can apply the activitytemplate to any project, regardless of the protocol associated with the project. In theActivity Template Details list, create records to describe activities and milestones forthe project. For information about how to create activity templates, see SiebelApplications Administration Guide.
This task is a step in "Process of Managing Clinical Projects" on page 10-2.
Setting Up Employee Profiles for Clinical ProjectsEnd users can use Siebel Assignment Manager to automatically search the employeedatabase for the available employees whose skills best fit the needs of the project.Siebel Assignment Manager requires that you set up profiles of skills andcompetencies for employees. For information about using Siebel Assignment Manager,see Siebel Assignment Manager Administration Guide.
Use of Siebel Assignment Manager is not required. End users can assign teammembers directly into the Team Workbook view, without using Siebel AssignmentManager.
This task is a step in "Process of Managing Clinical Projects" on page 10-2.

Setting Up Position Types and Rate Lists for Billing
10-4 Siebel Clinical Trial Management System Guide
Setting Up Position Types and Rate Lists for BillingIf project team members bill their time to the project through the Team Workbookview, then set position types and rate lists.
You set up position types, such as Consultant, as products, and you designate them asresources. You then set up lists of hourly rates for the position types. When you applythe rate list to the project, the hourly rates for the team members are automaticallysupplied in the team workbook. For more information about position types and ratelists for professional services, see Siebel Applications Administration Guide.
This task is a step in "Process of Managing Clinical Projects" on page 10-2.
Creating Position Types as ProductsComplete the procedure in this topic to create position types as products.
To create position types as products
1. Navigate to the Administration - Product screen, then the Products view.
2. In the Products list, create a new record and complete the necessary fields.
Some fields are described in the following table.
Field Comments
Product Type the product (resource) name, for example, Consultant.
Project Resource Select this field to indicate that the product is a project resource.
Creating Rate ListsComplete the procedure in this topic to create a rate list.
To create a rate list
1. Navigate to the Administration - Pricing screen, then the Rate List view.
2. In the Rate Lists list, create a new record and complete the necessary fields.
3. In the Rate Lists list, drill down on the Rate List field.
4. In the Rate List Line Items list, create a new record.
5. In the Add Position Types dialog box, select the Position Type and click OK.
This list of resources is created as a product.
6. In the Rate List Line Items list, complete the remaining fields.
Creating Clinical ProjectsYou can create a project record and associate a protocol with the project.
Note: It is recommended that you associate a protocol with only oneproject. However, you are not prevented from associating a protocolwith multiple projects. In this case, costs associated with payments tosites are rolled up to each project.
This task is a step in "Process of Managing Clinical Projects" on page 10-2.

Associating People and Accounts with Clinical Projects
Managing Clinical Projects 10-5
To create a clinical project
1. Navigate to the Projects screen, then the List view.
2. In the Project list, create a new record and complete the necessary fields.
Some fields are described in the following table.
Field Comments
Project ID Type a unique identification number for the project.
Account Select the account for the project. For example, select the name of thepharmaceutical company for which you carry out the project.
Start Select the start date and time for the project.
End Select the end date and time for the project.
Protocol # Select the protocol for the project. All available protocols areavailable for selection from the Pick Protocol dialog box. The projectcreator does not have to be a member of the protocol team.
Actual Cost Displays the actual cost of the project. This field is calculated bysumming the actual costs of all the tasks, activities, and sitepayments associated with the project.
Revenue Type the total revenue for the project. Click the currency calculatorbutton for this field to enter the amount of revenue, the currency, andthe exchange date for the currency.
Budgeted Cost Displays the budgeted cost of the project. This field is calculated bysumming the budgeted costs of all the tasks, activities, and sitepayments associated with the project.
3. Drill down on the Name field of the project, and navigate to the More Info view toadd more information.
Some field are described in the following table.
Field Comments
Rate List Select the rate list for the project if a rate list is set up for the projectteam members. Click the show more button if this field is not visible.For more information, see "Setting Up Position Types and Rate Listsfor Billing" on page 10-4.
Description Type a description of the project.
Associating People and Accounts with Clinical ProjectsYou can give employees in Siebel Clinical access to the project and add them to theteam workbook.
You can associate contacts with projects through the Contacts view and theOrganizational Analysis view. The same contacts appear in the Contacts view and theOrganizational Analysis view.
You can associate accounts with projects through the Partners view and theSubcontractors view. Adding accounts to the Subcontractors view allows you to addemployees from the subcontracting accounts to the project team workbook. For moreinformation about adding subcontractors, see Siebel Project and Resource ManagementAdministration Guide.
This task is a step in "Process of Managing Clinical Projects" on page 10-2.

Associating People and Accounts with Clinical Projects
10-6 Siebel Clinical Trial Management System Guide
Adding Employees to ProjectsComplete the procedure in this topic to add employees to a project.
To add employees to a project
1. Give employees access to a project by adding them to the Access view.
For more information about providing access to a project, see Siebel Project andResource Management Administration Guide.
2. Allow end users to assign employees and subcontractors to activities, and allowemployees and subcontractors to bill time to the project by adding them to theTeam Workbook view.
If a rate list is set up, then make sure that the Resource field on the Resource Detailform of the Team Workbook view is set for the team members. For moreinformation about the team workbook for project management, see Siebel Projectand Resource Management Administration Guide.
Adding Contacts to ProjectsComplete the procedure in this topic to add a contact to a project using theOrganization Analysis view.
To add a contact to a project
1. Navigate to the Projects screen, then the List view.
2. In the Project list, drill down on the Name field of the project.
3. Navigate to the Organization Analysis view.
4. From the Organization Analysis drop-down list, select Contacts.
5. In the Contacts list, create a new record and complete the necessary fields.
6. From the Contacts drop-down list, select Organization Analysis.
An organization chart of the contacts appears. Any employee-managerrelationships set in Step 5 are indicated.
Adding Partner Accounts to ProjectsComplete the procedure in this topic to add a partner account to a project.
To add a partner account to a project
1. Navigate to the Projects screen, then the List view.
2. In the Project list, drill down on the Name field of the project.
3. Navigate to the Partners view.
4. In the Partners list, create a new record and complete the necessary fields.
The Site field is a unique identifier for the site of the account. This field is notrelated to the sites where you carry out clinical trials.

Creating Activities and Tasks for Clinical Projects
Managing Clinical Projects 10-7
Creating Activities and Tasks for Clinical ProjectsYou can create activities for the project in the following ways:
■ Enter activities in the Activities view.
■ Generate activities in the Activity Plans view by applying an activity template toprojects.
■ Manually enter activities in the Activity Plans view. These activities must beassociated with an activity plan that is based on a template.
■ Create a task in the Task view and associate activities with the task.
A task is a container for activities. Activities associated with tasks are different fromregular standalone activities. Activity templates for projects cannot generate activitiesthat belong to tasks. You can only manually create these activities from within theProject Task Activity view. You cannot add a standalone activity to a task, nor can youdisassociate an activity for a task from the task. For more information about creatingactivities and tasks for project management, see Siebel Project and Resource ManagementAdministration Guide.
This task is a step in "Process of Managing Clinical Projects" on page 10-2.
Creating Activities for ProjectsComplete the procedure in this topic to create an activity for a project using an activitytemplate.
Note: You can also manually create activities in the Activities view.
To create an activity for a project
1. Navigate to the Projects screen, then the List view.
2. In the Project list, drill down on the Name field of the project.
3. Navigate to the Activity Plans view.
4. In the Activity Plans list, create a new record.
5. In the Template field, select a template from the drop-down list.
The activities associated with the activity plan appear in the Activities list.
Creating Tasks and Associated ActivitiesComplete the procedure in this topic to create a task and associated activities.
To create a task and associated activities
1. Navigate to the Projects screen, then the List view.
2. In the Project list, drill down on the Name field of the project.
3. Navigate to the Tasks view.
4. In the Tasks list, create a new record and complete the necessary fields.
5. In the Tasks list, drill down on the Name field.
6. In the Activities list, create a new record and complete the necessary fields.
Monitoring Costs for Clinical Projects
10-8 Siebel Clinical Trial Management System Guide
Monitoring Costs for Clinical ProjectsThe Cost view provides you with a valuable summary of all costs associated with aparticular project and protocol.
The cost items appear in the following lists:
■ Project Activities. Displays those records from the Activities view where the Costfield is selected.
■ Project Tasks. Displays those records from the Tasks view where the Cost field forthe task is selected. The actual cost and budgeted cost for a task are determined bysumming the costs of the activities contained in the task.
■ Clinical Payments. Displays payments made to the sites associated with theprotocol. These payment amounts are rolled up into the Actual Cost field in theproject record.
End users cannot create, modify, or delete records in the Costs view.
Note: All costs in this view are in the default currency set for theproject.
This task is a step in "Process of Managing Clinical Projects" on page 10-2.
To monitor costs for clinical projects
1. Navigate to the Projects screen, then the List view.
2. In the Project list, drill down on the Name field of the project.
3. Navigate to the Costs view.
4. Click a hyperlink in the Clinical Payments or Project Tasks list to see the activitiesassociated with a cost item.
Managing Risk for Clinical ProjectsAn important aspect of project management is risk management. The features of theRisks view allow you to enter information about project risks and create and assignresolution activities to address the risks. For more information about assessing risksfor project management, see Siebel Project and Resource Management AdministrationGuide.
This task is a step in "Process of Managing Clinical Projects" on page 10-2.
To manage risk for clinical projects
1. Navigate to the Projects screen, then the List view.
2. In the Project list, drill down on the Name field of the project.
3. Navigate to the Risks view.
4. In the Risks list, create a new record and complete the necessary fields.
5. In the Risks list, drill down on the Name field.
6. In the Resolution Activities list, create a new record and complete the necessaryfields.
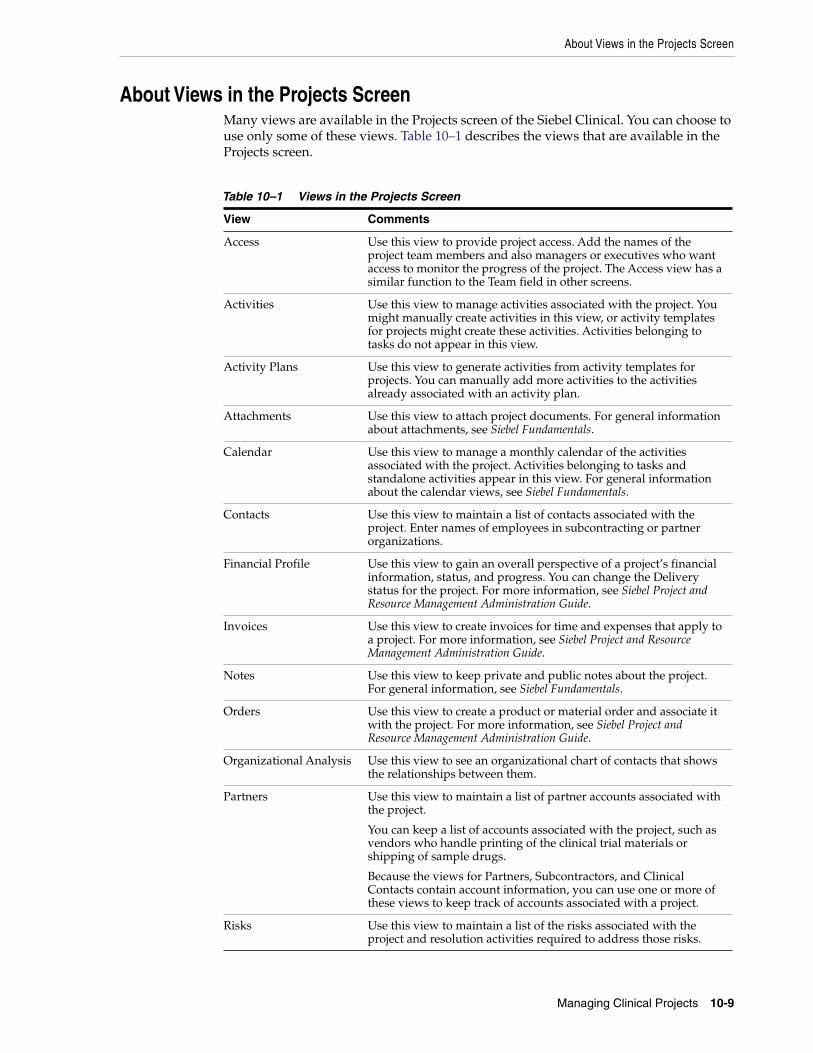
About Views in the Projects Screen
Managing Clinical Projects 10-9
About Views in the Projects ScreenMany views are available in the Projects screen of the Siebel Clinical. You can choose touse only some of these views. Table 10–1 describes the views that are available in theProjects screen.
Table 10–1 Views in the Projects Screen
View Comments
Access Use this view to provide project access. Add the names of theproject team members and also managers or executives who wantaccess to monitor the progress of the project. The Access view has asimilar function to the Team field in other screens.
Activities Use this view to manage activities associated with the project. Youmight manually create activities in this view, or activity templatesfor projects might create these activities. Activities belonging totasks do not appear in this view.
Activity Plans Use this view to generate activities from activity templates forprojects. You can manually add more activities to the activitiesalready associated with an activity plan.
Attachments Use this view to attach project documents. For general informationabout attachments, see Siebel Fundamentals.
Calendar Use this view to manage a monthly calendar of the activitiesassociated with the project. Activities belonging to tasks andstandalone activities appear in this view. For general informationabout the calendar views, see Siebel Fundamentals.
Contacts Use this view to maintain a list of contacts associated with theproject. Enter names of employees in subcontracting or partnerorganizations.
Financial Profile Use this view to gain an overall perspective of a project’s financialinformation, status, and progress. You can change the Deliverystatus for the project. For more information, see Siebel Project andResource Management Administration Guide.
Invoices Use this view to create invoices for time and expenses that apply toa project. For more information, see Siebel Project and ResourceManagement Administration Guide.
Notes Use this view to keep private and public notes about the project.For general information, see Siebel Fundamentals.
Orders Use this view to create a product or material order and associate itwith the project. For more information, see Siebel Project andResource Management Administration Guide.
Organizational Analysis Use this view to see an organizational chart of contacts that showsthe relationships between them.
Partners Use this view to maintain a list of partner accounts associated withthe project.
You can keep a list of accounts associated with the project, such asvendors who handle printing of the clinical trial materials orshipping of sample drugs.
Because the views for Partners, Subcontractors, and ClinicalContacts contain account information, you can use one or more ofthese views to keep track of accounts associated with a project.
Risks Use this view to maintain a list of the risks associated with theproject and resolution activities required to address those risks.

About Views in the Projects Screen
10-10 Siebel Clinical Trial Management System Guide
Status Report Use this view to create a status report summarizing the project’sprogress, forecast, and issues. For more information, see SiebelProject and Resource Management Administration Guide.
Subcontractors Use this view to keep a list of subcontractors associated with theproject. For more information, see the description of the Partnersfield.
Tasks Use this view to create and modify tasks for the project.
Team Workbook Use this view to assign team members to roles in the project. Youcan manually assign team members, or Siebel Assignment Managercan automatically assign them. Team members must be listed in theworkbook before you can assign them to activities.
Time & Expense Use this view to adjust and summarize time sheets and expensereports associated with the project. For more information abouttime sheets and expense reporting, see Siebel Project and ResourceManagement Administration Guide.
Table 10–1 (Cont.) Views in the Projects Screen
View Comments

11
Managing Clinical Training 11-1
11Managing Clinical Training
This chapter covers how to manage clinical training. It includes the following topics:
■ About Managing Clinical Training
■ Setting Up Training Topics for Clinical Training
■ Creating Training Plans
■ Adding Criteria to Training Plans
■ Creating Versions of Training Plans
■ About Publishing Training Plans
■ Publishing Training Plans
■ Adding Training Plans to Clinical Sites
■ Changing Training Topics for Clinical Sites
■ Designating Completed Training for Training Topics
■ Designating Completed Training for Contacts
■ Viewing Training Information for Clinical Protocols
■ Viewing Training Information for Clinical Regions
About Managing Clinical TrainingClinical Trials involve personnel at multiple sites. Companies and CROs (clinicalresearch organizations) that conduct clinical trials must train and certify these peopleabout those trials. This education is an important aspect of risk based monitoring andhelps companies and CROs to reduce monitoring costs and expedite the clinical trailprocess. Companies and CROs are responsible for making sure that site personnelunderstand:
■ The ethical aspects of research involving human subjects.
■ The rules and regulations of regulatory agencies.
■ Their roles and responsibilities in clinical trials.
■ The appropriate SOPs (standard operating procedures) and work instructions forclinical trials.
■ The various aspects of clinical trials, such as their clinical indications.
As part of the planning for clinical trials, administrators create training plans tomanage the training of personnel. These training plans include training topics. Userscan then track these training topics for themselves and close the topics when they

Setting Up Training Topics for Clinical Training
11-2 Siebel Clinical Trial Management System Guide
complete them. This tracking provides an audit record of the training for regulatoryagencies.
Setting Up Training Topics for Clinical TrainingAdministrators set up training topics for clinical training so that they can associate thetopics with versions of training plans. For more information about associating topicswith versions of training plans, see "Creating Versions of Training Plans" on page 11-5.
Administrators can associate a single topic with multiple training plans. Also, userscan manually add to sites the training topics that administrators create. For moreinformation, see "Changing Training Topics for Clinical Sites" on page 11-8.
After you publish a version of a training plan with associated topics, you cannotchange the field values (except for the value in the Obsolete Date field) for those topicsin the Training Topics view of the Administration - Clinical screen. If you change thefield values for a topic in the Training Topics view of the Administration - Clinicalscreen after you associate the topic with an unpublished version of a training plan,then the changed values are reflected in the topic for that version of the training plan.
To set up a training topic for clinical training
1. Navigate to the Administration - Clinical screen, then the Training Topics view.
2. In the Training Topics list, create a new record and complete the necessary fields.
Some fields are described in the following table.
Field Comments
Name Type the name of the training topic.
Category Select the type of training applicable to the training topic.
Role Select the roles of the users who must complete the training topic.
To select a role, click the select button in the field to open the Contact Rolesdialog box, click New (the plus (+) icon) to select the Role field in thedialog box, and then select a value from the drop-down list for the Rolefield.
Click OK after you select all of the appropriate roles for the training topic.If you do not select any roles, then all contacts for the clinical sites that areassociated with the topic must complete the topic.
Description Type a description of the training topic.
Mandatory Select this field to indicate that completing the training topic is mandatory.
Duration Type an estimate of the numeric value for the time that is needed tocomplete the training topic.
Duration Unit Select the units of time that apply to the numeric value that you enter inthe Duration field.
Created Date Displays the date and time that you create the training topic.

Creating Training Plans
Managing Clinical Training 11-3
Creating Training PlansAdministrators create training plans and then designate the criteria for those plansand the training topics for versions of those plans. For more information aboutdesignating the criteria, see "Adding Criteria to Training Plans" on page 11-4. For moreinformation about designating the training topics for versions, see "Creating Versionsof Training Plans" on page 11-5.
When administrators publish the plans, the training topics in those plans areautomatically associated with the appropriate contacts for the appropriate sites. TheRole field value for the training topics in the plans determines the appropriatecontacts. The plan criteria determines the appropriate sites.
To create a training plan
1. Navigate to the Administration - Clinical screen, then the Training Plans view.
2. In the Training Plans list, create a new record and complete the necessary fields.
Some fields are described in the following table.
Obsolete Date Select the date and time that the training topic is inactive. If you populatethis field for a topic after publication of a training plan that contains thistopic, then the topic is deleted from the site to which it is published.
Before you can delete a topic, you must populate this field for the topic andthen save the topic record. You can delete only the topics that are not yetassociated with published plans.
If you want to indicate that the training topic is again active, then clear thisfield. You cannot add an obsolete training topic to a training plan. If youadd a training topic to a training plan before the topic is obsolete, then thetopic remains on the training plan.
Field Comments
Name Type the name of the training plan.
Description Type a description of the training plan.
Version Number Displays the number for the version of the training plan when you selecta value of Approved in the Status field for that version, and then save theversion record. For more information, see "Creating Versions of TrainingPlans" on page 11-5.
Process Status Displays the status of the publishing process for the training plan asfollows:
■ When you create a new record for a training plan, this field valuedefaults to Not Started.
■ When you click the Publish button to publish the training plan, thisfield value changes from Not Started to Publishing.
■ After publishing is complete, and publishing is unsuccessful, thisfield value changes from Publishing to Failed.
■ After publishing is complete, and publishing is successful, this fieldvalue changes from Publishing to Published.
■ When you select a value of Approved in the Status field for a newversion (but not the first version) of the training plan, and then savethe version record, this field value changes from Published to NotStarted.
Created Date Displays the date and time that you create the training plan.
Field Comments

Adding Criteria to Training Plans
11-4 Siebel Clinical Trial Management System Guide
Adding Criteria to Training PlansAdministrators add criteria to training plans to designate the sites to which the plansapply. When they publish the training plans, the appropriate contacts for these sitesare automatically associated with the training topics in those plans. The Role fieldvalue for the training topics in the plans determines the appropriate contacts. Also,users can manually add training plans to sites. For more information, see "AddingTraining Plans to Clinical Sites" on page 11-8.
After you publish a version of a training plan, you cannot change or delete the criteriafor that training plan.
To add criteria to a training plan
1. Navigate to the Administration - Clinical screen, then the Training Plans view.
2. Drill down on the Name field of the training plan for which you want to addcriteria.
3. Navigate to the Criteria view.
4. In the Training Plan Criteria list, create a new record and complete the necessaryfields.
Some fields are described in the following table.
Obsolete Date Select the date and time that the training plan is inactive. After youpopulate this field and then save the plan record, you cannot change thefield values for the training plan, the criteria for the training plan, or theversions for the training plan. You cannot delete training plans.
If you want to indicate that the training plan is again active, then clearthis field. After the training plan is again active, you can change it.
Sites Processed/Total Sites
Displays the number of sites that the publishing process associated withthe training plan (sites processed) compared to the number of sites thatapply to the training plan (total sites).
This field is automatically populated when you publish the training plan.If you successfully publish the training plan, then the number ofprocessed sites equals the number of total sites. If you fail to successfullypublish the training plan, then the number of processed sites is not equalto the number of total sites.
If you create a new approved version of the training plan, then this fieldvalue is cleared.
% Completed Displays the fraction in the Sites Processed/Total Sites field as apercentage.
This field is automatically populated when you publish the training plan.If you successfully publish the training plan, then this field value is 100%.If you fail to successfully publish the training plan, then this field value isless than 100%.
If you create a new approved version of the training plan, then this fieldvalue is cleared.
Publish Result Displays the final result of the process to publish the training plan.
If you create a new approved version of the training plan, then this fieldvalue is cleared.
Field Comments

Field Comments
Scope Select the scope of the training plan as follows:
■ If you select a value of All, then the training plan applies to all sites inSiebel Clinical, and you cannot enter values in the other fields of theTraining Plan Criteria list. You cannot create more criteria records forthe training plan.
■ If you select a value of Specific, then the training plan applies to specificsites in Siebel Clinical, and you designate these sites in the other fieldsof the Training Plan Criteria list. You can create more criteria records forthe training plan.
Indication Select the clinical indication that applies to the training plan.
Trial Phase Select the trial phase that applies to the training plan.
Site Status Select the site status that applies to the training plan.
Protocol # Select the protocol number that applies to the training plan. The values thatyou select for the indication and trial phase determine the values that areavailable to you for selection in this field. If you select a protocol numberand subsequently select a value for an indication or a trial phase that is notassociated with that protocol number, then the criteria record that you createhas no effect because no protocols meet the criteria.
Region Select the region that applies to the training plan. The value that you selectfor the protocol number determines that values that are available to you forselection in this field.
Creating Versions of Training Plans
Managing Clinical Training 11-5
5. If necessary, create more new records in the Training Plan Criteria list to add morecriteria to the training plan.
Creating Versions of Training PlansAdministrators create versions of training plans so that they can associate trainingtopics with those plans. As business needs change over time, they can create newversions of training plans to accommodate those needs.
After you publish a version of a training plan, you cannot change the data in thatversion. For example, you cannot add training topics to or delete training topics fromthat version. If you want to change the data in an existing training plan, then you mustcreate a new version of the plan, and publish the plan again.
After you publish a version of a training plan, you cannot delete that version.
To create a version of a training plan
1. Navigate to the Administration - Clinical screen, then the Training Plans view.
2. Drill down on the Name field of the training plan for which you want to create aversion.
3. Navigate to the Versions view.
4. In the Versions list, create a new record and complete the necessary fields.
Some fields are described in the following table.
Field Comments
Version Number Displays an automatically generated version number. The first versionrecord that you create is automatically populated with a version numberof 1, the second version record that you create is automatically populatedwith a version number of 2, and so on.
About Publishing Training Plans
11-6 Siebel Clinical Trial Management System Guide
5. Complete the following steps to select the training topics for the version:
a. In the Training Topics list, click Add Topics.
b. In the Training Topics dialog box that appears, select the training topics for theversion.
To select multiple topics, hold down the CTRL key and click each topic record.Topics that have a value in the Obsolete Date field are not available forselection. For information about setting up the training topics that appear inthis dialog box, see "Setting Up Training Topics for Clinical Training" onpage 11-2.
c. Click OK.
The selected topics appear in the Training Topics list. You cannot change thefield values in these selected topic records. However, you can delete the topicfor which you want to change the field values, change the field values for thetopic in the Training Topics view of the Administration - Clinical screen (if thetopic is not associated with another published training plan), and then add thechanged topic to the version again.
About Publishing Training PlansAfter administrators create training plans, they publish the training plans so that thetraining topics in those plans are automatically associated with the appropriatecontacts for the appropriate sites. The Role field value for the training topics in theplans determines the appropriate contacts. The plan criteria determines theappropriate sites.
Name Type the name of the version of the training plan.
Status Select a value of Approved in this field to indicate that this version is theapproved version of the training plan. Only one version of a trainingplan can have an approved status. You must select the Approved valueand then save the version record before you can publish the trainingplan. You are not allowed to select the Approved value until you add atleast one training topic to the version. For more information aboutadding training topics to a version, see Step 5.
In addition, this field displays an automatically generated value for thestatus of the version as follows:
■ When you create a new version record, this field value defaults toDraft.
■ When you click the Publish button to publish the training plan forthis version record, this field value does not change from Approved.
■ When you select the Approved value in this field for another versionrecord in the training plan, this field value changes from Approvedto Archived for this version record.
Comments Type appropriate comments about the version of the training plan.
Created Date Displays the date and time that you create the version of the trainingplan.
Published Date Displays the date and time that you publish the version of the trainingplan.
Archived Date Displays the date and time that you archive the version of the trainingplan.
Field Comments

Publishing Training Plans
Managing Clinical Training 11-7
The publishing process for a training plan is a batch job that runs in the background.Consequently, users are not prevented from using other functionality in Siebel Clinicalwhile this batch job runs. To optimally run this batch job, administrators can set theClinical_Training_Commit_Freq system preference. For more information about thissystem preference, see "System Preferences in Siebel Clinical" on page A-22.
The duration of the publishing process for a training plan is determined by thefollowing factors:
■ The number of training topics in the plan
■ The number of site records to associate with the training topics in the plan
■ The number of contact records to associate with the training topics in the plan
When a user creates a site record after an administrator publishes a training plan thatapplies to that site, the topics in that plan are automatically associated with the newsite. Likewise, the topics in that plan are automatically associated with the contacts forthe new site if the Role field in the topics is blank or a Role field value in the topics isthe same as the Role field value in the contact records. If the administrator populatesthe Obsolete Date field (in the Training Topics view of the Administration - Clinicalscreen) for some topics in a plan after the plan publication, then those topics are notautomatically associated with a new site even though the topics exist in the trainingplan.
When a user creates a new contact record for an existing site after an administratorpublishes a training plan that applies to that site, the topics in that plan areautomatically associated with the new contact if the Role field in the topics is blank ora Role field value in the topics is the same as the Role field value in the new contactrecord. If the administrator populates the Obsolete Date field (in the Training Topicsview of the Administration - Clinical screen) for some topics in a plan after the planpublication, then those topics are not automatically associated with a new contact eventhough the topics exist in the training plan.
Publishing Training PlansAdministrators can publish only training plans that have a version with a Status fieldvalue of Approved. Also, users can manually add to sites the training plans thatadministrators publish. During the process to publish a training plan, no one canchange any of the data associated with that plan. For more information, see "AboutPublishing Training Plans" on page 11-6.
If the publishing process is unsuccessful, then possibly the server is not operating. Formore information about unsuccessful publishing processes, contact your systemadministrator.
To publish a training plan
1. Navigate to the Administration - Clinical screen, then the Training Plans view.
2. Drill down on the Name field of the training plan that you want to publish.
3. If necessary, change the Status field for the version of the plan from Draft toApproved, and save the version record.
4. Click Publish.
The publishing process is initiated, and the value in the Process Status field for thetraining plan changes from Not Started to Publishing.
5. Navigate back to the Administration - Clinical screen, then the Training Plans viewto see the final status of the publishing process.

Adding Training Plans to Clinical Sites
11-8 Siebel Clinical Trial Management System Guide
After the process is complete, the Process Status field changes to Published if theprocess is successful or to Failed if the process is unsuccessful.
Adding Training Plans to Clinical SitesWhen administrators publish training plans, the training topics in those plans areautomatically associated with the clinical sites that meet the criteria in the plans. Whena clinical site does not meet the criteria in a training plan, but the training plan appliesto the site, you can manually add the training plan to the site. When you manually adda training plan to a site, its associated training topics are automatically added to thesite. However, if the administrator populates the Obsolete Date field (in the TrainingTopics view of the Administration - Clinical screen) for some topics in that plan, thenthose topics are not automatically added to the site even though the topics exist in thetraining plan.
The contacts for a clinical site are automatically associated with the training topics inthe training plans that you add to the site if a Role field value in the topics is the sameas the Role field value in the contact records. If the Role field in a topic of an addedplan has no value, then all of the contacts for the clinical site are automaticallyassociated with that topic.
You can add to clinical sites only the versions of training plans for which:
■ The Obsolete Date field of the training plan has no value.
■ The Status field for the version of the training plan has a value of Approved.
To add training plans to a clinical site
1. Navigate to the Site Management screen, then the Protocol Site List view.
2. In the Protocol Site list, drill down on the site number field of the site for whichyou want to add training plans.
3. Navigate to the Training view.
4. To add training plans, complete the following steps:
a. Click Add Plans.
b. In the Training Plans dialog box that appears, select the training plans to add.
To select multiple plans, hold down the CTRL key and click each plan record.For information about setting up the training plans that appear in this dialogbox, see "Creating Training Plans" on page 11-3.
c. Click OK.
The training topics associated with the selected training plans appear in theSite Training Status list.
Changing Training Topics for Clinical SitesWhen administrators publish training plans, the training topics in those plans areautomatically associated with the clinical sites that meet the criteria in the plans. Whenadditional training topics apply to a site, you can manually add these topics to theautomatically-added topics.
The contacts for a clinical site are automatically associated with the training topics thatyou add to the site if a Role field value in the topics is the same as the Role field valuein the contact records. If the Role field in an added topic has no value, then all of thecontacts for the clinical site are automatically associated with that topic.

Designating Completed Training for Training Topics
Managing Clinical Training 11-9
You can add to clinical sites only the training topics for which the Obsolete Date fieldof the training topic has no value.
When training topics no longer apply to a site, you can delete the topics if theMandatory field is not selected for the topics. You cannot change the field values intraining topic records for clinical sites.
To change training topics for a clinical site
1. Navigate to the Site Management screen, then the Protocol Site List view.
2. In the Protocol Site list, drill down on the site number field of the site for whichyou want to change training topics.
3. Navigate to the Training view.
4. To add training topics, complete the following steps:
a. Click Add Topics.
b. In the Training Topics dialog box that appears, select the training topics toadd.
To select multiple topics, hold down the CTRL key and click each topic record.For information about setting up the training topics that appear in this dialogbox, see "Setting Up Training Topics for Clinical Training" on page 11-2.
c. Click OK.
The selected topics appear in the Site Training Status list.
5. To delete a training topic, select the topic in the Site Training Status list, and deleteit.
Designating Completed Training for Training TopicsIn Siebel Clinical, you can access the training topics for clinical sites, and thendesignate when the contacts who are associated with those topics complete thosetopics. A contact is associated with only the topics that have no value in the Role fieldor a Role field value that is the same as the Role field value in the contact record. If youchange the Role field value for a contact after the contact is associated with trainingtopics, then the incomplete training topics for the contact can automatically change toaccommodate the new role.
To designate completed training for training topics
1. Navigate to the Site Management screen, then the Protocol Site List view.
2. In the Protocol Site list, drill down on the site number field of the site for whichyou want to designate completed training for training topics.
3. Navigate to the Training view.
4. In the Site Training Status list, select the appropriate training topic.
5. Complete one of the following steps:
■ If you want to designate that training is complete for all contacts associatedwith the training topic, then in the Site Training Status list click Complete All.
In the Site Training Status list, the Contacts Completed field and the ContactsNot Completed field are automatically updated for the training topic. Also, forall contacts in the Contacts list, the Completed field is selected and theCompleted Date field is populated with the current date and time.

Designating Completed Training for Contacts
11-10 Siebel Clinical Trial Management System Guide
■ If you want to designate that training is complete for selected contactsassociated with the training topic, then in the Contacts list select theCompleted field for those contacts.
In the Site Training Status list, the Contacts Completed field and the ContactsNot Completed field are automatically updated for the training topic. Also, inthe Contacts list, the Completed Date field is populated with the current dateand time for those contacts for which you select the Completed field and savethe contact record.
If you want to reverse your designation of completed training for a contact, thenclear the Completed field for the contact.
6. (Optional) In the Contacts list, complete the following steps for the appropriatecontacts:
a. Enter comments about the completed training.
b. Change the value in the Completed Date field from the date and time whenyou designate that training is complete to the date and time that the contactactually completed the training.
Designating Completed Training for ContactsIn Siebel Clinical, you can access the contacts for clinical sites, and then designatewhen the contacts complete the training topics assigned to them. A contact isassociated with only the topics that have no value in the Role field or a Role field valuethat is the same as the Role field value in the contact record. If you change the Rolefield value for a contact after the contact is associated with training topics, then theincomplete training topics for the contact can automatically change to accommodatethe new role.
To designate completed training for contacts
1. Navigate to the Site Management screen, then the Protocol Site List view.
2. In the Protocol Site list, drill down on the site number field of the site for whichyou want to designate completed training for contacts.
3. Navigate to the Contacts view.
4. In Contacts list, select the appropriate contact.
5. Complete one of the following steps:
■ If you want to designate that training is complete for all training topicsassociated with the contact, then in the Training Topics list click Complete All.
In the Contacts list, the Trainings Completed field is automatically updated toshow the number of training topics that the contact completed. Also, for alltopics in the Training Topics list, the Completed field is selected and theCompleted Date field is populated with the current date and time.
■ If you want to designate that training is complete for selected training topicsassociated with the contact, then in the Training Topics list select theCompleted field for those training topics.
In the Contacts list, the Trainings Completed field is automatically updated toshow the number of training topics that the contact completed. Also, in theTraining Topics list, the Completed Date field is populated with the currentdate and time for those topics for which you select the Completed field andsave the contact record.

Viewing Training Information for Clinical Protocols
Managing Clinical Training 11-11
■ If you want to designate that training is complete for most training topicsassociated with the contact, then in the Training Topics list click Complete All,and clear the Completed field for the few training topics that the contact didnot complete.
In the Contacts list, the Trainings Completed field is automatically updated toshow the number of training topics that the contact completed. Also, in theTraining Topics list, the Completed Date field is populated with the currentdate and time for the topics in which the Completed field is selected.
6. (Optional) In the Training Topics list, complete the following steps for theappropriate training topics:
a. Enter comments about the completed training.
b. Change the value in the Completed Date field from the date and time whenyou designate that training is complete to the date and time that the contactactually completed the training.
Viewing Training Information for Clinical ProtocolsWhen administrators publish training plans, the training topics in those plans areautomatically associated with the clinical sites that meet the criteria in the plans. Eachsite is associated with a clinical protocol. When users designate completed training forthe training topics or for the contacts of a clinical site, the training completion detailsare summarized and rolled up to the associated clinical protocol. Complete theprocedure in this topic to view the progress of site training for a clinical protocol.
To view the training information for a clinical protocol
1. Navigate to the Protocols screen, then the Protocol List view.
2. In the Protocol list, drill down on the protocol number field of the protocol forwhich you want to view training information.
3. Navigate to the Training view.
4. Click Refresh to update the view with the latest information about completedtraining.
5. Review the training information in the training overview applet.
Some fields are described in the following table.
Field Comments
Total Trainings Displays the total number of training topics for the protocol. Each ofthese topics appears in the training details applet.
Trainings Completed Displays the number of training topics that all associated contactscompleted for all the sites in the protocol.
Sites Completed Displays the number of sites in the protocol for which all associatedcontacts completed all the training topics.
6. Review the training information in the training details applet.
Some fields are described in the following table.

Field Comments
Topic Name Displays the training topic name for the protocol. If a topic associatedwith a site record for the protocol does not apply to any contacts for theprotocol, then that topic does not appear in the training details applet.
Sites Completed Displays the number of sites in the protocol for which all associatedcontacts completed the training topic.
Sites Not Completed Displays the number of sites in the protocol for which all associatedcontacts have not completed the training topic.
Viewing Training Information for Clinical Regions
11-12 Siebel Clinical Trial Management System Guide
Viewing Training Information for Clinical RegionsWhen administrators publish training plans, the training topics in those plans areautomatically associated with the clinical sites that meet the criteria in the plans. Eachsite can be associated with a clinical region. When users designate completed trainingfor the training topics or for the contacts of a clinical site, the training completiondetails are summarized and rolled up to the associated clinical region if such a regionexists. Complete the procedure in this topic to view the progress of site training for aclinical region.
To view the training information for a clinical region
1. Navigate to the Regions screen, then the Region List view.
2. In the Region list, drill down on the Region field of the region for which you wantto view training information.
3. Navigate to the Training view.
4. Click Refresh to update the view with the latest information about completedtraining.
5. Review the training information in the training overview applet.
Some fields are described in the following table.
Field Comments
Total Trainings Displays the total number of training topics for the region. Each ofthese topics appears in the training details applet.
Trainings Completed Displays the number of training topics that all associated contactscompleted for all the sites in the region.
Sites Completed Displays the number of sites in the region for which all associatedcontacts completed all the training topics.
6. Review the training information in the training details applet.
Some fields are described in the following table.
Field Comments
Topic Name Displays the training topic name for the region. If a topic associatedwith a site record for the region does not apply to any contacts for theregion, then that topic does not appear in the training details applet.
Sites Completed Displays the number of sites in the region for which all associatedcontacts completed the training topic.
Sites Not Completed Displays the number of sites in the region for which all associatedcontacts have not completed the training topic.

12
Setting Up and Configuring Clinical Data Capture and Query Management System Integration 12-1
12Setting Up and Configuring Clinical DataCapture and Query Management System
Integration
This chapter covers setting up and configuring Siebel Clinical Trial ManagementSystem for integration with a clinical data capture and query management system,such as Oracle Health Sciences InForm. It includes the following topics:
■ Overview of Clinical Data Capture and Query Management System Integration
■ Process of Setting Up Clinical Data Capture and Query Management SystemIntegration
■ Configuring Protocol Integration Fields for Oracle Health Sciences InFormIntegration
■ Integrating Data for Subject Visits with Data for Activities
■ About Exporting Data for Sites
■ About Integrating Data for Activity Completion
Overview of Clinical Data Capture and Query Management SystemIntegration
You can use integration Web services for integrating Oracle’s Siebel Clinical TrialManagement System with clinical data capture and query management systems.Oracle’s Siebel Clinical Trial Management System is certified for integration withOracle Health Sciences InForm. For more information about the integration withOracle Health Sciences InForm, see Oracle Health Sciences InForm Publisher On Demand2.1 Integration Guide.
You can customize the Web services for integration with any third-party clinicalapplication or for specific business requirements. For more information aboutcustomizing Siebel Web services, see Siebel CRM Web Services Reference.
The following integration processes facilitate clinical data capture integration:
■ Study subject integration. A Siebel Clinical Web service creates screening andenrollment subjects, and enables screening and enrolling against the active subjectvisit template. Web services create subjects in Siebel Clinical when screening orenrollment data is entered in Oracle Health Sciences InForm.
■ Activity completion data integration. The integration Web services update thecompletion dates of visits and activities in the subject visit template. The SiebelClinical visit and activity completion data is updated using changes to the patientdata that is entered in Oracle Health Sciences InForm.

Process of Setting Up Clinical Data Capture and Query Management System Integration
12-2 Siebel Clinical Trial Management System Guide
Process of Setting Up Clinical Data Capture and Query ManagementSystem Integration
To set up clinical data capture and query management system integration for SiebelClinical, perform the following tasks:
■ "Activating Workflows for Clinical Data Capture and Query Management SystemIntegration" on page 12-2
■ "Configuring Web Services for Clinical Data Capture and Query ManagementSystem Integration" on page 12-2
Activating Workflows for Clinical Data Capture and Query Management SystemIntegration
This task describes how to activate the workflows that are required for clinical datacapture and query management system integration. You can use Siebel BusinessProcess Designer to modify the workflows to suit your own business model. For moreinformation, see Siebel Business Process Framework: Workflow Guide.
This task is a step in "Process of Setting Up Clinical Data Capture and QueryManagement System Integration" on page 12-2.
To activate workflows for clinical data capture and query management system inte-gration
1. Navigate to the Administration - Business Process screen, then the WorkflowDeployment view.
2. Query for and activate each of the following workflows:
■ SWI LS Clinical Subject Inbound - Subject
■ SWI LS Clinical Subject Inbound - Activity
■ SWI - Protocol Number Lookup
■ LS Clinical - DeleteNonAppVisits Process
3. Verify that each activated workflow is added to the Active Workflow Processesview at the end of the screen.
Configuring Web Services for Clinical Data Capture and Query Management SystemIntegration
This task describes how to configure the Web services that are required for clinical datacapture and query management system integration. For more information aboutconfiguring Web services, see Integration Platform Technologies: Siebel EnterpriseApplication Integration.
Note: It is recommended that you use HTTPS authentication. Forinformation about configuring Secure Sockets Layer (SSL) for HTTPSauthentication, see Siebel Security Guide.
This task is a step in "Process of Setting Up Clinical Data Capture and QueryManagement System Integration" on page 12-2.

Integrating Data for Subject Visits with Data for Activities
Setting Up and Configuring Clinical Data Capture and Query Management System Integration 12-3
To configure Web services for clinical data capture and query management system in-tegration
1. Navigate to the Administration - Web Services screen, then the Inbound WebServices view.
2. Query for each of the following Web services, and update the language andaddress variables:
■ ClinicalSubject Inbound Web service.
■ LS Clinical Protocol Site Interface Service
3. Click Clear Cache on the Inbound Web Services applet.
Configuring Protocol Integration Fields for Oracle Health Sciences InFormIntegration
The CDMS Study ID field in Siebel Clinical maps a protocol in Siebel Clinical to aclinical trial in Oracle Health Sciences InForm. Multiple protocols can be associatedwith a clinical program in Siebel Clinical. When you create a protocol record, you canalso add extra information about the protocol, such as financial information, centrallaboratory information, and so on.
To configure protocol integration fields for Oracle Health Sciences InForm integra-tion
1. Navigate to the Administration - Clinical screen, then the Protocol List view.
2. In the Protocol list, query for the correct protocol.
3. Drill down on the protocol number field.
4. Navigate to the integration section of the More Info view.
5. Complete the integration fields.
The integration fields are described in the following table.
Field Comments
CDMS Study ID Type the ID of the CDMS study. This required field links aclinical protocol in Siebel Clinical to a clinical study in anexternal application.
For integration with Oracle Health Sciences InForm, set thevalue to the trial name in Oracle Health Sciences InForm.
Synchronize Active Study Sites This field is not applicable for InForm integration.
Safety Study ID This field is not applicable for InForm integration.
Plan Study ID This field is not applicable for InForm integration.
Integrating Data for Subject Visits with Data for ActivitiesSubject visit templates allow you to set up a template schedule. The template scheduleis based on the protocol document. You use the template schedule to generatescreening, rescreening, and enrollment schedules for each subject, according to thesubject’s screening, rescreening, and enrollment dates.
The Clinical Item Integration field in the subject visit template is used for integratingvisit data with activity data between Siebel Clinical and Oracle Health SciencesInForm.

About Exporting Data for Sites
12-4 Siebel Clinical Trial Management System Guide
To integrate data for subject visits data with data for activities
1. Navigate to the Administration - Clinical screen, then the Visit Templates view.
2. In the Subject Visit Templates list, create a new record and complete the necessaryfields.
The Clinical Item fields in the Visits and Activities applets are automaticallypopulated.
3. Verify that the Clinical Item fields in the Visits and Activities applets are populatedas specified in the following table.
Field Comments
Visits - Clinical Item When you create a visit, the clinical item in the Visits applet ispopulated with the name of the visit.
The clinical item value defines the completion criteria for the visitin Oracle Health Sciences InForm. If multiple versions of thesubject visit template exist, and some visits are the same in bothtemplate versions, then you can specify the same clinical itemvalue. This feature allows both visits to have the same completioncriteria in Oracle Health Sciences InForm.
Note: The clinical item value for a visit must be unique within aversion of a subject visit template.
Activities - Clinical Item When you create a visit activity, the clinical item in the Activitiesapplet is populated with the value in the Activities Descriptionfield.
The clinical item value defines the completion criteria for theactivity in Oracle Health Sciences InForm. The user oftencompletes the same activity at multiple visits, therefore the usercan assign the same clinical item value to each activity, and thendefine the completion criteria only once in Oracle Health SciencesInForm.
Note: The clinical item value for an activity must be uniquewithin a visit in a version of a subject visit template.
About Exporting Data for SitesUse the LS Clinical Protocol Site Interface Service Web service to export the data in theProtocol Site List view from Siebel Clinical Trial Management System to an externalapplication. For information about the Protocol Site List view, see "Creating Sites forClinical Trials" on page 4-13.
The following data is exported:
■ Account
■ Initiation completed date
■ Primary investigator
■ Protocol number
■ Region
■ Site number
■ Status

About Integrating Data for Activity Completion
Setting Up and Configuring Clinical Data Capture and Query Management System Integration 12-5
About Integrating Data for Activity CompletionOracle Health Sciences InForm controls the integration of activity completion databetween Siebel Clinical and Oracle Health Sciences InForm. In Oracle Health SciencesInForm, when patient data is entered that complies with the criteria for the clinicalitem value for a visit or activity, Siebel Clinical receives a message containing acompletion date. The visit or activity is updated with the status of Complete, and thecompletion date is populated.
If the message from Oracle Health Sciences InForm does not contain a completiondate, and the visit or activity in Siebel Clinical already has a status of Complete, thenno change is made to the completion date or status in Siebel Clinical.
Oracle Health Sciences InForm integrates activity completion data with Siebel Clinicalas follows:
■ Siebel Clinical searches for the subject using the unique subject identifier (row ID).When the subject is found, it searches for the activity as follows:
– Siebel Clinical searches for the activity using the clinical item for the visit andthe clinical item for the visit activity as follows:
* If the clinical item in the update corresponds to a subject visit, then thecompleted date for that visit is updated.
* If the clinical item in the update corresponds to an activity for a subjectvisit, then the completed date for that activity is updated.
– If the clinical item sent from Oracle Health Sciences InForm cannot be mappedto an activity completion item in Siebel Clinical, then an error is generated toindicate that the update failed.

About Integrating Data for Activity Completion
12-6 Siebel Clinical Trial Management System Guide

13
Setting Up and Configuring Clinical Data Management System Integration 13-1
13Setting Up and Configuring Clinical DataManagement System Integration
This chapter covers setting up and configuring Siebel Clinical for integration with aclinical data management system. It includes the following topics:
■ Overview of Clinical Data Management System Integration
■ About Customizing Web Services for Clinical Data Management SystemIntegration
■ Process of Setting Up Clinical Data Management System Integration
■ Integrating Data for Subject Visits with Data for Activities
■ About Integrating Data for Clinical Subjects
■ About Integrating Data for Activity Completion
Overview of Clinical Data Management System IntegrationThe following integration processes facilitate clinical trial integration:
■ Study subject integration. A Siebel Clinical Web service creates screening andenrollment subjects, and enables screening and enrolling against the active subjectvisit template. A integration exists for Siebel Clinical and Oracle Health SciencesInForm that uses this Web service to create subjects in Siebel Clinical whenscreening or enrollment data is entered in Oracle Health Sciences InForm.
■ Activity completion data integration. The integration for Siebel Clinical andOracle Health Sciences InForm uses a Siebel Clinical Web service to update thecompletion dates of visits and activities in the subject visit template. The customerconfigures trigger conditions in the Oracle Health Sciences InForm trial to send thecompletion date from Oracle Health Sciences InForm to Siebel.
The integration from Oracle Health Sciences InForm to Siebel Clinical automates thecreation of subjects in Siebel Clinical and the completion of visits and activities.
The automation of these processes enables the timely and accurate payments toinvestigators. It also provides a means to more accurately track and respond to issuesrelating to site performance and protocol adherence.
For information about configuring Oracle Health Sciences InForm for integration withSiebel Clinical Trial Management System, see Oracle Health Sciences InForm PublisherOn Demand 2.1 Integration Guide.
About Customizing Web Services for Clinical Data Management System Integration
13-2 Siebel Clinical Trial Management System Guide
About Customizing Web Services for Clinical Data Management SystemIntegration
You can customize the ClinicalSubject Inbound Web service for integration with anythird-party clinical study application or for specific business requirements. For moreinformation about customizing Siebel Web services, see Siebel CRM Web ServicesReference.
Process of Setting Up Clinical Data Management System IntegrationTo set up clinical data management system integration for Siebel Clinical, perform thefollowing tasks:
■ "Activating Workflows for Clinical Data Management System Integration" onpage 13-2
■ "Configuring Web Services for Clinical Data Management System Integration" onpage 13-2
Activating Workflows for Clinical Data Management System IntegrationThis task describes how to activate the workflows that are required for clinical datamanagement system integration. You can use Siebel Business Process Designer tomodify the workflows to suit your own business model. For more information, seeSiebel Business Process Framework: Workflow Guide.
This task is a step in "Process of Setting Up Clinical Data Management SystemIntegration" on page 13-2.
To activate workflows for clinical data management system integration
1. Navigate to the Administration - Business Process screen, then the WorkflowDeployment view.
2. Query for and activate each of the following workflows:
■ SWI LS Clinical Subject Inbound - Subject
■ SWI LS Clinical Subject Inbound - Activity
■ SWI - Protocol Number Lookup
■ LS Clinical - DeleteNonAppVisits Process
3. Verify that each activated workflow is added to the Active Workflow Processesview at the end of the screen.
Configuring Web Services for Clinical Data Management System IntegrationThis task describes how to configure the Web services that are required for clinical datamanagement system integration. For more information about configuring Webservices, see Integration Platform Technologies: Siebel Enterprise Application Integration.
Note: It is recommended that you use HTTPS authentication. Forinformation about configuring Secure Sockets Layer (SSL) for HTTPSauthentication, see Siebel Security Guide.
This task is a step in "Process of Setting Up Clinical Data Management SystemIntegration" on page 13-2.

Integrating Data for Subject Visits with Data for Activities
Setting Up and Configuring Clinical Data Management System Integration 13-3
To configure Web services for clinical data management system integration
1. Navigate to the Administration - Web Services screen, then the Inbound WebServices view.
2. Query for each of the following Web services, and update the language andaddress variables:
■ ClinicalSubject Inbound Web service.
■ LS Clinical Protocol Site Interface Service
3. Click Clear Cache on the Inbound Web Services applet.
Integrating Data for Subject Visits with Data for ActivitiesSubject visit templates allow you to set up a template schedule. The template scheduleis based on the protocol document. You use the template schedule to generatescreening, rescreening, and enrollment schedules for each subject, according to thesubject’s screening, rescreening, and enrollment dates.
The Clinical Item Integration field in the subject visit template is used for integratingvisit data with activity data between Siebel Clinical and Oracle Health SciencesInForm.
To integrate data for subject visits with data for activities
1. Navigate to the Administration - Clinical screen, then the Visit Templates view.
2. In the Subject Visit Templates list, create a new record and complete the necessaryfields.
The Clinical Item fields in the Visits and Activities applets are automaticallypopulated.
3. Verify that the Clinical Item fields in the Visits and Activities applets are populatedas specified in the following table.
Field Comments
Visits - Clinical Item When you create a visit, the clinical item in the Visits applet ispopulated with the name of the visit.
The clinical item value is passed from Oracle Health SciencesInForm to Siebel Clinical when updating the visit or activitycompletion date. If multiple versions of the subject visit templateexist, and some visits are the same in both template versions, thenyou can specify the same clinical item value. This feature allowsboth visits to have the same completion criteria in Oracle HealthSciences InForm.
Note: The clinical item value for a visit must be unique within aversion of a subject visit template.
Activities - Clinical Item When you create a visit activity, the clinical item in the Activitiesapplet is populated with the value in the Activities Descriptionfield.
The clinical item value for the activity is passed from OracleHealth Sciences InForm when sending the completion date for theactivity.
Note: The clinical item value for an activity must be uniquewithin a visit in a version of a subject visit template.

About Integrating Data for Clinical Subjects
13-4 Siebel Clinical Trial Management System Guide
About Integrating Data for Clinical SubjectsThe customer defines events that invoke the Siebel Web service to create and updatesubject information. The event defines what data entry in Oracle Health SciencesInForm will cause Oracle Health Sciences InForm to call the Siebel Web service. Whenpatients are assigned to patient positions in Oracle Health Sciences InForm, or patientdata is entered for a patient position, the integration triggers the creation of a subject inSiebel Clinical. Updates to the information for the patient in Oracle Health SciencesInForm are exported to Siebel Clinical. Deleted data in Oracle Health Sciences InFormis not reflected in Siebel Clinical. Patient data for Oracle Health Sciences InForm andsubject data for Siebel Clinical is integrated as follows:
■ Subject Messages. When a subject message is received by Siebel Clinical fromOracle Health Sciences InForm, Siebel Clinical evaluates it to determine if a newsubject must be created or if an existing subject must be updated. Siebel Clinicalsearches for the system ID of the subject. If the system ID does not exist, thenSiebel Clinical creates a new subject. If it does exist, then Siebel Clinical updatesthe subject.
■ Subject Number and Subject ID. Oracle Health Sciences InForm sends the subjectnumber over as a Subject ID to Siebel Clinical.
■ Encounter Date. The customer decides which date from Oracle Health SciencesInForm to map to Encounter Date in Siebel Clinical, and configures the mappingaccordingly.
■ Screen Date. The customer decides which date from Oracle Health SciencesInForm to map to Screen Date in Siebel Clinical, and configures the mappingaccordingly.
■ Informed Consent Date. Informed Consent Date is required only if a new SubjectVisit Template is being applied. If Siebel Clinical does not have an informedconsent date, then an Effective Date (for the Subject View Template) is sent insteadof an informed consent date.
About Integrating Data for Activity CompletionOracle Health Sciences InForm controls the integration of activity completion databetween Siebel Clinical and Oracle Health Sciences InForm. The customer defines inthe Oracle Health Sciences InForm trial what data must be collected to determine thata visit or activity in Siebel Clinical is complete. When those conditions are met, SiebelClinical receives a message. The visit or activity is updated with the status ofComplete, and the completion date is populated.
If the message from Oracle Health Sciences InForm does not contain a completiondate, and the visit or activity in Siebel Clinical already has a status of Complete, thenno change is made to the completion date or status in Siebel Clinical.
Oracle Health Sciences InForm and Siebel Clinical integrate activity completion data asfollows:
■ Siebel Clinical searches for the subject using the unique subject identifier (row ID).When the subject is found, it searches for the activity as follows:
– Siebel Clinical searches for the activity using the clinical item for the visit andthe clinical item for the visit activity as follows:
* If the clinical item in the update corresponds to a subject visit, then thecompleted date for that visit is updated.

About Integrating Data for Activity Completion
Setting Up and Configuring Clinical Data Management System Integration 13-5
* If the clinical item in the update corresponds to an activity for a subjectvisit, then the completed date for that activity is updated.
– If the clinical item sent from Oracle Health Sciences InForm cannot be mappedto an activity completion item in Siebel Clinical, then an error is generated toindicate that the update failed.

About Integrating Data for Activity Completion
13-6 Siebel Clinical Trial Management System Guide

14
Setting Up and Using the Siebel Mobile Disconnected Application for Siebel Clinical 14-1
14Setting Up and Using the Siebel MobileDisconnected Application for Siebel Clinical
This chapter covers setting up a Siebel Mobile disconnected application for SiebelClinical and describes the tasks that a user of the application can execute in online(connected) and offline (disconnected) mode. It includes the following topics:
■ About Siebel Mobile Disconnected Applications
■ About the Siebel Mobile Disconnected Application for Siebel Clinical
■ Configuring a Siebel Mobile Disconnected Application for Siebel Clinical
■ Using the Siebel Mobile Disconnected Application for Siebel Clinical
■ Managing My Site Visits for Siebel Clinical
■ Managing My Sites for Siebel Clinical
About Siebel Mobile Disconnected ApplicationsSiebel Mobile applications allow you to access Siebel CRM information with your mobiledevice in real time by permitting you to access a browser-based version of the application(such as Siebel Clinical) on your mobile device (android or iOS tablet or smartphone).
Siebel Mobile Disconnected Applications are Siebel applications (such as SiebelClinical) accessed from a browser on a mobile device (android or iOS tablet orsmartphone), which synchronizes data directly to the browser client without use ofadditional software or a network connection.
About the Siebel Mobile Disconnected Application for Siebel ClinicalClinical Research Associates (CRAs) often work at clinical sites with limited or nointernet facility. An ability to use Siebel Clinical in offline (disconnected) mode helpsCRAs to capture real time data related to site visits such as monitoring trip reports, siteaccounts and contacts, and site findings.
Using the current version of the Siebel Mobile disconnected application for SiebelClinical, you can:
■ Perform a monitoring trip report in online (connected) and offline (disconnected)mode.
■ Manage My Site Visits and My Sites for Siebel Clinical.
Note that Site Visit and Trip Report are separate entities. You can complete aclinical trip report by changing the Visit Status field to Done in offline mode. TheTrip Report status field can only be changed in online mode.

Configuring a Siebel Mobile Disconnected Application for Siebel Clinical
14-2 Siebel Clinical Trial Management System Guide
■ Enter data in offline mode and later synchronize the data with the Siebel Clinicalapplication over the internet.
Before starting to use the current version of the Siebel Mobile disconnected applicationfor Siebel Clinical, you must do the following:
■ Synchronize data in the Siebel Mobile disconnected application for Siebel Clinicalin online mode first, before going offline, so that all existing trip report data isloaded and will be available in offline mode.
■ Create site visits using the Siebel Clinical Web application in online mode (formore information see, "Creating and Managing Site Visits" on page 6-11).
You perform data synchronization to the Siebel Clinical application in online mode.
Configuring a Siebel Mobile Disconnected Application for Siebel ClinicalUse the following procedure to configure a Siebel Mobile disconnected application forSiebel Clinical.
To configure a Siebel Mobile disconnected application for Siebel Clinical
1. Log in to the Siebel Clinical application as administrator.
2. Navigate to the Administration - Server Configuration screen, then theEnterprises, Component Definitions view and do the following:
a. Query for the Mobile Data Extraction (ENU) component, make a copy of therecord, and then set the following record values:
Field Value
Component eClinical Mobile Data Extraction (ENU)
Alias eClinicalMobileDbXtract_enu
Component Group Disconnected Mobile Synchronization
Description eClinical Mobile Data Extraction
b. Select the eClinicalMobileDbXtract_enu component and set the followingparameters for the component:
Name Value
Application Name Siebel eClinical Mobile
Language Code ENU
OM - Configuration File eclinicalm.cfg
Application Splashtext Siebel Clinical Mobile
Application Title Siebel Clinical Mobile
c. Click Activate to activate the new eClinical Mobile Data Extraction (ENU)component.
d. Click Synchronize to synchronize the eClinical Mobile Data Extraction (ENU)component
3. Navigate to the Synchronize view, and click Synchronize.
4. Navigate to the Component Groups view, and do the following:

Using the Siebel Mobile Disconnected Application for Siebel Clinical
Setting Up and Using the Siebel Mobile Disconnected Application for Siebel Clinical 14-3
a. Select the eClinicalMObjMgr_enu component and set the followingparameters for the component:
Name Value
EnableInlineForList Never
EnableOfflineMode True
b. Query for each of the following component groups:
HandheldSync
HandheldSyncSIS
Siebel Remote
MobileSync
c. For each of these component groups:
– Select the component group and then click Enable.
– In the Component Group Assignments applet, click Enable.
5. Restart Siebel Services and Siebel Gateway.
6. Navigate to the Administration - Server Management screen, then the Jobs viewand do the following:
a. Create a new job with the parameter values shown in the following table:
Field Value
Component Group Database Extract
Job Parameter Name: Client Name
Job Parameter Value: <USER ID>-MOBILE
b. Submit the job.
The status of the job changes to Success when the database extraction job issuccessful.
Using the Siebel Mobile Disconnected Application for Siebel ClinicalThe tasks that a user of the Siebel Mobile application for Siebel Clinical can execute inonline (connected) and offline (disconnected) mode include the following:
■ Getting Started with Siebel Mobile Disconnected Applications (general tasks)
■ Switching to Offline Mode and Synchronizing Data
■ Managing My Site Visits for Siebel Clinical
■ Managing My Sites for Siebel Clinical
Note: You must complete the relevant setup tasks detailed in this guidebefore using the Siebel Mobile disconnected application for Siebel Clinical.

Using the Siebel Mobile Disconnected Application for Siebel Clinical
14-4 Siebel Clinical Trial Management System Guide
Getting Started with Siebel Mobile Disconnected ApplicationsFor information about how to get started with Siebel Mobile disconnected applicationsand about the common procedures that you can execute in online (connected) andoffline (disconnected) mode in all applications, see the Getting Started chapter in SiebelMobile Guide: Disconnected which includes information about the following:
■ Logging in to and out of Siebel Mobile
■ Navigating the Siebel Mobile user interface
■ Managing records in Siebel Mobile
■ Reviewing notification messages in Siebel Mobile
■ Configuring application settings for Siebel Mobile
■ Displaying location details in Siebel Mobile
■ Running predefined queries in Siebel Mobile
■ Using Attachments in Siebel Mobile
■ Printing from Siebel Mobile
■ Process of using Siebel Mobile disconnected applications in offline mode
Switching to Offline Mode and Synchronizing DataYou can use the Siebel Mobile disconnected application for Siebel Clinical in offlinemode if your mobile device has a wireless network connection. In offline mode, yourmobile device is not connected to the Siebel Server and you cannot synchronize anychanges that you make while working in offline mode. You must switch back to onlinemode, and then synchronize the changes.
A prerequisite to using the Siebel Mobile disconnected application for Siebel Clinicalin offline mode is that you create sites and site visits in the Siebel Clinical Webapplication first (see "Creating and Managing Site Visits" on page 6-11).
When you initially log in to the Siebel Mobile disconnected application for SiebelClinical, you are in online mode. You must then decide whether to continue workingin online (connected) mode or to switch to offline (disconnected) mode. If you decideto stay working in online mode, then no further steps are required for datasynchronization. If you decide to work in offline mode, then you must switch to offlinemode. Then when you are finished working in offline mode, you must synchronize thedata or upload the changes you made while working in offline mode to the SiebelServer.
To switch to offline mode and synchronize data
1. Log in to the Siebel Mobile disconnected application for Siebel Clinical.
2. Tap Go Offline (the solid airplane icon) on the application banner to go offline andwork in disconnected mode.
If this is your fist time going offline, then you must wait for the following twonotification messages appear:
a. Data extraction has been scheduled.
This message may take a while to appear.
b. Data is ready for download.
After you receive this message, you can start working in offline mode.

Managing My Site Visits for Siebel Clinical
Setting Up and Using the Siebel Mobile Disconnected Application for Siebel Clinical 14-5
The following notification appears whenever new data is created in online mode:New data is ready for download.
3. When finished working in offline mode, tap Go Online (the empty airplane icon)on the application banner to synchronize the data changes and select one of thefollowing as required:
■ Upload and Go Online. Tap to trigger a data upload and go online.
■ Sync and stay Offline. Tap to synchronize the data changes but remain offline.
■ Upload Only and stay Offline. Tap to trigger a data upload but remain offline.
Managing My Site Visits for Siebel ClinicalTo ensure the smooth operation of clinical trials, CRAs (clinical research associates)typically carry out different types of visits to sites, such as, pre-study visits, invitationvisits, monitoring visits, and close-out visits.
The following procedures related to site visit management are included in this topic:
■ "Displaying My Site Visits Information" on page 14-5
■ "Modifying My Site Visits Information" on page 14-6
■ "Modifying Checklist Activity Information" on page 14-6
■ "Modifying Current Follow Up Information" on page 14-7
■ "Modifying All Follow Up Information" on page 14-7
■ "Modifying CRF Tracking Information" on page 14-8
For more information about creating site visits, see "Creating and Managing SiteVisits" on page 6-11creating.
Displaying My Site Visits InformationCRAs or logged in users can view all available site visits and related information in theMy Site Visits screen.
To display My Site Visits information
1. Tap Side Menu on the application banner, and then tap My Site Visits to displaythe following:
■ The My Site Visits list in the side pane, which includes the followinginformation: Visit Name, Visit Start, Account (associated with the visit).
Use these fields to search for a particular site visit.
■ The site visit details in the main pane, which includes the followinginformation: Visit Status (Editable), Visit Type, Primary Assignee, Trip reportStatus, Site, Region, Completed (Editable), Comments (Editable).
And the following related information: Checklist Activities, Current FollowUp, All Follow Up, CRF Tracking.
2. Tap a record in the My Site Visits list.
All the site visit details for the selected record appear, including the followingrelated information:
■ Checklist Activities. Tap the down arrow next to Checklist Activities to viewall the checklist activities associated with the selected site visit.

Managing My Site Visits for Siebel Clinical
14-6 Siebel Clinical Trial Management System Guide
■ Current Follow Up. Tap the down arrow next to Current Follow Up to viewthe most current follow up information associated with the selected site visit.
■ All Follow Up. Tap the down arrow next to All Follow Up to view all thefollow up information associated with the selected site visit.
■ CRF Tracking. Tap the down arrow next to CRF Tracking to view all the CRFtracking information associated with the selected site visit.
Modifying My Site Visits InformationComplete the following procedure to modify My Site Visits information.
To modify My Sites Visits information
1. Tap Side Menu on the application banner, and then tap My Site Visits to displaythe following:
■ The My Site Visits list in the side pane.
■ The site visit details in the main pane.
2. Update an existing site visit as follows:
a. Tap a record in the My Site Visits list.
All the site visit details for the selected record appear.
b. Update the following fields as required: Visit Status, Completed, Comments.
c. To modify checklist activity information, see "Modifying Checklist ActivityInformation" on page 14-6.
d. To modify current follow up information, see "Modifying Current Follow UpInformation" on page 14-7.
e. To modify all follow up information, see "Modifying All Follow UpInformation" on page 14-7.
f. To modify CRF tracking information, see "Modifying CRF TrackingInformation" on page 14-8.
Modifying Checklist Activity InformationComplete the following procedure to modify the checklist activity for a site visits.
To modify checklist activity information
1. Tap Side Menu on the application banner, and then tap My Site Visits to displaythe following:
■ The My Site Visits list in the side pane.
■ The site visit details in the main pane.
2. Tap a record in the My Site Visits list.
All the site visit details for the selected record appear.
3. Update the checklist activity information as follows:
a. Tap the down arrow next to Checklist Activities and then select the record thatyou want to modify.
b. Update the following fields as required: Quantity, UOM, Response,Comments.
Managing My Site Visits for Siebel Clinical
Setting Up and Using the Siebel Mobile Disconnected Application for Siebel Clinical 14-7
4. Add a new checklist activity as follows:
a. Tap New (the plus (+) icon) next to Checklist Activity.
b. Enter the information for the checklist activity in the fields that appear andthen save the record.
Modifying Current Follow Up InformationComplete the following procedure to modify the current follow up information for asite visit.
To modify current follow up information
1. Tap Side Menu on the application banner, and then tap My Site Visits to displaythe following:
■ The My Site Visits list in the side pane.
■ The site visit details in the main pane.
2. Tap a record in the My Site Visits list.
All the site visit details for the selected record appear.
3. Update the current follow up information as follows:
a. Tap the down arrow next to Current Follow Up and then select the record thatyou want to modify.
b. Update the following fields as required: Activity Type, Description, Due,Status, Comments.
4. Add a new follow up activity as follows:
a. Tap New (the plus (+) icon) next to Current Follow Up.
b. Enter the information for the follow up activity in the fields that appear andthen save the record.
Modifying All Follow Up InformationComplete the following procedure to modify all follow up information for a site visit.
To modify all follow up information
1. Tap Side Menu on the application banner, and then tap My Site Visits to displaythe following:
■ The My Site Visits list in the side pane.
■ The site visit details in the main pane.
2. Tap a record in the My Site Visits list.
All the site visit details for the selected record appear.
3. Update all follow up information as follows:
a. Tap the down arrow next to All Follow Up and then select the record that youwant to modify.
b. Update the following fields as required: Activity Type, Description, Due,Status, Completed Date, Comments.

Managing My Sites for Siebel Clinical
14-8 Siebel Clinical Trial Management System Guide
Modifying CRF Tracking InformationComplete the following procedure to modify the CRF tracking information for a sitevisit.
To modify CRF tracking information
1. Tap Side Menu on the application banner, and then tap My Site Visits to displaythe following:
■ The My Site Visits list in the side pane.
■ The site visit details in the main pane.
2. Tap a record in the My Site Visits list.
All the site visit details for the selected record appear.
3. Update the CRF tracking information as follows:
a. Tap the down arrow next to CRF Tracking and then select the record that youwant to modify.
b. Tap Attach-CRF to make all the fields in the selected record editable, and thenupdate the fields as required.
4. Delete CRF tracking information as follows:
a. Select the record that you want to modify.
b. Tap Detach-CRF.
Doing this makes all the fields in the selected record read-only and thendeletes all data entered for that record (if any).
Managing My Sites for Siebel ClinicalA site is an account that a principal investigator manages for a particular protocol.
The following procedures related to site management are included in this topic:
■ "Displaying My Sites Information" on page 14-8
■ "Viewing Site Contacts Information" on page 14-9
■ "Viewing Site Visits Information" on page 14-9
For more information about creating sites for clinical trials, see "Process of ManagingSites and Contacts for Clinical Trials" on page 6-3.
Displaying My Sites InformationCRAs or logged in users can view all available sites, site details and relatedinformation in the My Sites screen.
To display My Sites information
1. Tap Side Menu on the application banner, and then tap My Sites to display thefollowing:
■ The My Sites list in the side pane, which includes the following information:Protocol #, Protocol Name, Account.
Use these fields to search for a particular site.
Sites with a status of Terminated do not appear in the My Sites list.

Managing My Sites for Siebel Clinical
Setting Up and Using the Siebel Mobile Disconnected Application for Siebel Clinical 14-9
■ The site details in the main pane, which includes the following information:Site #, Parent Site (available for satellite sites only), Site Initiated (date), Status.
And the following related information: Site Contacts, Site Visits.
2. Tap a record in the My Sites list.
All the site details for the selected record appear, including the following relatedinformation:
■ Site Contacts. For more information, see "Viewing Site Contacts Information"on page 14-9.
■ Site Visits. For more information, see "Viewing Site Visits Information" onpage 14-9.
Viewing Site Contacts InformationComplete the following procedure to view the contacts associated with a site.
To view site contact information
1. Tap Side Menu on the application banner, and then tap My Sites to display thefollowing:
■ The My Sites list in the side pane.
■ The site details in the main pane.
2. Tap a record in the My Sites list.
All the site details for the selected record appear.
3. Tap the down arrow next to Site Contacts.
All the contacts associated with the selected site appear.
Viewing Site Visits InformationComplete the following procedure to view the visits associated with a site.
To view site visit information
1. Tap Side Menu on the application banner, and then tap My Site Visits to displaythe following:
■ The My Sites list in the side pane.
■ The site details in the main pane.
2. Tap a record in the My Sites list.
All the site details for the selected record appear.
3. Tap the down arrow next to Site Visits.
All the visits associated with the selected site appear.

Managing My Sites for Siebel Clinical
14-10 Siebel Clinical Trial Management System Guide

A
Developer’s Reference for Siebel Clinical A-1
ADeveloper’s Reference for Siebel Clinical
This appendix contains information about configuring and customizing Siebel Clinicalusing Siebel Tools and about customizing Siebel Clinical Web services. It assumes thatyou are familiar with the processes and conventions of working with Siebel Tools tochange object properties. For more information about changing properties in SiebelTools, see Configuring Siebel Business Applications.
This appendix includes the following topics:
■ About Using the Siebel REST API with Siebel Clinical
■ Overview of User Properties for Siebel Clinical
■ User Properties for Business Components in Siebel Clinical
■ User Properties for Business Services in Siebel Clinical
■ Applet Properties in Siebel Clinical
■ Field Properties in Siebel Clinical
■ System Preferences in Siebel Clinical
■ Workflows in Siebel Clinical
■ Web Services in Siebel Clinical
About Using the Siebel REST API with Siebel ClinicalYou can use the Siebel CRM Representational State Transfer (REST) applicationprogramming interface (API) to create, synchronize, and delete Siebel Clinical users.For more information about Siebel REST API and about using Siebel REST API withSiebel Clinical, see Siebel REST API Guide.
You can also use the Siebel REST API to invoke business services using Siebel serverscript techniques. For more information, see Using Siebel Tools.
When you create or synchronize Siebel Clinical users, you can pass default positionand responsibility information in the REST API response by configuring the LSClinical User Provisioning Service Business method. For more information, see thetopic about configuring Siebel Clinical users in Siebel REST API Guide.

Overview of User Properties for Siebel Clinical
A-2 Siebel Clinical Trial Management System Guide
Overview of User Properties for Siebel ClinicalUser properties are object definitions that are children of an applet, businesscomponent, control, field, or list column, and configure specialized behavior beyondthe configuration in the properties of the parent object definition.
User properties drive some Siebel Clinical functionalities. You can customize thesefunctionalities through their respective user properties. With user properties, you cancontrol the behavior of the user interface, change default settings or leave them as theyare, and enable or disable functionalities.
This appendix lists user properties that are specific to Siebel Clinical. For moreinformation about user properties and user properties that apply to all Siebel BusinessApplications, see Siebel Developer's Reference.
User Properties for Business Components in Siebel ClinicalTable A–1 describes the business component user properties that you can use to enableand configure functionality for Siebel Clinical.
Table A–1 User Properties for Business Components in Siebel Clinical
User Property Business Component Description
Apply Templates WorkFlowProcess Name
LS Subject Schedule DateVBC
This property defines the workflow process that isinvoked when the Enroll Screen Rescreen ThroughWorkFlow property is set to Y, and when the DisableDelete Non App Visit property is set to N.
The default value is LS Clinical - ApplyTemplatesProcess.
If the user clicks No on the pop-up message that theDisable Delete Non App Visit property enables, thenLS Clinical - ApplyTemplates Process is invoked, andthe subject visit template is applied.
Automatic Missed StatusTracking
Visit Plan This property configures whether or not Missed statusis automatically tracked in the Subject Status MVG(multi value group) for status tracking visits. Youconfigure the status tracking visit for each visit type inthe subject visit template.
Configure this property as follows:
■ To enable automatic tracking of Missed status forstatus tracking visits, set the value to Y.
■ To disable automatic tracking of Missed status forstatus tracking visits, set the value to N.
The default value is Y.
Completed Status Code Visit Plan This property configures automatic status tracking.
The default value follows:
Completed.
Note: Do not change this value.

User Properties for Business Components in Siebel Clinical
Developer’s Reference for Siebel Clinical A-3
Date RollUp Fields:Protocol n Clinical Protocol Site This property configures automatic rollup of the LastSubject Off Study date from the site record to theprotocol record.
The value takes the following parameters:
"<Source BC Field Name>", "<Target BC FieldName>", "<Sort Order>"
The value is set as follows:
"Last Subject Off Study Date", "Last Subject Off StudyDate", "(DESCENDING)"
Note: Do not change this value.
Date RollUp Fields:Region n Clinical Protocol Site This property configures automatic rollup of the LastSubject Off Study date from the site record to theregion record.
The value takes the following parameters:
"<Source BC Field Name>", "<Target BC FieldName>", "<Sort Order>"
The value is set as follows:
"Last Subject Off Study Date", "Last Subject Off StudyDate", "(DESCENDING)"
Note: Do not change this value.
Delete NonApp WorkFlowProcess Name
LS Subject Schedule DateVBC
This property defines the workflow process that isinvoked when the Enroll Screen Rescreen ThroughWorkFlow property is set to Y, and when the DisableDelete Non App Visit property is set to N.
The default value is LS Clinical - DeleteNonAppVisitsProcess.
If the user clicks OK on the pop-up message that theDisable Delete Non App Visit property enables, thenLS Clinical - DeleteNonAppVisits Process is invokedto delete incomplete clinical visits in the previousversion of a subject visit template.
Disable Delete Non App Visit Clinical Subject This property turns on or off deletion of nonapplicable clinical subject visits. When users scheduleclinical subject visits using a revised subject visittemplate, a pop-up message appears to confirm ifincomplete visits in the previous template versionmust be deleted, and if complete visits in the newtemplate version must be deleted. Clicking OK in thepop-up message deletes the non applicable subjectvisits. Clicking Cancel retains the non applicablesubject visits.
Configure the value as follows:
■ To enable deletion of non applicable subjectvisits, set the value to N.
■ To disable deletion of non applicable subjectvisits, set the value to Y.
The default value is N.
Table A–1 (Cont.) User Properties for Business Components in Siebel Clinical
User Property Business Component Description

User Properties for Business Components in Siebel Clinical
A-4 Siebel Clinical Trial Management System Guide
Enroll Screen RescreenThrough WorkFlow
LS Subject Schedule DateVBC
This property specifies whether subject visitscheduling tasks are executed through workflows orbusiness component methods.
Configure the value as follows:
■ To execute subject visit scheduling tasks throughworkflows, set the value to Y.
■ To execute subject visit scheduling tasks throughbusiness component methods, set the value to N.
The default value is N.
You configure the workflows that execute thescheduling tasks in the following business componentproperties:
■ WorkFlow Process Name
■ Apply Templates WorkFlow Process Name
■ Delete NonApp WorkFlow Process Name
Last Subject Off Study DateRollup Status n
Clinical Protocol Site This property identifies the qualified subject statusesthat are used to populate the date in the Last SubjectOff Study field. By default the following statuses areset:
■ Completed
■ Early Terminated
LS Amount Rollup Field 1 Clinical Payments This property configures automatic rollup of AmountPaid To Date from the payment record to the siterecord.
The value takes the following parameters:
"<Source BC Field Name>", "<Target BC FieldName>", "<Rollup Parent Buscomp Name>"
The value is set as follows:
"Amount Paid To Date", "Amount Paid To Date","Rollup Parent Buscomp Name"
Note: Do not change this value.
LS Amount Rollup Field 2 Clinical Payments This property configures automatic rollup of AmountEarned To Date from the payment record to the siterecord.
The value takes the following parameters:
"<Source BC Field Name>", "<Target BC FieldName>", "<Rollup Parent Buscomp Name>"
The value is set as follows:
"Amount Earned To Date", "Amount Earned To Date","Rollup Parent Buscomp Name"
Note: Do not change this value.
Table A–1 (Cont.) User Properties for Business Components in Siebel Clinical
User Property Business Component Description

User Properties for Business Components in Siebel Clinical
Developer’s Reference for Siebel Clinical A-5
LS Amount Rollup Field 3 Clinical Payments This property configures automatic rollup of VATamounts from the payment record to the site record.
The value takes the following parameters:
"<Source BC Field Name>", "<Target BC FieldName>", "<Rollup Parent Buscomp Name>"
The value is set as follows:
"VAT Amount", "VAT Amount", "Rollup ParentBuscomp Name"
Note: Do not change this value.
LS Amount Rollup Field 3 Clinical Protocol Site This property configures automatic rollup of VATamounts from the site record to the region record.
The value takes the following parameters:
"<Source BC Field Name>", "<Target BC FieldName>", "<Rollup Parent Buscomp Name>"
The value is set as follows:
"VAT Amount", "VAT Amount", "Rollup ParentBuscomp Name"
Note: Do not change this value.
LS Amount Rollup Field 3 Clinical Region This property configures automatic rollup of VATamounts from the region record to the clinicalprotocol record.
The value takes the following parameters:
"<Source BC Field Name>", "<Target BC FieldName>", "<Rollup Parent Buscomp Name>"
The value is set as follows:
"VAT Amount", "VAT Amount", "Rollup ParentBuscomp Name"
Note: Do not change this value.
LS Amount Rollup Field 3 Clinical Protocol This property configures automatic rollup of VATamounts from the protocol record to the programrecord.
The value takes the following parameters:
"<Source BC Field Name>", "<Target BC FieldName>", "<Rollup Parent Buscomp Name>"
The value is set as follows:
"VAT Amount", "VAT Amount", "Rollup ParentBuscomp Name"
Note: Do not change this value.
LS Amount Rollup On Status 1 Clinical Payments This property defines the payment status values thatare used to calculate the Paid to Date amount.
By default, only payments with a status of Paid areused to calculate the Paid to Date amount.
This property takes a comma delimited list of valuesas follows:
"Amount Paid to Date","Paid"
Table A–1 (Cont.) User Properties for Business Components in Siebel Clinical
User Property Business Component Description

User Properties for Business Components in Siebel Clinical
A-6 Siebel Clinical Trial Management System Guide
LS Clinical Enable Revert OnStatus
Clinical Payments This property defines the payment status values forwhich the Revert button is enabled.
The value takes a comma delimited list of paymentstatuses as follows:
"<Status1>", "<Status2>"
By default, the Revert button is enabled for thefollowing payment Status values:
■ In Progress
■ To Be Processed
LS Subject Terminate StudyStatus Value 1
Clinical Subject Status This property turns on or off the deletion ofincomplete future visits for a subject. Theseincomplete visits are visits for which the dateassociated with the subject status has a value, theCompleted field for the visit is not selected, and thedate in the Date field of the visit is later than the dateassociated with the subject status. When enabled, theincomplete future visits are deleted if the status of thesubject is a value in this property.
By default, this property includes the followingvalues:
■ Screen Failure
■ Early Terminated
Missed Status Code Visit Plan This property configures automatic status tracking.
The value is set to Missed.
Note: Do not change this value.
Named Method 1 Action (No Owner Lock) This property generates payment records.
The value string is set as follows:
"GenerateNewPayment", "INVOKESVC", "Action (NoOwner Lock)", "LS SubjectVisits Service","GeneratePayment", "'Site Id'", "[ProtocolSite Id]", "'srcBusComp'", "'Action (No OwnerLock)'", "'srcBusObj'", "'Clinical ProtocolSite'", "'tgtBusObj'", "'Clinical Payments'","'tgtBusComp'", "'Clinical Payments'"
Note: Do not change this value.
Named Method 1 LS Clinical Subject StatusSnapshot
This property generates the subject status snapshotfor a clinical site.
The value string is set as follows:
"SiteSnap", "INVOKESVC", "LS Clinical SubjectStatus Snapshot", "LS Clinical Trip ReportSvc", "GetSiteSnapshot", '"SVId"',"ParentFieldValue('Id')"
Note: Do not change this value.
Table A–1 (Cont.) User Properties for Business Components in Siebel Clinical
User Property Business Component Description
User Properties for Business Components in Siebel Clinical
Developer’s Reference for Siebel Clinical A-7
Named Method 2 Clinical Trip Report This property turns on or off approver verification fortrip reports. When enabled, the User Verificationscreen is launched during the approval process fortrip reports to verify the user logon credentials of theapprover.
Configure the value as follows:
■ To enable this property, set the value as follows:
"ValidateUser", "INVOKESVCSEL", "ClinicalTrip Report", "Workflow Process Manager","RunProcess", "ProcessName", "LS ClinicalTrip Report Approval", "RowId", "[Id]","Enable Verification", "Y"
■ To disable this property, set the value as follows:
"ValidateUser", "INVOKESVCSEL", "ClinicalTrip Report", "Workflow Process Manager","RunProcess", "ProcessName", "LS ClinicalTrip Report Approval", "RowId", "[Id]","Enable Verification", "N"
This property is disabled by default, and cannot benull.
Note: Customers who do not have a license for SiebelTools can use the CL – Verify TripReportApproversystem preference to configure this functionality. Formore information about configuring systempreferences, see "System Preferences in SiebelClinical" on page A-22.
Table A–1 (Cont.) User Properties for Business Components in Siebel Clinical
User Property Business Component Description

User Properties for Business Components in Siebel Clinical
A-8 Siebel Clinical Trial Management System Guide
Named Method n Clinical Protocol Site forPopup
This property associates accounts, activities, anddocuments for clinical protocols and clinical regionswith sites. It specifies the method (for example,ProtocolAccountRolldownToSite) for the appropriatepopup applet, the underlying business component(Clinical Protocol Site for Popup) for that applet, themethod (ApplyRolldown) in that business componentthat calls the rolldown business service (LS ClinicalRecord Rolldown Service), and the appropriate userproperty (for example, Protocol Account To SiteRolldown) as the input argument for the businessservice.
To associate accounts for clinical protocols with sites,set the value string as follows:
"ProtocolAccountRolldownToSite", "INVOKESVC","Clinical Protocol Site for Popup", "LSClinical Record Rolldown Service","ApplyRolldown", "UserPropertyName", "ProtocolAccount To Site Rolldown"
To associate accounts for clinical regions with sites, setthe value string as follows:
"RegionAccountRolldownToSite", "INVOKESVC","Clinical Protocol Site for Popup", "LSClinical Record Rolldown Service","ApplyRolldown", "UserPropertyName", "RegionAccount To Site Rolldown"
To associate activities for clinical protocols with sites,set the value string as follows:
"ProtocolActivityRolldownToSite", "INVOKESVC","Clinical Protocol Site for Popup", "LSClinical Record Rolldown Service","ApplyRolldown", "UserPropertyName", "ProtocolActivity To Site Rolldown"
To associate activities for clinical regions with sites,set the value string as follows:
"RegionActivityRolldownToSite", "INVOKESVC","Clinical Protocol Site for Popup", "LSClinical Record Rolldown Service","ApplyRolldown", "UserPropertyName", "RegionActivity To Site Rolldown"
To associate documents for clinical protocols withsites, set the value string as follows:
"ProtocolDocumentRolldownToSite", "INVOKESVC","Clinical Protocol Site for Popup", "LSClinical Record Rolldown Service","ApplyRolldown", "UserPropertyName", "ProtocolDocument To Site Rolldown"
To associate documents for clinical regions with sites,set the value string as follows:
"RegionDocumentRolldownToSite", "INVOKESVC","Clinical Protocol Site for Popup", "LSClinical Record Rolldown Service","ApplyRolldown", "UserPropertyName", "RegionDocument To Site Rolldown"
Table A–1 (Cont.) User Properties for Business Components in Siebel Clinical
User Property Business Component Description

User Properties for Business Components in Siebel Clinical
Developer’s Reference for Siebel Clinical A-9
Status Field RollUp n Clinical Subject Status This property collates subject numbers for each statusvalue. You can also configure it to collate subjectsstatus and visit type value pairs. The subject accrualsdata is rolled up to the site record.
The following comma-delimited parameterconfigurations are supported:
■ "[Subject Status]", "[Business Component FieldName]", "[Visit Type]"
■ "[Subject Status]", "[Business Component FieldName]", "[Null]"
■ "[Subject Status]", "[Business Component FieldName]"
The Subject Status and Business Component FieldName parameters are mandatory. The Visit Typeparameter is optional. The Visit Type value is notpopulated by default.
The following example provides the defaultconfiguration for the Enrolled status, and collates thesubjects with an Enrolled status for automatic rollupto the site record:
"Enrolled", "# Enrolled"
Status RollUp Fields:Protocol n Clinical Protocol Site This property collates subject numbers for each statusvalue. You can also configure it to collate subjectsstatus and visit type value pairs. The subject accrualsdata is rolled up to the protocol record.
The following comma-delimited parameterconfigurations are supported:
■ "[Subject Status]", "[Business Component FieldName]", "[Visit Type]"
■ "[Subject Status]", "[Business Component FieldName]", "[Null]"
■ "[Subject Status]", "[Business Component FieldName]"
The Subject Status and Business Component FieldName parameters are mandatory. The Visit Typeparameter is optional. The Visit Type value is notpopulated by default.
The following example provides the defaultconfiguration for the Enrolled status, and collates thesubjects with an Enrolled status for automatic rollupto the protocol record:
"Enrolled", "# Enrolled"
Table A–1 (Cont.) User Properties for Business Components in Siebel Clinical
User Property Business Component Description

User Properties for Business Components in Siebel Clinical
A-10 Siebel Clinical Trial Management System Guide
Status RollUp Fields:Region n Clinical Protocol Site This property collates subject numbers for each statusvalue. You ca also configure it to collate subject statusand visit type value pairs. The subject accruals data isrolled up to the region record.
The following comma-delimited parameterconfigurations are supported:
■ "[Subject Status]", "[Business Component FieldName]"
■ "[Subject Status]", "[Business Component FieldName]", "[Visit Type]"
■ "[Subject Status]", "[Business Component FieldName]", "[Null]"
The Subject Status and Business Component FieldName parameters are mandatory. The Visit Typeparameter is optional. The Visit Type value is notpopulated by default.
The following example provides the defaultconfiguration for the Enrolled status, and collates thesubjects with an Enrolled status for automatic rollupto the region record:
"Enrolled", "# Enrolled"
Status Tracking Field n Clinical Subject This property configures automatic status tracking forsubject status. By, default, automatic subject statustracking applies to fields related to the followingsubject statuses:
■ Screen Failure
■ Randomized
■ Withdrawn
■ Early Terminated
You can track additional custom subject statuses byconfiguring additional values for this property type.This property takes the following comma-delimitedlist of parameters:
"[Business Component Field Name]", "[DateField]","[Status Value]”
■ [Business Component Field Name] is the name ofthe business component field that is tracked forautomatic status tracking, for example,Randomization ID.
■ [Date Field] is the name of the correspondingdate field that is tracked for automatic statustracking, for example, Randomized Date.
■ [Status Value] is the corresponding status valuethat is tracked for automatic status tracking, forexample, Randomized.
Status Tracking Field 1 Clinical Subject This property configures automatic status tracking forthe subject status of Randomized.
The default value follows:
"Randomization Id", "Randomized Date","Randomized"
To track additional custom subject statuses, see StatusTracking Field n.
Table A–1 (Cont.) User Properties for Business Components in Siebel Clinical
User Property Business Component Description

User Properties for Business Components in Siebel Clinical
Developer’s Reference for Siebel Clinical A-11
Status Tracking Field 2 Clinical Subject This property configures automatic status tracking forthe subject status of Screen Failure.
The default value follows:
"Reason Excluded", "Screen Failure Date", "ScreenFailure"
To track additional custom subject statuses, see StatusTracking Field n.
Status Tracking Field 3 Clinical Subject This property configures automatic status tracking forthe subject status of Withdrawn.
The default value follows:
"Withdrawn Reason", "Withdrawn Date","Withdrawn"
To track additional custom subject statuses, see StatusTracking Field n.
Status Tracking Field 4 Clinical Subject This property configures automatic status tracking forthe subject status of Early Terminated.
The default value follows:
"Early Termination Reason", "Early Terminated Date","Early Terminated"
To track additional custom subject statuses, see StatusTracking Field n.
Trip Report Template Filter 1 Clinical Trip Report This property filters the trip report templates in thedialog box that appears when users click the selectbutton in the Template field of a Trip Report form. Itdesignates that templates with a protocol that is thesame as the protocol for the site visit appear in thedialog box. Templates with no protocol also appear inthe dialog box.
The default value follows:
"Protocol Id", "Protocol Id"
The first value designates the field name for protocolsin the Clinical Trip Report business component. Thesecond value designates the field name for protocolsin the LS Clinical Trip Report Template businesscomponent.
Trip Report Template Filter 2 Clinical Trip Report This property filters the trip report templates in thedialog box that appears when users click the selectbutton in the Template field of a Trip Report form. Itdesignates that templates with a region that is thesame as the region for the site visit appear in thedialog box. Templates with no region also appear inthe dialog box.
The default value follows:
"Region Id", "Region Id"
The first value designates the field name for regionsin the Clinical Trip Report business component. Thesecond value designates the field name for regions inthe LS Clinical Trip Report Template businesscomponent.
Table A–1 (Cont.) User Properties for Business Components in Siebel Clinical
User Property Business Component Description

User Properties for Business Components in Siebel Clinical
A-12 Siebel Clinical Trial Management System Guide
Trip Report Template Filter 3 Clinical Trip Report This property filters the trip report templates in thedialog box that appears when users click the selectbutton in the Template field of a Trip Report form. Itdesignates that templates with a visit type that is thesame as the visit type for the site visit appear in thedialog box. Templates with no visit type also appearin the dialog box.
The default value follows:
"Type", "Visit Type"
The first value designates the field name for visittypes in the Clinical Trip Report business component.The second value designates the field name for visittypes in the LS Clinical Trip Report Template businesscomponent.
Validate Field LS Subject EnrollmentDate VBC
Note: This property is deprecated in version 8.1.1.9and later.
This property represents the name of the field tovalidate.
The default value is Enrollment ID.
Validate On 1 Clinical Trip Report This property turns on or off validation for tripreports that have a status of Rejected.
When enabled, trip reports that have a status ofRejected are validated to ensure that one of thefollowing fields is populated:
■ Reviewer Comments
■ Approver Comments
Configure the value as follows:
■ To enable this property, set the value as follows:
“Rejected”, “Y”
■ To disable this property, set the value as follows:
“Rejected”, “N”
This property is enabled by default.
Validate On 2 Clinical Trip Report This property turns on or off validation for tripreports that have a status of Submitted.
When enabled, trip reports that have a status ofSubmitted are validated to ensure that a reviewer isassigned to the trip report.
Configure the value as follows:
■ To enable this property, set the value as follows:
"Submitted", "Y"
■ To disable this property, set the value as follows:
"Submitted", "N"
This property is enabled by default.
Table A–1 (Cont.) User Properties for Business Components in Siebel Clinical
User Property Business Component Description

User Properties for Business Services in Siebel Clinical
Developer’s Reference for Siebel Clinical A-13
User Properties for Business Services in Siebel ClinicalTable A–2 describes the business service user properties that you can use to enable andconfigure functionality for Siebel Clinical.
Validate On 3 Clinical Trip Report This property turns on or off validation for tripreports that have a status of Submitted for Approval.
When enabled, trip reports that have a status ofSubmitted for Approval are validated to ensure thatan approver is assigned to the trip report.
Configure the value as follows:
■ To enable this property, set the value as follows:
"Submitted for Approval", "Y"
■ To disable this property, set the value as follows:
"Submitted for Approval", "N"
This property is enabled by default.
WorkFlow Process Name LS Subject Schedule DateVBC
This property defines the workflow process that isinvoked when the Enroll Screen Rescreen ThroughWorkFlow property is set to Y.
The default value is LS Clinical - SubjectVisits Process.
This workflow process applies the approved subjectvisit template to the subject.
If the subject visit template that is applied is differentfrom the previous version of the subject visit templatethat was applied, and if the Disable Delete Non AppVisit property is set to N, then a pop-up messageappears to confirm if incomplete visits in the previoustemplate version must be deleted, and if completevisits in the new template version must be deleted.Clicking OK in the pop-up message deletes the nonapplicable subject visits. Clicking Cancel retains thenon applicable subject visits.
Table A–2 User Properties for Business Services in Siebel Clinical
User PropertyBusinessService Project Description
Data Rollup Is On LS Data Rollup LS ClinicalEnhancement
This property configures rollup of subject status data tosites, regions, and protocols.
Configure the value as follows:
■ To enable this property, set the value to Y.
■ To disable this property, set the value to N.
This property is enabled by default.
Table A–1 (Cont.) User Properties for Business Components in Siebel Clinical
User Property Business Component Description
User Properties for Business Services in Siebel Clinical
A-14 Siebel Clinical Trial Management System Guide
Protocol Account ToSite Rolldown
LS ClinicalRecordRolldownService
LS ClinicalAdmin
This property associates accounts for clinical protocolswith sites. It specifies the data map information in theform of an input argument for the business servicemethod. The named method property for theunderlying business component calls this businessservice when you click the OK button in the LS ClinicalProtocol Account Site Popup applet. This appletappears when you click the Apply To Sites button inthe Accounts view of the Protocols screen.
The default value for this property follows:
’LS Clinical Protocol Account To Sites’, ’LSClinical Account’, ’Id’, ’Clinical ProtocolSite for Popup’, ’Id’
In this value, LS Clinical Protocol Account To Sites is adata map that maps the fields in accounts for protocolsto the fields in accounts for sites, LS Clinical Account isthe name of the source business component, andClinical Protocol Site for Popup is the name of theunderlying business component for the LS ClinicalProtocol Account Site Popup applet. Id is a field thatuniquely identifies an account in the source businesscomponent and a site in the business component forthe popup applet.
You can change the field mapping for data maps in theData Component list in the Data Map Administrationview of the Administration - Application screen. Formore information about changing data maps, see SiebelOrder Management Infrastructure Guide.
Protocol Activity ToSite Rolldown
LS ClinicalRecordRolldownService
LS ClinicalAdmin
This property associates activities for clinical protocolswith sites. It specifies the data map information in theform of an input argument for the business servicemethod. The named method property for theunderlying business component calls this businessservice when you click the OK button in the LS ClinicalProtocol Activity Site Popup applet. This appletappears when you click the Apply To Sites button inthe Activities view of the Protocols screen.
The default value for this property follows:
’LS Clinical Protocol Activity To Sites’, ’LSAction(Protocol/Region)’, ’Id’, ’ClinicalProtocol Site for Popup’, ’Id’
In this value, LS Clinical Protocol Activity To Sites is adata map that maps the fields in activities for protocolsto the fields in activities for sites, LS Action(Protocol/Region) is the name of the source businesscomponent, and Clinical Protocol Site for Popup is thename of underlying business component for the LSClinical Protocol Activity Site Popup applet. Id is afield that uniquely identifies an activity in the sourcebusiness component and a site in the businesscomponent for the popup applet.
You can change the field mapping for data maps in theData Component list in the Data Map Administrationview of the Administration - Application screen. Formore information about changing data maps, see SiebelOrder Management Infrastructure Guide.
Table A–2 (Cont.) User Properties for Business Services in Siebel Clinical
User PropertyBusinessService Project Description

User Properties for Business Services in Siebel Clinical
Developer’s Reference for Siebel Clinical A-15
Protocol Document ToSite Rolldown
LS ClinicalRecordRolldownService
LS ClinicalAdmin
This property associates documents for clinicalprotocols with sites. It specifies the data mapinformation in the form of an input argument for thebusiness service method. The named method propertyfor the underlying business component calls thisbusiness service when you click the OK button in theLS Clinical Protocol Document Site Popup applet. Thisapplet appears when you click the Apply To Sitesbutton in the Document Tracking view of the Protocolsscreen.
The default value for this property follows:
’LS Clinical Protocol Document To Sites’, ’LSDocument Tracking’, ’Id’, ’Clinical ProtocolSite for Popup’, ’Id’
In this value, LS Clinical Protocol Document To Sites isa data map that maps the fields in documents forprotocols to the fields in documents for sites, LSDocument Tracking is the name of the source businesscomponent, and Clinical Protocol Site for Popup is thename of underlying business component for the LSClinical Protocol Document Site Popup applet. Id is afield that uniquely identifies a document in the sourcebusiness component and a site in the businesscomponent for the popup applet.
You can change the field mapping for data maps in theData Component list in the Data Map Administrationview of the Administration - Application screen. Formore information about changing data maps, see SiebelOrder Management Infrastructure Guide.
Region Account ToSite Rolldown
LS ClinicalRecordRolldownService
LS ClinicalAdmin
This property associates accounts for clinical regionswith sites. It specifies the data map information in theform of an input argument for the business servicemethod. The named method property for theunderlying business component calls this businessservice when you click the OK button in the LS ClinicalRegion Account Site Popup applet. This applet appearswhen you click the Apply To Sites button in theAccounts view of the Regions screen.
The default value for this property follows:
’LS Clinical Region Account To Sites’, ’LSClinical Account’, ’Id’, ’Clinical ProtocolSite for Popup’, ’Id’
In this value, LS Clinical Region Account To Sites is adata map that maps the fields in accounts for regionsto the fields in accounts for sites, LS Clinical Account isthe name of the source business component, andClinical Protocol Site for Popup is the name of theunderlying business component for the LS ClinicalRegion Account Site Popup applet. Id is a field thatuniquely identifies an account in the source businesscomponent and a site in the business component forthe popup applet.
You can change the field mapping for data maps in theData Component list in the Data Map Administrationview of the Administration - Application screen. Formore information about changing data maps, see SiebelOrder Management Infrastructure Guide.
Table A–2 (Cont.) User Properties for Business Services in Siebel Clinical
User PropertyBusinessService Project Description

User Properties for Business Services in Siebel Clinical
A-16 Siebel Clinical Trial Management System Guide
Region Activity ToSite Rolldown
LS ClinicalRecordRolldownService
LS ClinicalAdmin
This property associates activities for clinical regionswith sites. It specifies the data map information in theform of an input argument for the business servicemethod. The named method property for theunderlying business component calls this businessservice when you click the OK button in the LS ClinicalRegion Activity Site Popup applet. This applet appearswhen you click the Apply To Sites button in theActivities view of the Regions screen.
The default value for this property follows:
’LS Clinical Region Activity To Sites’, ’LSAction(Protocol/Region)’, ’Id’, ’ClinicalProtocol Site for Popup’, ’Id’
In this value, LS Clinical Region Activity To Sites is adata map that maps the fields in activities for regionsto the fields in activities for sites, LS Action(Protocol/Region) is the name of the source businesscomponent, and Clinical Protocol Site for Popup is thename of the underlying business component for the LSClinical Region Activity Site Popup applet. Id is a fieldthat uniquely identifies an activity in the sourcebusiness component and a site in the businesscomponent for the popup applet.
You can change the field mapping for data maps in theData Component list in the Data Map Administrationview of the Administration - Application screen. Formore information about changing data maps, see SiebelOrder Management Infrastructure Guide.
Region Document ToSite Rolldown
LS ClinicalRecordRolldownService
LS ClinicalAdmin
This property associates documents for clinical regionswith sites. It specifies the data map information in theform of an input argument for the business servicemethod. The named method property for theunderlying business component calls this businessservice when you click the OK button in the LS ClinicalRegion Document Site Popup applet. This appletappears when you click the Apply To Sites button inthe Document Tracking view of the Region screen.
The default value for this property follows:
’LS Clinical Region Document To Sites’, ’LSDocument Tracking’, ’Id’, ’Clinical ProtocolSite for Popup’, ’Id’
In this value, LS Clinical Region Document To Sites is adata map that maps the fields in documents for regionsto the fields in documents for sites, LS DocumentTracking is the name of the source businesscomponent, and Clinical Protocol Site for Popup is thename of the underlying business component for the LSClinical Region Document Site Popup applet. Id is afield that uniquely identifies a document in the sourcebusiness component and a site in the businesscomponent for the popup applet.
You can change the field mapping for data maps in theData Component list in the Data Map Administrationview of the Administration - Application screen. Formore information about changing data maps, see SiebelOrder Management Infrastructure Guide.
Table A–2 (Cont.) User Properties for Business Services in Siebel Clinical
User PropertyBusinessService Project Description

Applet Properties in Siebel Clinical
Developer’s Reference for Siebel Clinical A-17
You can configure additional properties for the LS Clinical Record Rolldown Servicebusiness service to set up additional functionality for rolldowns. An example of such acustom property follows:
’Custom Data Map’, ’Source Business Component’, ’Id’, ’Business Component for thePopup Applet’, ’Id’
In this value, Custom Data Map is a data map that maps the fields in the sourcebusiness component to the fields in the target business component, Id is a field thatuniquely identifies a record in the source business component and a record in theunderlying business component for the popup applet. The named method propertyfor the underlying business component calls this business service when you click theOK button in the appropriate popup applet.
The value for the named method property specifies the method for the appropriatepopup applet, the underlying business component for that applet, the method in thatbusiness component that calls the rolldown business service, and the appropriate userproperty as the input argument for the business service. An example of such a customproperty follows:
"CustomAppletMethod", "INVOKESVC", "Business Component for the Popup Applet", "LSClinical Record Rolldown Service", "ApplyRolldown", "UserPropertyName","CustomProperty"
Applet Properties in Siebel ClinicalTable A–3 describes the applet properties that you can use to enable and configurefunctionality for Siebel Clinical.
Table A–3 Applet Properties in Siebel Clinical
Property Applet Description
ClosePopUp LS Clinical ProtocolAccount Site PopupApplet
LS Clinical ProtocolActivity Site PopupApplet
LS Clinical ProtocolDocument Site PopupApplet
LS Clinical RegionAccount Site PopupApplet
LS Clinical RegionActivity Site PopupApplet
LS Clinical RegionDocument Site PopupApplet
This property closes the pop-up applet when an end user performsan action to close this applet, such as clicking the OK button. Thisaction calls the method in the value for this property.
You can enter a comma-delimited list in this property to specifymultiple methods. An example follows:
ClosePopUp="method 1", "method 2", "method 3"
The default value (method name) for each of the six applets follows:
■ ProtocolAccountRolldownToSite
■ ProtocolActivityRolldownToSite
■ ProtocolDocumentRolldownToSite
■ RegionAccountRolldownToSite
■ RegionActivityRolldownToSite
■ RegionDocumentRolldownToSite
You can use this property in applets that are associated with theCSSSWEFrRolePopup class.

Applet Properties in Siebel Clinical
A-18 Siebel Clinical Trial Management System Guide
HideInQueryMode Any applet that usesone of the followingclasses or a classderived from theseclasses:
CSSSWEClinicalListBase
CSSSWEClinicalFormBase
This property hides the buttons that call the methods in thisproperty. This property hides these buttons when end users clickQuery in the applet.
You can enter a comma-delimited list in this property to specifymultiple methods. An example follows:
HideInQueryMode="ShowAll", "ShowCurrent","CallCustomerMaster"
If the button calls the ShowPopup method, you do not have toinclude that method in this property.
History Target BC
(Internal)
Clinical ProtocolTeam Mvg Applet
Clinical Region TeamMvg Applet
This property specifies the target business component.
The default values follow:
■ Clinical Protocol Site Team Assignment History BC
■ Clinical Protocol Team Assignment History BC
■ Clinical Region Team Assignment History BC
The information about the positions added to or deleted from theteam list is added to the specified business component.
Search Specification Clinical Protocol SiteTemplate VersionAssoc Applet
This property configures the versions of the subject visit templatethat appear in the Site Management Versions MVG (multi valuegroup).
Configure this property as follows:
■ To display only the versions of the subject visit templates with astatus of Approved, set the value as follows:
[Status Cd] = LookupValue("CLNCL_VERSION_STATUS","Approved")
■ To display the versions of the subject visit templates with astatus of Reviewed or Approved, set the value as follows:
[Status Cd] = LookupValue("CLNCL_VERSION_STATUS","Approved") OR [Status Cd] = LookupValue("CLNCL_VERSION_STATUS"," Reviewed")
The default configuration displays only subject visit templates with astatus of Approved in the Site Management Versions MVG.
Table A–3 (Cont.) Applet Properties in Siebel Clinical
Property Applet Description
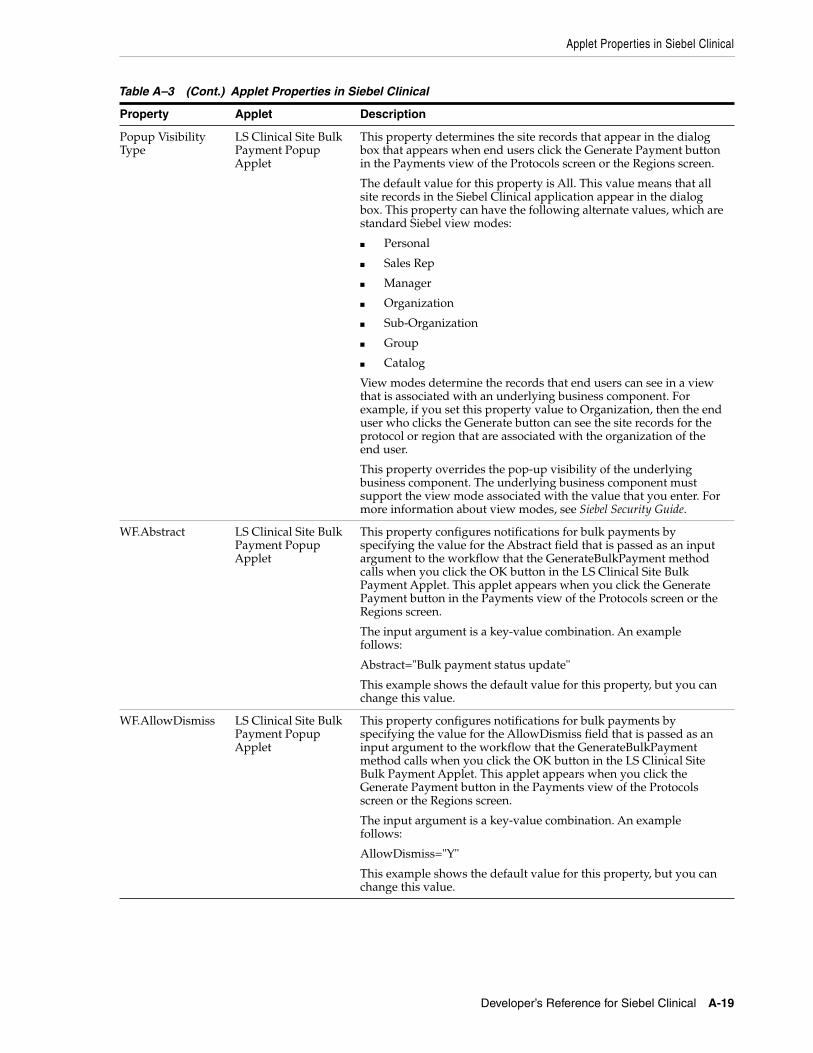
Applet Properties in Siebel Clinical
Developer’s Reference for Siebel Clinical A-19
Popup VisibilityType
LS Clinical Site BulkPayment PopupApplet
This property determines the site records that appear in the dialogbox that appears when end users click the Generate Payment buttonin the Payments view of the Protocols screen or the Regions screen.
The default value for this property is All. This value means that allsite records in the Siebel Clinical application appear in the dialogbox. This property can have the following alternate values, which arestandard Siebel view modes:
■ Personal
■ Sales Rep
■ Manager
■ Organization
■ Sub-Organization
■ Group
■ Catalog
View modes determine the records that end users can see in a viewthat is associated with an underlying business component. Forexample, if you set this property value to Organization, then the enduser who clicks the Generate button can see the site records for theprotocol or region that are associated with the organization of theend user.
This property overrides the pop-up visibility of the underlyingbusiness component. The underlying business component mustsupport the view mode associated with the value that you enter. Formore information about view modes, see Siebel Security Guide.
WF.Abstract LS Clinical Site BulkPayment PopupApplet
This property configures notifications for bulk payments byspecifying the value for the Abstract field that is passed as an inputargument to the workflow that the GenerateBulkPayment methodcalls when you click the OK button in the LS Clinical Site BulkPayment Applet. This applet appears when you click the GeneratePayment button in the Payments view of the Protocols screen or theRegions screen.
The input argument is a key-value combination. An examplefollows:
Abstract="Bulk payment status update"
This example shows the default value for this property, but you canchange this value.
WF.AllowDismiss LS Clinical Site BulkPayment PopupApplet
This property configures notifications for bulk payments byspecifying the value for the AllowDismiss field that is passed as aninput argument to the workflow that the GenerateBulkPaymentmethod calls when you click the OK button in the LS Clinical SiteBulk Payment Applet. This applet appears when you click theGenerate Payment button in the Payments view of the Protocolsscreen or the Regions screen.
The input argument is a key-value combination. An examplefollows:
AllowDismiss="Y"
This example shows the default value for this property, but you canchange this value.
Table A–3 (Cont.) Applet Properties in Siebel Clinical
Property Applet Description

Applet Properties in Siebel Clinical
A-20 Siebel Clinical Trial Management System Guide
WF.AllUsers LS Clinical Site BulkPayment PopupApplet
This property configures notifications for bulk payments byspecifying the value for the AllUsers field that is passed as an inputargument to the workflow that the GenerateBulkPayment methodcalls when you click the OK button in the LS Clinical Site BulkPayment Applet. This applet appears when you click the GeneratePayment button in the Payments view of the Protocols screen or theRegions screen.
The input argument is a key-value combination. An examplefollows:
AllUsers="N"
This example shows the default value for this property, but you canchange this value.
WF.ListOfRecipientDivisions
LS Clinical Site BulkPayment PopupApplet
This property configures notifications for bulk payments byspecifying the values for the Recipient Division field that are passedas an input argument to the workflow that theGenerateBulkPayment method calls when you click the OK button inthe LS Clinical Site Bulk Payment Applet. This applet appears whenyou click the Generate Payment button in the Payments view of theProtocols screen or the Regions screen.
When a value in the Recipient Division field of the notificationmessage matches a value in the Division field of a team record for asite, the end users associated with that division receive notificationsof payments to that site. For information about setting upnotification messages, see Siebel Applications Administration Guide.
The default value for this property is DivisionName(), but you canchange this value.
The value for this property is a Siebel grammar expression that issimilar to the expressions in calculated fields for businesscomponents. Because the destination field for this property is anMVG (multi value group), you can enter a comma-delimited list inthis property to specify multiple values. An example follows:
"DivisionName()", "Home Office Division"
You can activate this property if necessary.
WF.ListOfRecipientPositions
LS Clinical Site BulkPayment PopupApplet
This property configures notifications for bulk payments byspecifying the values for the Recipient Position field that are passedas an input argument to the workflow that theGenerateBulkPayment method calls when you click the OK button inthe LS Clinical Site Bulk Payment Applet. This applet appears whenyou click the Generate Payment button in the Payments view of theProtocols screen or the Regions screen.
When a value in the Recipient Position field of the notificationmessage matches a value in the Position field of a team record for asite, the end users associated with that position receive notificationsof payments to that site. For information about setting upnotification messages, see Siebel Applications Administration Guide.
The default value for this property is PositionName(), but you canchange this value.
The value for this property is a Siebel grammar expression that issimilar to the expressions in calculated fields for businesscomponents. Because the destination field for this property is anMVG (multi value group), you can enter a comma-delimited list inthis property to specify multiple values. An example follows:
"PositionName()", "HQ - US Region"
You can activate this property if necessary.
Table A–3 (Cont.) Applet Properties in Siebel Clinical
Property Applet Description

Applet Properties in Siebel Clinical
Developer’s Reference for Siebel Clinical A-21
For applets that are associated with the CSSSWEFrRolePopup class and that haveClinical Protocol Site Bulk Operations as the underlying business component, you cancreate additional input arguments for the workflow that the GenerateBulkPaymentmethod calls by creating additional applet properties as WF.field name, andrecompiling the applet. For example, a custom property of WF.CustomerName mighthave the following input argument for the workflow:
CustomerName="Elixir Labs"
WF.ListOfRecipientUsers
LS Clinical Site BulkPayment PopupApplet
This property configures notifications for bulk payments byspecifying the values for the Recipient User field that are passed asan input argument to the workflow that the GenerateBulkPaymentmethod calls when you click the OK button in the LS Clinical SiteBulk Payment Applet. This applet appears when you click theGenerate Payment button in the Payments view of the Protocolsscreen or the Regions screen.
When a value in the Recipient User field of the notification messagematches a value in the User ID field of a team record for a site, theend user associated with that user ID receives notifications ofpayments to that site. For information about setting up notificationmessages, see Siebel Applications Administration Guide.
The default value for this property is LoginName(), but you canchange this value.
The value for this property is a Siebel grammar expression that issimilar to the expressions in calculated fields for businesscomponents. Because the destination field for this property is anMVG (multi value group), you can enter a comma-delimited list inthis property to specify multiple values. An example follows:
"LoginName()", "JDOE"
WF.ProcessName LS Clinical Site BulkPayment PopupApplet
This property specifies the name of the underlying workflow that theGenerateBulkPayment method calls when you click the OK button inthe LS Clinical Site Bulk Payment Applet. This applet appears whenyou click the Generate Payment button in the Payments view of theProtocols screen or the Regions screen. Notification-relatedarguments (WF.Abstract, WF.AllowDismiss, and so on) are thenpassed as input arguments (Abstract, AllowDismiss, and so on) tothis workflow.
The default value for this property is LS Clinical - Generate BulkPayment Process, but you can change this value to a customworkflow.
WF.Severity LS Clinical Site BulkPayment PopupApplet
This property configures notifications for bulk payments byspecifying the value for the Severity field that is passed as an inputargument to the workflow that the GenerateBulkPayment methodcalls when you click the OK button in the LS Clinical Site BulkPayment Applet. This applet appears when you click the GeneratePayment button in the Payments view of the Protocols screen or theRegions screen.
The input argument is a key-value combination. An examplefollows:
Severity="Normal"
This example shows the default value for this property, but you canchange this value to any value for the Severity field that has a Typefield value of BRDCST_MSG_TYPE in the list of values and that isactive in the list of values. Alternate values include: High, Urgent,and Urgent with Alert.
Table A–3 (Cont.) Applet Properties in Siebel Clinical
Property Applet Description

Field Properties in Siebel Clinical
A-22 Siebel Clinical Trial Management System Guide
Field Properties in Siebel ClinicalTable A–4 lists the field properties that you can use to enable and configurefunctionality for Siebel Clinical.
Table A–4 Field Properties in Siebel Clinical
Property Parent Field Description
Append All Activities Enrollment Date
Screen Date
Rescreen Date
Note: This property is deprecated in version 8.1.1.9 and later.
This property configures whether or not users can copy theactivities in the subject visit template multiple times.
Configure this property as follows:
■ Set the value to Y to allow users to copy the activities in thesubject visit template multiple times.
■ Set the value to N to disallow users to copy the activities inthe subject visit template multiple times.
The default property value for each parent field follows:
Enrollment Date = N
Screen Date = N
Rescreen Date = Y
Subject Consent Required Screen Date This property configures whether or not subject informedconsent is mandatory when scheduling a clinical subject. Whenenabled, the Informed Consent Date field is checked for datawhen the user clicks Schedule.
Configure this property as follows:
■ To set the Informed Consent Date as a mandatory fieldwhen scheduling a clinical subject, set the value to Y.
■ To set the Informed Consent Date as an optional field whenscheduling a clinical subject, set the value to N.
The default value is N.
Template Type Code] Enrollment Date
Screen Date
Rescreen Date
Note: This property is deprecated in version 8.1.1.9 and later.
This property configures the subject visit template type that isused when applying a template.
The default property value for each parent field follows:
Enrollment Date = ‘Enrollment’
Screen Date = ‘Screening’
Rescreen Date =‘Re-Screening’
System Preferences in Siebel ClinicalTable A–5 lists the system preferences that you can use to configure core functionalityin Siebel Clinical Trial Management System and to integrate Siebel Clinical TrialManagement System with third-party applications.

System Preferences in Siebel Clinical
Developer’s Reference for Siebel Clinical A-23
Table A–5 System Preferences in Siebel Clinical
System Preference Functionality
CL Highest Preference SDV Rule This setting determines the priority order in which toimplement the 3 methods (Manual, Site, and Status) tochange the SDV Required field of a subject record. Validvalues for this system preference are Status and Manual.The default value is Status.
To understand the priority order for each value in thissystem preference, note the following scenario:
■ Site method: The Subject Auto-Select Rate field forthe site associated with the subject is 50%. Thus,every other subject record initially has a SDVRequired field of Yes.
■ Status method: A status rule set indicates that if theStatus field of a subject record is Early Terminated,then the SDV Required field of the subject record isautomatically changed to Yes. None of the Statusfields in the subject records initially has a value ofEarly Terminated.
If you set this system preference to Status, then the 3methods are implemented in the following priorityorder: Status, Manual, and Site. Note the following:
■ A user can manually change the SDV Required fieldof a subject record from Yes to No because themanual method has a higher priority than the sitemethod.
■ If a user changes the Status field of the subjectrecord to Early Terminated, then the SDV Requiredfield of the subject record automatically changesback to Yes because the status method has a higherpriority than the manual method.
■ A user cannot manually change the SDV Requiredfield of the subject record back to No because thestatus method has a higher priority than the manualmethod.
■ If a user changes the value in the Subject Auto-SelectRate field for the site associated with the subject,then the SDV Required field cannot automaticallychange because the status method has a higherpriority than the site method.
If you set this system preference to Manual, then the 3methods are implemented in the following order:Manual, Status, and Site. Note the following:
■ A user can manually change the SDV Required fieldof a subject record from Yes to No because themanual method has a higher priority than the statusmethod and the site method.
■ If a user changes the Status field of the subjectrecord to Early Terminated, then the SDV Requiredfield does not automatically change back to Yesbecause the manual method has a higher prioritythan the status method.
■ If a user changes the value in the Subject Auto-SelectRate field for the site associated with the subject,then the SDV Required field cannot automaticallychange because the manual method has a higherpriority than the site method.

Workflows in Siebel Clinical
A-24 Siebel Clinical Trial Management System Guide
Workflows in Siebel ClinicalTable A–6 lists the required workflows for Siebel Clinical core functionality and forintegrating Siebel Clinical with third-party applications. For more information abouteach workflow, see the corresponding functional area in this guide. You can use SiebelBusiness Process Designer to modify the workflows to suit your own business model.For information about configuring workflows, see Siebel Business Process Framework:Workflow Guide.
CL – Verify TripReportApprover This setting turns on or off approver verification for tripreports. When enabled, the User Verification screen islaunched during the approval process for trip reports toverify the user login credentials of the approver. Toenable approver verification for trip reports, set thevalue to Y. The value is set to N by default.
Clinical_Training_Commit_Freq This setting determines how frequently updated siterecords are saved in the Siebel database when you runthe batch job to publish training plans and associatetraining topics with the site records. The default valuefor this system preference is 10. This value indicates thateach time 10 site records are updated in the batch jobthose site records are saved in the Siebel database.
If the value for this system preference is 10, if 92 siterecords must be updated in the batch job, and if a failureoccurs during the job run, then the result of the batch jobis that the number of site records saved to the Siebeldatabase is a multiple of 10 (for example, 60 site records),and not 0 site records. If you run the batch job again,then only the remaining 32 updated site records aresaved in the Siebel database.
Table A–6 Workflows in Siebel Clinical
Workflow Name Siebel Clinical Functionality
Clinical Assign Position From Protocol Clinical Protocol
Clinical Assign Position From Region Rolldown Clinical Region
Clinical Assign Position From Region Clinical Region
Clinical Assign Position From Site Rollup Clinical Site
Clinical Assign Position From Site Clinical Site
Clinical Protocol Position History Update Clinical Protocol
Clinical Region Delete Rollup Clinical Region
Clinical Region First Site Initiation Date UpsertRollup
Clinical Region
Clinical Region First Subject Enrolled Date UpsertRollup
Clinical Region
Clinical Region Last Site Terminated Date UpsertRollup
Clinical Region
Clinical Region Last Subject Off Study Date UpsertRollup
Clinical Region
Clinical Region Position History Update Clinical Region
Table A–5 (Cont.) System Preferences in Siebel Clinical
System Preference Functionality

Workflows in Siebel Clinical
Developer’s Reference for Siebel Clinical A-25
Clinical Region Status Fields Rollup Clinical Region
Clinical Remove Position From Protocol Clinical Protocol
Clinical Remove Position From Region Clinical Region
Clinical Remove Position From Site Clinical Site
Clinical Rollup Batch Process Clinical Site
Clinical Site Delete Rollup to Protocol Clinical Site
Clinical Site Delete Rollup to Region Clinical Site
Clinical Site Delete Rollup Clinical Site
Clinical Site First Subject Enrolled Date Upsert Rollup Clinical Subject
Clinical Site Initiation Completed Date Upsert Rollup Clinical Site
Clinical Site Last Subject Off Study Date UpsertRollup
Clinical Site
Clinical Site Position History Update Clinical Site
Clinical Site Status Fields Rollup Clinical Site
Clinical Site Termination Date Upsert Rollup (WithSubject Info)
Clinical Site
Clinical Site Termination Date Upsert Rollup (WithoutSubject Info)
Clinical Site
Clinical Status Delete Rollup Clinical Subject
Clinical Status Upsert Rollup Clinical Subject
Clinical Subject Delete Rollup Clinical Subject
LS Clinical - ApplyTemplates Process Clinical Template
LS Clinical - DeleteNonAppVisits Process Clinical Subject Visits
LS Clinical - SubjectVisits Process Clinical Subject Visits
LS Clinical Contract Rollup Clinical Contract
LS Clinical Create Inbox Item for New Trip ReportOwner
Clinical Trip Report
LS Clinical Create Inbox Item for Trip ReportApprover
Clinical Trip Report
LS Clinical Create Inbox Item for Trip Report Owner Clinical Trip Report
LS Clinical Create Inbox Item for Trip ReportReviewer
Clinical Trip Report
LS Clinical Earned To Date Rollup Clinical Payments
LS Clinical - Generate Bulk Payment Process Clinical Payments
LS Clinical Get Site Snapshot Service Clinical Trip Report
LS Clinical Set Study Plan Information Clinical operations integration
LS Clinical Paid To Date Rollup Clinical Payments
LS Clinical Payment Delete Rollup Clinical Payments
LS Clinical Payments Outbound Third-party payments applicationintegration
Table A–6 (Cont.) Workflows in Siebel Clinical
Workflow Name Siebel Clinical Functionality

Web Services in Siebel Clinical
A-26 Siebel Clinical Trial Management System Guide
Web Services in Siebel ClinicalYou can customize the Web services in Siebel Clinical for integration with anythird-party clinical application or for specific business requirements. Table A–7 liststhe Web services for mobile and external application integration. For more informationabout each Web service, see the corresponding integration chapter in this guide. Forinformation about customizing Web services, see Siebel CRM Web Services Reference.
LS Clinical Protocol Delete Rollup Clinical Protocol
LS Clinical Protocol Site Get Sites Clinical Site
LS Clinical Protocol Site Get User Position Clinical Site
LS Clinical Protocol Training Rollup Clinical Training
LS Clinical Questions Batch Clean-up Clinical Trip Report
LS Clinical Region Training Rollup Clinical Training
LS Clinical Site Accruals Rollup Clinical Site
LS Clinical Site Subject Delete Accruals Rollup Clinical Subject
LS Clinical State Validation Third-party payments applicationintegration
LS Clinical Total Contract Amount Rollup Clinical operations integration
LS Clinical Training Implementation Clinical Training
LS Clinical Trip Report Approval Clinical Trip Report
LS Clinical VAT Amount Rollup Clinical Payments
LS ClinicalProtocolSite Outbound - NewSite Site visit data integration
LS ClinicalProtocolSite Outbound - UpdatedSite Clinical Protocol
SWI LS Clinical Create Site Visit Geo Location Site visit data integration
SWI LS Clinical Payments Inbound Third-party payments applicationintegration
SWI LS Clinical Query Protocol Site_Site Visits Site visit data integration
SWI LS Clinical Subject Inbound - Activity Clinical data management systemintegration
SWI LS Clinical Subject Inbound - Subject Clinical data management systemintegration
SWI LS Clinical Subject Inbound Clinical data management systemintegration
SWI - Protocol Number Lookup Clinical data management systemintegration
Table A–7 Web Services in Siebel Clinical
Web Service Name Siebel Clinical Feature
ClinicalSubject Clinical data capture integration
LS Clinical CRF Tracking Interface Clinical operations integration
Table A–6 (Cont.) Workflows in Siebel Clinical
Workflow Name Siebel Clinical Functionality

Web Services in Siebel Clinical
Developer’s Reference for Siebel Clinical A-27
LS Clinical Protocol Site Interface Service Clinical data capture integration
Clinical operations integration
LS Clinical Subject Information Interface Service Clinical operations integration
SWI LS Clinical Payments Inbound Payments application integration
SWILSClinicalActivityTemplate Mobile integration
SWILSClinicalCreateSiteVisitGeoLocation Site visit data integration
SWILSClinicalGetEmployees Mobile integration
SWILSClinicalGetSiteContacts Mobile integration
SWILSClinicalGetSiteSnapshot Mobile integration
SWILSClinicalGetSmartScriptDetails Mobile integration
SWILSClinicalGetStateModelService Mobile integration
SWILSClinicalGetSubjectVisitDetails Mobile integration
SWILSClinicalInsertEmployees Mobile integration
SWILSClinicalListOfValues Mobile integration
SWILSClinicalProtocolSiteGetSites Mobile integration
SWILSClinicalQueryProtocolSite_SiteVisits Site visit data integration
SWILSClinicalSiteContactsTrainingInterfaceService Training integration
SWILSClinicalTripReportInterfaceService Mobile integration
SWILSClinicalTripReportTemplates Mobile integration
Table A–7 (Cont.) Web Services in Siebel Clinical
Web Service Name Siebel Clinical Feature

Web Services in Siebel Clinical
A-28 Siebel Clinical Trial Management System Guide

Index-1
Index
Aaccount assessment templates, creating, 6-6accounts
assessing, 6-24associating clinical protocols with, 4-8associating clinical regions with, 4-11associating sites with, 4-19associating with clinical projects, 10-5associating with contracts, 6-7associating with sites, 6-8creating for clinical trials, 4-11maintaining, 6-6
action items, viewing universal inbox notificationsfor, 9-12
activitiesassociating with sites, 6-9creating for clinical projects, 10-7creating for document tracking, 6-19defining for subject visits, 5-5integrating data for subject visits with data
for, 12-3, 13-3activity completion, about integrating data for, 12-5,
13-4activity plans, creating for sites, 6-15activity templates
applying to sites, 6-16creating for clinical projects, 10-3
address types, adding for sites, 6-14administrative setup tasks, for Siebel Clinical, 3-5applet properties, in Siebel Clinical, A-17assignment objects, predefined, 3-7audit trail
using for changes to clinical trip reports, 9-17using for changes to subject status, 5-26using for reviews and approvals of clinical trip
reports, 9-16automated notification messages, for clinical trip
reports, 9-8automated validation messages, for clinical trip
reports, 9-8
Bbatch mode, administering subject visits in, 5-11business components, user properties for in Siebel
Clinical, A-2
business services, user properties for in SiebelClinical, A-13
Ccase report forms
managing tracking activities for, 6-20tracking, 6-21, 9-7tracking for partial source data verification during
site visits, 7-7viewing for partial source data verification, 7-7
clinical data capture and query management systemintegration
activating workflows for, 12-2configuring Web services for, 12-2overview of, 12-1process of setting up, 12-2
clinical data management system integrationabout customizing Web services for, 13-2activating workflows for, 13-2configuring Web services for, 13-2overview of, 13-1process of setting up, 13-2
clinical paymentsabout setting up and making for subject
activities, 8-1generating Oracle BI Publisher reports for, 8-13scenario for, 8-2
clinical programs, creating, 4-4clinical projects
about managing, 10-1associating people and accounts with, 10-5creating, 10-4creating activities and tasks for, 10-7creating activity templates for, 10-3managing risk for, 10-8monitoring costs for, 10-8process of managing, 10-2scenario for managing, 10-1setting up employee profiles for, 10-3
clinical protocol site templates, creating, 6-6clinical protocols
associating with accounts, 4-8creating and revising versions for, 4-8generating payment records for sites associated
with, 8-7

Index-2
setting up, 4-4setting up partial source data verification for, 7-2viewing status accruals for clinical subjects
of, 5-25viewing training information for, 11-11
clinical regionsassociating with accounts, 4-11generating payment records for sites associated
with, 8-7setting up, 4-9setting up partial source data verification for, 7-2viewing status accruals for clinical subjects
of, 5-24viewing training information for, 11-12
clinical subjectsabout integrating data for, 13-4applying protocol amendments to, 5-18applying revised subject visit templates to, 5-18creating records for, 5-7enrolling, 5-13monitoring status accruals for by visit type, 5-26randomizing, 5-13recalculating requiring source data
verification, 7-8rescheduling, 5-10rescreening, 5-12scheduling, 5-9screening, 5-11setting up partial source data verification for, 7-5terminating clinical trials early for, 5-17tracking status accruals for, 9-11transfer information, viewing, 5-15, 5-16transferring, 5-14viewing status accruals for, 5-23, 5-24, 5-25
clinical trainingabout managing, 11-1setting up training topics for, 11-2
clinical trialsabout setting up, 4-1creating accounts and contacts for, 4-11creating satellite sites for, 4-16creating sites for, 4-13performing risk assessments for, 4-22process of managing, 4-3risk assessment templates, creating, 4-20risk assessments, about, 4-20scenario for, 4-2terminating early for clinical subjects, 5-17
clinical trip report templatesapplying, 9-4creating, 9-3
clinical trip reportsabout administering and using, 9-2approving, 9-13automated validation and notification messages
for, 9-8completing, 9-5completing questionnaires for, 9-6creating new versions of, 9-15creating questions for using Siebel
SmartScript, 9-3deleting unanswered questions form
questionnaires of, 9-7obsolete, 9-14scenario for managing, 9-2tracking completion status for, 9-10using audit trail for changes to, 9-17using audit trail for reviews and approvals
of, 9-16version information, viewing, 9-15viewing, 9-13viewing geographical location details for, 9-16viewing universal inbox notifications for action
items of, 9-12completed training
designating for contacts, 11-10designating for training topics, 11-9
completion status, tracking for clinical tripreports, 9-10
contact assessment templates, creating, 6-6contact assignments, in Siebel Clinical, 3-8Contact Denormalization mode, in Siebel Life
Sciences, 3-8contacts
about managing for clinical trials, 6-2assessing, 6-24creating for clinical trials, 4-11designating completed training for, 11-10maintaining, 6-6managing for sites, 6-12process of managing for clinical trials, 6-3scenario for managing for clinical trials, 6-2
contractsassociating accounts with, 6-7associating with sites, 6-7
correspondence activities, creating for sites, 6-21criteria, adding to training plans, 11-4
Ddocument tracking
creating activities for, 6-19generating Oracle BI Publisher reports for, 6-25
documentsassociating with sites, 6-10tracking and adding at sites, 6-17
DTE data mapsexporting from server database to XML file, 3-9importing to local client from XML file, 3-10
Eemployee profiles, setting up for clinical
projects, 10-3
Ffield properties, in Siebel Clinical, A-22final payments, generating for sites, 8-11

Index-3
Ggeographical location details
viewing for clinical trip reports, 9-16
Mmobile Web clients, setting up for position
rollup, 3-9My Team’s filter, about, 3-6
Nnotes, adding to sites, 6-23
OOracle BI Publisher reports
generating for clinical payments, 8-13generating for document tracking, 6-25generating for site enrollment status, 5-27generating for site visits, 9-18
Oracle Health Sciences InForm integration,configuring protocol integration fields for, 12-3
Ppartial source data verification
about, 7-1about for protocol amendments, 7-9setting up for clinical protocols, 7-2setting up for clinical regions, 7-2setting up for clinical subjects, 7-5setting up for sites, 7-4setting up for subject visit templates, 7-3tracking case report forms for during site
visits, 7-7viewing case report forms for, 7-7
payees, splitting payment activities betweenmultiple, 8-4
payment activitiescreating for sites, 8-6generating payment records for unplanned, 8-9reversing splits for, 8-5splitting between multiple payees, 8-4
payment amounts, adjusting and generating paymentrecords for sites, 8-10
payment exceptions, setting up for sites, 8-3payment records
creating for sites, 8-7generating for sites, 8-10generating for sites associated with clinical
protocols and clinical regions, 8-7generating for unplanned payment activities, 8-9reverting, 8-12
payment splits, copying details for, 8-5people, associating with clinical projects, 10-5position rollup, setting up for mobile Web
clients, 3-9position types, setting up for billing, 10-4Projects screen, about views in, 10-9
protocol amendmentsabout partial source data verification for, 7-9applying to sites and clinical subjects, 5-18rules for applying, 5-20
protocol integration fieldsconfiguring for Oracle Health Sciences InForm
integration, 12-3
Rrate lists, setting up for billing, 10-4risk assessments
for clinical trials, about, 4-20performing for clinical trials, 4-22templates, creating for clinical trials, 4-20
Ssatellite sites
creating for clinical trials, 4-16Siebel Assignment Manager, using in Siebel
Clinical, 3-7Siebel Clinical
about setting up, 3-1activating workflow policies for, 3-3administrative setup tasks for, 3-5configuring properties for in Siebel Tools, 3-2configuring Siebel Mobile disconnected application
for, 14-2configuring Web services for, 3-4contact assignments in, 3-8enabling or disabling Siebel Open UI for, 3-2enabling Siebel Server component groups for, 3-2using Siebel Assignment Manager in, 3-7
Siebel Clinical Trial Management Systemabout, 2-1features of, 2-1product modules and options for, 2-3using Siebel REST API with, A-1
Siebel Mobile disconnected applicationabout, 14-1configuring for Siebel Clinical, 14-2for Siebel Clinical, about, 14-1for Siebel Clinical, managing site visits, 14-5for Siebel Clinical, managing sites, 14-8for Siebel Clinical, using, 14-3
Siebel Open UI, enabling or disabling for SiebelClinical, 3-2
Siebel Server component groupsenabling for Siebel Clinical, 3-2
Siebel SmartScript, creating questions for clinical tripreports using, 9-3
Siebel Toolsconfiguring properties for Siebel Clinical in, 3-2
site enrollment status, generating Oracle BI Publisherreports for, 5-27
site teams, assigning employees to, 6-15site visits
creating and managing, 6-11generating Oracle BI Publisher reports for, 9-18

Index-4
tracking case reports forms for partial source dataverification during, 7-7
sitesabout exporting data for, 12-4about managing for clinical trials, 6-2adding address types for, 6-14adding notes to, 6-23adding training plans to, 11-8adjusting payment amounts and generating
payment records for, 8-10applying activity templates to, 6-16applying protocol amendments to, 5-18applying revised subject visit templates to, 5-18associating contracts with, 6-7associating with accounts, 4-19, 6-8associating with activities, 6-9associating with documents, 6-10changing training topics for, 11-8creating activity plans for, 6-15creating correspondence activities for, 6-21creating for clinical trials, 4-13creating payment activities for, 8-6generating final payments for, 8-11generating payment records for, 8-7managing contacts for, 6-12process of managing for clinical trials, 6-3scenario for managing for clinical trials, 6-2setting up partial source data verification for, 7-4setting up payment exceptions for, 8-3tracking and adding documents at, 6-17tracking status accruals for clinical subjects
of, 9-11viewing status accruals for clinical subjects
of, 5-23viewing status history for, 6-23
source data verification, recalculating clinical subjectsrequiring, 7-8
standard payment amounts, setting up in subject visittemplates, 8-3
status accrualsmonitoring for clinical subjects by visit type, 5-26tracking for clinical subjects of sites, 9-11viewing for clinical subjects of clinical
protocols, 5-25viewing for clinical subjects of clinical
regions, 5-24viewing for clinical subjects of sites, 5-23
status history, viewing for sites, 6-23subject activities
about setting up and making clinical paymentsfor, 8-1
marking as complete, 8-6subject enrollment
about rolling up information for, 5-21monitoring rates for, 5-25
subject statusabout automatic tracking of, 5-6overriding initial, 5-14using audit trail for changes to, 5-26
subject visit templates
about, 5-2applying to clinical subjects, 5-18applying to sites, 5-18approving, 5-6creating, 5-2defining versions for, 5-2process of defining, 5-2setting up partial source data verification for, 7-3setting up standard payment amounts in, 8-3
subject visitsadministering in batch mode, 5-11creating unscheduled, 5-16defining, 5-3defining activities for, 5-5defining planned, 5-5generating reports for actual, 6-28generating reports for planned and actual dates
of, 6-28integrating data with data for activities, 12-3, 13-3rules for deleting when deemed non-applicable by
early termination, 5-21system preferences
in Siebel Clinical, A-22
Ttasks, creating for clinical projects, 10-7team assignment history, tracking and revising, 4-6tracking activities, managing for case report
forms, 6-20training plans
about publishing, 11-6adding criteria to, 11-4adding to clinical sites, 11-8creating, 11-3creating versions of, 11-5publishing, 11-7
training topicschanging for clinical sites, 11-8designating completed training for, 11-9setting up for clinical training, 11-2
Uuniversal inbox notifications, viewing for action items
of clinical trip reports, 9-12user properties
for business components in Siebel Clinical, A-2for business services in Siebel Clinical, A-13overview of for Siebel Clinical, A-2
Vversions
creating and revising for clinical protocols, 4-8creating for training plans, 11-5defining for subject visit templates, 5-2
visit type, monitoring status accruals for clinicalsubjects by, 5-26

Index-5
WWeb services
about customizing for clinical data managementsystem integration, 13-2
configuring for clinical data capture and querymanagement system integration, 12-2
configuring for clinical data management systemintegration, 13-2
configuring for Siebel Clinical, 3-4in Siebel Clinical, A-26
workflow policies, activating for Siebel Clinical, 3-3workflows
activating for clinical data capture and querymanagement system integration, 12-2
activating for clinical data management systemintegration, 13-2
in Siebel Clinical, A-24
XXML file
exporting DTE data maps from server databaseto, 3-9
importing DTE data maps from local clientto, 3-10

Index-6