sitecore web site content management system · the university of british columbia . sitecore web...
TRANSCRIPT

THE UNIVERSITY OF BRITISH COLUMBIA
Sitecore Web Site Content
Management System
Sauder User Guide Revised April 2016
Shirley Irvine
Web Services

Sitecore Web Content Management System – User Guide
2 | P a g e
Table of Contents Sauder User Guide Revised October 2014 ................................................................................................. 1
I Introduction ............................................................................................................................................. 4
II Setting Up Your Browser ........................................................................................................................ 4
III Logging In and Logging Out ................................................................................................................... 5
IV Editing: Basic Editing Using the Page Editor ......................................................................................... 7
(1) Editing a Web Page That You See on the Live Web ....................................................................... 9 (2) Locking and Unlocking Items ........................................................................................................... 9
(3) Summary Points ............................................................................................................................... 9
V Editing: More Editing Options using the Content Editor ...................................................................... 11
(1) Editing Text Content ....................................................................................................................... 12
(2) Code Snippets in the Rich Text Editor ........................................................................................... 13
Introduction .................................................................................................................................... 13 Image with Caption Snippet ........................................................................................................... 13
Read More Link .............................................................................................................................. 14
Two Column Block ......................................................................................................................... 15
Table Snippets ............................................................................................................................... 15
(3) Hyperlinks ...................................................................................................................................... 18 Linking to Sitecore Item.................................................................................................................. 18
Linking to a URL Outside of the Sauder Sitecore Site ................................................................... 19
(4) Creating a New Item (Page) .......................................................................................................... 20
(5) Adding the Top Bar, and Menu to a New Item ............................................................................... 21
(6) Changing / Adding Menu Items ...................................................................................................... 22
(7) Copying an Item ............................................................................................................................. 22 (8) Moving an Item ............................................................................................................................... 22
(9) Changing an Image ........................................................................................................................ 23
(10) Uploading an Image to the Media Library ...................................................................................... 23
(11) Editing the Image Properties .......................................................................................................... 23
(12) Uploading a File to Sitecore ........................................................................................................... 23
(13) Publishing ....................................................................................................................................... 24 VI Workflow (Publishing) ........................................................................................................................... 25
1. Editing/Creating Content ................................................................................................................ 25
2. Properties of Draft Items ................................................................................................................ 25
3. Viewing Draft items ........................................................................................................................ 25

Sitecore Web Content Management System – User Guide
3 | P a g e
4. Submitting Content for Approval .................................................................................................... 26
5. Properties of “Awaiting Approval” Items ......................................................................................... 27
6. Viewing “Awaiting Approva” Items (only for users with approval rights) ........................................ 27
7. Approving Items (only for users with approval rights) .................................................................... 28
8. Rejecting items (only for users with approval rights) ..................................................................... 29
VII Deleting a draft version from the Workbox ........................................................................................... 29 VIII Templates ............................................................................................................................................. 30
IX What Does A Sitecore Page Look Like? .............................................................................................. 31
(1) Core Data Section .......................................................................................................................... 32
(2) Full-Width Content Block Section .................................................................................................. 32
(3) Nav Menu Data Section ................................................................................................................. 32
X Template Components ......................................................................................................................... 33 Adding Google Analytics Tracking Code .................................................................................................... 37
(1) Adding Code to Links within the Content. ...................................................................................... 37
(2) Adding Code to Code Tracking Fields of Components .................................................................. 37
XI Content Switcher .................................................................................................................................. 38
XII Sitecore News Templates and Functionality (for Marketing and Communications) - Draft.................. 41
(1) Using the News Module ................................................................................................................. 41 News Feed Component vs News Page Component ..................................................................... 43
(2) News by Topic Component and News by Year Component.......................................................... 43
(3) Updating the Content Blocks on the Sauder Home Page (previously called Feature Stories) (for Marketing and Communications only) .................................................................................................. 44
(4) Home Page News (November 2012 onward) (for Marketing and Communications only) ............. 45 (5) News Results Page ........................................................................................................................ 45
XIII Creating an Anchor Point ..................................................................................................................... 46
XIV Appendix 1: URL Hygiene (or how to have clean URLs!) .................................................................... 49
XV Appendix 2 – Document Revision History ............................................................................................ 50
Sitecore Web Content Management System – User Guide
4 | P a g e
I Introduction Sitecore is a user-friendly web content management system. Although it is complex at the back-end for developers who are building the tools and structure, users find it intuitive and easy to use.
This manual will explain the basics of editing and managing Sitecore web sites using the Page Editor and the Content Editor. The manual is a "work in progress" and will be updated.
The Content Editor is the editing tool for experienced users.
The Page Editor is the tool for fast edits. More advanced work requires the Content Editor.
II Setting Up Your Browser 1. Sitecore Version 6.4 is compatible with Internet Explorer, Firefox, Apple Safari and Google
Chrome. If you have Internet Explorer 10, until Sitecore is upgraded to a new version, use Fire-fox.
2. Enable browser pop-ups to accept the Sitecore URL. (In IE: Tools, Pop-up Blocker, And Pop-up Blocker Settings). Add the URL of the Sitecore content management system.
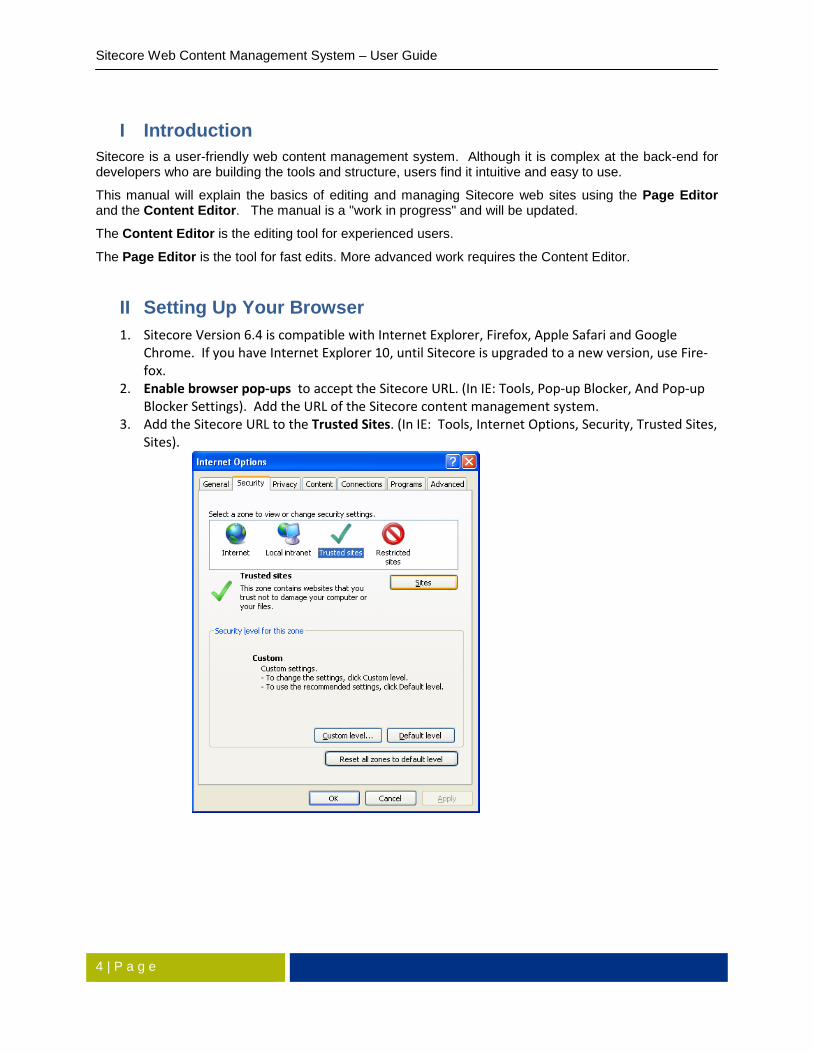
3. Add the Sitecore URL to the Trusted Sites. (In IE: Tools, Internet Options, Security, Trusted Sites, Sites).

Sitecore Web Content Management System – User Guide
5 | P a g e
III Logging In and Logging Out
1. Your Sitecore user name and password is your EAD (CWL) ID and password owing to the imple-mentation of EAD integration in August 2013.
To log in: User name: ead\CWL username Password: CWL password
2. Click on Options if you do not see the Page Editor or Content Editor buttons.
3. Open Sitecore site in your browser: http://webcontent.sauder.ubc.ca/sitecore/
4. Click on Page Editor (for simple inline edits) or Content Editor. Clicking on Desktop will give you access to both as well as to other items.
5. Enter your User Name and Password.
6. Click on Login button.

Sitecore Web Content Management System – User Guide
6 | P a g e
7. Log out when you are finished. Only 20 users are allowed into the system. The 21st user will not be able to log in and will receive a “too many users” message”. Closing the browser still leaves a user logged in for a few hours.
8. How to log out: Content Editor: click on the red circle at the top left and then on Exit. Sitecore
Desktop: click on the Sitecore button on the bottom left. It will open a menu. Click on Log Off. Page Editor: click on the Log Off button on the toolbar.

Sitecore Web Content Management System – User Guide
7 | P a g e
IV Editing: Basic Editing Using the Page Editor
The Page Editor (inline editing) allows simple editing while viewing the web site. The web site that you can see in the Page Editor looks similar to the live web site except for buttons at the top of the page. Changes must be published before they go live. This user guide concentrates on the Content Editor which provides more functionality but the main features of the Page Editor are described below.
1. Navigate to the web page you would like to edit.
2. Click on the Home button to expand the toolbar to have access to editing options.
3. Click on the Lock icon to lock the page.
4. Boxes will appear around editable objects. To edit text or images, click inside the box. A floating toolbar will appear near the area that you editing.
To have access to more editing options, click on the page icon on the left side of the floating toolbar. The Rich Text Editor will open. More information on the Rich Text Editor will be covered later in this document under the Content Editor section. To do more advanced edits, you will need to click on the More link which will open the Content Editor.
Sitecore Web Content Management System – User Guide
8 | P a g e
5. Add or revise the content in the selected area.
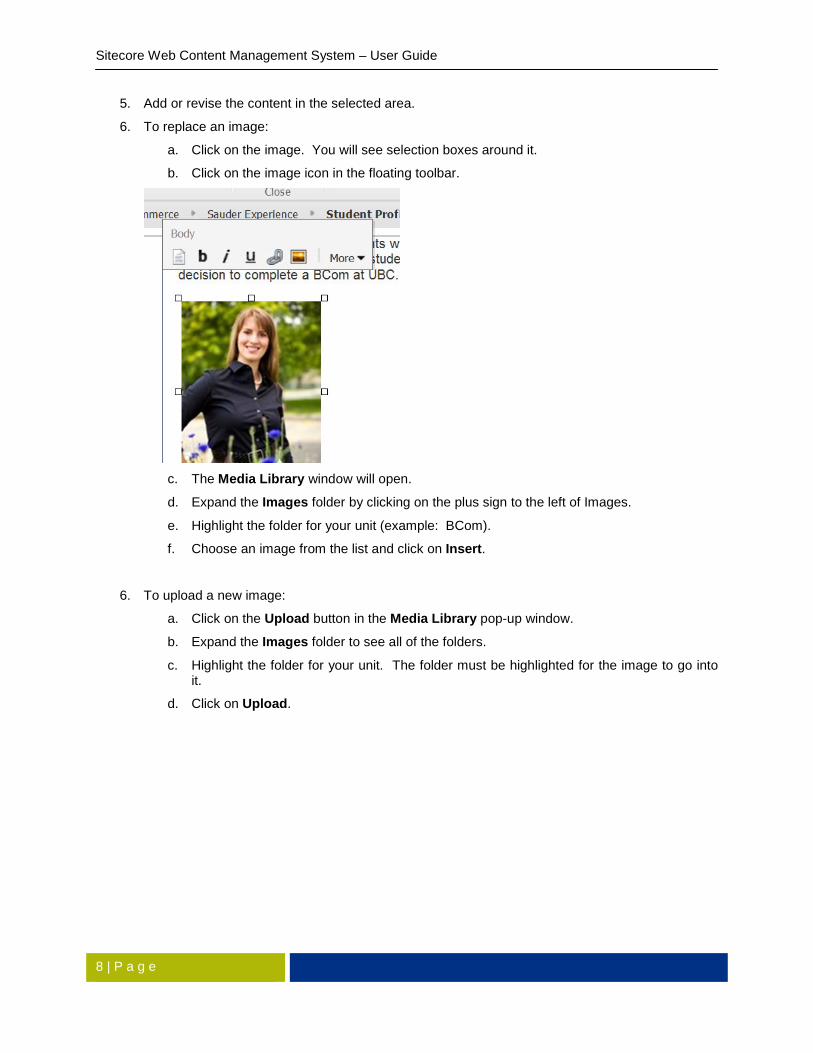
6. To replace an image:
a. Click on the image. You will see selection boxes around it.
b. Click on the image icon in the floating toolbar.
c. The Media Library window will open.
d. Expand the Images folder by clicking on the plus sign to the left of Images.
e. Highlight the folder for your unit (example: BCom).
f. Choose an image from the list and click on Insert.
6. To upload a new image:
a. Click on the Upload button in the Media Library pop-up window.
b. Expand the Images folder to see all of the folders.
c. Highlight the folder for your unit. The folder must be highlighted for the image to go into it.
d. Click on Upload.

Sitecore Web Content Management System – User Guide
9 | P a g e
(1) Editing a Web Page That You See on the Live Web
1. Log into the Page Editor. 2. Sitecore takes you back to the Home page. 3. Paste the URL of the page you want to edit into the browser address bar. 4. You return to the page you want to edit.
(2) Locking and Unlocking Items
The Page Editor automatically locks items that you are editing. However, if you click on the Lock icon in the Page Editor, please unlock it so that other users can edit it.
The My Items icon, when clicked, shows all the items you have locked and allows you to unlock one or more items.
The My Items dialogue box lists the items you have locked and allows you to select and unlock one or more items.
When you have finished editing an item in the Page Editor, please remember to unlock it!
(3) Summary Points Inline Editing using the Page Editor Inline editing allows you to edit the content in an item while navigating the Web site. Which Content is Editable? When you move the mouse across the page, boxes appear around all editable fields. How do you access the Rich Text Editor? Click on the icon of a page in the pop-up window (see image below). . In the Page Editor, what is Edit mode? After you log into the Page Editor, you must click the Edit button before you can enter Edit mode.

Sitecore Web Content Management System – User Guide
10 | P a g e
In Edit mode all editable fields have boxes around them to show which content is editable.
For more advanced editing options, click on the More button to open the Content Editor. The rest of this guide is about the Content Editor.

THE UNIVERSITY OF BRITISH COLUMBIA
V Editing: More Editing Options using the Content Editor
The Content Editor provides more editing options. It displays a view of the web structure in the left panel and allows you to edit web site content by editing fields that comprise the web pages. Text Fields are up-dated in a Microsoft Word-type editor (Rich Text Editor) by clicking on Show Editor.
The Content Editor consists of a tree structure on the left side that shows the website items.
Background Information
• Nodes on the Content Tree correspond to items on the web site. The nodes can be expanded or collapsed and you can use Search to find an item.
• In the Content Editor, you edit the web site content by entering text, links and images directly into fields.
• Each field corresponds to an editable area of a web page. Fields are defined when the template for the page is built. Each content item (page) consists of several fields.

Sitecore Web Content Management System – User Guide
12 | P a g e
(1) Editing Text Content
You can edit a single or multiple-line text field directly in their respective fields.
1. Lock the item. You must lock an item before you can edit it. To lock an item, use Lock and Edit at the top of the page or click on Edit on the Ribbon.
2. The main content will be found in the Body field if the page was created with the old templates. Most current pages contain the main content in the Full-Width Content Block component.
3. To edit the field using the Rich Text Editor, click on Show Editor which is at the top of the text field. You can write your text in Microsoft Word and paste it into the Rich Text Editor as plain text. The Rich Text Editor provides several choices when pasting text.
a. Paste b. Paste from Word (includes Word’s formatting) c. Paste from Word, strip font d. Paste Plain Text e. Paste as HTML
The option to use is (d) Paste Plain Text . The Sitecore Sauder style sheets provide the correct font and size and therefore you should not choose a font or size although the Rich Text Editor provides that option. You will also receive the same options if you right-click before pasting the copied text. The Rich Text Editor opens when you click on Show Editor. Float your mouse over the icons to see their function.
4. When you have finished editing, click on the Accept button at the bottom right of the window to save the changes.
5. Click on the Review tab and click on Spelling to spell-check your work. 6. Click on Save. 7. The item will stay locked and no one else will be able to update it until it is “submitted” and
“approved” (published) – more on that later. .

Sitecore Web Content Management System – User Guide
13 | P a g e
(2) Code Snippets in the Rich Text Editor
Introduction To facilitate content addition, code snippets are provided in the Rich Text Editor.
To access the code snippets:
• click on the downward arrow of the Code Snippet icon
• A drop-down menu with snippet selections will appear.
• Place your cursor on the page where the snippet should appear and click on one of the snippets. Most snippets will require some adjustments by the user. For example, the table snippets will require you to add your own content as well as add and delete rows or columns if necessary. Each table snippet represents a different Sauder style. Please use one of the four table snippets for all of your tables.
Image with Caption Snippet,
a. Insert the Image with Caption snippet into your content in the Rich Text Editor.
b. Right click on the image placeholder and choose Properties.
c. In the pop-up window's Image Src field scroll to the image in the Media Library.
d. in the Image Alignment field, choose one of the alignment options.

Sitecore Web Content Management System – User Guide
14 | P a g e
e. In the Alt Text field, add the alternative text (what you see when mousing over the image on the website)
f. Other options exist, such as adding the margin sizes
g. Click on OK to close the pop-up window.
Read More Link
This is the link to further information, added to the right-hand bottom of a block of text. The link changes colour on “mouse over”.
a. Insert the Read More code snippet into your content. Note that its alignment and
appearance will not alter in the Rich Text Editor but you will see the effect when you save and Preview your work.
b. Right-click on the snippet and choose Properties. A pop-up window will open.
c. To link to a document in the Media Library, click on the icon to the right of the URL field in the pop-up window and scroll to the document.

Sitecore Web Content Management System – User Guide
15 | P a g e
d. To link to another Sitecore page, create a separate temporary Sitecore link elsewhere on your page and copy that link URL into the URL field of the pop-up window.
e. To change the link display text from "Read More" to something else, change the information in the Link Text field.
f. Click on OK to close the pop-up window.
Two Column Block
a. Insert the Two Column Block into your content in the Rich Text Editor.
b. The columns will be designated by a rectangle. Although the rectangles can be viewed in the Rich Text Editor, they are invisible on the web page.
c. Place your cursor in one of the blocks to begin adding content.
d. Double-click. The curson beam should change to a vertical line to allow you to add content.
Table Snippets
a. Use one of the four Table Snippets provided because they conform to the Sauder style.

Sitecore Web Content Management System – User Guide
16 | P a g e
b. Insert your cursor in your content where you would like to add the table.
c. Add one of the tables.
d. Replace the placeholder table content with your own.
e. Add rows or columns by placing your cursor in one of the cells near where the new row or column will be added. Right-click and choose Insert Row Above, Insert Row Below or Insert Column to the Left, Insert Column to the Right from the menu.
f. Other options for adjusting the table exist on that menu.
g. Table Styles
Table Sample 1
Table Sample 2

Sitecore Web Content Management System – User Guide
17 | P a g e
Table Sample 3
Table Sample 4

Sitecore Web Content Management System – User Guide
18 | P a g e
(3) Hyperlinks There are two Hyperlink icons in the Rich Text Editor. One is for linking to items in Sitecore and one is for linking to external sites, e-mail links, and anchor text.
Linking to Sitecore Item
1. Click on Show Editor. When the Rich Text Editor opens, highlight the text to be hyperlinked.
2. Click on the Insert Site Core Link button: :
3. It opens up an Insert a Link dialogue box.
4. Select the item to be linked to.
5. Click on the Link button.

Sitecore Web Content Management System – User Guide
19 | P a g e
Linking to a URL Outside of the Sauder Sitecore Site
1. Click on the Hyperlink Manager icon:
2. The Hyperlink Manager dialogue box opens. It is the same dialogue box covered previously in the section about the Page Editor. Add the full URL.
Hyperlink Fields: URL: e.g. http://www.ubc.ca
Existing Anchor: can be a link to another part of the page
Link Text: text to be linked (will automatically be insert-ed if you highlight the word to be linked
Type: e.g. http for most links
Target: linked pages external to Sauder should open in a new window (New Window); pages that are internal to Sauder should open in the same window
Tooltip: A pop-up that appears when you move your mouse over the link.
CSS Class: Leave as it because it defaults to the Sauder Style Sheet.

Sitecore Web Content Management System – User Guide
20 | P a g e
(4) Creating a New Item (Page)
Select an item (e.g. Full-Time MBA). Under the Home tab at the top choose the template. You may need to click on the downward arrow to the right of the template list to find the template that you require. The most common template is the 3 Column 25-50-25. Another way to insert a new template is to right-click on the selected item, click on Insert from Template and choose the template from the Page Lay-outs folder in the Sauder Online folder.
Templates will be described in more detail later in the document.

Sitecore Web Content Management System – User Guide
21 | P a g e
(5) Adding the Top Bar, and Menu to a New Item 1. Menu: To add the menu, go to the Section Nav Parent field under the Nav Menu Data section
of the new item and choose the main item for your area from the pop-up drop-down list on the right. Example: To add the Full-Time MBA menu to your new page, highlight the Full Time MBA item on the far left, click on the downward arrow on the right of the Section Nav Parent field and choose "Full Time MBA" from the pop-up drop-down list.
2. Section Title: The title in the green block is in the Section Title Override Text field of the Nav Menu Data section. It is inherited by the subpages. The top title bar is shown in the image below.

Sitecore Web Content Management System – User Guide
22 | P a g e
(6) Changing / Adding Menu Items Menu changes, especially at the first two levels, should be approved by Marketing and Communi-cations before you make the changes.
1. To add or remove items from a sub-menu, in the Content Editor go to the item (page) under which the sub-menu items will go (e.g. Bachelor of Commerce)
2. Lock the page in the same way that is done when you edit it.
3. In the Secondary Nav Menu List field, add or remove the menu items using the arrows between the left and right panes. Move items up or down the menu list by highlighting them and using the up or down arrow to the far right of the Secondary Nav Menu List field.
4. Publish (Submit and Approve) the page.
(7) Copying an Item
3. In the content tree, find the item that you would like to copy. 4. On the Home tab, click on Duplicate (or right-click on the item in the left panel). 5. A dialog box opens that prompts you to name the new item. 6. The item is added to the content tree at the same level as the item you copied. 7. Edit the item and then move it to the correct place.
(8) Moving an Item

Sitecore Web Content Management System – User Guide
23 | P a g e
1. To move an item, locate the item to be moved. 2. On the Home tab, click on Move To. 3. In the dialogue box that opens, choose where you want to move the item to. 4. Click Move.
(9) Changing an Image
1. In the Content Editor, locate the item in the tree (left-hand pane). 2. In the Content Pane, click Browse to open the Media Browser. 3. Locate the image, select it and click OK.
(10) Uploading an Image to the Media Library
1. Before you upload the image, ensure that it is optimized for the web (correct dimensions, file size, in RGB mode). Although you can change the image dimensions for the copy on your page, the original dimensions remain on the server. Very large files should not be stored on the serv-er.
2. In the Content Pane, click Browse to open the Media Browser. Expand the Image folder until you find the folder for your section.
3. Highlight the folder for your section and click Upload. 4. In the dialogue box, click Browse and find the image on your computer that you want to add to
the Media Library. 5. When the image is uploaded, click on Lock and Edit on the image page, to add the Alt field in-
formation. This is the information that we see on the web site when the mouse hovers over an image.
6. Save the image by clicking on the Save button. 7. Click on the Review tab and on the My Items button. Highlight the image line in the My Items
pop-up window and click on the Unlock to unlock that image. 8. After the image is uploaded, minor edits to its properties can be made.
(11) Editing the Image Properties
1. In the Content Pane, find the field containing the image and right-click on the image. 2. Click on Properties and fill in the fields in the dialogue box that opens. Only very minor edits to
the image dimensions should be done here because the image should be optimized for the web before it is uploaded. (See section above on Uploading an Image to the Media Library.)
3. In the Space field, indicate how much space should be placed around the image.
(12) Uploading a File to Sitecore
1. Click on the Media Library on the footer area.
Sitecore Web Content Management System – User Guide
24 | P a g e
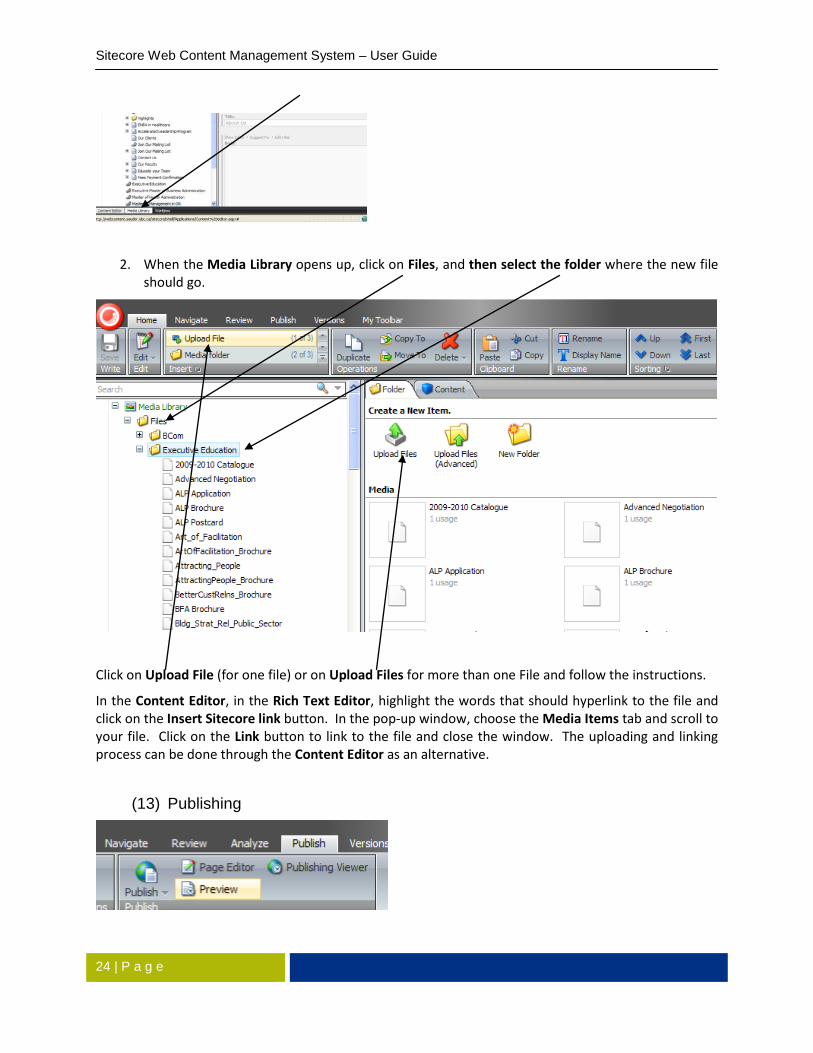
2. When the Media Library opens up, click on Files, and then select the folder where the new file should go.
Click on Upload File (for one file) or on Upload Files for more than one File and follow the instructions.
In the Content Editor, in the Rich Text Editor, highlight the words that should hyperlink to the file and click on the Insert Sitecore link button. In the pop-up window, choose the Media Items tab and scroll to your file. Click on the Link button to link to the file and close the window. The uploading and linking process can be done through the Content Editor as an alternative.
(13) Publishing

Sitecore Web Content Management System – User Guide
25 | P a g e
Publishing is done through the Sitecore Workbox using Sitecore's Workflow procedure described below or by using the Review tab of the page. If you are using the Review tab, click on the Submit link and then on the Approve link if you have approval rights.
VI Workflow (Publishing)
1. Editing/Creating Content
Locking an item will trigger the creation of a new version and the item will be in Draft state.
2. Properties of Draft Items • The most recent version will not be published.
• Other users will not be able to edit locked items.
• It will remain in Draft state, even if it is checked in, until it is submitted for approval.
3. Viewing Draft items
• In the Content Edi-tor, click on Workbox to view the Workbox.

Sitecore Web Content Management System – User Guide
26 | P a g e
• Under the Draft head-ing, you can see a list of items in Draft state.
Note: You can only see items that you or other in your group can edit, i.e.
• That are within your area of re-sponsibility
• That you have locked
• That have been checked in but not submitted for approval
4. Submitting Content for Approval When you have completed making your changes, you will need to submit content for approval be-fore it can be published. Submitting content will change the item’s state from Draft to Awaiting Approval and will automatically send an email to any relevant approvers, unless the unit has re-quested that the automatic e-mailed be disabled. If you are approving your own document, you will not receive the automatic e-mail.
In the Workbox, click Submit
-or-
Sitecore Web Content Management System – User Guide
27 | P a g e
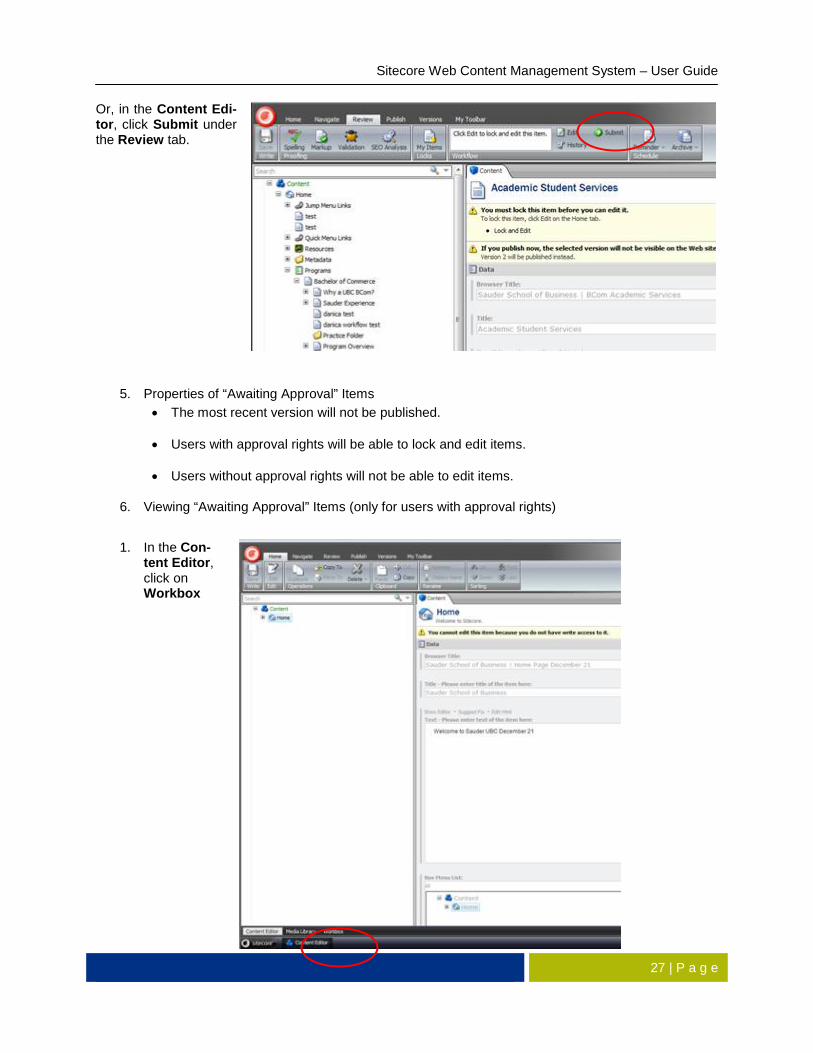
Or, in the Content Edi-tor, click Submit under the Review tab.
5. Properties of “Awaiting Approval” Items • The most recent version will not be published.
• Users with approval rights will be able to lock and edit items.
• Users without approval rights will not be able to edit items.
6. Viewing “Awaiting Approval” Items (only for users with approval rights)
1. In the Con-tent Editor, click on Workbox

Sitecore Web Content Management System – User Guide
28 | P a g e
2. Under the Awaiting Approval heading, you can see a list of items that require your approval. You have the option of ap-proving or rejecting the item.
7. Approving Items (only for users with approval rights) When you have reviewed content that is Awaiting Approval and you are satisfied with the changes, you can approve the item. Approving an item will automatically publish the latest version. After an item has been approved and published, other users (with the appropriate per-missions) will once again be able to edit the item, creating a new version and placing it in Draft state.
In the Workbox, click Approve
-or-
Or, in the Content Editor, click Ap-prove under the Review tab.

Sitecore Web Content Management System – User Guide
29 | P a g e
8. Rejecting items (only for users with approval rights) When you have reviewed content that is Awaiting Approval and you are not satisfied with the changes, you can reject the item. Rejecting an item will place it back in Draft state. Other users within your area of responsibility can then edit the content and re-submit it for approval.
In the Workbox, click Reject
-or-
Or, in the Content Editor, click Reject under the Review tab.
VII Deleting a draft version from the Workbox Although you can publish each page (Submit and Approve) under the Review tab, the Workbox should be cleared of draft versions because they slow down the system. Each time you lock a page for editing, it creates a new version in the Workbox. The draft will remain in the Workbox unless it is published (ap-proved).
To remove a version:
• Click on the Open link in the Workbox for that item. It will take you to that version in the Content Editor.
• If you are discarding that version, click on Remove which is found under the Versions tab. To see all of the versions, click on the downward arrow to the top right of the page or on the Ver-sions downward arrow under the Versions tab.

Sitecore Web Content Management System – User Guide
30 | P a g e
VIII Templates Most of the pages use the following three templates:
• Three column 25-50-25
• Three column 25-50-25 with image
• Two column 25-75
Some pages (usually landing pages) use the following templates:
• Two column 25-75 with content switcher
• Three column 25-50-25 with wider content switcher
News pages use the following template:
• News 3 column 25-50-25
3-column 25-50-25: This template has a right column referred to as a "right rail" for adding content into components along the right side. The right column extends from the top to the bottom. The top image is optional and should be a maximum of 475 px wide. It is inserted into the Image field of the Core Data section. The green box on the image is called a Tagline and is optional. To add content to the Tagline field, fill in the information. The Tagline field is located under the Image field in the Core Data section.
2-column 25-75: This template has no right column. Although the Sitecore page contains fields for components that are normally inserted into the right rail, the components will not display. This template should be used only for pages with very wide content.

Sitecore Web Content Management System – User Guide
31 | P a g e
3-column 25-50-25 with image: This template is similar to the 3-column 25-50-25 template except that the main image extends to the right of the page and the right rail begins below the main image. The im-age should be a maximum of 726 px wide.
The green box on the image is called the Program News Highlights component. To turn it on after add-ing your content, check the box called Show Highlights.
The other templates are more specialized and are only used in specific places.
IX What Does A Sitecore Page Look Like? A Sitecore page using one of the new templates has more sections and fields for entering content than it did before. The extra fields are optional and most pertain to content for the right rail. Below is an image of how the page looks before you expand the sections.

Sitecore Web Content Management System – User Guide
32 | P a g e
Expand the sections by clicking on the plus sign to the right of the section.
If the page is a new page, enter data in the Core Data section (at the top of the list), the Full-Width Con-tent Block section (11th from the top) and the Nav Menu Data section (4th from the top).
If the page is one which has been converted from the old template, the content will be in the Legacy Data section in the Body field.
(1) Core Data Section Complete the Title field.
Insert your image here if you have one.
Add the Tagline if the template you chose has that field.
Add the Browser Title. The format for browser title is: page title | Sauder School of Business at UBC, Vancouver Canada. All you need to add is the page title and the rest will be added automatically.
The Meta Keywords and Meta Description fields content will be provided by Marketing and Communi-cations.
(2) Full-Width Content Block Section Enter your content in the Full-Width Content Block (replaces Body field of old template).
(3) Nav Menu Data Section Section Nav Parent: To add the menu for your site, click on the downward arrow to the right of the Sec-tion Nav Parent field and scroll to find the home page of your unit. Click on it and the path to that page will be inserted into the field.
Section Title Override Text: This is the name that appears in the green box at the top of your menu. It is inherited by sub pages.
Sitecore Web Content Management System – User Guide
33 | P a g e
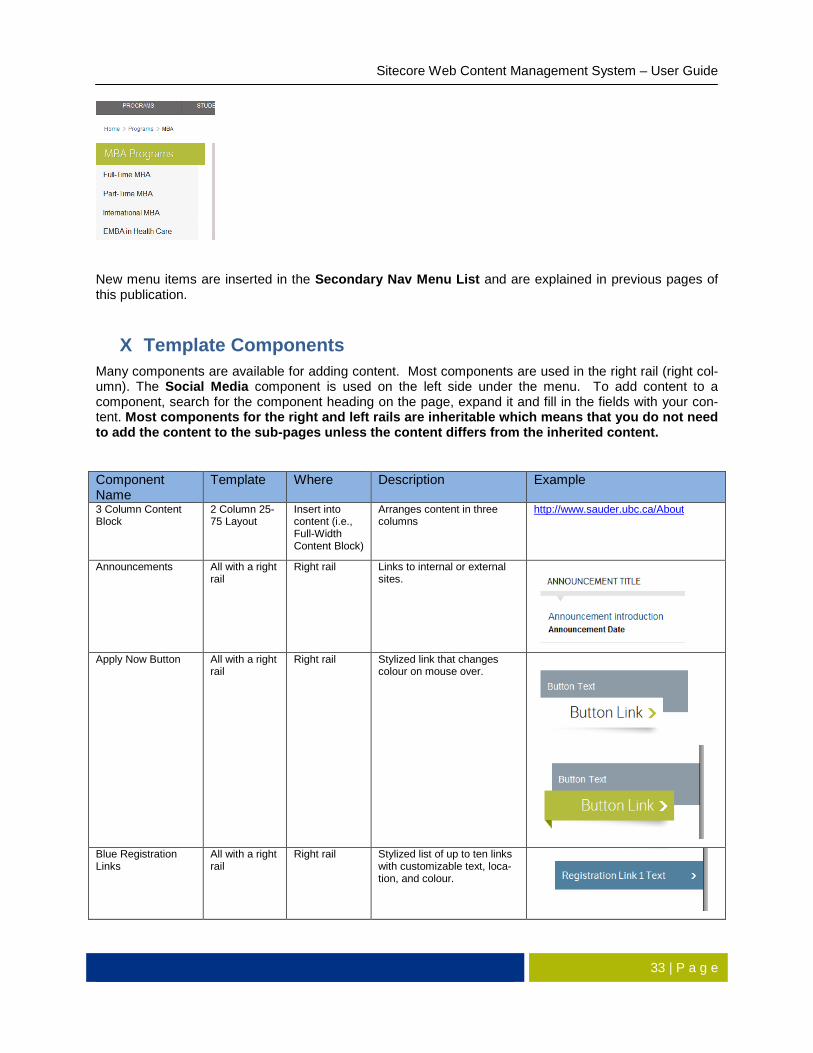
New menu items are inserted in the Secondary Nav Menu List and are explained in previous pages of this publication.
X Template Components Many components are available for adding content. Most components are used in the right rail (right col-umn). The Social Media component is used on the left side under the menu. To add content to a component, search for the component heading on the page, expand it and fill in the fields with your con-tent. Most components for the right and left rails are inheritable which means that you do not need to add the content to the sub-pages unless the content differs from the inherited content.
Component Name
Template Where Description Example
3 Column Content Block
2 Column 25-75 Layout
Insert into content (i.e., Full-Width Content Block)
Arranges content in three columns
http://www.sauder.ubc.ca/About
Announcements All with a right rail
Right rail Links to internal or external sites.
Apply Now Button All with a right
rail Right rail Stylized link that changes
colour on mouse over.
Blue Registration Links
All with a right rail
Right rail Stylized list of up to ten links with customizable text, loca-tion, and colour.

Sitecore Web Content Management System – User Guide
34 | P a g e
Featured News Story All Content (Full-width content block)
A highlighted news story featuring an image, a head-line, text and a link.
Image should be small (ap-prox 168 pixels w x 157 l)
Video can be added by com-pleting the Video Type and Video ID links. The content of the news story can have a separate link.
Featured Video All Right rail usu-ally but can also be added to the content.
Video with title, description, date and a placeholder im-age. The image should be no wider than 222 px.
Supports YouTube and Vimeo.
Full-Width Content Block
All Content Enter content here using the Rich Text Editor. Replaces the Body field of the old templates. Converted pages will still have content in the Body field. In new pages, place content in the Full-Width Content Block. (In-cludes an image field although image can be placed in the Rich Text Editor as well.)
Full-Width Content Block 2
All Content Same as Full-Width Content Block. Use when a second content block is required after another component
General Link List All with a right rail
Content Displays a set of up to 10 links, either internal or external.
Home Page News on Side Rail
All with a right rail
Right rail Displays and is updated with the same news stories that are on the homepage.
Important Dates All with a right
rail Right rail Displays up to five dates
with a link to each

Sitecore Web Content Management System – User Guide
35 | P a g e
Interesting Facts All with a right rail
Right rail Displays a headline and a longer message. There is an optional link. The whole message is clickable and has a hover effect. (similar to the Message compo-nent).
Latest Tweets All with a right
rail Right rail Displays a configurable
number of tweets with a configurable Twitter ac-count name. Account name field should contain only the account name, e.g."ubcsauderschool".
To display tweets, you will require an ID to enter into Sitecore. Contact Sauder Marketing & Communica-tions to create an ID for you.
Message Blocks All with a right rail
Right rail Displays a longer message with a headline. Includes 5 message blocks with dif-ferent headlines and bodies. Each message (body and headline) is clickable and has a hover effect.
News Page Compo-nent
All with a right rail
Centre column Displays a News block, based on a News item, with optional thumbnail photo.
See section on Using the News Module
.
News Feed Compo-nent
All with a right rail
Right rail Displays a News summary and thumbnail photo based on a News item.
See section on Using the News Module..
News By Topic All with a right rail
Right rail Generates a list of news topics and a link to view all news tagged for that topic.

Sitecore Web Content Management System – User Guide
36 | P a g e
News By Year All with a right rail
Right rail Generates a list of years from the current year and going back 10 years. Pro-vides a link to see all news stories created within that year.
Program List All with a right
rail Right rail Up to 9 programs can be
listed, including title, de-scription and an link. There is also an option for more programs.
Sidebar Profiles All with a right
rail Right rail Includes a Name, Descrip-
tion and Image field for each person. Image must not exceed 55 px in width.
Social Media Links All Left sidebar
under the menu
Each link has a description, a URL and one of one of several types (Facebook, Twitter, You Tube, etc.)
Tabbed Content All Content Up to five tabs that are
associated with a Rich Text area for adding content. Use short words for titles.
http://www.sauder.ubc.ca/About/Place
Upcoming Events All with right rail
Right rail Enter events which will be displayed as a list. Enter up to and including 6 events.
Upcoming Events Feed
All with a right rail
Right rail Displays tagged events. Events must be located and tagged in the News and Events section. Choice of displaying the Event Title, Short Introduc-tion, Display Count and/or the Event Venue
TBA

Sitecore Web Content Management System – User Guide
37 | P a g e
Adding Google Analytics Tracking Code Tracking code may be added to the links in the Rich Text Editor (e.g. Full-Width Content Block content) or to specific fields where the code can be added to right-rail button components, such as the Apply Now Button and the Blue Registration Links. You will receive this code from Marketing and Communications.
(1) Adding Code to Links within the Content. Example: RSVP links on MBA Events and Information Sessions page
• In the Content Editor find the content with the RSVP links. • Click on Edit HTML link above the content. A pop-up window will open.
• Find the RSVP link in the content and add the Google Analytics code to the link.
(Hint: Links start with <a href=" and end with </a>).
• Sample link without the GA code: <a ="~/link.aspx?_id=B140B5CBF5694691A63BBF07A87F3B0D&_z=z" target="_blank">Link</a>
• Sample link with the GA code shown in yellow: <a onclick="ga('send', 'event', 'Link Tracking', 'Click', 'Download Brochure');" target="_blank" href="~/link.aspx?_id=B140B5CBF5694691A63BBF07A87F3B0D&_z=z">Link</a>
• Make sure that you have copied all of the quotation marks, commas, brackets, from the code. • Click on the Accept button to close the pop-up window. • Save, Submit and Approve the page.
(2) Adding Code to Code Tracking Fields of Components The Apply Now Button and the Blue Registration Links components have special tracking fields where you can insert the Google Analytics code to track the clicking of those buttons. ga('send', 'event', 'Link Tracking', 'Click', 'Apply Online') Note: Because there is a field for this code in Sitecore, you do not need to add the quotation marks at the beginning and at the end.

Sitecore Web Content Management System – User Guide
38 | P a g e
XI Content Switcher When the site was first developed, only the home page had a content switcher. This feature was later expanded to the Executive Education and ISIS landing pages. It is now possible to add a Content Switcher to your section if you use either of the two Content-Switcher templates described previously (3 -column 25-50-25 with content switcher or 2-column 25-75 with content switcher.)
Introduction:
There are two main steps to creating a Content Switcher:
• Create a Content Switcher Item for each image that will be displayed in the Content Switcher.
• Create a new page to hold the Content Switcher by using one of the two Content Switcher templates.
• Create links to the Content Switcher items within the new page by using the Content Switcher Stories field within that page.
Steps:
1. The Content Switcher item section will need to be created for you if it does not exist yet under your section by highlighting the landing page of your section.
a. Right-click and select Insert from Template.
b. Choose the Item Section template and name it Content Switcher in the Item Name field of the pop-up window.
Sitecore Web Content Management System – User Guide
39 | P a g e
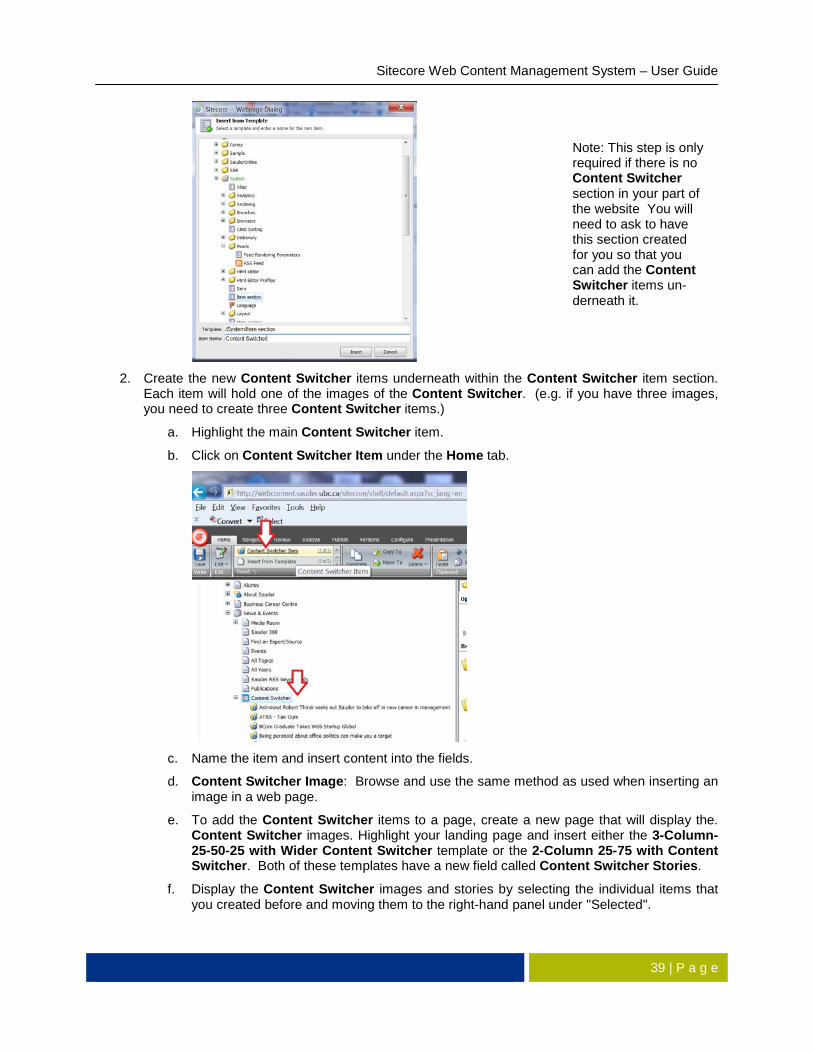
2. Create the new Content Switcher items underneath within the Content Switcher item section.
Each item will hold one of the images of the Content Switcher. (e.g. if you have three images, you need to create three Content Switcher items.)
a. Highlight the main Content Switcher item.
b. Click on Content Switcher Item under the Home tab.
c. Name the item and insert content into the fields.
d. Content Switcher Image: Browse and use the same method as used when inserting an image in a web page.
e. To add the Content Switcher items to a page, create a new page that will display the. Content Switcher images. Highlight your landing page and insert either the 3-Column-25-50-25 with Wider Content Switcher template or the 2-Column 25-75 with Content Switcher. Both of these templates have a new field called Content Switcher Stories.
f. Display the Content Switcher images and stories by selecting the individual items that you created before and moving them to the right-hand panel under "Selected".
Note: This step is only required if there is no Content Switcher section in your part of the website You will need to ask to have this section created for you so that you can add the Content Switcher items un-derneath it.

Sitecore Web Content Management System – User Guide
40 | P a g e
Home Page Content Switcher (for Marketing and Communications)
The home page Content Switcher can now display video if the Video Type and Video ID fields are filled in.

Sitecore Web Content Management System – User Guide
41 | P a g e
XII Sitecore News Templates and Functionality (for Marketing and Communications) - Draft
The instructions assume that the user has been using Sitecore previously.
(1) Using the News Module
The news items must be created in the News section in a year folder, e.g. 2013.
**(The News item can be added later as a block to the centre column of any 25-50-25 page on the web-site after it is created. (Presentation - Details - add News Page Component) or as a right-rail component. (Presentation - Details - add News Feed Component). Content for both will go into the News Feed section of the page. (for later)).
First, create the news item by going to the News section and highlighting the 2014 item. Click on Insert from template. Choose the Sauder Online folder, then the Page Layouts folder. Highlight News 3 Column 25-50-25.
Name the item and click on the OK button.

Sitecore Web Content Management System – User Guide
42 | P a g e
Lock the page to edit it.
Add the title, tags, summary, date, and thumbnail image (thumbnail is optional).
Add the full content to the Full Width Content Block.
To add the News Page Component to any page as a news block (title, date, summary, tag and optional thumbnail), add the News Page Component to that page. For example to add it to a 25-50-25 page on the Alumni site, add the News Page Component (Presentation tab - Details - Renderings - News Page Component) to that page to display the content from the news item that you previously created. Add CentreColumn to the Placeholder field.
Add your content in the News Feed section of the Sitecore page:
-News Feed Title
-News Feed Display Content (how many news feeds to display)
-Tags (what tagged items you would like to display)

Sitecore Web Content Management System – User Guide
43 | P a g e
News Feed Component vs News Page Component If you add the News Feed Component to the page instead of the News Page Component, the infor-mation will display in the Right Rail
Content for both of the above goes into the News Feed section of the Sitecore page.
For the News Feed (right rail only):
Check the box on whether to show the Title in the News Feed
Check the box on whether to show the Short Introduction in the News Feed
Note that the content for either choice goes into the News Feed section of the Sitecore item that you are working on.
News Result Page (hard-coded) shows all news: Can select which tags to show in the right rail by se-lecting the News Feeds Tags.
(2) News by Topic Component and News by Year Component Added to Right Rail from Presentation - Details - Renderings - SauderOnline - News By Topic Com-ponent. Also repeat for News By Year Component. Add to the Placeholder called RightSidebar.

Sitecore Web Content Management System – User Guide
44 | P a g e
(3) Updating the Content Blocks on the Sauder Home Page (previously called Feature Stories) (for Marketing and Communications only)
Images: Optimize and upload image to the Media Library (306 pixels wide). See section on images for more on images. Make sure that the image is unlocked after you save it. (Review tab, My Items, Un-lock).
Creating a New Item
a. Highlight the repository (currently called Home Page Content Blocks) for the home page block items in the content tree (under New and Events)
b. Right click and choose the Feature Stories template from the insert options (see earlier sec-tion on inserting a new item).
c. Complete the following fields. Save, submit and approve the item when you are finished.:
d. Browser Title: e.g "Full-Time MBA"
e. Short Intro: text in box below image
f. Image: 306 px wide x 161 px high (upload to Media Library, must be optimized, unlocked )
g. Title: Title below the Feature Story image on Home page "The re-imagined UBC MBA pro-gram" below
h. Body:
i. Section: Title on top of Feature Story image on Home page: "Full-Time MBA"
j. Override Link: link to Feature Story when you click on the story introduction or story title or link to the page on the site (e.g. MBA Programs)
k. Section Override Link: Link of section field - "Full-Time MBA" link to MBA landing page. Sometimes both are the same.
l. Section Nav Parent: sitecore/content/Home/News
m.
Go to Home page and in the Stories box select the item. Publish the Home page.

Sitecore Web Content Management System – User Guide
45 | P a g e
(4) Home Page News (for Marketing and Communications only) News information displayed on the home page is based on the Home Page News tag. This feature has replaced the "left to right" panels in Sitecore where items were selected to display on the home page. The Home Page News tag does not display on the right rail with the other tags when the News by Topic component is added..
Events tag: News items tagged as Events display on the Sauder Home page under Events.
Tags are created by Marketing and Communications in the Metadata section (Metadata, News Topics). The Home Page News tag is invisible in the list of tags that can be added to the right rail. To turn other tags on or off, the tags are checked as invisible or visible.
(5) News Results Page This page is hardcoded. The title displays the tag selected plus "News". For example, if the Faculty tag is selected (clicked) in the right rail, the News Results page title will be "Faculty News".
The All News tag displays all of the news on the News Results page.
Sitecore Web Content Management System – User Guide
46 | P a g e
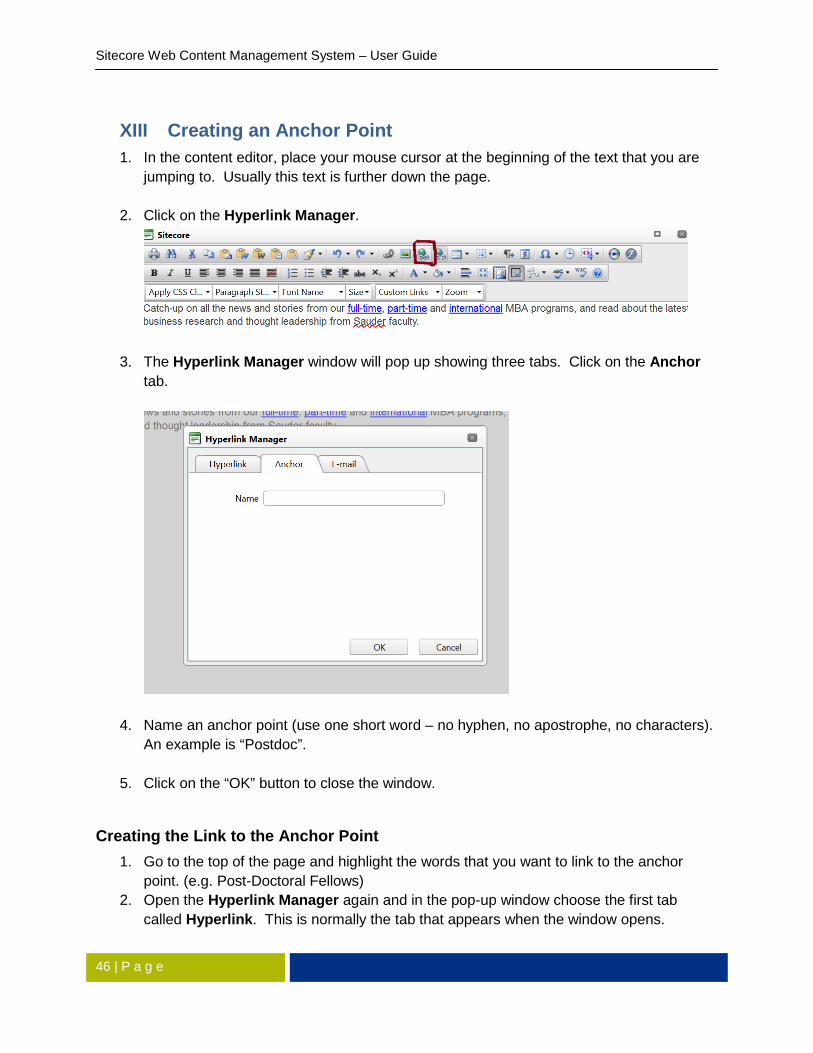
XIII Creating an Anchor Point 1. In the content editor, place your mouse cursor at the beginning of the text that you are
jumping to. Usually this text is further down the page.
2. Click on the Hyperlink Manager.
3. The Hyperlink Manager window will pop up showing three tabs. Click on the Anchor
tab.
4. Name an anchor point (use one short word – no hyphen, no apostrophe, no characters). An example is “Postdoc”.
5. Click on the “OK” button to close the window.
Creating the Link to the Anchor Point 1. Go to the top of the page and highlight the words that you want to link to the anchor
point. (e.g. Post-Doctoral Fellows) 2. Open the Hyperlink Manager again and in the pop-up window choose the first tab
called Hyperlink. This is normally the tab that appears when the window opens.

Sitecore Web Content Management System – User Guide
47 | P a g e
3. Click on the downward arrow to the right of the “Existing Anchor” field and choose the anchor name that you just created.
4. Click on OK.
You have just created an anchor.
Where To Use Anchors Anchors are normally used when you have a long page with a list of links at the top to content that is fur-ther down the page. An example is the People page of each division (e.g. http://www.sauder.ubc.ca/Faculty/Divisions/Accounting/People).

Sitecore Web Content Management System – User Guide
48 | P a g e
Summary: Important Points Versions Clutter – Clean your Workbox: To edit a page, click on Lock and Edit near the top of the page or on the Edit button on the toolbar. When you lock a page, you are creating a new unpublished version of that page in the Workbox. The page will disappear from the Workbox after it is published (submitted and approved) To remove the unpublished version from the Workbox, delete that version by following the steps outlined in this document.
Display Name and Rename: Under the Home tab of the toolbar, these two icons can be used to rename an item’s URL name and the item’s display name. For example, the Display Name of the "News & Events" section is entered here. However, the name in the URL is the name that is entered in the Re-name field when you click on the Rename button. For the "News & Events" section. the item is "news". This is what appears in the URL which is: http://www.sauder.ubc.ca/news. It is important to note that renaming an item will change the URL. The display name can have the symbol "&" in it but the URL name instead of using "&" will require the word "and".
No folders please except in the Media Library! (because of breadcrumbs): Pages placed in folders will break links in the breadcrumbs because folders are not recognized by the breadcrumbs.
Images: Optimize your images (correct dimensions, file size, RGB mode and file type before uploading the images to the Media Library.
Media Library (images and files): Highlight the folder for your area where the images or files should go before uploading them.
Clean Content: Do not specify font styles, sizes, or colours when using the Rich Text Editor. The glob-al style sheets will determine how fonts are displayed. For headings see the section on Titles below.
Pasting from Microsoft Word or Outlook: Global style sheets provide the content styles in Sitecore (e.g. correct font, font size, colour, heading size, When pasting content after copying it from a Word doc-ument, right-click and choose the paste plain text option. Do not alter the font type and other characteristics.
Titles in your content:: You may choose from a set of pre-defined styles in the Sitecore editor for your
subtitles:
URL Hygiene: If you are using an external editor to create your content, please ensure that none of the links in your content contain "%7E". It should be replaced with a "~". For procedures, please see the section called Appendix 1: URL Hygiene. To create Sitecore links to other Sitecore items, always use the “Insert Sitecore Link” function. The Hyperlink Manager is for external links.
Sitecore Web Content Management System – User Guide
49 | P a g e
Logging out when you are finished: Please log out according to the instructions at the beginning of the manual. Closing a browser window does not log you out. Only 20 users are currently permitted access at the same time. The 21st user receives a message about too many users.
XIV Appendix 1: URL Hygiene (or how to have clean URLs!) Google reports showed that many of the Sauder site web links contained non-standard URLs. Most of the problem links were inadvertently produced by users when editing or creating content. These irregulari-ties are easy to correct and to avoid in the future.
Tips
1. Use the Sitecore internal linker. To ensure clean URLs and to ensure that the internal links work correctly, always use the Sitecore internal link option ("Insert Sitecore Link") to create a link to an internal (within Sitecore) item. Do not use the Hyperlink Manager except for exter-nal links.
2. Avoid adding .aspx to internal links (e.g. www.sauder.ubc.ca/News/View_all_News.aspx).
3. Avoid coding spaces into URLs because browsers add %20 in place of the spaces, For exam-ple, http://www.sauder.ubc.ca/programs/bachelor of commerce will be converted to http://www.sauder.ubc.ca/programs/bachelor%20of%20commerce. If you are linking to that page using the Sitecore internal linker ("Insert Sitecore Link"), you will avoid this problem.
4. %7E problem: Know how to correct %7E inserted into your content when using an external edi-tor. If you are copying and pasting content from an external web editor into Sitecore, the external web editors replace the "~" part of the Sitecore link with "%7E". Please use the following proce-dures to clean up links that contain %7E. You may use Microsoft Word or a text editor with a search and replace function to search for "%7E" and replace it with "~".
Correcting the %7E problem:
o Open the HTML content editor in Sitecore to edit your content. The content is found either within the Body field in the Legacy section or in the Full Width Content Block field for content in new templates.
o Copy the HTML code by highlighting the text, right-clicking on the text and selecting "Copy" or by pressing CTRL + C on the keyboard.
o Paste the HTML code into a new Microsoft Word document by right-clicking and se-lecting "Paste" or by pressing CTRL +V on the keyboard.
o In the Word document find the "search and replace" function and search for "%7E". Replace it with "~". Replace all instances.
o Copy the code from Microsoft Word back into Sitecore.
o Save the changes, submit and publish.
Questions or Suggestions: Please contact Shirley Irvine.

Sitecore Web Content Management System – User Guide
50 | P a g e
XV Appendix 2 – Document Revision History
Ver-sion Date Author(s) Description of Change
0.1 September 30, 2009 Shirley Irvine Initial draft for first training session.
0.2 October 6, 2009 Shirley Irvine Incorporated Suggestions
0.3 October 8-14, 2009 Shirley Irvine Added new content
0.4 January 18, 2010 Shirley Irvine Incorporated new workflow procedure and changes to login owing to the implementation of Active Directory
0.5 January 26, 2010 Shirley Irvine Minor changes to the Rich Text Editor.
0.6 February 2, 2010 Shirley Irvine Added new content.
0.7 December 3, 2010 Shirley Irvine Added new content: minor revisions to existing sections; new section on adding and removing menu items; new section on adding theme, menu, title bar and link to a new page
0.8 May 6, 2011 Shirley Irvine Updated to reflect new features in Sitecore 6.4
0.9 September 23, 2011 Shirley Irvine Updated to reflect new Sitecore templates and compo-nents; updated with other information such as logging out, display name, rename.
1.0 September 26-7, 2011 Shirley Irvine Added new code snippet information and minor edits.
1.1 October 14, 2011 Shirley Irvine Minor edits for clarification.
1.2 October 18, 2011 Shirley Irvine More edits.
1.3 October 19, 2011 Shirley Irvine Additions to new template section and important points page.
1.4 October 26, 2011 Shirley Irvine Changed information about Browser Title to reflect global change made in Sitecore today.
1.5 December 1, 2011 Shirley Irvine Added new section called "URL Hygiene": based on re-search and report by Chad Embree.
1.6 December 2, 2011 Shirley Irvine Moved document revision history to end.
1.7 December 2012 & January, 2013
Shirley Irvine Added new material to deal with the recent new develop-ments and rewrote older sections
1.8 August 2013 Shirley Changed login instructions to EAD (CWL), added note about IE 10, and also added the new Twitter procedure.

Sitecore Web Content Management System – User Guide
51 | P a g e
Ver-sion Date Author(s) Description of Change
1.9 October 2014 Shirley Irvine Added new section on how to add anchors
2.0 April 2016 Shirley Irvine Updates