sleeve savvy - college of agriculture, food and environment · tending to the neck-line area....
TRANSCRIPT

FCS2-807
Types of Sleeves A quick look through a pattern catalog reveals
a profusion of sleeves in lengths and shapes to suit every whim. Sleeves and sleeve treatments help shape fashion for men and women alike. The inter-esting element is that most of these fashion-shapers fall into three basic types: set-in, raglan, or kimono.
Set-in SleeveA set-in sleeve
(Figure 1) is a separate, precisely shaped piece of fab-ric which joins the garment in a seam that encircles the arm over the shoulder.
Sleeve SavvyMarjorie M. Baker, Family and Consumer Sciences
Raglan Sleeve A raglan sleeve
(Figure 2) is a sepa-rate, precisely shaped piece of fabric which joins the bodice in a diagonal seam ex-tending to the neck-line area.
Kimono Sleeve A kimono sleeve
(Figure 3) is a sleeve that is cut as one with the garment or as a part of it, such as a yoke.
The manner or technique of handling the sleeve application can spell perfection or disaster—the difference between a “ homemade” look and the
“ handmade” look.
The sleeves in a garment should add style and beauty as well as provide comfort to the wearer. Perhaps few steps in the construction process can add so much to or detract so
much from the final appearance as do the sleeves. Sleeve savvy can be easily achieved with an understanding of fit and a few basic sewing principles.
Figure 1
Figure 3
Figure 2
2
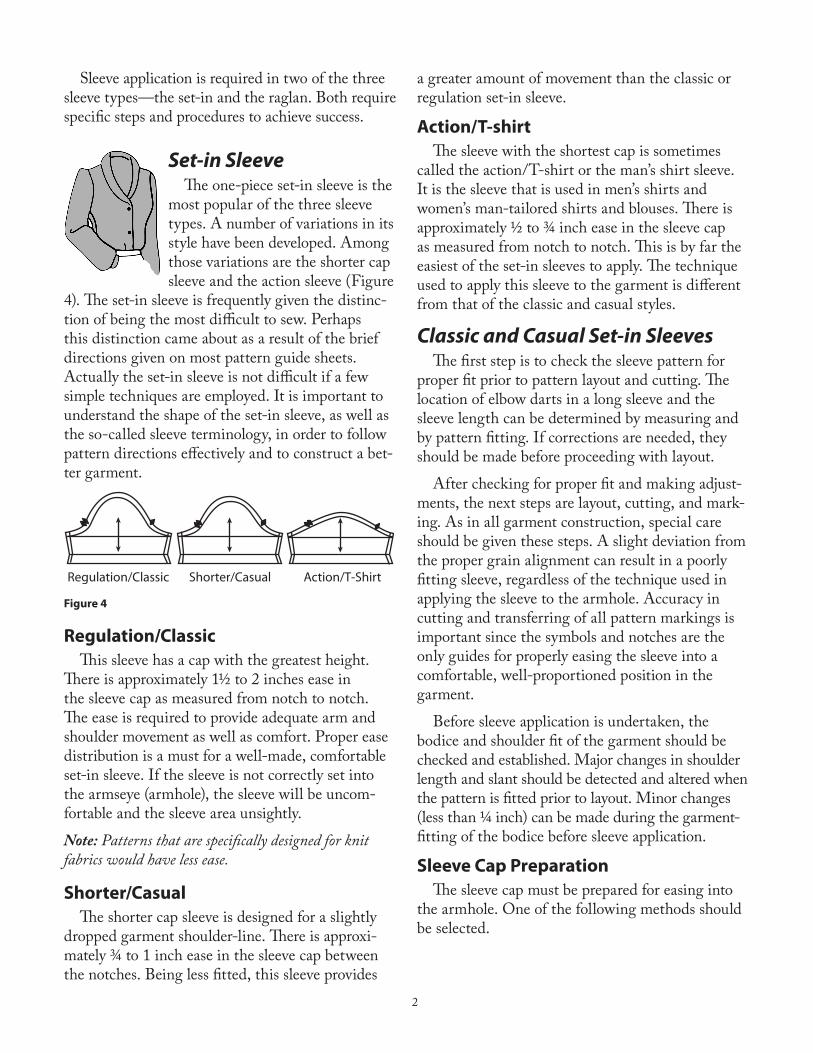
Regulation/Classic Shorter/Casual Action/T-Shirt
Figure 4
Sleeve application is required in two of the three sleeve types—the set-in and the raglan. Both require specific steps and procedures to achieve success.
Set-in SleeveThe one-piece set-in sleeve is the
most popular of the three sleeve types. A number of variations in its style have been developed. Among those variations are the shorter cap sleeve and the action sleeve (Figure
4). The set-in sleeve is frequently given the distinc-tion of being the most difficult to sew. Perhaps this distinction came about as a result of the brief directions given on most pattern guide sheets. Actually the set-in sleeve is not difficult if a few simple techniques are employed. It is important to understand the shape of the set-in sleeve, as well as the so-called sleeve terminology, in order to follow pattern directions effectively and to construct a bet-ter garment.
Regulation/ClassicThis sleeve has a cap with the greatest height.
There is approximately 1½ to 2 inches ease in the sleeve cap as measured from notch to notch. The ease is required to provide adequate arm and shoulder movement as well as comfort. Proper ease distribution is a must for a well-made, comfortable set-in sleeve. If the sleeve is not correctly set into the armseye (armhole), the sleeve will be uncom-fortable and the sleeve area unsightly.Note: Patterns that are specifically designed for knit fabrics would have less ease.
Shorter/CasualThe shorter cap sleeve is designed for a slightly
dropped garment shoulder-line. There is approxi-mately 3/4 to 1 inch ease in the sleeve cap between the notches. Being less fitted, this sleeve provides
a greater amount of movement than the classic or regulation set-in sleeve.
Action/T-shirtThe sleeve with the shortest cap is sometimes
called the action/T-shirt or the man’s shirt sleeve. It is the sleeve that is used in men’s shirts and women’s man-tailored shirts and blouses. There is approximately ½ to 3/4 inch ease in the sleeve cap as measured from notch to notch. This is by far the easiest of the set-in sleeves to apply. The technique used to apply this sleeve to the garment is different from that of the classic and casual styles.
Classic and Casual Set-in SleevesThe first step is to check the sleeve pattern for
proper fit prior to pattern layout and cutting. The location of elbow darts in a long sleeve and the sleeve length can be determined by measuring and by pattern fitting. If corrections are needed, they should be made before proceeding with layout.
After checking for proper fit and making adjust-ments, the next steps are layout, cutting, and mark-ing. As in all garment construction, special care should be given these steps. A slight deviation from the proper grain alignment can result in a poorly fitting sleeve, regardless of the technique used in applying the sleeve to the armhole. Accuracy in cutting and transferring of all pattern markings is important since the symbols and notches are the only guides for properly easing the sleeve into a comfortable, well-proportioned position in the garment.
Before sleeve application is undertaken, the bodice and shoulder fit of the garment should be checked and established. Major changes in shoulder length and slant should be detected and altered when the pattern is fitted prior to layout. Minor changes (less than 1/4 inch) can be made during the garment-fitting of the bodice before sleeve application.
Sleeve Cap PreparationThe sleeve cap must be prepared for easing into
the armhole. One of the following methods should be selected.
3
Figure 5
Figure 6
Figure 7
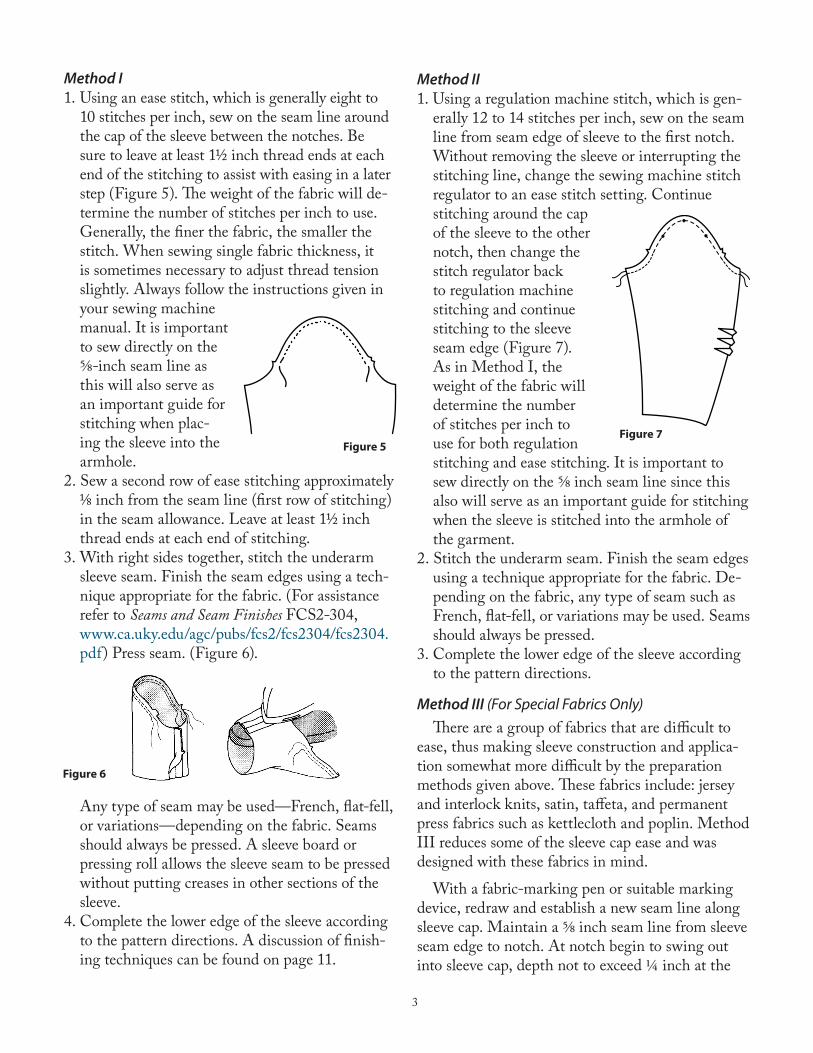
Method I1. Using an ease stitch, which is generally eight to
10 stitches per inch, sew on the seam line around the cap of the sleeve between the notches. Be sure to leave at least 1½ inch thread ends at each end of the stitching to assist with easing in a later step (Figure 5). The weight of the fabric will de-termine the number of stitches per inch to use. Generally, the finer the fabric, the smaller the stitch. When sewing single fabric thickness, it is sometimes necessary to adjust thread tension slightly. Always follow the instructions given in your sewing machine manual. It is important to sew directly on the 5/8-inch seam line as this will also serve as an important guide for stitching when plac-ing the sleeve into the armhole.
2. Sew a second row of ease stitching approximately 1/8 inch from the seam line (first row of stitching) in the seam allowance. Leave at least 1½ inch thread ends at each end of stitching.
3. With right sides together, stitch the underarm sleeve seam. Finish the seam edges using a tech-nique appropriate for the fabric. (For assistance refer to Seams and Seam Finishes FCS2-304, www.ca.uky.edu/agc/pubs/fcs2/fcs2304/fcs2304.pdf) Press seam. (Figure 6).
Any type of seam may be used—French, flat-fell, or variations—depending on the fabric. Seams should always be pressed. A sleeve board or pressing roll allows the sleeve seam to be pressed without putting creases in other sections of the sleeve.
4. Complete the lower edge of the sleeve according to the pattern directions. A discussion of finish-ing techniques can be found on page 11.
Method II1. Using a regulation machine stitch, which is gen-
erally 12 to 14 stitches per inch, sew on the seam line from seam edge of sleeve to the first notch. Without removing the sleeve or interrupting the stitching line, change the sewing machine stitch regulator to an ease stitch setting. Continue stitching around the cap of the sleeve to the other notch, then change the stitch regulator back to regulation machine stitching and continue stitching to the sleeve seam edge (Figure 7).
As in Method I, the weight of the fabric will determine the number of stitches per inch to use for both regulation stitching and ease stitching. It is important to sew directly on the 5/8 inch seam line since this also will serve as an important guide for stitching when the sleeve is stitched into the armhole of the garment.
2. Stitch the underarm seam. Finish the seam edges using a technique appropriate for the fabric. De-pending on the fabric, any type of seam such as French, flat-fell, or variations may be used. Seams should always be pressed.
3. Complete the lower edge of the sleeve according to the pattern directions.
Method III (For Special Fabrics Only)There are a group of fabrics that are difficult to
ease, thus making sleeve construction and applica-tion somewhat more difficult by the preparation methods given above. These fabrics include: jersey and interlock knits, satin, taffeta, and permanent press fabrics such as kettlecloth and poplin. Method III reduces some of the sleeve cap ease and was designed with these fabrics in mind.
With a fabric-marking pen or suitable marking device, redraw and establish a new seam line along sleeve cap. Maintain a 5/8 inch seam line from sleeve seam edge to notch. At notch begin to swing out into sleeve cap, depth not to exceed 1/4 inch at the
4
Figure 9
Figure 8
Figure 11
Figure 10
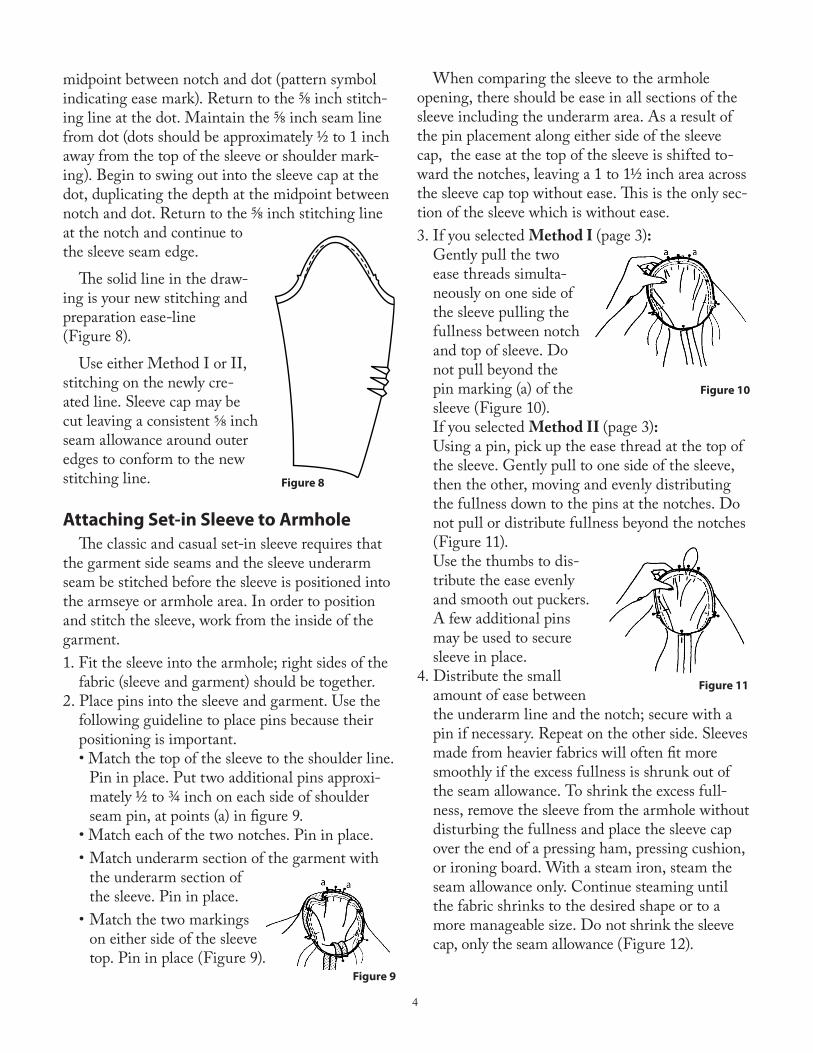
midpoint between notch and dot (pattern symbol indicating ease mark). Return to the 5/8 inch stitch-ing line at the dot. Maintain the 5/8 inch seam line from dot (dots should be approximately ½ to 1 inch away from the top of the sleeve or shoulder mark-ing). Begin to swing out into the sleeve cap at the dot, duplicating the depth at the midpoint between notch and dot. Return to the 5/8 inch stitching line at the notch and continue to the sleeve seam edge.
The solid line in the draw-ing is your new stitching and preparation ease-line (Figure 8).
Use either Method I or II, stitching on the newly cre-ated line. Sleeve cap may be cut leaving a consistent 5/8 inch seam allowance around outer edges to conform to the new stitching line.
Attaching Set-in Sleeve to ArmholeThe classic and casual set-in sleeve requires that
the garment side seams and the sleeve underarm seam be stitched before the sleeve is positioned into the armseye or armhole area. In order to position and stitch the sleeve, work from the inside of the garment.1. Fit the sleeve into the armhole; right sides of the
fabric (sleeve and garment) should be together.2. Place pins into the sleeve and garment. Use the
following guideline to place pins because their positioning is important.
• Match the top of the sleeve to the shoulder line. Pin in place. Put two additional pins approxi-mately ½ to 3/4 inch on each side of shoulder seam pin, at points (a) in figure 9.
• Match each of the two notches. Pin in place. • Match underarm section of the garment with
the underarm section of the sleeve. Pin in place.
• Match the two markings on either side of the sleeve top. Pin in place (Figure 9).
When comparing the sleeve to the armhole opening, there should be ease in all sections of the sleeve including the underarm area. As a result of the pin placement along either side of the sleeve cap, the ease at the top of the sleeve is shifted to-ward the notches, leaving a 1 to 1½ inch area across the sleeve cap top without ease. This is the only sec-tion of the sleeve which is without ease.3. If you selected Method I (page 3): Gently pull the two
ease threads simulta-neously on one side of the sleeve pulling the fullness between notch and top of sleeve. Do not pull beyond the pin marking (a) of the sleeve (Figure 10).
If you selected Method II (page 3): Using a pin, pick up the ease thread at the top of
the sleeve. Gently pull to one side of the sleeve, then the other, moving and evenly distributing the fullness down to the pins at the notches. Do not pull or distribute fullness beyond the notches (Figure 11).
Use the thumbs to dis-tribute the ease evenly and smooth out puckers. A few additional pins may be used to secure sleeve in place.
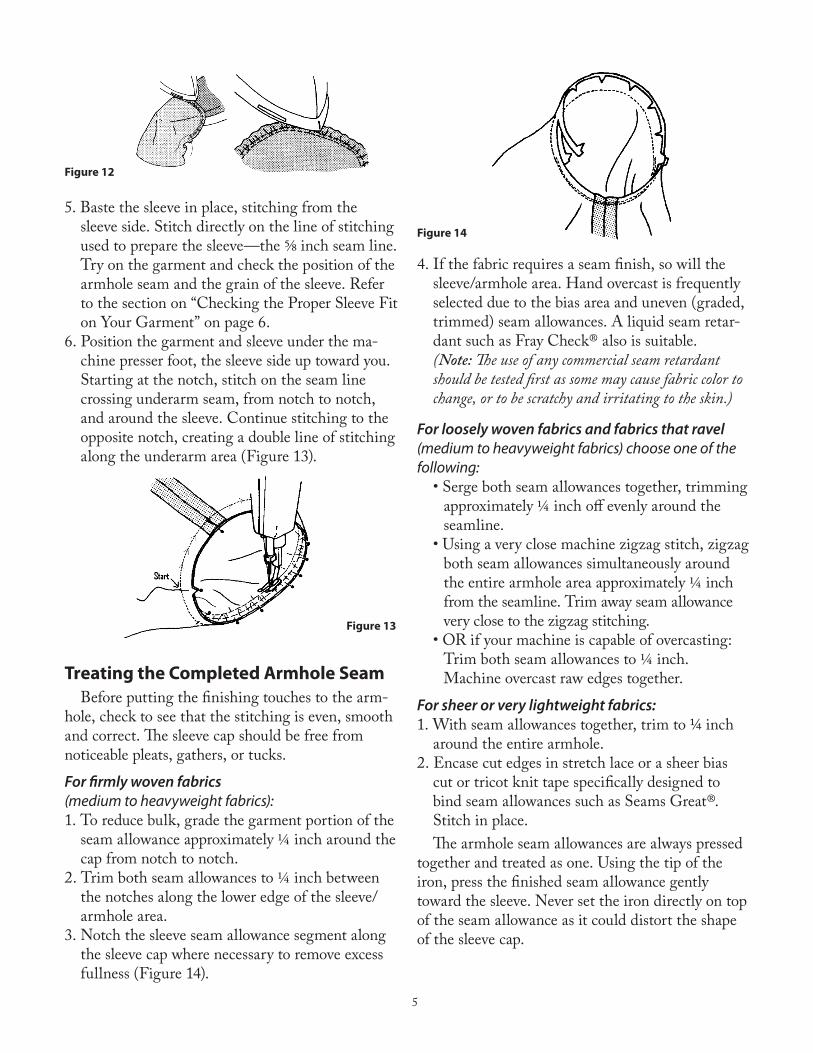
4. Distribute the small amount of ease between the underarm line and the notch; secure with a pin if necessary. Repeat on the other side. Sleeves made from heavier fabrics will often fit more smoothly if the excess fullness is shrunk out of the seam allowance. To shrink the excess full-ness, remove the sleeve from the armhole without disturbing the fullness and place the sleeve cap over the end of a pressing ham, pressing cushion, or ironing board. With a steam iron, steam the seam allowance only. Continue steaming until the fabric shrinks to the desired shape or to a more manageable size. Do not shrink the sleeve cap, only the seam allowance (Figure 12).
5
Figure 14
Figure 12
Figure 13
5. Baste the sleeve in place, stitching from the sleeve side. Stitch directly on the line of stitching used to prepare the sleeve—the 5/8 inch seam line. Try on the garment and check the position of the armhole seam and the grain of the sleeve. Refer to the section on “Checking the Proper Sleeve Fit on Your Garment” on page 6.
6. Position the garment and sleeve under the ma-chine presser foot, the sleeve side up toward you. Starting at the notch, stitch on the seam line crossing underarm seam, from notch to notch, and around the sleeve. Continue stitching to the opposite notch, creating a double line of stitching along the underarm area (Figure 13).
Treating the Completed Armhole SeamBefore putting the finishing touches to the arm-
hole, check to see that the stitching is even, smooth and correct. The sleeve cap should be free from noticeable pleats, gathers, or tucks.For firmly woven fabrics (medium to heavyweight fabrics):1. To reduce bulk, grade the garment portion of the
seam allowance approximately 1/4 inch around the cap from notch to notch.
2. Trim both seam allowances to 1/4 inch between the notches along the lower edge of the sleeve/armhole area.
3. Notch the sleeve seam allowance segment along the sleeve cap where necessary to remove excess fullness (Figure 14).
4. If the fabric requires a seam finish, so will the sleeve/armhole area. Hand overcast is frequently selected due to the bias area and uneven (graded, trimmed) seam allowances. A liquid seam retar-dant such as Fray Check® also is suitable.
(Note: The use of any commercial seam retardant should be tested first as some may cause fabric color to change, or to be scratchy and irritating to the skin.)
For loosely woven fabrics and fabrics that ravel (medium to heavyweight fabrics) choose one of the following: • Serge both seam allowances together, trimming
approximately 1/4 inch off evenly around the seamline.
• Using a very close machine zigzag stitch, zigzag both seam allowances simultaneously around the entire armhole area approximately 1/4 inch from the seamline. Trim away seam allowance very close to the zigzag stitching.
• OR if your machine is capable of overcasting: Trim both seam allowances to 1/4 inch. Machine overcast raw edges together.
For sheer or very lightweight fabrics:1. With seam allowances together, trim to 1/4 inch
around the entire armhole.2. Encase cut edges in stretch lace or a sheer bias
cut or tricot knit tape specifically designed to bind seam allowances such as Seams Great®. Stitch in place.The armhole seam allowances are always pressed
together and treated as one. Using the tip of the iron, press the finished seam allowance gently toward the sleeve. Never set the iron directly on top of the seam allowance as it could distort the shape of the sleeve cap.
6
Figure 19
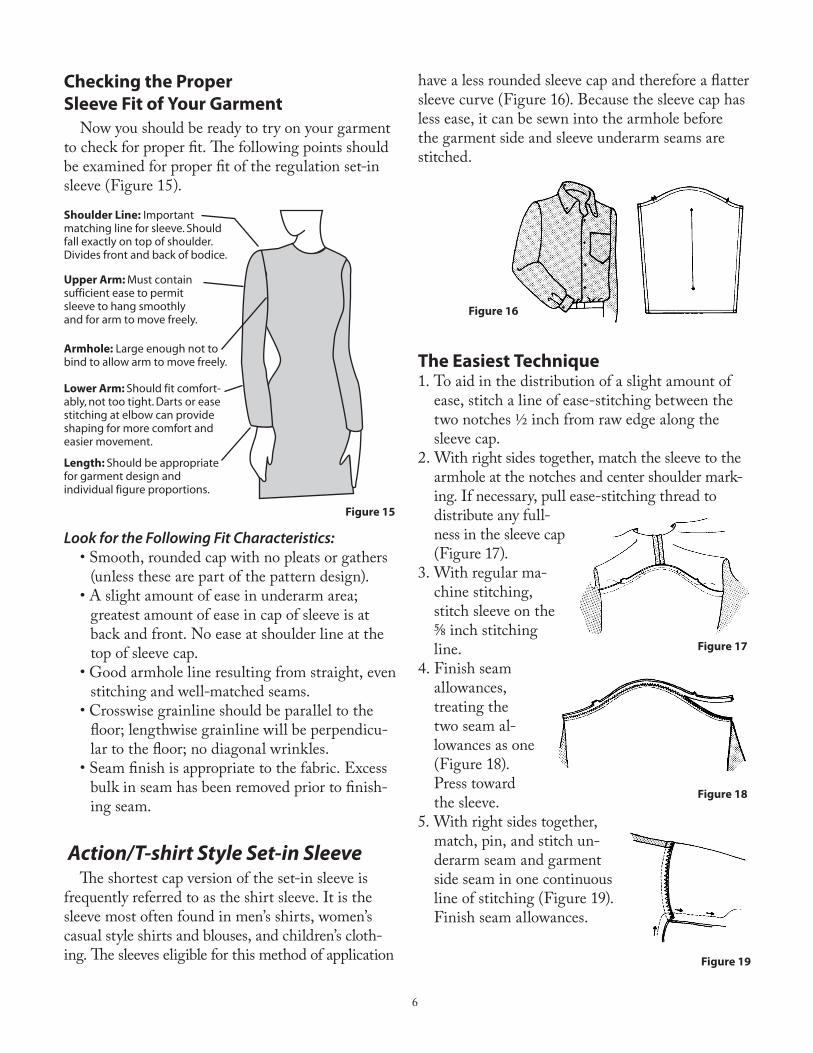
Shoulder Line: Important matching line for sleeve. Should fall exactly on top of shoulder. Divides front and back of bodice.
Upper Arm: Must contain sufficient ease to permit sleeve to hang smoothly and for arm to move freely.
Armhole: Large enough not to bind to allow arm to move freely.
Lower Arm: Should fit comfort-ably, not too tight. Darts or ease stitching at elbow can provide shaping for more comfort and easier movement.
Length: Should be appropriate for garment design and individual figure proportions.
Figure 15
Figure 17
Figure 18
Figure 16
Checking the Proper Sleeve Fit of Your Garment
Now you should be ready to try on your garment to check for proper fit. The following points should be examined for proper fit of the regulation set-in sleeve (Figure 15).
Look for the Following Fit Characteristics: • Smooth, rounded cap with no pleats or gathers
(unless these are part of the pattern design). • A slight amount of ease in underarm area;
greatest amount of ease in cap of sleeve is at back and front. No ease at shoulder line at the top of sleeve cap.
• Good armhole line resulting from straight, even stitching and well-matched seams.
• Crosswise grainline should be parallel to the floor; lengthwise grainline will be perpendicu-lar to the floor; no diagonal wrinkles.
• Seam finish is appropriate to the fabric. Excess bulk in seam has been removed prior to finish-ing seam.
Action/T-shirt Style Set-in SleeveThe shortest cap version of the set-in sleeve is
frequently referred to as the shirt sleeve. It is the sleeve most often found in men’s shirts, women’s casual style shirts and blouses, and children’s cloth-ing. The sleeves eligible for this method of application
have a less rounded sleeve cap and therefore a flatter sleeve curve (Figure 16). Because the sleeve cap has less ease, it can be sewn into the armhole before the garment side and sleeve underarm seams are stitched.
The Easiest Technique1. To aid in the distribution of a slight amount of
ease, stitch a line of ease-stitching between the two notches 1/2 inch from raw edge along the sleeve cap.
2. With right sides together, match the sleeve to the armhole at the notches and center shoulder mark-ing. If necessary, pull ease-stitching thread to distribute any full-ness in the sleeve cap (Figure 17).
3. With regular ma-chine stitching, stitch sleeve on the 5/8 inch stitching line.
4. Finish seam allowances, treating the two seam al-lowances as one (Figure 18). Press toward the sleeve.
5. With right sides together, match, pin, and stitch un-derarm seam and garment side seam in one continuous line of stitching (Figure 19). Finish seam allowances.

7
Figure 20
Figure 21A and B
Figure 22A and B
Flat-fell TechniqueThe masculine sleeve style frequently uses the flat-fell insertion technique. It should be selected for traditional fabrics and when a finished, man-tailored look is desired. The flatter the sleeve cap, the easier this application will be to achieve. 1. Pin sleeve to shirt, wrong sides together, match-
ing notches and markings. Adjust ease along cap area. Join edges together with continuous line of machine stitching.
2. Trim sleeve segment of seam allowance to 1/4 inch.
3. Complete flat-fell seam by turning garment seam allowance under. Topstitch to sleeve approxi-mately 1/4 inch from first line of stitching. Stitch sleeve and side seam; finish (Figure 20).
Raglan SleeveThe raglan sleeve is often
selected for its comfortable fit and relatively easy construc-tion. It can be cut on the straight or bias grain and in one or two pieces. Because the sleeve continues into
the neckline area or some other part of the gar-ment bodice, shaping is needed over the shoulder curve. Shaping may take the form of a dart, a seam, or gathers. The dart is the most common device used in the one-piece raglan sleeve, while the seam shapes the shoulder area in the two-piece raglan sleeve. Regardless of the type of sleeve, the deepest part of the sleeve curve should fall over the edge of the shoulder without protruding. Adjustment may be needed in the shoulder shaping after the sleeve is in the armhole area.
One-piece raglan sleeve with dart: With right sides together, pin and stitch shoul-
der dart using markings from pattern as stitching guide. Slash dart if necessary and press open using a pressing ham (Figure 21A)
Two-piece raglan sleeve: With right sides together, match, pin, and stitch
shoulder seam. Notch out full-ness from seam allowance along shoulder curve. Finish seam allowances and press open (Figure 21B).
Both the one-piece and two-piece raglan sleeve: a. Match, pin, and stitch sleeve underarm seam
allowance. Finish seam allowances and press. Garment seam allowances should also be stitched, finished, and pressed.
b. Pin sleeve to garment armhole area matching notches and underarm seams or markings. Baste in place and fit (Figure 22A).
c. With sleeve side up, stitch sleeve to garment in one continuous seam. Stitch a second row of stitching between notches approximately 1/8 to 1/4 inch from first stitching into the seam allowance.
d. Clip seam allowance at notches. Trim close to the 1/4 inch stitching between the notches at the underarm area. Press seams open above clips. Finish seam allowances as required for fabric (Figure 22B).

8
Figure 23
Figure 24
Alternative MethodThere are occasions when the raglan sleeve may
be constructed in flat form. Refer to the pattern guide for the most appropriate method to use.1. Stitch sleeve shoulder dart or shoulder seam.
Leave garment side seam and sleeve underarm seam open.
2. With right sides of fabric together, pin sleeve to garment front and back, matching notches. Stitch. Notch garment seam allowance as needed and clip sleeve seam allowance as needed for seam to press open and lie flat. Press seam open. Use a seam finish appropriate for fabric and situation (Figure 23).
3. Pin and stitch underarm and side seams. Clip curve seam as needed for seam allowance to be pressed open. Press (Figure 24).
Kimono SleeveThe kimono sleeve is
actually an extension of the bodice or body of the main garment and some-times is referred to as a gem of simplicity. The sleeve is frequently cut as one piece with the garment, thus
producing a T-shape bodice. When the garment is worn the arms are seldom at right angles, therefore the sleeves create folds in the arm and shoulder area. A very graceful draped effect can be achieved when the sleeve/armhole area is large or more open in structure.
Comfort and fit are important to sleeve success. As the kimono sleeve becomes more fitted, the arm movement becomes more restricted. If the sleeve fit is very close, a gusset is needed for comfort and movement. A gusset is a triangular or diamond-shaped piece of fabric which is set into a garment at a slashed location. It makes a longer, slimmer-fitting kimono sleeve possible with an armhole fitting clos-er to the body. As a general rule, the gusset provides a more sophisticated fit than a fitted kimono sleeve without a gusset. Comfort is an additional feature since there is increased flexibility in the sleeve and armhole area. Regardless of the kimono sleeve fit, some form of seam reinforcement is recommended.
Sewing the Kimono Sleeve (Without Gussets)Method I1. Stitch shoulder seam; finish seam allowances
appropriately for fabric. Press.2. With right sides together, match and pin front
and back garment piece at underarm seam line. On the garment back section, center and pin a 4- to 5-inch piece of open-width bias tape or Seams Great® over the curved section of the underarm seam line. Baste entire seam, catching the tape in the stitching. Fit garment as necessary Figure 25A).
3. Stitch the seam as basted; shorten stitch length slightly along the length of the tape. Press the seam flat, not open (Figure 25B).

9
Figure 26
Figure 27A and B
Figure 25A and B
Figure 29
Figure 28
4. Clip seam allowance along the curve, be-ing careful not to cut tape or stitching. Press seam open, using a tailor’s ham or rounded surface. Finish seam allow-ances (Figure 25B).
Method II1. Stitch shoulder seam and finish
seam allowances appropriately for fabric; press.
2. With right sides together, match and pin front and back garment pieces at underarm seam line. Baste and fit as necessary.
3. Stitch seam allowance; shorten stitch length along curved sec-tion of the same line. Press flat, not open (Figure 26).
4. Clip seam allowances along curve to the stitch-ing. Using a tailor’s ham or rounded surface, press seam open.
5. Center, pin and baste a 4- to 5-inch piece of open-width bias tape or Seams Great® along the curved seam area (Figure 27A). Basting stitches should go to the right side of the garment.
6. From the right side of the garment, stitch ap-proximately 1/8 inch on each side of basted line and across the ends. Stitching should be through all thicknesses—tape, seam allowances and gar-ment—to form a small rectangle. Remove bast-ing; press. Tape may be secured to each seam allowance on inside of garment (Figure 27B).
Sewing the Kimono Sleeve (With Gussets)
Although gussets vary in shape, there are basically two types: the one-piece (usu-ally diamond-shaped), and the two-piece (usually triangular) (Figure 28). The one-piece is frequently the more difficult to insert as the entire gusset must be sewed into an enclosed slashed opening after the underarm and side seams have been stitched. When using the two-piece gusset each piece is inserted sepa-rately, then the underarm and gusset sections are connected.
For maximum comfort and ease of movement, cut gussets on the bias. The length of the gusset should be placed on the fabric to attain the great-est amount of give or stretch. Transfer all pattern markings carefully and accurately, especially the gusset corners and garment slash points.Reinforcing slash opening with fusible interfacing
It is important to reinforce the garment at the point of the slash before slashing. If fashion fabric is lightweight or ravels easily, use a small, light-weight fusible interfacing patch on the wrong side of the fabric at the slash point before reinforcing (Figure 29).
Other options for reinforcement material may be a 2-inch bias square of lightweight self-fabric or lining fabric, or a 4-inch piece of seam tape. For all reinforcements, stitch along the stitching lines using short machine stitches (15 to 20 per inch), and take only one stitch across the slash point.

10
Figure 31
Figure 32
Figure 33
topstitching
Figure 37
Figure 36
Figure 35
Figure 34
Figure 38
frontfrontback
one-piecegusset pattern
Figure 30
Reinforcing slash opening with bias square:1. If necessary, reinforce fash-
ion fabric with fusible in-terfacing at slash point. On right side of garment, posi-tion bias square reinforce-ment over the center of the slash point. Pin and baste in place along stitching line (Figure 30).
2. Machine stitch a thread’s width from the marked stitching line, using shorter machine stitching. Begin stitching at the wide end and stitch to point, stitch one stitch across point, and stitch down other side. Press area flat.
3. Slash through center of marked opening (be-tween stitching lines) up to reinforced point. Cut through all fabric thicknesses; cut to point stitch-ing but not through it. (A small dot of liquid seam retardant may be helpful.) Turn square to the wrong side and press lightly so that it lies flat and in place (Figure 31).
4. Repeat for other side.Reinforcing slash opening with seam binding:1. Using a 4-inch piece
of seam tape, fold tape in half, form-ing a V. Position and pin tape to right side of garment so that the V of the tape coincides with the V of the slash point (Figure 32).
2. Machine stitch. Complete as in bias square technique.
One-piece Gusset1. Stitch all bodice seams,
making sure to end stitching at markings. Leave gusset area open. Press and finish seam ap-propriately (Figure 33).
2. With right sides together, position gusset over slashed opening so that points of gusset match corresponding markings of opening; pin. Be sure to accurately align stitching line of open-ing and gusset seam line. Baste, but do not remove pins from cor-ners (Figure 34).
3. With garment side up, using short machine stitches, machine stitch from point A to point B. Stitch one stitch across point at B. Stitch to point C (Figure 35). End stitching but leave approximately 3 to 4 inches of thread at each end of seam. Repeat on the other side of gusset, stitching from point C to point D to point A.
4. Pull all thread ends to wrong side; tie and secure. Press seams to-ward garment. Trim extending fabric edges to 3/8 inch from seam on outside section of gusset construction (Figure 36).
5. To strengthen gusset, especially on sporty or casual clothes, topstitch through all layers of fab-ric approximately 1/8 inch from seam on outside section of gusset con-struction (Figure 37).
Two-piece GussetA one-piece gusset may be converted to two
pieces for ease of construction. To convert, deter-mine which halves of the gusset pattern correspond to the front and back garment pieces. Divide with a line from point to point; cut in half. Pin divided pieces to fabric, mak-ing sure the long edge is on the bias (Figure 38).

11
Cap: A very short sleeve; almost an extension of the shoulder.
Short: Around midsection of upper arm, below short sleeve line. Typical short sleeve lies with its lower edge relatively straight across the upper arm.
Above-elbow: Slightly above the elbow.
Three Quarters: Approximately three-fours the length of the arm. Frequently halfway between elbow and wrist.
Seven-eights: Length terminates about 2 inches above the wrist bone or halfway between the three-quarter and the long sleeve.
Wrist Length: Comes to wrist bone.
Long or Full Length: Falls approxi-mately ½ inch beyond wrist bone but before reaching the hand.
Figure 39
Figure 40B
Figure 41
Figure 40A
Add a 5/8 inch seam allowance to long cut edge (for the underarm seam allowance). Cut pieces out and transfer all markings.1. Shoulder seams should be stitched, seams fin-
ished appropriately, and pressed. Slash opening has been reinforced. Underarm and side seam have not been stitched.
2. With right sides together, match and pin gusset to slashed opening of front bodice. Be sure to align seam lines of opening and gusset correctly. Baste, but do not remove pins from point. With garment side up, using a shorter stitch, machine stitch from edge A to point B, take one stitch across point B, stitch to edge C. Press seams toward garment (Figure 39).
3. Repeat for garment back.4. With right sides to-
gether, pin garment back to front at the underarm seam and side seams (Figure 40A). Be sure inter-secting lines of gusset edge and other mark-ings match; stitch. Press seam open (Fig-ure 40B) and finish seam allowances ap-propriately for fabric.
5. Trim gusset edges and extending fabric edges to 3/8 inch. Re-press toward garment. Pull threads to wrong side of garment, tie and secure.
6. Topstitch if desired (see “One-piece Gusset,” Step 5 on page 10).
Sleeve FinishesThe finishing of a sleeve edge generally depends
on the pattern design and fabric. It may be as simple as a self-hem or as sophisticated as a cuff and placket. The finish may also be a design feature such as a casing or cuff. Your pattern guide generally has a finishing technique suited to the pattern design, but not to the fabric you have selected. Feel free to adapt a finish which will be in accordance with the pattern design and the fabric.
For successful completion of any sleeve, a few simple guidelines should be followed: • The finish should be appropriate to the fabric.
In almost every instance, if the technique given in the pattern guide is not the most appropriate, adapt or change technique to suit fabric and cir-cumstance. An example would be the method of finishing a placket for a cuff. A ravelly fabric would best be finished with a faced placket rather than a continuous lap or bond placket.
• Sleeve hemline should be marked an appropri-ate, becoming length for the wearer as well as in proportion to the total garment silhouette. When changing hemline, take the total gar-ment silhouette into consideration as it can add to or detract from the total appearance of the garment.
• Practice good pressing and sewing techniques. • The handling of bulk is often a major consid-
eration. Be sure to reduce bulk (enclosed seam, seams crossed by other seams) when ever possible.
The following reference guide is to assist you in determining or adjusting sleeve length (Figure 41).

Educational programs of Kentucky Cooperative Extension serve all people regardless of race, color, age, sex, religion, disability, or national origin. Issued in furtherance of Cooperative Extension work, Acts of May 8 and June 30, 1914, in cooperation with the U.S. Department of Agriculture, M. Scott Smith, Director of Cooperative Extension Service, University of Kentucky College of Agriculture, Lexington, and Ken-tucky State University, Frankfort. Copyright © 2007 for materials developed by University of Kentucky Cooperative Extension. This publication may be reproduced in portions or its entirety for educational or nonprofit purposes only. Permitted users shall give credit to the author(s) and include this copyright notice. Publications are also available on the World Wide Web at www.ca.uky.edu.
Issued 3 -2007
Mention or display of a trademark, proprietary product, or firm in text or figures does not constitute an endorsement and does not imply approval to the exclusion of other suitable products or firms.
The correct sleeve length for you is one that is in direct proportion to your figure. If you experiment with sleeve lengths, you will probably find several that enhance your figure size and proportion.
Sleeves are frequently a very important part of a garment design. Not only do they influence the bodice of a design but the entire silhouette as well. The shape, length and finish can exaggerate a figure flaw or it can lead the eye away to a more impor-tant or pleasing part of the costume. The manner or technique of handling the sleeve application can spell perfection or disaster—the difference between a “homemade” look and the “handmade” look.
ReferencesReader’s Digest Complete Guide to Sewing: The
Reader’s Digest Association, Inc. Pleasantville, New York, 1978.
The New Vogue Sewing Book: Butterick Publishing, New York. 1980.
Unit Method of Clothing Construction: Iowa Home Economics Association, Iowa State University Press, Ames, Iowa. 1965.
Creative Clothing Construction: Allyne Bane, McGraw-Hill Book Company, New York. 1973.