smart parking - · pdf file• if using a car lighter as a power supply, ... electronic...
TRANSCRIPT

Smart ParkingTechnical Guide

-2- v5.1
Document version: v5.1 - 12/2015 © Libelium Comunicaciones Distribuidas S.L.
INDEX
1. General ................................................................................................................................................. 41.1. General and safety information ..............................................................................................................................................41.2. Conditions of use .........................................................................................................................................................................4
2. Waspmote Plug & Sense! ..................................................................................................................... 62.1. Features ...........................................................................................................................................................................................62.2. Sensor Probes ................................................................................................................................................................................62.3. Solar Powered ...............................................................................................................................................................................72.4. Programming the Nodes ...........................................................................................................................................................82.5. Radio Interfaces ............................................................................................................................................................................92.6. Program in minutes ..................................................................................................................................................................102.7. Data to the Cloud ......................................................................................................................................................................102.8. Meshlium Storage Options ....................................................................................................................................................112.9. Meshlium Connection Options ...........................................................................................................................................112.10. Models ........................................................................................................................................................................................12
2.10.1. Smart Parking ............................................................................................................................................................13
3. Hardware ............................................................................................................................................ 143.1. General Description .................................................................................................................................................................143.2. Specifications .............................................................................................................................................................................143.3. Electrical Characteristics .........................................................................................................................................................143.4. Assembling ..................................................................................................................................................................................15
4. Sensor ................................................................................................................................................ 174.1. Specifications .............................................................................................................................................................................174.2. Measurement Process .............................................................................................................................................................17
5. Board configuration and programming .......................................................................................... 195.1. Application considerations ...................................................................................................................................................19
5.1.1. Deployment of the motes .......................................................................................................................................195.1.2. Interference of other vehicles ................................................................................................................................215.1.3. Variation of the reference value ............................................................................................................................215.1.4. Determination of the state of the spot ...............................................................................................................215.1.5. Network structure ......................................................................................................................................................21
5.2. Installation of the mote ..........................................................................................................................................................255.3. Powering the mote ...................................................................................................................................................................36
5.3.1. Battery options ............................................................................................................................................................365.3.2. Estimated lifetime ......................................................................................................................................................37
Index

-3- v5.1
5.4. API ...................................................................................................................................................................................................385.5. Example code .............................................................................................................................................................................415.6. Resetting Waspmote with an external magnet .............................................................................................................44
6. Consumption ..................................................................................................................................... 456.1. Table of consumption ..............................................................................................................................................................45
7. API Changelog ................................................................................................................................... 46
8. Documentation changelog ............................................................................................................... 47
9. Maintenance ...................................................................................................................................... 48
10. Disposal and recycling .................................................................................................................... 49
Index
-4- v5.1
This shield is discontinued. New Smart Parking - LoRaWAN / Sigfox (double radio) On road surface > Coming in 2016
1. General
1.1. General and safety information • In this section, the term “Waspmote” encompasses both the Waspmote device itself and its modules and sensor boards. • Read through the document “General Conditions of Libelium Sale and Use”. • Do not allow contact of metallic objects with the electronic part to avoid injuries and burns. • NEVER submerge the device in any liquid. • Keep the device in a dry place and away from any liquid which may spill. • Waspmote consists of highly sensitive electronics which is accessible to the exterior, handle with great care and avoid
bangs or hard brushing against surfaces. • Check the product specifications section for the maximum allowed power voltage and amperage range and consequently
always use a current transformer and a battery which works within that range. Libelium is only responsible for the correct operation of the device with the batteries, power supplies and chargers which it supplies.
• Keep the device within the specified range of temperatures in the specifications section. • Do not connect or power the device with damaged cables or batteries. • Place the device in a place only accessible to maintenance personnel (a restricted area). • Keep children away from the device in all circumstances. • If there is an electrical failure, disconnect the main switch immediately and disconnect that battery or any other power
supply that is being used. • If using a car lighter as a power supply, be sure to respect the voltage and current data specified in the “Power Supplies”
section. • If using a battery in combination or not with a solar panel as a power supply, be sure to use the voltage and current data
specified in the “Power supplies” section. • If a software or hardware failure occurs, consult the Libelium Web Development section. • Check that the frequency and power of the communication radio modules together with the integrated antennas are
allowed in the area where you want to use the device. • Waspmote is a device to be integrated in a casing so that it is protected from environmental conditions such as light, dust,
humidity or sudden changes in temperature. The board supplied “as is” is not recommended for a final installation as the electronic components are open to the air and may be damaged.
1.2. Conditions of use • Read the “General and Safety Information” section carefully and keep the manual for future consultation. • Use Waspmote in accordance with the electrical specifications and the environment described in the “Electrical Data”
section of this manual. • Waspmote and its components and modules are supplied as electronic boards to be integrated within a final product. This
product must contain an enclosure to protect it from dust, humidity and other environmental interactions. In the event of outside use, this enclosure must be rated at least IP-65.
• Do not place Waspmote in contact with metallic surfaces; they could cause short-circuits which will permanently damage it. Further information you may need can be found at: http://www.libelium.com/development/waspmote
The “General Conditions of Libelium Sale and Use” document can be found at:http://www.libelium.com/development/waspmote/technical_service

-5- v5.1
This shield is discontinued. New Smart Parking - LoRaWAN / Sigfox (double radio) On road surface > Coming in 2016
Note: This shield is discontinued. New Smart Parking - LoRaWAN / Sigfox (double radio) – On road surface → Coming in 2016.
Figure : Next version of Libelium Smart Parking

-6- v5.1
This shield is discontinued. New Smart Parking - LoRaWAN / Sigfox (double radio) On road surface > Coming in 2016
2. Waspmote Plug & Sense!The new Waspmote Plug & Sense! line allows you to easily deploy wireless sensor networks in an easy and scalable way ensuring minimum maintenance costs. The new platform consists of a robust waterproof enclosure with specific external sockets to connect the sensors, the solar panel, the antenna and even the USB cable in order to reprogram the node. It has been specially designed to be scalable, easy to deploy and maintain.
Note: For a complete reference guide download the “Waspmote Plug & Sense! Technical Guide” in the Development section of the Libelium website.
2.1. Features • Robust waterproof IP65 enclosure • Add or change a sensor probe in seconds • Solar powered with internal and external panel options • Radios available: ZigBee, 802.15.4, WiFi, 868MHz, 900MHz, LoRaWAN, LoRa, Sigfox, 3G/GPRS and Bluetooth Low Energy • Over the air programming (OTAP) of multiple nodes at once • Special holders and brackets ready for installation in street lights and building fronts • Graphical and intuitive programming interface • External, contactless reset with magnet • External SIM connector for GPRS or 3G models
2.2. Sensor ProbesSensor probes can be easily attached by just screwing them into the bottom sockets. This allows you to add new sensing capabilities to existing networks just in minutes. In the same way, sensor probes may be easily replaced in order to ensure the lowest maintenance cost of the sensor network.
Figure : Connecting a sensor probe to Waspmote Plug & Sense!

-7- v5.1
This shield is discontinued. New Smart Parking - LoRaWAN / Sigfox (double radio) On road surface > Coming in 2016
2.3. Solar PoweredBattery can be recharged using the internal or external solar panel options.The external solar panel is mounted on a 45º holder which ensures the maximum performance of each outdoor installation.
Figure : Waspmote Plug & Sense! powered by an external solar panel
For the internal option, the solar panel is embedded on the front of the enclosure, perfect for use where space is a major challenge.
Figure : Internal solar panel

-8- v5.1
This shield is discontinued. New Smart Parking - LoRaWAN / Sigfox (double radio) On road surface > Coming in 2016
Figure : Waspmote Plug & Sense! powered by an internal solar panel
2.4. Programming the NodesWaspmote Plug & Sense! can be reprogrammed in two ways:
The basic programming is done from the USB port. Just connect the USB to the specific external socket and then to the computer to upload the new firmware.
Figure : Programming a node

-9- v5.1
This shield is discontinued. New Smart Parking - LoRaWAN / Sigfox (double radio) On road surface > Coming in 2016
Over the Air Programming is also possible once the node has been installed. With this technique you can reprogram wirelessly one or more Waspmote sensor nodes at the same time by using a laptop and the Waspmote Gateway.
Figure : Typical OTAP process
2.5. Radio Interfaces
Model Protocol Frequency txPower Sensitivity Range *
XBee-802.15.4-Pro 802.15.4 2.4GHz 100mW -100dBm 7000m
XBee-ZB-Pro ZigBee-Pro 2.4GHz 50mW -102dBm 7000m
XBee-868 RF 868MHz 315mW -112dBm 12Km
XBee-900 RF 900MHz 50mW -100dBm 10Km
LoRaWAN LoRaWAN868 and 433MHz. 900-915MHz version coming in 2016.
14dBm -136dBm- km - Typical base station
range
LoRa RF 868 and 900MHz 14dBm -137dBm 22Km
Sigfox Sigfox 868MHz 14dBm -126dBm- km - Typical base station
range
WiFi 802.11b/g 2.4GHz 0dBm - 12dBm -83dBm 50m-500m
GPRS Pro and GPRS+GPS - 850MHz/900MHz/1800MHz/1900MHz
2W(Class4) 850MHz/900MHz, 1W(Class1) 1800MHz/1900MHz -109dBm - Km - Typical
carrier range
3G/GPRS -
Tri-Band UMTS 2100/1900/900MHz Quad-Band GSM/EDGE, 850/900/1800/1900 MHz
UMTS 900/1900/2100 0,25W
GSM 850MHz/900MHz 2W
DCS1800MHz/PCS1900MHz 1W
-106dBm - Km - Typical carrier range
Bluetooth Low Energy Bluetooth v.4.0 / Bluetooth Smart 2.4GHz 3dBm -103dBm 100m
* Line of sight, Fresnel zone clearance and 5dBi dipole antenna.

-10- v5.1
This shield is discontinued. New Smart Parking - LoRaWAN / Sigfox (double radio) On road surface > Coming in 2016
2.6. Program in minutesIn order to program the nodes an intuitive graphic interface has been developed. Developers just need to fill a web form in order to obtain the complete source code for the sensor nodes. This means the complete program for an specific application can be generated just in minutes. Check the Code Generator to see how easy it is at:
http://www.libelium.com/development/plug_&_sense/sdk_and_applications/code_generator
Figure : Code Generator
2.7. Data to the CloudThe Sensor data gathered by the Waspmote Plug & Sense! nodes is sent to the Cloud by Meshlium, the Gateway router specially designed to connect Waspmote sensor networks to the Internet via Ethernet, WiFi and 3G interfaces.
Thanks to Meshlium’s new feature, the Sensor Parser, now it is easier to receive any frame, parse it and store the data into a local or external Data Base.
Figure : Meshlium

-11- v5.1
This shield is discontinued. New Smart Parking - LoRaWAN / Sigfox (double radio) On road surface > Coming in 2016
2.8. Meshlium Storage Options
Figure : Meshlium Storage Options
• Local Data Base
• External Data Base
2.9. Meshlium Connection Options
Figure : Meshlium Connection Options
• XBee / LoRa / GPRS / 3G / WiFi → Ethernet • XBee / LoRa / GPRS / 3G / WiFi → WiFi • XBee / LoRa / GPRS / 3G / WiFi → 3G/GPRS

-12- v5.1
This shield is discontinued. New Smart Parking - LoRaWAN / Sigfox (double radio) On road surface > Coming in 2016
2.10. ModelsThere are some defined configurations of Waspmote Plug & Sense! depending on which sensors are going to be used. Waspmote Plug & Sense! configurations allow to connect up to six sensor probes at the same time.
Each model takes a different conditioning circuit to enable the sensor integration. For this reason each model allows to connect just its specific sensors.
This section describes each model configuration in detail, showing the sensors which can be used in each case and how to connect them to Waspmote. In many cases, the sensor sockets accept the connection of more than one sensor probe. See the compatibility table for each model configuration to choose the best probe combination for the application.
It is very important to remark that each socket is designed only for one specific sensor, so they are not interchangeable. Always be sure you connected probes in the right socket, otherwise they can be damaged.
Figure : Identification of sensor sockets

-13- v5.1
This shield is discontinued. New Smart Parking - LoRaWAN / Sigfox (double radio) On road surface > Coming in 2016
2.10.1. Smart Parking
Smart Parking allows to detect available parking spots by placing the node under the pavement. It works with a magnetic sensor which detects when a vehicle is present or not. Waspmote Plug & Sense! can act as a repeater for a Smart Parking node.
Figure : Smart Parking enclosure
Sensor sockets are no used for this model.

-14- v5.1
This shield is discontinued. New Smart Parking - LoRaWAN / Sigfox (double radio) On road surface > Coming in 2016
3. Hardware
3.1. General DescriptionThe Waspmote’s Smart Parking Board principle of operation is based on the variation of the magnetic field above the board caused by the chassis of a vehicle placed on the parking lot where the mote has been deployed. This change is detected using a permalloy magnetic field sensor (MFS), a material whose electric resistance varies with the magnetic field through it, measured and processed to provide the system with an answer that can be used to determine the state of the parking spot.
3.2. SpecificationsWeight: 20grDimensions: 73.5 x 51 x 1.3 mmTemperature Range: [-20ºC, 65ºC]
Figure : Upper side
Figure : Image of the Z axis sens
3.3. Electrical CharacteristicsBoard Power Voltages: 5VSensor Power Voltages: 5VMaximum admitted current (continuous): 200mAMaximum admitted current (peak): 400mA
-15- v5.1
This shield is discontinued. New Smart Parking - LoRaWAN / Sigfox (double radio) On road surface > Coming in 2016
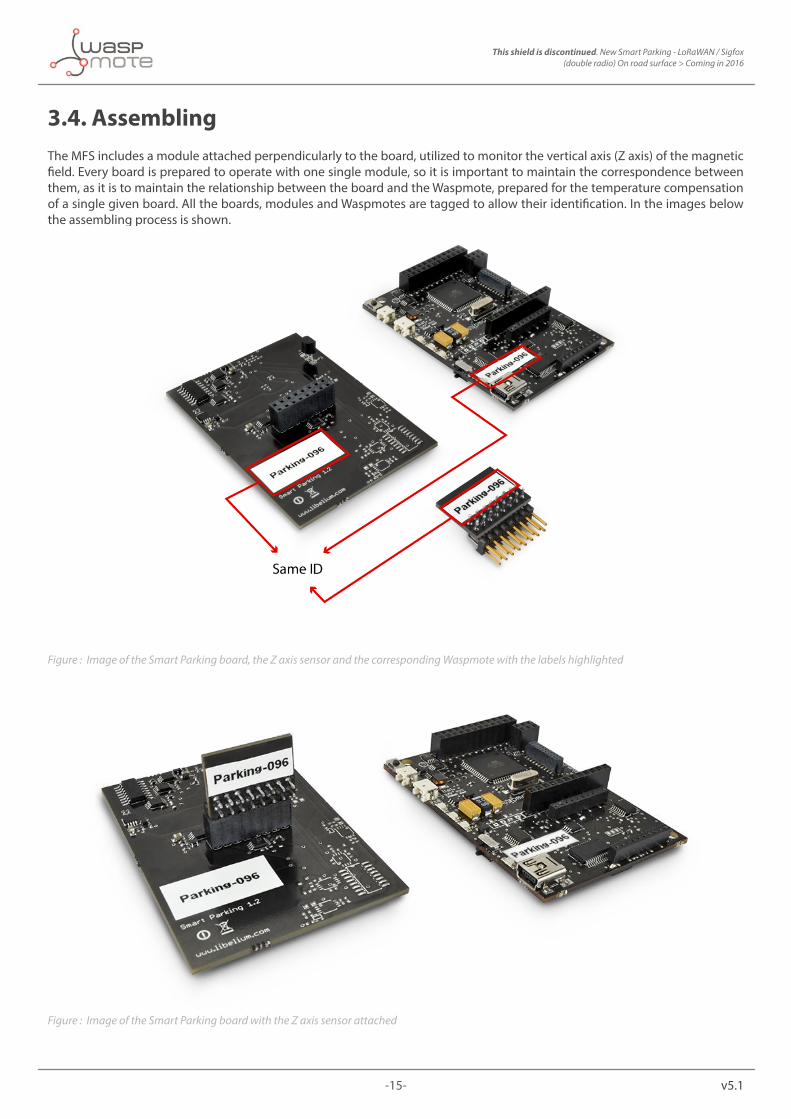
3.4. AssemblingThe MFS includes a module attached perpendicularly to the board, utilized to monitor the vertical axis (Z axis) of the magnetic field. Every board is prepared to operate with one single module, so it is important to maintain the correspondence between them, as it is to maintain the relationship between the board and the Waspmote, prepared for the temperature compensation of a single given board. All the boards, modules and Waspmotes are tagged to allow their identification. In the images below the assembling process is shown.
Figure : Image of the Smart Parking board, the Z axis sensor and the corresponding Waspmote with the labels highlighted
Figure : Image of the Smart Parking board with the Z axis sensor attached

-16- v5.1
This shield is discontinued. New Smart Parking - LoRaWAN / Sigfox (double radio) On road surface > Coming in 2016
Figure : Image of the complete system 2. Sensor
3.5 Differences between Smart Parking OEM and Smart Parking Plug & Sense!
Libelium offers 2 different lines for Wireless Sensor Notworks: Waspmote OEM and Plug & Sense!. The first one is advised for developing research or integrating into 3rd party systems, while the second one is advised for users who need a ready-to-use/install product.
Smart Parking OEM and Smart Parking Plug & Sense have important differences we are showing in this table:
Smart Parking, OEM system Smart Parking, Plug & Sense! system
Magnetic reset No Yes, Waspmote is modified
Enclosure No Yes
Gel No Yes
Filling foam No Yes
Communication radios Any Only the recommended for Parking
Batteries Any Only the recommended for Parking

-17- v5.1
This shield is discontinued. New Smart Parking - LoRaWAN / Sigfox (double radio) On road surface > Coming in 2016
4. Sensor
4.1. SpecificationsThree axis magnetic field sensorMaximum Supply Voltage: 12VOperation Temperature: -40 ~ 125ºCBridge Resistance: 600 ~ 1200ΩTypical Output Voltage: 3,5mV/V/gaussAverage consumption: 15mAMaximum consumption (peak): 500mA
4.2. Measurement ProcessThe MFS basically consists of a thin film of permalloy whose resistance is a function of the magnetic field through it (intensity and orientation). This film is integrated in a Wheatstone bridge of resistance between 600Ω and 1200Ω (typically 850Ω), thus between the two output terminals of the sensor we have a voltage in the order of the 3,5mV/V/gauss with a supply voltage of 5V.
Since the MFS is a three axis sensor it allows to monitor the magnetic field in any spatial direction. The output of each of the axis is amplified using an instrumentation amplifier and filtered to prevent glitches caused by external magnetic fields. The outputs of the three axis are directly read with the Waspmote’s microprocessor’s analog-to-digital converter in the analog input pins ANALOG1, ANALOG2 and ANALOG5.
To read the outputs it is enough with executing the commands readParking or readParkingSetReset from the board’s library, in which the analog voltage in the input of the analog-to-digital converter is captured. In the second of these functions a small current pulse (500mA of peak, one microsecond wide) is applied to an internal circuit before reading the sensor so the molecules of the permalloy film are realigned with the magnetic field, eliminating non-desired effects owed to the hysteresis of the material.
The board also incorporates a temperature sensor with the purpose of compensating the effects that this parameter has on the sensor. The output of the sensor at pin ANALOG7 can be read using the function readTemperature, assigning its output to an integer variable. Regarding the temperature compensation, Libelium facilitates the sensors calibrated for an operating range between 0º and 45º, with the parameters necessary to calculate the reference in function of the new temperature stored in the EEPROM memory of the mote.
Below, the resulting graphs of two different applications are shown. In the first of the figures below, the output of one axis sampled once every 10ms appears, with one car entering and leaving the spot twice. In the second figure the outputs of the three axis sampled every 10 seconds are shown. In this case we can see four different vehicles entering and leaving the lot.

-18- v5.1
This shield is discontinued. New Smart Parking - LoRaWAN / Sigfox (double radio) On road surface > Coming in 2016
Figure : Image of one of the axis of the MFS sampled every 10ms
Figure : Image of the outputs of the three axis of the MFS sampled every 10 seconds
More information about the functions of the library, as long as an example code for reading the sensors, can be found in section “API” of this guide.

-19- v5.1
This shield is discontinued. New Smart Parking - LoRaWAN / Sigfox (double radio) On road surface > Coming in 2016
5. Board configuration and programming
5.1. Application considerations
5.1.1. Deployment of the motes
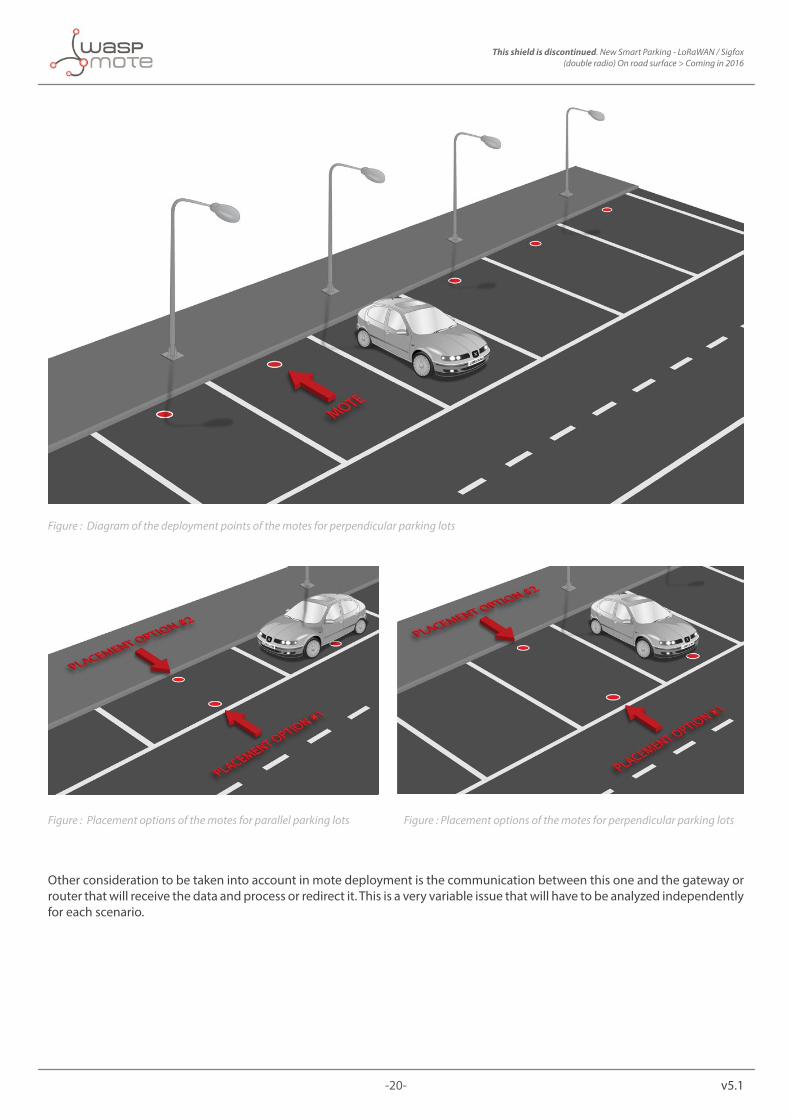
The optimum deployment point will be the one where the probability of detection is maximum, which means minimizing the probabilities of false detection (caused by other vehicles or objects near the lot under control) and false rejection (owed to a not high enough variation in the magnetic field above the mote with a vehicle parked in the spot).
This optimum deployment spot will depend on the kind of parking lot that we are going to monitor. In the case of parallel parking lots the mote should be deployed below one of the car sides, as shown in figure below, while for perpendicular parking spots the most adequate place will be the one nearest to the center of the motor or the backside of the vehicle.
Figure : Diagram of the deployment points of the motes for parallel parking lots
-20- v5.1
This shield is discontinued. New Smart Parking - LoRaWAN / Sigfox (double radio) On road surface > Coming in 2016
Figure : Diagram of the deployment points of the motes for perpendicular parking lots
Figure : Placement options of the motes for parallel parking lots Figure : Placement options of the motes for perpendicular parking lots
Other consideration to be taken into account in mote deployment is the communication between this one and the gateway or router that will receive the data and process or redirect it. This is a very variable issue that will have to be analyzed independently for each scenario.

-21- v5.1
This shield is discontinued. New Smart Parking - LoRaWAN / Sigfox (double radio) On road surface > Coming in 2016
5.1.2. Interference of other vehicles
As pointed in section “Deployment of the motes”, the presence of other vehicles in contiguous spots or near places may influence in the detection, modifying the detection threshold. This influence earns special importance in perpendicular lots, where the distance between the mote and the contiguous vehicles is shortest, and in the non-delimited parallel lots. The best way to avoid this disturbance is to take into account the state of the near spots in the detection decision when the variation in the magnetic field is very close to the detection threshold.
5.1.3. Variation of the reference value
Owing to the variation of the environmental conditions (such as temperature, presence of external fields or small changes in the magnetic field of the earth) the reference value from which the state of the lot is determined doesn’t remain constant, but shows a small oscillation that must be eliminated to maintain the reliability of the system. In the case of the small variations owed to the hysteresis of the permalloy under parasitic magnetic fields, the sensor is endowed with a readjustment system that permits to realign the molecules of the permalloy film with the present magnetic field through a small current pulse. In the case of the error for variations in the temperature of the sensor, Libelium supplies the sensors calibrated for an operation range between 0º and 45º approximately, so this alteration can be compensated through a degree two approximation that updates the reference value in function of the measured temperature in the moment of determining the magnetic field.
5.1.4. Determination of the state of the spot
The influence of external factors mentioned before make more difficult to make a decision about the state of the spot in the mote itself, lacking the information about the environmental conditions, such as the presence of vehicles in contiguous lots, which may lead to errors in the estimation. Owing to this, it may be advisable to carry out the calculation of the state of the spot on the routers or gateways which collect the information from all the motes at a zone. This entails an increase in the radio-frequency transmissions from the sensor motes, which involves a decrease of the battery’s life. Given the wide casuistry of this kind of applications, a deep study of the conditions of the location will be necessary to assure this procedure is necessary.
5.1.5. Network structure
There are two possible Network topologies depending on the frequency and protocol used:
• 2.4GHz - Multihop ZigBee/Digimesh
• 868/900MHz /LoRa Direct Access
a) 2.4GHz - Multihop ZigBee/Digimesh Network
With this frequency band we need to use Waspmote nodes acting as repeaters in the nearby street lights. Once they get the information they send using multihop topology to Meshlium, the Gateway of the network.
In order to communicate at this frequency band the high power module version (100mW) is recommended.
- 1st Step: The nodes send the information to the repeaters.
- 2nd Step: The repeaters perform multihop routing and send the information to Meshlium.
- 3rd Step: Meshlium sends the information to the Internet using the WiFi or 3G/GPRS radio.

-22- v5.1
This shield is discontinued. New Smart Parking - LoRaWAN / Sigfox (double radio) On road surface > Coming in 2016
Figure : 2.4 GHz - Multihop ZigBee / Digimesh Network - The motes send the information to the repeaters
Figure : 2.4 GHz - Multihop ZigBee / Digimesh Network - The repeaters send the data using a multihop topology

-23- v5.1
This shield is discontinued. New Smart Parking - LoRaWAN / Sigfox (double radio) On road surface > Coming in 2016
Figure : 868 / 900 MHz / LoRa Direct Access Network - The Gateway sends the data to the Internet
Figure : Meshlium Connection Options
b) 868/900MHz /LoRa - Direct Access Network
With this frequency band we can send directly the data from Waspmote to the Gateway located in the same street.
- 1st Step: The nodes send the information to Meshlium, the Gateway of the network.
- 2nd Step: Meshlium sends the information to the Internet using the WiFi or 3G/GPRS radio.

-24- v5.1
This shield is discontinued. New Smart Parking - LoRaWAN / Sigfox (double radio) On road surface > Coming in 2016
Figure : 868 / 900 MHz / LoRa Direct Access Network - The nodes send directly the data to the Gateway
Figure : 868 / 900 MHz / LoRa Direct Access Network - The Gateway sends the data to the Internet

-25- v5.1
This shield is discontinued. New Smart Parking - LoRaWAN / Sigfox (double radio) On road surface > Coming in 2016
5.2. Installation of the moteParking detection applications require a casing with more restrictive characteristics than other wireless sensor networks applications, owing to the need of lasting for a long time buried in asphalt, where they must resist the entry of water, owing to the possibility of puddles of water formed above it, and high pressures on it caused by vehicles parked or driven upon.
Libelium includes a PVC casing compliant with the IP-67 and IK-10 standards that may be installed in any environment of this characteristics.
Besides, Libelium provides a special non-conductive gel to avoid any damage caused by corrosion, humidity and bad environmental conditions. This gel is made of a two component silicone which becomes solid when these two components are mixed.
Next to these lines, a few recommendations are given in order to ensure right installation procedures, avoiding bad environmental conditions which can affect the Waspmote enclosure and the electronic equipment inside. Try to follow next steps carefully to achieve a right installation.
Important: Before installation, make sure enough tests have been performed in order to achieve a 100% functional code and that all the necessary information related to the mote, such as identification numbers or XBee MAC addresses, has been compiled and stored, since once the mote is installed, the access to it will be very limited. Be sure to add in your code a delay (or the possibility to make calibration using an external command) before calibration processes in order to carry out the case installation without affecting the sensor calibration (see section “Example code” for a complete example of calibration). Owing to this, it is highly recommended to carry out the gel preparation in the deployment location to minimize the battery consumption before operation.Moreover, Gel manipulation is simple and must be done just before placing the parking case in its final location.
The necessary elements for one complete parking node are:
1. 1 x Waspmote + Smart Parking board + Communication module2. 1 x non rechargeable battery3. 1 x PVC casing4. Gel packs: component A bottles + component B bottles (see note below) *5. 2 x pink filling foam
5
3 4
12
Figure : Necessary elements for a parking node

-26- v5.1
This shield is discontinued. New Smart Parking - LoRaWAN / Sigfox (double radio) On road surface > Coming in 2016
* Note: Each enclosure needs 650 ml of mixed gel to cover all electronic parts sensitive to humidity, that means 325ml of component A and 325ml of component B. However, gel is sold in packs of 500 ml (250 ml of component A + 250 ml of component B) so please check if yo have enough gel for all of your parking motes. Next table shows necessary gel depending how many motes are you planning to install.
Number of Parking motes Necessary packs
1 2
2 3
3 4
4 6
5 7
10 13
20 26
Once you have checked all necessary elements, next steps must be followed.
Step 1: Making a hole into pavement.
Use a hole saw or other dedicated tool to drill a hole into the pavement bigger enough for the PVC case. Try to perforate it deep enough to bury the mote completely without rising over the asphalt surface but trying to keep the top of the case as up as possible in order to have the best RF signal possible.
Figure : Making a hole into pavement
Figure : Final pavement hole

-27- v5.1
This shield is discontinued. New Smart Parking - LoRaWAN / Sigfox (double radio) On road surface > Coming in 2016
H =
150
mm
h =
135
mm
d = 100 mm
H max. height
h usable heightD max. diameterd usable diameter
D = 121 mm
Figure : Diagram of dimensions of the case
Step 2: Put Waspmote inside PVC enclosure
When Waspmote is placed into the parking enclosure, battery should be placed in the dedicated hole in the pink filling foam, taking care that the mote rests in horizontal position and with the antenna in vertical position.
IMPORTANT: Remember to stick the filling foam to the enclosure. Otherwise it will float when adding the protective gel.
Figure : Preparing the sticking foam

-28- v5.1
This shield is discontinued. New Smart Parking - LoRaWAN / Sigfox (double radio) On road surface > Coming in 2016
Figure : Sticking foam to enclosure
Step 3: Preparing magnetic reset
The magnetic reset sensor should remain as close as possible to the top of the enclosure, but allowing closing it. A good distance is leaving 1 cm from the top, as it is shown below. Besides, it is highly recommended to secure the magnetic reset sensor with some fixing tape.
Figure : Placing the magnetic reset sensor
Figure : Placing Waspmote after sticking foam

-29- v5.1
This shield is discontinued. New Smart Parking - LoRaWAN / Sigfox (double radio) On road surface > Coming in 2016
Figure : Fixing the magnetic reset sensor near to the top of enclosure
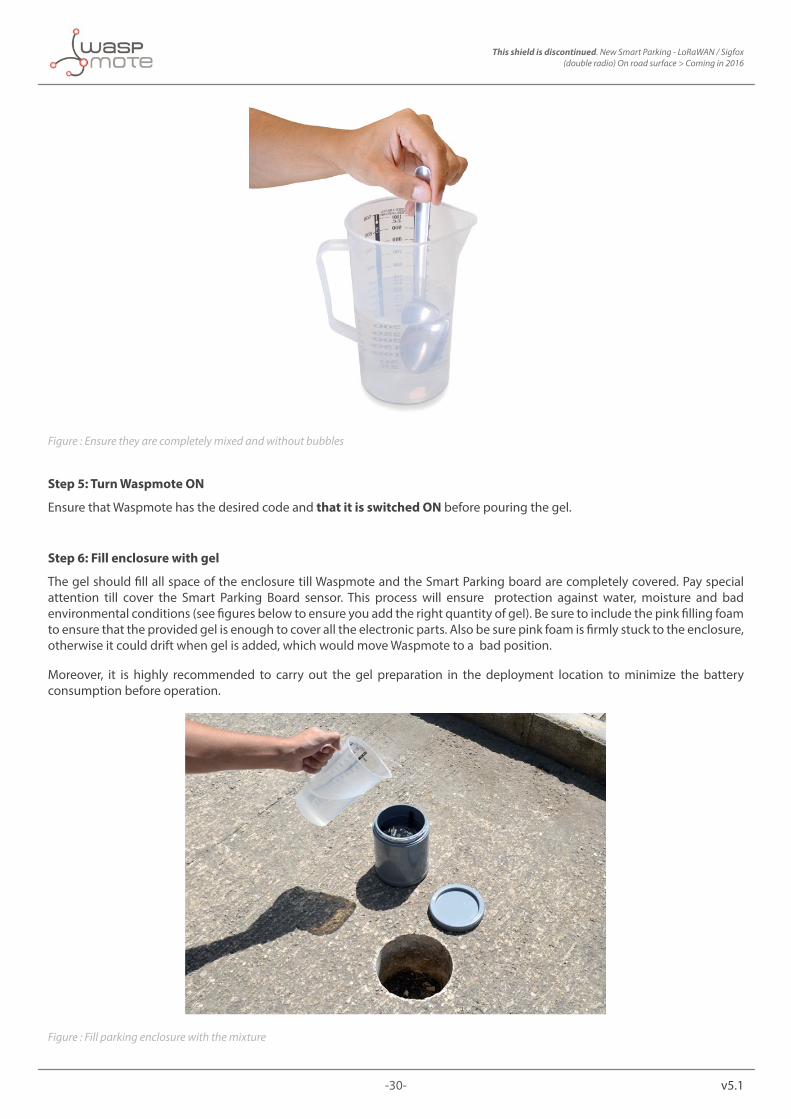
Step 4: Mix the gel
Gel is prepared by mixing the two components (A and B) in a 1:1 proportion in a vessel. Use a graduated recipient like shown in figures below to ensure you add the exactly required quantities. For one parking mote 650 ml of mixed gel are needed, therefore you should add 325 ml of component A and 325 ml of component B. Stir the mixture for a while ensuring the components are completely mixed, since it will not become solid otherwise. Once an homogeneous and without bubbles medley is got, pour carefully into the casing.
Figure : Mixing the two gel components
-30- v5.1
This shield is discontinued. New Smart Parking - LoRaWAN / Sigfox (double radio) On road surface > Coming in 2016
Figure : Ensure they are completely mixed and without bubbles
Step 5: Turn Waspmote ON
Ensure that Waspmote has the desired code and that it is switched ON before pouring the gel.
Step 6: Fill enclosure with gel
The gel should fill all space of the enclosure till Waspmote and the Smart Parking board are completely covered. Pay special attention till cover the Smart Parking Board sensor. This process will ensure protection against water, moisture and bad environmental conditions (see figures below to ensure you add the right quantity of gel). Be sure to include the pink filling foam to ensure that the provided gel is enough to cover all the electronic parts. Also be sure pink foam is firmly stuck to the enclosure, otherwise it could drift when gel is added, which would move Waspmote to a bad position.
Moreover, it is highly recommended to carry out the gel preparation in the deployment location to minimize the battery consumption before operation.
Figure : Fill parking enclosure with the mixture

-31- v5.1
This shield is discontinued. New Smart Parking - LoRaWAN / Sigfox (double radio) On road surface > Coming in 2016
Figure : Parking enclosure with the mixture
Step 7: Close PVC enclosure
After the gel is poured, close the PVC enclosure firmly. Make sure Waspmote is in horizontal position and the antenna is pointing the sky.
Step 8: Place enclosure into pavement hole
Be sure that the enclosure remains under pavement line but no more than one centimeter. Following images show the mote before and after the installation.
Figure : Internal diagram of a parking node
Figure : Image of a mote installed in a perpendicular parking lot

-32- v5.1
This shield is discontinued. New Smart Parking - LoRaWAN / Sigfox (double radio) On road surface > Coming in 2016
Step 9. Testing magnetic reset feature
Once the enclosure is placed into the hole, it is recommended to test the magnetic feature moving a magnet close to the top of the enclosure for a few seconds and then moving the magnet away. Then you should receive the starting message on your gateway.
Figure : Testing the magnetic reset feature
Step 10: Fixing enclosure to pavement
Now, the PVC enclosure has to be fixed to the pavement using Epoxy resin (commonly used for filling road fissures). This resin should fill all the space between enclosure and pavement and also should cover completely the top of the enclosure, ensuring protection against water, bad environmental conditions and vandalism.
Figure : Fixing enclosure to pavement

-33- v5.1
This shield is discontinued. New Smart Parking - LoRaWAN / Sigfox (double radio) On road surface > Coming in 2016
WATER
PAVEMENT
EPOXY
Figure : Epoxy filling. (Good installation)
PAVEMENT
WATER
WATER
Figure : No filling. (Bad installation)

-34- v5.1
This shield is discontinued. New Smart Parking - LoRaWAN / Sigfox (double radio) On road surface > Coming in 2016
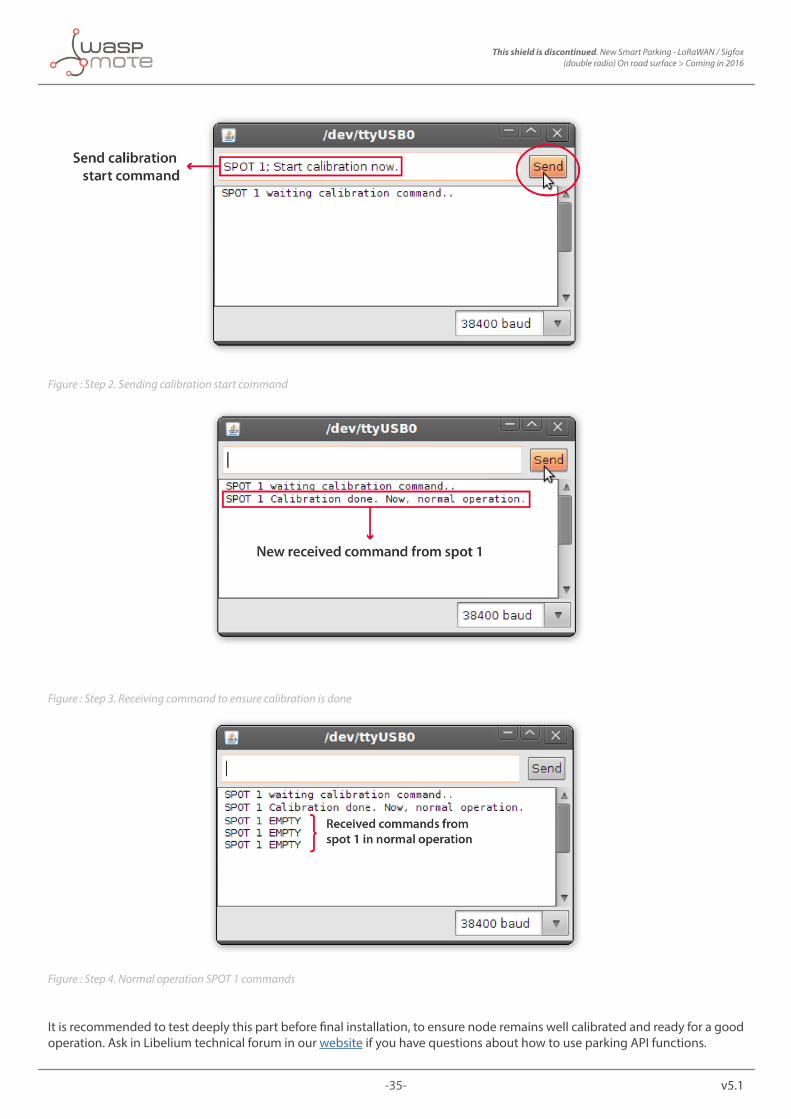
Step11: Recommended Parking node calibration
Once the node is placed into the pavement, it needs to be calibrated while the parking spot is empty. Use a laptop with a gateway connected to communicate with the parking mote and start calibration process.
Figure : Node calibration with an empty spot
To communicate with the node, a serial monitor should be used: Hyperterminal in Windows, Realterm in Mac or Cutecom in Linux are some examples. In this guide, Waspmote IDE serial monitor will be used. To use it, just open the IDE, select serial port where the Waspmote Gateway is connected and open the serial monitor.
Uploading a code into Waspmote like the provided in section “Example code”, next communication sequence would be carried out for node calibration.
1. After the node is turned on, it sends to the gateway a command asking for calibration and it enters in a waiting loop.
2. Once the node is installed and the spot is empty, a command is sent from the serial monitor which controls the gateway to start calibration process in this node ( this command will depend on the used XBee module and its configuration, and also how data reception is done in the code. For example code provided on section “Example code”, any data packet coming from a network node is valid to start the node calibration).
3. The node starts calibration process and it answers when calibration is done. Answer is shown in serial monitor.
4. Once the node has been calibrated, it sends periodically the normal operation commands.
Next four figures are screenshots which match with each described step.
Figure : Step 1. Receiving SPOT 1 command asking for calibration
-35- v5.1
This shield is discontinued. New Smart Parking - LoRaWAN / Sigfox (double radio) On road surface > Coming in 2016
Figure : Step 2. Sending calibration start command
Figure : Step 3. Receiving command to ensure calibration is done
Figure : Step 4. Normal operation SPOT 1 commands
It is recommended to test deeply this part before final installation, to ensure node remains well calibrated and ready for a good operation. Ask in Libelium technical forum in our website if you have questions about how to use parking API functions.

-36- v5.1
This shield is discontinued. New Smart Parking - LoRaWAN / Sigfox (double radio) On road surface > Coming in 2016
5.3. Powering the moteSince the mote in a parking monitoring application will be buried underground with no access to a system to recharge the battery, it is recommended to use a battery with the highest capacity available to extend as much as possible the life of the device. Under these conditions, Libelium recommends the utilization of one of the two Lithium non-rechargeable batteries described in next section (to obtain more information about them please contact Libelium’s sales department at [email protected]).
5.3.1. Battery options
Libelium provides two different Lithium non-rechargeable batteries for powering Waspmote in parking applications:
• Battery of 26Ah • Battery of 52Ah
Main differences between them are battery capacity and self discharge current. Next pictures show both possibilities.
Figure : Image of the 26Ah battery
Figure : Image of the 52Ah battery

-37- v5.1
This shield is discontinued. New Smart Parking - LoRaWAN / Sigfox (double radio) On road surface > Coming in 2016
5.3.2. Estimated lifetime
This section describes estimated lifetime for a parking application in which the state of the spot is measured every five minutes and transmitted via XBee Digimesh 2.4GHz and 868MHz.
• Consumption table:
XBee Digimesh 2.4GHz XBee RF 868MHz
Sleep Time and consumption 298.1 seconds, 64μA 297.3 seconds, 64μA
Measurement time and consumption 380 miliseconds, 33mA 380 miliseconds, 33mA
Transmission time and consumption 1.52 seconds, 72mA 2.32 seconds, 90.5mA
Complete cycle average consumption 0.470mA 0.805mA
• Battery lifetime estimation table:
XBee Digimesh 2.4GHz XBee RF 868MHz
26Ah battery approximate self discharge current 88μA 88μA
52Ah battery approximate self discharge current 176μA 176μA
26Ah battery estimated lifetime 5.3 years 3.3 years
52Ah battery estimated lifetime 9.1 years 6.0 years

-38- v5.1
This shield is discontinued. New Smart Parking - LoRaWAN / Sigfox (double radio) On road surface > Coming in 2016
5.4. APIThe functions to handle all the features of the board, included in the WaspSensorParking API library, are detailed below. The functions necessary to control the state of the spot in all kind of situations have been implemented, but take into account that not all of them will be needed in all the situations:
Library values:
• Compensation coefficients: this library includes those coefficients, in floating point format, necessary to estimate the compensation for the temperature variation using the function calculateReference. These coefficients are unique for each sensor board, are stored in the Waspmote’s EEPROM memory and can be read using the function loadReference. The list of the names of the coefficients is shown below:
- coefX2 - coefY2 - coefZ2 - coefX - coefY - coefZ - constX - constY - constZ
• Sensors’ initial values: after carrying out the calibration of the initial state of the parking lot the values read from the magnetic field and temperature sensors are stored in four integer variables that will be used to calculate the reference of the magnetic field for every measurement:
- initialX - initialY - initialZ - initialT
• Sensors’ read values: the values of the sensors read in the execution of functions readParking or readParkingSetReset are stored in three integer variables that will be used to estimate the state of the spot:
- valueX - valueY - valueZ
• Sensors’ reference values: after executing the calculateReference function the result is stored in three integer variables that contain the reference for each of the three sensors on the board.
- referenceX - referenceY - referenceZ
• Sensors’ compensation indexes: from the calibration temperature and the compensation coefficients three indexes, one for each sensor, that will be used in the calculation of the sensor’s reference are extracted and stored as floating point variables.
- indexX - indexY - indexZ
• THRESHOLD: defined as a constant instead of a variable, it defines the threshold used in function estimateState to determine the state of the parking lot. In case its value is to be modified, it must be done in the file WaspSensorParking.h of the library.

-39- v5.1
This shield is discontinued. New Smart Parking - LoRaWAN / Sigfox (double radio) On road surface > Coming in 2016
Reserved Memory Zone:
A zone of the EEPROM memory of the microcontroller between addresses 186 and 222 has been reserved to store the coefficients used in temperature compensation. Under no circumstances should this zone of the memory be overwritten, as long as it could lead to an irreparable error in most applications.
When using the Smart Parking Sensor Board on Waspmote PRO, remember it is mandatory to include the SensorParking library by introducing the next line at the beginning of the code:
#include <WaspSensorParking.h>
Library functions:
• SensorParking.ON()
Turns on the sensor board by activating the 5V supply line.
• SensorParking.OFF()
Turns off the sensor board by cutting the 5V supply line.
• SensorParking.setBoardMode(MODE)
The setBoardMode function of this board activates or deactivates completely the supply voltage of the board assigning the values SENS_ON or SENS_OFF to the parameter MODE. In the case of the parking detection board only the 5V power supply is used, and all the electronics contained in it, included the sensors, are turned on or off using this function.
• SensorParking.calibration()
This function calculates the initial values of magnetic field for each of the three sensors in the empty parking lot, which are stored in variables initialX, initialY and initialZ, and the compensation indexes of each sensor from the temperature measured in that moment, staying those values stored in variables indexX, indexY and indexZ.
• SensorParking.loadReference()
In those applications that require temperature compensation this function loads the compensation coefficients stored in the EEPROM memory, characteristic of a specific parking board, in the variables mentioned before.
• SensorParking.calculateReference(TEMPERATURE)
The calculateReference function is used in applications that require temperature compensation to update the reference value in function of the current temperature of the mote. It utilizes the values stored in variables initialX, initialY, initialZ, indexX, indexY, indexZ, the compensation coefficients and the temperature, introduced in Celsius degree as an integer variable through the parameter TEMPERATURE, returning the new values in variables referenceX, referenceY and referenceZ.
• SensorParking.readParking()
The readParking function is used to read the output of each of the sensors at the input of the microcontroller’s analog-to-digital converter. When it is executed the voltage values at the analog inputs of the three sensors (ANALOG1, ANALOG2 and ANALOG5) are captured and stored in variables valueX, valueY and valueZ respectively.
• SensorParking.readParkingSetReset()
The function behaves in a very similar way to the former one, with the only difference that this one applies a current pulse in the internal circuit of every sensor to realign the molecules of the permalloy film, as indicated in section “Measurement Process”.

-40- v5.1
This shield is discontinued. New Smart Parking - LoRaWAN / Sigfox (double radio) On road surface > Coming in 2016
• SensorParking.readTemperature()
The temperature sensor attached to the Smart Parking board can be read through the readTemperature function that, with the purpose of obtaining a more accurate measurement, averages eight captures of the voltage value at the analog pin corresponding to the sensor output (ANALOG7). The value is returned in Celsius degree as an integer variable.
• SensorParking.estimateState()
This function uses the values read from the sensors and stored in variables valueX, valueY and valueZ and the reference values calculated with the function to estimate the state of the spot, returning a boolean variable (‘1’ in the case of an occupied spot, ‘0’ in the case of an empty one). This calculation consists of a comparison between the difference between the value read from each sensor and its respective reference and a threshold stored in constant THRESHOLD. In the case any of these differences surpasses given threshold, the lot will be considered occupied.

-41- v5.1
This shield is discontinued. New Smart Parking - LoRaWAN / Sigfox (double radio) On road surface > Coming in 2016
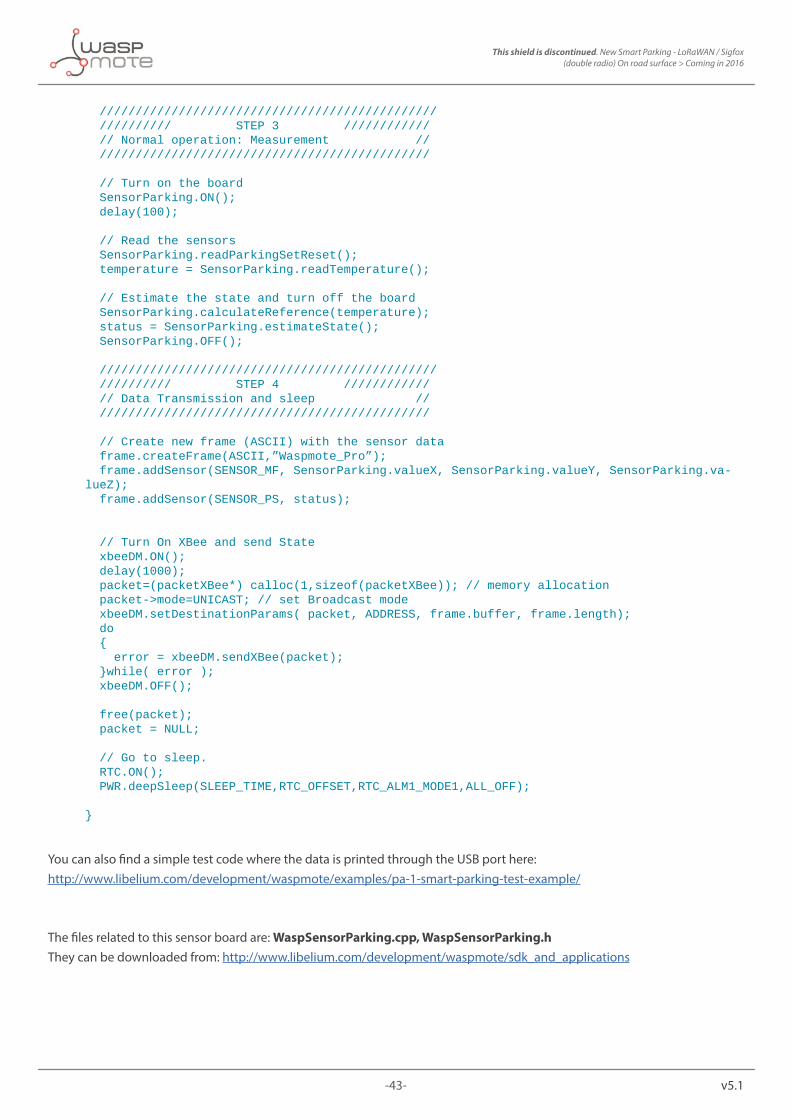
5.5. Example codeWe provide below with a code suitable for a simple parking detection application. Take into account that depending on the conditions of the application a more complex calculation in the decision of the state of the lot may be necessary.
/* ------------Smart Parking Sensor Board example--------------- www.Libelium.com */
// Inclusion of the Frame library#include <WaspFrame.h>
// Inclusion of the Smart Parking Sensor Board v20 library#include <WaspSensorParking.h>
// Inclusion of the XBee Digimesh library#include <WaspXBeeDM.h>
// Sleep time between measures#define SLEEP_TIME “00:00:00:05”
// Variable to store temperatureint temperature;
// Variable to store statusboolean status;
// Gateway address#define ADDRESS “0013A2004070DA3E”
packetXBee* packet;int error;
void setup(){ /////////////////////////////////////////////// ////////// STEP 1 ///////////// // Turn On XBee and wait calibration command // ///////////////////////////////////////////////
// Turn ON the XBee Digimesh module xbeeDM.ON(); delay(1000); packet=(packetXBee*) calloc(1,sizeof(packetXBee)); // memory allocation packet->mode=UNICAST; // set Unicast mode
// Send a broadcast message of “awaiting calibration” command xbeeDM.setDestinationParams(packet, ADDRESS, “SPOT1 Awaiting calibration command\n\r”, MAC_TYPE); do { error = xbeeDM.sendXBee(packet); }while( error ); free(packet); packet = NULL; // Note: Code hangs here until an answer is received.The user can // add here his own command and also its own waiting period, etc.

-42- v5.1
This shield is discontinued. New Smart Parking - LoRaWAN / Sigfox (double radio) On road surface > Coming in 2016
// It is mandatory to switch the MUX to XBee since it was set to USB // (USB and XBee share UART_0): Utils.setMuxSocket0(); delay(100); // Waspmote will wait forever here until it receives an answer // from the Gateway; the answer should be sent only when the mote is already // installed and buried: while( xbeeDM.available() == 0 ) { }
// If the user needs to check if the answer was the appropriate, now the // parsing can be done: // <your code>
// Turn off the XBee Digimesh module xbeeDM.OFF(); delay(100);
/////////////////////////////////////////////// ////////// STEP 2 //////////// // Calibration process. // //////////////////////////////////////////////
// Once “start calibration” command is received, calibration starts. SensorParking.loadReference(); SensorParking.ON(); delay(100); SensorParking.calibration(); SensorParking.OFF();
// Send a broadcast message with calibrated values xbeeDM.ON(); delay(1000); packet=(packetXBee*) calloc(1,sizeof(packetXBee)); // memory allocation packet->mode=UNICAST; // set Broadcast mode // Create new frame (ASCII) with the sensor data frame.createFrame(ASCII,”Waspmote_Pro”); frame.addSensor(SENSOR_STR, “SPOT1 initial values”); frame.addSensor(SENSOR_MF, SensorParking.initialX, SensorParking.initialY, SensorParking.initialZ); xbeeDM.setDestinationParams( packet, ADDRESS, frame.buffer, frame.length); do { error = xbeeDM.sendXBee(packet); }while( error ); xbeeDM.OFF();
free(packet); packet = NULL; }
void loop(){
-43- v5.1
This shield is discontinued. New Smart Parking - LoRaWAN / Sigfox (double radio) On road surface > Coming in 2016
/////////////////////////////////////////////// ////////// STEP 3 //////////// // Normal operation: Measurement // ////////////////////////////////////////////// // Turn on the board SensorParking.ON(); delay(100); // Read the sensors SensorParking.readParkingSetReset(); temperature = SensorParking.readTemperature(); // Estimate the state and turn off the board SensorParking.calculateReference(temperature); status = SensorParking.estimateState(); SensorParking.OFF();
/////////////////////////////////////////////// ////////// STEP 4 //////////// // Data Transmission and sleep // //////////////////////////////////////////////
// Create new frame (ASCII) with the sensor data frame.createFrame(ASCII,”Waspmote_Pro”); frame.addSensor(SENSOR_MF, SensorParking.valueX, SensorParking.valueY, SensorParking.va-lueZ); frame.addSensor(SENSOR_PS, status); // Turn On XBee and send State xbeeDM.ON(); delay(1000); packet=(packetXBee*) calloc(1,sizeof(packetXBee)); // memory allocation packet->mode=UNICAST; // set Broadcast mode xbeeDM.setDestinationParams( packet, ADDRESS, frame.buffer, frame.length); do { error = xbeeDM.sendXBee(packet); }while( error ); xbeeDM.OFF();
free(packet); packet = NULL;
// Go to sleep. RTC.ON(); PWR.deepSleep(SLEEP_TIME,RTC_OFFSET,RTC_ALM1_MODE1,ALL_OFF);
}
You can also find a simple test code where the data is printed through the USB port here:http://www.libelium.com/development/waspmote/examples/pa-1-smart-parking-test-example/
The files related to this sensor board are: WaspSensorParking.cpp, WaspSensorParking.hThey can be downloaded from: http://www.libelium.com/development/waspmote/sdk_and_applications

-44- v5.1
This shield is discontinued. New Smart Parking - LoRaWAN / Sigfox (double radio) On road surface > Coming in 2016
5.6. Resetting Waspmote with an external magnetSince June 2013, Waspmotes shipped to work in Plug & Sense! nodes have a new feature: they can be reset with an external magnet, with no contact. The access to an already-deployed Smart Parking node is complicated because the node is buried in the pavement. Besides, the node is covered with protective gel.
If one parking node stops working or if a defective behavior is detected, it would be costly to dig up the node and open the case just to reset the system. This new feature allows the network manager to reset the node in a quick and easy way. The hardware consists of a reed switch connected to the Waspmote reset line. When the user gets the magnet close to the reed-switch, the reset is activated. When the user moves the magnet away, the reset line is released and Waspmote executes the bootloader first and then, the setup function. After the setup, it will continue with the loop function. That means that the reset action with magnet should be performed only when the parking lot is empty. This way, the calibration will happen without the presence of a car, as needed. Remember the node will wait for the calibration start frame.
Take into account that the magnet interferes in the Parking Board sensors detection. So it is necessary to get away at least 2 meters the magnet from the node some seconds before starting the calibration. You can control this with a simple delay() on your code. It is not mandatory, but highly recommended to consider this feature in a parking detection project. The user should design the software in a way the mote can be reset and re-calibrated if things go wrong.
The magnet is made of neodymium. It is a special, high-power magnet. We only advise to use the magnet Libelium provides. The typical range is 6-8 cm. Libelium recommends to place the reed switch in the upper side of the Parking case, so the reed switch can be in range of the magnet even when it is buried. The reed switch should be fixed to the wall of the case with Scotch or glue. Please be careful with the cables and reed switch. Try not to move much the cables because you could damage it. Remember that laboratory tests are always needed to validate the feature before your final deployment.
Figure : Resetting a parking node with an external magnet

-45- v5.1
This shield is discontinued. New Smart Parking - LoRaWAN / Sigfox (double radio) On road surface > Coming in 2016
6. Consumption
6.1. Table of consumptionIn the case of the Smart Parking board, the power supply is only controlled by the general switch of the 5V source in Waspmote, so none of the components will be active once the board has been disconnected, so the consumption in this situation will be null.
Consumption
Board Off 0μA
Board On (Average) 25mA
Board On (Peak) 500mA (1 microsecond)

-46- v5.1
This shield is discontinued. New Smart Parking - LoRaWAN / Sigfox (double radio) On road surface > Coming in 2016
7. API Changelog
Keep track of the software changes on this link:
http://www.libelium.com/development/waspmote/documentation/changelog/#SmartParking

-47- v5.1
This shield is discontinued. New Smart Parking - LoRaWAN / Sigfox (double radio) On road surface > Coming in 2016
8. Documentation changelog
From v5.0 to v5.1
• References to the new LoRaWAN module
From v4.9 to v5.0
• References to the new Sigfox module
From v4.8 to v4.9
• References to the new LoRa module • Link to the new online API changelog
From v4.7 to v4.8:
• Radios table for Plug&Sense! updated
From v4.6 to v4.7:
• Radios table for Plug&Sense! updated
From v4.5 to v4.6:
• API changelog updated to API v006
From v4.4 to v4.5:
• Added reference to the External SIM socket
From v4.3 to v4.4:
• Deleted references to the Cantabria University
From v4.2 to v4.3:
• New section with differences between Smart Parking in versions OEM and Plug & Sense!
From v4.1 to v4.2:
• Added references to reset sensor feature • Small changes on the example code
From v4.0 to v4.1:
• Added references to 3G/GPRS Board in section: Radio Interfaces

-48- v5.1
This shield is discontinued. New Smart Parking - LoRaWAN / Sigfox (double radio) On road surface > Coming in 2016
9. Maintenance • In this section, the term “Waspmote” encompasses both the Waspmote device itself as well as its modules and sensor boards. • Take care with the handling of Waspmote, do not drop it, bang it or move it sharply. • Avoid putting the devices in areas of high temperatures since the electronic components may be damaged. • The antennas are lightly threaded to the connector; do not force them as this could damage the connectors. • Do not use any type of paint for the device, which may damage the functioning of the connections and closure mechanisms.

-49- v5.1
This shield is discontinued. New Smart Parking - LoRaWAN / Sigfox (double radio) On road surface > Coming in 2016
10. Disposal and recycling • In this section, the term “Waspmote” encompasses both the Waspmote device itself as well as its modules and sensor boards. • When Waspmote reaches the end of its useful life, it must be taken to a recycling point for electronic equipment. • The equipment has to be disposed on a selective waste collection system, different to that of urban solid waste. Please,
dispose it properly. • Your distributor will inform you about the most appropriate and environmentally friendly waste process for the used
product and its packaging.