smart phone monitoring software user’s manualdownloads.rhinoco.com.au/dvr/dahua/dmss_mobile...
TRANSCRIPT

Smart Phone Monitoring Software User’s Manual
iDMSS / gDMSS / wDMSS
Version 3.2.0

i
Table of Contents
1 OVERVIEW.............................................................................................................................. 1
1.1 General Introduction ................................................................................................................ 1
1.2 Features .................................................................................................................................... 1
1.3 Compatible Models .................................................................................................................. 1
2 DOWNLOADING AND INSTALLATION ................................................................................ 2
3 OPERATION............................................................................................................................ 2
3.1 Main Menu ................................................................................................................................. 2
3.2 Device Manager ........................................................................................................................ 3
3.2.1 Add Device............................................................................................................................. 3
3.2.2 Modify Device Info ................................................................................................................. 5
3.2.3 Delete Device ........................................................................................................................ 5
3.2.4 Remote Configuration ............................................................................................................ 6
3.2.5 View HDD Information ........................................................................................................... 8
3.2.6 Alarm Out Control .................................................................................................................. 9
3.2.7 Import Cloud Device ............................................................................................................ 10
3.3 Live Preview ........................................................................................................................... 10
3.3.1 Enable Monitoring ................................................................................................................ 11
3.3.2 Close Monitoring .................................................................................................................. 13
3.3.3 Record ................................................................................................................................. 14
3.3.4 Snapshot .............................................................................................................................. 14
3.3.5 Favorites .............................................................................................................................. 14
3.3.6 Real-time Playback .............................................................................................................. 16
3.3.7 PTZ ...................................................................................................................................... 16
3.3.8 Bit Stream Switch ................................................................................................................ 18
3.3.9 Alarm Out Control ................................................................................................................ 19
3.3.10 Light Control .................................................................................................................... 20
3.3.11 Lightness Setting ............................................................................................................. 21
3.3.12 Full Screen ...................................................................................................................... 22
3.4 Playback .................................................................................................................................. 23
3.4.1 Record Playback .................................................................................................................. 23
3.4.2 Picture Playback .................................................................................................................. 24
To playback picture: .......................................................................................................................... 24
3.5 File Manager ........................................................................................................................... 25
3.5.1 View File .............................................................................................................................. 25

ii
3.5.2 Share File............................................................................................................................. 25
3.5.3 Export File ............................................................................................................................ 26
3.6 E-Map....................................................................................................................................... 26
3.6.1 Create E-Map ...................................................................................................................... 26
3.6.2 Edit E-Map ........................................................................................................................... 27
3.7 Favorites ................................................................................................................................. 27
3.8 Alarm Push ............................................................................................................................. 28
3.8.1 Push Config ......................................................................................................................... 28
3.8.2 Instant View of Alarm Push.................................................................................................. 29
3.8.3 Alarm Push Event List ......................................................................................................... 29
3.9 Local Config ........................................................................................................................... 30

1
1 Overview
1.1 General Introduction
This manual is designed for smart phone to perform monitoring function. It is built on traits of mobile
device to include functions of multiple touch control, touch signal recognition, alarm push, P2P
function, DDNS analysis and etc. User can preview, control PTZ, play video and etc. from front-end
camera, DVR, and speed dome, under 3G, 4G and WIFI environments.
This software supports iOS and Android platforms only while iDMSS suppers iOS, and gDMSS
supports Android.
1.2 Features
This software has the following features:
Support multiple channel monitoring and playback with a max of 16 windows.
Support real-time playback when preview.
Playback supports quick, slow and by frame modes.
Support local snapshot and recording. Corresponding files are stored locally.
Support PTZ control by slide on touch screen.
Support memory of previous channel viewed last time.
Support color setting and streaming parameters adjustment.
Support alarm push.
Support alarm output control from smart phone for alarm push function.
Support bidirectional talk.
Support “Smart Picture” function which zooms in/out picture to view different parts of picture on
different windows and at the same time.
Support E-Map function, to show cameras on an electronic map of household or area.
Support channel resolution and frame Config, and view of HDD info.
1.3 Compatible Models
Android Android 2.2 and higher, Resolution: 480*800 and higher Note: To use the push function, you need to create a Google account first.
iphone IOS 4.3 and higher
2
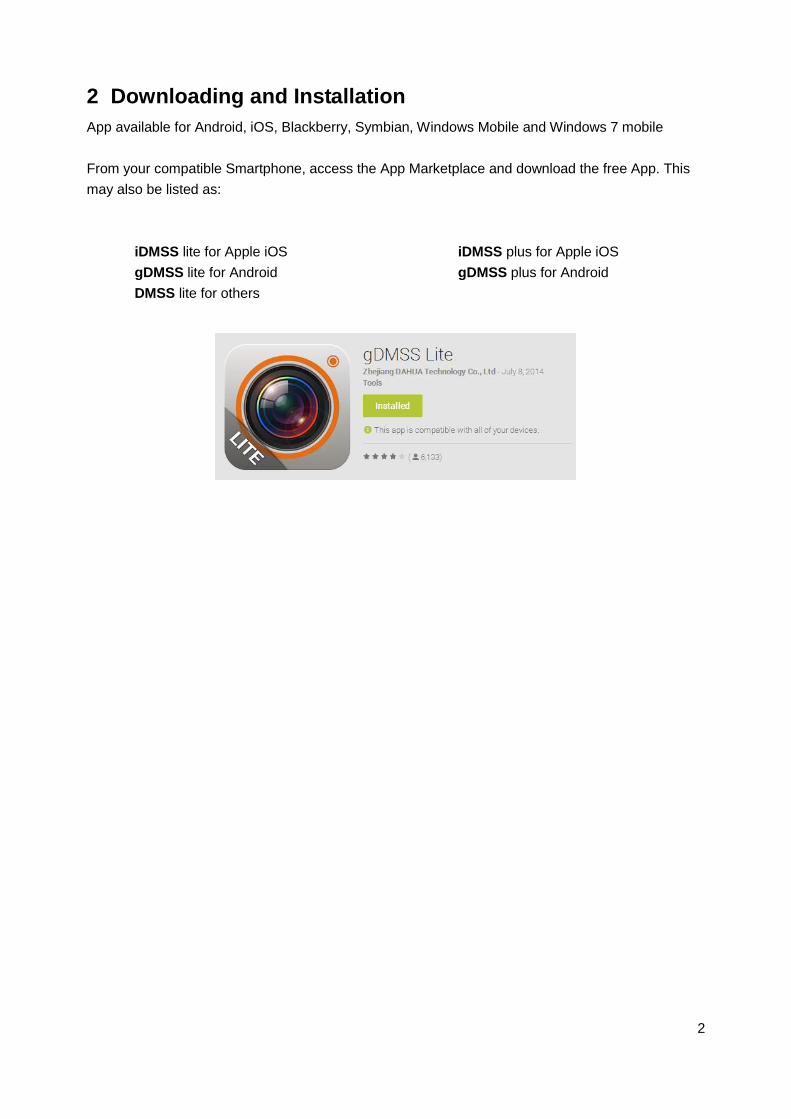
2 Downloading and Installation
App available for Android, iOS, Blackberry, Symbian, Windows Mobile and Windows 7 mobile
From your compatible Smartphone, access the App Marketplace and download the free App. This
may also be listed as:
iDMSS lite for Apple iOS
gDMSS lite for Android
DMSS lite for others
iDMSS plus for Apple iOS
gDMSS plus for Android
2
3 Operation
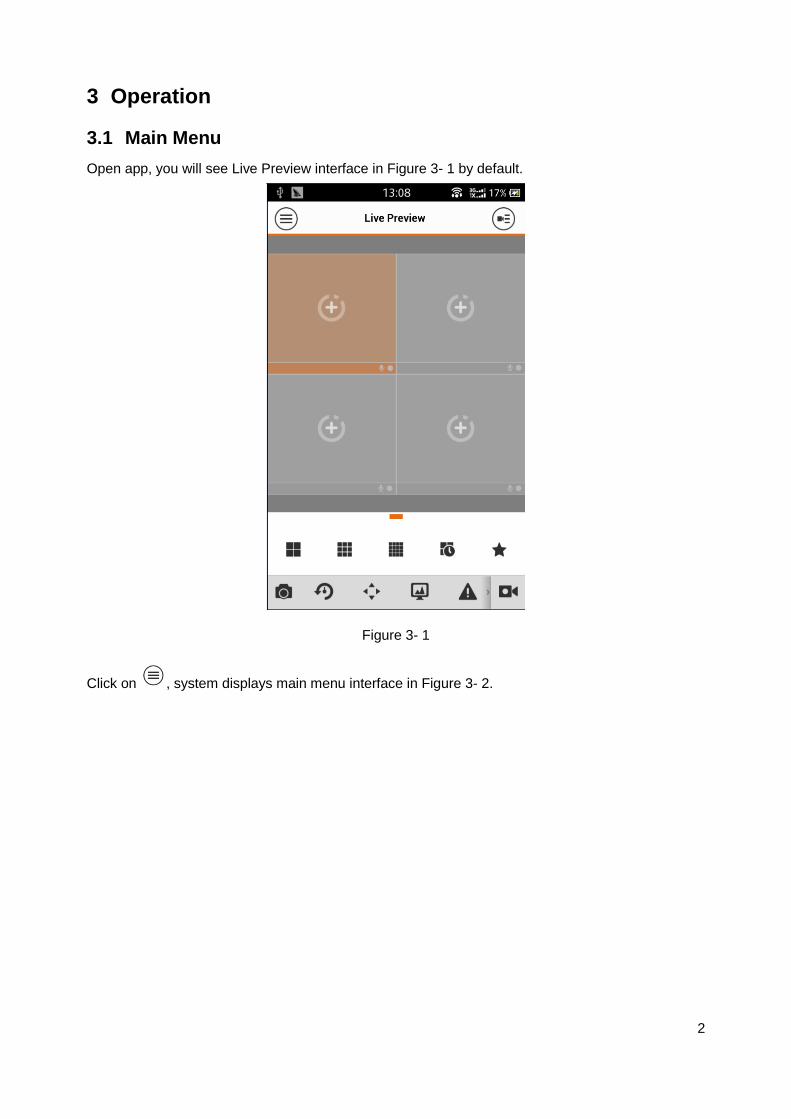
3.1 Main Menu
Open app, you will see Live Preview interface in Figure 3- 1 by default.
Figure 3- 1
Click on , system displays main menu interface in Figure 3- 2.

3
Figure 3- 2
User can click on function in main menu to enter corresponding function interface.
Main functions includes: Live Preview, Playback, Device Manager, Local Files, E-Map, Favorites,
Push Config, Event List, Local Config and Help.
3.2 Device Manager
In Device Manager, you can add device, modify device info, remotely configure device, control
alarm output, view HDD and delete. You also can import device list on cloud-end. Click on added
device in the list, you can see its functional buttons.
3.2.1 Add Device
To add device:
Step 1. In device manager interface, click on to enter add device interface, see Figure 3- 3.

4
Figure 3- 3
Parameter Note
Register Mode
P2P: for network environment, device should have P2P feature enabled and connects to internet. Add device by scanning QR code or inputting SN.
Dahua/QuickDDNS: for network environment, device has register in DDNS server and connects to internet. Add device by inputting complete DDNS domain name address, and analysis is done by DahuaDDNS and QuickDDNS.
IP/Domain name: for normal environment, add device by inputting its IP address or third-party domain name and port.
Name Device name.
SN Address IP/Domain and Port
P2P type: input SN. QuickDDNS/Dahua type: input complete domain name. IP/Domain name type: input IP address or complete third party
domain name and port.
Username/Password Device username and password are both admin by default. If changed, please input new username and password.
Live Preview/Playback
Select main stream or extra stream for live preview and playback.
Step 2. Fill in parameter, and click on to save.
Tip:
You can click on Start Live Preview to view all channels of the device. System will go to
monitoring page and save device info.
For device supporting P2P, you can scan QR code, input SN to add device.

5
3.2.2 Modify Device Info
To modify device information:
Step 1. In device manager interface, click on device. System shows dropdown menu in Figure 3- 4.
Figure 3- 4
Step 2. Click on in dropdown menu.
Step 3. Change device info, and click on to save.
3.2.3 Delete Device
To delete device:
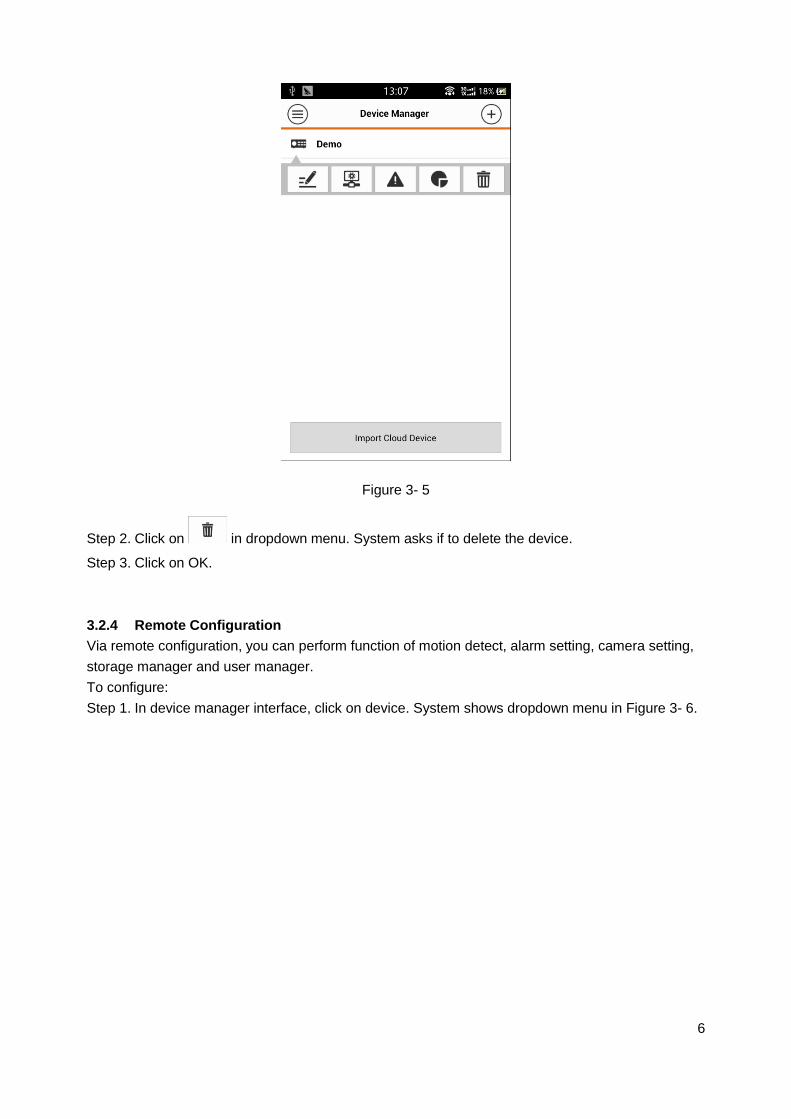
Step 1. In device manager interface, click on device. System shows dropdown menu in Figure 3- 5.
6
Figure 3- 5
Step 2. Click on in dropdown menu. System asks if to delete the device.
Step 3. Click on OK.
3.2.4 Remote Configuration
Via remote configuration, you can perform function of motion detect, alarm setting, camera setting,
storage manager and user manager.
To configure:
Step 1. In device manager interface, click on device. System shows dropdown menu in Figure 3- 6.

7
Figure 3- 6
Step 2. Click on in dropdown list.
Step 3. Select correspodning item to remote configuration page as in Figure 3- 7.
Figure 3- 7

8
3.2.5 View HDD Information
You can view HDD name, status, free capacity and total capacity.
Step 1. In device manager interface, click on device. System shows dropdown menu in Figure 3- 8.
Figure 3- 8
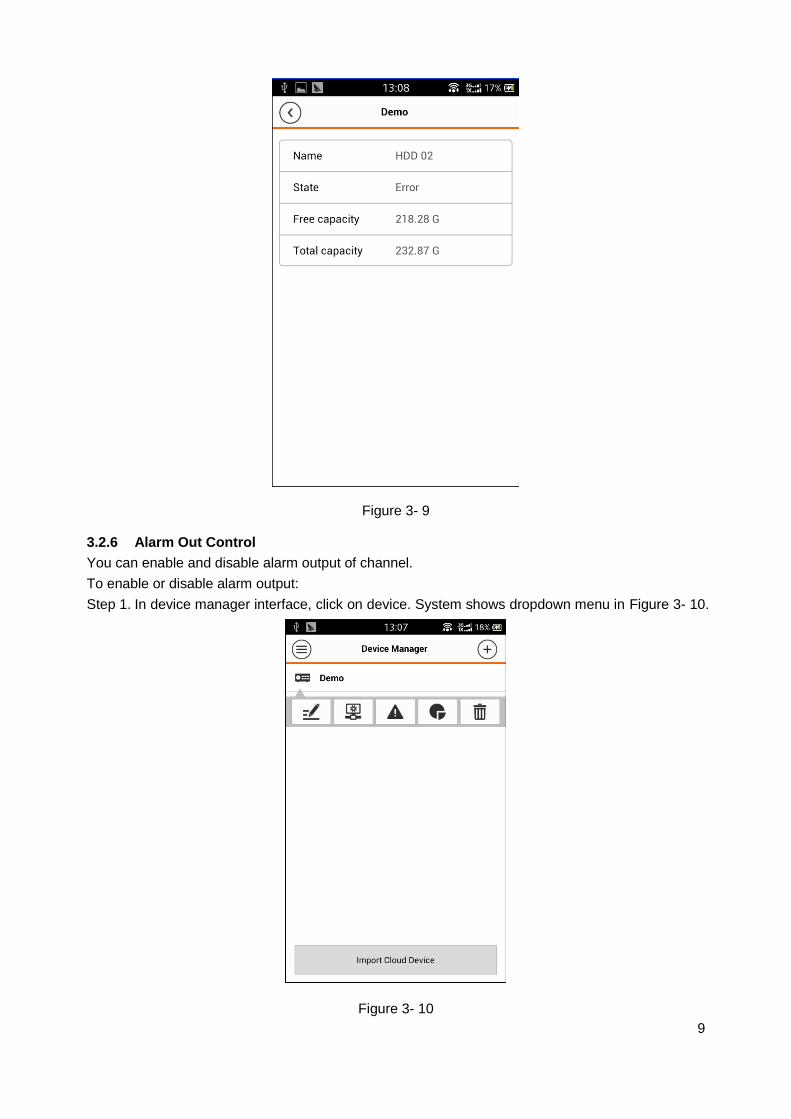
Step 2. In dropdown menu, click on to view HDD information. See Figure 3- 9.
9
Figure 3- 9
3.2.6 Alarm Out Control
You can enable and disable alarm output of channel.
To enable or disable alarm output:
Step 1. In device manager interface, click on device. System shows dropdown menu in Figure 3- 10.
Figure 3- 10

10
Step 2. In dropdown menu, click on .
Step 3. Select alarm out channel, click on to enable or disable alarm out in Figure 3- 11.
Figure 3- 11
3.2.7 Import Cloud Device
You can import cloud device. For example, you have a cloud account (i.e. DDNS account or
Easy4IP account), and the account is bound with device, then you can import corresponding
devices on client without manually adding one by one.
To import cloud device:
Step 1. In device manager interface, click on import cloud device button.
Step 2. Select cloud account type, and input username and password.
DahuaDDNS:use cloud account on Dahua DDNS.
QuickDDNS: use cloud account on Quick DDNS.
PSP: use cloud account on Easy4IP server.
Step 3. Click on Login to import device under the cloud account.
Note:
Device from DDNS account will have “?” mark. DDNS only memorizes IP the binding relationship
between the device and domain name. The”?” means there is incomplete information of device user
and password which shall be completed later.
3.3 Live Preview

11
Click on and click on Live Preview in main interface to enter live preview in Figure 3- 12. If it is
your first time opening this app, you will see live preview interface.
Figure 3- 12
Slice tool bar at the bottom to display more buttons as in:
Icon Note Icon Note
1/4/9/16 split
Open/Close bit stream control panel
Open channels; Close all channels
Open/Close alarm out control panel
Favorites
Open/Close audio
Local snapshot
Open/Close bidirectional talk
Start/Stop video in current window
Open/Close light control panel
Start/Stop playback
Open/Close image adjustment control panel
Open/Close PTZ control panel
3.3.1 Enable Monitoring
The app supports 4 methods to open monitoring.
1. In corresponding window open monitoring video of a certain window.
Click on in window, select channel of device displayed as to monitor the selected channel.

12
2. Open monitoring video of multiple windows.
Click on at the upper-right corner, and select one or more channels in displayed device
list. Click on Start Live Preview at the lower bottom. System will display monitoring video from
first window in sequence as in Figure 3- 13.
Figure 3- 13
3. Quick preview
After you add device, click on Start Live Preview to enable preview in Figure 3- 14.

13
Figure 3- 14
4. Open last channels
Click on to open channels viewed last time
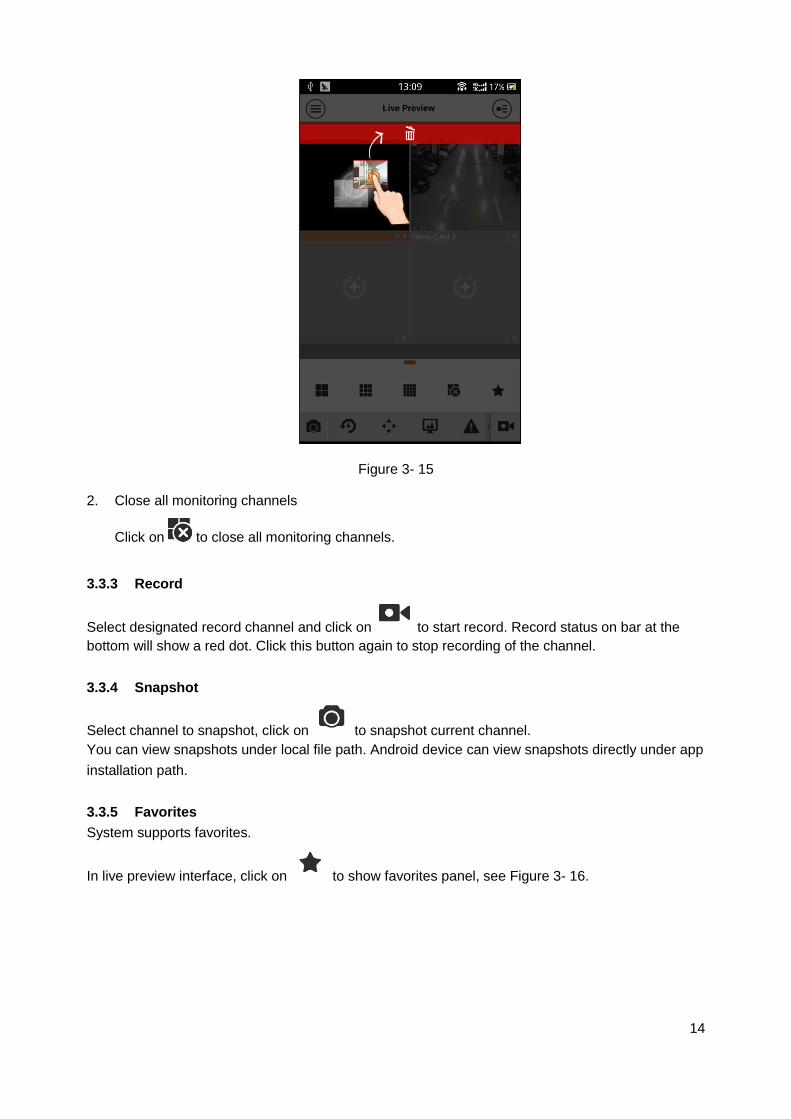
3.3.2 Close Monitoring
System supports two methods to close monitoring.
1. Close a single channel.
Long press monitoring window you want to close and drag it to the trashcan, it will be deleted.
See Figure 3- 15.
14
Figure 3- 15
2. Close all monitoring channels
Click on to close all monitoring channels.
3.3.3 Record
Select designated record channel and click on to start record. Record status on bar at the
bottom will show a red dot. Click this button again to stop recording of the channel.
3.3.4 Snapshot
Select channel to snapshot, click on to snapshot current channel.
You can view snapshots under local file path. Android device can view snapshots directly under app
installation path.
3.3.5 Favorites
System supports favorites.
In live preview interface, click on to show favorites panel, see Figure 3- 16.

15
Figure 3- 16
Click on to quickly open all channls included in favorites group.
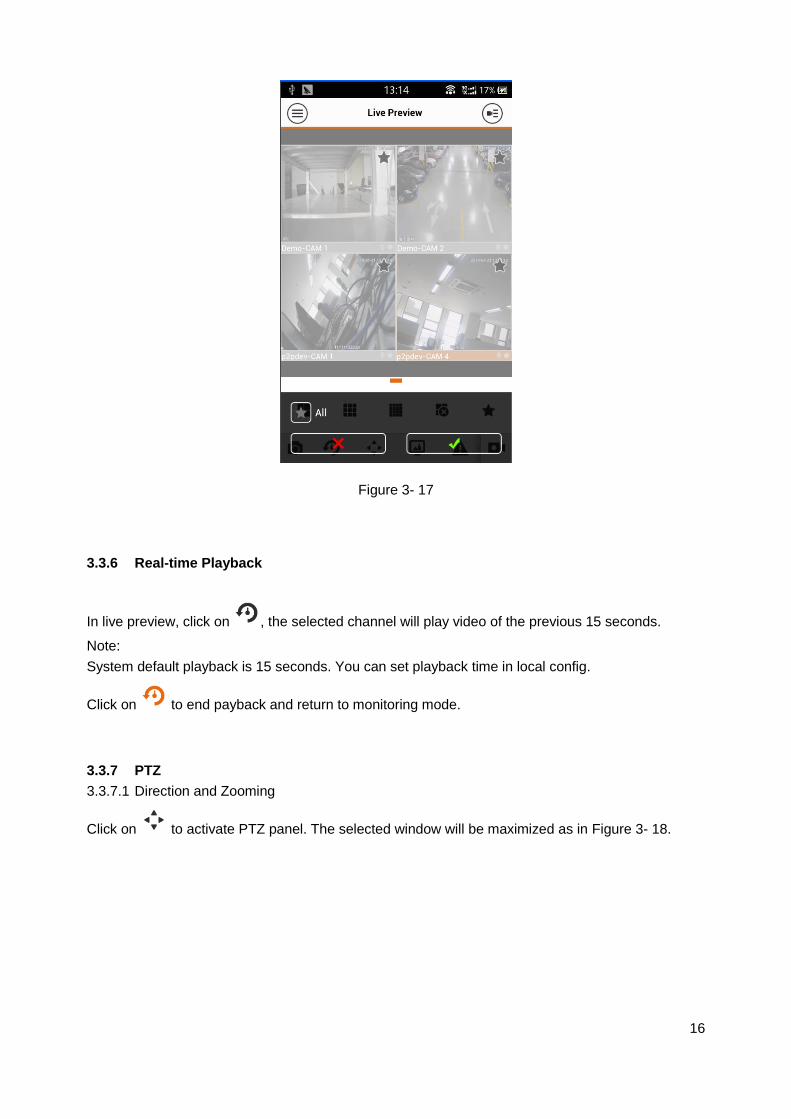
Click on to add channels in preview to favorites group. Click on channel to add and click
on . See Figure 3- 17.
16
Figure 3- 17
3.3.6 Real-time Playback
In live preview, click on , the selected channel will play video of the previous 15 seconds.
Note:
System default playback is 15 seconds. You can set playback time in local config.
Click on to end payback and return to monitoring mode.
3.3.7 PTZ
3.3.7.1 Direction and Zooming
Click on to activate PTZ panel. The selected window will be maximized as in Figure 3- 18.

17
Figure 3- 18
When PTZ control is activated, use hand to control PTZ direction by sliding touch screen:
PTZ rotation: slide the touch screen toward designated direction to rotate PTZ.
Focus control: Slide with two fingers to control focus.
You also can:
Icon Note
Zoom control
Focus control
Iris control
3.3.7.2 Preset
On PTZ panel, click on , select preset no., and click on to adjust this preset point as in Figure
3- 19.
Figure 3- 19
18
3.3.7.3 EPTZ
On PTZ panel, click on , switch to EPTZ mode. Under this mode, you also can slide touch
screen to control video display zoom in/out.
Note:
PTZ function is for camera with PTZ fucntion only. EPTZ is supported by all devices.
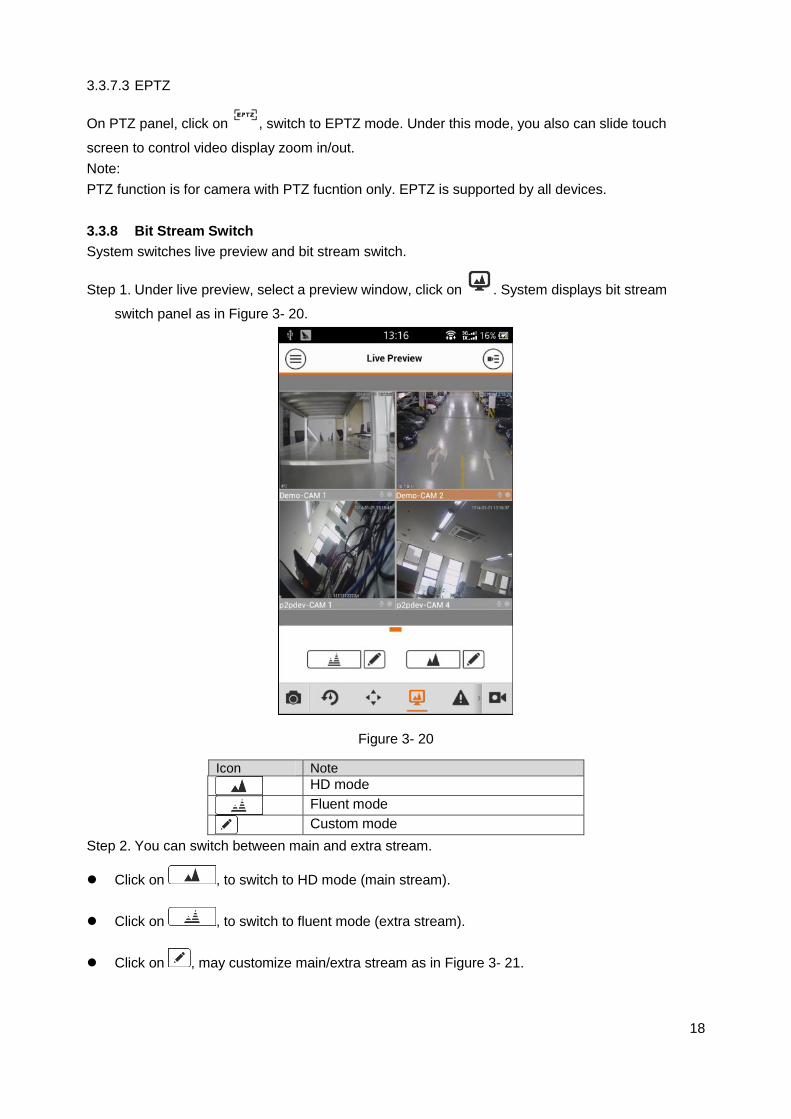
3.3.8 Bit Stream Switch
System switches live preview and bit stream switch.
Step 1. Under live preview, select a preview window, click on . System displays bit stream
switch panel as in Figure 3- 20.
Figure 3- 20
Icon Note
HD mode
Fluent mode
Custom mode
Step 2. You can switch between main and extra stream.
Click on , to switch to HD mode (main stream).
Click on , to switch to fluent mode (extra stream).
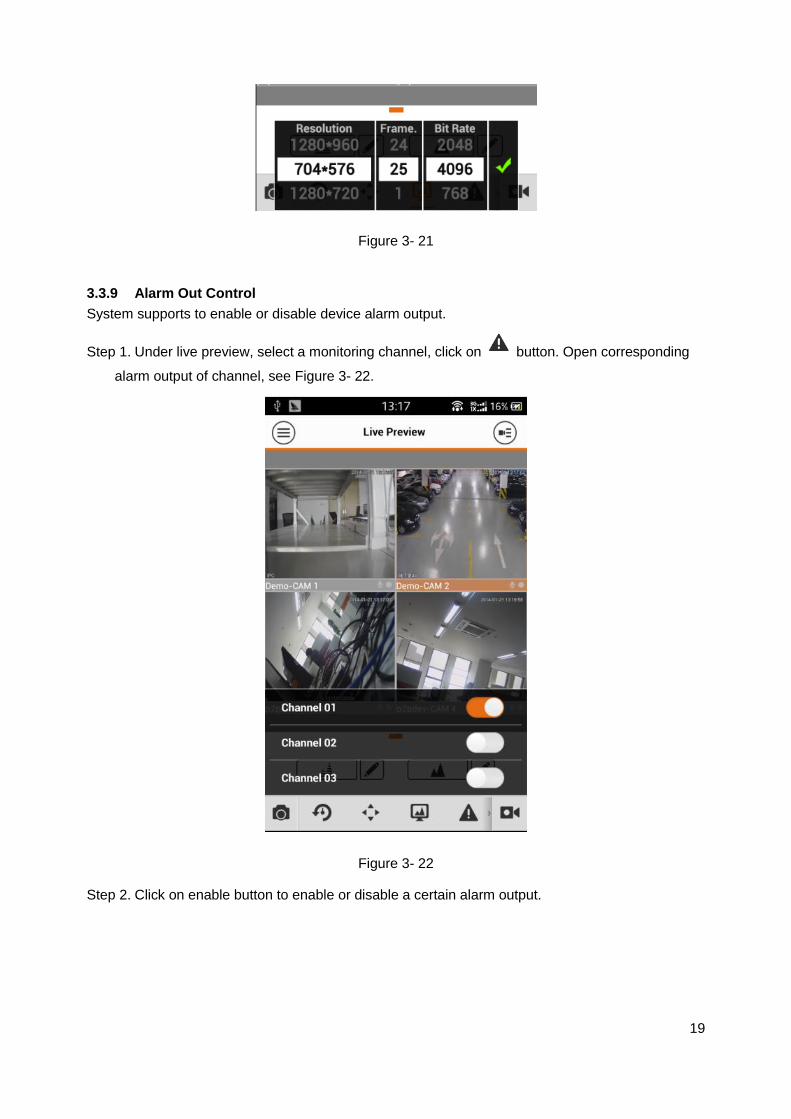
Click on , may customize main/extra stream as in Figure 3- 21.
19
Figure 3- 21
3.3.9 Alarm Out Control
System supports to enable or disable device alarm output.
Step 1. Under live preview, select a monitoring channel, click on button. Open corresponding
alarm output of channel, see Figure 3- 22.
Figure 3- 22
Step 2. Click on enable button to enable or disable a certain alarm output.
20
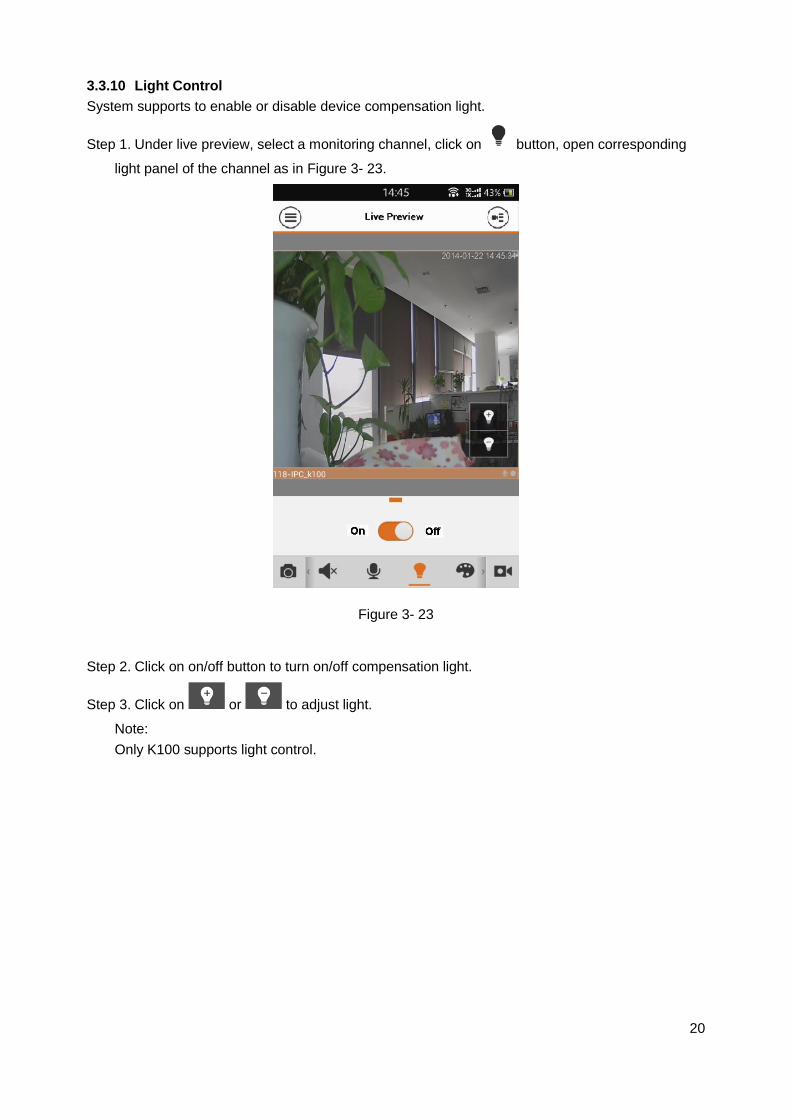
3.3.10 Light Control
System supports to enable or disable device compensation light.
Step 1. Under live preview, select a monitoring channel, click on button, open corresponding
light panel of the channel as in Figure 3- 23.
Figure 3- 23
Step 2. Click on on/off button to turn on/off compensation light.
Step 3. Click on or to adjust light.
Note:
Only K100 supports light control.

21
3.3.11 Lightness Setting
System supports image adjustment including brightness, contrast, saturation and etc.
Step 1. In live preview, select a monitoring window, click on button, open image adjustment
control panel in Figure 3- 24.
Figure 3- 24
Icon Note
Adjust brightness
Adjust contrast
Adjust color
Adjust saturation
Weight
Step 2. Click on functional icon to adjust corresponding effect. You can increase/decrease
parameter by clicking on +/- buttons in monitoring window.

22
3.3.12 Full Screen
In live preview, screen is rotated and enters full screen mode as in Figure 3- 25.
Figure 3- 25
Note:
If you cannot enter full screen mode, please check the settings of mobile phone.

23
3.4 Playback
System supports record playback and picture playback.
Record playback is to play record saved on device; picture playback is to play picture saved on
front-end device.
Click on button to view main menu. Click on playback on main menu to enter playback interface.
The default is to play record, but you can switch it to picture by clicking on tab above.
3.4.1 Record Playback
Figure 3- 26
To search record:
Step 1. Click on in window to open device list.
Step 2. Select playback period.
Step 3. Select record channel to view. System can play video of selected channel in selected
window as in Figure 3- 27.

24
Figure 3- 27
Parameter Note
Play tool bar control, including 5 min, 30 min, 60 min.
Previous/Next
Quick/Slow Quick: quick play with 2x or 4x speed. Select playing video, click
on to 2x play; click on , to 4x play. During 4x play, click
on to 2x play and click on it again back to normal speed. Slow: slow play with 1/2x, 1/4x speed. Select playing video, click
on to 1/2 play; click on to 1/4 play. During 1/4 play, click
on to 1/2 play and click on it again back to normal speed.
Play/Pause
Play by frame. Click on to play next frame.
You can close playback by either of:
Close a single channel playback: long press video to close playback and drag it to the trashcan
above.
Close all channels’ playback: click on to close all playback.
3.4.2 Picture Playback
To playback picture:
Step 1. Click on button to open deivce list.
Step 2. Select playback period.
Step 3. Select picture channel to view. System will play picture of selected channel in selected
window.

25
Click on to close playback.
Smart mode: during picture playback, click on to enter smart mode. Window becomes 4-
split. You can zoom in/out in window 2/3/4 as in Figure 3- 28.
Figure 3- 28
3.5 File Manager
System supports viewing, editing, exporting of live preview and snapshot, record during playback.
3.5.1 View File
Click on record file to view. In the interface, you can play, pause, snapshot, play audio, quickly play,
slowly play and etc.
3.5.2 Share File
Step 1. Click on or long press file to enter file manager mode.
Step 2. Select file to share.
Step 3. Click on to share file.
Note:
For Android only.

26
3.5.3 Export File
Step 1. Click on or long press local file to enter manager mode.
Step 2. Select file to export.
Step 3. Click on to export video as in Figure 3- 29.
Figure 3- 29
Note:
Android OS do not need to export picture and user can find picture under installation path.
3.6 E-Map
3.6.1 Create E-Map
Step 1. Click on to add one picture as map.
Step 2. Click on to add monitoring spot on map. Go to device list interface and select channel.
Step 3. Place added channel on appropriate location on map and click on to save. See Figure
3- 30.

27
Figure 3- 30
3.6.2 Edit E-Map
Select added e-map, click on button to editing mode.
Click on to siwtch map.
Click on to add monitoring spot.
Click on to delete monitoring spot.
3.7 Favorites
System supports to create new favorites, or add monitoring spot to existing favorites.
Step 1. Click on and input name.
Step 2. Enter a certain favorite group, click on at upper-right corner to enter device list. Check
designated channel and click on to add it into favorites.
You can delete favorites:
Delete favorite (Android): long press favorite to delete and click on delete in pop-up box.
Delete favorite (iOS): At row of favorite to delete, slide the delete button and click on delete
button.

28
You can remove monitoring spot in favorites:
Delete video channel in favorites (Android): enter favorites, long press channel to delete. Click
on OK to delete it.
Delete video channel in favorites (iOS): At row of channel to delete, slide the delete button and
click on delete button.
3.8 Alarm Push
Alarm push function is the function to push alarm info generated on device to mobile phone by
integrating device alarm module. User can view alarm record, preview and playback picture
according to push info.
3.8.1 Push Config
Step 1. Select device to push.
Step 2. Edit valid period and select push type.
Parameter Note
Valid period During valid period, you can receive alarm push.
Range: 1~365.
Push Type In includes video and picture. If current device has record, and this push type is video, so when you receive push info, you can play the record. This is similar for the case of picture.
Step 3. Select alarm info, and select channel to push. Click on to save. See Figure 3- 31.
Figure 3- 31

29
3.8.2 Instant View of Alarm Push
After you have set push info, when front-end device generates alarm push, client-end will receive
alarm info from the device. You can click on info in notice bar to view detailed info. System will open
record/picture according to the priority set by you. If there is no record or picture, system will go to
live preview.
In info viewing interface, click on tab above to switch to alarm record, alarm picture and live preview
as in Figure 3- 32.
Figure 3- 32
Note:
Android user need to login Google account.
Video and picture push requires storage medium on front-end device and you must set alarm
record.
System supports to store up to 50 historical records in event list.
3.8.3 Alarm Push Event List
You can view historical record in event list.

30
3.9 Local Config
System supports local configuration including PTZ step, capture mode, push duaration, video mode
and etc. See Figure 3- 33.
Figure 3- 33
Parameter Note
PTZ Step Used to set PTZ step during live preview. The larger the step length, the higher the speed will be.
Range: 1~8。
Capture Mode Configure continuous snapshot quantity in live preview interface and etc. There are three modes: 1, 3 and 5.
Push Duration Set corresponding playback duration of push info, including: 15s, 30s, 1min, 2min, 5min.
Video Mode Default is higher-performance mode. If you encounter window split error or system crash, please witch to compatible mode.
Real-time Playback
Set playback period, as 5s~60s adjustable.
Protection Set password protection of mobile monitoring app. After you have set password, every time you login, you must verify password for security purpose.

31
Note:
This user’s manual is for reference only. Slight difference may be found in user interface.
All the designs and software here are subject to change without prior written notice.
All trademarks and registered trademarks mentioned are the properties of their
respective owners.
If there is any uncertainty or controversy, please refer to the final explanation of us.
Please visit our website or contact your local service engineer for more information.