smart room system with skype for business table top...
TRANSCRIPT
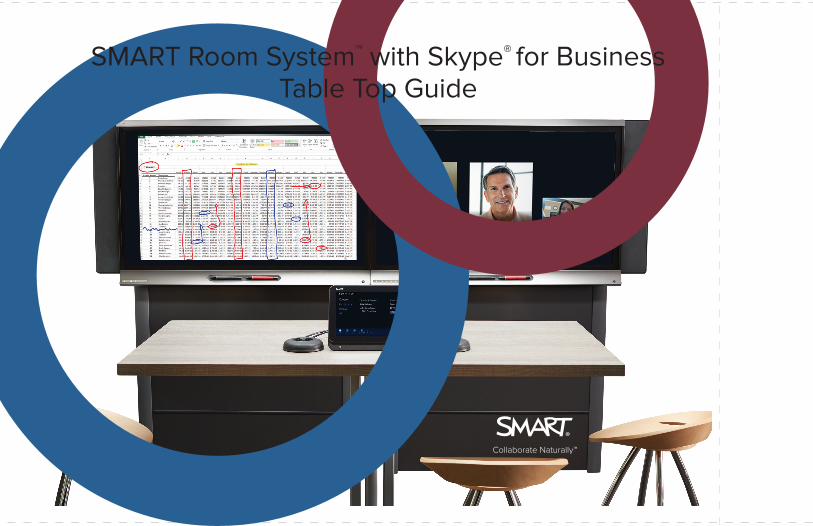
SMART Room System™ with Skype® for BusinessTable Top Guide
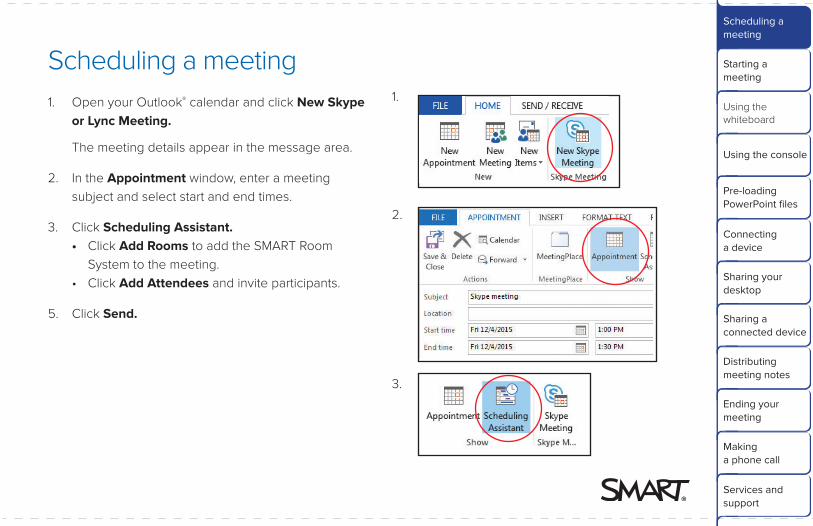
Scheduling a meeting1. Open your Outlook® calendar and click New Skype
or Lync Meeting.
The meeting details appear in the message area.
2. In the Appointment window, enter a meeting subject and select start and end times.
3. Click Scheduling Assistant. • Click Add Rooms to add the SMART Room System to the meeting. • Click Add Attendees and invite participants.
5. Click Send.
1.
2.
3.
Scheduling a meeting
Starting a meeting
Using the whiteboard
Using the console
Pre-loading PowerPoint files
Connecting a device
Sharing your desktop
Sharing a connected device
Distributing meeting notes
Ending your meeting
Making a phone call
Services and support

Starting a meeting
To join a scheduled meeting
1. When you enter the room, the system detects the movement and turns on automatically. Your scheduled meeting appears on both the console and the SMART Board® interactive flat panel.
2. Press the scheduled meeting on the console or interactive flat panel.
Note: If the meeting tile reads “Need this to be a Skype meeting?” the Skype Meeting button wasn’t selected when the meeting was scheduled. To convert the meeting to a Skype meeting:
• Reopen the invitation in Outlook, click Skype Meeting and then resend. OR
• Press the meeting on the SRS calendar, and the system will guide you through sending out a new Skype meeting invitation email.
To start an ad hoc meeting
1. Press Meet Now on the console.
2. Add participants to the meeting by searching for and selecting their names on the console.
3. Press Start Meeting.
Note: You can also use the interactive flat panel without starting a meeting. Press Start Whiteboard to begin an ad hoc white boarding session.
Scheduling a meeting
Starting a meeting
Using the whiteboard
Using the console
Pre-loading PowerPoint files
Connecting a device
Sharing your desktop
Sharing a connected device
Distributing meeting notes
Ending your meeting
Making a phone call
Services and support
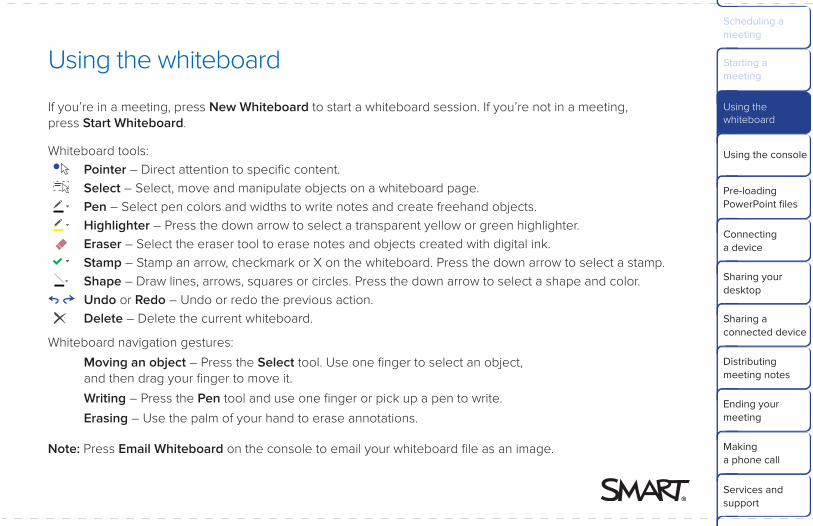
Using the whiteboard
If you’re in a meeting, press New Whiteboard to start a whiteboard session. If you’re not in a meeting, press Start Whiteboard.
Whiteboard tools: Pointer – Direct attention to specific content. Select – Select, move and manipulate objects on a whiteboard page. Pen – Select pen colors and widths to write notes and create freehand objects. Highlighter – Press the down arrow to select a transparent yellow or green highlighter. Eraser – Select the eraser tool to erase notes and objects created with digital ink. Stamp – Stamp an arrow, checkmark or X on the whiteboard. Press the down arrow to select a stamp. Shape – Draw lines, arrows, squares or circles. Press the down arrow to select a shape and color. Undo or Redo – Undo or redo the previous action. Delete – Delete the current whiteboard.
Whiteboard navigation gestures:
Moving an object – Press the Select tool. Use one finger to select an object, and then drag your finger to move it.
Writing – Press the Pen tool and use one finger or pick up a pen to write.
Erasing – Use the palm of your hand to erase annotations.
Note: Press Email Whiteboard on the console to email your whiteboard file as an image.
Starting a meeting
Using the whiteboard
Scheduling a meeting
Using the console
Pre-loading PowerPoint files
Connecting a device
Sharing your desktop
Sharing a connected device
Distributing meeting notes
Ending your meeting
Making a phone call
Services and support

Using the console
The console enables you to manage the meeting.
• Content – Displays the name of the participant who is currently presenting and the presentable content, including Microsoft® PowerPoint® files, whiteboard sessions and the participant’s desktop or device.
• Participants – Lists the meeting’s attendees and enables you to invite others.
• Display – Lists content and video display options.
• IM – Allows you to send instant messages to attendees.
Note: IM messages appear to all attendees of the cur-rent meeting. It is not possible to IM individual attendees.
Using the console
Starting a meeting
Using the whiteboard
Scheduling a meeting
Pre-loading PowerPoint files
Connecting a device
Sharing your desktop
Sharing a connected device
Distributing meeting notes
Ending your meeting
Making a phone call
Services and support
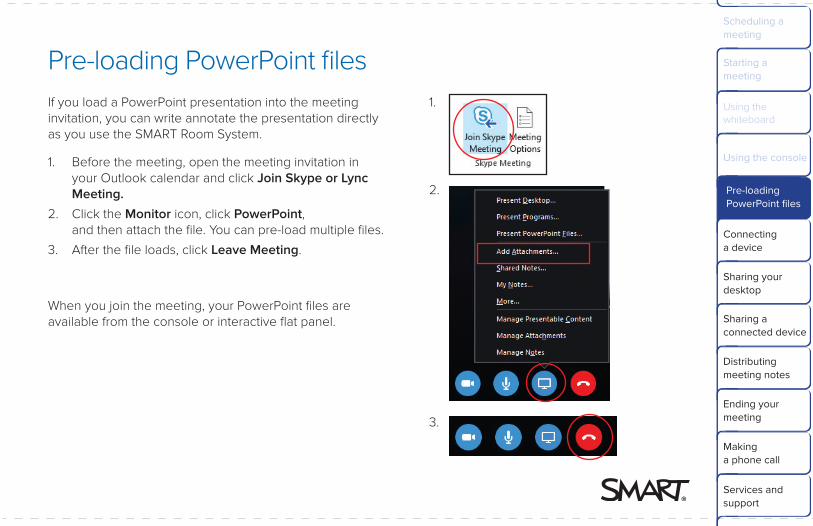
Pre-loading PowerPoint filesIf you load a PowerPoint presentation into the meeting invitation, you can write annotate the presentation directly as you use the SMART Room System.
1. Before the meeting, open the meeting invitation in your Outlook calendar and click Join Skype or Lync Meeting.
2. Click the Monitor icon, click PowerPoint, and then attach the file. You can pre-load multiple files.
3. After the file loads, click Leave Meeting.
When you join the meeting, your PowerPoint files are available from the console or interactive flat panel.
1.
2.
3.
Using the console
Pre-loading PowerPoint files
Starting a meeting
Using the whiteboard
Scheduling a meeting
Connecting a device
Sharing your desktop
Sharing a connected device
Distributing meeting notes
Ending your meeting
Making a phone call
Services and support
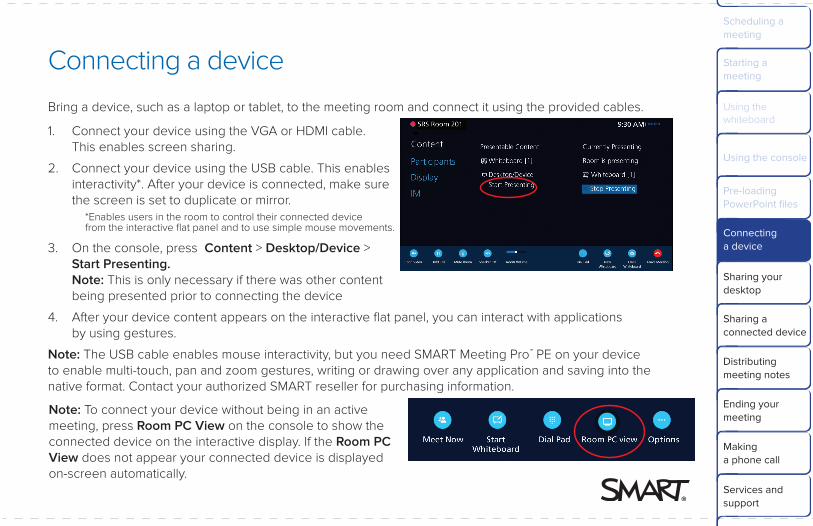
Connecting a device
Bring a device, such as a laptop or tablet, to the meeting room and connect it using the provided cables.
1. Connect your device using the VGA or HDMI cable. This enables screen sharing.
2. Connect your device using the USB cable. This enables interactivity*. After your device is connected, make sure the screen is set to duplicate or mirror. *Enables users in the room to control their connected device from the interactive flat panel and to use simple mouse movements.
3. On the console, press Content > Desktop/Device > Start Presenting. Note: This is only necessary if there was other content being presented prior to connecting the device
4. After your device content appears on the interactive flat panel, you can interact with applications by using gestures.
Note: The USB cable enables mouse interactivity, but you need SMART Meeting Pro™ PE on your device to enable multi-touch, pan and zoom gestures, writing or drawing over any application and saving into the native format. Contact your authorized SMART reseller for purchasing information.
Note: To connect your device without being in an active meeting, press Room PC View on the console to show the connected device on the interactive display. If the Room PC View does not appear your connected device is displayed on-screen automatically.
Connecting a device
Starting a meeting
Using the whiteboard
Scheduling a meeting
Pre-loading PowerPoint files
Sharing your desktop
Sharing a connected device
Distributing meeting notes
Ending your meeting
Making a phone call
Services and support
Using the console
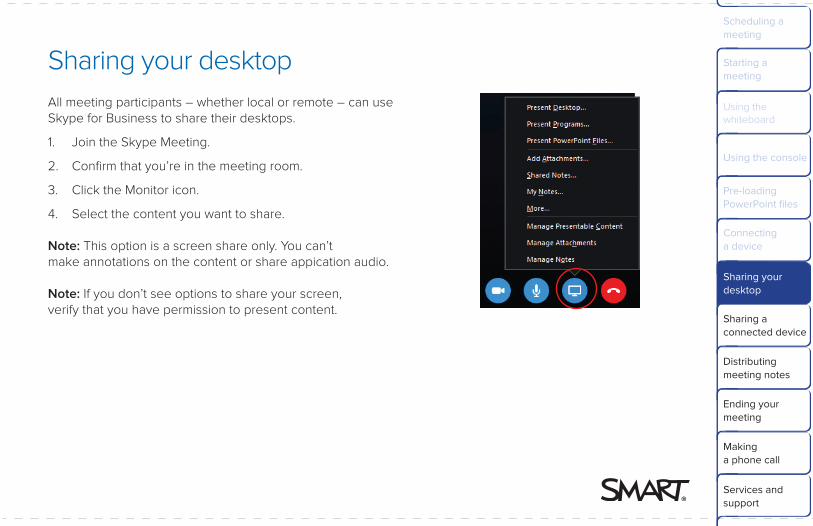
Sharing your desktopAll meeting participants – whether local or remote – can use Skype for Business to share their desktops.
1. Join the Skype Meeting.
2. Confirm that you’re in the meeting room.
3. Click the Monitor icon.
4. Select the content you want to share.
Note: This option is a screen share only. You can’t make annotations on the content or share appication audio.
Note: If you don’t see options to share your screen, verify that you have permission to present content.
Connecting a device
Starting a meeting
Using the whiteboard
Scheduling a meeting
Pre-loading PowerPoint files
Sharing your desktop
Sharing a connected device
Distributing meeting notes
Ending your meeting
Making a phone call
Services and support
Using the console
Sharing a connected deviceWhen you use the SMART Room System USB Bridge to connect a device that has SMART Meeting Pro™ PE installed, you can interact with the device using multi-touch or pan and zoom gestures, and you can draw or write over any application and save your notes in the application’s native format.
To connect and interact with a device
1. During a SMART Room System meeting, connect your device using the USB Bridge and the VGA or HDMI video cable.
2. Press Yes when prompted for permission to share the device’s desktop. Note: On a single-panel SMART Room System, the device’s shared desktop replaces the video feed,
and remote participants see the shared desktop as well. On a dual-panel SMART Room System, the shared desktop appears on one panel and the video feed continues on the other.
After you’ve connected your device, you can control it from the interactive flat panel: Use your finger to move windows and applications, use two fingers for pan and zoom touch gestures, or pick up the pen and write over any application. You can save annotations into the original files.
You can also open SMART Meeting Pro PE and use its Unbound Workspace, an unlimited canvas. Capture content and paste it into the whiteboard, make annotations, and pan and zoom in on content easily. You can save the whiteboard’s contents as PPT, PDF, or .FCW files.
Visit http://bit.ly/1AOQC10 for a video tutorial on SMART Meeting Pro PE.
You can download the latest version of SMART Meeting Pro PE from smarttech.com/downloads.
Sharing a connected device
Connecting a device
Starting a meeting
Using the whiteboard
Scheduling a meeting
Pre-loading PowerPoint files
Sharing your desktop
Distributing meeting notes
Ending your meeting
Making a phone call
Services and support
Using the console
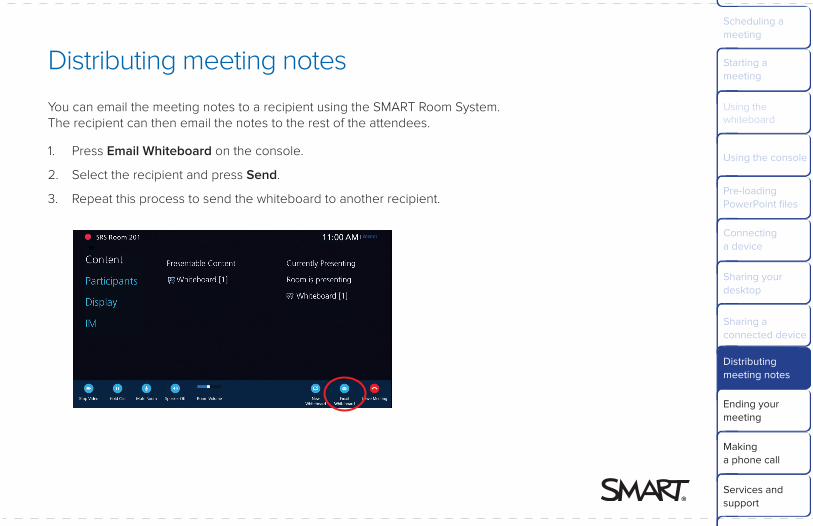
Distributing meeting notes
You can email the meeting notes to a recipient using the SMART Room System. The recipient can then email the notes to the rest of the attendees.
1. Press Email Whiteboard on the console.
2. Select the recipient and press Send.
3. Repeat this process to send the whiteboard to another recipient.
Distributing meeting notes
Sharing a connected device
Connecting a device
Starting a meeting
Using the whiteboard
Scheduling a meeting
Pre-loading PowerPoint files
Sharing your desktop
Ending your meeting
Making a phone call
Services and support
Using the console
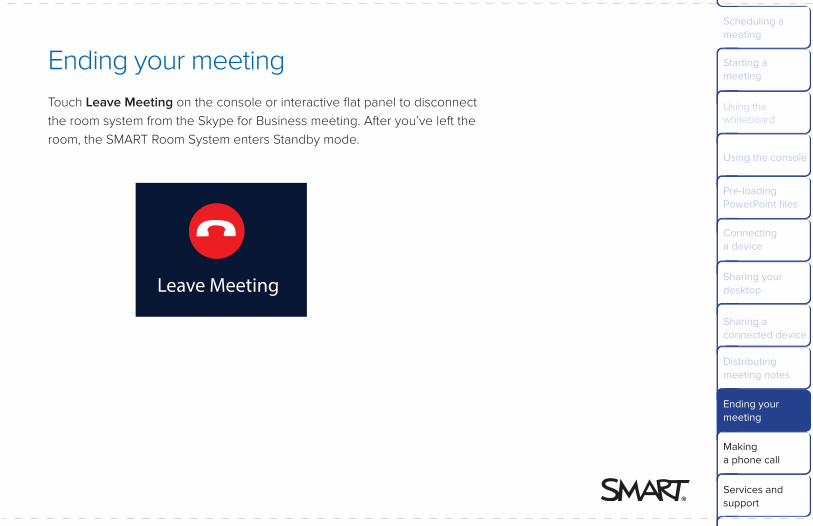
Ending your meetingTouch Leave Meeting on the console or interactive flat panel to disconnect the room system from the Skype for Business meeting. After you’ve left the room, the SMART Room System enters Standby mode.
Leave Meeting
Ending your meeting
Distributing meeting notes
Sharing a connected device
Connecting a device
Starting a meeting
Using the whiteboard
Scheduling a meeting
Pre-loading PowerPoint files
Sharing your desktop
Making a phone call
Services and support
Using the console
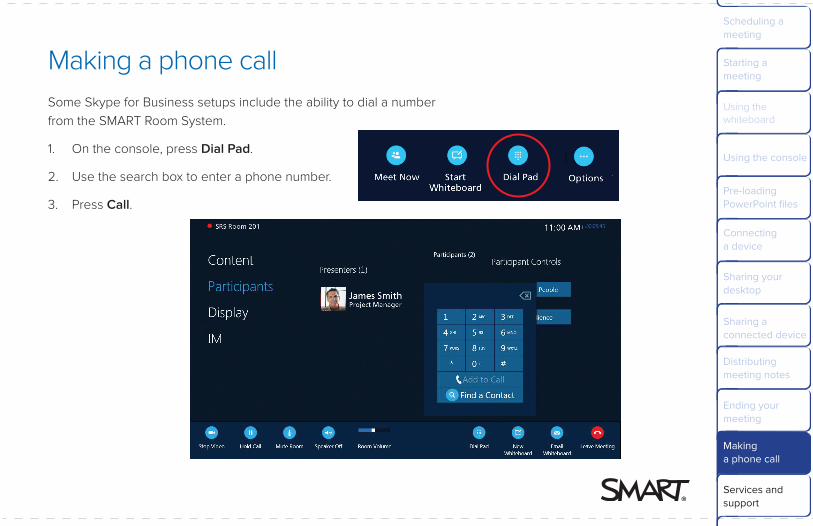
Making a phone callSome Skype for Business setups include the ability to dial a number from the SMART Room System.
1. On the console, press Dial Pad.
2. Use the search box to enter a phone number.
3. Press Call.
Making a phone call
Ending your meeting
Distributing meeting notes
Sharing a connected device
Connecting a device
Starting a meeting
Using the whiteboard
Scheduling a meeting
Pre-loading PowerPoint files
Sharing your desktop
Services and support
Using the console
1026268 Rev 02
*1026268*
© 2014-2016 SMART Technologies ULC. All rights reserved. SMART Room System, SMART Board, SMART Meeting Pro, smarttech, the SMART logo and all SMART taglines are trademarks or registered trademarks of SMART Technologies ULC in the U.S. and/or other countries. Microsoft, Windows, Skype for Business, Outlook and PowerPoint are either registered trademarks or trademarks of Microsoft Corporation in the U.S. and/or other countries. All other third-party product and company names may be trademarks of their respective owners. This product and/or use thereof covered by one or more of the following U.S. patents smarttech.com/patents. 01/2016.
Hardware environmental complianceSMART Technologies supports global efforts to ensure that electronic equipment is manufactured, sold and disposed of in a safe and environmentally friendly manner.
Waste Electrical and Electronic Equipment and Battery regulations (WEEE and Battery Directives)
Electrical and electronic equipment and batteries contain substances that can be harmful to the environment and to human health. The cross-out wheeled bin symbol indicates that products should be disposed of in the appropriate recycling stream and not as regular waste. See smarttech.com/compliance for more information smarttech.com/kb/171079
Services and support
Onsite support:
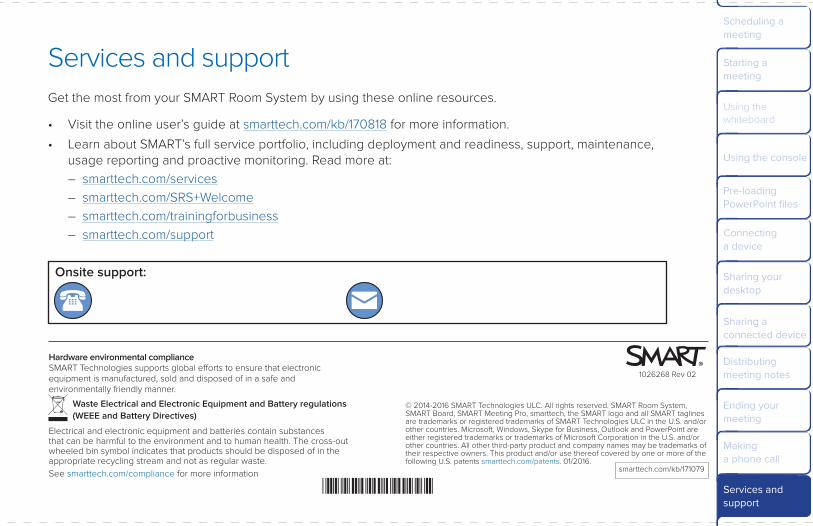
Get the most from your SMART Room System by using these online resources.
• Visit the online user’s guide at smarttech.com/kb/170818 for more information.
• Learn about SMART’s full service portfolio, including deployment and readiness, support, maintenance, usage reporting and proactive monitoring. Read more at: – smarttech.com/services – smarttech.com/SRS+Welcome – smarttech.com/trainingforbusiness – smarttech.com/support
Services and support
Making a phone call
Ending your meeting
Distributing meeting notes
Sharing a connected device
Connecting a device
Starting a meeting
Using the whiteboard
Scheduling a meeting
Pre-loading PowerPoint files
Sharing your desktop
Using the console