sound board, screen, and computer setup
TRANSCRIPT
The House of Faith – United Methodist Church of Yucaipa
Sound Technician Training
Sound Board, Screen, and Computer Setup
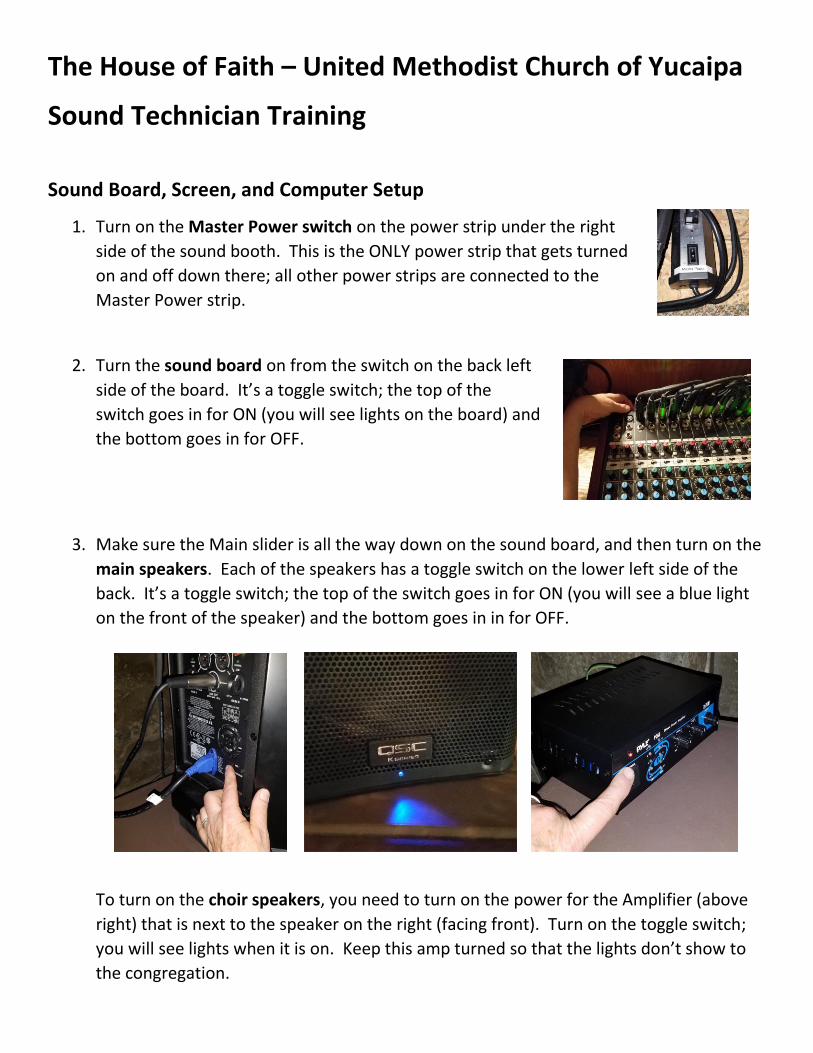
1. Turn on the Master Power switch on the power strip under the right
side of the sound booth. This is the ONLY power strip that gets turned
on and off down there; all other power strips are connected to the
Master Power strip.
2. Turn the sound board on from the switch on the back left
side of the board. It’s a toggle switch; the top of the
switch goes in for ON (you will see lights on the board) and
the bottom goes in for OFF.
3. Make sure the Main slider is all the way down on the sound board, and then turn on the
main speakers. Each of the speakers has a toggle switch on the lower left side of the
back. It’s a toggle switch; the top of the switch goes in for ON (you will see a blue light
on the front of the speaker) and the bottom goes in in for OFF.
To turn on the choir speakers, you need to turn on the power for the Amplifier (above
right) that is next to the speaker on the right (facing front). Turn on the toggle switch;
you will see lights when it is on. Keep this amp turned so that the lights don’t show to
the congregation.
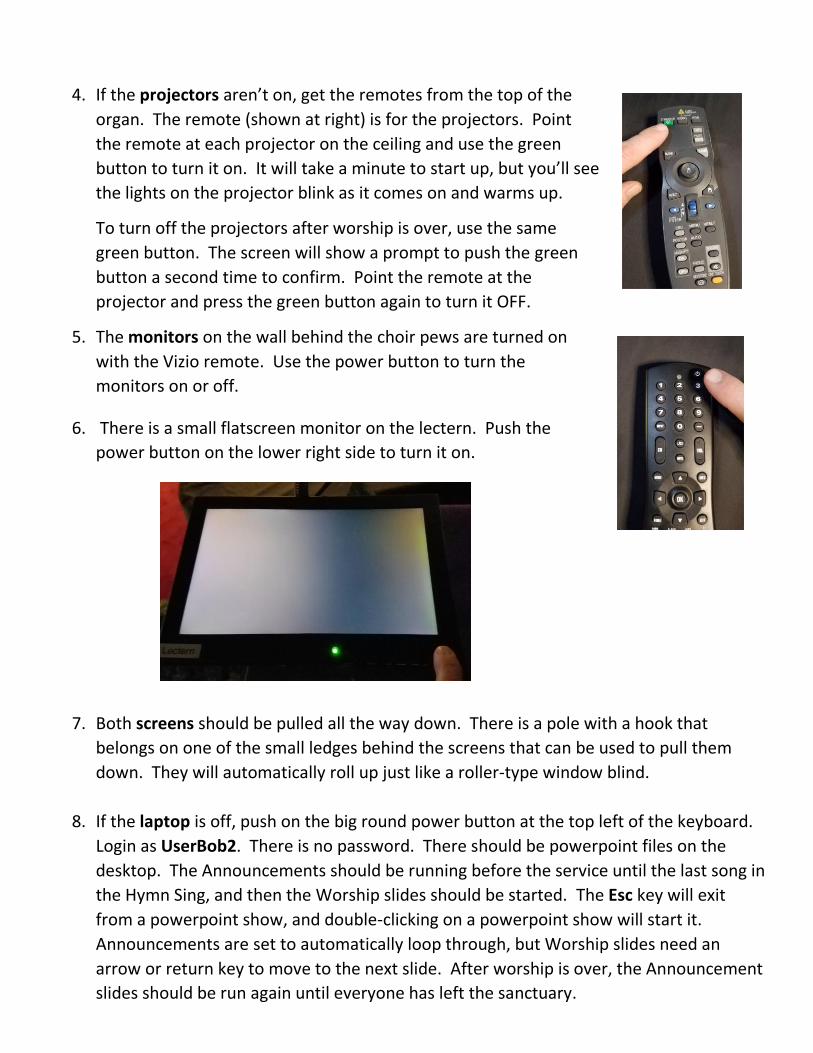
4. If the projectors aren’t on, get the remotes from the top of the
organ. The remote (shown at right) is for the projectors. Point
the remote at each projector on the ceiling and use the green
button to turn it on. It will take a minute to start up, but you’ll see
the lights on the projector blink as it comes on and warms up.
To turn off the projectors after worship is over, use the same
green button. The screen will show a prompt to push the green
button a second time to confirm. Point the remote at the
projector and press the green button again to turn it OFF.
5. The monitors on the wall behind the choir pews are turned on
with the Vizio remote. Use the power button to turn the
monitors on or off.
6. There is a small flatscreen monitor on the lectern. Push the
power button on the lower right side to turn it on.
7. Both screens should be pulled all the way down. There is a pole with a hook that
belongs on one of the small ledges behind the screens that can be used to pull them
down. They will automatically roll up just like a roller-type window blind.
8. If the laptop is off, push on the big round power button at the top left of the keyboard.
Login as UserBob2. There is no password. There should be powerpoint files on the
desktop. The Announcements should be running before the service until the last song in
the Hymn Sing, and then the Worship slides should be started. The Esc key will exit
from a powerpoint show, and double-clicking on a powerpoint show will start it.
Announcements are set to automatically loop through, but Worship slides need an
arrow or return key to move to the next slide. After worship is over, the Announcement
slides should be run again until everyone has left the sanctuary.
9. Check both of the wireless microphones to make sure there is a green light. Stick 1 is
kept in the second drawer in the sound booth for microphone access from the back of
the church. Stick 2 is kept in the side pocket of the liturgist’s chair. Press and hold the
button on the side of the wireless mic to turn it on. If the light is green, the batteries are
good. If red, change the batteries. When the light is green, a quick push will mute the
mic, and another quick push will un-mute it. Push and hold to turn off the mic.
10. The liturgist microphone is wired and does not have a switch or batteries.
11. Pastor Phillips’ microphone is kept in a case on the floor on the left side of the sound booth. The Countryman mic hooks over the ear and lays against the cheek toward the mouth. THIS MICROPHONE IS FRAGILE! The audio wire is also thin and fragile, and to make everything last as long as possible, don’t connect / disconnect the mic from the transceiver, and make sure everything is tucked inside the foam when you put it away. Push the button and and check for a green light; if it’s red, change the batteries. When the light is green, a quick push will mute the mic, and another quick push will un-mute it. Push and hold to turn off the mic.
12. If you need to change the batteries, there are new AA batteries in the second drawer in the soundbooth, and the old batteries go in the metal tin in the first drawer. To open the battery compartment of the stick mics, unscrew the bottom of the microphone case and squeeze the latch to access the batteries. Make sure to note the positive and negative directions before you replace them. The wireless transmitter battery compartments just pull open on the bottom. There is a ribbon that lays underneath that can be used to pop them out. Lay the ribbon back underneath before you put in the new batteries.
Running the Sound Board
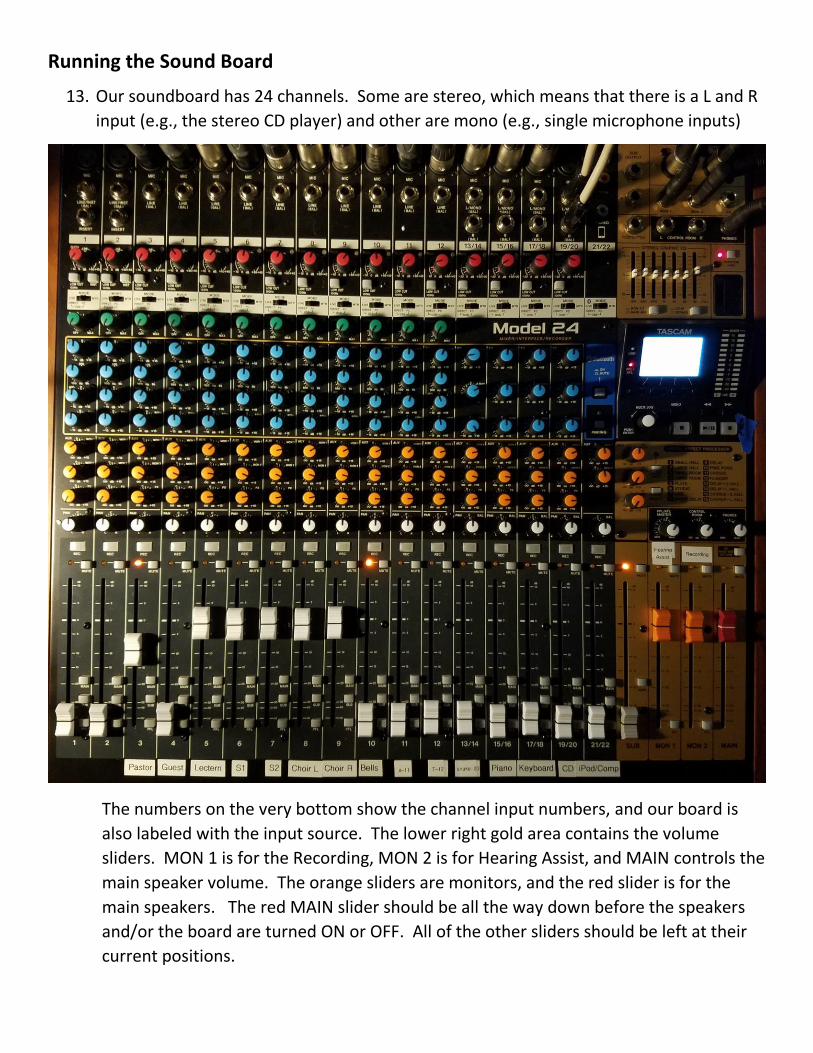
13. Our soundboard has 24 channels. Some are stereo, which means that there is a L and R
input (e.g., the stereo CD player) and other are mono (e.g., single microphone inputs)
The numbers on the very bottom show the channel input numbers, and our board is
also labeled with the input source. The lower right gold area contains the volume
sliders. MON 1 is for the Recording, MON 2 is for Hearing Assist, and MAIN controls the
main speaker volume. The orange sliders are monitors, and the red slider is for the
main speakers. The red MAIN slider should be all the way down before the speakers
and/or the board are turned ON or OFF. All of the other sliders should be left at their
current positions.
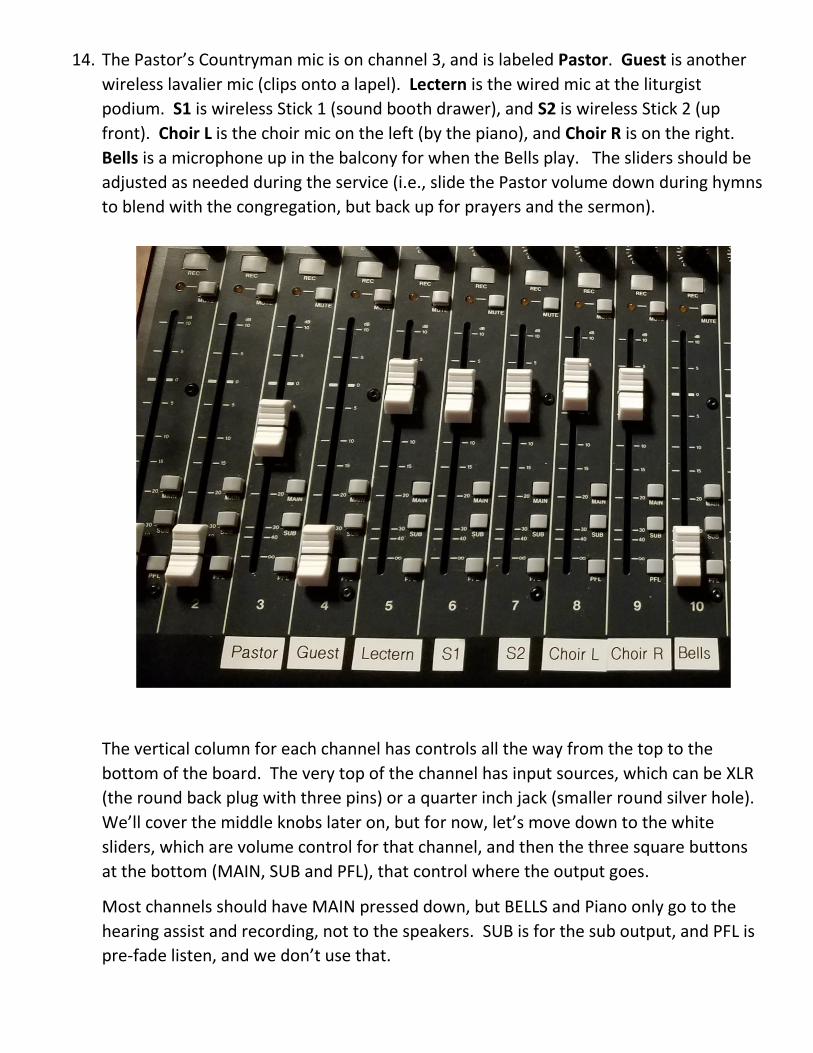
14. The Pastor’s Countryman mic is on channel 3, and is labeled Pastor. Guest is another
wireless lavalier mic (clips onto a lapel). Lectern is the wired mic at the liturgist
podium. S1 is wireless Stick 1 (sound booth drawer), and S2 is wireless Stick 2 (up
front). Choir L is the choir mic on the left (by the piano), and Choir R is on the right.
Bells is a microphone up in the balcony for when the Bells play. The sliders should be
adjusted as needed during the service (i.e., slide the Pastor volume down during hymns
to blend with the congregation, but back up for prayers and the sermon).
The vertical column for each channel has controls all the way from the top to the
bottom of the board. The very top of the channel has input sources, which can be XLR
(the round back plug with three pins) or a quarter inch jack (smaller round silver hole).
We’ll cover the middle knobs later on, but for now, let’s move down to the white
sliders, which are volume control for that channel, and then the three square buttons
at the bottom (MAIN, SUB and PFL), that control where the output goes.
Most channels should have MAIN pressed down, but BELLS and Piano only go to the
hearing assist and recording, not to the speakers. SUB is for the sub output, and PFL is
pre-fade listen, and we don’t use that.
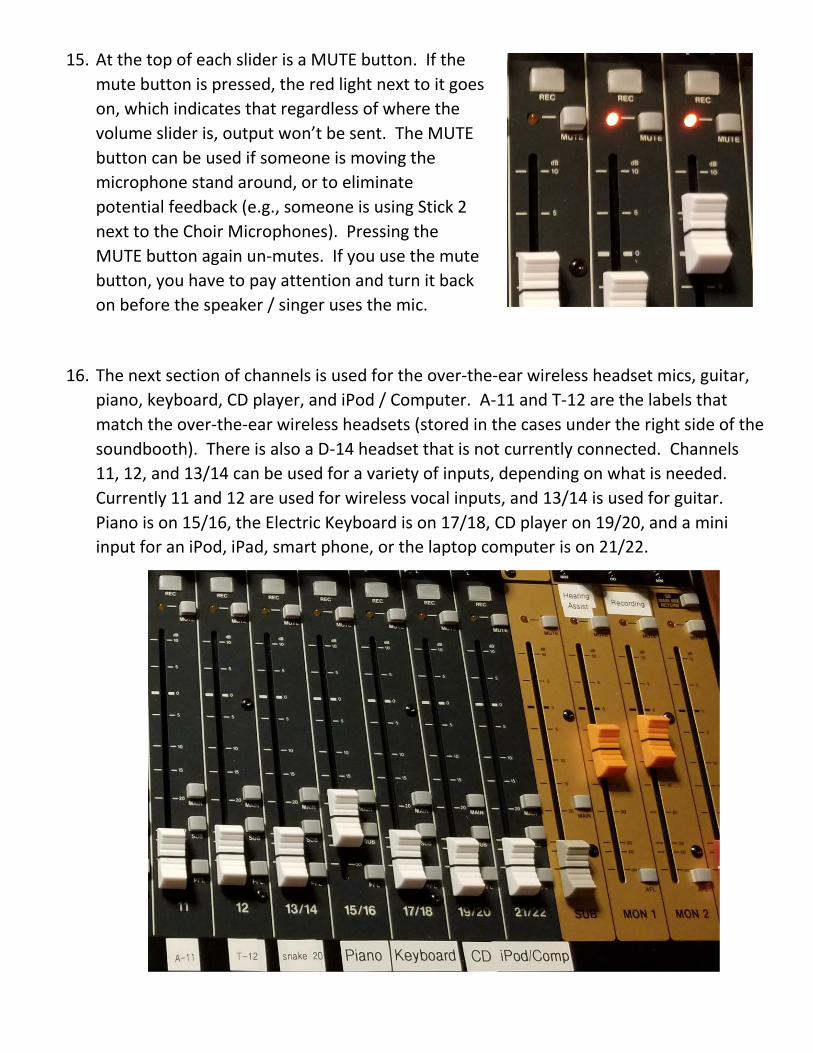
15. At the top of each slider is a MUTE button. If the
mute button is pressed, the red light next to it goes
on, which indicates that regardless of where the
volume slider is, output won’t be sent. The MUTE
button can be used if someone is moving the
microphone stand around, or to eliminate
potential feedback (e.g., someone is using Stick 2
next to the Choir Microphones). Pressing the
MUTE button again un-mutes. If you use the mute
button, you have to pay attention and turn it back
on before the speaker / singer uses the mic.
16. The next section of channels is used for the over-the-ear wireless headset mics, guitar,
piano, keyboard, CD player, and iPod / Computer. A-11 and T-12 are the labels that
match the over-the-ear wireless headsets (stored in the cases under the right side of the
soundbooth). There is also a D-14 headset that is not currently connected. Channels
11, 12, and 13/14 can be used for a variety of inputs, depending on what is needed.
Currently 11 and 12 are used for wireless vocal inputs, and 13/14 is used for guitar.
Piano is on 15/16, the Electric Keyboard is on 17/18, CD player on 19/20, and a mini
input for an iPod, iPad, smart phone, or the laptop computer is on 21/22.
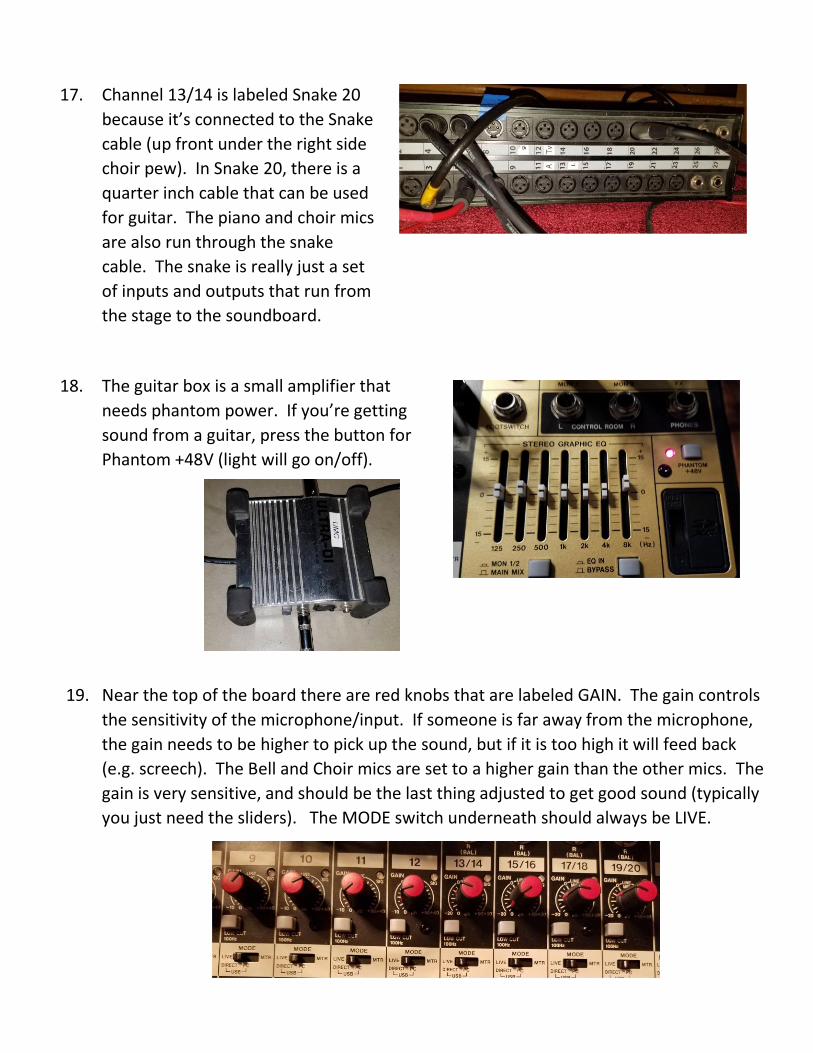
17. Channel 13/14 is labeled Snake 20
because it’s connected to the Snake
cable (up front under the right side
choir pew). In Snake 20, there is a
quarter inch cable that can be used
for guitar. The piano and choir mics
are also run through the snake
cable. The snake is really just a set
of inputs and outputs that run from
the stage to the soundboard.
18. The guitar box is a small amplifier that
needs phantom power. If you’re getting
sound from a guitar, press the button for
Phantom +48V (light will go on/off).
19. Near the top of the board there are red knobs that are labeled GAIN. The gain controls
the sensitivity of the microphone/input. If someone is far away from the microphone,
the gain needs to be higher to pick up the sound, but if it is too high it will feed back
(e.g. screech). The Bell and Choir mics are set to a higher gain than the other mics. The
gain is very sensitive, and should be the last thing adjusted to get good sound (typically
you just need the sliders). The MODE switch underneath should always be LIVE.
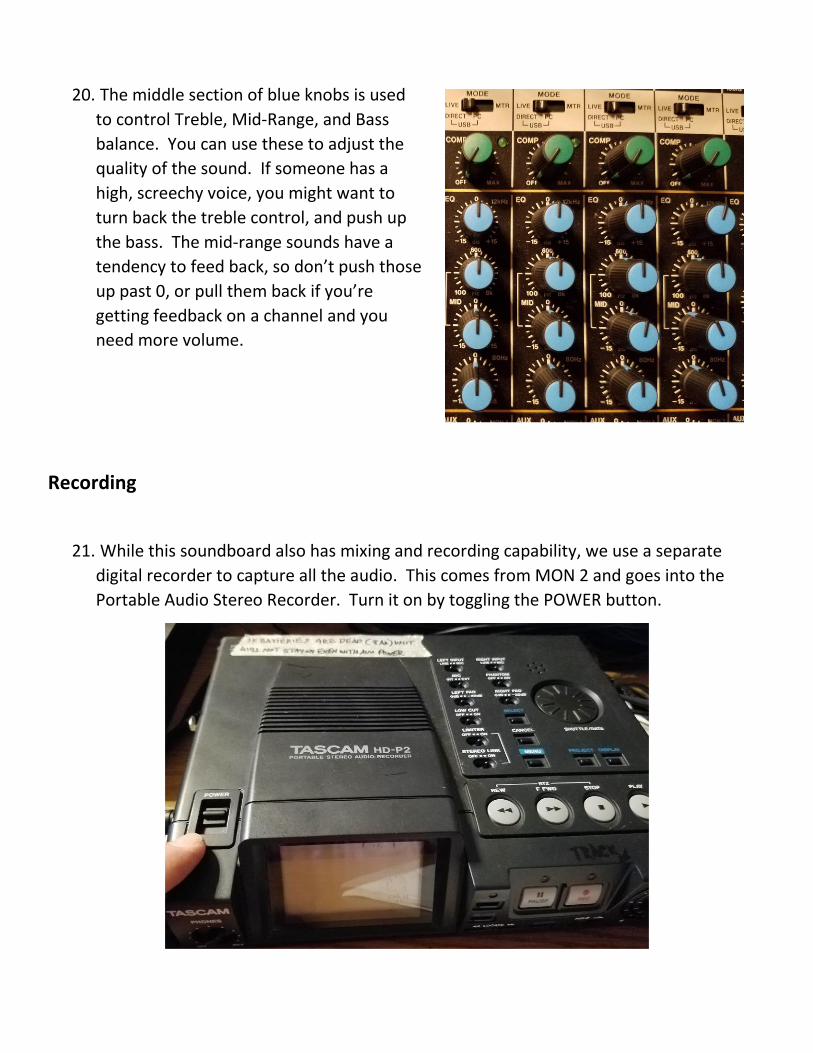
20. The middle section of blue knobs is used
to control Treble, Mid-Range, and Bass
balance. You can use these to adjust the
quality of the sound. If someone has a
high, screechy voice, you might want to
turn back the treble control, and push up
the bass. The mid-range sounds have a
tendency to feed back, so don’t push those
up past 0, or pull them back if you’re
getting feedback on a channel and you
need more volume.
Recording
21. While this soundboard also has mixing and recording capability, we use a separate
digital recorder to capture all the audio. This comes from MON 2 and goes into the
Portable Audio Stereo Recorder. Turn it on by toggling the POWER button.
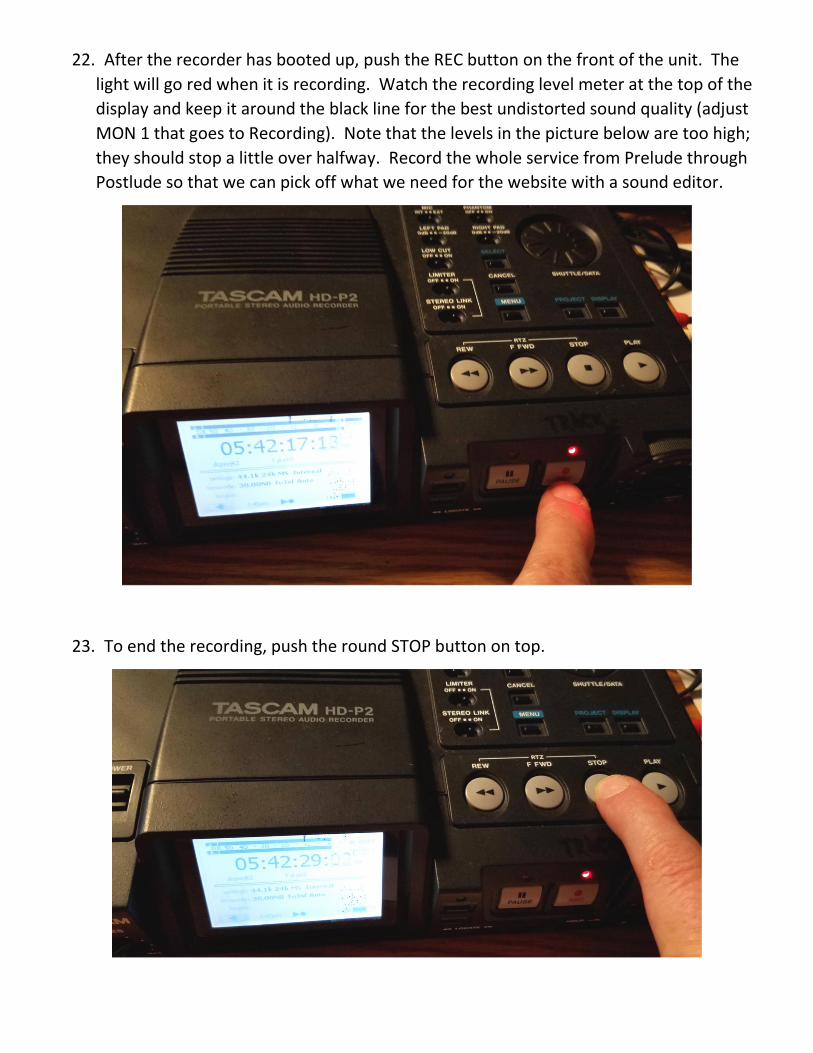
22. After the recorder has booted up, push the REC button on the front of the unit. The
light will go red when it is recording. Watch the recording level meter at the top of the
display and keep it around the black line for the best undistorted sound quality (adjust
MON 1 that goes to Recording). Note that the levels in the picture below are too high;
they should stop a little over halfway. Record the whole service from Prelude through
Postlude so that we can pick off what we need for the website with a sound editor.
23. To end the recording, push the round STOP button on top.
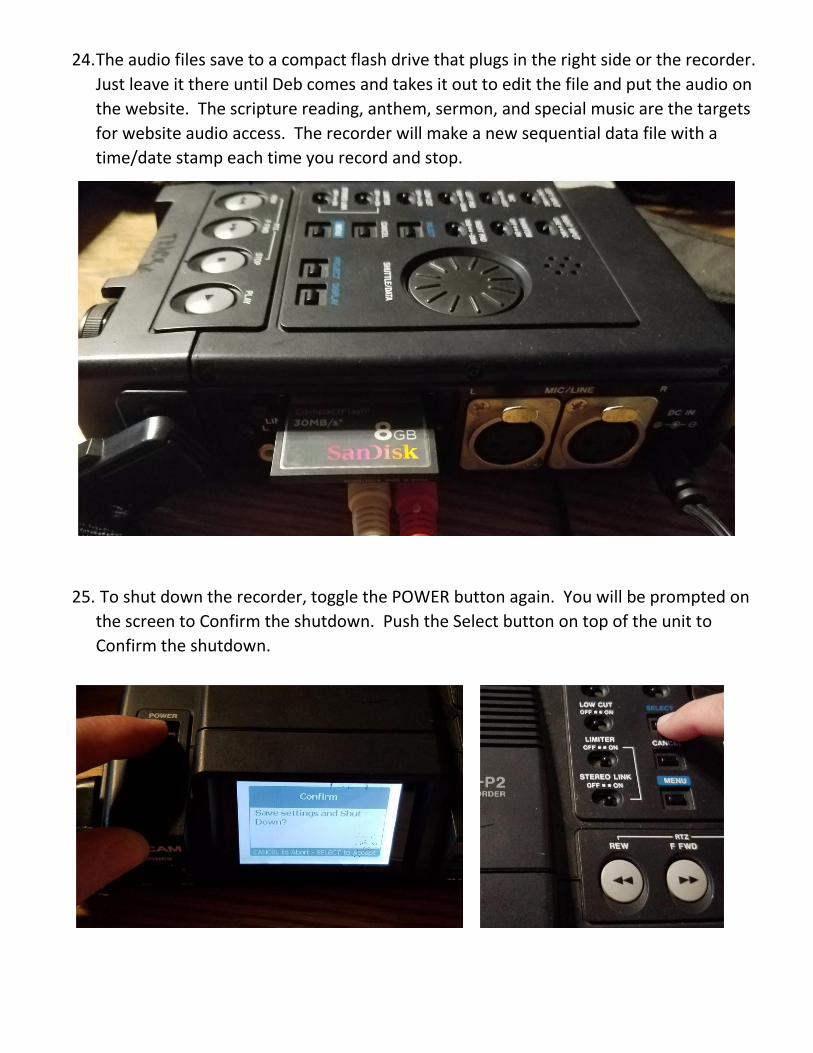
24. The audio files save to a compact flash drive that plugs in the right side or the recorder.
Just leave it there until Deb comes and takes it out to edit the file and put the audio on
the website. The scripture reading, anthem, sermon, and special music are the targets
for website audio access. The recorder will make a new sequential data file with a
time/date stamp each time you record and stop.
25. To shut down the recorder, toggle the POWER button again. You will be prompted on
the screen to Confirm the shutdown. Push the Select button on top of the unit to
Confirm the shutdown.