sparc/solaris gui management guide - fujitsu global · pdf filesparc/solaris gui management...
TRANSCRIPT
SPARC/Solaris GUI Management Guide
October 2014
Revision 1.0
Fujitsu Limited

SPARC/Solaris GUI Management Guide
Copyright 2014 FUJITSU LIMITED
i
Conditions of Use Copyright
This document and its content are protected under applicable copyrights, trademarks,
registered trademarks and other proprietary rights. This document may only be printed out or
downloaded for personal use. Permission must be sought from the rights holder for use in
other cases, such as republication on a website or uploading to a third party server).
Disclaimer
The content and information herein are provided “as-is”. Fujitsu does not guarantee its
accuracy, merchantability, or its compatibility with the purpose of use. Fujitsu shall accept no
liability for damages caused by its use and reserves the right to changed and delete content
without prior notice.
Trade Marks UNIX is an open group registered trademark in the U.S. and other countries.
SPARC Enterprise, SPARC64, SPARC64 logo and all other SPARC trademarks are used under
the license of U.S. SPARC International and are the trademark or registered trademark of the
same company in the U.S. and other countries.
Oracle and Java is a registered trademark of Oracle Corporation, its subsidiaries, and related
companies in the U.S. and other countries.
All other trademarks and trade names are properties of their respective owners. All rights
reserved.

SPARC/Solaris GUI Management Guide
Copyright 2014 FUJITSU LIMITED
ii
Introduction
About This Guide
This Guide describes the step-by-step procedures for server management of the XSCF Web
Console and Oracle Enterprise Manager Ops Center (hereinafter, Ops Center).
For details of XSCF, please refer to the related manuals via the link below.
http://www.fujitsu.com/global/products/computing/servers/unix/sparc/downloads/manuals/
m10-1/
- Fujitsu M10/SPARC M10 System Operation and Administration Guide
- Product Notes Archive
For information relating to the Ops Center, please refer to the related manual via the link
below.
http://docs.oracle.com/cd/E40871_01/index.htm
Notice
Oracle Solaris may be referred to as Solaris.
Oracle Solaris Zone may be referred to as Zone, or non-global zone.
Oracle VM Server for SPARC may be referred to as Oracle VM.
Enterprise Controller may be referred to as EC, Proxy Controller as PC, and Agent Controller as
AC.

SPARC/Solaris GUI Management Guide
Copyright 2014 FUJITSU LIMITED
iii
Contents
1. Overview ....................................................................................... 1
1-1. Requirements ................................................................................................... 1
1-2. Important Notice .............................................................................................. 1
1-3. The User Interface ............................................................................................ 2
1-3-1. The XSCF Web Console User Interface .................................................................... 2
1-3-2. The Ops Center Interface ....................................................................................... 2
1-4. How to Log In .................................................................................................. 3
1-4-1. How to Log In to the XSCF Web Console(Via Designated URL) ................................. 3
1-4-2. How to Log In to the Ops Center ............................................................................ 3
1-4-3. Accessing the XSCF Web Console from the Ops Center ............................................. 4
2. Virtual Environment Configuration .............................................. 5
2-1. Oracle VM Server for SPARC .............................................................................. 5
2-1-1. Guest Domain Configuration ................................................................................... 5
2-1-1. OS Installation ....................................................................................................... 7
2-2. Oracle Solaris Zone ......................................................................................... 11
2-2-1. Oracle Solaris Zone Configuration .......................................................................... 11
3. Hardware Settings and Operational Procedures ...................... 13
3-1. Power On and Off ........................................................................................... 13
3-1-1. Power Controls for the Physical Partitions (All Partitions) ......................................... 13
3-1-2. Power Controls for Specific Physical Partition (1 Partition) ....................................... 14
3-1-3. Power Schedule Settings ...................................................................................... 15
3-2. CPU Core Activation Key Registration and Deletion ............................................ 17
3-2-1. Registering the CPU Activation Key ........................................................................ 17
3-2-2. Configuring the CPU Core Resource for Physical Partitions ...................................... 18
3-2-3. Deleteing the CPU Core Activation Key .................................................................. 19
3-3. Firmware Updates ........................................................................................... 20
3-3-1. Execution of Firmware Updates ............................................................................. 20
4. OS Settings and Controls ........................................................... 21

SPARC/Solaris GUI Management Guide
Copyright 2014 FUJITSU LIMITED
iv
4-1. OS Restart ...................................................................................................... 21
4-1-1. OS Restart .......................................................................................................... 21
4-2. Network Settings ............................................................................................ 22
4-2-1. Adding a New Interface ........................................................................................ 22
4-2-2. Changing Network Settings .................................................................................. 24
4-2-3. IPMP Settings ...................................................................................................... 26
4-2-4. Link Aggregation Configuration ............................................................................. 28
4-2-5. Bandwidth Setup ................................................................................................. 29
4-3. Resource Allotment Settings ............................................................................ 30
4-3-1. Control Domain Resource Settings for Oracle VM Server for SPARC ......................... 30
4-3-2. Oracle VM Server for SPARC Guest Domain Resource Settings ................................. 31
4-3-3. Oracle Solaris Zone Configuration .......................................................................... 32
4-4. Monitoring ...................................................................................................... 33
4-4-1. Monitoring Messages ........................................................................................... 33
4-4-2. Resource Monitoring ............................................................................................ 34
4-4-3. Monitoring Processes ........................................................................................... 35
4-4-4. Monitoring Services .............................................................................................. 36
4-4-5. Setting Thresholds ............................................................................................... 37
4-4-6. Checking the Operating Status .............................................................................. 41
4-4-7. Displaying Resource Performance Status ............................................................... 43
4-4-8. Log Monitoring (XSCF) ........................................................................................ 44
Appendix.............................................................................................. 45
Appendix-1. Installing the Agent Controller ............................................................... 45
Appendix-2. Deleting the Agent Controller ................................................................ 46
Appendix-3. Setting the Operating Schedule for the Physical Partition ......................... 47
Appendix-4. Adding a New Subnet ........................................................................... 48
Appendix-5. Adding Users on Ops Center ................................................................. 49
Revision History ...................................................................................................... 50

SPARC/Solaris GUI Management Guide
Copyright 2014 FUJITSU LIMITED
1
1.Overview This document explains the server management operations and procedures that are available using a
web browser, focusing on the functional range of the XSCF Web Console and Ops Center.
1-1.Requirements ・ Prior to using the XSCF Web Console, you must:
1) Register for an XSCF user account.
2) Enable the HTTPS service.
3) Register the web server certificate in the HTTPS service settings.
For further details please see the link below.
http://www.fujitsu.com/global/products/computing/servers/unix/sparc/downloads/manuals/m
10-1/
- Fujitsu M10/SPARC M10 System Operation and Administration Guide
1-2.Important Notice ・ This guide details procedures that may be implemented on the following products:
EC/PC:Oracle Solaris 11.1(SRU13121(11.1.14.5.0), ESF5.0)
AC(M10-1):Oracle Solaris 11.1(SRU13121(11.1.14.5.0), ESF5.1), XCP2092
AC(T4-4):Oracle Solaris 11.1(SRU13121(11.1.14.5.0), ESF5.0)
- SRU14041(11.1.18.5.0) or later is recommended. If a prior version to the SRU14031
(11.1.17.5.0) is used, the EC or PC may not function properly.
・ Please use the correct numerical setting according to your system environment. The numerical
settings written in this document are examples.
・ The OS and XSCF commands provide examples of how to perform the same operations on the CLI.

SPARC/Solaris GUI Management Guide
Copyright 2014 FUJITSU LIMITED
2
1-3.The User Interface 1-3-1.The XSCF Web Console User Interface
1-3-2.The Ops Center Interface
Actions Pane Navigation Pane Center Pane
Jobs Pane
Masthead Frame
Menu Frame
Main Frame
Event Frame

SPARC/Solaris GUI Management Guide
Copyright 2014 FUJITSU LIMITED
3
1-4.How to Log In 1-4-1.How to Log In to the XSCF Web Console(Via Designated URL)
1)Open the browser and type in the following address to display the page.
https://IP address/
- The IP Address should be for the corresponding XSCF.
2)Enter the User Name and Password and press the Log In button.
- If login is successful, the default XSCF console screen will be displayed.
1-4-2.How to Log In to the Ops Center
1)Open the browser, and enter the address below. If successful, the login screen will be displayed.
http://IP address/
- The address of the server on which Ops Center has been installed.
2)Enter the user name and password and press the Log in button.
- If login is successful, the Ops Center page will be displayed.
2
2

SPARC/Solaris GUI Management Guide
Copyright 2014 FUJITSU LIMITED
4
1-4-3.Accessing the XSCF Web Console from the Ops Center
1)In the Navigation Pane, go to Assets and select the relevant server.
2)In the Actions Pane, go to Operate and select Launch SP Controller.
3)Enter the user name and password and press the Log In button.
- If login was successful, the XSCF Web Console screen will be displayed.
1 2
3
SPARC/Solaris GUI Management Guide
Copyright 2014 FUJITSU LIMITED
5
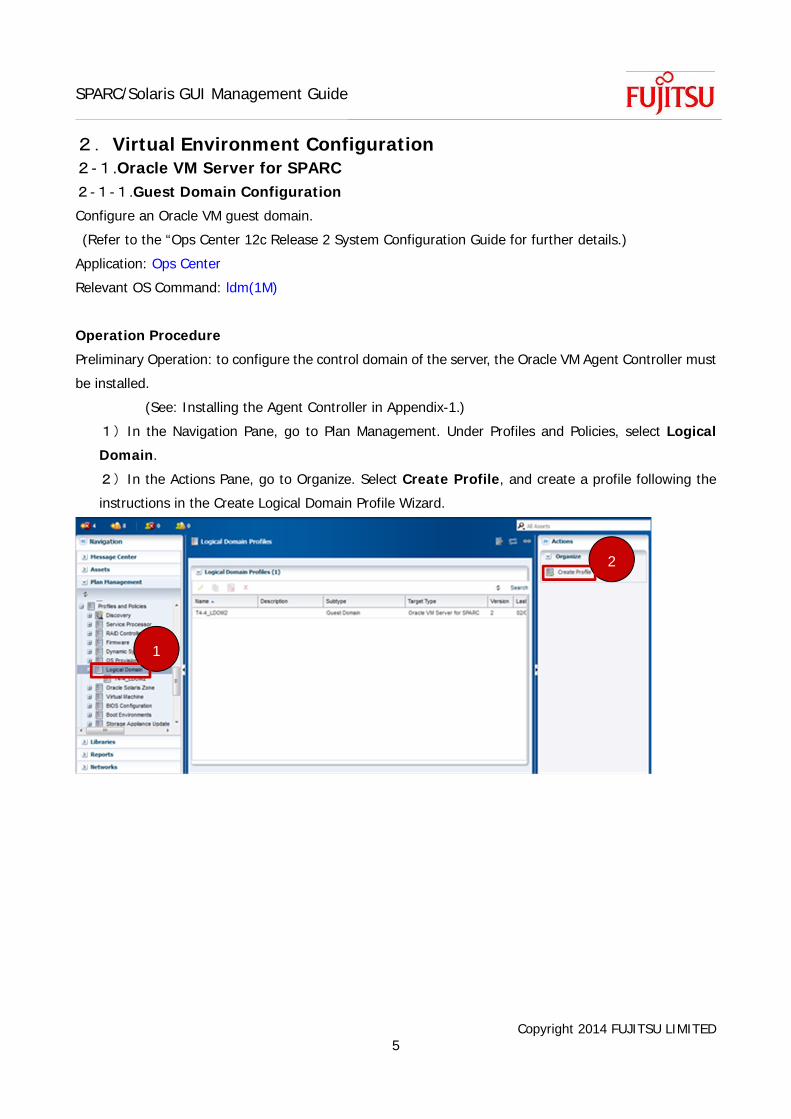
2.Virtual Environment Configuration 2-1.Oracle VM Server for SPARC 2-1-1.Guest Domain Configuration
Configure an Oracle VM guest domain.
(Refer to the “Ops Center 12c Release 2 System Configuration Guide for further details.)
Application: Ops Center
Relevant OS Command: ldm(1M)
Operation Procedure
Preliminary Operation: to configure the control domain of the server, the Oracle VM Agent Controller must
be installed.
(See: Installing the Agent Controller in Appendix-1.)
1)In the Navigation Pane, go to Plan Management. Under Profiles and Policies, select Logical
Domain.
2)In the Actions Pane, go to Organize. Select Create Profile, and create a profile following the
instructions in the Create Logical Domain Profile Wizard.
1
2
SPARC/Solaris GUI Management Guide
Copyright 2014 FUJITSU LIMITED
6
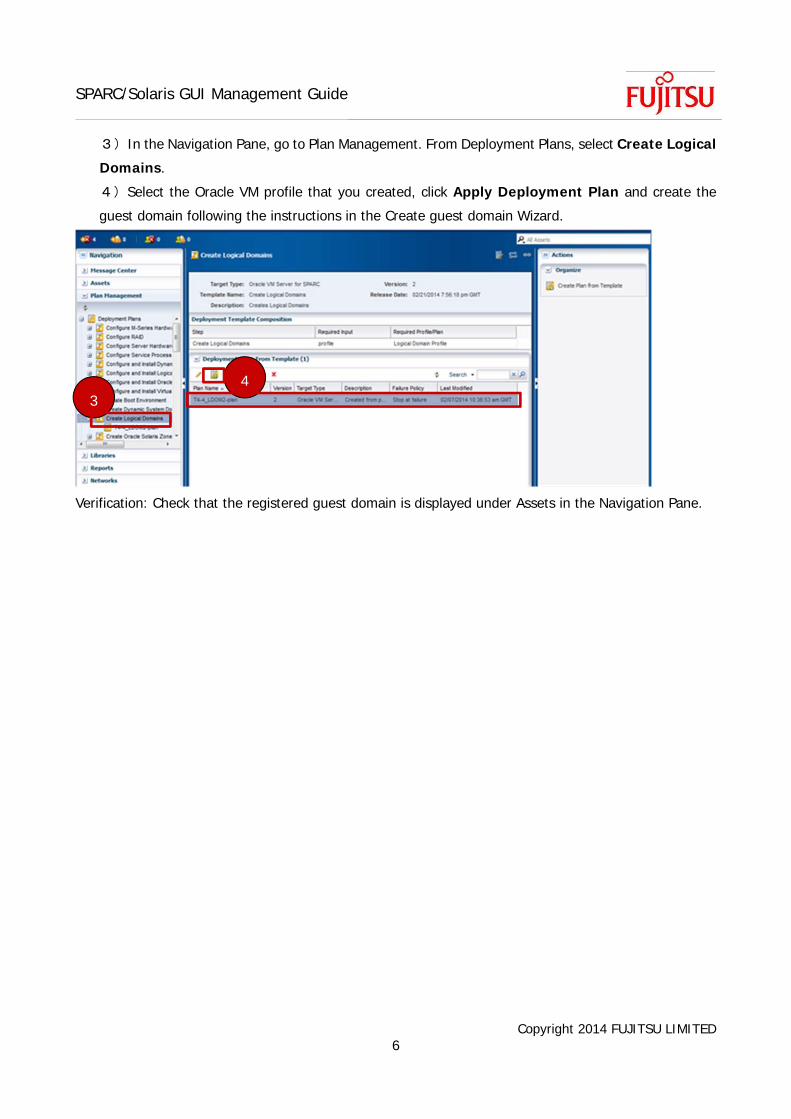
3)In the Navigation Pane, go to Plan Management. From Deployment Plans, select Create Logical
Domains.
4)Select the Oracle VM profile that you created, click Apply Deployment Plan and create the
guest domain following the instructions in the Create guest domain Wizard.
Verification: Check that the registered guest domain is displayed under Assets in the Navigation Pane.
3
4

SPARC/Solaris GUI Management Guide
Copyright 2014 FUJITSU LIMITED
7
2-1-1.OS Installation
Installing the OS onto a guest domain.
(Refer to the “Ops Center 12c Release 2 System Configuration Guide” for further details)
Application: Ops Center
Relevant OS Command: installadm(1M)
Operation Procedure
Preliminary Operation: Execute “2-1-1. Guest Domain Construction”
1)In the Navigation Pane, go to Plan Management. From Profiles and Policies, select OS
Provisioning.
2)In the Actions Pane, go to Organize, select Create Profile, and create a profile following
instructions in the OS Provisioning Wizard.
- Select the “Create a deployment plan for this profile” option. This is the default
option. If this option is not selected, the plan will not be automatically created.
1
2

SPARC/Solaris GUI Management Guide
Copyright 2014 FUJITSU LIMITED
8
3)In the Navigation Pane, go to Plan Management. From Profiles and Policies, select OS
Configuration.
4)In the Actions Pane, go to Organize, select Create Profile, and create a profile following the
instructions in the Wizard.
5)In the Navigation Pane, go to Plan Management. From Deployment Plans, select Provision OS.
6)In the Actions Pane, go to Organize and select Create Plan from Template.
3
4
5
6
SPARC/Solaris GUI Management Guide
Copyright 2014 FUJITSU LIMITED
9
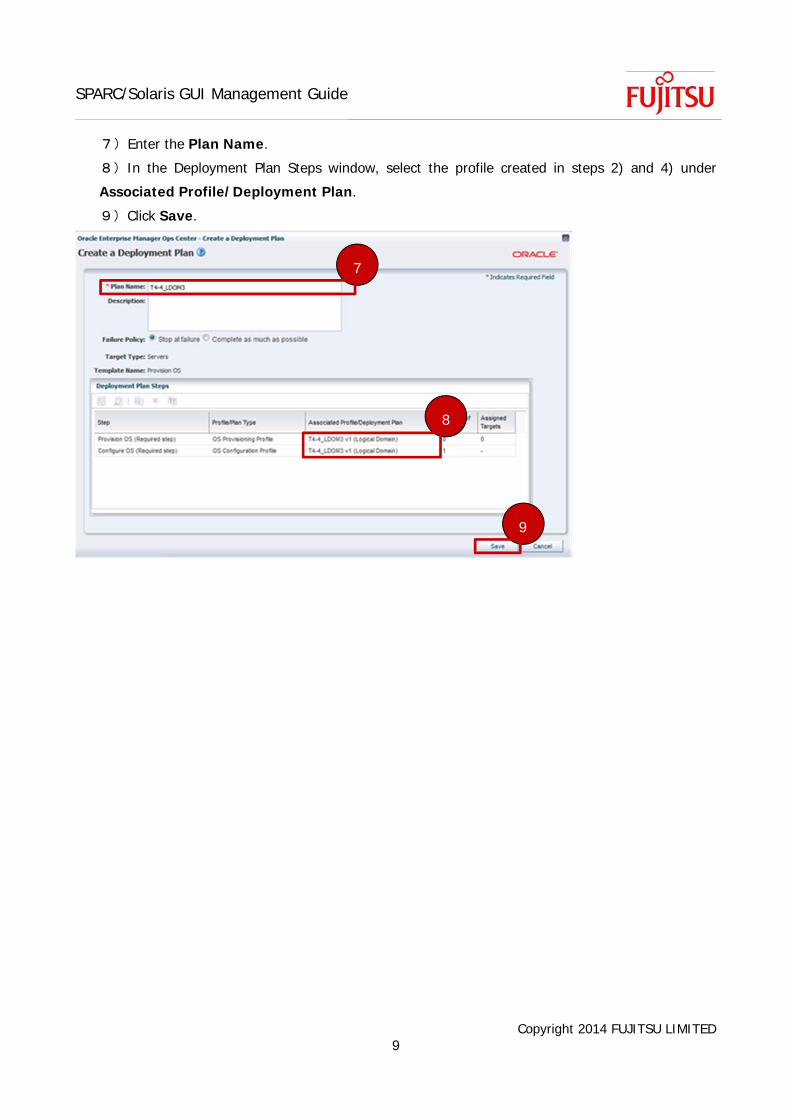
7)Enter the Plan Name.
8)In the Deployment Plan Steps window, select the profile created in steps 2) and 4) under
Associated Profile/Deployment Plan.
9)Click Save.
7
8
9
SPARC/Solaris GUI Management Guide
Copyright 2014 FUJITSU LIMITED
10
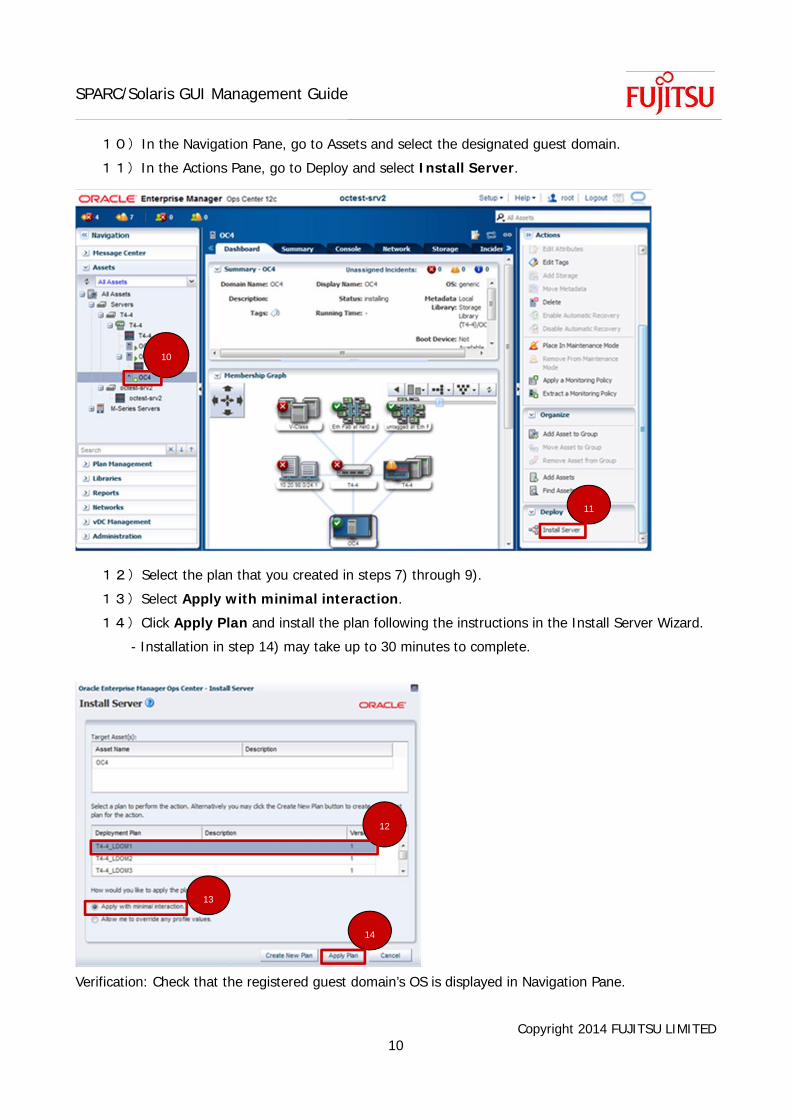
10)In the Navigation Pane, go to Assets and select the designated guest domain.
11)In the Actions Pane, go to Deploy and select Install Server.
12)Select the plan that you created in steps 7) through 9).
13)Select Apply with minimal interaction.
14)Click Apply Plan and install the plan following the instructions in the Install Server Wizard.
- Installation in step 14) may take up to 30 minutes to complete.
Verification: Check that the registered guest domain’s OS is displayed in Navigation Pane.
10
11
12
13
14

SPARC/Solaris GUI Management Guide
Copyright 2014 FUJITSU LIMITED
11
2-2.Oracle Solaris Zone 2-2-1.Oracle Solaris Zone Configuration
Configuring the Oracle Solaris Zone.
(For further information see the: Ops Center 12c Release 2 System Configuration Guide)
Application: Ops Center
Relevant OS Command: zoneadm(1M), zonecfg(1M)
Operation Procedure
Preliminary Operation: An Agent Controller must be installed on the server that the Zone (guest domain
or control domain) will be installed on.
(Please refer to: Installing an Agent Controller in Appendix-1)
1)In the Navigation Pane, go to Plan Management. From Profiles and Policies, select Oracle
Solaris Zone.
- Oracle Solaris Zone is sometimes displayed as 「TEST」. This is a recognized bug. If this is the
case, please read “test” as “Oracle Solaris Zone”.
2)In the Actions Pane go to Organize, select Create Profile, and create a profile following the
instructions in the Create Profile Wizard.
- Please select the “Create a deployment plan for this profile” option. This option is selected by
default. If it is not selected, the plan will not be automatically created.
2
1

SPARC/Solaris GUI Management Guide
Copyright 2014 FUJITSU LIMITED
12
3)In the Navigation Pane, go to Assets and select the relevant server.
4)In the Actions Pane, go to Deploy and select Create Oracle Solaris Zones.
5)After selecting the Zone plan you created, press the Apply Plan button.
6)Create the Zone following the instructions from the Wizard.
Verification: Check that the register Zone is displayed in the Assets section of the Navigation Pane.
3
4
5
SPARC/Solaris GUI Management Guide
Copyright 2014 FUJITSU LIMITED
13
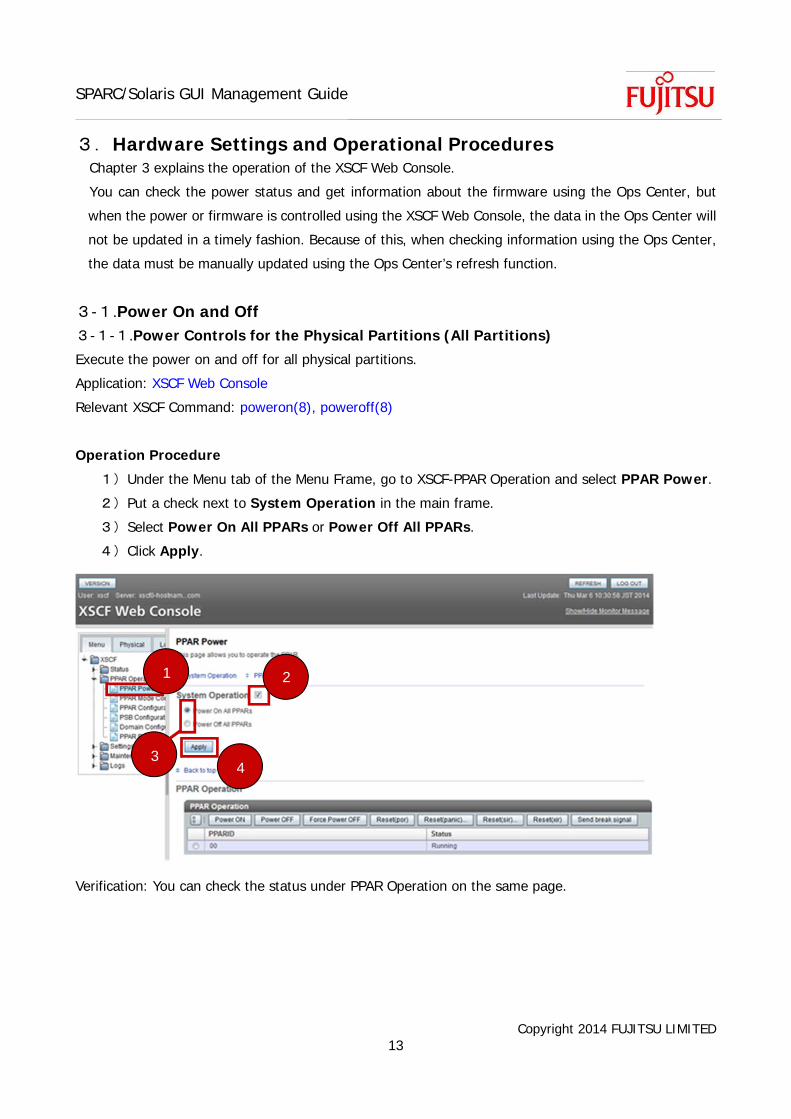
3.Hardware Settings and Operational Procedures Chapter 3 explains the operation of the XSCF Web Console.
You can check the power status and get information about the firmware using the Ops Center, but
when the power or firmware is controlled using the XSCF Web Console, the data in the Ops Center will
not be updated in a timely fashion. Because of this, when checking information using the Ops Center,
the data must be manually updated using the Ops Center’s refresh function.
3-1.Power On and Off 3-1-1.Power Controls for the Physical Partitions (All Partitions)
Execute the power on and off for all physical partitions.
Application: XSCF Web Console
Relevant XSCF Command: poweron(8), poweroff(8)
Operation Procedure
1)Under the Menu tab of the Menu Frame, go to XSCF-PPAR Operation and select PPAR Power.
2)Put a check next to System Operation in the main frame.
3)Select Power On All PPARs or Power Off All PPARs.
4)Click Apply.
Verification: You can check the status under PPAR Operation on the same page.
1 2
3 4

SPARC/Solaris GUI Management Guide
Copyright 2014 FUJITSU LIMITED
14
3-1-2.Power Controls for Specific Physical Partition (1 Partition)
Switch the power on or off for a specific partition.
Application: XSCF Web Console (May be executed with Ops Center)
Relevant XSCF Command: poweron(8), poweroff(8)
Operation Procedure
1)Under Menu in the Menu Frame, go to XSCF-PPAR Operation and select PPAR Power.
2)In PPAR Operation in the Main frame, select the PPAR to start up or shut down.
3)Click Power ON or Power OFF.
4)On the confirmation page, press OK.
Verification: You can check the status by looking in the PPAR operation section of the main frame.
1
2
3

SPARC/Solaris GUI Management Guide
Copyright 2014 FUJITSU LIMITED
15
3-1-3.Power Schedule Settings
Turn the system power on or off at a designated time.
Application: XSCF Web Console
Relevant XSCF Command: addpowerschedule(8)
Operation Procedure
Preliminary Operation: Activate the PPAR running schedule
(Please refer to Configuring Scheduled Activation for Physical Partitions in Appendix-3.)
1)In the Menu tab of the Menu Frame, go to XSCF settings and select Power Schedule.
2)In the Power Schedule List section of the Main Frame, press Add… .
3)Enter the required information and click OK.
- Regarding the PPAR ID, if All is checked, it is possible to setup all PPARs all at once. Select
specific PPARs to set them up individually.
- Under Type you can select the options: daily, weekly, monthly, special, or holiday.
1 2
3

SPARC/Solaris GUI Management Guide
Copyright 2014 FUJITSU LIMITED
16
- The above example shows the settings for turning the power off at 1 o’clock and turning it on at 6
o’clock on March 3rd.
Verification: Check that the schedule that you set up is registered in the Power Schedule List.

SPARC/Solaris GUI Management Guide
Copyright 2014 FUJITSU LIMITED
17
3-2.CPU Core Activation Key Registration and Deletion 3-2-1.Registering the CPU Activation Key
Register the CPU Core Activation key. By registering the activation key, you can activate the CPU Core.
Application: XSCF Web Console
Relevant XSCF Command: addcodactivation(8)
Operation Procedure
1)In the Menu tab of the Menu Frame, go to XSCF. From Settings, select CoD Activation.
2)In the CoD Key section of the Main Frame, click Add New Key.
3)Enter the activation key information, and click OK.
Verification: Check that new key is added in the CoD Key list.
1 2
3

SPARC/Solaris GUI Management Guide
Copyright 2014 FUJITSU LIMITED
18
3-2-2.Configuring the CPU Core Resource for Physical Partitions
The CPU core activated by the activation key will be registered in the Physical Partition (PPAR). You can
delete a CPU core that has been registered in PPAR.
Application: XSCF Web Console
Relevant XSCF Command: setcod(8)
Operation Procedure
1)In the Menu Tab of the Menu Frame, go to XSCF setting and select CoD Reservation.
2)In the PPAR Usage and Reservation section of the main frame, select the relevant PPAR.
3)Click Reserve… .
4)Next to Permanent, enter the number of cores to be set to the OS, and click the OK button.
Verification: In the PPAR Usage and Reservation list, check that the number of cores is equal to the
number you entered for that PPAR.
1
2 3
4

SPARC/Solaris GUI Management Guide
Copyright 2014 FUJITSU LIMITED
19
3-2-3.Deleteing the CPU Core Activation Key
Delete a CPU Core Activation key. The deleted activation key can be used on other servers. However, this
is possible only if used on the same model.
Application: XSCF Web Console
Relevant XSCF Command: deletecodactivation(8)
Operation Procedure
1)In the Menu Tab of the Menu Frame, go to XSCF settings and select CoD Activation.
2)Select the relevant activation key in the CoD Key section of the Main Frame.
3)Click the Delete button.
4)Click OK on the confirmation screen.
Verification: Check that the key you selected is deleted from the CoD Key list.
1
2
3

SPARC/Solaris GUI Management Guide
Copyright 2014 FUJITSU LIMITED
20
3-3.Firmware Updates 3-3-1.Execution of Firmware Updates
Update the Firmware.
Application: XSCF Web Console (May also be carried out using Ops Center)
Relevant XSCF Command: getflashimage(8), flashupdate(8)
Operation Procedure
1)In the Menu Tab of the Menu Frame, go to XSCF-Maintenance and select Firmware Update.
2)In the XCP import section of the Main Frame, press the button marked Choose File, select the
Firmware Update file, and click the Upload button.
3)Click Update… in the XCP Update section.
4)In the Update Firmware dialogue box, type in the version of the update, then select Target and
click OK.
Note: After executing the update, XSCF will be automatically reset. Accordingly, it will be necessary to log
back into the XSCF Web Console.
Verification: In the Display Firmware Version section of the same page, check the XCP Version and
confirm that it has been updated to the latest version.
1
2
3

SPARC/Solaris GUI Management Guide
Copyright 2014 FUJITSU LIMITED
21
4.OS Settings and Controls 4-1.OS Restart 4-1-1.OS Restart
Restart the OS.
- OS start up/shut down must be executed using the command line.
- Physical partitions may be started up and shut down. (For information about how to do this, refer to
“Startup and Shut down”)
Application: Ops Center
Relevant OS Command: reboot(1M), shutdown(1M), init(1M)
Operation Procedure
1)In the Navigation Pane, go to Assets and select the server concerned.
2)In the Actions Pane, go to Operate and select Reboot.
1
2

SPARC/Solaris GUI Management Guide
Copyright 2014 FUJITSU LIMITED
22
4-2.Network Settings 4-2-1.Adding a New Interface
Add a new interface. The procedure differs depending on whether you are using the Agent Controller for
Oracle VM or the Zone.
Application: Ops Center
Relevant OS Command: ipadm(1M)
Operation Procedure
Preliminary Operation: You must create a subnet before you create a new interface to go on it.
(Refer to: Adding a New Subnet Appendix-4.)
- When using Agent Controller for Oracle VM
1)In the Navigation Pane, go to Assets and select the relevant server.
2)Select the Networks tab.
3)Press Attach Network.
4)Enter the required parameters (e.g. the IP address) following the instructions in the Wizard and
press Finish.
Verification: Check that the new interface is displayed in the Oracle VM Server Network Physical
Connectivity list.
1
2
3
SPARC/Solaris GUI Management Guide
Copyright 2014 FUJITSU LIMITED
23
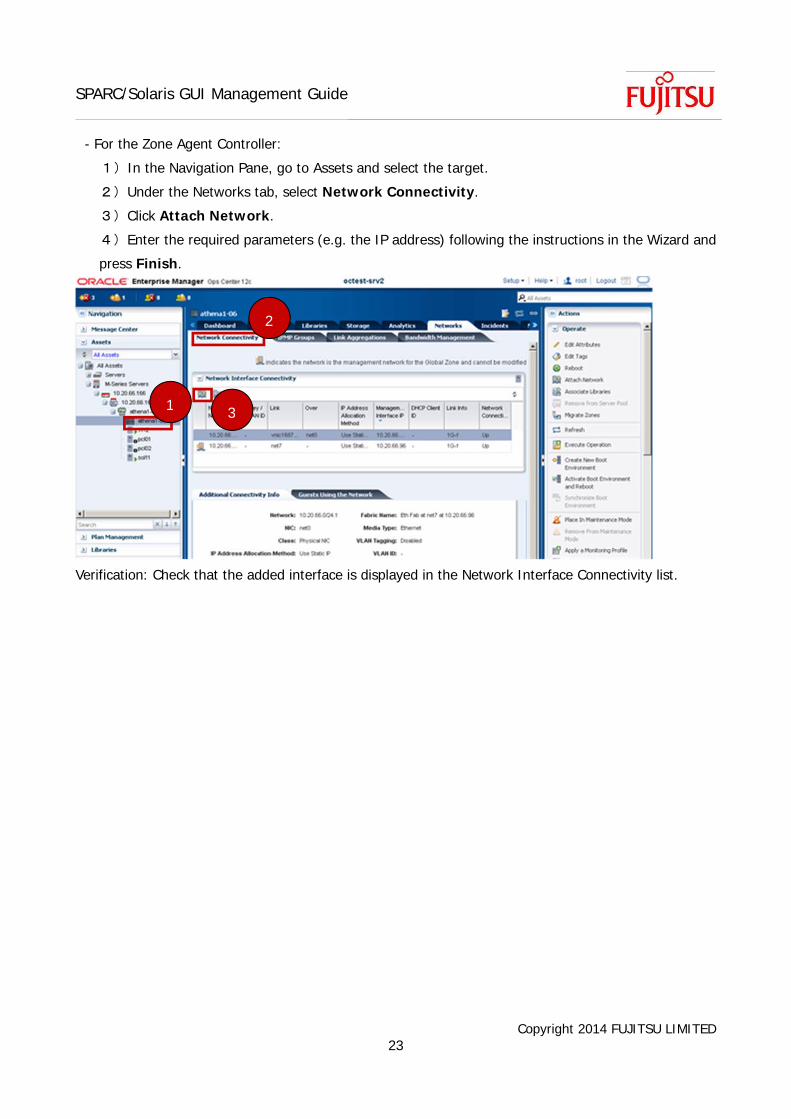
- For the Zone Agent Controller:
1)In the Navigation Pane, go to Assets and select the target.
2)Under the Networks tab, select Network Connectivity.
3)Click Attach Network.
4)Enter the required parameters (e.g. the IP address) following the instructions in the Wizard and
press Finish.
Verification: Check that the added interface is displayed in the Network Interface Connectivity list.
1
2
3

SPARC/Solaris GUI Management Guide
Copyright 2014 FUJITSU LIMITED
24
4-2-2.Changing Network Settings
This section describes how to change network settings such as IP addresses. Procedures differ depending
on whether the Agent Controller is for the Oracle VM or for the Zone.
Application: Ops Center
Relevant OS Command: ipadm(1M)
Operation Procedure
- For Oracle VM Agent Controller
1)In the Navigation Pane, go to Assets and select the relevant server.
2)Select the Networks tab.
3)Select the interface to be changed.
- You cannot change the managing interface.
4)Press Modify Physical Connectivity.
5)Enter the new setting parameters and press Submit.
Verification: Check that the parameters of the designated interface have been replaced with the new
ones.
1
2
3
4
5

SPARC/Solaris GUI Management Guide
Copyright 2014 FUJITSU LIMITED
25
- For the Zone Agent Controller:
6)In Navigation Pane, go to Assets and select the relevant server.
7)Select Network Connectivity in the Networks tab.
8)Select the interface your want to change.
- You cannot change the management interface.
9)Press Modify Physical Connectivity.
10)Enter new parameters and press Submit.
Verification: Check that the parameters of the designated interface have been replaced with the new
ones.
1
2
3
4
5
SPARC/Solaris GUI Management Guide
Copyright 2014 FUJITSU LIMITED
26
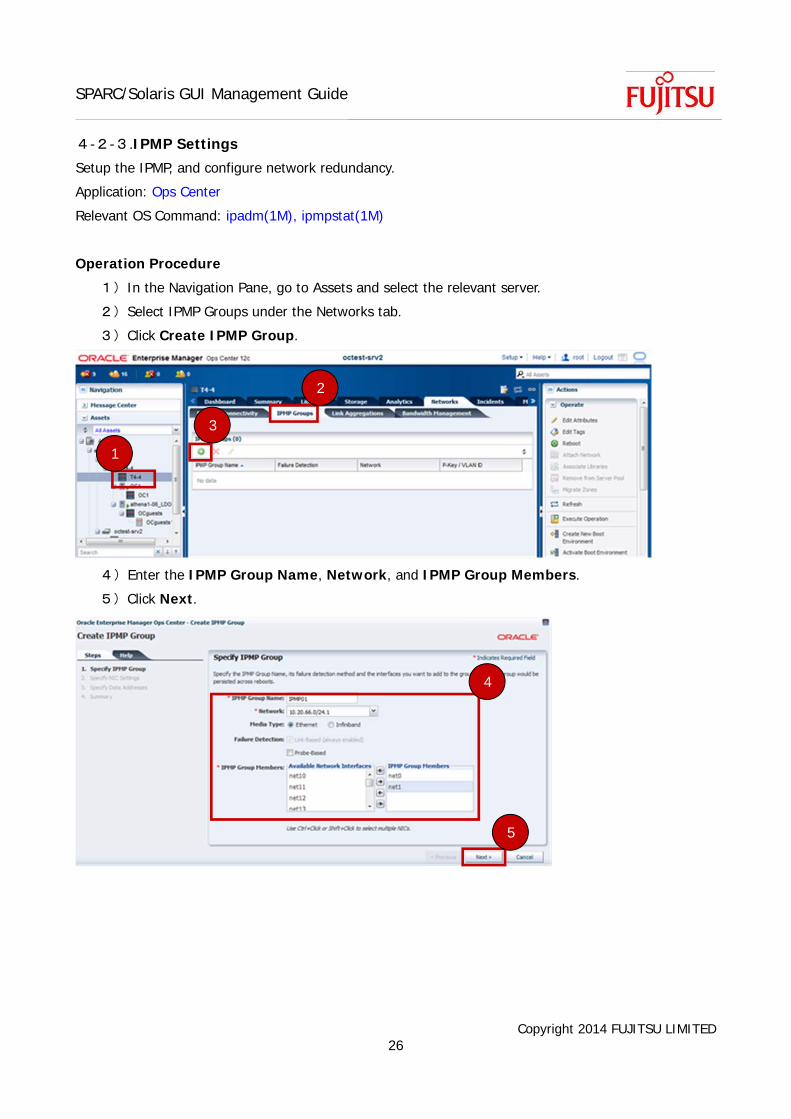
4-2-3.IPMP Settings
Setup the IPMP, and configure network redundancy.
Application: Ops Center
Relevant OS Command: ipadm(1M), ipmpstat(1M)
Operation Procedure
1)In the Navigation Pane, go to Assets and select the relevant server.
2)Select IPMP Groups under the Networks tab.
3)Click Create IPMP Group.
4)Enter the IPMP Group Name, Network, and IPMP Group Members.
5)Click Next.
1
2
3
4
5

SPARC/Solaris GUI Management Guide
Copyright 2014 FUJITSU LIMITED
27
6)Configure the Specify NIC Settings and Specify Data Addresses, if necessary, then go to Summary
and press Finish.
- To specify redundancy for the control domain Management LAN, put a check in Create vnic,
under Specify NIC Settings and make the vnic redundant.
Verification: Check that the settings you added are displayed.
-

SPARC/Solaris GUI Management Guide
Copyright 2014 FUJITSU LIMITED
28
4-2-4.Link Aggregation Configuration
Set up Link Aggregation and expand the network bandwidth.
Application: Ops Center
Relevant OS Command: dladm(1M)
Operation Procedure
1)In the Navigation Pane, go to Assets and select the relevant server.
2)In the Network tab, select Link Aggregations.
3)Click the Create Link Aggregation button.
4)Enter the Link Aggregation Name and the Link Aggregation Members.
5)Click Next.
6)Set specify Link Aggregation, if necessary, and then press Finish in the summary.
- To add an IP address after creating a Link Aggregation, refer to section 4-2-1. Adding a New
Interface.
Verification: Check that the settings you configured are displayed.
1
2
3
4
5

SPARC/Solaris GUI Management Guide
Copyright 2014 FUJITSU LIMITED
29
4-2-5.Bandwidth Setup
Set up the network bandwidth. This setup can only be used on the Solaris 11 server.
Application: Ops Center
Relevant OS Command: flowadm(1M)
Operation Procedure
1)In the Navigation Pane, go to Assets and select the relevant server.
2)In the Networks tab, select Bandwidth Management.
3)Click Create Bandwidth Flow.
4)Enter the Flow Name, Link, Properties, and Attributes Setting.
5)Press Create.
Verification: Check that the settings that you configured are displayed on the page.
1
2
3
4
5
SPARC/Solaris GUI Management Guide
Copyright 2014 FUJITSU LIMITED
30
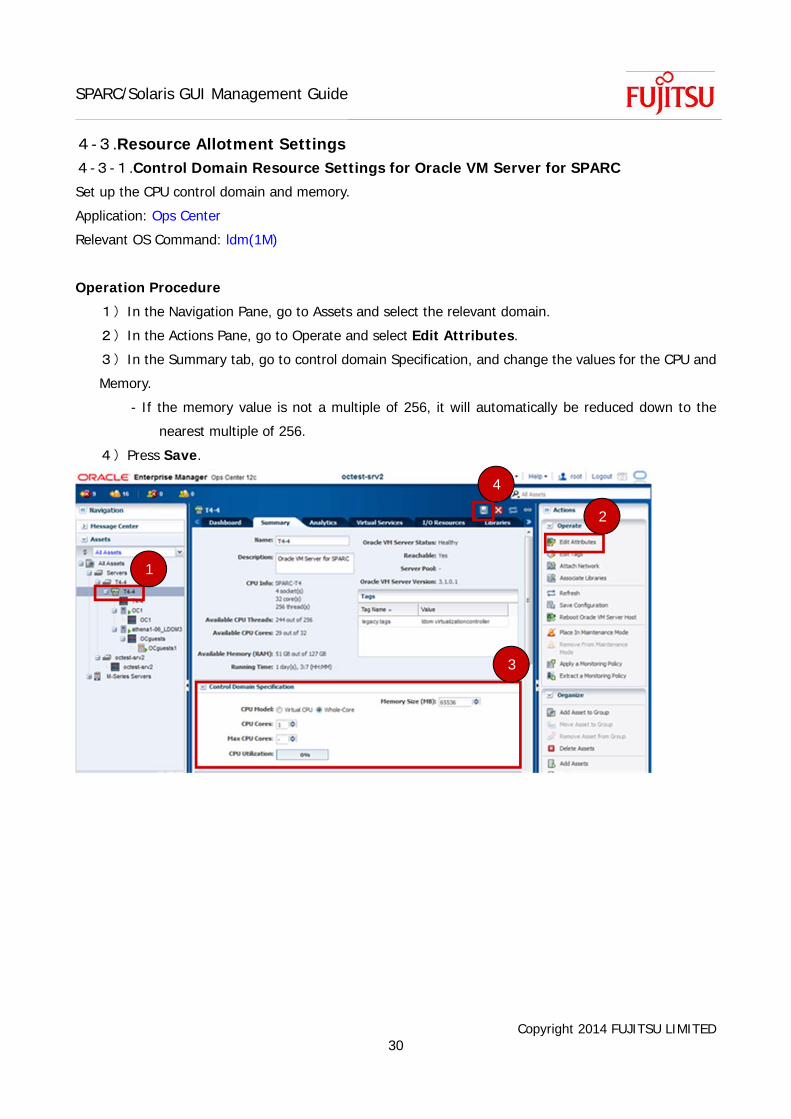
4-3.Resource Allotment Settings 4-3-1.Control Domain Resource Settings for Oracle VM Server for SPARC
Set up the CPU control domain and memory.
Application: Ops Center
Relevant OS Command: ldm(1M)
Operation Procedure
1)In the Navigation Pane, go to Assets and select the relevant domain.
2)In the Actions Pane, go to Operate and select Edit Attributes.
3)In the Summary tab, go to control domain Specification, and change the values for the CPU and
Memory.
- If the memory value is not a multiple of 256, it will automatically be reduced down to the
nearest multiple of 256.
4)Press Save.
1
2
3
4

SPARC/Solaris GUI Management Guide
Copyright 2014 FUJITSU LIMITED
31
4-3-2.Oracle VM Server for SPARC Guest Domain Resource Settings
Set up the CPU and memory of the guest domain.
Application: Ops Center
Relevant OS Command: ldm(1M)
Operation Procedure
1)In the Navigation Pane, go to Assets and select the relevant domain.
2)In the Actions Pane, go to Operate and select Edit Attributes.
3)In the Summary tab, go to CPU Mode and change the value of CPU Threads.
- When creating the guest domain, if “Whole-Core” is selected, it will be “CPU cores”.
4)Change the Memory Size value.
- If the memory value is not a multiple of 256, it will automatically be reduced down to the
nearest multiple of 256.
5)Click Save.
1 2 3
4
5
SPARC/Solaris GUI Management Guide
Copyright 2014 FUJITSU LIMITED
32
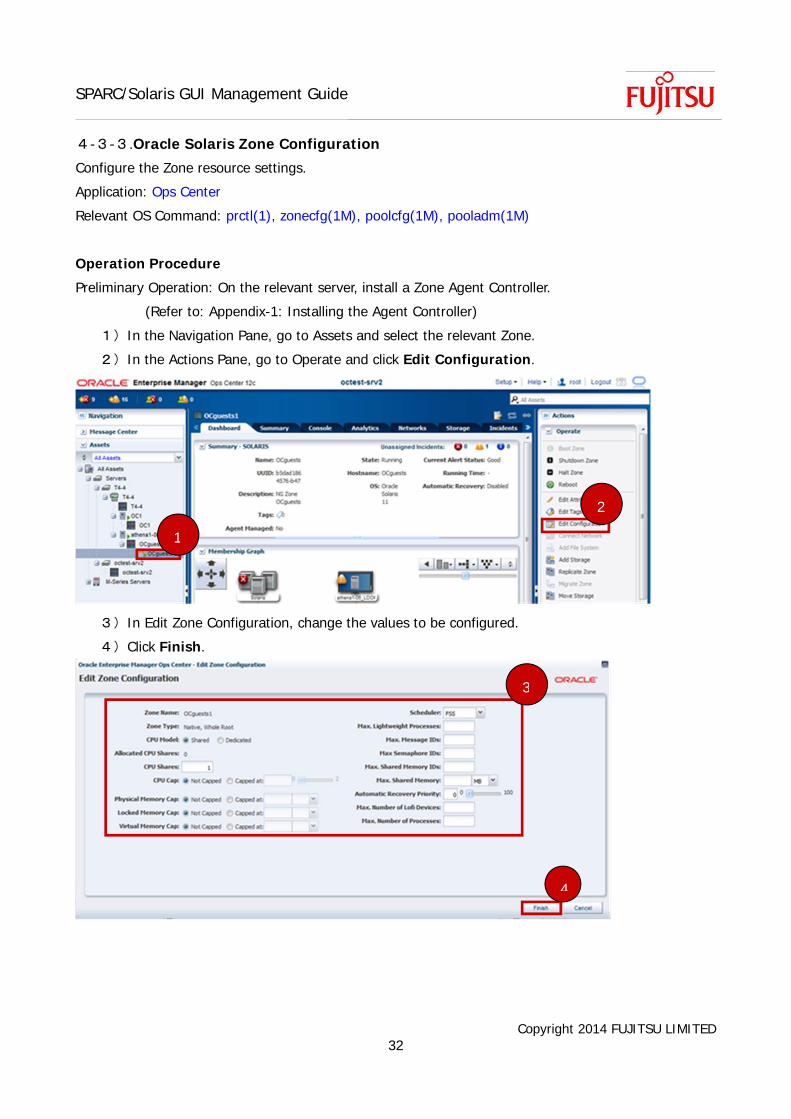
4-3-3.Oracle Solaris Zone Configuration
Configure the Zone resource settings.
Application: Ops Center
Relevant OS Command: prctl(1), zonecfg(1M), poolcfg(1M), pooladm(1M)
Operation Procedure
Preliminary Operation: On the relevant server, install a Zone Agent Controller.
(Refer to: Appendix-1: Installing the Agent Controller)
1)In the Navigation Pane, go to Assets and select the relevant Zone.
2)In the Actions Pane, go to Operate and click Edit Configuration.
3)In Edit Zone Configuration, change the values to be configured.
4)Click Finish.
1
2
3
4
SPARC/Solaris GUI Management Guide
Copyright 2014 FUJITSU LIMITED
33
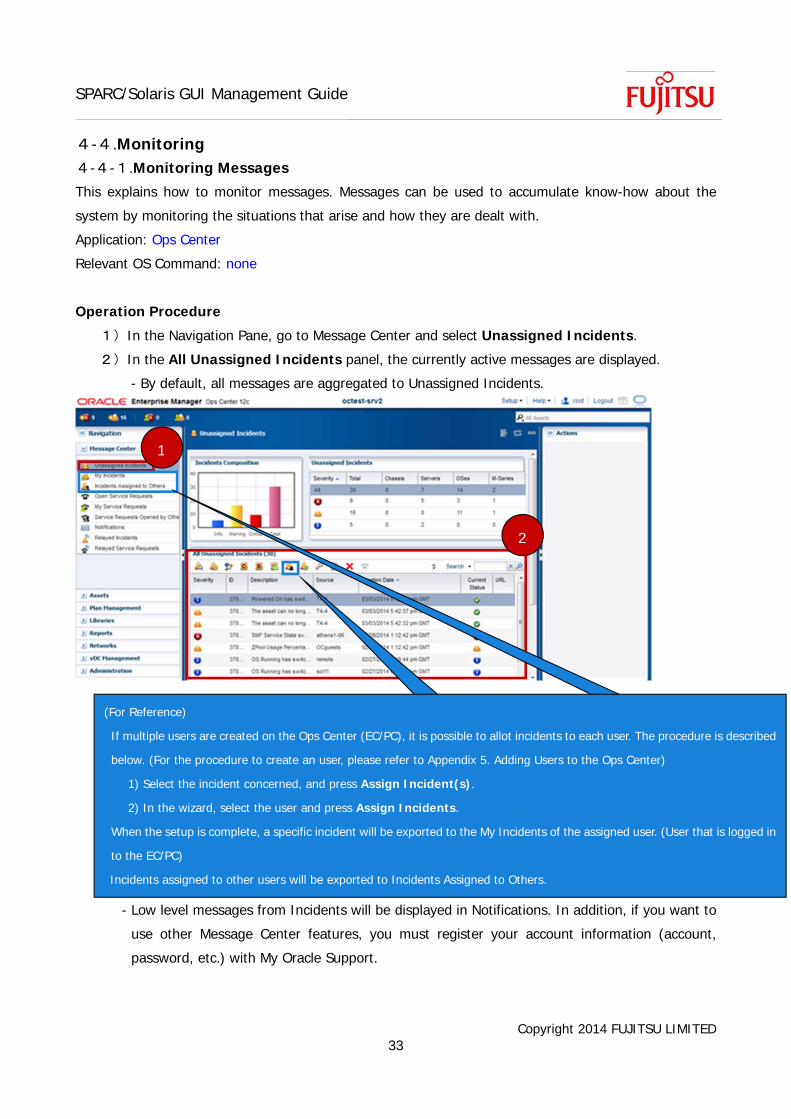
4-4.Monitoring 4-4-1.Monitoring Messages
This explains how to monitor messages. Messages can be used to accumulate know-how about the
system by monitoring the situations that arise and how they are dealt with.
Application: Ops Center
Relevant OS Command: none
Operation Procedure
1)In the Navigation Pane, go to Message Center and select Unassigned Incidents.
2)In the All Unassigned Incidents panel, the currently active messages are displayed.
- By default, all messages are aggregated to Unassigned Incidents.
- Low level messages from Incidents will be displayed in Notifications. In addition, if you want to
use other Message Center features, you must register your account information (account,
password, etc.) with My Oracle Support.
1
2
(For Reference)
If multiple users are created on the Ops Center (EC/PC), it is possible to allot incidents to each user. The procedure is described
below. (For the procedure to create an user, please refer to Appendix 5. Adding Users to the Ops Center)
1) Select the incident concerned, and press Assign Incident(s).
2) In the wizard, select the user and press Assign Incidents.
When the setup is complete, a specific incident will be exported to the My Incidents of the assigned user. (User that is logged in
to the EC/PC)
Incidents assigned to other users will be exported to Incidents Assigned to Others.

SPARC/Solaris GUI Management Guide
Copyright 2014 FUJITSU LIMITED
34
4-4-2.Resource Monitoring
Procedures for monitoring the use and status of resources. You can check the level of CPU, Network, and
I/O use.
Application: Ops Center
Relevant OS Command: sar(1), dlstat(1M), iostat(1M)
Operation Procedure
1)In the Navigation Pane, go to Assets and select the relevant server.
2)Under the Analytics tab, select Summary.
1
2
SPARC/Solaris GUI Management Guide
Copyright 2014 FUJITSU LIMITED
35
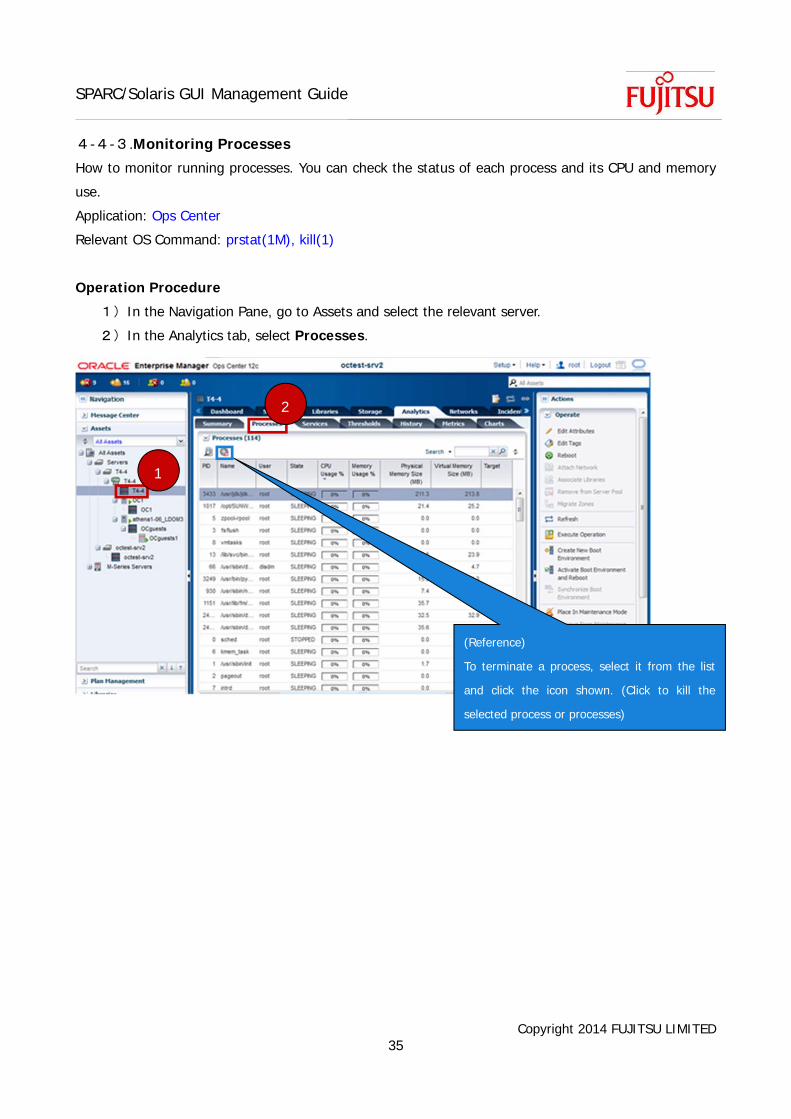
4-4-3.Monitoring Processes
How to monitor running processes. You can check the status of each process and its CPU and memory
use.
Application: Ops Center
Relevant OS Command: prstat(1M), kill(1)
Operation Procedure
1)In the Navigation Pane, go to Assets and select the relevant server.
2)In the Analytics tab, select Processes.
1
2
(Reference)
To terminate a process, select it from the list
and click the icon shown. (Click to kill the
selected process or processes)
SPARC/Solaris GUI Management Guide
Copyright 2014 FUJITSU LIMITED
36
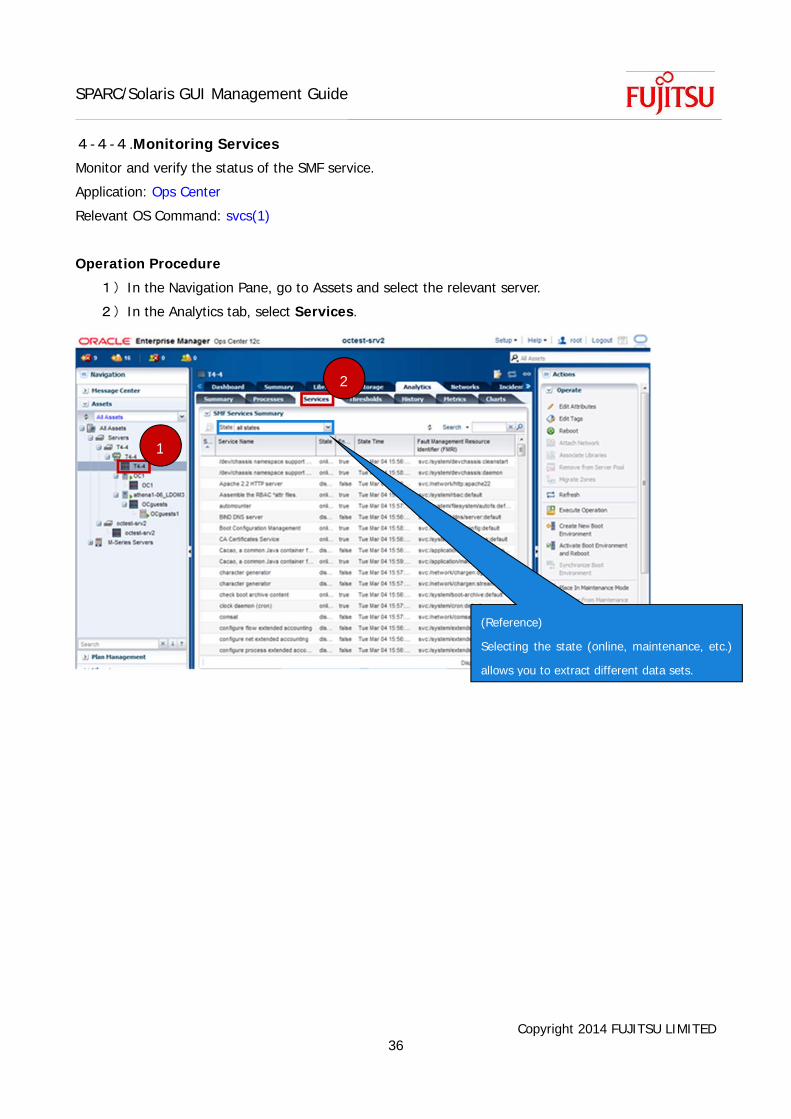
4-4-4.Monitoring Services
Monitor and verify the status of the SMF service.
Application: Ops Center
Relevant OS Command: svcs(1)
Operation Procedure
1)In the Navigation Pane, go to Assets and select the relevant server.
2)In the Analytics tab, select Services.
1
2
(Reference)
Selecting the state (online, maintenance, etc.)
allows you to extract different data sets.

SPARC/Solaris GUI Management Guide
Copyright 2014 FUJITSU LIMITED
37
4-4-5.Setting Thresholds
By configuring and monitoring thresholds, it is possible to generate alerts based on set resource status
conditions.
Application: Ops Center
Relevant OS Command: None
Operation Procedure
- Termination of Threshold Monitoring
1)In the Navigation Pane, go to Assets and select the target server.
2)In the Monitoring tab, select Alert Monitoring Rules.
3)From the Threshold Monitoring Rules, select the target resource.
4)Click Disable Alert Monitoring Rule(s). After the Wizard starts, click OK.
- This procedure is not necessary if in the Enabled? column No is shown next to the target
resource.
1
3
2
4

SPARC/Solaris GUI Management Guide
Copyright 2014 FUJITSU LIMITED
38
- Setting the Threshold
5)Select Edit Alert Monitoring Rule Parameters. The Wizard appears.
6)Set the Generate alert after value and click Next.
- This sets the time period between detection and generation of an alert.
6
5

SPARC/Solaris GUI Management Guide
Copyright 2014 FUJITSU LIMITED
39
7)Enter the threshold’s New Value, and click Apply.
- Initiating Threshold Monitoring
8)Press Enable Alert Monitoring Rule(s). After the Wizard starts, click OK.
Verification: The threshold of the target resource will be changed and Yes will be shown the Enabled? and
Active? columns.
7
8

SPARC/Solaris GUI Management Guide
Copyright 2014 FUJITSU LIMITED
40
- Monitoring Thresholds
9)In the Navigation Pane, go to Assets and select the relevant server.
10)Under the Analytics tab, select Thresholds.
11)Select the target resource to be shown in from Display.
9 11
(Reference)
Enter a new threshold under New Value, and press
Apply Thresholds to change the threshold. In this
case, follow steps 4) and 8).
10

SPARC/Solaris GUI Management Guide
Copyright 2014 FUJITSU LIMITED
41
4-4-6.Checking the Operating Status
How to display metrics (quality rating) for individual resources. This provides statistics for a range of
functions as numerical data and graphs.
Application: Ops Center
Relevant OS Command: sar(1), dlstat(1M), iostat(1M)
Operation Procedure
1)In the Navigation Pane, go to Assets and select the target server.
2)In the Analytics tab, select Metrics.
Below is a summary of the information that is available.
Resource Statistics Available
Load CPU and memory use, number of times User logged in, etc.
File System Remaining space in file system etc.
Network Input and output errors. etc.
Users Number of logons.
Buffer Activity Buffer operation conditions.
Disk Usage Disk operation conditions.
Paging Activity Paging operation conditions.
Message Activity Message operation conditions.
Tables Status Table related information.
TTY Activity Percentage of Modem Intrusion etc.
Kernel Memory Kernel memory operation conditions.
1
2

SPARC/Solaris GUI Management Guide
Copyright 2014 FUJITSU LIMITED
42
DNLC Directory name search information.
IPC Message Queue Message queue information.
IPC Shared Memory Shared memory information.
IPC Semaphore Usage Semaphore usage.
CPU Utilization CPU usage.
CPU Detail Detailed CPU information.
File Access File access information.
Disk Errors Disck error information.
Memory Utilization Memory usage.
SPARC/Solaris GUI Management Guide
Copyright 2014 FUJITSU LIMITED
43
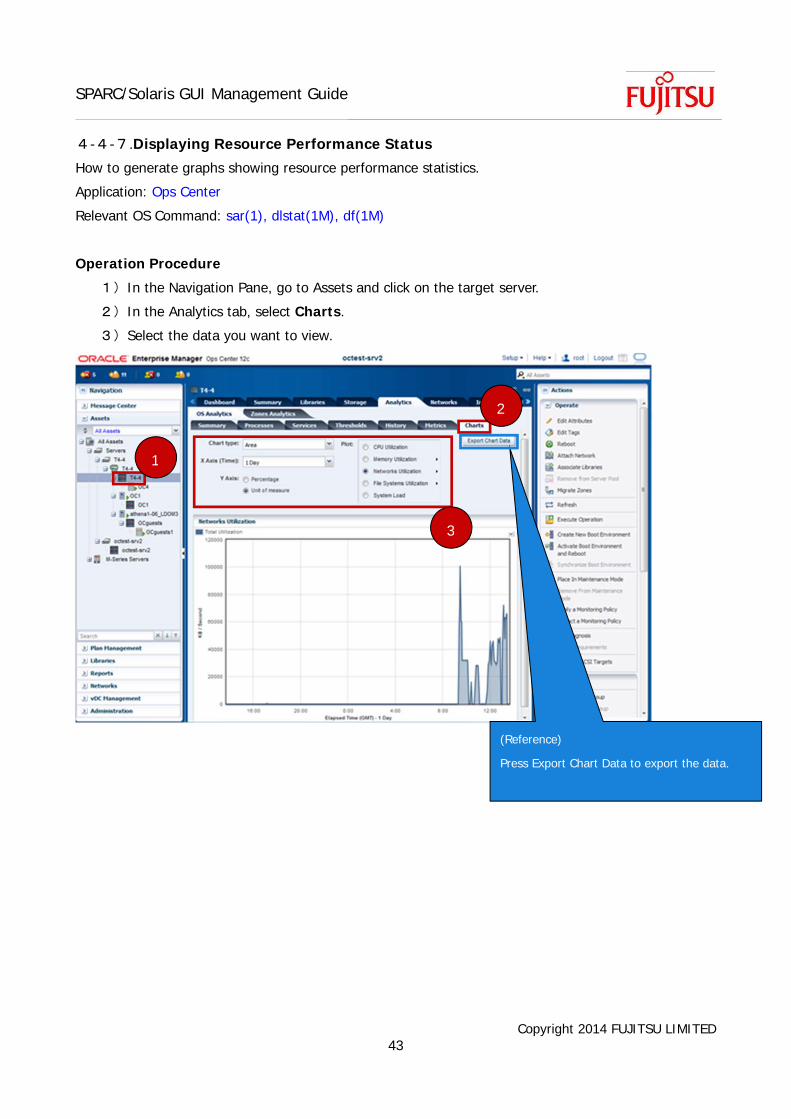
4-4-7.Displaying Resource Performance Status
How to generate graphs showing resource performance statistics.
Application: Ops Center
Relevant OS Command: sar(1), dlstat(1M), df(1M)
Operation Procedure
1)In the Navigation Pane, go to Assets and click on the target server.
2)In the Analytics tab, select Charts.
3)Select the data you want to view.
1
2
3
(Reference)
Press Export Chart Data to export the data.

SPARC/Solaris GUI Management Guide
Copyright 2014 FUJITSU LIMITED
44
4-4-8.Log Monitoring (XSCF)
How to monitor Logs within XSCF.
- OS logs cannot be checked from the GUI.
Application: XSCF Web Console
Relevant XSCF Command: showlogs(8)
Operation Procedure
1)In the Menu tab in the Menu Frame, go to XSCF-Logs and select the log.
The logs that can be monitored are listed below.
Log Log Name
Error Log Error Log
Power Log Power Log
Event Log Event Log
Console Log Console Log
Panic Log Panic Log
Environment Log Tempurature history Log
IPL Message Log IPL Message Log
Monitor Message Log Monitor Message Log
Audit Log Audit Log
1
(Reference)
In the Event frame, overall system events are
displayed in Monitor message format.
SPARC/Solaris GUI Management Guide
Copyright 2014 FUJITSU LIMITED
45
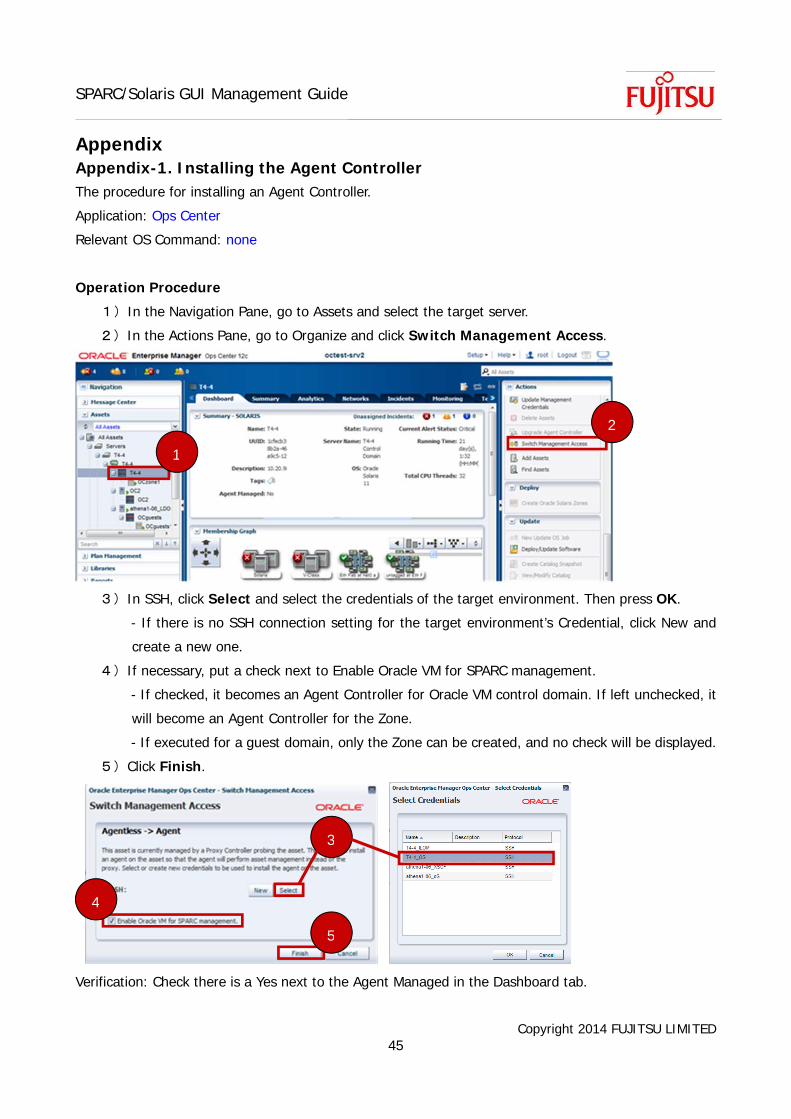
Appendix Appendix-1. Installing the Agent Controller The procedure for installing an Agent Controller.
Application: Ops Center
Relevant OS Command: none
Operation Procedure
1)In the Navigation Pane, go to Assets and select the target server.
2)In the Actions Pane, go to Organize and click Switch Management Access.
3)In SSH, click Select and select the credentials of the target environment. Then press OK.
- If there is no SSH connection setting for the target environment’s Credential, click New and
create a new one.
4)If necessary, put a check next to Enable Oracle VM for SPARC management.
- If checked, it becomes an Agent Controller for Oracle VM control domain. If left unchecked, it
will become an Agent Controller for the Zone.
- If executed for a guest domain, only the Zone can be created, and no check will be displayed.
5)Click Finish.
Verification: Check there is a Yes next to the Agent Managed in the Dashboard tab.
1
2
3
5
4

SPARC/Solaris GUI Management Guide
Copyright 2014 FUJITSU LIMITED
46
Appendix-2. Deleting the Agent Controller Delete the Agent Controller.
- Some functions will become unusable if the Agent Controller is deleted. Because of this, it is
recommended that in normal circumstances the Agent Controller is left installed.
Application: Ops Center
Relevant OS Command: none
Operation Procedure
1)In the Navigation Pane, go to Assets and select the target server.
2)In the Actions Pane, go to Organize and click Switch Management Access.
3)In SSH under Discovery, click Select. Click the target environment from the list and press OK.
4)Click Finish.
Verification: Check that there is a No next to Agent Managed in the Dashboard tab.
1
2
4
3

SPARC/Solaris GUI Management Guide
Copyright 2014 FUJITSU LIMITED
47
Appendix-3. Setting the Operating Schedule for the Physical Partition Set the scheduled running of the physical partition (PPAR) active.
Application: XSCF Web Console
Relevant XSCF Command: setpowerschedule(8)
Operation Procedure
Preliminary Operation: Make sure that the mode switch on the front side of the target server is on
“Locked”.
1)Under Menu in the Menu frame, go to XSCF, Settings and select Power Schedule.
2)In Main frame, go to Power Schedule State and put a check next to the PPAR that you want to
schedule.
3)Click Configure…
4)Select Enable in the Schedule tab.
5)Click OK.
Verification: Check that the Schedule of Power Schedule State is enabled.
1
2 3
4
5

SPARC/Solaris GUI Management Guide
Copyright 2014 FUJITSU LIMITED
48
Appendix-4. Adding a New Subnet Add a new subnet to Ops Center. To add a new interface in the Oracle Solaris’ Management Target, a
subnet for the new interface to be added must be created in the Ops Center.
Application: Ops Center
Relevant OS Command: none
Operation Procedure
1)In the Navigation Pane, go to Networks and select default.
2)In the Action Pane, go to Operate and click on Define Network.
3)Enter the parameters as instructed by the Wizard, and click Finish.
- Select the Create New Untagged Fabric option (It is not selected by default).
1 2

SPARC/Solaris GUI Management Guide
Copyright 2014 FUJITSU LIMITED
49
Appendix-5. Adding Users on Ops Center Add local users on Ops Center. Please note that, because the User on the Ops Center is linked to the user
on the EC’s OS, the user to be added must already exist on the OS.
Application: Ops Center
Relevant OS Command: none
Operation Procedure
Preliminary Operation: Create the user on the EC Server’s OS
1)In the Navigation Pane, go to Administration - Enterprise Controller - Select Local Users.
2)In the Users tab, press Add User.
3)Enter the User Name, select Roles, and click Add User.
Verification: Check that the user has been added in the Users and Notification Profiles.
1
2
3

SPARC/Solaris GUI Management Guide
Copyright 2014 FUJITSU LIMITED
50
Revision History Revision
date
Revision
No.
Revision contents
2014.10.14 1.0 New Guide Created

GUI 管理ガイド