spartan-ii development system - trenz electronic · introduction this tutorial was created to give...
TRANSCRIPT

1
Dünner Kirchweg 7732257 BündeGermanywww.trenz-electronic.de
IntroductionThis tutorial was created to give the interestedengineer a quick hands on experience on theXilinx’ WebPACK ISE software suite.
The tutorial provides only a very brief overviewof FPGA design methodology without going intotoo much detail. After completing this tutorialand the first own design steps, it is highly rec-ommended to proceed with further readings,e.g. the various application notes and onlinemanuals.
While concentrating on the basic steps andmethods, it is also the goal of this tutorial to cov-er the complete development cycle. Beginningwith design entry, through simulation, synthesis
and implementation up to the download to phys-ical hardware all covered in a single, consistentproject.
To achieve both of these goals, we decided todesign a very simple hexadecimal counterwhich is implemented on our TE-XC2S Spartan-II Development System. All steps required tocomplete this design are covered by this tutorial.There are no hidden steps or imported and half-completed files. While this limits the possiblesize of the project (without exceeding a certaintime frame) we feel that there is still no betterway of learning something than from own expe-rience.
Happy developing!
Figure 1: Spartan-II Development System
Spartan-II Development System
2001-November-6 Tutorial: First Steps with WebPACK ISE
Spartan-II Development System Tutorial: First Steps with WebPACK ISE
Trenz Electronic 2
Download and InstallationIn case you did not receive the Xilinx WebPACKISE software on CD-ROM, you may downloadthe latest revision from www.xilinx.com. Fromthe home page follow the links to
Buy OnlineWebPACK
If you do not have a Xilinx account yet, you willneed to register with Xilinx and create and ac-count. To do so, follow the link to
Register for WebPACK ISE
In case you already registered with Xilinx, followthe link to
Single File Download
This will lead you to the following screen:
Click Design Configurations, FPGA Design, Se-lect Configuration...
... and the following box appears:
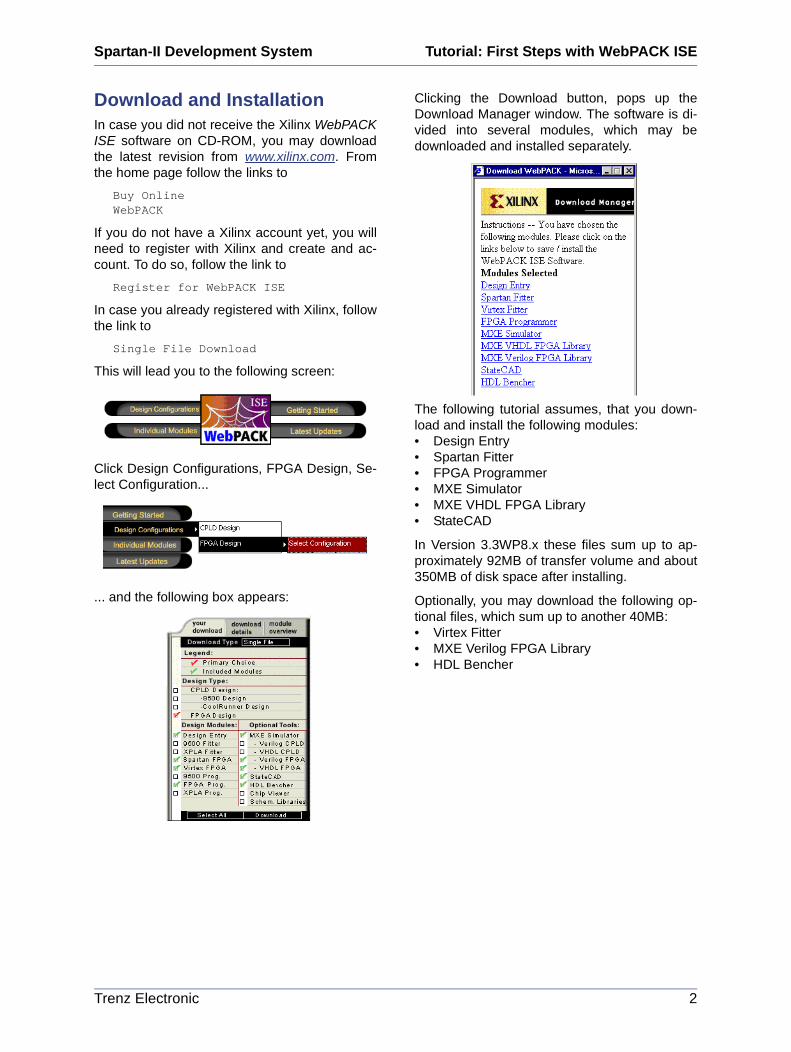
Clicking the Download button, pops up theDownload Manager window. The software is di-vided into several modules, which may bedownloaded and installed separately.
The following tutorial assumes, that you down-load and install the following modules:• Design Entry• Spartan Fitter• FPGA Programmer• MXE Simulator• MXE VHDL FPGA Library• StateCAD
In Version 3.3WP8.x these files sum up to ap-proximately 92MB of transfer volume and about350MB of disk space after installing.
Optionally, you may download the following op-tional files, which sum up to another 40MB:• Virtex Fitter• MXE Verilog FPGA Library• HDL Bencher

Spartan-II Development System Tutorial: First Steps with WebPACK ISE
Trenz Electronic 3
Creating a designAfter launching the WebPACK Project Navigatorfor the first time, it comes up with an emptyscreen, divided into several panes. The Sourcewindow lists all sources being included in aproject. The Process window lists the possibleactions for a selected source. The Edit windowis used to display and modify HDL sources. TheTranscript window shows a log of the most re-cent shell operations.
Before going further, we need to create a newproject.
A dialog pops up to specify the project’s nameand location. Furthermore the target family anddevice as well as the synthesis tool need to bechosen. To target the TE-XC2S board, we needto specify Spartan2 as the device family and2S200PQ208-5 as the device. Our synthesistool is XST VHDL.
After closing the dialog, an empty project will becreated in the project location specified above:
Source
Process
Edit
Transcript
Spartan-II Development System Tutorial: First Steps with WebPACK ISE
Trenz Electronic 4
Design entry
Adding existing Source FilesWe start our project by adding an existing VHDLmodule to it. Copy the file from the CD-ROM intoyour project location, before proceeding. Youmay use the Windows Explorer to do so.
The file TE-BL.vhd comes with your TE-XC2SDevelopment System and contains commonlyused code to interface with the Buttons & LightsExpansion Board.
A .vhd suffix is ambiguous, as VHDL files maycontain packages, modules, or test benches.Our file contains a VHDL entity or module.
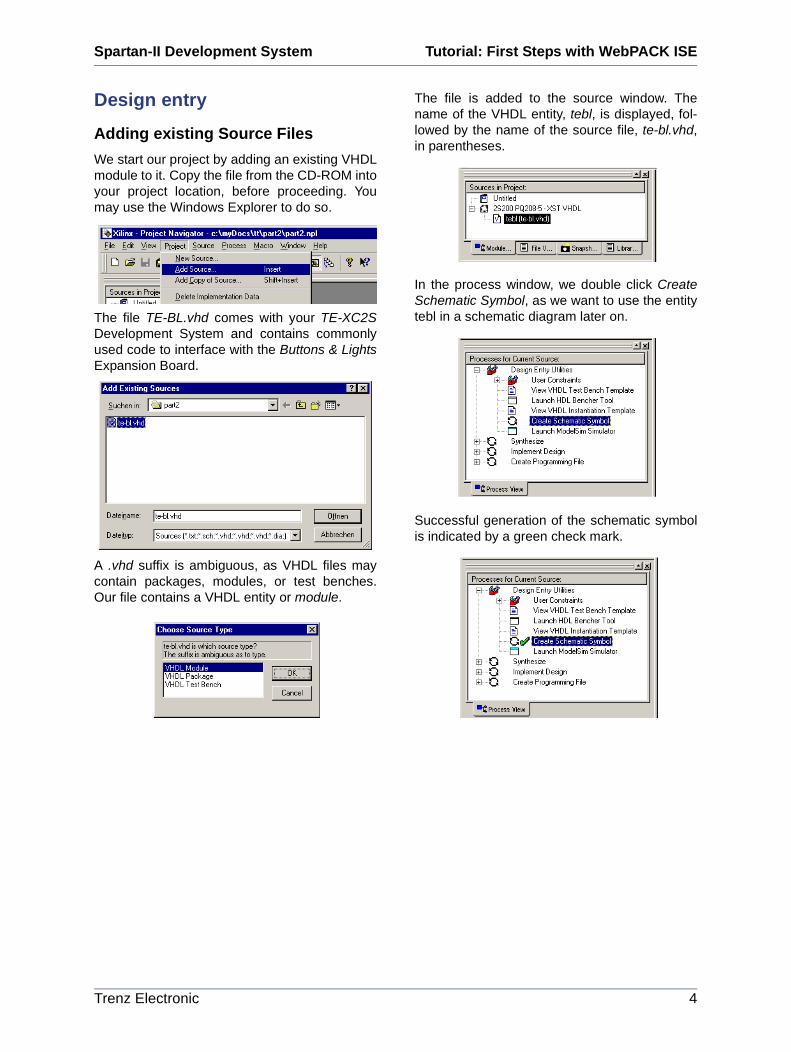
The file is added to the source window. Thename of the VHDL entity, tebl, is displayed, fol-lowed by the name of the source file, te-bl.vhd,in parentheses.
In the process window, we double click CreateSchematic Symbol, as we want to use the entitytebl in a schematic diagram later on.
Successful generation of the schematic symbolis indicated by a green check mark.
Spartan-II Development System Tutorial: First Steps with WebPACK ISE
Trenz Electronic 5
Using the HDL Editor
Next, we create a new VHDL file and add it tothe project.
A dialog box appears, to specify the type ofsource to create, the file name and location. Aswe want to create another VHDL entity, wechose VHDL Module.
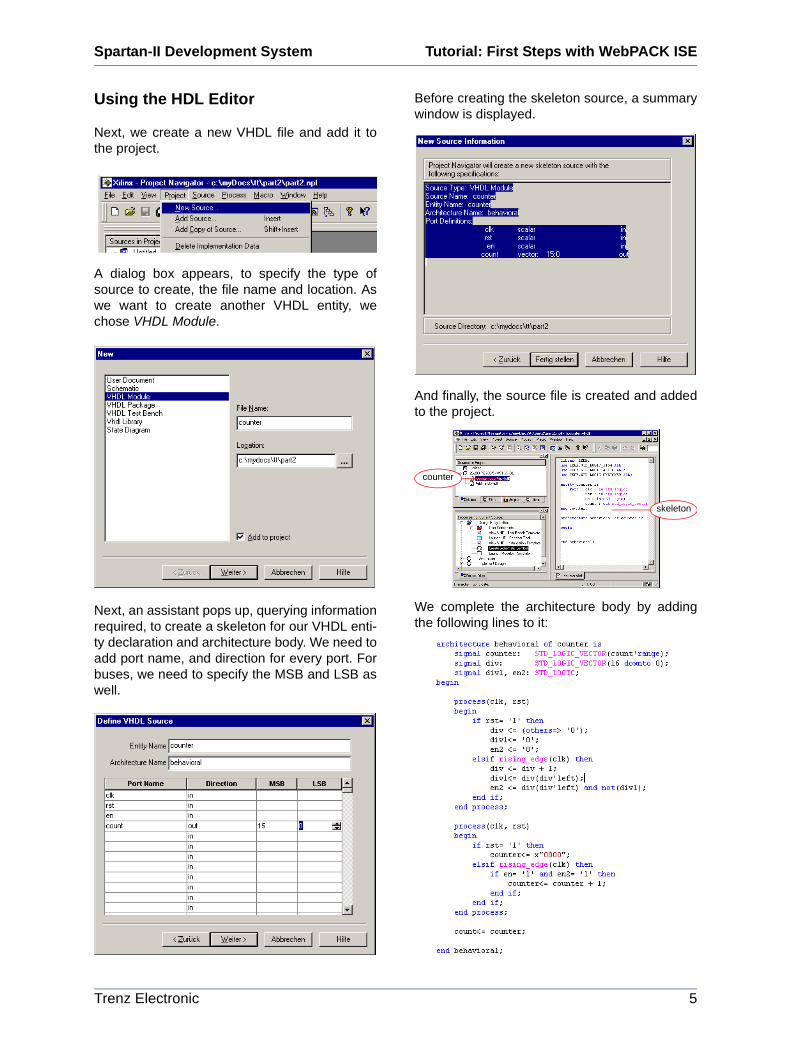
Next, an assistant pops up, querying informationrequired, to create a skeleton for our VHDL enti-ty declaration and architecture body. We need toadd port name, and direction for every port. Forbuses, we need to specify the MSB and LSB aswell.
Before creating the skeleton source, a summarywindow is displayed.
And finally, the source file is created and addedto the project.
We complete the architecture body by addingthe following lines to it:
counter
skeleton

Spartan-II Development System Tutorial: First Steps with WebPACK ISE
Trenz Electronic 6
And like before, create a schematic symbol. Weneed to select our newly created source first...
... double click Create Schematic Symbol...
... and a green check mark indicates successfulgeneration of the symbol.
In case we have questions about VHDL, or needsome inspiration, there are language templates.
The left pane sorts the templates by category,while the right pane displays the actual samplecode.
Check out the language templates and get fa-miliar with the editor! It behaves much like anyother programming editor, so you shouldn’t havea hard time doing so.
categories
example

Spartan-II Development System Tutorial: First Steps with WebPACK ISE
Trenz Electronic 7
Using the FSM Editor
Now we create a finite-state machine using theFSM Editor.
A dialog pops up, to query further informationabout the new source file. We chose State Dia-gram here.
Before creating the new diagram, a summarywindow is displayed.
Next, the FSM Editor is launched, displaying anempty sheet.
We use the Draw States tool, to add a few statesto our FSM.
Next, we use the Draw Transitions tool, to con-nect our states.
We chose the Draw Reset tool, to add a reset toState0, and will be prompted for the type of re-set. We select asynchronous here.
Draw States
DrawTransitions
DrawReset

Spartan-II Development System Tutorial: First Steps with WebPACK ISE
Trenz Electronic 8
Now our machine looks like this:
In the following, we edit the state’s properties. Adouble click on State0 pops up the following dia-log. We alter the state name and add an output.
We do the same for State1...
... and State2.
Next, we need to set up the transitions. Doubleclicking on the transition from idle to run pops upthe following dialog. We add a condition to thistransition.
For the transition connecting run with stop weneed to add a similar condition:
Our reset vector is already properly set up, butto be sure, we may open the according dialog aswell:

Spartan-II Development System Tutorial: First Steps with WebPACK ISE
Trenz Electronic 9
Now we finished editing our FSM, the final resultshould look like this:
Next, we compile our graphical representationof the state machine into synthesizable VHDL.
There are several options, how our statema-chine can be translated to VHDL. The most im-portant option is, whether the outputs areregistered or not. We chose not to register ouroutputs.
The parser detected, that there is no transitionleaving the stop state, except for a reset condi-
tion. For our machine this is intentional, so wemay safely ignore this warning.
Finally, the generated source code is displayedfor review. You should have a look at the codeand check, if this reflects, what you had in mind.
We exit the FSM Editor now and find ourselvesback in the Project Navigator. Unfortunately ourstatemachine has not been added to project, sowe need to do this manually.
For convenience, we add both, the VHDL file,and its graphical representation to our project.This allows us to open the diagram later on bysimply double clicking the .dia file. Unlike the.vhd file, the .dia file is not required for synthe-sis.

Spartan-II Development System Tutorial: First Steps with WebPACK ISE
Trenz Electronic 10
Again, we are asked for the type of our VHDLsource.
To create a schematic symbol for our state ma-chine, we select the source file.
Double clicking Create Schematic Symbol cre-ates the symbol, which is indicated by the greencheck mark.
Creating state machines is a non-trivial task. It ishighly recommended to get familiar with the var-ious options of the state machine editor, their ef-fect on the generated VHDL code and theireffect on synthesis and implementation.

Spartan-II Development System Tutorial: First Steps with WebPACK ISE
Trenz Electronic 11
Using the Schematic Editor
The top layer of our design is created with theschematic editor, instantiating the symbols be-ing defined during previous design entry steps.First, we need to create a new source.
We specify Schematic as the source type andenter file name and location.
A summary is displayed, before actually creat-ing the new source.
Then, the schematic editor is launched, display-ing an empty sheet.
First, we add our previously created schematicsymbols to the sheet.
The library window pops up. We add the sym-bols control, counter and tebl to the sheet.
After adding the symbols, our sheet looks likethis.

Spartan-II Development System Tutorial: First Steps with WebPACK ISE
Trenz Electronic 12
Probably, we need to tidy up our symbols a bit.
Clicking on symbol will open the symbol editorwindow. We adjust control to look like this.
And exit the symbol editor.
The schematic editor notifies us before updatingthe symbols. We click OK TO ALL.
Next, we adjust counter to look like this...
... and tebl to look like this.
Now we interconnect the symbol instances witha few wires.

Spartan-II Development System Tutorial: First Steps with WebPACK ISE
Trenz Electronic 13
The result should look like above.
Next, we assign names to some signals.
To do so, we edit the name in the status line...
... and after hitting return, we can assign thename to a wire, by clicking on its red marker.
We proceed to do so with some other lines...
... and add I/O Markers to them.
Spartan-II Development System Tutorial: First Steps with WebPACK ISE
Trenz Electronic 14
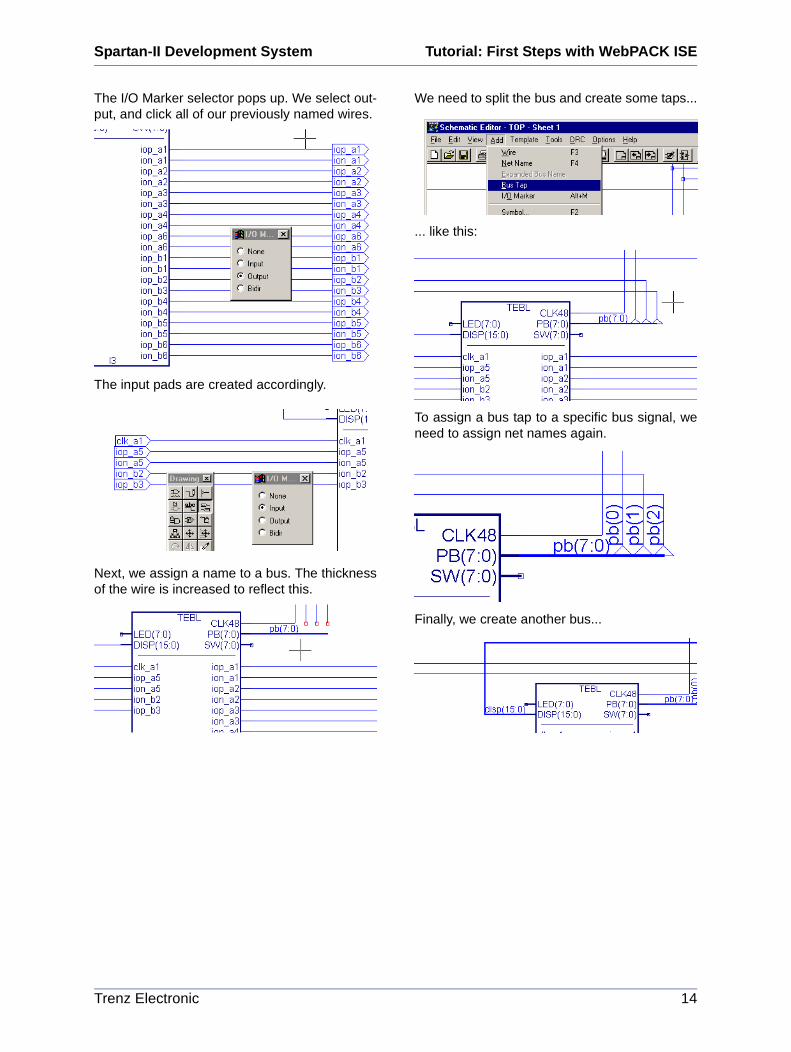
The I/O Marker selector pops up. We select out-put, and click all of our previously named wires.
The input pads are created accordingly.
Next, we assign a name to a bus. The thicknessof the wire is increased to reflect this.
We need to split the bus and create some taps...
... like this:
To assign a bus tap to a specific bus signal, weneed to assign net names again.
Finally, we create another bus...
Spartan-II Development System Tutorial: First Steps with WebPACK ISE
Trenz Electronic 15
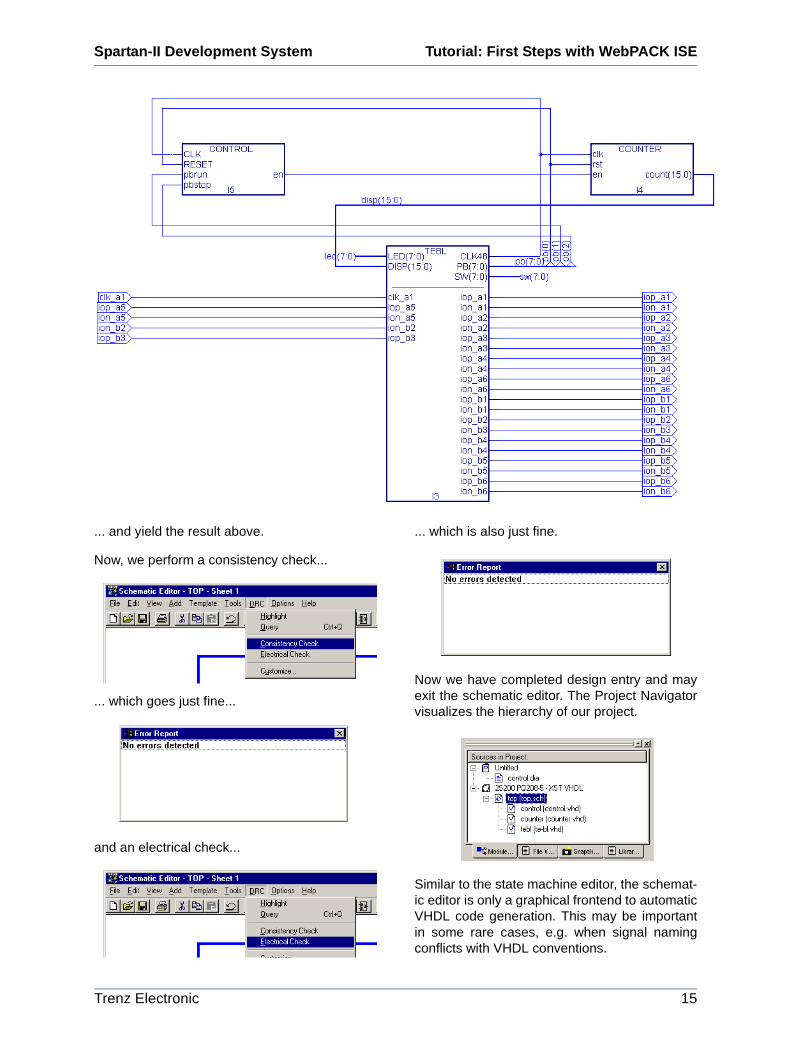
... and yield the result above.
Now, we perform a consistency check...
... which goes just fine...
and an electrical check...
... which is also just fine.
Now we have completed design entry and mayexit the schematic editor. The Project Navigatorvisualizes the hierarchy of our project.
Similar to the state machine editor, the schemat-ic editor is only a graphical frontend to automaticVHDL code generation. This may be importantin some rare cases, e.g. when signal namingconflicts with VHDL conventions.

Spartan-II Development System Tutorial: First Steps with WebPACK ISE
Trenz Electronic 16
Behavioral simulation
Creating a TestbenchBefore simulating our design, we need to createa Testbench, which is applying stimuli to our cir-cuit. Create a new source...
... with the wizard.
Review the information...
... and assign the newly created file to the de-sign’s top level.
Then type in your testbench code. The followingcode is the simplest form of a testbench, as it isonly applying stimuli to the design. More sophis-ticated testbenches also perform checks on thedesign’s responses.

Spartan-II Development System Tutorial: First Steps with WebPACK ISE
Trenz Electronic 17
Using the SimulatorSelect TBtop...
... and double-click Simulate Functional VHDLModel...
... to launch the ModelSim simulator.
Select all signals...
... and delete them.
Select the hierarchy level...
... and the signals to watch...
... and drag them into the wave window.
Repeating these steps...

Spartan-II Development System Tutorial: First Steps with WebPACK ISE
Trenz Electronic 18
... for entity counter as well...
... completes our wave window. Click the savebutton to store your setup for later sessions.
Now restart the simulator...
... click restart...
... and run the complete simulation. For our de-sign, the total simulation range is 15ms, whichresults in a run time of approximately 5 minuteson a Pentium-III with 700MHz.
Zoom to full...
... to see our counter design working. You are in-vited to play around with the simulator. Browsethe design hierarchy, watch signals, set break-points in the VHDL code and much more!
reset
count
start
stop

Spartan-II Development System Tutorial: First Steps with WebPACK ISE
Trenz Electronic 19
Compiling the design
SynthesisBefore synthesizing our design, we double-check that the correct target family is selected.When targeting the TE-XC2S board, the correctdevice is 2S200 PQ208-5.
Next select the design’s top level...
... and double click on the Synthesize process.
A green check mark indicates success...
... while a yellow exclamation mark indicateswarnings.
You should review the synthesis report to besure.
A number of options controls the way your be-havioral description is translated into a structuralnetlist during synthesis. You may safely leavethese options to their default values, unless youare working on a high-performance design.

Spartan-II Development System Tutorial: First Steps with WebPACK ISE
Trenz Electronic 20
ConstraintsBefore editing the constraints, you need totranslate your design. To do so, double click onTranslate.
Now launch the Constraints Editor.
Select the clk_a1 line...
... and edit the clock period...
... to be 48MHz:
Go to the Ports tab...

Spartan-II Development System Tutorial: First Steps with WebPACK ISE
Trenz Electronic 21
...and enter the following pin locations accordingto your TE-XC2S hardware:
Now save the result...
... click OK...
... end exit the Constraints Editor. Click Reset toincorporate your new constraints.
Most likely, you will need to set up your con-straints only once. Later implementation stepswill keep the settings you made here.
Be warned that wrong or incomplete timing con-straints may lead to unexpected behavior, whilewrong or missing pin lockings may lead to hard-ware damage!
Spartan-II Development System Tutorial: First Steps with WebPACK ISE
Trenz Electronic 22
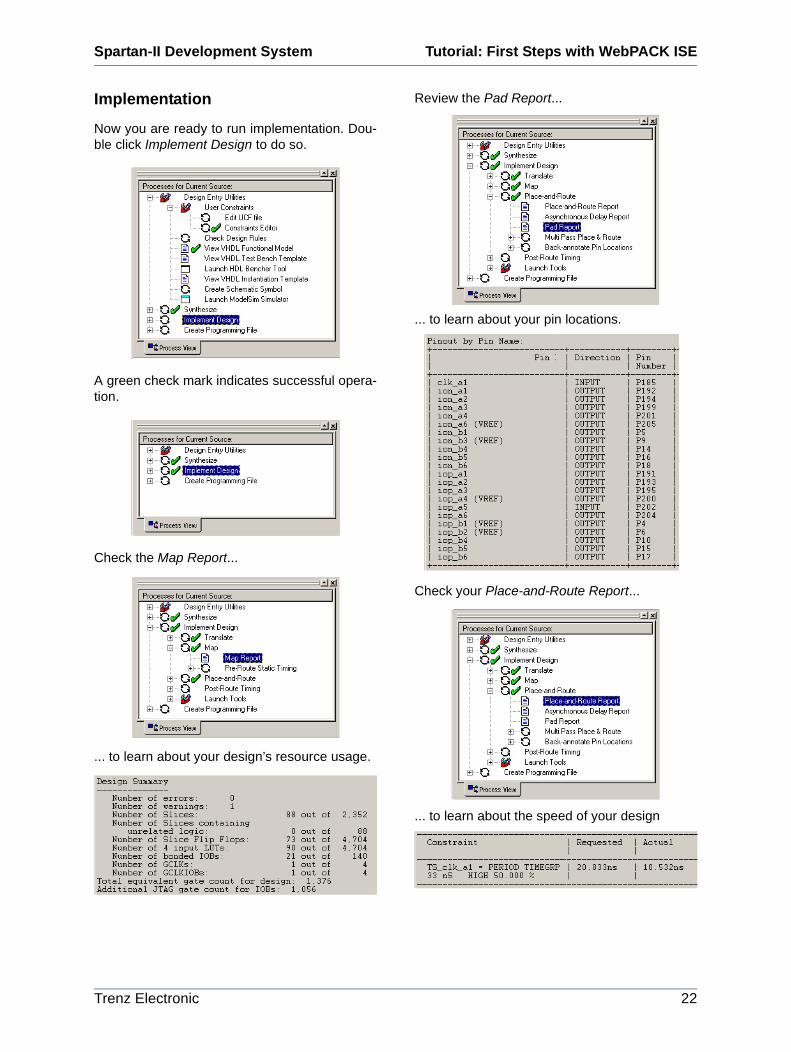
Implementation
Now you are ready to run implementation. Dou-ble click Implement Design to do so.
A green check mark indicates successful opera-tion.
Check the Map Report...
... to learn about your design’s resource usage.
Review the Pad Report...
... to learn about your pin locations.
Check your Place-and-Route Report...
... to learn about the speed of your design
Spartan-II Development System Tutorial: First Steps with WebPACK ISE
Trenz Electronic 23
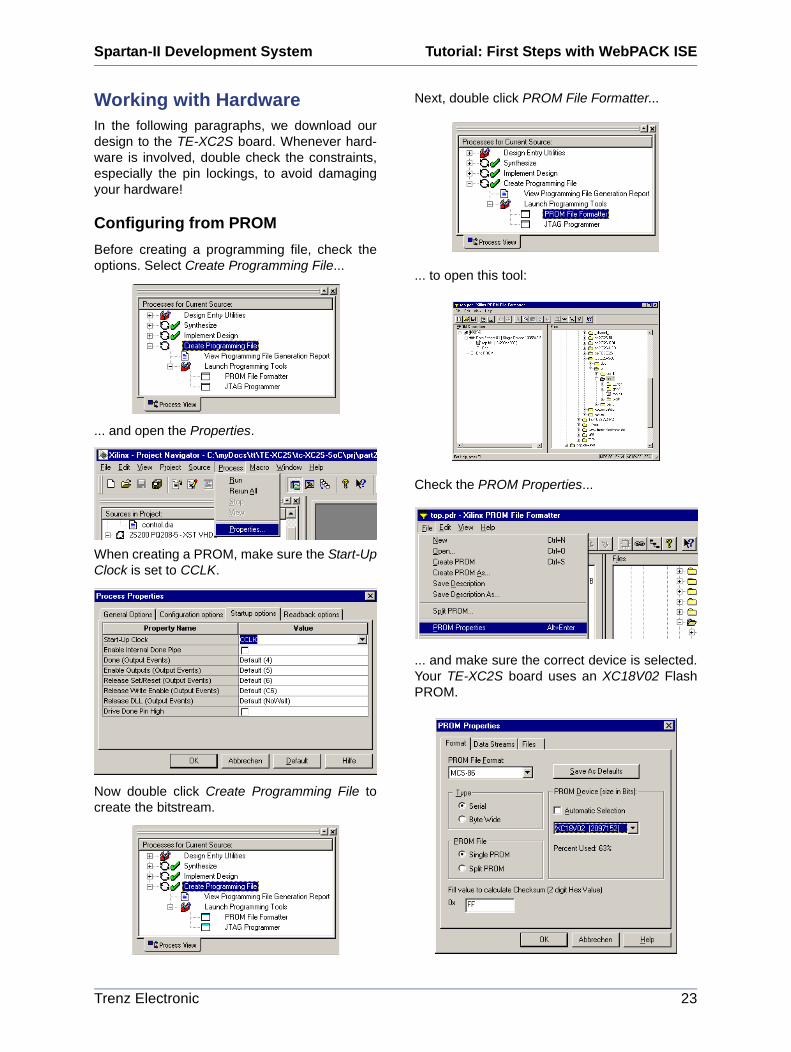
Working with HardwareIn the following paragraphs, we download ourdesign to the TE-XC2S board. Whenever hard-ware is involved, double check the constraints,especially the pin lockings, to avoid damagingyour hardware!
Configuring from PROMBefore creating a programming file, check theoptions. Select Create Programming File...
... and open the Properties.
When creating a PROM, make sure the Start-UpClock is set to CCLK.
Now double click Create Programming File tocreate the bitstream.
Next, double click PROM File Formatter...
... to open this tool:
Check the PROM Properties...
... and make sure the correct device is selected.Your TE-XC2S board uses an XC18V02 FlashPROM.

Spartan-II Development System Tutorial: First Steps with WebPACK ISE
Trenz Electronic 24
Now create the programming file,...
... exit the PROM File Formatter and launch theJTAG Programmer.
The following screen appears:
Open the Cable Setup...
... and setup for Parallel Cable III.
Successful cable detection is indicated like this:
Now scan your JTAG chain...
... for the devices on your TE-XC2S board.
Double click the XC18V02 PROM and browsefor the MCS file created by the PROM File For-matter a few steps ago.
Chose the XC18V02-VQ44 part.
Double click the XCV200 FPGA and browse forthe BIT file created during Implementation.

Spartan-II Development System Tutorial: First Steps with WebPACK ISE
Trenz Electronic 25
The Spartan-II family is a close derivative of theVirtex family, for this reason the following warn-ing may be safely ignored.
Select the Flash PROM again...
... and chose to program the device.
Setup the programming options...
... and program the device.
To configure your TE-XC2S board from theFlash PROM, setup the jumpers as follows...
... and hit the PRG button to configure the FP-GA. When the DONE LED lights up, your boardis configured successfully.
Don’t forget to save your setup.
Configuration via JTAGInstead of programming the Flash PROM andconfiguring the FPGA from the PROM, theFPGA may be configured directly via JTAG. Todo so, you will need to create a programming filewith modified options. Select Create Program-ming File...
Pin Setting
M0 open
M1 open
M2 open

Spartan-II Development System Tutorial: First Steps with WebPACK ISE
Trenz Electronic 26
... and open the Properties.
When configuring via JTAG, make sure theStart-Up Clock is set to JTAG.
Now double click Create Programming File tocreate the bitstream.
Launch the JTAG Programmer, open the previ-ously created project and select the FPGA.
Make sure your TE-XC2S board is set up as fol-lows...
Chose to program the device...
... setup the programming options...
... and program the device.
Like before, the DONE LED lights up, once theFPGA configured successfully. Unlike configur-ing from PROM, the configuration is lost, whenpressing the PRG button.
Pin Setting
M0 closed
M1 open
M2 open

Spartan-II Development System Tutorial: First Steps with WebPACK ISE
Trenz Electronic 27
Wrap UpCongratulations! Now that you completed the tu-torial, you gained a basic understanding ofFPGA development and the tools involved. Nowit’s up to you, to expand your knowledge usingthe various internet resources and further read-ings.
The References section lists those documents,which describe the soft- and hardware used inthis tutorial in full detail. While these documentsprovide complete and accurate information,most of them are not too instructive.
An introduction to FPGA technology is givenhere:• Spartan-II Development System
Tutorial: Introduction to FPGA TechnologyTrenz Electronic, November 5, 2001
The following application notes provide com-plete sample projects and helpful hints:• Spartan-II Development System
Application Note: Buttons & LightsTrenz Electronic, September 20, 2001
• Spartan-II Development SystemApplication Note: Game Of LifeTrenz Electronic, September 20, 2001
To improve your knowledge on VHDL, we rec-ommend the following resources:• The VHDL Cookbook
Peter J. Ashendenftp://ftp.cs.adelaide.edu.au/pub/VHDL-Cookbook/
• The Designer’s Guide to VHDL, 2nd EditionPeter J. AshendenISBN: 1558606742 Morgan Kaufmann, January, 2001
• Schaltungsdesign mit VHDLLehmann, Wunder, SelzISBN 3-7723-6163-3Franzis'-Verlag, 1994http://www-itiv.etec.uni-karlsruhe.de/FORSCHUNG/VEROEFFENTLICHUNGEN/lws94/lws94.html
• VHDL FAQhttp://www.vhdl.org/vi/comp.lang.vhdl/
To find a helping hand to answer your questions,you should join the following usenet discussiongroups:• comp.arch.fpga• comp.lang.vhdl
References• Foundation Series ISE 3.1i
User GuideXilinx, Inc., October 17, 2000
• Xilinx Synthesis Technology (XST)User GuideXilinx, Inc., October 17, 2000
• Development System Reference GuideXilinx, Inc., October 11, 2000
• Constraints Editor GuideXilinx, Inc., October 11, 2000
• PROM File Formatter GuideXilinx, Inc., October 11, 2000
• JTAG Programmer GuideXilinx, Inc., October 11, 2000
• Spartan-II Development SystemProduct SpecificationTrenz Electronic, September 12, 2001
• Spartan-II 2.5V FPGA FamilyProduct SpecificationXilinx, Inc., October 31, 2000
• XC18V00 Series of In-System Programmable Configuration PROMsProduct SpecificationXilinx, Inc., April 4, 2000
• Spartan-II FPGA Family Configuration and ReadbackXAPP176Xilinx, Inc., December 4, 1999
• Configuration and Readback of Virtex FPGAs Using (JTAG) Boundary-ScanXAPP139Xilinx, Inc., February 18, 2000
Copyright© 2001 Trenz Electronic.
All rights reserved. Reproduction in whole or inpart is prohibited without the written consent ofthe copyright owner.
Revision History
Version Date Who Description
1.0 2001sep25 FB Created, WP3.3
1.1 2001nov06 FB Minor additions
Table 1: Revision History