standard operating procedure for delivery partner on
TRANSCRIPT

Page 1-1
Standard Operating Procedure
For Delivery Partner On-Boarding Process

Page 1-2
1. Introduction
1.2 Purposes and Objectives
The USPS has developed and will provide a more comprehensive package tracking solution for Colleges and Universities. This solution will improve the customer experience, visibility, and efficiency for College/University deliveries. In addition, it will provide USPS Partners a mobile application to manage package delivery to final recipients, including tracking, notification, and reporting features. This SOP provides a step by step outline of how to get set up with the program.
1. Overview
Delivery Agent benefits include:
All On-Campus scan events revealed on USPS.com Tracking
Leverage of the Firmsheets Program:
o USPS captures and sends Firmsheet extract file to the Mail Center.
o Firmsheet files contain a list of incoming packages to the Mail Center.
o Use for reconciliations (e.g., compare to daily or weekly package receipts).
Take Advantage of the Delivery Partner Events Program
o Mail Center transmits partner tracking events using the Deliver Partner Event file to USPS (via in-house or vendor software, USPS Partner App, or manual upload).
o The Delivery Partner Event file lists all delivery histories that are captured by the Mail Center.

Page 1-3
2. Where to start?
2.1 On-Boarding Process Register
Register on the Business Customer Gateway, (BCG) to obtain a BCG user account
Get Access to Parcel Data Exchange (PDX) - for file receipts and transmissions
Complete the Onboarding Process in BCG for Tracking Only Program
Register for Firmsheet Delivery Extract
On Line Enrollment Log on to the Business Customer Gateway USPS Business Customer Gateway
1. Select “Register for free” radio button if you do not currently have a username and password. If you currently have a username and password skip to Registration Process by entering the exiting username and password for your institution

Page 1-4
2. Input Business information

Page 1-5
NOTE: Once you have input the company information, a screen will appear to inform you that you are registered.. Accept the terms and Conditions by clicking on “Continue”
3. Select continue with the enrollment process once you review the business information

Page 1-6
Registration Process -
1. Each customer must register on the “Business Customer Gateway” (BCG) accessed thru the USPS.com site.
2. Once on the BCG, click on the “Online enrollment ” located under Favorite Services – see below
3. Continue to the below screen and select “Tracking Only” for the type of application you are requesting.

Page 1-7
4. What type of customer are you?
Select “other”.
5. What type of mail do you want to ship?
Select “Domestic Packages”.

Page 1-8
6. Which domestic mail classes are you shipping? Select “First Class Mail”.
7. What services would you like to use?
Select “USPS Tracking”.

Page 1-9
8. What payment option will you be using for your mailing? Select “Postage Meter”.
9. You will now be directed to the “Welcome” page. Click on “Tracking only”.
Page 1-10
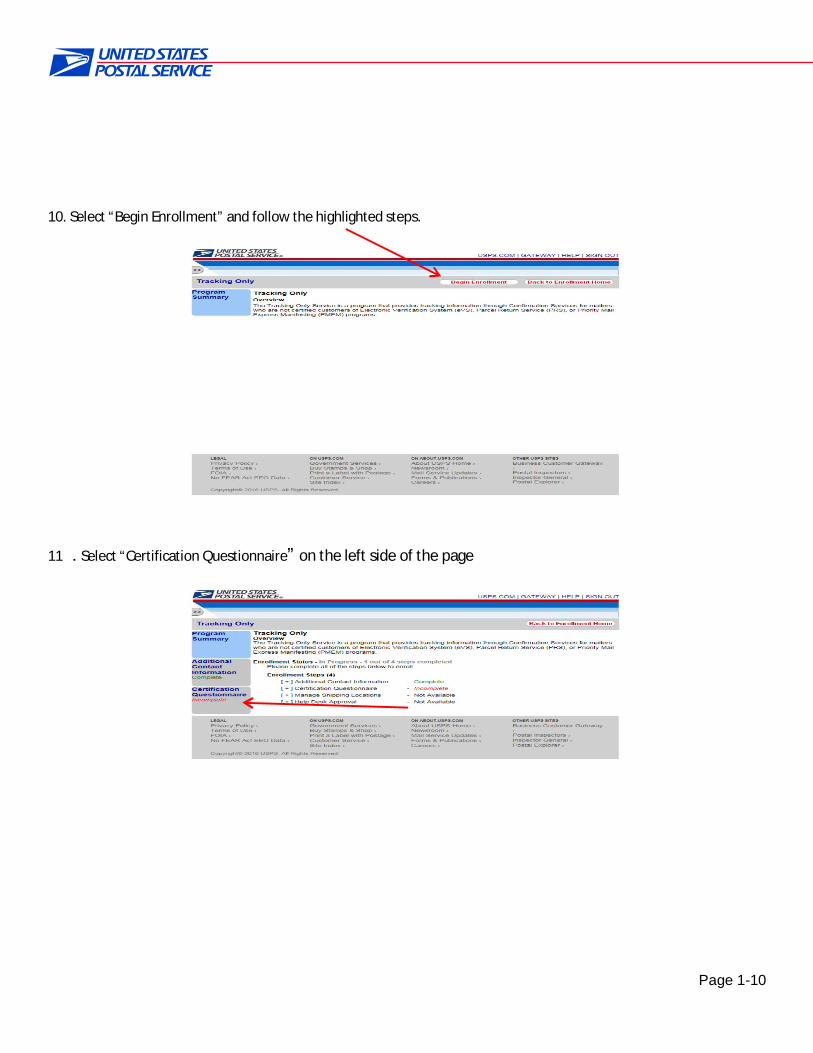
10. Select “Begin Enrollment” and follow the highlighted steps.
11 . Select “Certification Questionnaire” on the left side of the page

Page 1-11
12 . Will you be sending an electronic file to the USPS? Select highlighted choses below.
13. How will you transmit the file to USPS? Select highlighted choses below

Page 1-12
14. How will you be generating your bar-coded labels for packages? Select “Printing your own labels”.
15. Will you be using a software vendor? - Select the highlighted choices below and provide your software vendor. Find the vendor name in the drop down box in question 2. If your vendor does not appear in the dropdown box, select “Other” then enter the name in the free-form box that will appear once “Save and continue” is selected.

Page 1-13
16. What file format will you be using to submit your files to USPS? Select “Electronic file version 1.6”.
17. How do you want the USPS to provide your tracking and or postage information? Select “Web Services”.

Page 1-14
18. What format would you like to receive for your error/warning status file? Select “Report Format”.
19. Do you want to receive a file of tracking events for mail pieces? Select “No”.

Page 1-15
20. Do you want to receive a report of pieces for which the USPS has not received an electronic manifest? Select “No”.
21. Do you want to receive a Firm Deliveries Extract file? Select “Yes”

Page 1-16
22. Would you like to receive your Error/Warning and Extract files in a Compressed format? Select “No – Uncompressed File”
23. Now click on “Manage Shipping Locations” on the left side of the page

Page 1-17
24. Click on the Mailer ID (MID) that needs to be enrolled for the program by clicking on the box next to the MID you will use for the Delivery Partner Event scanning (Bottom left arrow), then select the “Link MID to Program” button
25. Confirm the MID populates table as shown below. Once complete click “Gateway” on the top of the page.
NOTE: After all steps are completed, you will receive a test kit with the instructions on how to complete your certification within the following 24 hours. This is for customers who plan on sending manifest files to the USPS
Page 1-18
For the Delivery Partner program and not sending the USPS manifest files, then you can ignore this email. The sign up for delivery partner events is almost completed. The last step is to email our National Support Center (NCSC) to finalize your instructions profile Once this step is complete contact NCSC help desk via email at [email protected]. Ensure in the email to NCSC that you identify this as a request to complete the Delivery Partner certification. This is completed within 1 business day. This step allows you to receive the file extracts from the USPS based on your profile and scheduled pick up times. In the email we need two specific things to complete the registration
1- All pick up times that you use to retrieve the mail from the post office. Whether 1, 2 or 3 times a day, tell us when you pick up the mail. We will have this time noted in the Program Registration so that we send this data to you prior to pick up. If the mail is delivered to you, pick a time PRIOR to the normal established arrival time.
2- FIRMSHEET name presently used by the USPS. If you do not receive a firmsheet from the USPS, you can create one as long as this name is unique. We suggest the University name and ZIP Code if one is not already established with the post office. If one is not established yet with the post office, ensure that you do tell the postmaster the name you chose so they can create this file name on their scanners. This will ensure consistent transmission of your data to the correct folder
There is a limit of 20 total characters including any spaces to the firmsheet name so please ensure this is considered. This file name is also the name of the folder in your institutions Gateway account. USPS will place the file extract in this folder prior to the scheduled pick up times established with the post office Once the USPS delivery office scans the packages as “Tendered to third party agent” using the firmsheet the files will upload to your Gateway folder for you to retrieve. If you have any questions, please contact Kevin Bray via email. His office will support you through the onboarding process and ensure any questions are answered. He can be reached at [email protected]