state of nevada unemployment insurance -...
TRANSCRIPT

State of Nevada
Unemployment Insurance
Guide to Online
Claimant Self Service

Guide to Online Claimant Self Service
UINV - CSS Claimant Guide {2013-08-20}.doc State of Nevada Page 2
Table of Contents
Getting Started ........................................................................................................... 3
Introduction ........................................................................................................................................... 3 Getting Help ........................................................................................................................................... 3 Basic System Navigation ........................................................................................................................ 4
Creating an Online Claimant Account .......................................................................... 5
Background ............................................................................................................................................ 5 Instructions ............................................................................................................................................ 5
Completing Your Claimant Registration ..................................................................... 12
Background .......................................................................................................................................... 12 Instructions .......................................................................................................................................... 12
Applying for Benefits ................................................................................................ 18
Background .......................................................................................................................................... 18 Instructions .......................................................................................................................................... 18
Claiming Weekly Benefits .......................................................................................... 29
Background .......................................................................................................................................... 29 Instructions .......................................................................................................................................... 29
Reactivating a Claim .................................................................................................. 36
Background .......................................................................................................................................... 36 Instructions .......................................................................................................................................... 36
Additional CSS Functionality ..................................................................................... 44
Background .......................................................................................................................................... 44 The Customer Menu ............................................................................................................................ 44 The Claimant Homepage ...................................................................................................................... 45 Changing Your Personal Information ................................................................................................... 46 Changing Your Security Preferences .................................................................................................... 46 Changing Your IVR PIN ......................................................................................................................... 47 Viewing Your Confirmation History ..................................................................................................... 47 Accessing the Debit Card Website ....................................................................................................... 48 Viewing Your Determination History ................................................................................................... 48 Viewing Your Appeal Information ........................................................................................................ 49 Viewing Your Documents ..................................................................................................................... 50

Guide to Online Claimant Self Service
UINV - CSS Claimant Guide {2013-08-20}.doc State of Nevada Page 3
Getting Started
Introduction
Welcome to the State of Nevada Unemployment Insurance Claimant Self Service (CSS) system.
You can use this online system to file an unemployment insurance claim, file your weekly claim,
check on the status of an existing claim, and more. This reference guide provides instructions
on how to perform these activities.
Filing a claim for Unemployment Benefits involves two steps:
1. Registering and applying for benefits (providing information about you, your past
employment, your separation from employment, and other information to establish your
claim for benefits and to help determine your eligibility). If you are determined eligible for
benefits, your weekly benefit amount will then be determined.
2. Filing a weekly claim to certify your unemployment for the past week and to request a
weekly benefit payment. To continue receiving benefits, you will need to file a claim for
each week to verify your ongoing eligibility.
For additional information about claim eligibility and the overall process, refer to the "Nevada
Unemployment Insurance Facts for Claimants" handbook.
Getting Help
If you experience difficulties with the CSS system, please contact the following numbers:
• For difficulties with your Claimant Self-Service login or PIN, please call the Security Help
Desk
o Northern Nevada (775) 687-6838
o Southern Nevada (702) 486-3293
• If you are able to successfully log into the system, but have questions about how to use
the system or questions about your claim, please call Telephone Claim Center
o Northern Nevada (775) 684-0350
o Southern Nevada (702) 486-0350
o Long Distance or Interstate (888) 890-8211

Guide to Online Claimant Self Service
UINV - CSS Claimant Guide {2013-08-20}.doc State of Nevada Page 4
Basic System Navigation
Many of the system’s screens have common features that are described below:
Note that you should not use the Internet browser’s Back button to navigate through the
screens in CSS. Instead, you should use the buttons on the screens (some screens contain a CSS
Back button) or use the left-hand navigation menu to move between screens.
Note that the screenshots used throughout this guide are meant for illustrative purposes, and
not all intended to be readable within this document.
Guide to Online Claimant Self Service
UINV - CSS Claimant Guide {2013-08-20}.doc State of Nevada Page 5
Creating an Online Claimant Account
Background
The first step in the online claims process is to create a new online claimant account. Doing so
involves creating your username and password, providing other basic information, and setting
your security questions and image. After creating your account, you should continue with the
instructions on how to complete your registration and apply for benefits.
In the future, if you need to file another claim, and have previously established an online CSS
account (e.g., because of a prior claim), you should login by entering your username, password,
and security questions. Once you gain access to the system, you should validate that your
registration information is still accurate and then proceed to the instructions on Applying for
Benefits to file a new claim.
Note that all claimants, including those who have filed using our former internet claim system,
will need to create a new online claimant account in order to access CSS.
Instructions
1. Connect your computer to the following internet address: www.ui.nv.gov
2. Proceed to the Claimant section to access the Claimant Self Service system.
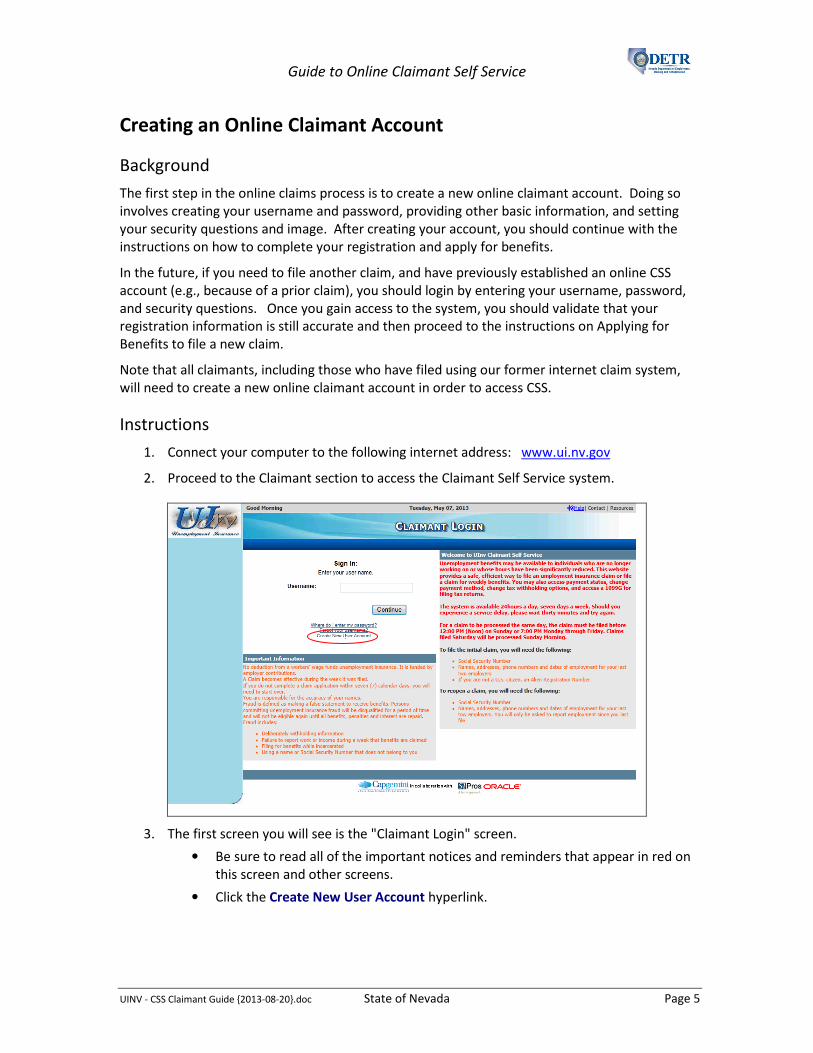
3. The first screen you will see is the "Claimant Login" screen.
• Be sure to read all of the important notices and reminders that appear in red on
this screen and other screens.
• Click the Create New User Account hyperlink.

Guide to Online Claimant Self Service
UINV - CSS Claimant Guide {2013-08-20}.doc State of Nevada Page 6
4. Complete the fields on the “Claimant Registration” screen. Note the following:
• Fields marked with an asterisk (*) are required and must be completed before
advancing to the next screen. (It is suggested that you also include as much
non-required information as possible to help the Division locate your
information if there are multiple claimants with the same name as yours.)
• If you have only a single name (e.g., “Cher”), you should enter a period (.) or
dash (-) in the First Name field and enter the single-name (e.g., Cher) in the Last
Name field.
• Create a username that is unique to you, but one that you can easily
remember. Your username must be between 8 and 20 characters in length,
must contain only alphanumeric characters, and cannot contain any spaces.
• Your password should be information that only you know and that is difficult for
others to determine. Be sure to click the Password Rules link to review specific
password criteria. The more complex your password, the greater the security
strength.
• Be sure to read the important information in the "Website Terms of Use
Agreement" section before proceeding. You will need to scroll down within the
section to read all of the text.
• Be sure to click the I accept the User Agreement option.
• The system uses randomly generated, wavy, "Captcha" text to help ensure the
information you enter is not generated by a computer. You must read the two
words in the system verification frame and then type them into the text field. If
you have difficulty reading the words, you can click Get a new challenge button
to the right of the entry field to request a new set of words.
• After entering information on this screen, click the Next button.

Guide to Online Claimant Self Service
UINV - CSS Claimant Guide {2013-08-20}.doc State of Nevada Page 7
5. Review the information on the confirmation screen and click the Submit button (or click
the Back button if you need to make a change).
6. Enter a 4-digit Phone Pin that you will use to identify yourself when you call the
Telephone Claim Center, and click the Submit button (if you already have a Phone Pin
on file you may not see this screen).

Guide to Online Claimant Self Service
UINV - CSS Claimant Guide {2013-08-20}.doc State of Nevada Page 8
7. Notice the message confirming your new user Id. After a few seconds, the "Claimant
Login" screen will automatically display. If there is a problem, and the screen does not
display, you can click the this link hyperlink to be redirected to the login screen.
8. Enter your newly created Username on the “Claimant Login” screen and click the
Continue button.

Guide to Online Claimant Self Service
UINV - CSS Claimant Guide {2013-08-20}.doc State of Nevada Page 9
9. Enter your Password in the “Security Device” and click the Enter button.
10. After successfully logging in for the first time, you will arrive on a screen that describes
the process for establishing your security profile. Be sure to read the information on
this screen and click the Continue button.

Guide to Online Claimant Self Service
UINV - CSS Claimant Guide {2013-08-20}.doc State of Nevada Page 10
11. A preview of your system generated security image and phrase is displayed.
• If desired, you can change your security image and phrase by clicking the image
and phrase link.
• When you are satisfied with your security image and phrase, click Continue.
12. Next, you need to select three questions and answers to establish your security profile.
• One at a time, for each selection box, choose a question from the dropdown list,
type your answer in the Answer field to the right, and click the Enter button.
(Note that the same Answer field is used is used for all three questions.)
• Continue until you have selected and provided answers for all three questions.
(Hint: You should write down the questions and answers you provided for future
reference – be sure to keep them in a secure place.)

Guide to Online Claimant Self Service
UINV - CSS Claimant Guide {2013-08-20}.doc State of Nevada Page 11
13. The system returns you to the "Claimant Login" screen.

Guide to Online Claimant Self Service
UINV - CSS Claimant Guide {2013-08-20}.doc State of Nevada Page 12
Completing Your Claimant Registration
Background
After creating your online CSS account, the next step in the filing process is to complete your
online registration information. Doing so involves the following:
• Entering your Personal, Address, Contact, and Demographic Information
• Reviewing and/or updating your Wage and Employer information
Note the following:
• If you have an existing or prior claim that was created in the former system, some of this
information may be pre-populated, in which case you would just update any out-of-date
information and provide any missing required information. (In the future, if you are
filing a new claim, and have completed your registration in CSS, the system will not
require you to complete it a second time, however it suggested that you review and
update your personal information as needed.)
• The system saves your responses as you move from screen to screen. If you leave the
system without completing your registration or claim, you have seven calendar days to
log back in to complete your filing. After seven days of inactivity, the system erases any
partially saved information and you will have to start over. Be aware that the benefit
period is based on the date your claim is completed, and not on the date you started.
Instructions
1. Log into the CSS system using your CSS account Username and Password. (Enter your
Username, click the Continue button, enter your Password into the security device on
the subsequent screen and then click the Enter button.) You may be prompted to
answer one of your security questions. If so, fill in the Answer field and click the Enter
button. (Any time you access your account using a new browser or PC, or if you are

Guide to Online Claimant Self Service
UINV - CSS Claimant Guide {2013-08-20}.doc State of Nevada Page 13
away from your computer for an extended period, you may need to answer one of your
security questions to verify your identity.)
2. Complete the empty fields on the “Personal Information” screen.
• Notice the information on the left side of the screen indicating that you should
not use the Internet browser Back button when navigating through the CSS
screens.
• Some of the fields on the "Personal Information" screen will be pre-populated
based on the information you entered when creating your online account.
• You should complete the Other Last Name Used fields if you have used a
different last name during any part of the previous 18 months.
• If you answer "Yes" to the child support question, you are required to complete
the additional child support fields (Child Support City, Child Support State, Child
Support County).
• After entering information on this screen, click the Next button.

Guide to Online Claimant Self Service
UINV - CSS Claimant Guide {2013-08-20}.doc State of Nevada Page 14
3. Complete the information on the “Address” screen.
• A "Mailing Address" is required for mailing of your debit card and agency
correspondence.
• You should enter a "Residential Address" if your place of residence is different
than your Mailing Address.
• If there is additional address information, such as a Post Office box number,
suite number, or apartment number, you can enter it into the Address Line 2
field.
• Select the JobConnect office that is closest or most convenient for you.
• If you entered an out of state address, you will be required to enter an answer
for the Commuter option. Select the "Yes" option if you regularly travel across a
state line or border to go to work or look for work, otherwise select the “No”
option.
• After entering information on this screen, click the Next button.

Guide to Online Claimant Self Service
UINV - CSS Claimant Guide {2013-08-20}.doc State of Nevada Page 15
4. If the address you entered is incomplete or not recognized by the system, a pop-up
window will appear and provide options to validate your address information.
• You can choose to accept the address you entered under "User entered
address" or instead select a system-suggested address under the "Addresses
selected by the system" list (if applicable).
• After making your address selection, click the Select button. You will then return
to the prior screen where your verified address information will be highlighted
in yellow and you will need to re-click the Next button.

Guide to Online Claimant Self Service
UINV - CSS Claimant Guide {2013-08-20}.doc State of Nevada Page 16
5. Complete the information on the “Contact” screen.
• If you choose "E-mail" as your Preferred Contact Method, you must include an
email address in the Email Address field and be sure to read the special
message regarding email.
• After entering information on this screen, click the Next button.
6. Complete the information on the “Demographics” screen.
• If you select "No" for the U.S. Citizen option, you will be required to enter your
Alien Registration Number and Alien Registration Expiration Date.
• If you select "Other" as your Preferred Language, you will be required to enter
your preferred language in the next field. Otherwise, leave this field blank.
• After entering information on this screen, click the Next button.

Guide to Online Claimant Self Service
UINV - CSS Claimant Guide {2013-08-20}.doc State of Nevada Page 17
7. The "Unemployment Insurance Benefits Estimator" screen is a preliminary assessment
of your potential eligibility for unemployment insurance benefits.
• Be sure to read the orange text displayed on the screen for additional
information.
• The "Base Period Quarterly Wages" section displays wages earned by you and
reported in Nevada during the current base period. These wages are used to
qualify you for an unemployment insurance claim.
• If you believe there are employers and/or wages missing from the "Base Period
Quarterly Wages" section, or you see employers you do not recognize, you
should make a selection from the Missing or Incorrectly Reported Wages
dropdown list.
• The "Current Quarterly Estimate" section contains the following information:
o Monetary Eligibility indicates, based on the existing records, whether you
have earned enough money during the base period on which to base a
claim.
o If deemed eligible, the Weekly Benefit Amt is the amount you are eligible to
receive during each week of unemployment (based on the wages listed).
o If deemed eligible, the Number of Weeks is the maximum number of weeks
you can draw unemployment checks, up to a maximum of 26 weeks.
o If deemed eligible, the Maximum Benefit Amount is the maximum amount
of money you can draw during the claim period.
• Notice the Print button at the bottom of the screen. It is recommended that
you print this screen so you will have this information available.
• Click the Continue to File Claim button and continue with the instructions in the
next section.

Guide to Online Claimant Self Service
UINV - CSS Claimant Guide {2013-08-20}.doc State of Nevada Page 18
Applying for Benefits
Background
After completing your registration, you are ready to apply for benefits (set up your initial claim).
Doing so involves the following:
• Providing required eligibility information
• Verifying and updating employment history and information about your last employer
(and possibly your next-to-last employer)
• Providing information about your separation(s) and your work search
• Reviewing the information you entered and submitting your claim
• Providing additional information through dynamic fact finding (DFF), if prompted
Note the following:
• After applying for benefits, you will need to file a weekly claim each week in order to
receive benefits (discussed in the next section).
• This section is specific to setting up an initial claim. If you had a break in your weekly
filing process and need to re-open an existing claim, you should refer to the section on
Reactivating a Claim.
Instructions
1. Log into the CSS system using your established Username and Password. (Enter your
Username, click the Continue button, enter your Password into the security device on
the subsequent screen and then click the Enter button.) You may be prompted to
answer one of your security questions. If so, fill in the Answer field and click the Enter
button.
If you have just completed your registration and are already on the “Initial Filing”
screen, skip to step number 4.

Guide to Online Claimant Self Service
UINV - CSS Claimant Guide {2013-08-20}.doc State of Nevada Page 19
2. You arrive on the “Customer Menu “screen. Click the File a New Unemployment
Insurance Claim link.
3. Review and perform any steps on the “Unemployment Insurance Benefits Estimator”
screen as described in the previous section, and click the Continue to File Claim button.

Guide to Online Claimant Self Service
UINV - CSS Claimant Guide {2013-08-20}.doc State of Nevada Page 20
4. After clicking the Continue to File Claim button on the “Benefits Estimator” screen, you
will arrive on the “Initial Filing” screen.
• Be sure to read each question carefully and select the correct option.
• Complete all the questions as appropriate and click the Next button. Note that
on this screen and subsequent screens, you must supply all required responses
in order to advance to the next screen.
5. The next screen continues the initial filing questions. Answer each question as
appropriate and click the Next button.

Guide to Online Claimant Self Service
UINV - CSS Claimant Guide {2013-08-20}.doc State of Nevada Page 21
6. Next you need to review and provide additional information about your work history.
Be sure to read the instructions at the top of the screen.
• Make sure that every employer for which you have worked during the base
period (last 18 months) is listed. If any are missing, add them as follows:
To add a Nevada employer, click the Add Nevada Employer button to open the “Add Nevada Employer” screen. You can either search for a Nevada employer or manually add them. It is best to first search for them to see if they are already in the system. If you do not find the desired employer using the search function, you can click the Manual Entry button to add them manually. When done, click the Finished Adding Nevada Employers button.
To add a Federal employer, click the Add Federal Employer button to open the “Add Federal Employer” screen. There are two ways to enter a Federal employer. (i) You can select from the Most Common Federal Employers dropdown list and then click the Add Employer button. (ii) Alternatively you can search for the employer using the search functionality. When done, click the Finished Adding Federal Employers button.
To add a Military employer, click the Add Military Employer button to open the “Add Military Employer” screen. Select the employer from the dropdown list. Then answer the "Yes/No" question and click the Add Employer button. Then click the Finished Adding Military Employers button.
To add an out of state employer, click the Add Out of State Employer button to open the “Add Out of State Employer” screen. Enter the employer information into the fields provided and click the Add Employer button. Then click the Finished Adding Out of State Employers button.
• Enter the type of employment and employment dates for your most recent
employer, as well as dates for any Federal or Military employers.
• You will need to also provide information on the next-to-last employer if you
meet any of the following criteria:
o You did work for two on call assignments in the last 16 weeks
o You did work for two temporary assignments in the last 16 weeks
o You did work for two different employers in the last 16 weeks
o You did not work more than 16 weeks at the last employer
• After entering information on this screen, click the Next button.

Guide to Online Claimant Self Service
UINV - CSS Claimant Guide {2013-08-20}.doc State of Nevada Page 22
7. If you had more than one employer listed on the "Employment History & Last Employer"
screen, the system will display a "Collect Separation Information" screen listing each of
those employers.
• If you receive this screen, click the Provide Additional Information link for the
first employer listed and complete the resulting screen (see next step). You will
then come back to this screen where you will need to click on that link for the
next employer to complete the same screen. Once you complete the process
for each of the employers listed, you will continue on through the remainder of
the instructions.
• If you do not receive this screen, you will proceed directly to the next step.

Guide to Online Claimant Self Service
UINV - CSS Claimant Guide {2013-08-20}.doc State of Nevada Page 23
8. Complete the information on the “Separation” screen.
• For the Reason Employment ended field, select the separation reason that most
closely describes your reason for separating from employment.
• Note that the Gross Earnings dates are based on your last week of work with
this employer.
• After entering information on this screen, click the Next button.
9. The "Other Separation" screen asks you for additional information regarding your
separation and claim eligibility. Complete the information on this screen as appropriate.
• If you are a member of a union with a hiring hall you will need to provide that
information by selecting the Yes radio button and then clicking the Union Name
search button.
• If you have a definite return to work date, or will start a new job within four (4)
weeks from the filing date, you will need to enter that information. Click the
Search button to open the "Employer Search" window to search for and enter
the employer information.
• After entering information on this screen, click the Next button.

Guide to Online Claimant Self Service
UINV - CSS Claimant Guide {2013-08-20}.doc State of Nevada Page 24
10. The "Work Search" screen asks for information regarding your occupation and your
availability to work. Complete the information on this screen as appropriate.
• You need to enter the primary and secondary occupations you are using for
your work search. These should include the occupation in which you have
worked most recently, or an occupation for which you have training or
education to support. Click the search button to the right of the Primary
Occupation and Secondary Occupation fields to complete these fields.
• After entering information on this screen, click the Next button.

Guide to Online Claimant Self Service
UINV - CSS Claimant Guide {2013-08-20}.doc State of Nevada Page 25
11. The "Summary" screen displays the information you entered in the previous screens. Be
sure to carefully review this information before proceeding.
• If you need to change any information, each section contains an Edit button
that will navigate you to the appropriate screen in order to make any necessary
changes. You would then click that screen’s Next button to return to this
“Summary” screen.
• Before submitting your claim application, it is recommended that you use the
Print button at the bottom of the screen to print a copy of your information for
your personal records.
• Click the Next button at the bottom of the screen when you are ready to
continue.

Guide to Online Claimant Self Service
UINV - CSS Claimant Guide {2013-08-20}.doc State of Nevada Page 26
12. Be sure to read the legal information on the "Submit Claim" screen and select the
appropriate options.
• If you are ready to file your claim, click the Yes, I agree- File my Claim button.
• If you decide you are not yet ready to submit your claim, you can click the No, I
do not agree button. Doing so will save all previously entered claim information
for 7 calendar days, during which time you can return to submit your claim.

Guide to Online Claimant Self Service
UINV - CSS Claimant Guide {2013-08-20}.doc State of Nevada Page 27
13. If any issues are identified with your claim, you will arrive on the “Fact Finding” screen.
(If there are no issues with the claim, you will arrive on the "File Claim Confirmation"
screen and you should skip to the next step.)
• The fact finding screen will show you all issues, along with their corresponding
fact finding link in the “Link to Additional Information” column. If given this
screen, you should click on the first link and answer the questions on the
resulting screen, and click that screen’s Submit button. Continue answering
each screen’s questions and clicking its Submit button until finished.
• At the end of each series of fact finding questions, you will arrive on a
“Summary” screen. Review that screen, and use the screen’s Edit button to
make changes or Submit button to submit your responses.
• If additional fact finding is required, you will return to the “Fact Finding” screen
where you should click on the next issue’s link to complete that issue’s fact
finding questions.
• Continue completing the fact finding questions for any remaining issues.

Guide to Online Claimant Self Service
UINV - CSS Claimant Guide {2013-08-20}.doc State of Nevada Page 28
14. Once you have completed all outstanding fact finding, you will arrive on the "File Claim
Confirmation" screen.
• Be sure to carefully read the information on this screen.
• This screen contains your Confirmation Number as well as additional
information you will need to begin filing your weekly benefit claims. It is
recommended that you use the Print button at the bottom of the screen print a
copy of this information for your records.
• Now that your initial claim has been filed, you will need to file weekly claim
certifications beginning the first Sunday date following your initial claim filing. If
you need assistance with filing your weekly claim certifications, please refer to
the next section of this guide book.

Guide to Online Claimant Self Service
UINV - CSS Claimant Guide {2013-08-20}.doc State of Nevada Page 29
Claiming Weekly Benefits
Background
In order to certify your eligibility, you need to file a weekly claim for each week you wish to
request a benefit payment. Benefit weeks begin on Sunday at 12:01 a.m. and end on the
following Saturday at midnight. You may not claim a week’s payment until the week has
completed.
Note that if you have a break in filing for three or more weeks, and your claim is inactive, you
should advance to the section of this guide book on Reactivating a Claim.
Instructions
1. Log into the CSS system using your established Username and Password. (Enter your
Username, click the Continue button, enter your Password into the security device on
the subsequent screen and then click the Enter button.) You may be prompted to
answer one of your security questions. If so, fill in the Answer field and click the Enter
button.

Guide to Online Claimant Self Service
UINV - CSS Claimant Guide {2013-08-20}.doc State of Nevada Page 30
2. Click the File Weekly Claim link. (You will only have this link if a weekly claim is available
to be filed.)
3. Be sure to read the reminders on the "Important Information" screen before continuing
with the weekly certification process. Then click the Next button.
Guide to Online Claimant Self Service
UINV - CSS Claimant Guide {2013-08-20}.doc State of Nevada Page 31
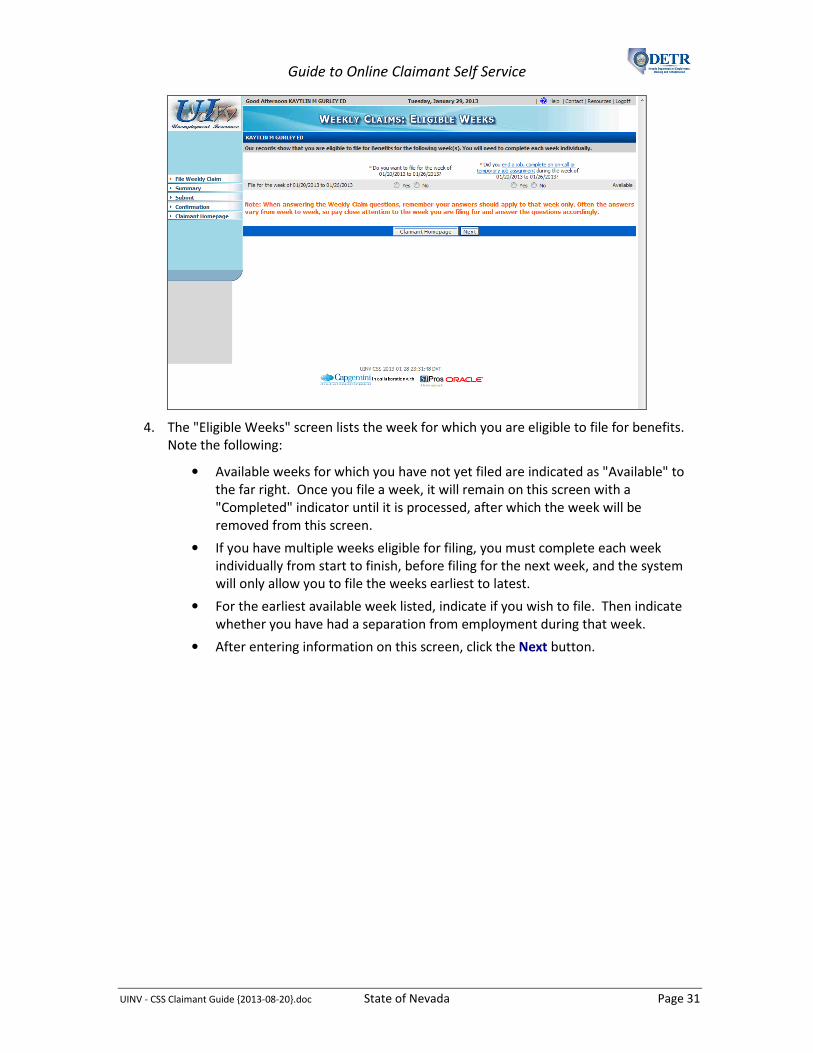
4. The "Eligible Weeks" screen lists the week for which you are eligible to file for benefits.
Note the following:
• Available weeks for which you have not yet filed are indicated as "Available" to
the far right. Once you file a week, it will remain on this screen with a
"Completed" indicator until it is processed, after which the week will be
removed from this screen.
• If you have multiple weeks eligible for filing, you must complete each week
individually from start to finish, before filing for the next week, and the system
will only allow you to file the weeks earliest to latest.
• For the earliest available week listed, indicate if you wish to file. Then indicate
whether you have had a separation from employment during that week.
• After entering information on this screen, click the Next button.

Guide to Online Claimant Self Service
UINV - CSS Claimant Guide {2013-08-20}.doc State of Nevada Page 32
5. If, on the prior screen, you indicated that you want to file for the selected week, you will
be directed to the "Certification" screen. Answer all the questions on this screen and
then click the Next button.

Guide to Online Claimant Self Service
UINV - CSS Claimant Guide {2013-08-20}.doc State of Nevada Page 33
6. Review the answers displayed on the "Confirm Answers" screen.
• If the system has identified any filing responses that could impact your
eligibility for benefits, they will be displayed toward the bottom of the screen.
• If you determine you need to correct an answer, click the I need to correct my
answers button to return to the "Eligible Weeks" screen. You will then be able
to walk through each screen again and make any appropriate changes to your
answers.
• Once all your answers are correct, click the My answers are correct button.

Guide to Online Claimant Self Service
UINV - CSS Claimant Guide {2013-08-20}.doc State of Nevada Page 34
7. Be sure to read the "Weekly Certification" information at the top of the "Agreement"
screen.
• If you are ready to submit your weekly benefit claim certification, click the Yes, I
agree-File my Claim button.
• If you click the No, I do not agree button, you will be returned to the "Claimant
Homepage" screen and the weekly certification will not be filed. You could then
complete the weekly certification at a later time.

Guide to Online Claimant Self Service
UINV - CSS Claimant Guide {2013-08-20}.doc State of Nevada Page 35
8. If any additional information is required based on your answers, the system will present
you with a "Fact Finding" screen where you would need to click on any fact finding links
and provide answers to any questions presented.
9. If there are no issues with your claim (or after completing any necessary fact finding),
you will arrive on the "Weekly Claim Confirmation" screen.
• Be sure to read the information on this screen, including your Confirmation
Number and the section explaining your weekly job search activities.
• It is suggested that you use the Print button toward the bottom of the screen to
print the information (including your Confirmation Number) for your records.
• If there are additional weeks for which you can claim benefits, you can click the
File My Next Available Weekly Claim button. (Doing so will return you to the
"Eligible Weeks" screen where you can complete your next weekly certification.)
• If there are no additional weeks to file you, can choose to return to your
"Claimant Homepage" to view your account information if desired or click the
Logoff button.

Guide to Online Claimant Self Service
UINV - CSS Claimant Guide {2013-08-20}.doc State of Nevada Page 36
Reactivating a Claim
Background
If you have a break in filing for three or more weeks (e.g., due to full time work, a new job you
have since lost, or neglecting to request benefits), your claim will automatically become inactive.
However, you will be able to reactivate your claim if the benefit year has not yet expired and if
you have not yet exhausted the benefits.
Note the following:
• If you select to reactivate your claim, and indicate that you have not worked since your
last reported separation, your claim will be reactivated.
• If you select to reactivate your claim, and indicate that you have worked since your last
reported separation, the system will create an Additional Claim, and you will need to
provide your last employer and the appropriate separation information.
• Once a claim is reactivated, you can request payments for prior weeks by contacting the
Telephone Claim Center and speaking with a representative. However, a request for
prior benefit weeks is not a guarantee, and may require adjudication.
Instructions
1. Review the information required to reactivate (re-open) a claim at the bottom right
corner of the login page.
Log into the CSS system using your established Username and Password. (Enter your
Username, click the Continue button, enter your Password into the security device on
the next screen and then click the Enter button.) You may be prompted to answer one
of your security questions. If so, fill in the Answer field and click the Enter button.

Guide to Online Claimant Self Service
UINV - CSS Claimant Guide {2013-08-20}.doc State of Nevada Page 37
2. Click the Reactivate My UI Claim link. (Note that you will only have this link if you have
an inactive claim.)
3. The "Reactivate Claim" screen contains the same questions as those you answered
when you filed your initial claim. Answer the questions as appropriate and click the
Next button.

Guide to Online Claimant Self Service
UINV - CSS Claimant Guide {2013-08-20}.doc State of Nevada Page 38
4. If you indicated you had worked since you last filed, you will arrive on the “Employment
History & Last Employer” screen.
• If you arrived on this screen, select your last employer and complete the
information as appropriate. Then click the Next button.
• If you did not arrive on this screen, then skip to the next step.

Guide to Online Claimant Self Service
UINV - CSS Claimant Guide {2013-08-20}.doc State of Nevada Page 39
5. If you arrive on the “Next to Last Employer” screen, select and complete information for
your next-to-last employer on the "Next to Last Employer" if appropriate. Then click the
Next button.
• Recall that you will need to also provide information on the next to last
employer if you meet any of the following criteria:
- You did work for two on call assignments in the last 16 weeks
- You did work for two temporary assignments in the last 16 weeks
- You did work for two different employers in the last 16 weeks
- You did not work more than 16 weeks at the last employer
• If you did not arrive on this screen, then skip to the next step.

Guide to Online Claimant Self Service
UINV - CSS Claimant Guide {2013-08-20}.doc State of Nevada Page 40
6. If you arrive on the "Collect Separation Information" screen, click the Provide Additional
Information link to complete it for each employer in the same manner as when you filed
your initial claim.
• Note that each employer has an Edit link in case you need to return to the
previous screen to change your answers.
7. If you arrive on the “Separation” screen, answer the questions related to the employer
listed on the screen and then click the Next button.

Guide to Online Claimant Self Service
UINV - CSS Claimant Guide {2013-08-20}.doc State of Nevada Page 41
8. Complete the "Work Search" screen in the same manner as when you filed your initial
claim. (Note that you would have come directly to this screen from the "Reactivate
Claim" screen if you were simply reactivating a claim and not filing an Additional Claim.)
• Click the Next button.
9. Review the "Summary" screen in the same manner as when you filed your initial claim,
and use the Edit buttons if you need to make any corrections.
• It is recommended that you print this screen for your records.
• Click the Next button.
Guide to Online Claimant Self Service
UINV - CSS Claimant Guide {2013-08-20}.doc State of Nevada Page 42
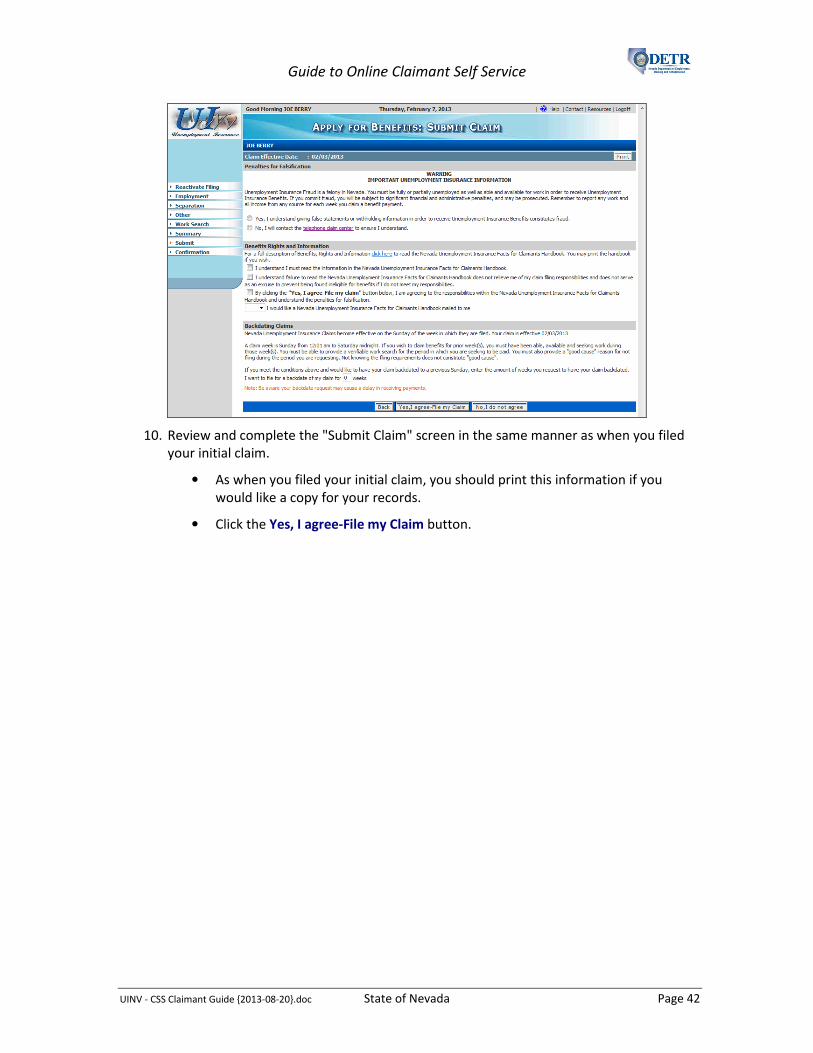
10. Review and complete the "Submit Claim" screen in the same manner as when you filed
your initial claim.
• As when you filed your initial claim, you should print this information if you
would like a copy for your records.
• Click the Yes, I agree-File my Claim button.

Guide to Online Claimant Self Service
UINV - CSS Claimant Guide {2013-08-20}.doc State of Nevada Page 43
11. If there are any issues, you may need to complete additional fact finding (as indicated by
one or more links under the “Link to Additional Information” column).
• If you see one or more links, click on them one at a time and answer any
questions, clicking the Submit button to advance from screen to screen.
Continue answering any questions until you arrive on the fact finding
"Summary" screen.
• If there are no issues with your claim (or once you complete any necessary fact
finding), you will arrive on the "File Claim Confirmation" screen and receive a
confirmation number.
• After filing your claim, if desired, you can view information about your
reactivate request by clicking the Claimant Homepage link on the left of the
screen and clicking the View link related to your claim. Doing so will open the
"Reactivate History" screen.

Guide to Online Claimant Self Service
UINV - CSS Claimant Guide {2013-08-20}.doc State of Nevada Page 44
Additional CSS Functionality
Background
This section provides an overview of the functions and various types of information available on
CSS using the options on the left-hand menu..
The Customer Menu
Each time you log into CSS, you arrive on the "Customer Menu" screen (you can also get
back to this screen by clicking the Customer Menu option on the left-hand menu).
Depending on the status of your account, you may see one or more of the following
links:
• Go to My HomePage
• Go to JobConnect
• File weekly claim
• Reactivate my UI Claim
• Please contact DETR to file your TRA claim
• Apply for Extended Benefits
• Benefits Held – Provide Additional Information (If you see this link, you should
click on it and answer any questions the system may ask in order to prevent a
possible delay in the processing of your claim.)
• From time to time, the Division may also display messages on this screen such
as hours of operation or special holiday schedules.
Guide to Online Claimant Self Service
UINV - CSS Claimant Guide {2013-08-20}.doc State of Nevada Page 45
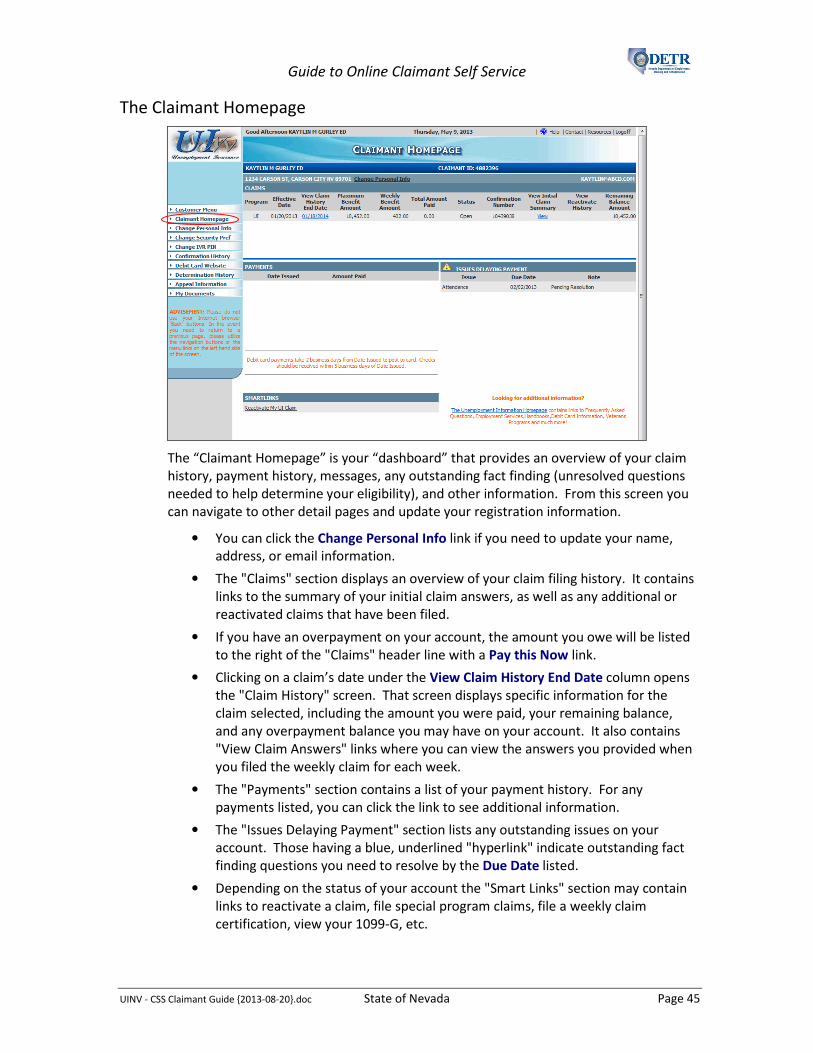
The Claimant Homepage
The “Claimant Homepage” is your “dashboard” that provides an overview of your claim
history, payment history, messages, any outstanding fact finding (unresolved questions
needed to help determine your eligibility), and other information. From this screen you
can navigate to other detail pages and update your registration information.
• You can click the Change Personal Info link if you need to update your name,
address, or email information.
• The "Claims" section displays an overview of your claim filing history. It contains
links to the summary of your initial claim answers, as well as any additional or
reactivated claims that have been filed.
• If you have an overpayment on your account, the amount you owe will be listed
to the right of the "Claims" header line with a Pay this Now link.
• Clicking on a claim’s date under the View Claim History End Date column opens
the "Claim History" screen. That screen displays specific information for the
claim selected, including the amount you were paid, your remaining balance,
and any overpayment balance you may have on your account. It also contains
"View Claim Answers" links where you can view the answers you provided when
you filed the weekly claim for each week.
• The "Payments" section contains a list of your payment history. For any
payments listed, you can click the link to see additional information.
• The "Issues Delaying Payment" section lists any outstanding issues on your
account. Those having a blue, underlined "hyperlink" indicate outstanding fact
finding questions you need to resolve by the Due Date listed.
• Depending on the status of your account the "Smart Links" section may contain
links to reactivate a claim, file special program claims, file a weekly claim
certification, view your 1099-G, etc.

Guide to Online Claimant Self Service
UINV - CSS Claimant Guide {2013-08-20}.doc State of Nevada Page 46
Changing Your Personal Information
The "Change Personal Information" screen contains links that allow you to access the
screens you originally completed during your registration process, in the event you need
to update any of your registration information.
Changing Your Security Preferences
Clicking the Change Security Preferences link from the left-hand menu will bring you to
screens where you can make changes to your security image and phrase, challenge
questions, or password.

Guide to Online Claimant Self Service
UINV - CSS Claimant Guide {2013-08-20}.doc State of Nevada Page 47
Changing Your IVR PIN
Clicking the Change IVR PIN link from the left-hand menu will bring you to a screen
where you can change your telephone PIN.
Viewing Your Confirmation History
The "Claimant Confirmation History" screen lists any actions performed on your
account, along with the date and time they occurred, and the confirmation number
associated with the action. This is a useful screen when you have a question about
whether an action has been successfully completed on your account.

Guide to Online Claimant Self Service
UINV - CSS Claimant Guide {2013-08-20}.doc State of Nevada Page 48
Accessing the Debit Card Website
Clicking the Debit Card Website link from the left-hand menu opens the "EPPICard"
website in a new window. Select the Nevada image and enter your login information to
access information concerning your UI debit card.
Viewing Your Determination History
The "Determination History" screen displays a list of all issue determinations that have
been made on your claim.
• You can select to view an image of a determination notice by clicking on its link.
• There are buttons available to print your list of determinations and access your
homepage.

Guide to Online Claimant Self Service
UINV - CSS Claimant Guide {2013-08-20}.doc State of Nevada Page 49
Viewing Your Appeal Information
The "Appeal Information" screen displays a list of appeals associated with your claim,
along with their appeal date, employer (optional), and current appeal status.
• You can select a specific appeal to display a list of the hearing history, including
the hearing method, the location, date/time and the hearing official's name.
• You can then select a specific hearing record to display a list of the schedule
details, hearing issues, and hearing participants (if available).
Guide to Online Claimant Self Service
UINV - CSS Claimant Guide {2013-08-20}.doc State of Nevada Page 50
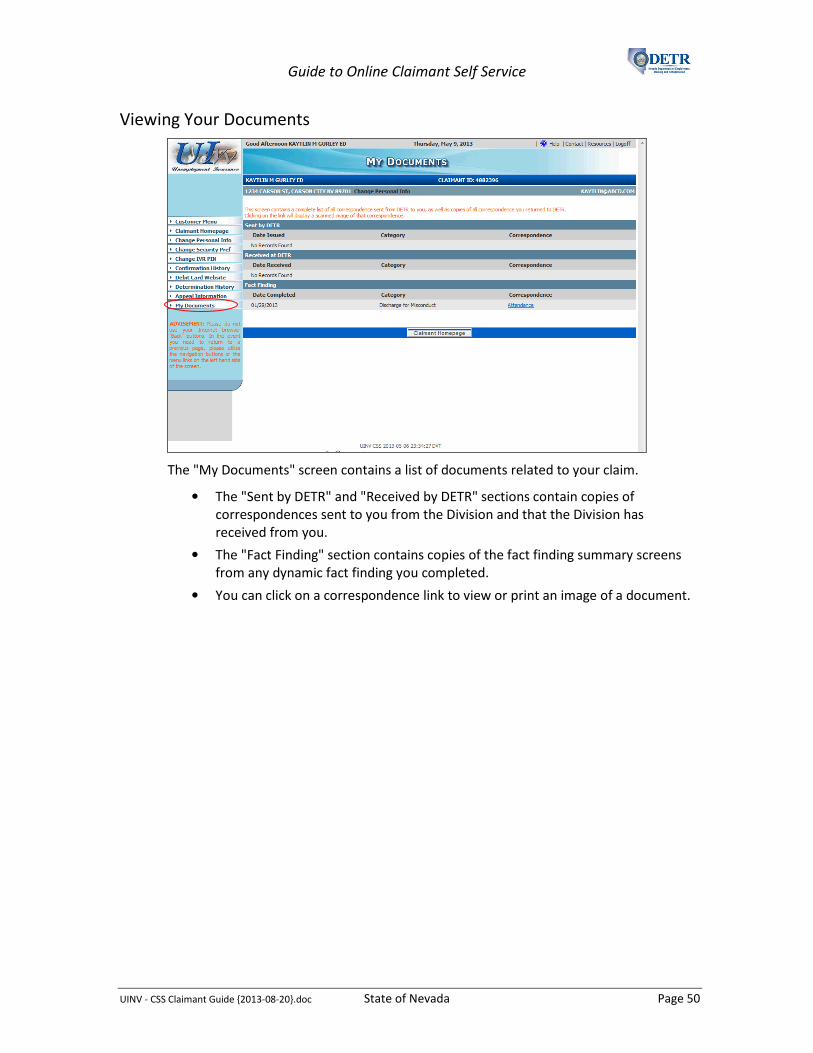
Viewing Your Documents
The "My Documents" screen contains a list of documents related to your claim.
• The "Sent by DETR" and "Received by DETR" sections contain copies of
correspondences sent to you from the Division and that the Division has
received from you.
• The "Fact Finding" section contains copies of the fact finding summary screens
from any dynamic fact finding you completed.
• You can click on a correspondence link to view or print an image of a document.