steampunk bug bead - amazon s3projects/steampunk... · 1 steampunk bug bead you gotta! try the...
TRANSCRIPT

1
Steampunk Bug bead
You gotta! try the steampunk look! This polymer clay & mixed media focal bead is so simple, it!ll go like clockwork!
by Christi Friesen
What!s “steampunk” anyway? It!s a style – sort of a
Victorian-era mad scientist with some fantasy around
the edges. It!s all clockwork gears and antique brass -
mechanical and gritty but with attitude! Doesn!t that
sound like fun?
First of all, let!s gather up a few steampunk-y
embellishments – some old watch gears and little
screws are ideal, but
you can also use
washers, grommets
and other hardware
finds as well as bead
findings and spacers
– just go for anything
that looks like old
machine innards.
Next get your clay
ready to use by conditioning it and then blending a
special bug color. To condition, use your hands to roll,
fold and twist repeatedly until the clay is soft and pliable. Or use a pasta
machine, which is easier of course – just feed the clay
into the rollers, fold the resulting sheet of clay and feed
it through again and again until the clay is conditioned.
The black, ecru, translucent and white clays for this
project don!t need to be blended – they are perfect
straight from the package (well, you have to condition
them of course, but the colors are good to go). You
will need to make a body color blend – I chose a mix
of green and gold, but you can make any buggy color
©20009 Christi Friesen www.CForiginals.com Hey you guys! You know already the kind of copyright
blather that goes on the bottom of these sorts of things by now – don!t resell these project pages (duh),
don!t use a sweat shop in Asia to mass produce this piece and flood the market with cheap imitations,
yada yada yada…
for this project you will need:
. polymer clay (I use and recommend
Premo brand for this project – it!s just
right for sculpting): half a package or
less each of green pearl, gold, ecru,
white, frost, and just a smidgen of
black.
. beads & embellishments: you!ll
need a few beads in colors to match
your bug body, and some steampunk
accents – watch gears or
washers/grommets, little screws, that
sort of thing!
. headpins: three l longer ones (2 “) for
antenna and bug body accents, and
several shorter ones for adding the
steampunk accents. I used an
enamel-tipped headpin for the
antennae of my bug, see resources
below for info.
. wire: (to support the head): any
metal, about 2 inches, 22- or 20-
gauge.
. tools: any of your favorite sculpting
tools (might I suggest my favorite
tools? the “Can!t Live Without It” tool
and the “Gotta Have It” tool – find them
on my website) as well as a needle
tool, cutting blade, wire cutters and
pliers. Optional: (for the patina) acrylic
paint in any dark brown, sponges,
paintbrush.

2
you like! Just use a bit of the colors
that you think will look fun, and mix
them the same way you just did to
condition them until they are blended
together. If you want you can stop
before they are completely mixed to
keep some subtle streaks in your
blend just for funsies.
From your body mix, save any part
with an interesting pattern for the wings, then roll out a ball for the body – about
the size of a gumball. Form that into an oval shape.
To make
the
segments
on the
beetle!s
body
(they!ve
got
segments,
you know),
press and
roll the edge of a needle tool all the way from one side to the other - up and
around the body. About five or six of these parallel lines should do the trick.
So now it!s time
for the first bit of
mixed media
embellishments –
beads! Yay! You
can never have
too many beads,
right? The end
of his body
should be jazzed
up with a stack of beads. Get a headpin (I chose one
with a ball tip on the end) and slip on a few beads. It
looks good if each bead you add is a bit bigger than the one before it. Use wire
©20009 Christi Friesen www.CForiginals.com Hey you guys! You know already the kind of copyright blather that goes on the bottom of these sorts of things by
now – don!t resell these project pages (duh), don!t use a sweat shop in Asia to mass produce this piece and flood the market with cheap imitations, yada yada
yada…

3
cutters to trim off the end of the pin so that you have about half an inch of pin
sticking past the beads. Use pliers to bend the end of the pin over into a little
hook (this will keep the beads securely attached to the clay – once the clay is
baked it will harden around the pin and the hook
will keep it locked in place. Pretty clever, huh?)
Just push the hook-end of the pin into the beetle
body and press the beads firmly up to the clay.
Next we!ll add the head to the other
end. Roll out a little ball of clay from
the same color as the body, press it to
make it slightly oval-shaped (the oval
should be just a little wider than the top
of the body where it will be attached).
To make sure the
head stays on
securely, let!s do
a little wire trick, ok? Use wire cutters and snip off about an
inch or so of 20 gauge wire. Bend that snippet into a tight
arch. Bend one end of the wire into a hook (which will help
the bug!s head stay put).
Press the hook end into the body, and then press
the head firmly onto the exposed wire (but no
mushing).
Usually I like to use beads for eyes, but this project
looks better with big clay eyes. Roll out a ball of
clay, about as big as a raisin (but not wrinkly).
Roll that into an oval. Use a
cutting blade to slice it in
half. Press one half on
each side of the bug!s
head, cut-side against the
head. Press to attach.
©20009 Christi Friesen www.CForiginals.com Hey you guys! You know already the kind of copyright blather
that goes on the bottom of these sorts of things by now – don!t resell these project pages (duh), don!t use a sweat shop in Asia to mass produce this piece and
flood the market with cheap imitations, yada yada yada…
4
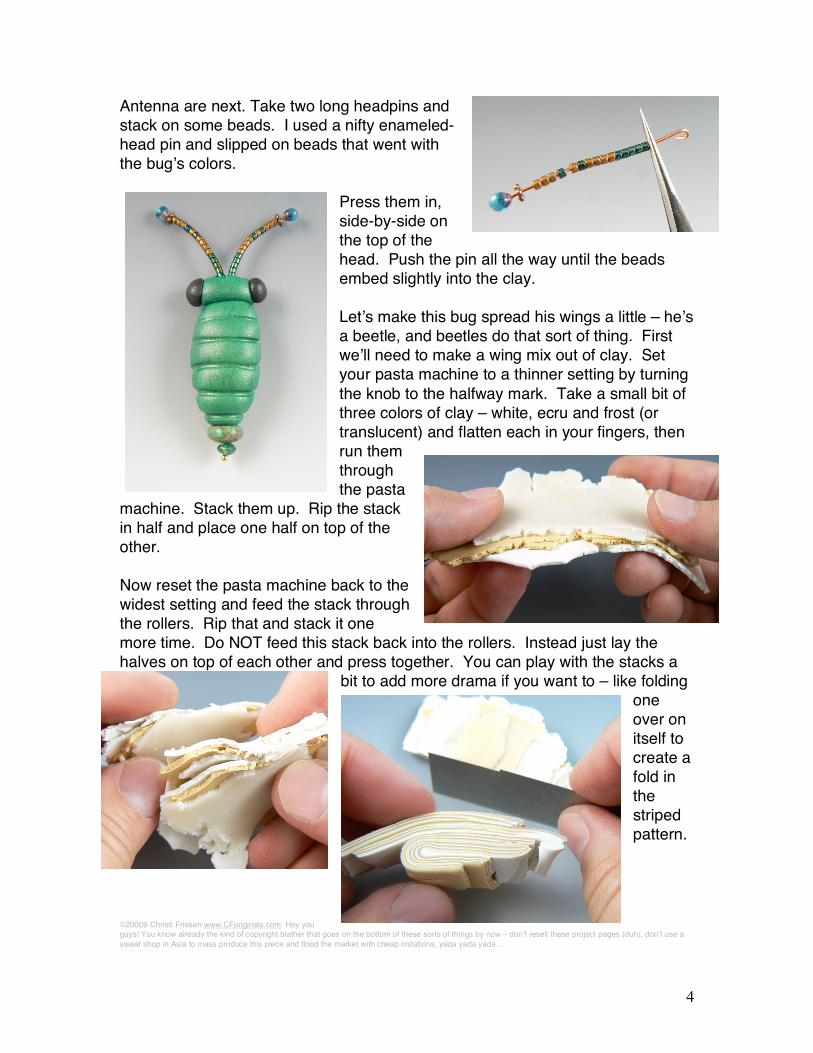
Antenna are next. Take two long headpins and
stack on some beads. I used a nifty enameled-
head pin and slipped on beads that went with
the bug!s colors.
Press them in,
side-by-side on
the top of the
head. Push the pin all the way until the beads
embed slightly into the clay.
Let!s make this bug spread his wings a little – he!s
a beetle, and beetles do that sort of thing. First
we!ll need to make a wing mix out of clay. Set
your pasta machine to a thinner setting by turning
the knob to the halfway mark. Take a small bit of
three colors of clay – white, ecru and frost (or
translucent) and flatten each in your fingers, then
run them
through
the pasta
machine. Stack them up. Rip the stack
in half and place one half on top of the
other.
Now reset the pasta machine back to the
widest setting and feed the stack through
the rollers. Rip that and stack it one
more time. Do NOT feed this stack back into the rollers. Instead just lay the
halves on top of each other and press together. You can play with the stacks a
bit to add more drama if you want to – like folding
one
over on
itself to
create a
fold in
the
striped
pattern.
©20009 Christi Friesen www.CForiginals.com Hey you
guys! You know already the kind of copyright blather that goes on the bottom of these sorts of things by now – don!t resell these project pages (duh), don!t use a
sweat shop in Asia to mass produce this piece and flood the market with cheap imitations, yada yada yada…

5
Press the stack firmly, and use your
fingertips to push the stack together to
eliminate any holes and gaps.
The wing stack is done! Now use a
cutting blade to cut two slices,
revealing all the pattern inside – one for
each wing. They should each be about
as thick as a nickel (3mm).
Form these slices in to wings by cutting off
any excess to make the piece smaller and
more correctly shaped, then continue to
shape with your fingers. The finished wings
should be about as long as the whole bug
body from head to bottom and be shaped
into an oval or teardrop.
Use your
fingers
to press
all
around
the cut edges to make them look
softer – you don!t want that "cookie-
cutter! look, do ya?
Press each wing onto the body, right below the head.
Beetles have hard covers to protect
those delicate wings, which they spread
apart to uncover the wings, so let!s make
those next. Grab that little sheet of body
blend color clay that you set aside at the
beginning for this part.
From that sheet, cut out a shield shape –
like an oval with it!s top cut off – then cut that in half
down the middle. That will make the two wing
©20009 Christi Friesen www.CForiginals.com Hey you guys! You know already the kind of copyright blather that goes on the bottom of these sorts of things by
now – don!t resell these project pages (duh), don!t use a sweat shop in Asia to mass produce this piece and flood the market with cheap imitations, yada yada
yada…

6
coverings. They should be just a bit longer than the beetle!s body (shorter than
the wings themselves).
There!s more – in order for them to
look good (and beetle-accurate for
that matter), we!ll need to slice the
tops at an angle so that when they
are placed side-by-side, it!ll look
like a triangle needs to sit right
inside them. Which it does! So cut
a little triangle out of the clay sheet
too. Set it at the top, inside the
wings and see how they all fit
together. Trim if you need to.
Pick each piece up
and smooth the cut
edges with your
fingers by pressing
gently
all around.
Press the triangle on the beetle first. The flat side
rests against his lil! head and the pointy bit should
be centered on his back. Now we can lay the two
wing covers on either side. This will cover up the
tops of the wings. Pull these wing covers apart a
bit to uncover the
bottom halves of the
wings.
If the bottoms of the
wings stick out too
far, you can pinch off
any excess.
©20009 Christi Friesen www.CForiginals.com Hey you guys! You know already the kind of copyright blather that goes on the bottom of these sorts of things by
now – don!t resell these project pages (duh), don!t use a sweat shop in Asia to mass produce this piece and flood the market with cheap imitations, yada yada
yada…

7
How!s he (or possibly she) looking so far?
The next part is really easy! If you have watch
gears with holes in the middle, you just slide them
on a headpin (you!ll probably want to slide a bead
on first if the gear hole is big so the pin won!t slip
through!)
Snip off any
excess wire
and bend the
tip into a
hook as
usual. Press
in the gears! If you have gears without a
center hole, just press them into the clay
and then you can remove them after
baking, add a drop of glue and replace.
Time for finishing touches. Tweak the antennas to
change their shape. Use a needle tool to press
some decorative lines into the wing cases. Press
in a couple little screws here and there as needed.
Beetles are screwy.
We also need a way to
string him up on a
necklace afterwards,
so use a needle tool to
piece a hole through
the backside, below
the head. You don!t have to add anything to keep
the hole open, it will be fine.
The steampunk beetle is done! Nifty, huh?! And now
it!s time to bake him… mmmm baked beetle.
Preheat the oven to 275ºF (130ºC) if you!re using Premo clay like I am (if not,
follow the manufacturer!s instructions). Use an oven thermometer inside the
oven to insure that the interior temperature is accurate. Bake for 30-45 minutes
and let it cool completely! (By the way, clay is still rubbery after it!s done, it
hardens as it cools! So leave it alone until it!s cool!)
©20009 Christi Friesen www.CForiginals.com Hey you guys! You know already the kind of copyright blather that goes on the bottom of these sorts of things by
now – don!t resell these project pages (duh), don!t use a sweat shop in Asia to mass produce this piece and flood the market with cheap imitations, yada yada
yada…

8
If you want, you can use brown acrylic paint to add a patina – just brush it on a
small area at a time, then wipe all the surface paint away with well-wrung damp
sponges. This will leave just an antiquing of color in the cracks and details – it!s
a good look for steampunk. No need to add any protective glaze, this bug is
good to go just as is!
Now start buggin! your friends with your
nifty creation! Or make more and start a
swarm!
©20009 Christi Friesen www.CForiginals.com Hey you guys! You know already the kind of copyright blather that goes on the bottom of these sorts of things by
now – don!t resell these project pages (duh), don!t use a sweat shop in Asia to mass produce this piece and flood the market with cheap imitations, yada yada
yada…