stitchery -...
TRANSCRIPT

16 Quilt Projects with Embroidered Twists
Ca ro l Ph i l l i P s o n
& Stitchery
Bonus CD inCluDes
100+ stitch charts

� Pat c h w o r k & S t i t c h e ry by Carol Phillipson �
c o n t e n t S
Introduction — 6
How to plan a mixed quilt — 8
Techniques and Tips — 10
Stitch Instructions — 12
The Quilts — 14
Aegean Sea — 16
Country Mice — 24
Antique Rose Quilt — 30
Poppy Log Cabin — 38
Roman Head — 46
Chinese Cushions — 54
Hedgerow Hexagons — 58
Little Owl Wall Hanging — 66
Victorian Sampler — 72
Edward Bear Wall Hanging — 88
Country House Garden — 84
Blue Floral Delight — 88
Flowers in Art — 96
Starry Flowers — 102
Historical Blackwork Animals — 108
Sashiko Charm Wall Hanging — 116
Resources and Acknowledgments — 124
Index — 126
(above) Blue Floral Delight
(opposite page) Victorian Sampler

� Pat c h w o r k & S t i t c h e ry by Carol Phillipson �
Materials list
F o r t h e S t i t c h i n g
8" square of 14-count Aida or 28-count
evenweave (work over 2 threads) for each
creature. You may find it easier to work
all four on one piece of fabric then cut them
out. Find the centre of each 8" square and
start stitching in the centre.
1 skein each of Anchor stranded cotton in 235
and 236
F o r t h e Pat c h w o r k
¾ yd (0.69m) black
5/8 yd (0.57m) red
5/8 yd (0.57m) assorted greys—the more shades
the merrier, but should include one long
quarter of a particular grey to be used for the
border corners. These should be cut as follows:
For the nine patches, cut:
dark grey centers 15 × 1½" (3.8cm) squares
mixed greys 120 × 1½" (3.8cm)
For the center surrounds, cut:
8 × 4½" (10.8cm) squares mixed greys
For the top and bottom borders, cut:
24½" × 1½" (62.2cm x 3.8cm) x 2
For the side borders, cut:
3½" × 2½" (8.9cm × 6.4cm) × 26
For the block centers, cut:
4 × 3½" (8.9cm) squares of a contrasting fabric.
A Japanese fabric was used here.
F o r t h e r e m a i n D e r o F t h e Q u i lt
Backing and batting 36" × 52" (91.4cm × 132cm)
Binding 156" × 1½" (397cm × 3.8cm)
* Finished size of star block 12" × 12" (30.5cm ×
30.5cm) Note that this quilt has overlapping blocks
which allows the stitching to fill the gaps, so is best
put together following the instructions.
*Finished size of quilt 31" × 47" ( 78.7cm × 119.4cm)
*Use ¼" (6mm) seam allowance throughout
B l aC k w o rk
Blackwork embroidery was originally associated with dress, especially
on sleeves and chemises. It is thought to have been brought from Spain
to England in 1501 by Katharine of Arragon at the time of her marriage
to Henry VIII. Its popularity continued through the sixteenth century,
but declined somewhat after that. It had a revival during the 1930s,
when many original patterns were used for decoration. Today blackwork
embroidery is much freer and is recognised as a creative art form.
It was basically a form of counted-thread work where patterns were
formed by straight stitches in black or red (called ‘scarletwork’) on
a contrasting evenly-woven background. Today, the term ‘blackwork’
refers to the technique rather than the colour used. In this design
shaded blackwork is achieved by using a variety of color, thickness of
thread and density of stitches.
A fter spending some considerable time researching designs in the Victoria and Albert Museum in
London, I kept returning to ceramic tile designs by William De Morgan, a contemporary of William Morris and Burne Jones, imagining these designs worked in blackwork.
De Morgan produced numerous designs based on plants and animals, and it was from four of these that this quilt originated—a fantastical bird, an antelope, a fish and a dodo.
The blackwork stitching uses two shades of grey, which is not as harsh as black, (perhaps it should be called ‘greywork’!) and the colour of the patchwork cottons follows the grey theme with a red relief. Changing the red for another colour would give an equally dramatic quilt, so it could be stitched to match the decor in a specific room.
h i S to ri ca l B l ac k wo r k a n i m a l S
� Pat c h w o r k & S t i t c h e ry by Carol Phillipson �
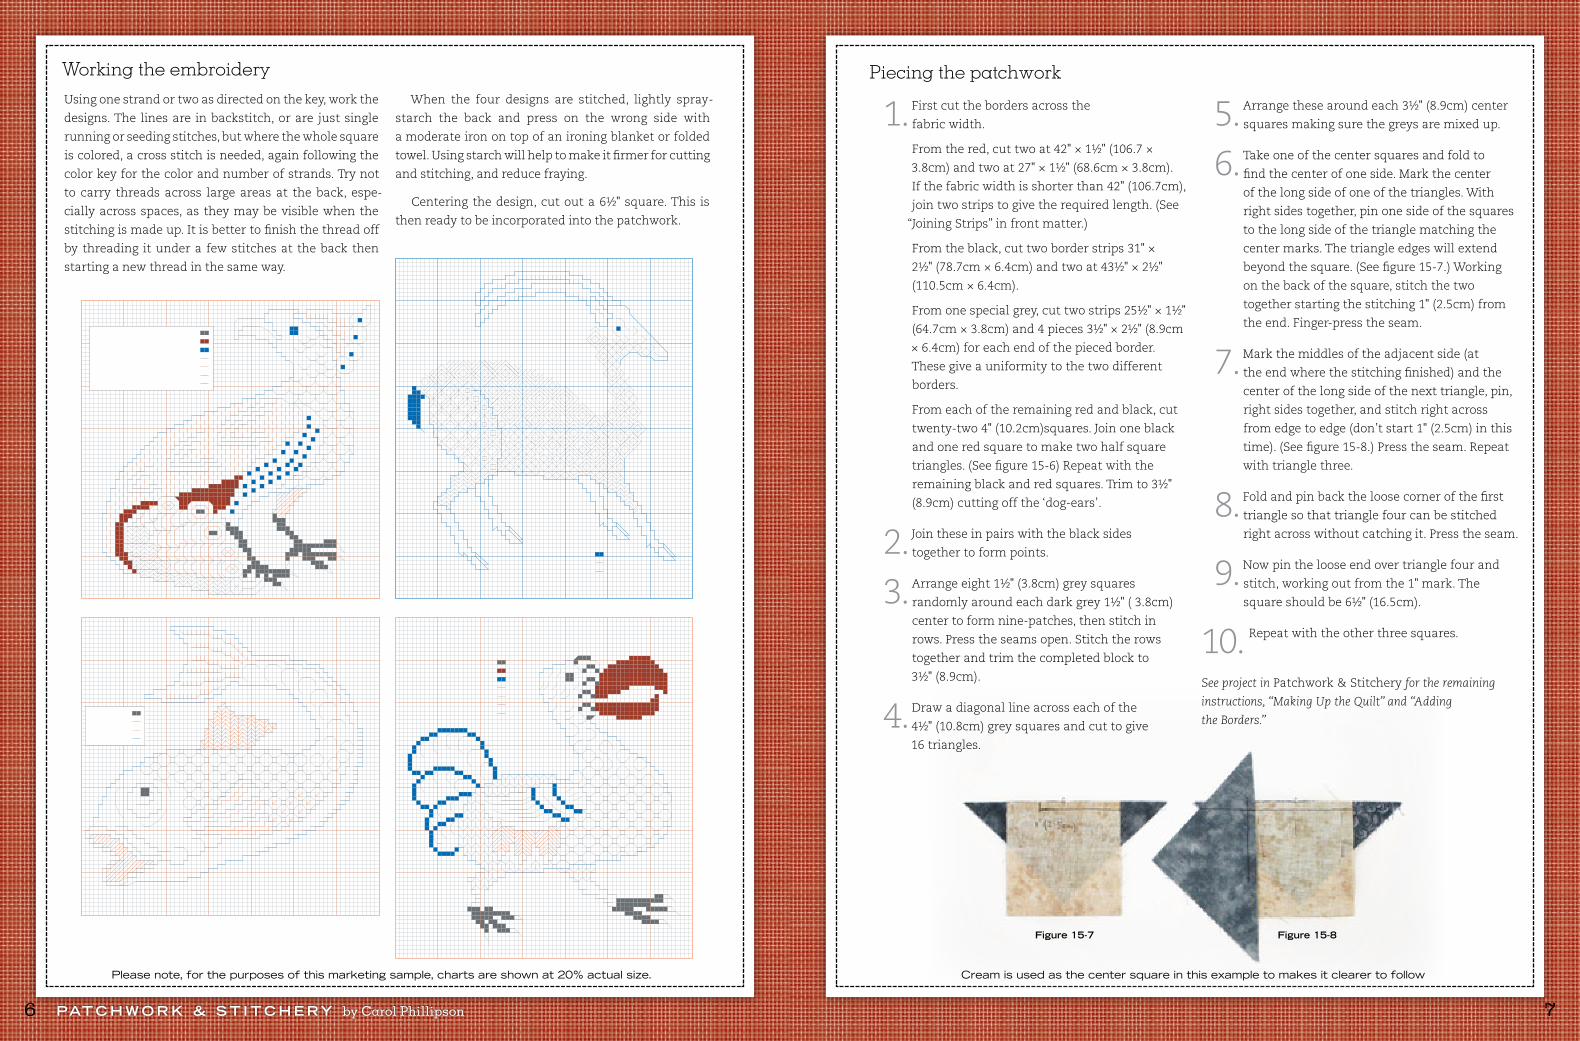
Working the embroideryUsing one strand or two as directed on the key, work the
designs. The lines are in backstitch, or are just single
running or seeding stitches, but where the whole square
is colored, a cross stitch is needed, again following the
color key for the color and number of strands. Try not
to carry threads across large areas at the back, espe-
cially across spaces, as they may be visible when the
stitching is made up. It is better to finish the thread off
by threading it under a few stitches at the back then
starting a new thread in the same way.
When the four designs are stitched, lightly spray-
starch the back and press on the wrong side with
a moderate iron on top of an ironing blanket or folded
towel. Using starch will help to make it firmer for cutting
and stitching, and reduce fraying.
Centering the design, cut out a 6½" square. This is
then ready to be incorporated into the patchwork.
Please note, for the purposes of this marketing sample, charts are shown at 20% actual size.
Figure 15-7 Figure 15-8
Piecing the patchwork
1. First cut the borders across the
fabric width.
From the red, cut two at 42" × 1½" (106.7 ×
3.8cm) and two at 27" × 1½" (68.6cm × 3.8cm).
If the fabric width is shorter than 42" (106.7cm),
join two strips to give the required length. (See
“Joining Strips” in front matter.)
From the black, cut two border strips 31" ×
2½" (78.7cm × 6.4cm) and two at 43½" × 2½"
(110.5cm × 6.4cm).
From one special grey, cut two strips 25½" × 1½"
(64.7cm × 3.8cm) and 4 pieces 3½" × 2½" (8.9cm
× 6.4cm) for each end of the pieced border.
These give a uniformity to the two different
borders.
From each of the remaining red and black, cut
twenty-two 4" (10.2cm)squares. Join one black
and one red square to make two half square
triangles. (See figure 15-6) Repeat with the
remaining black and red squares. Trim to 3½"
(8.9cm) cutting off the ‘dog-ears’.
2. Join these in pairs with the black sides
together to form points.
3. Arrange eight 1½" (3.8cm) grey squares
randomly around each dark grey 1½" ( 3.8cm)
center to form nine-patches, then stitch in
rows. Press the seams open. Stitch the rows
together and trim the completed block to
3½" (8.9cm).
4. Draw a diagonal line across each of the
4½" (10.8cm) grey squares and cut to give
16 triangles.
5. Arrange these around each 3½" (8.9cm) center
squares making sure the greys are mixed up.
6. Take one of the center squares and fold to
find the center of one side. Mark the center
of the long side of one of the triangles. With
right sides together, pin one side of the squares
to the long side of the triangle matching the
center marks. The triangle edges will extend
beyond the square. (See figure 15-7.) Working
on the back of the square, stitch the two
together starting the stitching 1" (2.5cm) from
the end. Finger-press the seam.
7. Mark the middles of the adjacent side (at
the end where the stitching finished) and the
center of the long side of the next triangle, pin,
right sides together, and stitch right across
from edge to edge (don’t start 1" (2.5cm) in this
time). (See figure 15-8.) Press the seam. Repeat
with triangle three.
8. Fold and pin back the loose corner of the first
triangle so that triangle four can be stitched
right across without catching it. Press the seam.
9. Now pin the loose end over triangle four and
stitch, working out from the 1" mark. The
square should be 6½" (16.5cm).
10. Repeat with the other three squares.
See project in Patchwork & Stitchery for the remaining
instructions, “Making Up the Quilt” and “Adding
the Borders.”
Cream is used as the center square in this example to makes it clearer to follow

&P a t c h w o r k
Stitchery
Patchwork & Stitchery combines the joys of traditional pieced
and appliqué quiltmaking and the art of stitchery (embroidery,
redwork, mixed stitches, sashiko and cross-stitch) to create
an individualized quilt. The book includes basic techniques
for quilting, appliqué and stitches, as well as planning tech-
niques (including designing on computer), as well as 15 quilt
projects, each with demonstrated (computer-generated)
designs for different color-waves.
100 Stitched Designs in embroidery, redwork, mixed
stitches, sashiko and cross-stitch provide a valuable
resource for quiltmaking options.
15 pieced quilt projects. All projects demonstrated,
will include computer-generated alternative colors
and designs.
CD includes 100 stitch designs, appliqué templates, and
piecing templates. Different formats—BITMAP, JPEG,
PDF, DOC—allows most flexibility for importing into
various quilt software platforms.
❀
❀
❀
About the AuthorCarol Phillipson is a recognized cross-stitch and needlearts
designer in the United Kingdom with many articles and exhibi-
tions to her credit. She was a partner in Wrencraft Needlework
kit producers. Carol is the author of several books on stitchery
and patchwork, including Designing Patchwork on Your Computer
(Krause Publications).
ISBN 13 .................. 978-1-4402-0235-3
ISBN 10 .......................... 1-4403-0235-4
UPC .............................. 0 74962 01018 6
EAN ............................. 9 781440 202353
SRN .............................................. Z4355
Category ...................................... Quilting
Price .................. US $29.99, CAN $35.99
Trim ......................... 8.25"w x 10.875"h
Page count ........................................ 128
Binding .................................. Paperback
Publication month ........ September 2010
Word count ................................... 15,000
# of color illustrations ...................... 300
# of b/w illustrations ............................. 0
Interior color ........................................ 4c
Krause Publicationscincinnati, ohio
a Division of f+W MeDia
F e at u r e S
� Pat c h w o r k & S t i t c h e ry by Carol Phillipson
by Carol Phillipson