stone grip-tie
TRANSCRIPT

Reanchor stone/precast panels and thin masonry veneersSTONE GRIP-TIE
EASY & FASTINSTALLATION
FORCEFULLY GRIPS THE MASONRY
REPAIRS ARE ALMOST INVISIBLE
NO GROUT/EPOXY RESINS ARE REQUIRED
ADAPTABLE TO VARIOUS SITE CONDITIONS
STRONG CONNECTION BETWEEN FACADE AND BACKUP
FacadeBackup structure
Corrosion-Resistant Fastenerto Parent Structure
Positive Mechnical Lockin Backup Material
Grip-Max Connection Positive Inward Load Resistance ( )
Use where there is a need to reattach existing stone and precast veneers that require additional restraint, or support, to resist live and dead loads. Stone Grip-Ties can accommodate bilateral live-load resistance, uni-directional forces, support loading, and combinations of all types. The backup material will determine the style of anchorage required.
Large Flat Bearing Area (1.4 in2) for Effective Suction Load Resistance ( )
EPDM Cushioning Washer
Corrosion-Resistant Shaft

Overview
Performance
Stone and precast panel veneers may become unstable and possibly life-threatening in the event of a connection failure. This failure can be the result of inadequate ties when built; existing material or anchor quality issues; the rusting or oxidation of existing anchors; or the delaminating of composite panels. A reanchoring solution is possible using retrofit anchors that would preclude the removal and resetting of the panel. The functional and performance characteristics of various retrofit anchors must be capable of fulfilling typical anchorage expectations. The Stone Grip-Tie product line offers those solutions.
Regardless of the panel type on the building envelope, it is subjected to two types of forces: Dead Loads – induced by gravity, and Live Loads – resulting commonly from wind and other external forces. Retrofit anchors may be required to “support” dead loads and/or “resist” live loads. Their selection depends on assessing the qualitative and quantitative characteristics they provide.
Stone Grip-Ties are the solution for reanchoring unstable dimensional stone and precast panel facades. The anchors provide a positive means to reanchor to the parent structure. The anchors are manufactured of corrosion-resistant materials for ultimate long-term performance and dependability. The functional and performance characteristics of the various ties are capable of fulfilling typical panel anchoring expectations for “live” or “dead” loads. The anchors have been engineered to reattach the veneer panel to backup structures constructed of either concrete, brick, masonry, structural steel, and wood/steel stud materials without the costly removal and resetting of the panels. The retrofit connections can be concealed with like-material Dutchmen or plugs, or it can be aesthetically exposed to create a new look for the building. The Stone Grip-Tie product line provides cost-effective solutions to removing and replacing existing stone and precast panel veneers.
Each construction site is unique and the appropriate use of this product is the responsibility of the engineers, architects, and other professionals who are familiar with the specific requirements of the project. The data reflects results of lab, field and in-house tests and are provided as a guideline for the designer. Site testing is encouraged for verification of load capacity.
Anchor components are manufactured of austenitic stainless steel and corrosion-resistant brass materials. The anchors are capable of reattaching stone panels for the following typical applications:
STONE-GRIP TIEReattaches Existing Stone and Precast Panel Veneers Without Removal or Resetting
CUSTOMER CARE 800-255-4255 // PROSOCO.COM3CUSTOMER CARE 800-255-4255 // PROSOCO.COM 2
Type 1 Wind load restraint for one direction (i.e. suction or movement away from the structure) loading.
DIFFERENT TYPES OF STONE GRIP APPLICATIONS
Forces Acting Away From
Structure
Restraint
Restraint
Type 2 Wind load restraint for dual direction (i.e. suction and compression wind e�ects) loading.
Restraint Grip Max*
2200 lb Ultimate Capacity
RestraintForces Acting Away And
Toward Structure
Type 3 Wind load restraint for one direction (i.e. suction or movement away from the structure) loading and panel support to solid backup.
Panel Weight
Restraint
Type 2LD Light-duty wind load restraint for dual direction (i.e. suction and compression wind e�ects) loading.
Restraint Toggle
425 lb Ultimate Capacity
RestraintForces Acting
Away And Toward Structure
Forces Acting Away And
Toward Structure
CUSTOMER CARE 800-255-4255 // PROSOCO.COM5CUSTOMER CARE 800-255-4255 // PROSOCO.COM 4
P ll O i O C
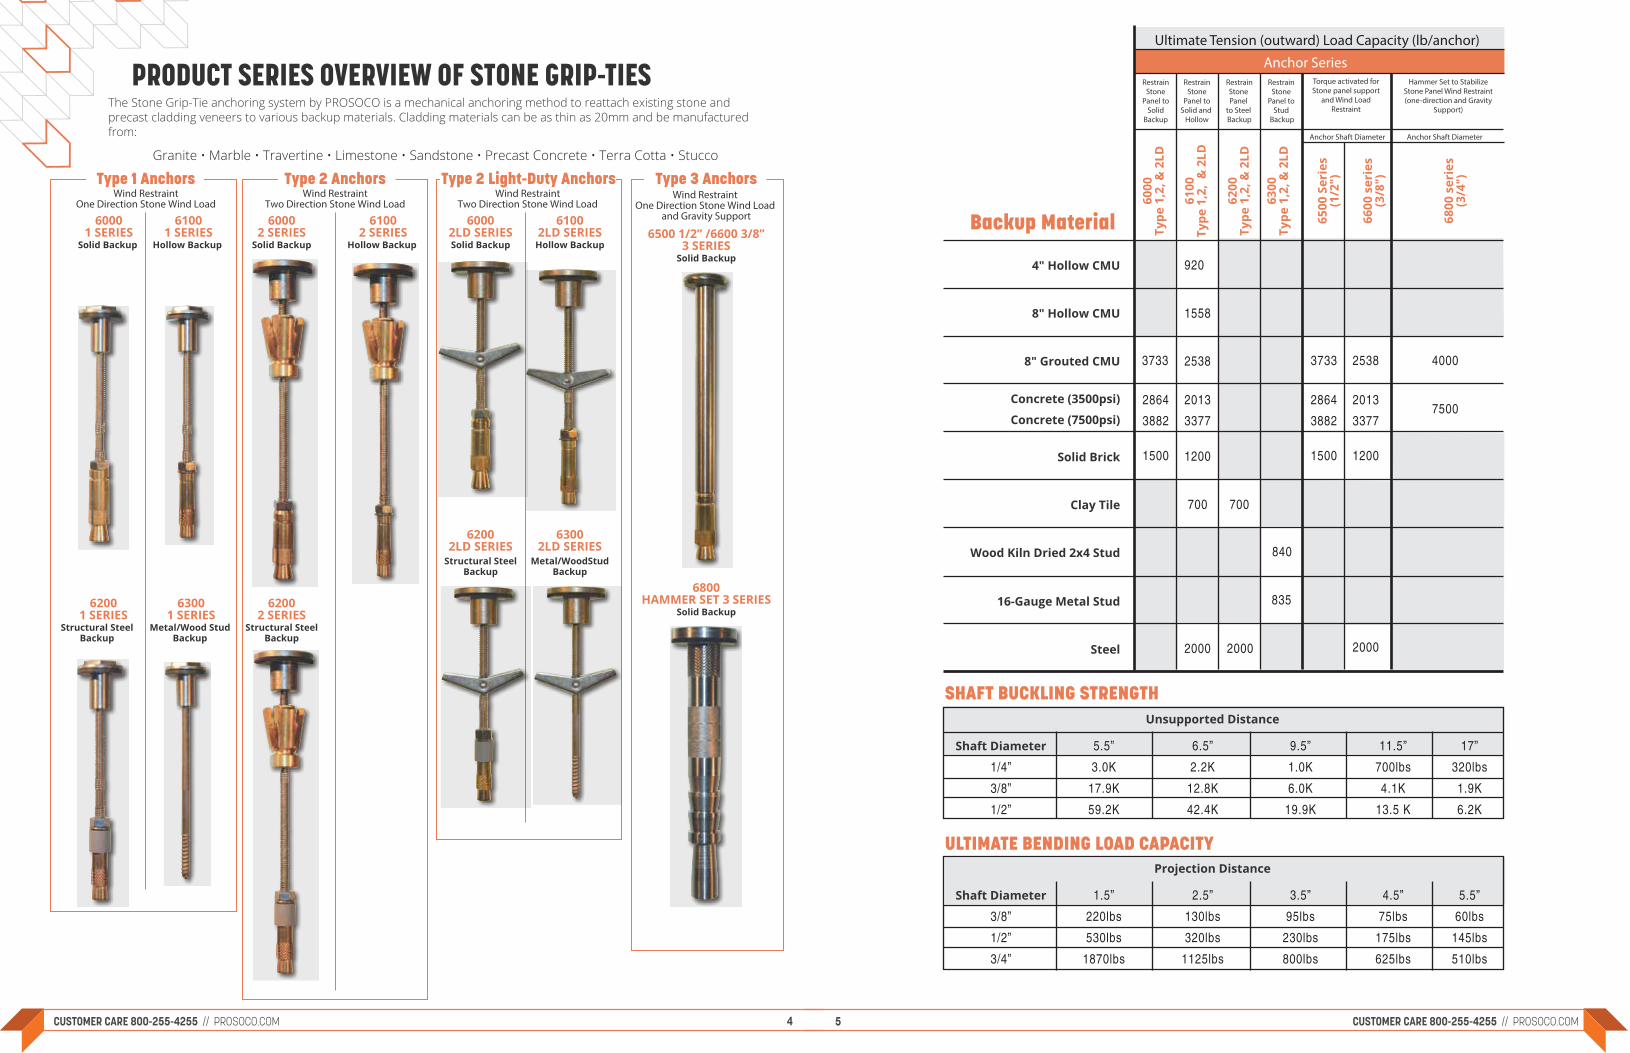
Ultimate Tension (outward) Load Capacity (lb/anchor)
4" Hollow CMU
Unsupported Distance
Backup Material
SHAFT BUCKLING STRENGTH
ULTIMATE BENDING LOAD CAPACITY
8" Hollow CMU
8" Grouted CMU
Concrete (3500psi)
Solid Brick
Clay Tile
Wood Kiln Dried 2x4 Stud
16-Gauge Metal Stud
Shaft Diameter
1/4”
3/8”
1/2”
5.5”
3.0K
17.9K
59.2K
6.5”
2.2K
12.8K
42.4K
9.5”
1.0K
6.0K
19.9K
11.5”
700lbs
4.1K
13.5 K
17”
320lbs
1.9K
6.2K
Steel
3733
2864
1500 1200
700 700
835
2538
2013
840
3733 2538 4000
2864 2013
Concrete (7500psi) 3882 33777500
3882 3377
1500 1200
2000
920
1558
6100
Type
1,2
, &
2LD
6200
Type
1,2
, & 2
LD
6300
Type
1,2
, & 2
LD
6500
Ser
ies
(1/2
")
6600
ser
ies
(3/8
")
6800
ser
ies
(3/4
")
6000
Type
1,2
, & 2
LD
Anchor Series
2000 2000
Projection Distance
Shaft Diameter
3/8”
1/2”
3/4”
1.5”
220lbs
530lbs
1870lbs
2.5”
130lbs
320lbs
1125lbs
3.5”
95lbs
230lbs
800lbs
4.5”
75lbs
175lbs
625lbs
5.5”
60lbs
145lbs
510lbs
Anchor Shaft Diameter Anchor Shaft Diameter
RestrainStone
Panel toSolid
Backup
RestrainStone
Panel toSolid and
Hollow
RestrainStone Panel
to Steel Backup
Restrain Stone
Panel to Stud
Backup
Torque activated for Stone panel support
and Wind Load Restraint
Hammer Set to Stabilize Stone Panel Wind Restraint (one-direction and Gravity
Support)
PRODUCT SERIES OVERVIEW OF STONE GRIP-TIES
Wind RestraintOne Direction Stone Wind Load
Wind RestraintTwo Direction Stone Wind Load
Solid Backup
Wind RestraintTwo Direction Stone Wind Load
Wind Restraint One Direction Stone Wind Load
and Gravity Support
Type 1 Anchors Type 2 Anchors Type 2 Light-Duty Anchors Type 3 Anchors
60002 SERIES
Hollow Backup
61001 SERIES
Solid Backup
60001 SERIES
Hollow Backup
61002 SERIES
Solid Backup
60002LD SERIES
Hollow Backup
61002LD SERIES
Solid Backup
6500 1/2” /6600 3/8”3 SERIES
Structural SteelBackup
62002 SERIES
Metal/Wood StudBackup
63001 SERIES
Structural SteelBackup
62001 SERIES
Structural SteelBackup
62002LD SERIES
Metal/WoodStudBackup
63002LD SERIES
Solid Backup
6800HAMMER SET 3 SERIES
The Stone Grip-Tie anchoring system by PROSOCO is a mechanical anchoring method to reattach existing stone and precast cladding veneers to various backup materials. Cladding materials can be as thin as 20mm and be manufactured from:
Granite • Marble • Travertine • Limestone • Sandstone • Precast Concrete • Terra Cotta • Stucco

You. Us. The project.We strive to provide the best construction products on the market, but we also know this business is about people. That’s why we dedicate our human resources and services to make your job easier. Our nationwide network of sales representatives is here to do whatever we can to help solve your job-site problems.
KELLYField SupportOur on-site service includes troubleshooting, training and installation support.
STEVEEngineering SupportEngineering details and personalized solutions for your specific needs.
BRIANField SupportWe come to you to support your projects when and where you need us.
COLLEENCustomer Care
We’re real live people who answer the phones! Really. We’re here M-F, 8a-5p, CST.

New life for your masonry
We help architects, engineers, contractors & owners return existing buildings to serviceability and ensure the stability of new buildings. Let us help save the wall of your next new construction or retrofit project.
Reanchoring to metal stud
Reanchoring terra cotta
Historic limetone repair

500
1000
0
DEFLECTION
COM
PRES
SION
LOAD
0 .005 .01 .015 .02 .025 .03 .04 .05
Grip-M
ax
(Ultim
ate Capacit
y > 2200 lb
)
1/8” Toggle(Ultimate Capacity > 425 lb)
CUSTOMER CARE 800-255-4255 // PROSOCO.COM11CUSTOMER CARE 800-255-4255 // PROSOCO.COM 10
6000-1 Series Anchor
WIND RESTRAINT; ONE DIRECTION STONE WIND LOAD
Grip-Max Stiffness vs Stainless Steel Toggle
Requires 3/4” Socket and 501 Setting Tool
3/4”
Type 1: Wind load restraint for one direction loading to solid backup.
EPDM WasherS.S.
Bearing Washer1 1/4”FacadeCountersinkDiameter or surface mount
1 1/4” Stone Veneer one directional loading to restrainstone panel to hollow solid backup
Stainless SteelStone Grip-Tie
Hex Head
1/2” Facade
Pilot Hole
"A" dimension: Face of facade to face of backup
1/4” Anchor
Diameter
300 S.S.Hardware
1/2” BackupHole
Diameter
360 Brass ExpanderElements
Torque: 50-100 in-lbs.
2" Minimum Solid EmbedmentDrip Control
Shaft: 304 S.S.
Solid Backup
1. Locate anchor placement per specified location.
2. Drill 1/2” diameter hole through the stone with a suitable “stone-drilling” drill bit, without percussion.
3. Using a suitable 1/2” diameter quality carbide, drill a 1/2” hole into the solid backup, on center with the 1/2” facade hole, 2” deeper than the “A” dimension as measured from the face of the stone. Blow out drill fines.
4. For a counter sink finish, on center with the 1/2” drilled hole, drill a counter-bore 1-1/8” minimum diameter hole into the stone facade 3/8” - 1/2” deep from the face of the stone on center with the previous drilled holes.
5. Assemble anchor shaft without head to the Grip-Tie 501 Setting Tool; slide assembly through the drilled holes until the expansion anchor bottoms in the concrete drilled hole; tighten by turning clockwise until 50-100 in-lbs of torque is reached; remove setting tool.
6. Attach Stone Grip Hex-Tie Head and washer with EPDM washer to the anchor shaft using an appropriate hex socket, hand-tighten clockwise until the washer and head bottom out into the counter-bore, tighten 20 – 25 in-lbs; remove tool.
7. Installation complete, patch or conceal anchorage per specification requirements.
62300-112N350 3.5” 1-5/8” – 2-7/8”
62300-112N400 4“ 2-1/8” – 3-3/8”
62300-112N450 4.5“ 2-5/8” – 3-7/8”
62300-112N550 5.5“ 3-5/8” – 4-7/8”
62300-112N650 6.5“ 4-5/8” – 5-7/8”
CATALOG # A
other lengths available upon request
• Adaptable to Variable Site Conditions• Inspection Quality Control• Monitor Anchorage Performance Over Time
Use with 6000-2, 6100-2, 6200-2
Grip-Max
Use with 6000-2LD, 6100-2LD, 6200-2LD, 6300-2LD
SS Toggle = 425lbs
what makes the Stone Grip different?
Use with 6200-2, 6200-2LDSteel Connection = 730lbs
Grip-Max = 2200lbs
Ultimate Compression (inward )Load Capacity
Recaptures Stone to Structure
TYPE 1 ANCHORS
ANCHOR SHAFT LENGTH

6100-1 Series Anchor 6200-1 Series Anchor
CUSTOMER CARE 800-255-4255 // PROSOCO.COM13CUSTOMER CARE 800-255-4255 // PROSOCO.COM 12
"A" dimension: Face of facade to face of backup "A" dimension: Face of facade to face of backup
1. Locate anchor placement per specified location.
2. Drill 1/2” diameter hole thru the stone with a suitable “stone drilling” drill bit, without percussion.
3. Using a suitable 3/8” diameter quality drill bit, drill a 3/8” hole into the hollow backup, on center with the 1/2” facade hole.
4. For a counter sink finish, on center with the 1/2” drilled hole, drill a counter-bore 1-1/8” minimum diameter hole into the stone facade 3/8” - 1/2” deep from the face of the stone on center with the previous drilled holes.
5. Assemble anchor shaft without head to the Grip-Tie 501Setting Tool; slide assembly through the drilled holes until the expansion anchor bottoms to the face of hollow backup; tighten by turning clockwise until 50-100 in-lbs of torque is reached; remove setting tool.
6. Attach Stone Grip-Tie Hex Head and washer with EPDM washer to the anchor shaft using an appropriate hex socket, hand-tighten clockwise until the washer and head bottom out into the counter-bore, tighten 20 – 25 in-lbs; remove tool.
7. Installation complete, patch or conceal anchorage per specification requirements.
CATALOG # A
other lengths available upon request
62315-150N350 3.5” 1-7/8” – 3”
62315-150N400 4” 2-3/8” – 3-1/2”
62315-150N450 4.5” 2-7/8” – 4”
62315-150N550 5.5” 3-7/8” – 5”
62315-150N650 6.5” 4-7/8” – 6”
1. Locate anchor placement per specified location.
2. Drill 1/2” diameter hole through the stone with a suitable “stone drilling” drill bit, without percussion.
3. Using a suitable 7/16” diameter quality drill bit, drill a 7/16” hole into the steel backup, on center with the 1/2” facade hole.
4. For a counter sink finish, on center with the 1/2” drilled hole, drill a counter-bore 1-1/8” minimum diameter hole into the stone facade 3/8” - 1/2” deep from the face of the stone on center with the previous drilled holes.
5. Assemble anchor shaft without head to the Grip-Tie 501 Setting Tool; slide assembly with the nylon spacer through the drilled holes until the expansion anchor bottoms to the backup; tighten by turning clockwise until 50-100 in-lbs of torque is reached; remove setting tool.
6. Attach Stone-Grip Hex Tie Head and washer with EPDM washer to the anchor shaft using an appropriate hex socket, hand-tighten clockwise until the washer and head bottom out into the counter-bore, tighten 20 – 25 in-lbs; remove tool.
7. Installation complete, patch or conceal anchorage per specification requirements.
1 1/4” Stone Veneer
EPDM WasherS.S.
Bearing Washer1 1/4”Facade
CountersinkDiameter or
surface mount
1/2”Facade
Pilot Hole
1/4”Anchor
Diameter
Torque: 50-100 in-lbs.S.S.Washer
Spacer
7/16” BackupHole
Diameter
360 Brass ExpanderElements
300 S.S.Hardware
requires 501 setting tool and 3/4" hex socket
Type 1 : Wind load restraint for one direction loading to structural steel or tile backup.
one direction loading to restrainsoft-stone panel to steel backup
Steel or Tile Backup
Drip Control Shaft: 304 S.S.Stainless Steel
Stone Grip-Tie Hex Head
3/4”
CATALOG # A
other lengths available upon request
62330-112N350 3.5” 2-1/4” – 3-3/8”
62330-112N400 4” 2-3/4” – 3-7/8”
62330-112N450 4.5” 3-1/4” – 4-3/8”
62330-112N550 5.5” 4-1/4” – 5-3/8”
62330-112N650 6.5” 5-1/4” – 6-3/8”
Requires 3/4” Socket and Grip-Tie 501 Setting Tool
3/4”
Type 1: Wind load restraint for one direction loading to hollow and solid back-up.
EPDM WasherS.S.
Bearing Washer1 1/4”Facade
CountersinkDiameter or
surface mount
1 1/4” Stone Veneer one directional loading to restrainstone panel to hollow solid backup
Stainless SteelStone-Grip Tie
Hex Head
1/2” Facade
Pilot Hole
1/4” Anchor
Diameter
300 S.S.Hardware
3/8” BackupHole
Diameter
360 Brass ExpanderElements
Torque: 50-100 in-lbs.Washer
1” Minimum Hollow Block EmbedmentDrip Control
Shaft: 304 S.S.
Hollow and Solid Backup
WIND RESTRAINT; ONE DIRECTION STONE WIND LOAD
TYPE 1 ANCHORSWIND RESTRAINT; ONE DIRECTION STONE WIND LOAD
TYPE 1 ANCHORS
ANCHOR SHAFT LENGTHANCHOR SHAFT
LENGTH

CUSTOMER CARE 800-255-4255 // PROSOCO.COM15CUSTOMER CARE 800-255-4255 // PROSOCO.COM 14
6300-1 Series Anchor 6000-2 (w/ Grip-Max) & 2LD (w/ SS Toggle) Series Anchor
"A" dimension: Face of facade to face of backup "A" dimension: Face of facade to face of backup
1. Locate anchor placement per specified location.
2. Drill 3/4” diameter hole through the stone with a suitable “stone drilling” drill bit, without percussion.
3. Using a suitable 1/2” diameter quality carbide, drill a 1/2” hole into the solid backup, on center with the 3/4” facade hole, 2” deeper then the max “A” dimension as measured from the face of the stone. Blow out drill fines.
4. For a counter sink finish, counter-bore a 1-1/2” – 1-5/8” hole into the stone facade 3/8” – 1/2” deep from the face of the stone on center with the previous drilled holes.
5. Assemble anchor shaft with the Grip-Max compression sleeve or SS Toggle (located approximately 1” – 2” from the anchor shaft end) to the Grip-Tie 501 Setting Tool; slide assembly through the drilled holes until the expansion anchor bottoms in the concrete drilled hole; tighten by turning clockwise until 50 – 100 in-lbs of torque is reached; remove setting tool.
6. When using the Grip-Max Compression Sleeve: Activate the Grip-Max using the Grip-Max Expansion Socket, expand the compression sleeve by engaging the Grip-Max Socket to the brass hex expander cone and expand the sleeve by turning the cone 6-10 turns. Remove socket
6a. For the Grip-Max: Using the twin tang “Compression Sleeve” positioning tool, slide prong of tool into the slot of the expanded sleeve until contact is made. Rotate counter-clockwise the assembly until contact is made to the back of the stone veneer plus 1/4 turn; remove the positioning tool.
7. For the toggle: Using the toggle positioning tool, slide tool into the channel section of sprung-open toggle until contact is made. Rotate toggle counter-clockwise until contact is made to the back of the stone veneer plus 1/4 turn; remove the positioning tool.
8. Attach Stone-Grip head with EPDM washer to the anchor shaft using the ‘T’ handle hex wrench, rotate clockwise until the washer and head bottom out into the counter-bore, tighten 20 – 25 in-lbs; remove tool.
9. Installation complete, patch or conceal anchorage per specification requirements.
1 1/4” Stone Veneer
EPDM Washer
Grip-Max Compression Sleeve
1 5/8”Facade
CountersinkDiameter or
surface mounts
HexDrive
3/4”Facade
Pilot Hole
1/4”Anchor
Diameter
2” Minimum Solid Embedment
Torque: 50-100 in-lbs.
1/2” Hole
Diameter
360 Brass ExpanderElements
300 S.S.Hardware
Requires Hex Key, Grip-Tie 501 Setting Tool,Compression Sleeve Positioning Tool andgrip-max expander socket
Type 2 : Wind load restraint for dual direction loading to hollow backup.
bi-lateral loading to restrainstone panel to solid backup
Solid Backup
Drip Control Shaft: 304 S.S.
1-1/2 Minimum RequiredStainless SteelStone Grip-Tie Head
1 1/2”
CATALOG # A
other lengths available upon request
Grip-Max Toggle
62305-112N450 62310-150N450 4.5” 3” – 4”
62305-112N550 62310-150N550 5.5” 4” – 5”
62305-112N650 62310-150N650 6.5” 5” – 6”
62305-112N750 62310-150N750 7.5” 6” – 7”
1. Locate anchor placement per specified location.
2. Drill 1/2” diameter hole through the stone with a suitable “stone drilling” drill bit, without percussion.
3. Using a suitable twist drill per the diameter illustrated drill a pilot hole into the backup, on center with the 1/2” facade hole.
4. For a counter sink finish, on center with the 1/2” drilled hole, drill a counter-bore 1-1/8” minimum diameter hole into the stone facade 3/8” – 1/2” deep from the face of the stone on center with the previous drilled holes.
5. Assemble anchor shaft without head to the Grip-Tie 501 Setting Tool; slide assembly through the drilled holes until the shaft bottoms in the backup stud or reaches the minimum embedment in wood.; tighten to desired torque; remove setting tool.
6. Attach Stone Grip-Tie Hex Head and washer with EPDM washer to the anchor shaft using an appropriate hex socket, hand-tighten clockwise until the washer and head bottom out into the counter-bore, tighten 20 – 25 in-lbs; remove tool.
7. Installation complete, patch or conceal anchorage per specification requirements.
1 1/4” Stone Veneer
EPDM Washer
1 1/4”Facade
CountersinkDiameter
1/2”Facade
Pilot Hole• 16 ga. =3/16”• 18 ga.=13/64”
• Veneer = 50-100 in-lbs.• 16 gauge = 30-50 in-lbs.• 18 gauge = 20-40 in-lbs.• Wood Stud = 30-50 in-lbs.
• 2x4 =3/16” (opt.)• 4x4=3/16”
S.S.Bearing Washer
Torque to Install:
Self-Tapping Lag Thread1 1/4” MinimumEmbedment in Wood
Metal Stud -or- Wood Stud
Requires 3/4” Socket and Grip-Tie 501 Setting Tool Type 1 : Wind load restraint for uni-directional loading to wood or steel stud backup.
one direction loading to restrainstone panel to wood or steel backup Stud Backup (Wood or Steel)
Drip Control Shaft: 304 S.S.
Stainless SteelStone Grip-Tie Head
3/4”
CATALOG # A
other lengths available upon request
62330-112N350 3.5” 2-1/4” – 3-1/2”
62330-112N400 4” 2-3/4” – 4”
62330-112N450 4.5” 3-1/4” – 4-1/2”
WIND RESTRAINT; ONE DIRECTION STONE WIND LOAD
TYPE 1 ANCHORSWIND RESTRAINT; DUAL DIRECTION STONE WIND LOAD
TYPE 2 ANCHORS
ANCHOR SHAFT LENGTH
ANCHOR SHAFT LENGTH

CUSTOMER CARE 800-255-4255 // PROSOCO.COM17CUSTOMER CARE 800-255-4255 // PROSOCO.COM 16
6100-2 (w/ Grip-Max) & 2LD (w/ SS Toggle) Series Anchor 6200-2 (w/ Grip-Max) & 2LD (w/ SS Toggle) Series Anchor
1. Locate anchor placement per specified location.
2. Drill 3/4” diameter hole through the stone with a suitable “stone drilling” drill bit, without percussion.
3. Using a suitable 3/8” diameter quality carbide, drill a 3/8” hole into the hollow backup, on center with the 3/4” facade hole.
4. On center with the 3/4” nominal hole through the stone facade. Counter-bore a 1-1/2” – 1-5/8” diameter hole into the stone facade 3/8” – 1/2” deep from the face of the stone on center with the previous drilled holes.
5. Assemble anchor shaft with the Grip-Max compression sleeve or SS Toggle (located approximately 1” – 2” from the anchor shaft end) to the Grip-Tie 501 setting tool; slide assembly through the drilled holes until the expansion anchor bottoms in the backup drilled hole; tighten by turning clockwise until 50 – 100 in-lbs of torque is reached; remove setting tool.
6. When using the Grip-Max Compression Sleeve: Activate the Grip-Max using the Grip-Max Expansion Socket, expand the compression sleeve by engaging the Grip-Max Socket to the brass hex expander cone and expand the sleeve by turning the cone 6-10 turns. Remove socket
6a. For the Grip-Max: Using the twin tang “Compression Sleeve” positioning tool, slide prong of tool into the slot of the expanded sleeve until contact is made. Rotate counter-clockwise the assembly until contact is made to the back of the marble veneer plus 1/4 turn; remove the positioning tool.
7. For the toggle: Using the toggle positioning tool, slide tool into the channel section of sprung-open toggle until contact is made. Rotate toggle counter-clockwise until contact is made to the back of the stone veneer plus 1/4 turn; remove the positioning tool.
8. Attach Stone-Grip head with EPDM washer to the anchor shaft using the ‘T’ handle hex wrench, rotate clockwise until the washer and head bottom out into the counter-bore, tighten 20 – 25 in-lbs; remove tool.
9. Installation complete, patch or conceal anchorage per specification requirements.
1. Locate anchor placement per specified location.
2. Drill 3/4” diameter hole through the stone with a suitable “stone drilling” drill bit, without percussion.
3. Using a suitable 7/16” diameter quality carbide, drill a 7/16” hole into the steel backup, on center with the 3/4” facade hole.
4. On center with the 3/4” nominal hole through the stone facade. Counter-bore a 1-1/2” – 1-5/8” diameter hole into the stone facade 3/8” – 1/2” deep from the face of the stone on center with the previous drilled holes.
5. Assemble anchor shaft with the Grip-Max compression sleeve or SS Toggle (located approximately 1” – 2” from the anchor shaft end) to the 501 setting tool; slide assembly through the drilled holes until the expansion anchor bottoms in the backup drilled hole; tighten by turning clockwise until 50 – 100 in-lbs of torque is reached; remove setting tool.
6. When using the Grip-Max Compression Sleeve: Activate the Grip-Max using the Grip-Max Expansion Socket, expand the compression sleeve by engaging the Grip-Max Socket to the brass hex expander cone and expand the sleeve by turning the cone 6-10 turns. Remove socket
6a. For the Grip-Max: Using the twin tang “Compression Sleeve” positioning tool, slide prong of tool into the slot of the expanded sleeve until contact is made. Rotate counter-clockwise the assembly until contact is made to the back of the marble veneer plus 1/4 turn; remove the positioning tool.
7. For the toggle: Using the toggle positioning tool, slide tool into the channel section of sprung-open toggle until contact is made. Rotate toggle counter-clockwise until contact is made to the back of the stone veneer plus 1/4 turn; remove the positioning tool.
8. Attach Stone-Grip head with EPDM washer to the anchor shaft using the ‘T’ handle hex wrench, rotate clockwise until the washer and head bottom out into the counter-bore, tighten 20 – 25 in-lbs; remove tool.
9. Installation complete, patch or conceal anchorage per specification requirements.
1 1/4” Stone Veneer
EPDM Washer
1 5/8”Facade
CountersinkDiameter or
Surface Mount
HexDrive
3/4”FacadePilot Hole
1/4”Anchor
DiameterTorque: 50-100 in-lbs.S.S.
Washer
3/8” BackupHole
Diameter
360 Brass Expander Elements
300 S.S.Hardware
Requires Hex Key, Grip-Tie 501 Setting Tool,Compression Sleeve Positioning Tool andgrip max expander socket
Type 2 : Wind load restraint for dual direction loading to backup.
bi-lateral loading to restrainstone panel to steel backup
Hollow Backup
Drip Control Shaft: 304 S.S.
Stainless SteelStone Grip-Tie Head
1 1/2”
1-1/2 Minimum Required
1 1/4” Stone Veneer
EPDM Washer
1 5/8”Facade
CountersinkDiameter or
Surface Mount
HexDrive
3/4”FacadePilot Hole
1/4”Anchor
DiameterTorque: 50-100 in-lbs.S.S.
Washer
Spacer
7/16” BackupHole
Diameter
360 Brass Expander Elements
300 S.S.Hardware
Requires Hex Key, Grip-Tie 501 Setting Tool,Compression Sleeve Positioning Tool andgrip max expander socket
Type 2 : Wind load restraint for dual direction loading to steel backup.
bi-lateral loading to restrainstone panel to steel backup
Steel Backup
Drip Control Shaft: 304 S.S.
Stainless SteelStone Grip- Tie Head
1 1/2”
1-1/2 Minimum Required
CATALOG # A
other lengths available upon request
Grip-Max Toggle
62320-112N450 62325-150N450 4.5” 3” – 4”
62320-112N550 62325-150N550 5.5” 4” – 5”
62320-112N650 62325-150N650 6.5” 5” – 6”
62320-112N750 62325-150N750 7.5” 6” – 7”
CATALOG # A
other lengths available upon request
Grip-Max Toggle
62335-112N450 62340-150N450 4.5” 3” – 4”
62335-112N550 62340-150N550 5.5” 4” – 5”
62335-112N650 62340-150N650 6.5” 5” – 6”
WIND RESTRAINT; DUAL DIRECTION STONE WIND LOAD WIND RESTRAINT; DUAL DIRECTION STONE WIND LOAD
TYPE 2 ANCHORS TYPE 2 ANCHORS
Grip-Max Compression Sleeve
Grip-Max Compression Sleeve
"A" dimension: Face of facade to face of backup"A" dimension: Face of facade to face of backup
ANCHOR SHAFT LENGTH
ANCHOR SHAFT LENGTH

CUSTOMER CARE 800-255-4255 // PROSOCO.COM19CUSTOMER CARE 800-255-4255 // PROSOCO.COM 18
6300-2LD Series Anchor 6500 (1/2” Dia.) 3 Series Anchor6600 (3/8” Dia.) 3 Series Anchor
1. Locate anchor placement per specified location.
2. Drill appropriate diameter hole through the stone with a suitable “stone drilling” drill bit, and into the solid backup to a depth 3/8” greater than the anchor length.
3. Blow out drill fines.
4. On center with the pilot hole, drill a counter-bore 1-1/4” minimum diameter hole into the stone facade 3/8” - 1/2” deep from the face of the stone on center with the previous drilled holes.
5. Assemble anchor shaft without head to the 501-EXT Setting Tool; slide assembly through the drilled holes until the expansion anchor bottoms in the concrete drilled hole; tighten by turning clockwise until 50-100 in-lbs of torque is reached; remove setting tool.
6. Attach Stone Grip head and washer with EPDM washer to the anchor shaft using an appropriate hex socket, hand-tighten clockwise until the washer and head bottom out into the counter-bore, tighten 20 – 25 in-lbs; remove tool.
7. Installation complete, patch or conceal anchorage per specification requirements.
Stone Veneer
EPDM Washer
FlatWasher
1 1/4”Facade
CountersinkDiameter3/4 Hex
Head
1/2” or 3/8”
Stainless SteelStone Grip-Tie
Head
Nominal Pilot Hole = 1/2 or 3/8
Optional Counterborefor Head Concealment
or surface mount
Torque: 50-100 in-lbs.
PilotHole
Diameter
360 BrassExpander Anchor
Elements300 S.S.Anchor Body
Requires 3/4" socket and 501-Ext Setting Tool Type 3 : Wind load restraint and support for one direction loading to solid back-up.
one direction loading to restrainstone panel to solid backup
Solid Masonry or Concrete Backup
3” Minimum Solid Embedment
CATALOG # A B
6500 SERIES 6600 SERIES
other lengths available upon request
62365-50N500 62365-37N600 0-2” 5”
62365-50N600 62365-37N600 0-3” 6”
62365-50N700 62365-37N700 0-4” 7“
62365-50N800 62365-37N800 0-5” 8”
Backup & Pilot Hole Diameter1/2” 3/8”
1. Locate anchor placement per specified location.
2. Drill 3/4” diameter hole through the stone with a suitable “stone drilling” drill bit, without percussion.
3. Using a suitable twist drill per the diameter illustrated drill a pilot hole into the back-up, on center with the 3/4” facade hole.
4. On center with the 3/4” drilled hole, drill a counter-bore 1-1/2” - 1-5/8” hole into the stone facade 3/8” - 1/2” deep from the face of the stone on center with the previous drilled holes.
5. SS Toggle (located approximately 1” – 2” from the anchor shaft end) to the Grip-Tie 501 Setting Tool; slide assembly through the drilled holes until the shaft bottoms in the back-up drilled hole; tighten by turning clockwise until torque is reached; remove setting tool.
6. For the toggle: Using the toggle positioning tool, slide tool into the channel section of sprung open toggle until contact is made. Rotate toggle counter-clockwise until contact is made to the back of the stone veneer plus 1/4 turn; remove the positioning tool.
7. Attach Stone-Grip head with EPDM washer to the anchor shaft using the ‘T’ handle hex wrench, rotate clockwise until the washer and head bottom out into the counter-bore, tighten 20 – 25 in-lbs; remove tool.
8. Installation complete, patch or conceal anchorage per specification requirements.
CATALOG # A
other lengths available upon request
Toggle
62355-150N450 4.5” 2-3/4” – 3-3/4”
62355-150N550 5.5” 3-3/4” – 4-3/4”
62355-150N650 6.5” 4-3/4” – 5-3/4”
62355-150N650 7.5” 5-3/4” – 6-3/4”
• 16 ga. =3/16”• 18 ga.=13/64”
• Veneer = 50-100 in-lbs.• 16 gauge = 30-50 in-lbs.
• 18 gauge = 20-40 in-lbs.• Wood Stud = 30-50 in-lbs.
• 2x4 =3/16” (opt.)• 4x4=3/16”
Torque to Install: Metal Stud -or- Wood Stud
1 1/4” Stone Veneer
EPDM Washer
S.S. Toggle WingCapacity 400# Ultimate
1 5/8”Facade
CountersinkDiameter
HexDrive
3/4”FacadePilot Hole
Self-Tapping Lag Thread1 1/4” MinimumEmbedment in Wood
300 S.S.Coupling
Requires Hex Key, Grip-Tie 501 Setting Tool,Toggle Positioning Tool
Type 2 : Wind load Type 2LD: Light Duty restraint for bi-lateral loading to wood or steel backup.
Stud Back-Up (Wood or Steel)
Drip Control Shaft:304 S.S.
1-1/2 Minimum Required
Stainless SteelStone-GripTie Head
1 1/2”
"A" dimension: Face of facade to face of backup
"A" dimension: Face of veneer to face of backup
"B" dimension: Anchor Length
WIND RESTRAINT; DUAL DIRECTION STONE LOAD WIND RESTRAINT AND SUPPORT; ONE DIRECTION STONE WIND LOAD
TYPE 2 ANCHORS TYPE 3 ANCHORS
bi-lateral loading to restrainstone panel to solid backup
ANCHOR SHAFT LENGTH

STONE-GRIP TIE PLANNING GUIDE
SETTING TOOLS
CUSTOMER CARE 800-255-4255 // PROSOCO.COM21CUSTOMER CARE 800-255-4255 // PROSOCO.COM 20
6800-3 Series Anchor
1. Locate anchor placement per specified location.
2. Drill appropriate diameter hole through the stone with a suitable “stone drilling” drill bit, and into the solid backup to a depth indicated in the chart.
3. Blow out drill fines.
4. On center with the pilot hole, drill a counter-bore 1-1/2”” minimum diameter hole into the stone facade 3/8” - 1/2” deep from the face of the stone on center with the previous drilled holes.
5. Assemble the anchor shaft without the Stone Grip-Tie Bearing Plate assembly to the H Series Setting Tool; slide assembly through the drilled holes until the expansion anchor bottoms in the concrete drilled hole; using a hand-held hammer, firmly strike the setting tool until hammer rebounds lively; remove setting tool.
6. Attach Stone Grip-Tie Bearing Plate assembly to the anchor shaft; hand tighten clockwise until the assembly bottoms out into the counter-bore, 20-25 in-lbs.
7. Installation complete, patch or conceal anchorage per specification requirements.
1 5/8” Facade
CountersinkDiameter or
surface mount
Plug, Adhesive& FIll
Expander plugEPDM
Washer
Requires H Series Setting Tools
Stainless Steel Stone Grip-Tie Bearing Plate
Anchor Body 3/4”
stabilize stone panelto concrete backup
and grouted masonryConcrete or Grouted Masonry Backup
3” Minimum Embedment
1 1/4” Stone Veneer
Hammer Set (HS) Series Anchor
1 1/2” PhillipsDrive
CATALOG #
62375-75N562 2-1/2” 4-5/8” 5-3/8”
62375-75N662 3-1/2” 5-5/8” 6-3/8”
62375-75N572 4-1/2” 6-5/8” 7-3/8”
Head can be surface mounted or recessed in a 3/16” deep counterbore. Minimum concrete cover at anchor bottom = 3.5 X F. Other lengths available upon request
A: FACE OF
VENEER TO FACE OF BACK-UP
B: ANCHOR
SHAFT LENGTH (IN)
C: MINIMUM OVERALL
HOLE DEPTH (IN)
STONE-GRIP ACCESSORIES, SETTING TOOLS, AND OPTIONS
1. Stone-Grip heads can be customized to suit a particular architectural finish appearance, size or shape.
2. Stone-Grip heads can be powder-coated for color-matching and surface-mounting.
3. Diamond-tipped core drills are available upon request for granite drilling.
4. Upon request, dual diameter diamond-tipped core drills are available. Contact Customer Service for assistance.
5. Carbide-tipped counter-bore drills are available for drilling into marble, travertine, limestone, sandstone, concrete for hand-held drills.
6. EPDM washers can be made to different thickness (.090 is typical) and hardness (60 + Durometer typical).
Stone Grip-Tie Head Setting Tool
HEX KEY
Hex Drive
for all 6500 and 6600 Series
Anchor Setting Tool
501-EXT
H Series
HS34 for 3/4” Anchor size
Compression sleeve positioning tool and toggle positioning tool
Hex Drive
501
for all 6000 and 6100 SeriesAnchor Setting Tool
501R and 501M
501R for 3/8” Tie
WIND RESTRAINT AND SUPPORT; ONE DIRECTION STONE WIND LOAD
TYPE 3 ANCHORS
"A" dimension: Face of veneer to face of backup
"B" dimension: anchor shaft length
"C" dimension: minimum overall hole depth

ACCESSORIES
WarningWarranty
Approval
CMS-GT-0719
Seller makes no warranty of any kind, expressed or implied, except that the goods sold under this agreement shall be of the standard quality of the seller, and buyer assumes all risk and liability resultingfrom the use of the goods, whether used singly or in combination with other goods. Seller neither assumes nor authorizes any person to assume for seller any other liability in conjunction with the sale or use of the goods sold, and there is no oral agreement or warranty collateral to or affecting this transaction.
The information contained in this publication does not constitute any professional opinion or judgement and should not be used as a substitute for competent professional determinations. Each construction project isunique and the appropriate use of this product is the responsibility of the engineers, architects, and other professionals who are familiar with the specific requirements of the project.
Notes
CUSTOMER CARE 800-255-4255 // PROSOCO.COM 22

United States CapitolWashington D.C.
R.W. Kern Center at Hampshire College
Wrigley BuildingChicago, IL
© 2021 PROSOCO INC. 090921 // CUSTOMER CARE 800-255-4255 // PROSOCO.COM Printed on paper certified by the Forest Stewardship Council. This paper is made of material from well-managed, FSC®-certified forests, and other controlled sources.
Grand Central StationNew York, NY
You. Us. The project.