storedge interface installation guide...solaredge storedge installation guide for smart energy...
TRANSCRIPT

SolarEdge StorEdge
Installation Guide
For Smart Energy Management using the StorEdge Interface
For Europe, APAC & South Africa
Version 1.3

DisclaimersImportant NoticeCopyright © SolarEdge Inc. All rights reserved.No part of this document may be reproduced, stored in a retrieval system or transmitted, in any form or by any means, electronic, mechanical, photographic, magnetic or otherwise, without the prior written permission of SolarEdge Inc.
All company and brand products and service names are trademarks or registered trademarks of their respective holders.
The general terms and conditions of delivery of SolarEdge shall apply.The content of these documents is continually reviewed and amended, where necessary. However, discrepancies cannot be excluded. No guarantee is made for the completeness of these documents.The images contained in this document are for illustrative purposes only and may vary depending on product models.
Emission ComplianceThis equipment has been tested and found to comply with the limits applied by the local regulations. These limits are designed to provide reasonable protection against harmful interference in a residential installation. This equipment generates, uses and can radiate radio frequency energy and, if not installed and used in accordance with the instructions, may cause harmful interference to radio communications. However, there is no guarantee that interference will not occur in a particular installation. If this equipment does cause harmful interference to radio or television reception, which can be determined by turning the equipment off and on, you are encouraged to try to correct the interference by one or more of the following measures: Reorient or relocate the receiving antenna. Increase the separation between the equipment and the receiver. Connect the equipment into an outlet on a circuit different from that to which the receiver is
connected. Consult the dealer or an experienced radio/TV technician for help.Changes or modifications not expressly approved by the party responsible for compliance may void the user’s authority to operate the equipment.
Disclaimers
-StorEdge Interface Installation Guide MAN-01-00249-1.3 1
The material furnished in this document is believed to be accurate and reliable. However, SolarEdge assumes no responsibility for the use of this material. SolarEdge reserves the right to make changes to the material at any time and without notice. You may refer to the SolarEdge web site (www.solaredge.com) for the most updated version.
Patent marking notice: see http://www.solaredge.com/groups/patent

Contents
Disclaimers 1Important Notice 1Emission Compliance 1
Contents 2HANDLING AND SAFETY INSTRUCTIONS 4
Safety Information 4IMPORTANT SAFETY INSTRUCTIONS 4
Chapter 1: Overview 6The StorEdge Solution Components 6About this Guide 7Installation Workflow 8Installation Equipment List 9Inverter Transport and Storage 9
Chapter 1: Meter Installation 10Chapter 2: StorEdge Interface Installation 12
Unpacking and Identifying the Product 12Mounting the StorEdge Interface 12Connecting the StorEdge Interface 13
Connecting the StorEdge Interface to the Inverter 13Connecting the StorEdge Interface to AC 15Connecting the StorEdge Interface to the Battery Pack 17
DIP Switch Setup 18Chapter 3: System Configuration 22
Upgrading the Inverter Firmware Version 22Configuring the RS485 Bus for Battery and Meter Connection 23Configuring Maximum Self-consumption 25
Maximize Self-consumption (MSC) 25Profile Programming (for time-of-use arbitrage) 26
Starting-up the System 26Appendix A: Troubleshooting 27
Communication Troubleshooting 27Device type, number and protocol are displayed incorrectly 27Troubleshooting Ethernet Communication 27
Meter Troubleshooting 28<OK> is not displayed 28An error message is displayed 28Power [Wh] Import value is not advancing 28
Battery Troubleshooting 29StorEdge Interface LEDs 30
Appendix B: Additional Battery Connections 31Connection with One Battery 31
Tesla Powerwall1 31LG Chem RESU7H/RESU10H 35
StorEdge Interface Installation Guide MAN-01-00249-1.32
Contents

Connections with Two Batteries 37Tesla Powerwall1 37DIP-Switch Setup - Powerwall1 Batteries 40
Appendix C: StorEdge Interface Technical Specifications 43
Contents
-StorEdge Interface Installation Guide MAN-01-00249-1.3 3
HANDLING AND SAFETY INSTRUCTIONSDuring installation, testing and inspection, adherence to all the handling and safety instructions is mandatory. Failure to do so may result in injury or loss of life and damage to the equipment.
Safety InformationWARNING!Denotes a hazard. It calls attention to a procedure that, if not correctly performed or adhered to, could result in injury or loss of life. Do not proceed beyond a warning note until the indicated conditions are fully understood and met. CAUTION!Denotes a hazard. It calls attention to a procedure that, if not correctly performed or adhered to, could result in damage or destruction of the product. Do not proceed beyond a caution sign until the indicated conditions are fully understood and met.NOTEDenotes additional information about the current subject.
IMPORTANT SAFETY FEATUREDenotes information about safety issues.
IMPORTANT SAFETY INSTRUCTIONS SAVE THESE INSTRUCTIONS
WARNING!The inverter cover must be opened only after shutting off the inverter ON/OFF switch located at the bottom of the inverter. This disables the DC voltage inside the inverter. Wait five minutes before opening the cover. Otherwise, there is a risk of electric shock from energy stored in the capacitors.
WARNING!Do not remove the StorEdge Interface cover before five minutes have elapsed after disconnecting all sources of power, and shutting OFF the inverter and the StorEdge Interface.
WARNING!Before operating the system, ensure that the power cable and wall outlet have been grounded properly.
WARNING!When handling the battery, adhere to all manufacturer safety instructions.
StorEdge Interface Installation Guide MAN-01-00249-1.34
HANDLING AND SAFETY INSTRUCTIONS

WARNING!
The battery should be powered OFF before and during wiring. Turn OFF: The auxiliary power supply switch The circuit breaker switch
CAUTION!This unit must be operated under the specified operating conditions as described in the technical specifications supplied with the unit.
NOTE
The battery used must be NRTL certified.
NOTEFor battery decommissioning and disposal, follow the manufacturer requirements and instructions.
NOTEThe StorEdge Interface is IP65 rated. Unused connectors and glands should be sealed with the provided seals.
NOTEThe symbol appears at grounding points on the SolarEdge equipment. This symbol may also be
used in this manual.
HANDLING AND SAFETY INSTRUCTIONS
-StorEdge Interface Installation Guide MAN-01-00249-1.3 5

Chapter 1: OverviewSolarEdge’s StorEdge™ solution for Smart Energy Management uses the StorEdge Interface to connect the battery to the inverter.Power is stored in the battery and can be used for various applications such as maximized self-consumption and time of use profile programming. For backup power, an inverter specifically designed for backup applications is required; this inverter is not in the scope of this document.
The StorEdge Solution Components The SolarEdge Inverter The SolarEdge Meter - The meter is used by the inverter for export/ consumption readings, and for
Smart Energy Management applications, such as: export limitation and maximizing self-consumption. The StorEdge Interface - The StorEdge Interface connects the battery to the inverter through fuses,
and supplies control and monitoring signals to the battery for operation. One or two batteries - DC coupled batteries designed to work with the SolarEdge system.
Figure 1: StorEdge system components
CAUTION!Do not connect this StorEdge Interface unit to SolarEdge HD-Wave inverters when using LG Chem batteries. Connecting these products may damage the equipment and void the warranty.
NOTE Additional SolarEdge inverters (without batteries) can be connected with RS485. The inverters will
participate in export limitation and Smart Energy Management.Connecting multiple inverters with RS485 master-slave connection may require an RS485 Expansion Kit (available from SolarEdge).
PV modules connected to power optimizers are not mandatory for charge/discharge profile programming and for backup power.
StorEdge Interface Installation Guide MAN-01-00249-1.36
Chapter 1: Overview

About this GuideThis document describes basic system connection and configuration - PV system (power optimizer strings), one inverter, one battery, backed-up loads panel and one meter. For additional configuration options refer to the StorEdge Solution Applications - Connection and Configuration Guide, available at http://www.solaredge.com/sites/default/files/storedge_backup_applications_connection_and_configuration_guide.pdf.
Chapter 1: Overview
-StorEdge Interface Installation Guide MAN-01-00249-1.3 7

Installation WorkflowWhen installing the StorEdge system, follow this workflow to ensure all the components are connected and functioning correctly.
Plan the StorEdge system layout: The battery and StorEdge Interface will connect to the DC side of the inverter. Since the inverter
DC connections are on its left side, it is recommended to position the battery and interface to the left of the inverter to simplify wiring.
To simplify cable management, a minimum distance of 1.5m between battery and interface is recommended.
Figure 2: System Layout
Step 1 - PV system installation - modules, power optimizers and inverter(s). Refer to the following chapters of the SolarEdge Installation Guide supplied with the inverter and available at http://www.solaredge.com/files/pdfs/products/inverters/guides/se-inverter-installation-guide.pdf: Installing the Power Optimizers (if applicable) Installing the Inverter Connecting the AC and the Strings to the Inverter Activating the inverter- as described in the Commissioning chapter of the SolarEdge Installation Guide,
using the activation card supplied with the inverter. Upgrading the inverter firmware version, using the upgrade card supplied with the StorEdge
Interface. Pairing the system - as described in the Commissioning chapter of the SolarEdge Installation Guide Setting Up Communication
Step 2 - Electricity Meter installation (required for Smart Energy Management). Refer to Meter Installation on page 10. Step 3 - StorEdge Interface installation and connection as described in StorEdge Interface Installation on page 12.Step 4 - Connect the battery to the StorEdge Interface and mount the battery. Refer to the installation information in the manufacturer documentation, and to Connecting the StorEdge Interface to the Battery Pack on page 17.Step 5 - Configuring the communication between the inverter and the other devices (meter, battery, etc.). Refer to Configuring the RS485 Bus for Battery and Meter Connection on page 23.Step 6 - System Configuration - Configuring the RS485 bus and StorEdge applications. Refer to System Configuration on page 22.
StorEdge Interface Installation Guide MAN-01-00249-1.38
Installation Workflow

Installation Equipment ListStandard tools can be used during the installation of the SolarEdge system. The following is a recommendation of the equipment needed for installation: Standard flat-head screwdrivers set Non-contact voltage detector Suitable hardware for attaching the inverter mounting bracket to the surface to which it will be
connected Wire cutters Wire strippers Voltmeter
For installing the communication options, you may also need the following: For Ethernet:
o CAT5/6 twisted pair Ethernet cable with RJ45 connector. o If using a CAT5/6 cable spool: RJ45 plug and RJ45 crimper
For RS485: o Four- or six-wire shielded twisted pair cable. o Watchmaker precision screwdriver set
Inverter Transport and StorageTransport the inverter in its original packaging, facing up and without exposing it to unnecessary shocks. If the original package is no longer available, use a similar box that can withstand the weight of the inverter (refer to the inverter weight in the specification datasheet provided with the unit), has a handle system and can be closed fully.
Chapter 1: Overview
-StorEdge Interface Installation Guide MAN-01-00249-1.3 9

Chapter 1: Meter InstallationThe StorEdge solution requires connecting a meter for Smart Energy Management applications, such as export limitation and maximizing self-consumption.The meter type (single or three phase) and number of current transformers (CTs) should be selected per the grid connection and energy management application rather than according to the inverter model. The CTs are supplied with 2m twisted pair wires for connecting the CTs.To install the SolarEdge meter, refer to the installation guide supplied with it: .The meter is connected to the inverter using RS485. RS485 wiring specifications: Cable type: Min. 3-wire shielded twisted pair (a shielded Ethernet cable (Cat5/5E STP) may be used) Wire cross-section area: 0.2-1 mm²/ 24-18 AWG (a CAT5 cable may be used)
NOTE
The inverter RS485 bus should be connected to the battery (via the StorEdge interface) and meter. Connecting multiple inverters (or an external logger) with RS485 master-slave connection may require an RS485 Expansion Kit (available form SolarEdge; Refer to http://www.solaredge.com/files/pdfs/RS485_expansion_kit_installation_guide.pdf).
To connect the meter to the inverter:
1. Remove the seal from one of the openings in communication gland at the bottom of the inverter and insert the RS485 wires from the meter through the opening.
Figure 3: Communication glands (Left - single phase inverter; Right - HD-Wave inverter) 2. Pull out the 9-pin RS485 connector located on the communication board.
Figure 4: Inverter RS485 connector (Left - single phase inverter; Right - HD-Wave inverter)
StorEdge Interface Installation Guide MAN-01-00249-1.310
Chapter 1: Meter Installation

3. Connect the wires as illustrated below:
Figure 5: Meter RS485 connections (Left - single phase inverter; Right - HD-Wave inverter) 4. Terminate the last device in the RS485 chain (see also DIP Switch Setup on page 18):
If the inverter is at the end of the RS485 bus, switch a termination DIP-switch inside the inverter to ON (top position). The switch is located on the communication board as follows:
Figure 6: RS485 termination switch (Left - single phase inverter; Right - HD-Wave inverter) If the meter is at the end of the RS485 chain, it should be terminated using its DIP switches (see
also DIP Switch Setup on page 18). If required, contact SolarEdge Support for an external 120 Ohm termination plug.
Chapter 1: Meter Installation
-StorEdge Interface Installation Guide MAN-01-00249-1.3 11

Chapter 2: StorEdge Interface InstallationUnpacking and Identifying the ProductAn identification label with product specifications is attached to each device.Check the equipment for damage before starting installation: There are no loose parts. All parts are either mounted or located in the accessory kit. If any damage is found, document the damage, and contact SolarEdge.
Mounting the StorEdge Interface 1. Determine the StorEdge Interface mounting location, on a wall or pole, as follows:
Maximum distance from the battery: 5m (15 ft) Maximum distance from the inverter: 100m (328 ft) Maintain a minimum 20 cm (8”) clearance between the StorEdge Interface and other objects.
Figure 7: StorEdge Interface clearance 2. Install the bracket with the semi-circles facing down, as shown below. Verify that the bracket is firmly
attached to the mounting surface.
Figure 8: Mounting bracket 3. Install the interface: Attach the StorEdge interface back brackets to the mounted bracket using the
four supplied screws. Tighten the screws with a torque of 9 N*m / 6.6 lb*ft.
Figure 9: The StorEdge Interface
4. Loosen the 4 Allen screws of the StorEdge Interface and remove the cover.
StorEdge Interface Installation Guide MAN-01-00249-1.312
Chapter 2: StorEdge Interface Installation

Connecting the StorEdge Interface
Figure 10: StorEdge Interface connectors
Connecting the StorEdge Interface to the Inverter
To connect to the inverter DC:
1. Prepare one pair of DC cables with MC4 connectors at both ends - male at one end and female at the other end.
2. Connect one end of the cables to the inverter, and connect the other end to the DC+ and DC- input connectors marked INV OUT.
NOTE
If all the inverter DC inputs are connected to PV strings, use a branch cable (available from SolarEdge) to connect the StorEdge Interface to the inverter DC input.
To connect RS485 communication between the inverter and StorEdge Interface:
RS485 wiring specifications: Cable type: Min. 3-wire shielded twisted pair (a shielded Ethernet cable (Cat5/5e STP) may be used) Wire cross-section area: 0.2- 1 mm²/ 24-18 AWG (a CAT5 cable may be used)
1. Connect one end to the RS485 terminal block marked "RS485 to Inv." in the StorEdge Interface: a. Open gland #2.
b. Remove the seal from one of the openings and insert the wire through the opening. c. Connect the wire ends in the A, B and G pins (use a twisted pair for A and B): Use a flat blade
screwdriver to press the protrusion at the top of the terminal block and open the connection hole; insert the wire and release to spring back and clamp the wire.You can use any color wire for each of the A, B and G connections, as long as the same color wire is used for both A pins (inverter and StorEdge Interface, the same color for both B pins and the same color for both G pins.
Chapter 2: StorEdge Interface Installation
-StorEdge Interface Installation Guide MAN-01-00249-1.3 13

Figure 11: RS485 connector in the StorEdge Interface 2. Connect the other end of the communication cable to the inverter communication board:
NOTEThe wires from the meter and from the StorEdge Interface are inserted into the same pins in the inverter RS485 terminal block. Make sure that the meter wires are not disconnected when inserting the Interface wires.
a. Open the inverter cover as described in its manual. b. Remove the seal from one of the openings in the communication gland and insert the wire
through the opening.
Figure 12: Inverter Communication glands (Left - single phase inverter; Right - HD-Wave inverter)
c. Pull out the 9-pin RS485 terminal block connector, as shown below:
Figure 13: Inverter RS485 terminal block (Left - single phase inverter; Right - HD-Wave inverter)
d. Loosen the screws of pins A(+), B(-), and G on the left of the RS485 terminal block.
e. Insert the wire ends into the G, A and B pins.
StorEdge Interface Installation Guide MAN-01-00249-1.314
Connecting the StorEdge Interface to the Inverter

3. Check that the wires are fully inserted and cannot be pulled out easily.
Figure 14: Connections to the inverter and meter (Up - Single phase inverter; Down - HD-Wave inverter)
Connecting the StorEdge Interface to ACNOTE
The AC is used for auxiliary power only and does not carry high power.
Use a three-wire cable with a cross section of 1-2mm2.
To connect to AC:
1. Turn OFF the AC power source to be connected to the interface.
2. Remove the interface AC sealing gland.
Chapter 2: StorEdge Interface Installation
-StorEdge Interface Installation Guide MAN-01-00249-1.3 15

3. Strip off 5/16" (8mm) of the AC cable insulation and expose two line wires and one grounding wire. 4. Insert the wire ends into the AC terminals (L, N), and the grounding terminal according to the labels.
Fasten the screws with a torque of 0.67 N*m/ 0.5 lb*ft.
Figure 15: AC and grounding connections
StorEdge Interface Installation Guide MAN-01-00249-1.316
Connecting the StorEdge Interface to AC

Connecting the StorEdge Interface to the Battery PackBefore installing the battery pack according to the instructions provided by the battery manufacturer, connect the battery to the StorEdge Interface as described in this section.Follow these guidelines: For easy access to battery connectors, it is recommended to connect the cables to the battery and
to set all the battery DIP switches to their correct positions while the battery is still on the ground, before mounting the battery according to the manufacturer instructions). The following procedure is recommended: a. Connect all the wires to the battery connection panel
b. Mount the battery
c. Connect to the StorEdge Interface. Measure the necessary length between the StorEdge Interface and the battery for all cables. Tie and wrap the cables to avoid pulling them out during mounting. Be sure to adhere to all safety cautions and information in the battery documentation.
Chapter 2: StorEdge Interface Installation
-StorEdge Interface Installation Guide MAN-01-00249-1.3 17
The following table, Figure 19 detail cable types and connections of the StorEdge Interface one with 2 DIP switches to one battery (LG-chem RESU7H/RESU10H). For additional battery types and connection options, refer to Additional Battery Connectionson page 31 and https://www.solaredge.com/sites/default/files/
storedge_wiring_and_onsite_checklist.pdf or https://www.solaredge.com/sites/default/files/storedge_interface_wiring_quick_guide_and_on_site_checklist_for_lg_batteries.pdf. w
CAUTION!Do not connect this StorEdge Interface unit to SolarEdge HD-Wave inverters when using LG Chem batteries. Connecting these products may damage the equipment and void the warranty.
WARNING!
The battery should be powered OFF before and during wiring. Turn OFF: The auxiliary power supply switch The circuit breaker switch

To connect the battery pack and the StorEdge Interface:
1. Prepare cables and connect as described in the following table; Pay attention to the wire colors:
Recommended cable type (min-
max cross section)
StorEdge Interface connection
LG Chem RESU7H/RESU10H
battery connection (Figure 19)
Connection method in StorEdge Interface
DC
One pair of PV DC cables with a cross section of 6 (4-6)mm2, 600V insulated, with MC4 connectors at one end.
BAT DC + DC+ MC4 connection
BAT DC - DC- MC4 connection
Control and monitoring
5-pin communication
terminal block:6-pin connector
5-wire shielded twisted pair cable with a cross section of 0.2 (0.2 - 1.5) mm2.
A CAT5 600V insulated cable can also be used.
En (Enable) ENABLE_H Press the protrusion at the top of the terminal block to open the connection hole, insert the wire and release to spring back and clamp the wire.Refer to Figure 19 and Figure 19
V+ Not connected
B (RS485)1 RS485_H +2
A (RS485)1 RS485_L - 2
G (RS485) EN_G
2. Connect the battery to ground using the battery grounding terminal.
3. Set the DIP switches as described in DIP Switch Setup on page 18.
4. Close the StorEdge Interface cover: Attach the cover and secure it by tightening the four screws with a torque of 1.2 N*m / 0.9 ft.*lb.
DIP Switch SetupVerify that the DIP switches on the system components are set as described in this section, according to the system hardware configuration. This section provides information aboutLG Chem RESU10 batteries. For other types refer to Additional Battery Connections on page 31 or http://www.solaredge.com/sites/default/files/storedge_wiring_and_onsite_checklist.pdf.Termination and bias guidelines: The last battery in the RS485 chain should have termination and bias. The last meter in the RS485 chain should be terminated with 120 Ohm (either internal or external). Inverter communication board should not have termination if meter is installed, otherwise ON.
1Must be twisted pair2Must be twisted pair
StorEdge Interface Installation Guide MAN-01-00249-1.318
DIP Switch Setup

Verify that the DIP switches of all the devices are set as described in the following table, according to the components used in the system and their location:
System Component Communication and Ter-mination Switches Address Switches
Batteries
LG Chem RESU10 N/A
Tesla Powerwall1 Refer to DIP-Switch Setup - Powerwall1 Batteries on page 40
StorEdge Interface
StorEdge Interface main boardCommunication DIP switches (if applicable,Figure 16 ): Up
N/A
Meters
SolarEdge Meter (Figure 18)
o If the meter is not the last in the chain - No termination
o Single meter or the meter is the lastin the RS485 chain - 120 Ohmtermination1 on the last meter connected on the chain
Meter 1 address: o Switch 1: Up o Other: Down
Meter 2 address: o Switch 2: Up o Other: Down
Inverter
Single phase inverters - inverter communication board (Figure 17)
o If a meter is installed: SW7 Down - No termination
o If a meter is not installed: SW7 Up - termination ON.w
N/A
HD-Wave inverter communication board(Figure 17)
RS485-1 connection - use SW2 DIP switch 1 (leftmost) o No meter installed: Up - terminated o Meter is installed: Down - Not
terminated
N/A
1For installing an external 120 Ohm termination plug, contact SolarEdge Support .
Chapter 2: StorEdge Interface Installation
-StorEdge Interface Installation Guide MAN-01-00249-1.3 19
RS485-1 connection - use SW7DIP switch 1 (leftmost)w

Figure 16: StorEdge Interface Communication DIP switches
Figure 17: RS485 termination switch on the HD-Wave inverter communication board (Left - Single phase inverter; Right - HD-Wave inverter)
Figure 18: SolarEdge Meter DIP Switches
StorEdge Interface Installation Guide MAN-01-00249-1.320
DIP Switch Setup

Figure 19: StorEdge Interface connections with LG Chem RESU10 battery
-StorEdge Interface Installation Guide MAN-01-00249-1.321
DIP Switch Setup

Chapter 3: System ConfigurationThis chapter describes how to configure your StorEdge system by setting up the communication between the system components and setting up the required application. To use the StorEdge applications, the inverter communication board firmware (CPU) version must be 3.xxxx and later. The latest firmware version is available for download at http://solaredge.com/storedge/firmware.
StorEdge Interface Installation Guide MAN-01-00249-1.322
Chapter 3: System Configuration
Upgrading the Inverter Firmware Version
To upgrade the inverter firmware:
SolarEdge 1Ph/3Ph inverters SolarEdge 1Ph inverter (HD-Wave)
Figure 20: Inserting the upgrade card
Upgrade the inverter firmware using a MicroSD card with the latest firmware version downloaded fromthe above link .
1. Make sure that:
The inverter has been activated using the activation card supplied with the inverterThe inverter ON/OFF switch is OFFThe AC voltage to the inverter is OFFIf applicable - the StorEdge Interface ON/OFF switch is OFF.
2. Remove the inverter cover.3. Insert the card into the communication board slot marked “CARD”.
4. Turn ON the battery AUX switch and circuit breaker. Wait 1 minute before proceeding.5. Turn ON:
AC to the StorEdge InterfaceAC to the inverter
WARNING!
ELECTRICAL SHOCK HAZARD. Do not touch uninsulated wires when the cover is removed.
6. The upgrade starts automatically. Wait for the messageDone to be displayed on the LCD.
7. Remove the card from the inverter.

Configuring the RS485 Bus for Battery and Meter ConnectionThis section describes how to set up the RS485 communication between the inverter, meter, StorEdge Interface, and one battery. For information on configuring two batteries, refer to the StorEdge Applications Connection and Configuration Guide available at .
To configure the RS485 bus:
1. Select Communication RS485-1 Conf Device Type Multi Devices. A list of devices is displayed.
D e v i c e T y p e < M L T >
M e t e r 1 < - - - >
M e t e r 2 < - - - >
M e t e r 3 < - - - >
B a t t e r y 1 < - - - >
B a t t e r y 2 < - - - >
2. Select Meter 2. The meter configuration screen is displayed (SolarEdge meters are pre-configured to Device ID 2):
D e v i c e T y p e < M T R >
P r o t o c o l < W N >
D e v i c e I D < 2 >
C T R a t i n g < 0 >
M e t e r F u n c . < N o n e >
3. Configure the meter: a. Select Device Type Revenue Meter
b. Select Protocol WattNode
c. Verify that Device ID is set to 2. d. Set the CT value that appears on the CT label: CT Rating <xxxxA>.
If CT resets to 0, check the communication as described in step b of verify the connection:below. e. For a meter installed at the grid connection point select Meter Func. Export+Import.
E x p o r t + I m p o r t
E x p o r t
C o n s u m p t i o n
P r o d u c t i o n
I m p o r t
N o n e
The selected option is displayed in the RS485 Conf screen as <E+I>. 4. Select Communication RS485-1 Conf Device Type Multi Devices Battery 1. The battery
configuration screen is displayed:
D e v i c e T y p e < B A T >
P r o t o c o l < T 7 4 B a t t e r y >
D e v i c e I D < 2 4 >
B a t t e r y I n f o < >
Chapter 3: System Configuration
-StorEdge Interface Installation Guide MAN-01-00249-1.3 23

5. Select Device Type Battery Pack. 6. Select the battery protocol and ID:
Battery type Protocol Device ID
Tesla Powerwall T74 Battery 24
LG Chem RESU LG Battery 15
7. To verify battery connection, select Battery Info and check that the battery information is displayed. If not, check the wiring to the battery:
S N : < s e r i a l # >
M o d e l : < X X X X X X >
R a t e d P W R [ k W H ] : N / A
F W V e r . < X X X X X >
Make sure to have the battery serial number and firmware version at hand whenever contacting support.
To verify the connection:
1. Turn the StorEdge Interface ON/OFF switch to ON. 2. Press the inverter external LCD light button to display the status screens one after the other:
a. Check the RS485 communication status:
w w w w w w w w D e v P r o t # #
R S 4 8 5 - 1 < M L T > < 0 2 > < 0 2 >
The MLT under Dev denotes that the configuration is for multiple devices. The number under Prot (protocol) should display the number of configured devices. The number under ## should display the number of detected devices.The above screen shows an example of 2 devices on the same bus (for example: meter and battery).If the number of devices under Prot does not match the number under ##, refer to Troubleshooting on page 27.
b. Check the meter(s): In the meter(s) status screen check that the status is OK. The following is an example of the status of an Export (or Export+Import) meter:
E x p o r t M e t e r
S t a t u s : < O K / E r r o r # >
P o w e r [ W ] : x x x x x . x
E n e r g y [ W h ] : X X X X X . X
If Comm. Error appears, refer to Troubleshooting on page 27. c. Check the battery information: identification, charging status and power, and the operating
mode.
B S N : X X X X X X X X X I D : 2 4
S O E : 8 9 % W W W W P W R : 2 W
T o t a l : < x > W h
S t a t e : C h a r g i n g
If Comm. Error appears, refer to Troubleshooting on page 27.
StorEdge Interface Installation Guide MAN-01-00249-1.324
Configuring the RS485 Bus for Battery and Meter Connection

Configuring Maximum Self-consumptionThis section describes the StorEdge applications and how to configure the system.
Maximize Self-consumption (MSC)In this mode, the battery is automatically charged and discharged to meet consumption needs. The battery has two states: OFF – the battery is in standby ON – the battery is controlled for maximized self-consumption
Battery OFF periods can be configured to extend battery lifetime by minimizing the number of shallow discharges (for example at nighttime or during the winter).
To set up maximize self-consumption:
1. Enter Setup mode, scroll down to the Power Control menu and select it. A menu similar to the following is displayed:
2. Select Energy Manager. The following screen is displayed:
L i m i t C o n t r o l < D i s >
E n e r g y C t r l < D i s >
A d v a n c e d
Limit Control: For power limitation (including export limitation) configuration. This option can be used in parallel to energy control. For more information refer to . Energy Control: The method by which to manage the energy.
3. Select Energy Ctrl.. The following is displayed, showing the SolarEdge applications:
M a x S e l f - c o n s u m e
T i m e o f U s e
D i s a b l e
Max Self-consume (MSC): Maximize Self-consumption Time of Use (TOU): Charge/Discharge Profile ProgrammingDisable: No energy control, that is, the battery is not used
4. For maximizing self consumption, select Max Self-Consume. The Energy Manager screen changes todisplay the following:
L i m i t C o n t r o l < D i s >
E n e r g y C t r l < M S C >
S e t O p e r a t i o n
S t o r a g e C t r l
Chapter 3: System Configuration
-StorEdge Interface Installation Guide MAN-01-00249-1.3 25
G r i d C o n t r o l < E n >
E n e r g y M a n a g e r
R R C R C o n f .
R e a c t i v e P w r C o n f .
A c t i v e P w r C o n f .
P h a s e B a l a n c e < D i s >
W a k e u p C o n f .
P ( f )
A d v a n c e d
L o a d D e f a u l t s

5. Optionally, set the battery OFF periods as follows: a. Select Set Operation. A list is displayed, allowing 12 monthly profile setup:
J a n < O N >
F e b < O N >
M a r < O N >
A p r < O N >
b. Select a month. A list of options is displayed.
S t a r t T i m e < 0 0 : 0 0 >
E n d T i m e < 0 0 : 0 0 >
A l w a y s O N
A l w a y s O F F
c. Select one of the options: Select Always OFF to avoid battery usage entirely (for example during winter) Set Start Time and End Time to set battery usage in specific hours and avoid usage during
specific hours throughout the month (for example at night). This sets the periods during which the battery will be in the OFF state.
Select Always ON to use battery at all times for charging/ discharging.
Profile Programming (for time-of-use arbitrage)In this mode, the StorEdge system operates according to a configured charge/ discharge profile. This application is covered in a separate application note available at http://www.solaredge.com/files/pdfs/storedge_backup_applications_connection_and_configuration_guide.pdf.
Starting-up the SystemUpon installation and configuration completion, the power optimizers should be paired to the inverter.Close the inverter cover and perform pairing as described in the installation guide provided with your inverter.
StorEdge Interface Installation Guide MAN-01-00249-1.326
Profile Programming (for time-of-use arbitrage)

Appendix A: TroubleshootingThis appendix describes how to troubleshoot StorEdge related errors.
Communication TroubleshootingWhen a battery and a meter are connected (2 devices connected to the same bus), the following should appear in the Communication status screen:
w w w w w w w D e v P r o t # #
R S 4 8 5 - 1 < M L T > < 0 2 > < 0 2 >
Z i g B e e < - - - > < - - > < - - >
Device type, number and protocol are displayed incorrectlyIf one or more of the following occurs, the meter(s) or the battery are not communicating with the inverter: If Dev is not MLT (Multi) , the system is not pre-configured and requires full configuration. Configure
the system as described in Configuring the RS485 Bus for Battery and Meter Connection on page 23. If ## < 02, the meter and/or the battery are not configured correctly. Check the configuration. If Prot < 02, the meter and/or the battery is not communicating correctly. Check the configuration
and wiring connection.
If Prot = ##– the battery and meter are configured and communicating properly.
Troubleshooting Ethernet CommunicationWhen using Ethernet communication, use the Server Communication Status window to identify the location of the error:
S e r v e r : L A N < S _ O K >
S t a t u s : < O K >
x x x x x x x x
< E R R O R M E S S A G E >
xxxxxxxx is a string of 1s and 0s showing an eight-bit communication connection status. 1 indicates OK and 0 indicates an error.
Bit Location Error Message Cause and Troubleshooting
1st LAN Disconnected
Physical connection fault. Check the cable pin-out assignment and cable connection. Refer to Creating an Ethernet (LAN) Connection in the inverter installation guide.
2nd DHCP Failed, or Invalid DHCP Config IP settings issue. Check the router and configuration. Consult your network IT.
3rd Gateway Ping Failed
Ping to router failed. Check the physical connection to the switch/router. Check that the link LED at the router /switch is lit (indicating phy-link). If OK - contact your network IT, otherwise replace the cable or change it from cross to straight connection.
Appendix A: Troubleshooting
-StorEdge Interface Installation Guide MAN-01-00249-1.3 27

Bit Location Error Message Cause and Troubleshooting
4th G Server Ping Failed
Ping to google.com failed. Connect a laptop and check for internet connection. If internet access is unavailable, contact your IT admin or your internet provider.
5th
Server x Ping Failed
Ping or connection to SolarEdge server failed.. Check the SolarEdge server address, under LAN Conf submenu:
Address: prod.solaredge.com
Port: 22222Check with your network administrator whether a firewall or another device is blocking transmission.
6th
7th
8th Tcp Connect. Failed
Meter TroubleshootingWhen a meter is connected, there will be a status screen for each meter function. The following is an example of the export meter function status:
<OK> is not displayedIf <OK> is not displayed in the Status line of the status screens, the meter is not communicating with the inverter communication board. Check the following: There are no loose connections at the inverter communication board and at the meter. The wiring between the 4-pin terminal block on the meter and the RS485 terminal block on the
StorEdge Interface is correct (refer to Figure 19).
An error message is displayedIf Error 185 Meter Comm. Error is displayed in the meter status screen, verify proper connection of: The RS485 cables and connectors The AC connection of the meter
Power [Wh] Import value is not advancingIf the inverter is not producing power, and there is power consumption by the loads, check the following: The meter status LEDs are lit. If the LEDs are all OFF, the meter is not connected to a power source.
o Check the meter AC connection (10-pin terminal block) o Check that the meter breaker is ON
There are no loose connections at the 10-pin AC wiring of the meter. The CT black and white cables are correctly connected to the 6-pin connector on the meter:
o White CT wire is connected to L1 white o Black CT wire is connected to L1 black
CT direction is towards the grid and the green power LEDs are ON. If the LEDs are not green indicating import power - the CTs are reversed.
StorEdge Interface Installation Guide MAN-01-00249-1.328
Meter Troubleshooting
E x p o r t M e t e r
< O K / E r r o r >S t a t u s :
P o w e r [ W ] :
E n e r g y [ W h ] :
x x x x x . x
x x x x x . x

Figure 21: Meter with
Battery TroubleshootingThe State line in the battery status screen should display one of the following: Charging, Discharging, Idle, Off, Init.:
B S N : X X X X X X X X X I D : 2 4
S O E : 8 9 % W W W W P W R : 2 W
T o t a l : < x > W h
S t a t e : C h a r g i n g
If Error 186 Battery Comm. Error appears, the battery communication is disconnected. Check the following: o The RS485 control connection to the battery o The communication DIP switches settings on the battery o The ID DIP switches setting on the battery
If the state Idle is displayed instead of Charging/Discharging, check the following: o The system configuration o The DC connection
If Battery Internal Fault is displayed, refer to the battery documentation supplied with it.The following is an example fault screen.
B a t t e r y I n t e r n a l
F a u l t < # > ( I D : 2 4 )
< x x x x >
< x x x x >
Fault # - according to batteryID - The Modbus ID of the battery<xxx> - text
Appendix A: Troubleshooting
-StorEdge Interface Installation Guide MAN-01-00249-1.3 29

StorEdge Interface LEDs
LED location Functionality Troubleshooting
12V IN (left of the main board)
ON -12V (or 13V) is supplied to the main board N/A
OFF - No power to the main board
o Check AC cable is connected to the the power supply (PSU).
o Check green LED indication on the PSU o Check the cable connection between the
PSU and the main board
12V OUT (right of the main board)
ON - 12V (or 13V) is supplied to the battery (thermal and logic) N/A
OFF - No power supply to the battery
o Check that the 12V IN LED is lit o Make sure all Control connections between
the inverter and battery are correct o Check the RS485 cable to the inverter and
battery o Check the 12V (thermal and logic) voltages to
the battery
Red PSU output is less than 10V Check the AC cable connection
Green PSU output is OK N/A
Figure 22: Power Supply LED location
StorEdge Interface Installation Guide MAN-01-00249-1.330
StorEdge Interface LEDs

Appendix B: Additional Battery ConnectionsThis appendix provides additional options for connecting batteries to the StorEdge Interface. Pay attention to the wire colors and DIP switch setup of the batteries (refer to DIP Switch Setup on page 18). Make sure the first and last device on the RS485 bus is terminated.
Connection with One Battery
Tesla Powerwall1
Figure 23: Connections to Tesla Powerwall1 battery Type B (single phase inverter)
-StorEdge Interface Installation Guide MAN-01-00249-1.331
Appendix B: Additional Battery Connections
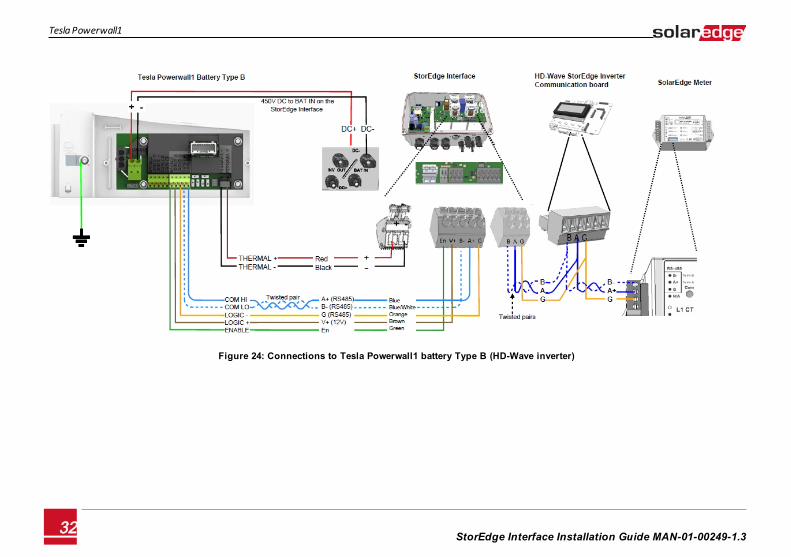
Figure 24: Connections to Tesla Powerwall1 battery Type B (HD-Wave inverter)
Tesla Powerwall1
-StorEdge Interface Installation Guide MAN-01-00249-1.332

Figure 25: Connections to Tesla Powerwall1 Battery Type E (single phase inverter)
-StorEdge Interface Installation Guide MAN-01-00249-1.333
Tesla Powerwall1

Figure 26: Connections to Tesla Powerwall1 Battery Type E (HD-Wave inverter)
Tesla Powerwall1
-StorEdge Interface Installation Guide MAN-01-00249-1.334

LG Chem RESU7H/RESU10H
Figure 27: Connections to LG Chem RESU7H/RESU10H battery (single phase inverter and StorEdge Interface without DIP-switches)
-StorEdge Interface Installation Guide MAN-01-00249-1.335
LG Chem RESU7H/RESU10H

Figure 28: Connections to LG Chem RESU7H/RESU10H battery (single phase inverter and StorEdge Interface with DIP-switches)
LG Chem RESU7H/RESU10H
-StorEdge Interface Installation Guide MAN-01-00249-1.336

Connections with Two Batteries
Tesla Powerwall1
Figure 29: Two Tesla Powerwall1 batteries Type B
-StorEdge Interface Installation Guide MAN-01-00249-1.337
Connections with Two Batteries

Figure 30: Two Tesla Powerwall1 batteries Type E and Type B
Tesla Powerwall1
-StorEdge Interface Installation Guide MAN-01-00249-1.338
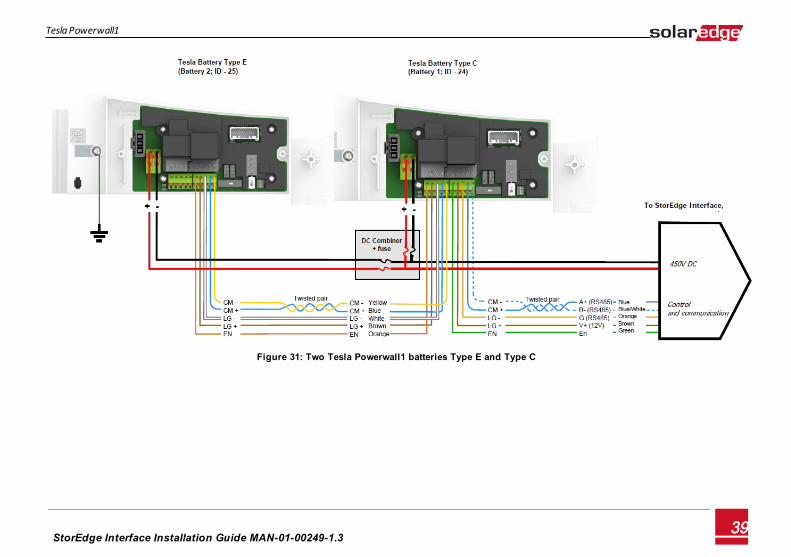
Figure 31: Two Tesla Powerwall1 batteries Type E and Type C
-StorEdge Interface Installation Guide MAN-01-00249-1.339
Tesla Powerwall1

DIP-Switch Setup - Powerwall1 Batteries
System Component Communication and Termination Switches Address Switches
Batteries
Tesla Powerwall1 batteries Type B (Figure 23)
Modbus protocol: Single battery or the battery is the last in the chain
(termination): o S2, S6: Left o S1, S5: Down o S3, S4: UP
If the battery is not the last in the chain (no termination): o S2, S6: Left o S1, S5: Down o S3, S4: Down
Battery address 1 (ID 24) - located closest to the inverter o Switch 1: Right o Switch 2: Right o Switch 3: Right
Battery address 2 (ID 25) o Switch 1: Left o Switch 2: Right o Switch 3: Right
Tesla Powerwall1 batteries Type C, E(Figure 25)
Termination: o If the battery is not the last in the chain: Middle - No
termination o Single battery or the battery is the last in the
chain: Bottom - Termination (with bias)
Modbus protocol: o Right (RS485)
Battery 1 - located closest to the inverter (address ID 24): o Switch 1: Right o Switch 2: Right o Switch 3: Right
Battery 2 - at the end of chain (address ID 25) : o Switch 1: Left o Switch 2: Right o Switch 3: Right
DIP-Switch Setup - Powerwall1 Batteries
-StorEdge Interface Installation Guide MAN-01-00249-1.340

System Component Communication and Termination Switches Address Switches
Meter
SolarEdge Meter (Figure 18) External 120 Ohm termination on the last meter connected on the RS485 chain
Meter 1 address: o Switch 1: Up o Other: Down
Meter 2 address: o Switch 2: Up o Other: Down
Inverter
Inverter communication board (Appendix B)Termination: o If a meter is installed: SW7 Down - No termination o If a meter is not installed: SW7 Up - termination ON.
N/A
StorEdge Interface
StorEdge Interface with DIP switches
Communication:
When using Tesla Powerwall1 Type B battery -both switches down.
Otherwise, both switches always up
N/A
-StorEdge Interface Installation Guide MAN-01-00249-1.341
DIP-Switch Setup - Powerwall1 Batteries

Figure 32: Tesla Powerwall1 battery Type B DIP switches
Figure 33: Tesla Powerwall1 battery Type C/E DIP switches
DIP-Switch Setup - Powerwall1 Batteries
-StorEdge Interface Installation Guide MAN-01-00249-1.342

Appendix C: StorEdge Interface Technical Specifications
SESTI-S1 SESTI-S2 Unit
BATTERY DC INPUT
Number of Batteries per Interface1 1 2 for high capacity 1 2 for high power
and high capacity
Compatible BatteriesLG Chem RESU7H;
Tesla Powerwall 1
Tesla Powerwall 1 (type B+B)
LG Chem RESU10H
Tesla Powerwall 2
Tesla Powerwall 12
Tesla Powerwall 2
Max Input Voltage 1000 Vdc
Max Input Current 8.5 17.5 Adc
DC Fuses on Plus and Minus3 12A (field replaceable), SB type 600V 25A (field replaceable), SB type 600V
ADDITIONAL FEATURES
Battery Communication Interface RS485
Meter Communication Interface RS485
Battery auxiliary power (thermal and control) Yes, 12V / 53W
Pollution degree classification (inside/ outside)
2/ 3
Maximum altitude rating 2000 m
Overvoltage Category III
STOREDGE INTERFACE POWER SUPPLY
AC Input Voltage (Nominal) 220 / 230 Vac
AC Input Voltage Range 184 - 264.5 Vac
AC Frequency (Nominal) 50 / 60 ± 5 Hz
Max AC Input Current 300 mA
INSTALLATION SPECIFICATIONS
AC input gland cable diameter / wire cross section 6-13mm / 1-2.5mm2
DC input (from the battery) 1 MC4 pair
DC output (to the inverter) 1 MC4 pair
Dimensions (HxWxD) 206.6 x 316 x 117.5 mm
1For more batteries per Interface, contact SolarEdge.2Any combination of B, C, E for high power and high capacity other than B+B for high capacity only.3Fuse replacement kits are available from SolarEdge or you can use other fuses with identical ratings.
Appendix C: StorEdge Interface Technical Specifications
-StorEdge Interface Installation Guide MAN-01-00249-1.3 43

SESTI-S1 SESTI-S2 Unit
Weight 3 kg
Min - Max Operating Temperature -20 to +50 °C
Humidity (non-condensing) < 95%
Protection Rating IP65
Installation Wall mounted
Figure 34: StorEdge Interface dimensions
StorEdge Interface Installation Guide MAN-01-00249-1.344
Appendix C: StorEdge Interface Technical Specifications
