strength max™ user guide
TRANSCRIPT

Strength Max™ User Guide
High-Strength Epoxy Infiltrant
DescriptionStrengthMax™ is a high-strength epoxy infiltrant specifically formulated for 3DSystems. StrengthMax™ has low viscosity and is designed to fortify parts built on 3DSystems' ProJet CJP x60 series of printers. Parts infiltrated with StrengthMax™ areeasily sanded and can be surface machined. StrengthMax™ will give you a very hard,very rigid, and very strong part.StrengthMax™ is a two-part system. It is available in small pre-weighed kits, or in largesizes with pumps for easy dispensing and measuring.
Handling and Use Safety Instructions
SymbolsThe following symbol is in this manual.General Caution: User should use care to avoid possible injury or damage toequipment.
Handling and Use Safety Instructions
Safety
Read and understand the container labels, user guide and MSDS (Materials Safety DataSheet) prior to using StrengthMax™. Adhere to all guidelines for personal protection andsafe handling.Wear protective clothing, Nitrile gloves and eye protection.Apply only in a ventilated hood. Do not inhale vapors.Use containers recommended for dispensing and application.Have a spill system in place: catch pan, wax paper, or a drop cloth.The curing reaction generates heat. Do not mix more than the recommended volume ofStrengthMax™.
Features
FeaturesThe strongest infiltrant available from 3D SystemsLow viscosity for deep infiltration of parts up to .4 in. (10mm)Enhances vibrancy of color partsClear appearance for use with multiple color partsParts are functional
They can be drilled, tapped, bored and machinedHelical inserts can be used to further reinforce tapped holes

Resin Properties
Resin Properties
Property StrengthMax™
Working Time at 73° F (23° C) 45 min. for 500 g*
Color Clear
Penetration Depth .2 - .4 in. (5-10 mm) **
Cure Time at 160° F (70° C) 2 Hours
Cure Time at 73° F (23° C) 24 Hours
* Smaller weight increases working time** Depends on part geometry
Preparation Before Application
Prepare the PartPlace a sheet of non-stick material (freezer or wax paper) on your work area for easyclean-up. Have extra ready to place your part on as it cures.Have a supply of paper towels ready to be used to absorb excess StrengthMax™.All part surfaces should be clean, dry and free of contaminants prior to applyingStrengthMax™.For best results, the part should be oven dried for 2-4 hours at 100°F (40°C), dependingon part volume and wall thickness, to dry any excess moisture left in the part afterdepowdering.Parts can be sanded prior to infiltration to improve surface finish. Start with 100-grit

paper and continue to 220-grit if a smoother finish is desired. Remove all loose materialbefore infiltrating.
Setup - StrengthMax™ Large Bottles
Setup - StrengthMax™ Large Bottles
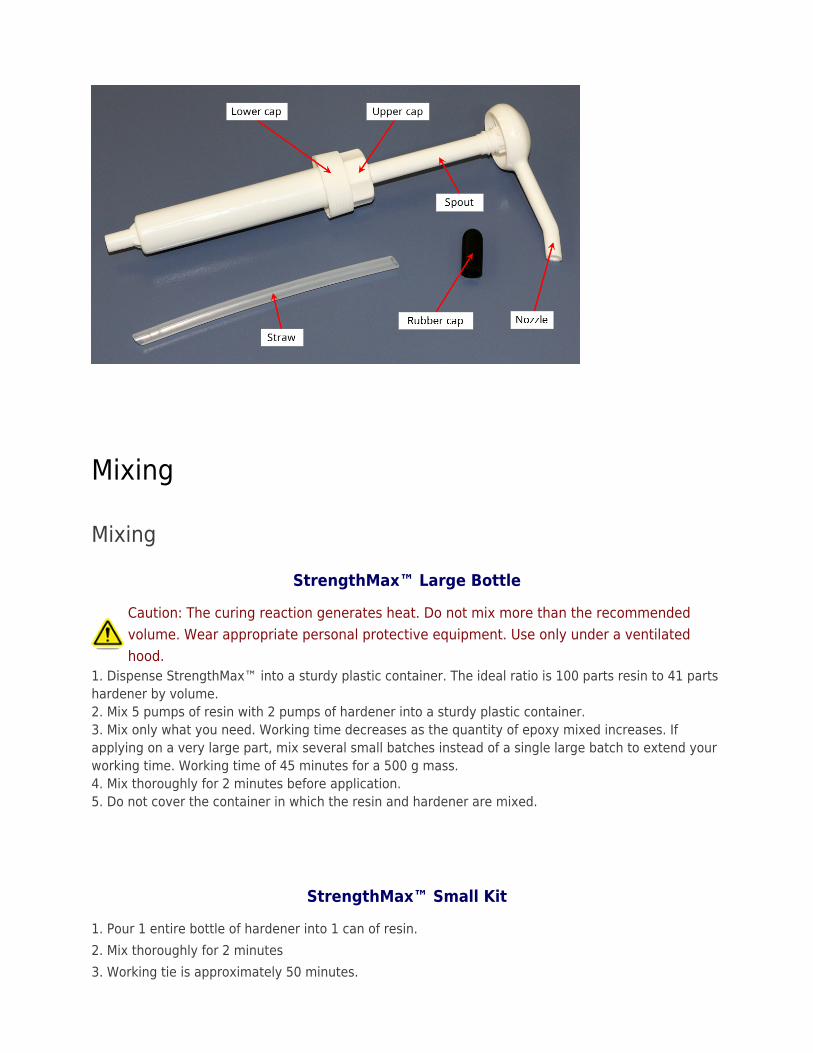
If using the StrengthMax™ large bottles,prepare them as follows:1. Locate plastic pumps and straws.2. Attach the long straw to one pump andscrew the pump onto the Resin bottle.Tighten the upper cap against the lower cap.3. Holding the upper cap, unscrew the spoutuntil it springs up into position.4. Attach the short straw to the other pumpand screw the pump onto the Hardenerbottle. Tighten the upper cap against thelower cap. Also unscrew its spout.5. Prime both pumps before measuring yourfirst batch.6. Place the rubber caps over the pumpnozzles between uses to prevent the pumpsfrom drying out. Once the rubber caps are inuse do not swap them or you may bond thecaps to the nozzles.
Mixing
Mixing
StrengthMax™ Large Bottle
Caution: The curing reaction generates heat. Do not mix more than the recommendedvolume. Wear appropriate personal protective equipment. Use only under a ventilatedhood.
1. Dispense StrengthMax™ into a sturdy plastic container. The ideal ratio is 100 parts resin to 41 partshardener by volume.2. Mix 5 pumps of resin with 2 pumps of hardener into a sturdy plastic container.3. Mix only what you need. Working time decreases as the quantity of epoxy mixed increases. Ifapplying on a very large part, mix several small batches instead of a single large batch to extend yourworking time. Working time of 45 minutes for a 500 g mass.4. Mix thoroughly for 2 minutes before application.5. Do not cover the container in which the resin and hardener are mixed.
StrengthMax™ Small Kit
1. Pour 1 entire bottle of hardener into 1 can of resin.2. Mix thoroughly for 2 minutes3. Working tie is approximately 50 minutes.

Application
Apply
1. StrengthMax™ is best applied using a paint brush. 2. Apply multiple thin coats to get maximum surface penetration depth. 3. Do not over-apply. If excess material has pooled on the part, dab itoff with paper towels. Drips of excess StrenghtMax™ will harden andcause defects.
Cure and Clean Up
Cure
Place infiltrated parts on a non-stick surface such as wax paper, freezer paper, or1.
Teflon®. If liquid pools under the part, move the part so it will not adhere to the surface.
Allow part to cure at ambient temperature for 2 hours or until the exothermic reaction2.
has completed (meaning the part is no longer sticky). Failure to do so may result in
bubbling or uneven color in the part when curing in an oven.
Then cure either:3.
In oven at 70°C (160°F) for 2 hours.At ambient temperature for 24 hours.
Wear gloves when handling parts at elevated temperatures. Parts are safe to touch after4.
they have cooled to room temperature.

Clean UpKeep any remaining mixed materials and soiled paper towels under a ventilated hooduntil they have cured and cooled to room temperature. They are then safe to disposeof in regular trash.
Using your part
MachineParts infiltrated with StrengthMax can be machined for functionality and part testing.Dry machining is recommended for milling, drilling, tapping, and boring. For bestresults when drilling and tapping, add a guide hole to the 3D model prior to printing.
The torque that can be safely applied to tapped holes, or to holes with Heli-Coil®screw thread inserts, is shown in the table below.
Thread Size Tapped Hole Inserted Heli-Coil
2-56 - 45 in-oz
4-40 - 70 in-oz
6-32 - 112 in-oz
10-24 80 in-oz 20 in-lbs
1/4-20 20 in-lbs 40 in-lbs
5/16-18 40 in-lbs 55 in-lbs


Paint
When a smooth painted appearance is desired, parts should beprimed.Apply a coat of primer as described below. No other surfacepreparation of the part is needed.1. Apply DuPont™ Fill 'N Sand® #131S™ Acrylic Primer-Surfacer, orDuPont™ 380S Clear Coat.2. Brush one coat of the primer or clear coat on the infiltrated part.Once the primer has dried, the part can be painted with your choice offinish coats.The primer and clear coat are available at most auto body supplystores. The best results are obtained when these products areallowed to dry overnight.
BondTo maintain high strength in the seams, use a structural adhesive to bond the 2 partstogether.
Toughened acrylic adhesive (example: Devcon® Plastic Welder™ II 14340)Fast cure epoxy (example: Devcon’s 5-Minute® Epoxy 14270)RTV silicone sealant (example: Dow Corning® 736)
When using adhesives, follow the mixing instructions carefully and apply to thesurfaces to be bonded. Clamping or taping the parts together may be required withsome of these adhesives while letting the assembly cure for the recommended time.
Storage and Shelf Life
Storage and Shelf LifeStrengthMax™ should always be stored in a cool, dry place as indicated on the label.The shelf life of StrengthMax™ is two (2) years from the date of manufacture.

Compatibility
CompatibilityStrengthMax™ is compatible with:
All 3D Systems High Performance Composite powderszp®14 Investment Casting powder
Quantities Available
Quantities Available
Material Medium Quantity
StrengthMax™ LargePlastic Jugs (1 each large hardenerand resin)
2.65 L (0.7 gal.)
StrengthMax™ SmallKit
Kit (2 each small hardener and resin,with brushes)
380 mL (12.9 fl. oz.)
StrengthMax™ Full KitBasic kit (1 each large hardener andresin) with pumps and all accessories
5.4 L (1.42 gal.)
StrengthMax™Resupply Kit
Basic kit (1 each large hardener andresin) with pumps
5.4 L (1.42 gal.)
Related documents
Related documentsMSDS/SDS (Materials Safety Data Sheet) for StrengthMax can be found in the Materialssection of our Web site: 3dscentral.3dsystems.com

Support Information
Support InformationIf you have any questions about using StrengthMax™, contact your local reseller oryou may contact 3D Systems support team directly:
United States (Corporate Headquarters)3D Systems, Inc.333 Three D Systems CircleRock Hill, SC 29730 USATelephone (803) 326-4080Toll Free (800) 889-2964)E-mail: [email protected]
Asia Pacific+852 8191 2453FAX: +852 2948 2244E-Mail: [email protected]+1 877-889-2677 +1 978-494-8240 [email protected]
Europe/Middle East/Africa+49 6151 357245 Support-emea@3DSystems