sudoku strategies richard dickerson
TRANSCRIPT

SUDOKU STRATEGIES
AND THE SUDOKERSON
MATRIX
RICHARD E. DICKERSON PASADENA, CALIFORNIA
APRIL 2008 O O
Sudoku Strategies and the Sudokerson Matrix 2
TABLE OF CONTENTS
Preface 3 1. The Sudokerson Matrix 4 2. Level: Easy 8 3. Level: Medium 13 4. Level: Hard 18 5. Level: Diabolical 23 6. Beyond Diabolical 32 7. Over the Top 43 8. Theseus Lives! 49 9. Sudoku Strategies 50 10. A Field Test of Parallel Analysis 53 Appendix 1: Notes on Sudoku Design 56 Appendix 2: How Many Different Sudoku Puzzles Are There? 61
Sudoku Strategies and the Sudokerson Matrix 3
PREFACE
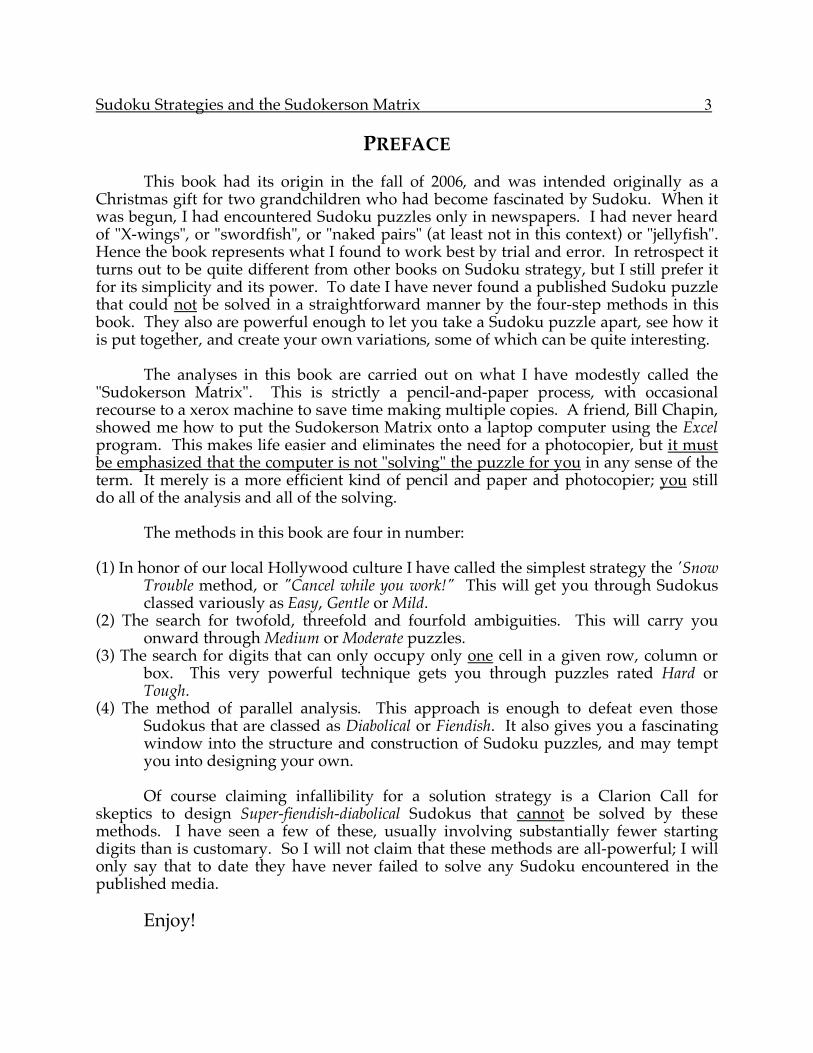
This book had its origin in the fall of 2006, and was intended originally as a Christmas gift for two grandchildren who had become fascinated by Sudoku. When it was begun, I had encountered Sudoku puzzles only in newspapers. I had never heard of "X-wings", or "swordfish", or "naked pairs" (at least not in this context) or "jellyfish". Hence the book represents what I found to work best by trial and error. In retrospect it turns out to be quite different from other books on Sudoku strategy, but I still prefer it for its simplicity and its power. To date I have never found a published Sudoku puzzle that could not be solved in a straightforward manner by the four-step methods in this book. They also are powerful enough to let you take a Sudoku puzzle apart, see how it is put together, and create your own variations, some of which can be quite interesting. The analyses in this book are carried out on what I have modestly called the "Sudokerson Matrix". This is strictly a pencil-and-paper process, with occasional recourse to a xerox machine to save time making multiple copies. A friend, Bill Chapin, showed me how to put the Sudokerson Matrix onto a laptop computer using the Excel program. This makes life easier and eliminates the need for a photocopier, but it must be emphasized that the computer is not "solving" the puzzle for you in any sense of the term. It merely is a more efficient kind of pencil and paper and photocopier; you still do all of the analysis and all of the solving. The methods in this book are four in number: (1) In honor of our local Hollywood culture I have called the simplest strategy the 'Snow
Trouble method, or "Cancel while you work!" This will get you through Sudokus classed variously as Easy, Gentle or Mild.
(2) The search for twofold, threefold and fourfold ambiguities. This will carry you onward through Medium or Moderate puzzles.
(3) The search for digits that can only occupy only one cell in a given row, column or box. This very powerful technique gets you through puzzles rated Hard or Tough.
(4) The method of parallel analysis. This approach is enough to defeat even those Sudokus that are classed as Diabolical or Fiendish. It also gives you a fascinating window into the structure and construction of Sudoku puzzles, and may tempt you into designing your own.
Of course claiming infallibility for a solution strategy is a Clarion Call for skeptics to design Super-fiendish-diabolical Sudokus that cannot be solved by these methods. I have seen a few of these, usually involving substantially fewer starting digits than is customary. So I will not claim that these methods are all-powerful; I will only say that to date they have never failed to solve any Sudoku encountered in the published media. Enjoy!
Sudoku Strategies and the Sudokerson Matrix 4
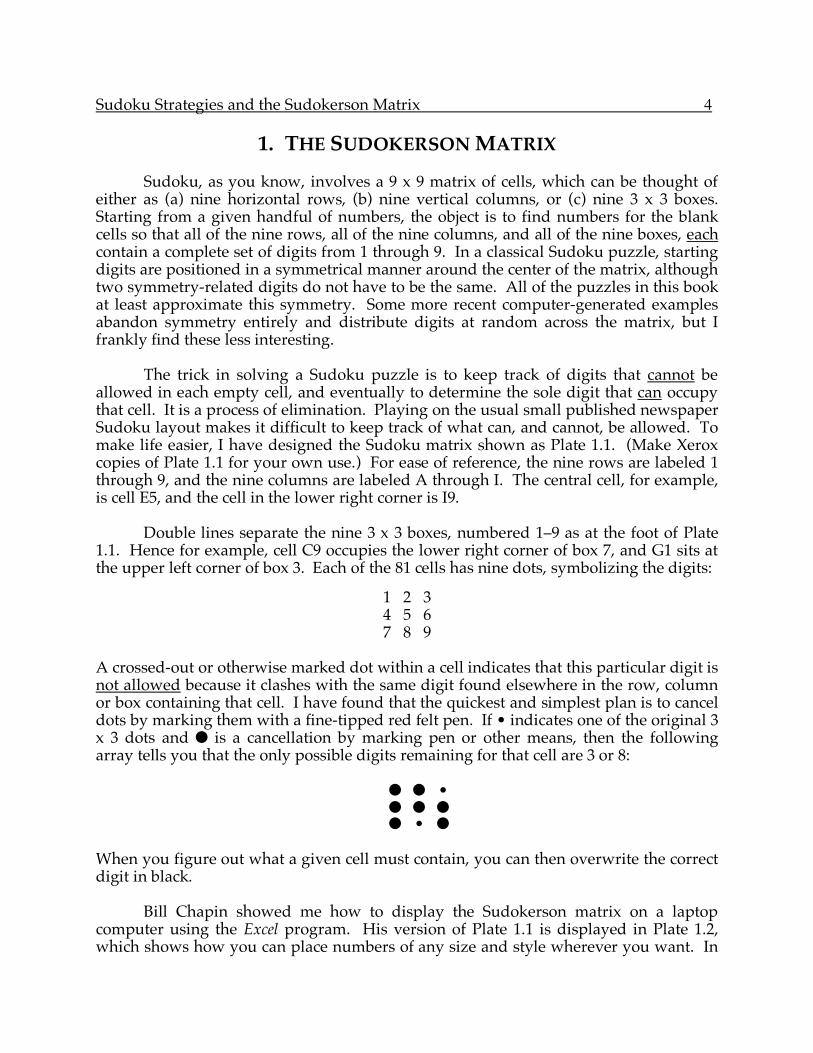
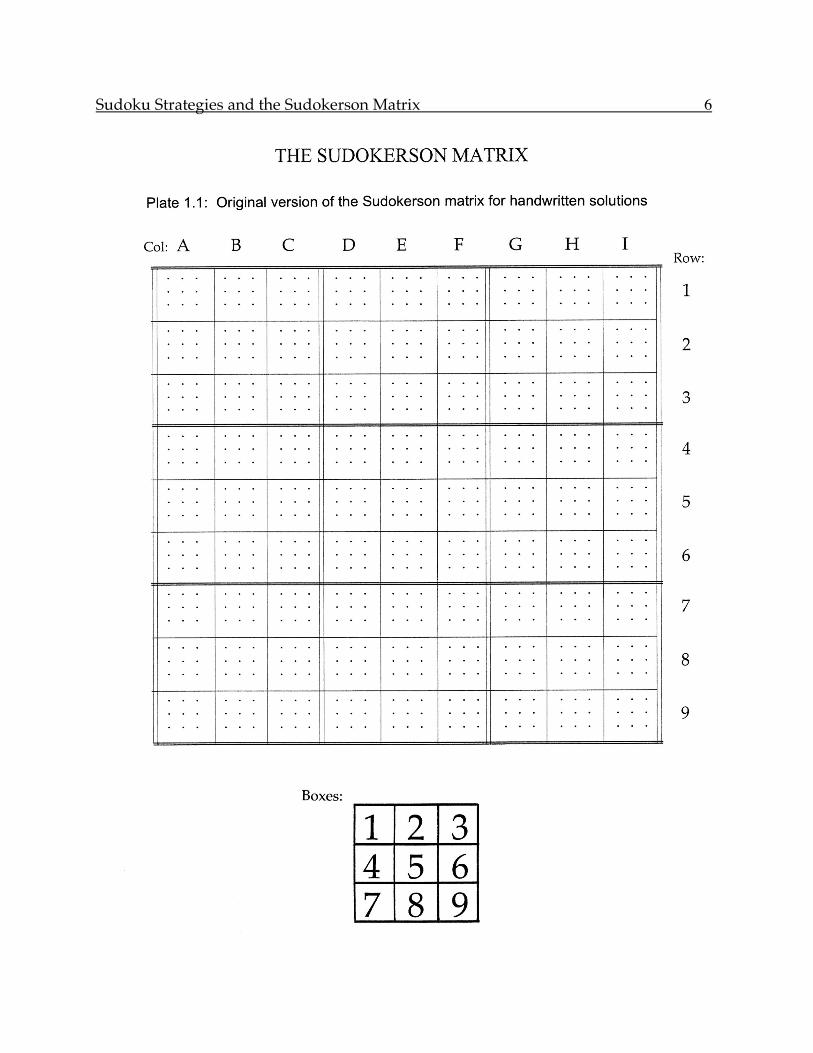
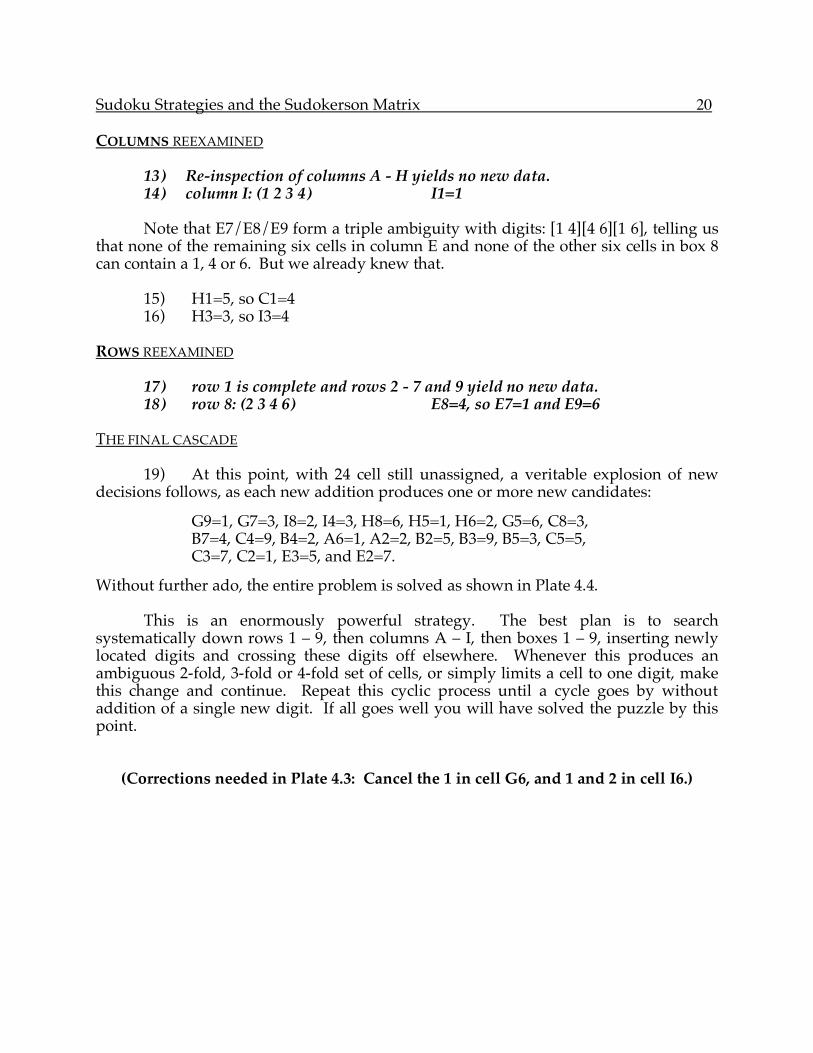
1. THE SUDOKERSON MATRIX Sudoku, as you know, involves a 9 x 9 matrix of cells, which can be thought of either as (a) nine horizontal rows, (b) nine vertical columns, or (c) nine 3 x 3 boxes. Starting from a given handful of numbers, the object is to find numbers for the blank cells so that all of the nine rows, all of the nine columns, and all of the nine boxes, each contain a complete set of digits from 1 through 9. In a classical Sudoku puzzle, starting digits are positioned in a symmetrical manner around the center of the matrix, although two symmetry-related digits do not have to be the same. All of the puzzles in this book at least approximate this symmetry. Some more recent computer-generated examples abandon symmetry entirely and distribute digits at random across the matrix, but I frankly find these less interesting. The trick in solving a Sudoku puzzle is to keep track of digits that cannot be allowed in each empty cell, and eventually to determine the sole digit that can occupy that cell. It is a process of elimination. Playing on the usual small published newspaper Sudoku layout makes it difficult to keep track of what can, and cannot, be allowed. To make life easier, I have designed the Sudoku matrix shown as Plate 1.1. (Make Xerox copies of Plate 1.1 for your own use.) For ease of reference, the nine rows are labeled 1 through 9, and the nine columns are labeled A through I. The central cell, for example, is cell E5, and the cell in the lower right corner is I9.
Double lines separate the nine 3 x 3 boxes, numbered 1–9 as at the foot of Plate 1.1. Hence for example, cell C9 occupies the lower right corner of box 7, and G1 sits at the upper left corner of box 3. Each of the 81 cells has nine dots, symbolizing the digits:
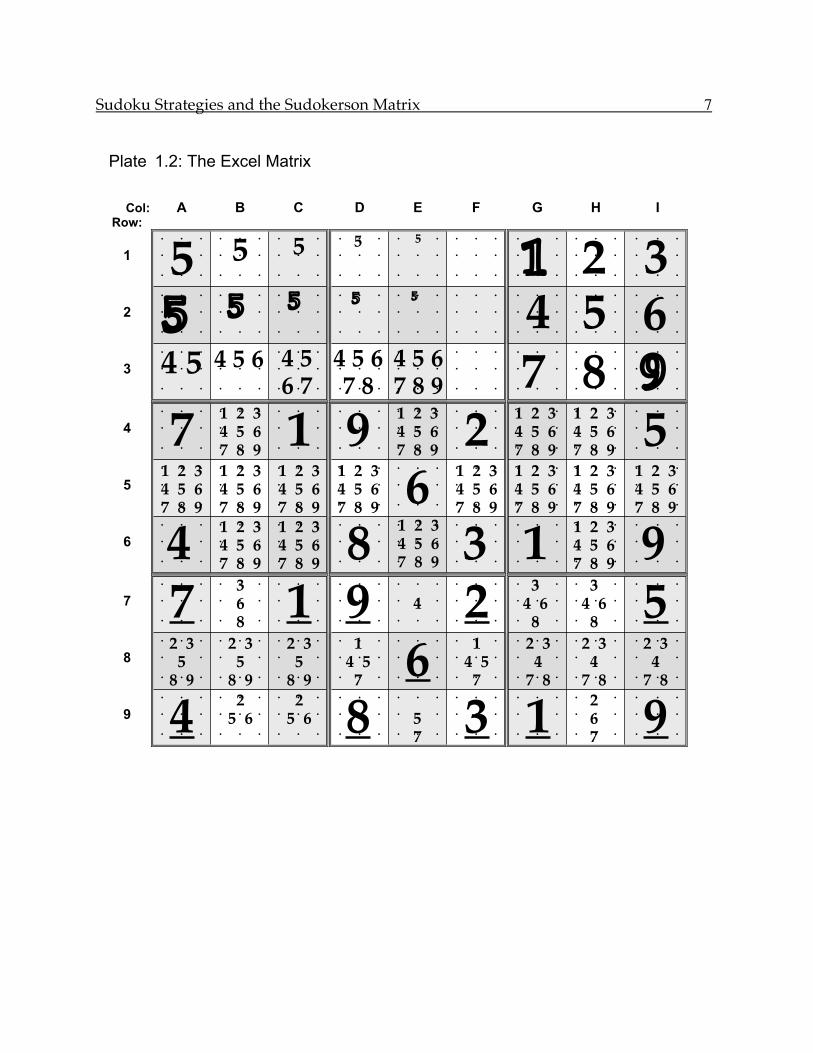
1 2 3 4 5 6 7 8 9 A crossed-out or otherwise marked dot within a cell indicates that this particular digit is not allowed because it clashes with the same digit found elsewhere in the row, column or box containing that cell. I have found that the quickest and simplest plan is to cancel dots by marking them with a fine-tipped red felt pen. If • indicates one of the original 3 x 3 dots and ! is a cancellation by marking pen or other means, then the following array tells you that the only possible digits remaining for that cell are 3 or 8: ! ! • ! ! ! ! • ! When you figure out what a given cell must contain, you can then overwrite the correct digit in black. Bill Chapin showed me how to display the Sudokerson matrix on a laptop computer using the Excel program. His version of Plate 1.1 is displayed in Plate 1.2, which shows how you can place numbers of any size and style wherever you want. In
Sudoku Strategies and the Sudokerson Matrix 5
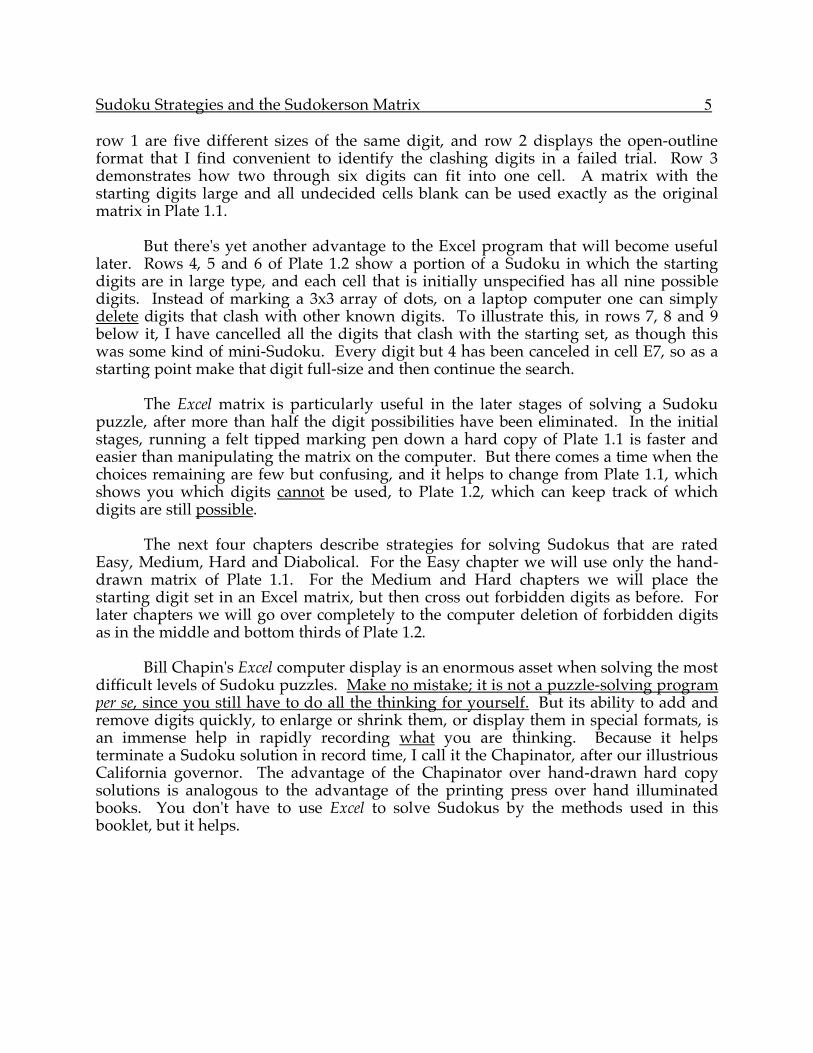
row 1 are five different sizes of the same digit, and row 2 displays the open-outline format that I find convenient to identify the clashing digits in a failed trial. Row 3 demonstrates how two through six digits can fit into one cell. A matrix with the starting digits large and all undecided cells blank can be used exactly as the original matrix in Plate 1.1. But there's yet another advantage to the Excel program that will become useful later. Rows 4, 5 and 6 of Plate 1.2 show a portion of a Sudoku in which the starting digits are in large type, and each cell that is initially unspecified has all nine possible digits. Instead of marking a 3x3 array of dots, on a laptop computer one can simply delete digits that clash with other known digits. To illustrate this, in rows 7, 8 and 9 below it, I have cancelled all the digits that clash with the starting set, as though this was some kind of mini-Sudoku. Every digit but 4 has been canceled in cell E7, so as a starting point make that digit full-size and then continue the search.
The Excel matrix is particularly useful in the later stages of solving a Sudoku puzzle, after more than half the digit possibilities have been eliminated. In the initial stages, running a felt tipped marking pen down a hard copy of Plate 1.1 is faster and easier than manipulating the matrix on the computer. But there comes a time when the choices remaining are few but confusing, and it helps to change from Plate 1.1, which shows you which digits cannot be used, to Plate 1.2, which can keep track of which digits are still possible.
The next four chapters describe strategies for solving Sudokus that are rated
Easy, Medium, Hard and Diabolical. For the Easy chapter we will use only the hand-drawn matrix of Plate 1.1. For the Medium and Hard chapters we will place the starting digit set in an Excel matrix, but then cross out forbidden digits as before. For later chapters we will go over completely to the computer deletion of forbidden digits as in the middle and bottom thirds of Plate 1.2. Bill Chapin's Excel computer display is an enormous asset when solving the most difficult levels of Sudoku puzzles. Make no mistake; it is not a puzzle-solving program per se, since you still have to do all the thinking for yourself. But its ability to add and remove digits quickly, to enlarge or shrink them, or display them in special formats, is an immense help in rapidly recording what you are thinking. Because it helps terminate a Sudoku solution in record time, I call it the Chapinator, after our illustrious California governor. The advantage of the Chapinator over hand-drawn hard copy solutions is analogous to the advantage of the printing press over hand illuminated books. You don't have to use Excel to solve Sudokus by the methods used in this booklet, but it helps.
Sudoku Strategies and the Sudokerson Matrix 6
Sudoku Strategies and the Sudokerson Matrix 7
Plate 1.2: The Excel Matrix
Col: A B C D E F G H I
Row:
• • • • • • • • • • • • • • • • • • • • • • • • • • •
1 • • • • • • • • • • • • • • • • • • • • • • • • • • •
• • • • • • • • • • • • • • • • • • • • • • • • • • •
• • • • • • • • • • • • • • • • • • • • • • • • • • •
2 • • • • • • • • • • • • • • • • • • • • • • • • • • •
• • • • • • • • • • • • • • • • • • • • • • • • • • •
• • • • • • • • • • • • • • • • • • • • • • • • • • •
3 • • • • • • • • • • • • • • • • • • • • • • • • • • •
• • • • • • • • • • • • • • • • • • • • • • • • • • •
• • • • • • • • • • • • • • • • • • • • • • • • • • •
4 • • • • • • • • • • • • • • • • • • • • • • • • • • •
• • • • • • • • • • • • • • • • • • • • • • • • • • •
• • • • • • • • • • • • • • • • • • • • • • • • • • •
5 • • • • • • • • • • • • • • • • • • • • • • • • • • •
• • • • • • • • • • • • • • • • • • • • • • • • • • •
• • • • • • • • • • • • • • • • • • • • • • • • • • •
6 • • • • • • • • • • • • • • • • • • • • • • • • • • •
• • • • • • • • • • • • • • • • • • • • • • • • • • •
• • • • • • • • • • • • • • • • • • • • • • • • • • •
7 • • • • • • • • • • • • • • • • • • • • • • • • • • •
• • • • • • • • • • • • • • • • • • • • • • • • • • •
• • • • • • • • • • • • • • • • • • • • • • • • • • •
8 • • • • • • • • • • • • • • • • • • • • • • • • • • •
• • • • • • • • • • • • • • • • • • • • • • • • • • •
• • • • • • • • • • • • • • • • • • • • • • • • • • •
9 • • • • • • • • • • • • • • • • • • • • • • • • • • •
• • • • • • • • • • • • • • • • • • • • • • • • • • •
5 5 5 5 5
1 2 3
71 2 3
4 5 6
7 8 91 9
1 2 3
4 5 6
7 8 92
1 2 3
4 5 6
7 8 9
1 2 3
4 5 6
7 8 95
4 5 4 5 6 4 5
6 7
4 5 6
7 8
4 5 6
7 8 9 7 8 9
5 5 5 5 5
4 5 6
1 2 3
4 5 6
7 8 9
1 2 3
4 5 6
7 8 9
1 2 3
4 5 6
7 8 9
1 2 3
4 5 6
7 8 96
1 2 3
4 5 6
7 8 9
1 2 3
4 5 6
7 8 9
1 2 3
4 5 6
7 8 9
1 2 3
4 5 6
7 8 9
41 2 3
4 5 6
7 8 9
1 2 3
4 5 6
7 8 98
1 2 3
4 5 6
7 8 93 1
1 2 3
4 5 6
7 8 99
73
6
81 9 4 2
3
4 6
8
3
4 6
85
2 3
5
8 9
2 3
5
8 9
2 3
5
8 9
1
4 5
76
1
4 5
7
2 3
4
7 8
2 3
4
7 8
2 3
4
7 8
42
5 6
2
5 6 8 5
73 1
2
6
79
Sudoku Strategies and the Sudokerson Matrix 8
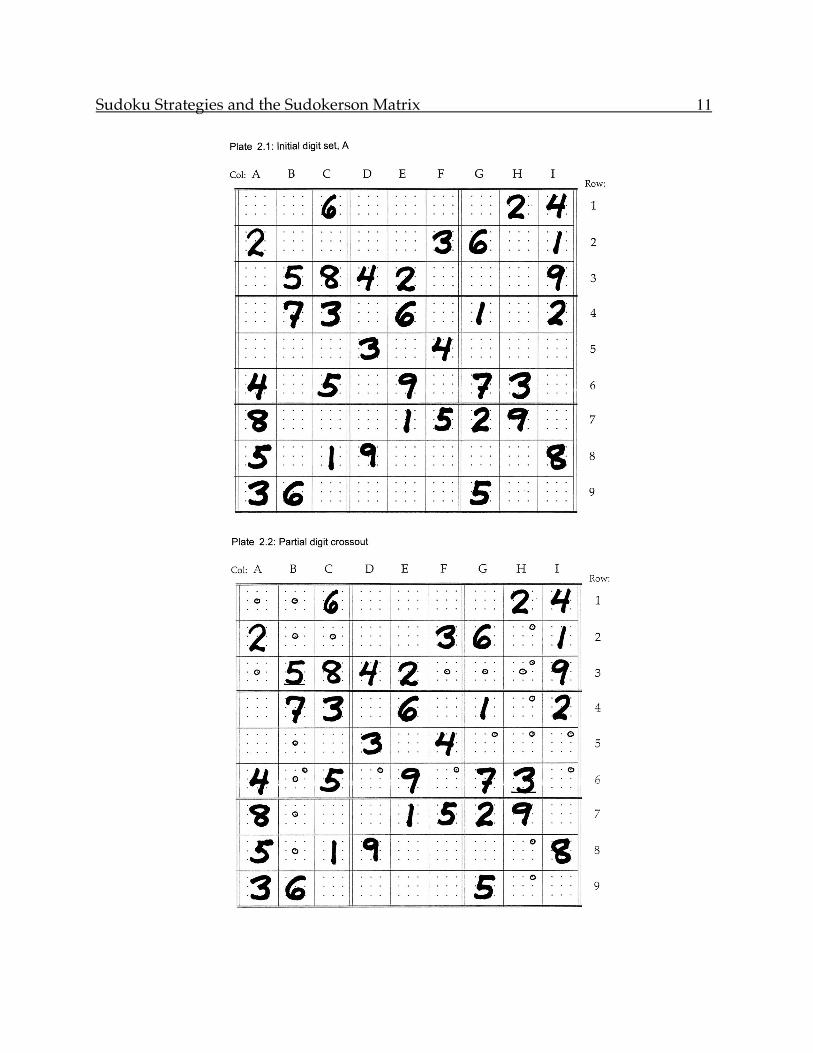
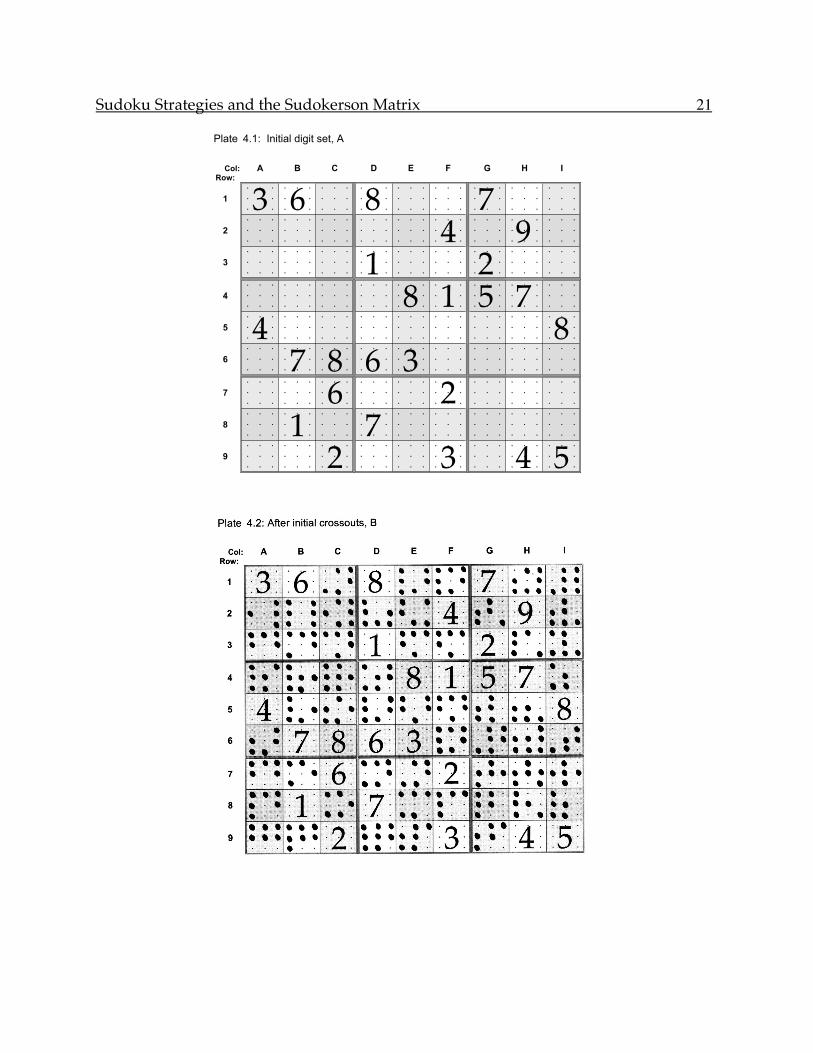
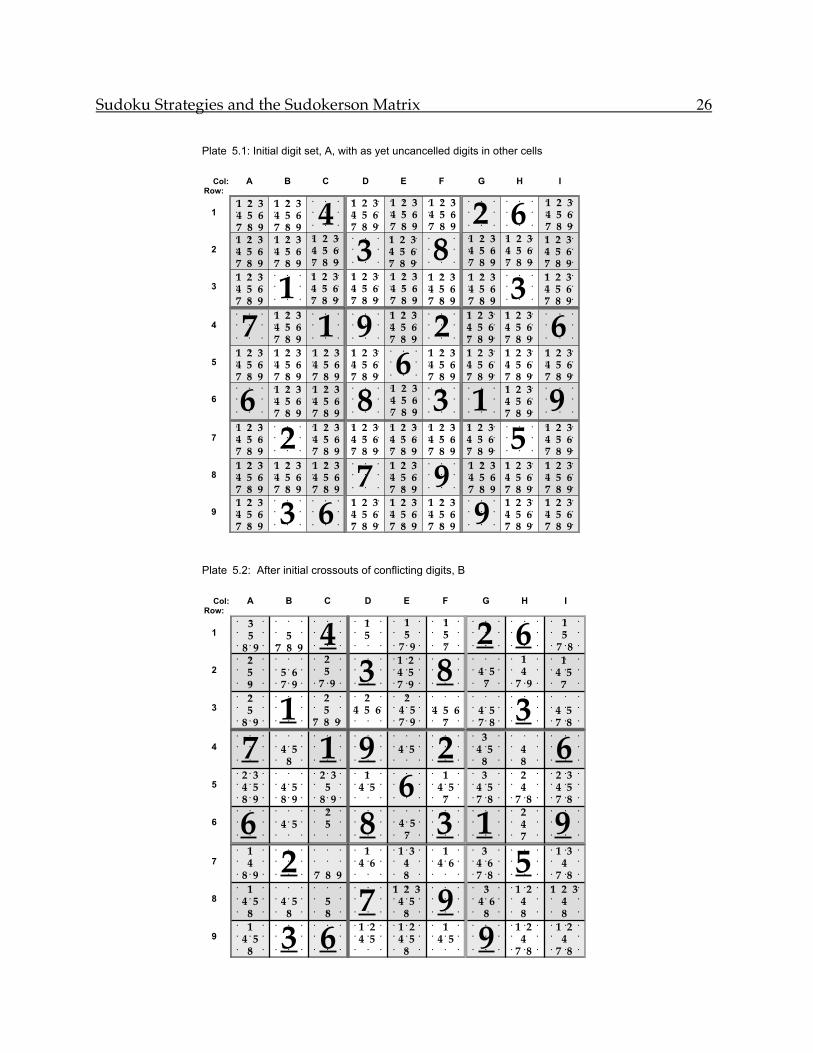
2. LEVEL: EASY The first strategy by itself is often sufficient for Easy puzzles. If you initially
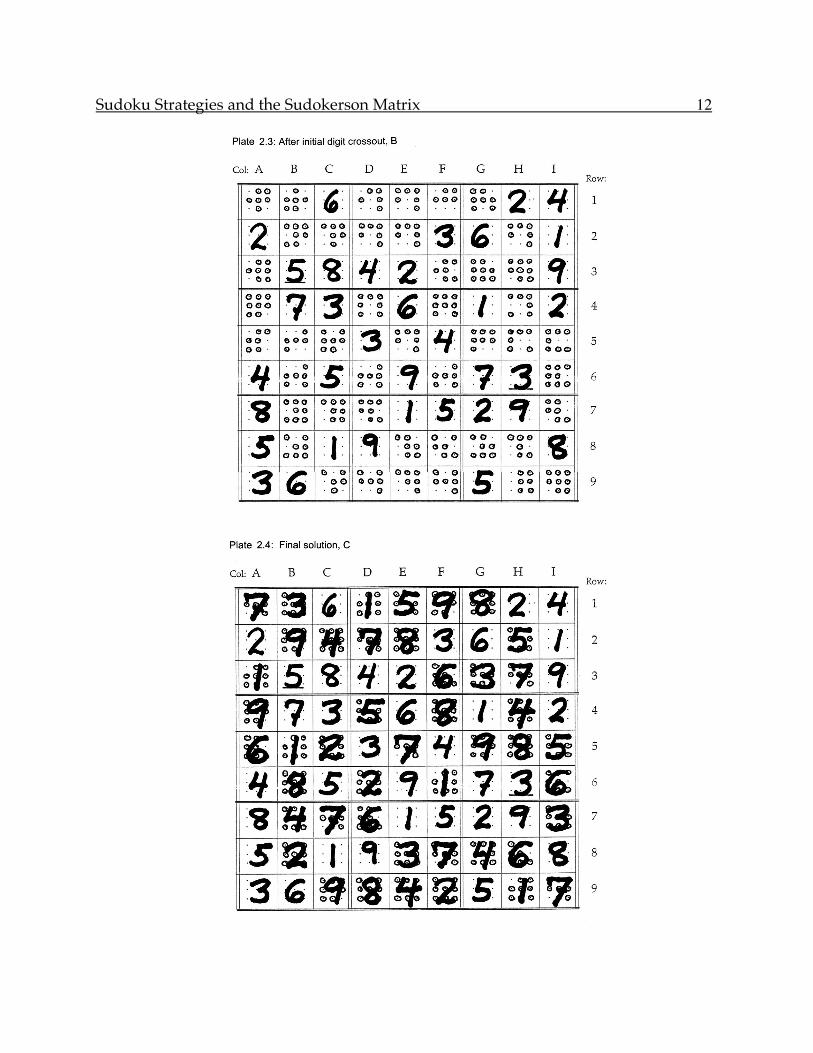
locate three or four cells that can accept only a single digit each, then filling these in can generate more single-digit cells, and the process may continue until the entire Easy puzzle is solved. Whenever eight of the nine dots in one cell are crossed out, then the ninth one must be the right answer. For example: ! • ! ! ! ! ! ! ! means that only the digit 2 is possible. Fill that digit in, and then do not forget to cross out or cancel the same digit all through the row, column and box that contain the cell in question. ("Cancel while you work!") Do it immediately, just after you fill in the digit. This is perhaps the most important single rule in Sudoku, since these newly cancelled digits are what you depend on to give you fresh information that lets other cells be identified. Canceling along rows and columns becomes a reflex, but it is all too easy to forget to cross out the newly added number elsewhere within its box as well. This chapter deliberately avoids using the Chapinator, just to show that it can be done. Plate 2.1 is an example of a Sudoku puzzle that is rated Easy. Note the symmetrical arrangement of digits. Cells H1 and B9 are arranged symmetrically around the center of the matrix, and each contains a digit, although one is 2 while the other is 6. Cells G4 and C6 also are symmetric, although one has a 1 and the other a 5. Every digit in the puzzle is matched by another digit (not necessarily the same) in a cell symmetric to it. This is not an iron-clad rule in Sudoku, but is a style choice that gives the puzzle a feeling of elegance. (In x-ray crystallography, which is my field, this is termed either a "center of symmetry" or a "twofold symmetry axis". The two are the same for figures in a plane such as diagrams on paper.) The first step in solving any Sudoku puzzle is to consider each of the given numbers in turn. For a number in a given cell, cross out this same number everywhere else that it occurs in the row, column, and box that contains that cell. In Plate 2.2 I have done these initial cross-outs for the 5 in the third row, and the 3 in the sixth row as examples. Rapid dots with a colored felt pen are the best way of crossing out digits, but I use small circles here to make overwriting easier to read in the absence of color. It is convenient to underline a number after you have finished crossing out its forbidden locations, just to help you keep track. Plate 2.3 shows the complete number cross-outs or eliminations for the entire puzzle. As we shall see later with more complex puzzles, it is convenient to refer to the starting matrix, Plate 2.1, as "sheet A", and the matrix after all initial crossouts have been made, Plate 2.3, as "sheet B". "Sheet C", to be defined later, is the starting point for higher-level analysis.
Sudoku Strategies and the Sudokerson Matrix 9
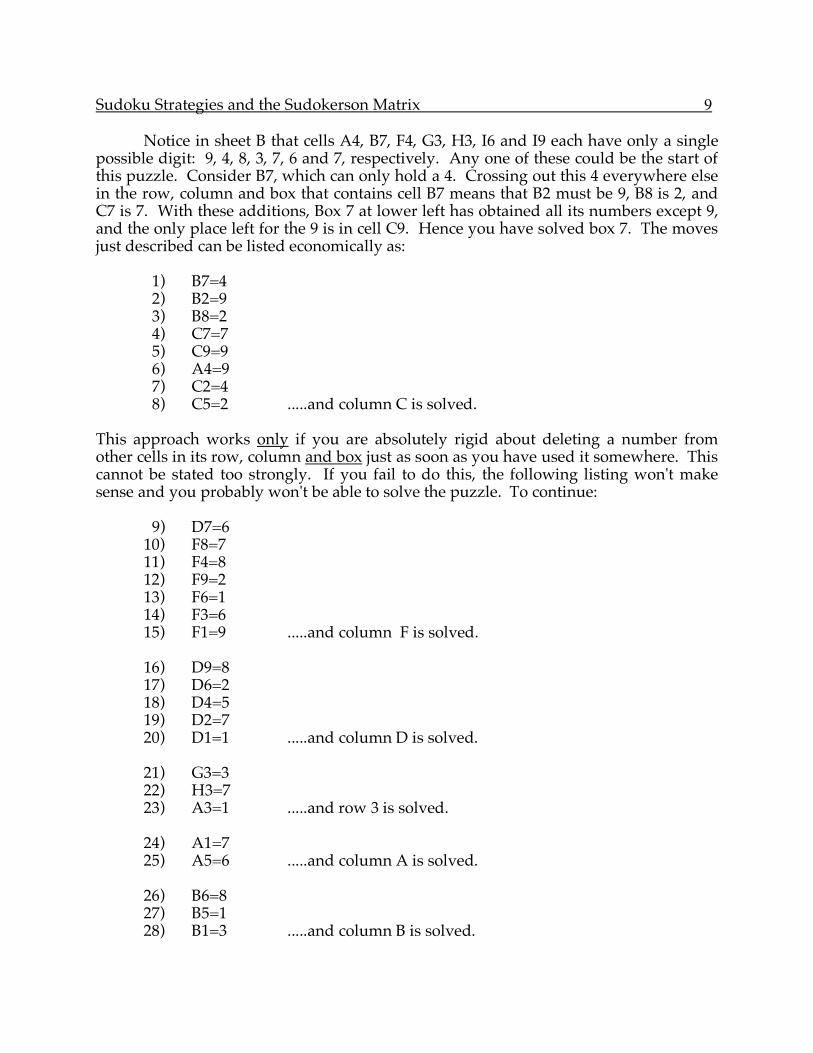
Notice in sheet B that cells A4, B7, F4, G3, H3, I6 and I9 each have only a single possible digit: 9, 4, 8, 3, 7, 6 and 7, respectively. Any one of these could be the start of this puzzle. Consider B7, which can only hold a 4. Crossing out this 4 everywhere else in the row, column and box that contains cell B7 means that B2 must be 9, B8 is 2, and C7 is 7. With these additions, Box 7 at lower left has obtained all its numbers except 9, and the only place left for the 9 is in cell C9. Hence you have solved box 7. The moves just described can be listed economically as:
1) B7=4 2) B2=9 3) B8=2 4) C7=7 5) C9=9 6) A4=9 7) C2=4 8) C5=2 .....and column C is solved.
This approach works only if you are absolutely rigid about deleting a number from other cells in its row, column and box just as soon as you have used it somewhere. This cannot be stated too strongly. If you fail to do this, the following listing won't make sense and you probably won't be able to solve the puzzle. To continue:
9) D7=6 10) F8=7 11) F4=8 12) F9=2 13) F6=1 14) F3=6 15) F1=9 .....and column F is solved. 16) D9=8 17) D6=2 18) D4=5 19) D2=7 20) D1=1 .....and column D is solved. 21) G3=3 22) H3=7 23) A3=1 .....and row 3 is solved. 24) A1=7 25) A5=6 .....and column A is solved. 26) B6=8 27) B5=1 28) B1=3 .....and column B is solved.
Sudoku Strategies and the Sudokerson Matrix 10
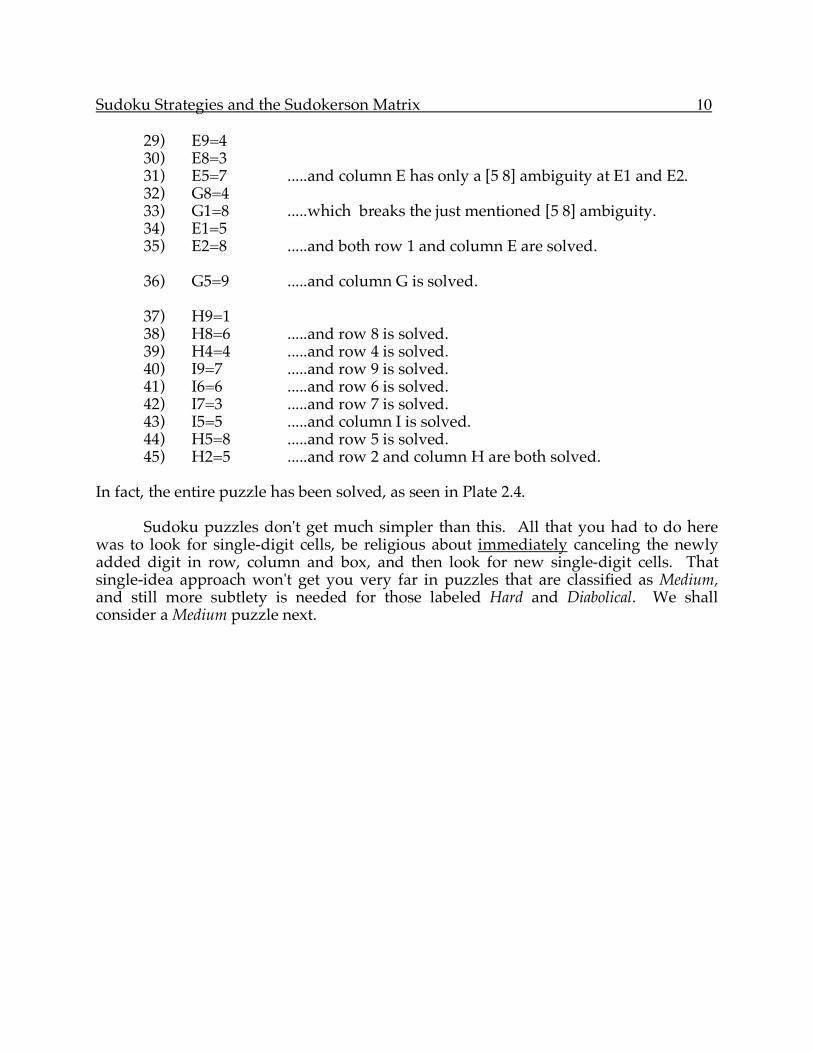
29) E9=4 30) E8=3 31) E5=7 .....and column E has only a [5 8] ambiguity at E1 and E2. 32) G8=4 33) G1=8 .....which breaks the just mentioned [5 8] ambiguity. 34) E1=5 35) E2=8 .....and both row 1 and column E are solved. 36) G5=9 .....and column G is solved. 37) H9=1 38) H8=6 .....and row 8 is solved. 39) H4=4 .....and row 4 is solved. 40) I9=7 .....and row 9 is solved. 41) I6=6 .....and row 6 is solved. 42) I7=3 .....and row 7 is solved. 43) I5=5 .....and column I is solved. 44) H5=8 .....and row 5 is solved. 45) H2=5 .....and row 2 and column H are both solved.
In fact, the entire puzzle has been solved, as seen in Plate 2.4. Sudoku puzzles don't get much simpler than this. All that you had to do here was to look for single-digit cells, be religious about immediately canceling the newly added digit in row, column and box, and then look for new single-digit cells. That single-idea approach won't get you very far in puzzles that are classified as Medium, and still more subtlety is needed for those labeled Hard and Diabolical. We shall consider a Medium puzzle next.
Sudoku Strategies and the Sudokerson Matrix 11
Sudoku Strategies and the Sudokerson Matrix 12
Sudoku Strategies and the Sudokerson Matrix 13
3. LEVEL: MEDIUM A very powerful tool is the recognition that, if two cells in a given row are each limited to the same two numbers, then that uses up these numbers for the row, and both numbers can be crossed out wherever else they occur in that row. If a and b represent digits, and square brackets [ ] indicate different cells, then the twofold ambiguity rule can be written as:
[a b] [a b] —> Neither a nor b can appear in any of the other seven cells of that row.
What has been said, and will be said, about rows, applies equally well but independently to columns and to boxes. For example, if one 3 x 3 box has two cells that each are limited to either a 5 or a 7, then 5 and 7 can be deleted from all the other seven cells of that box. The essential criterion for using these twofold ambiguities to cross out digits is that the two cells should be absolutely identical. Allow the possibility of a third digit in one of them, and the method fails. But the method of twofold ambiguities works independently for rows, for columns, and for boxes, making it very powerful.
Threefold ambiguity cancellations also are encountered frequently. If three digits, a, b and c, appear in some combinations in three different cells [ ] of a row (or column, or box), and if no other digit is allowed in these three cells, then these three cells must contain a, b and c in some as yet-undetermined order. Hence a, b and c can be crossed off as forbidden to the other six cells of the row (or column, or box). Examples of threefold ambiguities are:
[a b c] [a b c] [a b c] This one is less common but does turn up. [a b c] [a b c] [a b] [a b c] [a b] [a c] [a b] [b c] [c a] This one is reasonably common.
But a fourth digit in one cell wipes out the method entirely, as:
[a b d] [b c] [c a] No conclusions can be drawn. For if the first cell holds a d, then either a or b would be forced to show up in one of the remaining six cells in the row, and you couldn't generalize and cross out a, b and c from those cells. Fourfold ambiguity cancellations are less common, but occur more often than you might think. If four different cells contain only two or more of a set of four digits, then these four digits can be deleted from the other five cells of that row, or column or box. It turns out after the fact that this strategy is a familiar one to Sudoku solvers. For example, Andrew C. Stuart in his "The Logic of Sudoku" (Michael Mepham, 2007) refers to twofold, threefold and fourfold ambiguities as naked pairs, naked triples and naked quads.
Sudoku Strategies and the Sudokerson Matrix 14
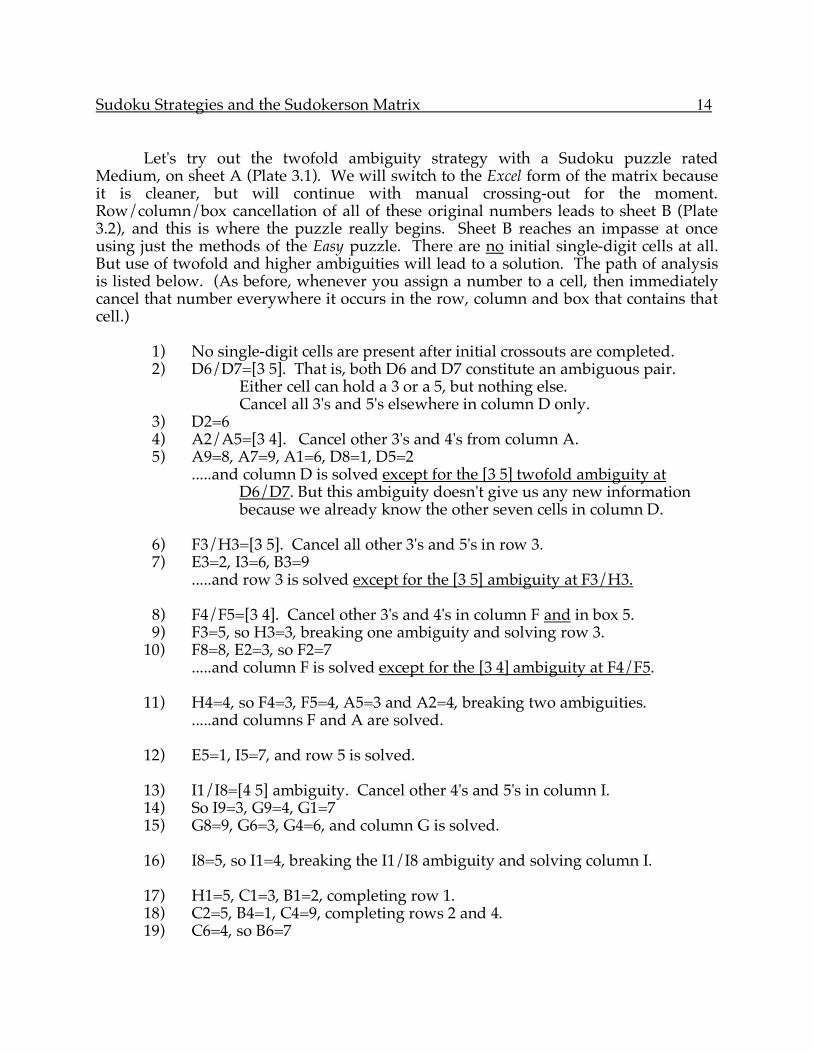
Let's try out the twofold ambiguity strategy with a Sudoku puzzle rated Medium, on sheet A (Plate 3.1). We will switch to the Excel form of the matrix because it is cleaner, but will continue with manual crossing-out for the moment. Row/column/box cancellation of all of these original numbers leads to sheet B (Plate 3.2), and this is where the puzzle really begins. Sheet B reaches an impasse at once using just the methods of the Easy puzzle. There are no initial single-digit cells at all. But use of twofold and higher ambiguities will lead to a solution. The path of analysis is listed below. (As before, whenever you assign a number to a cell, then immediately cancel that number everywhere it occurs in the row, column and box that contains that cell.) 1) No single-digit cells are present after initial crossouts are completed. 2) D6/D7=[3 5]. That is, both D6 and D7 constitute an ambiguous pair.
Either cell can hold a 3 or a 5, but nothing else. Cancel all 3's and 5's elsewhere in column D only. 3) D2=6 4) A2/A5=[3 4]. Cancel other 3's and 4's from column A. 5) A9=8, A7=9, A1=6, D8=1, D5=2 .....and column D is solved except for the [3 5] twofold ambiguity at D6/D7. But this ambiguity doesn't give us any new information because we already know the other seven cells in column D. 6) F3/H3=[3 5]. Cancel all other 3's and 5's in row 3. 7) E3=2, I3=6, B3=9 .....and row 3 is solved except for the [3 5] ambiguity at F3/H3. 8) F4/F5=[3 4]. Cancel other 3's and 4's in column F and in box 5. 9) F3=5, so H3=3, breaking one ambiguity and solving row 3. 10) F8=8, E2=3, so F2=7 .....and column F is solved except for the [3 4] ambiguity at F4/F5. 11) H4=4, so F4=3, F5=4, A5=3 and A2=4, breaking two ambiguities. .....and columns F and A are solved. 12) E5=1, I5=7, and row 5 is solved. 13) I1/I8=[4 5] ambiguity. Cancel other 4's and 5's in column I. 14) So I9=3, G9=4, G1=7 15) G8=9, G6=3, G4=6, and column G is solved. 16) I8=5, so I1=4, breaking the I1/I8 ambiguity and solving column I. 17) H1=5, C1=3, B1=2, completing row 1. 18) C2=5, B4=1, C4=9, completing rows 2 and 4. 19) C6=4, so B6=7
Sudoku Strategies and the Sudokerson Matrix 15
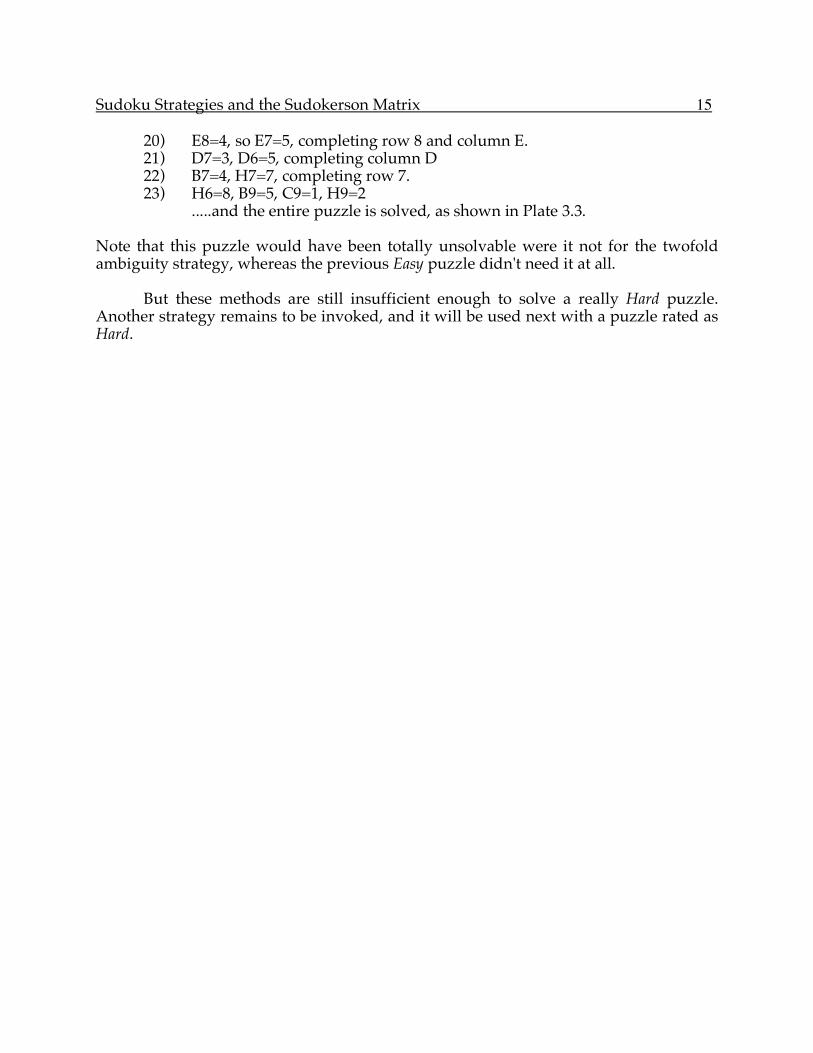
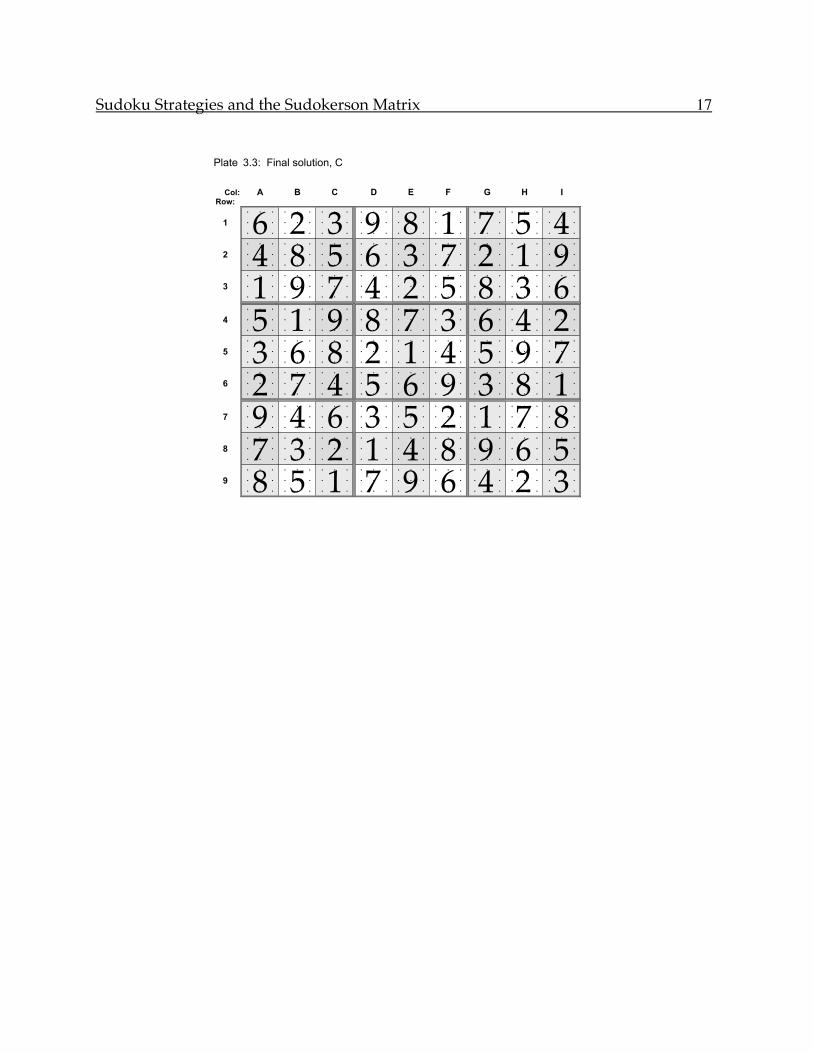
20) E8=4, so E7=5, completing row 8 and column E. 21) D7=3, D6=5, completing column D 22) B7=4, H7=7, completing row 7. 23) H6=8, B9=5, C9=1, H9=2 .....and the entire puzzle is solved, as shown in Plate 3.3. Note that this puzzle would have been totally unsolvable were it not for the twofold ambiguity strategy, whereas the previous Easy puzzle didn't need it at all. But these methods are still insufficient enough to solve a really Hard puzzle. Another strategy remains to be invoked, and it will be used next with a puzzle rated as Hard.

Sudoku Strategies and the Sudokerson Matrix 16
Plate 3.1: Initial digit set, A
Col: A B C D E F G H I
Row:
• • • • • • • • • • • • • • • • • • • • • • • • • • •
1 • • • • • • • • • • • • • • • • • • • • • • • • • • •
• • • • • • • • • • • • • • • • • • • • • • • • • • •
• • • • • • • • • • • • • • • • • • • • • • • • • • •
2 • • • • • • • • • • • • • • • • • • • • • • • • • • •
• • • • • • • • • • • • • • • • • • • • • • • • • • •
• • • • • • • • • • • • • • • • • • • • • • • • • • •
3 • • • • • • • • • • • • • • • • • • • • • • • • • • •
• • • • • • • • • • • • • • • • • • • • • • • • • • •
• • • • • • • • • • • • • • • • • • • • • • • • • • •
4 • • • • • • • • • • • • • • • • • • • • • • • • • • •
• • • • • • • • • • • • • • • • • • • • • • • • • • •
• • • • • • • • • • • • • • • • • • • • • • • • • • •
5 • • • • • • • • • • • • • • • • • • • • • • • • • • •
• • • • • • • • • • • • • • • • • • • • • • • • • • •
• • • • • • • • • • • • • • • • • • • • • • • • • • •
6 • • • • • • • • • • • • • • • • • • • • • • • • • • •
• • • • • • • • • • • • • • • • • • • • • • • • • • •
• • • • • • • • • • • • • • • • • • • • • • • • • • •
7 • • • • • • • • • • • • • • • • • • • • • • • • • • •
• • • • • • • • • • • • • • • • • • • • • • • • • • •
• • • • • • • • • • • • • • • • • • • • • • • • • • •
8 • • • • • • • • • • • • • • • • • • • • • • • • • • •
• • • • • • • • • • • • • • • • • • • • • • • • • • •
• • • • • • • • • • • • • • • • • • • • • • • • • • •
9 • • • • • • • • • • • • • • • • • • • • • • • • • • •
• • • • • • • • • • • • • • • • • • • • • • • • • • •
9 8 1
5 8 7 2
1 7 4 8
8 2 1 9
6 8 5 9
2 6 9 1
6 2 1 8
7 3 2 6
7 9 6
Sudoku Strategies and the Sudokerson Matrix 17
Plate 3.3: Final solution, C
Col: A B C D E F G H I
Row:
• • • • • • • • • • • • • • • • • • • • • • • • • • •
1 • • • • • • • • • • • • • • • • • • • • • • • • • • •
• • • • • • • • • • • • • • • • • • • • • • • • • • •
• • • • • • • • • • • • • • • • • • • • • • • • • • •
2 • • • • • • • • • • • • • • • • • • • • • • • • • • •
• • • • • • • • • • • • • • • • • • • • • • • • • • •
• • • • • • • • • • • • • • • • • • • • • • • • • • •
3 • • • • • • • • • • • • • • • • • • • • • • • • • • •
• • • • • • • • • • • • • • • • • • • • • • • • • • •
• • • • • • • • • • • • • • • • • • • • • • • • • • •
4 • • • • • • • • • • • • • • • • • • • • • • • • • • •
• • • • • • • • • • • • • • • • • • • • • • • • • • •
• • • • • • • • • • • • • • • • • • • • • • • • • • •
5 • • • • • • • • • • • • • • • • • • • • • • • • • • •
• • • • • • • • • • • • • • • • • • • • • • • • • • •
• • • • • • • • • • • • • • • • • • • • • • • • • • •
6 • • • • • • • • • • • • • • • • • • • • • • • • • • •
• • • • • • • • • • • • • • • • • • • • • • • • • • •
• • • • • • • • • • • • • • • • • • • • • • • • • • •
7 • • • • • • • • • • • • • • • • • • • • • • • • • • •
• • • • • • • • • • • • • • • • • • • • • • • • • • •
• • • • • • • • • • • • • • • • • • • • • • • • • • •
8 • • • • • • • • • • • • • • • • • • • • • • • • • • •
• • • • • • • • • • • • • • • • • • • • • • • • • • •
• • • • • • • • • • • • • • • • • • • • • • • • • • •
9 • • • • • • • • • • • • • • • • • • • • • • • • • • •
• • • • • • • • • • • • • • • • • • • • • • • • • • •
6 2 3 9 8 1 7 5 4
5 1 9 8 7 3 6 4 2
1 9 7 4 2 5 8 3 6
4 8 5 6 3 7 2 1 9
3 6 8 2 1 4 5 9 7
2 7 4 5 6 9 3 8 1
9 4 6 3 5 2 1 7 8
7 3 2 1 4 8 9 6 5
8 5 1 7 9 6 4 2 3
Sudoku Strategies and the Sudokerson Matrix 18
4. LEVEL: HARD
The two previous puzzles could be solved without using a powerful technique which I call "digit searching". Up to this point the main question has been: "Which digits can be allowed in any given cell?" Now we will reverse this and ask: "Which cells can still accommodate a given digit?" The former strategy will work with most puzzles rated Easy or Medium. But for Hard puzzles, the new strategy must be added.
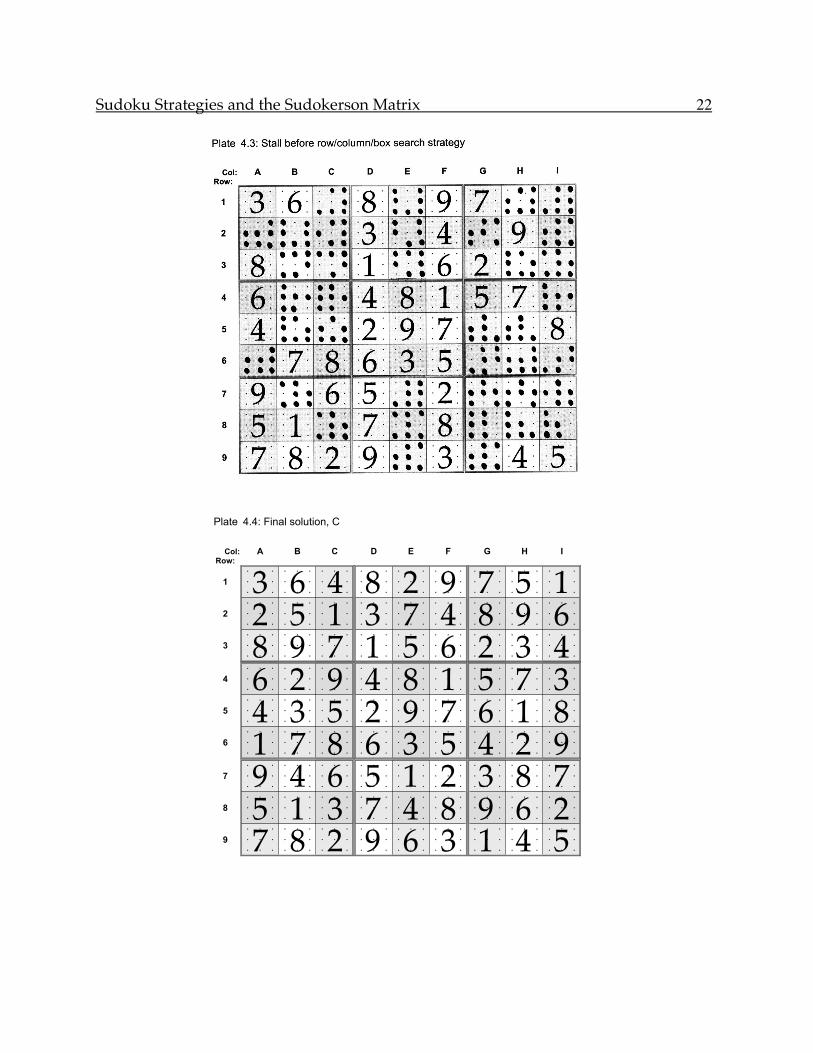
To demonstrate this, the puzzle in sheet A (Plate 4.1) is rated Hard. Simple initial mapping of disallowed digits leads to sheet B (Plate 4.2). The puzzle began with 26 specified digits, and use of single and double ambiguities as in the earlier examples leads to identification of seventeen more digits, by the process: 1) D9=9, B9=8, A9=7 2) A7/A8=[5 9] ambiguity. Delete other 5's and 9's from column A and box 7. 3) A3=8 4) A2/A6=[1 2] ambiguity. Delete 2 from A4. 5) A4=6 6) F1/F6=[5 9] ambiguity. Delete other 5's and 9's from column F. 7) F5=7, F3=6, F8=8 8) A6/H6=[1 2] ambiguity. Delete other 1's and 2's from row 6. 9) G6/I6=[4 9] ambiguity. Delete other 4's and 9's from row 6 and box 6.. 10) F6=5, so F1=9, completing column F. 11) D5=2, so D4=4, D7=5 and D2=3, completing column D. 12) E5=9, A7=9, so A8=5 This stage of the analysis is shown in Plate 4.3. The analysis has stalled with thirty-eight cells remaining unsolved. Where do we go from here? New methods are needed.
It cannot be emphasized too strongly that whenever you add a number to the column, you must be religious about immediately crossing that number out in the relevant row, column and box. These crossouts are your sources of new information, and in their absence the solution will go astray.
As an example of the importance of immediate cancellations, three digits in
Plate 4.3 that should have been cancelled have not been. Without them, some steps in the continued analysis below make no sense. (Try them and see.) Find the missing cancellations by starting with Plate 4.2 and carefully carrying out steps 1 - 12 listed above. As a clue, look carefully at box 6. Or if all else fails, check the end of this chapter. And then see what these added cancellations do for the subsequent analysis, steps 1 - 19.

Sudoku Strategies and the Sudokerson Matrix 19
The new strategy of this chapter is systematically to examine rows, columns and boxes for missing digits that have only one possible location. (Hence: "Which cells will a given digit fit into?") In column A of corrected Plate 4.3 there are two places for a 1 and two (the same two) for a 2, so one learns nothing. Column B lacks 2, 3, 4, 5 and 9, but there are at least two possible locations for each of them, so again nothing is learned. In fact, columns A through F all offer no new information. In column G, digits 1, 3, 4, 6, 8 and 9 are yet to be added, but only 4 has a unique position, at cell G6. In the abbreviated listing of the previous two puzzles, this search of Plate 4.3 begins as below. The expression:
column G: (1 3 4 6 8 9) G6=4 will be taken to mean that the digits 1, 3, 4, 6, 8 and 9 have not yet been assigned in column G, but that all of them have two or more possible locations except for 4, which is limited to cell G6. Because this "Finding cells for digits" method is so powerful compared to methods we have used so far, all entries below using this new strategy have been italicised. BEGINNING WITH COLUMNS A - I: 1) columns A - F no new information.
(Cols. D and F have already been solved.) 2) column G: (1 3 4 6 8 9) G6=4
(This is a key development, that exists only because no other cell in column G can accept a 4.)
3) column G: (1 3 6 8 9) G8=9 (We just looked at column G, but putting a 4 in cell G6
now leaves only G8 available for a 9.) 4) column H: (1 2 3 5 6 8) H7=8 5) column I: (1 2 3 4 6 7 9) I7=7 TURNING NOW TO ROWS 1 - 9: 6) row 1: (1 2 4 5) E1=2 7) row 2: (1 2 5 6 7 8) G2=8 8) row 6: (1 2 9) I6=9 9) The other rows all have multiple sites for missing digits and contribute nothing. EXAMINING 3 X 3 BOXES 1 - 9: 10) box 3: (1 3 4 5 6) I2=6 11) box 5 is solved, and boxes 2 and 7 have twofold ambiguities that are of no help because all the other 7 cells in that box are known. 12) boxes 1, 4, 6 and 8 have no unique sites for any of their missing numbers.
Sudoku Strategies and the Sudokerson Matrix 20
COLUMNS REEXAMINED 13) Re-inspection of columns A - H yields no new data. 14) column I: (1 2 3 4) I1=1 Note that E7/E8/E9 form a triple ambiguity with digits: [1 4][4 6][1 6], telling us that none of the remaining six cells in column E and none of the other six cells in box 8 can contain a 1, 4 or 6. But we already knew that.
15) H1=5, so C1=4 16) H3=3, so I3=4 ROWS REEXAMINED 17) row 1 is complete and rows 2 - 7 and 9 yield no new data. 18) row 8: (2 3 4 6) E8=4, so E7=1 and E9=6 THE FINAL CASCADE 19) At this point, with 24 cell still unassigned, a veritable explosion of new decisions follows, as each new addition produces one or more new candidates:
G9=1, G7=3, I8=2, I4=3, H8=6, H5=1, H6=2, G5=6, C8=3, B7=4, C4=9, B4=2, A6=1, A2=2, B2=5, B3=9, B5=3, C5=5, C3=7, C2=1, E3=5, and E2=7.
Without further ado, the entire problem is solved as shown in Plate 4.4. This is an enormously powerful strategy. The best plan is to search systematically down rows 1 – 9, then columns A – I, then boxes 1 – 9, inserting newly located digits and crossing these digits off elsewhere. Whenever this produces an ambiguous 2-fold, 3-fold or 4-fold set of cells, or simply limits a cell to one digit, make this change and continue. Repeat this cyclic process until a cycle goes by without addition of a single new digit. If all goes well you will have solved the puzzle by this point.
(Corrections needed in Plate 4.3: Cancel the 1 in cell G6, and 1 and 2 in cell I6.)
Sudoku Strategies and the Sudokerson Matrix 21
Plate 4.1: Initial digit set, A
Col: A B C D E F G H I
Row:
• • • • • • • • • • • • • • • • • • • • • • • • • • •
1 • • • • • • • • • • • • • • • • • • • • • • • • • • •
• • • • • • • • • • • • • • • • • • • • • • • • • • •
• • • • • • • • • • • • • • • • • • • • • • • • • • •
2 • • • • • • • • • • • • • • • • • • • • • • • • • • •
• • • • • • • • • • • • • • • • • • • • • • • • • • •
• • • • • • • • • • • • • • • • • • • • • • • • • • •
3 • • • • • • • • • • • • • • • • • • • • • • • • • • •
• • • • • • • • • • • • • • • • • • • • • • • • • • •
• • • • • • • • • • • • • • • • • • • • • • • • • • •
4 • • • • • • • • • • • • • • • • • • • • • • • • • • •
• • • • • • • • • • • • • • • • • • • • • • • • • • •
• • • • • • • • • • • • • • • • • • • • • • • • • • •
5 • • • • • • • • • • • • • • • • • • • • • • • • • • •
• • • • • • • • • • • • • • • • • • • • • • • • • • •
• • • • • • • • • • • • • • • • • • • • • • • • • • •
6 • • • • • • • • • • • • • • • • • • • • • • • • • • •
• • • • • • • • • • • • • • • • • • • • • • • • • • •
• • • • • • • • • • • • • • • • • • • • • • • • • • •
7 • • • • • • • • • • • • • • • • • • • • • • • • • • •
• • • • • • • • • • • • • • • • • • • • • • • • • • •
• • • • • • • • • • • • • • • • • • • • • • • • • • •
8 • • • • • • • • • • • • • • • • • • • • • • • • • • •
• • • • • • • • • • • • • • • • • • • • • • • • • • •
• • • • • • • • • • • • • • • • • • • • • • • • • • •
9 • • • • • • • • • • • • • • • • • • • • • • • • • • •
• • • • • • • • • • • • • • • • • • • • • • • • • • •
3 6 8 7
8 1 5 7
1 2
4 9
4 8
7 8 6 3
6 2
1 7
2 3 4 5
Sudoku Strategies and the Sudokerson Matrix 22
Plate 4.4: Final solution, C
Col: A B C D E F G H I
Row:
• • • • • • • • • • • • • • • • • • • • • • • • • • •
1 • • • • • • • • • • • • • • • • • • • • • • • • • • •
• • • • • • • • • • • • • • • • • • • • • • • • • • •
• • • • • • • • • • • • • • • • • • • • • • • • • • •
2 • • • • • • • • • • • • • • • • • • • • • • • • • • •
• • • • • • • • • • • • • • • • • • • • • • • • • • •
• • • • • • • • • • • • • • • • • • • • • • • • • • •
3 • • • • • • • • • • • • • • • • • • • • • • • • • • •
• • • • • • • • • • • • • • • • • • • • • • • • • • •
• • • • • • • • • • • • • • • • • • • • • • • • • • •
4 • • • • • • • • • • • • • • • • • • • • • • • • • • •
• • • • • • • • • • • • • • • • • • • • • • • • • • •
• • • • • • • • • • • • • • • • • • • • • • • • • • •
5 • • • • • • • • • • • • • • • • • • • • • • • • • • •
• • • • • • • • • • • • • • • • • • • • • • • • • • •
• • • • • • • • • • • • • • • • • • • • • • • • • • •
6 • • • • • • • • • • • • • • • • • • • • • • • • • • •
• • • • • • • • • • • • • • • • • • • • • • • • • • •
• • • • • • • • • • • • • • • • • • • • • • • • • • •
7 • • • • • • • • • • • • • • • • • • • • • • • • • • •
• • • • • • • • • • • • • • • • • • • • • • • • • • •
• • • • • • • • • • • • • • • • • • • • • • • • • • •
8 • • • • • • • • • • • • • • • • • • • • • • • • • • •
• • • • • • • • • • • • • • • • • • • • • • • • • • •
• • • • • • • • • • • • • • • • • • • • • • • • • • •
9 • • • • • • • • • • • • • • • • • • • • • • • • • • •
• • • • • • • • • • • • • • • • • • • • • • • • • • •
3 6 4 8 2 9 7 5 1
6 2 9 4 8 1 5 7 3
8 9 7 1 5 6 2 3 4
2 5 1 3 7 4 8 9 6
4 3 5 2 9 7 6 1 8
1 7 8 6 3 5 4 2 9
9 4 6 5 1 2 3 8 7
5 1 3 7 4 8 9 6 2
7 8 2 9 6 3 1 4 5
Sudoku Strategies and the Sudokerson Matrix 23
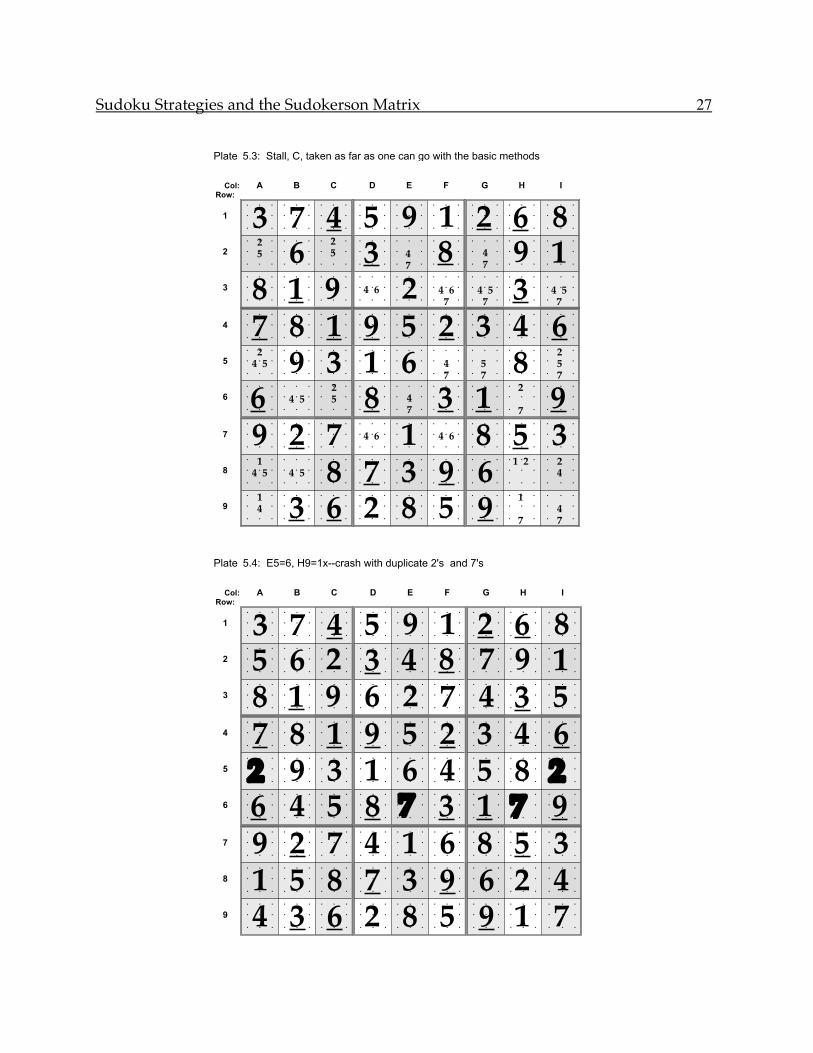
5. LEVEL: DIABOLICAL The methods described so far will be referred to collectively as the "three basic strategies". These will get you a long way, but they still usually fail with puzzles that are rated Extremely Difficult or Diabolical. The basic strategies alone can halt at a stalled solution, dead in the water, with no suggestion as to what to do or where to go next. A new and more powerful procedure is needed. This is the method of parallel analysis, and it will turn out to be the strongest weapon in the Sudoku-solver's arsenal. I have encountered no published Sudoku puzzle yet that could not be solved by the parallel analysis method. All that is needed is pen or pencil and a photocopier machine. But here is where Bill Chapin's matrix-drawing Excel file comes into its own; it is easy and rapid to use, makes the photocopier superfluous, and takes all the pain out of the most complicated of parallel solutions. To illustrate the parallel analysis method, the initial Plate 5.1 (which I call sheet A) contains an Extremely Difficult or Diabolical Sudoku. We now have switched over to my own extension of the Chapinator file, in which each of the 81 cells begins with a 3x3 grid of digits 1 – 9. The starting set of digits is introduced, enlarging them for convenience as in sheet A. This approach replaces the 3x3 grid of dots representing digits that have been ruled out, by a 3x3 array of digits that still remain possible for each particular cell. Instead of marking the dot that represents a forbidden digit, you now simply delete that digit from the cell. If you are not using the Chapinator it still pays to prepare a hand-drawn version of a page like Plate 5.3, so one can make as many photocopies as necessary and cross out numbers by hand. But the Excel version is much easier to use. In solving Plate 5.1, as usual, first delete all digits that are disallowed by the starting digit set, to obtain Plate 5.2 (which will be termed sheet B). Then use the three basic strategies seen earlier to go as far as possible toward a solution. If the analysis goes to completion, you have won. But with Diabolical puzzles there usually come a time when none of the basic strategies have anything more to offer. What we will call sheet C (Plate 5.3) displays the solution carried as far as one can go using the three basic strategies. It is the end of the line for the methods presented so far. The analysis is not wrong; it simply has stalled with nowhere left to go. The challenge of this chapter is how to use parallel analysis methods to break the stall observed in sheet C. Note that Plate 5.3 has nineteen different cells that are limited to two possible digits each. The starting point in parallel analysis is to select one such cell and try each of its two possible digits in turn in a continued analysis using the basic methods of the previous chapters. Not all of these binary cells in Plate 5.3 are genuinely independent. Cells B6 and B8 are an ambiguous pair that can hold only a 4 or a 5, so when you have specified the contents of one cell you also know the contents of the other. Other binary cells on Plate 5.3 are linked as triplets or even quadruplets:
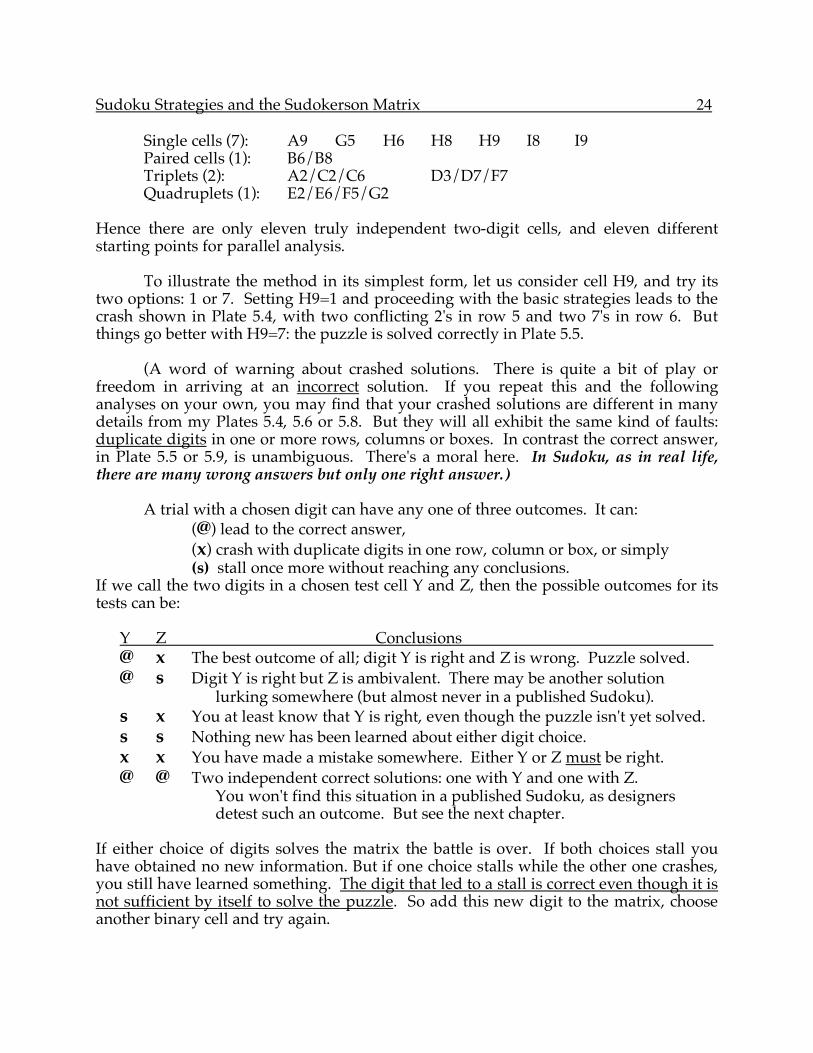
Sudoku Strategies and the Sudokerson Matrix 24
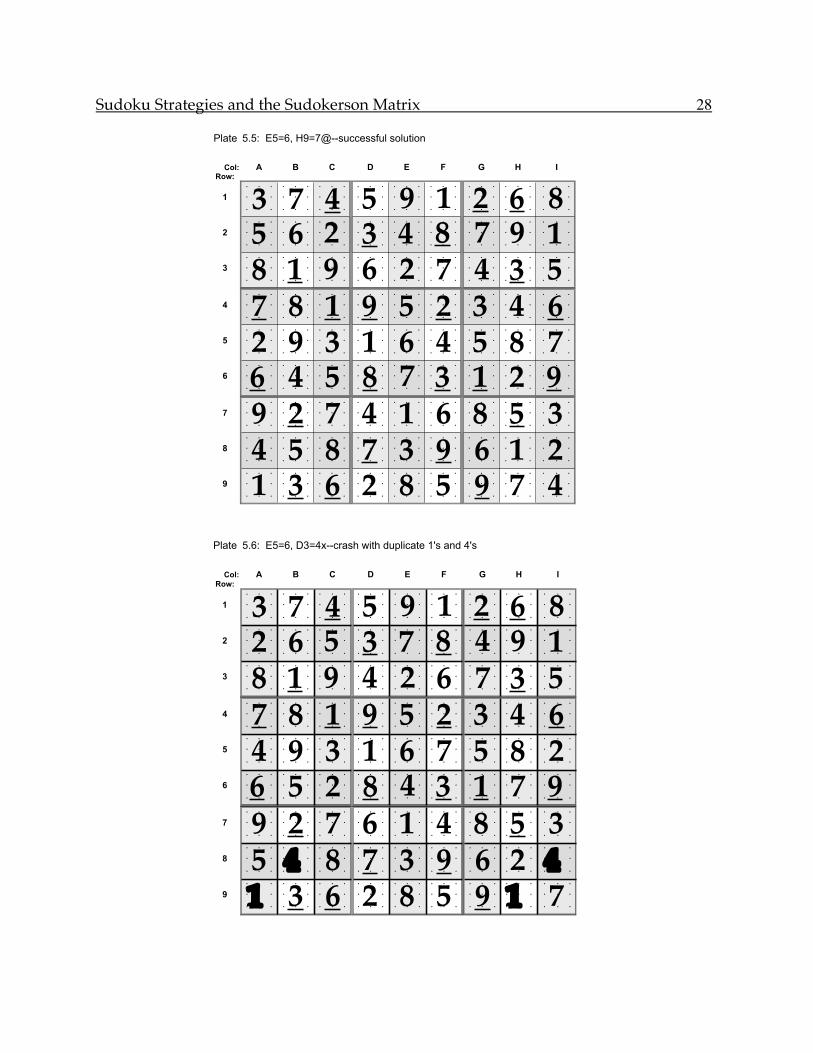
Single cells (7): A9 G5 H6 H8 H9 I8 I9 Paired cells (1): B6/B8 Triplets (2): A2/C2/C6 D3/D7/F7 Quadruplets (1): E2/E6/F5/G2 Hence there are only eleven truly independent two-digit cells, and eleven different starting points for parallel analysis. To illustrate the method in its simplest form, let us consider cell H9, and try its two options: 1 or 7. Setting H9=1 and proceeding with the basic strategies leads to the crash shown in Plate 5.4, with two conflicting 2's in row 5 and two 7's in row 6. But things go better with H9=7: the puzzle is solved correctly in Plate 5.5. (A word of warning about crashed solutions. There is quite a bit of play or freedom in arriving at an incorrect solution. If you repeat this and the following analyses on your own, you may find that your crashed solutions are different in many details from my Plates 5.4, 5.6 or 5.8. But they will all exhibit the same kind of faults: duplicate digits in one or more rows, columns or boxes. In contrast the correct answer, in Plate 5.5 or 5.9, is unambiguous. There's a moral here. In Sudoku, as in real life, there are many wrong answers but only one right answer.) A trial with a chosen digit can have any one of three outcomes. It can: (@) lead to the correct answer, (x) crash with duplicate digits in one row, column or box, or simply (s) stall once more without reaching any conclusions. If we call the two digits in a chosen test cell Y and Z, then the possible outcomes for its tests can be: Y Z Conclusions @ x The best outcome of all; digit Y is right and Z is wrong. Puzzle solved. @ s Digit Y is right but Z is ambivalent. There may be another solution lurking somewhere (but almost never in a published Sudoku). s x You at least know that Y is right, even though the puzzle isn't yet solved. s s Nothing new has been learned about either digit choice. x x You have made a mistake somewhere. Either Y or Z must be right. @ @ Two independent correct solutions: one with Y and one with Z. You won't find this situation in a published Sudoku, as designers detest such an outcome. But see the next chapter. If either choice of digits solves the matrix the battle is over. If both choices stall you have obtained no new information. But if one choice stalls while the other one crashes, you still have learned something. The digit that led to a stall is correct even though it is not sufficient by itself to solve the puzzle. So add this new digit to the matrix, choose another binary cell and try again.
Sudoku Strategies and the Sudokerson Matrix 25
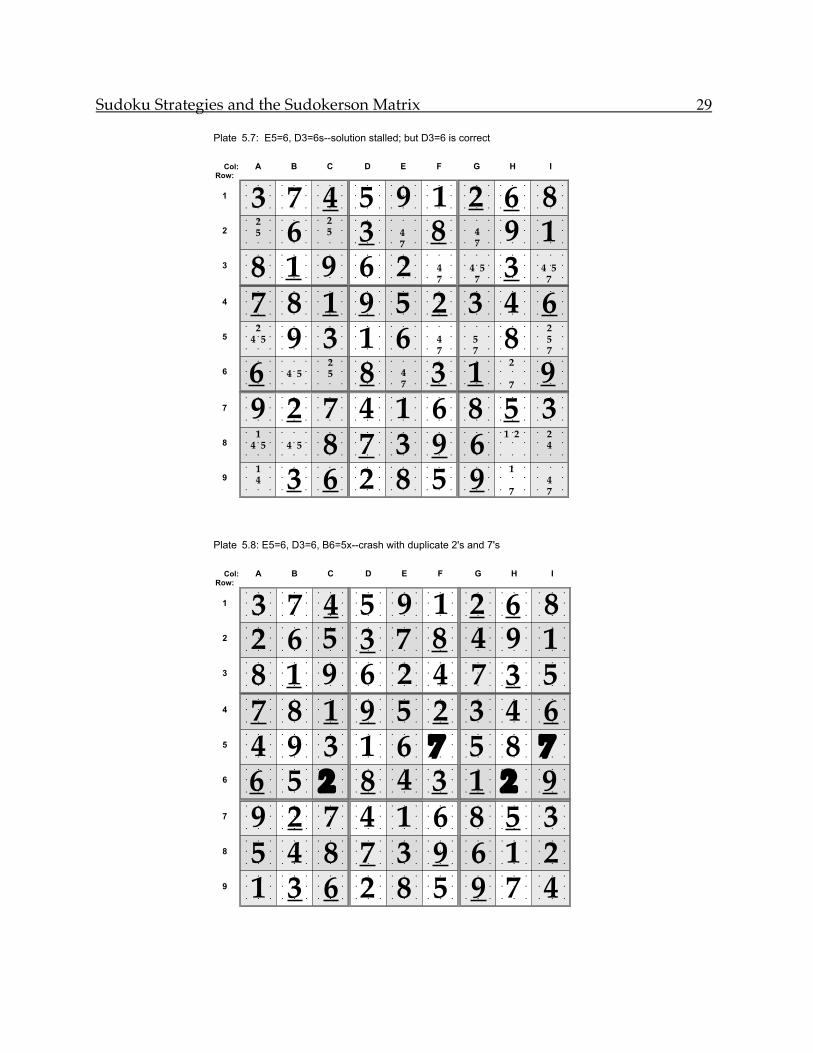
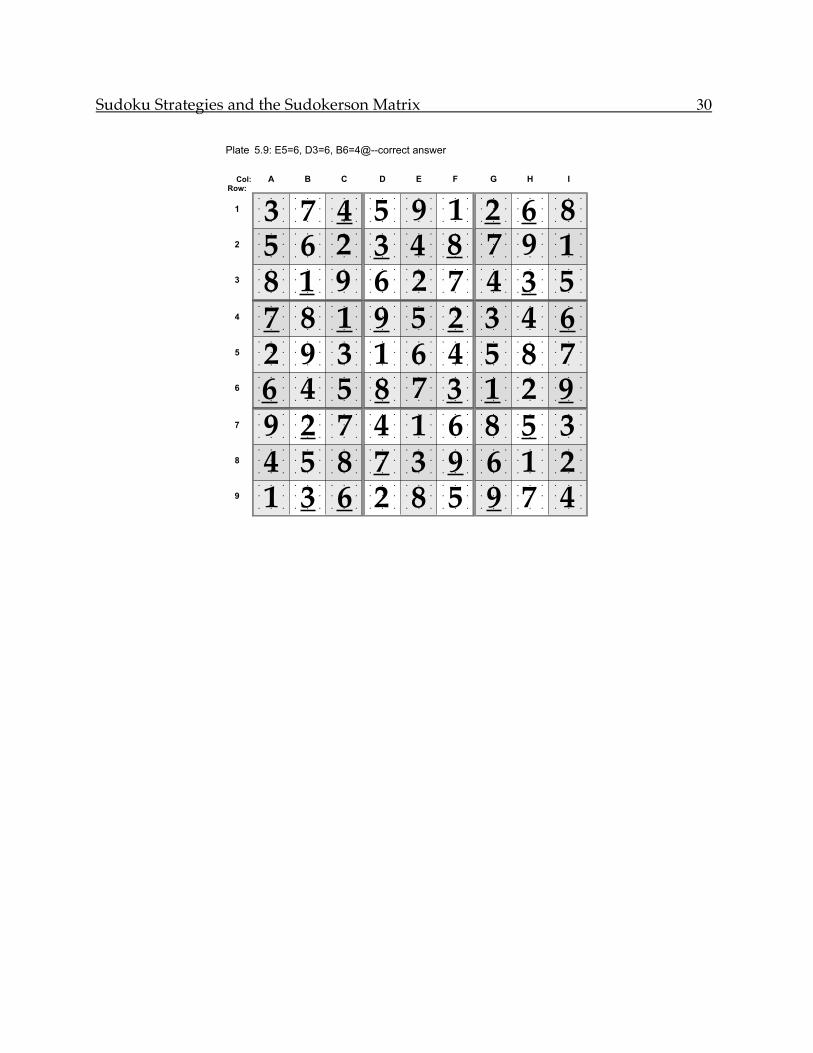
It might seem intuitive that the best strategy is to choose a cell that is linked to other cells, such as E2/E6/F5/G2 in this example, because choosing the digit in one of these cells also decides the digits in all the others of the set. This generally is true but not always. If you use E2=4 and its quadruplet set here, the correct answer comes up immediately. E2=7 leads to a crash. (Try this yourself.) But the D3/D7/F7 triplet is not so cooperative. A test with D3=4 leads to a crash with duplicate 1's and 4's (Plate 5.6). The other choice, D3=6, does not solve the puzzle, it only leads to another stall as seen in Plate 5.7. However, you still have gained new information: you know that D3=6 is correct even though it is not strong enough to bring about a solution. So add D3=6 to the matrix and choose another cell for testing. In this example I added cell B6, which can hold either 4 or 5. B6=5 crashes once again, in my trial on Plate 5.8 yielding duplicate 2's and 7's in rows 6 and 5. (As mentioned earlier, if you try this you may wind up with different duplicate digits. But there will still be a crash.) In contrast B6=4 solves the puzzle (Plate 5.9). And this solution, as it must be, is identical to that seen earlier in Plate 5.5.
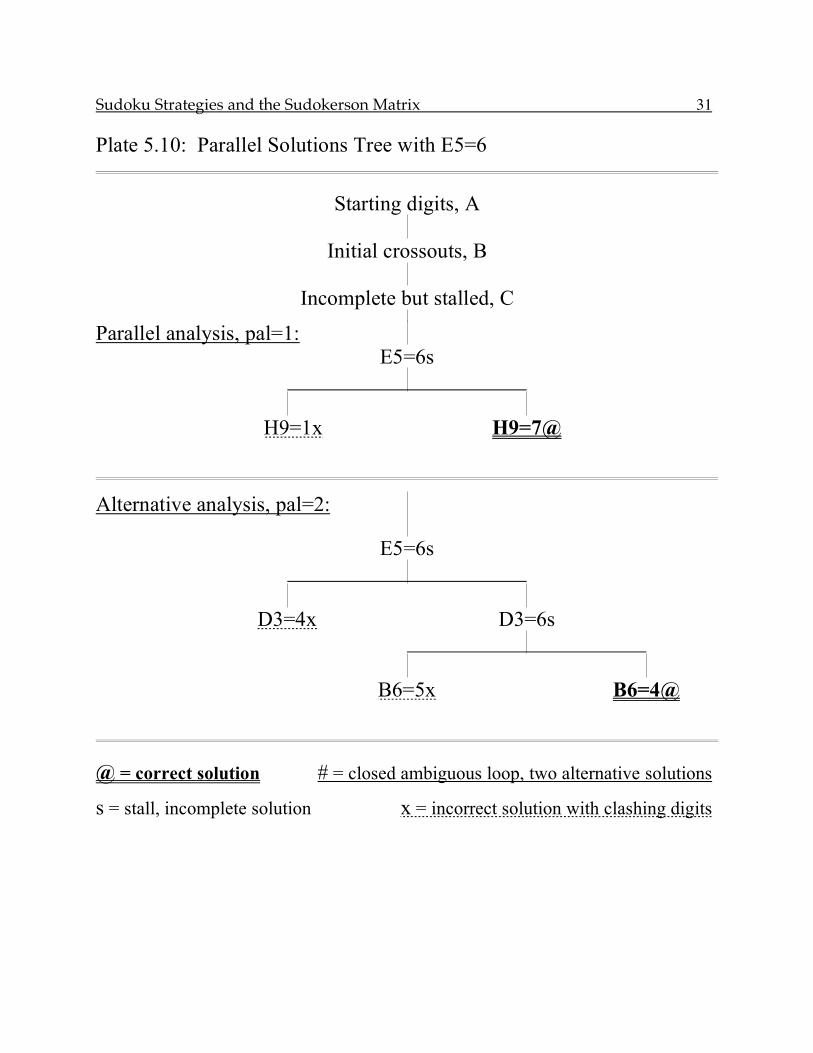
These two solving processes can be mapped by the tree diagrams shown in Plate 5.10. The term pal, for parallel analysis levels, will be used to record how many levels were needed to solve the puzzle. The trial with cell H9 required only one level of analysis to produce one solution and one crash, or pal=1. In contrast, the trial with D3 required two levels of analysis (pal=2) to yield the right answer. These two trees may seem trivial, but other especially tough Sudokus can require three or occasionally even four or more levels of analysis. In such cases a tree diagram is absolutely essential for keeping track of where you are. But in most cases the process of parallel analysis is fast, easy, and straightforward, involving only one or two levels. Diabolical puzzles simply are no longer diabolical if parallel analysis is used. Parallel analysis so far has been described as studying alternative choices in cells that have two possible digits. Of course, there is nothing sacred about two digits. In Plate 5.3 you could just as well have decided to try out the 4, 6 and 7 that are possibilities in cell F3. Sometime a threefold choice is good strategy. But it carries one fundamental danger. With a twofold choice cell, [3 5], if using 3 leads to a crash and 5 to a stall, you have still learned something: the correct occupant of that cell is 5. But with a threefold cell, [3 5 6], if 3 crashes but both 5 and 6 merely stall, you haven't learned much. Either 5 or 6 must be correct, but you don't know which one. I have found that testing twofold cells is generally the better strategy, especially those that are combined with other cells into pairs, triplets or quadruplets. In sum, parallel solution analysis is the most powerful Sudoku technique that I know of. It also can be hypnotic. Ferreting out all the different crashes and wrong answers, comparing them with one another and with the right answer, can be more interesting than merely going for the correct solution. If you continue examining solutions of Plate 5.3 on your own, you will find that it has a few more surprises to offer; surprises related to the example in the next chapter.
Sudoku Strategies and the Sudokerson Matrix 26
Plate 5.1: Initial digit set, A, with as yet uncancelled digits in other cells
Col: A B C D E F G H I
Row:
• • • • • • • • • • • • • • • • • • • • • • • • • • •
1 • • • • • • • • • • • • • • • • • • • • • • • • • • •
• • • • • • • • • • • • • • • • • • • • • • • • • • •
• • • • • • • • • • • • • • • • • • • • • • • • • • •
2 • • • • • • • • • • • • • • • • • • • • • • • • • • •
• • • • • • • • • • • • • • • • • • • • • • • • • • •
• • • • • • • • • • • • • • • • • • • • • • • • • • •
3 • • • • • • • • • • • • • • • • • • • • • • • • • • •
• • • • • • • • • • • • • • • • • • • • • • • • • • •
• • • • • • • • • • • • • • • • • • • • • • • • • • •
4 • • • • • • • • • • • • • • • • • • • • • • • • • • •
• • • • • • • • • • • • • • • • • • • • • • • • • • •
• • • • • • • • • • • • • • • • • • • • • • • • • • •
5 • • • • • • • • • • • • • • • • • • • • • • • • • • •
• • • • • • • • • • • • • • • • • • • • • • • • • • •
• • • • • • • • • • • • • • • • • • • • • • • • • • •
6 • • • • • • • • • • • • • • • • • • • • • • • • • • •
• • • • • • • • • • • • • • • • • • • • • • • • • • •
• • • • • • • • • • • • • • • • • • • • • • • • • • •
7 • • • • • • • • • • • • • • • • • • • • • • • • • • •
• • • • • • • • • • • • • • • • • • • • • • • • • • •
• • • • • • • • • • • • • • • • • • • • • • • • • • •
8 • • • • • • • • • • • • • • • • • • • • • • • • • • •
• • • • • • • • • • • • • • • • • • • • • • • • • • •
• • • • • • • • • • • • • • • • • • • • • • • • • • •
9 • • • • • • • • • • • • • • • • • • • • • • • • • • •
• • • • • • • • • • • • • • • • • • • • • • • • • • •
1 2 3
4 5 6
7 8 9
1 2 3
4 5 6
7 8 94
1 2 3
4 5 6
7 8 9
1 2 3
4 5 6
7 8 9
1 2 3
4 5 6
7 8 92 6
1 2 3
4 5 6
7 8 9
71 2 3
4 5 6
7 8 91 9
1 2 3
4 5 6
7 8 92
1 2 3
4 5 6
7 8 9
1 2 3
4 5 6
7 8 96
1 2 3
4 5 6
7 8 91
1 2 3
4 5 6
7 8 9
1 2 3
4 5 6
7 8 9
1 2 3
4 5 6
7 8 9
1 2 3
4 5 6
7 8 9
1 2 3
4 5 6
7 8 93
1 2 3
4 5 6
7 8 9
1 2 3
4 5 6
7 8 9
1 2 3
4 5 6
7 8 9
1 2 3
4 5 6
7 8 93
1 2 3
4 5 6
7 8 98
1 2 3
4 5 6
7 8 9
1 2 3
4 5 6
7 8 9
1 2 3
4 5 6
7 8 9
1 2 3
4 5 6
7 8 9
1 2 3
4 5 6
7 8 9
1 2 3
4 5 6
7 8 9
1 2 3
4 5 6
7 8 96
1 2 3
4 5 6
7 8 9
1 2 3
4 5 6
7 8 9
1 2 3
4 5 6
7 8 9
1 2 3
4 5 6
7 8 9
61 2 3
4 5 6
7 8 9
1 2 3
4 5 6
7 8 98
1 2 3
4 5 6
7 8 93 1
1 2 3
4 5 6
7 8 99
1 2 3
4 5 6
7 8 92
1 2 3
4 5 6
7 8 9
1 2 3
4 5 6
7 8 9
1 2 3
4 5 6
7 8 9
1 2 3
4 5 6
7 8 9
1 2 3
4 5 6
7 8 95
1 2 3
4 5 6
7 8 9
1 2 3
4 5 6
7 8 9
1 2 3
4 5 6
7 8 9
1 2 3
4 5 6
7 8 97
1 2 3
4 5 6
7 8 99
1 2 3
4 5 6
7 8 9
1 2 3
4 5 6
7 8 9
1 2 3
4 5 6
7 8 9
1 2 3
4 5 6
7 8 93 6
1 2 3
4 5 6
7 8 9
1 2 3
4 5 6
7 8 9
1 2 3
4 5 6
7 8 99
1 2 3
4 5 6
7 8 9
1 2 3
4 5 6
7 8 9
Plate 5.2: After initial crossouts of conflicting digits, B
Col: A B C D E F G H I
Row:
• • • • • • • • • • • • • • • • • • • • • • • • • • •
1 • • • • • • • • • • • • • • • • • • • • • • • • • • •
• • • • • • • • • • • • • • • • • • • • • • • • • • •
• • • • • • • • • • • • • • • • • • • • • • • • • • •
2 • • • • • • • • • • • • • • • • • • • • • • • • • • •
• • • • • • • • • • • • • • • • • • • • • • • • • • •
• • • • • • • • • • • • • • • • • • • • • • • • • • •
3 • • • • • • • • • • • • • • • • • • • • • • • • • • •
• • • • • • • • • • • • • • • • • • • • • • • • • • •
• • • • • • • • • • • • • • • • • • • • • • • • • • •
4 • • • • • • • • • • • • • • • • • • • • • • • • • • •
• • • • • • • • • • • • • • • • • • • • • • • • • • •
• • • • • • • • • • • • • • • • • • • • • • • • • • •
5 • • • • • • • • • • • • • • • • • • • • • • • • • • •
• • • • • • • • • • • • • • • • • • • • • • • • • • •
• • • • • • • • • • • • • • • • • • • • • • • • • • •
6 • • • • • • • • • • • • • • • • • • • • • • • • • • •
• • • • • • • • • • • • • • • • • • • • • • • • • • •
• • • • • • • • • • • • • • • • • • • • • • • • • • •
7 • • • • • • • • • • • • • • • • • • • • • • • • • • •
• • • • • • • • • • • • • • • • • • • • • • • • • • •
• • • • • • • • • • • • • • • • • • • • • • • • • • •
8 • • • • • • • • • • • • • • • • • • • • • • • • • • •
• • • • • • • • • • • • • • • • • • • • • • • • • • •
• • • • • • • • • • • • • • • • • • • • • • • • • • •
9 • • • • • • • • • • • • • • • • • • • • • • • • • • •
• • • • • • • • • • • • • • • • • • • • • • • • • • •
3
5
8 9
5
7 8 94
1
5
1
5
7 9
1
5
72 6
1
5
7 8
7 4 5
81 9 4 5 2
3
4 5
8
4
86
2
5
8 91
2
5
7 8 9
2
4 5 6
2
4 5
7 9
4 5 6
7
4 5
7 83 4 5
7 8
2
5
9
5 6
7 9
2
5
7 93
1 2
4 5
7 98 4 5
7
1
4
7 9
1
4 5
7
2 3
4 5
8 9
4 5
8 9
2 3
5
8 9
1
4 5 61
4 5
7
3
4 5
7 8
2
4
7 8
2 3
4 5
7 8
6 4 5
2
5 8 4 5
73 1
2
4
79
1
4
8 92
7 8 9
1
4 6
1 3
4
8
1
4 6
3
4 6
7 85
1 3
4
7 8
1
4 5
8
4 5
8
5
87
1 2 3
4 5
89
3
4 6
8
1 2
4
8
1 2 3
4
8
1
4 5
83 6
1 2
4 5
1 2
4 5
8
1
4 5 91 2
4
7 8
1 2
4
7 8
Sudoku Strategies and the Sudokerson Matrix 27
Plate 5.3: Stall, C, taken as far as one can go with the basic methods
Col: A B C D E F G H I
Row:
• • • • • • • • • • • • • • • • • • • • • • • • • • •
1 • • • • • • • • • • • • • • • • • • • • • • • • • • •
• • • • • • • • • • • • • • • • • • • • • • • • • • •
• • • • • • • • • • • • • • • • • • • • • • • • • • •
2 • • • • • • • • • • • • • • • • • • • • • • • • • • •
• • • • • • • • • • • • • • • • • • • • • • • • • • •
• • • • • • • • • • • • • • • • • • • • • • • • • • •
3 • • • • • • • • • • • • • • • • • • • • • • • • • • •
• • • • • • • • • • • • • • • • • • • • • • • • • • •
• • • • • • • • • • • • • • • • • • • • • • • • • • •
4 • • • • • • • • • • • • • • • • • • • • • • • • • • •
• • • • • • • • • • • • • • • • • • • • • • • • • • •
• • • • • • • • • • • • • • • • • • • • • • • • • • •
5 • • • • • • • • • • • • • • • • • • • • • • • • • • •
• • • • • • • • • • • • • • • • • • • • • • • • • • •
• • • • • • • • • • • • • • • • • • • • • • • • • • •
6 • • • • • • • • • • • • • • • • • • • • • • • • • • •
• • • • • • • • • • • • • • • • • • • • • • • • • • •
• • • • • • • • • • • • • • • • • • • • • • • • • • •
7 • • • • • • • • • • • • • • • • • • • • • • • • • • •
• • • • • • • • • • • • • • • • • • • • • • • • • • •
• • • • • • • • • • • • • • • • • • • • • • • • • • •
8 • • • • • • • • • • • • • • • • • • • • • • • • • • •
• • • • • • • • • • • • • • • • • • • • • • • • • • •
• • • • • • • • • • • • • • • • • • • • • • • • • • •
9 • • • • • • • • • • • • • • • • • • • • • • • • • • •
• • • • • • • • • • • • • • • • • • • • • • • • • • •
3 7 4 5 9 1 2 6 8
7 8 1 9 5 2 3 4 6
8 1 9 4 6 2 4 6
7
4 5
73 4 5
7
2
5 62
5 3 4
78 4
79 1
2
4 5 9 3 1 6 4
7
5
78
2
5
7
6 4 5
2
5 8 4
73 1
2
79
9 2 7 4 6 1 4 6 8 5 3 1
4 5 4 5 8 7 3 9 61 2 2
4
1
4 3 6 2 8 5 91
7
4
7
Plate 5.4: E5=6, H9=1x--crash with duplicate 2's and 7's
Col: A B C D E F G H I
Row:
• • • • • • • • • • • • • • • • • • • • • • • • • • •
1 • • • • • • • • • • • • • • • • • • • • • • • • • • •
• • • • • • • • • • • • • • • • • • • • • • • • • • •
• • • • • • • • • • • • • • • • • • • • • • • • • • •
2 • • • • • • • • • • • • • • • • • • • • • • • • • • •
• • • • • • • • • • • • • • • • • • • • • • • • • • •
• • • • • • • • • • • • • • • • • • • • • • • • • • •
3 • • • • • • • • • • • • • • • • • • • • • • • • • • •
• • • • • • • • • • • • • • • • • • • • • • • • • • •
• • • • • • • • • • • • • • • • • • • • • • • • • • •
4 • • • • • • • • • • • • • • • • • • • • • • • • • • •
• • • • • • • • • • • • • • • • • • • • • • • • • • •
• • • • • • • • • • • • • • • • • • • • • • • • • • •
5 • • • • • • • • • • • • • • • • • • • • • • • • • • •
• • • • • • • • • • • • • • • • • • • • • • • • • • •
• • • • • • • • • • • • • • • • • • • • • • • • • • •
6 • • • • • • • • • • • • • • • • • • • • • • • • • • •
• • • • • • • • • • • • • • • • • • • • • • • • • • •
• • • • • • • • • • • • • • • • • • • • • • • • • • •
7 • • • • • • • • • • • • • • • • • • • • • • • • • • •
• • • • • • • • • • • • • • • • • • • • • • • • • • •
• • • • • • • • • • • • • • • • • • • • • • • • • • •
8 • • • • • • • • • • • • • • • • • • • • • • • • • • •
• • • • • • • • • • • • • • • • • • • • • • • • • • •
• • • • • • • • • • • • • • • • • • • • • • • • • • •
9 • • • • • • • • • • • • • • • • • • • • • • • • • • •
• • • • • • • • • • • • • • • • • • • • • • • • • • •
3 7 4 5 9 1 2 6 8
7 8 1 9 5 2 3 4 6
8 1 9 6 2 7 4 3 5
5 6 2 3 4 8 7 9 1
2 9 3 1 6 4 5 8 2
6 4 5 8 7 3 1 7 9
9 2 7 4 1 6 8 5 3
1 5 8 7 3 9 6 2 4
4 3 6 2 8 5 9 1 7
Sudoku Strategies and the Sudokerson Matrix 28
Plate 5.5: E5=6, H9=7@--successful solution
Col: A B C D E F G H I
Row:
• • • • • • • • • • • • • • • • • • • • • • • • • • •
1 • • • • • • • • • • • • • • • • • • • • • • • • • • •
• • • • • • • • • • • • • • • • • • • • • • • • • • •
• • • • • • • • • • • • • • • • • • • • • • • • • • •
2 • • • • • • • • • • • • • • • • • • • • • • • • • • •
• • • • • • • • • • • • • • • • • • • • • • • • • • •
• • • • • • • • • • • • • • • • • • • • • • • • • • •
3 • • • • • • • • • • • • • • • • • • • • • • • • • • •
• • • • • • • • • • • • • • • • • • • • • • • • • • •
• • • • • • • • • • • • • • • • • • • • • • • • • • •
4 • • • • • • • • • • • • • • • • • • • • • • • • • • •
• • • • • • • • • • • • • • • • • • • • • • • • • • •
• • • • • • • • • • • • • • • • • • • • • • • • • • •
5 • • • • • • • • • • • • • • • • • • • • • • • • • • •
• • • • • • • • • • • • • • • • • • • • • • • • • • •
• • • • • • • • • • • • • • • • • • • • • • • • • • •
6 • • • • • • • • • • • • • • • • • • • • • • • • • • •
• • • • • • • • • • • • • • • • • • • • • • • • • • •
• • • • • • • • • • • • • • • • • • • • • • • • • • •
7 • • • • • • • • • • • • • • • • • • • • • • • • • • •
• • • • • • • • • • • • • • • • • • • • • • • • • • •
• • • • • • • • • • • • • • • • • • • • • • • • • • •
8 • • • • • • • • • • • • • • • • • • • • • • • • • • •
• • • • • • • • • • • • • • • • • • • • • • • • • • •
• • • • • • • • • • • • • • • • • • • • • • • • • • •
9 • • • • • • • • • • • • • • • • • • • • • • • • • • •
• • • • • • • • • • • • • • • • • • • • • • • • • • •
3 7 4 5 9 1 2 6 8
7 8 1 9 5 2 3 4 6
8 1 9 6 2 7 4 3 5
5 6 2 3 4 8 7 9 1
2 9 3 1 6 4 5 8 7
6 4 5 8 7 3 1 2 9
9 2 7 4 1 6 8 5 3
4 5 8 7 3 9 6 1 2
1 3 6 2 8 5 9 7 4
Plate 5.6: E5=6, D3=4x--crash with duplicate 1's and 4's
Col: A B C D E F G H I
Row:
• • • • • • • • • • • • • • • • • • • • • • • • • • •
1 • • • • • • • • • • • • • • • • • • • • • • • • • • •
• • • • • • • • • • • • • • • • • • • • • • • • • • •
• • • • • • • • • • • • • • • • • • • • • • • • • • •
2 • • • • • • • • • • • • • • • • • • • • • • • • • • •
• • • • • • • • • • • • • • • • • • • • • • • • • • •
• • • • • • • • • • • • • • • • • • • • • • • • • • •
3 • • • • • • • • • • • • • • • • • • • • • • • • • • •
• • • • • • • • • • • • • • • • • • • • • • • • • • •
• • • • • • • • • • • • • • • • • • • • • • • • • • •
4 • • • • • • • • • • • • • • • • • • • • • • • • • • •
• • • • • • • • • • • • • • • • • • • • • • • • • • •
• • • • • • • • • • • • • • • • • • • • • • • • • • •
5 • • • • • • • • • • • • • • • • • • • • • • • • • • •
• • • • • • • • • • • • • • • • • • • • • • • • • • •
• • • • • • • • • • • • • • • • • • • • • • • • • • •
6 • • • • • • • • • • • • • • • • • • • • • • • • • • •
• • • • • • • • • • • • • • • • • • • • • • • • • • •
• • • • • • • • • • • • • • • • • • • • • • • • • • •
7 • • • • • • • • • • • • • • • • • • • • • • • • • • •
• • • • • • • • • • • • • • • • • • • • • • • • • • •
• • • • • • • • • • • • • • • • • • • • • • • • • • •
8 • • • • • • • • • • • • • • • • • • • • • • • • • • •
• • • • • • • • • • • • • • • • • • • • • • • • • • •
• • • • • • • • • • • • • • • • • • • • • • • • • • •
9 • • • • • • • • • • • • • • • • • • • • • • • • • • •
• • • • • • • • • • • • • • • • • • • • • • • • • • •
3 7 4 5 9 1 2 6 8
7 8 1 9 5 2 3 4 6
8 1 9 4 2 6 7 3 5
2 6 5 3 7 8 4 9 1
4 9 3 1 6 7 5 8 2
6 5 2 8 4 3 1 7 9
9 2 7 6 1 4 8 5 3
5 4 8 7 3 9 6 2 4
1 3 6 2 8 5 9 1 7
Sudoku Strategies and the Sudokerson Matrix 29
Plate 5.7: E5=6, D3=6s--solution stalled; but D3=6 is correct
Col: A B C D E F G H I
Row:
• • • • • • • • • • • • • • • • • • • • • • • • • • •
1 • • • • • • • • • • • • • • • • • • • • • • • • • • •
• • • • • • • • • • • • • • • • • • • • • • • • • • •
• • • • • • • • • • • • • • • • • • • • • • • • • • •
2 • • • • • • • • • • • • • • • • • • • • • • • • • • •
• • • • • • • • • • • • • • • • • • • • • • • • • • •
• • • • • • • • • • • • • • • • • • • • • • • • • • •
3 • • • • • • • • • • • • • • • • • • • • • • • • • • •
• • • • • • • • • • • • • • • • • • • • • • • • • • •
• • • • • • • • • • • • • • • • • • • • • • • • • • •
4 • • • • • • • • • • • • • • • • • • • • • • • • • • •
• • • • • • • • • • • • • • • • • • • • • • • • • • •
• • • • • • • • • • • • • • • • • • • • • • • • • • •
5 • • • • • • • • • • • • • • • • • • • • • • • • • • •
• • • • • • • • • • • • • • • • • • • • • • • • • • •
• • • • • • • • • • • • • • • • • • • • • • • • • • •
6 • • • • • • • • • • • • • • • • • • • • • • • • • • •
• • • • • • • • • • • • • • • • • • • • • • • • • • •
• • • • • • • • • • • • • • • • • • • • • • • • • • •
7 • • • • • • • • • • • • • • • • • • • • • • • • • • •
• • • • • • • • • • • • • • • • • • • • • • • • • • •
• • • • • • • • • • • • • • • • • • • • • • • • • • •
8 • • • • • • • • • • • • • • • • • • • • • • • • • • •
• • • • • • • • • • • • • • • • • • • • • • • • • • •
• • • • • • • • • • • • • • • • • • • • • • • • • • •
9 • • • • • • • • • • • • • • • • • • • • • • • • • • •
• • • • • • • • • • • • • • • • • • • • • • • • • • •
3 7 4 5 9 1 2 6 8
7 8 1 9 5 2 3 4 6
8 1 9 6 2 4
7
4 5
73 4 5
7
2
5 62
5 3 4
78 4
79 1
2
4 5 9 3 1 6 4
7
5
78
2
5
7
6 4 5
2
5 8 4
73 1
2
79
9 2 7 4 1 6 8 5 3 1
4 5 4 5 8 7 3 9 61 2 2
4
1
4 3 6 2 8 5 91
7
4
7
Plate 5.8: E5=6, D3=6, B6=5x--crash with duplicate 2's and 7's
Col: A B C D E F G H I
Row:
• • • • • • • • • • • • • • • • • • • • • • • • • • •
1 • • • • • • • • • • • • • • • • • • • • • • • • • • •
• • • • • • • • • • • • • • • • • • • • • • • • • • •
• • • • • • • • • • • • • • • • • • • • • • • • • • •
2 • • • • • • • • • • • • • • • • • • • • • • • • • • •
• • • • • • • • • • • • • • • • • • • • • • • • • • •
• • • • • • • • • • • • • • • • • • • • • • • • • • •
3 • • • • • • • • • • • • • • • • • • • • • • • • • • •
• • • • • • • • • • • • • • • • • • • • • • • • • • •
• • • • • • • • • • • • • • • • • • • • • • • • • • •
4 • • • • • • • • • • • • • • • • • • • • • • • • • • •
• • • • • • • • • • • • • • • • • • • • • • • • • • •
• • • • • • • • • • • • • • • • • • • • • • • • • • •
5 • • • • • • • • • • • • • • • • • • • • • • • • • • •
• • • • • • • • • • • • • • • • • • • • • • • • • • •
• • • • • • • • • • • • • • • • • • • • • • • • • • •
6 • • • • • • • • • • • • • • • • • • • • • • • • • • •
• • • • • • • • • • • • • • • • • • • • • • • • • • •
• • • • • • • • • • • • • • • • • • • • • • • • • • •
7 • • • • • • • • • • • • • • • • • • • • • • • • • • •
• • • • • • • • • • • • • • • • • • • • • • • • • • •
• • • • • • • • • • • • • • • • • • • • • • • • • • •
8 • • • • • • • • • • • • • • • • • • • • • • • • • • •
• • • • • • • • • • • • • • • • • • • • • • • • • • •
• • • • • • • • • • • • • • • • • • • • • • • • • • •
9 • • • • • • • • • • • • • • • • • • • • • • • • • • •
• • • • • • • • • • • • • • • • • • • • • • • • • • •
3 7 4 5 9 1 2 6 8
7 8 1 9 5 2 3 4 6
8 1 9 6 2 4 7 3 5
2 6 5 3 7 8 4 9 1
4 9 3 1 6 7 5 8 7
6 5 2 8 4 3 1 2 9
9 2 7 4 1 6 8 5 3
5 4 8 7 3 9 6 1 2
1 3 6 2 8 5 9 7 4
Sudoku Strategies and the Sudokerson Matrix 30
Plate 5.9: E5=6, D3=6, B6=4@--correct answer
Col: A B C D E F G H I
Row:
• • • • • • • • • • • • • • • • • • • • • • • • • • •
1 • • • • • • • • • • • • • • • • • • • • • • • • • • •
• • • • • • • • • • • • • • • • • • • • • • • • • • •
• • • • • • • • • • • • • • • • • • • • • • • • • • •
2 • • • • • • • • • • • • • • • • • • • • • • • • • • •
• • • • • • • • • • • • • • • • • • • • • • • • • • •
• • • • • • • • • • • • • • • • • • • • • • • • • • •
3 • • • • • • • • • • • • • • • • • • • • • • • • • • •
• • • • • • • • • • • • • • • • • • • • • • • • • • •
• • • • • • • • • • • • • • • • • • • • • • • • • • •
4 • • • • • • • • • • • • • • • • • • • • • • • • • • •
• • • • • • • • • • • • • • • • • • • • • • • • • • •
• • • • • • • • • • • • • • • • • • • • • • • • • • •
5 • • • • • • • • • • • • • • • • • • • • • • • • • • •
• • • • • • • • • • • • • • • • • • • • • • • • • • •
• • • • • • • • • • • • • • • • • • • • • • • • • • •
6 • • • • • • • • • • • • • • • • • • • • • • • • • • •
• • • • • • • • • • • • • • • • • • • • • • • • • • •
• • • • • • • • • • • • • • • • • • • • • • • • • • •
7 • • • • • • • • • • • • • • • • • • • • • • • • • • •
• • • • • • • • • • • • • • • • • • • • • • • • • • •
• • • • • • • • • • • • • • • • • • • • • • • • • • •
8 • • • • • • • • • • • • • • • • • • • • • • • • • • •
• • • • • • • • • • • • • • • • • • • • • • • • • • •
• • • • • • • • • • • • • • • • • • • • • • • • • • •
9 • • • • • • • • • • • • • • • • • • • • • • • • • • •
• • • • • • • • • • • • • • • • • • • • • • • • • • •
3 7 4 5 9 1 2 6 8
7 8 1 9 5 2 3 4 6
8 1 9 6 2 7 4 3 5
5 6 2 3 4 8 7 9 1
2 9 3 1 6 4 5 8 7
6 4 5 8 7 3 1 2 9
9 2 7 4 1 6 8 5 3
4 5 8 7 3 9 6 1 2
1 3 6 2 8 5 9 7 4
Sudoku Strategies and the Sudokerson Matrix 31
Plate 5.10: Parallel Solutions Tree with E5=6
Starting digits, A Initial crossouts, B Incomplete but stalled, C
Parallel analysis, pal=1: E5=6s H9=1x H9=7@
Alternative analysis, pal=2:
E5=6s D3=4x D3=6s B6=5x B6=4@
@ = correct solution # = closed ambiguous loop, two alternative solutions
s = stall, incomplete solution x = incorrect solution with clashing digits
Sudoku Strategies and the Sudokerson Matrix 32
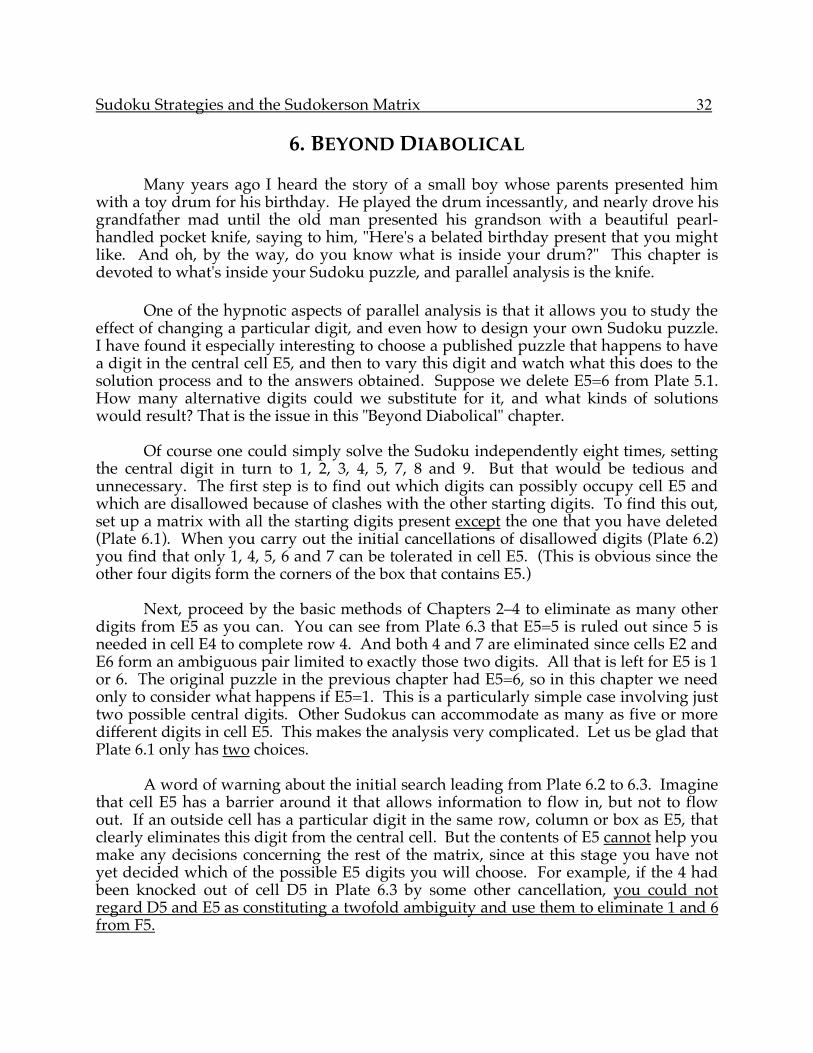
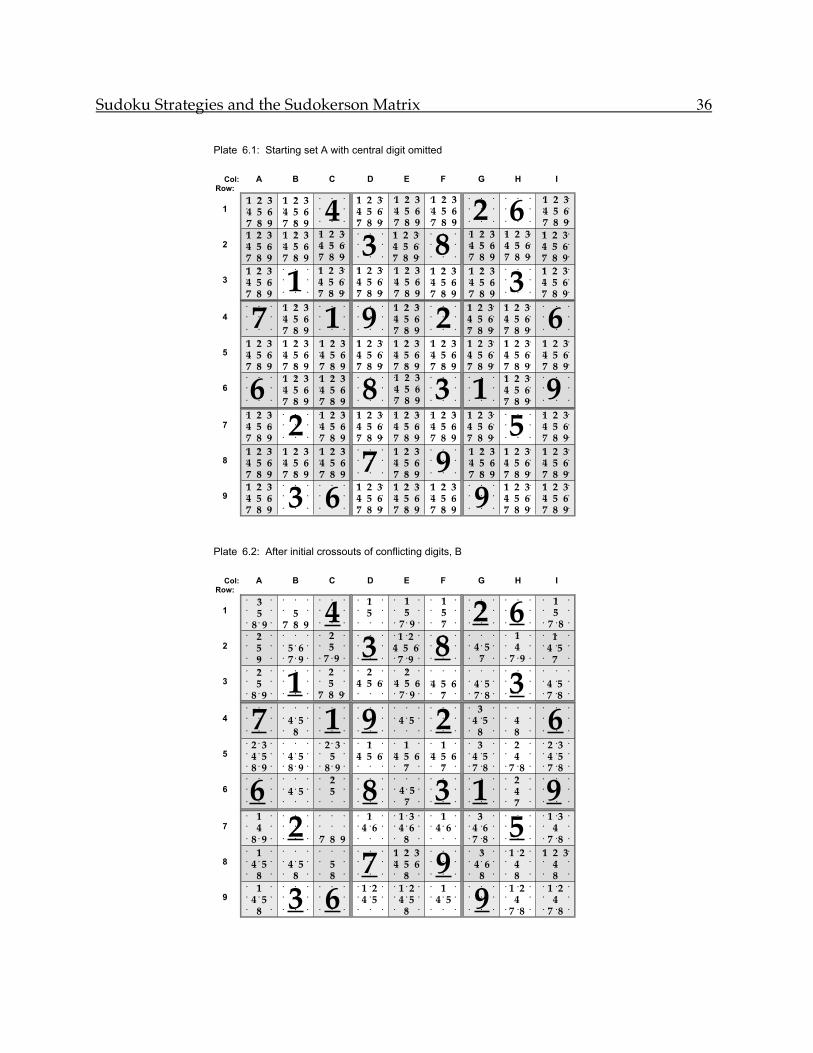
6. BEYOND DIABOLICAL Many years ago I heard the story of a small boy whose parents presented him with a toy drum for his birthday. He played the drum incessantly, and nearly drove his grandfather mad until the old man presented his grandson with a beautiful pearl-handled pocket knife, saying to him, "Here's a belated birthday present that you might like. And oh, by the way, do you know what is inside your drum?" This chapter is devoted to what's inside your Sudoku puzzle, and parallel analysis is the knife. One of the hypnotic aspects of parallel analysis is that it allows you to study the effect of changing a particular digit, and even how to design your own Sudoku puzzle. I have found it especially interesting to choose a published puzzle that happens to have a digit in the central cell E5, and then to vary this digit and watch what this does to the solution process and to the answers obtained. Suppose we delete E5=6 from Plate 5.1. How many alternative digits could we substitute for it, and what kinds of solutions would result? That is the issue in this "Beyond Diabolical" chapter. Of course one could simply solve the Sudoku independently eight times, setting the central digit in turn to 1, 2, 3, 4, 5, 7, 8 and 9. But that would be tedious and unnecessary. The first step is to find out which digits can possibly occupy cell E5 and which are disallowed because of clashes with the other starting digits. To find this out, set up a matrix with all the starting digits present except the one that you have deleted (Plate 6.1). When you carry out the initial cancellations of disallowed digits (Plate 6.2) you find that only 1, 4, 5, 6 and 7 can be tolerated in cell E5. (This is obvious since the other four digits form the corners of the box that contains E5.) Next, proceed by the basic methods of Chapters 2–4 to eliminate as many other digits from E5 as you can. You can see from Plate 6.3 that E5=5 is ruled out since 5 is needed in cell E4 to complete row 4. And both 4 and 7 are eliminated since cells E2 and E6 form an ambiguous pair limited to exactly those two digits. All that is left for E5 is 1 or 6. The original puzzle in the previous chapter had E5=6, so in this chapter we need only to consider what happens if E5=1. This is a particularly simple case involving just two possible central digits. Other Sudokus can accommodate as many as five or more different digits in cell E5. This makes the analysis very complicated. Let us be glad that Plate 6.1 only has two choices. A word of warning about the initial search leading from Plate 6.2 to 6.3. Imagine that cell E5 has a barrier around it that allows information to flow in, but not to flow out. If an outside cell has a particular digit in the same row, column or box as E5, that clearly eliminates this digit from the central cell. But the contents of E5 cannot help you make any decisions concerning the rest of the matrix, since at this stage you have not yet decided which of the possible E5 digits you will choose. For example, if the 4 had been knocked out of cell D5 in Plate 6.3 by some other cancellation, you could not regard D5 and E5 as constituting a twofold ambiguity and use them to eliminate 1 and 6 from F5.
Sudoku Strategies and the Sudokerson Matrix 33
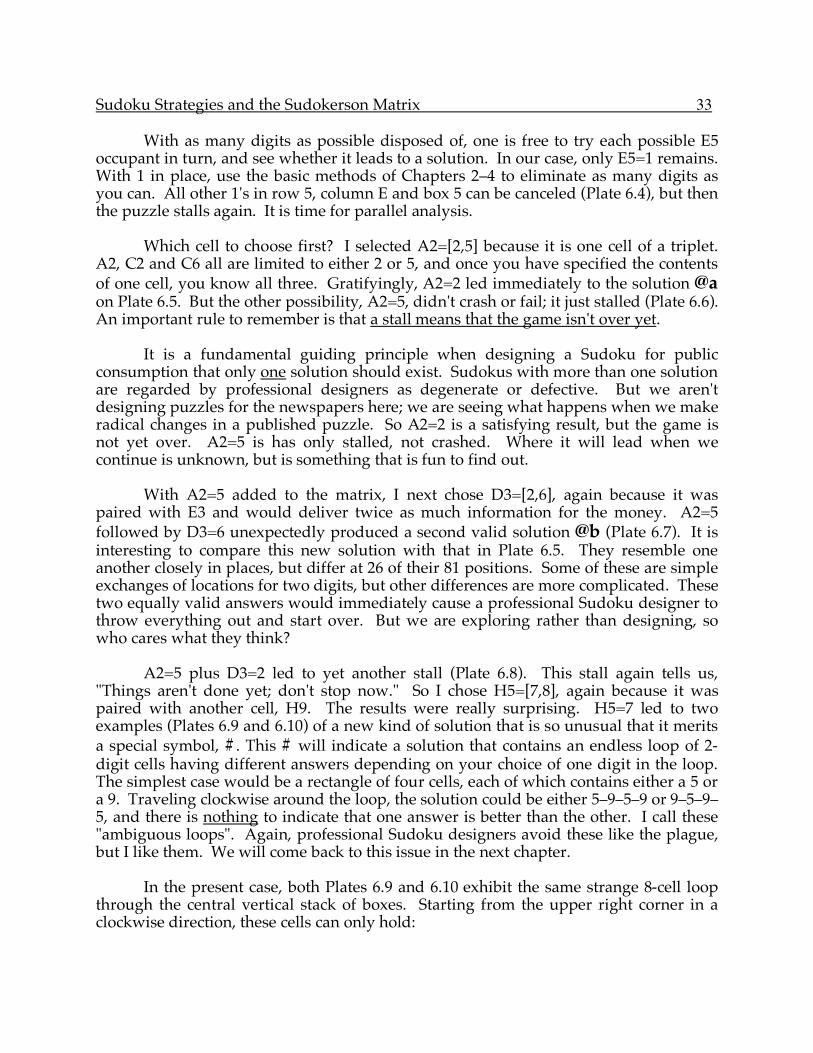
With as many digits as possible disposed of, one is free to try each possible E5 occupant in turn, and see whether it leads to a solution. In our case, only E5=1 remains. With 1 in place, use the basic methods of Chapters 2–4 to eliminate as many digits as you can. All other 1's in row 5, column E and box 5 can be canceled (Plate 6.4), but then the puzzle stalls again. It is time for parallel analysis. Which cell to choose first? I selected A2=[2,5] because it is one cell of a triplet. A2, C2 and C6 all are limited to either 2 or 5, and once you have specified the contents of one cell, you know all three. Gratifyingly, A2=2 led immediately to the solution @a on Plate 6.5. But the other possibility, A2=5, didn't crash or fail; it just stalled (Plate 6.6). An important rule to remember is that a stall means that the game isn't over yet. It is a fundamental guiding principle when designing a Sudoku for public consumption that only one solution should exist. Sudokus with more than one solution are regarded by professional designers as degenerate or defective. But we aren't designing puzzles for the newspapers here; we are seeing what happens when we make radical changes in a published puzzle. So A2=2 is a satisfying result, but the game is not yet over. A2=5 is has only stalled, not crashed. Where it will lead when we continue is unknown, but is something that is fun to find out. With A2=5 added to the matrix, I next chose D3=[2,6], again because it was paired with E3 and would deliver twice as much information for the money. A2=5 followed by D3=6 unexpectedly produced a second valid solution @b (Plate 6.7). It is interesting to compare this new solution with that in Plate 6.5. They resemble one another closely in places, but differ at 26 of their 81 positions. Some of these are simple exchanges of locations for two digits, but other differences are more complicated. These two equally valid answers would immediately cause a professional Sudoku designer to throw everything out and start over. But we are exploring rather than designing, so who cares what they think? A2=5 plus D3=2 led to yet another stall (Plate 6.8). This stall again tells us, "Things aren't done yet; don't stop now." So I chose H5=[7,8], again because it was paired with another cell, H9. The results were really surprising. H5=7 led to two examples (Plates 6.9 and 6.10) of a new kind of solution that is so unusual that it merits a special symbol, #. This # will indicate a solution that contains an endless loop of 2-digit cells having different answers depending on your choice of one digit in the loop. The simplest case would be a rectangle of four cells, each of which contains either a 5 or a 9. Traveling clockwise around the loop, the solution could be either 5–9–5–9 or 9–5–9–5, and there is nothing to indicate that one answer is better than the other. I call these "ambiguous loops". Again, professional Sudoku designers avoid these like the plague, but I like them. We will come back to this issue in the next chapter. In the present case, both Plates 6.9 and 6.10 exhibit the same strange 8-cell loop through the central vertical stack of boxes. Starting from the upper right corner in a clockwise direction, these cells can only hold:
Sudoku Strategies and the Sudokerson Matrix 34
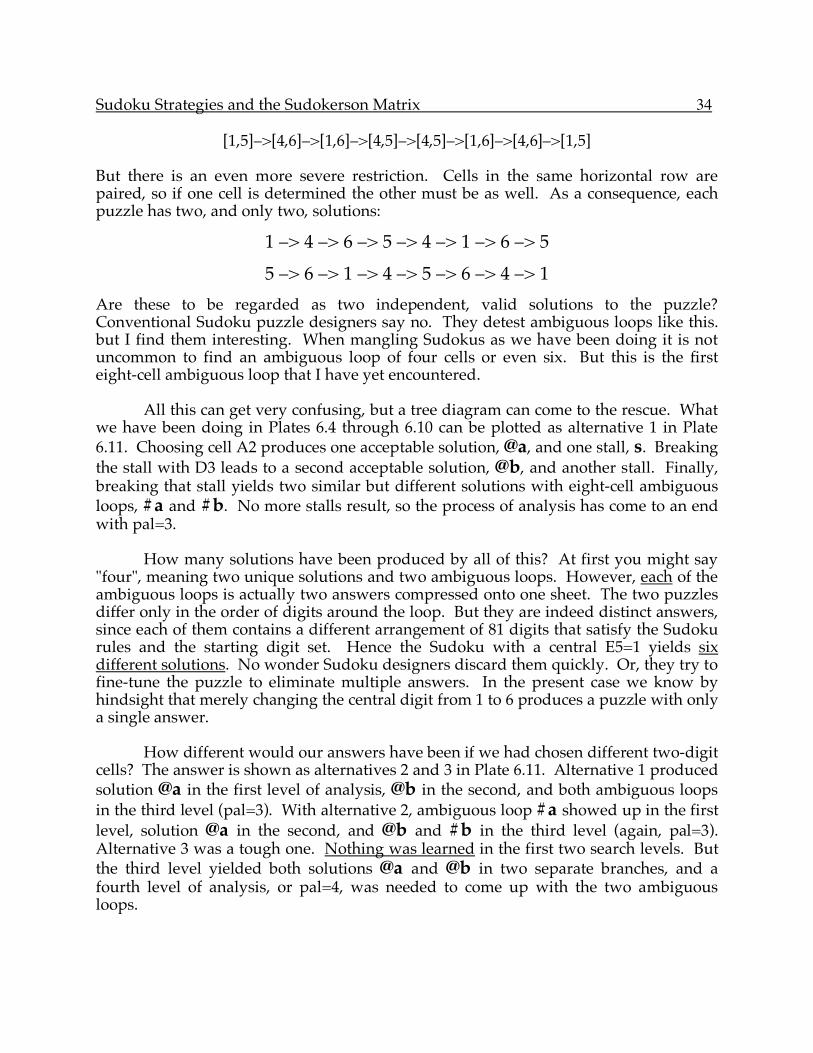
[1,5]–>[4,6]–>[1,6]–>[4,5]–>[4,5]–>[1,6]–>[4,6]–>[1,5] But there is an even more severe restriction. Cells in the same horizontal row are paired, so if one cell is determined the other must be as well. As a consequence, each puzzle has two, and only two, solutions:
1 –> 4 –> 6 –> 5 –> 4 –> 1 –> 6 –> 5
5 –> 6 –> 1 –> 4 –> 5 –> 6 –> 4 –> 1
Are these to be regarded as two independent, valid solutions to the puzzle? Conventional Sudoku puzzle designers say no. They detest ambiguous loops like this. but I find them interesting. When mangling Sudokus as we have been doing it is not uncommon to find an ambiguous loop of four cells or even six. But this is the first eight-cell ambiguous loop that I have yet encountered. All this can get very confusing, but a tree diagram can come to the rescue. What we have been doing in Plates 6.4 through 6.10 can be plotted as alternative 1 in Plate 6.11. Choosing cell A2 produces one acceptable solution, @a, and one stall, s. Breaking the stall with D3 leads to a second acceptable solution, @b, and another stall. Finally, breaking that stall yields two similar but different solutions with eight-cell ambiguous loops, #a and #b. No more stalls result, so the process of analysis has come to an end with pal=3. How many solutions have been produced by all of this? At first you might say "four", meaning two unique solutions and two ambiguous loops. However, each of the ambiguous loops is actually two answers compressed onto one sheet. The two puzzles differ only in the order of digits around the loop. But they are indeed distinct answers, since each of them contains a different arrangement of 81 digits that satisfy the Sudoku rules and the starting digit set. Hence the Sudoku with a central E5=1 yields six different solutions. No wonder Sudoku designers discard them quickly. Or, they try to fine-tune the puzzle to eliminate multiple answers. In the present case we know by hindsight that merely changing the central digit from 1 to 6 produces a puzzle with only a single answer. How different would our answers have been if we had chosen different two-digit cells? The answer is shown as alternatives 2 and 3 in Plate 6.11. Alternative 1 produced solution @a in the first level of analysis, @b in the second, and both ambiguous loops in the third level (pal=3). With alternative 2, ambiguous loop #a showed up in the first level, solution @a in the second, and @b and #b in the third level (again, pal=3). Alternative 3 was a tough one. Nothing was learned in the first two search levels. But the third level yielded both solutions @a and @b in two separate branches, and a fourth level of analysis, or pal=4, was needed to come up with the two ambiguous loops.
Sudoku Strategies and the Sudokerson Matrix 35
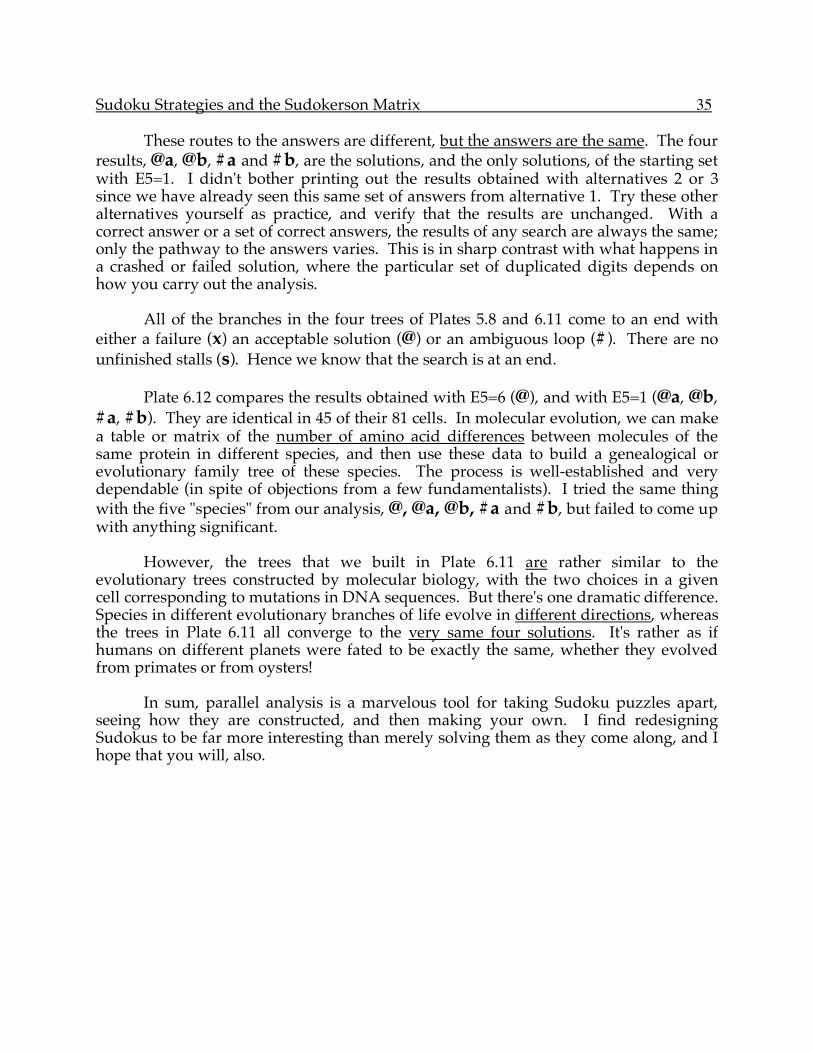
These routes to the answers are different, but the answers are the same. The four results, @a, @b, #a and #b, are the solutions, and the only solutions, of the starting set with E5=1. I didn't bother printing out the results obtained with alternatives 2 or 3 since we have already seen this same set of answers from alternative 1. Try these other alternatives yourself as practice, and verify that the results are unchanged. With a correct answer or a set of correct answers, the results of any search are always the same; only the pathway to the answers varies. This is in sharp contrast with what happens in a crashed or failed solution, where the particular set of duplicated digits depends on how you carry out the analysis. All of the branches in the four trees of Plates 5.8 and 6.11 come to an end with either a failure (x) an acceptable solution (@) or an ambiguous loop (#). There are no unfinished stalls (s). Hence we know that the search is at an end. Plate 6.12 compares the results obtained with E5=6 (@), and with E5=1 (@a, @b, #a, #b). They are identical in 45 of their 81 cells. In molecular evolution, we can make a table or matrix of the number of amino acid differences between molecules of the same protein in different species, and then use these data to build a genealogical or evolutionary family tree of these species. The process is well-established and very dependable (in spite of objections from a few fundamentalists). I tried the same thing with the five "species" from our analysis, @, @a, @b, #a and #b, but failed to come up with anything significant.
However, the trees that we built in Plate 6.11 are rather similar to the evolutionary trees constructed by molecular biology, with the two choices in a given cell corresponding to mutations in DNA sequences. But there's one dramatic difference. Species in different evolutionary branches of life evolve in different directions, whereas the trees in Plate 6.11 all converge to the very same four solutions. It's rather as if humans on different planets were fated to be exactly the same, whether they evolved from primates or from oysters! In sum, parallel analysis is a marvelous tool for taking Sudoku puzzles apart, seeing how they are constructed, and then making your own. I find redesigning Sudokus to be far more interesting than merely solving them as they come along, and I hope that you will, also.
Sudoku Strategies and the Sudokerson Matrix 36
Plate 6.1: Starting set A with central digit omitted
Col: A B C D E F G H I
Row:
• • • • • • • • • • • • • • • • • • • • • • • • • • •
1 • • • • • • • • • • • • • • • • • • • • • • • • • • •
• • • • • • • • • • • • • • • • • • • • • • • • • • •
• • • • • • • • • • • • • • • • • • • • • • • • • • •
2 • • • • • • • • • • • • • • • • • • • • • • • • • • •
• • • • • • • • • • • • • • • • • • • • • • • • • • •
• • • • • • • • • • • • • • • • • • • • • • • • • • •
3 • • • • • • • • • • • • • • • • • • • • • • • • • • •
• • • • • • • • • • • • • • • • • • • • • • • • • • •
• • • • • • • • • • • • • • • • • • • • • • • • • • •
4 • • • • • • • • • • • • • • • • • • • • • • • • • • •
• • • • • • • • • • • • • • • • • • • • • • • • • • •
• • • • • • • • • • • • • • • • • • • • • • • • • • •
5 • • • • • • • • • • • • • • • • • • • • • • • • • • •
• • • • • • • • • • • • • • • • • • • • • • • • • • •
• • • • • • • • • • • • • • • • • • • • • • • • • • •
6 • • • • • • • • • • • • • • • • • • • • • • • • • • •
• • • • • • • • • • • • • • • • • • • • • • • • • • •
• • • • • • • • • • • • • • • • • • • • • • • • • • •
7 • • • • • • • • • • • • • • • • • • • • • • • • • • •
• • • • • • • • • • • • • • • • • • • • • • • • • • •
• • • • • • • • • • • • • • • • • • • • • • • • • • •
8 • • • • • • • • • • • • • • • • • • • • • • • • • • •
• • • • • • • • • • • • • • • • • • • • • • • • • • •
• • • • • • • • • • • • • • • • • • • • • • • • • • •
9 • • • • • • • • • • • • • • • • • • • • • • • • • • •
• • • • • • • • • • • • • • • • • • • • • • • • • • •
1 2 3
4 5 6
7 8 9
1 2 3
4 5 6
7 8 94
1 2 3
4 5 6
7 8 9
1 2 3
4 5 6
7 8 9
1 2 3
4 5 6
7 8 92 6
1 2 3
4 5 6
7 8 9
71 2 3
4 5 6
7 8 91 9
1 2 3
4 5 6
7 8 92
1 2 3
4 5 6
7 8 9
1 2 3
4 5 6
7 8 96
1 2 3
4 5 6
7 8 91
1 2 3
4 5 6
7 8 9
1 2 3
4 5 6
7 8 9
1 2 3
4 5 6
7 8 9
1 2 3
4 5 6
7 8 9
1 2 3
4 5 6
7 8 93
1 2 3
4 5 6
7 8 9
1 2 3
4 5 6
7 8 9
1 2 3
4 5 6
7 8 9
1 2 3
4 5 6
7 8 93
1 2 3
4 5 6
7 8 98
1 2 3
4 5 6
7 8 9
1 2 3
4 5 6
7 8 9
1 2 3
4 5 6
7 8 9
1 2 3
4 5 6
7 8 9
1 2 3
4 5 6
7 8 9
1 2 3
4 5 6
7 8 9
1 2 3
4 5 6
7 8 9
1 2 3
4 5 6
7 8 9
1 2 3
4 5 6
7 8 9
1 2 3
4 5 6
7 8 9
1 2 3
4 5 6
7 8 9
1 2 3
4 5 6
7 8 9
61 2 3
4 5 6
7 8 9
1 2 3
4 5 6
7 8 98
1 2 3
4 5 6
7 8 93 1
1 2 3
4 5 6
7 8 99
1 2 3
4 5 6
7 8 92
1 2 3
4 5 6
7 8 9
1 2 3
4 5 6
7 8 9
1 2 3
4 5 6
7 8 9
1 2 3
4 5 6
7 8 9
1 2 3
4 5 6
7 8 95
1 2 3
4 5 6
7 8 9
1 2 3
4 5 6
7 8 9
1 2 3
4 5 6
7 8 9
1 2 3
4 5 6
7 8 97
1 2 3
4 5 6
7 8 99
1 2 3
4 5 6
7 8 9
1 2 3
4 5 6
7 8 9
1 2 3
4 5 6
7 8 9
1 2 3
4 5 6
7 8 93 6
1 2 3
4 5 6
7 8 9
1 2 3
4 5 6
7 8 9
1 2 3
4 5 6
7 8 99
1 2 3
4 5 6
7 8 9
1 2 3
4 5 6
7 8 9
Plate 6.2: After initial crossouts of conflicting digits, B
Col: A B C D E F G H I
Row:
• • • • • • • • • • • • • • • • • • • • • • • • • • •
1 • • • • • • • • • • • • • • • • • • • • • • • • • • •
• • • • • • • • • • • • • • • • • • • • • • • • • • •
• • • • • • • • • • • • • • • • • • • • • • • • • • •
2 • • • • • • • • • • • • • • • • • • • • • • • • • • •
• • • • • • • • • • • • • • • • • • • • • • • • • • •
• • • • • • • • • • • • • • • • • • • • • • • • • • •
3 • • • • • • • • • • • • • • • • • • • • • • • • • • •
• • • • • • • • • • • • • • • • • • • • • • • • • • •
• • • • • • • • • • • • • • • • • • • • • • • • • • •
4 • • • • • • • • • • • • • • • • • • • • • • • • • • •
• • • • • • • • • • • • • • • • • • • • • • • • • • •
• • • • • • • • • • • • • • • • • • • • • • • • • • •
5 • • • • • • • • • • • • • • • • • • • • • • • • • • •
• • • • • • • • • • • • • • • • • • • • • • • • • • •
• • • • • • • • • • • • • • • • • • • • • • • • • • •
6 • • • • • • • • • • • • • • • • • • • • • • • • • • •
• • • • • • • • • • • • • • • • • • • • • • • • • • •
• • • • • • • • • • • • • • • • • • • • • • • • • • •
7 • • • • • • • • • • • • • • • • • • • • • • • • • • •
• • • • • • • • • • • • • • • • • • • • • • • • • • •
• • • • • • • • • • • • • • • • • • • • • • • • • • •
8 • • • • • • • • • • • • • • • • • • • • • • • • • • •
• • • • • • • • • • • • • • • • • • • • • • • • • • •
• • • • • • • • • • • • • • • • • • • • • • • • • • •
9 • • • • • • • • • • • • • • • • • • • • • • • • • • •
• • • • • • • • • • • • • • • • • • • • • • • • • • •
3
5
8 9
5
7 8 94
1
5
1
5
7 9
1
5
72 6
1
5
7 8
7 4 5
81 9 4 5 2
3
4 5
8
4
86
2
5
8 91
2
5
7 8 9
2
4 5 6
2
4 5 6
7 9
4 5 6
7
4 5
7 83 4 5
7 8
2
5
9
5 6
7 9
2
5
7 93
1 2
4 5 6
7 98 4 5
7
1
4
7 9
1
4 5
7
2 3
4 5
8 9
4 5
8 9
2 3
5
8 9
1
4 5 6
1
4 5 6
7
1
4 5 6
7
3
4 5
7 8
2
4
7 8
2 3
4 5
7 8
6 4 5
2
5 8 4 5
73 1
2
4
79
1
4
8 92
7 8 9
1
4 6
1 3
4 6
8
1
4 6
3
4 6
7 85
1 3
4
7 8
1
4 5
8
4 5
8
5
87
1 2 3
4 5 6
89
3
4 6
8
1 2
4
8
1 2 3
4
8
1
4 5
83 6
1 2
4 5
1 2
4 5
8
1
4 5 91 2
4
7 8
1 2
4
7 8
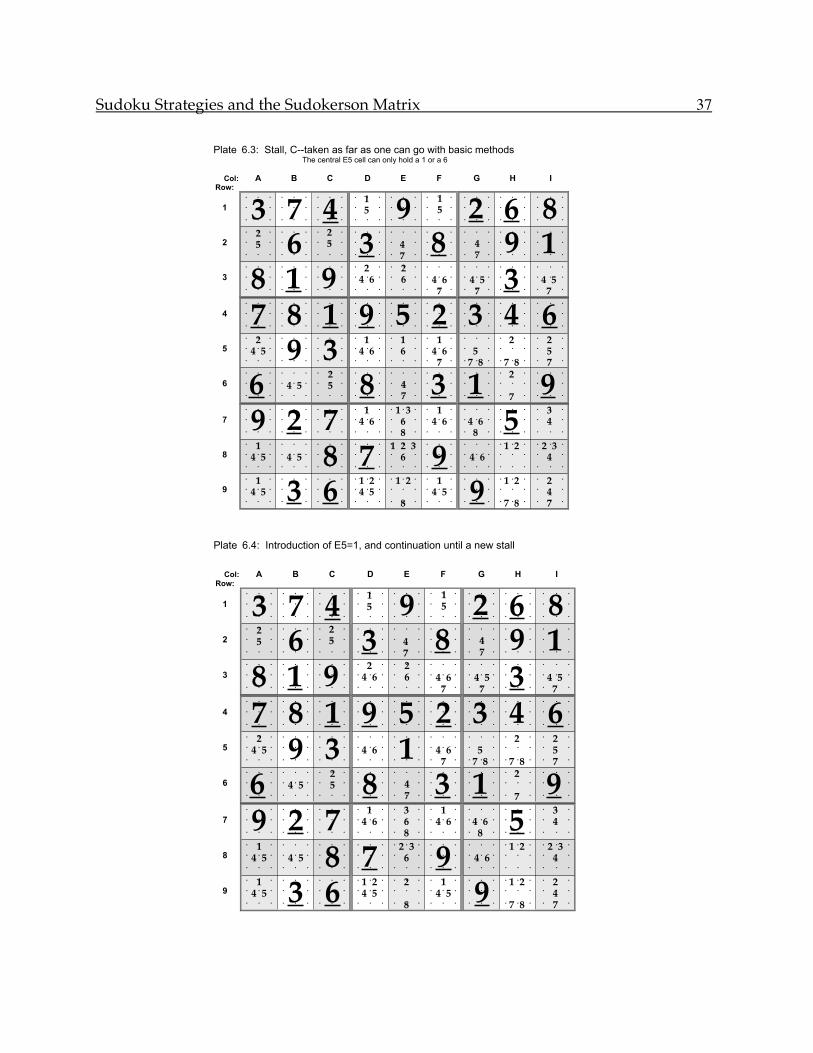
Sudoku Strategies and the Sudokerson Matrix 37
Plate 6.3: Stall, C--taken as far as one can go with basic methods The central E5 cell can only hold a 1 or a 6
Col: A B C D E F G H I
Row:
• • • • • • • • • • • • • • • • • • • • • • • • • • •
1 • • • • • • • • • • • • • • • • • • • • • • • • • • •
• • • • • • • • • • • • • • • • • • • • • • • • • • •
• • • • • • • • • • • • • • • • • • • • • • • • • • •
2 • • • • • • • • • • • • • • • • • • • • • • • • • • •
• • • • • • • • • • • • • • • • • • • • • • • • • • •
• • • • • • • • • • • • • • • • • • • • • • • • • • •
3 • • • • • • • • • • • • • • • • • • • • • • • • • • •
• • • • • • • • • • • • • • • • • • • • • • • • • • •
• • • • • • • • • • • • • • • • • • • • • • • • • • •
4 • • • • • • • • • • • • • • • • • • • • • • • • • • •
• • • • • • • • • • • • • • • • • • • • • • • • • • •
• • • • • • • • • • • • • • • • • • • • • • • • • • •
5 • • • • • • • • • • • • • • • • • • • • • • • • • • •
• • • • • • • • • • • • • • • • • • • • • • • • • • •
• • • • • • • • • • • • • • • • • • • • • • • • • • •
6 • • • • • • • • • • • • • • • • • • • • • • • • • • •
• • • • • • • • • • • • • • • • • • • • • • • • • • •
• • • • • • • • • • • • • • • • • • • • • • • • • • •
7 • • • • • • • • • • • • • • • • • • • • • • • • • • •
• • • • • • • • • • • • • • • • • • • • • • • • • • •
• • • • • • • • • • • • • • • • • • • • • • • • • • •
8 • • • • • • • • • • • • • • • • • • • • • • • • • • •
• • • • • • • • • • • • • • • • • • • • • • • • • • •
• • • • • • • • • • • • • • • • • • • • • • • • • • •
9 • • • • • • • • • • • • • • • • • • • • • • • • • • •
• • • • • • • • • • • • • • • • • • • • • • • • • • •
3 7 41
5 91
5 2 6 8
7 8 1 9 5 2 3 4 6
8 1 92
4 6
2
6 4 6
7
4 5
73 4 5
7
2
5 62
5 3 4
78 4
79 1
2
4 5 9 31
4 6
1
6
1
4 6
7
5
7 8
2
7 8
2
5
7
6 4 5
2
5 8 4
73 1
2
79
9 2 71
4 6
1 3
6
8
1
4 6 4 6
85
3
4
1
4 5 4 5 8 71 2 3
6 9 4 6
1 2 2 3
4
1
4 5 3 61 2
4 5
1 2
8
1
4 5 91 2
7 8
2
4
7
Plate 6.4: Introduction of E5=1, and continuation until a new stall
Col: A B C D E F G H I
Row:
• • • • • • • • • • • • • • • • • • • • • • • • • • •
1 • • • • • • • • • • • • • • • • • • • • • • • • • • •
• • • • • • • • • • • • • • • • • • • • • • • • • • •
• • • • • • • • • • • • • • • • • • • • • • • • • • •
2 • • • • • • • • • • • • • • • • • • • • • • • • • • •
• • • • • • • • • • • • • • • • • • • • • • • • • • •
• • • • • • • • • • • • • • • • • • • • • • • • • • •
3 • • • • • • • • • • • • • • • • • • • • • • • • • • •
• • • • • • • • • • • • • • • • • • • • • • • • • • •
• • • • • • • • • • • • • • • • • • • • • • • • • • •
4 • • • • • • • • • • • • • • • • • • • • • • • • • • •
• • • • • • • • • • • • • • • • • • • • • • • • • • •
• • • • • • • • • • • • • • • • • • • • • • • • • • •
5 • • • • • • • • • • • • • • • • • • • • • • • • • • •
• • • • • • • • • • • • • • • • • • • • • • • • • • •
• • • • • • • • • • • • • • • • • • • • • • • • • • •
6 • • • • • • • • • • • • • • • • • • • • • • • • • • •
• • • • • • • • • • • • • • • • • • • • • • • • • • •
• • • • • • • • • • • • • • • • • • • • • • • • • • •
7 • • • • • • • • • • • • • • • • • • • • • • • • • • •
• • • • • • • • • • • • • • • • • • • • • • • • • • •
• • • • • • • • • • • • • • • • • • • • • • • • • • •
8 • • • • • • • • • • • • • • • • • • • • • • • • • • •
• • • • • • • • • • • • • • • • • • • • • • • • • • •
• • • • • • • • • • • • • • • • • • • • • • • • • • •
9 • • • • • • • • • • • • • • • • • • • • • • • • • • •
• • • • • • • • • • • • • • • • • • • • • • • • • • •
3 7 41
5 91
5 2 6 8
7 8 1 9 5 2 3 4 6
8 1 92
4 6
2
6 4 6
7
4 5
73 4 5
7
2
5 62
5 3 4
78 4
79 1
2
4 5 9 3 4 6 1 4 6
7
5
7 8
2
7 8
2
5
7
6 4 5
2
5 8 4
73 1
2
79
9 2 71
4 6
3
6
8
1
4 6 4 6
85
3
4
1
4 5 4 5 8 72 3
6 9 4 6
1 2 2 3
4
1
4 5 3 61 2
4 5
2
8
1
4 5 91 2
7 8
2
4
7
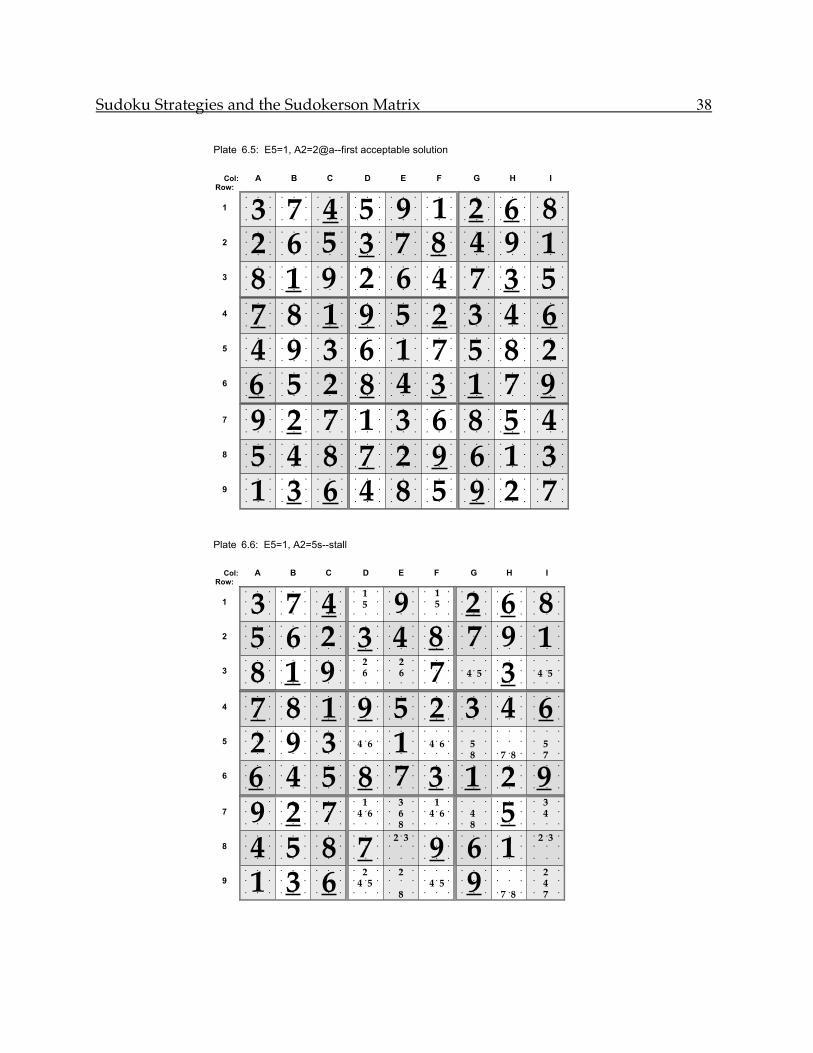
Sudoku Strategies and the Sudokerson Matrix 38
Plate 6.5: E5=1, A2=2@a--first acceptable solution
Col: A B C D E F G H I
Row:
• • • • • • • • • • • • • • • • • • • • • • • • • • •
1 • • • • • • • • • • • • • • • • • • • • • • • • • • •
• • • • • • • • • • • • • • • • • • • • • • • • • • •
• • • • • • • • • • • • • • • • • • • • • • • • • • •
2 • • • • • • • • • • • • • • • • • • • • • • • • • • •
• • • • • • • • • • • • • • • • • • • • • • • • • • •
• • • • • • • • • • • • • • • • • • • • • • • • • • •
3 • • • • • • • • • • • • • • • • • • • • • • • • • • •
• • • • • • • • • • • • • • • • • • • • • • • • • • •
• • • • • • • • • • • • • • • • • • • • • • • • • • •
4 • • • • • • • • • • • • • • • • • • • • • • • • • • •
• • • • • • • • • • • • • • • • • • • • • • • • • • •
• • • • • • • • • • • • • • • • • • • • • • • • • • •
5 • • • • • • • • • • • • • • • • • • • • • • • • • • •
• • • • • • • • • • • • • • • • • • • • • • • • • • •
• • • • • • • • • • • • • • • • • • • • • • • • • • •
6 • • • • • • • • • • • • • • • • • • • • • • • • • • •
• • • • • • • • • • • • • • • • • • • • • • • • • • •
• • • • • • • • • • • • • • • • • • • • • • • • • • •
7 • • • • • • • • • • • • • • • • • • • • • • • • • • •
• • • • • • • • • • • • • • • • • • • • • • • • • • •
• • • • • • • • • • • • • • • • • • • • • • • • • • •
8 • • • • • • • • • • • • • • • • • • • • • • • • • • •
• • • • • • • • • • • • • • • • • • • • • • • • • • •
• • • • • • • • • • • • • • • • • • • • • • • • • • •
9 • • • • • • • • • • • • • • • • • • • • • • • • • • •
• • • • • • • • • • • • • • • • • • • • • • • • • • •
3 7 4 5 9 1 2 6 8
7 8 1 9 5 2 3 4 6
8 1 9 2 6 4 7 3 5
2 6 5 3 7 8 4 9 1
4 9 3 6 1 7 5 8 2
6 5 2 8 4 3 1 7 9
9 2 7 1 3 6 8 5 4
5 4 8 7 2 9 6 1 3
1 3 6 4 8 5 9 2 7
Plate 6.6: E5=1, A2=5s--stall
Col: A B C D E F G H I
Row:
• • • • • • • • • • • • • • • • • • • • • • • • • • •
1 • • • • • • • • • • • • • • • • • • • • • • • • • • •
• • • • • • • • • • • • • • • • • • • • • • • • • • •
• • • • • • • • • • • • • • • • • • • • • • • • • • •
2 • • • • • • • • • • • • • • • • • • • • • • • • • • •
• • • • • • • • • • • • • • • • • • • • • • • • • • •
• • • • • • • • • • • • • • • • • • • • • • • • • • •
3 • • • • • • • • • • • • • • • • • • • • • • • • • • •
• • • • • • • • • • • • • • • • • • • • • • • • • • •
• • • • • • • • • • • • • • • • • • • • • • • • • • •
4 • • • • • • • • • • • • • • • • • • • • • • • • • • •
• • • • • • • • • • • • • • • • • • • • • • • • • • •
• • • • • • • • • • • • • • • • • • • • • • • • • • •
5 • • • • • • • • • • • • • • • • • • • • • • • • • • •
• • • • • • • • • • • • • • • • • • • • • • • • • • •
• • • • • • • • • • • • • • • • • • • • • • • • • • •
6 • • • • • • • • • • • • • • • • • • • • • • • • • • •
• • • • • • • • • • • • • • • • • • • • • • • • • • •
• • • • • • • • • • • • • • • • • • • • • • • • • • •
7 • • • • • • • • • • • • • • • • • • • • • • • • • • •
• • • • • • • • • • • • • • • • • • • • • • • • • • •
• • • • • • • • • • • • • • • • • • • • • • • • • • •
8 • • • • • • • • • • • • • • • • • • • • • • • • • • •
• • • • • • • • • • • • • • • • • • • • • • • • • • •
• • • • • • • • • • • • • • • • • • • • • • • • • • •
9 • • • • • • • • • • • • • • • • • • • • • • • • • • •
• • • • • • • • • • • • • • • • • • • • • • • • • • •
3 7 41
5 91
5 2 6 8
7 8 1 9 5 2 3 4 6
8 1 92
6
2
6 7 4 5 3 4 5
5 6 2 3 4 8 7 9 1
2 9 3 4 6 1 4 6 5
8 7 8
5
7
6 4 5 8 7 3 1 2 9
9 2 71
4 6
3
6
8
1
4 6 4
85
3
4
4 5 8 72 3
9 6 12 3
1 3 62
4 5
2
8
4 5 97 8
2
4
7
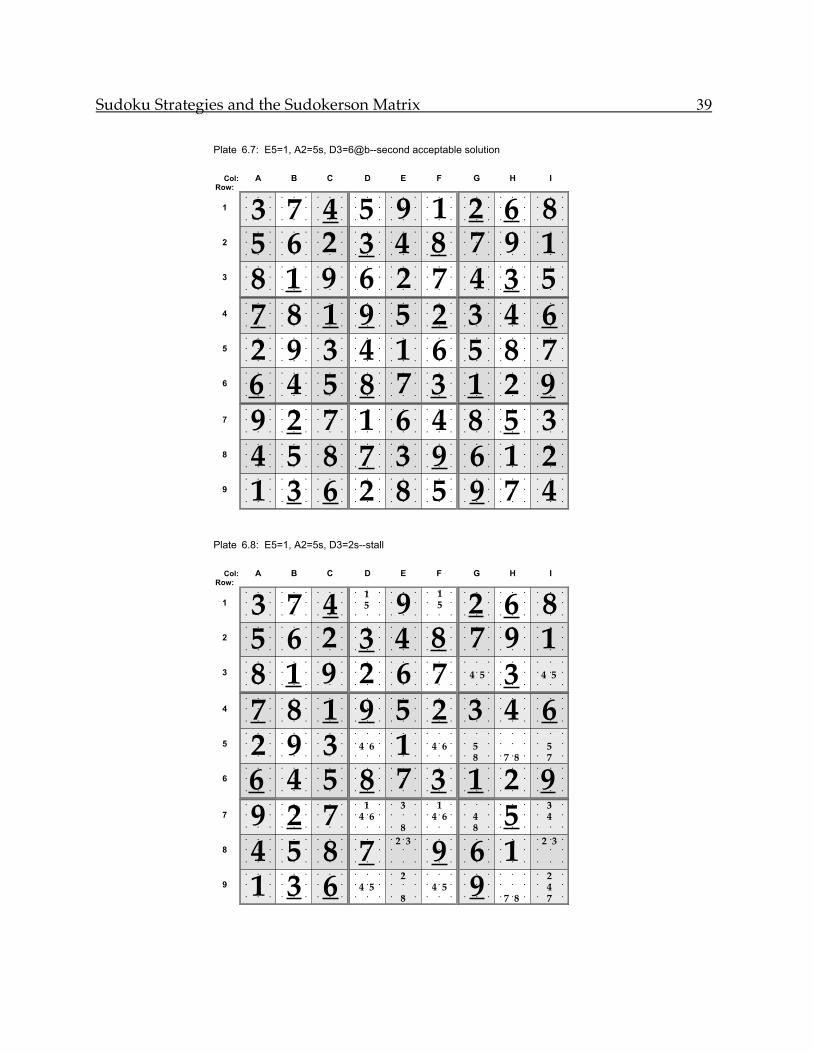
Sudoku Strategies and the Sudokerson Matrix 39
Plate 6.7: E5=1, A2=5s, D3=6@b--second acceptable solution
Col: A B C D E F G H I
Row:
• • • • • • • • • • • • • • • • • • • • • • • • • • •
1 • • • • • • • • • • • • • • • • • • • • • • • • • • •
• • • • • • • • • • • • • • • • • • • • • • • • • • •
• • • • • • • • • • • • • • • • • • • • • • • • • • •
2 • • • • • • • • • • • • • • • • • • • • • • • • • • •
• • • • • • • • • • • • • • • • • • • • • • • • • • •
• • • • • • • • • • • • • • • • • • • • • • • • • • •
3 • • • • • • • • • • • • • • • • • • • • • • • • • • •
• • • • • • • • • • • • • • • • • • • • • • • • • • •
• • • • • • • • • • • • • • • • • • • • • • • • • • •
4 • • • • • • • • • • • • • • • • • • • • • • • • • • •
• • • • • • • • • • • • • • • • • • • • • • • • • • •
• • • • • • • • • • • • • • • • • • • • • • • • • • •
5 • • • • • • • • • • • • • • • • • • • • • • • • • • •
• • • • • • • • • • • • • • • • • • • • • • • • • • •
• • • • • • • • • • • • • • • • • • • • • • • • • • •
6 • • • • • • • • • • • • • • • • • • • • • • • • • • •
• • • • • • • • • • • • • • • • • • • • • • • • • • •
• • • • • • • • • • • • • • • • • • • • • • • • • • •
7 • • • • • • • • • • • • • • • • • • • • • • • • • • •
• • • • • • • • • • • • • • • • • • • • • • • • • • •
• • • • • • • • • • • • • • • • • • • • • • • • • • •
8 • • • • • • • • • • • • • • • • • • • • • • • • • • •
• • • • • • • • • • • • • • • • • • • • • • • • • • •
• • • • • • • • • • • • • • • • • • • • • • • • • • •
9 • • • • • • • • • • • • • • • • • • • • • • • • • • •
• • • • • • • • • • • • • • • • • • • • • • • • • • •
3 7 4 5 9 1 2 6 8
7 8 1 9 5 2 3 4 6
8 1 9 6 2 7 4 3 5
5 6 2 3 4 8 7 9 1
2 9 3 4 1 6 5 8 7
6 4 5 8 7 3 1 2 9
9 2 7 1 6 4 8 5 3
4 5 8 7 3 9 6 1 2
1 3 6 2 8 5 9 7 4
Plate 6.8: E5=1, A2=5s, D3=2s--stall
Col: A B C D E F G H I
Row:
• • • • • • • • • • • • • • • • • • • • • • • • • • •
1 • • • • • • • • • • • • • • • • • • • • • • • • • • •
• • • • • • • • • • • • • • • • • • • • • • • • • • •
• • • • • • • • • • • • • • • • • • • • • • • • • • •
2 • • • • • • • • • • • • • • • • • • • • • • • • • • •
• • • • • • • • • • • • • • • • • • • • • • • • • • •
• • • • • • • • • • • • • • • • • • • • • • • • • • •
3 • • • • • • • • • • • • • • • • • • • • • • • • • • •
• • • • • • • • • • • • • • • • • • • • • • • • • • •
• • • • • • • • • • • • • • • • • • • • • • • • • • •
4 • • • • • • • • • • • • • • • • • • • • • • • • • • •
• • • • • • • • • • • • • • • • • • • • • • • • • • •
• • • • • • • • • • • • • • • • • • • • • • • • • • •
5 • • • • • • • • • • • • • • • • • • • • • • • • • • •
• • • • • • • • • • • • • • • • • • • • • • • • • • •
• • • • • • • • • • • • • • • • • • • • • • • • • • •
6 • • • • • • • • • • • • • • • • • • • • • • • • • • •
• • • • • • • • • • • • • • • • • • • • • • • • • • •
• • • • • • • • • • • • • • • • • • • • • • • • • • •
7 • • • • • • • • • • • • • • • • • • • • • • • • • • •
• • • • • • • • • • • • • • • • • • • • • • • • • • •
• • • • • • • • • • • • • • • • • • • • • • • • • • •
8 • • • • • • • • • • • • • • • • • • • • • • • • • • •
• • • • • • • • • • • • • • • • • • • • • • • • • • •
• • • • • • • • • • • • • • • • • • • • • • • • • • •
9 • • • • • • • • • • • • • • • • • • • • • • • • • • •
• • • • • • • • • • • • • • • • • • • • • • • • • • •
3 7 41
5 91
5 2 6 8
7 8 1 9 5 2 3 4 6
8 1 9 2 6 7 4 5 3 4 5
5 6 2 3 4 8 7 9 1
2 9 3 4 6 1 4 6 5
8 7 8
5
7
6 4 5 8 7 3 1 2 9
9 2 71
4 6
3
8
1
4 6 4
85
3
4
4 5 8 72 3
9 6 12 3
1 3 6 4 5
2
8
4 5 97 8
2
4
7
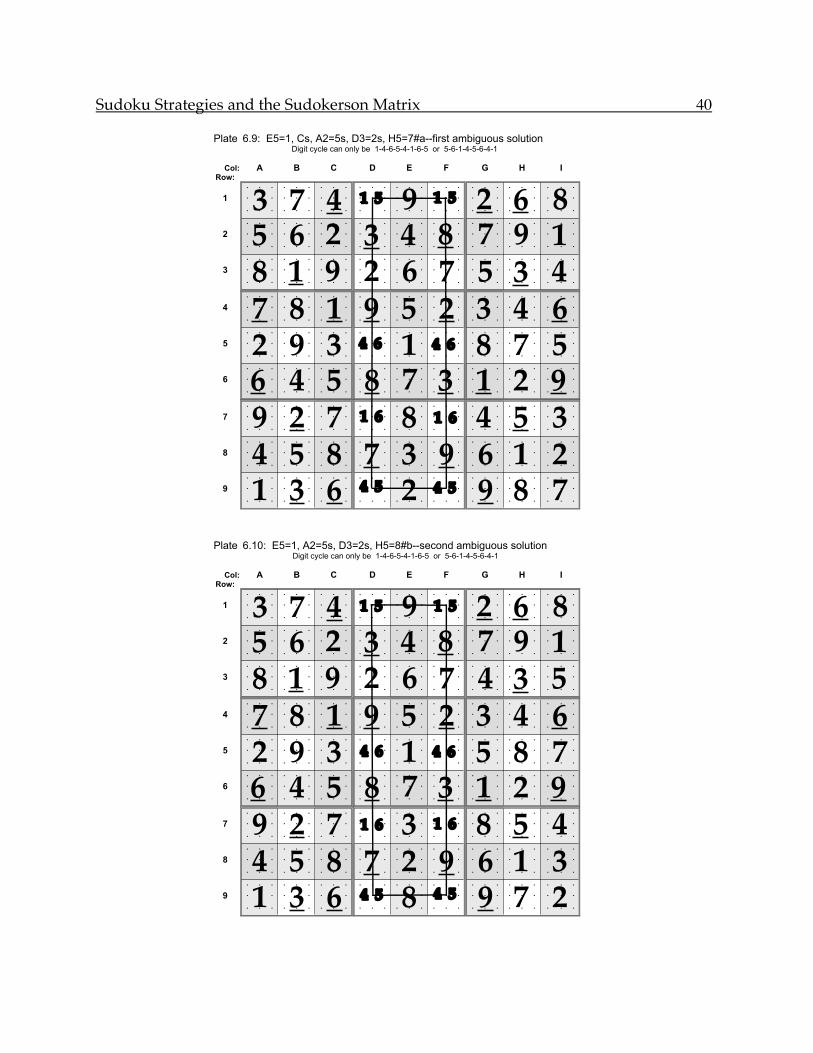
Sudoku Strategies and the Sudokerson Matrix 40
Plate 6.9: E5=1, Cs, A2=5s, D3=2s, H5=7#a--first ambiguous solutionDigit cycle can only be 1-4-6-5-4-1-6-5 or 5-6-1-4-5-6-4-1
Col: A B C D E F G H I
Row:
• • • • • • • • • • • • • • • • • • • • • • • • • • •
1 • • • • • • • • • • • • • • • • • • • • • • • • • • •
• • • • • • • • • • • • • • • • • • • • • • • • • • •
• • • • • • • • • • • • • • • • • • • • • • • • • • •
2 • • • • • • • • • • • • • • • • • • • • • • • • • • •
• • • • • • • • • • • • • • • • • • • • • • • • • • •
• • • • • • • • • • • • • • • • • • • • • • • • • • •
3 • • • • • • • • • • • • • • • • • • • • • • • • • • •
• • • • • • • • • • • • • • • • • • • • • • • • • • •
• • • • • • • • • • • • • • • • • • • • • • • • • • •
4 • • • • • • • • • • • • • • • • • • • • • • • • • • •
• • • • • • • • • • • • • • • • • • • • • • • • • • •
• • • • • • • • • • • • • • • • • • • • • • • • • • •
5 • • • • • • • • • • • • • • • • • • • • • • • • • • •
• • • • • • • • • • • • • • • • • • • • • • • • • • •
• • • • • • • • • • • • • • • • • • • • • • • • • • •
6 • • • • • • • • • • • • • • • • • • • • • • • • • • •
• • • • • • • • • • • • • • • • • • • • • • • • • • •
• • • • • • • • • • • • • • • • • • • • • • • • • • •
7 • • • • • • • • • • • • • • • • • • • • • • • • • • •
• • • • • • • • • • • • • • • • • • • • • • • • • • •
• • • • • • • • • • • • • • • • • • • • • • • • • • •
8 • • • • • • • • • • • • • • • • • • • • • • • • • • •
• • • • • • • • • • • • • • • • • • • • • • • • • • •
• • • • • • • • • • • • • • • • • • • • • • • • • • •
9 • • • • • • • • • • • • • • • • • • • • • • • • • • •
• • • • • • • • • • • • • • • • • • • • • • • • • • •
3 7 4 1 5 9 1 5 2 6 8
7 8 1 9 5 2 3 4 6
8 1 9 2 6 7 5 3 4
5 6 2 3 4 8 7 9 1
2 9 3 4 6 1 4 6 8 7 5
6 4 5 8 7 3 1 2 9
9 2 7 1 6 8 1 6 4 5 3
4 5 8 7 3 9 6 1 2
1 3 6 4 5 2 4 5 9 8 7
Plate 6.10: E5=1, A2=5s, D3=2s, H5=8#b--second ambiguous solution Digit cycle can only be 1-4-6-5-4-1-6-5 or 5-6-1-4-5-6-4-1
Col: A B C D E F G H I
Row:
• • • • • • • • • • • • • • • • • • • • • • • • • • •
1 • • • • • • • • • • • • • • • • • • • • • • • • • • •
• • • • • • • • • • • • • • • • • • • • • • • • • • •
• • • • • • • • • • • • • • • • • • • • • • • • • • •
2 • • • • • • • • • • • • • • • • • • • • • • • • • • •
• • • • • • • • • • • • • • • • • • • • • • • • • • •
• • • • • • • • • • • • • • • • • • • • • • • • • • •
3 • • • • • • • • • • • • • • • • • • • • • • • • • • •
• • • • • • • • • • • • • • • • • • • • • • • • • • •
• • • • • • • • • • • • • • • • • • • • • • • • • • •
4 • • • • • • • • • • • • • • • • • • • • • • • • • • •
• • • • • • • • • • • • • • • • • • • • • • • • • • •
• • • • • • • • • • • • • • • • • • • • • • • • • • •
5 • • • • • • • • • • • • • • • • • • • • • • • • • • •
• • • • • • • • • • • • • • • • • • • • • • • • • • •
• • • • • • • • • • • • • • • • • • • • • • • • • • •
6 • • • • • • • • • • • • • • • • • • • • • • • • • • •
• • • • • • • • • • • • • • • • • • • • • • • • • • •
• • • • • • • • • • • • • • • • • • • • • • • • • • •
7 • • • • • • • • • • • • • • • • • • • • • • • • • • •
• • • • • • • • • • • • • • • • • • • • • • • • • • •
• • • • • • • • • • • • • • • • • • • • • • • • • • •
8 • • • • • • • • • • • • • • • • • • • • • • • • • • •
• • • • • • • • • • • • • • • • • • • • • • • • • • •
• • • • • • • • • • • • • • • • • • • • • • • • • • •
9 • • • • • • • • • • • • • • • • • • • • • • • • • • •
• • • • • • • • • • • • • • • • • • • • • • • • • • •
3 7 4 1 5 9 1 5 2 6 8
7 8 1 9 5 2 3 4 6
8 1 9 2 6 7 4 3 5
5 6 2 3 4 8 7 9 1
2 9 3 4 6 1 4 6 5 8 7
6 4 5 8 7 3 1 2 9
9 2 7 1 6 3 1 6 8 5 4
4 5 8 7 2 9 6 1 3
1 3 6 4 5 8 4 5 9 7 2
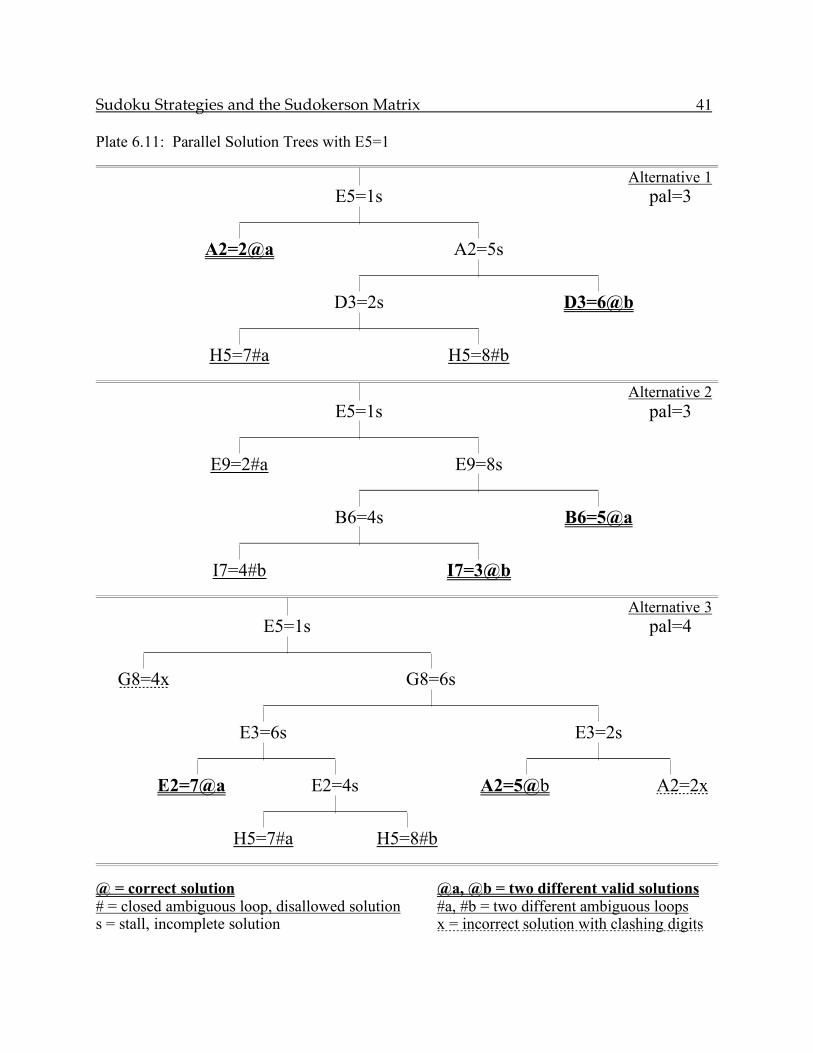
Sudoku Strategies and the Sudokerson Matrix 41
Plate 6.11: Parallel Solution Trees with E5=1 Alternative 1
E5=1s pal=3
A2=2@a A2=5s
D3=2s D3=6@b
H5=7#a H5=8#b Alternative 2
E5=1s pal=3
E9=2#a E9=8s
B6=4s B6=5@a
I7=4#b I7=3@b Alternative 3
E5=1s pal=4
G8=4x G8=6s
E3=6s E3=2s
E2=7@a E2=4s A2=5@b A2=2x
H5=7#a H5=8#b
@ = correct solution @a, @b = two different valid solutions # = closed ambiguous loop, disallowed solution #a, #b = two different ambiguous loops s = stall, incomplete solution x = incorrect solution with clashing digits
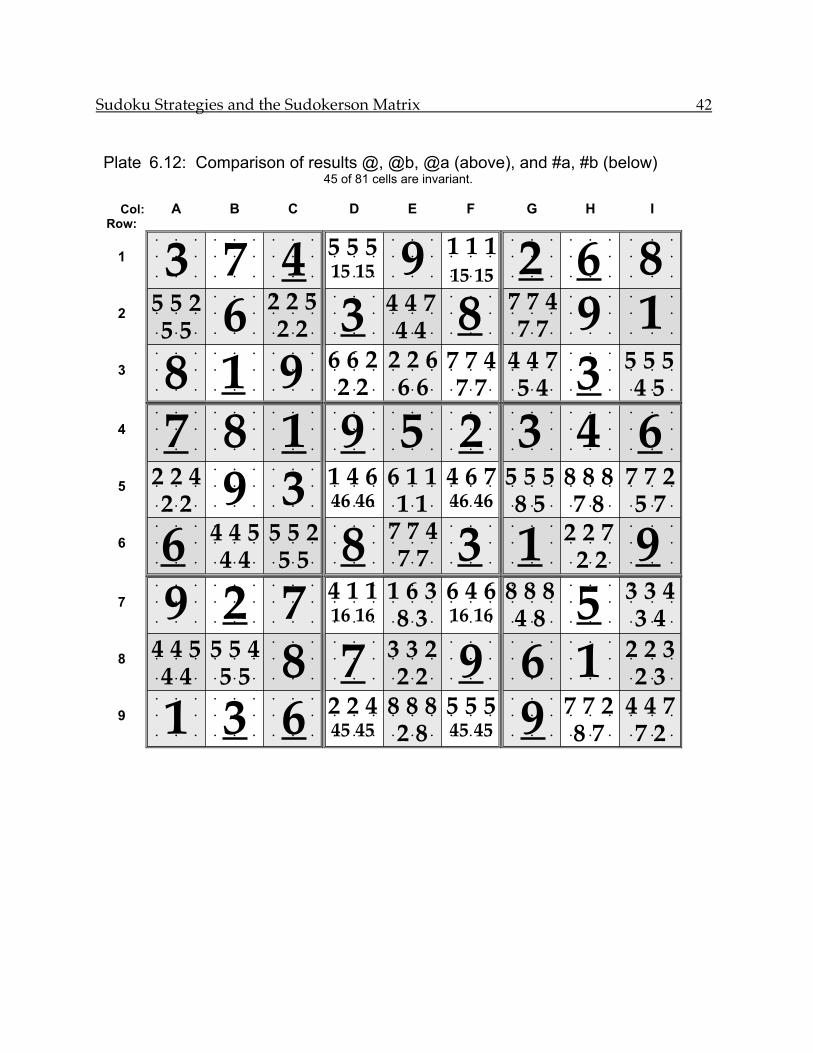
Sudoku Strategies and the Sudokerson Matrix 42
Plate 6.12: Comparison of results @, @b, @a (above), and #a, #b (below) 45 of 81 cells are invariant.
Col: A B C D E F G H I
Row:
• • • • • • • • • • • • • • • • • • • • • • • • • • •
1 • • • • • • • • • • • • • • • • • • • • • • • • • • •
• • • • • • • • • • • • • • • • • • • • • • • • • • •
• • • • • • • • • • • • • • • • • • • • • • • • • • •
2 • • • • • • • • • • • • • • • • • • • • • • • • • • •
• • • • • • • • • • • • • • • • • • • • • • • • • • •
• • • • • • • • • • • • • • • • • • • • • • • • • • •
3 • • • • • • • • • • • • • • • • • • • • • • • • • • •
• • • • • • • • • • • • • • • • • • • • • • • • • • •
• • • • • • • • • • • • • • • • • • • • • • • • • • •
4 • • • • • • • • • • • • • • • • • • • • • • • • • • •
• • • • • • • • • • • • • • • • • • • • • • • • • • •
• • • • • • • • • • • • • • • • • • • • • • • • • • •
5 • • • • • • • • • • • • • • • • • • • • • • • • • • •
• • • • • • • • • • • • • • • • • • • • • • • • • • •
• • • • • • • • • • • • • • • • • • • • • • • • • • •
6 • • • • • • • • • • • • • • • • • • • • • • • • • • •
• • • • • • • • • • • • • • • • • • • • • • • • • • •
• • • • • • • • • • • • • • • • • • • • • • • • • • •
7 • • • • • • • • • • • • • • • • • • • • • • • • • • •
• • • • • • • • • • • • • • • • • • • • • • • • • • •
• • • • • • • • • • • • • • • • • • • • • • • • • • •
8 • • • • • • • • • • • • • • • • • • • • • • • • • • •
• • • • • • • • • • • • • • • • • • • • • • • • • • •
• • • • • • • • • • • • • • • • • • • • • • • • • • •
9 • • • • • • • • • • • • • • • • • • • • • • • • • • •
• • • • • • • • • • • • • • • • • • • • • • • • • • •
3 7 45 5 5
15 15 91 1 1
15 152 6 8
7 8 1 9 5 2 3 4 6
8 1 96 6 2
2 2
2 2 6
6 6
7 7 4
7 7
4 4 7
5 4 35 5 5
4 5
5 5 2
5 5 62 2 5
2 2 34 4 7
4 48
7 7 4
7 7 9 1
2 2 4
2 2 9 31 4 6
46 46
6 1 1
1 1
4 6 7
46 46
5 5 5
8 5
8 8 8
7 8
7 7 2
5 7
64 4 5
4 4
5 5 2
5 5 87 7 4
7 7 3 12 2 7
2 2 9
9 2 74 1 1
16 16
1 6 3
8 3
6 4 6
16 16
8 8 8
4 8 53 3 4
3 4
4 4 5
4 4
5 5 4
5 5 8 73 3 2
2 2 9 6 12 2 3
2 3
1 3 62 2 4
45 45
8 8 8
2 8
5 5 5
45 45 97 7 2
8 7
4 4 7
7 2
Sudoku Strategies and the Sudokerson Matrix 43
7. OVER THE TOP
"Anything worth doing is worth overdoing." This is a philosophy that can make your life more interesting, if not necessarily more successful. In the last chapter we saw examples of an ambiguous loop having two different solutions. These are considered serious flaws by professional Sudoku designers, and are avoided like the plague. But in fact they can be more interesting than the standard newspaper Sudoku puzzle.
I wasted a lot of time last year in making a systematic study of how many, and
how large, ambiguous loops could exist in a solvable Sudoku. The trick was first to map out the loop that you wanted to find, then surround it with digits that satisfy the Sudoku rules, and finally select enough of those digits to permit the puzzle to be solved in the normal way. I named this backward analysis process "Kudosu", and wrote up the results in a small book entitled Sudoku, Cascades and Kudosu. In it are giant ambiguous loops made up of as many as 18 cells, each containing the same two digits. I also determined that the maximum number of ambiguous loops for a given Sudoku matrix is four. Plates 7.1–7.4 show a particularly attractive and symmetrical example of a 4-loop Sudoku. Please do not look at Plates 7.2–7.4 until you have tried to solve Plate 7.1 on your own. The solution is quite easy; only the basic strategies are needed, in particular the use of ambiguous pairs as in Chapter 3. But the results will astound you.
(Stop reading at this point and try your luck with Plate 7.1. The remainder of
this chapter can be considered a "spoiler".) To pick up where we left off, Plate 7.1 presents the 31 digits of the starting set,
along with 3x3 matrices of all nine digits for those cells that are initially undefined. Plate 7.2 shows the results after initial crossouts of forbidden digits in these undefined cells. With very little work, one reaches the final solution in Plate 7.3. But what does this mean: a matrix with eighteen cells containing only the digits 1 and 2? This is Plate 6.9 gone wild.
Plate 7.4 shows what is happening. Instead of one loop with eight cells as in
Plate 6.9, we now have three different loops with four cells, and one with six. The three rectangles in dotted or dashed lines are what one usually gets as an ambiguous loop. The central 6-cell loop in solid line is a less common but not especially rare configuration that I call a "bow tie loop".
An interesting question of logic arises. Plate 6.9 had two different solutions,
depending on which digit of each cell was picked. How many solutions are there for Plate 7.4? Each of the eighteen cells can hold either a 1 or a 2. Does this mean that once again there are two independent solutions? No, because each of the four loops is independent. You can define a particular solution by specifying the contents of one cell from each of the four loops, for example: A1, D2, G3 and B4. Call these the "marker cells". The various individual solutions then are:
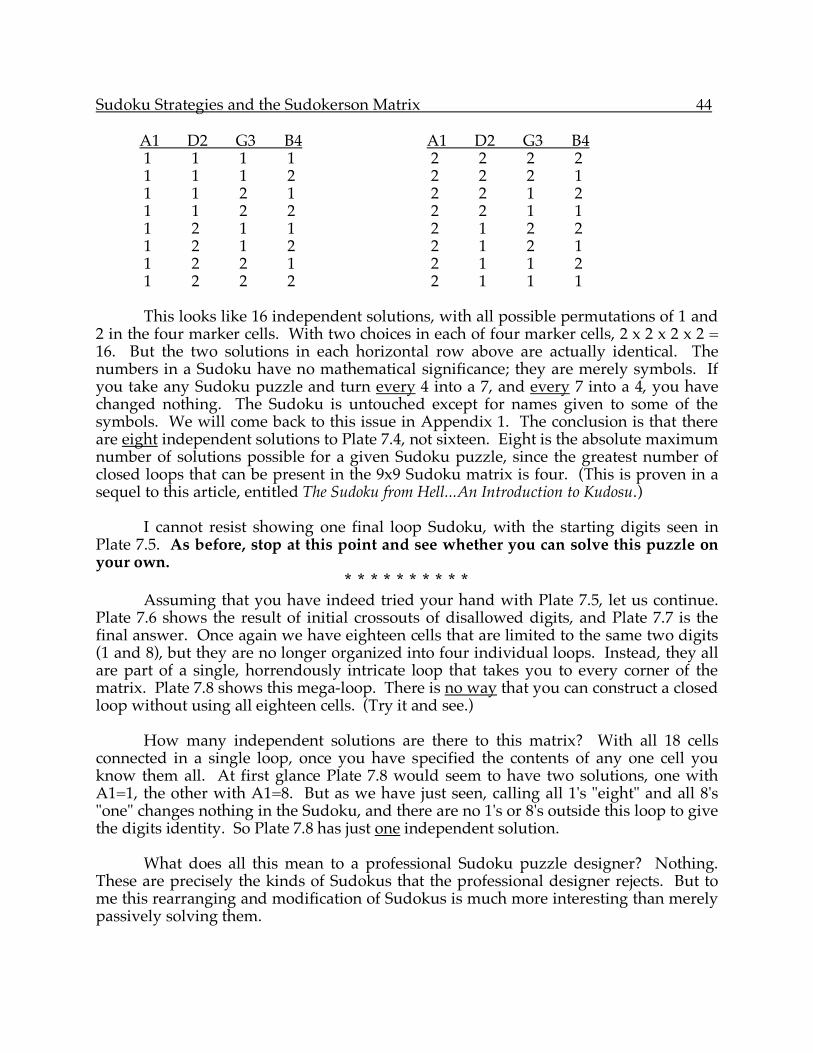
Sudoku Strategies and the Sudokerson Matrix 44
A1 D2 G3 B4 A1 D2 G3 B4 1 1 1 1 2 2 2 2 1 1 1 2 2 2 2 1 1 1 2 1 2 2 1 2 1 1 2 2 2 2 1 1 1 2 1 1 2 1 2 2 1 2 1 2 2 1 2 1 1 2 2 1 2 1 1 2 1 2 2 2 2 1 1 1 This looks like 16 independent solutions, with all possible permutations of 1 and
2 in the four marker cells. With two choices in each of four marker cells, 2 x 2 x 2 x 2 = 16. But the two solutions in each horizontal row above are actually identical. The numbers in a Sudoku have no mathematical significance; they are merely symbols. If you take any Sudoku puzzle and turn every 4 into a 7, and every 7 into a 4, you have changed nothing. The Sudoku is untouched except for names given to some of the symbols. We will come back to this issue in Appendix 1. The conclusion is that there are eight independent solutions to Plate 7.4, not sixteen. Eight is the absolute maximum number of solutions possible for a given Sudoku puzzle, since the greatest number of closed loops that can be present in the 9x9 Sudoku matrix is four. (This is proven in a sequel to this article, entitled The Sudoku from Hell...An Introduction to Kudosu.)
I cannot resist showing one final loop Sudoku, with the starting digits seen in
Plate 7.5. As before, stop at this point and see whether you can solve this puzzle on your own.
* * * * * * * * * * Assuming that you have indeed tried your hand with Plate 7.5, let us continue.
Plate 7.6 shows the result of initial crossouts of disallowed digits, and Plate 7.7 is the final answer. Once again we have eighteen cells that are limited to the same two digits (1 and 8), but they are no longer organized into four individual loops. Instead, they all are part of a single, horrendously intricate loop that takes you to every corner of the matrix. Plate 7.8 shows this mega-loop. There is no way that you can construct a closed loop without using all eighteen cells. (Try it and see.)
How many independent solutions are there to this matrix? With all 18 cells
connected in a single loop, once you have specified the contents of any one cell you know them all. At first glance Plate 7.8 would seem to have two solutions, one with A1=1, the other with A1=8. But as we have just seen, calling all 1's "eight" and all 8's "one" changes nothing in the Sudoku, and there are no 1's or 8's outside this loop to give the digits identity. So Plate 7.8 has just one independent solution.
What does all this mean to a professional Sudoku puzzle designer? Nothing.
These are precisely the kinds of Sudokus that the professional designer rejects. But to me this rearranging and modification of Sudokus is much more interesting than merely passively solving them.
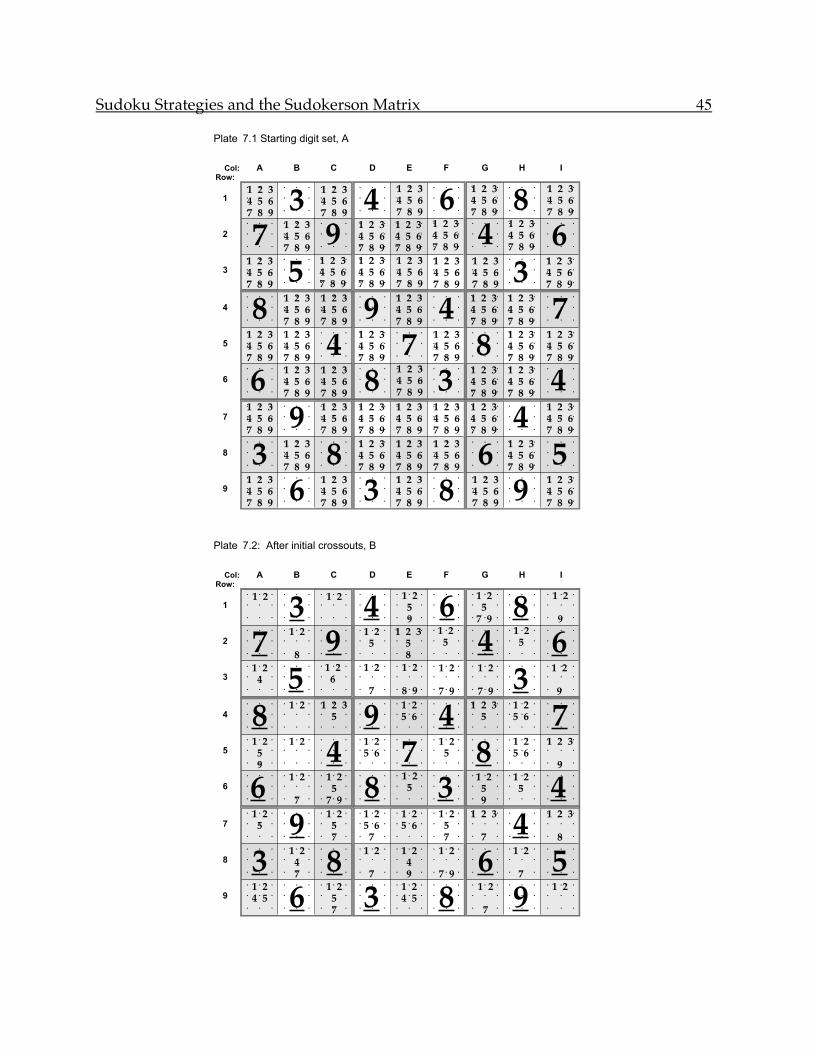
Sudoku Strategies and the Sudokerson Matrix 45
Plate 7.1 Starting digit set, A
Col: A B C D E F G H I
Row:
• • • • • • • • • • • • • • • • • • • • • • • • • • •
1 • • • • • • • • • • • • • • • • • • • • • • • • • • •
• • • • • • • • • • • • • • • • • • • • • • • • • • •
• • • • • • • • • • • • • • • • • • • • • • • • • • •
2 • • • • • • • • • • • • • • • • • • • • • • • • • • •
• • • • • • • • • • • • • • • • • • • • • • • • • • •
• • • • • • • • • • • • • • • • • • • • • • • • • • •
3 • • • • • • • • • • • • • • • • • • • • • • • • • • •
• • • • • • • • • • • • • • • • • • • • • • • • • • •
• • • • • • • • • • • • • • • • • • • • • • • • • • •
4 • • • • • • • • • • • • • • • • • • • • • • • • • • •
• • • • • • • • • • • • • • • • • • • • • • • • • • •
• • • • • • • • • • • • • • • • • • • • • • • • • • •
5 • • • • • • • • • • • • • • • • • • • • • • • • • • •
• • • • • • • • • • • • • • • • • • • • • • • • • • •
• • • • • • • • • • • • • • • • • • • • • • • • • • •
6 • • • • • • • • • • • • • • • • • • • • • • • • • • •
• • • • • • • • • • • • • • • • • • • • • • • • • • •
• • • • • • • • • • • • • • • • • • • • • • • • • • •
7 • • • • • • • • • • • • • • • • • • • • • • • • • • •
• • • • • • • • • • • • • • • • • • • • • • • • • • •
• • • • • • • • • • • • • • • • • • • • • • • • • • •
8 • • • • • • • • • • • • • • • • • • • • • • • • • • •
• • • • • • • • • • • • • • • • • • • • • • • • • • •
• • • • • • • • • • • • • • • • • • • • • • • • • • •
9 • • • • • • • • • • • • • • • • • • • • • • • • • • •
• • • • • • • • • • • • • • • • • • • • • • • • • • •
1 2 3
4 5 6
7 8 93
1 2 3
4 5 6
7 8 94
1 2 3
4 5 6
7 8 96
1 2 3
4 5 6
7 8 98
1 2 3
4 5 6
7 8 9
81 2 3
4 5 6
7 8 9
1 2 3
4 5 6
7 8 99
1 2 3
4 5 6
7 8 94
1 2 3
4 5 6
7 8 9
1 2 3
4 5 6
7 8 97
1 2 3
4 5 6
7 8 95
1 2 3
4 5 6
7 8 9
1 2 3
4 5 6
7 8 9
1 2 3
4 5 6
7 8 9
1 2 3
4 5 6
7 8 9
1 2 3
4 5 6
7 8 93
1 2 3
4 5 6
7 8 9
71 2 3
4 5 6
7 8 99
1 2 3
4 5 6
7 8 9
1 2 3
4 5 6
7 8 9
1 2 3
4 5 6
7 8 94
1 2 3
4 5 6
7 8 96
1 2 3
4 5 6
7 8 9
1 2 3
4 5 6
7 8 94
1 2 3
4 5 6
7 8 97
1 2 3
4 5 6
7 8 98
1 2 3
4 5 6
7 8 9
1 2 3
4 5 6
7 8 9
61 2 3
4 5 6
7 8 9
1 2 3
4 5 6
7 8 98
1 2 3
4 5 6
7 8 93
1 2 3
4 5 6
7 8 9
1 2 3
4 5 6
7 8 94
1 2 3
4 5 6
7 8 99
1 2 3
4 5 6
7 8 9
1 2 3
4 5 6
7 8 9
1 2 3
4 5 6
7 8 9
1 2 3
4 5 6
7 8 9
1 2 3
4 5 6
7 8 94
1 2 3
4 5 6
7 8 9
31 2 3
4 5 6
7 8 98
1 2 3
4 5 6
7 8 9
1 2 3
4 5 6
7 8 9
1 2 3
4 5 6
7 8 96
1 2 3
4 5 6
7 8 95
1 2 3
4 5 6
7 8 96
1 2 3
4 5 6
7 8 93
1 2 3
4 5 6
7 8 98
1 2 3
4 5 6
7 8 99
1 2 3
4 5 6
7 8 9
Plate 7.2: After initial crossouts, B
Col: A B C D E F G H I
Row:
• • • • • • • • • • • • • • • • • • • • • • • • • • •
1 • • • • • • • • • • • • • • • • • • • • • • • • • • •
• • • • • • • • • • • • • • • • • • • • • • • • • • •
• • • • • • • • • • • • • • • • • • • • • • • • • • •
2 • • • • • • • • • • • • • • • • • • • • • • • • • • •
• • • • • • • • • • • • • • • • • • • • • • • • • • •
• • • • • • • • • • • • • • • • • • • • • • • • • • •
3 • • • • • • • • • • • • • • • • • • • • • • • • • • •
• • • • • • • • • • • • • • • • • • • • • • • • • • •
• • • • • • • • • • • • • • • • • • • • • • • • • • •
4 • • • • • • • • • • • • • • • • • • • • • • • • • • •
• • • • • • • • • • • • • • • • • • • • • • • • • • •
• • • • • • • • • • • • • • • • • • • • • • • • • • •
5 • • • • • • • • • • • • • • • • • • • • • • • • • • •
• • • • • • • • • • • • • • • • • • • • • • • • • • •
• • • • • • • • • • • • • • • • • • • • • • • • • • •
6 • • • • • • • • • • • • • • • • • • • • • • • • • • •
• • • • • • • • • • • • • • • • • • • • • • • • • • •
• • • • • • • • • • • • • • • • • • • • • • • • • • •
7 • • • • • • • • • • • • • • • • • • • • • • • • • • •
• • • • • • • • • • • • • • • • • • • • • • • • • • •
• • • • • • • • • • • • • • • • • • • • • • • • • • •
8 • • • • • • • • • • • • • • • • • • • • • • • • • • •
• • • • • • • • • • • • • • • • • • • • • • • • • • •
• • • • • • • • • • • • • • • • • • • • • • • • • • •
9 • • • • • • • • • • • • • • • • • • • • • • • • • • •
• • • • • • • • • • • • • • • • • • • • • • • • • • •
1 2
31 2
41 2
5
96
1 2
5
7 98
1 2
9
81 2 1 2 3
5 91 2
5 6 41 2 3
5
1 2
5 6 7
1 2
4 51 2
6
1 2
7
1 2
8 9
1 2
7 9
1 2
7 93
1 2
9
71 2
89
1 2
5
1 2 3
5
8
1 2
5 41 2
5 6
1 2
5
9
1 2
41 2
5 6 71 2
5 81 2
5 6
1 2 3
9
61 2
7
1 2
5
7 98
1 2
5 31 2
5
9
1 2
5 41 2
5 91 2
5
7
1 2
5 6
7
1 2
5 6
1 2
5
7
1 2 3
74
1 2 3
8
31 2
4
78
1 2
7
1 2
4
9
1 2
7 96
1 2
75
1 2
4 5 61 2
5
73
1 2
4 5 81 2
79
1 2
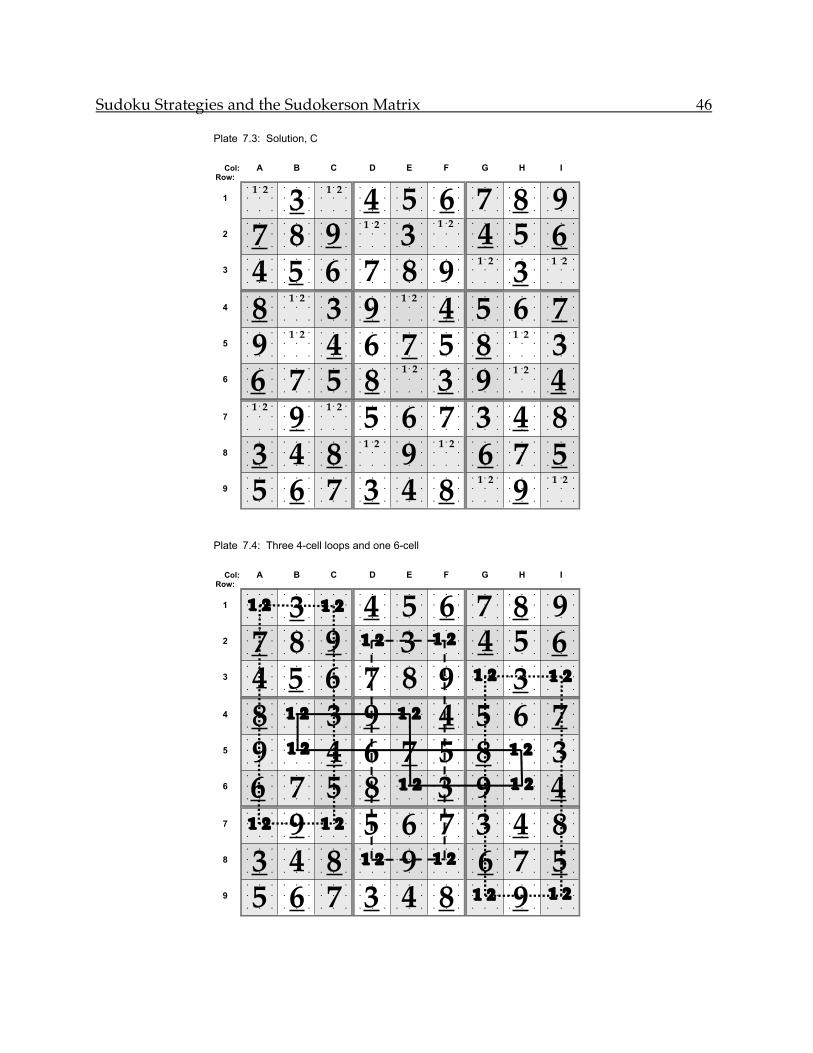
Sudoku Strategies and the Sudokerson Matrix 46
Plate 7.3: Solution, C
Col: A B C D E F G H I
Row:
• • • • • • • • • • • • • • • • • • • • • • • • • • •
1 • • • • • • • • • • • • • • • • • • • • • • • • • • •
• • • • • • • • • • • • • • • • • • • • • • • • • • •
• • • • • • • • • • • • • • • • • • • • • • • • • • •
2 • • • • • • • • • • • • • • • • • • • • • • • • • • •
• • • • • • • • • • • • • • • • • • • • • • • • • • •
• • • • • • • • • • • • • • • • • • • • • • • • • • •
3 • • • • • • • • • • • • • • • • • • • • • • • • • • •
• • • • • • • • • • • • • • • • • • • • • • • • • • •
• • • • • • • • • • • • • • • • • • • • • • • • • • •
4 • • • • • • • • • • • • • • • • • • • • • • • • • • •
• • • • • • • • • • • • • • • • • • • • • • • • • • •
• • • • • • • • • • • • • • • • • • • • • • • • • • •
5 • • • • • • • • • • • • • • • • • • • • • • • • • • •
• • • • • • • • • • • • • • • • • • • • • • • • • • •
• • • • • • • • • • • • • • • • • • • • • • • • • • •
6 • • • • • • • • • • • • • • • • • • • • • • • • • • •
• • • • • • • • • • • • • • • • • • • • • • • • • • •
• • • • • • • • • • • • • • • • • • • • • • • • • • •
7 • • • • • • • • • • • • • • • • • • • • • • • • • • •
• • • • • • • • • • • • • • • • • • • • • • • • • • •
• • • • • • • • • • • • • • • • • • • • • • • • • • •
8 • • • • • • • • • • • • • • • • • • • • • • • • • • •
• • • • • • • • • • • • • • • • • • • • • • • • • • •
• • • • • • • • • • • • • • • • • • • • • • • • • • •
9 • • • • • • • • • • • • • • • • • • • • • • • • • • •
• • • • • • • • • • • • • • • • • • • • • • • • • • •
1 2
31 2
4 5 6 7 8 9
81 2
3 91 2
4 5 6 7
4 5 6 7 8 91 2
31 2
7 8 91 2
31 2
4 5 6
91 2
4 6 7 5 81 2
3
6 7 5 81 2
3 91 2
41 2
91 2
5 6 7 3 4 8
3 4 81 2
91 2
6 7 5
5 6 7 3 4 81 2
91 2
Plate 7.4: Three 4-cell loops and one 6-cell
Col: A B C D E F G H I
Row:
• • • • • • • • • • • • • • • • • • • • • • • • • • •
1 • • • • • • • • • • • • • • • • • • • • • • • • • • •
• • • • • • • • • • • • • • • • • • • • • • • • • • •
• • • • • • • • • • • • • • • • • • • • • • • • • • •
2 • • • • • • • • • • • • • • • • • • • • • • • • • • •
• • • • • • • • • • • • • • • • • • • • • • • • • • •
• • • • • • • • • • • • • • • • • • • • • • • • • • •
3 • • • • • • • • • • • • • • • • • • • • • • • • • • •
• • • • • • • • • • • • • • • • • • • • • • • • • • •
• • • • • • • • • • • • • • • • • • • • • • • • • • •
4 • • • • • • • • • • • • • • • • • • • • • • • • • • •
• • • • • • • • • • • • • • • • • • • • • • • • • • •
• • • • • • • • • • • • • • • • • • • • • • • • • • •
5 • • • • • • • • • • • • • • • • • • • • • • • • • • •
• • • • • • • • • • • • • • • • • • • • • • • • • • •
• • • • • • • • • • • • • • • • • • • • • • • • • • •
6 • • • • • • • • • • • • • • • • • • • • • • • • • • •
• • • • • • • • • • • • • • • • • • • • • • • • • • •
• • • • • • • • • • • • • • • • • • • • • • • • • • •
7 • • • • • • • • • • • • • • • • • • • • • • • • • • •
• • • • • • • • • • • • • • • • • • • • • • • • • • •
• • • • • • • • • • • • • • • • • • • • • • • • • • •
8 • • • • • • • • • • • • • • • • • • • • • • • • • • •
• • • • • • • • • • • • • • • • • • • • • • • • • • •
• • • • • • • • • • • • • • • • • • • • • • • • • • •
9 • • • • • • • • • • • • • • • • • • • • • • • • • • •
• • • • • • • • • • • • • • • • • • • • • • • • • • •
1 2 3 1 2 4 5 6 7 8 9
8 1 2 3 9 1 2 4 5 6 7
4 5 6 7 8 9 1 2 3 1 2
7 8 9 1 2 3 1 2 4 5 6
9 1 2 4 6 7 5 8 1 2 3
6 7 5 8 1 2 3 9 1 2 4
1 2 9 1 2 5 6 7 3 4 8
3 4 8 1 2 9 1 2 6 7 5
5 6 7 3 4 8 1 2 9 1 2

Sudoku Strategies and the Sudokerson Matrix 47
Plate: 7.5 Starting digit set, A
Col: A B C D E F G H I
Row:
• • • • • • • • • • • • • • • • • • • • • • • • • • •
1 • • • • • • • • • • • • • • • • • • • • • • • • • • •
• • • • • • • • • • • • • • • • • • • • • • • • • • •
• • • • • • • • • • • • • • • • • • • • • • • • • • •
2 • • • • • • • • • • • • • • • • • • • • • • • • • • •
• • • • • • • • • • • • • • • • • • • • • • • • • • •
• • • • • • • • • • • • • • • • • • • • • • • • • • •
3 • • • • • • • • • • • • • • • • • • • • • • • • • • •
• • • • • • • • • • • • • • • • • • • • • • • • • • •
• • • • • • • • • • • • • • • • • • • • • • • • • • •
4 • • • • • • • • • • • • • • • • • • • • • • • • • • •
• • • • • • • • • • • • • • • • • • • • • • • • • • •
• • • • • • • • • • • • • • • • • • • • • • • • • • •
5 • • • • • • • • • • • • • • • • • • • • • • • • • • •
• • • • • • • • • • • • • • • • • • • • • • • • • • •
• • • • • • • • • • • • • • • • • • • • • • • • • • •
6 • • • • • • • • • • • • • • • • • • • • • • • • • • •
• • • • • • • • • • • • • • • • • • • • • • • • • • •
• • • • • • • • • • • • • • • • • • • • • • • • • • •
7 • • • • • • • • • • • • • • • • • • • • • • • • • • •
• • • • • • • • • • • • • • • • • • • • • • • • • • •
• • • • • • • • • • • • • • • • • • • • • • • • • • •
8 • • • • • • • • • • • • • • • • • • • • • • • • • • •
• • • • • • • • • • • • • • • • • • • • • • • • • • •
• • • • • • • • • • • • • • • • • • • • • • • • • • •
9 • • • • • • • • • • • • • • • • • • • • • • • • • • •
• • • • • • • • • • • • • • • • • • • • • • • • • • •
1 2 3
4 5 6
7 8 9
1 2 3
4 5 6
7 8 9
1 2 3
4 5 6
7 8 9
1 2 3
4 5 6
7 8 96 4 3
1 2 3
4 5 6
7 8 9
1 2 3
4 5 6
7 8 9
2 71 2 3
4 5 6
7 8 9
1 2 3
4 5 6
7 8 9
1 2 3
4 5 6
7 8 93
1 2 3
4 5 6
7 8 99
1 2 3
4 5 6
7 8 9
1 2 3
4 5 6
7 8 9
1 2 3
4 5 6
7 8 99
1 2 3
4 5 6
7 8 92
1 2 3
4 5 6
7 8 95
1 2 3
4 5 6
7 8 9
1 2 3
4 5 6
7 8 9
51 2 3
4 5 6
7 8 94 3
1 2 3
4 5 6
7 8 9
1 2 3
4 5 6
7 8 9
1 2 3
4 5 6
7 8 92 7
61 2 3
4 5 6
7 8 93
1 2 3
4 5 6
7 8 99
1 2 3
4 5 6
7 8 92
1 2 3
4 5 6
7 8 95
1 2 3
4 5 6
7 8 99
1 2 3
4 5 6
7 8 92
1 2 3
4 5 6
7 8 9
1 2 3
4 5 6
7 8 9
1 2 3
4 5 6
7 8 94 3
1 2 3
4 5 6
7 8 9
1 2 3
4 5 6
7 8 96
1 2 3
4 5 6
7 8 93
1 2 3
4 5 6
7 8 99
1 2 3
4 5 6
7 8 9
1 2 3
4 5 6
7 8 9
4 31 2 3
4 5 6
7 8 9
1 2 3
4 5 6
7 8 9
1 2 3
4 5 6
7 8 92 7
1 2 3
4 5 6
7 8 96
1 2 3
4 5 6
7 8 9
1 2 3
4 5 6
7 8 92 7 5
1 2 3
4 5 6
7 8 9
1 2 3
4 5 6
7 8 9
1 2 3
4 5 6
7 8 9
1 2 3
4 5 6
7 8 9
Plate: 7.6: After initial crossouts, B
Col: A B C D E F G H I
Row:
• • • • • • • • • • • • • • • • • • • • • • • • • • •
1 • • • • • • • • • • • • • • • • • • • • • • • • • • •
• • • • • • • • • • • • • • • • • • • • • • • • • • •
• • • • • • • • • • • • • • • • • • • • • • • • • • •
2 • • • • • • • • • • • • • • • • • • • • • • • • • • •
• • • • • • • • • • • • • • • • • • • • • • • • • • •
• • • • • • • • • • • • • • • • • • • • • • • • • • •
3 • • • • • • • • • • • • • • • • • • • • • • • • • • •
• • • • • • • • • • • • • • • • • • • • • • • • • • •
• • • • • • • • • • • • • • • • • • • • • • • • • • •
4 • • • • • • • • • • • • • • • • • • • • • • • • • • •
• • • • • • • • • • • • • • • • • • • • • • • • • • •
• • • • • • • • • • • • • • • • • • • • • • • • • • •
5 • • • • • • • • • • • • • • • • • • • • • • • • • • •
• • • • • • • • • • • • • • • • • • • • • • • • • • •
• • • • • • • • • • • • • • • • • • • • • • • • • • •
6 • • • • • • • • • • • • • • • • • • • • • • • • • • •
• • • • • • • • • • • • • • • • • • • • • • • • • • •
• • • • • • • • • • • • • • • • • • • • • • • • • • •
7 • • • • • • • • • • • • • • • • • • • • • • • • • • •
• • • • • • • • • • • • • • • • • • • • • • • • • • •
• • • • • • • • • • • • • • • • • • • • • • • • • • •
8 • • • • • • • • • • • • • • • • • • • • • • • • • • •
• • • • • • • • • • • • • • • • • • • • • • • • • • •
• • • • • • • • • • • • • • • • • • • • • • • • • • •
9 • • • • • • • • • • • • • • • • • • • • • • • • • • •
• • • • • • • • • • • • • • • • • • • • • • • • • • •
1
7 8
1 2
8
1
7 8
1
5
8 96 4 3
1
8
1
8 9
2 71
5
8
1
4 5 6
8
1
4
83
1
6
89
1
8
1 3
7 8
1
6
89
1
82
1
7 8 5
1
6
8
1
4
8
51
6
84 3
1
8
1
8 9
1
6
82 7
61
4
83
1
4
89
1
7 8 2
1
7 85
1
89
1
5
82
1
7 8
1
5 6
7 8
1
6
84 3
1
7 8
1
5
8 6
1
4
83
1
89
1
5
8
1 2
4
8
4 31
5
8
1
8 9
1
82 7
1
5
86
1
8 9
1
82 7 5
1
6
8 9
1
4
8
1 3
8
1
4
8
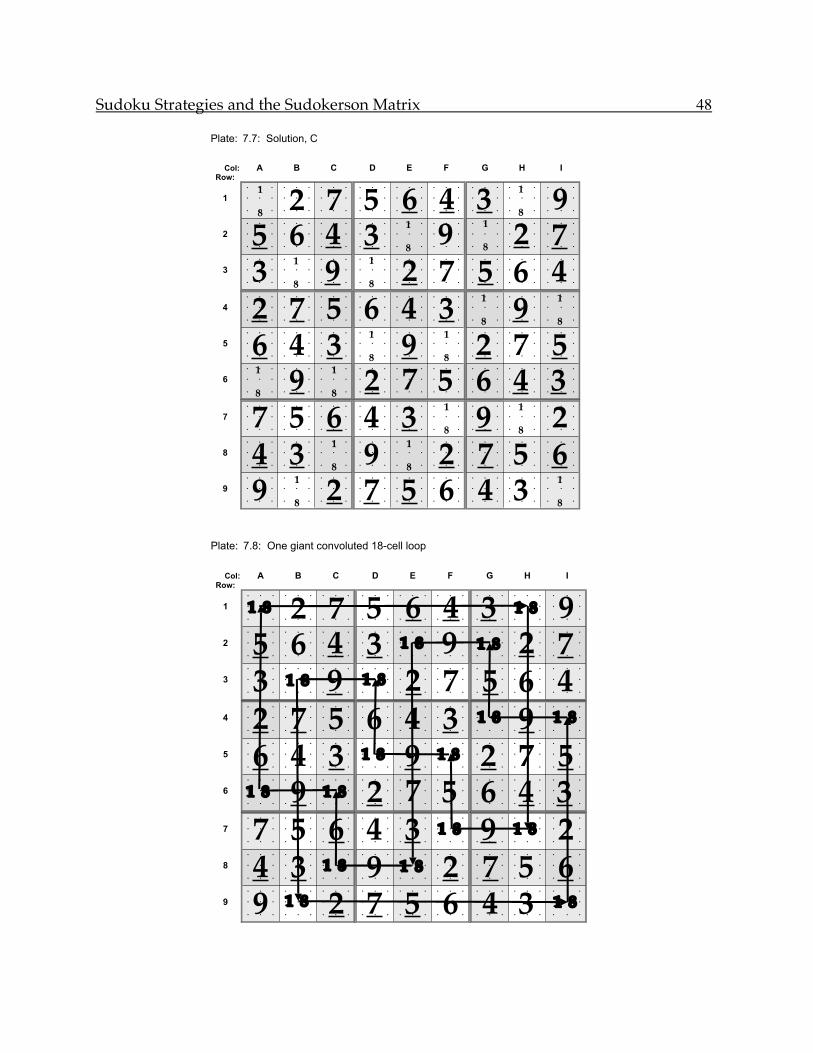
Sudoku Strategies and the Sudokerson Matrix 48
Plate: 7.7: Solution, C
Col: A B C D E F G H I
Row:
• • • • • • • • • • • • • • • • • • • • • • • • • • •
1 • • • • • • • • • • • • • • • • • • • • • • • • • • •
• • • • • • • • • • • • • • • • • • • • • • • • • • •
• • • • • • • • • • • • • • • • • • • • • • • • • • •
2 • • • • • • • • • • • • • • • • • • • • • • • • • • •
• • • • • • • • • • • • • • • • • • • • • • • • • • •
• • • • • • • • • • • • • • • • • • • • • • • • • • •
3 • • • • • • • • • • • • • • • • • • • • • • • • • • •
• • • • • • • • • • • • • • • • • • • • • • • • • • •
• • • • • • • • • • • • • • • • • • • • • • • • • • •
4 • • • • • • • • • • • • • • • • • • • • • • • • • • •
• • • • • • • • • • • • • • • • • • • • • • • • • • •
• • • • • • • • • • • • • • • • • • • • • • • • • • •
5 • • • • • • • • • • • • • • • • • • • • • • • • • • •
• • • • • • • • • • • • • • • • • • • • • • • • • • •
• • • • • • • • • • • • • • • • • • • • • • • • • • •
6 • • • • • • • • • • • • • • • • • • • • • • • • • • •
• • • • • • • • • • • • • • • • • • • • • • • • • • •
• • • • • • • • • • • • • • • • • • • • • • • • • • •
7 • • • • • • • • • • • • • • • • • • • • • • • • • • •
• • • • • • • • • • • • • • • • • • • • • • • • • • •
• • • • • • • • • • • • • • • • • • • • • • • • • • •
8 • • • • • • • • • • • • • • • • • • • • • • • • • • •
• • • • • • • • • • • • • • • • • • • • • • • • • • •
• • • • • • • • • • • • • • • • • • • • • • • • • • •
9 • • • • • • • • • • • • • • • • • • • • • • • • • • •
• • • • • • • • • • • • • • • • • • • • • • • • • • •
1
82 7 5 6 4 3
1
89
2 7 5 6 4 31
89
1
8
31
89
1
82 7 5 6 4
5 6 4 31
89
1
82 7
6 4 31
89
1
8 2 7 5
1
89
1
82 7 5 6 4 3
7 5 6 4 31
89
1
82
4 31
89
1
82 7 5 6
91
82 7 5 6 4 3
1
8
Plate: 7.8: One giant convoluted 18-cell loop
Col: A B C D E F G H I
Row:
• • • • • • • • • • • • • • • • • • • • • • • • • • •
1 • • • • • • • • • • • • • • • • • • • • • • • • • • •
• • • • • • • • • • • • • • • • • • • • • • • • • • •
• • • • • • • • • • • • • • • • • • • • • • • • • • •
2 • • • • • • • • • • • • • • • • • • • • • • • • • • •
• • • • • • • • • • • • • • • • • • • • • • • • • • •
• • • • • • • • • • • • • • • • • • • • • • • • • • •
3 • • • • • • • • • • • • • • • • • • • • • • • • • • •
• • • • • • • • • • • • • • • • • • • • • • • • • • •
• • • • • • • • • • • • • • • • • • • • • • • • • • •
4 • • • • • • • • • • • • • • • • • • • • • • • • • • •
• • • • • • • • • • • • • • • • • • • • • • • • • • •
• • • • • • • • • • • • • • • • • • • • • • • • • • •
5 • • • • • • • • • • • • • • • • • • • • • • • • • • •
• • • • • • • • • • • • • • • • • • • • • • • • • • •
• • • • • • • • • • • • • • • • • • • • • • • • • • •
6 • • • • • • • • • • • • • • • • • • • • • • • • • • •
• • • • • • • • • • • • • • • • • • • • • • • • • • •
• • • • • • • • • • • • • • • • • • • • • • • • • • •
7 • • • • • • • • • • • • • • • • • • • • • • • • • • •
• • • • • • • • • • • • • • • • • • • • • • • • • • •
• • • • • • • • • • • • • • • • • • • • • • • • • • •
8 • • • • • • • • • • • • • • • • • • • • • • • • • • •
• • • • • • • • • • • • • • • • • • • • • • • • • • •
• • • • • • • • • • • • • • • • • • • • • • • • • • •
9 • • • • • • • • • • • • • • • • • • • • • • • • • • •
• • • • • • • • • • • • • • • • • • • • • • • • • • •
1 8 2 7 5 6 4 3 1 8 9
2 7 5 6 4 3 1 8 9 1 8
3 1 8 9 1 8 2 7 5 6 4
5 6 4 3 1 8 9 1 8 2 7
6 4 3 1 8 9 1 8 2 7 5
1 8 9 1 8 2 7 5 6 4 3
7 5 6 4 3 1 8 9 1 8 2
4 3 1 8 9 1 8 2 7 5 6
9 1 8 2 7 5 6 4 3 1 8
Sudoku Strategies and the Sudokerson Matrix 49
8. THESEUS LIVES! There are few things more disconcerting than finding out, after investing months of time and effort, that you have only managed to reinvent the wheel, or to rediscover America. I only recently became aware that the first part of the parallel analysis method had been anticipated by master Sudoku-designer Michael Mepham, as what he termed "Ariadne's thread". The name comes from Greek mythology, where the young Athenian hero Theseus volunteers to enter the Labyrinth in Crete and slay the Minotaur. Princess Ariadne gives him a silken thread by which he can mark his pathway through the Labyrinth, so that whenever he comes to a blind alley he can backtrack and try again, rather than becoming hopelessly lost. The Ariadne's thread strategy is outlined in an excellent PDF document by Mepham entitled, logically, "Solving Sudoku". It is available on the internet at:
www.sudoku.org.uk/PDF/Solving_Sudoku.pdf Ariadne's thread is equivalent to single-level parallel analysis. Choose one two-digit cell and try each of its digits in turn. If one of these digits solves the puzzle, you are done. If neither digit does so, then choose a different two-digit cell and try again. Keep going until one of them finally solves the puzzle. The parallel analysis approach goes one logical step further. Ariadne's thread makes no distinction between a stall, meaning an impasse or a failure to solve, and a true crash with disallowed clashing of digits. In contrast, the parallel analysis method does differentiate between a stall and a crash, and uses a stall as the starting point for a new bifurcation step. In the earlier Plate 5.10, the first example, with H9 = 1/7, can be thought of as a use of Ariadne's thread. But the example below it, with D3 = 4/6, is not. Rather than abandoning cell D3 because neither choice led to a solution, the parallel analysis method accepts D3=6 as correct because D3=4 crashed, adds D3=6 to the matrix, and builds on this with another choice, here B6 = 4/5.
In the more complex Plate 6.11, Ariadne's thread alone fails to solve the puzzle. Three or even four iterations or parallel analysis levels are required to do the job. Granted, Plate 6.11 shows a messy puzzle with multiple solutions that would cause it to be rejected for publication. But I find exploring these complications the most fascinating side of Sudoku, and only parallel analysis will get you through them.
In conclusion, the parallel analysis method might justifiably be called, not Ariadne's thread, but Ariadne's thicket. And if you plunge into this thicket or jungle, you are likely to encounter many more interesting creatures than if you had merely stayed on the straight-and-narrow road.
Sudoku Strategies and the Sudokerson Matrix 50
9. SUDOKU STRATEGIES What makes some Sudoku puzzles harder than others? The way in which the initial set of numbers is arranged is critically important, of course. Another more general factor is the size of the starting puzzle. The more initial digits you are given to work with at the outset, the more interactions there will be, and the greater the ease of crossing out impossible locations for digits. Our Easy puzzle began with 36 digits, the Medium had 34, the Hard had 26 and the Diabolical puzzle had 25. A quick flip through a paperback of Sudoku puzzles shows that those rated Easy typically have around 30 to 32 starting digits, those marked Medium have 29 to 31, and the Hard and Diabolical puzzles have 24 to 28. These are not absolute numbers, of course; they merely express a trend that is loosely correlated with puzzle difficulty. According to Japanese designers, the smallest known number of starting digits in a published Sudoku puzzle having a unique solution is 17. With the rise of popular enthusiasm for Sudoku puzzles, many different people and agencies have become involved in designing them. An American, Howard Garnes, first created the puzzles in 1979 by adding a 3x3 box requirement to the centuries-old Latin Square puzzle. Garnes called them "Number Place", and published them through Dell Magazines. But the real explosion of interest occurred in 1984, when Nikoli Publishing in Japan began designing their own and calling them "Sudoku", an abbreviation of a longer Japanese phrase meaning "The digits must occur only once". Sudoku came to Britain in late 2004 via the London Times, and to America the following spring. Today almost any American bookstore or newsstand offers an array of Sudoku books. The Guardian of London reprints the Nikoli puzzles. The Times of London and the New York Post feature puzzles by Wayne Gould. Will Shortz, puzzle editor for the New York Times, has many good paperback collections of Sudokus in print. Another designer of crosswords and other puzzles as well as Sudokus, Michael Mepham, worked with the Daily Telegraph in Great Britain, which provided his puzzles to many newspapers across the world, including among others the Los Angeles Times, the Chicago Tribune, the National Post, and Life magazine. Being a Los Angeleno, I have followed Mepham's Sudokus in particular. He was a master of the Diabolical. Regrettably, he died in December 2006 at age 62, but his daughter Kate is carrying on in his place. The Amazon.com web site lists 39 paperback Sudoku collections by Mepham's firm. Most of these, and indeed almost all Sudoku books in print, contain puzzles with a broad range of difficulty from Easy to Diabolical. The Mepham Group also has four especially handy little paperbacks entitled Sudoku to Go, rated separately as Gentle, Moderate, Tough and Diabolical. But this is not all. A quick visit to a Pasadena bookstore yielded fourteen other puzzle experts or publishers who have issued one or more books on Sudoku. The field is wide open; look around and take your pick. Sudoku is a process of systematically eliminating the impossible, leading at the end (hopefully) to that which is possible. As the great detective Sherlock Holmes said
Sudoku Strategies and the Sudokerson Matrix 51
on more than one occasion: "When you have eliminated all that is impossible, then whatever remains, however improbable, must be the truth". Holmes would have been a great Sudoku player.
Four strategies have been presented here:
1. Searching for cells that can host only one digit. 2. Finding ambiguous pairs or triples that use up two or three digits, thereby denying these digits to other neighboring cells. 3. Finding rows, columns or boxes which offer only one location for a particular digit. 4. Running systematic parallel solutions.
1. The search for single digit cells, and the generation of more such cells as numbers are added, is frequently good enough for Easy Sudoku puzzles.
2. For most Medium puzzles, one should look for ambiguous digit pairs which can be used to delete possible digits elsewhere in a row, a column or a box. With a cell containing two possible digits, you need two identical examples in order to cancel those digits from the other seven cells. Threefold and fourfold ambiguities also exist and are surprisingly common.
3. With puzzles labeled Hard, the above techniques eventually lead to an
impasse. In such cases you need to look systematically at individual rows, columns and boxes, asking "Which digits are still missing?" and then "Which of these missing digits can fit in only one location?" The most thorough approach is to go through all nine rows, one after the other, then all nine columns, and then all nine boxes. At the end of this process, begin it again, since cancellations from new numbers that you located during the first round can make other numbers obvious.
4. If all the foregoing tactics fail, one can turn to the fourth strategy, parallel analysis. Select a cell that has only two possibilities, such as 3 and 7. You have a 50:50 chance of randomly choosing the right one. So make two xerox copies of the matrix, place a 3 in one and a 7 in the other, and continue solving the two puzzles in parallel. This will lead to a winner unless one or both of the attempts stalls. If it is the incorrect choice that stalls while the correct choice goes to completion, you have won. But if the correct choice stalls (which can happen) but the incorrect choice crashes with duplicate numbers, you know which the correct digit was, but can't use it alone to solve the puzzle. In that case, add the correct digit to the matrix, choose a different two-digit test cell and try again. It is even more powerful to pick a twofold ambiguity, if one exists. A binary ambiguity such as A4/C6=[1 8] guarantees that you will begin with either two correct digits or two incorrect ones. Having more correct digits at the start makes a stall less likely. So carry out two parallel solutions: in this example, one with A4=1 and C6=8, the other with A4=8 and C6=1. Hopefully, one of these will crash with duplicate numbers whereas the other will give the right answer. If not, then choose a different ambiguous pair, or even simply a cell having only two possibilities, and try again.
Sudoku Strategies and the Sudokerson Matrix 52
Strategies 1 - 3 frequently are best applied in reverse order. For example, if you have a good supply of single-digit cells in an Easy puzzle, you don't need strategy #2. But if you don't, then applying #2 is a good way of producing single-digit cells. And if you don't have many double or triple ambiguities that permit cancellations, then a systematic application of strategy #3 is a good way to generate them. A good plan of attack is first to fill in as many single digits as you can find, canceling their mates in row, column and box. Then use strategy #3 to cancel as many choices as you can, and follow this by searching through the remaining permitted digits for double or triple ambiguities.
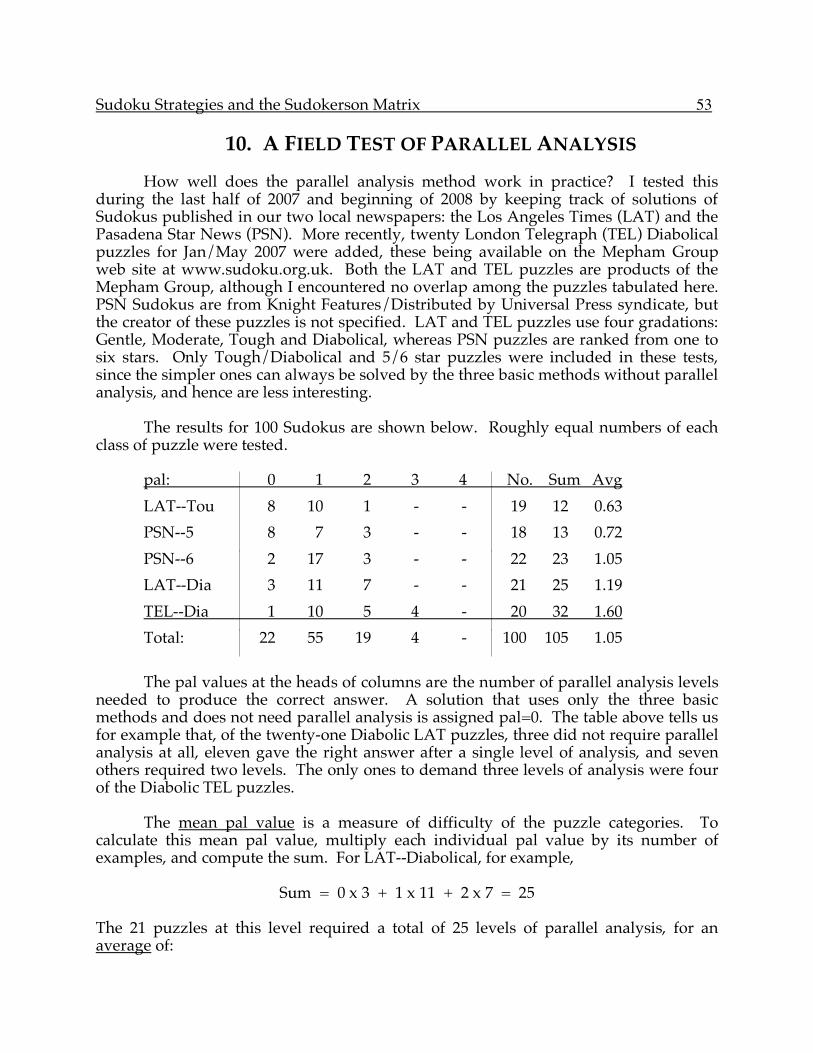
Sudoku Strategies and the Sudokerson Matrix 53
10. A FIELD TEST OF PARALLEL ANALYSIS How well does the parallel analysis method work in practice? I tested this during the last half of 2007 and beginning of 2008 by keeping track of solutions of Sudokus published in our two local newspapers: the Los Angeles Times (LAT) and the Pasadena Star News (PSN). More recently, twenty London Telegraph (TEL) Diabolical puzzles for Jan/May 2007 were added, these being available on the Mepham Group web site at www.sudoku.org.uk. Both the LAT and TEL puzzles are products of the Mepham Group, although I encountered no overlap among the puzzles tabulated here. PSN Sudokus are from Knight Features/Distributed by Universal Press syndicate, but the creator of these puzzles is not specified. LAT and TEL puzzles use four gradations: Gentle, Moderate, Tough and Diabolical, whereas PSN puzzles are ranked from one to six stars. Only Tough/Diabolical and 5/6 star puzzles were included in these tests, since the simpler ones can always be solved by the three basic methods without parallel analysis, and hence are less interesting. The results for 100 Sudokus are shown below. Roughly equal numbers of each class of puzzle were tested. pal: 0 1 2 3 4 No. Sum Avg
LAT--Tou 8 10 1 - - 19 12 0.63
PSN--5 8 7 3 - - 18 13 0.72
PSN--6 2 17 3 - - 22 23 1.05
LAT--Dia 3 11 7 - - 21 25 1.19
TEL--Dia 1 10 5 4 - 20 32 1.60
Total: 22 55 19 4 - 100 105 1.05
The pal values at the heads of columns are the number of parallel analysis levels needed to produce the correct answer. A solution that uses only the three basic methods and does not need parallel analysis is assigned pal=0. The table above tells us for example that, of the twenty-one Diabolic LAT puzzles, three did not require parallel analysis at all, eleven gave the right answer after a single level of analysis, and seven others required two levels. The only ones to demand three levels of analysis were four of the Diabolic TEL puzzles. The mean pal value is a measure of difficulty of the puzzle categories. To calculate this mean pal value, multiply each individual pal value by its number of examples, and compute the sum. For LAT--Diabolical, for example,
Sum = 0 x 3 + 1 x 11 + 2 x 7 = 25 The 21 puzzles at this level required a total of 25 levels of parallel analysis, for an average of:
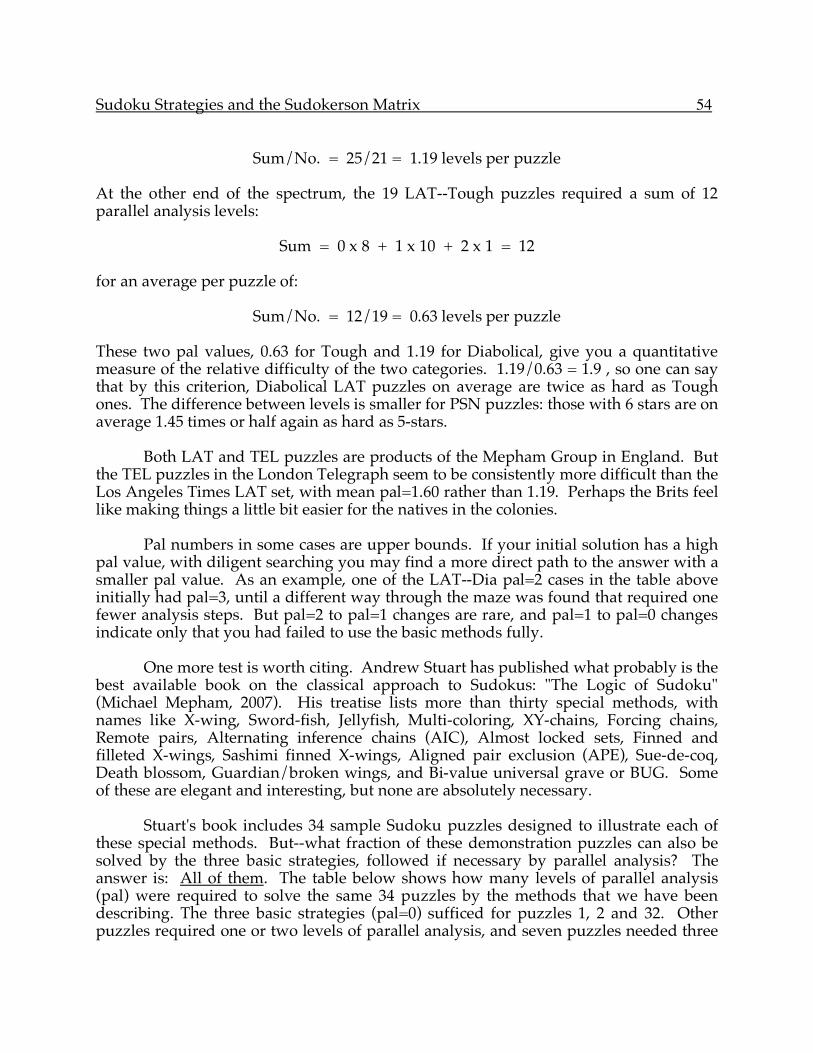
Sudoku Strategies and the Sudokerson Matrix 54
Sum/No. = 25/21 = 1.19 levels per puzzle
At the other end of the spectrum, the 19 LAT--Tough puzzles required a sum of 12 parallel analysis levels:
Sum = 0 x 8 + 1 x 10 + 2 x 1 = 12 for an average per puzzle of:
Sum/No. = 12/19 = 0.63 levels per puzzle These two pal values, 0.63 for Tough and 1.19 for Diabolical, give you a quantitative measure of the relative difficulty of the two categories. 1.19/0.63 = 1.9 , so one can say that by this criterion, Diabolical LAT puzzles on average are twice as hard as Tough ones. The difference between levels is smaller for PSN puzzles: those with 6 stars are on average 1.45 times or half again as hard as 5-stars. Both LAT and TEL puzzles are products of the Mepham Group in England. But the TEL puzzles in the London Telegraph seem to be consistently more difficult than the Los Angeles Times LAT set, with mean pal=1.60 rather than 1.19. Perhaps the Brits feel like making things a little bit easier for the natives in the colonies. Pal numbers in some cases are upper bounds. If your initial solution has a high pal value, with diligent searching you may find a more direct path to the answer with a smaller pal value. As an example, one of the LAT--Dia pal=2 cases in the table above initially had pal=3, until a different way through the maze was found that required one fewer analysis steps. But pal=2 to pal=1 changes are rare, and pal=1 to pal=0 changes indicate only that you had failed to use the basic methods fully. One more test is worth citing. Andrew Stuart has published what probably is the best available book on the classical approach to Sudokus: "The Logic of Sudoku" (Michael Mepham, 2007). His treatise lists more than thirty special methods, with names like X-wing, Sword-fish, Jellyfish, Multi-coloring, XY-chains, Forcing chains, Remote pairs, Alternating inference chains (AIC), Almost locked sets, Finned and filleted X-wings, Sashimi finned X-wings, Aligned pair exclusion (APE), Sue-de-coq, Death blossom, Guardian/broken wings, and Bi-value universal grave or BUG. Some of these are elegant and interesting, but none are absolutely necessary. Stuart's book includes 34 sample Sudoku puzzles designed to illustrate each of these special methods. But--what fraction of these demonstration puzzles can also be solved by the three basic strategies, followed if necessary by parallel analysis? The answer is: All of them. The table below shows how many levels of parallel analysis (pal) were required to solve the same 34 puzzles by the methods that we have been describing. The three basic strategies (pal=0) sufficed for puzzles 1, 2 and 32. Other puzzles required one or two levels of parallel analysis, and seven puzzles needed three
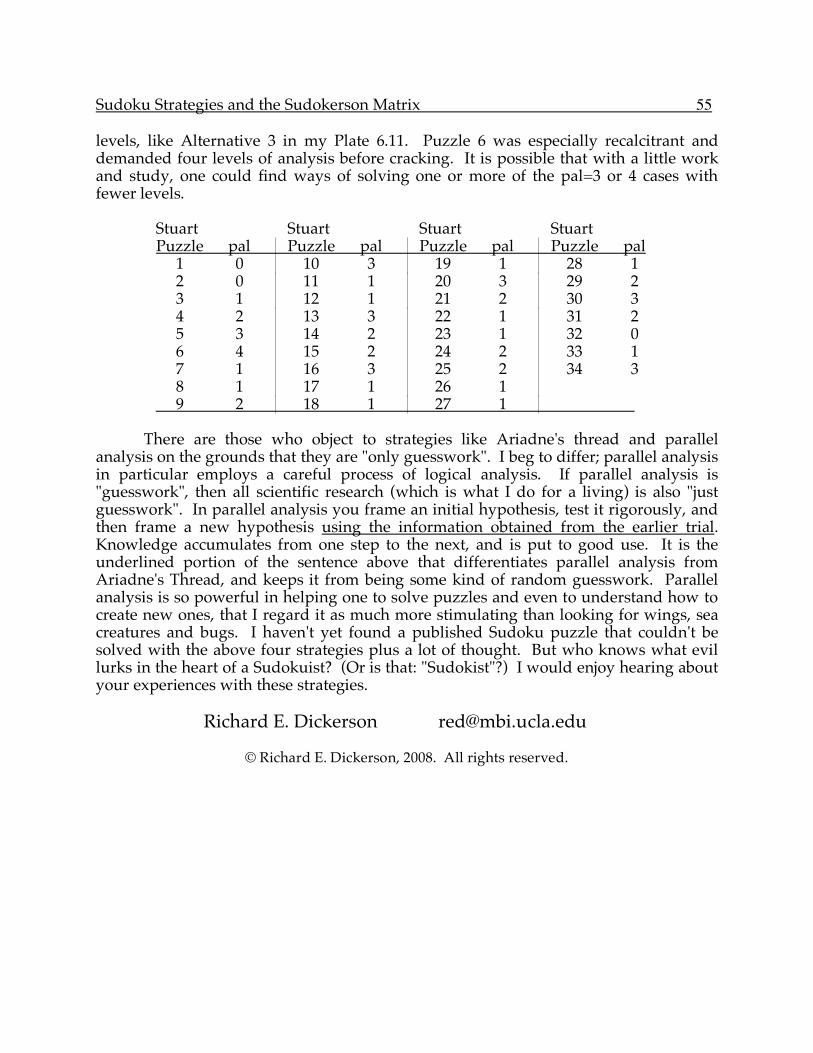
Sudoku Strategies and the Sudokerson Matrix 55
levels, like Alternative 3 in my Plate 6.11. Puzzle 6 was especially recalcitrant and demanded four levels of analysis before cracking. It is possible that with a little work and study, one could find ways of solving one or more of the pal=3 or 4 cases with fewer levels. Stuart Stuart Stuart Stuart Puzzle pal Puzzle pal Puzzle pal Puzzle pal 1 0 10 3 19 1 28 1 2 0 11 1 20 3 29 2 3 1 12 1 21 2 30 3 4 2 13 3 22 1 31 2 5 3 14 2 23 1 32 0 6 4 15 2 24 2 33 1 7 1 16 3 25 2 34 3 8 1 17 1 26 1 9 2 18 1 27 1
There are those who object to strategies like Ariadne's thread and parallel analysis on the grounds that they are "only guesswork". I beg to differ; parallel analysis in particular employs a careful process of logical analysis. If parallel analysis is "guesswork", then all scientific research (which is what I do for a living) is also "just guesswork". In parallel analysis you frame an initial hypothesis, test it rigorously, and then frame a new hypothesis using the information obtained from the earlier trial. Knowledge accumulates from one step to the next, and is put to good use. It is the underlined portion of the sentence above that differentiates parallel analysis from Ariadne's Thread, and keeps it from being some kind of random guesswork. Parallel analysis is so powerful in helping one to solve puzzles and even to understand how to create new ones, that I regard it as much more stimulating than looking for wings, sea creatures and bugs. I haven't yet found a published Sudoku puzzle that couldn't be solved with the above four strategies plus a lot of thought. But who knows what evil lurks in the heart of a Sudokuist? (Or is that: "Sudokist"?) I would enjoy hearing about your experiences with these strategies.
Richard E. Dickerson [email protected]
© Richard E. Dickerson, 2008. All rights reserved.
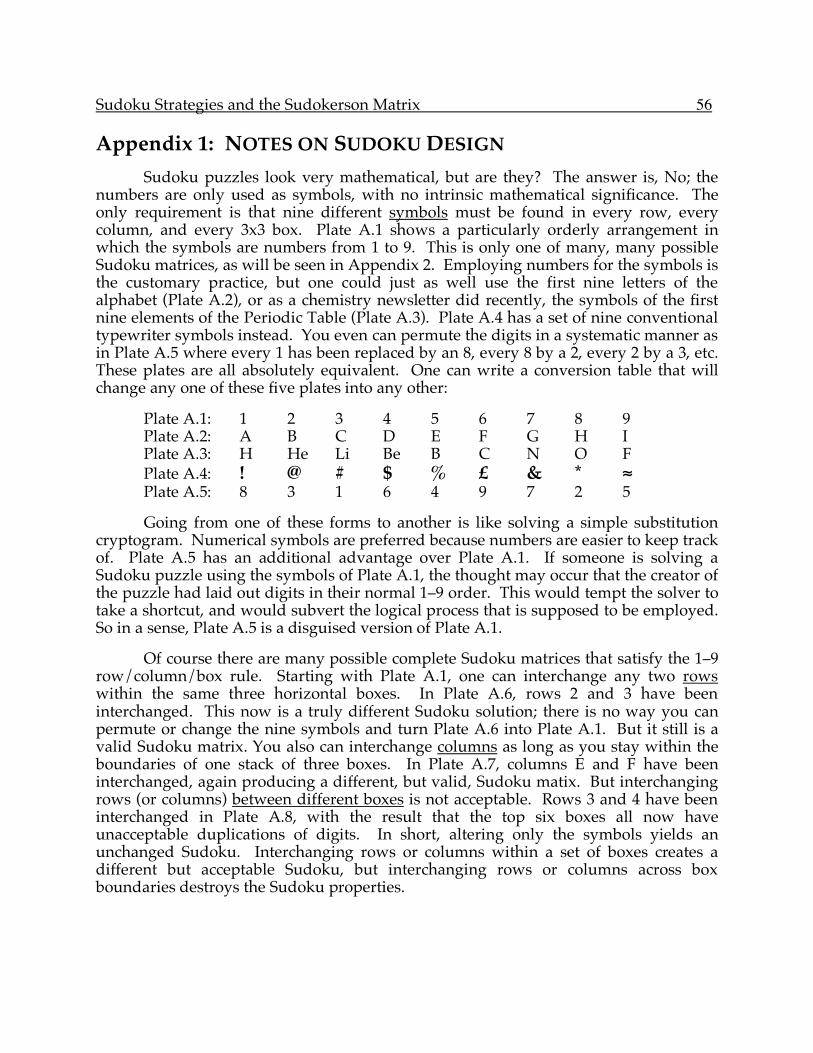
Sudoku Strategies and the Sudokerson Matrix 56
Appendix 1: NOTES ON SUDOKU DESIGN
Sudoku puzzles look very mathematical, but are they? The answer is, No; the numbers are only used as symbols, with no intrinsic mathematical significance. The only requirement is that nine different symbols must be found in every row, every column, and every 3x3 box. Plate A.1 shows a particularly orderly arrangement in which the symbols are numbers from 1 to 9. This is only one of many, many possible Sudoku matrices, as will be seen in Appendix 2. Employing numbers for the symbols is the customary practice, but one could just as well use the first nine letters of the alphabet (Plate A.2), or as a chemistry newsletter did recently, the symbols of the first nine elements of the Periodic Table (Plate A.3). Plate A.4 has a set of nine conventional typewriter symbols instead. You even can permute the digits in a systematic manner as in Plate A.5 where every 1 has been replaced by an 8, every 8 by a 2, every 2 by a 3, etc. These plates are all absolutely equivalent. One can write a conversion table that will change any one of these five plates into any other:
Plate A.1: 1 2 3 4 5 6 7 8 9 Plate A.2: A B C D E F G H I Plate A.3: H He Li Be B C N O F Plate A.4: ! @ # $ % £ & * ! Plate A.5: 8 3 1 6 4 9 7 2 5
Going from one of these forms to another is like solving a simple substitution cryptogram. Numerical symbols are preferred because numbers are easier to keep track of. Plate A.5 has an additional advantage over Plate A.1. If someone is solving a Sudoku puzzle using the symbols of Plate A.1, the thought may occur that the creator of the puzzle had laid out digits in their normal 1–9 order. This would tempt the solver to take a shortcut, and would subvert the logical process that is supposed to be employed. So in a sense, Plate A.5 is a disguised version of Plate A.1.
Of course there are many possible complete Sudoku matrices that satisfy the 1–9 row/column/box rule. Starting with Plate A.1, one can interchange any two rows within the same three horizontal boxes. In Plate A.6, rows 2 and 3 have been interchanged. This now is a truly different Sudoku solution; there is no way you can permute or change the nine symbols and turn Plate A.6 into Plate A.1. But it still is a valid Sudoku matrix. You also can interchange columns as long as you stay within the boundaries of one stack of three boxes. In Plate A.7, columns E and F have been interchanged, again producing a different, but valid, Sudoku matix. But interchanging rows (or columns) between different boxes is not acceptable. Rows 3 and 4 have been interchanged in Plate A.8, with the result that the top six boxes all now have unacceptable duplications of digits. In short, altering only the symbols yields an unchanged Sudoku. Interchanging rows or columns within a set of boxes creates a different but acceptable Sudoku, but interchanging rows or columns across box boundaries destroys the Sudoku properties.
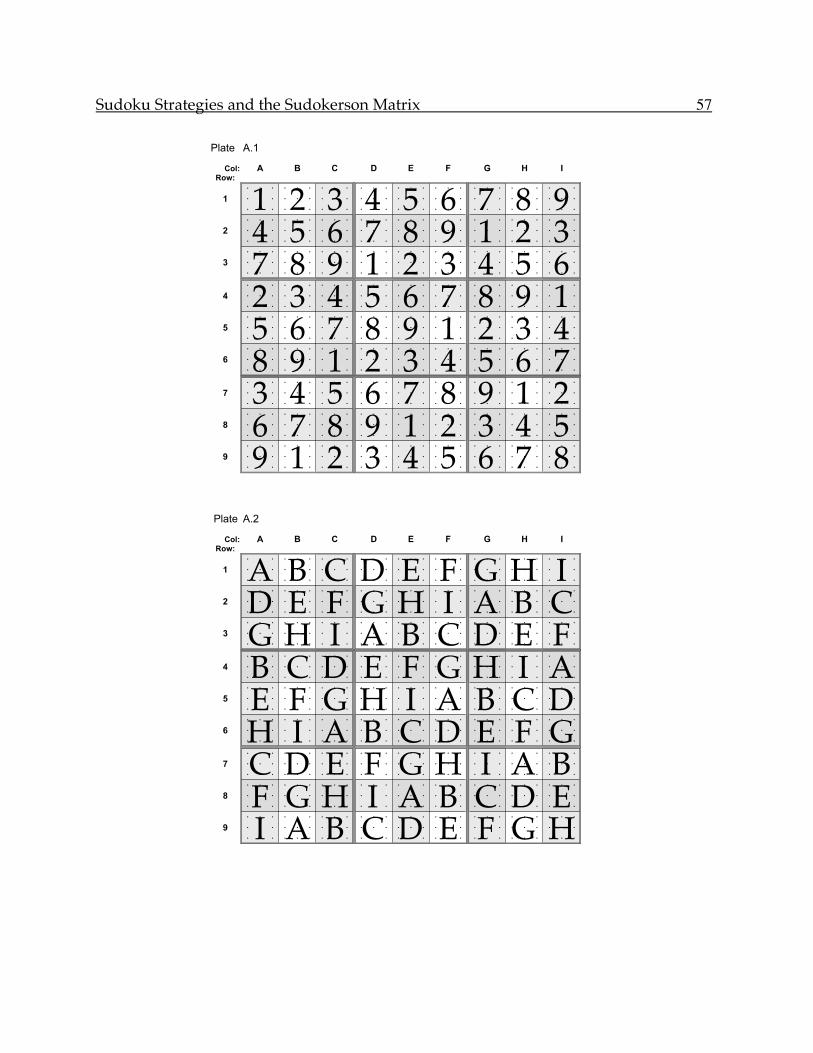
Sudoku Strategies and the Sudokerson Matrix 57
Plate A.1
Col: A B C D E F G H I
Row:
• • • • • • • • • • • • • • • • • • • • • • • • • • •
1 • • • • • • • • • • • • • • • • • • • • • • • • • • •
• • • • • • • • • • • • • • • • • • • • • • • • • • •
• • • • • • • • • • • • • • • • • • • • • • • • • • •
2 • • • • • • • • • • • • • • • • • • • • • • • • • • •
• • • • • • • • • • • • • • • • • • • • • • • • • • •
• • • • • • • • • • • • • • • • • • • • • • • • • • •
3 • • • • • • • • • • • • • • • • • • • • • • • • • • •
• • • • • • • • • • • • • • • • • • • • • • • • • • •
• • • • • • • • • • • • • • • • • • • • • • • • • • •
4 • • • • • • • • • • • • • • • • • • • • • • • • • • •
• • • • • • • • • • • • • • • • • • • • • • • • • • •
• • • • • • • • • • • • • • • • • • • • • • • • • • •
5 • • • • • • • • • • • • • • • • • • • • • • • • • • •
• • • • • • • • • • • • • • • • • • • • • • • • • • •
• • • • • • • • • • • • • • • • • • • • • • • • • • •
6 • • • • • • • • • • • • • • • • • • • • • • • • • • •
• • • • • • • • • • • • • • • • • • • • • • • • • • •
• • • • • • • • • • • • • • • • • • • • • • • • • • •
7 • • • • • • • • • • • • • • • • • • • • • • • • • • •
• • • • • • • • • • • • • • • • • • • • • • • • • • •
• • • • • • • • • • • • • • • • • • • • • • • • • • •
8 • • • • • • • • • • • • • • • • • • • • • • • • • • •
• • • • • • • • • • • • • • • • • • • • • • • • • • •
• • • • • • • • • • • • • • • • • • • • • • • • • • •
9 • • • • • • • • • • • • • • • • • • • • • • • • • • •
• • • • • • • • • • • • • • • • • • • • • • • • • • •
1 2 3 4 5 6 7 8 9
2 3 4 5 6 7 8 9 1
7 8 9 1 2 3 4 5 6
4 5 6 7 8 9 1 2 3
5 6 7 8 9 1 2 3 4
8 9 1 2 3 4 5 6 7
3 4 5 6 7 8 9 1 2
6 7 8 9 1 2 3 4 5
9 1 2 3 4 5 6 7 8
Plate A.2
Col: A B C D E F G H I
Row:
• • • • • • • • • • • • • • • • • • • • • • • • • • •
1 • • • • • • • • • • • • • • • • • • • • • • • • • • •
• • • • • • • • • • • • • • • • • • • • • • • • • • •
• • • • • • • • • • • • • • • • • • • • • • • • • • •
2 • • • • • • • • • • • • • • • • • • • • • • • • • • •
• • • • • • • • • • • • • • • • • • • • • • • • • • •
• • • • • • • • • • • • • • • • • • • • • • • • • • •
3 • • • • • • • • • • • • • • • • • • • • • • • • • • •
• • • • • • • • • • • • • • • • • • • • • • • • • • •
• • • • • • • • • • • • • • • • • • • • • • • • • • •
4 • • • • • • • • • • • • • • • • • • • • • • • • • • •
• • • • • • • • • • • • • • • • • • • • • • • • • • •
• • • • • • • • • • • • • • • • • • • • • • • • • • •
5 • • • • • • • • • • • • • • • • • • • • • • • • • • •
• • • • • • • • • • • • • • • • • • • • • • • • • • •
• • • • • • • • • • • • • • • • • • • • • • • • • • •
6 • • • • • • • • • • • • • • • • • • • • • • • • • • •
• • • • • • • • • • • • • • • • • • • • • • • • • • •
• • • • • • • • • • • • • • • • • • • • • • • • • • •
7 • • • • • • • • • • • • • • • • • • • • • • • • • • •
• • • • • • • • • • • • • • • • • • • • • • • • • • •
• • • • • • • • • • • • • • • • • • • • • • • • • • •
8 • • • • • • • • • • • • • • • • • • • • • • • • • • •
• • • • • • • • • • • • • • • • • • • • • • • • • • •
• • • • • • • • • • • • • • • • • • • • • • • • • • •
9 • • • • • • • • • • • • • • • • • • • • • • • • • • •
• • • • • • • • • • • • • • • • • • • • • • • • • • •
A B C D E F G H I
B C D E F G H I A
G H I A B C D E F
D E F G H I A B C
E F G H I A B C D
H I A B C D E F G
C D E F G H I A B
F G H I A B C D E
I A B C D E F G H
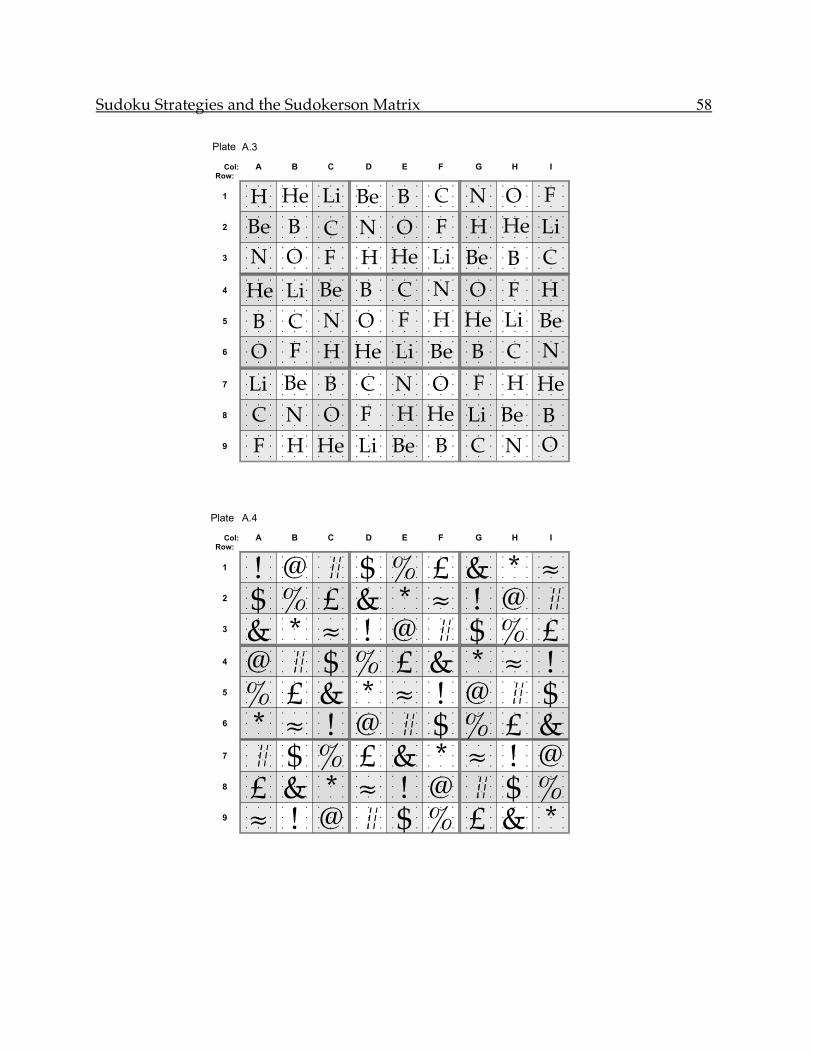
Sudoku Strategies and the Sudokerson Matrix 58
Plate A.3
Col: A B C D E F G H I
Row:
• • • • • • • • • • • • • • • • • • • • • • • • • • •
1 • • • • • • • • • • • • • • • • • • • • • • • • • • •
• • • • • • • • • • • • • • • • • • • • • • • • • • •
• • • • • • • • • • • • • • • • • • • • • • • • • • •
2 • • • • • • • • • • • • • • • • • • • • • • • • • • •
• • • • • • • • • • • • • • • • • • • • • • • • • • •
• • • • • • • • • • • • • • • • • • • • • • • • • • •
3 • • • • • • • • • • • • • • • • • • • • • • • • • • •
• • • • • • • • • • • • • • • • • • • • • • • • • • •
• • • • • • • • • • • • • • • • • • • • • • • • • • •
4 • • • • • • • • • • • • • • • • • • • • • • • • • • •
• • • • • • • • • • • • • • • • • • • • • • • • • • •
• • • • • • • • • • • • • • • • • • • • • • • • • • •
5 • • • • • • • • • • • • • • • • • • • • • • • • • • •
• • • • • • • • • • • • • • • • • • • • • • • • • • •
• • • • • • • • • • • • • • • • • • • • • • • • • • •
6 • • • • • • • • • • • • • • • • • • • • • • • • • • •
• • • • • • • • • • • • • • • • • • • • • • • • • • •
• • • • • • • • • • • • • • • • • • • • • • • • • • •
7 • • • • • • • • • • • • • • • • • • • • • • • • • • •
• • • • • • • • • • • • • • • • • • • • • • • • • • •
• • • • • • • • • • • • • • • • • • • • • • • • • • •
8 • • • • • • • • • • • • • • • • • • • • • • • • • • •
• • • • • • • • • • • • • • • • • • • • • • • • • • •
• • • • • • • • • • • • • • • • • • • • • • • • • • •
9 • • • • • • • • • • • • • • • • • • • • • • • • • • •
• • • • • • • • • • • • • • • • • • • • • • • • • • •
H He Li Be B C N O F
He Li Be B C N O F H
N O F H He Li Be B C
Be B C N O F H He Li
B C N O F H He Li Be
O F H He Li Be B C N
Li Be B C N O F H He
C N O F H He Li Be B
F H He Li Be B C N O
Plate A.4
Col: A B C D E F G H I
Row:
• • • • • • • • • • • • • • • • • • • • • • • • • • •
1 • • • • • • • • • • • • • • • • • • • • • • • • • • •
• • • • • • • • • • • • • • • • • • • • • • • • • • •
• • • • • • • • • • • • • • • • • • • • • • • • • • •
2 • • • • • • • • • • • • • • • • • • • • • • • • • • •
• • • • • • • • • • • • • • • • • • • • • • • • • • •
• • • • • • • • • • • • • • • • • • • • • • • • • • •
3 • • • • • • • • • • • • • • • • • • • • • • • • • • •
• • • • • • • • • • • • • • • • • • • • • • • • • • •
• • • • • • • • • • • • • • • • • • • • • • • • • • •
4 • • • • • • • • • • • • • • • • • • • • • • • • • • •
• • • • • • • • • • • • • • • • • • • • • • • • • • •
• • • • • • • • • • • • • • • • • • • • • • • • • • •
5 • • • • • • • • • • • • • • • • • • • • • • • • • • •
• • • • • • • • • • • • • • • • • • • • • • • • • • •
• • • • • • • • • • • • • • • • • • • • • • • • • • •
6 • • • • • • • • • • • • • • • • • • • • • • • • • • •
• • • • • • • • • • • • • • • • • • • • • • • • • • •
• • • • • • • • • • • • • • • • • • • • • • • • • • •
7 • • • • • • • • • • • • • • • • • • • • • • • • • • •
• • • • • • • • • • • • • • • • • • • • • • • • • • •
• • • • • • • • • • • • • • • • • • • • • • • • • • •
8 • • • • • • • • • • • • • • • • • • • • • • • • • • •
• • • • • • • • • • • • • • • • • • • • • • • • • • •
• • • • • • • • • • • • • • • • • • • • • • • • • • •
9 • • • • • • • • • • • • • • • • • • • • • • • • • • •
• • • • • • • • • • • • • • • • • • • • • • • • • • •
! @ # $ % £ & * !
@ # $ % £ & * ! !& * ! ! @ # $ % £$ % £ & * ! ! @ #
% £ & * ! ! @ # $* ! ! @ # $ % £ &# $ % £ & * ! ! @£ & * ! ! @ # $ %! ! @ # $ % £ & *
Sudoku Strategies and the Sudokerson Matrix 59
Plate A.5
Col: A B C D E F G H I
Row:
• • • • • • • • • • • • • • • • • • • • • • • • • • •
1 • • • • • • • • • • • • • • • • • • • • • • • • • • •
• • • • • • • • • • • • • • • • • • • • • • • • • • •
• • • • • • • • • • • • • • • • • • • • • • • • • • •
2 • • • • • • • • • • • • • • • • • • • • • • • • • • •
• • • • • • • • • • • • • • • • • • • • • • • • • • •
• • • • • • • • • • • • • • • • • • • • • • • • • • •
3 • • • • • • • • • • • • • • • • • • • • • • • • • • •
• • • • • • • • • • • • • • • • • • • • • • • • • • •
• • • • • • • • • • • • • • • • • • • • • • • • • • •
4 • • • • • • • • • • • • • • • • • • • • • • • • • • •
• • • • • • • • • • • • • • • • • • • • • • • • • • •
• • • • • • • • • • • • • • • • • • • • • • • • • • •
5 • • • • • • • • • • • • • • • • • • • • • • • • • • •
• • • • • • • • • • • • • • • • • • • • • • • • • • •
• • • • • • • • • • • • • • • • • • • • • • • • • • •
6 • • • • • • • • • • • • • • • • • • • • • • • • • • •
• • • • • • • • • • • • • • • • • • • • • • • • • • •
• • • • • • • • • • • • • • • • • • • • • • • • • • •
7 • • • • • • • • • • • • • • • • • • • • • • • • • • •
• • • • • • • • • • • • • • • • • • • • • • • • • • •
• • • • • • • • • • • • • • • • • • • • • • • • • • •
8 • • • • • • • • • • • • • • • • • • • • • • • • • • •
• • • • • • • • • • • • • • • • • • • • • • • • • • •
• • • • • • • • • • • • • • • • • • • • • • • • • • •
9 • • • • • • • • • • • • • • • • • • • • • • • • • • •
• • • • • • • • • • • • • • • • • • • • • • • • • • •
8 3 1 6 4 9 7 2 5
3 1 6 4 9 7 2 5 8
7 2 5 8 3 1 6 4 9
6 4 9 7 2 5 8 3 1
4 9 7 2 5 8 3 1 6
2 5 8 3 1 6 4 9 7
1 6 4 9 7 2 5 8 3
9 7 2 5 8 3 1 6 4
5 8 3 1 6 4 9 7 2
Plate A.6
Col: A B C D E F G H I
Row:
• • • • • • • • • • • • • • • • • • • • • • • • • • •
1 • • • • • • • • • • • • • • • • • • • • • • • • • • •
• • • • • • • • • • • • • • • • • • • • • • • • • • •
• • • • • • • • • • • • • • • • • • • • • • • • • • •
2 • • • • • • • • • • • • • • • • • • • • • • • • • • •
• • • • • • • • • • • • • • • • • • • • • • • • • • •
• • • • • • • • • • • • • • • • • • • • • • • • • • •
3 • • • • • • • • • • • • • • • • • • • • • • • • • • •
• • • • • • • • • • • • • • • • • • • • • • • • • • •
• • • • • • • • • • • • • • • • • • • • • • • • • • •
4 • • • • • • • • • • • • • • • • • • • • • • • • • • •
• • • • • • • • • • • • • • • • • • • • • • • • • • •
• • • • • • • • • • • • • • • • • • • • • • • • • • •
5 • • • • • • • • • • • • • • • • • • • • • • • • • • •
• • • • • • • • • • • • • • • • • • • • • • • • • • •
• • • • • • • • • • • • • • • • • • • • • • • • • • •
6 • • • • • • • • • • • • • • • • • • • • • • • • • • •
• • • • • • • • • • • • • • • • • • • • • • • • • • •
• • • • • • • • • • • • • • • • • • • • • • • • • • •
7 • • • • • • • • • • • • • • • • • • • • • • • • • • •
• • • • • • • • • • • • • • • • • • • • • • • • • • •
• • • • • • • • • • • • • • • • • • • • • • • • • • •
8 • • • • • • • • • • • • • • • • • • • • • • • • • • •
• • • • • • • • • • • • • • • • • • • • • • • • • • •
• • • • • • • • • • • • • • • • • • • • • • • • • • •
9 • • • • • • • • • • • • • • • • • • • • • • • • • • •
• • • • • • • • • • • • • • • • • • • • • • • • • • •
1 2 3 4 5 6 7 8 9
2 3 4 5 6 7 8 9 1
4 5 6 7 8 9 1 2 3
7 8 9 1 2 3 4 5 6
5 6 7 8 9 1 2 3 4
8 9 1 2 3 4 5 6 7
3 4 5 6 7 8 9 1 2
6 7 8 9 1 2 3 4 5
9 1 2 3 4 5 6 7 8
Sudoku Strategies and the Sudokerson Matrix 60
Plate A.7
Col: A B C D E F G H I
Row:
• • • • • • • • • • • • • • • • • • • • • • • • • • •
1 • • • • • • • • • • • • • • • • • • • • • • • • • • •
• • • • • • • • • • • • • • • • • • • • • • • • • • •
• • • • • • • • • • • • • • • • • • • • • • • • • • •
2 • • • • • • • • • • • • • • • • • • • • • • • • • • •
• • • • • • • • • • • • • • • • • • • • • • • • • • •
• • • • • • • • • • • • • • • • • • • • • • • • • • •
3 • • • • • • • • • • • • • • • • • • • • • • • • • • •
• • • • • • • • • • • • • • • • • • • • • • • • • • •
• • • • • • • • • • • • • • • • • • • • • • • • • • •
4 • • • • • • • • • • • • • • • • • • • • • • • • • • •
• • • • • • • • • • • • • • • • • • • • • • • • • • •
• • • • • • • • • • • • • • • • • • • • • • • • • • •
5 • • • • • • • • • • • • • • • • • • • • • • • • • • •
• • • • • • • • • • • • • • • • • • • • • • • • • • •
• • • • • • • • • • • • • • • • • • • • • • • • • • •
6 • • • • • • • • • • • • • • • • • • • • • • • • • • •
• • • • • • • • • • • • • • • • • • • • • • • • • • •
• • • • • • • • • • • • • • • • • • • • • • • • • • •
7 • • • • • • • • • • • • • • • • • • • • • • • • • • •
• • • • • • • • • • • • • • • • • • • • • • • • • • •
• • • • • • • • • • • • • • • • • • • • • • • • • • •
8 • • • • • • • • • • • • • • • • • • • • • • • • • • •
• • • • • • • • • • • • • • • • • • • • • • • • • • •
• • • • • • • • • • • • • • • • • • • • • • • • • • •
9 • • • • • • • • • • • • • • • • • • • • • • • • • • •
• • • • • • • • • • • • • • • • • • • • • • • • • • •
1 2 3 4 6 5 7 8 9
2 3 4 5 7 6 8 9 1
7 8 9 1 3 2 4 5 6
4 5 6 7 9 8 1 2 3
5 6 7 8 1 9 2 3 4
8 9 1 2 4 3 5 6 7
3 4 5 6 8 7 9 1 2
6 7 8 9 2 1 3 4 5
9 1 2 3 5 4 6 7 8
Plate A.8
Col: A B C D E F G H I
Row:
• • • • • • • • • • • • • • • • • • • • • • • • • • •
1 • • • • • • • • • • • • • • • • • • • • • • • • • • •
• • • • • • • • • • • • • • • • • • • • • • • • • • •
• • • • • • • • • • • • • • • • • • • • • • • • • • •
2 • • • • • • • • • • • • • • • • • • • • • • • • • • •
• • • • • • • • • • • • • • • • • • • • • • • • • • •
• • • • • • • • • • • • • • • • • • • • • • • • • • •
3 • • • • • • • • • • • • • • • • • • • • • • • • • • •
• • • • • • • • • • • • • • • • • • • • • • • • • • •
• • • • • • • • • • • • • • • • • • • • • • • • • • •
4 • • • • • • • • • • • • • • • • • • • • • • • • • • •
• • • • • • • • • • • • • • • • • • • • • • • • • • •
• • • • • • • • • • • • • • • • • • • • • • • • • • •
5 • • • • • • • • • • • • • • • • • • • • • • • • • • •
• • • • • • • • • • • • • • • • • • • • • • • • • • •
• • • • • • • • • • • • • • • • • • • • • • • • • • •
6 • • • • • • • • • • • • • • • • • • • • • • • • • • •
• • • • • • • • • • • • • • • • • • • • • • • • • • •
• • • • • • • • • • • • • • • • • • • • • • • • • • •
7 • • • • • • • • • • • • • • • • • • • • • • • • • • •
• • • • • • • • • • • • • • • • • • • • • • • • • • •
• • • • • • • • • • • • • • • • • • • • • • • • • • •
8 • • • • • • • • • • • • • • • • • • • • • • • • • • •
• • • • • • • • • • • • • • • • • • • • • • • • • • •
• • • • • • • • • • • • • • • • • • • • • • • • • • •
9 • • • • • • • • • • • • • • • • • • • • • • • • • • •
• • • • • • • • • • • • • • • • • • • • • • • • • • •
1 2 3 4 5 6 7 8 9
7 8 9 1 2 3 4 5 6
2 3 4 5 6 7 8 9 0
4 5 6 7 8 9 1 2 3
5 6 7 8 9 1 2 3 4
8 9 1 2 3 4 5 6 7
3 4 5 6 7 8 9 1 2
6 7 8 9 1 2 3 4 5
9 1 2 3 4 5 6 7 8
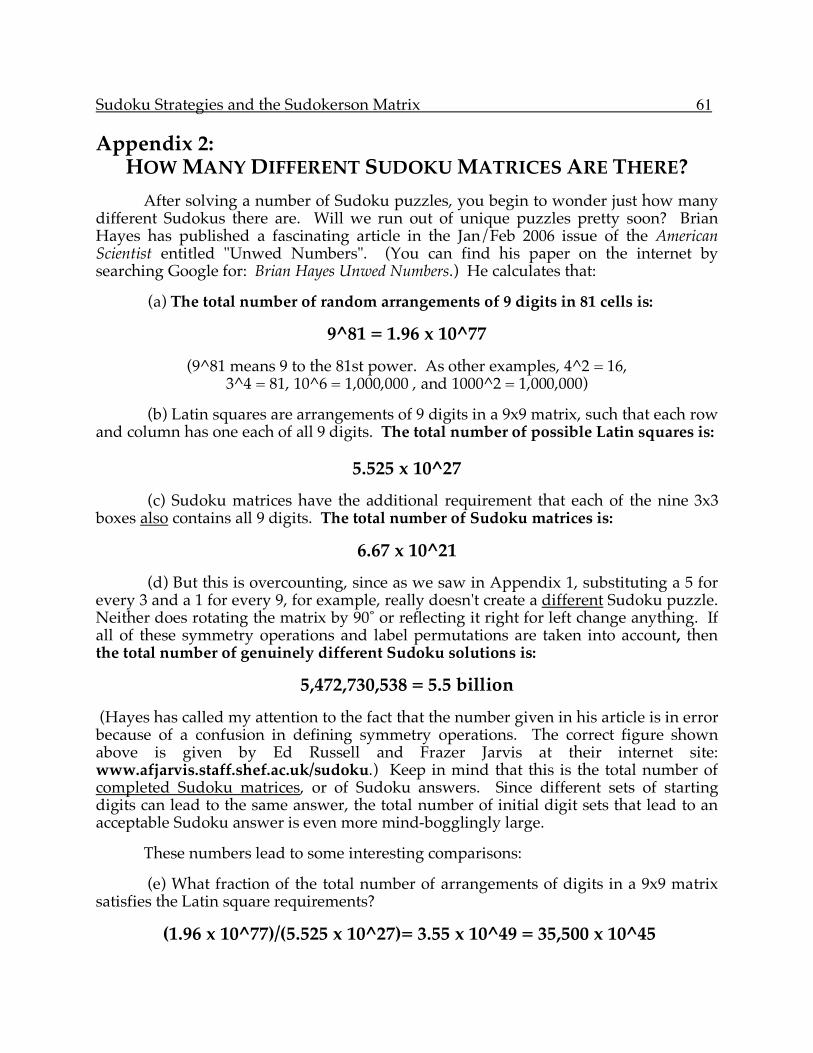
Sudoku Strategies and the Sudokerson Matrix 61
Appendix 2: HOW MANY DIFFERENT SUDOKU MATRICES ARE THERE?
After solving a number of Sudoku puzzles, you begin to wonder just how many different Sudokus there are. Will we run out of unique puzzles pretty soon? Brian Hayes has published a fascinating article in the Jan/Feb 2006 issue of the American Scientist entitled "Unwed Numbers". (You can find his paper on the internet by searching Google for: Brian Hayes Unwed Numbers.) He calculates that:
(a) The total number of random arrangements of 9 digits in 81 cells is:
9^81 = 1.96 x 10^77
(9^81 means 9 to the 81st power. As other examples, 4^2 = 16, 3^4 = 81, 10^6 = 1,000,000 , and 1000^2 = 1,000,000)
(b) Latin squares are arrangements of 9 digits in a 9x9 matrix, such that each row and column has one each of all 9 digits. The total number of possible Latin squares is:
5.525 x 10^27
(c) Sudoku matrices have the additional requirement that each of the nine 3x3 boxes also contains all 9 digits. The total number of Sudoku matrices is:
6.67 x 10^21
(d) But this is overcounting, since as we saw in Appendix 1, substituting a 5 for every 3 and a 1 for every 9, for example, really doesn't create a different Sudoku puzzle. Neither does rotating the matrix by 90˚ or reflecting it right for left change anything. If all of these symmetry operations and label permutations are taken into account, then the total number of genuinely different Sudoku solutions is:
5,472,730,538 = 5.5 billion
(Hayes has called my attention to the fact that the number given in his article is in error because of a confusion in defining symmetry operations. The correct figure shown above is given by Ed Russell and Frazer Jarvis at their internet site: www.afjarvis.staff.shef.ac.uk/sudoku.) Keep in mind that this is the total number of completed Sudoku matrices, or of Sudoku answers. Since different sets of starting digits can lead to the same answer, the total number of initial digit sets that lead to an acceptable Sudoku answer is even more mind-bogglingly large.
These numbers lead to some interesting comparisons:
(e) What fraction of the total number of arrangements of digits in a 9x9 matrix satisfies the Latin square requirements?
(1.96 x 10^77)/(5.525 x 10^27)= 3.55 x 10^49 = 35,500 x 10^45
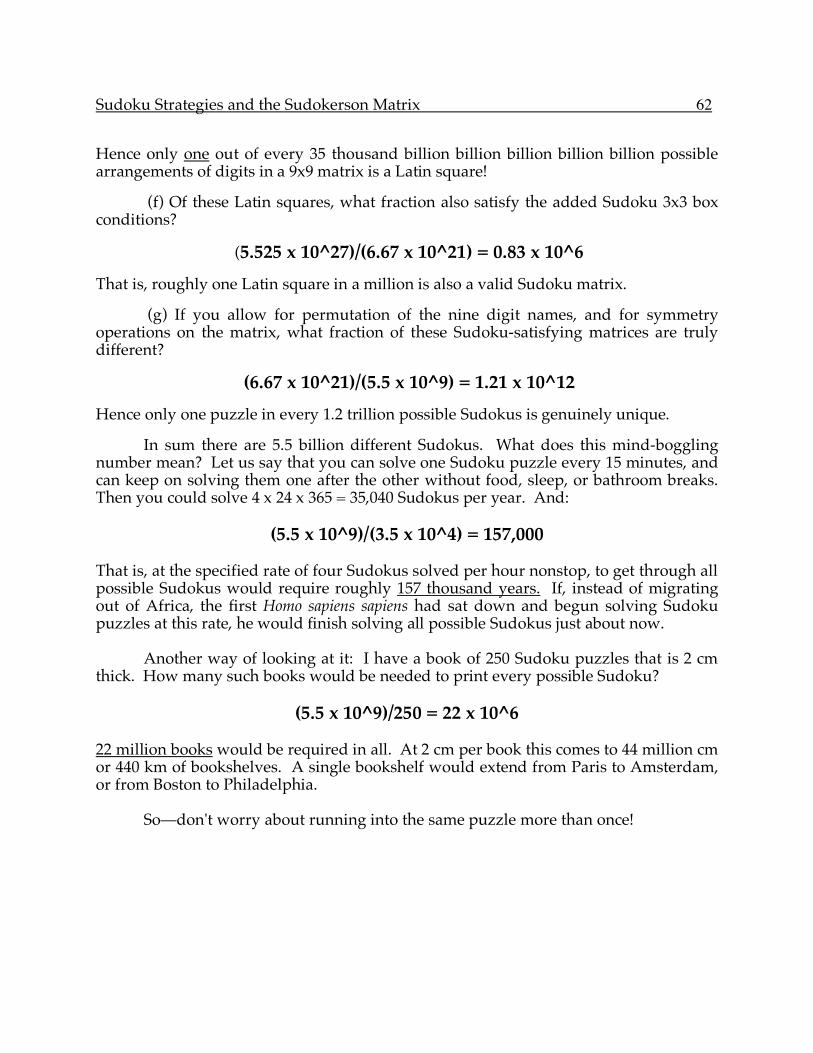
Sudoku Strategies and the Sudokerson Matrix 62
Hence only one out of every 35 thousand billion billion billion billion billion possible arrangements of digits in a 9x9 matrix is a Latin square!
(f) Of these Latin squares, what fraction also satisfy the added Sudoku 3x3 box conditions?
(5.525 x 10^27)/(6.67 x 10^21) = 0.83 x 10^6
That is, roughly one Latin square in a million is also a valid Sudoku matrix.
(g) If you allow for permutation of the nine digit names, and for symmetry operations on the matrix, what fraction of these Sudoku-satisfying matrices are truly different?
(6.67 x 10^21)/(5.5 x 10^9) = 1.21 x 10^12
Hence only one puzzle in every 1.2 trillion possible Sudokus is genuinely unique.
In sum there are 5.5 billion different Sudokus. What does this mind-boggling number mean? Let us say that you can solve one Sudoku puzzle every 15 minutes, and can keep on solving them one after the other without food, sleep, or bathroom breaks. Then you could solve 4 x 24 x 365 = 35,040 Sudokus per year. And:
(5.5 x 10^9)/(3.5 x 10^4) = 157,000 That is, at the specified rate of four Sudokus solved per hour nonstop, to get through all possible Sudokus would require roughly 157 thousand years. If, instead of migrating out of Africa, the first Homo sapiens sapiens had sat down and begun solving Sudoku puzzles at this rate, he would finish solving all possible Sudokus just about now. Another way of looking at it: I have a book of 250 Sudoku puzzles that is 2 cm thick. How many such books would be needed to print every possible Sudoku?
(5.5 x 10^9)/250 = 22 x 10^6 22 million books would be required in all. At 2 cm per book this comes to 44 million cm or 440 km of bookshelves. A single bookshelf would extend from Paris to Amsterdam, or from Boston to Philadelphia. So—don't worry about running into the same puzzle more than once!