supervising a vfx shoot - leckman.com · tutorials | vfx supervision tips slate the lens grid with...
TRANSCRIPT
TUTORIALS | VFX supervision tips
054 | 3D WORLD3D WORLD July 2006
On-set reference material is the key to realistic visual effects. Discover what data to record – and how to record it – with this complete set of expert tips
Supervising a VFX shoot TIPS & TRICKSTIPS & TRICKS
Our experts this issue…
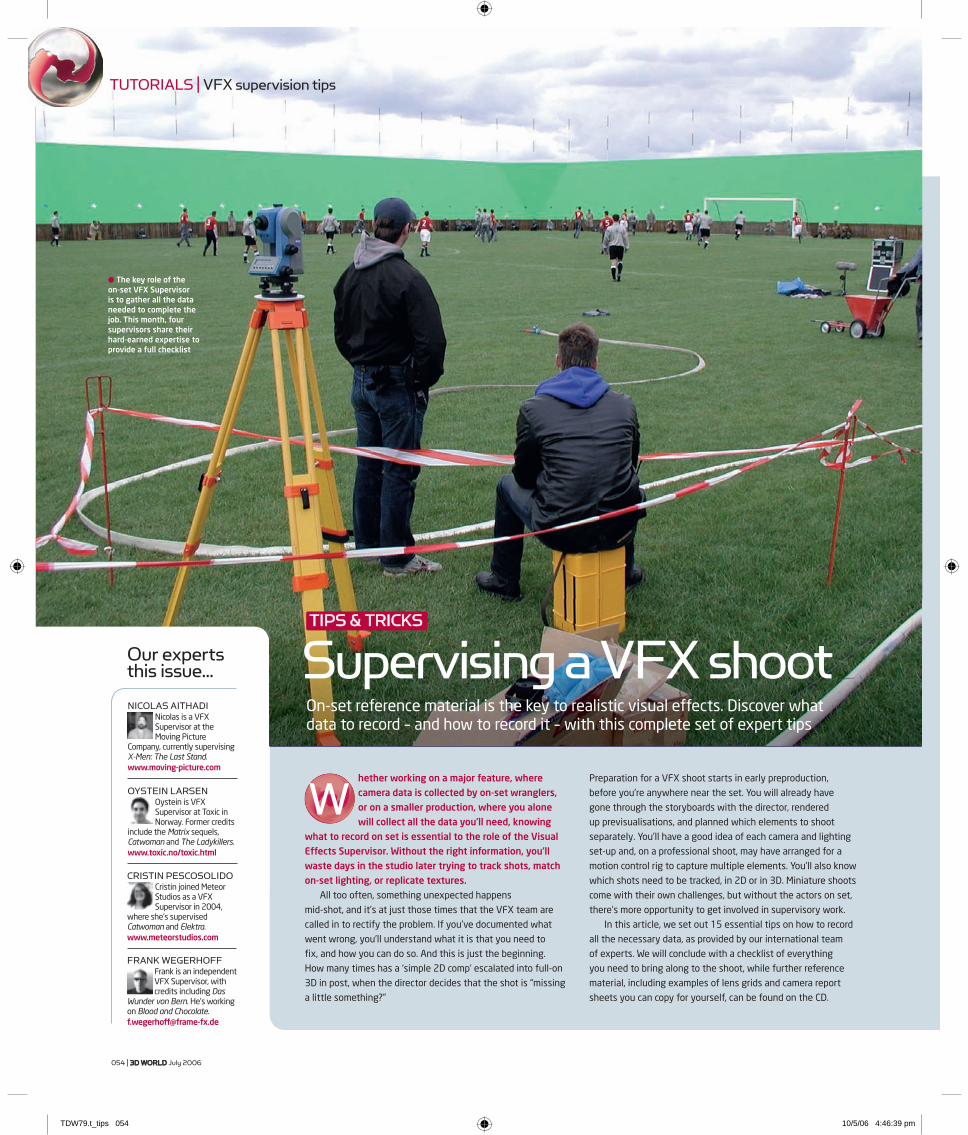
● The key role of the on-set VFX Supervisor is to gather all the data needed to complete the job. This month, four supervisors share their hard-earned expertise to provide a full checklist
hether working on a major feature, where camera data is collected by on-set wranglers, or on a smaller production, where you alone will collect all the data you’ll need, knowing
what to record on set is essential to the role of the Visual Effects Supervisor. Without the right information, you’ll waste days in the studio later trying to track shots, match on-set lighting, or replicate textures.
All too often, something unexpected happens
mid-shot, and it’s at just those times that the VFX team are
called in to rectify the problem. If you’ve documented what
went wrong, you’ll understand what it is that you need to
fi x, and how you can do so. And this is just the beginning.
How many times has a ‘simple 2D comp’ escalated into full-on
3D in post, when the director decides that the shot is “missing
a little something?”
Preparation for a VFX shoot starts in early preproduction,
before you’re anywhere near the set. You will already have
gone through the storyboards with the director, rendered
up previsualisations, and planned which elements to shoot
separately. You’ll have a good idea of each camera and lighting
set-up and, on a professional shoot, may have arranged for a
motion control rig to capture multiple elements. You’ll also know
which shots need to be tracked, in 2D or in 3D. Miniature shoots
come with their own challenges, but without the actors on set,
there’s more opportunity to get involved in supervisory work.
In this article, we set out 15 essential tips on how to record
all the necessary data, as provided by our international team
of experts. We will conclude with a checklist of everything
you need to bring along to the shoot, while further reference
material, including examples of lens grids and camera report
sheets you can copy for yourself, can be found on the CD.
WCRISTIN PESCOSOLIDO
Cristin joined Meteor Studios as a VFX Supervisor in 2004,
where she’s supervised Catwoman and Elektra.www.meteorstudios.com
NICOLAS AITHADINicolas is a VFX Supervisor at the Moving Picture
Company, currently supervising X-Men: The Last Stand.www.moving-picture.com
OYSTEIN LARSENOystein is VFX Supervisor at Toxic in Norway. Former credits
include the Matrix sequels, Catwoman and The Ladykillers.www.toxic.no/toxic.html
FRANK WEGERHOFF Frank is an independent VFX Supervisor, with credits including Das
Wunder von Bern. He’s working on Blood and [email protected]
TDW79.t_tips 054TDW79.t_tips 054 10/5/06 4:46:39 pm10/5/06 4:46:39 pm

▲
BE PREPAREDBefore you even reach the set, know your shots inside out, including
know which elements you’ll need to shoot and how they’ll be
photographed. You’ll need to have every unit of photography
covered, and depending on the complexity of the shoot, you may
need assistants for each unit. While one is taking notes, another
could be setting up tracking markers, and a third helping queue
camera moves on the motion control rig. Make sure each assistant
has access to all the equipment they’ll need.
OBSERVE ON-SET ETIQUETTEBe friendly, know who’s who, and don’t pester the wrong people
for information they don’t have. Your allies will be the Camera
Assistant, who will provide you with much of the camera information
you’ll require, and the Script Continuity Supervisor, who will also be
recording camera data. Remember, there’s no reason why the crew
should understand visual effects jargon, so talk in a language they
understand. Explaining what you’re doing, and why you’re doing it,
is a good way to build productive relationships.
BE FAST, AND BE INVISIBLEFilm shoots are extremely expensive and, unfortunately, the VFX
crew (however unfairly) have the reputation of being the ones to
hold up the shoot. Since time is money, work as fast as you can. Let
the shoot run smoothly as you gather data from behind the scenes.
ASSIST THE DIRECTORDo whatever you can to help the Director get the images he needs.
You’ll need to help in creative decision making, as well as ensure
you’ve got the visual effects shots covered technically. Set-ups
you’ve proposed in preproduction may not work out as planned,
so you’ll need to think on your feet. A background in photography
helps, as does a good eye for composition. If your knowledge of
cinematography is sketchy, now’s the time to do some homework.
Start by purchasing the American Cinematographer Manual edited
by Rod Ryan (1993, ASC Holding Corporation, ISBN 0935578110).
MEASURE EVERYTHINGYou can never collect too much data. Not only will you need to know
everything about the camera settings, you’ll also need to know
the camera’s relationship to the set, positions of the primary lights,
the set’s layout and the positions of the actors. Don’t rely on the
Camera Assistant for their camera reports. If they miss vital lens
information on a take, you’ll be the one struggling in postproduction.
Any data you capture will be used in a variety of situations, from
reconstructing precise models of the set in 3D, to matching on-set
lighting or camera positions, or tracking live-action footage.
While tape measures are fi ne for miniature shoots, it’s worth
investing in the more expensive laser range-fi nder for live-action
shoots. Also carried by the Camera Assistant, these are good for
measuring distance up to about 150m, and are accurate to 1cm
or less. When you next need to measure the height of a cathedral
ceiling with a tape measure, you’ll wonder why you never made the
investment earlier. (You can buy laser measuring devices from
www.microglobe.co.uk.)
SHOOT LENS GRIDSUnless you’re trusted by the Director of Photography, and
experienced enough to operate the fi lm camera yourself, ask the
Camera Assistant to shoot a lens grid, full frame, for each lens. (An
example can be seen at the top of this page, and is also included on
the CD.) Lens grids are a way of measuring the barrelling distortion
of any particular lens, and are used back in the visual effects offi ce
to ‘undistort’ the scans when compositing. Shooting a lens grid is
particularly important for wide-angle lenses with greater distortion.
● Lens distortion grids can be made by mounting a printed A3 grid on polyboard. The cross is lined up with the crosshairs in the viewfi nder
● Shoot a visual effects slate before HDR or photogrammetry stills. It can be as simple as handwritten notes on paper
VFX supervision tips | TUTORIALS
IN FOCUS | The camera report sheet
The camera report sheet is the fi rst place you’ll go when looking for information about a shot. Always record all of the information from the slate, as it will be removed in the rough cut. In the sheet shown on the right (a full-size version can be found on the CD for you to adapt to your own projects), 28 is the scene number (from the shooting script); 001 refers to the fi rst FX sequence; and 005 means this is the fi fth shot in that sequence.The sheet should also contain the following information about the set up of the shot:
• Shot description: a brief aide memoire when reviewing your notes in the offi ce
• Lens information: particularly for zoom lenses. Include any serial numbers
• Frames per second: was the shot normal, high speed or slow motion?
• Camera roll number: found on the mag• Any fi lters placed on the camera lens• Height and focus distance of the camera:
measured from the fi lm-back• Tilt of the camera: measured with an
inclinometer placed on the base plate of
the camera. Some camera heads have a scale to show this, but it’s rarely accurate
• Shoot dates: on longer shoots, fi ling reports by date, unit and location is vital
July 2006 3D WORLD3D WORLD | 055
TDW79.t_tips 055TDW79.t_tips 055 10/5/06 4:46:45 pm10/5/06 4:46:45 pm

TUTORIALS | VFX supervision tips
Slate the lens grid with a note of its make, model and focal length.
There should be a ‘grid warping’ tool in your compositing software
that enables you to ‘undistort’ the plate using the distortion you’ve
captured in the lens grid. All you have to do is create the same
number of lines as your lens grid and pin its points to match, before
fi nally applying the warp effect.
TAKE REFERENCE PHOTOGRAPHSShoot everything you can with a good quality digital stills camera
– something capable of taking shots in excess of 4MP, and that
can shoot in RAW format (we recommend digital SLRs that offer
exposure bracketing and interchangeable lenses). You’ll need
general reference stills showing each lighting and camera set-up,
as well as the layout of the set. If there’s any possibility you’ll need
to reconstruct elements of the set in 3D, shoot as many texture
references as you can. However great the temptation is to fi re
off the camera fl ash in low-light conditions, don’t use one on set
without warning everyone fi rst. And, as obvious as it may sound,
never fi re a fl ash while fi lming! (This has reportedly been done.)
SHOOT HDR PANORAMAS High Dynamic Range (HDR) images, created from multiple exposures
of the same shot, provide a means to light a 3D scene to match a
real-world reference (for more details, see the tutorial on page 58).
Set up your digital camera on a panorama head and take a series of
stills by rotating the camera around its optical centre. Bracket each
exposure fi ve to seven times, either manually by incrementally
varying the aperture one stop from the previous image, or by using
your camera’s auto exposure bracketing function. Overlap the sets
of images to create a 360-degree panorama. The rotation between
overlapping tiles will depend on the lens and resolution. When the
bracketed images are combined using a tool such as HDR Shop, the
HDR log image has a greater dynamic range than the individual
exposures, affording more defi nition to rendered highlights.
ALLOW FOR SET RECONSTRUCTIONHDR images are used in 2.5D reconstructions, or photogrammetry,
where photographs of the set are re-projected back onto 3D
geometry, then rendered with a virtual camera. Shoot the set from
a similar angle to your 3D virtual camera, matching the lens. You’ll
need to photograph at least six or seven images, which should have
overlapping features visible in at least a few of the images. If you
don’t have the time to work with HDR images, single exposures will
do. If your virtual camera moves signifi cantly through the scene, you
may need to shoot image tiles from key points along its move.
MAKE USE OF LIGHT PROBESGrey, chrome and white lighting reference balls are used to set up
3D global illumination in the VFX studio. They’re mostly used
mounted on sticks to avoid unnecessary issues with fi ngerprints,
and should be photographed for each lighting and camera set-up.
Leave the fi lm camera in its set-up for the shot; have the Camera
Assistant shoot a VFX slate marked up with the shot number, lens
and focal length; place the lighting reference ball where the main
action occurs, then run a few frames of fi lm. If the action moves
across a large area, shoot the reference balls in positions that span
its breadth. If the camera set-up is far from the action, and the
reference balls are small, you can request a 4K version of the scan.
If you’re striving for perfection, take care when using balls that
aren’t optically perfect. Secondary refl ections caused by ripples on
the surface are quite diffi cult to fi x.
● 8cm diameter Christmas tree baubles make excellent light probes on a miniature shoot. To create the grey ball, spray the bauble with an 18 per cent grey automotive primer
IN FOCUS | Drawing up a plan
If you’re shooting on a stage, ask the art department for a copy of its fl oor plan. Out on location, survey the site as accurately as possible, and sketch out both plans and elevations. You’ll need detailed measurements of anything you may need to reconstruct in 3D. Additionally, for each lighting set-up, mark the locations of the primary lights on the plan. It’s always helpful when you’re back in the offi ce, matching the scene in 3D, and trying to determine where exactly to put the keylight. Sketches are also vital in describing camera tracks or dollies on the camera report.
● It pays dividends to have a notebook handy for all manner of data collection – in this instance, for noting on-set camera and light positions
056 | 3D WORLD3D WORLD July 2006
TDW79.t_tips 056TDW79.t_tips 056 10/5/06 4:46:49 pm10/5/06 4:46:49 pm

IN FOCUS | The supervisor’s survival kit
Here’s your complete checklist of what you’ll need to bring with you to the set. It’s a mixed bag of handy gadgets and absolute necessities. Some things may seem superfl uous, but you’ll be a long way from the offi ce, and you’ll need to be prepared for all the situations you’ve planned for. One of your best investments will be a good quality digital camera, capable of shooting high-resolution reference stills and HDR images. Make sure it’s able to shoot roll images in their RAW, uncompressed format. A laser pointer is also handy in quickly pointing out a problem in-shot, particularly if you’re with a foreign crew and don’t speak the same language.
• Digital stills camera, various lenses, spare batteries, memory cards and a battery charger
• Tripod and lighting fl ag stands• Tracking markers• Light meter
• Printed templates for shoot notes• Visual effects slates and a clipboard• Pocket-size notebook or PDA• Sharpies, pens and pencils• Gaffer tape and camera tape (you never know
what you might need to fi x)• Lighting reference balls: grey, chrome and
possibly white balls• A laptop with your compositing software
of choice• Lens grids• Tape measure and a laser range fi nder• Grey glass and various coloured fi lters• Video cameras on a miniature shoot, spare
batteries and tapes • Leatherman and scissors• An LED torch• A laser pointer• An inclinometer (to measure camera tilt)• A spirit level• The American Cinematographer Manual
THE GREY BALLImages of the grey ball are used to fi gure out the direction of the
keylight when setting up a 3D scene for global illumination. The
18 per cent grey tone appears neutral to the human eye, and is
equivalent to the average Caucasian skin tone. There’s no need to
buy a special-purpose visual effects grey ball – any medium-size
spherical, wooden or Styrofoam ball, available from a crafts shop,
will serve the purpose. First, coat the ball with a white base-paint,
then paint with an 18 per cent grey, matching the swatch to a grey
reference card (this can be purchased from www.amazon.com).
THE CHROME BALLAs an alternative to shooting a HDR panorama of the set, the
chrome ball (or ‘mirror ball’), provides the necessary data needed
for setting up 3D refl ection environments. To get full, complete
coverage of the set, you’ll need to shoot the ball twice, from
opposite sides, so that each hemisphere is represented. Special-
purpose chrome balls come in a range of sizes, so choose the sizes
you’ll need according to your camera set-ups and location. If there’s
only time to shoot one angle, photograph it matching the fi lm
camera’s aperture for equal depth of fi eld, and from as far away as
possible with a fairly small ball (6-8cm). Calibrate your chrome ball
for colour by placing a white card visible in both the frame and the
refl ection within the chrome ball.
THE WHITE BALLMany VFX supervisors just shoot grey and chrome balls. Shooting a
white lighting reference ball provides additional information about
multicoloured lights.
SET UP WITNESS CAMERASOn a miniature shoot, bring or borrow as many video cameras as you
can. Set up a video camera pointing at the lens of each fi lm camera,
so you can shoot and record the speed of any zooms, particularly
when they’re not constant. It’s also good to set up a video camera
encompassing the whole of the working area on the stage. If
anything unexpected happens mid-shot, you’ll have it recorded on
tape for later reference. ●
VFX supervision tips | TUTORIALS
● Oystein Larsen makes the fi nal checks to one of the cameras in the UCAP rig, capturing Halle Berry’s facial performance for Catwoman. A good example of the complexity of a professional VFX shoot
● Reference photos are vital. Here, they show the layout of
the miniature set for the subway crash sequence on
Final Destination 3
July 2006 3D WORLD3D WORLD | 057
TDW79.t_tips 057TDW79.t_tips 057 10/5/06 4:46:54 pm10/5/06 4:46:54 pm