swamp water and me program - nps.gov homepage …€™s limestone: tums for our water and soil........
TRANSCRIPT

SWAMP WATER AND ME PROGRAM
Collier County Schools – 6th
Grade Program
Teacher’s Guide
Revision Date: July 2009


Table of Contents
I) PROGRAM INTRODUCTION ...........................................................................................................
Foreword .......................................................................................................................................................................
Acknowledgements........................................................................................................................................................
Visions and Goals........................................................................................................................................ ...........................
Teacher Workshop .........................................................................................................................................................
Pre-Site Ranger Visit .....................................................................................................................................................
Contents of Backpack ....................................................................................................................................................
Field Trip Logistics and Supply List ...............................................................................................................................
Safety Concerns and Precautions ....................................................................................................................................
Field Trip Agenda ..........................................................................................................................................................
Map to S.W.A.M.P Environmental Education Center .....................................................................................................
II) PRE SITE INFORMATION ..............................................................................................................
Why Should I Care About Swamp Water? ......................................................................................................................
Habitats of Big Cypress .................................................................................................................................................
Florida Panther ..............................................................................................................................................................
Alligators ......................................................................................................................................................................
Global Positioning System (GPS) ...................................................................................................................................
Radio Telemetry ............................................................................................................................................................
Animals .........................................................................................................................................................................
Vegetation .....................................................................................................................................................................
Bald Cypress .................................................................................................................................................................
Water ............................................................................................................................................................................
Soil................................................................................................................................................................................
Weather in the Swamp ...................................................................................................................................................
Fire................................................................................................................................................................................
Student Vocabulary .......................................................................................................................................................
III) PRE-SITE CLASSROOM LESSONS AND LABS...........................................................................
SWAMP Backpack Orientation ......................................................................................................................................
Measuring Relative Humidity ........................................................................................................................................
Measuring Dissolved Oxygen ........................................................................................................................................
Florida’s Limestone: Tums for Our Water and Soil.........................................................................................................
Ecosystem Research: Getting to Know Your Field Site ...................................................................................................
Fire Ecology: Optimal Weather Conditions for a Prescribed Burn ...................................................................................
A Year in the Life of a Florida Panther ...........................................................................................................................
Interactive SWAMP Journal...........................................................................................................................................
Soil Moisture and Decomposition ..................................................................................................................................
IV) POST-SITE CLASSROOM ENRICHMENT, DATA ANALYSIS, AND ASSESSMENT ...............
Communicating Your Results ........................................................................................................................................

Human Impact: Losing Habitat ......................................................................................................................................
Where’s the Panther? Using GPS Coordinates to Determine Location .............................................................................
Big Cypress Food Web ..................................................................................................................................................
V) TEACHING RESOURCES ...............................................................................................................
Books for Teachers ........................................................................................................................................................
Books for Students .........................................................................................................................................................
Web Sites ......................................................................................................................................................................
Agencies That Supply Information .................................................................................................................................
VI) REPRODUCIBLE MASTERS .........................................................................................................
Chaperone Letter ...........................................................................................................................................................
Media Release Letter .....................................................................................................................................................
VII) SWAMP ASSESSMENT FORM ....................................................................................................

Big Cypress National Preserve
Big Cypress National Preserve is a National Park! It is one of over 390 National Parks in our country
administered by the Department of the Interior and one of four National Park Service units in South
Florida.
National Parks are places that are so important to our country either historically, culturally, naturally or
recreationally that they must be preserved, protected and maintained. That’s what the National Park
Service does, so that these magnificent places will always be here for you and future generations to
explore and enjoy.
Big Cypress was established as a National Preserve in 1974 to preserve the very important watershed in
eastern Collier County. This water flows southward and empties into the Ten Thousand Islands and
Everglades National Park. It is a very diverse and magical place covering 729,000 acres of cypress
strands, pinelands, prairies, hardwood hammocks and mangrove forests. Its name comes from the vast
amount of cypress trees growing within its boundaries and it is home to many threatened and
endangered species of plants and animals including the Florida panther.
Big Cypress is very unique in that there are many activities that take place there which aren’t allowed in
other National Park areas, for example, hunting, off road vehicle use, oil and gas exploration, cattle
leases and private land ownership. These activities are why it was called a preserve and not a park.
Visitors can enjoy many activities in the Preserve such as canoeing, hiking, fishing, bird watching,
biking or taking a class field trip.
By taking part in the S.W.A.M.P. program you and your classmates can learn about and teach others
how special Big Cypress National Preserve and all of our National Parks are and how you can help to
protect them.


Acknowledgements
In 1998 Big Cypress National Preserve was selected to receive a grant for science education made
possible by an innovative partnership between the National Park Service, Exxon Corporation, the
National Park Foundation (NPF), and the National Science Teachers Association (NSTA). Big Cypress
National Preserve was one of 36 National Parks chosen from a competitive process that was open to all
National Parks.
The Parks as Resources for Knowledge in Science (P.A.R.K.S.) program was created to encourage
collaboration in science education between National Parks, schools and local communities. The
framework of the P.A.R.K.S. program builds on NSTA’s “Building a Presence for Science” initiative,
which aims to improve science education by helping implement the National Science Education
Standards.
The $25,000 grant awarded to 32 parks will fund a partnership between Big Cypress National Preserve
and the Collier County School District that will implement an environmental education/outreach
program that utilizes the American alligator and the Florida panther to highlight the importance of
habitats to plants and animals in the South Florida ecosystem and enhance the awareness of endangered
species. Four additional National Parks received $10,000 grants to host a 2½ day training session where
park officials and their partner teachers were trained in the NSTA standards.
In addition to the grant from Exxon Mobile, S.W.A.M.P has received generous donations for equipment,
supplies, staffing, and transportation from: South Florida Water Management District – Big Cypress
Basin, Collier County Public School District, South Florida National Parks Trust, and Friends of the Big
Cypress Swamp.
We would like to extend a very special thank you to the many volunteers and employees of Big Cypress
National Preserve and teachers who contributed their time and creative efforts in the development and
facilitation of this program.

Vision and Goals
The Swamp Water and Me Program (S.W.A.M.P) is an Environmental Education Program for the 6th
grade science classes in the Collier County School District. The program focuses on the Big Cypress
Watershed, its major habitats, flora, fauna, while highlighting the Florida panther and American
alligator. S.W.A.M.P. is a four part program which includes a teacher and student guide, a mandatory
teacher workshop, a pre-site visit by a ranger to the classroom and a field trip to the Preserve. A variety
of hands-on, inquiry-based activities are performed by the students during their field trip. This includes
tracking a panther radio transmitter using radio telemetry, collecting data by performing water quality,
soil and weather testing, and vegetation and animal identification.
The goals of the Program are thus:
I. To provide students with hands on, interdisciplinary, and curriculum based field experience that
aligns to Florida Sunshine State Standards.
II. To give students a clearer understanding of their connection and responsibilities to the natural
world so that they may become better informed citizens, community leaders, and stewards of
the fragile and unique environment of South Florida.

Teacher Workshop
Before any class can come!
The teacher must have attended the teacher workshop. Teachers cannot send their class with another
teacher.
The workshop will be held in Big Cypress National Preserve beginning at the S.W.A.M.P.
Environmental Education Center on Birdon Road (CR 841), in Ochopee, FL.
Contact Lisa Andrews at 239-695-1164 to sign up, receive directions and important information.
All teachers will be expected to assist in leading a group on the field trip so this is the time to learn and
ask questions!
What to wear:
We will be walking in the swamp! You will get wet!! It will be fun!
Wear comfortable and cool clothing.
Long pants and old tennis shoes that lace up and can get wet and muddy.
What to bring:
Lunch
Water
Bug Spray
Sun protection – hat, sunglasses, sunscreen
Long sleeve shirt
Rain jacket just in case
Are you allergic to insect stings? Bring what you need.
That’s all!
Notebooks, pencils, teacher/student workbook, lots of good information and soft drinks will be provided.

Pre-Site Ranger Visit
A ranger will visit the classroom before each field trip.
Schedule this visit by calling Lisa Andrews, Education Specialist at Big Cypress National Preserve at
239-695-1164 or through e-mail at: [email protected]
The visit will include discussion on:
What is the National Park Service?
What is the Big Cypress National Preserve?
When it was established
Why
Slide presentation
Introduction to the habitats in Big Cypress National Preserve
Cypress Strand
Hardwood Hammock
Pineland
Prairie
Mangrove estuary
Wildlife in the Preserve
How to track a Panther
Students from previous year doing activities
Discuss upcoming field trip
Fears about field trip
Safety
What to and not to wear/bring
Rules and regulations of the Preserve

Contents of Backpacks
In the backpacks you will find the materials your students need to successfully collect data at their field
site in Big Cypress National Preserve. You will be provided with a backpack to take to your classroom
to complete the Pre-Site Lessons and Labs with your students. It is essential that your students are
familiar with the contents of the backpack in terms of both the procedure for use of the instruments and
what information can be discovered by the correct use of the instrument in the field. The Pre-Site
Lessons and Labs provide all of the information you’ll need to help your students to gain the knowledge
and experience necessary to be successful with the field site data collection and experimentation on the
day of the field trip.
Pencils
Clipboards
Data Booklets
Rubbermaid containers containing the following:
Animals Laminated Track ID Rings – Aquatic Animals
Vegetation Vegetation I.D. cards
Water Water/Soil Depth measuring stick
Thermometers
D.O. kits
pH dipsticks
Clear water collecting bottles
Weather Anemometer
Compass
Sling Psychrometer
Orange flagging
Relative humidity chart
Cloud ID card
Soil Water/Soil Depth Measuring Stick
Color chart

Field Trip Logistics and Supply Checklist 45 students with one chaperone to every ten students
10:00 – meet at the S.W.A.M.P. Environmental Education Center in Big Cypress National Preserve
2:30 – leave the Preserve
Directions to the S.W.A.M.P. Center located on Birdon Road (CR 841)
From North Naples:
From the intersection of CR 951 and Hwy 41, travel east on 41 approximately 28 miles. Pass the
Preserve Headquarters and continue on 0.7 miles, turn left onto CR 841 or Birdon Road. Travel north
on Birdon Rd. about 2.5 miles to the S.W.A.M.P. Education Center on the left.
**Along HWY 41 watch for these landmarks:
HWY 29, Wooten's airboat tours, the Big Cypress National Preserve Headquarters, RVs on Dona
Drive, turn left there onto Birdon Rd
From South Naples
From the intersection of CR 951 and Hwy 75: pay $2.50 toll and travel east. Exit right at #80 onto hwy
29. Travel south 12.6 miles on 29 to CR 837 or Wagon Wheel Rd. and turn left. Travel approximately
1 mile to the “T” and turn right onto Birdon Rd. Travel south on Birdon Rd. about 2.5 miles to the
S.W.A.M.P. Education Center on right.
From Immokalee:
Travel south on HWY 29 toward HWY 41. After passing hwy 75 travel 12.6 miles and turn left onto
CR837 (Wagon Wheel Rd). At the “T” turn right and travel 2.5 miles south to the S.W.A.M.P.
Education Center.
Check List for Field Trip
What to Bring What Not To Bring Sun protection – hat, sunscreen, sunglasses
Water – plenty of it
Bug repellant – not spray
Lunch – Something that does not need to be kept
cold Suitable clothing for the weather
Comfortable clothing
Long pants Extra long sleeve shirt
Closed toed shoes that lace on tight
Shoes and pants that can get wet and muddy White socks and t-shirts will never be white again!!
MP3 and IPods
Cell phones
Backpacks Cameras
Money
No change of clothes Do not bring anything that will be damaged if
gotten wet or could get lost

Safety Concerns and Precautions
Teacher Workshop
The safety discussion during the Teacher Workshop includes:
If they don’t feel comfortable about this trip then this is not the trip for them
What to wear and bring - Long pants, closed toed lace on shoes, sun protection – hat, sunscreen,
sunglasses, long sleeve shirt, water, insect repellent
Things to be aware of:
Paper wasps and other stinging insects – make sure they are aware of student’s allergies to these
and if they come to bring the proper medication
Fire ants
Snakes – went over the 4 poisonous snakes found here, where they are likely to be found, how
students and teachers should react to them and how to avoid them
Alligators – where they are found, when they are more dangerous – fed, have young, threatened
Spiders
Respect for the wildlife – do not feed, or touch or harm any wildlife
Footing – walking in the muck, twisting ankles on rocks, submerged things to trip on and bang
shins on – branches, stumps, logs, cypress knees, limestone, solution holes
Poisonous vegetation – Poison Ivy, Poison wood, Brazilian pepper
Safe use of the walking sticks
Alternate program at E.E. center in case of inclement weather
If lightning or other threatening weather occurs we will leave the field immediately
All students, teachers and chaperones will wear orange safety vests
Fears they might have
What happens in the event of an emergency
First aid kits for each ranger and teacher
Rangers and teacher will each have a hand-held walky-talky to communicate between each
group.
Rangers will have a park radio and a cell phone with direct contact to EVER dispatch, EMT,
Park Rangers, Collier County Sheriff
A Park Service Volunteer will also accompany each group
Ranger pre-site school visits A large part of the pre-site visit is devoted to discussing the upcoming field trip including safety. All of
the safety information that has been discussed with the teachers above will be discussed again in the
classroom with the students.
Student/Teacher Workbook This will also contain all of the safety information discussed above and is available to the students,
teachers, other school employees and parents.

Checklists of what to bring, how to dress, etc. is included
Safety discussion at teacher workshop
Safety discussion with students at pre-site classroom visit
Safety information included in Teacher/ Student Workbook
Safety briefing at field trip site
The rangers and volunteers will be certified in:
CPR
Basic First Aid
Basic Water Safety
Rangers will have park radios and cell phones and have been trained in the proper procedure for using
the radios in case of a medical emergency.
On the field trip - each leader will be carrying a first aid kit.
A first aid kit will also be available at the E.E. Center.
Orange safety vests are required to be worn by all students, chaperones and teachers.
A schedule of field trip dates and locations has been supplied to Law enforcement.
The rangers and teacher will carry small walky-talky type radios to communicate between groups
without causing disturbance on the park radios – to use in case of emergency, however, the three groups
will never be out of shouting distance from each other.
Radio procedures:
First, call 784 and notify them of a medical emergency. They will notify park rangers and Collier
County depending on the type of emergency. Med-Flight will be called in if necessary and can reach us
within 15 minutes.
Teacher and rangers will each have a 2-way radio to communicate between groups.
The lead ranger will have a park radio and cell phone with direct contact to Law Enforcement Rangers.
Teacher and rangers will have first aid kits with them at all times.
Rangers and volunteers hold current certifications in Basic First Aid, C.P.R. and Basic Water Rescue
training.
Please inform the ranger of any students with allergies to medications or insect stings, or other medical
problems prior to the trip.

Field Trip Agenda
(Subject to change due to late bus – adjust times as needed)
10:00 Arrive at SWAMP Center
10:00 – 10:20 Restrooms and Nametags
10:30 – 10:50 Travel up Birdon Road to picnic area
11:00 – 11:30 Lunch
11:40 – 12:00 Go to field site, divide into groups, hand out walking sticks, backpacks, safety
briefing
12:00 – 2:15 The three groups will rotate through three different habitats: Cypress Strand,
Prairie, and Pineland performing tests, identification activities and recording data
in each habitat.
2:30 Back on bus to leave for school

Map to S.W.A.M.P Environmental Education Center
Big Cypress National Preserve


Swamp Water And Me Program
Pre-Site Information


Why Should I Care About Swamp Water?
Do you like to swim, fish, go boating, or go to the beach? Do you like to eat fruit, vegetables, fish and
sugar? Do you like to have clean water to drink, wash your cloths, and take a bath in? Do you like to
see wildlife living in their natural habitat undisturbed? Then water is very important to all of us!
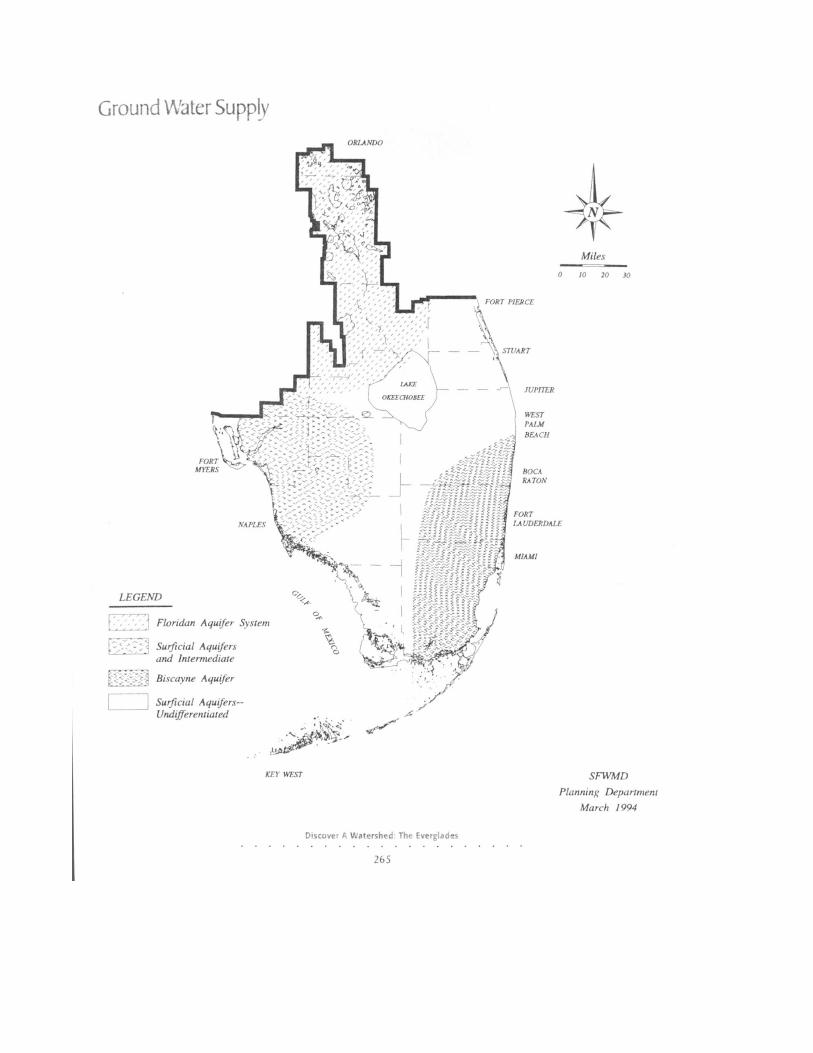
The water in the Big Cypress Swamp is very important in many ways to people living in Collier County.
This huge swamp or wetland acts like a filter, straining out impurities and pollutants as the water flows
over it making the water cleaner downstream and as it percolates into the aquifers. It also acts like a
sponge, absorbing the water as it flows. Without this sponge effect the water would run off the land
quickly and flood some areas. People need fresh, clean water to drink, to bathe in, to wash clothes in,
grow food with and for recreation. The water you use for these things comes from the Shallow Aquifer
of Southwest Florida which lies deep beneath Collier County and the Big Cypress Swamp.
Water is also important to all wildlife. From the tiniest microscopic plant or animal right on up to the
panther and alligator, their lives depend on the water to be clean and just the right levels to thrive and
reproduce. Many animals and plants live in the water, and others depend on water creatures for their
food. Different elevations and water levels determine what kind of habitats will exist in a place and in
turn different habitats determine which animals and plants will be found living there. So you see, water
is vitally important to all living creatures and because of that, we are all connected.
Big Cypress National Preserve is a part of the Big Cypress Swamp. The Preserve gets its water mostly
through rainfall, but also from the wetlands to the North and West. The water flows through the
Preserve southward through the eastern portion of Collier County. Along its journey it passes through
many habitats that are used by wildlife and people in many ways.
Throughout this program we will be exploring three habitats in the Big Cypress National Preserve and
determining if these are healthy habitats for the Florida panther, the American alligator, and people to
exist.
Why should you be concerned? Every day more and more people are moving to South Florida. That
means that more houses and buildings are being constructed in important habitats, more people are using
your water, more water is being polluted, and thus more impacts are being placed upon this fragile
ecosystem. In order for us all (wildlife included) to live together, be able to go to the beach, eat fish and
see the panther and alligator in their natural habitats, we all have to know what we can do to help.

Habitats in Big Cypress National Preserve
The five basic habitats of Big Cypress National Preserve include hardwood hammocks, pinelands,
prairies, cypress swamps, and mangrove forests. Each is unique in the type of plants, soils and animals
it contains depending on the elevation, which can range from sea level to 17 feet. During the field trip to
the preserve you will be exploring at least three of these habitats.
Hardwood Hammocks are found on slightly elevated bedrock areas or on the remains of Calusa shell
mounds. Hammocks look a bit like a tropical forest due to the rich diversity of ferns, epiphytes, lichens
and vines that grow in their sheltered interior. Oaks, wild tamarind, cabbage palms, maple and saw
palmetto are often found in these tree islands. Hammocks have a hydroperiod of about 10-45 days. The
plants in the hammock provide food and shelter to many different organisms including the Florida
panther which likes to lounge in the tall trees during the day. The Ligguus Tree Snail can also be found
in many hammocks.
Pinelands come in two types, one with an understory made up mostly of saw palmetto and the other with
a mixed grass understory. South Florida Slash Pine is the dominant overstory species. This slash pine
has developed longer taproots and smaller needle size than its northern cousin. These adaptations allow
the South Florida Slash Pine to survive the spring droughts and summer floods. This pine is also very
tolerant of fire. Its seeds may be eaten by many types of rodents, insects and birds.
The slash pine is a very hard wood, extremely resistant to termites. This has made it a very desirable
wood for building houses resulting in the logging of the old growth trees in Florida. The term Slash
comes from the once widespread practice of extracting its sap by cutting diagonal slash marks in the
trunk, draining the sap from the cuts and using it to make turpentine and other products.
A pine forest has a hydroperiod of about 20 – 60 days annually. Prairies are called wet or dry based
more on what plant species grow there than on the actual amount of water present. Wet prairies occur
on mineral soils that are covered with water about 50-150 days per year. The water rarely gets any
deeper than about 20 cm even in the wettest of seasons. Wet prairies usually burn at least once during a
five year period. Without fire, woody plants would push out the prairie plant species. This would in
turn cause prairie mammals and birds to lose their habitat.
Periphyton is a common part of the vegetation in wet prairies and is an important link in the wet prairie
food chain. Periphyton is made up of many species of blue-green and green algae. It may form a
blanket over the prairie floor that is 4 cm thick or more. Periphyton is eaten by a variety of flies, snails,
fish, tadpoles and zooplankton. During the rainy season, tadpoles and insect larvae hatch in prairies
providing many wading birds, reptiles and amphibians with a good meal.
Cypress Swamps are magical places with most of the overstory made up of cypress trees. In the
understory however, swamp fern, spikerush and marsh fleabane abound. Bladderwort, a carnivorous
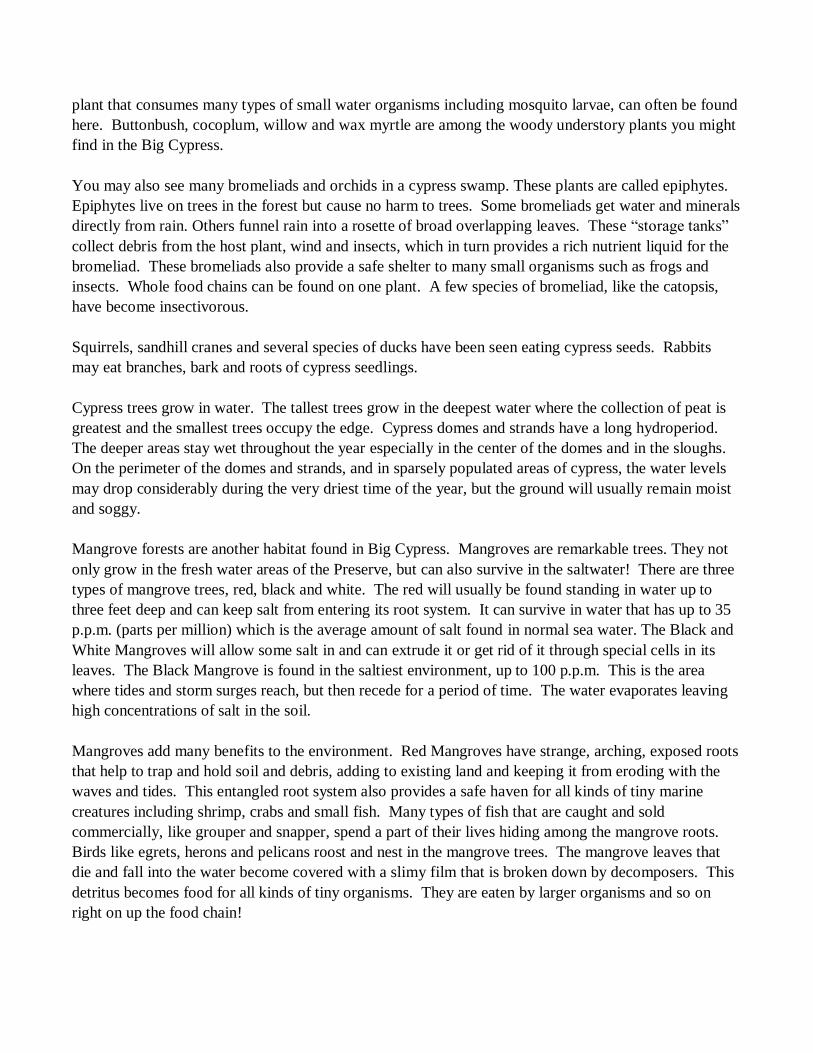
plant that consumes many types of small water organisms including mosquito larvae, can often be found
here. Buttonbush, cocoplum, willow and wax myrtle are among the woody understory plants you might
find in the Big Cypress.
You may also see many bromeliads and orchids in a cypress swamp. These plants are called epiphytes.
Epiphytes live on trees in the forest but cause no harm to trees. Some bromeliads get water and minerals
directly from rain. Others funnel rain into a rosette of broad overlapping leaves. These “storage tanks”
collect debris from the host plant, wind and insects, which in turn provides a rich nutrient liquid for the
bromeliad. These bromeliads also provide a safe shelter to many small organisms such as frogs and
insects. Whole food chains can be found on one plant. A few species of bromeliad, like the catopsis,
have become insectivorous.
Squirrels, sandhill cranes and several species of ducks have been seen eating cypress seeds. Rabbits
may eat branches, bark and roots of cypress seedlings.
Cypress trees grow in water. The tallest trees grow in the deepest water where the collection of peat is
greatest and the smallest trees occupy the edge. Cypress domes and strands have a long hydroperiod.
The deeper areas stay wet throughout the year especially in the center of the domes and in the sloughs.
On the perimeter of the domes and strands, and in sparsely populated areas of cypress, the water levels
may drop considerably during the very driest time of the year, but the ground will usually remain moist
and soggy.
Mangrove forests are another habitat found in Big Cypress. Mangroves are remarkable trees. They not
only grow in the fresh water areas of the Preserve, but can also survive in the saltwater! There are three
types of mangrove trees, red, black and white. The red will usually be found standing in water up to
three feet deep and can keep salt from entering its root system. It can survive in water that has up to 35
p.p.m. (parts per million) which is the average amount of salt found in normal sea water. The Black and
White Mangroves will allow some salt in and can extrude it or get rid of it through special cells in its
leaves. The Black Mangrove is found in the saltiest environment, up to 100 p.p.m. This is the area
where tides and storm surges reach, but then recede for a period of time. The water evaporates leaving
high concentrations of salt in the soil.
Mangroves add many benefits to the environment. Red Mangroves have strange, arching, exposed roots
that help to trap and hold soil and debris, adding to existing land and keeping it from eroding with the
waves and tides. This entangled root system also provides a safe haven for all kinds of tiny marine
creatures including shrimp, crabs and small fish. Many types of fish that are caught and sold
commercially, like grouper and snapper, spend a part of their lives hiding among the mangrove roots.
Birds like egrets, herons and pelicans roost and nest in the mangrove trees. The mangrove leaves that
die and fall into the water become covered with a slimy film that is broken down by decomposers. This
detritus becomes food for all kinds of tiny organisms. They are eaten by larger organisms and so on
right on up the food chain!


The Florida Panther
Family Tree: The Florida panther is a subspecies of the cougar like you and your cousin are in the same
family (subspecies) and you and your friend are humans (species). The cougar has many names in
different regions such as puma, mountain lion, painter, catamount, cougar and panther.
Beauty Marks: The panther is a large cat with a tail almost two-thirds as long as its body. Males and
females look alike except the males are larger. Their fur is medium tan and lighter tan on the chest and
belly. The kittens have spots which fade by the time they are about six months old. These colors
provide good camouflage for self-protection and hunting. Males weigh 100 to 150 pounds and are about
7 feet in length and females weigh 65 to 100 pounds and are about 6 feet in length. Many Florida
panthers have a distinctive crook in the tail and a cowlick in the middle of the back.
All in the Family: Panthers are solitary animals except for brief mating times and except for the bond of
the female for her kittens. Kittens may be born anytime in the year, but usually in late spring. Blind and
helpless, they weigh less than one pound. A litter may have up to four kittens, but two is the average
number that the female raises. For the first six weeks their primary diet is mother’s milk, but at two
months they begin to eat fresh meat brought to them by their mother. They remain with their mother for
one to one and a half years while they learn to hunt and survive.
Danger! Pellagro! Once bountiful, the Florida panther is now the only cougar subspecies scientifically
documented east of the Mississippi River. Prior to 1995 it was estimated that less than thirty panthers
remained in Florida. Research efforts have helped to increase the population keeping the Florida
panther from disappearing into the mists of time and gone forever.


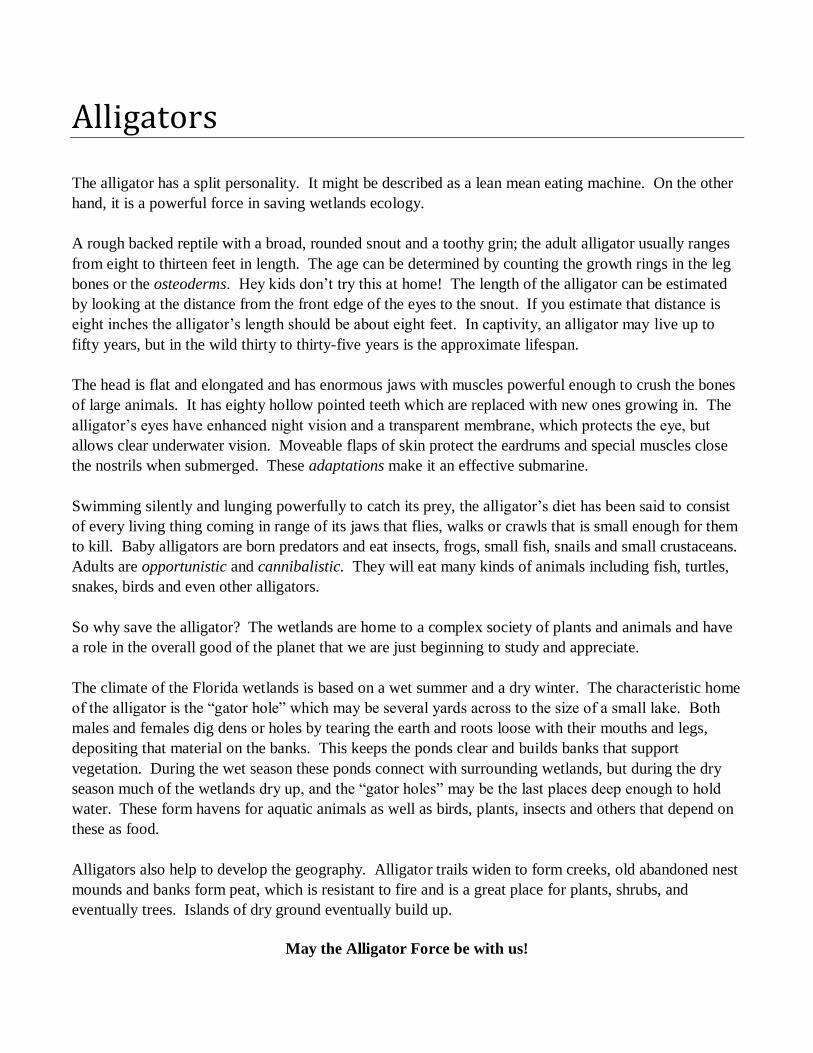
Alligators
The alligator has a split personality. It might be described as a lean mean eating machine. On the other
hand, it is a powerful force in saving wetlands ecology.
A rough backed reptile with a broad, rounded snout and a toothy grin; the adult alligator usually ranges
from eight to thirteen feet in length. The age can be determined by counting the growth rings in the leg
bones or the osteoderms. Hey kids don’t try this at home! The length of the alligator can be estimated
by looking at the distance from the front edge of the eyes to the snout. If you estimate that distance is
eight inches the alligator’s length should be about eight feet. In captivity, an alligator may live up to
fifty years, but in the wild thirty to thirty-five years is the approximate lifespan.
The head is flat and elongated and has enormous jaws with muscles powerful enough to crush the bones
of large animals. It has eighty hollow pointed teeth which are replaced with new ones growing in. The
alligator’s eyes have enhanced night vision and a transparent membrane, which protects the eye, but
allows clear underwater vision. Moveable flaps of skin protect the eardrums and special muscles close
the nostrils when submerged. These adaptations make it an effective submarine.
Swimming silently and lunging powerfully to catch its prey, the alligator’s diet has been said to consist
of every living thing coming in range of its jaws that flies, walks or crawls that is small enough for them
to kill. Baby alligators are born predators and eat insects, frogs, small fish, snails and small crustaceans.
Adults are opportunistic and cannibalistic. They will eat many kinds of animals including fish, turtles,
snakes, birds and even other alligators.
So why save the alligator? The wetlands are home to a complex society of plants and animals and have
a role in the overall good of the planet that we are just beginning to study and appreciate.
The climate of the Florida wetlands is based on a wet summer and a dry winter. The characteristic home
of the alligator is the “gator hole” which may be several yards across to the size of a small lake. Both
males and females dig dens or holes by tearing the earth and roots loose with their mouths and legs,
depositing that material on the banks. This keeps the ponds clear and builds banks that support
vegetation. During the wet season these ponds connect with surrounding wetlands, but during the dry
season much of the wetlands dry up, and the “gator holes” may be the last places deep enough to hold
water. These form havens for aquatic animals as well as birds, plants, insects and others that depend on
these as food.
Alligators also help to develop the geography. Alligator trails widen to form creeks, old abandoned nest
mounds and banks form peat, which is resistant to fire and is a great place for plants, shrubs, and
eventually trees. Islands of dry ground eventually build up.
May the Alligator Force be with us!

Global Positioning System (G.P.S.)
Global positioning system (G.P.S.) is a navigational tool (essentially a “high-tech compass”) that uses
satellites orbiting the Earth to:
Determine the coordinates of your position on the ground
Show your elevation, ground speed and compass heading
Find the coordinates of a landmark
Plot your route from one landmark to the next
Estimate the distance from your current position to your destination
Guide you in the right direction and keep you on course
G.P.S. is used by many different types of people, such as law enforcement officers, aircraft pilots, boat
captains, firefighters, hunters and fisherman, campers, and hikers.
G.P.S. is even useful for swamp scientists like all of you. Scientists in the Big Cypress National
Preserve use G.P.S. to:
Plot the position of wildlife such as the endangered red-cockaded woodpecker and exotic,
invasive vegetation like Melaleuca sp., Cassuarina sp. (Australian pine) and Brazilian pepper
Track animals such as the endangered Florida panther and the white-tailed deer for
conservation studies
Plot trails created by off-road vehicles (O.R.V.s) and airboats to monitor the environmental
impact caused by these vehicles
Mark boundaries for prescribed vegetation burns
Plot habitats such as sawgrass prairies, slash pine flatlands, hardwood hammocks, mangroves
and cypress domes
Mark the location of sampling sites for water quality testing so that the sites can easily be
found
You will be using a G.P.S. unit during the field trip to find coordinates. These will be used in a mapping
activity back in your classroom.

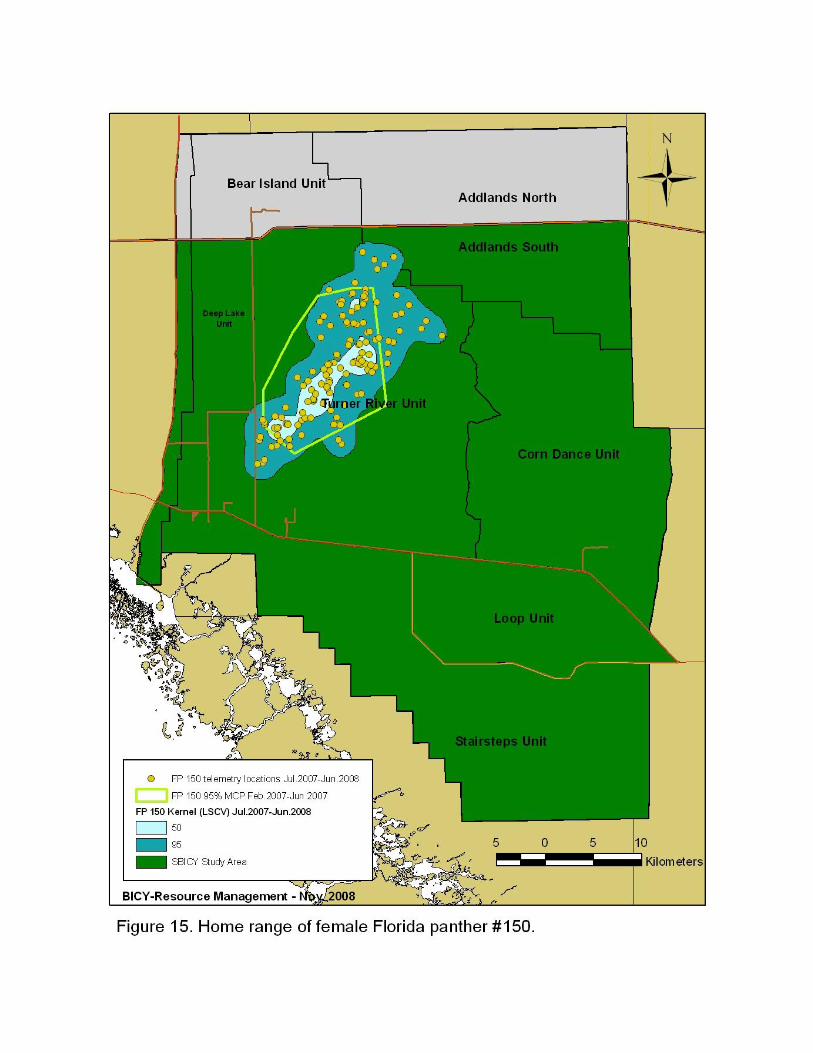
Radio Telemetry The Wildlife Biologist in Big Cypress National Preserve uses radio telemetry to locate and study Florida
panthers and other wildlife. These studies provide the biologist with valuable data used in the efforts to
save this extremely endangered species.
First the panthers are captured and fitted with a radio collar that contains a transmitter. The transmitter
sends out signals to a receiver much like radio frequencies are picked up by a radio in your home. The
receiver gives off beeping sounds that help the biologist locate the transmitter on the panther again in the
future. Tracking the panthers using this equipment provides important information about how far and
how frequently a panther travels and where its home territory is. From this data the biologist can study
what kind of food and cover is found in that area, potential threats that might be there and if it is a
healthy habitat for the panther.
From the beeps or signals transmitted the biologist can also tell if a panther is staying in one spot for a
long period of time. This could be a sign that there is a problem. The biologist will then go into the
field and locate the panther to find out what the problem is. It may be that the panther is having kittens,
is injured or maybe it has died. If there are new kittens a translocator chip is placed just under the
surface of the skin so they can be identified when caught again as adults and fitted with their own radio
collar. If the panther is sick or injured, a veterinarian may be able to administer treatment to make it
healthy again. If a panther collar has given off the mortality signal and the panther is found dead, a
necropsy is performed to discover what the cause of death was. This information may be used to save
the lives of other panthers in that area.
During your field trip to the Preserve, you will be using a receiver and an antennae to locate a panther
collar in three different habitats. Then we will gather data to determine if it is a suitable place for the
Florida panther to live.

Animals Shhh!!! Most animals in the swamp are nocturnal and you may only see signs that they were here, but
you can still see many animals here during the day if you are quiet! Many animals are diurnal and
might be busy hunting for prey or being hunted by a predator in the daytime. Some might even be
watching you right now!
This ecosystem is teeming with wildlife. Thousands of animal species make Big Cypress their home
including thirty-four animals listed as protected, rare, or threatened and endangered by the Federal or
State governments.
Some animals are found only in specific habitats and others will occupy many different habitats. What
makes them live where they do is the availability of food, water and shelter. So when scientists study
what kind of food source is in an area, how much water is there and what could be used for cover by an
animal they can decide what animals might live there and if that habitat is suitable and healthy. Take the
alligator for instance. It must have plenty of fish and other small animals to eat, plenty of water year-
round and lots of vegetation to provide cover for itself and its prey. An alligator hole would be a perfect
habitat for it. The alligator hole contains water even during the driest part of the year when other more
shallow areas dry down. At that time it is concentrated with fish and other animals that frequent the hole
for water and food. There are plenty of types of aquatic vegetation there to provide cover such as the
big, green leaves of the Alligator Flag.
There are many “signs” that tell scientists if there are particular types of animals found in an area.
Tracks in the mud or loose dirt are one of the best signs. Scat (animal poop) is another. By looking at
animal scat you can even find out what the animal has been eating. You may find feathers, fur or bones
that are also signs of what type of animals live there and if they were the predator or the prey!
Human activities have had a great impact on the animals in Big Cypress. The consequences of some of
these activities are easy to see like Prescribed Fires, O.R.V. trails, roads and exotic vegetation. Some
you can’t see right away, such as pollution, run off from agricultural areas, loss of habitat and diversion
of water flow. All of these impacts must be studied to find out how they have good or bad effects on the
animals and the environment and what should be done.

Vegetation
There are many different types of plants and trees or vegetation found in Big Cypress National Preserve.
What types are found where is determined by their ability to tolerate many factors such as climate,
nutrients, water and competition. Some types of vegetation are found only in specific habitats while
others are found overlapping into a few habitats or in all of them.
The type of vegetation found in an area and the abundance of it is extremely important to many types of
animals. This determines what kinds of animals and how many can live in a particular area. Herbivores
and omnivores use vegetation for food. Carnivores are attracted to areas that have vegetation that is
eaten by herbivores and omnivores. Vegetation also supplies a source of cover and protection for many
species.
Some types of vegetation found in South Florida are called Exotic Species because they are not naturally
found growing in this environment and in some cases are from another country altogether. Some of
these are very invasive and can do much damage to habitats. Species like Melaleuca and Brazilian
Pepper crowd out the native species of vegetation and grow so thick that wildlife can’t even use the area.
Some aquatic exotics growing in streams and ponds take up all the oxygen and prevent the movement of
the water. The reason these plants seem to survive so well is that they have no natural predators here as
they would where they have come from so they take over or invade the area!
Disturbances to the environment either natural or human caused may result in changes in the types of
vegetation growing in certain areas. Fires, floods, hurricanes, development, overuse of trails and
contaminates from agricultural lands are all things that can change the whole landscape. These areas
can be monitored by scientists to find out what kinds of plants regrow or what new plants grow in their
place. This could result in different types of wildlife living in the area.

Bald Cypress
A Gentle Giant The bald cypress is a large cone-bearing tree with needle-like leaves that are flat, soft to the touch, and
flexible. Unlike many trees, which would die if they were standing in water, the bald cypress thrives in
water. The trunk appears smooth and gray and spreads widely at the bottom. Submerged roots spread
around the tree and come up through the water in projections that look like someone's skinny knees.
The wide base, roots and knees help the bald cypress survive periodic hurricane force winds, and the
knees help provide oxygen to the roots.
This tree is called "bald" because it loses its leaves in the winter, which is very unusual. It is related to
the dawn redwood in China, which also loses its leaves in winter, and to the giant redwood trees in
California. Another of its cousins is the Montezuma bald cypress in Mexico, one of which has a
circumference of 112 feet and is 141 feet tall. Dwarf cypress on the other hand, usually are less than 25
feet tall but may be hundreds of years old due to less favorable growing conditions. Both large and
dwarf bald cypress can easily be seen in Big Cypress National Preserve.
One of the things making the bald cypress really special is that the heartwood is very resistant to rot. In
fact, it is sometimes referred to as "wood eternal". This makes it great for building docks, warehouses,
bridges and boats like mine sweepers. It is that quality that nearly destroyed the once abundant cypress
in this area.
The trees here were heavily logged, and most of the trees you see now are second growth. Other
enemies are the non-native plants that crowd them out, such as the Brazilian pepper, melaleuca, and
Australian pine, and the changes man made to the watershed.
At this time Big Cypress National Preserve, along with others, is attempting to insure that the bald
cypress survives in Southern Florida. Just by being aware of its plight, you too, may be able to help
insure the survival of this gentle giant.

Water Water is the most important environmental feature of Big Cypress National Preserve and because of that
the Preserve was created.
There are many factors that determine what organisms live in and around the water. One of these
factors is water depth. Many aquatic species of plants and animals depend on the depth of the water to
survive. The water depth varies throughout the Preserve depending on the amount of rain that falls and
the elevation of certain areas. This causes some areas to have longer or shorter hydroperiods and
determines what plants and animals are able to survive there. The deepest water is found in the Cypress
Domes. Even during the dry season the centers of the cypress domes stay wet and provide habitat for
the alligators. This is why they are often called alligator holes. The pinelands are often the driest areas
resulting in species of plants that require less water such as saw palmetto, sabal palms and pines.
Another factor is water temperature. Water temperature is often affected by water depth and air
temperature and can also determine the species found in various habitats.
Dissolved Oxygen is the oxygen within the water. This oxygen is essential to aquatic animals and some
plant species. Aquatic animals respire or “breathe” oxygen from the water and most animals require a
certain amount of oxygen to be in the water. Low levels of dissolved oxygen results in lower diversity
of life. Some plant species use oxygen from the water instead of the air to carry out photosynthesis.
pH is a measure of the acidity or alkalinity in the water which also determines what lives there. It can
be affected by chemical reactions in the water such as decaying organic matter and dissolving bedrock.
Water colors change throughout the habitats. Tannins from the pine needles and other vegetation turn
the water brown like tea. Algae can cause it to turn green. Water color can also be affected by the
amount of suspended sediments within the water, like pollen, which can appear yellow.

Everglades
BigCypressSwamp
Gulf ofMexico
LakeOkeechobee
10 miles
EvergladesNational
Park
BigCypressNationalPreserve
Big Cypress - Everglades
Water Connection
direction of
surface-water flow
Soil
Soils are some of our most important resources. Soils hold nutrients and water for plants and animals.
Soils filter water as it flows through, cleansing it. Soils affect the chemistry of the water and the amount
of water that returns to the atmosphere to form rain. The foods we eat and most of the materials we use
for paper, buildings, and clothing are dependent on soils. Knowledge of soil is important in making
decisions about where to build our houses, roads, and playgrounds.
Soil is formed from particles of rock that are broken into smaller pieces by physical, chemical and
biological weathering processes mixed with dead plant and animal matter. The formation of soils is
affected by climate, topography, living things, rock composition and time. Soil is made up of sand, silt,
clay and organic material.
Soil moisture is a critical characteristic and dictates what types of plants will grow in an area and it
determines if an area will flood or the water will run off. About one fourth of the volume of productive
soil is water as either a vapor or a liquid.
Soil temperature influences all living organisms. The upper layers of soil insulate the deeper layers of
soil and their inhabitants from temperature extremes.
Soil color is determined by the amount of organic matter present and on what minerals it contains, such
as calcium carbonate that colors the soil white if the area is dry.
Texture is determined by the amount of clay, silt and sand in the soil. Sand is the largest particle, silt is
next in size and clay is the smallest and defined as being smaller than 0.002 mm.
Gases may be trapped in anaerobic soils. Plants are broken down by little organisms powered by
anaerobic respiration which gives off alcohol and methane gas. When you are walking through the
swamp the methane gas is released and you can sometimes see the little bubbles of methane coming up
to the surface, leaving a sheen on the water. The Methane gas smells a little like rotten eggs.
Sulfur also hangs around in soils that are wet most of the time and is sometimes present as a residual
from oil and gas. It also has a very strong odor of rotten eggs.
The three main soil types in the Big Cypress are organic, marl, and sand.
Organic soils form when litter builds up. In dry areas the organic material is destroyed by fire, decay
and oxidation. If water covers an area so that oxygen for decay is lacking, plant bits build up as peat.
Peat development is dependent on water depth, pH, hydroperiod, vegetation type and topography.

Peats and mucks, both having organic materials, have a greater ability to store water and serve as a
reservoir for nutrients.
Carbonate marls are the most widespread loose soil type. These may occur as thin sheets over prairies,
or more thickly in lakes and sloughs. Marl is a crumbly soil consisting mainly of clay, sand and
calcium carbonate.
Sand is a loose granular material, made up primarily of quartz or calcium carbonate, that results from the
disintegration of rocks. It contains particles that are smaller than gravel but coarser than silt.


Weather in the Swamp Weather in the swamp is made up of five basic components: wind speed, direction of wind, air
temperature, relative humidity and dew point. Weather is important to all of the Park Rangers,
especially the firefighters. The weather components let the firefighters know when they can perform
prescribed fires. It also lets them know when the wildfires have potential to become out of control with
extreme fire behavior. Weather can be observed in prairies, cypress domes, and pinelands. The weather
conditions can vary between the three habitats.
Prairies tend to be wide, open spaces. There is very little shade; therefore air temperatures tend to be
higher. There are few obstacles to slow the wind speed. As a result, the relative humidity is often lower
here. Weather in the prairie is important because the wind speed can push fires faster. The hotter air
temperatures and drier air can help the fires burn faster too.
Cypress domes are made up of hundreds of cypress trees. There is very little space between the trees.
All the obstacles slow the wind speeds. The trees provide shade that lowers air temperatures. The
moisture held in cypress domes combined with lower air temperatures, cause the relative humidity to be
higher. This information lets firefighters know that fires are a little easier to control in and around
cypress domes.
Pinelands can contain a few trees or hundreds of trees. There are other plants found in pinelands such as
saw palmetto, wax myrtle bushes, and cabbage palms. These obstacles slow the wind speeds like they
do in cypress domes. Pine trees provide shade that can cause lower air temperature. Pinelands usually
do not hold as much moisture as cypress domes, because the land is higher above sea level. Relative
humidity in pinelands is usually lower than cypress domes because of less moisture and higher air
temperature. Relative humidity in pinelands is usually higher than the prairies, because of lower air
temperature. Weather information from pinelands lets firefighters know whether or not they will be
able to control a fire burning in pinelands.
Dew Point is important because it lets us know at what air temperature we can expect dew to form on
grasses, bushes and other things outdoors. Firefighters use this information to determine whether the
dew will help them control a fire at night. A heavy layer of dew can help put a fire out over night.
Campers, hikers and scientists can use this information to determine if their tents and gear will be
soaked when left outside over night.

Fires
Fire is an important part of the South Florida Ecosystem
In South Florida wildfires can be caused by many things. Lightning and careless people are most
common. Wildfires are usually watched and controlled carefully and put out in areas where it causes a
threat to people and their property.
The firefighters at Big Cypress National Preserve actually start more fires than they put out. They start
what we call prescribed fires. When old, dead brush, logs and grasses build up very thick it becomes
fuel for a fire. If lightning were to cause a fire in an area that has this extra fuel it would cause the fire to
be very hot and out of control and could even kill many of the native trees and plants. Prescribed fires
eliminate extra fuel and lower the chances of a devastating fire occurring.
To plan for a prescribed fire, the firefighters study the fuel load in an area to see if the extra fuel needs to
be burned off. They must study the weather to see when wind, humidity, and other conditions are just
right in order to start a fire. It is very important that they work closely with Preserve scientists to find
out information on water levels, soil types, and animal/vegetation species in the area. All of these
factors are taken into consideration during the planning stages. After collecting all this data they write
out their plan, or prescription, and begin burning. Firefighters are like doctors of the land; just like a
doctor writes a prescription to make people healthy, fire prescription helps to make the environment
healthy.
The fire burns old, dead growth eliminating the fuel while the ashes add nutrients to the soil. This
allows new growth to have room to sprout, which supplies food and shelter for wildlife. Some plants
and trees, like the slash pine, need heat from fires to grow and spread their seeds. The fires also keep
other types of plants and trees from taking over certain habitats.
Big Cypress National Preserve has the largest prescribed fire program in the National Park System.
Each year the firefighters set a goal of burning at least 70,000 acres in Big Cypress. That’s about 10%
of the entire Preserve!

Student Vocabulary Abiotic - a non-living factor in the environment
Adaptation – the process of becoming better suited for survival in an environment
Aerobic – able to live only in the presence of air or free oxygen
Air temperature – the degree of the hotness or coldness of the air around us
Anaerobic – able to live and grow where there is no air or free oxygen
Anemometer – tool used to measure wind speed
Aquatic – growing, living in, or frequenting water
Aquifer - a water-bearing stratum of permeable rock, sand, or gravel
Biodiversity – the variety of life forms in a given area
Biome – all the living things within a region that make up a single ecosystem
Biotic – caused or produced by living beings
Bromeliads - any of a family (Bromeliaceae) of chiefly tropical American, usually epiphytic,
herbaceous plants including the pineapple, Spanish moss, and various ornamentals
Camouflage – a way that animals blend into their surroundings for protection from their predators
Cannibalistic – The eating of the flesh of an animal by another animal of the same kind
Carnivore – a meat eater
Carrying capacity- ability of a given habitat to supply food, water, shelter and necessary space for
wildlife
Climate - the weather conditions that are typical for a place or region
Colony – a group of people or animals living together in the same areas
Commensalism - a close association between two organisms in which one organism obtains some
benefit (ex. food, shelter) from the other organism without causing harm or benefit; a type of symbiosis
Community – a system created by the interactions between organisms which inhabit a common
environment and play specific roles (ecological niches)
Compass – tool used to find magnetic North and direction of travel in the woods
Competition – when two or more organisms have the potential for using the same resource
Conifer – a plant that bears its seeds in cones
Conductivity - the ability of water to transport an electrical charge
Conservation – the use of natural resources in a way that assures the continued availability to future
generations; the wise or intelligent use and protection of natural resources
Consumer – organisms that use producers as their food supply because they can not make their own
food
Consumptive Use – any use that involves an activity that results in the loss of wildlife or other natural
resources
Cover – the vegetation, debris and irregularities of the land that provide shelter for wildlife to sleep,
feed and breed
Culture – the way of life, customs, and traditions of a group of people
Cypress – a type of tree which grows in wet environments, such as the Big Cypress Swamp, and forms
a habitat for organisms to exist
Cypress Dome – tall, dome-shaped tree islands of Bald Cypress trees occupying depressions in the
limestone. These depressions contain water or have water running through them most of the year
Cypress Strand – an area of Cypress trees growing along a slough
Deciduous – referring to trees that annually shed their leaves
Decompose – to rot or decay
Detritus - loose material that results from disintegration – in organic matter it becomes the base of the
food chain
Development – the spread of buildings, roads, railways, or other construction
Dew point - the temperature of the air at the point which the air is saturated one hundred percent with
moisture
Direct Water Uses – apparent uses of water (ex. bathing, cooking, washing)
Dissolved oxygen – oxygen dissolved in water that is available for use by some aquatic organisms
Diurnal – active during the day; opposite of nocturnal
Diversity – a variety of different types and kinds
Ecology – study of the relationship between organisms and their environment
Epiphyte - a plant that grows on another plant and derives its water and nutrients from the surrounding
environment
Ecosystem – communities of plants and animals interacting with each other and with the environment
Elevation - the height above a surface
Endangered species - a species of plant or animal whose numbers are so low it is in danger of
extinction
Environment – the surroundings of a plant or animal including other plants and animals, weather and
location
Everglades – the expanses of freshwater marsh originally extending from Lake Okeechobee to nearly
the southern tip of the Florida mainland. The bulk of the Everglades ecosystem receives nutrients only
from the atmosphere, primarily in the form of rainfall unlike other ecosystems which receive nutrients
from associated rivers that overflow their banks. It is a “sheet flow” ecosystem independent of river or
stream channels and is unique in the world.
Exotic species – a plant or animal that has been introduced into an area where it does not naturally occur
Extinction – the disappearance of a plant or animal species from our world
Food Chain – the relationship between predators and prey in an ecosystem
Food Web – the relationship between all of the food chains in an ecosystem
Freshwater- clean, unpolluted water containing no dissolved salt
Groundwater – water found in spaces between soil particles underground (in the saturation zone)
Habitat – food, water, shelter and space that compose an organism’s environment
Habitat loss – the loss of a place where an organism lives (gets water, air, food and shelter)
Headwaters – the source of a stream
Herbivore – an animal that eats only plants and grasses
Hydrologic cycle – the never-ending circle of changes that water repeatedly undergoes as it moves from
the oceans, rivers and lakes into the clouds and back into the surface waters (also called the water cycle)
Hydroperiod –the amount of time a wetland area is flooded with water
Indigenous – a naturally occurring species
Indirect water use – uses of water that are not immediately apparent
Introduced species – a plant or animal found in an environment where it does not naturally occur
Latitude – the horizontal location on a map North or South of the equator; measured in degrees or time
Longitude – the vertical location on a map East or West of the Prime Meridian; measured in degrees or
time
Limited welfare factor – a factor in the environment (necessary for life) that will restrict the growth of
a population when in short supply
Mammal – warm-blooded animal that has fur and young that feed on milk

Migrate – to relocate from one habitat to another in a regular cycle
Macro-invertebrates – invertebrates (animals without backbones) large enough to be observed without
the aid of a microscope
Microorganism – an organism can be seen only through a microscope
Multiple Use Concept – principle by which habitat is managed to provide more than one benefit
Mutualism – a close association between two organisms in which both species derive some benefit; a
type of symbiosis
Native species – an organism which occurs naturally in the environment
Natural resource – materials of nature, such as timber, water, and all species of wildlife
Necropsy – to perform an autopsy on
Nocturnal – active during the night; opposite of diurnal
Non-consumptive use – any use that does not directly harm wildlife (ex. bird watching, photography,
hiking)
Non-point source pollution – pollution that comes from more than one place
Orchid – a large family of epiphytic or terrestrial plants that have three-petaled flowers with the middle
petal enlarged into a lip and differing from the others in shape and color
Organic – coming from living things (ex. decomposed plant and animal material in the soil)
Omnivore – an animal that eats both plants and animals
Opportunistic – an animal that feeds on whatever food is available
Overstory - the layer of foliage in a forest canopy
Parasitism – a close association between two organisms in which one organism benefits from another
organism at the cost of the parasitized individual; a type of symbiosis
Periphyton - organisms that live attached to underwater surfaces (ex. some algae)
Pesticide - a chemical used to kill bugs and other pests
pH – a measure that indicates the relative acidity or alkalinity of a liquid
Photosynthesis – a biochemical process found in green plants by which energy from the sun is used to
turn water and carbon dioxide into food; oxygen and water are released as by-products
Plume – a cluster of large or showy feathers on a bird
Poacher – a person who takes fish or game illegally
Point source pollution – pollution caused by one direct source
Pollutant – waste or foreign material that contaminates soils, water or air
Predator – an animal that hunts other animals for food
Prescribed burn – a controlled fire that is deliberately set for management of the land and used to
prevent wild fires
Preserve - an area restricted for the protection and preservation of natural resources (ex. animals or
trees)
Preservation – saving natural resources for the future
Prevention – the act of prohibiting an activity
Prey – an animal that is hunted or caught by another animal for food
Private property – land owned by one person or a group of people that is not open for public use unless
permitted
Producer – an organism that is able to make its own food and is eaten by other organisms (ex. green
plants)
Public land – lands managed by the state and Federal government and usually open for everyone’s use
Rare – referring to wildlife not presently in danger but of concern because of low numbers
Refuge – area used to protect wildlife

Relative humidity – the amount of moisture in the air
Resource – a portion of an environment upon which people have placed or assigned value for use
Restoration – the act of bringing something back to a previous condition
Runoff – water that drains or flows off the surface of the land
Salinity – the concentration of salt found in the water
Salt marsh – habitat that is saturated with salt water or flooded by the sea
Saltwater – water that contains a definite percentage of dissolved salt
Shrub land – an area covered by low-growing woody plants
Sling psychrometer – tool made with two thermometers used to calculate relative humidity
Slough –a depression in the limestone running through a swamp forming a long narrow creek
Solution – the mixture of a solute and a solvent (ex. Saltwater is a solution composed of salts (solute)
and water (solvent))
Species – a group into which plants and animals are divided based on shared characteristics and the
ability to reproduce their own kind
Stewardship – a practice which allows the responsible management of the environment for future
generations
Succession – the orderly, gradual and continuous replacement of plant and animal species by other plant
and animal species
Surface tension – attraction of water molecules at the surface of a liquid creating a skin-like barrier
between air and underlying water molecules
Surface water – water above the surface of the land, including lakes, rivers, streams, ponds, floodwater,
and runoff
Swamp – a wetland dominated by trees where the soil is saturated and often inundated with water
Symbiosis – a close living relationship between organisms
Thermometer – tool used to measure the temperature
Threatened species – a species that because of its low numbers is likely to become endangered.
Understory - an underlying layer of vegetation; specifically the vegetative layer and especially the trees
and shrubs between the forest canopy and the ground cover
Vegetation – the plants that grow in a habitat
Venn diagram – a graph using circles to show relationships among sets of different things
Water – an odorless, tasteless, colorless liquid made up of a combination of hydrogen and oxygen.
Water forms streams, lakes, and seas, and is a major constituent of all living things
Water cycle – see hydrologic cycle
Water table - top level to which ground water rises when underground
Water quality – the chemical, physical, and biological characteristics of water with respect to its
suitability for a particular use
Watershed – land areas from which surface runoff drains into a stream channel, lake reservoir, or other
body of water; also called a drainage basin
Wetlands – areas containing much soil moisture, such as marshes, bogs, swamps, rivers and lakes
Wildlife – non-domesticated animals, including mammals, birds, and fishes, which may be hunted as
controlled by the law
Wildlife management – wise use and management of land and wildlife for the conservation purposes
Wildfire – fire that burns out of control
Wind direction – the direction from which the wind blows – example: a North wind blows from the
North towards the South
Wind speed – how fast the air is moving


Swamp Water And Me Program
Pre-Site Classroom
Lessons and Labs
Before Your Field Trip


SWAMP Backpack Orientation Objectives
Students will be able to (1) identify and use the
tools and instruments in the SWAMP backpack (2)
feel comfortable with group work and the data
recording process.
Overview
Students will rotate around to stations to become
familiar with the different types of measurements
and observations they will make during the field-
trip.
Background Information
In order to be successful and make meaningful
connections on the field trip, students must be
familiar with the instruments, observations, and
data recording protocols they will be exposed to
during the trip. Each instrument or tool used on the
trip is provided in the backpack you received from
the Big Cypress National Preserve Educational
Program. If no back backpack exists at your school,
please contact the educational center. In the
meantime, the procedure can still be carried out
using replacement instruments that would most
likely be stocked in a science classroom.
Materials
SWAMP backpack [includes the following: sling
psychrometer, weather flag, anemometer,
thermometer, various collection jars, pH strips,
Dissolved Oxygen kit, compass, vegetation cards],
also a yard stick or ruler for depth measurements.
Optional: G.P.S., radio telemetry equipment,
authentic depth stick.
Procedures
1) There will be four to five stations set up during
this activity. Each station has a handout that
can be printed and copied for use by the
students at each station. The stations can be
modified, combined, or removed as necessary.
2) Each student needs a data worksheet that can be
copied double sided (see handouts).
3) Before the stations begin, explain and
demonstrate the DO kit, and leave it on the
water station table so that the students can
observe and estimate the DO level of the water.
If there is no G.P.S. unit available, explaining
how G.P.S. works would also fit here.
Stations
Weather: sling psychrometer, flagging, and
anemometer out. Can be outside or inside with
a fan for wind. Student might need help with
sling psychrometer if they have not used it
before.
Water: Thermometer, a ruler or yardstick, pH
strips, the DO kit, a container filled with
pond/lake/stream water, sampling jar. Students
go through steps to use each instrument,
recording data. Make sure temperature is in
Celsius. DO kit needs to be explained before
stations.
Location: compass, G.P.S. (if available).
Students use a compass to find direction from a
landmark they choose to their current location.
Animal and Vegetation: This can be
combined using an outdoor setting. Students
will observe plants and animals in the area and
fill out the table accordingly, answering the
questions or recording data. If there is no
outside setting, students can look out a window,
watch a video, or look at pictures of a natural
setting.
Evaluation
1) SWAMP field trip evaluation, Student records,
teacher-generated multiple choice.

Student Data Weather Station
Instrument or Test What does it
measure?
My Data
Sling Psychrometer Dry Bulb = __________
Wet Bulb = __________
Depression: Dry – Wet = ____ - _____ = __
Relative Humidity % = _______ %
Weather Vane Wind Direction = ___________
Anemometer Wind Speed = ____________
Water Station
Instrument or Test What does it
measure?
My Data
Water Temperature Temperature = ____________
Water Depth Depth = ____________
Water Color Color = ____________
pH pH = ___________
Dissolved Oxygen
(DO)
DO = ___________

Location Station
Types of Habitats Match the habitats to
their correct pictures
Landmarks What landmarks do
you see?
Compass Direction to your
position from the
landmark
G.P.S. Coordinates
Animal Station Animal Observation What animals do
you see?
Signs of Animals How do you know
animals were there?
Predators and prey List some predators
and some prey in the
environment
Vegetation Station Plant Types What types of plants
do you see?
Food Sources What food is there
for the animals?
Cover
What places could
animals hide in?
Human
Disturbances
How did humans
impact the area?
Natural
Disturbances
How did nature
impact the area?

Weather Station Directions: There are three instruments that measure different properties of the atmosphere that you will use
during the SWAMP program. Read through each of the directions and work together to solve the problems.
1) Sling Psychrometer. This instrument measures the relative humidity of the air. That means it
measures how much water is in the air compared to how much water the air can hold. On a humid
day, when your skin feels muggy and wet, the relative humidity is high. On a dry day, the relative
humidity is low.
a. Dip the cotton ball in a small amount of water.
b. Twirl the two thermometers in a circle above your head for 60 seconds, holding tightly and
not letting the thermometers go for any reason.
c. Record the temperature of both thermometers in your data table. The wet thermometer is the
wet bulb; the dry thermometer is the dry bulb.
d. Subtract the wet bulb from the dry bulb temperature to get the difference between the two
temperatures. Then use the difference and the dry bulb temperature to look up relative
humidity in the chart included at your station.
2) Weather Vane (flag). This flag allows you to determine wind direction. The direction that the flag
is blowing is the direction the wind is blowing. Wind direction is written down as the direction the
wind comes from. For example, if the wind is blowing from the North to the South, we say the wind
is a North wind. Accurate wind direction can be measured using a flag and a compass.
3) Anemometer. This instrument measures wind speed. The anemometer you will use needs to be held
vertically, with the opening facing the direction of the wind. The white ball will bounce. Take an
average reading of the height of the ball.

Water Station Directions: at the SWAMP you will be measuring water depth, temperature, pH, color, and dissolved
oxygen levels. Read through the directions and work in your groups to solve the problems.
1) Water Temperature. Use the thermometer to record the temperature of the water. Do not touch the
thermometer to any part of the container. Do not let it touch because you are measuring the
temperature of the water, not the ground. Ask your teacher what decimal place to read the
thermometer to.
2) Water Depth. Use the depth stick or a ruler to measure the depth of the water in centimeters. Make
sure that the stick touches the bottom and the dept is read from the water line.
3) Water Color. In your group, record the color of the water. Some examples: light brown, colorless,
or light green. Place a white sheet of paper behind the water container to make it easier to see.
4) pH. This is a measure of how acidic or basic the water is. Using the pH strips provided, dip one pH
strip into the water and quickly remove it. Let the pH strip dry out on the table, and compare the
color of the strip to the color on the pH strip container. Record the pH value in your table.
5) Dissolved Oxygen. Your teacher will have preformed this test for you. In the field, you will break
the small glass ampoule into a water sample, which will suck up water and turn it a shade of blue.
Compare the shade of blue in your teacher’s ampoule with the standards sitting out. Record the
dissolved oxygen value in your table.

Location Station Directions: at the SWAMP you will be measuring water depth, temperature, pH, color, and dissolved
oxygen levels. Read through the directions and work in your groups to solve the problems.
1) Types of habitats. Use the handout at the station to identify the three habitats you will be seeing at
Big Cypress. Bonus points for identifying all of the different habitats!
2) Landmarks. How well can you describe your location? Could you describe it in enough detail to let
someone else come find you? In your group, try to point out physical details and landmarks that
could be used to mark your position.
3) Compass. Pick one landmark from your last activity. Move to that landmark. Once at the landmark,
rotate your compass so that the red arrow is pointing to N or North. Now, record the direction on the
compass that points toward your station. Also record how many steps to the station it would take to
get there. (Example: twenty steps West of the station from the big tree.)
4) G.P.S.. You will not be using a G.P.S. in class unless your teacher has one. If your teacher does not
have a G.P.S., he or she will supply the coordinates. If you do have a G.P.S. at the station, use the
G.P.S. to record the latitude and longitude of your current location.

Animal / Vegetation Station Directions: You will be looking for many different types of plants while on the SWAMP trip. Carefully
follow directions and record data in your data table.
1) Animal Observation. In the three tables provided on your student sheet, list the types of animals
you observe, the evidence that animals have been in the area, and the types of predators and prey you
see evidence of or that you think live in the area.
2) Plant observation (vegetation). Next, observe the different types of plants in the area, and compare
them with each group member’s observations. Complete the table for the vegetation section,
recording the types of plants, the cover for animals they provide, the types of food sources that
plants in the area provide, and the human disturbances (for example: a human trail, garbage) as well
as natural disturbances (wind, rain, storms) seen in the area.
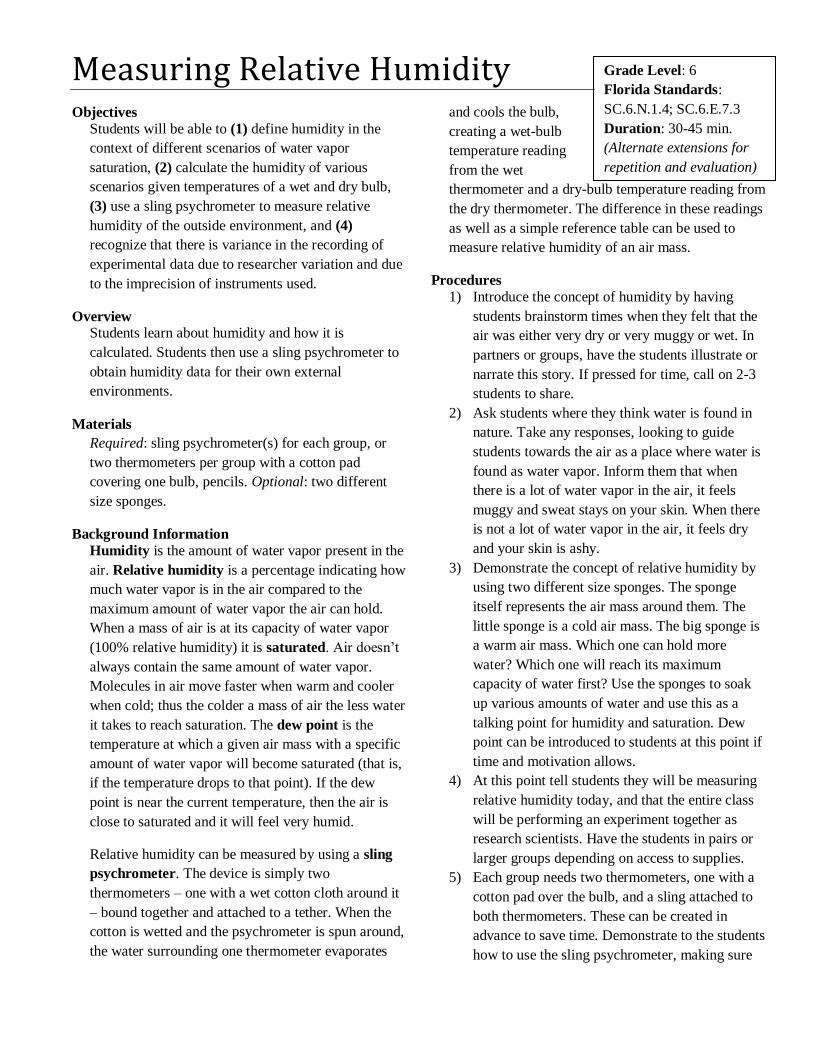
Grade Level: 6
Florida Standards:
SC.6.N.1.4; SC.6.E.7.3
Duration: 30-45 min.
(Alternate extensions for
repetition and evaluation)
Measuring Relative Humidity Objectives
Students will be able to (1) define humidity in the
context of different scenarios of water vapor
saturation, (2) calculate the humidity of various
scenarios given temperatures of a wet and dry bulb,
(3) use a sling psychrometer to measure relative
humidity of the outside environment, and (4)
recognize that there is variance in the recording of
experimental data due to researcher variation and due
to the imprecision of instruments used.
Overview Students learn about humidity and how it is
calculated. Students then use a sling psychrometer to
obtain humidity data for their own external
environments.
Materials
Required: sling psychrometer(s) for each group, or
two thermometers per group with a cotton pad
covering one bulb, pencils. Optional: two different
size sponges.
Background Information
Humidity is the amount of water vapor present in the
air. Relative humidity is a percentage indicating how
much water vapor is in the air compared to the
maximum amount of water vapor the air can hold.
When a mass of air is at its capacity of water vapor
(100% relative humidity) it is saturated. Air doesn’t
always contain the same amount of water vapor.
Molecules in air move faster when warm and cooler
when cold; thus the colder a mass of air the less water
it takes to reach saturation. The dew point is the
temperature at which a given air mass with a specific
amount of water vapor will become saturated (that is,
if the temperature drops to that point). If the dew
point is near the current temperature, then the air is
close to saturated and it will feel very humid.
Relative humidity can be measured by using a sling
psychrometer. The device is simply two
thermometers – one with a wet cotton cloth around it
– bound together and attached to a tether. When the
cotton is wetted and the psychrometer is spun around,
the water surrounding one thermometer evaporates
and cools the bulb,
creating a wet-bulb
temperature reading
from the wet
thermometer and a dry-bulb temperature reading from
the dry thermometer. The difference in these readings
as well as a simple reference table can be used to
measure relative humidity of an air mass.
Procedures
1) Introduce the concept of humidity by having
students brainstorm times when they felt that the
air was either very dry or very muggy or wet. In
partners or groups, have the students illustrate or
narrate this story. If pressed for time, call on 2-3
students to share.
2) Ask students where they think water is found in
nature. Take any responses, looking to guide
students towards the air as a place where water is
found as water vapor. Inform them that when
there is a lot of water vapor in the air, it feels
muggy and sweat stays on your skin. When there
is not a lot of water vapor in the air, it feels dry
and your skin is ashy.
3) Demonstrate the concept of relative humidity by
using two different size sponges. The sponge
itself represents the air mass around them. The
little sponge is a cold air mass. The big sponge is
a warm air mass. Which one can hold more
water? Which one will reach its maximum
capacity of water first? Use the sponges to soak
up various amounts of water and use this as a
talking point for humidity and saturation. Dew
point can be introduced to students at this point if
time and motivation allows.
4) At this point tell students they will be measuring
relative humidity today, and that the entire class
will be performing an experiment together as
research scientists. Have the students in pairs or
larger groups depending on access to supplies.
5) Each group needs two thermometers, one with a
cotton pad over the bulb, and a sling attached to
both thermometers. These can be created in
advance to save time. Demonstrate to the students
how to use the sling psychrometer, making sure

to have them record all data as they take readings.
If students do not know how to read a
thermometer, a quick mini-lesson would be
essential before proceeding. Make sure students
read the thermometers in Celsius, as metric
measurement is most pertinent to science.
6) Now, introduce today’s experiment as a
comparison of the humidity of the air inside and
outside of the school building. Each group will be
taking a reading of relative humidity inside and
outside, and comparing the two values. Instruct
each group to make a prediction (template: “If
relative humidity of both outside and inside
environments at our middle school are measured
using a sling psychrometer, then the outside
humidity will be ________ than the inside
humidity”).
7) Have student groups record relative humidity
inside the building and then outside of the
building. Management is easier if there is a
reward for the most scholarly scientists that show
careful and accurate recording of data without
disturbing the environment.
8) Back in the classroom, have students write data
on the board, and then calculate class averages
for inside and outside. Instruct students to discuss
the results with their partner and evaluate their
hypothesis – can they accept their hypothesis or
reject their hypothesis? Are the values too close
to make a decision? What can we say about the
difference of data in both conditions from each
group? (mention researcher error, instrument
error or lack of precision).
9) Have students record humidity over the next
week, tracking changes in the external humidity
using their sling psychrometers.
Evaluation 1) Have students keep a personal record of the
external humidity using their sling psychrometer
(or a group psychrometer) over an extended period
of time.
2) Have one student measure and record relative
humidity of the external environment each day for
the remainder of the year or month, and explain to
the class what that means compared to previous
data.
3) Multiple choice or free-response questions for
practice in class or for quizzes:
The air feels warm and muggy, and the sweat on
your face and arms is trickling down – not
evaporating off. Using the term relative humidity,
explain why the air feels wet and muggy and the
sweat is not evaporating off of your body.
There is 7g of water vapor in an air mass outside.
The maximum water vapor the air mass can hold
is 10g. What is the relative humidity of the air?
How would a scientist measure relative humidity
of the air if they were interested in recoding
relative humidity every day over a long period of
time?
What instrument would most likely be used to
measure the relative humidity of an air mass?
a. Barometer
b. Sling psychrometer
c. One thermometer
d. Weather vane

Directions
The table above is a relative humidity reference table. First, measure wet-bulb and dry-bulb temperatures
using a sling psychrometer after whirling it around your head for about one minute. Next, calculate the
difference in the two temperatures (dry minus wet). Lastly, connect the corresponding difference column to
the correct dry-bulb temperature row. Where they meet is a percentage – the relative humidity. (Table from
Flinn Scientific, flinnsci.com)
Practice
1) Use the following sling psychrometer measurements to find relative humidity.
a. A temperature difference of 3 degrees C at a temperature of 30 degrees C. __________
b. A temperature difference of 5 degrees C at a temperature of 20 degrees C. __________
c. A wet-bulb reading of 24 degrees C and a dry-bulb reading of 30 degrees C. _________
d. A wet-bulb reading of 20 degrees C and a dry-bulb reading of 21 degrees C. _________

Experiment: Indoor vs. Outdoor Humidity
Problem: _______________________________________________________________
_______________________________________________________________
_______________________________________________________________
Hypothesis: _______________________________________________________________
_______________________________________________________________
_______________________________________________________________
_______________________________________________________________
Data Collection
Dry-bulb Wet-bulb Difference
Indoors
Outdoors
Conclusion: _______________________________________________________________
_______________________________________________________________
_______________________________________________________________
_______________________________________________________________
_______________________________________________________________
Inside Relative
Humidity (%)
Outside Relative
Humidity (%)
My Data
Class
Average
Name:
Date:

Grade Level: 6
Florida Standards:
SC.6.N.1.5
Duration: 45 min.
(Alternate extensions for
repetition and evaluation)
Measuring Dissolved Oxygen Objectives
Students will be able to (1) define dissolved oxygen
and state the purpose of dissolved oxygen in an
aquatic environment, (2) list the chemical and
physical factors that affect dissolved oxygen
concentrations, (3) measure dissolved oxygen in a
sample of water by using a field dissolved oxygen
kit, (4) evaluate the health of an aquatic ecosystem
based on the results of a dissolved oxygen test, (5)
recognize that science involves creativity, not just in
designing experiments, but in creating explanations
that fit evidence.
Overview
Students learn about dissolved oxygen and why it is
an important indicator of a body of water’s ability to
support aquatic plant and animal life. Students will
observe how gas enters water through the
atmosphere by relating the affects of blowing into a
solution of Bromothymol Blue and water. Students
will also observe how plant respiration affects
oxygen and carbon dioxide levels in water by
relating it to submerging Elodea in Bromothymol
Blue and water solution. (If time does not permit for
both simulations, choose one). Students will then
learn how to use a field dissolved oxygen kit to
measure the amount of dissolved oxygen in a sample
of water. Lastly, students will learn how to evaluate
the ability of an aquatic ecosystem to support plant
and animal species based on the amount of dissolved
oxygen in the sample of water.
Background Information Dissolved oxygen (DO) is the amount of oxygen
dissolved in water. Oxygen enters the water either
directly from the atmosphere or through plant
respiration. The amount of DO in a sample of water
is used to assess the ability of the aquatic ecosystem
to support aerobic life.
Our air contains 21% oxygen. DO in water,
however, only makes up a very small percentage of
the water. Therefore, oxygen from the atmosphere
diffuses (moves from an area of higher
concentration to lower concentration) into the water.
During plant respiration, plants take in carbon
dioxide and let out
oxygen as a byproduct.
DO can range from 0-
18 parts per million
(ppm) -- parts of oxygen per million parts of water.
Most healthy aquatic ecosystems need to maintain at
least 5-6ppm. DO concentrations below 3ppm stress
most warm water species of fish and insects. DO
concentrations less than 2ppm have been known to
cause mass fish kills or leave the fish more
susceptible to disease.
There are many different chemical and physical
factors that affect DO concentrations – temperature,
time of day, weather, clarity of water, abundance of
plants, current, and salinity.
Students will be working with Bromothymol Blue
(BTB). BTB is an indicator. Indicators are
substances that show the presence of certain
chemicals by changing colors. BTB is an indicator
used to show the presence of a weak acid. Carbon
dioxide reacts with water, forming a weak acid, so
BTB can indicate the presence of carbon dioxide in
water. When the BTB is first put in water it is a
blue-green color because the water has little acidity.
Once students breath into the solution, it will turn to
a yellow color, indicating that carbon dioxide has
made the water more acidic.
In the field dissolved oxygen kit you received there
are directions for how to successfully determine the
amount of dissolved oxygen in a sample of water.
Procedures
1) Introduce the concept of dissolved oxygen by
having the students take a slow deep breath in
and then slowly breathe out. Ask – What gas
did you breathe in? What gas did you breathe
out? Explain that just like humans, there are fish
and other aerobic forms of aquatic life that
breathe in or use oxygen to survive.
2) State that the definition of dissolved oxygen is
simply the amount of dissolved oxygen in a
body of water. (Oxygen is considered dissolved

because it becomes surrounded by water
molecules once it enters the water)
3) Explain that unlike the air we breathe, which
contains 21% oxygen, water only contains a
small percentage of oxygen that easily fluctuates
with changing chemical and physical factors.
Explain that there are two main ways that
oxygen dissolves into water – through the
atmosphere and through plant respiration.
Explain to students that they will conduct two
experiments to demonstrate how a gas can
become dissolved in water. Tell students that
they will do experiments with carbon dioxide,
but that it is the same process as oxygen
dissolving into water.
4) Divide students into group of 3-4 and distribute
the materials to each group: goggles, three
beakers for each group, graduated cylinder of
water, droppers, Bromothymol Blue, plastic
straws, Elodea plants, and two plastic test tubes
with stoppers.
5) Students should fill one beaker with about
200ml of water using a graduated cylinder.
Explain BTB as noted in the background and
then direct students to combine drops of BTB
solution into the water until it turns blue. Next,
have students use a plastic straw to blow into the
water. Ask students to record their observations
and then facilitate a discussion on why the water
changed color.
6) In a separate beaker, fill with 200ml of water
and drop in BTB until the solution is blue. Have
students now perform an exercise task for 1-3
minutes, such as jogging in place or jumping
jacks. Now, have students blow into the BTB
solution again and record their observations.
Ask students why their solution did not turn as
deep of color as last time? Explain that their
“out of breath” feeling forced them to not be
able to take in as much gas from the air and thus
not be able to breathe out as much carbon
dioxide into the BTB and water solution as they
did before when they were rested.
7) Explain to students that just as they breathed
carbon dioxide into the water, oxygen from the
atmosphere goes into the water by the same
process.
8) Introduce to students that they will be
conducting another experiment to explore the
affect that plant respiration has on
concentrations of carbon dioxide and oxygen in
water.
9) Direct students to fill the plastic test tubes with
water and again add BTB until the water
becomes blue. Have students again blow into
each test tube until the solution turns yellow. In
one test tube put in Elodea and place the stopper
in the tube. In the other test tube, just place the
stopper in the tube without putting in Elodea.
Place both test tubes in sunlight. Explain to
students that they will leave these two test tubes
over night and record their findings the next day.
10) Once students have recorded their results the
following day, ask students to explain what they
observed. Guide students to the correct
understanding that the Elodea plant takes in
carbon dioxide and lets out oxygen during
respiration. Therefore the beaker with the
Elodea plant will contain less carbon dioxide
and will thus be bluer than the beaker without
the Elodea. The test tube without Elodea
remained the same color since there was no
plant to take in the carbon dioxide from the
water. The presence of plants thus influences
the amount of carbon dioxide in water – through
plant respiration the plant takes in carbon
dioxide and lets out oxygen, thus making the
water less acidic from carbon dioxide and more
oxygen rich. The less acidic and more oxygen
rich an aquatic environment is, the better the
water is able to support aquatic animal and place
species.
11) Summarize with students how oxygen becomes
dissolved in water – atmosphere and as a
byproduct of plant respiration. Make sure to
emphasize that this exploration of dissolved
carbon dioxide in water is meant to simulate the
same process by which oxygen becomes
dissolved in water.
12) Explain that aquatic environments need a certain
amount of dissolved oxygen in order to be able
to support aquatic life. DO can range from 0-18
parts per million (ppm), which means - parts of
oxygen per million parts of water. Most healthy

aquatic ecosystems need to maintain at least 5-
6ppm. DO concentrations below 3ppm stress
most warm water species of fish and insects.
DO concentrations less than 2ppm have been
known to cause mass fish kills or leave the fish
more susceptible to disease.
13) Explain that there are many different factors that
effect dissolved oxygen concentration in the
body of water - temperature, time of day,
weather, clarity of water, abundance of plants,
current, and salinity.
14) Demonstrate how to determine the amount of
dissolved oxygen using the field dissolved
oxygen kit. For your water sample, use water
taken from a body of water in your community
or, if you performed the experiment with Elodea,
you may sample the test tube with Elodea and
compare it to the test tube without Elodea. (The
directions are printed on the DO kit in your
backpack – be very thorough as you are
demonstrating how to do this. The students will
perform the same test in the field on the day of
the field trip.) Make sure the sample of water is
tested immediately after taken from the larger
body of water or after the caps are removed from
the test tube.
15) Once the DO is tested, have students determine
whether or not the water has enough DO in order
to successfully support aquatic life. Have them
list factors that may have influenced the amount
of dissolved oxygen in the water sample based
on their observations of where the sample was
taken.
Evaluation
1) Have students predict whether the amount of
dissolved oxygen in the waters of the cypress
swamp will be sufficient to support a healthy
aquatic ecosystem. Students must defend their
predictions using the factors that affect dissolved
oxygen content in water - temperature, time of
day, weather, clarity of water, abundance of
plants, current, and salinity.
2) Multiple choice or free-response questions for
practice in class or for quizzes
Define dissolved oxygen and state why it is
important to aquatic ecosystems.
The pond in your neighborhood is murky due to
non-toxic waste that has been dumped into it
from a nearby factory. Predict what the
dissolved oxygen concentration will be and
whether the aquatic ecosystem will continue to be
healthy. Defend your prediction with your
knowledge of factors that affect dissolved oxygen
concentrations in water.
You test the lake near your house and determine
that the amount of dissolved oxygen is 6ppm.
What information can you gather from this test
regarding the health of the aquatic ecosystem?
What is the predominant way that oxygen enters
or diffuses into water?
a. Through fish breathing
b. Through the atmosphere
c. Through plant respiration
d. Both b and c

Name:
Date:
Experiment: Dissolved Carbon Dioxide in Water
Data Collection and Interpretation
Experiment Two – Plant Respiration
Initial
Color of
Solution
Color of
solution
after 24
Hours
Indication
Did the solution change color? What does the color
change or lack of color change mean?
Test Tube with
Elodea
Test Tube without
Elodea
Experiment One – Human Respiration
Color of
Solution
Indication
1
Before
Breathing into
Beaker
What significance does the color of the solution have in terms
of the amount of carbon dioxide in the water?
2 After Breathing
into Beaker
Why did the color change? What does it mean in terms the
amount of carbon dioxide in the water?
3
After Blowing
into Beaker
Following
Exercise
Why did the color change? What does it mean in terms of the
amount of carbon dioxide in the water?

Grade Level: 6
Florida Standards:
SC.6.N.14; SC.6.E.6.1
Duration: 30- 40 min.
Florida’s Limestone – Tums for Our Water and SoilObjectives
Students will be able to (1) discuss, compare, and
negotiate methods used, results obtained, and
explanations among groups of students conducting
the same investigation, (2) understand the effect the
limestone of Florida has on the pH level of water,
(3) Describe and give examples of ways in which
Earth's surface is built up and torn down by
physical and chemical weathering, erosion, and
deposition.
Overview Students will conduct a controlled experiment to
determine the effect Florida’s limestone has on the
pH levels of Florida’s water and soil. Students will
compare limestone’s effect to that of other rocks
and minerals found naturally in Florida. At the end
of this investigation, students should be able to
articulate the effect limestone has on the pH of
water in Florida, the importance of this
phenomenon, and a basic understanding of the
process by which limestone effects pH levels in
water.
Background Information
pH is one way that scientists can test the quality of
water and soil. pH is measured on a scale of 0-14.
If water has a pH level of less than 7 it is
considered an acid, or acidic. Acidic substances are
potentially harmful or deadly to land and aquatic
wildlife and vegetation. If water has a pH level
greater than 7, it is considered to be a base, or
basic. Water that has a pH level greater than 7 is
also not suitable to sustain plant or animal species.
The ideal pH level for plant and animal species is
approximately 7, which means that it is neutral,
neither an acid nor a base. It is important to note
that when assessing pH you are not just looking at
definite numbers, but at ranges. For example, a
stream is not only able to sustain plant and animal
species at 7, it can actually successfully sustain
plant and animal species in a pH range of 6-8.
Limestone is a
sedimentary rock
composed mostly of calcium carbonate. You may
recognize that calcium carbonate is a substance
used in making antacids you take for an upset
stomach, such as Tums. Your stomach produces
hydrochloric acid, which among other things, helps
in the digestion of food by breaking it down.
Sometimes your stomach may become too acidic
and can make you ill. When this occurs you can
take Tums, which is composed of the buffer
calcium carbonate, and the acid in your stomach
will become more neutral or closer to the
appropriate level of acidity for your stomach as the
calcium carbonate dissolves in your stomach.
Calcium carbonate is considered a buffer, which
means that when it comes into contact with a base
or an acid, it reacts with it to make it more neutral.
Limestone has a similar effect on the groundwater
supply and soil of those regions in which it
composes most of the bedrock, such as Florida.
Rainwater, which makes up a large volume of our
groundwater supply and replenishes our streams,
wetlands, lakes, and rivers, has the potential to be
acidic, meaning that it has a pH less than 7.0. In
fact, rain water in South Florida has an average pH
level of 5. As acidic water comes into contact with
the limestone that makes up the bedrock of Florida,
which is considered a basic substance with a pH
level greater than 7, the limestone dissolves into the
water and neutralizes the acidity of the water. As
the water attains a more neutral pH, it becomes
more suitable for plant and animal species.
Groundwater also sinks through the holes in the
limestone that have been dissolved away by acidic
rain to create aquifers beneath the ground.
Aquifers are an underground layer or water
bearing permeable rock. It is from these aquifers in
Florida in which we receive most of our drinking
water. Limestone thus plays an important part in
our daily life as it both helps to store water as an

aquifer and reduce its acidity as the calcium
carbonate dissolved into it.
During your students’ field work at Big Cypress,
they will test the pH of the water. Your students
will also observe the exposed limestone throughout
the three habitats that they will visit. It is this
limestone that helps to reduce the acidity of the
water as it flows through each habitat.
Procedures
1) Introduce to students through discussion the
aforementioned background of pH, limestone,
aquifers, and their relationship to Florida and
Big Cypress.
2) Divide students into lab groups. Distribute the
materials to each group: limestone rocks, other
rocks or minerals of a similar size, three clear
plastic cups or beakers, pH paper or other pH
testing device, water, large beaker or container
for mixing, and vinegar.
3) Distribute the lab background sheet and allow
for the lab groups to look over and discuss the
information independently for approximately 6-
8 minutes.
4) Explain to students that they will conduct their
own investigation into the ability of limestone
to alter the acidity of a substance. They will
also test the ability of other rocks and minerals
found naturally in Florida to alter the acidity of
a substance.
5) Facilitate the procedure of the lab with the
students in a step by step fashion and pause to
elaborate upon the reasoning behind certain
steps, which is outlined below:
Pour enough vinegar into a large cup or
breaker so that you can test its pH. Test the
pH of the vinegar. You will find that
vinegar is a highly acidic substance. Note
the pH level of vinegar.
Now, to the vinegar add water until the pH
level of the mixture is between 3 - 5.
Fill the plastic cup or beaker half way to
the top with limestone. Label this cup
“Limestone”.
Fill the second plastic cup or beaker with
non-limestone rocks. Label this cup “non-
limestone” or the name of the non-
limestone rocks you choose to use.
Fill the third plastic cup half way with the
water/vinegar mixture. Label this cup
“Control”. This third cup is termed control
so that we can judge the effect of the
limestone and non-limestone rocks as
compared to the original substance.
Take the remainder of the water/vinegar
mixture from step one and pour it over the
limestone and non-limestone rocks of cups
one and two.
Explain to students that they will let the
three cups – limestone, non-limestone, and
control – sit for 24 hours and take note of
any changes the following day.
The following day test and record the pH of
each cup, have the students individually
answer the evaluative questions on the lab
sheet, discuss their findings with their lab
group, and then open up their findings to
the class as you facilitate a class discussion
and mark the class averages for data.
Evaluation
1) See Attached Document

Name:
Date:
Experiment – Measuring Limestone’s Effect on pH
Question/Problem – What question or problem are you trying to answer?
Hypothesis – Do you think the pH will increase, decrease, or stay the same?
Control:
Non-Limestone:
Limestone:
Data Collection – Lab Group
Initial pH Final pH
after 24 hours
Difference Final – Initial = Difference
Control
water/vinegar solution
Non-limestone
non-limestone and water/vinegar
solution
Limestone
limestone and water/vinegar solution
Data Collection – Class Average
Conclusion – What were the results of the experiment? Was your hypothesis correct? Why?
Control Difference Non-Limestone
Difference Limestone Difference
My Data
Class Average

Evaluation
1) In what way does limestone affect the pH of water?
2) Why is limestone important to Big Cypress National Preserve and all of Florida?
3) Rainwater in South Florida typically has a pH of 5. How do you think a limestone rock would affect
the pH of swamp water?
4) Look at the table below. Answer the following questions regarding appropriate ranges.
Normal range of stream pH: _____ - _____
Normal range of precipitation pH: _____ - _____
Range at which fish reproduction is affected: _____ - _____
Range at which Adult Fish Die: _____ - _____

Grade Level: 6
Florida Standards:
SC.6.E.6.2; SS.6.G.1.1;
SS.6.G.1.2.
Duration: 30-45 min
Ecosystem Research: Getting to Know Your Field SiteObjectives
Students will be able to (1) use latitude and
longitude coordinates to understand the relationship
between people and places on the earth, (2) analyze
the purposes of map projections and explain the
application of various types of maps, (3) understand
the location and habitats of their field site at Big
Cypress National Preserve.
Overview Students will use a map of their field site to
determine the three habitats in which their field
work will be done. Students will be divided into
their field groups for the day of their field work at
Big Cypress and will then gather information on
the websites provided regarding the three habitats
to begin building a background for their field work.
It is important for students to understand that, as
scientists, they must do background research of an
area before they even go there in order to be
prepared for what they’ll encounter. This helps
scientists to be more prepared and effective with
their field work. There is much you can learn and
understand about a certain place before you
actually experience it. Going into a place with
background knowledge helps you to better
understand your work in that area and more
effectively conduct your experiments.
Background Information
Your students will be scientists performing
multiple experiments at their field site in Big
Cypress National Preserve. All scientists, before
they conduct field work, must become familiar with
the ecosystem or variety of ecosystems in which
they’ll be working. This enables them to have a
richer experience as they’re able to be prepared to
look out for things they would not know of
otherwise during the day of their field work. More
importantly, it helps them with their field work as
they make connections to why their work is
important and how their work may potentially
supply information that will help them to positively
affect an entire ecosystem. This lesson will
provide a more general background into the area in
which their field work will be done and it is meant
to provide a base for the students to begin making
connections between their work and the greater
ecosystem.
Procedures
1) Distribute the Birdon Trail Field Site map to
students (make sure to copy or print in color; or
you may place a color copy on an over head).
Explain to students that this is a map of their
field site. During their field work they will be
performing experiments in three of the five
habitats of Big Cypress National Preserve –
Freshwater Cypress Swamp, Pineland, and
Freshwater Marl Prairie.
2) For your field work, your students will need to
be divided into three groups. Now will be a
great time to establish these three groups and
have students work within their groups to begin
establishing a team atmosphere for the day of
their field work. Explain to students that
scientists often work in teams to complete a
scientific investigation. You may either choose
groups for students or have students choose
their groups, but make sure they are students
who will be able to work well and
professionally together.
3) Once students are divided into their three field
site groups, assign each group one of the
habitats from their field work. Explain that
there are five habitats found in Big Cypress.
The other two habitats – mangroves and
hardwood hammocks – will not be explored at
this time. Each habitat has different
characteristics – different animals, vegetation,
supply of water. Yet, the habitats are
connected in many ways; the health of one is
dependent on the health of the others that
surround it. Tell students that they will be
investigating the characteristics of their habitat

as well as the similarities between their habitat
and others. Also, students will be investigating
what determines why a certain ecosystem
develops in a certain area (give students the
hint to take note of elevation). Note that a
habitat is also referred to as an ecosystem in
which animals, vegetation, water, soil, and
weather work together to create a unique
environment.
4) Distribute ecosystem research paper to each
student.
5) For the Freshwater Cypress Swamp, Freshwater
Marl Prairie, and Pineland groups, direct
students to www.nwf.org/everglades/tour.cfm.
Tell students that the ecosystems on the page
are ordered by elevation, with the first having
the highest elevation above sea level and the
last have the least elevation above sea level.
Evaluation
1) Students accurately complete the Big Cypress
Research paper.
2) Students understand that what causes on e type
of ecosystem to form in an area rather than
another is due to elevation. Students can put all
five ecosystems in order from highest elevation
to lowest elevation. In addition, students
understand that elevation influences water levels
in each ecosystem.
3) Students can name all five ecosystems of Big
Cypress and name one thing about each that
makes them unique from and similar to the
others.

Name:
Date:
Big Cypress Ecosystem ResearchName of ecosystem: ______________________________
Three types of vegetation found in your ecosystem
(draw and label the one that is the most abundantly
found in your ecosystem):
1) _________________________________
2) _________________________________
3) _________________________________
Three types of animals (choose one to draw and label):
1) _________________________________
2) _________________________________
3) _________________________________
What role that water plays in your ecosystem?
(how much water? where is it found in your ecosystem? is it there all year long?):
______________________________________________________________________________________________
______________________________________________________________________________________________
______________________________________________________________________________________________
What is one characteristic that is unique to your ecosystem?
______________________________________________________________________________________________
______________________________________________________________________________________________
What is one characteristic that is similar to the other two ecosystems?
1) Other Ecosystem: ____________________
Similarity: ________________________________________________________________________
2) Other Ecosystem: _____________________
Similarity: ________________________________________________________________________
Put the ecosystems in order from highest elevation to lowest elevation:
______________ → ______________ → _____________ → _____________ → _____________
Draw your ecosystem:
Vegetation Animal


Grade Level: 6
Florida Standards:
SC.6.E.7.7; SC.6 N.2.3
Duration: 30-45 min
Fire Ecology: Optimal Weather Conditions for a Prescribed BurnObjectives
Students will be able to (1) investigate how natural
disasters have affected human life in Florida; (2)
recognize that scientists who make contributions to
scientific knowledge come from all kinds of
backgrounds and possess varied talents, interests
and goals.
Overview
Students will learn that many of the ecosystems in
South Florida are fire-dependent, which means that
fire is a necessary component to ensure the
ecosystem’s ability to provide an environment
suitable to support the plant and animal species that
live there. Through this introduction, students will
begin to understand fire as not just a randomly
occurring disaster that must be extinguished
immediately to ensure the safety of all involved,
but as a potentially safe and prescribed endeavor by
humans to ensure the continued health of an
ecosystem. Once students begin to alter their
perspective on fire, they will be introduced to the
way in which information from hydrologists,
botanists, wildlife biologists, pedologists (soil), and
meteorologists is used to inform the work of a fire
ecologist. At this point students may perform an
investigation to understand the affect that relative
humidity and other meteorological factors have on
the decision to perform a prescribed burn. Students
may also assume the role of a fire ecologist and
perform a more comprehensive investigation to
check the extended weather forecast online and
chart which days have weather conditions suitable
for a burn and which days do not. Once students
have chosen the appropriate day or decide there are
no appropriate days, they will write their own
“prescription” for a prescribed burn.
Background Information
See Teacher Reference Sheet on Fire in the
Teacher Reference Portion of this guide.
Procedures
1) Distribute the photos of the before, right after,
one week after, one month after, and one year
after a prescribed burn. Have students put
these photos in order. Ask students what they
notice about the sequence of the photos. Get a
feel for how students feel about fire; guide
students to the understanding that fire can
actually have a positive effect on ecosystems.
Ecosystems may even be dependent on fire to
help them to continue to support the plant and
animal species that live there.
2) Distribute the Teacher Reference Sheet for Fire
to each student. Have students read this sheet
independently and answer the short answer
evaluation questions in preparation for
discussion.
3) Highlight fire ecology as a field of science and
that many other science fields contribute to the
success of a fire ecologist’s decision to perform
a prescribed burn – hydrologists, botanists,
wildlife biologists, pedologists, and
meteorologists. Conditions with all the above
factors must be perfectly suitable for a burn to
be prescribed. Explain that you will mostly
focus on the meteorological aspect of the fire
ecology of a prescribed burn.
4) Review with students what they learned about
relative humidity in the previous lesson.
Explain to students that fire ecologists consider
the relative humidity of the days before and the
days of a prescribed burn. If the relative
humidity is too high, there will be too much
moisture in the air and in the plants for the
plants to burn. If the relative humidity is too
low, the plants will be very dry and thus will
more readily catch fire, which may prevent the
fire ecologists and fire-fighters from being able
control a burn.

5) Demonstrate this concept with the follow
activity:
a. Take two small paper cups and pour a
small amount of water into one cup,
while leaving the other cup empty.
b. Light a candle. Hold the empty paper cup
over the flame. The cup should ignite
relatively quickly. Immediately
extinguish the flame.
c. Next, take the cup with the small amount
of water and hold it over the flame. The
water inside the cup absorbs the heat
from the flame, thus preventing the cup
from being hot enough to burn. The heat
being absorbed by the water causes it to
evaporate. Once all the water in the cup
has evaporated, the cup will become hot
enough to burn.
6) Discuss with students that moisture content in
plants and in air influences what days are
chosen for a prescribed burn. Information on a
day’s relative humidity can be obtained on your
local weather station or online. Fire ecologists
are given very specific and detailed reports by
local meteorologists to help them make a
decision.
7) Inform students that they will now learn of the
ideal weather conditions for a prescribed burn
and play the role of a fire ecologist to decide
which day is ideal for a prescribed burn. In
addition, they will look at the ten-day weather
forecast online to determine if any of the
coming days would be suitable for a prescribed
burn.
Evaluation
1) For what reasons are burns prescribed?
2) What other fields of science contribute to
a fire ecologist’s decision to perform a
prescribed burn?
3) If relative humidity is high the days before
and the day of the projected day for a
prescribed burn, would conditions be
considered ideal? Should the fire
ecologists still perform the burn? Why or
why not?

Name:
Date:
Optimal Weather Conditions For a Prescribed Burn In the table below, you will find information regarding the ideal weather conditions for prescribed burns.
Use the table to help you to answer the questions below.
Ideal Conditions Reasons Why
Wind Speed 1-5 miles per hour
Wind is an important factor in controlling fire. If the wind
speed is too high, the fire poses a danger of spreading to
places that were not intended to burn.
Relative Humidity 30-55%
Relative humidity is a measure of moisture content in the air.
If the air contains too much moisture, the fire will not burn
effectively. If the air contains too little moisture, the fire may
ignite and spread too quickly and become unsafe.
Temperature
Fall and Winter: below 60°F
Spring & Summer: 80°F – 90°F
Fire needs to reach a certain temperature in order to be
become lethal to plants, - 147°F. If the goal of the fire is to
clear underbrush, it is best to do it on a cool winter day so that
it is easier to control and the heat from the fire does not
damage the trees. If it is during the Spring and Summer
growing season and you are targeting trees, it is best on a
warm drier day so that the trees ignite more quickly and the
fire is easier to control.
Rainfall/Soil Moisture ¼ to ½ inch of average rain
The preferred soil moisture is damp. Recent rainfall of ¼ to ½
inch followed by sunny skies, low winds, and low humidity is
generally ideal.
1. Look at the local weather information below. Choose which day is most suitable for a prescribed burn.
Monday
7/13/09
Tuesday
7/14/09
Wednesday
7/15/09
Thursday
7/16/09
Friday
7/17/09
Saturday
7/18/09
Sunday
7/19/09
Wind Speed 15 miles per
hour
9 miles per
hour
2 miles per
hour
18 miles per
hour
17 miles per
hour
3 miles per
hour
1 mile per
hour
Relative
Humidity 13% 18% 25% 33% 19% 45% 43%
Temperature 55°F 64°F 71% 77°F 64°F 83°F 81°F
Precipitation
Chance 10% 13% 20% 40% 10% 10% 18%
On which day are weather conditions most suitable for a prescribed burn? _____________________________
Why did you choose this day? _______________________________________________________________________

Fire ecologists of Big Cypress National Preserve are seeking to burn the part of the preserve found to the
right. This is a 10,000 acre combination of prairie and
pineland. In the data table below, you will record your
research from online meteorological forecasts to determine
if there is any day in the next ten days suitable for
performing a prescribed burn. Once you have collected
your meteorological data, you will then write your own
prescription for a burn.
2. Go to www.weather.com. Search for the ten day forecast for Ochopee, Florida. Fill out the information below
and assess whether or not any of the days will be suitable to perform a prescribed burn in the area. Record your
weather data below.
Weather
Data
Next Ten Days
Wind Speed
Relative
Humidity
Temperature
Precipitation
Chance
3. Fire ecologists are like doctors of the land as they prescribe burns to enable ecosystems to be better equipped
to support plant and animal species. From your meteorological research results above, write your prescription
for the burn of the prairie and pineland area. Choose which day has the ideal weather conditions for a
prescribed burn, and tell why. If there is not a day that has ideal conditions, write why no days are appropriate
for a prescribed burn given then current weather conditions.
__________________________________________________________________________________________________
__________________________________________________________________________________________________
__________________________________________________________________________________________________
__________________________________________________________________________________________________
__________________________________________________________________________________________________
__________________________________________________________________________________________________
__________________________________________________________________________________________________
__________________________________________________________________________________________________
__________________________________________________________________________________________________
__________________________________________________________________________________________________
__________________________________________________________________________________________________
__________________________________________________________________________________________________
_________________________________________________________________________________________________

Grade Level: 6
Florida Standards:
SC.6.N.1.2; SC.6.N.1.4;
SC.6.N.2.1; SC.6.N.1.5
Duration: 20-30 min.
(Alternate extensions for
repetition and evaluation)
Interactive S.W.A.M.P JournalObjectives
Students will be able to (1) distinguish science from
other activities of thought, (2) recognize that science
involves not just designing experiments, but also
creating explanations that fit evidence, (3) discuss,
compare, and negotiate methods used, results
obtained, and explanations among groups of students
conducting the same investigation, 4)explain why
scientific investigations should be replicable.
Overview
Students will first design a journal in which to
record information and observations from their pre-
site, field trip, and post-site work. This is an
interactive journal, meaning that students will not
only write and sketch in it, but will also paste or tape
their pre-site, field trip, and post-site work in the
journal as it is completed.
Following each in-class activity, students will record
in detail or post their work for one or more of the
following: their procedure, what results they
gathered, what new information they learned from
the results, what they think it means to Big Cypress
National Preserve, how it may affect them, and what
they plan to do with the new information. Their
records should be detailed enough so that others can
easily read, understand, and/or replicate what they
have done.
Through the process of keeping this interactive
journal, students will learn and practice how to keep
detailed records of scientific inquiry as well as how
to record their observations in a way that can be
understood by the greater scientific community,
which includes their peers as well as other scientists
interested in the ecology of Big Cypress.
If time does not allow for this to be completed in
class, students may complete their journal for
homework on the days the activities are completed.
Background Information
It is important for students to understand that
science is not just composed of facts about the
world, but that science provides a way to think about
the world. In science
you do not just
memorize information,
but you process it and
test it in order to find out how and why the world is
the way it is. Science is not just information, but a
process for gaining information. Students may one
day be a part of discovering something about the
world that no one else ever had. In addition, a
scientist’s work on how they see the world, what
they’ve investigated, or what results they achieved
must be specific, detailed, and organized so that
their work is considered replicable. A scientist’s
work is considered replicable if another person can
go through the same procedure and achieve the same
results as the original scientist. If a scientist’s work
is not replicable, it has no importance in the field of
science because there is no way to check whether or
not the results are valid.
Procedures
1) Introduce to students that science is not just
composed of facts about the world, but that
science provides a way to think about the world.
2) Explain that in science, how you describe things,
experiences, and phenomena must be very
specific, detailed, and organized so that others
may understand what you have done and/or use
the same method to verify your results. The
results of an experiment in science are not valid
if they cannot be done again by a different
person using the same procedure to achieve the
same results.
3) To exemplify the importance of specificity, give
students what will become the first working
page of their journal. Tell students to draw a
triangle and a square. Call a few students up to
the board to share the shapes they drew. Next,
write on the board the following directions - 1)
Draw a triangle with three equal sides with one
point of the triangle pointing to the top of the
page, 2) Use the bottom part of the triangle as
the top part of your square. 3) The square should
have equal sides, 4) Draw the rest of your

square. Next, call a few students to the board to
share their drawings
4) Debrief with students – Why was it important to
be specific? Can anyone look at these directions
and achieve the same results?
5) Explain that they will create a comprehensive
journal in which they will record their
investigations and observations from their pre-
site, field trip, and post-site work.
6) Describe that following each in-class activity,
students will record in detail or paste their work
for one or more of the following: their
procedure, what results they achieved, what new
information they learned from the results, what
they think it means to Big Cypress National
Preserve, how it may affect them, and what they
plan to do with the new information. Their
records should be detailed enough so that others
can read, understand, and/or replicate what they
have done.
7) Explain to students that this is an interactive
journal, meaning that students will not only
write and sketch in it, but will also paste or tape
their pre-site, field trip, and post-site work in the
journal as it is completed.
8) Allow time for students to create their journal.
Use a heavy material such as cardstock for the
front and back covers. For the inside pages, use
paper that is at least 8 ½ by 11 in size and use
enough paper to cover the topics and worksheets
you plan to use from this teacher guide also from
your lessons. Also prepare for extra pages so
that students may reflect, sketch, and paste
pictures from their experience.
9) Make sure it is clear to students that this
interactive journal will be assessed based on
how well they communicated what they’ve done
during their pre-site, field trip, and post-site
observation. Emphasize that their work must be
specific, detailed, and organized enough so that
others may easily read, understand, and/or
replicate what they have done.
10) Once the journal has been assembled and the
meaning and process of the journal is made
clear, students will complete their second entry:
Why is it said that science is not just composed of
facts about the world, but is a way of thinking?
Evaluation
Multiple choice or free-response questions for
practice in class or for quizzes
What is meant by a scientist’s work being
replicable?

Name:
Date:
Interactive S.W.A.M.P Journal: Introductory Entries
Follow teacher’s directions to complete drawings for each box.
Why is it said that science is not just composed of facts about the world, but is a way of
thinking?
__________________________________________________________________________
__________________________________________________________________________
__________________________________________________________________________
__________________________________________________________________________
__________________________________________________________________________
__________________________________________________________________________
__________________________________________________________________________
__________________________________________________________________________
__________________________________________________________________________
__________________________________________________________________________
__________________________________________________________________________
__________________________________________________________________________
__________________________________________________________________________
__________________________________________________________________________
__________________________________________________________________________


Grade Level: 6
Florida Standards:
SC.6.N.1.1; SC.7.N.1.2;
SC.6.N.1.2; SC.7.N.1.4,
SC.6.E.6.1, SC.6.E.7.4
Duration: 30 min. prep, a
week or two after
Soil Moisture and Decomposition
Objectives
• Recognize how microorganisms interact
with animals, plants, and humans in both
harmful and helpful ways (decay,
fermentation, disease.)
• Describe the physical and chemical
characteristics of various soil types.
• Describe local/regional soil types and
their formation (ridges, phosphatic
limestone, Flatwoods soils, organic soils,
etc.)
• Know the ways that plants and animals
reconstitute the soil and alter the
landscape.
• Distinguishes between biotic and abiotic
factors in the environment.
• Uses appropriate experimental design,
with consideration for rules, time and
materials required when solving a
problem.
Overview
Students investigate how water affects the
rate of decomposition of organic matter in
the soil.
Materials
Per group: Three 2-liter plastic bottles with
the tops cut off. (Or use one container per
group and set it up as a class experiment.)
Vegetable matter (grass or other plant
clippings, veggie peelings, etc.), scissors
for cutting vegetation if necessary, soil,
rulers, spoons for mixing soil and plant
matter, plastic wrap.
Procedure:
1. Add equal amounts of soil to each of the
bottles- about 10 cm.
2. Add 3 cm of vegetable matter to each
container of soil. Mix the soil and
vegetable material together well. Be sure
to use the same type of soil and vegetable
matter in all the jars. Why is this
important?
3. Label the jars
as follows
a. Dry b. Moist
c. Wet
4. Water the containers marked “wet” with
500 ml (2 cups) of water - enough to
saturate the soil so that there is a little
standing water at the surface.
5. Water the containers marked “moist” with
250 ml of water (1 cup) - enough water to
moisten the mixture with no standing
water at the surface.
6. Do not put water in the “dry” containers.
7. Cover the jars with plastic wrap. Poke 15
pencil-lead sized holes in the tops so that
air can circulate.
8. Every two days, saturate the soils marked
“wet”. Moisten the jars marked “moist” at
the same time. Record your observations.
You may stir the soil to check on the state
of the vegetable matter, but be sure to stir
the soil in all three jars.
Evaluation:
1. Describe what happened to the plant
material in the soil in each container.
2. What are the possible reasons for the
changes in each container?
3. How might the effects of the water level
impact plants and animals in the Big
Cypress Preserve?
4. Choose another variable to test and write
your question and hypothesis regarding
this variable. Some other possibilities for
experiments might include:
a. Manipulating the hydro period
b. Adding worms
c. Manipulating the amount of light-
put some in a shady spot and some
in a sunny spot
d. Manipulating temperature

Swamp Water And Me Program
Post-Site Classroom Enrichment,
Data Analysis, and
Assessment


Grade Level: 6
Florida Standards:
SC.6.N.1.2; SC.6.N.1.4;
SC.6.N.1.5; SC.7.L.17.1
SC.7.L.17.3
Duration: Two 30-45 min.
Periods
Communicating Your ResultsObjectives
Students will be able to (1) recognize that science
involves not just designing experiments, but also
creating explanations that fit evidence,(2) discuss,
compare, and negotiate methods used, results
obtained, and explanations among groups of students
conducting the same investigation, (3) explain why
scientific investigations should be replicable, (4)
explain and illustrate the roles of and relationships
among producers, consumers, and decomposers in
the process of energy transfer in a food web,
(5)Describe and investigate various limiting factors
in the local ecosystem and their impact on native
populations, including food, shelter, water, space,
disease, parasitism, predation, and nesting sites.
Overview
Students will work in their field groups to
communicate their findings from their pre-site and
field trip investigations to the class. This may take
two class periods to complete – one to create the
poster and presentation and another for each group
to present it. Or you can have them complete the
poster and presentation for homework and come
prepare to present it to the class.
Background Information
As a scientist, it is important to not only perform
investigations and collect data, but to analyze it and
communicate it to others in a clear and meaningful
way. In order to do this successfully, it is necessary
to be specific, detailed, and organized in both the
speech and content of your presentations. Often,
scientists will create posters that offer a summative
glance into the results and meaning of their work,
which includes written descriptions, graphs, charts,
pictures, and diagrams. The post is not meant to be
an extensive look at their research, but is meant to
offer a synopsis of the most significant data and
what it means for the greater topic of investigation.
Procedures
1) Explain to students that they will complete a
poster and presentation with their field group
that communicates their conclusions from their
pre-site
investigations and
field work at Big
Cypress.
2) Distribute the
requirements for their poster and presentation
(you may add or take away criteria as
necessary). Tell students that they will receive
both a grade from the teacher as well as a grade
from their peers.
3) As groups are working, circulate and ask
guiding questions to those groups who may be
struggling.
4) Once it is time for the groups to give their
presentations, pass out a peer evaluation sheet to
each student. When a group is giving their
presentation, all other students will take notes
and rate the group on the extent to which their
work is scientifically sound. (See peer
evaluation rubric for more details). In addition,
explain to students that they will be given a quiz
on the presentations of their peers and may use
their notes from the presentations to complete
the quiz.
Evaluation
1) See Rubric
2) Multiple choice or free-response questions for
practice in class or for quizzes
What should be the characteristics of a
presentation and poster created by a scientist?

Name:
Date:
Communicating Your Results: Poster and Presentation
Create a title for your poster that sums up the big topic of your investigation
Map of Birdon Trail Field Site
o Label the three habitats
o Write the coordinates for each habitat
Make a Venn Diagram of the animals or tracks of animals (example: tracks, scat, fur, feathers, bones
etc) you found in each habitat.
o Of the animals you found, which are predators of the panther and alligator?
o Of the animals you found, which are prey of the panther and alligator?
o Where should panthers and alligators be placed on the food chain (near top or near bottom)?
Why?
o What are the threats to panthers and alligators?
Make a Venn Diagram of the vegetation you found in each habitat.
o Draw and label each type of vegetation that you found
o Tell what kind of animal eats each type of vegetation or uses it for shelter
o Describe the human causes and natural causes of disturbances you observed.
Discuss the water quality of the Cypress Swamp.
o Create a table for your data. Include: depth, temperature, dissolved oxygen, pH, and water
color
o Is the water quality indicative of a healthy ecosystem that supports a diversity of aquatic life?
How do you know?
o What cause pollution of water in the swamp and throughout South Florida?
Draw and describe the type of soil from each habitat. What does the type of soil say about the
habitat in which it was found?
Create a table for the data you collected on weather at the Field Site at Big Cypress. Include:
direction of wind, wind speed, relative humidity, air temperature, time of day.
o What differences do you see in the weather of the habitats? What evidence can explain those
differences?
o What similarities do you see in the weather of the habitats? What evidence can explain those
differences?
Illustrate each habitat.
o For each habitat, draw a diagram as accurately as possible that shows the animals, vegetation,
water, soil, and weather
o In the diagram, draw a food web that shows the interconnectivity amongst the animals and
vegetation
From your work in the classroom and in the field, why is it important to preserve Big Cypress?
o What are ways that you can help to preserve the animals, vegetation, and water of Big
Cypress? What will you do differently in your daily life?

Name:
Date:
Communicating Your Results: Peer Evaluation
Criteria I II III Score
Poster
The poster is
sloppy and the
topics are not
organized.
The topics are
clearly
organized, but
the work is
sloppy.
The topics are
organized well
and the work is
neatly done.
Speech
The group did
not speak loudly
and clearly.
The group spoke
loudly and
clearly at some
points, but not
the whole time.
The group spoke
both loudly and
clearly the whole
time.
Content
Most content on
the poster and in
the presentation
is not accurate.
Some content on
the poster and in
the presentation
is not accurate.
All content on
the poster and in
the presentation
is accurate.
Understanding
It was clear that
the group did not
understand what
they were talking
about during the
presentation.
The group spoke
knowledgably
about some
topics, but not all
topics.
The group spoke
knowledgably
about all topics.
Participation
No group
members
actively
participated
during the
presentation.
Students shuffled
around and
hoped others
would talk.
Some group
members
actively
participated in
the presentation,
but not all.
All group
members
actively
participated in
the presentation.
Scale: 14-15 A 12-13 B 11C 10D 0-10F Grade Total
Notes

Grade Level: 6
Florida Standards:
SC.7.E.6.6; SC.6.N.2.3.
Duration: 30- 40 min.
Human Impact - Losing Habitat Objectives
Students will be able to (1) identify the impact that
humans have on the earth, such as deforestation,
urbanization, desertification, erosion, air and water
quality, changing the flow of water, (2) Recognize that
scientists who make contributions to scientific
knowledge come from all kinds of backgrounds and
possess varied talents, interests, and goals.
Overview Students will play the role of animals, vegetation,
water, and human land developers in order to explore
impacts, both negative and positive, of human
development on the ecosystems within Big Cypress
National Preserve.
Background Information
In order for human development (housing, grocery
stores, shopping centers, farms) to be created, parts of
ecosystems are paved over or cleared, and thus
partially or completely destroyed. This kind of
development has serious deleterious affects on the
ecosystems of Florida, as well as all over the world.
Each time humans develop a large or small part of
land, local vegetation and small animals lose their
homes and potentially disappear from the land
altogether. As small animals disappear, so too do the
larger animals that previously depended on the smaller
animals in the food chain as a source of food. In
addition, if humans are negligent with their waste
during construction and daily life, the water and air
can become polluted in their community and
throughout the surrounding ecosystem, which has the
potential to eliminate or harm many or all types of
land and aquatic animals and vegetation as well as
pose harm to the people who live there.
The affect of human development on an ecosystem
can be studied in South Florida. In South Florida,
there is much human development, yet there also
exists Big Cypress National Preserve, Everglades
National Park, Biscayne National Park, and other state
and local parks. These parks and preserves exist in
order to protect ecosystems of Florida. Despite what
these parks and preserves are currently protecting, past
land development and current misuse of developed
land through pollution
continues to affect the
health and function of
the many kinds of
ecosystems in South Florida.
A large obstacle that development has posed to South
Florida ecosystems relates to how water flows from
the land to the sea. South Florida is what is known as
a watershed, meaning that all the water within the
ecosystem comes from rain. Due to the slight slope of
Florida, that rain water flows through the land to the
ocean. Development has interrupted the flow of water
from Lake Okeechobee and Big Cypress to the ocean
and so parts of Florida that once became saturated
with water during certain parts of the year now remain
dry and lifeless.
Scientists and engineers are working to correct this
imbalance in the ecosystem through the creation and
construction of canals that will direct water flow to the
right parts of Florida. Yet, we’re learning that once an
ecosystem has been transformed by human
development, it takes more work to fix it than it did to
destroy it.
Procedures
1) Review with students the elements that are
necessary for a habitat (food, water, shelter, and
enough space for each particular kind of animal).
Integrate their experience at Big Cypress into the
discussion and ask what elements of a habitat they
saw while in the field. Explain further that the
habitats of Big Cypress that they experienced
during the field work were only a very small
percentage of all the land of Big Cypress. Explain
that there are five main habitats in Big Cypress
and they make up approximately 729,000 acres or
1125 square miles and they only experienced less
than one acre of that land. Once the elements of a
habitat are made clear and students understand the
connection to Big Cypress, tell students that today
they will explore the relationship between human
development and the habitats of Big Cypress.

2) Divide students into five groups: herbivores,
carnivores, vegetation, water, and people who will
be land developers. If students are not familiar
with the terms herbivore and carnivore, explain
that herbivore is an animal that only eats plants
and that carnivore is an animal that only eats other
animals, and although it is not needed for this
activity, explain that an omnivore is an animals
that eats both plants and animals.
3) Give students art supplies in order to draw and
label a sign that reveals what kind of herbivore,
carnivore, or vegetation they are from Big Cypress
(each member of the group must choose
something different). At this time the water and
human developers will also create signs for
themselves.
4) Create a space large enough for all herbivores,
carnivores, and vegetation to live comfortably in
their habitat. This can be done with a large rope as
the boundary either inside or outside of the
classroom.
5) Give the herbivores, carnivores, and vegetation 3-
6 minutes to set up in the habitat. Remind
students that they must make sure they have
enough space in their habitat while at the same
time considering that they need to be near their
food source as well as hidden from potential
predators.
6) Once the herbivores, carnivores, and vegetation
are finished setting up their habitat, tell those
students who represent water to flow through the
habitat. Remind them that they can easily flow
near and around trees and wildlife.
7) Once the water has flowed through the habitat, tell
the human land developers that they must create
plans to develop this land. Give the group 6-7
minutes and a piece of paper to draw the current
habitat as well as to make plans for how they will
expand a nearby community whose population of
people is growing to large for the amount of land
they have.
8) Once the human land developers have finished
their plans, give them 3-7 minutes to clear out and
build what they need within the habitat. In order
to clear out part of the habitat, tell students to
gently remove the vegetation to outside of the
parameters of the habitat. Tell the herbivores and
carnivores that if their food source leaves, they
must leave too. In order to designate what is being
build, tell the human developers to take create
signs. In addition , tell the human developers that
each time they remove a part of the habitat and/or
build upon, they have to state the reason why they
choose to do it.
9) Once the expansion of the human community is
complete, tell the water to flow through the
habitat. Remind the students who are water that
they cannot flow through or around buildings, but
must stop if they reach one.
10) Have students stay where they are and guide them
through a discussion about the activity. First, ask
the herbivores, carnivores, and vegetation, and
water how they felt before the development took
place? After? Now ask the same questions to the
land developers. What were the consequences of
the developer’s actions? Did any animals or
vegetation die? What was the difference in water
flow before and after development? How is that
similar to what is happening in South Florida?
11) Were there any positive consequences to the
development? What could the developers have
done differently to change the consequences?
Would it have been any different if the developers
had used small scattered plots of land instead of
developing the whole thing?
12) Ask students to summarize the possible effects
that human development can have on wildlife.
Are there places in your community where
wildlife habitat has been lost due to human
development? Are there places where wildlife
habitat has benefited from human activity?
13) Compare with students a map of land development
in Florida from 50 years ago to a map of land
development in Florida today. What changes are
there? What can you do to reduce the impact of
human development on wildlife habitat?
Evaluation 1) In what ways can human development positively affect
and negatively affect wildlife and ecosystems?
2) What negative consequences of human development and
activity do you see in South Florida? What positive
consequences do you see?
3) Is there anything you can do to make a positive
difference in the quality of wildlife habitat in your
community
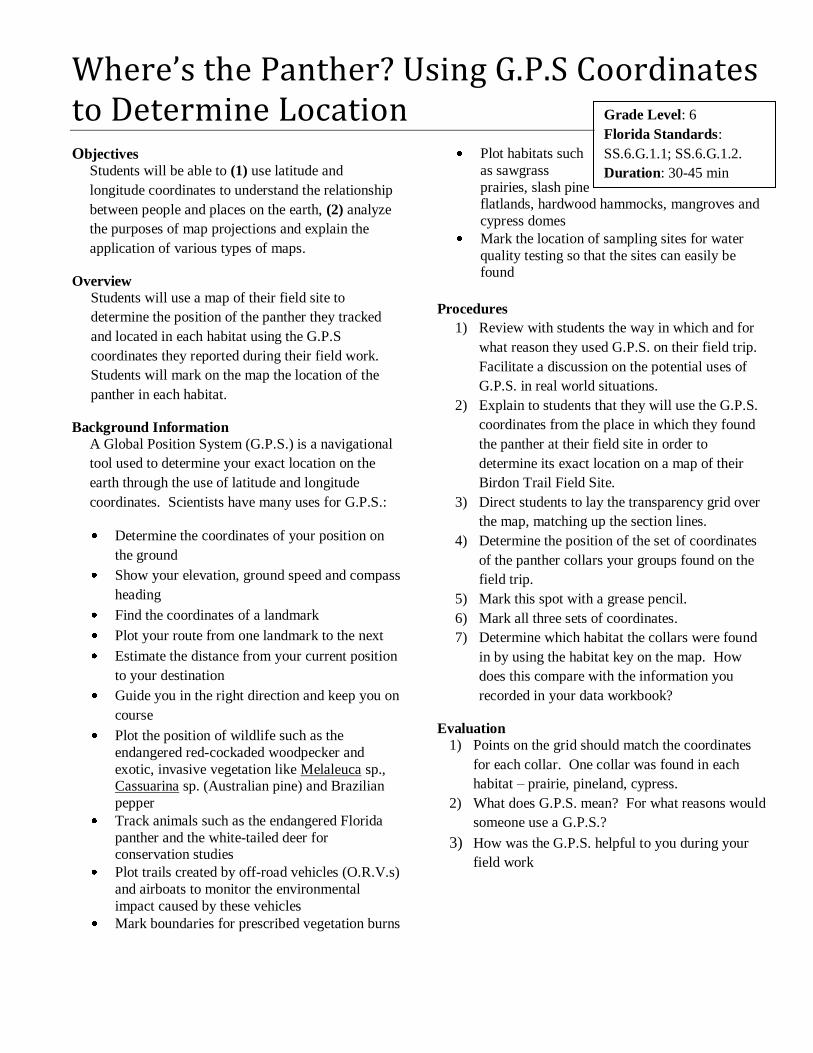
Grade Level: 6
Florida Standards:
SS.6.G.1.1; SS.6.G.1.2.
Duration: 30-45 min
Where’s the Panther? Using G.P.S Coordinates to Determine LocationObjectives
Students will be able to (1) use latitude and
longitude coordinates to understand the relationship
between people and places on the earth, (2) analyze
the purposes of map projections and explain the
application of various types of maps.
Overview
Students will use a map of their field site to
determine the position of the panther they tracked
and located in each habitat using the G.P.S
coordinates they reported during their field work.
Students will mark on the map the location of the
panther in each habitat.
Background Information
A Global Position System (G.P.S.) is a navigational
tool used to determine your exact location on the
earth through the use of latitude and longitude
coordinates. Scientists have many uses for G.P.S.:
Determine the coordinates of your position on
the ground
Show your elevation, ground speed and compass
heading
Find the coordinates of a landmark
Plot your route from one landmark to the next
Estimate the distance from your current position
to your destination
Guide you in the right direction and keep you on
course
Plot the position of wildlife such as the
endangered red-cockaded woodpecker and
exotic, invasive vegetation like Melaleuca sp., Cassuarina sp. (Australian pine) and Brazilian
pepper
Track animals such as the endangered Florida
panther and the white-tailed deer for conservation studies
Plot trails created by off-road vehicles (O.R.V.s)
and airboats to monitor the environmental
impact caused by these vehicles
Mark boundaries for prescribed vegetation burns
Plot habitats such
as sawgrass
prairies, slash pine flatlands, hardwood hammocks, mangroves and
cypress domes
Mark the location of sampling sites for water
quality testing so that the sites can easily be found
Procedures
1) Review with students the way in which and for
what reason they used G.P.S. on their field trip.
Facilitate a discussion on the potential uses of
G.P.S. in real world situations.
2) Explain to students that they will use the G.P.S.
coordinates from the place in which they found
the panther at their field site in order to
determine its exact location on a map of their
Birdon Trail Field Site.
3) Direct students to lay the transparency grid over
the map, matching up the section lines.
4) Determine the position of the set of coordinates
of the panther collars your groups found on the
field trip.
5) Mark this spot with a grease pencil.
6) Mark all three sets of coordinates.
7) Determine which habitat the collars were found
in by using the habitat key on the map. How
does this compare with the information you
recorded in your data workbook?
Evaluation
1) Points on the grid should match the coordinates
for each collar. One collar was found in each
habitat – prairie, pineland, cypress.
2) What does G.P.S. mean? For what reasons would
someone use a G.P.S.?
3) How was the G.P.S. helpful to you during your
field work


Print this page onto a transparency

Grade Level: 6
Florida Standards:
SC.7.L.17.1, SC.7.L.17.2,
SC.7.L.17.3
Duration: 30- 40 min.
Big Cypress Food Web Objectives:
• Understands the complex nature of the
interactions among organisms in an
ecosystem. Students will chart how
energy flows and matter is cycled
throughout a system.
• Understands that food chains show
specific trophic relationships, and food
webs are used to illustrate
interrelationships of trophic levels.
• Understands that humans are a part of an
ecosystem and their activities may
deliberately or inadvertently alter the
equilibrium in the ecosystem.
Overview:
Students complete the construction of a food web
involving organisms living in the project area, and
analyze some of the relationships and interactions
within it.
Materials:
Pencils, copies of food web page
Procedure
1. Life is maintained by the recycling of the
atoms that make up the molecules of
living organisms. What provides the input
of energy for this system?
2. Organisms that make their own food are
called producers, or autotrophs. Which
organisms on the diagram are producers?
(Bladderwort, cypress, lily, algae etc)
3. Organisms that get their energy from
other organisms are called consumers, or
heterotrophs. Which organisms are
consumers? (Mosquito, grasshopper,
rabbit, deer, dragonfly, crayfish, mosquito
fish, frog, heron, fish, turtle, raccoon,
alligator, panther, human.)
4. Draw an arrow from each organism to an
organism that might eat it. The arrow will
show the direction of energy flow, and
will point from the organism that is eaten
to the organism that eats it.
5. Organisms
that break
down other
organisms
and return nutrients to the soil are called
decomposers. What decomposers are
shown in the diagram? (Bacteria, fungi)
Because of space, we will not draw
arrows to the decomposers. How many of
the organisms on the diagram die and
have their nutrients recycled? (All of
them.)
6. Imagine that an organism in this food web
were to disappear. How many other
organisms would be affected (remember
that subsequent connections will also be
affected.)
Evaluation
Arrows should show the direction of energy flow.
Any relationship that may be supported is
acceptable. For example:
-Dragonfly larvae eat mosquito fish.
-Some humans eat frog legs, mushrooms, and
crayfish etc.
-Bladderwort plants trap mosquito larvae.

Big Cypress Food Web
Energy Transfer
When one organism eats another organism, energy is transferred to the organisms that just ate, for
example, if you just ate a delicious salad, the energy from the vegetables is transferred from the plant to
your body.
A food chain shows the flow of energy from one organism to another. A food web is the connection of
many food chains, showing the many paths that energy flows in an ecosystem. Food webs are a great way to
visualize the energy flowing from the bottom level producers all the way up to top level consumers.
Food Chain Food Web
Roles in a Food Web
Each organism in an ecosystem plays an important role in a food chain or web. The producers are the
organisms that convert energy from sunlight into useable energy for the rest of the food web (like most
plants or algae). The consumers are organisms that eat other organisms for energy. Primary consumers
(e.g. rabbits, crickets) eat producers for energy – these are also called herbivores because they only eat
plant vegetation. Secondary consumers (e.g. foxes) eat primary consumers. Lastly, tertiary consumers
(e.g. hawks, owls) eat primary and secondary consumers. Decomposers are organisms that break down
other dead organisms.
1) Take a look at the food web on the next page. Draw arrows from each organism to another organism
in the direction of energy flow. One arrow is drawn for you.
2) Then put the organisms on the back in the category they belong:
Producers: ___________________________________________________________________
___________________________________________________________________
Consumers: ___________________________________________________________________
___________________________________________________________________
Decomposers: ___________________________________________________________________
___________________________________________________________________


Swamp Water And Me Program
Teaching Resources


Books for Teachers
Big Cypress and Everglades Big Cypress Swamp & 10,000 Islands, by Jeff Ripple
Everglades Handbook, by T. Lodge Land from the Sea – geologic story, by J.E. Hoffmeister
Discover a Watershed – The Everglades
The Everglades Handbook
Plants Trees of Florida, by Nelson
Wildflowers and Roadside Plants, by Bell and Taylor
Wildlife Alligator: Monarch of the Marsh, by Connie Toops
Audubon Field Guide to Florida Birder’s Guide to Florida, by B. Pranty
National Geographic Field Guide to Birds of North America
Florida’s Birds, by Kale & Maehr Florida’s Fabulous Nature Series – Land Birds, Water Birds, Butterflies, Mammals, Reptiles/Amphibians
Manatees-Gentle Giants in Peril, by M. Unterbrink
Stokes Field Guide – Eastern Birds, by D. and L. Stokes
History Florida Seminole Indians, by W.T. Neill
Forty Years in the Everglades, C.R. Stone
Gladesmen – Gator Hunters, Moonshiners and Skiffers, by G. Simmons and L. Ogen Nine Florida Stories, by Marjory Stoneman Douglas
Man in the Everglades, by C.W. Tebeau
True Tales of the Everglades, by Stuart McIver Voice of the River, by Marjory Stoneman Douglas
Books for Students
Alligators-A Success Story, by P. Lauber
Discovering Endangered Species
Leapfrogging through Wetlands Everglades National Park Activity Book
Marjory Stoneman Douglas – Voice of the Everglades, by J. Bryant
One Small Square Swamp, by D. Silver
She’s Wearing a Dead Bird on Her Head, by Cathryn Lasky
Sawgrass Poems, by Frank Asch
Missing Gator of Gumbo Limbo, by Jean Craighead George
The Talking Earth, by Jean Craighead George
Golden Guides

Web Sites
www.nps.gov/bicy/
www.owl-online.org/library/edu_anim/miss_o.htm
www.fws.gov/r9endsppkid
www.ed.gov/free/
www.fws.gov/educator
www.panther.state.fl.us
www.nea.org/helpfrom/wbworks4.html
www.eelink.net
www.greenmap.org
www.bio2.edu/education/student
www.restudy.com
www.wetlands.ca/
www.nifc.gov
www.panther.state.fl.us
www.fi.edu/tfi/units/life/
www.wwf.org/windows/ecoregions/index.html
www.arborday.net/kids
www.muohio.edu/dragonfly/
www.virtualbirder.com/vbirder/onLoc/
www.cr.nps.gov/ever/eco/wdstork.htm
www.cr.nps.gov/ever/eco/wading.htm
www.nwf.org/nwf/habitats/schoolyard
www.readnwritenaturally.org
Agencies That Supply Information
Big Cypress National Preserve
Everglades National Park
South Florida Water Management District - Big Cypress Basin
Florida Fish and Wildlife Conservation Commission
U.S. Fish and Wildlife Service

Swamp Water And Me Program
Reproducible Masters

Chaperone Letter Dear Chaperone,
Thank you for volunteering to assist with the S.W.A.M.P. field trip to Big Cypress National Preserve. An
extra adult on the trip is always a big help to the rangers, teachers and especially the students. We think
you will find it to be a rewarding learning experience while you have a fun day in the swamp with your
child and his or her classmates.
There are some rules, however, even for the grown ups who attend. Full participation is expected by each
chaperone. This means you go into the swamp with the students and assist them with all activities. You
may be walking through ankle to knee deep water and mud depending on the water levels at the time of year
you come. Check with your child or their teacher to see what the most recent conditions are. There is no
facility for you to wait for the students to return from the swamp.
Included is a list of what you should wear and bring along on the trip. It is the same as the list for the
students as the same safety concerns apply for both.
Comfortable clothing - suitable for the weather - that can get wet and muddy
Closed-toed shoes that lace on tight - old tennis shoes work best.
Socks
Long pants
Bring an extra long sleeve shirt in your pack - if necessary this can guard against the sun and insects.
White clothing will never be white again!
Sun protection
Hat, sunscreen, sunglasses.
Water Plenty of it.
Bug repellant
This may not be necessary.
Please bring lotion instead of aerosol.
Lunch
Something that does not need to be kept cold between the time you leave your home and lunchtime.
What not to bring:
Cell phones - you will be busy helping the students who will be recording data from their activities for a
grade. Cell phones have proven to be quite a distraction and can easily be dropped in the water. There are

many areas of the Preserve in which cell phones do not pick up signals. The rangers will have park radios
and Nextel phones in case of an emergency.
Cameras can also be a big distraction and be easily dropped in the water. If you bring a camera please limit
your pictures. Students may not bring cameras.
Money is not needed on the trip. We will be in the swamp. There are no gift shops, restaurants or snack
machines.
Do not bring or wear valuables that could be damaged if gotten wet or lost.
Avoid bringing heavy backpacks full of stuff.
What your backpack should contain:
Water, lunch, sunscreen, bug repellant, long sleeve shirt, special medication if needed. Nothing else!
We will be walking a lot and there is no place dry to put your backpack if it gets too heavy.
We will be traveling on a dusty, sometimes rough gravel road for approximately 6 miles one way. Please
keep this in mind if you decide to travel in your own car. Please do not leave valuables in your car. Make
sure you have plenty of gas before leaving Naples.
Please remember this trip can be hot and strenuous. If you have any medical needs or physical limitations
please inform the teacher.
Thanks again for volunteering. Parents like you help to make this program a success!
We look forward to seeing you on the field trip.
Sincerely,
The Environmental Education Staff

Date: __________
Dear Parent,
Your child came to Big Cypress National Preserve for the S.W.A.M.P. field trip along with the rest of the
sixth grade science class last school year.
Occasionally photographs are taken of the students by park staff or local newspaper photographers during
the experiments and activities of the trip. With your permission these photographs can be used in the
production of educational materials such as exhibits, brochures, newspaper articles, our National Park
Service web page or in annual reports. We may also use comments from the students about the program.
Would you please sign the following release so that this information can be used and send it back to school
with your child. If you have any questions about the use of these materials please feel free to contact me at
239-695-1164.
Thank you for your cooperation.
Sincerely,
Lisa M. Andrews, Outreach/Education Specialist
Big Cypress National Preserve
Media Release Form
I, __________________________________ attest that I am the parent/legal guardian of
____________________________________who is a minor child.
I give Big Cypress National Preserve permission to use photographs or comments of
___________________________________ in the production of educational materials such as exhibits,
brochures, newspaper articles, our National Park Service web page or in annual reports for the Swamp
Water And Me Program, S.W.A.M.P.
I understand fully that neither my child nor I will receive any form of compensation for the use of his or her
photograph or comment.
__________________________
Signature
_______________
Date

Teacher S.W.A.M.P Assessment Form
Please return this in the pre-stamped self addressed envelope within three weeks after your field trip. The
information you supply us with will help to create better programs for the future.
Pre-Site Assessment Teacher: Date of Pre-Site: Pre-Site Ranger: Did you receive enough materials and guidance in order to properly
prepare your students for their
field work at Big Cypress?
Did you use the Pre-Site Study
materials from the Teacher’s
Guide in order to inform your instruction? If so, which ones
and in what way did you use it?
If not, why?
Do you have any suggestions for the improvement of the Pre-Site
Study?
Did you use the Pre-Site Lesson
Plans in order to prepare your
students for their field work at Big Cypress? If so, which ones?
If not, why?
Do you have any suggestions for
the improvement of the Lesson Plans?
Did you use any of the materials in the backpacks provided for
you in order to prepare your
students for their field work? If so, in what way? If not, why?
Do you have any suggestions for
how to improve the backpack
provided for your classroom?
During your Pre-Site Ranger visit, was the ranger
knowledgeable and engaging?
Did the ranger act in a way that was inappropriate or to deter
from the success of your
students?

Field Trip Experience Assessment Did you receive enough information
and instructions to be able to
successfully conduct the field trip?
Was the length of time of the field
trip adequate?
Was the Ranger knowledgeable and
engaging? Did the ranger act in a
way that was inappropriate or to deter from the success of your
students?
What did the students enjoy the
most? Why?
What did the students enjoy the
least? Why?
Field Trip Activities Assessment One is the lowest; Five is the highest.
Teacher: Rangers:
Activity 1 2 3 4 5 Why did you give this rating?
Radio
Telemetry
G.P.S.
Animals
Water
Vegetation
Soil
Weather
Extra
activities
Overall
field trip

Post-Site Assessment Did you use any of the Post-Site
Lesson plans? If so, which ones? If not, why?
Did you give the Pre- and Post- Assessment to determine how
much your students learned from
this experience? If so, how did
they do? If not, why?
What new information did you learn about Big Cypress?
What new information did you
learn about ways that you can
help protect the wildlife of Big
Cypress?
What would you like to see done differently with this program?
Would you be willing to help in
the development of new or
improved materials and activities for this program? If yes, how
can we contact you?
Additional Comments: