switchboard user manual - packet8 - support information management
TRANSCRIPT
www.8x8.com | 1.866.879.8647
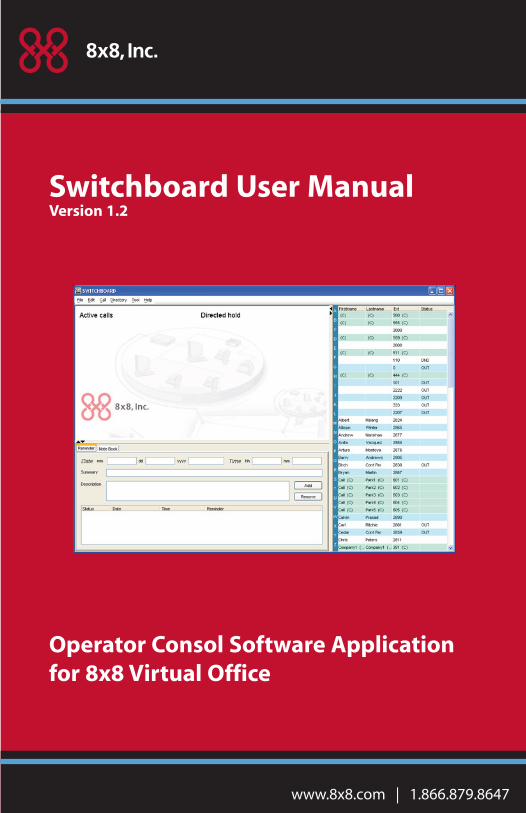
Switchboard User ManualVersion 1.2
Operator Consol Software Application for 8x8 Virtual Office

| 2
Contents
Introduction ....................................................................................................................................... 3System Requirements ........................................................................................................... 3
Getting Started ................................................................................................................................. 3Installation ................................................................................................................................. 3
On-Screen Organization ................................................................................................................ 4Window Display ...................................................................................................................... 4Directory Area .......................................................................................................................... 5Reminder/Notebook Area ................................................................................................... 5Menu Bar.................................................................................................................................... 6
Managing Active Calls .................................................................................................................... 9Answering an Incoming Call .............................................................................................. 9To answer an incoming call: ..............................................................................................10Placing and Retrieving a Call on Hold ..........................................................................10To manually put a call on hold:........................................................................................10Alternative manual methods: ...........................................................................................10Transferring a Call .................................................................................................................10To transfer a call: ....................................................................................................................10Announcing a Call ................................................................................................................11To announce a call: ...............................................................................................................11Retrieving an Announced Call .........................................................................................12To re-activate the incoming call: .....................................................................................12Transferring a Call Directly to Voicemail ......................................................................12To transfer a call to Voicemail, in the Active Calls area:...........................................12Making an Internal Call ......................................................................................................13To call within the organization, the simplest way is to: ..........................................13To call within the organization: .......................................................................................13Leaving an Internal Message ............................................................................................13Holding a Call for a Person ................................................................................................13Activating the Auto-Attendant ........................................................................................14To activate the Auto-Attendant: ......................................................................................14Deactivating the Auto-Attendant...................................................................................14To deactivate the Auto-Attendant: .................................................................................14Directed Hold .........................................................................................................................14
Preferences Window .....................................................................................................................14Resizing the Windows .........................................................................................................16To move either divider: .......................................................................................................16Miscellaneous System Numbers .....................................................................................17
3 |
IntroductionThe Switchboard Application is an optional receptionist/operator console software application for 8x8 Virtual Office that will increase the efficiency of your organization with better phone call management. Switchboard allows:
Multiple call viewing and handling »Direct transfer to extension’s Voicemail »Supervised call transfers »View of extensions’ status »
The Virtual Office switchboard is flexible and easy-to-use. It does not require advanced computer applications knowledge or experience. With a few clicks of a PC’s mouse, a receptionist can transfer a call, put a caller on hold and announce the caller to an intended recipient or search the organization’s directory.
System RequirementsTo operate your switchboard, you must have the following requirements on your computer: Windows 98, NT, 2000 or XP operating system 128 MB of RAM 200 MB of free disk space 10/100 Base-T Ethernet connection
Getting StartedUpon subscribing to the Switchboard application, you will be provided a link to the software within your confirmation letter. The confirmation letter also provides step-by-step download and installation instructions to guide you through the Switchboard installation process.
InstallationThe Switchboard application must be installed on the local computers that will be using the Switchboard Application before the Switchboard will work. Additional concurrent Switchboard subscription licenses must purchased for any additional number of con-current Switchboard sessions that will be run on different computers. A user can install Switchboard on several computers and share one subscription license as long as only one concurrent session is running. Follow the instructions to install and set up the Switchboard Application.
| 4
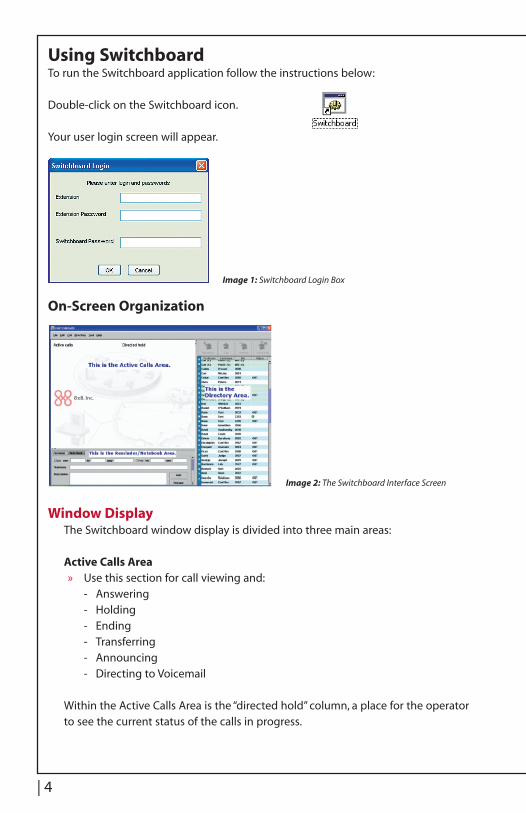
Using SwitchboardTo run the Switchboard application follow the instructions below:
Double-click on the Switchboard icon.
Your user login screen will appear.
On-Screen Organization
Window DisplayThe Switchboard window display is divided into three main areas:
Active Calls AreaUse this section for call viewing and: »- Answering - Holding - Ending - Transferring - Announcing - Directing to Voicemail
Within the Active Calls Area is the “directed hold” column, a place for the operator to see the current status of the calls in progress.
Image 1: Switchboard Login Box
Image 2: The Switchboard Interface Screen

5 |
Directory AreaEach extension has 4 fields for: »- Firstname* - Lastname* - Ext*
Directory AreaEach extension has 4 fields for: »- Firstname* - Lastname* - Ext* - Status - Green Dot (extension in use)
- DND (do not disturb) - OUT (extension not in service)
*These fields can be sorted on screen.
Use this section to: »- Easily locate extensions, names and status - Place internal call - Leave a VoicemailUse this section to move active calls: » - Transfer- - Announce (supervised) transfer - Direct to Voicemail
Reminder/Notebook AreaUse this section to: »- Store messages for the organization - Make personal notes
Image 4: Reminder/Notebook Section
Image 3: The Directory Listing

| 6
Menu BarSwitchboard’s menu bar has six options (File, Edit, Call, Directory, Tool and Help) which gives you access to pull-down menus. These entries control all aspects of the application.
Note: Command options in the menus and the Toolbar will only be highlighted or “live” when they are available and can be used in the current situation.
The 1. File Menu has controls for the reminder/notebook functions and permits program exit.
The 2. Edit Menu provides standard cut, copy and paste functions and allows preference changes.
7 |
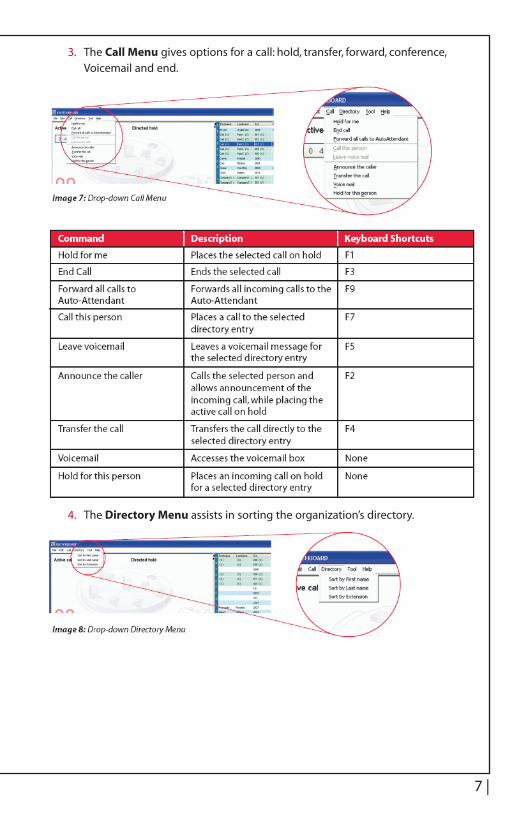
The 3. Call Menu gives options for a call: hold, transfer, forward, conference, Voicemail and end.
The4. Directory Menu assists in sorting the organization’s directory.

| 8
The 5. Tool Menu provides the ability to modify the appearance of the Switchboard display window and to show or hide tool bar buttons.

9 |
The 6. Help Menu has application information and tips for problem solving.
Managing Active CallsThe Active Calls Area displays all active calls. A button appears on each call displayed, giving the switchboard operator options to answer, hold, transfer or end it. These incoming calls are listed top to bottom in order of appearance. In other words, the most recent calls are displayed at the bottom of the caller list in the Active Calls Area.
Answering an Incoming CallIncoming calls ring and appear on the computer screen as a button with a telephone symbol.
| 10
To answer an incoming call:Pick up the telephone receiver (if not using a headset)1. Use the mouse to click on the incoming call’s button2. The call becomes active3. Speak into your phone handset or headset4.
Placing and Retrieving a Call on HoldCircumstances demand that some callers be placed on hold. If you answer an incoming call while talking on another one, the first call will automatically be put on
hold.
To manually put a call on hold:Click on the on-screen button for the call you want to hold1. Click on the Call Menu2. Select “Hold For Me”3. The timer shows the length of the call being held.4.
Alternative manual methods:Click on the on-screen button for the call you want to holda. b. Select the “Hold” button on the Toolbarb.
OrRight-click on the incoming call button to display the pop-up menua. Select “Hold For Me”b.
To retrieve a call on hold:Click once on the on-screen button for the call on holda.
Or1. Right-Click on the button to bring down a menua. 2. Select “Retrieve”b.
Transferring a CallTransferring an incoming phone call is a common chore that can be done quickly and easily via Switchboard.
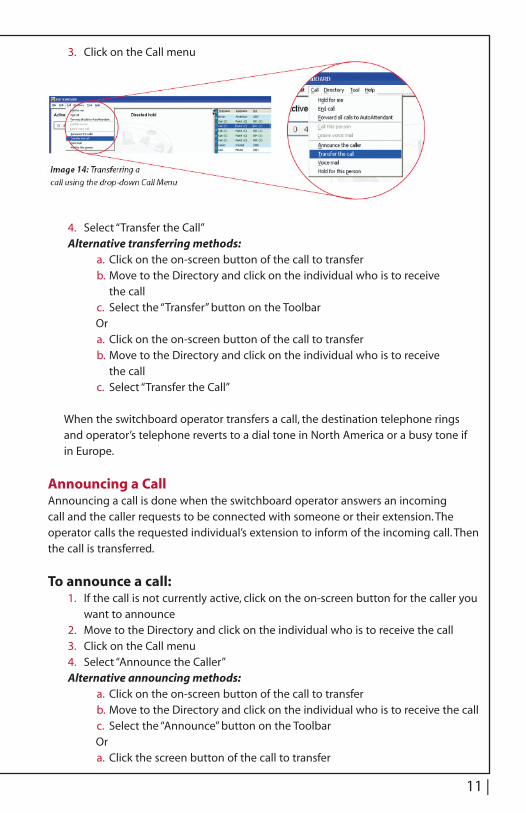
To transfer a call:Click on the on-screen button for the call you want to transfer1. Move to the Directory and click on the individual who is to receive the call2.
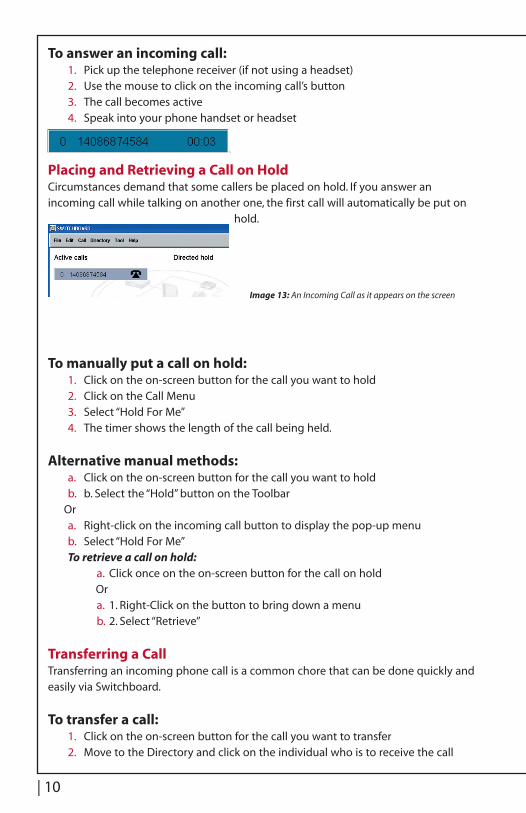
Image 13: An Incoming Call as it appears on the screen
11 |
Click on the Call menu3.
Select “Transfer the Call”4. Alternative transferring methods:
Click on the on-screen button of the call to transfera. Move to the Directory and click on the individual who is to receive b. the callSelect the “Transfer” button on the Toolbarc.
OrClick on the on-screen button of the call to transfera. Move to the Directory and click on the individual who is to receive b. the callSelect “Transfer the Call” c.
When the switchboard operator transfers a call, the destination telephone rings and operator’s telephone reverts to a dial tone in North America or a busy tone if in Europe.
Announcing a CallAnnouncing a call is done when the switchboard operator answers an incoming call and the caller requests to be connected with someone or their extension. The operator calls the requested individual’s extension to inform of the incoming call. Then the call is transferred.
To announce a call:If the call is not currently active, click on the on-screen button for the caller you 1. want to announceMove to the Directory and click on the individual who is to receive the call2. Click on the Call menu3. Select “Announce the Caller”4.
Alternative announcing methods:Click on the on-screen button of the call to transfera. Move to the Directory and click on the individual who is to receive the callb. Select the “Announce” button on the Toolbarc.
OrClick the screen button of the call to transfera.

| 12
Move to the Directory and click on the individual who is to receive the callb. Select “Announce the Caller”c.
When the intended recipient answers, operator advises of the incoming call5. Then right-click on the “Directed Hold” area button to display a pop-up menu6. Click on “Transfer” 7.
Both caller and recipient information will disappear from the Active Calls area. The phone reverts to a dial tone in North America or a busy tone if in Europe.
Retrieving an Announced CallYou can continue a dialogue with the incoming caller, after having announced a call. You do this by re-activating the incoming call before you make the final transfer.
To re-activate the incoming call:Right-click on the incoming call button in the “Directed Hold” area to display a 1. pop-up menuSelect “Retrieve”2.
OrSimply click on the button directly and the incoming call will become active. »The recipient button will stay in the Active Calls area. The switchboard operator can speak to either the caller or the recipient by clicking on their respective call buttons in the “Active Calls” or “Directed Hold” columns. Transfer as instructed above.
Transferring a Call Directly to VoicemailTransferring an incoming caller directly to an individual’s or group’s mailbox is simple.
To transfer a call to Voicemail, in the Active Calls area:Click on the on-screen button for the call you want to transfer1. Move to the Directory and click on the individual who is to receive the mes-2. sageClick on the Call menu3. Select “Voicemail”4.
Alternative transferring methods:Click on the on-screen button of the call to transfera. Move to the Directory and click on the individual who is to receive the b. messageSelect the “Voicemail” button on the Toolbarc.
OrClick on the on-screen button of the call to transfera. Right-click on individual in the Directory who is to receive the messageb. Select “Voicemail”c.

13 |
Making an Internal Call
To call within the organization, the simplest way is to:In the Directory, double-click the name of the individual you want to contact1. Your own telephone will ring2. When you answer it, a button with a telephone icon will appear in the Active 3. Calls area on the computer screen
To call within the organization:Click on the individual in the Directory you want to contact1. Click on the Call menu2. Select “Call This Person”3. Your own telephone will ring4. When you answer it, a button with a telephone icon will appear in the “Active 5. Calls” area on the computer screen (this screenshot would be more relevant if the console section was shown).
Leaving an Internal MessageTo leave a message in an individual’s Voicemail box:
Click on the individual in the Directory you want to contact1. Click on the Call menu2. Select “Leave a Voicemail”3.
Holding a Call for a PersonTo hold a call for a specific person, in the Active Calls area:
Click on the on-screen button for the call you want to place on hold1. Move to the Directory and click on the individual who is to receive the call2. Click on the Call menu3. Select “Hold for this person”4.
Alternative method:Click on the on-screen button of the call to place on holda. Move to the Directory and right-click on the individual to display the b. pop-up menuSelect “Hold for this person”c.

| 14
Activating the Auto-AttendantSwitchboard’s Auto-Attendant is the application’s advanced feature that will automatically manage in-coming calls when the operator cannot be present or during after-hours.
To activate the Auto-Attendant:Using the Call menu, select “Forward all calls to Auto-Attendant” »
Alternative method:Using the Toolbar, click on the “Auto-Attendant” buttona.
Deactivating the Auto-Attendant
To deactivate the Auto-Attendant:Using the Call menu, select “Cancel forwarding to Auto-Attendant” »
Alternative method:Using the Toolbar, click off the “Auto-Attendant” buttona.
When the Auto-Attendant is deactivated, the Active Calls area will revert to its normal state.
Directed HoldWhen a call is located in the “Directed hold” column, this indicates the caller has been placed on hold by someone at an extension within the organization. The operator can check on the caller if several minutes pass without a change in status.
Preferences WindowYou can change the appearance of your Switchboard to suit your own tastes and way of working. Preference options are found under the Edit menu. After selecting Preferences, you will find:
15 |
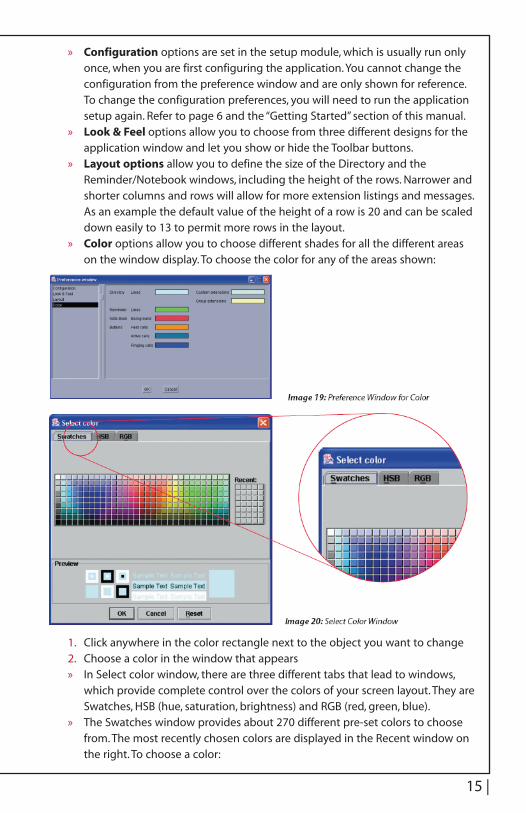
Configuration » options are set in the setup module, which is usually run only once, when you are first configuring the application. You cannot change the configuration from the preference window and are only shown for reference.To change the configuration preferences, you will need to run the application setup again. Refer to page 6 and the “Getting Started” section of this manual.Look & Feel » options allow you to choose from three different designs for the application window and let you show or hide the Toolbar buttons.Layout options » allow you to define the size of the Directory and the Reminder/Notebook windows, including the height of the rows. Narrower and shorter columns and rows will allow for more extension listings and messages. As an example the default value of the height of a row is 20 and can be scaled down easily to 13 to permit more rows in the layout.Color » options allow you to choose different shades for all the different areas on the window display. To choose the color for any of the areas shown:
Click anywhere in the color rectangle next to the object you want to change1. Choose a color in the window that appears2. In Select color window, there are three different tabs that lead to windows, »which provide complete control over the colors of your screen layout. They are Swatches, HSB (hue, saturation, brightness) and RGB (red, green, blue).The Swatches window provides about 270 different pre-set colors to choose »from. The most recently chosen colors are displayed in the Recent window on the right. To choose a color:

| 16
- Click on one of the predetermined colors in the main Swatches areaOr
Click on one of the recently used colors on the Recent area.1. Click on the OK button on the Swatches window2. Click on the OK button on the main color preferences window3. The HSB window uses a slider bar to choose a color. Here’s how: » - Slide the bar up or down until the color is correct
OrMove the small white circle until the required mix is achieved1. Click on the OK button on the HSB window2. Click on the OK button on the main color preferences window3. The RGB window uses three slider bars to choose a color. There is one for each »of the colors, red green and blue:Slide each bar to the right or left until the color area is correct1. Click on the OK button on the RGB window2. Click on the OK button on the main color preferences window3.
Resizing the WindowsYou can resize the windows on Switchboard’s screen display. There are two main window dividers. One separates the Active Calls area from the Reminder/Notebook area below it. Another divider separates the Directory area from the two other areas.
To move either divider:Move the mouse pointer over the divider and when it changes to a 1. double-headed arrow.Click, hold and drag the divider to the required location.2.

17 |
Miscellaneous System NumbersThe following numbers are to access different extensions not associated withemployees.
555: Voicemail: » This is the internal number you call from your extension to access Voicemail556: Conference Bridge: » The conference bridge is a reservation bridge that users of the system can schedule conference bridges for internal and/or external use.444: Auto-Attendant: » This is the internal number you could call or transfer a caller to reach the Auto-Attendant allowing, menus including dial by name 1, dial by extension 2, company directory 4, or 500 to reach Voicemail.This is also the greeting someone will get when they call your company and someone does not answer.500: Access Voicemail: » This number can be reached from the outside through the attendant to access your Voicemail.559: Company Voicemail and Auto-Attendant recording: » Extension 559 changes require a system password. Default password will be 388045 it is recommended that it is changed.601-605: » Park Extension Range: These numbers are used to park a call without transferring it to a specific extension. A parked call can be picked up from any extension phone on the system.

www.8x8.com | 1.866.879.8647
WARNINGToll fraud is committed when individuals unlawfully gain access to a customers telecommunication system. This is a criminal offense. Currently, we do not know of any telecommunications system that is immune to this type of criminal activity. 8x8 Inc.will not accept liability for any damages, including long distance charges, which result from unauthorized and/or unlawful use. Although 8x8 Inc. has designed security features into its products and services, it is your sole responsibility to use the security features and to establish security practices within your organization, including training, security awareness, and call auditing to eliminate security risks.
NOTICEWhile every effort has been made to ensure accuracy, 8x8, Inc.will not be liable for technical or editorial errors or omissions contained within the documentation.The information contained in this documentation is subject to change without notice. This documentation may be used only in accordance with the terms of the 8x8, Inc. License Agreement.
8x8, Inc.Contact Information• Personal Web Page: http://www.8x8.com
Support:• http://www.8x8.com/support• Customer Service, toll free: 1.888.898.8733• Customer Service, outside of the U.S.: 1.408.687.4120
The 8x8, Inc. logo are registered trademarks of 8x8, Inc.8x8, Inc. is a Nasdaq listed company, symbol EGHT.© 2009. 8x8, Inc. All rights reserved. corp09209