system administration manual commander® nt40phoenixcommunications.com.au/downloads/nt40 users...
TRANSCRIPT

System Administration Manual Commander® NT40

DOC-NT-SAM40-A P0906413 Issue 01 Printed in Canada
System Administration ManualCommander® NT40

.
© PlesTel Pty Limited (ACN 082 384 343)
All rights reserved. No part of this document may be released, distributed, reproduced, copied, stored or transmitted in any form or by any means, without prior written permission of PlesTel Pty Limited. Commander is the registered trademark of PlesTel Pty Limited

Commander ® Customer Response Centre
The Commander Customer Response Centre has been set up by PlesTel to help you administer and maintain the Commander NT.
Help Desk Documentation suggestions
The Help Desk is staffed by personnel experienced in all areas of customer premises equipment. Call them during normal working hours for support on:
• installation procedures
• programming problems
• fault issues
• detailing
• equipment compatibility
• modifications
The staff at the Commander Customer Response Centre are keen to assist you, however, please read the documentation provided with the product carefully before calling.
If you find any problems with the documentation for this Commander product, please tell us.We want to know if you find any of the following problems:
• mistakes in the manual
• sections hard to understand
• difficulty in locating a subject
You can call the Help Desk to report a problem, or you can use the Suggestions form on the other side of this page.
How to contact the Commander Customer Response Centre:
Phone
FREECALL ™ 1800 809 882
Fax
FREECALL ™ 1800 044 113
8:00 am to 7:00 pm (EST) Monday to Friday
P0906413 Issue 01 System Administration Manual

4 /
Suggestions about this manual
The following form is provided for your suggestions. Please photocopy this page and fill it in. When completed, post it to us at:
Commander Customer Response CentreLocked Bag 5Unley SA 5061
OR
Fax the copy to: 1800 044 113
Name: __________________________________________________
Company: __________________________________________________
Operations Group: Business and Government Services �Service Delivery Unit �
Address: __________________________________________________
__________________________________________________
State: _______________________________ Postcode: __________
Telephone: _______________________________ Fax: ______________
Manual: Commander NT40 System Administration Manual Issue 01
Suggestions: _______________________________________________
_______________________________________________
_______________________________________________
_______________________________________________
_______________________________________________
_______________________________________________
_______________________________________________
_______________________________________________
_______________________________________________
_______________________________________________
_______________________________________________
System Administration Manual P0906413 Issue 01

Table of contents
SECTION I: Getting started with Commander NT40 1
Chapter 1 Tutorial 2Regulatory information 2You must be the Administrator! 2What is programming? 3Before you start 3Making changes is simple 3Using keys 4The programming overlay 8A map for working in programming 9Starting and ending a programming session 10
Chapter 2 Frequently used programming operations 13Programming a System Speed Dial code 13Assigning names instead of numbers 16Changing the time and date on the display 18Creating a restriction for call barring 20Applying a dialling restriction to a line 22Applying a dialling restriction to a keystation 24Applying a dialling restriction to a a line on a station 26Congratulations, Administrator! 27
SECTION II: System programming 29
Chapter 3 System programming introduction 31Conventions used in this guide 31Using passwords 31Programmable settings and features 34
P0906413 Issue 01 System Administration Manual

ii /
Chapter 4 Programming stations and peripherals 43Stations & Peripheral 43Assigning a line to a station (line access) 43Assigning line pool access 45Assigning a Prime line to a station 46Assigning intercom keys to a station 47Assigning an Answer station to a keystation 48Setting the Originating Line Identification for a station 50
Chapter 5 Software keys 53Viewing the system ID 53Software Keys 53
Chapter 6 Setting System Speed Dial 55Assigning a number to a System Speed Dial code 55Selecting a line 56Setting the system to display a name instead of number 57Setting whether the speed dial number bypasses restrictions 58
Chapter 7 Naming stations and lines 59Naming stations 59Naming lines 60
Chapter 8 Changing the time and date 61Changing the time 61Changing the date 62Changing the time and date using the Basic password 62Changing the time by an hour 63Automatic Time and Date 64
Chapter 9 Barring calls and privileges (Restrictions) 65Customising a call barring (restriction) filter 67Assigning filters 69
System Administration Manual P0906413 Issue 01

/ iii
Assigning calling privileges (Class of Service Password) 73Locking a station 79Preventing Last Number Redial 80Preventing Saved Number Redial 80Preventing Recall 81Preventing Redirect 82
Chapter 10 Programming station capabilities 83Seeing what has been programmed on a station 83Setting divert 84Programming Do Not Disturb on Busy 88Programming Handsfree 89Assigning a pickup group 91Assigning a page zone 91Programming paging 92Programming Direct-Dial 93Allowing Priority Call 95Assigning a Hotline 96Auxiliary ringer 97Allowing a station to use Redirect Ring 98Receive tones 99
Chapter 11 Programming User preferences 101Changing the key programming for a station 101Changing a Personal (user) speed dial code 102Changing the Call log options 103Changing the Dialling options 103Changing the display contrast 104Changing the Ring type 105
Chapter 12 Programming hunt groups 107Adding or removing members from a group 108Moving members of a group 109Assigning or unassigning lines to a group 109Setting the distribution mode 110Setting the hunt delay 112Programming options if all hunt group members are busy 112Programming the queue timeout 113
P0906413 Issue 01 System Administration Manual

iv /
Programming the overflow station 114Setting the name 115Checking hunt group metrics 115
Chapter 13 Programming feature settings 117Background music 117On hold 117Handset volume 118Camp timeout 119Park timeout 120Park Mode 120Transfer revert 121Network revert 122Held reminder 123Remind delay 124Conference tone 124Directed (call) pickup 125Page tone 125Page timeout 126Auto Time&Date 127Call log space 128Alarm station 129Station relocation 130Message reply enhancement 131Answer key 132
Chapter 14 Hospitality Services 135Common keystation 135Room keystation 135Hospitality Services (HS) admin keystation 136Alarm time (AL) feature 136Hospitality Services admin alarm feature 138Room occupancy (RO) 139Room condition (RC) 140Service time 142
Chapter 15 Network features 145ONN blocking 145
System Administration Manual P0906413 Issue 01

/ v
Chapter 16 Settings for analogue equipment 147Setting the delay before the SLT answers 147Changing the dial mode of a SLT Adaptor 148Setting whether the SLT Adaptor should receive system tones 149
Chapter 17 Moving and copying 151Station relocation 151Copying programming for keystations 153
Chapter 18 Programming services 157Using alternate or scheduled services 157Turning Services on or off 158Designating alternate routes for calls 161Programming routes 165Programming destination codes 166Turning a manual service on or off with a feature code 169Assigning control stations 170Changing the name of a mode 172Changing the time of a mode 172
Chapter 19 Changing passwords 175Password security 175Erasing a call log password 175Setting the SAPLUS password 176Setting the Administrator password 176Setting the Basic password 177Hospitality passwords 177
Chapter 20 Network features 181CLI assignment 181Caller ID station 181Call log station 1821st Display 182Auto called ID 183Log space 184
P0906413 Issue 01 System Administration Manual

vi /
Chapter 21 Auto Attendant 185System Answer 186Custom Call Routing (CCR) 186Customising System Answer and CCR 188Programming CCR lines 191Fax switch feature 198
Chapter 22 Remote access 203Remote access packages 203Remote line access 206
Chapter 23 Maintenance 209Beginning a Maintenance session 209Checking the system version of the software 209System administration log record 210
Chapter 24 Troubleshooting 213Using the alarm station 213Reporting and recording alarm codes 213Clearing lines 214Power failure 215Power-fail keystation 215
Chapter 25 Testing 217Testing the keystation 217
Section III: Using keystation features 221
Chapter 26 About Commander NT Keystations 223Principal Keystation 223Advantage Keystation 224Standard Keystation 224Economy Keystation 224M7000 Keystation 225
System Administration Manual P0906413 Issue 01

/ vii
Direct Station Select (DSS) Console 226Busy Lamp Field (BLF) Display (Advantage Keystation only) 226Release key 226
Chapter 27 Customising a keystation 227Dialling mode 227Display contrast 228Key Inquiry 228Moving line keys 230Ring type 230Ring volume 231Customising the M7000 Keystation 231
Chapter 28 Using personal features 233Background music 233Do Not Disturb 233User Speed Dial codes 234Using Speed Dial 234
Chapter 29 Answering calls 237Answering a call 237Privacy feature (external calls only) 237Answering the next queued call 238Answering hunt group calls 238Multiple appearances of DDI lines 239Using Handsfree 239Making calls without lifting the handset 239Answering a keystation using Directed Pickup 240Answering a keystation using Pickup Group 241Answer keys 242Listening in a group 244Disconnecting Accidentally 244
Chapter 30 Holding calls 245Holding 245
P0906413 Issue 01 System Administration Manual

viii /
Listening on hold 246
Chapter 31 Routing calls 247Call Parking 247DDI calls 248Making a Priority call 251Transferring a call 251Transferring to a busy station (Call Camping) 252
Chapter 32 Making external calls 255Using an exchange code 255Using line pools 255Making a conference call 256Using Class of service passwords 260
Chapter 33 Making internal calls 263Making an Internal call 263Making a Conference call 263Accessing a Direct-Dial station 263Leaving Messages 264Paging 267Remote paging 269Voice Call 270
Chapter 34 Diverting calls 273Diverting all calls 273Line redirection 274
Chapter 35 Saving time with features 279Using System Speed Dial 279Using Autodial 279Using Redial 281Programming memory keys 282Using Callback 284Using Hotline 284
System Administration Manual P0906413 Issue 01

/ ix
Chapter 36 Using Display Features 287Time and Date 287Static Time 287Call duration time 287Call Information 288Call log 289Autobumping 295
Chapter 37 Special dialling features 297Inserting a pause 297Setting long tones 297Programmed Release 298Recall 298Run/Stop 299Wait for Dial Tone 299
Chapter 38 ISDN services 301ETSI ISDN BRA standard 301
Chapter 39 General system features 305Choosing a line using a line key 306Economy Keystation 306Memory keys 307One-line display 307Prime line 308Private lines 308Volume bar 308Wall mounting 308Uninterruptible power supply (UPS) 308Changing to tone dialling 308Using your Commander NT40 from an external location 309Tones 311Answer keys 312Control station 312
P0906413 Issue 01 System Administration Manual

x /
Chapter 40 List of Commander NT features 313How to use Commander NT features 313
Chapter 41 List of ISDN terminal features 317Divert All Calls 317Transfer 318Line access from an ISDN terminal 318Making or receiving calls involving two B-channels 318
Chapter 42 List of SLT station features 321
Chapter 43 Common feature displays 325
Chapter 44 Index 331
System Administration Manual P0906413 Issue 01

SECTION I: Getting started with Commander NT40
P0906413 Issue 01 System Administration Manual

2 / Tutorial
TutorialThe Commander NT40 Compact is a smaller but fully-featured version of the Commander NT40. The Main Equipment (ME) for the Commander NT40 Compact supports up to 4 PSTN lines or 8 ISDN lines and 8 Commander NT40 keystations and peripherals. You can expand the Commander NT40 system to 8 PSTN lines or 16 ISDN lines or 24 Commander NT40 keystations by using a Digital Station Cartridge or NT40 Services/Expansion Cartridge for BRA ISDN.
Regulatory information
The symbol located above indicates that the equipment described herein meets all relevant Telecommunication Requirements for connection and operation with the Telecommunications Network as outlined by the Australian Communications Authority (ACA).
You must be the Administrator!
If the Installer has given this manual to you, you’re most likely the System Administrator.
As an Administrator your role is to:
• Help your colleagues learn to use their Commander NT Keystations.
• Change Commander NT programming to customise the system for your office or to keep up with changes in your office environment or personnel.
• Call for help or service when necessary.
N441
System Administration Manual P0906413 Issue 01

Tutorial / 3
The System Administration Manual contains all the information you need to become an expert in using and programming the Commander NT.
This tutorial contains exercises to get you started with Commander NT programming. By the time you finish the tutorial, you will have done all levels of programming (using different passwords), from the simplest to the most complex. You can always come back to an exercise to help you remember how to change settings like the time and date.
What is programming?
The Installer has set up your Commander NT Keystation system with standard settings, so that you can use it right away.
By following instructions on the keystation display and pressing a few keys, you can change some of the Commander NT settings to suit the specific needs of your business. This tutorial contains exercises that show you how to program Commander NT settings:
Before you start
Before you start, plan what changes you want to make. Record the changes in the Programming Record so you will have the information at hand. For example, if you are going to program system speed dial numbers, fill out the page in the Programming Record so you will have all the numbers and codes handy once you start programming.
Making changes is simple
You can change settings either on individual keystations or across the system. Follow the display on your keystation and use a few keystrokes to change settings quickly and easily.
P0906413 Issue 01 System Administration Manual
4 / Tutorial
Using keys
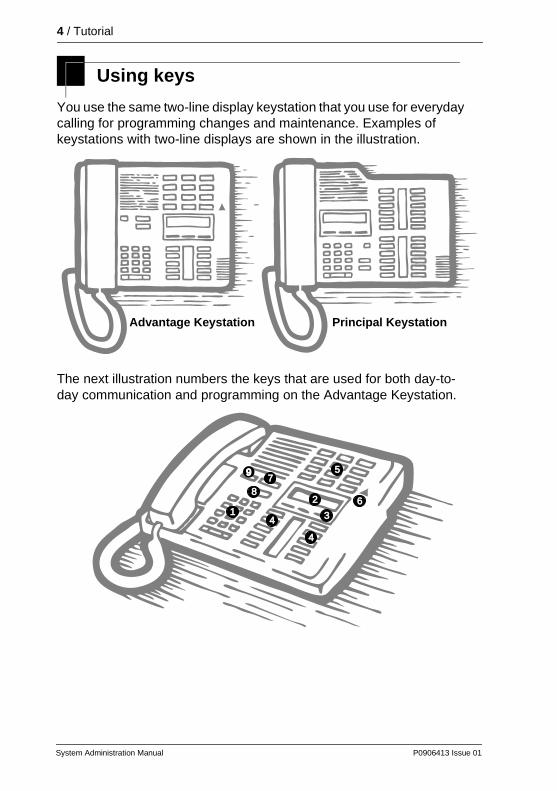
You use the same two-line display keystation that you use for everyday calling for programming changes and maintenance. Examples of keystations with two-line displays are shown in the illustration.
The next illustration numbers the keys that are used for both day-to-day communication and programming on the Advantage Keystation.
Advantage Keystation Principal Keystation
87
9 5
2
3 1
4
4
6
System Administration Manual P0906413 Issue 01
Tutorial / 5
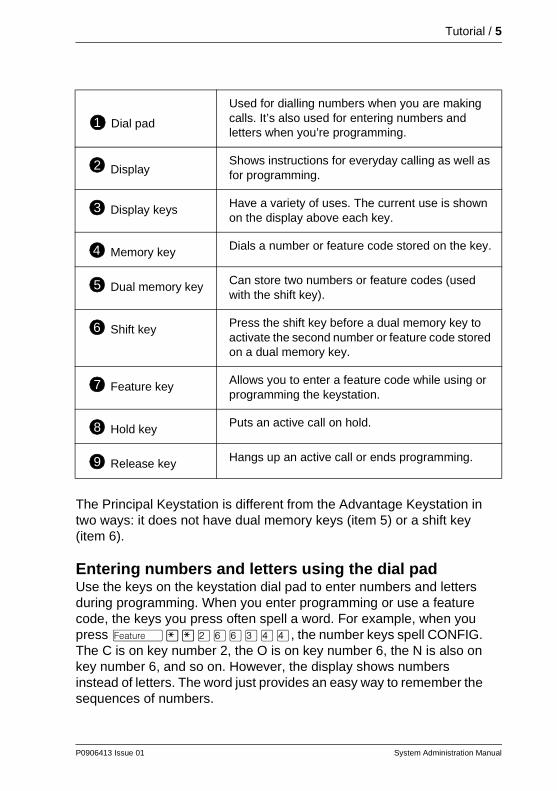
The Principal Keystation is different from the Advantage Keystation in two ways: it does not have dual memory keys (item 5) or a shift key (item 6).
Entering numbers and letters using the dial padUse the keys on the keystation dial pad to enter numbers and letters during programming. When you enter programming or use a feature code, the keys you press often spell a word. For example, when you press Ä¥¥ÛßßÜÝÝ, the number keys spell CONFIG. The C is on key number 2, the O is on key number 6, the N is also on key number 6, and so on. However, the display shows numbers instead of letters. The word just provides an easy way to remember the sequences of numbers.
Dial pad
Used for dialling numbers when you are making calls. It’s also used for entering numbers and letters when you’re programming.
DisplayShows instructions for everyday calling as well as for programming.
Display keys Have a variety of uses. The current use is shown on the display above each key.
Memory key Dials a number or feature code stored on the key.
Dual memory key Can store two numbers or feature codes (used with the shift key).
Shift key Press the shift key before a dual memory key to activate the second number or feature code stored on a dual memory key.
Feature key Allows you to enter a feature code while using or programming the keystation.
Hold key Puts an active call on hold.
Release key Hangs up an active call or ends programming.
1
2
3
4
5
6
7
8
9
P0906413 Issue 01 System Administration Manual
6
/ Tutorial
Entering names using the dial padWhen you want to use a key to spell a name, such as naming a hunt group during programming, the function of the key changes according to the number of times you press the key. The following illustration shows the functions for the dial pad key ‹ when entering letters.
Dial pad key
More about display keysYou use the three display keys below the display on your keystation to set and select options. Their function depends on the instruction that appears on the display directly above each key. Some display instructions that you may see during programming are OK, CHANGE or COPY. In this manual, display key instructions are underlined.
Display keys
press four times for the number 3
press once for the letter D
press twice for the letter E
press three times for the letter F
Display key
AutoHold: N
CHANGE
Display text
Instruction for Display key
System Administration Manual P0906413 Issue 01

Tutorial / 7
The most common display key labels are:
Viewing your programming updatesIf any changes you have made to programming have not taken effect yet, you will see an UPDATE display key when you end a programming session. The display will show you how many telephones have not been updated yet because the system is busy with other programming or the telephone is in use.
Press Stns to see the specific sets where programming changes have not been updated. Items will disappear from the list as they are updated, and UPDATE will disappear once all changes are complete.
CHANGE changes a programmable setting
BKSP moves the cursor one space to the left (backspace) and deletes a character, enabling you to re-enter a number or letter
COPY copies the settings of items like lines, stations, and filters to an item of the same type
FIND gives the user the option to directly enter data
CANCL cancels the previously invoked feature or programming setting
RETRY allows the user to re-enter the preferred data or setting
JOIN allows the user to join in on a call such as when invoking the Transfer feature
LIST displays the lowest value in a list of station numbers, lines, or other items
VIEW views the last part of a displayed message longer than 16 characters
--> moves the cursor one position to the right when programming a name
<-- moves the cursor one position to the left when programming a name
P0906413 Issue 01 System Administration Manual

8 / Tutorial
The programming overlay
When you begin programming, a group of keys on the keystation become the keys for moving through programming headings and settings. The programming overlay is a paper cutout that shows what the four keys do during programming.
Placing the programming overlay
Programming keys are active or inactive at different stages of programming. A key is active (meaning you can use that option), when the indicator next to it is lit (» or ¼).
Heading
Back Next
Show
Norstar Programming Overlay
Heading
Back Next
Show
Norstar Programming Overlay
Programming Overlay
Show
Next
Heading
Back
Takes you to the heading for the current level
Moves you one item back at the current level
Takes you to the first setting within the level
Moves you one item forward at the current level
System Administration Manual P0906413 Issue 01

Tutorial / 9
A map for working in programming
Once you know how to start a programming session and use the Ð, , Ò and Ô keys, you’re ready to customise the Commander NT40 for your workplace, and keep it up to date.
The following headings are what you’ll see when you move through the display menu after pressing Ä¥¥ÛßßÜÝÝ (CONFIG) and entering the System Administrator Plus password àÛàÞ¡à (SAPLUS).
Stns&Peripheral Stns&Peripheral - customise the many features used by stations. You can change where a call is diverted, give a station a name, or allow certain features to be used at a station. You can also change the key programming on any stations on the system.
Lines Lines - Program names for each line.
Services Services - Turn services on or off. These are Ringing service, (often called night service) that allows additional keystations to ring, Restriction service that blocks certain kinds of calls and Routing Service that decides what lines a call will use.
Sys speed dial System speed dial - Program up to 90 different telephone numbers so that people in your office can dial them with a two-digit code.
Passwords Passwords - Change the password you use for programming, or erase a Call log password.
Time&Date Time and date - Change the time, date, or both.
System prgrming System programming - Change the settings for the System Answer that handles the overflow when the attendant station is busy, and Custom Call Routing (CCR) that gives a caller a choice of where to direct their call.
Netwk features Parameters for ONN Blocking. (Call Line Restriction (CLIR))
P0906413 Issue 01 System Administration Manual

10 / Tutorial
Starting and ending a programming session
Try the starting procedure now, on your Commander NT Keystation.
Now end your programming session.
Software keys Software Keys - Location for entering password numbers provided by the Commander Customer Response Centre, that enable the technician to activate system capabilities such as the Auto Attendant and Hospitality Services group of features.
Maintenance Displays the version number of the System Processor software. Allows to clears hung lines.
Displays the Sys Admin log which gives a list of system initialisations, programming sessions, invalid password attempts and password changes. Allows access to activate Remote monitor.
Usage Metrics Detailed reports on Hunt group metrics.
1. Press Ä. Feature
2. Press ¥¥ÛßßÜÝÝ.
Password: RETRY
It’s the same as pressing ¥¥�¯öìéí.
3. Press àÛàÞ¡à
(it�s the same as pressing ê�¸ñèê).
Stns&Peripheral ê�¸ñèê is the password, unless the password has been changed. Now you see the first of six headings.
Press RETRY to re-enter the password if it is entered incorrectly.
4. Press ¨. End of session After a few seconds, the time and date appear on the display.
System Administration Manual P0906413 Issue 01

Tutorial / 11
IMPORTANT: The alpha numeric dial pad keys are also used for programming names or words. For example, the Û key also gives you the letters A, B and C. The first press of the Û key shows the number 2. The second press shows the letter A, the third press shows B, and the fourth C.
Always record any changes you make in the Programming Record. If there is a problem with the system, the Installer needs to see a history of the changes you have made. Also, remember to inform people in your office of any changes you have made that affect them. For example you may change System Speed Dial codes or a dialling restriction to a specific station.
Using passwords to access programmingThere are three passwords for Administration programming.
• àÛàÞ¡à (ê�¸ñèê) — The System Administrator Plus password lets the administrator access all the settings for Administration programming. The System Administrator Plus access includes several installer settings and all of the settings accessible with the System Administration password.
• ÛÜßÝß (�ë÷éö) — The System Administrator password accesses most of the settings for Administration programming.
• ÛÛàÝÛ (õ�êé�) — The Basic password accesses a few settings that can be changed using feature codes.
The Basic password lets you delegate some of the duties of being an administrator without allowing access to sensitive programming. It should be given out with care and changed when necessary (for example, when someone leaves the company).
For information on changing passwords, see "Changing passwords" on page 175. For more information on the settings that can be changed with the Basic password, see "Using passwords" on page 31.
P0906413 Issue 01 System Administration Manual

12 / Tutorial
System Administration Manual P0906413 Issue 01
Understanding your systemExchange lines have been set up by your installer to be either public, private, or part of a line pool.
• A public line is assigned to more than one station.
• A private line is assigned to only one station and to the Prime station for that line.
• A line can be assigned to one of fifteen line pools. Stations are assigned access to line pools and they ‘share’ the lines in the pool with other stations having access to that pool.
The Commander NT system automatically assigns station 221 as the Prime station for each exchange line. The Prime station provides backup answering for all unanswered calls coming in on the exchange line.

Frequently used programming operations / 13
Frequently used programming operations
The following sections highlight the most frequently used programming operations. To consult these or other programming operations, see either the Table of Contents or the Index.
Programming a System Speed Dial code
Think of a telephone number that everyone in your office calls regularly. Write it down.
You’re going to program your Commander NT so that anyone in your office can dial that number using a two-digit Speed Dial code.
Begin the programming session
Select the Speed Dial code
1. Press Ä. Feature:
2. Press ¥¥ÛßßÜÝÝ.
Password: RETRY
3. Press àÛàÞ¡à. Stns&Peripheral
4. Press Ô three
times.Sys speed dial
5. Press Speed dial #: LIST
6. Press âÚ. Speed dial #:01 FIND
You can select any System Speed Dial code between 01 and 70.
P0906413 Issue 01 System Administration Manual

14 / Frequently used programming operations
Add the telephone number
Select a line This is where you tell the system what type of line to select to make the call.
Decide what the display will show
7. Press 01:No number CHANGE
Your display shows No number or the number currently assigned to the code.
8. Press CHANGE. 01:_CANCL
9. Use the dial pad to dial the number that you wrote down. You can press BKSP (backspace) to delete a mistake.
01:XXXXXXXCANCL BKSP OK
Your display shows the telephone number, and not x’s as shown here.
10.Press OK. 01:XXXXXXXCLR CHANGE
11.Press Ô. Use prime line CHANGE
12.Press CHANGE several times and watch the display.
Pool Code:_ CHANGE
You have a choice of prime line, a specific line, routing table, or a line pool.
13.Stop pressing CHANGE when the display shows the prime line again.
Use prime line CHANGE
The system automatically selects the prime line to dial Speed Dial code 01.
14.Press Ô. Display digits:Y CHANGE
Your choices are Yes and No. Yes means the display will show the telephone number.
15.Press CHANGE. Display digits:N CHANGE
No means the display will show a name for the code.
System Administration Manual P0906413 Issue 01

Frequently used programming operations / 15
Program the nameThe system has a standard name to display, so it is not necessary for you to program one. However, if you have chosen not to display the telephone number, you will probably want a specific name instead.
Adjust the dialling restrictions The system is programmed not to bypass any dialling restrictions that may be on the station or line. You can change this setting if the telephone number requires long distance or another type of specialized access.
You will see how dialling restrictions are applied to stations and lines when you do the exercise on creating and assigning a dialling restriction.
End the session
16.Press Ô. Name: Sys Spd Di...
17.Press . ...al 06 CHANGE
This is the name the display will show if you don’t change it.
18.Press CHANGE. NAME:_ -->
Decide what name you want to give to the Speed Dial code.
19.Press the key that has the first letter of the name. Press it repeatedly until the display shows the letter you want.
Name: B BKSP -->
The letters are on the numeric dial pad.
20.Press -->. Name: B_<-- BKSP -->
21.Use the dial pad and --> until you have the entire name.
BANK OF JAPAN <-- -->
The name can be up to 16 characters long, including spaces.
22.Press Ô. Bypass restrn:N CHANGE
The dialling restrictions (filters) that have been assigned to the station and line will remain in effect.
23.Press ¨. End of session
After a few seconds, the time and date appear on the display.
P0906413 Issue 01 System Administration Manual

16 / Frequently used programming operations
Test the Speed dial
Assigning names instead of numbers
You can assign a personal name to each of the stations in your office and you can assign specific names to each line in your system.
In this exercise, you will rename the office manager’s station.
Begin the programming session
Select the station
1. Press Äâ. Speed dial
2. Press âÚ. BANK OF JAPAN TRANSFER
The number is dialled automatically on the preselected line.
3. Press ¨. The time and date appear on the display.
1. Press Ä. Feature:
2. Press ¥¥ÛßßÜÝÝ.
Password: RETRY
3. Press àÛàÞ¡à. Stns&Peripheral
4. Press Show stn#:___
5. Enter the station number for the office manager.
221: 221 COPY FIND
This tutorial shows station number 221 as an example.
6. Press Line accessCOPY
7. Press Ô twice. Name: 221 CHANGE
System Administration Manual P0906413 Issue 01

Frequently used programming operations / 17
Change the number to a name
End the session
8. Press CHANGE. Name:_ -->
9. Press the key that has the first letter of the name. Press it repeatedly until the display shows the letter you want.
Name:_ BKSP -->
Each press of the dial pad key moves you to the next letter on the key.
10.Press -->. Name:<-- BKSP -->
This moves you to the next space.
11.Use the dial pad and the <-- and --> until you have the entire name.
Name: B JONES<-- BKSP -->
The name can have up to seven characters.
12.Press Ô Name: B JONESCLR CHANGE
This stores the name.
13.Press ¨. End of session After a few seconds, the time and date appear on the display.
P0906413 Issue 01 System Administration Manual
18 / Frequently used programming operations
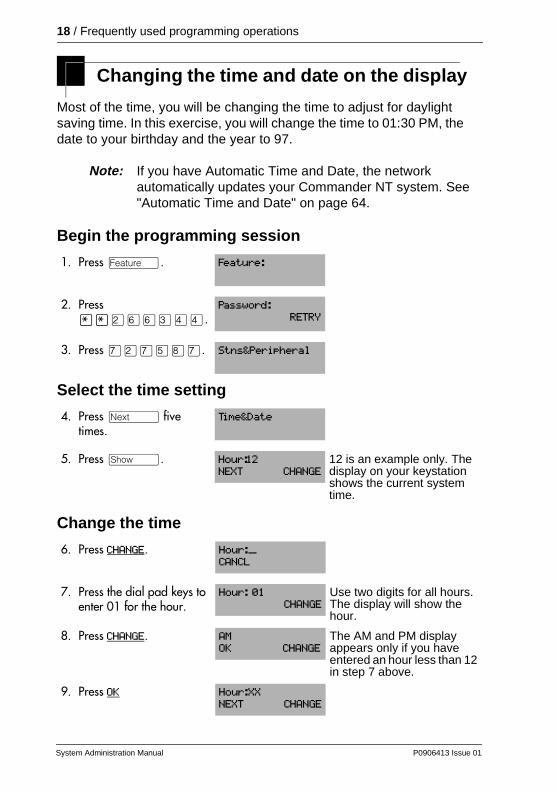
Changing the time and date on the display
Most of the time, you will be changing the time to adjust for daylight saving time. In this exercise, you will change the time to 01:30 PM, the date to your birthday and the year to 97.
Note: If you have Automatic Time and Date, the network automatically updates your Commander NT system. See "Automatic Time and Date" on page 64.
Begin the programming session
Select the time setting
Change the time
1. Press Ä. Feature:
2. Press ¥¥ÛßßÜÝÝ.
Password: RETRY
3. Press àÛàÞ¡à. Stns&Peripheral
4. Press Ô five times.
Time&Date
5. Press . Hour:12 NEXT CHANGE
12 is an example only. The display on your keystation shows the current system time.
6. Press CHANGE. Hour:___CANCL
7. Press the dial pad keys to enter 01 for the hour.
Hour: 01 CHANGE
Use two digits for all hours. The display will show the hour.
8. Press CHANGE. AM OK CHANGE
The AM and PM display appears only if you have entered an hour less than 12 in step 7 above.
9. Press OK Hour:XXNEXT CHANGE
System Administration Manual P0906413 Issue 01

Frequently used programming operations / 19
Change the date
10.Press Ô. Minutes: 01 NEXT CHANGE
11.Press CHANGE. Minutes: __CANCL
12.Press the dial pad keys to enter 30 for the number of minutes.
Minutes: 30 NEXT CHANGE
13.Press Ô. Year: 98 NEXT CHANGE
98 is an example only. The display on your keystation shows the current system year.
14.Press CHANGE. Year: __CANCL
15.Press the dial pad keys to enter 97 for the year.
Year: 97 NEXT CHANGE
16.Press Ô. Month: 01NEXT CHANGE
01 is an example only. The display on your keystation shows the current system month.
17.Press CHANGE. Month:_ _CANCL
18.Press the dial pad keys to enter the month.
Month: xx NEXT CHANGE
Use numbers for the months: 01 is January; 12 is December.
19.Press Ô. Day: 01 NEXT CHANGE
01 is an example only. The display on your keystation shows the current system day.
20.Press CHANGE. Day: ___CANCL
21.Press the dial pad keys to enter your birthday.
Day: xx NEXT CHANGE
Enter two digits for the day of the month.
P0906413 Issue 01 System Administration Manual
20 / Frequently used programming operations
End the session
Creating a restriction for call barring
For complete information, see "Barring calls and privileges (Restrictions)" on page 65.
You can bar calls to certain numbers by creating dialling restrictions for your system. These restrictions specify the numbers that cannot be dialled and any exceptions to the restriction.
There are three ways to bar calls to certain numbers:
• by applying restrictions to a particular line
• by applying restrictions to a particular station
• by applying restrictions to a particular station that shares a line
In this exercise, you will program a dialling restriction to bar a certain number, and then program any exceptions to the restriction.
Begin the programming session
22.Press ¨.
23.Repeat the exercise to change the settings to the current time, date and year.
End of session After a few seconds, the time and date appear on the display.
1. Press Ä. Feature:
2. Press ¥¥ÛßßÜÝÝ.
Password: RETRY
3. Press àÛàÞ¡à. Stns&Peripherals
System Administration Manual P0906413 Issue 01

Frequently used programming operations / 21
Select a dialling restriction
Add restrictions Program the number that you do not want callers to dial.
Add exceptions Although you want to bar all numbers of a certain type, there may be times when people need to call a barred number.
4. Press . Show stn#:__ LIST
Enter the station number of the keystation
5. Press . Line accessCOPY
6. Press Ô four times.
RestrictionsCOPY
7. Press . Restrn filters
8. Press . Show filter:___COPY LIST
Enter the two-digit code or press next.
9. Press â¡. Restrn flt 08COPY FIND
Select dialling restriction filter 08.
10.Press . No restrictions ADD
11.Press ADD. Restrn 01:_ANY
This is the first restriction for dialling restriction 11.
12.Press ANY and then ¡. Restrn 01:×8ANY BKSP OK
Any number with 8 as the second digit cannot be dialled.
13.Press OK. Restrn 01:×8ADD REMOVE
14.Press . Deny: ×8 You are still programming dialling restriction 11, restriction 01.
15.Press Ô No overridesADD
P0906413 Issue 01 System Administration Manual

22 / Frequently used programming operations
End the session
Applying a dialling restriction to a line
In the diagram that follows, a line restriction restricts dialling on line 1, no matter which stations use that line.
In this exercise, you will apply dialling restriction 00 to a line on your Commander NT.
Begin the programming session
16.Press ADD. Override 001:_
17.Press Ú¡ââ. erride 001: 1800_ANY BKSP OK
Numbers that begin with 1800 can be dialled.
18.Press OK. Override 001: 18..ADD REMOVE
To view the additional digits press .
19.Press ¨. End of session After a few seconds, the time and date appear on the display.
1. Press Ä. Feature:
2. Press ¥¥ÛßßÜÝÝ.
Password: RETRY
3. Press àÛàÞ¡à. Stns&Peripheral
line 1
Line Filter
no longdistance
Stn 227
System Administration Manual P0906413 Issue 01

Frequently used programming operations / 23
Apply a dialling restriction to a line
End the session
4. Press Ô. Lines
5. Press . Show line:____ LIST
Enter a line number
6. Press . Name:Line# CHANGE
7. Press Ô. RestrictionsCOPY
8. Press . Restrn filters
9. Press Ô. Line restrns
10.Press . Normal fltr: 03CLR CHANGE
11.Press CHANGE. Use flt:___CANCL
12.Press ââ. Normal fltr:00 CHANGE
Dialling restriction 00 has no restrictions. You can call any number, but only on this line.
13.Press ¨. End of session After a few seconds, the time and date appear on the display.
P0906413 Issue 01 System Administration Manual

24 / Frequently used programming operations
Applying a dialling restriction to a keystation
The next diagram shows a station restriction on a keystation. No matter how many lines there are on the station, the station restriction operates for all of them. If a line on the station has a restriction of its own, both the line restriction and the station restriction are applied.
You will now assign a dialling restriction to your station.
Begin the programming session
Apply the dialling restriction to a station
1. Press Ä. Feature:
2. Press ¥¥ÛßßÜÝÝ.
Password: RETRY
3. Press àÛàÞ¡à. Stns&Peripherals
4. Press . Show stn#___ LIST
Enter a station number
5. Press . Line accessCopy
6. Press Ô four times.
RestrictionsCOPY
7. Press . Restrn filters
all lines
StnFilterStn 227
no longdistanceexceptcodes
0212, 0718
System Administration Manual P0906413 Issue 01

Frequently used programming operations / 25
End the session
8. Press Ô. Stn restrns
9. Press . Filters
10.Press . Normal fltr:xxCLR CHANGE
The xx represents the filter number
11.Press CHANGE. Use flt:_CANEL
12.Press âÚ. Normal fltr:01CLR CHANGE
Dialling restriction 01 restricts calls to local only. You cannot dial long distance calls, even on line 001.
13.Press ¨. End of session After a few seconds, the time and date appear on the display.
P0906413 Issue 01 System Administration Manual

26 / Frequently used programming operations
Applying a dialling restriction to a a line on a station
The next diagram shows a line/station restriction on a keystation. The restriction applies to line 5, but only on station 227. Note that other stations with access to line 5 can still be restricted if there is also a line restriction applied to line 5.
You will now apply a dialling restriction to a line on a specific station (use your own station).
Begin the programming session
Apply a dialling restriction to a line on your station
1. Press Ä. Feature:
2. Press ¥¥ÛßßÜÝÝ.
Password: RETRY
3. Press àÛàÞ¡à. Stns&Peripherals
4. Press . Show stn#:____ LIST
Enter the keystation number.
5. Press . Line accessCOPY
6. Press Ô four times.
RestrictionsCOPY
line 5
Line/stnFilterStn 227
no longdistanceexceptcodes
0718, 0415
line 5
Stn 248
(no line filter)
System Administration Manual P0906413 Issue 01

Frequently used programming operations / 27
End the session
Congratulations, Administrator!
Now that you have completed the exercises in the tutorial, you know the basics of how to program your Commander NT. If you wish, you can come back to the tutorial to refresh your memory or to train a colleague. The rest of the manual gives the same kind of detailed instructions that you have just followed.
Section II describes what programming choices are available to enable you to design the system that is most efficient for your business. Section III helps you make the most of Commander NT features.
7. Press . Restrn filters
8. Press Ô two times.
Line/stn rstrns
9. Press . Show line:___ LIST
Enter a line number.
10.Press ââÛ LINEXXX:LINEXXX FIND
11.Press . Normal: NONE CHANGE
12.Press CHANGE. Use flt:__CANCL
13.Press âÞ. Normal:05CLR CHANGE
Dialling restriction 05 will not allow numbers beginning with 1 to be dialed. This affects only line 002 and only on your station.
14.Press ¨. End of session After a few seconds, the time and date appear on the display.
P0906413 Issue 01 System Administration Manual

28 / Frequently used programming operations
System Administration Manual P0906413 Issue 01

SECTION II:System programming
P0906413 Issue 01 System Administration Manual

30 /
System Administration Manual P0906413 Issue 01

System programming introduction
Conventions used in this guideThis section describes the programming choices available to assist you in designing a system that is efficient for your business. When you see a numbered symbol, Ú, it represents the numbers on the keystation dial pad. A lettered symbol, �, represents the letters on the keystation dial pad. Keys shown like this, Ä, are found on the Commander NT Keystations. Four keys, Ð, , Ò and Ô, are labelled on the programming overlay and represent the temporary use of keys during programming.
A word shown like this, OK, represents the display key directly below that word on the display of Advantage and Principal Keystations. All default settings appear in bold in the procedures. For example, if the default setting is none, it appears as None.
Note: Programming can only be done from a Principal or Advantage Keystation.
Using passwordsProgramming access is controlled by three passwords.
• System Administrator Plus password—provides knowledgeable users with access to all but a few sensitive areas of programming.
• Administrator password—used to view and change the settings that are part of day-to-day administration of the Commander NT system.
• Basic password—only used with a limited number of feature codes to change programming and control system services.
The following tables show the items that can be programmed when using the System Administrator Plus password or the Administrator password.
P0906413 Issue 01 System Administration Manual

32 / System programming introduction
Programming using the SAPLUS password
Programming using the Administrator password
Entering programming using the SAPLUS passwordThe staff member who is in charge of making changes to the Commander NT system is called the system administrator.
The System Administrator Plus password lets the administrator access all the settings for administration programming, plus a few installer settings that may have to be changed infrequently. All procedures in this guide, indicate whether you need to use the System Administrator Plus or the Administrator password.
The default System Administrator Plus password is àÛàÞ¡à, which spells ê�¸ñèê on the dial pad.
Stns&Peripheral Sys speed dial Netwk features
Line access Passwords ONN blocking
Capabilities COS pswds Software Keys
Name Call Log pswds SysIDUser Prefernces Progrming pswds Password keysRestrictions Hospitality Maintenance
Netwk features Time&Date System versionLines System prgrming Clear linesName Hunt groups Sys admin logRestrictions Featr settings Remote montrServices Direct-dial Usage Metrics
Ringing service Auto AttendantRestrn service Fax stn Routing service Remote access
Common settings Hospitality
Stns&Peripheral Lines Passwords
Capabilities Name Call Log pswds
Name Services Progrming pswds
User Prefernces Ringing service Hospitality
Restrictions Restrn service Time&Date
Netwk features Routing service System prgrming
Sys speed dial Auto AttendantFax stn
System Administration Manual P0906413 Issue 01

System programming introduction / 33
1. Press Ä¥¥ÛßßÜÝÝ (�¯öìéí). The display reads Password:.
2. Enter àÛàÞ¡à (ê�¸ñèê). The display reads Stns&Peripheral. Three triangular indicators ¼ appear on the vertical display between the rows of keys.
3. Place the programming overlay over the keys pointed to by the indicators ¼.
Entering programming using the Administrator password
The Administrator password is your key to administration programming. Most of the programming in this guide can be entered with the Administrator password.
The default Administrator password is ÛÜßÝß, which spells �ë÷éö on the keystation keys.
Entering programming using the Basic passwordThe Basic password allows someone to do day-to-day maintenance of individual keystations without allowing access to sensitive programming.
The default Basic password is ÛÛàÝÛ, which spells õ�êé� on the keystation keys.
You do not enter Basic programming using ÛßßÜÝÝ (CONFIG). Instead, you enter the Feature code that you want to program, followed by ÛÛàÝÛ (õ�êé�). For example:
1. Press Ä¥¥, followed by the code.
2. Enter ÛÛàÝÛ (õ�êé�).
3. Follow the instructions on the display and make your selections using the display keys.
The following feature codes can be accessed using the Basic password:
P0906413 Issue 01 System Administration Manual

34 / System programming introduction
• Ä¥¥¡àÜà (USER)—User preferences settings allow you to program keystation model, key programming, Personal speed dial, Call log options, Dialling options, Display contrast, and Ring type.
• Ä¥¥¡ÝßÜ (TIME)—Time and Date settings let you change any of the settings for hour, minutes, seconds, year, month, and day.
Programmable settings and featuresCommander NT has several features for ensuring that calls do not go unanswered or do not get lost. For example, stations can be programmed to provide back-up answering for other stations or lines. You can also create an attendant position to provide answering for a group of stations.
You can divert calls that are unanswered, pick up calls for other stations, redirect selected lines to stations inside or outside your business, and have calls answered from any station during non-business or off-peak hours.
Many call capture features are pre-configured with your Commander NT system. Others, however, must be programmed in order to take full advantage of their flexibility. The following programming settings are used to enhance answering and handling calls:
Do Not Disturb (DND) on Busy Answer key
Divert on Busy Divert all calls
Divert No Answer Call Pickup Directed
Hunt groups Call Pickup group
Pickup Group Call Queuing
Prime station Do Not Disturb
Prime line Line redirection
Redirect Ring Callback
Line Answer Transfer
System Administration Manual P0906413 Issue 01

System programming introduction / 35
Do Not Disturb (DND) on BusyWhen this setting is turned on, you do not hear any ringing if a second call arrives while you are talking on the keystation. If you want to know when a second call arrives, turn this setting off.
For example, Mr. Forbes dislikes having his keystation ring when he is on a call. Therefore, he uses the DND on Busy feature so that additional calls are diverted to the Prime station until he has finished his current call.
If your keystation is a Prime station for any line, do not use the DND on Busy feature.
If a station is a member of a hunt group and the station activates this feature, the station will not receive notification of incoming hunt group calls while on a call.
See "Setting the system to divert calls for a busy keystation" on page 86.
Divert on busyWhen you already have a call, ensure that other calls to your station are answered. Divert the additional calls to a station or external telephone that you know will be monitored.
For example, Miss Vale works with Mr. Cassidy as a team. They answer each other’s calls. Divert on busy is set for the team-mate’s station. When Mr. Cassidy is busy on a call, other calls to his station are diverted immediately to Miss Vale.
If your station is a member of a hunt group, the Divert on busy setting is overridden by the hunt group routing.
See "Setting the system to divert calls for a busy keystation" on page 86.
Divert no answerWhen you are away from your station, ensure that calls are answered by diverting to a station or external telephone that you know will be monitored.
P0906413 Issue 01 System Administration Manual

36 / System programming introduction
For example, Miss Vale works with Mr. Cassidy as a team. They make sure that one of them is always in the office. Divert No Answer is set for the team-mate’s station. When Miss Vale is away from her station, calls are diverted, after a programmed delay, to Mr. Cassidy.
If your station is a member of a hunt group, the Divert no answer setting is overridden by the hunt group routing.
See "Setting the system to divert calls for an unanswered keystation" on page 84.
Hunt groupsEstablish hunt groups in your system to allow external and internal callers to reach a group of stations by calling a single directory number. The hunt groups feature ensures calls are easily routed to the appropriate people. You can program the members for a group, member position within a group, how calls are distributed, how long is spent looking for available agents and what happens if all agents are busy.
For example, your company has five sales people available to field calls from clients. Bob is your most experienced salesperson and you would like him to receive incoming calls first. You would set up a hunt group with these five stations as members, program Bob’s station as the first member in the group, set the distribution mode to sequential so Bob receives incoming calls first and name this group SALES.
See "Programming hunt groups" on page 107.
Pickup groupAssign stations to one of three Pickup groups for maximum call coverage. This ensures that stations in a group can answer calls for any other station in that group.
For example, Mr. Forbes and Ms. Smith both belong to Pickup group 3. When Mr. Forbes is away from his station, Ms. Smith presses ÄàÞ on her own station to answer Mr. Forbes’s calls.
A hunt group call ringing at a station that is a member of a hunt group can be picked up by any station in that call pickup group.
System Administration Manual P0906413 Issue 01

System programming introduction / 37
See "Assigning a pickup group" on page 91.
Prime stationThe Commander NT system automatically assigns station 221 as the Prime station for each exchange line. Your system installer can change the station number in Lines programming.
The Prime station can be programmed to receive unanswered calls through Delayed Ring Transfer, Held Line Reminders and Do not Disturb transfers.
In a busy office, the receptionist or secretary station may be designated as the Prime station.
Prime line for a stationA line can be assigned to a keystation as its primary line to use when making an outgoing call. This feature saves the user time because the system automatically selects the line rather than the user having to select the line.
See "Assigning a Prime line to a station" on page 46.
Redirect ringWhen this feature is turned on, the station gives an audible signal whenever a call has been re-directed. This reminds you that a line has been re-directed using the Line redirection feature, and serves as a cue to turn the feature off.
For example, you have re-directed line 1 to another number in the network. If Redirect ring is on, you hear a short ring every time a call on line 1 is re-directed to the other number.
See "Allowing a station to use Redirect Ring" on page 98.
Line answerThis feature is active by default for all Services. This means that during non-business or non-busy times, any station can answer calls ringing at any other station. It does not matter which lines appear on the stations. It only matters that the line itself has been placed in Services using its Control station.
P0906413 Issue 01 System Administration Manual

38 / System programming introduction
For example, during the lunch break between 11:30 a.m. and 1:00 p.m., lines 1, 2, and 3 are put in Lunch mode. Line answer is active, so whenever any station rings, Mr. Cassidy, who acts as a temporary attendant, can answer from his station.
See "Programming services" on page 157.
Answer keyIf your keystation has an Answer key for someone else’s station, you can answer that other person’s calls on your keystation.
For example, Mr. Cassidy’s keystation has an Answer key for Miss Vale. When Miss Vale’s keystation rings, Mr. Cassidy can answer it on his keystation by pressing the Answer key. Miss Vale has been assigned as an Answer station on Mr. Cassidy’s keystation.
Simply press the Answer key when you hear the other person’s keystation ringing.
See "Answer key" on page 132.
Divert all callsIf you know you are going to be away from your station for a while, If you know you are going to be away from your station for a while, divert your calls to another station or an external telephone. Otherwise the callers must wait for the divert no answer feature to automatically transfer the call after several rings, if the divert no answer feature is set.
For example, Mr. Forbes knows that most client calls arrive in the morning, but he will be in meetings until noon. He diverts his station to Ms. Smith, who can deal with issues right away.
Press ÄÝ, then the station number or (to divert to an external telephone) enter the line pool access code and number that you wish to send the calls to.
If your station is a member of a hunt group, the Divert all calls setting is overridden by the hunt group routing.
See "Diverting calls" on page 273.
System Administration Manual P0906413 Issue 01

System programming introduction / 39
Call Pickup DirectedIf any keystation is ringing in your office, you can answer it from your station.
For example, only a few people are in the office early in the morning. When Miss Vale’s keystation rings, Mr. Forbes takes the call using Call Pickup Directed.
Press Äàß, then dial the station of the keystation that is ringing.
See "Answering a keystation using Directed Pickup" on page 240.
Call Pickup GroupIf your keystation is part of a Pickup Group, you can answer calls ringing on any keystation in the same group.
For example, Mr. Forbes and Ms. Smith both belong to Pickup Group 3. When Mr. Forbes is away from his station, Ms. Smith uses the Call Pickup Group feature on her own station to answer Mr. Forbes’s calls.
Press ÄàÞ.
See "Answering a keystation using Pickup Group" on page 241.
Call QueuingWhen more than one call is ringing at your station, you can ensure you answer the calls in the order they arrived.
For example, Mr. Cassidy notices that he has calls on Line 3 and on line 4. He does not know which call arrived first, so he uses Call Queuing to answer.
Press Ä¡âÚ.
See "Answering the next queued call" on page 238.
P0906413 Issue 01 System Administration Manual

40 / System programming introduction
Do Not DisturbIf you do not want to be interrupted by any telephone calls, turn on the Do Not Disturb feature so that calls are immediately transferred to the Prime station.
For example, Mr. Moore is having a performance review meeting with the president of the company. Mr. Moore turns on Do Not Disturb before the meeting so that all calls are routed to the attendant.
Press Ä¡Þ.
A hunt group station can temporarily leave the hunt group by activating this feature.
See "Do Not Disturb" on page 233.
Line redirectionYou can use the Line redirection feature to redirect the calls coming in on your external lines to a keystation outside the office.
You can redirect exchange lines to exchange lines.
You may choose to redirect all your external lines or only some of them. For example, you generally receive personal calls on Line 1 and customer calls on Line 2. You can redirect Line 2 to a colleague when you are busy, but still accept personal calls on line 1.
Press Ä¡Ý, then follow the prompts on your display.
See "Line redirection" on page 274.
CallbackYou can have the Commander NT system notify you when a station is either not busy or has just been used. This feature enables you to reach the person on that station.
For example, Miss Vale has an urgent request for Mr. Moore. When she dials his station, it is busy. She uses the Callback feature to monitor the line. As soon as Mr. Moore hangs up, Miss Vale’s keystation rings to let her know that she can try her call again.
System Administration Manual P0906413 Issue 01

System programming introduction / 41
Dial the station number, press ÄÛ, then hang up.
See "Using Callback" on page 284.
TransferIf you are an attendant, or if a call should be routed to someone else, you can do it easily with Commander NT. For example, a client calls Mr. Forbes. Mr. Forbes realizes that it would be better for the client to speak to Ms. Smith, so he transfers the call to Ms. Smith’s station. When Ms. Smith answers, Mr. Forbes explains the situation briefly and then hangs up. The client remains on the line with Ms. Smith.
Press Äàâ, dial the number, then hang up.
See "Transferring a call" on page 251.
P0906413 Issue 01 System Administration Manual

42 / System programming introduction
System Administration Manual P0906413 Issue 01

Programming stations and peripherals
Stations & PeripheralStns&Peripheral lets you assign settings to each keystation.
1. Place the programming overlay on any Advantage or Principal Keystation.
2. Press Ä¥¥ÛßßÜÝÝ (CONFIG). The display reads Password:.
3. Press àÛàÞ¡à (SAPLUS). The display reads Stns&Peripheral.
4. Press . The display reads Show stn#:.
5. Enter the station number of the keystation you want to program. The display reads nnn:nnn (nnn represents the 3 digit station number).
Assigning a line to a station (line access)Line access allows you to assign lines to individual keystations.
When you are finished programming line access settings for one keystation, you can copy those settings to other keystations by using COPY at the Line Access display. For more information about copying station programming, see "Copying programming for keystations" on page 153.
Line assignmentThis setting allows you to assign physical lines and DDI lines to each keystation. DDI lines are assigned and removed in the same manner as other lines.
1. Place the programming overlay on any Advantage or Principal Keystation.
P0906413 Issue 01 System Administration Manual
44 / Programming stations and peripherals
2. Press Ä¥¥ÛßßÜÝÝ (CONFIG). The display reads Password:.
3. Press àÛàÞ¡à (SAPLUS). The display reads Stns&Peripheral.
4. Press . The display reads Show stn#:.
5. Enter the station number of the keystation you want to program. The display reads nnn:nnn.
6. Press three times. The display reads Show line:.
7. Enter the line number. The display reads Lnnn:Unassigned.
8. Press CHANGE to change the setting for each line: Appr&Ring, Appr only, Unassigned, or Ring only .
9. Press SCAN to view the lines assigned to this keystation and the setting for each.
10. Press ¨ to exit or Ô to continue in programming.
In general, exchange lines are not assigned to keystations. If assigned, they are used for monitoring incoming call usage, or for making outgoing calls.
You cannot assign a line that is private to another keystation.
Each line assigned to appear at a keystation must appear at a key with an indicator on that keystation.
If you set a line to Ring only, incoming calls appear on an intercom key.
A Direct Station Select (DSS) Console module can provide extra line keys. (Only one DSS Console can be configured on a Commander NT40 system.)
The Economy Keystation, M7000 Keystation and SLT are an exception. They have no line keys and can be assigned any number of lines.
Make sure that lines assigned to an Economy Keystation, M7000 Keystation and SLT are assigned to ring; otherwise, you cannot detect incoming calls on the lines.
System Administration Manual P0906413 Issue 01

Programming stations and peripherals / 45
Number of appearancesThis setting allows you to assign multiple appearances of a DDI line (lines 101 to 140) for a station. In order to program multiple appearances, the line assignment value must be Assigned.
By default the number of DDI line appearances is one. The secondary appearance of a target line, is any appearance given to a station after the first appearance. There is a limit to the number of secondary target line appearances in the system.
1. Place the programming overlay on any Advantage or Principal Keystation.
2. Press Ä¥¥ÛßßÜÝÝ (CONFIG). The display reads Password:.
3. Press àÛàÞ¡à (SAPLUS). The display reads Stns&Peripheral.
4. Press . The display reads Show stn#:.
5. Enter the station number of the keystation you want to program. The display reads nnn:nnn.
6. Press three times. The display reads Show line:.
7. Enter the line number (101 to 140). The display reads the line number and its assignment.
8. Press until the display reads Appearances:1. This prompt does not appear if the line is unassigned.
9. Press CHANGE and enter a numeric value from 1 to 101.
10. Press ¨ to exit or Ô to continue in programming.
Note: You can program from 1-101 appearances of a line within your Commander NT40 system. You may be limited by the number of Line keys available on your keystation.
Assigning line pool accessLine pools allows the system to share lines among a number of keystations, reducing line costs and the number of button appearances on the keystations in the system.
P0906413 Issue 01 System Administration Manual

46 / Programming stations and peripherals
This setting allows a keystation to access one or more of the line pools available (A, B and C).
When you change the setting to Yes for a line pool, the keystation being programmed can access any line in that line pool.
1. Place the programming overlay on any Advantage or Principal Keystation.
2. Press Ä¥¥ÛßßÜÝÝ (CONFIG). The display reads Password:.
3. Press àÛàÞ¡à (SAPLUS). The display reads Stns&Peripheral.
4. Press . The display reads Show stn#:.
5. Enter the station number of the keystation you want to program. The display reads nnn:nnn.
6. Press twice. The display reads Line assignment.
7. Press Ô. The display reads LinePool access.
8. Press .
9. Press CHANGE to select the setting: N (No) or Y (Yes).
10. Press ¨ to exit or Ô to continue in programming.
Assigning a Prime line to a stationThis setting assigns a Prime line to the keystation. When the keystation is being used to make an outgoing call, the Prime line is the first line the system selects.
1. Place the programming overlay on any Advantage or Principal Keystation.
2. Press Ä¥¥ÛßßÜÝÝ (CONFIG). The display reads Password:.
3. Press àÛàÞ¡à (SAPLUS). The display reads Stns&Peripheral.
4. Press . The display reads Show stn#:.
5. Enter the station number of the keystation you want to program. The display reads nnn:nnn.
System Administration Manual P0906413 Issue 01

Programming stations and peripherals / 47
6. Press twice. The display reads Line assignment.
7. Press Ô until the display reads Prime line:.
8. Press CHANGE to select the setting: None, Pool A, Pool B, Pool C or I/C (intercom). Only assigned lines and line pools appear.
9. Press ¨ to exit or Ô to continue in programming.
An assigned Prime line is not associated with the assignment of a Prime keystation.
An exchange line must be assigned to the keystation in Line assignment before it can be assigned as the Prime line to the keystation.
A line pool must be assigned to the keystation in line pool access before a line pool can be assigned as the Prime line to the keystation.
By assigning a line pool as a Prime line, a keystation can be made to search automatically for an idle line in a pool.
Note: If you set Prime line to I/C (intercom), you can still access any line pools you have assigned to the keystation. When you enter the line pool access code, the system searches for an idle line in that pool. When all the lines in the pool are busy, the display reads No free lines. The system does not search from one pool to another.
Assigning intercom keys to a stationThis setting assigns the number of intercom keys to a keystation. Intercom keys can provide a keystation with access to internal lines and line pools.
See "Using Autodial" on page 279 for information on using intercom keys.
1. Place the programming overlay on any Advantage or Principal Keystation.
2. Press Ä¥¥ÛßßÜÝÝ (CONFIG). The display reads Password:.
P0906413 Issue 01 System Administration Manual

48 / Programming stations and peripherals
3. Press àÛàÞ¡à (SAPLUS). The display reads Stns&Peripheral.
4. Press . The display reads Show stn#:.
5. Enter the station number of the keystation you want to program. The display reads nnn:nnn.
6. Press twice. The display reads Line assignment.
7. Press Ô until the display reads Intercom keys:.
8. Press CHANGE to select the setting: 0, 1, 2, 3, 4, 5, 6, 7, or 8.
9. Press ¨ to exit or Ô to continue in programming.
Each intercom key assigned during programming automatically appears on the keystation. The keys start with the lower right-hand key, or one key above if the Handsfree/Mute feature is assigned to the keystation.
A keystation needs two intercom keys to establish a conference call with two other Commander NT Keystations.
Only one intercom key may be required if the key is only to be used to access line pools and to make and receive internal calls.
If a keystation has several lines assigned only to ring and not appear, the arrangement works better if there are two intercom keys.
The Economy, SLT and M7000 Keystation default assignment of two intercom keys cannot be changed. These keys do not appear on the keystation.
Assigning an Answer station to a keystationCalls for other Commander keystations can appear and be answered at the keystation being programmed. The station numbers of the other keystations are referred to as Answer station numbers. You can assign up to eight Answer station numbers to the keystation being programmed.
See "Answer keys" on page 242 for information on using Answer keys.
System Administration Manual P0906413 Issue 01

Programming stations and peripherals / 49
1. Place the programming overlay on any Advantage or Principal Keystation.
2. Press Ä¥¥ÛßßÜÝÝ (CONFIG). The display reads Password:.
3. Press àÛàÞ¡à (SAPLUS). The display reads Stns&Peripheral.
4. Press . The display reads Show stn#:.
5. Enter the station number of the keystation you want to program. The display reads nnn:nnn.
6. Press twice. The display reads Line assignment.
7. Press Ô until the display reads Answer Stns.
8. Press . The display reads Show stn#:.
9. Enter the station number.
10. Press CHANGE to change the setting for the Answer station number: Appr&Ring, Appr only, or Unassigned .
11. To assign additional Answer station numbers, press Ð, , then enter the next Answer station number.
12. Press SCAN to view the Answer station numbers assigned to this keystation.
13. Press ¨ to exit or Ô to continue in programming.
Every Answer station number assigned to the keystation automatically assigns an Answer key with an indicator to the keystation. These keys should be labelled accordingly, identifying the keystation with its name or station number.
More than one keystation can have an Answer key for the same station number. In this way, more than one keystation can provide Call Alerting and Call Answering for any calls directed to that station number.
A private line does not generate alerting at an Answer key.
Note: You cannot assign Answer station numbers to an Economy Keystation, M7000 Keystation or to a single-line telephone connected to a SLT Adaptor.
P0906413 Issue 01 System Administration Manual

50 / Programming stations and peripherals
See page 242 for information on using Answer keys.
Setting the Originating Line Identification for a station
Outgoing calls on an ISDN line use an Originating Line Identification (OLI) number, which appears on the keystation display of the called party as part of the calling line identification (CLID). Commander NT allows you to program the OLI number for each station. The OLI number could be the Received number for the DDI line assigned to the stations, or it could be a different Received number if you wish calls to be returned to someone else’s station. Ensure that the OLI numbers are in the same range as the received digits that come from the exchange.
For example, a sales manager who uses a DDI line to call clients may wish to have returned calls directed to an assistant. The OLI programmed for the manager’s station is the Received number for the assistant’s station. Thus, a client viewing the CLID number on their keystation display sees the assistant’s telephone number.
If the OLI number is set to None, then the CLID displayed at the called party’s telephone is simply the network listed number (the number that is listed by the network). If the programmed OLI number is outside the allowed range, Commander NT may insert a default number.
Note: OLI must be programmed for ONN blocking (Calling Line ID Restriction) Ä¡Úá to work with an ISDN line.
ATTENTION!
If your system is equipped with a mixture of digital line cards, it is strongly recommended that stations are programmed to use line pools when making outgoing calls.
If line pools are not properly configured, a station may use a line with a network range that does not include the station�s OLI, causing the network to present an incorrect CLID to the called party.
System Administration Manual P0906413 Issue 01

Programming stations and peripherals / 51
1. Place the programming overlay on any Advantage or Principal Keystation.
2. Press Ä¥¥ÛßßÜÝÝ (CONFIG). The display reads Password:.
3. Press àÛàÞ¡à (SAPLUS). The display reads Stns&Peripheral.
4. Press . The display reads Show stn#:.
5. Enter the station number of the keystation you want to program. The display reads nnn:nnn.
6. Press twice. The display reads Line assignment.
7. Press Ô until the display reads OLI #:.
8. Press CHANGE and enter the number, up to 9 digits (FNN (area code and phone number) less the leading 0).
9. Press ¨ to exit or Ô to continue in programming.
P0906413 Issue 01 System Administration Manual

52 / Programming stations and peripherals
System Administration Manual P0906413 Issue 01

Software keys
Viewing the system IDYou can view the system ID during a programming session in Software Keys.
1. Place the programming overlay on any Advantage or Principal Keystation.
2. Press Ä¥¥ÛßßÜÝÝ (CONFIG). The display reads Password:.
3. Press àÛàÞ¡à (SAPLUS). The display reads Stns&Peripheral.
4. Press Ô until the display reads Software Keys.
5. Press . The display reads SysID: followed by the unique system ID number.
6. Press ¨ to exit or Ô to continue in programming.
Software KeysSoftware Keys are password numbers provided by the Commander Customer Response Centre, that enable the technician to activate system capabilities such as the Auto Attendant and the Hospitality Services group of features.
The technician is given three keys (passwords), consisting of eight digits each. These numbers are entered in the Commander NT system through programming using the Prime keystation and the Software Keys heading. Once the Software Keys are entered, the system makes the corresponding capability available.
For record keeping purposes, record the passwords in the Commander NT Programming Record.
P0906413 Issue 01 System Administration Manual

54 / Software keys
System Administration Manual P0906413 Issue 01

Setting System Speed Dial
Speed Dial saves time by allowing you to dial frequently called numbers using a two-digit code. For example, you can program telephone numbers for major suppliers or clients for easy dialling by everyone in the office.
Speed Dial codes numbered from 01 to 70 are intended for system-wide use. Speed Dial codes from 71 to 94 are for personal use and can be individually programmed at each Commander NT Keystation. See "Changing a Personal (user) speed dial code" on page 102 for more information on the Speed dial feature.
The steps to programming System Speed Dial are:
• Assign a telephone number to a System Speed Dial code.
• Select a line to be used by the telephone number.
• Set whether the system displays the telephone number or a name (optional).
• Set whether the speed dial number will bypass any restrictions on the line or station where it is used (optional).
Note: When a speed dial number is changed, all of its associated attributes must be reprogrammed.
Assigning a number to a System Speed Dial codeFirst, choose a two-digit speed dial code (between 01 and 70) and then assign a telephone number to it.
1. Place the programming overlay on any Advantage or Principal Keystation.
2. Press Ä¥¥ÛßßÜÝÝ (CONFIG). The display reads Password:.
3. Press ÛÜßÝß (ADMIN). The display reads Stns&Peripheral.
4. Press Ô until the display reads Sys speed dial.
P0906413 Issue 01 System Administration Manual

56 / Setting System Speed Dial
5. Press . The display reads Speed dial #:.
6. Enter the system Speed dial code (01 to 70).
7. Press . The display reads the number currently assigned to the code, or No number.
8. Press CHANGE. Enter the required phone number (up to 24 digits) and press OK.
9. Press ¨ to exit or Ô to continue in programming.
Selecting a line After assigning a telephone number to the speed dial code, you must select an outgoing facility for the number to use. Choose either a Prime line, an exchange line, a line pool, or the routing table.
When you program a line pool as part of a speed dial number, use Æ and the line pool access code, or a programmed line pool key.
If you assign a specific line to a system speed dial number, only keystations with an appearance of that line can use the speed dial number.
1. Place the programming overlay on any Advantage or Principal Keystation.
2. Press Ä¥¥ÛßßÜÝÝ (CONFIG). The display reads Password:.
3. Press ÛÜßÝß (ADMIN). The display reads Stns&Peripheral.
4. Press Ô until the display reads Sys speed dial.
5. Press . The display reads Speed dial #:.
6. Enter the system Speed dial code (01 to 70).
7. Press . The display reads the number currently assigned to the code, or No number.
8. Press CHANGE. Enter the required phone number (up to 24 digits) and press OK.
9. Press Ô. The display reads Use prime line.
System Administration Manual P0906413 Issue 01

Setting System Speed Dial / 57
10. Press CHANGE to choose Use prime line , Use routing tabl, Use line, or Pool code. Stop pressing CHANGE when you see the line you want to use for the speed dial.
11. Press ¨ to exit or Ô to continue in programming.
Setting the system to display a name instead of number
When you use a speed dial code, you can choose to have the display read either the phone number or a name for that speed dial code. For example, you could program a speed dial for a frequently used courier and have the display read Courier instead of the courier’s telephone number. System speed dial names can be 16 characters long. The default is set to display the number.
1. Place the programming overlay on any Advantage or Principal Keystation.
2. Press Ä¥¥ÛßßÜÝÝ (CONFIG). The display reads Password:.
3. Press ÛÜßÝß (ADMIN). The display reads Stns&Peripheral.
4. Press Ô until the display reads Sys speed dial.
5. Press . The display reads Speed dial#:.
6. Enter the system Speed dial code (01 to 70) you want to use.
7. Press . The display reads the number currently assigned to the code, or No number.
8. Press CHANGE. Use the dial pad to enter the required phone number (up to 24 digits) and press OK.
9. Press Ô until the display reads Display digits:.
10. Press CHANGE to choose Y (Yes) or N (No). No means the display reads a name for the code.
11. Press Ô. The display reads Name:Sys spd diÉ. Press to see the rest of the display.
12. Press CHANGE. The display reads Name:.
P0906413 Issue 01 System Administration Manual

58 / Setting System Speed Dial
13. Enter the name you want to give to the Speed Dial code by pressing the appropriate key on the dial pad until the first letter of the name is displayed. Press -->, then enter the next letter of the name and so on until the name is complete. Up to 16 characters are allowed. Press # to add spaces.
14. Press Ô to accept the changes.
15. Press ¨ to exit or Ô to continue in programming.
Setting whether the speed dial number bypasses restrictions
System speed dial numbers are normally subject to any restrictions that are programmed in the Commander NT, but they can be programmed to bypass these restrictions. You may choose to have the speed dial number bypass the normal call restrictions (Yes to bypass), or you may choose to have the speed dial number be subject to normal call restrictions (No). The default is No.
1. Place the programming overlay on any Advantage or Principal Keystation.
2. Press Ä¥¥ÛßßÜÝÝ (CONFIG). The display reads Password:.
3. Press ÛÜßÝß (ADMIN). The display reads Stns&Peripheral.
4. Press Ô until the display reads Sys speed dial.
5. Press . The display reads Speed dial #:.
6. Enter the System Speed Dial code (01 to 70).
7. Press . The display reads the telephone number currently assigned to the code, or No number.
8. Press CHANGE. Enter the telephone number (up to 24 digits) and press OK.
9. Press Ô until the display reads Bypass restrÕn:.10. Press CHANGE to choose Y (Yes) or N (No).
11. Press ¨ to exit or Ô to continue in programming.
System Administration Manual P0906413 Issue 01

Naming stations and lines
You can personalise your office communications by assigning names to lines and stations in the Commander NT. The station's default name is its station number (for example, 221). A line’s default name is its line number (for example, Line 001).
Names can be up to 7 characters long. Line and station names can contain both letters and numbers, but not the # and * symbols. To avoid confusion, do not assign the same name to more than one station or line, or to a station and a line in your system. Use creative combinations of initials, abbreviations, or even nicknames, to give each station and line a unique name.
Naming stationsAs the Administrator you can program the system so that when a station number is dialled, the person’s name appears on the keystation display. At the same time, the person called sees the caller’s name on their display.
1. Place the programming overlay on any Advantage or Principal Keystation.
2. Press Ä¥¥ÛßßÜÝÝ (CONFIG). The display reads Password:.
3. Press ÛÜßÝß (ADMIN). The display reads Stns&Peripheral.
4. Press . The display reads Show stn#:.
5. Enter the station number of the keystation you want to program. The display reads nnn:nnn.
6. Press . The display reads Capabilities.
7. Press Ô. The display reads Name:.
8. Press CHANGE. Enter the characters of the name using the keystation dial pad to a maximum of 7 letters.
P0906413 Issue 01 System Administration Manual

60 / Naming stations and lines
9. Press Ô to store the name.
10. Press ¨ to exit or Ô to continue in programming.
Naming linesAssigning names to lines can help you identify incoming calls. For example, if both the Sales line and the Service line ring at your station, your display reads which line is calling, Sales or Service, when the line key is pressed, or the handset is lifted.
If the Sales department is in a meeting and have diverted their lines to your station, the keystation display reads Sales for any incoming calls on their lines.
1. Place the programming overlay on any Advantage or Principal Keystation.
2. Press Ä¥¥ÛßßÜÝÝ (CONFIG). The display reads Password:.
3. Press ÛÜßÝß (ADMIN). The display reads Stns&Peripheral.
4. Press Ô until the display reads Lines.
5. Press . The display reads Show line:.
6. Enter the line number. The display reads the current name.
7. Press .
8. Press CHANGE. Enter the characters of the name using the dial pad or press Ô to restore the default name.
9. Press Ô to store the name.
10. Press ¨ to exit or Ô to continue in programming.
System Administration Manual P0906413 Issue 01

Changing the time and date
The system time and date appear on the display of idle Commander NT Keystations. Economy, M7000 Keystations and telephones connected to a SLT Adaptor cannot display the time and date. If the mains power is interrupted, you may have to reset the time and date.
Note: You only need to change the time and date at one Commander NT Keystation. The clock is reset for the entire system. If you have BRA lines then your time and date will automatically correct itself when an outgoing call is answered. See "Automatic Time and Date" on page 64.
The clock also controls the modes used for services such as ringing and routing.
After a power failure, the clock is behind by the length of time power was lost. For example, if the power is out for two minutes, the clock is two minutes behind.
Note: To quickly change the time one hour ahead or one hour back, use **FWD or ** BACK features on page 63.
Changing the time1. Place the programming overlay on any Advantage or Principal
Keystation.
2. Press Ä¥¥ÛßßÜÝÝ (CONFIG). The display reads Password:.
3. Press ÛÜßÝß (ADMIN). The display reads Stns&Peripheral.
4. Press Ô until the display reads Time&Date.
5. Press . The display reads Hour.
6. Press CHANGE (or NEXT if you do not need to change the hour).
P0906413 Issue 01 System Administration Manual

62 / Changing the time and date
7. Enter the hour (00 to 23). If the number is less than 13, the display reads AM. Press CHANGE to select PM.
8. Press OK.
9. Press Ô. The display reads Minutes:.
10. Press CHANGE.
11. Enter the minutes (00 to 59).
12. Press ¨ to exit or Ô to continue in programming.
Changing the date1. Place the programming overlay on any Advantage or Principal
Keystation.
2. Press Ä¥¥ÛßßÜÝÝ (CONFIG). The display reads Password:.
3. Press ÛÜßÝß (ADMIN). The display reads Stns&Peripheral.
4. Press Ô until the display reads Time&Date.
5. Press . The display reads Hour:.
6. Press Ô twice. The display reads Year:.
7. Press CHANGE. Enter the last two digits of the current year.
8. Press Ô. The display reads Month:.
9. Press CHANGE. Enter the month (01 to 12).
10. Press Ô. The display reads Day:.
11. Press CHANGE. Enter the day of the month (01 to 31).
12. Press ¨ to exit or Ô to continue in programming.
Changing the time and date using the Basic password
You can change the time and date using Ä¥¥¡ÝßÜ (TIME) and the Basic password.
1. Press Ä¥¥¡ÝßÜ (TIME). The display reads Password:.
System Administration Manual P0906413 Issue 01

Changing the time and date / 63
2. Press ÛÛàÝÛ (BASIC). The display reads Hour:.
3. Press CHANGE (or NEXT if you do not need to change the hour).
4. Enter the hour (00 to 23). If the number is less than 13, the display reads AM. Press CHANGE to select PM.
5. Press NEXT. The display reads Minutes:.
6. Press CHANGE (or NEXT if you do not need to change the minutes). Enter the minutes (00 to 59).
7. Press NEXT. The display reads Year:.
8. Press CHANGE (or NEXT if you do not need to change the year).
9. Enter the last two digits of the current year.
10. Press NEXT. The display reads Month:.
11. Press CHANGE (or NEXT if you do not need to change the month). Enter the month (01 to 12).
12. Press NEXT. The display reads Day:.
13. Press CHANGE. Enter the day of the month (01 to 31).
14. Press ¨ to exit.
Changing the time by an hourCommander NT offers two features that let you quickly adjust the time.
Moving one hour forward with ** FWD1. Press Ä¥¥ÜáÜ (FWD). The display reads
Forward by 1Hr?.
2. Press YES. The display briefly reads Time Changed.
Moving one hour backward with ** BACK1. Press Ä¥¥ÛÛÛÞ (BACK). The display reads
Backward by 1Hr?.
2. Press YES. The display briefly reads Time Changed.
P0906413 Issue 01 System Administration Manual

64 / Changing the time and date
Automatic Time and DateWhen an outgoing BRA call is answered, the network may provide time and date information to the Commander NT system. The Auto Time&Date feature enables the Commander NT system to use this information to automatically update the time and date on the Commander NT system.
The keystation displays are changed to the correct time when each keystation changes state.
1. Place the programming overlay on any Advantage or Principal Keystation.
2. Press Ä¥¥ÛßßÜÝÝ (CONFIG). The display reads Password:.
3. Press àÛàÞ¡à (SAPLUS). The display reads Stns&Peripheral.
4. Press Ô until the display reads System prgrming.
5. Press . The display reads Hunt groups.
6. Press Ô until the display reads Featr settings.
7. Press . The display reads Backgrnd music:.
8. Press Ô until the display reads AutoTime&Date.
9. Press CHANGE to choose Y or N.
10. Press ¨ to exit or Ô to continue in programming.
Note: The display does not reflect the Time and Date change until the keystation changes state (receives information from the network).
System Administration Manual P0906413 Issue 01

Barring calls and privileges (Restrictions)
Restrictions are digits that the system does not accept during dialling. Overrides are digits that the system accepts in spite of the restrictions. Groups of restrictions and overrides are programmed into Restriction filters.
Rather than define individual restrictions and apply them repeatedly to each keystation and line, a restriction filter allows you to apply restrictions as a single package of dialling sequences that are not permitted.
Different filters can be applied to
• lines, to prevent stations that share a line from dialling restricted numbers
• stations, to prevent a specific stations from dialling restricted numbers
• a combination of line and station, to allow specific keystations to be exempt from the line restriction.
For example, a manager and four employees share a line but the employees have a line/station filter that restricts the calls they can make on that line.
The number of restriction filters that you have for your system depends on a number of factors. You may want to have different restrictions for different times of the day (such as barring long-distance calls after work hours). You may want different restrictions for a keystation that clients may use.
Default filtersYou may not have to create or change a filter. Some of the more popular filters that restrict long-distance calls exist by default. The following table shows the default restriction filters that the Commander NT system provides.
P0906413 Issue 01 System Administration Manual
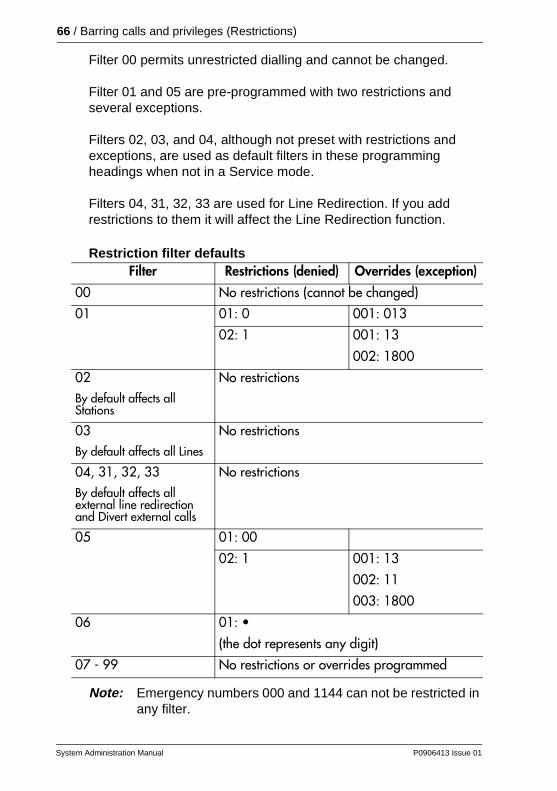
66 / Barring calls and privileges (Restrictions)
Filter 00 permits unrestricted dialling and cannot be changed.
Filter 01 and 05 are pre-programmed with two restrictions and several exceptions.
Filters 02, 03, and 04, although not preset with restrictions and exceptions, are used as default filters in these programming headings when not in a Service mode.
Filters 04, 31, 32, 33 are used for Line Redirection. If you add restrictions to them it will affect the Line Redirection function.
Restriction filter defaults
Note: Emergency numbers 000 and 1144 can not be restricted in any filter.
Filter Restrictions (denied) Overrides (exception)
00 No restrictions (cannot be changed)
01 01: 0 001: 013
02: 1 001: 13
002: 1800
02By default affects all Stations
No restrictions
03By default affects all Lines
No restrictions
04, 31, 32, 33By default affects all external line redirection and Divert external calls
No restrictions
05 01: 00
02: 1 001: 13
002: 11
003: 1800
06 01: �
(the dot represents any digit)
07 - 99 No restrictions or overrides programmed
System Administration Manual P0906413 Issue 01

Barring calls and privileges (Restrictions) / 67
Customising a call barring (restriction) filterYou can customise default filters for your needs before you apply them. You can
• create a new restriction filter
• add or remove restrictions
• add or remove overrides
The rules for adding and creating filters are as follows:
• You can have up to 100 restriction filters.
• There is a maximum of 400 restrictions and overrides allocated to the 100 programmable filters.
• Each programmable filter can have up to 48 restrictions. There is no limit on the number of overrides that can be allocated to a restriction.
• You can use any restriction or override in more than one filter. Each time it is used, it counts as one entry. For example, if restriction 411 exists in filters 01, 02 and 03, it uses up three of the 400 entries available.
• You can use ¥ and £ in a sequence of numbers in either a restriction or an override. These characters are often used as part of feature codes for other systems or for features provided by the PSTN.
• The maximum length of a restriction is 15 digits. The maximum length of an override is 16 digits.
• The solid dot (•) can represent any digit. It is inserted by pressing ANY.
• When you are finished programming restrictions for one keystation, you can copy those settings to other keystations by using COPY at the Restrictions ö display. For more information about copying keystation programming, see "Copying programming for keystations" on page 153.
P0906413 Issue 01 System Administration Manual

68 / Barring calls and privileges (Restrictions)
• You cannot delete a filter but you can delete a restriction within a filter. Removing the restrictions programmed on a filter makes it an unrestricted filter but the filter itself is not removed.
Applying restriction filtersOnce you create the filters, you can assign the restrictions to a keystation (under Stns&Peripheral), to a line (under Lines), to a particular line on a keystation (under Stns&Peripheral).
To assign restriction filters for different times of the day, see "Restriction service" on page 160.
1. Place the programming overlay on any Advantage or Principal Keystation.
2. Press Ä¥¥ÛßßÜÝÝ (CONFIG). The display reads Password:.
3. Press àÛàÞ¡à (SAPLUS). The display reads Stns&Peripheral.
4. Press . The display reads Show stn#:.
5. Enter the station number of the keystation you want to program. The display reads nnn:nnn.
6. Press . The display reads Line access.
7. Press Ô until the display reads Restrictions.
8. Press . The display reads Restrn filters.
9. Press . The display reads Show filter:
10. Enter the two-digit code or press Ô.
11. Press .
Removing a restriction changes the identifying number of the restriction.
Removing a restriction removes the overrides associated with it, and changes the identifying number of the restriction. For example, removal of restriction 01 re-numbers restrictions 01 to 08 as 01 to 07.
System Administration Manual P0906413 Issue 01

Barring calls and privileges (Restrictions) / 69
12. Use REMOVE, ADD, the dial pad, and OK to change the restrictions for the filter.
13. Press , then Ô to see the overrides for the restriction.
14. Use REMOVE, ADD, the dial pad, and OK to change the overrides (if any) for the restriction.
15. Press ¨ to exit or Ô to continue in programming.
Assigning filtersDefault or customised dialling filters can be assigned to the following:
• a line (applies to all keystations that access that line)
• a keystation (applies to all lines on that keystation)
• a particular line on a specific keystation (line/keystation filter)
A line/keystation filter does not restrict the telephone numbers that can be dialled on other lines appearing on that keystation. It does not restrict what numbers can be dialled on that line by other keystations either.
Assigning filters to a keystation (Stns restrictions)Keystation restrictions lets you assign a restriction filter to a keystation to prevent certain numbers from being dialled from that keystation. You can assign a different restriction filter for normal service and for each of six modes.
See "Programming services" on page 157 for more information about the modes.
1. Place the programming overlay on any Advantage or Principal Keystation.
2. Press Ä¥¥ÛßßÜÝÝ (CONFIG). The display reads Password:.
3. Press àÛàÞ¡à (SAPLUS). The display reads Stns&Peripheral.
4. Press . The display reads Show stn#:.
P0906413 Issue 01 System Administration Manual

70 / Barring calls and privileges (Restrictions)
5. Enter the station number of the keystation you want to program. The display reads nnn:nnn.
6. Press . The display reads Line access.
7. Press Ô until the display reads Restrictions.
8. Press . The display reads Restrn filters.
9. Press Ô. The display reads Stn restrns.
10. Press . The display reads Filters.
11. Press . The display reads Normal fltr:.
12. Press CHANGE. The display reads Use flt:.
13. Enter the number of the restriction filter to be assigned to the keystation for each mode. The following table shows the default restrictions.
Default filters for stations
This means, for example, that if you enter a set of restrictions for filter 11, they are automatically applied when the Night mode is in use.
14. Press ¨ to exit or Ô to continue in programming.
Assigning filters to a line (Line restrictions)Line restrictions let you assign a restriction filter to a line to prevent certain numbers from being dialled from any keystation with that line appearance. You can assign a different restriction filter for normal service and for each of six modes. See "Programming services" on page 157 for more information about the modes.
mode Restriction filter
Normal 02
Sched 1 (Night) 11
Sched 2 (Evening) 12
Sched 3 (Lunch) 13
Sched 4 00
Sched 5 00
Sched 6 00
System Administration Manual P0906413 Issue 01

Barring calls and privileges (Restrictions) / 71
1. Place the programming overlay on any Advantage or Principal Keystation.
2. Press Ä¥¥ÛßßÜÝÝ (CONFIG). The display reads Password:.
3. Press àÛàÞ¡à (SAPLUS). The display reads Stns&Peripheral.
4. Press Ô. The displays reads Lines.
5. Press . The display reads Show line:.
6. Enter the line number you want to program.
7. Press . The display reads Name: Line#.
8. Press Ô until the display reads Restrictions.
9. Press . The display reads Restrn filters.
10. Press Ô. The display reads Line restrns.
11. Press . The display reads Normal fltr:.
12. Press CHANGE. The display reads Use flt:.
13. Enter the number of the restriction filter to be assigned to the station for each mode. The following table shows the default restrictions.
Default Filters for stations
This means, for example, that if you enter a set of restrictions for filter 21, they are automatically applied when the Night mode is in use.
14. Press ¨ to exit or Ô to continue in programming.
mode Restriction filter
Normal 03
Sched 1 (Night) 21
Sched 2 (Evening) 22
Sched 3 (Lunch) 23
Sched 4 00
Sched 5 00
Sched 6 00
P0906413 Issue 01 System Administration Manual

72 / Barring calls and privileges (Restrictions)
Assigning filters to a specific line/stationLine/station restrictions let you assign a restriction filter to a specific line that can be used for outgoing calls at a specific keystation. This type of filter replaces any line or station restriction filters that might otherwise apply. It restricts the numbers you can dial on a line, but only from that keystation. The same line on another keystation can have different restrictions.
As with station restrictions, you can apply a different line or station restriction for normal service and for each of six modes.
A maximum of 255 line/station restrictions may be applied to lines at keystations.
If a line/station restriction is assigned to a line at a particular keystation, it overrides any line restrictions or station restrictions that might otherwise apply.
If no line/station restrictions have been defined, the numbers are checked against the station restrictions and the line restrictions, if either of these have been defined. The numbers may be rejected by either restriction.
1. Place the programming overlay on any Advantage or Principal Keystation.
2. Press Ä¥¥ÛßßÜÝÝ (CONFIG). The display reads Password:.
3. Press àÛàÞ¡à (SAPLUS). The display reads Stns&Peripheral.
4. Press . The display reads Show stn#:.
5. Enter the station number of the keystation you want to program. The display reads nnn:nnn.
6. Press . The display reads Line access.
7. Press Ô until the display reads Restrictions.
8. Press . The display reads Restrn filters.
9. Press Ô until the display reads Line/stn rstrns.
10. Press . The display reads Show line:.
System Administration Manual P0906413 Issue 01

Barring calls and privileges (Restrictions) / 73
11. Enter the line number you want to program.
12. Press . The display reads Normal fltr:
13. Press CHANGE. The display reads Use flt:.
14. Enter the number of the filter to be assigned as the line/station restriction for each mode. There are no default line/station restrictions.
15. Press ¨ to exit or Ô to continue in programming.
Assigning calling privileges (Class of Service Password)
Call barring shows you how to customise and apply dialling filters to restrict calls. You can temporarily override these filters with a Class of service (COS) password. COS passwords replace one set of filters with another to allow someone to make calls that would otherwise be restricted, without giving them complete freedom to make every kind of call. COS passwords let you define individual passwords and determine the restriction filter associated with each.
A system can have a maximum of 100 six-digit COS passwords, ranging from 00 to 99. Each password consists of a user filter, which replaces the current station or line/station filter, and a line restriction, which replaces the current line restriction.
Your COS password is in effect only for the duration of your call and does not affect the restrictions placed on other users of the system.
COS passwords for a system should be determined randomly and should be changed regularly. Employee COS passwords should be deleted when they leave the company.
Typically, each user has a separate COS password. However, several users can share a password or one user can have several passwords. Users should memorise their COS passwords instead of writing them down.
You can use COPY and the dial pad to copy the restriction filters from one COS password to another. COS passwords must be unique.
P0906413 Issue 01 System Administration Manual

74 / Barring calls and privileges (Restrictions)
Before you begin programming a COS password, make sure you have defined the appropriate restriction filters in Restrictions under Lines.
See "Using Class of service passwords" on page 260 for information on using this feature.
Selecting a COS password1. Place the programming overlay on any Advantage or Principal
Keystation.
2. Press Ä¥¥ÛßßÜÝÝ (CONFIG). The display reads Password:.
3. Press àÛàÞ¡à (SAPLUS). The display reads Stns&Peripheral.
4. Press Ô until the display reads Passwords.
5. Press . The display reads COS pswds.
6. Press . The displays reads Show pswd #:.
7. Enter a two-digit password (00 to 99).
8. Press . The display reads the setting for that COS password.
9. Press CHANGE. Enter a password (maximum six digits).
10. Press ¨ to exit or Ô to continue in programming.
Assigning user restrictions to the COS passwordA COS password can be used by internal and external users, therefore you must assign restrictions for the user instead of for the station.
1. Place the programming overlay on any Advantage or Principal Keystation.
2. Press Ä¥¥ÛßßÜÝÝ (CONFIG). The display reads Password:.
3. Press àÛàÞ¡à (SAPLUS). The display reads Stns&Peripheral.
4. Press Ô until the display reads Passwords.
System Administration Manual P0906413 Issue 01

Barring calls and privileges (Restrictions) / 75
5. Press . The display reads COS pswds.
6. Press . The displays reads Show pswd #:.
7. Enter a two-digit password (00 to 99).
8. Press . The display reads the setting for that COS password.
9. Press Ô. The display reads User fltr:.
10. Press CHANGE. Enter the number for the restriction filter to be applied with this COS password.
11. Press ¨ to exit or Ô to continue in programming.
Assigning line restrictions to the COS password1. Place the programming overlay on any Advantage or Principal
Keystation.
2. Press Ä¥¥ÛßßÜÝÝ (CONFIG). The display reads Password:.
3. Press àÛàÞ¡à (SAPLUS). The display reads Stns&Peripheral.
4. Press Ô until the display reads Passwords.
5. Press . The display reads COS pswds.
6. Press . The displays reads Show pswd #:.
7. Enter a two-digit password (00 to 99).
8. Press . The display reads the setting for that COS password.
9. Press Ô until the display reads Line fltr:.
10. Press CHANGE. Enter the number for the restriction that applies to the line when this COS password is used.
11. Press ¨ to exit or Ô to continue in programming.
P0906413 Issue 01 System Administration Manual

76 / Barring calls and privileges (Restrictions)
Setting up a new Class of Service passwordAs the Administrator you set up the COS passwords. You choose a password number, the password, and finally the user and line restrictions for your new Class of service.
You may assign a new filter to either the user or line restriction, or to both, depending on your needs. You must change at least one of them, or your Class of service is no different from ordinary service.
1. Place the programming overlay on any Advantage or Principal Keystation.
2. Press Ä¥¥ÛßßÜÝÝ (CONFIG). The display reads Password:.
3. Press àÛàÞ¡à (SAPLUS). The display reads Stns&Peripheral.
4. Press Ô until the display reads Passwords.
5. Press . The display reads COS pswds.
6. Press . The display reads Show pswd #:.
7. Enter an unused password number (00 to 99). The display reads COS pswd # followed by the number you chose.
8. Press . The display reads Pswd nn: and the current setting.
9. Press CHANGE. Enter six digits for the new password.
10. Press Ô. The display reads User fltr: and the current setting.
11. If you are changing the user filter, press CHANGE. The display reads User fltr:.
12. Enter the two-digit number of an existing dialling filter.
13. Press Ô. The display reads Line fltr: and the current setting.
14. If you are changing the line restriction, press CHANGE. The display reads Line fltr:.
15. Enter the two-digit number of an existing dialling filter.
16. Press ¨ to exit or Ô to continue in programming.
System Administration Manual P0906413 Issue 01

Barring calls and privileges (Restrictions) / 77
Changing an existing COS passwordTo maintain the security of a Class of service password, it is a good idea to change it frequently.
1. Place the programming overlay on any Advantage or Principal Keystation.
2. Press Ä¥¥ÛßßÜÝÝ (CONFIG). The display reads Password:.
3. Press àÛàÞ¡à (SAPLUS). The display reads Stns&Peripheral.
4. Press Ô until the display reads Passwords.
5. Press . The display reads COS pswds.
6. Press . The display reads Show pswd #:.
7. Enter the password number of the COS password you want to change (00 to 99).
8. Press . The display reads Pswd, followed by the number you chose and the current password.
9. Press CHANGE. Enter six digits for the new password.
10. Press ¨ to exit or Ô to continue in programming.
Changing the filters assigned to an existing COS password
1. Place the programming overlay on any Advantage or Principal Keystation.
2. Press Ä¥¥ÛßßÜÝÝ (CONFIG). The display reads Password:.
3. Press àÛàÞ¡à (SAPLUS). The display reads Stns&Peripheral.
4. Press Ô until the display reads Passwords.
5. Press . The display reads COS pswds.
6. Press . The display reads Show pswd #:.
7. Enter the password number of the COS password whose filter you want to change (00 to 99).
P0906413 Issue 01 System Administration Manual
78 / Barring calls and privileges (Restrictions)
8. Press . The display reads Pswd, followed by the number you chose and the current password.
9. Press Ô. The display reads User fltr: and the current setting.
10. If you are changing the user filter, press CHANGE. The display reads User fltr:.
11. Enter the two-digit number of an existing dialling filter or leave blank to return to the default filter.
12. Press Ô. The display reads Line fltr: and the current filter assigned.
13. If you are changing the line restriction, press CHANGE. The display reads Line fltr:.
14. Enter the two-digit number of an existing dialling filter or leave blank to return to the default filter.
15. Press ¨ to exit or Ô to continue in programming.
Erasing an existing COS passwordWhen a COS password is no longer needed, you can erase it.
1. Place the programming overlay on any Advantage or Principal Keystation.
2. Press Ä¥¥ÛßßÜÝÝ (CONFIG). The display reads Password:.
3. Press àÛàÞ¡à (SAPLUS). The display reads Stns&Peripheral.
4. Press Ô until the display reads Passwords.
5. Press . The display reads COS pswds.
6. Press . The display reads Show pswd #:.
7. Enter the password number of the COS password you want to erase (00 to 99).
8. Press . The display reads Pswd, followed by the number you chose and current password.
9. Press CLR. Press Ô.
10. Press ¨ to exit or Ô to continue in programming.
System Administration Manual P0906413 Issue 01

Barring calls and privileges (Restrictions) / 79
Locking a stationYou can limit the number of features that can be used or programmed at a particular station. The options are
• None (default)— not locked. You can program any system or station setting.
• Full —fully locked. You can program only these settings: display contrast, ring type, ring volume, and volume control.
• Partial —partly locked. You can program most station settings. You cannot program system settings, User Speed Dial codes, dialling mode, or memory keys; and you cannot move line keys or enable Voice Call Deny.
Note: Do not apply station lock to the keystation you use to program the system. There must be at least one Advantage or Principal Keystation in the system that has Station Lock set to None, or you will not be able to program the system.
Setting Station Lock for a keystation1. Place the programming overlay on any Advantage or Principal
Keystation.
2. Press Ä¥¥ÛßßÜÝÝ (CONFIG). The display reads Password:.
3. Press àÛàÞ¡à (SAPLUS). The display reads Stns&Peripheral.
4. Press . The display reads Show stn#:.
5. Enter the station number of the keystation you want to program. The displays reads nnn:nnn.
6. Press . The display reads Line access.
7. Press Ô until the display reads Restrictions.
8. Press . The display reads Restrn filters.
9. Press Ô. The display reads Stn restrns.
10. Press . The display reads Filters.
11. Press Ô. The display reads StnLock:.
P0906413 Issue 01 System Administration Manual

80 / Barring calls and privileges (Restrictions)
12. Press CHANGE to select None , Full, or Partial.
13. Press ¨ to exit or Ô to continue in programming.
Preventing Last Number RedialUnder some conditions, a keystation may be used by customers or clients. You can prevent non-employees from accessing sensitive numbers by blocking certain features at the keystation. The default setting allows a station to use the Last Number Redial feature.
1. Place the programming overlay on any Advantage or Principal Keystation.
2. Press Ä¥¥ÛßßÜÝÝ (CONFIG). The display reads Password:.
3. Press àÛàÞ¡à (SAPLUS). The display reads Stns&Peripheral.
4. Press . The display reads Show stn#:.
5. Enter the station number of the keystation you want to program. The display reads nnn:nnn.
6. Press . The display reads Line access.
7. Press Ô until the display reads Restrictions.
8. Press . The display reads Restrn filters.
9. Press Ô. The display reads Stn restrns.
10. Press . The display reads Filters.
11. Press Ô until the display reads Allow last no:.
12. Press CHANGE to choose Y (Yes) or N (No).
13. Press ¨ to exit or Ô to continue in programming.
Preventing Saved Number RedialThe default setting allows a station to use the Saved Number Redial feature.
1. Place the programming overlay on any Advantage or Principal Keystation.
System Administration Manual P0906413 Issue 01

Barring calls and privileges (Restrictions) / 81
2. Press Ä¥¥ÛßßÜÝÝ (CONFIG). The display reads Password:.
3. Press àÛàÞ¡à (SAPLUS). The display reads Stns&Peripheral.
4. Press . The display reads Show stn#:.
5. Enter the station number of the keystation you want to program. The display reads nnn:nnn.
6. Press . The display reads Line access.
7. Press Ô until the display reads Restrictions.
8. Press . The display reads Restrn filters.
9. Press Ô. The display reads Stn restrns.
10. Press . The display reads Filters.
11. Press Ô until the display reads Allow saved no:.
12. Press CHANGE to choose Y (Yes) or N (No).
13. Press ¨ to exit or Ô to continue in programming.
Preventing RecallThe default setting allows a station to use the Recall feature.
1. Place the programming overlay on any Advantage or Principal Keystation.
2. Press Ä¥¥ÛßßÜÝÝ (CONFIG). The display reads Password:.
3. Press àÛàÞ¡à (SAPLUS). The display reads Stns&Peripheral.
4. Press . The display reads Show stn#:.
5. Enter the station number of the keystation you want to program. The display reads nnn:nnn.
6. Press . The display reads Line access.
7. Press Ô until the display reads Restrictions.
8. Press . The display reads Restrn filters.
9. Press Ô until the display reads Stn restrns.
P0906413 Issue 01 System Administration Manual

82 / Barring calls and privileges (Restrictions)
10. Press . The display reads Filters.
11. Press Ô until the display reads Allow recall:.
12. Press CHANGE to choose Y (Yes) or N (No).
13. Press ¨ to exit or Ô to continue in programming.
Preventing RedirectThe default setting allows a station to use the Redirect feature.
Note: If you prevent Redirect, the station will not be able to Redirect lines or Divert calls to external destinations using ÄÝ.
1. Place the programming overlay on any Advantage or Principal Keystation.
2. Press Ä¥¥ÛßßÜÝÝ (CONFIG). The display reads Password:.
3. Press àÛàÞ¡à (SAPLUS). The display reads Stns&Peripheral.
4. Press . The display reads Show stn#:.
5. Enter the station number of the keystation you want to program. The display reads nnn:nnn.
6. Press . The display reads Line access.
7. Press Ô until the display reads Restrictions.
8. Press . The display reads Restrn filters.
9. Press Ô until the display reads Stn restrns.
10. Press . The display reads Filters.
11. Press Ô until the display reads Allow redirect:.
12. Press CHANGE to choose Y (Yes) or N (No).
13. Press ¨ to exit or Ô to continue in programming.
System Administration Manual P0906413 Issue 01

Programming station capabilities
Many features that can be used at individual stations (see "Section III: Using keystation features" on page 221) must first be programmed by you in Administration programming. As the Administrator, you can:
• assign a Direct-Dial station to enable your colleagues to reach an attendant by dialling just one digit
• assign a Hotline station to dial one number automatically
• assign page zones so that colleagues can call page within their groups without disturbing the whole office
• assign pick-up groups to allow colleagues to easily answer calls ringing at another station
• set Diversions so that all calls can be answered at other stations even when people’s stations are busy or they do not answer
• lock a station to limit the features that can be used on it
• program an Auxiliary ringer.
There are several settings that affect individual keystations that you can activate only in Administration programming. As the Administrator you can do the following:
• program Do not Disturb on Busy
• program Full and Automatic Handsfree
• allow Priority Call
• activate Redirect ring
Seeing what has been programmed on a stationStation profile lets you examine, without changing, all of the system programming assigned to any Commander NT Keystation.
1. Enter Ä¥¥äôæö on any Advantage or Principal Keystation.
P0906413 Issue 01 System Administration Manual

84 / Programming station capabilities
2. Enter the station number of the keystation whose programming you want to check.
3. Use Next, Show and Back to navigate through the settings.
Setting divertAs the Administrator, you can set the system to automatically divert your calls to another destination when your keystation is busy and when it is not answered.
To temporarily divert all calls to another destination within or outside your Commander NT enter ÄÝ. Enter the station number or line pool access code plus telephone number (for external destinations) you want to divert to, on the keystation you want to be diverted. For more information see "Diverting calls" on page 273.
Setting Divert to external destinationsYou must program a station to Allow Redirect in order to Divert to external destinations. Only supervised lines can divert to external destinations. Calls diverted outside the Commander NT system are subject to the restriction filters placed on the lines for the line pool code specified.
You cannot program ÄÝ using:
• last number redial key
• saved number redial key
• external auto-dial key
Setting the system to divert calls for an unanswered keystation
When you set the system up to divert calls that are not answered at a particular keystation, you must define the station (or external destination) that the calls are sent to and the number of times that an incoming call rings before the call is diverted. You can choose 6, 9, 12, 18 and 30 rings. The default is 12 rings.
System Administration Manual P0906413 Issue 01
Programming station capabilities / 85
Note: If the station that you are diverting calls to does not have a free intercom key, or has Do Not Disturb or Do Not Disturb on busy activated, the incoming call continues to visually alert at your keystation, and the caller continues to hear ringback.
If this is not desirable, you can program a Divert on busy or Divert no answer destination for the second station.
For example, station 224 is programmed to divert all incoming calls to station 235, which in turn is programmed to divert all incoming calls to station 240.
Unanswered calls coming in on an outside line are automatically transferred to the Prime station for that line.
If the station is a member of a hunt group, the Divert no answer feature is overridden and the hunt group call will continue to ring until the hunt time has expired.
You can Divert on busy to a Hunt Group number.
1. Place the programming overlay on any Advantage or Principal Keystation.
2. Press Ä¥¥ÛßßÜÝÝ (CONFIG). The display reads Password:.
3. Press ÛÜßÝß (ADMIN). The display reads Stns&Peripheral.
4. Press . The display reads Show stn#:.
5. Enter the station number of the keystation you wish to program. The display reads nnn:nnn.
6. Press . The display reads Capabilities.
7. Press . The display reads Divert no answer.
8. Press . The display reads Divert to:None.
P0906413 Issue 01 System Administration Manual

86 / Programming station capabilities
9. Press CHANGE and enter the station number where you want the calls to be sent. You can press CLR to change the destination back to None.For external destinations, enter the line pool access code plus the telephone number.
10. Press Ô. The display reads Divert delay:.
11. Press CHANGE to choose between 6, 9, 12, 18 or 30 rings.
12. Press ¨ to exit or Ô to continue programming.
Cancelling Divert for an unanswered keystation1. Place the programming overlay on any Advantage or Principal
Keystation.
2. Press Ä¥¥ÛßßÜÝÝ (CONFIG). The display reads Password:.
3. Press ÛÜßÝß (ADMIN). The display reads Stns&Peripheral.
4. Press . The display reads Show stn#:.
5. Enter the station number of the keystation you wish to program. The display reads nnn:nnn.
6. Press . The display reads Capabilities.
7. Press . The display reads Divert no answer.
8. Press . The display reads Divert to:.
9. Press CHANGE. You can press CLR to change the destination back to None.
10. Press ¨ to exit or Ô to continue in programming.
Setting the system to divert calls for a busy keystationWhen a call comes in and you are already engaged on a call, Divert on busy will pass the incoming call on to another station or an external destination.
1. Place the programming overlay on any Advantage or Principal Keystation.
2. Press Ä¥¥ÛßßÜÝÝ (CONFIG). The display reads Password:.
System Administration Manual P0906413 Issue 01

Programming station capabilities / 87
3. Press ÛÜßÝß (ADMIN). The display reads Stns&Peripheral.
4. Press . The display reads Show stn#:.
5. Enter the number of the keystation that will have its calls diverted.
6. Press Ô until the display reads Capabilities.
7. Press Ô until the display reads Divert on busy.
8. Press . The display reads Divert to:.
9. Press CHANGE.
10. Enter the number of the station you want your calls diverted to.
Note: For external destinations, enter the line pool access code plus the telephone number.
11. Press ¨ to exit or Ô to continue in programming.
Cancelling Divert on busy1. Place the programming overlay on any Advantage or Principal
Keystation.
2. Press Ä¥¥ÛßßÜÝÝ (CONFIG). The display reads Password:.
3. Press ÛÜßÝß (ADMIN). The display reads Stns&Peripheral.
4. Press . The display reads Show stn#:.
5. Enter the number of the keystation that will have its calls diverted.
6. Press . The display reads Capabilities.
7. Press . The display reads Divert no answr.
8. Press Ô. The display reads Divert on busy.
9. Press . The display reads Divert to:.
10. Press CHANGE. Enter the number of the station you want your calls diverted to.
11. Press ¨ to exit or Ô to continue in programming.
P0906413 Issue 01 System Administration Manual

88 / Programming station capabilities
Note: You can use the Do Not Disturb (Ä¡Þ) to divert your calls to the prime station.
Programming Do Not Disturb on BusyWhen you are busy on a call and a second call comes in, your keystation rings softly to alert you to the second call. If you find this second ring distracting, you can have the system prevent a second call from ringing by assigning Do Not Disturb (DND) on busy to your station.
When DND on busy is turned on for the station, internal and private network callers hear a busy tone instead of ringing when you are on the keystation. External callers are transferred to the Prime station used in your system.
If you use DND on busy, the line indicator for an external incoming call still flashes, but your keystation does not ring.
Divert on busy takes priority over DND on busy.
If an external call uses a DDI line, the call is processed according to the programming of the DDI line. If there are no available appearances of the DDI line, the caller will hear a busy tone.
Note: When using DND on busy with the Economy Keystation, M7000 Keystation or a single-line keystation connected to a SLT Adaptor, there is no indication that a second call is ringing on your keystation. Putting your first call on hold, automatically answers the second incoming call.
If the station is a member of a hunt group, the DND on busy feature overrides the hunt group. This station does not receive notification of hunt group calls while on a call.
See "Do Not Disturb" on page 233 for information on using this feature.
Setting and cancelling Do Not Disturb on BusyYou can set or cancel DND on Busy for each keystation according to personal preference. Except for the prime station (221), the default is Y (the station has DND on Busy).
System Administration Manual P0906413 Issue 01
Programming station capabilities / 89
1. Place the programming overlay on any Advantage or Principal Keystation.
2. Press Ä¥¥ÛßßÜÝÝ (CONFIG). The display reads Password:.
3. Press ÛÜßÝß (ADMIN). The display reads Stns&Peripheral.
4. Press . The display reads Show stn#:.
5. Enter the station number of the keystation you wish to program. The display reads nnn:nnn.
6. Press . The display reads Capabilities.
7. Press . The display reads Divert no answr.
8. Press Ô twice. The display reads DND on busy:.
9. Press CHANGE to choose Y (Yes) or N (No).
10. Press ¨ to exit or Ô to continue in programming.
Programming HandsfreeCommander NT Keystations allow you to make calls without using the keystation handset. When Handsfree operation is programmed for a keystation, a Handsfree/Mute key is automatically assigned to the station. Once a keystation has Handsfree you can also program Automatic Handsfree. Automatic Handsfree allows you to make and receive Handsfree calls without pressing the Handsfree/Mute key.
Note: Handsfree operation is not available on an Economy Keystation, M7000 Keystation or a keystation connected by a Single Line Telephone Adaptor.
See "Using Handsfree" on page 239 for information on using this feature.
Programming Handsfree operation for a keystationHandsfree allows you to use a Handsfree/Mute key to activate the handsfree microphone and receiver.
1. Place the programming overlay on any Advantage or Principal Keystation.
P0906413 Issue 01 System Administration Manual

90 / Programming station capabilities
2. Press Ä¥¥ÛßßÜÝÝ (CONFIG). The display reads Password:.
3. Press ÛÜßÝß (ADMIN). The display reads Stns&Peripheral.
4. Press . The display reads Show stn#:.
5. Enter the station number of the keystation you wish to program. The display reads nnn:nnn.
6. Press . The display reads Capabilities.
7. Press . The display reads Divert no answr.
8. Press Ô until the display reads Handsfree:.
9. Press CHANGE to choose Auto , Std, or None.
10. Press ¨ to exit or Ô to continue in programming.
Programming Handsfree AnswerbackHandsfree answerback allows you to answer a call without lifting the receiver. It is always turned off for an Economy Keystation, M7000 Keystation and SLT.
1. Place the programming overlay on any Advantage or Principal Keystation.
2. Press Ä¥¥ÛßßÜÝÝ (CONFIG). The display reads Password:.
3. Press ÛÜßÝß (ADMIN). The display reads Stns&Peripheral.
4. Press . The display reads Show stn#:.
5. Enter the station number of the keystation you wish to program. The display reads nnn:nnn.
6. Press . The display reads Capabilities.
7. Press . The display reads Divert no answr.
8. Press Ô until the display reads HF answerback:.
9. Press CHANGE to choose Y (Yes) or N (No).
10. Press ¨ to exit or Ô to continue in programming.
System Administration Manual P0906413 Issue 01

Programming station capabilities / 91
Assigning a pickup groupThe Call pickup feature allows you to pick up calls that are ringing at another keystation in your Pickup group. You can assign keystations into one of four Pickup groups. Options for this setting are 1 to 4, and None. The default is 1.
Keystations can be put into and taken out of any Pickup group. See "Answering a keystation using Directed Pickup" on page 240 for information on using this feature.
A hunt group call ringing at a station that is a member of a Pickup Group can be picked up by any station in that Call Pickup Group.
1. Place the programming overlay on any Advantage or Principal Keystation.
2. Press Ä¥¥ÛßßÜÝÝ (CONFIG). The display reads Password:.
3. Press ÛÜßÝß (ADMIN). The display reads Stns&Peripheral.
4. Press . The display reads Show stn#:.
5. Enter the station number of the keystation you wish to program. The display reads nnn:nnn.
6. Press . The display reads Capabilities.
7. Press . The display reads Divert no answr.
8. Press Ô until the display reads Pickup grp:.
9. Press CHANGE to assign the keystation to Pickup Group 1, 2, 3, 4, or None.
10. Press ¨ to exit or Ô to continue in programming.
Assigning a page zonePage zones give you the advantage of paging different parts of the office without disturbing the entire office. You can assign keystations to one of six page zones. (A zone is any set of Commander NT Keystations that you want to group together for paging, regardless of their location.) The options for this setting are zones 1, 2, 3 or None (no page zone assigned). The default is page zone 1.
P0906413 Issue 01 System Administration Manual

92 / Programming station capabilities
Members of a hunt group can be included in a page zone but hunt group stations (315 to 320) cannot.
You can make a keystation part of a page zone only if the keystation has paging set to Y (Yes).
Make sure that everyone who needs to make page announcements has a list showing the keystations that are in each page zone.
See "Paging" on page 267 for information on using this feature.
Note: You can make an announcement to one person by placing a Voice call (Äßß) to that person’s keystation.
1. Place the programming overlay on any Advantage or Principal Keystation.
2. Press Ä¥¥ÛßßÜÝÝ (CONFIG). The display reads Password:.
3. Press ÛÜßÝß (ADMIN). The display reads Stns&Peripheral.
4. Press . The display reads Show stn#:.
5. Enter the station number of the keystation you wish to program. The display reads nnn:nnn.
6. Press . The display reads Capabilities.
7. Press . The display reads Divert no answr.
8. Press Ô until the display reads Page zone.
9. Press CHANGE to assign page zone 1, 2, 3 or None.
10. Press ¨ to exit or Ô to continue in programming.
Programming paging1. Place the programming overlay on any Advantage or Principal
Keystation.
2. Press Ä¥¥ÛßßÜÝÝ (CONFIG). The display reads Password:.
3. Press ÛÜßÝß (ADMIN). The display reads Stns&Peripheral.
System Administration Manual P0906413 Issue 01

Programming station capabilities / 93
4. Press . The display reads Show stn#:.
5. Enter the station number of the keystation you wish to program. The display reads nnn:nnn.
6. Press . The display reads Capabilities.
7. Press . The display reads Divert no answr.
8. Press Ô until the display reads Paging:.
9. Press CHANGE to choose Y (Yes) or N (No).
10. Press ¨ to exit or Ô to continue in programming.
Programming Direct-DialDirect-Dial lets you dial a designated station in your Commander NT system or private network, with a single digit. The Direct-Dial digit is the digit you dial to reach an attendant in your office.
The Direct-Dial digit is an internal or external number that the system will automatically dial when someone enters the Direct-dial digit.
The Commander NT40 system allows for one Direct-Dial station. A person whose keystation is a Direct-Dial station is usually a receptionist for your entire office or for a particular department. To access the Direct-Dial station, enter the Direct-Dial digit (the default Direct-Dial number is 0).
The Direct-Dial keystation can send up to 30 messages and can invoke Services to activate the extra-dial keystation.
You cannot divert calls to a Direct-Dial keystation by using the Direct Dial digit.
Note that ISDN terminals cannot use the Direct-Dial digit to reach a Direct-Dial station.
See "Accessing a Direct-Dial station" on page 263 for information on using the Direct-Dial feature.
P0906413 Issue 01 System Administration Manual

94 / Programming station capabilities
Programming an internal Direct-Dial stationBy default, stations are not Direct-dial stations. They have the default 221.
1. Place the programming overlay on any Advantage or Principal Keystation.
2. Press Ä¥¥ÛßßÜÝÝ (CONFIG). The display reads Password:.
3. Press àÛàÞ¡à (SAPLUS). The display reads Stns&Peripheral.
4. Press Ô until the display reads System prgrming.
5. Press . The display reads Hunt groups.
6. Press Ô until the display reads Direct-dial.
7. Press . The display reads D-Dial1:Intrnl.
8. Press . The display reads Intrnl #:.
9. Press CHANGE. Enter the station number.
10. Press ¨ to exit or Ô to continue in programming.
Programming an external Direct-Dial stationWhen you assign an external number as the Direct-Dial station, you must also specify whether to use a Prime line, exchange line, line pool or routing table to place the call.
1. Place the programming overlay on any Advantage or Principal Keystation.
2. Press Ä¥¥ÛßßÜÝÝ (CONFIG). The display reads Password:.
3. Press àÛàÞ¡à (SAPLUS). The display reads Stns&Peripheral.
4. Press Ô until the display reads System prgrming.
5. Press . The display reads Hunt groups.
6. Press Ô until the display reads Direct-dial.
7. Press . The display reads D-Dial1:Intrnl.
8. Press CHANGE to switch to Extrnl.
System Administration Manual P0906413 Issue 01
Programming station capabilities / 95
9. Press . The display reads Extrnl#:.
10. Press CHANGE, then enter up to 24 digits for the external number.
11. Press OK. The display reads the number you have entered.
12. Press Ô. The display reads the facility.
13. Press CHANGE until the display reads the facility you want. Options are Use prime line , Use line:, Pool code:, or Use routing tabl.
14. If you choose Use line or Pool code, you must enter a line number or pool code. If you choose Use routing tabl, you must enter a destination code.
15. Press ¨ to exit or Ô to continue in programming.
Allowing Priority CallIf you get a busy signal or a Do Not Disturb message when you have an urgent call for someone in your office, you can interrupt their call using the Priority call feature.
By default, keystations are not allowed to make Priority calls. If you want a keystation to be able to make a Priority call, you must program Priority call for that station.
A person who receives a Priority call while on another call has 8 seconds to accept or block the call. For information on blocking calls see "Do Not Disturb" on page 233. If the person does nothing, the Priority call feature puts their active call, including conference parties, on Exclusive Hold and connects your call.
See "Making a Priority call" on page 251 for information on using this feature.
1. Place the programming overlay on any Advantage or Principal Keystation.
2. Press Ä¥¥ÛßßÜÝÝ (CONFIG). The display reads Password:.
3. Press ÛÜßÝß (ADMIN). The display reads Stns&Peripheral.
4. Press . The display reads Show stn#:.
P0906413 Issue 01 System Administration Manual

96 / Programming station capabilities
5. Enter the telephone number of the keystation you wish to program. The display reads nnn:nnn.
6. Press . The display reads Capabilities.
7. Press . The display reads Divert no answr.
8. Press Ô until the display reads Priority call:.
9. Press CHANGE to choose Y (Yes) or N (No).
10. Press ¨ to exit or Ô to continue in programming.
Assigning a HotlineYou can set up a Hotline keystation that automatically calls one number (internal or external) when you lift the handset or press the © key. For example, you can have an external Hotline to your local taxi company for your customers to use.
A hunt group station number can be specified as a Hotline keystation.
Label the keystation, telling people that it is a Hotline and what number it dials so that they do not use it mistakenly.
See "Using Hotline" on page 284 for information on using this feature.
1. Place the programming overlay on any Advantage or Principal Keystation.
2. Press Ä¥¥ÛßßÜÝÝ (CONFIG). The display reads Password:.
3. Press ÛÜßÝß (ADMIN). The display reads Stns&Peripheral.
4. Press . The display reads Show stn#:.
5. Enter the station number of the station you wish to program. The display reads nnn:nnn.
6. Press . The display reads Capabilities.
7. Press . The display reads Divert no answr.
System Administration Manual P0906413 Issue 01

Programming station capabilities / 97
8. Press Ô until the display reads Hotline.
9. Press CHANGE to select the type of call the hotline makes: None , Intrnl, or Extrnl.Choosing Internal assigns a station number.Choosing External assigns a station number. If you select an external number:
10. Press . The display reads Extrnl#:None.
11. Press CHANGE. Enter the station number as you would dial it. Press OK.
12. Press Ô, then CHANGE to choose Use prime line , Use line:, Pool code:, or Use routing tabl.
13. Press ¨ to exit or Ô to continue in programming.
Bypassing a HotlinePress a line key, or use the Pre-Dial or Automatic dial feature before you pick up the handset or press © on a hotline keystation. Refer to the Keystation Feature Card.
Auxiliary ringerAn Auxiliary ringer is a separate external keystation ringer or bell that must be connected by the Installer. The Installer programs the Auxiliary ringer to generate ringing for calls on particular lines in Programming. An Auxiliary ringer can also be programmed to generate ringing for a line placed in Services. The station default for Auxiliary ringer is No.
Programming the Auxiliary ringer to ring for a keystation1. Place the programming overlay on any Advantage or Principal
Keystation.
2. Press Ä¥¥ÛßßÜÝÝ (CONFIG). The display reads Password:.
3. Press ÛÜßÝß (ADMIN). The display reads Stns&Peripheral.
4. Press . The display reads Show stn#:.
5. Enter the station number of the keystation you wish to program. The display reads nnn:nnn.
P0906413 Issue 01 System Administration Manual

98 / Programming station capabilities
6. Press . The display reads Capabilities.
7. Press . The display reads Divert no answr.
8. Press Ô until the display reads Aux. ringer.
9. Press CHANGE to choose Y (Yes) or N (No).
10. Press ¨ to exit or Ô to continue in programming.
Allowing a station to use Redirect RingAs the Administrator, you may want to program the system to remind people when a line is being redirected. Redirect Ring alerts you with a brief ring when a call is redirected on one of its lines.
See "Line redirection" on page 274 for information on using this feature.
To allow a station to use Redirect Ring:
1. Place the programming overlay on any Advantage or Principal Keystation.
2. Press Ä¥¥ÛßßÜÝÝ (CONFIG). The display reads Password:.
3. Press ÛÜßÝß (ADMIN). The display reads Stns&Peripheral.
4. Press . The display reads Show stn#:.
5. Enter the station number of the keystation you wish to program. The display reads nnn:nnn.
6. Press . The display reads Capabilities.
7. Press . The display reads Divert no answr.
8. Press Ô until the display reads Redirect ring:.
9. Press CHANGE to select Y (Yes) or N (No).
10. Press ¨ to exit or Ô to continue in programming.
System Administration Manual P0906413 Issue 01

Programming station capabilities / 99
How Line redirection is different from DivertDivert forwards all calls that arrive at a particular keystation to another keystation within the Commander NT system or to an external destination. Line redirection redirects only the lines you specify, no matter which keystation they appear on, to a telephone outside the Commander NT system. Line redirection takes precedence over Divert.
Receive tonesAnalogue equipment that is connected to the system with an analogue terminal adapter (external or internal), responds only to tone dialling signals. If you have analogue equipment connected to a station, set Receive Tones for that station to Yes. Otherwise, leave Receive Tones set to No.
1. Place the programming overlay on any Advantage or Principal Keystation.
2. Press Ä¥¥ÛßßÜÝÝ (CONFIG). The display reads Password:.
3. Press ÛÜßÝß (ADMIN). The display reads Stns&Peripheral.
4. Press . The display reads Show stn#:.
5. Enter the station number of the keystation you wish to program. The display reads nnn:nnn.
6. Press . The display reads Capabilities.
7. Press . The display reads Divert no answr.
8. Press Ô until the display reads Receive tones.
9. Press CHANGE to choose Y (Yes) or N (No).
10. Press ¨ to exit or Ô to continue in programming.
P0906413 Issue 01 System Administration Manual

100 / Programming station capabilities
System Administration Manual P0906413 Issue 01

Programming User preferences
The User preferences section of programming allows you to program memory keys, speed dial codes, and other settings for any Commander NT Keystation on the system.
For example, an employee may want to have the Do Not Disturb feature programmed to a memory key or create a speed dial code. Instead of programming from that employee’s keystation, you can enter User preferences on the nearest keystation to make the change.
You can copy User preferences settings from one keystation to another whenever COPY appears on the display. The only programming that does not get copied is key programming between different models of keystations.
Changing the key programming for a stationIf there is one or more key on a particular model of keystation that you would like to change, you can customise one key at a time.
1. Place the programming overlay on any Advantage or Principal Keystation.
2. Press Ä¥¥ÛßßÜÝÝ (CONFIG). The display reads Password:.
3. Press àÛàÞ¡à (SAPLUS). The display reads Stns&Peripheral.
4. Press . The display reads Show stn#:.
5. Enter the station number of the keystation you wish to program. The display reads nnn:nnn.
6. Press . The display reads Line access.
7. Press Ô until the display reads User prefernces.
8. Press . The display reads Model: followed by the station type.
P0906413 Issue 01 System Administration Manual

102 / Programming User preferences
9. Press Ô. The display reads Key programming.
10. Press . The display reads how many keys are on that model of keystation.
11. Press FIND or press Ô to see a list of key programming.
12. Press TEL#, FEATR, or CLR to change the programming for any key.
13. Press ¨ to exit or Ô to continue in programming.
Changing a Personal (user) speed dial codeSee "Using System Speed Dial" on page 279 for information on using this feature.
1. Place the programming overlay on any Advantage or Principal Keystation.
2. Press Ä¥¥ÛßßÜÝÝ (CONFIG). The display reads Password:.
3. Press ÛÜßÝß (ADMIN). The display reads Stns&Peripheral.
4. Press . The display reads Show stn#:.
5. Enter the station number of the keystation you wish to program. The display reads nnn:nnn.
6. Press . The display reads Capabilities.
7. Press Ô until the display reads User prefernces.
8. Press . The display reads Model: followed by the station type.
9. Press Ô twice. The display reads Personal spd dl.
10. Press . The display reads the number of speed dial codes that are available.
11. Press Ô to see the first speed dial code (71).
12. Press Ô to search through all the speed dial codes.
13. Press when you see the code you want to change.
14. Press CHANGE and enter the telephone number the same way you would dial it on the keystation.
System Administration Manual P0906413 Issue 01

Programming User preferences / 103
15. Press OK.
16. Press Ô and choose the line (or enter a code for a line pool) that the speed dial code should use.
17. Press ¨ to exit or Ô to continue in programming.
Changing the Call log optionsSee "Call log" on page 289 for information on using this feature.
1. Place the programming overlay on any Advantage or Principal Keystation.
2. Press Ä¥¥ÛßßÜÝÝ (CONFIG). The display reads Password:.
3. Press ÛÜßÝß (ADMIN). The display reads Stns&Peripheral.
4. Press . The display reads Show stn:#.
5. Enter the station number of the keystation you wish to program. The display reads nnn:nnn.
6. Press . The display reads Capabilities.
7. Press Ô until the display reads User prefernces.
8. Press . The display reads Model: followed by the station type.
9. Press Ô until the display reads Call log optns.
10. Press . The display reads No one answered.
11. Press CHANGE to choose No one answered , Unanswerd by me, Log all calls, or No autologging.
12. Press ¨ to exit or Ô to continue in programming.
Changing the Dialling optionsSee "Using Autodial" on page 279 for information on using this feature.
1. Place the programming overlay on any Advantage or Principal Keystation.
P0906413 Issue 01 System Administration Manual

104 / Programming User preferences
2. Press Ä¥¥ÛßßÜÝÝ (CONFIG). The display reads Password:.
3. Press ÛÜßÝß (ADMIN). The display reads Stns&Peripheral.
4. Press . The display reads Show stn#:.
5. Enter the station number of the keystation you wish to program. The display reads nnn:nnn.
6. Press . The display reads Capabilities.
7. Press Ô until the display reads User prefernces.
8. Press . The display reads Model: followed by the station type.
9. Press Ô until the display reads Dialing optns.
10. Press . The display reads Automatic dial.
11. Press CHANGE to choose Automatic dial , Predial or Standard dial.
12. Press ¨ to exit or Ô to continue in programming.
Changing the display contrastDisplay contrast allows you to lighten or darken the keystation display to suit the lighting conditions in your office.
See "Changing the display contrast" on page 104 for information on using this feature.
1. Place the programming overlay on any Advantage or Principal Keystation.
2. Press Ä¥¥ÛßßÜÝÝ (CONFIG). The display reads Password:.
3. Press ÛÜßÝß (ADMIN). The display reads Stns&Peripheral.
4. Press . The display reads Show stn#:.
5. Enter the station number of the keystation you wish to program. The display reads nnn:nnn.
6. Press . The display reads Capabilities.
System Administration Manual P0906413 Issue 01

Programming User preferences / 105
7. Press Ô until the display reads User prefernces.
8. Press . The display reads Model: followed by the station type.
9. Press Ô until the display reads Display cntrst:.
10. Press CHANGE to choose 1, 2, 3, 4, 5, 6, 7, 8,or 9.
11. Press ¨ to exit or Ô to continue in programming.
Note: You do not see any change in the display of the keystation you are using when you are programming User preferences from another keystation.
Changing the Ring typeSee "Ring type" on page 230 for information on using this feature.
1. Place the programming overlay on any Advantage or Principal Keystation.
2. Press Ä¥¥ÛßßÜÝÝ (CONFIG). The display reads Password:.
3. Press ÛÜßÝß (ADMIN). The display reads Stns&Peripheral.
4. Press . The display reads Show stn#:.
5. Enter the station number of the keystation you wish to program. The display reads nnn:nnn.
6. Press . The display reads Capabilities.
7. Press Ô until the display reads User prefernces.
8. Press . The display reads Model: followed by the station type.
9. Press Ô until the display reads Ring type:.
10. Press CHANGE to choose 1, 2, 3, or 4.
11. Press ¨ to exit or Ô to continue in programming.
P0906413 Issue 01 System Administration Manual

106 / Programming User preferences
System Administration Manual P0906413 Issue 01

Programming hunt groups
Establish hunt groups in your system to allow incoming calls to reach a group of stations. The hunt groups feature allows you to call a group of stations with a single directory number.
Hunt groups are used in situations where a group of people performing the same task are required to answer a number of related queries. Some typical uses of hunt groups are:
• a sales department answering questions on product prices, availability etc.
• a support department answering questions concerning the operation of a product
• an emergency department answering calls for help
A company with support services for different products may want to have a hunt group dedicated to each product. Support personnel handling Product A can be in one group, and support personnel handling Product B can be in another group. Incoming calls look for the next available station in the group. If no station is available, the hunt groups feature places the call in a queue or routes it to an overflow station.
Under the hunt groups sub-heading, you program:
• members of a group
• member position in a group
• the lines assigned to a group
• the distribution of incoming calls
• the length of time the system looks for available agents before sending the call to the overflow position
• how the system handles calls if all agents are busy
P0906413 Issue 01 System Administration Manual

108 / Programming hunt groups
Note: Do not program videophones as members of a hunt group. Hunt groups allow one B channel connection at a time and videophones use two B channels.
Adding or removing members from a groupCommander NT supports 6 groups. Members of the group can be any Commander NT, DNA, or ISDN station. A station can be in multiple hunt groups but each occurrence increases the total number of members in the system.
There can be one appearance of the same hunt group on a set.
The station number range allows for up to 6 hunt groups.
1. Place the programming overlay on any Advantage or Principal Keystation.
2. Press Ä¥¥ÛßßÜÝÝ (CONFIG). The display reads Password:.
3. Press àÛàÞ¡à (SAPLUS). The display reads Stns&Peripheral.
4. Press Ô until the display reads System prgrming.
5. Press . The display reads Hunt groups.
6. Press . The display reads Show group:.
7. Enter the hunt group number you want to program (01-06). The display reads HG01:nnn.
8. Press . The display reads Member stns:.
9. Press . The display reads the members for that group.
10. Press ADD to add a member or press REMOVE to remove a member from the group. To view other members of the group press NEXT.
11. Press ¨ to exit or Ô to continue in programming.
System Administration Manual P0906413 Issue 01

Programming hunt groups / 109
Moving members of a groupMember order within a hunt group is important. The member order determines how the system routes calls through a hunt group.
1. Place the programming overlay on any Advantage or Principal Keystation.
2. Press Ä¥¥ÛßßÜÝÝ (CONFIG). The display reads Password:.
3. Press àÛàÞ¡à (SAPLUS). The display reads Stns&Peripheral.
4. Press Ô until the display reads System prgrming.
5. Press . The display reads Hunt groups.
6. Press . The display reads Show group:.
7. Enter the hunt group number you want to program (01-06). The display reads HG01:nnn.
8. Press . The display reads Member stns:.
9. Press . The display reads the members for that group.
10. Press MOVE to move an existing member to another place within the hunt group.The display reads the member number followed by an arrow.
11. Enter the new position number for the station.
12. Press ¨ to exit or Ô to continue in programming.
Assigning or unassigning lines to a groupIt is recommended to set the hunt group’s line Prime station to None. Doing so prevents delayed ring transfer of external hunt group calls to the Prime station before the hunt group can receive the call.
You can assign a line to only one group.
1. Place the programming overlay on any Advantage or Principal Keystation.
2. Press Ä¥¥ÛßßÜÝÝ (CONFIG). The display reads Password:.
P0906413 Issue 01 System Administration Manual

110 / Programming hunt groups
3. Press àÛàÞ¡à (SAPLUS). The display reads Stns&Peripheral.
4. Press Ô until the display reads System prgrming.
5. Press . The display reads Hunt groups.
6. Press . The display reads Show group:.
7. Enter the hunt group number you want to program (01-06). The display reads HG01:nnn.
8. Press . The display reads Member stns:.
9. Press Ô. The display reads Line assignment.
10. Press . The display reads Show line:.
11. Enter the line number you want to program, press SCAN to go the first line assigned to this group or press LIST to go to the first line in the system.
12. Press CHANGE to program the line as Unassigned or Assigned.
13. *HGn* means the line is assigned to another hunt group.
14. Press ¨ to exit or Ô to continue in programming.
Setting the distribution modeThere are three distribution settings.
• Broadcast —rings each station in the group simultaneously. The system handles calls one at a time, routing other calls according to the routing option selected in the If busy setting (see "Programming options if all hunt group members are busy" on page 112). When a call is answered, the next call in the queue is presented to the hunt group.
In Broadcast mode, a single incoming call will ring simultaneously at all the stations in a group. This way, all receptionists in the group can share the load of answering large volumes of calls. An example is a fund-raising campaign where a group of operators wait to take each call as it comes in.
System Administration Manual P0906413 Issue 01

Programming hunt groups / 111
• Sequential —starts the call at the first station in the hunt group. Distribution is complete when the system finds the first free station. This distribution method allows the system to present simultaneous calls to the hunt group. Distribution is order-based.
In Sequential mode, you can program your top salesperson to be the first member of the group to receive incoming calls.
• Cyclic —distribution begins with the member following the last station to receive a hunt group call. Distribution is complete when the system finds the first free station. This distribution method allows the system to present simultaneous calls to the hunt group. Distribution is order-based.
Using Cyclic mode, you ensure that your helpline personnel receive calls in an evenly distributed method.
If a call goes unanswered and the hunt group has available agents, the system routes the call through the member list until someone answers the call or the queue time-out occurs. If a queue timeout occurs, the system routes the call to the overflow position.
1. Place the programming overlay on any Advantage or Principal Keystation.
2. Press Ä¥¥ÛßßÜÝÝ (CONFIG). The display reads Password:.
3. Press àÛàÞ¡à (SAPLUS). The display reads Stns&Peripheral.
4. Press Ô until the display reads System prgrming.
5. Press . The display reads Hunt groups.
6. Press . The display reads Show group:.
7. Enter the hunt group number you want to program (01-06). The display reads HG01:nnn.
8. Press . The display reads Member stns:.
9. Press Ô until the display reads Mode.
10. Press CHANGE to set the mode: Sequential , Cyclic, Broadcast.
11. Press ¨ to exit or Ô to continue in programming.
P0906413 Issue 01 System Administration Manual

112 / Programming hunt groups
Setting the hunt delayYou can program the number of ring cycles the system allows at a hunt group station before moving to the next hunt group station.
You can estimate the delay in seconds by multiplying the number of rings by six.
1. Place the programming overlay on any Advantage or Principal Keystation.
2. Press Ä¥¥ÛßßÜÝÝ (CONFIG). The display reads Password:.
3. Press àÛàÞ¡à (SAPLUS). The display reads Stns&Peripheral.
4. Press Ô until the display reads System prgrming.
5. Press . The display reads Hunt groups.
6. Press . The display reads Show group:.
7. Enter the hunt group number you want to program (01-06). The display reads HG01:nnn.
8. Press . The display reads Member stns:.
9. Press Ô until the display reads Hunt delay:.
10. Press CHANGE to select the setting: 6, 9, 12, 15, 18, 21, 24, 27, 30.
11. Press ¨ to exit or Ô to continue in programming.
Programming options if all hunt group members are busy
A Hunt Group is busy when all stations are ringing for a Hunt group call or all members are on a Hunt group call. A station that invokes Do Not Disturb (DND) on busy or is on an internal or external call does not make the Hunt group busy.
There are three routing options if all agents are busy:
• BusyTone—the caller gets a busy tone
• Overflow—the call routes to the hunt group overflow position
System Administration Manual P0906413 Issue 01

Programming hunt groups / 113
• Queue—the call stays in the system for the period of time programmed in Q timeout. Within this period of time, the call presents to an agent if one becomes available. When time-out occurs, the call routes to the hunt group overflow position.
1. Place the programming overlay on any Advantage or Principal Keystation.
2. Press Ä¥¥ÛßßÜÝÝ (CONFIG). The display reads Password:.
3. Press àÛàÞ¡à (SAPLUS). The display reads Stns&Peripheral.
4. Press Ô until the display reads System prgrming.
5. Press . The display reads Hunt groups.
6. Press . The display reads Show group:.
7. Enter the hunt group number you want to program (01-06). The display reads HG01:nnn.
8. Press . The display reads Member stns:.
9. Press Ô until the display reads If busy:.
10. Press CHANGE to set the mode: BusyTone , Overflow, Queue.
11. Press ¨ to exit or Ô to continue in programming.
Programming the queue timeoutThis setting allows you to program the number of seconds a call remains in the hunt group queue before it is also routed to the overflow position.
1. Place the programming overlay on any Advantage or Principal Keystation.
2. Press Ä¥¥ÛßßÜÝÝ (CONFIG). The display reads Password:.
3. Press àÛàÞ¡à (SAPLUS). The display reads Stns&Peripheral.
4. Press Ô until the display reads System prgrming.
5. Press . The display reads Hunt groups.
6. Press . The display reads Show group:.
P0906413 Issue 01 System Administration Manual

114 / Programming hunt groups
7. Enter the hunt group number you want to program (01-06). The display reads HG01:nnn.
8. Press . The display reads Member stns:.
9. Press Ô until the display reads Q Timeout:.
10. Press CHANGE to set the queue timeout: 15, 30, 45, 60, 120 or 180.
11. Press ¨ to exit or Ô to continue in programming.
Programming the overflow stationYou can program which station receives overflow calls. If the overflow station is a hunt group station, the call is considered a new call and joins the queue.
The overflow station can be a station number associated with a voice mailbox.
1. Place the programming overlay on any Advantage or Principal Keystation.
2. Press Ä¥¥ÛßßÜÝÝ (CONFIG). The display reads Password:.
3. Press àÛàÞ¡à (SAPLUS). The display reads Stns&Peripheral.
4. Press Ô until the display reads System prgrming.
5. Press . The display reads Hunt groups.
6. Press . The display reads Show group:.
7. Enter the hunt group number you want to program (01-06). The display reads HG01:nnn.
8. Press . The display reads Member stns:.
9. Press Ô until the display reads Overflow:.
10. Press CHANGE to change the overflow position. Enter the new overflow position.
11. Press ¨ to exit or Ô to continue in programming.
System Administration Manual P0906413 Issue 01

Programming hunt groups / 115
Setting the nameYou can program the hunt group name, such as SERVICE or SALES. The name can be up to seven characters in length.
Note: The Hunt group name does not display on incoming calls to that group, only the line or station number.
1. Place the programming overlay on any Advantage or Principal Keystation.
2. Press Ä¥¥ÛßßÜÝÝ (CONFIG). The display reads Password:.
3. Press àÛàÞ¡à (SAPLUS). The display reads Stns&Peripheral.
4. Press Ô until the display reads System prgrming.
5. Press . The display reads Hunt Groups.
6. Press . The display reads Show group:.
7. Enter the hunt group number you want to program (01-06). The display reads HG01:nnn.
8. Press . The display reads Member stns:.
9. Press Ô until the display reads Name:.
10. Press CHANGE. Using the dial pad, enter the name of the hunt group.
11. Press Ô to store the name.
12. Press ¨ to exit or Ô to continue in programming.
Checking hunt group metricsThis feature provides you with hunt group call information.
1. Place the programming overlay on any Advantage or Principal Keystation.
2. Press Ä¥¥ÛßßÜÝÝ (CONFIG). The display reads Password:.
3. Press àÛàÞ¡à (SAPLUS). The display reads Stns&Peripheral.
P0906413 Issue 01 System Administration Manual

116 / Programming hunt groups
4. Press Ô until the display reads Usage Metrics.
5. Press . The display reads Hunt groups.
6. Press . The display reads Show group:.
7. Enter the number of the hunt group you wish to view. The display reads HG<n> metrics.
8. Press . The display reads the date the information was last cleared.
9. Press Ô. The display reads TotalCalls:.
The value shown is the total number of calls received by the hunt group, to a maximum of 99999.
10. Press Ô. The display reads Ans:.
The values shown are the total number of calls that were answered and the percentage of answered calls to total calls.
11. Press Ô. The display reads Avg ans: _sec.
The value shown is the average time in seconds that it took to answer a call, to a maximum of 999.
12. Press Ô. The display reads Abndn:.
The values shown are the number of abandoned calls and the percentage of abandoned calls to total calls.
13. Press Ô. The display reads Busy:.
The values shown are the number of times the hunt group was busy and the percentage of busy calls to total calls.
14. Press Ô. The display reads Ovrfl:.
The values shown are the number of calls sent to the overflow position and the percentage of overflow calls to total calls.
15. Press Ô. The display reads Avg Q: xxxsec.
The value shown is the average time, in seconds, the call waited in the queue, to a maximum of 999.
16. Press ¨ to exit or Ô to continue in programming.
System Administration Manual P0906413 Issue 01

Programming feature settings
Background music This feature allows people to listen to music through their keystation speakers providing an external music source has been installed. The default is No, which means that background music is disabled.
See "Background music" on page 233 for information on using this feature.
1. Place the programming overlay on any Advantage or Principal Keystation.
2. Press Ä¥¥ÛßßÜÝÝ (CONFIG). The display reads Password:.
3. Press àÛàÞ¡à (SAPLUS). The display reads Stns&Peripheral.
4. Press Ô until the display reads System prgrming.
5. Press . The display reads Hunt groups.
6. Press Ô. The display reads Featr settings.
7. Press . The display reads Backgrnd music:.
8. Press CHANGE to choose Y (Yes) or N (No).
9. Press ¨ to exit or Ô to continue in programming.
On holdYou can choose what a caller hears when the call has been put on hold.
Note: In systems networked with private circuits, it is a good idea to have callers hear tones on all systems on the private network. Otherwise, callers who are transferred across the private network may hear a confusing variety of music, tones, and silence.
P0906413 Issue 01 System Administration Manual

118 / Programming feature settings
1. Place the programming overlay on any Advantage or Principal Keystation.
2. Press Ä¥¥ÛßßÜÝÝ (CONFIG). The display reads Password:.
3. Press àÛàÞ¡à (SAPLUS). The display reads Stns&Peripheral.
4. Press Ô until the display reads System prgrming.
5. Press . The display reads Hunt groups.
6. Press Ô. The display reads Featr settings.
7. Press . The display reads Backgrnd music:.
8. Press Ô until the display reads On hold:.
9. Press CHANGE to choose Tones , Music, or Silence.
10. Press ¨ to exit or Ô to continue in programming.
Handset volumeHandset volume allows you to specify whether the volume level of a Handset or headset returns to the system default level when a call is ended or put on hold, or whether it remains at the level set at the individual keystation.
1. Place the programming overlay on any Advantage or Principal Keystation.
2. Press Ä¥¥ÛßßÜÝÝ (CONFIG). The display reads Password:.
3. Press àÛàÞ¡à (SAPLUS). The display reads Stns&Peripheral.
4. Press Ô until the display reads System prgrming.
5. Press . The display reads Hunt groups.
6. Press Ô. The display reads Featr settings.
7. Press . The display reads Backgrnd music:.
8. Press Ô until the display reads Handset volume.
System Administration Manual P0906413 Issue 01

Programming feature settings / 119
9. Press and use CHANGE to choose Use sys volume or Use stn volume.
10. Press ¨ to exit or Ô to continue in programming.
Note: This feature is not available on some older keystations.
Camp timeoutYou can send an external call to another station, even though all of its lines are busy using the Camp-on feature. It is useful for people who process many calls, such as secretaries or receptionists. Camp timeout specifies the number of seconds before an unanswered call returns to the keystation that camped the call.
See "Transferring to a busy station (Call Camping)" on page 252 for information on using this feature.
1. Place the programming overlay on any Advantage or Principal Keystation.
2. Press Ä¥¥ÛßßÜÝÝ (CONFIG). The display reads Password:.
3. Press àÛàÞ¡à (SAPLUS). The display reads Stns&Peripheral.
4. Press Ô until the display reads System prgrming.
5. Press . The display reads Hunt groups.
6. Press Ô. The display reads Featr settings.
7. Press . The display reads Backgrnd music.
8. Press Ô until the display reads Camp timeout:.
9. Press CHANGE to choose 30, 45, 60, 90, 120, 150, or 180 seconds.
10. Press ¨ to exit or Ô to continue in programming.
P0906413 Issue 01 System Administration Manual

120 / Programming feature settings
Park timeoutThe Call Park feature allows you to place a call on hold and assign it a code so it can be retrieved from any keystation in the Commander NT system. The Park timeout setting allows you to specify how long, in seconds, a call can be parked without being answered before the call is returned to the keystation that parked the call.
See "Call Parking" on page 247 for information on using this feature.
1. Place the programming overlay on any Advantage or Principal Keystation.
2. Press Ä¥¥ÛßßÜÝÝ (CONFIG). The display reads Password:.
3. Press àÛàÞ¡à (SAPLUS). The display reads Stns&Peripheral.
4. Press Ô until the display reads System prgrming.
5. Press . The display reads Hunt groups.
6. Press Ô. The display reads Featr settings.
7. Press . The display reads Backgrnd music.
8. Press Ô until the display reads Park timeout:.
9. Press CHANGE to choose 30, 45, 60, 90, 120, 150, 180, 300, or 600 seconds.
10. Press ¨ to exit or Ô to continue in programming.
Park ModePark Mode lets you suspend a call, and lets someone retrieve the call by entering a retrieval code at any Commander NT Keystation in the system.
The Park Mode retrieval code is a three-digit number. By default, the first digit of that number is 1, with the possible retrieval codes ranging from 101 to 109. M7000 Keystations and SLTs use only retrieval code 109.
You can program the system to assign retrieval codes two different ways:
System Administration Manual P0906413 Issue 01

Programming feature settings / 121
Lowest—Commander NT assigns the lowest available retrieval code. If there is only one parked call on the system, the number is 101. If there are 3 calls, they are assigned 101, 102, and 103.
Cycle—Commander NT assigns the next available retrieval code in the sequence (101 to 108). If the last parked call was assigned 106, then the next one is assigned 107. If the last retrieval code was 108, then the next code is 101.
See "Call Parking" on page 247 for information on using this feature.
1. Place the programming overlay on any Advantage or Principal Keystation.
2. Press Ä¥¥ÛßßÜÝÝ (CONFIG). The display reads Password:.
3. Press àÛàÞ¡à (SAPLUS). The display reads Stns&Peripheral.
4. Press Ô until the display reads System prgrming.
5. Press . The display reads Hunt groups.
6. Press Ô. The display reads Featr settings.
7. Press . The display reads Backgrnd music.
8. Press Ô until the display reads Park Mode:.
9. Press CHANGE to choose Lowest or Cycle.
10. Press ¨ to exit or Ô to continue in programming.
Transfer revertAfter a specified number of rings, an unanswered transferred call returns to the keystation that made the transfer. Transfer revert, specifies the number of rings before the call is returned. You can estimate the delay in seconds if you multiply the number of rings by six.
See "Transferring a call" on page 251 for information on the Transfer feature.
1. Place the programming overlay on any Advantage or Principal Keystation.
P0906413 Issue 01 System Administration Manual

122 / Programming feature settings
2. Press Ä¥¥ÛßßÜÝÝ (CONFIG). The display reads Password:.
3. Press àÛàÞ¡à (SAPLUS). The display reads Stns&Peripheral.
4. Press Ô until the display reads System prgrming.
5. Press . The display reads Hunt groups.
6. Press Ô. The display reads Featr settings.
7. Press . The display reads Backgrnd music.
8. Press Ô until the display reads Trnsfr revert:.
9. Press CHANGE to choose 20, 30, 45, 60, 90 seconds.
10. Press ¨ to exit or Ô to continue in programming.
Network revert If you transfer a call to a external destination and the call is not answered, it comes back to you after a specified time. Network revert defines the time, in seconds, before a call is returned to your station.
Since the time required to transfer a call across the telephone network varies, you may need to experiment to achieve the correct setting.
Note: Depending on how the external call is routed, it may not always be possible for the system to return a transferred call.
1. Place the programming overlay on any Advantage or Principal Keystation.
2. Press Ä¥¥ÛßßÜÝÝ (CONFIG). The display reads Password:.
3. Press àÛàÞ¡à (SAPLUS). The display reads Stns&Peripheral.
4. Press Ô until the display reads System prgrming.
5. Press . The display reads Hunt groups.
6. Press Ô. The display reads Featr settings.
System Administration Manual P0906413 Issue 01

Programming feature settings / 123
7. Press . The display reads Backgrnd music.
8. Press Ô until the display reads Netwk revert:.
9. Press CHANGE to choose 15, 30, 45, 60, 90 or 120 seconds.
10. Press ¨ to exit or Ô to continue in programming.
Held reminderA reminder tone and display message occur at a Commander NT Keystation when a call has been placed on hold for a certain period of time. The display continues to show the name of the held line until the call is dealt with. In the case of multiple calls on hold, the display reads the name of the line that has been held the longest. Once that call has been dealt with, the display reads the number of the next longest held call.
You can switch Held line reminder on or off and set the time before the reminder takes effect.
The Held line reminder emits a double periodic tone. This tone distinguishes the feature from the Call Waiting tone, which uses a single periodic tone.
See "Holding" on page 245 for information on this feature.
1. Place the programming overlay on any Advantage or Principal Keystation.
2. Press Ä¥¥ÛßßÜÝÝ (CONFIG). The display reads Password:.
3. Press àÛàÞ¡à (SAPLUS). The display reads Stns&Peripheral.
4. Press Ô until the display reads System prgrming.
5. Press . The display reads Hunt groups.
6. Press Ô. The display reads Featr settings.
7. Press . The display reads Backgrnd music.
8. Press Ô until the display reads Held reminder:.
9. Press CHANGE to choose Y (Yes) or N (No).
10. Press ¨ to exit or Ô to continue in programming.
P0906413 Issue 01 System Administration Manual

124 / Programming feature settings
Remind delay1. Place the programming overlay on any Advantage or Principal
Keystation.
2. Press Ä¥¥ÛßßÜÝÝ (CONFIG). The display reads Password:.
3. Press àÛàÞ¡à (SAPLUS). The display reads Stns&Peripheral.
4. Press Ô until the display reads System prgrming.
5. Press . The display reads Hunt groups.
6. Press Ô. The display reads Featr settings.
7. Press . The display reads Backgrnd music.
8. Press Ô until the display reads Held reminder:.
9. Press CHANGE to choose Y (Yes) or N (No).
10. Press Ô. The display reads Remind delay:.
11. Press CHANGE to choose 30, 60, 90, 120, 150, or 180 seconds.
12. Press ¨ to exit or Ô to continue in programming.
Conference toneThis tone may be heard by all parties as soon as a three-way call is established using the Conference or Privacy feature. You can turn conference tones on and off for the whole system.
See "Making a Conference call" on page 263 for information on using the Conference feature.
1. Place the programming overlay on any Advantage or Principal Keystation.
2. Press Ä¥¥ÛßßÜÝÝ (CONFIG). The display reads Password:.
3. Press àÛàÞ¡à (SAPLUS). The display reads Stns&Peripheral.
4. Press Ô until the display reads System prgrming.
5. Press . The display reads Hunt groups.
System Administration Manual P0906413 Issue 01

Programming feature settings / 125
6. Press Ô. The display reads Featr settings.
7. Press . The display reads Backgrnd music.
8. Press Ô until the display reads Confrence tone:.
9. Press CHANGE to choose Y (Yes) or N (No).
10. Press ¨ to exit or Ô to continue in programming.
Directed (call) pickupThe Directed pickup feature allows someone to pick up calls that are ringing at another keystation by entering Äàß and the station number. You can enable or disable Directed pickup for the system. The default is Yes, which means that Directed pickup is enabled.
See "Answering a keystation using Directed Pickup" on page 240 for information on using this feature.
1. Place the programming overlay on any Advantage or Principal Keystation.
2. Press Ä¥¥ÛßßÜÝÝ (CONFIG). The display reads Password:.
3. Press àÛàÞ¡à (SAPLUS). The display reads Stns&Peripheral.
4. Press Ô until the display reads System prgrming.
5. Press . The display reads Hunt groups.
6. Press Ô. The display reads Featr settings.
7. Press . The display reads Backgrnd music.
8. Press Ô until the display reads Directd pickup:.
9. Press CHANGE to choose Y (Yes) or N (No).
10. Press ¨ to exit or Ô to continue in programming.
Page toneYou can choose whether a tone sounds before a page begins.
See "Paging" on page 267 for information on using the Paging feature.
P0906413 Issue 01 System Administration Manual

126 / Programming feature settings
1. Place the programming overlay on any Advantage or Principal Keystation.
2. Press Ä¥¥ÛßßÜÝÝ (CONFIG). The display reads Password:.
3. Press àÛàÞ¡à (SAPLUS). The display reads Stns&Peripheral.
4. Press Ô until the display reads System prgrming.
5. Press . The display reads Hunt groups.
6. Press Ô. The display reads Featr settings.
7. Press . The display reads Backgrnd music.
8. Press Ô until the display reads Page tone:.
9. Press CHANGE to choose Y (Yes) or N (No).
10. Press ¨ to exit or Ô to continue in programming.
Page timeoutThe paging feature is automatically disconnected after a specified length of time.
See "Paging" on page 267 for information on using the Paging feature.
1. Place the programming overlay on any Advantage or Principal Keystation.
2. Press Ä¥¥ÛßßÜÝÝ (CONFIG). The display reads Password:.
3. Press àÛàÞ¡à (SAPLUS). The display reads Stns&Peripheral.
4. Press Ô until the display reads System prgrming.
5. Press . The display reads Hunt groups.
6. Press Ô. The display reads Featr settings.
7. Press . The display reads Backgrnd music.
8. Press Ô until the display reads Page timeout:.
System Administration Manual P0906413 Issue 01

Programming feature settings / 127
9. Press CHANGE to choose 15, 30, 60, 120, 180, 300, 600, 2700 seconds.
10. Press ¨ to exit or Ô to continue in programming.
Auto Time&DateWhen an outgoing BRA call is answered, the network may provide time and date information to the Commander NT system. The Auto Time&Date feature enables the Commander NT system to use this information to automatically update the time and date on the Commander NT system. The keystation displays are changed to the correct time when each keystation changes state.
1. Place the programming overlay on any Advantage or Principal Keystation.
2. Press Ä¥¥ÛßßÜÝÝ (CONFIG). The display reads Password:.
3. Press àÛàÞ¡à (SAPLUS). The display reads Stns&Peripheral.
4. Press Ô until the display reads System prgrming.
5. Press . The display reads Hunt groups.
6. Press Ô. The display reads Featr settings.
7. Press . The display reads Backgrnd music:.
8. Press Ô until the display reads AutoTime&Date.
9. Press CHANGE to choose Y or N.
10. Press ¨ to exit or Ô to continue in programming.
Note: The display does not reflect the Time and Date change until the keystation changes state (receives information from the network).
P0906413 Issue 01 System Administration Manual

128 / Programming feature settings
Call log spaceCall log space customises how log space is allocated to keystations in the system. Resetting all logs allows you to re-allocate the Call log space equally to all keystations in your system.
Use this heading only if you want to allocate an equal amount of log space to all the keystations in your system. There are 250 call log spaces available in the system. There are no spaces allocated by default. Changing the space allocation using Call Log spaces defines the log space available to all keystations in the system. Any remaining unassigned log space is available in a log pool, and can be re-allocated under Stns&Peripheral.
Re-allocating call log space may destroy call log data at keystations that lose space.
See "Call log" on page 289 for information on using the Call log feature.
1. Place the programming overlay on any Advantage or Principal Keystation.
2. Press Ä¥¥ÛßßÜÝÝ (CONFIG). The display reads Password:.
3. Press àÛàÞ¡à (SAPLUS). The display reads Stns&Peripheral.
4. Press Ô until the display reads System prgrming.
5. Press . The display reads Hunt groups.
6. Press Ô. The display reads Featr settings.
7. Press . The display reads Backgrnd music.
8. Press Ô until the display reads Call log space.
9. Press . The display reads Reset all logs?.
10. Press YES and use the dial pad to enter the space allocation for the call log at each keystation. You must use a three-digit number (for example, 020 to give each 12 stations 20 spaces).
11. Press YES to accept the settings and end programming. The system automatically re-allocates Log space. Press NO to reset the number of spaces allocated to each log.
System Administration Manual P0906413 Issue 01

Programming feature settings / 129
Alarm stationAn Alarm station displays system alarm codes, should they occur. You can determine which station receives the alarms. The default is station 221
See "Reporting and recording alarm codes" on page 213 for information on the alarm codes.
1. Place the programming overlay on any Advantage or Principal Keystation.
2. Press Ä¥¥ÛßßÜÝÝ (CONFIG). The display reads Password:.
3. Press àÛàÞ¡à (SAPLUS). The display reads Stns&Peripheral.
4. Press Ô until the display reads System prgrming.
5. Press . The display reads Hunt groups.
6. Press Ô. The display reads Featr settings.
7. Press . The display reads Backgrnd music.
8. Press Ô until the display reads AlarmStn:.
9. Press CHANGE.
10. Enter the station number or press CLR to set the Alarm keystation to None.
11. Press ¨ to exit or Ô to continue in programming.
ATTENTION!The Alarm telephone must have a two-line display.
The Alarm keystation must be an Advantage or Principal Keystation.
P0906413 Issue 01 System Administration Manual

130 / Programming feature settings
Station relocationThe Station relocation feature lets you move a keystation from one station socket to another without losing any of its custom programming or its assigned station number. By default Station relocation is set to No.
Turn Station relocation to No after the keystation installation and programming are completed, rather than before. This provides you with more flexibility in testing equipment. If Station relocation is set to No while a keystation is moved, that keystation’s station number and data remain with the physical port on the Main Equipment (ME), and the keystation does not receive the original programming when it is reconnected elsewhere.
ATTENTION!Wait 1 minute between moves.
After moving a keystation, wait 1 minute before moving the keystation a second time or changing the keystation�s station number. The ME may take up to 60 seconds to recognise a keystation moved to a new location.
ATTENTION!Don�t fill the vacated socket before relocating the keystation.
When moving a keystation with Station relocation turned on, do not connect another keystation to the vacated socket before connecting that keystation to a new station socket.
If you connect a keystation of the same type to the vacated station socket, the newly connected keystation will receive the programming of the original keystation.
If you connect a keystation of a different type to the vacated station socket, the newly connected keystation will receive default programming, and the original keystation�s programming will be lost.
System Administration Manual P0906413 Issue 01

Programming feature settings / 131
Remember to record any programming changes in Programming Record.
1. Place the programming overlay on any Advantage or Principal Keystation.
2. Press Ä¥¥ÛßßÜÝÝ (CONFIG). The display reads Password:.
3. Press àÛàÞ¡à (SAPLUS). The display reads Stns&Peripheral.
4. Press Ô until the display reads System prgrming.
5. Press . The display reads Hunt groups.
6. Press Ô. The display reads Featr settings.
7. Press . The display reads Backgrnd music.
8. Press Ô until the display reads Stn relocation:.
9. Press CHANGE to choose Y (Yes) or N (No).
10. Press ¨ to exit or Ô to continue in programming.
Message reply enhancementThe Message reply enhancement feature allows the message waiting indicator on analogue telephones to deactivate automatically. If the user replies from the analogue telephone to the designated direct-dial telephone and their call is answered the message waiting indicator deactivates.
ATTENTION!Relocate to station jacks that are configured for keystation.
When moving stations from one jack to another, ensure that all jacks support a Commander NT Keystation. If a fax machine, SLT Adaptor, analogue telephone, or modem was plugged into the jack, do not plug a Commander NT Keystation into the jack.
P0906413 Issue 01 System Administration Manual

132 / Programming feature settings
This feature also functions if the user invokes the Call Pickup feature to answer the reply call from the analogue set. It does not however, work with the Retrieve Parked Call feature.
1. Place the programming overlay on any Advantage or Principal Keystation.
2. Press Ä¥¥ÛßßÜÝÝ (CONFIG). The display reads Password:.
3. Press àÛàÞ¡à (SAPLUS). The display reads Stns&Peripheral.
4. Press Ô until the display reads System prgrming.
5. Press . The display reads Hunt Groups.
6. Press Ô. The display reads Featr settings.
7. Press . The display reads Backgrnd music:.
8. Press Ô until the display reads Msg reply enh:.
9. Press CHANGE to choose Y (Yes) or N (No).
10. Press ¨ to exit or Ô to continue in programming.
Answer keyThe Answer Stns setting in Stns&Peripheral programming lets you assign Answer station numbers to a keystation. The Ans Key setting in Featr settings programming lets you determine what types of calls will alert at the keystation. Your choices are: Basic, Enhanced and Extended.
The Basic Answer Key setting answers all calls except:
• Priority calls
• other Answer key calls
• Overflow call routing and delayed ring transfer calls
• calls routed using Divert all Calls, Divert on Busy, Divert No Answer
• Ringing service calls
• Callback calls
System Administration Manual P0906413 Issue 01

Programming feature settings / 133
Enhanced permits the same as Basic as well as overflow call routing calls but will not answer blind transferred calls. Extended answers all call types except priority calls, voice calls and other Answer key calls.
A Commander NT Keystation may have up to eight Answer keys to monitor other stations.
See "Answer keys" on page 242 for information on using Answer keys.
1. Place the programming overlay on any Advantage or Principal Keystation.
2. Press Ä¥¥ÛßßÜÝÝ (CONFIG). The display reads Password:.
3. Press àÛàÞ¡à (SAPLUS). The display reads Stns&Peripheral.
4. Press Ô until the display reads System prgrming.
5. Press . The display reads Hunt Groups.
6. Press Ô. The display reads Featr settings.
7. Press . The display reads Backgrnd music:.
8. Press Ô until the display reads Ans. key:.
9. Press CHANGE to select the settings: Basic , Enhanced, and Extended.
10. Press ¨ to exit or Ô to continue in programming.
P0906413 Issue 01 System Administration Manual

134 / Programming feature settings
System Administration Manual P0906413 Issue 01

Hospitality Services
Hospitality Services (HS) is a group of features that increases the value of the Commander NT system in small to medium sized hotels, motels or hospitals.
In a hotel setting, guests gain improved services through immediate access to basic functions like:
• wake-up service or reminders
• accurate tracking of the room’s service requirements (for example check-in/check-out).
Hospitality Services features must be activated by your technician using Software keycodes. See "Software keys" on page 53, for more information.
Commander NT Keystations are classified as one of three types of keystations: a common keystation, a room keystation or a Hospitality Services (HS) admin keystation.
Common keystationA common keystation can be a telephone found in a lobby, office, or common area, it is not associated with a room. A common keystation does not have access to the all of HS features.
Common keystations are Commander NT Keystations or analogue telephones connected to a single line terminal adaptor (SLTA).
Room keystationA Room keystation is a keystation assigned to a room in System programming. Up to five keystations can be assigned to the same room (they all share same room number).
Room keystations can be any Commander NT Keystation or an analogue telephone connected to a SLTA.
P0906413 Issue 01 System Administration Manual
136 / Hospitality Services
Hospitality Services (HS) admin keystationA Hospitality Services (HS) admin keystation is any two-line display Commander NT Keystation. A Hospitality Services (HS) admin keystation can be programmed to require a user to enter the Desk admin password before access to HS admin features is granted. To change the Desk admin password see "Hospitality passwords" on page 177.
Alarm time (AL) featureThe Alarm time feature provides an alarm clock capability on Commander NT Keystations and analogue telephones connected to a SLTA. Both room keystations and common keystations can be programmed to sound an audible alert at a requested time.
One Alarm time within a 24 hour period is programmable on a room or common keystation and must be reset daily. When the alarm sounds, all keystations in a given room alert. Cancelling the alarm on any keystation cancels the alarm on all the keystations in the room. A new Alarm time entered on a room or common keystation overwrites any alarm set previously.
If the Commander NT system experiences a mains failure, the failure can result in missed Alarm times. When the Commander NT system is running and the system’s time resets, the missed Alarm times alert on respective room or common keystations. At all times, the Commander NT system allows up to a maximum of 24 keystations that can alert at the same time.
Programming the Alarm time feature To programme the Alarm time feature on a Commander NT Keystation telephone:
1. Press Ä¡àÞ. The display shows Alrm: 07:00am
OFF.
2. If the alarm time is correct press ON/OFF. The display shows Alrm:07:00am ON. Press DONE to exit.orTo enter a new alarm time press CHG. The display shows Enter time:.
3. Enter a new 4 digit alarm time.
System Administration Manual P0906413 Issue 01

Hospitality Services / 137
— If the 24 hour clock format is used (hour: 00 to 23 and minutes: 00 to 59), no confirmation is required. The display shows Alarm ON hh:mm.
— If the 12 hour format is used, the display shows hh:mm AM or PM?. Press the AM or PM display key. The display shows Alarm ON hh:mm.
To programme the Alarm time feature on an M7000 Keystation or analogue telephone:
1. Press ²¡àÞ on an M7000 Keystation or press À¥¡àÞ on an analogue telephone.A tone sounds.
2. Enter a 4 digit alarm time.
— If the 24 hour clock format is used (hour: 00 to 23 and minutes: 00 to 59), a tone sounds.
— If the 12 hour format is used, press ¥ to select am or £ to select pm. A tone sounds.
At the selected times, keystations in the room ring to wake-up or remind the occupant of the next event or meeting. If Music on hold is programmed for the system the occupant will hear music when they answer a wake-up call.
Changing or cancelling an earlier selected Alarm timeTo set a new time for an Alarm time, re-enter a new Alarm time. The new time overwrites any earlier set time. Cancelling the Alarm time for any keystation cancels the Alarm time for all the keystations in the same room.
Cancelling the alarm
• To cancel the Alarm time on a Commander NT Keystation, press Ä£¡àÞ. The display reads Alarm off.
• To cancel the Alarm time on an M7000 Keystation, press ²£¡àÞ or press À£¡àÞ on an analogue telephone.
P0906413 Issue 01 System Administration Manual

138 / Hospitality Services
Turning off the AlarmWhen a keystation rings at the selected time, the occupant can release the Alarm ring as follows:
• On a Commander NT Keystation, press any key except the ú key.
• On an M7000 Keystation, press any key except the ³ key.
• On an analogue telephone lift and replace the handset back into position.
Note: If the user presses the ú or ³ key when the keystation rings, it temporarily deactivates the Alarm. After a number of minutes, the keystation will alert again. If the user is on a call when the alarm sounds they can press any key except ¨ to cancel the alarm and maintain their active call.
Hospitality Services admin alarm featureOnly a Hospitality Services (HS) admin keystation can use the Hospitality Services admin alarm feature. The HS admin alarm feature is room oriented only, it does not control the alarms on common keystations.
The Hospitality Services admin feature can:
• query the current or last alarm time set for a room
• overwrite previous Alarm time programming for a room on the system
— assign an Alarm time for any room on the system
— change an Alarm time for any room on the system
— cancel an Alarm pending for any room on the system
To programme the Alarm time for a room with the Hospitality Services admin alarm feature:
1. Press Ä¡àà on a two-line display Commander NT Keystation.
System Administration Manual P0906413 Issue 01

Hospitality Services / 139
2. If configured, the display reads Password:. Enter the Desk admin password.
3. The display reads Al of rm#:. Enter the room number.
4. Press VIEW. The display shows Alrm: 07:00am OFF:. If the alarm time is correct press the ON/OFF display key to activate the alarm.
5. Enter a four digit alarm time.
— If the 24 hour format is used (hour: 00 to 23 and minutes: 00 to 59), no confirmation is required. The display shows Alarm hh:mm ON.
— If the 12 hour format is used, the display shows the four digit time plus AM or PM?. Press the AM or PM display key. The display shows Alarm hh:mm am or pm ON.
6. Press the ¨ key to exit programming.
Room occupancy (RO)The Room occupancy (RO) feature allows front desk operators to assign dialling restrictions to room keystations, and also works with the Room condition (RC) feature.
Dialling restrictions for room keystations, defined in Restrictions under Stns&Peripheral and Call restrns under Hospitality in System prgrming, replace dialling filters set under Services. The RO feature does not apply to common keystations.
The RO feature uses the following room states: Vacant, Basic, Mid, and Full. A variety of dialling filters can be configured for each room states. The default setting is Vacant .
• Vacant — Room is empty.
• Basic — Room is occupied.
• Mid — Room is occupied.
• Full — Room is occupied.
Programming the state of a room keystationTo access the Room Occupancy feature and assign the state of a room keystation:
P0906413 Issue 01 System Administration Manual

140 / Hospitality Services
1. Press Ä¡àá on a two-line display Commander NT Keystation.
2. If configured, the display reads Password:. Enter the Desk admin password.
3. The display reads Oc of rm#:. Enter the room number and press OK or LIST.
4. The display reads rrrrr:Vacant. Press the CHANGE display key and select the required status for the room keystation: Vacant, Basic, Mid or Full. The default setting is Vacant .
5. To programme other rooms, press the FIND or NEXT display key and return to step 3. If no more rooms require programming, press the ¨ key to exit programming.
Note: Programming a room to Vacant state cancels any outstanding alarms.
Room condition (RC)The Room condition (RC) feature allows users to exchange information about the serviced state of a room. Users are front desk attendants, cleaning or maintenance personnel of an establishment. The RC feature is not available from a common keystation.
The Commander NT system maintains a database of the state of each room. This database is accessed from either the room keystation or a Hospitality Services admin keystation.You can set a Room Condition password to limit access to this features. See "Room condition password" on page 178.
Room keystations can:
• set the associated room’s state to Service done (Srvc done)
• set the associated room’s state to Needs service (Needs srvc)
• query the state of the associated room on a keystation with a display.
Hospitality Services admin keystations can:
• set any room’s state to Service done (Srvc done)
System Administration Manual P0906413 Issue 01

Hospitality Services / 141
• set any room’s state to Needs service (Needs srvc)
• query the state of any room.
The system changes the state of occupied rooms to Needs service on a daily basis at a set time as configured in the system.
Maintenance personnel programme the condition of the room to Service done when service in the room is complete.
The front desk attendant can query or programme the condition of a room with a Hospitality Services admin keystation. The Commander NT system automatically sets the status of a room to Needs srvc, when a Room occupancy status changes from occupied to Vacant.
Room condition with a room keystationTo update the Room condition using a room keystation:
1. Press Ä¡àß on a Commander NT Keystation; press ²¡àß on an M7000 Keystation or press À¥¡àß on an analogue telephone.
2. At the prompt, enter the status of the room.
3. Press Ú on the dialpad to indicate Set to srv done. If required, enter the Room condition password. or,Press Û on the dialpad to indicate Set to needs srv. If required, enter the Room condition password.
4. On a Commander NT Keystation the display reads Set to srv done or Set to needs srv. On an M7000 Keystation or an analogue telephone, replace the handset to exit.
Room condition with a Hospitality service admin keystation
To update or query the Room condition using a Hospitality services admin keystation:
1. Press Ä¡à¡ on a two-line display Commander NT Keystation.
2. If configured, the display reads Password:. Enter the Desk admin password.
P0906413 Issue 01 System Administration Manual

142 / Hospitality Services
3. The display reads Cd of rm#:. Enter the room number and press OK.
4. The display reads rrrrr:Vacant. Press the CHANGE display key and select the required status for the room keystation: if the room is occupied, select Srvc done or Needs srvc; if the room is vacant, select Vacant or Needs srvc. The default setting is Vacant .
5. To update or query other room keystations, press the FIND or NEXT display key and return to step 3. If there are no more room keystations updates or queries, press the ¨ key to exit programming.
Service timeThe Service time heading of programming under Hospitality in System prgrming allows for the installer or system administrator to programme the time when occupied rooms change state from Service done to Service required. The Service time heading is an integral part of the Room condition (RC) feature.
1. Place the programming overlay on any Advantage or Principal Keystation.
2. Press Ä¥¥ÛßßÜÝÝ (CONFIG). The display reads Password:.
3. Press àÛàÞ¡à (SAPLUS). The display reads Stns&Peripheral.
4. Press Ô until the display reads System prgrming.
5. Press . The display reads Hunt groups.
6. Press Ô until the display reads Hospitality.
7. Press . The display reads Room/desk info.
8. Press Ô until the display reads Service time.
9. Press . The display reads Hour:00.
10. Press the CHANGE display key. Enter the hour (00 to 23). If the number is less than 13, the display reads AM. Press CHANGE to select PM.
11. Press Ô. The display reads Minutes:00.
System Administration Manual P0906413 Issue 01

Hospitality Services / 143
12. Press the CHANGE display key. Enter the minutes (00 to 59).
13. Press the ¨ key to exit programming.
P0906413 Issue 01 System Administration Manual

144 / Hospitality Services
System Administration Manual P0906413 Issue 01

Network features
ONN blockingTo block the outgoing number CLI, press Ä¡Úá. When this feature is used, the call is flagged to the exchange so that the number will not be presented to the person being called.
On CLI supported lines, a call blocking digit sequence is sent to the exchange before sending the dialout digits. You can change these digits in System Prgrming and set it to the digit sequence recognized by the local exchange for number blocking on a call by call basis.
Note: OLI must be programmed for ONN blocking (Calling Line ID Restriction) to work on an ISDN line. See "Setting the Originating Line Identification for a station" on page 50 for more information.
1. Place the programming overlay on any Advantage or Principal Keystation.
2. Press Ä¥¥ÛßßÜÝÝ (CONFIG). The display reads Password:.
3. Press àÛàÞ¡à (SAPLUS). The display reads Stns&Peripheral.
4. Press Ô until the display reads Netwk features.
5. Press . The display reads ONN blocking:.
6. Press . The display reads Tone:1831.
7. Press CHANGE to enter a new tone dialling Number blocking digit sequence.
8. Press Ô. The display reads Pulse:1831.
9. Press CHANGE to enter a new pulse dialling Number blocking digit sequence.
10. Press ¨ to exit or Ô to continue in programming.
P0906413 Issue 01 System Administration Manual

146 / Network features
System Administration Manual P0906413 Issue 01

Settings for analogue equipment
Analogue equipment includes answering and fax machines as well as Single Line Telephones (SLT’s). Analogue equipment is connected to the Commander NT with a Single Line Telephone (SLT) Adaptor that responds only to tone dialling signals.
The SLT Adaptor allows SLT’s to access some Commander NT features such as Divert, Conference, Transfer, and Last Number Redial. Keystations connected to the SLT Adaptor cannot display the system time and date. For information on using features available from a SLT connected to a SLT Adaptor, see the Single Line Telephone Adaptor User Card.
Note that unlike Commander NT Keystations that retain an active call for a minute if unplugged from the socket, a device connected to the SLT Adaptor will immediately drop an active call if the SLT Adaptor is disconnected.
You can adjust the following settings:
• whether the station used for analogue equipment will receive tone dialling signals
• change the dial mode of the SLT Adaptor to send the correct tone
• set whether the SLT Adaptor should receive confirmation and error tones (only for analogue keystations rather than analogue devices such as faxes and answering machines).
• set the timer for when dialling is complete for the SLT Adaptor
• set whether the SLT is used on-site or off-site.
Setting the delay before the SLT answersTo accommodate the device connected to the Single Line Telephone (SLT), you may want to lengthen or shorten the delay before the device is able to receive tones. For example, a modem or fax machine requires only a short delay.
P0906413 Issue 01 System Administration Manual

148 / Settings for analogue equipment
Refer to the SLT Terminal Feature Card for information on using the SLT features.
The SLT answer timer controls this delay. The default setting is a 10-second delay before the speech path is connected.
1. Place the programming overlay on any Advantage or Principal Keystation.
2. Press Ä¥¥ÛßßÜÝÝ (CONFIG). The display reads Password:.
3. Press àÛàÞ¡à (SAPLUS). The display reads Stns&Peripheral.
4. Press . The display reads Show stn#:.
5. Enter the station number of the keystation you wish to program. The display reads nnn:nnn.
6. Press . The display reads Line access.
7. Press Ô. The display reads Capabilities.
8. Press . The display reads Divert no answr.
9. Press Ô until the display reads SLTA settings.
10. Press . The display reads SLTA ans timer:.
11. Press CHANGE to choose 3, 5, 7, or 10 seconds.
12. Press ¨ to exit or Ô to continue in programming.
Changing the dial mode of a SLT AdaptorYou must tell the system whether the device connected to the SLT Adaptor sends out pulse or tone (DTMF) signals. The default is Tone.
1. Place the programming overlay on any Advantage or Principal Keystation.
2. Press Ä¥¥ÛßßÜÝÝ (CONFIG). The display reads Password:.
3. Press àÛàÞ¡à (SAPLUS). The display reads Stns&Peripheral.
4. Press . The display reads Show stn#:.
System Administration Manual P0906413 Issue 01

Settings for analogue equipment / 149
5. Enter the station number of the keystation you wish to program. The display reads nnn:nnn.
6. Press . The display reads Line access.
7. Press Ô. The display reads Capabilities.
8. Press . The display reads Divert no answr.
9. Press Ô until the display reads SLTA settings.
10. Press . The display reads SLTA mode:.
11. Press CHANGE to toggle the setting.
12. Press ¨ to exit or Ô to continue in programming.
Setting whether the SLT Adaptor should receive system tones
You must tell the system whether or not the device connected to the SLT Adaptor should receive confirmation and error tones. These tones inform a person of call progress, but only confuse a modem or fax machine.
• If the SLT Adaptor is connected to a telephone, set Tones to Y.
• If the SLT Adaptor is connected to any other device, set Tones to N.
The default is disabled (N).
1. Place the programming overlay on any Advantage or Principal Keystation.
2. Press Ä¥¥ÛßßÜÝÝ (CONFIG). The display reads Password:.
3. Press àÛàÞ¡à (SAPLUS). The display reads Stns&Peripheral.
4. Press . The display reads Show stn#:.
5. Enter the station number of the keystation you wish to program. The display reads nnn:nnn.
6. Press . The display reads Line access.
7. Press Ô. The display reads Capabilities.
P0906413 Issue 01 System Administration Manual

150 / Settings for analogue equipment
8. Press . The display reads Divert no answr.
9. Press Ô until the display reads SLTA settings.
10. Press . The display reads SLTA mode:.
11. Press Ô until the display reads SLTA tones:.
12. Press CHANGE to choose Y (Yes) or N (No).
13. Press ¨ to exit or Ô to continue in programming.
Note: This setting does not interfere with intrusion and conference tones presented to a telephone connected to a SLT Adaptor. These tones are heard through the telephone handset regardless of the SLT Adaptor tones setting.
System Administration Manual P0906413 Issue 01
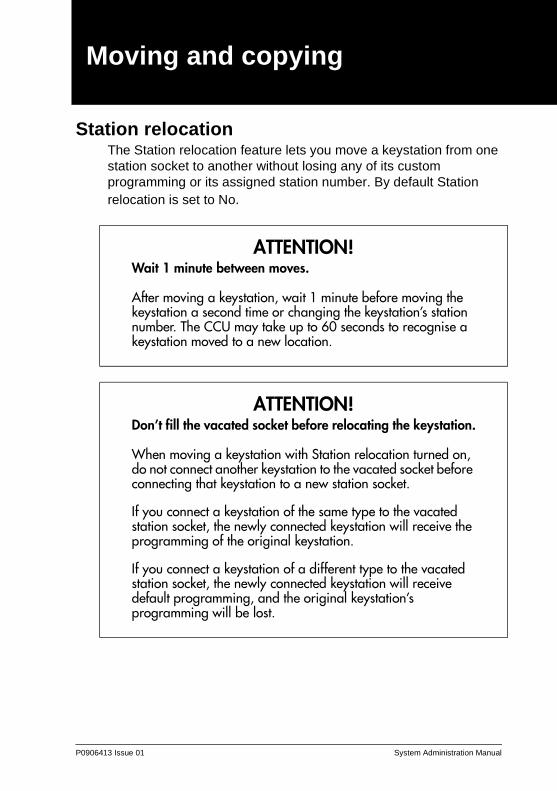
Moving and copying
Station relocationThe Station relocation feature lets you move a keystation from one station socket to another without losing any of its custom programming or its assigned station number. By default Station relocation is set to No.
ATTENTION!Wait 1 minute between moves.
After moving a keystation, wait 1 minute before moving the keystation a second time or changing the keystation�s station number. The CCU may take up to 60 seconds to recognise a keystation moved to a new location.
ATTENTION!Don�t fill the vacated socket before relocating the keystation.
When moving a keystation with Station relocation turned on, do not connect another keystation to the vacated socket before connecting that keystation to a new station socket.
If you connect a keystation of the same type to the vacated station socket, the newly connected keystation will receive the programming of the original keystation.
If you connect a keystation of a different type to the vacated station socket, the newly connected keystation will receive default programming, and the original keystation�s programming will be lost.
P0906413 Issue 01 System Administration Manual

152 / Moving and copying
Turn Station relocation to No after the keystation installation and programming are completed, rather than before. This provides you with more flexibility in testing equipment. If Station relocation is set to No while a keystation is moved, that keystation’s station number and data remain with the physical port on the Main Equipment (ME), and the keystation does not receive the original programming when it is reconnected elsewhere.
Remember to record any programming changes in Programming Record.
1. Place the programming overlay on any Advantage or Principal Keystation.
2. Press Ä¥¥ÛßßÜÝÝ (CONFIG). The display reads Password:.
3. Press àÛàÞ¡à (SAPLUS). The display reads Stns&Peripheral.
4. Press Ô until the display reads System prgrming.
5. Press . The display reads Hunt groups.
6. Press Ô. The display reads Featr settings.
7. Press . The display reads Backgrnd music.
8. Press Ô until the display reads Stn relocatn:.
9. Press CHANGE to choose Y (Yes) or N (No).
10. Press ¨ to exit or Ô to continue in programming.
ATTENTION!Relocate to station jacks that are configured for keystation.
When moving stations from one jack to another, ensure that all jacks support a Commander NT Keystation. If a fax machine, SLT Adaptor, analogue telephone, or modem was plugged into the jack, do not plug a Commander NT Keystation into the jack.
System Administration Manual P0906413 Issue 01

Moving and copying / 153
Copying programming for keystationsDuring programming, you can copy certain programmed settings from one line to another, or from one keystation to another using the COPY key when it appears on the display. You can copy either system programming or system programming and user preferences.
User preferences includes the settings programmed by people at their own keystations using feature codes. You can only copy user preferences between keystations of the same type, when both are plugged into the system.
Copying system programming to a single stationPressing the COPY softkey allows you to copy programming from one keystation to another keystation, to a range of keystations, or to all keystations in the system.
1. Place the programming overlay on any Advantage or Principal Keystation.
2. Press Ä¥¥ÛßßÜÝÝ (CONFIG). The display reads Password:.
3. Press àÛàÞ¡à (SAPLUS). The display reads Stns&Peripheral.
4. Press and enter the station number whose programming you want to copy.
5. Press COPY. The display reads Copy:SYSTEM data.
6. Press CHANGE to toggle between SYSTEM data (to copy the programming of the system) and SYSTEM+USER (to copy the programming of the system and the programming of a particular station).
7. Press Ô. The display reads Copy:SINGLE.
8. Press Ô. The display reads Copy to:.
9. Enter the station number of the keystation that will be programmed. The display reads nnn>nnn briefly, then returns to Copy to:.
P0906413 Issue 01 System Administration Manual

154 / Moving and copying
10. Keep entering station numbers if you have other, single stations that you wish to program.
11. Press CANCL when you are finished.
Copying system programming to a range of stations1. Place the programming overlay on any Advantage or Principal
Keystation.
2. Press Ä¥¥ÛßßÜÝÝ (CONFIG). The display reads Password:.
3. Press àÛàÞ¡à (SAPLUS). The display reads Stns&Peripheral.
4. Press and enter the station number whose programming you want to copy.
5. Press COPY. The display reads Copy:SYSTEM data.
6. Press CHANGE to toggle between SYSTEM data (to copy the programming of the system) and SYSTEM+USER (to copy the programming of the system and the programming of a particular station).
7. Press Ô. The display reads Copy:SINGLE.
8. Press CHANGE to select either a range of stations or all stations.
9. Press Ô. The display reads Only equippd Stn.
10. Press CHANGE to switch between equipped stations and all stations. The display reads All stn #Õs.
11. Press Ô. The display reads Begin at:.
12. Enter the starting station number. The display reads End at:.
13. Enter the ending station number. The display reads nnn>nnn-nnn?.
14. Press OK to copy the programming to the specified stations.
Depending on the activities going on in the system, a copy may not take effect for a while. The brief display you see once you have finished a copying session does not indicate the process is complete.
System Administration Manual P0906413 Issue 01

Moving and copying / 155
You can leave the programming session even if the copy has not been completed. If you exit programming, copying continues uninterrupted until it is complete.
Event codes capture both the start and completion of the copying process.
System settings you can copy
• line assignment
• line pool access
• Prime line designation
• number of intercom keys
• settings programmed under the heading Capabilities
Personal settings you can copy
• the user preferences for dialling modes
• line key positions
• user speed dial entries
• automatic delivery of call information for outgoing calls
• log settings
• programmed memory keys
Settings you cannot copy
• station number and name
• call log password
• Direct-Dial and Extra-Dial station designations
• Services Control station designation for a line
• Services ringing station designation for a line
• Prime station designation for a line, or private line appearances
• user preferences for display contrast, ring type, and ring volume
P0906413 Issue 01 System Administration Manual

156 / Moving and copying
System Administration Manual P0906413 Issue 01

Programming services
Using alternate or scheduled servicesYour Commander NT40 system is set up to handle calls during normal business hours. However, you may wish to handle incoming calls differently at lunch time, in the evening, at night, or during holidays.
To accommodate changes, Commander NT40 provides Services that let you customise the way calls are handled at different times of the day. Besides a Normal mode, there are six additional modes. Three of the modes are already named: Lunch, Evening, and Night. You can assign new names for these modes and assign names to the three unnamed modes.
When Ringing service and Restriction service are set to manual, a control station is used to place the stations and exchange lines that it controls into and out of service modes. A control station can be assigned to control either lines or stations, or both lines and stations. A service mode activates three aspects of how the system operates: Ringing, Restriction, and Routing.
• You can customise the Ringing service so that
— an extra station rings for calls placed to the Direct-Dial station
— additional stations ring for incoming calls
— an auxiliary ringer notifies when a line rings
• You can bar long-distance calls by applying Restriction service to a line or station in a service mode.
• You can take advantage of alternate route selection by assigning different routes to be used during the different modes.
P0906413 Issue 01 System Administration Manual

158 / Programming services
Turning Services on or off
Ringing serviceYou can have Ringing service set up to run differently for each of the six modes. You may decide you want Ringing service for the Night mode to come into effect only when it is turned on and off manually.
If you manually call on a service, it remains in effect until you cancel it, regardless of any automatic modes scheduled. Manual service also overrides any automatic mode that is active.
If you program a service as Manual, you must use the control station to turn the service on using a feature code. The default control station for all lines and stations is 221.
1. Place the programming overlay on any Advantage or Principal Keystation.
2. Press Ä¥¥ÛßßÜÝÝ (CONFIG). The display reads Password:.
3. Press àÛàÞ¡à (SAPLUS). The display reads Stns&Peripheral.
4. Press Ô until the display reads Services.
5. Press . The display reads Ringing service.
6. Press . The display reads Ringing groups.
7. Press Ô. The display reads Mode:Night.
8. Press . The display reads Service:.
9. Press CHANGE to choose Manual, Auto, or Off .
10. Press ¨ to exit or Ô to continue in programming.
Assigning stations to Ringing groupsYou can assign stations to Ringing groups that are applied to a specific line for a mode.
For example, you may want line 001 to ring at three different stations for Night mode. First, program those stations to a Ringing group, then assign that Ringing group to line 001 in Night mode.
System Administration Manual P0906413 Issue 01

Programming services / 159
By default, station 221 is assigned to all Ringing groups.
1. Place the programming overlay on any Advantage or Principal Keystation.
2. Press Ä¥¥ÛßßÜÝÝ (CONFIG). The display reads Password:.
3. Press àÛàÞ¡à (SAPLUS). The display reads Stns&Peripheral.
4. Press Ô until the display reads Services.
5. Press . The display reads Ringing service.
6. Press . The display reads Ringing groups.
7. Press . The display reads Show group:.
8. Enter the number of the ringing group you want to program. The display reads Ring grp: nnn.
9. Press . The display reads Show stn#:. Enter the station number you wish to assign to the Ringing group.
10. Press CHANGE to choose Assigned, or Unassign .
11. Press Ôto continue with the next station number, or Ð to return to Ring grp: nnn , or ¨ to exit programming.
Assigning a Ringing group to a line1. Place the programming overlay on any Advantage or Principal
Keystation.
2. Press Ä¥¥ÛßßÜÝÝ (CONFIG). The display reads Password:.
3. Press àÛàÞ¡à (SAPLUS). The display reads Stns&Peripheral.
4. Press Ô until the display reads Services.
5. Press . The display reads Ringing service.
6. Press . The display reads Ringing groups.
7. Press Ôuntil the display reads the mode you wish to program. For example, Mode:Night.
P0906413 Issue 01 System Administration Manual
160 / Programming services
8. Press . The display reads Service:.
9. Press Ôuntil the display reads Line settings.
10. Press . The display reads Show line:.
11. Enter the line number you wish to program.
12. Press . The display reads Ring grp:.
13. Press CHANGE and enter the Ring group number you wish to assign to this line.
14. Press ¨ to exit or Ô to continue in programming.
Restriction serviceAssigning restriction filters to modes gives you control over calls made outside of normal business hours. For example, you may allow long-distance calls during the day but bar them in the evening (using the Night mode), and on weekends (using Mode 5, which you may have renamed Weekend mode).
1. Place the programming overlay on any Advantage or Principal Keystation.
2. Press Ä¥¥ÛßßÜÝÝ (CONFIG). The display reads Password:.
3. Press àÛàÞ¡à (SAPLUS). The display reads Stns&Peripheral.
4. Press Ô until the display reads Services.
5. Press . The display reads Ringing service.
6. Press Ô. The display reads Restrn service.
7. Press . The display reads Mode:Night.
8. Press . The display reads Service:.
9. Press CHANGE to choose Manual, Auto, or Off .
10. Press ¨ to exit or Ô to continue in programming.
Routing serviceInstead of having to manually decide which routes to use at different times of the day, you can set the routes to automatically be selected according to the programmed settings for each of the six modes.
System Administration Manual P0906413 Issue 01

Programming services / 161
Designating alternate routes for callsThe programming for Routing service decides what path an outgoing call takes using the digits that are dialled.
When you select an internal line and dial, the numbers you enter are checked against the routes. If the number you dialled starts with a destination code, the system uses the line pool and dials out digits specified by the route assigned to that destination code, and then dials the number that you dialled.
Routing service replaces a number of tasks that otherwise have to be done manually, including
• entering a line pool code
• dialling an access code for a long-distance carrier
• accessing an alternate route if the Prime line is busy or unavailable
Uniform numbering planCommander NT40 can be programmed to provide dialling transparency by using a uniform numbering plan. For example, a worker at an office in Melbourne can call a colleague at a branch office in Adelaide as though the person is calling a station in their own company.
Dialling transparency depends on establishing a numbering plan where all station numbers are unique and of a uniform length. For example, if you have three company sites (two in Melbourne and one in Adelaide) then all three sites should have the same number of digits in their station numbers, and each station number should be unique.
When performing System Startup you can change the starting value and length of station numbers as well as the received number length. If you apply the PBX template at System Startup, received numbers and the received number length are set automatically to match the station numbers.
P0906413 Issue 01 System Administration Manual

162 / Programming services
How Routing service worksThere are two headings for Routing service: Routes and Dest codes . Under Routes , you program DialOut and Use.
• DialOut— specifies the digits (up to 24) to be dialled out to reach the called station.
• Use—defines a specific line pool to be used to make the call.
Under Dest codes you program the Destination route and Absorb length.
• Normal— is for assigning the route code to be used during regular business hours.
• Absorb length— indicates how many of the digits in the destination code should be absorbed by the system (not dialled out to reach the called station).
When a caller dials a number, Commander NT checks the leading digits of the number against the destination codes. If the leading digits are matched to a destination code, Commander NT proceeds to select the route containing the appropriate line pool and dial-out digits. It then adds the digits that the caller dialled (subtracting the ones that are to be absorbed from the destination code).
In the following example, a caller at station 6625 in Melbourne wants to reach a colleague in Adelaide. Without the routing service, the caller would have to select a line and dial 01628 784221 to reach station 4221 in Adelaide.
System Administration Manual P0906413 Issue 01

Programming services / 163
Because the system has an appropriate route and destination code, the caller simply dials 4221. The system recognises 4 as a destination code. It checks destination code 4, which instructs it to use DialOut 01628 78 and Line Pool A from Route 002. It is instructed not to absorb any digits from the destination code, so it adds all of the caller’s digits (4221) to complete the call.
Specifying the type of line to be usedEach Routing table lets you program the line pool, and thus the type of line to be used as the outgoing facility to reach a destination. For example, if ISDN lines have been placed in line pool B, specifying pool B as the line pool to use in a route for a particular destination code, ensures that all calls being routed to that destination use ISDN lines.
AdelaideMelbourne
(dialled digits 01628 784221)
(dialled digits 4221)
Line pool A
Extn 4221Extn 6625
Routing service settings
Routes (Route 002)DialOut: 01628 78Use: Pool A
Dest codes (DstCode 4)Normal: 002AbsorbLength: 0
MEME
P0906413 Issue 01 System Administration Manual

164 / Programming services
You must ensure that stations and ISDN terminals have access to the line pools that they need to make calls (programmed under Line Access in Stns&Peripherals).
Overflow call routingOverflow call routing is used with Routing Service. When you make a call and the programmed route is busy, you hear the expensive route warning tone and see a display indicating that an expensive route is being used. Overflow routing directs calls using different line pools. A call may be affected by different line filters when it is handled by overflow routing.
For example, Destination code 444 uses Route 001 (Pool A) for Normal mode and Route 002 (Pool B) for Night mode. You can program Night mode to overflow to the route used for Normal mode (Route 001/Pool A) when all the lines in Pool B for Route 002 are busy.
You can only program modes to overflow to Normal mode and you must turn Overflow call routing on for each mode (except Normal mode).
To turn Overflow routing on for each mode1. Place the programming overlay on any Advantage or Principal
Keystation.
2. Press Ä¥¥ÛßßÜÝÝ (CONFIG). The display reads Password:.
3. Press àÛàÞ¡à (SAPLUS). The display reads Stns&Peripheral.
4. Press Ô until the display reads Services.
5. Press . The display reads Ringing service.
6. Press Ôuntil the display reads Routing service.
7. Press . The display reads Routes.
8. Press Ôuntil the display reads the mode you wish to program. For example, Mode: Night.
9. Press . The display reads Service:.
10. Press Ô. The display reads Overflow:No .
System Administration Manual P0906413 Issue 01

Programming services / 165
11. Press CHANGE to choose Yes.
12. Press ¨ to exit or Ð to continue programming Overflow for other modes.
Programming routes
DialOut1. Place the programming overlay on any Advantage or Principal
Keystation.
2. Press Ä¥¥ÛßßÜÝÝ (CONFIG). The display reads Password:.
3. Press àÛàÞ¡à (SAPLUS). The display reads Stns&Peripheral.
4. Press Ô until the display reads Services.
5. Press . The display reads Ringing service.
6. Press Ô until the display reads Routing service.
7. Press . The display reads Routes.
8. Press . The display reads Show route:.
9. Enter a three-digit route code or press Ô. The display reads Rtennn.
10. Press . The display reads DialOut:.
11. Press CHANGE.
12. Enter the Dial Out digits (up to 24) or press CANCL to choose No number .
You can press Äà¡to insert a 1.5 second pause in the dialling string, if necessary.
Route 000 shows no DialOut:No numbr by default and cannot be changed.
13. Press OK.
P0906413 Issue 01 System Administration Manual

166 / Programming services
Use Pool1. Place the programming overlay on any Advantage or Principal
Keystation.
2. Press Ä¥¥ÛßßÜÝÝ (CONFIG). The display reads Password:.
3. Press àÛàÞ¡à (SAPLUS). The display reads Stns&Peripheral.
4. Press Ô until the display reads Services.
5. Press . The display reads Ringing service.
6. Press Ô until the display reads Routing service.
7. Press . The display reads Routes.
8. Press . The display reads Show route:.
9. Enter a three-digit route code or press Ô. The display reads Rtennn.
10. Press . The display reads DialOut:.
11. Press Ô. The display reads Use:
12. Press CHANGE to choose Pool A to C.
Note: Route 000 uses Pool A by default and cannot be changed.
Programming destination codes
Dest CodeWhen programming destination codes, you can use wild cards in the destination code string. As a result of wild card characters, the number of destination codes programmed in the system is reduced, maximizing the use of destination codes in the system.
The wild card character can be used only for the last digit of a destination code and represents any digit from 0 to 9 except for digits already programmed or used by other numbering plans. Should there be a conflict with other digits already programmed or used with by numbering plans, the digit will not be displayed.
The wild card character can only be used to group destination codes that use the same Route and Absorb Length.
System Administration Manual P0906413 Issue 01

Programming services / 167
Destination codes without the use of a wild card character
Destination codes with the use of a wild card character
Enter a destination code that is recognised when used as part of a telephone number for an outgoing call. It can be up to seven digits long.
1. Place the programming overlay on any Advantage or Principal Keystation.
Route DialOut Line Pool
555 0162 237 625 Line Pool C
565 0173 133 2211 Line Pool A
Destination codes Route Absorb Length DialOut
0621 555 3 0162 237 6251
0622 555 3 0162 237 6252
0623 555 3 0162 237 6253
0624 555 3 0162 237 6254
0625 555 3 0162 237 6255
0626 555 3 0162 237 6256
0627 565 All 0173 133 2211
0628 555 3 0162 237 6258
0629 555 3 0162 237 6259
Destination codes Route Absorb Length DialOut
062 • 555 3 0162 237 625 •
0627 565 All 0173 133 2211
P0906413 Issue 01 System Administration Manual

168 / Programming services
2. Press Ä¥¥ÛßßÜÝÝ (CONFIG). The display reads Password:.
3. Press àÛàÞ¡à (SAPLUS). The display reads Stns&Peripheral.
4. Press Ô until the display reads Services.
5. Press . The display reads Ringing service.
6. Press Ô until the display reads Routing service.
7. Press . The display reads Routes.
8. Press Ô. The display reads Dest codes.
9. Press . The display reads Show DstCode:.
10. If there are no codes defined, use ADD, and OK to add a new destination code (up to 7). To enter a wild card character (•) in the destination code, press the ANY display key.
11. If there are codes defined, press Ô to select one.
12. Use ADD, FIND, and REMOVE to change the destination code.
Normal rteSelect which route a call using the destination code will take during normal service and for each of the modes. The automatic mode times are programmed under Services. The default Normal route is 000, which has no DialOut digits and uses Pool A.
Note: Be sure you have pre-programmed the route. See "Designating alternate routes for calls" on page 161.
1. Place the programming overlay on any Advantage or Principal Keystation.
2. Press Ä¥¥ÛßßÜÝÝ (CONFIG). The display reads Password:.
3. Press àÛàÞ¡à (SAPLUS). The display reads Stns&Peripheral.
4. Press Ô until the display reads Services.
5. Press . The display reads Ringing service.
6. Press Ô until the display reads Routing service.
System Administration Manual P0906413 Issue 01

Programming services / 169
7. Press . The display reads Routes.
8. Press Ô. The display reads Dest codes.
9. Press . The display reads Show DstCode:.
10. If there are no codes defined, use ADD, and OK to add a new destination code (up to 7). To enter a wild card character (•) in the destination code, press the ANY display key.
11. Press . The display reads Normal:.
12. Press CHANGE to select a different route for the destination code.
13. Enter the three-digit code.
Turning a manual service on or off with a feature code
There are separate on and off codes for each of the services: Ringing, Routing, and Restriction.
To turn on a serviceFrom a Control station, enter the feature code to turn Ringing, Restriction, or Routing service on. If activating Restriction or Routing service, use the password ÛÜßÝß (ADMIN). The display reads Services ON.
To turn off a serviceFrom a Control station, enter the feature code to turn Ringing, Restriction, or Routing service off. The display reads Normal followed by the name of the service (Ringing, Restrn, or Routing).
Ä¡àÚ Turn on Ringing service.
Ä£¡àÚ Turn off Ringing service.
Ä¡àÛ Turn on Restriction service.
Ä£¡àÛ Turn off Restriction service.
Ä¡àÜ Turn on Routing service.
Ä£¡àÜ Turn off Routing service.
P0906413 Issue 01 System Administration Manual

170 / Programming services
Assigning control stationsWhen Ringing service and Restriction service are set to Manual, a control station is used to place the stations and exchange lines that it controls into and out of service modes. A control station can be assigned to control either lines or stations, or both lines and stations.
You can also use a control station to manually override an automatic Mode.
You may want different lines to be assigned to different control stations. For example, if the Customer Service department is open during evening hours, you could place the Customer Service lines under a separate control station. The Sales department, which closes at the end of the afternoon, could be placed under a different control station that could call on a service mode for those lines, while leaving the Customer Service lines unaffected.
System Administration Manual P0906413 Issue 01

Programming services / 171
Assigning lines to a control station1. Place the programming overlay on any Advantage or Principal
Keystation.
2. Press Ä¥¥ÛßßÜÝÝ (CONFIG). The display reads Password:.
3. Press àÛàÞ¡à (SAPLUS). The display reads Stns&Peripheral.
4. Press Ô until the display reads Services.
5. Press . The display reads Ringing service.
6. Press Ô until the display reads Common settings.
7. Press . The display reads Control stns.
8. Press . The display reads For lines.
9. Press twice. The display reads Show line:.
10. Enter the line number. The display reads the line number followed by the current control station.
11. Press CHANGE and enter the station number you want to assign as the control station for this line.
12. Press ¨ to exit or Ô to continue in programming.
Assigning stations to a control stationIn addition to placing lines into Services, a control station can apply Restriction service (dialling filters) to other stations.
1. Place the programming overlay on any Advantage or Principal Keystation.
2. Press Ä¥¥ÛßßÜÝÝ (CONFIG). The display reads Password:.
3. Press àÛàÞ¡à (SAPLUS). The display reads Stns&Peripheral.
4. Press Ô until the display reads Services.
5. Press . The display reads Ringing service.
6. Press Ô until the display reads Common settings.
7. Press . The display reads Control stns.
P0906413 Issue 01 System Administration Manual

172 / Programming services
8. Press . The display reads For lines.
9. Press Ô. The display reads For stns.
10. Press . The display reads Show stn:.
11. Enter the station number. The display reads the station number followed by the current control station.
12. Press CHANGE and enter the station number you want to assign as the control station.
13. Press ¨ to exit or Ô to continue in programming.
Changing the name of a mode1. Place the programming overlay on any Advantage or Principal
Keystation.
2. Press Ä¥¥ÛßßÜÝÝ (CONFIG). The display reads Password:.
3. Press àÛàÞ¡à (SAPLUS). The display reads Stns&Peripheral.
4. Press Ô until the display reads Services.
5. Press . The display reads Ringing service.
6. Press Ô until the display reads Common settings.
7. Press . The display reads Control stns.
8. Press Ô. The display reads Mode names.
9. Press . The display reads Mode 1:.
10. Press CHANGE and enter the name you want to assign to the mode.
11. Press ¨ to exit or Ô to continue in programming.
Changing the time of a modeIt is only necessary to program the start and stop times for modes that are activated automatically.
If you are programming a mode to start and stop at the same time each day, use COPY to transfer the settings from one day to the next.
1. Place the programming overlay on any Advantage or Principal Keystation.
System Administration Manual P0906413 Issue 01

Programming services / 173
2. Press Ä¥¥ÛßßÜÝÝ (CONFIG). The display reads Password:.
3. Press àÛàÞ¡à (SAPLUS). The display reads Stns&Peripheral.
4. Press Ô until the display reads Services.
5. Press . The display reads Ringing service.
6. Press Ô until the display reads Common settings.
7. Press . The display reads Control stns.
8. Press Ô. The display reads Mode names.
9. Press Ô. The display reads Mode times.
10. Press . The display reads Monday mode.
11. Press . The display reads Mode:Night.
12. Press . The display reads Start time:.
13. Press CHANGE and enter the time you want the mode to start.
14. Press Ô. The display reads Stop time:.
15. Press CHANGE and enter the time you want the mode to stop. Press OK to accept AM or CHANGE and OK to accept PM.
16. Press ¨ to exit or Ô to continue in programming.
P0906413 Issue 01 System Administration Manual

174 / Programming services
System Administration Manual P0906413 Issue 01

Changing passwords
Password securityYou can, and should, change your passwords regularly for security reasons. Keep a record of your passwords in a secure place, and remember: the longer the password, the more likely it is to be secure.
Erasing a call log passwordIf someone forgets their Call Log password, you can erase it so that they can set a new one. You cannot set a new password using this method, you can only erase an existing one.
To set a new Call Log password, see "Setting your Call log password" on page 291.
1. Place the programming overlay on any Advantage or Principal Keystation.
2. Press Ä¥¥ÛßßÜÝÝ (CONFIG). The display reads Password:.
3. Press ÛÜßÝß (ADMIN). The display reads Stns&Peripheral.
4. Press Ô until the display reads Passwords.
5. Press . The display reads Call log pswd:.
6. Press . The display reads Show stn#:_.
7. Enter a station number.
8. Press . The display reads Log pswd:nnnnn.
9. Press CLR to erase the current Call log password.
10. Press ¨ to exit or Ô to continue in programming.
P0906413 Issue 01 System Administration Manual

176 / Changing passwords
Setting the SAPLUS passwordThe System Administrator plus password is one to six digits long and allows you to access all of the programming needed to set up the system for your company. The default password is àÛàÞ¡à, which spells SAPLUS on the dial pad.
1. Place the programming overlay on any Advantage or Principal Keystation.
2. Press Ä¥¥ÛßßÜÝÝ (CONFIG). The display reads Password:.
3. Press àÛàÞ¡à (SAPLUS). The display reads Stns&Peripheral.
4. Press Ô until the display reads Passwords.
5. Press . The display reads COS pswds.
6. Press Ô until the display reads Progrming pswds.
7. Press . The display reads SysAdmin+:.
8. Press CHANGE and enter the new password.
9. Press OK to accept the new password.
10. Press ¨ to exit or Ô to continue in programming.
Setting the Administrator passwordThe Administrator password is one to six digits long and allows you to access programming. The default password is ÛÜßÝß, which spells ADMIN on the dial pad.
1. Place the programming overlay on any Advantage or Principal Keystation.
2. Press Ä¥¥ÛßßÜÝÝ (CONFIG). The display reads Password:.
3. Press ÛÜßÝß (ADMIN). The display reads Stns&Peripheral.
4. Press Ô until the display reads Passwords.
5. Press . The display reads COS pswds.
6. Press Ô until the display reads Progrming pswds.
System Administration Manual P0906413 Issue 01

Changing passwords / 177
7. Press until the display reads SysAdmin:.
8. Press CHANGE and enter the new password.
9. Press OK to accept the new password.
10. Press ¨ to exit or Ô to continue in programming.
Setting the Basic passwordThe Basic password is one to six digits long and allows you to access some programming settings using feature codes. You cannot enter regular programming with this password. The default is ÛÛàÝÛ, which spells BASIC on the dial pad.
1. Place the programming overlay on any Advantage or Principal Keystation.
2. Press Ä¥¥ÛßßÜÝÝ (CONFIG). The display reads Password:.
3. Press ÛÜßÝß (ADMIN). The display reads Stns&Peripheral.
4. Press Ô until the display reads Passwords.
5. Press . The display reads COS pswds.
6. Press Ô until the display reads Progrming pswds.
7. Press . The display reads SysAdmin:.
8. Press Ô. The display reads Basic:.
9. Press CHANGE and enter the new password.
10. Press OK to accept the new password.
11. Press ¨ to exit or Ô to continue in programming.
Hospitality passwordsThe Hospitality passwords are one to six digits long and allow you to access some or all of the Hospitality Services feature programming. There are two types of Hospitality services feature passwords, the Desk admin password and the Room condition password.
P0906413 Issue 01 System Administration Manual

178 / Changing passwords
Setting the Desk admin passwordThe Desk admin password is used to access all the Hospitality Services admin features. The default password is Ýßàà, which spells HOSP on the dial pad.
1. Place the programming overlay on any Advantage or Principal Keystation.
2. Press Ä¥¥ÛßßÜÝÝ (CONFIG). The display reads Password:.
3. Press àÛàÞ¡à (SAPLUS). The display reads Stns&Peripheral.
4. Press Ô until the display reads Passwords.
5. Press . The display reads COS pswds.
6. Press Ô until the display reads Hospitality.
7. Press . The display reads Desk pswd:.
8. Press CHANGE and enter the new password.
9. Press OK to accept the new password.
10. Press ¨ to exit or Ô to continue in programming.
Room condition passwordThe Room condition password is used to control the ability to change the room condition with Ä¡àß. The default room condition password is: None . Different from the Desk admin password, the room condition password can remain as None.
To change the default Room condition password:
1. Place the programming overlay on any Advantage or Principal Keystation.
2. Press Ä¥¥ÛßßÜÝÝ (CONFIG). The display reads Password:.
3. Press àÛàÞ¡à (SAPLUS). The display reads Stns&Peripheral.
4. Press Ô until the display reads Passwords.
5. Press . The display reads COS pswds.
System Administration Manual P0906413 Issue 01

Changing passwords / 179
6. Press Ô until the display reads Hospitality.
7. Press . The display reads Desk pswd:.
8. Press Ô. The display reads Cond pswd:.
9. Press CHANGE and enter the new password.
10. Press OK to accept the new password.
11. Press ¨ to exit or Ô to continue in programming.
P0906413 Issue 01 System Administration Manual

180 / Changing passwords
System Administration Manual P0906413 Issue 01

Network features
CLI assignmentIf you subscribe to Call Display services (often called Calling Line identification), external calls are identified on the display. The display may also show a message indicator from an external voice mail service. CLI assignment programming enables you to customise how this information is used. You can program a station to display Caller ID and you can program a station to log Call Display information for calls on an exchange line.
Caller ID station1. Place the programming overlay on any Advantage or Principal
Keystation.
2. Press Ä¥¥ÛßßÜÝÝ (CONFIG). The display reads Password:.
3. Press àÛàÞ¡à (SAPLUS). The display reads Stns&Peripheral.
4. Enter the station number of the keystation you would like to program. The display reads nnn:nnn.
5. Press . The display reads Line access.
6. Press Ô until the display reads Netwk features.
7. Press . The display reads CLI assignment.
8. Press and enter the number of the line you want to program with settings for the station.
9. Press Ô. The display reads Caller ID stn:.
10. Press CHANGE to select the setting: N (No) or Y (Yes).
11. Press ¨ to exit or Ô to continue in programming.
P0906413 Issue 01 System Administration Manual

182 / Network features
Call log stationCall log station enables you to specify whether the station automatically logs Call Display information for calls on an exchange line. The line must appear on that station but it does not have to be a ringing line. The default setting is No.
1. Place the programming overlay on any Advantage or Principal Keystation.
2. Press Ä¥¥ÛßßÜÝÝ (CONFIG). The display reads Password:.
3. Press àÛàÞ¡à (SAPLUS). The display reads Stns&Peripheral.
4. Enter the station number of the keystation you would like to program. The display reads nnn:nnn.
5. Press . The display reads Line access.
6. Press Ô until the display reads Netwk features.
7. Press . The display reads CLI assignment.
8. Press and enter the number of the line you want to program with settings for the station.
9. Press . The display reads Caller ID stn:N.
10. Press . The display reads Call log stn:.
11. Press CHANGE to select the setting: N (No) or Y (Yes).
12. Press ¨ to exit or Ô to continue in programming.
1st DisplayThe Commander NT system allows keystations to display call information. The 1st Display option lets you choose what call information is first displayed on that keystation. The options are Name, Numbr or Line. The default is Numbr .
Depending on the services you subscribe to, Call Display information may contain the number of the caller, or the name of the line in your Commander NT system that the call is on.
1. Place the programming overlay on any Advantage or Principal Keystation.
System Administration Manual P0906413 Issue 01

Network features / 183
2. Press Ä¥¥ÛßßÜÝÝ (CONFIG). The display reads Password:.
3. Press àÛàÞ¡à (SAPLUS). The display reads Stns&Peripheral.
4. Press . The display reads Show stn#:.
5. Enter the station number of the keystation you wish to program. The display reads nnn:nnn.
6. Press . The display reads Line access.
7. Press Ô until the display reads Netwk features.
8. Press . The display reads CLI assignment.
9. Press Ô. The display reads 1stDisplay.
10. Press CHANGE to choose Numbr , Line or Name.
On an incoming call, the display may show Unknown number if the information is not available from your telephone company. You may see Private number on the display if the caller blocks that information.
Auto called IDThis setting applies to Commander NT Keystations only. The Auto called ID (identification) momentarily shows the number of the called party on the display of a Commander NT Keystation. The default is No, the Auto called ID is not displayed.
1. Place the programming overlay on any Advantage or Principal Keystation.
2. Press Ä¥¥ÛßßÜÝÝ (CONFIG). The display reads Password:.
3. Press àÛàÞ¡à (SAPLUS). The display reads Stns&Peripheral.
4. Press . The display reads Show stn#:.
5. Enter the station number of the keystation you wish to program. The displays reads nnn:nnn.
6. Press . The display reads Line access.
7. Press Ô until the display reads Netwk features.
P0906413 Issue 01 System Administration Manual

184 / Network features
8. Press . The display reads CLI assignment.
9. Press Ô until the display reads Auto called ID:.
10. Press CHANGE to choose N (No) or Y (Yes).
11. Press ¨ to exit or Ô to continue in programming.
Log spaceLog space determines the number of items that can be stored in the Call log for each station.
1. Place the programming overlay on any Advantage or Principal Keystation.
2. Press Ä¥¥ÛßßÜÝÝ (CONFIG). The display reads Password:.
3. Press àÛàÞ¡à (SAPLUS). The display reads Stns&Peripheral.
4. Press . The display reads Show stn#:.
5. Enter the station number of the keystation you wish to program. The displays reads nnn:nnn.
6. Press . The display reads Line access.
7. Press Ô until the display reads Netwk features.
8. Press . The display reads CLI assignment.
9. Press Ô until the display reads Log Space.
10. Use , ADD, and REMOVE to redistribute the log space. There is no log space assigned by default.
Space must be available in the log pool to add space to a Call log. The maximum number of spaces available is 250. System-wide log space allocation is performed in Call log space under System programming.
System Administration Manual P0906413 Issue 01

Auto Attendant
The Auto Attendant feature must be activated by your technician using Software keycodes. See "Software keys" on page 53, for more information.
Initiate a Program Session when the Auto Attendant feature is enabled.
Do not use the Attendant station to initiate a programming session when the Auto Attendant feature is enabled.
If programming is entered from the attendant station:
• any new calls on the system will not ring on the attendant station and therefore will not answer the call.
• any existing call that has already been answered by the auto attendant will be placed on common hold once the greeting has been played and able to be retrieved from other stations.
You will be unable to enter programming from the attendant station with a call answered by the auto attendant or on common hold on the attendant station. The keystation displays Release all Calls.
Once the programming session is terminated, all new calls will be available as normal.
Unanswered calls ring back to other stations.
When the Auto Attendant transfers a call to a station that isn’t answered, the call rings back to the Prime station programmed for the line and to all stations with a ringing appearance for that line.
P0906413 Issue 01 System Administration Manual

186 / Auto Attendant
The optional built-in Automated Attendant feature automatically answers and directs incoming calls, which can reduce or eliminate the workload for the person who answers incoming calls for an office. The Auto Attendant carries out two tasks: System Answer, and Custom Call Routing (CCR).
Note: Ensure the programmed Attendant station has Do not Disturb on Busy set to No.
System AnswerThe System Answer feature simplifies the job of answering calls by making sure all calls are answered within a set number of rings. When calls go unanswered at the station monitored by System Answer (called the attendant station), Commander NT40 answers the call and plays a greeting. It then puts the call on hold until someone can retrieve it.
If the caller knows the station number he or she wants to reach, or is using the Commander NT40 remote features, they can dial while the System Answer greeting is playing.
System Answer monitors all external calls that ring on the attendant station, including lines that appear and ring or ring only, Intercom, Answer keys and external calls that have been transferred. After System Answer has played the greeting, the call will be put on hold at the same line indicator where it first appeared. The feature does not answer calls from internal stations.
All System Answer features apply to calls on all lines including DDI lines.
Custom Call Routing (CCR)The job of answering and transferring calls can be taken over by CCR. When someone calls on lines monitored by CCR, the system answers the call and plays a greeting you have recorded.
If assigned, CCR will answer calls on DDI lines. CCR will not answer calls on Auto answer lines.
CCR not only answers the call, it gives the caller a menu of places to direct the call. Callers using a tone dial telephone can then:
System Administration Manual P0906413 Issue 01

Auto Attendant / 187
• direct their call by pressing a digit as instructed by your greeting (for example, “to reach our salespeople, press 4”)
• access remote features
• reach an attendant by pressing a single digit
You can use two greetings with CCR: one for when your office is open and one for when it is closed. The business closed greeting may announce your office hours and give a digit to press to leave a message on an answering machine connected to a SLT Adaptor on the system, and callers can also dial a station number to reach someone who is working after hours.
Note: When the Business Closed Greeting is selected, the CCR menu is disabled.
Once a caller has dialled out of the CCR greeting, he or she will not be able to return and make another selection.
CCR groupsCCR allows callers to reach groups of stations by dialling a single digit they select from the audio menu. You create the CCR groups in programming.
When a call that is sent to a CCR group goes unanswered, it will be diverted according to the station programming that takes effect first.
For example, if a station in a group diverts to Voice Mail after two rings, it will divert the call from CCR to Voice Mail before the other stations in the CCR group that are programmed to divert after three rings. A CCR call will also be diverted by Divert on Busy or the Divert Immediate feature code. Be sure to program the stations in your CCR groups appropriately. If the stations in a group have conflicting programming, you will not be able to predict how calls are handled.
Direct station diallingBoth System Answer and CCR give the caller the opportunity to dial a station number or use remote feature access like direct inward system access (DISA). This means callers that know the station number of the person they are calling can dial it and be transferred automatically, without operator intervention, to that station.
P0906413 Issue 01 System Administration Manual

188 / Auto Attendant
Customising System Answer and CCRThe installer turns System Answer and CCR on for your system. They also assign which lines can be answered with CCR. Until this optional feature is turned on, the Auto Attendant features are not available.
It’s a good idea to plan how you will customise System Answer and CCR before you start programming:
• Decide which station will be the attendant station (where calls can be answered automatically and put on hold).
• Write down the greetings or scripts that you will record as the company greeting and business closed greeting (see examples in "Custom Call Routing (CCR)" on page 186).
• Organise your stations into groups and decide what number a caller will use to reach each group. Using the groups and numbers you have created, write down the greeting or “script” that will be heard as the CCR greeting.
• Decide how many times a call will ring before System Answer and CCR will answer. Be sure it will not conflict with voice mail or other auto attendant applications you may be using. If CCR lines ring at the attendant keystation, CCR and System Answer can also conflict.
• Use a programming session and feature codes to create your custom System Answer and CCR.
— Program the Attendant Station for System Answer and CCR (page 188).
— If System Answer is required, program the number of ring cycles before System Answer will answer a call (page 191).
— If CCR is required, program the number of ring cycles before CCR answers a call (page 192) and program stations to CCR Groups for caller selection (page 193).
— Record your customised Company greeting for System Answer and CCR (page 196).
— If CCR is required, record the customised Caller Menu and Business Closed greeting (page 196) and program the CCR destinations to CCR Groups for caller selection (page 197).
System Administration Manual P0906413 Issue 01
Auto Attendant / 189
— If required, activate System Answer (page 189).
— If required, activate CCR (page 190).
• Test both System Answer and CCR to make sure they are working properly.
• Make sure your installer has programmed your Commander NT40 to use the held line reminder tone. This will provide another indication that System Answer has placed a call on hold.
• An optional enhancement is available with System Answer and CCR if the system is equipped with supervised lines and supervised line cartridge. The system can detect if an external caller has hung up while their call is being processed by System Answer or CCR, and it automatically clears the call.
Turning System Answer on or off If optional Auto Attendant feature has been enabled, System Answer can be turned on and off at any station in the system. System Answer only handles calls that ring at the attendant station.
1. Press Ä¥¡ÜÚ. The display reads the current status of System Answer.
2. Press CHANGE and enter the System Administrator password or Basic password (the default passwords are ÛÜßÝß and ÛÛàÝÛ) to turn the feature on or off.
Because System Answer answers calls and then puts them on hold, the feature should be turned off when no one is at the attendant station to retrieve the calls.
Note: You can program the feature code for turning System Answer and CCR on or off on a memory key with an indicator at the attendant station. You will know that the feature is turned on when the indicator is lit at the attendant keystation.
P0906413 Issue 01 System Administration Manual

190 / Auto Attendant
Turning CCR on or off 1. Press Ä¥¡ÜÛ. The display reads the current
status of CCR.
2. Press CHANGE and enter the System Administrator password or Basic password (the default passwords are ÛÜßÝß and ÛÛàÝÛ) to select a setting: OFF, Bus. Open, or Bus. Closed.
See the section on recording greetings for a description of the Business Open and Business Closed greetings used with CCR (page 196).
Choosing the attendant stationProgramming allows you to choose a station to be the attendant station. External calls that go unanswered at this station are handled by System Answer. External callers answered by the CCR Menu can also select the Attendant station. If no menu option is selected, they will be transferred to the Attendant station.
1. Place the programming overlay on any Advantage or Principal Keystation.
2. Press Ä¥¥ÛßßÜÝÝ (CONFIG). The display reads Password:.
3. Press àÛàÞ¡à (SAPLUS). The display reads Stns&Peripheral.
4. Press Ô until the display reads System prgrming.
5. Press . The display reads Hunt groups.
6. Press Ô until the display reads Auto Attendant.
7. Press . The display reads Auto attend.
8. Press Ô until the display reads the station number of the current attendant keystation.
9. Press CHANGE and enter the station number you want to assign as the attendant station.
10. Press ¨ to exit or Ô to continue in programming.
System Administration Manual P0906413 Issue 01

Auto Attendant / 191
Setting the number of rings before System Answer answers a call
A ring cycle is defined as two bursts and then silence. It takes 3 seconds.
1. Place the programming overlay on any Advantage or Principal Keystation.
2. Press Ä¥¥ÛßßÜÝÝ (CONFIG). The display reads Password:.
3. Press àÛàÞ¡à (SAPLUS). The display reads Stns&Peripheral.
4. Press Ô until the display reads System prgrming.
5. Press . The display reads Hunt groups.
6. Press Ô until the display reads Auto Attendant.
7. Press . The display reads Auto attend.
8. Press Ô until the display reads System Answer.
9. Press . The display reads After:3 rings.
10. Press CHANGE until you see the appropriate number of ring cycles. Choices are 2, 3, 4, 5, 6, 7, 8, 9, 10, 11, 12. The default is 3 rings.
11. Press ¨ to exit or Ô to continue in programming.
If the system is busy answering multiple calls, the line will ring until System Answer is available to answer the call.
Programming CCR linesCustom Call Routing (CCR) enables calls on certain lines (including DDI lines) to be directed to a station or group of stations according to a numbered menu offered to a caller. Custom Call Routing (CCR) will not answer calls if the Answer mode for a line is set to Auto.
To choose what lines will be answered by CCR:
1. Place the programming overlay on any Advantage or Principal Keystation.
P0906413 Issue 01 System Administration Manual

192 / Auto Attendant
2. Press Ä¥¥ÛßßÜÝÝ (CONFIG). The display reads Password:.
3. Press àÛàÞ¡à (SAPLUS). The display reads Stns&Peripheral.
4. Press Ô until the display reads System prgrming.
5. Press . The display reads Hunt groups.
6. Press Ô until the display reads Auto Attendant.
7. Press . The display reads Auto Attend:.
8. Press Ô until the display reads CCR.
9. Press . The display reads After:3 rings.
10. Press Ô. The display reads CCR lines.
11. Press and enter the three digit line number.
12. Use CHANGE and Ô to choose which lines will be answered by the CCR feature. The options are Yes or No. The default setting is No.
Setting the number of rings before a caller hears the CCR greeting
A ring cycle is defined as two bursts and then silence. It takes 3 seconds.
1. Place the programming overlay on any Advantage or Principal Keystation.
2. Press Ä¥¥ÛßßÜÝÝ (CONFIG). The display reads Password:.
3. Press àÛàÞ¡à (SAPLUS). The display reads Stns&Peripheral.
4. Press Ô until the display reads System prgrming.
5. Press . The display reads Hunt groups.
6. Press Ô until the display reads Auto Attendant.
7. Press . The display reads Auto attend.
8. Press Ô until the display reads CCR.
9. Press . The display reads After:3 rings.
System Administration Manual P0906413 Issue 01

Auto Attendant / 193
10. Press CHANGE until you see the appropriate number of ring cycles. Choices are 2, 3, 4, 5, 6, 7, 8, 9, 10, 11, 12. The default is 3 rings.
11. Press ¨ to exit or Ô to continue in programming.
If both System Answer and CCR facilities are operational, lines programmed to ring at the Attendant Station and answered by CCR will be answered by which ever feature is set to the lowest number of ring cycles. If both features are operational and the settings for ring cycles are identical, both features will compete to answer the call, however, only one feature will be successful.
If the system is busy answering multiple calls, the line will ring until CCR is available to answer the call.
Adding or removing stations from a group used with CCR
The greeting you create for CCR Caller Menu tells a caller to press a number to reach a group of stations. You add or remove stations from these groups (CCR groups) in programming.
1. Place the programming overlay on any Advantage or Principal Keystation.
2. Press Ä¥¥ÛßßÜÝÝ (CONFIG). The display reads Password:.
3. Press àÛàÞ¡à (SAPLUS). The display reads Stns&Peripheral.
4. Press Ô until the display reads System prgrming.
5. Press . The display reads Hunt groups.
6. Press Ô until the display reads Auto Attendant.
7. Press Ô until the display reads System Answer.
8. Press . The display reads After:3 rings.
9. Press Ô until the display reads CCR groups.
10. Press and enter the CCR group number.
11. Press and enter the station number you want to add or remove from the group.
P0906413 Issue 01 System Administration Manual

194 / Auto Attendant
12. Press CHANGE to select the status of the station in the group: Assigned, Unassgnd.
13. Press ¨ to exit or Ô to continue in programming.
You can have a total of nine CCR groups. Each group can include up to 20 stations.
Using the pre-recorded greetingsPre-recorded greetings can be used whenever System Answer or CCR are turned on. Pre-recorded greetings can be turned off (not erased) and/or replaced with user-recorded substitutes.
If a pre-recorded greeting is turned off, all SA and CCR features that use that greeting will be affected.
When pre-recorded greetings are used, incoming callers at the attendant telephone hear the System Answer greetings. Lines that are set up to be answered by CCR play one of these pre-recorded greetings. They are:
• All of our operators are busy.
• If you know the station that you want, and are using a touch-tone telephone, please dial it now.
• Or, hold the line and your call will be answered as soon as possible.
• Thank you for calling.
‘Thank you for calling’ is heard when the caller does not respond to the CCR business closed greeting after it has been repeated, just before the system disconnects the caller.
Using customised greetings for System Answer and CCR
Commander NT40 allows users to make their own voice recordings for all the greetings used in System Answer and Custom Call Routing. A combination of pre-recorded greetings and user-recorded greetings can also be used to tell callers how their call is being handled.
System Administration Manual P0906413 Issue 01

Auto Attendant / 195
For customer greetings, users can create their own version or turn the greeting off completely. With system greetings, users can select either the system version, their own version, or they can turn the greeting off.
The following table lists the seven available recordings (A-G) and the features that use them.
Users have a total of 96 seconds of recording time to allocate to the 7 potential recordings. If a customer begins by recording a 15 second Company Greeting, then there will be (96-15=81) seconds available for the other remaining greetings. The maximum length of a single recording is 32 seconds. If a user exceeds the maximum time for a single recording, an error message and a tone will be given.
G reeting User recorded example or pre-recorded message if available (italics)
Source Used byfeature
A (Company greeting)
You have reached Bluebird Consulting.
User SA
CCR
B (Business closed)
Our offices are closed. Our business hours are 9 to 5, Monday to Friday.
User CCR
C (Caller menu)
To reach sales press 1, to reach a receptionist press 0.
User CCR
D (Thank you)
Good-bye.
Thank you for calling.
User or
Pre-recorded
CCR
E (Hold the line)
Wait a moment and someone will pickup.
Or, hold the line and your call will be answered as soon as possible.
User or
Pre-recorded
SA
CCR
F (Dial the station)
You can dial through if you know the station number.
If you know the station that you want, and are using a touch-tone phone, please dial it now.
User or
Pre-recorded
SA
CCR
G (Operators busy)
We can’t come to the phone right now.
All of our operators are busy.
User or
Pre-recorded
SA
P0906413 Issue 01 System Administration Manual

196 / Auto Attendant
A greeting that is turned off is not erased. The time used by the greeting will not be returned to the 96 second time pool.
User recordings are stored on the feature card and the recordings will be erased if the card is replaced. If the same card is removed and reinserted, the greetings are preserved. The user will have to re-record all user greetings when they upgrade to the new feature card.
System greetings are permanent and can never be erased.
FLASH memory degrades slightly each time a message is recorded. Typically, messages can be erased and written thousands of times. However, care must be taken to plan out what messages are to be recorded and how often, in order to reduce the number of re-recordings made over a long period of time. A warning will be given when the card has degraded significantly. This warning indicates that a new card should be obtained.
The pre-recorded system messages do not use any portion of the 96 seconds of total recording time. They cannot be erased, but they can be turned off or replaced with a user substitute.
For clear sound quality in your greetings, use the handset for recording greetings (not the handsfree microphone).
Recording customised greetings for System Answer and CCR
You can record your own versions of any user greetings and pre-recorded greetings. You can also turn off any user or pre-recorded greeting.
1. Press Ä¥¡ÜÜ and enter ÛÜßÝß (ADMIN).
2. The display reads Auto att. grtngs.
3. Press . The display reads Grtg A mode: User.
4. Press PLAY to play the company greeting (A).
5. Press REC to record a company greeting. As soon as you press REC the previous recording will be erased. Making a recording of less than 2 seconds duration will also erase a greeting.
System Administration Manual P0906413 Issue 01

Auto Attendant / 197
6. Press OK when you have completed your recording.
7. A company greeting is the first greeting your callers hear.
8. To continue recording messages, press NEXT, then REC to record the business closed greeting (B).
9. Press OK when you have completed your recording.
10. Example: ‘Our business hours are 8 a.m. to 5 p.m., Monday through Friday’.
11. To continue recording messages, press NEXT, then REC to record the caller menu greeting (C).
12. The greeting used with the caller menu indicates the destinations you have chosen for each digit.
Example: ‘To reach one of our sales agents, press 1. To contact our accounting office, press 2. To talk to an attendant, press 0. To repeat this menu, press *’.
13. Continue recording the remaining messages (D-G) if desired. Remember that some greetings are shared by both SA and CCR. Ensure that the recording is appropriate for both features.
14. Press ¨ to exit or Ô to continue programming.
Programming or changing CCR destinations 1. Press Ä¥¡ÜÜ and enter the System
Administrator password (the default password is ÛÜßÝß).
2. The display reads Auto att. grtngs.
3. Press NEXT. The display reads CCR Tree.
4. Press SHOW. The display reads Dial 0: Att.
5. Press CHANGE if you want to choose Attendant, None, CCR or grp. Press NEXT until the display reads Dial 0: and the current destination when the caller presses zero.
6. Press CHANGE to select the appropriate destination.
7. Each number from zero to nine and * can direct a call to the attendant telephone or one of the nine CCR groups. The * can be set up to make the system play the CCR greeting again (Repeat). If a digit is set to None, it has no destination.
P0906413 Issue 01 System Administration Manual

198 / Auto Attendant
8. Using NEXT and CHANGE, select the destinations for the remaining digits.
Testing your custom System Answer and CCRIf you have more than one external line, you can call in to hear your greetings. Dial the number used by external callers that rings at the attendant station or a line that is answered using CCR.
To call systems with only one external line, you will have to go to a telephone that is not connected to your system.
Fax switch featureThe Fax switch feature (available on Commander NT40 systems only) monitors incoming lines and automatically transfers calls to a fax when it hears fax tones. The Fax switch contains all of the required Fax tone detection and transfer abilities within the Commander NT40 system.
External devices between the PSTN and the Commander NT40 are not necessary, to monitor analogue and digital lines for Fax tones. If the Fax switch is configured, the Auto Attendant answers a call, the Fax switch feature turns on and monitors for fax calling tones.
The Fax switch feature allows for
• easy connection to the Commander NT40 system, through the I-SLTA port or through a SLTA connected to any TCM port.
Note: To prevent a Fax device from answering a line before the Auto Attendant answers, do not define the Appear and Ring or Ring settings for the SLTA.
• configuration of a system with just one incoming line, answered by an Auto Attendant, used for voice, data, and Fax services.
• Commander NT40 systems which have a mix of analogue and digital incoming lines. All of these line types, if answered by an Auto Attendant, can handle voice, data, and Fax services.
• configuration of a Hunt group that contains a collection of Fax devices. All Fax devices collected under one station number.
System Administration Manual P0906413 Issue 01

Auto Attendant / 199
Note: Hunt group mode must be to either Cyclical or Sequential. The use of Broadcast mode is not recommended.
Fax detectionThe Fax switch feature requires a Fax tone detector to listen to incoming lines. The Fax switch feature automatically transfer a call to a Fax machine when it hears Fax tones.
The Fax tone detector listens for the standard fax calling tone*. Fax machines emit fax calling tones to connect with another Fax machine or a device capable of handling Fax calls. The Fax tone detector listens for 0.5 seconds of the Fax frequency tone. Three seconds of silence (the absence of tone), followed by the detection of the Fax frequency tone again. The Fax detector requires up to seven seconds to determine if a call is a Fax call or not.
If the Fax tone detector detects a Fax call, the call is transferred to a Fax Stn # in the Commander NT40 system.
The Fax tone detector ceases to monitor for fax tones during a call when:
• there is no Fax call detection within the first seven seconds of a call, or
• a caller enters a Direct Inward Access (DIA) number.
The Fax tone detector can have one Fax Stn # programmed. If there is no Fax Stn # in the system, the Fax tone detector does not activate.
Note: A Fax tone detector cannot be used when the Internal modem is set to Fast and in use.
(* Fax calling tones (CNG) as described in ITU-T T.30. The system will detect these Fax calling tones down to a level of -27 dBM.)
Auto Attendant interactions with the Fax switchTo enable the Fax switch feature and the Auto Attendant to manually answer lines after a predefined number of rings, define a Fax Stn# and turn the Fax switch On for either Auto Attendant feature (System Answer (SA) or a Custom Call Routing (CCR)).
P0906413 Issue 01 System Administration Manual

200 / Auto Attendant
When the Fax switch is enabled in a Commander NT40 system
• the first Auto Attendant answered call provides a playback channel, tone dialling and Fax tone monitoring capabilities
• a second Auto Attendant answered call (while the first one continues) provides only a playback channel and tone dialling monitoring capabilities.
When the Auto Attendant answers two calls, the system does not provide Fax tone detection to the second call. The Auto Attendant cannot answer a third call while the Auto Attendant is supporting the first two answered calls. When the first call no longer requires Auto Attendant support, the Auto Attendant provides Fax tone detection to the second call. The Auto Attendant can answer a third call providing playback channel and tone dialling monitoring capabilities.
When the Fax switch is enabled, the tone detector limit of three prevents the Auto Attendant from servicing three calls at once. The Auto Attendant can answer three lines when the Fax switch is Off.
The Auto Attendant has the necessary transfer capabilities required by the Fax switch. With an incoming Fax call, the call is transferred to the appropriate station number for the Fax machine.
The Fax switch monitors any line type answered by an Auto Attendant. The functionalities a caller hears when the Auto Attendant answers, remain the same when the Fax switch is On. If a call is not a Fax call, the system provides call handling (Auto Attendant) to the caller.
The length of time before a user enters the first digit must be at least seven seconds in length. The length of time includes the period of the Auto Attendant greeting and the time waiting, after the greeting finishes. Seven seconds is the maximum amount of time required by the Fax switch to determine if a Fax machine is calling. If a user starts to enter digits (for example, DIA) the Fax tone detector stops and a call is transferred.
Programming the Fax switchTo enable the Fax switch feature, define a Fax station number and turn the Fax switch On for either Auto Attendant feature (System Answer (SA) or Custom Call Routing (CCR)).
System Administration Manual P0906413 Issue 01

Auto Attendant / 201
Programming the Fax station numberThe Fax switch allows one defined Fax Stn #, on the system. The user defines the Fax Stn # in the System Programming section.
1. Place the programming overlay on any Advantage or Principal Keystation.
2. Press Ä¥¥ÛßßÜÝÝ (CONFIG). The display reads Password:.
3. Press àÛàÞ¡à (SAPLUS). The display reads Stns&Peripheral.
4. Press Ô until the display reads System prgrming.
5. Press . The display reads Hunt groups.
6. Press Ô until the displays reads Fax stn:.
7. Press the CHANGE display key. Enter the station number you need the Fax switch feature to identify. The default is None .
The Fax switch identifies one station number and does not support the unique definition of a number of Fax devices. Through the use of the defined station number, a programmable option exist to create a collection of Fax devices. To support a collection of Fax devices
• use the Divert on Busy setting on a keystation.
• use the Hunt group functionality to collect all Fax devices under one station number.
Programming the Fax switch in Auto AttendantThe Fax switch default for both the CCR and SA features is Off.
System Answer 1. Place the programming overlay on any Advantage or Principal
Keystation.
2. Press Ä¥¥ÛßßÜÝÝ (CONFIG). The display reads Password:.
3. Press àÛàÞ¡à (SAPLUS). The display reads Stns&Peripheral.
4. Press Ô until the display reads System prgrming.
P0906413 Issue 01 System Administration Manual

202 / Auto Attendant
5. Press . The display reads Hunt groups.
6. Press Ô until the display reads Auto Attendant.
7. Press . The display reads Auto attend:Off.
8. Press Ô until the display reads System Answer.
9. Press . The display reads After: 3 rings.
10. Press Ô. The display reads Fax Switch:Off.
11. Press the CHANGE to select On or Off .
CCR1. Place the programming overlay on any Advantage or Principal
Keystation.
2. Press Ä¥¥ÛßßÜÝÝ (CONFIG). The display reads Password:.
3. Press àÛàÞ¡à (SAPLUS). The display reads Stns&Peripheral.
4. Press Ô until the display reads System prgrming.
5. Press . The display reads Hunt groups.
6. Press Ô until the display reads Auto Attendant.
7. Press . The display reads Auto attend:Off.
8. Press Ô until the display reads CCR.
9. Press . The display reads After: 3 rings.
10. Press Ô until the display reads Fax Switch:Off.
11. Press the CHANGE to select On or Off .
Because Custom Call Routing allows for more flexibility in automatically answering and transferring calls, CCR is best for the Fax detection setting. Custom Call Routing, different from System Answer, helps businesses that have no dedicated attendant answering calls.
System Administration Manual P0906413 Issue 01

Remote access
Remote access packages enable you to control the remote use of Commander NT40 line pools and the paging feature. Packages are also used to control remote administration and monitoring of the system.
You create a Remote access package by defining which of your system line pools it will be able to access and whether it can use Page, line pools, and remote administration. You then assign the package to individual lines (using Rem line access) and to a particular Class of Service password (Remote package in COS passwords).
Remote access packages1. Place the programming overlay on any Advantage or Principal
Keystation.
2. Press Ä¥¥ÛßßÜÝÝ (CONFIG). The display reads Password:.
3. Press àÛàÞ¡à (SAPLUS). The display reads Stns&Peripheral.
4. Press Ô until the display reads System prgrming.
5. Press . The display reads Hunt groups.
6. Press Ô until the display reads Remote access.
7. Press . The display reads Rem access pkgs.
8. Press . The display reads Show pkg:.
9. Use the dial pad to select the Remote access package you want to program.
10. Press ¨ to exit or Ô to continue in programming.
P0906413 Issue 01 System Administration Manual

204 / Remote access
LinePool access1. Place the programming overlay on any Advantage or Principal
Keystation.
2. Press Ä¥¥ÛßßÜÝÝ (CONFIG). The display reads Password:.
3. Press àÛàÞ¡à (SAPLUS). The display reads Stns&Peripheral.
4. Press Ô until the display reads System prgrming.
5. Press . The display reads Hunt groups.
6. Press Ô until the display reads Remote access.
7. Press . The display reads Rem access pkgs.
8. Press . The display reads Show pkg:.
9. Use the dial pad to select the Remote access package you want to program.
10. Press . The display reads LinePool access.
11. Press and CHANGE.
12. Press Ô to select the Line Pool access setting for each pool: N (No) or Y (Yes).
13. Press ¨ to exit or Ô to continue in programming.
Remote page1. Place the programming overlay on any Advantage or Principal
Keystation.
2. Press Ä¥¥ÛßßÜÝÝ (CONFIG). The display reads Password:.
3. Press àÛàÞ¡à (SAPLUS). The display reads Stns&Peripheral.
4. Press Ô until the display reads System prgrming.
5. Press . The display reads Hunt groups.
6. Press Ô until the display reads Remote access.
7. Press . The display reads Rem access pkgs.
8. Press . The display reads Show pkg:.
System Administration Manual P0906413 Issue 01

Remote access / 205
9. Use the dial pad to select the Remote access package you want to program.
10. Press . The display reads LinePool access.
11. Press Ô. The display reads Remote page:.
12. Press CHANGE to select the Remote page setting: N (No) or Y (Yes).
13. Press ¨ to exit or Ô to continue in programming.
Remote administration1. Place the programming overlay on any Advantage or Principal
Keystation.
2. Press Ä¥¥ÛßßÜÝÝ (CONFIG). The display reads Password:.
3. Press àÛàÞ¡à (SAPLUS). The display reads Stns&Peripheral.
4. Press Ô until the display reads System prgrming.
5. Press . The display reads Hunt groups.
6. Press Ô until the display reads Remote access.
7. Press . The display reads Rem access pkgs.
8. Press . The display reads Show pkg:.
9. Use the dial pad to select the Remote access package you want to program.
10. Press . The display reads LinePool access.
11. Press Ô until the display reads Remote admin:.
12. Press CHANGE to select the Remote administration setting: N (No) or Y (Yes).
13. Press ¨ to exit or Ô to continue in programming.
Remote monitor1. Place the programming overlay on any Advantage or Principal
Keystation.
2. Press Ä¥¥ÛßßÜÝÝ (CONFIG). The display reads Password:.
P0906413 Issue 01 System Administration Manual

206 / Remote access
3. Press àÛàÞ¡à (SAPLUS). The display reads Stns&Peripheral.
4. Press Ô until the display reads System prgrming.
5. Press . The display reads Hunt groups.
6. Press Ô until the display reads Remote access.
7. Press . The display reads Rem access pkgs.
8. Press . The display reads Show pkg:.
9. Use the dial pad to select the Remote access package you want to program.
10. Press . The display reads LinePool access.
11. Press Ô until the display reads Remote monitor:.
12. Press CHANGE to select the Remote monitor setting: N (No) or Y (Yes).
13. Press ¨ to exit or Ô to continue in programming.
Remote line accessEnter the number of the line that will be accessible by remote users.
L001 Remote package1. Place the programming overlay on any Advantage or Principal
Keystation.
2. Press Ä¥¥ÛßßÜÝÝ (CONFIG). The display reads Password:.
3. Press àÛàÞ¡à (SAPLUS). The display reads Stns&Peripheral.
4. Press Ô until the display reads System prgrming.
5. Press . The display reads Hunt groups.
6. Press Ô until the display reads Remote access.
7. Press . The display reads Rem access pkgs.
8. Press Ô. The display reads Rem line access.
9. Press . The display reads Show line:___.
10. Press Ô. The display reads L001:Rem pkg 00.
System Administration Manual P0906413 Issue 01

Remote access / 207
11. Press CHANGE and enter the number of the Remote access package that will apply to remote use of the line.
12. Press ¨ to exit or Ô to continue in programming.
Remote access packages defaults
You can use COPY and the dial pad to copy settings from one remote package to another.
The Line Pool access display reads an alphabetic line pool identifier, followed by a numeric Line Pool access code in brackets, for example, Pool A (9): N. If no access code has been identified, there is nothing between the brackets, for example, PoolA ( ): N.
Remote package 00 is the default setting for the Remote package setting. It permits no access to line pools or to Remote paging. Unlike packages 01 to 15, package 00 cannot be changed. You can define up to 15 Remote access packages (01 to 15).
For remote users who call into the Commander NT40 to use Commander NT40 lines for calling out, the remote restrictions on the incoming line and line restrictions on the outgoing still apply.
Parameter Square PBX Hybrid
Package 00 Prohibits remote access to line pools, Page, remote monitoring and administration. Cannot be changed.
Package 01
Line Pool access Y for Pool AN for Pools B and C
Remote page, administration, and monitoring
No
Packages 02 - 15
Line pool access
N for Pools A to C
Remote Page, administration and monitoring
No
P0906413 Issue 01 System Administration Manual

208 / Remote access
System Administration Manual P0906413 Issue 01

Maintenance
Beginning a Maintenance session
Maintenance overviewA Maintenance session helps you diagnose problems that may occasionally arise within the Commander NT system.
The Maintenance section of programming has three headings available for System Administrator programming.
You can run a Maintenance session from any working Commander NT Advantage or Principal Keystation. Only one person at a time can access a Maintenance session. Photocopy the System Administration log found at the end of this chapter, and use it to record maintenance information.
Checking the system version of the softwareSystem version tells you the version number of the system processor software found in the Feature card. The release version can be used to trace a software fault if one occurs. Write the system processor version number in the maintenance records.
1. Place the programming overlay on any Advantage or Principal Keystation.
2. Press Ä¥¥ÛßßÜÝÝ (CONFIG). The display reads Password:.
System version Displays the version number of the System Processor software.
Clear lines Clears a hung line. See "Clearing a hung line" on page 214 for more information
Sys admin log Displays a list of system initialisations, programming sessions, invalid password attempts and password changes.
Remote monitor
P0906413 Issue 01 System Administration Manual

210 / Maintenance
3. Press àÛàÞ¡à (SAPLUS). The display reads Stns&Peripheral.
4. Press Ô until the display reads Maintenance.
5. Press . The display reads System version.
6. Press . The display reads the version number of the system processor.
7. Write the system processor version number in the appropriate maintenance record.
8. Press ¨ to exit or Ô to continue in programming.
System administration log recordYou can check under the Sys admin log heading to find a list of administrative events performed on Commander NT. Use the following table to record these log items whenever you run a Maintenance session.
1. Place the programming overlay on any Advantage or Principal Keystation.
2. Press Ä¥¥ÛßßÜÝÝ (CONFIG). The display reads Password:.
3. Press àÛàÞ¡à (SAPLUS). The display reads Stns&Peripheral.
4. Press Ô until the display reads Maintenance.
5. Press . The display reads System version.
6. Press Ô until the display reads Sys admin log.
7. Press . The display reads Items in log:.
8. Press Ô and Ò to move down or up the list of event codes.
9. Write the System admin items in the log on page 211.
10. Press ¨ to exit or Ô to continue in programming.
System Administration Manual P0906413 Issue 01

Maintenance / 211
System administration logSys admin log
Log item Time of log item Number of repetitions
:
:
:
:
:
:
:
:
:
:
:
:
:
:
:
:
:
:
:
:
:
:
:
:
:
:
:
Time and date that log was checked : / /
P0906413 Issue 01 System Administration Manual

212 / Maintenance
System Administration Manual P0906413 Issue 01

Troubleshooting
On occasion you may encounter a problem with your Commander NT either from internal or external causes.
You need to know:
• about the alarm station that displays when there is a problem with the system
• about recognising and clearing hung lines
• about power failures and what happens with the system.
Using the alarm stationAn alarm station displays Commander NT40’s alarm codes, should they occur. It must be a Commander NT Keystation with a two-line display (Advantage or Principal Keystation) that the installer has assigned as an alarm station.
Reporting and recording alarm codesIf there is a problem, the Commander NT generates messages called alarm codes on an Alarm station. The Installer assigned a Commander NT Keystation with a double line display (Advantage or Principal) to be the Alarm station.
If an alarm message appears on the alarm station’s display
1. Record the alarm number.
2. Press TIME and record the time and date displayed.
3. Call the Commander Customer Response Centre at1 800 809 882 and report the alarm code.
4. After speaking to the centre, press CLEAR.
P0906413 Issue 01 System Administration Manual
214 / Troubleshooting
Clearing linesA line is hung when it remains busy even though no conversation or data communication is taking place, and it cannot be disconnected by normal means. Lines connected to a device such as an answering machine, fax machine or modem can become hung.
It is a matter of judgement to decide that a line is hung and not simply in use. When a line is busy, you see a solid indicator next to the line key and the message Line in use when you attempt to select the line.
For a line that is the only line in a line pool, indications that the line is busy are a solid indicator next to a programmed line pool key and the message No free lines. For a line that is one of several lines in a line pool, there is no direct indication that the line is busy as long as other lines in the line pool are free. The indicator next to the line pool key and the No free lines message appear only when all lines in a line pool are busy. If one or more lines in a line pool become hung, these busy indications will appear with greater frequency than normal.
If you ensure that all lines assigned to line pools also appear individually on at least one station in the system, it will be much easier to detect hung lines. If network lines become hung regularly, this indicates a problem with your network configuration.
Clearing a hung line1. Place the programming overlay on any Advantage or Principal
Keystation.
2. Check the line number of the hung line using Ä ¥â (the Key Inquiry feature).
3. Press Ä¥¥ÛßßÜÝÝ (CONFIG). The display reads Password:.
4. Press àÛàÞ¡à (SAPLUS). The display reads Stns&Peripheral.
5. Press Ô until the display reads Maintenance.
6. Press . The display reads System version.
7. Press Ô. The display reads Clear lines.
System Administration Manual P0906413 Issue 01

Troubleshooting / 215
8. Press . The display reads the number of the first busy line in the system, followed by the time, in hours and minutes, that the line has been busy. If there are no hung lines, the display reads No busy lines for a short time, then Clear lines.
9. If this is not the line you want to clear, press Ô until the line you want to clear is displayed.
10. Press CLEAR to disconnect the line. The display confirms that the line has been cleared.
11. Press ¨ to exit or Ô to continue in programming.
Power failureIf the mains power fails, your Commander NT Main Equipment maintains its programming for a period of three days. Keystations also keep their user preferences.
Power-fail keystationEach analogue line card installed in the Commander NT Main Equipment (ME) only provides one power-fail connection at the Cable Point.
The power-fail connection is an analogue phone (not a Commander NT Keystation) that functions independently of the Commander NT system. You can use the power-fail phone only when your Commander NT system is disconnected or without power. The power-fail phone is usually located near the Commander NT ME. If there is no power-fail phone next to the ME, plug a standard analogue phone into the power-fail phone socket located near the ME.
The power-fail phone facility is not supported on an ISDN (BRA) loop. Commander NT customers with digital exchange lines who require power-fail phones, have the following options:
• add analogue exchange lines to the system
• install an uninterruptable power supply (UPS) stand-by power unit for the Commander NT.
P0906413 Issue 01 System Administration Manual

216 / Troubleshooting
System Administration Manual P0906413 Issue 01

Testing
Testing the keystationIf you suspect something is wrong with a key, the speaker, the displays, or some other part of the Commander NT Keystation hardware, you can do a quick test to see which part of the keystation is broken.
Note: Ensure that the function of a key matches its label by pressing Ä¥âand then the key to see its function.
You can end the keystation testing session anytime by pressing ¨ or Ä unless you are testing those keys. The test feature will time-out after 30 minutes of no activity.
Testing the keystation displayUse a display test if you suspect that one of the indicators on the keystation is not working.
1. Display test is the first display you will see after pressing Ä¡âÞ.
2. Press TEST or ú to start a display test.
3. Adjust the contrast for the keystation display so you will be able to see the test results clearly. Enter a number to change the contrast or press DOWN and UP.
4. Press OK or ú to start the test.
During the test, the display should be filled with small, dark lines and all the indicators next to the keys on the keystation should be turned on. Any Busy Lamp Field (BLF) displays or DSS Consoles that are attached to the keystation should also be completely lit. You will lose any information that was showing on the BLF before the test started.
Pressing any key ends the test.
P0906413 Issue 01 System Administration Manual

218 / Testing
Testing the keystation keys1. Press Ä¡âÞ, then £ or NEXT.
2. Press TEST or ú to start a key test.
3. Press key to see its function. If the key you pressed uses an indicator, it should also turn on when you test the key.
4. Pressing the ¨ key puts Rls key on the display briefly and returns you to the Key test display.
Testing the speaker in the keystation handsetThe handset test is not available if you have a headset plugged into the keystation.
1. Press Ä¡âÞ, then £ or NEXT twice. The display reads Handset test.
2. Press TEST or ú to start a handset test.
3. Pick up the handset and listen. You should hear dial tone through the handset at a maximum volume. The volume is reset to maximum only while the test is going on.
Pressing any key or hanging up ends the test.
Testing the keystation headsetThe headset test is not available to keystations that do not have a headset jack or a headset plugged in.
1. Press Ä¡âÞ, then £ or NEXT until the display reads Headset test.
2. Press TEST or ú to start a headset test. You should hear dial tone through the headset. The volume will be reset to a default level during the test.
Pressing any key ends the test.
Testing the keystation speaker1. Press Ä¡âÞ, then £ or NEXT until the display
reads Speaker test.
2. Press TEST or ú to start a speaker test.
System Administration Manual P0906413 Issue 01

Testing / 219
You should hear page tone through the keystation speaker at the maximum volume. The volume returns to its previous setting when you end the test.
Pressing any key ends the test.
Testing the power supply to a keystation1. Press Ä¡âÞ, then £ or NEXT until the display
reads Power test.
2. Press TEST or ú to start a power supply test.
You should see all the indicators on the keystation go on and hear ringing at maximum volume. When the test has ended, the display should briefly show Power OK.
The test lasts for five seconds or until you press a key.
P0906413 Issue 01 System Administration Manual

220 / Testing
System Administration Manual P0906413 Issue 01

Section III:Using keystation features
P0906413 Issue 01 System Administration Manual

222 /
System Administration Manual P0906413 Issue 01

About Commander NT Keystations
Commander NT is both simple and flexible. You can use many features with just a few key presses and see what is happening by reading the keystation display. You can choose which of its features you want to have available, make them work the way that suits you best, and assign the features you use most to the keys on your keystation.
The system time and date appears on the display of idle Commander NT Keystations.
Principal KeystationThe Principal Keystation has a double line display, three display keys, 24 memory keys with indicators, and handsfree capability.
P0906413 Issue 01 System Administration Manual

224 / About Commander NT Keystations
Advantage KeystationThe Advantage Keystation has a double line display, three display keys, 10 memory keys with indicators, 12 dual-memory keys without indicators, and handsfree capability.
Standard KeystationThe Standard Keystation has a single line display, eight memory keys with indicators, and handsfree capability.
Economy KeystationThe Economy Keystation has a single line display and a single memory key with no indicator.
System Administration Manual P0906413 Issue 01

About Commander NT Keystations / 225
Because the Economy Keystation does not have any line keys, it works differently from other Commander NT Keystations. Where other keystations may require you to select a line key to answer a call, on the Economy Keystation you simply pick up the handset. Where other keystations require you to select a line key to take a call off hold, you press ú on the Economy Keystation. The Economy Keystation cannot have a Handsfree/Mute key and is therefore not suitable for a headset. You will find special instructions for the Economy Keystation in some feature descriptions.
M7000 Keystation
The M7000 Keystation does not have any line keys. To answer a call with the M7000 Keystation, lift the handset. To place a call on hold you press the ³ key and press ³ key again to connect the call. The M7000 Keystation does not have a Handsfree/Mute key.
The M7000 Keystation is commonly used with the Hospitality Services feature.
P0906413 Issue 01 System Administration Manual

226 / About Commander NT Keystations
Direct Station Select (DSS) ConsoleThe DSS Console is useful for receptionists who handle a lot of calls. A DSS Console provides 48 additional memory keys for a Principal Keystation.
Busy Lamp Field (BLF) Display (Advantage Keystation only)
The BLF Display allows an attendant to monitor whether keystations are busy or not. It connects to the Advantage Keystation and provides indicators for the Advantage’s dual-memory keys.
Release keyPressing ̈ ends a call. You do not have to put the handset down. ¨ also ends feature programming. While you are on a call, do not press ¨ to end a feature you are using. If you do, you disconnect the call. Press Ä instead.
System Administration Manual P0906413 Issue 01

Customising a keystation
Dialling modeCommander NT Keystations support three dialling methods. All three methods let you dial a call without picking up the handset. The special features of the Automatic dial and Predial methods are available only when you dial without picking up the handset.
• Standard dial : You make a call by selecting a line and dialling the number. If you have a Prime line, it is selected automatically when you lift the handset or press ©.
• Automatic : If you have a Prime line assigned to your keystation, you can dial a number without selecting a line. Your Prime line is selected as soon as you start dialling a number. Automatic dial does not work if your keystation has no Prime line or if the Prime line is in use. Keystations connected to a Single Line Telephone (SLT) Adaptor cannot use Automatic dial.
• Predial : Allows you to enter a telephone number, check it, then change it before actually making the call. The call is not dialled until you select a line or line pool or pick up the handset.
You can Predial both external and internal numbers. You must, however, select the correct type of line (external or internal) for the type of number you have entered. If all the lines on your keystation are busy, you will not be able to enter a telephone number. If your keystation starts ringing while you are pre-dialling a number, you can stop the ringing by turning on Do Not Disturb (Ä¡Þ). This does not affect numbers you are entering.
Setting the dialling method of your keystation1. Press Ä¥¡Û.
2. Press £ or NEXT to choose Automatic dial, Predial, or Standard dial.
3. Press ¨, ú or OK to select the displayed dial mode.
P0906413 Issue 01 System Administration Manual

228 / Customising a keystation
Note: Standard Dial will not dial without lifting the handset on an Economy Keystation and M7000 Keystation. If you have an Economy Keystation or M7000 Keystation, use the Automatic dial or Predial modes for dialling without lifting the handset.
The dialling modes feature code cannot be programmed to a memory key.
Display contrastYou can adjust the contrast on your keystation display to make it easier to read.
1. Press Ä¥à. The display reads Contrast level 4.
2. Press a number on the dial pad for the contrast level you want or if you have a two-line keystation, press the UP or DOWN to adjust the contrast.
3. Press ¨, ú or OK to set the new contrast level.
Key InquiryYou can check the function of any line, Intercom, or memory key on your Commander NT Keystation or determine the station number.
Ensure that the function of a key matches its label by pressing Ä¥â and then the key to display its function. On the Economy Keystation, Key Inquiry shows your station number followed by the function assigned to your single memory key.
To find out your station number, use the key Inquiry feature (Ä¥â) on an intercom key.
Displays001 Line001 SHOW OK
The display reads the number and name of the line. Press SHOW to view the redirection status of the line.
123456789012345É VIEW OK
Press £ or press VIEW‚ or áVIEW to view a number that is too long to fit on the display. Press ú or OK when you are done.
System Administration Manual P0906413 Issue 01

Customising a keystation / 229
Checking the function of a key1. Press Ä¥â.
2. Press the key you want to know about.
The display reads what has been programmed for the key.
Checking your station number1. Press Ä¥â.
2. Press Æ. The display reads your station number.
Labelling keys on the keystationAfter programming a key on your keystation you may wish to label it or cap it with one of the pre-labelled key caps. When you are labelling or removing a key cap, activate Key Inquiry Ä¥â first so that you won’t accidentally activate a feature.
Note: On the Economy Keystation, Key Inquiry shows your station number followed by the function assigned to your single memory key.
To remove a keycap, slip the fingernails of your index fingers under each end of the keycap and pull up until it pops off. If you do not have a printed keycap to replace it, you can write the name in the blank label space beside the key (on the Principal, Standard, Economy and M7000 Keystations).
21<SETNAME>NEXT VIEWâ
The display reads the directory number of the keystation, and the assigned name. Press NEXT to see the first line assigned to ring at the intercom key.
<Feature name> SHOW OK
The name of the feature assigned to a key is displayed when you press the key. Press £ or SHOW for additional information.
Press a key EXIT
Press the key you want to check. Press Ä or EXIT when you are finished.
P0906413 Issue 01 System Administration Manual

230 / Customising a keystation
Moving line keysYou can move exchange lines to different keys on your keystation. Use this feature to arrange your lines as you prefer.
1. Press Ä¥¡Ú.
2. Press the key you want to move the line from.
3. Press the key you want to move the line to.
4. Press Ä or QUIT when you are finished moving lines.
Displays
Ring typeTo help you recognise which keystation is ringing in an open office you can choose one of four distinctive rings for your keystation.
1. Press Ä¥ß.
2. Press Ú, Û, Ü, Ý or NEXT. You hear the selected ring for two seconds.
3. Repeat until you hear the ring you prefer then pressú or OK. The display briefly reads New ring stored.
Exchanged The two keys you selected have exchanged position.
Invalid location You have tried to move a line to a key that cannot be used as a line key, such as an intercom key, Handsfree/Mute key, or an Answer key.
Move line from: QUIT
Press the key of the line you want to move. Press Ä or QUIT when you have finished moving lines.
Move line to: QUIT
Press the key you want to move the line to. Neither of the keys is erased. The lines, or the line and feature, simply switch places.
Press a line The key you are trying to move is not a line key. If you are trying to switch a line and a feature, move the line to the feature key and not the feature key to the line.
System Administration Manual P0906413 Issue 01

Customising a keystation / 231
Ring volumeYou can adjust the volume level of your keystation’s ring. Adjusting the ring volume does not affect other volume levels.
1. Press Ä¥¡â to make the keystation ring.
2. Press à to adjust the volume up or down.
Customising the M7000 Keystation
Programming M7000 memory keysThe M7000 Keystation has 4 programmable keys. Features programmed on the M7000 Keystation’s programmable keys have the following restrictions:
• do not have a display for information or instructions
• do not have line or station keys
To program standard features:
External autodial 1. Press ²¥Ú.
2. Press the key you want to programme.
3. Enter the telephone number.
4. Press the ³ key.
Internal autodial (DSS) 1. Press ²¥Û.
2. Press the key you want to programme.
3. Enter the telephone number.
Feature access key 1. Press ²¥Ü.
2. Press the key you want to program.
3. Press ² and the code you wish to programme.
P0906413 Issue 01 System Administration Manual

232 / Customising a keystation
Personal Speed Dial programming1. Press ²¥Ý.
2. Enter the speed dial code.
3. Enter the telephone number.
4. Press the ³ key.
Ring Type programming1. Press ²¥ß.
2. Press 1, 2, 3 or 4 to select the Ring type desired.
3. Press the ³ key.
M7000 tonesSince the M7000 Keystation does not have a display you will hear the following tones:
• stuttered dialtone for Do Not Disturb and Divert
• single, low frequency command input tone
• single, high frequency confirmation tone
Note: The lamp shows a solid light if there is a message from a Direct-Dial station or a Voicemail message for an M7000 Keystation.
System Administration Manual P0906413 Issue 01

Using personal features
Background musicIf an external music source has been connected to your Commander NT, this feature allows you to play music over your keystation speaker.
1. Press Ä¡ß.
The music pauses while you make or answer a call.
To cancel, press Ä£¡ß.
Do Not DisturbStations that are members of a hunt group can temporarily leave a hunt group by activating this feature. Hunt group calls arriving while a station is in Do Not Disturb mode will be routed to the next member in the hunt group. Do Not Disturb does not make a Hunt group busy and trigger overflow conditions.
Stopping calls from ringing at your keystation using Do Not Disturb (DND)
You can stop calls from ringing at your keystation by pressing Ä¡Þ. The display reads Do not disturb.
Only Priority Calls ring at your keystation. A line key will flash when you receive a call, but your keystation does not ring.
Refusing to answer a callWhile you are on a call, you can refuse to answer a second call (including a Priority Call).
Press Ä¡Þ while your keystation is ringing.
Cancelling Do Not Disturb Press Ä£¡Þ. The display briefly shows Allow calls. Your keystation now receives calls normally.
P0906413 Issue 01 System Administration Manual

234 / Using personal features
Using Do Not DisturbOnce you turn Do Not Disturb on, calls are diverted to the Prime station only if there is no other keystation on which the line appears. If there is another keystation that shares the same line, the call may be answered by that person.
Do Not Disturb also prevents voice calls from alerting at your keystation. Voice calls are presented as normal intercom calls.
User Speed Dial codesYou can quickly dial external telephone numbers that have been programmed onto Speed Dial codes. Speed Dial codes
• 01 to 70 are programmed for the entire system by you and can be used on any keystation in the Commander NT system
• 71 to 94 are personal and may be programmed differently at each Commander NT Keystation by the user
Speed dial numbers are generally subject to any call barring restrictions that have been programmed in the Commander NT system.
Using Speed DialCommander NT provides two types of speed dialling: system and personal. System Speed Dial programming allows you to assign two-digit Speed Dial codes to the external numbers your colleagues call most frequently. user speed dial programming allows individuals to program their own Speed Dial numbers.
Speed Dial numbers are subject to the same restriction filters as regularly dialled numbers. You can program system Speed Dial numbers to bypass dialling restrictions.
Speed Dial numbers may include host system signaling codes.
System Speed Dial codes numbered from 01 to 70 are intended for system-wide use. Speed Dial codes from 71 to 94 are for personal use and can be individually programmed at each Commander NT Keystation.
System Administration Manual P0906413 Issue 01
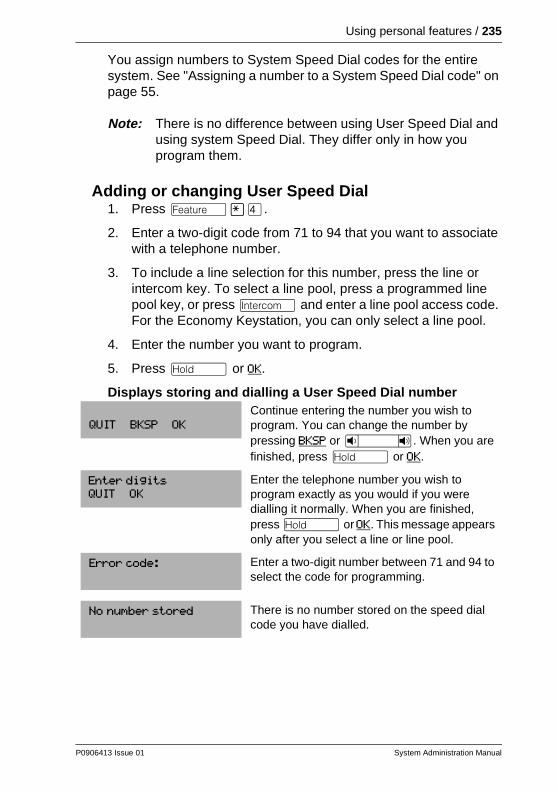
Using personal features / 235
You assign numbers to System Speed Dial codes for the entire system. See "Assigning a number to a System Speed Dial code" on page 55.
Note: There is no difference between using User Speed Dial and using system Speed Dial. They differ only in how you program them.
Adding or changing User Speed Dial1. Press Ä¥Ý.
2. Enter a two-digit code from 71 to 94 that you want to associate with a telephone number.
3. To include a line selection for this number, press the line or intercom key. To select a line pool, press a programmed line pool key, or press Æ and enter a line pool access code. For the Economy Keystation, you can only select a line pool.
4. Enter the number you want to program.
5. Press ú or OK.
Displays storing and dialling a User Speed Dial number
QUIT BKSP OK
Continue entering the number you wish to program. You can change the number by pressing BKSP or Ã. When you are finished, press ú or OK.
Enter digits QUIT OK
Enter the telephone number you wish to program exactly as you would if you were dialling it normally. When you are finished, press ú or OK. This message appears only after you select a line or line pool.
Error code: Enter a two-digit number between 71 and 94 to select the code for programming.
No number stored There is no number stored on the speed dial code you have dialled.
P0906413 Issue 01 System Administration Manual

236 / Using personal features
Making a Speed Dial callTo make a call using a personal or system Speed Dial code:
1. Press Äâ.
2. Enter the appropriate two-digit Speed Dial code (01–94).
Program and HOLD On the Economy or Standard only, if you want to program a line or line pool selection for this speed dial number, select the line or line pool. Otherwise, enter the telephone number exactly as you would if you were dialling it normally. When you are finished, press ú.
Program and OK QUIT OK
If you want to program a line or line pool selection for this speed dial number, select the line or line pool. Otherwise, enter the telephone number you wish to program exactly as you would if you were dialling it normally. When you are finished, press OK.
Select a line There is no line associated with the speed dial number you are trying to use. Select a free exchange line or line pool and enter the speed dial feature code again.
Unknown number The system cannot dial the number stored. Reprogram the number.
Speed dial> Enter a two-digit number between 01 and 94 to select the code for dialling.
No Free LinesLATER
All lines are busy. Press LATER, then YES to have the system notify you when a line is free.
System Administration Manual P0906413 Issue 01

Answering calls
Answering a callWhen a call rings at the keystation, pick up the handset or press © to connect the call.
Privacy feature (external calls only)Lines in your system can be programmed to have automatic privacy. If a line is programmed with automatic privacy, only one person at a time can use the line. If a line is not programmed with automatic privacy, anyone with the line assigned to their keystation can join your call by pressing the line key. Should another keystation join your call, you hear a tone and see a message on the keystation display. A keystation cannot join a call without this tone being heard.
If a line is not programmed with automatic privacy, you can still use the privacy feature by pressing Ä¡Ü after connecting an external call.
Note: Privacy control cannot be used on internal or conference calls.
Creating a conference by releasing PrivacyIf a line is programmed with automatic privacy, you can turn privacy off to allow another person with the same line to join in your conversation and form a conference. All the rules applicable to a conference apply, except there is only one line in use, instead of the normal two. This means that you cannot split a conference that was set up by releasing Privacy.
1. After connecting an external call, press Ä¡Ü.
2. Tell the other person to press the line button and join your conversation.
Only two Commander NT Keystations in addition to the external caller can take part in this kind of conference.
P0906413 Issue 01 System Administration Manual

238 / Answering calls
Answering the next queued callAn attendant who has many calls coming in at once can use Call Queuing to help them answer the calls in order. When there is more than one call ringing, you can answer the call that has been ringing longest. If you are already on an incoming call, it is put on hold and the next longest waiting call is automatically connected.
1. After you pick up the handset, press Ä¡âÚ.
Answering hunt group callsThe three hunt group distribution modes allow you to customise how hunt group calls are distributed in your office.
In Broadcast mode, a single incoming call will ring simultaneously at all the stations in a group. In a busy office you might have three receptionists in a hunt group. Each receptionist has a hunt group button on their keystation so incoming calls alert at all three keystations, if available, and can be answered by any one of the receptionists. The other two keystations do not track the call.
The sequential distribution mode follows the programmed member order when distributing calls. The incoming call starts at the first station in the hunt group and directs the call through the hunt group members in order until a hunt group member answers the call. The next hunt group call goes through the same distribution process.
In this mode, you can program your most experienced personnel to be the first members of the group to receive incoming calls.
The cyclic distribution starts the call at the station following the one which was last presented with a call. So if station 223, 224 and 225 are members 001, 002 and 003 respectively of a hunt group and the last call was answered by 224 (member 002), the next incoming call will start with station 225 (member 003).
This way, you can ensure that all your personnel are receiving calls, rather than one person receiving the majority of calls.
System Administration Manual P0906413 Issue 01

Answering calls / 239
Multiple appearances of DDI linesDDI lines can be assigned to one or more keystations. Calls on DDI lines alert at all keystations programmed with appearances of the DDI line. Once the DDI call is answered, the call is no longer tracked by any other keystation with the appearance of the DDI line, leaving the other keystations free to receive subsequent incoming calls.
Using HandsfreeCommander NT Keystations allow you to make calls without using the handset. The Economy and M7000 Keystations do not support handsfree operation.
Making calls without lifting the handset1. If you do not have a Prime line assigned to your keystation,
press a line key.
2. Press ©. The keystation’s internal microphone and speaker are automatically turned on.
3. Dial your call and speak at a normal level.
Answering calls without lifting the handset1. Press the line key for the ringing call. (This step is not necessary
if you have a Prime line assigned to your keystation.)
2. When your keystation rings, press © and speak normally.
Direct your voice toward the keystation. The closer you are to the keystation, the easier it is for the microphone to transmit your voice clearly to your listener.
Muting a Handsfree callYou can switch off the keystation microphone so that you can speak privately while you are on a Handsfree call.
Press ©. The microphone is turned off.
To turn the microphone back on again and continue your Handsfree call, press ©.
P0906413 Issue 01 System Administration Manual

240 / Answering calls
Note: The indicator next to © is solid when you are in Handsfree mode. It flashes when you mute the microphone.
Changing a handset call to a Handsfree callPress © and hang up the handset.
Changing a Handsfree to a regular callLift the handset.
Hints for using HandsfreeWait for your caller to finish talking before you speak. The microphone and speaker cannot be on at the same time. Your caller’s voice may be cut off if you both speak at the same time. Noises such as a tapping pencil could be loud enough to turn on your microphone and cut off your caller’s speech.
To prevent a possible echo, keep the area around your keystation free of paper and other objects that might screen your microphone. Turning down the microphone’s volume (press à while speaking), also prevents echoes. When you change the volume level, both the microphone and speaker volume are adjusted to prevent feedback problems.
Place the keystation so that any unavoidable local noise (such as an air conditioner) is behind it. This limits the amount of disruptive background noise being transmitted.
In open-concept environments, use the handset when Handsfree communication is not necessary or when you need privacy during a call. Another option is to use a headset.
Answering a keystation using Directed PickupYou can answer any keystation that is ringing in your Commander NT system using Directed Pickup or Group Pickup.
1. Press Äàß.
2. Enter the station number of the ringing keystation.
Directed Pickup cannot be used to answer private lines.
System Administration Manual P0906413 Issue 01

Answering calls / 241
To use Directed Pickup, the keystation must be ringing. If, for example, the auxiliary ringer is ringing, but the call is not ringing at a keystation, the call cannot be answered using Directed Pickup. It must be answered normally at a keystation that has a flashing indicator for the call, or by using Line Answer. You can also answer a call that is ringing when someone has transferred the call to a keystation and the call is ringing on an intercom key.
Directed Pickup can also retrieve calls that are ringing on an Answer station number. Although you may enter the station number of the keystation you hear ringing, it may be calls from another keystation you are answering.
Answering a keystation using Pickup GroupYour Commander NT system can be divided into nine Pickup Groups. If you are a member of a Pickup Group, you can pick up a call that is ringing at any keystation in your Pickup Group.
1. PressÄàÞ.
Note: Group Pickup cannot be used to retrieve a camped call.
If there is more than one incoming call at a keystation in a Pickup Group, a call ringing on an exchange line is answered first followed by calls on the Prime line and, finally, calls on internal lines.
DisplaysAlready joined You are already connected to the keystation
that made the call you are trying to pick up. This can happen if you are on a call to a colleague, your colleague dials the number of a keystation in your Pickup Group, and you attempt to pick up that call.
Pickup denied There is no call that you can pick up or the call that was ringing has already been answered.
You have tried to pick up a call on someone else’s private line.
P0906413 Issue 01 System Administration Manual

242 / Answering calls
Line AnswerThe Line Answer feature lets you answer a ringing call anywhere in the system from any keystation in the system. The line you are answering does not have to appear or ring at the keystation you are using.
Line Answer works only with calls that are ringing on lines for which a Ringing service schedule is active and if Line Answer is enabled.
Answering a call using Line Answer1. Press Ä¡ââ.
If there is more than one incoming call on lines in a Ringing service, the Line Answer feature picks up the external call that has been ringing the longest.
Displays
Note: Line Answer does not pick up calls that are coming in on a private line.
Answer keysAn Answer key lets a keystation answer calls intended for another keystation. For example, an Answer key allows an assistant to answer incoming calls to a manager’s keystation.
Basic, Enhanced and Extended settings determine what types of calls will alert at the keystation.
Pickup: Enter the station number of the keystation that is ringing. (You may use an internal autodial key to do this.)
If you decide not to answer a ringing call after you have activated Directed Pickup, press Ä.
Line denied You have tried to pick up a call on someone else’s private line.
Pickup denied The call that is ringing is on a line that is not in a Ringing Service.
System Administration Manual P0906413 Issue 01

Answering calls / 243
The Basic Answer key setting answers all calls except:
• Priority calls
• other Answer key calls
• Overflow call routing calls
• Voice calls
• Ringing service calls
• Callback calls
• Delayed ring transfer calls
Enhanced permits the same as Basic as well as overflow call routing calls but cannot answer blind transferred calls. Extended answers the same as Enhanced plus Ringing service, Callback and Delayed ring transfer calls. The Extended setting cannot answer priority calls, voice calls and other Answer key calls.
When installing your Commander NT system, you assign keystations to have Answer keys for other stations. You also set whether the incoming call for the monitored station will ring at the Answer key or simply activate the key indicator (» or ¼). A Commander NT Keystation may have up to eight Answer keys to monitor other stations.
Economy, M7000 Keystations, SLTs and ISDN terminals cannot be assigned Answer keys to monitor other stations, but they can be monitored.
Each Answer key should be clearly labelled with the name or number of the station it monitors.
You cannot make calls using Answer keys.
If more than one call is ringing at someone’s keystation, the first call appears on the attendant’s Answer key. Any subsequent calls appear on intercom keys, if they are available.
More than one attendant may have an Answer key for a single keystation. This allows two or more attendants to handle calls for a busy person.
P0906413 Issue 01 System Administration Manual

244 / Answering calls
Each keystation can handle calls for up to eight other people using separate Answer keys for each person.
Listening in a groupThe Group Listen feature allows other people in your office to listen in on a call without the caller hearing any noise from the office by turning the keystation’s external microphone off.
1. Press Ä¡âÛ. You hear the caller’s voice through your keystation’s speaker.
2. Speak to the caller through the keystation handset.
To cancel the Group Listen feature during your call, press Ä£¡âÛ.
Group Listen is cancelled automatically when you hang up the call.
You can switch a Group Listen call to Handsfree by pressing ©. To switch back to Group Listen, enter the Group Listen feature code again.
Note: Keep the handset away from the speaker, or you may hear feedback. Press ¨ to prevent feedback when hanging up.
Disconnecting AccidentallyIf you accidentally drop the handset into the keystation cradle while answering a call, you can retrieve the call by picking up the handset. The system calls on the © feature, which keeps the call active.
System Administration Manual P0906413 Issue 01

Holding calls
HoldingWhen you put a call on hold, the Commander NT system maintains the connection to the caller but the call is no longer active at your keystation. The indicator flashes on all keystations that have access to the line with the call on hold. The call can be retrieved from any of these keystations.
If the call comes in on a DDI line, the indicator flashes at the keystation that answered the call, leaving other keystations with appearances of that DDI line free to take other incoming calls. The call can be retrieved at the answering station.
On the Economy Keystation, ú alternates between two lines: one active, one on hold. The Economy Keystation cannot retrieve a call placed on hold by another keystation.
On the M7000 Keystation, ³ puts a call on hold. The M7000 Keystation cannot retrieve a call placed on hold by another keystation.
Answered hunt group calls can be placed on hold at the answering station.
To put a call on hold, press ú.
To retrieve a held call, press the flashing line key of the held call.
Automatic HoldIf you are on a call and want to pick-up another call at your keystation, use Automatic Hold.
Press the line key of the caller you want to speak to. Your current caller is put on hold automatically.
P0906413 Issue 01 System Administration Manual

246 / Holding calls
Exclusive HoldYou can put a call on Exclusive Hold so that it can be retrieved only at your keystation.
Press Äàá or Äú. The line appears busy on all other keystation, and the call cannot be picked up by anyone else in the office.
Display
Listening on holdIf you have been put on hold, Listen on Hold lets you replace the handset and wait to hear when the other person speaks.
If Automatic Handsfree has been assigned to your keystation, you can use the Handsfree/Mute feature instead of Listen on Hold.
Without Handsfree1. Press ú.
2. Hang up the handset.
3. Press the line key of the call. You may hear indications from the far end that you are on hold (for example, tones or music). Your keystation’s microphone is off so no one at the other end can hear anything in your office.
4. When the person you were talking to returns, you hear them through your keystation speaker. Lift the handset and talk.
With Handsfree1. If using the handset, press ©.
2. Hang up the handset.
3. Press © again. Your microphone is off but you can hear when the caller returns.
4. When the caller returns, press © or lift the handset.
On hold: LINE NAM You have placed one or more lines on hold. The name of the line that has been held the longest is displayed. This feature works with external calls only.
System Administration Manual P0906413 Issue 01

Routing calls
Call ParkingCall Parking allows you to suspend a call so that someone else can retrieve it from any keystation in the Commander NT system. You retrieve a parked call by dialling the retrieval code. As many as nine calls can be parked at one time on the Commander NT system.
When you park a call, the system assigns one of nine codes for retrieval of the call. These codes number between 101 and 109. For example, the first parked call is assigned Call Parking retrieval code 101.
The Commander NT system can assign Call Parking codes according to two methods: Lowest and Cycle. The are set under the Park Mode programming setting.
Lowest—Commander NT assigns the lowest available retrieval code. If there is only one parked call on the system, the number is 101. If there are 3 calls, they are assigned 101, 102, and 103.
Cycle—Commander NT assigns the next available retrieval code in the sequence (101 to 108). If the last parked call was assigned 106, then the next one is assigned 107. If the last retrieval code was 108, then the next code is 101.
The highest call number (109) is used only by Economy, M7000 Keystations and devices connected to the system using an Single Line Telephone Adaptor.
You program the Call Parking prefix and the time delay before parked calls are returned to the originating keystation. External calls parked for longer than the programmed delay are returned to the Prime station.
Answered hunt group calls are parked in the same manner as other calls.
P0906413 Issue 01 System Administration Manual

248 / Routing calls
Call Parking can be disabled by your System Administrator.
Parking a call1. While on a call, press ÄàÝ. The display reads the
Call Parking retrieval code.
2. Use Äßâ (the Page feature) or press PAGE to announce the retrieval code displayed by your keystation.
Retrieving a parked call1. Select an internal line on any Commander NT Keystation. (On
the Economy Keystation, pick up the handset.)
2. Dial the Call Parking retrieval code (the default retrieval codes are 101 to 109).
DDI callsDirect Dial Inward (DDI) allows BRA lines to use internal lines to route incoming calls from the public exchange; the calls pass directly to a Commander NT station without operator intervention. The internal lines 101 to 140 between the Commander NT40 ME and the stations are called DDI lines.
BRA lines must have Answer Mode programmed to Auto for DDI. Outgoing calls can also be made on auto-answer BRA lines if they are assigned to a line pool or appear on a station.
The Commander NT system handles simultaneous calls on DDI lines. The number of appearances of a DDI line on a station depends on the Line assignment setting for that station.
If the DDI line is programmed to Appr&Ring or Appr only, then the station can have as many simultaneous DDI calls as there are DDI key appearances. If the DDI line is programmed to Ring only then the station can have as many simultaneous DDI calls as there are Intercom keys.
System Administration Manual P0906413 Issue 01

Routing calls / 249
Number of appearancesThe installer programs the number of appearances for each DDI line assigned to the station.When a station with an appearance of a DDI line answers a call, other stations with appearances of that DDI line do not track the state of that call. The other stations are free to receive additional calls on the DDI line while the first call is still in progress.
By default the number of DDI line appearances is one. The secondary appearance of a target line, is any appearance given to a station after the first appearance. There is a limit to the number of secondary target line appearances in the system.
Automatically, the first DDI line (101) is assigned to the first Start station number of 5001, DDI line 102 is assigned to the next station number 5002, and so on. Also, the Received numbers, as well as the Originating Line Identification number, are automatically set to the station number.
Received numberWhen the system automatically answers an incoming call on auto-answer ISDN BRA lines, it matches these digits to a Received number, and routes the call to the appropriate DDI line.
The installer programs the Received number length. A Received number cannot be the same as another Received number or the Auto number. It also cannot start with the same first digit as any line pool code.
Busy tone for a Direct Dial Inward lineYou can program a DDI line to return busy tone or route a call to the Prime station for the line, if all stations are busy.
When If busy is set to Busy Tone, the caller receives a busy tone. When If busy is set To Prime the call is routed to the Prime station. If all intercom keys on the Prime station are busy the caller receives busy tone.
P0906413 Issue 01 System Administration Manual

250 / Routing calls
Busy tone with Do Not Disturb on BusyWhen Do Not Disturb on Busy (DND) is turned on for a station, internal and network callers hear a busy tone. External callers are transferred to the Prime station.
If there are no available appearances of the DDI line and the DND on busy feature is set to Yes for one of these stations, the second caller hears ring-back and the call is routed to the Prime station for the line.
If there are no available appearances of the DDI line and the DND on busy feature is set to No on all stations with an appearance of the DDI line, the caller hears busy tone. When If busy is set to Busy Tone the call is routed to the Prime station if the DDI line feature is set to Prime station.
The If busy feature is a line feature and DND is a station feature. The If busy feature is activated when a call cannot ring at any station in the system.
The following table outlines the call scenarios when a DDI line is busy, that is, there are no available appearances of the DDI line.
Note: DDI does not apply to ISDN lines that are programmed as manual answer lines.
DND on busy Yes Yes No No
If busy Busy Tone Prime Busy Tone Prime
The caller hears:
If Prime is Y es Ring-back, call goes to Prime
Ring-back, call goes to Prime
Busy Tone Ring-back, call goes to Prime
If Prime is No Busy Tone Busy Tone Busy Tone Busy Tone
System Administration Manual P0906413 Issue 01

Routing calls / 251
Making a Priority callIf the Administrator has allowed Priority call for your station, you can make an internal voice call when the Commander NT Keystation you are calling is idle, busy, or has Do Not Disturb activated. If you get a busy signal when you call someone in your office, you can interrupt them. Use this feature for urgent calls only.
Press Äßá or press PRIORITY. Wait for a connection, then speak.
Note: A person who receives a Priority call while they are on another call has eight seconds to accept or reject the call. If the person does not take the call, the Priority call feature puts their active call on Exclusive Hold and connects your call.
If Divert is active at the keystation you are trying to reach, your call is diverted.
If the keystation receiving the Priority call is in a conference call, the other two parties are automatically put on hold when the Priority call is accepted.
If the station is a hunt group, the Priority call is rejected.
Transferring a callYou can transfer a call to any internal or external number. Depending on how the Installer has programmed your system, you may not be able to transfer a call on one exchange line to another exchange line.
1. Press Äàâ or press TRANSFER.
2. Call the person you want to transfer the call to.
3. If you want to talk to the person you are transferring the call to, wait for them to answer before proceeding.
4. When you are ready to complete the transfer, press OK or hang up. (You do not have to wait for the person to answer.)
You can cancel a transfer and reconnect with the party you are attempting to transfer at any time before the transfer is complete.
P0906413 Issue 01 System Administration Manual

252 / Routing calls
1. Press Ä£àâ or press CANCL.
2. If you are not reconnected, press ¨ and then press the line key of the original call, which is now on hold.
Transferring to a busy station (Call Camping)You can send an external call to another station, even though all of its lines are busy, by camping the call. The Call Camping feature is useful for people who process many calls, such as secretaries or receptionists.
1. After answering an external call, press Ä¡Û.
2. Dial the station number that is the destination for the call.
Camped calls appear on a line key on the receiving keystation, if one is available. If there is no line key available, you receive a message on the display and hear camp tones.
Each Commander NT Keystation can handle only one camped call at a time.
Note: The Call Camping feature will only work if Do Not Disturb (DND) is programmed to No for that station.
Displays221 Camp max CALLBACK
You tried to camp a call to a keystation that already has a camped call. The call has come back to you. Press CALLBACK or the line key to reconnect to the call. On the Economy Keystation, just pick up the handset.
221 DND CALLBACK
The person to whom you redirected a call has Do Not Disturb activated. The call has come back to you. Press CALLBACK or the line key to reconnect to the call. On the Economy Keystation, just pick up the handset.
Camp denied You have tried to camp an internal call. You can only camp external calls.
Camp to: CANCEL Dial the number of the internal keystation to which the call is to be sent.
System Administration Manual P0906413 Issue 01

Routing calls / 253
Answering a camped callWhile you are on a call, you hear a beep whenever there is a camped call waiting.
Press the flashing line key or intercom key that the call is camped on. If your station has no free lines, finishing one of your active calls releases a line for the camped call.
Camped: 221 CALLBACK
The keystation to which you camped a call did not answer the call. The call has come back to you. Press CALLBACK or the line key to reconnect to the call. On the Economy Keystation, just pick up the handset.
Line001 hung up A call you camped has come back to you, but the caller hung up before you could reconnect.
Not in service CALLBACK
The keystation to which you have camped a call is out of service or is being used for programming. The call has come back to you. Press CALLBACK or the line key to reconnect to the call. On the Economy Keystation, just pick up the handset.
Release a call The line that the camped call is on is in use, or that line does not appear at your keystation. Release the line or release an internal line.
P0906413 Issue 01 System Administration Manual

254 / Routing calls
System Administration Manual P0906413 Issue 01

Making external calls
Using an exchange codeYou can access exchange lines to make external calls by using the intercom key and dialling the exchange code (the default exchange code is 9).
The exchange code is generally used to make external calls on the Economy, M7000 Keystations and on keystations connected to an Single Line Telephone Adaptor.
Using line poolsA line pool is a group of exchange lines that can be shared by many keystations. You can use a line in a line pool to make an external call.
The Commander NT can have fifteen line pools, and a keystation can be programmed to access any of them.
A line pool access code is a number you dial to get a line pool. The access code can be up to four digits long. You can have several different line pools for your system, each one giving you access to a different set of exchange lines. It is one way of sharing lines across keystations in a system.
You program the line pool access codes and give each keystation access to a line pool.
Everyone in the office should have a list of the line pool access codes for the line pools their keystations can use.
Using a line pool to make a call 1. Press ÄßÝ.
2. Enter a line pool access code.
If you have a free internal line, you can make a call using a line pool without entering the feature code first.
P0906413 Issue 01 System Administration Manual

256 / Making external calls
1. Select an internal line (intercom).
2. Dial the line pool access code.
If no lines are available in the line pool, you can use Callback at the busy tone. You are notified when a line in the line pool becomes available. See "Using Callback" on page 284.
Programming a memory key with a line pool feature code
When you program a key with the line pool feature code, you must enter a line pool access code after the feature code. The programmed line pool key accesses a specific line pool, not the line pool feature. See "Using line pools" on page 255 for more information.
If you program a key with an indicator to access a line pool, when all the lines in a line pool are busy, the indicator for the line pool key turns on. The indicator turns off when a line becomes available.
Making calls from an ISDN terminalNote that ISDN terminals do not have line keys or intercom keys as do Commander NT Keystation. To make an outgoing call from an ISDN terminal, access an exchange line by entering a line pool code or a destination code.
Making a conference callYou can share a call with two other people (internal or external) by forming a conference. Once a conference is established, any one of the parties can hang up, leaving the other two connected, unless the two other parties are on exchange lines. In this case, if the person who created the conference hangs up, the other two parties may be disconnected, or they may remain connected depending on the equipment in use.Your system may be programmed to prevent connections between one exchange line and another.
To establish a conference call with two other Commander NT Keystations, a keystation must have two intercom keys assigned to it. The keys appear starting at the lowest right-hand position, or one key above that if the Handsfree feature is assigned to the keystation.
The Economy and M7000 Keystations do not have intercom keys.
System Administration Manual P0906413 Issue 01

Making external calls / 257
Forming a conference1. Make or answer the call with the first party.
2. Place that call on hold.
3. Make the call to the second party.
4. Press ÄÜ.
5. Take the held call off hold. This is automatic on the Economy and M7000 Keystations.
Allowing a colleague to join your conferenceNormally your calls are private.You can turn Privacy off for a call allowing another person in your office with the same line to press the line key and join in a conference or a two-way call.
1. While on a call, press Ä¡Ü.
2. Tell the other person to press the line key and join your conversation.
Only two Commander NT Keystations in addition to the external caller can take part in this kind of conference.
Disconnecting one person from the conference You can disconnect one party from a conference and continue talking to the other.
On a Standard, Advantage or Principal Keystation1. Press the line key of the call that you want to disconnect. The
call that you want to keep is automatically put on hold.
2. Press ¨. The call is disconnected.
3. Press the line key of the held call to speak to the remaining person.
On an M7000 Keystation1. Press ²£Ü, to place one caller on hold. Press
³ again to put the caller you want to keep on hold.
2. Press ¨. The call is disconnected.
3. Press ³ to speak to the remaining party.
P0906413 Issue 01 System Administration Manual

258 / Making external calls
On an Economy Keystation1. Press Ä£Ü, to place one caller on hold. Press
ú again to put the caller you want to keep on hold.
2. Press ¨. The call is disconnected.
3. Press ú to speak to the remaining party.
Using Hold on a conferenceIf you use Hold on a conference, you can
• put the two other people on hold (they cannot speak to each other)
• put the conference on hold (the other two people can speak to each other)
• put one person on hold while you continue to talk to the other person.
You can reconnect to the conference by pressing either of the held line keys. For the Economy Keystation, press ú.
Separately holding two callsFor all Commander NT Keystations except the Economy and M7000 Keystations, you can put the two people in a conference call on hold independently so that they cannot talk to each other.
1. Press the line key of one person. The other person is automatically put on hold.
2. Press ú. The second person is put on hold.
You can re-establish the conference.
1. Take one call off hold.
2. Press ÄÜ.
3. Take the other call off hold.
Putting a conference on holdYou can put a conference on hold, allowing the other two people to continue speaking to each other.
1. Press ú.
System Administration Manual P0906413 Issue 01
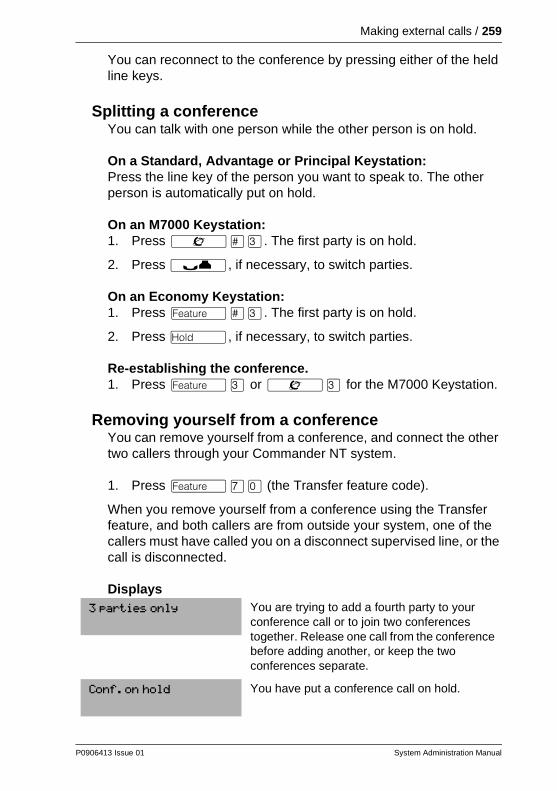
Making external calls / 259
You can reconnect to the conference by pressing either of the held line keys.
Splitting a conferenceYou can talk with one person while the other person is on hold.
On a Standard, Advantage or Principal Keystation:Press the line key of the person you want to speak to. The other person is automatically put on hold.
On an M7000 Keystation:1. Press ²£Ü. The first party is on hold.
2. Press ³, if necessary, to switch parties.
On an Economy Keystation:1. Press Ä£Ü. The first party is on hold.
2. Press ú, if necessary, to switch parties.
Re-establishing the conference.1. Press ÄÜ or ²Ü for the M7000 Keystation.
Removing yourself from a conference You can remove yourself from a conference, and connect the other two callers through your Commander NT system.
1. Press Äàâ (the Transfer feature code).
When you remove yourself from a conference using the Transfer feature, and both callers are from outside your system, one of the callers must have called you on a disconnect supervised line, or the call is disconnected.
Displays3 parties only You are trying to add a fourth party to your
conference call or to join two conferences together. Release one call from the conference before adding another, or keep the two conferences separate.
Conf. on hold You have put a conference call on hold.
P0906413 Issue 01 System Administration Manual

260 / Making external calls
Using Class of service passwordsClass of service (COS) passwords permit controlled access to a system’s resources by internal users. When you enter a COS password at a keystation, the restriction filters associated with your COS password apply, rather than the normal restriction filters. COS passwords are programmed by either your Customer Sales Support Officer or installer.
Users should memorize their COS passwords instead of writing them down. Employees’ COS passwords should be deleted when they leave the company. Typically, each user has a separate password. Several users can share a password or one user can have several passwords.
Changing your COS password You must enter a COS password each time you wish to make a call that is normally restricted on a line or keystation.
Changing the restriction filters on a line or keystation1. Press Äß¡.
2. Enter your six-digit COS password.
COS passwords let you define individual passwords and determine the restriction filters associated with each.
If you use your Commander NT system from outside the office, you may have to enter a COS password to gain access to the system.
Conference busy You have tried to make a conference call, but your system is already handling its maximum of four conference calls.
Line 001 221 TRANSFER
You are on a conference with the two lines or keystations shown. You can drop out of the conference and leave the other two parties connected (Unsupervised Conference) by pressing TRANSFER or entering the Transfer feature code.
Press held line You have activated the Conference feature with one call active and another on hold. Press the line of the call on hold to bring that person into the conference.
System Administration Manual P0906413 Issue 01

Making external calls / 261
Displays(Blank display) Enter your password. It is not shown on the display.
Invalid Password You have entered a password that is not programmed into your system.
P0906413 Issue 01 System Administration Manual

262 / Making external calls
System Administration Manual P0906413 Issue 01

Making internal calls
Making an Internal callWhen you want to make or receive internal or private network calls, make calls to hunt group stations, or access exchange lines through line pools, use Æ. A keystation may be assigned up to eight intercom keys.
1. Press an intercom key or, on the Economy and M7000 Keystation, lift the handset.
2. Dial the station number or a line pool access code.
Making a Conference callTo establish a conference call with two other Commander NT Keystations, a keystation must have two intercom keys assigned to it.
1. Make or answer a call with one station.
2. Put the call on hold.
3. Press the remaining intercom key and dial the second station.
Note: Press ÄÜ.
4. Press the held intercom key (step 2) to connect.
Accessing a Direct-Dial stationDirect-Dial lets you dial a designated station in your Commander NT system or private network, with a single digit. The Direct-Dial digit is the digit you dial to reach an attendant in your office.
The Direct-Dial digit is an internal or external number that the system will automatically dial when someone enters the Direct-dial digit.
P0906413 Issue 01 System Administration Manual

264 / Making internal calls
The Commander NT40 system allows for one Direct-Dial station. A person whose keystation is a Direct-Dial station is usually a receptionist for your entire office or for a particular department. To access the Direct-Dial station, enter the Direct-Dial digit (the default Direct-Dial number is 0).
The Direct-Dial keystation can send up to 30 messages and can invoke Services to activate the extra-dial keystation.
You cannot divert calls to a Direct-Dial keystation that is outside your Commander NT system.
Note: ISDN terminals cannot use the Direct-Dial digit to reach a Direct-Dial station.
Leaving MessagesYou can leave a message on the display of another keystation in your Commander NT system. Messages appear on the Commander NT Keystation display informing the recipient to call the person who sent the message. Messages can only be sent within the Commander NT system. The message sent reads MSG.
Only an SLT attached to an Analogue Station Module (ASM) with message wait indication can receive messages. Telephones attached to a regular SLT adaptor cannot receive messages, but can send them.
Direct-Dial stations can send up to 30 messages. Only Direct-Dial stations can send messages to M7000 Keystations and telephones connected to an ASM with message wait indication.
Sending a message1. Press ÄÚ.
2. On a keystation with a two-line display, press ADD. (This step is not necessary on a keystation with a single-line display.)
3. Enter the station number of the person you want to send the message to. The person’s display reads Message for You and above the display key MSG.
System Administration Manual P0906413 Issue 01

Making internal calls / 265
Cancelling a message1. Press Ä£Ú.The display reads Cancel for:.
2. Enter the station number of the person you sent the message to.
Viewing received messagesYou can receive up to four messages from different keystation.
On a keystation with a two-line display:1. Press MSG. The display reads nnn called (where nnn represents
the station number of the caller).
2. Press NEXT to move through your messages.
On a keystation with a single-line display:1. Press ÄßÞ. The display reads the first message you
received.
2. Press ¥ or £ to move through your messages.
Note: You cannot view messages on an Economy or M7000 Keystation. A solid light indicates that there is either a message from a Direct-Dial station or a Voicemail message.
Replying to a messageYou can call the person (or your voice message centre) who sent a message while you are viewing the message.
On a keystation with a one-line display1. Press â.
On a keystation with a two-line display1. Press CALL.
On an M7000 Keystation1. Press ÄßÞ. The keystation will call the Direct-dial
station that left the message.
If you wish to call your voice message centre using a line other than the programmed line, exit your message list and dial the voice message centre telephone number using normal dialling methods.
P0906413 Issue 01 System Administration Manual

266 / Making internal calls
Viewing the messages you have sent On a keystation with a two-line display, you can view the messages you have sent. You can send up to four messages to different stations. Each station, including the Prime station, can receive up to four messages from different stations, but only one message from any one station.
1. Press ÄÚ.
2. Press SHOW to display your first sent message.
3. Press NEXT to move through your sent messages.
DisplaysCancel denied You have entered an invalid number when
attempting to cancel a message.
In use 21 You are trying to call from your message waiting list. The line that you are trying to use is being used by the identified Commander NT user.
Message denied You have tried to send a message to an invalid station number or to a keystation that is out of service.
Message list SHOW ADD EXIT
SHOW appears only if you have outstanding messages. Press SHOW to review messages you have sent. Press ADD to send a new message.
Message to: Enter the station number of the keystation to which you want to send a message.
Message & CallsMSG CALLS
You have one or more messages and one or more new Call Logs. Press Ä¡âß to change the first line of the display to the current time and date.
No key free You have no line key free with which to reply to a message.
Start of list NEXT
Your are at the beginning of your list of messages. Press NEXT to move through your messages.
System Administration Manual P0906413 Issue 01

Making internal calls / 267
Erasing messagesYou can erase a message while you are viewing it in your message list.
On a keystation with a one-line display1. Press ú.
On a keystation with a two-line display1. Press ERASE.
The Direct-Dial station can receive up to four messages and can send up to 30 messages.
If your reply to a message is diverted or is answered at another station using the Call Pickup feature, the message remains on your station until you cancel it or successfully contact the station that sent the message.
PagingPaging allows you to make announcements over the Commander NT system using the keystation speakers, or your loudspeaker system, if one is available.
The administrator can assign stations to one of three page zones.
Making a page announcement1. Press Äßâ.
2. Choose a page type:
Ú or STNS through the keystation speakers (internal page)
Û or SPKR through an external speaker (external page)
Their list full You are trying to send a message to a user whose message waiting list is full.
Your list full You have tried to send a message but your keystation’s list of sent messages is full. Cancel one of the messages you have sent, if possible, or wait until you have received a reply to one of those messages.
P0906413 Issue 01 System Administration Manual
268 / Making internal calls
Ü or BOTH for both internal and external (combined page)
3. If necessary, choose a zone (0 to 3).
4. Speak clearly into the handset and make your announcement.
5. Press ¨.
Paging shortcutsInstead of entering the Page feature code followed by the page type, you can enter the following shortcut codes:
• Internal (STNS)—ÄßÚ and zone (1 to 3)
• External (SPKR)—ÄßÛ (no zones)
• Combined (BOTH)—ÄßÜ and zone (1 to 3)
Programmable Page TimeoutThe paging feature is automatically disconnected after a specified length of time.
1. Place the programming overlay on any Advantage or Principal Keystation.
2. Press Ä¥¥ÛßßÜÝÝ (CONFIG). The display reads Password:.
3. Press àÛàÞ¡à (SAPLUS). The display reads Stns&Peripheral.
4. Press Ô until the display reads System prgrming.
5. Press . The display reads Hunt groups.
6. Press Ô. The display reads Featr settings.
7. Press . The display reads Backgrnd music.
8. Press Ô until the display reads PageTimeout:.
9. Press CHANGE to choose 15, 30, 60, 120, 180, 300, 600, or 2700 seconds.
10. Press ¨ to exit or Ô to continue in programming.
System Administration Manual P0906413 Issue 01

Making internal calls / 269
Programmable Page tone on/offYou can choose whether a tone sounds before a page begins.
The paging feature is automatically disconnected after a specified length of time.
1. Place the programming overlay on any Advantage or Principal Keystation.
2. Press Ä¥¥ÛßßÜÝÝ (CONFIG). The display reads Password:.
3. Press àÛàÞ¡à (SAPLUS). The display reads Stns&Peripheral.
4. Press Ô until the display reads System prgrming.
5. Press . The display reads Hunt groups.
6. Press Ô. The display reads Featr settings.
7. Press . The display reads Backgrnd music.
8. Press Ô until the display reads Page tone:.
9. Press CHANGE to choose Y (Yes) or N (No).
10. Press ¨ to exit or Ô to continue in programming.
Remote pagingTo use features on a Commander NT system remotely, press ¥ followed by the feature code. Even if you are calling from another Commander NT system, press ¥ instead of Ä.
Making a remote page announcement1. Dial the number to access your Commander NT system.
2. Enter your Class of Service password.
3. Press ¥ßâ.
4. Choose a page type:
Ú or STNS through the keystation speakers (internal page)
Û or SPKR through an external speaker (external page)
Ü or BOTH for both internal and external (combined page)
P0906413 Issue 01 System Administration Manual

270 / Making internal calls
5. If necessary, choose a zone (0 to 3).
6. Speak clearly into the handset and make your announcement.
7. Hang up.
Voice CallVoice Call allows you to make a voice announcement or begin a conversation, through the speaker of one other keystation in the Commander NT system. The person you call hears a tone before your voice call comes through.
Hunt groups cannot accept voice calls.
Making a Voice Call1. Press Äßß.
2. Dial the station for the person you want to speak to.
3. Wait for the beep, then speak.
Muting voice call tonesWhen a voice call begins at your keystation, you hear a beep every 15 seconds as a reminder that the microphone is on.
To stop the beeping, pick up the handset or press ©.
Preventing Voice Calls to your keystationYou can use Voice Call Deny to prevent your keystation from receiving voice calls.
Press Ä¡¡. Voice calls ring as do regular internal calls. Your other calls proceed normally.
To cancel, press Ä£¡¡.
Answering a voice call without touching your keystationIf Handsfree Answerback is assigned to your keystation, you can respond to a voice call without touching the keystation. Handsfree Answerback is not available to the Economy Keystation.
When someone makes a voice call to you, simply start talking. Your keystation’s microphone picks up your voice.
System Administration Manual P0906413 Issue 01

Making internal calls / 271
Once you have answered a voice call, you treat it as a normal call.
DisplaysDial voice call Dial the station number or press the internal
autodial key of the person to whom you want to speak.
Microphone muted Your Handsfree microphone is muted. Press © or pick up your handset to respond to the voice call.
No voice call The keystation receiving the call cannot accept voice calls for one of the following reasons: it is active or ringing with another call; Divert is turned on; Do Not Disturb is turned on; Voice Call Deny is turned on; it is not a Commander NT Keystation.
Your call proceeds automatically as a regular ringing call.
Voice call The line is open for you to speak.
P0906413 Issue 01 System Administration Manual

272 / Making internal calls
System Administration Manual P0906413 Issue 01

Diverting calls
Diverting all callsYou can temporarily divert your calls to another keystation in the Commander NT system or to an external destination by using the Divert feature.
If the keystation to which you diverted your calls does not have the same exchange lines as your keystation, the diverted calls appear on intercom keys.
If a call is diverted, it does not ring but the line indicator flashes on your keystation. You can still answer the call by pressing the key next to the flashing indicator.
If you are one of a group of people who regularly divert their calls to one another, be aware that it is possible to set up loops where a call is diverted from one keystation to another in a circle, but it is not answered anywhere.
1. Press ÄÝ.
2. Enter the station number of the keystation you want to divert your calls to. The display reads Divert>nnn.
Note: For external destinations enter the Line pool access code plus the telephone number you want to divert your calls to.
3. To cancel, press Ä£Ý or press CANCEL.
Note: You can also set the system to divert your calls to another keystation when your keystation is busy or is not answered.
P0906413 Issue 01 System Administration Manual

274 / Diverting calls
Note the differences between Line redirection and Divert. Divert forwards all calls that arrive at your keystation to another keystation within the Commander NT system or to an external destination. Line redirection redirects only the lines you specify, no matter which keystations they appear on, to a keystation outside the Commander NT system. Line redirection takes precedence over Divert.
Setting Divert to external destinationsWhen you divert your calls to an external destination you must use a line pool access code before the telephone number.
You cannot program Divert to an external destination using:
• last number redial key
• saved number redial key
• external auto-dial key
Note: You can only Divert to external destinations on supervised lines.Your station must be programmed to Allow Redirect in order to Divert to external destinations.
Overriding Divert If you telephone someone who has their calls diverted to your station, your call rings at that person’s keystation. In this way you can still communicate with the diverted station.
Line redirectionIn a networked system, Line redirection lets you redirect calls coming in on your external lines to a keystation outside the office. Commander NT supports simultaneous redirection of DDI calls, subject to the same barring rules and depending on the availability of outgoing resources.
You may choose to redirect all your exchange lines or only some of them.
System Administration Manual P0906413 Issue 01

Diverting calls / 275
The incoming line must have disconnect supervision and the outgoing line must be answer supervised for Line Redirection to perform properly.
You cannot use the Line redirection feature code at Economy, M7000 Keystations or a keystation connected to an Single Line Telephone Adaptor.
You redirect lines at a keystation, but once redirected, the lines are redirected for the entire system. You can only redirect lines for which there are line keys on the keystation you are using.
How Line redirection is different from DivertDivert forwards all calls that arrive at a particular keystation to another keystation within the Commander NT system or to an external destination. Line redirection redirects only the lines you specify, no matter which keystation they appear on, to a keystation outside the Commander NT system. Line redirection takes precedence over Divert.
Using Line redirectionYou redirect lines at a keystation, but once redirected, the lines are redirected for the entire system.
You can only redirect lines that appear at line keys on your keystation.
When redirecting DDI lines, ensure the outgoing resource is a line pool with sufficient lines to support redirected traffic. The number of appearances for a DDI line is not limited to the number of appearances on that station. As many DDI calls are redirected as the outgoing resource permits.
You can answer the keystation if it rings while you are in the middle of programming Line redirection, but none of the Commander NT call handling features are available until the feature times out. If you need to use a Commander NT feature to process the call, quit Line redirection programming by pressing Ä. Do not press ¨ or you will disconnect the call you are trying to process.
While you are programming Line redirection, you do not receive any indication of calls that do not actually ring at your keystation.
P0906413 Issue 01 System Administration Manual

276 / Diverting calls
Be careful to avoid redirection loops. If for example, you redirect your lines to your branch office and your branch office redirects its lines to you, you can create a redirection loop.
In certain situations, callers may experience lower volume levels when you redirect calls to an external location.
Redirecting your lines1. Press Ä¡Ý.
2. Select the outgoing line to be used for redirected calls.
3. Enter the number to which calls will be redirected by pressing an external auto-dial key, or entering an external telephone number (using no more than 24 digits) then pressing ú or OK, or doing nothing (if the line you have chosen as the outgoing line is a private network line that does not require you to dial digits).
4. Select the lines to be redirected using ALL or individual line keys.
5. Wait until the line indicators for the selected lines are lit, then press ú or OK.
Note: If you press ú or OK before all the lines light up, those lines not lit are not redirected.
The line chosen for redirecting calls on other lines can still be used normally when it is not busy on a redirected call. To avoid redirection failing because the chosen line is in use, choose a line pool with several lines in it.
The system does not check that the number you give for line redirection is a valid one. If you redirect to an invalid number, redirection fails. Using an auto-dial key to enter the redirection number helps avoid this possibility. An auto-dial key used for Line redirection must be programmed to use a specific line.
Cancelling Line redirection 1. Press Ä£¡Ý.
2. Select the lines you no longer want to be redirected.
If a keystation has redirect ring enabled, it rings briefly for redirected calls on one of its lines even if another keystation set up the line redirection.
System Administration Manual P0906413 Issue 01

Diverting calls / 277
Displays while redirecting linesIntercom You selected the intercom key as the facility to
place the call on. Enter a line pool code or a destination code.
Line redirectionQUIT ADD REMOVE
Press ¥ or ADD to begin redirection. Press £ or REMOVE to cancel a previous redirection.
No line to use You have one exchange line on your keystation, but you need a second line to perform line redirection. Redirect your exchange line using a line pool as the outgoing line.
Outgoing line You are attempting to redirect a line and the line you have chosen is the outgoing line you have selected as a destination. You cannot redirect a line to itself. Select another line.
Pool code: _ QUIT
Enter a valid line pool access code.
Redir by 221 OVERRIDE
You have attempted to redirect a line, but someone else has already redirected that line. Press ¥ or OVERRIDE to override the previous redirection and redirect the line as you wish.
Redirect denied You can only redirect calls on individual line.
Select line out QUIT
Select the line that will be used to redirect calls out of the system.
Select line (s) QUIT ALL
Press the lines to be redirected. To undo a line selection, press it again. Press ALL to redirect all your lines.
Select line(s) ALL OK
Continue to press the lines to be redirected. Press ú or OK when you are finished.
Unequipped line The line you are attempting to redirect cannot be redirected because the hardware does not support redirection.
P0906413 Issue 01 System Administration Manual

278 / Diverting calls
Displays while cancelling redirectionSelect line (s) QUIT ALL
Press the lines that are no longer to be redirected. The lines light up as you press them. Once you cancel redirection for a line you cannot restore it by pressing the line again. Press ALL to cancel redirection for all your lines. When you are finished, press ú
or OK.
Select Line (s) ALL OK
Continue to press the lines that are no longer to be redirected. Press ú or OK when you are finished.
System Administration Manual P0906413 Issue 01

Saving time with features
Using System Speed DialFrequently dialled numbers can be programmed with System Speed Dial codes so that they can be accessed quickly with a two-digit code. The Administrator will give you a list of System Speed Dial codes for your office.
1. Press Äâ.
2. Enter the appropriate two-digit speed dial code (01-94).
Note: To program User Speed Dial codes (71 to 94) at your station, "User Speed Dial codes" on page 234.
Using AutodialYou can program memory keys for one-touch dialling of internal stations or external telephone numbers.
Keys used for lines, answer or Handsfree/Mute cannot be used as autodial keys.
If the power to your Commander NT system is off for more than three days, autodial numbers (as well as some other system programming) may be lost from the memory.
Autodial key for an external number1. Press Ä¥Ú. The display briefly shows Externl
autodial then Press a key.
2. Press the key you want to program. (This step is not necessary on the Economy Keystation which has only one memory key.)
3. If you want this autodial key to use a particular line or line pool, select that line or line pool.
4. Enter the number. Press ú or OK when you are finished. The display reads Programmed.
P0906413 Issue 01 System Administration Manual

280 / Saving time with features
Autodial key for a station number1. Press Ä¥Û. The display briefly shows Internl
autodial then Press a key.
2. Press the key you want to program. (This step is not necessary on the Economy Keystation which has only one memory key.) The display reads Stn#:_.
3. Enter the number. The display reads Programmed.
Note: Autodial numbers must be programmed to memory keys and not to line keys, intercom keys, the Handsfree/Mute key, or Answer keys.
When programming a line pool as part of an autodial number, press Æ and enter the line pool access code, or choose a programmed line pool key.
For the Economy Keystation, an external autodialer can only be programmed using a line and not a line pool.
If you do not include a line selection in an autodial number, the call uses your Prime line (if you have one).
Using Intercom as the line for AutodialIf you press Æ as the line for an external autodial number, you must include a valid line pool access code or a destination code. If line pool access codes or destination codes are changed, remember to re-program autodial numbers as well.
Displays987_ QUIT BKSP OK
Continue to enter digits until the number is complete. Press à or BKSP to erase an incorrect digit. Press ú or OK when you are finished.
Autodial full The memory allotted to autodial numbers in your Commander NT system is full.
key erased While programming external Autodial, you erased the key by pressing ú or OK before entering any digits.
System Administration Manual P0906413 Issue 01

Saving time with features / 281
Using RedialYou can save the number of any external call you dialled and call it again later. You can also redial the last external number you dialled.
Saving a number to redial laterWhile you are still on the call, press Äßà.
Saved Number Redial records a maximum of 24 digits.
Enter Digits QUIT OK
Enter the number you wish to programme (choosing the line first if necessary) exactly as you would if you were making a call.
Intercom #: _ QUIT
Enter the internal telephone number you wish to program.
Invalid number You are programming an internal autodial key and have entered a number that is not a station number on your system. Enter a valid station number. If the number you are entering is a destination code, use external autodial.
Press a key QUIT
Press the memory key you want to program.
Program and HOLD Enter the number you want to program to the key, then press ú.
Program and OK QUIT OK
Enter the number you want to program to the key, then press ú or OK. You may include a line or line pool selection in an autodial sequence by selecting the line before entering any digits.
Programmed The number is stored on the key.
Feature moved You have programmed an autodial number to a key that had a feature code programmed. The feature has moved to another key. Use Ä¥â(Key Inquiry feature) to locate it.
P0906413 Issue 01 System Administration Manual

282 / Saving time with features
Redialling a saved numberPress Äßà when you are not on a call.
If you have a programmed Saved Number Redial key, you can use Ä¥â(Key Inquiry), then press the Last Number Redial key followed by £ to check the last number before you dial it.
Last Number RedialPress ÄÞ.
Last Number Redial records a maximum of 24 digits.
If you have a programmed Last Number Redial key, you can use Ä¥â (Key Inquiry), then press the Last Number Redial key followed by £ to check the last number before you dial it.
Programming memory keysYou can program a feature code to a memory key. When this guide tells you to enter a feature code, you can press the memory key as a shortcut. In some cases, pressing the key a second time cancels the feature.
Any memory key not programmed as an external or internal DDI line, intercom, Answer key, or Handsfree/Mute key is available for programming features.
You can erase a memory key, however, you cannot erase Answer, Handsfree/Mute, Intercom, or line keys.
You cannot program the following feature codes to a memory key:
• Long Tones for signalling remote devices (see "Setting long tones" on page 297)
• Any code beginning with ¥ except Ä¥ÞâÚ (Language Choice) and Ä¥à (Contrast Adjustment).
When you program a key with the line pool feature code, you must enter a line pool access code after the feature code. The programmed line pool key accesses a specific line pool, not the line pool feature.
System Administration Manual P0906413 Issue 01

Saving time with features / 283
Programming a memory key1. Press Ä¥Ü.
2. Press the key you want to program with a feature. (This step is not necessary on the Economy Keystation, which has only one memory key.)
3. Enter the feature code you want to assign to the key.
Erasing a key1. Press Ä¥Ú.
2. Press the feature key.
3. Press ú or OK to erase the key.
Displays<Feature name> SHOW OK
The name of the feature assigned to a key is displayed when you press the key. SHOW appears when there is more information available. Press £ or SHOW for additional information.
Enter code: If you are checking a speed dial key, enter the two-digit speed dial code that you want to check.
F_ QUIT CLEAR
Enter the feature code, or press ¨ or QUIT to quit programming or CLEAR to clear the numbers you have entered. The system accepts the entry as soon as you enter a valid feature code.
Feature code: QUIT
Press Ä and enter the feature code you want to assign to the key. You cannot enter invalid codes.
Feature moved You have programmed a key with a feature that was already programmed to another key. The feature has moved to the key you just programmed. Its original key is now blank.
Press a key EXIT
Press the key you want to check. Press Ä or EXIT when you are finished.
Program and HOLD Enter the number you want to program and press ú. To erase the key, just press ú.
P0906413 Issue 01 System Administration Manual
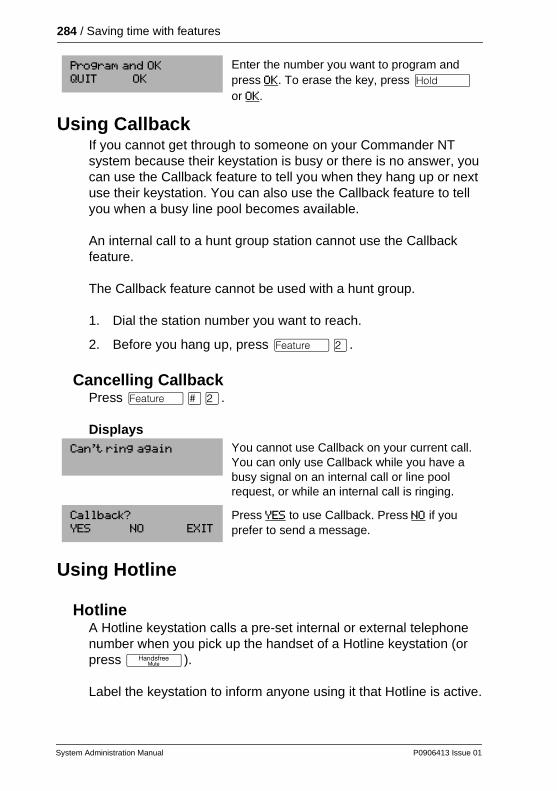
284 / Saving time with features
Using CallbackIf you cannot get through to someone on your Commander NT system because their keystation is busy or there is no answer, you can use the Callback feature to tell you when they hang up or next use their keystation. You can also use the Callback feature to tell you when a busy line pool becomes available.
An internal call to a hunt group station cannot use the Callback feature.
The Callback feature cannot be used with a hunt group.
1. Dial the station number you want to reach.
2. Before you hang up, press ÄÛ.
Cancelling CallbackPress Ä£Û.
Displays
Using Hotline
HotlineA Hotline keystation calls a pre-set internal or external telephone number when you pick up the handset of a Hotline keystation (or press ©).
Label the keystation to inform anyone using it that Hotline is active.
Program and OK QUIT OK
Enter the number you want to program and press OK. To erase the key, press ú
or OK.
Can't ring again You cannot use Callback on your current call. You can only use Callback while you have a busy signal on an internal call or line pool request, or while an internal call is ringing.
Callback? YES NO EXIT
Press YES to use Callback. Press NO if you prefer to send a message.
System Administration Manual P0906413 Issue 01
Saving time with features / 285
Bypassing a HotlinePress a line key, use the Pre-Dial or Automatic Dial feature, or press © before you pick up the handset on a hotline keystation. Refer to Keystation Feature Card.
P0906413 Issue 01 System Administration Manual

286 / Saving time with features
System Administration Manual P0906413 Issue 01

Using Display Features
Time and DateThe system time and date appears on the display of idle Commander NT Keystations. Telephones connected to the Single Line Telephone Adaptor cannot display the time and date.
Checking the current time and date while on a callYou can briefly display the current time and date while you are on a call by pressing Ä¡âÜ.
Static TimeWhen you have a message or a call log item on the keystation display, the time and date are not shown. The Static Time feature allows the time and date to be displayed at all times.
• Press Ä¡âß to turn Static Time on.
• Press Ä£¡âß to turn Static Time off.
Call duration timeUse the Call Duration Time feature to see how long you spent on your last call or how long you have been on your present call.
By pressing Äàà, you can see how long you spent
• on your last call
• how long you have been on your present call
Displays21 02:47 The display reads the last call you made or the
current call, and the total elapsed time in minutes and seconds.
Line001 01:45 You parked your last call. The display reads the length of time the call was parked. You cannot see the length of time a call was parked unless the call is active at your keystation or has just been released by your keystation.
P0906413 Issue 01 System Administration Manual

288 / Using Display Features
Call InformationCall Information is an optional supplementary service provided by the public telephone company. If your business subscribes to this service, you can view the number of an external caller unless the caller has blocked the information.
Lines in your Commander NT system may appear at more than one station. However, only one station can receive Call Information automatically for an incoming call. You program which Commander NT station will automatically receive Call Information. If Call Information is not delivered automatically to your station and your company subscribes to the service, you can view Call Information using Ä¡ÚÚ (the Call Information feature code).
ISDN terminals receive Call Information automatically if supported by the terminal.
Note: Not all calls on ISDN lines necessarily provide Call Information because of the way the call is routed, or because the information was lost or corrupted.
Call Information gives you information about your active call or the highest priority ringing call.
Call Information is more detailed than the Call Display information you can receive without subscribing to Call Information. For external calls, you can display the caller’s telephone number, name, or a combination of these items. For an internal call, it is possible to display the caller’s name and their station number. It is also possible to display information for ringing, answered, or held calls.
Call Information displays even if the call has been transferred, diverted, or re-routed in some way.
Call Log displays the same information as Call Information, along with the date and time of the call, and the number of times the caller called.
System Administration Manual P0906413 Issue 01

Using Display Features / 289
Note: You may continue to press line keys to get information on other calls. If you press the same line key twice, you are connected to that call. If you press any other key, including keys used to show more information about a call, you exit the Call Information feature, and the key you pressed performs its normal function.
Call Information symbolsOnly incoming calls can be logged. Calls preceded by + are outgoing and cannot be logged.
Call logIf your system is equipped with the appropriate equipment and you have subscribed to the call information feature supplied by your service provider, you can capture information about incoming callers in your call log. The same feature is supplied by an ISDN service package that comes with calling line identification (CLID).
You can protect the privacy of your call log by assigning a password. A handy feature of the call log is that you can easily use it to place calls to the numbers recorded
Call log information is stored in Non-volatile Random Access Memory (NVRAM). If a loss of power occurs in the Commander NT system, all logs will be preserved.
Symbol Description
+ Indicates the number of the telephone you called (not an incoming call).
… Press ¥ or VIEW to see the rest of the number.
ˆ You cannot use another feature until you exit the Call Information feature.
x The number is incomplete (missing digits).
/ The number shown is too long. The last 14 digits are shown following the /.
¯ The call shown in the call log has been answered.
P0906413 Issue 01 System Administration Manual

290 / Using Display Features
Call log creates a record of incoming external calls. For each call the log could contain the following
• sequence number in the call log
• number of the caller
• indication if the call was long-distance
• indication if the call was answered (and identity of who answered it)
• time and date of the call
• number of repeated calls from the same source
• name of the line that the call came in on
Call log can help you to
• keep track of abandoned or unanswered calls
• track patterns for your callers (for example volume of calls and geographical location of calls)
• record caller information quickly and accurately
• build a personal telephone directory from log items
The long-distance indicator, as well as the caller’s number, may not be shown in the log, depending on the Call Display services provided by your local telephone company and the caller’s local telephone company.
Setting which calls are logged at a stationYou can set which types of incoming calls are logged at your station. The options are:
• No autologging
• No one answered (only for autologging stations)
• Unanswered by me (only for autologging stations) but answered elsewhere in the system
• Log all calls (including those you answer)—applies to all lines capable of providing call information, even if your station is not assigned as an autologging station for that line
System Administration Manual P0906413 Issue 01

Using Display Features / 291
The default is No one answered.
1. Press Ä¥¡Ý.
2. Press £ or NEXT to change the options.
3. Press ú or OK to select the display option.
Setting your Call log passwordYou can set a password for access to your call log to keep your log private. From then on you must enter this password to view your call log.
1. Press Ä¥¡Þ. The displays reads New passwrd:.
2. Enter your four-digit password. The display reads Repeat New:.
3. Re-enter your four-digit password. The display reads Password changed, which confirms that your password has been assigned.
To enter Call log using your password1. Press Ä¡ÚÛ to enter Call log. If you have
programmed a password, the display reads Password:.
2. Enter your four-digit password.
If you forget your Call log password, it can be removed in programming. See "Changing your Call log password" on page 291.
Changing your Call log password1. Press Ä¥¡Þ. The display reads Old passwrd:.
2. Enter your old password. The display reads New passwrd:.
3. Enter your new four-digit password. The display reads Repeat New:.
4. Re-enter your password. The display reads Password changed, which confirms that your password has been changed.
Removing your Call log passwordWhen you remove your Call log password, anyone can access your call log.
P0906413 Issue 01 System Administration Manual

292 / Using Display Features
1. Press Ä¥¡Þ. The display reads Old passwrd:.
2. Enter your old password. The display reads New passwrd:.
3. Press ú or OK. The display reads No pswd assigned, which confirms that your password has been deleted.
Logging an incoming call (Logit)If your calls are not automatically logged, you can manually log call information when you are connected to an external call. Storing information for your current call can be helpful in many situations. For example, you may want to
• record a caller’s name and number without using paper and pencil
• record only calls that you choose, as opposed to using Call log automatically
• quickly record caller information before a caller hangs up.
To log an external call manually:
Press Ä¡ÚÜ.
Note: If you program the Call log feature code to a memory key with an indicator, the indicator lights when there are new items in the log.
Viewing your Call logNew items are shown with the first character underlined.
Press Ä¡ÚÛ.
Use either the display keys or your dial pad to navigate through the log.
Action Key Display key
On entering the log
View log items you have viewed before ¥ OLD
View the last item you viewed â RESUME
System Administration Manual P0906413 Issue 01

Using Display Features / 293
Placing a call to a number in the call logYou may find it helpful to place calls from within your call log. The number stored for each call may vary depending on the type of call.
To place a call1. Display the log item for the call you want to place.
2. Display the associated telephone number.
3. Dial any extra digits required.
4. Press an exchange line or line pool key.
5. Lift the handset. (This is not necessary if Handsfree is programmed at your keystation). The displayed number is dialled.
While viewing the log, you can place a call to the number displayed in the log.
1. If the number begins with digits that you do not need when calling from your location, press the left side of à or TRIM, once for every digit that you want to remove.
View new items in the log £ NEW
When viewing an item
View the next item in the log £ NEXT
Erase the item you are viewing ú ERASE
View more information on this item Right side of Ã
MORE
Trim digits from the beginning of the number you are viewing prior to dialling the number
Left side of Ã
TRIM
Go back to the previous item ¥
Action Key Display key
P0906413 Issue 01 System Administration Manual

294 / Using Display Features
2. Add any digits required to route this number to an appropriate line (for example, 9 to get an outside line, if your system requires it). Use the left side of à or BKSP to erase incorrect digits. You cannot enter host system signalling codes.
3. Select a line for the call as you normally would for making a call of this type (for example, by pressing an appropriate line, Intercom or Handsfree/Mute key, or by lifting the handset).
4. The displayed number is dialled.
Note: When you edit a number in the log to call that number, the edits you make are not saved in the log.
Programming a keystation to log calls automaticallyYour installer or Sales Support Officer can program each keystation to log calls coming in on a line automatically.
DisplaysUnknown number
The caller’s number is unavailable.
12_1234567890123 NEXT ERASE MORE
_ indicates a new item.
12ø1234567890123 NEXT ERASE MORE
ø indicates that the call was answered.
12¤1234567890123 NEXT ERASE MORE
¤ indicates a long-distance call.
49/1234567890123NEXT ERASE MORE
/ indicates that the stored number has been shortened to its final 11 digits. Press à or MORE to display additional information about the call.
Call(s) bumped One or more log entries have been deleted by the Autobumping feature while you are looking at the call log.
Hold or release Hold or release your active call before entering Call Log.
System Administration Manual P0906413 Issue 01

Using Display Features / 295
Autobumping
Deleting log items Your log has a set number of items that it can hold. When it becomes full, new calls cannot be logged. When your log is full, Autobumping automatically deletes the oldest Call Log item and logs the new call.
In use: SETNAME The exchange line is in use.
Jan 4 9:00am 3XNEXT ERASE MORE
The repeat call counter, shown along with time and date, indicates the number of calls you have received from the same caller.
Line001 ø227 NEXT ERASE MORE
This call was answered at another keystation (227).
Line001 øLogitNEXT ERASE MORE
This call was logged manually.
Line001 NEXT ERASE MORE
This call was not answered.
Messages & CallsMSG CALLS
There are one or more items in your message waiting list, and there are one or more new items in your Call Log.
Press Ä¡âß to change the first line of the display to the current time and date.
New calls begin
You have viewed your last old log item and can now view your new log items.
No info to log
No information is available for the call.
No log assigned
No log space has been assigned to the keystation.
No resume item The resume item has been removed because of Autobumping. Repeat Call Update, or log reallocation while you are looking at the call log.
P0906413 Issue 01 System Administration Manual

296 / Using Display Features
To enable AutobumpingPress Ä¡ÚÞ. The display reads Autobump ON.
To disable AutobumpingPress Ä£¡ÚÞ. The display reads Autobump OFF.
System Administration Manual P0906413 Issue 01

Special dialling features
Commander NT Keystations can access a remote system or dial a number on a private network by using host system access features such as Recall, Pause, Wait for Dial Tone, and Run/Stop. These features either send a special signal to the host system or allow you to program delays required by host systems to external autodial keys or speed dial codes.
Inserting a pauseThe Pause feature enters a 3.5 second delay in a dialling sequence on an exchange line. You may need this for signalling remote devices, such as answering machines, or when dialling through to PBX features or host systems.
You can program more than one pause in an external autodial or speed dial sequence.
For pulse dialling, ¥ inserts a 1.5 second pause into the dialling sequence.
The pause symbol (Ý) uses one of the 24 spaces in a dialling sequence.
Press Äà¡ while programming a dialling sequence.
Note: You can obtain a pause with one key press if you program the feature code to a memory key. More than one pause can be programmed to an external autodial key.
Setting long tonesThe Long Tones feature lets you control the length of a tone so that you can signal devices such as fax or answering machines, which require tones longer than the standard 120 milliseconds.
P0906413 Issue 01 System Administration Manual

298 / Special dialling features
1. While on a call, press Ä¡â¡.
2. Use the dial pad to produce the appropriate tones. Each tone sounds for as long as you hold down the key.
Note: Long Tones can be used on any call except a conference call.
You can use internal lines of the Commander NT system to activate a device connected to an Single Line Telephone Adaptor (SLT) in another area of your office, or exchange lines to access devices outside the Commander NT system.
Programmed ReleaseThe Programmed Release feature performs the function of the ¨ key in a programmed dialling sequence. When the system encounters a Programmed Release in a dialling sequence, it stops dialling and hangs up the call.
The Programmed Release symbol (Þ) takes up two of the 24 spaces in a programmed dialling sequence.
The system ignores any digits or commands that follow a Programmed Release in a programmed dialling sequence.
Press Ä¥¡á while programming a dialling sequence.
RecallIf your Commander NT system is connected to a PBX, you can use a Recall signal to access special features. Program Recall to a memory key for one-touch access.
The Recall signal can also be included as part of a longer stored sequence on an external autodial key or in a speed dial code. The Recall symbol (Û) uses two of the 24 spaces in a dialling sequence.
If your Commander NT system is connected to a host system, a private branch exchange (PBX) for example, you can use a Recall signal to access special features such as PBX Divert and PBX Transfer.
System Administration Manual P0906413 Issue 01

Special dialling features / 299
While you are on a call or programming an autodial key, press ÄàÚ.
Run/StopRun/Stop inserts a break point into an autodial or speed dial number. This may be necessary when you are connecting to a PBX or similar host system.
For example, you may call a company with an automated receptionist that instructs you to dial the station number you need. You can program the company number, a Run/Stop, then the station number on one external autodial key. Press the autodial key once to dial the company number. When you hear the automated receptionist, press the autodial key again to dial the station number.
The Run/Stop symbol (ß) uses one of the 24 spaces in an autodial or speed dial sequence.
You can include up to three Run/Stop commands in a dialling string. The system ignores a fourth Run/Stop, and any digits or commands that follow it in a programmed dialling sequence.
Press Ä¥á while programming a dialling sequence.
Wait for Dial ToneWait for Dial Tone causes a sequence of numbers to pause until dial tone is present on the line before continuing to dial. This is useful if you must dial a remote system and then wait for dial tone from that system before dialling the rest of your number.
The Wait for Dial Tone symbol (à) uses two of the 24 spaces in an autodial or speed dial sequence.
Press Ä¡âÝ while programming a dialling sequence.
DisplaysInvalid code You have entered a code that can only be used
in a programmed autodial or speed dial sequence, not on a call you dial directly. Programmed Release and Run/Stop are for use in programmed dialling sequences only.
P0906413 Issue 01 System Administration Manual

300 / Special dialling features
Using pulse dialling for a callIf your external telephone lines use pulse dialling, you can temporarily switch to tone dialling by pressing £ after selecting the line. Tone dialling lets your Commander NT Keystation communicate with devices and services that respond to tone signals, such as automatic switchboards and fax or answering machines.
System Administration Manual P0906413 Issue 01

ISDN services
ETSI ISDN BRA standardETSI ISDN BRA is the European Telecommunications Standards Institute specification for Basic Rate Access ISDN service. BRA provides 2 bearer B-channels operating at 64 kbit/s and a data D-channel which operates at 16 kbit/s (which is used primarily to carry call information). PlesTel markets this service in Australia as OnRamp™.
Applications available within the ISDN networkUsing the appropriate ISDN terminal equipment, you can access a wide range of business applications available with ISDN:
Videoconferencing and video telephonyVideoconferencing offers instant visual and audio contact between distant parties using either studio-based or desktop ISDN terminals.
Desktop conferencingISDN allows computer users in distant locations to share and edit any image, data, or text file on their own computer screen, while simultaneously discussing the information.
File transferThe ISDN network allows you to transfer files containing data, text, image, or audio clips, faster and cheaper than with a conventional modem.
Home workingConvenient retrieval, processing, and storage of files is possible for the home worker, using ISDN lines to give high-speed access to information held in the office.
Group 4 faxISDN fax applications provide cost savings by increasing both transmission speed and quality of resolution.
P0906413 Issue 01 System Administration Manual

302 / ISDN services
Remote LAN accessISDN provides an affordable and fast means for workers in remote sites (at home or branch offices) to access LANs.
Leased circuit backupEssential backup for leased circuits can be provided using ISDN as required, rather than duplicating costly permanent circuits.
LAN to LAN bridgingLocal Area Network (LAN) bridge/routers allow flexible interconnection between LANs using ISDN.
BroadcastingUsing ISDN and digital codes, broadcasters can convey music, news, and commentaries with absolute clarity.
Video surveillanceDial up access using videocodes provides advanced surveillance on demand.
Accessing information servicesThe fast call set up and high bandwidth of ISDN are ideal for accessing information services such as Internet and databases.
Commander NT40 and ISDN supported servicesThe Commander NT40 can support up to two ISDN Basic Rate Access (BRA) Cartridges, each of which allows the connection of up to four ISDN BRA loops. Each of these loops consists of two separate B-channels that can be used to make two simultaneous voice or data calls, or one data call and one voice call. A video call requires the use of both B-channels on the loop.
Your installer configures the ISDN BRA loops for the Commander NT40. As an Administrator you should be familiar with ISDN basics and terminology.
Commander NT40 supports the following ISDN services:
• basic incoming calls
• basic outgoing calls
System Administration Manual P0906413 Issue 01

ISDN services / 303
• Direct In Dial
• Calling Line Identification Presentation
• Multiple Subscriber Numbering
• Sub-addressing
• bearer capabilities
• teleservices
The Divert All Calls and Transfer features can be used from ISDN terminals connected to the Commander NT40 using the User side S Bus.
Note that Commander NT Keystations can accept voice calls only. Video and data calls will not alert at a Commander NT Keystation.
If your Installer has installed an ISDN S-loop to be used as a user side S bus, the Installer can assign an ISDN station number to the loop for the ISDN terminals to be able to make or receive calls. There are eight ISDN station numbers available and sub addressing is also available. All eight ISDN station numbers can be assigned to one ISDN S-loop.
Commander NT40 uses the ISDN station number assigned to the ISDN terminal as the terminal address, to distinguish that device from other devices.
Although an ISDN S-loop can support up to 8 devices, the loop has a limit of 2 B-channels. An ISDN data or voice terminal uses 1 B-channel for an incoming or outgoing call. An ISDN video terminal uses 2 B-channels for an incoming or outgoing call. If both B-channels are in use, other devices on that loop will not be able to make or receive calls until a B-channel is available, or until both B-channels are available in the case of a video terminal. Thus, the number of terminals installed on an S-loop must take into account whether you require dedicated access for the terminals on that loop.
P0906413 Issue 01 System Administration Manual

304 / ISDN services
There are significant advantages in configuring S-loops on the Commander NT40 rather than sharing the network ISDN loop. All ISDN devices can be programmed to have access to any of the network ISDN loops. Indial programming can be used to allow incoming access to the ISDN devices. ISDN devices use a station number within the range of the NT40 and can be accessed internally with this station number. This is a better use of system resources since any unused ISDN network loops can be configured as S-loops.
PlesTel currently supports 2 ISDN Terminal Adapters; the TA 220 and the 3-Comm Digital Modem. PlesTel will continue to test and evaluate new ISDN compatible devices.
Unavailable ISDN ServicesTo enquire further about ISDN services the Commander NT40 system does not support, please contact the Commander Customer Response Centre on 1800 809 882.
System Administration Manual P0906413 Issue 01

General system features
The following features are available for the entire Commander NT40 system.
Station numbersEach station on the Commander NT40 has its own station number. The length of station numbers in your system can be from three to seven digits. All station numbers on your system are the same length. Your installer sets the length of station numbers (also called the Stn # length).
To find out your station number, use the Key Inquiry feature (Ä¥â) on an intercom key. On the Economy Keystation, Key Inquiry shows your station number followed by the function assigned to your single-memory key.
Line assignmentAny of the lines in your system can be assigned to any of your stations. Your installer assigns lines to stations in Line access (Stns&Peripheral subheading) programming.
Lines can be assigned to appear only, appear and ring, or to ring only.
Usually, only the lines that are appropriate for a particular person appear at that person’s station. When a line is assigned to a station it is automatically given a line key on that keystation, if a key is available. The Economy Keystation has no line keys for its lines.
Calls on lines that ring but do not appear at a keystation are presented on an intercom key.
You may be able to answer a call on a line that does not appear or ring at your keystation. To pick up such a call, use Call Pickup, Call Parking, or Line Answer.
P0906413 Issue 01 System Administration Manual

306 / General system features
A keystation may have keys assigned for lines 001 to 003, but have only lines 001 and 002 programmed to ring. An incoming call on any of the three lines causes a line key indicator to flash, and the keystation can be used to answer the call. This is especially useful for people who monitor other telephone lines, but want only their own lines to ring.
Choosing a line using a line keyYou have one line key for each line assigned to your station. Press the line key to select the line you want to answer or use to make a call. Having several line keys allows you immediate access to more than one line.
The Economy Keystation does not have line keys and can have a maximum of two calls. Press ú to switch between its two calls, one active and one on hold.
Economy KeystationBecause the Economy Keystation does not have line keys, it sometimes works slightly differently from other Commander NT40 stations. Where other keystations can require that you select a line key to answer a call, on the Economy Keystation you simply pick up the handset. Where other keystations require you to select a line key to take a call off hold, you press ú on the Economy Keystation.
On Economy Keystations, you can answer a second call by pressing ú. Your active call is put on hold and you are connected to the waiting call. You can have no more than two calls at a time.
The Economy Keystation cannot have a © key. When applicable, special instructions for the Economy Keystation are included with each feature description.
System Administration Manual P0906413 Issue 01

General system features / 307
Memory keysMemory keys are the keys with indicators on the Standard, Advantage, and Principal Keystations, and the dual keys without indicators on the Advantage Keystation. There is also a single memory key, without an indicator, on the Economy Keystation. Memory keys can be used as answer, autodial, line, incoming line group, and programmed feature keys. Line, incoming line group, intercom and answer keys must have indicators.
One-line displayThe Economy and Standard Keystations have a one-line display. Other Commander NT Keystations have a second line on the display which shows the functions of the three keys directly below it.
Some display keys, such as TRANSFER and ALL, are simply shortcuts which are not available on a one-line display.
Other display keys, such as OK and SHOW, perform essential functions. For a one-line display keystation, use the following keys instead of these display keys.
Substitutes for display keys
All displays listed in this book are shown as they appear on the two-line display.
Display key Dial pad key
OK ú
QUIT ¨
ADD ¥
SHOW £
CANCEL ú
MORE £
OVERRIDE £
BKSP Ã
P0906413 Issue 01 System Administration Manual

308 / General system features
Prime lineYour keystation can be programmed to select an intercom link or external line or a line pool automatically whenever you lift the handset or press ©. This is your prime line.
Private linesA private line is exclusive to a particular station. Calls that are put on hold or left unanswered on a private line cannot be picked up at any station except the prime station.
Volume barThe volume bar controls the volume of the handset, keystation ringer, handsfree speaker, and headset. Press either end of the volume bar à to adjust the volume.
Wall mountingCommander NT Keystations can be mounted on a wall. Contact Telstra if you wish to have any keystations on your system wall-mounted.
Uninterruptible power supply (UPS)
If you require power backup, please contact the Commander Customer Response Centre on 1800 809 882 for advice to ensure a safe installation.
Changing to tone diallingIf your external telephone lines use pulse dialling, you can temporarily switch to tone dialling by pressing £ after selecting the line. Tone dialling lets your Commander NT Keystation communicate with devices and services that respond to tone signals, such as fax or answering machines.
Improper installation and use of an UPS can result in a shock haz ard.
Installation and use of an UPS without proper precautions can result in danger of electrical shock.
System Administration Manual P0906413 Issue 01

General system features / 309
Using your Commander NT40 from an external location
You can use the lines and some of the features of a Commander NT40 from outside the system. You can do this when you are away from the office.
Note: Supervised lines are required to operate this optional facility.
Here is an example of how remote access works. A sales representative who spends a lot of time out of the office needs to make long distance calls to the European office. Your Commander NT40 has a leased line to Europe with reduced charges. You provide that sales representative with a Class of Service password that gives access to the cheaper line. The sales representative can then telephone into the Commander NT40 from a hotel, enter their Class of Service password, and use the leased line to make calls.
Remote users can access Commander NT40 lines, line pools and the page feature. The exact facilities available to you through remote access vary depending on how your installer set up your system.
Controlling access to your Commander NT40It is important to maintain the security of your Commander NT40 by limiting access to authorised users and limiting those users to the features they need.
Remote users can make long distance calls.
Remember that a remote user can make long distance calls that will be charged to your company. They can also make page announcements in your office.
P0906413 Issue 01 System Administration Manual

310 / General system features
Direct Inward System AccessControl access to your Commander NT40 with direct inward system access (DISA). Access to your Commander NT40 from the public telephone network should always be controlled with DISA. If your installer programs the line used for remote access to answer a call automatically, callers will hear a stuttered dial tone and must enter a Class of Service password before they are allowed into the system.
Class of ServiceTo control the level of service a remote user can access, your installer can assign a remote filter and remote package to the line used for remote access. The remote filter restricts the numbers that can be dialled on the line, and the remote package restricts the use of line pools and the page feature. To change the restrictions for the line, the user can enter their Class of Service password when the system answers with DISA, or can dial the DISA station number and enter their Class of Service password if programmed, from the optional Auto Attendant feature.
Note: Each Remote caller to DISA has the ability to make either one call or use the page facility once. If further calls are required or the page facility is required again, a new call must be made to the Commander NT40.
Maintaining securityTo maintain the security of your system, the following practices are recommended:
• Warn anyone to whom you give the remote access number, to keep it confidential.
• Change Class of Service passwords often.
• Warn anyone to whom you give a Class of Service password to remember it and not to write it down.
• Remove the Class of Service password of anyone who leaves your company.
Accessing Commander NT40 remotely
• Dial the Commander NT40’s remote access number.
• When you hear a stuttered dial tone, enter your COS password.
System Administration Manual P0906413 Issue 01

General system features / 311
• Wait for the system dial tone.
If your system is using System Answer or CCR, you may also enter the DISA number or Auto station number once your call has been automatically answered by one of the features.
To use the system remotely, you must use a telephone with tone dialling to call the system.
Remote access is possible only on supervised lines.
To use features on a remote Commander NT40, press ¥ followed by the feature code. Even if you are calling from a Commander NT40 remotely, press ¥ instead of Ä.
In certain situations, you may experience lower volume levels when using Commander NT40 remotely.
TonesYou may hear some of the following tones while accessing Commander NT40 remotely.
Tone What it means
Busy tone • Dialled a busy line pool access code. You will hear system dial tone again after 5 seconds.
Commander NT40 dial tone
• You may use the Commander NT40 remotely.
Fast busy tone You have done one of the following:
• Entered an incorrect COS password. Your call will be disconnected after 5 seconds.
• Taken too long while entering a COS password. Your call will be disconnected after 5 seconds.
• Tried to use a line pool or feature not permitted by your Class of Service. You will hear system dial tone again after 5 seconds.
Stuttered dial tone Enter your COS password.
P0906413 Issue 01 System Administration Manual

312 / General system features
Answer keysYou can use an Answer key to monitor calls on another person’s station. All external calls to the monitored station appear, or ring and appear, on the Answer key. Answer keys are useful for an attendant who monitors incoming calls for other people.
You cannot make calls using Answer keys.
If more than one call is ringing at someone’s station, the first call appears on the attendant’s Answer key. Any subsequent calls appear on intercom key, if they are available.
Note: More than one attendant may have an Answer key for a single station. This allows two or more attendants to handle calls for a busy person.
A keystation can have up to eight answer keys for other people.
Control stationThe control station lets you place the stations and external lines for which it has responsibility for, into and out of service modes.
System Administration Manual P0906413 Issue 01

List of Commander NT features
How to use Commander NT features1. Press Ä, and enter the desired feature code on the dial
pad.orPress the programmed memory key.
2. Follow the display messages.
If you change your mind while entering a feature code, press Ä to cancel. If you use the ¨ key to end a feature, you may drop an active call.
To view what has been programmed on a memory key, enter the Key Inquiry feature code (Ä¥â) and press the memory key.
Feature Name To Activate To Cancel
Admin Alarm time (Hospitality)
Ä¡àà
Alarm time (Hospitality) Ä¡àÞ Ä£¡àÞ
Automated Attendant
CCR Ä¥¡ÜÛ
Customized greetings
Ä¥¡ÜÜ
System Answer Ä¥¡ÜÚ
Autobumping (Call Logs)
Ä¡ÚÞ Ä£¡ÚÞ
Background music Ä¡ß Ä£¡ß
Callback ÄÛ Ä£Û
P0906413 Issue 01 System Administration Manual

314 / List of Commander NT features
Call Camp-on Ä¡Û
Call Duration Timer Äàà
Call log Ä¡ÚÛ
Call log options Ä¥¡Ý
Call log password Ä¥¡Þ
Call Parking ÄàÝ
Call Pickup Directed Äàß
Call Pickup Group ÄàÞ
Call Queuing Ä¡âÚ
Class of service password
Äß¡
Conference ÄÜ ¨
Contrast adjustment Ä¥à
Dialling modes Ä¥¡Û
Divert All Calls ÄÝ Ä£Ý
Do Not Disturb Ä¡Þ Ä£¡Þ
Group listen Ä¡âÛ Ä£¡âÛ
Hold ú
Holding a call exclusively
Äàá
or Ä HOLD
Key Inquiry Ä¥â
Last Number Redial ÄÞ
Line pools ÄßÝ
Feature Name To Activate To Cancel
System Administration Manual P0906413 Issue 01

List of Commander NT features / 315
Line redirection(not available on Economy)
Ä¡Ý Ä£¡Ý
Logit (Call Logs) Ä¡ÚÜ
Long tones Ä¡â¡
Memory keys
ProgrammingFeature codes
Internal Autodial
External Autodial
Ä¥Ü
or Ä¥Û
or Ä¥Ú
Erasing Ä¥Ú then OK
Messages
Reply ÄßÞ Ä£
Sending ÄÚ Ä£Ú
View messages ÄßÞ
Moving line keys Ä¥¡Ú ¨
ONN blocking (CLIR) Ä¡Úá Ä£¡Úá
Page
General Äßâ
Internal ÄßÚ
External ÄßÛ
Internal and external
ÄßÜ
Pause Äà¡
Priority Call Äßá
Feature Name To Activate To Cancel
P0906413 Issue 01 System Administration Manual

316 / List of Commander NT features
To block a Priority call Ä¡Þ Ä£¡Þ
Privacy Ä¡Ü Ä£¡Ü
Programmed release Ä¥¡á
Recall ÄàÚ
Ring type Ä¥ß
Ring volume Ä¥¡â
Room condition (Hospitality)
Ä¡àß
Room occupancy (Hospitality)
Ä¡àá
Saved Number Redial Äßà
Services
Alternative ringing Ä¡àÚ Ä£¡àÚ
Alternative restrictions
Ä¡àÛ Ä£¡àÛ
Alternate routing Ä¡àÜ Ä£¡àÜ
Show Time and Date Ä¡âÜ
Speed Dial Äâ
Transfer Äàâ
Voice Call Äßß
Voice Call deny Ä¡¡ Ä£¡¡
Feature Name To Activate To Cancel
System Administration Manual P0906413 Issue 01
List of ISDN terminal features
The Divert All Calls and Transfer features can be used from an ISDN terminal connected to Commander NT. On most ISDN terminals, you need to press one or more keys to access feature services before you enter the feature code for these features. To see what keys to press, consult the instructions that came with the ISDN terminal.
Note: Although ISDN terminals may have Transfer and Divert keys or display prompts, these keys do not activate Commander NT features. Always use the appropriate procedure to access feature services, then enter the feature code as described below.
Other Commander NT station features are not available to ISDN terminals. In addition, you cannot retrieve a parked call, or use the Direct-Dial digit to reach a Direct-Dial station from an ISDN terminal.
Divert All Calls
Using the Divert All Calls feature The Divert All Calls feature lets you divert your calls to another keystation in your Commander NT system.
1. Press ¥Ý¥.
2. Enter the number of the station you want your calls diverted to, followed by £.
3. Enter the appropriate key to send.
Cancelling Divert1. Press £Ý£.
2. Enter the appropriate key to send.
P0906413 Issue 01 System Administration Manual

318 / List of ISDN terminal features
Transfer
Using the Transfer feature The Transfer feature lets you transfer a call to an internal or external telephone. You can transfer a call to a hunt group station. Depending on how you have programmed your system, you may not be able to transfer a call on one exchange line to another exchange line.
Depending on the type of ISDN terminal, you may have to press a service key to access feature services (consult the instructions that came with your ISDN terminal).
1. Press ¥àâ¥.
2. Enter the number of the station you want to transfer the call to, followed by £.
3. Enter the appropriate key to send.
Cancelling TransferDepending on the type of ISDN terminal, you may have to press a service key to access feature services (consult the instructions for your terminal).
1. Press £àâ£.
2. Enter the appropriate key to send.
Line access from an ISDN terminalNote that ISDN terminals do not have line keys or intercom keys as does a Commander NT Keystation. To make an outgoing call from an ISDN terminal, access an exchange line by entering a line pool code or a destination code.
Making or receiving calls involving two B-channels
For incoming calls that require two simultaneous B-channels, Commander NT requires that calls be made sequentially to two distinct numbers, rather than simultaneously to the same number.
System Administration Manual P0906413 Issue 01

List of ISDN terminal features / 319
In the case of a DDI call, the same DDI line can be used but the ISDN station needs to have the number of appearances for that DDI line to 2.
P0906413 Issue 01 System Administration Manual

320 / List of ISDN terminal features
System Administration Manual P0906413 Issue 01

List of SLT station features
The Single Line Telephone Adaptor (SLT) connects a digital Commander NT Keystation port to a standard analogue voice device. It is most commonly used to attach to a single-line telephone or a data communication device such as a modem or facsimile machine.
Refer to the SLT Adaptor User Card for complete information.
Feature To activate To cancel
Admin Alarm time (Hospitality)
À¥¡àà
Alarm time (Hospitality)
À¥¡àÞ À£¡àÞ
Alternate line ÀÛ
Call parking À¥àÝ
Call pick-up (Directed)
À¥àß
Call pick-up (Group) À¥àÞ
Call Queuing À¥¡âÚ
Call Waiting À¥¡âÚ
Camp-on À¥¡Û
Conference call À¥Ü
Divert À¥Ý À£Ý
Hold Call (Exclusive)
À¥àá
Hold Call (Public) ÀÛ
P0906413 Issue 01 System Administration Manual

322 / List of SLT station features
Last Number Redial À¥Þ
Line Answer from any keystation
À¥¡ââ
Line Pool selection À¥ßÝ
Page
General À¥ßâ
Internal À¥ßÚ
External À¥ßÛ
Internal/External À¥ßÜ
Priority Call À¥ßá
Privacy control À¥¡Ü
Reach through
Recall À¥àÚ
Room condition (Hospitality)
À¥¡àß
Room occupancy (Hospitality)
À¥¡àá
Pause À¥à¡
Timed release À¥àÛ
Restriction override À¥ß¡
Camp On À¥Û À£Û
Saved Number Redial
À¥ßà
Send Message (from Direct dial station)
À¥Ú À£Ú
Feature To activate To cancel
System Administration Manual P0906413 Issue 01

List of SLT station features / 323
StarTalk or Commander NT Voice Mail
Access mailbox À¥á¡Ú
Leave a message À¥á¡â
System Speed Dial À¥â
Tones À¥¡âá À£¡âá
Transfer À¥àâ
Voice Call À¥ßß
Feature To activate To cancel
P0906413 Issue 01 System Administration Manual

324 / List of SLT station features
System Administration Manual P0906413 Issue 01

Common feature displays
You may see the following displays when you use a feature.
Access denied Someone is already using programming, or the feature you are trying to use is not compatible with the configuration of the station or line.
Denied in admin You have tried to use a feature, but you have not been given access to it in programming.
Feature timeout You have taken more than 15 seconds to press a key in response to a display.
Inactive feature You have entered a feature code that is used by an application program that your system does not have.
Invalid code You have entered an invalid feature code.
Not available You have tried to use a feature that is not available in the present setup of your Commander NT40.
stn locked You cannot use the feature you have chosen because your keystation is locked. See "Locking a station" on page 79.
1234567890123ÉVIEWâ OK
Press £ or press VIEWâ or áVIEW to view a number that is too long to fit on the display. Press ú or OK when you are finished.
247> 221 Either you are receiving an internal call from station 247 forwarded by station 221 or you have an Answer key for station 221 and an internal call from 247 is ringing on 221.
221 TRANSFER You are connected to an internal call. Press TRANSFER to transfer the call.
221 calling You are receiving a call from station 221.
P0906413 Issue 01 System Administration Manual

326 / Common feature displays
Call 221? YES NO
You have placed a Callback for station 221 and that station is now available. Press the flashing internal line key or YES to call the number again. On the Economy Keystation, just lift the handset. Otherwise, press NO or wait 30 seconds for the offer to expire.
Camped: 221 CALLBACK
The person to whom you camped the call did not answer it. The call has come back to you. Press the line key or CALLBACK to reconnect to the call.
Line001 TRANSFER You are on an external call. Press TRANSFER to transfer the call.
Line001>221 Either you are receiving an external call on line 001 forwarded from station 221 or you have an answer key for station 221 and an external call is ringing for line 001 on that keystation.
Line001 transfer The call on line 001 is being transferred to you by someone else in your Commander NT40.
Line001 waiting A camped call is waiting. Press the line key or use Call Queuing to answer the call.
Press ú if you have an Economy Keystation.
No calls waiting You tried to use Call Queuing but no call was ringing at your keystation.
No line selected There is no call ringing at your keystation. If you have a flashing line key but your keystation is not ringing, press the line key to answer the call on that line.
Not in service The station to which you directed a call is not in service or is otherwise unavailable. The call is returned to your station.
Parked call CALLBACK
No one answered the call you parked. The call has come back to you.
System Administration Manual P0906413 Issue 01

Common feature displays / 327
Pick up handset You have used the Call Queuing feature without picking up the handset. Auto Handsfree has not been assigned to your station. You must use the handset or © to answer a call.
Priority> 221 BLOCK
You are receiving a priority call. If you are on another call, inform the person you are speaking to that the call is about to be put on hold. Press the flashing line indicator of the priority call or wait until the call connects automatically (in eight seconds). The priority call goes through when you hear the next beep. Your active call is placed on Exclusive Hold. It is reconnected automatically when the priority call ends (unless you transfer the priority call, in which case you must press the line key of your original call to reconnect). Use DND (Ä¡Þ) or press BLOCK to reject a priority call.
Release a call You have no free line keys on which to receive a call. Release one of your current calls and try again to answer the incoming call.
Use line pool? YES NO
You have received a Callback offer for a line pool. Press the flashing internal line key or YES to use the line pool. On the Economy Keystation just lift the handset. Otherwise, press NO or wait 30 seconds for the Callback offer to expire.
Hold or release You cannot program a feature key while you are on a call.
Release calls You have tried to use a feature while you were on a call or had calls on hold. Release the call or calls, before using the feature.
Line in use The line is in use. Make the call on another line or wait until the line is free.
No key free You have tried to make, receive or pick up a call when no line key was available. Some features also require you to have a key free. Releasing calls can free up line keys.
P0906413 Issue 01 System Administration Manual

328 / Common feature displays
Make call first The feature you tried to use requires you to be on an active call at your station.
No free lines Either all the lines in a line pool assigned to the station are busy or all the lines available at the station are in use. This display also appears when the programmed dialling feature you have used requires a line pool or line assignment that is not available to the station. If this display appears at a Hotline keystation, the programming has to be changed.
No free lines The station has been set up to dial a hotline external number on a prime line but the station has an internal prime line and no access to line pools. Either the line pool assigned to the station is busy, or the station does not have access to a line pool. This must be corrected by your customer service representative or installer.
No line selected The station has been set up to dial a hotline external number on a prime line but the station does not have a prime line. This must be corrected by your customer service representative or installer.
In use:221 You have tried to program redirection while someone else is programming redirection. Only one person can program line redirection at a time.
Incoming only The line you are trying to use for redirecting calls is for incoming calls only. Choose an outgoing line.
QUIT BKSP OK Continue entering digits. PressÃ
or BKSP to delete incorrect digits. Press ú or OK when you are finished.
Invalid number You have entered an invalid line pool code or an invalid destination code.
Line denied You have selected a line that is private to another station.
System Administration Manual P0906413 Issue 01

Common feature displays / 329
Restricted call The destination you have chosen for line redirection is restricted. You have attempted to dial a restricted number.
P0906413 Issue 01 System Administration Manual

330 / Common feature displays
System Administration Manual P0906413 Issue 01

Index
A
accessCommander NT40 outside
the system 309remote 310using a COS password 310using DISA 310
Access denied 325Advantage Keystation
memory keys 307troubleshooting 213
Alarm codesrecording 213reporting 213
alarm codesreporting and recording 213
Alarm station 129alarm station 213Analogue equipment
Single Line Telephone Adaptor 147
Analogue Terminal Adapterdelay before answering 147
Answer keysassigning to a station 48using 242
Answer stationcall coverage 132
Answering callsCustom Call Routing 186System Answer 186
answering callsCall Pickup 240external 237hunt group calls 238
P0906413 Issue 01
internal 237Line Answer 242queued 238
attendant station 190Auto Attendant 185–198Autobumping
feature 295Autodial
using intercom key 280Autodial key
external number 279Automated Attendant 186
tasks 186Automatic Keystation Relocation
130, 151Automatic Time&Date 64Auxiliary ringer 97
B
Background Musicprogramming 117
Background music 233Barring calls
customising 67Basic password 177B-channels 303BLF Display
See Busy Lamp Field Display
broadcasting 302Busy Lamp Field Display 226busy tone
fast 311
System Administration Manual

332 / Index
C
Calldiverting 84–88
Call capturesettings that enhance 34–41
Call duration time 287Call Information
symbols 289viewing 288
Call LogAutobumping 295automatic 182feature 289Logit 292password 291programming 294selecting options 103setting station 290space 128, 184station 182using CLI assignment 184viewing 292
Call logpassword 175
Call ParkHunt group calls 247
Call Pickupdirected 240group 241programming directed 125
Call queuing 238Call Services
1st Display 182Auto Called ID 183
Callbackfeature 284
Camp timeoutprogramming 119
Camped 326CCR
See Custom Call RoutingCentral Answering Position
line assignment 44Class of Service
using a password 310Class of service password
changing 77, 260changing dialling filter 77erasing 78feature 260overriding filters 73using 260
CLIDprogramming OLI 50
Commander NT KeystationsAdvantage 224Direct Station Select
Console 226Economy 224Principal 223Standard 224
Commander NT40system dial tone 311
Conference Callfeature 256
Conference tones 124contrast adjustment 104control station 312copying
programming 153settings that can be copied
155settings that cannot be
copied 155COS
See Class of service password
System Administration Manual P0906413 Issue 01

Index / 333
Custom Call Routingattendant station 190customising 187, 188groups 187recording a greeting 196,
197using 186
D
date and time 18default
dialling restriction 66Remote access packages
207Denied in admin 325desktop conferencing 301destination code 167dial pad
description 5dial tone
Commander NT40 311stuttered 311
DiallingLive dial 227one-touch 279Pre-Dial 227setting 227Standard dial 227
diallingchanging pulse to tone 308
dialling featureslong tones 297Programmed Release 298Recall 298Run/Stop 299Wait for dialtone 299
Dialling filterslines 65lines and stations 69
stations 65dialling options 103dialling restriction
defaults 66dialling signal
switching from pulse to tone 308
Direct Inward System Access 310, 311
Direct Station Select ConsoleDirect-Dial station
assigning a keystation 93, 263
internal station 94directing calls
using Custom Call Routing 186
DISASee Direct Inward System
Accessdisconnecting accidentally 244display
contrast 104display keys 6one-line 307testing 217
Display adjusting contrast 228display keys
description 5one-line display 307
Divert all calls 38Divert No Answer
Hunt groups 85Diverting calls
redirect ring 98setting up 84
DNSee station numbers
Do Not Disturb on Busy
P0906413 Issue 01 System Administration Manual

334 / Index
cancelling 88DDI lines 88Hunt groups 88setting 88
DSSSee Direct Station Select
Consoledual memory key 5E
Economy KeystationCall Queuing 326line assignment 305line keys 306memory keys 307one-line display 307Ring Again 326, 327station numbers 305
ETSI ISDNapplications 301BRA standard 301broadcasting 302desktop conferencing 301file transfer 301Group 4 fax 301home working 301LAN to LAN 302leased circuits 302remote LAN access 302services not supported 304S-loops 303supported services 302video surveillance 302videoconferencing 301
exchange code 255exchange line
and keystation assignment 44
external access to Commander NT40 309
external music source 233
F
fast busy tone 311feature
Autobumping 295Automatic hold 245Call duration time 287Call Information services
288Call Pickup, directed 240Call Pickup, group 241Call queuing 238Callback 284Class of service passwords
260Conference Call 256Contrast adjustment 104Exclusive hold 246Group Listen 244hunt groups 238Last Number Redial 80Line Answer 242Line Pool 255Line Redirection 274Logit 292Long tones 297Paging 267Priority Call 251Privacy 237Programmed Release 298Recall 298Run/Stop 299Saved Number Redial 80Static Time 287Transfer 251Voice Call 270
System Administration Manual P0906413 Issue 01

Index / 335
Voice Call deny 270Wait for dialtone 299
feature codesISDN terminals 317Single Line Telephone
Adaptor 321feature key 5Feature timeout display 325features
test a keystation 217–219file transfer 301
G
greetings, Auto AttendantCustom Call Routing 187customising 194pre-recorded 194recording 196
Group 4 fax 301Group Listen 244
H
handsettesting 218
handset speakertesting 218
Handset volumeprogramming 118
HandsfreeFull 89muting 239using 239
headsettesting 218
Held line reminder 123Hold
automatic 245exclusive 246key 5
reminder 123what a caller hears 117
Hold or release 328Hold or release display 327home worker 301Hospitality passwords 177Hotline
assigning a telephone 96bypassing 97, 284cancelling 96using 284
hung line 214hunt group calls 238Hunt groups
adding and removing members 108
and videophones 108assigning lines 109Call Park feature 247checking metrics 115distributing hunt group calls
110Divert No Answer feature 85Do Not Disturb on Busy
feature 88member order 109naming the group 115overflow station 114programming hunt delay
112routing calls if all members
are busy 112time in queue 113
I
In use 328Inactive feature 325Incoming only 328intercom keys
P0906413 Issue 01 System Administration Manual

336 / Index
programming 47using for Autodial 280
Invalid code display 325Invalid number display 328ISDN services 301ISDN terminals
calls with two B-channels 318
Direct-Dial 93divert all calls 317feature codes 317line access 256transfer call 318using 256
K
Key Inquiry 217, 305keys
Autodial 280autodial 279Call Log 293display 5, 6dual memory 5feature 5Hold 5Inquiry 228labelling 229memory 5, 279, 307programming 101Release 5shift 5testing 217, 218using a line key 306using keys 4
Keystationdisplay contrast 228key function 229Key Inquiry 228labelling keys 229
moving 130ring type 230ring volume 231
keystationAdvantage, illustration 4difference between
Advantage and Principal Keystations 5
Economy, illustration 306mounting on wall 308moving 151Principal, illustration 4testing 217–219
L
LAN bridging 302Last Number Redial
preventing 80leased circuits 302length of station numbers 305limiting
access to Commander NT40 309
Lineassigning to a station 43clearing 214–215naming 60number of appearances 45
line accessISDN terminals 318
Line Answerusing 242
line assignment 305Line denied 328Line in use 327line key
using to choose a line 306Line pool
and OLI 50
System Administration Manual P0906413 Issue 01

Index / 337
feature 255Line pool access
programming 45Line Redirection
cancelling 276feature 274using 275
Listen on hold 246listening in a group 244log calls
See Call Loglog space
allocation 128number of spaces 184
Logit 292long distance call
using COS password 309long tones
feature 297
M
maintaining security 310Maintenance
overview 209Make calls first display 328making calls
using a line key 306Memory keys
erasing 283feature code 282programming 282
memory keys 5, 307Messages
erasing 267replying 265viewing 265
monitoringcalls 306
mounting keystations 308
moving keystations 130, 151music
See Background music 233music on hold
background 117
N
Network Transfer Callback delay 122
No calls waiting 326No free lines 328No key free display 327No line selected 326, 328Not available 325Not in service 326
O
one-touch dialling 279ONN blocking 145Originating Line Identification
249Originating Line Identification
(OLI)and line pools 50setting for a station 50
overridingCall Forward 274
P
Page Timeout 126Page Tone 125Paging
features 267remote 269
Park Modeprogramming 120
Park timeoutprogramming 120
Parked call 326
P0906413 Issue 01 System Administration Manual
338 / Index
PasswordsBasic 177Call Log 175, 291Call log 175Hospitality 177SAPLUS 176using 31
Personal Speed DialSee also System Speed Dial
Pick up handset 327power failure 215power supply
testing 219Power-fail keystation 215Prime line
assigning to a station 46prime line 308, 328Principal Keystation
description 5memory keys 307troubleshooting 213
Priority Callfeature 251
Privacy 237private line 308Programming
What is programming? 3programming
copying 153programming basics
programming indicator 8programming map 9programming overlay 8starting and ending a
session 10understanding programming
2programming system features
adding or removing 193
Call Log 184Call log station 182remote access 203setting number of rings 191Time & Date 18
pulse dialling 300
Q
queued call 238
R
re-allocating log space 128Recall
preventing 81Receive tones feature 149redialling a number 281Redirect
preventing 82Release a call 327Release calls display 327Release key 5, 226relocation of station 130, 151Remind delay 123remote access 309–311
defaults 207restricting 203
remote LAN access 302Remote paging 269remote use
security 309using lines and features 309
reporting and recording alarms 213
Restricted call 329restricting
access to Commander NT40 309
remote access 203ring
System Administration Manual P0906413 Issue 01
Index / 339
See Service Modestype 230volume 231
Ring Againcancelling 284
Ring typechanging 105
Ringerauxiliary 97
routingDDI calls 248
routing callsusing Custom Call Routing
186Routing service
programming DestCode 166Run/Stop 299
S
SAPLUS password 176Saved Number Redial
preventing 80security
recommendations 310system 309
ServicesLine Answer 242
shift key 5Single Line Telephone Adaptor
delay before answering 147dial mode 148feature codes 321tones 149
SLTSee Single Line Telephone
AdaptorSoftware Keys 53Speed Dial
adding or changing 13
personal 102System 55–58, 279using 234
Standard Keystationmemory keys 307one-line display 307
Static Timefeature 287
Stationdisplay number 229naming 59programming 83
stationAlarm 129alarm 213attendant 190control 312log calls automatically 182relocation 130, 151testing 217–219
station numberslength of 305
stuttered dial tone 311Symbols
keys 289System administration log 210System Answer 186
attendant station 190customising 187recording a greeting 196,
197turning on or off 189
system dial tone 311system ID 53System Speed Dial
Call Barring 58making a call 279See also Personal Speed
Dial
P0906413 Issue 01 System Administration Manual

340 / Index
setting up 55–58system tones 149system version number 209
T
testingCustom Call Routing 198display 217ending a session 217handset 218headset 218keys 217, 218keystation speaker 218power supply 219station 217System Answer 198
Time and DateAutomatic from the network
64checking 287Single Line Telephone
Adaptor 287using **BACK 63using **FWD 63
toneremote access tones 311
Transfer Revert delayprogramming 121
transferring a callfeature 251ISDN 318
transferring callsCustom Call Routing 186
Troubleshooting 213–215troubleshooting
handset speaker 218headset 218keystation display 217keystation keys 218
keystation speaker 218power supply 219reporting and recording
alarms 213using the alarm station 213
U
understanding programming 3using Commander NT40
remotely 309–311
V
version numbersystem software 209
video surveillance 302videoconferencing 301Voice Call
answering 270features 270making 270muting tones 270preventing 270
volumebar 308control 308
W
Wait for dialtonefeature 299
wall mounting keystations 308
System Administration Manual P0906413 Issue 01