system for administering grants electronically (sage ... · sage is used by department of state...
TRANSCRIPT
This document (written, electronic, or other medium) contains proprietary information of Agate Software Inc., its affiliates, and the New Jersey Department of State. It has been furnished only for informational purposes, and no license or permission is hereby Granted to use such information in any manner. In no event may this information be reproduced, distributed and/or publicly displayed in any form or by any means without prior expressed written permission. © Agate Software Inc. All rights reserved.
STATE OF NEW JERSEY
DEPARTMENT OF STATE
System for Administering Grants Electronically (SAGE) Department of State Applicant User Guide
April 2013
This user guide gives a general overview of the SAGE system navigation. SAGE is used by Department of State Applicants to create/submit Grant
Applications, reimbursement requests, and submit various reports.
NJDOS SAGE Applicant User Guide, April 2013
Page 2 of 40
Table of Contents 1. SAGE SYSTEM REQUIREMENTS ...................................................................... 3
1.A. OPERATING SYSTEM ........................................................................................ 3 1.B. INTERNET CONNECTION .................................................................................... 3 1.C. WEB BROWSER .............................................................................................. 3 1.D. ADOBE ACROBAT READER .................................................................................. 3
2. APPLICANT USER TYPES ............................................................................... 4 2.A. AUTHORIZED OFFICIAL ..................................................................................... 4 2.B. AGENCY ADMINISTRATOR .................................................................................. 4 2.C. AGENCY STAFF............................................................................................... 5
3. SYSTEM ACCESS ............................................................................................ 6 3.A. AUTHORIZED OFFICIAL ACCESS ........................................................................... 6 3.B. AGENCY ADMINISTRATOR AND AGENCY STAFF ACCESS ................................................ 7
4. LOGIN PAGE ................................................................................................ 10 4.A. ACCESSING SAGE ........................................................................................ 10 4.B. BOOKMARK/FAVORITES .................................................................................. 10 4.C. ADDING SAGE TO LIST OF TRUSTED SITES ........................................................... 11
5. USER CONTACT INFORMATION ................................................................... 12 5.A. UPDATING USER PROFILE ................................................................................ 12 5.B. UPDATING ANOTHER USER’S CONTACT INFORMATION ............................................... 13
6. APPLICANT ORGANIZATION ....................................................................... 14 6.A. ORGANIZATION PROFILE ................................................................................. 14 6.B. DEACTIVATING A USER ................................................................................... 15 6.C. ORGANIZATION DOCUMENTS ............................................................................ 15 6.D. ORGANIZATION DETAILS ................................................................................. 16
7. HOME PAGE ................................................................................................. 17 7.A. SEARCHING FOR DOCUMENTS ........................................................................... 18 7.B. VIEWING AVAILABLE APPLICATIONS .................................................................... 19 7.C. ACCESSING MY INBOX (E-MAIL/MESSAGES) ......................................................... 19 7.D. COMPLETING MY TASKS .................................................................................. 21
8. APPLICATION INITIATION.......................................................................... 22 8.A. INITIATING AN APPLICATION ............................................................................. 22 8.B. RETURNING TO AN APPLICATION IN PROCESS ......................................................... 23
9. APPLICATION/GRANT MENU ....................................................................... 24 9.A. VIEWING, EDITING, AND COMPLETING FORMS ........................................................ 24 9.B. CHANGING THE STATUS .................................................................................. 25 9.C. ACCESSING MANAGEMENT TOOLS ...................................................................... 26 9.D. EXAMINING RELATED ITEMS ............................................................................. 29 9.E. ADDING AND EDITING NOTES ........................................................................... 30
10. APPLICATION/GRANT USER MANAGEMENT ................................................ 32 10.A. ASSIGNING USER ACCESS TO APPLICATION/GRANT ................................................. 32 10.B. REMOVING USER ACCESS TO APPLICATION/GRANT .................................................. 33
11. FORMS COMPLETION ................................................................................... 34 11.A. NAVIGATING FORMS ...................................................................................... 34 11.B. COMPLETING FORMS ...................................................................................... 35 11.C. AUTOMATIC CALCULATIONS .............................................................................. 37 11.D. ERROR MESSAGES ........................................................................................ 37 11.E. UPLOADING ATTACHMENTS .............................................................................. 38 11.F. PRINTING (PDF) .......................................................................................... 38 11.G. COPY AND PASTE RESTRICTIONS ........................................................................ 39
12. APPLICATION SUBMISSION ........................................................................ 40
NJDOS SAGE Applicant User Guide, April 2013
Page 3 of 40
1. SAGE System Requirements
The New Jersey Department of State (NJDOS) SAGE system is designed for use by the vast
majority of computer users with little or no changes to the computer environment. The
requirements that are mentioned below are common computer elements that should be
present on most machines.
1.a. Operating System
NJDOS SAGE is designed for both of the two more common computer operating systems -
Windows and Macintosh. It has not been tested and is not supported on other operating
systems such as Linux and Unix. Users accessing SAGE from a Macintosh environment are
required to have MacOS 7.5 or higher. Windows users are required to have an operating
system that is Windows XP or higher.
1.b. Internet Connection
SAGE is a web site designed for access via the Internet. For purpose of accessing SAGE,
minimum connection is by modem. For those using a modem, recommended connection
speed is at least 33.6 kbps (kilobits per second). Internet connections “faster” than modem,
i.e., cable, DSL, T1, wireless improve speed at which the system operates. In an office
environment, there may already be an Internet connection, but if unsure, contact the
network administrator.
1.c. Web Browser
This system was designed to be compatible with common up-to-date web browsers
including Internet Explorer 7 and above, Firefox, Safari, and Opera.
1.d. Adobe Acrobat Reader
Adobe Acrobat Reader is used to view PDF (Portable Document Format) documents. The
SAGE system automatically generates Grant documents in PDF format using information
that is saved into various narrative and budget pages. Using Adobe Acrobat Reader can
view, print, or save PDF documents. Adobe Acrobat Reader can be downloaded at
www.adobe.com.
NJDOS SAGE Applicant User Guide, April 2013
Page 4 of 40
2. Applicant User Types
There are three types of applicant security roles:
Authorized Official
Agency Administrator
Agency Staff
These roles have different security levels needed to access Applications/Grants, Final
Reports, Requests for Reimbursement, etc. Once an Authorized Official is identified and a
new user account is created, the Authorized Official can select and enter the organization’s
staff member names into SAGE. Staff members, assigned by an Authorized Official are
given any of the 3 applicant security roles, while staff members assigned by an Agency
Administrator are given either the role of Agency Administrator or Agency staff. The three
security roles are summarized below:
2.a. Authorized Official
Creates new user account (NJDOS will then validate this user)
Adds new users to SAGE and assigns organization staff to Authorized Official, Agency
Administrator or Agency staff security roles
Edits and/or deletes user account information
Views, applies for, and submits Grant Applications
Enters, updates, and deletes information on Applications, Grants, Requests for
Reimbursement, and Final Reports
Downloads and attaches files to Applications, Grants, Requests for Reimbursement,
and Final Reports
Cancels Applications, Grants, Requests for Reimbursement, and/or Final Reports
Modifies Applications, Grants, Requests for Reimbursement, and/or Final Reports
with status of “Modifications Required”
Checks status of Applications, Grants, Requests for Reimbursement, and/or Final
Reports
2.b. Agency Administrator
Adds new users to SAGE and assigns organization staff to Agency staff or Agency
Administrator security roles
Edits and/or deletes user account information
Views, applies for, and submits Grant Applications
Enters, updates, and deletes information on Applications, Grants, Requests for
Reimbursement, and Final Reports
Downloads and attaches files to Applications, Grants, Requests for Reimbursement,
and Final Reports
Cancels Applications, Grants, Requests for Reimbursement, and/or Final Reports
NJDOS SAGE Applicant User Guide, April 2013
Page 5 of 40
Modifies Applications, Grants, Requests for Reimbursement, and/or Final Reports
with status of “Modifications Required”
Checks status of Applications, Grants, Requests for Reimbursement, and/or Final
Reports
2.c. Agency Staff
Edits user account information, and
When permission is Granted by the Authorized Official or Agency Administrator:
o Enters, updates, and deletes information on Applications, Grants, Requests for
Reimbursement, and/or Final Reports
o Downloads and attaches files to Applications, Grants, Requests for
Reimbursement, and/or Final Reports
o Modifies Applications, Grants, Requests for Reimbursement, and/or Final Reports
with status of “Modifications Required”
o Checks status of Applications, Grants, Requests for Reimbursement, and/or Final
Reports

NJDOS SAGE Applicant User Guide, April 2013
Page 6 of 40
3. System Access
There are two ways to access SAGE:
1. Request access to SAGE via the SAGE Login page and get approved by a NJDOS
SAGE system administrator
or
2. When an organization already has an SAGE account, obtain access from the
organization’s Authorized Official or Agency Administrator. This is the preferred way
to access SAGE – it is quick and provides greater security for the organization’s
records.
3.a. Authorized Official Access
To gain access to SAGE as an Authorized Official, first:
Create a new user account.
From the SAGE Home page select “New User?” located in the Login section.
1. Fill in the Contact Information as required. All items marked with an * are required
a. The “Username” field can consist of
letters and/or numbers and must be
between 5 and 20 characters long
b. The “Password” field can consist of
letters and numbers and must be
between 7-20 characters
c. The fields “Password” and “Confirm
Password” must match
2. Save
After saving the new user information, the account will be validated by a NJDOS SAGE
system administrator. If attempting to access the system before validation, the following
message will appear:
When access has been granted, an e-mail confirming the account has been validated will be
received. If the account is set up as an Authorized Official or Agency Administrator, the user
will now be able to create additional Applicant user accounts for the organization.
Note: Applicant users are not able to access documents created prior to the date they are
activated/assigned to an organization. For access to documents dated before a user’s
activation date, an Authorized Official or Agency Administrator must assign the user to each
individual document using the “Add/Edit People” tool located within each document. On the
NJDOS SAGE Applicant User Guide, April 2013
Page 7 of 40
document’s main menu, under “Access Management Tools,” “View Management Tools,”
select “Add/Edit People.”
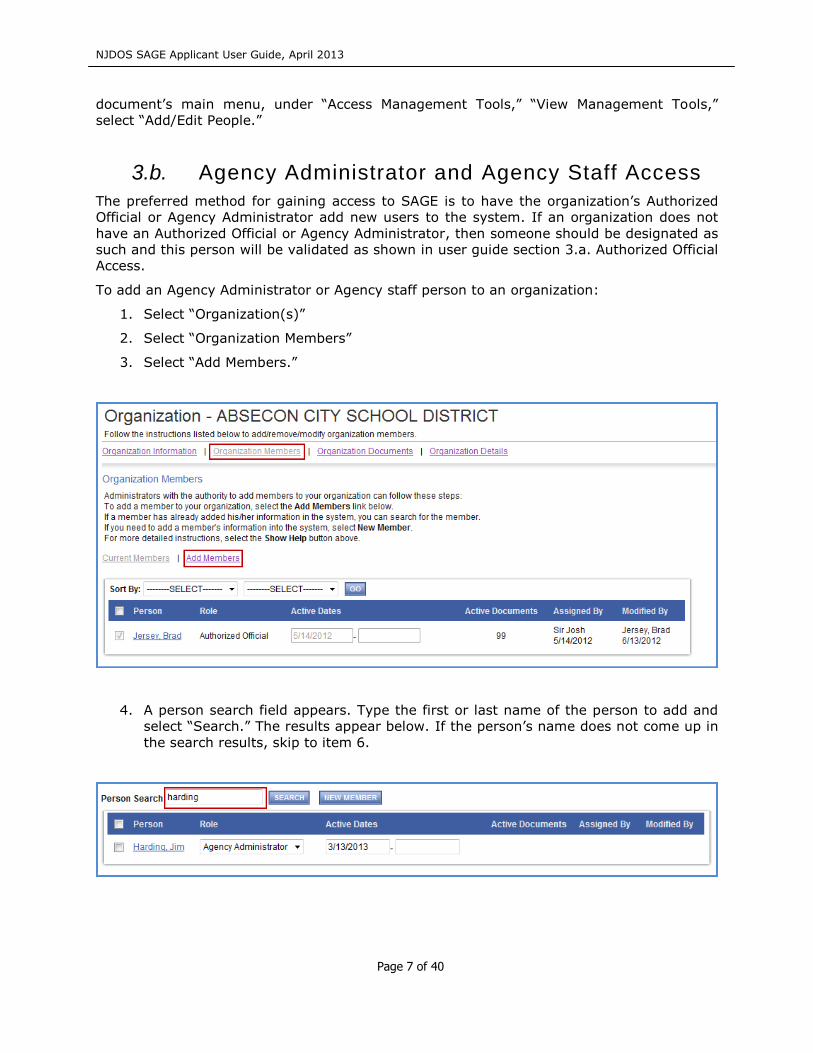
3.b. Agency Administrator and Agency Staff Access
The preferred method for gaining access to SAGE is to have the organization’s Authorized
Official or Agency Administrator add new users to the system. If an organization does not
have an Authorized Official or Agency Administrator, then someone should be designated as
such and this person will be validated as shown in user guide section 3.a. Authorized Official
Access.
To add an Agency Administrator or Agency staff person to an organization:
1. Select “Organization(s)”
2. Select “Organization Members”
3. Select “Add Members.”
4. A person search field appears. Type the first or last name of the person to add and
select “Search.” The results appear below. If the person’s name does not come up in
the search results, skip to item 6.
NJDOS SAGE Applicant User Guide, April 2013
Page 8 of 40
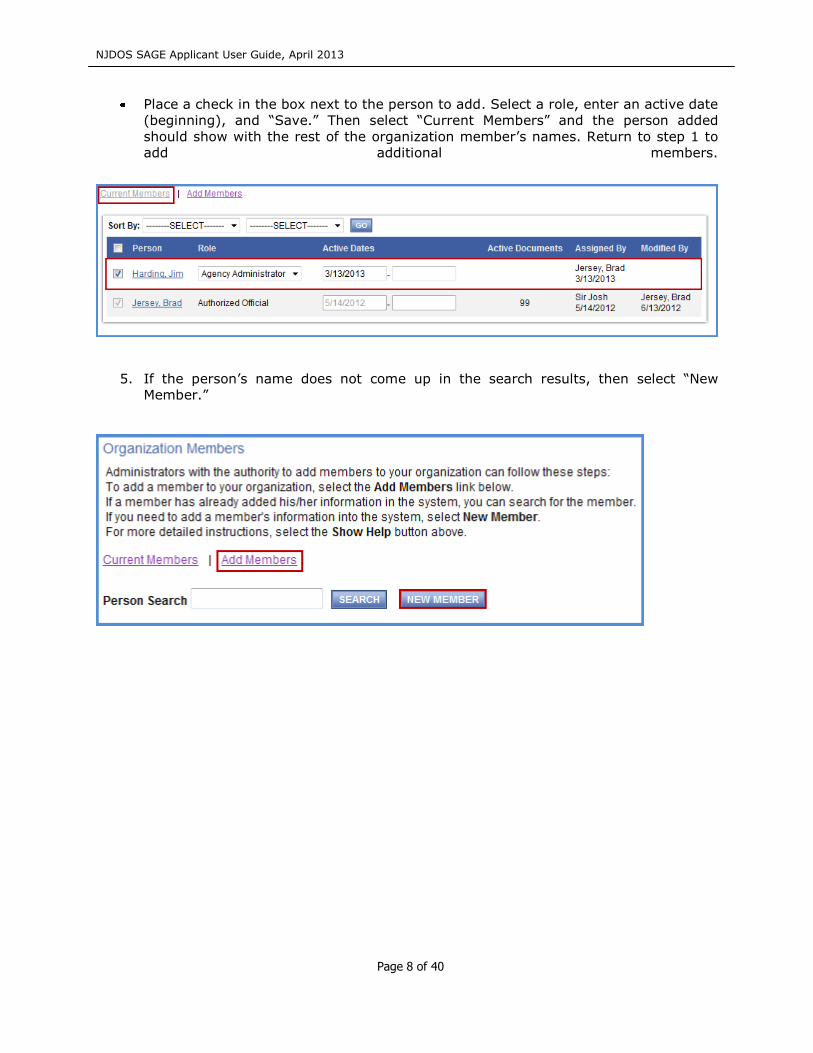
Place a check in the box next to the person to add. Select a role, enter an active date
(beginning), and “Save.” Then select “Current Members” and the person added
should show with the rest of the organization member’s names. Return to step 1 to
add additional members.
5. If the person’s name does not come up in the search results, then select “New
Member.”

NJDOS SAGE Applicant User Guide, April 2013
Page 9 of 40
6. Enter information for the new user and “Save & Add to Organization.”
NJDOS SAGE Applicant User Guide, April 2013
Page 10 of 40
4. Login Page
4.a. Accessing SAGE
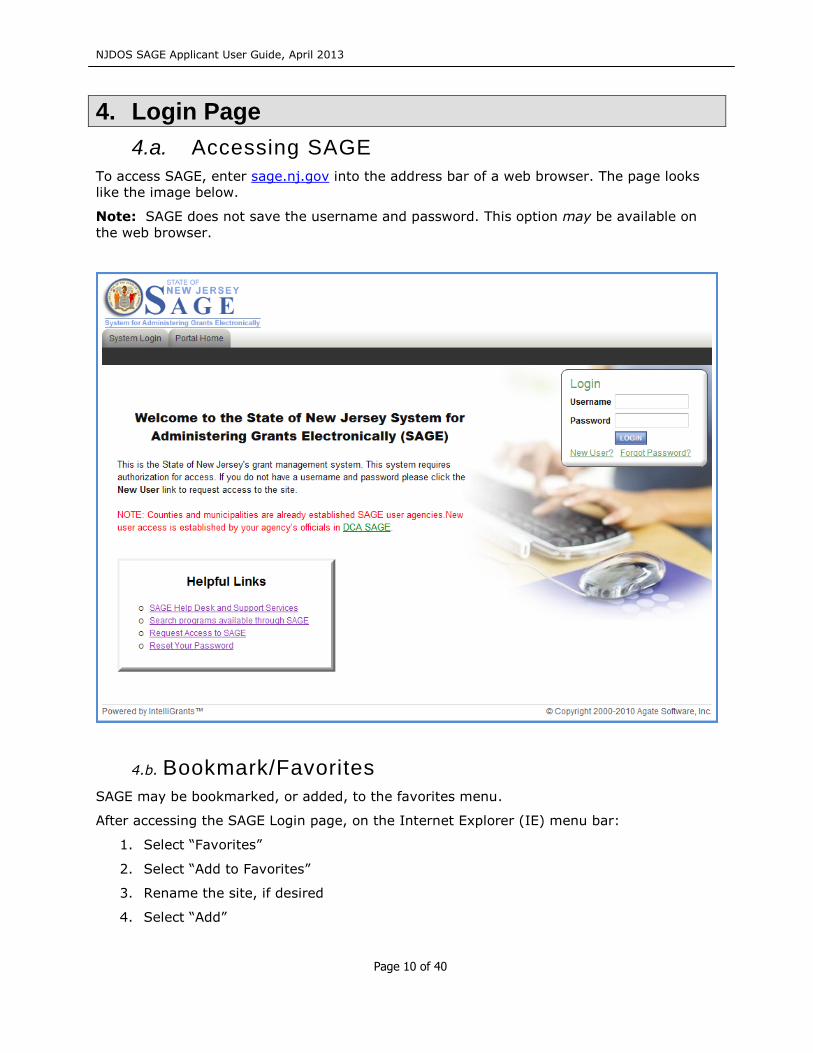
To access SAGE, enter sage.nj.gov into the address bar of a web browser. The page looks
like the image below.
Note: SAGE does not save the username and password. This option may be available on
the web browser.
4.b. Bookmark/Favorites
SAGE may be bookmarked, or added, to the favorites menu.
After accessing the SAGE Login page, on the Internet Explorer (IE) menu bar:
1. Select “Favorites”
2. Select “Add to Favorites”
3. Rename the site, if desired
4. Select “Add”

NJDOS SAGE Applicant User Guide, April 2013
Page 11 of 40
4.c. Adding SAGE to List of Trusted Sites
To avoid various browser-related restrictions unnecessarily placed on SAGE, make the
following changes to the web browser.
If using Internet Explorer, we recommend adding the NJDOS SAGE Home page to the list of
trusted sites as follows:
1. Select “Tools”
2. Select “Internet Options”
3. Select “Security”
4. Select “Trusted sites”
5. Select “Sites”
6. In “Add this website to the zone:” enter:
https://enterprisegrantapps.state.nj.us/NJSAGE/
7. Select “Add”
8. Select “Close” and then “OK”
NJDOS SAGE Applicant User Guide, April 2013
Page 12 of 40
5. User Contact Information
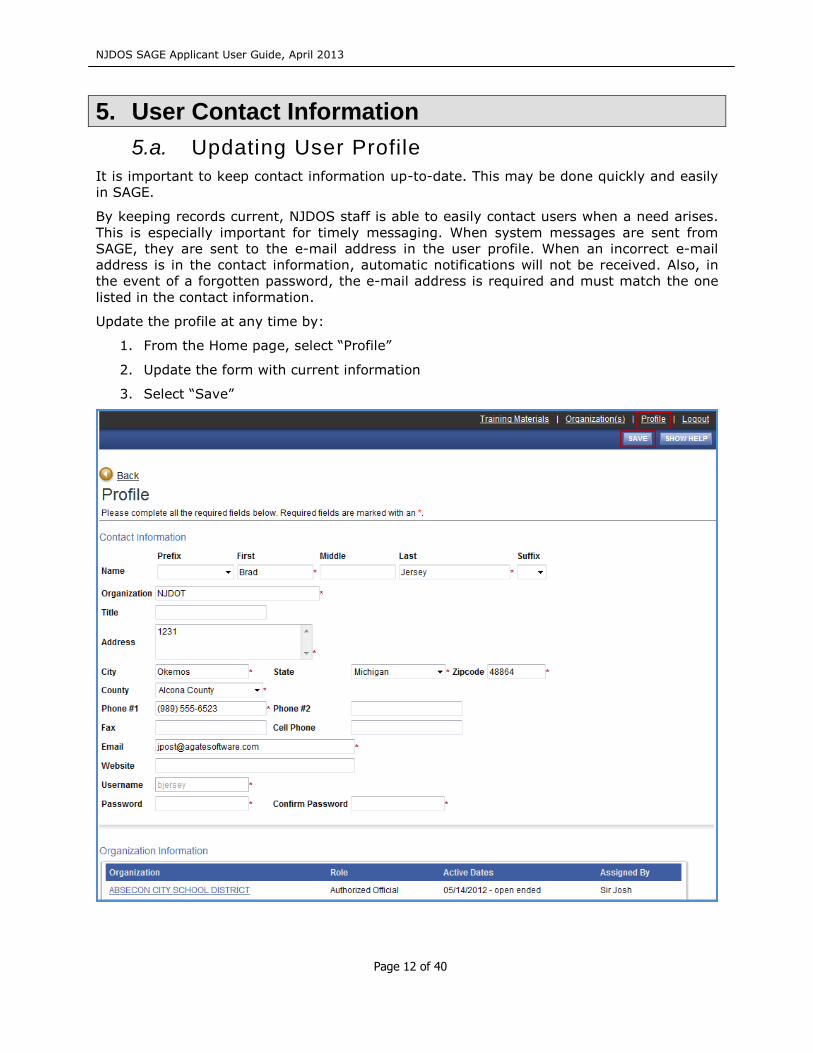
5.a. Updating User Profile
It is important to keep contact information up-to-date. This may be done quickly and easily
in SAGE.
By keeping records current, NJDOS staff is able to easily contact users when a need arises.
This is especially important for timely messaging. When system messages are sent from
SAGE, they are sent to the e-mail address in the user profile. When an incorrect e-mail
address is in the contact information, automatic notifications will not be received. Also, in
the event of a forgotten password, the e-mail address is required and must match the one
listed in the contact information.
Update the profile at any time by:
1. From the Home page, select “Profile”
2. Update the form with current information
3. Select “Save”
NJDOS SAGE Applicant User Guide, April 2013
Page 13 of 40
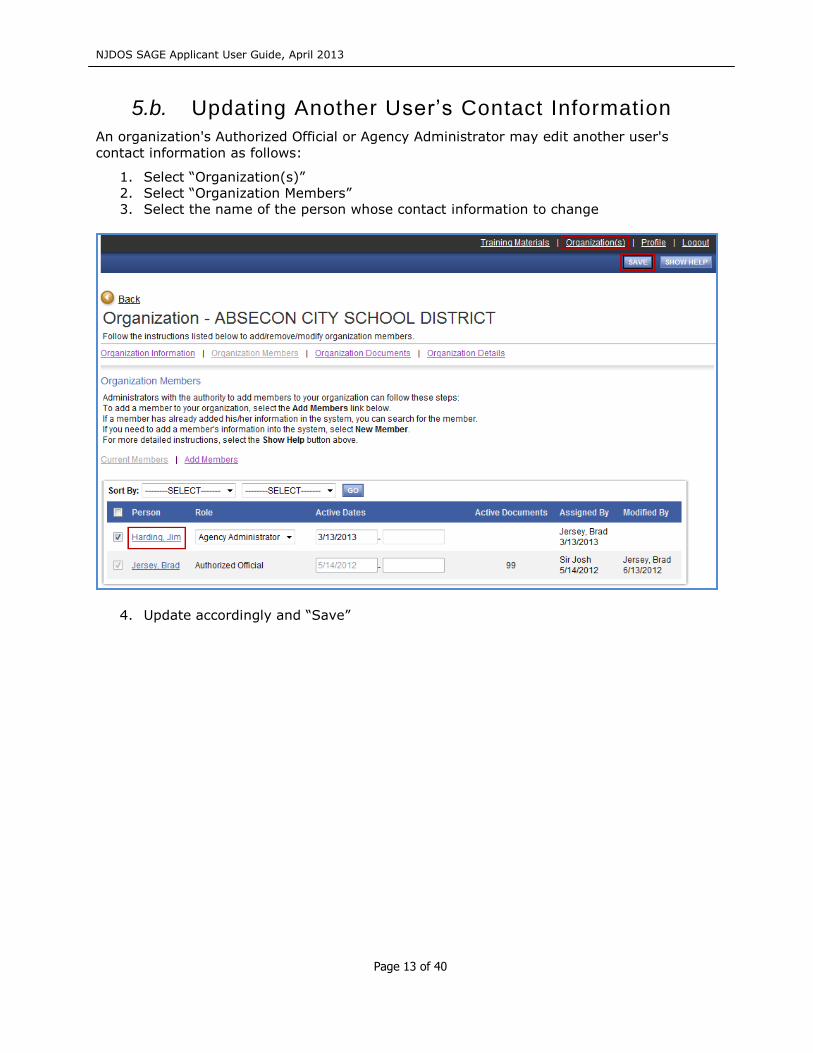
5.b. Updating Another User’s Contact Information
An organization's Authorized Official or Agency Administrator may edit another user's
contact information as follows:
1. Select “Organization(s)”
2. Select “Organization Members”
3. Select the name of the person whose contact information to change
4. Update accordingly and “Save”
NJDOS SAGE Applicant User Guide, April 2013
Page 14 of 40
6. Applicant Organization
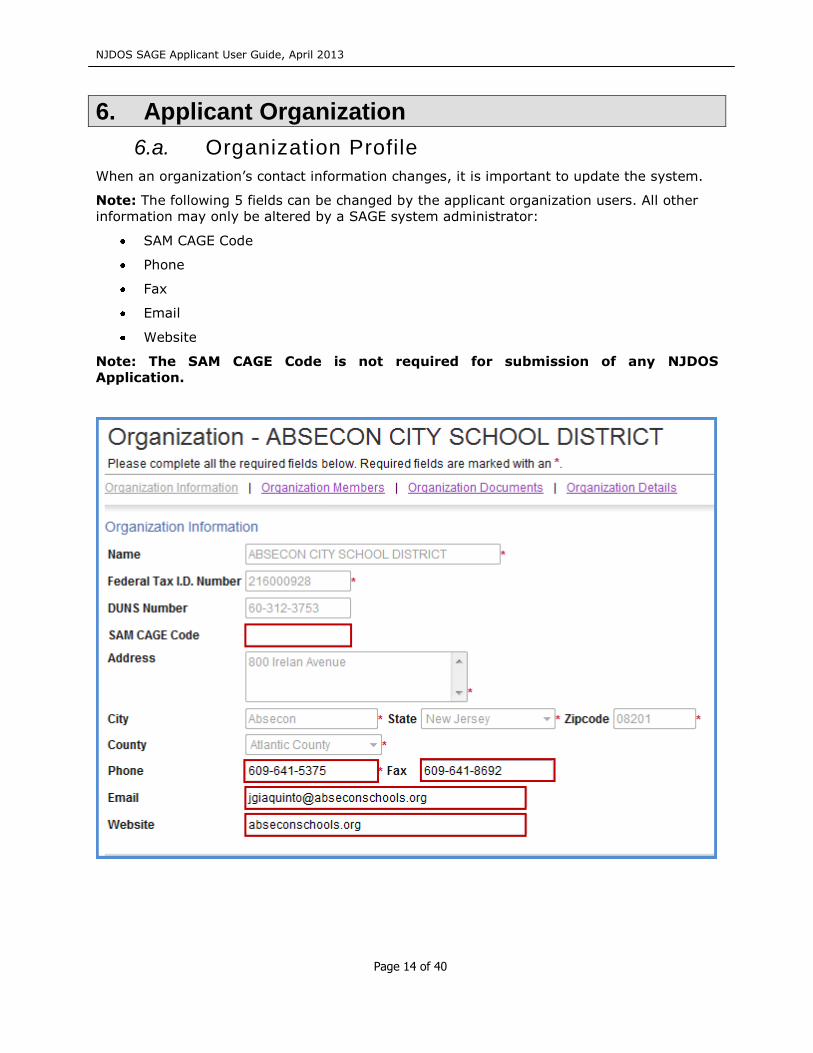
6.a. Organization Profile
When an organization’s contact information changes, it is important to update the system.
Note: The following 5 fields can be changed by the applicant organization users. All other
information may only be altered by a SAGE system administrator:
SAM CAGE Code
Phone
Fax
Website
Note: The SAM CAGE Code is not required for submission of any NJDOS
Application.
NJDOS SAGE Applicant User Guide, April 2013
Page 15 of 40
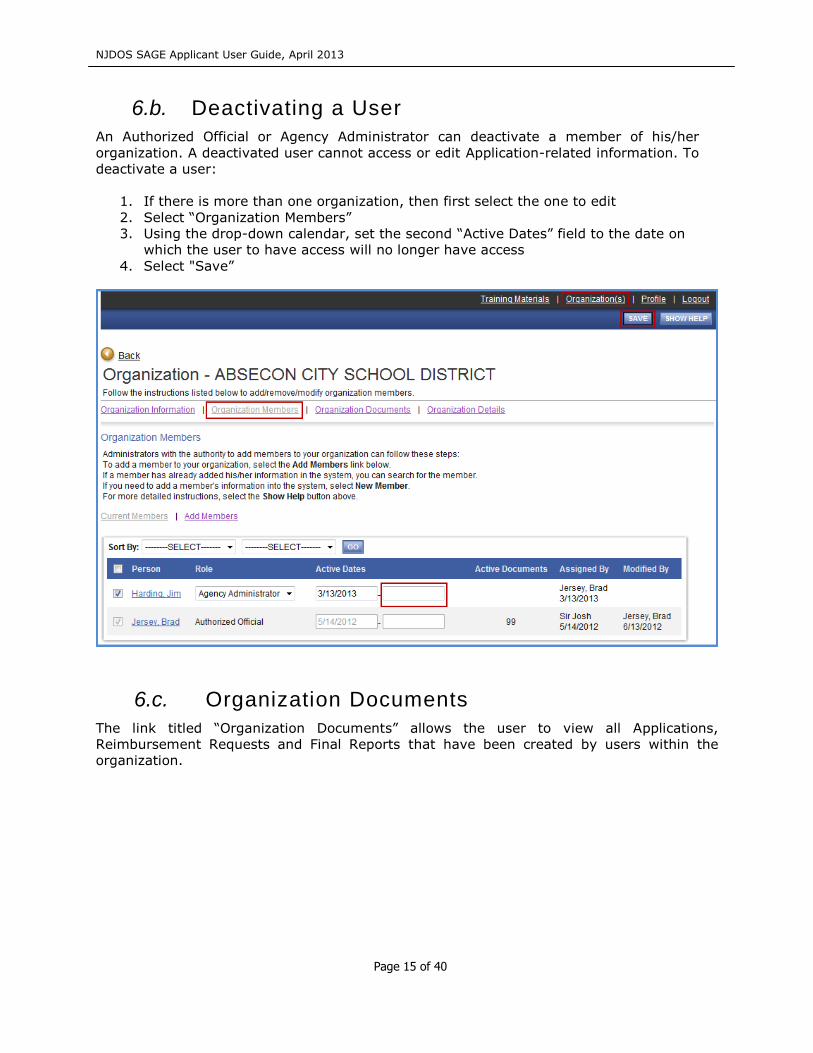
6.b. Deactivating a User
An Authorized Official or Agency Administrator can deactivate a member of his/her
organization. A deactivated user cannot access or edit Application-related information. To
deactivate a user:
1. If there is more than one organization, then first select the one to edit
2. Select “Organization Members”
3. Using the drop-down calendar, set the second “Active Dates” field to the date on
which the user to have access will no longer have access
4. Select "Save”
6.c. Organization Documents
The link titled “Organization Documents” allows the user to view all Applications,
Reimbursement Requests and Final Reports that have been created by users within the
organization.
NJDOS SAGE Applicant User Guide, April 2013
Page 16 of 40
You can also export the list of organization documents to excel, text, or XML files and sort
the documents by type, name, status, or year.
When you are viewing the list of organization documents you can navigate to a documents
menu by clicking the name of the document.
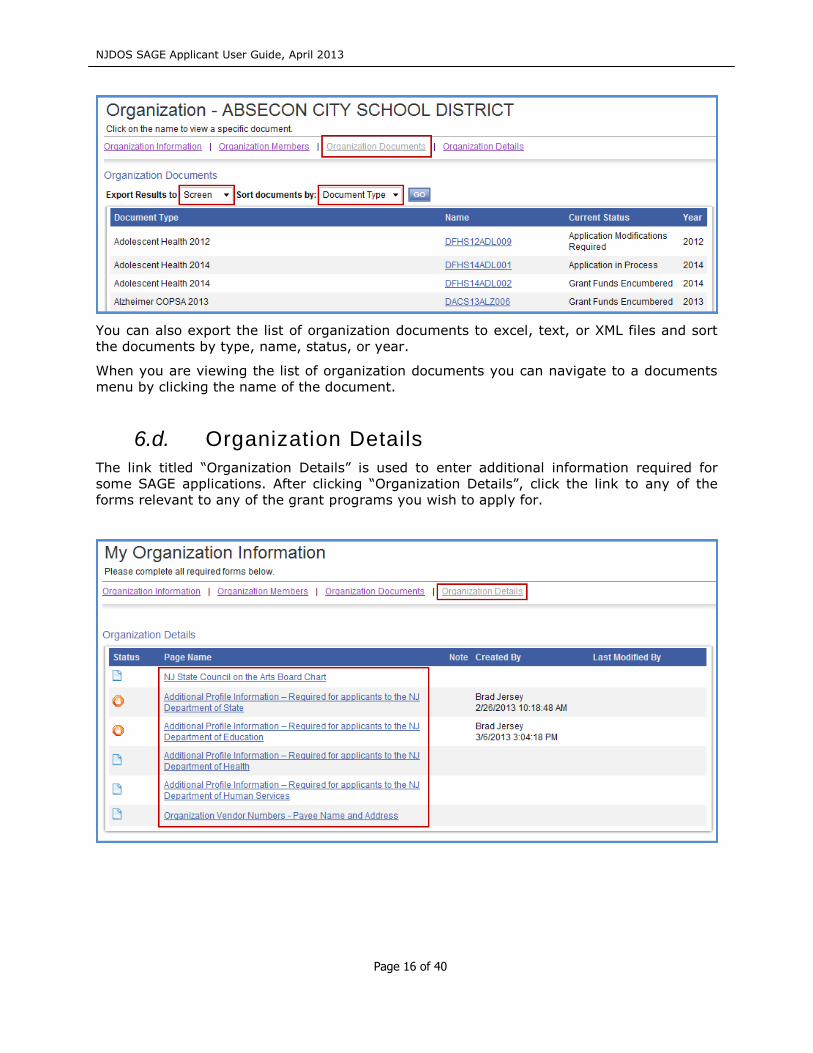
6.d. Organization Details
The link titled “Organization Details” is used to enter additional information required for
some SAGE applications. After clicking “Organization Details”, click the link to any of the
forms relevant to any of the grant programs you wish to apply for.
NJDOS SAGE Applicant User Guide, April 2013
Page 17 of 40
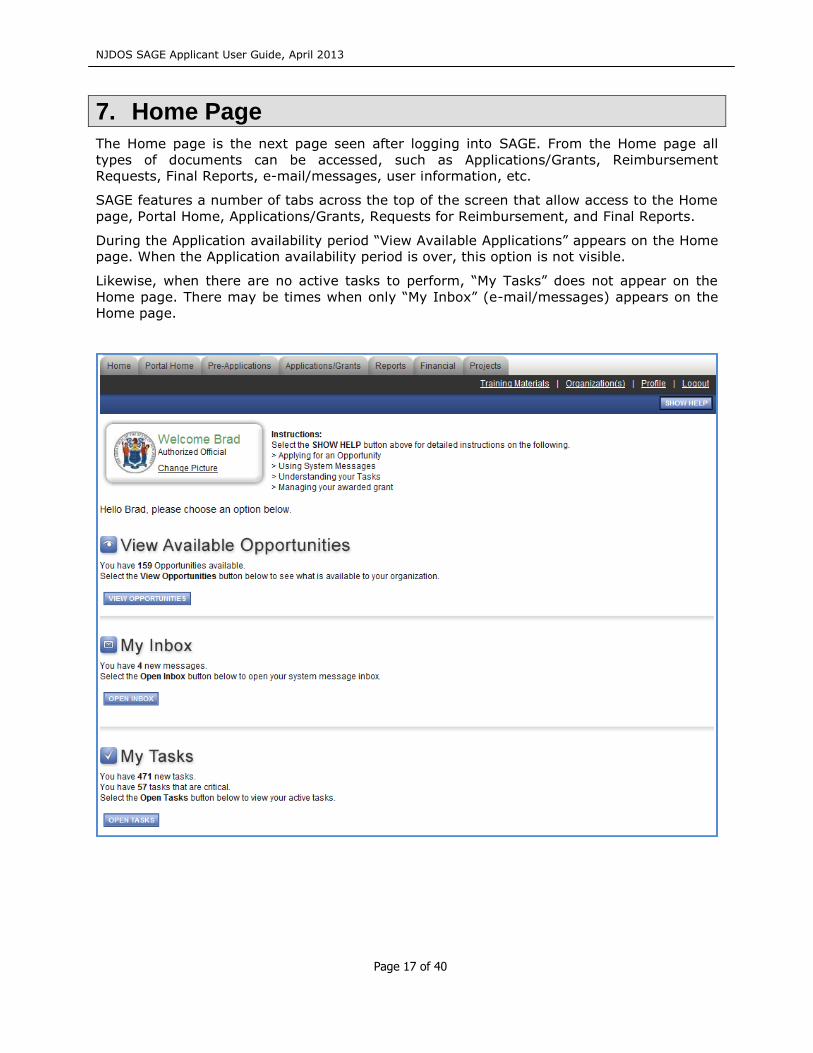
7. Home Page
The Home page is the next page seen after logging into SAGE. From the Home page all
types of documents can be accessed, such as Applications/Grants, Reimbursement
Requests, Final Reports, e-mail/messages, user information, etc.
SAGE features a number of tabs across the top of the screen that allow access to the Home
page, Portal Home, Applications/Grants, Requests for Reimbursement, and Final Reports.
During the Application availability period “View Available Applications” appears on the Home
page. When the Application availability period is over, this option is not visible.
Likewise, when there are no active tasks to perform, “My Tasks” does not appear on the
Home page. There may be times when only “My Inbox” (e-mail/messages) appears on the
Home page.
NJDOS SAGE Applicant User Guide, April 2013
Page 18 of 40
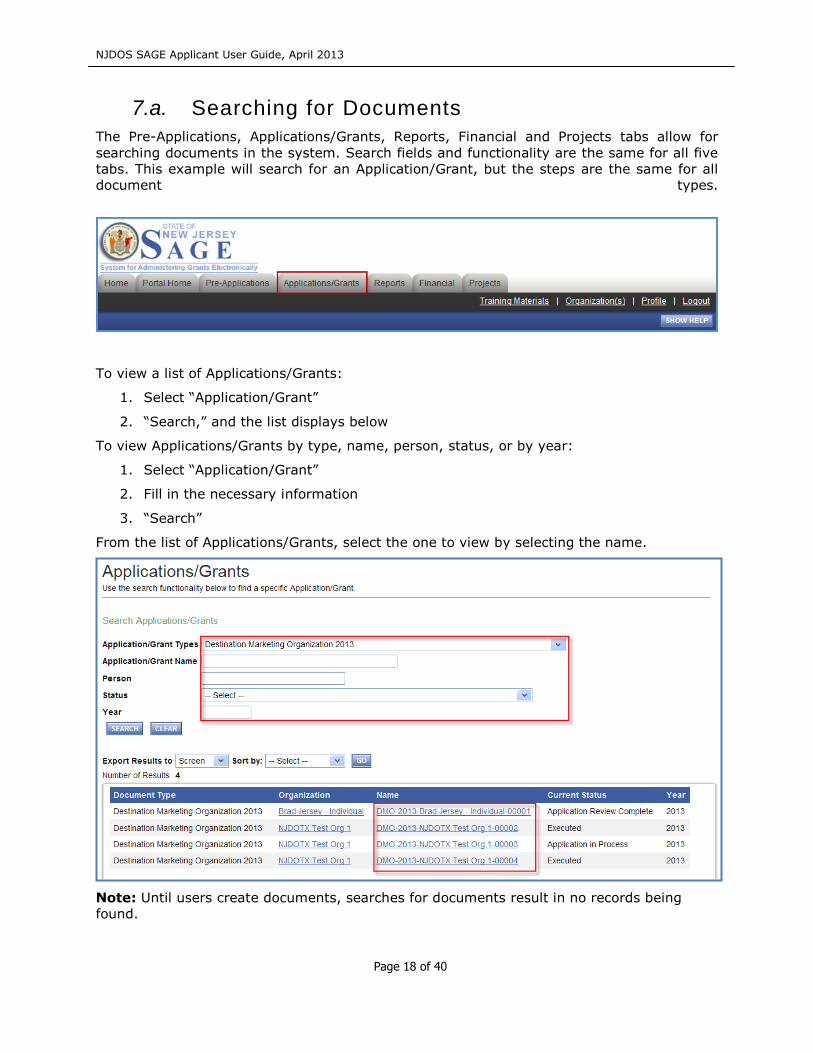
7.a. Searching for Documents
The Pre-Applications, Applications/Grants, Reports, Financial and Projects tabs allow for
searching documents in the system. Search fields and functionality are the same for all five
tabs. This example will search for an Application/Grant, but the steps are the same for all
document types.
To view a list of Applications/Grants:
1. Select “Application/Grant”
2. “Search,” and the list displays below
To view Applications/Grants by type, name, person, status, or by year:
1. Select “Application/Grant”
2. Fill in the necessary information
3. “Search”
From the list of Applications/Grants, select the one to view by selecting the name.
Note: Until users create documents, searches for documents result in no records being
found.
NJDOS SAGE Applicant User Guide, April 2013
Page 19 of 40
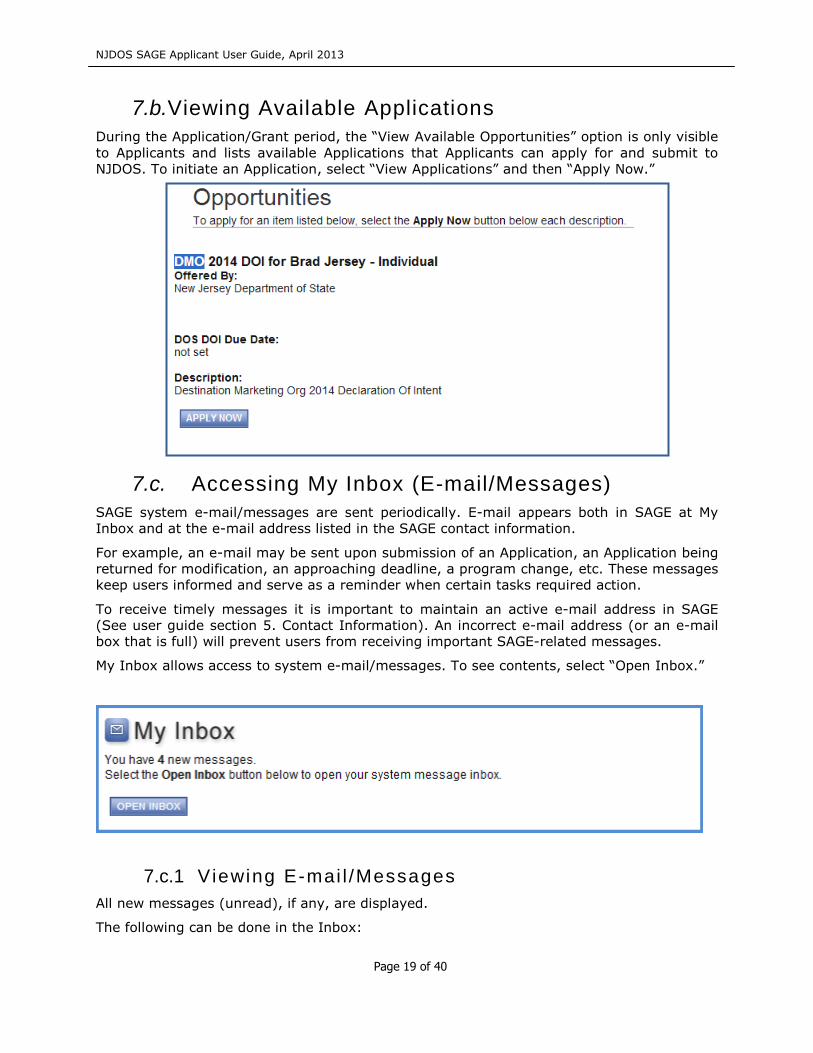
7.b. Viewing Available Applications
During the Application/Grant period, the “View Available Opportunities” option is only visible
to Applicants and lists available Applications that Applicants can apply for and submit to
NJDOS. To initiate an Application, select “View Applications” and then “Apply Now.”
7.c. Accessing My Inbox (E-mail/Messages)
SAGE system e-mail/messages are sent periodically. E-mail appears both in SAGE at My
Inbox and at the e-mail address listed in the SAGE contact information.
For example, an e-mail may be sent upon submission of an Application, an Application being
returned for modification, an approaching deadline, a program change, etc. These messages
keep users informed and serve as a reminder when certain tasks required action.
To receive timely messages it is important to maintain an active e-mail address in SAGE
(See user guide section 5. Contact Information). An incorrect e-mail address (or an e-mail
box that is full) will prevent users from receiving important SAGE-related messages.
My Inbox allows access to system e-mail/messages. To see contents, select “Open Inbox.”
7.c.1 Viewing E-mai l /Messages
All new messages (unread), if any, are displayed.
The following can be done in the Inbox:
NJDOS SAGE Applicant User Guide, April 2013
Page 20 of 40
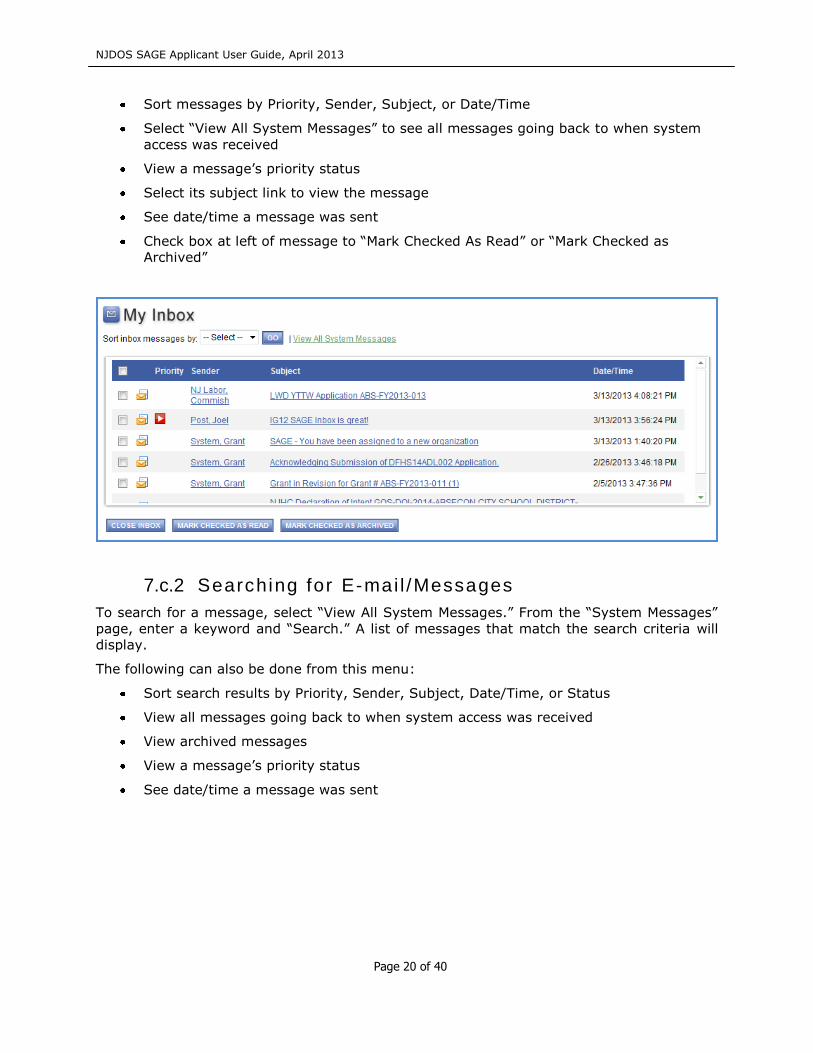
Sort messages by Priority, Sender, Subject, or Date/Time
Select “View All System Messages” to see all messages going back to when system
access was received
View a message’s priority status
Select its subject link to view the message
See date/time a message was sent
Check box at left of message to “Mark Checked As Read” or “Mark Checked as
Archived”
7.c.2 Searching for E-mai l /Messages
To search for a message, select “View All System Messages.” From the “System Messages”
page, enter a keyword and “Search.” A list of messages that match the search criteria will
display.
The following can also be done from this menu:
Sort search results by Priority, Sender, Subject, Date/Time, or Status
View all messages going back to when system access was received
View archived messages
View a message’s priority status
See date/time a message was sent
NJDOS SAGE Applicant User Guide, April 2013
Page 21 of 40
7.d. Completing My Tasks
“My Tasks” appears on the Home page when there are tasks that require action. Some of
the tasks may be critical (indicated by a red Date Due).
To access documents requiring action, select “Open Tasks” and then the name of a
document to go to that document’s menu.
You can also export the list of documents to excel, text, or XML files and sort the documents
by date due, date received, type, status, name, or organization.
When there are no active tasks, “My Tasks” is not visible on the Home page.
Note: To access all Applications/Grants that are assigned, see user guide section 7.a.
Searching for Documents.
NJDOS SAGE Applicant User Guide, April 2013
Page 22 of 40
8. Application Initiation
During a Grant cycle’s Application period, “View Available Opportunities” appears on the
Home page. When the Application period is over, this option is not visible.
An Authorized Official and Agency Administrator are the only roles authorized to initiate
and submit a Grant Application.
8.a. Initiating an Application
To initiate a Grant Application:
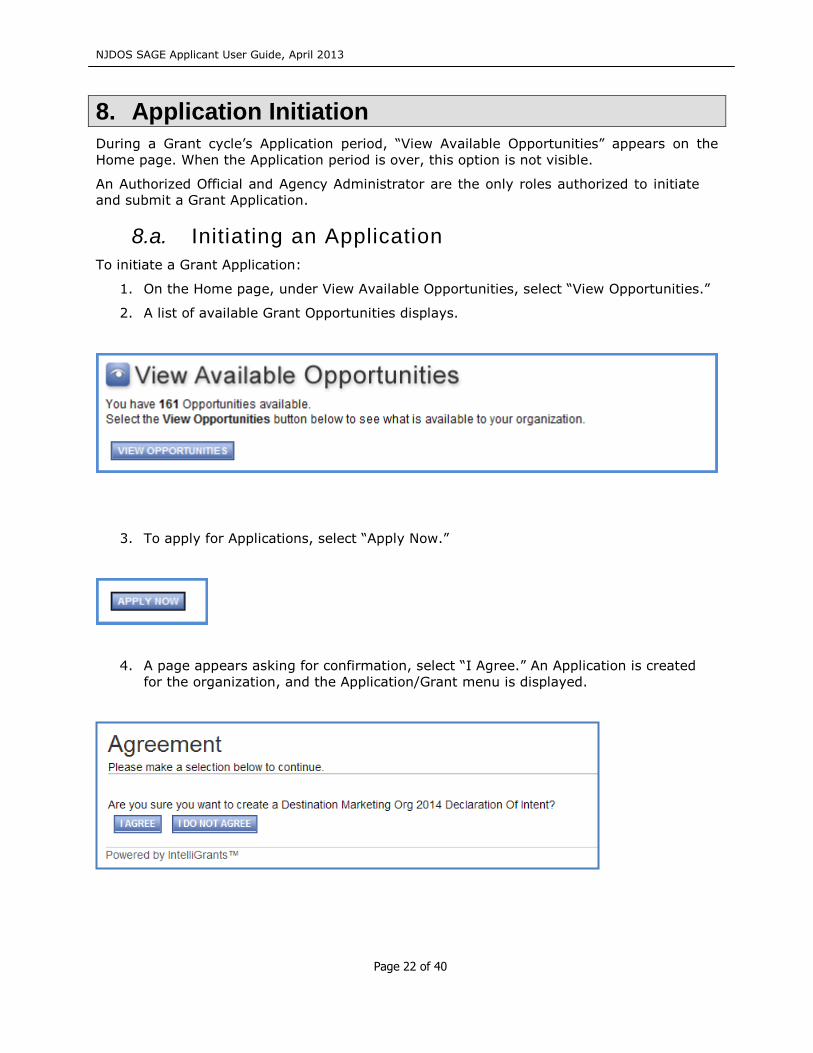
1. On the Home page, under View Available Opportunities, select “View Opportunities.”
2. A list of available Grant Opportunities displays.
3. To apply for Applications, select “Apply Now.”
4. A page appears asking for confirmation, select “I Agree.” An Application is created
for the organization, and the Application/Grant menu is displayed.
NJDOS SAGE Applicant User Guide, April 2013
Page 23 of 40
8.b. Returning to an Application in Process
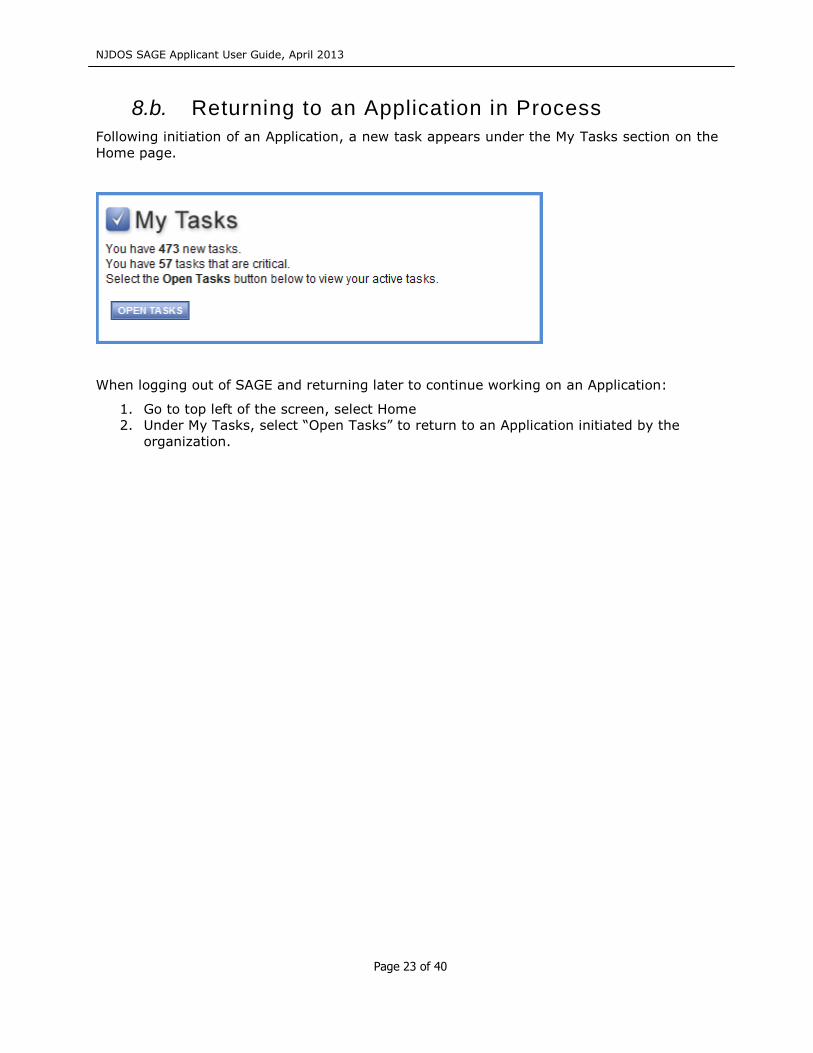
Following initiation of an Application, a new task appears under the My Tasks section on the
Home page.
When logging out of SAGE and returning later to continue working on an Application:
1. Go to top left of the screen, select Home
2. Under My Tasks, select “Open Tasks” to return to an Application initiated by the
organization.
NJDOS SAGE Applicant User Guide, April 2013
Page 24 of 40
9. Application/Grant Menu
The Application/Grant menu is ordered into four sections to help keep tasks and
information organized. The sections are described below.
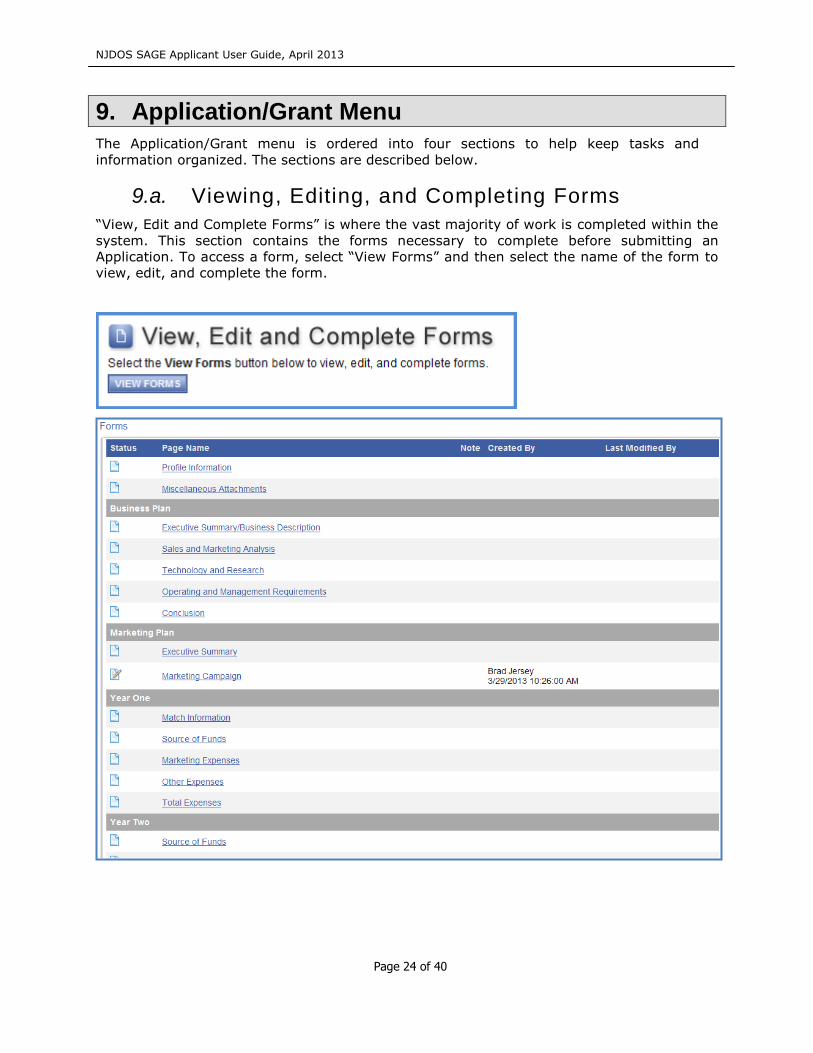
9.a. Viewing, Editing, and Completing Forms
“View, Edit and Complete Forms” is where the vast majority of work is completed within the
system. This section contains the forms necessary to complete before submitting an
Application. To access a form, select “View Forms” and then select the name of the form to
view, edit, and complete the form.
NJDOS SAGE Applicant User Guide, April 2013
Page 25 of 40
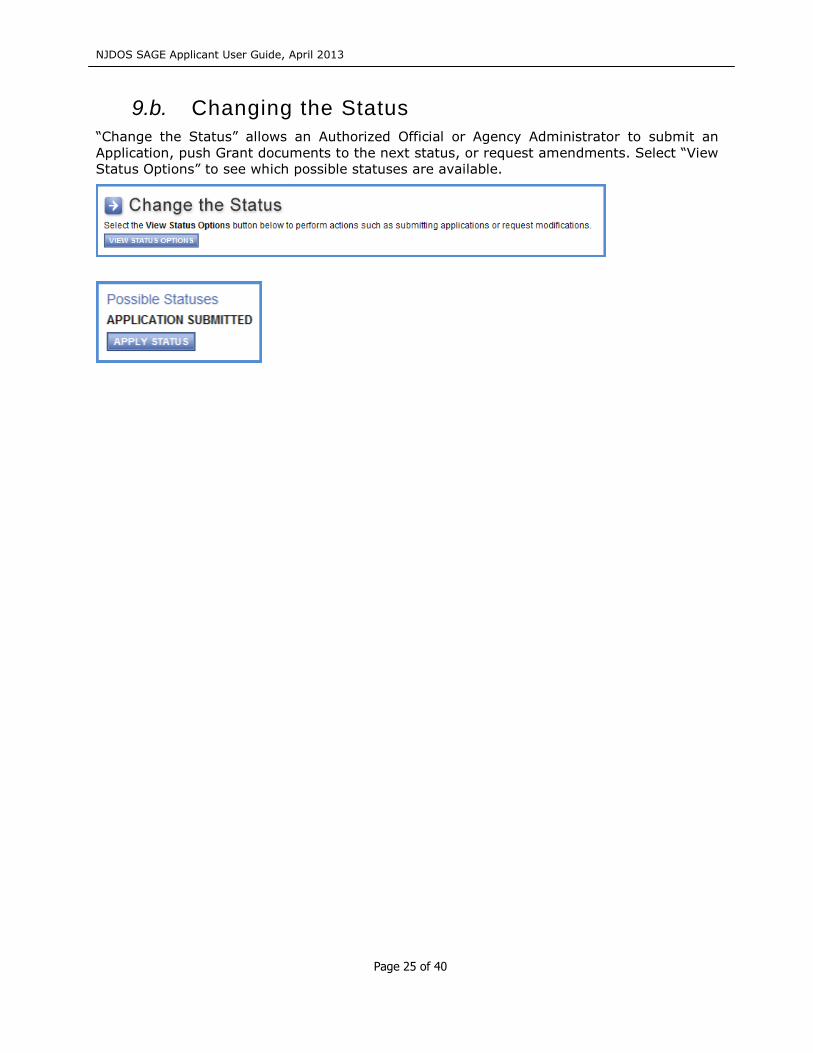
9.b. Changing the Status
“Change the Status” allows an Authorized Official or Agency Administrator to submit an
Application, push Grant documents to the next status, or request amendments. Select “View
Status Options” to see which possible statuses are available.
NJDOS SAGE Applicant User Guide, April 2013
Page 26 of 40
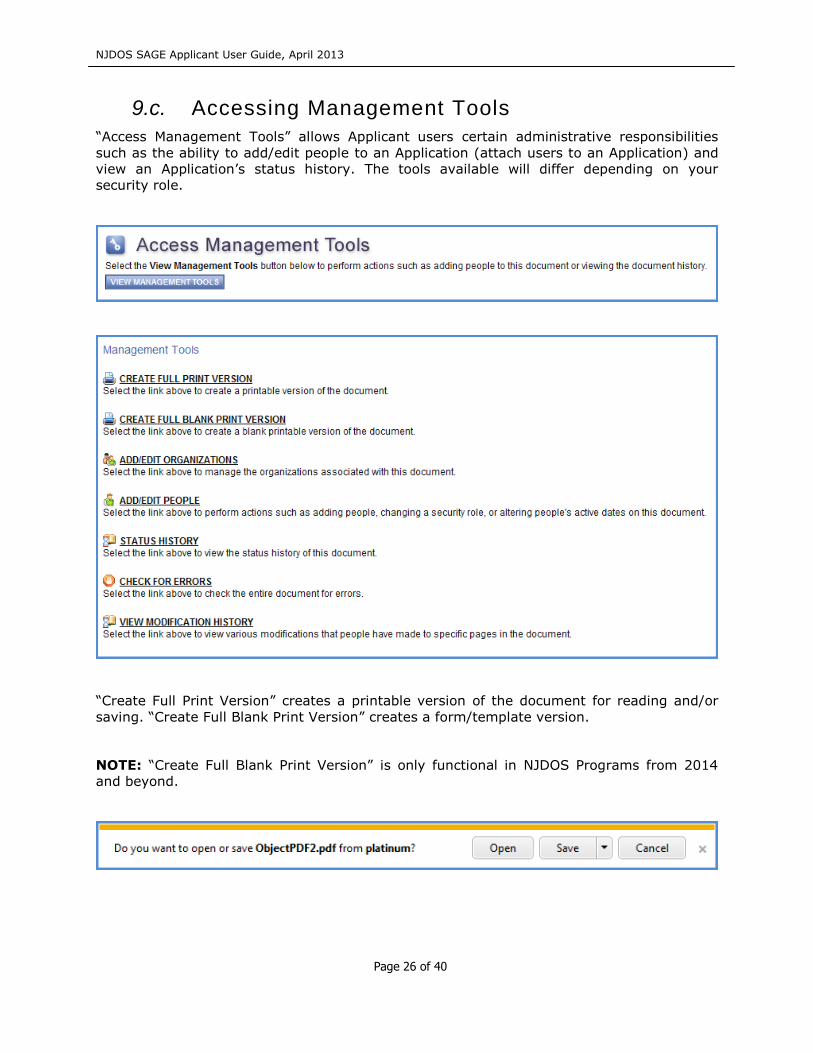
9.c. Accessing Management Tools
“Access Management Tools” allows Applicant users certain administrative responsibilities
such as the ability to add/edit people to an Application (attach users to an Application) and
view an Application’s status history. The tools available will differ depending on your
security role.
“Create Full Print Version” creates a printable version of the document for reading and/or
saving. “Create Full Blank Print Version” creates a form/template version.
NOTE: “Create Full Blank Print Version” is only functional in NJDOS Programs from 2014
and beyond.
NJDOS SAGE Applicant User Guide, April 2013
Page 27 of 40
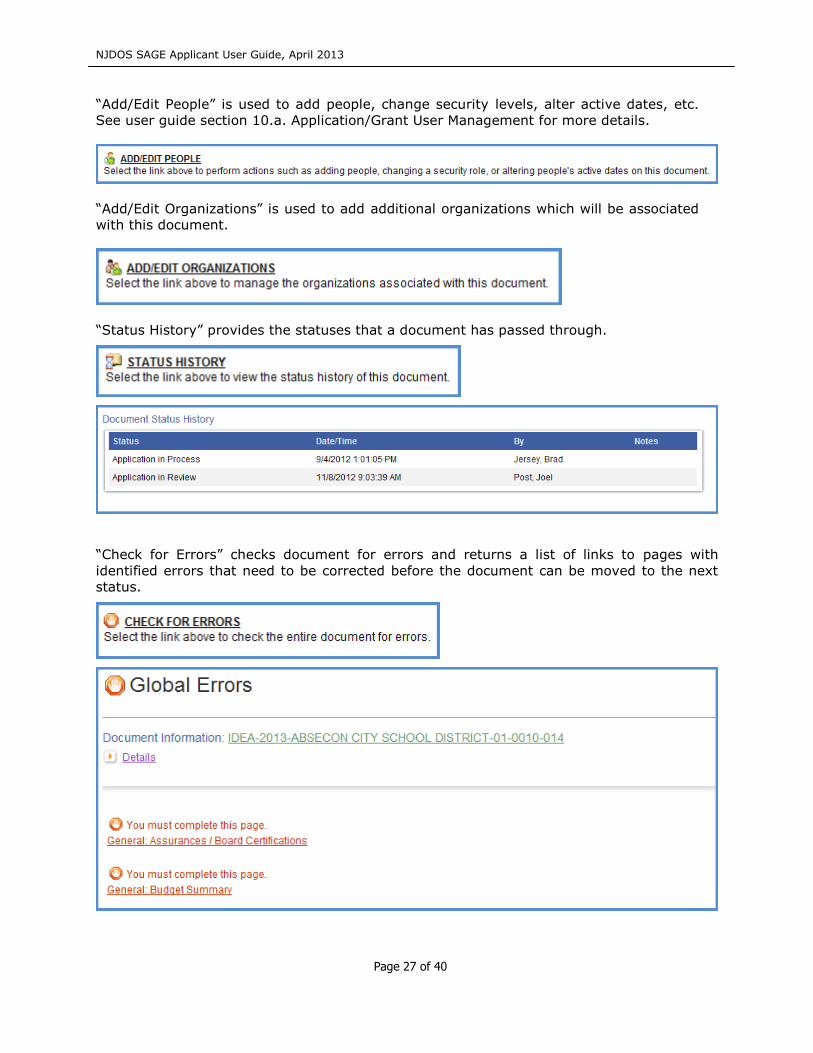
“Add/Edit People” is used to add people, change security levels, alter active dates, etc.
See user guide section 10.a. Application/Grant User Management for more details.
“Add/Edit Organizations” is used to add additional organizations which will be associated
with this document.
“Status History” provides the statuses that a document has passed through.
“Check for Errors” checks document for errors and returns a list of links to pages with
identified errors that need to be corrected before the document can be moved to the next
status.
NJDOS SAGE Applicant User Guide, April 2013
Page 28 of 40
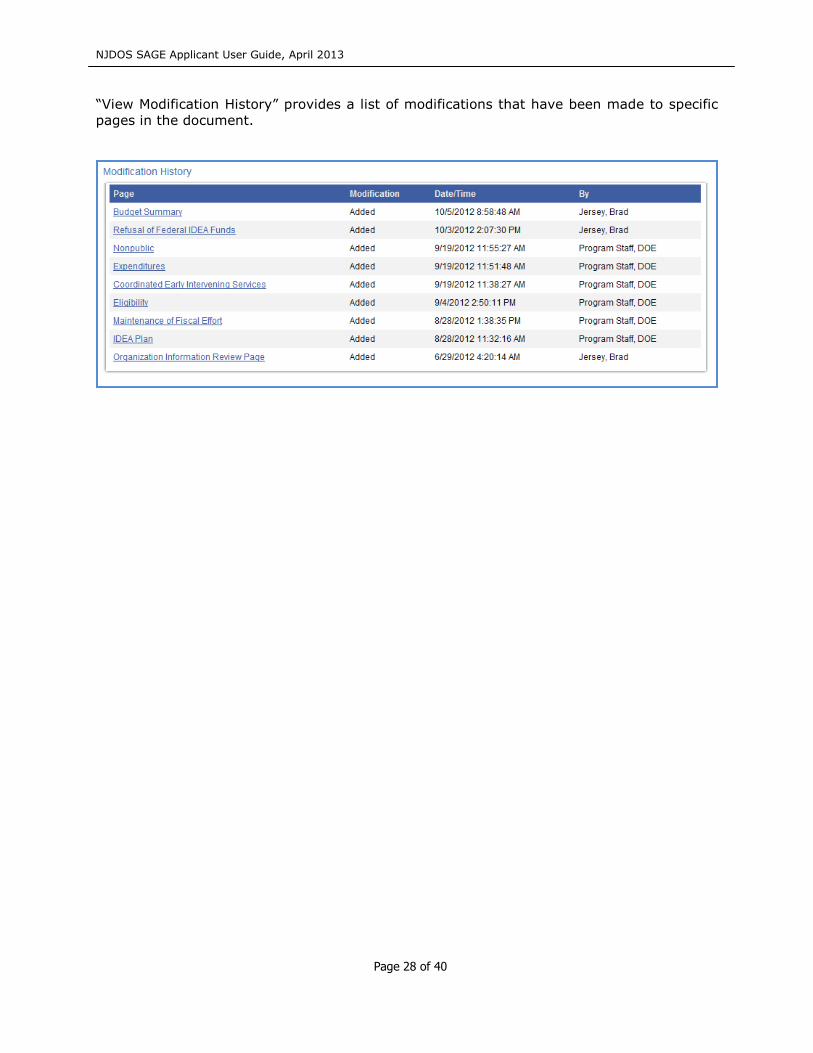
“View Modification History” provides a list of modifications that have been made to specific
pages in the document.
NJDOS SAGE Applicant User Guide, April 2013
Page 29 of 40
9.d. Examining Related Items
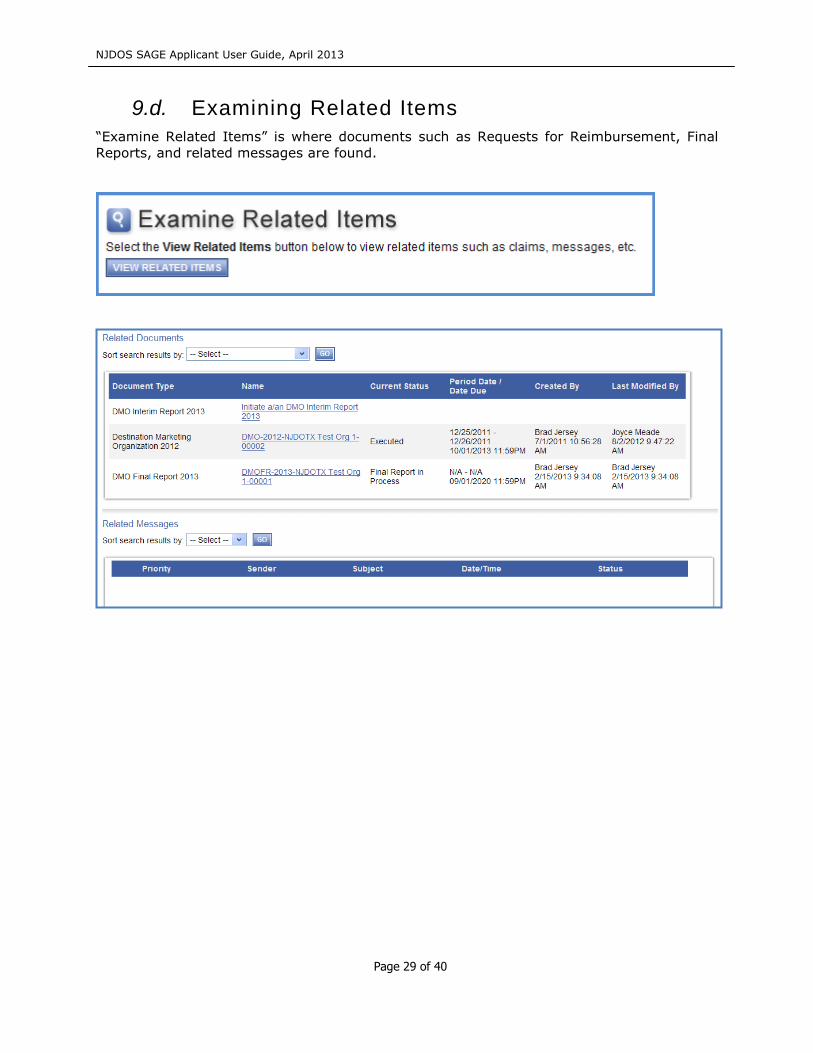
“Examine Related Items” is where documents such as Requests for Reimbursement, Final
Reports, and related messages are found.
NJDOS SAGE Applicant User Guide, April 2013
Page 30 of 40
9.e. Adding and Editing Notes
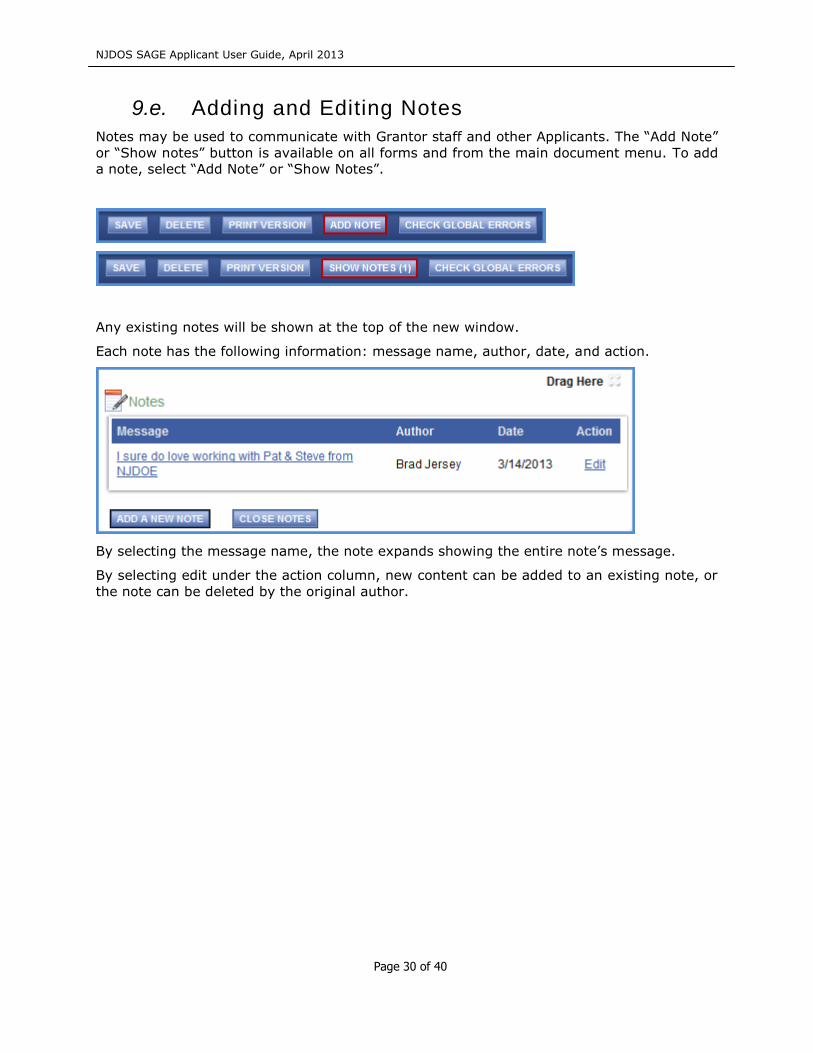
Notes may be used to communicate with Grantor staff and other Applicants. The “Add Note”
or “Show notes” button is available on all forms and from the main document menu. To add
a note, select “Add Note” or “Show Notes”.
Any existing notes will be shown at the top of the new window.
Each note has the following information: message name, author, date, and action.
By selecting the message name, the note expands showing the entire note’s message.
By selecting edit under the action column, new content can be added to an existing note, or
the note can be deleted by the original author.
NJDOS SAGE Applicant User Guide, April 2013
Page 31 of 40
To add a new note:
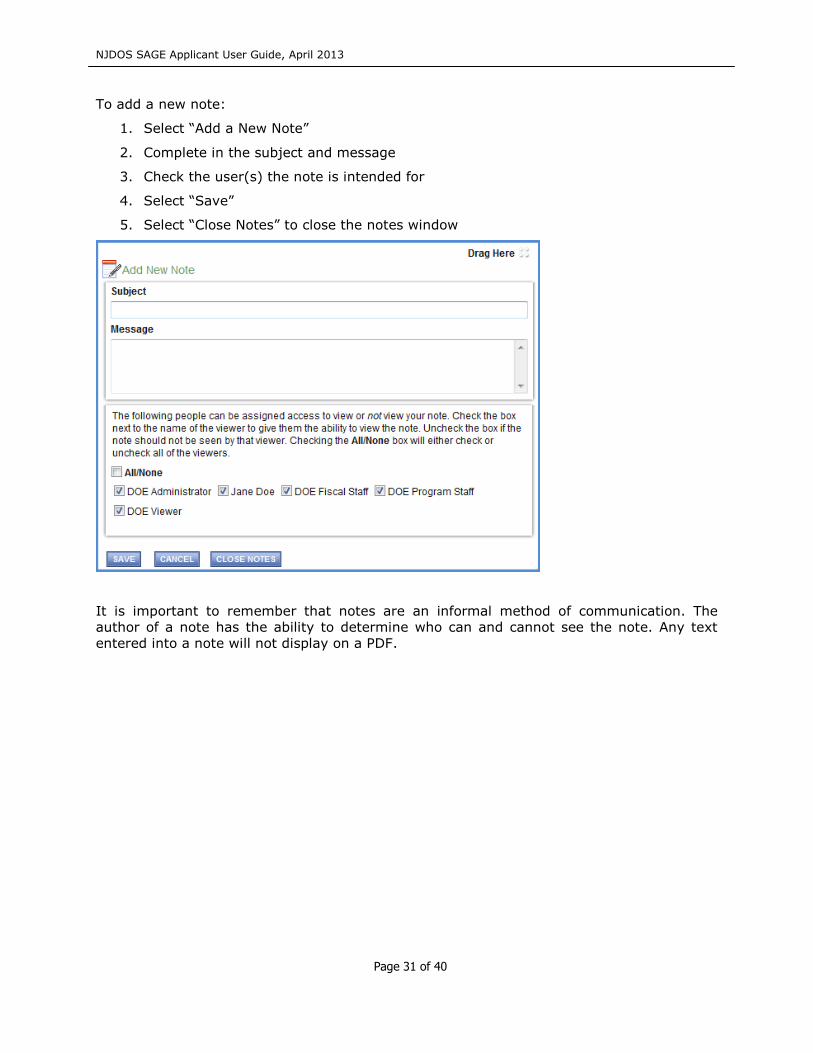
1. Select “Add a New Note”
2. Complete in the subject and message
3. Check the user(s) the note is intended for
4. Select “Save”
5. Select “Close Notes” to close the notes window
It is important to remember that notes are an informal method of communication. The
author of a note has the ability to determine who can and cannot see the note. Any text
entered into a note will not display on a PDF.
NJDOS SAGE Applicant User Guide, April 2013
Page 32 of 40
10. Application/Grant User Management
The Authorized Official and Agency Administrator are responsible for ensuring that
appropriate users are assigned documents. Any organization staff in SAGE assigned as an
Authorized Official or Agency Administrator will automatically be added to any
Application/Grant document when it is initiated. Agency staff may assist the Authorized
Official and Agency Administrator with completing required forms. User access can be
assigned or removed throughout a Grant’s lifecycle. Only an Authorized Official or Agency
Administrator can submit an Application.
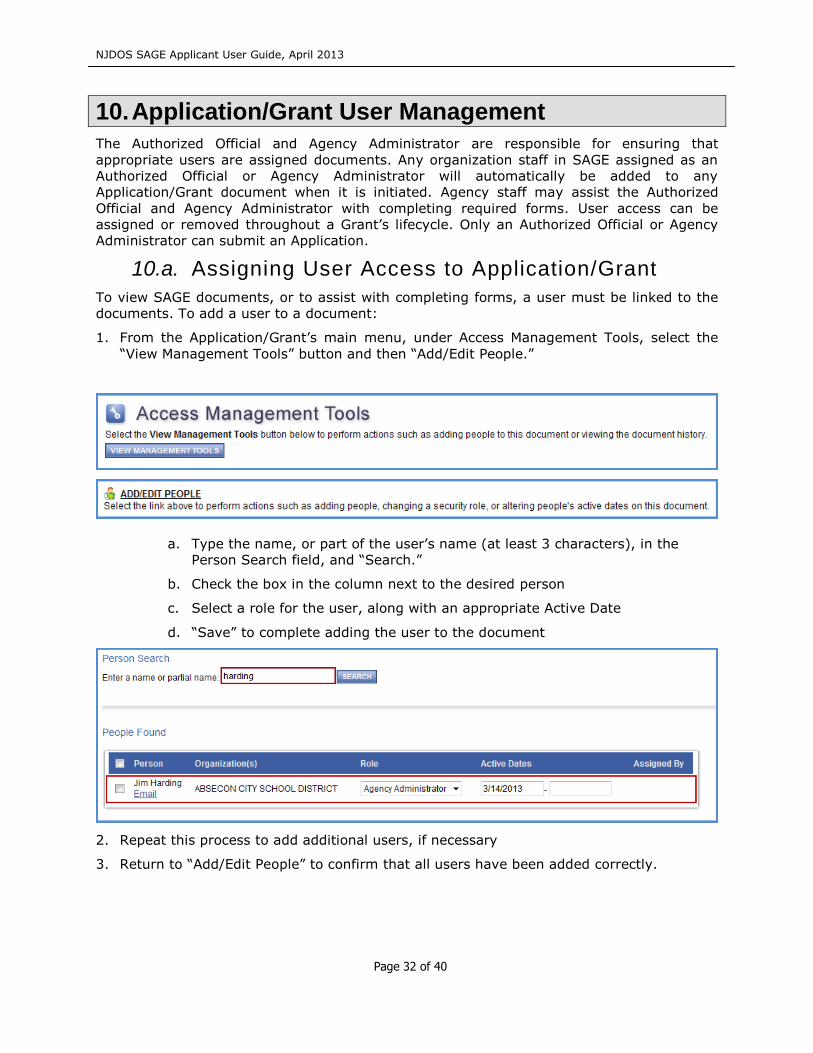
10.a. Assigning User Access to Application/Grant
To view SAGE documents, or to assist with completing forms, a user must be linked to the
documents. To add a user to a document:
1. From the Application/Grant’s main menu, under Access Management Tools, select the
“View Management Tools” button and then “Add/Edit People.”
a. Type the name, or part of the user’s name (at least 3 characters), in the
Person Search field, and “Search.”
b. Check the box in the column next to the desired person
c. Select a role for the user, along with an appropriate Active Date
d. “Save” to complete adding the user to the document
2. Repeat this process to add additional users, if necessary
3. Return to “Add/Edit People” to confirm that all users have been added correctly.
NJDOS SAGE Applicant User Guide, April 2013
Page 33 of 40
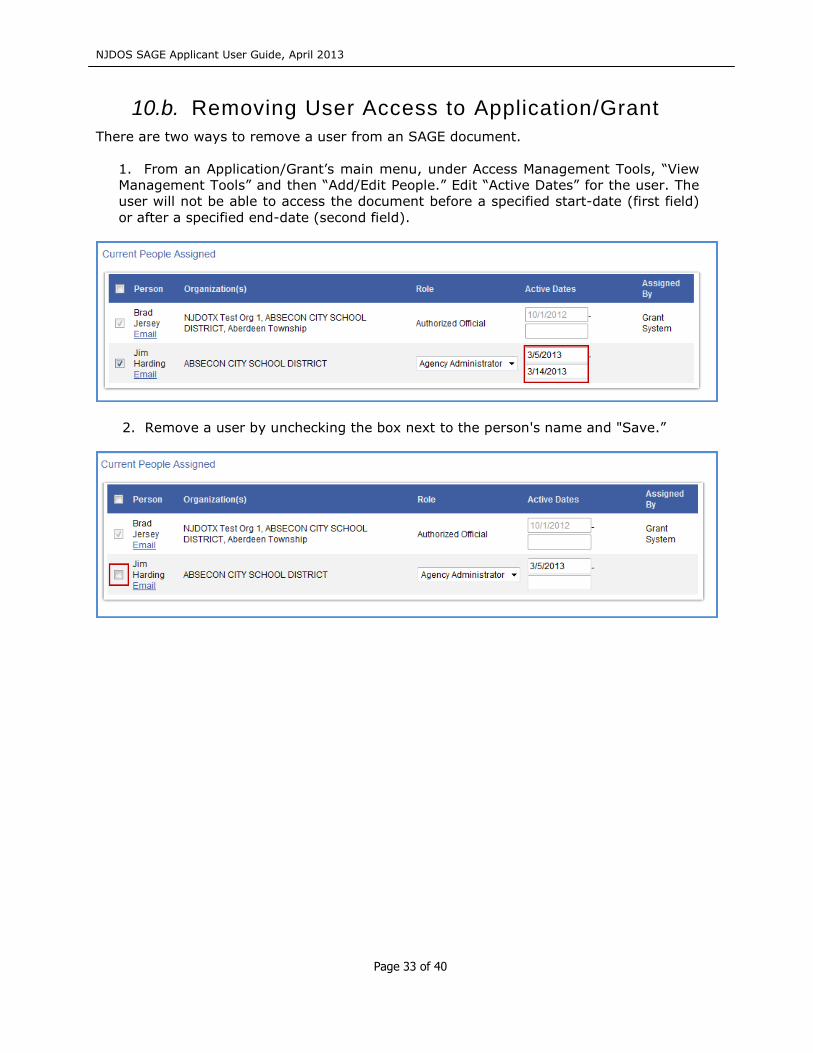
10.b. Removing User Access to Application/Grant
There are two ways to remove a user from an SAGE document.
1. From an Application/Grant’s main menu, under Access Management Tools, “View
Management Tools” and then “Add/Edit People.” Edit “Active Dates” for the user. The
user will not be able to access the document before a specified start-date (first field)
or after a specified end-date (second field).
2. Remove a user by unchecking the box next to the person's name and "Save.”
NJDOS SAGE Applicant User Guide, April 2013
Page 34 of 40
11. Forms Completion
On an Application/Grant’s Form Menu the forms within an Application are shown. These
are the forms that must be completed before submitting the Application. The following
sections go through the information necessary to complete an Application.
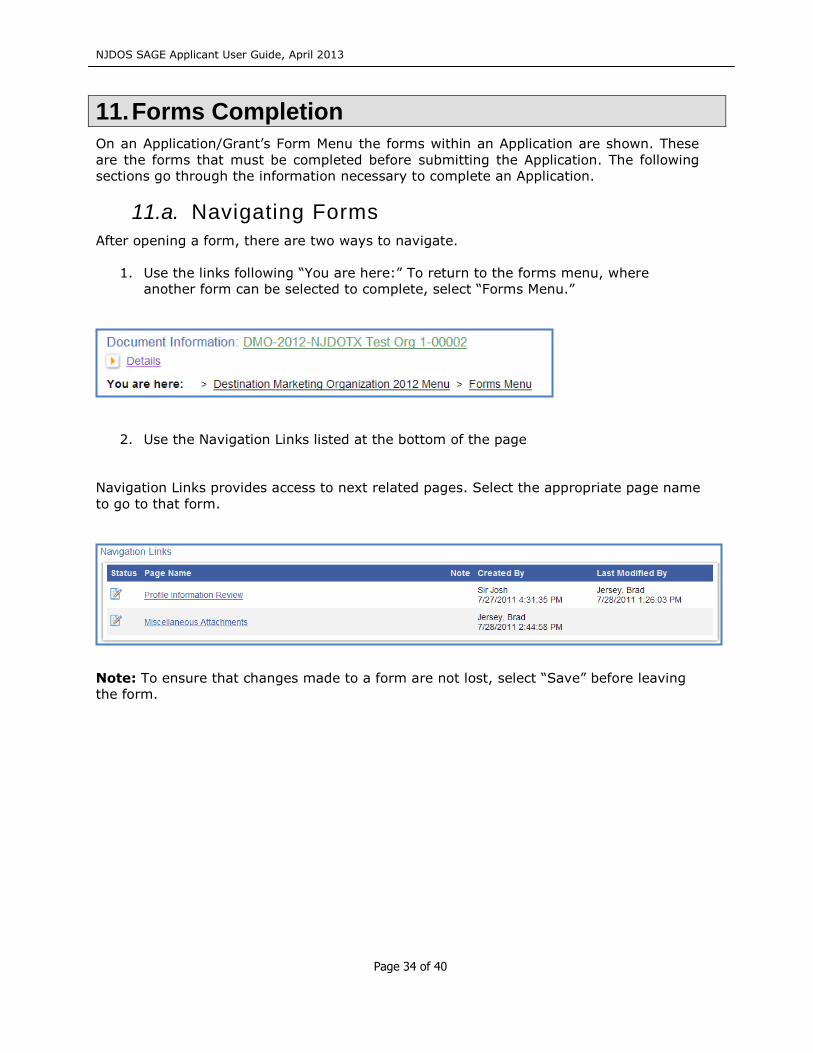
11.a. Navigating Forms
After opening a form, there are two ways to navigate.
1. Use the links following “You are here:” To return to the forms menu, where
another form can be selected to complete, select “Forms Menu.”
2. Use the Navigation Links listed at the bottom of the page
Navigation Links provides access to next related pages. Select the appropriate page name
to go to that form.
Note: To ensure that changes made to a form are not lost, select “Save” before leaving
the form.
NJDOS SAGE Applicant User Guide, April 2013
Page 35 of 40
11.b. Completing Forms
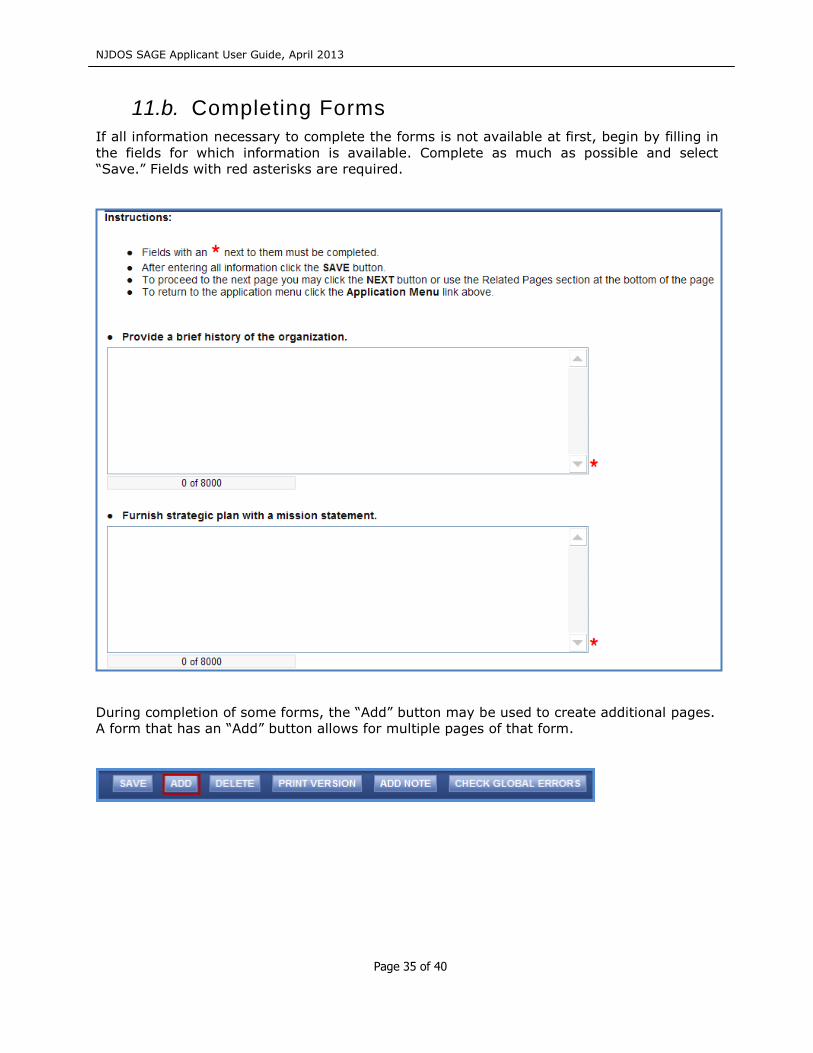
If all information necessary to complete the forms is not available at first, begin by filling in
the fields for which information is available. Complete as much as possible and select
“Save.” Fields with red asterisks are required.
During completion of some forms, the “Add” button may be used to create additional pages.
A form that has an “Add” button allows for multiple pages of that form.
NJDOS SAGE Applicant User Guide, April 2013
Page 36 of 40
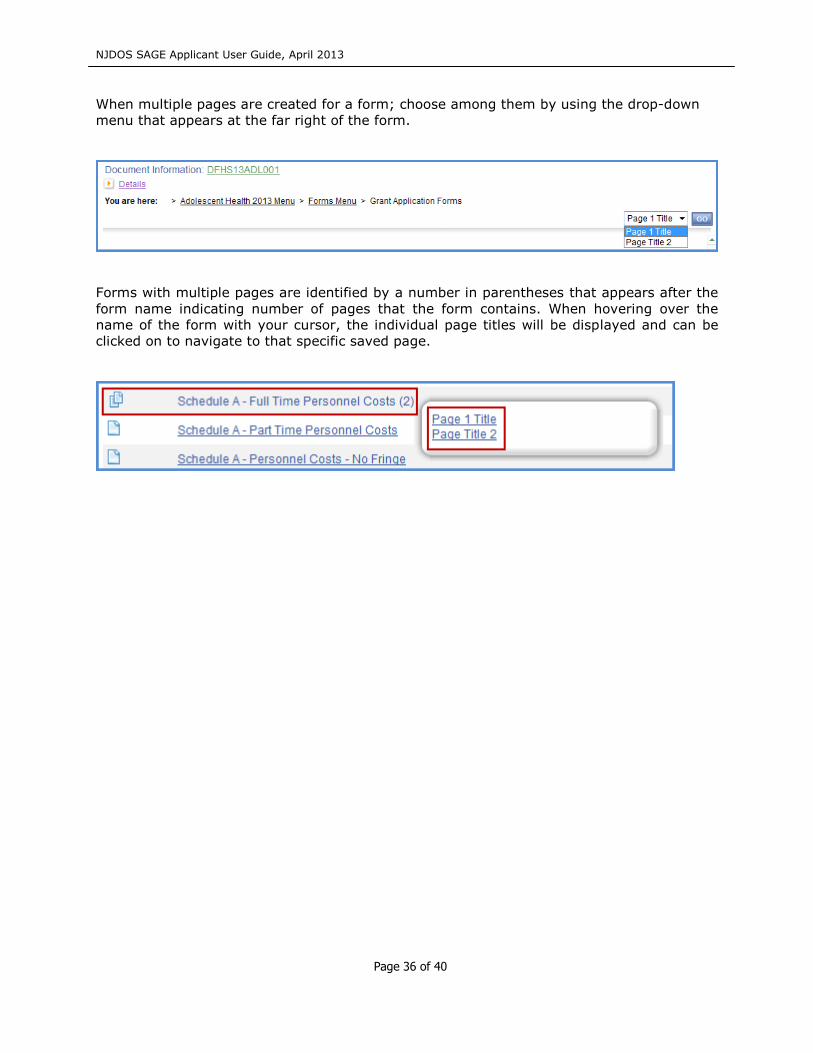
When multiple pages are created for a form; choose among them by using the drop-down
menu that appears at the far right of the form.
Forms with multiple pages are identified by a number in parentheses that appears after the
form name indicating number of pages that the form contains. When hovering over the
name of the form with your cursor, the individual page titles will be displayed and can be
clicked on to navigate to that specific saved page.
NJDOS SAGE Applicant User Guide, April 2013
Page 37 of 40
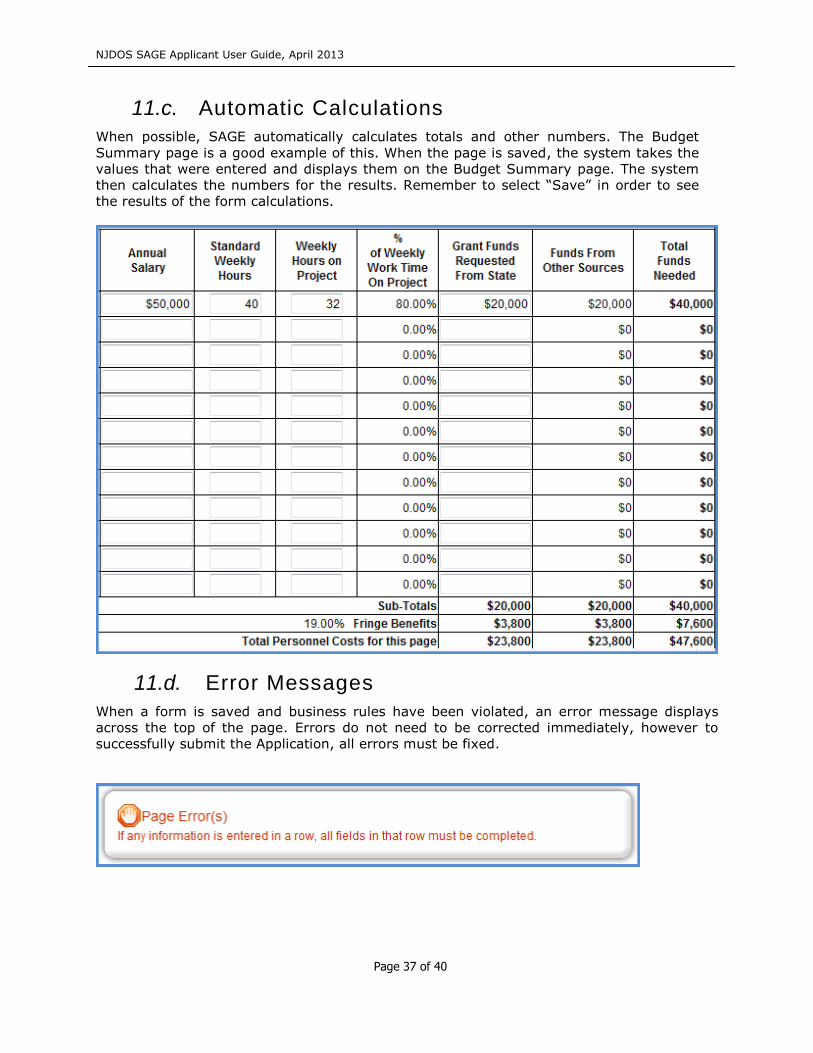
11.c. Automatic Calculations
When possible, SAGE automatically calculates totals and other numbers. The Budget
Summary page is a good example of this. When the page is saved, the system takes the
values that were entered and displays them on the Budget Summary page. The system
then calculates the numbers for the results. Remember to select “Save” in order to see
the results of the form calculations.
11.d. Error Messages
When a form is saved and business rules have been violated, an error message displays
across the top of the page. Errors do not need to be corrected immediately, however to
successfully submit the Application, all errors must be fixed.
NJDOS SAGE Applicant User Guide, April 2013
Page 38 of 40
11.e. Uploading Attachments
All attachments submitted via SAGE must not contain confidential/sensitive data that is
not required to support the Grants-management process. Before attachments are
uploaded, sensitive information must be redacted. Examples of sensitive information
include social security numbers (even if it is only the last 4 digits of an SSN), items such
as bank account numbers (generally found at the bottom of a check), or credit card data.
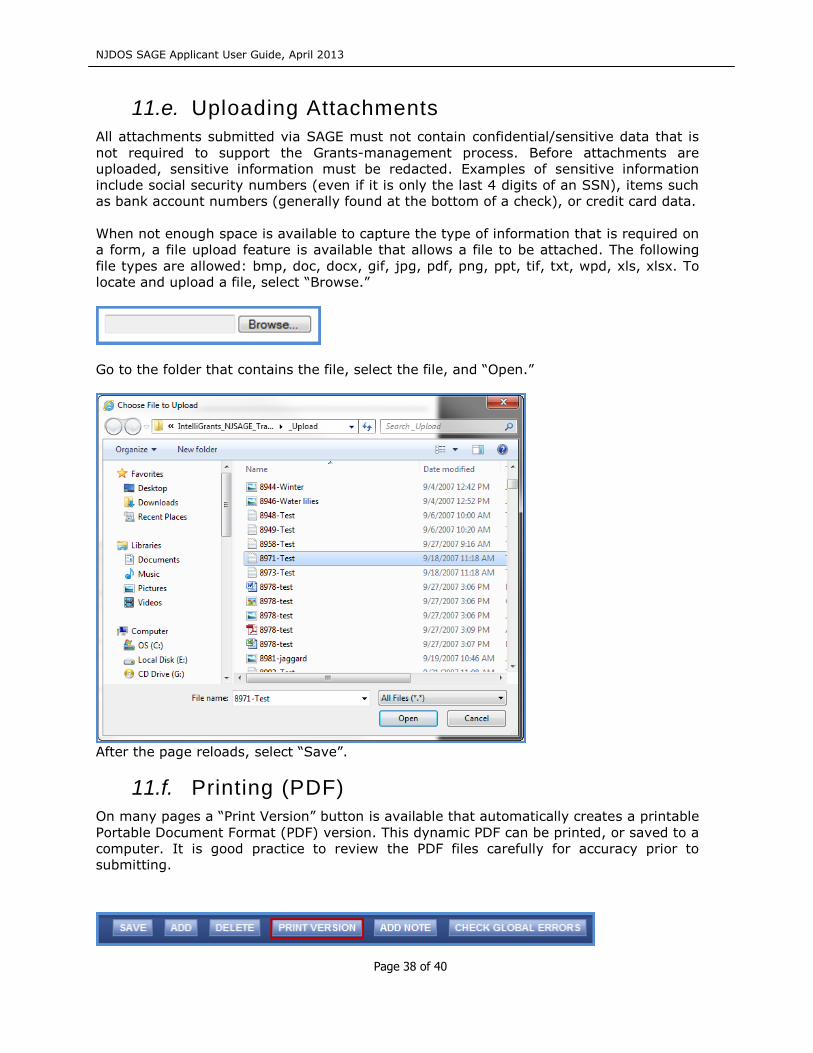
When not enough space is available to capture the type of information that is required on
a form, a file upload feature is available that allows a file to be attached. The following
file types are allowed: bmp, doc, docx, gif, jpg, pdf, png, ppt, tif, txt, wpd, xls, xlsx. To
locate and upload a file, select “Browse.”
Go to the folder that contains the file, select the file, and “Open.”
After the page reloads, select “Save”.
11.f. Printing (PDF)
On many pages a “Print Version” button is available that automatically creates a printable
Portable Document Format (PDF) version. This dynamic PDF can be printed, or saved to a
computer. It is good practice to review the PDF files carefully for accuracy prior to
submitting.
NJDOS SAGE Applicant User Guide, April 2013
Page 39 of 40
11.g. Copy and Paste Restrictions
Be cautious when using the copy and paste function of most word processing programs
(e.g., MS Word) to transfer text into SAGE form fields or narrative text boxes.
SAGE does not recognize some characters and formatting, such as tables, graphs,
photographs, bullets, and some tabs.
Also be aware of the different character limits of text boxes--attempting to copy and
paste text that is longer than the allotted space returns an error message. The character
limit is located at the bottom left of a text box.

NJDOS SAGE Applicant User Guide, April 2013
Page 40 of 40
12. Application Submission
The Authorized Official and Agency Administrator are the only ones authorized to submit an
Application. When the Application is complete and no additional changes are required, the
Authorized Official or Agency Administrator may submit.
Once an Application is submitted, it becomes ‘read-only’
and can no longer be changed!
To submit an Application, the Authorized Official or Agency Administrator selects “View
Status Options” under the Change the Status header on the Application’s main menu.
Possible status changes display. Select “Apply Status” under the appropriate status change.
If errors exist on any of the Application’s forms when attempting to submit, a message
appears showing the form(s) that contain errors. All errors must be fixed before SAGE will
accept the Application. When errors do not exist, the Authorized Official or Agency
Administrator is prompted to confirm their decision to submit.