table of contents - vmwaredocs.hol.vmware.com/hol-2018/hol-1804-02-chg_pdf_en.pdftable of contents...
TRANSCRIPT

Table of ContentsLab Overview - HOL-1804-02-CHG - vSphere Challenge Lab ............................................2
Lab Guidance .......................................................................................................... 3Module 1 - Let's Start with the Basics (30 minutes) .......................................................... 8
Introduction............................................................................................................. 9Can't vMotion a VM ............................................................................................... 11Can't ping a VM..................................................................................................... 18
Module 2 - Basic Operations Management (30 minutes) ................................................ 24Introduction........................................................................................................... 25Update VMware Tools ............................................................................................ 26My PowerCLI script isn't working........................................................................... 39
Module 3 - Basic Resource Management (30 minutes) ................................................... 43Introduction........................................................................................................... 44Troubleshoot a Poorly Performing VM.................................................................... 46Troubleshoot a Poorly Performing Host.................................................................. 53
Module 4 - Advanced Operations Management (45 minutes) .........................................58Introduction........................................................................................................... 59Assigning the Correct Permissions ........................................................................ 61My VM Won't Power On ......................................................................................... 69My Host is Out of Compliance ............................................................................... 74
Module 5 - Advanced Resource Management (45 minutes) ............................................83Introduction........................................................................................................... 84My Application is Sensitive to Latency .................................................................. 86I Created a Resource Pool and now Performance is Worse....................................94vNUMA Troubleshooting ...................................................................................... 101
Module Hints ................................................................................................................. 112Module 1 - Let's Start with the Basics ................................................................. 113Module 2 - Basic Operations Management.......................................................... 114Module 3 - Basic Resource Management............................................................. 115Module 4 - Advanced Operations Management................................................... 116Module 5 - Advanced Resource Management ..................................................... 117
HOL-1804-02-CHG
Page 1HOL-1804-02-CHG

Lab Overview -HOL-1804-02-CHG -
vSphere Challenge Lab
HOL-1804-02-CHG
Page 2HOL-1804-02-CHG
Lab GuidanceNote: It will take more than 90 minutes to complete this lab. You shouldexpect to only finish 3-4 of the modules during your time. The modules areindependent of each other so you can start at the beginning of any moduleand proceed from there. You can use the Table of Contents to access anymodule of your choosing.
The Table of Contents can be accessed in the upper right-hand corner of theLab Manual.
The vSphere 6 Challenge Lab will do exactly that, challenge you to solve commonvSphere problems that many experience on a daily basis! Each module places you in adifferent fictional scenario to fix common vSphere operational and performanceproblems. Will you be able to fix a PowerCLI script that is not working? Can you poweron a VM that won't power on? It's time to put your vSphere skills to the test.
Lab Module List:
• Module 1 - Let's Start with the Basics (30 minutes).• Module 2 - Basic Operations Management (30 minutes).• Module 3 - Basic Resource Management (30 minutes).• Module 4 - Advanced Operations Management (45 minutes).• Module 5 - Advanced Resource Management (45 minutes).
Lab Captains:
• Nick Fritsch, Senior Technical Account Manager, USA
This lab manual can be downloaded from the Hands-on Labs Document site found here:
http://docs.hol.vmware.com/
This lab may be available in other languages. To set your language preference and havea localized manual deployed with your lab, you may utilize this document to help guideyou through the process:
http://docs.hol.vmware.com/announcements/nee-default-language.pdf
VMware Technology Network (VMTN)
For additional hints and to discuss the challenges presented in the lab further, be sureto visit the VMware Technology Netowork (VMTN) Community Pages:
https://communities.vmware.com/community/vmtn/challenge-lab/vrealize-operations
HOL-1804-02-CHG
Page 3HOL-1804-02-CHG
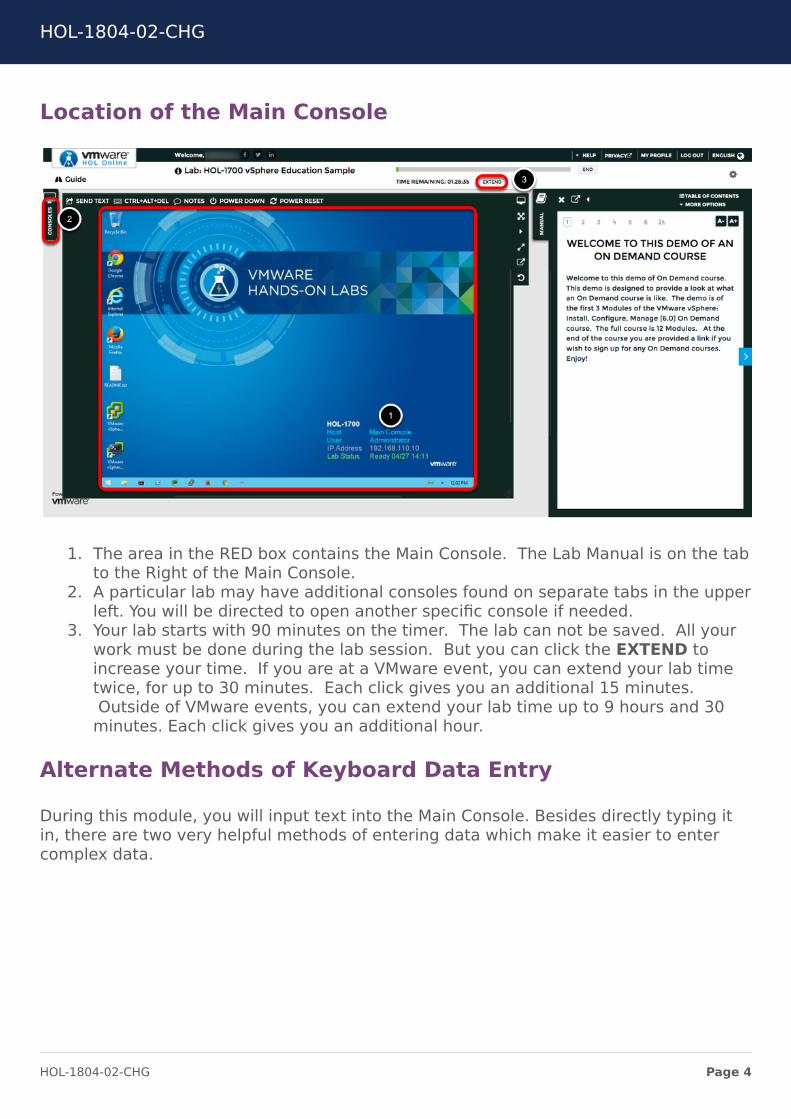
Location of the Main Console
1. The area in the RED box contains the Main Console. The Lab Manual is on the tabto the Right of the Main Console.
2. A particular lab may have additional consoles found on separate tabs in the upperleft. You will be directed to open another specific console if needed.
3. Your lab starts with 90 minutes on the timer. The lab can not be saved. All yourwork must be done during the lab session. But you can click the EXTEND toincrease your time. If you are at a VMware event, you can extend your lab timetwice, for up to 30 minutes. Each click gives you an additional 15 minutes.Outside of VMware events, you can extend your lab time up to 9 hours and 30
minutes. Each click gives you an additional hour.
Alternate Methods of Keyboard Data Entry
During this module, you will input text into the Main Console. Besides directly typing itin, there are two very helpful methods of entering data which make it easier to entercomplex data.
HOL-1804-02-CHG
Page 4HOL-1804-02-CHG
Click and Drag Lab Manual Content Into Console ActiveWindow
You can also click and drag text and Command Line Interface (CLI) commands directlyfrom the Lab Manual into the active window in the Main Console.
Accessing the Online International Keyboard
You can also use the Online International Keyboard found in the Main Console.
1. Click on the Keyboard Icon found on the Windows Quick Launch Task Bar.
<div class="player-unavailable"><h1 class="message">An error occurred.</h1><div class="submessage"><ahref="http://www.youtube.com/watch?v=xS07n6GzGuo" target="_blank">Try watching this video on www.youtube.com</a>, or enableJavaScript if it is disabled in your browser.</div></div>
HOL-1804-02-CHG
Page 5HOL-1804-02-CHG
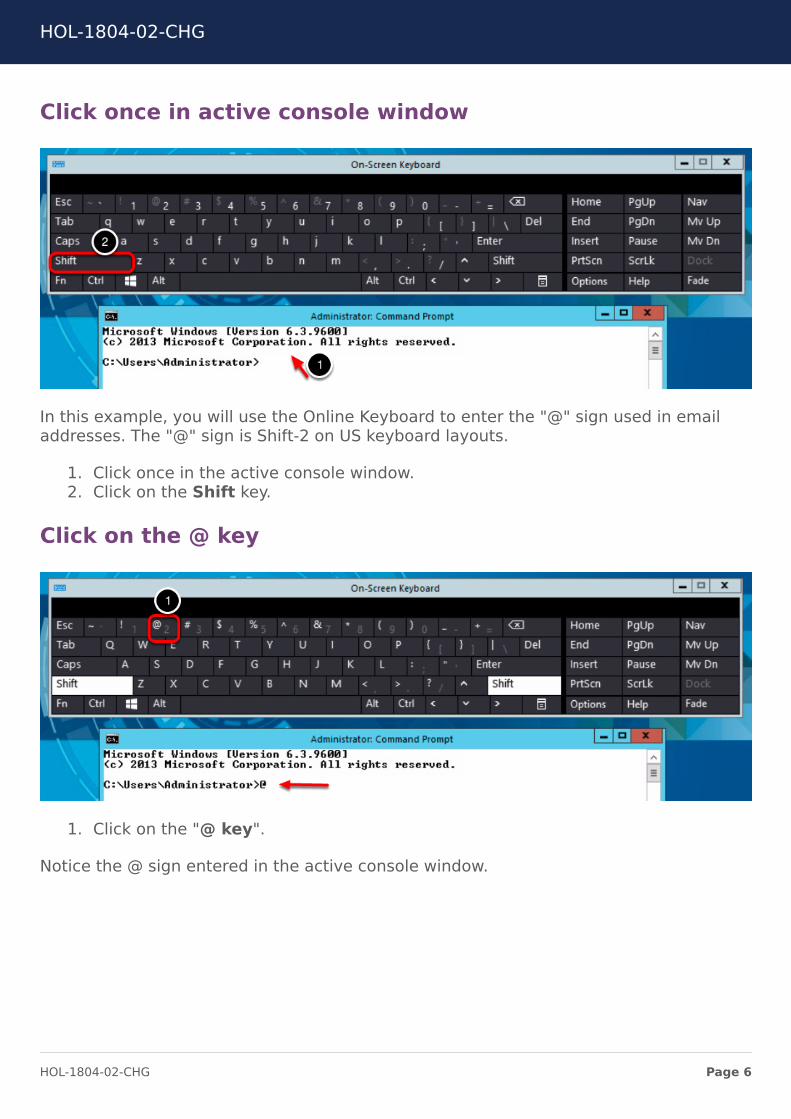
Click once in active console window
In this example, you will use the Online Keyboard to enter the "@" sign used in emailaddresses. The "@" sign is Shift-2 on US keyboard layouts.
1. Click once in the active console window.2. Click on the Shift key.
Click on the @ key
1. Click on the "@ key".
Notice the @ sign entered in the active console window.
HOL-1804-02-CHG
Page 6HOL-1804-02-CHG
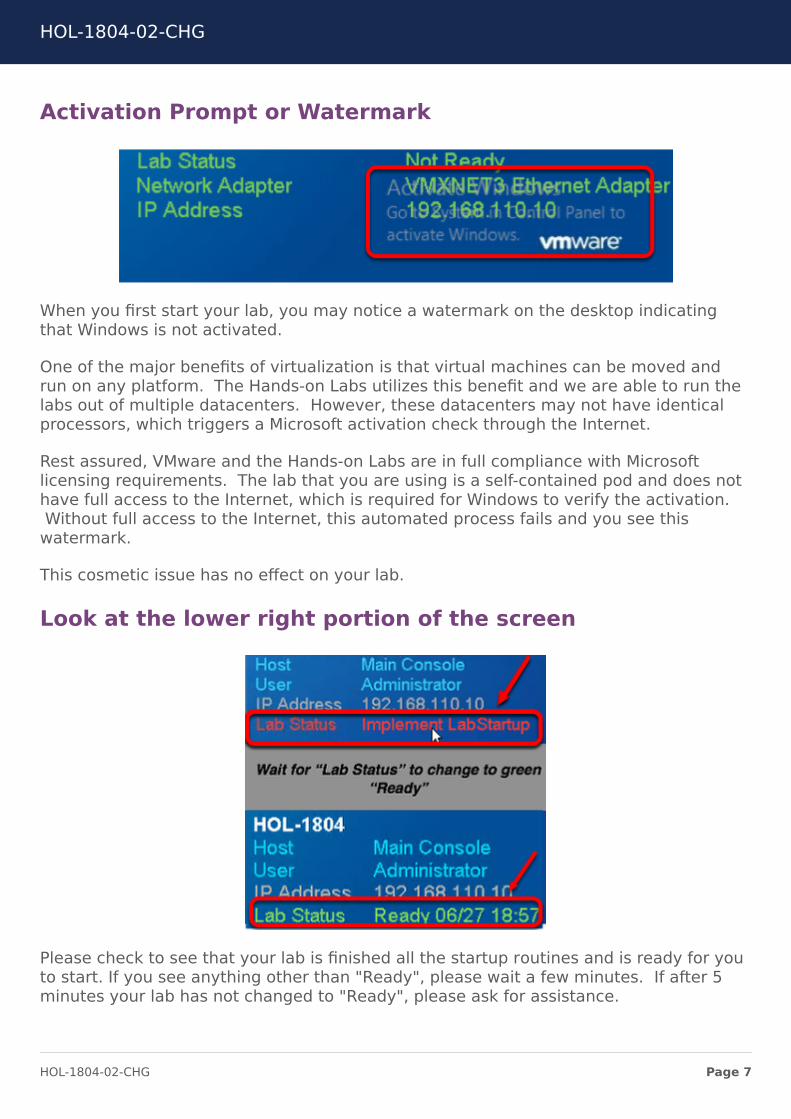
Activation Prompt or Watermark
When you first start your lab, you may notice a watermark on the desktop indicatingthat Windows is not activated.
One of the major benefits of virtualization is that virtual machines can be moved andrun on any platform. The Hands-on Labs utilizes this benefit and we are able to run thelabs out of multiple datacenters. However, these datacenters may not have identicalprocessors, which triggers a Microsoft activation check through the Internet.
Rest assured, VMware and the Hands-on Labs are in full compliance with Microsoftlicensing requirements. The lab that you are using is a self-contained pod and does nothave full access to the Internet, which is required for Windows to verify the activation.Without full access to the Internet, this automated process fails and you see this
watermark.
This cosmetic issue has no effect on your lab.
Look at the lower right portion of the screen
Please check to see that your lab is finished all the startup routines and is ready for youto start. If you see anything other than "Ready", please wait a few minutes. If after 5minutes your lab has not changed to "Ready", please ask for assistance.
HOL-1804-02-CHG
Page 7HOL-1804-02-CHG

Module 1 - Let's Startwith the Basics (30
minutes)
HOL-1804-02-CHG
Page 8HOL-1804-02-CHG

IntroductionWe'll start with the basics within this module to get your troubleshooting enginewarmed-up. In this lab, you'll be challenged to:
• Resolve an issue with a virtual machine that cannot be migrated to a differentESXi host (vMotion)
• Determine why a virtual machine cannot be contacted by ping, and resolve theissue.
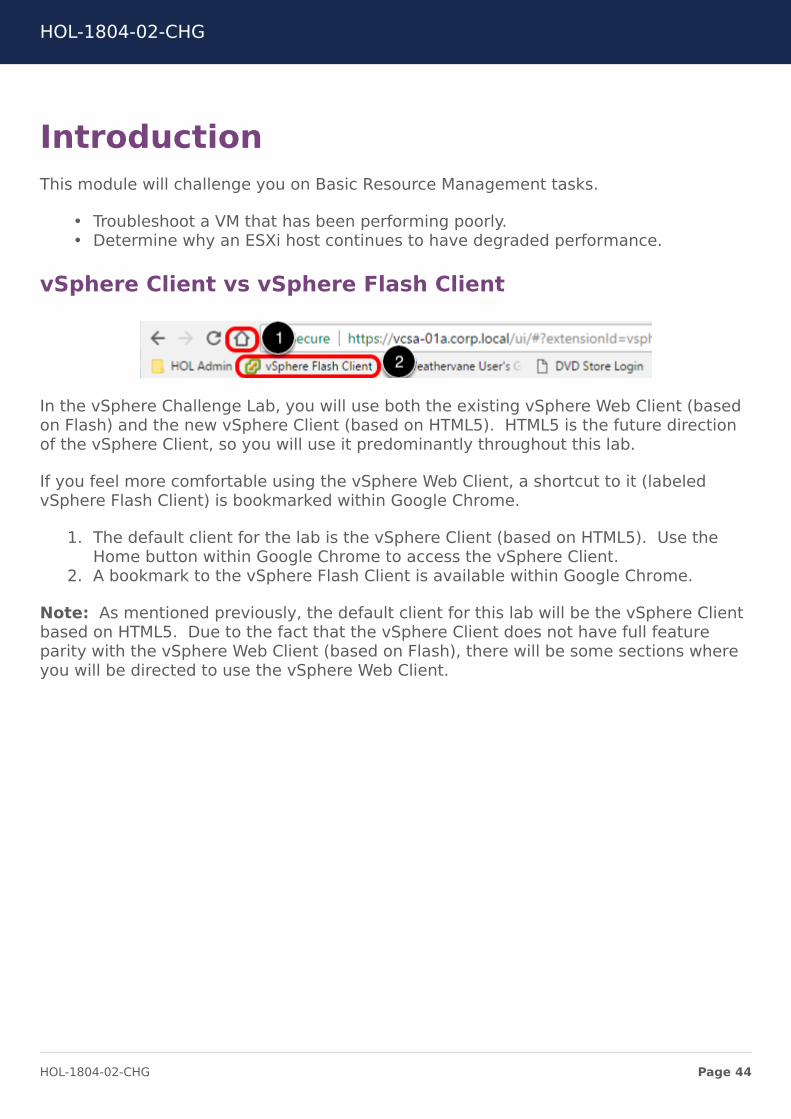
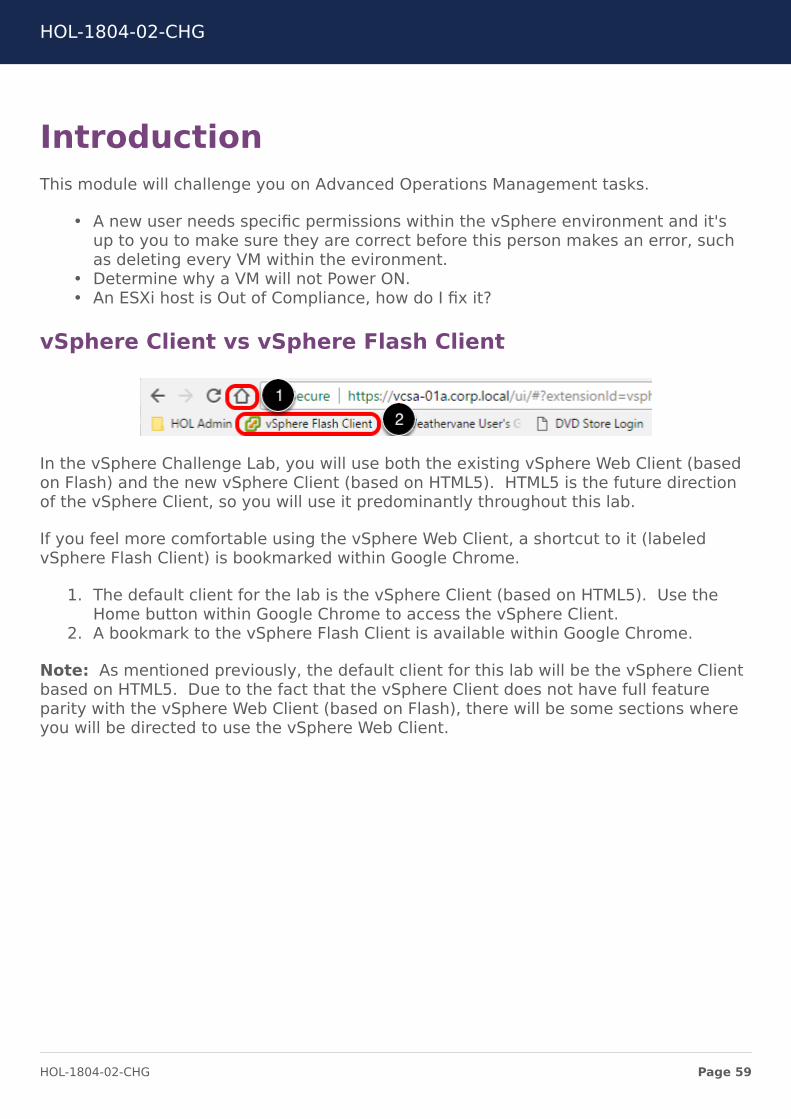
vSphere Client vs vSphere Flash Client
In the vSphere Challenge Lab, you will use both the existing vSphere Web Client (basedon Flash) and the new vSphere Client (based on HTML5). HTML5 is the future directionof the vSphere Client, so you will use it predominantly throughout this lab.
If you feel more comfortable using the vSphere Web Client, a shortcut to it (labeledvSphere Flash Client) is bookmarked within Google Chrome.
1. The default client for the lab is the vSphere Client (based on HTML5). Use theHome button within Google Chrome to access the vSphere Client.
2. A bookmark to the vSphere Flash Client is available within Google Chrome.
Note: As mentioned previously, the default client for this lab will be the vSphere Clientbased on HTML5. Due to the fact that the vSphere Client does not have full featureparity with the vSphere Web Client (based on Flash), there will be some sections whereyou will be directed to use the vSphere Web Client.
HOL-1804-02-CHG
Page 9HOL-1804-02-CHG

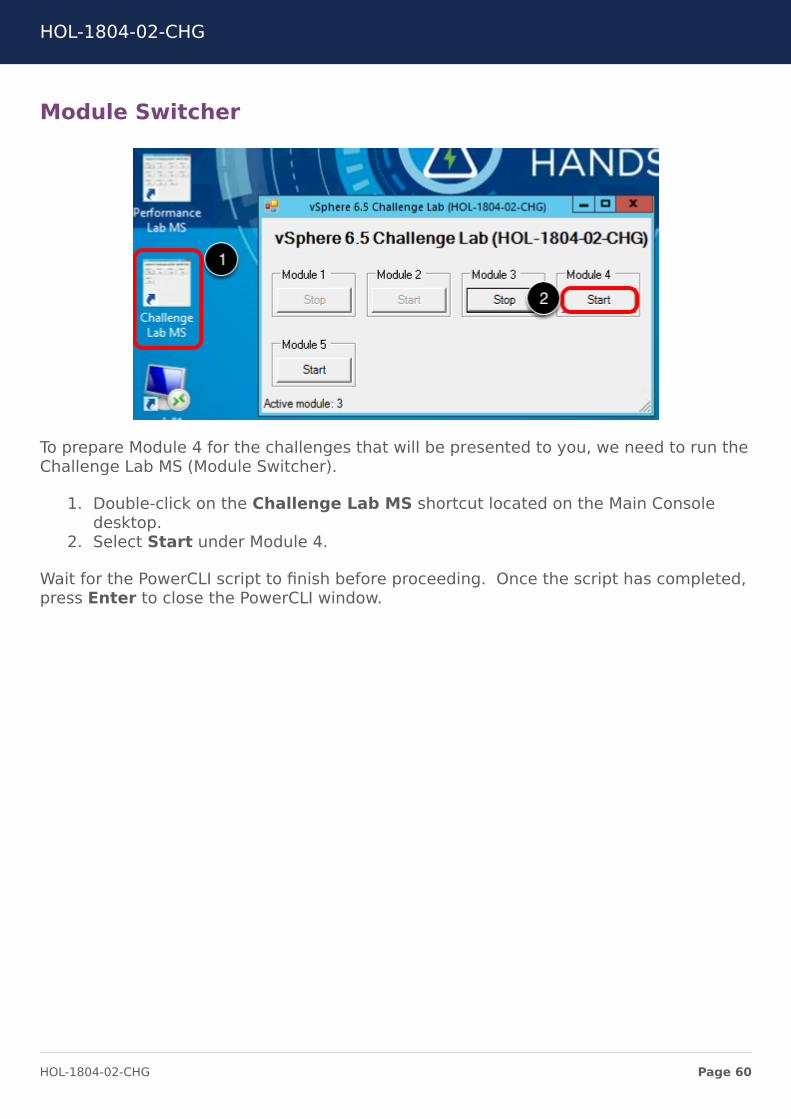
Module Switcher
To prepare Module 1 for the challenges that will be presented to you, we need to run theChallenge Lab MS (Module Switcher).
1. Double-click on the Challenge Lab MS shortcut located on the Main Consoledesktop.
2. Select Start under Module 1.
Wait for the PowerCLI script to finish before proceeding. Once the script has completed,press Enter to close the PowerCLI window.
HOL-1804-02-CHG
Page 10HOL-1804-02-CHG

Can't vMotion a VMWith vMotion, you can change the host on which a virtual machine is running, or youcan change both the host and the datastore of the virtual machine.
When you migrate virtual machines with vMotion and choose to change only the host,the entire state of the virtual machine is moved to the new host. The associated virtualdisk remains in the same location on storage that is shared between the two hosts.
When you choose to change both the host and the datastore, the virtual machine stateis moved to a new host and the virtual disk is moved to another datastore. vMotionmigration to another host and datastore is possible in vSphere environments withoutshared storage.
After the virtual machine state is migrated to the alternate host, the virtual machineruns on the new host. Migrations with vMotion are completely transparent to therunning virtual machine.
The state information includes the current memory content and all the information thatdefines and identifies the virtual machine. The memory content includes transactiondata and the bits of the operating system and applications that are in the memory. Thedefining and identification information stored in the state includes all the data thatmaps to the virtual machine hardware elements, such as BIOS, devices, CPU,MAC addresses for the Ethernet cards, chip set states, registers, and so forth.
When you migrate a virtual machine with vMotion, the new host for the virtual machinemust meet compatibility requirements so that the migration can proceed.
Migration with vMotion occurs in three stages:
1. When the migration with vMotion is requested, vCenter Server verifies that theexisting virtual machine is in a stable state with its current host.
2. The virtual machine state information (memory, registers, and networkconnections) is copied to the target host.
3. The virtual machine resumes its activities on the new host.
If errors occur during migration, the virtual machine reverts to its original state andlocation.
Open Google Chrome
1. Open Google Chrome using the shortcut on the taskbar.
HOL-1804-02-CHG
Page 11HOL-1804-02-CHG
If you did not Start Module 1 using the Challenge Lab Module Switcher outlined withinthe Introduction of this Module, please Stop and go back to the Introduction of Module 1and follow the directions to Start the Module using the Challenge Lab Module Switcher.
If you already completed this step, please proceed to the next page.
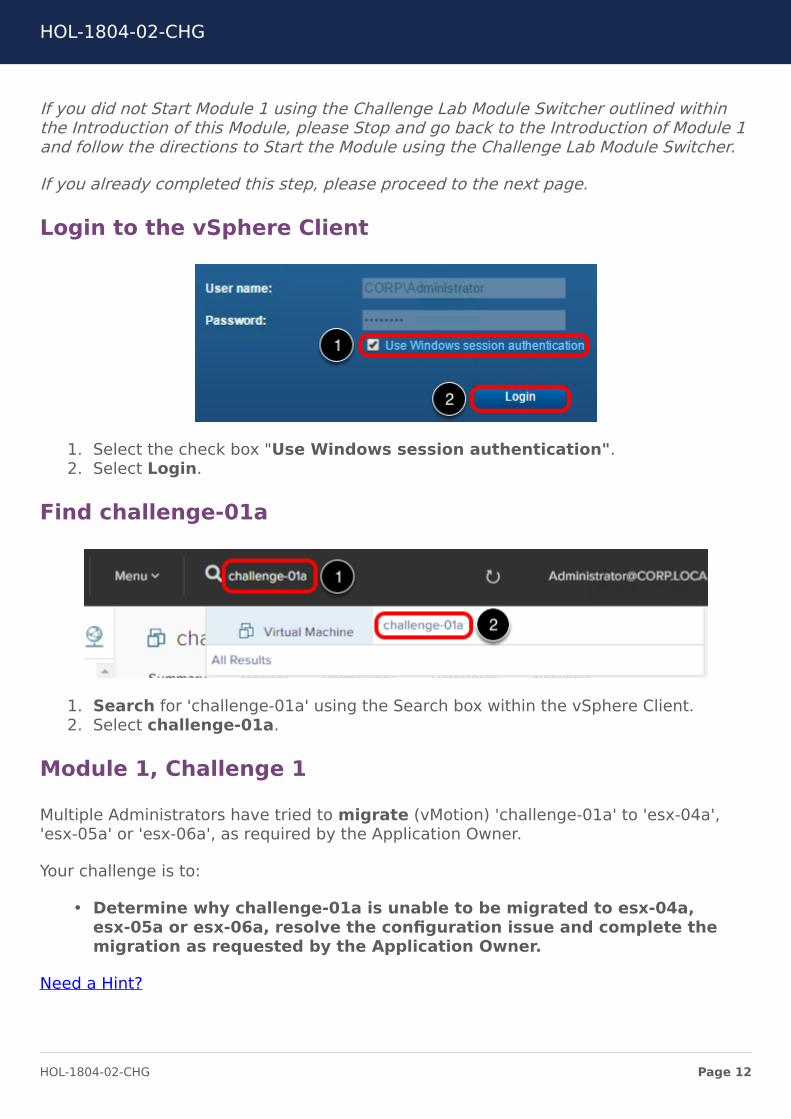
Login to the vSphere Client
1. Select the check box "Use Windows session authentication".2. Select Login.
Find challenge-01a
1. Search for 'challenge-01a' using the Search box within the vSphere Client.2. Select challenge-01a.
Module 1, Challenge 1
Multiple Administrators have tried to migrate (vMotion) 'challenge-01a' to 'esx-04a','esx-05a' or 'esx-06a', as required by the Application Owner.
Your challenge is to:
• Determine why challenge-01a is unable to be migrated to esx-04a,esx-05a or esx-06a, resolve the configuration issue and complete themigration as requested by the Application Owner.
Need a Hint?
HOL-1804-02-CHG
Page 12HOL-1804-02-CHG
You can also view hints on the VMware Technology Network Communities here:
https://communities.vmware.com/docs/DOC-36958
DO NOT proceed to the next step unless you want to see the solution to the challenge.
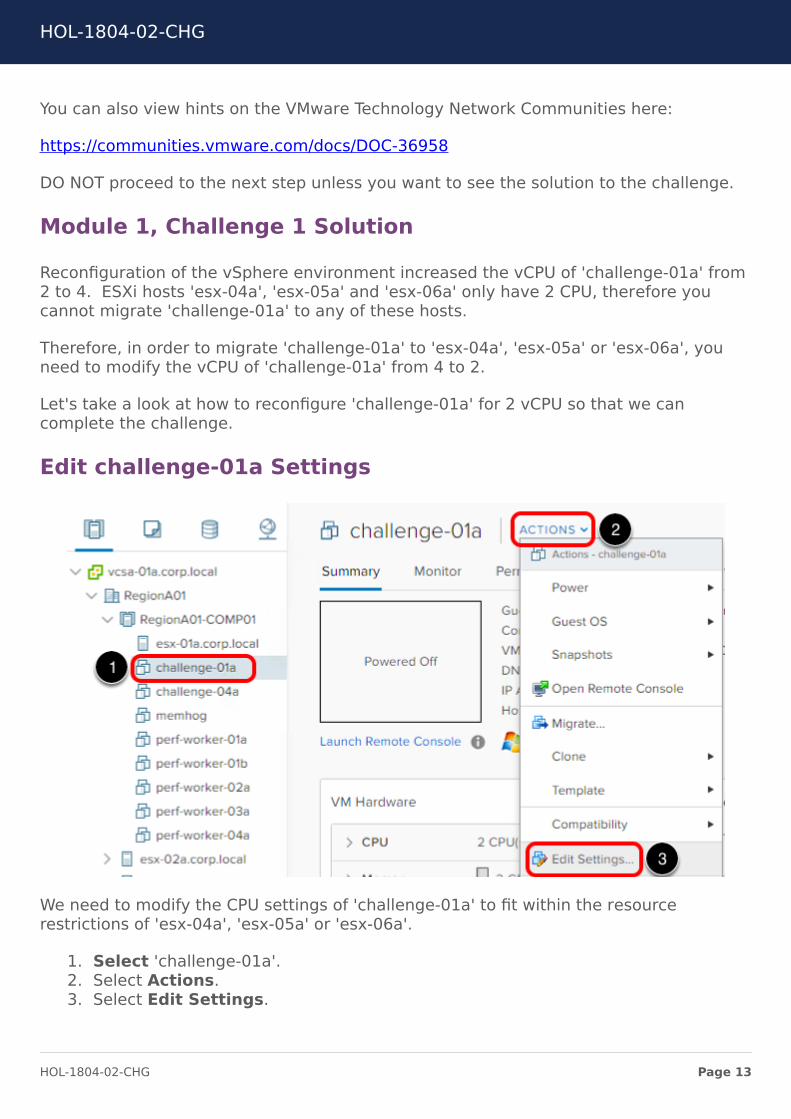
Module 1, Challenge 1 Solution
Reconfiguration of the vSphere environment increased the vCPU of 'challenge-01a' from2 to 4. ESXi hosts 'esx-04a', 'esx-05a' and 'esx-06a' only have 2 CPU, therefore youcannot migrate 'challenge-01a' to any of these hosts.
Therefore, in order to migrate 'challenge-01a' to 'esx-04a', 'esx-05a' or 'esx-06a', youneed to modify the vCPU of 'challenge-01a' from 4 to 2.
Let's take a look at how to reconfigure 'challenge-01a' for 2 vCPU so that we cancomplete the challenge.
Edit challenge-01a Settings
We need to modify the CPU settings of 'challenge-01a' to fit within the resourcerestrictions of 'esx-04a', 'esx-05a' or 'esx-06a'.
1. Select 'challenge-01a'.2. Select Actions.3. Select Edit Settings.
HOL-1804-02-CHG
Page 13HOL-1804-02-CHG

Modify CPU Settings
1. Select the CPU drop-down and change CPU from 4 to 2.2. Select OK.
Migrate challenge-01a
1. Right-click on 'challenge-01a'.2. Select Migrate.
HOL-1804-02-CHG
Page 14HOL-1804-02-CHG
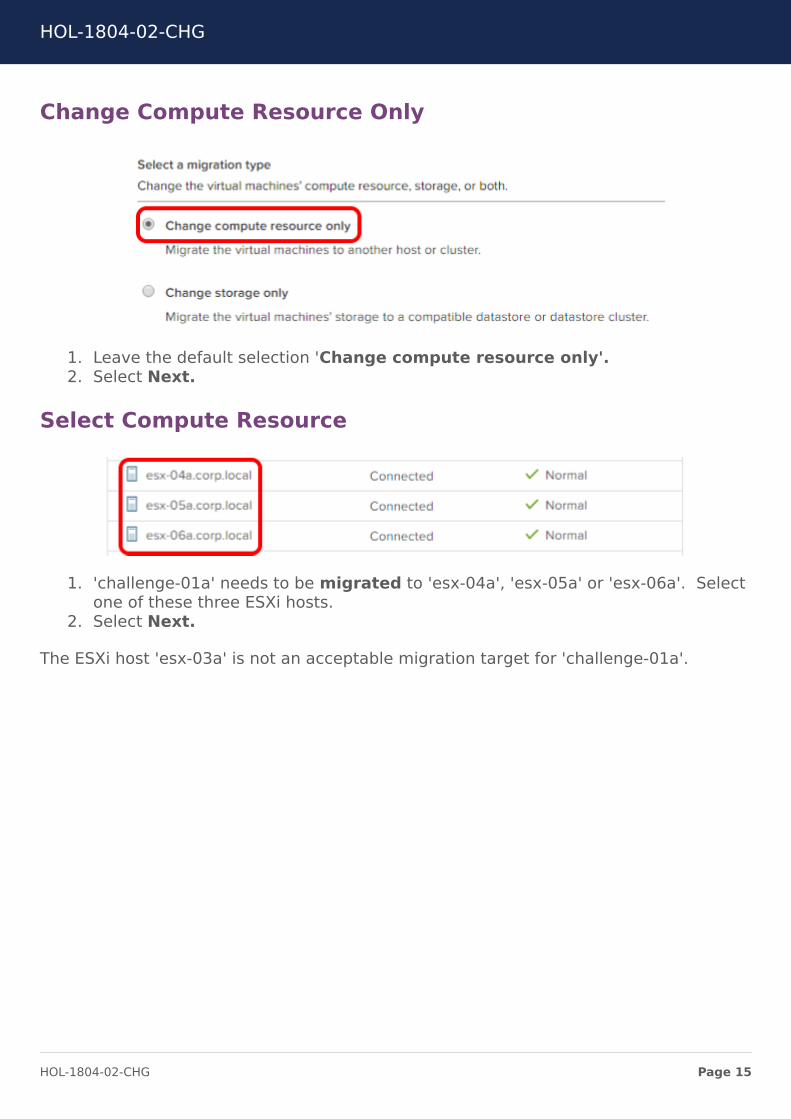
Change Compute Resource Only
1. Leave the default selection 'Change compute resource only'.2. Select Next.
Select Compute Resource
1. 'challenge-01a' needs to be migrated to 'esx-04a', 'esx-05a' or 'esx-06a'. Selectone of these three ESXi hosts.
2. Select Next.
The ESXi host 'esx-03a' is not an acceptable migration target for 'challenge-01a'.
HOL-1804-02-CHG
Page 15HOL-1804-02-CHG

Select Networks
You should not need to make any changes on the Select networks window.
1. Select Next.
HOL-1804-02-CHG
Page 16HOL-1804-02-CHG
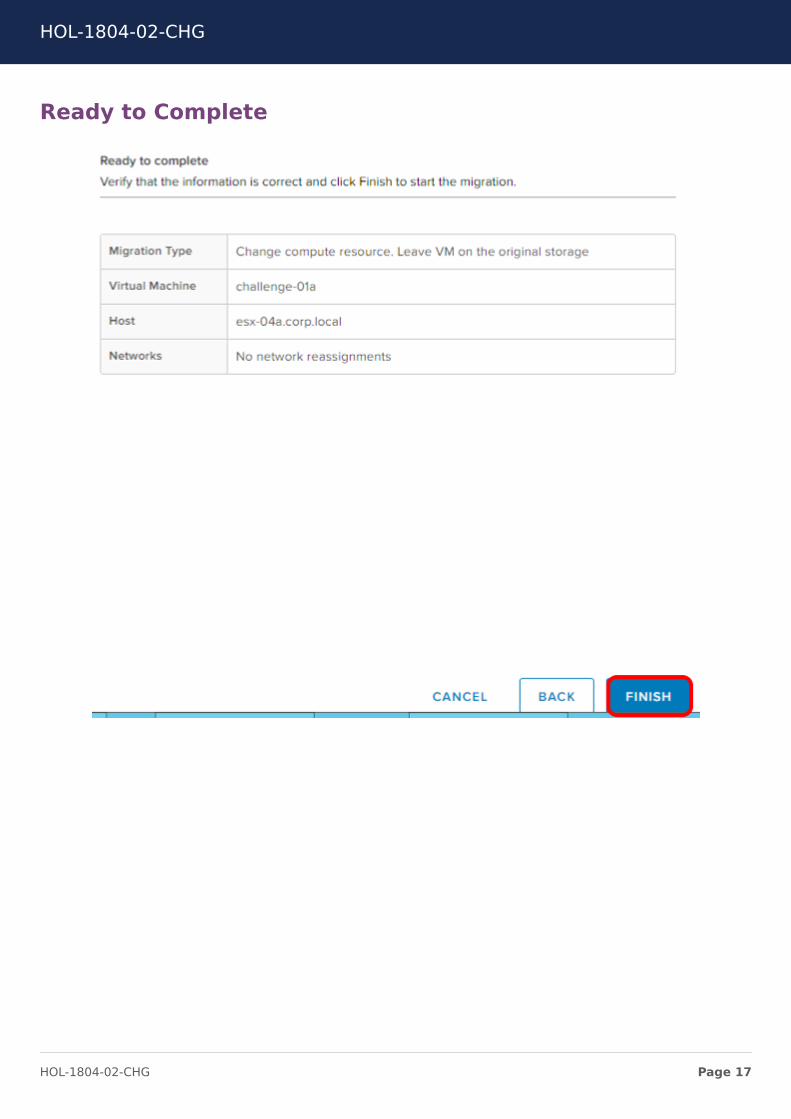
Ready to Complete
HOL-1804-02-CHG
Page 17HOL-1804-02-CHG

Can't ping a VMBefore we proceed with the next challenge which involves troubleshooting a networkingissue with a particular virtual machine, consider these best practices when youconfigure your network.
• To ensure a stable connection between vCenter Server, ESXi, and other productsand services, do not set connection limits and timeouts between the products.Setting limits and timeouts can affect the packet flow and cause services
interruption.• Isolate from one another the networks for host management, vSphere vMotion,
vSphere FT, and so on to improve security and performance.• Dedicate a separate physical NIC to a group of virtual machines, or use Network I/
O Control and traffic shaping to guarantee bandwidth to the virtual machines.This separation also enables distributing a portion of the total networking
workload across multiple CPUs. The isolated virtual machines can then betterhandle application traffic, for example, from a Web client.
• To physically separate network services and to dedicate a particular set of NICs toa specific network service, create a vSphere Standard Switch or vSphereDistributed Switch for each service. If this is not possible, separate networkservices on a single switch by attaching them to port groups with different VLANIDs. In either case, verify with your network administrator that the networks orVLANs you choose are isolated from the rest of your environment and that norouters connect them.
• Keep the vSphere vMotion connection on a separate network. When migrationwith vMotion occurs, the contents of the guest operating systems memory istransmitted over the network. You can do this either by using VLANs to segmenta single physical network or by using separate physical networks (the latter ispreferable).
• For migration across IP subnets and for using separate pools of buffer andsockets, place traffic for vMotion on the vMotion TCP/IP stack, and traffic formigration of powered-off virtual machines and cloning on the Provisioning TCP/IPstack.
• You can add and remove network adapters from a standard or distributed switchwithout affecting the virtual machines or the network service that is runningbehind that switch. If you remove all the running hardware, the virtual machinescan still communicate among themselves. If you leave one network adapterintact, all the virtual machines can still connect with the physical network.
• To protect your most sensitive virtual machines, deploy firewalls in virtualmachines that route between virtual networks with uplinks to physical networksand pure virtual networks with no uplinks.
• For best performance, use VMXNET 3 virtual machine NICs.• Physical network adapters connected to the same vSphere Standard Switch or
vSphere Distributed Switch should also be connected to the same physicalnetwork.
HOL-1804-02-CHG
Page 18HOL-1804-02-CHG

• Configure the same MTU on all VMkernel network adapters in a vSphereDistributed Switch. If several VMkernel network adapters, configured withdifferent MTUs, are connected to vSphere distributed switches, you mightexperience network connectivity problems.
Open a Command Prompt
1. Select the Command Prompt shortcut located on the taskbar on the MainConsole.
Ping challenge-02a
1. Enter the following text into the command prompt.
ping challenge-02a -t
The -t keeps the ping going infinitely which will allow you to test different solutionswithout having to repeat this step to determine if the problem is solved or not.
Module 1, Challenge 2
Notice the ping response is 'Destination host unreachable'. Your challenge is to
• Determine why challenge-02a is unreachable by ping.
HOL-1804-02-CHG
Page 19HOL-1804-02-CHG
Need a Hint?
You can also view hints on the VMware Technology Network Communities here:
https://communities.vmware.com/docs/DOC-36958
Do NOT proceed to the next page unless you want to view the solution to yourchallenge.
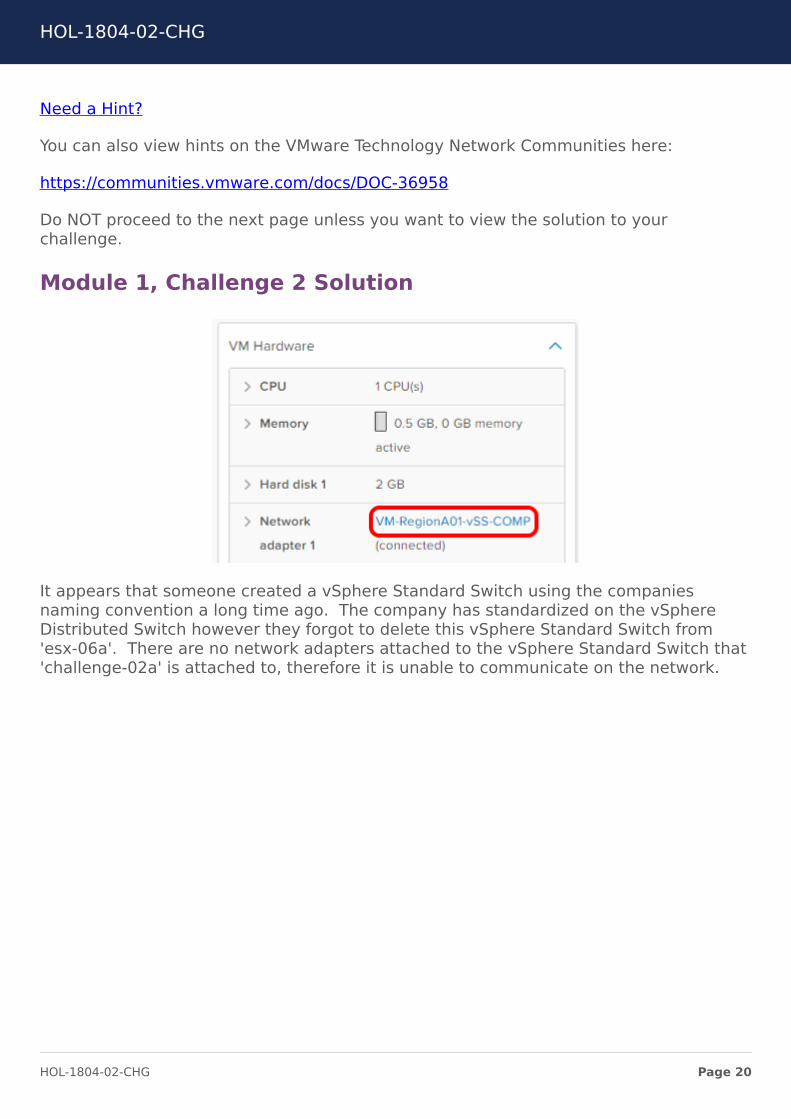
Module 1, Challenge 2 Solution
It appears that someone created a vSphere Standard Switch using the companiesnaming convention a long time ago. The company has standardized on the vSphereDistributed Switch however they forgot to delete this vSphere Standard Switch from'esx-06a'. There are no network adapters attached to the vSphere Standard Switch that'challenge-02a' is attached to, therefore it is unable to communicate on the network.
HOL-1804-02-CHG
Page 20HOL-1804-02-CHG
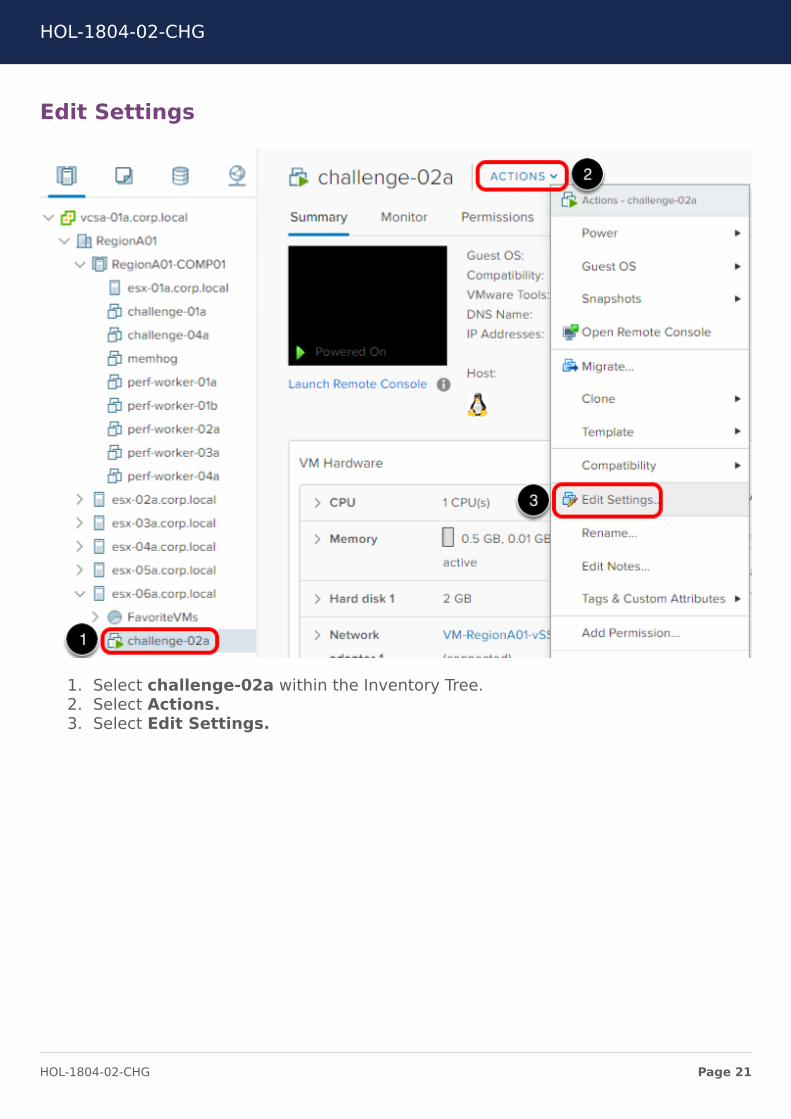
Edit Settings
1. Select challenge-02a within the Inventory Tree.2. Select Actions.3. Select Edit Settings.
HOL-1804-02-CHG
Page 21HOL-1804-02-CHG

Change Network Adapter
1. For Network adapter 1, select VM-RegionA01-vDS-COMP.2. Select OK.
Return to the command prompt. Is the 'challenge-02a' now responding to ping?
If your continuous ping has stopped, restart the continuous ping using this command.
ping challenge-02a -t
Responding to Ping
HOL-1804-02-CHG
Page 22HOL-1804-02-CHG

Congratulations, 'challenge-02a' is now communicating on the network. Great jobdiagnosing and resolving the problem before your manager called you asking why theycouldn't login to the server.
Module Switcher
Now that you have completed Module 1, we need to reset the lab for your nextchallenge.
1. Double-click on Challenge Lab MS (Module Switcher) located on the MainConsole desktop.
2. Select Stop under Module 1.
You've Finished Module 1
This concludes Module 1, Let's Start with the Basics. We hope you have enjoyedtaking it. Please do not forget to fill out the survey when you are finished.
If you have time reamining, you can continue to the next page to proceed to Module 2or jump to another module that is part of this lab. Click on "More Options - Table ofContents" to quickly jump to a module within the manual.
• Module 1 - Let's Start with the Basics (30 minutes)• Module 2 - Basic Operations Management (30 minutes)• Module 3 - Basic Resource Management (30 minutes)• Module 4 - Advanced Operations Management (45 minutes)• Module 5 - Advanced Resource Management (45 minutes)
HOL-1804-02-CHG
Page 23HOL-1804-02-CHG
Module 2 - BasicOperations Management
(30 minutes)
HOL-1804-02-CHG
Page 24HOL-1804-02-CHG

IntroductionThis module will challenge you on Basic Operations Management tasks.
• Create a shared VMware Tools respository then update VMware Tools on aWindows virtual machine.
• Resolve an issue with a PowerCLI script that continues to fail.
vSphere Client vs vSphere Flash Client
In the vSphere Challenge Lab, you will use both the existing vSphere Web Client (basedon Flash) and the new vSphere Client (based on HTML5). HTML5 is the future directionof the vSphere Client, so you will use it predominantly throughout this lab.
If you feel more comfortable using the vSphere Web Client, a shortcut to it (labeledvSphere Flash Client) is bookmarked within Google Chrome.
1. The default client for the lab is the vSphere Client (based on HTML5). Use theHome button within Google Chrome to access the vSphere Client.
2. A bookmark to the vSphere Flash Client is available within Google Chrome.
Note: As mentioned previously, the default client for this lab will be the vSphere Clientbased on HTML5. Due to the fact that the vSphere Client does not have full featureparity with the vSphere Web Client (based on Flash), there will be some sections whereyou will be directed to use the vSphere Web Client.
HOL-1804-02-CHG
Page 25HOL-1804-02-CHG

Update VMware ToolsVMware Tools is a set of services and modules that enable several features in VMwareproducts for better management of, and seamless user interactions with, guestsoperating systems. For example, VMware Tools has the ability to:
• Pass messages from the host operating system to the guest operating system.• Customize guest operating systems as a part of the vCenter Server and other
VMware products.• Run scripts that help automate guest operating system operations. The scripts
run when the power state of the virtual machine changes.• Synchronize the time in the guest operating system with the time on the host
operating system.
VMware Tools Lifecycle Management provides a simplified and scalable approach forinstallation and upgrade of VMware Tools. It includes a number of featureenhancements, driver-related enhancements, and support for new guest operatingsystems. Run the latest version of VMware Tools or use open-vm-tools distributed withthe Linux OS distribution. Although a guest operating system can run without VMwareTools, always run the latest version of VMware Tools in your guest operating systems toaccess the latest features and updates. You can configure your virtual machine toautomatically check for and apply VMware Tools upgrades each time you power on yourvirtual machines. For information about enabling automatic upgrade of VMware Tools onyour virtual machines, see the vSphere Virtual Machine Administration Guide.
More Information:
• VMware Tools User Guide• VMware Tools Lifecycle: Why Tools Can Drive You Crazy
productLocker
When downloading ESXi from My VMware, you have the option to download ESXi with orwithout VMware Tools packaged within the ESXi installer. ESXi with VMware Toolsincluded is ~300MB in size, half of which is made up of the VMware Tools source files.Therefore, you can save significant space within ESXi, especially when using features
such as Auto Deploy, if using the ESXi installer that does not include VMware Tools.
To help streamline the updating of VMware Tools in the future, you're first challengewithin this module is to create a shared VMware Tools source folder on a datastoreshared amongst all ESXi hosts and copy the contents of the Product Locker folder to thatshared folder. Don't worry, we'll help guide you along the way.
HOL-1804-02-CHG
Page 26HOL-1804-02-CHG

Open Putty
1. From the Windows taskbar, select the Putty shorcut
Module 2 does not require you to use the Challenge Lab Module Switcher to Start theModule. Please proceed to the next step.
Connect to an ESXi Host
All ESXi hosts within the vSphere environment are running vSphere 6.5, therefore wecan connect to any of the ESXi hosts within the environment.
1. Select esx-01a.2. Select Open.
HOL-1804-02-CHG
Page 27HOL-1804-02-CHG
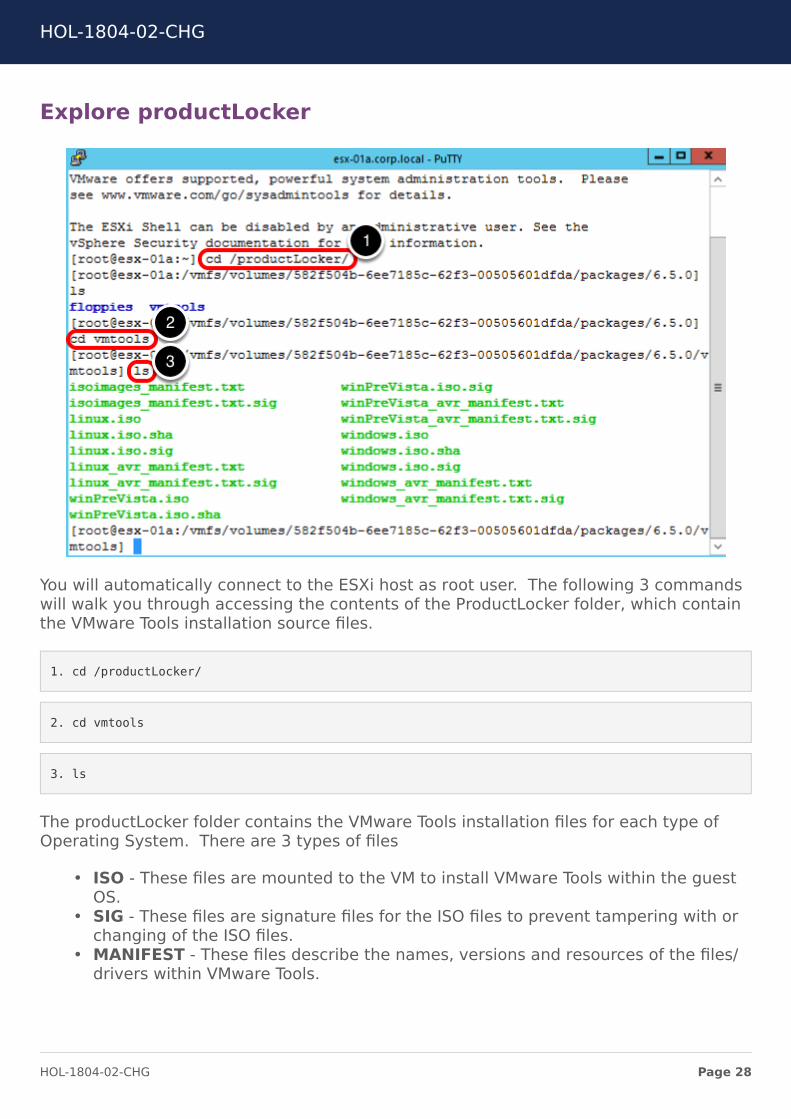
Explore productLocker
You will automatically connect to the ESXi host as root user. The following 3 commandswill walk you through accessing the contents of the ProductLocker folder, which containthe VMware Tools installation source files.
1. cd /productLocker/
2. cd vmtools
3. ls
The productLocker folder contains the VMware Tools installation files for each type ofOperating System. There are 3 types of files
• ISO - These files are mounted to the VM to install VMware Tools within the guestOS.
• SIG - These files are signature files for the ISO files to prevent tampering with orchanging of the ISO files.
• MANIFEST - These files describe the names, versions and resources of the files/drivers within VMware Tools.
HOL-1804-02-CHG
Page 28HOL-1804-02-CHG
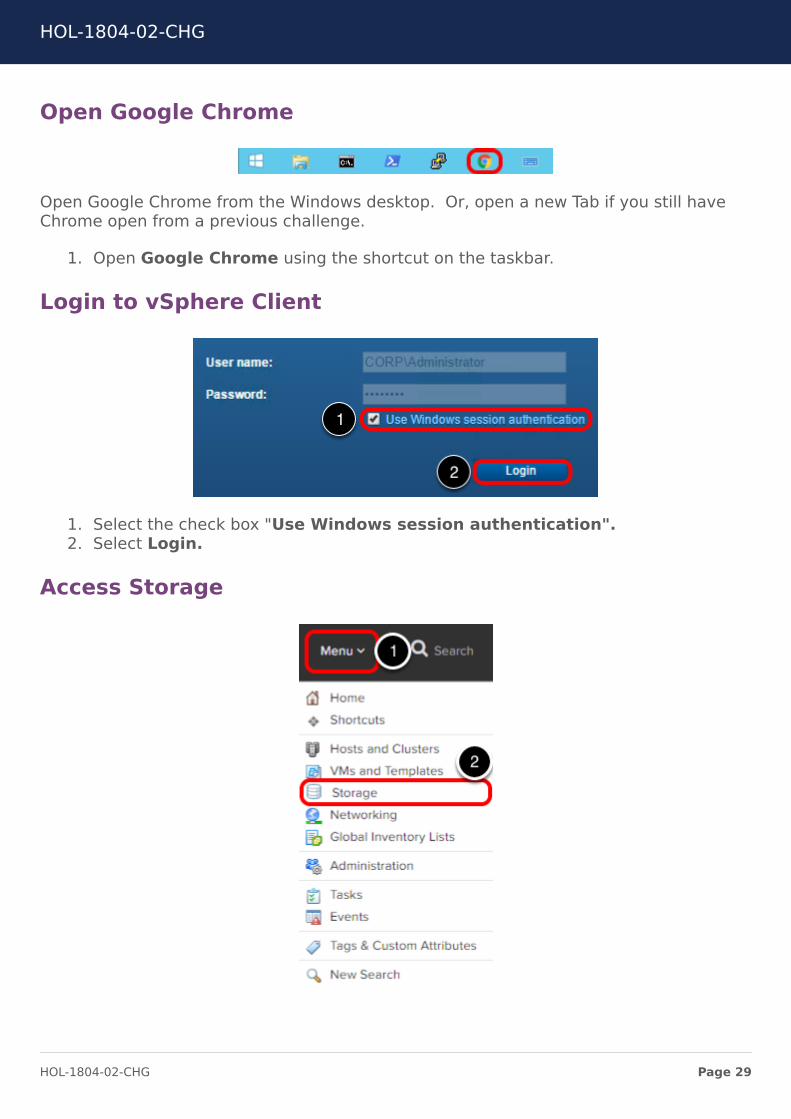
Open Google Chrome
Open Google Chrome from the Windows desktop. Or, open a new Tab if you still haveChrome open from a previous challenge.
1. Open Google Chrome using the shortcut on the taskbar.
Login to vSphere Client
1. Select the check box "Use Windows session authentication".2. Select Login.
Access Storage
HOL-1804-02-CHG
Page 29HOL-1804-02-CHG
1. Select Menu. A dropdown will appear with a list of vCenter choices.2. Select Storage.
Module 2, Challenge 1
We've helped get you started down the right path, but now it's your turn to completethe challenge. Your challenge is to:
• Create a shared productLocker folder that can be accessed by all ESXihosts.
• Copy the contents from the productLocker folder on an ESXi host to theshared productLocker folder.
Tools you will possibly use to complete this challenge:
• vSphere Client• WinSCP
Need a Hint?
You can also view hints on the VMware Technology Network Communities here:
https://communities.vmware.com/docs/DOC-36959
DO NOT proceed to the next page unless you are ready to see the solution to yourchallenge.
Module 2, Challenge 1 Solution
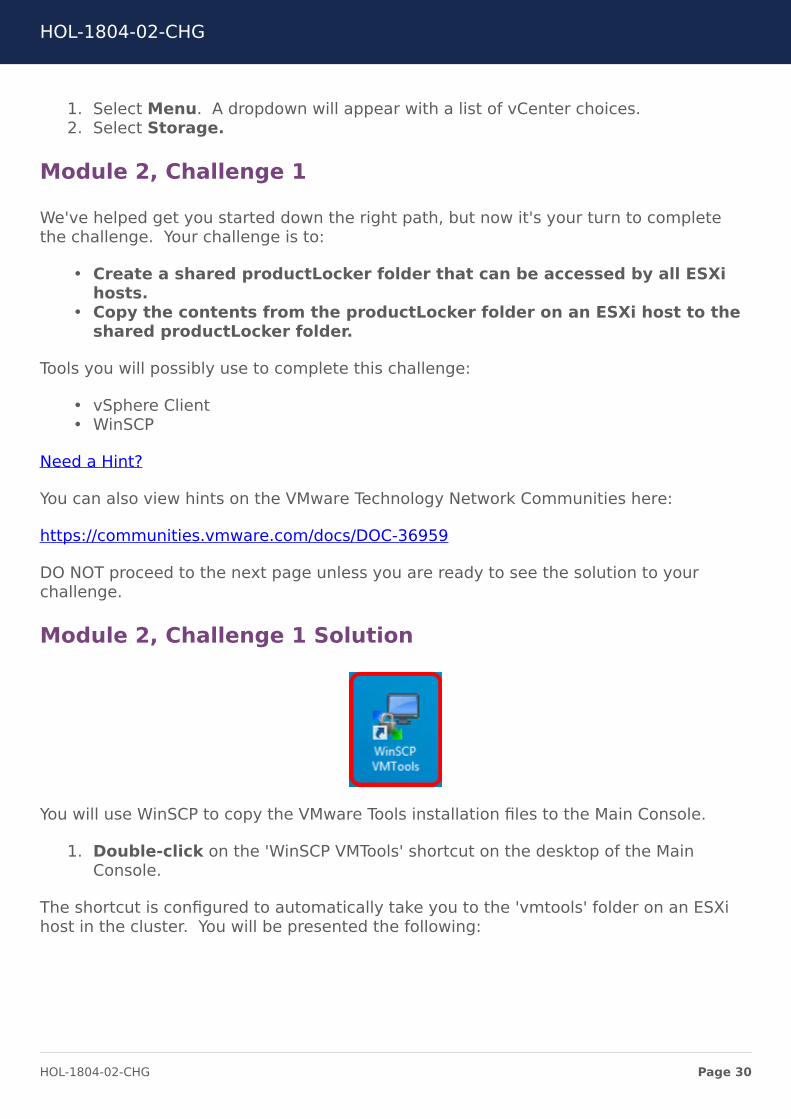
You will use WinSCP to copy the VMware Tools installation files to the Main Console.
1. Double-click on the 'WinSCP VMTools' shortcut on the desktop of the MainConsole.
The shortcut is configured to automatically take you to the 'vmtools' folder on an ESXihost in the cluster. You will be presented the following:
HOL-1804-02-CHG
Page 30HOL-1804-02-CHG

HOL-1804-02-CHG
Page 31HOL-1804-02-CHG

Download VMware Tools Installation Files
1. Select all the files within the 'vmtools' folder on the right-hand side of WinSCP.
By default, the left-hand side of WinSCP should default to the 'VMTools' folder located onthe desktop of the Main Console (not shown). The 'VMTools' folder is currently empty. Ifnot, browse to 'C:\Users\Administrator\Desktop\VMTools' on the left-hand side of WinSCP.
2. Download all of the files within the 'vmtools' folder (right-hand side of WinSCP)to the 'VMTools' folder (left-hand side of WinSCP).
We need to copy the files we downloaded from the ESXi host to a folder shared amongstall ESXi hosts in the vSphere cluster.
HOL-1804-02-CHG
Page 32HOL-1804-02-CHG
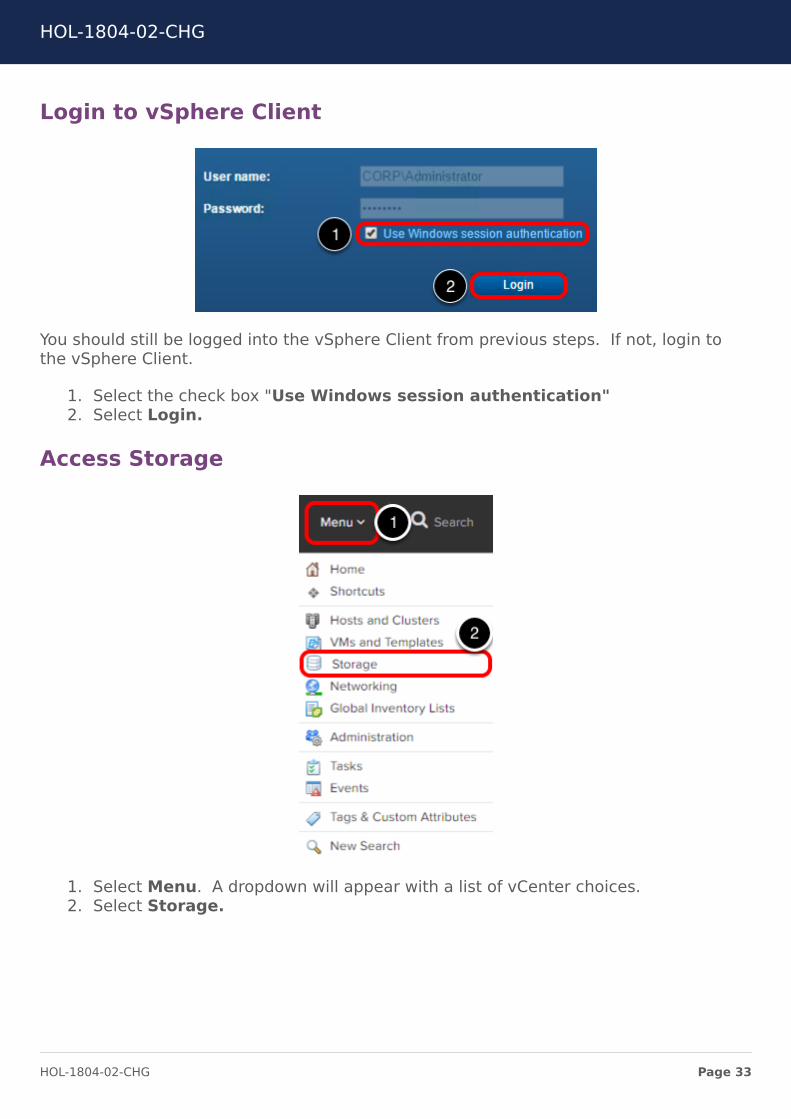
Login to vSphere Client
You should still be logged into the vSphere Client from previous steps. If not, login tothe vSphere Client.
1. Select the check box "Use Windows session authentication"2. Select Login.
Access Storage
1. Select Menu. A dropdown will appear with a list of vCenter choices.2. Select Storage.
HOL-1804-02-CHG
Page 33HOL-1804-02-CHG
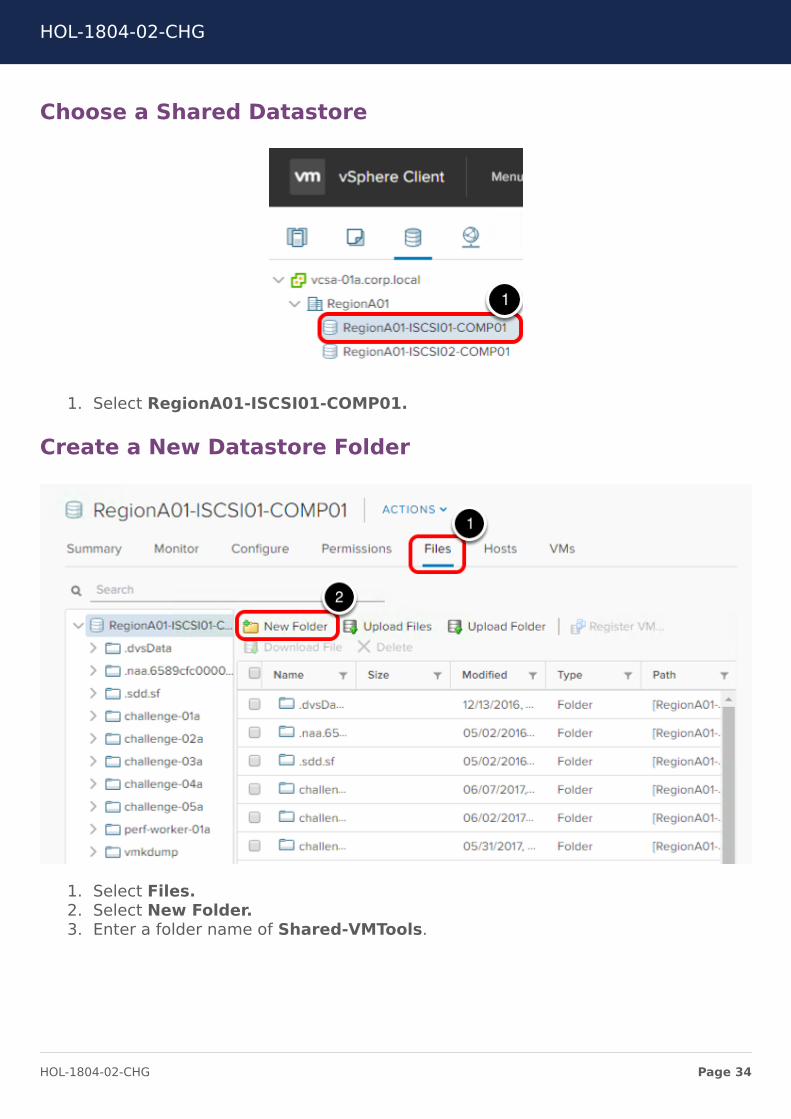
Choose a Shared Datastore
1. Select RegionA01-ISCSI01-COMP01.
Create a New Datastore Folder
1. Select Files.2. Select New Folder.3. Enter a folder name of Shared-VMTools.
HOL-1804-02-CHG
Page 34HOL-1804-02-CHG

Use WinSCP to Copy VMware Tools Installation Files toNew Folder
1. Double-click on the WinSCP VMTools shortcut on the desktop of the MainConsole.
The shortcut is configured to automatically take you to the 'vmtools' folder on an ESXihost in the cluster. You need to locate the folder you created in the previous step on theVMFS datastore.
Browse VMFS
HOL-1804-02-CHG
Page 35HOL-1804-02-CHG
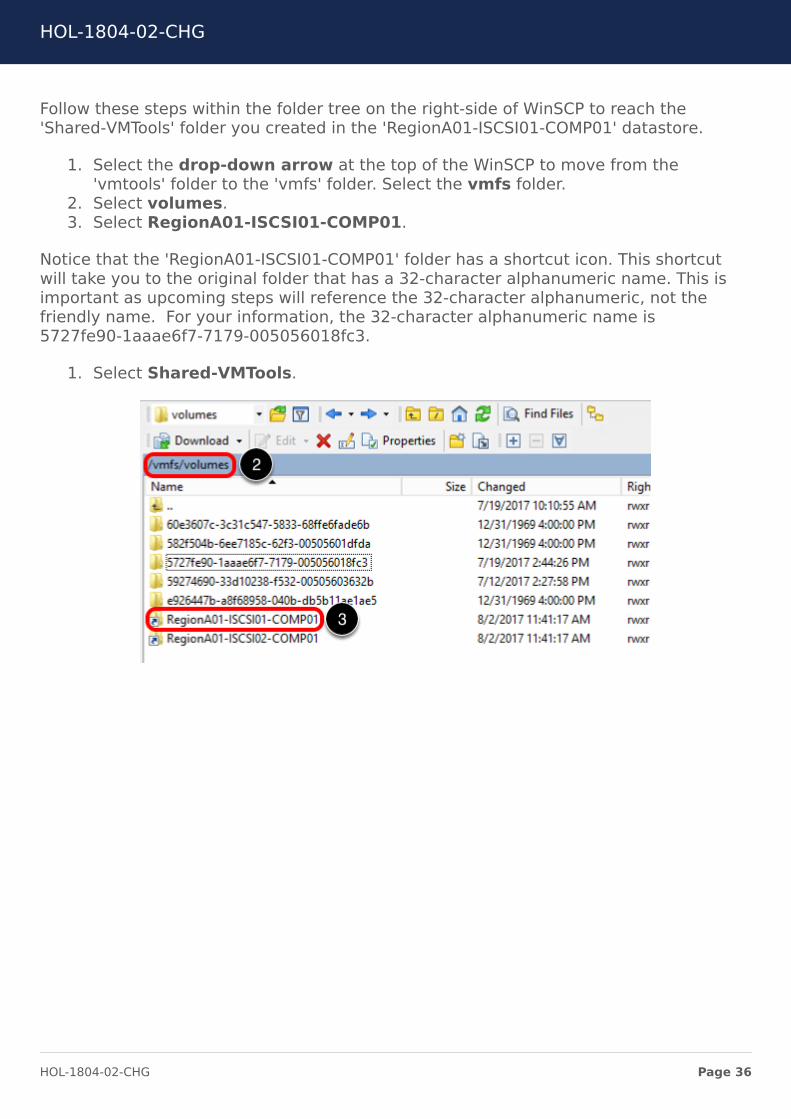
Follow these steps within the folder tree on the right-side of WinSCP to reach the'Shared-VMTools' folder you created in the 'RegionA01-ISCSI01-COMP01' datastore.
1. Select the drop-down arrow at the top of the WinSCP to move from the'vmtools' folder to the 'vmfs' folder. Select the vmfs folder.
2. Select volumes.3. Select RegionA01-ISCSI01-COMP01.
Notice that the 'RegionA01-ISCSI01-COMP01' folder has a shortcut icon. This shortcutwill take you to the original folder that has a 32-character alphanumeric name. This isimportant as upcoming steps will reference the 32-character alphanumeric, not thefriendly name. For your information, the 32-character alphanumeric name is5727fe90-1aaae6f7-7179-005056018fc3.
1. Select Shared-VMTools.
HOL-1804-02-CHG
Page 36HOL-1804-02-CHG

Copy VMware Tools Installation Files
1. Copy the VMware Tools installation files that you downloaded to the 'VMTools'folder (left-hand side of WinSCP) into the 'Shared-VMTools' folder (right-hands sideof WinSCP) you created within the 'RegionA01-ISCSI01-COMP01' datastore.
HOL-1804-02-CHG
Page 37HOL-1804-02-CHG
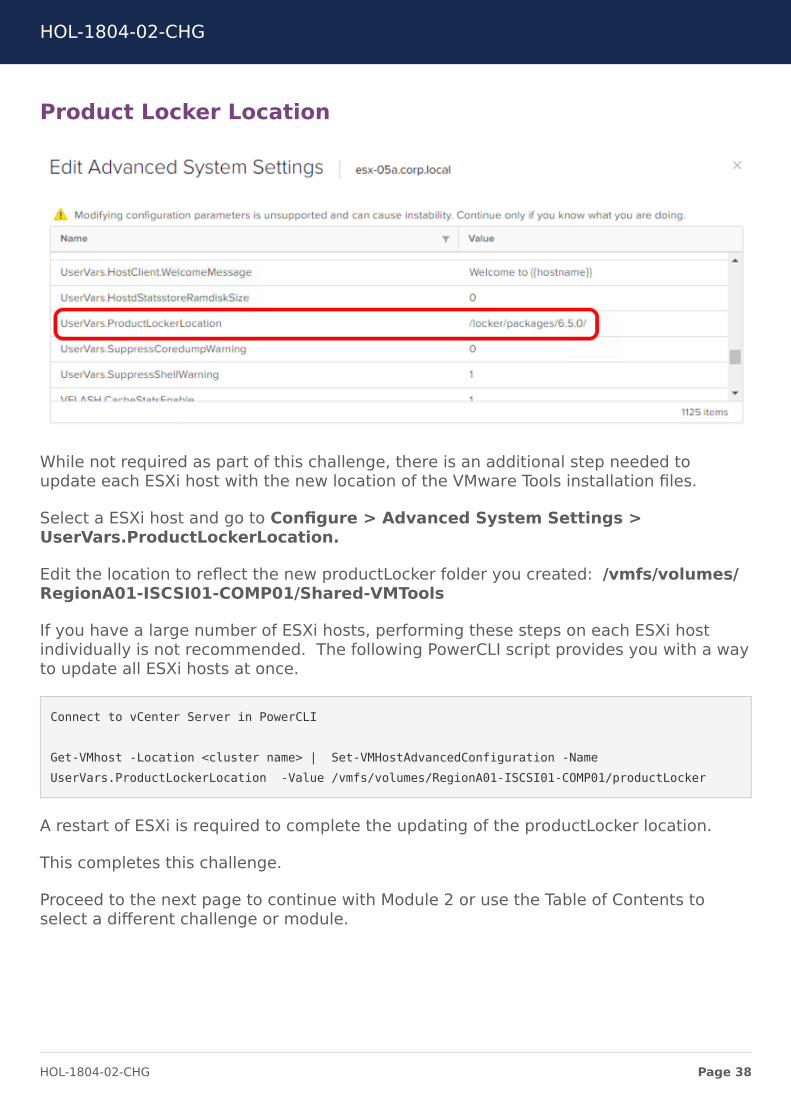
Product Locker Location
While not required as part of this challenge, there is an additional step needed toupdate each ESXi host with the new location of the VMware Tools installation files.
Select a ESXi host and go to Configure > Advanced System Settings >UserVars.ProductLockerLocation.
Edit the location to reflect the new productLocker folder you created: /vmfs/volumes/RegionA01-ISCSI01-COMP01/Shared-VMTools
If you have a large number of ESXi hosts, performing these steps on each ESXi hostindividually is not recommended. The following PowerCLI script provides you with a wayto update all ESXi hosts at once.
Connect to vCenter Server in PowerCLI
Get-VMhost -Location <cluster name> | Set-VMHostAdvancedConfiguration -NameUserVars.ProductLockerLocation -Value /vmfs/volumes/RegionA01-ISCSI01-COMP01/productLocker
A restart of ESXi is required to complete the updating of the productLocker location.
This completes this challenge.
Proceed to the next page to continue with Module 2 or use the Table of Contents toselect a different challenge or module.
HOL-1804-02-CHG
Page 38HOL-1804-02-CHG
My PowerCLI script isn't workingvSphere PowerCLI is a powerful command line tool that lets you automate all aspects ofvSphere management, including networking, storage, virtual machines, tasks, andmore. vSphere PowerCLI is distributed as a Windows PowerShell snap-in, and includesmore than 300 PowerShell cmdlets, along with documentation and samples.
More Information:
• VMware PowerCLI 6.5.1 User's Guide• VMware PowerCLI 6.5.1 Cmdlet Reference
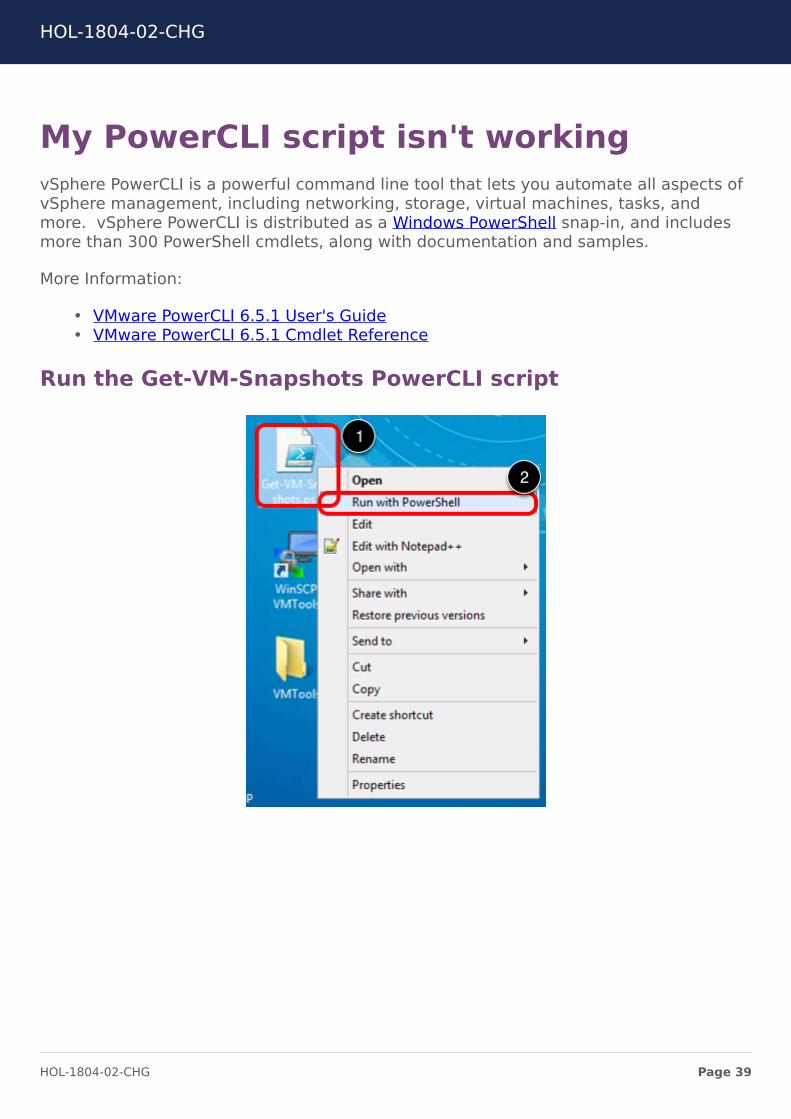
Run the Get-VM-Snapshots PowerCLI script
HOL-1804-02-CHG
Page 39HOL-1804-02-CHG

Module 2, Challenge 2
You'll notice the 'Get-VM-Snapshots' PowerCLI script fails to run. Your challenge is to:
• Determine why the script failed to execute and resolve the issue.
Need a Hint?
You can also view hints on the VMware Technology Network Communities here:
https://communities.vmware.com/docs/DOC-36959
DO NOT proceed to the next page unless you want to view the solution to thechallenge.
Module 2, Challenge 2 Solution
Did you figure it out? The error message will give you a hint to where the error is withinthe PowerCLI script. Focus on the characters after the path to Get-VM-Snapshot.ps1.
3 char:1
This indicates the issue with the PowerCLI script is located on line 3 of the script. Let'stake a closer look at line 3 of the script.
1. Right click on Get-VM-Snapshots.ps1 within the Challenge Lab Scripts folder.2. Select Edit with Notepad++.
HOL-1804-02-CHG
Page 40HOL-1804-02-CHG
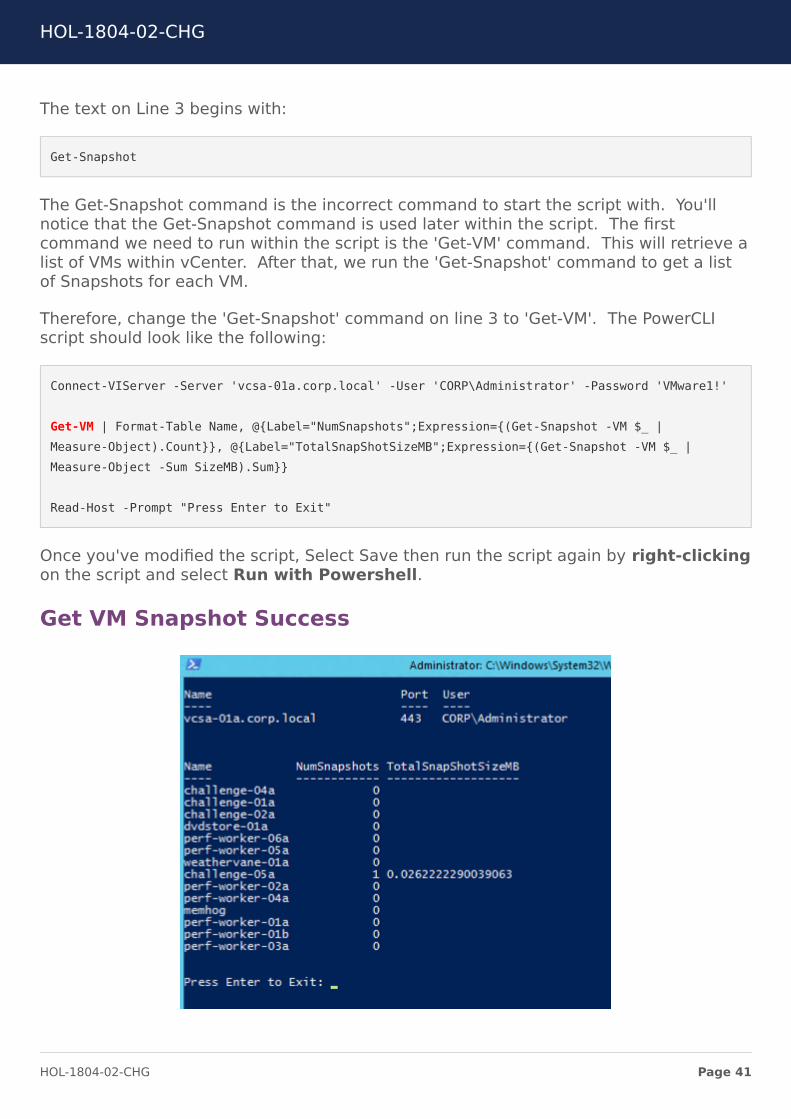
The text on Line 3 begins with:
Get-Snapshot
The Get-Snapshot command is the incorrect command to start the script with. You'llnotice that the Get-Snapshot command is used later within the script. The firstcommand we need to run within the script is the 'Get-VM' command. This will retrieve alist of VMs within vCenter. After that, we run the 'Get-Snapshot' command to get a listof Snapshots for each VM.
Therefore, change the 'Get-Snapshot' command on line 3 to 'Get-VM'. The PowerCLIscript should look like the following:
Connect-VIServer -Server 'vcsa-01a.corp.local' -User 'CORP\Administrator' -Password 'VMware1!'
Get-VM | Format-Table Name, @{Label="NumSnapshots";Expression={(Get-Snapshot -VM $_ |Measure-Object).Count}}, @{Label="TotalSnapShotSizeMB";Expression={(Get-Snapshot -VM $_ |Measure-Object -Sum SizeMB).Sum}}
Read-Host -Prompt "Press Enter to Exit"
Once you've modified the script, Select Save then run the script again by right-clickingon the script and select Run with Powershell.
Get VM Snapshot Success
HOL-1804-02-CHG
Page 41HOL-1804-02-CHG

After correcting the 'Get-VM-Snapshot.ps1' PowerCLI script and Runnig with Powershell,we can see the number and size of snapshots associated with each virtual machine.
You've Finished Module 2
This concludes Module 2, Basic Operations Management. We hope you enjoyedtaking it. Please do not forget to fill out the survey when you are finished.
If you have time remaining, you can continue to the next page to begin Module 3, or youcan jump to another Module within this lab. Click on "More Options - Table ofContents" to quickly jump to a challenge within the module.
Module 1 - Let's Start with the Basics (30 minutes)
Module 2 - Basic Operations Management (30 minutes)
Module 3 - Basic Resource Management (30 minutes)
Module 4 - Advanced Operations Management (45 minutes)
Module 5 - Advanced Resource Management (45 minutes)
HOL-1804-02-CHG
Page 42HOL-1804-02-CHG

Module 3 - Basic ResourceManagement (30
minutes)
HOL-1804-02-CHG
Page 43HOL-1804-02-CHG
IntroductionThis module will challenge you on Basic Resource Management tasks.
• Troubleshoot a VM that has been performing poorly.• Determine why an ESXi host continues to have degraded performance.
vSphere Client vs vSphere Flash Client
In the vSphere Challenge Lab, you will use both the existing vSphere Web Client (basedon Flash) and the new vSphere Client (based on HTML5). HTML5 is the future directionof the vSphere Client, so you will use it predominantly throughout this lab.
If you feel more comfortable using the vSphere Web Client, a shortcut to it (labeledvSphere Flash Client) is bookmarked within Google Chrome.
1. The default client for the lab is the vSphere Client (based on HTML5). Use theHome button within Google Chrome to access the vSphere Client.
2. A bookmark to the vSphere Flash Client is available within Google Chrome.
Note: As mentioned previously, the default client for this lab will be the vSphere Clientbased on HTML5. Due to the fact that the vSphere Client does not have full featureparity with the vSphere Web Client (based on Flash), there will be some sections whereyou will be directed to use the vSphere Web Client.
HOL-1804-02-CHG
Page 44HOL-1804-02-CHG

Module Switcher
To prepare Module 3 for the challenges that will be presented to you, we need to run theChallenge Lab MS (Module Switcher).
1. Double-click on the Challenge Lab MS shortcut located on the Main Consoledesktop.
2. Select Start under Module 3.
Wait for the PowerCLI script to finish before proceeding. Once the script has completed,press Enter to close the PowerCLI window.
HOL-1804-02-CHG
Page 45HOL-1804-02-CHG

Troubleshoot a Poorly Performing VMBefore we get started troubleshooting a poorly performing virtual machine, let's reviewsome troubleshooting suggestions.
The suggestions are not meant to be a comprehensive guide to diagnosing andtroubleshooting problems in the virtual environment. It is meant to provide informationabout some common problems that can be solved without contacting VMware TechnicalSupport.
• Temporary spikes in CPU usage indicate that you are making the best use of CPUresources. Consistently high CPU usage might indicate a problem. You can usethe CPU performance charts to monitor CPU usage for hosts, clusters, resourcepools, virtual machines, and vApps.
• Host machine memory is the hardware backing for guest virtual memory andguest physical memory. Host machine memory must be at least slightly larger
than the combined active memory of the virtual machines on the host. A virtualmachine's memory size must be slightly larger than the average guest memoryusage. Increasing the virtual machine memory size results in more overheadmemory usage.
• Datastores represent storage locations for virtual machine files. A storagelocation can be a VMFS volume, a directory on Network Attached Storage, or alocal file system path. Datastores are platform-independent and host-independent.
• Use the disk charts to monitor average disk loads and to determine trends in diskusage. For example, you might notice a performance degradation withapplications that frequently read from and write to the hard disk. If you see aspike in the number of disk read/write requests, check if any such applicationswere running at that time.
• Network performance is dependent on application workload and networkconfiguration. Dropped network packets indicate a bottleneck in the network.Slow network performance can be a sign of load-balancing problems.
More Information:
• vSphere Monitoring and Performance• Monitoring Guest Operating System Performance
Connect to challenge-01a
HOL-1804-02-CHG
Page 46HOL-1804-02-CHG

1. Connect to 'challenge-01a' by double-clicking on the 'chg-01a.RDP' shortuct onthe Main Console desktop. Alternatively, you can right-click on 'chg-01a.RDP' andselect Connect.
If you did not Start Module 3 using the Challenge Lab Module Switcher outlined withinthe Introduction of this Module, please Stop and go back to the Introduction of Module 3and follow the directions to Start the Module using the Challenge Lab Module Switcher.
If you already completed this step, please proceed to the next page.
Connect to challenge-04a
Repeat the same steps for 'challenge-04a'.
1. Connect to 'challenge-04a' by double-clicking on the 'chg-04a.RDP' shortuct onthe Main Console desktop. Alternatively, you can right-click on 'chg-04a.RDP' andselect Connect.
Wait to be logged into both 'challenge-01a' and 'challenge-04a' before proceeding to thenext step.
Start SPECjbb
Both 'challenge-01a' and 'challenge-04a' has some tools installed on it to help youmonitor its well-being. On the desktop, you can see information about the virtualmachine including its hostname, IP address, CPU usage, and memory usage. The CPUusage and memory usage update in real time.
In the CPU usage chart, you can see both the total CPU used ("Total:") and thepercentage of CPU usage that is consumed by the guest operating system's kernel("Krnl:").
1. Double-click on SPECjbb to start the performance measurement application.
HOL-1804-02-CHG
Page 47HOL-1804-02-CHG

Start Benchmark
A window titled SPECjbb2005 opens. A copy of SPECjbb2005 is installed on both'challenge-01a' and 'challenge-04a'. SPECjbb2005 is a real SPEC java-based benchmarkthat can measure CPU and memory performance.
1. Select Start Benchmark to start the benchmark. Make sure you Start theBenchmark on both 'challenge-01a' and 'challenge-04a'.
SPECjbb Starts
Wait about a minute for the benchmark to begin running on both 'challenge-01a' and'challenge-04a'.
HOL-1804-02-CHG
Page 48HOL-1804-02-CHG
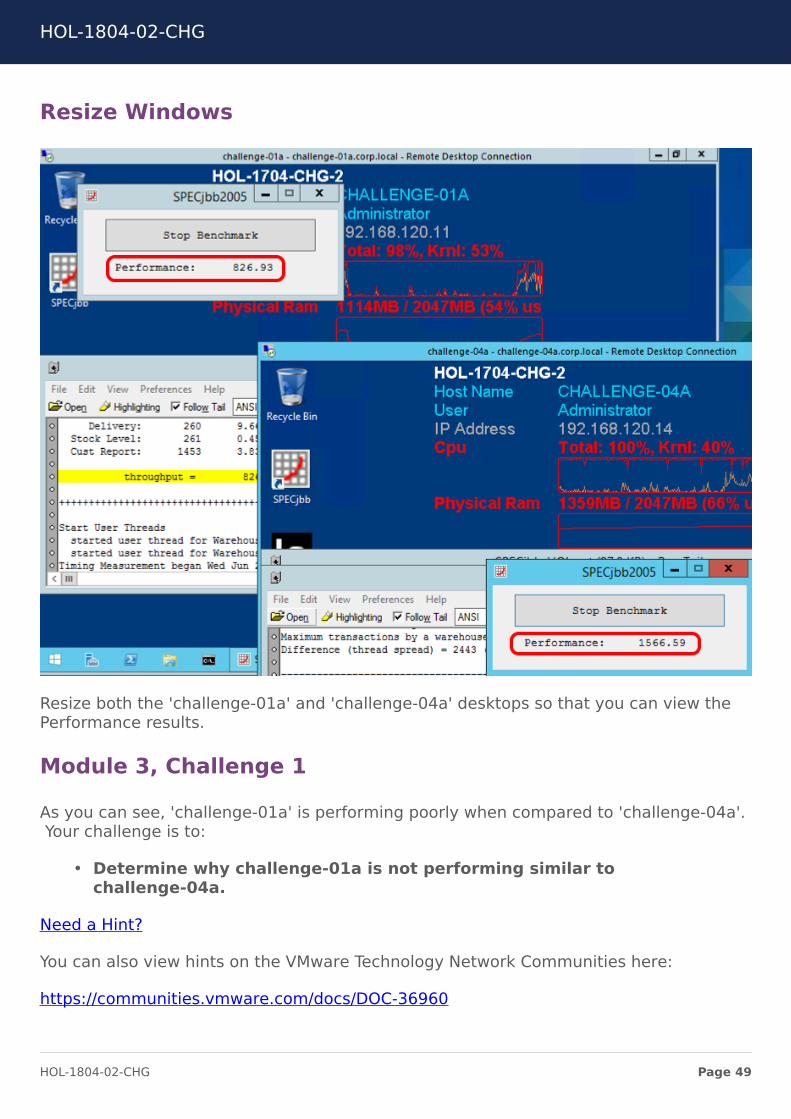
Resize Windows
Resize both the 'challenge-01a' and 'challenge-04a' desktops so that you can view thePerformance results.
Module 3, Challenge 1
As you can see, 'challenge-01a' is performing poorly when compared to 'challenge-04a'.Your challenge is to:
• Determine why challenge-01a is not performing similar tochallenge-04a.
Need a Hint?
You can also view hints on the VMware Technology Network Communities here:
https://communities.vmware.com/docs/DOC-36960
HOL-1804-02-CHG
Page 49HOL-1804-02-CHG
DO NOT proceed to the next page unless you are ready to view the Solution to thisChallenge.
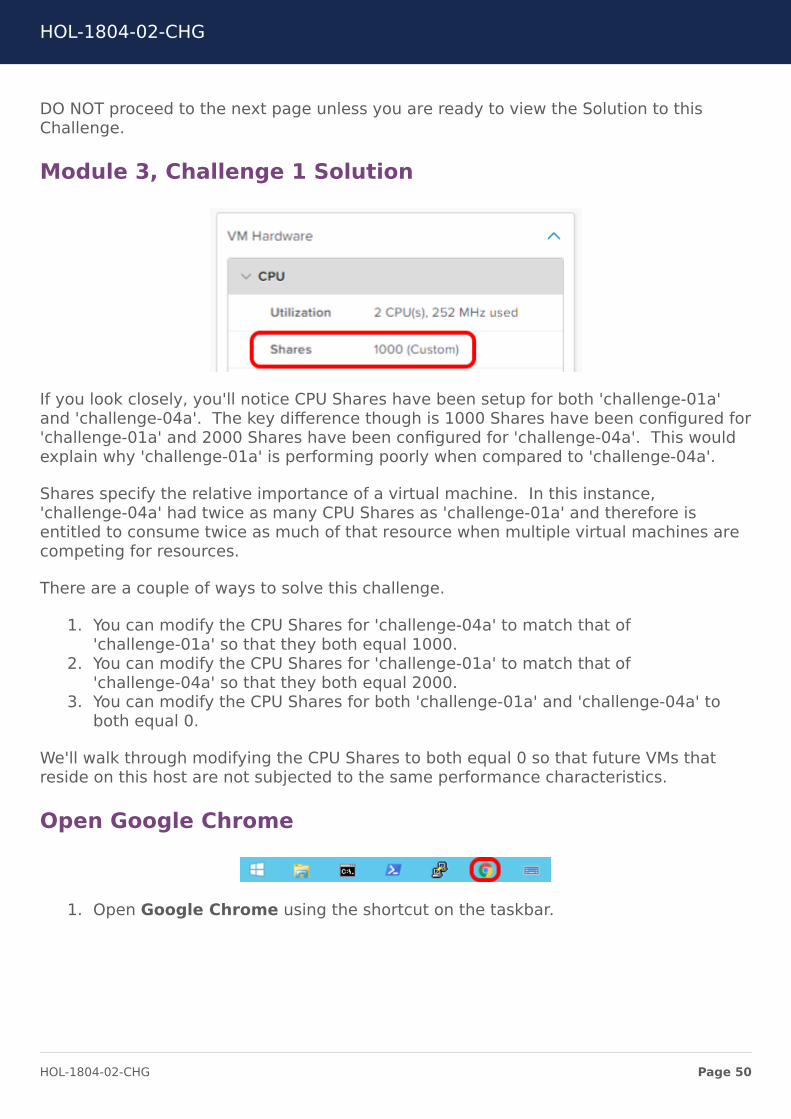
Module 3, Challenge 1 Solution
If you look closely, you'll notice CPU Shares have been setup for both 'challenge-01a'and 'challenge-04a'. The key difference though is 1000 Shares have been configured for'challenge-01a' and 2000 Shares have been configured for 'challenge-04a'. This wouldexplain why 'challenge-01a' is performing poorly when compared to 'challenge-04a'.
Shares specify the relative importance of a virtual machine. In this instance,'challenge-04a' had twice as many CPU Shares as 'challenge-01a' and therefore isentitled to consume twice as much of that resource when multiple virtual machines arecompeting for resources.
There are a couple of ways to solve this challenge.
1. You can modify the CPU Shares for 'challenge-04a' to match that of'challenge-01a' so that they both equal 1000.
2. You can modify the CPU Shares for 'challenge-01a' to match that of'challenge-04a' so that they both equal 2000.
3. You can modify the CPU Shares for both 'challenge-01a' and 'challenge-04a' toboth equal 0.
We'll walk through modifying the CPU Shares to both equal 0 so that future VMs thatreside on this host are not subjected to the same performance characteristics.
Open Google Chrome
1. Open Google Chrome using the shortcut on the taskbar.
HOL-1804-02-CHG
Page 50HOL-1804-02-CHG

Login to the vSphere Client
1. Select the check box "Use Windows session authentication".2. Select Login.
Edit Settings on challenge-01a
1. Find 'challenge-01a' within the Inventory Tree on the left hand side of the vSphereClient. Right click on 'challenge-01a' to launch the context menu.
2. Select Edit Settings.
HOL-1804-02-CHG
Page 51HOL-1804-02-CHG
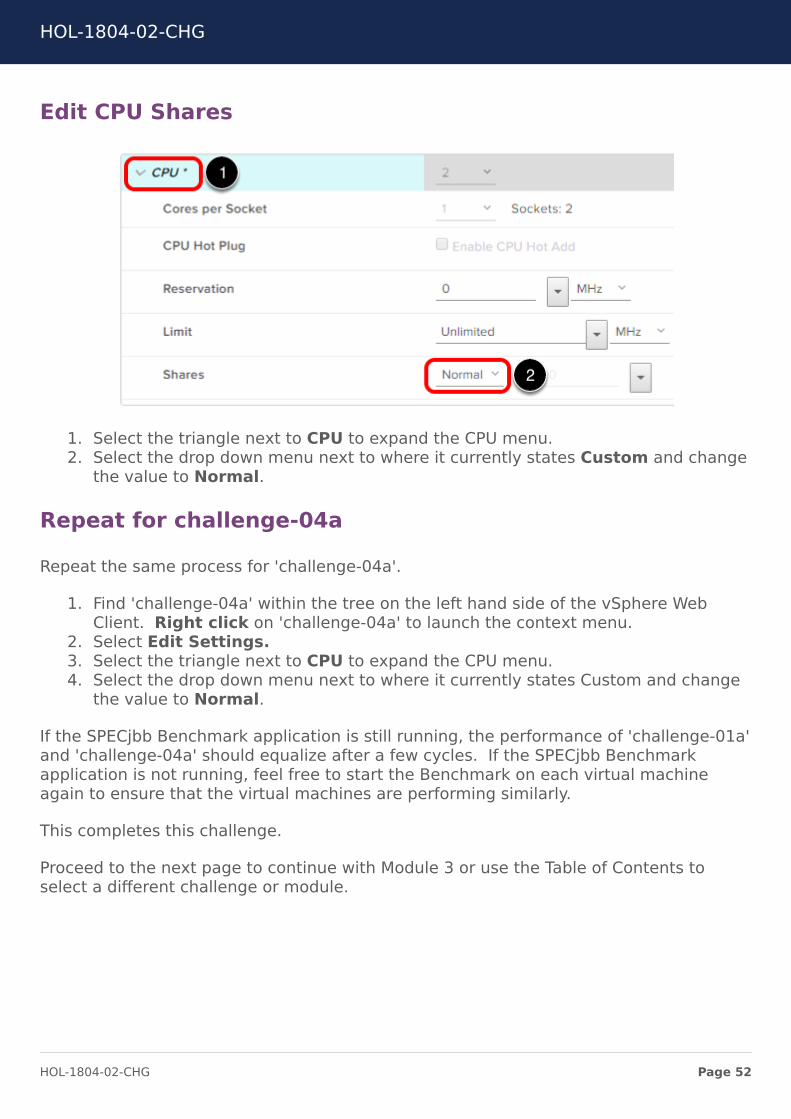
Edit CPU Shares
1. Select the triangle next to CPU to expand the CPU menu.2. Select the drop down menu next to where it currently states Custom and change
the value to Normal.
Repeat for challenge-04a
Repeat the same process for 'challenge-04a'.
1. Find 'challenge-04a' within the tree on the left hand side of the vSphere WebClient. Right click on 'challenge-04a' to launch the context menu.
2. Select Edit Settings.3. Select the triangle next to CPU to expand the CPU menu.4. Select the drop down menu next to where it currently states Custom and change
the value to Normal.
If the SPECjbb Benchmark application is still running, the performance of 'challenge-01a'and 'challenge-04a' should equalize after a few cycles. If the SPECjbb Benchmarkapplication is not running, feel free to start the Benchmark on each virtual machineagain to ensure that the virtual machines are performing similarly.
This completes this challenge.
Proceed to the next page to continue with Module 3 or use the Table of Contents toselect a different challenge or module.
HOL-1804-02-CHG
Page 52HOL-1804-02-CHG
Troubleshoot a Poorly Performing HostBefore your next challenge, let's review some solutions for Consistently High CPUUsage.
Temporary spikes in CPU usage indicate that you are making the best use of CPUresources. Consistently high CPU usage might indicate a problem. You can use the CPUperformance charts to monitor CPU usage for hosts, clusters, resource pools, virtualmachines, and vApps.
• Host CPU usage constantly is high. A high CPU usage value can lead to increasedready time and processor queuing of the virtual machines on the host.
• Virtual machine CPU usage is above 90% and the CPU ready value is above 20%.Application performance is impacted.
• The host probably is lacking the CPU resources required to meet the demand.• There might be too many virtual CPUs relative to the number of regular CPUs.• There might be an IO storage or networking operation that places the CPU in a
wait state.• The Guest OS generates too much load for the CPU.
Solutions
• Verify that VMware Tools is installed on every virtual machine on the host.• Compare the CPU usage value of a virtual machine with the CPU usage of other
virtual machines on the host or in the resource pool. The stacked bar chart onthe host's Virtual Machine view shows the CPU usage for all virtual machines onthe host.
• Determine whether the high ready time for the virtual machine resulted from itsCPU usage time reaching the CPU limit setting. If so, increase the CPU limit onthe virtual machine.
• Increase the CPU shares to give the virtual machine more opportunities to run.The total ready time on the host might remain at the same level if the host
system is constrained by CPU. If the host ready time doesn't decrease, set theCPU reservations for high-priority virtual machines to guarantee that they receivethe required CPU cycles.
• Increase the amount of memory allocated to the virtual machine. This actiondecreases disk and or network activity for applications that cache. This mightlower disk I/O and reduce the need for the host to virtualize the hardware. Virtualmachines with smaller resource allocations generally accumulate more CPU readytime.
• Reduce the number of virtual CPUs on a virtual machine to only the numberrequired to execute the workload. For example, a single-threaded application ona four-way virtual machine only benefits from a single vCPU. But the hypervisor'smaintenance of the three idle vCPUs takes CPU cycles that could be used forother work.
HOL-1804-02-CHG
Page 53HOL-1804-02-CHG

• If the host is not already in a DRS cluster, add it to one. If the host is in a DRScluster, increase the number of hosts and migrate one or more virtual machinesonto the new host.
• Upgrade the physical CPUs or cores on the host if necessary.• Use the newest version of hypervisor software, and enable CPU-saving features
such as TCP Segmentation Offload, large memory pages, and jumbo frames.
Now you may be thinking that this challenge is related Host CPU Performance. You maybe right, but you may also be wrong. The only way to find out is to proceed with yourchallenge. Good luck!
Launch Google Chrome
1. Open Google Chrome using the shortcut on the taskbar.
Login to vSphere Client
1. Select the check box "Use Windows session authentication".2. Select Login.
Browse to the Poorly Performing Host
HOL-1804-02-CHG
Page 54HOL-1804-02-CHG

The Operations team informed you that 'esx-01a' is performing poorly. We need toinvestigate further.
1. Select the host esx-01a.2. Select Monitor.3. Select Advanced. You may need to expand Performance to see Advanced by
selecting the arrow to the left of Performance.
The current virtual machine workload on 'esx-05a' is consuming 50% of the availableCPU resources available. If you look closely at the Performance graph, you'll notice 5different counters: green, blue, purple, orange and black. Using the Performance ChartLegend, we see that the blue counter represents CPU 0, the purple counter representsCPU 1, the green counter represents CPU 2, the orange counter represents CPU 3 andthe black counter represents overall CPU usage for the host.
View Memory Performance
Modify the view to show Memory Usage. 'esx-01a' has 8GB of memory available to it.The current virtual machine workload is consuming close to 80% of available Memory.
Investigate the performance of 'esx-01a' by using the Advanced Performance Monitor.Use the dropdown (CPU usage in %) in the upper right-hand corner of the Performance
window to view metrics for Memory, Network and other host-based metrics.
Module 3, Challenge 2
Your challenge is to:
• Alleviate the performance pressure on 'esx-01a'.
Need a Hint?
You can also view hints on the VMware Technology Network Communities here:
HOL-1804-02-CHG
Page 55HOL-1804-02-CHG
https://communities.vmware.com/docs/DOC-36960
DO NOT proceed to the next page unless you are ready to view the Solution to thisChallenge.
Module 3, Challenge 2 Solution
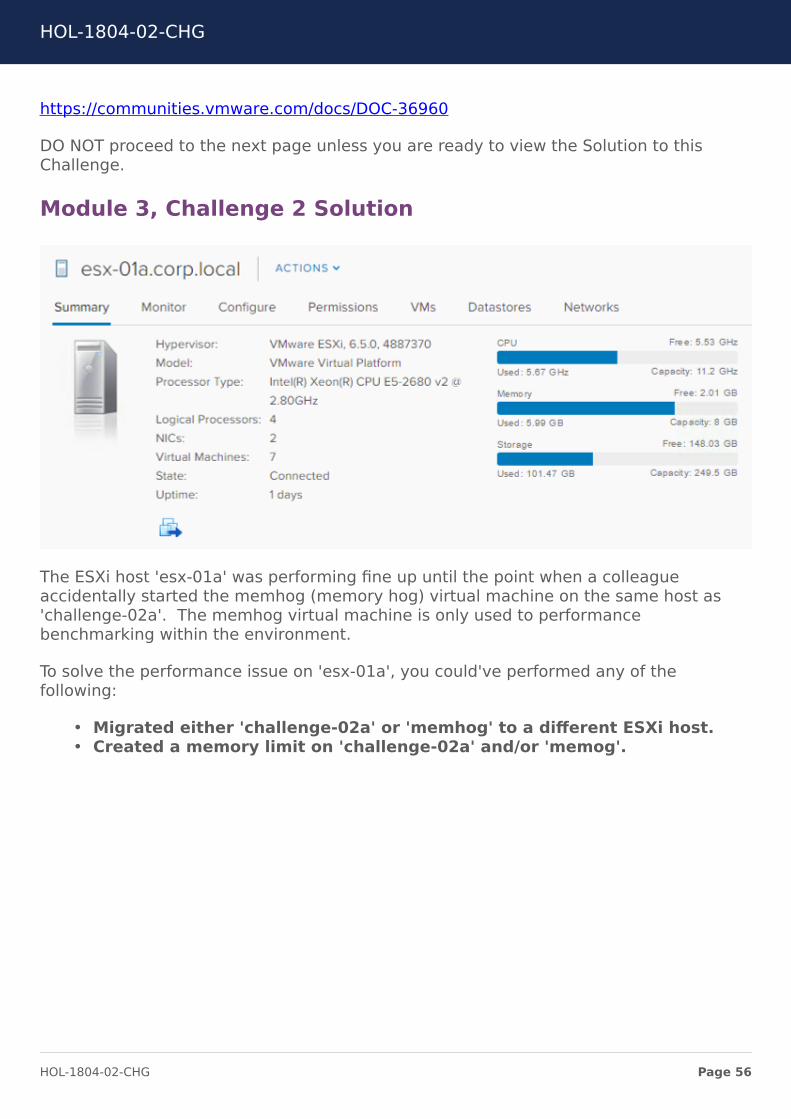
The ESXi host 'esx-01a' was performing fine up until the point when a colleagueaccidentally started the memhog (memory hog) virtual machine on the same host as'challenge-02a'. The memhog virtual machine is only used to performancebenchmarking within the environment.
To solve the performance issue on 'esx-01a', you could've performed any of thefollowing:
• Migrated either 'challenge-02a' or 'memhog' to a different ESXi host.• Created a memory limit on 'challenge-02a' and/or 'memog'.
HOL-1804-02-CHG
Page 56HOL-1804-02-CHG

Stop Module 3
Before you celebrate with colleagues, open the Challenge Lab MS (module switcher)located on the desktop of the Main Console.
1. Double-click on the Challenge Lab MS (Module Switcher) shortcut located on theMain Console desktop.
2. Select Stop under Module 3.
Wait for the PowerCLI window to close before proceeding to the next step.
You've Finished Module 3
This concludes Module 3, Basic Resource Management. We hope you have enjoyedtaking it. Please do not forget to fill out the survey when you are finished.
If you have time remaining, you can proceed to the next page to begin Module 4 or youcan jump to another Module within this lab. Click on "More Options - Table ofContents" to quickly jump to a challenge within the module.
Module 1 - Let's Start with the Basics (30 minutes)
Module 2 - Basic Operations Management (30 minutes)
Module 3 - Basic Resource Management (30 minutes)
Module 4 - Advanced Operations Management (45 minutes)
Module 5 - Advanced Resource Management (45 minutes)
HOL-1804-02-CHG
Page 57HOL-1804-02-CHG

Module 4 - AdvancedOperations Management
(45 minutes)
HOL-1804-02-CHG
Page 58HOL-1804-02-CHG
IntroductionThis module will challenge you on Advanced Operations Management tasks.
• A new user needs specific permissions within the vSphere environment and it'sup to you to make sure they are correct before this person makes an error, suchas deleting every VM within the evironment.
• Determine why a VM will not Power ON.• An ESXi host is Out of Compliance, how do I fix it?
vSphere Client vs vSphere Flash Client
In the vSphere Challenge Lab, you will use both the existing vSphere Web Client (basedon Flash) and the new vSphere Client (based on HTML5). HTML5 is the future directionof the vSphere Client, so you will use it predominantly throughout this lab.
If you feel more comfortable using the vSphere Web Client, a shortcut to it (labeledvSphere Flash Client) is bookmarked within Google Chrome.
1. The default client for the lab is the vSphere Client (based on HTML5). Use theHome button within Google Chrome to access the vSphere Client.
2. A bookmark to the vSphere Flash Client is available within Google Chrome.
Note: As mentioned previously, the default client for this lab will be the vSphere Clientbased on HTML5. Due to the fact that the vSphere Client does not have full featureparity with the vSphere Web Client (based on Flash), there will be some sections whereyou will be directed to use the vSphere Web Client.
HOL-1804-02-CHG
Page 59HOL-1804-02-CHG
Module Switcher
To prepare Module 4 for the challenges that will be presented to you, we need to run theChallenge Lab MS (Module Switcher).
1. Double-click on the Challenge Lab MS shortcut located on the Main Consoledesktop.
2. Select Start under Module 4.
Wait for the PowerCLI script to finish before proceeding. Once the script has completed,press Enter to close the PowerCLI window.
HOL-1804-02-CHG
Page 60HOL-1804-02-CHG
Assigning the Correct PermissionsPermissions are access roles that consist of a user and the users assigned role for anobject such as a virtual machine or ESXi host. Permissions grant users the right toperform the activities specified by the role on the object to which the role is assigned.
For example, to configure memory for the host, you must grant a role to a user thatincludes the Host > Configuration > Memory Configuration privilege. By assigningdifferent roles to users for different objects, you control the tasks that users can performin your vSphere environment.
Users other than root and vpxuser initially have no permissions on any objects, whichmeans they cannot view these objects or perform operations on them. A user withAdministrator privileges must assign permissions to these users to allow them toperform tasks.
The list of privileges is the same for ESXi and vCenter Server.
Multiple Permissions
Many tasks require permissions on more than one object.
Permissions applied on a child object always override permissions that are applied on aparent object. Virtual machine folders and resource pools are equivalent levels in thehierarchy. If you assign propagating permissions to a user or group on a virtualmachine's folder and its resource pool, the user has the privileges propagated from theresource pool and from the folder.
If multiple group permissions are defined on the same object and the user belongs totwo or more of those groups, two situations are possible:
• If no permission is defined for the user on that object, the user is assigned the setof privileges assigned to the groups for that object.
• If a permission is defined for the user on that object, the user's permission takesprecedence over all group permissions.
Permission Examples
These rules can help you determine where you must assign permissions to allowparticular operations:
• Any operation that consumes storage space, such as creating a virtual disk ortaking a snapshot, requires the Datastore > Allocate Space privilege on the targetdatastore, as well as the privilege to perform the operation itself.
• Moving an object in the inventory hierarchy requires appropriate privileges on theobject itself, the source parent object (such as a folder or cluster), and thedestination parent object.
HOL-1804-02-CHG
Page 61HOL-1804-02-CHG
• Each host and cluster has its own implicit resource pool that contains all theresources of that host or cluster. Deploying a virtual machine directly to a host orcluster requires the Resource > Assign Virtual Machine to Resource Pool privilege.
Module 4, Challenge 1
If you did not Start Module 4 using the Challenge Lab Module Switcher outlined withinthe Introduction of this Module, please Stop and go back to the Introduction of Module 4and follow the directions to Start the Module using the Challenge Lab Module Switcher.
If you already completed this step, please proceed to the next page.
The Developer Manager sent you an email with the following permission requirementsfor the new Junior Developer.
1. Needs access to virtual machines and templates, including ability to provisionnew virtual machines from template.
2. Should not be able to add or remove CPU or memory from any virtual machines.3. Complete snapshot capabilities including create, rename, remove and revert to
for virtual machines.4. Ability to create new folders.5. Ability to perform all power operations for virtual machines.6. Ability to clone virtual machines.
An Active Directory account has already been created for the new developer within theCORP.LOCAL domain. Those details are as follows:
• Username: CORP\jdev• Password: VMware1!
Your challenge is to
• Assign the correct vCenter permissions to the Junior Developer basedupon the requirements provided.
Before you get started, your Director has implemented security standards, therefore allrequested permissions for the Junior Developer should only be applied on theDevelopment folder within vCenter.
Need a Hint?
You can also view hints on the VMware Technology Network Communities here:
https://communities.vmware.com/docs/DOC-36961
DO NOT proceed to the next page unless you want to view the solution to this challenge.
HOL-1804-02-CHG
Page 62HOL-1804-02-CHG

Module 4, Challenge 1 Solution
Were you able to assign the correct permissions to the Junior Developer? Let's put yourresolution to the test and walk through the solution.
Open Google Chrome
1. Open Google Chrome using the shortcut on the taskbar.
Login to the vSphere Client
1. Select the check box "Use Windows session authentication".2. Select Login.
HOL-1804-02-CHG
Page 63HOL-1804-02-CHG
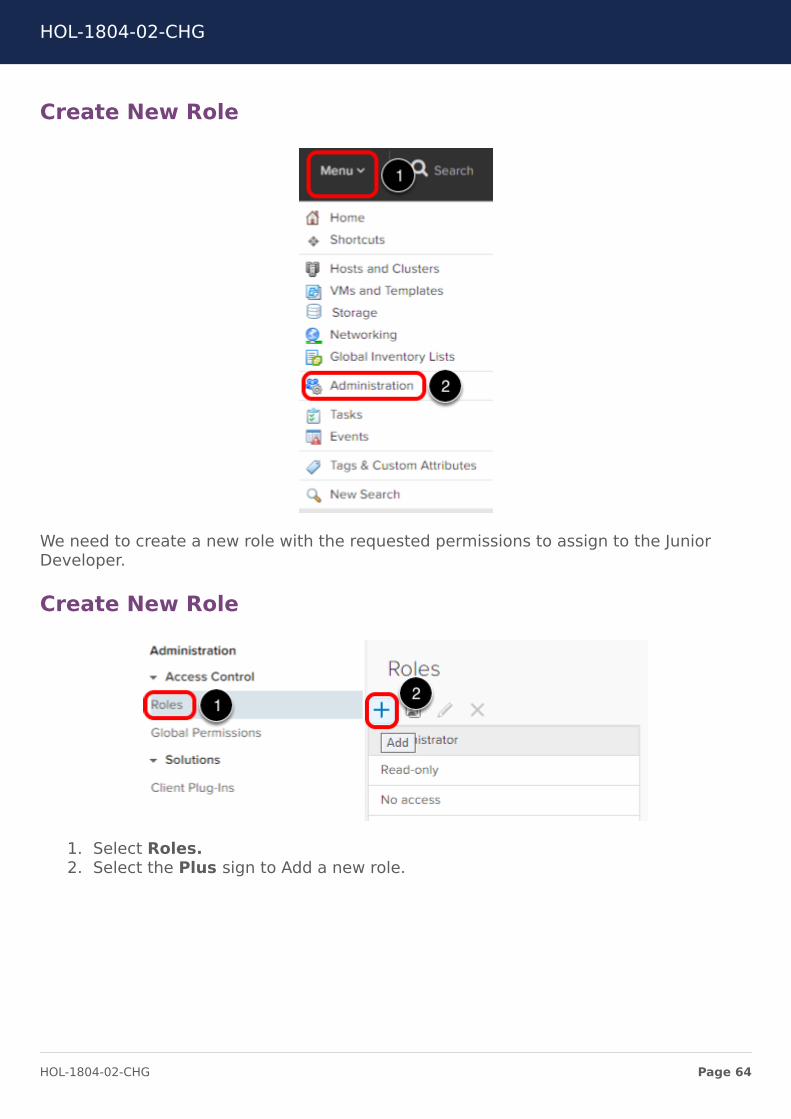
Create New Role
We need to create a new role with the requested permissions to assign to the JuniorDeveloper.
Create New Role
1. Select Roles.2. Select the Plus sign to Add a new role.
HOL-1804-02-CHG
Page 64HOL-1804-02-CHG

Provisioning
1. Select Virtual machine.2. Select Create template from virtual machine and Deploy template.
Snapshot Management
1. Select Snapshot management. Selecting the 'Snapshot management' privilegewill propogate all privilege's located within Snapshot management.
Power Operations
HOL-1804-02-CHG
Page 65HOL-1804-02-CHG

Clone Virtual Machine
1. Select Clone virtual machine. That should cover all requested privileges forthe Junior Developer.
2. Select Next.
Name Role
1. Name the Role Junior Developer.2. Select Finish.
HOL-1804-02-CHG
Page 66HOL-1804-02-CHG

Browse to the Development Folder
1. Select Menu.2. Select VMs and Templates.
Browse to Development Folder
1. Select the Development folder. You may need to expand 'vcsa-01a.corp.loca'land 'RegionA01' in order to see the Development folder.
2. Select Permissions.3. Select the Plus sign to add a new permission.
HOL-1804-02-CHG
Page 67HOL-1804-02-CHG

Add New Permission
1. Select CORP.LOCAL from the dropdown list.2. Enter jdev.3. Select the Junior Developer role from the dropdown list.4. Check the box Propogate to children.5. Select OK.
Notice Development at the top of the window next to Add Permission. This helps youidentify which vCenter object you are applying the new permission to.
Permission Added
This completes this challenge.
Proceed to the next page to continue with Module 4 or use the Table of Contents toselect a different challenge or module.
HOL-1804-02-CHG
Page 68HOL-1804-02-CHG
My VM Won't Power OnYou can often obtain valuable troubleshooting information by looking at the logsprovided by the various services and agents that your implementation is using.
Most logs are located in C:\ProgramData\VMware\vCenterServer\logs for Windowsdeployments or /var/log/ for vCenter Server Appliance deployments. Common logs areavailable in all implementations. Other logs are unique to certain deployment options(Management Node or Platform Services Controller).
Common Logs
• applmgmt = VMware Appliance Management Service• CloudVM = Logs for allotment and distribution of resources between services• CM = VMware Component Manager• FirstBoot = Location where first boot logs are stored• rhttpproxy = Reverse Web Proxy• SCA = VMware Service Control Agent• statsmonitor = VMware Appliance Monitoring Server (VCSA only)• Vapi = VMware vAPI Endpoint• vmaffd = VMware Authentication Framework daemon• vmdird = VMware Directory Service daemon• vmon = VMware Service Lifecycle Manager
More Information:
• vSphere Troubleshooting
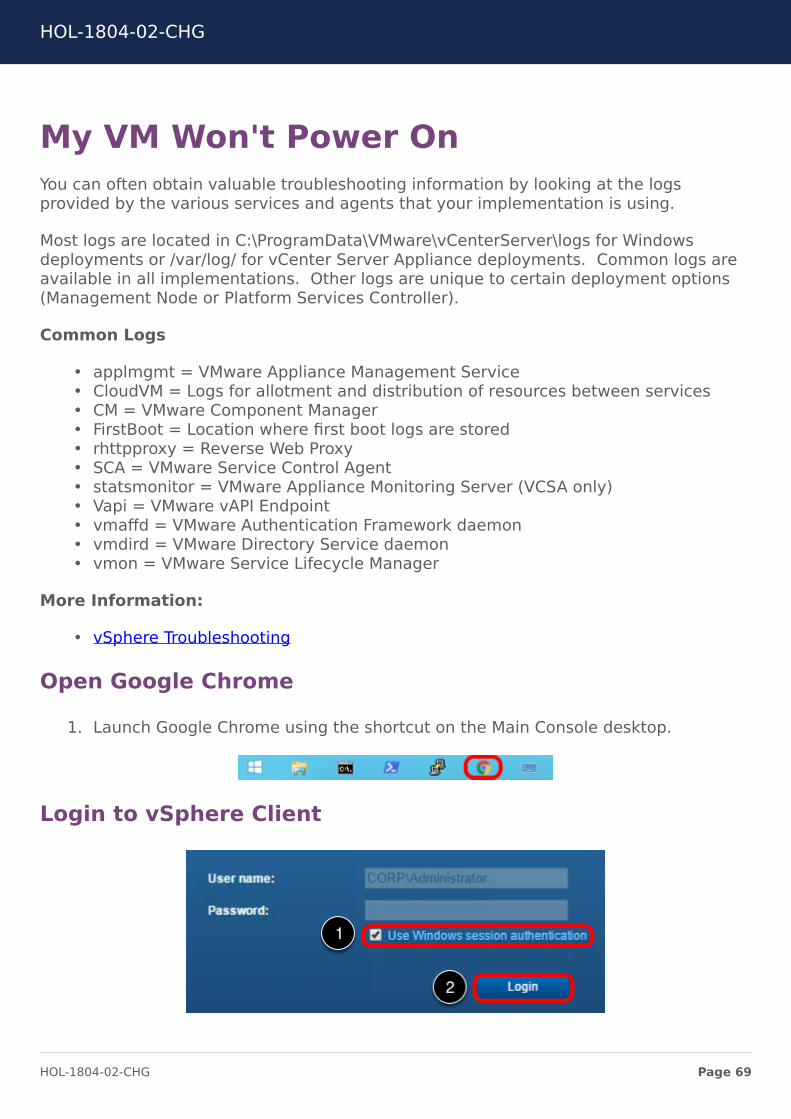
Open Google Chrome
1. Launch Google Chrome using the shortcut on the Main Console desktop.
Login to vSphere Client
HOL-1804-02-CHG
Page 69HOL-1804-02-CHG

1. Select the check box "Use Windows session authentication".2. Select Login.
Search for challenge-05a
1. Within the Search field located next to the Menu drop down, enterchallenge-05a and press Enter.
2. Select challenge-05a.
Power On challenge-05a
1. Select Actions.2. Expand Power to see all available Power options.3. Select Power On.
Module 4, Challenge 2
1. Expand Recent Tasks by selecting it at the bottom of the window and check tomake sure 'challenge-05a' powered on successfully.
HOL-1804-02-CHG
Page 70HOL-1804-02-CHG
It appears 'challenge-05a' won't power on. Examine the error message to begintroubleshooting the issue. Your challenge is to:
• Power on the challenge-05a virtual machine.
Need a Hint?
You can also view hints on the VMware Technology Network Communities here:
https://communities.vmware.com/docs/DOC-36961
DO NOT proceed to the next page unless you want to see the solution to the challenge.
Module 4, Challenge 2 Solution
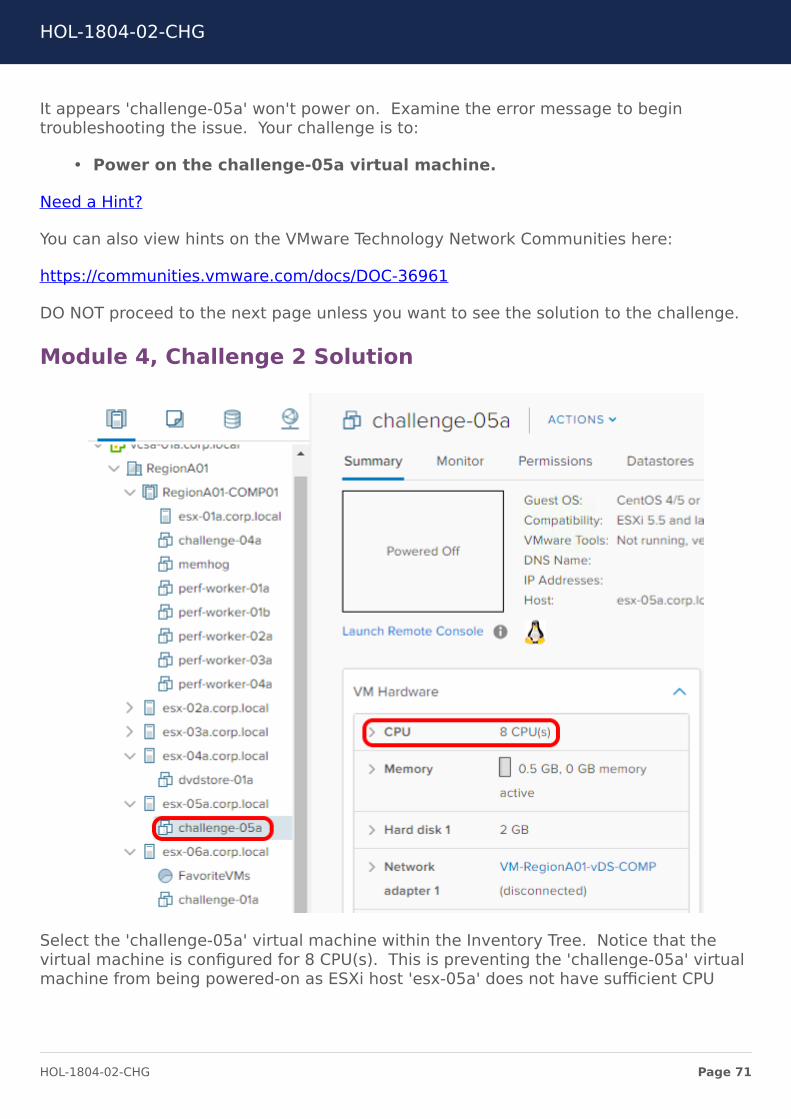
Select the 'challenge-05a' virtual machine within the Inventory Tree. Notice that thevirtual machine is configured for 8 CPU(s). This is preventing the 'challenge-05a' virtualmachine from being powered-on as ESXi host 'esx-05a' does not have sufficient CPU
HOL-1804-02-CHG
Page 71HOL-1804-02-CHG

resources to meet the current CPU requirements (8 CPU) of the 'challenge-05a' virtualmachine..
Edit Settings
To resolve the misconfiguration issue for the 'challenge-05a' virtual machine:
1. Right-click on 'challenge-05a'.2. Select Edit Settings.
Correct CPU Configuration
1. Select the Core per Socket drop-down menu. Notice that the only optionsavailable to you are 1 or 2. Select 1 or 2.
HOL-1804-02-CHG
Page 72HOL-1804-02-CHG

2. Select OK.
Notice that vCenter Server prevents you from misconfiguring the virtual machine withinthe User Interface. Now you may be asking yourself how the 'challenge-05a' virtualmachine was configured with 8 CPU if the vCenter Server User Interface will not allowyou to choose such a setting.
The numvcpus line within the virtual machines VMX file (configuration file) was modifiedto 8 CPU. This shows the danger of modifying the VMX file directly, as it can overridethe measures put in-place within vCenter Server to prevent a misconfiguration.
Challenge Completed
Good job, after modifying the number of CPU from 8 to 1 or 2, the 'challenge-05a' virtualmachine successfully powers on.
This completes this challenge.
Proceed to the next page to continue with Module 4 or use the Table of Contents toselect a different challenge or module.
HOL-1804-02-CHG
Page 73HOL-1804-02-CHG
My Host is Out of ComplianceThe Host Profiles feature creates a profile that encapsulates the host configuration andhelps to manage the host configuration, especially in environments where anadministrator manages multiple hosts or clusters invCenter Server.
Host Profiles provide an automated and centrally managed mechanism for hostconfiguration andconfiguration compliance. Host Profiles can improve efficiency byreducing reliance upon repetitive, manualtasks. Host Profiles capture the configurationof a pre-configured and validated reference host, store the configuration as a managedobject and use the catalog of parameters contained within to configure networking,storage, security, and other host-level parameters. Host Profiles can be applied toindividual hosts, a cluster, or all the hosts and clusters associated to a host profile.Applying a Host Profile to a cluster affects all hosts in the cluster and result in a
consistent configuration across the applied hosts.
Host Profiles can be used to validate the configuration of a host by checking complianceof a host or cluster against the Host Profile that is associated with that host or cluster.
More Information:
• vSphere Host Profiles• Enhancements to Host Profiles in vSphere 6.5
Getting Started with Host Profiles
Host Profiles is not available yet within the vSphere Client (HTML5), therefore we mustuse the current vSphere Flash Client.
1. Select the Google Chome shortcut on the taskbar.
vSphere Flash Client
1. Select vSphere Flash Client from the Bookmarks Bar.
HOL-1804-02-CHG
Page 74HOL-1804-02-CHG

Login to vSphere Flash Client
1. Select the check box "Use Windows session authentication".2. Select Login.
Explore Host Profiles
1. Select the Home icon within vSphere Web Client.2. Select Policies and Profiles.
HOL-1804-02-CHG
Page 75HOL-1804-02-CHG

Explore Host Profiles
1. Select Host Profiles from Navigator.
Production Host Profile
A team member has already created a Host Profile appropriately named 'ProductionHost Profile'. Notice that one host is currently attached to this host profile and it isshowing as 'Not Compliant'. Let's determine why the host is showing as 'Not Compliant'.
1. Select Host Profile Compliance.
Wait for the 'Check Compliance' task to complete. Use the Recent Tasks windows tocheck the status of the 'Check Compliance' task.
Not Compliant Hosts
After the Check Compliance task completes, notice that 1 ESXi host is not compliant.
1. Select Production Host Profile.
HOL-1804-02-CHG
Page 76HOL-1804-02-CHG

Not Compliant
Notice that 'esx-05a' is Not Compliant against the Production Host Profile.
Module 4, Challenge 3
Now that you've started down the correct path, it's time for you to take control. Yourchallenge is to:
• Resolve the issue so that 'esx-05a' is Compliant against the ProductionHost Profile.
Need a Hint?
You can also view hints on the VMware Technology Network Communities here:
https://communities.vmware.com/docs/DOC-36961
DO NOT proceed to the next page unless you want to see the solution to this challenge.
Module 4, Challenge 3 Solution
Were you able to resolve the issue with the Non-Compliant host? The Solution to thisChallenge is as follows:
• 'esx-05a' is Non-Compliant due to an invalid NTP Server list. There is anadditional NTP Server address within the NTP Server configuration of 'esx-05a'that is not located within the Host Profile.
• The NTP Server address 'ntp.corp.local' needs to be removed from the NTP Serverlist.
HOL-1804-02-CHG
Page 77HOL-1804-02-CHG

Take a Closer Look
1. Select Monitor.2. Select Compliance.3. Highlight the esx-05a.corp.local row. Do not select the 'esx-05a' object as it
will take you to the host you selected. If this happens, select the Back button inthe top right-hand corner of the vSphere Web Client to return to this page.
4. Notice the Host Value and the Host Profile Value fields are different. The HostValue has the additional NTP Server which is causing the host to be NotCompliant.
HOL-1804-02-CHG
Page 78HOL-1804-02-CHG

Modify the NTP Server Settings
The NTP Server Settings can be modified within the vSphere Client (based on HTML5),therefore we will proceed with modifying the NTP Server Settings there.
1. Open a new tab within Google Chrome by selecting the reverse parallelogram.2. Select Home.
You will automatically be logged into vCenter since you are currently logged-in as CORP\Administrator within the vSphere Flash Client. If you are not automatically logged-in,check the box to "Use windows session authentication" to login to vCenter.
Hosts and Clusters
1. Select Menu.2. Select Host and Clusters from the drop down list.
HOL-1804-02-CHG
Page 79HOL-1804-02-CHG
Time Configuration
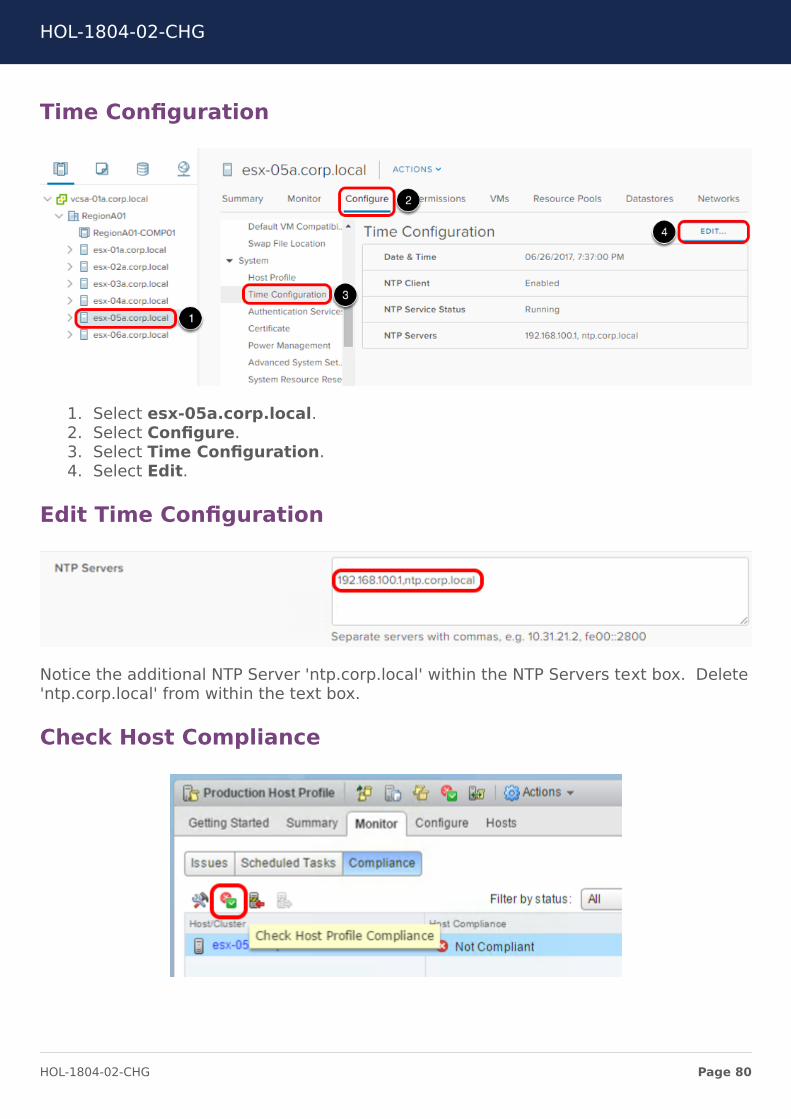
1. Select esx-05a.corp.local.2. Select Configure.3. Select Time Configuration.4. Select Edit.
Edit Time Configuration
Notice the additional NTP Server 'ntp.corp.local' within the NTP Servers text box. Delete'ntp.corp.local' from within the text box.
Check Host Compliance
HOL-1804-02-CHG
Page 80HOL-1804-02-CHG
Now that you have removed the invalid NTP Server entry, we need to re-check theCompliance of the host against the Host Profile. The vSphere Flash Client tab that youwere working in within the first part of this lab should still be open.
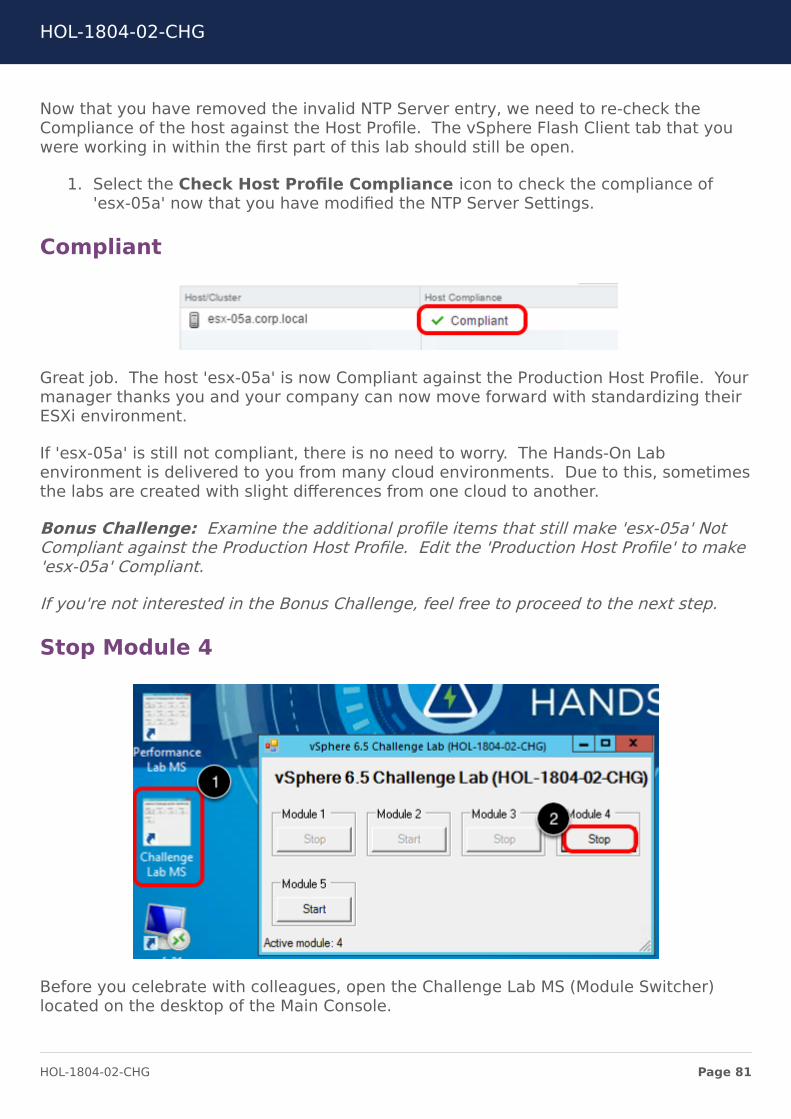
1. Select the Check Host Profile Compliance icon to check the compliance of'esx-05a' now that you have modified the NTP Server Settings.
Compliant
Great job. The host 'esx-05a' is now Compliant against the Production Host Profile. Yourmanager thanks you and your company can now move forward with standardizing theirESXi environment.
If 'esx-05a' is still not compliant, there is no need to worry. The Hands-On Labenvironment is delivered to you from many cloud environments. Due to this, sometimesthe labs are created with slight differences from one cloud to another.
Bonus Challenge: Examine the additional profile items that still make 'esx-05a' NotCompliant against the Production Host Profile. Edit the 'Production Host Profile' to make'esx-05a' Compliant.
If you're not interested in the Bonus Challenge, feel free to proceed to the next step.
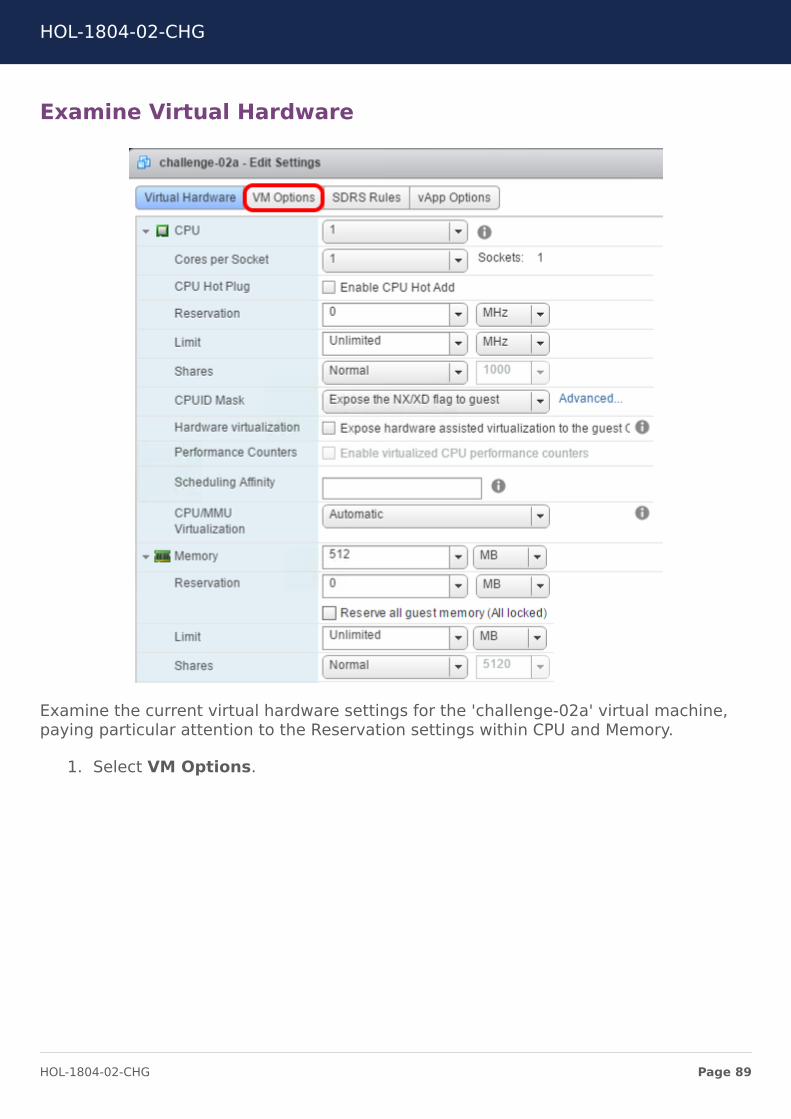
Stop Module 4
Before you celebrate with colleagues, open the Challenge Lab MS (Module Switcher)located on the desktop of the Main Console.
HOL-1804-02-CHG
Page 81HOL-1804-02-CHG

1. Double-click on Challenge Lab MS (Module Switcher) shortcut located on thedesktop of the Main Console.
2. Select Stop under Module 4.
Wait for the PowerCLI window to close before proceeding to the next step.
You've Finished Module 4
Congatulations on finishing Module 4.
You can now proceed in the manual to Module 5, or you can jump to a different modulemore suited for your skill level.
Module 1 - Let's Start with the Basics (30 minutes)
Module 2 - Basic Operations Management (30 minutes)
Module 3 - Basic Resource Management (30 minutes)
Module 4 - Advanced Operations Management (45 minutes)
Module 5 - Advanced Resource Management (45 minutes)
HOL-1804-02-CHG
Page 82HOL-1804-02-CHG

Module 5 - AdvancedResource Management
(45 minutes)
HOL-1804-02-CHG
Page 83HOL-1804-02-CHG

IntroductionThis module will challenge you on Advanced Resource Management tasks.
• My application is sensitive to latency, how do I ensure it gets the resources itneeds to perform properly?
• I created a Resource Pool with the goal of improving performance, butperformance is worse. What did I do wrong?
• I'm concerned my VM isn't configured correctly for vNUMA, how can I check this?
vSphere Client vs vSphere Flash Client
In the vSphere Challenge Lab, you will use both the existing vSphere Web Client (basedon Flash) and the new vSphere Client (based on HTML5). HTML5 is the future directionof the vSphere Client, so you will use it predominantly throughout this lab.
If you feel more comfortable using the vSphere Web Client, a shortcut to it (labeledvSphere Flash Client) is bookmarked within Google Chrome.
1. The default client for the lab is the vSphere Client (based on HTML5). Use theHome button within Google Chrome to access the vSphere Client.
2. A bookmark to the vSphere Flash Client is available within Google Chrome.
Note: As mentioned previously, the default client for this lab will be the vSphere Clientbased on HTML5. Due to the fact that the vSphere Client does not have full featureparity with the vSphere Web Client (based on Flash), there will be some sections whereyou will be directed to use the vSphere Web Client.
HOL-1804-02-CHG
Page 84HOL-1804-02-CHG

Module Switcher
To prepare your lab for the Challenges, you will need to run the Challenge Lab MS(Module Switcher).
1. Double-click on the Challenge Lab MS shortcut located on the Main Consoledesktop.
2. Select Start under Module 5.
Wait for the PowerCLI script to finish before proceeding. Once the script has completed,press Enter to close the PowerCLI window.
HOL-1804-02-CHG
Page 85HOL-1804-02-CHG

My Application is Sensitive to LatencyESXi is optimized for high throughput to minimize virtualization overhead for a wide-range of applications, including business critical applications such as databases.Latency, measures the time it takes to transfer data from one endpoint to another and
is typically measured in milliseconds. Latency-sensitive applications typically includeVoIP services or high-frequency trading, where low response times are critical.
More Information:
• Best Practices for Performance Tuning of Latency-Sensitive Workloads in VMwarevSphere
Open Google Chrome
1. Open Google Chrome using the shortcut on the taskbar.
If you did not Start Module 5 using the Challenge Lab Module Switcher outlined withinthe Introduction of this Module, please Stop and go back to the Introduction of Module 5and follow the directions to Start the Module using the Challenge Lab Module Switcher.
If you already completed this step, please proceed to the next page.
Login to vSphere Flash Client
The Latency Sensitivity feature is not available yet within the vSphere Client (based onHTML5), therefore you must use the vSphere Web Client to complete this challenge.
1. Select the vSphere Flash Client bookmark in Google Chrome.
HOL-1804-02-CHG
Page 86HOL-1804-02-CHG

Login to vSphere Flash Client
1. Check the box "Use Windows session authentication".2. Select Login.
Module 5, Challenge 1
Your Manager has informed you that the 'challenge-02a' virtual machine needs to havethe Latency Sensitivity feature enabled on it. Your challenge is to:
• Enable Latency Sensitivity and ensure all Latency Sensitivityrequirements are met for the virtual machine.
Need a Hint?
You can also view hints on the VMware Technology Network Communities here:
https://communities.vmware.com/docs/DOC-37002
DO NOT proceed to the next page unless you want to see The Solution to the Challenge.
Module 5, Challenge 1 Solution
To enable Latency Sensitivity on the 'challenge-02a' virtual machine, the following stepsneed to be completed.
• Right-click 'challenge-02a' > Edit Settings > VM Options > Advanced > LatencySensitivity. Change the Latency Sensitivity setting from Normal to High. Whenchanging the Latency Sensitivity setting from Normal to High, notice the warningyou receive concerning CPU Reservation.
Proceed to the next page to walk through this process step-by-step.
HOL-1804-02-CHG
Page 87HOL-1804-02-CHG

Edit challenge-02a
1. Right click on challenge-02a within the Inventory Tree.2. Select Edit Settings.
HOL-1804-02-CHG
Page 88HOL-1804-02-CHG
Examine Virtual Hardware
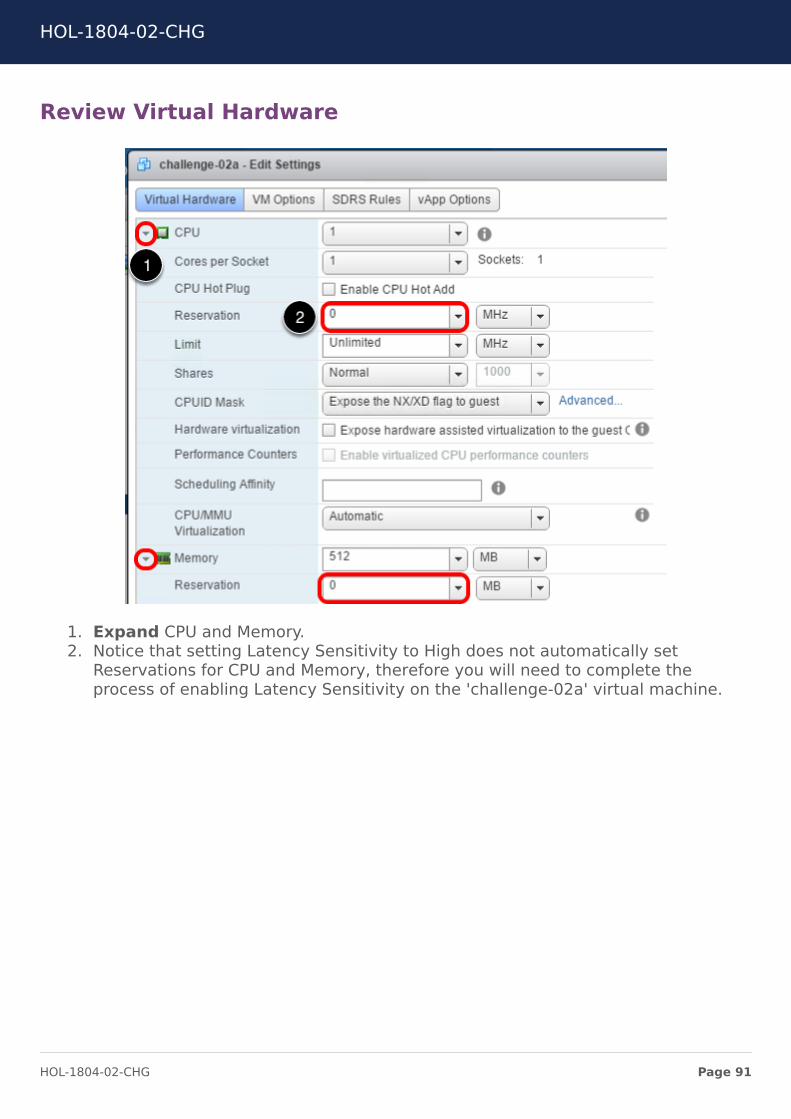
Examine the current virtual hardware settings for the 'challenge-02a' virtual machine,paying particular attention to the Reservation settings within CPU and Memory.
1. Select VM Options.
HOL-1804-02-CHG
Page 89HOL-1804-02-CHG

Latency Sensitivity
Scroll down to Latency Sensitivity.
1. Use the dropdown to modify the Latency Sensitivity setting from Normal to High.Notice the Check CPU reservation warning. Select the information button to
display a dialog box stating the following:
For best performance, High Latency Sensitivity requires you to set 100% CPUreservation for this VM.
2. Select OK.
Review Virtual Hardware
Review the virtual machine virtual hardware settings to ensure the proper Reservationshave been set.
1. Right click on 'challenge-02a'.2. Select Edit Settings.
HOL-1804-02-CHG
Page 90HOL-1804-02-CHG
Review Virtual Hardware
1. Expand CPU and Memory.2. Notice that setting Latency Sensitivity to High does not automatically set
Reservations for CPU and Memory, therefore you will need to complete theprocess of enabling Latency Sensitivity on the 'challenge-02a' virtual machine.
HOL-1804-02-CHG
Page 91HOL-1804-02-CHG

Set Reservations
1. Select the CPU Reservation drop-down and select Maximum to configure theMaximum CPU Reservation for the virtual machine. For 'challenge-02a', that is2880 MHz of CPU.
2. Select the Memory Reservation drop-down and select Maximum to configure theMaximum Memory Reservation for the virtual machine. For 'challenge-02a', thatis 512 MB of Memory.
More Information
While you only receive a warning for CPU Reservation when setting Latency Sensitivityto High, it is highly recommended to set memory reservation to 100% as well. Withoutthe memory reservation, vMotion will fail. If the virtual machine is powered-off, itcannot be powered-on until the reservation is set.
HOL-1804-02-CHG
Page 92HOL-1804-02-CHG
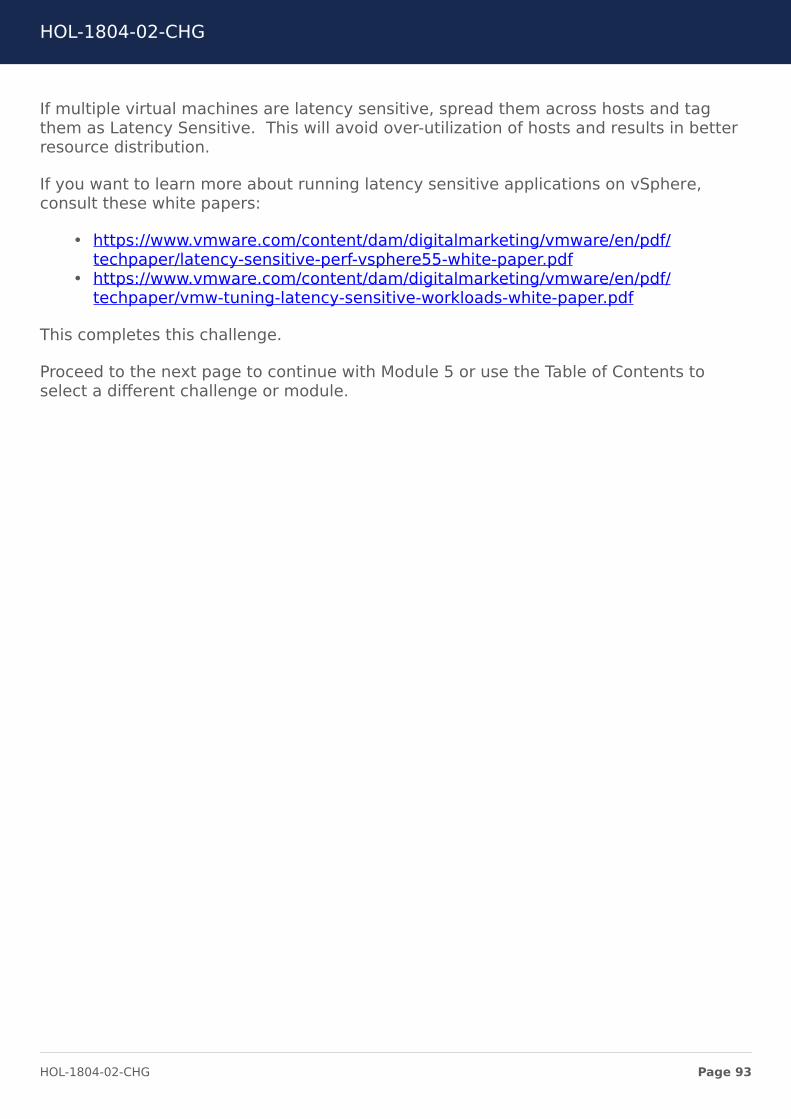
If multiple virtual machines are latency sensitive, spread them across hosts and tagthem as Latency Sensitive. This will avoid over-utilization of hosts and results in betterresource distribution.
If you want to learn more about running latency sensitive applications on vSphere,consult these white papers:
• https://www.vmware.com/content/dam/digitalmarketing/vmware/en/pdf/techpaper/latency-sensitive-perf-vsphere55-white-paper.pdf
• https://www.vmware.com/content/dam/digitalmarketing/vmware/en/pdf/techpaper/vmw-tuning-latency-sensitive-workloads-white-paper.pdf
This completes this challenge.
Proceed to the next page to continue with Module 5 or use the Table of Contents toselect a different challenge or module.
HOL-1804-02-CHG
Page 93HOL-1804-02-CHG

I Created a Resource Pool and nowPerformance is WorseResource pools allow you to delegate control over resources of a host (or a cluster), butthe benefits are evident when you use resource pools to compartmentalize all resourcesin a cluster.
Using resource pools can result in the following benefits:
• Flexible hierarchical organization: Add, remove, or reorganize resource poolsor change resource allocations as needed.
• Isolation between pools and sharing within pools: Top-level administratorscan make a pool of resources available to a department-level administrator andany allocation changes that are internal to one departmental resource pool do notunfairly affect other unrelated resource pools.
• Access control and delegation: When a top-level administrator makes aresource pool available to a department-level administrator, that administratorcan then perform all virtual machine creation and management within theboundaries of the resources to which the resource pool is entitled by the currentshares, reservation, and limit settings. Delegation is usually done in conjunctionwith permissions settings.
• Separation of resources from hardware: If you are using clusters enabledfor DRS, the resources of all hosts are always assigned to the cluster. That meansadministrators can perform resource management independently of the actualhosts that contribute to the resources. If you replace three 2GB hosts with two3GB hosts, you do not need to make changes to your resource allocations. Thisseparation allows administrators to think more about aggregate computingcapacity and less about individual hosts.
• Management of sets of virtual machines running a multitier service:Group virtual machines for a multitier service in a resource pool. You do not
need to set resources on each virtual machine. Instead, you can control theaggregate allocation of resources to the set of virtual machines by changingsettings on their enclosing resource pool.
Open Google Chrome
1. Open Google Chrome using the shortcut on the taskbar.
HOL-1804-02-CHG
Page 94HOL-1804-02-CHG

Login to vSphere Client
We will use the vSphere Client in this challenge.
1. Select the check box "Use Windows session authentication".2. Select Login.
FavoriteVMs Resource Pool
Browse the Inventory Tree. Notice the 'FavoriteVMs' Resource Pool has already beencreated. Additionally, the 'challenge-01a' virtual machine has already been moved intothe 'FavoriteVMs' Resource Pool.
HOL-1804-02-CHG
Page 95HOL-1804-02-CHG
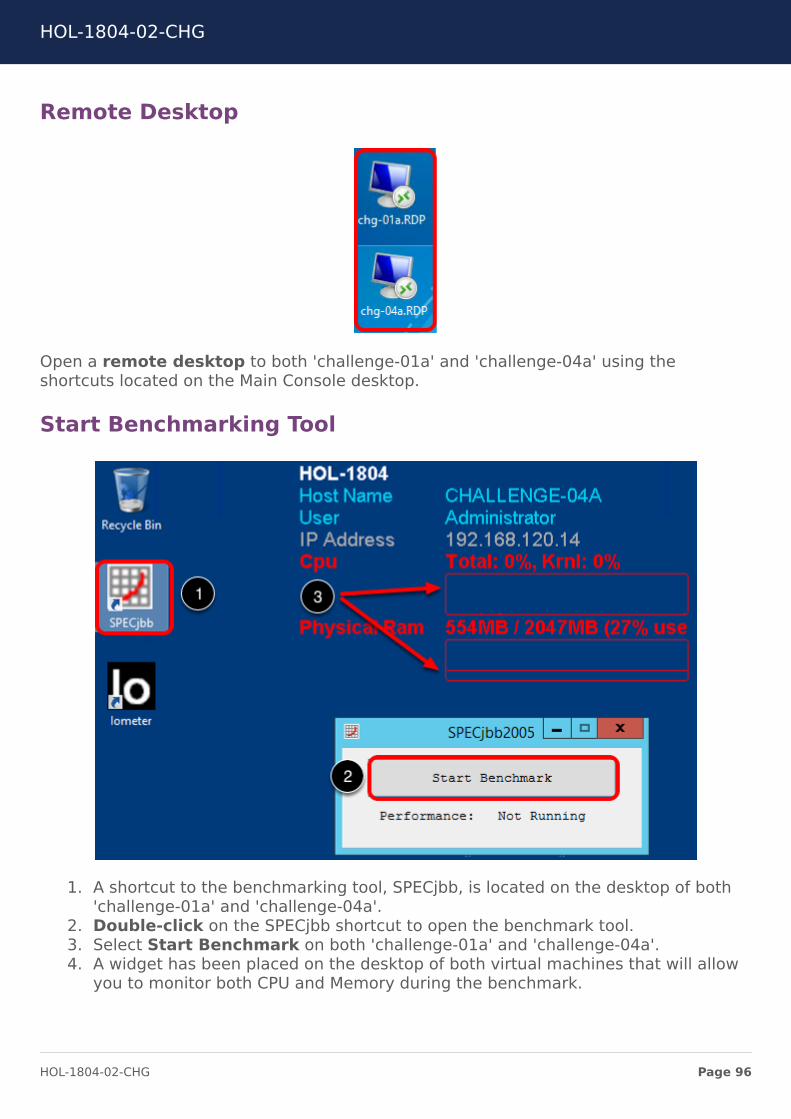
Remote Desktop
Open a remote desktop to both 'challenge-01a' and 'challenge-04a' using theshortcuts located on the Main Console desktop.
Start Benchmarking Tool
1. A shortcut to the benchmarking tool, SPECjbb, is located on the desktop of both'challenge-01a' and 'challenge-04a'.
2. Double-click on the SPECjbb shortcut to open the benchmark tool.3. Select Start Benchmark on both 'challenge-01a' and 'challenge-04a'.4. A widget has been placed on the desktop of both virtual machines that will allow
you to monitor both CPU and Memory during the benchmark.
HOL-1804-02-CHG
Page 96HOL-1804-02-CHG
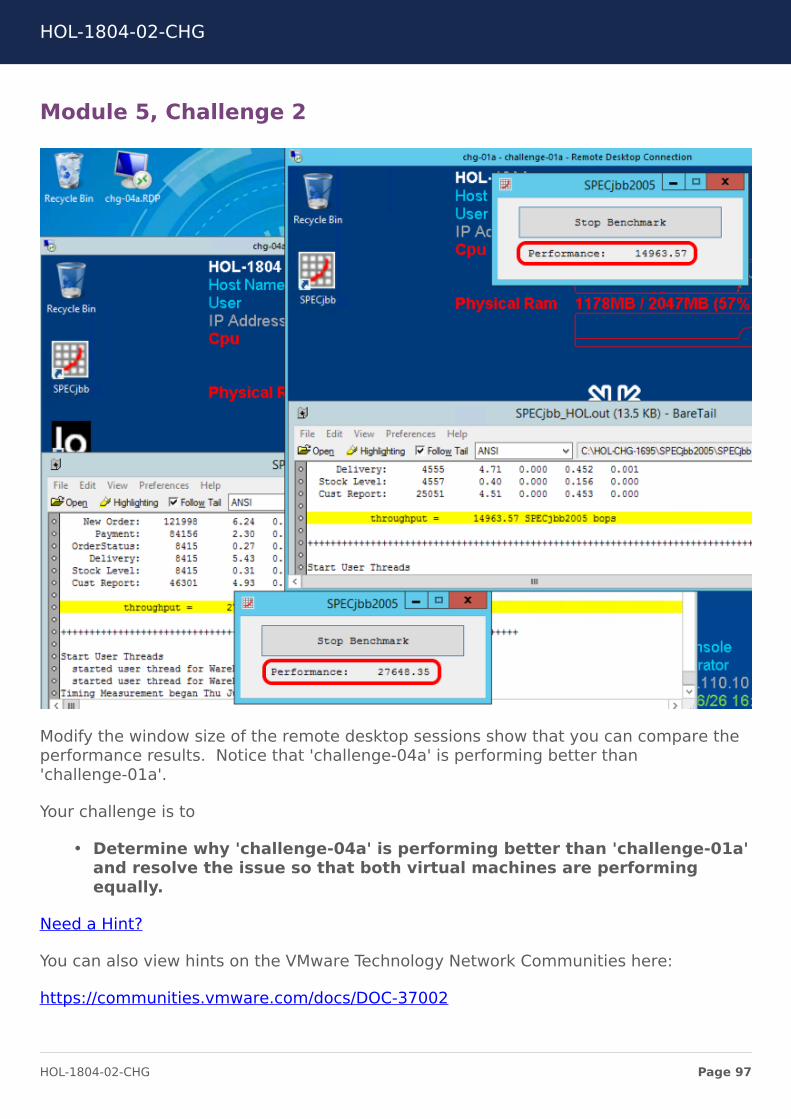
Module 5, Challenge 2
Modify the window size of the remote desktop sessions show that you can compare theperformance results. Notice that 'challenge-04a' is performing better than'challenge-01a'.
Your challenge is to
• Determine why 'challenge-04a' is performing better than 'challenge-01a'and resolve the issue so that both virtual machines are performingequally.
Need a Hint?
You can also view hints on the VMware Technology Network Communities here:
https://communities.vmware.com/docs/DOC-37002
HOL-1804-02-CHG
Page 97HOL-1804-02-CHG

DO NOT proceed to the next page unless you want to see the solution to the challenge.
Module 5, Challenge 2 Solution
Both 'challenge-01a' and 'challenge-04a' have the same resource configuration,therefore the issue must be related to the 'FavoriteVMs' Resourcee Pool.
1. Right-click on the FavoriteVMs Resource Pool in the Inventory Tree and selectEdit Resource Settings.
If you look closer at the 'FavoriteVMs' Resource Pool, you will notice that Shares havebeen configured for the resource pool. Since the 'challenge-01a' virtual machine islocated within the 'FavoriteVMs' Resource Pool, that virtual machine does not utilizeresources available to it, which includes the Custom Shares setting.
2. Select OK to close the Edit Resource Settings window.
HOL-1804-02-CHG
Page 98HOL-1804-02-CHG

Shares
1. Right-click on 'challenge-04a' and select Edit Settings.
The 'challenge-04a' virtual machine has a Shares setting of Normal. Look closely at theShares setting for 'challenge-04a' and you will notice a greyed-out Shares value of 2000.Toggle the Shares setting on 'challenge-04a' to Low and High. You will see the values
changing based on the selected setting. Notice a setting of Low changes the Sharesvalue to 1000, and a setting of High changes the Shares value to 4000. Do not modifythe Shares setting at this time.
2. Select OK to close the Edit Settings window.
Impact of Resource Pool
Because the 'challenge-01a' virtual machine is located within the FavoriteVMs ResourcePool, it inherits the CPU Shares value of 1000. The 'challenge-04a' virtual machine hasa Shares setting of Normal and after investigating further, the Normal setting has aShares value of 2000.
This would explain why 'challenge-01a' is performing roughly half as well as'challenge-04a'.
To resolve the issue you could do one of the following:
• Modify the CPU Shares setting of the FavoriteVMs Resource Pool to match that of'challenge-04a'. In this instance, you would either change the CPU Shares settingof Custom to Normal or change the CPU Shares value from 1000 to 2000.
• You could remove 'challenge-01a' from the 'FavoriteVMs' Resource Pool.
HOL-1804-02-CHG
Page 99HOL-1804-02-CHG
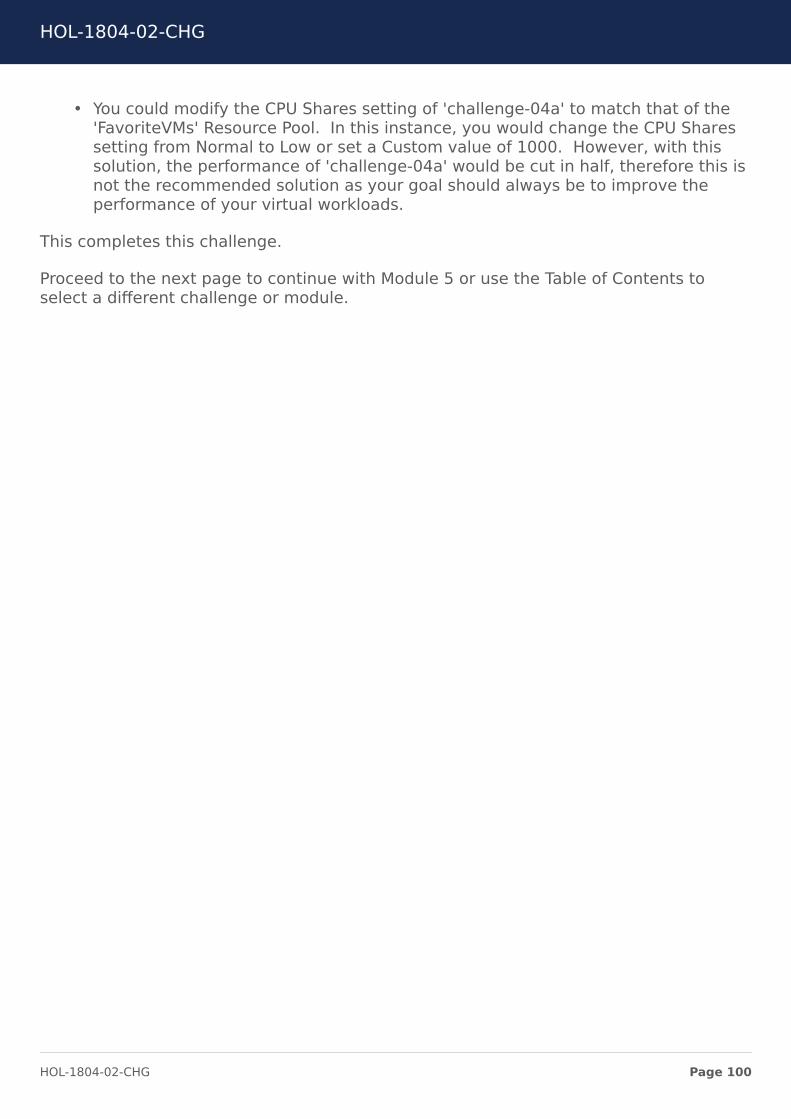
• You could modify the CPU Shares setting of 'challenge-04a' to match that of the'FavoriteVMs' Resource Pool. In this instance, you would change the CPU Sharessetting from Normal to Low or set a Custom value of 1000. However, with thissolution, the performance of 'challenge-04a' would be cut in half, therefore this isnot the recommended solution as your goal should always be to improve theperformance of your virtual workloads.
This completes this challenge.
Proceed to the next page to continue with Module 5 or use the Table of Contents toselect a different challenge or module.
HOL-1804-02-CHG
Page 100HOL-1804-02-CHG

vNUMA TroubleshootingNUMA is becoming increasingly more important to ensure workloads, such as databases,allocate and consume memory within the same physical NUMA node that the vCPUs arescheduled. When a virtual machine is sized larger than a single physical NUMA node, avNUMA topology is created and presented to the guest operating system. This virtualconstruct allows a workload within the virtual machine to benefit from physical NUMA,while continuing to support functions like vMotion.
More Information:
• Virtual Machine CPU and vNUMA Rightsizing - Rules of Thumb• How ESXi NUMA Scheduling Works
Open challenge-04a Remote Desktop
If the 'challenge-04a' Remote Desktop session is not already open, double-click on the'chg-04a.DRP' desktop shortcut to open a remote desktop session to the virtual machine'challenge-04a'.
Examine NUMA
1. Double-click on the NUMA coreinfo shortcut located on the desktop of the'challenge-04a' virtual machine.
HOL-1804-02-CHG
Page 101HOL-1804-02-CHG
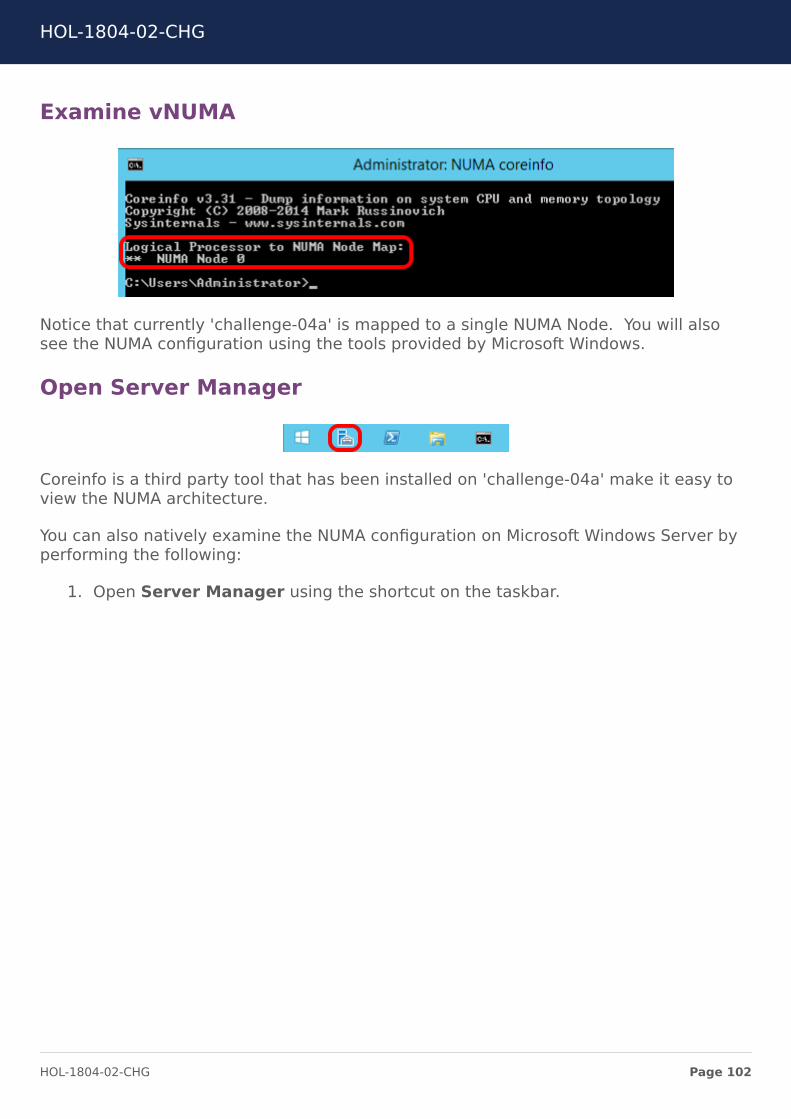
Examine vNUMA
Notice that currently 'challenge-04a' is mapped to a single NUMA Node. You will alsosee the NUMA configuration using the tools provided by Microsoft Windows.
Open Server Manager
Coreinfo is a third party tool that has been installed on 'challenge-04a' make it easy toview the NUMA architecture.
You can also natively examine the NUMA configuration on Microsoft Windows Server byperforming the following:
1. Open Server Manager using the shortcut on the taskbar.
HOL-1804-02-CHG
Page 102HOL-1804-02-CHG
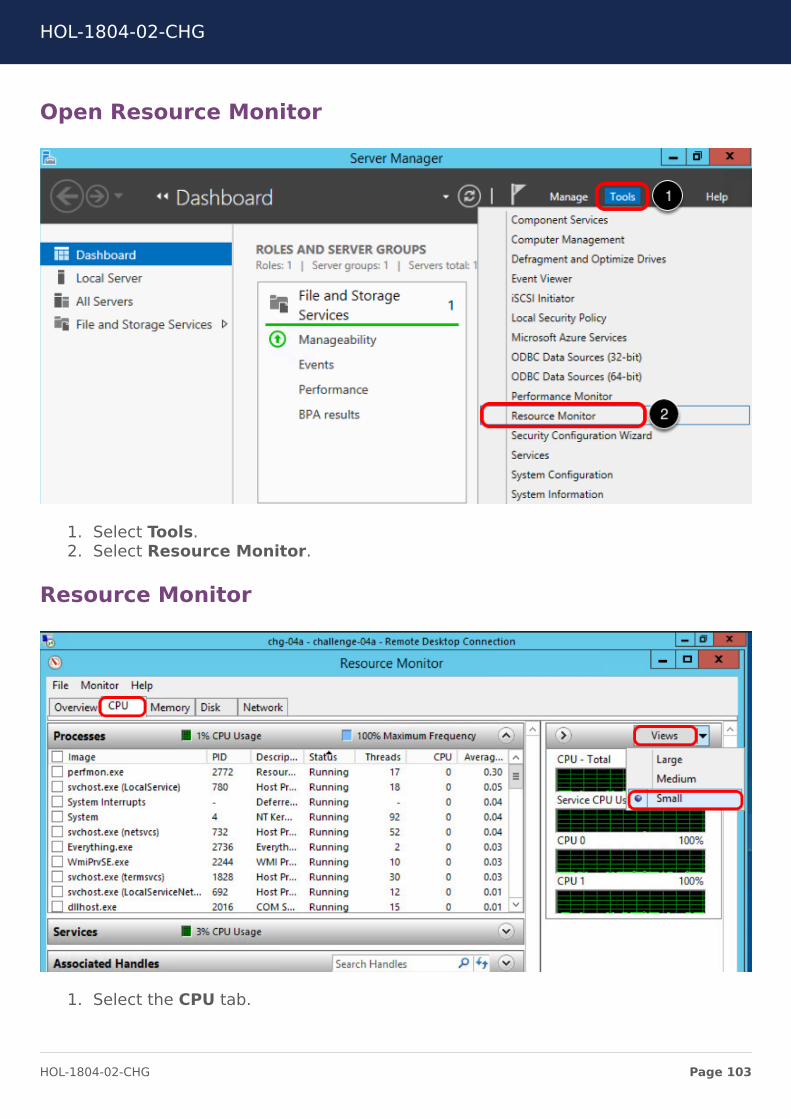
Open Resource Monitor
1. Select Tools.2. Select Resource Monitor.
Resource Monitor
1. Select the CPU tab.
HOL-1804-02-CHG
Page 103HOL-1804-02-CHG
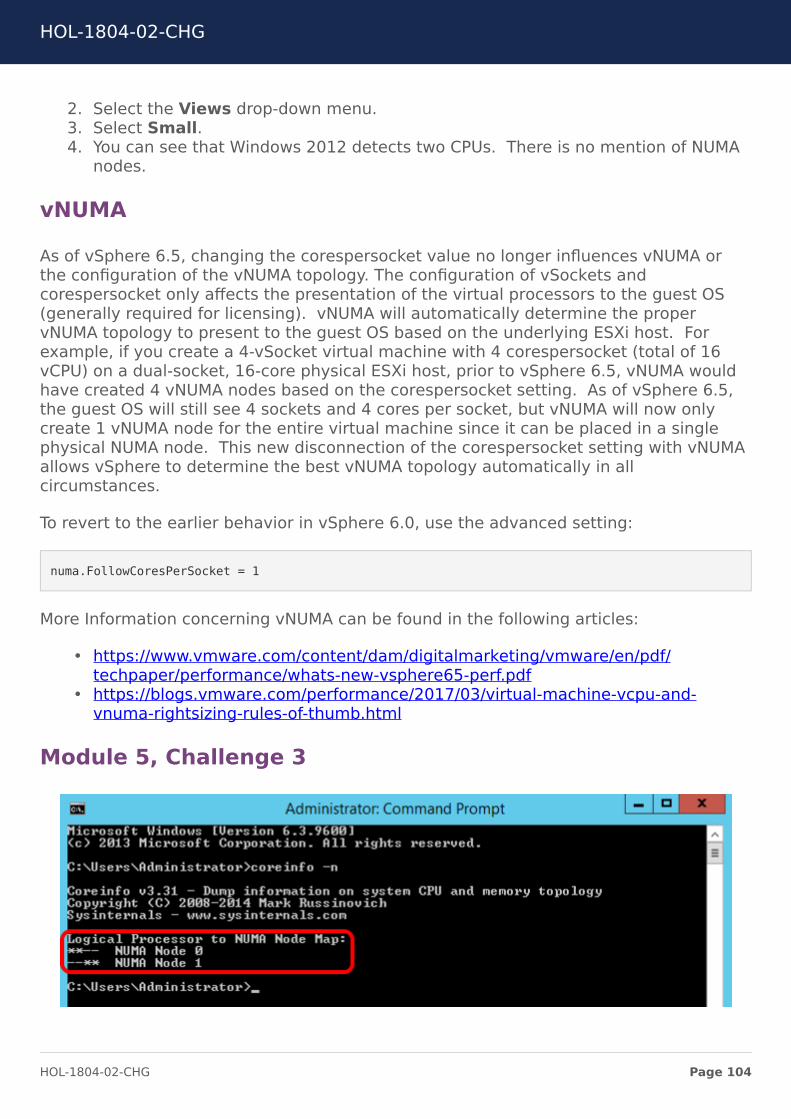
2. Select the Views drop-down menu.3. Select Small.4. You can see that Windows 2012 detects two CPUs. There is no mention of NUMA
nodes.
vNUMA
As of vSphere 6.5, changing the corespersocket value no longer influences vNUMA orthe configuration of the vNUMA topology. The configuration of vSockets andcorespersocket only affects the presentation of the virtual processors to the guest OS(generally required for licensing). vNUMA will automatically determine the propervNUMA topology to present to the guest OS based on the underlying ESXi host. Forexample, if you create a 4-vSocket virtual machine with 4 corespersocket (total of 16vCPU) on a dual-socket, 16-core physical ESXi host, prior to vSphere 6.5, vNUMA wouldhave created 4 vNUMA nodes based on the corespersocket setting. As of vSphere 6.5,the guest OS will still see 4 sockets and 4 cores per socket, but vNUMA will now onlycreate 1 vNUMA node for the entire virtual machine since it can be placed in a singlephysical NUMA node. This new disconnection of the corespersocket setting with vNUMAallows vSphere to determine the best vNUMA topology automatically in allcircumstances.
To revert to the earlier behavior in vSphere 6.0, use the advanced setting:
numa.FollowCoresPerSocket = 1
More Information concerning vNUMA can be found in the following articles:
• https://www.vmware.com/content/dam/digitalmarketing/vmware/en/pdf/techpaper/performance/whats-new-vsphere65-perf.pdf
• https://blogs.vmware.com/performance/2017/03/virtual-machine-vcpu-and-vnuma-rightsizing-rules-of-thumb.html
Module 5, Challenge 3
HOL-1804-02-CHG
Page 104HOL-1804-02-CHG

In this challenge, the Database Manager is not comfortable with the new NUMA settingas it relates to the Database servers. Therefore, the Database Manager would preferthe NUMA behavior mimic that of vSphere 6.0.
Your challenge is to:
• Modify the settings needed to create two NUMA nodes on'challenge-04a'.
Need a Hint?
You can also view hints on the VMware Technology Network Communities here:
https://communities.vmware.com/docs/DOC-37002
DO NOT proceed to the next page unless you are ready to view the solution to thischallenge.
Module 5, Challenge 3 Solution
If the Hot Add vCPU virtual hardware setting is enabled, then the architecturepresented to the virtual machine will be uniform memory access (UMA) only.
To solve this issue:
1. Power off the 'challenge-04a' virtual machine.2. Within the vSphere Web Client, right click on 'challenge-04a', select Edit
Settings. Within CPU, deselect Enable CPU Hot Add.3. Select OK.4. Power on the challenge-04a. Did the NUMA Architecture change on
'challenge-04a'?
Additional steps are needed to force 'challenge-04a' to use 2 NUMA Nodes. We willcomplete the configuration of 'challenge-04a' in the upcoming steps.
You should keep the Enable CPU Hot Add setting disabled unless you know that youneed it.
Note that the VM is configured with 2 vCPUs and 1 cores per socket. Typically, youshould leave Cores per Socket = 1 which results in the best performance.When Cores per Socket is left at its default value of 1, this allows ESXi to automatically
choose the optimal vNUMA configuration for the VM based on the physical server, whichgenerally results in the best performance. Leave Cores per Socket = 1 unless you havea very specific reason to do otherwise, such as for licensing purposes.
If your guest OS does not see a vNUMA architecture and you think it should, check thefollowing:
HOL-1804-02-CHG
Page 105HOL-1804-02-CHG

By default, vNUMA is enabled only for virtual machines with more than eightvCPUs. You can enable vNUMA for virtual machines with eight or fewer vCPUs bychanging the VM setting numa.vcpu.min from its default value of 9 to the number ofvCPUs in the virtual machine. This setting controls the minimum number of vCPUsrequired to enable vNUMA. This setting was modified on 'challenge-04a'.
vNUMA requires virtual hardware version 8 or later.
Other factors that may completely disable NUMA (for the host and the VM) are BIOSsettings such as enabling node interleaving. Node Interleaving is generally disabledby default, but if you enable it, it will present a UMA architecture to the ESXi host.
Open Google Chrome
1. Open Google Chrome using the shortcut on the taskbar.
Open vSphere Flash Client
1. Select the vSphere Flash Client bookmark within Google Chrome.
Login to vSphere Flash Client
1. Select the check box "Use windows session authentication".2. Select Login.
HOL-1804-02-CHG
Page 106HOL-1804-02-CHG

Power Off challenge-04a
Before proceeding to the next step, Power Off the 'challenge-04a' virtual machine. If'challenge-04a' is already Powered-Off, you can proceed to the next step.
1. Right-click on 'challenge-04a'.2. Select Power to expand the Power context menu.3. Select Power Off.
HOL-1804-02-CHG
Page 107HOL-1804-02-CHG
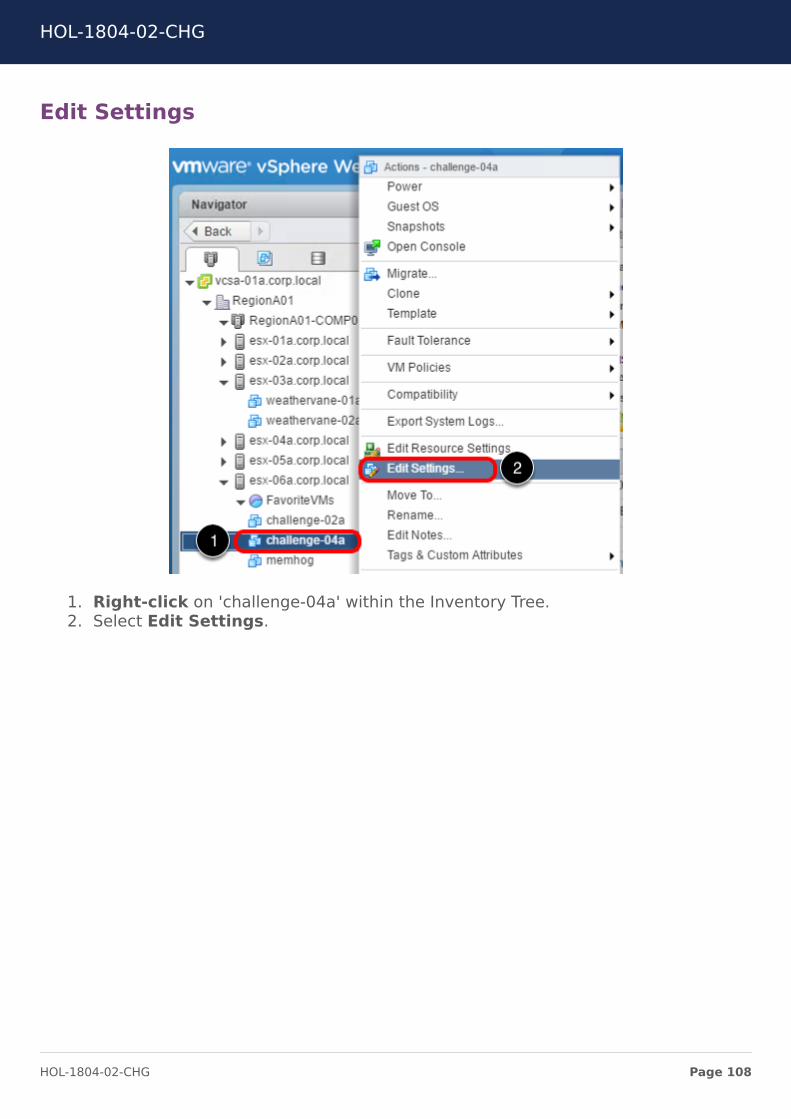
Edit Settings
1. Right-click on 'challenge-04a' within the Inventory Tree.2. Select Edit Settings.
HOL-1804-02-CHG
Page 108HOL-1804-02-CHG
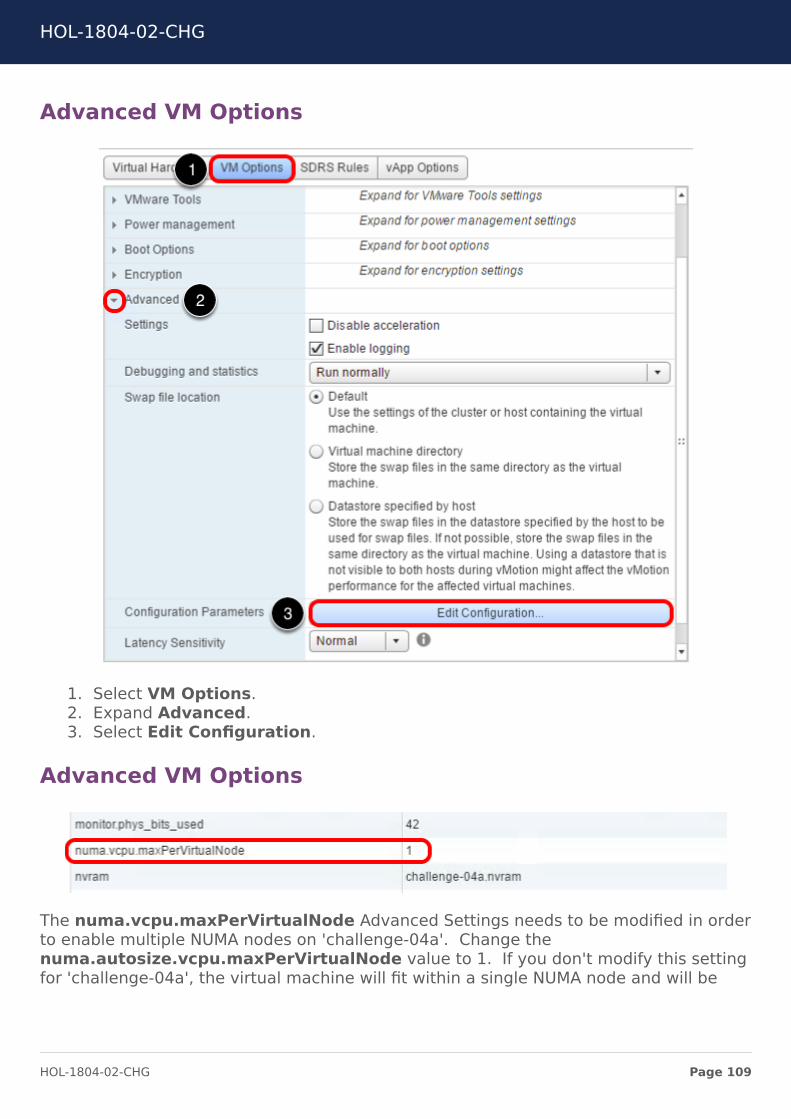
Advanced VM Options
1. Select VM Options.2. Expand Advanced.3. Select Edit Configuration.
Advanced VM Options
The numa.vcpu.maxPerVirtualNode Advanced Settings needs to be modified in orderto enable multiple NUMA nodes on 'challenge-04a'. Change thenuma.autosize.vcpu.maxPerVirtualNode value to 1. If you don't modify this settingfor 'challenge-04a', the virtual machine will fit within a single NUMA node and will be
HOL-1804-02-CHG
Page 109HOL-1804-02-CHG
presented as such . With the maxPerVirtualNode value set at 1, we are forcing NUMA torecognize NUMA in multiples of 1, as opposed to 2 or 4.
2 NUMA Nodes
Check the NUMA Node configuration after modifying the "maxPerVirtualNode" setting todetermine if a 2nd NUMA Node was successfully created on the 'challenge-04a' virtualmachine. Use the desktop 'NUMA coreinfo' desktop shortcut once again to view theNUMA Node configuration.
Great job, the 'challenge-04a' virtual machine can now take advantage of multipleNUMA nodes.
Go to Server Manager > Resource Monitor and select the CPU tab. Notice thatNUMA Node 0 and NUMA Node 1 are now visible within Resource Monitor.
If you're curious to see if both NUMA nodes will be utilized, use the SPECjbb benchmarkapplication located on the desktop to Start a Benchmark. View NUMA Node usagewithin Resource Monitor to ensure both NUMA Nodes are being utilized.
If you DO NOT see 2 NUMA Nodes, be sure that you deselected Enable CPU HotAdd within the virtual machine settings.
HOL-1804-02-CHG
Page 110HOL-1804-02-CHG
Stop Module 5
Before you celebrate with colleagues, open the Challenge Lab MS (Module Switcher)located on the desktop of the Main Console.
1. Double-click on Challenge Lab MS (Module Switcher) shortcut located on thedesktop of the Main Console.
2. Select Stop under Module 5.
Wait for the PowerCLI window to close before proceeding to the next step.
You've Finished Module 5
This concludes Module 5, Advanced Resource Management. We hope you enjoyedtaking it. Please do not forget to fill out the survey when you are finished.
If you have time remaining, you can proceed to a different Module that interests you.Click on "More Options - Table of Contents" to quickly jump to a different Challenge
within the Module.
• Module 1 - Let's Start with the Basics (30 minutes)• Module 2 - Basic Operations Management (30 minutes)• Module 3 - Basic Resource Management (30 minutes)• Module 4 - Advanced Operations Management (45 minutes)• Module 5 - Advanced Resource Management (45 minutes)
HOL-1804-02-CHG
Page 111HOL-1804-02-CHG

Module Hints
HOL-1804-02-CHG
Page 112HOL-1804-02-CHG

Module 1 - Let's Start with the BasicsModule 1, Challenge 1, Hint
The challenge is to migrate the 'challenge-01a' virtual machine from ESXi host 'esx-01a'to 'esx-04a', 'esx-05a' or 'esx-06a'. Why not 'esx-03a'? Try to determine the similaritiesbetween 'esx-01a' and 'esx-03a' and differences between between 'esx-01a' andesx-03a' and the hosts your attempting to migrate 'challenge-01a' to.
Bonus Hint: Examine the error message you receive when attempting to migrate the'challenge-01a' virtual machine to ESXi host(s) 'esx-04a', 'esx-05a' or 'esx-06a'.
Return to Module 1, Challenge 1
Module 1, Challenge 2, Hint
Examine all the networking properties for 'challenge-02a' within vCenter Serverincluding the virtual NIC, port group and virtual switch. You may need to compare thesettings of 'challenge-02a' to another challenge virtual machine to determine where theerror is.
Return to Module 1, Challenge 2
HOL-1804-02-CHG
Page 113HOL-1804-02-CHG

Module 2 - Basic OperationsManagementModule 2, Challenge 1 Hint
A couple of hints that will help you down the path of solving this challenge:
• You will need to download the VMware Tools installation files from one of the ESXihosts to the Main Console.
• You will need to create a folder within a shared vSphere datastore for the VMwareTools installation files.
• You will need to use 'WinSCP' to copy the VMware Tools installation files to afolder within a shared datastore.
Return to Module 2, Challenge 1
Module 2, Challenge 2 Hint
Look closely at line 3, character 1 of the 'Get-VM-Snaphshots' PowerCLI script. That iswhere the syntax error is. Look for any duplicate commands within the script as thereshould only be unique commands within the script.
Return to Module 2, Challenge 2
HOL-1804-02-CHG
Page 114HOL-1804-02-CHG

Module 3 - Basic ResourceManagementModule 3, Challenge 1 Hint
Look closely and compare the resource settings for both 'challenge-01a' and'challenge-04a' including CPU and Memory. In order for 'challenge-01a' to be performingpoorly when compared to 'challenge-04a' with both running the same benchmarkingapplication, there must be a resource configuration on 'challenge-01a' and/or'challenge-04a' that is causing the performance behavior.
Return to Module 3, Challenge 1
Module 3, Challenge 2 Hint
There are multiple ways to alleviate the memory pressure being put on 'esx-01a'. Thereare 5 other ESXi hosts within the cluster that do not have memory pressure, thereforeperhaps using one of the other ESXi hosts within the cluster. Also, it's mentioned thatthe 'memhog' virtual machine was started by accident, therefore you could take actionagainst that virtual machine.
Return to Module 3, Challenge 2
HOL-1804-02-CHG
Page 115HOL-1804-02-CHG

Module 4 - Advanced OperationsManagementModule 4, Challenge 1, Hint
In order to assign unqiue permissions to a particular user, it's much easier to create aRole first, then assign that Role to the user. You define the requested permissions withinthe Role. A role provides flexibility for the future. If permissions need to be modified,you can modify the role as opposed to modifying permissions on the user object. Also, ifmore than one user needs the same permission, you can assign a Role to multiply usersas opposed to assigning permissions to individual users.
Return to Module 4, Challenge 1
Module 4, Challenge 2 Hint
Module 4, Challenge 3 Hint
Within the 'Production Host Profile' Host Profile, details are provided as to why the ESXihost 'esx-05a' is not compliant. You may need to look deeper within the Compliancewindow to determine why it is not compliant.
Return to Module 4, Challenge 3
HOL-1804-02-CHG
Page 116HOL-1804-02-CHG
Module 5 - Advanced ResourceManagementModule 5, Challenge 1 Hint
These hints will help you solve the Latency Sensitivity challenge:
• The Latency Sensitivity setting is located under VM Options.• A CPU and Memory Reservation is required for enabling Latency Sensitivity on a
virtual machine.
Return to Module 5, Challenge 1
Module 5, Challenge 2 Hint
First, examine the resource settings of both the 'challenge-01a' and 'challenge-04a'virtual machines. Are they both configured the same or does one have more/less CPUand/or Memory that could be causing the difference in performance? Also, look closelyat the configuration of the 'FavoriteVMs' Resource Pool. Is the Resource Pool configuredin such a way that would cause the difference in performance.
You could also move the 'challenge-01a' virtual machine out of the Resource Pool tofurther determine if the Resource Pool is the cause of the difference in performance.Remember to allow the benchmark tool to run a few cycles before determining if the
Resource Pool is the cause of the difference in performance or not.
Return to Module 5, Challenge 2
Module 5, Challenge 3 Hint
These hints will help you solve the vNUMA Troubleshooting challenge:
• You will need to Power Off the 'challenge-04a' virtual machine. Why? You willneed to edit the Configuration Parameters of the virtual machine using EditConfiguration within VM Options.
• There is an Advanced Setting that can produce the wanted vNUMA output.
Return to Module 5, Challenge 3
HOL-1804-02-CHG
Page 117HOL-1804-02-CHG

ConclusionThank you for participating in the VMware Hands-on Labs. Be sure to visithttp://hol.vmware.com/ to continue your lab experience online.
Lab SKU: HOL-1804-02-CHG
Version: 20180202-122348
HOL-1804-02-CHG
Page 118HOL-1804-02-CHG