table of contents - vmwaredocs.hol.vmware.com/hol-2017/hol-1701-chg-5_pdf_en.pdf · this module...
TRANSCRIPT

Table of ContentsLab Overview: HOL-1701-CHG-5 vRealize Operations Application Monitoring: ChallengeLab.................................................................................................................................... 2
Lab Overview .......................................................................................................... 3Lab Guidance .......................................................................................................... 5
Module 1 - Configuring a Custom Application (15 minutes) ............................................10Introduction........................................................................................................... 11Creating the Application........................................................................................ 14
Module 2 - Configuring Metrics and the Policy for the Application (30 minutes) .............18Introduction........................................................................................................... 19Creating Super Metrics.......................................................................................... 22Creating a New Application Policy......................................................................... 25Assigning the New Policy to Teleport Application .................................................. 27
Module 3 - Building the Application Monitoring Dashboard (30 minutes) .......................36Introduction........................................................................................................... 37Building the Object View for the Application ......................................................... 40Building the Application Monitoring Dashboard .................................................... 42
Module 4 - Publishing the Application Monitoring Dashboard (15 minutes) ....................45Introduction........................................................................................................... 46Publishing the Application Monitoring Dashboard ................................................. 49
Module 5 - Challenge Solution (45 minutes) ................................................................... 50Module 1 - Creating the Teleporter Application ..................................................... 51Module 2 - Setup Metrics & Policy to the Application ............................................61Module 3 - Building the Application Monitoring Dashboard...................................78Module 4 - Publishing the Application Monitoring Dashboard ...............................96Module Conclusion .............................................................................................. 101
HOL-1701-CHG-5
Page 1HOL-1701-CHG-5

Lab Overview:HOL-1701-CHG-5 vRealize
Operations ApplicationMonitoring: Challenge
Lab
HOL-1701-CHG-5
Page 2HOL-1701-CHG-5

Lab OverviewThe Intelligent Operations Challenge Lab asks you to put on your thinking cap to savethe day! This is a full story challenge lab, which means we recommend you to completethe the modules sequentially in order to advance to the next step. If you would like toskip some modules, you should complete the previous modules tasks located in theSolution module.
Remember that this is a Challenge Lab. You will not be given the step-by-stepinstructions in this part of the lab. The idea is to challenge advanced vRealizeOperations users to figure out the necessary steps on their own. If you getstuck or want to see the entire solution, skip to Module 5 of this lab (use theTable of Contents link at the top of the lab manual).
Lab Preface
As you walk into a tall glass building, you glance at your watch; it is 9:00 AM. It is thebeginning of another workday at one of the most desirable companies in the year 2096,PanContinental Teleportation Corporation. PanContinental Teleportation moves peopleand things instantaneously across the globe. After a quick payment, anyone can stepinto a booth-like "Waypoint™" located in every major city across the globe. Thecustomer then selects their destination and instantaneously emerge in their destinationWaypoint™.
PanContinental technology is not magic. No, it powered by the primary datacenter usingVMware vSphere 6.0 and vRealize Operations 6.2, which is the gleaming building youjust entered. As the largest and most trusted global teleportation network,PanContinental's highest priorities are the safety of its customers and continuity ofoperations. That responsibility rests on your team's shoulders. In this lab, you will learnto understand and map a teleportation application in vRealize Operations.
This module will test your mettle and keep the teleportation application runningsmoothly. It is best suited for those with some vRealize Operations experience.
We provide optional hints along the way as well as providing the Challenges' finalsolutions.
A Readme.txt file is included on the desktop with authentication information.
Lab Module List:
• Module 1 - Configuring a Custom Application (15 minutes) (Advanced) Inthis module, we will be challenged to create a new application, selecting VMsacross the vCenter and setting up application layers for those VMs.
HOL-1701-CHG-5
Page 3HOL-1701-CHG-5

• Module 2 - Setup Metrics & Policy to the Application (30 minutes)(Advanced) In this module, we will be challenged to understand the customapplication behavior and apply correct metrics and policy.
• Module 3 - Building the Application Monitoring Dashboard (30 minutes)(Advanced) In this module, we will be challenged to build views and dashboardsto publish the application metrics monitoring.
• Module 4 - Publishing the Application Monitoring Dashboard (15 minutes)(Advanced) In this module, we will be challanged to share the ApplicationDashboard for a specific user and grant him limited access to some of thevRealize Operations objects.
• Module 5 - Challenge Solution (45 minutes) (Advanced) In this module, wecan find the full solution about the challenge.
Lab Captains: Danny Farber, Staff Systems Engineer, Brazil
This lab manual can be downloaded from the Hands-on Labs Document site found here:
http://docs.hol.vmware.com/
This lab may be available in other languages. To set your language preference and havea localized manual deployed with your lab, you may utilize this document to help guideyou through the process:
http://docs.hol.vmware.com/announcements/nee-default-language.pdf
HOL-1701-CHG-5
Page 4HOL-1701-CHG-5

Lab GuidanceNote: It will take more than 90 minutes to complete this lab. The modules areindependent of each other so you can start at the beginning of any moduleand proceed from there. You can use the Table of Contents to access anymodule of your choosing.
The Table of Contents can be accessed in the upper right-hand corner of theLab Manual.
Location of the Main Console
1. The area in the RED box contains the Main Console. The Lab Manual is on the tabto the Right of the Main Console.
2. A particular lab may have additional consoles found on separate tabs in the upperleft. You will be directed to open another specific console if needed.
3. Your lab starts with 90 minutes on the timer. The lab can not be saved. All yourwork must be done during the lab session. But you can click the EXTEND toincrease your time. If you are at a VMware event, you can extend your lab timetwice, for up to 30 minutes. Each click gives you an additional 15 minutes.Outside of VMware events, you can extend your lab time up to 9 hours and 30
minutes. Each click gives you an additional hour.
HOL-1701-CHG-5
Page 5HOL-1701-CHG-5

Activation Prompt or Watermark
When you first start your lab, you may notice a watermark on the desktop indicatingthat Windows is not activated.
One of the major benefits of virtualization is that virtual machines can be moved andrun on any platform. The Hands-on Labs utilizes this benefit and we are able to run thelabs out of multiple datacenters. However, these datacenters may not have identicalprocessors, which triggers a Microsoft activation check through the Internet.
Rest assured, VMware and the Hands-on Labs are in full compliance with Microsoftlicensing requirements. The lab that you are using is a self-contained pod and does nothave full access to the Internet, which is required for Windows to verify the activation.Without full access to the Internet, this automated process fails and you see this
watermark.
This cosmetic issue has no effect on your lab.
Alternate Methods of Keyboard Data Entry
During this module, you will input text into the Main Console. Besides directly typing itin, there are two very helpful methods of entering data which make it easier to entercomplex data.
HOL-1701-CHG-5
Page 6HOL-1701-CHG-5

Click and Drag Lab Manual Content Into Console ActiveWindow
You can also click and drag text and Command Line Interface (CLI) commands directlyfrom the Lab Manual into the active window in the Main Console.
Accessing the Online International Keyboard
You can also use the Online International Keyboard found in the Main Console.
1. Click on the Keyboard Icon found on the Windows Quick Launch Task Bar.
<div class="player-unavailable"><h1 class="message">An error occurred.</h1><div class="submessage"><ahref="http://www.youtube.com/watch?v=xS07n6GzGuo" target="_blank">Try watching this video on www.youtube.com</a>, or enableJavaScript if it is disabled in your browser.</div></div>
HOL-1701-CHG-5
Page 7HOL-1701-CHG-5

Click once in active console window
In this example, you will use the Online Keyboard to enter the "@" sign used in emailaddresses. The "@" sign is Shift-2 on US keyboard layouts.
1. Click once in the active console window.2. Click on the Shift key.
Click on the @ key
1. Click on the "@" key.
Notice the @ sign entered in the active console window.
HOL-1701-CHG-5
Page 8HOL-1701-CHG-5

Look at the lower right portion of the screen
Please check to see that your lab is finished all the startup routines and is ready for youto start. If you see anything other than "Ready", please wait a few minutes. If after 5minutes you lab has not changed to "Ready", please ask for assistance.
HOL-1701-CHG-5
Page 9HOL-1701-CHG-5

Module 1 - Configuring aCustom Application (15
minutes)
HOL-1701-CHG-5
Page 10HOL-1701-CHG-5

IntroductionLet's start!!!
The teleporter application is a three tier application. Your mission here is to identify theapplication components and create the application structure using vRealize Operations.
The virtual machines' application layers are identified with the acronyms: Web, App, andDB.
Remember that this is a Challenge Lab. You will not be given the step-by-stepinstructions in this part of the lab. The idea is to challenge advanced vRealizeOperations users to figure out the necessary steps on their own. If you getstuck or want to see the entire solution, skip to Module 5 of this lab (use theTable of Contents link at the top of the lab manual).
Virtual Machines - vSphere Cluster Localization
Referring to the image above, you can identify the virtual machines' vSphere Clusterdependency.
With that, we are ready to move to the first challenge...
HOL-1701-CHG-5
Page 11HOL-1701-CHG-5

Open Firefox Browser from Windows Quick Launch TaskBar
1. Click on the Firefox icon on the Windows Quick Launch Task Bar.
HOL-1701 Lab Links Page
Once the firefox has been opened, the HOL-1701 Lab Links page should be loaded.
If not, please copy the link below to load the HOL-1701 Lab Links Page.
http://localhost or click the Home button in the browser.
HOL-1701-CHG-5
Page 12HOL-1701-CHG-5

Open vRealize Operations
1. Click on the vRealize Operations Manager - Live Instance link.
Login to vRealize Operations
1. Login to vRealize Operations Manager with the following credentials.
User name: AdminPassword: VMware1!
2. Click the Login button.
HOL-1701-CHG-5
Page 13HOL-1701-CHG-5

Creating the ApplicationManaging Application Groups
An application is a container construct that represents a collection of interdependenthardware and software components that deliver a specific capability to support yourbusiness. vRealize Operations Manager builds an application to determine how yourenvironment is affected when one or more components in an application experiencesproblems and to monitor the overall health and performance of the application. Objectmembership in an application is not dynamic. To change the application, you manuallymodify the objects in the container.
Reasons to Use Applications
vRealize Operations Manager collects data from components in the application anddisplays the results in a summary dashboard for each application with a real-timeanalysis for any or all of the components. If a component experiences problems, you cansee where in the application the problems arise, and determine how problems spread toother objects.
HOL-1701-CHG-5
Page 14HOL-1701-CHG-5

Mission 1 - Identify the Teleporter Virtual MachinesApplication
For your first mission, identify, using vRealize Operations, the Teleporter Applicationcluster and virtual machines.
Here is the vRealize Operations screenshot.
1. Navigate to the correct place to identify the cluster and Teleporter Applicationvirtual machines. [hint: Environment|vSphere Hosts and Clusters]
Mission 2 - Create the Application using vRealizeOperations
The first mission was too easy!!! Let's move to the second mission.
Create the application in the vRealize Operations.
HOL-1701-CHG-5
Page 15HOL-1701-CHG-5

1. Create an application with the name: Teleporter Application2. Create the three tiers application: Web, App and DB.3. Add the five chg-xxx-0xa VMs to the applicable tiers4. Save the application
Hint #1: If you have identified the virtual machines in the Environment Area, you are onthe right track.
Hint #2: You should not have any additional tiers, just the three mentioned above.
Hint #3: Due the screen resolution, you may not see the application "Save" buttonwhen you will build your application. For best results:
1. Select the Options menu in Firefox2. Click the '-' button to zoom out to 90%
This will provide more viewing space while still allowing you to read the text.
HOL-1701-CHG-5
Page 16HOL-1701-CHG-5

The Teleporter Application
Here is the final result for the Teleporter Application in vRealize Operations. What aboutyour Teleporter Application? Was it built correctly?
Ready for the next missions... Ready? Let's go...
HOL-1701-CHG-5
Page 17HOL-1701-CHG-5

Module 2 - ConfiguringMetrics and the Policy for
the Application (30minutes)
HOL-1701-CHG-5
Page 18HOL-1701-CHG-5

IntroductionModule 2 will challenge you to create new Super Metrics and a new policy to beassigned to the Teleporter Application.
Remember that this is a Challenge Lab. You will not be given the step-by-stepinstructions in this part of the lab. The idea is to challenge advanced vRealizeOperations users to figure out the necessary steps on their own. If you getstuck or want to see the entire solution, skip to Module 5 of this lab (use theTable of Contents link at the top of the lab manual).
Open Firefox Browser from Windows Quick Launch TaskBar
1. If not already in vRealize Operations, click on the Firefox icon on the WindowsQuick Launch Task Bar.
HOL-1701-CHG-5
Page 19HOL-1701-CHG-5

HOL-1701 Lab Links Page
Once the firefox has been opened, the HOL-1701 Lab Links page should be loaded.
If not, please type the link below to load the HOL-1701 Lab Links Page.
http://localhost or click the Home button in the browser
Open vRealize Operations
1. Click on the vRealize Operations Manager - Live Instance link.
HOL-1701-CHG-5
Page 20HOL-1701-CHG-5

Login to vRealize Operations
Login to vRealize Operations
• Type the User name: Admin• Type the password: VMware1!
Action Required for Module 2
If you did not complete Module 1, please complete all steps in:
Module 1 - Steps required to proceed for the Module 2
HOL-1701-CHG-5
Page 21HOL-1701-CHG-5

Creating Super MetricsSuper Metrics are mathematical formulas that contain one or more metrics. They arecustom metrics we create when we need to track combinations of metrics, either froma single object or from multiple objects.
After we define the Super Metric, we can assign it to one or more object types. Thisaction calculates the Super Metric for the objects in that object type and simplifies themetrics display. For example, if we define a Super Metric that calculates the averageCPU usage on all virtual machines and we assign the Super Metric to a cluster, theaverage CPU usage on all virtual machines in that cluster is reported as a Super Metricfor the cluster.
If the Super Metric attribute is enabled in a policy, we can then collect Super Metricsfrom a group of objects associated with a policy.
Review the Teleporter Application
If you completed all of the steps in Module 1, you should have the Teleporter Applicationas the image above.
Mission 3 - Create the Super Metrics
At this point you are challenged to create two Super Metrics for the TeleporterApplication. Those Super Metrics will be used for troubleshooting and applicationdashboard.
HOL-1701-CHG-5
Page 22HOL-1701-CHG-5

[hint: Content|Super Metrics] Due to the limited screen resolution in the labenvironment, you may need to expand the left navigation pane if you don't see the iconfor Content. Also you might have to zoom out the browser to 80% to see the Savebutton.
1. Super Metric: Max-Risk(%)
Name: Max-Risk(%)
Super Metric Formula: Max of Risk(%) for Teleporter Application
Hint #1: This is the formula for the Super Metric:
max(${adaptertype=Container, objecttype=BusinessService,objectname=Teleporter Application, metric=badge|risk}) [hint: BusinessServiceis the object type key for Application]
2. Super Metric: Min-Health(%)
Name: Min-Health(%)
Super Metric Formula: Min of Health(%) for Teleporter Application
Hint #2: This is the formula for the Super Metric:
min(${adaptertype=Container, objecttype=BusinessService,objectname=Teleporter Application, metric=badge|health})
Hint #3: Do not forget to associate the super metric to Container: ApplicationObject Typesfor both Super Metrics.
HOL-1701-CHG-5
Page 23HOL-1701-CHG-5

Conclusion
At the end of the Super Metrics creation, you should have the screen above.
If so, you are ready for the next mission...
HOL-1701-CHG-5
Page 24HOL-1701-CHG-5

Creating a New Application PolicyHere you will create a policy to use with your new application.
About Operational Policies
Operational Policies determine how to have vRealize Operations Manager monitor yourobjects, and how to notify you about problems that occur with those objects.
vRealize Operations Manager Administrators assign policies to object groups andapplications to support Service Level Agreements (SLAs) and business priorities. Whenyou use policies with object groups, you ensure that the rules defined in the policies arequickly put into effect for the objects in your environment.
With policies, you can:
■ Enable and disable alerts.
■ Control data collections by persisting or not persisting metrics on the objects in yourenvironment.
■ Configure the product analytics and thresholds.
■ Monitor objects and applications at different service levels.
■ Prioritize policies so that the most important rules override the defaults.
■ Understand the rules that affect the analytics.
■ Understand which policies apply to object groups.
vRealize Operations Manager includes a library of built-in active policies that are alreadydefined for your use. vRealize Operations Manager applies these policies in priorityorder.
Mission 4 - Creating a New Policy
The Teleporter Application, used by PanContinental Teleportation Corporation, has aspecial behavior. The Teleporter Application is used only four days per week ( Monday,Tuesday, Wednesday and Thursday ) from 9:00 AM to 5:00 PM.
You are responsible to have this application monitored correctly.
HOL-1701-CHG-5
Page 25HOL-1701-CHG-5

Your mission is to create a policy with these requirements [hint:Administration|Policies|Policy Library. Create as a child of the ...Default Policy (Hands onLabs) policy]:
Policy Name: Teleporter App PolicyBase Policy and Analysis Settings : ApplicationTime Frame: Monday, Tuesday, Wednesday and Thursday from 9:00 AM to 5:00 PM
Hint #1: Do not forget to setup the Super Metrics Visible by the Policy.
Conclusion
Here is the policy ready to be applied to the application.
What about your policy? If it is ready, we can now apply the policy to the application.
HOL-1701-CHG-5
Page 26HOL-1701-CHG-5

Assigning the New Policy to TeleportApplicationSo... we have the policy and it could be assigned to the Teleporter Application, howeverwe would like to apply a Group Type before we assign the policy. In this step, you willcreate a Group Type.
Object Group Types
An object Group Type is an identifier that you apply to a specific group of objects in yourenvironment to categorize them. You can add new Group Types and apply them togroups of objects so that vRealize Operations Manager can collect data from the objectgroup and display the results in the dashboards and views.
How the Group Types Work
Use Group Types to categorize your objects so vRealize Operations Manager can applypolicies to them to track and display specific status, such as alerts, workload, faults,risk, and so on.
When you create a new Group Type, vRealize Operations Manager adds it to the existinglist of Group Types and creates a new folder with the name of your Group Type in theEnvironment Custom Groups list.
When you create a new group of objects, you assign a Group Type to that group ofobjects. You add objects from the inventory trees to your custom group, then createyour dashboard, add widgets to the dashboard, and configure the widgets to display thedata collected from the objects in the group. You can then monitor and manage theobjects.
You can also apply a Group Type to a group of objects that you create manually or toobject groups that you cannot modify, such those added by adapters. Each adapter thatyou add to vRealize Operations Manager adds one or more static groups of objects togroup the data received from the adapter sources.
The list of Group Types appears in the Content area under Group Types. The customobject groups appear in the Environment area under Custom Groups.
Create a new Group Type to have all PanContinental Application in the sameplace.
HOL-1701-CHG-5
Page 27HOL-1701-CHG-5

Creating a Group Type
1. Navigate to Content and click on Group Types.2. Click on Plus icon.
HOL-1701-CHG-5
Page 28HOL-1701-CHG-5

Type the Group Type Name
1. Type the Group Type name: PanContinental Applications.2. Click on OK Button.
HOL-1701-CHG-5
Page 29HOL-1701-CHG-5

Mission 5 - Applying the Policy
Now we have the Group Type and we are ready to assign the policy.
Do you know how to assign the policy? I can give you a tip here: Think about CustomGroups. [Environment|Groups]
So, now, this is you turn, apply the created policy to the application.
Custom Group Name: Teleporter Application - Custom Group
Hint #1 - Assign the policy you just created to this new group.
Hint #2 - Use the PanContinental Applications Group Type for your CustomGroup.
Hint #3 - Use the Object Name and the expression "contains" to set the TeleporterApplication as the object for the policy.
HOL-1701-CHG-5
Page 30HOL-1701-CHG-5

HOL-1701-CHG-5
Page 31HOL-1701-CHG-5

Application and the Group Type
Now, we will check the Group Type and the Custom Group Creation.
1. Navigate to Environment and click on Custom Groups.2. You will see the PanContinental Applications Group Type and your Custom
Group created.
HOL-1701-CHG-5
Page 32HOL-1701-CHG-5

Navigate to the Application
If your policy was assigned correctly, you can follow the next steps to validate theApplication Policy Assignment.
1. Double-Click on the Teleporter Application - Custom Group.
HOL-1701-CHG-5
Page 33HOL-1701-CHG-5

Select the Application
1. Click on Application.2. Click on Teleporter Application.
HOL-1701-CHG-5
Page 34HOL-1701-CHG-5

Validating the Policy Assignment
1. Check the policy on the top-right in the screen.
If you can see the Teleporter App Policy, you successfully did your job.
Good Job!!!
So, now it is time to create a View and a Dashboard for the application.
HOL-1701-CHG-5
Page 35HOL-1701-CHG-5

Module 3 - Building theApplication Monitoring
Dashboard (30 minutes)
HOL-1701-CHG-5
Page 36HOL-1701-CHG-5
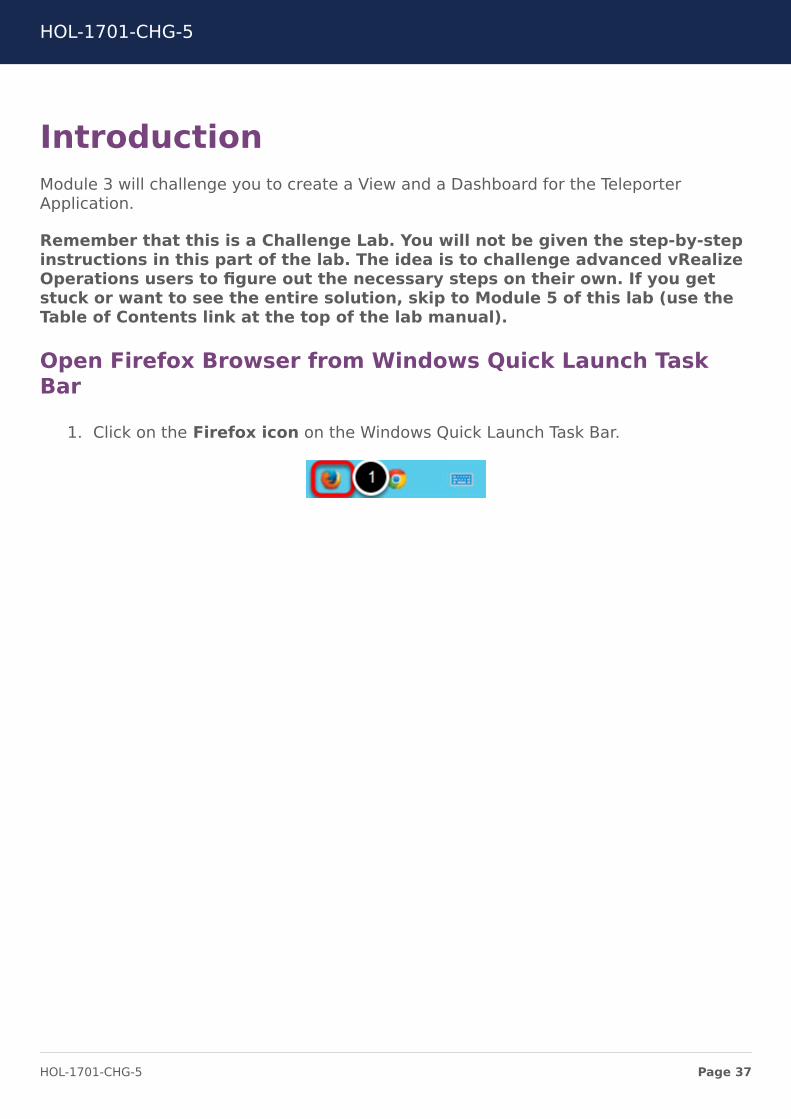
IntroductionModule 3 will challenge you to create a View and a Dashboard for the TeleporterApplication.
Remember that this is a Challenge Lab. You will not be given the step-by-stepinstructions in this part of the lab. The idea is to challenge advanced vRealizeOperations users to figure out the necessary steps on their own. If you getstuck or want to see the entire solution, skip to Module 5 of this lab (use theTable of Contents link at the top of the lab manual).
Open Firefox Browser from Windows Quick Launch TaskBar
1. Click on the Firefox icon on the Windows Quick Launch Task Bar.
HOL-1701-CHG-5
Page 37HOL-1701-CHG-5

HOL-1701 Lab Links Page
Once the firefox has been opened, the HOL-1701 Lab Links page should be loaded.
If not, please type the link below to load the HOL-1701 Lab Links Page.
http://localhost
Open vRealize Operations
1. Click on the vRealize Operations Manager - Live Instance link.
HOL-1701-CHG-5
Page 38HOL-1701-CHG-5
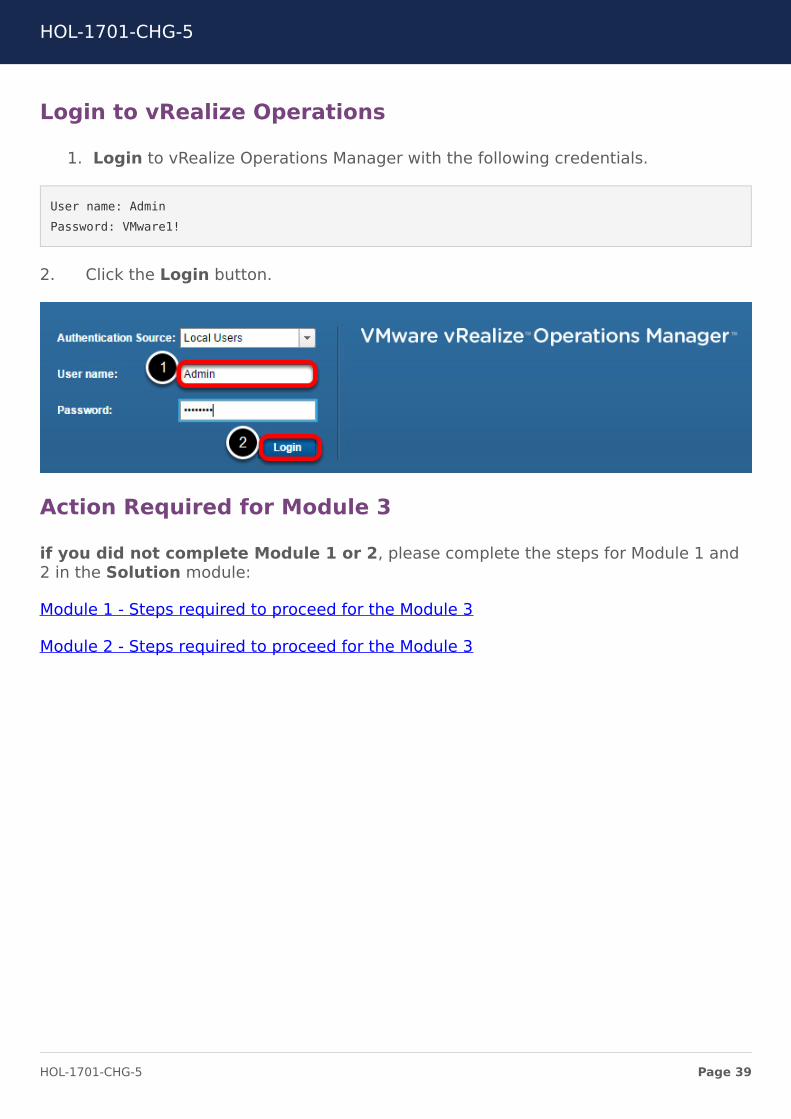
Login to vRealize Operations
1. Login to vRealize Operations Manager with the following credentials.
User name: AdminPassword: VMware1!
2. Click the Login button.
Action Required for Module 3
if you did not complete Module 1 or 2, please complete the steps for Module 1 and2 in the Solution module:
Module 1 - Steps required to proceed for the Module 3
Module 2 - Steps required to proceed for the Module 3
HOL-1701-CHG-5
Page 39HOL-1701-CHG-5

Building the Object View for theApplicationvRealize Operations Manager Views Overview
A View presents collected information for an object in a certain way depending on theview type.
vRealize Operations Manager provides several types of views. Each type of view helpsyou to interpret metrics, properties, policies of various monitored objects includingalerts, symptoms, and so on, from a different perspective. vRealize Operations ManagerViews also show information that the adapters in your environment provide.
Checking the Super Metrics
Now, let's check if the Super Metrics are available to be used in our View.
1. Navigate to Environment and click on Applicationsthen click the TeleporterApplication
2. Click on the All Metrics tab.3. Expand the All Metrics treeview and You will see the Super Metrics you created.
HOL-1701-CHG-5
Page 40HOL-1701-CHG-5

Mission 6 - Building the Object View
In this mission you will create an Object View using the Super Metrics you created inprevious steps.
This View will help you analyze the Risk and Health for the Teleporter Application.
Attributes of the View creation [hint: Content|Views]
Name: Teleporter Application ViewDescription : Risk and Health Teleporter Application MonitoringPresentation: TrendSubjects: ApplicationData: the Max-Risk(%) and Min-Health(%)Super Metrics
Optional #1: Use this View as a Further Analysis tool for the Anomalies Analysis.
Hint #1: You can preview the data before to move forward. Try to do this test to checkthe View results.
Conclusion
Have you finished already? Your View should now be available in the View List.
Great!!! Let's to publish it in your Teleporter Application Dashboard.
HOL-1701-CHG-5
Page 41HOL-1701-CHG-5

Building the Application MonitoringDashboardvRealize Operations Manager Dashboards
The Dashboard provides a quick overview of the performance and condition of yourvirtual infrastructure.
vRealize Operations Manager collects performance data from monitored software andhardware resources in your enterprise and provides predictive analysis and real-timeinformation about problems. The data and analysis are presented through alerts, inconfigurable dashboards, on predefined pages, and in several predefined dashboards.
Mission 7 - Building the Application Monitoring Dashboard
You are close to the end of the challenge. Here, you will consolidate all of yourcompleted missions.
Your challenge is to create a dashboard for Teleporter Application monitoring as showedin the screenshot. You will add 6 widgets in your dashboard as described below.
Note: If you are using Chrome as your Browser and you will see any issue withthe Widget position arrangement, please move to the Firefox Browser.
[hint: Content|Dashboards]
Dashboard PropertiesDashboard Name: Teleporter Application DashboardDashboard default: Yes
Widgets PropertiesWidget #1 - Teleporter Application Components: Use the Object List widget where you can selectthe Teleporter Application Components. Set the widget filter to Applications|TeleporterApplication. Set the "Teleporter Application" as "Auto Select First Row=on"Widget #2 - Metric Picker: Select this as your second WidgetWidget #3 - Metric Chart: This Widget will show the results of Application Component andMetric selected in the Widget #1 and #2 respectivelyWidget #4 - Teleporter Application View: Here you will apply the Object View you builtpreviously. This widget could not change when you select some Application component (SelfProvider = on)Widget #5 - Teleporter Application Alert List: This Widget needs to list all Alerts related tothe component selected in the Widget #1
HOL-1701-CHG-5
Page 42HOL-1701-CHG-5

Widget #6 - Teleporter Application Health: Monitor the Application Health in this Widget. Thiswidget could not change when you select some Application component
Hint #1: You need to configure widgets #2, #3 and #5 interaction and don't forget toapply the interactions before navigating away
Hint #2: Build your widgets in two columns as shown in the screenshot.
HOL-1701-CHG-5
Page 43HOL-1701-CHG-5

Conclusion
What about your dashboard? Are your widget interacting correctly? [hint: Home
Great Job!!!
You are ready to publish your Teleporter Application Dashboard to the PanContinentalOperations team. Let's move to your last Intelligent Operations Challenge Lab Mission.
HOL-1701-CHG-5
Page 44HOL-1701-CHG-5

Module 4 - Publishing theApplication Monitoring
Dashboard (15 minutes)
HOL-1701-CHG-5
Page 45HOL-1701-CHG-5

IntroductionModule 4 will challenge you to publish the Teleporter Application dashboard to thePanCorporation Operations team.
Remember that this is a Challenge Lab. You will not be given the step-by-stepinstructions in this part of the lab. The idea is to challenge advanced vRealizeOperations users to figure out the necessary steps on their own. If you getstuck or want to see the entire solution, skip to Module 5 of this lab (use theTable of Contents link at the top of the lab manual).
Open Firefox Browser from Windows Quick Launch TaskBar
1. Click on the Firefox icon on the Windows Quick Launch Task Bar.
HOL-1701-CHG-5
Page 46HOL-1701-CHG-5

HOL-1701 Lab Links Page
Once the firefox has been opened, the HOL-1701 Lab Links page should be loaded.
If not, please type the link below to load the HOL-1701 Lab Links Page.
http://localhost
Open vRealize Operations
1. Click on the vRealize Operations Manager - Live Instance link.
HOL-1701-CHG-5
Page 47HOL-1701-CHG-5

Login to vRealize Operations
Login to vRealize Operations
• Type the User name: Admin• Type the password: VMware1!
Action Required for Module 4
if you did not complete Module 1, 2 or 3, please complete all steps for Modules 1 -3 in the Solution:
Module 5 ( Module 1 ) - Steps required to proceed for the Module 4
Module 5 ( Module 2 ) - Steps required to proceed for the Module 4
Module 5 ( Module 3 ) - Steps required to proceed for the Module 4
HOL-1701-CHG-5
Page 48HOL-1701-CHG-5

Publishing the Application MonitoringDashboardShare Dashboards
You can share a dashboard or dashboard template with one or more user groups. Whenyou share a dashboard, it becomes available to all of the users in the user group thatyou select. The dashboard appears the same to all of the users who share it. If you edita shared dashboard, the dashboard changes for all users. Other users can only view ashared dashboard; they cannot change it.
Mission 8 - Publish the Teleporter Application Dashboardto the Operations User
This is your last mission...
Grant limited access to the Teleporter Application Dashboard for Operations User.
[hint: Content|Dashboards|Action drop-down|Share Dashboards]
1. Remove all Shared Dashboards from Everyone. This is a required step to preventthe Operations User to have all Dashboards Access.
2. Share the Teleporter Application Dashboard to the Operations User.
Hint #1: Log Off from Admin and Log In with Operations credentials to test theOperations user view.
User name: operationsPassword: VMware1!
Conclusion
Once you have finished the dashboard sharing, the Operations user should see thescreen as above, only five dashboards: Three main dashboards (Recommendations,Home, Diagnose, and Self Health ) and the Teleporter Application dashboard.
HOL-1701-CHG-5
Page 49HOL-1701-CHG-5

Module 5 - ChallengeSolution (45 minutes)
HOL-1701-CHG-5
Page 50HOL-1701-CHG-5

Module 1 - Creating the TeleporterApplicationIn this module you will find the full solution for the HOL-1701 Challenge Lab: IntelligentOperations - Module 1.
Mission 1: Identify the Teleporter Virtual MachinesApplication
1. Click on Environment icon
HOL-1701-CHG-5
Page 51HOL-1701-CHG-5

Mission 1: Identify the Teleporter Virtual MachinesApplication
1. Click on vSphere Hosts and Clusters inventory Tree.
HOL-1701-CHG-5
Page 52HOL-1701-CHG-5

Mission 1: Identify the Teleporter Virtual MachinesApplication
1. Open the vSphere World Tree and navigate to esx-02a.corp.local and you will findthe Teleporter Virtual Machine Application.
HOL-1701-CHG-5
Page 53HOL-1701-CHG-5

Mission 2: Creating the Teleporter Application
Let's start to create the Teleporter Application...
1. Click on Environment icon.2. Click on Applications tab.
Mission 2: Add a new Application
1. Click on New Application icon.
HOL-1701-CHG-5
Page 54HOL-1701-CHG-5

Mission 2: Select the Application template
1. Select the Custom option.2. Click the OK button.
HOL-1701-CHG-5
Page 55HOL-1701-CHG-5

Mission 2: Create the Tiers
1. Type the Application Name: Teleporter Application.2. Click on Add Tier icon to add a new tier for the application.3. Type the Tier Name (App, Web, or DB).4. Click on Update button.
You should repeat the steps 2, 3 and 4 for all Tiers: App, Web and DB.
HOL-1701-CHG-5
Page 56HOL-1701-CHG-5
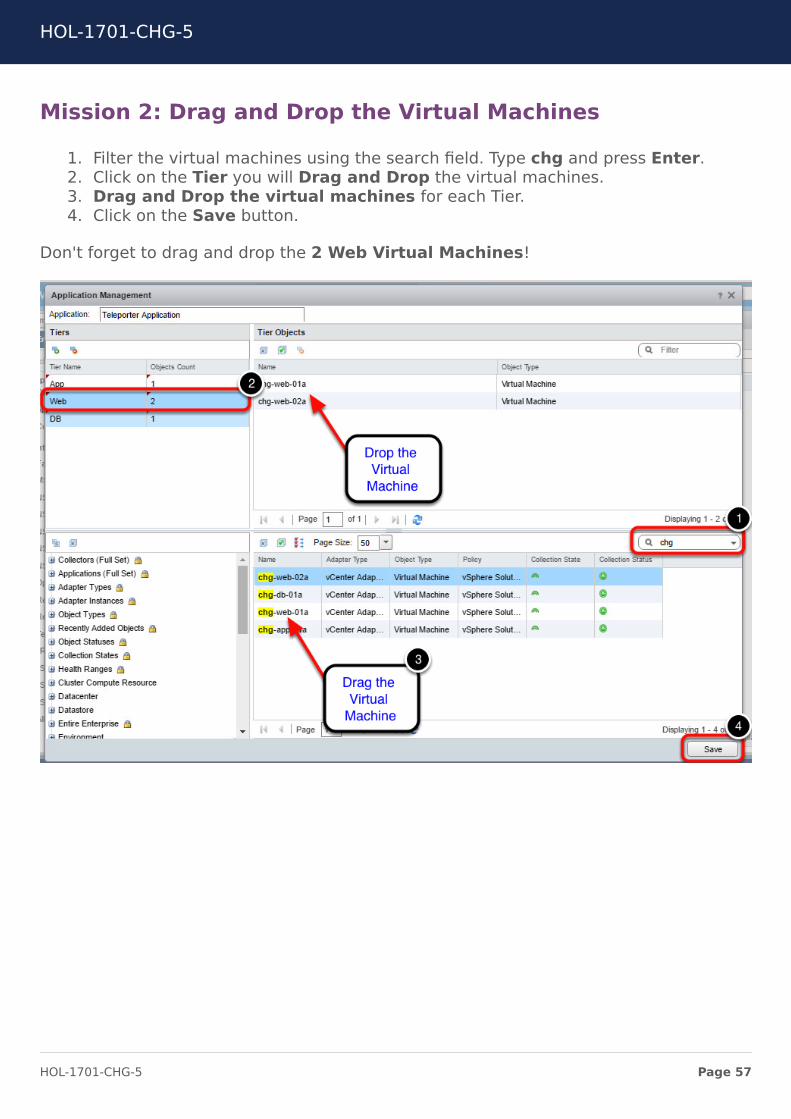
Mission 2: Drag and Drop the Virtual Machines
1. Filter the virtual machines using the search field. Type chg and press Enter.2. Click on the Tier you will Drag and Drop the virtual machines.3. Drag and Drop the virtual machines for each Tier.4. Click on the Save button.
Don't forget to drag and drop the 2 Web Virtual Machines!
HOL-1701-CHG-5
Page 57HOL-1701-CHG-5

Mission 2: The Application has been Created
You should see the Teleporter Application created.
Mission 2: Checking the Application Components
1. Click on Teleporter Application
HOL-1701-CHG-5
Page 58HOL-1701-CHG-5

Mission 2: Checking the Application Components
1. Click on Applications link
HOL-1701-CHG-5
Page 59HOL-1701-CHG-5

Mission 2: Checking the Application Components
1. Expand the Teleporter Application.2. Validate all tiers and components.
Summary
Your Application has been created. You are ready to move forward to the next step.
HOL-1701-CHG-5
Page 60HOL-1701-CHG-5

Module 2 - Setup Metrics & Policy tothe ApplicationIn this module you will find the full solution for the HOL-1701 Challenge Lab: IntelligentOperations - Module 2.
Mission 3: Creating Super Metrics
1. Click on Content icon.2. Click on Super Metrics.3. Click on Add New Super Metric icon.
HOL-1701-CHG-5
Page 61HOL-1701-CHG-5

Mission 3: Create the new Super Metric: Max-Risk(%)
1. Type the Super Metric Name: Max-Risk(%).2. Open the Functions drop down list.3. Select the max function.
HOL-1701-CHG-5
Page 62HOL-1701-CHG-5

Mission 3: Configure the Super Metric Formula
Note: If the Save Button is not visible at the end of Manage Super MetricsPanel, please zoom out the Browser to 75%.
1. Type "(" after max in the formula field.2. Filter the Teleporter Application using the word Application.3. Select the Teleporter Application.4. Expand the Badge metrics.5. Double click on Risk(%) metric.6. Type ")" after max in the formula field.7. Click on Save button.
Mission 3: First Metric was Created
The Max-Risk(%) Super Metric was successful created.
HOL-1701-CHG-5
Page 63HOL-1701-CHG-5

1. Click on Add New Super Metric to add the second Metric - Min Health(%).
Mission 3: Create the new Super Metric: Min-Health(%)
1. Type the Super Metric Name: Min-Health(%).2. Open the Functions drop down list.3. Select the min function.
HOL-1701-CHG-5
Page 64HOL-1701-CHG-5

Mission 3: Configure the Super Metric Min-Health(%)
Note: If the Save Button is not visible at the end of Manage Super MetricsPanel, please zoom out the Browser to 75%.
1. Type "(" after min in the formula field.2. Filter the Teleporter Application using the word Application.3. Select the Teleporter Application.4. Expand the Badge metrics.5. Douible click on Health(%) Metric.6. Type ")" after min in the formula field.7. Click on Save button.
HOL-1701-CHG-5
Page 65HOL-1701-CHG-5

Mission 3: Configure the Object Types for the SuperMetrics
1. Select the Metric.2. Click Add Object Type icon.3. Select Container and then Application.
HOL-1701-CHG-5
Page 66HOL-1701-CHG-5

Mission 3: Save the selected Object type
1. Click on Select button.
Mission 3: Object type for the two Super Metrics
Perform the same steps for the two Super Metrics.
HOL-1701-CHG-5
Page 67HOL-1701-CHG-5

Mission 4: Creating the new Application Policy
1. Click on Administration icon.2. Click on Policies.3. Click on Policy Library tab.4. Click on Add New Monitoring Policy icon.
HOL-1701-CHG-5
Page 68HOL-1701-CHG-5

Mission 4: Configure the Policy Name
1. Type the Policy Name: Teleporter App Policy.2. Click on Select Base Policy.
HOL-1701-CHG-5
Page 69HOL-1701-CHG-5

Mission 4: Select Base Policy
1. Click on "Add settings for new set of objects".2. Expand the drop down list.3. Expand Container and select Application.4. Click OK.
HOL-1701-CHG-5
Page 70HOL-1701-CHG-5

Mission 4: Moving to Analysis Settings...
1. Click on Analysis Settings.
HOL-1701-CHG-5
Page 71HOL-1701-CHG-5

Mission 4: Select Analysis Settings
1. Click on "Add settings for new set of objects".2. Expand the drop down list.3. Expand Container and select Application.4. Click OK.
HOL-1701-CHG-5
Page 72HOL-1701-CHG-5

Mission 4: Configure the Time Range for the Policy
1. Click on the lock icon to unlock the Time Range session.2. Configure the days of week ( Mon, Tue, Wed and Thu ) and the time range ( 08:00
to 17:00 ) for the Time Range session.
Mission 4: Configure the Metrics and Properties
Once you have configured the Time Range in the previous step, you can select theattribute type to include in your policy, with those attributes vRealize OperationsManager can collect data from the objects in your environment. Attribute types includemetrics, properties, and super metrics. You enable or disable each metric and determinewhether to inherit the metrics from base policies that you selected in the workspace.
For this lab, you will change the attributes values as mentioned in the screenshot.
■ State. Indicates whether the metric, property, or super metric is inherited from thebase policy.
■ KPI. Indicates whether the key performance indicator is inherited from the base policy.If a violation against a KPI occurs, vRealize Operations Manager generates an alert.
■ DT. Indicates whether the dynamic threshold (DT) is inherited from the base policy.
1. Click Collect Metrics and Properties
HOL-1701-CHG-5
Page 73HOL-1701-CHG-5

2. Filter the list to only show Supermetrics attribute types by de-selecting Metricand Property
3. Change the values for the Super Metrics as specified in the screenshot. You onlywant the Super Metrics to be applied to the Application object type.
4. Click on the Save Button (Note: The Save button could not be visible due screenresolution. Please, scroll down the screen and you can find the Save button)
Mission 4: The New Application Policy is Created
The Teleporter App Policy policy has been created.
HOL-1701-CHG-5
Page 74HOL-1701-CHG-5

Mission 5: Assigning the New Policy to the TeleporterApplication
For the Policy assignment you need to create a new Custom Group.
1. Click on Environment icon.2. Click on Add New Group icon.
HOL-1701-CHG-5
Page 75HOL-1701-CHG-5

Mission 5: Configure the New Custom Group
1. Type the Custom Group Name: Teleporter Application - Custom Group.2. Select PanContinental Applications as Group Type. (Note: You can find the
instructions how to create this group on Module 2 - "Assigning the New Policyto Teleport Application" section of this lab).
3. Select Teleporter App Policy as Policy.4. Select Object Name.5. Select Contains.6. Type Teleporter in the filter field.7. Select Teleporter Application.8. Click on OK button.
HOL-1701-CHG-5
Page 76HOL-1701-CHG-5

Mission 5: The Custom Group has been Created
With this Custom Group we have assigned the Teleporter App Policy to the TeleporterApplication.
Summary
You are ready to move to the next module.
HOL-1701-CHG-5
Page 77HOL-1701-CHG-5

Module 3 - Building the ApplicationMonitoring DashboardIn this module you will find the full solution for the HOL-1701 Challenge Lab: IntelligentOperations - Module 3
Gain screen space in vRealize Operations by Zooming Out -(Chrome)
1. Select the Options menu in Chrome.2. Click the '-' button to zoom out to 90%.
This will provide more viewing space while still allowing you to read the text.
HOL-1701-CHG-5
Page 78HOL-1701-CHG-5

Mission 6: Creating the Teleporter Application View
1. Click on the Content icon.2. Click on Views menu item.3. Click on the Create View icon.
HOL-1701-CHG-5
Page 79HOL-1701-CHG-5

Mission 6: Configure the Teleporter View Name
1. Type the View Name: Teleporter Application View.2. Type the Description: Risk and Health Teleporter Application Monitoring.
HOL-1701-CHG-5
Page 80HOL-1701-CHG-5

Mission 6: Select the View Presentation
1. Click Presentation menu item.2. Click Trend as View Presentation.
Mission 6: Select the View Subject
1. Click Subjects menu item.2. Expand the Subjects drop down list.3. Select Application from Container.
HOL-1701-CHG-5
Page 81HOL-1701-CHG-5

Mission 6: Drag and drop the Super Metrics
1. Click Data menu item.2. Expand the Super Metrics tree.3. Drag the Max-Risk(%) and Min-Health(&).4. Drop the Super Metrics to the data View area.
Next, click on Visibility.
HOL-1701-CHG-5
Page 82HOL-1701-CHG-5

Mission 6: Select the View Visibility
1. Select Anomalies check-box2. Click on Save Button
HOL-1701-CHG-5
Page 83HOL-1701-CHG-5

Mission 6: The View has been created
You have the View ready to use.
HOL-1701-CHG-5
Page 84HOL-1701-CHG-5

Mission 7: Creating the Teleporter Application Dashboard
1. Click on the Content icon.2. Click on Dashboards menu item.3. Click on the Create Dashboard icon.
HOL-1701-CHG-5
Page 85HOL-1701-CHG-5

Mission 7: Configure the Teleporter Application DashboardProperties
1. Type the Dashboard name: Teleporter Application Dashboard.2. Check Yes for the "Is default" field option.3. Click on Widget List.
Mission 7: Add the Widgets to the Teleporter ApplicationDashboard
Widgets are the panes on your dashboards. They show information about attributes,resources, applications, or the overall processes in your environment.
Drag and drop the Widgets: Object List, Metric Picker, Metric Chart, View, AlertList, Health Chart.
Note: If you are using Chrome as your Browser and you will see any issue withthe Widget position arrangement, please move to the Firefox Browser.
HOL-1701-CHG-5
Page 86HOL-1701-CHG-5

Now, you will configure the Widgets.
1. Click on Edit Button for each Widget to configure.
HOL-1701-CHG-5
Page 87HOL-1701-CHG-5

Mission 7: Configure the Object List Widget
1. For Title, type Teleporter Application Components.2. For Refresh Content, select On.3. Expand the Application tree and click on Teleporter Application.4. Click the Save button.
HOL-1701-CHG-5
Page 88HOL-1701-CHG-5

Mission 7: Configure the Metric Picker Widget
1. For Title, type Teleporter Metric Picker.2. For Refresh Content, select On.3. Click the Save button.
HOL-1701-CHG-5
Page 89HOL-1701-CHG-5

Mission 7: Configure the Metric Chart Widget
1. Type the title: Teleporter Metric Chart.2. For Refresh Content, select On.3. Click the Save button.
HOL-1701-CHG-5
Page 90HOL-1701-CHG-5

Mission 7: Configure the View Chart
1. Type the title: Teleporter Application View.2. For Self Provider, select On.3. Select the Object: Teleporter Application.4. Type Teleporter on Filter field and press Enter to search the Teleporter
Application View.5. Select the Teleporter Application View.6. Click the Save button.
HOL-1701-CHG-5
Page 91HOL-1701-CHG-5

Mission 7: Configure the Alert List Widget
1. Type the title: Teleporter Alert List.2. For Refresh Content, select On.3. Click on Save button.
HOL-1701-CHG-5
Page 92HOL-1701-CHG-5

Mission 7: Configure Health Chart Widget
1. Type the title: Teleporter Application Health Chart.2. For Refresh Content, select On.3. For Mode, select Children.4. Click on Save button.
HOL-1701-CHG-5
Page 93HOL-1701-CHG-5

Mission 7: Configure the Widget Interactions
Widget interactions are the configured relationships between widgets in a dashboardwhere one widget provides information to a receiving widget. When you are using awidget in the dashboard, you select data on one widget to limit the data that appears inanother widget, allowing you to focus on a smaller subset data.
Now we will configure the Widget interactions.
1. Do not configure any Interaction to the Teleporter Application Components.2. Select Teleporter Application Components as the Selected Object(s).3. Select Teleporter Application Components as the Selected Object(s).4. Select Teleporter Metric Picker as the Selected Metric(s).5. Select Teleporter Application Components as the Selected Object(s).6. Click on Apply Interactions.
HOL-1701-CHG-5
Page 94HOL-1701-CHG-5

Mission 7: Save your Dashboard
1. Click the Save button.
Mission 7: Your Dashboard Is Ready To Use
1. Type Teleporter on the Dashboard Filter field and press Enter to search theTeleporter Application View and check your dashboard has been created.
The Teleporter Application Dashboard is ready.
Summary
You are ready to move to the final step.
HOL-1701-CHG-5
Page 95HOL-1701-CHG-5

Module 4 - Publishing the ApplicationMonitoring DashboardIn this module you will find the full solution for the HOl-1701 Challenge Lab: IntelligentOperations - Module 4.
Mission 8: Sharing the Teleporter Application Dashboard
You can share a dashboard or dashboard template with one or more user groups. Whenyou share a dashboard, it becomes available to all of the users in the user group thatyou select. The dashboard appears the same to all of the users who share it. If you edita shared dashboard, the dashboard changes for all users. Other users can only view ashared dashboard; they cannot change it.
1. Select the Teleporter Application Dashboard.2. Click on Actions icon.3. Click on Share Dashboards menu item.
HOL-1701-CHG-5
Page 96HOL-1701-CHG-5

Mission 8: Sharing the Teleporter Application Dashboard
1. Select all Dashboards.2. Drag and drop all Dashboards to Not Grouped Accounts Group.
HOL-1701-CHG-5
Page 97HOL-1701-CHG-5

Mission 8: Sharing the Teleporter Application Dashboard
1. Click on Not Grouped Accounts Group.2. Click on Teleporter Application Dashboard.3. Drag and drop the Teleporter Application Dashboard to Teleporter App
Operations.4. Click the Save button.
Mission 8: Log out the Admin User
1. Click the drop down for admin; then Log Out.
HOL-1701-CHG-5
Page 98HOL-1701-CHG-5

Mission 8: Log In with the Operations User
1. Enter Operations for the user name.2. Enter VMware1! for the password.3. Click the Login button.
HOL-1701-CHG-5
Page 99HOL-1701-CHG-5

Mission 8: Teleporter Application Dashboard Shared
The Teleporter Application is correctly shared and it is available for the Operations User.
HOL-1701-CHG-5
Page 100HOL-1701-CHG-5

Module ConclusionYou have completed Module 5 - Challenge Solution of the The Intelligent OperationsChallenge Lab.
CONGRATULATIONS! You should now have completed all tasks related to this moduleand you have finished the Challenge Lab.
You can, from now, proceed to any other module for review:
Module 1 - Configuring a Custom Application (15 minutes)
Module 2 - Setup Metrics & Policy to the Application (30 minutes)
Module 3 - Building the Application Monitoring Dashboard (30 minutes)
Module 4 - Publishing the Application Monitoring Dashboard (15 minutes)
We hope you have enjoyed this Challenge.
How to End Lab
To end your lab click on the END button.
HOL-1701-CHG-5
Page 101HOL-1701-CHG-5

ConclusionThank you for participating in the VMware Hands-on Labs. Be sure to visithttp://hol.vmware.com/ to continue your lab experience online.
Lab SKU: HOL-1701-CHG-5
Version: 20170414-081922
HOL-1701-CHG-5
Page 102HOL-1701-CHG-5