table of - email on acid€¦ · table of ontents chapter 1: outlook ... if you are trying to stack...
TRANSCRIPT
1
Table of Contents
Chapter 1: Outlook Isn’t Going Anywhere ............................................................................................ 2
Chapter 2: 17 Must-Know Tricks for Outlook 2007, 2010 & 2013 ....................................................... 3
Chapter 3: 3 Way to Remove Unwanted Gaps Between Tables ........................................................ 12
Chapter 4: Seeing Gaps between Your Images in Outlook 2013? ...................................................... 15
Chapter 5: CSS Padding in Outlook 2007 & 2010 ............................................................................... 20
2
Chapter 1: Outlook Isn’t Going Anywhere
Hate coding your emails for Outlook? Too bad! Outlook isn’t going anywhere. There is a light at the end of the tunnel, though!
Here at Email on Acid, we’ve spent hours testing to ensure we’ve worked out all the Outlook kinks. In this marketing guide, we're sharing our years of experience coding for this pesky email client. This guide consists of four tutorials:
• 17 Must-Know Tricks for Outlook 2007, 2010 and 2013
• 3 Ways to Remove Unwanted Gaps between Tables in Outlook 2007 and 2010
• Removing Gaps between Your Images in Outlook 2013
• CSS Padding in Outlook 2007 and 2010

3
Chapter 2: 17 Must-Know Tricks for Outlook 2007, 2010 and 2013
Designing for Outlook is like chasing the ever elusive White Whale. We spend hours pursuing it, tracking down bugs and glitches, trying to achieve pixel perfection in a distinctly imperfect environment. Outlook is still a top dog, though, and figuring out workarounds for this client is a necessary evil.
Here are 17 tips to improve your outlook on Outlook.
1. Outlook ignores margin and padding on images.
Outlook 2007-13 do not support the margin or padding CSS properties when placed within an image.
Try using hspace and/or vspace:
Or add the additional spacing to the image itself (in pixels).
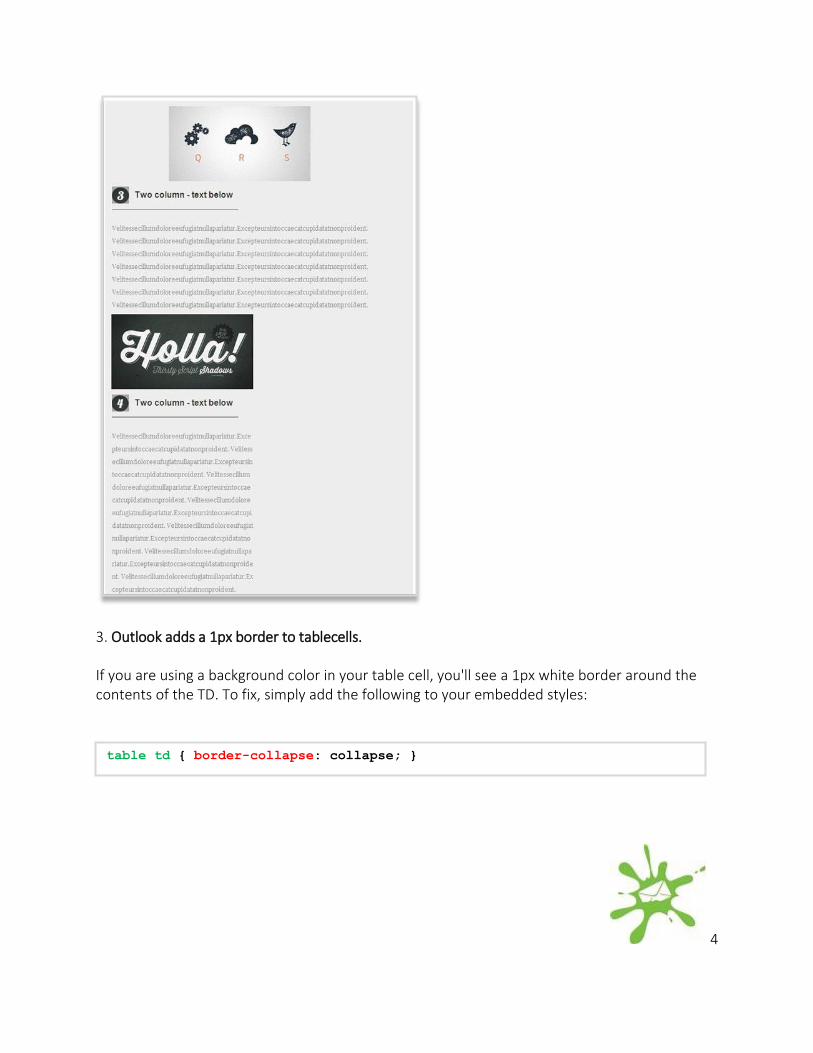
2. Text doesn't wrap automatically in Outlook.
If you have text within a table, for instance “aaaaaaaaaaaaaaaaa” and you want it to wrap, try adding this style:
In the example below, #3 does not have word break and #4 does. As you can see, #3 has broken its width to accommodate the text, and #4 has not.
<img src="http://www.emailonacid.com/example.jpg" align="left"
vspace="10" hspace="10" />
<td style="word-break:break-all;">
4
3. Outlook adds a 1px border to tablecells.
If you are using a background color in your table cell, you'll see a 1px white border around the contents of the TD. To fix, simply add the following to your embedded styles:
table td { border-collapse: collapse; }
5
Or you can add it inline:
Check out this post from Campaign Monitor for more info.
If you are trying to “right” or “left” align multiple nested tables, the fix is a little more involved. Jump down to chapter three for more on that.
4. Outlook sometimes ignores link styling.
Outlook 2007 and 2010 do NOT support inline styles IF the “a” tag does NOT include an “href” attribute.
For example:
Should be changed to:
<td style="border-collapse: collapse;">... </td>
<a style="font-size: 20px; color: #004990;">Shop Flooring </a>
<a href="http://www.test.com" style="font-size: 20px; color:
#004990;">Shop Flooring </a>

6
5. If spacing is important, avoid using lists.
The safest way to get consistent results is to use a table instead:
6. Use cellpadding and cellspacing with tables.
Avoid using “margin” or “padding” CSS properties in your TABLE tag. Cellpadding and Cellspacing attributes are generally safe but margin or padding will often be added to every TD within the table.
If you are using an align attribute on your table, for example:
The fix is a little more involved. Click here for more on that.
Note: Be extra cautious with table alignment, you never know what the interpretation will be from Word rendering engine. We’ve seen instances where it tries to write its own absolute positioning.
7. Outlook sometimes removes padding.
Outlook 07 and 2010 have been known to convert divs and headings to paragraphs with nested spans. This changes the HTML container from a box element to an inline element.
<table cellpadding="2" cellspacing="2" border="0">
<tr>
<td valign="top">•</td>
<td>Test</td>
</tr>
<tr>
<td valign="top">1.</td>
<td>Test</td>
</tr>
</table>
<table align="left">

7
For example this:
Will get converted to:
In the example below, you can see that the padding set above the header is displayed in Thunderbird, but not in Outlook 2007.
One fix is to move your padding into the containing TD, for example:
Another fix is to avoid headings and divs and use paragraphs instead.
<h2 style="font-size: 15px; font-weight: bold; margin: 0; padding: 17px 0
0 0;">
NEW FASHIONS
</h2>
<p class=MsoNormal style='mso-outline-level:3'>
<b>
<span style='font-size:11.5pt'>NEW FASHIONS<o:p></o:p></span>
</b>
</p>
<td style="padding: 17px 0 0 0">
<h2 style="font-size: 15px; font-weight: bold; margin: 0">NEW
FASHIONS</h2>
</td>
8
8. Use MSO to control line height.
Try adding “mso-line-height-rule:exactly” just before your line-height declaration.
For example:
This fix ONLY works on block elements. So trying to achieve the same effect inside a font or span tag will not work. Since this is a Microsoft only CSS property, it should not interfere with any other email client.
9. Outlook interprets tables literally.
Be sure your rowspan attributes within your TDs are set to the correct value. Most web browsers are very lenient if you have a higher value than required but Outlook 07 and 2010 will interpret them even if the additional rows do not exist in your table.
10. Outlook sometimes ignores the width and height of HTML elements.
Box elements with a fixed width and height may not display correctly. If horizontal and vertical spacing is determined by spacer graphics (as opposed to the email’s content), be aware that customized spacing and alignment may be impossible in some cases. For best results, try using a combination of transparent spacer images and the HTML height attribute on the table cell.
11. Outlook sets TDs at a minimum of 2 pixels high.
Outlook 2007 and 2010 impose a 2-pixel height minimum for table cells. So, for example, if a table cell contains a 1-pixel transparent gif and a background color, your ‘horizontal line’ will appear thicker than expected.
12. Image backgrounds in Outlook require VML.
In some versions of Outlook (07/10/13) image backgrounds won’t work without using Vector Markup Language (VML). VML is a deprecated, XML-based file format for two-dimensional vector graphics which is part of the Office Open XML standards. This is a complicated problem to fix, so check out this blog about how to use VML to create functional image backgrounds.
<td style="mso-line-height-rule:exactly; line-height:50px;">
9
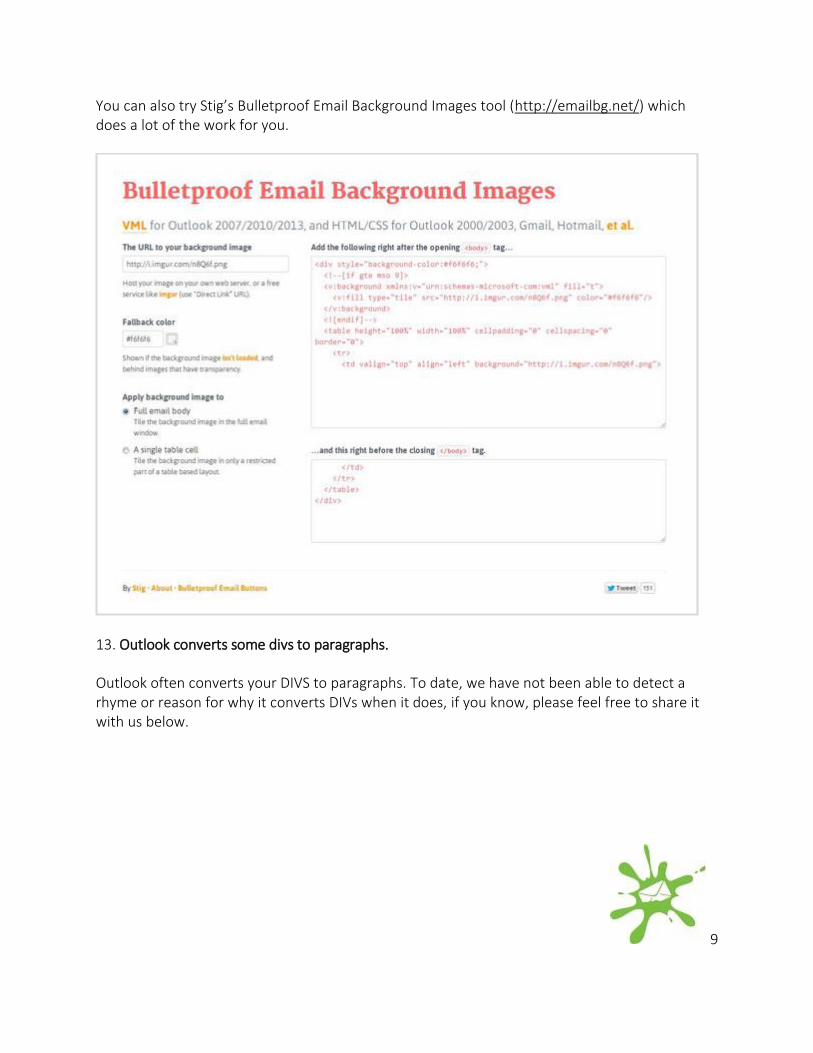
You can also try Stig’s Bulletproof Email Background Images tool (http://emailbg.net/) which does a lot of the work for you.
13. Outlook converts some divs to paragraphs.
Outlook often converts your DIVS to paragraphs. To date, we have not been able to detect a rhyme or reason for why it converts DIVs when it does, if you know, please feel free to share it with us below.
10
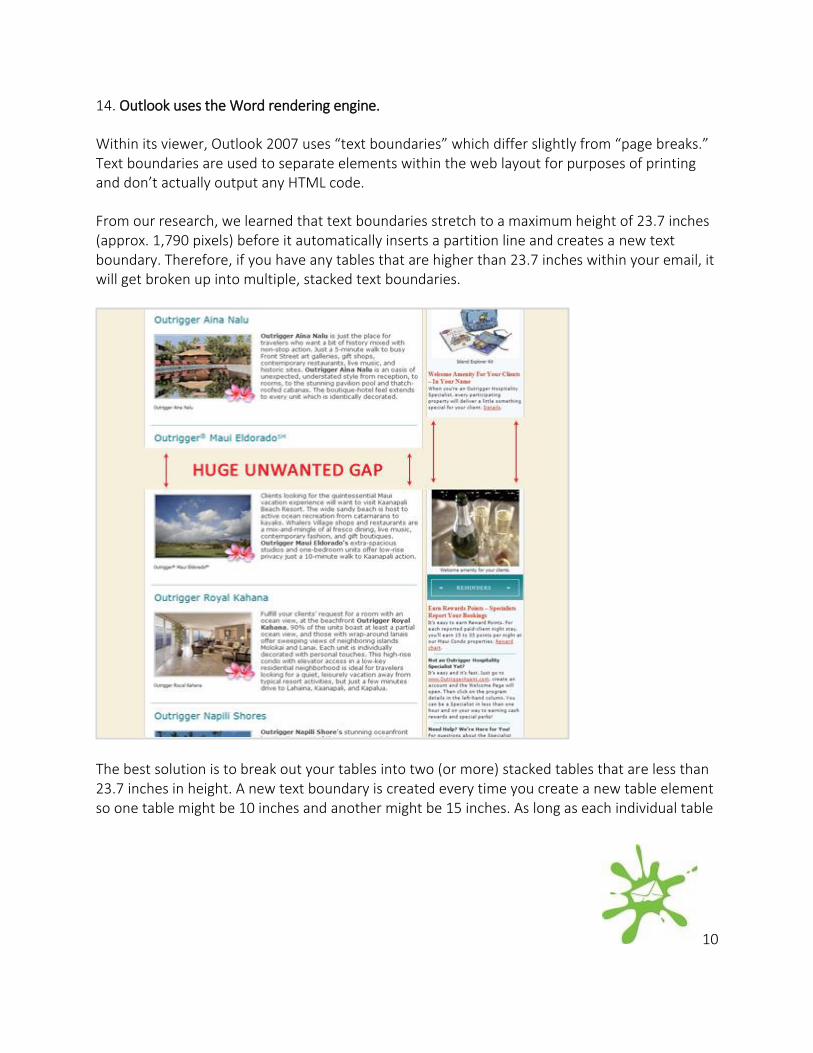
14. Outlook uses the Word rendering engine.
Within its viewer, Outlook 2007 uses “text boundaries” which differ slightly from “page breaks.” Text boundaries are used to separate elements within the web layout for purposes of printing and don’t actually output any HTML code.
From our research, we learned that text boundaries stretch to a maximum height of 23.7 inches (approx. 1,790 pixels) before it automatically inserts a partition line and creates a new text boundary. Therefore, if you have any tables that are higher than 23.7 inches within your email, it will get broken up into multiple, stacked text boundaries.
The best solution is to break out your tables into two (or more) stacked tables that are less than 23.7 inches in height. A new text boundary is created every time you create a new table element so one table might be 10 inches and another might be 15 inches. As long as each individual table

11
does not exceed the height constraint you won’t end up with automatically generated text boundaries.
Use nested tables within each stacked table but be aware of the fact that some of your nested tables might be over 23.7 inches in height. With that said, you could start breaking those apart first and test between each iteration.
When doing this, you might have to remove all spaces and carriage returns within your code, particularly between your closing and opening tables. This helps to ensure that they stack on top of each other perfectly. Since this may cause a complete restructure of your table layout, it’s a good idea to get in the habit of designing your tables so that they can be easily stackable when needed. You might only have to break apart one table that exceeds the maximum height, others might not cause a noticeable gap.
If this solution does not work for you, click here for more information and a few alternative work-a-rounds.
15. Tall images will be cropped in Outlook.
Outlook truncates the upper portion of all images higher than 1728px from the top-down. So, if your image is 250px longer than the 1728px limit, 250px will get cropped off the top.
We’ve also seen Outlook re-scale an image so that its max height is 1728px.
We suggest that you crop your images and stack them on top of each other.
16. Images with dimensions defined in HTML may render incorrectly.
Stretched images (e.g., bars, borders, gradients, etc.) may not render correctly. All graphics should have their correct dimensions in the file properties. Do not rely on HTML-defined dimensions for images that are critical to the email’s layout.
17. Animated GIFs aren't supported by Outlook.
Outlook does not support animated GIFs, instead it only shows the first slide of your animation so make sure the most important call to action is on that slide.

12
Chapter 3: 3 Ways to Remove Unwanted Gaps between Tables in Outlook 2007 and 2010
If you are trying to stack tables side by side or top to bottom, you might find Outlook 2007 & 2010 to be a bit, well... troublesome. If you are seeing unwanted gaps or spacing between your tables, you've come to the right place.
In this section, we’ll spare you the speech about Outlook and its infamous Word rendering engine and we'll cut straight to the fix.
Step 1. Add the border-collapse property to your embedded CSS
Step 2. Zero out the border, cellpadding and cellspacing in each of your table tags.
Step 3. If you are trying to "right" or "left" align multiple nested tables, the fix is a little more involved.
In this instance, you might see large gaps between your tables. Here are the steps to correct that:
1. Add a bgcolor to each TD in your aligned table(s) - select the color based on your layout. 2. Add a 1px border to your aligned table(s) - this should be set to the same color as the td's
within it. 3. Decrease the width of your aligned table(s) by 2px to accommodate for the border. 4. Wrap the content of the first TD in a paragraph tag. Style that paragraph tag using the
following: mso-table-lspace:0;mso-table-rspace:0:
<style type="text/css">
table {border-collapse: collapse;}
</style>
<table border="0" cellpadding="0" cellspacing="0">
13
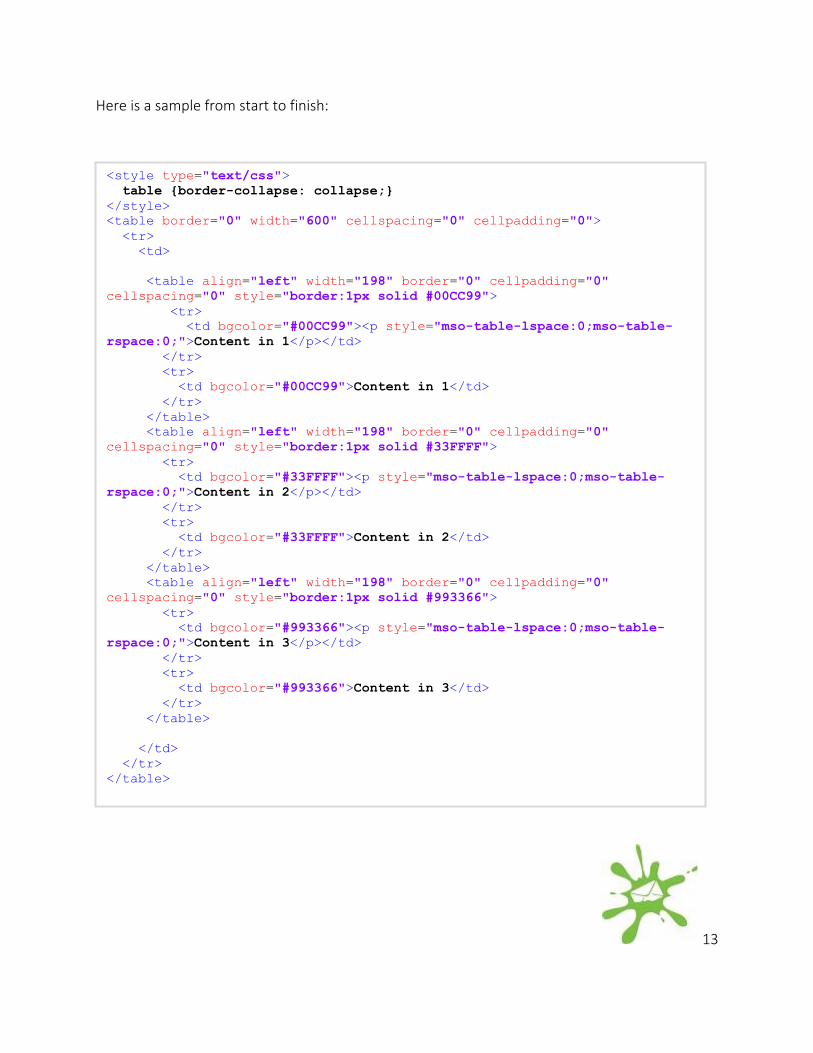
Here is a sample from start to finish:
<style type="text/css">
table {border-collapse: collapse;}
</style>
<table border="0" width="600" cellspacing="0" cellpadding="0">
<tr>
<td>
<table align="left" width="198" border="0" cellpadding="0"
cellspacing="0" style="border:1px solid #00CC99">
<tr>
<td bgcolor="#00CC99"><p style="mso-table-lspace:0;mso-table-
rspace:0;">Content in 1</p></td>
</tr>
<tr>
<td bgcolor="#00CC99">Content in 1</td>
</tr>
</table>
<table align="left" width="198" border="0" cellpadding="0"
cellspacing="0" style="border:1px solid #33FFFF">
<tr>
<td bgcolor="#33FFFF"><p style="mso-table-lspace:0;mso-table-
rspace:0;">Content in 2</p></td>
</tr>
<tr>
<td bgcolor="#33FFFF">Content in 2</td>
</tr>
</table>
<table align="left" width="198" border="0" cellpadding="0"
cellspacing="0" style="border:1px solid #993366">
<tr>
<td bgcolor="#993366"><p style="mso-table-lspace:0;mso-table-
rspace:0;">Content in 3</p></td>
</tr>
<tr>
<td bgcolor="#993366">Content in 3</td>
</tr>
</table>
</td>
</tr>
</table>
14
A couple final notes on this fix:
The issue only seems to occur if you are using left/right align in your table You only need to embed the contents of your first TD in a P tag (as shown above) If you have different colors in your table cells you might be forced to nest another table This fix might not work if you are trying to stack images side by side. In that instance
you'd be better off putting all of your images into one, nested table and using <td align="left"> vs. <table align="left">
15
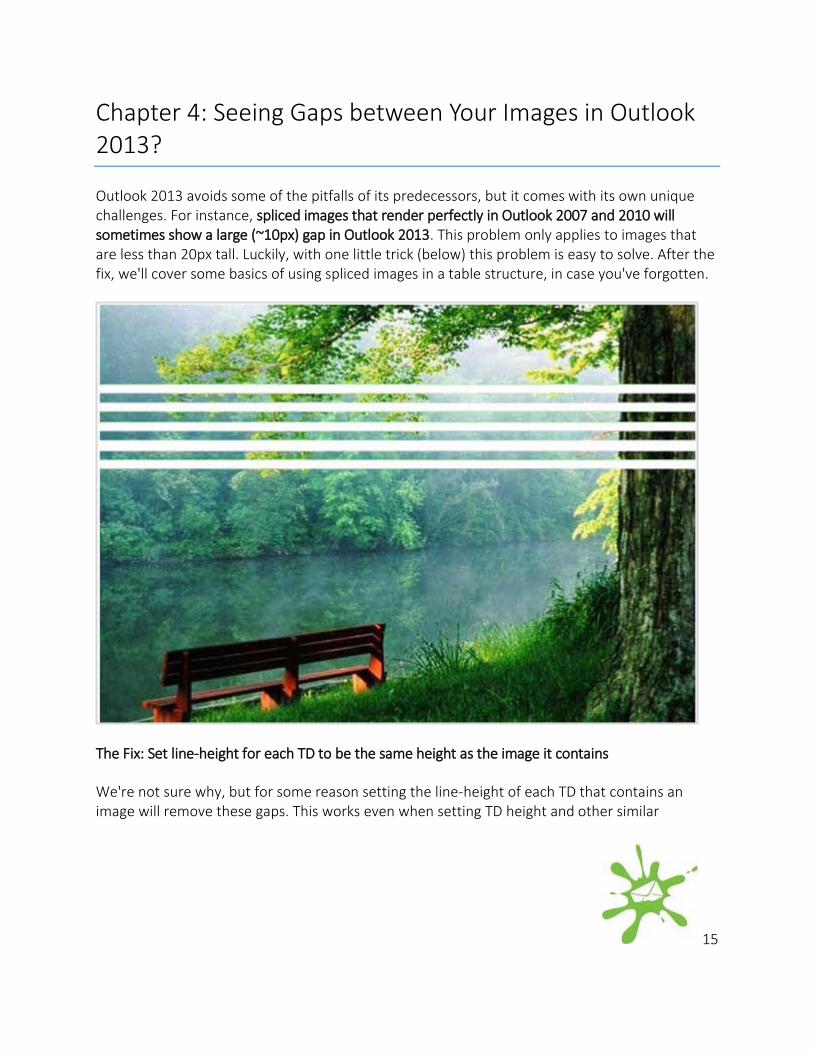
Chapter 4: Seeing Gaps between Your Images in Outlook 2013?
Outlook 2013 avoids some of the pitfalls of its predecessors, but it comes with its own unique challenges. For instance, spliced images that render perfectly in Outlook 2007 and 2010 will sometimes show a large (~10px) gap in Outlook 2013. This problem only applies to images that are less than 20px tall. Luckily, with one little trick (below) this problem is easy to solve. After the fix, we'll cover some basics of using spliced images in a table structure, in case you've forgotten.
The Fix: Set line-height for each TD to be the same height as the image it contains
We're not sure why, but for some reason setting the line-height of each TD that contains an image will remove these gaps. This works even when setting TD height and other similar

16
attributes has no effect in Outlook 2013. Remember, this fix is only needed for smaller images, less than 20px in height.
Here are a few more tips you should keep in mind:
1.) Add the border-collapse property to tables in your embedded CSS
The border collapse property will help make sure you don't have small borders between your spliced images in Outlook 2007, 2010 and 2013.
2.) Add the display:block property to images in your embedded CSS
Some clients, like Gmail, will add spacing around images if they aren't display:block.
<td width="600" height="80" style="line-height: 80px;" >
<img height="80" src="http://www.website.com/images/Nature_01.jpg"
width="600" />
</td>
<style type="text/css">
table {border-collapse: collapse;}
</style>
<style type="text/css">
table {border-collapse: collapse;}
img {display:block;}
</style>

17
3.) Zero out the border, cellpadding and cellspacing in each of your table tags
These three make sure there is no extra space in your table in all clients. If you're using "left" or "right" align on your tables, the fix is a little more complicated.
4.) Set each TD to be the same height as the image it contains
This fix prevents problems in Outlook 2007, 2010 and 2013.
<table border="0" cellpadding="0" cellspacing="0">
<td width="600" height="80">
<img height="80" src="http://www.website.com/images/Nature_01.jpg"
width="600" />
</td>

18
A Completed Example
Now let's take a look at a completed example of this code. This code should display a perfectly stitched image in every client.

19
<html> <head>
<style type="text/css">
table {border-collapse: collapse;}
img {display:block;}
</style>
</head>
<body>
<table border="0" cellpadding="0" cellspacing="0">
<tr>
<td width="600" height="80" style="line-height: 80px;">
<img height="80" src="http://www.website.com/images/Nature_01.jpg"
width="600" />
</td>
</tr>
<tr>
<td width="600" height="10" style="line-height: 10px;">
<img height="10" src="http://www.website.com/images/Nature_02.jpg"
width="600" />
</td>
</tr>
<tr>
<td width="600" height="10" style="line-height: 10px;">
<img height="10" src="http://www.website.com/images/Nature_03.jpg"
width="600" />
</td>
</tr>
<tr>
<td width="600" height="10" style="line-height: 10px;">
<img height="10" src="http://www.website.com/images/Nature_04.jpg"
width="600" />
</td>
</tr>
<tr>
<td width="600" height="9" style="line-height: 9px;">
<img height="9" src="http://www.website.com/images/Nature_05.jpg"
width="600" />
</td>
</tr>
<tr>
<td width="600" height="10" style="line-height: 10px;">
<img height="10" src="http://www.website.com/images/Nature_06.jpg"
width="600" />
</td>
</tr>
<tr>
<td width="600" height="246" style="line-height: 246px;">
<img height="246"
src="http://www.website.com/images/Nature_07.jpg" width="600" />
</td>
</tr>
</table>
</body>
</html>
20
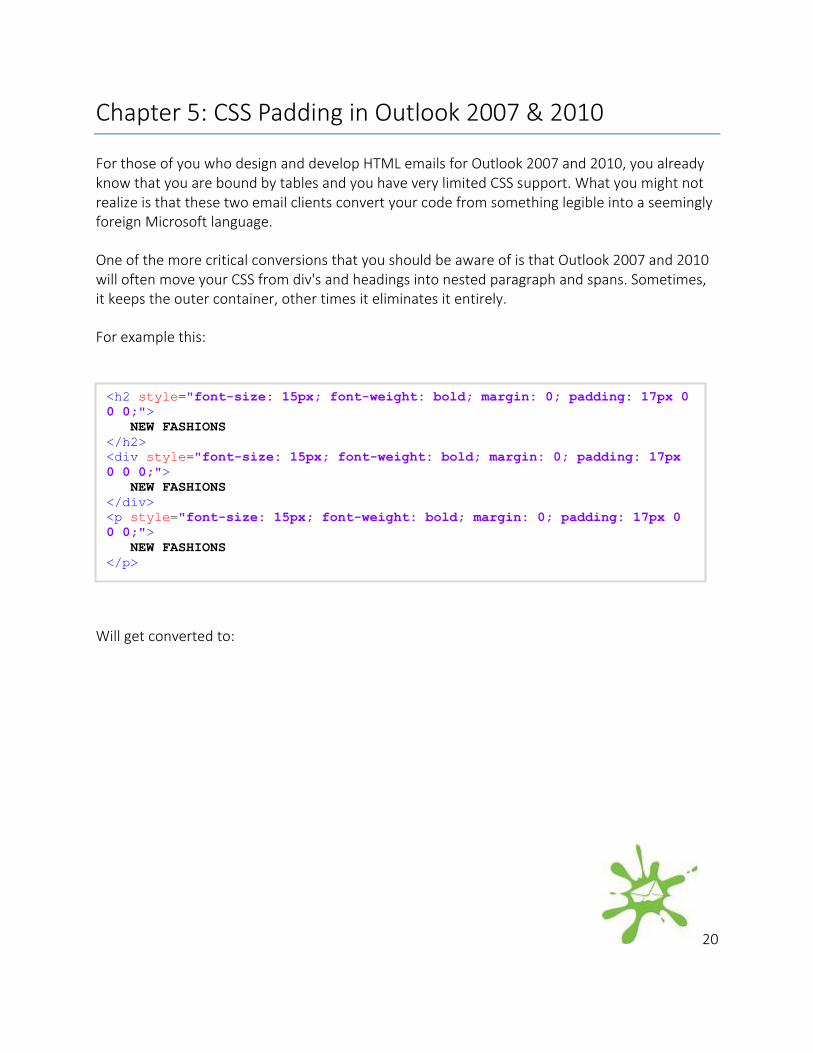
Chapter 5: CSS Padding in Outlook 2007 & 2010
For those of you who design and develop HTML emails for Outlook 2007 and 2010, you already know that you are bound by tables and you have very limited CSS support. What you might not realize is that these two email clients convert your code from something legible into a seemingly foreign Microsoft language.
One of the more critical conversions that you should be aware of is that Outlook 2007 and 2010 will often move your CSS from div's and headings into nested paragraph and spans. Sometimes, it keeps the outer container, other times it eliminates it entirely.
For example this:
Will get converted to:
<h2 style="font-size: 15px; font-weight: bold; margin: 0; padding: 17px 0
0 0;">
NEW FASHIONS
</h2>
<div style="font-size: 15px; font-weight: bold; margin: 0; padding: 17px
0 0 0;">
NEW FASHIONS
</div>
<p style="font-size: 15px; font-weight: bold; margin: 0; padding: 17px 0
0 0;">
NEW FASHIONS
</p>

21
<style>
p.MsoNormal, li.MsoNormal, div.MsoNormal
{mso-style-unhide:no;
mso-style-qformat:yes;
mso-style-parent:"";
margin:0in;
margin-bottom:.0001pt;
mso-pagination:widow-orphan;
font-size:12.0pt;
font-family:"Times New Roman","serif";
mso-fareast-font-family:"Times New Roman";
mso-fareast-theme-font:minor-fareast;}
h2
{mso-style-priority:9;
mso-style-unhide:no;
mso-style-qformat:yes;
mso-style-link:"Heading 2 Char";
mso-margin-top-alt:auto;
margin-right:0in;
mso-margin-bottom-alt:auto;
margin-left:0in;
mso-pagination:widow-orphan;
mso-outline-level:2;
font-size:18.0pt;
font-family:"Times New Roman","serif";
mso-fareast-font-family:"Times New Roman";
mso-fareast-theme-font:minor-fareast;}
p
{mso-style-noshow:yes;
mso-style-priority:99;
mso-margin-top-alt:auto;
margin-right:0in;
mso-margin-bottom-alt:auto;
margin-left:0in;
mso-pagination:widow-orphan;
font-size:12.0pt;
font-family:"Times New Roman","serif";
mso-fareast-font-family:"Times New Roman";
mso-fareast-theme-font:minor-fareast;}
</style>
<h2 style='margin:0in;margin-bottom:.0001pt'>
<span style='font-size:11.5pt; mso-fareast-font-family:"Times New Roman"'>
NEW FASHIONS
<o:p></o:p>
</span>
</h2>
<div>
<p class=MsoNormal>
<b>
<span style='font-size:11.5pt;mso-fareast-font-family:"Times New
Roman"'>
NEW FASHIONS
<o:p></o:p>
</span>
</b>
</p>
</div><
<p style='margin:0in;margin-bottom:.0001pt'>
<b> <span style='font-size:11.5pt'>
NEW FASHIONS
<o:p></o:p>
</span>
</b>
</p>

22
The Problem
As you can see, this conversion moved our CSS from its original box element container to an inline SPAN element and the padding was ignored.
Solutions
One work-around is to avoid padding in block element containers and use margins instead.
Note: We did not include the "margin" nor "margin-top" properties in this example because they are not supported by Hotmail.
After extensive testing, we have confirmed that the padding property is supported in TD's. So another fix is to move your padding into the containing TD, for example:
That's it for our Outlook tips this time around! You should now have a sleek email that looks good in Outlook! We're always on the hunt for new coding tricks and workarounds so check out our blog in the meantime to stay up-to-date with breaking industry news.
<h2 style="font-size: 15px; font-weight: bold; margin-left: 5px; margin-
right: 5px; margin-bottom: 5px;">
NEW FASHIONS
</h2>
<td style="padding: 17px 0 0 0">
<h2 style="font-size: 15px; font-weight: bold; margin: 0">NEW
FASHIONS</h2>
</td>