table of contentsassets.cobaltnitra.com/teams/repository/export/0e9/... · website manager window....
TRANSCRIPT

QUICK GUIDE
USING FLEX WIDGETS
Page 1 of 38 © 2012 ADP Dealer Services, Inc.. All rights reserved h>p://www.cobaltu.com
Table of Contents
Flexible Design Overview ……………………………………………….…3
Selecting the Flex Design …………………………………………….……3 Widget Overview ………………………………………………………….…4
Configuring Widgets …………………………………………………….….5
Contact at Once Widget ………………………………………….….5
Contact Us Widget …………………………………………….……..5
Contact Info Widget ………………………………………….………6
Dealership Contacts Widget ……………………………….………6
Flex Specials Rotator Widget …………………………….……..…7
Hero Image Rotator Widget ………………………….…………..…8
Hours of Operation Widget ………………….……………………...9
iFrame Widget .……………….……………………………………….9
Image Carousel Widget …...….…………………………………....10
Image Flex Widget .………....….……………………………………11
Masthead Widget ..………....….……………………………………12
Model Showroom Carousel Widget ………………………………12
Markup Widget ……..……......….……………………………………13 Promo Badges Widget ……………………...……………………… 13
Rich Text Widget …………..………………...…………………….…14
Social Media Widget ……………………...………………………….14
Video Widget …………….…………………...…………………….…15
Quick Links Widget ……………………...…………………………..16
Franchise Logo Widget ……………………...…………………..…16
Inventory Search Widget ……………………...……………………16
Map Tile Widget ……………………...………………………………16
Spacer Widget ……………………...……………………..……….…16

QUICK GUIDE
USING FLEX WIDGETS
Page 2 of 38 © 2012 ADP Dealer Services, Inc.. All rights reserved h>p://www.cobaltu.com
Table of Contents (continued)
Widget Profiles …………..…………………………………………………17
Contact at Once Widget ……………………………………………17
Contact Us Widget ……………………………………………….... 18
Contact Info Widget ……………………………...…………………19
Dealership Contacts Widget ………………………………………20
Flex Specials Rotator Widget …………………………………..…21
Franchise Logo Widget …………….…………………………....…22
Hero Image Rotator Widget ……………………………………..…23
Hours of Operation Widget ………………………………………...24
iFrame Widget ……………….……………………………………….25
Image Carousel Widget …...….……………………………………..26
Image Flex Widget .………....….…………………………………….27
Inventory Search Widget ...………....….…………………………. 28
Map Tile Widget …...………....….……………………………………29
Markup Widget ……..……......….…………………………………….30
Masthead Widget ...………....….……………………………………31
Model Showroom Carousel Widget ………………………………32
Promo Badges Widget .……………………...………………………33
Quick Links Widget .……….………………...………………………34
Rich Text Widget .…….…….………………...………………………35
Social Media Widget …. .……….………………...…………………36
Spacer Widget .……….…….………………...………………………37
Video Widget ………….…….………………...………………………38

QUICK GUIDE
USING FLEX WIDGETS
Page 3 of 38 © 2012 ADP Dealer Services, Inc.. All rights reserved h>p://www.cobaltu.com
Flexible Design Overview
• The Flex design uses widgets to provide thousands of layout and content combinations that allow for more choice and dealership differentiation.
• Improved features make it easier to keep a site up to date, including drag and drop functionality as well as dynamic resizing of images.
• Interchangeable widgets can be easily swapped and replaced, including promotional content and vehicle lineups.
• Flash widgets have been replaced with search friendly widgets to improve search ranking (SEO).
NOTE: Content on the Homepage from non-flex designs will not be pulled into the new design automatically.
Selecting the Flex Design
1. Login to Dealer Command Center (dealercommandcenter.com).
2. Select Website; click the Go button.
3. Choose the Editor tab.
4. Select the Design button.
5. Select the Capella design.
6. Select the Save button.
QUICK GUIDE
USING FLEX WIDGETS
Page 4 of 38 © 2012 ADP Dealer Services, Inc.. All rights reserved h>p://www.cobaltu.com
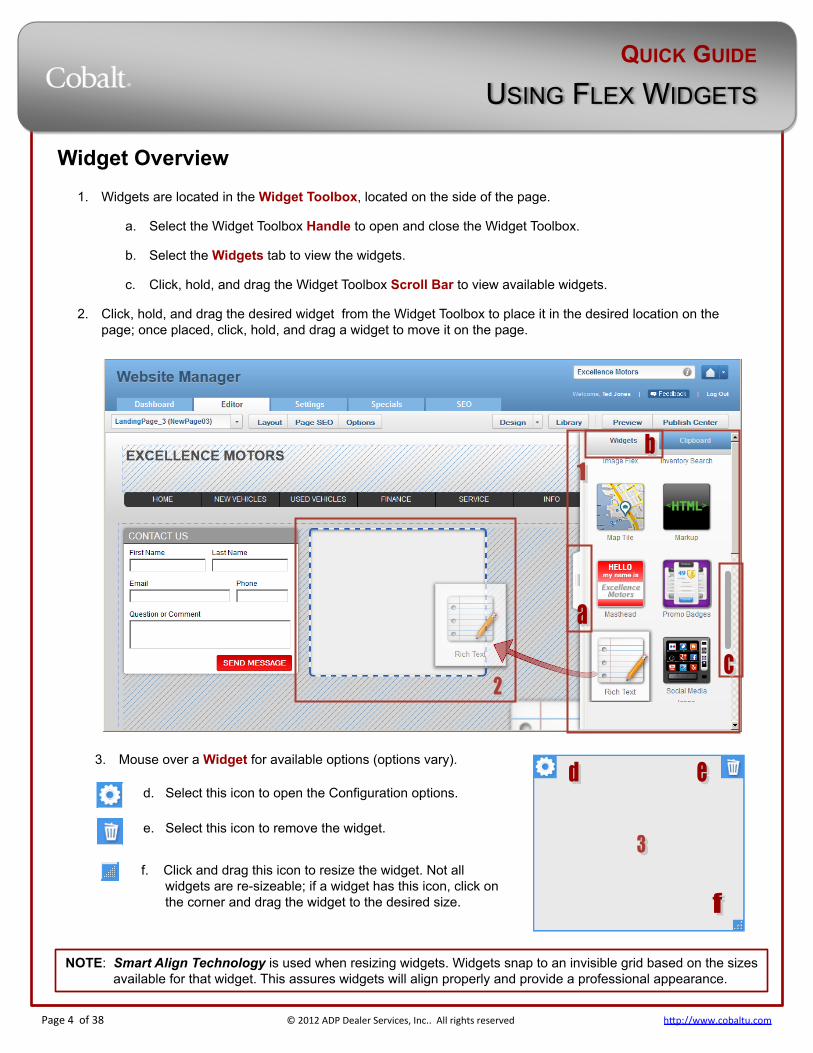
Widget Overview
1. Widgets are located in the Widget Toolbox, located on the side of the page.
a. Select the Widget Toolbox Handle to open and close the Widget Toolbox.
b. Select the Widgets tab to view the widgets.
c. Click, hold, and drag the Widget Toolbox Scroll Bar to view available widgets.
2. Click, hold, and drag the desired widget from the Widget Toolbox to place it in the desired location on the page; once placed, click, hold, and drag a widget to move it on the page.
3. Mouse over a Widget for available options (options vary).
f. Click and drag this icon to resize the widget. Not all widgets are re-sizeable; if a widget has this icon, click on the corner and drag the widget to the desired size.
d. Select this icon to open the Configuration options.
e. Select this icon to remove the widget.
NOTE: Smart Align Technology is used when resizing widgets. Widgets snap to an invisible grid based on the sizes available for that widget. This assures widgets will align properly and provide a professional appearance.
QUICK GUIDE
USING FLEX WIDGETS
Page 5 of 38 © 2012 ADP Dealer Services, Inc.. All rights reserved h>p://www.cobaltu.com
Configuring Widgets
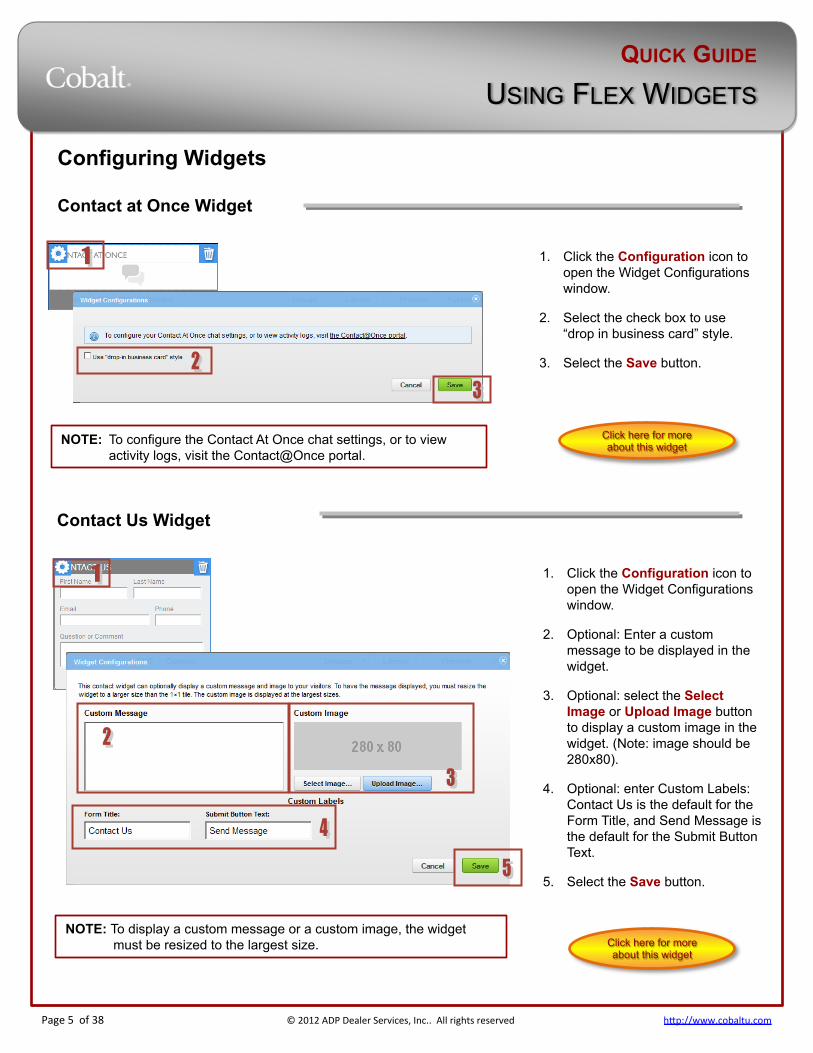
1. Click the Configuration icon to open the Widget Configurations window.
2. Select the check box to use “drop in business card” style.
3. Select the Save button.
NOTE: To display a custom message or a custom image, the widget must be resized to the largest size.
Contact at Once Widget
Contact Us Widget
1. Click the Configuration icon to open the Widget Configurations window.
2. Optional: Enter a custom message to be displayed in the widget.
3. Optional: select the Select Image or Upload Image button to display a custom image in the widget. (Note: image should be 280x80).
4. Optional: enter Custom Labels: Contact Us is the default for the Form Title, and Send Message is the default for the Submit Button Text.
5. Select the Save button.
Click here for more about this widget
Click here for more about this widget
NOTE: To configure the Contact At Once chat settings, or to view activity logs, visit the Contact@Once portal.

QUICK GUIDE
USING FLEX WIDGETS
Page 6 of 38 © 2012 ADP Dealer Services, Inc.. All rights reserved h>p://www.cobaltu.com
Configuring Widgets (continued)
1. Click the Configuration icon to open the Website Manager window.
2. Select the check boxes of the Call Tracking Numbers to be displayed.
3. Select the Save button.
Contact Info Widget
Click here for more about this widget
NOTE: The information displayed in this widget is administered in the Dealership Phone Numbers section under the Settings tab in Website Manager.
Dealership Contacts Widget
1. Click the Configuration icon to open the Widget Configurations window.
2. Select the check boxes of the Departments to be displayed.
3. Select the check boxes if email addresses are to be hidden.
4. Select how the employees are to be sorted.
5. Select the Save button.
NOTE: The information displayed in this widget is administered in the Dealership Contacts section under the Settings tab in Website Manager.
Click here for more about this widget
Click here to see how to administer Dealership Contacts

QUICK GUIDE
USING FLEX WIDGETS
Page 7 of 38 © 2012 ADP Dealer Services, Inc.. All rights reserved h>p://www.cobaltu.com
Configuring Widgets (continued)
Flex Specials Rotator
1. Click the Configuration icon to open the Widget Configurations window.
2. Select the checkbox of the Specials Categories to be shown in the rotator.
• To edit the category label, double click a category and change the value.
• To change the order, click and hold on a category and drag up or down.
3. Select or deselect the checkbox to display the categories as tabs.
4. Select or deselect the checkbox to display Inventory if no Specials are available.
5. Select the appropriate radio button to determine Rotate Mode.
• Manual
• Auto (enter the number of seconds)
6. Select the Save button.
NOTE: The information displayed in this widget is administered under the Specials tab in Website Manager.
Click here for more about this widget
Click here to see how to administer Specials
QUICK GUIDE
USING FLEX WIDGETS
Page 8 of 38 © 2012 ADP Dealer Services, Inc.. All rights reserved h>p://www.cobaltu.com
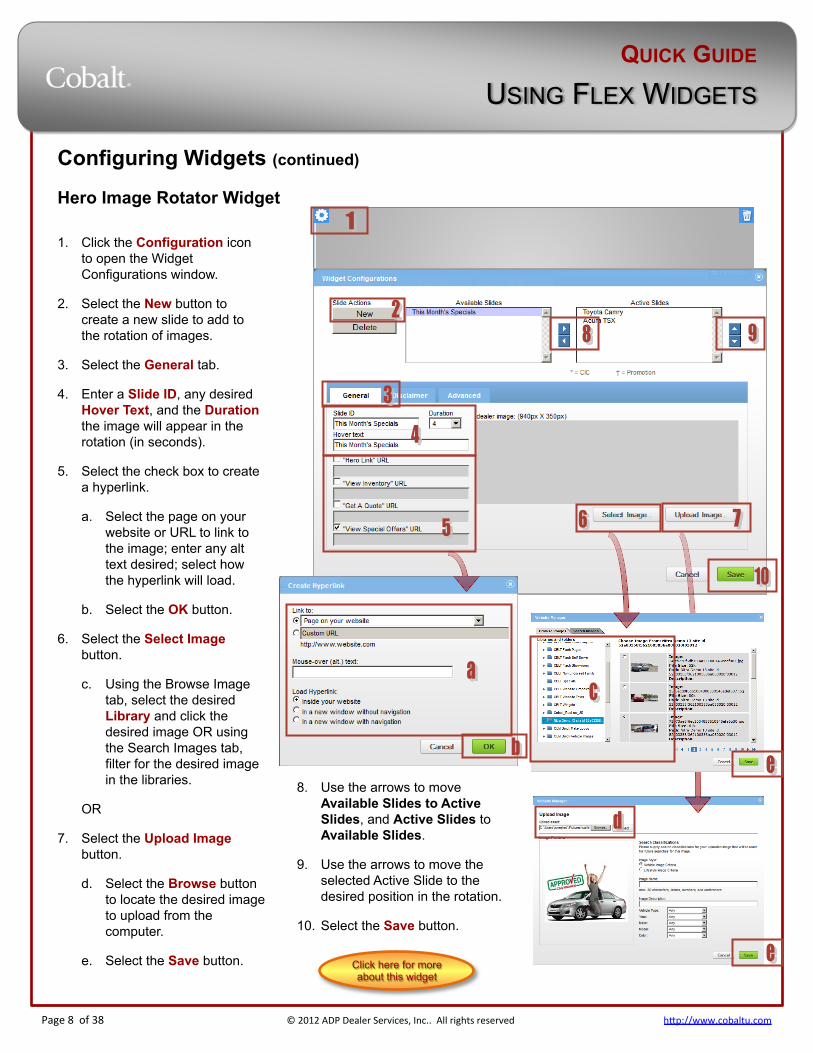
8. Use the arrows to move Available Slides to Active Slides, and Active Slides to Available Slides.
9. Use the arrows to move the selected Active Slide to the desired position in the rotation.
10. Select the Save button.
Click here for more about this widget
Configuring Widgets (continued)
Hero Image Rotator Widget
1. Click the Configuration icon to open the Widget Configurations window.
2. Select the New button to create a new slide to add to the rotation of images.
3. Select the General tab.
4. Enter a Slide ID, any desired Hover Text, and the Duration the image will appear in the rotation (in seconds).
5. Select the check box to create a hyperlink.
a. Select the page on your website or URL to link to the image; enter any alt text desired; select how the hyperlink will load.
b. Select the OK button.
6. Select the Select Image button.
c. Using the Browse Image tab, select the desired Library and click the desired image OR using the Search Images tab, filter for the desired image in the libraries.
OR
7. Select the Upload Image button.
d. Select the Browse button to locate the desired image to upload from the computer.
e. Select the Save button.
QUICK GUIDE
USING FLEX WIDGETS
Page 9 of 38 © 2012 ADP Dealer Services, Inc.. All rights reserved h>p://www.cobaltu.com
Configuring Widgets (continued)
NOTE: The information displayed in this widget is administered in the Dealership Hours section under the Settings tab in Website Manager.
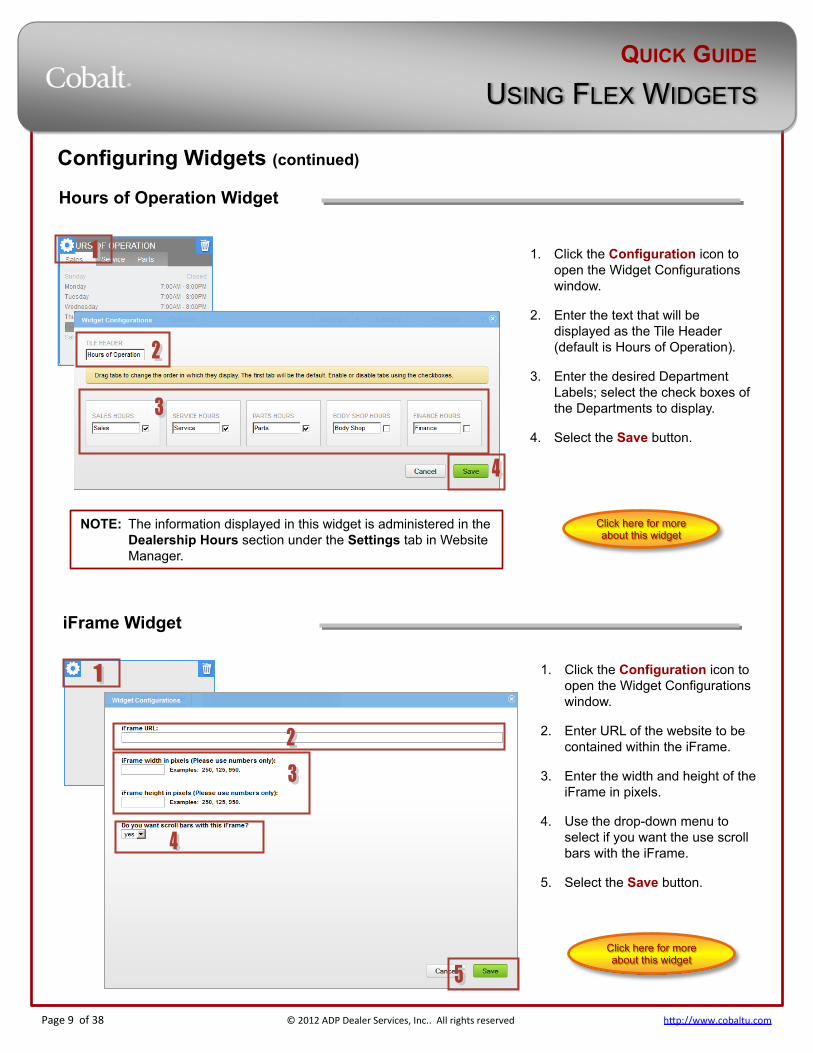
Hours of Operation Widget
1. Click the Configuration icon to open the Widget Configurations window.
2. Enter the text that will be displayed as the Tile Header (default is Hours of Operation).
3. Enter the desired Department Labels; select the check boxes of the Departments to display.
4. Select the Save button.
Click here for more about this widget
iFrame Widget
1. Click the Configuration icon to open the Widget Configurations window.
2. Enter URL of the website to be contained within the iFrame.
3. Enter the width and height of the iFrame in pixels.
4. Use the drop-down menu to select if you want the use scroll bars with the iFrame.
5. Select the Save button.
Click here for more about this widget
QUICK GUIDE
USING FLEX WIDGETS
Page 10 of 38 © 2012 ADP Dealer Services, Inc.. All rights reserved h>p://www.cobaltu.com
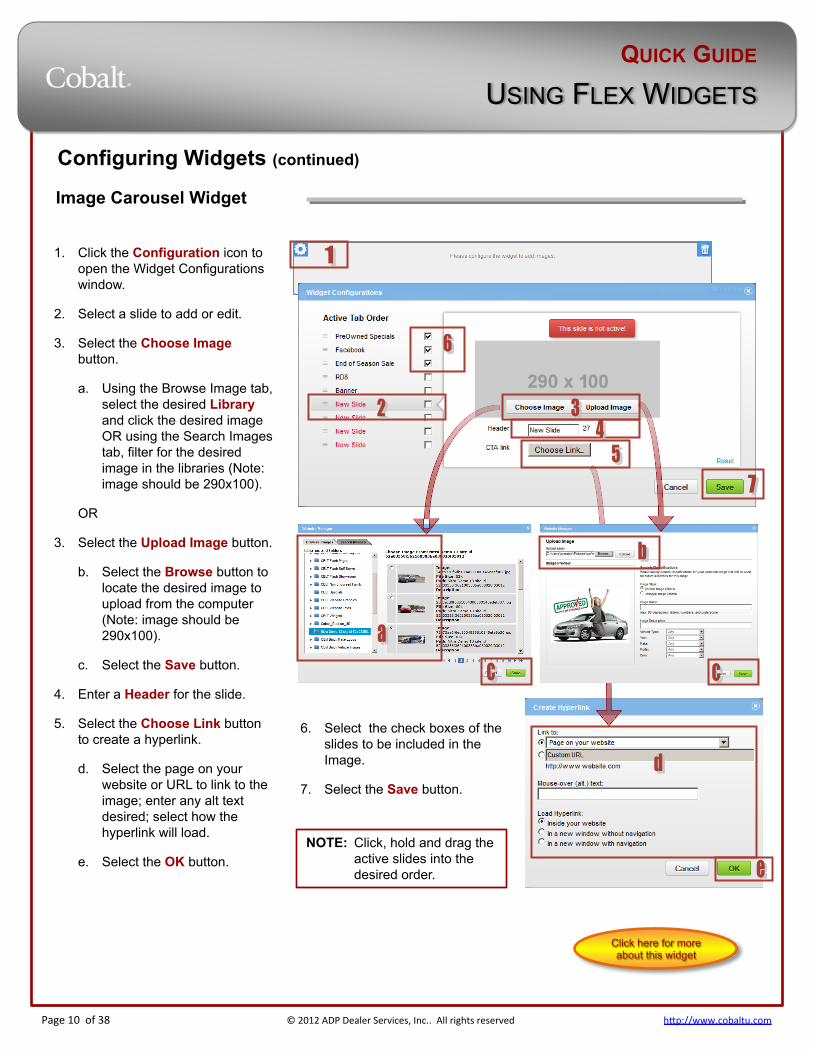
Configuring Widgets (continued)
NOTE: Click, hold and drag the active slides into the desired order.
Image Carousel Widget
Click here for more about this widget
6. Select the check boxes of the slides to be included in the Image.
7. Select the Save button.
1. Click the Configuration icon to open the Widget Configurations window.
2. Select a slide to add or edit.
3. Select the Choose Image button.
a. Using the Browse Image tab, select the desired Library and click the desired image OR using the Search Images tab, filter for the desired image in the libraries (Note: image should be 290x100).
OR
3. Select the Upload Image button.
b. Select the Browse button to locate the desired image to upload from the computer (Note: image should be 290x100).
c. Select the Save button.
4. Enter a Header for the slide.
5. Select the Choose Link button to create a hyperlink.
d. Select the page on your website or URL to link to the image; enter any alt text desired; select how the hyperlink will load.
e. Select the OK button.
QUICK GUIDE
USING FLEX WIDGETS
Page 11 of 38 © 2012 ADP Dealer Services, Inc.. All rights reserved h>p://www.cobaltu.com
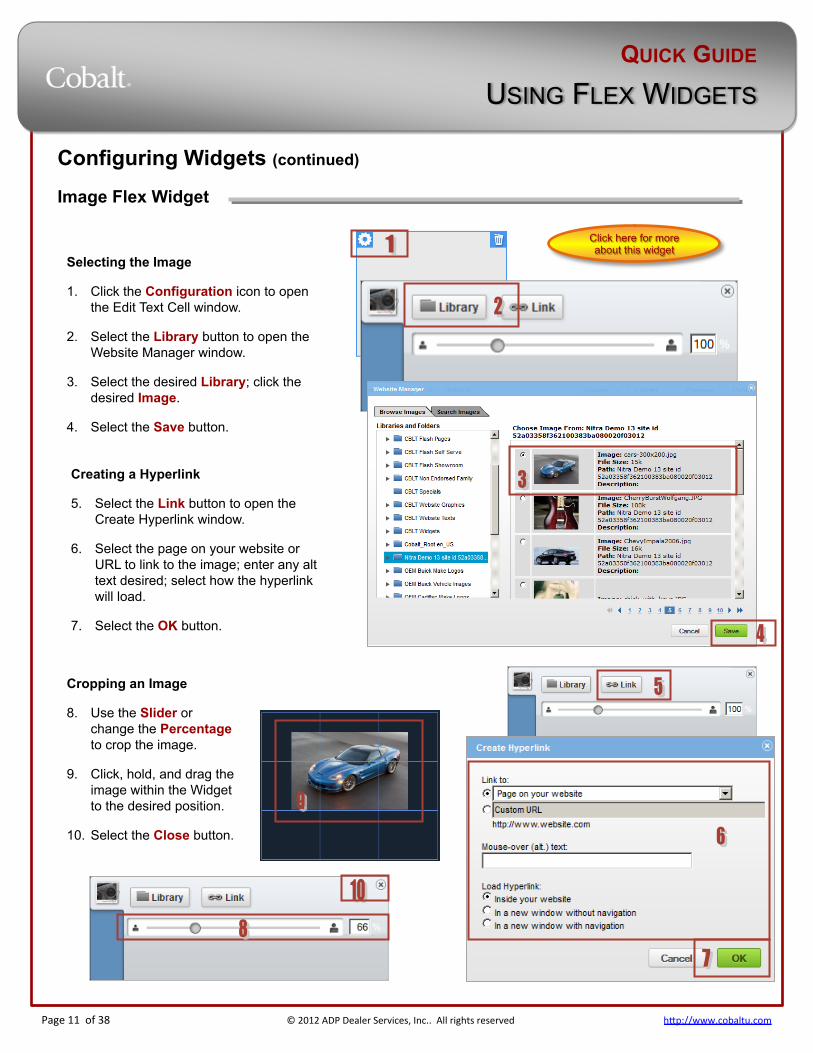
Configuring Widgets (continued) Image Flex Widget
Cropping an Image
8. Use the Slider or change the Percentage to crop the image.
9. Click, hold, and drag the image within the Widget to the desired position.
10. Select the Close button.
Click here for more about this widget
Selecting the Image
1. Click the Configuration icon to open the Edit Text Cell window.
2. Select the Library button to open the Website Manager window.
3. Select the desired Library; click the desired Image.
4. Select the Save button.
Creating a Hyperlink
5. Select the Link button to open the Create Hyperlink window.
6. Select the page on your website or URL to link to the image; enter any alt text desired; select how the hyperlink will load.
7. Select the OK button.
QUICK GUIDE
USING FLEX WIDGETS
Page 12 of 38 © 2012 ADP Dealer Services, Inc.. All rights reserved h>p://www.cobaltu.com
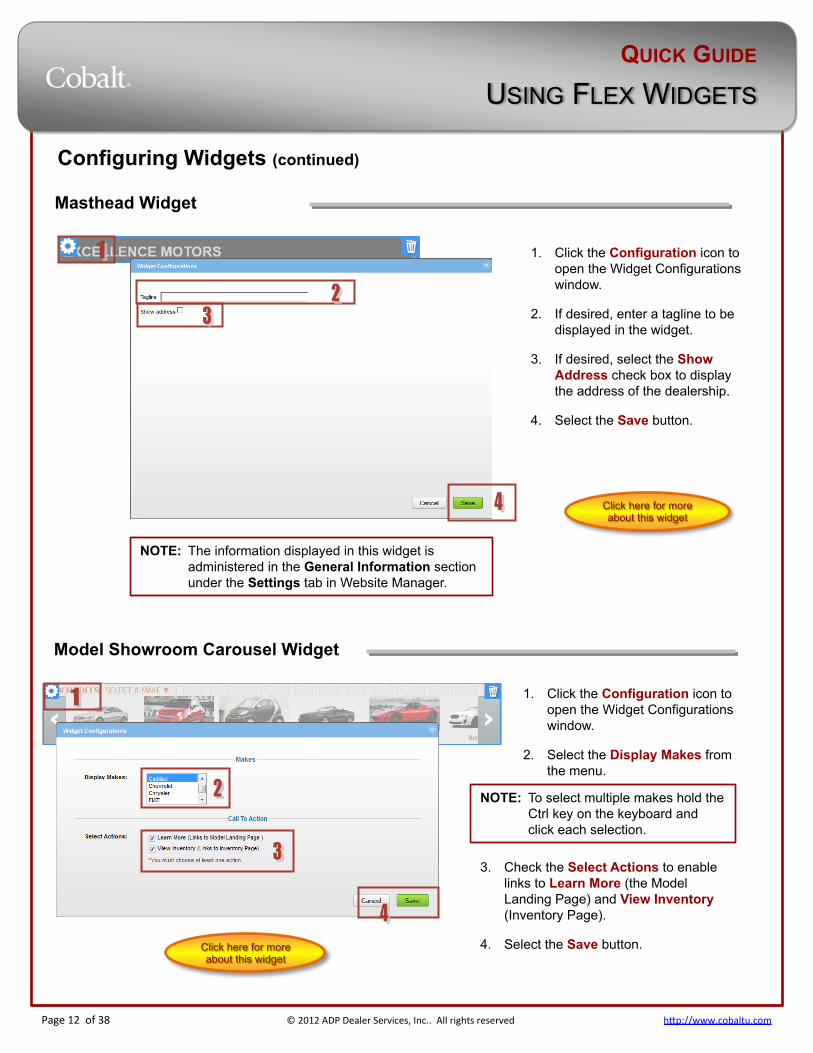
1. Click the Configuration icon to open the Widget Configurations window.
2. Select the Display Makes from the menu.
NOTE: To select multiple makes hold the Ctrl key on the keyboard and click each selection.
Model Showroom Carousel Widget
Configuring Widgets (continued)
3. Check the Select Actions to enable links to Learn More (the Model Landing Page) and View Inventory (Inventory Page).
4. Select the Save button. Click here for more about this widget
Masthead Widget
1. Click the Configuration icon to open the Widget Configurations window.
2. If desired, enter a tagline to be displayed in the widget.
3. If desired, select the Show Address check box to display the address of the dealership.
4. Select the Save button.
Click here for more about this widget
NOTE: The information displayed in this widget is administered in the General Information section under the Settings tab in Website Manager.
QUICK GUIDE
USING FLEX WIDGETS
Page 13 of 38 © 2012 ADP Dealer Services, Inc.. All rights reserved h>p://www.cobaltu.com
Configuring Widgets (continued)
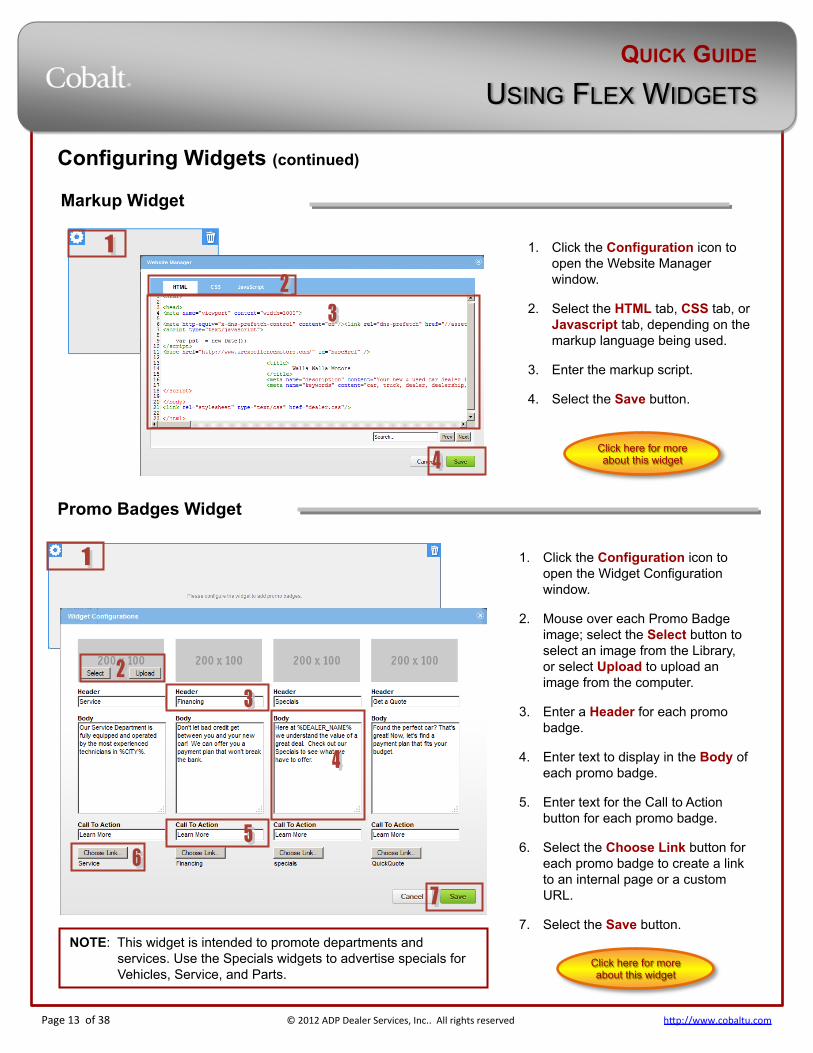
Markup Widget
1. Click the Configuration icon to open the Website Manager window.
2. Select the HTML tab, CSS tab, or Javascript tab, depending on the markup language being used.
3. Enter the markup script.
4. Select the Save button.
Click here for more about this widget
1. Click the Configuration icon to open the Widget Configuration window.
2. Mouse over each Promo Badge image; select the Select button to select an image from the Library, or select Upload to upload an image from the computer.
3. Enter a Header for each promo badge.
4. Enter text to display in the Body of each promo badge.
5. Enter text for the Call to Action button for each promo badge.
6. Select the Choose Link button for each promo badge to create a link to an internal page or a custom URL.
7. Select the Save button.
Promo Badges Widget
Click here for more about this widget
NOTE: This widget is intended to promote departments and services. Use the Specials widgets to advertise specials for Vehicles, Service, and Parts.
QUICK GUIDE
USING FLEX WIDGETS
Page 14 of 38 © 2012 ADP Dealer Services, Inc.. All rights reserved h>p://www.cobaltu.com
Configuring Widgets (continued)
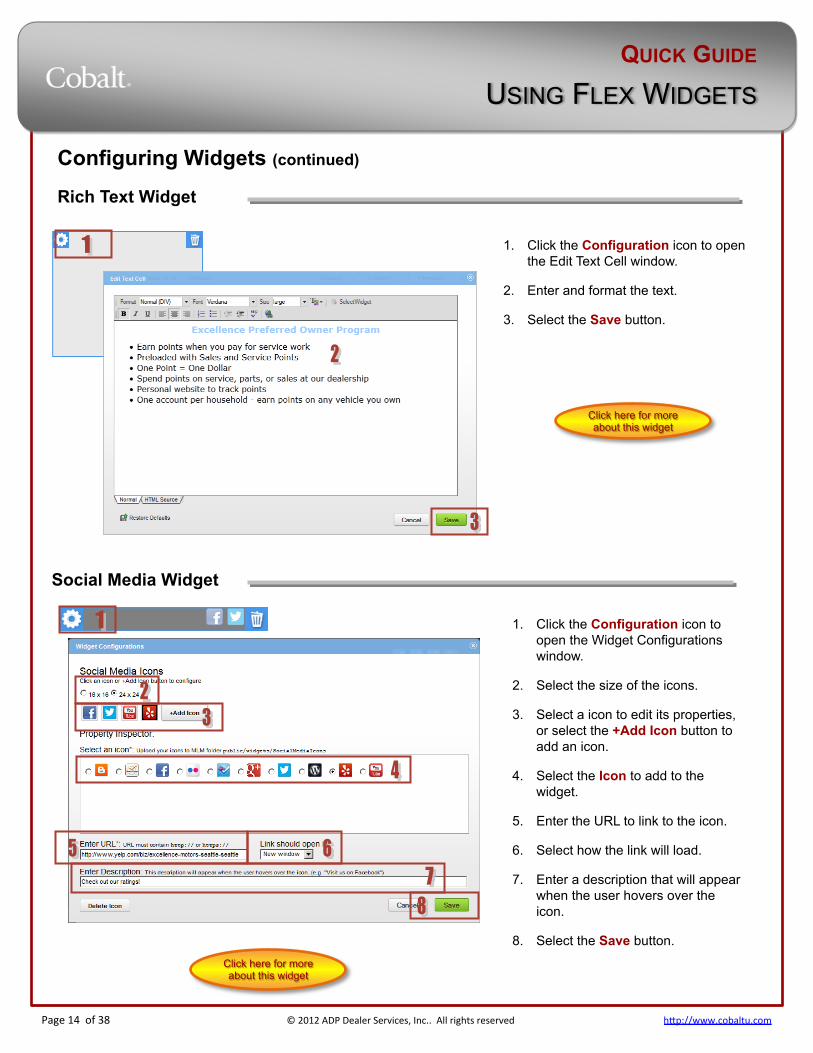
1. Click the Configuration icon to open the Edit Text Cell window.
2. Enter and format the text.
3. Select the Save button.
Rich Text Widget
Click here for more about this widget
Social Media Widget
1. Click the Configuration icon to open the Widget Configurations window.
2. Select the size of the icons.
3. Select a icon to edit its properties, or select the +Add Icon button to add an icon.
4. Select the Icon to add to the widget.
5. Enter the URL to link to the icon.
6. Select how the link will load.
7. Enter a description that will appear when the user hovers over the icon.
8. Select the Save button. Click here for more about this widget
QUICK GUIDE
USING FLEX WIDGETS
Page 15 of 38 © 2012 ADP Dealer Services, Inc.. All rights reserved h>p://www.cobaltu.com
Configuring Widgets (continued)
Adding a Video
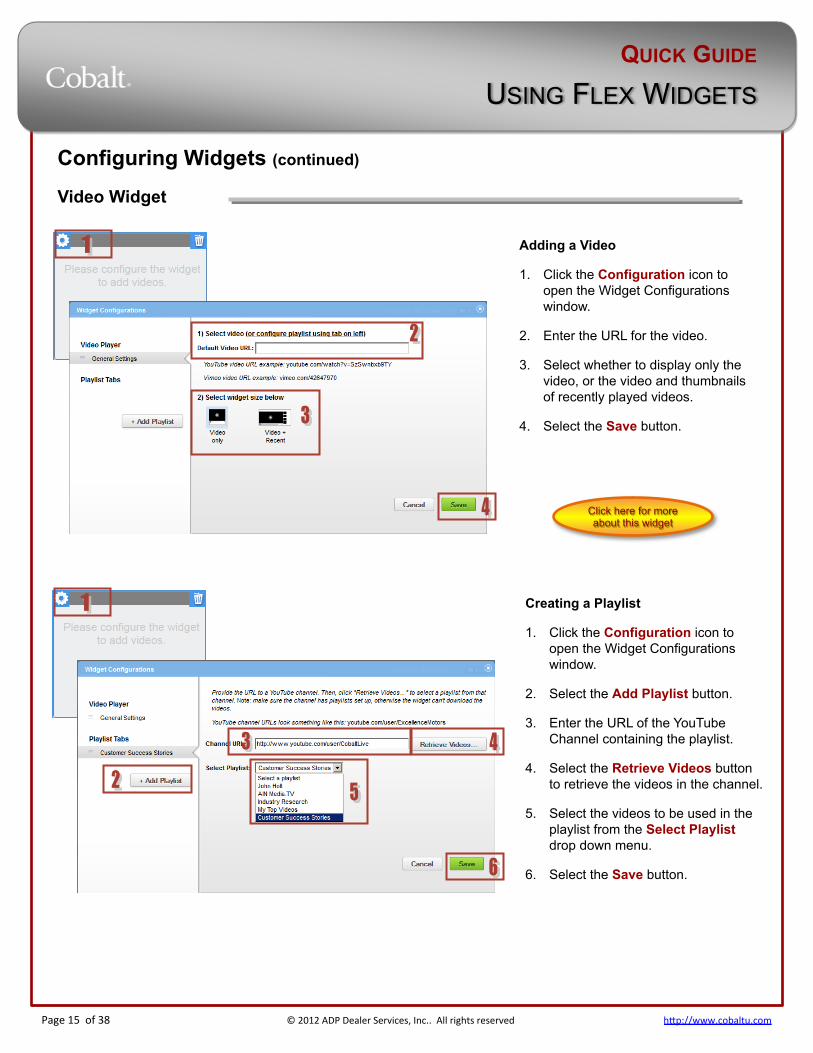
1. Click the Configuration icon to open the Widget Configurations window.
2. Enter the URL for the video.
3. Select whether to display only the video, or the video and thumbnails of recently played videos.
4. Select the Save button.
Video Widget
Click here for more about this widget
Creating a Playlist
1. Click the Configuration icon to open the Widget Configurations window.
2. Select the Add Playlist button.
3. Enter the URL of the YouTube Channel containing the playlist.
4. Select the Retrieve Videos button to retrieve the videos in the channel.
5. Select the videos to be used in the playlist from the Select Playlist drop down menu.
6. Select the Save button.
QUICK GUIDE
USING FLEX WIDGETS
Page 16 of 38 © 2012 ADP Dealer Services, Inc.. All rights reserved h>p://www.cobaltu.com
Configuring Widgets (continued)
Quick Links Widget
Click here for more about this widget
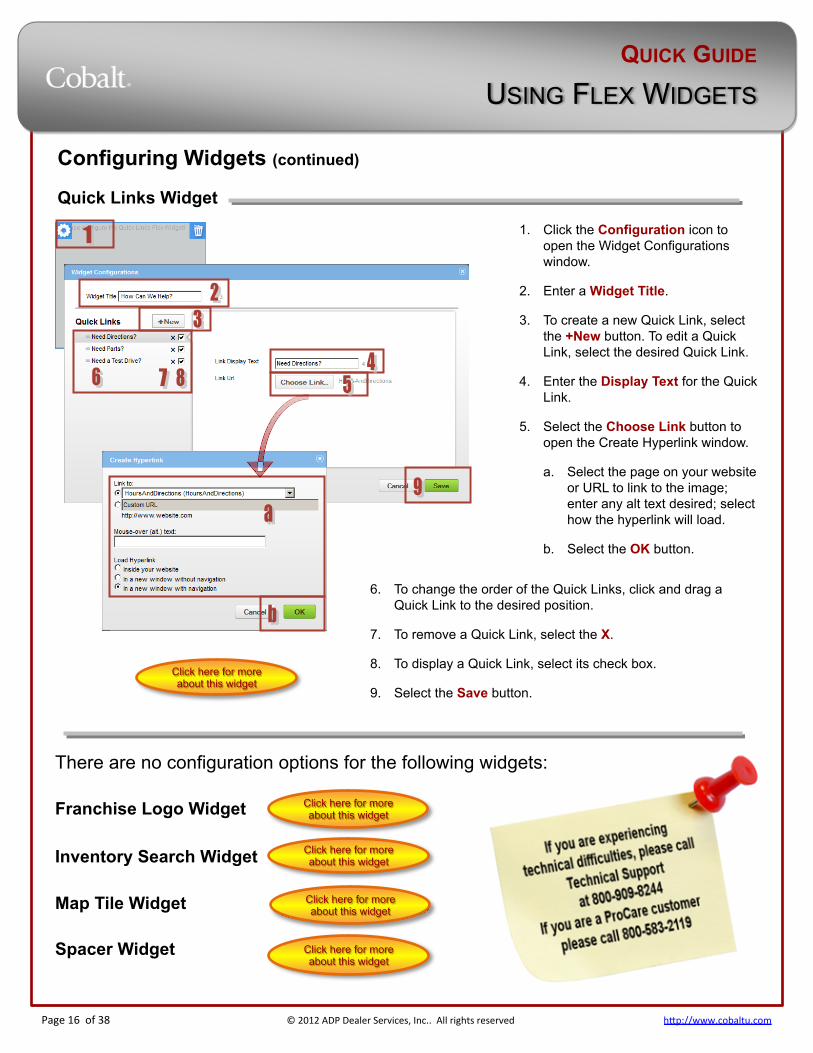
1. Click the Configuration icon to open the Widget Configurations window.
2. Enter a Widget Title.
3. To create a new Quick Link, select the +New button. To edit a Quick Link, select the desired Quick Link.
4. Enter the Display Text for the Quick Link.
5. Select the Choose Link button to open the Create Hyperlink window.
a. Select the page on your website or URL to link to the image; enter any alt text desired; select how the hyperlink will load.
b. Select the OK button.
6. To change the order of the Quick Links, click and drag a Quick Link to the desired position.
7. To remove a Quick Link, select the X.
8. To display a Quick Link, select its check box.
9. Select the Save button.
There are no configuration options for the following widgets:
Spacer Widget
Franchise Logo Widget
Map Tile Widget
Inventory Search Widget
Click here for more about this widget
Click here for more about this widget
Click here for more about this widget
Click here for more about this widget
QUICK GUIDE
USING FLEX WIDGETS
Page 17 of 38 © 2012 ADP Dealer Services, Inc.. All rights reserved h>p://www.cobaltu.com
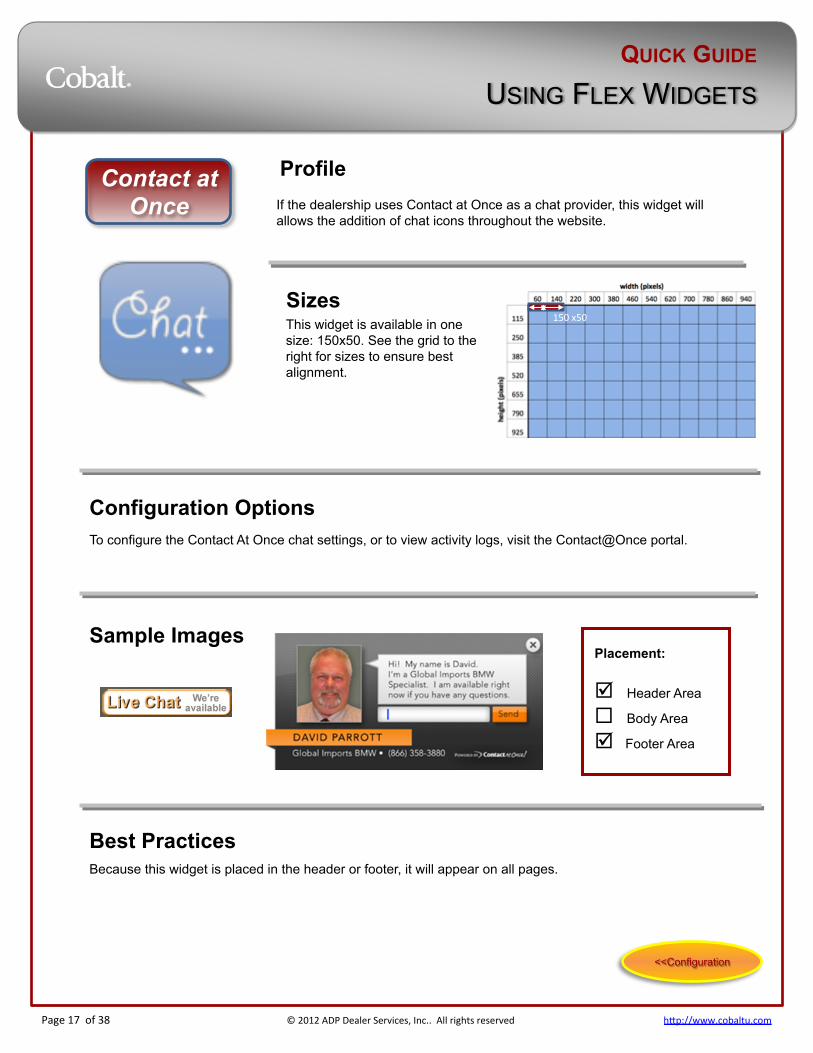
Profile If the dealership uses Contact at Once as a chat provider, this widget will allows the addition of chat icons throughout the website.
Sizes This widget is available in one size: 150x50. See the grid to the right for sizes to ensure best alignment.
Configuration Options To configure the Contact At Once chat settings, or to view activity logs, visit the Contact@Once portal.
Sample Images
Best Practices Because this widget is placed in the header or footer, it will appear on all pages.
150 x50
Placement:
þ Header Area
¨ Body Area
þ Footer Area
Contact at Once
<<Configuration
QUICK GUIDE
USING FLEX WIDGETS
Page 18 of 38 © 2012 ADP Dealer Services, Inc.. All rights reserved h>p://www.cobaltu.com
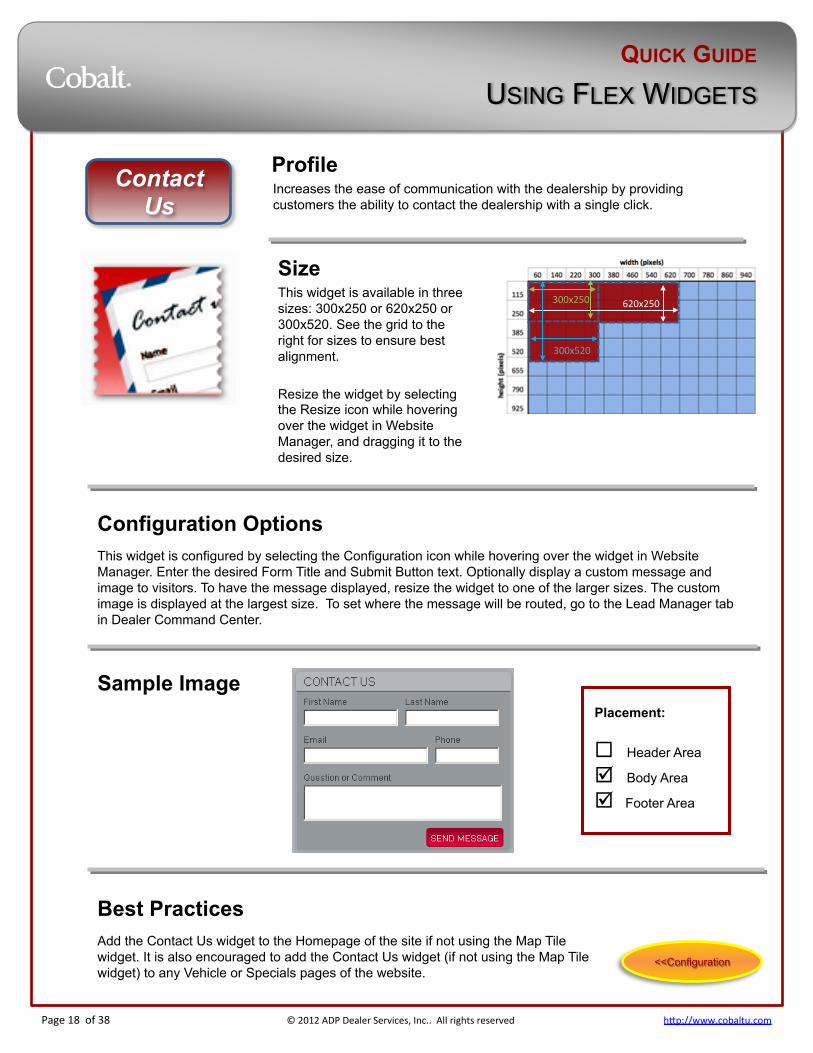
Profile Increases the ease of communication with the dealership by providing customers the ability to contact the dealership with a single click.
Size This widget is available in three sizes: 300x250 or 620x250 or 300x520. See the grid to the right for sizes to ensure best alignment. Resize the widget by selecting the Resize icon while hovering over the widget in Website Manager, and dragging it to the desired size.
Configuration Options This widget is configured by selecting the Configuration icon while hovering over the widget in Website Manager. Enter the desired Form Title and Submit Button text. Optionally display a custom message and image to visitors. To have the message displayed, resize the widget to one of the larger sizes. The custom image is displayed at the largest size. To set where the message will be routed, go to the Lead Manager tab in Dealer Command Center.
Sample Image
Best Practices Add the Contact Us widget to the Homepage of the site if not using the Map Tile widget. It is also encouraged to add the Contact Us widget (if not using the Map Tile widget) to any Vehicle or Specials pages of the website.
620x250 300x250
300x520
Placement:
¨ Header Area
þ Body Area
þ Footer Area
Contact Us
<<Configuration
QUICK GUIDE
USING FLEX WIDGETS
Page 19 of 38 © 2012 ADP Dealer Services, Inc.. All rights reserved h>p://www.cobaltu.com
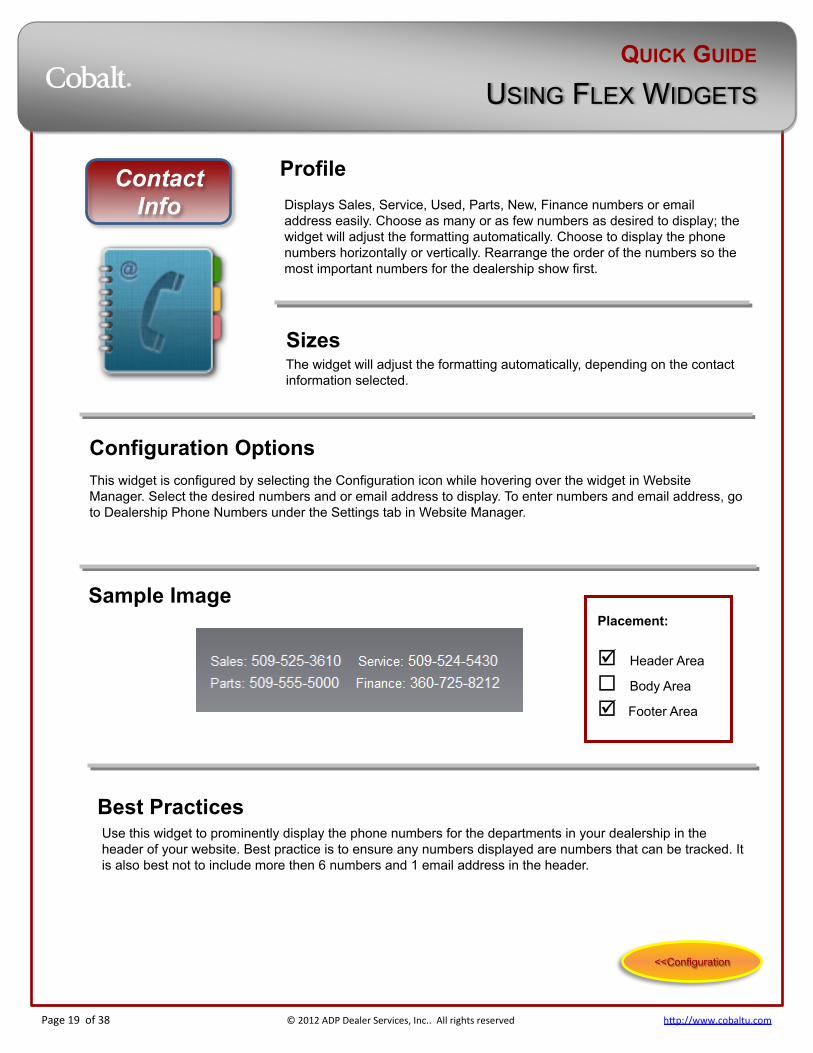
Profile Displays Sales, Service, Used, Parts, New, Finance numbers or email address easily. Choose as many or as few numbers as desired to display; the widget will adjust the formatting automatically. Choose to display the phone numbers horizontally or vertically. Rearrange the order of the numbers so the most important numbers for the dealership show first.
Sizes The widget will adjust the formatting automatically, depending on the contact information selected.
Configuration Options This widget is configured by selecting the Configuration icon while hovering over the widget in Website Manager. Select the desired numbers and or email address to display. To enter numbers and email address, go to Dealership Phone Numbers under the Settings tab in Website Manager.
Sample Image
Best Practices Use this widget to prominently display the phone numbers for the departments in your dealership in the header of your website. Best practice is to ensure any numbers displayed are numbers that can be tracked. It is also best not to include more then 6 numbers and 1 email address in the header.
Placement:
þ Header Area
¨ Body Area
þ Footer Area
Contact Info
<<Configuration
QUICK GUIDE
USING FLEX WIDGETS
Page 20 of 38 © 2012 ADP Dealer Services, Inc.. All rights reserved h>p://www.cobaltu.com
Placement:
¨ Header Area
þ Body Area
¨ Footer Area
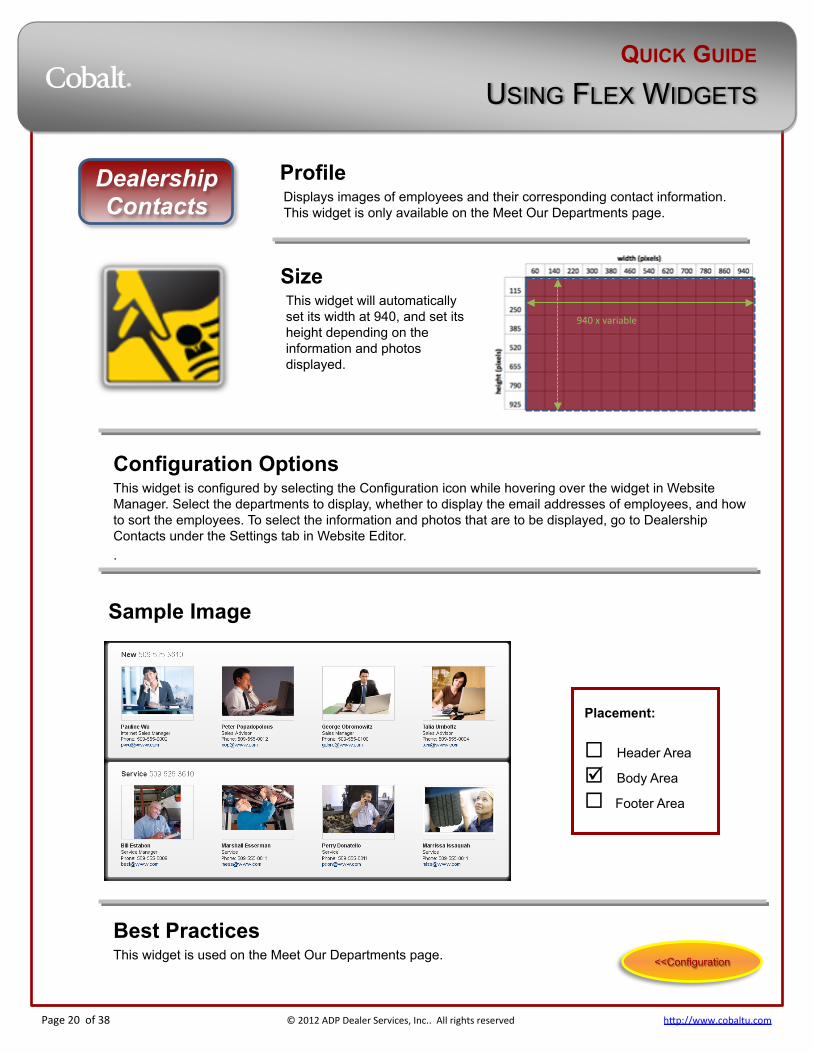
Profile Displays images of employees and their corresponding contact information. This widget is only available on the Meet Our Departments page.
Size This widget will automatically set its width at 940, and set its height depending on the information and photos displayed.
Configuration Options This widget is configured by selecting the Configuration icon while hovering over the widget in Website Manager. Select the departments to display, whether to display the email addresses of employees, and how to sort the employees. To select the information and photos that are to be displayed, go to Dealership Contacts under the Settings tab in Website Editor. .
Sample Image
Best Practices This widget is used on the Meet Our Departments page.
940 x variable
Dealership Contacts
<<Configuration
QUICK GUIDE
USING FLEX WIDGETS
Page 21 of 38 © 2012 ADP Dealer Services, Inc.. All rights reserved h>p://www.cobaltu.com
Profile
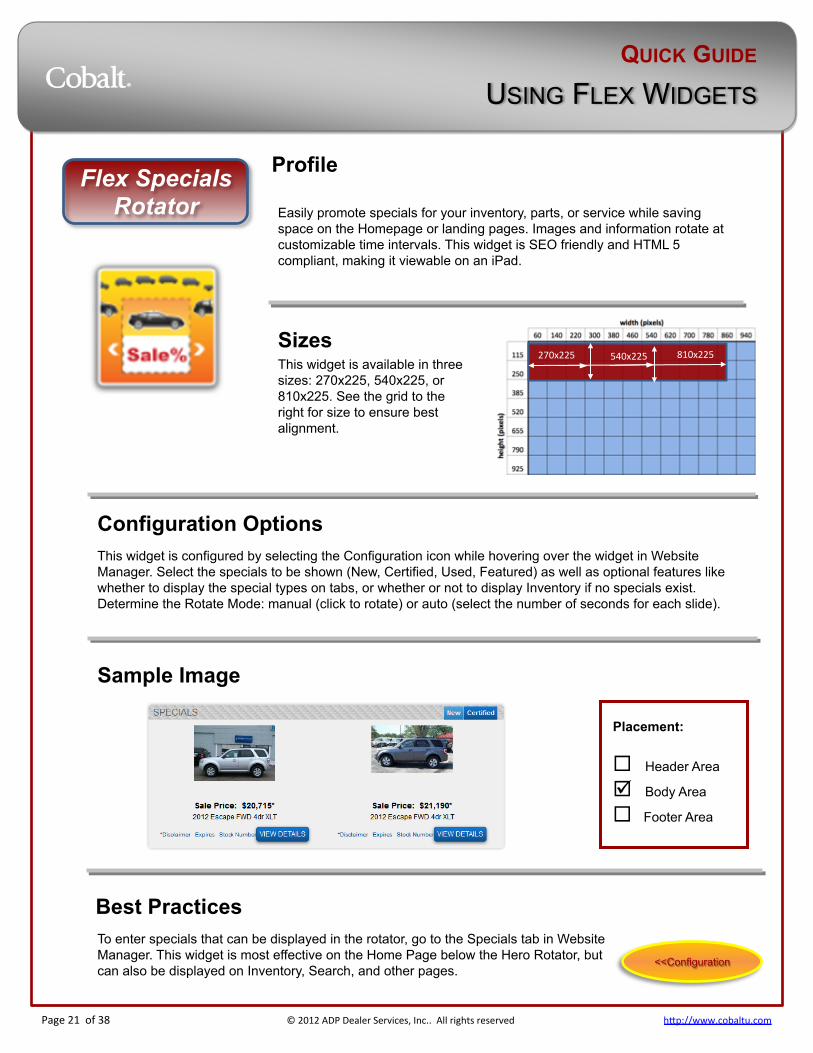
Easily promote specials for your inventory, parts, or service while saving space on the Homepage or landing pages. Images and information rotate at customizable time intervals. This widget is SEO friendly and HTML 5 compliant, making it viewable on an iPad.
Sizes This widget is available in three sizes: 270x225, 540x225, or 810x225. See the grid to the right for size to ensure best alignment.
Configuration Options This widget is configured by selecting the Configuration icon while hovering over the widget in Website Manager. Select the specials to be shown (New, Certified, Used, Featured) as well as optional features like whether to display the special types on tabs, or whether or not to display Inventory if no specials exist. Determine the Rotate Mode: manual (click to rotate) or auto (select the number of seconds for each slide).
Sample Image
Best Practices To enter specials that can be displayed in the rotator, go to the Specials tab in Website Manager. This widget is most effective on the Home Page below the Hero Rotator, but can also be displayed on Inventory, Search, and other pages.
810x225
Placement:
¨ Header Area
þ Body Area
¨ Footer Area
Flex Specials Rotator
<<Configuration
540x225 270x225
QUICK GUIDE
USING FLEX WIDGETS
Page 22 of 38 © 2012 ADP Dealer Services, Inc.. All rights reserved h>p://www.cobaltu.com
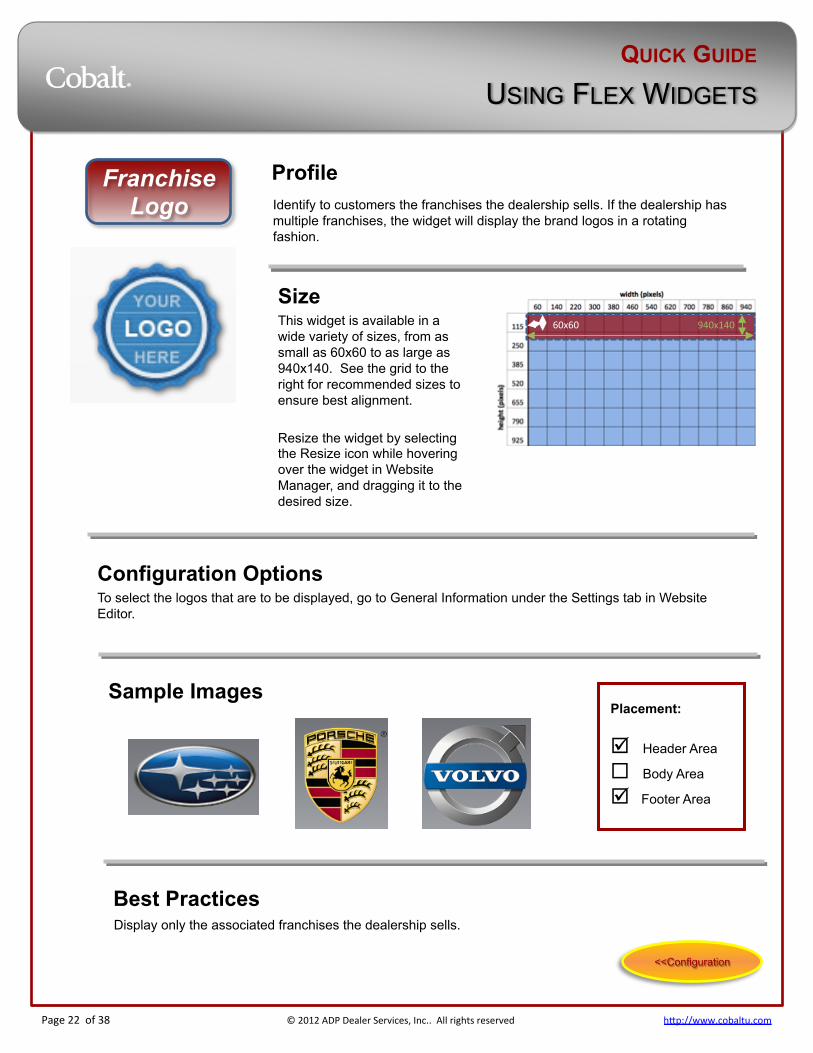
Profile Identify to customers the franchises the dealership sells. If the dealership has multiple franchises, the widget will display the brand logos in a rotating fashion.
Size This widget is available in a wide variety of sizes, from as small as 60x60 to as large as 940x140. See the grid to the right for recommended sizes to ensure best alignment. Resize the widget by selecting the Resize icon while hovering over the widget in Website Manager, and dragging it to the desired size.
Configuration Options To select the logos that are to be displayed, go to General Information under the Settings tab in Website Editor.
Sample Images
Best Practices Display only the associated franchises the dealership sells.
940x140 60x60
Placement:
þ Header Area
¨ Body Area
þ Footer Area
Franchise Logo
<<Configuration
QUICK GUIDE
USING FLEX WIDGETS
Page 23 of 38 © 2012 ADP Dealer Services, Inc.. All rights reserved h>p://www.cobaltu.com
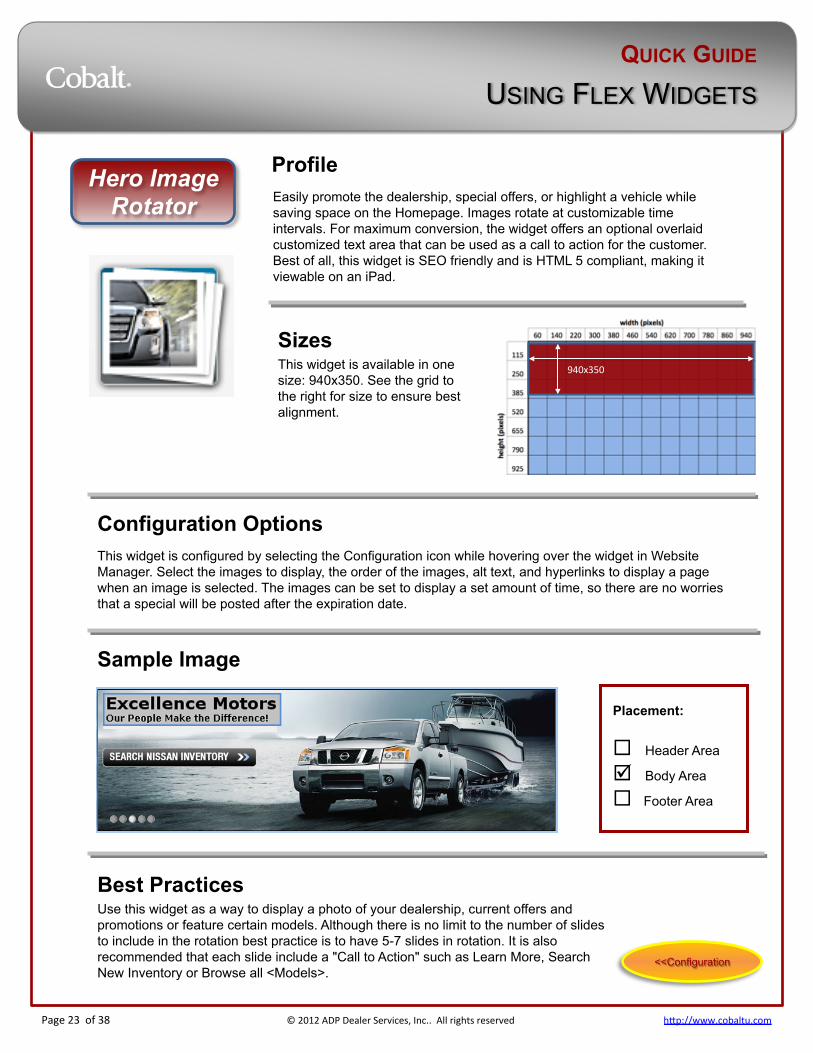
Profile Easily promote the dealership, special offers, or highlight a vehicle while saving space on the Homepage. Images rotate at customizable time intervals. For maximum conversion, the widget offers an optional overlaid customized text area that can be used as a call to action for the customer. Best of all, this widget is SEO friendly and is HTML 5 compliant, making it viewable on an iPad.
Sizes This widget is available in one size: 940x350. See the grid to the right for size to ensure best alignment.
Configuration Options This widget is configured by selecting the Configuration icon while hovering over the widget in Website Manager. Select the images to display, the order of the images, alt text, and hyperlinks to display a page when an image is selected. The images can be set to display a set amount of time, so there are no worries that a special will be posted after the expiration date.
Sample Image
Best Practices Use this widget as a way to display a photo of your dealership, current offers and promotions or feature certain models. Although there is no limit to the number of slides to include in the rotation best practice is to have 5-7 slides in rotation. It is also recommended that each slide include a "Call to Action" such as Learn More, Search New Inventory or Browse all <Models>.
940x350
Placement:
¨ Header Area
þ Body Area
¨ Footer Area
Hero Image Rotator
<<Configuration
QUICK GUIDE
USING FLEX WIDGETS
Page 24 of 38 © 2012 ADP Dealer Services, Inc.. All rights reserved h>p://www.cobaltu.com
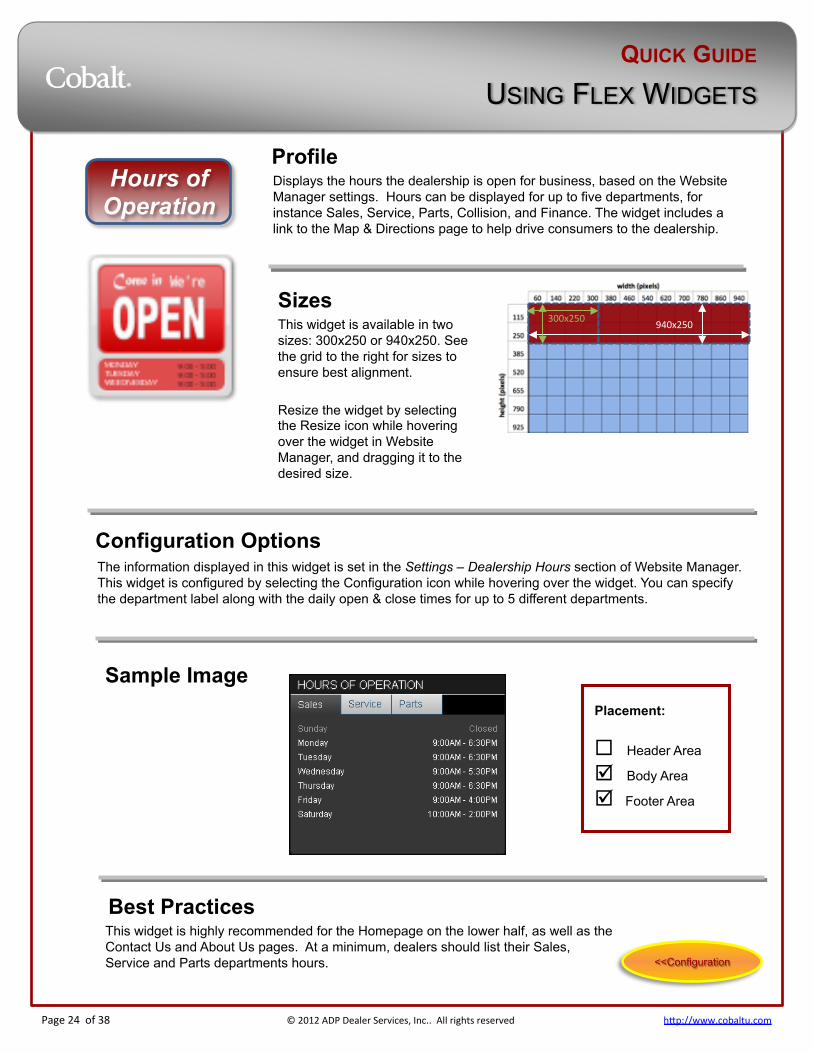
Profile Displays the hours the dealership is open for business, based on the Website Manager settings. Hours can be displayed for up to five departments, for instance Sales, Service, Parts, Collision, and Finance. The widget includes a link to the Map & Directions page to help drive consumers to the dealership.
Sizes This widget is available in two sizes: 300x250 or 940x250. See the grid to the right for sizes to ensure best alignment. Resize the widget by selecting the Resize icon while hovering over the widget in Website Manager, and dragging it to the desired size.
Configuration Options The information displayed in this widget is set in the Settings – Dealership Hours section of Website Manager. This widget is configured by selecting the Configuration icon while hovering over the widget. You can specify the department label along with the daily open & close times for up to 5 different departments.
Sample Image
Best Practices This widget is highly recommended for the Homepage on the lower half, as well as the Contact Us and About Us pages. At a minimum, dealers should list their Sales, Service and Parts departments hours.
300x250 940x250
Placement:
¨ Header Area
þ Body Area
þ Footer Area
Hours of Operation
<<Configuration
QUICK GUIDE
USING FLEX WIDGETS
Page 25 of 38 © 2012 ADP Dealer Services, Inc.. All rights reserved h>p://www.cobaltu.com
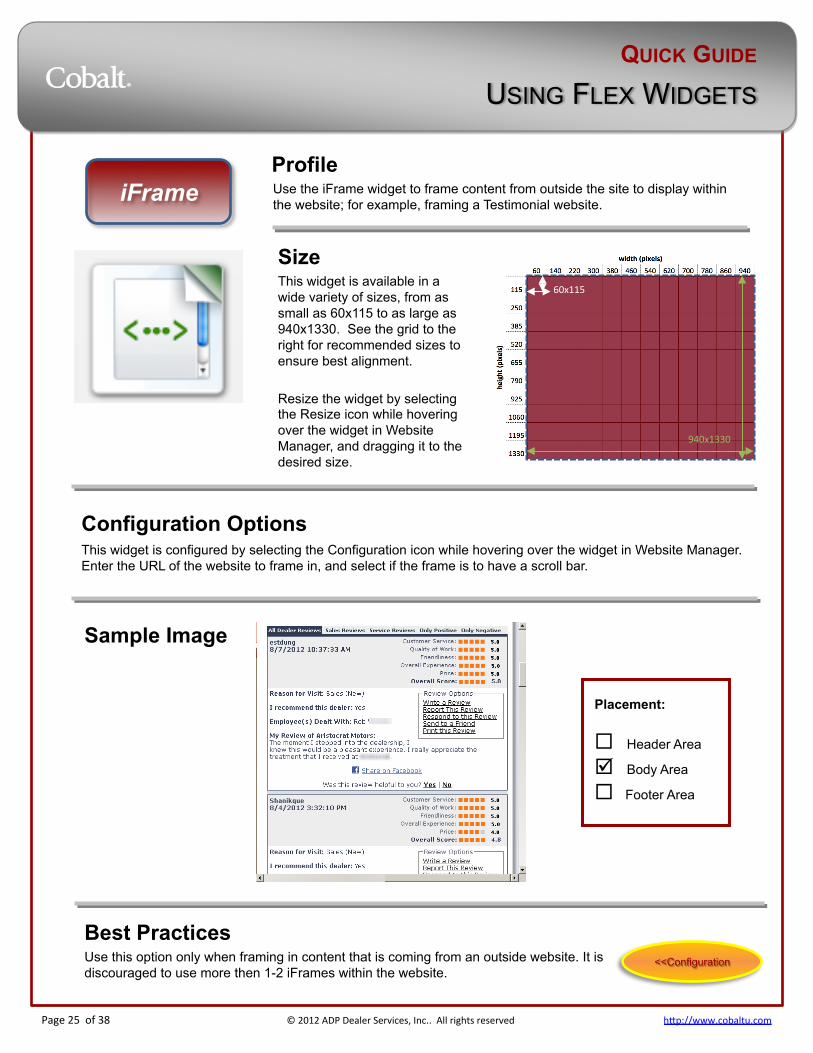
Profile Use the iFrame widget to frame content from outside the site to display within the website; for example, framing a Testimonial website.
Size This widget is available in a wide variety of sizes, from as small as 60x115 to as large as 940x1330. See the grid to the right for recommended sizes to ensure best alignment. Resize the widget by selecting the Resize icon while hovering over the widget in Website Manager, and dragging it to the desired size.
Configuration Options This widget is configured by selecting the Configuration icon while hovering over the widget in Website Manager. Enter the URL of the website to frame in, and select if the frame is to have a scroll bar.
Sample Image
Best Practices Use this option only when framing in content that is coming from an outside website. It is discouraged to use more then 1-2 iFrames within the website.
940x1330
60x115
Placement:
¨ Header Area
þ Body Area
¨ Footer Area
iFrame
<<Configuration
QUICK GUIDE
USING FLEX WIDGETS
Page 26 of 38 © 2012 ADP Dealer Services, Inc.. All rights reserved h>p://www.cobaltu.com
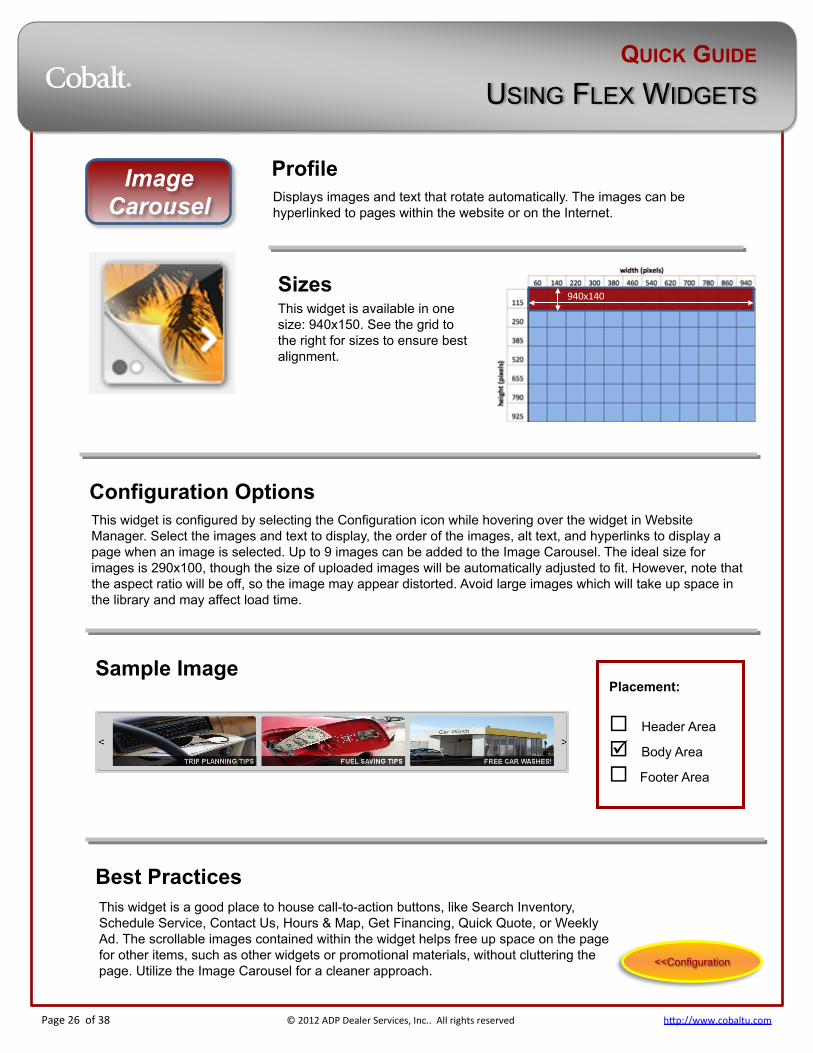
Profile Displays images and text that rotate automatically. The images can be hyperlinked to pages within the website or on the Internet.
Sizes This widget is available in one size: 940x150. See the grid to the right for sizes to ensure best alignment.
Configuration Options This widget is configured by selecting the Configuration icon while hovering over the widget in Website Manager. Select the images and text to display, the order of the images, alt text, and hyperlinks to display a page when an image is selected. Up to 9 images can be added to the Image Carousel. The ideal size for images is 290x100, though the size of uploaded images will be automatically adjusted to fit. However, note that the aspect ratio will be off, so the image may appear distorted. Avoid large images which will take up space in the library and may affect load time.
Sample Image
Best Practices This widget is a good place to house call-to-action buttons, like Search Inventory, Schedule Service, Contact Us, Hours & Map, Get Financing, Quick Quote, or Weekly Ad. The scrollable images contained within the widget helps free up space on the page for other items, such as other widgets or promotional materials, without cluttering the page. Utilize the Image Carousel for a cleaner approach.
Placement:
¨ Header Area
þ Body Area
¨ Footer Area
940x140
Image Carousel
<<Configuration
QUICK GUIDE
USING FLEX WIDGETS
Page 27 of 38 © 2012 ADP Dealer Services, Inc.. All rights reserved h>p://www.cobaltu.com
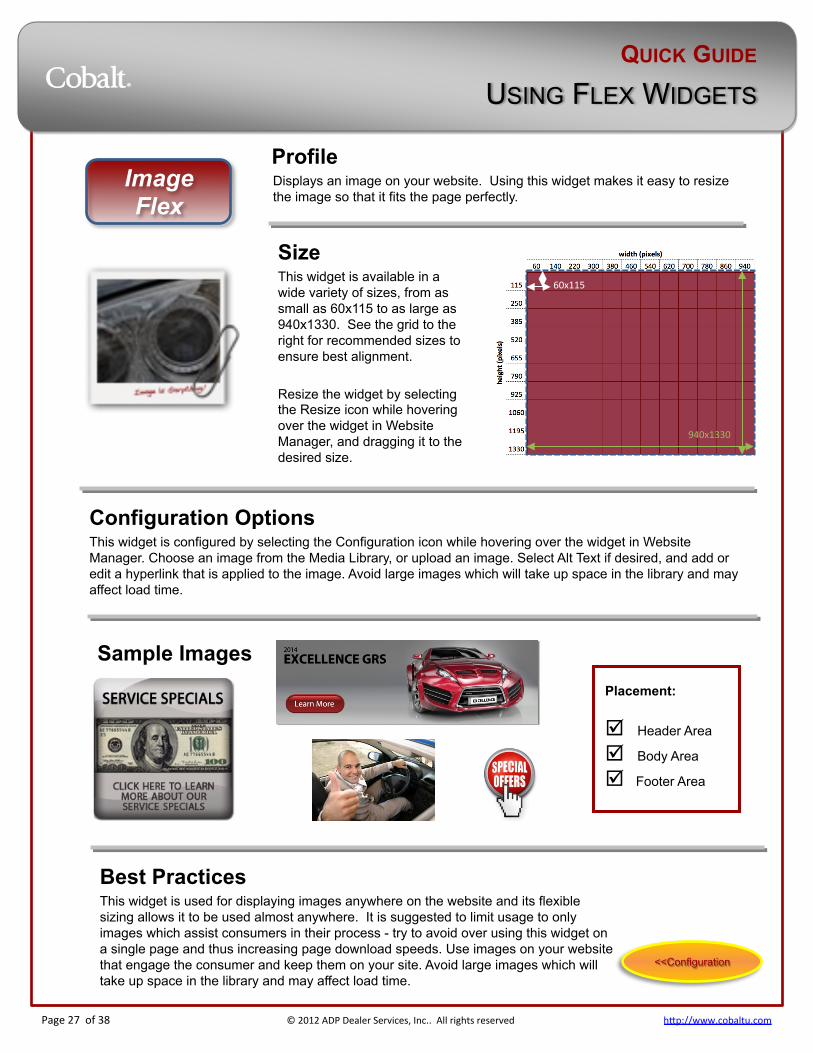
Profile Displays an image on your website. Using this widget makes it easy to resize the image so that it fits the page perfectly.
Size This widget is available in a wide variety of sizes, from as small as 60x115 to as large as 940x1330. See the grid to the right for recommended sizes to ensure best alignment. Resize the widget by selecting the Resize icon while hovering over the widget in Website Manager, and dragging it to the desired size.
Configuration Options This widget is configured by selecting the Configuration icon while hovering over the widget in Website Manager. Choose an image from the Media Library, or upload an image. Select Alt Text if desired, and add or edit a hyperlink that is applied to the image. Avoid large images which will take up space in the library and may affect load time.
Sample Images
Best Practices This widget is used for displaying images anywhere on the website and its flexible sizing allows it to be used almost anywhere. It is suggested to limit usage to only images which assist consumers in their process - try to avoid over using this widget on a single page and thus increasing page download speeds. Use images on your website that engage the consumer and keep them on your site. Avoid large images which will take up space in the library and may affect load time.
940x1330
60x115
Placement:
þ Header Area
þ Body Area
þ Footer Area
Image Flex
<<Configuration

QUICK GUIDE
USING FLEX WIDGETS
Page 28 of 38 © 2012 ADP Dealer Services, Inc.. All rights reserved h>p://www.cobaltu.com
Profile Provides customers easy access to search the inventory. This widget allows the customer to search for a new, used, or certified vehicle by inputting a make and model.
Size This widget is available in one size: 300x250. See the grid to the right for sizes to ensure best alignment.
Configuration Options There are no configuration options for this widget.
Sample Image
Best Practices The Inventory Search widget can be used in the Body Area of any page on the website. Most often this widget is used on the Homepage of the website; however, it is also used on landing pages such as an About Us page, Staff page, or Specials page to drive customers to view inventory.
300x250
Placement:
¨ Header Area
þ Body Area
¨ Footer Area
Inventory Search
<<Configuration
QUICK GUIDE
USING FLEX WIDGETS
Page 29 of 38 © 2012 ADP Dealer Services, Inc.. All rights reserved h>p://www.cobaltu.com
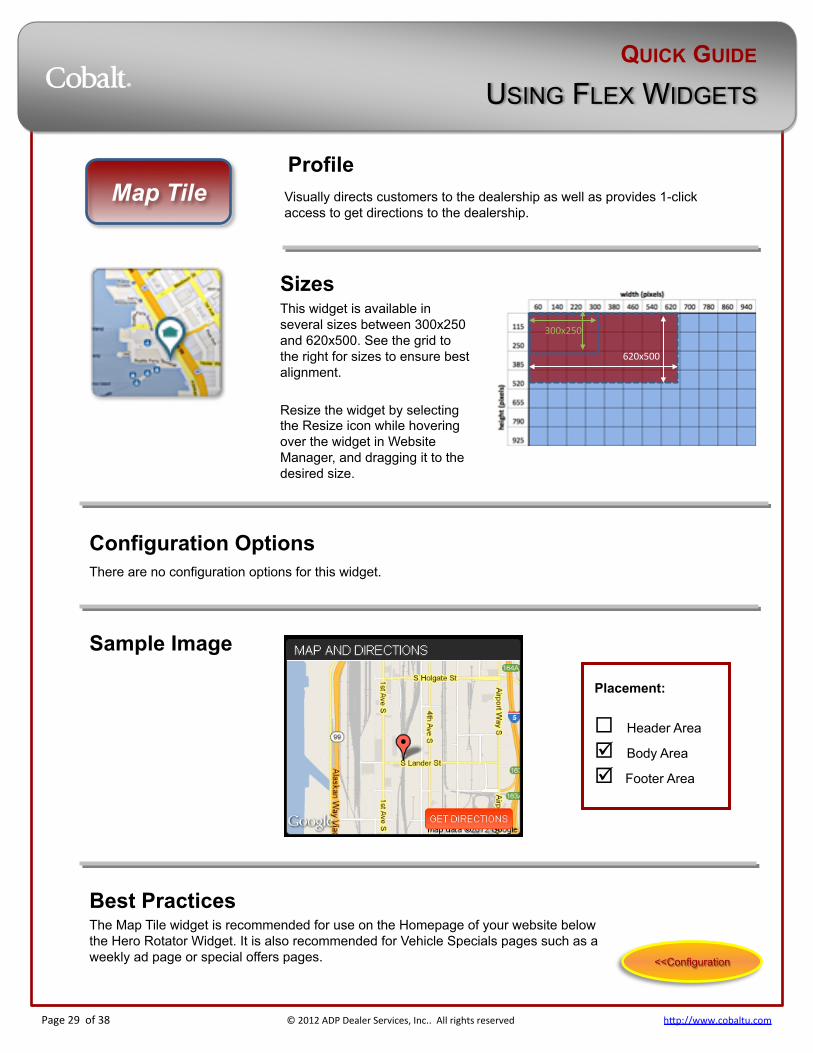
Profile Visually directs customers to the dealership as well as provides 1-click access to get directions to the dealership.
Sizes
Configuration Options There are no configuration options for this widget.
Sample Image
Best Practices The Map Tile widget is recommended for use on the Homepage of your website below the Hero Rotator Widget. It is also recommended for Vehicle Specials pages such as a weekly ad page or special offers pages.
This widget is available in several sizes between 300x250 and 620x500. See the grid to the right for sizes to ensure best alignment. Resize the widget by selecting the Resize icon while hovering over the widget in Website Manager, and dragging it to the desired size.
620x500
300x250
Placement:
¨ Header Area
þ Body Area
þ Footer Area
Map Tile
<<Configuration
QUICK GUIDE
USING FLEX WIDGETS
Page 30 of 38 © 2012 ADP Dealer Services, Inc.. All rights reserved h>p://www.cobaltu.com
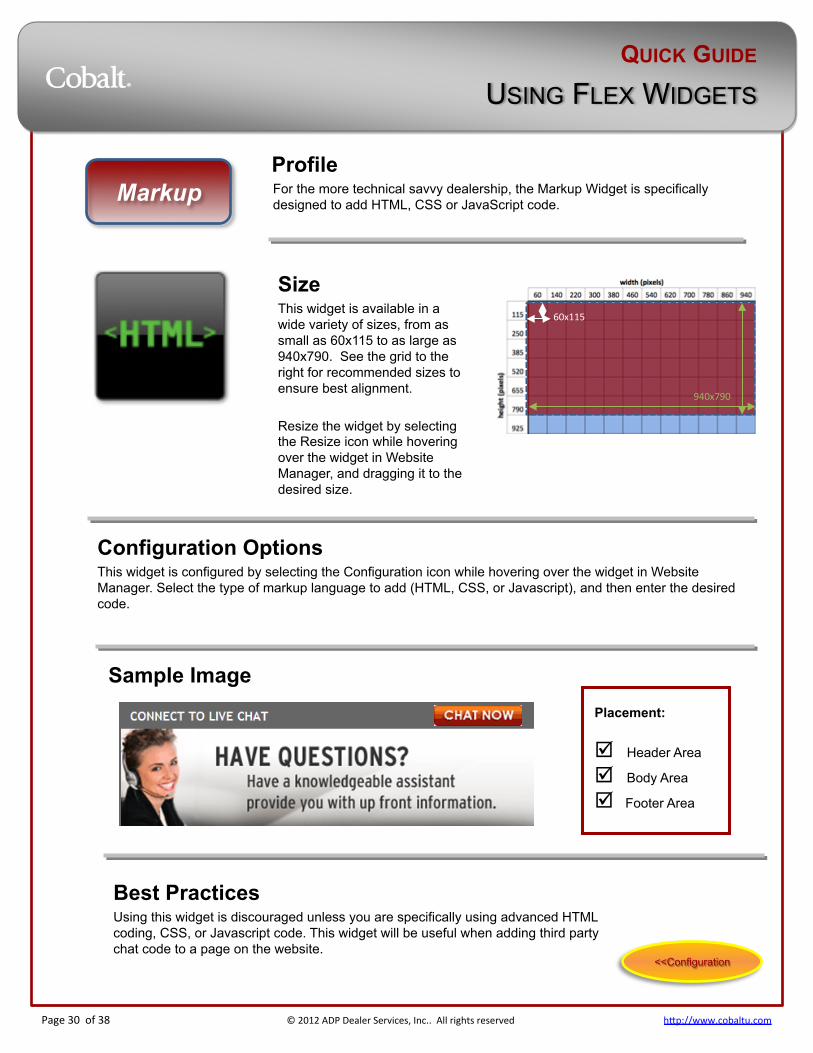
Profile For the more technical savvy dealership, the Markup Widget is specifically designed to add HTML, CSS or JavaScript code.
Size This widget is available in a wide variety of sizes, from as small as 60x115 to as large as 940x790. See the grid to the right for recommended sizes to ensure best alignment. Resize the widget by selecting the Resize icon while hovering over the widget in Website Manager, and dragging it to the desired size.
Configuration Options This widget is configured by selecting the Configuration icon while hovering over the widget in Website Manager. Select the type of markup language to add (HTML, CSS, or Javascript), and then enter the desired code.
Sample Image
Best Practices Using this widget is discouraged unless you are specifically using advanced HTML coding, CSS, or Javascript code. This widget will be useful when adding third party chat code to a page on the website.
940x790
60x115
Placement:
þ Header Area
þ Body Area
þ Footer Area
Markup
<<Configuration
QUICK GUIDE
USING FLEX WIDGETS
Page 31 of 38 © 2012 ADP Dealer Services, Inc.. All rights reserved h>p://www.cobaltu.com
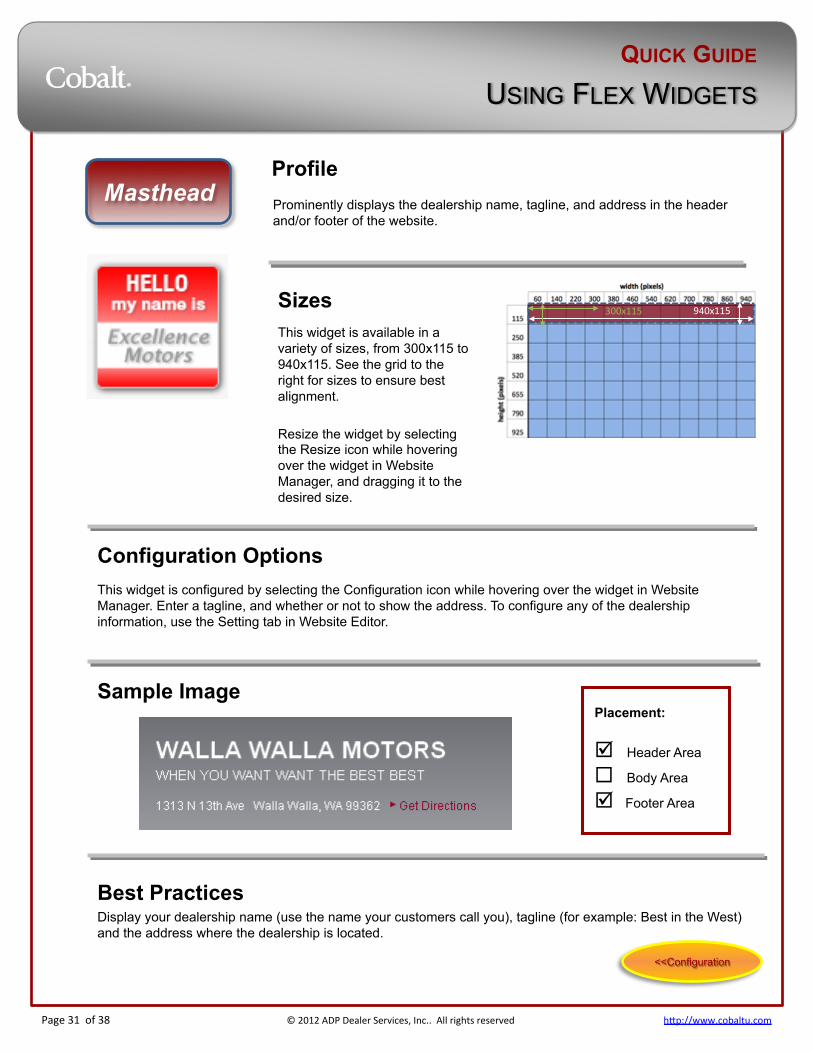
Profile Prominently displays the dealership name, tagline, and address in the header and/or footer of the website.
Sizes This widget is available in a variety of sizes, from 300x115 to 940x115. See the grid to the right for sizes to ensure best alignment. Resize the widget by selecting the Resize icon while hovering over the widget in Website Manager, and dragging it to the desired size.
Configuration Options This widget is configured by selecting the Configuration icon while hovering over the widget in Website Manager. Enter a tagline, and whether or not to show the address. To configure any of the dealership information, use the Setting tab in Website Editor.
Sample Image
Best Practices Display your dealership name (use the name your customers call you), tagline (for example: Best in the West) and the address where the dealership is located.
940x115 300x115
Placement:
þ Header Area
¨ Body Area
þ Footer Area
Masthead
<<Configuration
QUICK GUIDE
USING FLEX WIDGETS
Page 32 of 38 © 2012 ADP Dealer Services, Inc.. All rights reserved h>p://www.cobaltu.com
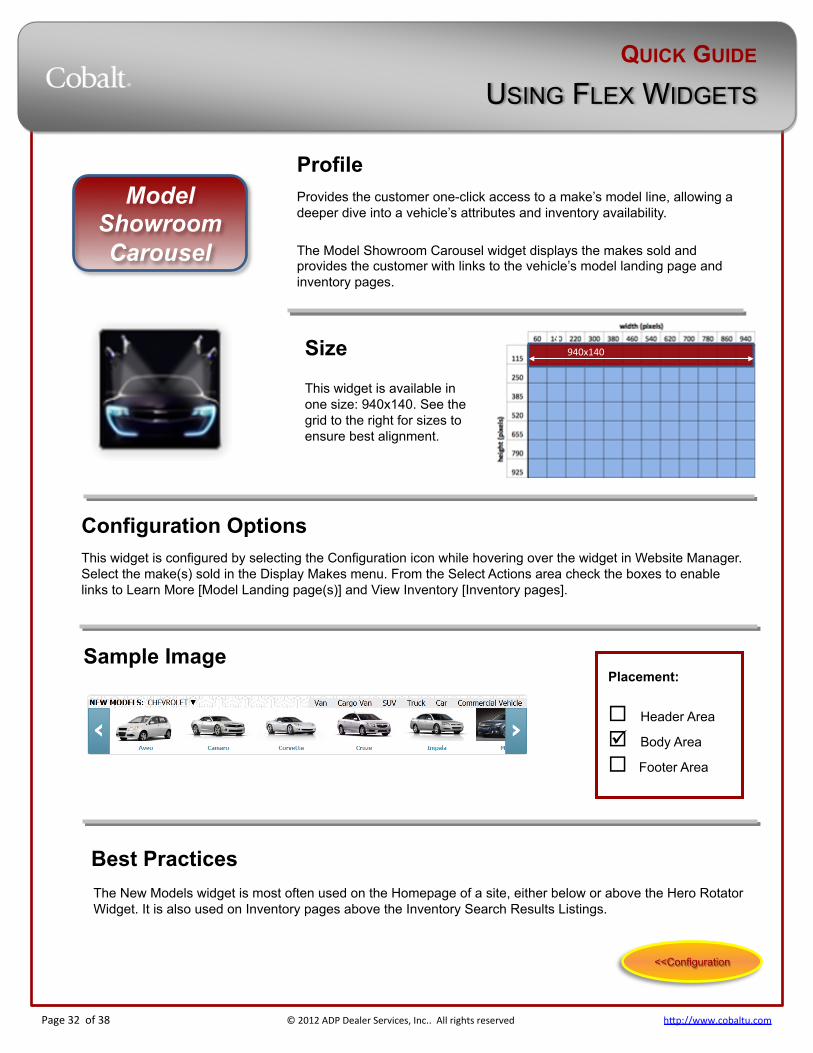
Profile Provides the customer one-click access to a make’s model line, allowing a deeper dive into a vehicle’s attributes and inventory availability. The Model Showroom Carousel widget displays the makes sold and provides the customer with links to the vehicle’s model landing page and inventory pages.
Size
This widget is available in one size: 940x140. See the grid to the right for sizes to ensure best alignment.
Configuration Options This widget is configured by selecting the Configuration icon while hovering over the widget in Website Manager. Select the make(s) sold in the Display Makes menu. From the Select Actions area check the boxes to enable links to Learn More [Model Landing page(s)] and View Inventory [Inventory pages].
Sample Image
The New Models widget is most often used on the Homepage of a site, either below or above the Hero Rotator Widget. It is also used on Inventory pages above the Inventory Search Results Listings.
940x140
Placement:
¨ Header Area
þ Body Area
¨ Footer Area
<<Configuration
Best Practices
Model Showroom Carousel
QUICK GUIDE
USING FLEX WIDGETS
Page 33 of 38 © 2012 ADP Dealer Services, Inc.. All rights reserved h>p://www.cobaltu.com
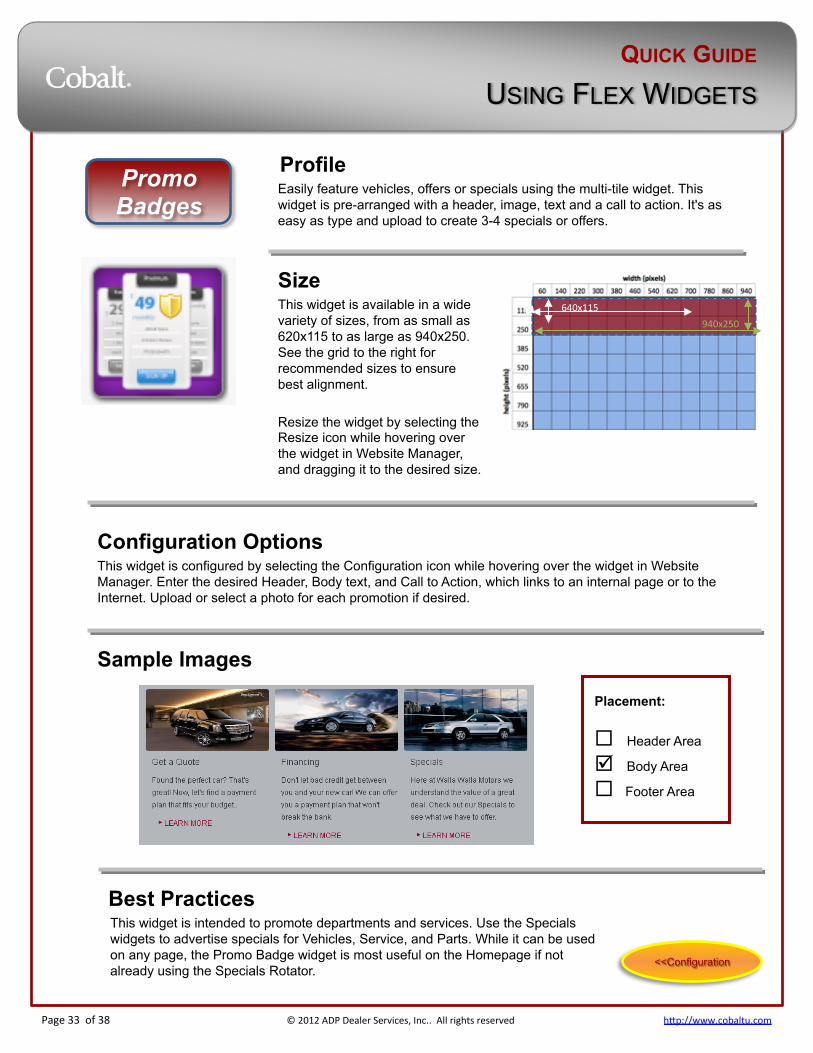
Profile Easily feature vehicles, offers or specials using the multi-tile widget. This widget is pre-arranged with a header, image, text and a call to action. It's as easy as type and upload to create 3-4 specials or offers.
Size This widget is available in a wide variety of sizes, from as small as 620x115 to as large as 940x250. See the grid to the right for recommended sizes to ensure best alignment. Resize the widget by selecting the Resize icon while hovering over the widget in Website Manager, and dragging it to the desired size.
Configuration Options This widget is configured by selecting the Configuration icon while hovering over the widget in Website Manager. Enter the desired Header, Body text, and Call to Action, which links to an internal page or to the Internet. Upload or select a photo for each promotion if desired.
Sample Images
Best Practices This widget is intended to promote departments and services. Use the Specials widgets to advertise specials for Vehicles, Service, and Parts. While it can be used on any page, the Promo Badge widget is most useful on the Homepage if not already using the Specials Rotator.
940x250 640x115
Placement:
¨ Header Area
þ Body Area
¨ Footer Area
Promo Badges
<<Configuration
QUICK GUIDE
USING FLEX WIDGETS
Page 34 of 38 © 2012 ADP Dealer Services, Inc.. All rights reserved h>p://www.cobaltu.com
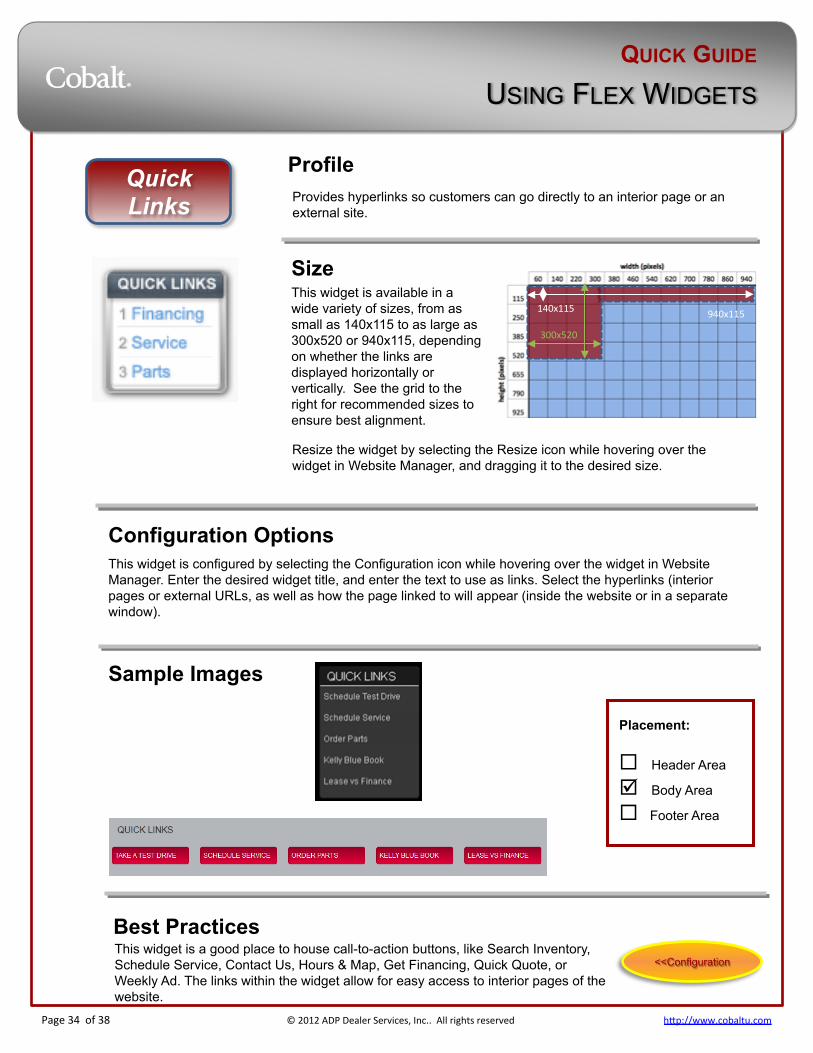
Profile Provides hyperlinks so customers can go directly to an interior page or an external site.
Configuration Options This widget is configured by selecting the Configuration icon while hovering over the widget in Website Manager. Enter the desired widget title, and enter the text to use as links. Select the hyperlinks (interior pages or external URLs, as well as how the page linked to will appear (inside the website or in a separate window).
Sample Images
Best Practices This widget is a good place to house call-to-action buttons, like Search Inventory, Schedule Service, Contact Us, Hours & Map, Get Financing, Quick Quote, or Weekly Ad. The links within the widget allow for easy access to interior pages of the website.
Size This widget is available in a wide variety of sizes, from as small as 140x115 to as large as 300x520 or 940x115, depending on whether the links are displayed horizontally or vertically. See the grid to the right for recommended sizes to ensure best alignment.
300x520
140x115
Placement:
¨ Header Area
þ Body Area
¨ Footer Area
940x115
Resize the widget by selecting the Resize icon while hovering over the widget in Website Manager, and dragging it to the desired size.
Quick Links
<<Configuration
QUICK GUIDE
USING FLEX WIDGETS
Page 35 of 38 © 2012 ADP Dealer Services, Inc.. All rights reserved h>p://www.cobaltu.com
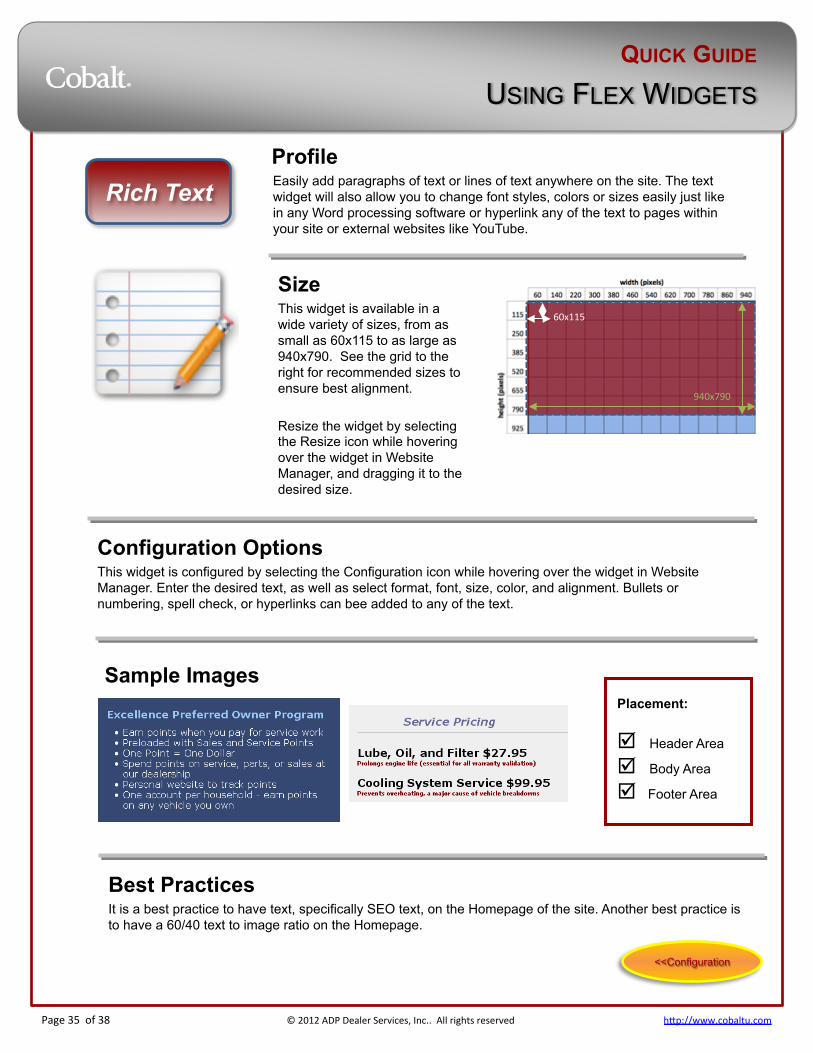
Profile Easily add paragraphs of text or lines of text anywhere on the site. The text widget will also allow you to change font styles, colors or sizes easily just like in any Word processing software or hyperlink any of the text to pages within your site or external websites like YouTube.
Size This widget is available in a wide variety of sizes, from as small as 60x115 to as large as 940x790. See the grid to the right for recommended sizes to ensure best alignment. Resize the widget by selecting the Resize icon while hovering over the widget in Website Manager, and dragging it to the desired size.
Configuration Options This widget is configured by selecting the Configuration icon while hovering over the widget in Website Manager. Enter the desired text, as well as select format, font, size, color, and alignment. Bullets or numbering, spell check, or hyperlinks can bee added to any of the text.
Sample Images
Best Practices It is a best practice to have text, specifically SEO text, on the Homepage of the site. Another best practice is to have a 60/40 text to image ratio on the Homepage.
940x790
60x115
Placement:
þ Header Area
þ Body Area
þ Footer Area
Rich Text
<<Configuration

QUICK GUIDE
USING FLEX WIDGETS
Page 36 of 38 © 2012 ADP Dealer Services, Inc.. All rights reserved h>p://www.cobaltu.com
Profile Allows customers to share the content of the website with their social network, including Facebook, Twitter, Google+, as well as others. This widget will also let customers print, bookmark or email any page of the website.
Sizes This widget is available in one size: 300x30. See the grid to the right for sizes to ensure best alignment.
Configuration Options This widget is configured by selecting the Configuration icon while hovering over the widget in Website Manager. Select the social networks and icons to display, and configure the URL for each. Select the size of the icons (16x16 or 24x24), the order of the icons, whether the link opens in a new window or the same window, and enter any desired alt text when the customer hovers over the icon.
Sample Image
Best Practices Because this widget is placed in the header or footer, it will appear on all pages.
300x30
Placement:
þ Header Area
¨ Body Area
þ Footer Area
Social Media
<<Configuration

QUICK GUIDE
USING FLEX WIDGETS
Page 37 of 38 © 2012 ADP Dealer Services, Inc.. All rights reserved h>p://www.cobaltu.com
Profile Create space and divisions between the content of the site.
Size This widget is available in a wide variety of sizes, from as small as 60x115 to as large as 940x1330. See the grid to the right for recommended sizes to ensure best alignment. Resize the widget by selecting the Resize icon while hovering over the widget in Website Manager, and dragging it to the desired size.
Configuration Options There are no configuration options for this widget.
Sample Image
Best Practices Use this widget to create division between content when two images are side by side. Also use the spacer widget to add space between paragraphs of text to make the content of your site easier to scan and read.
940x1330
60x115
Placement:
þ Header Area
þ Body Area
þ Footer Area
Spacer
<<Configuration
QUICK GUIDE
USING FLEX WIDGETS
Page 38 of 38 © 2012 ADP Dealer Services, Inc.. All rights reserved h>p://www.cobaltu.com
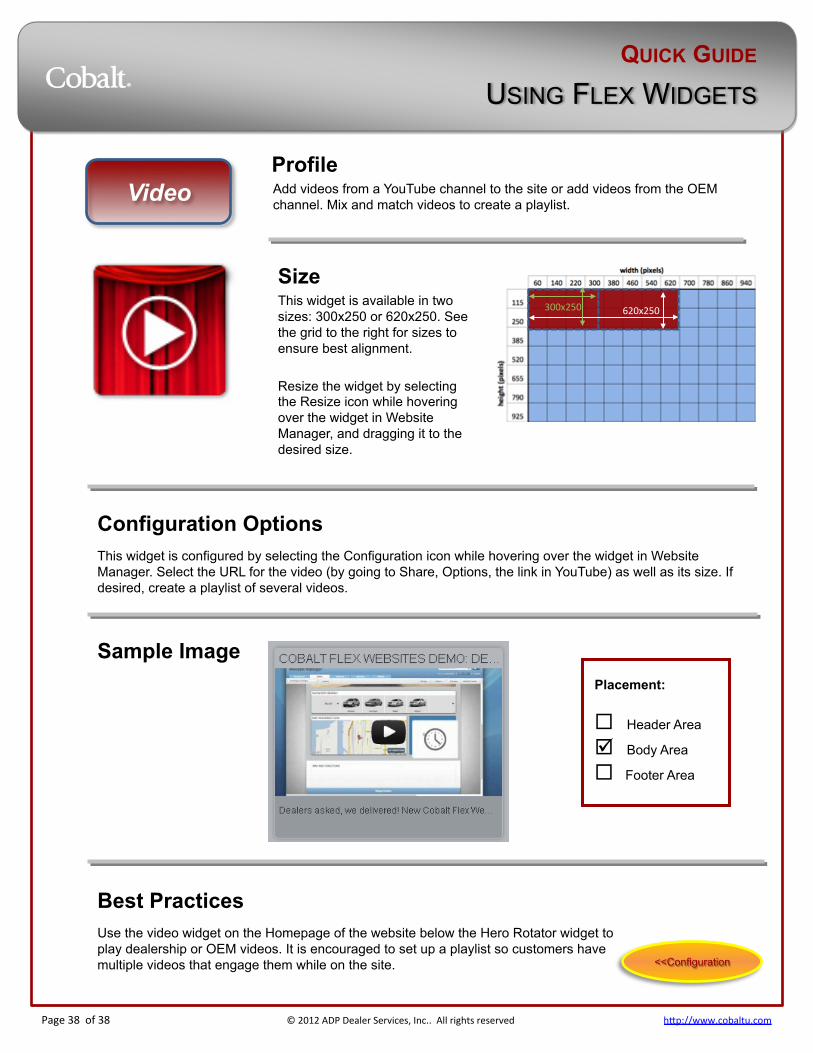
Profile Add videos from a YouTube channel to the site or add videos from the OEM channel. Mix and match videos to create a playlist.
Size This widget is available in two sizes: 300x250 or 620x250. See the grid to the right for sizes to ensure best alignment. Resize the widget by selecting the Resize icon while hovering over the widget in Website Manager, and dragging it to the desired size.
Configuration Options This widget is configured by selecting the Configuration icon while hovering over the widget in Website Manager. Select the URL for the video (by going to Share, Options, the link in YouTube) as well as its size. If desired, create a playlist of several videos.
Sample Image
Best Practices Use the video widget on the Homepage of the website below the Hero Rotator widget to play dealership or OEM videos. It is encouraged to set up a playlist so customers have multiple videos that engage them while on the site.
620x250 300x250
Placement:
¨ Header Area
þ Body Area
¨ Footer Area
Video
<<Configuration