tableau td 2 version 4.01 user's guide · 2 tableau td 2 version 4.01 user's guide...
TRANSCRIPT
GUIDANCE SOFTWARE | USER'S GUIDE | TABLEAU TD2
Tableau®TD2 VERSION 4.01
USER'S GUIDE

Copyright © 2009‐2012 Guidance Software, Inc. All rights reserved.
EnCase®, EnScript®, FastBloc®, Guidance Software® and EnCE® are registered trademarks or trademarks owned by Guidance Software
in the United States and other jurisdictions and may not be used without prior written permission. All other marks and brands may be
claimed as the property of their respective owners. Products and corporate names appearing in this work may or may not be
registered trademarks or copyrights of their respective companies, and are used only for identification or explanation into the
owners' benefit, without intent to infringe. Any use and duplication of this work is subject to the terms of the license agreement
between you and Guidance Software, Inc. Except as stated in the license agreement or as otherwise permitted under Sections 107 or
108 of the 1976 United States Copyright Act, no part of this work may be reproduced, stored in a retrieval system or transmitted in
any form or by any means, electronic, mechanical, photocopying, recording, scanning or otherwise. Product manuals and
documentation are specific to the software versions for which they are written. For previous or outdated versions of this work, please
contact Guidance Software, Inc. at http://www.guidancesoftware.com. Information contained in this work is furnished for
informational use only, and is subject to change at any time without notice.

Contents
Preface 3
About this Guide ................................................................................................................................................ 4 Conventions Used in this Guide ......................................................................................................................... 4 Disk Capacity and Transfer Rate Measurement Conventions ............................................................................ 4
Overview 1
Tableau TD2 ....................................................................................................................................................... 2 TD2 Kit Contents ................................................................................................................................................ 3 Navigating the TD2 ............................................................................................................................................. 5 Reading the LEDs ................................................................................................................................................ 6 USB Keyboard Support ....................................................................................................................................... 6 LCD Contrast ...................................................................................................................................................... 6
Setting up the TD2 9
Startup Sequence ............................................................................................................................................. 10 Initialization ..................................................................................................................................................... 10 Configuring the TD2 ......................................................................................................................................... 11 User‐Selected Startup Mode ............................................................................................................................ 11 Setup (Menu 9) ................................................................................................................................................ 11
System Options (Menu 9.1) ........................................................................................................................ 12 Imaging Options (Menu 9.2) ....................................................................................................................... 13 TD2 Info (Menu 9.3) ................................................................................................................................... 15 Factory Reset (Menu 9.4) ........................................................................................................................... 15
Connecting Hard Disks ..................................................................................................................................... 16 Connecting Notebook Hard Disks ............................................................................................................... 17
Drive Detection ................................................................................................................................................ 17
Using the TD2 19
Overview .......................................................................................................................................................... 20 TD2 Menus and Options ............................................................................................................................. 20
Duplicate Disk (Menu 1) ................................................................................................................................... 22 Disk‐to‐Disk/Cloning (Menu 1.1) ................................................................................................................ 22 Disk‐to‐File/Imaging (Menu 1.2) ................................................................................................................ 24
Preconditions Checking .................................................................................................................................... 28 Format Disk (Menu 2) ...................................................................................................................................... 30
Format Dest (Menu 2.1) ............................................................................................................................. 30 Format USB (Menu 2.2) .............................................................................................................................. 31
Wipe Disk (Menu 3) ......................................................................................................................................... 32 One Pass Write (Menu 3.1) ........................................................................................................................ 32 Multi Pass Write (Menu 3.2) ...................................................................................................................... 32
Hash Utilities (Menu 4) .................................................................................................................................... 32 Blank Check (Menu 5) ...................................................................................................................................... 33 Disk Information (Menu 6) ............................................................................................................................... 33 Disk Utilities (Menu 7) ...................................................................................................................................... 34
Removal of DCO and HPA Regions ............................................................................................................. 34 Dest Free Space (Menu 7.3) ....................................................................................................................... 35
Status Information ........................................................................................................................................... 35 Logs (Menu 8) .................................................................................................................................................. 36
View Logs (Menu 8.1) ................................................................................................................................. 36 Sample TD2 Log .......................................................................................................................................... 37 Save All Logs (Menu 8.2) ............................................................................................................................ 39 Print All Logs (Menu 8.3) ............................................................................................................................ 39 Erase Logs (Menu 8.4) ................................................................................................................................ 39
Resetting and Clearing Internally Stored Information ..................................................................................... 40
Troubleshooting and Support 43
Troubleshooting Common Problems ............................................................................................................... 44 Power Supply Issues ................................................................................................................................... 44 Problems with Disk Detection .................................................................................................................... 44 Replacing the Backup Battery for the Real‐time Clock .............................................................................. 45
Support ............................................................................................................................................................ 50 Technical Support ....................................................................................................................................... 50 Online Support ........................................................................................................................................... 51 Professional Services .................................................................................................................................. 55 Training ...................................................................................................................................................... 55
Index ................................................................................................................................................................ 57
In This Chapter
Preface
About this Guide
Conventions Used in this Guide
Disk Capacity and Transfer Rate Measurement Conventions

4 Tableau TD 2 Version 4.01 User's Guide
About this Guide This guide presents a wide range of technical information and procedures for using the TD2. It is divided into the following chapters.
Overview: Provides general information about the TD2 as well as unpacking, starting up, and navigating the TD2ʹs menus and LEDs.
Setting up the TD2: Provides system overview information about the TD2 as well as procedures for configuring and connecting the TD2.
Using the TD2: Provides detailed information and procedures for using the TD2.
Troubleshooting and Support: Provides a brief list of potential problems and solutions. For more complete and current troubleshooting information as well as answers to frequently asked questions (FAQ), visit the Tableau web site at www.tableau.com.
Conventions Used in this Guide The TD2 has two soft keys placed immediately under the LCD display. The bottom line of the LCD displays text indicating the current function for each of the two soft keys. In this guide, soft key labels are indicated with square brackets. For example, [Select] indicates that Select is displayed above a soft key on the LCD.
Disk Capacity and Transfer Rate Measurement Conventions The computer industry generally adheres to two different conventions for the definitions of the terms megabyte (MB) and gigabyte (GB). For computer RAM, 1 MB is defined as 220 = 1,048,576 bytes and 1 GB is defined as 230 = 1,073,741,824 bytes. For disk storage, 1 MB is defined as 106 = 1,000,000 bytes and 1 GB is defined as 109 = 1,000,000,000 bytes. These two conventions are known as powers of two and powers of ten respectively. Microsoft deviates from the hard disk capacity measurement convention and uses the powers of two convention for its operating systems.
Tableau reports disk capacities and transfer rates according to the industry standard powers of ten convention. In TD2 screens, reports, and documentation, a 4 GB hard disk stores up to 4,000,000,000 bytes; a hard disk with a 150 MB/sec transfer rate transfers 150,000,000 bytes per second.
In This Chapter
Tableau TD2
TD2 Kit Contents
Navigating the TD2
Reading the LEDs
USB Keyboard Support
LCD Contrast
Chapter 1
Overview
2 Tableau TD 2 Version 4.01 User's Guide
Tableau TD2 The Tableau TD2 is a forensic 1:2 duplicator. It has many of the functions traditionally found in general‐purpose, IT‐oriented hard disk duplicators and provides features and functions that serve the specialized needs of forensic practice, including:
Sustained data transfer rates of up to 9 GB/minute, while performing calculations of MD5 and SHA‐1 hash values, also known as fingerprints.
Native support for SATA and IDE hard disks from the source interface.
Parallel duplication, or twinning, to two destination interfaces for SATA hard disks.
Detailed log generation for case documentation.
Automatic blank checking of source and destination drives.
HPA and DCO support for the detection and handling of hidden/protected data areas on source and destination drives.

Overview 3
TD2 Kit Contents The TD2 ships in a boxed kit that includes the following. Do not discard the foam packaging. It is designed to fit several industry‐standard hard‐sided carrying cases. If you received the TD2 kit in the cardboard box shipped by Tableau, you can buy a hard‐sided case and reuse the foam insert directly in that case.
Item Model # Description
TD2 TD2 Forensic 1:2 Duplicator
TP4-NC High-output power supply. The TP4 provides enough power to supply the TD2 and most common combinations of source and destination hard disks. The TP4 uses a universal 2-pin AC line cord and is compatible with 110-240VAC line voltages worldwide.
TP4-LC-US North America shipments include the TP4-LC-US AC line cord for use with the TP4-NC power supply. When shipped to other geographic markets, the local reseller typically adds an AC line cord which is appropriate for the local market.
TC2-8-R2 Hard disk power cable to connect IDE and some legacy-style SATA hard disks to the TD2 (3M to Molex).
TC3-8 SATA signal cable to connect SATA hard disks to the TD2.
TC4-8-R2 SATA/SAS power/signal cable to SAS signal and 3M power (2 pieces). This unified cable connects power and signal connectors current hard disks.
4 Tableau TD 2 Version 4.01 User's Guide
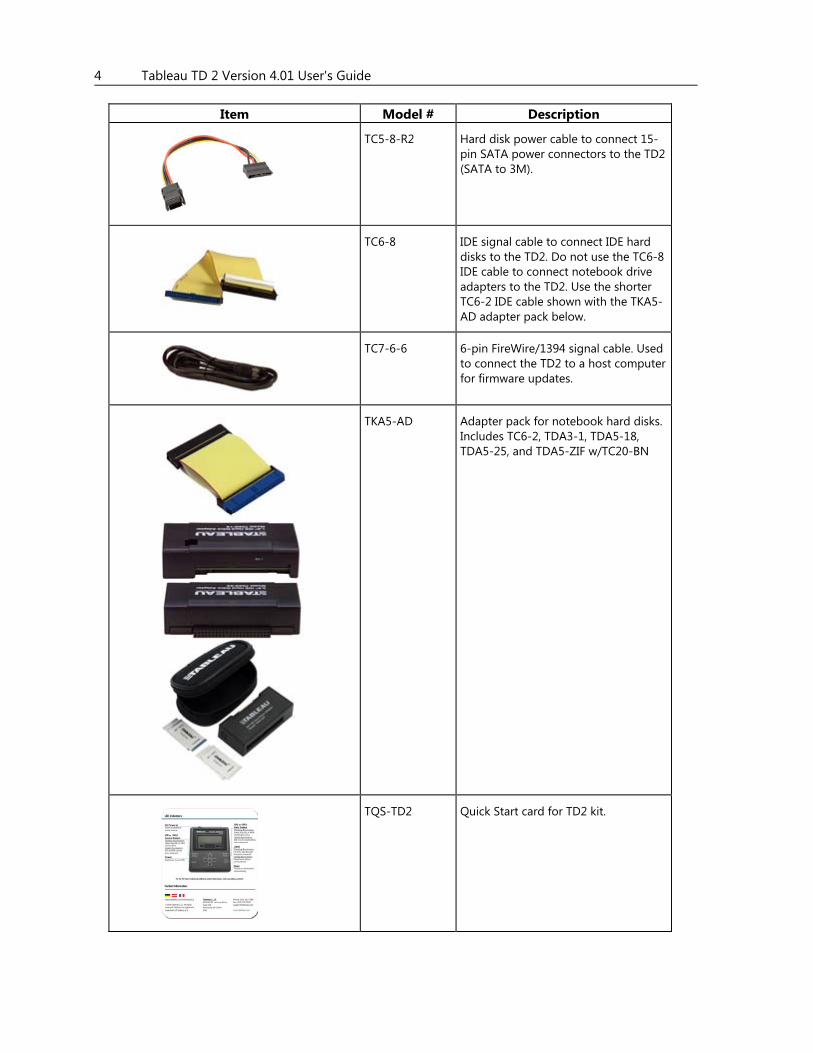
Item Model # Description
TC5-8-R2 Hard disk power cable to connect 15-pin SATA power connectors to the TD2 (SATA to 3M).
TC6-8 IDE signal cable to connect IDE hard disks to the TD2. Do not use the TC6-8 IDE cable to connect notebook drive adapters to the TD2. Use the shorter TC6-2 IDE cable shown with the TKA5-AD adapter pack below.
TC7-6-6 6-pin FireWire/1394 signal cable. Used to connect the TD2 to a host computer for firmware updates.
TKA5-AD Adapter pack for notebook hard disks. Includes TC6-2, TDA3-1, TDA5-18, TDA5-25, and TDA5-ZIF w/TC20-BN
TQS-TD2 Quick Start card for TD2 kit.

Overview 5
Navigating the TD2 When using the TD2, you may be prompted to enter certain information into the display. Use the up/down/left/right arrow keys and the center button to select values.
While you are entering information, the TD2 displays two soft key functions at the bottom of the LCD display. The soft keys perform major actions such as selecting a task, canceling a function, or moving between different display screens. Use the arrow keypad to navigate within a given screen/menu. The function of the soft keys depends on the current context. The soft keys might have functions such as [Back] and [Next], as they do during the Configuration Wizard. The soft keys might also serve to select items like [Cancel] and [Ok].
The center button on the arrow keypad also serves as a [Select] button when navigating among TD2 menus. However, it cannot be used to start major tasks, such as duplication or disk wiping. Only soft keys labeled [Select] or [Start] initiate major tasks. Vertical Arrow Keys scroll up or down and highlight menu items for selection. Horizontal Arrow Keys scroll left or right and toggle between character lists.
In the upper left corner of the Main menu, the TD2 displays the date and time. As you navigate the TD2’s menu structure, date/time is replaced by the menu item number. For example, the Duplicate Disk menu is Menu 1, the Disk‐to‐Disk menu is Menu 1.1, and the Disk‐to‐File menu is Menu 1.2. These menu numbers help you navigate the menu hierarchy.
The TD2 is shipped with a Quick Start card that illustrates the layout of the display, buttons, connectors, and switches on the TD2. Keep the Quick Start card with the TD2 as you familiarize yourself with its operation.
6 Tableau TD 2 Version 4.01 User's Guide
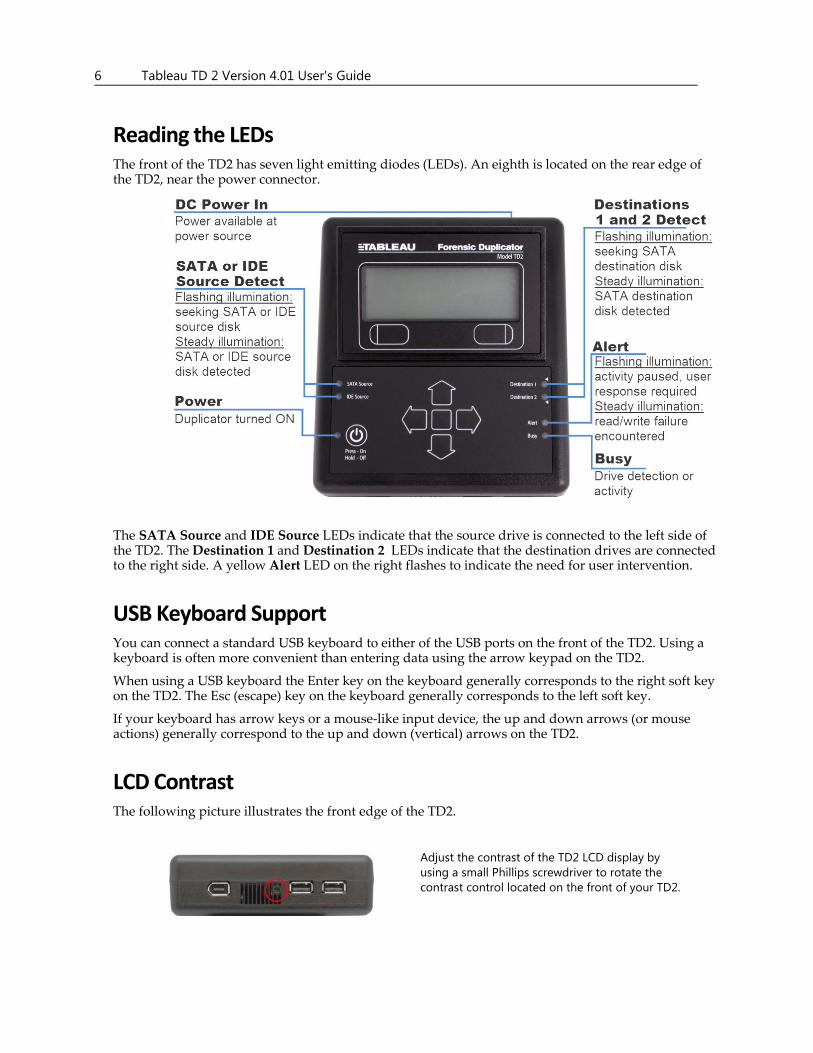
Reading the LEDs The front of the TD2 has seven light emitting diodes (LEDs). An eighth is located on the rear edge of the TD2, near the power connector.
The SATA Source and IDE Source LEDs indicate that the source drive is connected to the left side of the TD2. The Destination 1 and Destination 2 LEDs indicate that the destination drives are connected to the right side. A yellow Alert LED on the right flashes to indicate the need for user intervention.
USB Keyboard Support You can connect a standard USB keyboard to either of the USB ports on the front of the TD2. Using a keyboard is often more convenient than entering data using the arrow keypad on the TD2.
When using a USB keyboard the Enter key on the keyboard generally corresponds to the right soft key on the TD2. The Esc (escape) key on the keyboard generally corresponds to the left soft key.
If your keyboard has arrow keys or a mouse‐like input device, the up and down arrows (or mouse actions) generally correspond to the up and down (vertical) arrows on the TD2.
LCD Contrast The following picture illustrates the front edge of the TD2.
Adjust the contrast of the TD2 LCD display by using a small Phillips screwdriver to rotate the contrast control located on the front of your TD2.

Overview 7

In This Chapter
Startup Sequence
Initialization
Configuring the TD2
User-Selected Startup Mode
Setup (Menu 9)
Connecting Hard Disks
Drive Detection
CHAPTER 2
Setting up the TD2
10 Tableau TD 2 Version 4.01 User's Guide
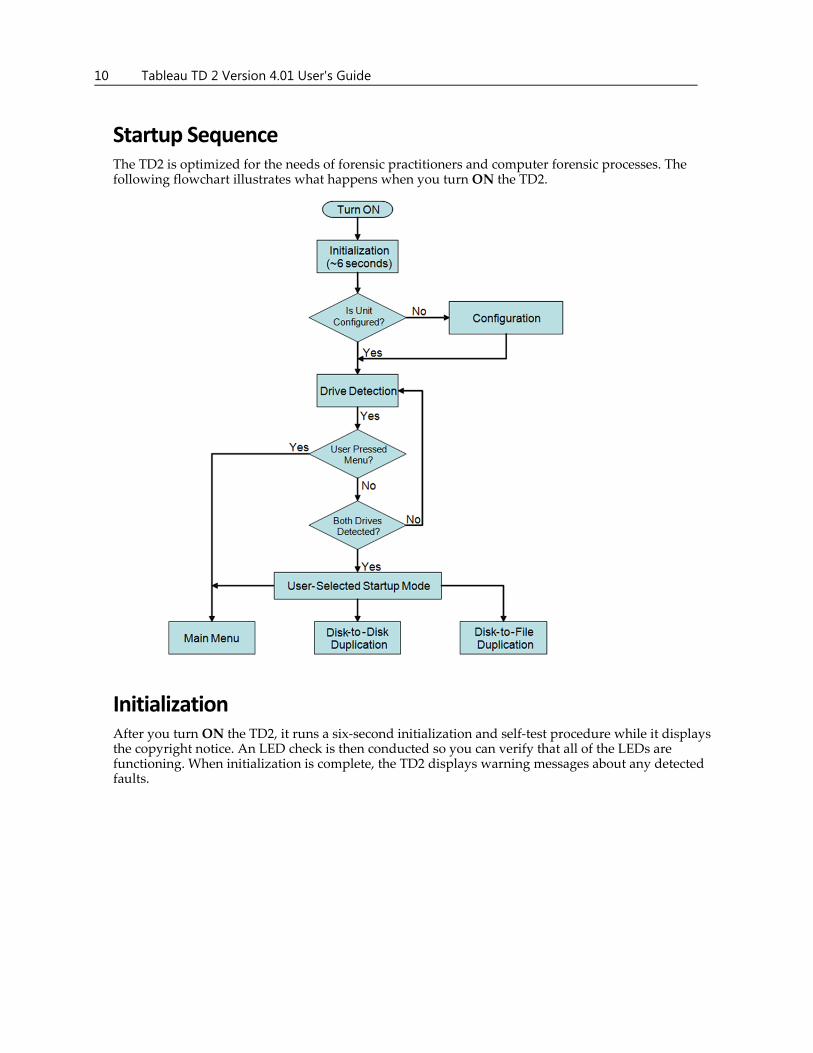
Startup Sequence The TD2 is optimized for the needs of forensic practitioners and computer forensic processes. The following flowchart illustrates what happens when you turn ON the TD2.
Initialization After you turn ON the TD2, it runs a six‐second initialization and self‐test procedure while it displays the copyright notice. An LED check is then conducted so you can verify that all of the LEDs are functioning. When initialization is complete, the TD2 displays warning messages about any detected faults.
Setting up the TD2 11
Configuring the TD2 The TD2 comes ready to be connected to the TP4 power supply and turned ON.
After running a six‐second initialization and self‐test procedure, the TD2 runs the Configuration Wizard. The Configuration Wizard prompts you for the default username, current date/time, and preferred startup mode. The TD2 stores these settings in non‐volatile flash memory for use at each startup.
The startup mode feature lets you customize the TD2 for a specific workflow. The Startup Mode setting provides the following options.
Disk‐to‐Disk (cloning) for disk cloning
Disk‐to‐File (imaging) for disk imaging
Main menu
You can configure the startup mode and other settings any time from the Setup menu (Menu 9.4).
Once you have configured your TD2, the startup sequence bypasses the Configuration Wizard unless you have used Factory Reset (Menu 9.7) in the Setup menu.
User‐Selected Startup Mode If you use the TD2 for duplication only, you can customize the startup mode for disk duplication. In the Startup menu, you can change the default startup target of the TD2 from the Main menu to either Disk‐to‐Disk or Disk‐to‐File duplication.
Setup (Menu 9) The Setup menu provides options for setting TD2 options, defaults, and the current date/time. The Setup menu also provides options for viewing TD2 information and current status.
12 Tableau TD 2 Version 4.01 User's Guide
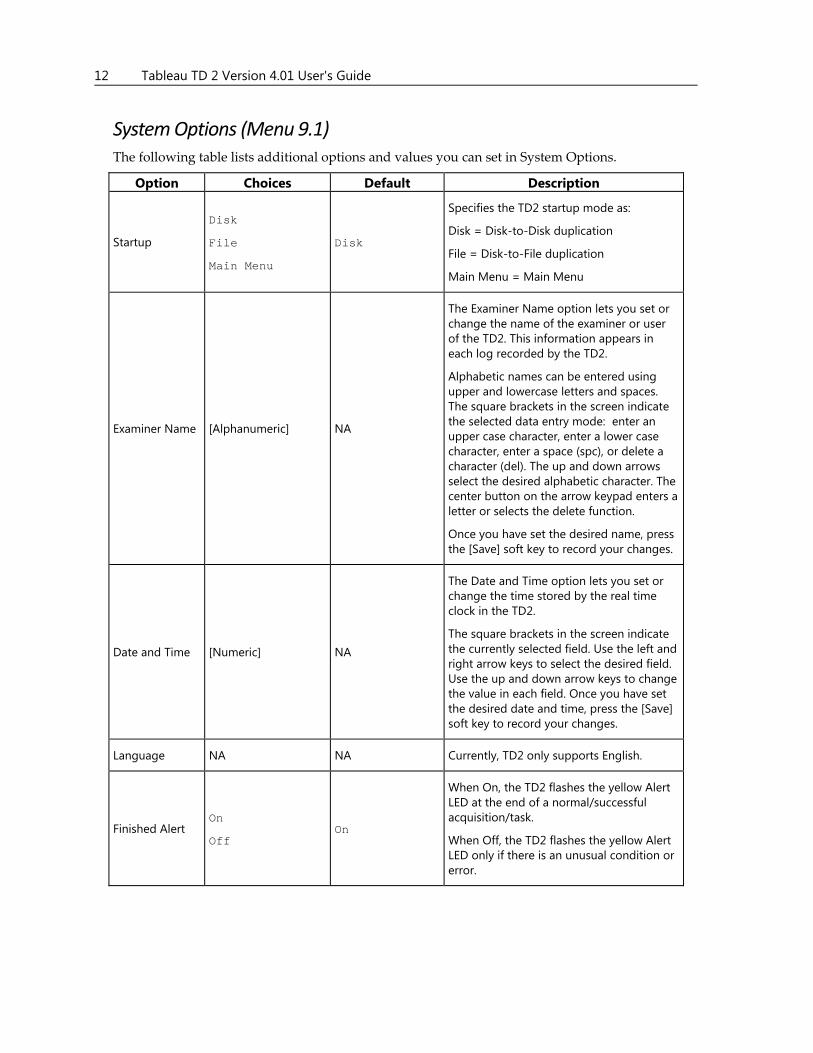
System Options (Menu 9.1) The following table lists additional options and values you can set in System Options.
Option Choices Default Description
Startup
Disk
File
Main Menu
Disk
Specifies the TD2 startup mode as:
Disk = Disk-to-Disk duplication
File = Disk-to-File duplication
Main Menu = Main Menu
Examiner Name [Alphanumeric] NA
The Examiner Name option lets you set or change the name of the examiner or user of the TD2. This information appears in each log recorded by the TD2.
Alphabetic names can be entered using upper and lowercase letters and spaces. The square brackets in the screen indicate the selected data entry mode: enter an upper case character, enter a lower case character, enter a space (spc), or delete a character (del). The up and down arrows select the desired alphabetic character. The center button on the arrow keypad enters a letter or selects the delete function.
Once you have set the desired name, press the [Save] soft key to record your changes.
Date and Time [Numeric] NA
The Date and Time option lets you set or change the time stored by the real time clock in the TD2.
The square brackets in the screen indicate the currently selected field. Use the left and right arrow keys to select the desired field. Use the up and down arrow keys to change the value in each field. Once you have set the desired date and time, press the [Save] soft key to record your changes.
Language NA NA Currently, TD2 only supports English.
Finished Alert On
Off On
When On, the TD2 flashes the yellow Alert LED at the end of a normal/successful acquisition/task.
When Off, the TD2 flashes the yellow Alert LED only if there is an unusual condition or error.
Setting up the TD2 13
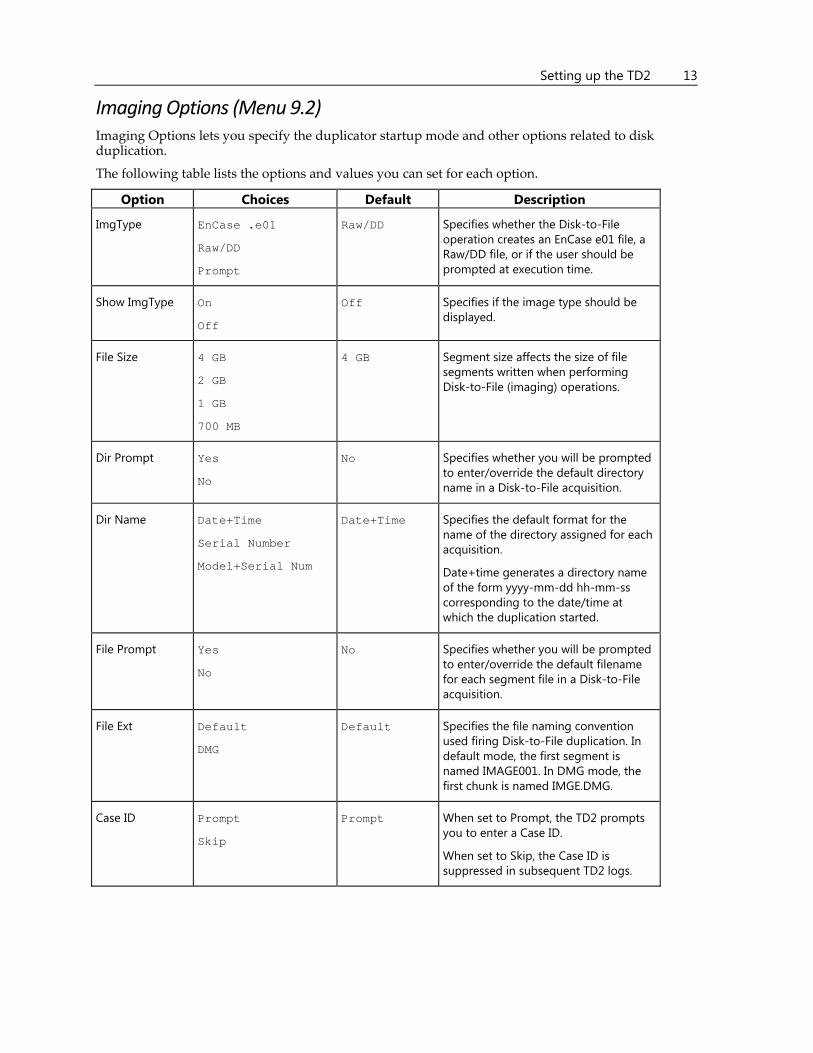
Imaging Options (Menu 9.2) Imaging Options lets you specify the duplicator startup mode and other options related to disk duplication.
The following table lists the options and values you can set for each option.
Option Choices Default Description
ImgType EnCase .e01
Raw/DD
Prompt
Raw/DD Specifies whether the Disk-to-File operation creates an EnCase e01 file, a Raw/DD file, or if the user should be prompted at execution time.
Show ImgType On
Off
Off Specifies if the image type should be displayed.
File Size 4 GB
2 GB
1 GB
700 MB
4 GB Segment size affects the size of file segments written when performing Disk-to-File (imaging) operations.
Dir Prompt Yes
No
No Specifies whether you will be prompted to enter/override the default directory name in a Disk-to-File acquisition.
Dir Name Date+Time
Serial Number
Model+Serial Num
Date+Time Specifies the default format for the name of the directory assigned for each acquisition.
Date+time generates a directory name of the form yyyy-mm-dd hh-mm-ss corresponding to the date/time at which the duplication started.
File Prompt Yes
No
No Specifies whether you will be prompted to enter/override the default filename for each segment file in a Disk-to-File acquisition.
File Ext Default
DMG
Default Specifies the file naming convention used firing Disk-to-File duplication. In default mode, the first segment is named IMAGE001. In DMG mode, the first chunk is named IMGE.DMG.
Case ID Prompt
Skip
Prompt When set to Prompt, the TD2 prompts you to enter a Case ID.
When set to Skip, the Case ID is suppressed in subsequent TD2 logs.
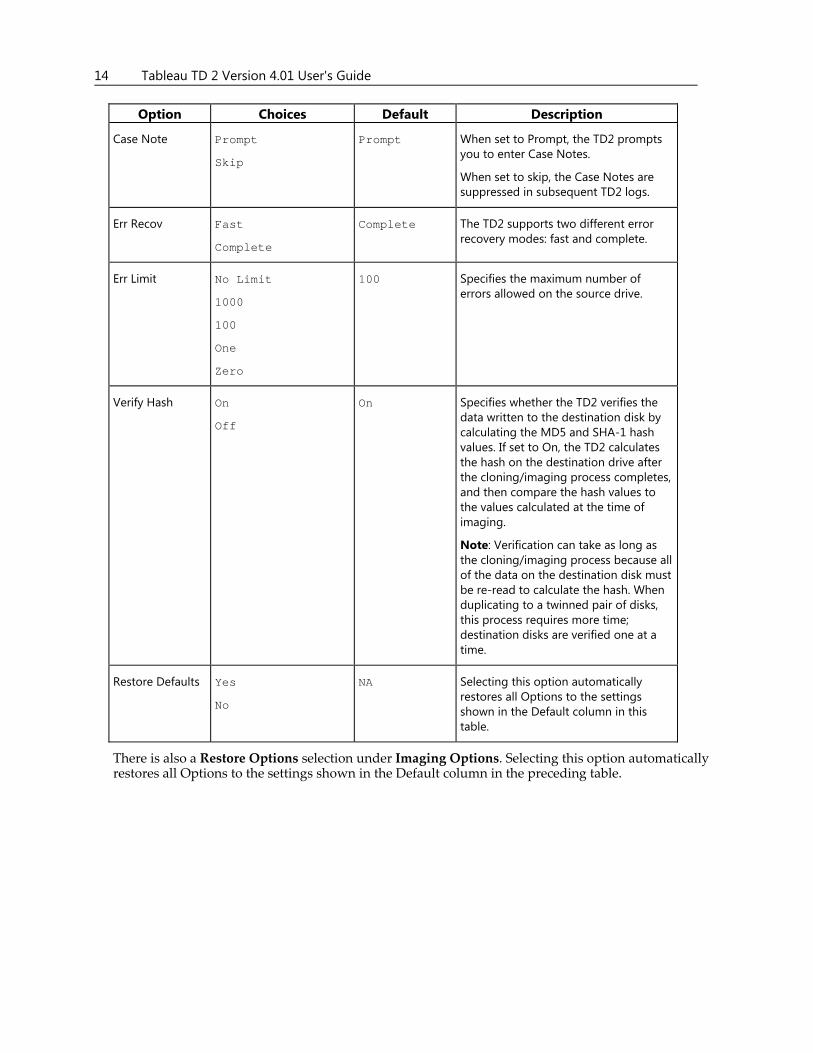
14 Tableau TD 2 Version 4.01 User's Guide
Option Choices Default Description
Case Note Prompt
Skip
Prompt When set to Prompt, the TD2 prompts you to enter Case Notes.
When set to skip, the Case Notes are suppressed in subsequent TD2 logs.
Err Recov Fast
Complete
Complete The TD2 supports two different error recovery modes: fast and complete.
Err Limit No Limit
1000
100
One
Zero
100 Specifies the maximum number of errors allowed on the source drive.
Verify Hash On
Off
On Specifies whether the TD2 verifies the data written to the destination disk by calculating the MD5 and SHA-1 hash values. If set to On, the TD2 calculates the hash on the destination drive after the cloning/imaging process completes, and then compare the hash values to the values calculated at the time of imaging.
Note: Verification can take as long as the cloning/imaging process because all of the data on the destination disk must be re-read to calculate the hash. When duplicating to a twinned pair of disks, this process requires more time; destination disks are verified one at a time.
Restore Defaults Yes
No
NA Selecting this option automatically restores all Options to the settings shown in the Default column in this table.
There is also a Restore Options selection under Imaging Options. Selecting this option automatically restores all Options to the settings shown in the Default column in the preceding table.

Setting up the TD2 15
Error Recovery Modes
The TD2 supports two different error recovery modes, Complete and Fast. Both modes refer to the way in which the TD2 recovers from read errors on the source hard disk.
The Complete error recovery mode is the default and more exhaustive of the two. When the TD2 detects a read fault in Complete mode, it begins a retry strategy that attempts to read each sector in the 64‐sector block that contains the error. Complete mode therefore produces the most complete destination image. However, the exhaustive strategy used by the TD2 can also be time‐consuming, if the source drive has many read faults.
The Fast error recovery mode is intended for use with drives that have a high number of read faults. When in Fast mode, the TD2 treats the source drive as a series of 64‐sector blocks (32,768‐byte blocks). An error in any 64‐sector block causes the entire block to be treated as an error. This allows the TD2 to move quickly through a drive with many read faults, but at the loss of some potentially readable sectors near each fault.
In both error recovery modes, the TD2 handles unreadable sectors in the same way. When the TD2 has determined that a sector cannot be read from the source drive, it fills in the missing data with zeros on the destination drive. Zero data inserted in this way is also included by the TD2 when calculating the MD5 and SHA1 hashes for the duplication.
The TD2 treats all media errors on a destination disk as fatal or unrecoverable errors because each destination disk is receiving a copy of evidence critical to a forensic examination. It is not recommended to store data to a destination disk with known defects.
TD2 Info (Menu 9.3) Selecting the TD2 Info option displays selected information for the TD2 itself, as shown in the following table.
Legend Example Value Description
S/N 01d1000c The TD2 serial number.
FWVersion 1.20 The TD2 firmware release.
FWDate Oct 10 2008 The build date for the TD2 firmware release.
FWTime 09:05:46 The build time for the TD2 firmware release.
Factory Reset (Menu 9.4) The Factory Reset option resets all TD2 configuration settings and defaults to the factory state. Factory Reset also does a physical erase of all logs stored in TD2 flash.
After performing a Factory Reset the TD2 retains no user‐specific or case‐specific information.
The only setting not cleared by a Factory Reset is the current date and time.
Internally Stored Information provides additional information regarding data stored in non‐volatile memory by the TD2.

16 Tableau TD 2 Version 4.01 User's Guide
Connecting Hard Disks Looking from the front view, make sure to attach the source drive to the left side of the duplicator and the destination drive(s) to the right side.
The following procedure provides the steps for connecting hard disks to the TD2. This procedure applies to typical 3.5ʺ SATA and IDE hard disks.
To connect hard disks to the TD2:
1. Confirm that the TD2 power switch is Off (the Power LED will be Off).
2. Connect the source disk with its signal cable to the TD2 signal input using the appropriate cable.
• TC6‐8 IDE signal cable
• TC3‐8 SATA signal cable
3. Connect the source disk with its power cable to the TD2 power input.
• TC2‐8‐R2: IDE/SATA drive power cable
• TC5‐8‐R2: SATA drive power cable
4. Connect the destination disk or disks with the TC4‐8‐R2: SATA drive unified cable(s) to the TD2 signal/power output(s).
5. Note: The TD2 is equipped with the ability to connect two destination disks to the unit at the same time. Currently, the TD2 can write to two destination drives simultaneously (twinning). To create a single copy, connect a drive only to the Dest‐1 port.
6. On the back of the TD2, connect the TP4 power supply to the TD2 power input.
7. Using the appropriate line cord, plug your TD2 into an AC power source. The green DC Power In LED indicates that power is available at the power connector.
8. Turn On the TD2 by pressing the TD2 power switch located on the front of the unit to the lower left. The green Power LED indicates that the duplicator is turned On.
Setting up the TD2 17
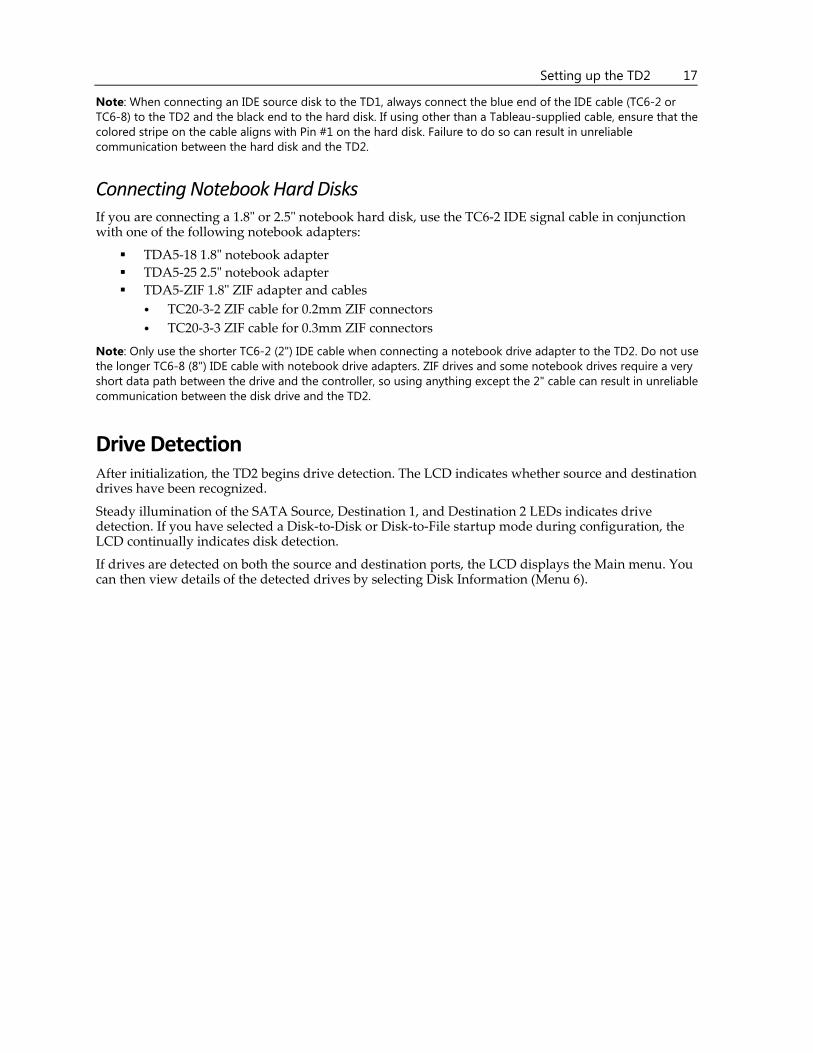
Note: When connecting an IDE source disk to the TD1, always connect the blue end of the IDE cable (TC6-2 or TC6-8) to the TD2 and the black end to the hard disk. If using other than a Tableau-supplied cable, ensure that the colored stripe on the cable aligns with Pin #1 on the hard disk. Failure to do so can result in unreliable communication between the hard disk and the TD2.
Connecting Notebook Hard Disks If you are connecting a 1.8ʺ or 2.5ʺ notebook hard disk, use the TC6‐2 IDE signal cable in conjunction with one of the following notebook adapters:
TDA5‐18 1.8ʺ notebook adapter
TDA5‐25 2.5ʺ notebook adapter
TDA5‐ZIF 1.8ʺ ZIF adapter and cables
• TC20‐3‐2 ZIF cable for 0.2mm ZIF connectors
• TC20‐3‐3 ZIF cable for 0.3mm ZIF connectors
Note: Only use the shorter TC6-2 (2") IDE cable when connecting a notebook drive adapter to the TD2. Do not use the longer TC6-8 (8") IDE cable with notebook drive adapters. ZIF drives and some notebook drives require a very short data path between the drive and the controller, so using anything except the 2" cable can result in unreliable communication between the disk drive and the TD2.
Drive Detection After initialization, the TD2 begins drive detection. The LCD indicates whether source and destination drives have been recognized.
Steady illumination of the SATA Source, Destination 1, and Destination 2 LEDs indicates drive detection. If you have selected a Disk‐to‐Disk or Disk‐to‐File startup mode during configuration, the LCD continually indicates disk detection.
If drives are detected on both the source and destination ports, the LCD displays the Main menu. You can then view details of the detected drives by selecting Disk Information (Menu 6).


In This Chapter
Overview
Duplicate Disk (Menu 1)
Preconditions Checking
Format Disk (Menu 2)
Wipe Disk (Menu 3)
Hash Utilities (Menu 4)
Blank Check (Menu 5)
Disk Information (Menu 6)
Disk Utilities (Menu 7)
Status Information
Logs (Menu 8)
Resetting and Clearing Internally Stored Information
CHAPTER 3
Using the TD2
20 Tableau TD 2 Version 4.01 User's Guide
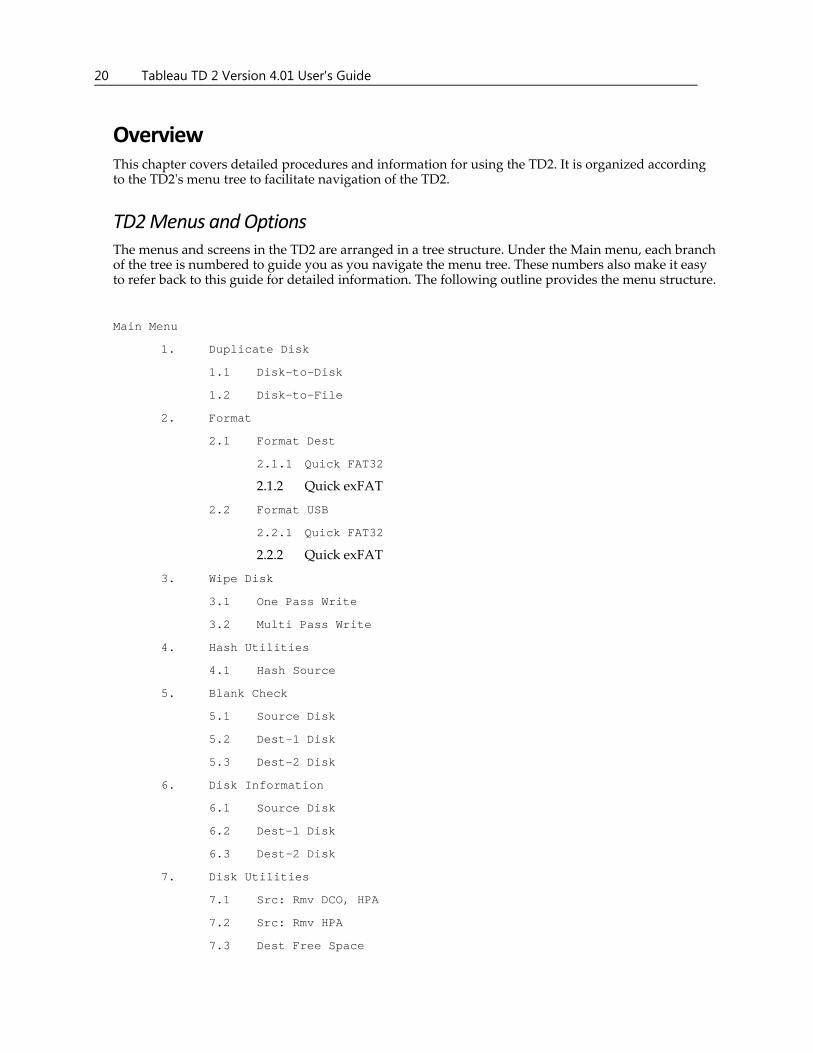
Overview This chapter covers detailed procedures and information for using the TD2. It is organized according to the TD2ʹs menu tree to facilitate navigation of the TD2.
TD2 Menus and Options The menus and screens in the TD2 are arranged in a tree structure. Under the Main menu, each branch of the tree is numbered to guide you as you navigate the menu tree. These numbers also make it easy to refer back to this guide for detailed information. The following outline provides the menu structure.
Main Menu
1. Duplicate Disk
1.1 Disk-to-Disk
1.2 Disk-to-File
2. Format
2.1 Format Dest
2.1.1 Quick FAT32
2.1.2 Quick exFAT
2.2 Format USB
2.2.1 Quick FAT32
2.2.2 Quick exFAT
3. Wipe Disk
3.1 One Pass Write
3.2 Multi Pass Write
4. Hash Utilities
4.1 Hash Source
5. Blank Check
5.1 Source Disk
5.2 Dest-1 Disk
5.3 Dest-2 Disk
6. Disk Information
6.1 Source Disk
6.2 Dest-1 Disk
6.3 Dest-2 Disk
7. Disk Utilities
7.1 Src: Rmv DCO, HPA
7.2 Src: Rmv HPA
7.3 Dest Free Space
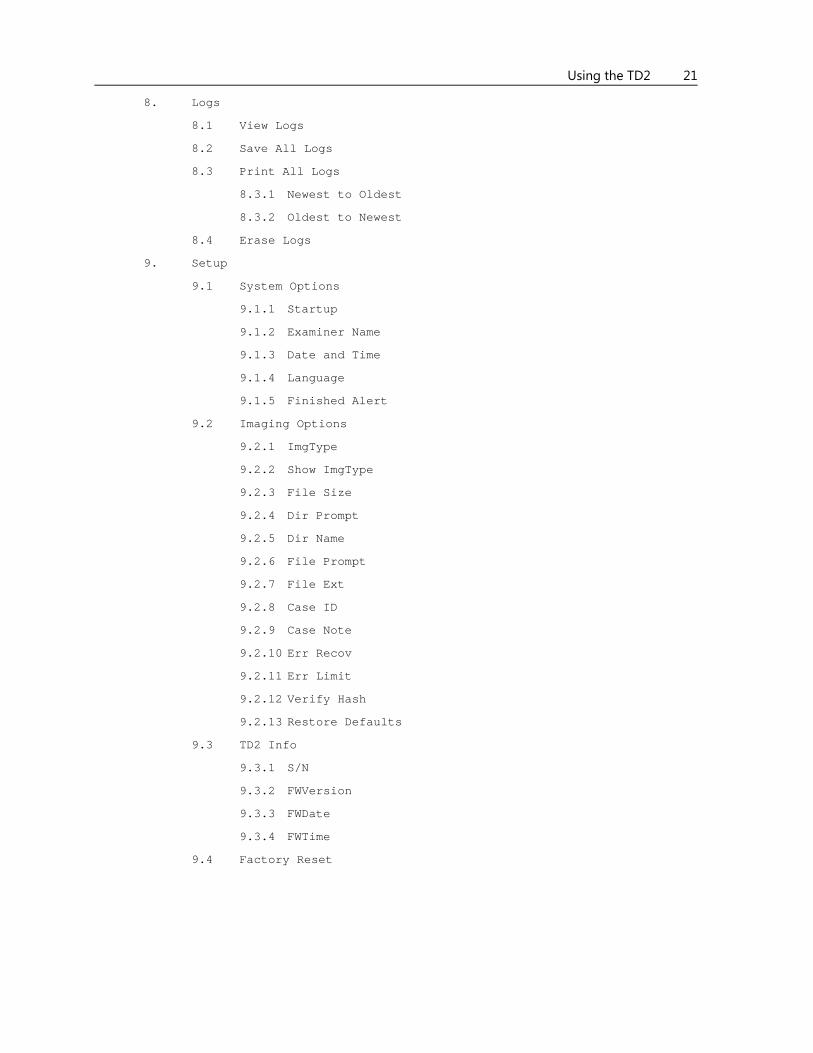
Using the TD2 21
8. Logs
8.1 View Logs
8.2 Save All Logs
8.3 Print All Logs
8.3.1 Newest to Oldest
8.3.2 Oldest to Newest
8.4 Erase Logs
9. Setup
9.1 System Options
9.1.1 Startup
9.1.2 Examiner Name
9.1.3 Date and Time
9.1.4 Language
9.1.5 Finished Alert
9.2 Imaging Options
9.2.1 ImgType
9.2.2 Show ImgType
9.2.3 File Size
9.2.4 Dir Prompt
9.2.5 Dir Name
9.2.6 File Prompt
9.2.7 File Ext
9.2.8 Case ID
9.2.9 Case Note
9.2.10 Err Recov
9.2.11 Err Limit
9.2.12 Verify Hash
9.2.13 Restore Defaults
9.3 TD2 Info
9.3.1 S/N
9.3.2 FWVersion
9.3.3 FWDate
9.3.4 FWTime
9.4 Factory Reset
22 Tableau TD 2 Version 4.01 User's Guide
Duplicate Disk (Menu 1) The TD2 duplicates hard disks by either cloning or imaging them. Cloning, also known as disk‐to‐disk duplication, is the process of copying a source disk, sector by sector, to a destination disk. Source disk sector one is copied to destination disk sector one, then sector two is copied to sector two, sector three to sector three, and so on. Imaging, also known as disk‐to‐file duplication, is the process of copying a source disk to a series of files on destination disks.
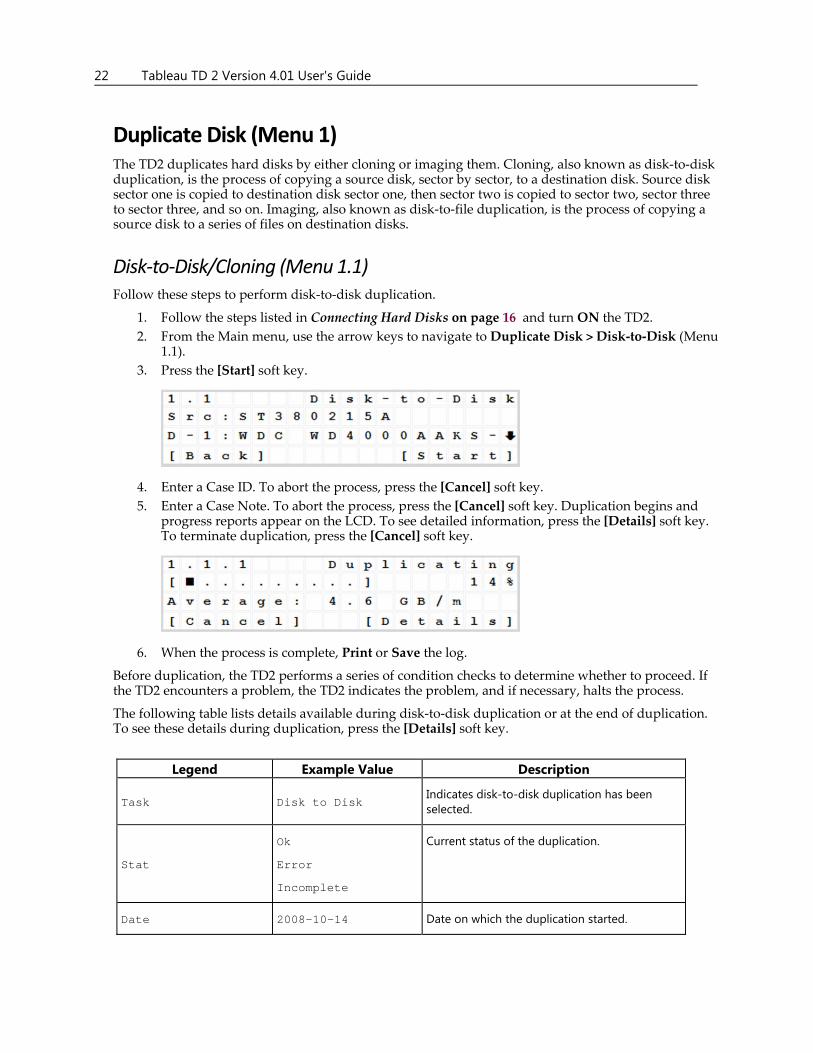
Disk‐to‐Disk/Cloning (Menu 1.1) Follow these steps to perform disk‐to‐disk duplication.
1. Follow the steps listed in Connecting Hard Disks on page 16 and turn ON the TD2.
2. From the Main menu, use the arrow keys to navigate to Duplicate Disk > Disk‐to‐Disk (Menu 1.1).
3. Press the [Start] soft key.
4. Enter a Case ID. To abort the process, press the [Cancel] soft key.
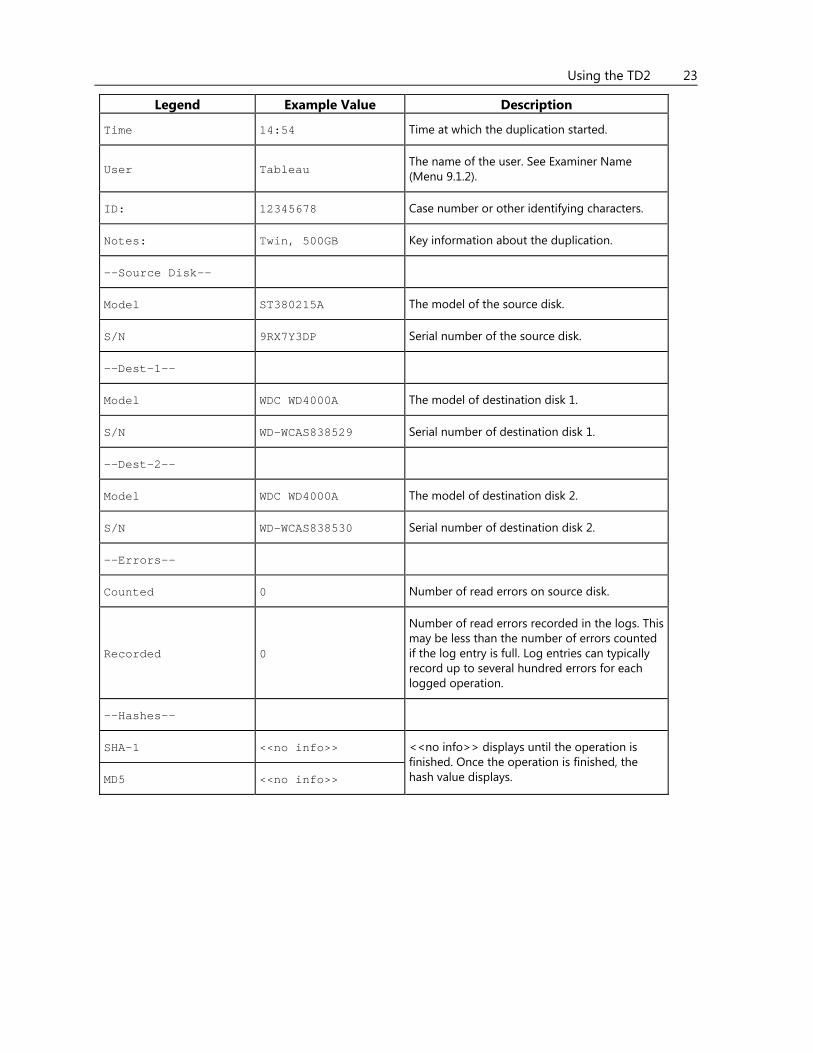
5. Enter a Case Note. To abort the process, press the [Cancel] soft key. Duplication begins and progress reports appear on the LCD. To see detailed information, press the [Details] soft key. To terminate duplication, press the [Cancel] soft key.
6. When the process is complete, Print or Save the log.
Before duplication, the TD2 performs a series of condition checks to determine whether to proceed. If the TD2 encounters a problem, the TD2 indicates the problem, and if necessary, halts the process.
The following table lists details available during disk‐to‐disk duplication or at the end of duplication. To see these details during duplication, press the [Details] soft key.
Legend Example Value Description
Task Disk to Disk Indicates disk-to-disk duplication has been selected.
Stat
Ok
Error
Incomplete
Current status of the duplication.
Date 2008-10-14 Date on which the duplication started.
Using the TD2 23
Legend Example Value Description
Time 14:54 Time at which the duplication started.
User Tableau The name of the user. See Examiner Name (Menu 9.1.2).
ID: 12345678 Case number or other identifying characters.
Notes: Twin, 500GB Key information about the duplication.
--Source Disk--
Model ST380215A The model of the source disk.
S/N 9RX7Y3DP Serial number of the source disk.
--Dest-1--
Model WDC WD4000A The model of destination disk 1.
S/N WD-WCAS838529 Serial number of destination disk 1.
--Dest-2--
Model WDC WD4000A The model of destination disk 2.
S/N WD-WCAS838530 Serial number of destination disk 2.
--Errors--
Counted 0 Number of read errors on source disk.
Recorded 0
Number of read errors recorded in the logs. This may be less than the number of errors counted if the log entry is full. Log entries can typically record up to several hundred errors for each logged operation.
--Hashes--
SHA-1 <<no info>> <<no info>> displays until the operation is finished. Once the operation is finished, the hash value displays. MD5 <<no info>>
24 Tableau TD 2 Version 4.01 User's Guide
Disk‐to‐File/Imaging (Menu 1.2) During disk‐to‐file duplication, the TD2 performs any necessary destination disk formatting automatically. If a destination disk already has an acceptable format and sufficient free space to store at least one image file, the TD2 uses that format. If a destination disk is not either formatted or blank, or if it lacks sufficient free space, the TD2 prompts you for confirmation to format the disk. This reduces the risk of overwriting valuable data.
In most cases, the Tableau TD2 should be turned Off when you connect and disconnect hard disks; however, when you perform a disk‐to‐file duplication, the destination disk might become full. When this happens, the TD2 prompts you to connect the next destination disk. Do not turn Off the TD2 during this process.
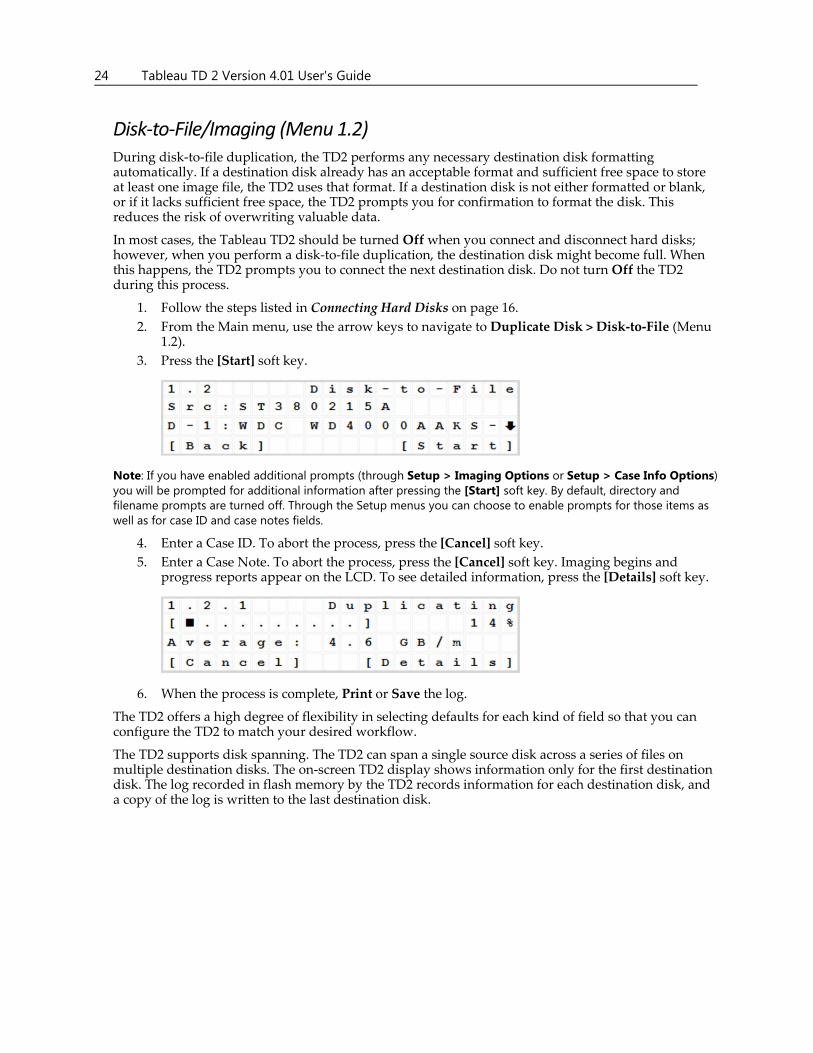
1. Follow the steps listed in Connecting Hard Disks on page 16.
2. From the Main menu, use the arrow keys to navigate to Duplicate Disk > Disk‐to‐File (Menu 1.2).
3. Press the [Start] soft key.
Note: If you have enabled additional prompts (through Setup > Imaging Options or Setup > Case Info Options) you will be prompted for additional information after pressing the [Start] soft key. By default, directory and filename prompts are turned off. Through the Setup menus you can choose to enable prompts for those items as well as for case ID and case notes fields.
4. Enter a Case ID. To abort the process, press the [Cancel] soft key.
5. Enter a Case Note. To abort the process, press the [Cancel] soft key. Imaging begins and progress reports appear on the LCD. To see detailed information, press the [Details] soft key.
6. When the process is complete, Print or Save the log.
The TD2 offers a high degree of flexibility in selecting defaults for each kind of field so that you can configure the TD2 to match your desired workflow.
The TD2 supports disk spanning. The TD2 can span a single source disk across a series of files on multiple destination disks. The on‐screen TD2 display shows information only for the first destination disk. The log recorded in flash memory by the TD2 records information for each destination disk, and a copy of the log is written to the last destination disk.
Using the TD2 25
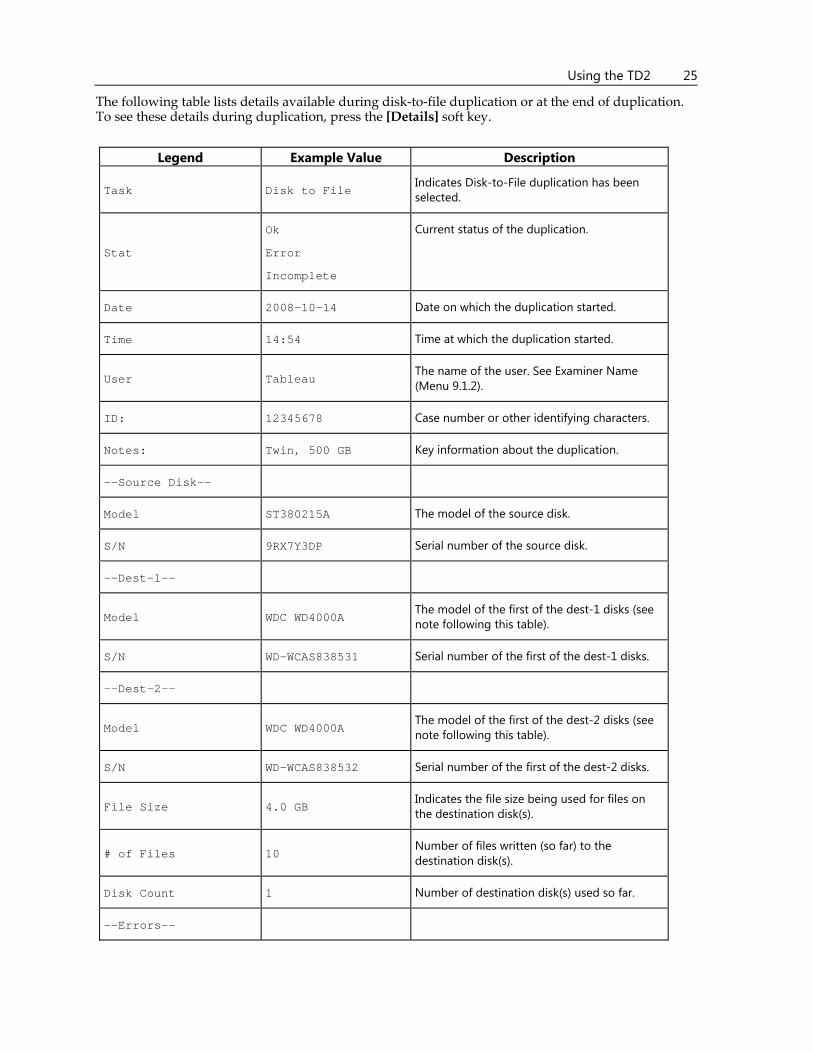
The following table lists details available during disk‐to‐file duplication or at the end of duplication. To see these details during duplication, press the [Details] soft key.
Legend Example Value Description
Task Disk to File Indicates Disk-to-File duplication has been selected.
Stat
Ok
Error
Incomplete
Current status of the duplication.
Date 2008-10-14 Date on which the duplication started.
Time 14:54 Time at which the duplication started.
User Tableau The name of the user. See Examiner Name (Menu 9.1.2).
ID: 12345678 Case number or other identifying characters.
Notes: Twin, 500 GB Key information about the duplication.
--Source Disk--
Model ST380215A The model of the source disk.
S/N 9RX7Y3DP Serial number of the source disk.
--Dest-1--
Model WDC WD4000A The model of the first of the dest-1 disks (see note following this table).
S/N WD-WCAS838531 Serial number of the first of the dest-1 disks.
--Dest-2--
Model WDC WD4000A The model of the first of the dest-2 disks (see note following this table).
S/N WD-WCAS838532 Serial number of the first of the dest-2 disks.
File Size 4.0 GB Indicates the file size being used for files on the destination disk(s).
# of Files 10 Number of files written (so far) to the destination disk(s).
Disk Count 1 Number of destination disk(s) used so far.
--Errors--

26 Tableau TD 2 Version 4.01 User's Guide
Legend Example Value Description
Counted 0 Number of read errors on source disk.
Recorded 0
Number of read errors recorded in the logs. This may be less than the number of errors counted if the log entry is full. Log entries can typically record up to several hundred errors for each logged operation.
--Hashes--
SHA-1 <<no info>> <<no info>> displays until the operation is finished. Once the operation is finished, the hash value displays. MD5 <<no info>>
Files Created During Disk‐to‐File Duplication
When performing disk‐to‐file duplication or imaging, the TD2 creates files on the destination hard disk that contain the data copied from the source hard disk.
Files are written to the destination disk according to the following convention:
(root dir)/
TD2_IMG/
[directory name]/
[filename].E01
[filename].E02
…
[filename].E99
yyyy-mm-dd hh-mm-ss nnnnn TTT.LOG
[directory name] is the name generated by the TD2 for each separate acquisition. If an acquisition spans multiple destination disks, the same [directory name] is used on each destination disk. This makes it easy to group image files related to a particular acquisition.
The [directory name] can be auto‐generated by the TD2 or you can enter it yourself. Auto‐generated names can be based on the date/time, the serial number of the source device, or the model and serial number of the source device. The auto‐generated [filename] is IMAGE, although you may choose to override this value. For a complete list of the options you may use to control the auto‐generation and user prompting for directory and filenames, see Imaging Options (Menu 9.2) on page 12.
[filename].001 is the first file, or portion of the data copied from the source disk. The file size is a user‐settable option and may also be specified under the Setup > Imaging Options menu. There may be a maximum of 999 files for a single disk copy. If you have specified a file size that requires more than 999 files, the TD2 reports an error and aborts the duplication process.
When creating a DD image, you can also specify .DMG naming for files. .DMG refers to a file naming convention used by Apple operating systems. If the .DMG naming option is selected, the first file is named IMAGE.DMG instead of IMAGE.001. All other files have standard filenames (for example, IMAGE.002, IMAGE.003, and so on).

Using the TD2 27
A .LOG file is generated by the TD2 for each disk‐to‐file acquisition. yyyy-mm-dd hh-mm-ss is the duplication task start date/time. The next five characters – nnnnn – are generated from the internal log ID number assigned to the log by the TD2. The TTT in the filename refers to the type of task as listed in the following table.
Prefix Type of Log Entry/Task
BCK Blank Check
D2D Disk-to-Disk Duplication
D2F Disk-to-File Duplication
FMT Disk Formatting (destination only)
HPA HPA / DCO Operation
HSH Disk Hashing (source only)
WIP Disk Wiping (destination only)
The three‐character codes in the above table match those displayed in the Logs > View Logs menu.
If the disk‐to‐file duplication spans more than one destination disk, the directory structure shown in the above table is reproduced on each destination disk. However, the .LOG file is written only to the last disk in the set.
Swapping Destination Hard Disks during Disk‐to‐File Duplication
In most cases, the Tableau TD2 should be turned Off when you connect and disconnect hard disks; however, when you perform a Disk‐to‐File duplication, the destination disk might become full. When this happens, the TD2 prompts you to connect the next destination disk. Do not turn Off the TD2 during this process.
After connecting the new disk, press the [Continue] soft key. The TD2 checks the status of the new destination disk and prompts you to format it, if necessary. The duplication process then continues.
28 Tableau TD 2 Version 4.01 User's Guide
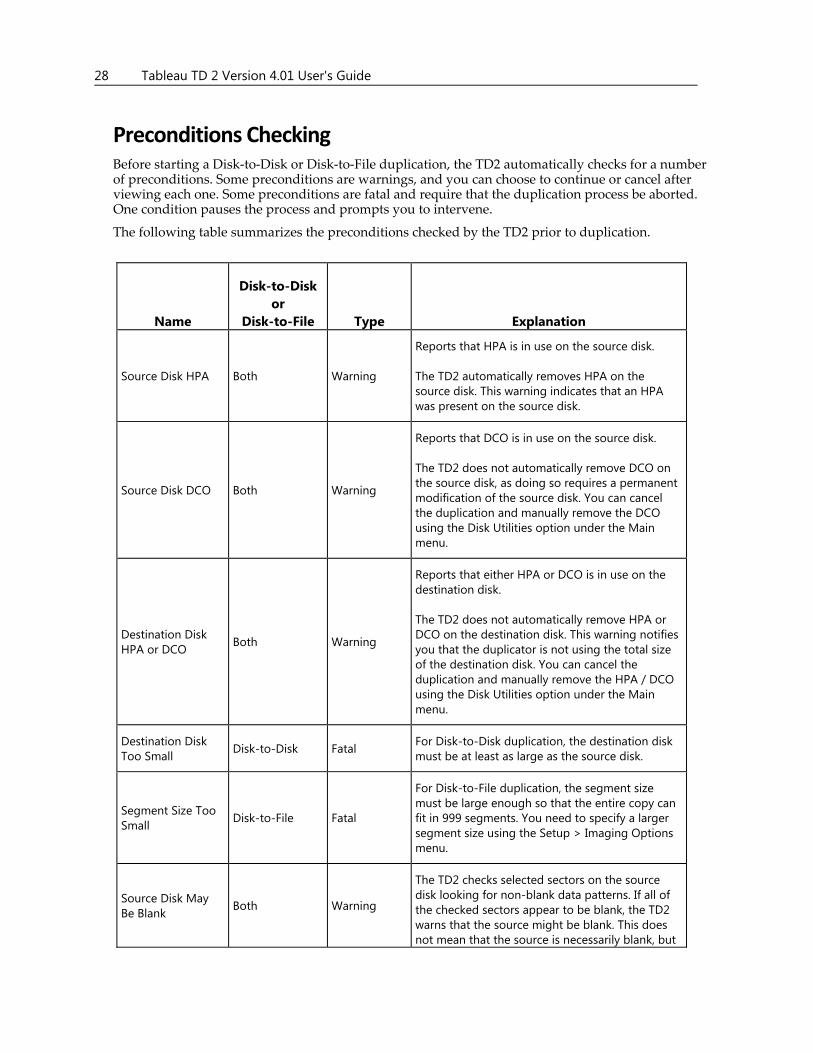
Preconditions Checking Before starting a Disk‐to‐Disk or Disk‐to‐File duplication, the TD2 automatically checks for a number of preconditions. Some preconditions are warnings, and you can choose to continue or cancel after viewing each one. Some preconditions are fatal and require that the duplication process be aborted. One condition pauses the process and prompts you to intervene.
The following table summarizes the preconditions checked by the TD2 prior to duplication.
Name
Disk-to-Disk or
Disk-to-File Type Explanation
Source Disk HPA Both Warning
Reports that HPA is in use on the source disk. The TD2 automatically removes HPA on the source disk. This warning indicates that an HPA was present on the source disk.
Source Disk DCO Both Warning
Reports that DCO is in use on the source disk. The TD2 does not automatically remove DCO on the source disk, as doing so requires a permanent modification of the source disk. You can cancel the duplication and manually remove the DCO using the Disk Utilities option under the Main menu.
Destination Disk HPA or DCO Both Warning
Reports that either HPA or DCO is in use on the destination disk. The TD2 does not automatically remove HPA or DCO on the destination disk. This warning notifies you that the duplicator is not using the total size of the destination disk. You can cancel the duplication and manually remove the HPA / DCO using the Disk Utilities option under the Main menu.
Destination Disk Too Small Disk-to-Disk Fatal For Disk-to-Disk duplication, the destination disk
must be at least as large as the source disk.
Segment Size Too Small Disk-to-File Fatal
For Disk-to-File duplication, the segment size must be large enough so that the entire copy can fit in 999 segments. You need to specify a larger segment size using the Setup > Imaging Options menu.
Source Disk May Be Blank Both Warning
The TD2 checks selected sectors on the source disk looking for non-blank data patterns. If all of the checked sectors appear to be blank, the TD2 warns that the source might be blank. This does not mean that the source is necessarily blank, but
Using the TD2 29
Name
Disk-to-Disk or
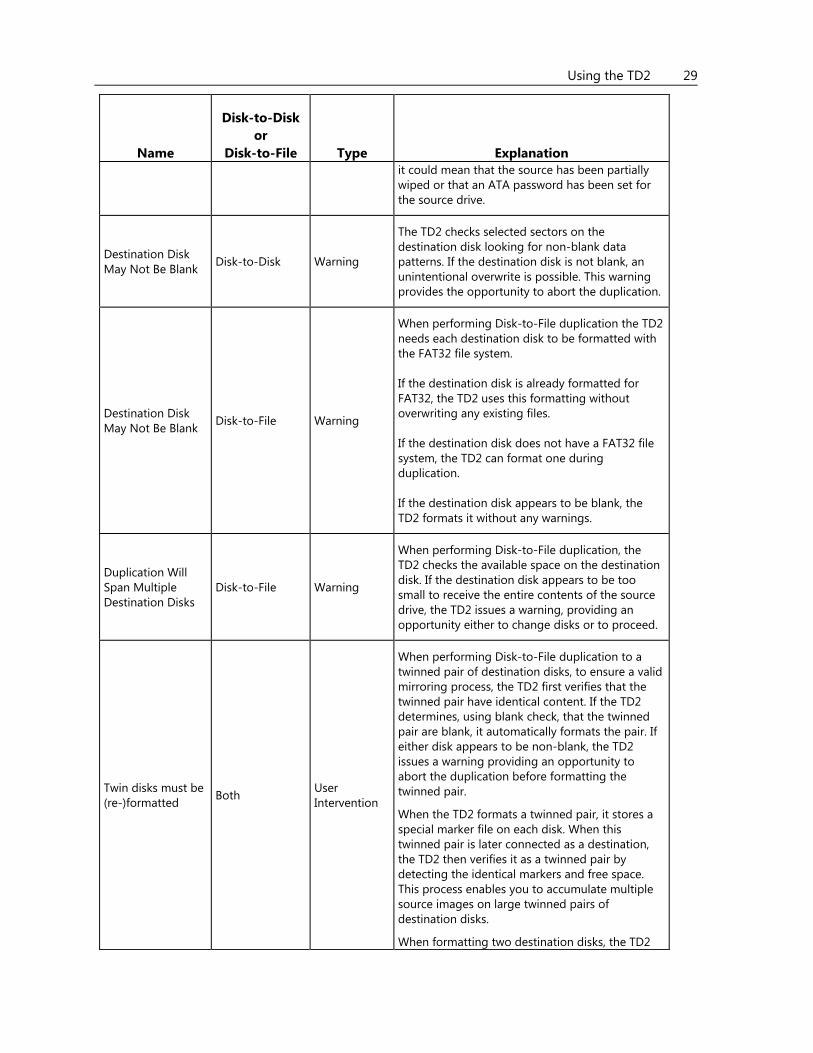
Disk-to-File Type Explanation it could mean that the source has been partially wiped or that an ATA password has been set for the source drive.
Destination Disk May Not Be Blank Disk-to-Disk Warning
The TD2 checks selected sectors on the destination disk looking for non-blank data patterns. If the destination disk is not blank, an unintentional overwrite is possible. This warning provides the opportunity to abort the duplication.
Destination Disk May Not Be Blank Disk-to-File Warning
When performing Disk-to-File duplication the TD2 needs each destination disk to be formatted with the FAT32 file system. If the destination disk is already formatted for FAT32, the TD2 uses this formatting without overwriting any existing files. If the destination disk does not have a FAT32 file system, the TD2 can format one during duplication. If the destination disk appears to be blank, the TD2 formats it without any warnings.
Duplication Will Span Multiple Destination Disks
Disk-to-File Warning
When performing Disk-to-File duplication, the TD2 checks the available space on the destination disk. If the destination disk appears to be too small to receive the entire contents of the source drive, the TD2 issues a warning, providing an opportunity either to change disks or to proceed.
Twin disks must be (re-)formatted Both User
Intervention
When performing Disk-to-File duplication to a twinned pair of destination disks, to ensure a valid mirroring process, the TD2 first verifies that the twinned pair have identical content. If the TD2 determines, using blank check, that the twinned pair are blank, it automatically formats the pair. If either disk appears to be non-blank, the TD2 issues a warning providing an opportunity to abort the duplication before formatting the twinned pair.
When the TD2 formats a twinned pair, it stores a special marker file on each disk. When this twinned pair is later connected as a destination, the TD2 then verifies it as a twinned pair by detecting the identical markers and free space. This process enables you to accumulate multiple source images on large twinned pairs of destination disks.
When formatting two destination disks, the TD2

30 Tableau TD 2 Version 4.01 User's Guide
Name
Disk-to-Disk or
Disk-to-File Type Explanation sets the usable capacity to be the lesser capacity of the two drives.
Note: If either disk is connected to a Windows system without a write blocker, Windows will probably alter the disk contents. The TD2 will then reject the altered twinned pair as invalid and prompt you to reformat them. Reformatting an invalidated twinned pair destroys any previously collected images.
New destination disk is full Disk-to-File User
Intervention
When performing Disk-to-File duplication, the TD2 checks the available space on the destination disk. If the destination disk does not have enough room for a complete file, then the TD2 pauses and requires you to change destination disks.
Format Disk (Menu 2) When using disk‐to‐file imaging, the destination drive must be formatted with a file system that is recognizable by the TD2. Currently, the TD2 supports destination disks that are formatted as FAT32 or exFAT. The FAT32 file size limit is 4 GB. The exFAT file size limit is 16 EB (16,000,000 TB). When file sizes are larger than 4 GB, exFAT should be used.
From the formatting menu you can manually format either the destination disk or a USB mass storage device attached to one of the TD2ʹs USB ports.
1. From the Main menu, use the arrow keys to navigate to Format (Menu 2).
2. Select Format Dest (Menu 2.1) or Format USB (Menu 2.2).
3. Select the file system (Quick FAT32 or Quick exFAT).
4. To confirm your selection, press the [Yes] soft key. The formatting task begins.
Format Dest (Menu 2.1) The Format Dest option allows you to format the destination disk with the FAT32 file system used by the TD2. The TD2 does what is generally referred to as a Quick Format. In other words, the TD2 writes the necessary Master Boot Record, Partition Boot Record, and FAT32 data structures to the destination disk. The TD2 does not do a full surface scan of the destination disk. If you want to verify the integrity of the destination disk you should format it using a traditional computer and operating system.
You do not need to pre‐format destination drives when using the Disk‐to‐File duplication mode of the TD2. If a destination disk is unformatted, or formatted, and not blank, the TD2 prompts you to format it before beginning the duplication..

Using the TD2 31
Large Disk Support
The TD2 supports two methods of formatting disks:
Master Boot Record (MBR)
GUID Partition Table (GPT)
In general, disks of less than 2 TB are formatted with the MBR option. Disks greater than 2 TB are formatted with GPT. Large disks can be formatted with MBR, but only the first two terabytes of space are used.
The GPT format involves creating multiple partitions of up to 2 TB each. When a GPT disk is attached to a Windows system, Windows assigns each partition a drive letter.
In the formatting step, when the TD2 recognizes a large disk greater than 2 TB, a menu displays:
Large disk found. Select disk format.
Two soft keys allow you to select GPT or MBR. If two destination disks are connected, twinning is selected. The formatting operation formats to the capacity of the lower capacity drive. If this capacity is less than 2 TB, the MBR format is used regardless of the size of the larger drive.
Advanced Format Support
Traditionally, hard drives have had an internal structure built around sectors of 512 bytes. Newer drives, especially drives with capacities greater than 2 TB, feature the Advanced Format (AF) structure that uses internal sectors of 4096 bytes. Such drives still support I/O transfers that reference 512‐sectors; internally, the drives map these references to the internal 4096‐byte physical sectors. Implicit in this mapping is the need to accommodate writes that alter the data stored in just a portion of a physical sector. This is accomplished by an inefficient read‐modify‐write cycle.
Historically, disks have been formatted with the first partition located at sector 63. However, if a host computer aligns partitions and clusters of 512‐byte sectors on boundaries that are not a multiple of 8, then the frequency with which the drive must resort to read‐modify‐write cycles can severely degrade performance.
The TD2 recognizes AF disks. It formats them accordingly with partitions and clusters positioned at sector locations that are a multiple of 8.
If an AF disk is paired with a non‐AF disk for twinning, they are both are formatted in accordance with the rules for optimum AF alignment.
Format USB (Menu 2.2) The Format USB option allows you to format a USB mass storage device connected to one of the TD2ʹs USB ports. You must attach a USB mass storage device, such as a thumb drive, to one of the TD2ʹs USB ports before selecting this option.
Note: You can attach only one USB mass storage device to the TD2 at a time. Connecting more than one USB mass storage device to the TD2's USB ports may lead to confusing results, as you cannot tell which USB mass storage device the TD2 is using.
32 Tableau TD 2 Version 4.01 User's Guide
Wipe Disk (Menu 3) You may wish to wipe the destination disk before use, especially when doing disk‐to‐disk cloning. The TD2 gives you two options to wipe a destination disk: you can perform a fast, one‐pass wipe or a multi‐pass wipe.
1. Follow the steps listed in Connecting Hard Disks on page 16 and turn ON the TD2. No source disk is necessary.
2. From the Main menu, use the arrow keys to navigate to Wipe Disk (Menu 3).
3. Select One Pass Write (Menu 3.1) or Multi Pass Write (Menu 3.2).
4. To confirm your selection, press [Yes]. The wiping task begins, and progress reports appear on the LCD.
Note: If you connect two destination disks of different sizes, the Wipe Disk utility wipes an area equal to the capacity of the smaller drive. To fully wipe the larger of two destination drives, connect it to the Dest-1 port as the only destination drive.
One Pass Write (Menu 3.1) The TD2 writes a constant pattern of zeros (00h) to the destination drive in a single pass. The TD2 will display on‐screen performance and timing metrics during the wiping process.
You may cancel the wiping operation at any time by pressing the [Cancel] soft key.
Note: The TD2 will not automatically overwrite an HPA or DCO on the destination drive.
Multi Pass Write (Menu 3.2) The TD2 performs full passes of writes to the destination drive. The first pass writes zeros (00h), the second pass writes ones (FFh), and the third pass writes a randomly selected constant value between 01h and FEh. The TD2 will display on‐screen performance and timing metrics during the wiping process.
You may cancel the wiping operation at any time by pressing the [Cancel] soft key.
Hash Utilities (Menu 4) There are times when a forensic practitioner would like to calculate the hash values, or fingerprints, for a source disk without making a copy of the disk. With the Hash Utilities menu, you can generate an MD5 and SHA‐1 hash value for the hard disk attached to the source side of the TD2.
You can cancel the hashing operation at any time by pressing the [Cancel] soft key.
If the source disk has an HPA‐protected region, the TD2 automatically disables the HPA before performing the hash calculation. This is the same as the TD2ʹs behavior during duplication. If you compare the hash values produced when duplicating a disk and when using the Hash Utilities, you should get the same hash results.
When the hashing operation is finished, the TD2 prompts you to press the [Ok] soft key. After pressing [Ok], you see a Hash Options menu:
Hash Options
1. View Hash
2. Compare to Logs
Using the TD2 33
Selecting View Hash lets you view the MD5 and SHA‐1 hash results on the TD2 display. The MD5 and SHA‐1 hash results are too wide to display completely on screen, so you may use the left and right arrow keys to scroll the hash results.
Selecting Compare to Logs lets you see quickly if you have recently performed any other tasks with the same source drive on this TD2 unit. The TD2 will search the logs stored in flash memory looking for any Disk‐to‐Disk, Disk‐to‐File, or Hash log entries that have matching hash values. If there are any matching entries, the TD2 displays a list of them.
Blank Check (Menu 5) The Blank Check menu lets you do a quick blank check on the source or either destination drive.
The TD2 performs a quick check to determine if the selected disk appears to be blank by reading sectors in the Master Boot Record, the Primary GPT, and the Secondary GPT. A sector is considered to be blank if it contains only a repeating pattern such as 00h, E5h, or FFh. Any non‐repeating pattern is considered to be non‐blank. If all sectors read by the TD2 have repeating patterns (though not necessarily the same repeating pattern), then the TD2 concludes the drive may be blank.
This quick check is not an exhaustive check of the entire drive. It is possible for a drive to appear to be blank according to the quick check while still storing forensically relevant information. A forensic examiner should treat blank source disks with some suspicion and use other tools, like a Tableau write blocker, to examine the drive to see if it contains forensically relevant information.
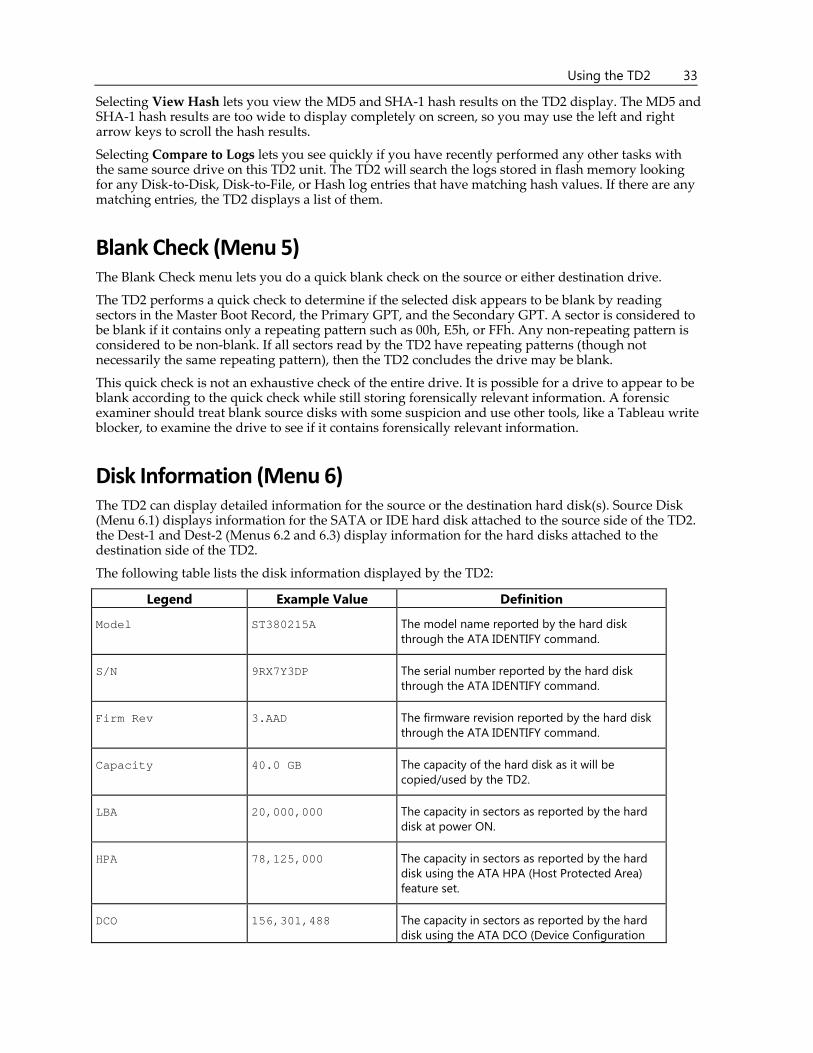
Disk Information (Menu 6) The TD2 can display detailed information for the source or the destination hard disk(s). Source Disk (Menu 6.1) displays information for the SATA or IDE hard disk attached to the source side of the TD2. the Dest‐1 and Dest‐2 (Menus 6.2 and 6.3) display information for the hard disks attached to the destination side of the TD2.
The following table lists the disk information displayed by the TD2:
Legend Example Value Definition
Model ST380215A The model name reported by the hard disk through the ATA IDENTIFY command.
S/N 9RX7Y3DP The serial number reported by the hard disk through the ATA IDENTIFY command.
Firm Rev 3.AAD The firmware revision reported by the hard disk through the ATA IDENTIFY command.
Capacity 40.0 GB The capacity of the hard disk as it will be copied/used by the TD2.
LBA 20,000,000 The capacity in sectors as reported by the hard disk at power ON.
HPA 78,125,000 The capacity in sectors as reported by the hard disk using the ATA HPA (Host Protected Area) feature set.
DCO 156,301,488 The capacity in sectors as reported by the hard disk using the ATA DCO (Device Configuration
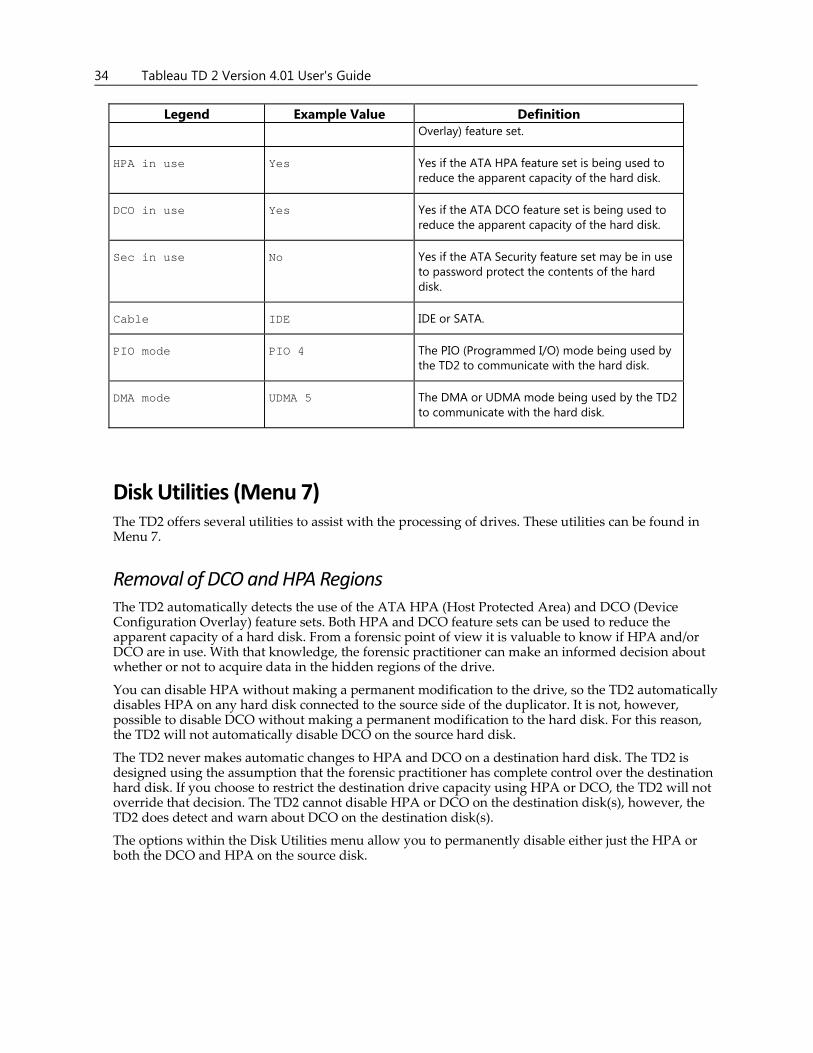
34 Tableau TD 2 Version 4.01 User's Guide
Legend Example Value Definition Overlay) feature set.
HPA in use Yes Yes if the ATA HPA feature set is being used to reduce the apparent capacity of the hard disk.
DCO in use Yes Yes if the ATA DCO feature set is being used to reduce the apparent capacity of the hard disk.
Sec in use No Yes if the ATA Security feature set may be in use to password protect the contents of the hard disk.
Cable IDE IDE or SATA.
PIO mode PIO 4 The PIO (Programmed I/O) mode being used by the TD2 to communicate with the hard disk.
DMA mode UDMA 5 The DMA or UDMA mode being used by the TD2 to communicate with the hard disk.
Disk Utilities (Menu 7) The TD2 offers several utilities to assist with the processing of drives. These utilities can be found in Menu 7.
Removal of DCO and HPA Regions The TD2 automatically detects the use of the ATA HPA (Host Protected Area) and DCO (Device Configuration Overlay) feature sets. Both HPA and DCO feature sets can be used to reduce the apparent capacity of a hard disk. From a forensic point of view it is valuable to know if HPA and/or DCO are in use. With that knowledge, the forensic practitioner can make an informed decision about whether or not to acquire data in the hidden regions of the drive.
You can disable HPA without making a permanent modification to the drive, so the TD2 automatically disables HPA on any hard disk connected to the source side of the duplicator. It is not, however, possible to disable DCO without making a permanent modification to the hard disk. For this reason, the TD2 will not automatically disable DCO on the source hard disk.
The TD2 never makes automatic changes to HPA and DCO on a destination hard disk. The TD2 is designed using the assumption that the forensic practitioner has complete control over the destination hard disk. If you choose to restrict the destination drive capacity using HPA or DCO, the TD2 will not override that decision. The TD2 cannot disable HPA or DCO on the destination disk(s), however, the TD2 does detect and warn about DCO on the destination disk(s).
The options within the Disk Utilities menu allow you to permanently disable either just the HPA or both the DCO and HPA on the source disk.
Using the TD2 35
Remove DCO & HPA (Menu 7.1)
You cannot remove a DCO‐protected region on a hard disk without also removing any HPA‐protected region. If you want to permanently remove both the HPA and DCO on either the source or destination hard disk, use the options under this menu.
Remove HPA (Menu 7.2)
You can remove an HPA‐protected region on a hard disk without making any changes to the DCO settings on the hard disk. If you want to permanently remove the HPA on either the source or destination hard disk, use the options under this menu.
Dest Free Space (Menu 7.3) To quickly determine the free space on the attached destination drive, select Disk Utilities > Dest Free Space (Menu 7.3). This option displays the capacity of the drive and the available space.
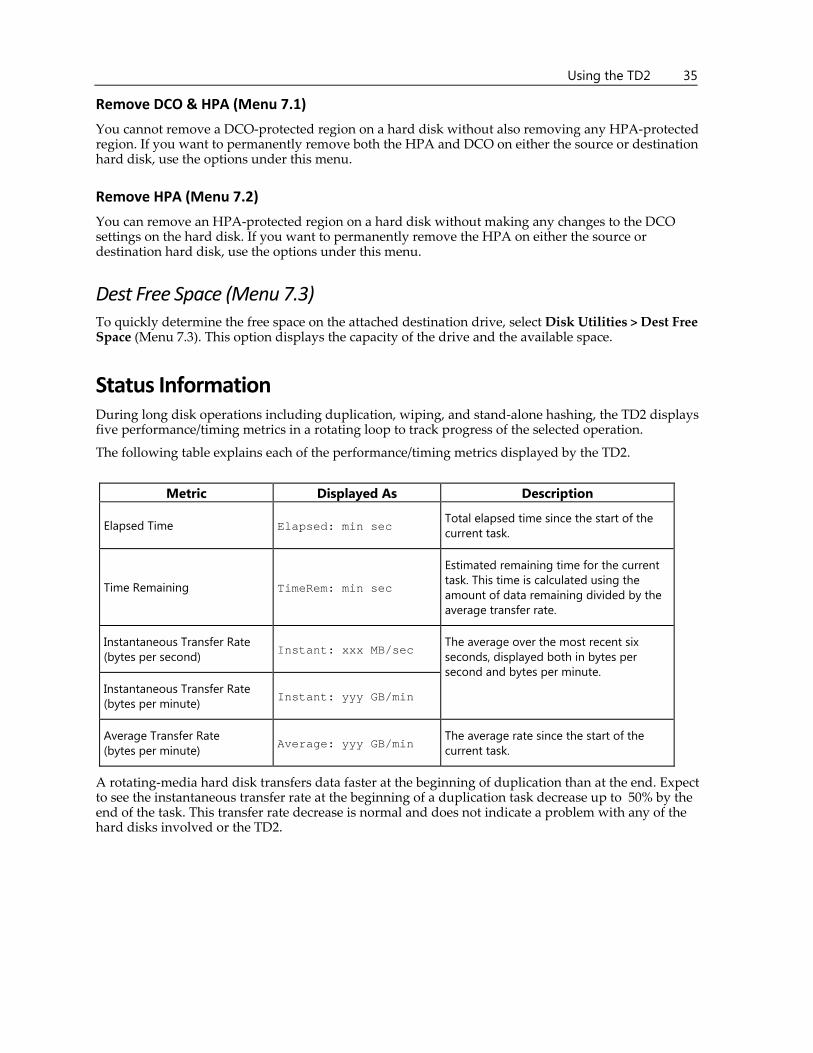
Status Information During long disk operations including duplication, wiping, and stand‐alone hashing, the TD2 displays five performance/timing metrics in a rotating loop to track progress of the selected operation.
The following table explains each of the performance/timing metrics displayed by the TD2.
Metric Displayed As Description
Elapsed Time Elapsed: min sec Total elapsed time since the start of the current task.
Time Remaining TimeRem: min sec
Estimated remaining time for the current task. This time is calculated using the amount of data remaining divided by the average transfer rate.
Instantaneous Transfer Rate (bytes per second) Instant: xxx MB/sec The average over the most recent six
seconds, displayed both in bytes per second and bytes per minute.
Instantaneous Transfer Rate (bytes per minute) Instant: yyy GB/min
Average Transfer Rate (bytes per minute) Average: yyy GB/min The average rate since the start of the
current task.
A rotating‐media hard disk transfers data faster at the beginning of duplication than at the end. Expect to see the instantaneous transfer rate at the beginning of a duplication task decrease up to 50% by the end of the task. This transfer rate decrease is normal and does not indicate a problem with any of the hard disks involved or the TD2.
36 Tableau TD 2 Version 4.01 User's Guide
Logs (Menu 8) Whenever the TD2 performs an operation which reads, writes, or modifies a hard disk, it creates a log entry to record that operation.
The TD2 has an internal flash memory with the capacity to store approximately 59 of the most recently logged operations. Once the TD2 has stored 59 log entries, the creation of a new log entry will automatically overwrite the oldest log entry.
The Logs menu lets you view, print, save, and erase log entries.
View Logs (Menu 8.1) Selecting the View Logs option displays a list of the logs currently recorded in the TD2ʹs internal flash memory. The most recent log entry is displayed at the top of this list with the oldest log entry at the bottom (end) of the list. Log entries are displayed as:
10-13 12:46 Wip Ok
10-13 12:45 Wip X
…
The first part of the line is the month and date (MM‐DD) on which the log was recorded. The second part is the time at which the log was recorded (HH:MM) using a 24‐hour clock format.
The third part of each line is a three‐character code indicating the type of task recorded in the log. For a complete listing of the three‐character codes, see Writing Logs to a USB Storage Device on page 39. In the above example, Wip refers to a Disk Wiping operation.
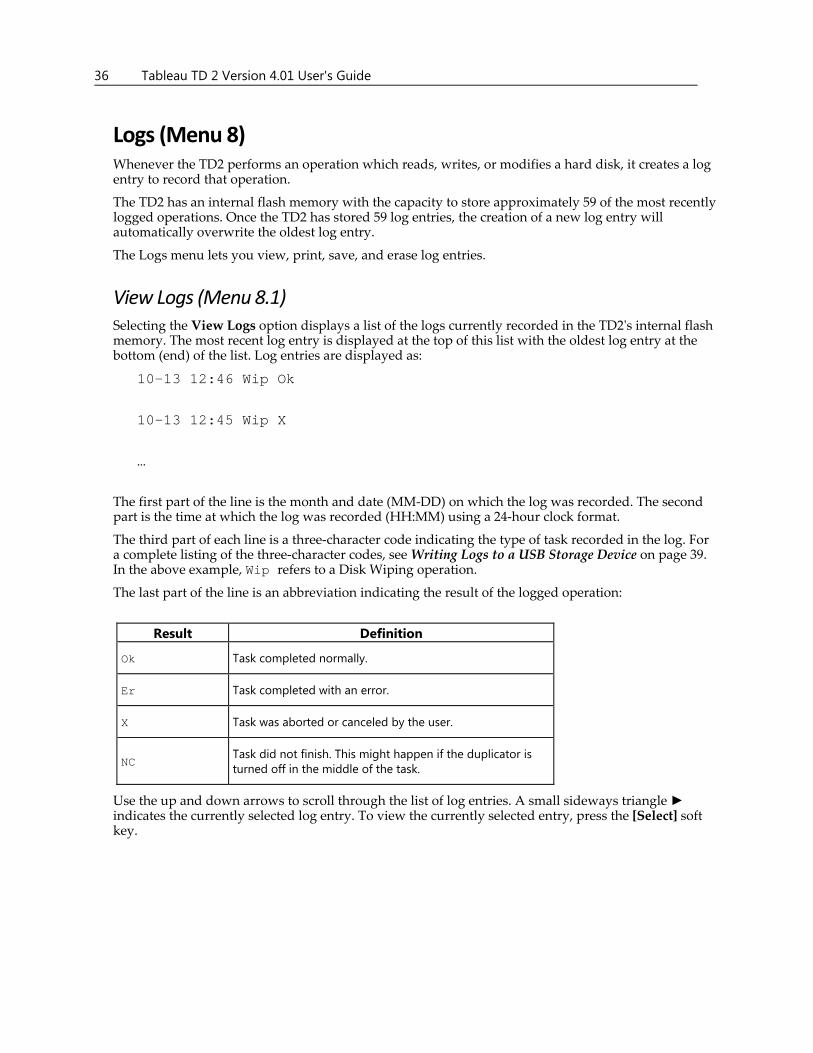
The last part of the line is an abbreviation indicating the result of the logged operation:
Result Definition
Ok Task completed normally.
Er Task completed with an error.
X Task was aborted or canceled by the user.
NC Task did not finish. This might happen if the duplicator is turned off in the middle of the task.
Use the up and down arrows to scroll through the list of log entries. A small sideways triangle ► indicates the currently selected log entry. To view the currently selected entry, press the [Select] soft key.

Using the TD2 37
Sample TD2 Log The TD2 maintains detailed logs for each task initiated by the user. Here is a sample of an error‐free log for a Disk‐to‐File acquisition.
-------------------------Start of Tableau TD2 Log entry-------------------------
Task: Disk to File
Status: Ok
Created: 2008-08-14 13:15
Closed : 2008-08-14 13:43
User: Tableau
Case ID:
TD2 Demonstration
Case Notes:
The TD2 is an awesome forensic duplicator!
Duplicator serial num: 01d1101a
Duplicator firmware timestamp: Aug 12 2009 11:43:33
Duplicator firmware revision: 2.10
Duplicator log ID num: 7
----------------------Disk-to-File Results----------------------
# of sectors: 293,046,768 (150.0 GB)
Destination filename convention: Default
Segment size in sectors: 7,812,480 (3.9 GB)
Segments expected: 38
Segments written: 38
Filename of first segment: TD2_IMG/WDC WD1500HLFS-01G6U0_WD-WXLY08147051/IMAGE.001
Total errors: 0
Errors recorded: 0
SHA1: 813d0f6bf853d6681314911fe6fe02c9b96ecbd8
MD5 : af995be7c61fc0a8ffe052b842fbabbd
--------------------------Source Disk---------------------------
Model: WDC WD1500HLFS-01G6U0
S/N: WD-WXLY08147051

38 Tableau TD 2 Version 4.01 User's Guide
Firmware Revision: 04.04V01
Capacity in sectors reported Pwr-ON: 293,046,768 (150.0 GB)
Capacity in sectors reported by HPA: 293,046,768 (150.0 GB)
Capacity in sectors reported by DCO: 293,046,768 (150.0 GB)
HPA in use: No
DCO in use: No
ATA Security in use: No
Cable/Interface type: SATA
ATA PIO mode: PIO 4
ATA DMA mode: UDMA 5
Peak power:
+5V : 4.81 V 691 mA
+12V: 12.2 V 335 mA
-----------------------Destination Disks------------------------
Destination disks used: 1
Destination disks recorded: 1
----------------------Dest-1 Disk #1-----------------------
Model: WDC WD3000GLFS-01F8U0
S/N: WD-WXL508028462
Firmware Revision: 03.03V01
Capacity in sectors reported Pwr-ON: 586,072,368 (300.0 GB)
Capacity in sectors reported by HPA: 586,072,368 (300.0 GB)
Capacity in sectors reported by DCO: 586,072,368 (300.0 GB)
HPA in use: No
DCO in use: No
ATA Security in use: No
Cable/Interface type: SATA
ATA PIO mode: PIO 4
ATA DMA mode: UDMA 5
Peak power:
+5V : 4.74 V 746 mA
+12V: 12.5 V 298 mA
--------------------------End of Tableau TD2 Log entry--------------------------
Using the TD2 39
If the TD2 had detected any bad sectors on the source drive, it would have added a section at the end of the TD2 log. This additional section would list the sector address and sector length of each unreadable region of the source disk.
Save All Logs (Menu 8.2) You can save all logs to a USB storage device connected to one of the TD2ʹs USB ports. After connecting a USB storage device to one of the TD2ʹs USB ports, select the Save All Logs option to save the logs. Logs are saved in an ASCII text format. Use a text editor of your choice to view the logs.
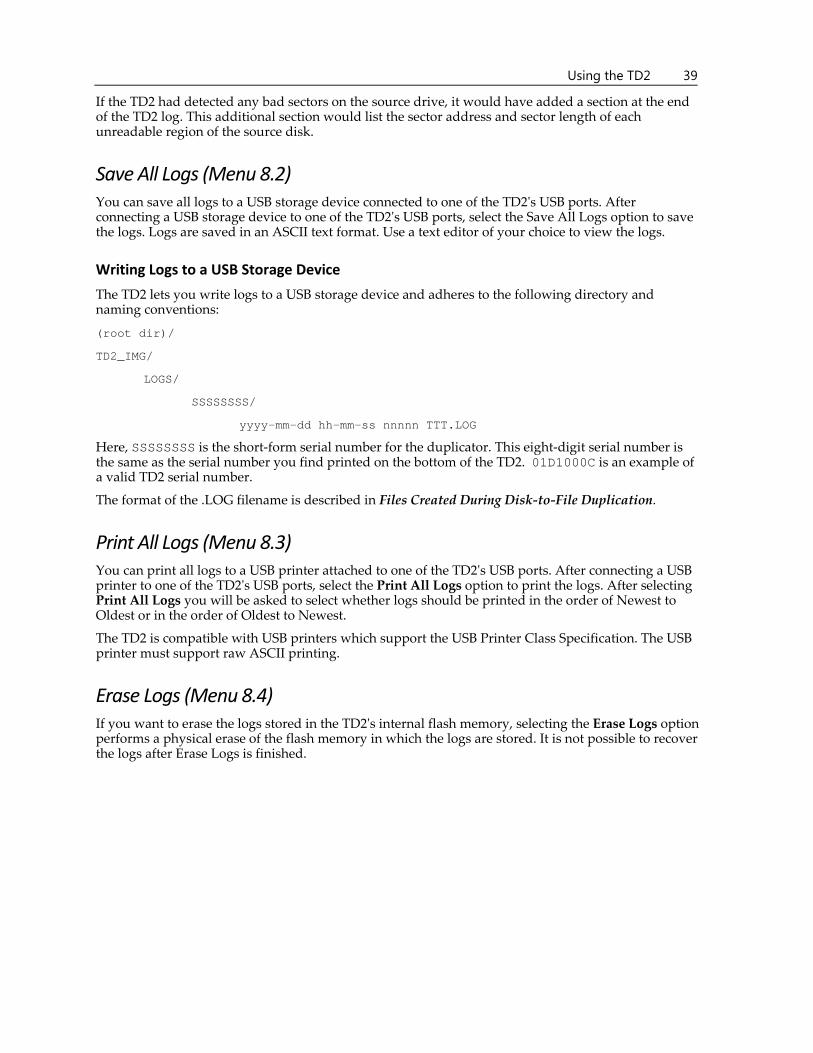
Writing Logs to a USB Storage Device
The TD2 lets you write logs to a USB storage device and adheres to the following directory and naming conventions:
(root dir)/
TD2_IMG/
LOGS/
SSSSSSSS/
yyyy-mm-dd hh-mm-ss nnnnn TTT.LOG
Here, SSSSSSSS is the short‐form serial number for the duplicator. This eight‐digit serial number is the same as the serial number you find printed on the bottom of the TD2. 01D1000C is an example of a valid TD2 serial number.
The format of the .LOG filename is described in Files Created During Disk‐to‐File Duplication.
Print All Logs (Menu 8.3) You can print all logs to a USB printer attached to one of the TD2ʹs USB ports. After connecting a USB printer to one of the TD2ʹs USB ports, select the Print All Logs option to print the logs. After selecting Print All Logs you will be asked to select whether logs should be printed in the order of Newest to Oldest or in the order of Oldest to Newest.
The TD2 is compatible with USB printers which support the USB Printer Class Specification. The USB printer must support raw ASCII printing.
Erase Logs (Menu 8.4) If you want to erase the logs stored in the TD2ʹs internal flash memory, selecting the Erase Logs option performs a physical erase of the flash memory in which the logs are stored. It is not possible to recover the logs after Erase Logs is finished.

40 Tableau TD 2 Version 4.01 User's Guide
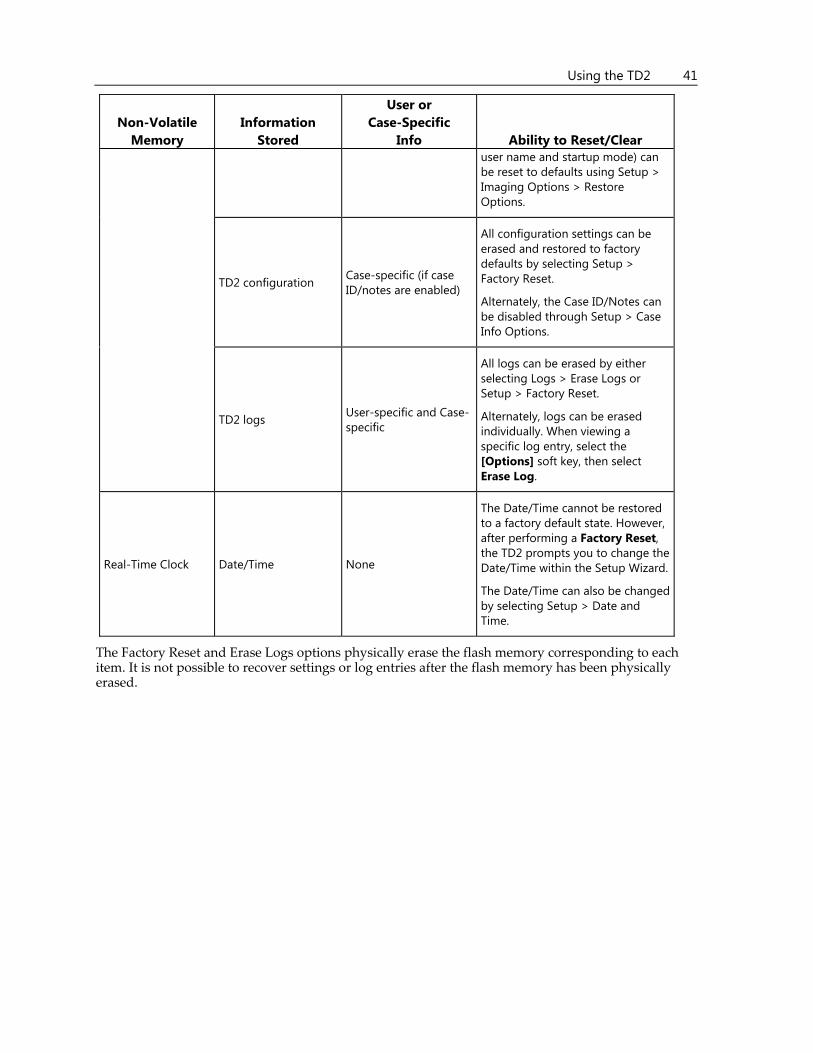
Resetting and Clearing Internally Stored Information Some forensic and security applications require that the user be aware of the kinds of information that the duplicator can store. In some cases, you may want to know what, if any, information is preserved by the unit from one acquisition to the next. Or you might be in security‐sensitive environments and need to be able to sanitize equipment before that equipment can be removed.
The TD2 has three separate non‐volatile memories.
The first non‐volatile memory is a flash device which is used to store the TD2ʹs firmware and serial number. The firmware can be updated using the Tableau Firmware Update utility (available from Tableauʹs Web site). This flash device is never used to record any user‐specific or acquisition‐specific information.
The second non‐volatile memory is a separate flash device used to store two different types of information: configuration settings and logs. Configuration settings include the following.
User/operator name (entered via Configuration Wizard or Setup Menu).
Startup mode of operation (entered via Configuration Wizard or Setup Menu).
Error handling settings (error recovery strategy and error counter limits).
Default directory naming conventions for disk‐to‐file duplication (directory name format).
Default file naming conventions for disk‐to‐file duplication (file name format).
Default file format conventions (segment size, etc.).
Last‐used case ID and case notes (if case information is enabled).
User preferences for prompts (directory name, file name, case information).
This second flash also records up to 59 of the most recent tasks performed by the duplicator. A task in this context is any operation which operates on a disk device, including duplication, formatting, wiping, hashing, blank checking, and HPA/DCO operations. Logs include detailed information about each disk device attached to the TD2; this includes the make/model, serial number, capacity, and so on.
The third and final non‐volatile memory is the on‐board real‐time clock (RTC) with battery backup. The real‐time clock records the date and time as set by the user. The real‐time clock does not record any user‐specific or acquisition‐specific information.
The following table lists the reset/clear information stored internally by the TD2.
Non-Volatile Memory
Information Stored
User or Case-Specific
Info Ability to Reset/Clear
Flash #1
TD2 firmware None
Firmware cannot be erased, but can be updated using the Tableau Firmware Update program, which can be downloaded from Tableau's Web site.
TD2 serial number None It is not possible to change the TD2 serial number in the field.
Flash #2 TD2 configuration User-specific
All configuration settings can be erased and restored to factory defaults by selecting Setup > Factory Reset.
Configuration settings (excluding
Using the TD2 41
Non-Volatile Memory
Information Stored
User or Case-Specific
Info Ability to Reset/Clear user name and startup mode) can be reset to defaults using Setup > Imaging Options > Restore Options.
TD2 configuration Case-specific (if case ID/notes are enabled)
All configuration settings can be erased and restored to factory defaults by selecting Setup > Factory Reset.
Alternately, the Case ID/Notes can be disabled through Setup > Case Info Options.
TD2 logs User-specific and Case-specific
All logs can be erased by either selecting Logs > Erase Logs or Setup > Factory Reset.
Alternately, logs can be erased individually. When viewing a specific log entry, select the [Options] soft key, then select Erase Log.
Real-Time Clock Date/Time None
The Date/Time cannot be restored to a factory default state. However, after performing a Factory Reset, the TD2 prompts you to change the Date/Time within the Setup Wizard.
The Date/Time can also be changed by selecting Setup > Date and Time.
The Factory Reset and Erase Logs options physically erase the flash memory corresponding to each item. It is not possible to recover settings or log entries after the flash memory has been physically erased.


In This Chapter
Troubleshooting Common Problems
Support
CHAPTER 4
Troubleshooting and Support
44 Tableau TD 2 Version 4.01 User's Guide
Troubleshooting Common Problems This section provides the following troubleshooting issues and solutions:
Power Supply Issues
Problems with Disk Detection
Replacing the Backup Battery for the Real‐time Clock
Power Supply Issues The TP4 power supply provided with the TD2 is a 24‐volt (16V‐28V) power supply that uses a barrel connector to interface with the TD2. It is capable of powering the TD2 and nearly all combinations of one, two, or three hard disks. The TD2 also employs staggered power sequencing for the source and destination hard disks. With staggered sequencing, power is first provided to one hard disk as it spins up, then to the second hard disk as it spins up, and finally to the third hard disk. It is normal to hear the source and destination drives spin up separately.
During power‐On initialization and self‐test, the TD2 will check the output voltages of the TP4 power supply. If the voltage is below the minimum specification, the TD2 displays an on‐screen warning.
There is a green DC power LED on the rear edge of the TD2, next to the female DC power barrel connector. If the TP4 power supply is connected properly to the TD2 and to AC power, the green LED illuminates. If you are having difficulty turning the TD2 On, check the status of the DC power LED to ensure that the TD2 is receiving power from the TP4 power supply.
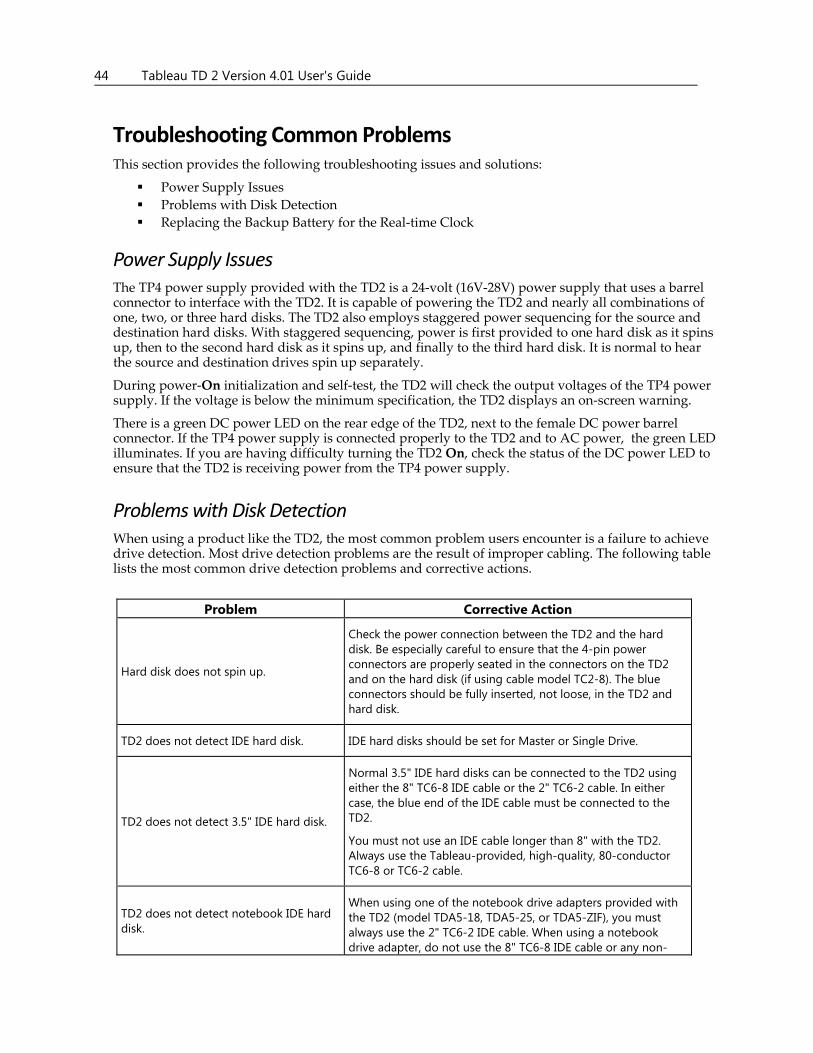
Problems with Disk Detection When using a product like the TD2, the most common problem users encounter is a failure to achieve drive detection. Most drive detection problems are the result of improper cabling. The following table lists the most common drive detection problems and corrective actions.
Problem Corrective Action
Hard disk does not spin up.
Check the power connection between the TD2 and the hard disk. Be especially careful to ensure that the 4-pin power connectors are properly seated in the connectors on the TD2 and on the hard disk (if using cable model TC2-8). The blue connectors should be fully inserted, not loose, in the TD2 and hard disk.
TD2 does not detect IDE hard disk. IDE hard disks should be set for Master or Single Drive.
TD2 does not detect 3.5" IDE hard disk.
Normal 3.5" IDE hard disks can be connected to the TD2 using either the 8" TC6-8 IDE cable or the 2" TC6-2 cable. In either case, the blue end of the IDE cable must be connected to the TD2.
You must not use an IDE cable longer than 8" with the TD2. Always use the Tableau-provided, high-quality, 80-conductor TC6-8 or TC6-2 cable.
TD2 does not detect notebook IDE hard disk.
When using one of the notebook drive adapters provided with the TD2 (model TDA5-18, TDA5-25, or TDA5-ZIF), you must always use the 2" TC6-2 IDE cable. When using a notebook drive adapter, do not use the 8" TC6-8 IDE cable or any non-
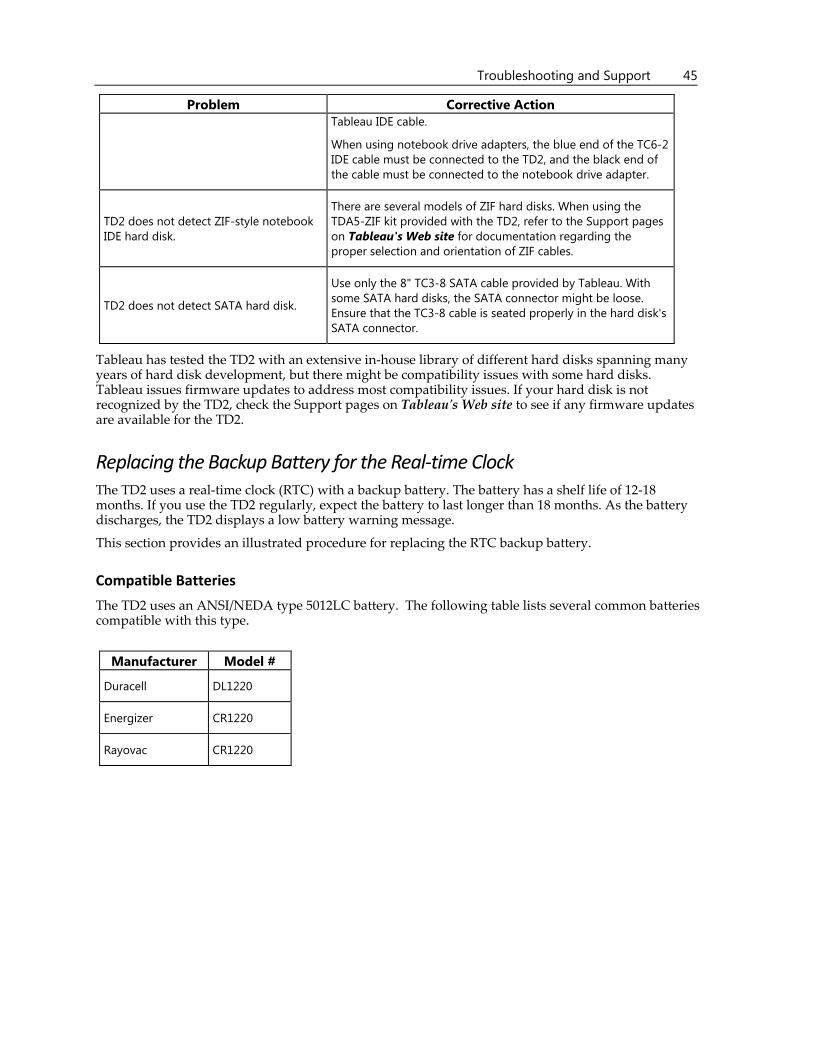
Troubleshooting and Support 45
Problem Corrective Action Tableau IDE cable.
When using notebook drive adapters, the blue end of the TC6-2 IDE cable must be connected to the TD2, and the black end of the cable must be connected to the notebook drive adapter.
TD2 does not detect ZIF-style notebook IDE hard disk.
There are several models of ZIF hard disks. When using the TDA5-ZIF kit provided with the TD2, refer to the Support pages on Tableau's Web site for documentation regarding the proper selection and orientation of ZIF cables.
TD2 does not detect SATA hard disk.
Use only the 8" TC3-8 SATA cable provided by Tableau. With some SATA hard disks, the SATA connector might be loose. Ensure that the TC3-8 cable is seated properly in the hard disk's SATA connector.
Tableau has tested the TD2 with an extensive in‐house library of different hard disks spanning many years of hard disk development, but there might be compatibility issues with some hard disks. Tableau issues firmware updates to address most compatibility issues. If your hard disk is not recognized by the TD2, check the Support pages on Tableauʹs Web site to see if any firmware updates are available for the TD2.
Replacing the Backup Battery for the Real‐time Clock The TD2 uses a real‐time clock (RTC) with a backup battery. The battery has a shelf life of 12‐18 months. If you use the TD2 regularly, expect the battery to last longer than 18 months. As the battery discharges, the TD2 displays a low battery warning message.
This section provides an illustrated procedure for replacing the RTC backup battery.
Compatible Batteries
The TD2 uses an ANSI/NEDA type 5012LC battery. The following table lists several common batteries compatible with this type.
Manufacturer Model #
Duracell DL1220
Energizer CR1220
Rayovac CR1220
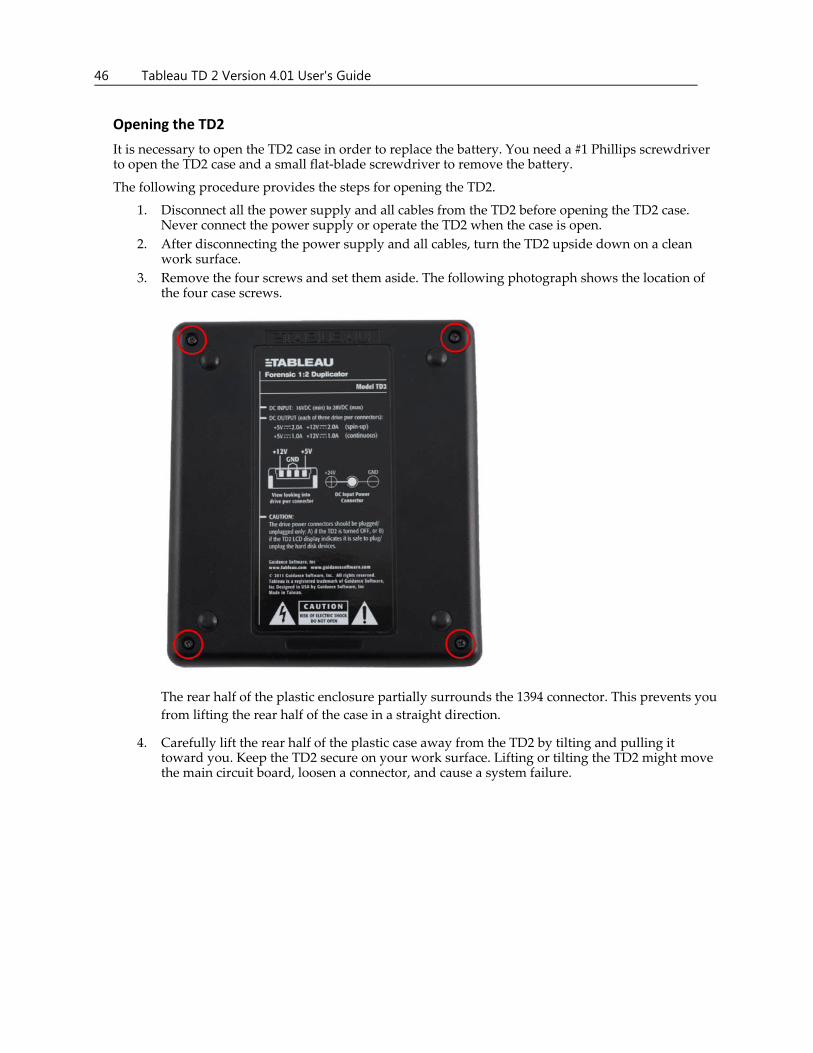
46 Tableau TD 2 Version 4.01 User's Guide
Opening the TD2
It is necessary to open the TD2 case in order to replace the battery. You need a #1 Phillips screwdriver to open the TD2 case and a small flat‐blade screwdriver to remove the battery.
The following procedure provides the steps for opening the TD2.
1. Disconnect all the power supply and all cables from the TD2 before opening the TD2 case. Never connect the power supply or operate the TD2 when the case is open.
2. After disconnecting the power supply and all cables, turn the TD2 upside down on a clean work surface.
3. Remove the four screws and set them aside. The following photograph shows the location of the four case screws.
The rear half of the plastic enclosure partially surrounds the 1394 connector. This prevents you
from lifting the rear half of the case in a straight direction.
4. Carefully lift the rear half of the plastic case away from the TD2 by tilting and pulling it toward you. Keep the TD2 secure on your work surface. Lifting or tilting the TD2 might move the main circuit board, loosen a connector, and cause a system failure.
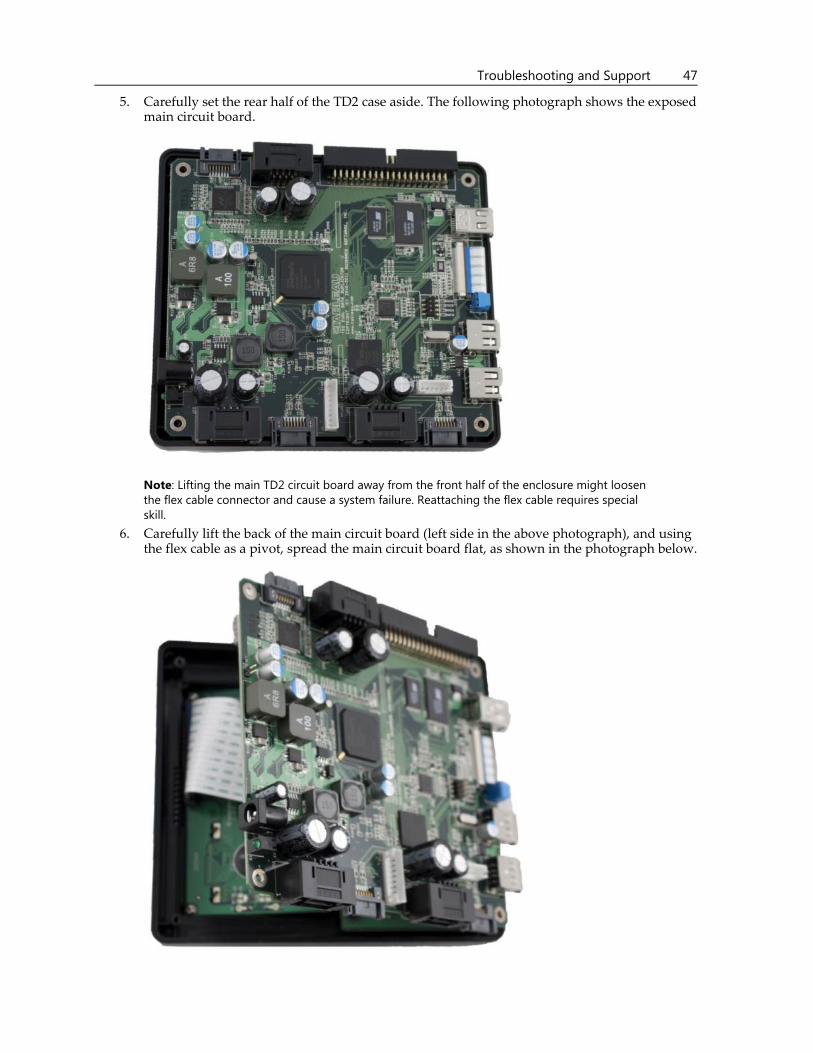
Troubleshooting and Support 47
5. Carefully set the rear half of the TD2 case aside. The following photograph shows the exposed main circuit board.
Note: Lifting the main TD2 circuit board away from the front half of the enclosure might loosen the flex cable connector and cause a system failure. Reattaching the flex cable requires special skill.
6. Carefully lift the back of the main circuit board (left side in the above photograph), and using the flex cable as a pivot, spread the main circuit board flat, as shown in the photograph below.
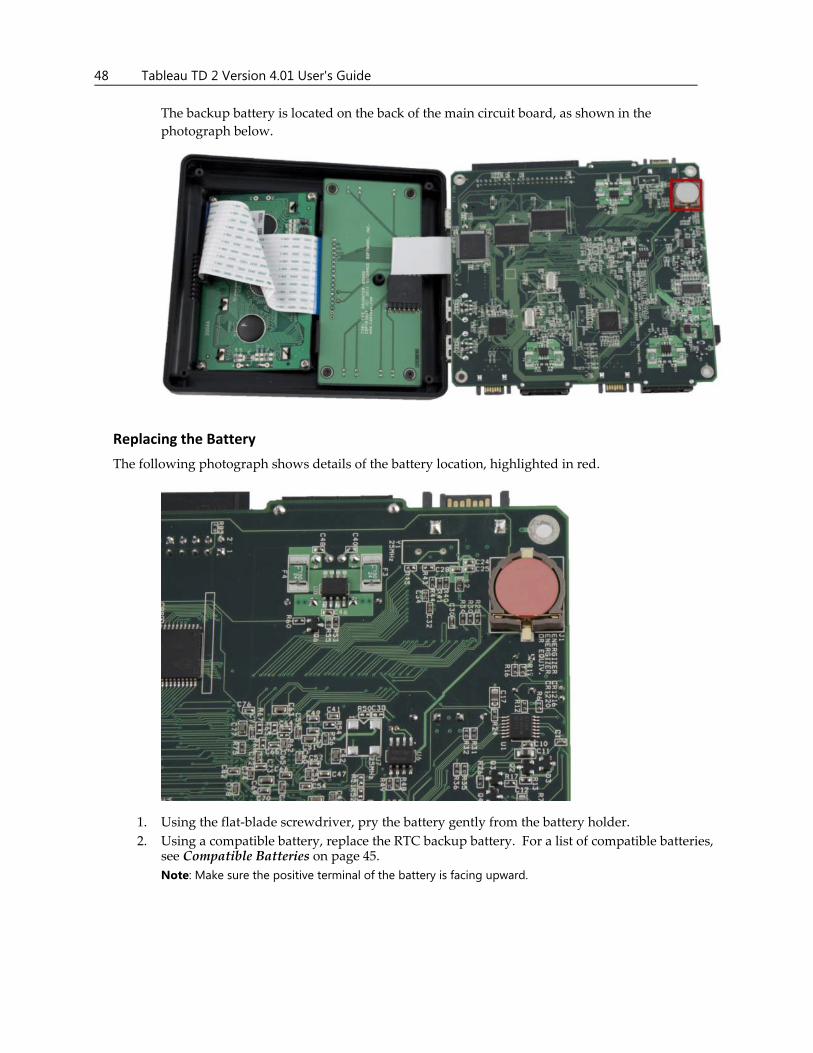
48 Tableau TD 2 Version 4.01 User's Guide
The backup battery is located on the back of the main circuit board, as shown in the
photograph below.
Replacing the Battery
The following photograph shows details of the battery location, highlighted in red.
1. Using the flat‐blade screwdriver, pry the battery gently from the battery holder.
2. Using a compatible battery, replace the RTC backup battery. For a list of compatible batteries, see Compatible Batteries on page 45.
Note: Make sure the positive terminal of the battery is facing upward.
Troubleshooting and Support 49
Closing the TD2
Because of the shape of the 1394 connector, replacing the rear half of the TD2ʹs case requires some care.
To replace the TD2ʹs case:
1. Tilt the bottom edge of the rear case into position.
2. Tip the case downward while simultaneously aligning the USB and 1394 connectors at the bottom of the case.
3. Ensure that the case and main circuit board are aligned and replace the four case screws. The four screws that hold the TD2 case together also secure the main circuit board.
4. After replacing the four case screws, inspect the TD2 and determine whether the case is tightly secured.
Testing the New Battery
After you have securely fastened the TD2ʹs case, return it to its normal upright position and attach just the TP4 power supply. Turn the TD2 On and observe the startup sequence. You should not see a battery warning dialog, but you will probably see a date/time warning to reset the RTC.
To reset the date/time, from the TD2 Main menu, select Setup > Date and Time. For detailed information about setting the date and time, see Date and Time (Menu 9.1.3).
After resetting the date/time, turn the TD2 Off, wait two minutes, and turn the TD2 ON. The date/time, located in the upper‐left corner of the Main menu should be correct.
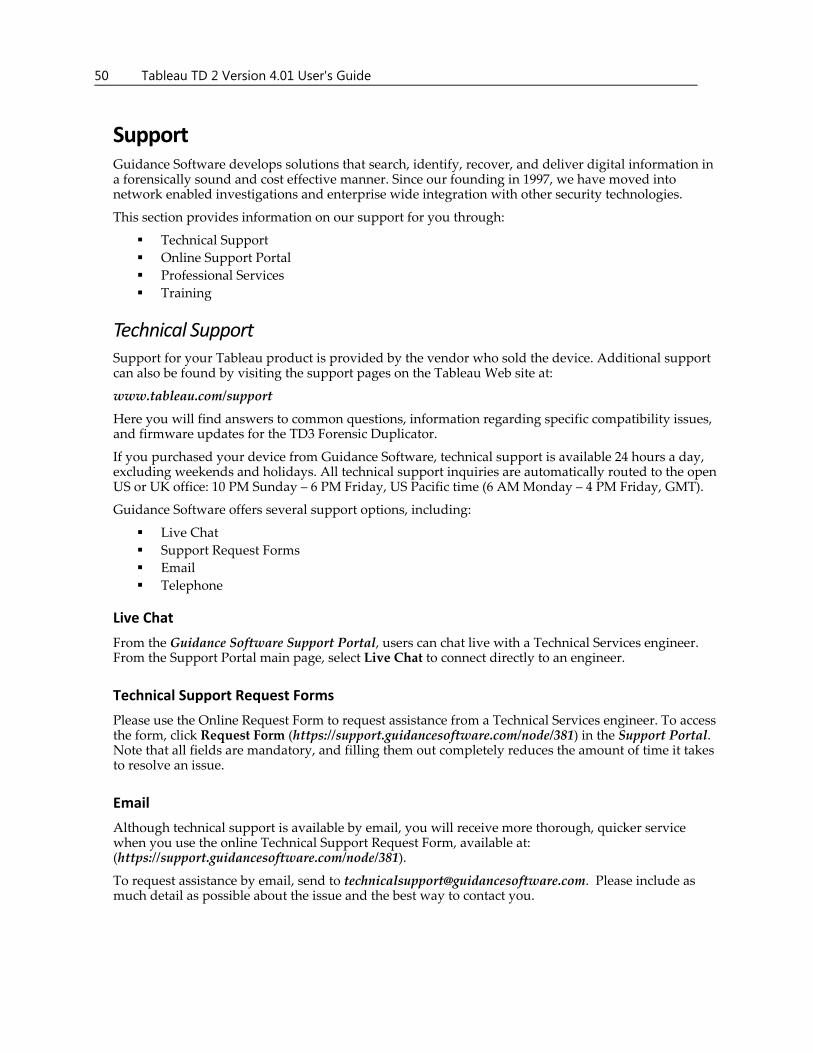
50 Tableau TD 2 Version 4.01 User's Guide
Support Guidance Software develops solutions that search, identify, recover, and deliver digital information in a forensically sound and cost effective manner. Since our founding in 1997, we have moved into network enabled investigations and enterprise wide integration with other security technologies.
This section provides information on our support for you through:
Technical Support
Online Support Portal
Professional Services
Training
Technical Support Support for your Tableau product is provided by the vendor who sold the device. Additional support can also be found by visiting the support pages on the Tableau Web site at:
www.tableau.com/support
Here you will find answers to common questions, information regarding specific compatibility issues, and firmware updates for the TD3 Forensic Duplicator.
If you purchased your device from Guidance Software, technical support is available 24 hours a day, excluding weekends and holidays. All technical support inquiries are automatically routed to the open US or UK office: 10 PM Sunday – 6 PM Friday, US Pacific time (6 AM Monday – 4 PM Friday, GMT).
Guidance Software offers several support options, including:
Live Chat
Support Request Forms
Telephone
Live Chat
From the Guidance Software Support Portal, users can chat live with a Technical Services engineer. From the Support Portal main page, select Live Chat to connect directly to an engineer.
Technical Support Request Forms
Please use the Online Request Form to request assistance from a Technical Services engineer. To access the form, click Request Form (https://support.guidancesoftware.com/node/381) in the Support Portal. Note that all fields are mandatory, and filling them out completely reduces the amount of time it takes to resolve an issue.
Although technical support is available by email, you will receive more thorough, quicker service when you use the online Technical Support Request Form, available at: (https://support.guidancesoftware.com/node/381).
To request assistance by email, send to [email protected]. Please include as much detail as possible about the issue and the best way to contact you.
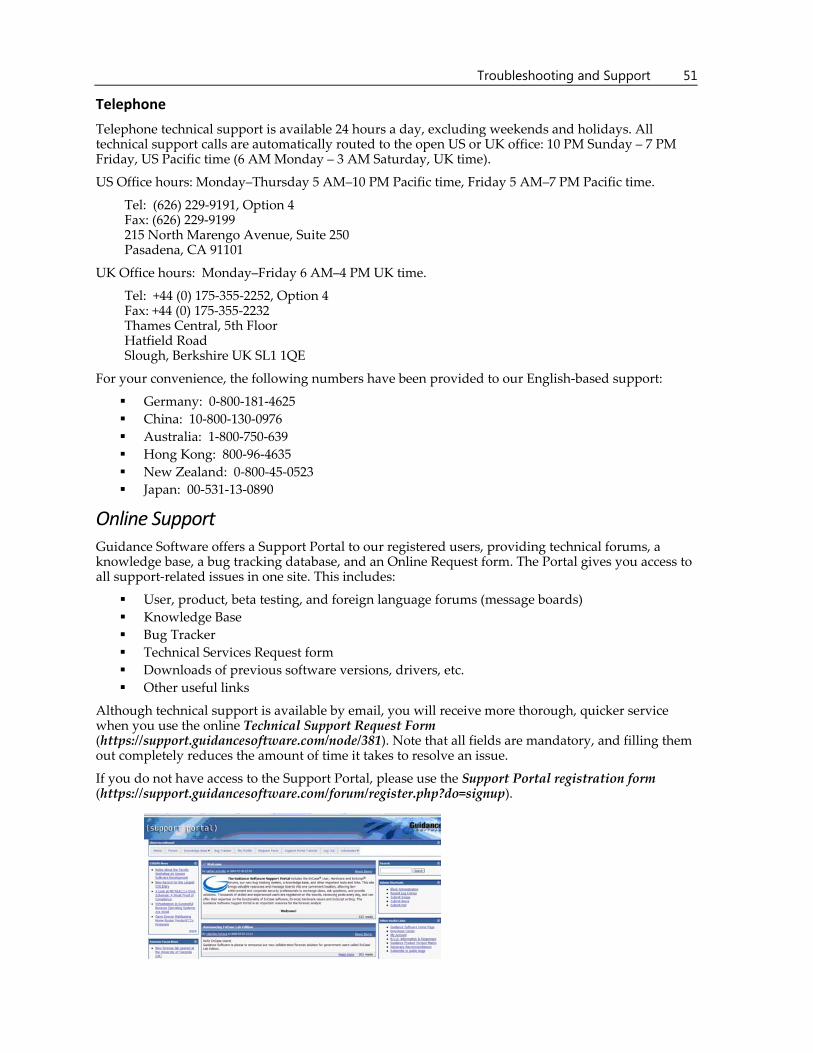
Troubleshooting and Support 51
Telephone
Telephone technical support is available 24 hours a day, excluding weekends and holidays. All technical support calls are automatically routed to the open US or UK office: 10 PM Sunday – 7 PM Friday, US Pacific time (6 AM Monday – 3 AM Saturday, UK time).
US Office hours: Monday–Thursday 5 AM–10 PM Pacific time, Friday 5 AM–7 PM Pacific time.
Tel: (626) 229‐9191, Option 4 Fax: (626) 229‐9199 215 North Marengo Avenue, Suite 250 Pasadena, CA 91101
UK Office hours: Monday–Friday 6 AM–4 PM UK time.
Tel: +44 (0) 175‐355‐2252, Option 4 Fax: +44 (0) 175‐355‐2232 Thames Central, 5th Floor Hatfield Road Slough, Berkshire UK SL1 1QE
For your convenience, the following numbers have been provided to our English‐based support:
Germany: 0‐800‐181‐4625
China: 10‐800‐130‐0976
Australia: 1‐800‐750‐639
Hong Kong: 800‐96‐4635
New Zealand: 0‐800‐45‐0523
Japan: 00‐531‐13‐0890
Online Support Guidance Software offers a Support Portal to our registered users, providing technical forums, a knowledge base, a bug tracking database, and an Online Request form. The Portal gives you access to all support‐related issues in one site. This includes:
User, product, beta testing, and foreign language forums (message boards)
Knowledge Base
Bug Tracker
Technical Services Request form
Downloads of previous software versions, drivers, etc.
Other useful links
Although technical support is available by email, you will receive more thorough, quicker service when you use the online Technical Support Request Form (https://support.guidancesoftware.com/node/381). Note that all fields are mandatory, and filling them out completely reduces the amount of time it takes to resolve an issue.
If you do not have access to the Support Portal, please use the Support Portal registration form (https://support.guidancesoftware.com/forum/register.php?do=signup).

52 Tableau TD 2 Version 4.01 User's Guide
Registration
Registration requires you to choose a unique username and password. Please provide all requested information, including dongle ID, phone, email address, organization, etc. This helps us identify you as a registered owner of EnCase.
You will receive an email reply within 24 hours. You must follow the link in that email before you can post on the forums. Once you have verified your email address, you will be added to the Registration List. Please allow 24 business hours for your account to be approved.
Once your registration is approved, you can access the Support Portal (https://support.guidancesoftware.com/). The Support Portal provides an overview tutorial of the site.
User, Product, and Foreign Language Forums
To access the forums, click the Forum Tab (https://support.guidancesoftware.com/forum/) in the Support Portal.
The forums allow registered users to post questions, exchange information, and hold discussions with Guidance Software and other users in the EnCase community. Several discussion groups are available, including:
Foreign Language Groups
French
Arabic
German
Spanish
Japanese
Chinese
Korean
Forum Groups
User Group
Consultant and Practitioner
Computer Forensic Hardware Issues
EnScript Forum
Product Specific Groups
EnCase Neutrino
Enterprise
Field Intelligence Model (FIM)
eDiscovery
These groups are available only to customers who have purchased the respective products.
Enter a group by clicking the group name.
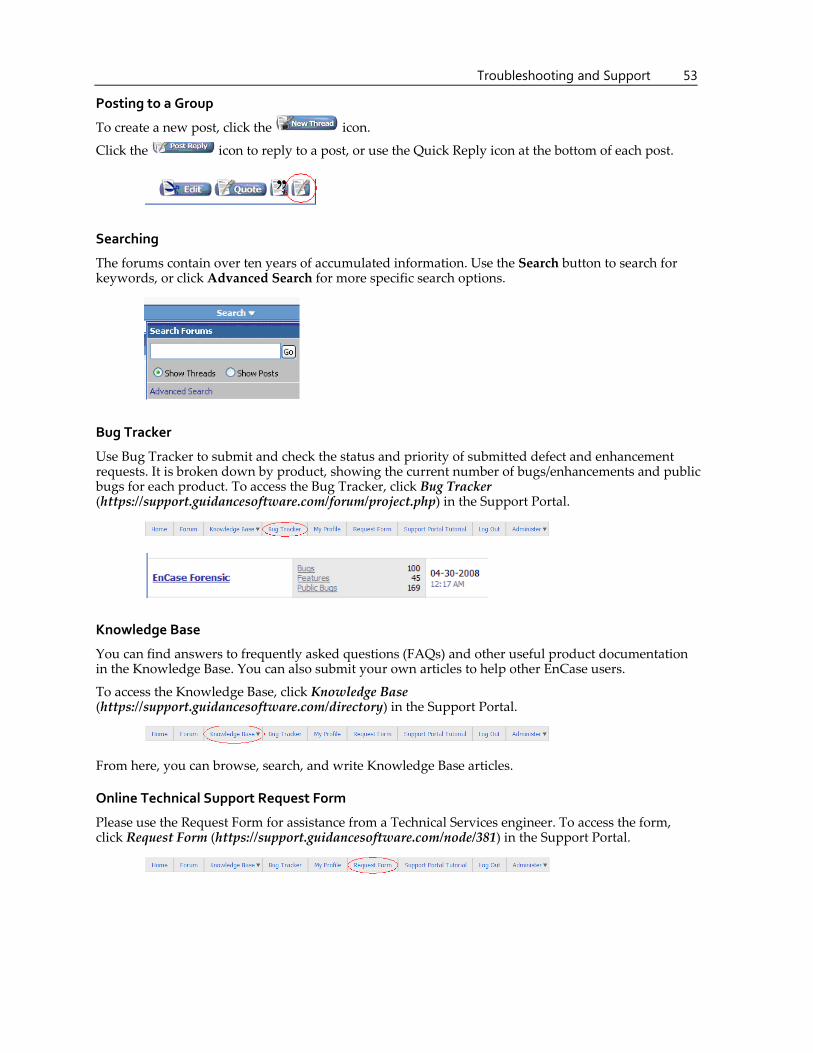
Troubleshooting and Support 53
Posting to a Group
To create a new post, click the icon.
Click the icon to reply to a post, or use the Quick Reply icon at the bottom of each post.
Searching
The forums contain over ten years of accumulated information. Use the Search button to search for keywords, or click Advanced Search for more specific search options.
Bug Tracker
Use Bug Tracker to submit and check the status and priority of submitted defect and enhancement requests. It is broken down by product, showing the current number of bugs/enhancements and public bugs for each product. To access the Bug Tracker, click Bug Tracker (https://support.guidancesoftware.com/forum/project.php) in the Support Portal.
Knowledge Base
You can find answers to frequently asked questions (FAQs) and other useful product documentation in the Knowledge Base. You can also submit your own articles to help other EnCase users.
To access the Knowledge Base, click Knowledge Base (https://support.guidancesoftware.com/directory) in the Support Portal.
From here, you can browse, search, and write Knowledge Base articles.
Online Technical Support Request Form
Please use the Request Form for assistance from a Technical Services engineer. To access the form, click Request Form (https://support.guidancesoftware.com/node/381) in the Support Portal.
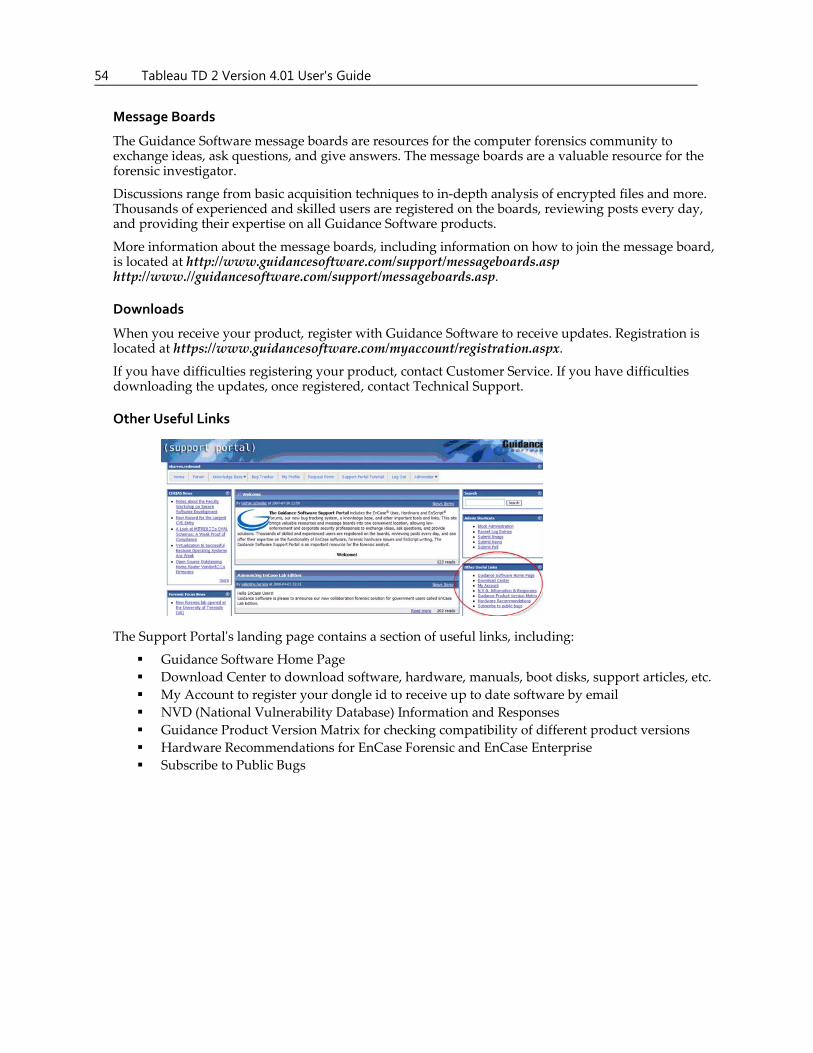
54 Tableau TD 2 Version 4.01 User's Guide
Message Boards
The Guidance Software message boards are resources for the computer forensics community to exchange ideas, ask questions, and give answers. The message boards are a valuable resource for the forensic investigator.
Discussions range from basic acquisition techniques to in‐depth analysis of encrypted files and more. Thousands of experienced and skilled users are registered on the boards, reviewing posts every day, and providing their expertise on all Guidance Software products.
More information about the message boards, including information on how to join the message board, is located at http://www.guidancesoftware.com/support/messageboards.asp http://www.//guidancesoftware.com/support/messageboards.asp.
Downloads
When you receive your product, register with Guidance Software to receive updates. Registration is located at https://www.guidancesoftware.com/myaccount/registration.aspx.
If you have difficulties registering your product, contact Customer Service. If you have difficulties downloading the updates, once registered, contact Technical Support.
Other Useful Links
The Support Portalʹs landing page contains a section of useful links, including:
Guidance Software Home Page
Download Center to download software, hardware, manuals, boot disks, support articles, etc.
My Account to register your dongle id to receive up to date software by email
NVD (National Vulnerability Database) Information and Responses
Guidance Product Version Matrix for checking compatibility of different product versions
Hardware Recommendations for EnCase Forensic and EnCase Enterprise
Subscribe to Public Bugs
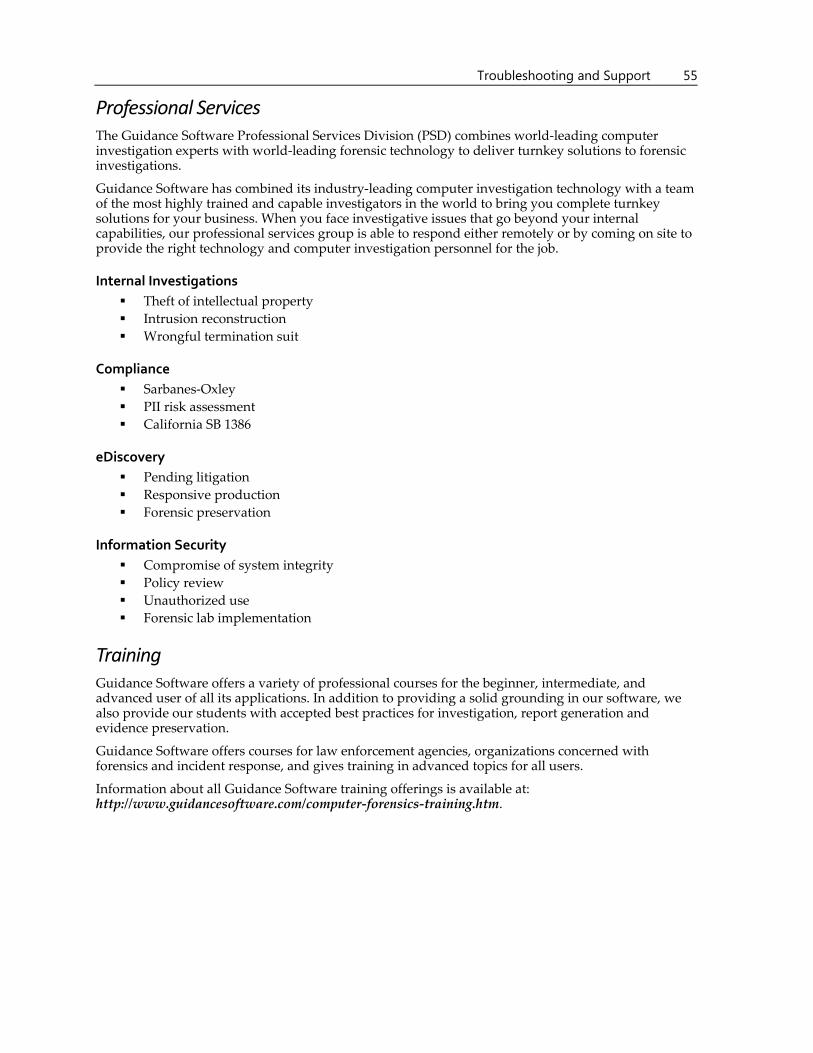
Troubleshooting and Support 55
Professional Services The Guidance Software Professional Services Division (PSD) combines world‐leading computer investigation experts with world‐leading forensic technology to deliver turnkey solutions to forensic investigations.
Guidance Software has combined its industry‐leading computer investigation technology with a team of the most highly trained and capable investigators in the world to bring you complete turnkey solutions for your business. When you face investigative issues that go beyond your internal capabilities, our professional services group is able to respond either remotely or by coming on site to provide the right technology and computer investigation personnel for the job.
Internal Investigations
Theft of intellectual property
Intrusion reconstruction
Wrongful termination suit
Compliance
Sarbanes‐Oxley
PII risk assessment
California SB 1386
eDiscovery
Pending litigation
Responsive production
Forensic preservation
Information Security
Compromise of system integrity
Policy review
Unauthorized use
Forensic lab implementation
Training Guidance Software offers a variety of professional courses for the beginner, intermediate, and advanced user of all its applications. In addition to providing a solid grounding in our software, we also provide our students with accepted best practices for investigation, report generation and evidence preservation.
Guidance Software offers courses for law enforcement agencies, organizations concerned with forensics and incident response, and gives training in advanced topics for all users.
Information about all Guidance Software training offerings is available at: http://www.guidancesoftware.com/computer‐forensics‐training.htm.

Index A
About this Guide • 4 Advanced Format Support • 31
B
Blank Check (Menu 5) • 33
C
Closing the TD2 • 49 Compatible Batteries • 45 Configuring the TD2 • 11 Connecting Hard Disks • 16 Connecting Notebook Hard Disks • 17 Conventions Used in this Guide • 4
D
Dest Free Space (Menu 7.3) • 35 Disk Capacity and Transfer Rate Measurement Conventions • 4
Disk Information (Menu 6) • 33 Disk Utilities (Menu 7) • 34 Disk‐to‐Disk/Cloning (Menu 1.1) • 22 Disk‐to‐File/Imaging (Menu 1.2) • 24 Drive Detection • 17 Duplicate Disk (Menu 1) • 22
E
Email • 50 Erase Logs (Menu 8.4) • 39 Error Recovery Modes • 15
F
Factory Reset (Menu 9.4) • 15 Files Created During Disk‐to‐File Duplication • 26 Format Dest (Menu 2.1) • 30 Format Disk (Menu 2) • 30 Format USB (Menu 2.2) • 31
H
Hash Utilities (Menu 4) • 32
I
Imaging Options (Menu 9.2) • 13 Initialization • 10
L
Large Disk Support • 31 LCD Contrast • 6 Live Chat • 50 Logs (Menu 8) • 36
M
Multi Pass Write (Menu 3.2) • 32
N
Navigating the TD2 • 5
O
One Pass Write (Menu 3.1) • 32 Online Support • 51 Opening the TD2 • 46 Overview • 1, 20
P
Power Supply Issues • 44 Preconditions Checking • 28 Preface • 3 Print All Logs (Menu 8.3) • 39 Problems with Disk Detection • 44 Professional Services • 55
R
Reading the LEDs • 6 Removal of DCO and HPA Regions • 34 Remove DCO & HPA (Menu 7.1) • 35 Remove HPA (Menu 7.2) • 35 Replacing the Backup Battery for the Real‐time Clock • 45
Replacing the Battery • 48 Resetting and Clearing Internally Stored Information • 40
S
Sample TD2 Log • 37 Save All Logs (Menu 8.2) • 39 Setting up the TD2 • 9 Setup (Menu 9) • 11 Startup Sequence • 10 Status Information • 35 Support • 50 Swapping Destination Hard Disks during Disk‐to‐File Duplication • 27
System Options (Menu 9.1) • 11
T
Tableau TD2 • 2 TD2 Info (Menu 9.3) • 15 TD2 Kit Contents • 3 TD2 Menus and Options • 20 Technical Support • 50 Technical Support Request Forms • 50 Telephone • 51 Testing the New Battery • 49 Training • 55 Troubleshooting and Support • 43 Troubleshooting Common Problems • 44
U
USB Keyboard Support • 6 User‐Selected Startup Mode • 11 Using the TD2 • 19
V
View Logs (Menu 8.1) • 36
W
Wipe Disk (Menu 3) • 32 Writing Logs to a USB Storage Device • 39