teachers guide - elearning- rwanda polytechnic
TRANSCRIPT

IPRCs Version 1.0.0
Teachers Guide

Skills for better destiny
i
Table of contents
List of figures ......................................................................................................................... ii
1. Get Started ..................................................................................................................... 1
2. Course Set up .................................................................................................................. 2
2.1. Add a New Course ................................................................................................... 3
2.1.1. New course settings ............................................................................................................................ 3 2.1.2. Course General Information ................................................................................................................ 7
3. Course Enrollment (Participant enrollment) ..................................................................... 9
4. Grading ........................................................................................................................ 13
5. Add activities & resources ............................................................................................. 16
5.1. Learning unit setting .............................................................................................. 16
5.2. Adding new Activity ............................................................................................... 18
5.2.1. Adding File contents. ......................................................................................................................... 19 5.2.2. Adding an Assignment ....................................................................................................................... 20 5.2.3. Adding URL resource ......................................................................................................................... 23 5.2.4. Adding H5P content........................................................................................................................... 24 5.2.5. Create a forum activity ...................................................................................................................... 32 5.2.6. Adding a Quiz..................................................................................................................................... 34

Skills for better destiny
ii
List of figures Figure 1 ........................................................................................................................................... 1
Figure 2 ........................................................................................................................................... 2
Figure 3 ........................................................................................................................................... 2
Figure 4 ........................................................................................................................................... 3
Figure 5 ........................................................................................................................................... 3
Figure 6 ........................................................................................................................................... 4
Figure 7 ........................................................................................................................................... 5
Figure 8 ........................................................................................................................................... 5
Figure 9 ........................................................................................................................................... 6
Figure 10 ......................................................................................................................................... 7
Figure 11 ......................................................................................................................................... 7
Figure 12 ......................................................................................................................................... 8
Figure 13 ......................................................................................................................................... 8
Figure 14 ......................................................................................................................................... 9
Figure 15 ......................................................................................................................................... 9
Figure 16 ....................................................................................................................................... 10
Figure 17 ....................................................................................................................................... 11
Figure 18 ....................................................................................................................................... 11
Figure 19 ....................................................................................................................................... 12
Figure 20 ....................................................................................................................................... 12
Figure 21 ....................................................................................................................................... 13
Figure 22 ....................................................................................................................................... 14
Figure 23 ....................................................................................................................................... 14
Figure 24 ....................................................................................................................................... 15
Figure 25 ....................................................................................................................................... 15
Figure 26 ....................................................................................................................................... 16
Figure 27 ....................................................................................................................................... 17
Figure 28 ....................................................................................................................................... 17
Figure 29 ....................................................................................................................................... 18
Figure 30 ....................................................................................................................................... 18
Figure 31 ....................................................................................................................................... 19
Figure 32 ....................................................................................................................................... 19
Figure 33 ....................................................................................................................................... 20
Figure 34 ....................................................................................................................................... 20
Figure 35 ....................................................................................................................................... 21
Figure 36 ....................................................................................................................................... 21

Skills for better destiny
iii
Figure 37 ....................................................................................................................................... 22
Figure 38 ....................................................................................................................................... 22
Figure 39 ....................................................................................................................................... 23
Figure 40 ....................................................................................................................................... 23
Figure 41 ....................................................................................................................................... 24
Figure 42 ....................................................................................................................................... 24
Figure 43 ....................................................................................................................................... 25
Figure 44 ....................................................................................................................................... 25
Figure 45 ....................................................................................................................................... 26
Figure 46 ....................................................................................................................................... 26
Figure 47 ....................................................................................................................................... 27
Figure 48 ....................................................................................................................................... 27
Figure 49 ....................................................................................................................................... 28
Figure 50 ....................................................................................................................................... 28
Figure 51 ....................................................................................................................................... 29
Figure 52 ....................................................................................................................................... 29
Figure 53 ....................................................................................................................................... 30
Figure 54 ....................................................................................................................................... 30
Figure 55 ....................................................................................................................................... 31
Figure 56 ....................................................................................................................................... 31
Figure 57 ....................................................................................................................................... 32
Figure 58 ....................................................................................................................................... 32
Figure 59 ....................................................................................................................................... 33
Figure 60 ....................................................................................................................................... 33
Figure 61 ....................................................................................................................................... 34
Figure 62 ....................................................................................................................................... 34
Figure 63 ....................................................................................................................................... 35
Figure 64 ....................................................................................................................................... 35
Figure 65 ....................................................................................................................................... 36
Figure 66 ....................................................................................................................................... 36
Figure 67 ....................................................................................................................................... 37
Figure 68 ....................................................................................................................................... 37
Figure 69 ....................................................................................................................................... 38
Figure 70 ....................................................................................................................................... 38
Figure 71 ....................................................................................................................................... 39
Figure 72 ....................................................................................................................................... 39
Figure 73 ....................................................................................................................................... 40

Skills for better destiny
1
1. Get Started ✓ Open the browser and navigate to https://elearning.rp.ac.rw [1]
✓ Click (login) link [2] to sign in. see Figure 1
Figure 1
✓ Enter your username and password [3]. See figure 2

Skills for better destiny
2
Figure 2
2. Course Set up To set a course, follow the steps below
✓ Go to site administration [4] to be able to set up a course. See Figure 3
Figure 3

Skills for better destiny
3
✓ Go to manage courses and categories [5] as indicated see figure 4
Figure 4
✓ Go to CREATE NEW COURSE [6]. see figure 5
Figure 5
2.1. Add a New Course
2.1.1. New course settings
To add a new course, fill the fields as required:

Skills for better destiny
4
✓ Click on the question mark icon [7] for the description of each field.
✓ Enter the course full name and the short name. See figure 6
Figure 6
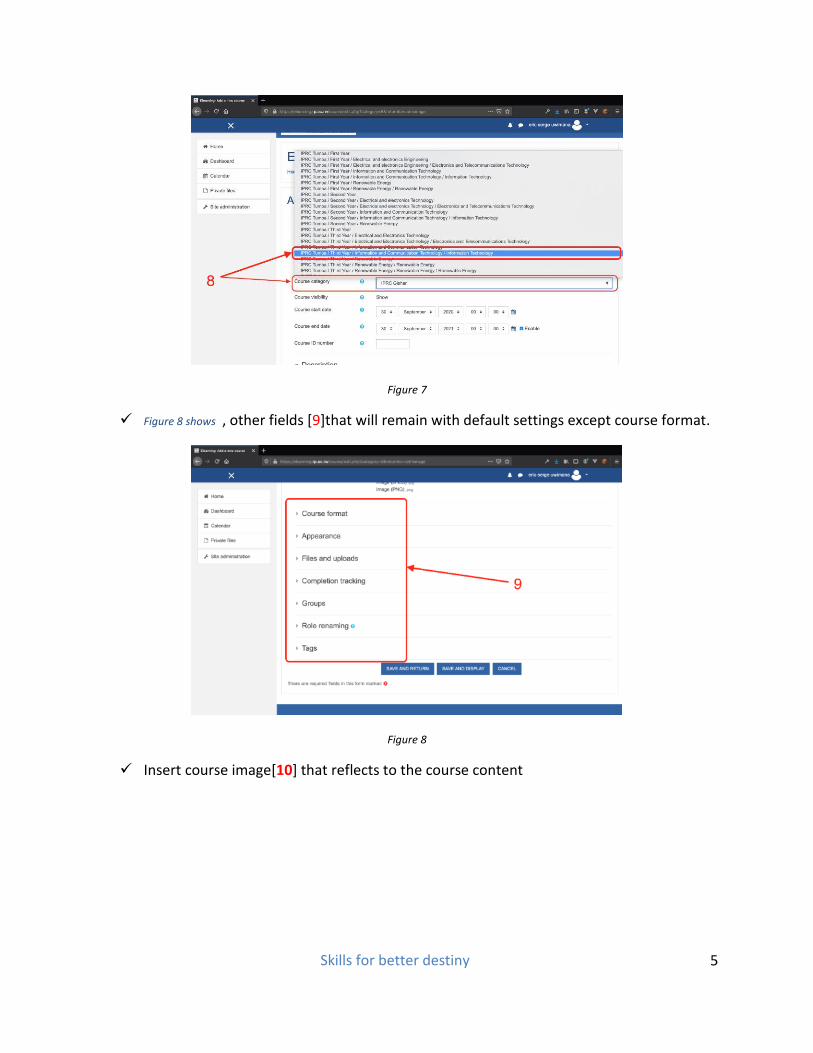
✓ Click on course category drop down menu and choose the right category [8] where the
course should belong (Eg: College/Year/Department/Program). See figure 7
✓ Set the course start date and course end date of your preferences (You have to Enable
the checkbox to be able to edit the course end date). See Figure 7
N.B: If you do not change course start date and end date, the default settings will be
applied.
✓ Ignore Course ID number and description (Course summary and course image) and go to
next fields.
Skills for better destiny
5
Figure 7
✓ Figure 8 shows , other fields [9]that will remain with default settings except course format.
Figure 8
✓ Insert course image[10] that reflects to the course content

Skills for better destiny
6
✓ In course format, Choose layout (Card Layout is recommended) [11], also upload a
course image (same image in [10]), [12]. Leave other details of course formats with the
default settings. See Figure 9
Figure 9
✓ Skip other fields (default settings will be applied) and go to save and display [13]. See
figure 10

Skills for better destiny
7
Figure 10
✓ Course layout (view) figure 11
Figure 11
2.1.2. Course General Information
✓ To add general information about the course/module, click the gear setting icon and
turn editing on [14]as indicated by figure 12

Skills for better destiny
8
Figure 12
✓ Click the gear icon [15] to add general information about the course. see figure 13
Figure 13
✓ Fill the information about the course; Section name [16] the summary of the course [17]
should contain at least The learning objectives, learning outcomes and facilitator’s
contacts, go to SAVE CHANGES [18]. See figure 14

Skills for better destiny
9
Figure 14
3. Course Enrollment (Participant enrollment) Before students access a course, they must be first enrolled by the teacher. To enroll students
or other participants go to Participants link [19]. See figure 15
Figure 15

Skills for better destiny
10
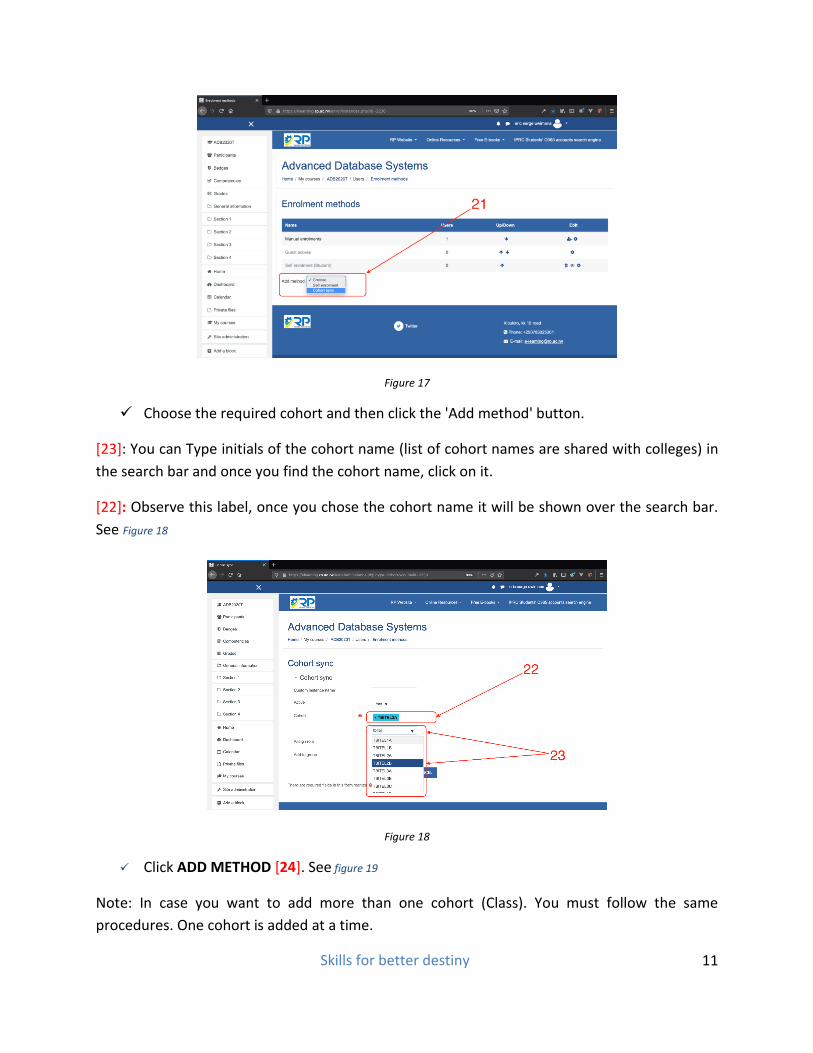
There are different enrolment methods available to a teacher, they include manual enrollment,
cohort sync method, self-enrollment method, etc. in this guide, this guide focuses on cohort
sync and manual enrollment as commonly used.
✓ To enroll participants using any method, click on the gear setting icon [20] then click on
enrollment methods as indicated. See figure 16
Figure 16
✓ Cohort sync method
Cohort sync is for automatically enrolling members of a cohort in a course. If a user is added or
removed from the cohort, he/she is automatically enrolled or unenrolled respectively. In other
words, cohort sync synchronizes cohort membership with course enrolment.
To enroll a cohort in a course:
✓ Go to add method and select 'Cohort sync' in the dropdown menu [21]. See figure 17
Skills for better destiny
11
Figure 17
✓ Choose the required cohort and then click the 'Add method' button.
[23]: You can Type initials of the cohort name (list of cohort names are shared with colleges) in
the search bar and once you find the cohort name, click on it.
[22]: Observe this label, once you chose the cohort name it will be shown over the search bar.
See Figure 18
Figure 18
✓ Click ADD METHOD [24]. See figure 19
Note: In case you want to add more than one cohort (Class). You must follow the same
procedures. One cohort is added at a time.

Skills for better destiny
12
Figure 19
✓ Manual enrollment
The manual enrollment allows participants to be added manually.
To manually enroll a participant, click to person icon [25] on manual enrollment method row.
See figure 20
Figure 20
Skills for better destiny
13
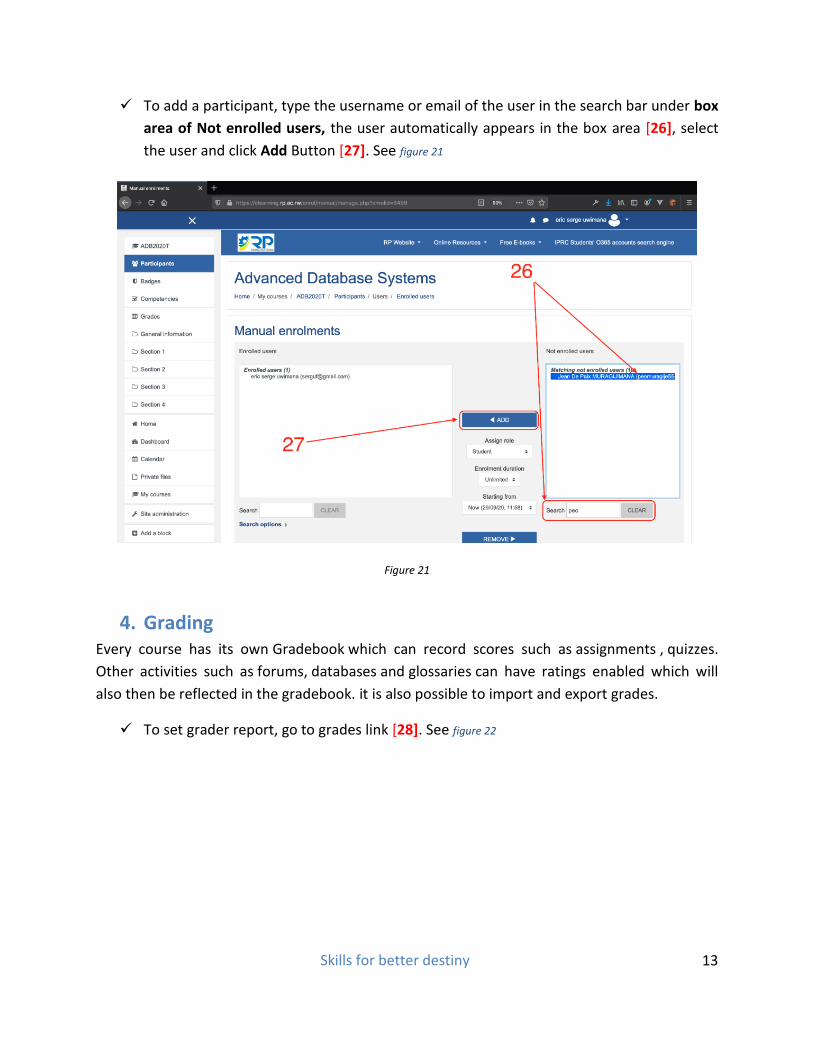
✓ To add a participant, type the username or email of the user in the search bar under box
area of Not enrolled users, the user automatically appears in the box area [26], select
the user and click Add Button [27]. See figure 21
Figure 21
4. Grading Every course has its own Gradebook which can record scores such as assignments , quizzes.
Other activities such as forums, databases and glossaries can have ratings enabled which will
also then be reflected in the gradebook. it is also possible to import and export grades.
✓ To set grader report, go to grades link [28]. See figure 22

Skills for better destiny
14
Figure 22
✓ Go to set up [29]. See figure 23
Figure 23
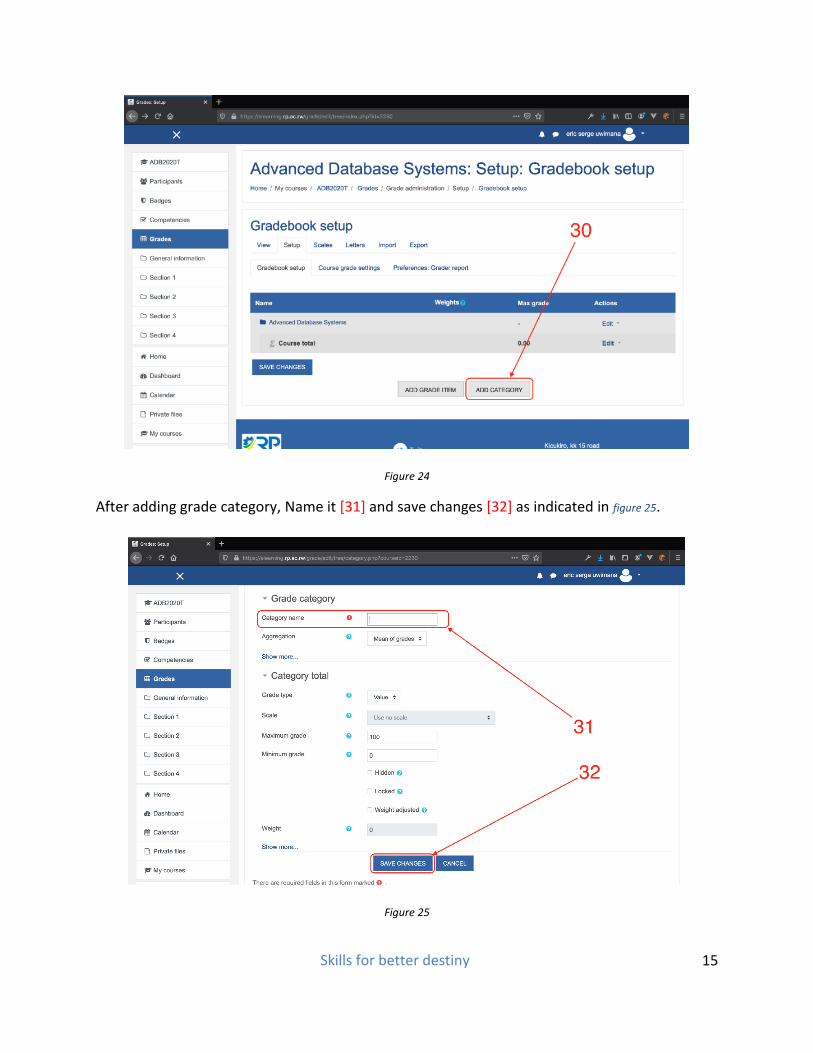
✓ Click add category button [30]. See figure 24
Skills for better destiny
15
Figure 24
After adding grade category, Name it [31] and save changes [32] as indicated in figure 25.
Figure 25

Skills for better destiny
16
✓ Set the weights of each grade category created in the previous step.
I. Enter a weight value for the category. Make sure the box is checked.
II. Repeat the remaining categories that need to be weighted.
▪ To manually weight all the categories in the gradebook, confirm that the
sum of all category weights equals100%.
▪ If you are leaving some categories alone, the system will calculate and
adjust the appropriate weightings to total 100% for the course.
✓ Scroll down and click Save Changes. See figure 26
Figure 26
5. Add activities & resources
5.1. Learning unit setting
To add an activity to a course, make sure editing is turned on.
✓ Click the gear icon [35]. See figure 27

Skills for better destiny
17
Figure 27
Section name should be renamed into Learning unit. To do so, enable the Custom checkbox.
✓ Enter the summary of the learning unit such as brief description, and outcomes of the
learning unit then save changes [36].
Figure 28

Skills for better destiny
18
5.2. Adding new Activity
✓ Click to the learning unit name [37]. See figure 29.
Figure 29
✓ Click add an activity or resource see [38]. See figure 30.
Figure 30
✓ Then follow the next steps, choose an activity and add button.

Skills for better destiny
19
5.2.1. Adding File contents.
File activity enables the teacher to upload file contents that can be accessed by students. To
add it, do the following steps.
✓ Select File and click the Add button [39]. See figure 31.
Figure 31
✓ Fill in the name of the activity (E.g. Lecture 1) [40]
✓ Fill in the content description [40]
✓ Make sure the display description on course page is enabled [40] by ticking the
checkbox as indicated in figure 32.
✓ Select the file for that activity [40]. Leave other fields with the default settings and go to
save and display.
Figure 32

Skills for better destiny
20
5.2.2. Adding an Assignment
Assignment helps teachers to assess students and provides grade. To add it, do the following
steps.
✓ Select File and click the Add button [41]. See figure 33.
Figure 33
Follow steps below, explained in figure 34 to set up an assignment.
✓ Fill in name and description [42].
✓ Make sure the display description on course page is enabled [42] by ticking the
checkbox as indicated in figure 34.
Figure 34

Skills for better destiny
21
✓ Go to Availability and set allow submissions from, due date [43] and cutoff date. For
more information click question mark (sky blue color) icon available for most of the
items. See figure 35.
Figure 35
✓ Leave other fields with default settings except grade. See figure 36.
Figure 36
✓ Expand grade option and choose the grade type (e.g. Point), maximum grade [45], grade
category (refer to section 4) [46]. See figure 37.

Skills for better destiny
22
Figure 37
✓ Leave other fields and scroll down and click save and display (47). See figure 38.
Figure 38

Skills for better destiny
23
5.2.3. Adding URL resource
URL activity allows the teacher to set a web course content. URL resources include but not
limited to prerecorded videos (see also H5P resource in 5.2.4), links to course webinars, and
pertinent tutorials if applicable. To add it, do the following steps.
✓ Select URL in resources and click add button [48]. See figure 39.
Figure 39
✓ Fill the resource name, external URL, and description [49].
✓ Make sure the display description on course page is enabled [49] by ticking the
checkbox as indicated in figure 40.
✓ Leave other fields (default settings will be applied) and click the Save and display button.
Figure 40

Skills for better destiny
24
5.2.4. Adding H5P content
H5P module enables the teacher to create interactive video contents that students can watch
especially before class time. H5P helps to track student participation to the module by inserting
questions in video and updating automatically the student’s gradebook. To add H5P contents,
do the following steps.
✓ Select Interactive content from activities and click add button [78]. See figure 41.
Figure 41
✓ Fill in the description and make sure the display description on course page checkbox is
enabled [79]. See figure 42.
Figure 42

Skills for better destiny
25
✓ Scroll down and click on create videos enriched with interaction [79]. See figure 43.
Figure 43
✓ Expand the section to fill the whole page by clicking on label 80. See figure 44.
Figure 44

Skills for better destiny
26
✓ Fill in the title for your video content [81].
✓ Click on the add icon to upload the video content [82]. See figure 45.
Figure 45
✓ Upload video or provide the video link (E.g. YouTube video link) [83] and click the insert
button. See figure 46.
Figure 46

Skills for better destiny
27
✓ Expand Interactive video menu [84] in figure 47 and provide the title [85] for the
uploaded video. See figure 48.
Figure 47
✓ Click Add interactions tab [85] for adding questions to video. See figure 48.
Figure 48

Skills for better destiny
28
✓ You can add questions to the video by using a play button and pausing to a desired time.
Questions can take different forms such as statements, single choice question, multiple
choice question, true/false, and drag and drop [87]. See figure 49.
Figure 49
✓ Make sure the pause video checkbox is active [88] and the title for the quiz is set [89].
See figure 50.
Figure 50

Skills for better destiny
29
✓ Fill in the question [90] and alternative answers [91] depending on which kind of
question you set. See figure 51.
✓ Click on Add answer button [92] to add another set of alternative answers to the
current question. See figure 51.
Figure 51
✓ Click on Add question button [94] to add additional question to the current question set.
See figure 52.
Figure 52

Skills for better destiny
30
✓ Click on Done [95] to save the current question set and return to video. After that you
can set additional questions by following the same procedure we used to set the first
question. See figure 53.
Figure 53
✓ Click on Proceed to save [96] to return back to the page where you can set other
properties such as grade. See figure 54.
Figure 54

Skills for better destiny
31
✓ Select grade category and the maximum grade for the current H5P contents [97]. See figure 55.
Figure 55
✓ Click on Save and display [99]. See figure 56.
Figure 56

Skills for better destiny
32
5.2.5. Create a forum activity
The forum enables the asynchronous interaction between students and teacher for a particular
class subject. It might be graded if the teacher desires it. To add it, do the following steps.
✓ Select Forum content from activities and click add button [51]. See figure 57.
Figure 57
✓ Fill in the name, description, and the forum type [52].
✓ If forum type is set to standard forum for general use, leave it as it is as we recommend
it. See figure 58.
Figure 58

Skills for better destiny
33
✓ Go to Whole Forum Grading, set the grade type, maximum grade, grading method
(simple direct grading), and choose grade category [53]. See figure 59.
Figure 59
✓ Scroll down and click on Save and display
Adding a new discussion topic
Once the forum is set, teacher can add one or multiple discussion topic. To add them, do the
following steps.
✓ Click the Add new discussion topic button [54a].
✓ Type in the subject for the discussion [54b]
✓ Click Post to forum button [54c]. See figure 60.
Figure 60

Skills for better destiny
34
5.2.6. Adding a Quiz
Quizzes are crucial especially if the teacher wants to quickly assess if the students captured the
provided lecture. To add it, do the following steps.
✓ Select Quiz from activity and click add button [55]. See figure 61.
Figure 61
Setting Quiz
As the quit is made up of questions of different types, the first step to accomplish is to set the
quiz itself. For that, we need to set its different attributes such as the description, grade, and
Timing.
✓ Enter the name of the Quiz, Description of the quiz, and make sure the display the
description on the course page checkbox is enabled [56]. See figure 62.
Figure 62

Skills for better destiny
35
✓ There are different quiz attributes we can set but we recommend leaving them to their
default values and click on timing [57]. See figure 63.
Figure 63
✓ Set the time when the quiz will open to students and when it will close, set also the time
limit for the quiz [58]. See figure 64.
Figure 64

Skills for better destiny
36
✓ Expand Grade and choose grade category and allowed attempts (1 in our case) [59]. See figure 65.
Figure 65
✓ Expand the Extra restrictions on attempts menu and protect the quiz with a password
[60]. You can share it later with students. Note that once the password is set, the quiz
can only be accessed when the password is entered. See figure 66.
Figure 66

Skills for better destiny
37
✓ Scroll down and click on Save and display button [61]. See figure 67.
Figure 67
Adding Questions
After setting up the quiz, the next step is to set up questions for the quiz. Questions might be of
different types such as true/false, multiple choice questions, matching, even essay to list a few.
To add a question, do the following steps.
✓ Click the edit quiz button [62]. See figure 68.
Figure 68

Skills for better destiny
38
✓ Set the maximum grade for the quiz [63].
✓ Click the add link and add a new question [64]. See figure 69.
Figure 69
Now choose the type of the question you want to add. You can learn more of available type of
questions from https://docs.moodle.org
True/False Question.
After clicking add a new question from label 64, select True/False questions and click the add
button [65]. See figure 70.
Figure 70

Skills for better destiny
39
✓ Type the question name, question text and the default mark [66]. See figure 71.
Figure 71
✓ Choose the correct answer. If the statement is true, then the correct answer will be true
otherwise it will be false [67]. See figure 72.
Figure 72

Skills for better destiny
40
✓ Scroll down and click save changes [68]. See figure 73.
Figure 73