technical paper rendering the print: the art of … · rendering of a photograph for its selected...
TRANSCRIPT

Technical paper
Rendering the Print: the Art of Photography
by Karl Lang
Digital Raw photography—the use of raw sensor data instead of a camera-processed JPEG as a starting point for photographers—is often a topic of controversy. Photo-graphers make statements such as “my prints look good, I don’t see any need for Raw” and “I adjust my images in Photoshop®; it works just fine” or “all those controls are too much work, I just want my software to match the JPEG.” Somewhat complex and widely misunderstood, the Raw workflow was created to return control of the print to the photographer. With traditional film, years and even lifetimes were spent learning the techniques of printing in the darkroom. Modern Raw photography provides even more control with less effort, but some education is still required.
This paper will provide a foundation for the understanding of scene rendering. It will introduce the concepts, history, and tools of printmaking, and express their bearing on modern digital photography. It will demonstrate why you should invest the effort to learn the tools of Raw photography, and most importantly, it will prove there is no single “correct” way to render a print.
State of the artThe advent of the digital SLR has created a renaissance in photography. The capabilities and ease of use exhibited by digital SLRs are amazing. Much of the excitement and popular-ity driving this renaissance can be traced directly to the quality of the prints produced by digital SLRs. If you expose your subject well and choose the right shooting mode, these cameras will produce a very good-looking print with little effort.
“Point and shoot” is a paradigm engrained in our minds by the marketing of a multi-billion dollar industry. For holiday snapshots, a child’s dance recital, or a high school football game, these cameras produce excellent keepsakes that document and reinforce our memories. With the click of a button, these modern marvels produce a digital file in the form of a JPEG, ready to be printed with no intervention. What more could you ask for?
To reach this stunning level of automation, the camera is making many decisions about how to render a scene and create the print. Translating reality to a photographic print is not a simple task, and the methods used are sophisticated and proprietary. Camera manufacturers have applied years of research and development to the unique algorithms inside each camera. Given a scene, each camera will arrive at a different result. None of these cameras typically deliver results that can objectively be considered “wrong,” and in fact each photographer may develop a preference for a camera’s results. Because there are so many different possible ways to render a scene into a print, it becomes important to differentiate between the science of photographic imaging and the art of photography. We will show that a photograph cannot be an accurate reproduction of the light that existed in reality: A photograph is always an interpretation.
TABLE OF CONTENTS
1 Stateoftheart
2 Atraditionofprints
2 Easyorhard
2 Thebigsqueeze
3 Thescene
5 Thecapture
6 Thescene-referredimage
7 Theprint
9 Output-referred
9 Perception
11 Imagerendering–History
13 Camerarendering
14 Thecatch
15 TheRawprocessor
16 Aneutralstartingpoint
17 Conclusion
Throughoutthispaper,thefinalrenderingofaphotographisdescribedas“theprint”—indeed,thetermisusedinthetitle“RenderingthePrint:TheArtofPhotography.”Today,thefinalrenderingofaphotographmayverywellbeanactualprintonpaperorotherphysicalmaterial.Butitcouldalsojustaseasilybeonawebpage,onacellphone,orprojectedonawall.Thereforewhilereadingthispaper,pleaseassumethewords“theprint”tomeananyfinalrenderingofaphotographforitsselecteddisplaymedium.
�RenderingthePrint:theArtofPhotgraphy
A tradition of printsTraditional film photographers make many decisions throughout the process that affect their art. Some of these—like framing, exposure, and depth of field—are straightforward and well understood, while others are more elusory. The end point in film photography is the print. Many things affect how a scene is rendered in print, even the choice of film itself. A film may increase the contrast of a scene or bring out the color. It may impart grain or warm the skin tones. Simply choosing a given film will have a significant effect on the final print.
After taking a picture with film, it must be printed. In the traditional darkroom process, print-ing has more variables than taking the original picture. The person printing an image from the negative may be as much an artist as the photographer. The printmaker may interpret a single negative in myriad ways. Papers, developers, toners, filters, dodging, burning, flashing; whole libraries of books exist on the printing of photographs and the techniques that may be used.
Not all great photographers are great printers. In fact, many great photographers never venture into the darkroom. Most of them have trusted printers with whom they work closely. Other photographers want complete control. They are scientists and tinkerers spending hours in the darkroom working and reworking the same print, attempting to extract their “vision” of the image. Ansel Adams is a great example of the latter. He reinterpreted many of his photographs each time he went into the darkroom. Prints of “Moonrise” created at various times over his lifetime appear very different from one another.
Photography is at its core an attempt to represent the reality of light in a media that can’t faithfully reproduce it. The range of the print is limited. The photographer and the printmaker must make sac-rifices and judgments about what should be represented in the final print. These kinds of judgments can be made by a computer, but if they are, the emotional qualities of the scene are ignored. The result may still be called art—after all, the work of the photographer is still there. Such an image can always be improved by a good printmaker, and even more so if that printmaker is the photographer. Only with the human element in the rendering process can the original perception be evoked.
Easy or hardTwo forces have driven photographic technology forward. First is the commercial desire to make photography simple for the masses, and to include photography as a way to document our experience simply and easily. This began in 1900 with the first Kodak Brownie and continues today with the hundreds of “point and shoot” digital cameras. The primary objective is a pleasing memory with little effort and low cost.
In stark contrast to this goal is the artist’s desire for absolute quality and the flexibility to inter-pret the scene as he or she envisions it. These photographers desire as much scene information as possible with absolute control over how that information is rendered. A photographic system designed to be fast, easy, and automatic does not have the quality and flexibility required to realize the vision of the artist.
Our ability to capture and render an image has advanced swiftly. Today there are thousands of ways to create a photograph: from the hand-made glass plate, 35mm film, 4x5 view cameras, a cell phone, or a digital SLR, to amazing purse-candy point and shoots. Each has vastly different capabilities, and each requires various levels of user expertise to realize a final image.
The big squeezeMany people erroneously think of a photograph as an “exact” reproduction of a scene. The reality is that light levels in a natural scene can’t be reproduced using any current technology and certainly not in a print. We must squash the vast dynamic range of sunlight and shadow onto the paper of a print that simply can’t hold it.
Throughout this paper the terms scene-referred and output-referred will be prominent. Our goal is simply a deep understanding of these terms and their application to digital photography. In our context, these concepts are applied to the image data itself. Scene-referred data has a direct relationship to the original scene; the values represent the properties of the original light emanating from the scene. Output-referred data has a direct relationship to the actual values that will be used to produce a photographic print.
When the term rendering is used in this paper, it is the translation of the data from the scene-referred state to an output-referred space that is being described.

�RenderingthePrint:theArtofPhotgraphy
The capture of scene-referred data is a science. The printing of output-referred data is also a science. The translation of an image from scene-referred to output-referred is the art of pho-tographic printing. The original scene must be interpreted to produce a print. This process is subjective; there is no single “right way” to do this.
Figure 1: Afaithfulreproductionofthelightinasceneisnotalwaysagoodreflectionoftheactualperception.Thesefishareagreatexample.Themindtendstoignorereflectionsandseethroughthesurface.Thefirstpanelisa“faithful”output-referredreproductionoftherelativeluminance—whatyouwouldgetfroma“pointandshoot”orthe“Program”modeofaDSLR.InitiallyIshotmanyframes,andthecameraJPEGslookedjustlikethis.InanattempttocompensateIunderexposedthisshot;thesecondpanelisthecameraJPEG.ThethirdpanelhasbeenprocessedinAdobePhotoshop®Lightroom™asIperceivedthescene,Youwillnoticethedarksarestillverydarkandthereflectionsarekeptclosertoshadowswhiletherestoftheimageisstretchedtowardsthelight.
The sceneYou may think of a scene as the physical objects within your field of view. When imaging scien-tists use the term scene the definition is quite specific. In our context, and for all the purposes of this paper, I’ll use a very simple definition.
Field of View Lens Projected Scene
Figure �: Theimagecreatedbyvisiblelightatthefocalplaneofasimplecamera(top),andthehumaneye(bottom).Notethatthehumaneyeisatypeofsimple“camera.”
�RenderingthePrint:theArtofPhotgraphy
One way to record our scene would be a perfect scientific capture called a spectral pixmap. The image plane would be divided up into a grid of pixels (picture elements); for each pixel we would record 300 values representing the energy for each wavelength of visible light. Spectral pixmaps are huge. A 10-million pixel image would be 5.8 gigabytes.
Creating such a map is a very slow process, quite cost-prohibitive, and currently can only be accomplished when the subject is at rest. At this time the use of spectral pixmaps is limited to satellites, astronomical telescopes, and art historians. It’s important to note that while we have the technology and expertise to create such a recording, the technology to reproduce that data in a display or print of some sort doesn’t exist.
If we have the data from a spectral pix map, we can create a much smaller file that represents the scene as the photoreceptors in the human eye would see it. This file would be much smaller—about 60 MB—and still contain all the information required to perfectly reproduce the scene for our eyes. However, due to the complex nature of human vision, you still need to capture the huge spectral pixmap in order to create this smaller file.
All forms of photography other than creating a spectral pixmap are imperfect, and can only represent an approximation of the original scene. Whether film or digital, the data we start with is already significantly limited by the method of capture. In human terms those limited factors are dynamic range, color gamut, and color accuracy.
Color is an extremely complex subject, and, luckily, for a good part of this paper we can ignore it. Most of the concepts and problems in rendering the digital print can all be described in the context of black and white photography, but apply equally to color.
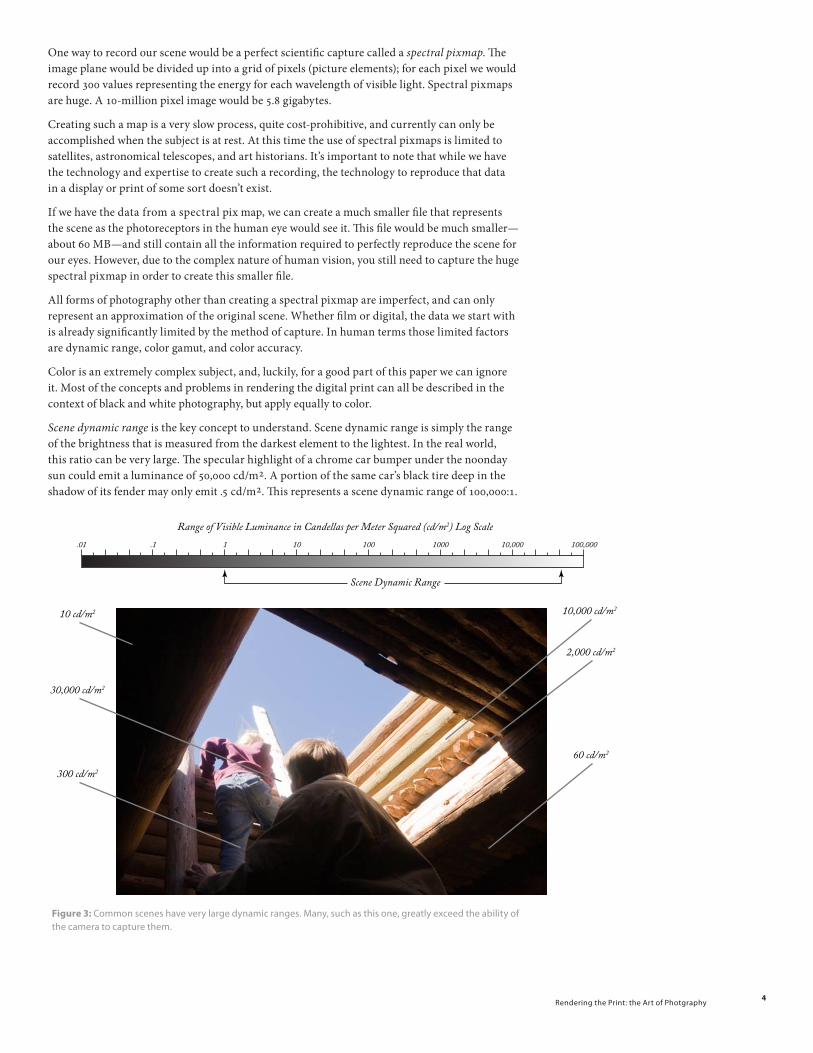
Scene dynamic range is the key concept to understand. Scene dynamic range is simply the range of the brightness that is measured from the darkest element to the lightest. In the real world, this ratio can be very large. The specular highlight of a chrome car bumper under the noonday sun could emit a luminance of 50,000 cd/m2. A portion of the same car’s black tire deep in the shadow of its fender may only emit .5 cd/m2. This represents a scene dynamic range of 100,000:1.
.01 .1 1 10 100 1000 10,000 100,000
Range of Visible Luminance in Candellas per Meter Squared (cd/m2) Log Scale
Scene Dynamic Range
30,000 cd/m2
300 cd/m2
10 cd/m2 10,000 cd/m2
2,000 cd/m2
60 cd/m2
Figure �: Commonsceneshaveverylargedynamicranges.Many,suchasthisone,greatlyexceedtheabilityofthecameratocapturethem.

�RenderingthePrint:theArtofPhotgraphy
The captureWith a clear definition of the scene, let’s examine what happens when a digital camera attempts to capture it. All digital cameras initially capture the scene in a similar manner. What happens to the data after the initial capture varies widely depending on the camera and its controls. In the Raw workflow, “raw data” from the initial capture is stored in the file. With a JPEG-based point-and-shoot camera, extensive processing occurs after the capture.
The mechanics of a digital camera are similar to its film-based cousin. The lenses, shutters, light meters, auto-focus systems, and aperture control are all very much the same. The difference is at the film plane. Instead of film, there’s a sensor array. Two types of sensor arrays are widely used; CMOS and CCD. For our purposes these are functionally similar and the differences won’t be covered. The sensor array is often referred to as the chip. The complete chip may also contain other components that are used to read the array and provide calibration data.
The individual light sensors are arranged in a grid. Each sensor is capable of translating light energy into an electrical signal. Once the sensor array has been exposed, each cell is sampled by on-board electronics, and the signal is converted to a digital value and then stored in the camera’s temporary memory. Unlike the human visual system, the response of the sensor is linear. That is, twice as much light will produce a digital value twice as large over the entire dynamic range of the sensor.
The limiting factor during capture is the dynamic range of the sensor itself. Except in the very flattest lighting situations, a sensor can’t capture the full dynamic range of light in a scene. It’s a useful analogy to think of our sensor as a bucket. During the time of exposure our bucket fills with light, and once the bucket is full we can’t measure any more—it just spills over the side. We call this state sensor saturation and it will prevent the capture of all the highlight information. Given the normal exposure range required to capture the average scene, the specular highlight on the chrome bumper will always saturate the sensor.
Light arriving from scene
Exposure Time
Figure �a: Themiddlesensorbucketisfullandoverflowing.Eventhoughtheexposurehasnotended,nofurtherusefulinformationcanberecordedcomingfromthesensor.Allwecanknowisthatthispixelisgreaterthan1bucketbright.Itcouldbeanyamountmorethanthat.Thisiscalledsensor saturationanddeterminestheupperlimitofthesensor’sdynamicrange.

�RenderingthePrint:theArtofPhotgraphy
Another technical problem prevents us from seeing all the way into the darkest regions of the scene. The sensor is sensitive to a wide range of radiation, not just the visible kind. This other radiation is all around us and is also emitted by components of the sensor itself. In the illustra-tion the extra radiation is represented by condensation and leaking pipes. Each time we measure how full the bucket is, part of the sampled data is extra. It’s mostly random, and we don’t know how much of our measurement is this extra radiation. To compensate, the chip has rows of sensors with opaque covers. It measures the signal in these “dark” buckets to determine the average and maximum amount of stray radiation during the capture. This “dark current” measurement defines a level beyond which we can’t be sure of our data. In the vocabulary of signal processing we call this the noise floor.
Condensation
Fullest sensor bucket
Leaky pipes
Figure �b: Duringadarkexposure(shutterclosed)thesensorbucketswillstillbegintofilleventhoughnolightisarrivingfromthescene.Inouranalogythepipesleakandthehumiditycausescondensationinsidethebucketsthemselves.Theamountofwaterinthefullestsensorbucketoverthetimeperiodtobemeasuredistheamountofmeasurementuncertainty.Thisamountiscalledthenoise floor.Thenoisefloordeterminesthelowerlimitofthesensor’sdynamicrange.Wecan’tseeanyfartherintothedarkareasbecausewecan’ttellthediffer-encebetweenrealscenedataandwhatcamefromtheleakypipes.
The noise floor and the saturation point define the dynamic range of the sensor. For the best modern DSLRs this range is approximately 8,000 to 1, or about 12 stops—which is similar to the range of color reversal film. Note that this is far less than the possible range of a scene. When we capture a scene, we must choose an exposure that positions the window of potential capture range onto that scene. We must determine what’s more important to capture: the highlights, the shadows, or some compromise in the middle.
The scene-referred imageThe raw data read from the sensor chip is called scene-referred data. The numeric values have a direct relationship to the energy of light that was present in the original scene. The only thing missing are the portions of the scene above or below our “exposure window.” These will be clipped to white or black. The values in the file accurately represent the actual differences in light energy between each pixel in the scene. If a pixel has a value of 10, and another 100, we know with great accuracy that there was 10 times more light at the second pixel. To be precise, we call this kind of raw sensor information linear scene-referred data.
The human visual system does not perceive light in a linear fashion as the sensor does. We don’t see 10 cd/m2 as 10 times brighter than 1 cd/m2. Scientific experiments have enabled us to build a model of how we perceive light. By applying that model we can transform the data into what we call scene-referred lightness data. Lightness is the term color scientists use to describe how bright we perceive a source.
Both forms of data—linear and lightness—are scene-referred in this case, as they have a direct numeric relationship to the actual light levels in the scene. As long as we know the position of our exposure window, we can recreate with accuracy all the light levels that were in the scene within that window.

�RenderingthePrint:theArtofPhotgraphy
If you send scene-referred data directly to a printer, or even a high quality computer display, you will not be very happy with the result. Even using the lightness-mapped data will provide a flat, lifeless image. These media don’t have the dynamic range that’s encoded in the original scene; in fact, far from it.
.01 .1 1 10 100 1000 10,000 100,000
Range of Visible Luminance in Candelas per Meter Squared (cd/m2) Log Scale
Original Scene Dynamic Range
Camera Sensor Dynamic Range
Quality Inkjet Pigment Print
.01 .1 1 10 100 1000 10,000 100,000
Scene Referred Image Output Referred Image
Figure �:Dynamicrangewindowsrelativetooneanother.NotethatwhiletheInkjetprintrangeappearsnearlyaswideastherangeofsensorcapability,sinceitisfartherdownonthislogscale,itactuallyrepresentsadramaticallysmallerbreadthofrange.
There are some new (and very expensive) display technologies on the market that have a real dynamic range of 10,000:1 and can produce extremely bright whites. With one of these, we could send a properly exposed scene-referred image directly to the display. The image would look just like we were there, except for the clipping at white and black caused by the sensor.
The printThe photographic print is a reflective medium. The dynamic range of the photographic print is limited. The lightest part of the image can only be as bright as the white of the paper itself. The darkest black we can reproduce is dependent on the amount of light that the pigment can absorb.
The very best silver photographic papers or pigment inkjet systems can only realize a dynamic range of ~275:1, but a more typical value is ~250:1, while a glossy magazine may be 175:1. Some types of reflective media like platinum prints (100:1) or newspaper (40:1) are much less.
To throw another wrench in the works, prints are viewed at moderate light levels. Unless we’re in a well-lit gallery, ambient objects and light sources within our surroundings often have greater luminance than the print. This further disrupts our perception of light and dark.

�RenderingthePrint:theArtofPhotgraphy
Trying to reproduce the dynamic range of our original scene-referred image within the dynamic range of print isn’t possible. We could apply the windowing method, like we did from scene to sensor. However, to do this we’d have to clip most of the image, as the range of a print is much less. This isn’t a workable solution, unless your original image was shot in fog; even then, how each individual perceives the image will be different.
Figure �:ThisimageofthePalaceHotelwastakenonatypicalgreySanFranciscoday;however,thescenefilledmyfieldofviewanddidnotlookgreyatall.WhatIperceivedwasrichandfullofcontrast.Thefirstpanelisthelinearscene-referreddata;theluminancelevelshavebeendirectlyprinted.Thesecondimageisalsoscene-referred;however,theluminancedatahasbeentransformedtolightness,thewayphotoreceptorsintheeyereacttotheluminancelevelsinthescene.Theimagestilldoesnotlooklikewhatweseeinourmind.Thelastpanelisanoutput-referredversionIcreatedinLightroom.
In order to create a photographic image that evokes some resemblance to the original scene, we need to compress some parts of the tone scale and stretch others. We may also use clip-ping on at least one end. Clearly this process is both subjective and image-dependent. There’s no universal right way, no formula or curve that will work for every image.

�RenderingthePrint:theArtofPhotgraphy
Output-referredThe process of tone scale manipulation to create a pleasing photograph is what I call rendering the print. Now that you understand the scene and how we capture it, the balance of this paper is all about rendering the print.
The process of rendering begins with the scene-referred data. We manipulate that source data to create an interpretation of the scene—within the dynamic range of our print—and then we record a file with these new values. The values in this file represent the relative lightness of the pixels that will actually be printed on the paper. That data is called output-referred.
In a perfect world, we’d render an output-referred image for each specific paper type and pig-ment. The output-referred image is directly related to the dynamic range of the print, so each media needs its own file. This poses a problem for the camera manufacturer. A camera JPEG is essentially an output-referred file intended for print, yet the camera doesn’t know what media or ink you intend to use at the time you shoot the picture.
Transforming scene-referred data with a 100,000:1 dynamic range into a print is a complex and subjective process. Any two viewers will disagree on what looks best. Transforming a 400:1 output-referred image to 300:1 or 200:1 is pretty straightforward and most people will be happy with a simple fixed method that is the same for all their photographs. Although the photographic industry still has not fixed a universal standard, most JPEGs and other output-referred images have a target dynamic range of about 400:1. By design, this also compares favorably with com-puter displays, so the images look correct on your screen as well. When you print the image, the printer profile performs that final transformation to actual print dynamic range to account for the difference in JPEG dynamic range.
PerceptionHuman perception of a scene is very different than taking a picture (see Perception sidebar.) What parts we remember, what we deem important, and how it made us feel, are all subjective. Individuals presented with the same scene will remember and describe it very differently. The way each individual perceives a print is also unique. Listen to the comments at an art opening.
Rendering the extreme dynamic range of reality onto a print is dependent on an individual’s response to the original scene. Imagine a scene with a boat in the fog, and the sun just peeking out (see Figure 7). One person—an artist—may remember the scene as very soft, low contrast, with little detail, and an ethereal feel. Another person—a sailor—may have spent far more time with their eye lingering on the boat. This viewer may have recognized the boat’s maker, the crew, and the fact that it was in the process of changing course. This person might very well pump up the contrast for the boat because that’s what they remember seeing. The sailor may have also experienced the ethereal soft impression, but would apply more weight to the boat in their ver-sion of the rendering.
10RenderingthePrint:theArtofPhotgraphy
PERCEPTiON
Perceptionisacomplexsubjectandanintenseareaofscientificresearch.Adigitalimagedrasticallydiffersfromourperceptionofascene;however,ourperceptionofascenehasabearingonhowwechoosetorenderitasaphotographicprint.
Ourperceptionofasceneisnotlikeaphotograph.Wetendtothinkaboutscenesindigitalphotographyasmadeupofpixels;however,thehumanvisualsystemdoesnotrecordorprocessasceneinthisway.Theeyeisnotlikeasensoronadigitalcamera,thephotoreceptiveelementsarenotarrangedinagrid.Theyarenotuniformandmuchoftheimagedatanevermakesittoourbrainorisrecordedinanywaybyourmemory.
Whenweexperienceascenethefirstthingtheeyedoesisscan.Itmovesaroundveryfastfocusingandidentifyingvariousparts.Aswedothistheiriswilladjustthelightlevelsforeachpartofthescenesowecanseeintotheshadowsandfinddetailinthebrightareas.Wemaynotethatoneareaisdarkoranotherreallybright;however,atthetimewescaneachelement,thephotoreceptorsarereceivinganoptimalexposure.Ifanareaisofinterest,wewilllingerinourscan.Thecenteroftheretina,calledthefovea,hasthemostpho-toreceptorsandthemajorityofthecolorones.Ifwewanttoseedetailwemustlookdirectlyataparticulararea.Wedonotcapturedetailoffaxisasacameradoes.
Structuresintheeyepreprocessandreacttomanyelementsofascenebeforetheimagedatafromtheretinaevenreachestheopticnerve.Movement,edgecontrast,brightlights,andcertainshapesandpat-ternsareallrecognizedbyneuralnetsdirectlyconnectedtothephotoreceptors.Thesepassinformationontootherpartsofthenervoussystem,notjustthevisualcortex.Thesenonvisualsystemsmaymediatetheprocessingofthescene.Inthiswaythebraincanreacttoimportantvisualinformationquickly.Ifyouhadto“image”and“think”aboutjumpingoutofthewayofanoncomingcar,youwouldnevergetoutofthewayintime.Ifyouaretryingtowalkonabalancebeam,theedgeofthebeamisveryimportantinforma-tiontohandoffquickly.Thevisualcortexalsoappearstoprocessimagesinstagesandmayhandoffsignalstootherpartsofthebrainveryquickly.Itseemsthatthebrainishard-wiredtorecognizemanythingsveryearlyandreportthosefindingsbeforewehavefully“thought”aboutthescene.
Thispreprocessingisanimportantconcept.Perceptionofthesceneismediatedbytheseprimarynetworks.Ahigh-contrastobjectgrowinglargerinyourfieldofviewwillcreateaspecificsignal.Thatsignalispassedontoanothernetwork,whichwillcomparethesignalsfromeacheyetodetermineifthisgrowingobjectiscomingatyou.Ifitis,thenetworkamplifiesthesignalandpassesitontobecombinedwithotherdata,whichmayincludesound,smell,orothersenses.
Scientistscallthistypeofsignalanevokedpotential.Thenameforthisparticularreactioniscalledthe“loomingresponse.”Thisveryfastsignaltellsthebrain,“Hey!Payattention!Somethingiscomingatyou.”Manypartsofthenervoussystemreacttothissignal.Adrenalinmaybepumpedintoyourbloodstream,otherprocessingmaybeputonhold,thevisualsystemwilltrytoidentifytheobject,andanotherlowlevelnetworkwillbeprimedtomakeafastdecisionthatwecall“fightorflight.”Ifyouaskapersonwhohasjustjumpedoutoftheywayofacarwhattheyrememberofthescene,theymaybeabletotellyouthattheysawacarortruck,butlittleelse.Morelikelyitwouldbe,“somethingwascomingatmeandIjumped.”Nothingelseinthescenewaseverprocessedbythebrain.Theywillnotrememberanythingelsethatwasintheirfieldofvision.
Higher-levelnetworksfartheralongtheprocessingchainalsohaveasignificanteffectonourperception.Oneexampleisthefacialgestalt.Thebraincanrecognizefacesveryquickly.Whenweseeafaceittriggersasignal.Wefocusonthispartofthesceneandexaminetheface.Theexaminationofthefacemaytriggermanyemotionalresponses.Wemayfindthefacetobecute,scary,sexy,worried,anxious…Theseresponsesinturnwillmediateanddirectourperceptionofthescene.Ifwerecognizefearinaface,wemaystartscanningthescenefordanger.Ifwereallylikethefacewemaynotlookatmuchelse.Whenwedolookelsewhere,wemayhaveamorefavorableimpressionofwhatelsewesee.Theeffectofvariouselements“colors”ourperceptionoftheindividualelements.Howwerememberthoseelementswillbeaffectedbyouremotionalresponse.
Thisisonlyabriefglimpseatsomethesystemsthatgovernourperception.Wherewelook,whatwesee,andwhatweremember,isnothingliketakingapicture.Humanfactorsgovernourresponsetoascene,ourmemory,andthepriorityweplaceinitselements.Ifwewantaphotographicprinttoevoketheemotionalresponseofourexperience,theimagedatamustbealteredtocompensatefortheperceptualattenuationnotreproducedbythephotographicprocess.It’sthistranslationoftheimagethatmakesphotographyanartratherthanscience.

11RenderingthePrint:theArtofPhotgraphy
10 100 1000 10,000
Fog SceneCamera Sensor Dynamic Range
Figure �:Thedynamicrangeofthisfoggysceneiswithinboththerangeofthecamerasensorandthedynamicrangeoftheprint;however,perceptionofsuchscenesissovariablethatrenderingsarealwaysuniqueforeachindividual.
The reality is that both perceptions were correct. If we could reproduce the scene with all the original light levels, both the soft feel and the detail would be present. The eye, while lingering on the boat, would open the iris to bring out the detail. When it scans the rest of the scene, with its bright and diffuse light, it would close the iris. The overall perception of the scene is built up over time with—in effect—multiple exposures. The camera doesn’t work this way. This is why photographers often feel the need to make local corrections to enhance their rendering of a scene. One example of this is the common practice of “burning down the edges” of a photograph, to focus the attention in the center.
image rendering – HistorySince the first days of photography scientists have been studying how we perceive a photographic print and our scene-rendering preferences. Early photographic methods were capable of capturing and displaying only a very low dynamic range. In many media “white” was light grey and “black” was dark grey. It became clear early on that boosting the contrast of the print made the image seem more realistic. As media improved, and more research accumulated, complex response curves were derived that represented an average of these preferences. With traditional photogra-phy, we weren’t able to manipulate the values directly, as we do today with a computer. Instead, complex chemical interactions and filter systems were employed to reach an approximation of these idealized responses. Scientists worked very hard and employed many complex methods to create a reasonable rendering.
At the turn of the twentieth century, the science reached a point where a combination of a negative image on celluloid, and a print created on specially treated paper, could reproduce those “aver-age” response curves very well. Along with this advance came the ability to adjust the exposure when printing in the darkroom to compensate for the picture’s initial exposure. This provided the latitude for the average consumer to take a photograph.

1�RenderingthePrint:theArtofPhotgraphy
Not long after making these advances, researchers went to work on films and papers that pro-duced exotic responses. It became clear that the average response was not “correct” or “best” for any individual picture. High- and low-contrast printing papers were developed. Printing papers were developed that would allow you to adjust response by changing the color of the light used for printing. New films were created that could capture more dark or highlight detail. Unique films mixed with exotic developer chemistry created still other responses. And photographers created special mixtures of all these things to create their own unique looks.
Ansel Adams in his darkroom, Carmel, California – 1981 © Henry Wilhelm
Figure �:AnselAdamsusedcomplexdarkroomrecipestocreatethetonescalemappingthatwashisgoal.Tri-Xfilm,HC-110developer,andseleniumtonerwerenotoriouspartsofthetoolkitheusedtocreatehissignature“look.”ThroughouthislifeAnselwasconstantlyrevisingtherenderingofevenhismostfamousimages.Newtechnologyandgreaterexperienceallowedhim,overtime,tocomeclosertohisultimatevision.
All of these developments occurred before we even got to color photography. After color arrived it became clear that individual preferences were even more complex. When films were developed that matched skin tones, it was discovered that people disliked how they looked in early color prints. Massive investment in research was undertaken to figure out how people wanted their skin tones to render. When films were initially created that fit these preferences, they did a poor job of rendering saturated flowers or landscape scenes in a pleasing way. Soon we had an explo-sion of color films to suit various tastes and needs. The choice of film by a wedding, nature, or commercial photographer was different for each instance.

1�RenderingthePrint:theArtofPhotgraphy
The variety of color films and consumer preference posed a real problem for the consumer photography industry. Consumers could not be asked to change film by subject. What transpired was a massive effort to change the equipment used by photo labs to print consumer images. Systems were developed that allowed operators to choose “presets” that improved the rendering for various “standard” image types. Eventually these systems started to analyze image content and make these decisions automatically. They guessed the “type” of each print: landscape, out-door portrait, indoor, sunset etc. This, combined with automated development and transport, was the advent of the “one hour” photo lab.
Camera JPEG Camera JPEGPhotoshop Correction
Raw FileLightroom Correction
Figure �: ThisisanextremebutfairandtrueexampleofwhatcanbelostifyouonlyshootJPEG.ThefirstimageisthecameraJPEGIshotofabeautifulorange-brownharvestmoon.ThefirstshotItookthecamerablewoutthehighlightssoIdroppedtheexposure4stopsandshotitagain.Ididnotrealizeduetomyinexperienceshootingthemoon,thatIstillhadnotreducedtheexposurefarenough.ThefirstframeisthecameraJPG,shotwiththemoonastheonlylightsource.Thecamerausedthemoontodeterminewhitebalance,soitcameoutgray,notorange.ThesecondframeisthethecameraJPEG,correctedforcolorandtoneinAdobePhotoshop.TherewasnohighlightdetailtobringoutintheJPEG,asithadbeenclippedbythecamera.Also,noticetheJPEGcolorandcompressionartifactsthatwereenhancedbythecorrectionprocess.ThefinalframeisthesameperceptualcorrectionperformedinAdobeLightroomontheRawfilefromtheexactsameshot.LightroomwasabletorecoverthehighlightdetailandextractthecolorjustasIrememberedit.
Camera rendering
“Science is what we understand well enough to explain to a computer. Art is everything else we do.” – Donald Knuth
The complexities of traditional photography made advances in rendering automation occur at a very slow pace. Even as researchers figured out what the “average” consumer wanted, figur-ing out chemistry and processes that would do this was tedious and inexact. Sometimes only approximations could be achieved. Also, cameras couldn’t send data about the scene or the photographer’s preferences with each picture to the printer. An unhappy consumer had to send a picture back to the lab, with notes, to get a better print. Automated systems couldn’t tell that you wanted the foreground brighter because of backlighting, and they almost always got this wrong.
The digital camera changed everything. In a blink of an eye, 100 years of world-wide color science research could be applied with much greater ease. You didn’t need to spend years figuring out the magic chemistry to change the way skin tones are rendered, for instance. You just programmed the change.
Changes made for skin tones no longer need to affect other colors. The automated systems created for the quick labs can now be put into the camera itself. When the picture is taken, the camera can analyze the scene and choose a rendering mode. Those modes can be very complex and far better than anything a quick lab could do. Additional information is also now available to make decisions. A light sensor on the camera can read the color of the predominant light source and set the camera with optimized outdoor, indoor, or sports photgraphy settings. The autofocus can inform the rendering system of distance information. If you’re outdoors and the whole scene is at infinity, the camera might assume you’re shooting a landscape and set the rendering accordingly.

1�RenderingthePrint:theArtofPhotgraphy
The user can now add information at the time of capture. By using a dial to set the shooting mode, the user can direct the camera to make a specific choice. Most cameras have a backlit mode. Not only does this change the exposure, it adjusts the rendering to bring out the detail in the shadows.
For these reasons the apparent quality of consumer photography has become much better. Relative to the quality you were probably getting from film taken to the neighborhood quick lab, the results you get from a digital camera will be much better. If you’re experienced and set your own exposure, the results may be better on average than even a professional lab would create over a roll of film. If, however, you sent an individual frame to a pro lab and asked them to print it, the individual human intervention will still produce a better result.
What digital point-and-shoot technology has given us is a better average photograph. The ren-dering of most pictures is pleasing and recognizable, with very little intervention. What it can’t do is perceive the scene as we do. The picture of the boat in a fog will always be grey, very low contrast and flat. The camera will never accentuate the contrast of the sail. When the sail flapped in the wind, the edge contrast was enhanced in our minds eye. The camera didn’t see this. We were standing on shore under the canopy of a forest, and the dark surround made the flat scene in front of us feel bright and luminous. The camera did not feel this way.
So you may ask the question, can’t we just fix the JPEG?
The catchWhen a digital camera renders its image and stores a JPEG, what you have in your possession is an output-referred image ready for printing. If all you want to do is print the image as the camera created it, all is well. However, if you wish a different rendering of the scene with the same quality, you’re out of luck. The JPEG is a print; it has already been rendered.
In a film workflow, if you received a print from the lab with blown out highlights, would you send them the print to fix? Of course not. You’d send the negative or slide to reprint. The output-referred JPEG no longer contains the highlight data or dynamic range that would have been present in the raw data. There’s no way to recover it.
Camera JPEG rendering is a destructive process. First, the exposure window is set, determining which part of the scene highlight or shadow data should be thrown away. Then, the adjustment curves and color shifts are applied to move the image state from scene-referred to output-referred. The final step is to reduce the image data from the thousands of shades captured by the sensor (generally 12 bits per pixel) to only the amount needed for final printing (generally 8 bits.) Even if we knew the original correction curve that had been used, we could not reverse it. A large portion of the original scene data is gone.

1�RenderingthePrint:theArtofPhotgraphy
JAy MAiSEL ANd THE JPEG
Aproperexposurethatmatchesyourartisticgoalswillalwaysproduceabetterphotograph,whetherweuseRaworJPEG.Theoutput-referredJPEGthatresultsfromaperfectexposuremaybewhatyouwanted.However,apoorexposureinJPEGformwillalwaysproduceapoorresult.Noadjustmentwillresurrectit.ARawcaptureislessconstrainedbyyourchoiceofexposure.ApoorexposureinRawformhasmuchmoresceneinformationandthereforemoreadjustmentlatitude.Itisverymuchlikethedifferencebetweenshootingnegativefilmandchrome.Withanegativewehavemuchmorelatitudeinthedarkroom.Rawissimilarinthisway.
WhenIwatchmyfriendJayMaiseltakepicturesIaminaweofhisabilitytomatchtheexposureofeachscenetotheartisticvisionhehasinmind,instantly.Jay’svisionismoreaboutcontent,layout,framingandcolor;helikesthewayhiscameratranslatestone.WhenJaylooksatasceneheknowshowhewantsittotranslateinthefinalprint.Healsoknowsexactlyhowtosethiscameraandexposuretogetveryclose.TheJPEGsdirectlyfromhiscameraareoftenwhathewants;infact,muchofthetimeheinstructshisassistanttosimply“matchtheJPEG”whenheprocessesRawfilesforprinting.
Ifonlyweallhad50yearsofexperienceshootingmillionsofpicturesmostlyonchrome.Fewofuswilleverachievethatkindofintuitiveexposuremeter.Ifyouareanythinglikeme,mostofthetimeyouareoffahalfastop,oreventwo.Whenyoureactin5secondstotakethatonceinlifetimepicture,theonewiththeperfectlightthatjustburstthroughtheclouds,willyourexposureberight?DoyouwantaJPEGofthatbadexposurewithnowaytorecoverthelosthighlights?Or,doyouwanttheRawfile,thefilefromwhichyoucanrecoverthe2stopsonthetopendthatisclippedinyourJPEG?
JayMaiseloftenusesthispictureinhispresentationstodemonstratetheconceptofa“colorevent”—atermcoinedbyGaryWinogrand.JaywaswalkingbyHydeParkonatypicalgreyLondondaywhenasmallcrackopenedintheclouds.Forafewbriefsecondsthiselectricsceneappearedbeforehim.Whentheseeventsoccurweoftendon’thavetimetogeteverysettingonourcamerajustright.IfyourcameraisalwayssettorecordRaw,youwillhaveamuchbetterchanceofgettingagreatprint.
JaynowshootsbothRawandJPEGatthesametime.Whilehealmostalwayshasthecorrectexposure,theadvantagesofworkingwiththeRawfileinsharpening,scaling,anddetailarestillverymuchworththeeffort.Jaylikestomakebigprints,andheneedseverybitofimagedatahecanget.ArtifactsthatcanoccurwhenprocessingaJPEGwillshowupmoreasyouscalelarger;theseartifactsdonotexistwhenusingtheRawfile.Ifhedoeschoosetopost-processthetonemapping,hewillgetabetterresultfromtheRawfile.WithRawpost-processing,tonalregionscanbecompressedorstretchedwithouteffectingotherpartsoftheimageorcausingartifacts;withaJPEGtheadditionalinformationdoesnotexisttomakesignificantchanges.
©JayMaisel
The Raw processorThe Raw workflow returns the concept of an information rich “negative” back to the digital photographer. The Raw file is the complete scene-referred image, as seen by the camera’s sensor, and is the same data the camera’s automated system uses to produce a JPEG. No longer is this important data lost; it’s available to return to any time.

1�RenderingthePrint:theArtofPhotgraphy
Like a negative, the Raw file is not of much use until it has been rendered. To perform the task of rendering the Raw file on a desktop computer, we need a software application called a Raw processor. The Camera Raw engine used in Adobe Photoshop and Adobe Lightroom is an example of one such application. There are already many others.
Just as there are myriad types of film, paper, enlargers, and chemistry, there are different Raw processors. Each application provides its own set of tools or “controls” to adjust the rendering of the print. Just as there was no single “correct” set of darkroom equipment, there is no single right way to design a Raw processor.
What the raw processor needs to do is well understood. The controls offered to adjust the various parameters in Raw processing are determined by the individual application designer. Each Raw processor has different tools, and new tools are constantly being developed. These applications are in their infancy and will evolve rapidly over the next few years.
A key point to remember is that you can always return to the Raw file and re-render it. As Raw processors become more sophisticated, new tools will allow more control and exciting new methods of rendering. Just as better chemistry and papers allow us to make prints of old nega-tives that are far superior to what was done at the time, new rendering tools will allow you to go back and improve a modern digital print that is rendered from the raw data.
Printing technologies are also getting better. It’s not out of the realm of possibility that we could develop a printer, ink and paper capable of a 500:1 contrast ratio. If you don’t have the raw file, you will not be able to re-render an image specifically for this new print type. If all you have is a JPEG the information you need has already been lost.
A neutral starting pointRaw processors like Lightroom start with a neutral rendering and allow you to construct your vision from this starting point. This can cause some confusion and frustration among new users. If you are used to looking at your camera JPEG, the initial rendering of the Raw file won’t match it for several reasons.
A camera JPEG is the result of an automated raw processor inside the camera. That processor doesn’t accept input from you. Conceptually, you can think of the camera as setting all the sliders and adjustments for you, based on a best guess of what you want. Each camera company has invested years of research developing the internal processor for their cameras and the algo-rithms that predict how to adjust each image.
When you open a Raw file into Lightroom, it doesn’t attempt to guess what you want. It makes no assumptions. Instead, it applies a set of default positions for each of its adjustments. These adjustments throw out little of the original scene data and place the scene into the output-referred image-state in a standard, repeatable way. This allows you to see what’s “in the negative.” From this we can get a good idea of what scene information we have to work with. After a short learn-ing curve you will begin to understand this initial rendering, and know instantly how to get what you want. It’s good to think of this like a standard exposure of the enlarger and a standard time in the developer bath. You have to start somewhere, and then make a change.
To realize our vision of the scene, our art, we must be able to see what we have to work with and then manipulate it towards our goal. The neutral starting point is a reference that the artist will learn to appreciate. It also teaches you how to shoot images that have the most information. After working with Raw files for a few months, I completely changed the way I captured my images so that I’d have more information to work with when I rendered them.
At first it may sound like this will create a lot of additional work. For some images that you deem important, it will. For others, it’s not as much as you think. Lightroom and other Raw processors allow you to create presets and synchronize settings. If you have 20 images shot at the same time, similar adjustments can be applied to all the images simultaneously. You really only need to adjust one and then copy the settings to the others.
Raw processor methods and design will advance at a rapid pace. The important thing is to shoot and store the Raw file. As technology advances, you’ll want the ability to render those important images with newer technology. If all you have is the JPEG, that won’t be possible. Remember, don’t throw out the negative.

ConclusionA real scene contains far more information than we can reproduce in any media. Human perception has evolved to capture much of this information in a novel way. Unlike a photograph, to process and store a scene as humans, we compress it into objects, relation-ships, and emotions. What we see when we look at a scene, what we remember about it, and the emotional response or affect that scene evokes, is only partly drawn by the light emanating from it. A successful photograph strives to reproduce the human experience of vision without the benefit of sunshine or cold, movement or noise.
Science has made great advances to automatically render a photographic print in a way that’s clearly recognizable as the original scene. Indeed, today’s digital cameras produce better automatic prints than any previous photographic system. Their ability to create a print that’s pleasing to the average person is excellent. However, none of these render-ings are “correct.” They can’t be, because individual perception is unique.
Today, digital cameras record their rendering as a JPEG. The JPEG is a print, an output-referred file. The rendering is complete, and a large amount of the original scene information is lost. Storing only the JPEG file means throwing away the negative forever. If you want the option to interpret the scene yourself, you must store the Raw file.
When opening a raw file, the processing software produces a neutral rendering of the image, a starting point to begin the process. This is not the same as the automated rendering in the camera. It’s designed to utilize the full range of the source scene in a predictable way, to provide a reference. An experienced photo printer can look at a negative and know what to do, and likewise, a Raw print maker learns to look at the “neutral” rendering of the Raw software. From it he can see what’s possible, and know just what controls will realize his vision for the print. It’s also important to understand that there is no correct way to realize the neutral rendering. In fact, just like the camera JPEG it will vary by manufacturer. In the darkroom, you learn how the the brand of paper you work with acts. In the same way, with experience you will learn how your Raw processing software acts, and you will be better able to process satisfying render-ings from your Raw digital captures.
Raw processing software provides more control over the rendering of a print than any process in the history of photography. The tools now available control aspects of the print that weren’t possible with traditional photography. The rate at which these tools have already advanced is unprecedented, and they will continue to evolve. The ability for us to return over time to the Raw file, and use these new tools to reinterpret the print, is an exciting prospect.
I predict that no advance in photography will have as great an impact on artistic expres-sion than the Raw workflow.
As photographers, our job is to interpret the scene as a print. We must make the deci-sions about what to keep and what to throw away. The photographic print is limited. To compensate for those limitations, we must enhance and discount portions of our image to create a photographic print that evokes our original perception. The raw work-flow allows us to express our artistic vision.
The scene is our message, the photograph our media, and rendering is the art.
“I don’t know what you mean by ‘glory,’” Alice said.
Humpty Dumpty smiled contemptuously. “Of course you don’t, ‘till I tell you. I meant—‘there’s a nice knock-down argument for you!’”
“But ‘glory’—doesn’t mean ‘a nice knock-down argument,’” Alice objected.
“When I use a word,” Humpty Dumpty said, in a rather scornful tone, “it means just what I choose it to mean—neither more, nor less.”
“The question is,” said Alice, “whether you can make words mean so many different things.”
“The question is,” said Humpty Dumpty, “which is to be master—that’s all.”
– Excerpt from “Through the Looking Class, and What Alice Found There” by Lewis Carroll (1871)
Adobe Systems Incorporated345ParkAvenue,SanJose,CA95110-2704USAwww.adobe.com
Adobe,theAdobelogo,Lightroom,andPhotoshopareeitherreg-isteredtrademarksortrademarksofAdobeSystemsIncorporatedintheUnitedStatesand/orothercountries.Allothertrademarksarethepropertyoftheirrespectiveowners.
©2007AdobeSystemsIncorporated.Allrightsreserved.06/07
ABOuT THE AuTHOR
KarlLangisacolorimagingconsultant,engineerandphotographer.Overthelast20years,Karlhasbroughtanextensiveportfolioofproductsandtechnologiestotheimagingcommunity.RadiusPressView,TheColorMatchSystem,Artica,ThunderColor,andtheSonyArtisanareafewofhismorepubliccreations.Karldesignscolorsoftwareandhardware,andprovidesconsultingservicesatwww.lumita.com.