telehealth client registration module--staff training
TRANSCRIPT
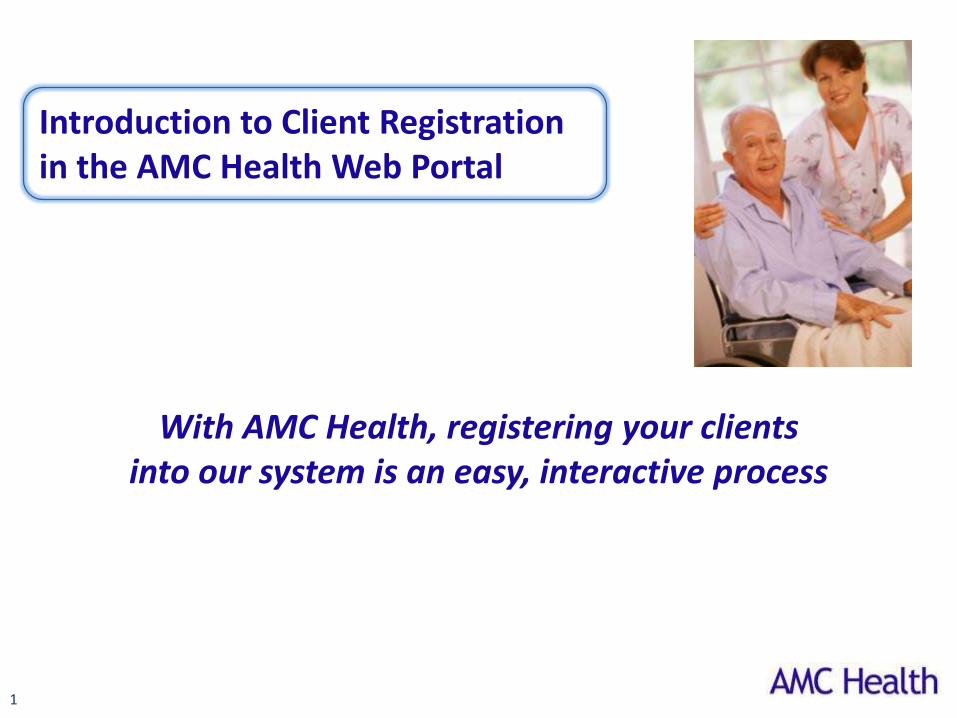
Introduction to Client Registration in the AMC Health Web Portal
With AMC Health, registering your clients into our system is an easy, interactive process
1
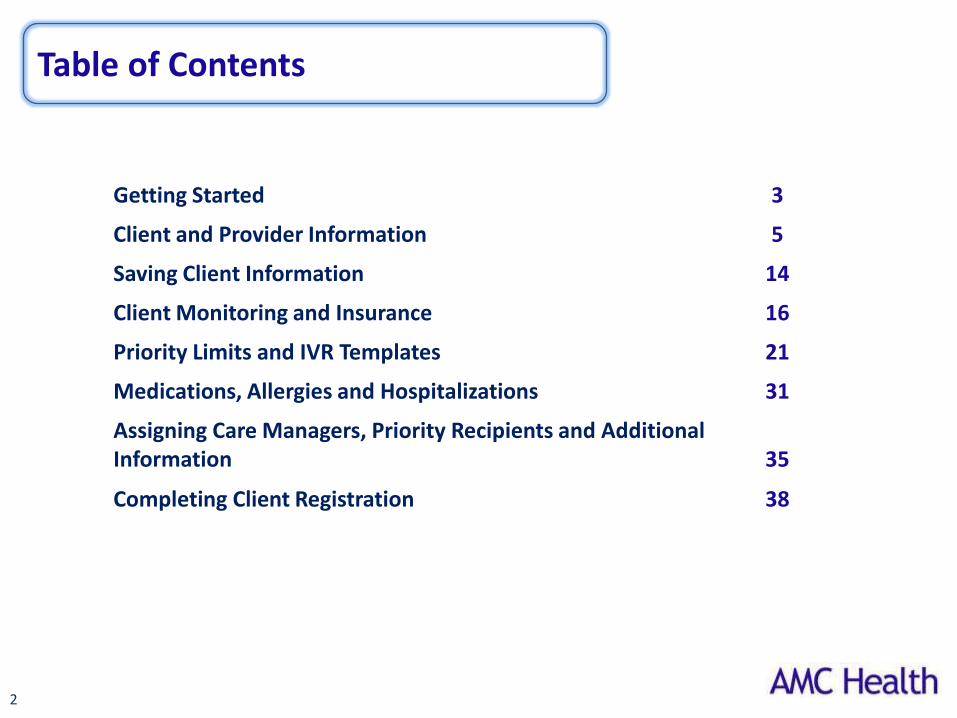
Table of Contents
2
Getting Started 3
Client and Provider Information 5
Saving Client Information 14
Client Monitoring and Insurance 16
Priority Limits and IVR Templates 21
Medications, Allergies and Hospitalizations 31
Assigning Care Managers, Priority Recipients and Additional Information 35
Completing Client Registration 38
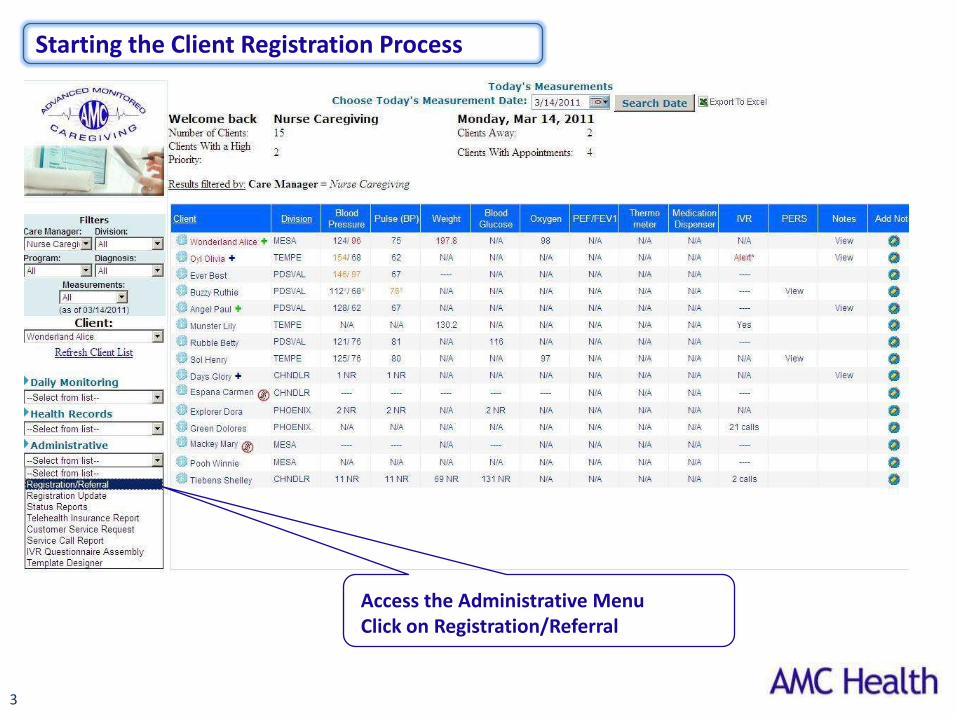
Starting the Client Registration Process
Access the Administrative MenuClick on Registration/Referral
3

Registering a New Patient
Click here to start registration
4
For a client who has previously participated in telehealth, enter the
Client ID and click ‘Re-Register’
Page 1: Client and Provider Information
5
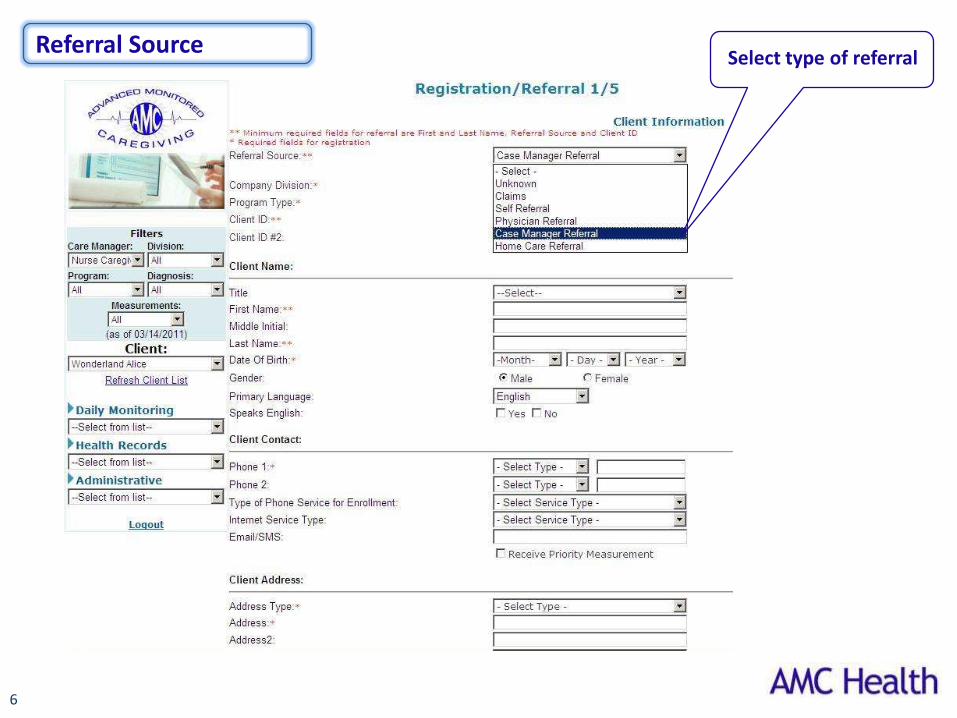
Select type of referral
6
Referral Source

Select ‘division’ (usually your location)• The field is
customized according to your needs
• Not all organizations opt to identify clients by division
7
Company Division

The options are selected by your organization
8
Program Type
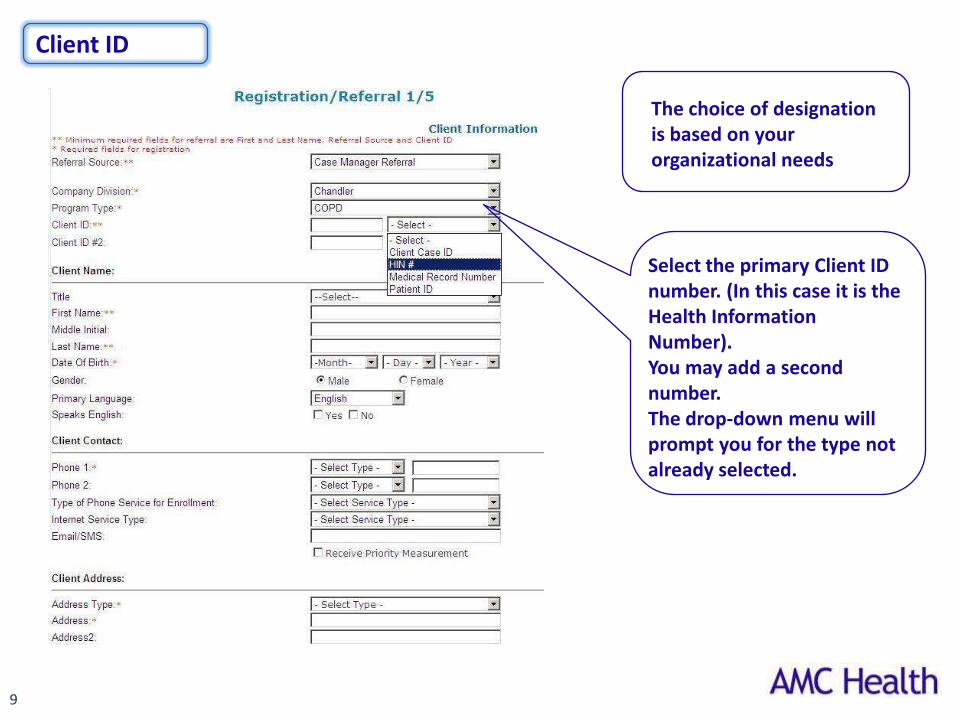
Select the primary Client ID number. (In this case it is the Health Information Number). You may add a second number.The drop-down menu will prompt you for the type not already selected.
9
Client ID
The choice of designation is based on your organizational needs
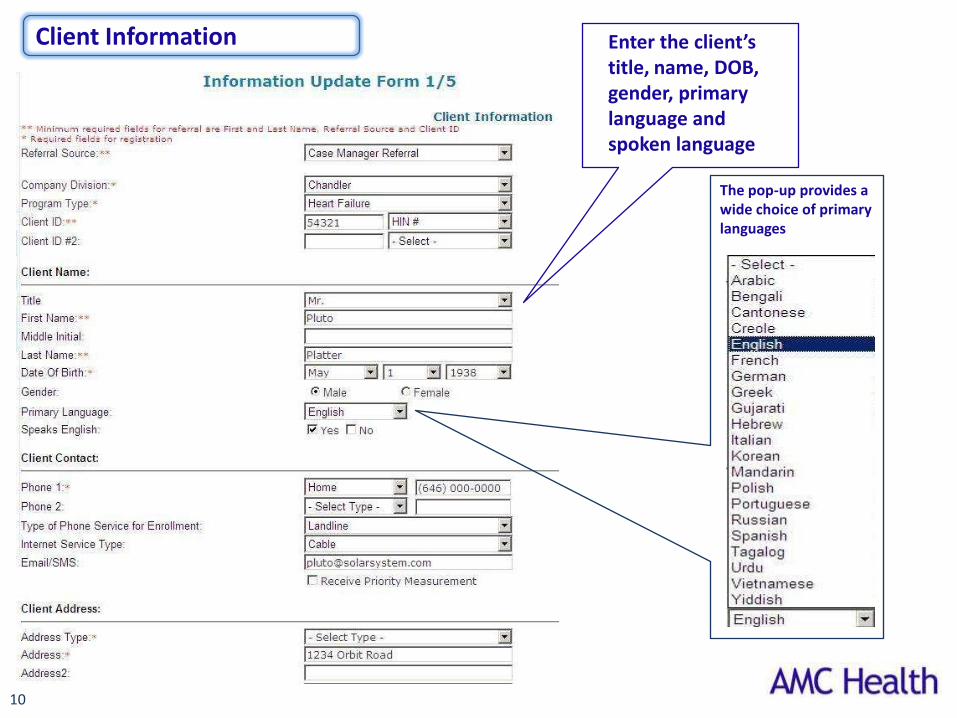
Enter the client’s title, name, DOB, gender, primary language and spoken language
The pop-up provides a wide choice of primary languages
10
Client Information
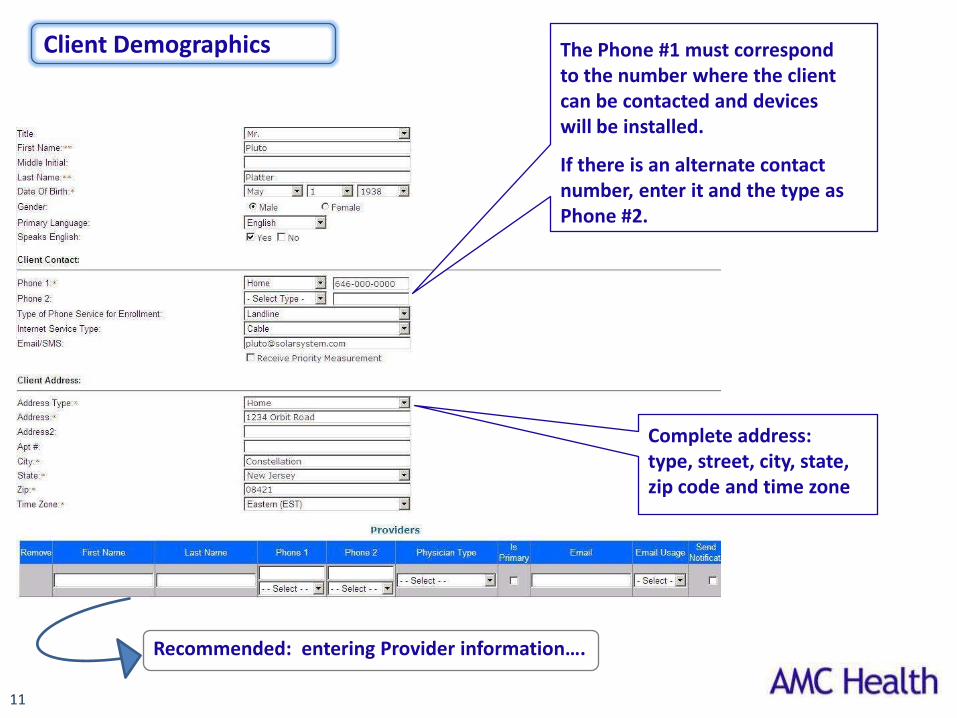
Complete address: type, street, city, state, zip code and time zone
The Phone #1 must correspond to the number where the client can be contacted and devices will be installed.
If there is an alternate contact number, enter it and the type as Phone #2.
Recommended: entering Provider information….
11
Client Demographics
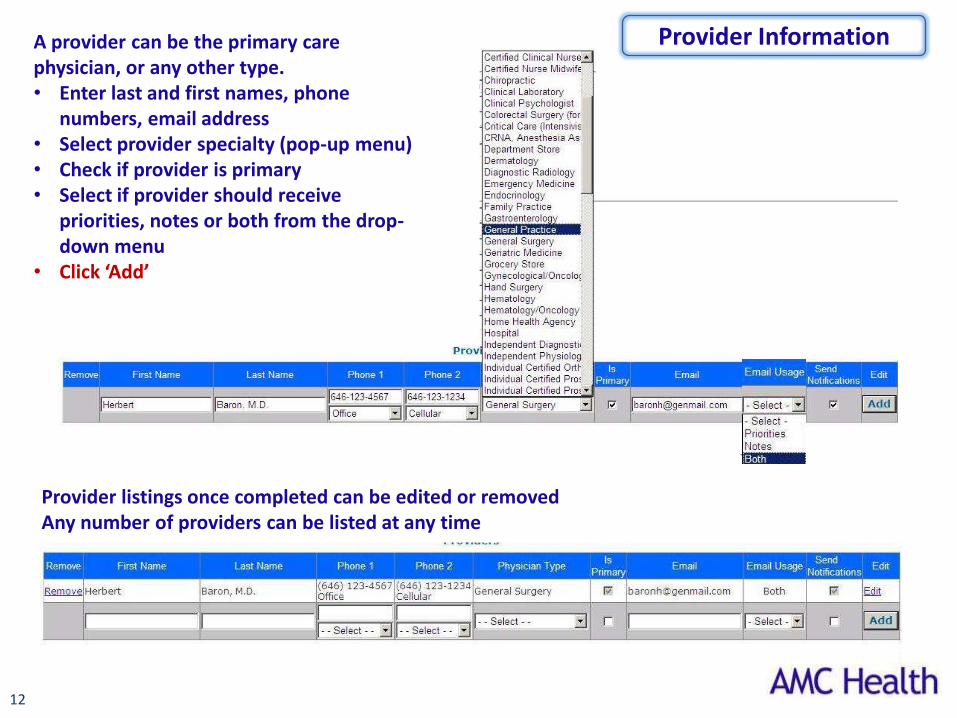
A provider can be the primary care physician, or any other type. • Enter last and first names, phone
numbers, email address• Select provider specialty (pop-up menu)• Check if provider is primary• Select if provider should receive
priorities, notes or both from the drop-down menu
• Click ‘Add’
Provider listings once completed can be edited or removedAny number of providers can be listed at any time
12
Provider Information
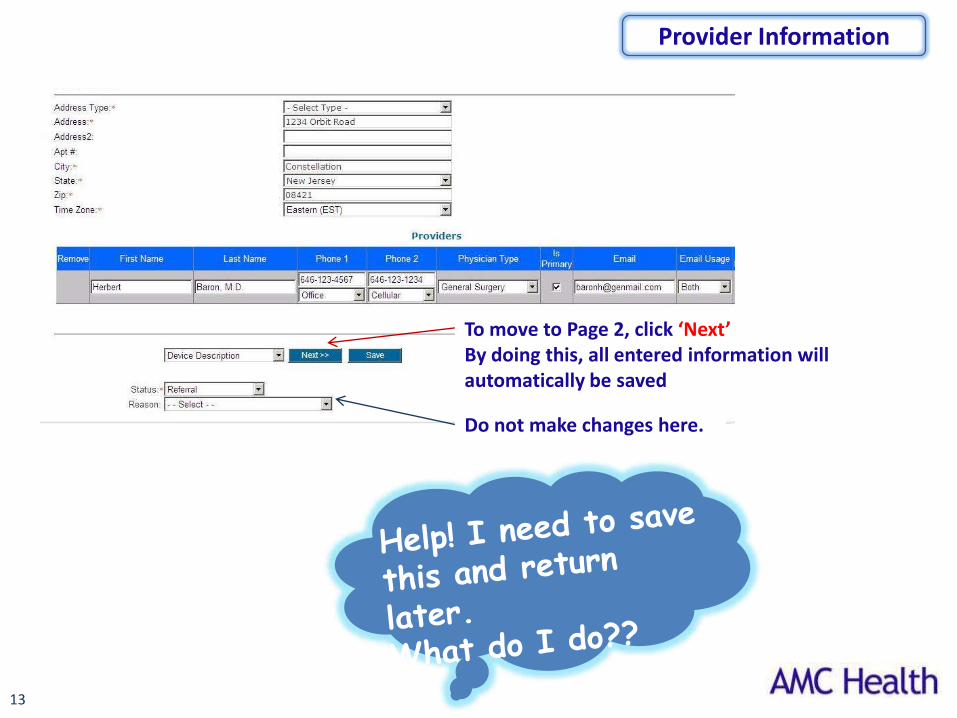
Do not make changes here.
To move to Page 2, click ‘Next’By doing this, all entered information will automatically be saved
13
Provider Information

Saving information…and how to find it later!
14
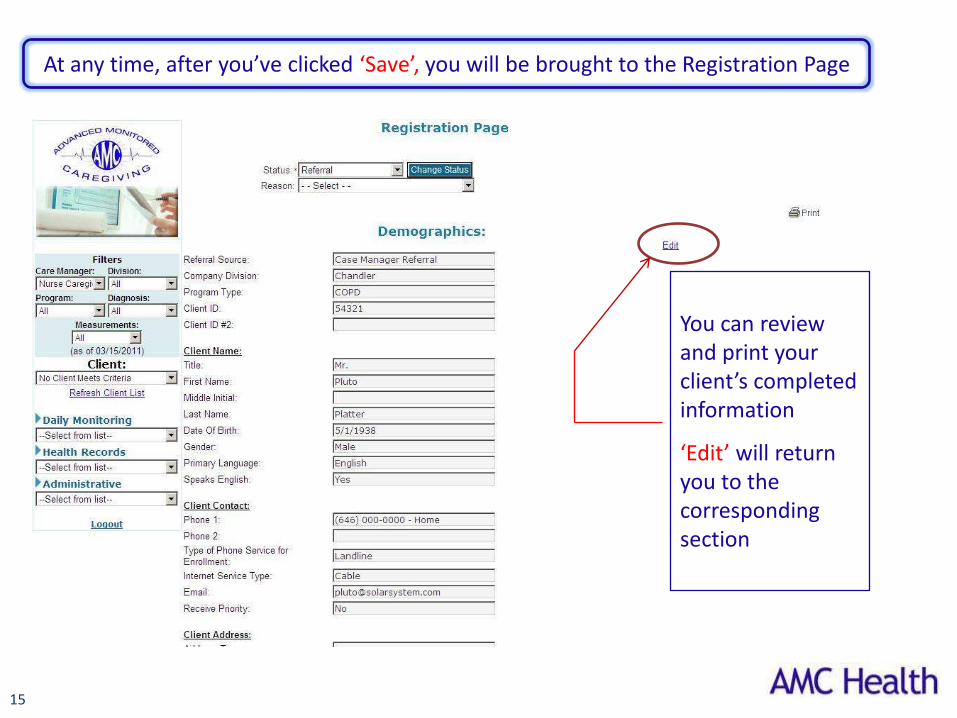
At any time, after you’ve clicked ‘Save’, you will be brought to the Registration Page
You can review and print your client’s completed information
‘Edit’ will return you to the corresponding section
15

Page 2: Patient Monitoring and Insurance
16
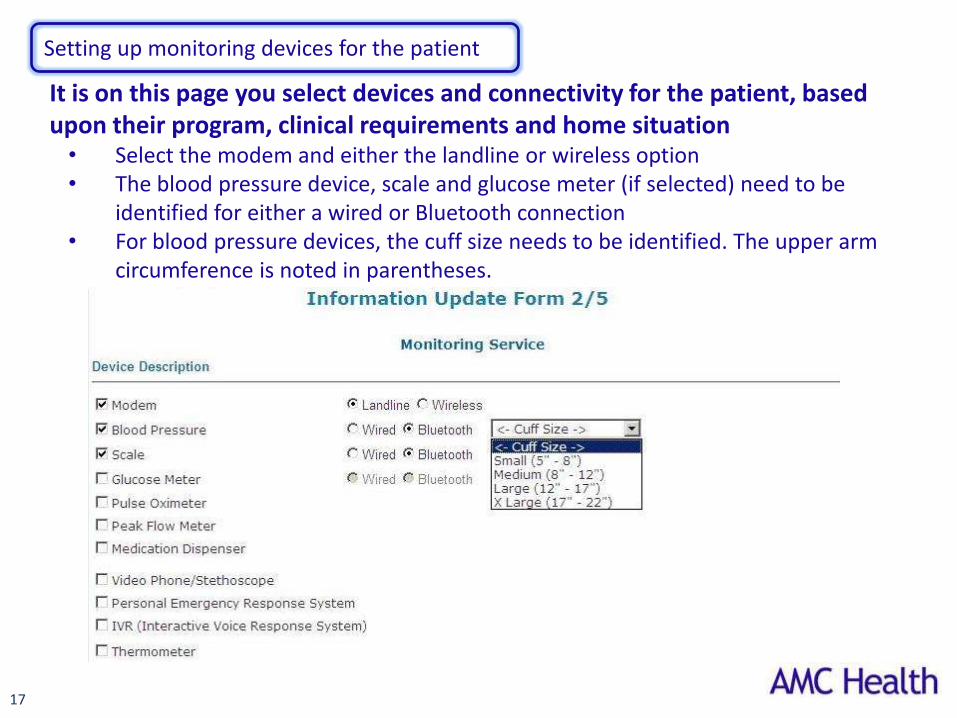
Setting up monitoring devices for the patient
It is on this page you select devices and connectivity for the patient, based upon their program, clinical requirements and home situation
• Select the modem and either the landline or wireless option• The blood pressure device, scale and glucose meter (if selected) need to be
identified for either a wired or Bluetooth connection• For blood pressure devices, the cuff size needs to be identified. The upper arm
circumference is noted in parentheses.
17
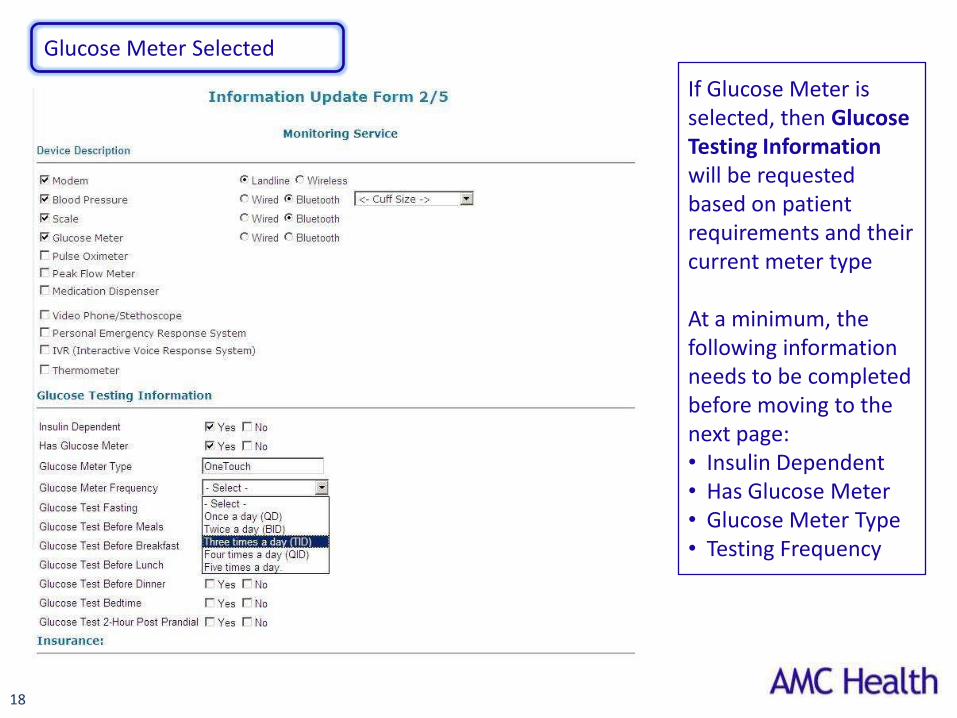
If Glucose Meter is selected, then Glucose Testing Information will be requested based on patient requirements and their current meter type
At a minimum, the following information needs to be completed before moving to the next page:• Insulin Dependent• Has Glucose Meter• Glucose Meter Type• Testing Frequency
18
Glucose Meter Selected
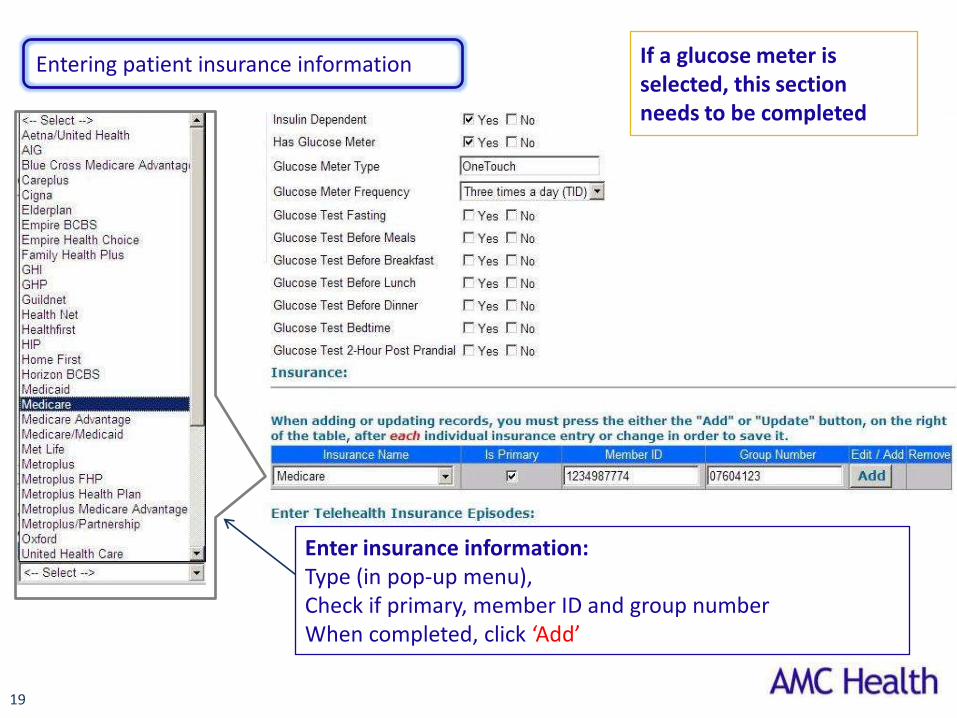
Entering patient insurance information
Enter insurance information: Type (in pop-up menu), Check if primary, member ID and group numberWhen completed, click ‘Add’
19
If a glucose meter is selected, this section needs to be completed
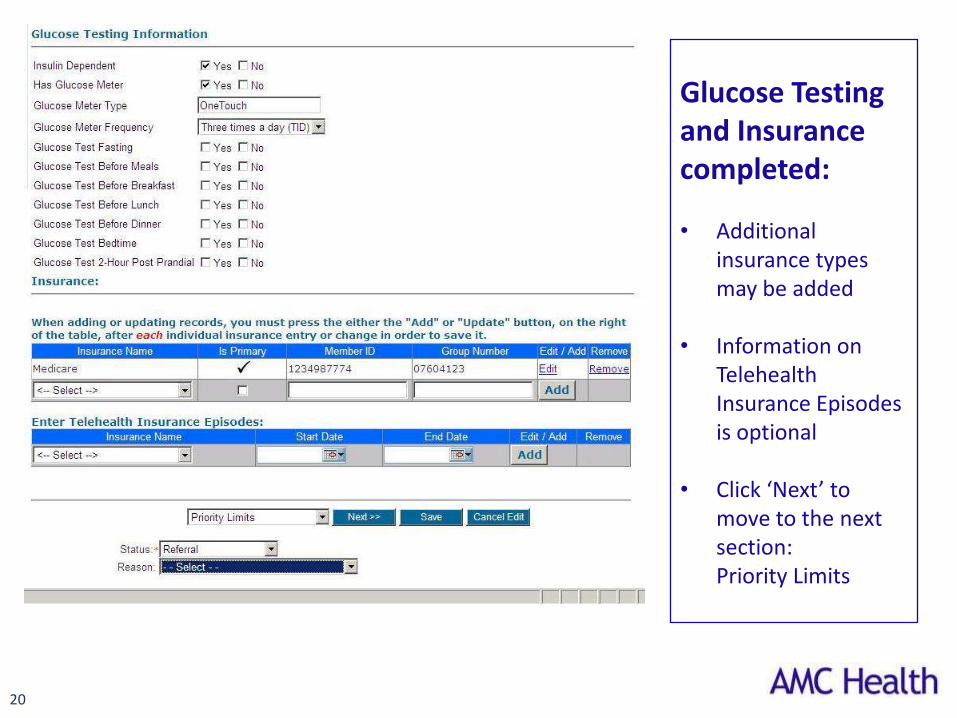
Glucose Testing and Insurance completed:
• Additional insurance types may be added
• Information on TelehealthInsurance Episodes is optional
• Click ‘Next’ to move to the next section: Priority Limits
20

Page 3: Priority Limits and IVR Templates
21

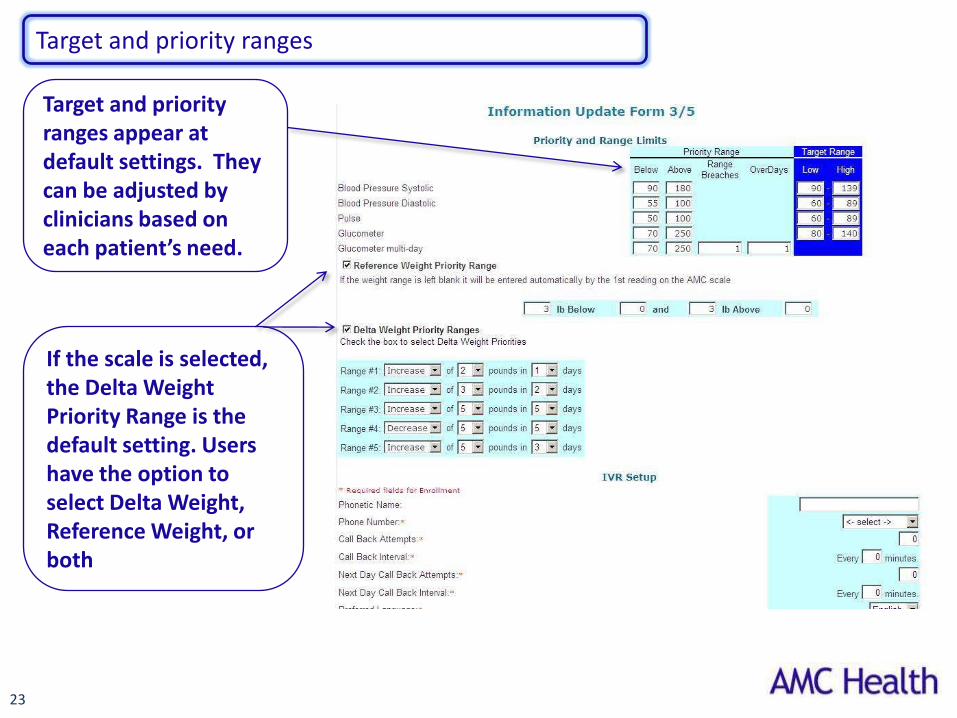
Clinicians have the option of changing these according to understood clinical needs. Default is clinical parameters based on standard guidelines.
Understanding priority limits and setting up IVR
22
What appears on this page corresponds to devices selected and IVR
23
Target and priority ranges appear at default settings. They can be adjusted by clinicians based on each patient’s need.
If the scale is selected, the Delta Weight Priority Range is the default setting. Users have the option to select Delta Weight, Reference Weight, or both
Target and priority ranges
24
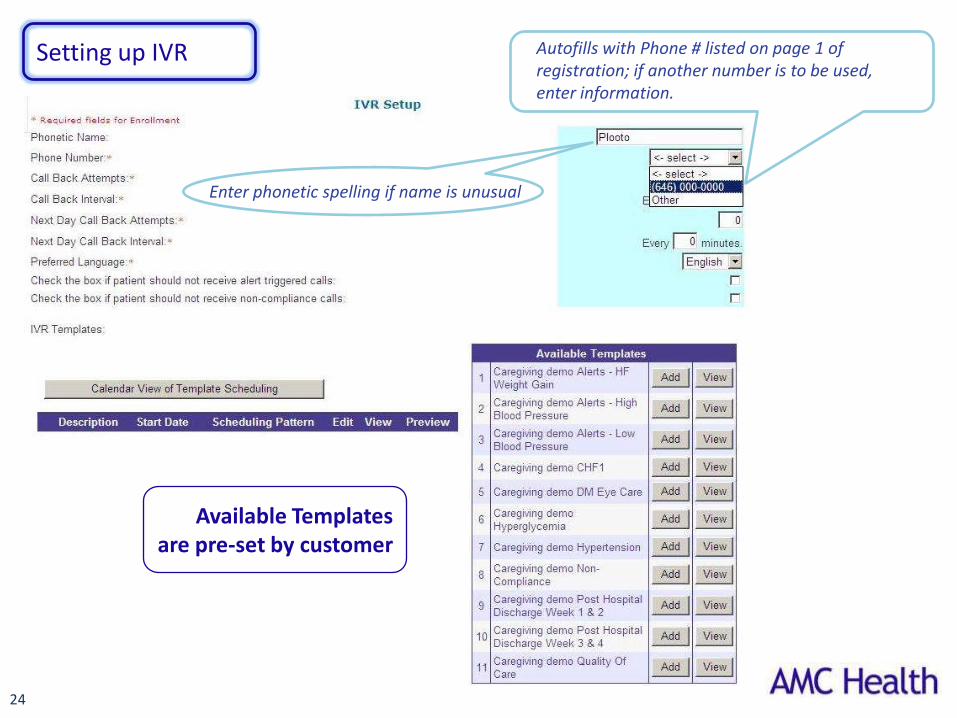
Setting up IVR Autofills with Phone # listed on page 1 of registration; if another number is to be used, enter information.
Enter phonetic spelling if name is unusual
Available Templates are pre-set by customer

25
Users have the choice of setting up number of call back attempts and timing :• Same day• Next day
Preferred language autofills with client’s selected language. One of three depending on customer setup
IVR Call Back Attempts

26
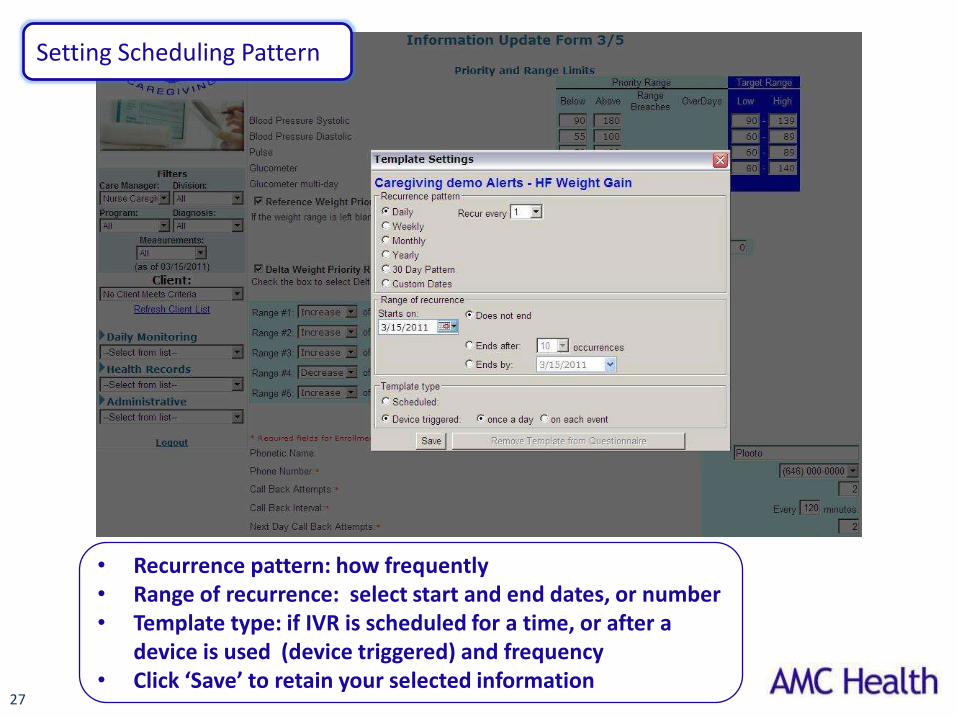
Setting IVR Templates
Select template for client, e.g. HF Weight Gain, by
using the Add button
27
• Recurrence pattern: how frequently • Range of recurrence: select start and end dates, or number• Template type: if IVR is scheduled for a time, or after a
device is used (device triggered) and frequency• Click ‘Save’ to retain your selected information
Setting Scheduling Pattern
28
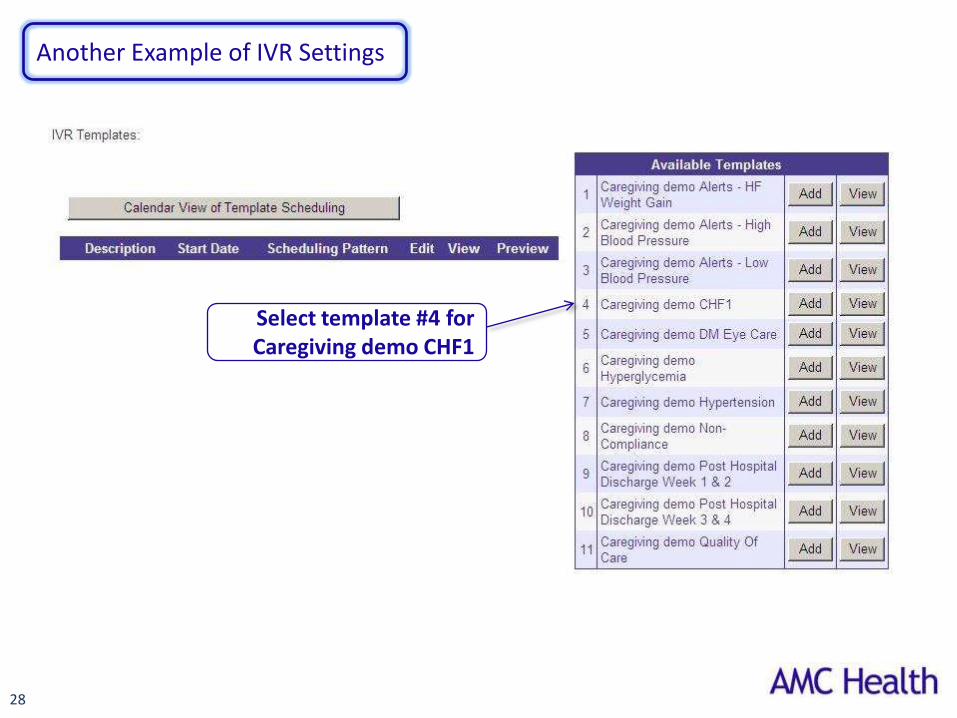
Another Example of IVR Settings
Select template #4 for Caregiving demo CHF1
29
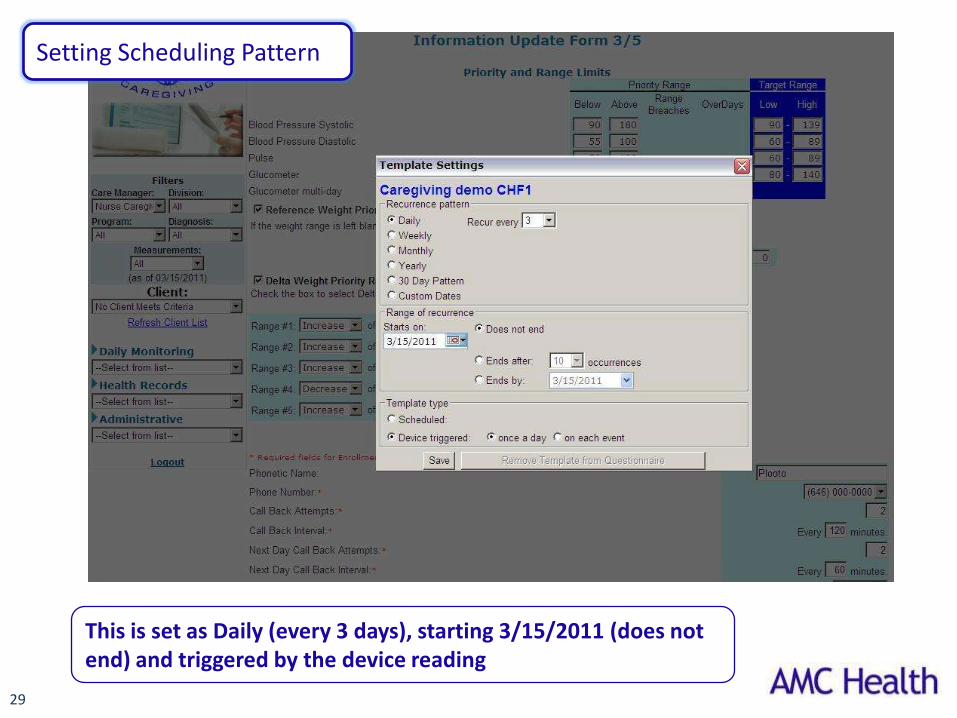
This is set as Daily (every 3 days), starting 3/15/2011 (does not end) and triggered by the device reading
Setting Scheduling Pattern
30
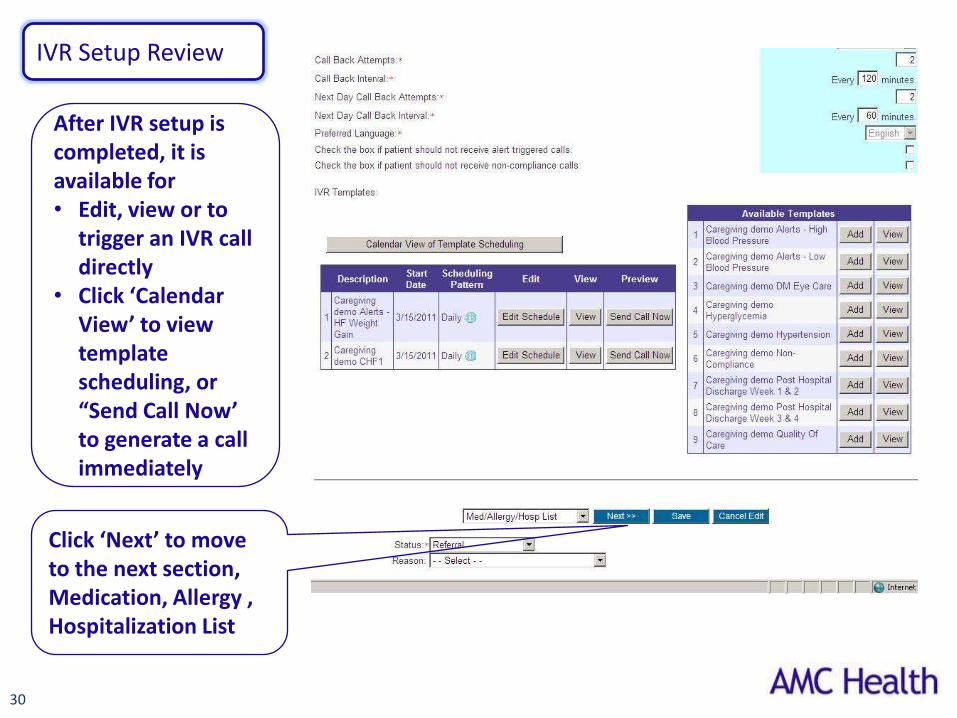
After IVR setup is completed, it is available for• Edit, view or to
trigger an IVR call directly
• Click ‘Calendar View’ to view template scheduling, or “Send Call Now’ to generate a call immediately
Click ‘Next’ to move to the next section, Medication, Allergy , Hospitalization List
IVR Setup Review

31
Page 4: Medications, Allergies and Hospitalizations
32
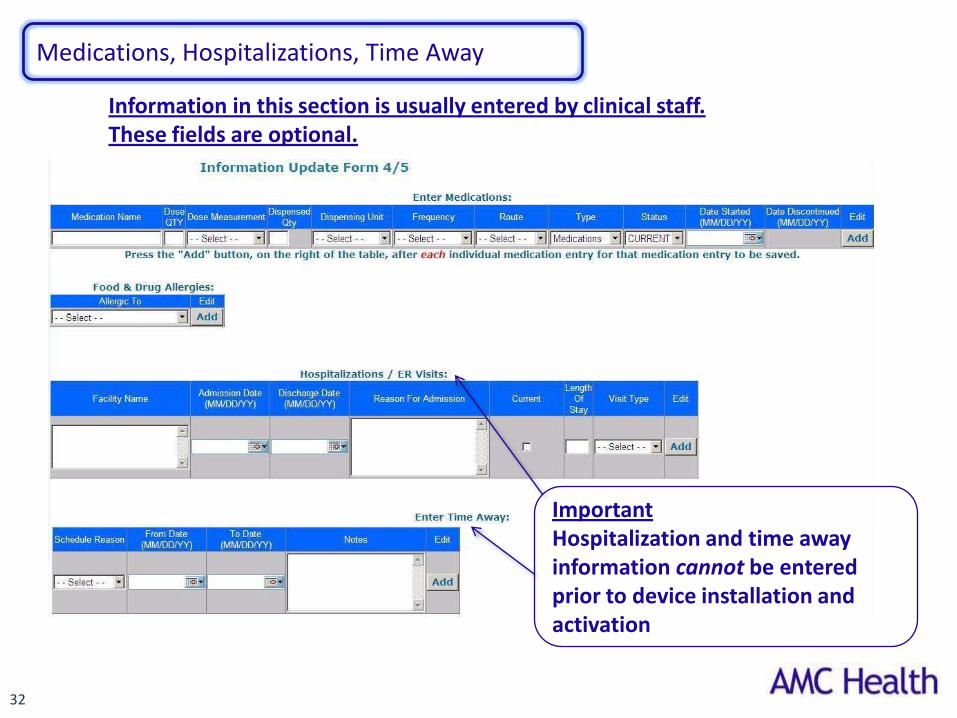
Medications, Hospitalizations, Time Away
Information in this section is usually entered by clinical staff. These fields are optional.
ImportantHospitalization and time away information cannot be entered prior to device installation and activation

33
Select allergic drugs and foods from the drop-down menu and click ‘Add’
Food and Drug Allergies
34
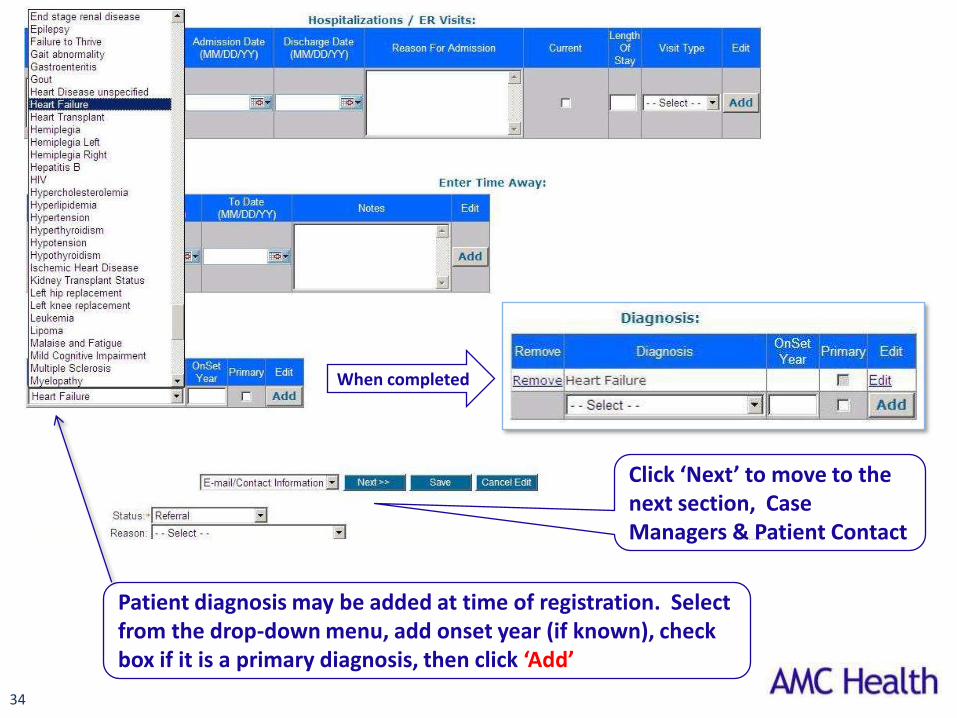
Patient diagnosis may be added at time of registration. Select from the drop-down menu, add onset year (if known), check box if it is a primary diagnosis, then click ‘Add’
When completed
Click ‘Next’ to move to the next section, Case Managers & Patient Contact

35
Page 5: Assigning Care Managers, Priority Recipients, and Additional Information
36
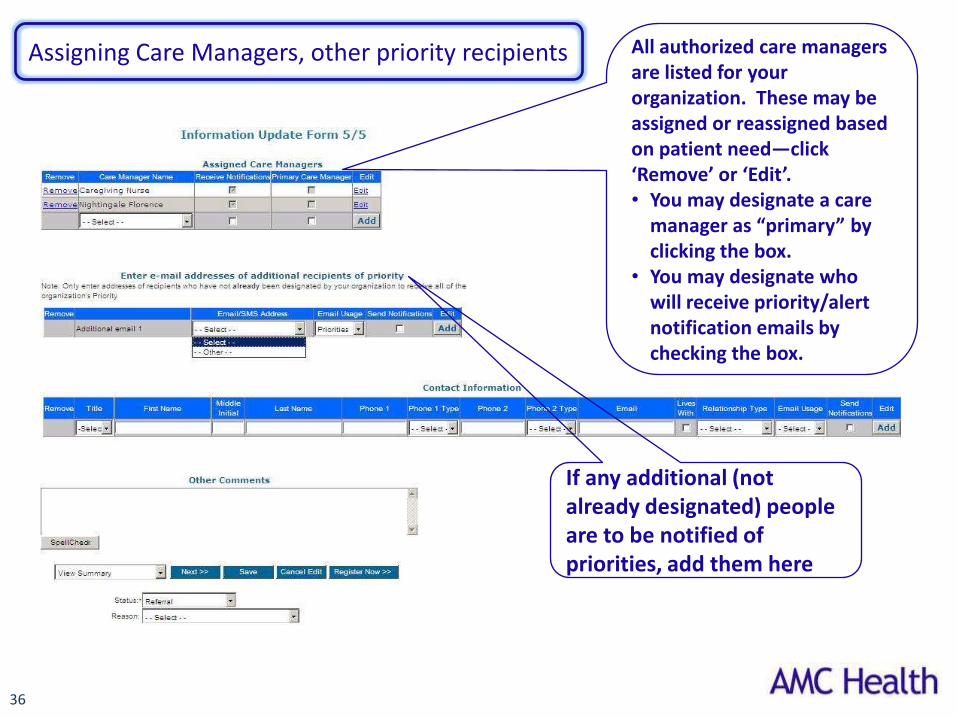
Assigning Care Managers, other priority recipients All authorized care managers are listed for your organization. These may be assigned or reassigned based on patient need—click ‘Remove’ or ‘Edit’. • You may designate a care
manager as “primary” by clicking the box.
• You may designate who will receive priority/alert notification emails by checking the box.
If any additional (not already designated) people are to be notified of priorities, add them here

37
Adding other contact information and comments
Add alternative contacts such as family members or other caregivers here. Use drop-downs for phone type and relationship type
Add any pertinent comments about the client in this field. This may be related to device installation, days available, patient physical condition (e.g. ROM), limitations, name of caregiver to be present, etc.
This is useful information for clinicians and service support personnel to reach out to clients
By pressing ‘Save’ at the end of this page, the user is able to bring up a summary of all entered information
38
Completing Client Registration
39
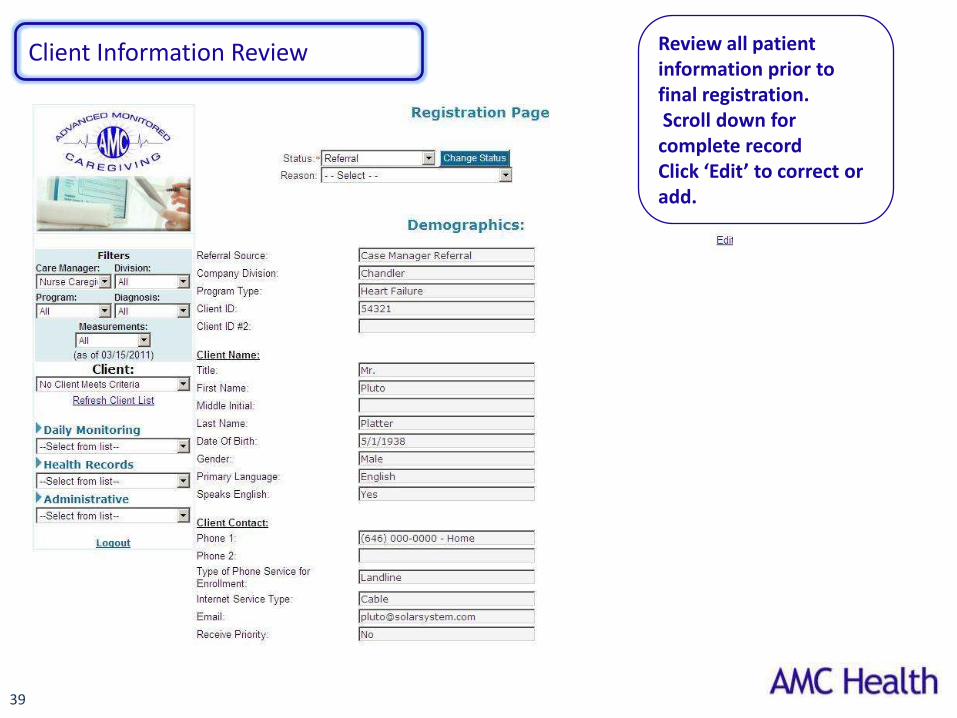
Review all patient information prior to final registration.Scroll down for complete record Click ‘Edit’ to correct or add.
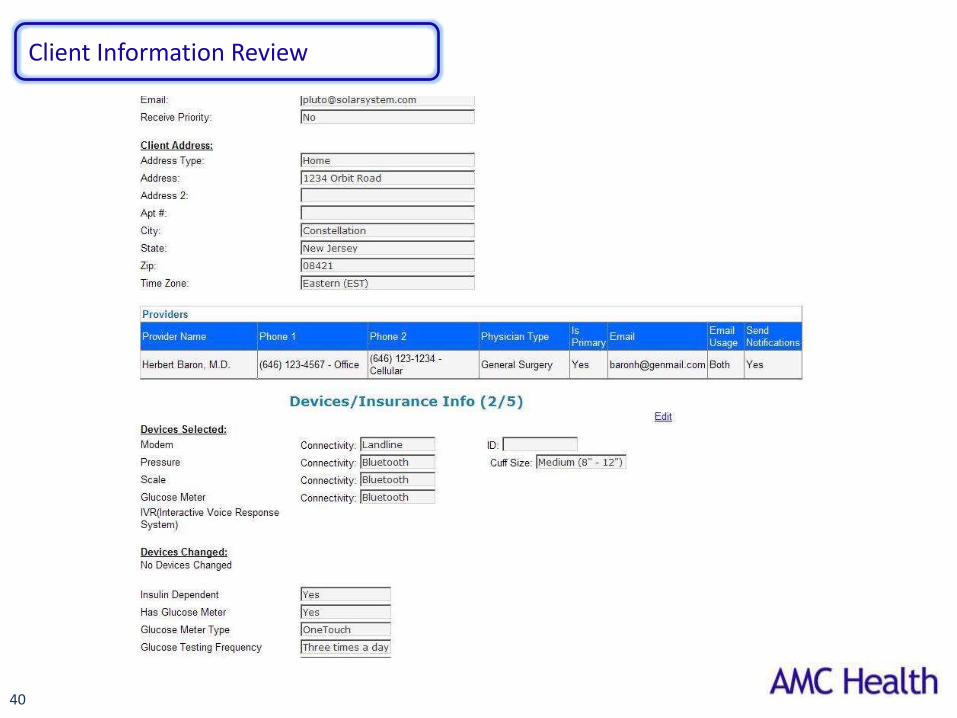
Client Information Review
40
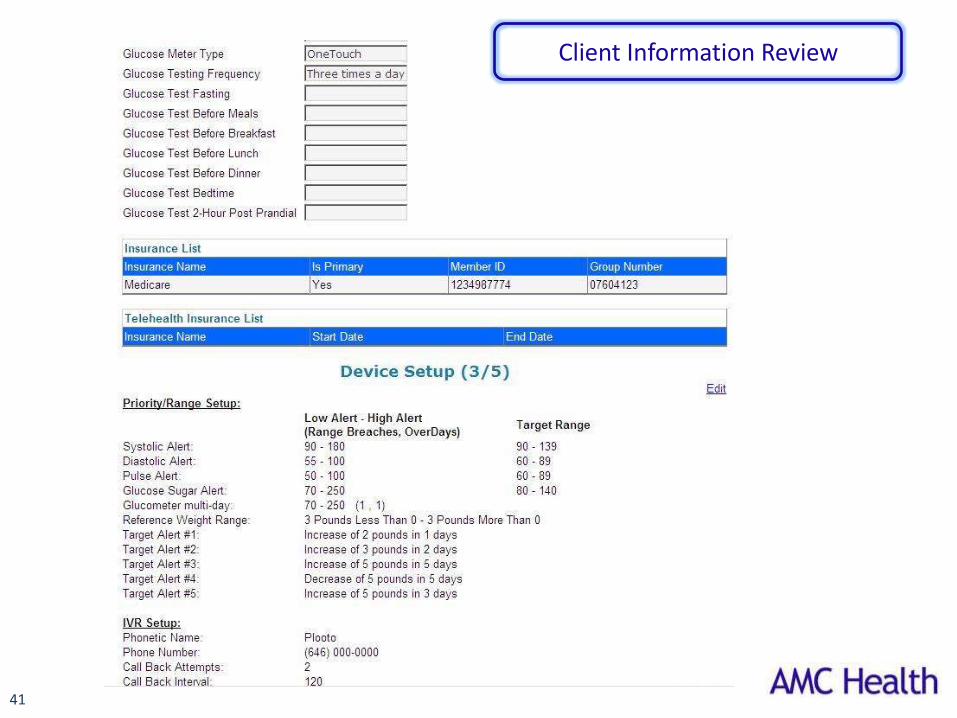
Client Information Review
41
Client Information Review
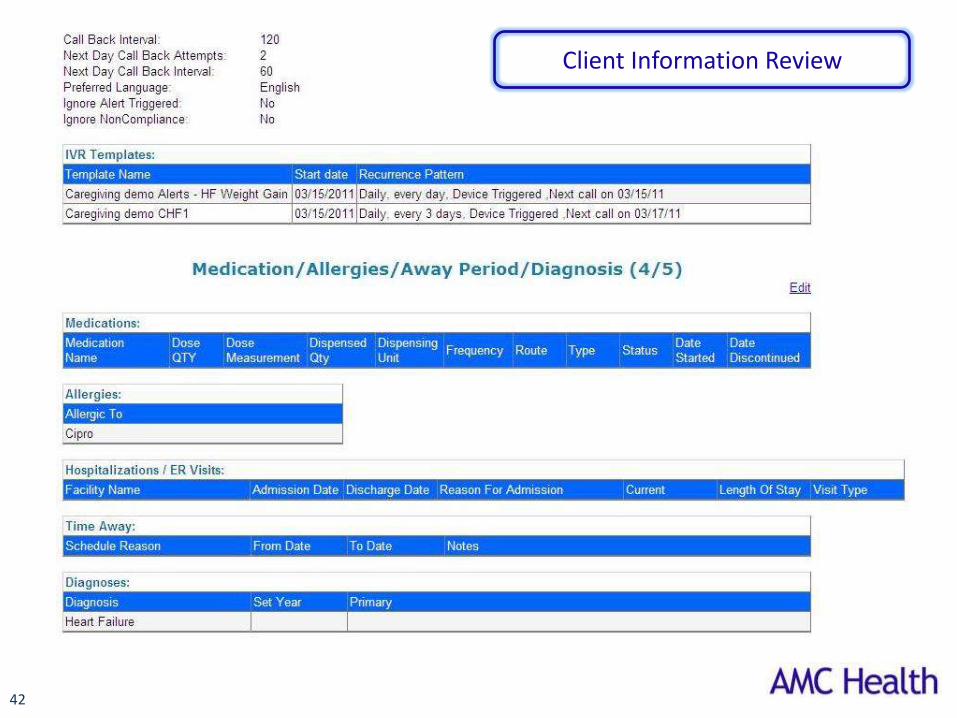
42
Client Information Review

43
44
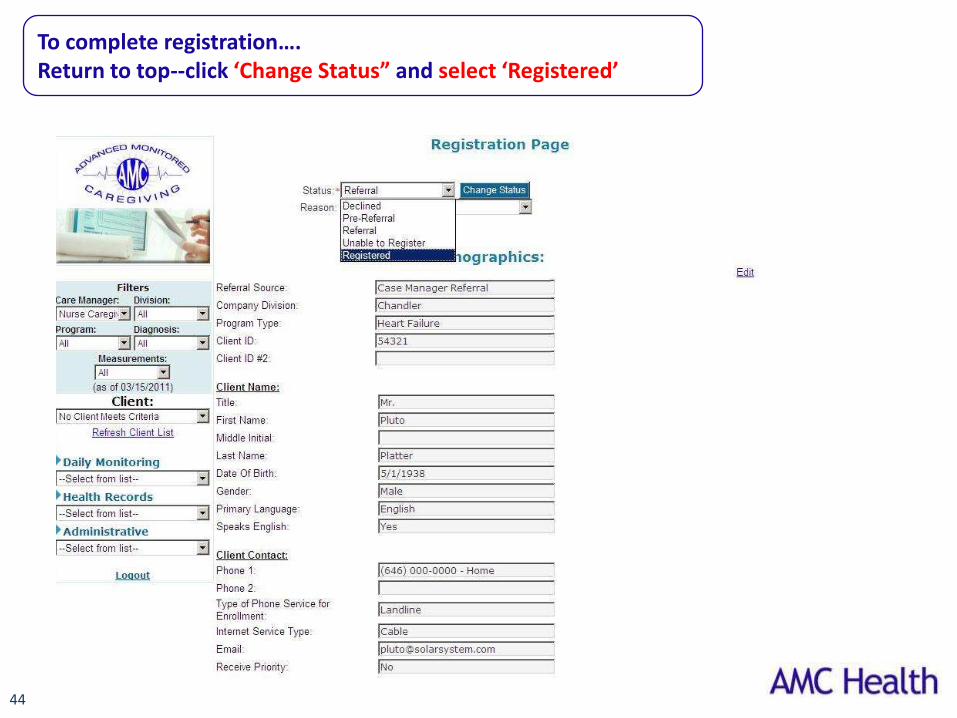
To complete registration….Return to top--click ‘Change Status” and select ‘Registered’
45
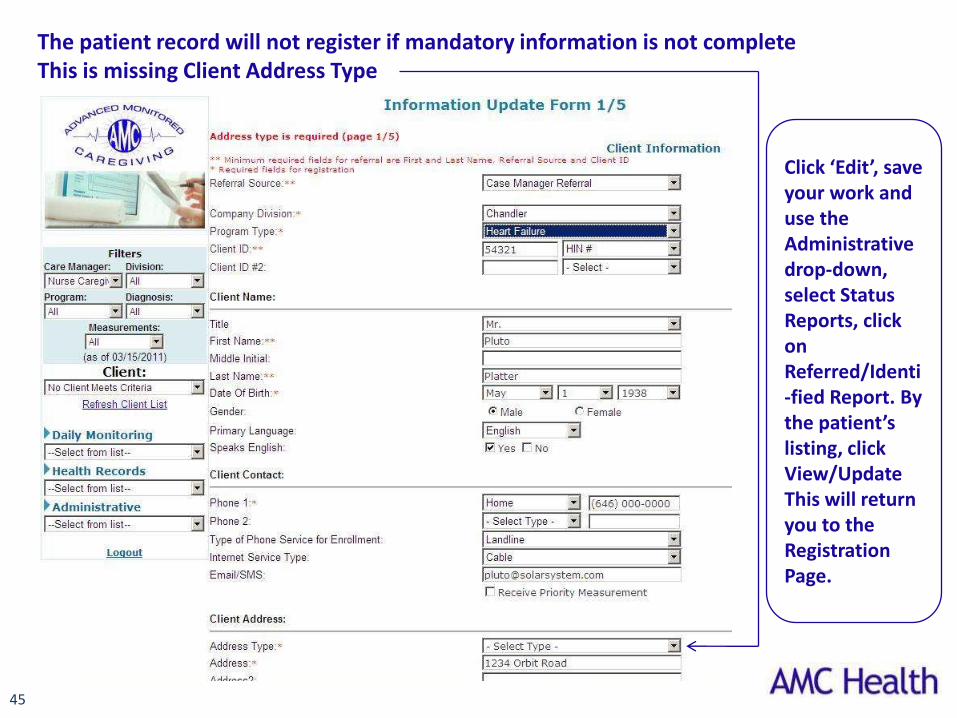
The patient record will not register if mandatory information is not completeThis is missing Client Address Type
Click ‘Edit’, save your work and use the Administrative drop-down, select Status Reports, click on Referred/Identi-fied Report. By the patient’s listing, click View/UpdateThis will return you to the Registration Page.

46
To complete registration:Return to top--click ‘Change Status” and select ‘Registered’ again to completeThe screen will reload and your work will be saved
Tip: To confirm if Registration is completed, click Change Status. Only the Registered option will appear.
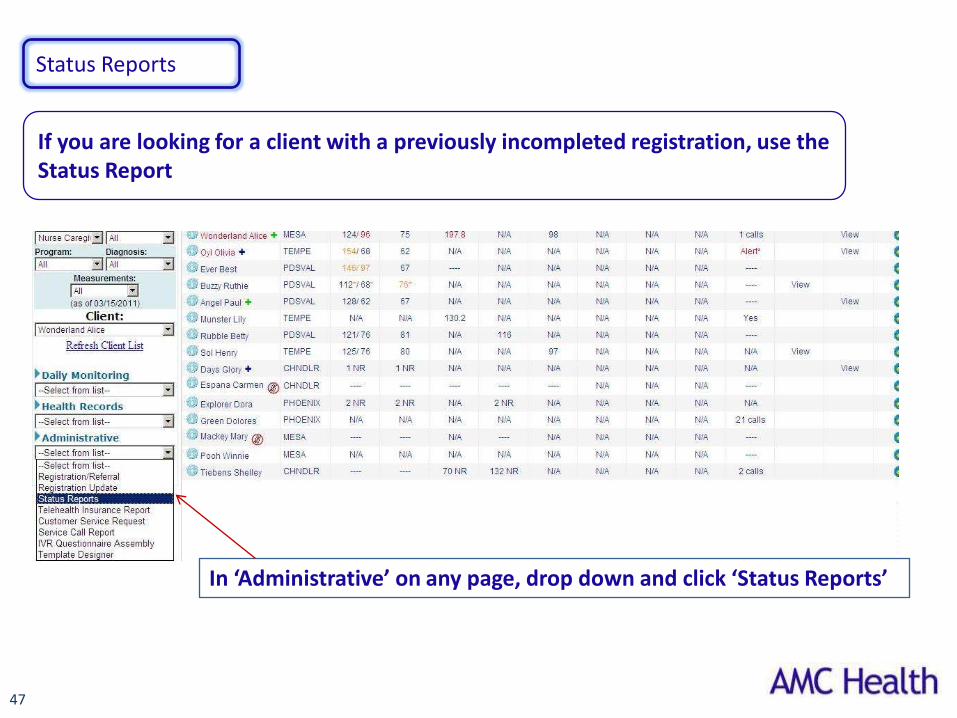
Status Reports
In ‘Administrative’ on any page, drop down and click ‘Status Reports’
47
If you are looking for a client with a previously incompleted registration, use the Status Report
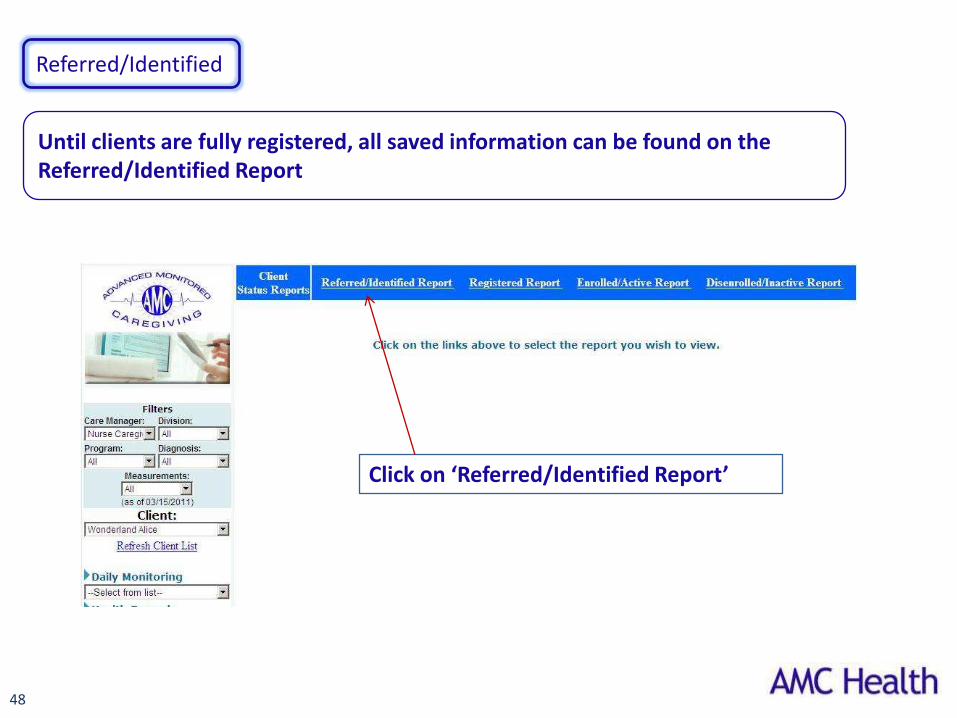
Click on ‘Referred/Identified Report’
48
Referred/Identified
Until clients are fully registered, all saved information can be found on the Referred/Identified Report

In the list of Referred Clients Reported, click on ‘View/Update’ for the patient (Mr. Platter)
49
To access this information
50
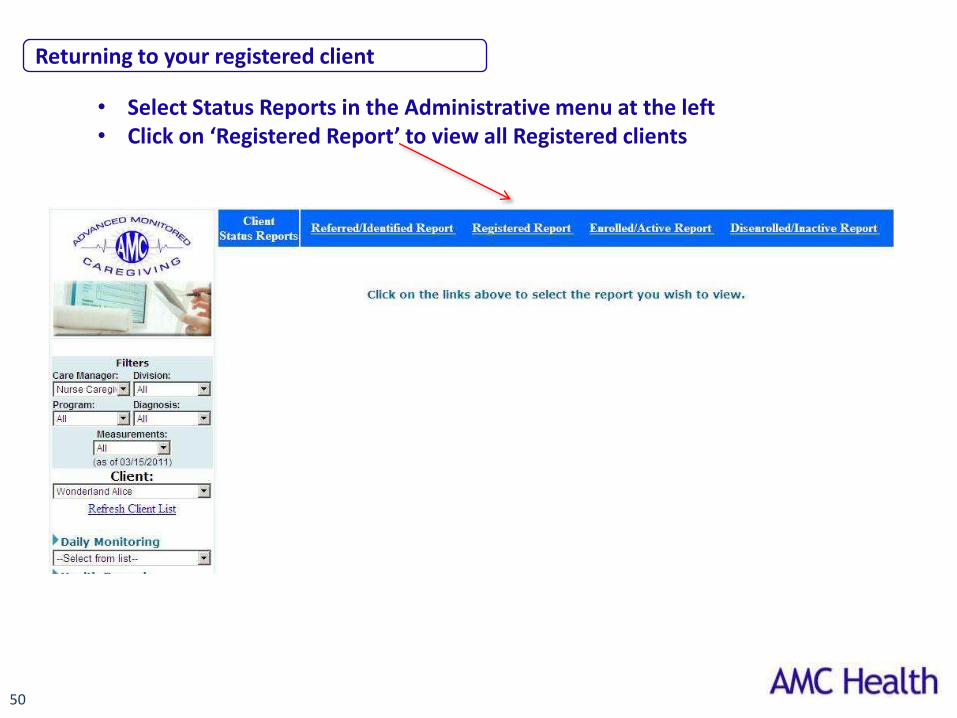
Returning to your registered client
• Select Status Reports in the Administrative menu at the left• Click on ‘Registered Report’ to view all Registered clients
51
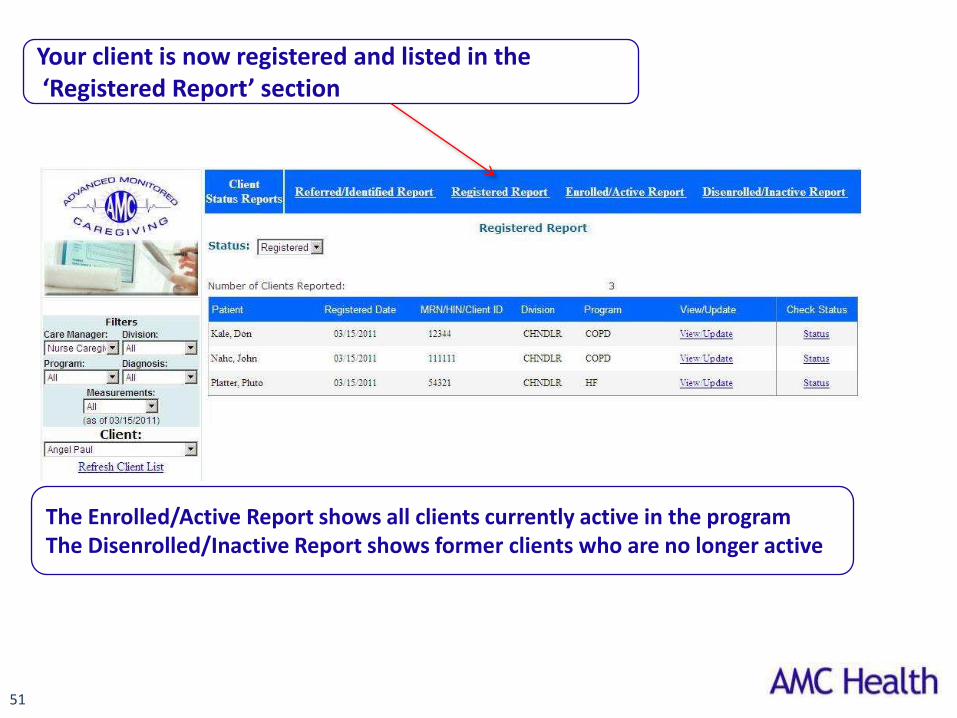
Your client is now registered and listed in the‘Registered Report’ section
The Enrolled/Active Report shows all clients currently active in the programThe Disenrolled/Inactive Report shows former clients who are no longer active