the exposure triangle - enchanted lens · exposure triangle 9/30/2009 ©kim ashley 1 ......
TRANSCRIPT

Exposure Triangle 9/30/2009
©Kim Ashley 1
Welcome!
The Exposure Triangle
Kim Ashley, Instructor
www.kimashleyphotos.com
OVERVIEW1. Exposure Triangle Workshop – October 1
Meet from 5:45 to 6:45 pm
2. Field Trip in Old Town - October 3Meet at 8:30 am at Gazebo in Plaza. Bring tripod, zoom lens, manual.
2-Hour Session
3. Feedback Session – October 15Meet from 5:45 to 6:45 pm. Bring images on CD, flashdrive, prints.
Exposure Triangle 9/30/2009
©Kim Ashley 2
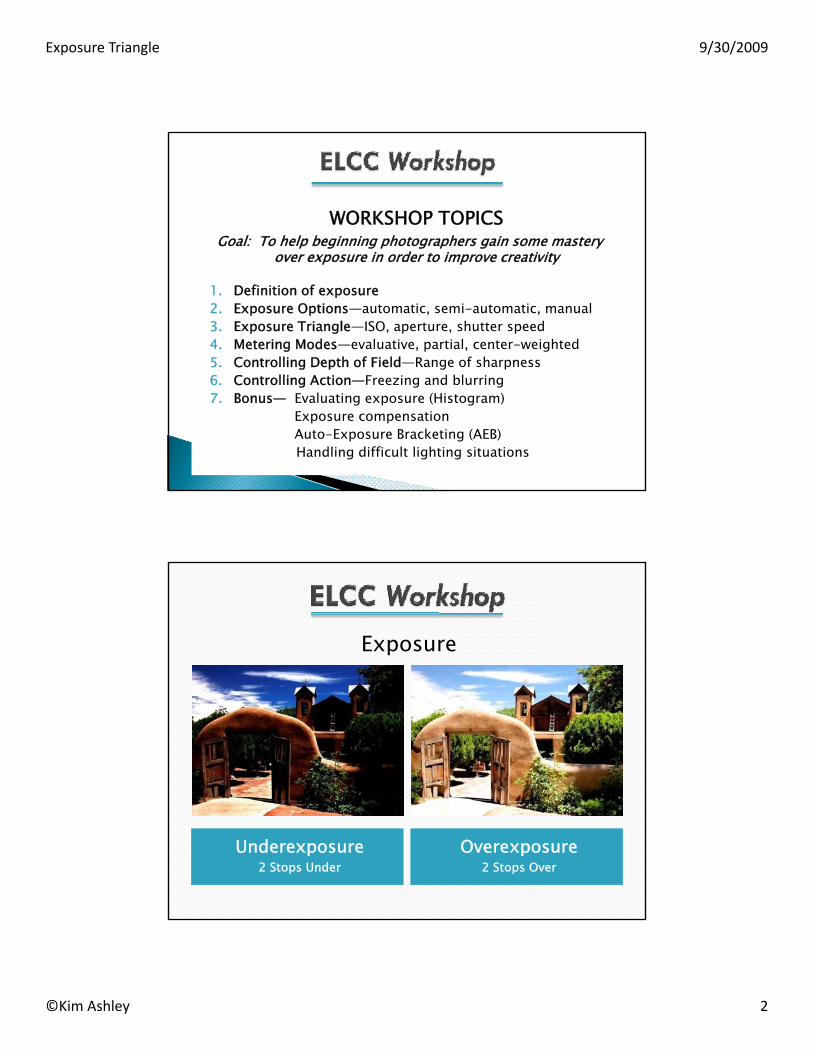
WORKSHOP TOPICSGoal: To help beginning photographers gain some mastery
over exposure in order to improve creativity
1. Definition of exposure2. Exposure Options—automatic, semi-automatic, manual3. Exposure Triangle—ISO, aperture, shutter speed4. Metering Modes—evaluative, partial, center-weighted5. Controlling Depth of Field—Range of sharpness6. Controlling Action—Freezing and blurring7. Bonus— Evaluating exposure (Histogram)
Exposure compensationAuto-Exposure Bracketing (AEB)Handling difficult lighting situations
Underexposure2 Stops Under
Overexposure2 Stops Over
Exposure
Exposure Triangle 9/30/2009
©Kim Ashley 3
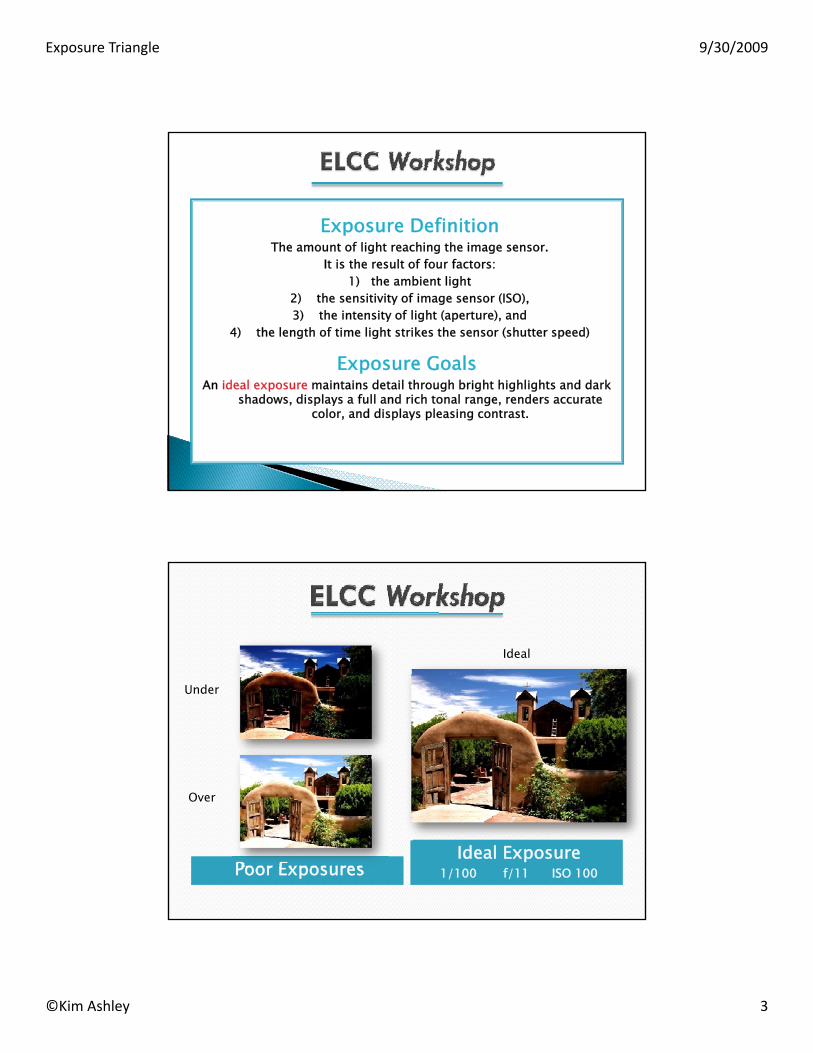
Exposure DefinitionThe amount of light reaching the image sensor.
It is the result of four factors: 1) the ambient light
2) the sensitivity of image sensor (ISO), 3) the intensity of light (aperture), and
4) the length of time light strikes the sensor (shutter speed)
Exposure GoalsAn ideal exposure maintains detail through bright highlights and dark
shadows, displays a full and rich tonal range, renders accurate color, and displays pleasing contrast.
Poor ExposuresIdeal Exposure
1/100 f/11 ISO 100
Under
Over
Ideal
Exposure Triangle 9/30/2009
©Kim Ashley 4
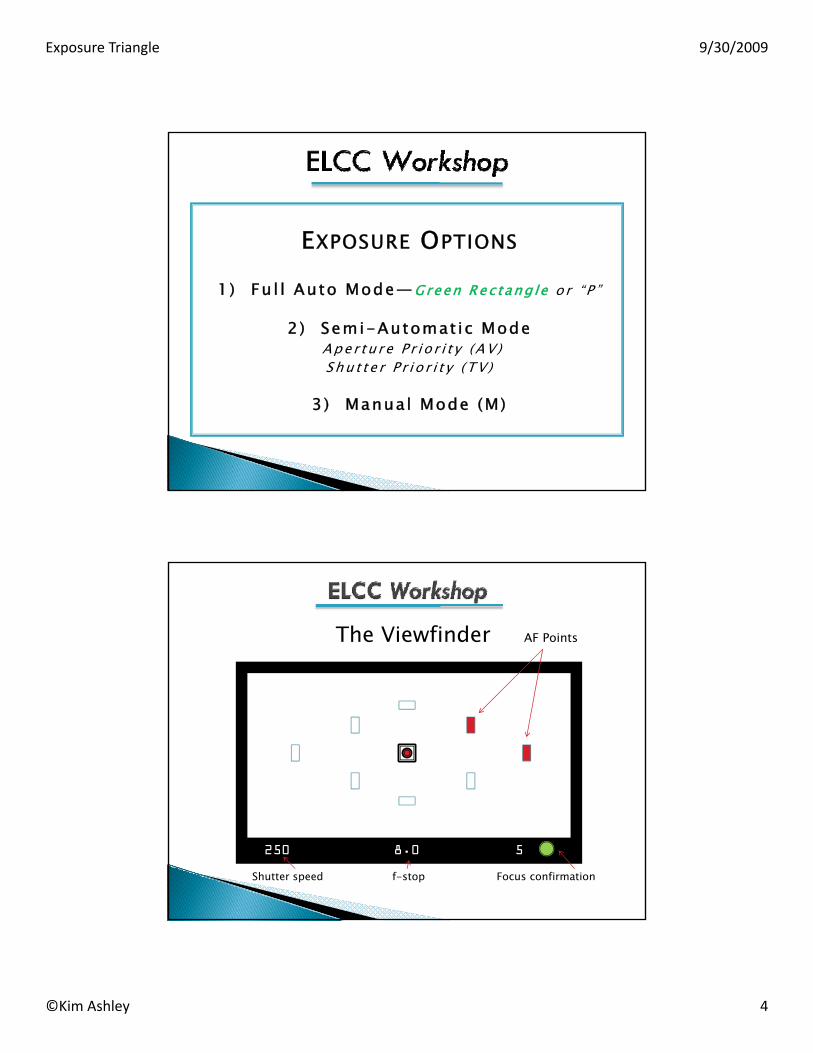
EXPOSURE OPTIONS
1) Fu l l Auto Mode—Green R ec tang le o r “ P ”
2 ) Semi-Automat ic ModeAper tu re P r i o r i t y (AV )Shu t t e r P r i o r i t y ( TV )
3 ) Manual Mode (M)
250 8.0 5
The Viewfinder AF Points
Shutter speed f-stop Focus confirmation
Exposure Triangle 9/30/2009
©Kim Ashley 5
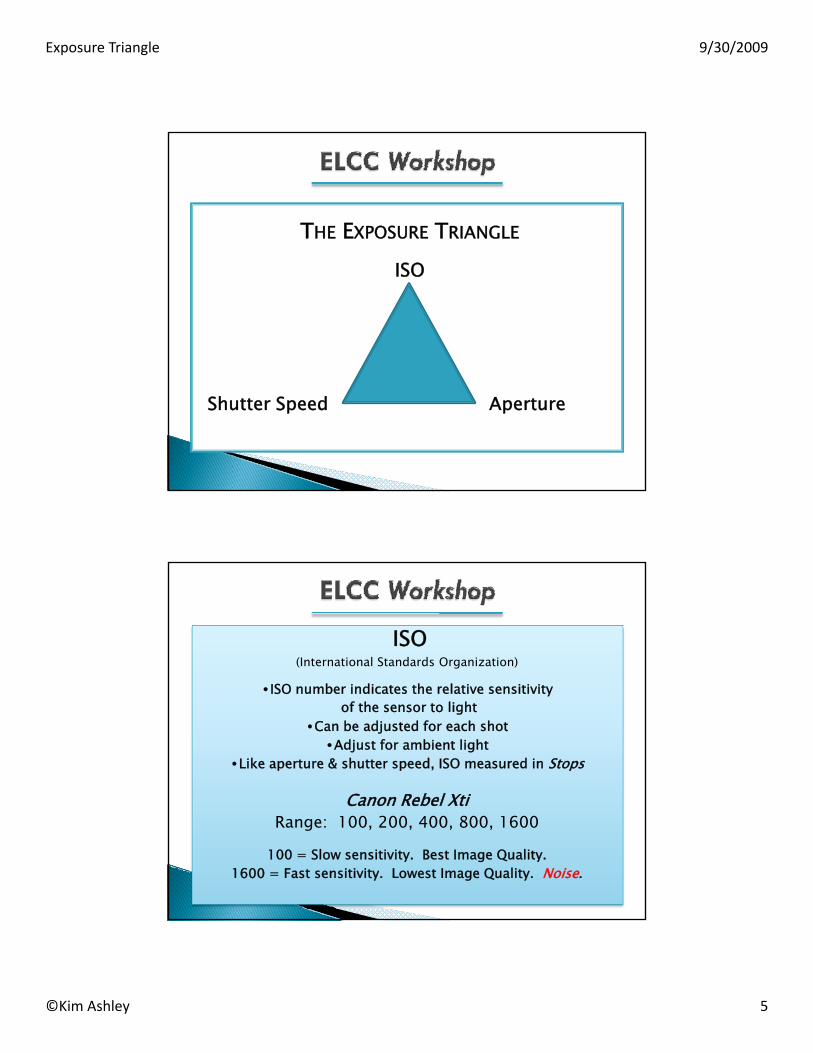
THE EXPOSURE TRIANGLE
ISO
Shutter Speed Aperture
ISO(International Standards Organization)
•ISO number indicates the relative sensitivityof the sensor to light
•Can be adjusted for each shot•Adjust for ambient light
•Like aperture & shutter speed, ISO measured in Stops
Canon Rebel XtiRange: 100, 200, 400, 800, 1600
100 = Slow sensitivity. Best Image Quality.1600 = Fast sensitivity. Lowest Image Quality. Noise.
Exposure Triangle 9/30/2009
©Kim Ashley 6
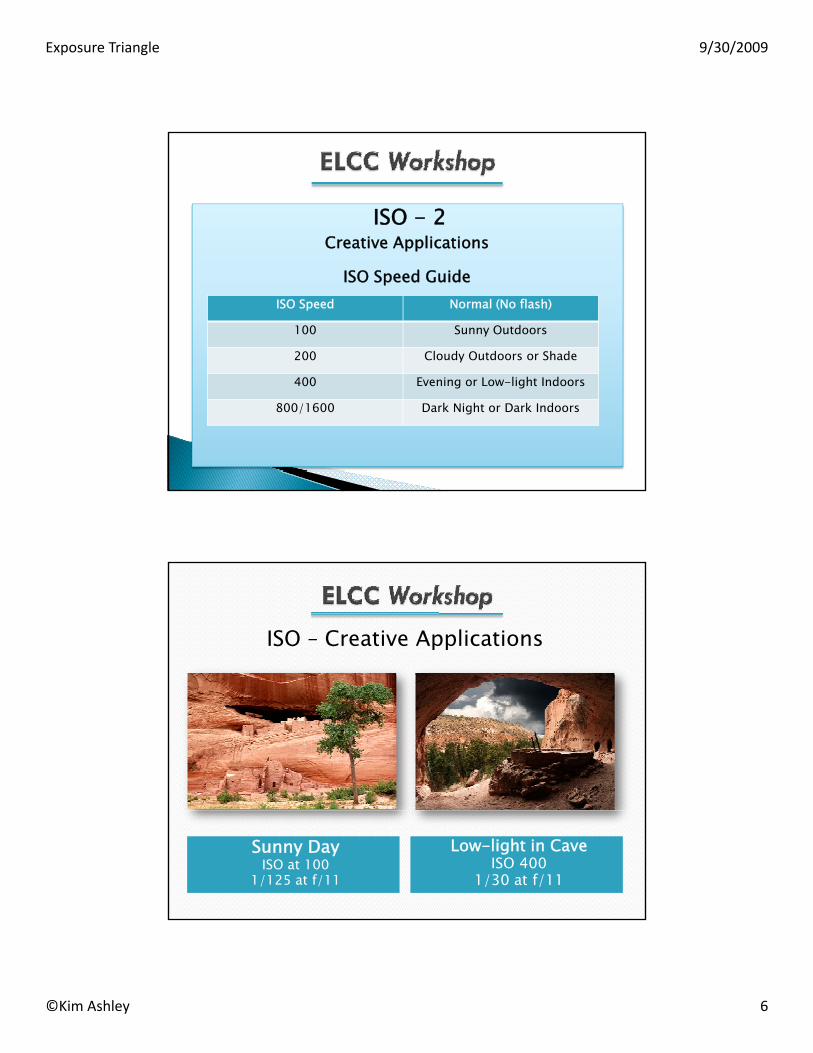
ISO - 2Creative Applications
ISO Speed GuideISO Speed Normal (No flash)
100 Sunny Outdoors
200 Cloudy Outdoors or Shade
400 Evening or Low-light Indoors
800/1600 Dark Night or Dark Indoors
Sunny DayISO at 100
1/125 at f/11
Low-light in CaveISO 400
1/30 at f/11
ISO – Creative Applications
Exposure Triangle 9/30/2009
©Kim Ashley 7
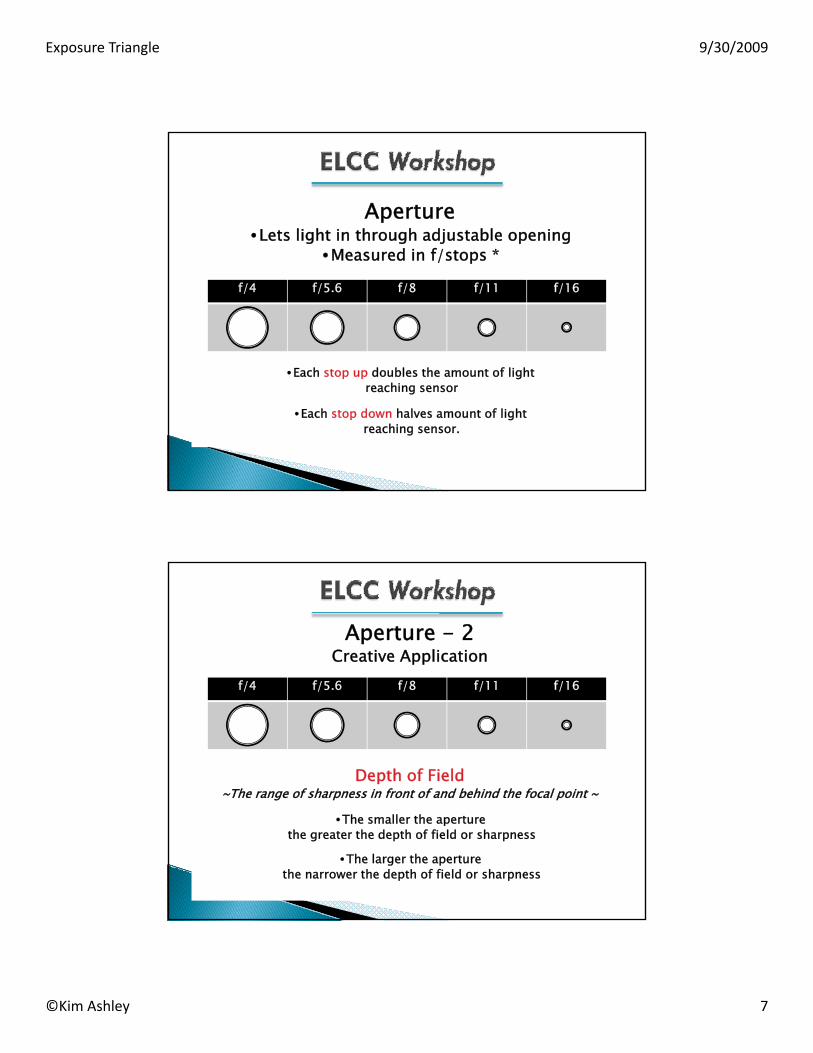
Aperture•Lets light in through adjustable opening
•Measured in f/stops *
•Each stop up doubles the amount of lightreaching sensor
•Each stop down halves amount of lightreaching sensor.
f/4 f/5.6 f/8 f/11 f/16
Aperture - 2Creative Application
Depth of Field~The range of sharpness in front of and behind the focal point ~
•The smaller the aperturethe greater the depth of field or sharpness
•The larger the aperturethe narrower the depth of field or sharpness
f/4 f/5.6 f/8 f/11 f/16
Exposure Triangle 9/30/2009
©Kim Ashley 8
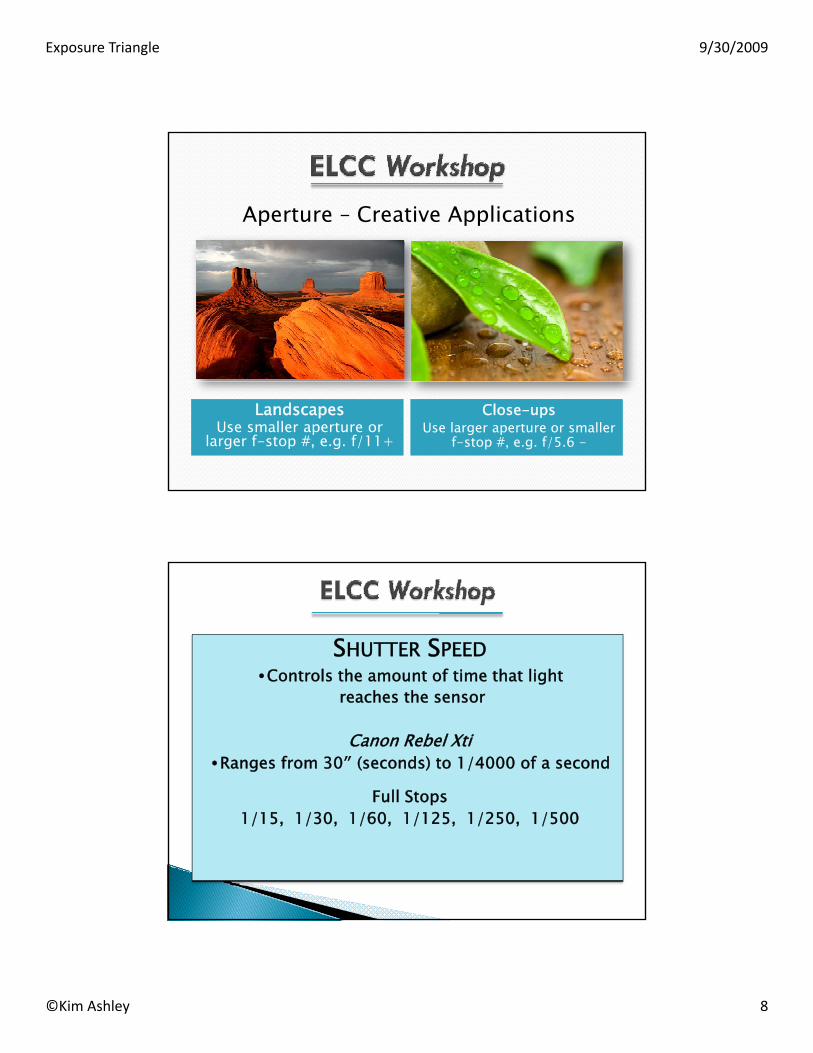
LandscapesUse smaller aperture or
larger f-stop #, e.g. f/11+
Close-upsUse larger aperture or smaller
f-stop #, e.g. f/5.6 -
Aperture – Creative Applications
SHUTTER SPEED•Controls the amount of time that light
reaches the sensor
Canon Rebel Xti•Ranges from 30″ (seconds) to 1/4000 of a second
Full Stops1/15, 1/30, 1/60, 1/125, 1/250, 1/500
Exposure Triangle 9/30/2009
©Kim Ashley 9
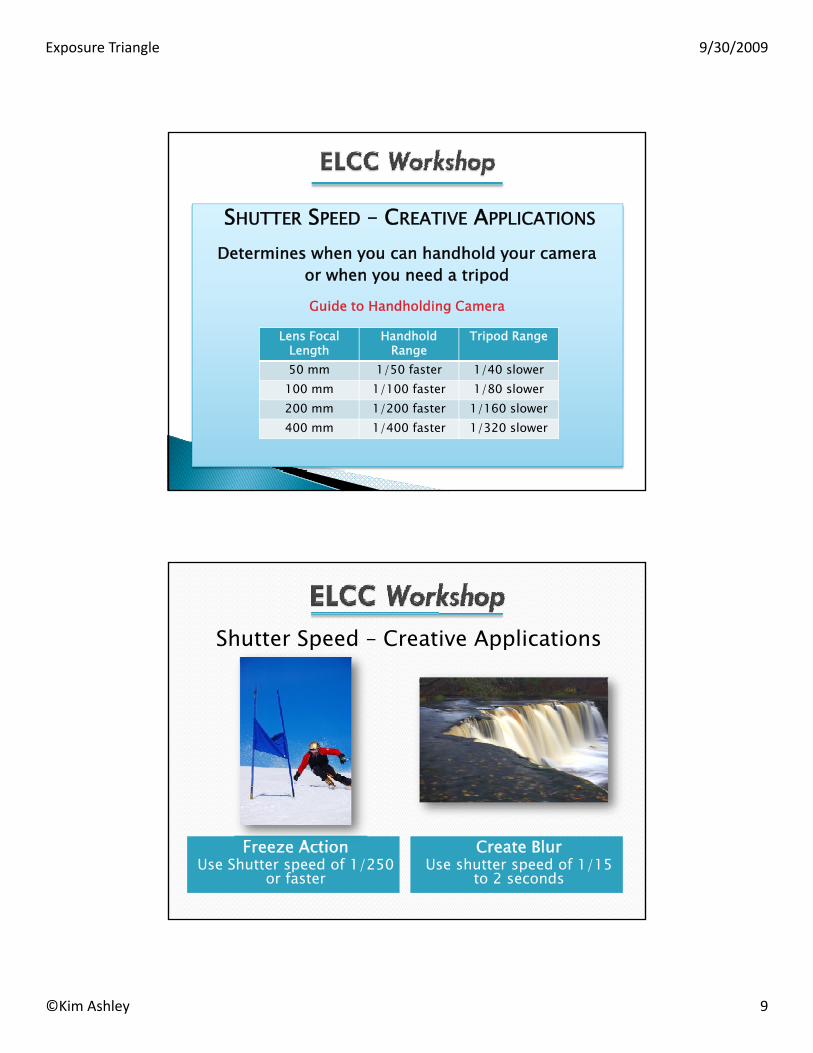
SHUTTER SPEED – CREATIVE APPLICATIONS
Determines when you can handhold your cameraor when you need a tripod
Guide to Handholding Camera
Lens Focal Length
Handhold Range
Tripod Range
50 mm 1/50 faster 1/40 slower100 mm 1/100 faster 1/80 slower200 mm 1/200 faster 1/160 slower400 mm 1/400 faster 1/320 slower
Freeze ActionUse Shutter speed of 1/250
or faster
Create BlurUse shutter speed of 1/15
to 2 seconds
Shutter Speed – Creative Applications
Exposure Triangle 9/30/2009
©Kim Ashley 10
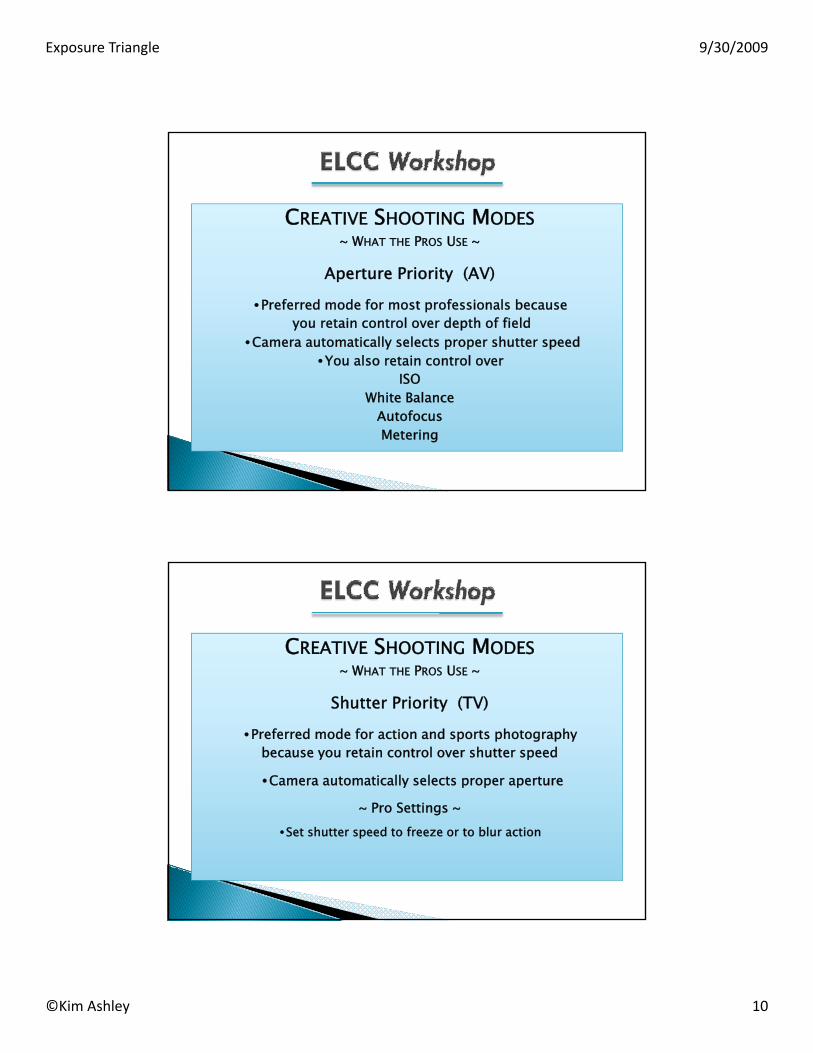
CREATIVE SHOOTING MODES~ WHAT THE PROS USE ~
Aperture Priority (AV)
•Preferred mode for most professionals becauseyou retain control over depth of field
•Camera automatically selects proper shutter speed•You also retain control over
ISOWhite Balance
AutofocusMetering
CREATIVE SHOOTING MODES~ WHAT THE PROS USE ~
Shutter Priority (TV)
•Preferred mode for action and sports photographybecause you retain control over shutter speed
•Camera automatically selects proper aperture
~ Pro Settings ~•Set shutter speed to freeze or to blur action
Exposure Triangle 9/30/2009
©Kim Ashley 11
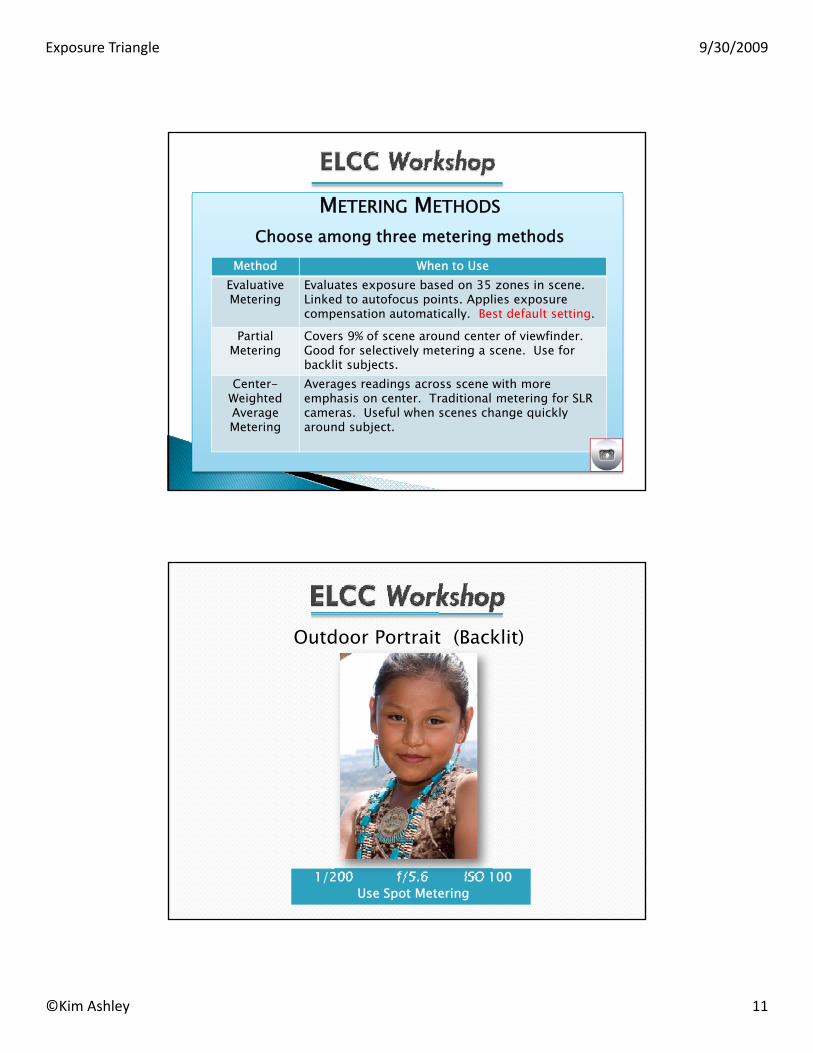
METERING METHODSChoose among three metering methods
Method When to UseEvaluative Metering
Evaluates exposure based on 35 zones in scene. Linked to autofocus points. Applies exposure compensation automatically. Best default setting.
Partial Metering
Covers 9% of scene around center of viewfinder. Good for selectively metering a scene. Use for backlit subjects.
Center-Weighted AverageMetering
Averages readings across scene with more emphasis on center. Traditional metering for SLR cameras. Useful when scenes change quickly around subject.
1/200 f/5.6 ISO 100Use Spot Metering
Outdoor Portrait (Backlit)
Exposure Triangle 9/30/2009
©Kim Ashley 12
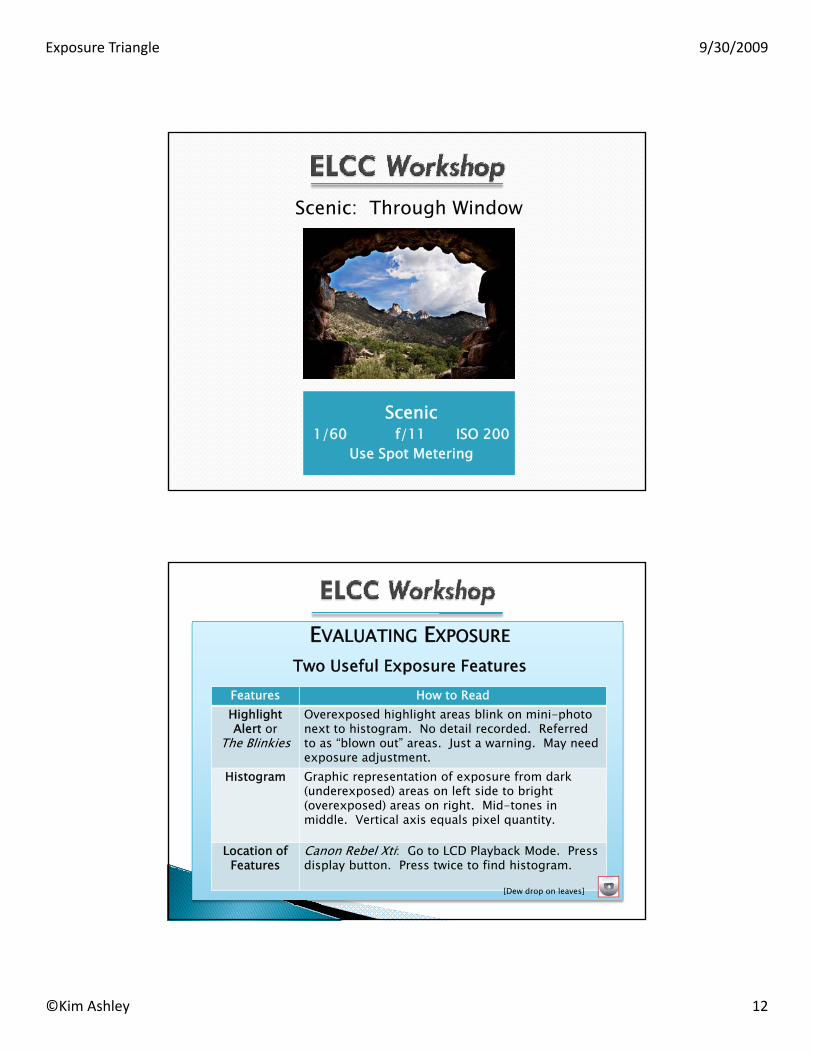
Scenic1/60 f/11 ISO 200
Use Spot Metering
Scenic: Through Window
EVALUATING EXPOSURETwo Useful Exposure Features
Features How to ReadHighlight Alert or
The Blinkies
Overexposed highlight areas blink on mini-photo next to histogram. No detail recorded. Referred to as “blown out” areas. Just a warning. May need exposure adjustment.
Histogram Graphic representation of exposure from dark (underexposed) areas on left side to bright (overexposed) areas on right. Mid-tones in middle. Vertical axis equals pixel quantity.
Location of Features
Canon Rebel Xti: Go to LCD Playback Mode. Press display button. Press twice to find histogram.
[Dew drop on leaves]

Exposure Triangle 9/30/2009
©Kim Ashley 13
Exposure CompensationYour meter bases exposure on average reflectance of objects,
which is 18%
What do you do for non-average scenes?
1. Overly bright scenes—e.g. white bunny in snow Add +1 to +2 compensation
2. Overly dark scenes—e.g. black cat in coal binSubtract -1 to -2 compensation
ELCC Workshop
EXPOSURE COMPENSATIONPLUS/MINUS Button
Feature DescriptionAdd compensation for brighter exposure. Subtract compensation for darker exposure. To use, press button and rotate main dial. Compensation appears in viewfinder and LCD monitor. Reset after use.
Bright SubjectsWhite Bunny in
Snow
Meter underexposes very bright subjects. So add compensation in increments to get correct exposure. White bunny in snow, add +2 stops of compensation.
Dark SubjectsBlack Cat in
Coal Bin
Meter increases exposure on very dark subjects. So subtract compensation in increments. Black cat in coal bin, subtract -2 stops of compensation.
-
+
[Bowling Pin]
-
+
Exposure Triangle 9/30/2009
©Kim Ashley 14
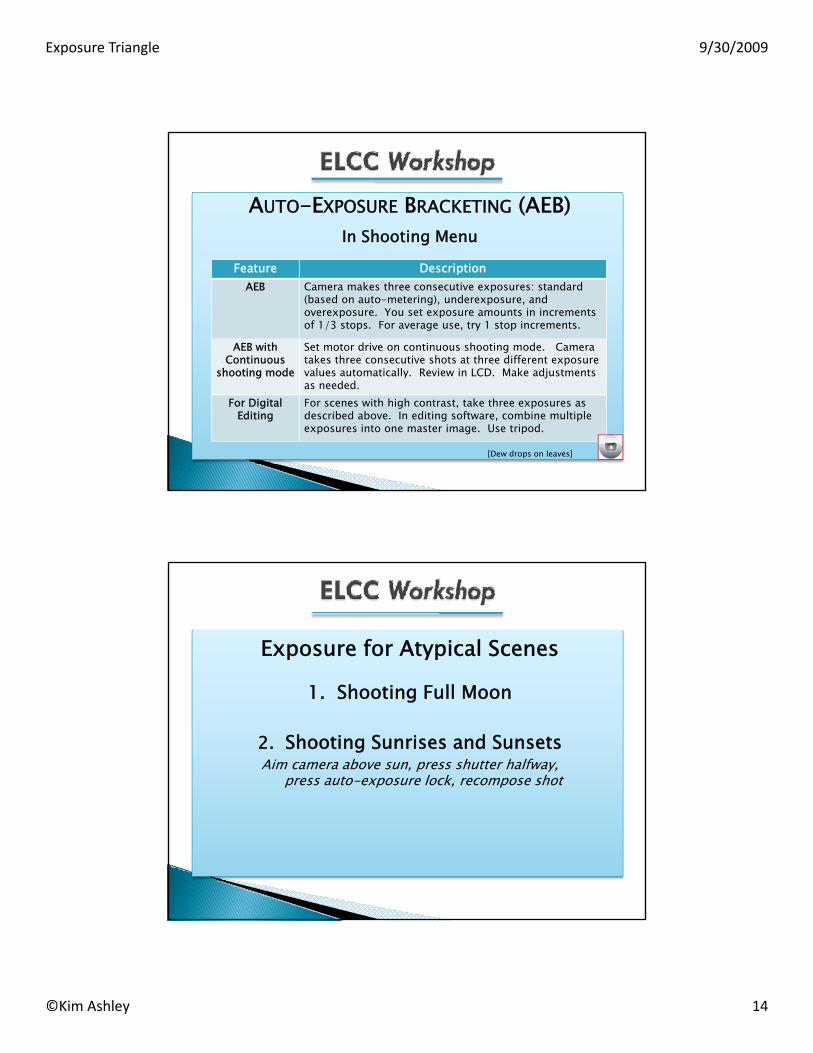
AUTO-EXPOSURE BRACKETING (AEB)In Shooting Menu
Feature DescriptionAEB Camera makes three consecutive exposures: standard
(based on auto-metering), underexposure, and overexposure. You set exposure amounts in increments of 1/3 stops. For average use, try 1 stop increments.
AEB with Continuous
shooting mode
Set motor drive on continuous shooting mode. Camera takes three consecutive shots at three different exposure values automatically. Review in LCD. Make adjustmentsas needed.
For Digital Editing
For scenes with high contrast, take three exposures as described above. In editing software, combine multiple exposures into one master image. Use tripod.
[Dew drops on leaves]
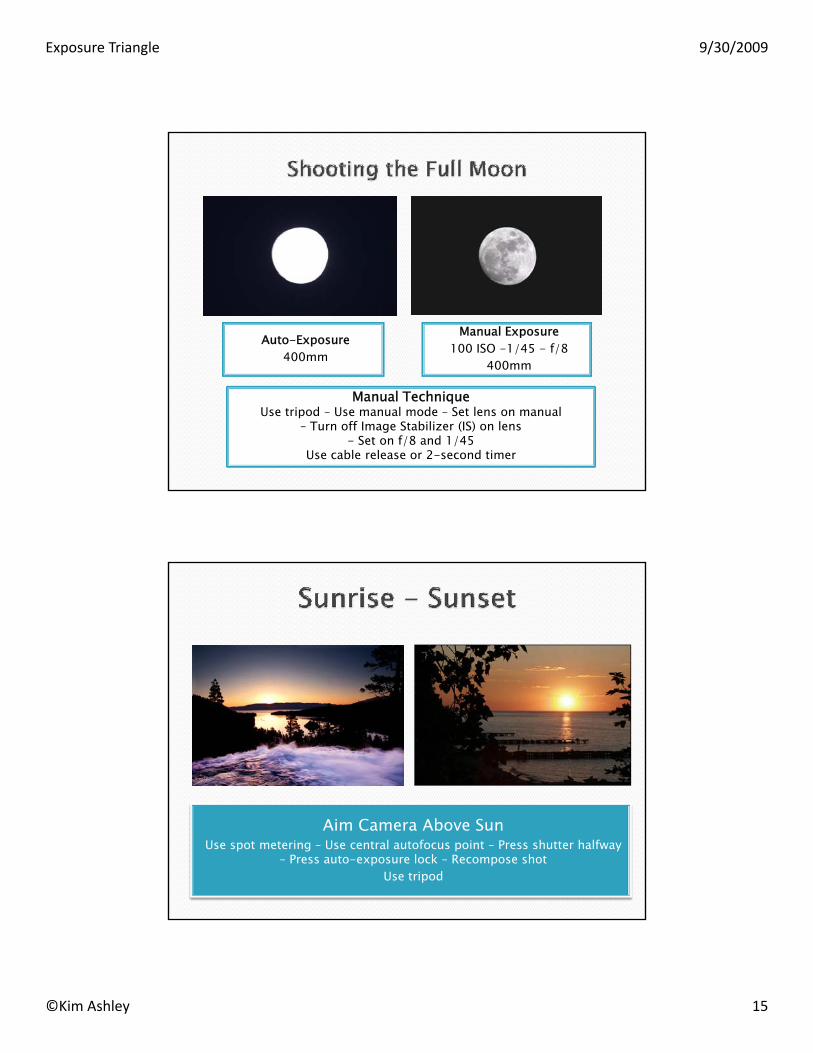
Exposure for Atypical Scenes
1. Shooting Full Moon
2. Shooting Sunrises and SunsetsAim camera above sun, press shutter halfway,
press auto-exposure lock, recompose shot
Exposure Triangle 9/30/2009
©Kim Ashley 15
Manual Exposure100 ISO -1/45 - f/8
400mm
Auto-Exposure400mm
Manual TechniqueUse tripod – Use manual mode – Set lens on manual
– Turn off Image Stabilizer (IS) on lens- Set on f/8 and 1/45
Use cable release or 2-second timer
Aim Camera Above SunUse spot metering – Use central autofocus point – Press shutter halfway
– Press auto-exposure lock – Recompose shotUse tripod