the little crab coconut - amilovesgurumi
TRANSCRIPT

1
http://amilovesgurumi.com/
The Little Crab Coconut
Crochet Pattern
Design by K. Godinez

2
http://amilovesgurumi.com/
Material:
• crochet hook size 2.5
• Wool: Mouzakis butterfly super 10 in shades of red, yellow, ecru, orange
• fiberfill
• Safety eyes 12 mm
• sewing needle
• 6 small red buttons for the shell
• pipe cleaners
Size:
The crab coconut has a span of 11,81 inches (30 cm)
Abbreviations:
ch - chain
st - stitch
R - round
sc – single crochet
Number x sc – the number tells you how many times you make a single crochet
(or a dc, hdc …) in each stitch
inc - make two single crochet in one stitch
dec - two stitches crochet together with a sc
rep - repeat until end of round
sl st - slip stitch
sc with color change: change the color on this sc (when you make this single crochet stitch, grab
the new color of your wool and pull it through the two loops on your hook).
Note:
Unless indicated otherwise, parts are worked in rounds for the crab. You can start with 2 ch or
make a magic ring. It is important to mark the beginning of your round.
Body
2 x ch in color yellow
R 01 6 x sc in second ch from hook 6
R 02 inc in each stitch 12
R 03 sc, inc, rep 18
R 04 2 x sc, inc, rep 24
R 05 3 x sc, inc, rep 30
R 06 4 x sc, inc, rep 36
R 07 5 x sc, inc, rep 42
R 08 6 x sc, inc, rep 48
R 09 7 x sc, inc, rep 54
R 10 8 x sc, inc, rep 60

3
http://amilovesgurumi.com/
R 11 9 x sc, inc, rep 66
R 12 – R 15 sc in each stitch 66
R 16 9 x sc, dec, rep 60
R 17 8 x sc, dec, rep 54
R 18 7 x sc, dec, rep 48
R 19 6 x sc, dec, rep 42
R 20 5 x sc, dec, rep 36
R 21 4 x sc, dec, rep 30
R 22 3 x sc, dec, rep, stuff the body firmly with fiberfill 24
R 23 2 x sc, dec, rep 18
R 24 sc, dec, rep, stuff it again 12
R 25 dec, rep 6
sl st, cut the thread and sew it.
Legs at the side (6 x)
2 x ch in color orange
R 01 5 x sc in second ch from hook 5
R 02 inc, 4 x sc 6
R 03 – R 06 sc in each stitch 6
R 07 sc with color change to ecru, 5 x sc 6
R 08 sc, sc with color change to orange, sc, inc, 2 x sc 7
R 09 – R 13 sc in each stitch 7
R 14 6 x sc, sc with color change to ecru 7
R 15 sc in each stitch 7
R 16 sc, dec, 2 x sc, inc, sc with color change to orange 7
R 17 sc, dec, 2 x sc, inc, sc 7
R 18 sc, inc, 5 x sc, 8
R 19 5 x sc, inc, 2 x sc 9
R 20 2 x sc, inc, 6 x sc, pull in the pipe cleaner, now start stuffing with fiberfill
continuously 10

4
http://amilovesgurumi.com/
R 21 – R 27 sc in each stitch 10
R 28 6 x sc, dec, 2 x sc 9
R 29 sc in each stitch 9
R 30 sc in each stitch 9
R 31 9 x sl st, stuff the leg 9
Cut the thread and sew it.
Legs (hind legs 2 x)
2 x ch in color orange
R 01 5 x sc in second ch from hook 5
R 02 inc, 4 x sc 6
R 03 – R 05 sc in each stitch 6
R 06 sc with color change to ecru, 5 x sc 6
R 07 sc, sc with color change to orange, sc, inc, 2 x sc 7
R 08 – R 11 sc in each stitch 7
R 12 6 x sc, sc with color change to ecru 7
R 13 sc in each stitch 7
R 14 sc, dec, 2 x sc, inc, sc with color change to orange 7
R 15 sc, dec, 2 x sc, inc, sc 7
R 16 sc, inc, 5 x sc, 8
R 17 5 x sc, inc, 2 x sc 9
R 18 2 x sc, inc, 6 x sc, pull in the pipe cleaner,
now start stuffing with fiberfill continuously 10
R 19 – R 24 sc in each stitch 10
R 25 6 x sc, dec, 2 x sc 9
R 26 sc in each stitch 9
R 27 9 x sl st, stuff the leg 9
Cut the thread and sew it.
Scissor legs (2 x)
2 x ch in color orange
R 01 6 x sc in second ch from hook 6
R 02 inc in each stitch 12
R 03 inc, 11 x sc 13
R 04 – R 08 sc in each stitch 13
R 09 dec, 4 x sc, dec, 4 x sc, sc with color change to ecru 11
R 10 3 x sc, dec, 4 x sc, dec 9
R 11 sc in each stitch 9
R 12 sc with color change to orange, 3 x sc, inc, 3 x sc, inc 11
R 13 5 x sc, inc, 5 x sc 12
R 14 inc, 11 x sc 13
R 15 sc in each stitch 13

5
http://amilovesgurumi.com/
R 16 sc in each stitch 13
R 17 12 x sc, sc with color change to ecru 13
R 18 4 x sc, dec, 5 x sc, dec 11
R 19 3 x sc, dec, 4 x sc, dec 9
R 20 sc with color change to red, inc, 3 x (sc, inc), sc 13
R 21 inc in each stitch 26
R 22 sc in each stitch 26
R 23 sc in each stitch 26
R 24 sc in each stitch, put the pipe cleaner inside and stuff the leg 26
R 25 14 x sc 14
R 26 Skip 12 stitches, you can see it at the picture:
the row starts after the marked stitch. Split the pipe cleaners, 14 x sc 14
R 27 12 x sc, dec 13
R 28 dec, 11 x sc 12
R 29 dec, 10 x sc 11
R 30 6 x sc, dec, 3 x sc 10
R 31 5 x sc, dec, 3 x sc 9
R 32 4 x sc, dec, 3 x sc 8
R 33 3 x sc, dec, 3 x sc 7
R 34 2 x sc, dec, 3 x sc, cut off the overhanging pipe cleaner 6
R 35 dec, sl st, cut he thread and sew the opening.
Stuff this part from below with fiberfill and shape it.
Row 26 starts here
6
http://amilovesgurumi.com/
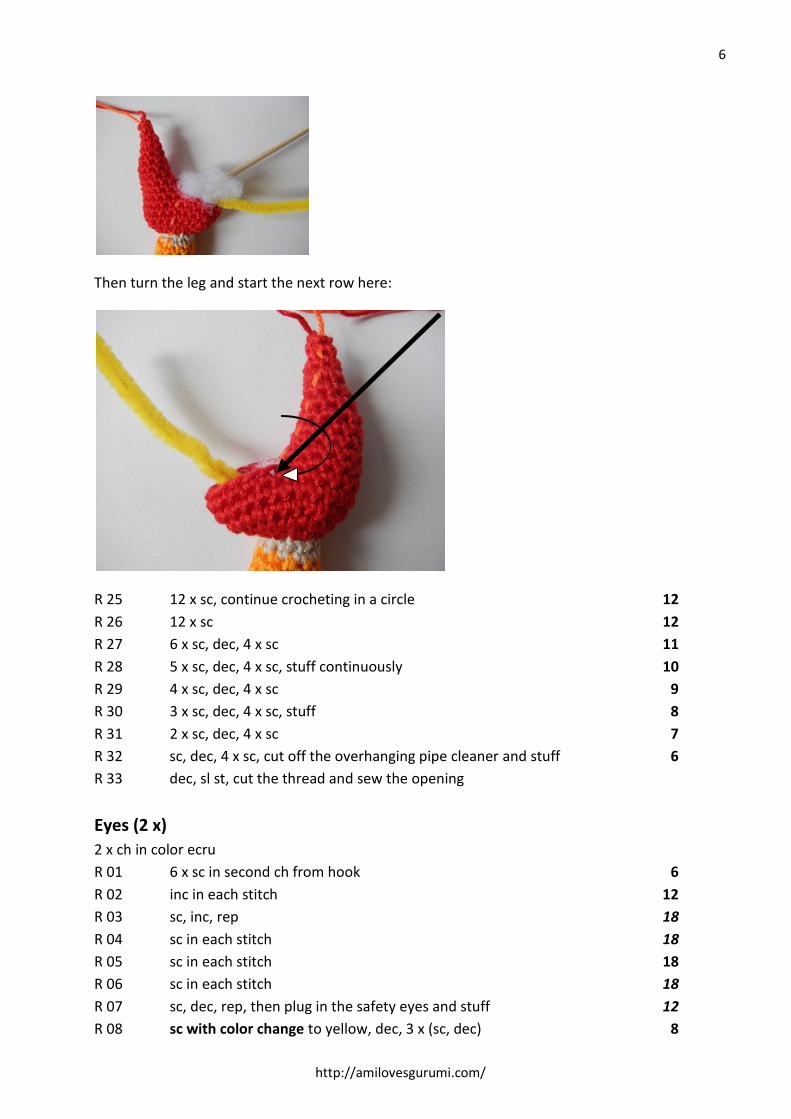
Then turn the leg and start the next row here:
R 25 12 x sc, continue crocheting in a circle 12
R 26 12 x sc 12
R 27 6 x sc, dec, 4 x sc 11
R 28 5 x sc, dec, 4 x sc, stuff continuously 10
R 29 4 x sc, dec, 4 x sc 9
R 30 3 x sc, dec, 4 x sc, stuff 8
R 31 2 x sc, dec, 4 x sc 7
R 32 sc, dec, 4 x sc, cut off the overhanging pipe cleaner and stuff 6
R 33 dec, sl st, cut the thread and sew the opening
Eyes (2 x)
2 x ch in color ecru
R 01 6 x sc in second ch from hook 6
R 02 inc in each stitch 12
R 03 sc, inc, rep 18
R 04 sc in each stitch 18
R 05 sc in each stitch 18
R 06 sc in each stitch 18
R 07 sc, dec, rep, then plug in the safety eyes and stuff 12
R 08 sc with color change to yellow, dec, 3 x (sc, dec) 8

7
http://amilovesgurumi.com/
R 09 – R 14 sc in each stitch, stuff again 8
sl st, cut the thread and sew it
Shell on top
2 x ch in color red
R 01 6 x sc in second ch from hook 6
R 02 inc in each stitch 12
R 03 sc, inc, rep 18
R 04 2 x sc, inc, rep 24
R 05 sc, inc, 5 x (3 x sc, inc), 2 x sc 30
R 06 4 x sc, inc, rep 36
R 07 2 x sc, inc, 5 x (5 x sc, inc), 3 x sc 42
R 08 6 x sc, inc, rep 48
R 09 3 x sc, inc, 5 x (7 x sc, inc), 4 x sc 54
R 10 8 x sc, inc, rep 60
R 11 sc in each stitch 60
R 12 1. sc, 4 x ch,
2. crochet in the 4th stitch from the needle a sc
3. skip two stitches,
4. sc, 4 x ch, continue with 2.
Crochet around the shell one time with these stitches, cut the thread and sew it.
1. 2.
3. 4.

8
http://amilovesgurumi.com/
Shell at the bottom
2 x ch in color red
R 01 6 x sc in second ch from hook 6
R 02 inc in each stitch 12
R 03 sc, inc, rep 18
R 04 2 x sc, inc, rep 24
R 05 sc, inc, 5 x (3 x sc, inc), 2 x sc 30
R 06 4 x sc, inc, rep 36
R 07 2 x sc, inc, 5 x (5 x sc, inc), 3 x sc 42
R 08 6 x sc, inc, rep 48
R 09 3 x sc, inc, 5 x (7 x sc, inc), 4 x sc 54
R 10 8 x sc, inc, rep 60
R 11 sc in each stitch 60
R 12 With these stitches we make a loop, which we need for the buttons.
8 x sc, 17 x ch, crochet in the 17th chain from the needle a sc.
5 x sc, 17 x ch, crochet in the 17th chain from the needle a sc.
5 x sc, 17 x ch, crochet in the 17th chain from the needle a sc.
5 x sc, 17 x ch, crochet in the 17th chain from the needle a sc.
15 x sc, 17 x ch, crochet in the 17th chain from the needle a sc.
5 x sc, 17 x ch, crochet in the 17th chain from the needle a sc.
5 x sc, 17 x ch, crochet in the 17th chain from the needle a sc.
5 x sc, 17 x ch, crochet in the 17th chain from the needle a sc.
7 x sc

9
http://amilovesgurumi.com/
Finishing
All parts of the crab:
First pin the top and the bottom part of the shell to the body:
Then the buttons are pinned on the top part, so we can find the exact place for them
Take off the top part now and sew on the buttons.

10
http://amilovesgurumi.com/
Place the parts to the body and button up:
Pin the eyes and the scissor legs and sew them.
The second picture shows the exact place of the scissor legs:
Pin the side and the shorter hind legs between the loops and sew them onto the body. Make sure that you don’t sew the shell, because the shell is replaceable and your crab can wear different colored shells.

11
http://amilovesgurumi.com/
Here you can see the place, where you have to sew the hind legs:
Your little crab coconut is ready!!
Have fun
Do not copy or post this pattern without my permission. Don‘t translate this pattern into another language for reselling or publishing on the internet. You can sell a small number of the finished item on markets or local stores.
This pattern is copyrighted by Karin Godinez (amilovesgurumi.com).