mailin and skyla - amilovesgurumi
TRANSCRIPT
1
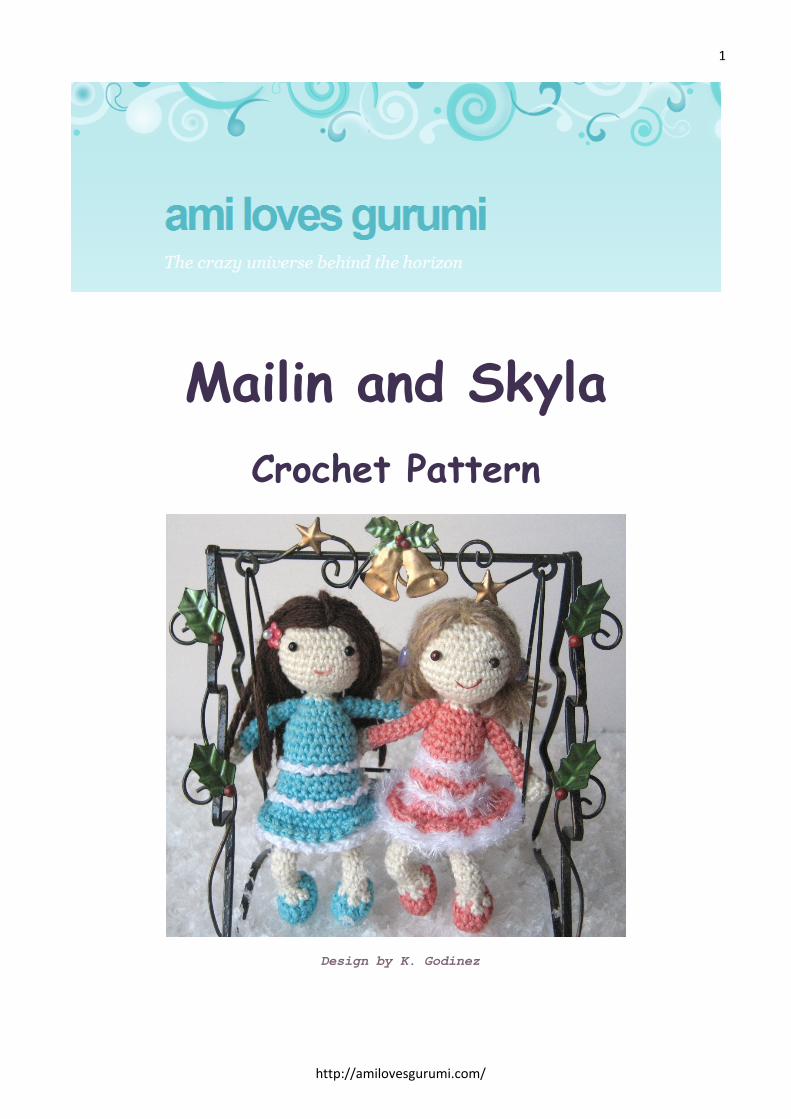
Mailin and SkylaCrochet Pattern
Design by K. Godinez
http://amilovesgurumi.com/

2
Material:
• crochet hook size 2.5
• wool in shades of white, turquoise, salmon pink, brown, skin color, eyelash yarn
• fiberfill
• 2 Safety Eyes, 9 mm/0,35 inches
• beads for the hair
• Pipe cleaners
• sewing needle
Size: Mailin and Skyla are about 14 cm (5,5 inches) tall
Abbreviations:
ch - chain
st - stitch
R - round
sc – single crochet
Number x sc – the number tells you how many times you make a single crochet in each stitch
inc - two sc in one stitch
dec – decrease: two stitches crochet together
dc – double crochet
sl st - slip stitch
rep - repeat until end of round
BLO – back loops only
FLO – front loops only
Note:
Unless indicated otherwise, parts are worked in rounds. You can start with 2 ch or make a magic
ring. It is important to mark the beginning of your round.
http://amilovesgurumi.com/

3
Body and head
Starting from the body: 2 ch in color turquoise or salmon pink
R 01 6 x sc in second ch from hook 6
R 02 6 x inc 12
R 03 (sc, inc) x 6 18
R 04 sc in each stitch 18
R 05 sc in each stitch 18
R 06 sc in each stitch 18
R 07 BLO, sc in each stitch 18
R 08 BLO, sc in each stitch 18
R 09 sc in each stitch 18
R 10 sc in each stitch 18
R 11 sc in each stitch 18
R 12 sc in each stitch 18
R 13 (sc, dec) x 6, change to skin color, stuff the body 12
R 14 dec x 6 6
R 15 sc in each stitch 6
R 16 inc in each stitch 12
R 17 inc in each stitch 24
R 18 sc in each stitch 24
R 19 (5 x sc, inc) x 4 28
R 20 sc in each stitch 28
R 21 10 x sc, put in a thread to mark the place for the eye, 6 x FM,
put in a thread for the second eye, 12 x sc 28
R 22 sc in each stitch 28
R 23 sc in each stitch 28
R 24 (5 x sc, dec) x 4, plug in the Safety Eyes 24
R 25 (2 x sc, dec) x 6 18
R 26 (sc, dec) x 6, stuff the head 16
R 27 dec x 6 12
sl st, cut the thread and close the opening
http://amilovesgurumi.com/

4
Dress
in color white: start on the dolls back (in front loops from
round 8): sl st, 2 x ch, sl st, rep
if you want to use eyelash yarn, work only with sl st into the
front loops
start on the dolls back (in front loops from round 7)
in color turquoise or salmon pink
R 01 (2 x sc, inc) x 6 24
R 02 sc in each stitch 24
R 03 sc in each stitch 24
R 04 BLO, 3 x sc, inc, rep 30
(when the dress is finished, work in this front loops sc, 2 x ch, sc, rep) or
with eyelash yarn only sl st
R 05 sc in each stitch 30
R 06 sc in each stitch 30
R 07 FLO: (sc, ch) x 30 30 sc + 30 ch
R 08 with white, BLO from R 7 of the dress (dc, 2 x ch) x 30 30 dc + 60 ch
cut the thread
Arms
2 ch in skin color
R 01 6 x sc in second ch from hook 6
R 02 sc in each stitch 6
R 03 sc in each stitch, change color to turquoise or salmon pink 6
R 04 dec, 4 x sc 5
R 05 sc in each stitch 5
R 06 sc in each stitch 5
R 07 sc in each stitch 5
R 08 sc in each stitch 5
http://amilovesgurumi.com/

5
R 09 sc in each stitch 5
R 10 sc in each stitch 5
R 11 sc in each stitch 5
R 12 sc in each stitch 5
sl st, cut the thread, pull a piece of pipe cleaner inside the arm.
Legs
in color turquoise or salmon pink
5 x ch
R 01 start in the second chain from hook: 3 x sc, 3 x sc in one stitch,
continue working on the other side of the chain 3 x sc,
3 x sc in the first chain from R 01 12
R 02 continue crocheting in a circle: 4 x sc, 2 x inc, 6 x sc 14
R 03 2 x sc, 4 x dec, 4 x sc, change to skin color 10
R 04 4 x dec, 2 x sc 6
R 05 sc in each stitch 6
R 06 sc in each stitch, stuff only the foot 6
R 07 sc in each stitch 6
R 08 sc in each stitch 6
R 09 sc in each stitch 6
R 10 sc in each stitch 6
R 11 inc, 5 x sc 7
R 12 sc in each stitch 7
R 13 sc in each stitch 7
R 14 sc in each stitch 7
sl st, cut the yarn, pull two pieces of pipe cleaner inside the leg
http://amilovesgurumi.com/

6
Hair for Mailin
Cut threads with a length of about 20 cm (8 inches)
As shown in the picture, pin the threads of hair in the back of the
head first.
Now start on the front head and
sew on the thread to the head.
Then cut the hair to the desired
length. If you want, you can sew a
pearl on the side.
http://amilovesgurumi.com/

7
Hair for Skyla
Cut yarn with a length of about 20 cm (8 inches)
Mark the middle line of the head with pins.
Put the yarn from the front to the
back on the head and sew them.
Cut hair to the desired length.
Make the braids and sew
on the beads.
Finishing
Sew arms and legs to the body. Embroider the mouth.
Congratulations, your doll is finished!
Do not copy or post this pattern without my permission. Don‘t translate this pattern into
another language for reselling or publishing on the internet. You can sell a small number of the
finished doll on markets or local stores.
http://amilovesgurumi.com/