the perils of painting portuguese - warlord games · however, wargames illustrated asked if i would...
TRANSCRIPT

I had noticed that Warlord had released a very nice box of Portuguese Napoleonic Line Infantry but I had filed them under ‘might do later’ in my list of projects. The Portuguese army had a good reputation as solid allies of the British in the Peninsular War but my main focus was on the Waterloo period. Although I had nearly completed my British contingent for this period, my attention was drawn towards some of our other allies at the time, such as Brunswickers, Nassau or even Dutch troops. Portuguese were definitely not on the agenda.
However, Wargames Illustrated asked if I would mind producing a short article on
how I batch paint my Napoleonic troops and bribed me with a big bag of Warlord Portuguese line infantry. I am easily seduced by new toys and so I cleared the work bench and set to work on my new project. After all, they looked simple enough. I should make clear at this stage, that I am more interested in producing units for a general club wargame rather than painting a specific unit for a specific battle. My army is destined to appear on the table at the White Hart pub in Nottingham not in a painting comp.
The batch painting method that I use not only enables me to produce units at a reasonable rate but also allows me to maximise my painting time. It’s very easy to use any spare five minutes to add some paint to a figure without having to think about where you are in the process. With all the above in mind, I’ll take you through the stages that I used to produce my first unit of Portuguese Line infantry, the 23rd, Almeida Regiment.
WHERE TO START...
Having begun my reasearch on the the uniforms of the 23rd, I swiftly dicovered that whilst there are plenty of pictures and articles on the more glamorous Portuguese light infantry - the Caçadores, the Line infantry are somewhat overlooked. The usually dependable Osprey book was a good source on the organization and history of the Portuguese Army but lacked detail, and more importantly, pictures of the Portuguese as they appeared later in the Peninsular campaign.
Hence the title of this piece. I found myself going round in circles trying to track down relivant information. Not a big concern when painting for myself, however I was conscious that I was writing for this august organ and did not want to mislead other wargamers with my mistakes. So in my step by step guide I have highlighted the uncertainties and explain why I have painted the troops the way I have. I hope that it will be useful and cautionary.
THE PERILS OF PAINTING
PORTUGUESE
We asked Steve Wood of Arcane Scenery fame to expand his British Napoleonic army and try his hand at painting up some Warlord Games plastic Portuguese, little did he know what we were getting him into! In this article he explains his journey, his findings and how he applied the paints.
From the pages of wargames illustrated magazine (where you will find lots of other similar great articles)
THE PERILS OF PAINTING
PORTUGUESE
Step One Assembly & priming
The first job is to clean up and assemble the models. There are no specific assem-bly instructions with the set, nor could I find any online and this is my only minor gripe about the set. Although the leaflet included gives you some clues, you have to pretty much work it out for yourself. This is a bit frustrating as I know that Warlord Games will have done their homework and you can bet that they researched the subject in depth before starting the new figures. Each sprue has five torsos and equipment packs, as well as five heads wearing the early ‘Barretina’ shako and five heads wearing the later stovepipe shako as supplied by the British as part of the reorganisation of the Portuguese army under Beresford in 1810.
One of the torsos requires an arm (two choices) to be attached and it is at this point that you notice that this figure has the larger epaulettes as worn by the grenadier company. This does make sense as there are enough parts to make 16 centre company figures and four grenadiers. With four command figures, this gives you the ideal number for a Black Powder unit.
On closer inspection, the grenadier torso is missing a bayonet scabbard, so I assumed that the pack with the swords would go with the grenadiers, the rest with the line company figures. It also seemed sensible to use the heads with moustaches for the grenadiers, as regulations allowed them to sport moustaches. There was also a separate water bottle included, again I assume for the grenadiers but I left this off my models as I thought it too fiddly to attach. Besides, as I said earlier, most of my gaming is done in a pub, so if they got thirsty, they could pop to the bar for a drink..! I used the heads with stovepipe shakos as I wanted the troops to represent a unit in the later stages of the Peninsular War.
Once I had sorted this out, it was a very straightforward task to assemble the models and prime them ready for painting. There is very little in the way of mould lines and there was no flash at all on the figures that I had.
Step TwoFlesh and black bits
I always start with the faces and hands using Vallejo 70815 Flesh.
I work from the inside of a figure to the outside. As each colour is applied I try to ensure that I am as neat as possible, tidying any major errors as I go. The next colour was 70850 Black for the shakos, scabbards, boots and gaiters.
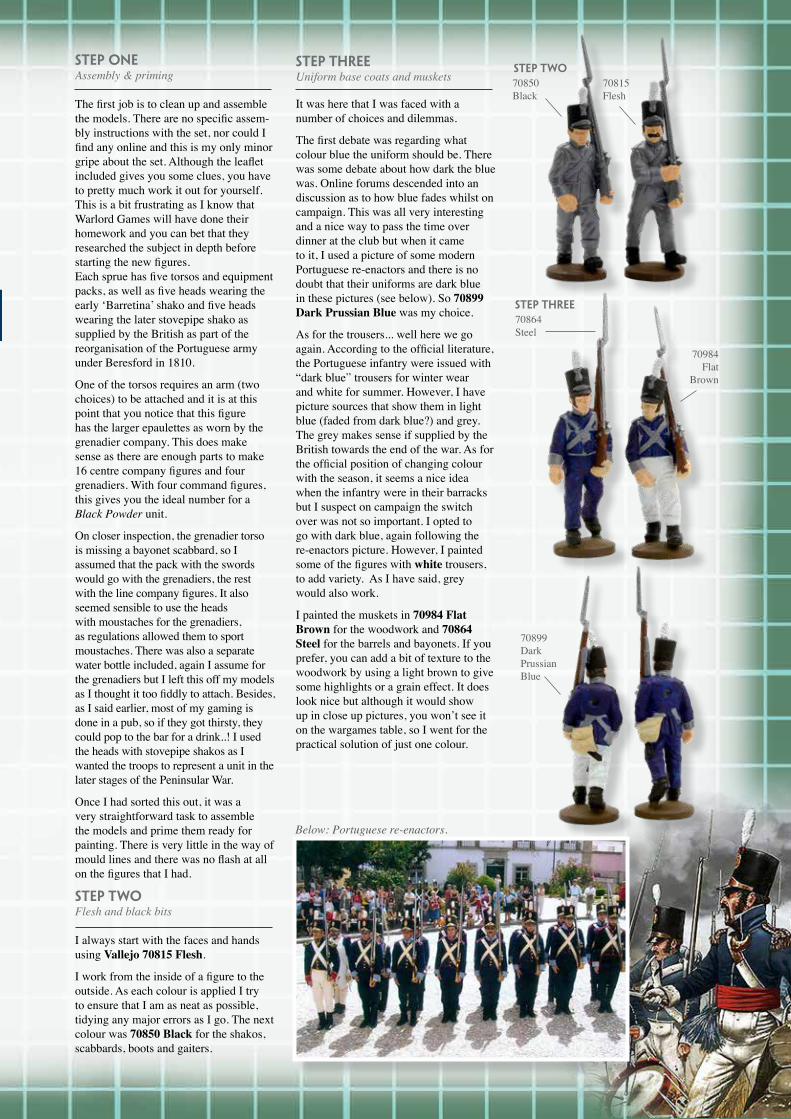
Step THREE Uniform base coats and muskets It was here that I was faced with a number of choices and dilemmas.
The first debate was regarding what colour blue the uniform should be. There was some debate about how dark the blue was. Online forums descended into an discussion as to how blue fades whilst on campaign. This was all very interesting and a nice way to pass the time over dinner at the club but when it came to it, I used a picture of some modern Portuguese re-enactors and there is no doubt that their uniforms are dark blue in these pictures (see below). So 70899 Dark Prussian Blue was my choice.
As for the trousers... well here we go again. According to the official literature, the Portuguese infantry were issued with “dark blue” trousers for winter wear and white for summer. However, I have picture sources that show them in light blue (faded from dark blue?) and grey. The grey makes sense if supplied by the British towards the end of the war. As for the official position of changing colour with the season, it seems a nice idea when the infantry were in their barracks but I suspect on campaign the switch over was not so important. I opted to go with dark blue, again following the re-enactors picture. However, I painted some of the figures with white trousers, to add variety. As I have said, grey would also work.
I painted the muskets in 70984 Flat Brown for the woodwork and 70864 Steel for the barrels and bayonets. If you prefer, you can add a bit of texture to the woodwork by using a light brown to give some highlights or a grain effect. It does look nice but although it would show up in close up pictures, you won’t see it on the wargames table, so I went for the practical solution of just one colour.
Step Two
Step three
70850 Black
70864 Steel
Below: Portuguese re-enactors.
70815 Flesh
70984 Flat
Brown
70899 Dark Prussian Blue

84
Step fourCross Straps and Webbing
Most pictures show these as being white, although there is some debate as to whether black was also used.
I wouldn’t be surprised if the straps for the haversacks were black, if they were supplied by the British this seems likely. Also, the Caçadores were equipped with black webbing and equipment so I can see how a cross over would have occurred. I went for the white option however and used 70820 Off White. I prefer this white to True White 70951 The off white is a little softer.
Step fiveFacings, piping and turnbacks
Time to start on the detail, in this case the facings and turnbacks.
With regard to the facings, the Osprey book is very clear here as is another good sourcebook Uniforms of the Napoleonic Wars by Digby Smith. The table supplied in both shows how the Portuguese army was divided into three divisions, each division with its own facing colours. The Warlord Games leaflet also has this information. (They also say that the shako plumes should be red and white - all the pictures I could find show them as white.)
I had chosen the 23rd Ameida Regiment and so the piping and turnbacks on the uniform for this division would have been red and the facings (collars & cuffs) for the regiment sky blue. I used 70961 Sky Blue for the facings and 70947 Red for the piping and turn-backs.
The large shoulder straps on the centre company are left dark blue with red piping around the edge. The epaulettes for the grenadiers are described as being same as the facing colour of the regiment, mixed with dark blue. I am not sure how this looked but just went for some vertical stripes!
For the turnbacks, I painted them a solid red. I’m not sure if this is correct as some pictures show the turn-backs in dark blue with a broad red stripe around the outside. Other pictures seem to show some sort of ornate button holding the turnbacks in place. As the equipment will almost cover the turnbacks, I went for the simple one colour option!
Step sixFinal details In adding the final detailing I painted the front plate and badge of the shako in 70801 Brass and also used this colour to paint the buttons and the detail on the musket straps.
Incidentally, there is some question regarding the shape of the front plate on the shakos. Most of the pictures that I have seen show the plate to have a pointed shape to it. Warlord have sculpted it as a rounded crescent. I am assured that both existed. If you are bothered it is easy to change this with paint. I just kept the plate as sculpted.
The cockade on the shako was painted with 70899 Dark Prussian Blue blue centre and red outside. I also took this opportunity to correct any overruns in my painting and to tidy any other errors.
70820 Off White
70961 Sky Blue
70947 Red
70801 Brass
70899 Dark Prussian Blue

Step sevenBack packs & equipment
I now painted the back packs and equipment. They had been primed in black whilst on the sprue, so painting them was a quick job.
I followed the British pattern, with grey blankets (70992 Neutral Grey - they could also be dark blue but I assumed that if they were British supplied, they would be grey or white), black haversacks and cartridge boxes, white strapping and I used 70871 Leather Brown for the other accessories.
I wasn’t sure what colour to paint the sword straps for the grenadiers and initially painted them white. However, closer inspection of the picture references showed an ensign with red sword strap and the knot the colour of his facings, so I followed this scheme using 70947 Red.
The packs are then glued in place.
Step eightShading & highlights
I now painted the figures in Army Painter Quick Shade Varnish. I prefer the Dark Tone and this works well with blue figures. This will give the shading that brings the figure to life.
Note that I always paint the shade on. I don’t like the full immersion technique, it’s messy and wasteful. Painting the shade on also gives me control of what is going where!
I let the figures dry for at least 24 hours - don’t be impatient at this stage. The figures will be touch dry in an hour or so but leaving them allows the varnish to harden.
The final part of this stage is to spray the figures with matt varnish or anti shine. This can be fraught with difficulty as matt varnish can be temperamental. Follow the advice given by Army Painter and the results will be fine.
Incidentally, there is no need to use the Quick Shade if you are not a fan. Vallejo make shading ink in sepia and black, and Army Painter also make a water-based ink that works. Before Army Painter came along I used Windsor and Newton sepia ink very successfully. I now prefer the Quick Shade as it has a protective varnish that does a good job of protecting my figures on the table.
The figures are just about complete but I now spend a bit more time on painting. I find that the Quick Shade can ‘dirty down’ the lighter colours and dull the metals, so it is worth giving some areas a quick highlight.
I repaint the main straps and the shako plumes with white to make them really stand out. I also repaint the bayonets with silver and highlight the buttons with a dot of gold. It’s also worth adding a bit of flesh to highlight the figures’ noses and cheeks. If all this sounds like a stage too far, it is really up to you. I find it very quick to do and you only have to touch in the highlights where you think it needs doing.
Step nineBasing
Really the basing could be a whole article on its own! However to cut to the chase - I use four figures to a 40mm square base - I prefer Renedra plastic bases for plastic figures and use Sarissa MDF for my metals. I used Vallejo Dark Brown Paste to blend the figures into the base and then it’s a question of painting or dry brushing with light browns, and applying scatter and tufts. The unit is now ready for battle!
I don’t expect to win any painting competitions with the above method but I do expect to win a few games! My plan is to paint four battalions of Portuguese infantry along with a battalion of Caçadores to give me a nice solid base for my Peninsular army.
Backpacks in place (post Quick Shade)
The finished figure, pre basing.
A finished stand of the Warlord Games plastic Portuguese Line Infantry. Four down, twenty more to go.
85