the science of air: lungometer - home | bioed online€¦ · land animals use lungs and a blood...
TRANSCRIPT

THE SCIENCE OF AIR TEACHER’S GUIDE © Baylor College of Medicine
i
from The Science of Air Teacher’s Guide and for Mr. Slaptail’s Secret
Written by
Nancy P. Moreno, Ph.D. Barbara Z. Tharp, M.S. Judith H. Dresden, M.S.
Teacher Resources from the Center for Educational Outreach at
Baylor College of Medicine
© 2010 Baylor College of Medicine. This activity is part of The Science of Air unit. The Science of Air Teacher’s Guide may be used alone or with integrated unit components. The Air unit is comprised of the guide, Mr. Slaptail’s Secret student storybook, Explorations magazine, and two supplements: The Reading Link and The Math Link. For more information on this and other educational programs, contact the Center for Educational Outreach at 713-798-8200, 800-798-8244, or visit www.bcm.edu/edoutreach.

© 2010 by Baylor College of Medicine. All rights reserved.Third edition. First edition published 1997. Printed in the United States of America
ISBN: 978-1-888997-74-3
Teacher Resources from the Center for Educational Outreach at Baylor College of Medicine.
The mark “BioEd” is a service mark of Baylor College of Medicine. The mark “My Health My World” is a trademark of Baylor College of Medicine.
No part of this book may be reproduced by any mechanical, photographic or electronic process, or in the form of an audio recording, nor may it be stored in a retrieval system, transmitted, or otherwise copied for public or private use without prior written permission of the publisher. Black-line masters may be photocopied for classroom use.
The activities described in this book are intended for school-age children under direct supervision of adults. The authors and Baylor College of Medicine cannot be responsible for any accidents or injuries that may result from conduct of the activities, from not specifically following directions, or from ignoring cautions contained in the text.
Development of this unit was supported, in part, by grant numbers R25 ES06932 and R25 ES010698 from the National Institute of Environmental Health Sciences (NIEHS) of the National Institutes of Health (NIH). The opinions, findings and conclusions expressed in this publication are solely those of the authors and do not necessarily reflect the official views of Baylor College of Medicine, NIEHS or NIH.
Authors: Nancy P. Moreno, Ph.D., Barbara Z. Tharp, M.S., and Judith H. Dresden, M.S.Editor: James P. Denk, M.A.Designer and Illustrator: Martha S. Young, B.F.A.
ACKNOWLEDGMENTSThe Science of Air educational materials, first developed as part of the My Health My World® project at Baylor College of Medicine, have benefited from the vision and expertise of scientists and educators representing a wide range of specialties. Our heartfelt appreciation goes to Michael Lieberman, M.D., Ph.D., William A. Thomson, Ph.D., and Carlos Vallbona, M.D., who have lent their support and expertise to the project.
Special acknowledgment is due to our original partners in this project, the Texas Medical Association and the American Physiological Society (APS). We especially thank Marsha Lakes Matyas, Ph.D., of APS, for her direction of field test activities and ongoing collaboration.
Several colleagues provided valuable assistance during the development of this guide. In par-ticular, we would like to thank Zenaido Camacho, Ph.D., Cynthia Jumper, M.D., Fabiola Pineda, M.S., Ronald Sass, Ph.D., and Cathey Whitener, M.S.
Special thanks go to the National Institute of Environmental Health Sciences, Allen Dearry, Ph.D., Frederick Tyson, Ph.D., and Liam O’Fallon for their support of the My Health My World project and the related Environment as a Context for Opportunities in Schools (ECOS) project.
We are especially grateful to the many classroom teachers in Washington, D.C., and Houston and Austin, Texas, who participated in the field tests of these materials and provided invaluable feedback.
Center for Educational Outreach Baylor College of Medicine One Baylor Plaza, BCM411 Houston, Texas 77030 713-798-8200 | 800-798-8244 | [email protected] www.bcm.edu/edoutreach | www.bioedonline.org | www.k8science.org
Baylor College of Medicine www.bcm.edu BioEd Online www.bioedonline.org Center for Educational Outreach www.bcm.edu/edoutreach Centers for Disease Control and Prevention Public Health Image Library http://phil.cdc.gov/phil Frank R. Segarra www.flickr.com/photos/fsegarra K8 Science www.k8science.org National Heart, Lung, and Blood Institute, NIH www.nhlbi.nih.gov U.S. Environmental Protection Agency www.epa.gov
THE SCIENCE OF AIR TEACHER’S GUIDE © Baylor College of Medicine
1
BreathingLife Science Basics
T he cells in our bodies require oxygen to complete the reactions that allow energy to be released from food. The process through which these reactions occur, known as aerobic (from aeros for air) respiration, pro-
duces carbon dioxide as a waste product. Many large organisms have developed systems to supply cells
with oxygen and eliminate carbon dioxide from the body. Fish gills, for example, draw water across thin membranes, thus al-lowing dissolved oxygen to be transferred into the bloodstream. Insects have a network of small tubes that branch throughout the body and carry air directly to individual cells. Most other land animals use lungs and a blood transport (circulatory) system to take in oxygen and transport it throughout the body, while simultaneously removing carbon dioxide.
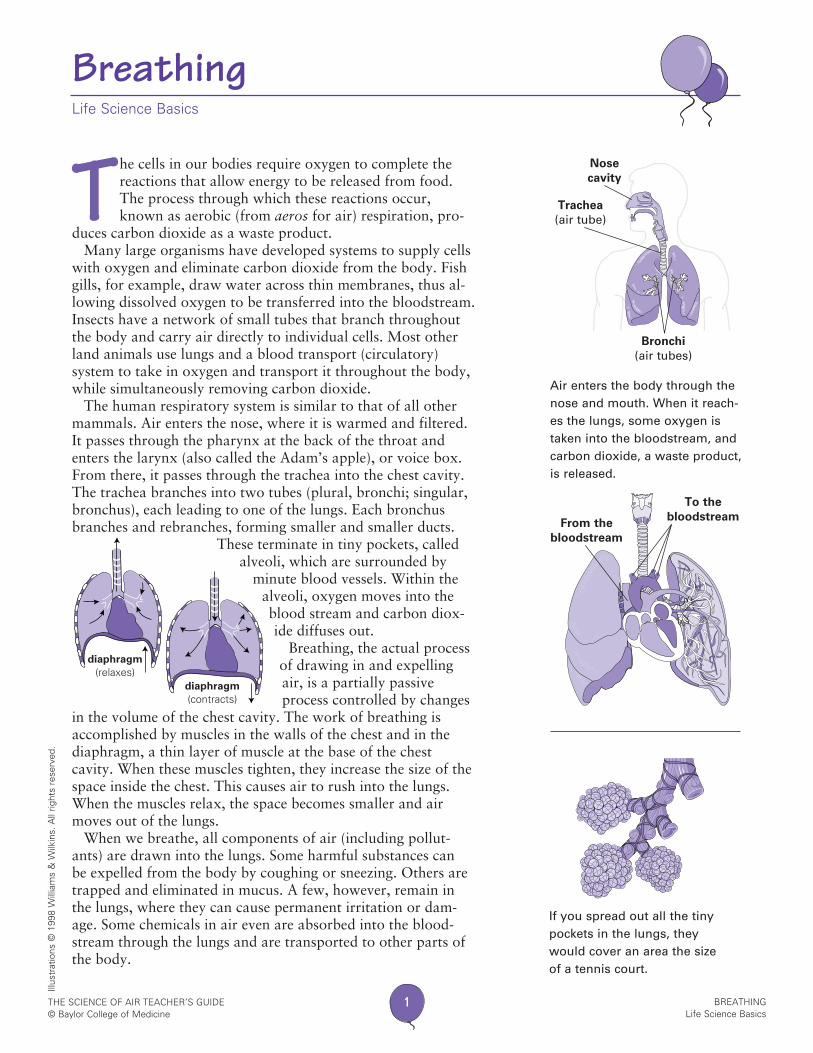
The human respiratory system is similar to that of all other mammals. Air enters the nose, where it is warmed and filtered. It passes through the pharynx at the back of the throat and enters the larynx (also called the Adam’s apple), or voice box. From there, it passes through the trachea into the chest cavity. The trachea branches into two tubes (plural, bronchi; singular, bronchus), each leading to one of the lungs. Each bronchus branches and rebranches, forming smaller and smaller ducts.
These terminate in tiny pockets, called alveoli, which are surrounded by
minute blood vessels. Within the alveoli, oxygen moves into the blood stream and carbon diox-ide diffuses out.
Breathing, the actual process of drawing in and expelling air, is a partially passive process controlled by changes
in the volume of the chest cavity. The work of breathing is accomplished by muscles in the walls of the chest and in the diaphragm, a thin layer of muscle at the base of the chest cavity. When these muscles tighten, they increase the size of the space inside the chest. This causes air to rush into the lungs. When the muscles relax, the space becomes smaller and air moves out of the lungs.
When we breathe, all components of air (including pollut-ants) are drawn into the lungs. Some harmful substances can be expelled from the body by coughing or sneezing. Others are trapped and eliminated in mucus. A few, however, remain in the lungs, where they can cause permanent irritation or dam-age. Some chemicals in air even are absorbed into the blood-stream through the lungs and are transported to other parts of the body.
diaphragm(contracts)
diaphragm(relaxes)
Trachea (air tube)
Bronchi (air tubes)
Nose cavity
Air enters the body through the nose and mouth. When it reach-es the lungs, some oxygen is taken into the bloodstream, and carbon dioxide, a waste product, is released.
To the bloodstreamFrom the
bloodstream
If you spread out all the tiny pockets in the lungs, they would cover an area the size of a tennis court.
BREATHING Life Science Basics
Illus
trat
ions
© 1
998
Will
iam
s &
Wilk
ins.
All
right
s re
serv
ed.

THE SCIENCE OF AIR TEACHER’S GUIDE © Baylor College of Medicine
2
LungometerLife Science
W hen we breathe inward (inhale), air from outside enters our airways and lungs. As demonstrated in the activity, “Breathing Machine,” breathing is a mechani-cal process, driven by changes in the volume of the
chest cavity. The air taken in with a normal breath represents only part of the total amount of air the lungs can hold. Likewise, the
amount of air normally breathed out-ward (exhaled) represents just a portion of the total amount of air that can be expelled.
The maximum amount of air that can be blown out of the lungs after taking a deep breath is known as vital lung capacity. But some air always remains in the lungs and airways.
Diseases of the respiratory system affect lung volumes and capacities in
many different ways. Some diseases reduce the lungs’ vital capacity. Others cause changes in the amount of air held in the lungs after air is blown out forcefully.
SAFETY Students with asthma or other breathing problems should not measure their vital lung capacities. Each student will need his or her own mouthpiece (see Setup). Tubing also may be washed with antibacterial soap or soaked in a mild bleach solution. Wash tubing before storing. Always follow district and school science laboratory safety procedures. It is good practice to have students wash hands before and after any laboratory activity. Clean work areas with disinfectant.
SETUPCut plastic drinking straws in half to serve as mouthpieces. Each student will use his or her own clean mouthpiece, inserted into the plastic tubing of the lungometer. This activity requires two class periods and is appropriate for students to carry out in small groups. Students should rotate jobs, so that each participant has an oppor-tunity to measure his or her vital lung capacity. Most students will find it helpful to see a lungometer that you have
Mr. Slaptail’s Secret Story, pp. 27–31
Explorations Dr. Cindy Jumper, p. 7
Unit Links
Mouthpiece
CONCEPTS • Air takes up space.• The lungs hold air.• Air travels in and out of the
lungs.• People differ in the amount
of air that they can blow out of their lungs.
OVERVIEW Students will investigate their own vital lung capacities — the amount of air that can be forced out of the lungs in a single breath.
SCIENCE, HEALTH & MATH SKILLS • Predicting• Observing• Measuring• Graphing
TIMEPreparation: 10–20 minutesClass: one session of 30–45 minutes to build and use lungometers; one session of 30–45 minutes to examine results
MATERIALS Each group will need:• Beaker or marked container,
500–1,000 mL• Crayon or permanent marker
(dark colors)• Milk jug with lid, 1-gal size • Piece of plastic tubing,
0.5–2 cm diameter, 45 cm in length (18 in.)
• Plastic tub, 10-qt size• Self-adhesive notepad,
1-1/2 in. x 2 in.• Water• Copy of “Make a Lungom-
eter” student sheetEach student will need:• Prepared mouthpiece• Copy of “Lungometer Data
Sheet”
LUNGOMETER Life Science
Illustration by M.S
. Young ©
Baylor C
ollege of Medicine

THE SCIENCE OF AIR TEACHER’S GUIDE © Baylor College of Medicine
3
constructed (see “Make a Lungometer,”) before they attempt to make one themselves. Alternatively, you may conduct the activity as a demonstration, or let each student measure his or her vital lung capacity on a lungometer that you have made.
PROCEDURESession 1: Making lungometers1. Make a lungometer and demonstrate your vital lung capacity to
the class. Tell students they will be able to measure their own vital lung capacities using lungometers that they will build. If students have read Mr. Slaptail’s Secret, mention that they will be making a lungometer just like the one that Riff built. Ask students to predict how much air they will be able to blow out of their lungs.
2. Have the Materials Manager from each group pick up a clean plastic gallon milk container and lid, a plastic dishpan, one piece of plastic tubing and a crayon from a central area.
3. Fill each group’s tub (or have the students fill their tubs) about halfway with water.
4. Have each group calibrate the volume of its plastic jug by add-ing water, 500 mL at a time. One student should pour and another should label each level (500 mL, 1,000 mL, 1,500 mL, etc.) using a crayon. When the jug is filled, put on the lid.
5. Instruct two students from each group to turn the milk jug upside down and lower it into the tub, submerging the top under water.
6. While those two students continue to hold the jug in place, a third student should carefully remove the lid and slide one end of the tubing up into the submerged mouth of the jug. The lungometer is now ready for testing.
7. Before each student uses the lungometer, he or she should insert his or her own clean mouthpiece into the plastic tubing.
8. To measure vital lung capacity, each student will inhale deeply and then blow out all the air he or she can through the tubing into the jug. Then, the students holding the jug should put the lid back on and carefully turn the jug upright. This will enable them to determine the amount of water remaining. Have each student record this value on his/her “Lungometer Data Sheet.”
9. Have younger students measure their vital lung capacities once. Older students may try three times and determine the average.
10. Allow students to calculate their vital lung capacities as shown on the “Lungometer Data Sheet.” (Total volume of jug will equal approximately 4,000 mL with a standard gallon milk jug.)
The vital lung capacity of elementary school children often falls between 1,300 and 2,300 mL.
The Air unit’s Explorations magazine features an inter-view with a doctor who specializes in lung diseases (see p. 7). She is pictured with a real “lungometer,” known as a spirometer.
Did you know that the speed of the particles exhaled by a cough can reach 340 miles per hour?
Continued
LUNGOMETER Life Science
Illus
trat
ion
by M
.S. Y
oung
© B
aylo
r C
olle
ge o
f M
edic
ine

THE SCIENCE OF AIR TEACHER’S GUIDE © Baylor College of Medicine
4
Session 2: Looking at results1. With younger students, draw a large graph on the board. Label
the X axis “Students.” Number the Y axis from 0 to 4,000 mL, using 500 mL intervals. Have the students write their names and lung capacity measurements on “sticky” notes. Help each student place his/her “sticky” at the appropriate level on the graph.
2. Older students should obtain the average value for their vital lung capacities, as shown on the “Lungometer Data Sheet.” After students have completed their calculations, have them graph their average vital lung capacities as illustrated above.
3. Discuss the class results represented on the graph. Ask, Which was the highest vital lung capacity? Which was the lowest? What range of values did we find? How could we find the aver-age vital lung capacity for the class?
4. Elicit a discussion of factors that might limit vital lung capacity. Ask questions such as, What might account for differences in vital lung capacity? Do large people have larger vital lung capacities? How does exercise affect vital lung capacity? How might the vital lung capacity of a smoker compare to that of a non-smoker?
5. Have students group their data (for example, by student height or by amounts of daily exercise) to investigate some of the questions raised during their classroom discussion.
QUESTIONS FOR STUDENTS TO THINK ABOUT
• Ask students, Which types of diseases might limit a person’s ability to blow out much air? Have them use resources in your classroom or library to investigate diseases of the airways and lungs. (Examples include asthma, emphysema, some types of bronchitis, and occupational lung diseases caused by prolonged exposure to asbestos or certain kinds of dusts.)
• In the story, Mr. Slaptail’s Secret, Mr. Slaptail improves his ability to blow air out of a lung-ometer like the one constructed in this activ-ity. Ask, What changes did Mr. Slaptail make in his lifestyle to improve his lung capacity?
LUNGOMETER Life Science

THE SCIENCE OF AIR TEACHER’S GUIDE © Baylor College of Medicine
5
Make a Lungometer
1 Fill a one-gallon plastic jug with water, 500 mL at a time. Draw a line on the jug to mark the water level each time you put in water.
2 Fill a plastic tub halfway with water. Put a cap on the jug, turn it upside down and lower it into the tub. Carefully remove the cap.
3 Put one end of a plastic tube into the jug. Insert a piece of drinking straw (a mouthpiece) into the other end of the tube. Take a deep breath and blow into the mouthpiece. Blow out as much air as you can with one breath.
mouthpiece (piece of
drinking straw)
Put the cap back on, turn the jug over, and measure the amount of water left in the jug.4
Write this number on your data sheet.5
LUNGOMETER Life Science
Illus
trat
ions
by
M.S
. You
ng ©
Bay
lor
Col
lege
of
Med
icin
e
THE SCIENCE OF AIR TEACHER’S GUIDE © Baylor College of Medicine
6
Haz un Pulmómetro
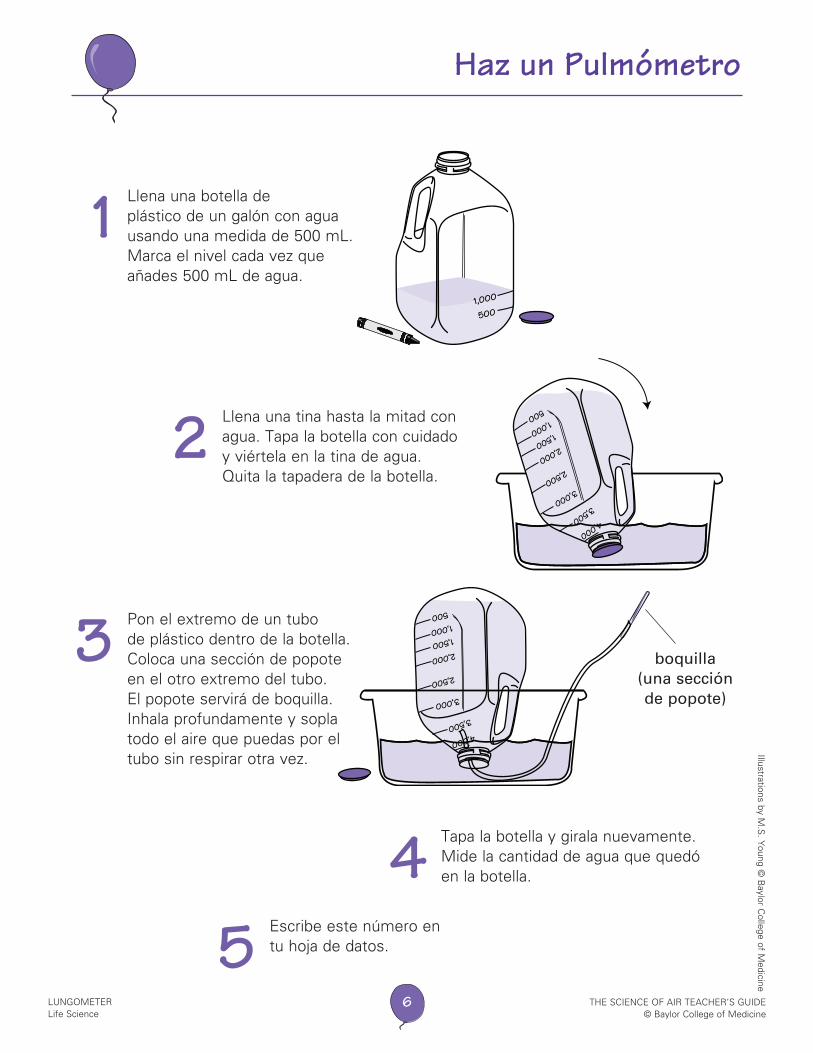
1 Llena una botella de plástico de un galón con agua usando una medida de 500 mL. Marca el nivel cada vez que añades 500 mL de agua.
2 Llena una tina hasta la mitad con agua. Tapa la botella con cuidado y viértela en la tina de agua. Quita la tapadera de la botella.
3 Pon el extremo de un tubo de plástico dentro de la botella. Coloca una sección de popote en el otro extremo del tubo. El popote servirá de boquilla. Inhala profundamente y sopla todo el aire que puedas por el tubo sin respirar otra vez.
boquilla (una sección de popote)
Tapa la botella y girala nuevamente. Mide la cantidad de agua que quedó en la botella.4
Escribe este número en tu hoja de datos.5
LUNGOMETER Life Science
Illustrations by M.S
. Young ©
Baylor C
ollege of Medicine

THE SCIENCE OF AIR TEACHER’S GUIDE © Baylor College of Medicine
7
Lungometer Data Sheet
Name
Total volume of jug
Amount of water left in jug
Vital Lung Capacity
First Try
Second Try
Third Try
mL
−−− mL
mL
1. Add all three numbers in the Vital Lung Capacity row.
mL
2. Divide that number by 3 to figure out your average vital lung capacity.
Write your answer in the space below.
3. My average Vital Lung Capacity:
+
mL
÷ =
LUNGOMETER Life Science

THE SCIENCE OF AIR TEACHER’S GUIDE © Baylor College of Medicine
8
Hoja de Datos para el Pulmómetro
Mi nombre
Volumen total de la botella
Cantidad de agua que quedó en la botella
Capacidad Vital Pulmonar
Primer Intento
Segundo Intento
Tercer Intento
mL
mL−−−
mL
1. Suma todos los valores que obtuviste para Capacidad Vital Pulmonar.
mL
2. Divide la respuesta por tres para calcular tu capacidad promedia.
Escribe la respuesta en el espacio abajo.
3. Mi Capacidad Vital Pulmonar promedia:
+
mL
÷ =
LUNGOMETER Life Science