the variation in conversation (vic) project: creation of
TRANSCRIPT

The Variation in Conversation (ViC) Project: Creation of the Buckeye Corpus of Conversational Speech
Scott Kiesling Laura Dilley
William D. Raymond
Buckeye Corpus Manual:11/30/06
1. Introduction. This manual is intended to provide an overview of some the methodology employed in the creation of the Buckeye Corpus of spontaneous speech, including data collection and labeling. Additional information can be found in Pitt et al. (2005). This project will be referred to in the present manual as the ViC (Variation in Conversation) project. The purpose of the ViC project was to create a database of approximately 300,000 words of conversational speech by native central Ohio speakers which contained time-aligned phonetic labels. Interviews with 40 speakers were conducted and are archived on digital audio cassette and compact discs. The interviews were balanced for three factors: age of speaker (over 40, under 40), gender of speaker, and gender of interviewer. This manual is organized as follows. Section 2 describes aspects of the data collection along with characteristics of the talkers who comprise the corpus. Section 3 of the manual describes procedures used for the transferring of speech from audio cassettes to digital soundwave files. Section 4 outlines the procedures for creating English text transcriptions of the wave files and discusses guidelines to be followed by text transcribers in creating English transcriptions of the sound files. Finally, Section 5 describes how aligned lexical and phonetic transcriptions of the speech were created. Aligning was done in two steps, an automatic aligning phase and manual adjustment of the phonetic and lexical symbol alignment. Conventions for manual adjustment of phonetic symbols may also be found in Section 5.
2

Buckeye Corpus Manual:11/30/06
2. Speaker characteristics and corpus design. 2.1 Overview. In September of 1999, corpus creation was initiated. Forty talkers were recruited from the Columbus, OH community. All were natives of Central Ohio (i.e., born in or near Columbus, or moved there no later than age 10). The sample was stratified for age (under thirty and over forty) and sex, and the sampling frame was limited to middle-class Caucasians. Past work suggests that such a sample is large enough to ensure that the interspeaker variation observed in the corpus will be representative of the speech community (Chambers, 1995; Fasold, 1990). With a more heterogeneous population, variation may be too great to identify generalities. Also, by holding interspeaker variation to a minimum and sampling from a single community, the need for a larger sample was averted. Hence ethnicity and class were controlled while stratifying for age and sex. Talkers were recruited using three methods: (1) advertisements in local free newspapers in four neighborhoods of Columbus; (2) referrals from other talkers; (3) recruitment of friends and neighbors. Talkers were screened during a short phone call to make sure they were members of the target population. Potential talkers were told that the research team was interested in how people express their opinions. Qualified talkers were invited to come to the Ohio State University campus to have a conversation about everyday topics such as politics, sports, traffic, schools. Use of this procedure was approved by the Internal Review Board, and no talker expressed concern after being debriefed on the true purpose of the study. After a significant amount of piloting different protocols for eliciting large amounts of unmonitored speech, a modified sociolinguistic interview format was chosen. Interviews were conducted in a small seminar room by the (male) postdoc and (female) graduate assistant. Upon arrival, talkers were told that the purpose of the study was to learn how people express "everyday" opinions in conversation. Each interview began with a few questions about the talker concerning his/her age, place of birth, family make-up, etc. This information was found by the interviewers to lead to questions that easily elicited opinions, such as how Columbus has changed over the years, how families get along, how children should be raised, etc. These topics in turn offered opportunities for talkers to express other opinions. In order to elicit more conversation, the interviewer often challenged the talker with other points of view, or asked for illustrations of alternative opinions. As the session proceeded, talkers become less inhibited and the interview approximated a friendly conversation. One reason why the formality of the interview tended to dissipate quickly was because the talker was not always conscious that a microphone was being worn. This may have been due to the fact the interviewer did not wear a microphone and the head-mounted microphone worn by the talker was not squarely in the talker's field of view. Interviews lasted from 30 to 60 minutes, with the latter being the target length. To control for the possible influences of the interviewer's sex, cells were balanced so that each interviewer met with half of the talkers in each cell (Table 1). Interviews were completed by Spring, 2000.
3

Buckeye Corpus Manual:11/30/06
SPEAKER SPEAKER'S GENDER SPEAKER'S AGE INTERVIEWER GENDER
S01 f y f S02 f o m S03 m o m S04 f y f S05 f o f S06 m y f S07 f o f S08 f y f S09 f y f S10 m o f S11 m y m S12 f y m S13 m y f S14 f o f S15 m y m S16 f o m S17 f o m S18 f o f S19 m o f S20 f o f S21 f y m S22 m o f S23 m o m S24 m o m S25 f o m S26 f y f S27 f o m S28 m y m S29 m o f S30 m y m S31 f y m S32 m y f S33 m y f S34 m y m S35 m o m S36 m o f S37 f y m S38 m o m S39 f y m S40 m y f
TABLE 1. Characteristics of talkers in the corpus (f = female, m = male, y = young, o = old).
4

Buckeye Corpus Manual:11/30/06
3. Transferring. Creating digital sound files from digital audio tape. The following section describes the methodology used in creating digital sound files from digital audio cassette recordings. 3.1 Hookup of audio equipment. If the equipment in the ViC lab is not plugged in, put the power strip on the floor, plug it in and turn it on. There are three cables to hook up; all three should already be attached to Sierra. On the mixer, hook the two large gray cables to lines 7 and 8. The small gray cable connects to the DAT recorder. Plug it into the slot marked ‘coaxial’ on underneath and ‘output’ above. On the front of the mixer, turn all front knobs all the way to the left, except the bottom knobs under 7 and 8. Leave them at 12 o’clock. You will also want to leave the ‘phones’ volume knob (all the way to the right) at 12 o’clock. Plug the earphones into the plug just below. 3.2 Transfer. Turn on the DAT and mixer and put the tape in the DAT. In the bottom right corner of the computer screen (Sierra), check the fourth icon from the left, which looks like a ‘Z’ with some other stuff. If the dot in that icon is blue, then you are hooked up. If red, check your cables and power. If you can’t get it to go green, ask Mark or Scott. If Sierra is not on, turn it on and type ‘dos’ at the ‘LILO:’ prompt. When windows is up and running, double-click the icon labeled “Cool Edit 2000.” Select FILE, NEW in the menus (or Ctrl-n). In the box select 16000 for sample rate, mono, and 16-bit, then OK. You are now ready to transfer. In the bottom left of the Cool Edit window are the play/record controls. Click on the record (red circle) button, and just after that push the play button on the DAT recorder. The large numbers should begin advancing. If they don’t, it indicates that Cool Edit is not getting a signal. Check your cables and power, and try again. Let the computer record for about 20 minutes, doing your best to stop during a significant pause (by the talker). Stop by clicking on the button with the square in it. Click the PLAY (triangle) buttons to listen and check the recording. If it sounds quiet (or the waveform is small in the window), then you should amplify the wave form: Select EDIT, SELECT ENTIRE WAVE (ctrl+a). Then select TRANSFORM, AMPLITUDE, NORMALIZE. Type 75%. Then hit OK. Check to see if the wave is now loud enough. If not, re-amplify. Now save the wave. Select FILE, SAVE AS. Make sure you save the file in the “C:/Conversation” folder, so that it can be easily converted to ESPS. For the name, make the first character a capital ‘S’, and the next two the speaker number, e.g., S01 or S24. The next two characters will be the consecutive number of the transfer. If it’s the first file for that speaker, it will be ‘01,’ the tenth, ‘10.’ Save as a *.wav file. For example: if you’re saving the first file of the S03’s tape, the filename will be: S0301.wav. You do not need to save extra non-audio information. It’s not a bad idea to use Windows Explorer to double-check that the file saved (it should be big!). Log the file on the log sheet. Use this sheet to track each file through the transcription process. Select FILE, NEW and transfer the next file and so on. Before continuing, backup your new *.wav files to a CD.
5

Buckeye Corpus Manual:11/30/06
4. Transcribing orthography. Producing an English transcription of a sound file. English transcriptions of sound files were produced by listening to a playback from CD of a sound file using the Soundscriber software and typing what was heard into a text document (using any text editor). This section describes the use of Soundscriber and the project transcribing conventions. The transcribers were provided with these instructions for creating English text transcriptions. 4.1 Using Soundscriber. Transcription can be done on any Windows OS machines equipped with a sound card. The Soundscriber software, running on a Windows PC, comes with every CD containing ViC sound files. It is used to transcribe conversations recorded on the CDs. The output of this process is a text file keyed by name to the sound file that contains an English transcription of a conversation from a CD. Use Soundscriber and your favorite word processor to transcribe on a PC computer. Open the Soundscriber program by double-clicking on ‘sscriber.exe’ in the Soundscriber folder. Choose FILE:OPEN, and then browse to find the CD and a .wav file on it, and open the file. Now open the word processor with a new document. Save it as the same base name as the .wav file, but with a .txt extension instead of the .wav extension. For example, when transcribing file s0102.wav, you will create s0102.txt. Open a second file for notes about the transcription and name it <conversation name>.nts (s0102.nts corresponding to the s0102.wav file). Now you are ready to begin transcribing. To play the file, use the mouse to click on the button with the footprints icon. The file will begin “walking.” This means that a portion of the file will play, then pause, then play again, looping for a set number of times (3 is the default). The other controls are fairly transparent. Experiment to find the best arrangement for your typing style and the tape you are working with. Note that if there is a long stretch of silence or non-transcribable material, you can move forward in the file using the slide at the top left, and that you can use keyboard shortcuts for functions to minimize having to use the mouse. You can also switch between soundscriber and your word-processing window. If you have a keyboard with the ‘windows’ key, you can use window+tab to move between programs. 4.2 File headers. Make a “header” at the beginning of each text file you create that has the following five lines:
FILENAME: <*.wav filename> (e.g., ns0104.wav) DATE TRANSCRIBED: (the date you finished working on the
file) TRANSCRIBER: <your initials> (e.g., AB) LENGTH: <MM:SS time> (e.g., 04:22 -- you should be able to get
this from Soundscriber) WORDS: <number of words> (if you’re using Word, just use Word’s
WORD COUNT tool for the transcription portion of the file only; highlight the
6

Buckeye Corpus Manual:11/30/06
transcribed text and choose TOOLS:WORD COUNT from the menu in Word)
You header should something look like this example when you’re done:
FILENAME: ns0104.wav DATE TRANSCRIBED: 10/15/00 TRANSCRIBER: AB LENGTH: 4:22 WORDS: 13,340
4.3 Transcription conventions for the ViC project. In order to ensure consistency among transcribers and facilitate the subsequent aligning process, the following conventions should be adhered to in producing English transcriptions of sound files.
• Transcribe the interviewee’s speech exactly as you hear it. Transcribe verbatim -- do not “correct” any “errors” in the speech you hear. If the speaker stops while speaking and restarts, changing what they said, type everything you hear. If a speaker restarts in the middle of a word, try to indicate how much was said, using a dash to indicate a word was not completed. Here’s an example of transcribed speech, with repetitions, restarts, and cut off words:
when I called around I I found out th- they do it there • Do not use ANY punctuation, such as periods, commas, exclamation marks. See the
above example. • Use normal capitalization on proper nouns (e.g., “Columbus”). Do not capitalize the
beginning of the sentence or line. The pronoun ‘I’ should be capitalized because it’s conventional.
• Write out any numbers said: one hundred thirty five, sixty four hundred (if said this
way), etc.
• Transcribe only the interviewee’s speech. You should, not in general, transcribe the speech of the interviewer that you may hear in the background. When they talk, just type <IVER> to indicate that the interviewer was speaking. However, if you can understand any of the interviewer’s speech or the gist of their question or comment, include that in the angle brackets to help us keep track of where the conversation is going. For example:
<IVER: Where were you born?>
or <IVER: (a question about the interviewee’s political preferences)>
7
Buckeye Corpus Manual:11/30/06
Don’t spend a lot of time trying to listen to the interviewer, because the interviewer’s voice is very often hard , if not impossible, to understand because the interviewer had no microphone during the interview.
• Use line breaks as indications of phrasing and punctuation. In other words, if there is a
pause (whether or not it comes at the end of a sentence) or an abrupt change in pitch or loudness, start a new line. Also start a new line if the speaker begins a new sentence, or the interviewer speaks. When you’re done, you should have many short lines more or less corresponding to stretches of continuous speech, like this:
yeah as I was teasing hm <IVER> okay <IVER: how long have you been teaching in columbus?> twenty eight years this is my twenty eighth year in Columbus I have two more years to go then I get to retire and then I’ll go retrain and probably do something else for another twenty years <IVER> oh no
• Do not use hyphenation or abbreviation, e.g., type “Fort Worth”, not “Ft. Worth” and
“twenty eight” not “twenty-eight”
• Use these special spellings of the following collocations (common word combinations):
gonna (going to, as in “he’s gonna do it”) wanna (want to, as in “do you wanna stop?”) yknow (as in “I found, yknow, a lot more mistakes” but not “how do you know?”) kinda (kind of, as in “I kinda forget”) sorta (sort of, like kinda) hafta (“must”, as in “I have to finish”)
• Use the following spellings for these special words: okay TV (no space)
• Use full dictionary spellings of all other words, except for contractions:
“copular” contractions (pronoun + a form of the verb “be”): I’m, you’re, he’s, she’s, it’s, they’re...
“not” contractions: don’t, won’t, can’t... modal contractions: I’ll, she’d (“she would”)...
8

Buckeye Corpus Manual:11/30/06
“have” contractions: I’ve, she’s, they’d...
• Use “all right” (“not alright”) and “a while” (not “awhile”) • Hesitation sounds: Use “uh” or “ah” for hesitations consisting of a vowel sound, and
“um” “mm” or “hm” for hesitations ending with a nasal sound, depending upon which transcription the actual sound is closest to.
• Use the spelling “huh” when this is used to mean “you don’t say”.
• Yes/no sounds: Use “uh-huh” or “um-hum” (yes) and “huh-uh” or “hum-um” (no) for
anything resembling these sounds of assent or denial. Again, the versions with ‘m’ are used when the speaker’s utterance ends with a nasal sound. Use “yeah,” “yep,” and “nope” if these words are said by the speaker. Use “huh” when it is used to mean “what?”.
• Transcribing letters and symbols.
(1) When a speaker says a sequence of letters, spell out the letter sequences and separate letters by spaces: D F W, U S A, F B I. (2) When an acronym is used that is pronounced as a word, write it as a single word: NASA, ROM. (3) When a letter sequence is inflected (e.g., plural), add the inflection after the letter sequence attached to the last word: e.g. “T Ier” (someone who works at TI), “B Sing”, “the Oakland As”, “a witness I Ded him” (identified him). (4) Transcribe a spoken spelling in all capital letters, each separated by a space: e.g. “dog is spelled D O G”; “my name is Tirelly, that’s T I R E L L Y”. (5) If letter sequences contain special symbols then transcribe them as they would be spoken: e.g. ,”A T and T” (not “AT&T”); “Texas A and M” (not “Texas A&M”).
• Label non-speech sounds with the following special labels:
<LAUGH> = laughter that is NOT part of any word. <LAUGH_word> = laughter that is part of a word, e.g., if a speaker laughs while
saying the word help, write <LAUGH_help>. <NOISE> = noise not from the speaker, such as microphone pops and
background sounds. <NOISE_word> = noise not from the speaker that occurs while the speaker is
saying a word. Supply the word if you can understand it. <VOCNOISE > = vocal noise made by the speaker (clearing the throat, sighs,
etc.). <VOCNOISE_word> = vocalized noised made by the speaker while saying a
word.
• If a speaker uses and gives meaning to a word that is not an actual word, spell the word out as it sounds.
9

Buckeye Corpus Manual:11/30/06
5. Lexical and phonetic alignment. Creating aligned phonetic and lexical transcriptions of a sound file.1
Creating aligned transcriptions of a sound file were accomplished using the ESPS Aligner software. Alignment was carried out in two phases. The first phase involved automatically creating a rough lexical and phonetic alignment of an entire file. The second phase involved adjusting by hand the output of the automatic alignment process: manipulating the temporal position of labels, as well as adding, deleting or changing labels to be consistent with the evaluation of a phonetically trained human labeler. Human labelers used speech spectrogram and waveform displays generated using Xwaves (formerly from Entropics Inc.) software as well as auditory perceptual evaluation in determining phone labels. Preliminary adjustments to the automatic alignments were accomplished using software tools written to perform some frequent realignments. A final detailed examination of each aligned file will correct and refine the output of the automatic aligning process. A list of the phonetic and special labels used in labeling sound files is found in the appendix. What follows are instructions that were used to create the initial time-alignments for labels using the ESPS Aligner program, as well as labeling conventions that were used by phonetically trained human labelers in adjusting the output labels of the Aligner program. 5.1 Overview. Using Aligner to create lexical and phonetic alignments is fairly straightforward. Begin by opening a sound file (with .sd suffix) using a script we provide for you (described below), mark off text to be aligned, copy the text into a special window, and let the Aligner go. The automatic alignments form the basis used later to produce a more detailed phonetic transcription by enhancing the alignments, using specially written ViC tools and manually, to contain more distinctions and greater accuracy of alignment. The manual phase requires some detailed knowledge of phonetics and acoustic analysis. The first thing you need to begin aligning is the sound file to be aligned. Section 5.2 describes where to find files and where to put them to get ready for aligning. The file structure exists to align on the ling system. If you want to work on a machine that’s not on the linguistics system (ling), or isn’t the ViC machine (vic.psy.ohio-state.edu), then you’ll have to transfer file to your machine. However, the computer you work on must have ESPS software, and many of the special scripts must also be transferred to use a different system. Section 5.3 outlines the process of automatic aligning. Section 5.4 discusses the second phase and the conventions that will be
1A note on on-line help.
General Unix/Linux help is available by typing: unixhelp Linux/GNOME help can be found by clicking on the “?” icon in the panel at the bottom left
of the Linux screen. An xwaves tutorial will run if you type: wavestut The Aligner manual will be displayed if you type: alignman
10
Buckeye Corpus Manual:11/30/06
followed in creating the final, narrower phonetic transcription. 5.2 The file structure and file administration for the aligning process. The ViC files are in a special directory on the vic.psy system (and a parallel one on the ling system). The structure of this directory looks like this on vic (and is duplicated in /home/vic on ling):
/usr/vic/ aligning/ SK/ WR/ ... pass1.done/ Sxx ... pass2.done/ Sxx ...
Here’s what you should do to get to the right place, get files, and start aligning:
1. Change directories (cd) to /usr/vic (or /home/vic on ling):
cd /usr/vic/aligning This will put you in the directory with files currently being aligned. Here, there
is a directory for each aligner, named using your initials (e. g., ‘WR’ above).
2. Change to your work directory (say your initials are AB): cd AB You will be provided with files to transcribe as needed.
3. Now you are ready to align a file (see sec. 3.2). You should align while in your
/home/vic/aligning/XX directory. To check to see what directory you are in at any time, type:
pwd
4. When you are finished aligning and checking a file, inform the person managing the aligning and ask for another file to work on.
5.3 Phase 1: Starting and running Aligner for automatic labeling. To start Aligner, type vicalign, followed by the first part of the filename to be aligned. So if you want to align
11

Buckeye Corpus Manual:11/30/06
s0901.sd, type: vicalign s0901 & Aligner will start up, and you will see a bunch of windows, including a control panel at the top. Vicalign (as opposed to Align as discussed in the Aligner manual) will allow you to use the customized project menus. Among the window you now have available are (1) the sound wave; (2) a window for creating aligned (orthographic and phonetic) transcriptions; (3) a log file for tracking progress and noting questions about the file; and (4) a text file containing the English transcription of the sound file. See the xwaves manual for details on working in the xwaves soundwave window. Click on the AUTO ALIGN button, and a text box will appear. Choose a section of speech to align, importantly, one bounded by silence, containing continuous speech from the interviewee only, and relatively short. Then copy the text of this section from the text file into the text box of the align window. If the copied portion contains special labels (e.g., <LAUGH>), remove these from the aligning window. Check to make sure the transcription correctly corresponds to the highlighted section of the sound file, and then hit the “Align” button, and the labels will (eventually) appear. (Note: make sure you are familiar with the transcription conventions from Section 4 above.)2 There will be two sets of labels in the alignment window: aligned phones and aligned words, each appearing on a separate “tier” in the label window, below the sound wave window. The phones will be in the upper tier, and the words in the lower tier. See the Aligner manual for details on working in the label window. The Aligner aligns phones to the sounds wave by using a dictionary containing the phonetic transcription of words. Occasionally during alignment, the Aligner will encounter a word in the text will not be in the Aligner’s dictionary. You will have to add it to the dictionary using the phonetic alphabet used by Aligner in a window that is provided when this situation arises. The alphabet Aligner uses is the same set of symbols that are produced during the aligning process, which appear in the phonetic tier of the transcription window. A list of the symbols and their sound correspondences can be found in the Aligner manual. The mapping is also available in the window that appears when Aligner does not recognize a word. Before adding a word to the dictionary, make sure that the word is spelled correctly in the text file and other conventions (including use of punctuation) have been followed in the text. If the unrecognized word is truly novel, follow the instructions in the Aligner manual to add it to the dictionary. The Aligner will also not be able to handle words that have been transcribed as partially produced, such as “thi-” for “this”. For aligning partial words, enter the individual phones of the word fragment in Aligner symbols, each preceded by a ! (e.g., !dh !ih to align “thi-” as in this. Once the alignments is completed, change the word tier from the phone labels “(!dh !ih) to the following format:
2. The Aligner usually adds any text put in the interactive text box to the *.txt file. I have disabled this feature because we will mostly be cutting and pasting, and do not want two iterations of the transcript in our *.txt files. (If this needs to be changed, uncomment line 120 (roughly) of the “doalign” script in $ALIGNER_BASE/bin.)
12

Buckeye Corpus Manual:11/30/06
<CUTOFF-thi=this> This word label format will mark the word as an error, specifically a cutoff in this case, record the partial word produced as in the text file (“thi”), and document your judgment regarding the speaker’s target for that word (here, “this”). After aligning, move the error marker to the last phone of the partial word, and delete the other labels on the word tier. The phone tier should still contain the individual phones ‘dh’ and ‘ih’ aligned to the sound wave. After aligning a section of speech, check to see that the words (and their sounds) line up fairly well with the speech of the aligned section. If Aligner is badly off (puts labels in very wrong places), it’s easiest to simply delete everything done in that section using the “Delete all labels from marked region” button, choose another (shorter, more clearly pause-bounded) section, and try again. Length of a section, speech rate, background noise (including the interviewer’s voice, sighs, coughing, microphone noise etc.), and extremely long pauses may all adversely affect the accuracy of the alignment and require realignment of stretches of speech. A third tier, the “log” tier (sXXXX.log>) is created for each speaker file. In it you may record any comments or questions about things you are unsure of or that are unusual and should be looked at again later. Repeat the process until the labels have been created for the entire sound file. Select CONTINUE to exit from the Aligner. You can also quit at any time during the aligning process and return to the work later. Aligner automatically saves your work as you go along. To help yourself out, you may note in the log tier where you left off, so you can find your place easily when you resume. 5.4 Phase 2: Adjustment and correction of automatically generated phonetic labels. Adjustment and correction of phonetic labels generated by the Aligner program was conducted by graduate and undergraduate students in linguistics and related fields. These students were trained by a postdoctoral research associate who was an experienced phonetician to use visual displays of speech spectrograms and waveforms as well as auditory-perceptual information in order to apply the labeling conventions described in this section. 5.4.1 General instructions to labelers. Phase 2 of the aligning process involves a second pass through a file that has undergone automatic aligning to improve on Aligner’s work. Use vicwaves (or vicalign). These customized scripts provide a standardized interface. Start xwaves with a set of files using the following command (using the above example): vicwaves s0901 & A spectrogram is indispensible for the task of fine tuning the automatic alignment. Use “SPECTROGRAM W.B.” in the soundwave window menu to create a spectrogram. Again, see the xwaves manual for details on creating and using spectrograms and manipulating words and phones in the label window.
13

Buckeye Corpus Manual:11/30/06
As you go through a file for this second pass, check to make sure Aligner has selected phonetic labels that correspond to the way a word is actually pronounced. If the dictionary did not include the pronunciation used by a speaker for a given word, then the segments found in the dictionary, and used by Aligner, will not correspond to the speakers pronunciation. For example, if the speaker has not produced a segment (i.e., you can’t see acoustic evidence of the segment on the spectrogram), take out the segment label and reset the surrounding labels to their correct positions. If a segment has been inserted by the speaker, put in a new label. If Aligner has the wrong segment, change it. Changing segments may involve replacing them with another symbol the Aligner uses, but it also includes introducing some distinctions that the Aligner does not make in its aligning process. The following section discusses the conventions used to adjust the Aligner’s automatic alignment. The manipulation of segments and words in the aligning window is described in the Aligner manual. Always make a spectrogram of the speech you are checking, and use this as the final arbiter of label placement. You can easily make a spectrogram of a large stretch of speech (even the entire file) and then zoom in on short stretch that you are working on. A spectrogram is made in the sound wave window from the pull-down menu on the right mouse button. Note that the labels used by Aligner mark the end of a segment. This means that the beginning of a segment is marked by the preceding label (at the end of the preceding segment). If the segment is preceded by silence, the label SIL is important as a marker of segment boundary. When you adjust a word’s phone labels, make sure that you also change the word label’s position if necessary, so that it lines up with the end of the final segment of that word (words will not move automatically). The third “log” tier is available for comments and questions about aligning during phase 2. It is also used to record additional information about the speech stream that is not in the phone and word tiers. One type of information that may be included in the log tier is an indication of dysfluency type. (These conventions are currently being developed.) 5.4.2 Aligning tools. Some software tools have been developed to perform automatic adjustments of the automatically aligned files produced by Aligner and to add other information to the label files for future reference. These tools are C and Perl programs that can be run on word label and phone label files to accomplish some frequent translations from Aligner output to the transcription conventions that we are following in the ViC project. It’s probably most helpful to use these tools before hand aligning. The tools are found in /home/vic/bin directory on the ling system. One important automatic translation tool, autoalign.o, performs the following adjustments on a phone label file:
1. “ax r” -> “axr”. Aligner does not have single symbols for the stressed r-vowel or a reduced r-vowel (“schwar”). It produces the sequence “ax r” for schwar. The program translates this sequence into axr. (Stressed r-vowels must be hand transcribed as “er”). Note that both schwas and schwars are then changed to another label by phonetically
14

Buckeye Corpus Manual:11/30/06
trained labelers at the hand-correction stage based on perceived vowel quality. (See Section 5.4.3.)
2. <SIL> -> null within a word. Silences are often spuriously placed by the Aliger in the
middle of words (especially during fricatives). These are removed by autoalign.o.
A second tool, wordandphone.prl, adds a canonical phonetic transcription to the word label file as a secondary label. Canonical pronunciations are taken from a dictionary at /home/vic/vic/dic.aligner Details for the use of the above tools can be found in the “usage” message (type the command name with no arguments), or by reading leading comments in the text versions of the source file for each tool (found in /home/vic/bin). 5.4.3 Labeling Conventions Note: Tables 2-4 in the Appendix give the set of phones and other symbols used for this corpus. Stops.
1. Stops are marked with a single label spanning both a closure (silence) and any release (including any aspiration). Label silences which occur during running speech that arise from a stop closure as part of a stop. If there is no evidence of when an initial stop begins or a final stop ends, assume a 70ms closure interval.
2. GLOTTALIZATION. Glottalization can be recognized by characteristic period-to-period
irregularity in the duration of successive pitch pulses. Speakers sometimes produce glottalization for /t/ or /d/, where the glottalized voice quality may be produced with or without an oral closure. Label all /t/ or /d/ phones which show glottalization the phoneme label /tq/. In addition, if the glottalization occurs over a region greater than the /t/ or /d/, label the extent of the glottalized voice quality using the label <Voice = creaky> in the .log tier. This is accomplished by placing the label <Voice = modal> at the rightmost edge of the region which is modal, i.e. on the last pitch pulse which has the same period as those to its left. Thus, when there is an extended region of glottalization, there will be some redundancy in the labels in the phones and log tier.
3. PALATALIZATION. Sometimes, a /t/ and /d/ can become palatalized preceding /r/, so
that “tree” and “drip” sound like /ch r iy/ and /jh r ih p/, respectively. In these cases, /t/ and /d/ should be labeled explicitly as /ch/ and /jh/, respectively.
4. FLAPS. Label an oral flap or tap using the symbol "dx." (Aligner will not put in flaps,
even though this is part of our customized label set.) Flaps can occur as allophones of either /t/ or /d/, especially when they are between vowels after stressed syllables and before unstressed syllables. Here you will have to use listening as a cue as well as the spectrogram, as you should hear what sounds like one flap of the tongue, but you
15
Buckeye Corpus Manual:11/30/06
should also not see the closure in the spectrogram you would expect for /t/ or /d/. Flap segment will be very short (around 30 ms). Voicing must continue through the closure. You will often see just a momentary (less than 5 glottal pulses) bit of white space in the spectrogram. Sometimes there is just a dip in the formants of the surrounding vowels.
5. STOP SEQUENCES, AND STOPS IN CONSONANT CLUSTERS. For sequences of two or
more stops where there is only one closure and release (e. g., "bad bear"), mark the middle of the closure as the segment boundary, provided that there is evidence (e.g. formant transitions) that the first stop gesture was produced. In cases where two stops occur in a row where the first is word-final and the second is word-initial (e.g., /t k/ in "just coming"), where there is no evidence of the formant transitions for the first stop, as well as no evidence of a release for that stop, then mark the preceding stop as deleted. Moreover, mark the closure period and release as belonging to the second stop in the sequence (here, /k/). Also note that assimilatory processes sometimes create geminates, which should be marked as two phones (e.g., "and then" "ah n n eh n"). Note that this transcription implies that the word-final stop has been deleted.
6. APPROXIMATED STOPS. Sometimes speakers will only approximate a stop, especially
nasals, or even a fricative. In these cases, use the canonical consonant symbol for the label.
7. CHANGES IN VOICING. Voiced stops can become unvoiced, and correspondingly,
unvoiced stops can become voiced. For voiced stops which become voiceless, mark the voiceless counterpart of the segment. For voiceless stops which become voiced, mark the voiced counterpart of the segment. If voicing cues are in conflict, so that part of the segment is voiced while the remainder is unvoiced, select the segment consistent with the predominating or strongest voicing cues: voiceless if the segment is predominantly voiceless, and voiced otherwise.
Moreover, when a voiceless stop is followed by a sonorant sound, such as [tr] in “truck”, part of the sonorant ([r]) may be devoiced so that there is an intervening silence. In this case, the boundary should be put in the middle of the silent region.
8. ADJACENT NASALS. Note that word-final stops are apparently quite likely to delete in
the context of an adjacent nasal and/or dental fricative. When a nasal segment is adjacent, the result of this assimilation and/or deletion of a stop consonant in word-final position is sometimes to create a context in which nasal segments are adjacent. Such cases should be marked as two phones (e.g., "and then" "ah n n eh n").
Fricatives.
1. FRICATIVES. Mark the start of a fricative when frication starts, even if some formant
structure from a preceding sonorant remains (you may find that particularly the lower formants will continue). The non-sibilant fricatives /dh/ and /th/ will sometimes be preceded by a full or partial closure, such that their acoustic characteristics resemble those of stops. When a /dh/ or /th/ is preceded by an unreleased stop consonant, look
16
Buckeye Corpus Manual:11/30/06
for an acoustic discontinuity in the closure region associated with a change in articulation of the closure from the stop to the fricative. If such a discontinuity is not apparent, mark the boundary halfway through the closure region.
2. AFFRICATED FRICATIVES. Affricated fricatives result when there is a closure preceding
the fricative, similar to a stop closure. In this case, mark as the affricate if it exists in English. Otherwise, mark an additional stop before the fricative if you hear it as being there and see evidence of it in the signal.
Nasals, liquids, and glides.
1. NASALS. Nasals are marked with a single label indicating the extent of the “nasal murmur”.
2. NASAL FLAPS. The coronal nasal /n/, and the cluster /nt/, may be realized as a nasal
flap. Mark this with the label “nx,” using the flap guidelines for ‘dx’ from above. 3. SYLLABIC NASALS. If you see any evidence of a preceding vowel, probably a schwa,
use two separate labels (vowel and nasal). Otherwise, use the labels “em”, “en”, or “eng”, for syllabic nasals. If you are unsure, include a vowel.
4. ADJACENT NASALS AND GEMINATES. For geminated word final/word initial sequences
(e.g., "home-made"), mark both segments by indicating the first to be at the midpoint of the closure and the second to be at the release. Do not mark ambisyllabic segments as geminates. Note that assimilation and deletion in the context of stop consonants sometimes create geminates, which should be marked as two phones (e.g., "and then"
"ah n n eh n"). 5. APPROXIMANTS/SEMIVOWELS. The approximants in speech (/r, l, j, and w/) are highly
sonorant segments that often exhibit spectral characteristics not unlike those of vowels. In general, to find the change from an approximant to a vowel, look for changes in F3 or F4. More details are given below.
The approximants are highly sonorant and bear much in common with vowels. The glides, /w/ and /j/, have characteristic formant structure. In particular, /w/ is characterized by a very low F2. In contrast, /j/ is characterized by a quite high F2 and low F1. The liquids, /l/ and /r/, also have characteristic formant structure. In particular, /l/ is characterized by a relatively low F2 and relatively high F3. In determining where and whether a vowel becomes /l/, it is often useful to look for amplitude reduction across the formants. Use ‘plain’ “l” for /l/ in onsets, not in syllabic positions. The segment /r/ is characterized by a dip in F3, which can be used as a diagnostic for this segment. Other cues are amplitude reduction across all formants, or just the higher formants.
It will often not be possible to define a single point in time that marks the boundary of the approximant when it is adjacent to another sonorant segment, such as a vowel. For guidelines on marking approximant/vowel boundaries, see “Transitions from approximants/semivowels to vowels,” below.
17

Buckeye Corpus Manual:11/30/06
6. SYLLABIC LATERALS. If the ‘l’ is syllabic, use ‘el’. If you are unsure, put a vowel in.
(For an example of ‘el’ see nS1004tstGP.sd at time 11.2.) Vowels.
1. FULL VOWELS. Both full and reduced vowels are labeled based on their perceived quality alone, using the same set of vowel labels. Users who are interested in separating full from reduced vowels for research purposes have a number of options, including cross-referencing words that appear in the conversations with a stress-marked dictionary. This labeling decision was based on a finding in an inter-transcriber reliability study that it was not possible to reliably distinguish between full and reduced vowels when the stress status of a syllable was not dictated by a word’s lexical entry. Words which are not in the dictionary (e.g., proper names referring to places in Ohio) were marked for the full/reduced distinction using the tag <Sylstress-word=XXXX> in the log tier. In this tag, “word” corresponded to the word in question (e.g., proper names like “Cuyahoga”), and “XXXX” was replaced with a sequence of symbols, one for each syllable in the word, indicating the stress of that syllable (P for primary, S for secondary, U for unstressed unreduced, and X for reduced).
2. “VOICELESS” VOWELS. In some cases, it is possible to perceive a syllable as having a
vocalic nucleus, even if the syllable itself is completely devoiced. For example, unstressed syllables of some words (e.g., the initial syllables in Toledo and Columbus) sometimes may show completely devoiced vowels. In cases where a syllable is completely devoiced, voiceless vowels can be distinguished from a resyllabified variant in which there is no voiceless vowel primarily by the number of syllables which is perceived. For example, if the initial syllable of the word Columbus is devoiced, yet three syllables are heard, a voiceless vowel should be marked for the first syllable so long as there is some evidence in the signal (e.g., consistent with such an event. In such instances, mark the vowel in the phones tier based on its perceived quality, and insert the tag <voiceless-vowel> in the log tier during the time interval corresponding to the voiceless vowel. On the other hand, if the /k/ of Columbus is resyllabified so as to produce a word with two syllables (/k l ah m b ah s/), then no voiceless vowel is marked.
3. NASALIZED VOWELS. When vowels are in positions adjacent to nasals, vowels
themselves often become nasalized. In such cases, mark the vowel and nasal separately when a region of the spectrogram can be identified corresponding to the nasal murmur. In contrast, when a separate nasal murmur region cannot be identified, mark the vowel as nasalized by adding an “n” (e.g., /ae/ => /aen/). Finally, if the vowel sounds highly nasalized even in the case when a separate nasal murmur can be identified, mark the vowel as nasalized by adding an “n” to it, and mark the nasal murmur with a separate nasal symbol.
18

Buckeye Corpus Manual:11/30/06
4. “r”-COLORED VOWELS. Use “er” for r-colored vowels, as in “person” (=‘p er s ah n’). In contrast, if you see any evidence of a separate vowel with a following ‘r’, then put in a vowel and ‘r’ to indicate a rhotic offglide (e.g., for may be transcribed ‘f ao r’ for vowel and offglide).
5. TRANSITIONS FROM APPROXIMANTS/SEMIVOWELS TO VOWELS. The approximants in
speech (/r, l, j, and w/) are highly sonorant segments that often exhibit spectral characteristics not unlike those of vowels. As a result, when they are in positions adjacent to vowels, it is often very difficult to determine how to mark their boundaries. In general, to find the change from an approximant to a vowel, look for changes in F3 or F4. However, it will often not be possible to define a single point in time that separates the vowel from the approximant. The first strategy is to place the label boundary half way between the points at which the segments become clearly vowel and semivowel. If that is not possible (they may never become prototypical!), then assign one-third of the vocalic region to the approximant, and two-thirds to the vowel.
Silence.
1. Silent portions of the speech signal can be divided into two categories: those which occur during running speech, and those which occur between stretches of running speech. Label silences which separate stretches of running speech with the SIL label for phones and the <SIL> label for words. Label silences which occur during running speech which may be attributed to a stop closure as part of a stop. If there is no evidence of when an initial stop begins, assume a 70ms closure interval. Treat short silences (less than about 50 ms) which occur during running speech which cannot be attributed to a stop closure as arising from the surrounding phonemes. Moreover, you may occasionally see silence before or after a fricative, or you may see silence after a stop burst but before a sonorant. (See examples.) In these cases, treat the silence as part of the surrounding phonemes, and put the phone boundary in the middle of the silent region. Finally, silence may occur during a speech disfluency of some kind, such as during a hesitation or a restart. When a silence occurs during a region of hesitation or disfluency, label the silence explicitly as a SIL label in the phones tier and a <SIL> label in the words tier.
2. Consolidate adjacent silence labels; multiple labels often result from first pass
aligning. You may want remove extra silence labels when you have finished checking labels by zooming as far out as practical, looking for adjacent SIL labels, and deleting all the leftmost SIL labels in a sequence. Remember to adjust both SIL and <SIL> labels on the word and phone tiers.
19

Buckeye Corpus Manual:11/30/06
Additional labeling conventions.
1. NORMALIZATION FOR TALKER CHARACTERISTICS. In general, you should try to learn the general characteristics of how each individual speaker produces different segments and use this information to help you transcribe the phonemes each talker, at least for the consonants. For example, some speakers in the ViC corpus produce /s/ in a way that sounds like /sh/, but the speaker nevertheless produces reliable differences within his or her own speech for /s/ and /sh/. For such talkers, you should learn to identify how he or she produces /s/ and mark each instance as /s/, even though it may sound somewhat like /sh/ to you.
2. CONFLICTING CUES. When two cues are in conflict regarding how to label something,
choose the label which is associated with the cue that is stronger or which predominates.
3. DELETION. You should assume a segment is present, unless it cannot be “heard” or
“seen”. That is, indicate a segment as deleted when auditorily, it cannot be heard when a short context is played, and visually, there is no evidence in the normal spectrogram display that the segment is present.
4. You should not spend an inordinate amount of time deliberating about where to put a
segment or whether to change it. To save time: -if you are unsure about whether to delete or change a segment, don’t. -if you are not sure where a boundary might be, especially between vowels and
liquids, select the midpoint. 5. For some additional help, see pp. 174-191 (“Spectrographic Analysis”) of Ladefoged’s
A Course in Phonetics (copy attached). An excellent web resource is http://depts.washington.edu/phonlab/mystery/howto.htm. Another useful page at that site is the discussion of past mystery spectrograms at http://depts.washington.edu/phonlab/mystery/arcmyst.htm. You can get this page easily on the vic by typing spectroread from the command line.
6. Make notes in the log file of any idiosyncrasies of the speaker -- reductions s/he makes
often, talks fast, sounds clear, sounds like they are from a dialect, etc. Also note lexical errors resulting in words (which will be transcribed as heard) and special voice qualities used by the speaker (e.g., mimicking another’s voice).
4.4.4 Post-aligning tools. After aligning is complete, some additional tools will add information to the labels files that will help in database creation and analysis. The following programs were used for general quality assurance to ensure that adjustment of phonetic labels was done accurately:
20

Buckeye Corpus Manual:11/30/06
quality_phones.prl – Checks that all phone labels were included in the symbol set find_phones.prl – Displays all user-specified phones for a given file for inspection Moreover, the program /home/vic/bin/wordandphone.prl should be run on each completed word label file using the following format: /home/vic/bin/wordandphone.prl /usr/vic/bin/dic.aligner sXXXX.words > out The file “out” created by this procedure will be identical to the word label file, except that each label line will have an additional secondary label consisting of the word’s canonical pronunciation, as listed in the dictionary /usr/vic/bin/dic.aligner. The new label lines will look like this, with the canonical transcription following the word, separated from it by a semicolon: 33.144333 122 between; b ih * t w iy n Check the “out” file to see that all words have been assigned canonical transcriptions, and then replace the old word label file with the new “out” file: mv out sXXXX.words The wordandphone.prl script can be run on a set of speaker files using the UNIX script /home/vic/bin/wap. e.g., wap *.words will run wordandphone.prl on all .word files in a directory, replacing each .word file with an updated version. Aligning of canonical and transcribed pronunciations is done using /home/bin/sap. The command sap *.words will create aligned files in <basename>.phowo for each .word file in a directory.
21

Buckeye Corpus Manual:11/30/06
Appendix: Symbol set used for phonetic labeling
TABLE 2. Aligner's Phonetic Alphabet ITEM ALIGNER
SYMBOL EXAMPLE
1 aa cot 2 ae bat 3 ay bite 4 aw now 5 ao bought 6 oy boy 7 ow boat 8 eh bet 9 ey bait 10 er bird, dinner 11 ah butt 12 uw boot 13 uh book 14 ih bit 15 iy beat 16 m mom 17 n nun 18 en button (syllabic n) 19 ng sing 20 l led 21 el battle (syllabic l)
TABLE 3. Phones added/relabeled during hand labeling
ITEM LABEL EXAMPLE 43 dx better (flap) 44 nx center (nasal flap) 45 tq tha? (glottal stop) 46 er bird (stressed rhotic V) 47 em prism (syllabic /m/) 48-64 Vn (e.g., ihn) (nasal vowel, no nasal
segment)
ITEM ALIGNER SYMBOL
EXAMPLE
22 t tot 23 d dad 24 ch church 25 jh judge 26 th thief 27 dh they 28 sh shoe 29 zh measure 30 s sis 31 z zoo 32 k kick 33 g gag 34 p pop 35 b bob 36 f fief 37 v verve 38 w wet 39 hh hay 40 y yet 41 r red
22
Buckeye Corpus Manual:11/30/06
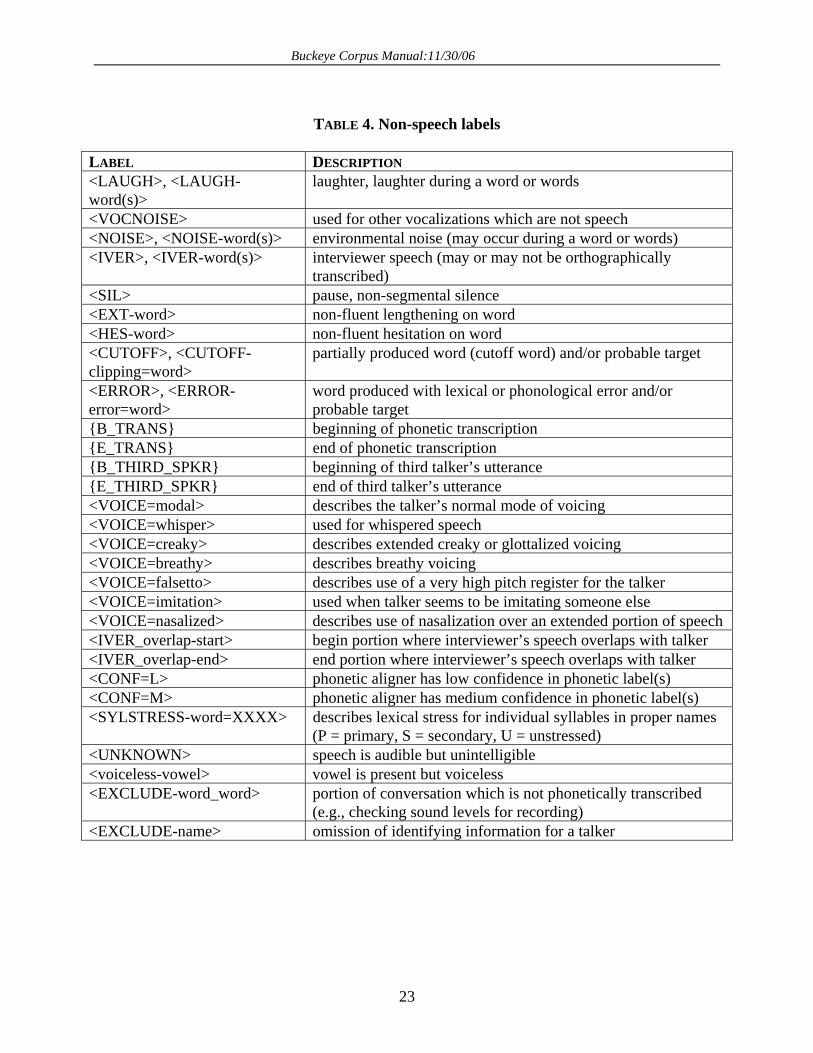
TABLE 4. Non-speech labels
LABEL DESCRIPTION <LAUGH>, <LAUGH-word(s)>
laughter, laughter during a word or words
<VOCNOISE> used for other vocalizations which are not speech <NOISE>, <NOISE-word(s)> environmental noise (may occur during a word or words) <IVER>, <IVER-word(s)> interviewer speech (may or may not be orthographically
transcribed) <SIL> pause, non-segmental silence <EXT-word> non-fluent lengthening on word <HES-word> non-fluent hesitation on word <CUTOFF>, <CUTOFF-clipping=word>
partially produced word (cutoff word) and/or probable target
<ERROR>, <ERROR-error=word>
word produced with lexical or phonological error and/or probable target
{B_TRANS} beginning of phonetic transcription {E_TRANS} end of phonetic transcription {B_THIRD_SPKR} beginning of third talker’s utterance {E_THIRD_SPKR} end of third talker’s utterance <VOICE=modal> describes the talker’s normal mode of voicing <VOICE=whisper> used for whispered speech <VOICE=creaky> describes extended creaky or glottalized voicing <VOICE=breathy> describes breathy voicing <VOICE=falsetto> describes use of a very high pitch register for the talker <VOICE=imitation> used when talker seems to be imitating someone else <VOICE=nasalized> describes use of nasalization over an extended portion of speech <IVER_overlap-start> begin portion where interviewer’s speech overlaps with talker <IVER_overlap-end> end portion where interviewer’s speech overlaps with talker <CONF=L> phonetic aligner has low confidence in phonetic label(s) <CONF=M> phonetic aligner has medium confidence in phonetic label(s) <SYLSTRESS-word=XXXX> describes lexical stress for individual syllables in proper names
(P = primary, S = secondary, U = unstressed) <UNKNOWN> speech is audible but unintelligible <voiceless-vowel> vowel is present but voiceless <EXCLUDE-word_word> portion of conversation which is not phonetically transcribed
(e.g., checking sound levels for recording) <EXCLUDE-name> omission of identifying information for a talker
23

Part of Speech Tagging
DJ Hovermale
August 10, 2009

0.1 Part-of-Speech Tagging Conventions
0.1.1 Tagset
We used the same set of part-of-speech tags as is used by the Penn Tree-bank project (Marcus et al., 1993). These tags are listed below:
CC Coordinating conjunction PP$ Possessive pronounCD Cardinal number RB AdverbDT Determiner RBR Adverb, comparativeEX Existential there RBS Adverb, superlativeFW Foreign word RP ParticleIN Preposition/sub. conj. SYM Symbol (math. or scientific)JJ Adjective TO toJJR Adjective, comparative UH InterjectionJJS Adjective, superlative VB Verb, base formLS List item Marker VBD Verb, past tenseMD Modal VBG Verb, gerund/pres. part.NN Noun, singular or mass VBN Verb, past participleNNS Noun, plural VBP Verb, non-3rd sing. presentNNP Proper Noun, singular VBZ Verb, 3rd sing. presentNNPS Proper Noun, plural WDT wh-determinerPDT Predeterminer WP wh-pronounPOS Possessive ending WP$ Possessive wh-pronounPRP Personal pronoun WRB wh-adverb
The Buckeye Speech Corpus poses some unique challenges to part-of-speech tagging, and the tagset was modified to account for these chal-lenges. First of all, the transcription conventions of the speech corpus donot include punctuation of any kind. Thus there are no tags for punctua-tion. Secondly, there are many comments and annotations inside bracketswithin the corpus. These are assigned a “NULL” tag. Because the corpusis organized into acoustic chunks it was desirable to tag the entire acousticchunk rather than tag the component words separately in cases such ascontractions and what the transcription conventions refer to as “colloca-tions”. This resulted in the creation of compound tags, which consist ofthe Penn Treebank tags for the individual words connected by an under-score. A list of the additional tags which were used to annotate the corpus
1

along with typical words which were assigned these tags follows:
DT VBZ that’sEX VBZ there’sNULL comments in <...> or {...}PRP MD I’ll, you’ll, we’ll, he’ll, she’ll, it’ll, they’ll, I’d, you’d, we’d, he’d, she’d, it’d, they’dPRP VBP I’m, you’re, we’re, they’re, I’ve, you’ve, we’ve, they’ve, yknowPRP VBZ it’s, he’s, she’sVBG TO gonnaVBP RB don’t, didn’t, can’t, haven’t, weren’tVBP TO wannaVBZ RB doesn’t, hasn’t, isn’tWP VBZ who’sWP RB wouldn’t, shouldn’t, couldn’t, won’t
0.1.2 Automated Tagging Method
With roughly 400 000 acoustic chunks to be tagged, it was necessary to au-tomate the tagging process. We created two hand-tagged training sets of2 000 acoustic chunks each and one test set of 3 000 acoustic chunks fromtwo different speakers. We used the C&C part-of-speech tagger (Curran& Clark, 2003). Several pre-processing and post-processing steps weretaken, since written English differs greatly from the transcribed spokenEnglish of the corpus, which has repeated words, no punctuation, no cap-italization, and bracketed text, among other differences. Before runningthe tagger on the corpus, we introduced capitalization. We then simulatedutterance boundaries by creating a new line before and after each piece ofbracketed information in the corpus. The maximum length of these utter-ances was set to 15 acoustic chunks. After running the tagger on the re-sulting corpus, we assigned the NULL tag to the bracketed information andthe compound tags to the contractions and ‘collocations’. We achievedroughly 91% accuracy on development sets, and 90% accuracy on the testset. The entire corpus was then tagged using this procedure.
2