tim mara archive – the artist’s alphabet by mark hampson · · 2018-02-28tim mara archive –...
TRANSCRIPT

1 © Text: Mark Hampson / Images: Belinda Mara
Tim Mara Archive – The Artist’s Alphabet by Mark Hampson
WORKSHOP In this section of the Artist’s Alphabet you are given the opportunity to try and produce your own basic silkscreen print. Although the process is a relatively simple one it does require some specialist equipment and knowledge. The workshop outlined below is a practical guide created to introduce you to the technique and in acting as a starting point for the creation of your own images is intended to give you some direct practical and technical insight into how Tim created his own prints. Before attempting to do this, read through the workshop notes very carefully and several times over. Reading about a process and actually attempting it are very different activities and to successfully follow the workshop you will have to make some fairly extensive preparations. THE FRAME Materials and Equipment
• Basic tool kit (hammer, saw, screwdriver, knife etc) • Wood or aluminum frame • Screen fabric (silk, nylon or polyester) • Gum tape or parcel tape • Staple gun • Scrubbing brush • A powdered cleaner, pumice or carborundum (No 400) • Gummed brown paper tape
The first step in preparing a silkscreen is to obtain a frame that will hold the screen. These can be bought ready made from most Art & Craft supply shops in various sizes or can be handmade to your exact requirements. (A good tip is to start quite modestly with both the scale of your print and the complexity of it, and if you enjoy the process build up to a more ambitious project). If you are making your own frame you can follow the simple formula suggested here:

2 © Text: Mark Hampson / Images: Belinda Mara
Firstly, select your wood. The most commonly used is a soft wood such as pine or spruce. This should be straight, free from knots and planed smooth. The size of wood you use depends upon the size of the image and frame you require, but it should be sturdy and strong without being too heavy or cumbersome. For example, if you require a frame measuring approximately 30cm x 40cm you could use stock wood of 2.5cm x 4.5cm in dimension. If however, you were making a considerably larger frame such as 92cm x 122cm then use a heavier stock wood at least 6cm x 6cm in dimension. When making your frame you should also remember that it must allow room for the squeegee to travel and the ink to be deposited at either end of the screen (Fig 1). It is a good idea to leave margins of around 10cm between the inside of the frame and the beginning of the image area on all its four sides particularly on larger screen sizes. This will allow the image to be printed in any direction either vertically or horizontally.
3 © Text: Mark Hampson / Images: Belinda Mara
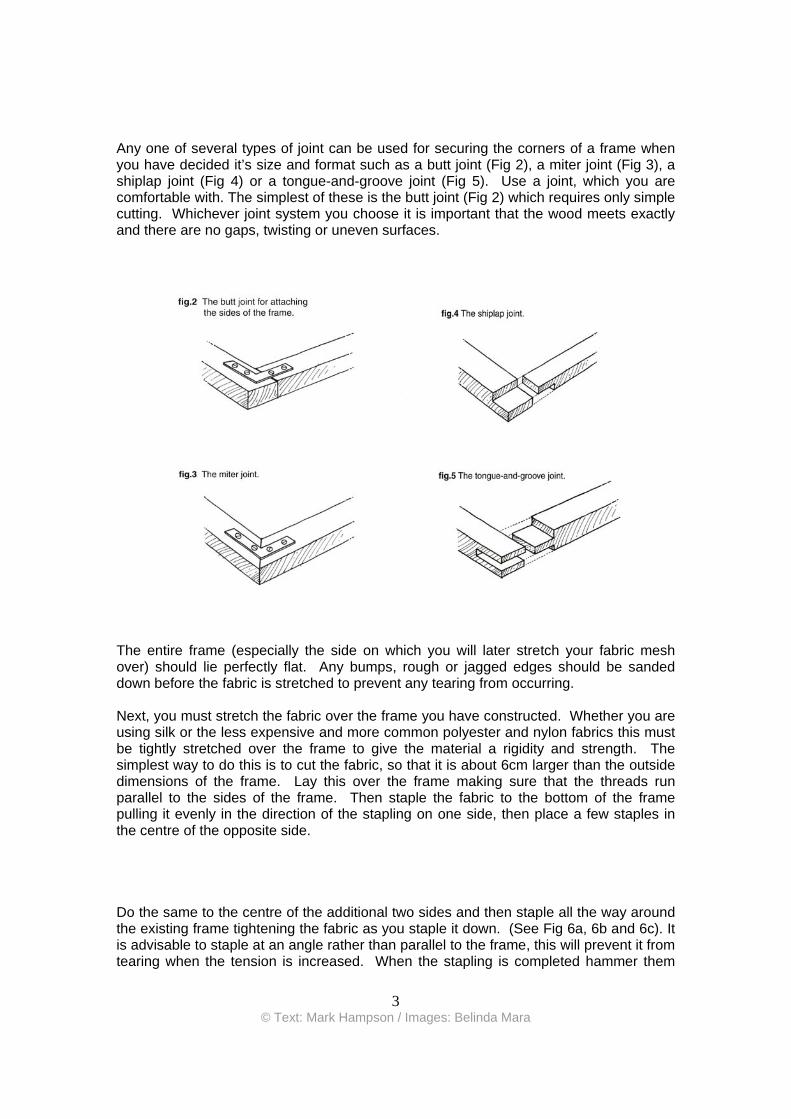
Any one of several types of joint can be used for securing the corners of a frame when you have decided it’s size and format such as a butt joint (Fig 2), a miter joint (Fig 3), a shiplap joint (Fig 4) or a tongue-and-groove joint (Fig 5). Use a joint, which you are comfortable with. The simplest of these is the butt joint (Fig 2) which requires only simple cutting. Whichever joint system you choose it is important that the wood meets exactly and there are no gaps, twisting or uneven surfaces.
The entire frame (especially the side on which you will later stretch your fabric mesh over) should lie perfectly flat. Any bumps, rough or jagged edges should be sanded down before the fabric is stretched to prevent any tearing from occurring. Next, you must stretch the fabric over the frame you have constructed. Whether you are using silk or the less expensive and more common polyester and nylon fabrics this must be tightly stretched over the frame to give the material a rigidity and strength. The simplest way to do this is to cut the fabric, so that it is about 6cm larger than the outside dimensions of the frame. Lay this over the frame making sure that the threads run parallel to the sides of the frame. Then staple the fabric to the bottom of the frame pulling it evenly in the direction of the stapling on one side, then place a few staples in the centre of the opposite side. Do the same to the centre of the additional two sides and then staple all the way around the existing frame tightening the fabric as you staple it down. (See Fig 6a, 6b and 6c). It is advisable to staple at an angle rather than parallel to the frame, this will prevent it from tearing when the tension is increased. When the stapling is completed hammer them

4 © Text: Mark Hampson / Images: Belinda Mara
into the frame so that they are flush with the surface. Cut away any additional fabric, which is in excess of the frame.

5 © Text: Mark Hampson / Images: Belinda Mara
Once stretched, the fabric needs to be given a ‘tooth’ so that your stencil can easily adhere to its surface. Scrub both sides of the fabric with powdered cleanser, pumice or the No 400 carborundum with a little detergent and water. Thoroughly rinse clean with water removing all traces of the powder you have used.

6 © Text: Mark Hampson / Images: Belinda Mara
When the screen is dry you must then tape the edges of the screen, this will prevent ink from seeping through the edges of the fabric and onto your printing surface. It will also ease your cleaning of the screen upon completion of the printing. For this you can use either a gummed brown paper tape, which you must moisten, or an ordinary self-adhesive parcel tape. Press your choice of tape along each edge of the back of the screen slightly overlapping the frame onto the fabric, then on the other side of the frame cut four more strips and place them on the inside of the frame covering it partially and additionally on area of approximately 3cm of the fabric (see Fig 7a and 7b).
7 © Text: Mark Hampson / Images: Belinda Mara
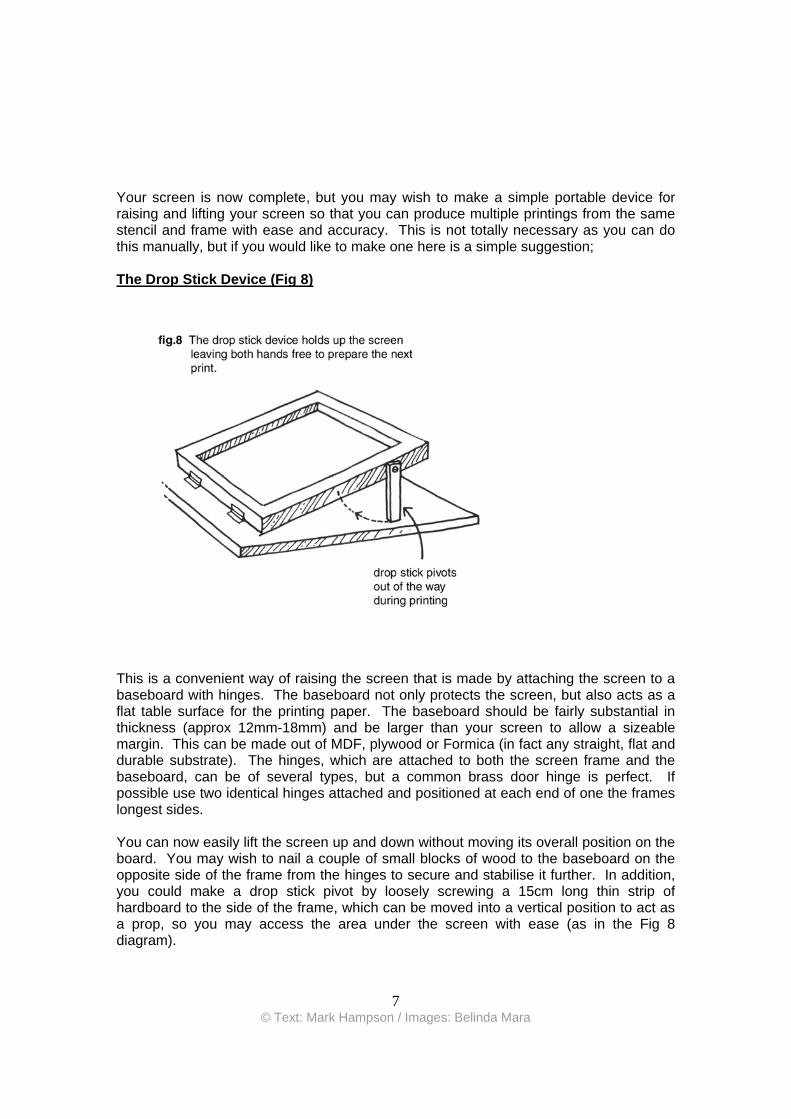
Your screen is now complete, but you may wish to make a simple portable device for raising and lifting your screen so that you can produce multiple printings from the same stencil and frame with ease and accuracy. This is not totally necessary as you can do this manually, but if you would like to make one here is a simple suggestion; The Drop Stick Device (Fig 8)
This is a convenient way of raising the screen that is made by attaching the screen to a baseboard with hinges. The baseboard not only protects the screen, but also acts as a flat table surface for the printing paper. The baseboard should be fairly substantial in thickness (approx 12mm-18mm) and be larger than your screen to allow a sizeable margin. This can be made out of MDF, plywood or Formica (in fact any straight, flat and durable substrate). The hinges, which are attached to both the screen frame and the baseboard, can be of several types, but a common brass door hinge is perfect. If possible use two identical hinges attached and positioned at each end of one the frames longest sides. You can now easily lift the screen up and down without moving its overall position on the board. You may wish to nail a couple of small blocks of wood to the baseboard on the opposite side of the frame from the hinges to secure and stabilise it further. In addition, you could make a drop stick pivot by loosely screwing a 15cm long thin strip of hardboard to the side of the frame, which can be moved into a vertical position to act as a prop, so you may access the area under the screen with ease (as in the Fig 8 diagram).

8 © Text: Mark Hampson / Images: Belinda Mara
THE STENCIL Materials and Equipment
• Paper (either cartridge, sugar, layout, tracing or newsprint or a selection of these) • Knife or scissors • Drawing materials • Ink or pain
Now your frame is complete you must make a stencil for it. There are many ways of producing a stencil which as you will have learned from Tim’s work can be highly complex and involved, using photographic processes, hand painting and drawing and also indirect stenciling techniques where the stencil is made away from the screen and subsequently applied to it before printing. The easiest and original indirect screen stencil method uses paper. You can use various types of paper to create your stencil, but several factors should be considered first. The thickness of the paper used for your stencil will determine the thickness of the ink deposit, and it should be smaller than the outside measurement of the screen frame. Also, remember that a paper stencil will not withstand prolonged printing although many good impressions can be created this way. The technique is best suited for simple, bold images. Firstly, select a paper to use (newsprint, cartridge, layout, sugar and even newspaper are suitable). Draw your design onto the paper and then cut out the areas you would like to print. It is essential that you realise that any open areas you cut into the paper will represent the image once the ink is pushed through the fabric. The remaining paper will be the stencil and block out any ink. With this in mind you can work either in negative or positive. You can cut the paper with a knife or scissors or tear and perforate it depending on your requirements. When you have completed your stencil design, lay it over the paper you intend to print on and place on your baseboard or work surface. Bring your screen down onto the papers below and fix the stencil into position by dabbing some amounts of paint or ink to attach the paper to the screen and allow drying. Alternatively, you could allow the ink used on the pulling of your first print to adhere the paper to the mesh, but this can sometimes be problematic, without any additional attachment. You are now ready to print.

9 © Text: Mark Hampson / Images: Belinda Mara
PRINTING Materials and Equipment
• Squeegee or paintbrush • Palette knife or spoon • Rags • Paper • Ink or paint • Paint containers • Card (thin) • Masking tape • Cleaning solvent (white spirit or solvent)
Place your paper under the screen making sure both are fairly parallel to achieve a neat image. If you are using a drop stick frame (Fig 8) device as suggested earlier each time you print your image it will be in the same place. If you are using your frame manually and would like a fairly accurate registration for each individual print you must place registration guide tabs around your paper. To do this cut some strips of thin card or several layers of masking tape and place one at each corner of the paper framing the sheet. Each time you replace your paper you will now know exactly where to place it (i.e. in between the registration guide tabs you have placed) (Fig 9).
Prepare your ink or paint, this can be either water based or oil based, depending on what you have available. You cannot use all inks and paints and it is best to buy either a specialist silk screening ink or an acrylic paint which you must first mix with an acrylic

10 © Text: Mark Hampson / Images: Belinda Mara
retarder which will stop your paint from drying in the screen and clogging up the mesh of the fabric and which will be viscous so it does not soak through the mesh unassisted by the squeegee or brush. Preferably the choice of paint or ink should have certain characteristics to make it suitable for screen-printing. It must be non-oily, short and buttery in consistency and have sufficient body for sharp even printing. Shortness is the quality which prevents drag on the squeegee and makes the ink break from the screen without leaving any leftover ‘strings’ of ink. An over oily ink will leave unwanted rings or ‘halos’ around your images. Here are some basic suggestions for types of screen printing inks; Poster inks – these are fairly fast drying cellulose based which under normal temperature and humidity conditions dry in about 15-20 minutes primarily by means of solvent evaporation. Because they are solvent based you should use these in a well-ventilated place. They are available in matt or gloss finishes and suitable for all paper techniques. They are normally opaque but can be mixed with transparent bases, binding varnishes and extender bases. Enamel inks - These are tougher inks, which are characterised by their ability to adhere to a variety of surfaces including glass and metal and their flexibility and brilliance of colour. They are made in matt and glosses finishes but are normally associated with high gloss surfaces. It is possible to produce a heavy build up of ink creating a surface tactility but they are extremely slow drying (approximately 12 hours or more), relatively expensive and not always suitable for working with paper stencils. Inks made with Oil Colours – Oil colours can be mixed with a transparent base to produce brilliantly coloured improvised inks. The more colour used, the longer the drying times. Water based Inks - Water based inks are manufactured in quantity and extremely useful for certain types of silkscreen printings but can be problematic when working with paper stencils as they absorb into the stencil material and eventually dissolve it shrinking or cockling the stencil. This can be avoided by using a low sized absorbent quality paper both for printing and stencil making which produces interesting qualities of printing not normally associated with the screen process. Many of the acrylic paints and water based inks are extremely effective and quick drying (in 15-20 minutes) and can be extremely economic to use and have good pigmentation, although their final finish is sometimes drab in it’s opaque mattness, varnishes are available to correct this. There is also very real health and safety benefits to using water based silkscreen inks as they do not involve the use of heavy solvents or require ventilation extraction. Once you have chosen your ink, and have mixed it to the required consistency (you should refer to the makers specifications, and the guidelines suggested above) you have completed your preparations and are ready to apply the ink to the screen.

11 © Text: Mark Hampson / Images: Belinda Mara
Pour a small amount of the ink to the outside margin of the image (refer to Fig 1 for positioning of this). The amount of ink must be estimated considering how many prints you wish to produce and how large your image is. Lift your screen into an upraised diagonal position away from the paper and apply a ‘flood’ stroke (Fig 10). This is done by pulling your squeegee across the length of the screen and in doing so distributing the ink across the screen. Do not apply any pressure to the squeegee, the weight of it will be sufficient to transfer the ink across the fabrics surface and fill the image area with an even layer of ink which will assist printing and prevent the mesh of the screen from becoming clogged with ink due to drying.

12 © Text: Mark Hampson / Images: Belinda Mara
Next, lower the screen into its downward position ready for the printing stroke (Fig 11).
Without turning it around, grasp the squeegee firmly in both hands and pull it across the screen holding it at an angle of about 45 degrees from a vertical position (Fig 12).

13 © Text: Mark Hampson / Images: Belinda Mara
The pressure of this pull brings the silkscreen down onto the paper below transferring the image to the surface through the exposed area and additionally attaching the loosely positioned paper stencil to the backside of the fabric screen. You should now remove your printed-paper from the baseboard and leave to dry. Replace the paper with another sheet; repeat the action of flooding the screen and print again. You may repeat this action as many times as required adding paper and ink as you go. The paper stencil should last for several printings. When you have completed the run of images you require leave the screen unflooded and remove the excess ink (most inks are re-usable for a period of time so you may wish to return it to your original container). Remove and discard if no longer required the paper stencil and clean off the remaining additional ink on the screen using rags and the appropriate cleaner (this will depend upon the type and make of ink or paint used and should be checked beforehand). Once your screen is clean of all inks and any solvents, you should wash it thoroughly and again ‘re-tooth’ and degrease it using the powdered cleaner or pumice or the No 400 carborundum mixture and then rinse clean again ready for a new printing. If you wish to produce any additional colours on your print you can now make a new stencil. Remember, that for every colour you require you must make a new individual stencil.
14 © Text: Mark Hampson / Images: Belinda Mara
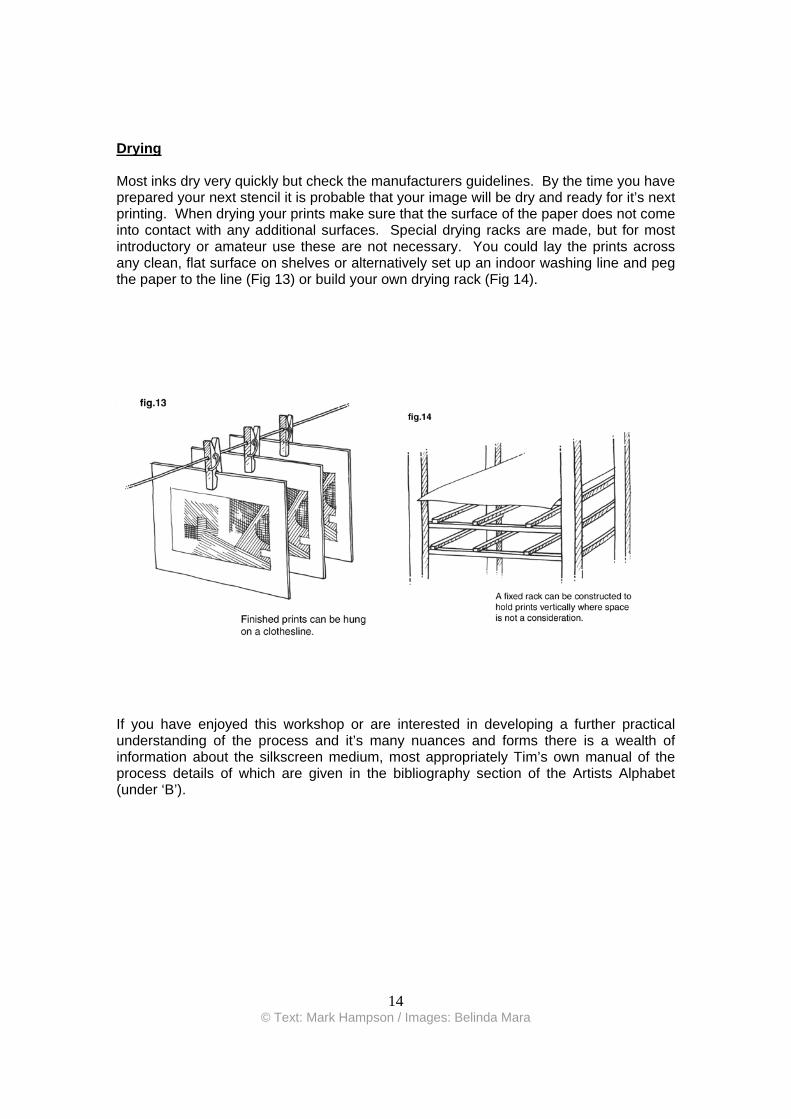
Drying Most inks dry very quickly but check the manufacturers guidelines. By the time you have prepared your next stencil it is probable that your image will be dry and ready for it’s next printing. When drying your prints make sure that the surface of the paper does not come into contact with any additional surfaces. Special drying racks are made, but for most introductory or amateur use these are not necessary. You could lay the prints across any clean, flat surface on shelves or alternatively set up an indoor washing line and peg the paper to the line (Fig 13) or build your own drying rack (Fig 14).
If you have enjoyed this workshop or are interested in developing a further practical understanding of the process and it’s many nuances and forms there is a wealth of information about the silkscreen medium, most appropriately Tim’s own manual of the process details of which are given in the bibliography section of the Artists Alphabet (under ‘B’).